


Canon LEGRIA HF R106, LEGRIA HF R16, LEGRIA HF R17, LEGRIA HF R18 Instruction Manual
PUB. DIE-0343-000A
HD Camcorder
Instruction Manual
Introduction
Important Usage Instructions
WARNING!
WARNING!
CAUTION:
TO REDUCE THE RISK OF ELECTRIC SHOCK AND TO REDUCE ANNOYING INTERFERENCE, USE
THE RECOMMENDED ACCESSORIES ONLY.
CAUTION:
DISCONNECT THE MAINS PLUG FROM THE SUPPLY SOCKET WHEN NOT IN USE.
To reduce the risk of electric shock, do not expose this product to dripping or splashing.
The Mains plug is used as the disconnect device. The Mains plug shall remain readily operable
to disconnect the plug in case of an accident.
While using the compact power adapter, do not wrap it or cover it with a piece of cloth, and do
not place it in confined narrow spaces. Heat may build up, the plastic case may deform and it
could result in electric shock or fire.
CA-590E identification plate is located on the bottom.
TO REDUCE THE RISK OF ELECTRIC SHOCK, DO NOT REMOVE COVER (OR BACK).
NO USER SERVICEABLE PARTS INSIDE. REFER SERVICING TO QUALIFIED
SERVICE PERSONNEL.
TO REDUCE THE RISK OF FIRE OR ELECTRIC SHOCK, DO NOT EXPOSE THIS
PRODUCT TO RAIN OR MOISTURE.
Using any device other than the Compact Power Adapter CA-590E may damage
the camcorder.
2
European Union (and EEA) only.
These symbols indicate that this product is not to be disposed of with
your household waste, according to the WEEE Directive (2002/96/EC),
the Battery Directive (2006/66/EC) and/or your national laws
implementing those Directives.
This product should be handed over to a designated collection point, e.g., on an
authorized one-for-one basis when you buy a new similar product or to an authorized
collection site for recycling waste electrical and electronic equipment (EEE) and batteries
and accumulators. Improper handling of this type of waste could have a possible impact
on the environment and human health due to potentially hazardous substances that are
generally associated with EEE. Your cooperation in the correct disposal of this product will
contribute to the effective usage of natural resources.
For more information about the recycling of this product, please contact your local city
office, waste authority, approved scheme or your household waste disposal service or
visit www.canon-europe.com/environment.
(EEA: Norway, Iceland and Liechtenstein)
Trademark Acknowledgements
• The SD logo is a trademark. The SDHC logo is a trademark.
• Microsoft and Windows are trademarks or registered trademarks of Microsoft Corporation in the United States
and/or other countries.
• Macintosh and Mac OS are trademarks of Apple Inc., registered in the U.S. and other countries.
•“x.v.Colour” and the “x.v.Colour” logo are trademarks.
• HDMI, the HDMI logo and High-Definition Multimedia Interface are
trademarks or registered trademarks of HDMI L icensing LLC.
•“AVCHD” and the “AVCHD” logo are trademarks of Panasonic Corporation
and Sony Corporation.
• Manufactured under license from Dolby Labora tories.
“Dolby” and the double-D symbol are trademarks of Dolby Laboratories.
• YouTube is a trademark of Google Inc.
• Other names and products not mentioned above may be trademarks or registered trademarks of their
respective companies.
• This device incorporates exFAT technology licensed from Microsoft.
• ANY USE OF THIS PRODUCT OTHER THAN CONSUMER PERSONAL USE IN ANY MANNER THAT COMPLIES WITH
THE MPEG-2 STANDARD FOR ENCODING VIDEO INFORMATION FOR PACKAGED MEDIA IS EXPRESSLY
PROHIBITED WITHOUT A LICENSE UNDER APPLICABLE PATENTS IN THE MPEG-2 PATENT PORTFOLIO, WHICH
LICENSE IS AVAILABLE FROM MPEG LA, L.L.C., 250 STEELE STREET, SUITE 300, DENVER, COLORADO 80206.
• This product is licensed under AT&T patents for the MPEG-4 standard and may be used for encoding MPEG-4
compliant video and/or decoding MPEG-4 compl iant video that was encoded only (1) for a personal and noncommercial purpose or (2) by a video provider licensed under the AT&T patents to provide MPEG-4 compliant
video. No license is granted or implied for any other use for MPEG-4 standard.
3
Exciting Features and New Functions
1
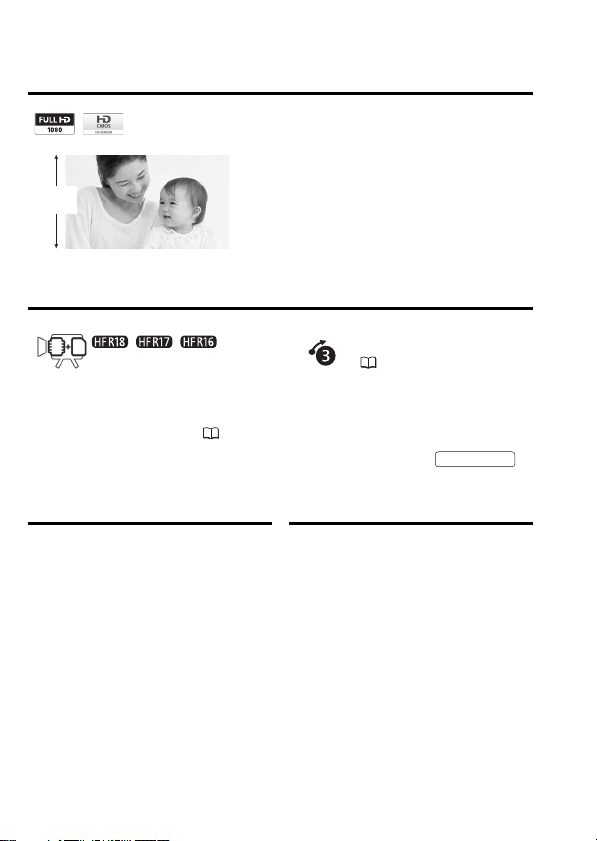
High-Definition Video
Your camcorder’s high-definition image
sensor (HD CMOS) captures video at a
1,080
lines
amazing image quality and in lifelike vibrant colors is easy and fun!
resolution of 1,920 x 1,080 pixels
are then recorded in the memory in high
definition, using AVCHD specifications
With your new HD camcorder, capturing
the special moments in your life with
2
. Videos
3
.
// Dual
Flash Memory
You can record in the built-in
memory or on commercially
available memory cards (34).
1
“Full HD 1080” refers to Canon camcorders compliant with high-definition video
composed of 1,080 vertical pixels (scanning lines).
2
Video is recorded at th is resolution only when the recording mode is set to FXP
mode. In other recording modes, the picture is recorded at 1,440 x 1,080 pixels.
3
AVCHD is a standard for recording high-definition video. W ith AVCHD specifica-
tions, the video signal is recorded using MPEG-4 AVC/H.264 compression and
the audio signal is recorded in Dolby Digital.
Pre-recording
(56)
When pre-recording is activated,
the camcorder starts recording
video continuously into a
temporary 3-second memory.
When you press the
button, the scene recorded will
have started 3 seconds before you
started shooting.
START/STOP
4
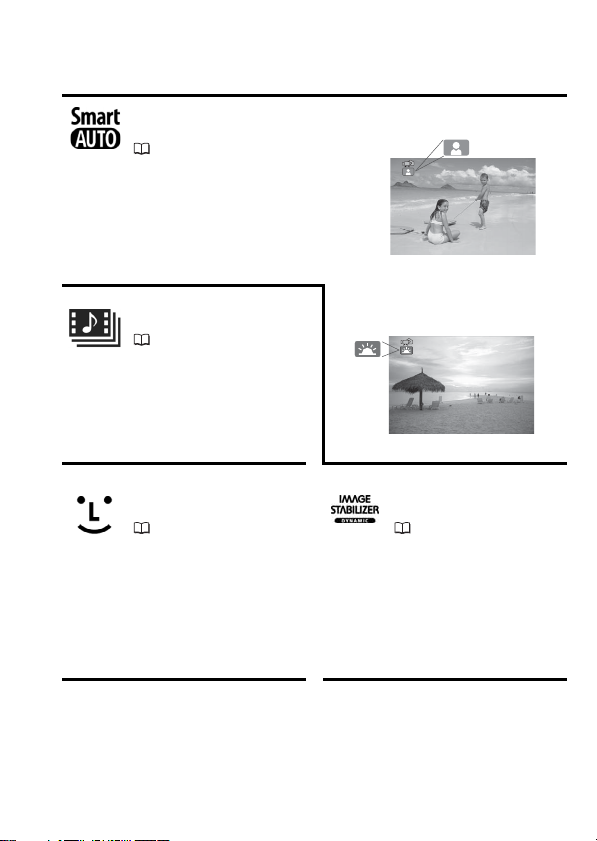
Smart AUTO
(24)
Smart AUTO automatically selects the best
settings for the scene you want to shoot.
Yo u g et spectacular recordings every time
without worrying about settings.
Video Snapshot
(55)
Shoot or capture short scenes
and arrange them into a video
clip set to your favorite
background music.
Just point the camcorder
and it will automatically
select the best settings for
your subject
Face Detection
(59)
The camcorder automatically
detects people’s faces and
adjusts the focus and other
settings accordingly for beautiful
results.
Image Stabilization
( 126)
Dynamic IS compensates for
camcorder shake when you
shoot video while walking. This
gives you more freedom and
mobility when recording movies.
5
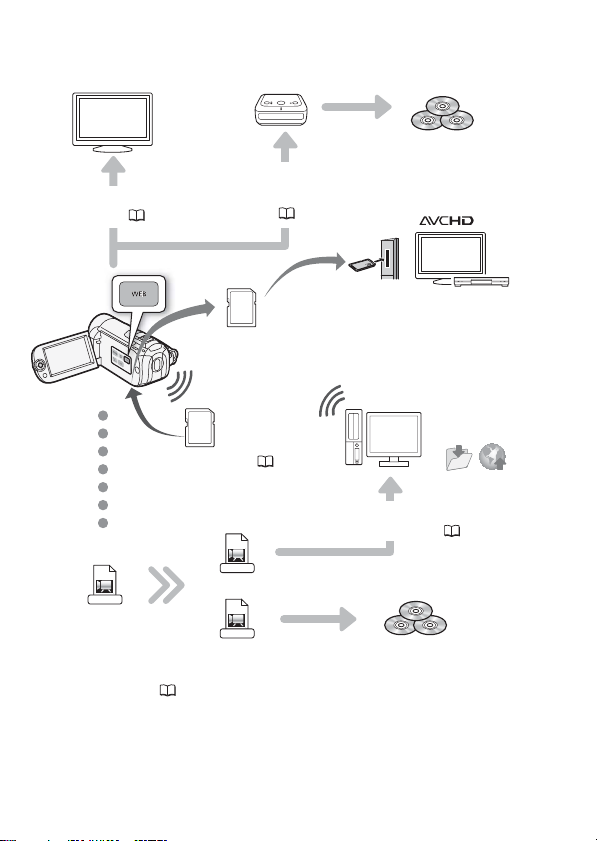
Enjoying your Recordings on Other Devices
Connect the camcorder to
Connect the camcorder
to an HDTV ( 103)
the optional DW-100 DVD
Burner ( 106, 108)
AVCHD discs
Photo DVDs
SD
Play video directly
AVCHD-compatible HDTVs and
digital recorders with an SD
memory card slot
*
from your recorded
memory card
Eye-Fi
Save or upload
to the Web
Use an Eye-Fi card ( 120) to
wirelessly upload recordings to your
computer or a video sharing Web site
High Definition
AVCHD
Convert your HD movies, in the
MPEG-2
Standard Definition
SD-Video
Use the supplied software
ImageMixer 3 SE ( 104, 116)
Standard DVDs
camcorder itself, to standard definition
files ( 109, 117)
* Refer to the instruction manual of the device. Depending on the device used, cor-
rect playback may not be possible even if the device is AVCHD-compatible. In
such case, play back the recordings on the memory card using the camcorder.
6

Table of contents
Introduction
4 Exciting Features and New Functions
11 About this Manual
13 Getting to Know the Camcorder
13 Supplied Accessories and CD-ROMs
15 Names of Parts
Preparations
18 Getting Started
18 Charging the Battery Pack
21 Preparing the Accessories
22 Adjusting the Position and Brightness of the LCD
24 Basic Operation of the Camcorder
24 Operating Modes
27 Joystick and Joystick Guide
28 Using the Menus
30 First Time Settings
30 Setting the Date and Time
31 Changing the Language
31 Changing the Time Zone
32 Using a Memory Card
32 Memory Cards Compatible for Use with the Camcorder
33 Inserting and Removing a Memory Card
34 // Selecting the Memory for the
35 Initializing the Built-in Memory ( // only)
Screen
Recordings
or Memory Card
Table of contents 7

Video
37 Basic Recording
37 Shooting Video
38 Selecting the Video Quality (Recording Mode)
39 Zooming
40 Quick Start Function
42 Basic Playback
42 Playing Back the Video
44 Selecting what Recordings to Play Back
46 Searching for Scenes
49 Pre-selecting Recordings from the Index Screen
50 Deleting Scenes
52 Advanced Functions
52 Programmed AE and Special Scene Recording
54 Cinema Mode: Giving a Cinematic Look to Your
55 Video Snapshot
56 Pre-recording Function
56 Self Timer
57 Manual Exposure Adjustment
58 Manual Focus Adjustment
59 Face Detection
60 White Balance
62 Image Effects
62 Digital Effects
64 On-Screen Displays and Data Code
65 Audio Recording Level
66 Selecting the Playback Starting Point
69 Scene and Playlist Operations
69 Playing Back Recordings Set to Background Music
71 Dividing Scenes
72 Editing the Playlist: Adding, Deleting, Moving and
75 Capturing Video Snapshot Scenes from a Movie
76 // Copying Scenes to a Memory Card
Programs
Recordings
Playing Back
8 Table of contents

Photos
79 Basic Recording
79 Taking Photos
80 Selecting Photo Size and Quality
82 Basic Playback
82 Viewing Photos
83 Deleting Photos
85 Magnifying Photos during Playback
86 Additional Functions
86 Slideshow
87 Rotating Photos
87 Histogram Display
88 Capturing Photos from a Movie
89 Protecting Photos
90 // Copying Photos to a Memory Card
93 Printing Photos
93 Printing Photos (Direct Print)
96 Print Orders
External Connections
99 Terminals on the Camcorder
100 Connection Diagrams
103 Playback on a TV Screen
104 Saving and Sharing Your Recordings
104 Saving Recordings on a Computer
106 Saving Movies onto High-Definition Discs
108 // Saving Movies onto Standard-
113 Creating Photo DVDs
114 Playing Back Discs Using the DW-100 DVD Burner
115 Copying Your Recordings to an External Video
116 Uploading Movies to Video Sharing Web Sites
(AVCHD/Blu-ray Discs)
Definition Discs (DVD)
Recorder
Table of contents 9

Additional Information
122 Appendix: Menu Options Lists
122 FUNC. Menu
125 Setup Menus
135 Onscreen Icons and Displays
139 Trouble?
139 Troubleshooting
145 List of Messages
155 Do’s and Don’ts
155 Handling Precautions
159 Maintenance/Others
160 Using the Camcorder Abroad
161 General Information
161 Accessories
162 Optional Accessories
165 Specifications
169 Index
10 Table of contents
About this Manual
Thank you for purchasing the Canon LEGRIA HF R18 / LEGRIA HF R17
/ LEGRIA HF R16 / LEGRIA HF R106. Please read this manual carefully
before you use the camcorder and retain it for future reference. Should
your camcorder fail to operate correctly, refer to Tr oubl es ho ot ing
( 139).
Conventions Used in this Manual
• IMPORTANT: Precautions related to the camcorder’s operation.
•NOTES: Additional topics that complement the basic operating
procedures.
•POINTS TO CHECK: Restrictions or requirements regarding the
function described.
• : Reference page number within this manual.
To c o m p le t e some operation
instruction manuals. This will be indicated with the following icons:
PHOTO
DW-100
• : Text that applies only to the model(s) shown in the icon.
• The following terms are used in this manual:
•The photos included in this manual are simulated pictures taken with
Refer to the
included as a PDF file in the supplied Camcorder
Supplemental Disc.
Refer to the instruction manual of the optional DW-100
DVD Burner.
When not specified as “memory card” or “built-in memory”, the term
“memory” by itself refers to both.
“Scene” refers to one movie unit from the point you press the
START/STOP
the recording.
a still camera. Unless indicated otherwise, illustrations and menu
icons refer to the .
button to start recording until you press again to pause
s you will need to refer also to other
‘Photo Application’ instruction manual,
Introduction 11

Selecting the Video Quality (Recording Mode)
The camcorder offers 4 recording modes. Changing the recording
mode will change the recording time available on the memory. Select
FXP or XP+ mode for better movie quality; select LP mode for longer
recording tim es. The following table gives approximate recording
times.
NOTES
• The camcorder uses a variable bit rate (VBR) to encode video so the
actual recording times will vary depending on the content of the scenes.
•The camcorder retains the last setting used even if you set the cam-
corder to mode.
Operating modes:
[ Standard Play 7 Mbps] Desired record ing
mode
FUNC.
FUNC.
Brackets [ ] are used to refer to
menu options as they are
displayed on screen.
The names of most buttons and
switches are indicated within a
“button” frame.
For example .
The arrow is used to abbreviate menu selections. For a detailed
explanation on how to use the menus, refer to Using the Menus
( 28). For a concise summary of all available menu options and
settings, refer to the appendix Menu Options Lists ( 122).
refer to Operating Modes ( 24).
12 Introduction
FUNC.
indicates that a function is available in the operating mode indicated and
indicates that the function is not available. For a detailed explanation
Getting to Know the Camcorder
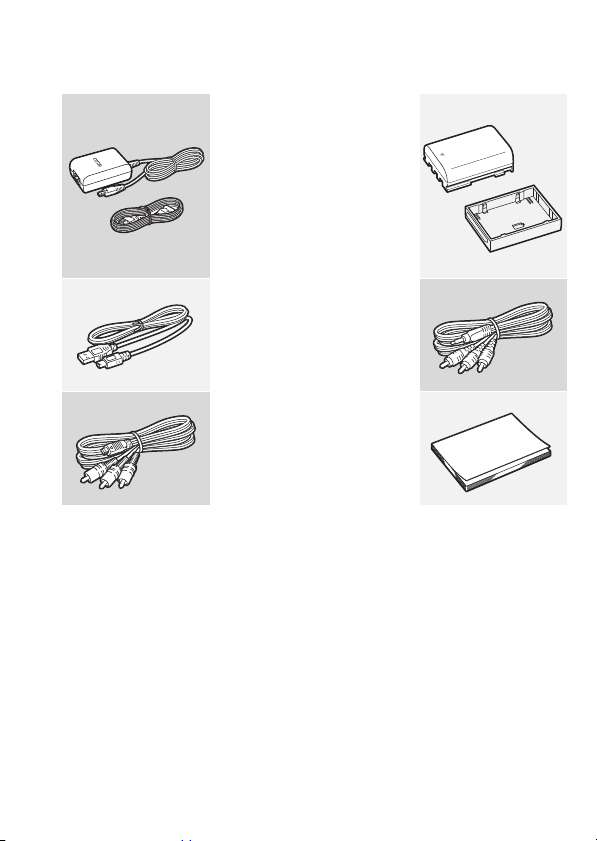
Supplied Accessories and CD-ROMs
The following accessories are supplied with the camcorder:
XCA-590E Compact Power
Adapter (incl. power cord)
BP-2L5 Battery PackW
XIFC-300PCU USB Cable
STV-250N Stereo Video CableW
Yellow • Red • White plugs
XCTC-100/S Component Cable
Red • Green • Blue plugs
Quick GuideW
Introduction 13

The following CD-ROMs and software are supplied with the camcorder:
• PIXELA Application - Disc 1 CD-ROM* and ‘PIXELA Applications’
Installation Guide
- ImageMixer 3 SE Transfer Utilities - Software for saving and
transferring movies and music files you can use as background music.
• PIXELA Application - Disc 2 CD-ROM*
- ImageMixer 3 SE Video Tools - Software for managing, editing, and
playing back movies.
Instruction Manual/Photo Applications Ver.34.0*/Music Data
•
CD-ROM (referred to in this manual as “Camcorder Supplemental Disc”)
-Instruction Manual - The full-version instruction manual of the
camcorder (this PDF file).
- Photo Application - Software for saving, managing, and printing
photos.
-Music data - Music files that can be used as background music during
playback. These music files are for exclusive use with the supplied
software ImageMixer 3 SE. The disc cannot be played back on CD
players. For more details, refer to ‘ImageMixer 3 SE Software Guide’.
* The CD-ROM includes the instruction manual of the software (on PDF file).
14 Introduction
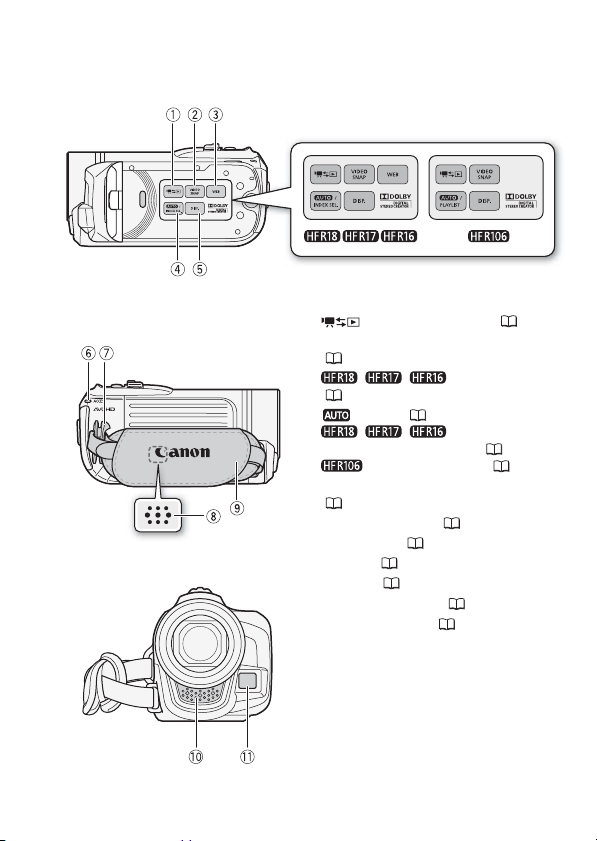
Names of Parts
Left side view
Right side view
Front view
1 (camera/play) button ( 26)
2 VIDEO SNAP (video snapshot) button
(55)
3 // WEB button
( 116)
4 button ( 24)/
// INDEX SEL.
(index selection) button (
5
6 ACCESS indicator ( 37, 79 )
7 Strap mount ( 21)
8 Speaker ( 42)
9 Grip belt ( 21)
Aq Stereo microphone ( 65)
Aa Instant AF sensor ( 126)
PLAYLIST button (
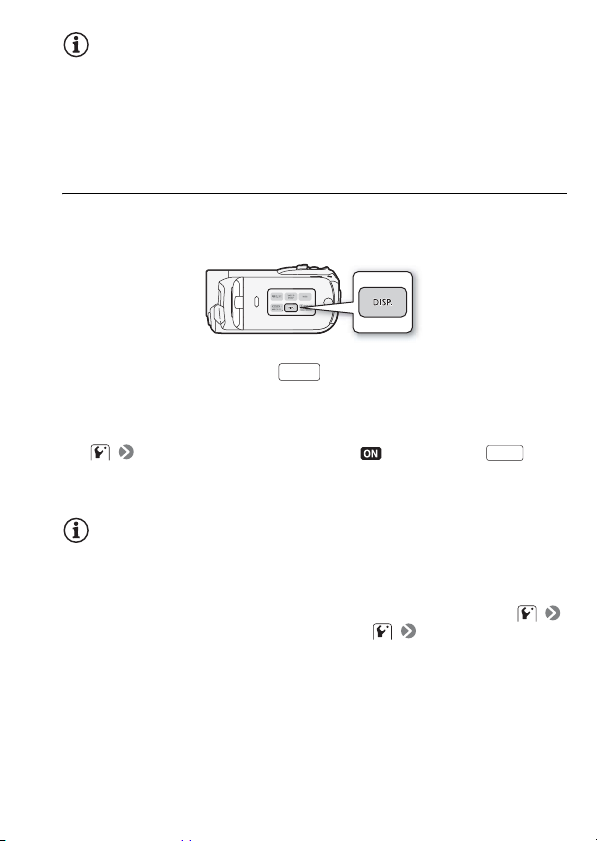
DISP. ( o n -screen display) button
(64)
44)/
44)
Introduction 15
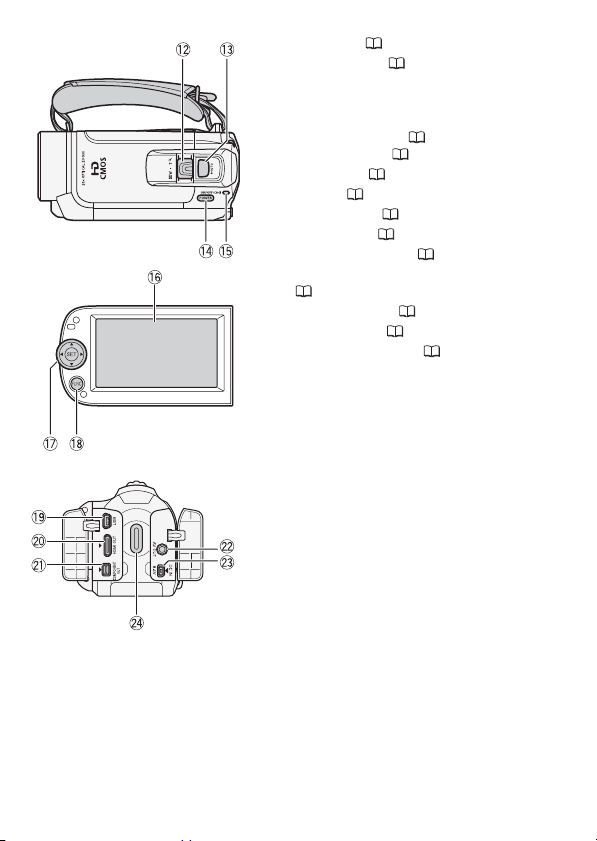
Top vie w
LCD panel
Back view
As
Zoom lever ( 39)
Ad PHOTO button ( 79)
Af POWER button
Ag ON/OFF (CHG) (charge) indicator:
Green – On
Orange – Standby ( 40)
Red – Charging ( 18)
Ah LCD screen ( 22)
Aj Joystick (27)
Ak FUNC. button ( 28, 122)
Al USB terminal ( 99, 102)
Sq HDMI OUT terminal ( 99, 100)
Sa COMPONENT OUT terminal
( 99, 101)
Ss AV OUT terminal ( 99, 101)
Sd DC IN terminal ( 18)
Sf START/ STOP button ( 37)
16 Introduction
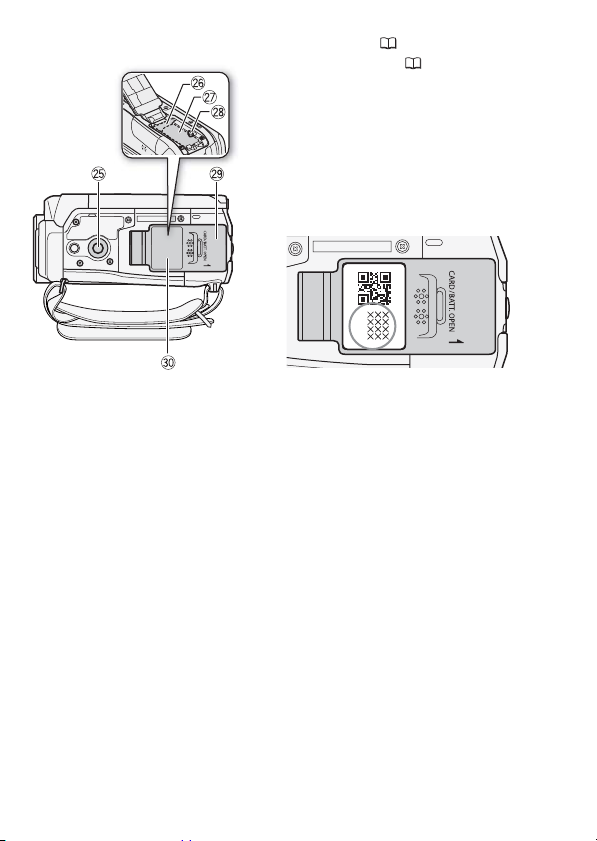
Bottom view
Sg Tri po d socket ( 155)
Sh Memory card slot (33)
Battery compartment
Sj
Sk Battery release latch
Sl Battery compartment cover/Memory
card slot cover
Dq Serial number
The serial number label is located on
the battery compartment cover.
Introduction 17
Preparations
This chapter describes basic operations, such as navigating the
menus, and first time settings to help you learn more about your
camcorder.
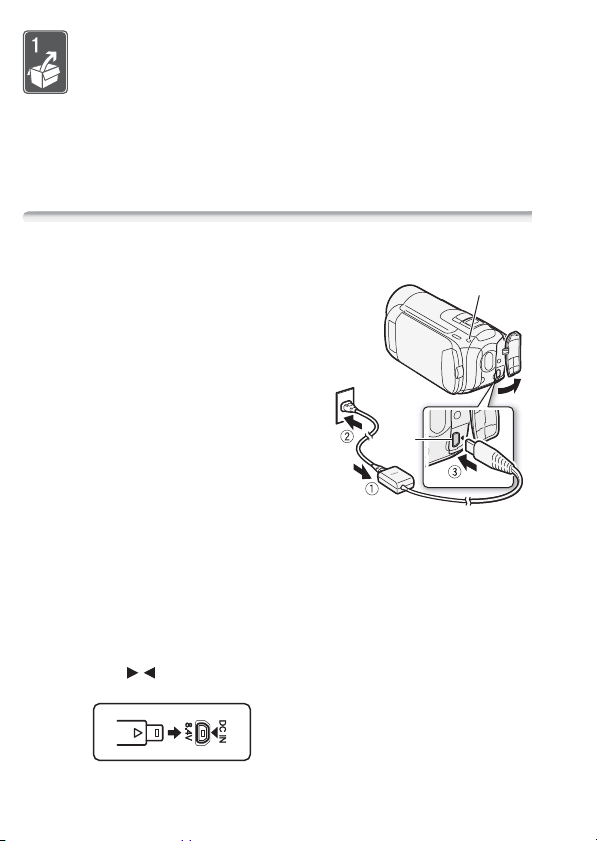
Getting Started
Charging the Battery Pack
The camcorder can be powered with a
battery pack or directly using the compact power adapter. Charge the battery
pack before use.
For approximate charging times and
recording/playback times with a fully
charged battery pack, refer to the tables
on pages 162-163.
1 Connect the power cord to the
compact power adapter.
2 Plug the compact power adapter
into a power outlet.
3 Connect the compact power
adapter to the camcorder’s DC IN
terminal.
• When connecting the compact
power adapter’s cable to the
camcorder (3), make sure to align
the triangle marks on the cable’s
connector and on the camcorder’s
terminal ( ).
18 Preparations
DC IN
terminal
ON/OFF (CHG)
(charge) indicator
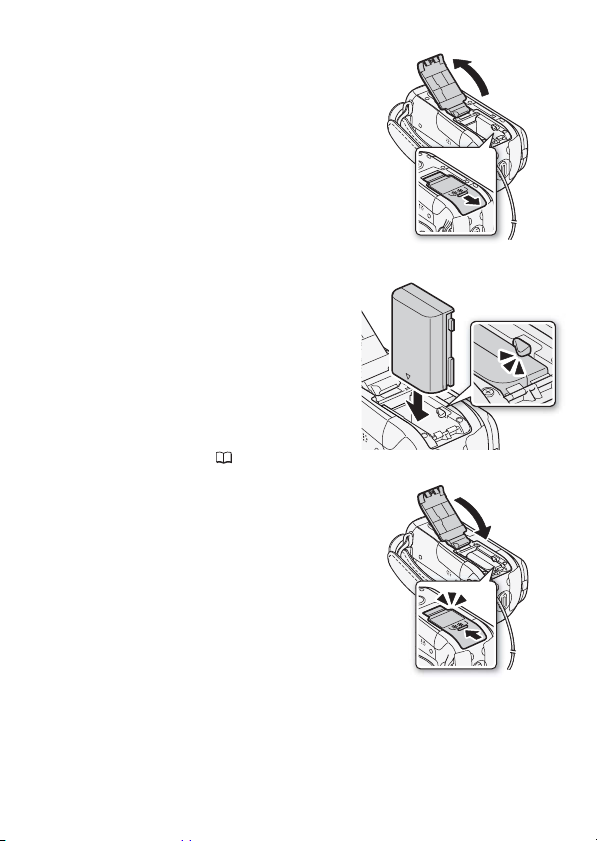
4 Slide the battery compartment cover
away from the lens and open it.
5 Remove the battery terminal cover
from the battery pack.
6 Insert the battery pack all the way
into the compartment and press
gently until it clicks.
7 Close the cover and slide it toward
the lens until you hear a click.
8 Charging will start when the
camcorder is turned off.
•If the camcorder was on, the green
ON/OFF (CHG) indicator will go out
when you turn off the camcorder.
After a moment, the ON/OFF (CHG)
indicator will start flashing in red
(battery pack charging). The red ON/
OFF (CHG) indicator will go out when
the battery pack is fully charged.
• If the indicator flashes quickly, refer to
Tro ub le shooting
( 139).
4
6
7
Preparations 19
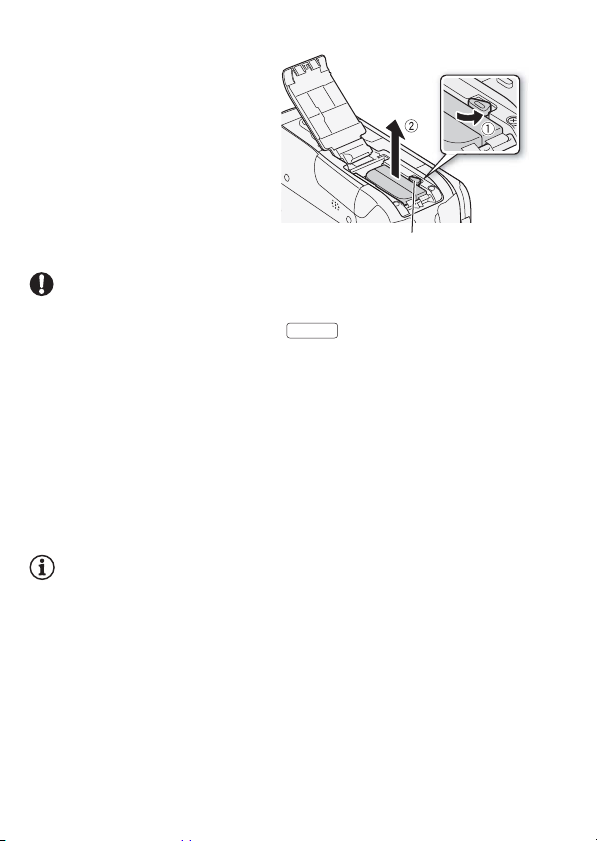
To remove the battery pack
1 Slide the battery compartment
cover away from the lens and
open it.
2Press the battery release latch
and pull out the battery pack.
3Close the cover and slide it
toward the lens until you hear a
click.
Battery release latch
IMPORTANT
• Turn off the camcorder before connecting or disconnecting the compact power adapter. After pressing to turn off the camcorder,
POWER
important data is updated in the memory. Be sure to wait until the green
ON/OFF (CHG) indicator goes out.
•The first time you use a battery pack, fully charge it and then use the
camcorder until the battery pack is completely exhausted.
• Do not connect to the camcorder’s DC IN terminal or to the compact
power adapter any electrical equipment that is not expressly recommended for use with this camcorder.
• To prevent equipment breakdowns and excessive heating, do not connect the supplied compact power adapter to voltage converters for
overseas travels or special power sources such as those on aircraft and
ships, DC-AC inverters, etc.
NOTES
• The battery pack will be charged only when the camcorder is off.
• We recommend charging the battery pack in temperatures between
10 °C and 30 °C. Outside the temperature range of 0 °C to 40 °C,
charging will not start.
• If remaining battery time is an issue, you can power the camcorder
using the compact power adapter so the battery pack will not be consumed.
• Charged battery packs continue to discharge naturally. Therefore,
charge them on the day of use, or the day before, to ensure a full
charge.
20 Preparations
• We recommend that you prepare battery packs to last 2 to 3 times
longer than you think you might need.
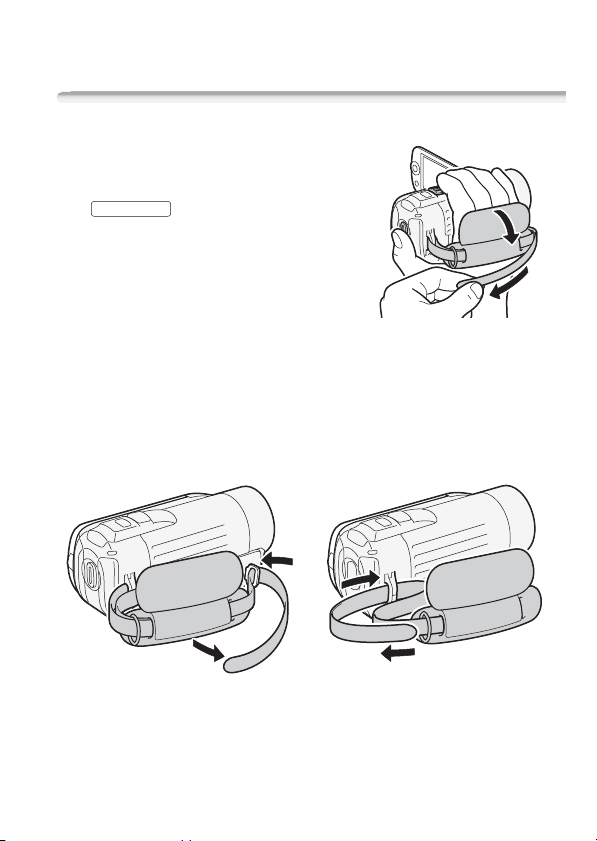
Preparing the Accessories
Fasten the grip belt.
Adjust the grip belt so that you can reach
the zoom lever with your index finger, and
START/STOP
the button with your thumb.
To remove the grip belt
1 Lift the padded handgrip’s flap and detach the strap from the
Velcro pad.
2 Pull the strap to remove it first from the front bracket on the
camcorder, then to unthread it from the handgrip and finally to
remove it from the rear bracket on the camcorder.
Preparations 21
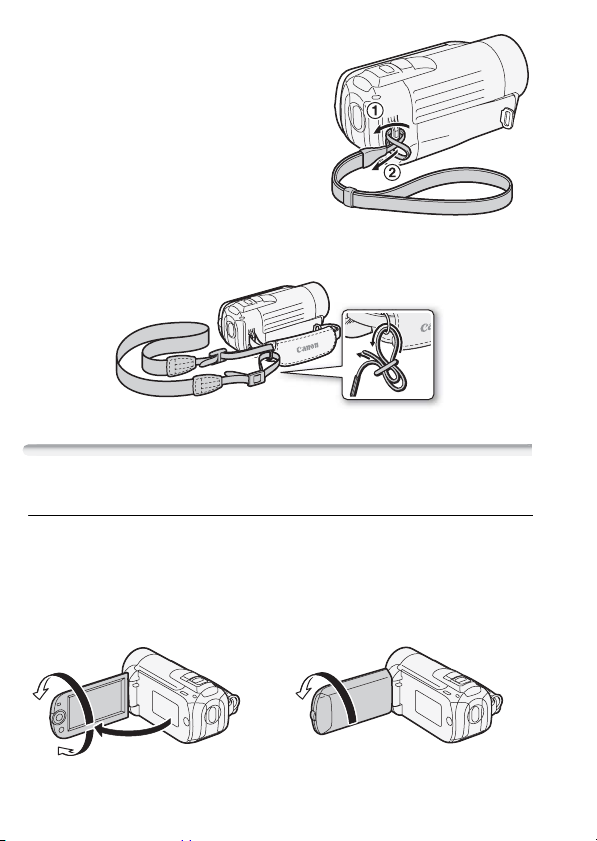
To attach an optional wrist strap
Pass the attaching end of the wrist strap
through the rear bracket on the camcorder, thread the wrist strap through
the loop and fasten.
You can also attach the wrist strap to the
strap mount on the grip belt to use both
for extra convenience and protection.
To attach an optional shoulder strap
Pass the ends of the shoulder strap through the s trap mount on the grip
belt and adjust the length of the strap.
Adjusting the Position and Brightness of the LCD Screen
Rotating the LCD Panel
Open the LCD panel 90 degrees.
• You can rotate the panel 90 degrees downward.
• You can rotate the panel 180 degrees toward the lens. Rotating the
LCD panel 180 degrees can be useful when you wish to include yourself
in the picture when recording with the self timer.
180°
90°
22 Preparations
180°
Subject can monitor the LCD screen
NOTES
• About the LCD screen: The screen is produced using extremely high-precision manufacturing techniques, with more than 99.99% of the pixels
operating to specification. Less than 0.01% of the pixels may occasion-
ally misfire or appear as black, red, blue or green dots. This has no
effect on the recorded image and does not constitute a malfunction.
LCD Backlight
When recording in bright places it may be difficult to use the LCD
screen. Turn on the LCD backlight to make it brighter.
With the camcorder on, hold pressed down for more than
DISP.
2 seconds.
• Repeat this action to switch the LCD backlight between off (normal) and
on (bright).
• If [LCD Screen Dimmer] is set to [ On], pressing for
DISP.
more than 2 seconds will turn off the screen dimmer and return the LCD
screen to its previous brightness setting.
NOTES
• The LCD backlight does not affect the brightness of the recordings.
•Using the bright setting will shorten the effective usage time of the bat-
tery pack.
• You can further adjust the brightness of the LCD screen with the
[LCD Brightness] setting, or dim it with the [LCD Screen Dimmer] setting to use in places where the light from the LCD screen can
be a nuisance.
Preparations 23
Basic Operation of the Camcorder
Operating Modes
Recording
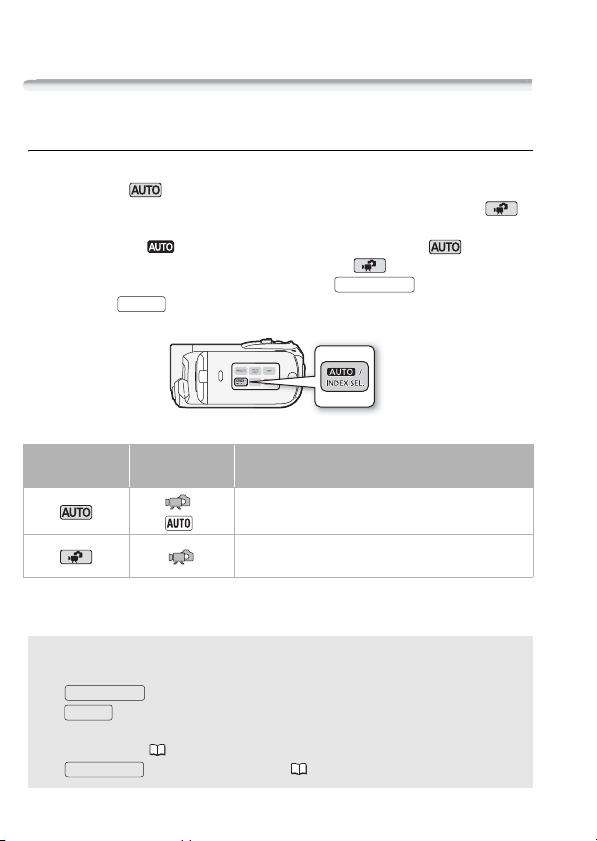
The camcorder offers two basic modes for recording video and photos:
Smart AUTO ( ) mode for beginners or if you just prefer not to
bother with detailed camcorder settings, and flexible recording ( )
mode, which lets you change the camcorder’s settings to your preference. Press the button to switch the camcorder to mode
and press the button again to switch back to mode. In either
mode, you can record movies by pressing or take photos
by pressing .
PHOTO
START/STOP
Operating
mode
* The mode icon displayed will change according to the optimal mode selected by
the Smart AUTO function.
Onscreen
icon
*
Operation
Easy recording of movies and photos.
Recording of movies and photos while enjoying full
access to the menus and advanced functions.
About the Smart AUTO mode
• Only the following buttons/functions are available in this mode.
START/STOP
- for recording movies
PHOTO
- for recording photos
- Zoom lever
- Quick Start ( 40)
VIDEO SNAP
- for video snapshot ( 55)
24 Preparations
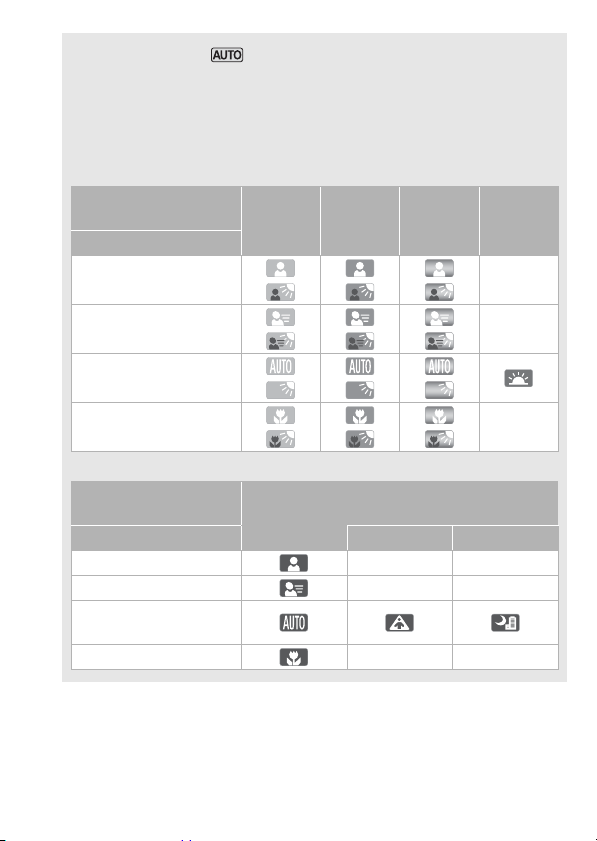
•When shooting in mode, the camcorder will automatically
detect certain characteristics of the subject, background, lighting
conditions, etc. It will then adjust various settings (focus, exposure,
color, image stabilization, image quality, among others), selecting the
best settings for the scene you want to shoot. The Smart AUTO
mode icon will change to one of the following icons.
Smart AUTO icons
Background →
(color of the icon)
Subject ↓
Bright
(grey)
Blue skies
(light blue)
Vivid colors
(green/red)
Sunsets
(orange)
People (stationary)
() () ()
People (moving)
() () ()
Subjects other than people,
such as landscapes
() () ()
Close objects
() () ()
The icon in parentheses appears under backlight conditions.
Background →
(color of the icon)
Subject ↓
Dark (dark blue)
Spotlight
Night scene
People (stationary) – –
People (moving) – –
Subjects other than people,
such as landscapes
Close objects – –
–
–
–
Preparations 25
NOTES
• In mode, menus cannot be accessed but the following settings
can be changed in advance.
- Recording mode of movies
- Size/quality of photos
- // You r selection of recording media for movies/
photos
-Video snapshot length
-Auto slow shutter
-All settings under the setup menu’s , and tabs.
• Even in flexible recording mode, the camcorder can help you with the
settings. For example, you can use the Special Scene recording programs ( 52) to set at once all the optimal settings to match special
recording conditions.
• Under certain conditions, the Smart AUTO icon that appears on the
screen may not match the actual scene. Especially when shooting
against orange or blue backgrounds, the Sunset or one of the Blue
skies icons may appear and the colors may not look natural. In such
case, we recommend recording in [ Programmed AE] mode ( 52).
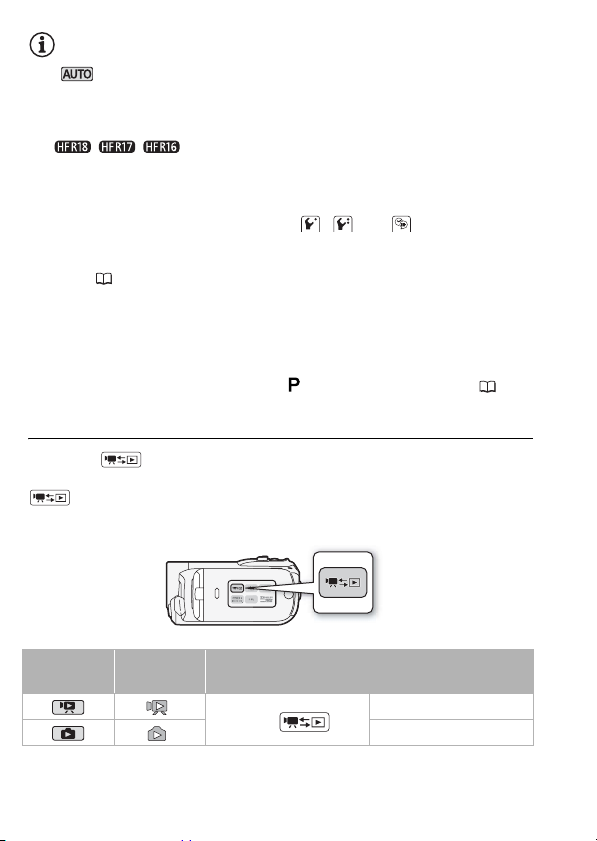
Playback
Press the (camera/play) button to switch the camcorder
between camera (recording) mode and playback mode. You can press
when the camcorder is off to turn it on directly in playback
mode.
Operating
mode
26 Preparations
Onscreen
icon
Press
Operation
Playing back movies.
Viewing photos.
NOTES
• // When switching to a playback mode, the memory
selected for playback will be the same currently used for recording.
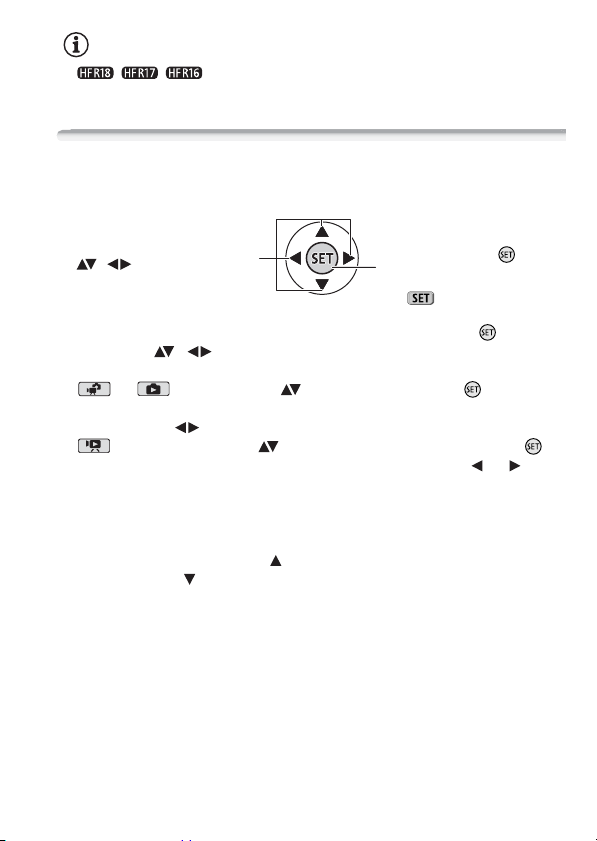
Joystick and Joystick Guide
Use the joystick to operate the camcorder’s menus.
Push the joystick up, down, left or right
( , ) to select an item or
change settings.
Press the joystick itself ( ) to save
the settings or confirm an action. On
menu screens, this is indicated by the
icon .
If the joystick guide does not appear on the screen, press or push
the joystick (, ) to display it. The functions that appear depend
on the operating mode.
• or mode: Select ( ) a function and press to change
the setting. With some functions, you will need to make further
adjustments ().
• mode: First, select ( ) a “row” of functions; then, press to
operate the function in the middle or push the joystick ( or ) to
operate the function on the left or right, respectively.
The joystick guide will minimize after 2 seconds. When the joystick
guide is minimized, you can still adjust or turn on/off the selected function; you can also maximize ( ) the joystick
guide to select another
function or hide ( ) it altogether.
Preparations 27
Using the Menus
Many of the camcorder’s functions can
be adjusted from the menus that open
after pressing . In mode,
menus cannot be accessed and, except
in a few cases, most menu settings will
return to their default values.
For details about the available menu
options and settings, refer to the appendix Menu Options Lists ( 122).
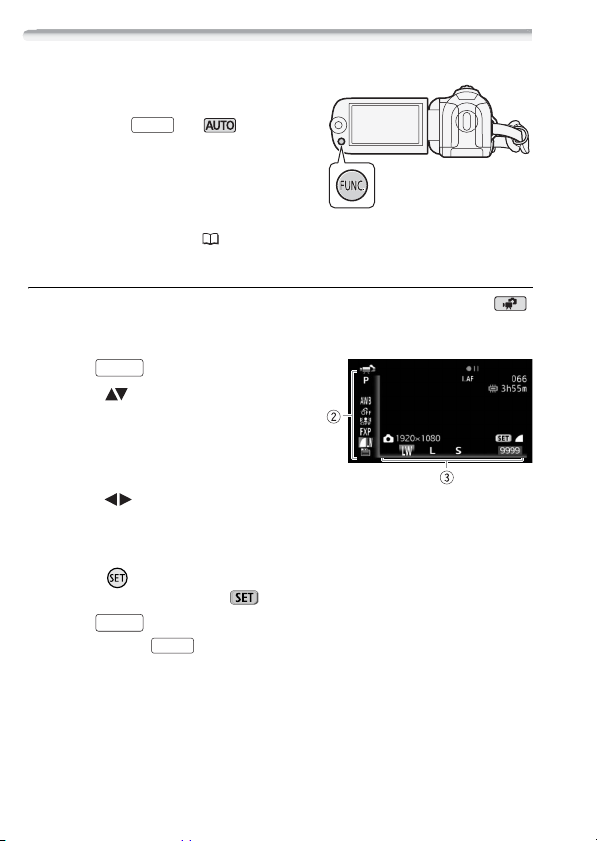
Selecting an Option from the FUNC. Menu
The following is an example of selecting a FUNC. menu option in
mode. In playback modes, the operation varies depending on the function selected so refer to the relevant chapter as necessary.
1Press .
2 Select ( ) the icon of the function
you want to change from the left
side column.
Menu items not available will appear
grayed out.
3 Select ( ) the desired setting from the available options at the
bottom bar.
•The selected option will be highlighted in orange.
•With some settings you will need to make further selections and/or
press . Follow the additional operation guides that will appear on
the screen (such as the icon, small arrows, etc.).
4 Press to save the settings and close the menu.
You can press to close the menu at any time.
FUNC.
FUNC.
FUNC.
FUNC.
28 Preparations
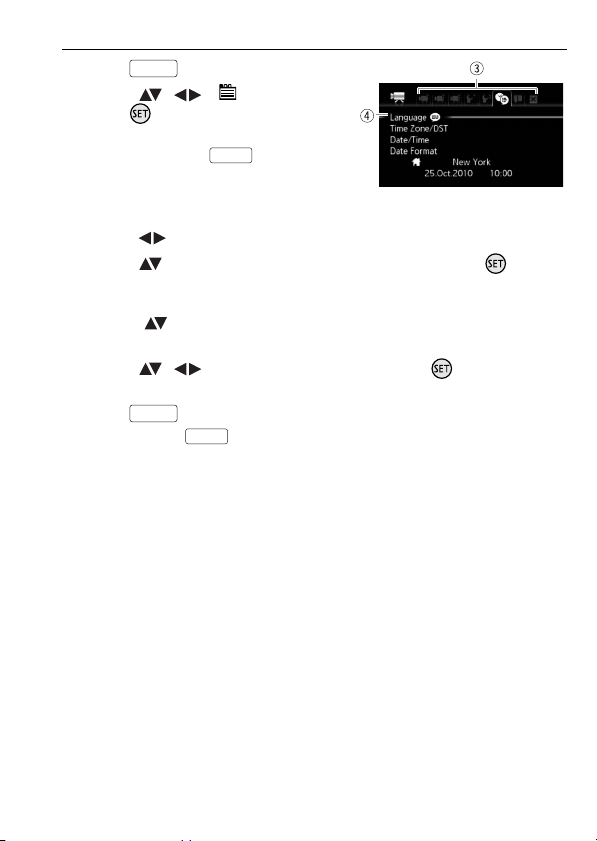
Selecting an Option from the Setup Menus
1Press .
2 Select ( , ) [ Menu] and
3 Select ( ) the tab of the desired menu.
4 Select ( ) the setting you want to change and press .
5 Select ( , ) the desired option and press to save the
6Press .
FUNC.
press to open the setup
menus.
You can also hold pressed
FUNC.
down for more than 1 second to
open directly the setup menus
screen.
• The orange selection bar indicates the menu setting currently
selected. Menu items not available appear grayed out.
• Move ( ) the orange selection bar to the tabs at the top of the
screen to select a different menu (step 3).
setting.
FUNC.
You can press to close the menu at any time.
FUNC.
Preparations 29
First Time Settings
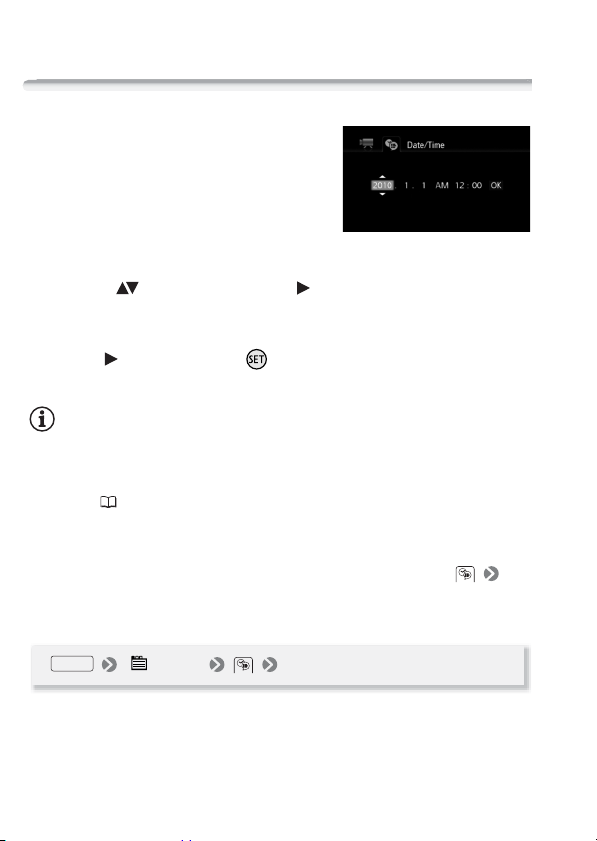
Setting the Date and Time
You will need to set the date and time of
the camcorder before you can start
using it. The [Date/Time] screen will
appear automatically when the camcorder’s clock is not set.
When the [Date/Time] screen appears,
the year will be selected.
1 Change ( ) the year and move ( ) to the month.
2 Change the rest of the fields (month, day, hour and minutes) in the
same way.
3 Select ( ) [OK] and press to start the clock and close the
setup screen.
NOTES
• When you do not use the camcorder for about 3 months, the built-in
rechargeable lithium battery may discharge completely and the date
and time setting may be lost. In such case, recharge the built-in lithium
battery ( 158) and set the time zone, date and time again.
•The date appears in a year-month-day format only in the first setup
screen. In subsequent screen displays the date and time will appear as
day-month-year (for example, [1.Jan.2010 12:00 AM]). You can change
the date format and the clock format (12/24 hours) with the
[Date Format] setting.
•You can also change the date and time later on (not during the initial
setup). Open the [Date/Time] screen from the setup menus:
FUNC.
[ Menu] [Date/Time]
30 Preparations
 Loading...