


Getting Started
Getting Started
Introducción
IMPORTANT
IMPORTANTE
You can access http://canon.com/oip-manual to
read the User’s Guide that describes all functions
of this machine.
For Mac OS users,
please refer to P.13
Para usuarios de Mac OS,
consulte la pág.27
En
Es
FT6-1690 (000)
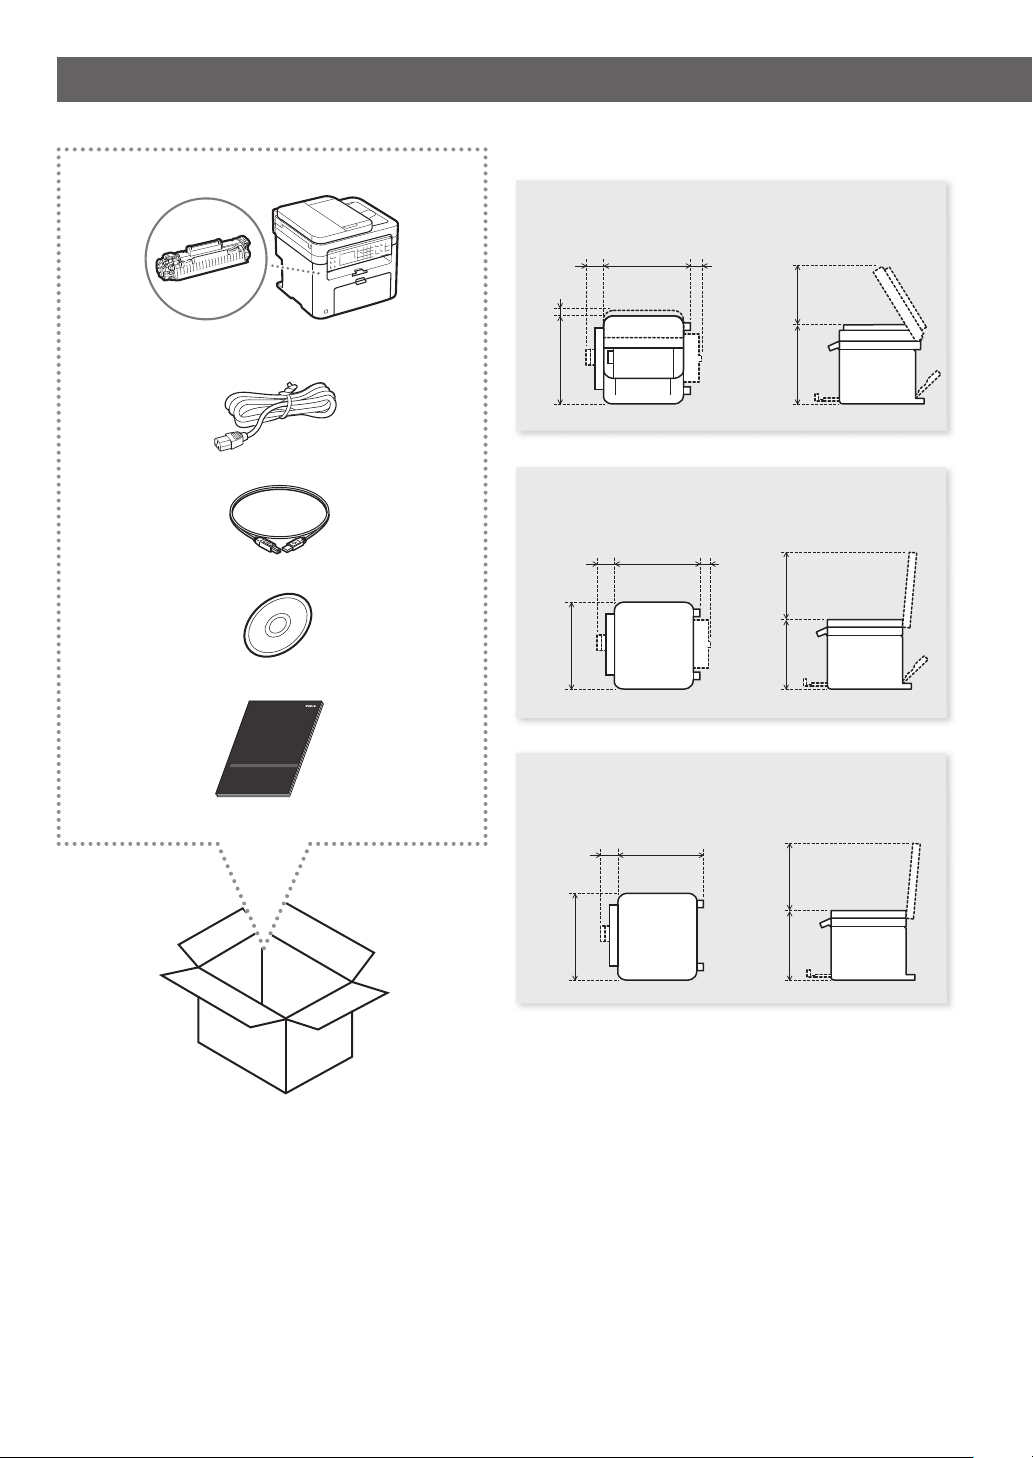
Installing the Machine
Installation Requirements
●
MF244dw
128 mm 362 mm 106 mm
39 mm
390 mm
●
MF241d
128 mm 362 mm 106 mm
390 mm
●
MF232w
128 mm 362 mm
390 mm
360 mm 270 mm
312 mm 310 mm
312 mm 310 mm
2
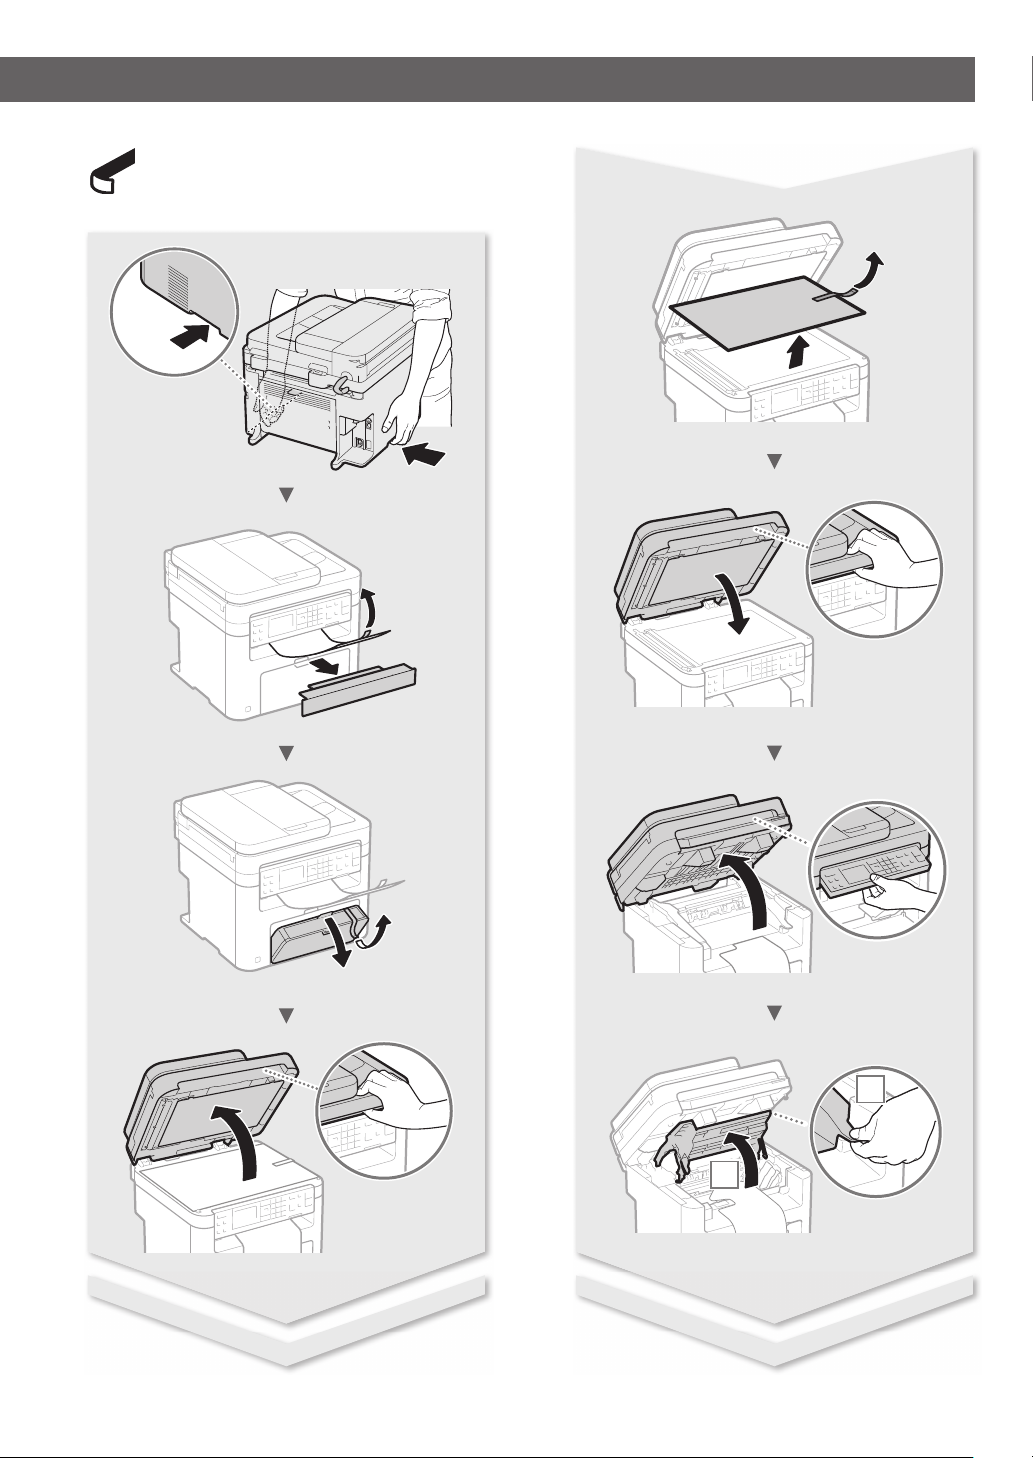
Remove all the tape.
1
2
3
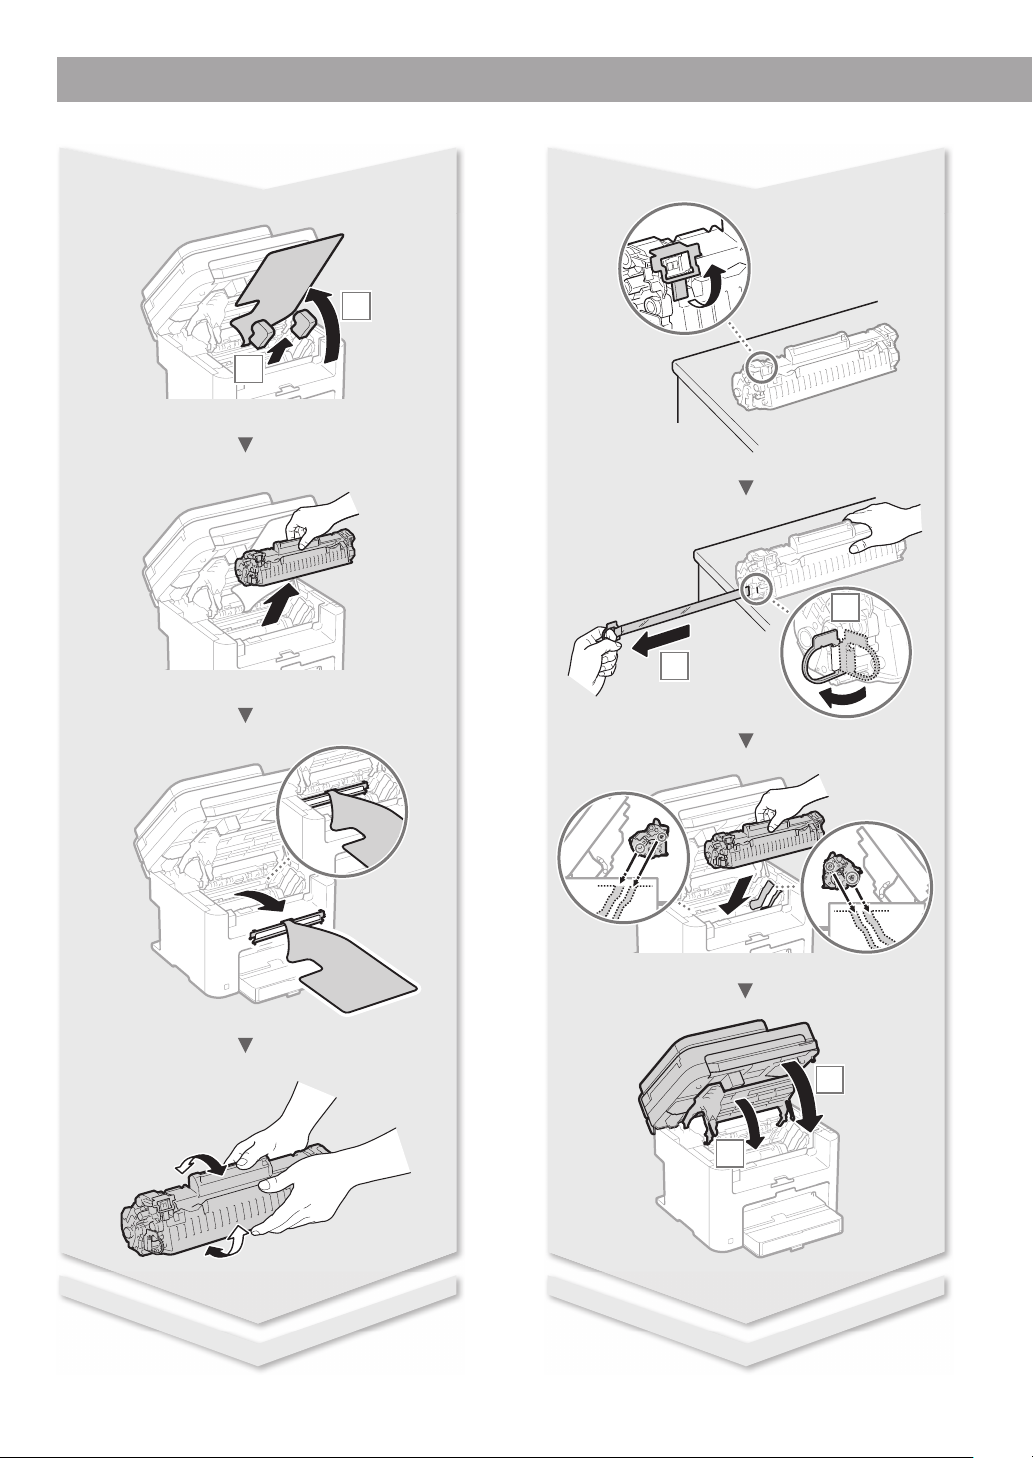
Installing the Machine
2
1
1
2
2
1
4
2
1
5

Contents
About the Manuals .......................................................................8
Navigating the Menu and Text Input Method ....................8
Connecting the Power Cord and Turning ON
the Power .........................................................................................8
Specifying the Initial Settings ...................................................9
Choosing the Method to Connect the Machine ................9
Choosing the Method to Connect:
Via Wireless LAN or Other Method ....................................... 10
Connecting via a Wired LAN
(MF244dw/MF232w Only)....................................................... 10
Contenido
Acerca de los manuales ............................................................ 22
Navegación por el menú y método de introducción
de texto .......................................................................................... 22
Conexión del cable de alimentación y encendido del
interruptor de alimentación ................................................... 22
Especi cación de la con guración inicial ..........................23
Selección del método de conexión del equipo ............... 23
Selección del método de conexión: a través de red
LAN inalámbrica u otro método ........................................... 24
Conexión mediante una red LAN cableada
(MF244dw/MF232w únicamente) ........................................ 24
Connecting via a USB Cable ...................................................10
Connecting via a Wireless LAN
(MF244dw/MF232w Only)....................................................... 11
Setting Wireless LAN (MF244dw/MF232w Only) ........... 11
Setting a Paper Size and Type ................................................ 13
Perform Useful Tasks ................................................................. 14
Replacing Toner Cartridge ...................................................... 15
Clearing Paper Jams ..................................................................16
* For Mac OS users, please refer to P.13
Conexión con un cable USB.................................................... 24
Conexión mediante una red LAN inalámbrica
(MF244dw/MF232w únicamente) ........................................ 25
Con guración de la red LAN inalámbrica
(MF244dw/MF232w únicamente) ........................................ 25
Ajuste del tamaño y el tipo del papel ................................. 27
Tareas útiles .................................................................................. 28
Sustitución del cartucho de tóner ........................................ 29
Eliminación de atascos de papel .......................................... 30
* Para usuarios de Mac OS, consulte la pág.27
6

7
About the Manuals
Getting Started (This manual):
Read this manual rst. This manual
describes the installation of the
machine, the settings, and a caution. Be
sure to read this manual before using
the machine.
Navigating the Menu and Text Input Method
MF Driver Installation Guide (Visit
the website):
This manual describes software
installation.
You can access
http://canon.com/oip-manual to
read the User’s Guide that describes
all functions of this machine.
User’s Guide (Visit the website):
You can access
http://canon.com/oip-manual to
read the User’s Guide that describes
all functions of this machine.
En
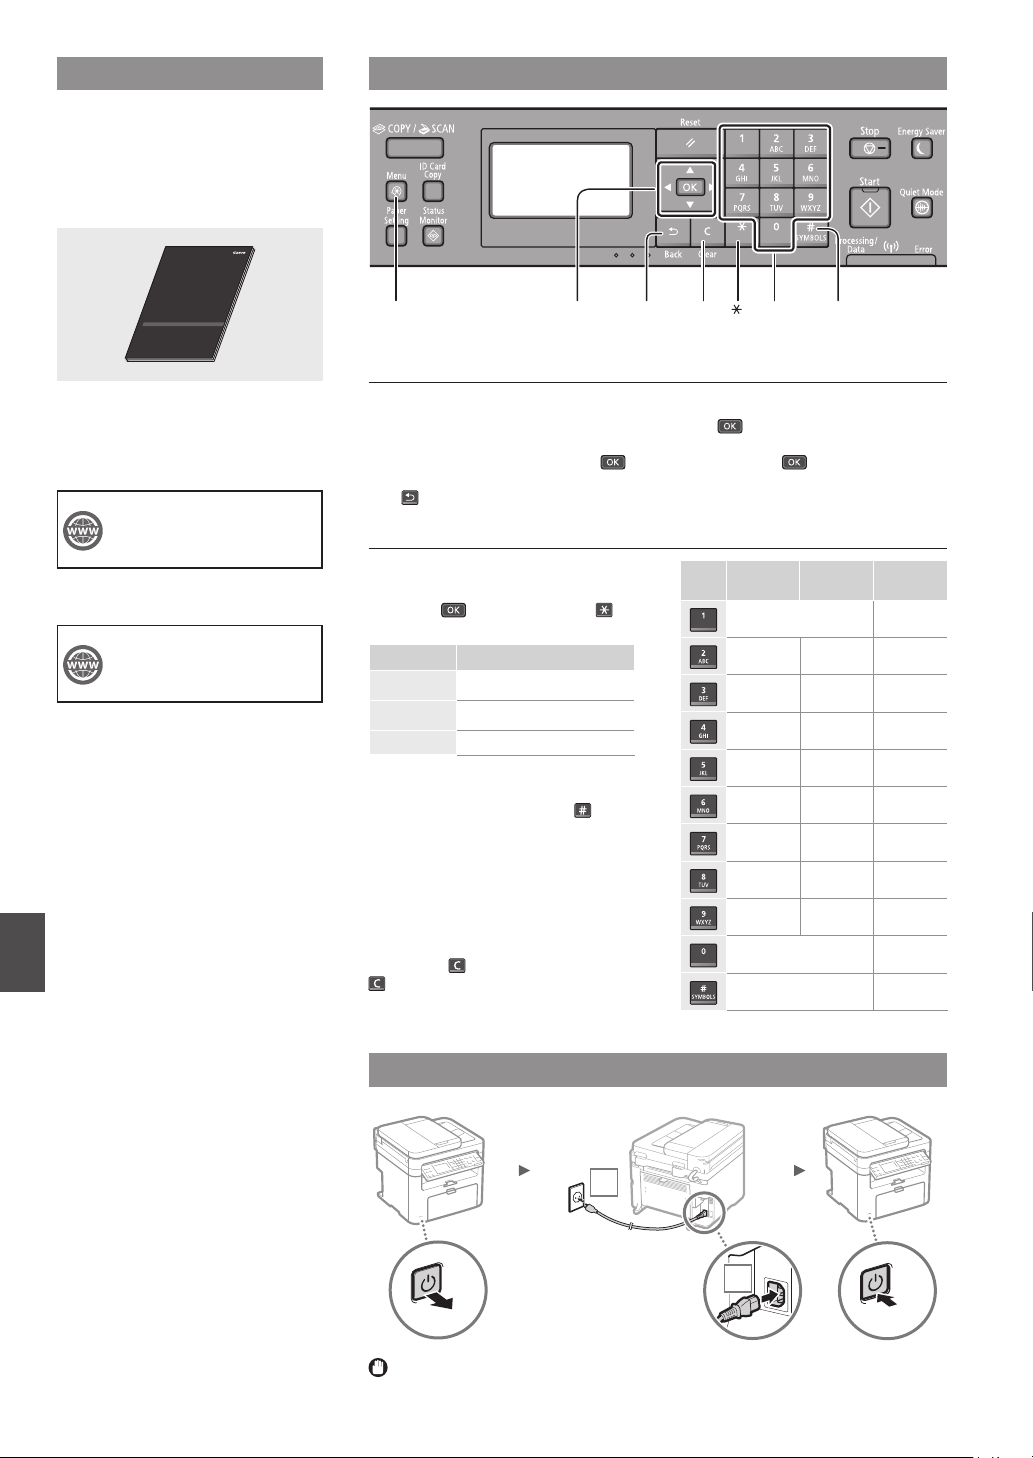
Menu #Clear Numeric keys
▲▼◀▶OK
Back
Navigating the Menu
Item selection or moving the cursor
among the menu items
Select an item with [▲] or [▼].
Proceed to the next hierarchy with
or [▶]. Return to the previous hierarchy
with or [◀].
Setting con rmation
Press . However, when <Apply>
appears on the display, select <Apply>,
and then press .
Text Input Method
Changing entry mode
Press [▼] to select <Entry Mode>, and
then press
. You can also press to
change the entry mode.
Entry mode Available text
Uppercase alphabetic letters and
<A>
symbols
Lowercase alphabetic letters and
<a>
symbols
<12> Numbers
Entering text, symbols, and numbers
Enter with the numeric keys or
.
Moving the cursor (Entering a space)
Move with [◀] or [▶]. Move the cursor
to the end of the text and press [▶] to
enter a space.
Deleting characters
Delete with
. Pressing and holding
deletes all characters.
Entry mode:
<A>
@ . - _ / 1
ABC abc 2
DEF def 3
GHI ghi 4
JKL jkl 5
MNO mno 6
PQRS pqrs 7
TUV tuv 8
WXYZ wxyz 9
(Not available) 0
(space) - . * # ! “ , ; : ^ ` _ = / | ‘
? $ @ % & + \ ˜ ( ) [ ] { } < >
Entry mode:
<a>
Entry mode:
<12>
(Not available)
Connecting the Power Cord and Turning ON the Power
2
1
OFF
Do not connect the USB cable at this time. Connect it when installing software.
ON
8

Specifying the Initial Settings
The rst time you turn on the power, follow the instructions
on the screen. For details on navigating the menu and how to
input the numbers, see “Navigating the Menu and Text Input
Method” ( P.8).
●
Complete settings starting with language
and through to date and time
Follow the instructions on the screen, set the language,
region, time zone*, and date and time*.
* MF244dw/MF232w Only
MF244dw/MF232w
Language
Chinese (Simplified)
Chinese (Traditional
English
French
Current Time Set.
08/08 2014 12:52 AM
(0:00-12:59)
●
Connecting via a USB cable
You can connect the machine to the computer using a USB
cable.
Make sure that the USB cable you use has the following
mark.
●
Connecting via a Wireless LAN (MF244dw/
MF232w Only)
You can connect the machine to a wireless router*. Since it
is wirelessly connected, no LAN cables are needed.
MF241d
Language
Chinese (Simplified)
Chinese (Traditional
English
French
●
Setting a Remote UI PIN (MF244dw/MF232w
Check that paper is
loaded in Drawer 1.
Previous Next
Only)
You can set a PIN for access to the Remote UI. Protect the
machine from unauthorized access by only allowing users
with access privileges to use the machine.
To specify settings later, please refer to “Setting a Remote UI
PIN” in the User’s Guide.
User’s Guide “Setting a Remote UI PIN”
Set Remote UI Access
PIN? (Settings can
be configured later)
Yes No
Remote UI Access PIN
<Apply>
Choosing the Method to Connect the
Machine
●
Connecting via a Wired LAN (MF244dw/
MF232w Only)
You can connect the machine to a wired router. Use the LAN
cables to connect the machine to the wired router (access
point).
* A wireless router (access point) that supports IEEE802.11b/g/n is
required.
Connect the computer to the router by cable or wirelessly.
If you do not sure whether your router is wireless or
wired:
See the instruction manual provided with your network
device, or contact the manufacturer.
Check if your router has a button
Select from the following two methods depending on the
router (access point) that you are using.
●
There is a button.
You can easily setup if your router (access point)
has a button, and if the mark is on the router.
●
There is no button.
If there is no button on your router (access point),
manually select your SSID and complete the settings.
●
Direct Connection (MF244dw/MF232w Only)
Connect a mobile device to the machine wirelessly and
directly without routing through a wireless LAN router (or
access point).
User’s Guide “Can Be Used Conveniently with a Mobile
Device” ▶ “Make Direct Connection (Access Point Mode)”
En
Connect the computer to the router by cable or wirelessly.
Make sure that there is an available port in the router to connect
the machine and the computer.
Have a LAN Cable of Category 5 twisted-pair cable or higher ready.
9

Choosing the Method to Connect:
Via Wireless LAN or Other Method
●
MF244dw/MF232w
Use wireless LAN to
connect to network?
(Can config. later.)
Yes No
There is a button.
Yes
No
●
MF241d
Connect to the computer via a USB cable
Start from step 4 of “Push Button Mode” (P.11).
There is no button.
Start from step 4 of “Setting the Access Point Manually”
(P.12).
Connect to the computer via a wired LAN
Proceed to “Connecting via a Wired LAN
(MF244dw/MF232w Only)” (P.10).
Connect to the computer via a USB cable
Proceed to “Connecting via a USB Cable” (P.10).
Connect to the computer via a wireless LAN later
Proceed to “Connecting via a Wireless LAN
(MF244dw/MF232w Only)” (P.11).
Proceed to “Connecting via a USB Cable” (P.10).
Current Time Set.
Must rechg. battery
for 24 hours to save
time settings. After
turning main power
NOTE
• You cannot connect both the wired LAN and wireless
LAN at the same time. In addition, the machine is set to
the “Wired LAN” by default.
• When you connect to a network environment that is not
security protected, your personal information could be
disclosed to third parties. Please use caution.
• If you connect through a LAN in the o ce, contact your
network administrator.
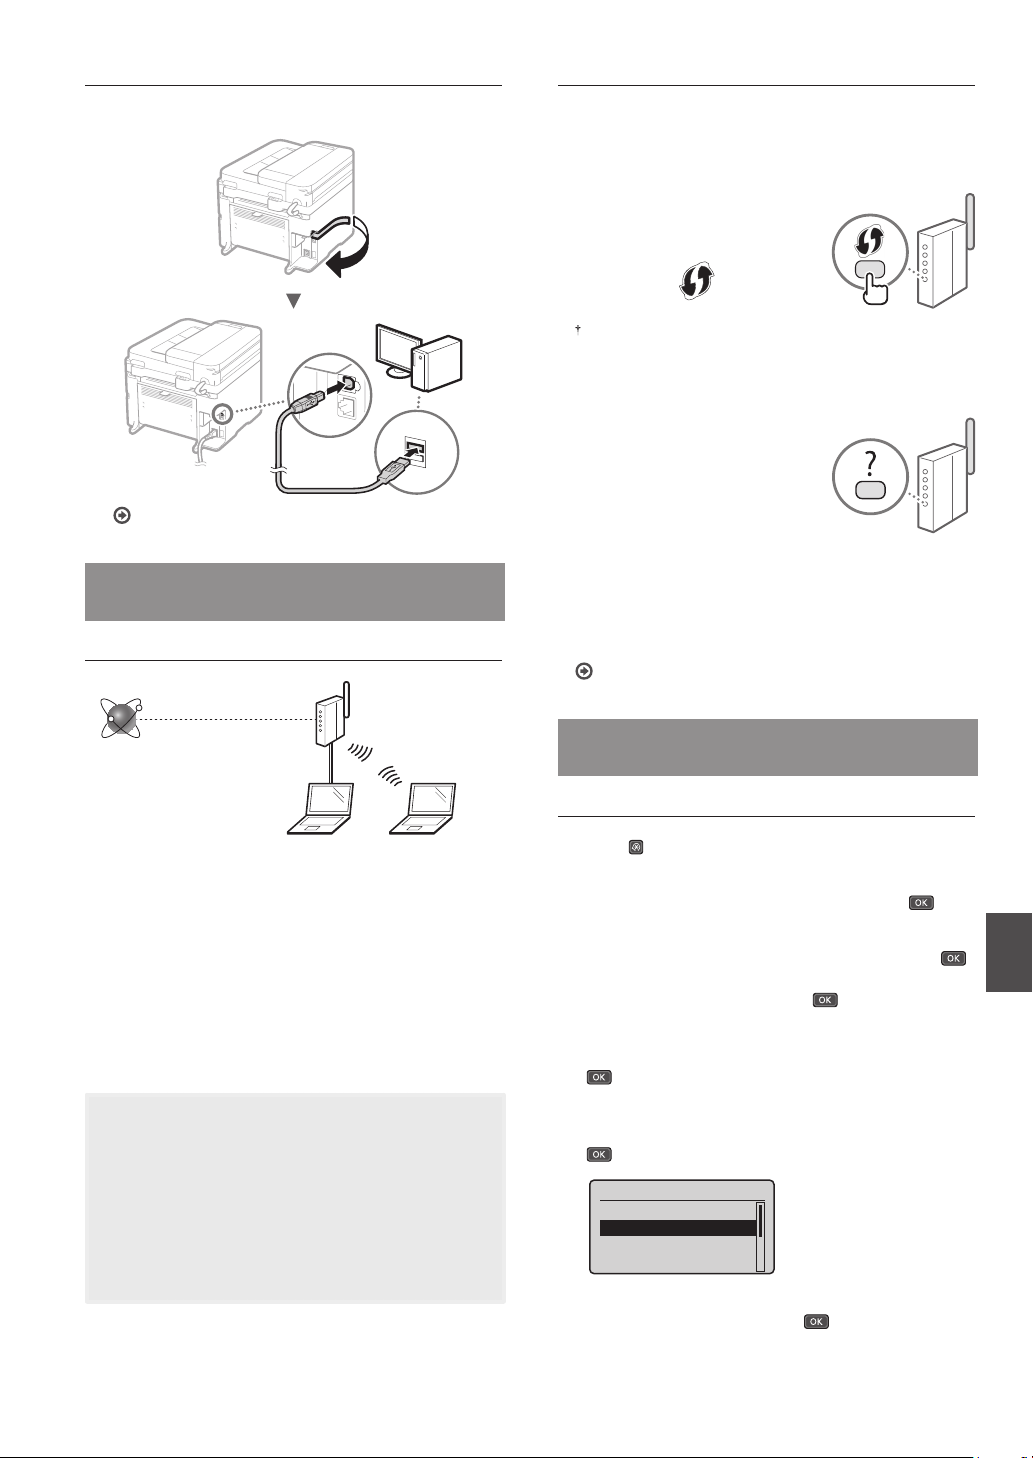
Connecting via a Wired LAN
Connect the LAN cable.
1
The IP address will be automatically con gured in 2
minutes. If you want to set the IP address manually, see
the following items.
User’s Guide “Network” ▶ “Connecting to a Network” ▶
“Setting IP Addresses”
Connecting via a Wired LAN
(MF244dw/MF232w Only)
Checking Before the Setup
Internet
Router
or
hub
En
Are the computer and the router (or hub) properly
connected using a LAN cable?
For more information, see the instruction manual for the
network device you are using, or contact the networking
device manufacturer.
Have the network settings on the computer been
completed?
If the computer is not properly con gured, you may not be
able to use the wired LAN connection even after completing
the following settings.
LAN cable
Install the driver and software using the provided
2
DVD-ROM.
See “For details on the installation procedures:” (P.13).
Proceed to “Setting a Paper Size and Type” (P.13).
Connecting via a USB Cable
Install the Driver and Software
Install the driver and software on the provided DVD-ROM.
See “For details on the installation procedures:” (P.13).
Proceed to “Setting a Paper Size and Type” (P.13).
NOTE
• If you connected the USB cable before installing, rst
remove the USB cable and then re-install.
10
Connecting via a USB Cable
Follow the MF Driver Installation Guide to connect the USB
cable.
Proceed to “Setting a Paper Size and Type” (P.13).
Connecting via a Wireless LAN
(MF244dw/MF232w Only)
Checking Before the Setup
Checking the Router
Select the connection method to the wireless LAN. Select from
the following two methods depending on the router (access
point) that you are using.
●
There is a button.
This machine supports WPS
(Wi-Fi Protected Setup). You
can easily set up if your router
(access point) has a button,
and if the mark is on the
router.
If you are not sure whether or not your router supports WPS,
please see the manual included in the product, or contact the
product manufacturer.
●
There is no button.
If there is no button on your
router (access point), you
may manually select SSID and
complete the settings. In this
case, you need to remember
SSID and network key of your
router (access point).
See “1 Check SSID or Network
Key for a Wireless LAN Router/
Access Point.” (P.12) to learn how to nd out your SSID and
network key.
To set up with the WPS PIN code method/To set up
manually:
User’s Guide “Connecting to a Wireless LAN”
Wireless LAN Router
Internet
Is the computer connected to the router (access point)
correctly by a LAN cable or wireless LAN?
For more information, see the instruction manual for the
network device you are using, or contact the networking
device manufacturer.
Have the network settings on the computer been
completed?
If the computer is not properly con gured, you may not be
able to use the wireless LAN connection even after completing
the following settings.
NOTE
• You cannot connect both the wired LAN and wireless
LAN at the same time. In addition, the machine is set to
the “Wired LAN” by default.
• When you connect to an unsecured network environment,
your personal information could be disclosed to third
parties. Please use caution.
• If you connect through a LAN in the o ce, contact your
network administrator.
Setting Wireless LAN
(MF244dw/MF232w Only)
Push Button Mode
Press .
1
Select <Network Settings>, and then press .
2
Select <Wireless LAN Settings>, and then press .
3
If a screen appears asking whether to enable the wireless
LAN, select <Yes>, and then press .
Read the message that is displayed, and then press
4
.
Select <WPS Push Button Mode>, and then press
5
.
Wireless LAN Settings
SSID Settings
WPS Push Button Mode
WPS PIN Code Mode
Power Save Mode
En
Select <Yes>, and then press .
6
11

Press and hold* the button until the lamp lights or
7
blinks.
You should press the WPS button within 2 minutes after
you select <Yes> in step 6.
* The time that you should hold the button may vary depending
on the router you are using.
Wait approximately 2 minutes after the connection.
8
IP address is set during this period of time.
SampleABCD WEP 01234567890123456789ABCDEF
SampleEFGHIJ WPA-PSK 543210EDCBA
SampleK WPA2-PSK 1234ABCD
When an error message appears:
Press
network key is correct, and then retry the settings. If the
access point cannot be detected even after retrying,
see the following.
When checking the network connection:
You can check if the machine is properly connected to
the network by using a computer that is connected to the
network.
To set IP address manually:
to close the screen, check whether or not the
User’s Guide “When an Error Message Appears”
User’s Guide “Viewing Network Settings”
User’s Guide “Connecting to a Wireless LAN”
Setting the Access Point Manually
Check SSID or Network Key for a Wireless LAN
1
Router/Access Point.
• Check the label on the Wireless LAN router.
• You can check the SSID or the network key using “Canon
MF / LBP Wireless Setup Assistant,” which is included in
En
the DVD-ROM supplied with the machine.
If the information of the wireless LAN router is not
displayed, click the [Refresh] button. If the information is
not displayed when you click the [Refresh] button, check
if the computer settings for a wireless LAN router (access
point) are complete.
Write down the name of SSID and network key
2
displayed in step 1. When multiple access points are
displayed, write all SSIDs that are displayed.
SSID
It is sometimes written as name of network, or name of
access point. If there are multiple SSIDs, please write down
all.
Network Key
It is sometimes written as PIN, WEP key, WPA/WPA2
passphrase, PSK or preshared key.
12
Press .
3
Select <Network Settings>, and then press .
4
Select <Wireless LAN Settings>, and then press .
5
If a screen appears asking whether to enable the wireless
LAN, select <Yes>, and then press .
Read the message that is displayed, and then press
6
.
Select <SSID Settings>, and then press .
7

Select <Select Access Point>, and then press .
8
SSID Settings
Select Access Point
Enter Manually
Select a wireless LAN router.
9
If multiple matched SSIDs are displayed, select the ID that
is listed rst (the one with the strongest signal).
Enter the network key that you have written
10
down.
Enter the network key using the numeric keys.
Select <Apply>, and then press
WEP Key (5-26 Char.)
XXXXXXXX
<Apply>
Entry Mode: A
Select <Yes>, and then press .
11
After the <Connected.> screen is displayed, wait
12
.
until the Wi-Fi indicator stops blinking and turns on.
For details on the installation procedures:
Install the driver and software using the provided DVDROM.
You can also download the driver from the Canon website.
For details on the installation procedures, see the MF
Driver Installation Guide.
For Mac OS users:
The DVD-ROM supplied with this machine may not include
the printer driver for Mac OS. This is di erent depending
on when you purchase the machine. Please nd and
download the appropriate driver on our Canon homepage.
For further information on installation or using the driver,
see the manual for the driver.
Setting a Paper Size and Type
Following the instructions on the screen, set the paper size
and type.
Paper Settings
MP Tray
1
Drawer 1
Select Frequently Us
...
Wait approximately 2 minutes after the
13
connection.
IP address is set during this period of time.
When an error message appears:
Press
network key is correct, and then retry the settings.
If the access point cannot be detected even after
retrying, see the following.
To set IP address manually:
to close the screen, check whether or not the
User’s Guide “When an Error Message Appears”
User’s Guide “Connecting to a Wireless LAN”
En
13

Perform Useful Tasks
You can use various functions in this machine. Following functions are the overview of the main functions that you can use routinely.
Copy
Enlarged/Reduced Copies
You can enlarge or reduce standard
size documents to copy on standard
size paper or specify the copy ratio in
percentage.
2-Sided Copying*
You can copy 1-sided documents on
both sides of paper.
Collating
You can sort copies into sets arranged
in page order.
Reduced Layout
You can reduce the amount of paper
by printing multiple documents onto
one sheet.
2 on 1 4 on 1
Copying ID Card
You can make a copy of a 2-sided card
onto one side of paper.
Print
Enlarged/Reduced Printing
2-Sided Printing*
Reduced Layout
You can reduce the amount of paper
by printing multiple documents onto
one sheet.
2 on 1 4 on 1
Booklet Printing*
Poster Printing
Watermark Printing
Displaying a Preview before Printing
Selecting a “Pro le”
Network Settings**
This machine comes equipped with a
network interface that you can construct
a network environment easily. You can
print a document, use the network scan
from all computers which are connected
with the machine. The machine supports
to increase work e ciency as a shared
machine in the o ce.
Scan
Saving the Documents Using the
Operation Panel of the Machine
Documents
Data
Saving the Documents Using
Operations from a Computer
●
Scanning with the MF Scan Utility
Documents
Data
●
Scanning from an Application
●
Scanning with the WIA Driver
Remote UI**
You can understand the condition of
the machine from the computers on the
network. You can access the machine
and manage jobs or specify various
settings via network.
* MF244dw/MF241d Only
** MF244dw/MF232w Only
En
14

Replacing Toner Cartridge
Toner cartridges are consumables. When the toner becomes nearly empty or has run out completely in the middle of a job run, a
message appears on the screen, or the following problems may occur. Take the appropriate action accordingly.
When a Message Appears
When the toner becomes nearly empty in the middle of a job run, a message appears on the screen.
Message
<Preparing
a cartridge is
recommended.>
<Cart. end of
lifetime. Rplcmt.
recommended.>
When white streaks appear on the output, or the output is partially faded:
When white streaks appear on the output or the output is partially faded, the toner cartridge has almost reached the end of its life,
even if no message appears on the screen. When the print quality becomes unacceptable, see the following to x the problem.
When the message is
displayed on the screen
When the toner cartridge
needs a replacement
soon.
When the toner cartridge
has reached the end of
its life.
Description and Solutions
Shake the toner cartridge to evenly distribute the toner inside the cartridge.
User’s Guide “Before Replacing the Toner Cartridge”
We recommend that the toner cartridge be replaced before printing highvolume documents.
User’s Guide “How to Replace Toner Cartridges”
If this message does not disappear, replace the toner cartridge. You can
continue printing, but the print quality cannot be guaranteed.
User’s Guide “Replacing Toner Cartridges”
When White Streaks Appear on the Output or the Output Is Partially Faded
When the toner nearly runs out, white streaks appear on the output, or the output is partially faded.
No message appears on the screen, if the toner nearly runs out.
Replace the toner cartridge when white streaks appear on the
output, or the output is partially faded.
When this problem occurs:
Follow the steps in the procedure below before replacing the toner cartridge. The machine continues printing until the toner runs out
completely.
User’s Guide “Before Replacing the Toner Cartridge”
When the print quality is still unacceptable:
If the problem persists after you have followed the steps in the procedure below, replace the toner cartridge.
User’s Guide “How to Replace Toner Cartridges”
En
15

Clearing Paper Jams
If the following screen appears, a paper jam has occurred inside the machine. Follow
the procedure displayed on the screen to remove the jammed document or paper. This
manual indicates only areas where paper jams occur. For details on each function, see
the User’s Guide.
Inside the machine
Feeder
(MF244dw only)
Paper jammed.
Press [ ] to
display steps.
Manual Feed Slot
En
Rear cover
(MF244dw/MF241d only)
16
Paper drawer

17
En

En
T
T
Appendix
Important Safety
Instructions
This chapter describes important saf ety
instructions for the prevention of injury to users of
this machine and others, and damage to propert y.
Read this chapter bef ore using the machine, and
follow the instructions to use the machine properly.
Do not perf orm any operations not described in
this manual. Canon will not be responsible for any
damages resulting from operations not described
in this manual, improper use, or repair or changes
not perf ormed by Canon or a third part y
authorized by Canon. Improper operation or use of
this machine could result in personal injury and/or
damage requiring extensive repair that may not be
covered un der your Limited Warranty.
WARNING
Indicates a warning concerning operations
that may lead to death or injury to persons if
not performed correctly. To use the machine
safely, always pay attention to these warnings.
CAUTION
Indicates a caution concerning operations
that may lead to injury to persons if not
performed correctly. To use the machine
safely, always pay attention to these cautions.
IMPORTAN
Indicates operational requirements and
restrictions. Be sure to read these items
carefully to operate the machine correctly and
avoid damage to the machine or property.
Installation
To use this machine safely and in a trouble-free
way, carefully read the following precautions and
install the machine in an appropriate location.
WARNING
Do not install in a location that may result in a
re or electrical shock
•
A location where the ventilation slots are
blocked (too close to walls, beds, sofas, rugs, or
similar objects)
•
A damp or dusty location
•
A location exposed to direct sunlight or outdoors
•
A location subject to high temperatures
•
A location exposed to open ames
•
Near alcohol, paint thinners or other
ammable substances
Other warnings
•
Do not connect unapproved cables to this
machine. Doing so may result in a re or
electrical shock.
•
Do not place necklaces and other metal
objects or containers lled with liquid on the
machine. If foreign substances come in contact
with electrical parts inside the machine, it may
result in a re or electrical shock.
•
If any foreign substance falls into this machine,
unplug the power plug f rom the AC power outlet
and contact your local authorized Canon dealer.
Do not install in the following locations
The machine may drop or fall, resulting in injur y.
•
An unstable location
•
A location exposed to vibrations
CAUTION
Do not install in the following locations
Doing so may result in damage to the
machine.
•
A location subject to temperature and
humidity extremes, whether low or high
•
A location subject to dramatic changes in
temperature or humidity
•
A location near equipment that generates
magnetic or electromagnetic waves
•
A laboratory or location where chemical
reactions occur
•
A location exposed to corrosive or toxic gases
•
A location that may warp from the weight of
the machine or where the machine is liable to
sink (a carpet, etc.)
Avoid poorly ventilated locations
This machine generates a slight amount of ozone
and other emissions during normal use. These
emissions are not harmful to health. However,
they may be noticeable during ex tended use or
long production runs in poorly ventilated rooms.
To maintain a comfortable working environment,
it is recommended that the room where the
machine operates be appropriately ventilated.
Also avoid locations where people would be
exposed to emissions from the machine.
Do not install in a location where
condensation occurs
Water droplets (condensation) may form inside
the machine when the room where the machine
is installed is heated rapidly, and when the
machine is moved from a cool or dry location to
a hot or humid location. Using the machine
under these conditions may result in paper jams,
poor print quality, or damage to the machine.
Let the machine adjust to the ambient
temperature and humidity for at least 2 hours
before use.
In altitudes of above sea level 3,000 m or higher
Machines with a hard disk may not operate
properly when used at high altitudes of about
3,000 meters above sea level, or higher.
Leveling feet (only for products with leveling
feet)
Do not remove the machine’s leveling feet af ter
the machine has been installed, as this may
cause the machine to fall or tip over, resulting in
personal injury.
Connecting the Telephone Line (Only for
Products with a Fax Function)
This machine conforms to a analog telephone
line standard. The machine can be connected to
the public switched telephone network (PSTN)
only. If you connect the machine to a digital
telephone line or a dedicated telephone line, it
might impede proper operation of the machine
and could be the cause of damage. Make sure to
con rm a t ype of telephone line before
connecting the machine. Contact your optical
ber line or IP telephone line service providers if
you want to connect the machine to those
telephone lines.
When using wireless LAN (only for products
with a wireless LAN func tion)
•
Install the machine at a distance of 50 meters
or less from the wireless LAN router.
•
As far as possible, install in a location where
communication is not blocked by intervening
objects. The signal may be degraded when
passing through walls or oors.
•
Keep the machine as far as possible from
digital cordless phones, microwave ovens, or
other equipment that emits radio waves.
•
Do not use near medical equipment. Radio
waves emitted from this machine may
interfere with medical equipment, which may
result in malfunctions and accidents.
Power Supply
WARNING
•
Use only a power supply that meets the
speci ed voltage requirements. Failure to do
so may result in a re or electrical shock.
•
Do not use power cords other than the one
provided, as this may result in a re or electrical
shock.
•
The provided power cord is intended for use
with this machine. Do not connect the power
cord to other devices.
•
Do not modify, pull, forcibly bend, or perform
any other act that may damage the power
cord. Do not place heavy objects on the power
cord. Damaging the power cord may result in
a re or electrical shock.
•
Do not plug in or unplug the power plug with
wet hands, as this may result in an electrical
shock.
•
Do not use extension cords or multi-plug
power strips with the machine. Doing so may
result in a re or electrical shock.
•
Do not wrap the power cord or tie it in a knot,
as this may result in a re or electrical shock.
•
Insert the power plug completely into the AC
power outlet. Failure to do so may result in a
re or electrical shock.
•
Remove the power plug completely from the
AC power outlet during a thunder storm.
Failure to do so may result in a re, electrical
shock, or damage to the machine.
•
Make sure that the power supply for the
machine is safe, and has a steady voltage.
•
Keep the power cord away from a heat source;
failure to do this may cause the power cord
coating to melt, resulting in a re or electrical
shock.
•
If excessive stress is applied to the connection
part of the power cord, it may damage the
power cord or the wires inside the machine
may disconnect. This could result in a re.
Avoid the following situations:
– Connecting and disconnecting the power cord
frequently.
– Tripping over the power cord.
– The power cord is bent near the connection
part, and continuous stress is being applied to
the power outlet or the connection part.
– Applying excessive force on the power plug.
CAUTION
Install this machine near the power outlet and
leave su cient space around the power plug so
that it can be unplugged easily in an emergency.
IMPORTAN
When connecting power
•
Do not connect the power cord to an
uninterruptible power source. Doing so may
result in malfunction of or damage to the
machine at power failure.
•
If you plug this machine into an AC power
outlet with multiple sockets, do not use the
remaining sockets to connect other devices.
•
Do not connect the power cord to the auxiliary
AC power outlet on a computer.
Other precautions
Electrical noise may cause this machine to
malfunction or lose data.
Handling
WARNING
•
Immediately unplug the power plug from the
AC power outlet and contact an authorized
Canon dealer if the machine makes an unusual
noise, emits an unusual smell, or emits smoke
or excessive heat. Continued use may result in
a re or electrical shock.
18

•
Do not disassemble or modify this machine.
There are high-voltage and high-temperature
components inside the machine. Disassembly
or modi cation may result in a re or electrical
shock.
•
Place the machine where children will not
come in contact with the power cord and
other cables or gears and electrical parts inside
the machine. Failure to do so may result in
unexpected accidents.
•
Do not use ammable sprays near this
machine. If ammable substances come into
contact with electrical parts inside this
machine, it may result in a re or electrical
shock.
•
When moving this machine, be sure to turn
OFF the power of this machine, and then
unplug the power plug and interface cables.
Failure to do so may damage the power cord
or interface cables, resulting in a re or
electrical shock.
•
When plugging or unplugging a USB cable
when the power plug is plugged into an AC
power outlet, do not touch the metal part of
the connector, as this may result in an electrical
shock.
•
Use a modular cable that is shorter than 3
meters.
•
Use a USB cable that is shorter than 3 meters.
If the operating noise concerns you
Depending on the use environment and
operating mode, if the operating noise is of
concern, it is recommended that the machine be
Installed in a place other than the o ce.
If you are using a cardiac pacemaker
This machine generates a low level magnetic
ux. If you use a cardiac pacemaker and feel
abnormalities, please move away from this
machine and consult your physician
immediately.
CAUTION
•
Do not place heavy objects on this machine as
they may fall, resulting in injury.
•
For safety, unplug the power plug if the
machine will not be used for a long period of
time.
•
Use caution when opening and closing covers
to avoid injury to your hands.
•
Keep hands and clothing away from the rollers
in the output area. If the rollers catch your
hands or clothing, this may result in personal
injury.
•
The inside of the machine and the output slot
are very hot during and immediately after use.
Avoid contact with these areas to prevent
burns. Also, printed paper may be hot
immediately after being output, so use caution
when handling it. Failure to do so may result in
burns.
Feeder (only for products with a feeder)
•
Do not press down hard on the feeder when
using the platen glass to make copies of thick
books. Doing so may damage the platen glass
and result in personal injury.
•
Close the feeder gently to avoid catching your
hands, as this may result in personal injury.
•
Close the feeder gently to avoid catching your
hands in the back of the feeder, as this may
result in personal injury.
Finisher (only for products with a nisher)
•
Do not place your hands in the part of the tray
where stapling is performed (near the rollers),
especially pay careful attention to the sharp
staples, as this may result in personal injury.
Paper drawer (only for products with a paper
drawer)
•
Do not insert your hand into the machine
while the paper drawer is removed, as this may
result in personal injury.
Energy Saver key (only for produc ts with an
Energy Saver key)
•
Press (Energy Saver) for safety when the
machine will not be used for a long period of
time, such as overnight. Also, turn OFF the
main power switch, and disconnect the power
cord for safety when the machine will not be
used for an extended period of time, such as
during consecutive holidays.
Laser Safety
This product is con rmed as a Class 1 laser
product in IEC60825-1:2007 and EN60825-1:2007.
CLASS 1 LASER PRODUCT
LASER KLASSE 1
APPAREIL À LASER DE CLASSE 1
APPARECCHIO LASER DI CLASSE 1
PRODUCTO LÁSER DE CLASE 1
APARELHO A LASER DE CLASSE 1
LUOKAN 1 LASER-TUOTE
LASERPRODUKT KLASS 1
The laser beam can be harmful to human bodies.
Since radiation emitted inside the product is
completely con ned within protective housings
and external covers, the laser beam cannot
escape from the machine during any phase of
user operation. Read the following remarks and
instructions for safety.
•
Never open covers other than those instructed
in the manuals for this machine.
•
If the laser beam should escape and enter your
eyes, exposure may cause damage to your
eyes.
CAUTION
Use of controls, adjustments, or performance of
procedures other than those speci ed in this
manual may result in hazardous radiation
exposure
Other precautions
•
Follow the instructions on the caution label
attached to this machine.
•
Do not subject the machine to strong shocks
or vibration.
•
Do not forcibly open and close doors, covers,
and other parts. Doing so may result in
damage to the machine.
•
Do not turn the main power switch OFF or
open the covers while the machine is in
operation. This may result in paper jams.
Maintenance and Inspections
Clean this machine periodically. If dust
accumulates, the machine may not operate
properly. When cleaning, be sure to observe the
following. If a problem occurs during operation,
see Troubleshooting. If the problem cannot be
resolved or you feel the machine requires an
inspection, see When a Problem Cannot Be
Solved.
WARNING
•
Before cleaning, turn OFF the power and
unplug the power plug from the AC power
outlet. Failure to do so may result in a re or
electrical shock.
•
Unplug the power plug periodically and clean
with a dry cloth to remove dust and grime.
Accumulated dust may absorb humidity in the
air and may result in a re if it comes into
contact with electricity.
•
Use a damp, well wrung-out cloth to clean the
machine. Dampen cleaning cloths with water
only. Do not use alcohol, benzenes, paint
thinners, or other ammable substances. Do
not use tissue paper or paper towels. If these
substances come into contact with electrical
parts inside the machine, they may generate
static electricity or result in a re or electrical
shock.
•
Check the power cord and plug periodically
for rust, bent prongs, fraying, cracks, or
excessive heat generation. Use of poorlymaintained power cord or plug may result in a
re or electrical shock.
CAUTION
•
The inside of the machine has hightemperature and high-voltage components.
Touching these components may result in
injury or burns. Do not touch any part of the
machine that is not indicated in the manual.
•
When loading paper or removing jammed
paper, be careful not to cut your hands with
the edges of the paper.
Legal Limitations on the Usage of Your
Product and the Use of Images
Using your produc t to scan, print or otherwise
reproduce certain documents, and the use of
such images as scanned, printed or otherwise
reproduced by your product, may be prohibited
by law and may result in criminal and/or civil
liability. A non-exhaustive list of these
documents is set forth below. This list is intended
to be a guide only. If you are uncertain about the
legality of using your product to scan, print or
otherwise reproduce any particular document,
and/or of the use of the images scanned, printed
or otherwise reproduced, you should consult in
advance with your legal advisor for guidance.
•
Paper Money
•
Travelers Checks
•
Money Orders
•
Food Stamps
•
Certi cates of Deposit
•
Passports
•
Postage Stamps (canceled or uncanceled)
•
Immigration Papers
•
Identifying Badges or Insignias
•
Internal Revenue Stamps (canceled or
uncanceled)
•
Selective Service or Draft Papers
•
Bonds or Other Certi cates of Indebtedness
•
Checks or Drafts Issued by Governmental
Agencies
•
Stock Certi cates
•
Motor Vehicle Licenses and Certi cates of Title
•
Copyrighted Works/Works of Art without
Permission of Copyright Owner
Safety-Related Symbols
Power switch: “ON” position
Power switch: “OFF” position
Power switch: “STAND-BY” position
Push-push switch “ON” “OFF”
Protective earthing terminal
Dangerous voltage inside. Do not open
covers other than instructed.
CAUTION: Hot surface. Do not touch.
Class II equipment
Moving parts: Keep body parts away from
moving parts
[NOTE]
Some of symbols shown above may not be
a xed depending on the product.
v1602 _00_ en- GB
En
19

En
Laser Safety Label
Consumables
WARNING
Do not dispose of used toner cartridges in open
ames. Also, do not store toner cartridges or
paper in a location exposed to open ames. This
may cause the toner or paper to ignite, and result
in burns or re.
Notice
Product Name
Safety regulations require the product’s name to
be registered.
In some regions where this product is sold, the
following name(s) in parentheses () may be
registered instead.
imageCLASS MF244dw (F173700)
imageCLASS MF241d (F173700)
imageCLASS MF232w (F171900)
EMC requirements of EC Directive
This equipment conforms with the essential EMC
requirements of EC Directive. We declare that
this product conforms with the EMC
requirements of EC Directive at nominal mains
input 230 V, 50 Hz although the rated input of
the product is 220 to 240 V, 50/60 Hz. Use of
shielded cable is necessar y to comply with the
technical EMC requirements of EC Directive.
E-Waste Rule
You can see the information about proper
handling equipment after use in the latest User’s
Guide (HTML manual) from the Canon website
(http://canon.com/oip-manual).
Regulator y information for users in Singapore
imageCLASS MF244dw/MF232w includes
approved Wireless LAN Module (Model name:
AW-N M383).
Complies with IDA
Standards
DA103787
Regulator y information for users in Thailand
imageCLASS MF244dw/MF232w includes
approved Wireless LAN Module (Model name:
AW-N M383).
This telecommunication equipment conforms to
NTC technical requirement.
Regulator y information for users in Argentina
Incluye módulo Wireless LAN Module Marca
AzureWave, Modelo AW-NM383, CNC C-13282
Regulator y information for users in Uruguay
imageCLASS MF244dw contains URSEC
approved Wireless LAN Module (Model name:
AW-N M383).
Disclaimers
•
The information in this document is subject to
change without notice.
•
CANON INC. MAKES NO WARRANTY OF ANY
KIND WITH REGARD TO THIS MATERIAL, EITHER
EXPRESS OR IMPLIED, EXCEPT AS PROVIDED
HEREIN, INCLUDING WITHOUT LIMITATION,
THEREOF, WARRANTIES AS TO MARKETABILITY,
MERCHANTABILITY, FITNESS FOR A
PARTICULAR PURPOSE OF USE OR NONINFRINGEMENT. CANON INC. SHALL NOT BE
LIABLE FOR ANY DIRECT, INCIDENTAL, OR
CONSEQUENTIAL DAMAGES OF ANY NATURE,
OR LOSSES OR EXPENSES RESULTING FROM
THE USE OF THIS MATERIAL.
•
The following applies in California, USA only:
The battery included with your product
contains Perchlorate Material and may require
special handling.
See http://www.dtsc.ca.gov/hazardouswaste/
perchlorate/ for details.
About This Manual
Keys and Buttons Used in This Manual
The following symbols and key names are a few
examples of how keys to be pressed are
expressed in this manual.
•
Operation panel keys: [Key icon]
Example:
•
Display: <Specify destination.>
•
Buttons and items on the computer display:
[Preferences]
Illustrations and Displays Used in This Manual
Illustrations and displays used in this manual are
which of imageCLASS MF244dw unless
speci ed.
Tra dem ark s
Mac is a trademark of Apple Inc.
Microsoft, Windows, Windows Vista, Windows
Server, Internet Explorer, Excel, and PowerPoint
are either registered trademarks or trademarks of
Microsoft Corporation in the United States and/
or other countries.
Other product and company names herein may
be the trademarks of their respective owners.
Third Party Software
This Canon product (the “PRODUCT”) product
includes third-party software modules. Use and
distribution of these sof tware modules,
including any updates of such software modules
(collectively, the “SOFTWARE”) are subject to
license conditions (1) through (9) below.
(1) You agree that you will comply with any
applicable export control laws, restrictions or
regulations of the countries involved in the
event that this PRODUCT including the
SOFTWARE is shipped, transferred or
exported into any countr y.
(2) Rights holders of the SOFT WARE retain in all
respects the title, ownership and intellectual
property rights in and to the SOFT WARE.
Except as expressly provided herein, no
license or right, expressed or implied, is
hereby conveyed or granted by rights
holders of the SOFTWARE to you for any
intellectual propert y of rights holders of the
SOFTWARE.
(3) You may use the SOFTWARE solely for use
with the PRODUCT.
(4) You may not assign, sublicense, market,
distribute, or transfer the SOFTWARE to any
third part y without prior writ ten consent of
rights holders of the SOFTWARE.
(5) Not withstanding the foregoing, you may
transfer the SOFTWARE only when (a) you
assign all of your rights to the PRODUC T and all
rights and obligations under the license
conditions to tr ansferee and (b) such transferee
agrees to be bound by all these conditions.
(MF244dw / MF232w)
(6) You may not decompile, reverse engineer,
disassemble or otherwise reduce the code of
the SOFT WARE to human readable form.
(7) You may not modify, adapt, translate, rent,
lease or loan the SOFTWARE or create
derivative works based on the SOFTWARE.
(8) You are not entitled to remove or make
separate copies of the SOFTWARE from the
PRODUCT.
(9) The human-readable portion (the source
code) of the SOFTWARE is not licensed to
you.
Notwithstanding (1) through (9) above, the
PRODUCT includes third-party software modules
accompanying the other license conditions, and
these software modules are subject to the other
license conditions.
Please refer to the other license conditions of
third-par ty software modules described in
Appendix of Manual for the corresponding the
PRODUCT. This Manual is available at http://
canon.com/oip-manual.
By using the PRODUCT, you shall be deemed to
have agreed to all applicable license conditions.
If you do not agree to these license conditions,
please contac t your service representative.
Third Party Software
This Canon product (the “PRODUCT”) product
includes third-party software modules. Use and
distribution of these sof tware modules,
including any updates of such software modules
(collectively, the “SOFTWARE”) are subject to
license conditions (1) through (9) below.
(1) You agree that you will comply with any
applicable export control laws, restrictions or
regulations of the countries involved in the
event that this PRODUCT including the
SOFTWARE is shipped, transferred or
exported into any countr y.
(2) Rights holders of the SOFT WARE retain in all
respects the title, ownership and intellectual
property rights in and to the SOFT WARE.
Except as expressly provided herein, no
license or right, expressed or implied, is
hereby conveyed or granted by rights
holders of the SOFTWARE to you for any
intellectual propert y of rights holders of the
SOFTWARE.
(3) You may use the SOFTWARE solely for use
with the PRODUCT.
(4) You may not assign, sublicense, market,
distribute, or transfer the SOFTWARE to any
third part y without prior writ ten consent of
rights holders of the SOFTWARE.
(5) Notwithstanding the foregoing, you may
transfer the SOFTWARE only when (a) you
assign all of your rights to the PRODUC T and
all rights and obligations under the license
conditions to transferee and (b) such
transferee agrees to be bound by all these
conditions.
(6) You may not decompile, reverse engineer,
disassemble or otherwise reduce the code of
the SOFT WARE to human readable form.
(7) You may not modify, adapt, translate, rent,
lease or loan the SOFTWARE or create
derivative works based on the SOFTWARE.
(8) You are not entitled to remove or make
separate copies of the SOFTWARE from the
PRODUCT.
(9) The human-readable portion (the source
code) of the SOFTWARE is not licensed to
you.
By using the PRODUCT, you shall be deemed to
have agreed to all applicable license conditions.
If you do not agree to these license conditions,
please contac t your service representative.
(MF241d)
20

21
En

Acerca de los manuales
Introducción (este manual):
Lea este manual en primer lugar. Este
manual describe la instalación del
equipo, los ajustes y las precauciones.
Asegúrese de leer este manual antes de
utilizar el equipo.
Navegación por el menú y método de introducción de texto
Guía de instalación del
controlador MF (visite el sitio web):
En este manual se describe la
instalación del software.
Acceda a
http://canon.com/oip-manual
para leer la Guía de usuario que
describe todas las funciones de
esta máquina.
Guía de usuario (visite el sitio
web):
Acceda a
http://canon.com/oip-manual
para leer la Guía de usuario que
describe todas las funciones de
esta máquina.
Es
Menu #Clear Teclas
▲▼◀▶OK
Back
numéricas
Navegación por el menú
Selección de elementos o
desplazamiento del cursor por los
elementos del menú
Seleccione un elemento con [▲] o [▼].
Proceda con la siguiente jerarquía con
o [▶]. Vuelva a la jerarquía anterior
con
o [◀].
Con rmación de la con guración
Pulse
. Sin embargo, cuando
aparezca <Aplicar> en la pantalla,
seleccione <Aplicar> y, luego, pulse
.
Método de introducción de texto
Cambio del modo de entrada
Pulse [▼] para seleccionar <Modo de
entrada> y, a continuación, pulse
También podrá pulsar
para cambiar
el modo de entrada.
Modo de
entrada
<A>
<a>
<12> Números
Texto disponible
Letras alfabéticas mayúsculas y
símbolos
Letras alfabéticas minúsculas y
símbolos
Introducción de texto, símbolos y
números
Introduzca con las teclas numéricas o
Desplazamiento del cursor
(introducción de un espacio)
Desplácese con [◀] o [▶]. Desplace el
cursor al nal del texto y pulse [▶] para
introducir un espacio.
Eliminación de caracteres
Elimine con
presionado
. Si se pulsa y mantiene
, se eliminarán todos los
caracteres.
.
.
Modo de
entrada: <A>
ABC abc 2
DEF def 3
GHI ghi 4
JKL jkl 5
MNÑO mnño 6
PQRS pqrs 7
TUV tuv 8
WXYZ wxyz 9
(No
disponible)
(espacio) - . * # ! “ , ; : ^ ` _ = / |
‘ ? $ @ % & + \ ˜ ( ) [ ] { } < >
Modo de
entrada: <a>
@ . - _ / 1
бйнуъь 0
Modo de
entrada: <12>
disponible)
(No
22
Conexión del cable de alimentación y encendido del
interruptor de alimentación
2
1
APAGADO
No conecte el cable USB en este momento, conéctelo cuando esté instalando el software.
ENCENDIDO

Especi cación de la con guración inicial
La primera vez que encienda el ordenador, siga las
instrucciones que aparecen en la pantalla. Para obtener una
información detallada acerca de cómo navegar por el menú y
cómo introducir números, consulte “Navegación por el menú y
método de introducción de texto” ( pág.22).
●
Complete la con guración, empezando por
el idioma y la fecha y la hora
Siga las instrucciones de la pantalla para establecer el
idioma, la región, la zona horaria* y la fecha y la hora*.
* MF244dw/MF232w únicamente
MF244dw/MF232w
Language
Portuguese
Spanish
Thai
Vietnamese
Opc. fecha y hora
08/08/2016 12:52 AM
(0:00-12:59)
MF241d
Language
Portuguese
Spanish
Thai
Vietnamese
●
Con guración de un PIN para la IU remota
Compruebe que el
papel está cargado
en el casete 1.
Anterior Siguien.
(MF244dw/MF232w únicamente)
Podrá establecer un PIN para acceder a la IU remota. Proteja
el equipo frente a acceso no autorizador permitiendo
acceder al equipo únicamente a los usuarios con privilegios
de acceso.
Para especi car las opciones más tarde, consulte
“Con guración de un PIN para la IU remota” en la Guía de
usuario.
En la Guía de usuario, consulte “Con guración de un PIN
para la IU remota”
¿Est. PIN de acceso
IUR? (Opc. se pueden
config. más tarde).
Sí No
PIN acceso a IU remota
<Aplicar>
Selección del método de conexión del
equipo
●
Conexión mediante una red LAN cableada
(MF244dw/MF232w únicamente)
Podrá conectar el equipo a un router cableado. Use los
cables de LAN para conectar el equipo al router cableado (o
punto de acceso).
●
Conexión con un cable USB
Podrá conectar el equipo al ordenador con un cable USB.
Asegúrese de que el cable USB utilizado tenga
la siguiente marca.
●
Conexión mediante una red LAN inalámbrica
(MF244dw/MF232w únicamente)
Podrá conectar el equipo a un router inalámbrico*. Como la
conexión es inalámbrica, no se requieren cables de LAN.
* Se requiere un router (o punto de acceso) inalámbrico compatible
con IEEE802.11b/g/n.
Conecte el ordenador al router mediante cable o de forma
inalámbrica.
Para determinar si su router es inalámbrico o no:
Consulte el manual de instrucciones suministrado con el
dispositivo de red que está utilizando, o bien, póngase en
contacto con el fabricante.
Compruebe si su router tiene un botón
Elija entre los dos métodos siguientes en función del router
(punto de acceso) que esté utilizando.
●
Hay un botón.
Podrá llevar a cabo fácilmente la con guración
si su router (punto de acceso) tiene un botón y
si existe la marca en el router.
●
No hay ningún botón.
Si no hay ningún botón en el router (punto de acceso),
seleccione el SSID y lleve a cabo la con guración
manualmente.
●
Conexión directa (MF244dw/MF232w
únicamente)
Conecte un dispositivo móvil al equipo de forma
inalámbrica y directamente sin encaminar a través de un
router de red (o punto de acceso) inalámbrico.
En la Guía de usuario, consulte “Puede utilizarse
cómodamente con un dispositivo móvil” ▶ “Conexión
directa (modo Punto de acceso)”
Es
Conecte el ordenador al router mediante cable o de forma
inalámbrica.
Asegúrese de contar con un puerto disponible en el router para
conectar el equipo y el ordenador.
Deberá tener listo un cable de red de par trenzado de Categoría 5
o superior.
23

Selección del método de conexión: a través
de red LAN inalámbrica u otro método
●
MF244dw/MF232w
¿Usar LAN inalámbr.
para conectar a red?
(Puede conf. luego)
Sí No
Hay un botón.
Comience desde el paso 4 de “Modo de botón
Sí
No
●
MF241d
Conéctese con el ordenador mediante un cable USB
pulsador” (pág.25).
No hay ningún botón.
Comience desde el paso 4 de “Con guración manual
del punto de acceso” (pág.26).
Conéctese con el ordenador mediante una red LAN
cableada
Proceda con “Conexión mediante una red LAN
cableada (MF244dw/MF232w únicamente)” (pág.24).
Conéctese con el ordenador mediante un cable USB
Proceda con “Conexión con un cable USB” (pág.24).
Conéctese con el ordenador mediante una red LAN
inalámbrica más tarde
Proceda con “Conexión mediante una red LAN
inalámbrica (MF244dw/MF232w únicamente)” (pág.25).
Proceda con “Conexión con un cable USB” (pág.24).
Opc. fecha y hora
Debe recarg. batería
24 hor. para guardar
opc. hora. Tras ap.
y encender la alim.
Conexión mediante una red LAN cableada
(MF244dw/MF232w únicamente)
Comprobación antes de la con guración
Internet
Router
o
concentrador
NOTA
• No podrá utilizar una red LAN cableada y una LAN
inalámbrica al mismo tiempo. Asimismo, el equipo está
con gurado de manera predeterminada como “LAN
cableada”.
• Cuando se conecte a un entorno de red que no esté
protegido, es posible que otras personas puedan ver su
información personal. Sea cuidadoso.
• Para conectarse mediante una LAN en la o cina,
consulte al administrador de red.
Conexión mediante una red LAN cableada
Conecte el cable de LAN.
1
La dirección IP se con gura automáticamente en 2
minutos. Si desea con gurar la dirección IP manualmente,
consulte lo siguiente.
En la Guía de usuario, consulte “Red” ▶ “Conexión a una
red” ▶ “Con guración de direcciones IP”
Instale el controlador y el software utilizando el
2
DVD-ROM suministrado.
Consulte “Para obtener información detallada sobre los
procedimientos de instalación:” (pág.27).
Proceda con “Ajuste del tamaño y el tipo del papel” (pág.27).
Conexión con un cable USB
Cable de LAN
¿El ordenador y el router (o concentrador) están
Es
conectados correctamente con un cable de LAN?
Para obtener más información, consulte el manual de
instrucciones del dispositivo de red que está utilizando, o bien,
póngase en contacto con el fabricante.
¿Se completó la con guración de la red en el ordenador?
Si el ordenador no está con gurado correctamente, es posible
que no pueda usar la conexión de LAN cableada ni siquiera
después de llevar a cabo los siguientes ajustes.
24
Instalación de los controladores y el software
Instale el controlador y el software del DVD-ROM suministrado.
Consulte “Para obtener información detallada sobre los
procedimientos de instalación:” (pág.27).
Proceda con “Ajuste del tamaño y el tipo del papel” (pág.27).
NOTA
• Si conectó el cable USB antes de la instalación, retire en
primer lugar el cable USB y repita la instalación.

Conexión con un cable USB
Siga la Guía de instalación del controlador MF para conectar el
cable USB.
Proceda con “Ajuste del tamaño y el tipo del papel” (pág.27).
Conexión mediante una red LAN inalámbrica
(MF244dw/MF232w únicamente)
Comprobación antes de la con guración
Router de LAN
inalámbrico
Internet
Veri cación del router
Seleccione el método de conexión para la LAN inalámbrica.
Seleccione uno de los siguientes dos métodos en función del
router (punto de acceso) que esté utilizando.
●
Hay un botón.
Este equipo es compatible con
WPS (Wi-Fi Protected Setup,
Instalación protegida por Wi-Fi).
Podrá llevar a cabo fácilmente la
instalación si su router (punto de
acceso) dispone de un botón y si
existe la marca en el router.
Si no está seguro de si el router admite o no WPS, consulte el
manual suministrado con el producto o póngase en contacto con
el fabricante.
●
No hay ningún botón.
Si no hay un botón en el router
(punto de acceso), podrá
seleccionar manualmente el SSID
y completar la con guración. En
este caso, deberá recordar el SSID
y la clave de red del router (punto
de acceso).
Consulte “1 Compruebe el SSID
o la clave de red del router o punto de acceso de LAN
inalámbrica.” (pág.26) para obtener más información sobre el
SSID y la clave de red.
Para realizar la con guración con el método de código
PIN de WPS/Para realizar la con guración manualmente:
En la Guía de usuario, consulte “Conexión a una red
inalámbrica”
Con guración de la red LAN inalámbrica
(MF244dw/MF232w únicamente)
¿El ordenador está conectado correctamente al router
(punto de acceso) mediante un cable de LAN o una LAN
inalámbrica?
Para obtener más información, consulte el manual de
instrucciones del dispositivo de red que está utilizando, o bien,
póngase en contacto con el fabricante.
¿Se completó la con guración de la red en el ordenador?
Si el ordenador no está con gurado correctamente, es posible
que no pueda usar la conexión de LAN inalámbrica ni siquiera
después de llevar a cabo los siguientes ajustes.
NOTA
• No podrá utilizar una red LAN cableada y una LAN
inalámbrica al mismo tiempo. Asimismo, el equipo está
con gurado de manera predeterminada como “LAN
cableada”.
• Cuando se conecte a un entorno de red que no esté
protegido, es posible que otras personas puedan ver su
información personal. Sea cuidadoso.
• Para conectarse mediante una LAN en la o cina,
consulte al administrador de red.
Modo de botón pulsador
Pulse .
1
Seleccione <Opciones de red> y, a continuación,
2
pulse .
Seleccione <Opciones de LAN inalámbrica> y, a
3
continuación, pulse .
Si aparece una pantalla preguntándole si desea activar la
LAN inalámbrica, pulse <Sí> y, a continuación, pulse .
Lea el mensaje mostrado y, a continuación, pulse .
4
Seleccione <Modo de pulsador WPS> y, a
5
continuación, pulse .
Opc. de LAN inalámbr.
Opciones de SSID
Modo de pulsador WPS
Modo de código PIN W
Modo de ahorro de en
Seleccione <Sí> y, a continuación, pulse .
6
Es
25

Mantenga pulsado* el botón hasta que la luz se
7
encienda o parpadee.
Deberá pulsar el botón WPS dentro de los 2 minutos
posteriores a la selección de <Sí> en el paso 6.
* El tiempo que se debe mantener pulsado el botón puede variar
en función del router que se utilice.
Espere aproximadamente 2 minutos después de la
8
conexión.
La dirección IP se establece durante este período.
SampleABCD WEP 01234567890123456789ABCDEF
SampleEFGHIJ WPA-PSK 543210EDCBA
SampleK WPA2-PSK 1234ABCD
Cuando aparece un mensaje de error:
Pulse
de red es correcta o no y, luego, vuelva a intentar la
con guración. Si, el punto de acceso no puede detectarse
ni siquiera después de reintentarlo, consulte lo siguiente.
Veri cación de la conexión de red:
Podrá veri car si el equipo está bien conectado a la red con
un ordenador que esté conectado a la red.
Para con gurar manualmente la dirección IP:
para cerrar la pantalla, veri que si la clave
En la Guía de usuario, consulte “Cuando aparece un
mensaje de error”
En la Guía de usuario, consulte “Visualización de las
opciones de red”
En la Guía de usuario, consulte “Conexión a una red
inalámbrica”
Con guración manual del punto de acceso
Compruebe el SSID o la clave de red del router o
1
punto de acceso de LAN inalámbrica.
• Compruebe la etiqueta ubicada sobre el router de LAN
inalámbrica.
• Para veri car el SSID o la clave de red, podrá utilizar
el “Canon MF / LBP Wireless Setup Assistant”, que se
Es
incluye en el DVD-ROM suministrado con el equipo.
Si no se muestra la información del router de LAN
inalámbrico, haga clic en el botón [Refresh]. Si no aparece
la información al hacer clic en el botón [Refresh], veri que
si se completó la con guración del ordenador para el
router (punto de acceso) de LAN inalámbrico.
Tome nota del nombre del SSID y de la clave de
2
red mostrados en el paso 1. Si aparecen múltiples
puntos de acceso, tome nota de todos ellos.
SSID
A veces se escribe como el nombre de la red o el nombre
del punto de acceso. Si existen múltiples SSID, tome nota
de todos ellos.
Clave de red
A veces se escribe como PIN, clave WEP, frase de contraseña
WPA/WPA2 o PSK (clave precompartida).
Pulse .
3
26
Seleccione <Opciones de red> y, a continuación,
4
pulse .
Seleccione <Opciones de LAN inalámbrica> y, a
5
continuación, pulse .
Si aparece una pantalla preguntándole si desea activar la
LAN inalámbrica, pulse <Sí> y, a continuación, pulse .
Lea el mensaje mostrado y, a continuación, pulse
6
.
Seleccione <Opciones de SSID> y, a continuación,
7
pulse .

Seleccione <Selec. punto de acceso> y, a
8
continuación, pulse .
Opciones de SSID
Selec. punto de acces
Introducir manualmente
Seleccione un router de red inalámbrico.
9
Si se muestran varios SSID asociados, seleccione el ID
que aparece primero en la lista (el que tiene la señal más
fuerte).
Introduzca la clave de red que tenga anotada.
10
Introduzca la clave de red con las teclas numéricas.
Seleccione <Aplicar> y, a continuación, pulse
Clave WEP (5-26 car.)
XXXXXXXX
<Aplicar>
Modo de introducción:
Seleccione <Sí> y, a continuación, pulse .
11
Para obtener información detallada sobre
los procedimientos de instalación:
Instale el controlador y el software utilizando el DVD-ROM
suministrado.
También podrá descargar el controlador del sitio web de Canon.
Para obtener información sobre los procedimientos de
instalación, consulte la Guía de instalación del controlador
MF.
.
Para usuarios de Mac OS:
El DVD-ROM suministrado con este equipo podría no
incluir el controlador de impresora para Mac OS. Esto
dependerá de dónde haya adquirido el equipo. Busque
y descargue el controlador apropiado del sitio web de
Canon. Para obtener información adicional sobre la
instalación o la utilización del controlador, consulte el
manual del controlador.
Ajuste del tamaño y el tipo del papel
Cuando aparezca la pantalla <Conectado.>,
12
espere hasta que el indicador de Wi-Fi deje de
parpadear y se ilumine de forma ja.
Espere aproximadamente 2 minutos después de
13
la conexión.
La dirección IP se establece durante este período.
Cuando aparece un mensaje de error:
Pulse
correcta la clave de red y, luego, vuelva a reintentar la
con guración.
Si el punto de acceso no se puede conectar después de
volver a intentarlo, consulte lo siguiente.
Para con gurar manualmente la dirección IP:
para cerrar la pantalla, veri que si es
En la Guía de usuario, consulte “Cuando aparece un
mensaje de error”
En la Guía de usuario, consulte “Conexión a una red
inalámbrica”
Siga las instrucciones en pantalla para establecer el tamaño y
el tipo de papel.
Opciones de papel
Bandeja MU
1
Casete 1
Seleccionar tamaños d
Es
27

Tareas útiles
Podrá usar diferentes funciones del equipo. A continuación se describen las principales funciones que podrá usar rutinariamente.
Copia
Ampliación/reducción de copias
Podrá ampliar o reducir los documentos
de tamaño estándar para copiar en
papel de tamaño estándar, o especi car
una escala de copia en porcentajes.
Copia a doble cara*
Podrá copiar documentos de una cara
en ambas caras del papel.
Intercalado
Podrá clasi car las copias en juegos
ordenados por páginas.
Diseño de página reducido
Podrá reducir la cantidad de papel
imprimiendo varios documentos en
una hoja.
2 en 1 4 en 1
Copia de tarjetas de identidad
Es posible realizar la copia de una
tarjeta de dos caras en una sola cara del
papel.
Impresión
Impresión ampliada/reducida
Impresión a doble cara*
Diseño de página reducido
Podrá reducir la cantidad de papel
imprimiendo varios documentos en
una hoja.
2 en 1 4 en 1
Impresión de cuadernillo*
Impresión de pósteres
Impresión de marcas sobreimpresas
Vista previa antes de la impresión
Selección de un “Per l”
Opciones de red**
Este equipo viene equipado con una
interfaz de red que le permitirá construir
con facilidad un entorno de red. Podrá
imprimir un documento y usar la función
de escaneado de red desde todos los
ordenadores que estén conectados
con el equipo. El equipo admite el
incremento de trabajo e cazmente como
equipo compartido de una o cina.
Lectura
Almacenamiento de documentos
desde el panel de control del equipo
Documentos
Datos
Almacenamiento de documentos con
las operaciones del ordenador
●
Lectura con MF Scan Utility
Documentos
Datos
●
Lectura desde una aplicación
●
Lectura con el controlador WIA
IU Remota**
Podrá comprender el estado del equipo
desde los ordenadores de la red. Podrá
acceder al equipo y administrar trabajos
o especi car diversos ajustes desde la
red.
* MF244dw/MF241d únicamente
** MF244dw/MF232w únicamente
Es
28

Sustitución del cartucho de tóner
Los cartuchos de tóner son productos consumibles. Cuando el tóner esté a punto de agotarse o se haya agotado completamente en
medio de la ejecución de un trabajo, aparecerá un mensaje en la pantalla o podrían producirse los siguientes problemas. Lleve a cabo
la acción adecuada pertinente.
Cuando aparezca un mensaje
Cuando el tóner esté a punto de agotarse durante la ejecución de un trabajo, aparecerá un mensaje en la pantalla.
Mensaje
<Se recomienda
la preparación de
un cartucho.>
<El cartucho
se ha agotado.
Cambio
recomendado.>
Cuando aparezcan rayas blancas en la impresión o la impresión esté parcialmente descolorida:
Cuando aparezcan rayas blancas en la impresión o la impresión esté parcialmente descolorida, el cartucho de tóner estará a punto de
agotarse, aunque no aparezcan mensajes en la pantalla. Cuando la calidad de impresión sea inaceptable, consulte lo siguiente para
resolver el problema.
Cuando se muestre el
mensaje en la pantalla
Cuando sea necesario
sustituir pronto un
cartucho de tóner.
Cuando el cartucho de
tóner haya alcanzado el
n de su vida útil.
Descripción y soluciones
El cartucho está a punto de llegar al nal de su vida útil. Agite el cartucho de
tóner para distribuir el tóner uniformemente en el interior del mismo.
En la Guía de usuario, consulte “Antes de sustituir el cartucho de tóner”
Le recomendamos sustituir el cartucho de tóner antes de imprimir documentos
de gran volumen.
En la Guía de usuario, consulte “Cómo sustituir los cartuchos de tóner”
Si este mensaje no desaparece, sustituya el cartucho de tóner. Podrá continuar
imprimiendo, aunque no se podrá garantizar la calidad de impresión.
En la Guía de usuario, consulte “Sustitución de los cartuchos de tóner”
Cuando aparezcan rayas blancas en la impresión o la impresión esté parcialmente descolorida
Cuando el tóner esté casi agotado, aparezcan rayas blancas en la impresión o la impresión esté parcialmente descolorida.
Si queda poco tóner, no aparecerá ningún mensaje en la pantalla.
Sustituya el cartucho de tóner cuando aparezcan rayas blancas en
la impresión o algunas partes de la impresión estén parcialmente
descoloridas.
Cuando se produzca este problema:
Lleve a cabo los pasos del siguiente procedimiento antes de sustituir el cartucho de tóner. El equipo seguirá imprimiendo hasta que el
tóner se agote totalmente.
En la Guía de usuario, consulte “Antes de sustituir el cartucho de tóner”
Si la calidad de impresión sigue siendo inaceptable:
Si el problema persiste tras haber llevado a cabo los pasos del siguiente procedimiento, sustituya el cartucho de tóner.
En la Guía de usuario, consulte “Cómo sustituir los cartuchos de tóner”
Es
29

Eliminación de atascos de papel
Si aparece la siguiente pantalla, es posible que se haya producido un atasco de papel
en el interior del equipo. Siga las instrucciones en pantalla para retirar el documento o
el papel atascado. Este manual indica solamente las áreas en las que se producen los
atascos de papel. Para obtener información detallada sobre cada función, consulte la
Guía de usuario.
Dentro del equipo
Alimentador
(MF244dw únicamente)
Papel atascado.
Pulse [ ] para
ver los pasos.
Ranura de alimentación
manual
Tapa trasera
(MF244dw/MF241d únicamente)
Es
Casete de papel
30

31
Es

Apéndice
•
Instrucciones de
seguridad importantes
En este capítulo se describen instrucciones de
seguridad importantes para evitar que se produzcan
lesiones, entre otros, a los usuarios de este equipo, o
daños en la propiedad. Antes de comenzar a utilizarlo,
lea este capítulo y siga sus instrucciones para poder
utilizar el equipo correctamente. No realice
operaciones que no se describan en este manual.
Canon no se responsabilizará de aquellos daños
provocados por usos no descritos en este manual, usos
inadecuados o reparaciones/cambios no realizados
por Canon o por una tercera persona autorizada por
Canon. El uso o funcionamiento inadecuado del
equipo podría provocar lesiones personales y/o daños
que requieran reparaciones importantes que podrían
no estar cubiertas por la Garantía limitada.
ADVERTENCIA
Indica una advertencia relativa a operaciones
que pueden ocasionar la muerte o lesiones
personales si no se ejecutan correctamente.
Para utilizar el equipo de forma segura, preste
atención siempre a estas advertencias.
ATENCIÓN
Indica una precaución relativa a operaciones
que pueden ocasionar lesiones personales si
no se ejecutan correctamente. Para utilizar el
equipo de forma segura, preste atención
siempre a estas precauciones.
IMPORTANTE
Indica requisitos y limitaciones de uso. Lea estos
puntos atentamente para utilizar correctamente
el equipo y evitar así su deterioro o el de otros
elementos.
Instalación
Para utilizar este equipo de un modo seguro y sin
problemas, lea atentamente las siguientes
precauciones e instálelo en un lugar adecuado.
ADVERTENCIA
No lo instale en lugares que puedan producir
descargas eléctricas o incendios
•
Lugares donde las ranuras de ventilación queden
tapadas (cerca de paredes, camas, sofás, alfombras
u objetos similares)
•
Lugares húmedos o polvorientos
•
Lugares expuestos a la luz solar directa o a la
intemperie
•
Lugares sujetos a altas temperaturas
•
Lugares expuestos a llamas
•
Cerca de alcohol, disolventes de pintura u otras
Es
sustancias in amables
Otras advertencias
•
No conecte cables no aprobados en este equipo.
De lo contrario, podrían producirse descargas
eléctricas o incendios.
•
No coloque collares, otros objetos metálicos ni
recipientes llenos de líquido sobre el equipo. Si
alguna sustancia extraña entra en contacto con
las piezas eléctricas del equipo, podrían
producirse descargas eléctricas o incendios.
•
Si alguna sustancia extraña cae sobre este equipo,
desenchufe la clavija de toma de corriente del
receptáculo de alimentación de CA y póngase en
contacto con su distribuidor de Canon local
autorizado.
No instale el equipo en los siguientes lugares
Lugares en los que el equipo pueda caerse y provocar
lesiones.
•
Un lugar inestable
•
Un lugar expuesto a vibraciones
ATENCIÓN
No instale el equipo en los siguientes lugares
Podría causar daños en el equipo si lo hiciera.
Lugar sometido a niveles extremos (muy altos o
muy bajos) de temperatura y humedad.
•
Lugares sujetos a cambios drásticos de temperatura
o de humedad
•
Lugares situados cerca de equipos que generen
ondas magnéticas o electromagnéticas
•
Laboratorios o lugares en los que se produzcan
reacciones químicas
•
Lugares expuestos a gases corrosivos o tóxicos
•
Lugares que puedan deformarse debido al peso
del equipo o lugares en los que el equipo pueda
hundirse (alfombras, etc.)
Evite los lugares con poca ventilación
Este equipo genera una pequeña cantidad de ozono
y otras emisiones durante el uso normal que no son
perjudiciales para la salud. No obstante, podrían ser
percibidas durante el uso prolongado o durante los
ciclos de producción largos en salas mal ventiladas.
Para que el entorno de trabajo sea cómodo se
recomienda que la sala en la que vaya a utilizarse el
equipo esté bien ventilada. Evite también lugares
donde pueda haber personas expuestas a las
emisiones del equipo.
No instale el equipo en lugares en los que se
produzca condensación
Pueden formarse gotas de agua (condensación) en el
interior del equipo si la sala en la que se ha instalado
se calienta rápidamente o si el equipo se traslada de
un lugar fresco o seco a un lugar cálido o húmedo. El
uso del equipo en estas condiciones puede producir
atascos de papel, una mala calidad de impresión o
incluso daños en el equipo. Deje que el equipo se
adapte a la humedad y a la temperatura ambiente
durante un mínimo de dos horas antes de utilizarlo.
En altitudes de 3.000 m o más sobre el nivel del
mar
Las máquinas que llevan incorporado un disco duro
podrían no funcionar correctamente si se utilizan en
altitudes elevadas, de unos 3.000 metros o más por
encima del nivel del mar.
Patas niveladoras (solo en productos con patas
niveladoras)
No quite las patas de nivelación del equipo una vez
instalado, dado que el equipo podría volcar y
provocar lesiones personales.
Conexión de la línea telefónica (solo en productos
con una función de fax)
Este equipo está en conformidad con la normativa
sobre líneas telefónicas analógicas y únicamente
podrá conectarse a una red telefónica pública
conmutada (Public Switched Telephone Network,
PSTN). La conexión del equipo a una línea telefónica
digital o a una línea telefónica dedicada podría
impedir el funcionamiento adecuado del equipo y
causar daños. Asegúrese de comprobar el tipo de
línea telefónica antes de conectar el equipo. Antes
de conectar el equipo a una línea de bra óptica o
de telefonía a través de IP, póngase en contacto con
el proveedor de servicio.
Conexión de red inalámbrica (solo en productos
con una función de red inalámbrica)
•
Instale el equipo a una distancia de 50 m o
menos con respecto al router de red inalámbrica.
•
En la medida de lo posible, instale el equipo en
lugares donde la comunicación no esté
bloqueada por objetos intermedios. La señal
podría debilitarse al traspasar paredes o suelos.
•
Mantenga el equipo lo más alejado posible de
teléfonos inalámbricos digitales, hornos microondas
u otros aparatos que emitan ondas de radio.
•
No utilice el equipo cerca de equipos médicos.
Las ondas de radio que emite podrían afectar al
equipo médico, lo que a su vez podría provocar
errores de funcionamiento y accidentes.
Fuente de alimentación
ADVERTENCIA
•
Utilice solo fuentes de alimentación que cumplan
los requisitos de voltaje especi cados. De lo
contrario, podrían producirse descargas eléctricas
o incendios.
•
No utilice cables de alimentación que no sean los
incluidos, ya que podrían producirse descargas
eléctricas o incendios.
•
El cable de alimentación suministrado es para
uso con este equipo. No conecte el cable de
alimentación a otros dispositivos.
•
No modi que, estire, doble con fuerza ni trate el
cable de alimentación de forma que pueda
dañarlo. No coloque objetos pesados sobre el
cable de alimentación. Si se producen daños en
el cable de alimentación, podrían producirse
descargas eléctricas o incendios.
•
No enchufe ni desenchufe la clavija de toma de
corriente con las manos mojadas, ya que podrían
producirse descargas eléctricas.
•
No utilice alargaderas ni bases múltiples con el
equipo. De lo contrario, podrían producirse
descargas eléctricas o incendios.
•
No enrolle el cable de alimentación ni lo anude,
ya que podrían producirse descargas eléctricas o
incendios.
•
Inserte la clavija de toma de corriente por
completo en el receptáculo de alimentación de
CA. De lo contrario, podrían producirse descargas
eléctricas o incendios.
•
Quite la clavija de toma de corriente por
completo del receptáculo de alimentación de CA
durante las tormentas eléctricas. De lo contrario,
podrían producirse descargas eléctricas,
incendios o daños en el equipo.
•
Asegúrese de que la alimentación eléctrica del
equipo es segura, y tiene una tensión sin
uctuaciones.
•
Mantenga el cable de alimentación alejado de
fuentes de calor; si no lo hace, el aislante del
cable se puede fundir y producir un incendio o
descarga eléctrica.
•
Si se aplica una tensión excesiva a la parte de
conexión del cable de alimentación, se puede
dañar éste o se pueden desconectar los cables
del interior del equipo. Esto puede producir un
incendio. Evite las siguientes situaciones:
– Conectar y desconectar el cable de alimentación
con frecuencia.
– Tropezar con el cable de alimentación.
– El cable de alimentación está doblado cerca de la
parte de conexión y se está aplicando una tensión
continua al enchufe o la parte de conexión.
– Aplicar una fuerza excesiva a la clavija de
alimentación.
ATENCIÓN
Instale este equipo cerca de la clavija de
alimentación y deje espacio su ciente alrededor de
la clavija de alimentación de modo que pueda
desconectarse fácilmente en caso de emergencia.
IMPORTANTE
Conexión de la alimentación
•
No conecte el cable de alimentación a una fuente
de alimentación ininterrumpida. De lo contrario,
el equipo podría no funcionar correctamente o
podría averiarse al cortarse el suministro eléctrico.
•
Si conecta este equipo a un receptáculo de
alimentación de CA con varios enchufes, no
utilice los enchufes restantes para conectar otros
dispositivos.
•
No conecte el cable de alimentación al receptáculo
de alimentación de CA auxiliar de un ordenador.
Otras precauciones
La perturbación eléctrica puede provocar errores de
funcionamiento o pérdidas de datos.
Manipulación
ADVERTENCIA
•
Desenchufe inmediatamente el cable de
alimentación del receptáculo de alimentación de
CA y póngase en contacto con un distribuidor de
Canon autorizado si el equipo hace algún ruido
inusual, despide olores extraños o emite humo o
demasiado calor. El uso continuado podría
provocar descargas eléctricas o incendios.
32

•
No desmonte ni modi que este equipo, ya que
su interior contiene componentes de alta tensión
y alta temperatura. Su desmontaje o modi cación
pueden producir descargas eléctricas o incendios.
•
Coloque el equipo en lugares en los que los
niños no puedan acceder al cable de
alimentación, a otros cables, a motores o a
componentes eléctricos internos. De lo contrario,
podrían producirse accidentes inesperados.
•
No utilice pulverizadores in amables cerca de este
equipo. Si alguna sustancia in amable entra en
contacto con las piezas eléctricas del equipo,
podrían producirse descargas eléctricas o incendios.
•
A la hora de trasladar este equipo, asegúrese de
desconectar la alimentación del equipo y, a
continuación, desenchufe la clavija de toma de
corriente y los cables de interfaz. De lo contrario,
el cable de alimentación o los cables de interfaz
podrían resultar dañados, lo que a su vez podría
producir descargas eléctricas o incendios.
•
A la hora de enchufar o desenchufar un cable
USB cuando la clavija de toma de corriente está
conectada a un receptáculo de alimentación de
CA, no toque la parte metálica del conector, ya
que podrían producirse descargas eléctricas.
•
Utilice un cable modular de longitud inferior a 3
metros.
•
Utilice un cable USB de longitud inferior a 3 metros.
Si el ruido de funcionamiento le preocupa
Según el entorno de uso y el modo de funcionamiento,
si el ruido de funcionamiento le preocupa, le
recomendamos que instale el equipo en un lugar que
no sea la o cina.
Si utiliza un marcapasos cardíaco
Esta máquina genera un ujo magnético de bajo nivel.
Si utiliza un marcapasos cardíaco y detecta anomalías,
aléjese de la máquina y acuda inmediatamente a un
médico.
ATENCIÓN
•
No coloque objetos pesados sobre este equipo,
ya que podrían caerse y provocar lesiones.
•
Por su seguridad, desenchufe la clavija de toma
de corriente si no va a utilizar el equipo durante
un periodo de tiempo prolongado.
•
Tenga cuidado cuando abra y cierre las tapas
para no lastimarse las manos.
•
Mantenga las manos y la ropa alejadas de los
rodillos del área de salida. Si sus manos o su ropa
quedan atrapadas entre los rodillos, podrían
producirse lesiones personales.
•
La parte interna del equipo y la ranura de
impresión se calientan mucho durante e
inmediatamente después de su uso. Evite tocar
estas zonas para evitar quemaduras. Asimismo, el
papel impreso puede estar caliente justo después
de salir, por lo que debe tener cuidado a la hora de
tocarlo. De lo contrario, podría sufrir quemaduras.
Alimentador (solo en productos con un alimentador)
•
No presione con fuerza la tapa del alimentador
cuando utilice el cristal de copia para realizar copias
de libros gruesos. Si lo hace, podría dañar el cristal
de copia y podrían producirse lesiones personales.
•
Cierre con cuidado el alimentador para evitar
lesionarse la mano.
•
Cierre con cuidado el alimentador para evitar
pillarse la mano con la parte posterior del
alimentador.
Unidad de acabado (solo en productos con una
unidad de acabado)
•
No coloque las manos en la parte de la bandeja
donde se realiza el grapado (cerca de los rodillos)
y preste especial atención a las a ladas grapas, ya
que podría sufrir lesiones personales.
Casete de papel (solo en productos con un casete
de papel)
•
Para evitar lesiones personales, no ponga la
mano dentro de la máquina mientras retira el
casete de papel.
Tecla de Ahorro de energía (solo en productos con
una tecla de Ahorro de energía)
•
Pulse (Ahorro de energía) como medida de
seguridad cuando no vaya a utilizar el equipo
durante un período de tiempo prolongado, por
ejemplo, por la noche. Asimismo, apague el
interruptor de alimentación principal y
desenchufe el cable de alimentación cuando no
vaya a utilizar el equipo durante varios días.
Seguridad de láser
Este equipo se considera un producto láser de clase 1
según las normas IEC60825-1:2007 y EN60825-1:2007.
CLASS 1 LASER PRODUCT
LASER KLASSE 1
APPAREIL À LASER DE CLASSE 1
APPARECCHIO LASER DI CLASSE 1
PRODUCTO LÁSER DE CLASE 1
APARELHO A LASER DE CLASSE 1
LUOKAN 1 LASER-TUOTE
LASERPRODUKT KLASS 1
El haz de láser puede ser perjudicial para el cuerpo
humano. Como la radiación que emite el aparato
está completamente con nada bajo tapas
protectoras y cubiertas externas, no existe peligro
de que el haz de láser escape durante ninguna de
las fases de utilización del equipo por parte de
usuario. Lea las siguientes observaciones e
instrucciones para garantizar la seguridad.
•
No abra nunca tapas que no se indiquen en los
manuales de este equipo.
•
Si el haz de láser escapara y entrara en contacto
con sus ojos, la exposición al mismo podría
causarle daños oculares.
ATENCIÓN
El uso de controles, ajustes o procedimientos que no
se especi quen en este manual podría tener como
resultado una exposición a radiación peligrosa.
Otras precauciones
•
Siga las instrucciones de la etiqueta de
precaución que encontrará en el equipo.
•
No exponga el equipo a impactos fuertes o
vibraciones.
•
No abra ni cierre puertas, tapas u otras piezas a la
fuerza. De lo contrario, podrían producirse daños
en el equipo.
•
No apague el interruptor de alimentación principal
ni abra las tapas durante el funcionamiento del
equipo. Si lo hace, pueden producirse atascos de
papel.
Mantenimiento e inspecciones
Limpie este equipo periódicamente. Si se acumula el
polvo, es posible que el equipo no funcione
correctamente. Durante la limpieza, asegúrese de
tener en cuenta lo siguiente. Si se produce algún
problema durante el funcionamiento, consulte
Solución de problemas. Si el problema no se resuelve
o cree que el equipo necesita una revisión, consulte
Cuando no puede solucionarse un problema.
ADVERTENCIA
•
Antes de la limpieza, desconecte la alimentación y
desenchufe la clavija de toma de corriente del
receptáculo de alimentación de CA. De lo contrario,
podrían producirse descargas eléctricas o incendios.
•
Desenchufe la clavija de toma de corriente
periódicamente y límpiela con un paño seco para
eliminar el polvo y la suciedad. El polvo acumulado
puede absorber la humedad del aire y provocar un
incendio si entra en contacto con electricidad.
•
Utilice un paño húmedo y bien escurrido para
limpiar el equipo. Humedezca los paños de
limpieza únicamente con agua. No utilice alcohol,
bencenos, disolventes de pintura ni ninguna otra
sustancia in amable. No utilice papel de seda ni
toallitas de papel. Si estas sustancias entran en
contacto con las piezas eléctricas del interior del
equipo, podrían generar electricidad estática o
provocar descargas eléctricas o incendios.
•
Revise el cable de alimentación y la clavija
periódicamente para controlar óxido, puntas
dobladas, desgaste, grietas o una excesiva
generación de calor en el equipo. Las clavijas de
toma de corriente o los cables de alimentación
que no están sometidos a un buen proceso de
mantenimiento pueden producir descargas
eléctricas o incendios.
ATENCIÓN
•
El equipo incluye en su interior componentes de
alta tensión y alta temperatura. Si los toca podrían
producirse lesiones o quemaduras. No toque
ninguna parte del equipo que no se indique en el
manual.
•
A la hora de cargar papel o de quitar papel
atascado, tenga cuidado de no cortarse las
manos con los bordes del papel.
Limitaciones legales sobre el uso de su
producto y sobre el empleo de imágenes
El uso de su producto para escanear, imprimir o
reproducir determinados documentos, así como el
uso de dichas imágenes escaneadas, impresas o
reproducidas con la ayuda de su producto, podría
estar prohibido por ley e incurrir en responsabilidad
penal y/o civil. A continuación se ha preparado una
lista no exhaustiva de dichos documentos. Esta lista
solo pretende orientarle a este respecto. Si tiene
dudas sobre la legalidad del uso de su producto
para escanear, imprimir o reproducir cualquier
documento especí co, y/o del uso de las imágenes
escaneadas, impresas o reproducidas, debe ponerse
en contacto previamente con su asesor legal para
obtener consejo.
•
Billetes de curso legal
•
Cheques de viaje
•
Giros postales
•
Cupones de alimentos
•
Certi cados de depósitos
•
Pasaportes
•
Sellos postales (matasellados o no)
•
Documentos de inmigración
•
Chapas o insignias de identi cación
•
Sellos de ingresos scales (matasellados o no)
•
Documentos del Servicio Selectivo o de
conscripción
•
Bonos u otros certi cados de endeudamiento
•
Cheques o letras de cambio emitidos por
agencias gubernamentales
•
Certi cados de acciones
•
Licencias de vehículos motorizados y certi cados
de titularidad
•
Obras protegidas por los derechos de la
propiedad intelectual/Obras de arte sin permiso
del propietario de los derechos de autor
Símbolos relacionados con la seguridad
Interruptor de alimentación: posición “ON”
(encendido)
Interruptor de alimentación: posición “OFF”
(apagado)
Interruptor de alimentación: posición “STANDBY” (en espera)
Interruptor pulsador “ON” “OFF”
(encendido/apagado)
Terminal de conexión a tierra de protección
Tensión peligrosa en el interior. No abra las
tapas a menos que así se le indique.
ATENCIÓN: super cie caliente. No toque.
Equipo de Clase II
Piezas móviles: mantenga las partes del cuerpo
alejadas de las piezas en movimiento
[NOTA]
Algunos de los símbolos mostrados anteriormente
podrían no estar jados en función del producto.
v1602_00_es-ES
Es
33

Etiqueta de seguridad láser
Consumibles
ADVERTENCIA
No se deshaga de los cartuchos de tóner
utilizados en llamas al descubierto. Asimismo, no
guarde los car tuchos de tóner ni el papel en
lugares que estén expuestos a llamas, ya que el
tóner podría prenderse y provocar quemaduras
o incendios.
Aviso
Nombre del producto
Las normativas sobre seguridad requieren que el
nombre del producto esté registrado.
En algunas regiones donde se vende este
producto, podría(n) estar registrado(s) en su
lugar el (los) siguiente(s) nombre(s) entre
paréntesis ( ).
imageCLASS MF244dw (F173700)
imageCLASS MF241d (F173700)
imageCLASS MF232w (F171900)
Directiva de la CE sobre compatibilidad
electromagnética
Este equipo cumple con los requisitos esenciales
de la Directiva de la CE sobre compatibilidad
electromagnética. Declaramos que este
producto cumple con los requisitos de
compatibilidad electromagnética de la Directiva
de la CE cuando la tensión de entrada nominal
es de 230 V y 50 Hz aunque la tensión de entrada
prevista para el producto va de 220 V a 240 V y
de 50 a 60 Hz. El empleo de cables apantallados
es necesario para cumplir con los requisitos
técnicos de la Directiva de compatibilidad
electromagnética.
Regulator y information for users in Singapore
imageCLASS MF244dw/MF232w includes
approved Wireless LAN Module (Model name:
AW-N M383).
Complies with IDA
Standards
Es
DA103787
Regulator y information for users in Thailand
imageCLASS MF244dw/MF232w includes
approved Wireless LAN Module (Model name:
AW-N M383).
This telecommunication equipment conforms to
NTC technical requirement.
Regulator y information for users in Argentina
Incluye módulo Wireless LAN Module Marca
AzureWave, Modelo AW-NM383, CNC C-13282
Regulator y information for users in Uruguay
imageCLASS MF244dw contains URSEC
approved Wireless LAN Module (Model name:
AW-N M383).
Aviso legal
•
La información de este documento puede ser
modi cada sin previo aviso.
•
CANON INC. NO OFRECE GARANTÍAS DE
NINGÚN TIPO EN RELACIÓN CON ESTE
MATERIAL, YA SEAN EXPRESAS O IMPLÍCITAS,
EXCEPTO EN LA MEDIDA EN QUE SE DESCRIBE
EN ESTE DOCUMENTO, INCLUIDAS, SIN
LIMITACIÓN, LAS RESPECTIVAS GARANTÍAS DE
PUBLICIDAD, COMERCIABILIDAD,
ADECUACIÓN A UN FIN CONCRETO O
AUSENCIA DE INFRACCIÓN. CANON INC. NO
ASUME NINGUNA RESPONSABILIDAD EN
CUANTO A LOS DAÑOS DIRECTOS, FORTUITOS
O RESULTANTES, INDEPENDIENTEMENTE DE LA
NATURALEZA DE ÉSTOS, O EN CUANTO A LAS
PÉRDIDAS O GASTOS QUE SE DERIVEN DEL
USO DE ESTE MATERIAL.
Acerca de este manual
Teclas y botones utilizados en este manual
Los siguientes nombres de teclas y símbolos son
algunos ejemplos de cómo se expresa en este
manual cómo deben pulsarse las teclas.
•
Teclas del panel de control: [Icono de tecla]
Ejemplo:
•
Pantalla: <Especi que destino.>
•
Botones y elementos en la pantalla del
ordenador: [Preferencias]
Ilustraciones y pantallas utilizadas en este
manual
Las ilustraciones y las pantallas que se utilizan en
este manual pertenecen a imageCLASS MF244dw
a menos que se especi que lo contrario.
Marcas comerciales
Mac es una marca comercial de Apple Inc.
Microsoft, Windows, Windows Vista, Windows
Server, Internet Explorer, Excel y PowerPoint son
marcas comerciales o registradas de Microsoft
Corporation en Estados Unidos y otros países.
El resto de nombres de productos y compañías
citados son marcas comerciales propiedad de
sus respectivos compañías.
Software de otros fabricantes
MF232w)
Este producto Canon (el “PRODUCTO”) incluye
módulos de software de terceros. El uso y la
distribución de dichos módulos de software,
incluidas las actualizaciones de los mismos (en
conjunto, el “SOFTWARE”) están sujetos a las
condiciones de licencia (1) a (9) que se presentan
a continuación.
(1) Usted acepta cumplir todas las leyes,
restricciones o normativas aplicables
relativas al control de las expor taciones de
los países implicados en caso de que este
PRODUCTO que contiene el SOFTWARE sea
enviado, transferido o exportado a cualquier
país.
(2) Los titulares de los derechos del SOFTWARE
conservan en todos los aspectos la
titularidad, la propiedad y los derechos de la
propiedad intelectual inherentes y relativos
al SOFTWARE. Salvo que aquí se indique
expresamente, mediante el presente
documento los titulares de los derechos del
SOFTWARE no le trans eren ni otorgan
ninguna licencia o derecho, ni expresos ni
implícitos, relativos a la propiedad intelectual
del SOFT WARE.
(3) Puede utilizar el SOFTWARE únicamente para
utilizarlo con el PRODUC TO.
(4) No podrá ceder, otorgar sublicencias,
comercializar, distribuir o transferir el
SOFTWARE a ningún tercero sin el
consentimiento previo por escrito de los
(MF244dw /
titulares de los derechos del SOFTWARE.
(5) Sin perjuicio de lo anterior, podrá transferir el
SOFTWARE únicamente cuando (a) ceda
todos sus derechos respecto al PRODUCTO y
todos los derechos y obligaciones
establecidos en las condiciones de licencia al
receptor y (b) el receptor acepte acatar la
totalidad de dichas condiciones.
(6) No podrá descompilar, invertir la ingeniería,
desensamblar o reducir de cualquier otro
modo el código del SOFT WARE a una forma
legible por el ser humano.
(7) No podrá modi car, adaptar, traducir,
alquilar, arrendar o prestar el SOFT WARE ni
crear obras derivadas basadas en el
SOFTWARE.
(8) No tendrá derecho a eliminar o a efectuar
copias independientes del SOFTWARE del
PRODUC TO.
(9) No se le otorga ninguna licencia sobre la
parte del SOFTWARE que resulta legible para
el ser humano (el código fuente).
Sin perjuicio de lo establecido en los puntos (1) a
(9) precedentes, el PRODUCTO incluye módulos
de soft ware de terceros que van acompañados
de otras condiciones de licencia, y dichos
módulos de software estarán sujetos a esas otras
condiciones de licencia.
Consulte las demás condiciones de licencia de
los módulos de software de terceros descritas en
el Apéndice del Manual del PRODUCTO
correspondiente. Este Manual está disponible en
http://canon.com/oip-manual.
Al utilizar el PRODUCTO, se considera que usted
ha aceptado todas las condiciones de licencia
vigentes. En caso de que no las acepte, póngase
en contacto con su representante del servicio
técnico.
Software de otros fabricantes
Este producto Canon (el “PRODUCTO”) incluye
módulos de software de terceros. El uso y la
distribución de dichos módulos de software,
incluidas las actualizaciones de los mismos (en
conjunto, el “SOFTWARE”) están sujetos a las
condiciones de licencia (1) a (9) que se presentan
a continuación.
(1) Usted acepta cumplir todas las leyes,
restricciones o normativas aplicables
relativas al control de las expor taciones de
los países implicados en caso de que este
PRODUCTO que contiene el SOFTWARE sea
enviado, transferido o exportado a cualquier
país.
(2) Los titulares de los derechos del SOFTWARE
conservan en todos los aspectos la
titularidad, la propiedad y los derechos de la
propiedad intelectual inherentes y relativos
al SOFTWARE. Salvo que aquí se indique
expresamente, mediante el presente
documento los titulares de los derechos del
SOFTWARE no le trans eren ni otorgan
ninguna licencia o derecho, ni expresos ni
implícitos, relativos a la propiedad intelectual
del SOFT WARE.
(3) Puede utilizar el SOFTWARE únicamente para
utilizarlo con el PRODUC TO.
(4) No podrá ceder, otorgar sublicencias,
comercializar, distribuir o transferir el
SOFTWARE a ningún tercero sin el
consentimiento previo por escrito de los
titulares de los derechos del SOFTWARE.
(5) Sin perjuicio de lo anterior, podrá transferir el
SOFTWARE únicamente cuando (a) ceda
todos sus derechos respecto al PRODUCTO y
todos los derechos y obligaciones
establecidos en las condiciones de licencia al
receptor y (b) el receptor acepte acatar la
totalidad de dichas condiciones.
(MF241d)
34

(6) No podrá descompilar, invertir la ingeniería,
desensamblar o reducir de cualquier otro
modo el código del SOFT WARE a una forma
legible por el ser humano.
(7) No podrá modi car, adaptar, traducir,
alquilar, arrendar o prestar el SOFT WARE ni
crear obras derivadas basadas en el
SOFTWARE.
(8) No tendrá derecho a eliminar o a efectuar
copias independientes del SOFTWARE del
PRODUC TO.
(9) No se le otorga ninguna licencia sobre la
parte del SOFTWARE que resulta legible para
el ser humano (el código fuente).
Al utilizar el PRODUCTO, se considera que usted
ha aceptado todas las condiciones de licencia
vigentes. En caso de que no las acepte, póngase
en contacto con su representante del servicio
técnico.
35
Es

CANON INC.
30-2, Shimomaruko 3-chome, Ohta-ku, Tokyo 146-8501, Japan
CANON MARKETING JAPAN INC.
16-6, Konan 2-chome, Minato-ku, Tokyo 108-8011, Japan
CANON U.S.A., INC.
One Canon Park, Melville, NY 11747, U.S.A.
CANON EUROPA N.V.
Bovenkerkerweg 59, 1185 XB Amstelveen, The Netherlands
CANON CHINA CO. LTD.
2F Jinbao Building No.89, Jinbao Street, Dongcheng District, Beijing 100005, PRC
CANON SINGAPORE PTE LTD
1 Fusionopolis Place, #15-10, Galaxis, Singapore 138522
CANON AUSTRALIA PTY LTD
Building A, The Park Estate, 5 Talavera Road, Macquarie Park, NSW 2113, Australia
CANON GLOBAL WORLDWIDE SITES
http://www.canon.com/
FT6-1690 (000) XXXXXXXXXX
Copyright CANON INC. 2016 PRINTED IN KOREA
 Loading...