

Color Bubble Jet Printer
Quick Start Guide
i80
Series

Getting Help from Canon
Help Us Help You Better
Before you contact Canon, please record the following information.
Serial Number (located on the inside of the printer):
Model Number (located on the front of the printer):
Printer Driver CD-ROM number (located on the CD-ROM):
Purchase Date:
Customer Technical Support Sequence
Internet — www.canontechsupport.com
1.
For quick and comprehensive self-help in an intuitively guided interactive
troubleshooting environment, the place to start is our helpful tech support web site.
In addition, the latest driver downloads, answers to frequently asked questions,
product information, and “where to buy” instructions are found here.
*
2. Email Tech Support — www.canontechsupport.com
For individual attention to a special issue, try emailing our friendly technical engineers,
specially trained to communicate quick, easy, and logical solutions to your inquiries
within 24 hours.
3. 90-Day Toll-Free Tech Support** — (1-800-828-4040)
This option provides live telephone technical support, free of service charges, MondaySaturday (excluding holidays), for a period of 90 consecutive days from your first call.
You can start your 90-day Toll-Free Technical Support period at any time during your
product’s warranty period. After that 90-day period, you can continue to call via the toll
number for technical support (see #4, below) during the balance of your warranty period,
or you can extend your service and support coverage (both toll-free tech support and
repair) by purchasing a cost-attractive Canon CarePAK extended service plan. For more
information, please visit our Web site at www.canontechsupport.com.
4. Live Tech Support** — (1-757-413-2848)
This service is available to you throughout your product’s warranty period, and provides
live telephone technical support, free of service charges, Monday-Saturday (excluding
holidays). Telephone Device for the Deaf (TDD) support is available at (1-866-251-3752).
5. Extended Service and Support — www.canonesp.com
Canon CarePAK Extended Service Plan is a cost-attractive and easy-to-use extended
service program that provides up to three full years of service and support coverage
at a very attractive price. CarePAK offers toll-free Canon technical support and includes
Canon’s superb InstantExchange product replacement program. For further information
about extending your Canon service and support, call (1-800-385-2155), or visit our
Web site at www.canonesp.com. CarePAK must be purchased during your product’s
warranty period.
* Support program specifics are subject to change without notice.
** Refer to the individual product information for details.
Series
Color Bubble Jet Printer
Quick Start Guide

Canon i80 Color Bubble Jet Printer Quick Start Guide.
Copyright
This manual is copyrighted by Canon U.S.A., Inc. with all rights reserved. Under the copyright laws,
this manual may not be reproduced in any form, in whole or in part, without the prior written
consent of Canon U.S.A., Inc.
© 2004 Canon U.S.A., Inc.
Disclaimer
Canon U.S.A., Inc. has reviewed this manual thoroughly in order that it will be an easy-to-use
guide to your Canon i80 Color Bubble Jet Printer. All statements, technical information and
recommendations in this manual and in any guides or related documents are believed reliable, but
the accuracy and completeness thereof are not guaranteed or warranted, and they are not intended
to be, nor should they be understood to be, representation or warranties concerning the products
described.
Specifications are subject to change without notice.
E
As an
the
All information regarding non-Canon products was compiled from publicly available information. No
representation is made regarding the accuracy thereof.
NERGY STAR partner, Canon U.S.A., Inc., has determined that this product meets
E
NERGY STAR guidelines for energy efficiency.
Trademarks
•
Canon is a registered trademark of Canon Inc.
•
PhotoRecord is a trademark of Canon Information System Research Australia.
•
Macintosh, Mac and the Mac logo are registered trademarks of Apple Computer, Inc., registered
in the U.S. and other countries.
•
Microsoft® and Windows® are registered trademarks of Microsoft Corporation in the U.S. and
other countries.
•
The Bluetooth® word mark and logos are owned by the Bluetooth SIG, Inc. and any use of such
marks by Canon, Inc. is under licence.
•
All other product and brand names are trademarks of their respective owners.
Canon U.S.A., Inc.
One Canon Plaza
Lake Success, NY 11042

Contents
Basic Printing
Turning on the Printer . . . . . . . . . . . . . . . . . . . . . . . . . . . . . . . . . . . . . . . . . . . . . . . . . . . . . . . . . . . . . . . 2
Loading Paper . . . . . . . . . . . . . . . . . . . . . . . . . . . . . . . . . . . . . . . . . . . . . . . . . . . . . . . . . . . . . . . . . . . . . 3
Using Speciality Media . . . . . . . . . . . . . . . . . . . . . . . . . . . . . . . . . . . . . . . . . . . . . . . . . . . . . . . . . . . . . . 5
Printing with Windows . . . . . . . . . . . . . . . . . . . . . . . . . . . . . . . . . . . . . . . . . . . . . . . . . . . . . . . . . . . . . . 7
Printing with Macintosh . . . . . . . . . . . . . . . . . . . . . . . . . . . . . . . . . . . . . . . . . . . . . . . . . . . . . . . . . . . . . 9
Printing Data through Infrared Communication . . . . . . . . . . . . . . . . . . . . . . . . . . . . . . . . . . . . . . . . . 11
Advanced Printing
Printing Photographs Directly from a Digital Camera . . . . . . . . . . . . . . . . . . . . . . . . . . . . . . . . . . . . 17
Accessing Printer Driver . . . . . . . . . . . . . . . . . . . . . . . . . . . . . . . . . . . . . . . . . . . . . . . . . . . . . . . . . . . . 22
Adjusting Print Quality for Photographs . . . . . . . . . . . . . . . . . . . . . . . . . . . . . . . . . . . . . . . . . . . . . . . 23
Using Printer Driver Options. . . . . . . . . . . . . . . . . . . . . . . . . . . . . . . . . . . . . . . . . . . . . . . . . . . . . . . . . 30
Using the Bundle Software. . . . . . . . . . . . . . . . . . . . . . . . . . . . . . . . . . . . . . . . . . . . . . . . . . . . . . . . . . 31
Printing Borderless Photographs with Windows . . . . . . . . . . . . . . . . . . . . . . . . . . . . . . . . . . . . . . . . 32
Printing Borderless Photographs with Macintosh . . . . . . . . . . . . . . . . . . . . . . . . . . . . . . . . . . . . . . . 34
Printing Maintenance
When Printing Becomes Faint or Colors are Incorrect . . . . . . . . . . . . . . . . . . . . . . . . . . . . . . . . . . . . 37
Printing the Nozzle Check Pattern . . . . . . . . . . . . . . . . . . . . . . . . . . . . . . . . . . . . . . . . . . . . . . . . . . . . 38
Print Head Cleaning. . . . . . . . . . . . . . . . . . . . . . . . . . . . . . . . . . . . . . . . . . . . . . . . . . . . . . . . . . . . . . . . 41
Print Head Deep Cleaning . . . . . . . . . . . . . . . . . . . . . . . . . . . . . . . . . . . . . . . . . . . . . . . . . . . . . . . . . . . 44
Aligning the Print Head . . . . . . . . . . . . . . . . . . . . . . . . . . . . . . . . . . . . . . . . . . . . . . . . . . . . . . . . . . . . . 46
Replacing an Ink Tank . . . . . . . . . . . . . . . . . . . . . . . . . . . . . . . . . . . . . . . . . . . . . . . . . . . . . . . . . . . . . . 50
Contents
Troubleshooting
Cannot Install the Printer Driver. . . . . . . . . . . . . . . . . . . . . . . . . . . . . . . . . . . . . . . . . . . . . . . . . . . . . . 56
Print Quality is Poor or Contains Errors . . . . . . . . . . . . . . . . . . . . . . . . . . . . . . . . . . . . . . . . . . . . . . . . 57
Troubleshooting Printer Hardware. . . . . . . . . . . . . . . . . . . . . . . . . . . . . . . . . . . . . . . . . . . . . . . . . . . . 58
Paper Does Not Feed Properly . . . . . . . . . . . . . . . . . . . . . . . . . . . . . . . . . . . . . . . . . . . . . . . . . . . . . . . 59
Handling Error Messages . . . . . . . . . . . . . . . . . . . . . . . . . . . . . . . . . . . . . . . . . . . . . . . . . . . . . . . . . . . 60
An Error Message Appears on the Screen . . . . . . . . . . . . . . . . . . . . . . . . . . . . . . . . . . . . . . . . . . . . . . 61
Cannot Print Properly through Infrared Communication . . . . . . . . . . . . . . . . . . . . . . . . . . . . . . . . . . 63
Cannot Print Properly from the Digital Camera. . . . . . . . . . . . . . . . . . . . . . . . . . . . . . . . . . . . . . . . . . 64
Appendix
Installing the Printer Driver when using Mac OS 9.x . . . . . . . . . . . . . . . . . . . . . . . . . . . . . . . . . . . . . 66
User’s Guide Table of Contents . . . . . . . . . . . . . . . . . . . . . . . . . . . . . . . . . . . . . . . . . . . . . . . . . . . . . . 67
Accessory Options. . . . . . . . . . . . . . . . . . . . . . . . . . . . . . . . . . . . . . . . . . . . . . . . . . . . . . . . . . . . . . . . . 68
Specifications . . . . . . . . . . . . . . . . . . . . . . . . . . . . . . . . . . . . . . . . . . . . . . . . . . . . . . . . . . . . . . . . . . . . 69
Safety Precautions . . . . . . . . . . . . . . . . . . . . . . . . . . . . . . . . . . . . . . . . . . . . . . . . . . . . . . . . . . . . . . . . 71
Regulatory Information . . . . . . . . . . . . . . . . . . . . . . . . . . . . . . . . . . . . . . . . . . . . . . . . . . . . . . . . . . . . . 73
CANON U.S.A., INC. LIMITED WARRANTY --- (USA Only) . . . . . . . . . . . . . . . . . . . . . . . . . . . . . . . . . . . 74
Index
. . . . . . . . . . . . . . . . . . . . . . . . . . . . . . . . . . . . . . . . . . . . . . . . . . . . . . . . . . . . . . . . . . . . . . . . . . . . . . . . . . . . . . 76
1
Basic Printing
Basic Printing
This Q
Note
Quick Start Guide describes some of the features of your i80 printer
and how to use them. For more information, view the i80 U
installed on your computer, or use the online help within your printer
driver interface:
While in the printer's Properties window, press the FF1 key, or click in
the upper right corner. Then click the feature you want to know more
about, or click H
While in the PPage Setup dialog box or PPrint dialog box, click in the
lower left corner.
Click provides detailed information about each setting.
User's Guide
Help when displayed.
When the Help window appears, select your desired topic.
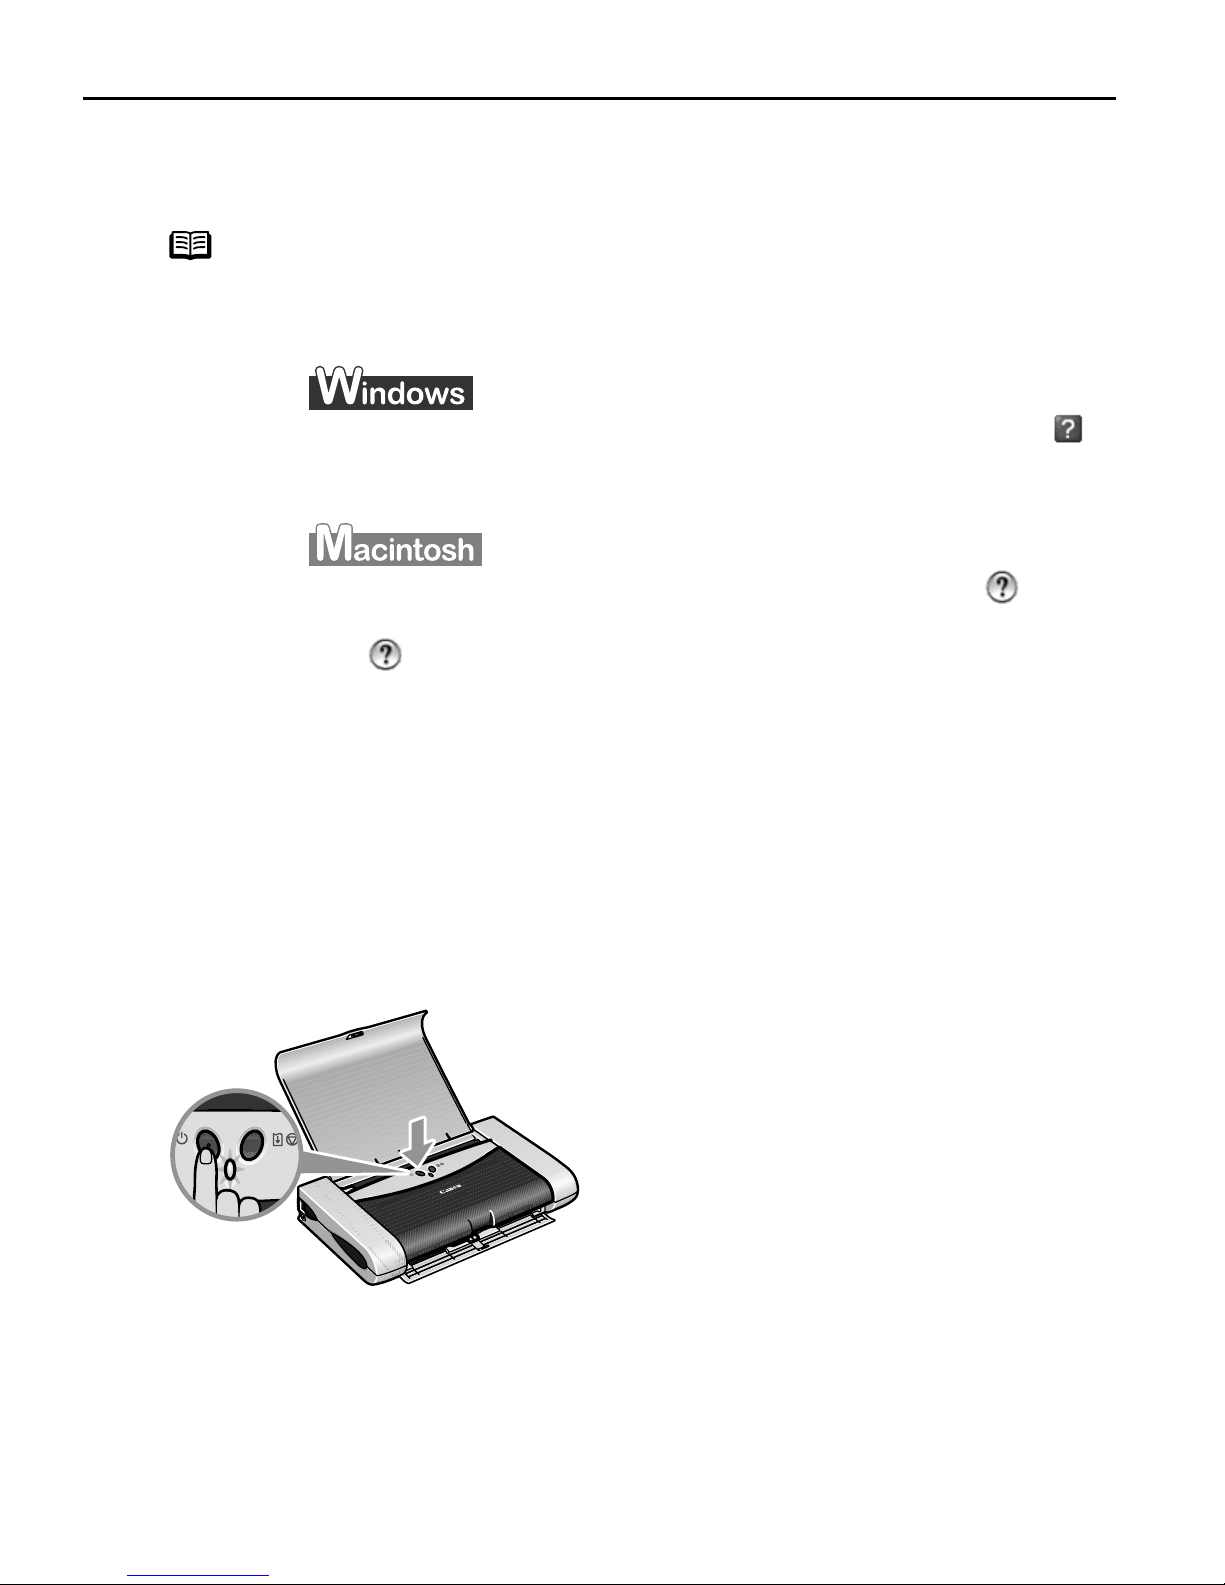
Turning on the Printer
1
2
Open the paper rest.
Press the POWER button.
The PPOWER lamp flashes while the printer warms up and changes to steady (non-
flashing) green when the printer is ready.
Important z Before unplugging the power cord, turn off the printer and ensure
that the green lamp has gone out.
z If the P
the section "H
2
POWER lamp changes to orange and begins flashing, refer to
Handling Error Messages" on page 60.

Loading Paper
Print Media to Avoid
Do not use the following types of paper. Using such paper will not only produce
unsatisfactory results, but can also cause the printer to jam or malfunction.
• Folded, curled or wrinkled paper
• Damp paper
• Paper that is too thin (less than 64 gsm or 17 lb)
• Paper that is too thick* (more than 105 gsm or 28 lb)
*non-Canon branded paper
• Picture postcards
• Postcards with an affixed photo or sticker
• Envelopes with a double flap
Basic Printing
• Envelopes with pressure seals
• Envelopes with an embossed or treated surface
Loading the Print Media
This section describes how to load plain paper into your printer.
• For detailed information on the speciality media Canon provides for use with its
various printers, refer to the section "U
• Consult the
speciality media into the printer.
1
Flatten the four corners of the paper before loading it.
Important When paper is curled, gently bend them in the opposite direction until
User’s Guide
the paper becomes completely flat.
for detailed instructions on how to load envelopes and
Using Speciality Media" on page 5.
3
Basic Printing
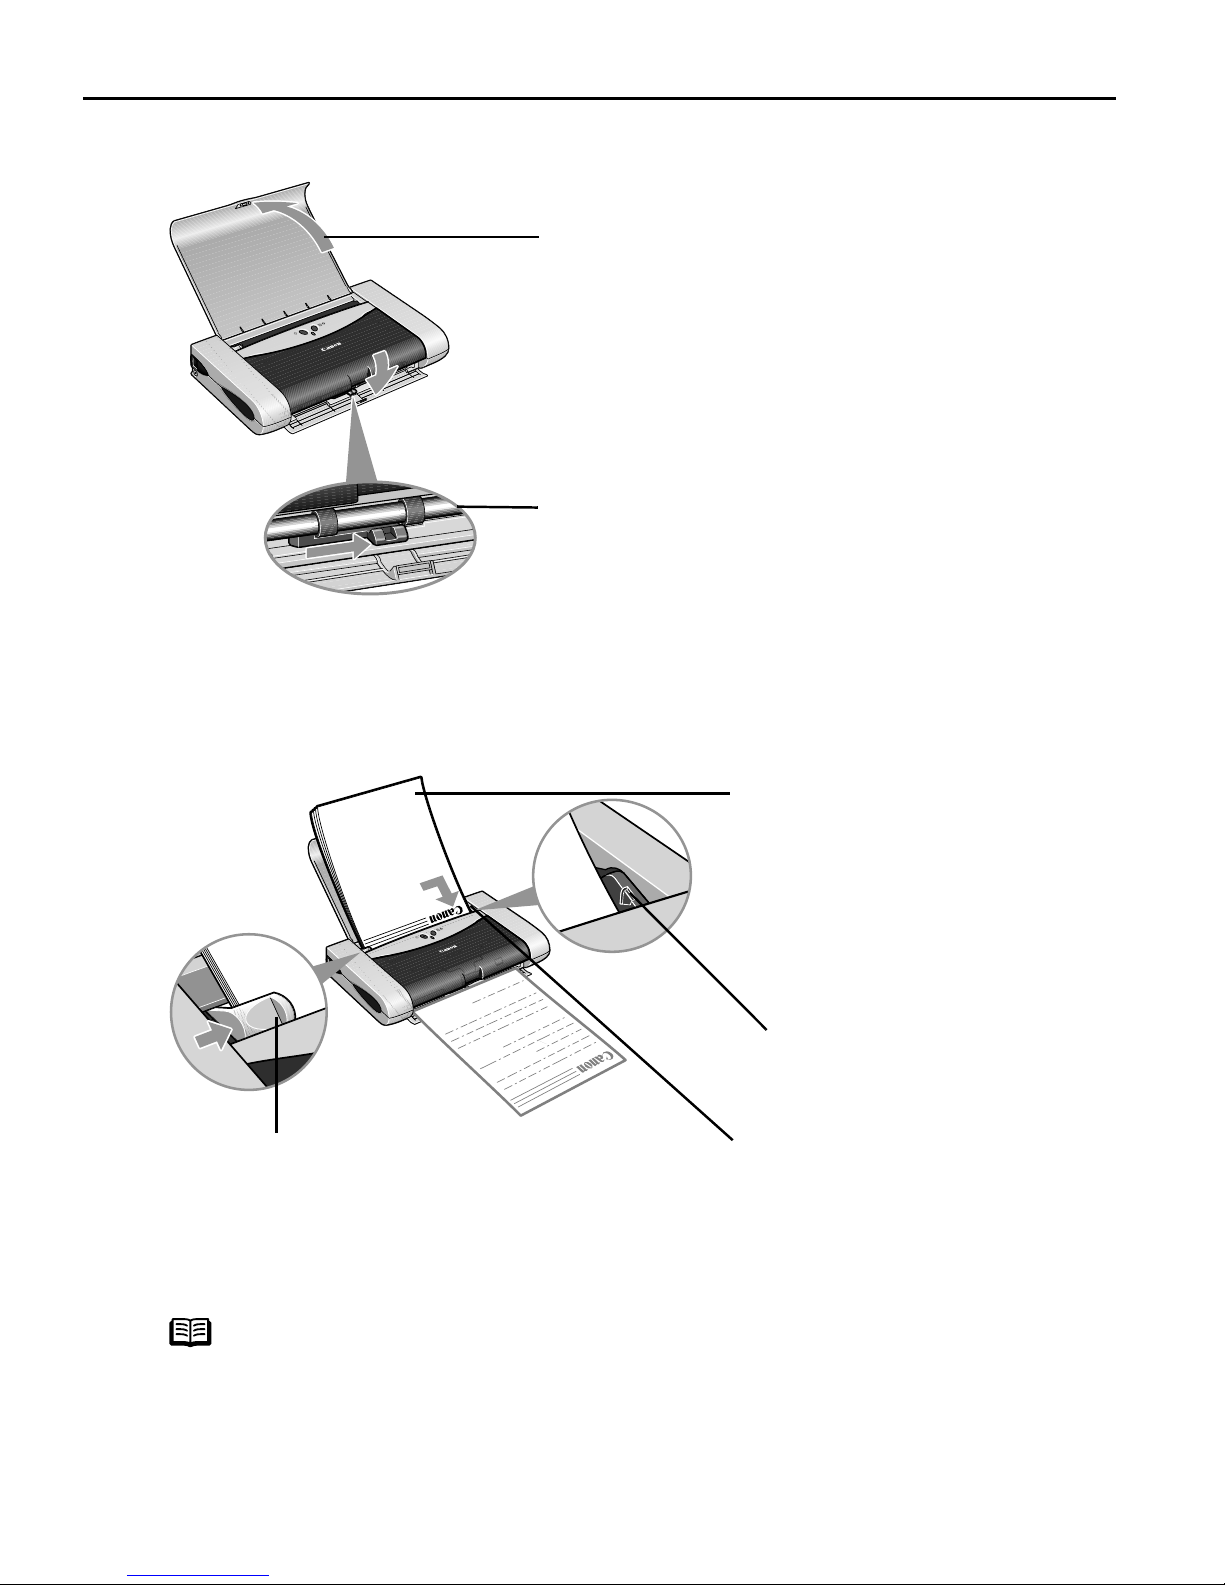
2
Prepare to load paper.
(1) Open the paper rest
and output slot cover.
(2) Move the paper thickness lever to
the correct position for the media
in use.
Move to the right position for plain
paper. Move to the left position for
envelope, and T-Shirt Transfers.
3
Load the paper.
(3) Slide the paper guide
against the left side of the
stack of paper.
Note
z Do not stack more than 10 sheets in the paper output slot cover.
z Do not touch the printed surfaces until the ink dries. For specific
drying times, refer to the instructions packaged with your media.
(1) Insert the paper into the
sheet feeder with print
side facing up.
When loading the
4"×6"paper, load sheets
in the portrait position
(short side facing down).
Load Limit Mark
Do not load beyond
this Load Limit Mark.
(2) Align the paper stack
against the right side of
the sheet feeder.
4
Basic Printing
Using Speciality Media
Canon recommends that you use genuine Canon media to ensure optimal print quality.
Photo Quality Media
•Photo Paper Pro
• Photo Paper Pro Perforated
• Photo Paper Plus Glossy
• Photo Paper Plus Semi-Gloss
• Matte Photo Paper
•Glossy Photo Paper
Media Suited to Business
Documents
•High Resolution Paper
• Transparencies
5
Basic Printing
Canon Speciality Media
Media Name Paper Rest Load Limit Paper
Thickness
Lever Position
Photo Paper Pro Letter: up to 1 sheet
4"×6": up to 10 sheets
Photo Paper Pro
Perforated
Photo Paper Plus
Glossy
Photo Paper Plus
Semi-Gloss
Matte Photo Paper Up to 10 sheets Right Matte Photo Paper
Glossy Photo Paper Letter: up to 10 sheets*
High Resolution Paper Up to 10 sheets Right High Resolution Paper
4"×6": up to 10 sheets Right Photo Paper Pro
Letter: up to 5 sheets
5"×7": up to 10 sheets
4"×6": up to 10 sheets
Letter: up to 5 sheets*
4"×6": up to 10 sheets
4"×6": up to 10 sheets
Right Photo Paper Pro
Right Photo Paper Plus
Right Photo Paper Plus
Right Glossy Photo Paper
Printer Driver Settings
for Media Type
**
Glossy
Glossy
T-Shirt Transfers 1 sheet Left T-Shirt Transfer
Transparencies Up to 10 sheets* Right Transparency
Note
z When using plain paper (64 gsm or 17 lb), up to 30 sheets can be set. Set
the Paper Thickness Lever to the right and select P
driver M
z For detailed description of print media types, refer to the
* When paper cannot be fed normally, load the necessary number of sheets in
the sheet feeder with them separating from each other to avoid them from
sticking together.
** Print settings are much easier to select if you use the applications included
on the
Paper Pro Perforated.
For instructions on how to print from the software applications, refer to the
Photo Application Guide
Media Type.
Setup Software & User’s Guide CD-ROM
.
Plain Paper from the printer
User’s Guide
when printing with Photo
.
6
Printing with Windows
Basic Printing
1
2
Note
z The menu screens and dialog boxes that appear may vary, depending on the
software application you are using.
z The steps described in this section are for printing in Windows XP.
Create a document or open a file to print.
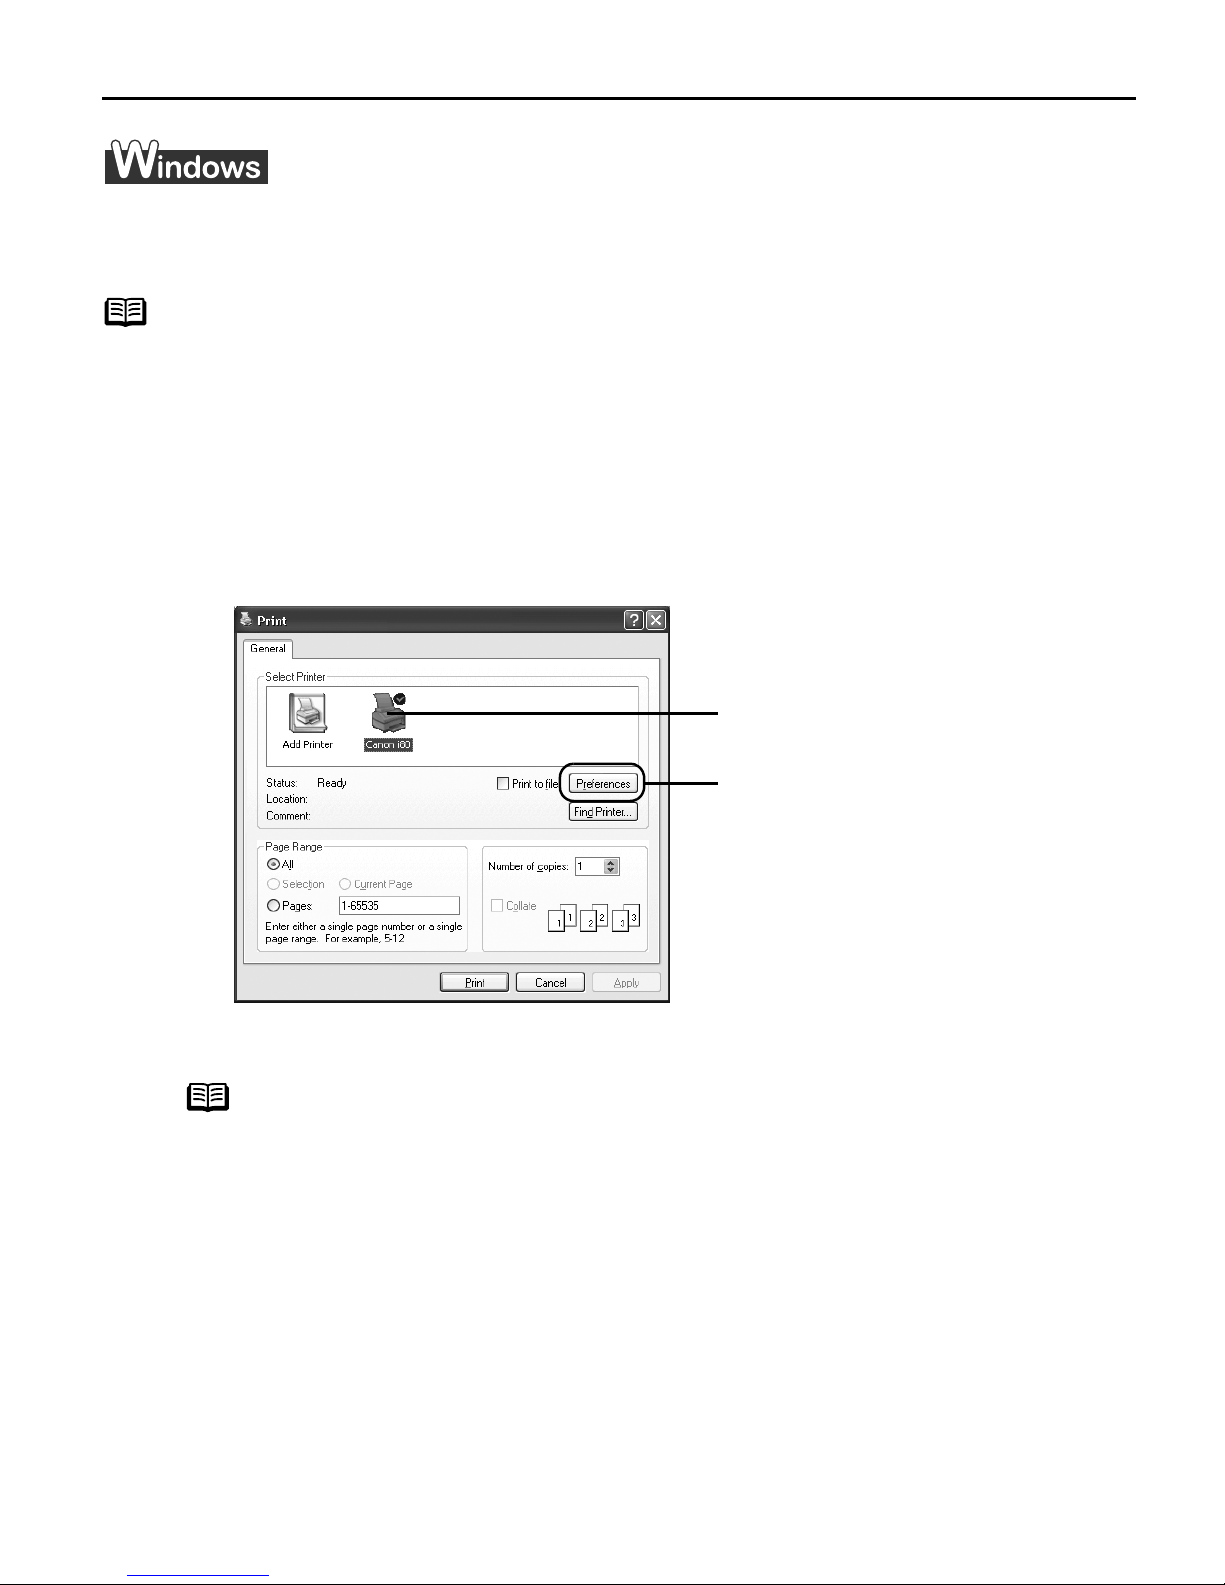
Open Printer Properties dialog box.
(1) Select PPrint from the application software's FFile menu.
(2) Ensure that CCanon i80 is
selected.
(3)
Click PPreferences or
Properties
.
Note
In Windows 2000, click the M
Main tab in the PPrint dialog box.
7
Basic Printing
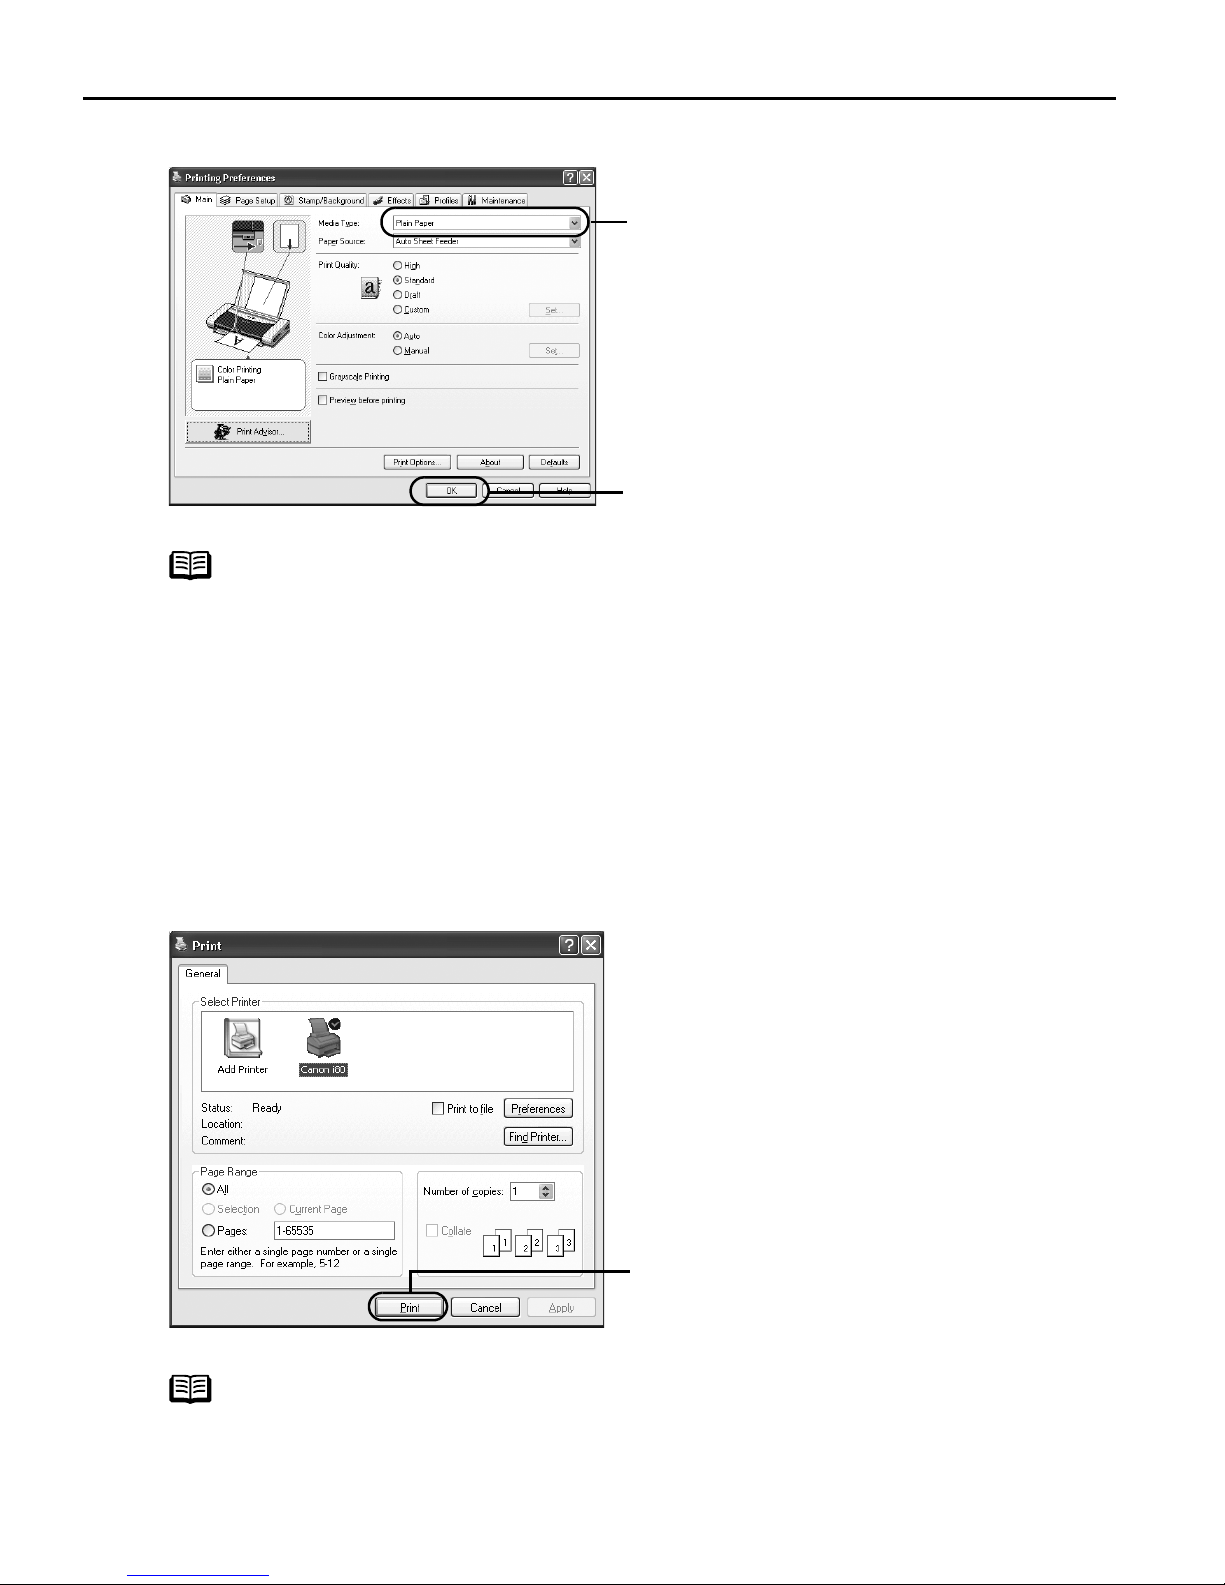
3
Specify the required settings.
Note
z From the P
printed.
z To adjust Print Quality settings, select C
Main tab. You can control quality in the S
z For details about other printer driver functions, refer to the
Guide
z Select P
displays a preview screen that allows you to confirm the selected
printing effects and how your document will look when printed.
Some applications do not contain the function to display the
preview.
Page Setup tab select the correct document size to be
or Help.
Preview before printing by clicking the check box. This
(1) Click MMedia Type to select
the media loaded in the
printer.
(2) Click OOK.
Custom and click SSet on the
Set Print Quality dialog box.
User’s
4
Print the document.
Note
You can cancel a print job in progress by simply pressing the R
CANCEL button on the printer.
(1) Click PPrint.
RESUME/
8
Printing with Macintosh
Basic Printing
1
2
Note
z The menu screens and dialog boxes that appear may vary, depending on the
software application you are using.
z The steps described in this section are for printing in Mac OS X.
Create a document or open a file to print.
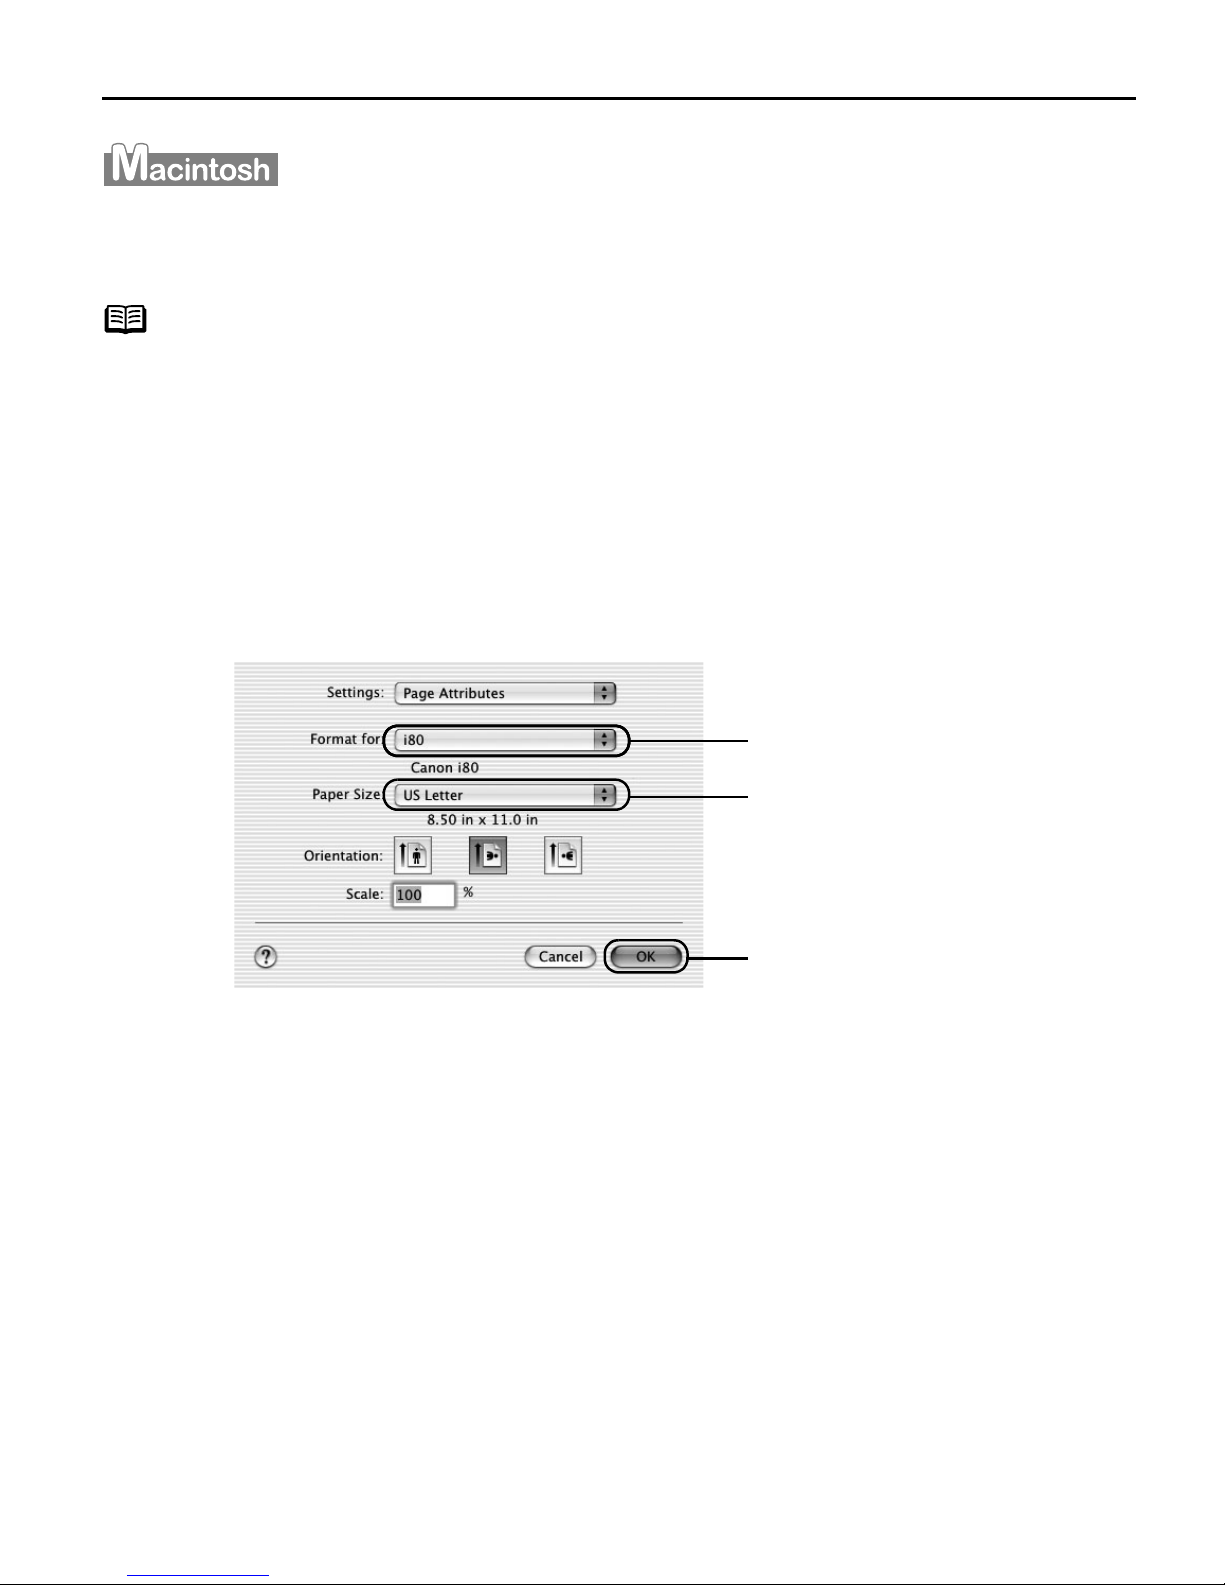
Select Paper Size.
(1) Select the PPage Setup from the application software's FFile menu.
Page Setup dialog box opens.
(2) Select i80 from FFormat for.(2) Select i80 from FFormat for.
(3) Select the desired paper
size from the P
pop-up menu.
Paper Size
(4) Click O
OK.
9
Basic Printing
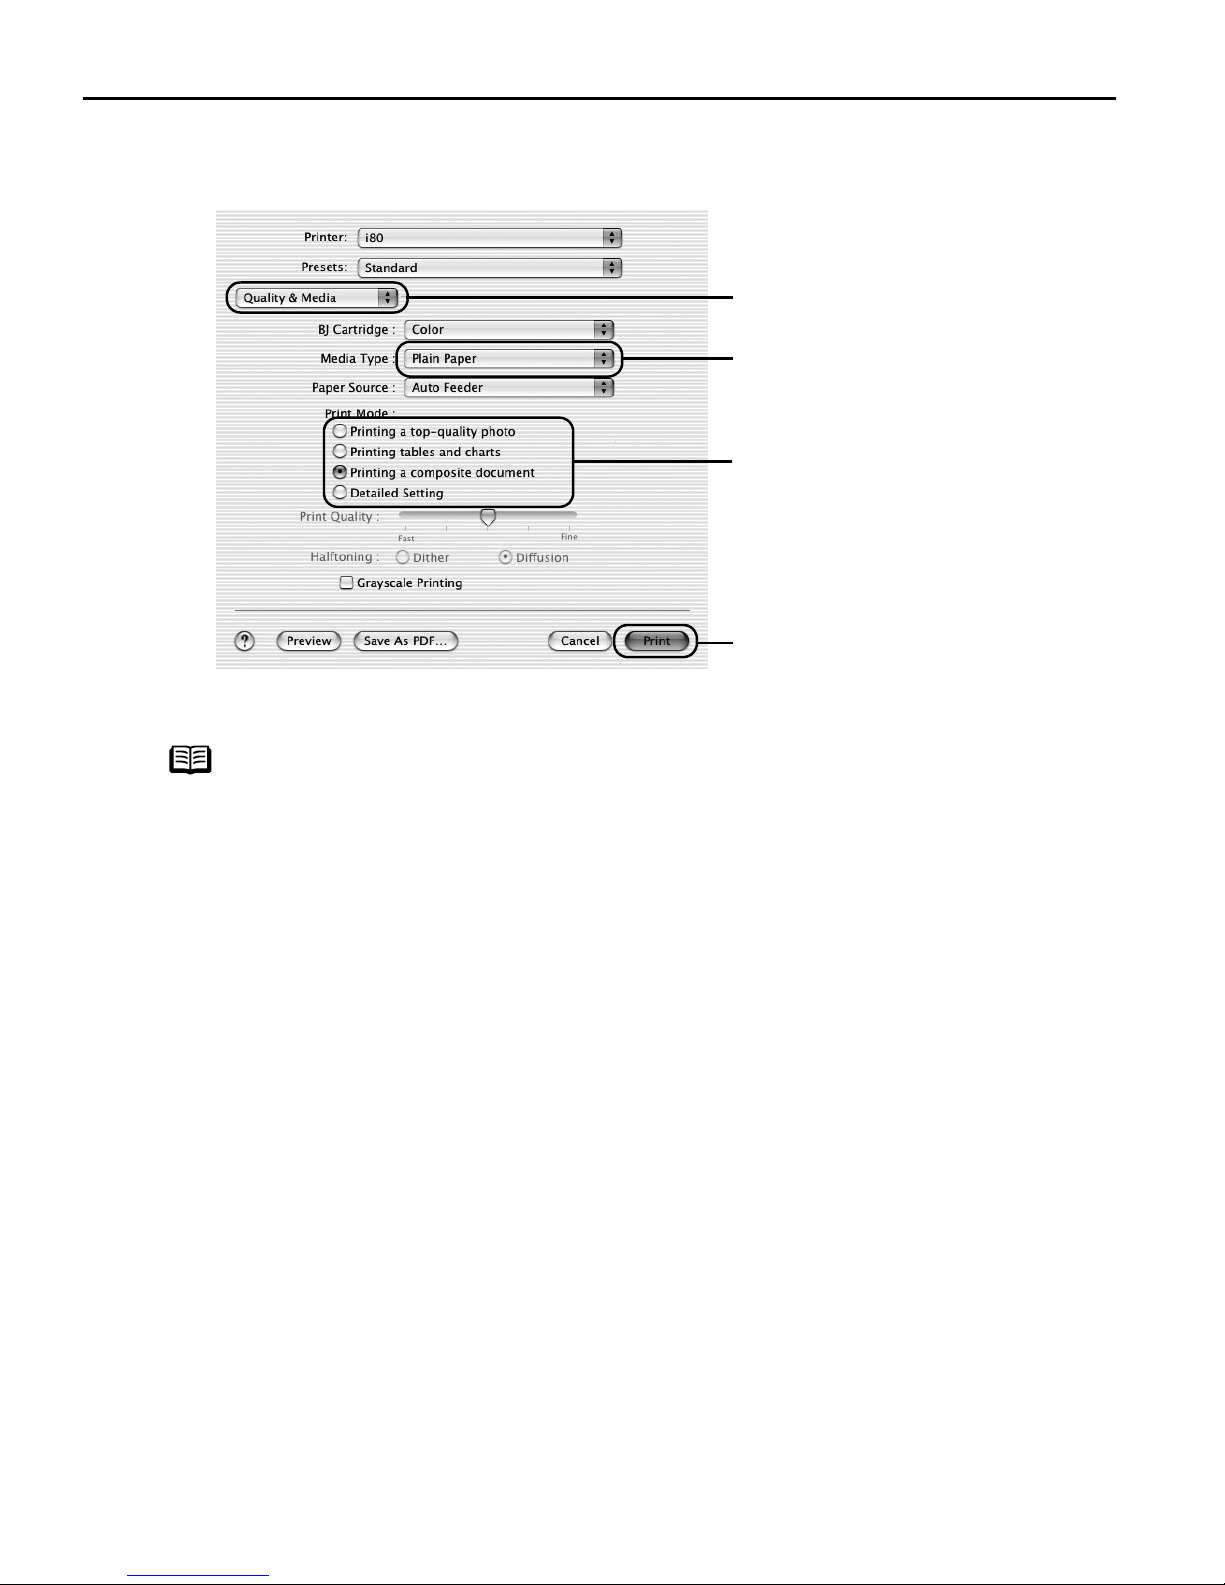
3
Specify the required settings.
(1) Select PPrint from the application software's FFile menu.
(2) Select QQuality & Media from
the pop-up menu.
(3) Select the MMedia Type from
the pop-up menu.
(4) Select the print mode
appropriate to your
document from the P
Mode.
(5) Click PPrint.
Print
Note
z When you select the print mode appropriate to your document from
the P
Print Mode, the document will be printed in color and print
quality suited to the characteristics of the M
selected.
Printing a top-quality photo: Select when printing documents
consisting mainly of photographs and graphics featuring fine color
gradation.
Printing tables and charts: Select when printing documents
consisting mainly of graphs and graphics (illustrations) with strong
color definition.
Printing a composite document: Select when printing documents
consisting mainly of text.
Detailed Setting: You can fine-tune the Print Quality and Halftoning
settings.
Refer to the
z For details about other printer driver functions, refer to the
Guide
z You can cancel a print job in progress by simply pressing the
RESUME/CANCEL button on the printer.
or Help.
User’s Guide
.
Media Type you have
User’s
10
Basic Printing
Printing Data through Infrared Communication
If you have a computer or PDA with an infrared port for wireless data transmission, you can
print data with a cordless connection with the printer. You can print images, an address
book, schedule, or memos received from a PDA in a specified format through infrared
communication.
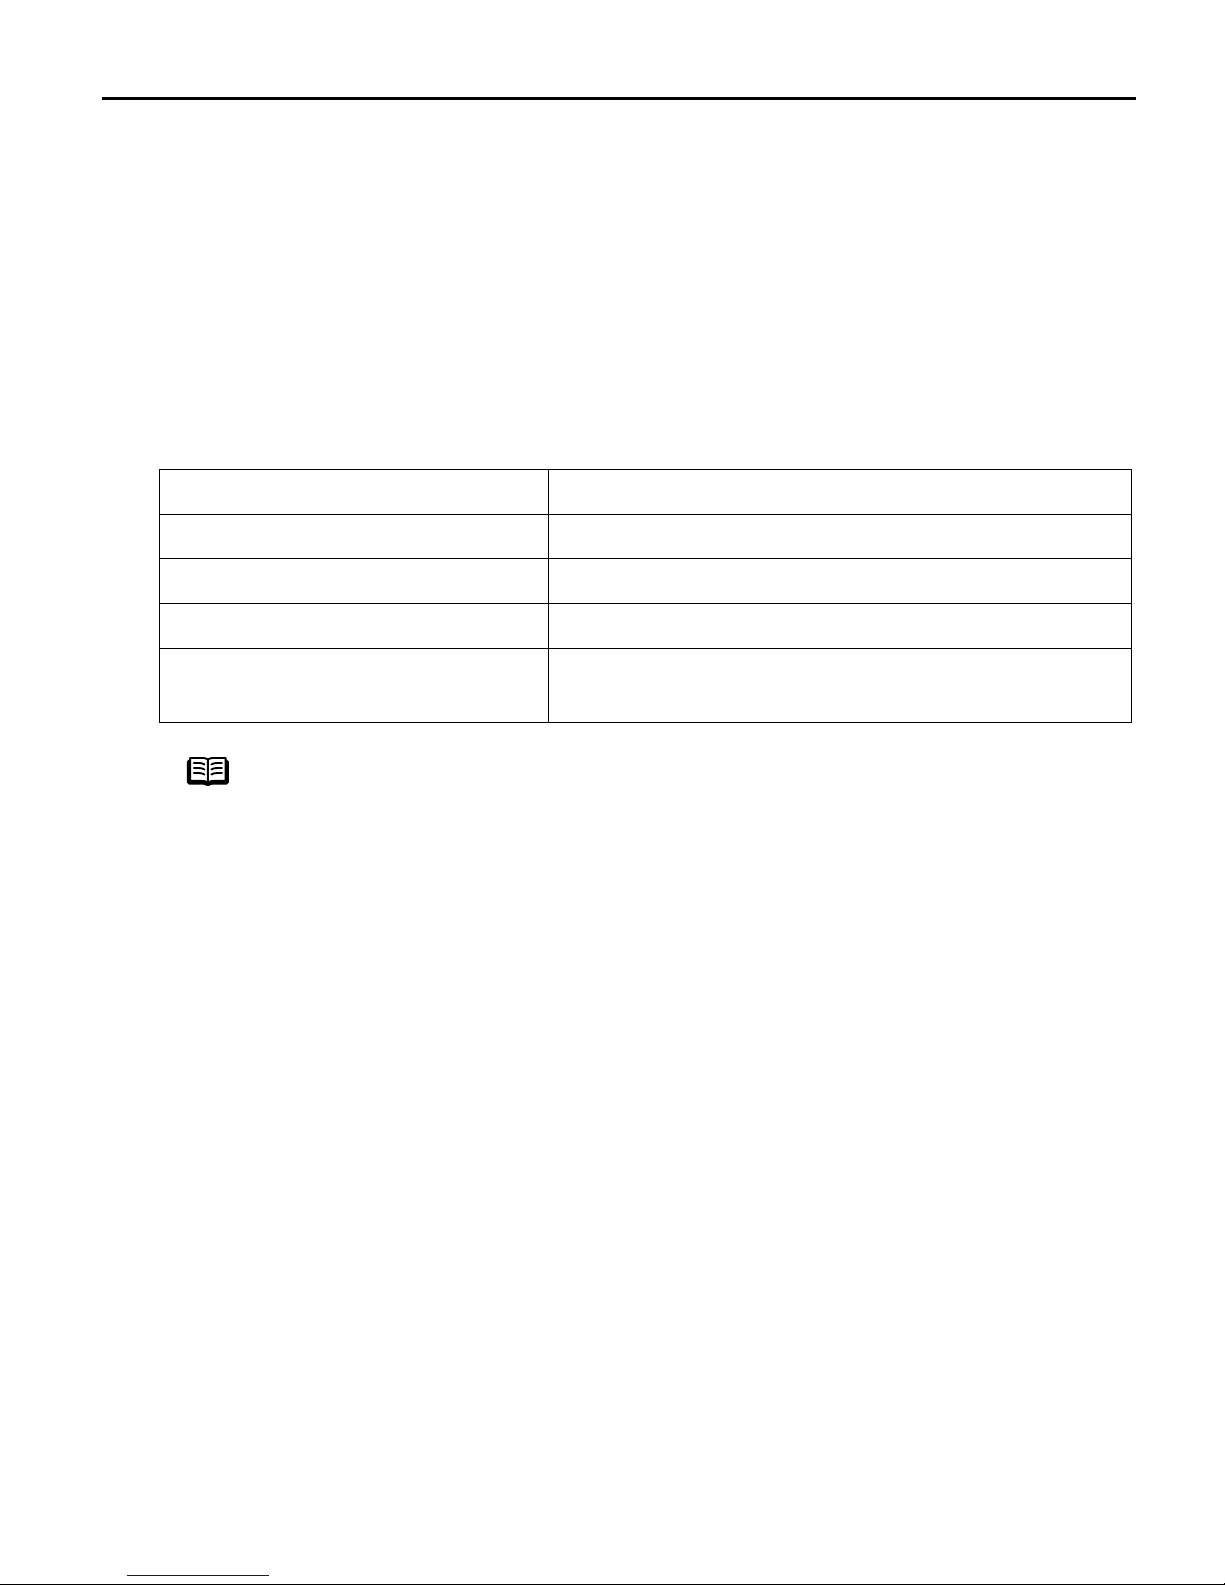
Requirements for Infrared Communication with the Computer
Printing through infrared communication can be performed under Windows XP,
Windows Me, Windows 2000 or Windows 98. In order to use infrared communication,
your computer must satisfy the following requirements:
Computer IBM PC/AT or compatible machine
CPU Intel Pentium or higher
IrDA IrDA 1.1 compliant
Baud rate (communication speed) Max. 4 Mbps
Infrared communication devices Infrared communication port incorporated in the
computer
Note
z When printing through infrared communication, the Microsoft
infrared communication driver must have been installed in Windows
98 computer or later.
z In Windows 98 or Windows Me, check whether the infrared
communication driver has been installed. To activate the infrared
port, carry out the following operation:
1.Click S
2.Check whether the W
icon (Windows 98) is displayed in the window.
If this icon is displayed, the required infrared driver has already
been installed. If this icon is not displayed, change the BIOS
setting to activate (turn on) the infrared port. For the procedure,
refer to your computer manual.
In Windows 98, follow the procedure below:
3.Double-click the I
4.Check whether the E
selected. If the check box is not selected, select it.
z Before printing data or using a maintenance function of the printer
driver, ensure that the name of the printer is displayed by placing the
mouse pointer on the W
Infrared icon) on the Control Panel.
z In Windows XP or Windows 2000, BJ Status Monitor is not displayed.
Start, and select SSettings and then CControl Panel.
Wireless Link icon (Windows Me) or the IInfrared
Infrared icon.
Enable infrared communication check box is
Wireless Link icon (For Windows 98, click the
11
Basic Printing
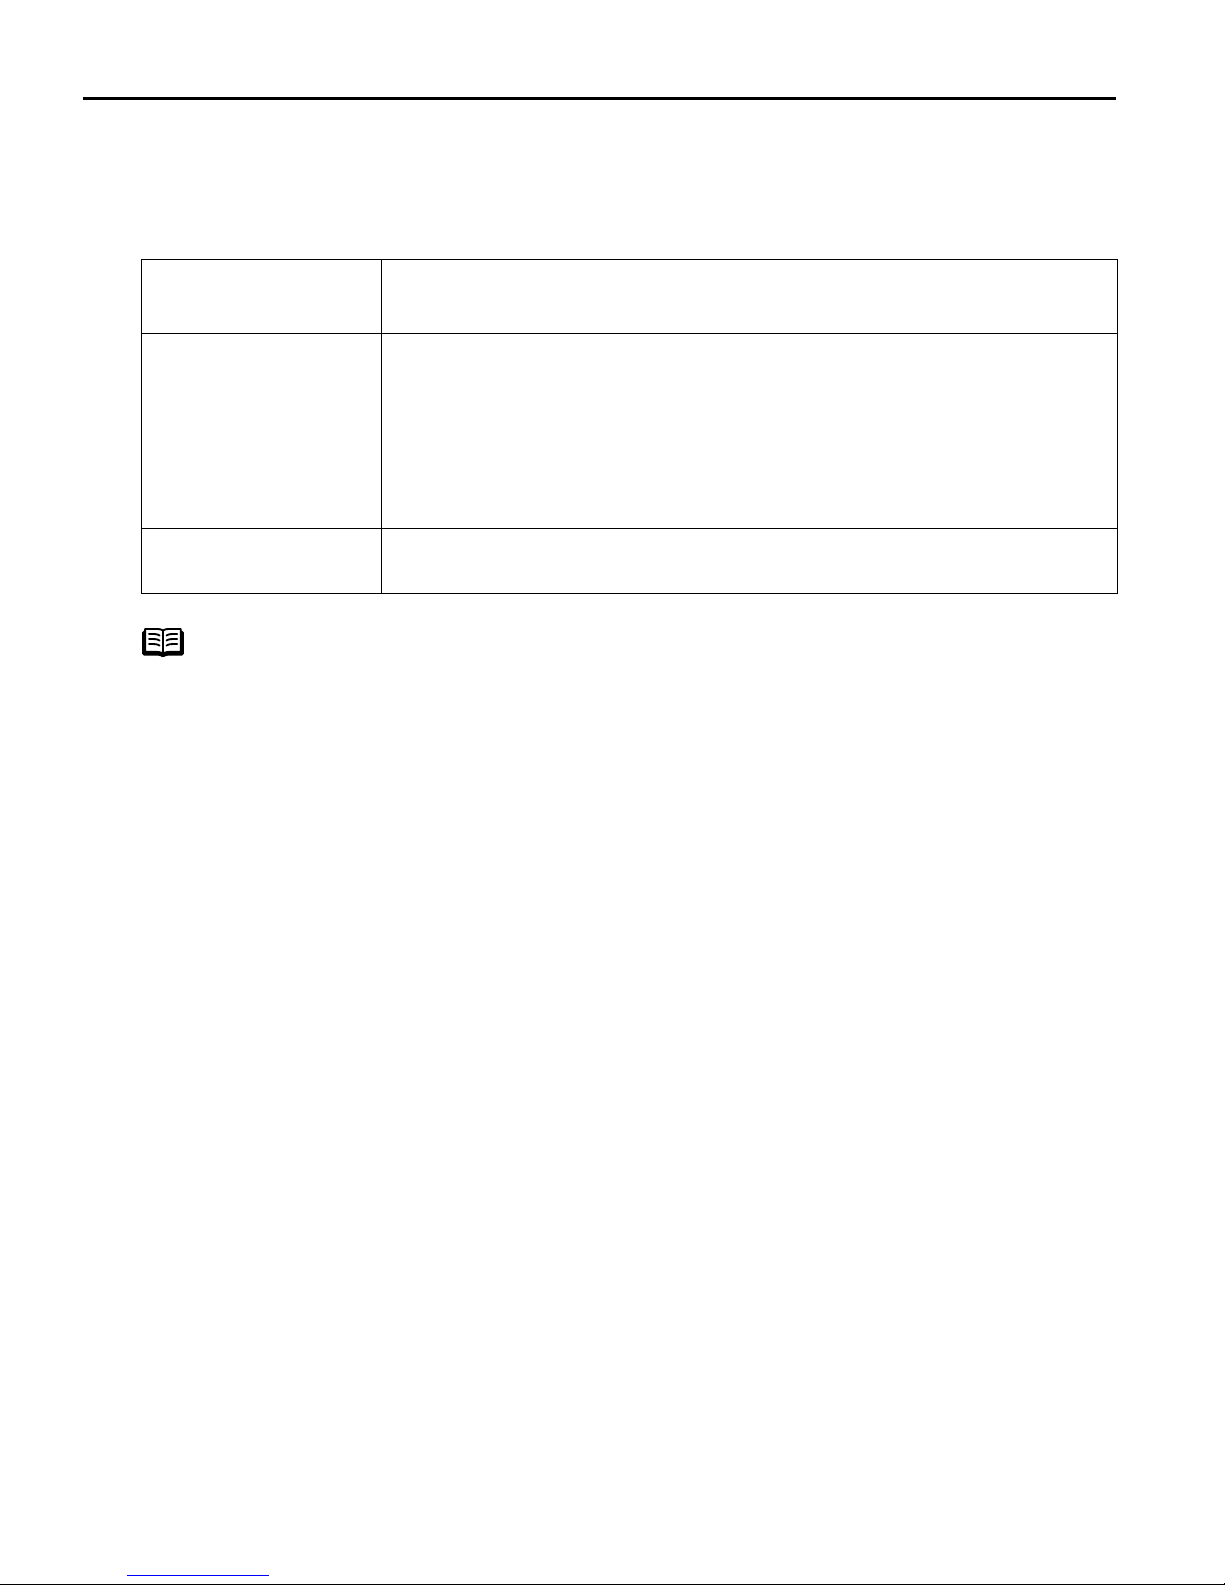
Requirements for Infrared Communication with the PDA
In order to use infrared communication, your PDA must satisfy the following
requirements:
PDA The PDA must have an IrDA port and support the file transfer
using the IrOBEX (Infrared Object Exchange) protocol
Printable contents
Character code
Note
z To carry out printing through infrared communication with a mobile
phone:
- The mobile phone must have an IrDA port and support IrMC ver 1.1.
- JPEG images are only supported.
z Following limitations apply on transmittable data
- It does not support printing a downloaded content or photo and a
- It does not support printing video files.
- Depending on your device, the Fine print quality option may not be
- Depending on your device, it may not print data stored in a memory
- It automatically sets the image quality and orientation (horizontal or
- It automatically sets the margin according to the image size.
- Depending on the size of an image, it may take a while for this printer
z If the print head has not been aligned, the print speed may be reduced
to improve the print quality.
Align the print head by connecting the printer to the computer. The
print speed may increase. For details on how to align the print head,
refer to "A
z Microsoft Pocket PC 2002
Contacts (perform printing from the contacts list), Calendar,
Tasks, and Image (JPEG images only)
z Palm Computing Palm OS 3.5/4.1
Contacts, Date Book, To Do List, and Memo Pad (text only;
printing hand-written memo pad is not supported)
z Alphanumeric code
z ISO 8859-1/2/5
photo attached to an email for security reason.
available due to the restriction on the infrared transfer capacity.
card.
landscape) according to the image size.
to start to print after starting the infrared transfer.
Aligning the Print Head" on page 46.
12
Basic Printing
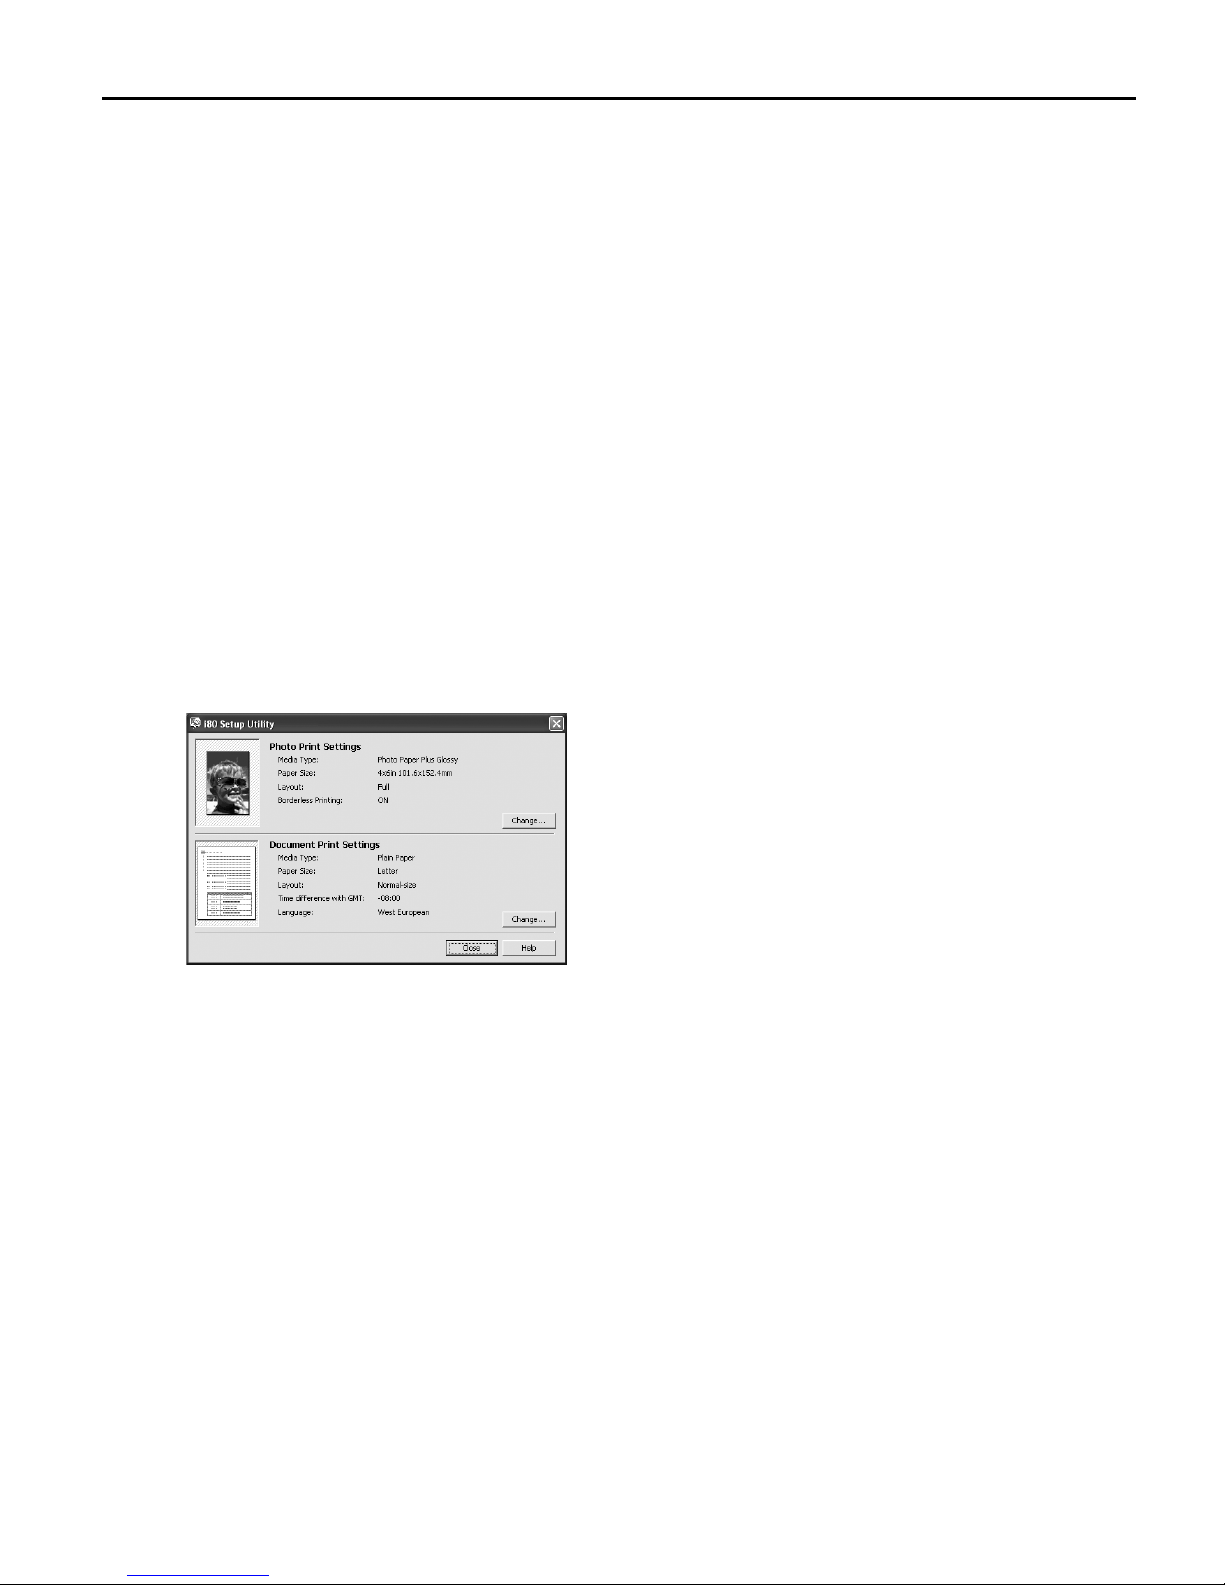
Setting the Media Type, Paper Size, and Layout When Printing From
a PDA
You can select the media type, page size, layout and borderless printing in the i80
Setup Utility when printing from a PDA or mobile phone.
Important Before using the ii80 Setup Utility, you must connect this printer to your
computer with a USB cable and install the printer driver and the i
Utility.
i80 Setup
1
2
Set up the printer.
(1) Ensure that the universal AC adapter is connected securely.
When using an optional battery, ensure that it has been charged.
(2) Connect the printer to your computer with a USB cable.
(3) Open the paper rest, turn on the printer, and then turn on the computer.
Start the i80 Setup Utility.
Windows
Start and select AAll Programs (or
Click S
Programs), C
i80 Setup Utility.
and i
The i80 Setup Utility screen appears.
Macintosh
Open the A
double-click the i
i80 Setup Utility icon.
the i
The i80 Setup Utility screen appears.
Canon Utilities,ii80 Setup Utility
Applications folder, and then
i80 Setup Utility folder and
* Windows XP is used as an example here.
The same operation is applicable in
Macintosh.
13
Basic Printing
3
Specify the paper size and layout.
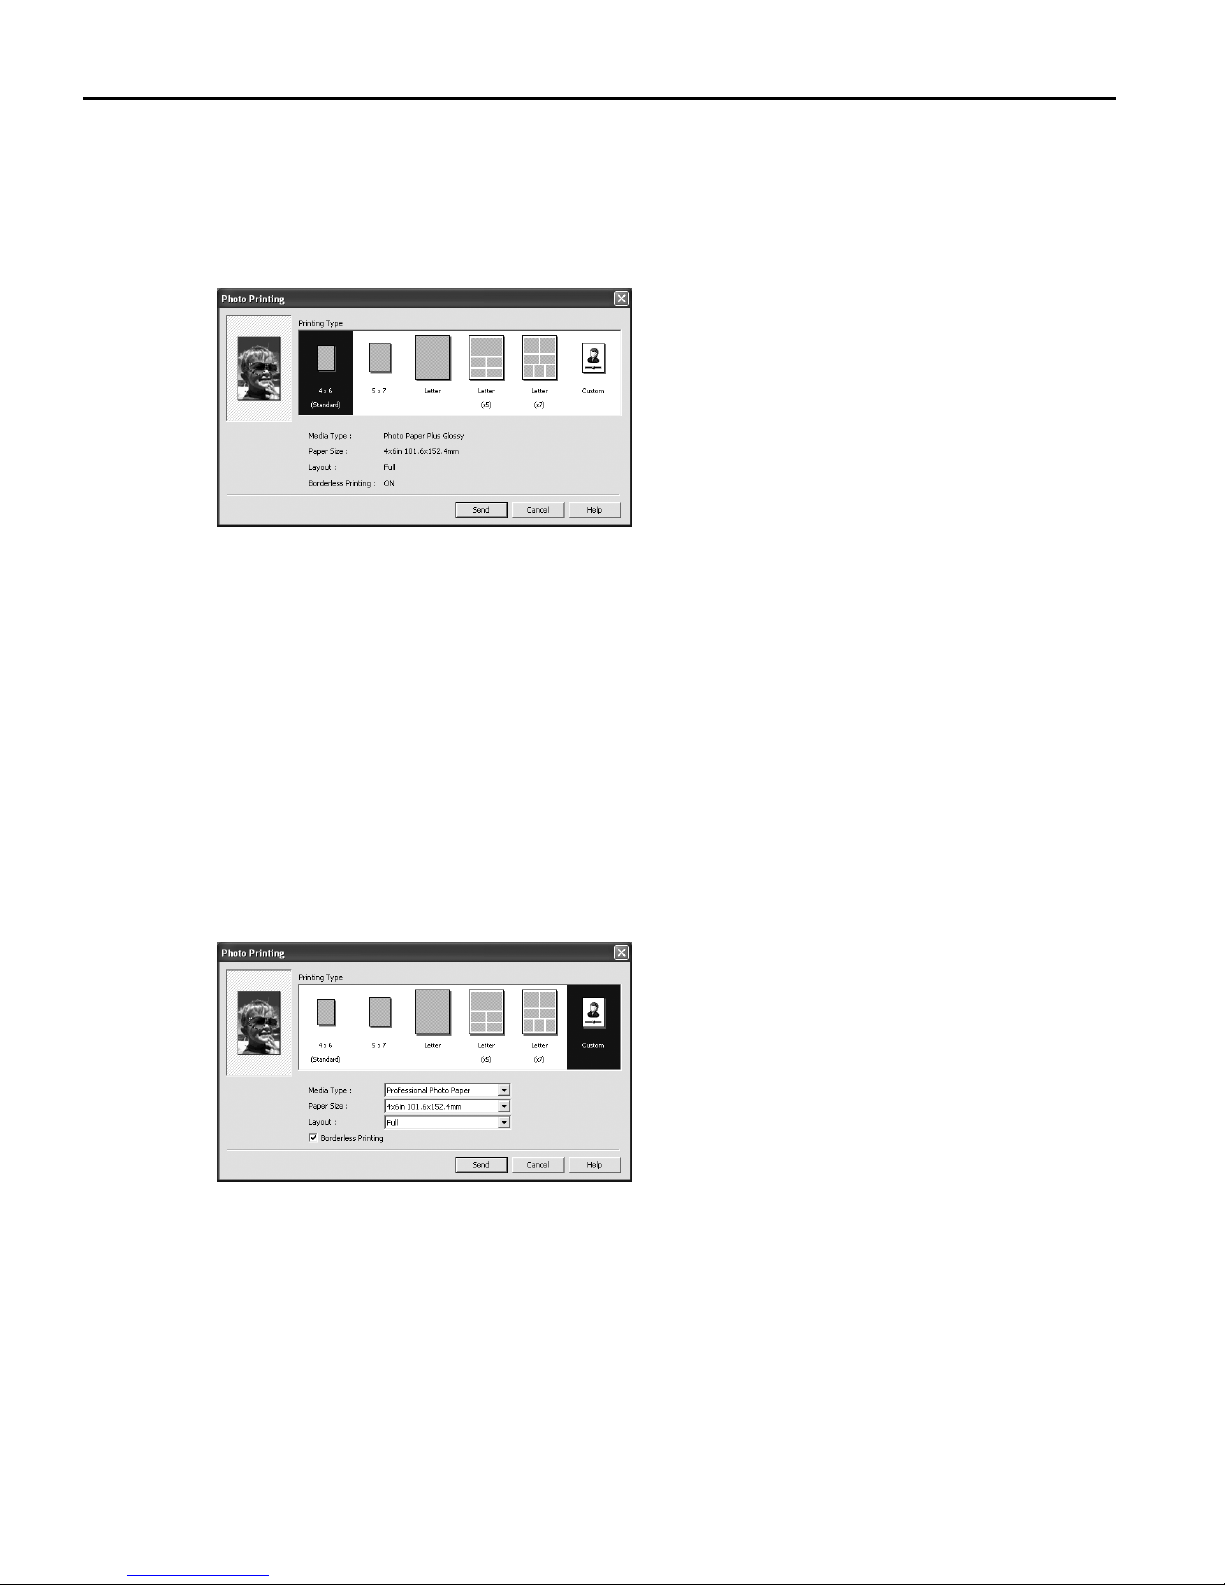
Changing the Photo Print Settings
(1) Click CChange on PPhoto Print Settings in the i80 setup utility screen.
Photo Printing dialog box appears.
The P
(2) Select a desired layout for printing.
4×6 Prints a photo on Photo Paper Plus Glossy 4"×6"/101.6×152.4 mm
paper without border.
5×7 Prints a photo on Photo Paper Plus Glossy 5"×7"/127.0×177.8 mm
paper without border.
Letter Prints a photo on Photo Paper Plus Glossy Letter paper without border.
Letter (×5) Prints 5 photos on Photo Paper Plus Glossy Letter paper with border.
Letter (×7) Prints 7 photos on Photo Paper Plus Glossy Letter paper with border.
(3) Click C
borderless printing.
(4) Set the media type, paper size, and layout.
- Media type .............. Specifies the type of media loaded on the printer.
- Paper size ............... Specifies the size of paper loaded on the printer.
- Layout..................... Specifies how many images to print on a sheet.
- Borderless Printing.. Specifies whether to perform borderless printing or not.
Custom if you want to specify the media type, paper size, layout, and
* Refer to the User’s Guide for more detailed information on media type.
14
Basic Printing
(5) Click SSend.
You can perform printing from a PDA or mobile phone with the specified media
type and layout.
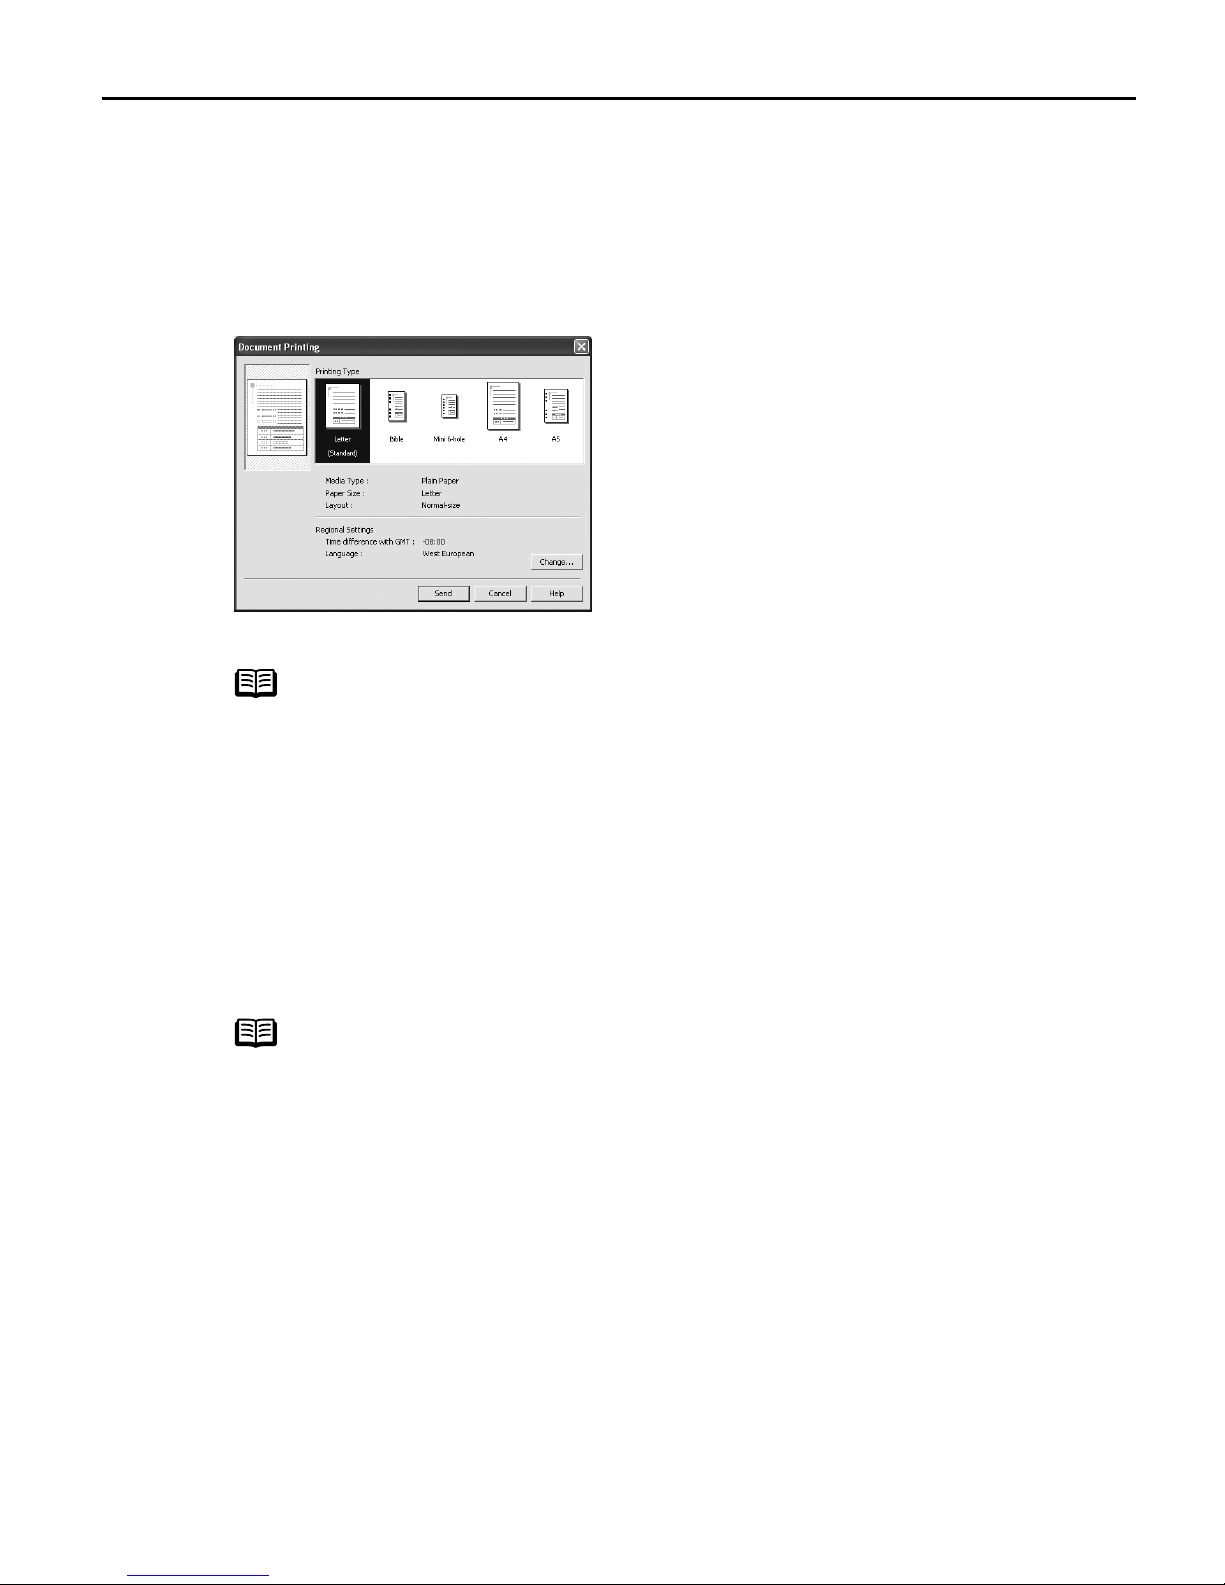
Changing the Document Print Settings
(1)
Click CChange on DDocument Print Settings in the i80 setup utility screen.
The DDocument Printing dialog box appears.
(2) Select the paper size for the document.
Note
Bible, Mini 6-hole and A5 paper are used for a personal organizer.
When Printing these papers;
z Select 3.74"×6.69"/95×170mm for B
76×126mm for M
Mini 6-hole and 8.27"×5.83"/210×148mm for
Bible, 2.99"×4.96"/
A5 as paper size.
z Load only one sheet at a time.
z Do not use paper thinner than 64 gsm or 17lb.
(3) Click S
Send.
You can perform printing from a PDA or mobile phone with the specified media
type and layout.
Note
Click C
Change on DDocument Printing to change the following
settings.
Time difference with GMT: when printing time-specifiable data,
such as a schedule, you can reflect the time difference by
specifying the country in which the data was created.
Language: You can adopt the Language if incorrect text is printed.
15
Basic Printing
Performing Infrared Communication
When performing infrared communication, also refer to your computer or PDA manual.
1
2
Set up the Printer.
(1) Ensure that the universal AC adapter is connected securely.
When using an optional battery, ensure that it has been charged.
(2) Open the paper rest and turn on the printer.
(3) Load the paper on the paper rest.
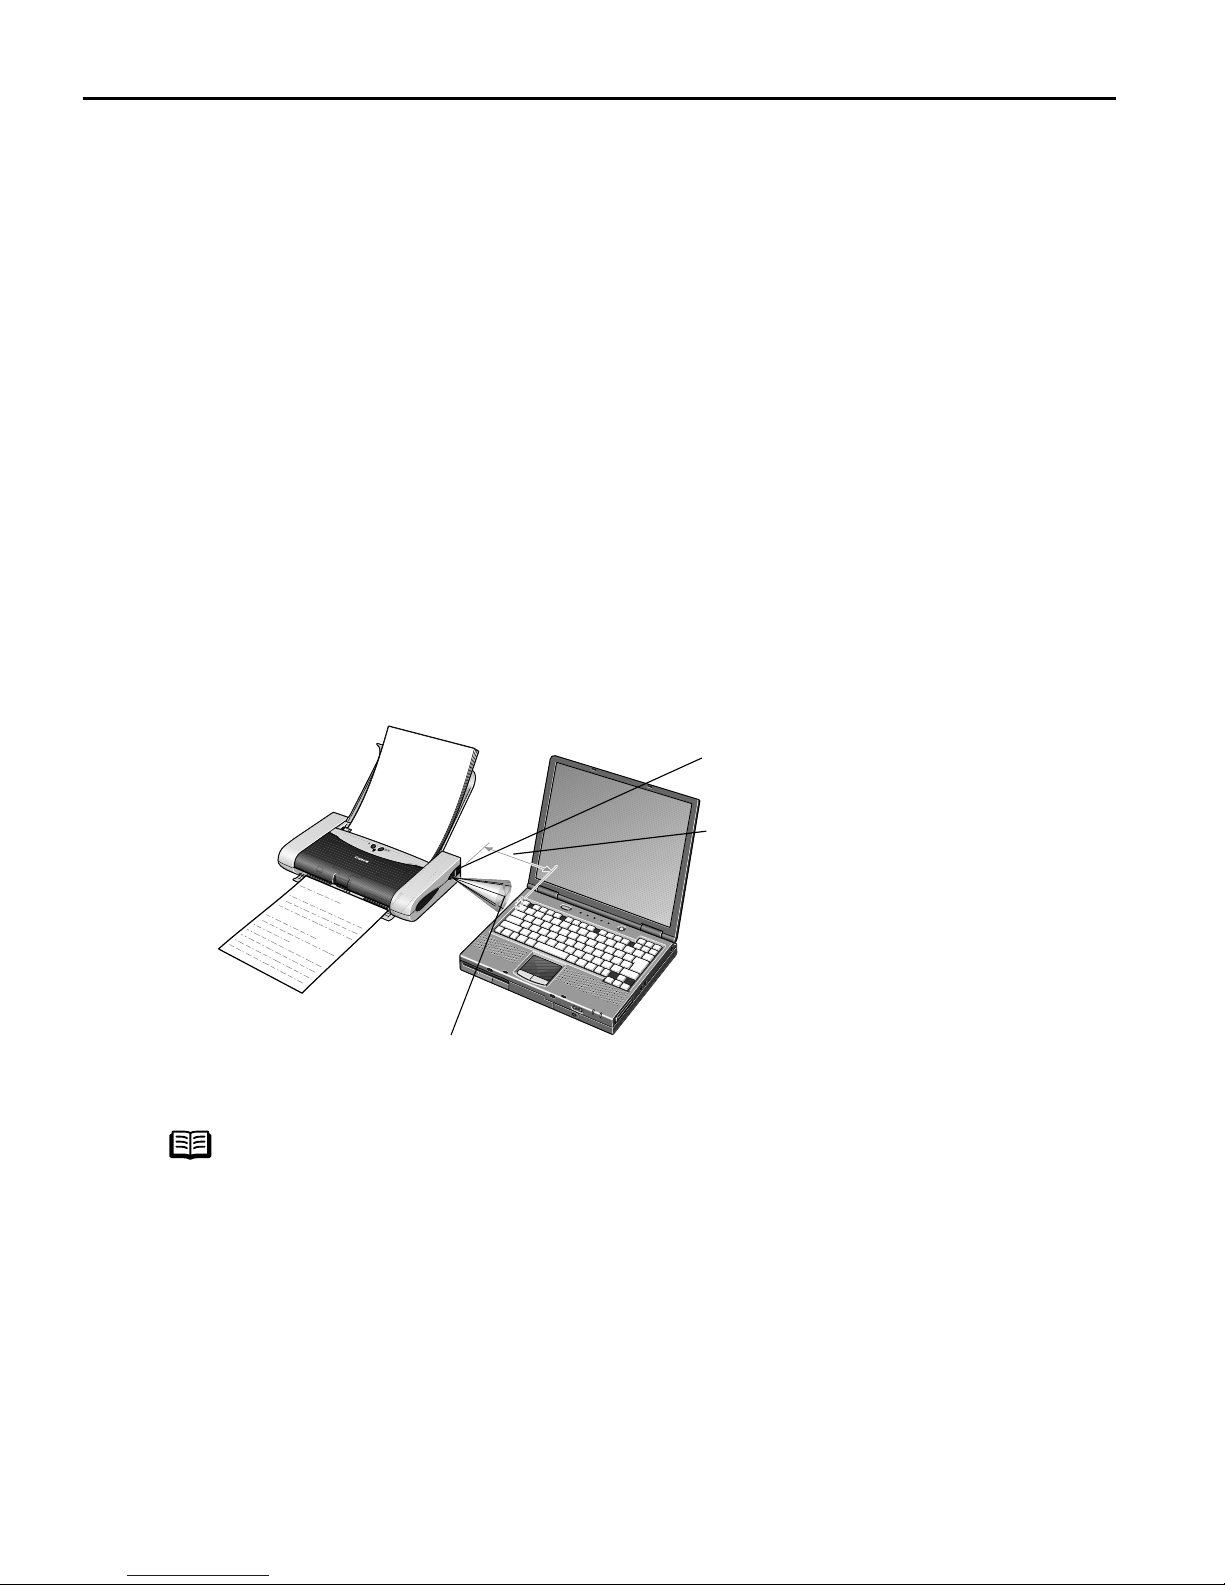
Start Infrared Communication.
(1) Oppose the infrared port of the computer or PDA to that of the printer at a
distance of less than 31.5 inch (80 cm). When printing from a mobile phone,
place it at a distance of less than 7.9 inch (20 cm).
The effective angle of the infrared port of the printer is about 10° from the
central axis in both vertical and horizontal directions.
The allowable distance of communication with the printer depends on the
computer or PDA you use. For this distance, refer to your computer or PDA
manual.
Infrared port of printer
Note
Less than 31.5 inch (80 cm)
(Do not block with any obstacle.)
Effective angle
(in both vertical and horizontal direction): About 10°
z
Do not place any obstacle between the infrared ports of the printer and
PDA or computer. Data cannot be transmitted between them. Check
the orientation and positions of the infrared ports of the printer and
PDA or computer. Oppose these ports properly as mentioned above.
z
During printing, be careful not to interrupt infrared communication
with the printer. If it is interrupted, turn off the printer and cancel
printing on the computer or PDA. Placing the pointer on the W
Link icon (For Windows Me or Windows 98, click the I
Control Panel allows you to check whether IrDA transmission has
the C
been interrupted.
Infrared icon) on
Wireless
16
Advanced Printing
Advanced Printing
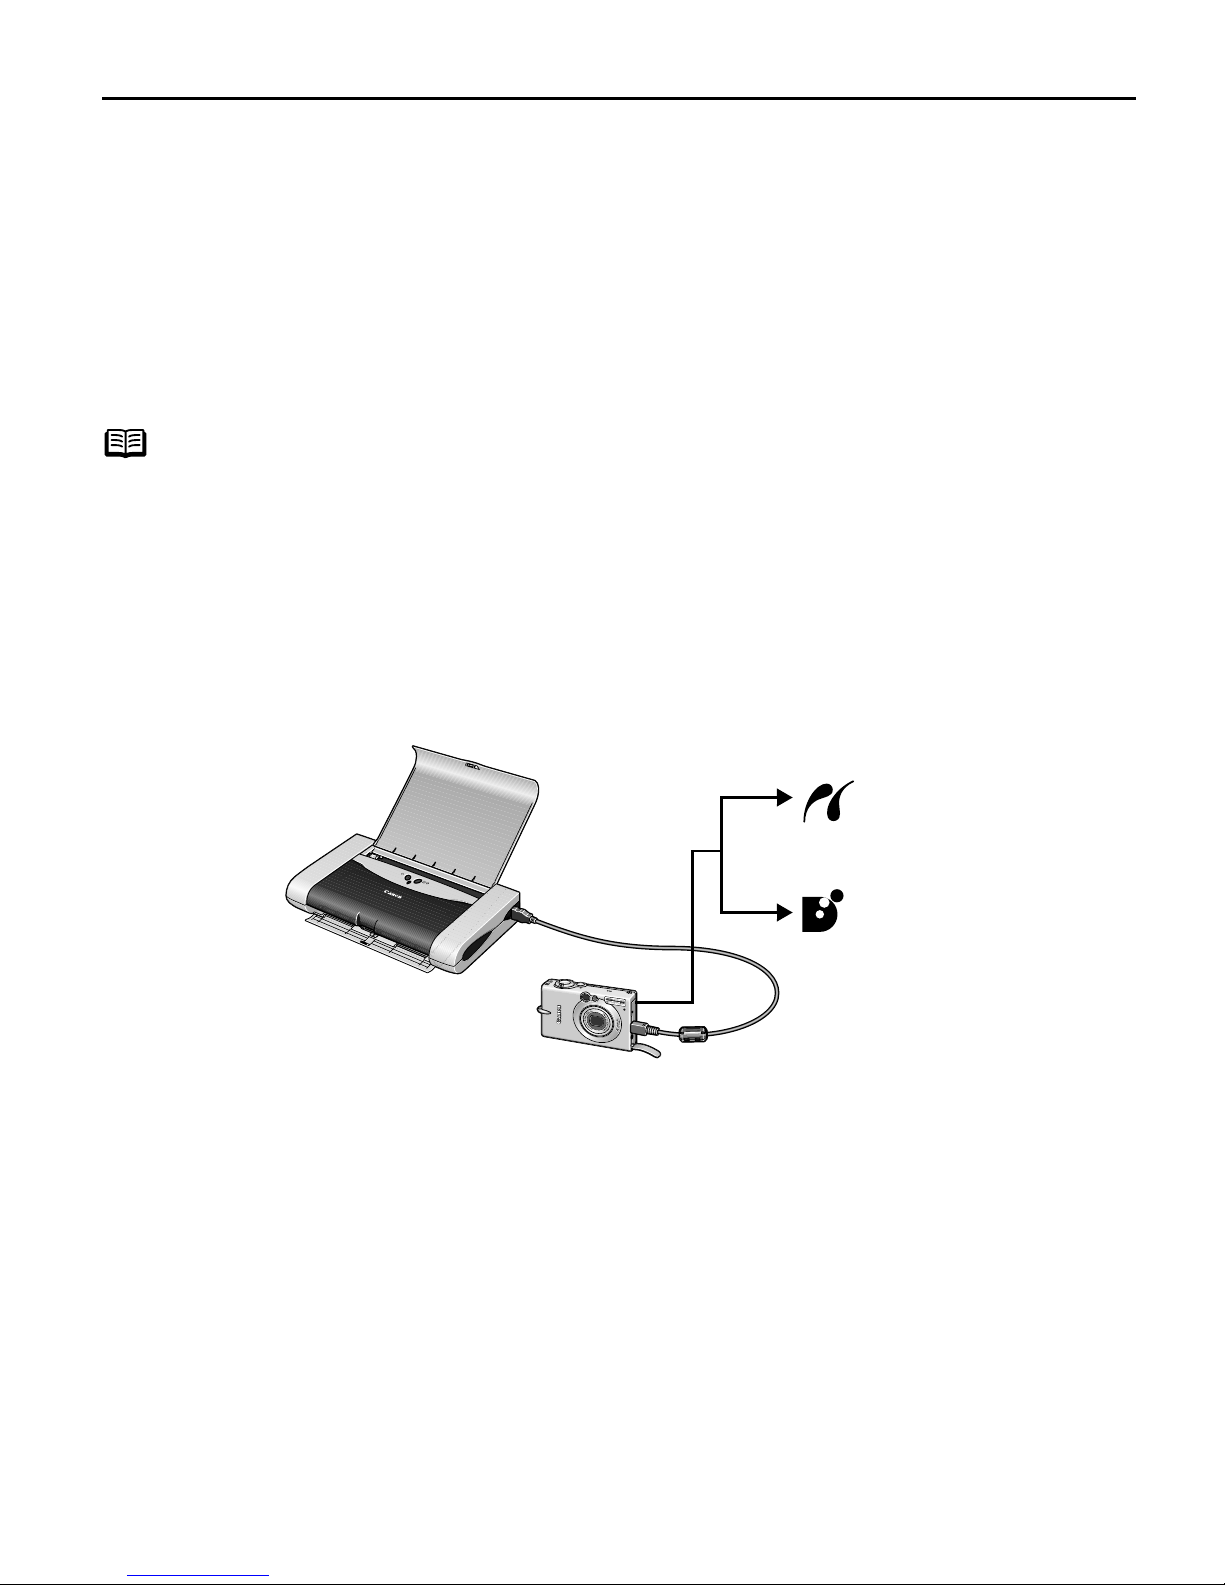
Printing Photographs Directly from a Digital Camera
Connecting a digital camera or camcoder to printer allows you to print
recorded images directly without using a computer. Connect the USB cable
that came with your digital camera.
Note
z This printer supports PictBridge. PictBridge is an Industry standard enabling
a range of digital photo solutions, including the direct printing of photos
from a digital still cameras or camcoders* without the need to use a
computer.
z This printer supports Canon “Bubble Jet Direct.” It allows you to print photos
from a Canon “Bubble Jet Direct” compatible (“PictBridge” incompatible)
digital camera or digital camcorder without a computer by simply
connecting the digital camera or digital camcorder to this printer.
* Hereafter, the digital still camera and digital video camcorder are
collectively called a digital camera or camera.
PictBridge-compatible
Digital Cameras
On page 19
Canon “Bubble Jet
Direct” compatible
digital camera
On page 21
Connecting to a Digital Camera
To connect a digital camera to this printer, use the USB cable supplied with the digital
camera for connection to a computer.
Caution Do not connect any equipment other than the camera ready for
“PictBridge” or Canon “Bubble Jet Direct” to the Direct Print Port of the
printer. Otherwise, electric shock, fire, or damage to the camera could
result.
17

Advanced Printing
1
Note
Set up the printer
Ensure that the universal AC adapter is connected securely.
If you do use a battery pack, ensure that it is fully charged.
z When printing photos with the digital camera connected to the printer,
it is advisable to use the AC adapter supplied with the camera. If you
use the camera battery, be sure to charge it fully.
z Depending on the model or brand of your camera, you may have to
select a mode of printing photos in compliance with “PictBridge”
before connecting the camera.
You may also have to turn on the camera or select Play mode manually
after connecting the camera to the printer.
Perform necessary operations according to the Instruction Manual
supplied with your camera.
z When printing from your PC, be sure to unplug the cable connecting the
digital camera.
Note
The printer performs printing with its print speed decreased to improve
its print quality as much as possible when the print head has not been
aligned. The print speed may be increased if you connect the printer
with the computer and perform the print head alignment.
See "A
Aligning the Print Head" on page 46.
2
3
4
Open the paper rest and turn on the printer.
Load the 4"×6" paper into the sheet feeder in the portrait position (short
side facing down) and the print side facing up.
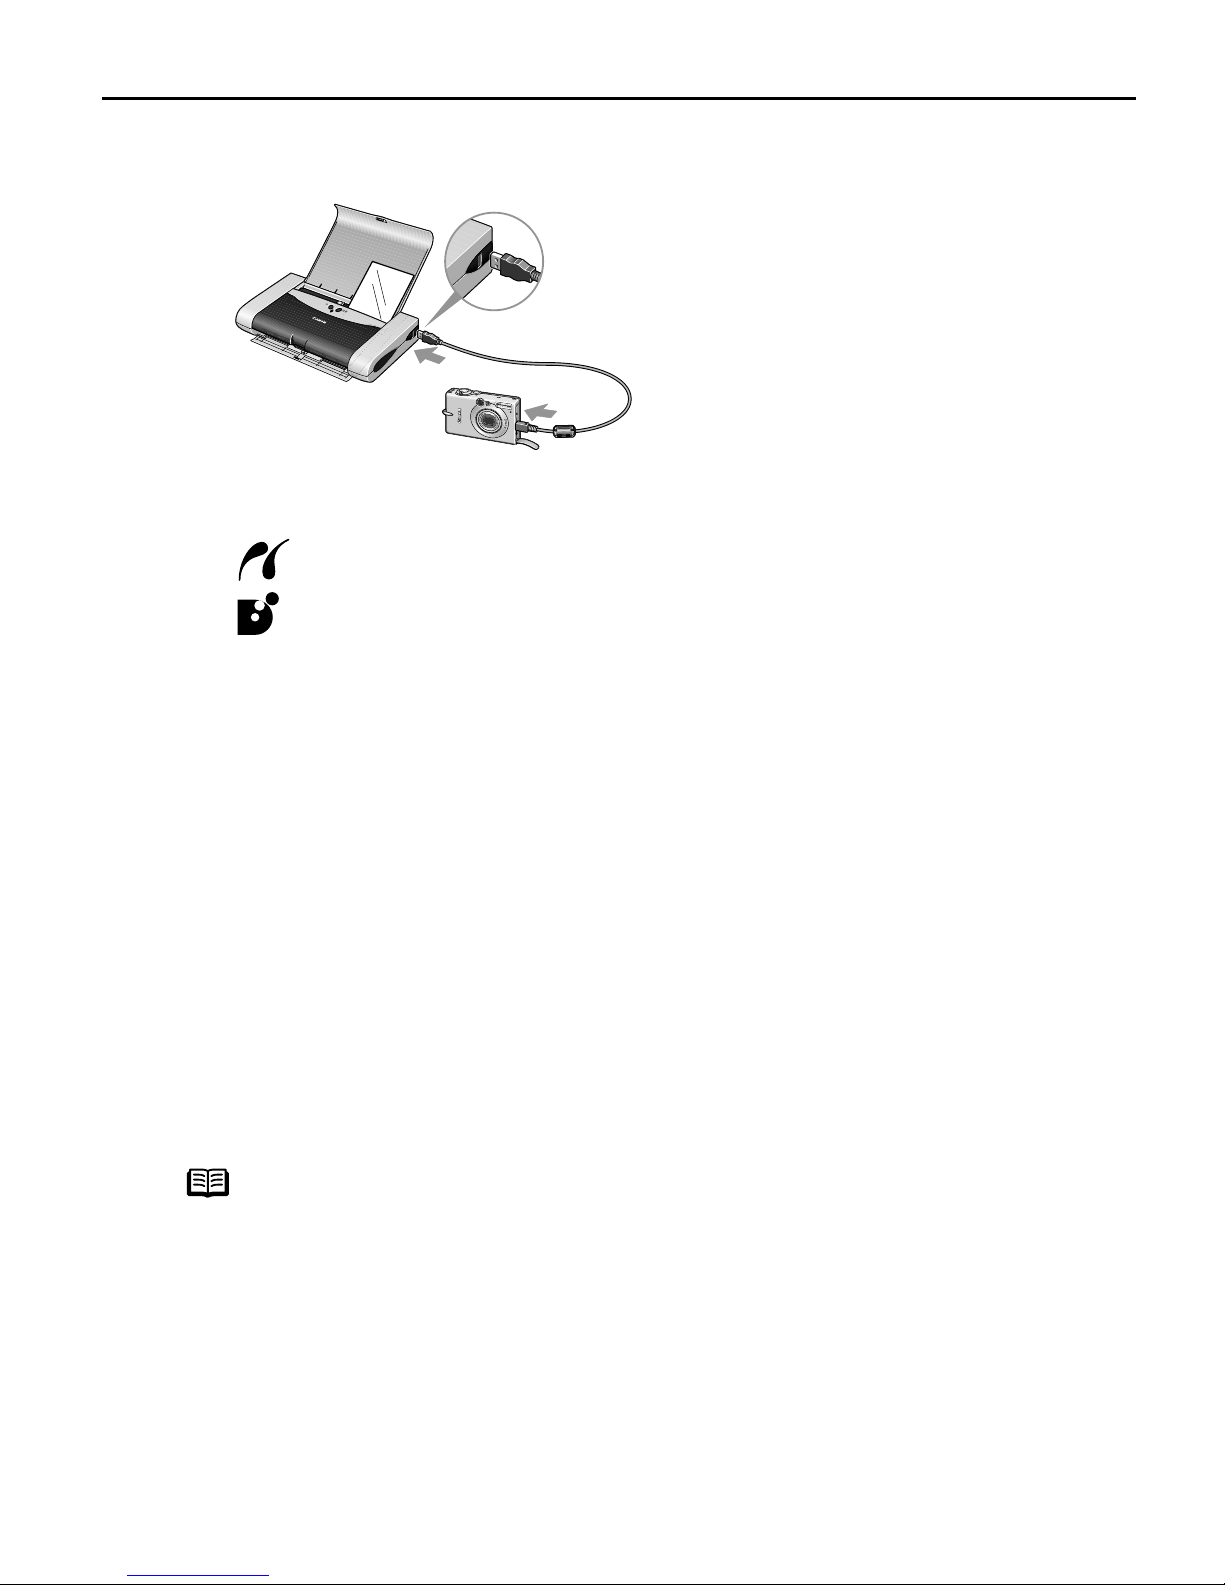
Connect the digital camera to the printer.
(1) Make sure the camera is turned off.
(2) Connect the camera to the printer using the USB cable (for connection to a
computer) supplied with the camera.
(3) Set up the camera for direct printing.
When the connection between the camera and printer has been established, the
Power lamp on the printer flashes once.
18
Advanced Printing
* The power-on sequence may differ depending on the model or brand of the
camera.
The icon will display on the LCD display of the digital camera when the printer is
correctly connected.
A PictBridge-compliant digital camera.
A Canon “Bubble Jet Direct” compatible digital camera.
Direct Printing from PictBridge-compatible Digital Cameras
When operating the camera, be sure to follow the instructions given in the Instruction
Manual supplied with the camera. Let’s take a look at the paper size, paper type,
layout, image optimization modes, and date printing modes that can be set on the
PictBridge-compatible camera connected to the printer.
Confirming or Changing the Camera Settings
When a PictBridge-compatible camera is connected and printing is started with no
setting changes, this printer operates based on the following default settings:
- Paper size ..................4"×6"
- Paper type ..................Photo (Photo Paper Plus Glossy)
- Layout ........................Borderless
- Trimming....................Off (No trimming)
- Image optimize...........On (Exif Print)
- Date print ...................Off (No printing)
Note
About the Settings Explained Below
The settings explained below cannot be made depending on the brand
or model of your camera. If any setting cannot be made, the default
setting explained above is used.
Names of settings that are displayed on Canon PictBridge-compatible
cameras are used in the description given below. Different names may
be displayed on your camera depending on the brand or model.
19
Advanced Printing
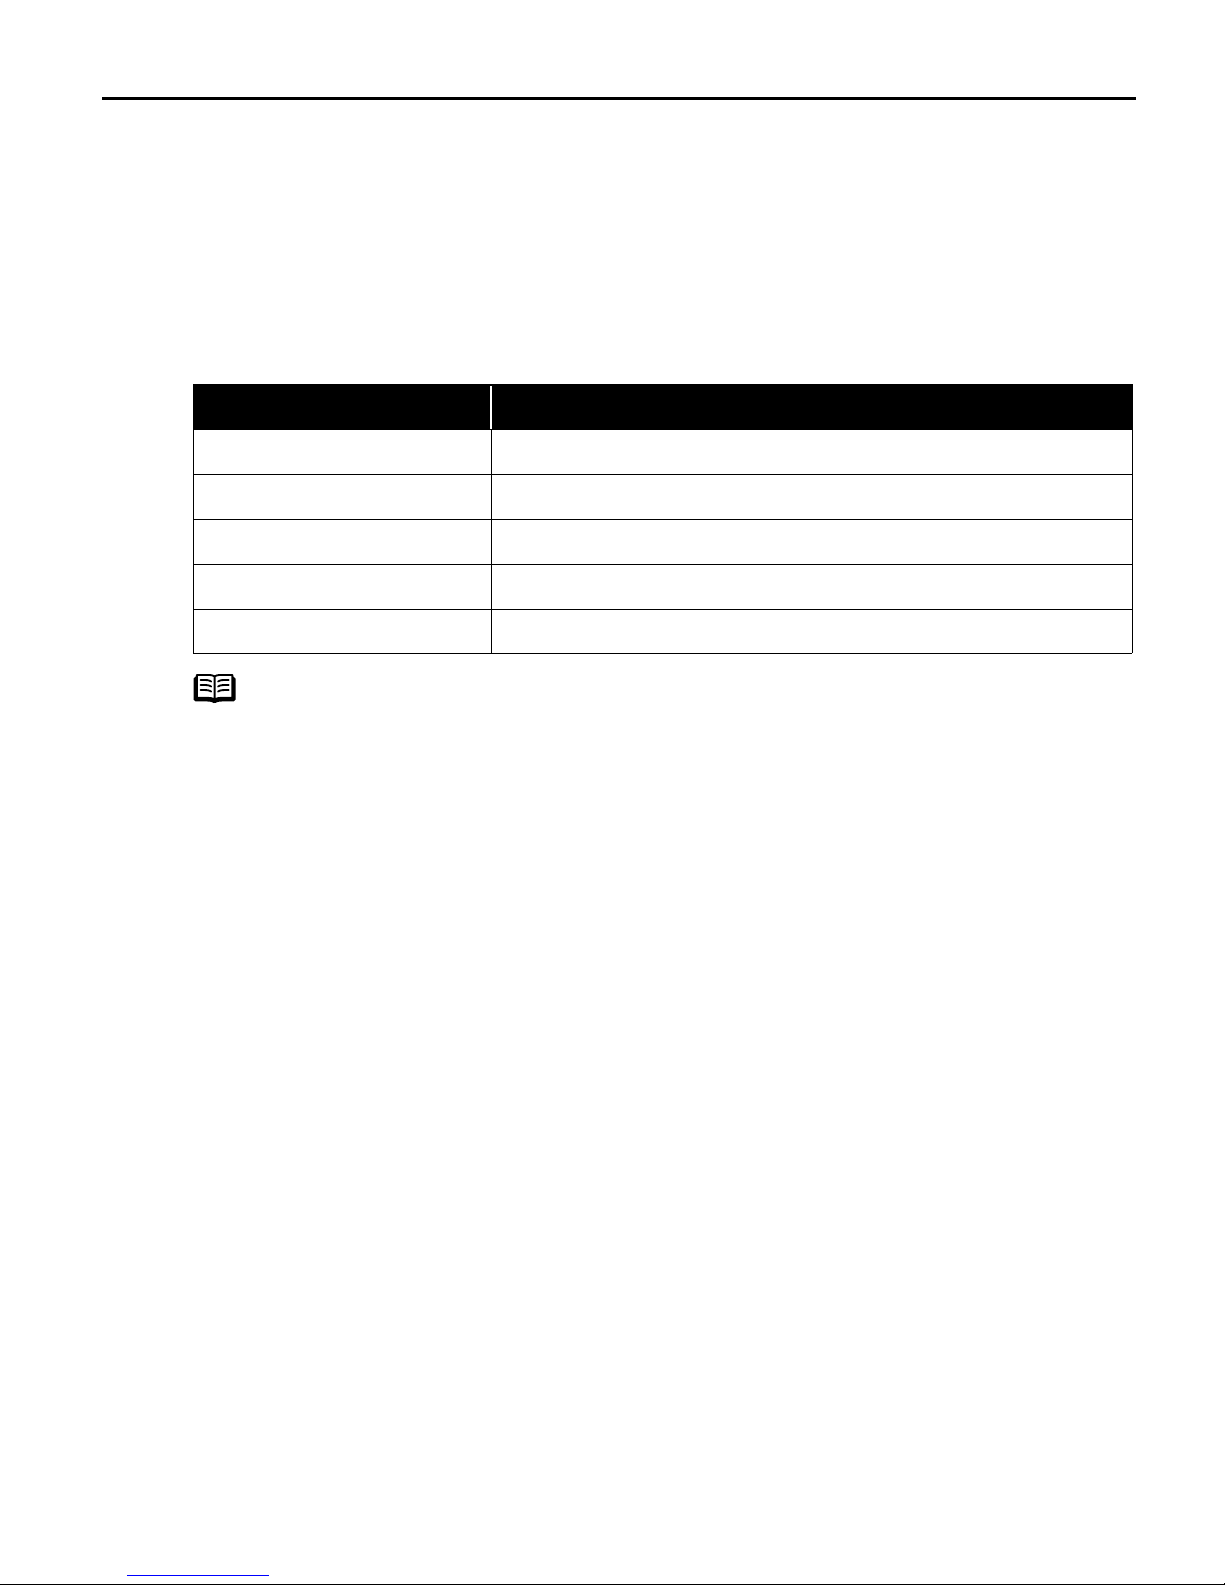
About “Paper Size” and “Paper Type”
To change the paper size or paper type, operate the camera to select the PictBridge
print setup mode and confirm or change the settings.
By default, 4"×6" is selected in “Paper Size” and “Photo “(Photo Paper Plus Glossy)
is selected in “Paper Type” for this printer. To use Photo Paper Pro, select “Fast
Photo” in “Paper type”.
If using a Canon PictBridge-compatible camera, you can select 5"×7" in “Paper
Size”. The following sizes and types of paper can be loaded in the printer by
selecting options in “Paper Size” and “Paper Type”.
“Paper Size” setting Paper Type” setting Paper loaded in printer
4"×6" (Default) Photo (Default) Photo Paper Plus Glossy
Fast Photo Photo Paper Pro
8.5"×11" (Letter) Photo Photo Paper Plus Glossy
Fast Photo Photo Paper Pro
5"×7" * Photo Photo Paper Plus Glossy
* This size can be selected only for Canon PictBridge-compatible cameras. (Note
that it cannot be selected for some models.)
About “Layout” and “Trimming”
By default, “Borderless” is selected in “Layout” and “Off (No trimming)” is selected
in “Trimming” for this printer.
About “Image optimize”
By default, “On (Exif Print)” is selected for this printer.
About “Date print”
By default, “Off” is selected for this printer.
“Date Print” depends on the settings using the controls of the camera.
Note
z This printer can handle only Exif/JPEG image data to produce photos
using PictBridge.
z Never disconnect the USB cable during printing.
z When disconnecting the USB cable between the digital camera and
printer, follow the instructions given in the Instruction Manual of
Camera.
z Controls of the digital camera cannot be used for the following:
- Print quality setting
- Printer maintenance
20
Advanced Printing
Printing Photographs Directly from a Canon “Bubble Jet Direct”
compatible digital camera
Let’s take a look at the media types that can be set on the Canon “Bubble Jet Direct”
compatible digital camera connected to this printer and limitations.
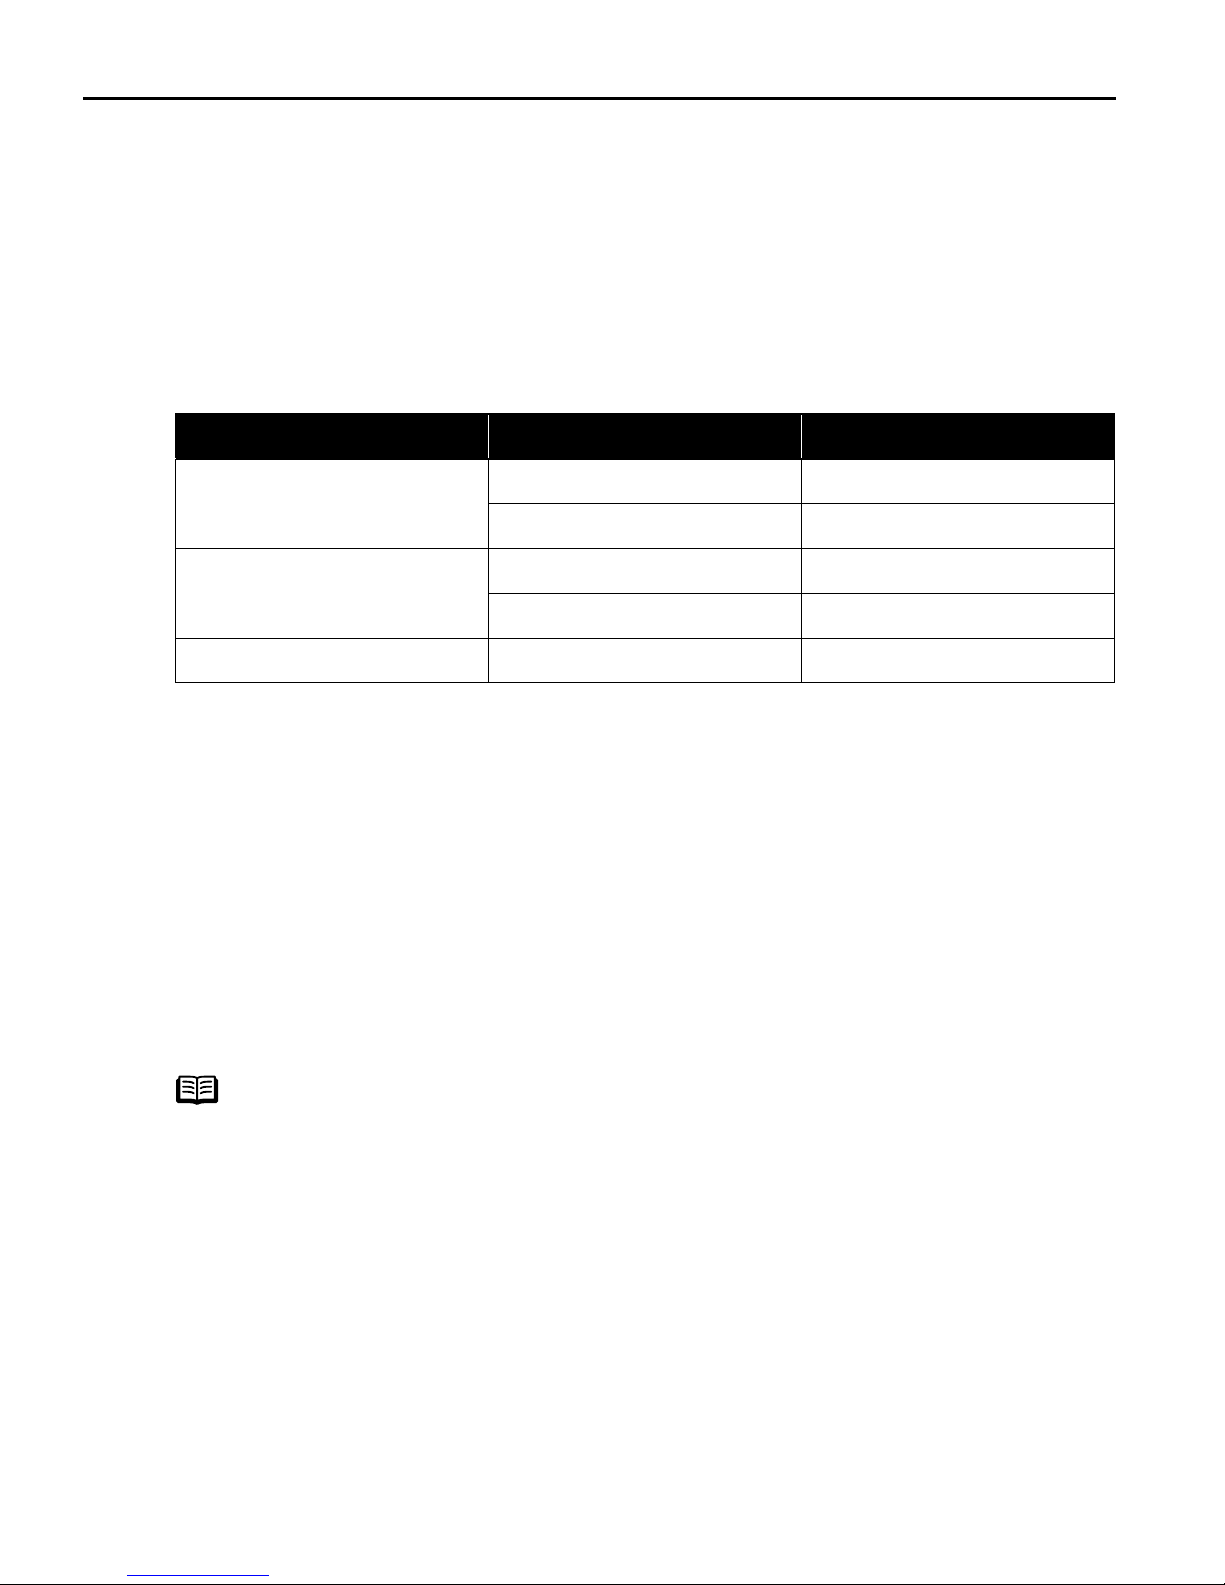
Media Types for Digital Camera
When you connect a digital camera, you can use the following media:
Digital Camera Setting Media Type
Card #1 Photo Paper Pro 4"×6" / 101.6×152.4 mm
Card #2 Photo Paper Plus Glossy 4"×6" / 101.6×152.4 mm
Card #3 Photo Paper Plus Glossy 5"×7" / 127.0×177.8 mm
LTR Photo Paper Pro or Photo Paper Plus Glossy Letter
A4 Photo Paper Pro or Photo Paper Plus Glossy A4
Note
z For the digital camera operation method and troubleshooting, refer
to your digital camera manual.
For print error messages, refer to the User’s Guide.
z By operating the digital camera, you can make the following prints:
- You can make a standard print from the image displayed in the
single display mode or in the index display mode.
- You can print specified numbers of images, or make an index print
by editing the DPOF.
- For the images taken with an Exif 2.2-compatible digital camera,
the Photo Optimizer PRO function can be used.
- If date printing is set from the operation panel of the digital
camera, the date when the photograph was taken is to be printed
(excluding the index print).
- Images will be scaled automatically according to the image size
set on the digital camera and the size of the media set on the
printer.
z The digital camera does not support the following functions:
- Print quality setting
-Maintenance
* The print head position cannot be adjusted by operating the
digital camera. Connect the printer to the computer, and then
align the print head position. If the print head position has not
been adjusted, reduce the printing speed (one-way printing) for
better print quality.
z Images other than Exif may not be index printed.
21

Advanced Printing
Accessing Printer Driver
The PPrinter Properties dialog box can be opened from either within an
application, or directly from the Windows S
Start menu.
Note
z This manual refers to Windows XP operation.
The operations may vary depending on your operating system.
z Depending on your application program, the command and menu names
may differ, and there may be more steps involved in opening the P
Properties dialog box. For more details, see the user's manual for your
application.
Printer
Opening the Printer Properties Dialog Box from Your Application
Program
1
2
In your application, select the command to print a document.
The PPrint dialog box can usually be opened by selecting PPrint from the FFile menu.
Ensure that the Canon i80 is selected. Then click Preferences (or Properties).
The PPrinter Properties dialog box opens.
Opening the Printer Properties Dialog Box Directly from the Start
Menu
This method is used for maintenance operations such as print head cleaning, or to
specify printer settings common to all application programs.
When the P
appear, including the D
dialog box is opened from within an application.
For more information about these additional tabs, refer to your Windows
documentation.
1
2
3
22
Click Start and select Control Panel, Printers and Other Hardware, and then
Printers and Faxes.
For non-Windows XP users, click SStart, select SSettings, and then PPrinters.
Select the Canon i80 icon.
Open the File menu and select Printing Preferences (or Properties).
The PPrinter Properties dialog box opens.
Printer Properties dialog box is opened from the SStart menu, additional tabs
Details tab. These do not appear when the PPrinter Properties
 Loading...