

Page 1
FAXPHONE L170 Basic Guide
About the Manuals for the Machine
The manuals for this machine are divided as follows. Please refer to them for detailed information.
The manuals supplied with optional equipment are included in the list below.
Guides with this symbol are book manuals.
• Setting up the Machine
• Installing Printer Driver
Guides with this symbol are PDF manuals included on the
CD-ROM
accompanying CD-ROM. (See footnote.)
Set-Up Instructions
• Document an d Paper Handling
• Sending and Receiving Faxes
• Speed Dialing
• Making Copies
• Maintenance
• Troubleshooting
• The Menu System
• Installing Printer Driver Software
• Printer Propert ies
• Troubleshooting Printer Driver Issues
Basic Guide
(This Document)
Software Guide
CD-ROM
• To view the manual in PDF format, Adobe Reader/ Acrobat Reader/Acrobat is required. If Adobe Reader/ Acrobat Reader/Acrobat is not installed on your system, please download
it from the Adobe Systems Incorporated website (http://www.adobe.com).
ii
Page 2

Where to Find Help
Canon offers a full range of customer technical support* options:
• For e-mail support, the latest driver downloads and answers to frequently asked questions (www.usa.canon.com/
consumer)
• Free technical support Monday-Saturday (excluding holidays) for products still under warranty (1-800-828-4040)
• Technical support for products no longer under warranty (1-757-413-2848)
NOTE
Within Canada, call for technical support 24 hours a day, 7 days a week (1-800-263-1121).
*Support program specifics are subject to change without notice.
Where to Find Help
iii
Page 3

Product Type and Model
FAXPHONE L170 : Facsimile Transceiver, Model H12425
Copyright
This Basic Guide is copyrighted by Canon U.S.A., Inc. with all rights reserved. Under the copyright laws, this guide may not
be reproduced in any form, in whole or part, without prior written consent of Canon U.S.A.
© 2004 Canon U.S.A., Inc.
Laser Safety
This product complies with 21 CFR Chapter 1 Subchapter J as a Class I laser product under the U.S. Department of Health
and Human Services (DHHS) Radiation Performance Standard according to the Radiation Control for Health and Safety
Act of 1968. Class I levels of laser radiation are not considered to be hazardous.
Since radiation emitted inside the product is completely confined within protective housings and external covers, the laser
beam cannot escape from the machine during any phase of user operation. Do not remove protective housings or external
covers, except as directed by this manual.
Disclaimer
Canon U.S.A., Inc. has reviewed this guide thoroughly in order to make it easy to use guide for your Canon FAXPHONE
L170 system. All statements, technical information, and recommendations in this guide and in any guides or related
documents are believed reliable, but the accuracy and completeness thereof are not guaranteed or warranted, and they are
not intended to be, nor should they be understood to be, representations or warranties concerning the products described.
Your FAXPHONE L170 has been sold to you subject to the limited warranties set forth in the warranty cards. Further,
Canon U.S.A. reserves the right to make changes in the specifications of the products described in this guide at any time
without notice and without obligation to notify any person of such changes.
Trademarks
Canon and FAXPHONE are registered trademarks, and UHQ is a trademark of Canon Inc.
All other product and brand names are registered trademarks, trademarks or service marks of their respective owners.
As an ENERGY STAR™ Partner, Canon U.S.A. has determined that the FAXPHONE L170
meets the ENERGY STAR™ guidelines for energy efficiency.
Super G3 is a phrase used to describe the new generation of fax units that use ITU-T V.34
standard 33.6 Kbps* modems. Super G3 High Speed Fax units allow transmission time of
approximately three seconds* per page which results in reduced telephone line charges.
*Approximately three seconds per page document transmission time based on ITU-T No. 1 Chart, standard mode, at 33.6
Kbps modem speed. The Public Switched Telephone Network (PSTN) currently supports 28.8 Kbps modem speeds or
lower, depending on telephone line conditions.
iv
Where to Fi nd Help
Page 4
Type conventions
Please read the list below of symbols used in this guide.
CAUTION
Indicates a warning concerning operations that may lead to death or injury to persons if not performed correctly. In order to
use the machine safely, always pay attention to these warnings.
WARNING
Indicates a caution concerning operations that may lead to injury to persons or damage to property if not performed
correctly. In order to use the machine safely, always pay attention to these cautions.
IMPORTANT
Indicates operational warnings and restrictions. Be certain to read these items to operate the machine correctly, and to avoid damage to
the machine.
NOTE
Indicates notes for operation or additional explanations. Reading these is highly recommended.
In addition, this Guide uses brackets to show button and switch names on the machine, such as [Start], and [Set]. Text that
appears in the machine’s display is shown in capital letters, such as: <RECEPTION OK>.
Safety information
Read this safety information thoroughly before using your machine, and keep it handy in case you need to refer to it later.
WARNING
This product emits low level magnetic flux. If you use a cardiac pacemaker and feel abnormalities, please move away from
this product and consult your doctor.
CAUTION
• Do not disassemble or modify. There are high-temperature and high-voltage components inside the machine which may
result in a fire or electrical shock.
• Follow all warnings and instructions marked on the machine.
■ Location
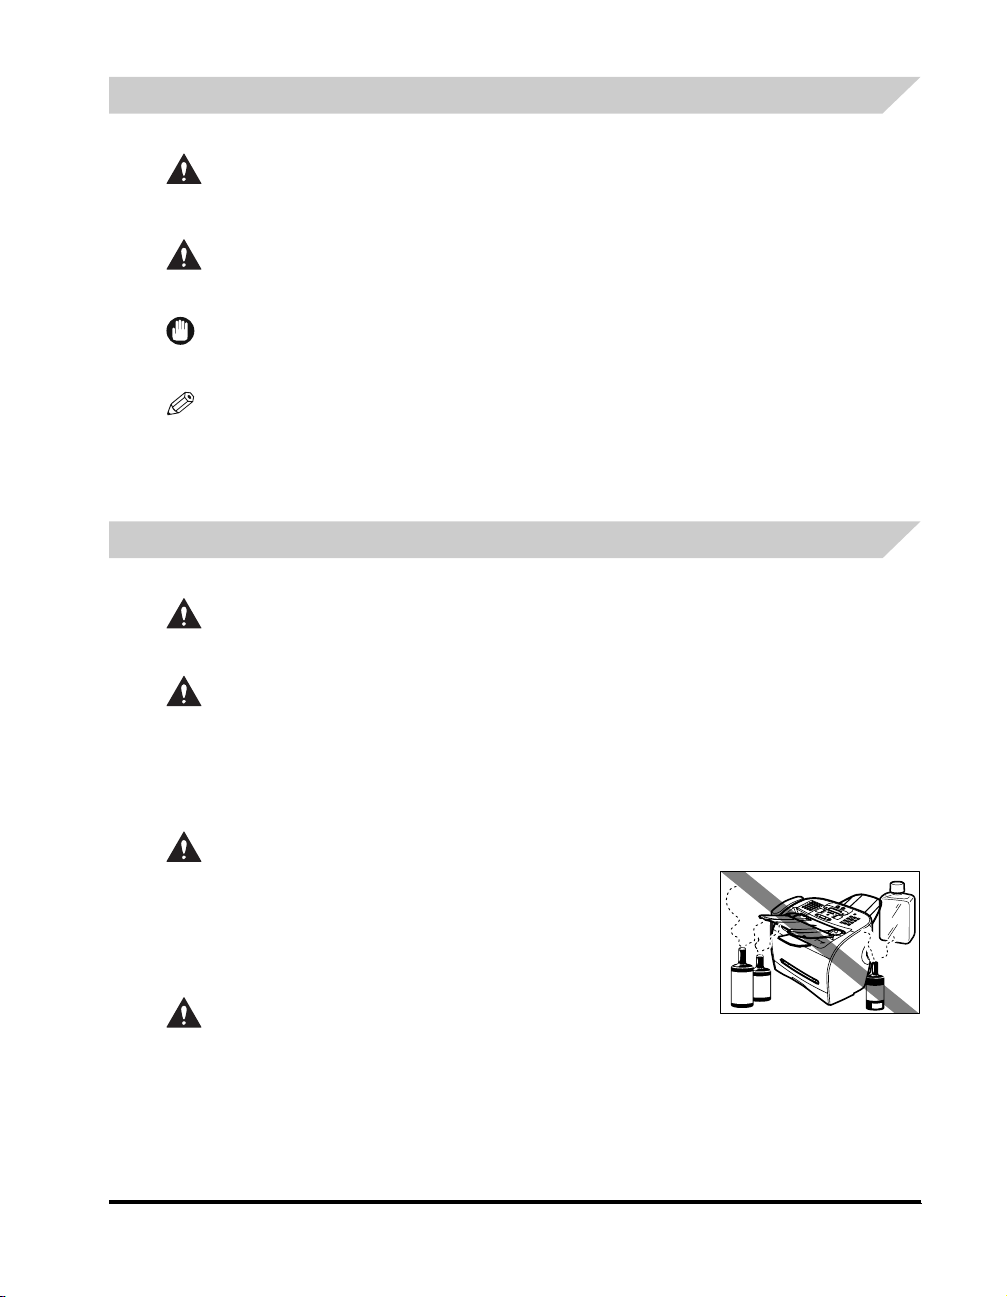
WARNING
Do not place the machine near alcohol, paint thinner, or other inflammable
substances. If inflammable substances come into contact with electrical parts inside
the machine, it may result in a fire or electrical shock.
CAUTION
• Do not place the machine on top of a carpet or rug which has long pile. The threads
may get inside the machine and cause a fire.
• Do not block or cover the ventilation port or any openings on the machine with
objects, as this may result in a fire.
Where to Find Help
v
Page 5
• Place the machine on a flat, stable, vibration-free surface that is strong enough to
support its weight.
• Do not place objects around the power plug so that you are able at any time to
readily disconnect the power plug from the wall outlet. Otherwise you will be unable
to disconnect the power plug in case of an emergency.
• Make sure the area is free from dust.
• Make sure the location is not affected by extreme temperature changes, and always
stays between 50°F and 90.5°F (10°C and 32.5°C).
• Make sure the relative humidity of the area is between 20% and 80%.
• Keep the machine away from direct sunlight.
• Do not use or store the machine outdoors.
• Do not install the machine near devices that contain magnets or generate magnetic
fields, such as speakers.
• To ensure proper ventilation, make sure the machine is approximately 4 inches (10
cm) away from walls and other equipment.
Power supply
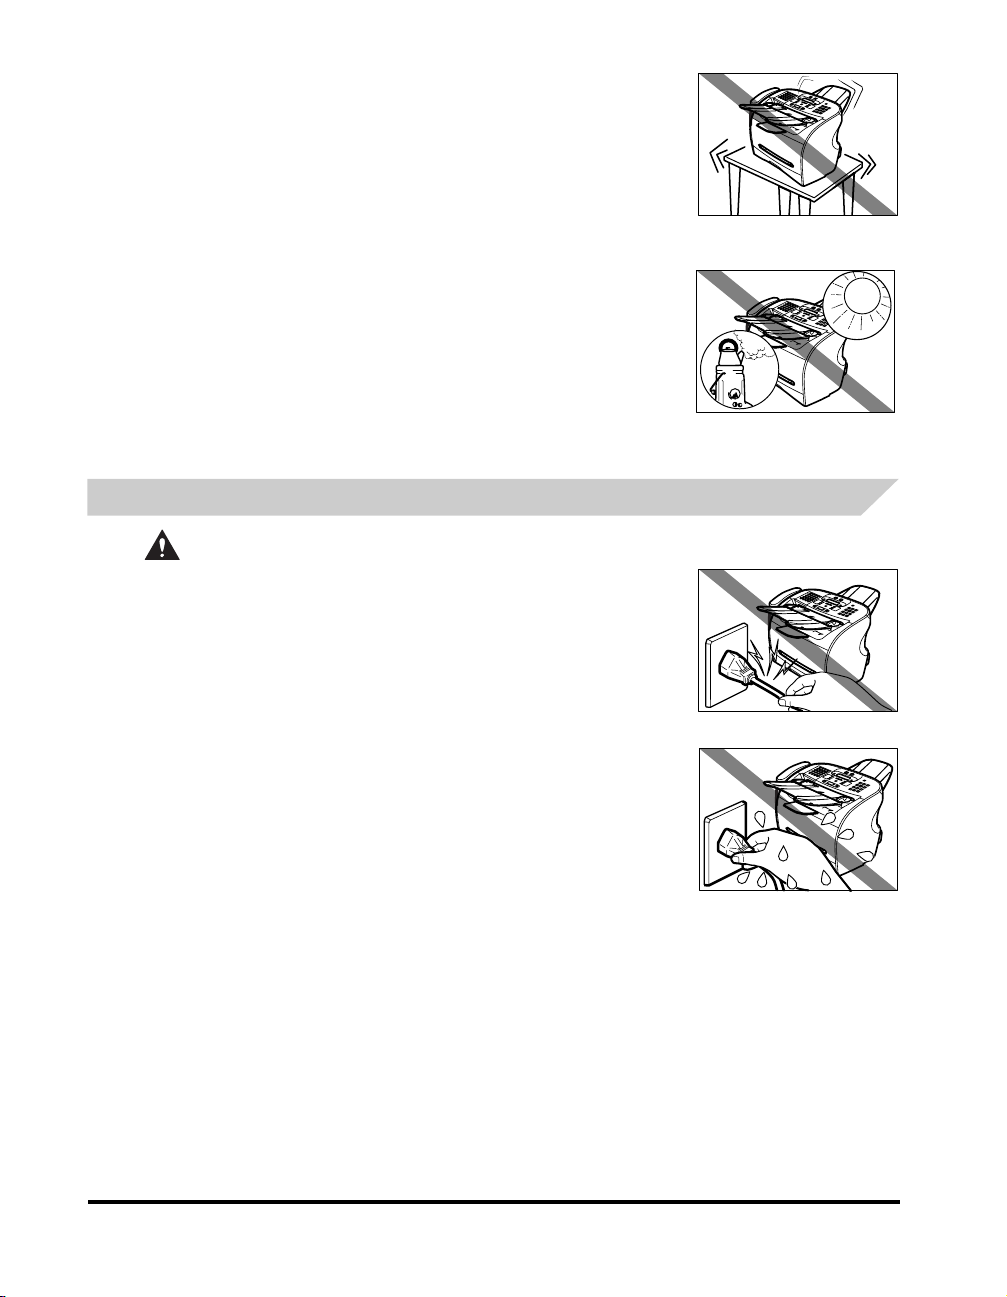
WARNING
• Do not damage or modify the power cord and power plug. Also do not place heavy
objects on the power cord, pull on it, or extensively bend it. These actions may cause
electrical damage and result in a fire or electrical shock.
• Do not insert or unplug the power plug with wet hands, as this may result in electrical
shock.
• Do not overload the wall outlet with too many electrical appliances, as this may
result in a fire or electrical shock.
• Plug the machine into a standard 120 V AC, 60 Hz, three-prong grounded outlet.
Operate the machine only from the type of power source indicated on the machine’s
label or a fire, electrical shock or malfunction may occur. If you are not sure of the
type of power available, consult your local power company.
• Do not allow the power cord to be near objects that emit heat. The outer cover of the
power cord may melt resulting in fire or electrical shock.
• Make sure the power cord is fully extended and has no knots in it when electricity is
running through it. Knots etc. in the cord may result in fire or electrical shock.
• Fully insert the power plug securely into the electrical outlet. If the prongs of the
power plug come into contact with metallic objects etc., it may result in fire or
electrical shock.
vi
Where to Fi nd Help
Page 6
CAUTION
• During electrical storms, disconnect the power cord from the power outlet.
(Please note that any documents stored in the machine’s memory will be deleted
after 1 hour when you turn off the power.)
• Do not use an extension cord as this may result in fire or electrical shock.
• Disconnect the power cord if the machine will not be used for a long period such as
during holidays.
IMPORTANT
•
If dust accumulates around the plug of the power cord when it is connected to a power outlet, unplug the machine and wipe the plug with a
clean, dry cloth.
•
Do not plug the machine into the same circuit as appliances such as an air conditioner,
television, or copier. These devices generate electrical noise which may interfere with your
machine’s operation.
•
Whenever you unplug the machine, wait at least 5 seconds before you plug it in again.
•
Use only the power cord that came with the machine.
•
Unplug the machine in the following conditions:
- If the power cord or plug is damaged or frayed.
- If liquid has spilled into the machine.
- If the machine has been exposed to rain or water.
- If the machine does not operate normall y when you have followed the instructions in the
- If the machine has been dropped or damaged.
- If the machine exhibits a distinc t change in performance, indicating a need for servicing.
Handling
guides included with your machine. Adjust only those controls that are covered by the instruc tions in the guides since i mproper
adjustment of other controls may result in damage and will often require extensive work by a qualified technician to restore the product to
normal operation.
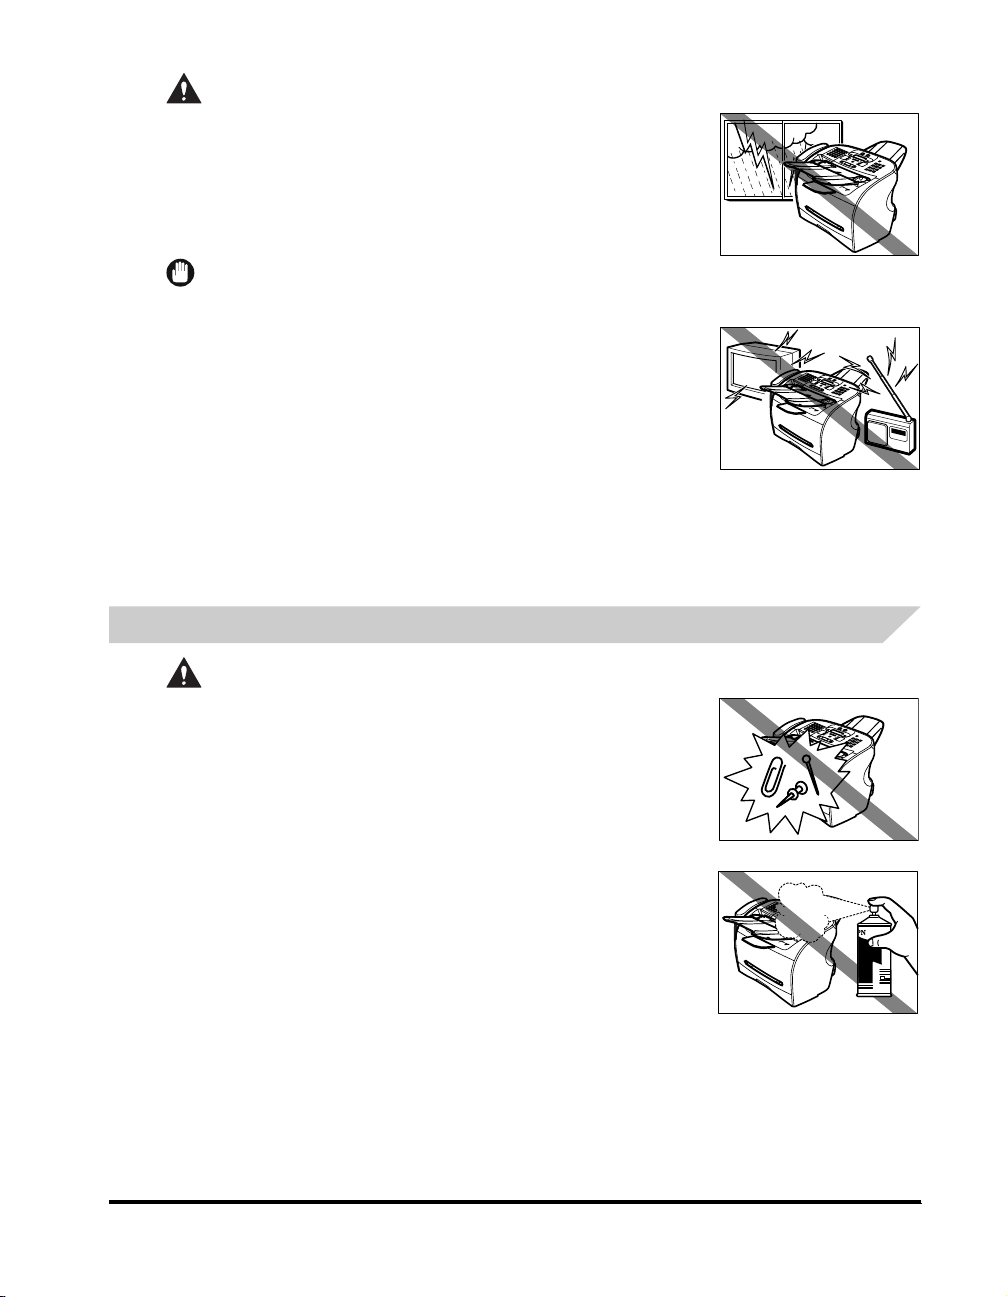
WARNING
• Do not drop paper clips, staples, or other metal objects inside the machine. Also, do
not spill water, liquid, or inflammable substances inside the machine.
If these items come into contact with high-voltage parts inside the machine, it may
result in a fire or electrical shock. If these items are dropped or spilled in the
machine, unplug the power cord immediately with dry hands. Then, contact the
Canon Customer Care Center at 1-800-828-4040.
• Do not use any highly flammable spray near the machine. If gas from a spray comes
into contact with the electrical components inside the machine, it may result in a fire.
• There are high-voltage components inside the machine. If you are looking inside the
machine to remove paper jams etc., do not allow metallic objects such as jewelry to
come into contact with the inside of the machine. Contact may result in burns or
electrical shock.
Where to Find Help
vii
Page 7
CAUTION
• Do not place the following objects on top of the machine. If such objects come into contact with internal electrical
components, the machine may short-circuit resulting in fire or electrical shock.
- Metallic objects such as jewelry and watches
- Containers of water or other liquids such as glasses, vases or pot plants
• If water etc. does spill inside the machine, immediately disconnect the power cord and contact the retailer.
• Do not touch the internal electrical parts as this may result in electrical shock.
• Do not place heavy objects on top of the machine as these may topple over and result in injury.
• Do not subject the machine to strong physical shock or vibration.
• Unplug the machine before moving it.
• Do not lift the machine by any of its attachments. Lift it by the recessed areas on the
sides of the machine.
• A distinct change in performance may indicate a need for servicing.
Maintenance
WARNING
• Do not service the machine yourself except as specifically described in this guide. If further servicing is required, contact
the Canon Customer Care Center.
• Keep the machine clean. Dust accumulation may prevent the machine from operating properly.
viii
Where to Fi nd Help
Page 8

Legal limitation on usage of your product and the use of images
Using your product to scan, print or otherwise reproduce certain documents, and the use of such images as scanned,
printed or otherwise reproduced by your product, may be prohibited by law and may result in criminal and/or civil liability. A
non-exhaustive list of these documents is set forth below. This list is intended to be a guide only. If you are uncertain about
the legality of using your product to scan, print or otherwise reproduce any particular document, and/or of the use of the
images scanned, printed or otherwise reproduced, you should consult in advance with your legal advisor for guidance.
• Paper money • Traveler’s checks
• Money orders • Food stamps
• Certificates of deposit • Passports
• Postage stamps (canceled or uncanceled) • Immigration papers
• Identifying badges or insignias • Internal revenue stamps (canceled or uncanceled)
• Selective service or draft papers • Bonds or other certificates of indebtedness
• Checks or drafts issued by governmental agencies • Stock certificates
• Motor vehicle licenses and certificates of title • Copyrighted works/works of art without permission of
copyright owner
Legal limitation on usage of your product and the use of images
ix
Page 9

Users in the U.S.A.
Pre-installation requirements for Canon facsimile equipment
A. Location
Supply a suitable table, cabinet, or desk. See the Appendix for the machine’s dimensions and weight.
B. Order information
1. Only a single line, touch-tone or rotary telephone set is to be used.
2. Order an RJ11-C modular jack (USOC code), which should be installed by the telephone company. If the RJ11-C jack is
not present, installation cannot occur.
3. Order a normal business line from your telephone company’s business representative. The line should be a regular
voice grade line or the equivalent. Use one line per machine.
DDD (DIRECT DISTANCE DIAL) LINE
-or-
IDDD (INTERNATIONAL DIRECT DISTANCE DIAL) LINE IF YOU COMMUNICATE OVERSEAS
NOTE
Canon recommends an individual line following industr y standards, e.g., the 2500 (Touch Tone) or 500 (Rotar y/Pulse Dial) telephones. A
dedicated extension off a PBX machine without “Call Waiting” can be used with your FAXPHONE L170. Key telephone systems are not
recommended because they send non-standard signals to indivi dual telephones for ringing and special codes, which may cause a fax
error.
C. Power requirements
This equipment should be connected to a standard 120-volt AC, three-wire grounded outlet only. Do not connect this
machine to an outlet or power line shared with other appliances that cause “electrical noise.” Air conditioners, electric
typewriters, copiers, and machines of this sor t generate electrical noise which often interferes with communications
equipment and the sending and receiving of documents.
Connection of the equipment
This equipment complies with Part 68 of the FCC rules and the requirements adopted by the ACTA. On the rear panel of
this equipment is a label that contains, among other information, a product identifier in the format US:AAAEQ##TXXXX. If
requested, this number must be provided to the telephone company.
An FCC compliant telephone cord and modular jack are provided with this equipment. This equipment is designed to be
connected to the telephone network or premises wiring using a compatible modular jack which is Part 68 compliant. See
Installation instructions for details.
The Ringer Equivalence Number (REN) is used to determine the number of devices that may be connected to a telephone
line. Excessive RENs on a telephone line may result in the devices not ringing in response to an incoming call. In most but
not all areas, the sum of RENs should not exceed five (5.0). To be cer tain of the number of devices that may be connected
to a line, as determined by the total RENs, contact the local telephone company. The REN for this product is part of the
product identifier that has the format US:AAAEQ##TXXXX. The digits represented by ## are the REN without a decimal
point (e.g., 10 is a REN of 1.0).
This equipment may not be used on coin service provided by the telephone company.
This equipment if it uses a telephone receiver is hearing aid compatible.
Connection to party lines is subjected to state tariffs.
x
Users in the U.S.A.
Page 10

In case of equipment malfunction
Should any malfunction occur which cannot be corrected by the procedures described in this guide, disconnect the
equipment from the telephone line and unplug the power cord. The telephone line should not be reconnected or the power
cord plugged in until the problem is completely resolved. Users should contact Canon Authorized Service Facilities for
servicing of equipment. Information regarding Authorized Service Facility locations can be obtained by calling the Canon
Customer Care Center. (1-800-828-4040)
Rights of the telephone company
Should the equipment cause harm to the telephone network, the telephone company may temporarily disconnect service.
The telephone company also retains the right to make changes in facilities and services which may affect the operation of
this equipment. When such changes are necessary, the telephone company is required to give adequate pr ior notice to the
user.
FCC Notice
This device complies with Part 15 of the FCC Rules.
Operation is subject to the following two conditions:
(1)This device may not cause harmful interference, and
(2)this device must accept an interference received, including interference that may cause undesired operation.
NOTE
This equipment has been tested and found to comply with the limits for a class B digital device, pursuant to Part 15 of the FCC Rules.
These limits are designed to provide reasonable protection against harmful interference in a residential installat ion. This equipment
generates, uses and can radiate radio frequency energy and, if not installed and used in accordance with the instructions, may cause
harmful interference to radio communications. However, there is no guarantee that interference will not occur in a par ticular installation. If
this equipment does cause harmful interference to radio or television reception, which can be deter mined by turning the equipment off and
on, the user is encouraged to try to correct the interference by one or more of the following measures:
- Reorient or relocate the receivi ng antenna.
- Increase the separation between the equipment and receiver.
- Connect the equipment into an outlet on a circuit different from that to which the receiver is connected.
- Consult the dealer or an experienced radio/TV technician for help.
Use of shielded cable is required to comply with class B limits in Subpart B of Part 15 of the FCC Rules.
Do not make any changes or modifications to the equipment unless otherwise specified in this guide. If such changes or
modifications should be made, you could be required to stop operation of the equipment.
One Canon Plaza, Lake Success, NY 11042, U.S.A.
The Telephone Consumer Protection Act of 1991 makes it unlawful for any person to use a computer or other electronic
device to send any message via a telephone fax machine unless such message clearly contains in a margin at the top or
bottom of each transmitted page or on the first page of the transmission, the date and time it is sent and an identification of
the business or other entity, or other individual sending the message and the telephone number of the sending machine or
such business, other entity, or individual.
To enter this information into your machine, follow the instructions in Chapter 3.
Canon U.S.A. Inc.
TEL No. 1-516-328-5000
Users in the U.S.A.
xi
Page 11

Users in Canada
Pre-installation requirements for Canon facsimile equipment
A. Location
Supply a suitable table, cabinet, or desk. See the Appendix for the machine’s dimensions and weight.
B. Order information
1. Provide only a single-line to touch-tone or rotary telephone set terminated with a standard 4-pin modular phone plug.
(Touch-tone is recommended if available in your area.)
2. Order an CA11A modular jack, which should be installed by the telephone company. If the CA11A jack is not present,
installation cannot occur.
3. Order a normal business line from your telephone company’s business representative. The line should be a regular
voice grade line or equivalent. Use one line per machine.
DDD (DIRECT DISTANCE DIAL) LINE
-or-
IDDD (INTERNATIONAL DIRECT DISTANCE DIAL) LINE IF YOU COMMUNICATE OVERSEAS
NOTE
Canon recommends an individual line following industr y standards [e.g., the 2500 (touch tone) or 500 (rotary/pulse di al) telephones]. A
dedicated extension off a PBX machine without “Camp On” signals is also permissible with your FAXPHONE L170. Key telephone systems
are not recommended because they send non-standard signals to individual telephones for ringing and special codes, which may cause a
fax error.
C. Power requirements
The power outlet should be a three-prong grounded receptacle (Single or Duplex). It should be independent from copiers,
heaters, air conditioners or any electric equipment that is thermostatically controlled. The rated value is 120 volts and 15
amperes. The CA11A modular jack should be relatively close to the power outlet to facilitate installation.
xii
Users in Canada
Page 12

Notice
This product meets the applicable Industry Canada technical Specifications.
Le présent matérial est conforme aux spécifications techniques applicables d’Industrie Canada.
Before installing this equipment, users should ensure that it is permissible to be connected to the facilities of the local
telecommunications company. The equipment must also be installed using an acceptable method of connection. The
customer should be aware that compliance with the above conditions may not prevent degradation of ser vice in some
situations.
Repairs to certified equipment should be coordinated by a representative designated by the supplier. Any repairs or
alterations made by the user to this equipment, or equipment malfunctions, may give the telecommunications company
cause to request the user to disconnect the equipment.
Users should ensure for their own protection that the electrical ground connections of the power utility, telephone lines and
internal metallic water pipe system, if present, are connected together. This precaution may be particularly important in
rural areas.
CAUTION
Users should not attempt to make such connections themselves, but should contact the appropriate electric inspection
authority, or electrician, as appropriate.
NOTE
This Class B digital apparatus meets all requirements of the Canadian Interference-Causing Equipment Regulations.
Cet appareil numérique de la classe B respect e toutes les exigences du Rglement sur le matér iel brouilleur du Canada.
The Ringer Equivalence Number is an indication of the maximum number of devices allowed to be connected to a
telephone interface. The termination on an interface may consist of any combination of devices subject only to the
requirement that the sum of the RENs of all the devices does not exceed five.
The REN of this product is 1.0.
L’indice d’équivalence de la sonnerie (IES) sert à indiquer le nombre maximal de terminaux qui peuvent être raccordés à
une interface téléphonique. La terminaison d’une interface peut consister en une combinaison quelconque de dispositifs, à
la seule condition que la somme d’indices d’équivalence de la sonnerie de tous les dispositifs n’excède pas 5.
Le nombre d’équivalents sonnerie (REN) de ce produit est 1.0.
CANON CANADA INC.
1-800-263-1121
24 HOURS A DAY, SEVEN DAYS A WEEK
Users in Canada
xiii
Page 13
Laser Safety
Laser Safety
This machine complies with 21 CFR Chapter 1 Subchapter J as a Class 1 laser product under the U.S. Department of
Health and Human Services (DHHS) Radiation Performance Standard according to the Radiation Control for Health and
Safety Act of 1968. This means that the machine does not produce hazardous radiation.
Since radiation emitted inside the machine is completely confined within protective housings and external covers, the laser
beam cannot escape from the machine during any phase of user operation.
CDRH Regulations
The Center for Devices and Radiological Health (CDRH) of the U.S. Food and Drug Administration implemented
regulations for laser products on August 2, 1976. These regulations apply to laser products manufactured from August 1,
1976. Compliance is mandatory for products marketsed in the United States.
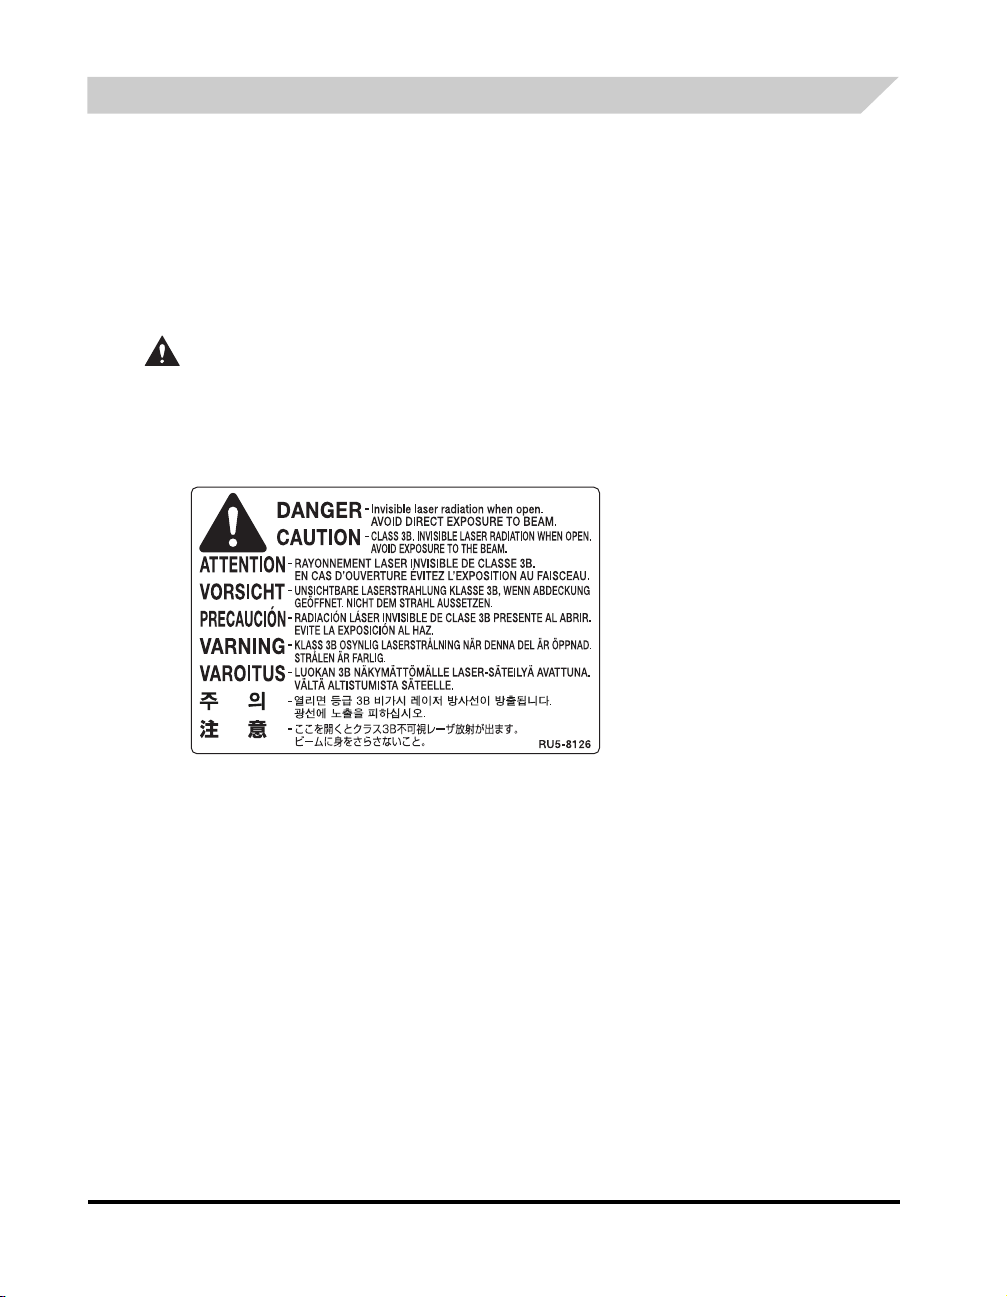
CAUTION
Use of controls , adjustment s, or performan ce of procedure s other than those specified in this User’s Guide may result in
hazardous radiation exposure.
The label is attached to the laser scanner machine inside the machine and is not in a user access area.
xiv
Users in Canada
Page 14

Contents
About the Manuals for the Machine . . . . . . . . . . . . . . . . . . . . . . . . . . . . . . . . . . . . . . . . . . . . . . . . . . . . ii
Where to Find Help . . . . . . . . . . . . . . . . . . . . . . . . . . . . . . . . . . . . . . . . . . . . . . . . . . . . . . . . . . . . . . . . . iii
Product Type and Model . . . . . . . . . . . . . . . . . . . . . . . . . . . . . . . . . . . . . . . . . . . . . . . . . . . . . . . . . . iv
Copyright. . . . . . . . . . . . . . . . . . . . . . . . . . . . . . . . . . . . . . . . . . . . . . . . . . . . . . . . . . . . . . . . . . . . . . iv
Laser Safety . . . . . . . . . . . . . . . . . . . . . . . . . . . . . . . . . . . . . . . . . . . . . . . . . . . . . . . . . . . . . . . . . . . iv
Disclaimer . . . . . . . . . . . . . . . . . . . . . . . . . . . . . . . . . . . . . . . . . . . . . . . . . . . . . . . . . . . . . . . . . . . . . iv
Trademarks . . . . . . . . . . . . . . . . . . . . . . . . . . . . . . . . . . . . . . . . . . . . . . . . . . . . . . . . . . . . . . . . . . . . iv
Type conventions. . . . . . . . . . . . . . . . . . . . . . . . . . . . . . . . . . . . . . . . . . . . . . . . . . . . . . . . . . . . . . . . v
Safety information . . . . . . . . . . . . . . . . . . . . . . . . . . . . . . . . . . . . . . . . . . . . . . . . . . . . . . . . . . . . . . . v
Power supply. . . . . . . . . . . . . . . . . . . . . . . . . . . . . . . . . . . . . . . . . . . . . . . . . . . . . . . . . . . . . . . . . . . vi
Handling . . . . . . . . . . . . . . . . . . . . . . . . . . . . . . . . . . . . . . . . . . . . . . . . . . . . . . . . . . . . . . . . . . . . . .vii
Maintenance . . . . . . . . . . . . . . . . . . . . . . . . . . . . . . . . . . . . . . . . . . . . . . . . . . . . . . . . . . . . . . . . . . viii
Legal limitation on usage of your product and the use of images . . . . . . . . . . . . . . . . . . . . . . . . . . . ix
Users in the U.S.A.. . . . . . . . . . . . . . . . . . . . . . . . . . . . . . . . . . . . . . . . . . . . . . . . . . . . . . . . . . . . . . . . . . x
Pre-installation requirements for Canon facsimile equipment. . . . . . . . . . . . . . . . . . . . . . . . . . . . . . x
Connection of the equipment . . . . . . . . . . . . . . . . . . . . . . . . . . . . . . . . . . . . . . . . . . . . . . . . . . . . . . x
In case of equipment malfunction . . . . . . . . . . . . . . . . . . . . . . . . . . . . . . . . . . . . . . . . . . . . . . . . . . . xi
Rights of the telephone company . . . . . . . . . . . . . . . . . . . . . . . . . . . . . . . . . . . . . . . . . . . . . . . . . . . xi
FCC Notice . . . . . . . . . . . . . . . . . . . . . . . . . . . . . . . . . . . . . . . . . . . . . . . . . . . . . . . . . . . . . . . . . . . . xi
Users in Canada. . . . . . . . . . . . . . . . . . . . . . . . . . . . . . . . . . . . . . . . . . . . . . . . . . . . . . . . . . . . . . . . . . . xii
Pre-installation requirements for Canon facsimile equipment. . . . . . . . . . . . . . . . . . . . . . . . . . . . . .xii
Notice . . . . . . . . . . . . . . . . . . . . . . . . . . . . . . . . . . . . . . . . . . . . . . . . . . . . . . . . . . . . . . . . . . . . . . . xiii
Laser Safety . . . . . . . . . . . . . . . . . . . . . . . . . . . . . . . . . . . . . . . . . . . . . . . . . . . . . . . . . . . . . . . . . . xiv
CDRH Regulations . . . . . . . . . . . . . . . . . . . . . . . . . . . . . . . . . . . . . . . . . . . . . . . . . . . . . . . . . xiv
Contents . . . . . . . . . . . . . . . . . . . . . . . . . . . . . . . . . . . . . . . . . . . . . . . . . . . . . . . . . . . . . . . . . . . . . . . . . xv
Chapter 1 Introducing the FAXPHONE L170
Welcome. . . . . . . . . . . . . . . . . . . . . . . . . . . . . . . . . . . . . . . . . . . . . . . . . . . . . . . . . . . . . . . . . . . . . . . . .1-1
The Main Features of the Machine. . . . . . . . . . . . . . . . . . . . . . . . . . . . . . . . . . . . . . . . . . . . . . . . . . . .1-2
Fax Features . . . . . . . . . . . . . . . . . . . . . . . . . . . . . . . . . . . . . . . . . . . . . . . . . . . . . . . . . . . . . . . . . .1-2
Printer Features . . . . . . . . . . . . . . . . . . . . . . . . . . . . . . . . . . . . . . . . . . . . . . . . . . . . . . . . . . . . . . . 1-3
Copier Features . . . . . . . . . . . . . . . . . . . . . . . . . . . . . . . . . . . . . . . . . . . . . . . . . . . . . . . . . . . . . . . 1-3
Telephone Features. . . . . . . . . . . . . . . . . . . . . . . . . . . . . . . . . . . . . . . . . . . . . . . . . . . . . . . . . . . . .1-3
Using the Machine as a Printer . . . . . . . . . . . . . . . . . . . . . . . . . . . . . . . . . . . . . . . . . . . . . . . . . . . . . .1-4
System Requirements. . . . . . . . . . . . . . . . . . . . . . . . . . . . . . . . . . . . . . . . . . . . . . . . . . . . . . . . . . .1-4
Using Your Documentation. . . . . . . . . . . . . . . . . . . . . . . . . . . . . . . . . . . . . . . . . . . . . . . . . . . . . . . . . . 1-5
Chapter 2 Setting Up Your Machine
Choosing a Location for Your Machine . . . . . . . . . . . . . . . . . . . . . . . . . . . . . . . . . . . . . . . . . . . . . . . . 2-1
Unpacking Your Machine . . . . . . . . . . . . . . . . . . . . . . . . . . . . . . . . . . . . . . . . . . . . . . . . . . . . . . . . . . .2-2
Do You Have Everything? . . . . . . . . . . . . . . . . . . . . . . . . . . . . . . . . . . . . . . . . . . . . . . . . . . . . . . . .2-2
Removing Shipping Materials . . . . . . . . . . . . . . . . . . . . . . . . . . . . . . . . . . . . . . . . . . . . . . . . . . . . .2-3
Replaceable Parts. . . . . . . . . . . . . . . . . . . . . . . . . . . . . . . . . . . . . . . . . . . . . . . . . . . . . . . . . . . . . .2-3
Assembling the Machine. . . . . . . . . . . . . . . . . . . . . . . . . . . . . . . . . . . . . . . . . . . . . . . . . . . . . . . . . . . .2-4
Attaching Components . . . . . . . . . . . . . . . . . . . . . . . . . . . . . . . . . . . . . . . . . . . . . . . . . . . . . . . . . .2-4
Document Output Tray . . . . . . . . . . . . . . . . . . . . . . . . . . . . . . . . . . . . . . . . . . . . . . . . . . . . . .2-4
Output Tray . . . . . . . . . . . . . . . . . . . . . . . . . . . . . . . . . . . . . . . . . . . . . . . . . . . . . . . . . . . . . . .2-4
Installing the Paper Cassette . . . . . . . . . . . . . . . . . . . . . . . . . . . . . . . . . . . . . . . . . . . . . . . . . . . . .2-5
Making Connections . . . . . . . . . . . . . . . . . . . . . . . . . . . . . . . . . . . . . . . . . . . . . . . . . . . . . . . . . . . . . . .2-6
Connecting the Machine to Your PC . . . . . . . . . . . . . . . . . . . . . . . . . . . . . . . . . . . . . . . . . . . . . . . .2-6
Connecting the Telephone Line. . . . . . . . . . . . . . . . . . . . . . . . . . . . . . . . . . . . . . . . . . . . . . . . . . . .2-7
Connecting the Power Cord . . . . . . . . . . . . . . . . . . . . . . . . . . . . . . . . . . . . . . . . . . . . . . . . . . . . . .2-7
Getting Acquainted With Your Machine . . . . . . . . . . . . . . . . . . . . . . . . . . . . . . . . . . . . . . . . . . . . . . .2-9
Front View. . . . . . . . . . . . . . . . . . . . . . . . . . . . . . . . . . . . . . . . . . . . . . . . . . . . . . . . . . . . . . . . . . . .2-9
Rear View . . . . . . . . . . . . . . . . . . . . . . . . . . . . . . . . . . . . . . . . . . . . . . . . . . . . . . . . . . . . . . . . . . .2-10
Contents
xv
Page 15

The Operation Panel . . . . . . . . . . . . . . . . . . . . . . . . . . . . . . . . . . . . . . . . . . . . . . . . . . . . . . . . . . 2-11
Special Function Buttons (One-Touch Speed Dial Panel Open) . . . . . . . . . . . . . . . . . . . . . . . . . 2-12
Handset . . . . . . . . . . . . . . . . . . . . . . . . . . . . . . . . . . . . . . . . . . . . . . . . . . . . . . . . . . . . . . . . . . . . 2-13
Energy Saver Mode . . . . . . . . . . . . . . . . . . . . . . . . . . . . . . . . . . . . . . . . . . . . . . . . . . . . . . . . . . . . . . 2-14
Setting the Energy Saver Mode Manually . . . . . . . . . . . . . . . . . . . . . . . . . . . . . . . . . . . . . . . . . . 2-14
Restoring from the Energy Saver Mode. . . . . . . . . . . . . . . . . . . . . . . . . . . . . . . . . . . . . . . . . . . . 2-14
The Toner Cartridge. . . . . . . . . . . . . . . . . . . . . . . . . . . . . . . . . . . . . . . . . . . . . . . . . . . . . . . . . . . . . . 2-15
Handling and Storing Cartridges . . . . . . . . . . . . . . . . . . . . . . . . . . . . . . . . . . . . . . . . . . . . . . . . . 2-15
Installing/Replacing the Toner Cartridge . . . . . . . . . . . . . . . . . . . . . . . . . . . . . . . . . . . . . . . . . . . 2-16
Chapter 3 Registering Information in the Machine
Guidelines for Entering Information . . . . . . . . . . . . . . . . . . . . . . . . . . . . . . . . . . . . . . . . . . . . . . . . . . 3-1
Entering Numbers, Letters, and Symbols . . . . . . . . . . . . . . . . . . . . . . . . . . . . . . . . . . . . . . . . . . . 3-1
Personalizing Your Machine . . . . . . . . . . . . . . . . . . . . . . . . . . . . . . . . . . . . . . . . . . . . . . . . . . . . . . . . 3-3
Registering Required Sender Information. . . . . . . . . . . . . . . . . . . . . . . . . . . . . . . . . . . . . . . . . . . 3-3
What is Sender Information?. . . . . . . . . . . . . . . . . . . . . . . . . . . . . . . . . . . . . . . . . . . . . . . . . . . . . 3-3
Entering the Date and Time. . . . . . . . . . . . . . . . . . . . . . . . . . . . . . . . . . . . . . . . . . . . . . . . . . . . . . 3-4
Registering Your Fax Number and Name . . . . . . . . . . . . . . . . . . . . . . . . . . . . . . . . . . . . . . . . . . . 3-4
Setting the Telephone Line Type . . . . . . . . . . . . . . . . . . . . . . . . . . . . . . . . . . . . . . . . . . . . . . . . . . 3-5
Setting the Daylight Saving Time. . . . . . . . . . . . . . . . . . . . . . . . . . . . . . . . . . . . . . . . . . . . . . . . . . 3-5
Chapter 4 Paper Handling
Print Media Requirements. . . . . . . . . . . . . . . . . . . . . . . . . . . . . . . . . . . . . . . . . . . . . . . . . . . . . . . . . . 4-1
Printing Areas . . . . . . . . . . . . . . . . . . . . . . . . . . . . . . . . . . . . . . . . . . . . . . . . . . . . . . . . . . . . . . . . 4-2
Loading Paper . . . . . . . . . . . . . . . . . . . . . . . . . . . . . . . . . . . . . . . . . . . . . . . . . . . . . . . . . . . . . . . . . . . 4-3
Loading Paper in the Cassette . . . . . . . . . . . . . . . . . . . . . . . . . . . . . . . . . . . . . . . . . . . . . . . . . . . 4-3
Loading Envelopes in the Cassette. . . . . . . . . . . . . . . . . . . . . . . . . . . . . . . . . . . . . . . . . . . . . . . . 4-5
Loading Paper in the Multi-Purpose Feeder . . . . . . . . . . . . . . . . . . . . . . . . . . . . . . . . . . . . . . . . . 4-8
Loading an Envelope in the Multi-Purpose Feeder . . . . . . . . . . . . . . . . . . . . . . . . . . . . . . . . . . . . 4-9
Testing the Machine. . . . . . . . . . . . . . . . . . . . . . . . . . . . . . . . . . . . . . . . . . . . . . . . . . . . . . . . . . . 4-10
Orientation of the Document and the Paper Loading . . . . . . . . . . . . . . . . . . . . . . . . . . . . . . . . . 4-11
Selecting the Paper Output Area . . . . . . . . . . . . . . . . . . . . . . . . . . . . . . . . . . . . . . . . . . . . . . . . . . . 4-12
Paper Type and Paper Output Area. . . . . . . . . . . . . . . . . . . . . . . . . . . . . . . . . . . . . . . . . . . . . . . 4-12
Face Down Paper Output Area . . . . . . . . . . . . . . . . . . . . . . . . . . . . . . . . . . . . . . . . . . . . . . . . . . 4-13
Face Up Paper Output Area . . . . . . . . . . . . . . . . . . . . . . . . . . . . . . . . . . . . . . . . . . . . . . . . . . . . 4-13
Chapter 5 Speed Dialing
Speed Dialing Methods . . . . . . . . . . . . . . . . . . . . . . . . . . . . . . . . . . . . . . . . . . . . . . . . . . . . . . . . . . . . 5-1
One-Touch Speed Dialing . . . . . . . . . . . . . . . . . . . . . . . . . . . . . . . . . . . . . . . . . . . . . . . . . . . . . . . . . . 5-2
Storing Numbers for One-Touch Speed Dialing. . . . . . . . . . . . . . . . . . . . . . . . . . . . . . . . . . . . . . . 5-2
Changing or Deleting a Number/Name Stored Under a One-Touch Speed Dial Button . . . . . . . . 5-3
Using One-Touch Speed Dialing . . . . . . . . . . . . . . . . . . . . . . . . . . . . . . . . . . . . . . . . . . . . . . . . . . 5-4
Coded Speed Dialing . . . . . . . . . . . . . . . . . . . . . . . . . . . . . . . . . . . . . . . . . . . . . . . . . . . . . . . . . . . . . . 5-5
Storing Numbers for Coded Speed Dialing . . . . . . . . . . . . . . . . . . . . . . . . . . . . . . . . . . . . . . . . . . 5-5
Changing or Deleting a Number/Name Stored under a Coded Speed Dialing Code . . . . . . . . . . 5-6
Using Coded Speed Dialing . . . . . . . . . . . . . . . . . . . . . . . . . . . . . . . . . . . . . . . . . . . . . . . . . . . . . 5-7
Group Dialing . . . . . . . . . . . . . . . . . . . . . . . . . . . . . . . . . . . . . . . . . . . . . . . . . . . . . . . . . . . . . . . . . . . . 5-8
Creating Groups for Group Dialing . . . . . . . . . . . . . . . . . . . . . . . . . . . . . . . . . . . . . . . . . . . . . . . . 5-8
Changing or Deleting a Number/Name Stored under a Group Dialing . . . . . . . . . . . . . . . . . . . . . 5-9
Using Group Dialing . . . . . . . . . . . . . . . . . . . . . . . . . . . . . . . . . . . . . . . . . . . . . . . . . . . . . . . . . . 5-10
Directory Dialing . . . . . . . . . . . . . . . . . . . . . . . . . . . . . . . . . . . . . . . . . . . . . . . . . . . . . . . . . . . . . . . . 5-11
Chapter 6 Sending Faxes
Preparing to Send a Fax . . . . . . . . . . . . . . . . . . . . . . . . . . . . . . . . . . . . . . . . . . . . . . . . . . . . . . . . . . . 6-1
Document Requirements. . . . . . . . . . . . . . . . . . . . . . . . . . . . . . . . . . . . . . . . . . . . . . . . . . . . . . . . 6-1
Scanning Area. . . . . . . . . . . . . . . . . . . . . . . . . . . . . . . . . . . . . . . . . . . . . . . . . . . . . . . . . . . . 6-2
Loading Documents in the ADF. . . . . . . . . . . . . . . . . . . . . . . . . . . . . . . . . . . . . . . . . . . . . . . . . . . 6-3
Adjusting the Resolution and Contrast . . . . . . . . . . . . . . . . . . . . . . . . . . . . . . . . . . . . . . . . . . . . . 6-4
Adjusting the Image Quality (Resolution) . . . . . . . . . . . . . . . . . . . . . . . . . . . . . . . . . . . . . . . 6-4
Adjusting the Exposure (Density) . . . . . . . . . . . . . . . . . . . . . . . . . . . . . . . . . . . . . . . . . . . . . 6-5
Sending Methods. . . . . . . . . . . . . . . . . . . . . . . . . . . . . . . . . . . . . . . . . . . . . . . . . . . . . . . . . . . . . . 6-6
Memory Sending. . . . . . . . . . . . . . . . . . . . . . . . . . . . . . . . . . . . . . . . . . . . . . . . . . . . . . . . . . 6-6
xvi
Contents
Page 16

Manual Sending Via the Handset. . . . . . . . . . . . . . . . . . . . . . . . . . . . . . . . . . . . . . . . . . . . . . 6-6
Dialing Methods . . . . . . . . . . . . . . . . . . . . . . . . . . . . . . . . . . . . . . . . . . . . . . . . . . . . . . . . . . . . . . . 6-6
Sending Documents . . . . . . . . . . . . . . . . . . . . . . . . . . . . . . . . . . . . . . . . . . . . . . . . . . . . . . . . . . . . . . .6-7
Memory Sending. . . . . . . . . . . . . . . . . . . . . . . . . . . . . . . . . . . . . . . . . . . . . . . . . . . . . . . . . . . . . . .6-7
Manual Sending Via the Handset . . . . . . . . . . . . . . . . . . . . . . . . . . . . . . . . . . . . . . . . . . . . . . . . . .6-8
Canceling Sending . . . . . . . . . . . . . . . . . . . . . . . . . . . . . . . . . . . . . . . . . . . . . . . . . . . . . . . . . . . . . . . . 6-9
Canceling Memory Sending . . . . . . . . . . . . . . . . . . . . . . . . . . . . . . . . . . . . . . . . . . . . . . . . . . . . . .6-9
While Documents Are Being Scanned Using the ADF . . . . . . . . . . . . . . . . . . . . . . . . . . . . . .6-9
After All Documents Are Scanned . . . . . . . . . . . . . . . . . . . . . . . . . . . . . . . . . . . . . . . . . . . . .6-9
Redialing . . . . . . . . . . . . . . . . . . . . . . . . . . . . . . . . . . . . . . . . . . . . . . . . . . . . . . . . . . . . . . . . . . . . . . . 6-10
Manual Redialing . . . . . . . . . . . . . . . . . . . . . . . . . . . . . . . . . . . . . . . . . . . . . . . . . . . . . . . . . . . . . 6-10
Automatic Redialing With Memory Sending . . . . . . . . . . . . . . . . . . . . . . . . . . . . . . . . . . . . . . . . .6-10
Canceling Automatic Redialing. . . . . . . . . . . . . . . . . . . . . . . . . . . . . . . . . . . . . . . . . . . . . . .6-10
Setting Up Automatic Redialing . . . . . . . . . . . . . . . . . . . . . . . . . . . . . . . . . . . . . . . . . . . . . . 6-10
Sequential Broadcasting. . . . . . . . . . . . . . . . . . . . . . . . . . . . . . . . . . . . . . . . . . . . . . . . . . . . . . . . . . .6-12
Sending a Document to More Than One Destination . . . . . . . . . . . . . . . . . . . . . . . . . . . . . . . . . . 6-12
Sending a Document Using Group Dialing . . . . . . . . . . . . . . . . . . . . . . . . . . . . . . . . . . . . . . . . . .6-13
Delayed Sending . . . . . . . . . . . . . . . . . . . . . . . . . . . . . . . . . . . . . . . . . . . . . . . . . . . . . . . . . . . . . . . . .6-14
Chapter 7 Receiving Faxes
Different Ways to Receive a Fax. . . . . . . . . . . . . . . . . . . . . . . . . . . . . . . . . . . . . . . . . . . . . . . . . . . . . .7-1
Setting the Receive Mode. . . . . . . . . . . . . . . . . . . . . . . . . . . . . . . . . . . . . . . . . . . . . . . . . . . . . . . .7-2
Receiving Faxes and Phone Calls Automatically:
FaxTel Mode . . . . . . . . . . . . . . . . . . . . . . . . . . . . . . . . . . . . . . . . . . . . . . . . . . . . . . . . . . . . . . . . . .7-2
Setting the Options for FaxTel Mode. . . . . . . . . . . . . . . . . . . . . . . . . . . . . . . . . . . . . . . . . . . .7-2
What Happens When FaxTel Mode is Selected . . . . . . . . . . . . . . . . . . . . . . . . . . . . . . . . . . .7-3
Receiving Faxes Manually: Manual Mode. . . . . . . . . . . . . . . . . . . . . . . . . . . . . . . . . . . . . . . . . . . .7-4
Receiving Faxes Automatically: FaxOnly Mode . . . . . . . . . . . . . . . . . . . . . . . . . . . . . . . . . . . . . . .7-5
Using an Answering Machine: AnsMode . . . . . . . . . . . . . . . . . . . . . . . . . . . . . . . . . . . . . . . . . . . .7-5
Using the Machine With an Answering Machine . . . . . . . . . . . . . . . . . . . . . . . . . . . . . . . . . .7-5
Receiving with a DRPD (Distinctive Ring Pattern Detection) service: DRPD . . . . . . . . . . . . . . . . . 7-5
Receiving Faxes in Memory When a Problem Occurs . . . . . . . . . . . . . . . . . . . . . . . . . . . . . . . . . . . .7-6
Receiving While Performing Other Tasks . . . . . . . . . . . . . . . . . . . . . . . . . . . . . . . . . . . . . . . . . . . . 7-7
Canceling an Incoming Fax. . . . . . . . . . . . . . . . . . . . . . . . . . . . . . . . . . . . . . . . . . . . . . . . . . . . . . .7-7
Chapter 8 Setting Up and Using Polling
What’s Polling? . . . . . . . . . . . . . . . . . . . . . . . . . . . . . . . . . . . . . . . . . . . . . . . . . . . . . . . . . . . . . . . . . . . 8-1
Before You Use Polling Receiving. . . . . . . . . . . . . . . . . . . . . . . . . . . . . . . . . . . . . . . . . . . . . . . . . . 8-1
Polling Other Fax Machines to Receive Documents . . . . . . . . . . . . . . . . . . . . . . . . . . . . . . . . . . . . .8-2
Requesting Another Fax to Send a Document . . . . . . . . . . . . . . . . . . . . . . . . . . . . . . . . . . . . . . . .8-2
Setting Up Polling Sending. . . . . . . . . . . . . . . . . . . . . . . . . . . . . . . . . . . . . . . . . . . . . . . . . . . . . . . . . .8-3
Setting Up a Polling Box . . . . . . . . . . . . . . . . . . . . . . . . . . . . . . . . . . . . . . . . . . . . . . . . . . . . . . . . .8-3
Scanning a Document into the Memory for Polling Sending . . . . . . . . . . . . . . . . . . . . . . . . . . . . . .8-4
Changing the Polling Box Settings . . . . . . . . . . . . . . . . . . . . . . . . . . . . . . . . . . . . . . . . . . . . . . . . .8-5
Deleting a Polling Box. . . . . . . . . . . . . . . . . . . . . . . . . . . . . . . . . . . . . . . . . . . . . . . . . . . . . . . . . . . 8-6
Chapter 9 Special Features
Special Dialing. . . . . . . . . . . . . . . . . . . . . . . . . . . . . . . . . . . . . . . . . . . . . . . . . . . . . . . . . . . . . . . . . . . .9-1
Dialing Long Distance. . . . . . . . . . . . . . . . . . . . . . . . . . . . . . . . . . . . . . . . . . . . . . . . . . . . . . . . . . .9-1
How to Enter Pauses . . . . . . . . . . . . . . . . . . . . . . . . . . . . . . . . . . . . . . . . . . . . . . . . . . . . . . .9-1
Using Tone Dialing On a Pulse Line . . . . . . . . . . . . . . . . . . . . . . . . . . . . . . . . . . . . . . . . . . . . . . . .9-2
Using Memory Lock. . . . . . . . . . . . . . . . . . . . . . . . . . . . . . . . . . . . . . . . . . . . . . . . . . . . . . . . . . . . . . . .9-3
Turning Memory Lock ON and Setting the Password . . . . . . . . . . . . . . . . . . . . . . . . . . . . . . . . . . .9-3
Turning Memory Lock OFF and Printing Documents . . . . . . . . . . . . . . . . . . . . . . . . . . . . . . . . . . .9-4
Chapter 10 Making Copies
Making Copies . . . . . . . . . . . . . . . . . . . . . . . . . . . . . . . . . . . . . . . . . . . . . . . . . . . . . . . . . . . . . . . . . . .10-1
Specifying the Paper Size and Type
(Common for Cassette and Multi-Purpose Feeder) . . . . . . . . . . . . . . . . . . . . . . . . . . . . . . . . . . . . .10-2
Specifying the Paper Size. . . . . . . . . . . . . . . . . . . . . . . . . . . . . . . . . . . . . . . . . . . . . . . . . . . . . . .10-2
Specifying the Paper Type. . . . . . . . . . . . . . . . . . . . . . . . . . . . . . . . . . . . . . . . . . . . . . . . . . . . . . .10-3
Contents
xvii
Page 17

Setting Enlarging/Reducing . . . . . . . . . . . . . . . . . . . . . . . . . . . . . . . . . . . . . . . . . . . . . . . . . . . . . . . 10-4
Enlarging/Reducing Using Preset Copy Ratios . . . . . . . . . . . . . . . . . . . . . . . . . . . . . . . . . . . . . . 10-4
Enlarging/Reducing Using Custom Copy Ratios . . . . . . . . . . . . . . . . . . . . . . . . . . . . . . . . . . . . . 10-5
Improving Copied Image . . . . . . . . . . . . . . . . . . . . . . . . . . . . . . . . . . . . . . . . . . . . . . . . . . . . . . . . . . 10-6
Adjusting the Image Quality (Resolution) . . . . . . . . . . . . . . . . . . . . . . . . . . . . . . . . . . . . . . . . . . 10-6
Adjusting the Exposure (Density) . . . . . . . . . . . . . . . . . . . . . . . . . . . . . . . . . . . . . . . . . . . . . . . . 10-6
Adjusting Automatically. . . . . . . . . . . . . . . . . . . . . . . . . . . . . . . . . . . . . . . . . . . . . . . . . . . . 10-6
Adjusting Manually . . . . . . . . . . . . . . . . . . . . . . . . . . . . . . . . . . . . . . . . . . . . . . . . . . . . . . . 10-7
Special Features. . . . . . . . . . . . . . . . . . . . . . . . . . . . . . . . . . . . . . . . . . . . . . . . . . . . . . . . . . . . . . . . . 10-8
Collate Copy . . . . . . . . . . . . . . . . . . . . . . . . . . . . . . . . . . . . . . . . . . . . . . . . . . . . . . . . . . . . . . . . 10-8
Reserve Copy . . . . . . . . . . . . . . . . . . . . . . . . . . . . . . . . . . . . . . . . . . . . . . . . . . . . . . . . . . . . . . . 10-9
Confirming the Copy Job You Reserved . . . . . . . . . . . . . . . . . . . . . . . . . . . . . . . . . . . . . . 10-10
Deleting the Copy Job You Reserved . . . . . . . . . . . . . . . . . . . . . . . . . . . . . . . . . . . . . . . . 10-10
Chapter 11 System Monitor
Checking the Status of Copy, Fax, Print and Report Jobs. . . . . . . . . . . . . . . . . . . . . . . . . . . . . . . 11-1
Confirming Transmission Status . . . . . . . . . . . . . . . . . . . . . . . . . . . . . . . . . . . . . . . . . . . . . . . . . 11-1
Confirming Transmission Results and Sending Reservation. . . . . . . . . . . . . . . . . . . . . . . . . . . . 11-2
Deleting a Fax Job. . . . . . . . . . . . . . . . . . . . . . . . . . . . . . . . . . . . . . . . . . . . . . . . . . . . . . . . . . . . 11-2
Confirming and Deleting a Copy Job. . . . . . . . . . . . . . . . . . . . . . . . . . . . . . . . . . . . . . . . . . . . . . 11-3
Confirming and Deleting a Print Job . . . . . . . . . . . . . . . . . . . . . . . . . . . . . . . . . . . . . . . . . . . . . . 11-3
Confirming and Deleting a Report Job . . . . . . . . . . . . . . . . . . . . . . . . . . . . . . . . . . . . . . . . . . . . 11-4
Chapter 12 Reports and Lists
Activity Report . . . . . . . . . . . . . . . . . . . . . . . . . . . . . . . . . . . . . . . . . . . . . . . . . . . . . . . . . . . . . . . . . . 12-1
Transmission (TX) Reports . . . . . . . . . . . . . . . . . . . . . . . . . . . . . . . . . . . . . . . . . . . . . . . . . . . . . . . . 12-2
Error TX Report . . . . . . . . . . . . . . . . . . . . . . . . . . . . . . . . . . . . . . . . . . . . . . . . . . . . . . . . . . . . . . 12-2
TX Report . . . . . . . . . . . . . . . . . . . . . . . . . . . . . . . . . . . . . . . . . . . . . . . . . . . . . . . . . . . . . . . . . . 12-3
Multi TX/RX Report . . . . . . . . . . . . . . . . . . . . . . . . . . . . . . . . . . . . . . . . . . . . . . . . . . . . . . . . . . . 12-3
Reception (RX) Report. . . . . . . . . . . . . . . . . . . . . . . . . . . . . . . . . . . . . . . . . . . . . . . . . . . . . . . . . . . . 12-4
Memory Clear Report. . . . . . . . . . . . . . . . . . . . . . . . . . . . . . . . . . . . . . . . . . . . . . . . . . . . . . . . . . . . . 12-5
Speed Dialing Lists . . . . . . . . . . . . . . . . . . . . . . . . . . . . . . . . . . . . . . . . . . . . . . . . . . . . . . . . . . . . . . 12-6
One-Touch Speed Dial List . . . . . . . . . . . . . . . . . . . . . . . . . . . . . . . . . . . . . . . . . . . . . . . . . . . . . 12-7
Coded Speed Dial List. . . . . . . . . . . . . . . . . . . . . . . . . . . . . . . . . . . . . . . . . . . . . . . . . . . . . . . . . 12-7
Group Dial List. . . . . . . . . . . . . . . . . . . . . . . . . . . . . . . . . . . . . . . . . . . . . . . . . . . . . . . . . . . . . . . 12-8
User’s Data List . . . . . . . . . . . . . . . . . . . . . . . . . . . . . . . . . . . . . . . . . . . . . . . . . . . . . . . . . . . . . . . . . 12-9
Document Memory List . . . . . . . . . . . . . . . . . . . . . . . . . . . . . . . . . . . . . . . . . . . . . . . . . . . . . . . . . . 12-10
Chapter 13 Troubleshooting
Clearing Jams. . . . . . . . . . . . . . . . . . . . . . . . . . . . . . . . . . . . . . . . . . . . . . . . . . . . . . . . . . . . . . . . . . . 13-1
Removing Jammed Paper from Inside the Machine . . . . . . . . . . . . . . . . . . . . . . . . . . . . . . . . . . 13-1
Removing Jammed Paper from the ADF . . . . . . . . . . . . . . . . . . . . . . . . . . . . . . . . . . . . . . . . . . . 13-6
LCD Messages . . . . . . . . . . . . . . . . . . . . . . . . . . . . . . . . . . . . . . . . . . . . . . . . . . . . . . . . . . . . . . . . . . 13-7
Paper Feeding Problems. . . . . . . . . . . . . . . . . . . . . . . . . . . . . . . . . . . . . . . . . . . . . . . . . . . . . . . . . . 13-9
Faxing Problems . . . . . . . . . . . . . . . . . . . . . . . . . . . . . . . . . . . . . . . . . . . . . . . . . . . . . . . . . . . . . . . 13-12
Sending Problems . . . . . . . . . . . . . . . . . . . . . . . . . . . . . . . . . . . . . . . . . . . . . . . . . . . . . . . . . . . 13-12
Receiving Problems. . . . . . . . . . . . . . . . . . . . . . . . . . . . . . . . . . . . . . . . . . . . . . . . . . . . . . . . . . 13-14
Telephone Problems . . . . . . . . . . . . . . . . . . . . . . . . . . . . . . . . . . . . . . . . . . . . . . . . . . . . . . . . . . . . 13-17
Copying Problems . . . . . . . . . . . . . . . . . . . . . . . . . . . . . . . . . . . . . . . . . . . . . . . . . . . . . . . . . . . . . . 13-18
Print Quality Problems. . . . . . . . . . . . . . . . . . . . . . . . . . . . . . . . . . . . . . . . . . . . . . . . . . . . . . . . . . . 13-19
Printing Problems . . . . . . . . . . . . . . . . . . . . . . . . . . . . . . . . . . . . . . . . . . . . . . . . . . . . . . . . . . . . . . 13-21
If You Cannot Solve the Problem . . . . . . . . . . . . . . . . . . . . . . . . . . . . . . . . . . . . . . . . . . . . . . . . . . 13-22
Chapter 14 Maintaining Your Machine
Cleaning the Machine . . . . . . . . . . . . . . . . . . . . . . . . . . . . . . . . . . . . . . . . . . . . . . . . . . . . . . . . . . . . 14-1
Cleaning the Machine’s Exterior . . . . . . . . . . . . . . . . . . . . . . . . . . . . . . . . . . . . . . . . . . . . . . . . . 14-1
Cleaning the ADF Area . . . . . . . . . . . . . . . . . . . . . . . . . . . . . . . . . . . . . . . . . . . . . . . . . . . . . . . . 14-2
Transporting the machine . . . . . . . . . . . . . . . . . . . . . . . . . . . . . . . . . . . . . . . . . . . . . . . . . . . . . . . . . 14-4
xviii
Contents
Page 18

Chapter 15 The Menu System
Accessing the Menu . . . . . . . . . . . . . . . . . . . . . . . . . . . . . . . . . . . . . . . . . . . . . . . . . . . . . . . . . . . . . .15-1
Menu Descriptions. . . . . . . . . . . . . . . . . . . . . . . . . . . . . . . . . . . . . . . . . . . . . . . . . . . . . . . . . . . . . . . . 15-2
1. PAPER SETTINGS . . . . . . . . . . . . . . . . . . . . . . . . . . . . . . . . . . . . . . . . . . . . . . . . . . . . . . . . . .15-2
2. COMMON SETTINGS . . . . . . . . . . . . . . . . . . . . . . . . . . . . . . . . . . . . . . . . . . . . . . . . . . . . . . .15-3
3. COPY SETTINGS. . . . . . . . . . . . . . . . . . . . . . . . . . . . . . . . . . . . . . . . . . . . . . . . . . . . . . . . . . . 15-5
4. FAX SETTINGS . . . . . . . . . . . . . . . . . . . . . . . . . . . . . . . . . . . . . . . . . . . . . . . . . . . . . . . . . . . .15-6
5. ADD. REGISTRATION . . . . . . . . . . . . . . . . . . . . . . . . . . . . . . . . . . . . . . . . . . . . . . . . . . . . . . 15-13
6. PRINTER SETTINGS . . . . . . . . . . . . . . . . . . . . . . . . . . . . . . . . . . . . . . . . . . . . . . . . . . . . . . .15-14
7. TIMER SETTINGS . . . . . . . . . . . . . . . . . . . . . . . . . . . . . . . . . . . . . . . . . . . . . . . . . . . . . . . . . 15-15
8. PRINT LISTS . . . . . . . . . . . . . . . . . . . . . . . . . . . . . . . . . . . . . . . . . . . . . . . . . . . . . . . . . . . . . 15-16
Appendix Specifications
General . . . . . . . . . . . . . . . . . . . . . . . . . . . . . . . . . . . . . . . . . . . . . . . . . . . . . . . . . . . . . . . . . . . . . . . . . A-1
Fax. . . . . . . . . . . . . . . . . . . . . . . . . . . . . . . . . . . . . . . . . . . . . . . . . . . . . . . . . . . . . . . . . . . . . . . . . . . . . A-2
Copier . . . . . . . . . . . . . . . . . . . . . . . . . . . . . . . . . . . . . . . . . . . . . . . . . . . . . . . . . . . . . . . . . . . . . . . . . . A-3
Telephone. . . . . . . . . . . . . . . . . . . . . . . . . . . . . . . . . . . . . . . . . . . . . . . . . . . . . . . . . . . . . . . . . . . . . . . A-3
Printer . . . . . . . . . . . . . . . . . . . . . . . . . . . . . . . . . . . . . . . . . . . . . . . . . . . . . . . . . . . . . . . . . . . . . . . . . . A-4
Printable Area: Papers . . . . . . . . . . . . . . . . . . . . . . . . . . . . . . . . . . . . . . . . . . . . . . . . . . . . . . . . . A-5
Printable Area: Envelopes. . . . . . . . . . . . . . . . . . . . . . . . . . . . . . . . . . . . . . . . . . . . . . . . . . . . . . . A-6
Document Sizes. . . . . . . . . . . . . . . . . . . . . . . . . . . . . . . . . . . . . . . . . . . . . . . . . . . . . . . . . . . . . . . . . . A-7
Printer Driver . . . . . . . . . . . . . . . . . . . . . . . . . . . . . . . . . . . . . . . . . . . . . . . . . . . . . . . . . . . . . . . . . . . . A-8
Glossary
Index
Contents
xix
Page 19

xx
Contents
Page 20
Introducing the FAXPHONE L170
CHAPTER
This chapter introduces you to the main features of the machine. It also explains how to get the most out of the documentation that comes with
the machine, and gives impor tant safety instructions.
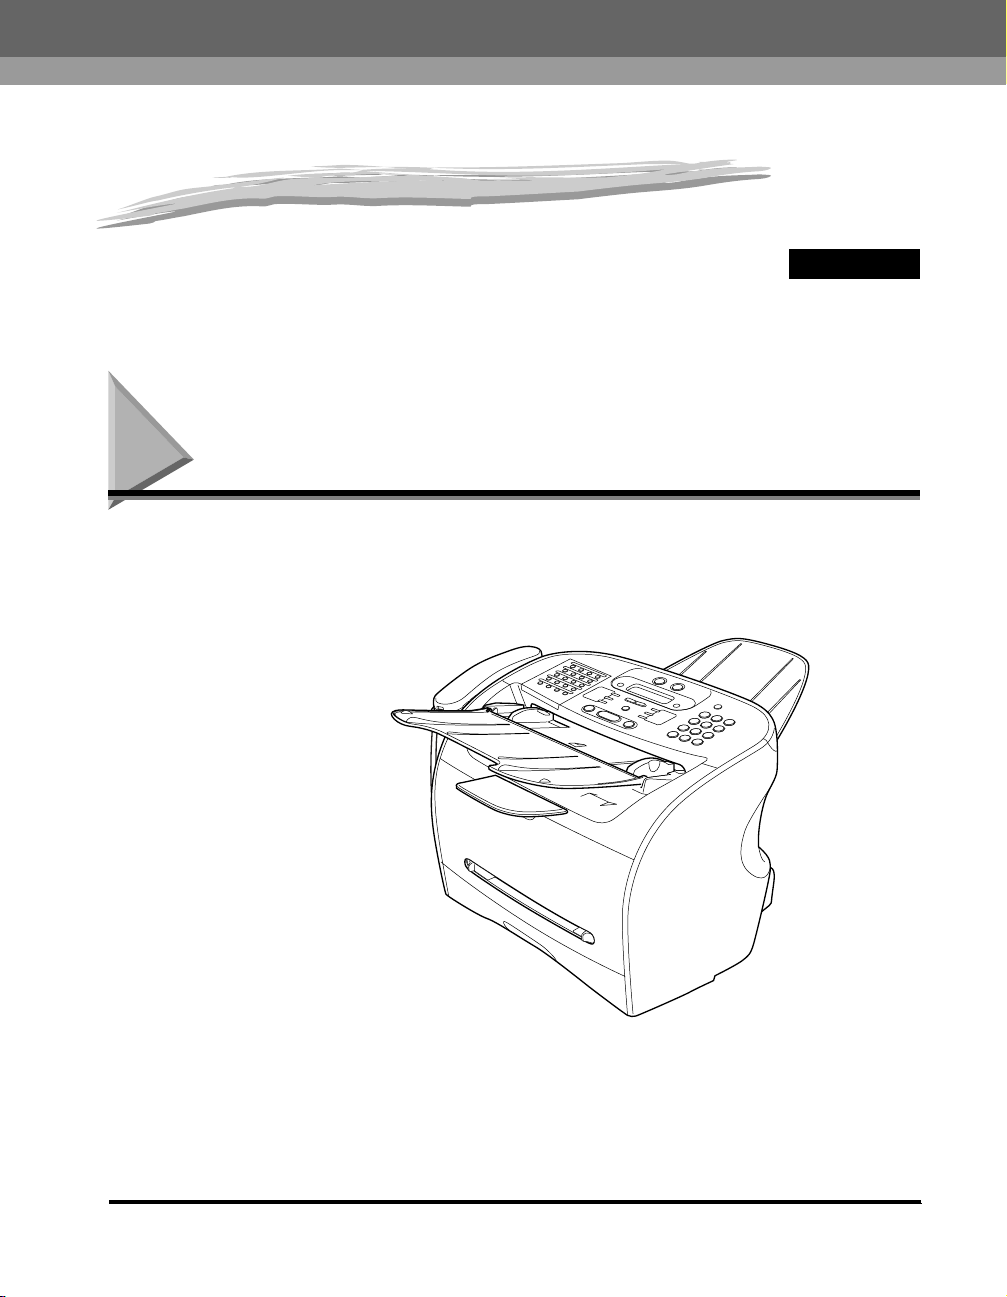
Welcome
Thank you for purchasing the new Canon FAXPHONE L170. We are sure that your machine will meet your printing and
copying needs easily and conveniently, as well as your fax and phone requirements.
1
FAXPHONE L170
Welcome
1-1
Page 21

The Main Features of the Machine
This machine is a multifunction system for your home or small office, and combines a plain paper fax machine, a laser
1
Introducing the FAXPHONE L170
printer, a copier, and a telephone into a single, convenient desktop machine.
The machine’s multitasking ability enables you to perform multiple operations simultaneously. For example, you can print a
document or make copies at the same time you are sending a fax.
The compact size of the machine makes it ideal for desktop use, and allows you to use it in places where other machines
may not fit.
Fax Features
■ UHQ™ Image Processing System
The machine uses Canon’s Ultra High Quality Image Processing System to provide enhanced definition in faxed photos.
■ Error Correction Mode (ECM)
The machine’s Error Correction Mode (ECM) reduces transmission errors while communicating with another ECM-capable machine.
■ Automatic switching between fax and voice calls
The machine can automatically distinguish between fax and voice calls, so that you can receive both through a single phone line.
■ Answering machine connection
You can connect an answering machine to receive telephone messages while you are away.
■ Transmission speed
The machine uses G3 data encoding methods that increase transmission speed to approx. 3 seconds* per page.
■ Memory sending/receiving
The machine can store up to 450** fax pages in its memory, and can receive faxes while printing.
■ Reduced-size printing
The machine automatically scales received faxes to fit the size of the paper loaded in the machine.
■ Automatic dialing and broadcasting
For easier faxing, the machine provides One-Touch Speed Dialing, Coded Speed Dialing, and Group Dialing methods for automatic dialing.
It also allows you to broadcast or send a fax at a preset time to as many as 142 locations.
* Based on Canon FAX Standard Chart No.1, standard mode.
1-2
The Main Features of the Machine
Page 22

Printer Features
■ Excellent print quality
The machine offers 1200 dpi enhanced × 600 dpi laser beam printing, providing you with high resolution text and graphics.
■ Simple maintenance
The S35 Cartridge for the machine contains both the toner and drum, making installation and replacement simple.
■ Economy toner-saving printing
The machine includes an economy printing mode which allows you to reduce toner consumption by approx. 30%.
Copier Features
■ Up to 99 copies
The machine can make up to 99 copies of a document at a time, at a rate of up to 19 copies per minute on LTR-Size paper.
■ Resolution
The machine scans documents at 300 × 300 dpi. Printing resolution is 1200 dpi enhanced × 600 dpi .
■ Copy enlargement/reduction
The machine can reduce or enlarge copies in the range between 50% and 200% of their original size.
■ Collate copy
The machine can sort copies in page order. It is convenient when you make multiple copies of a multiple page document.
Telephone Features
■ Automatic dialing
The machine’s 3 automatic dialing methods (One-Touch Speed Dialing, Coded Speed Dialing, and Group Dialing) can be used to store
phone and fax numbers for easy and efficient calling.
■ Connection for the handset, an answering machine, or a telephone
Connecting the handset or a telephone to the machine allows you to use it to make and receive normal telephone calls. In addition,
connecting an answering machine allows you to receive faxes and phone messages while you are away from your desk.
1
Introducing the FAXPHONE L170
The Main Features of the Machine
1-3
Page 23
Using the Machine as a Printer
1
Introducing the FAXPHONE L170
The printer driver that is included with your machine allows you to use the machine’s printing function directly from your PC.
• Use the machine as the default printer for Windows applications
For more information on using the printer driver with your machine, refer to the Software Guide also stored on this
CD-ROM.
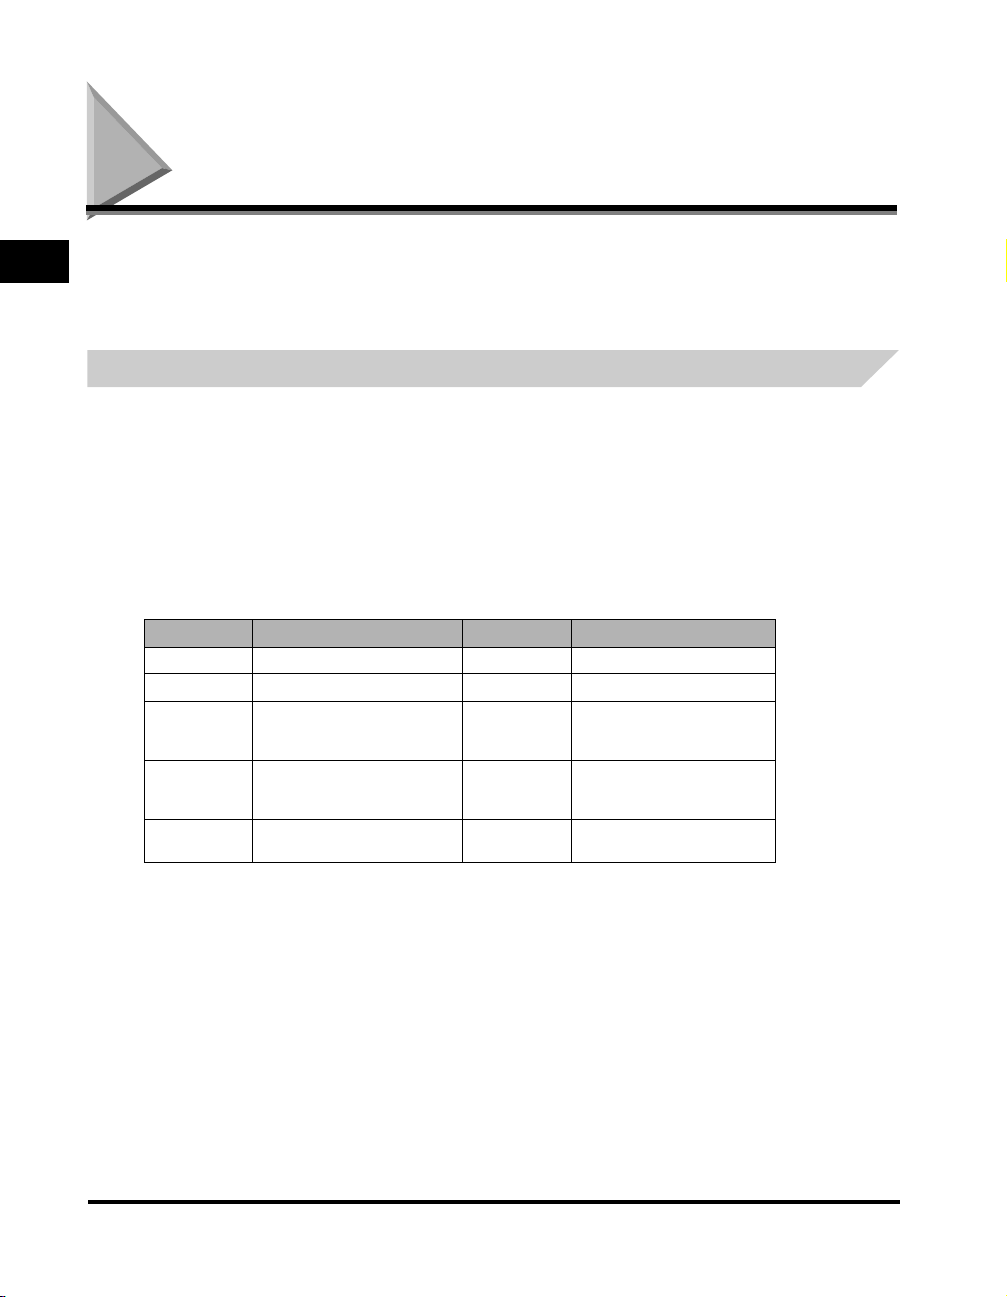
System Requirements
The printer driver for Windows 98/Me/2000/XP can be used in the following system environments.
■ Operating System
Windows 98, Windows Me, Windows 2000, or Windows XP.
■ Computer
Any computer on which Windows 98, Windows Me, Windows 2000, or Windows XP runs properly.
■ Hardware Requirements
•
IBM or IBM-compatible PC
• CD-ROM drive or network environment with the access to CD-ROM
• PC equipped with a USB port and the USB class driver installed
OS CPU RAM Available free disk space
Windows 98 Intel Pentium® 90 MHz or greater 32 MB or greater 100 MB or greater
Windows Me Intel Pentium® 150 MHz or greater 32 MB or greater 100 MB or greater
Windows 2000*
Professional
Windows 2000*
Server
Windows XP*
Intel Pentium® 133 MHz or greater,
or compatible micro processors (up
to 2 processors are supported)
Intel Pentium® 133 MHz or greater,
or compatible micro processors (up
to 4 processors are supported)
Pentium Family®
233 MHz or greater
64 MB or greater 500 MB or greater
128 MB or greater 500 MB or greater
64 MB or greater 500 MB or greater
* Logon as a user account with Administrators’ rights is recommended.
1-4
Using the Machine as a Printer
Page 24

Using Your Documentation
Your machine includes the following documentation to help you learn how to use your machine:
• Set-Up Instructions
This Guide provides basic information on how to set up and use the machine.
• Basic Guide (this Guide)
This Guide provides detailed information on how to use and troubleshoot your machine.
• Software Guide
This Guide (stored in the CD-ROM) describes how to use the machine to print from your PC.
1
Introducing the FAXPHONE L170
Using Your Documentation
1-5
Page 25

1
Introducing the FAXPHONE L170
1-6
Using Your Documentation
Page 26

Setting Up Your Machine
CHAPTER
This chapter tells you how to unpack, assemble, and connect your machine, install the toner cartridge, and load paper-everything you need to
know to get your machine ready to use.
Choosing a Location for Your Machine
Before unpacking your machine, follow these guidelines to choose an appropriate location for the machine.
CAUTION
Please review the information provided in "Safety information" on p. v, to make sure you are installing your machine for safe
use.
• Put the machine in a cool, dry, clean, well ventilated place:
- Make sure the area is free from dust.
- Make sure the location is not affected by extreme temperature fluctuations, and remains between 50°F and 90.5°F (10°
and 32.5°C).
- Make sure the area’s relative humidity is always between 20% and 80%.
• Keep the machine away from direct sunlight.
• If possible, place the machine near an existing telephone outlet, to allow for an easy connection of the telephone line to
the machine.
• Place the machine near an electrical wall outlet that provides 120 V AC (60 Hz) power.
• Place the machine near the PC you will be connecting it to. Make sure you can reach it easily, as you will be using the
machine as a printer, fax machine, copier, and telephone.
• Do not plug the machine into the same circuit as an appliance such as an air conditioner, electric typewriter, television, or
copier. Such devices generate electrical noise that can interfere with your machine’s ability to send or receive faxes.
• Set the machine on a flat, stable, vibration-free surface that is strong enough to support its weight approx. 24.7 lb (11.2
kg).
2
Choosing a Location for Your Machine
2-1
Page 27
Unpacking Your Machine
Follow the directions below to unpack your machine properly, and to make sure you have all of its components and
documentation.
2
Do You Have Everything?
As you unpack the machine, save the car ton and packing material in case you want to move or ship the machine in the
future.
Carefully remove all items from the box. You should have someone help by holding the box while you lift the machine and
its protective packaging out of the carton.
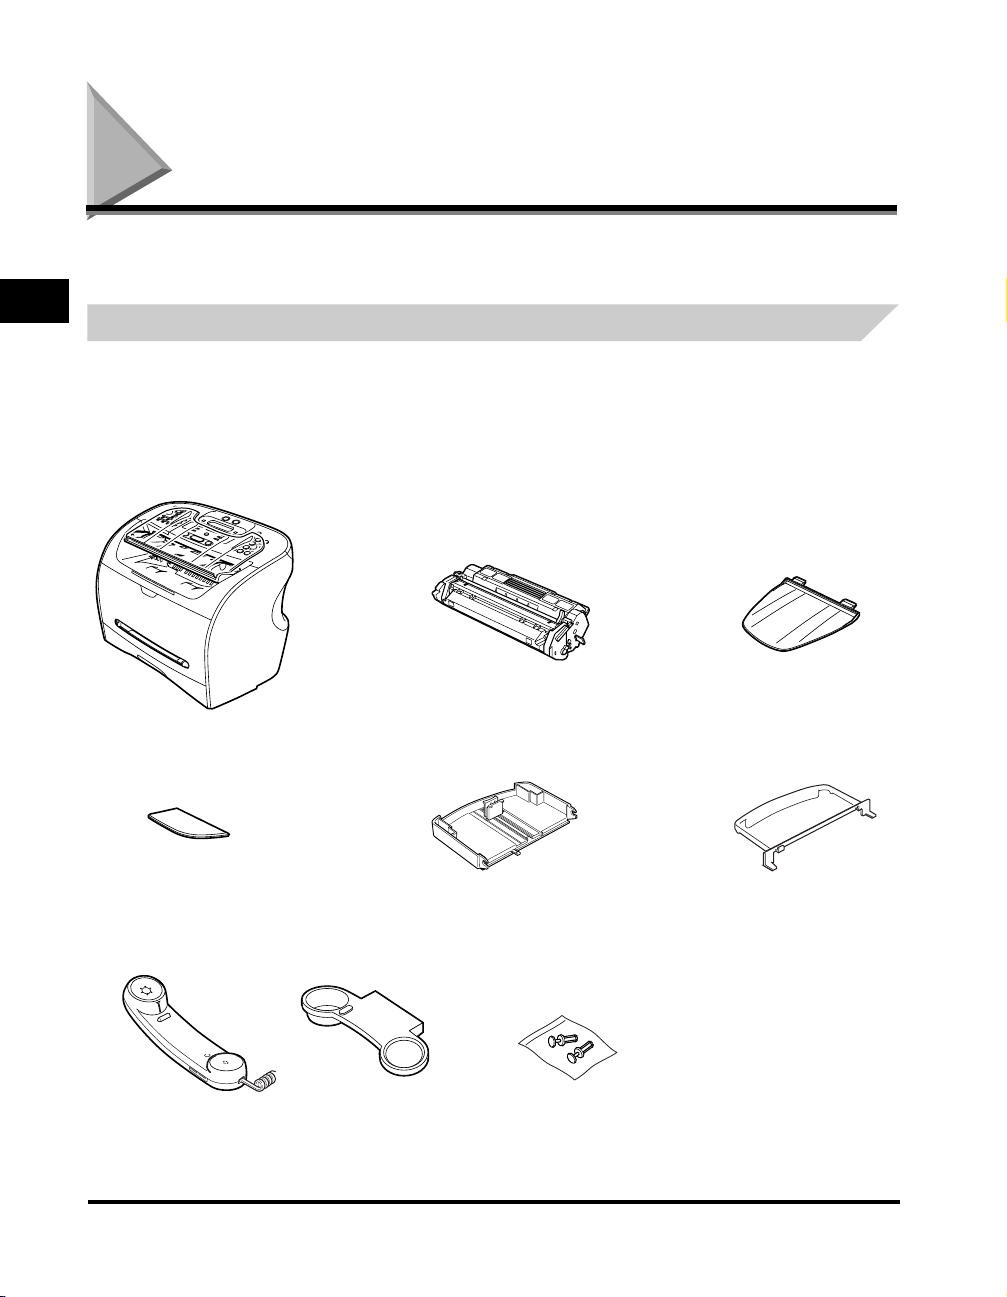
Make sure you have the following items:
Setting Up Your Machine
• Machine • S35 S-Cartridge • Document output tray
• Output tray • Cassette extension • Extension cover
• Power cord
• Telephone line cord
• Documentation
• Handset • Plugs with pins• Handset cradle
If any of the above items are damaged or missing, notify your local authorized Canon dealer immediately.
2-2
Unpacking Your Machine
• FAXPHONE L170 Software CD-ROM
Set-Up Instructions
Basic Guide
Warranty
Warranty for S35 Cartridge
Registration Card (for USA only)
Page 28

NOTE
•
The actual items may differ in shape and quantity from t he one shown on p. 2-2.
•
Note that the items included with your machine may vary depending on the country of purchase.
•
Important! Save your sales receipt for proof of purchase in case your machine requires warranty service.
•
In addition to the items shipped with your machine, if you wish to use the machine as a printer, you will need a USB cable, which you can
purchase from your Canon dealer. For best results, use a cable that is no more than 5 meters long.
Removing Shipping Materials
In order to protect your machine during shipping, the machine has been packed with protective material that you must
remove before using. Follow these steps:
NOTE
The actual shipping materials may differ in shape, quantity, and position from the ones shown in the illustrations below.
1
Remove all pieces of shipping tape from the exterior of the machine.
2
Open the document feeder tray by flipping it down.
2
3
Open the operation panel by grasping it at the center and gently pulling it up.
Remove protective sheet from the Automatic Document Feeder (ADF), then gently close the operation panel by pressing it
down until it clicks.
Replaceable Parts
The only component of the machine that needs regular ser vice or replacement is the S35 Car tridge.
The S35 S-Cartridge comes with your machine but you should purchase the regular S35 Cartridge for replacement.
Although Canon manufactures many types of toner cartridges, the S35 Cartridge is the only one designed to be used with
your machine. The S35 Car tridge can be purchased at any Canon authorized dealer.
Setting Up Your Machine
Unpacking Your Machine
2-3
Page 29
Assembling the Machine
Use the following instructions to assemble the main unit and its components. To see how the machine will look fully
assembled, see “Getting Acquainted With Your Machine,” on p. 2-9.
2
Attaching Components
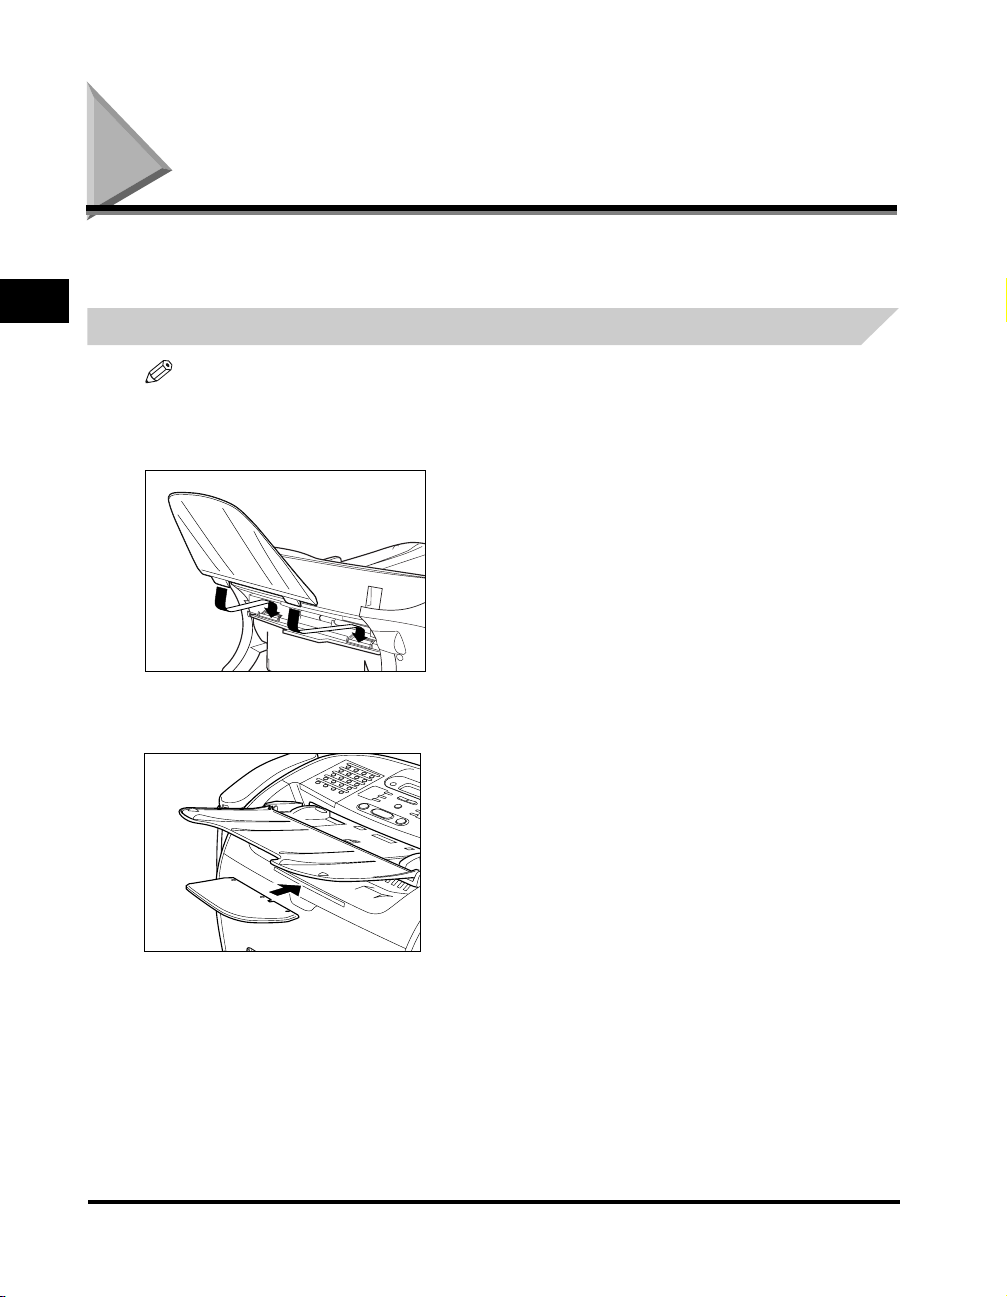
NOTE
Make sure the tabs are inserted into the slot completely.
Document Output Tray
Insert the tabs into the slots on the back of the machine.
Setting Up Your Machine
Output Tray
Insert the tray into the corresponding slots.
2-4
Assembling the Machine
Page 30
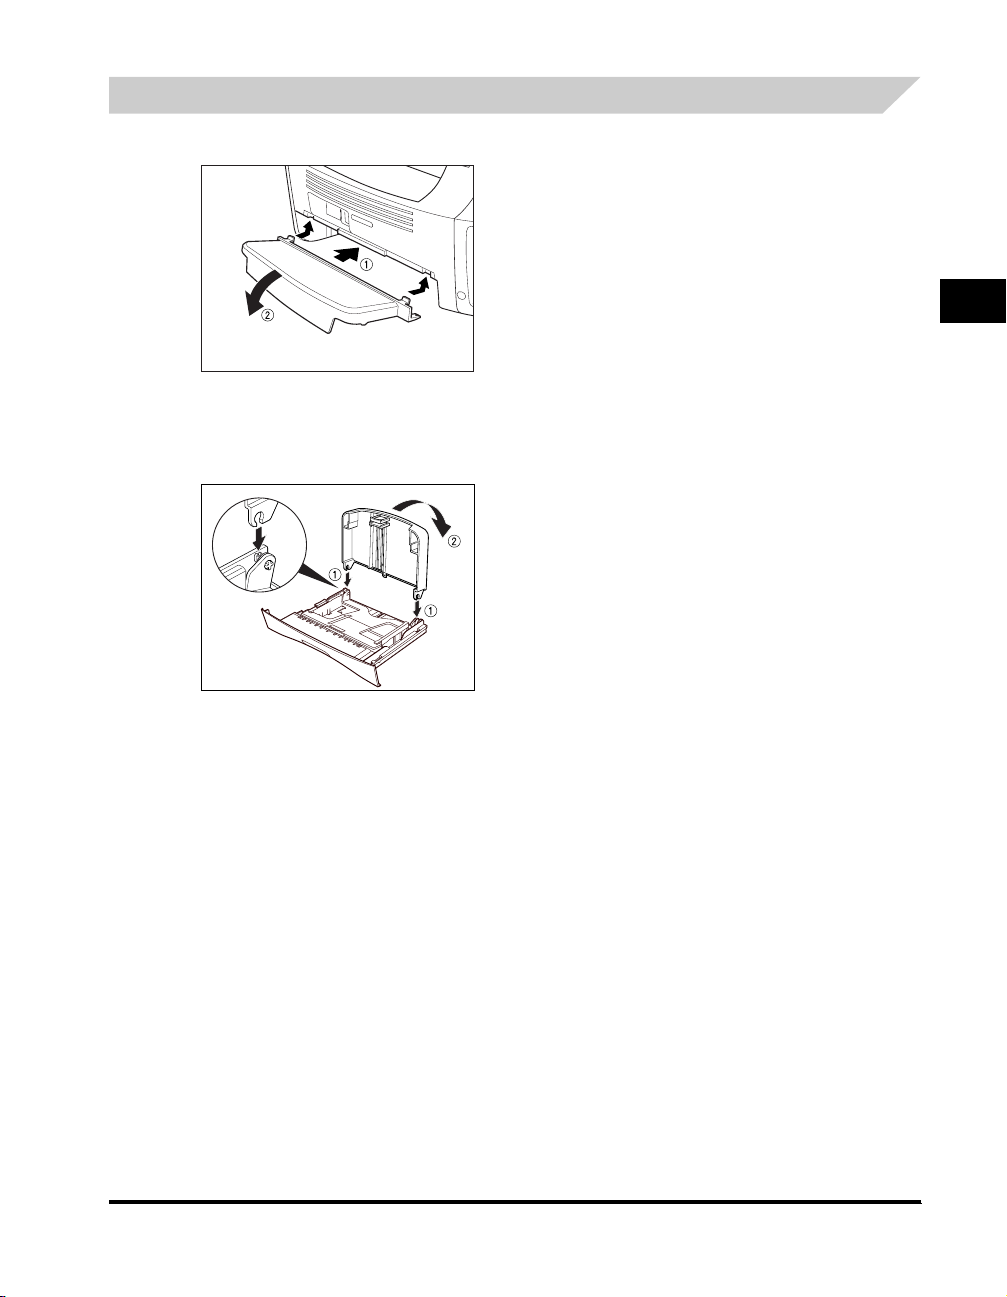
Installing the Paper Cassette
1
Attach the extension cove r on the back of the machine .
2
Pull out the paper cassette.
3
Attach the cassette extension to the cassette.
2
Setting Up Your Machine
4
Insert the paper cassette into the machine.
Assembling the Machine
2-5
Page 31

Making Connections
NOTE
•
Be sure to connect any external device before using your machine.
•
2
Connecting the Machine to Your PC
Setting Up Your Machine
Canon cannot guarantee that all answering machines will be compatible with your machine, due to varying specifications.
•
If you have connected an external device to your machine, be sure to set the correct receive mode. (See Chapter 7, “Receiving Faxes.”)
•
To connect an extension phone as well as an answering machine, connect the extension phone to the answering machine, and then the
answering machine to your machine.
•
If you connect a data modem to your machine and you use it extensively, or others access your PC frequently through the data modem,
you may want a dedicated telephone line for your data modem.
Your machine has a USB port that allows you to connect it to a PC. To do this, you need to purchase a USB cable from your
dealer.
NOTE
For best results, use a cable that is 5 meters in length or shorter.
Connect the machine to your computer as follows:
1
Make sure the computer is turned off and the machine is unplugged.
2
Connect the USB cable to your machine and PC during software installation to ensure the proper operation of the printer driver.
(See the Software Guide.)
2-6
Making Connections
Page 32
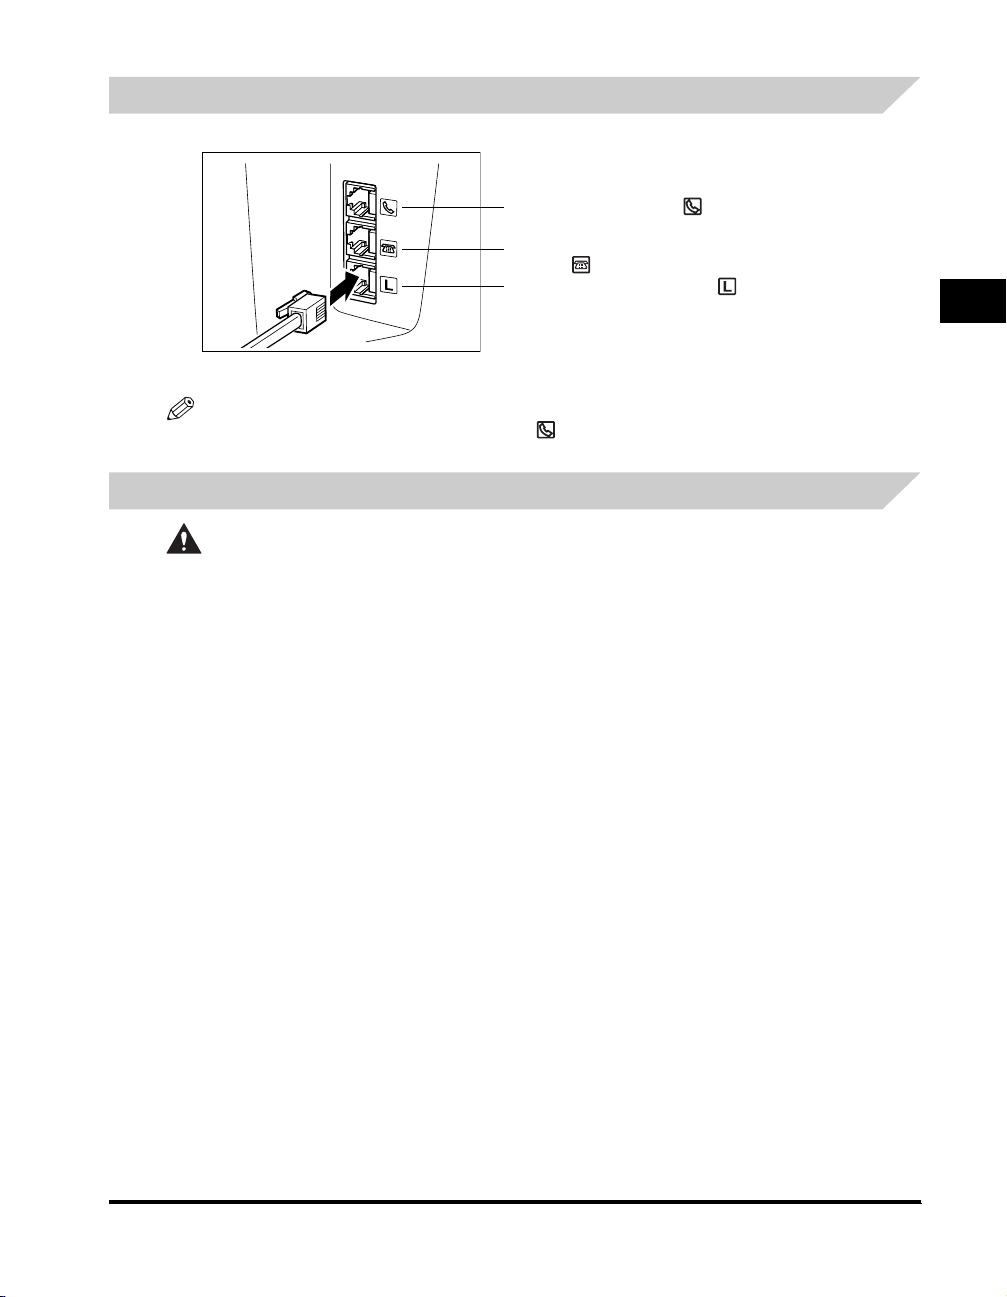
Connecting the Telephone Line
Connect the telephone line to the jack on the left side of the machine:
Connect the optional handset to .
Connect an extension phone or answering
machine to .
Connect the supplied telephone line to .
Connect the other end of line to a wall telephone jack.
If you connect an answering machine to the machine, be sure to read your answering machine’s manual.
NOTE
You can also connect t he extension phone to the jack marked if you have not connected the handset.
2
Connecting the Power Cord
CAUTION
Follow these guidelines when connecting your machine to a power source:
- The machine is intended for domestic use only and requires 120 V AC. Do not use it outside the country where it was
purchased.
- Use only the power cord that came with the machine. Using a longer cord or extension cord can cause the machine to
malfunction.
- Unplug the machine only by pulling on the plug itself. Never pull on the cord.
- Do not plug the machine into an outlet shared with an appliance such as an air conditioner, computer, electric typewriter,
or copier. These devices generate electrical noise, which can interfere with the operation of the machine.
- Make sure nothing is laying on the power cord, and that the cord cannot be walked on or tripped over.
- Do not overload the electrical outlet. Make sure the total amperage used by all the machines plugged into the outlet does
not exceed the ampere rating of the outlet’s circuit breaker.
- Do not plug the machine into an uninterruptible power supply (UPS).
Setting Up Your Machine
Making Connections
2-7
Page 33
2
Setting Up Your Machine
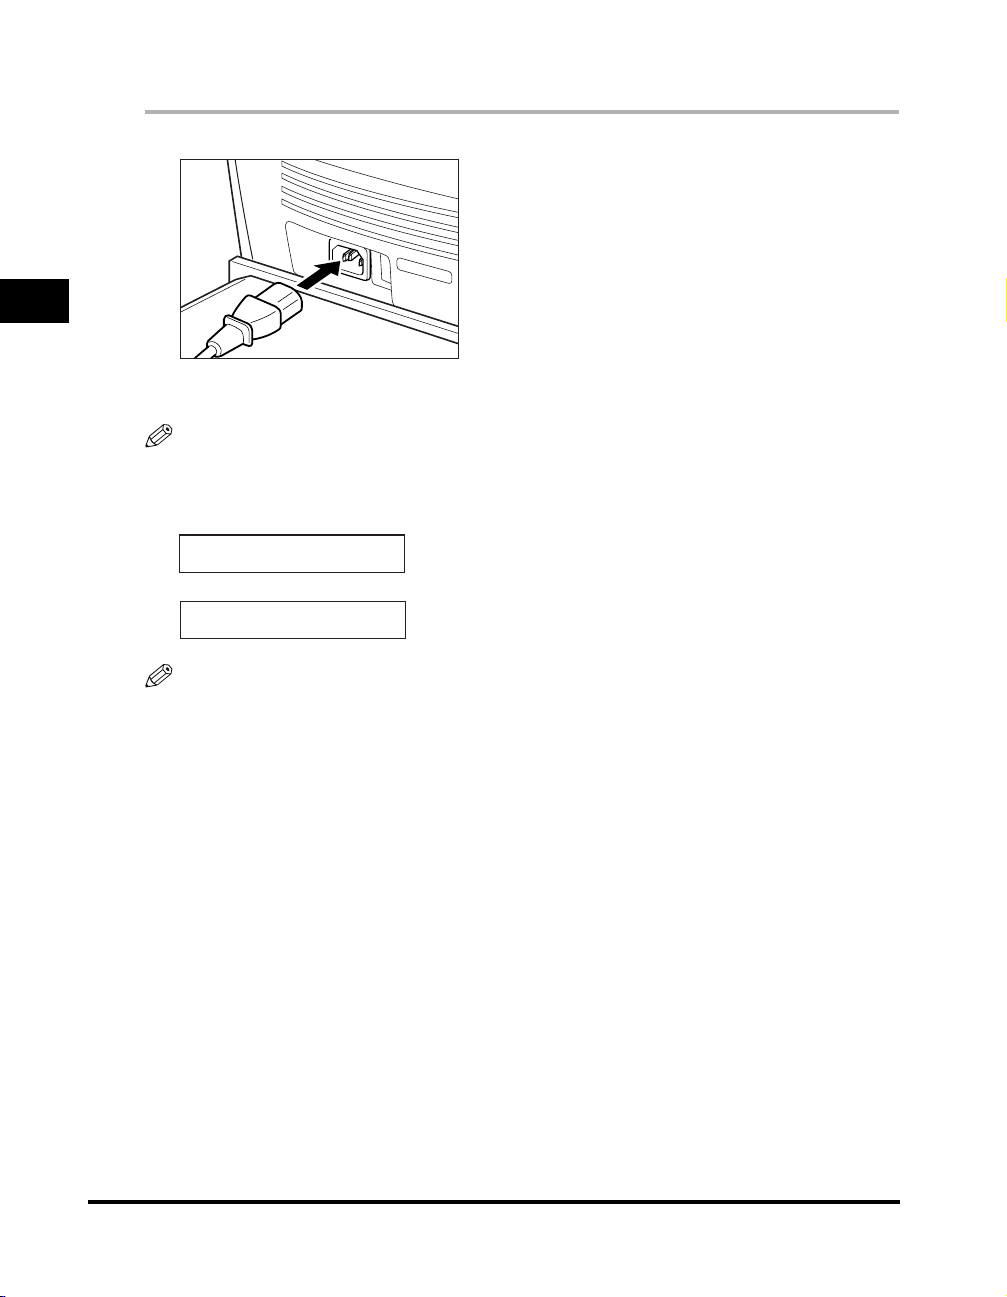
Connect the power cord as follows:
1
Plug the supplied power cord into the power connector on the back of the machine.
2
Plug the other end of the power cord into the outlet.
NOTE
The machine has no power switch, so its power is on as long as it is plugged in. Once connected, though, the machine still needs to warm
up before you can use it.
While the machine is warming up, the message <PLEASE WAIT> appears in the LCD display:
PLEASE WAIT
12/31/2004 WED 15:11
FaxOnly STANDARD
2-8
NOTE
If the toner cartridge has not been install ed yet, the message <INSTALL CARTRIDGE> appears in the LCD display, and the Alarm
indicator flashes. In this case, install the toner car tridge. (See “Installing/Replacing the Toner Cartridge,” on p. 2-16.)
Making Connections
Page 34

Getting Acquainted With Your Machine
Before using your machine, look over the diagrams on these pages to become familiar with the machine’s components.
Front View
2
Setting Up Your Machine
a Document feeder tray
Place documents to be faxed or copied.
b ADF (Automatic Document Feeder)
Holds documents and feeds them automatically into the scanning machine.
c Document out put tray
Documents come out here.
d Slide guides
Adjust to the width of documents.
e Operation panel
Controls the machine.
f Output tray
Holds printout. Received faxes.
g Printer cover
Open it when you install the car tridge, or remove jammed paper.
h Multi-purpose feeder
Used when printing paper one by one manually.
i Cassette
Holds the paper supply.
Getting Acquainted With Your Machine
2-9
Page 35
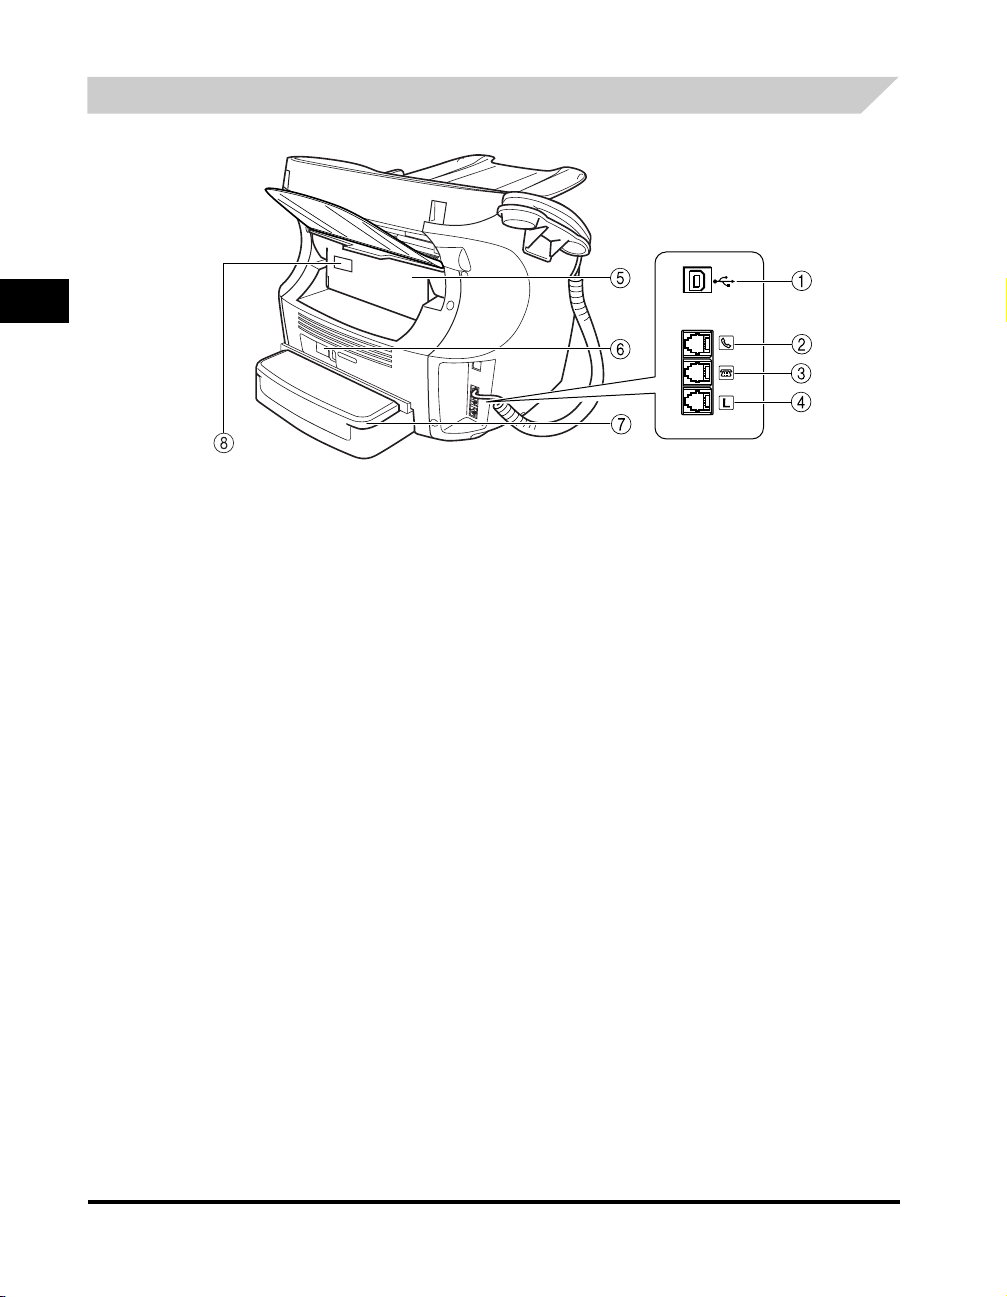
Rear View
2
a USB port
Setting Up Your Machine
Connect the USB (Universal Serial Bus) cable.
b Handset jack
Connect the handset.
c Extension phon e jack
Connect an extension phone.
d Telephone line jack
Connect the telephone cable.
e Face up cover
Open it when you output paper face up, or remove jammed paper.
f Power socket
Connect the power cord.
g Extension cover
Protects paper supply in the cassette from dirt and dust.
h Machine Serial Number
2-10
Getting Acquainted With Your Machine
Page 36

The Operation Panel
l
2
a Menu button
Use this button to customize the operation of the machine.
b In Use/Memory indicator
Lights when the telephone line is used or a document has been received in
memory.
c LCD display
The LCD display shows messages and prompts while you use the machine.
d COPY button
Use this button to switch standby display to Copy mode.
e FAX button
Use this button to switch standby display to Fax mode.
f Alarm indicator
This indicator flashes when an error occurs, or when the machine is out of paper
or toner.
g Status Monit or button
Use this button to check the status of copy, fax, print and report jobs.
h Energy Saver button
Use this button to set or cancel the energy saver mode manually. The button
lights green when the energy saver mode is enabled.
i Numeric buttons
Use these buttons to enter numbers and names whe n registering information,
and to dial fax/telephone numbers.
j Tone button
Use this button to use tone dialing temporarily when your ma chine i s set for
pulse dialing.
k Enlarge/Redu ce button
Use this button to set an enlargement or reduction ratio of a copy.
l Exposure button
Use this button to adjust the copy exposure.
m Image Quality button
Use this button to select the resolution the machine will use for the document
you want to fax, or copy.
n Stop/Reset button
Use this button to cancel sending or receiving faxes and other operations, and
bring back the standby display in the LCD.
o (-), (+) button
Use this button to scroll through the selections.
p Set button
Use this button to register your settings. Also, if the document being scanned
stops in the ADF, pressing this button makes the document come out
automatically.
q Start button
Use this button to begin faxing, or copying.
r Hook button
Use this button to dial, even with the hands et still in the handset cradle.
s Directory button
Use this button to look up fax/telephone numbers registered for speed dialing.
t Co ded Dial button
Use this button to dial a fax/telephone number that you have registered for
Coded Speed Dialing.
u Redial/Pause button
Use this button to redial the last number that was dialed using the numeric
buttons, or to enter pauses in a fax number.
v One-Touch Speed Dial buttons
Use these buttons for One-Touch Speed Dialing.
w One-Touch Speed Dial panel
Open this panel to access the spec ial function buttons.
Setting Up Your Machine
Getting Acquainted With Your Machine
2-11
Page 37
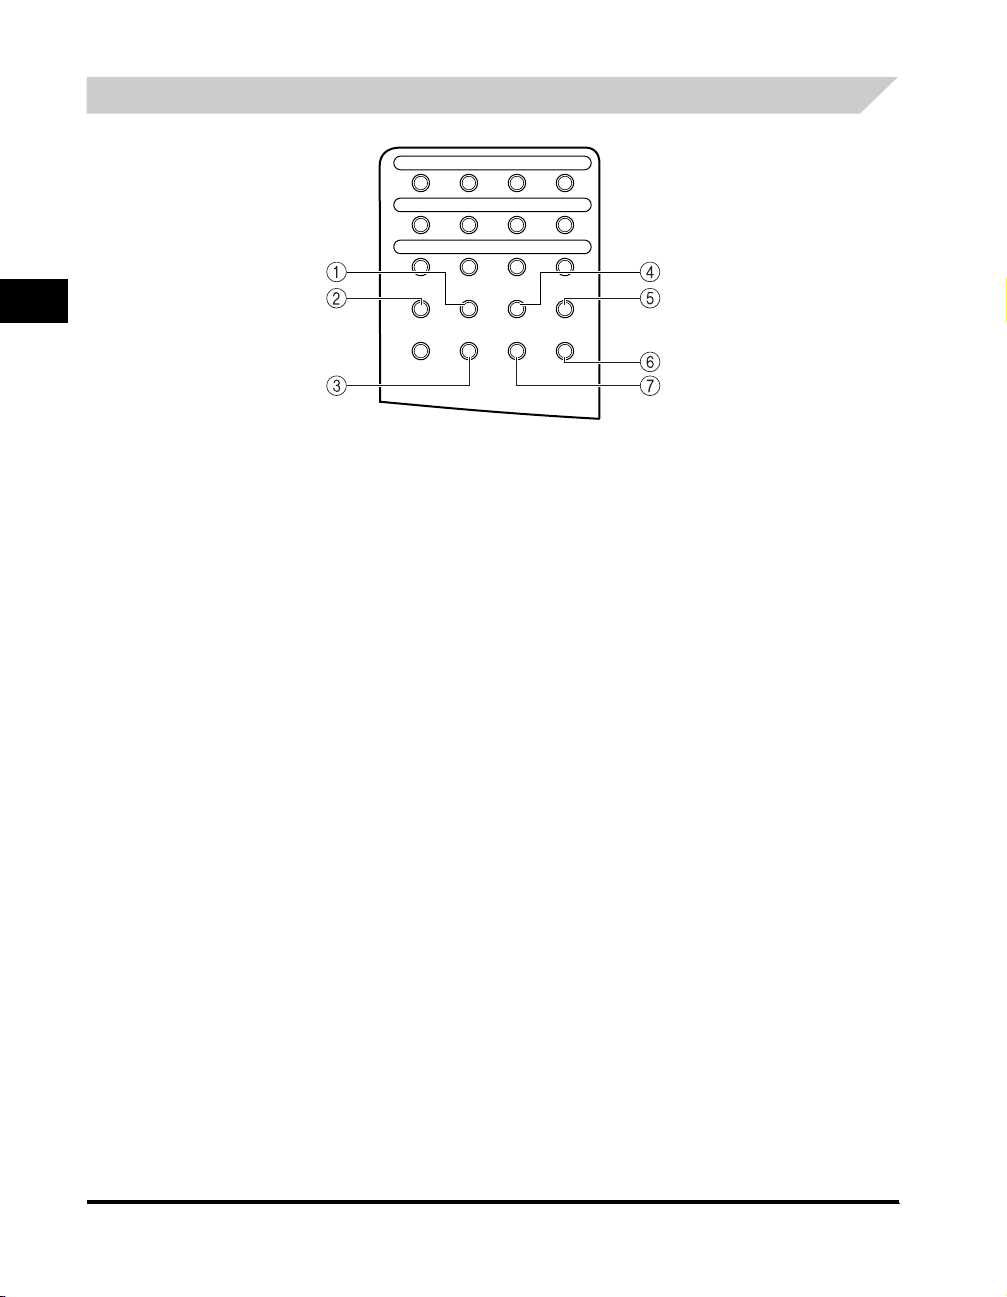
Special Function Buttons (One-Touch Speed Dial Panel Open)
22
21
24
23
2
a Re port button
Use this button to print activity reports.
b Receive Mode button
Setting Up Your Machine
Use this button to select the receive mode fo r receiving faxes.
c Space button
Use this button to enter a space between letters and numbers when you are
registering information.
25
29
Receive
Report
Mode
Space Delete Clear
282726
31 3230
Delayed
Polling
Transmission
d Delayed Transmis sion button
Use this button to register a time for delayed sending.
e Polling button
Use this button to set a document for polling sending, and to poll the other fax to
receive a document.
f Clear button
Use this button to clear an entire entry during information registration.
g Delete button
Use this button to delete characters one by one.
2-12
Getting Acquainted With Your Machine
Page 38

Handset
a Ringer Volume Switch
Adjust the volume of the ringer. Use a pen or another pointed object to adjust the switch to ‘High’, ‘Low’, or ‘OFF’.
b Speaker Volume Switch
Adjust the volume of the handset so you can hear suitable from the speaker.
2
Setting Up Your Machine
Getting Acquainted With Your Machine
2-13
Page 39

Energy Saver Mode
The machine provides an energy saver function. When no operations are performed for about 5 minutes, the machine
automatically enters the energy saver mode.
2
Setting Up Your Machine
NOTE
•
The time until the machine enters the energy saver mode can be specified in a range of 3 minutes to 30 minutes. You can also turn off the
energy saver function. (See Chapter 15, “The Menu System.”)
•
The energy saver function does not activate when the machine is in the following status:
- When printing out copies, faxes or other pages
- When sending or receiving faxes
- While a copy job is saved in memor y or when the reserve copy or other functions are operating, or when the In Use/Memory indicator
lights up
- When paper jams occur
- When an error code appears and the Alarm indicat or flashes
- When no paper is loaded in the cassette
Setting the Energy Saver Mode Manually
1
Press [Energy Saver].
The LCD is turned off and [Energy Saver] lights up.
NOTE
Right after the machine is restored from the energy saver mode, or right after copying finishes, wait about 2 seconds before pressing
[Energy Saver].
Restoring from the Energy Saver Mode
1
Press [Energy Saver].
[Energy Saver] goes off and the machine enters standby mode.
NOTE
The machine can be restored from the energy saver mode immediately. However, it may vary according to room temperature and
circumstances.
2-14
Energy Saver Mode
Page 40
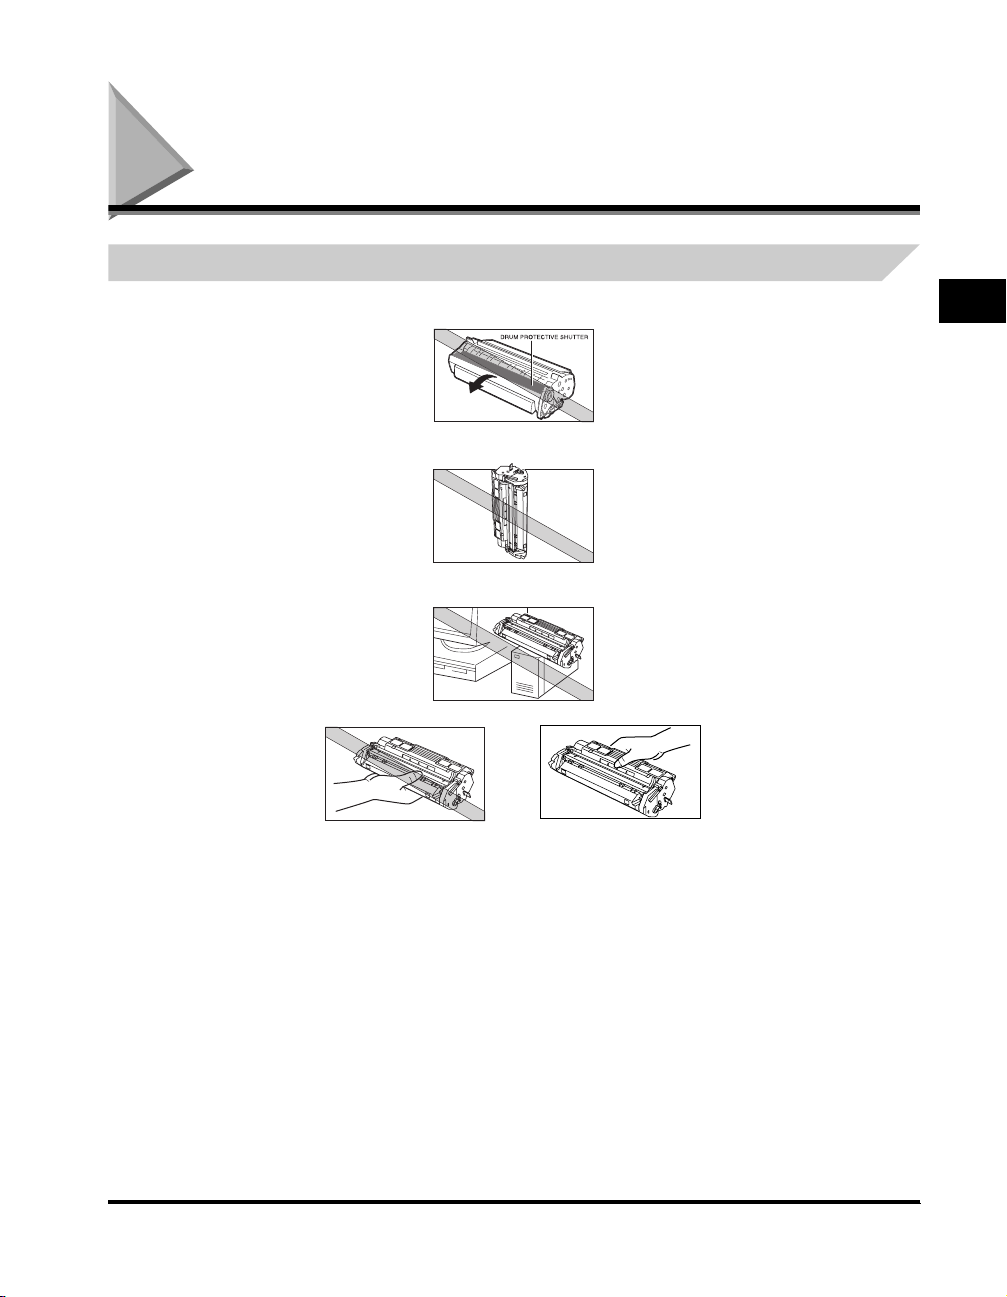
The Toner Cartridge
Handling and Storing Cartridges
• Do not open the drum protective shutter on the cartridge. If the drum surface is exposed to light and damaged, print
quality may deteriorate.
• Do not stand the car tridge on end, and do not turn it upside down. If toner becomes caked in the cartridge, it may prove
impossible to free it even by shaking the cartridge.
• Keep the cartridge away from computer screens, disk drives, and floppy disks. The magnet inside the cartr idge may harm
these items.
HDD
• When holding the cartridge never touch the drum protective shutter with your hands.
2
Setting Up Your Machine
The Toner Cartridge
2-15
Page 41

• Do not expose the car tridge to direct sunlight or bright light for longer than 5 minutes.
• Do not store the cartridge in direct sunlight.
• Avoid locations subject to high temperature, high humidity, or rapid changes in temperature. Store the cartridge between
32° and 95°F ( 0° and 35°C).
• Hold the car tridge as shown so that your hand is not touching the drum’s protective shutter.
• Store the car tridge in its protective bag. Do not open the bag until you are ready to install the car tridge in the machine.
• Save the protective bag. You may need to repack and transport the cartridge at a later date.
• Do not store the cartridge in salty air or where there are corrosive gases such as from aerosol sprays.
• Do not remove the car tridge from the machine unless necessary.
• Be sure to remove the toner cartridge from the machine when disposing of the machine.
2
Setting Up Your Machine
CAUTION
DO NOT PLACE THE CARTRIDGE IN FIRE. TONER POWDER IS FLAMMABLE.
Installing/Replacing the Toner Cartridge
The machine uses a Canon S35 Cartridge. The procedure on the next page explains how to install the cartridge for the first
time, and how to replace it when the toner runs out.
When the message <REPLACE CARTRIDGE> appears, the toner in the cartridge may simply be unevenly distributed.
Before replacing the car tridge, follow the instructions on p. 2-17 to evenly distribute the toner. If after doing this the
message remains displayed or the print quality is low, replace the cartridge as described below.
NOTE
The S35-S is a starter cartridge that comes with your machine and yields approx. 2,500 page of pri ntouts, while the S35 cartridge you
purchase can yield approx. 3,500 page of printouts.
1
Remove any documents and/or printed pages from the machine.
2
Make sure the machine is plugged in.
3
Remove the cartridge from the bag. Keep the bag in a safe place for future use.
2-16
The Toner Cartridge
Page 42
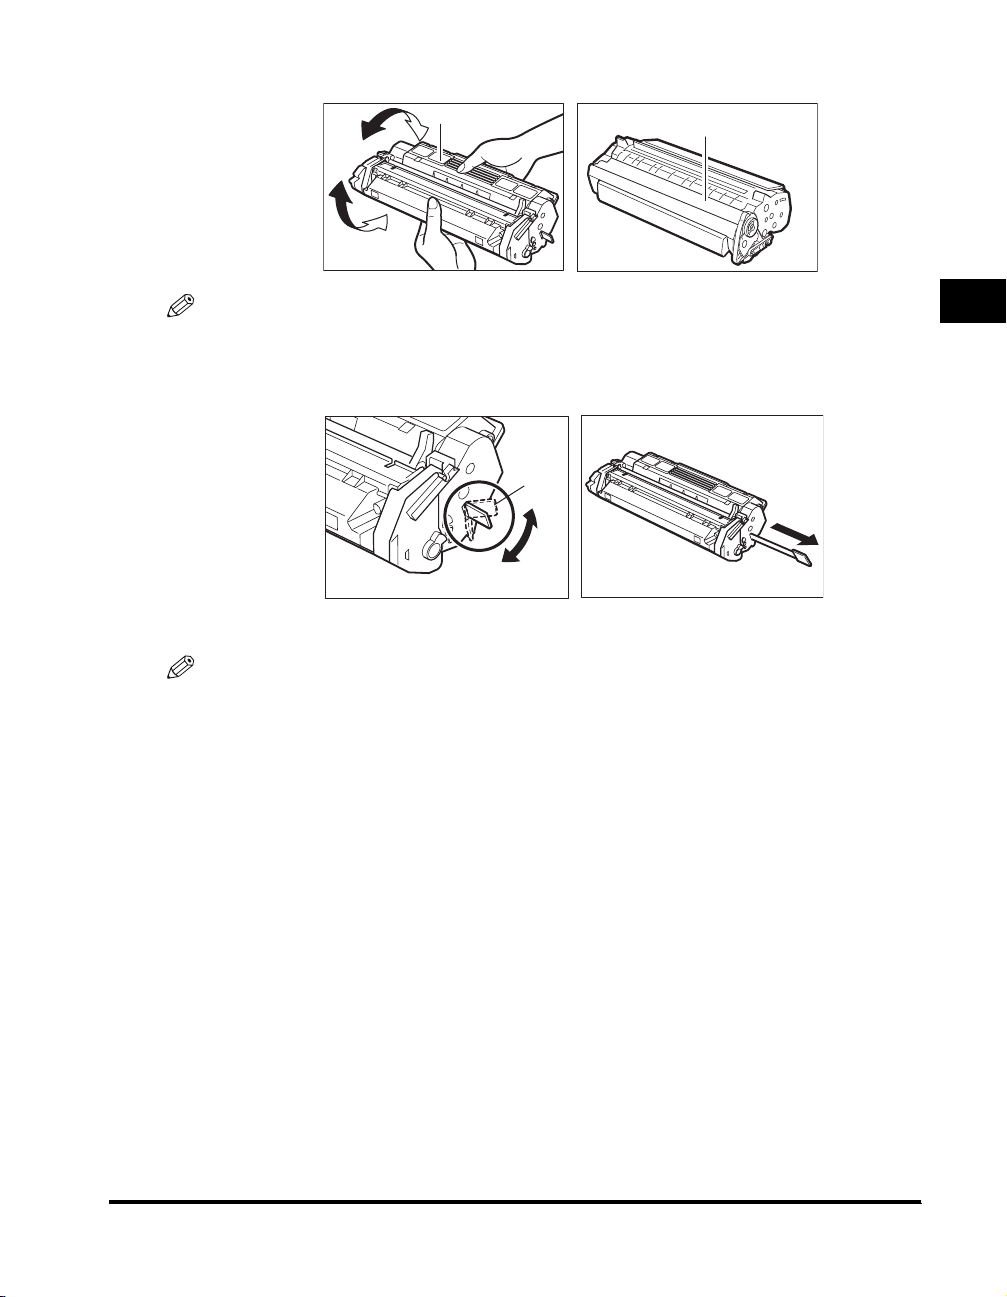
4
Gently rock the cartridge several times to evenly distribute the toner inside.
INSTRUCTIONS
DRUM PROTECTIVE SHUTTER
NOTE
Always hold the cartridge as shown so that the side with the instructions are facing upward. Do not forcefully move or push the protective
shutter of the drum in any way.
5
Hold the cartridge on a flat stable surface with one hand, and break the tab and pull out the seal completely with the other hand.
TAB
6
Open the printer cover.
NOTE
If you are replacing the old car tridge with the new one, remove the old car tridge from the machine. Then, discard t he old toner cartr idge
immediately according to the local laws and regulations for disposal of consumables.
2
Setting Up Your Machine
The Toner Cartridge
2-17
Page 43

2
Setting Up Your Machine
7
Hold the cartridge and position the arrow mark on the cartridge towards the inside of the machine as shown below.
8
Align the projections on both sides of the cartridge to the guides in the machine and slide the cartridge completely into
the machine.
9
Close the printer cover.
2-18
The Toner Cartridge
Page 44
Registering Information in the Machine
This chapter describes how to enter information in your machine.
Guidelines for Entering Information
The following section explains how to enter user information into the machine.
NOTE
If you pause while entering informati on and do not make an entry for more than 60 seconds, the machine returns to standby mode and
loses all information you had entered up t o that point. You will then have to start again.
The time until the machine returns to the standby mode can be specified in a range of 1 minute to 9 minutes. You can also turn off AUTO
CLEAR function. (See Chapter 15 “The Menu System.”)
Entering Numbers, Letters, and Symbols
Each numeric button has a number and a group of uppercase and lowercase letters assigned to it. Use the chart below to
determine which numeric button to press for each character.
3
CHAPTER
Button
1
2 ABCabc 2
3 DEFdef 3
4 GHIghi 4
5 JKLjkl 5
6 MNOmno 6
7
8
9
00
#
– . # ! “ , ; : ^ _ = / | ’ ?
$ @ % & + \ ( ) [ ] { } < >
Follow this procedure when you come to a step that requires you to enter a name or number.
@ . – _ / 1
PQRSpqrs 7
TUVtuv 8
WXYZwxyz 9
Number ModeLetter Mode
Guidelines for Entering Information
3-1
Page 45

1
Press [ ] to switch to the letter mode (:A) or the number mode (:1).
You can see what mode you are in by the character indicated on the top right corner of the LCD display.
:A
_
2
Use the numeric buttons to enter the letter or number.
Press the button repeatedly until the letter or number you want appears.
● To enter two letters or symbols that are under the same button:
❑
3
Press the numeric button ➞ [ (+)] ➞ press the same numeric button again.
For example, to enter <DD> you would press [3] ➞ [(+)] ➞ [3].
● To enter a space:
❑
Press [Space] under the One-Touch Speed Dial panel.
● To delete a character:
❑
Press [Delete] under the One-Touch Speed Dial panel.
● To delete an entire entry:
❑
Press [Clear] under the One-Touch Speed Dial panel.
Registering Information in the Machine
3-2
Guidelines for Entering Information
Page 46
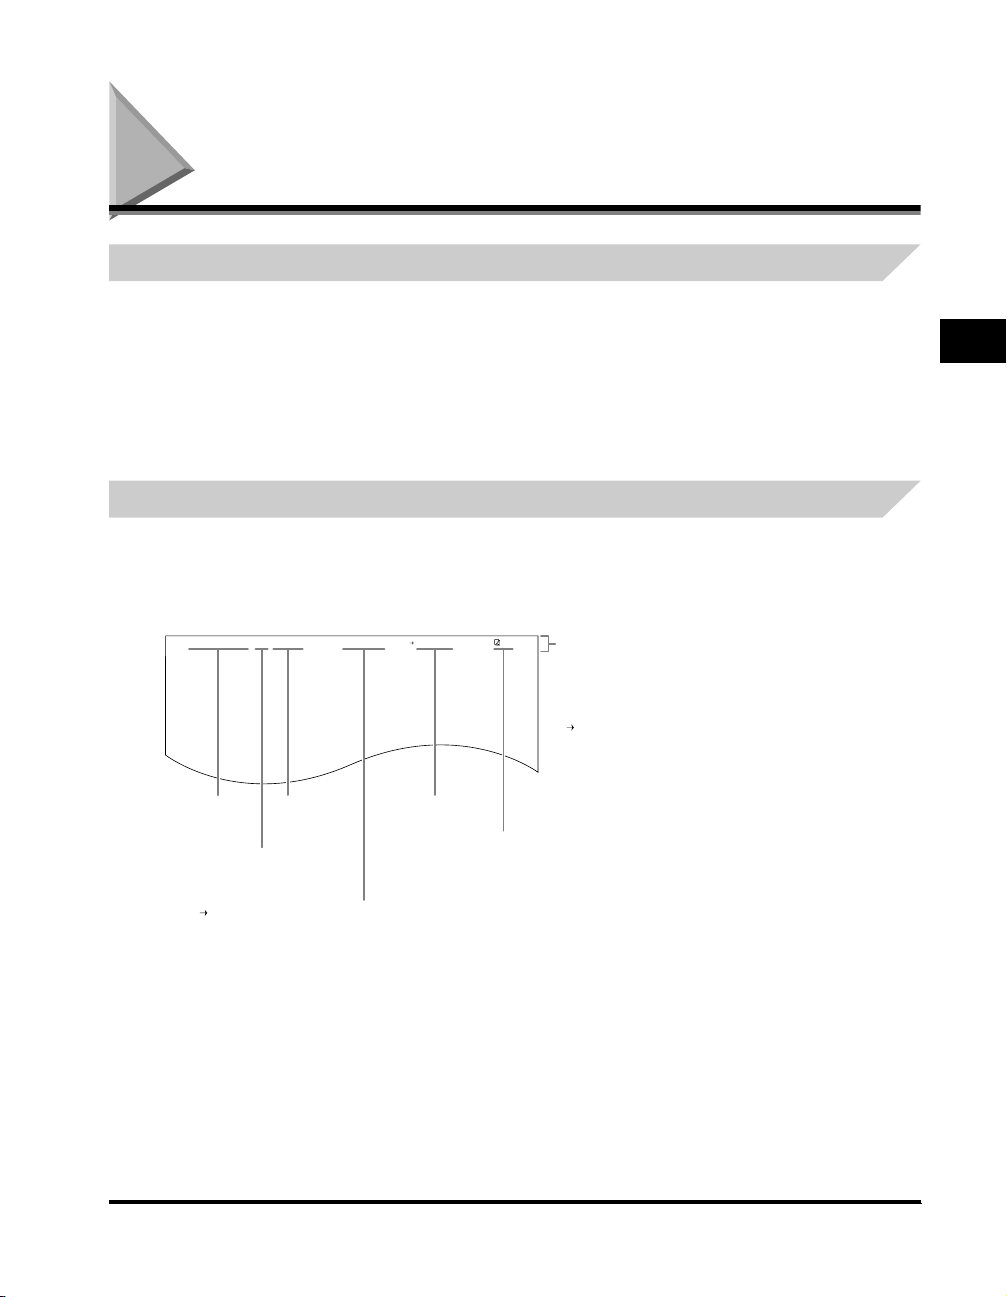
Personalizing Your Machine
Registering Required Sender Information
In the United States, FCC rules governing the use of facsimile equipment state that the following sender information must
be printed on every facsimile transmission:
• Your fax number
• Your personal name or company name
• The time and date of transmission
Your machine has been designed to print this information at the top of every fax you send. You must therefore register your
machine’s telephone/fax number, your personal name or company name, and the current date and time before using your
machine. This section gives details on registering your sender information.
What is Sender Information?
When you receive a fax, the name of the person or company who sent you the fax, their fax/telephone number, and the date
and time of transmission will be printed in small type at the top of each page. This information is called the Sender
information or the Transmit Terminal Identification (TTI). You must register your details in your machine so that whenever
you send a fax, the other par ty knows who sent it, and when it was sent. Below is an example of how your sender
information would print on a fax sent from your machine:
12/26/2004 10:12 FAX 123 4567 YOUR NAME RECEIVER 001
THE SLEREXE COMPANY LIMITED
SAPORS LANE•BOOLE•DORSET•BH25 8ER
TELEPHONE BOOLE (945 13) 51617 – FAX 123456
Our Ref. 350/PJC/EAC
You can select
if the sender
information is
printed inside
or outside the
image area
( TTI
POSITION,
p. 15-6).
3
Registering Information in the Machine
Date and time
of transmission.
You can select if
FAX or TEL is
displayed before
the number
( TEL NUMBER
MARK, p. 15-6).
Your fax or
telephone
number.
Your name or
company name.
Receiver’s name
appears here if
you used memory
sending and
dialed their fax
number using
speed dialing.
The page
number of
the fax.
To enter the sender information in your machine, follow the procedures on the following pages.
Personalizing Your Machine
3-3
Page 47

Entering the Date and Time
Follow this procedure to enter the date and time:
1
Press [Menu].
2
Press [ (-)] or [ (+)] to select <7.TIMER SETTINGS> ➞ press [Set] twice.
3
Use the numeric buttons to enter the date (month/day/year) and time (in 24-hour format) ➞ press [Set].
3
DATE/TIME SETTING
12/31 ’04 15:10
Enter only the last 2 digits of the year.
4
Press [Stop/Reset] to return to standby mode.
TIMER SETTINGS
➞
2.AUTO CLEAR
Registering Your Fax Number and Name
Follow this procedure to register your fax/telephone number and name:
1
Press [Menu].
Registering Information in the Machine
3-4
2
Press [ (-)] or [ (+)] to select <4.FAX SETTINGS> ➞ press [Set] four times.
3
Use the numeric buttons to enter your fax/telephone number (max. 20 digits, including spaces) ➞ press [Set].
USER TEL NO.
123xxxxxxx
To enter a plus sign (+) before the number, press [#] repeatedly until it appears.
For details on how to enter or delete numbers, see “Entering Numbers, Letters, and Symbols,” on p. 3-1.
4
Press [Menu] ➞ [ (-)] or [ (+)] to select <2.UNIT NAME> ➞ press [Set].
5
Use the numeric buttons to enter your name (max. 24 characters, including spaces) ➞ press [Set].
:A
Canon
For details on how to enter or delete characters, see “Entering Numbers, Letter, and Symbols,” on p. 3-1.
6
Press [Stop/Reset] to return to standby mode.
Personalizing Your Machine
TEL LINE SETTINGS
➞
2.TEL LINE TYPE
USER SETTINGS
➞
3.TX TERMINAL ID
Page 48

Setting the Telephone Line Type
Use this procedure if you need to change the telephone line setting. <TOUCH TONE> is set as the default setting.
If you are unsure which setting to use, contact your local telephone company.
Follow this procedure to set the telephone line type:
1
Press [Menu].
2
Press [ (-)] or [ (+)] to select <4.FAX SETTINGS> ➞ press [Set] three times.
3
Press [ (-)] or [ (+)] to select <2.TEL LINE TYPE> ➞ press [Set].
4
Press [ (-)] or [ (+)] to select the telephone line type ➞ press [Set].
TEL LINE TYPE
TOUCH TONE
You can select from the following:
- <TOUCH TONE> for tone dialing
- <ROTARY PULSE> for pulse dialing
5
Press [Stop/Reset] to return to standby mode.
TEL LINE TYPE
➞
3.TX START SPEED
Setting the Daylight Saving Time
This machine supports the daylight saving time system that shifts the clock time ahead or back according to the change in
seasons. You can select whether the time information in your machine changes to match the daylight saving time system
and set the day and time when the daylight saving time starts and ends.
1
Press [Menu].
2
Press [ (-)] or [ (+)] to select <7.TIMER SETTINGS> ➞ press [Set].
3
Press [ (-)] or [ (+)] to select <5.DAYLGHT SAV TIME> ➞ press [Set].
4
Press [ (-)] or [ (+)] to select <ON> to enable the daylight saving time setting or <OFF> to disable it ➞ press [Set].
If you selected <ON>, go to step 5.
If you selected <OFF>, go to step 12.
3
Registering Information in the Machine
5
Press [Set] twice.
6
Press [ (-)] or [ (+)] to select the month in which the daylight saving time starts ➞ press [Set] twice.
MONTH
APRIL
WEEK
➞
FIRST WEEK
Personalizing Your Machine
3-5
Page 49

7
Press [ (-)] or [ (+)] to select the week in which the daylight saving time starts ➞ press [Set] twice.
You can select from the following:
-<
FIRST WEEK
-<
SECOND WEEK
-<
THIRD WEEK
-<
FOURTH WEEK
-
<LAST WEEK>
WEEK
SECOND WEEK
8
Press [ (-)] or [ (+)] to select the day of the week on which the daylight saving time starts ➞ press [Set] twice.
DAY
3
Registering Information in the Machine
SUNDAY
9
Use the numeric buttons to enter the time at which the daylight saving time compensation is made ➞ press [Set] three times.
Use the 24-hour format for the time (e.g., 2:00 p.m. as 14:00) and precede single digits with a zero.
TIME
02:00
10
Press [ (-)] or [ (+)] and [Set] to select the month, week, day of the week, and time when the daylight saving time ends. (e.g.
OCTOBER LAST WEEK, SUNDAY and 02:00)
11
Press [Set].
12
Press [Stop/Reset] to return to standby mode.
>
>
>
>
(fourth or fifth week depending on the selected month)
DAY
➞
SUNDAY
TIME
➞
02:00
MONTH
➞
OCTOBER
3-6
Personalizing Your Machine
Page 50

Paper Handling
This chapter describes how to select and prepare the print media for the different functions your machine can perform.
Print Media Requirements
For high-quality printing, we recommend using paper and transparencies recommended by Canon. Some types of paper
available at office supply stores may not be suitable for the machine. If you have any questions about paper and
transparencies, contact the Canon Customer Care Center.
■ Paper Storage
In order to prevent paper jams, do the following:
• To prevent moisture buildup, store remaining paper wrapped tightly in its original package. Store paper in a dry location,
out of direct sunlight.
• To prevent curling, store paper flat, not upright.
• If the paper is curled, uncurl it before loading it in the cassette or multi-purpose feeder. Failure to do so will cause paper
creases and a paper jam.
■ Unacceptable Paper
Do not print on the following types of paper stock. Doing so may result in paper jams.
• Severely curled or wrinkled paper
• Transparencies designed for full-color copiers or printers
• Paper which has already been copied using a digital full-color copier (Do not print on the reverse side.)
• Paper which has been printed on using a thermal transfer printer (Do not print on the reverse side.)
4
CHAPTER
IMPORTANT
Never attempt to print on full-color transparencies. Doing so may result in product malfunction.
Print Media Requirements
4-1
Page 51

4
Paper Handling
■ Acceptable Paper
Cassette/Multi-Purpose Feeder
A4, B5, A5, LTR, LGL, EXECUTIVE
Paper Size
Paper Weight 17 lb to 34 lb (64 g/m2 to 128 g/m2)
Paper Type
* A label that can be loaded in the cassette is a standard type (label standard card) only.
Envelope: COM10, MONARCH, DL, ISO-C5
Free Size (Multi-purpose feeder):8 1/2”× 14” (216 mm
× 356 mm) [max.]/3”× 5” (76 mm × 127 mm) [min.]
Plain paper (20 Ib(75 g/m2)), Recycled paper (20 Ib(75
g/m2)), Plain paper L (18 Ib(64 g/m2)), Heavy paper (28
Ib(105 g/ m2)), Heavy paper H (32 Ib(128 g/m2)),
Transparency, Label*, Envelope, Postcard.
NOTE
•
The printing speed may become slower than usual depending on the paper si ze, the paper type, and the number of sheets you specify.
This is because the machine's safety functi on works to prevent the failure due to heat.
•
Some types of paper may not feed properly into the cassette or the multi-purpose feeder.
Printing Areas
Please note that the term “printing area” represents both the recommended area for optimum print quality and the entire
area where the machine can technically print from your computer.
Printing area (light shade): Canon recommends that you print within this area.
■ Paper
MAX. 13/64" (5 mm) MAX. 13/64" (5 mm)
MAX. 13/64" (5 mm)
4-2
Feeding
direction
■ Envelope
MAX. 13/64" (5 mm)
Feeding
direction
NOTE
Copying areas are a little larger than printing areas.
Print Media Requirements
MAX. 13/64" (5 mm)
MAX. 13/64" (5 mm)
MAX. 13/64" (5 mm)
MAX. 13/64" (5 mm)
Page 52

Loading Paper
This section describes how to load paper in the cassette and the multi-purpose feeder.
CAUTION
When loading paper, take care not to cut your hands on the edges of the paper.
NOTE
•
The paper in the multi-purpose feeder is fed prior to the paper in the cassette.
•
The cassette holds up to approx. 250 sheets of 17 lb (64 g/m2) paper or approx. 20 envelopes.
When the message <SUPPLY REC. PAPER> appears in the LCD display, you need to add paper to the paper cassette.
Here are a few tips you should follow when you load paper into the paper cassette.
• Be sure to load paper of the correct size, weight, and quantity recommended for your machine.
• Stack the paper so that the top and bottom edges and sides are straight and even before placing it in the paper cassette.
• Do not print on both sides of the paper. Doing so may cause several sheets to feed into the machine at the same time.
• Let the paper run out before you refill the paper cassette.
• Avoid mixing new stock with paper already loaded in the paper cassette. When adding new stock to the cassette, be sure
to remove the remaining paper in the cassette and reload it together with the new stock. Failure to do so may cause paper
jams.
NOTE
•
Do not use damp, curled, wrinkled, or t orn paper as these can cause paper j ams or poor print quality.
•
Highly textured, extremely smooth or shiny paper does not print well.
•
The laser printing process uses high temperatures to fuse toner to the paper. Use paper that will not melt, vaporize, discolor, or emit
dangerous fumes at temperatures near 340°F (170°C). For example, do not use vellum paper in a laser printer. Make sure any letterhead
or colored paper you use can withstand high temperatures.
•
Make sure the paper is free of dust, li nt, and oil stains.
•
To keep the paper from curling, do not open paper packs until you are ready to use the paper. Store unused paper from opened packs in a
cool, dry locati on in the original packaging.
•
Your machine is factor y-set to use LTR-size paper in the paper cassette.
If you wish to use different sized paper, you must change the setting using the <PAPER SETTINGS> menu.
See p. 15-2 for more details.
•
Do not load paper from the rear of the cassette under the dust cover.
4
Paper Handling
.
Loading Paper in the Cassette
1
Fan the paper stack first, then tap the edges on a flat surface to even the stack.
Loading Paper
4-3
Page 53

2
Pull out the cassette completely.
NOTE
Do not load paper from the rear of the cass ette.
3
Pinch and slide the length slide guide to fit the size of the paper stack you want to load.
4
Paper Handling
IMPORTANT
If the slide guides are not adjusted correctly for the size of the paper, the quality of your printouts may be adversely affected or jams may
occur.
4
Load the paper stack in the cassette with the print side down.
When you load paper with a logo on, position the paper with the print side down (logo side) and load it so that the top of the paper feeds
first in the cassette.
5
Pinch and slide the width slide guides to fit the paper stack.
4-4
Make sure the paper stack does not exceed the load limit mark located on the width slide guides.
Loading Paper
Page 54

HOOK
6
Insert the cassette into the machine.
HOOKS
LOAD LIMIT
MARK
HOOK
NOTE
If you do not completely insert the cassette into the machine, paper jams may occur.
Do not load paper from the rear of the cassette.
7
Specify the paper size and type.
❑ Press [Menu] ➞ [Set].
❑ Press [ (-)] or [ (+)] to select <1.CASSETTE> ➞ press [Set] twice.
❑ Press [ (-)] or [ (+)] to select the appropriate paper size ➞ press [Set] twice.
❑ Press [ (-)] or [ (+)] to select the appropriate paper type ➞ press [Set].
❑ Press [Stop/Reset] to return to standby mode.
IMPORTANT
•
Do not load different size and type of paper at the same time.
•
Do not load extra paper when there is still paper left in the cassette. If you load extra paper whil e printing, remove the loaded paper first.
Then put it together with the extra paper and tap t he edges. After that, reload it in the cassette.
•
Do not load paper from the rear of the cassette.
4
Paper Handling
NOTE
•
Select ‘ENVELOPE’ for envelopes. For details on loading envelopes in the cassette, see “Loading Envelopes in the Cassette,” on p. 4-5.
•
For information on how to use non-standard size paper, see “Loading Paper in the Multi-Purpose Feeder,” on p. 4-8, or “Loading an
Envelope in the Multi-Purpose Feeder,” on p. 4-9.
•
You must set the paper si ze and type from the operation panel.
Loading Envelopes in the Cassette
1
Arrange the stack of envelopes on a firm, clean surface, and press down firmly on the edges to make the folds crisp.
Press all the way around the envelopes to remove any curls and expel air from inside the envelopes. Also, press firmly on the area that
corresponds to the edges of the back flap.
Loading Paper
4-5
Page 55
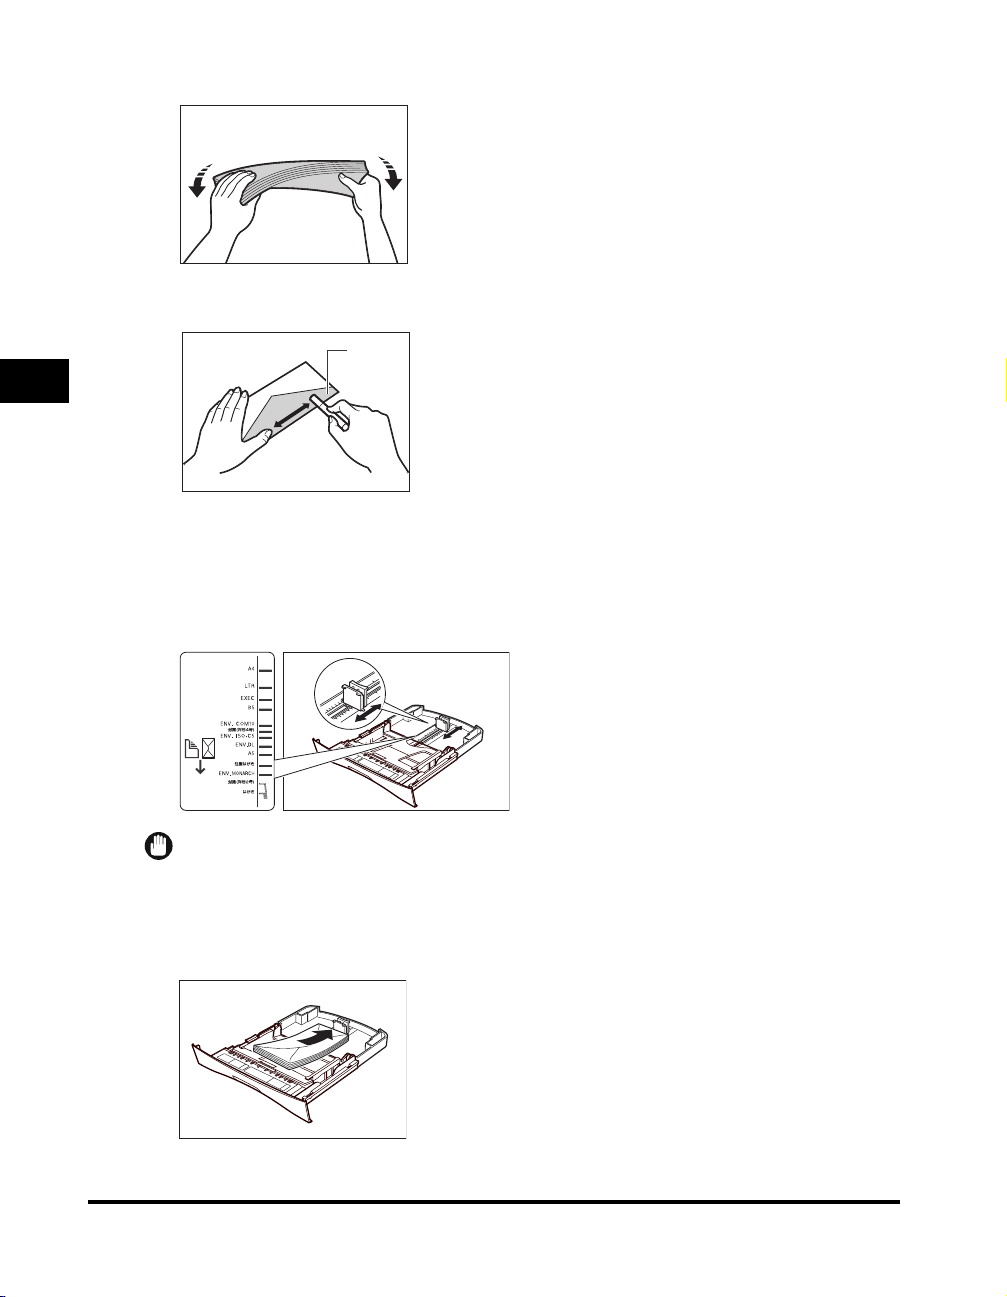
2
Remove any curling from the envelopes by holding the edges diagonally and bending them gently.
3
Run a pen or other rounded object along the back flaps to flatten them.
The flaps should not bulge more than 13/64” (5 mm).
FLAP
4
Paper Handling
4
Tap the edges on a flat surface to even the envelopes.
5
Pull out the cassette completely.
6
Pinch and slide the length slide guide to fit the size of the envelopes you want to load.
IMPORTANT
If the slide guides are not adjusted correctly for the size of the envelopes, the quality of your printouts may be adversely affected.
Do not load paper from the rear of the cass ette.
7
Load the envelopes with the print side down and the flap comes toward the left of the cassette.
Envelopes with a flap on the short edge cannot be used.
4-6
Loading Paper
Page 56

8
Pinch and slide the width slide guides to fit the envelopes.
Make sure the envelopes do not exceed the load limit mark.
HOOK
9
Insert the cassette into the machine.
HOOKS
LOAD LIMIT
MARK
HOOK
IMPORTANT
A maximum of approx. 20 envelopes can be loaded in the cassette. Be sure that the envelopes do not exceed the load limit mark of the
paper guide. If the envelopes exceed the load limit mark, this may result in misfeeds.
NOTE
If you do not completely insert the cassette into the machine, paper jams may occur.
10
Specify the paper size and type.
❑ Press [Menu] ➞ press [Set].
❑ Press [ (-)] or [ (+)] to select <1.CASSETTE> ➞ press [Set] twice.
❑ Press [ (-)] or [ (+)] to select <ENVELOPE> ➞ press [Set].
❑ Press [ (-)] or [ (+)] to select the appropriate envelope type ➞ press [Set] twice.
❑ Press [ (-)] or [ (+)] to select <HEAVY PAPER> or <HEAVY PAPER H> ➞ press [Set].
❑ Press [Stop/Reset] to return to standby mode.
NOTE
You must set envelope size through the operati on panel.
4
Paper Handling
Loading Paper
4-7
Page 57

4
Paper Handling
Loading Paper in the Multi-Purpose Feeder
Use the multi-purpose feeder when you want to copy or print on different paper which is in the cassette. Load paper one by
one in the multi-purpose feeder.
NOTE
The paper in the multi-purpose feeder is fed prior to the paper in the cassett e.
1
Slide the slide guides to fit the size of the paper you want to load.
IMPORTANT
If the slide guides are not adjusted correctly for the size of the paper, the quality of your printouts may be adversely affected or jams may
occur.
2
Insert the paper straightly into the multi-purpose feeder with the print side up.
4-8
NOTE
When you load paper with a logo on it, position the paper with the print side up (logo side) and insert it so that the top of the paper feeds
first in the multi-purpose feeder.
Loading Paper
Page 58

3
Specify the paper size.
❑ Press [Menu] ➞ press [Set].
❑ Press [ (-)] or [ (+)] to select <2.MP TRAY> ➞ press [Set] twice.
❑ Press [ (-)] or [ (+)] to select the appropriate paper size ➞ press [Set] twice.
NOTE
•
Select ‘ENVELOPE’ for envelopes. For details on loading an envelope in the multi-purpose feeder, see “Loading an Envelope in the
Multi-Purpose Feeder,” on p. 4-9.
•
When <FREESIZE> is selected, you can specify vertical and horizontal sizes of the paper in the following ranges:
- <VERTICAL SIZE>: 127 mm to 356 mm (5” to14”)
- <HORIZONTAL SIZE>: 76 mm to 216 mm (3” to 8 1/2”)
4
Specify the paper type.
❑ Press [ (-)] or [ (+)] to select the appropriate paper type ➞ press [Set].
❑ Press [Stop/Reset] to return to standby mode.
Loading an Envelope in the Multi-Purpose Feeder
Use the multi-purpose feeder when you want to copy or print an envelope one by one.
IMPORTANT
The recommended envelopes are COM10, MONARCH, DL, and ISO-C5. Using other envelopes may affect the quality of the printout.
NOTE
The envelope in the multi-purpose feeder is fed prior to the paper in the cassette.
1
Slide the slide guides to fit the size of the envelope you want to load.
4
Paper Handling
IMPORTANT
If the slide guides are not adj usted correctly for the size of the envelope, the quality of your printouts may be adversely affected or jams
may occur.
Loading Paper
4-9
Page 59

4
Paper Handling
2
Insert the envelope straightly in the multi-purpose feeder with the print side up and the right edge (i.e., closer to the stamp)
first.
Envelopes with a flap on the short edge cannot be used.
3
Specify the paper size.
❑ Press [Menu] ➞ press [Set].
❑ Press [ (-)] or [ (+)] to select <2.MP TRAY> ➞ press [Set] twice.
❑ Press [ (-)] or [ (+)] to select <ENVELOPE> ➞ press [Set].
❑ Press [ (-)] or [ (+)] to select the appropriate envelope type ➞ press [Set] twice.
NOTE
You can select <FREESIZE> instead of <ENVELOPE> as the paper size. When <FREESIZE> is selected, you can specify ver tical and
horizontal sizes of the envelope in the foll owing ranges:
- <VERTICAL SIZE>: 127 mm to 356 mm (5” to 14”)
- <HORIZONTAL SIZE>: 76 mm to 216 mm (3” to 8 1/ 2”)
4
Specify the paper type.
❑ Press [ (-)] or [ (+)] to select <HEAVY PAPER> or <HEAVY PAPER H> ➞ press [Set].
❑ Press [Stop/Reset] to return to standby mode.
Testing the Machine
After you have assembled your machine, installed the toner cartridge, loaded paper, you can make sure the machine is
printing properly by making several copies of a document. For instructions, see Chapter 10, “Making Copies.”
Note the following:
• If the printed sheets are curled as they exit the machine, remove them from the output slot immediately to avoid paper
jams.
• Make sure your text or graphics fall within the printable area.
4-10
Loading Paper
Page 60

Orientation of the Document and the Paper Loading
When you load a document in the ADF, the orientation of the document and the orientation of the paper in the cassette or in
the multi-purpose feeder are as shown below.
DOCUMENT
PAPER
CASSETTE MULTI-PURPOSE
FEEDER
COPY
4
Paper Handling
Loading Paper
4-11
Page 61
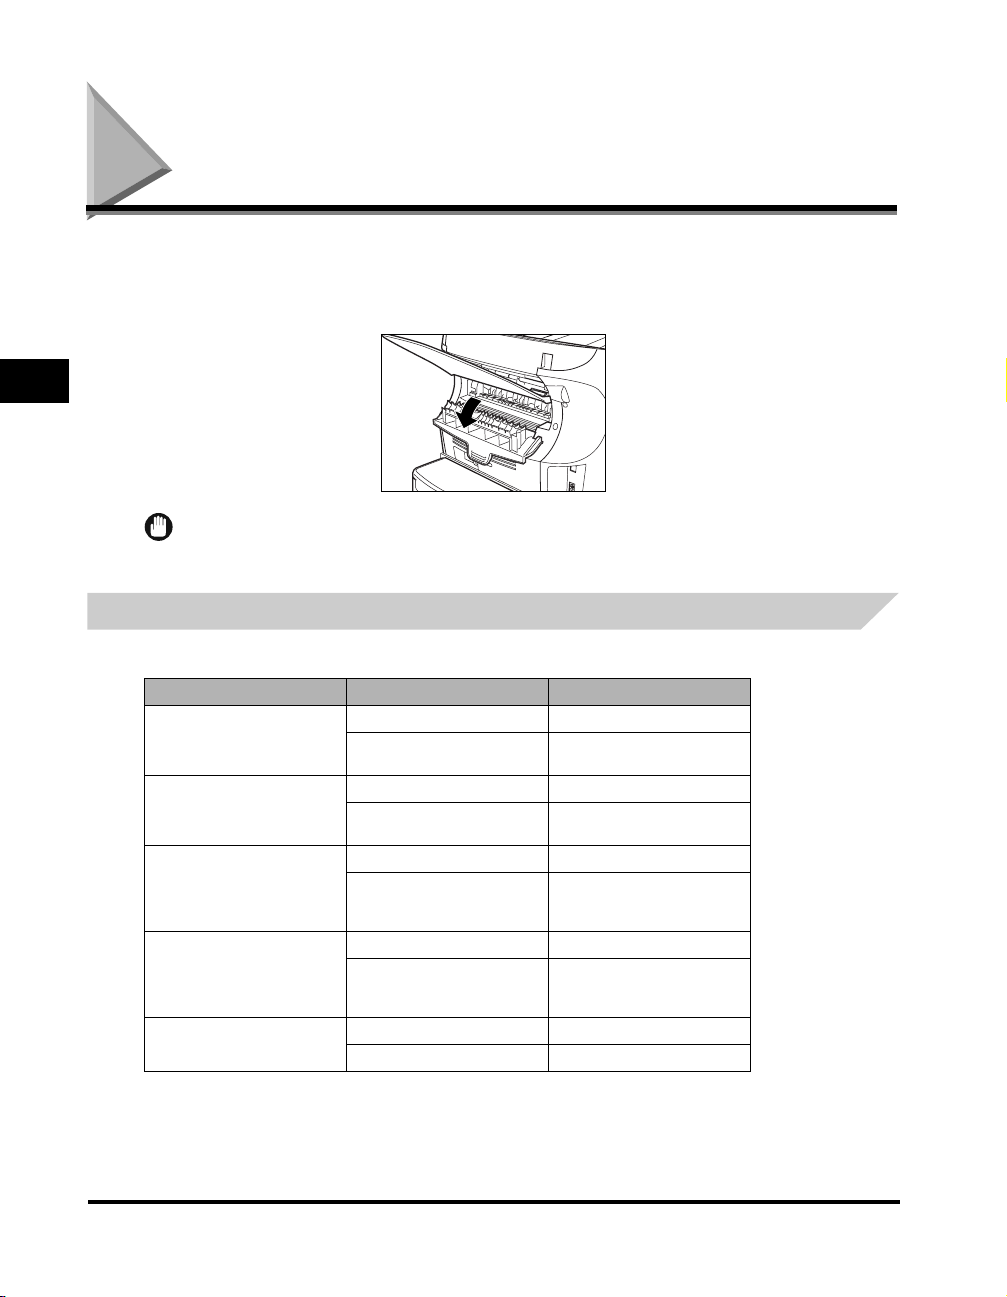
Selecting the Paper Output Area
Face down paper output delivers paper with the printed side down on the output tray. Face up paper output delivers paper
with the printed side up out of the face up paper output. Select the area depending on your purpose by opening or closing
the face up cover on the back of the machine.
Open the face up cover for face up paper output, or close the face up cover for face down paper output.
4
Paper Handling
IMPORTANT
Do not open or close the face up cover while copying and printi ng.
Paper Type and Paper Output Area
Select the suitable paper output area depending on the paper type and your purpose.
Paper Type Paper Output Area The Number of Output Sheets
face up 1 sheet
Plain Paper L
Plain Paper
Heavy Paper
Heavy Paper H
Transparencies
face down
face up 1 sheet
face down
face up 1 sheet
face down
face up 1 sheet
face down
face up 1 sheet
face down approx. 10 sheets
approx. 50 sheets
(17 lb to 20 lb (64 g/m2 to 75 g/m2))
approx. 50 sheets
(20 lb to 24 lb (75 g/m2 to 90 g/m2))
approx. 30 sheets
(24 lb to 28 lb (91 g/m2 to 105 g/
m2))
approx. 30 sheets
(28 lb to 34 lb (106 g/m2 to 128 g/
2
))
m
4-12
Selecting the Paper Output Area
Page 62
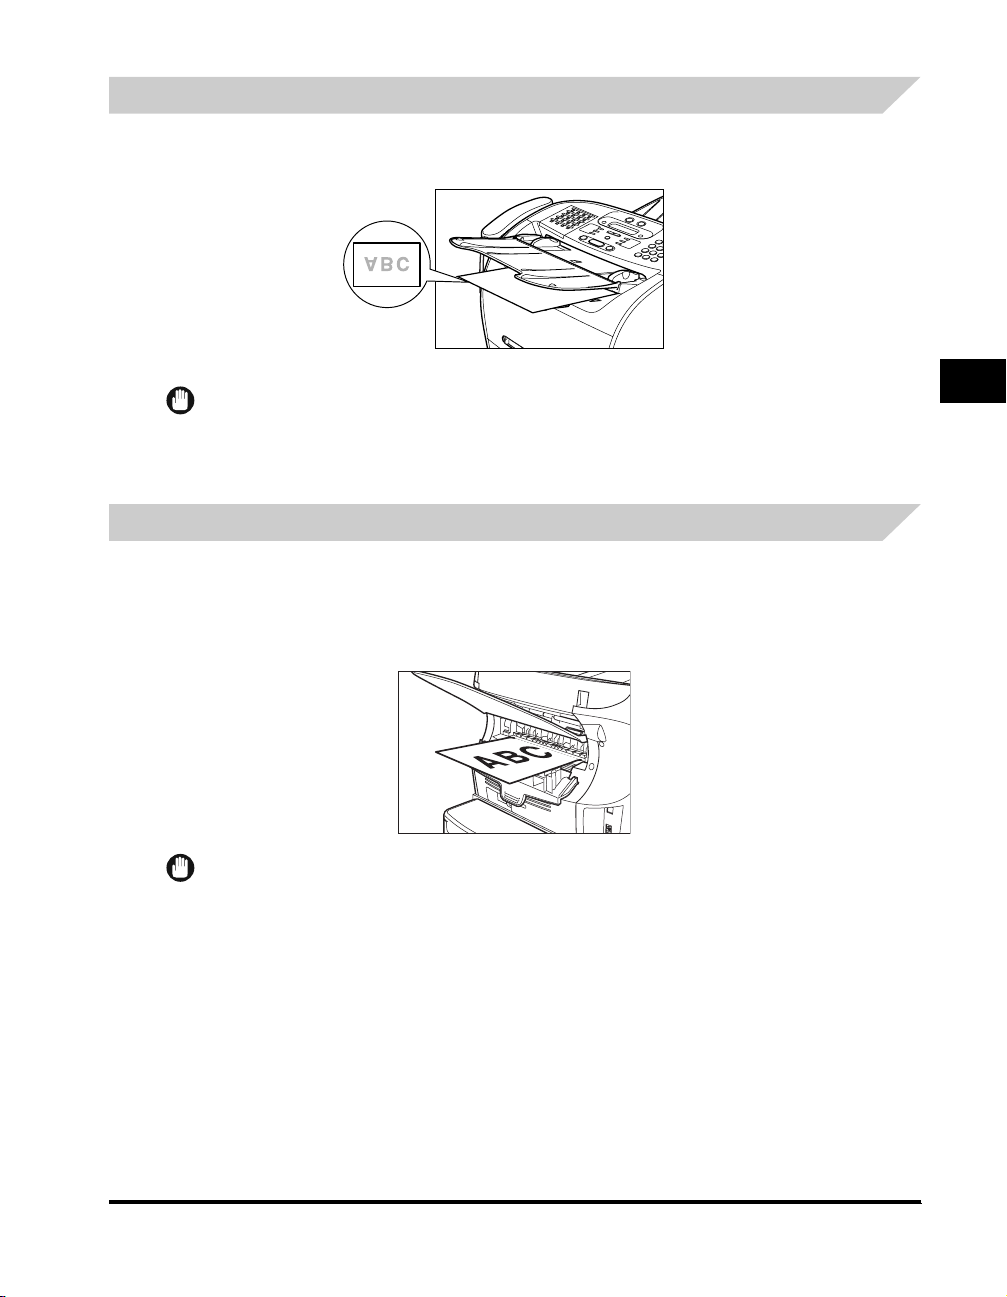
Face Down Paper Output Area
The paper is delivered with the printed side down on the output tray.
Paper is stacked in printed order.
Close the face up cover.
IMPORTANT
•
Do not place the delivered paper back on the output t ray. Doing so may result in paper jams.
•
Do not place objects other than paper on t he output tray. Doing so may result in paper jams.
•
It is recommended to fold up the output tray when printi ng many pages.
4
Face Up Paper Output Area
The paper is delivered with the printed side up out of the face up paper output on the back side of the machine. This way is
convenient for printing on transparencies, envelopes, or labels which tend to curl, because the paper is delivered straight
through the machine.
Open the face up cover on the back of the machine.
• Remove the delivered paper one by one.
IMPORTANT
•
Do not pull the paper forcibly.
•
The machine has no face up output tray. Remove the delivered paper with your hand.
•
Do not place an object in front of the face up paper output to prevent a paper jam.
Paper Handling
Selecting the Paper Output Area
4-13
Page 63

4
Paper Handling
4-14
Selecting the Paper Output Area
Page 64

Speed Dialing
This chapter describes how to register and use the speed dialing features of the machine.
Speed Dialing Methods
In addition to regular dialing, the machine provides several ways to dial fax/telephone numbers automatically.
■ One-Touch Speed Dialing
Dial a fax/telephone number by pressing the One-Touch Speed Dial button that the number is assigned to.
■ Coded Speed Dialing
Dial a fax/telephone number by pressing [Coded Dial] followed by a two-digit code assigned to that number.
■ Group Dialing
Send a document to a pre-defined group of fax numbers. (The numbers must already be stored as One-Touch Speed Dialing numbers or
Coded Speed Dialing numbers.)
■ Directory Dialing
Dial a fax/telephone number by pressing [Directory] and entering the first letter of the other party's name. In this manner you can search for
the fax/telephone number registered for One-Touch Speed Dialing.
The following pages describe how to register numbers for speed dialing. You will also find instructions for changing numbers
and names registered under speed dialing buttons and codes, and how to use speed dialing.
5
CHAPTER
Speed Dialing Methods
5-1
Page 65

One-Touch Speed Dialing
Storing Numbers for One-Touch Speed Dialing
Your machine can store up to 32 fax numbers under One-Touch Speed Dial buttons. Follow this procedure to store
One-Touch Speed Dialing numbers and names.
1
Press [Menu].
5
Speed Dialing
2
Use [ (-)] or [ (+)] to select <5.ADD. REGISTRATION> ➞ press [Set] twice.
3
Press [ (-)], [ (+)], or the One-Touch Speed Dial button to select a One-Touch Speed Dial button under which you want to
register a fax/telephone number between 01 and 32 ➞ press [Set] twice.
• If a number is already stored under the button you select, that number appears.
• If the button you select is registered for Group Dialing, <GROUP DIAL> appears.
4
Use the numeric buttons to enter the telephone number (max. 120 digits, including spaces and pauses) ➞ press [Set] twice.
TEL NUMBER ENTRY
TEL=123xxxx
• For details on how to enter or delete numbers, see “Entering Numbers, Letters, and Symbols,” on p. 3-1.
• Open the One-Touch Speed Dial panel ➞ press [Space] to enter spaces between numbers (spaces are optional and are ignored during
dialing).
• To enter a pause in the number, press [Redial/Pause] one or more times (See p.9-1).
:A
➞
5-2
5
Use the numeric buttons to enter the name you want to store (max. 16 letters, including spaces) ➞ press [Set].
• For details on how to enter or delete letters, see “Entering Numbers, Letters, and Symbols,” on p. 3-1.
6
To continue registering numbers, repeat steps 3 to 5.
-or-
If you have finished registering numbers, press [Stop/Reset] to return to standby mode.
7
After you register a number for One-Touch Speed Dialing, it is recommended to write the name of the other party on a
destination label and stick it on the One-Touch Speed Dial panel above the number of the One-Touch Speed Dial button where
the number is registered.
NOTE
You may need to inser t a pause if you are tr ying to access on outside li ne or you are making an international call. (See p.9-1)
One-Touch Speed Dialing
Page 66

Changing or Deleting a Number/Name Stored Under a One-Touch Speed Dial Button
Follow these steps if you want to change a number and/or name registered under a One-Touch Speed Dial button, or if you
want to delete all information stored under a button.
1
Follow steps 1 and 2 of “Storing Numbers for One-Touch Speed Dialing.” (See p. 5-2.)
2
Use [ (-)], [ (+)], or the One-Touch Speed Dial button to select the One-Touch Speed Dial button you want to change or delete
➞ press [Set] twice.
● To delete a number:
3
Open One-Touch Speed Dial panel ➞ press [Clear] to delete the number ➞ press [Set].
TEL NUMBER ENTRY
TEL=
❑ When you delete a number, the name registered for that number is also deleted.
4
Press [Stop/Reset] to return to standby mode.
● To change the number and/or name:
3
Open One-Touch Speed Dial panel ➞ press [Clear] to delete the previous entry.
4
Press the numeric buttons to enter the new number ➞ press [Set] twice.
TEL NUMBER ENTRY
TEL=124xxxx
• For details on how to enter or delete numbers, see “Entering Numbers, Letters, and Symbols,” on p. 3-1.
• If you want to delete a digit, press [ (-)] or [ (+)] to move the cursor under the digit you want to delete ➞ press [Delete].
• If you only want to change the name, press [Set] twice after step 2 ➞ open One-Touch Speed Dial panel ➞ go to step 5.
1-TOUCH SPD DIAL
➞
2.NAME
:A
➞
Canon Canada
5
Speed Dialing
5
Press [Clear] to delete the previous entry.
6
Press the numeric buttons to enter the new name ➞ press [Set].
• For details on how to enter or delete letters, see “Entering Numbers, Letters, and Symbols,” on p. 3-1.
• If you want to keep the same name, go to step 7.
7
To change additional numbers and/or names, repeat steps 2 to 6.
-or-
If you have finished changing numbers and/or names, press [Stop/Reset] to return to standby mode.
One-Touch Speed Dialing
5-3
Page 67

Using One-Touch Speed Dialing
Once you have registered your numbers under One-Touch Speed Dial buttons, you can use them to send documents as
follows:
1
Load the document in the ADF.
For details on the types of documents you can fax, their requirements, and how to load documents, see “Document Requirements,” on
p. 6-1, and “Loading Documents in the ADF,” on p. 6-3.
2
Press [FAX].
If you are already in the Fax standby mode, you can skip this step.
3
Adjust any necessary settings for your document.
• Press [Image Quality] to select the fax resolution. (See “Adjusting the Image Quality (Resolution),” on p. 6-4.)
5
Speed Dialing
• Press [Exposure] to select the scan density. (See “Adjusting the Exposure (Density),” on p. 6-5.)
4
Press the One-Touch Speed Dial button assigned to the number to which you wish to fax.
TEL= 123xxxx
04 Canon USA
• The name registered under that One-Touch Speed Dial button is displayed. If no name is registered, the number registered under that
button will be displayed.
• If you mistakenly press the wrong One-Touch Speed Dial button, press [Stop/Reset] ➞ press the correct button.
• If no fax number is assigned to the One-Touch Speed Dial button you press, the LCD displays <NOT REGISTERED>. If this happens,
make sure you press the correct button and that the number you want to dial is registered under that button.
5
Press [Start].
• If you do not press [Start] within 5 seconds of pressing the One-Touch Speed Dial button, the machine will begin sending automatically.
If you do not want the machine to send automatically, you need to change the <TIME OUT> setting. See p.15-9 for more details.
• If an error occurs during sending, the machine will print an error report. If this happens, try sending the fax again. See “Faxing
Problems,” on p. 13-12 for details about errors.
5-4
NOTE
•
You can also use One-Touch Speed Diali ng to send a document to more than one location at a time. For details, see “Group Dialing,” on
p. 5-8, and “Sequential Broadcasting,” on p. 6-12.
•
Changing image quality can affect transmission times.
One-Touch Speed Dialing
Page 68

Coded Speed Dialing
Storing Numbers for Coded Speed Dialing
You can store up to 100 numbers for Coded Speed Dialing. Follow this procedure to store Coded Speed Dialing numbers
and names.
1
Press [Menu].
2
Press [ (-)] or [ (+)] to select <5.ADD. REGISTRATION> ➞ press [Set].
3
Press [ (-)] or [ (+)] to select <2.CODED SPD DIAL> ➞ press [Set].
4
Press [ (-)] or [ (+)] to select a two-digit code (00-99) ➞ press [Set] twice.
• You can also select a code by pressing [Coded Dial] and entering the two-digit code with the numeric buttons.
• If a number is already registered under the code you select, that number is displayed.
• If the code you select is registered for group dialing, <GROUP DIAL> appears.
5
Use the numeric buttons to enter the telephone number (max. 120 digits, including spaces and pauses) ➞ press [Set] twice.
TEL NUMBER ENTRY
TEL=456xxxx
• For details on how to enter or delete numbers, see “Entering Numbers, Letters, and Symbols,” on p. 3-1.
• Open the One-Touch Speed Dial panel ➞ press [Space] to enter spaces between numbers (spaces are optional and are ignored during
dialing).
• To enter a pause in the number, press [Redial/Pause] one or more times (See p.9-1).
:A
➞
5
Speed Dialing
6
Use the numeric buttons to enter the name you want to store (max. 16 letters, including spaces) ➞ press [Set].
:A
Canon OPTICS
• For details on how to enter or delete letters, see “Entering Numbers, Letters, and Symbols,” on p. 3-1.
7
To continue registering numbers, repeat steps 4 to 6.
-or-
If you have finished registering numbers, press [Stop/Reset] to return to standby mode.
CODED SPD DIAL
➞
03=
Coded Speed Dialing
5-5
Page 69

Changing or Deleting a Number/Name Stored under a Coded Speed Dialing Code
Follow these steps if you want to change the number and/or name registered under a Coded Speed Dialing code, or if you
want to delete all information stored under a code.
1
Follow steps 1 to 3 of “Storing Numbers for Coded Speed Dialing.” (See p. 5-5.)
2
Press [ (-)] or [ (+)] to select the code (00-99) you want to change or delete ➞ press [Set] twice.
You can also select a code by pressing [Coded Dial] and entering the two-digit code with the numeric buttons.
● To delete a number:
3
5
Speed Dialing
Open One-Touch Speed Dial panel ➞ press [Clear] to delete the number ➞ press [Set].
TEL NUMBER ENTRY
TEL=
When you delete a number, the name registered for that number is also deleted.
4
Press [Stop/Reset] to return to standby mode.
● To change the number and/or name:
3
Open One-Touch Speed Dial panel ➞ press [Clear] to delete the previous entry.
4
Press the numeric buttons to enter the new number ➞ press [Set] twice.
TEL NUMBER ENTRY
TEL=457xxxx
• For details on how to enter or delete numbers, see “Entering Numbers, L etters, and Symbols,” on p. 3-1.
• If you want to delete a digit, press [W(-)] or [X(+)] to move the cursor under the digit you want to delete ➞ press [Delete].
• If you only want to change the name, press [Set] twice after step 2 ➞ open One-Touch Speed Dial panel ➞ go to step 5.
CODED SPD DIAL
➞
2.NAME
:A
➞
Canon CANADA
5-6
5
Press [Clear] to delete the previous entry.
6
Press the numeric buttons to enter the new name ➞ press [Set].
:A
Canon ITALIA
• For details on how to enter or delete letters, see “Entering Numbers, Letters, and Symbols,” on p. 3-1.
• If you want to keep the same name, go to step 7.
7
To change additional numbers and/or names, repeat steps 2 to 6.
-or-
If you have finished changing numbers and/or names, press [Stop/Reset] to return to standby mode.
Coded Speed Dialing
CODED SPD DIAL
➞
03=
Page 70

Using Coded Speed Dialing
Once you have registered your numbers under Coded Speed Dialing codes, you can send documents as follows:
1
Load the document in the ADF.
For details on the types of documents you can fax, their requirements, and how to load documents, see “Document Requirements,” on
p. 6-1, and “Loading Documents in the ADF,” on p. 6-3.
2
Press [FAX].
If you are already in the Fax standby mode, you can skip this step.
3
Adjust any necessary settings for your document.
• Press [Image Quality] to select the fax resolution. (See “Adjusting the Image Quality (Resolution),” on p. 6-4.)
• Press [Exposure] to select the scan density. (See “Adjusting the Exposure (Density),” on p. 6-5.)
4
Press [Coded Dial] ➞ use the numeric buttons to enter the two-digit code assigned to the number to which you wish to fax.
TEL=
• The name registered under that Coded Speed Dialing code is displayed. If no name is registered, the number registered under that
code will be displayed.
• If you mistakenly enter the wrong code, press [Stop/Reset] ➞ [Coded Dial] ➞ enter the correct code.
• If no fax number is assigned to the Coded Speed Dialing code you press, the LCD displays <NOT REGISTERED>. If this happens,
make sure you enter the correct code and that the number you want to dial is registered under that code.
5
Press [Start].
• If you do not press [Start] within 5 seconds of entering the Coded Speed Dialing code, the machine will begin sending automatically. If
you do not want the machine to send automatically, you need to change the <TIME OUT> setting. See p.15-9 for more details.
• If an error occurs during sending, the machine will print an error report. If this happens, try sending the fax again. See “Faxing
Problems,” on p. 13-12 for details about errors.
TEL= 456xxxx
➞
04 Canon CANADA
5
Speed Dialing
NOTE
You can also use Coded Speed Dialing to send a document to more than one locati on at a time. For details, see “Group Dialing,” on p. 5-8,
and “Sequential Broadcasting,” on p. 6-12.
Coded Speed Dialing
5-7
Page 71

Group Dialing
Group dialing allows you to store as many as 131 numbers under One-Touch Speed Dial buttons or Coded Speed Dialing
codes.
Creating Groups for Group Dialing
The numbers you register in a group must already be stored under One-Touch Speed Dial buttons or Coded Speed Dialing
codes. Each group is stored under a One-Touch Speed Dial button or a Coded Speed Dialing code. Create groups for
group dialing as follows:
5
1
Press [Menu].
2
Use [ (-)] or [ (+)] to select <5.ADD REGISTRATION> ➞ press [Set].
Speed Dialing
3
Use [ (-)] or [ (+)] to select <3.GROUP DIAL> ➞ press [Set].
● To register a group under a One-Touch Speed Dial button:
4
Use [ (-)], [ (+)], or the One-Touch Speed Dial button to select an unused One-Touch Speed Dial button (01 to 32) ➞ press
[Set] twice.
If a group or number is already registered under the button you select, <GROUP DIAL> or <1-TOUCH SPD DIAL> is displayed.
● To register a group under a Coded Speed Dialing code:
4
Press [Coded Dial] ➞ use the numeric buttons to enter an unused two-digit code (00 to 99) ➞ press [Set] twice.
GROUP DIAL
21=
• If a group or number is already registered under the code you select, <GROUP DIAL> or <CODED SPD DIAL> is displayed.
• To continue storing under a Coded Speed Dialing code, you can use [ (-)] or [ (+)] also.
TEL=
➞
NOTE
•
Each One-Touch Speed Dial button or Coded Speed Dialing code can store either a name and number for speed dialing, or a group. Be
careful not to override speed dialing numbers and names when creating groups.
•
If you wish to register a group under a One-Touch Speed Dial button or Coded Speed Dialing code already registered for speed dialing, or
if you want to re-enter a group, you must delete the previous information first. See p. 5-3 for more details.
5
Select the speed dialing numbers you want to register in the group ➞ press [Set] twice.
• To enter in the group a number stored under a One-Touch Speed Dial button, press the desired One-Touch Speed Dial button(s).
• To enter a number stored under a Coded Speed Dialing code, press [Coded Dial] ➞ enter the two-digit code for the number using the
numeric buttons. For multiple entries, press [Coded Dial] between each entry.
NOTE
•
You cannot register numbers in the groups that have not been registered for One-Touch or Coded Speed Dialing.
•
You can review the numbers registered under the group by pressing [ (-)] or [ (+)].
5-8
Group Dialing
Page 72

6
Enter the name using the numeric buttons for the group (max. 16 letters, including spaces) ➞ press [Set].
:A
USA GROUP
For details on how to enter or delete letters, see “Entering Numbers, Letters, and Symbols,” on p. 3-1.
7
To enter additional groups, repeat steps 4 to 6.
-or-
If you have finished registering groups, press [Stop/Reset] to return to standby mode.
GROUP DIAL
➞
22=
Changing or Deleting a Number/Name Stored under a Group Dialing
Follow these steps if you want to change or delete the number/name registered under a Group Dialing.
1
Follow steps 1 to 3 of “Creating Groups for Group Dialing” (See p. 5-8.)
● To delete a number and a name:
2
Press [ (-)] or [ (+)] to select the number you want to delete ➞ press [Set] twice.
3
Open One-Touch Speed Dial panel ➞ press [Clear] to delete the numbers registered under the group.
• Press [ (-)] or [ (+)] to select the numbers you want to delete.
4
Press [Set] twice.
5
Press [Clear] to delete the name ➞ press [Set].
6
Press [Stop/Reset] to return to standby mode.
● To change the number and/or name:
2
Press [ (-)] or [ (+)] to select the number you want to change ➞ press [Set] twice.
3
Press [Clear] to delete the numbers registered under the group.
4
Select the speed dialing numbers you want to register in the group ➞ press [Set] twice.
• To enter in the group a number stored under a One-Touch Speed Dial button, press the desired One-Touch Speed Dial button(s).
• To enter a number stored under a Coded Speed Dialing code, press [Coded Dial] ➞ enter the two-digit code for the number using the
numeric buttons. For multiple entries, press [Coded Dial] between each entry.
NOTE
•
You cannot register numbers in the groups that have not been registered for One-Touch or Coded Speed Dialing.
•
You can review the numbers registered under the group by pressing [ (-)] or [ (+)].
5
Speed Dialing
5
Press [Clear] to delete the name.
6
Press the numeric buttons to enter the new name ➞ press [Set]
• For details on how to enter or delete letters, see “Entering Numbers, Letters, and Symbols,” on p. 3-1.
Group Dialing
5-9
Page 73

7
To change additional groups, repeat steps 2 to 6.
-or-
If you have finished registering groups, press [Stop/Reset] to return to standby mode.
Using Group Dialing
To send a document to a group of numbers, follow these instructions.
1
Load the document in the ADF.
For details on the types of documents you can fax, their requirements, and how to load documents, see “Document Requirements,” on
p. 6-1, and “Loading Documents in the ADF,” on p. 6-3.
2
Press [FAX].
If you are already in the Fax standby mode, you can skip this step.
5
3
Adjust any necessary settings for your document.
• Press [Image Quality] to select the fax resolution. (See “Adjusting the Image Quality (Resolution),” on p. 6-4.)
• Press [Exposure] to select the scan density. (See “Adjusting the Exposure (Density),” on p. 6-5.)
4
Enter the group(s) stored under a One-Touch Speed Dial button(s) and/or Coded Speed Dialing code(s).
Speed Dialing
TEL=GROUP DIAL
03 USA GROUP
TEL=GROUP DIAL
21 USA GROUP
• If you make a mistake when selecting a group, press [Stop/Reset] ➞ start again.
• The name registered under that One-Touch Speed Dial button or Coded Speed Dialing code is displayed.
• If you press a One-Touch Speed Dial button or Coded Speed Dialing code that has no group (or fax number) registered under it, the
LCD displays <NOT REGISTERED>. Make sure that you press the correct One-Touch Speed Dial button or enter the correct Coded
Speed Dialing code, and that the group you want has been registered correctly under that button or code.
• After entering the first One-Touch Speed Dial button or Coded Speed Dialing code, you have 5 seconds to enter another speed dialing
button or code before the machine begins sending automatically. If you have entered more than one speed dialing button or code, the
machine waits for 10 seconds before it begins sending. If you do not want the machine to send automatically, you need to change the
<TIME OUT> setting. See p.15-9 for more details.
5-10
5
Press [Start].
The machine then scans the document into memory, and begins dialing the numbers in the groups.
Group Dialing
Page 74

Directory Dialing
Directory dialing allows you to look up the other party's name you registered and retrieve the number for dialing. This
feature is convenient when you know the other par ty's name but can not recall the One-Touch Speed Dial button, the code
for Coded Speed Dialing, or Group Dialing where the number is registered.
1
Press [FAX].
If you are already in the Fax standby mode, you can skip this step.
2
Press [Directory].
:A
_
<NOT REGISTERED> appears if there are no numbers registered, and the display returns to dial entry mode.
3
Press a numeric button to enter the first letter of the name of the party you are searching for.
For example, if you want to search for a name that starts with the letter “H”, press [4 (GHI)] twice.
4
Press [Set].
• Entries starting with the letter you entered are displayed.
• If there is no entry that starts with the letter you entered, entries that start with the next letter will be displayed.
5
Press [ (-)] or [ (+)] to display the other names.
• Pressing [ (+)] displays the names of other parties in alphabetical order.
Pressing [ (-)] displays them in reverse order.
• When you reach the last name, the display returns to the first name.
6
Press [Set].
The other party’s fax number and name, or <GROUP DIAL> and the group's name appear.
5
Speed Dialing
Directory Dialing
5-11
Page 75

5
Speed Dialing
5-12
Directory Dialing
Page 76

Sending Faxes
This chapter describes how to use your machine to send faxes.
Preparing to Send a Fax
Document Requirements
The documents you load into the machine must meet the following requirements.
When loading a multi-page document:
Size: Max.: 8 1/2” × 14” (216 × 356 mm)
(W × L) Min.: 5 13/16” × 4 1/8” (148 × 105 mm)
Quantity:
Thickness
Weight: 13 lb – 28 lb (50 – 105 g/m2)
Up to 50 letter-size, 50 A4-size, or 20 legal-size sheets
(1 sheet for sizes other than these)
0.003” - 0.005” (0.07 – 0.13 mm)
(For sheet thicker than this, load 1 sheet at a time)
All sheets should be of the same thickness.
All sheets should be of the same weight.
6
CHAPTER
When loading a single-page document:
Size: Max.: 8 1/2” × approx.39 3/8” (216 mm × approx.1 m)
(W x L) Min.: 5 53/64” × 4 9/64” (148 × 105 mm)
Quantity 1 sheet
Thickness 0.002” – 0.009” (0.06 – 0.23 mm)
Weight: 13 lb – 64 lb (50 – 240 g/m
2
)
Preparing to Send a Fax
6-1
Page 77
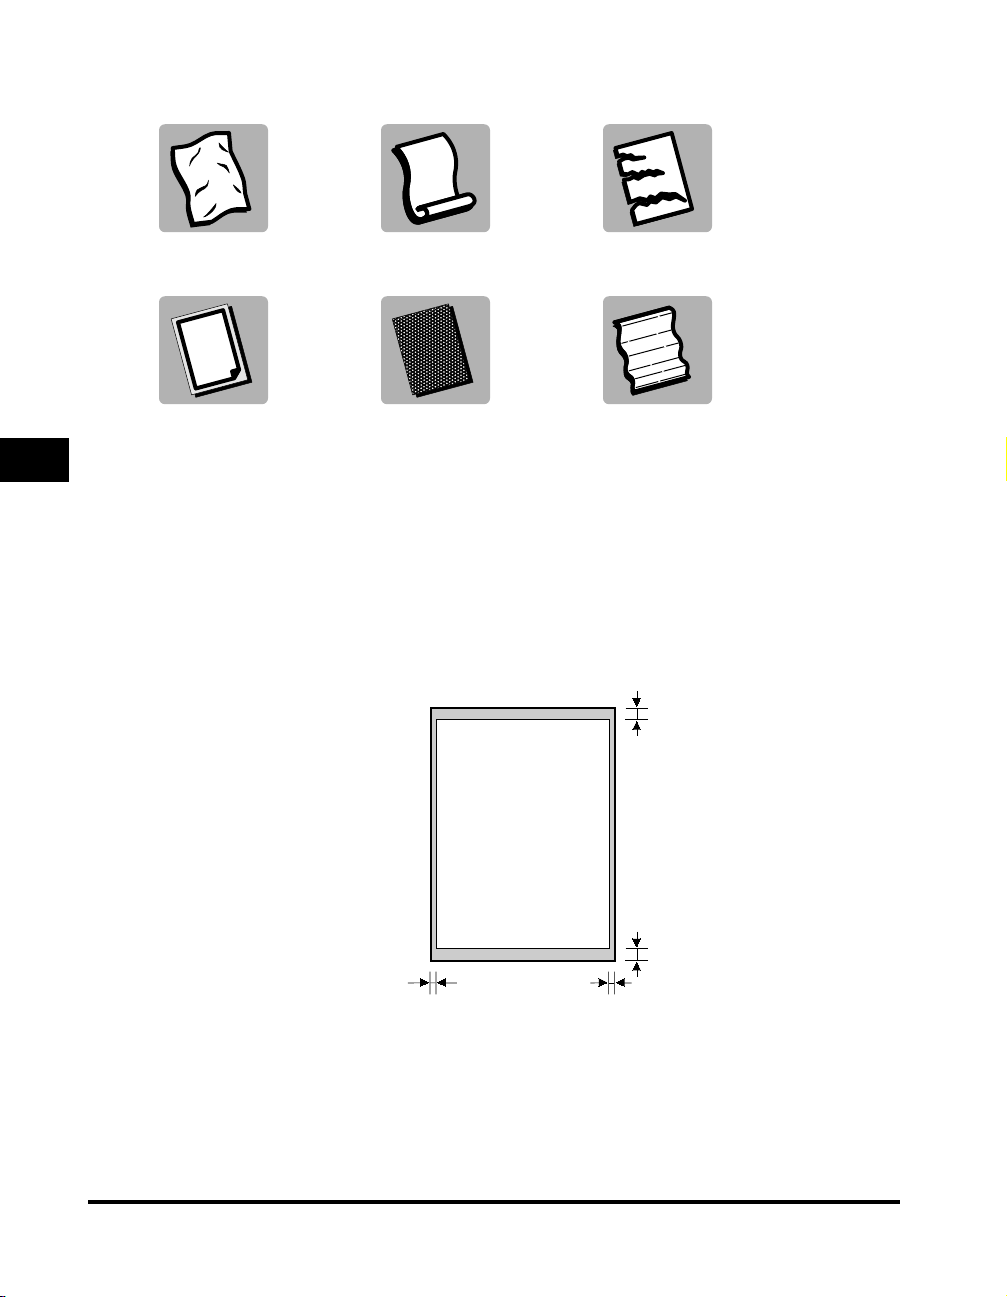
■ Problem documents
•
To prevent paper jams in the Automatic Document Feeder (ADF), do not use any of the following paper in the machine:
WRINKLED OR
CREASED PAPER
CARBON PAPER OR
CARBON-BACKED
6
PAPER
CURLED OR
ROLLED PAPER
COATED PAPER
TORN PAPER
ONION SKIN OR
THIN PAPER
• Remove all staples, paper clips, or any other fasteners before loading the document into the Automatic Document Feeder
(ADF).
• Make sure any glue, ink, or correction fluid on the paper is completely dry before loading the document into the Automatic
Document Feeder (ADF).
• If you have a document that will not feed into the machine properly, make a photocopy of the document, then load the
Sending Faxes
copy instead.
Scanning Area
The margins shown in the illustration below are outside the machine’s scanning area. Make sure your document’s text and
graphics do not extend into these margins.
MAX. 5/32" (4.0 mm)
6-2
Preparing to Send a Fax
MAX. 1/8" (3.0 mm)
LT R
MAX. 5/32" (4.0 mm)
MAX. 5/32" (4.0 mm)
Page 78

Loading Documents in the ADF
1
Fan the edges that will feed into the machine first, then tap the edges of multiple page documents on a flat surface to even the
stack.
2
Adjust the document guides to the width of the document.
6
Sending Faxes
3
Load the document faced down in the ADF.
The document is now ready for scanning.
NOTE
•
For multiple page documents, the pages are fed one by one from the top of the stack (from the first page).
•
Wait until all pages of your document have been scanned before starting a new job.
•
50 sheets of LTR-size documents or 20 sheets of LGL-size documents can be set in the ADF. If more than 50 sheets of LTR-size
documents or 20 sheets of LGL-size documents are set in the ADF, paper jams may occur.
Preparing to Send a Fax
6-3
Page 79
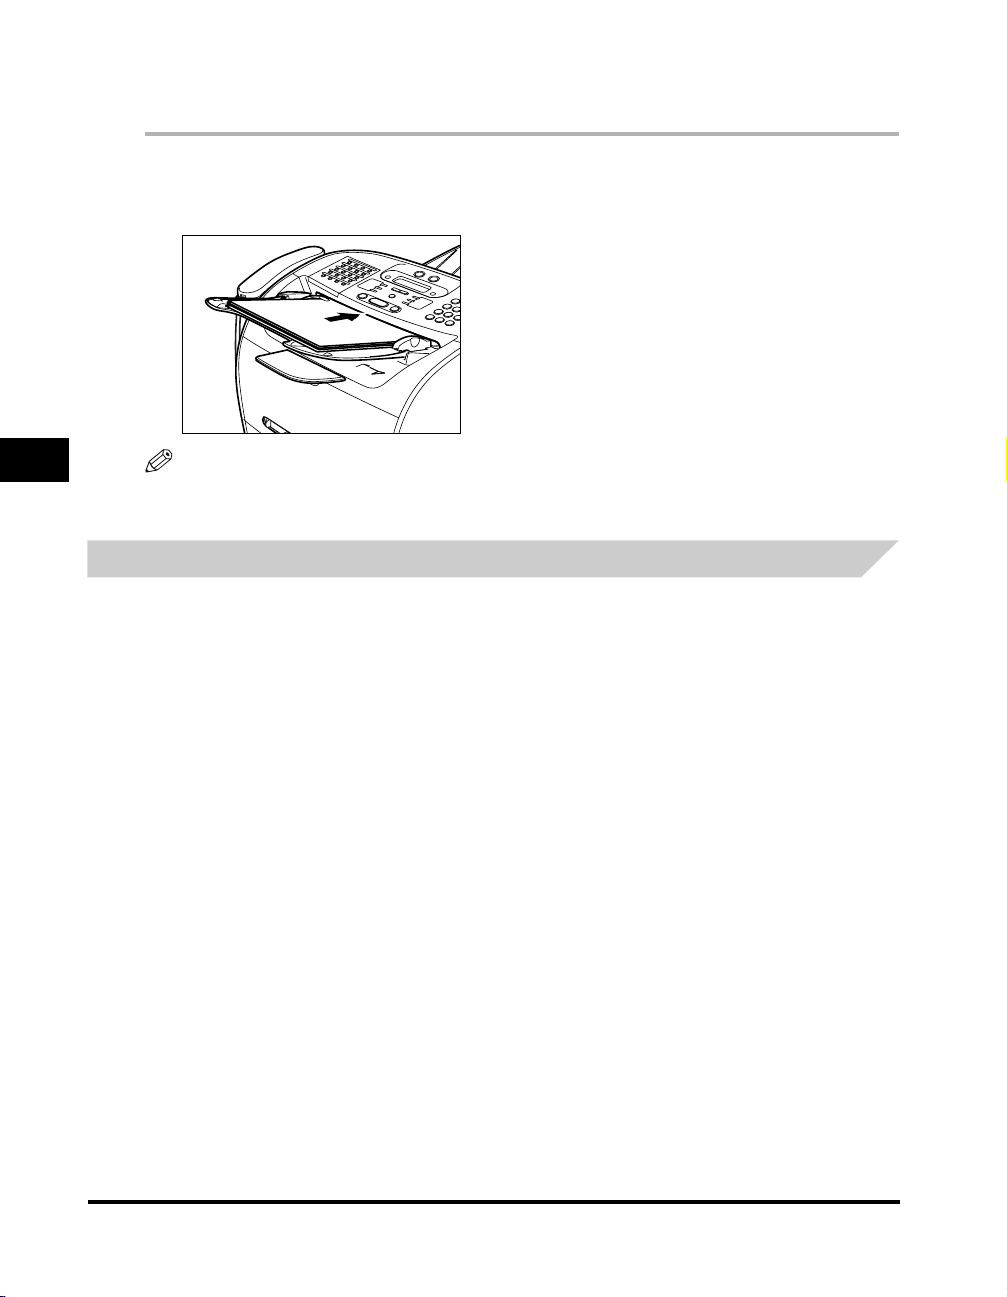
● Trouble With Multipage Documents
If you have any trouble in feeding a multipage document, do the following:
❑
1
Remove the stack and tap it on a flat surface to even the edges.
2
Gently insert the stack into the Automatic Document Feeder (ADF) until it stops.
6
NOTE
•
If you have further trouble with page jams while feeding, see “Removing Jammed Paper from the ADF,” on p. 13-6.
•
Wait until all pages of your document have been scanned completely before star ting a new job.
Adjusting the Resolution and Contrast
Sending Faxes
Adjusting the Image Quality (Resolution)
Canon’s Ultra High Quality (UHQ™) imaging technology enables you to send faxes with a print quality that is very close to
that of the original document. The machine also lets you adjust the resolution it uses in sending faxes to best suit your
particular document.
The machine has 5 resolution settings:
• <STANDARD> is adequate for most text documents.
• <FINE> is suitable for documents with fine print (smaller than the print in this sentence).
• <PHOTO> is for documents that contain photographs. With this setting, areas of the document that contain photos are
automatically scanned with 256 levels of gray, rather than just two (black and white). This gives a much better
reproduction of the photos, though transmission time is longer.
• <SUPER FINE> is for documents that contain fine print and images (much smaller than the print in this sentence), and its
resolution is four times of <STANDARD>.
• <ULTRA FINE> is for documents that contain fine print and images (much smaller than the print in this sentence), and its
resolution is eight times of <STANDARD>.
6-4
Preparing to Send a Fax
Page 80
Set the resolution as follows:
1
Press [FAX].
If you are already in the Fax standby mode, you can skip this step.
2
Press [Image Quality].
The LCD display shows the current resolution setting.
3
Press [Image Quality] repeatedly until the resolution you want is displayed ➞ press [Set].
FAX RESOLUTION
FINE
4
Continue with the operation you wish to complete.
If you do not proceed with any other operation, the LCD display returns to standby mode.
12/31/2004 FRI 10:00
➞
FaxOnly FINE
Adjusting the Exposure (Density)
You can adjust the lightness/darkness of the document pages before you scan for sending.
You can select the scanning density from the following:
• <LIGHT> for documents with dark text or color.
• <STANDARD> for normal printed or written text.
• <DARK> for documents with light text or color.
1
Press [FAX].
If you are already in the Fax standby mode, you can skip this step.
2
Press [Exposure].
The LCD display shows the current exposure setting.
3
Press [Exposure] repeatedly until the scanning density you want is displayed ➞ press [Set].
DENSITY CONTROL
DARK
4
Continue the operation you wish to complete.
If you do not proceed with any other operation, the LCD display returns to standby mode.
NOTE
•
You can set the scanning density so that the desi red scanning density such as ‘STANDARD’ is automatically returned after the <AUTO
CLEAR> function activates or documents are scanned. Since <SCAN DENSITY> of <FAX DEFAULT> is set to 'OFF' in the factory default
setting, the scanning density s et using [Exposure] will remain unchanged. (See Chapter 15, “The Menu System.”)
•
You can set the level of each scanning density (LIGHT/STANDARD/DARK) in the <DENSITY CONTROL> of the Menu. (See Chapter 15,
“The Menu System.”)
12/31/2004 FRI 10:00
➞
FaxOnly STANDARD
6
Sending Faxes
Preparing to Send a Fax
6-5
Page 81

Sending Methods
Memory Sending
To use memory sending, you load the document, dial the fax number ➞ press [Start]. See p. 6-7 for more details on
memory sending.
Since the machine is multitasking, you can even scan a document into the memory while sending a document, receiving a
document, or printing a report.
Manual Sending Via the Handset
Use manual sending via the handset if you want to speak with the other party before sending a fax to them. With manual
sending via the handset, dial and converse normally, and when they are ready to receive your fax, press [Start] to begin
sending. See p. 6-8 for more details on manual sending via the handset.
Dialing Methods
There are several ways of dialing the number of the party you want to send to:
6
■ Regular Dialing
Use the numeric buttons to dial the recipient’s fax number.
■ One-Touch Speed Dialing
Press the One-Touch Speed Dial button (1 to 32) under which you have registered the number you want to send to. See Chapter 5, “Speed
Dialing,” for details on registering and using One-Touch Speed Dialing.
Sending Faxes
■ Coded Speed Dialing
Press [Coded Dial] ➞ enter the two-digit code (00 to 99) under which you have registered the number you want to send to. See Chapter 5,
“Speed Dialing,” for details on registering and using Coded Speed Dialing.
■ Group Dialing
Send a document to a pre-defined group of fax numbers. (The numbers must already be stored as One-Touch Speed Dialing numbers or
Coded Speed Dialing numbers.) See Chapter 5, “Speed Dialing,” for details on registering and using Group Dialing.
■ Directory Dialing
Press [Directory] ➞ enter the first letter of the other party’s name and retrieve the number for dialing. See Chapter 5, “Speed Dialing,” for
details on how to use Directory Dialing.
6-6
Preparing to Send a Fax
Page 82

Sending Documents
This section describes the different ways to send faxes with the machine.
Memory Sending
You should normally use memory sending to send documents efficiently. If <MEMORY FULL> is displayed, the machine
cannot scan the documents. In this case, wait for the machine to send any faxes stored in the memory, then scan the
documents.
NOTE
You can register a new fax job while the machine is waiting to redial the other party’s number automatically. For details on how to set the
machine to redial automatically, see “Automatic Redialing With Memory Sending,” on p. 6-10.
Follow this procedure for memor y sending:
1
Load the document in the ADF.
For details on the types of documents you can fax, their requirements, and how to load documents, see “Document Requirements,” on
p. 6-1, and “Loading Documents in the ADF” on p. 6-3.
2
Press [FAX].
If you are already in the FAX standby mode, you can skip this step.
3
Adjust any necessary settings for your document.
• Press [Image Quality] to select the fax resolution. (See “Adjusting the Image Quality (Resolution),” on p. 6-4.)
• Press [Exposure] to select the scan density. (See “Adjusting the Exposure (Density),” on p. 6-5.)
6
Sending Faxes
4
Dial the other party’s fax/telephone numbe r.
For details on the different dialing methods, see “Dialing Methods,” on p. 6-6.
5
Press [Start].
NOTE
To cancel memory sending, press [Stop/Reset]. (See Chapter 11, “System Monitor.”)
Sending Documents
6-7
Page 83

Manual Sending Via the Handset
Use manual sending when you want to talk to the other party before sending a document, or if the other par ty does not
have a fax machine that can receive automatically.
Follow this procedure for manual sending:
1
Load the document in the ADF.
For details on the types of documents you can fax, their requirements, and how to load documents, see “Document Requirements,” on
p. 6-1, and “Loading Documents in the ADF” on p. 6-3.
2
Press [FAX].
If you are already in the Fax standby mode, you can skip this step.
3
Adjust any necessary settings for your document.
6
Sending Faxes
• Press [Image Quality] to select the fax resolution. (See “Adjusting the Image Quality (Resolution),” on p. 6-4.)
• Press [Exposure] to select the scan density. (See “Adjusting the Exposure (Density),” on p. 6-5.)
4
Pick up the hand set.
5
Dial the other party’s fax/telephone number.
For details on the different dialing methods, see “Dialing Methods,” on p. 6-6.
6
Talk through the handset to the othe r party.
If you hear a high-pitched signal instead of the other party’s voice, go to step 8.
6-8
7
Ask the other party to set their fax machine to receive faxes.
8
When you hear a high-pitched signal, press [Start] ➞ hang up the handset.
NOTE
To cancel manual sending, press [Stop/Reset].
Sending Documents
Page 84

Canceling Sending
Canceling Memory Sending
While Documents Are Being Scanned Using the ADF
1
Press [Stop/Reset].
Scanning is canceled.
After All Documents Are Scanned
1
While documents are being sent, press [Stop/Reset].
The machine asks you to confirm that you want to cancel.
CANCEL DURING TX/RX?
< YES NO >
2
Press [ (-)] to cancel sending.
• If you change your mind and want to continue sending, press [ (+)] for <NO>.
• The machine prints an ERROR TX REPORT if a transmission report is set to print automatically. (See “1.TX REPORT,” on p. 15-7.)
6
Sending Faxes
Canceling Sending
6-9
Page 85

Redialing
Manual Redialing
Automatic Redialing With Memory Sending
6
Sending Faxes
To redial the last number dialed with the numeric buttons, press [Redial/Pause].
To cancel manual redialing, press [Stop/Reset] ➞ [ (-)].
With memory sending, you can set the machine to automatically dial the fax number again if the receiving fax machine
does not answer or if the line is busy. You can also control how many times the machine will redial the number and how long
it will wait between dialing attempts.
Canceling Automatic Redialing
If you press [Stop/Reset] when waiting to redial, the LCD displays standby mode but you are still in automatic redialing. To
cancel redialing while the machine is waiting to redial, follow the procedure described in “Deleting a Fax Job,” on p.11-2. To
cancel while the machine is redialing, do the following:
Wait until the machine begins redialing.
❑
❑ Press [Stop/Reset] ➞ [(-)].
NOTE
The machine can print a list of document stored in memory (DOCUMENT MEMORY LIST), along with the transaction number of each
document. The document waiting to be sent using automatic redialing will be listed as <TRANSMIT>. To print the list, see “Document
Memory List,” on p. 12-10.
Setting Up Automatic Redialing
You can set up the following options for automatic redialing:
• Whether or not the machine redials automatically
• The number of times the machine attempts redialing
• The time interval between redialing attempts
6-10
Redialing
Page 86

Follow the procedure below to adjust the automatic redialing settings.
1
Press [Menu].
2
Press [ (-)] or [ (+)] to select <4.FAX SETTINGS> ➞ press [Set].
3
Press [ (-)] or [ (+)] to select <3.TX SETTINGS> ➞ press [Set].
4
Press [ (-)] or [ (+)] to select <3.AUTO REDIAL> ➞ press [Set].
5
Press [ (-)] or [ (+)] to select <ON> to enable automatic redialing or <OFF> to disable it ➞ press [Set].
• If you selected <ON>: Go to step 6.
• If you selected <OFF>: Go to step 8.
AUTO REDIAL
ON
6
Press [Set] again ➞ use [ (-)], [ (+)], or the numeric buttons to enter the number of times you want the machine to redial ➞
press [Set] twice.
REDIAL TIMES
02TIMES
7
Press [ (-)], [ (+)], or the numeric buttons to select the time interval between redialings ➞ press [Set].
REDIAL INTERVAL
02MIN.
AUTO REDIAL
➞
1.REDIAL TIMES
REDIAL INTERVAL
➞
02MIN.
TX SETTINGS
➞
4.TIME OUT
6
Sending Faxes
8
Press [Stop/Reset] to return to standby mode.
Redialing
6-11
Page 87

Sequential Broadcasting
Sending a Document to More Than One Destination
The machine’s sequential broadcasting feature allows you to send a fax to a sequence of up to 142 fax numbers, using any
combination of dialing methods as follows:
• One-Touch Speed Dialing: up to 32 destinations
• Coded Speed Dialing: up to 100 destinations
• Regular dialing and redialing: 10 destinations
(with the numeric buttons or [Redial/Pause])
You can enter the One-Touch Speed Dialing and Coded Speed Dialing destinations in any order. You can also include one
destination that you dial manually using the numeric buttons or [Redial/Pause]. Be sure to press [Set] after your entry with
6
Sending Faxes
the numeric keys.
To send a fax to more than one location, do the following:
1
Load the document in the ADF.
For details on the types of documents you can fax, their requirements, and how to load documents, see “Document Requirements,” on
p. 6-1, and “Loading Documents in the ADF” on p. 6-3.
2
Press [FAX].
If you are already in the Fax standby mode, you can skip this step.
3
Adjust any necessary settings for your document.
• Press [Image Quality] to select the fax resolution. (See “Adjusting the Image Quality (Resolution),” on p. 6-4.)
• Press [Exposure] to select the scan density. (See “Adjusting the Exposure (Density),” on p. 6-5.)
6-12
Sequential Broadcasting
Page 88

4
Enter up to 142 fax destinations using any of the following methods:
● One-Touch Speed Dialing:
Press the desired One-Touch Speed Dial button(s).
❑
● Coded Speed Dialing:
Press [Coded Dial] ➞ enter the two-digit code (00-99) using the numeric buttons.
❑
• Be sure to press [Coded Dial] before each code.
● Directory Dialing:
❑
Press [Directory] ➞ enter the first letter of the name of the party you are searching for.
● Regular Dialing:
❑
Enter the number using the numeric buttons or [Redial/Pause].
• Be sure to press [Set] after your entry with the numeric keys.
NOTE
•
If you make a mistake, open One-Touch Speed Dial panel ➞ [Delete] to delete the l ast number, or press [Clear] to delete all numbers you
entered when you use the numeric keys.
•
After entering the first One-Touch Speed Dial button or Coded Speed Dialing code, you have 5 seconds to enter another speed dialing
button or code before the machine begins sending automatically. If you have entered more than one speed dialing button or code, the
machine waits for 10 seconds before it begins sending. If you do not want the machine to send automatically, you need to change the
<TIME OUT> setting. See p. 15-9 for more details.
•
If you want to review the numbers you entered, use the [ (-)] or [ (+)] to scroll through the numbers.
5
Press [Start].
The machine then scans the document into memory, and begins sending it to the destinations in numerical order, starting with the
One-Touch Speed Dialing numbers, then the Coded Speed Dialing numbers, and finally the numbers dialed with the numeric buttons or
[Redial/Pause].
NOTE
•
If the machine memory becomes full while scanning your document, <MEMORY FULL> appears in the LCD display. If this happens,
remove the remainder of the document from the Automatic Document Feeder (ADF).Then divide the document into several sections and
send each section separately.
•
Only one broadcasting job will be active at any given time.
•
To cancel sending, press [Stop/Reset] ➞ follow the instructions in the LCD display. When you press [Stop/Reset], sending to all recipi ents
will be canceled. You cannot cancel sending to only one recipient. (See Chapter 11, “System Monitor.”)
6
Sending Faxes
Sending a Document Using Group Dialing
If you frequently send faxes to the same group of people, you can create a “group.” Groups are stored under One-Touch
Speed Dial buttons or Coded Speed Dialing codes. See Chapter 5, “Speed Dialing,” for details on registering numbers
under groups and using Group Dialing.
Sequential Broadcasting
6-13
Page 89

Delayed Sending
Your machine allows you to scan a document into its memory and send it automatically at a preset time. By using this
feature, you can take advantage of lower long distance rates at night, for example.
You can set up to 142 destinations and up to 20 reservations for delayed sending.
1
Load the document in the ADF.
For details on the types of documents you can fax, their requirements, and how to load documents, see “Document Requirements,” on
p. 6-1, and “Loading Documents in the ADF” on p. 6-3.
2
Press [FAX].
6
If you are already in the Fax standby mode, you can skip this step.
3
Adjust any necessary settings for your document.
• Press [Image Quality] to select the fax resolution. (See “Adjusting the Image Quality (Resolution),” on p. 6-4.)
• Press [Exposure] to select the scan density. (See “Adjusting the Exposure (Density),” on p. 6-5.)
Sending Faxes
4
Open One-Touch Speed Dial panel ➞ press [Delayed Transmission].
5
Use the numeric buttons to enter the time at which you want to send the document ➞ press [Set].
DELAYED TX
TX TIME SETTNG 10:00
Enter the time using the 24-hour clock system. Precede single digits with a zero.
Example:
7:30 a.m. = 07:30
11:30 p.m. = 23:30
6
Enter the destination(s) using any of the following 4 methods.
● One-Touch Speed Dialing:
Press the desired One-Touch Speed Dial button(s).
❑
● Coded Speed Dialing:
Press [Coded Dial] ➞ enter the two-digit code (00-99) using the numeric buttons.
❑
➞
TEL=
• Be sure to press [Coded Dial] before each code.
● Directory Dialing:
❑
Press [Directory] ➞ enter the first letter of the name of the party you are searching for.
● Regular Dialing:
❑
Enter the number using the numeric buttons or [Redial/Pause].
• You can enter 10 numbers.
• Be sure to press [Set] after your entry with the numeric buttons.
NOTE
If you make a mistake, open One-Touch Speed Dial panel ➞ [Delete] to delete the last number, or press [Clear] to delete all numbers you
entered when you use the numeric buttons.
6-14
Delayed Sending
Page 90

7
Press [Start].
The machine scans the document into memory.
NOTE
•
If the machine memory becomes full while scanning your document, <MEMORY FULL> appears in the LCD display. If this happens, you
cannot send the document at a delayed time.
•
You can only register one preset sending operation at a time.
•
The machine is a multitasking machine, so you can send, receive, print, and copy other documents even when you have set the machine
for delayed sending.
•
To print, copy, or send other documents after setting the machine for delayed sending, simply follow the procedures described in this Basic
Guide.
•
To cancel a delayed sending, see “Deleting a Fax Job,” on p.11-2.
•
The machine can print a list of document stored in memory (DOCUMENT MEMORY LIST), along with the transaction number of each
document. The document to be sent using delayed sending will be listed as <DELAYED TX> or <DEL SQ BDCST>. To print the list, see
“Document Memory List,” on p. 12-10.
When the set time comes, the machine dials and sends the document.
6
Sending Faxes
Delayed Sending
6-15
Page 91

6
Sending Faxes
6-16
Delayed Sending
Page 92

Receiving Faxes
This chapter describes how to use your machine to receive faxes.
Different Ways to Receive a Fax
The machine provides you with 5 different modes for receiving faxes. To decide which mode will best suit your requirements,
consider how you want to use the machine:
Receive Mode Main Use Operation Requirements
FaxOnly* Fax
FaxTel Fax/Tel
Manual Tel
AnsMode Fax/Tel
DRPD Fax/Tel
Answers all calls as fax calls. It
receives faxes automatically and
disconnects voice calls.
Automatically switches between fax
calls and voice calls. Receives faxes
automatically and rings for voice calls.
To set the details see p. 7-2.
Rings for every call, whether it is a fax
call or a voice call. For a fax call, you
have to manual ly activa te recept ion of
the fax.
Receives faxes automatically and
routes voice calls to the answering
machine.
Rings differently depending on whether
a call is a fax or voice call.
Separate telephone line for fax use
only.
Handset or telephone connected to the
machine.
Handset or telephone connected to the
machine.
Answering machine connected to the
machine.
Subscription to a DRPD service.
Handset or the extension telephone
connected to your machine.
7
CHAPTER
* Factory default setting
You can confirm which receive mode is set by checking the standby display. The receive mode is displayed in the lower left
of the LCD.
Different Ways to Receive a Fax
7-1
Page 93

Setting the Receive Mode
Set the machine receive mode as follows:
1
Open One-Touch Speed Dial panel ➞ press [Receive Mode].
The LCD display shows the current receive mode setting.
2
If you want to change the receive mode, press [Receive Mode] repeatedly until the mode you want appears ➞ press [Set].
Each time you press [Receive Mode], the receive mode changes in the following order:
FaxO nly ➞ DRPD ➞ Manual ➞ AnsMode ➞ FaxTel ➞ FaxOnly ➞ …
Receiving Faxes and Phone Calls Automatically: FaxTel Mode
Set this mode if you want your machine to automatically switch between voice and fax calls.
You can control precisely how your machine handles incoming calls by adjusting the settings below.
7
Receiving Faxes
Setting the Options for FaxTel Mode
■ RING START TIME
When a call comes in, the machine checks to see if it is a person wishing to speak to you or a fax machine trying to send a document. If
your machine does not have enough time to detect the fax tone, it assumes the call is from a telephone. Use the <RING START TIME>
setting to increase the time the machine takes to check whether a call is from a fax machine or a telephone. You can select a time between
0 and 30 seconds; the default is 6 seconds.
■ F/T RING TIME
When your machine is set to receive both fax and telephone calls automatically, the telephone rings to alert you to pick up the handset if the
call is from a person. If you do not pick up the handset within a certain amount of time, the telephone stops ringing. Use this option to
change the number of times the machine rings, from 15 to 300 seconds. The default is 15 seconds.
■ F/T SWITCH ACTION
Not all fax machines are capable of sending a fax tone (the CNG tone that warns the receiving fax machine that a fax is coming). For those
cases the machine may think that the call coming in is a voice call and rings to alert you of the call (the amount of time it is going to ring is
determined by the <F/T RING TIME> setting above). If you do not answer the call, one of two things can happen:
1. If you set the <F/T SWITCH ACTION> to ‘RECEIVE’, the machine will switch to fax receive mode automatically at that point and start to
receive the document. If no document comes in, it disconnects the call after approx. 40 seconds. The factory default setting is
‘RECEIVE’.
2. If you set the <F/T SWITCH ACTION> to ‘DISCONNECT’, the machine will disconnect the phone call immediately freeing up your phone
line at this point.
7-2
Different Ways to Receive a Fax
Page 94
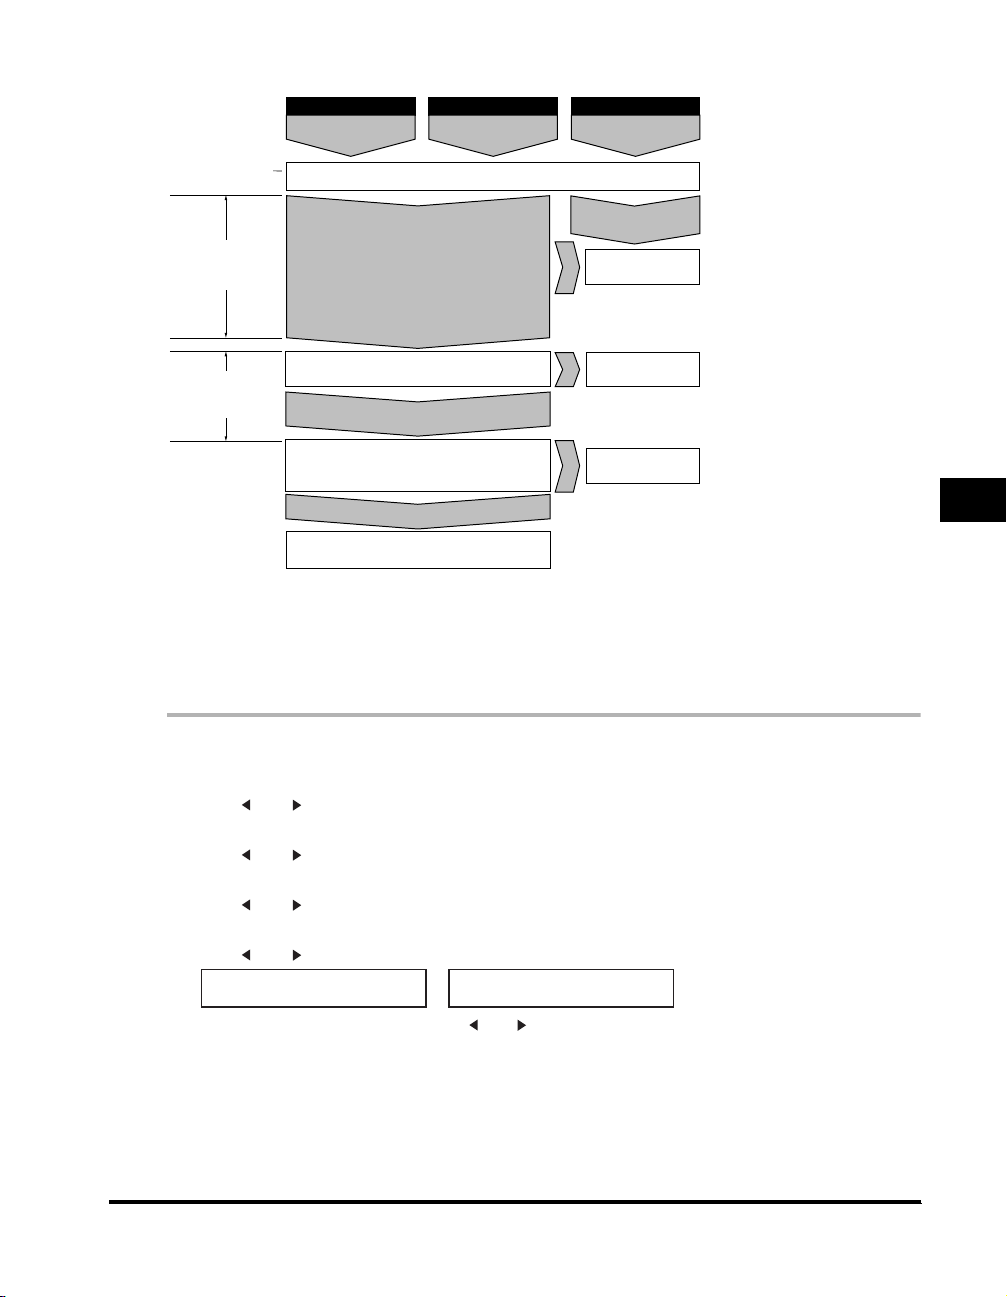
What Happens When FaxTel Mode is Selected
Type of call
Telephone charges
begin for caller.
RING START TIME
(Factory default
=
6 sec.)
setting
F/T RING TIME
(Factory default
setting = 15 sec.)
Set the FaxTel Mode options as follows:
Telephone Fax Fax
The machine listens for fax tone
Fax tone is not detected
The telephone starts ringing
If you donít pick up the handset
(within 15 sec.)
F/T SWITCH ACTION
RECEIVE (factory default setting) and DISCONNECT
Not all fax machines are capable of sending a fax
tone. For those cases if you set the <F/T SWITCH
ACTION> to RECEIVE, the
receive mode automatically and starts receiving
the document. If no document comes in, it
disconnects after approx. 40 seconds.
Choose between:
(Factory default setting)
Sending document
manually
The machine answers without ringing
(For 6 sec.)
RECEIVE
machine
Fax tone
detected
switches to
Sending document
automatically
Document received
automatically
(Fax tone is detected
and the FAXPHONE
L170 switches to
receive mode.)
Pick up the
handset to talk
DISCONNECT
The machine
disconnects the call.
7
Receiving Faxes
1
Press [Menu].
2
Press [ (-)] or [ (+)] to select <4.FAX SETTINGS> ➞ press [Set].
3
Press [ (-)] or [ (+)] to select <4.RX SETTINGS> ➞ press [Set].
4
Press [ (-)] or [ (+)] to select <2.FAX/TEL OPT. SET> ➞ press [Set] twice.
5
Press [ (-)] or [ (+)] to set the time the machine waits before ringing when it receives a call ➞ press [Set] twice.
RING START TIME
06SEC
You can use the numeric buttons instead of using [ (-)] or [ (+)] to set the time.
F/T RING TIME
➞
015SEC
Different Ways to Receive a Fax
7-3
Page 95

6
Press [ (-)] or [ (+)] to set the time the machine rings while waiting for someone to pick up the handset ➞ press [Set] twice.
F/T RING TIME
015SEC
You can use the numeric buttons instead of using [ (-)] or [ (+)] to set the time.
7
Press [ (-)] or [ (+)] to select <RECEIVE> or <DISCONNECT> ➞ press [Set].
F/T SWITCH ACTION
DISCONNECT
This setting tells the machine what to do if no one picks up the handset within the specified ring time set in step 6.
8
Press [Stop/Reset] to return to standby mode.
F/T SWITCH ACTION
➞
RECEIVE
RX SETTINGS
➞
3.DRPD:SELECT FAX
Receiving Faxes Manually: Manual Mode
To use this mode, you must have the handset or a telephone connected to the machine. In Manual Mode, the machine rings
every time it receives a call, whether the call is from a telephone or a fax machine.
NOTE
7
Receiving Faxes
Make sure the <REMOTE RX> setting in the <RX SETTINGS> menu is enabled. See p. 15-11 for details.
If you use your machine with Manual Mode, answer incoming calls as follows:
1
When the handset or the telephone rings, pick up the receiver.
● If you hear a person’s voice:
❑
Start your conversation. If the caller wants to send a document after talking to you, ask them to press the start button on their fax
machine. When you hear a beep, press [Start] to begin receiving the document, then hang up.
● If you hear a slow beep or silence:
A fax machine is trying to send you a document.
❑
Press [Start] on the machine, then hang up.
-orEnter the two-digit ID code from the telephone, then hang up.
7-4
Different Ways to Receive a Fax
Page 96

• The machine then begins receiving the document. (This is particularly convenient if your telephone is located away from the machine.)
• If you do not hang up after pressing [Start] or the two-digit ID code, the machine beeps intermittently after you receive the document.
(You can turn the beeping off by disabling the <OFFHOOK ALARM> in the <USER SETTINGS> menu. See p. 15-7 for details.)
NOTE
If you have an answering machine connected to your machine that can carry out remote-cont rol operations (controlling your answering
machine from a remote telephone), the security code for this function may be the same as the two-digit ID code described above. If so,
make sure you change the machine two-digit ID code to make it disti nct from the answering machine’s security code. See p. 15-11 for
details on changing the code (<REMOTE RX ID> setting).
Receiving Faxes Automatically: FaxOnly Mode
When the machine is set up for a dedicated line, set FaxOnly Mode to automatically receive documents whenever a call
comes over the fax line.
• The machine assumes all incoming calls are from fax machines sending documents. It receives the documents
automatically and disconnects all voice calls.
• In FaxOnly Mode, you can control whether or not the machine rings when it receives a fax call. To set this option from the
machine operation panel, see p. 15-10 (<INCOMING RING> setting).
Using an Answering Machine: AnsMode
Connecting an answering machine to the machine allows you to receive faxes and phone messages while you are out of
the office.
Using the Machine With an Answering Machine
Follow these guidelines when using the machine with an answering machine:
• Set the answering machine to answer on the first or second ring.
• If the machine runs out of paper or toner in AnsMode, it receives all faxes into memory. The faxes then print automatically
when you add paper or replace the toner car tridge.
• When recording the outgoing message on the answering machine:
- The entire message must be no more than 15 seconds long.
- In the message, tell your callers how to send a fax. For example:
“Hello. I can’t answer the phone right now. If you would like to send a fax, press the start button on your fax machine. Thank
you.”
7
Receiving Faxes
Receiving with a DRPD (Distinctive Ring Pattern Detection) service: DRPD
DRPD service assigns two or more telephone numbers with distinctive ring patterns to a single telephone line, allowing you
to have both a fax number(s) and a telephone number(s) using only one telephone line. Your fax will automatically monitor
incoming calls and based on the ring pattern, will let you know if the call is a fax or voice call. Set the fax ring pattern that
matches the pattern assigned by your telephone company.
NOTE
Contact your local telephone company for detailed informati on on this service.
Different Ways to Receive a Fax
7-5
Page 97

Receiving Faxes in Memory When a Problem Occurs
The machine will automatically receive incoming faxes into its memory if it encounters a problem that prevents it from
printing normally. The LCD will display <RECEIVED IN MEMORY> and a message showing the problem. See below the
error messages, their cause and the action you need to take to correct the problem.
NOTE
•
The machine memory can store up to approx. 450 LTR-size pages*.
•
Once the pages are printed, they are deleted from memory.
•
If the memory becomes full, you will not be able to receive the remaining pages. Contact the other party and ask them to resend the
remaining pages of the fax.
If the machine receives a document into its memory, the LCD displays one of the following messages. These messages
show the action you must take to correct the problem.
REPLACE CARTRIDGE
7
Cause: The toner cartridge ran out of toner or is not installed properly.
Action: Make sure the cartridge is installed properly, and install a new one if necessary. See “Installing/Replacing the
Toner Cartridge,” on p. 2-16.
SUPPLY REC. PAPER
Receiving Faxes
Cause: The machine ran out of paper.
Action: Add paper to the paper cassette/multi-pur pose feeder. See “Loading Paper,” on p. 4-3.
REC. PAPER JAM
Cause: A paper jam occurred.
Action: Clear the jam. See “Clearing Jams,” on p. 13-1.
Cause: Over capacity on the output tray.
Action: Take out sheets from output tray and clear the paper jam. See “Clearing Jams,” on p. 13-1.
Once you have corrected the problem, the machine automatically prints the documents stored in memory.
* Based on Canon FAX Standard Chart No.1, standard mode
7-6
Receiving Faxes in Memory When a Problem Occurs
OPEN PRINTER COVER
Page 98

Receiving While Performing Other Tasks
Since the machine is a multitasking device, it can receive faxes and phone calls while you are entering your user
information, making copies, or printing.
If you receive a fax while you are making copies or printing, the machine stores the incoming fax in memory. Then, as soon
as you finish making copies or printing, the machine automatically prints the fax. If you are entering registration information,
the fax is printed as soon as it is received, and does not go into memory.
Canceling an Incoming Fax
To cancel an incoming fax, follow this procedure:
1
Press [Stop/Reset].
CANCEL DURING TX/RX?
< YES NO >
2
Press [ (-)] to [Stop/Reset] receiving, or [ (+)] to resume receiving the fax.
7
Receiving Faxes
Receiving Faxes in Memory When a Problem Occurs
7-7
Page 99

7
Receiving Faxes
7-8
Receiving Faxes in Memory When a Problem Occurs
Page 100

Setting Up and Using Polling
CHAPTER
This chapter shows you how to set up and use polling sending and receiving. Polling is useful when the sending party cannot be in the office
at the same time.
What’s Polling?
Polling means a fax calls another fax and requests the other fax to send a document that it is holding. Unlike normal sending
and receiving, in polling the receiver always calls the sender. This is called polling to receive a document. The sender sends
the document in response to the polling by a telephone call from the receiver.
NOTE
Your fax can be set up to function in both roles. Your fax can poll to receive a document, or it can be polled to send a document that it is
holding.
Before You Use Polling Receiving
Before you try to set up polling, note the following points:
• With one operation you can poll several faxes. You can dial up to 142 telephone numbers and poll those faxes to receive
documents that they are holding.
• If the other party is using a Canon fax machine which has the Polling ID function, ask them to set the Polling ID of their fax
machine to 255 (1111 1111 binary number). For details on the Polling ID, see the other party’s fax machine manual. In all
other cases the Polling ID is not a concern.
8
What’s Polling?
8-1
 Loading...