

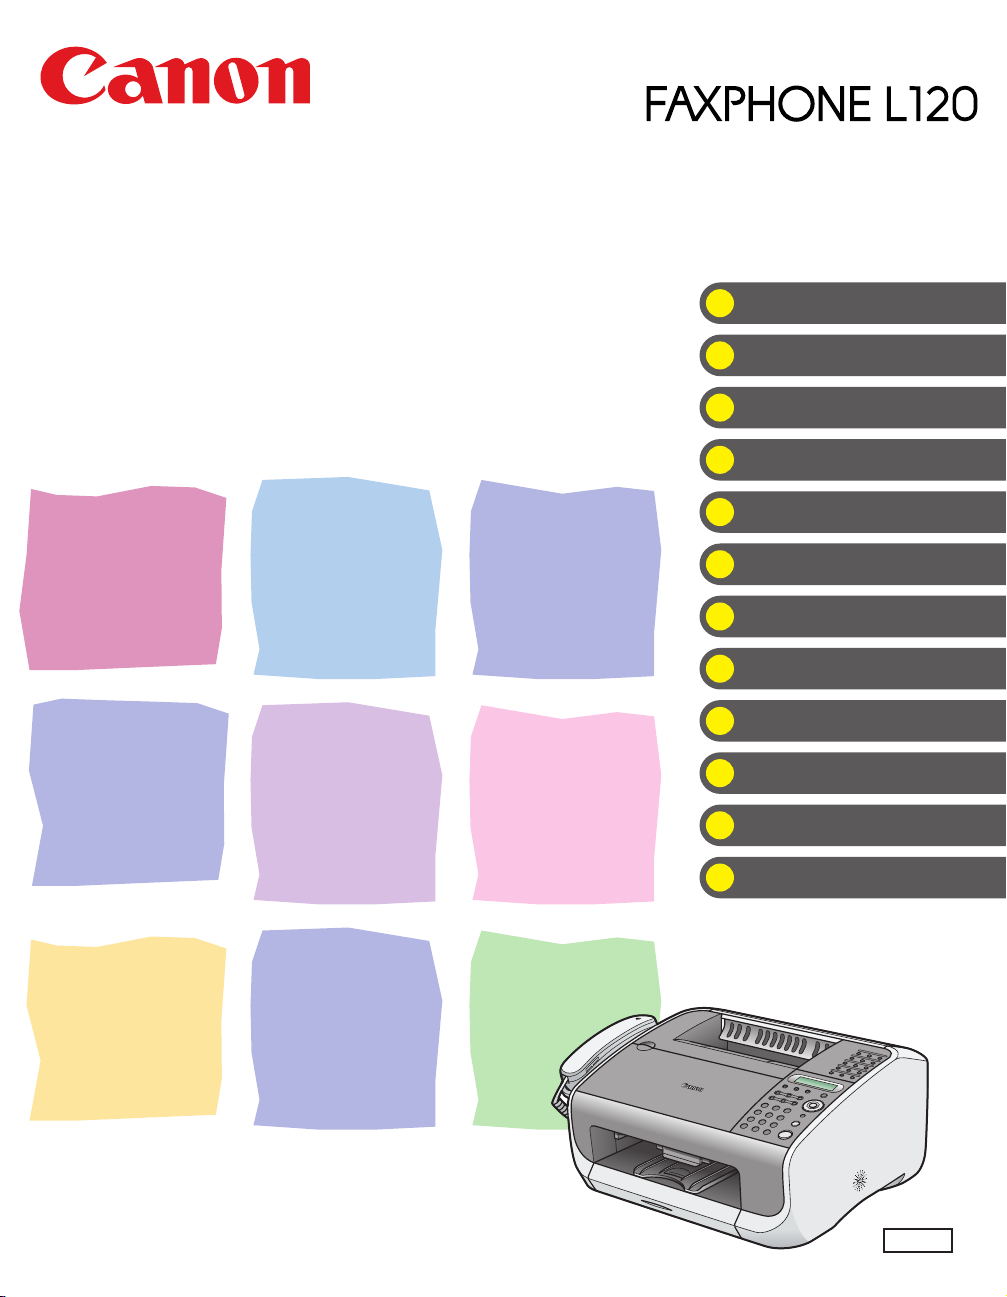
Page 1
Basic Guide
What Can I Do with This Machine?
Before Using the Machine
Document Handling
Print Media
Sending Faxes
Receiving Faxes
Copying
Printing
Maintenance
Troubleshooting
Machine Settings
Please read this guide before operating this equipment.
After you finish reading this guide, store it in a safe place for future reference.
Appendix
ENG
Page 2

Page 3
Manuals for the Machine
● Machine Set-Up
● Software Installation
● Basic Features
● Machine Settings
● Specifications
● Advanced Fax Features
● Status Monitor
● Reports and Lists
● Driver Set-Up
● Printing
Indicates the manual is supplied in PDF format in the accompanying CD-ROM.
CD-ROM
Starter Guide
Basic Guide
(This Document)
Advanced Guide
Software Guide
CD-ROM
CD-ROM
● To view the manuals in PDF format, Adobe Reader/Acrobat Reader/Acrobat is required. If Adobe
Reader/Acrobat Reader/Acrobat is not installed on your system, please download it from the Adobe
Systems Incorporated website (http://www.adobe.com).
● Considerable effort has been made to make sure that the manuals for the machine are free of
inaccuracies and omissions. However, as we are constantly improving our products if you need an
exact specification, please contact Canon.
● The machine illustration on the cover may differ slightly from your machine.
i
Page 4
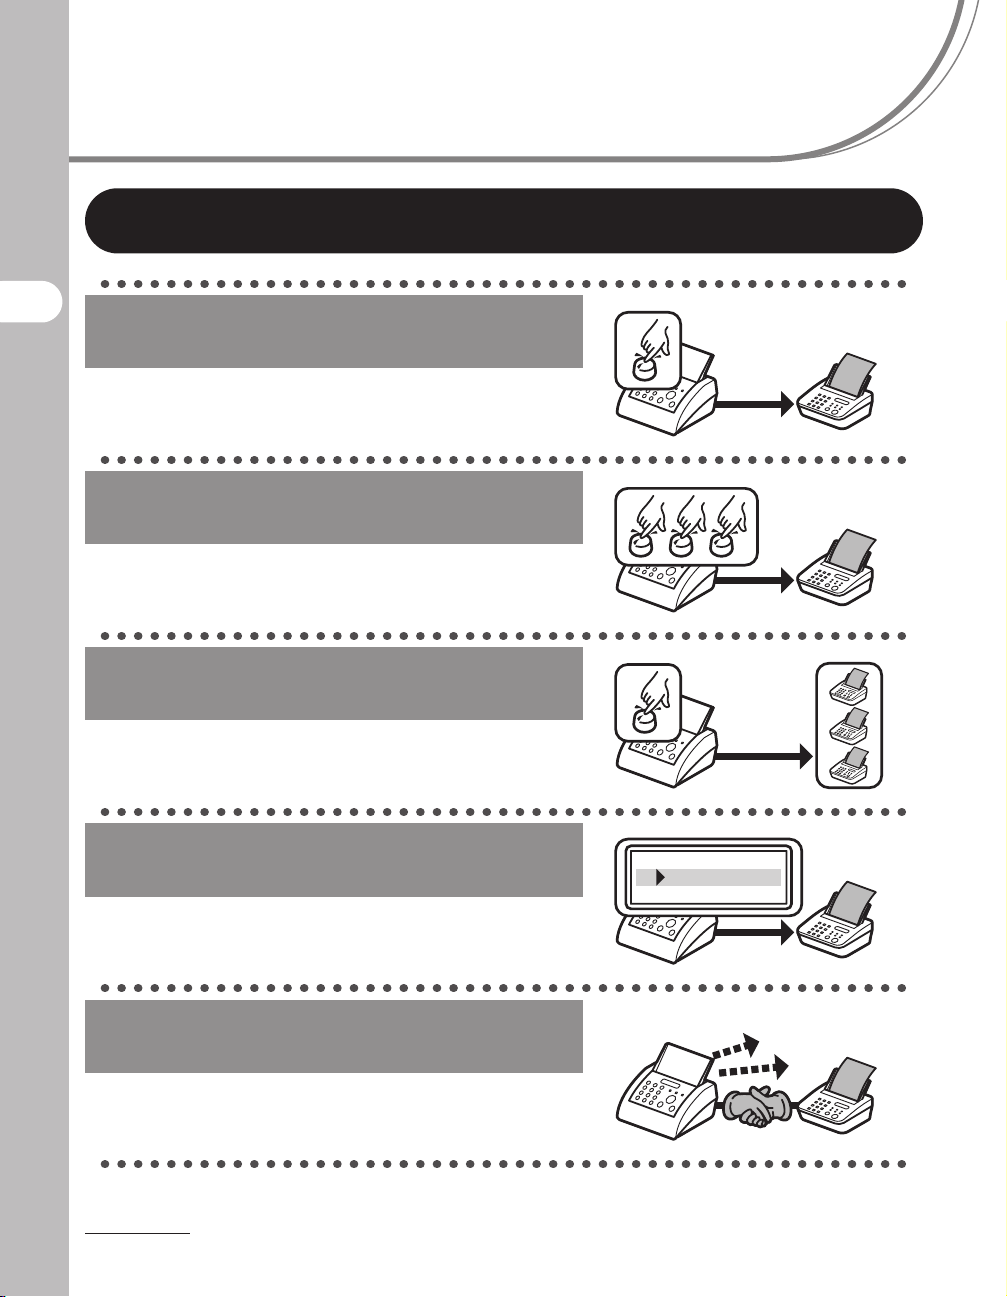
What Can I Do with This Machine?
Fax Features
Specify a recipient with a single
button
One-Touch Speed Dialing
→ p. 4-7
Specify a recipient with a three-digit
code
What Can I Do with This Machine?
Coded Speed Dialing
→ p. 4-15
Specify multiple recipients with a
single button
Group Dialing
→ p. 4-22
Look up registered recipients
Directory Dialing
→ Advanced Guide
Redial when the line is busy
Redialing
→ Advanced Guide
AAAAA
BBBBB
CCCCC
ii
Page 5
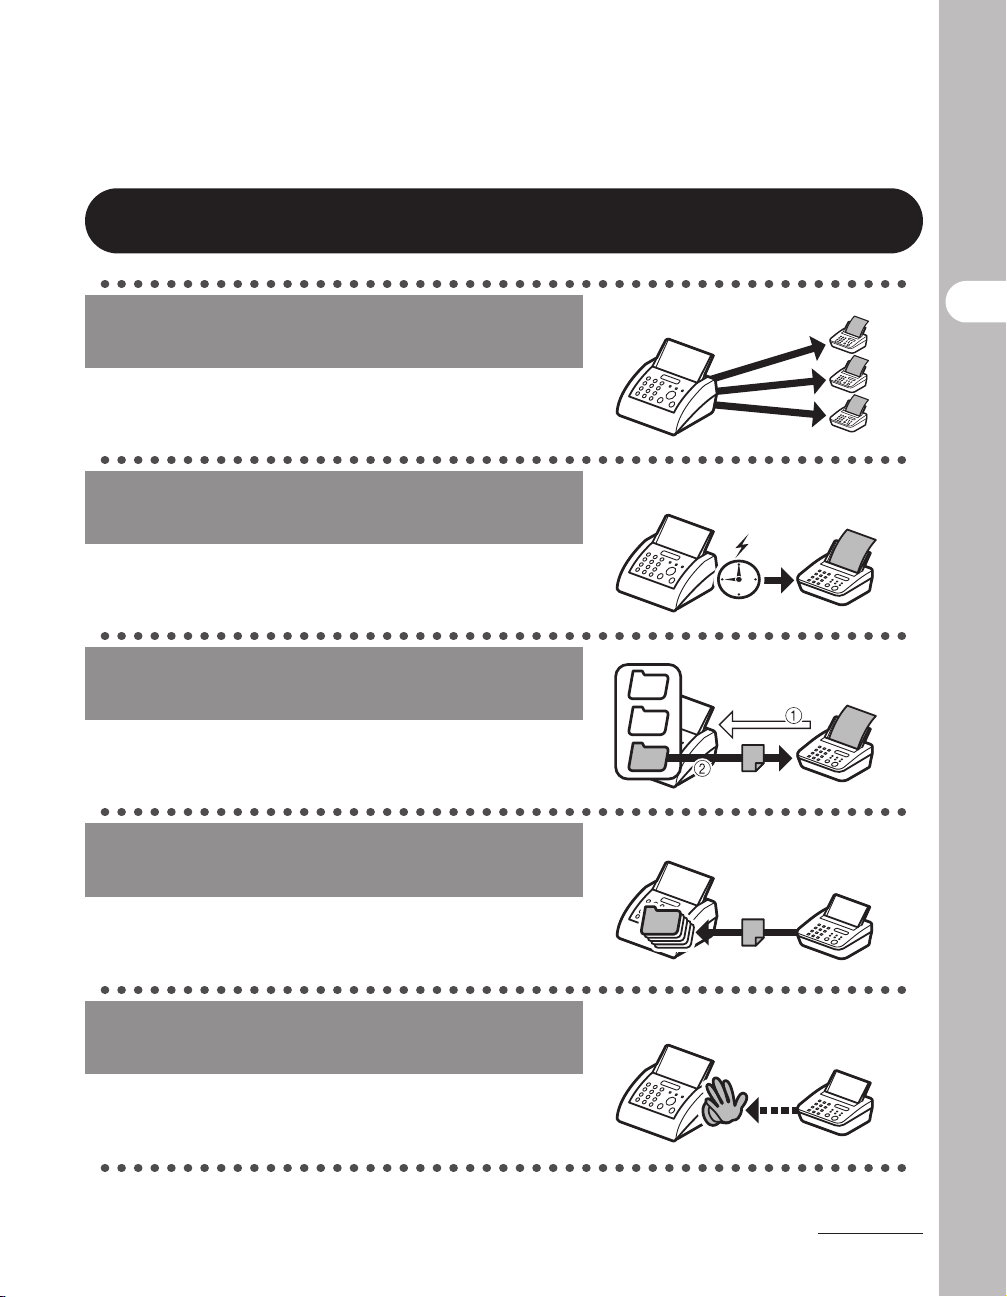
Fax Features (continued)
Send a fax to multiple recipients
Broadcasting
→ Advanced Guide
Send a fax at a specified time
Timer Sending
→ Advanced Guide
Send a fax in response to the
recipient’s request
Polling Sending
→ Advanced Guide
Receive faxes in memory without
printing out
What Can I Do with This Machine?
Memory Reception
→ Advanced Guide
Reject faxes from unregistered
telephone numbers
Reception Restriction
→ Advanced Guide
iii
Page 6

What Can I Do with This Machine?
Fax Features (continued)
Send a fax to be relayed to other fax
machines
Relay Initiation
→ Advanced Guide
iv
Page 7
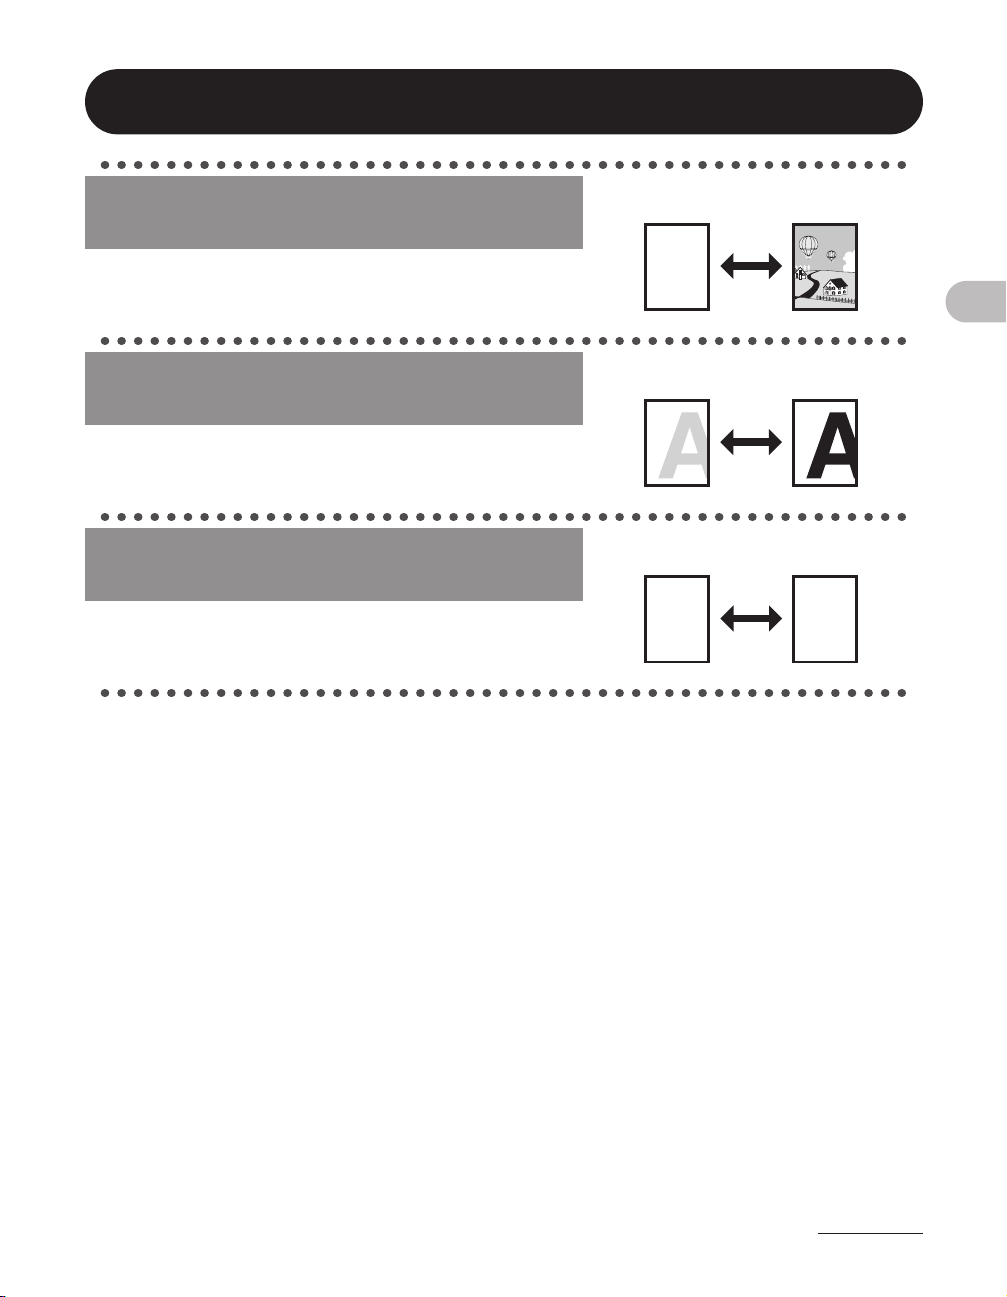
Copy Features
Select a scan mode depending on
the quality of image to be scanned
Image Quality
→ p. 6-3
Adjust the density level of scanned
images
Density
→ p. 6-4
Enlarge or reduce copied images
ABC
ABC
ABC
ABC
What Can I Do with This Machine?
Zoom Ratio
→ p. 6-5
A
A
v
Page 8

Contents
Manuals for the Machine.................................................................i
What Can I Do with This Machine? .............................................. ii
Fax Features....................................................................................ii
Copy Features.................................................................................v
Contents ......................................................................................... vi
Preface............................................................................................xi
Important Safety Instructions .......................................... xi
Handling and Maintenance............................................. xi
Location ..........................................................................xii
Power Supply.................................................................xiii
Customer Support (U.S.A.)............................................xiii
What Can I Do with This Machine?
How to Use This Guide................................................................. xv
Legal Notices ...............................................................................xvi
Customer Support (Canada)..........................................xiv
Copyright .......................................................................xvi
Disclaimer ......................................................................xvi
Trademarks...................................................................xvii
vi
Users in the U.S.A......................................................................xviii
Pre-Installation Requirements for Canon Facsimile
Equipment....................................................................xviii
Connection of the Equipment ........................................xix
In Case of Equipment Malfunction.................................xix
Rights of the Telephone Company ................................xix
FCC Notice .................................................................... xx
Users in Canada..........................................................................xxii
Pre-Installation Requirements for Canon Facsimile
Equipment.....................................................................xxii
Notice...........................................................................xxiii
Laser Safety ................................................................................xxv
CDRH Regulations .......................................................xxv
Page 9

1 Before Using the Machine ......................................................1-1
Machine Components .................................................................1-1
Operation Panel ...........................................................................1-3
LCD (Standby Mode) ...................................................................1-5
Fax Mode......................................................................1-5
Copy Mode ...................................................................1-5
Handset.........................................................................................1-6
Maintaining the Handset ...............................................1-6
Toner Cartridge............................................................................1-7
Maintaining the Toner Cartridge ...................................1-7
2 Document Handling................................................................. 2-1
Document Requirements ............................................................2-1
Scanned Area...............................................................................2-2
Loading Documents ....................................................................2-3
3 Print Media ...............................................................................3-1
What Can I Do with This Machine?
Paper Requirements....................................................................3-1
Printable Area ..............................................................................3-2
Paper Guidelines .........................................................................3-3
Loading Paper..............................................................................3-4
Loading Envelopes .......................................................3-4
Setting Paper Type and Size.......................................................3-7
vii
Page 10

4 Sending Faxes .........................................................................4-1
Scan Settings ...............................................................................4-3
Contrast ........................................................................4-3
Image Quality................................................................4-4
Speed Dialing ...............................................................................4-6
Registering Recipients for Speed Dialing .....................4-6
Registering One-Touch Speed Dialing .........................4-7
Editing One-Touch Speed Dialing ..............................4-11
Deleting One-Touch Speed Dialing ............................4-14
Registering Coded Speed Dialing...............................4-15
Editing Coded Speed Dialing......................................4-18
Deleting Coded Speed Dialing....................................4-21
Registering Group Dialing...........................................4-22
Editing Group Dialing..................................................4-24
Deleting Group Dialing................................................4-26
Using Speed Dialing ...................................................4-27
What Can I Do with This Machine?
Manual Sending ........................................................................4-29
Using One-Touch Speed/Group Dialing .....................4-27
Using Coded Speed Dialing........................................4-28
Sending Faxes Manually ............................................4-29
Entering Pauses .........................................................4-30
5 Receiving Faxes ...................................................................... 5-1
6 Copying ....................................................................................6-1
Scan Settings ...............................................................................6-3
Image Quality................................................................6-3
Density..........................................................................6-4
Zoom Ratio ...................................................................6-5
7 Printing .....................................................................................7-1
viii
Page 11

8 Maintenance............................................................................. 8-1
Cleaning the Machine..................................................................8-1
Exterior .........................................................................8-1
Interior...........................................................................8-2
Scanning Area ..............................................................8-4
Replacing the Cartridge ..............................................................8-5
Redistributing Toner .....................................................8-5
Replacing the Cartridge ................................................8-7
Recycling Used Cartridges .........................................................8-9
The Clean Earth Campaign ..........................................8-9
U.S.A. PROGRAM......................................................8-10
CANADA PROGRAM-CANADA PROGRAMME ........8-13
Transporting the Machine.........................................................8-15
9 Troubleshooting ......................................................................9-1
Clearing Jams ..............................................................................9-1
Document Jams............................................................9-1
Paper Jams...................................................................9-3
Inside the Machine........................................................9-3
Paper Feeder................................................................9-5
What Can I Do with This Machine?
LCD Messages .............................................................................9-6
Error Codes ................................................................................9-11
If a Power Failure Occurs..........................................................9-12
If You Cannot Solve a Problem ................................................9-13
10 Machine Settings .................................................................10-1
Machine Settings .......................................................................10-1
Printing the Machine Status List .................................10-1
Accessing the Setting Menu .......................................10-3
Setting Menu ..............................................................................10-5
ix
Page 12

11 Appendix ..............................................................................11-1
Specifications ............................................................................11-1
General.......................................................................11-1
Facsimile.....................................................................11-2
Copier .........................................................................11-3
Telephone...................................................................11-3
Printer .........................................................................11-4
Index ...........................................................................................11-5
What Can I Do with This Machine?
x
Page 13

Preface
Thank you for choosing a Canon product. Before using the machine, please read
the following instructions for your safety.
Important Safety Instructions
WAR NING
Except as specifically described in this guide, do not attempt to service the machine yourself. Never
attempt to disassemble the machine: opening and removing its interior covers will expose you to
dangerous voltages and other risks. For all service, contact Canon Customer Care Center.
Handling and Maintenance
– Follow all warnings and instructions marked on the machine.
– Do not subject the machine to strong physical shocks or vibrations.
– Always unplug the machine before moving or cleaning it.
– To avoid paper jams, never unplug the power cord, open the cartridge cover, or add
or remove paper in the machine while printing.
– When transporting the machine, be sure to remove the toner cartridge from the
machine.
– Place the toner cartridge in its original protective bag or wrap it in a thick cloth to
prevent exposure to light.
– Always hold the bottom when you lift the machine. Never lift it by any of its trays or
attachments.
– Do not insert any objects into the slots or openings on the machine since they may
touch dangerous voltage points or short out parts. This could result in fire or electric
shock.
– Do not allow small objects (such as pins, paper clips, or staples) to fall into the
machine. If something does fall into it, unplug the machine immediately and contact
Canon Customer Care Center.
– To avoid spillage in or around the machine, do not eat or drink near it. If you spill
liquid or if any substance falls into it, unplug the power cord immediately and contact
Canon Customer Care Center.
– Keep the machine clean. Dust accumulation can prevent the machine from operating
properly.
What Can I Do with This Machine?
xi
Page 14

– Unplug the machine from the wall outlet and contact Canon Customer Care Center
in any of the following cases:
– When the power cord or plug is damaged or frayed.
– If liquid has spilled into the machine.
– If the machine has been exposed to rain or water.
– If the machine does not operate normally when you have followed the instructions
in this guide. Adjust only those controls that are covered by the instructions in this
guide. Improper adjustment of other controls may result in damage and may
require extensive work by a qualified technician to restore the product to normal
operation.
– If the machine has been dropped or the cabinet has been damaged.
– If the machine exhibits a distinct change in performance, indicating a need for
servicing.
Location
– Place the machine on a flat, stable, vibration-free surface that is strong enough to
What Can I Do with This Machine?
support its weight.
– Place the machine in a cool, dry, clean, well ventilated place.
– Make sure the area is free from dust.
– Make sure the location is not exposed to high temperature or humidity.
– Keep the machine away from direct sunlight as this can damage the machine or
affect print quality. If you have to place the machine near a window, install heavy
curtains or blinds.
– Do not use the machine near water. Make sure that no wet or humid objects come
into contact with the machine.
– Do not use or store the machine outdoors.
– Do not install the machine near devices that contain magnets or generate magnetic
fields, such as speakers.
– If possible, place the machine near an existing telephone line outlet for easy
connection of the telephone line cord, and to avoid the expense of installing a new
outlet.
– Place the machine near a standard 120 V AC (60 Hz) power outlet.
xii
Page 15

– To ensure reliable operation of the machine and to protect it from overheating (which
can cause it to operate abnormally and create a fire risk), do not block the exhaust
vent. Never block or cover any openings on the machine by placing it on a bed, sofa,
rug, or other similar surface. Do not place the machine in a cupboard or built-in
installation, or near a radiator or other heat source unless proper ventilation is
provided. Leave enough space around all sides of the machine.
– Do not stack boxes or furniture around the power outlet. Keep the area free so you
can reach the outlet quickly. If you notice anything unusual (smoke, strange odors,
noises) around the machine, unplug the power cord immediately. Contact Canon
Customer Care Center.
– Do not allow anything to rest on the power cord, and do not place the machine where
the cord will be walked on. Make sure the cord is not knotted or kinked.
Power Supply
– During electrical storms, disconnect the power cord from the power outlet.
(Please note that any documents stored in the machine’s memory will be deleted
when you unplug the machine.)
– Whenever you unplug the machine, wait at least five seconds before you plug it in
again.
– Do not plug the machine into an uninterruptible power supply (UPS).
What Can I Do with This Machine?
WAR NING
This product emits low level magnetic flux. If you use a cardiac pacemaker and feel abnormalities, please
move away from this product and consult your doctor.
Customer Support (U.S.A.)
Your machine is designed with the latest technology to provide trouble-free operation. If
you encounter a problem with the machine’s operation, try to solve it by using the
information in Chapter 9. If you cannot solve the problem or if you think your machine
needs servicing, contact Canon Customer Care Center at 1-800-828-4040 between
the hours of 8:00 A.M. to 8:00 P.M. EST Monday through Friday and 10:00 A.M. to 8:00
P.M. on Saturday. 24 hour online support is also available at the website:
http://www.canontechsupport.com/.
xiii
Page 16

Customer Support (Canada)
Canon Canada Inc., offers a full range of customer technical support options*:
– For step-by-step troubleshooting, e-mail technical support, the latest driver or
document downloads, and answers to frequently asked questions visit
http://www.canon.ca/
– Automated step-by-step telephone support on most current products 24 hours, 7
days a week 1-800-652-2666
– Free live technical support 9 A.M. to 8 P.M. EST Monday through Friday (excluding
holidays) for products still under warranty 1-800-652-2666
– The location of the authorized service facility nearest you visit http://www.canon.ca/
or 1-800-652-2666
If the problem cannot be corrected by using one of the above technical support options,
repair options are available at the time of your call to the live technical support number
above or via the website at http://www.canon.ca/
* Support program specifics are subject to change without notice.
What Can I Do with This Machine?
xiv
Page 17

How to Use This Guide
The following symbols are used throughout the manuals for the machine and
indicate the warnings, cautions and notes you should keep in mind when using
the machine.
WAR NING
CAUTION
NOTE
Indicates a warning that may lead to death or serious injury if not
observed.
Explains how to avoid actions that could injure you or damage your
machine.
Explains operating restrictions and how to avoid minor difficulties.
In addition, this guide uses distinctive notations to identify buttons and information in
the LCD:
– The buttons you press appear in square brackets: [Stop/Reset].
– Information in the LCD appears in angle brackets: <SET DOCUMENT>.
The numbers that point to the buttons on the operation panel diagram correspond to
the order of steps to take in the procedure.
What Can I Do with This Machine?
xv
Page 18

Legal Notices
Copyright
Copyright © 2005 by Canon Inc. All rights reserved. No part of this publication may be
reproduced, transmitted, transcribed, stored in a retrieval system, or translated into any
language or computer language in any form or by any means, electronic, mechanical,
magnetic, optical, chemical, manual, or otherwise, without the prior written permission
of Canon, Inc.
Disclaimer
The information in this document is subject to change without notice.
CANON INC. MAKES NO WARRANTY OF ANY KIND WITH REGARD TO THIS
MATERIAL, EITHER EXPRESS OR IMPLIED, EXCEPT AS PROVIDED HEREIN,
INCLUDING WITHOUT LIMITATION, THEREOF, WARRANTIES AS TO
What Can I Do with This Machine?
MARKETABILITY, MERCHANTABILITY, FITNESS FOR A PARTICULAR PURPOSE
OF USE OR AGAINST INFRINGEMENT OF ANY PATENT. CANON INC. SHALL NOT
BE LIABLE FOR ANY DIRECT, INCIDENTAL, OR CONSEQUENTIAL DAMAGES OF
ANY NATURE, OR LOSSES OR EXPENSES RESULTING FROM THE USE OF THIS
MATERIAL.
xvi
Page 19

Trademarks
Canon and FAXPHONE are registered trademarks, and UHQ is a trademark of Canon
Inc.
All other product and brand names are registered trademarks, trademarks or service
marks of their respective owners.
As an ENERGY STAR
®
Partner, Canon has determined that this
product meets the ENERGY STAR
®
guidelines for energy efficiency.
What Can I Do with This Machine?
xvii
Page 20

Users in the U.S.A.
Pre-Installation Requirements for Canon Facsimile Equipment
A. Location
Supply a suitable table, cabinet, or desk. See p. 11-1 for the machine’s weight and
dimensions.
B. Order Information
1. Only a single line, touch-tone or rotary telephone set is to be used.
2. Order an RJ11-C modular jack (USOC code), which should be installed by the
telephone company. If the RJ11-C jack is not present, installation cannot occur.
3. Order a normal business line from your telephone company’s business representative.
The line should be a regular voice grade line or the equivalent.
What Can I Do with This Machine?
Use one line per machine.
DDD (DIRECT DISTANCE DIAL) LINE
-or-
IDDD (INTERNATIONAL DIRECT DISTANCE DIAL) LINE IF YOU COMMUNICATE
OVERSEAS
NOTE
Canon recommends an individual line following industry standards, e.g. the 2500 (Touch Tone) or
500 (Rotary/Pulse Dial) telephones. A dedicated extension off a PBX machine without “Call Waiting”
can be used with the machine. Key telephone systems are not recommended because they send
non-standard signals to individual telephones for ringing and special codes, which may cause a fax
error.
C. Power Requirements
This equipment should be connected to a standard 120-volt AC, three-wire grounded
outlet only. Do not connect this machine to an outlet or power line shared with other
appliances that cause “electrical noise.” Air conditioners, electric typewriters, copiers, and
machines of this sort generate electrical noise which often interferes with communications
equipment and the sending and receiving of documents.
xviii
Page 21

Connection of the Equipment
This equipment complies with Part 68 of the FCC rules and the requirements adopted
by the ACTA. On the rear panel of this equipment is a label that contains, among other
information, a product identifier in the format US:AAAEQ##TXXXX. If requested, this
number must be provided to the telephone company.
An FCC compliant telephone cord and modular jack are provided with this equipment.
This equipment is designed to be connected to the telephone network or premises
wiring using a compatible modular jack which is Part 68 compliant. See the Starter
Guide for details.
The Ringer Equivalence Number (REN) is used to determine the number of devices
that may be connected to a telephone line. Excessive RENs on a telephone line may
result in the devices not ringing in response to an incoming call. In most but not all
areas, the sum of RENs should not exceed five (5.0). To be certain of the number of
devices that may be connected to a line, as determined by the total RENs, contact the
local telephone company. The REN for this product is part of the product identifier that
has the format US:AAAEQ##TXXXX. The digits represented by ## are the REN
without a decimal point (e.g., 10 is a REN of 1.0).
This equipment may not be used on coin service provided by the telephone company.
Connection to party lines is subjected to state tariffs.
What Can I Do with This Machine?
In Case of Equipment Malfunction
Should any malfunction occur which cannot be corrected by the procedures described
in this guide, disconnect the equipment from the telephone line and unplug the power
cord. The telephone line should not be reconnected or the power cord plugged in until
the problem is completely resolved. Users should contact Canon Authorized Service
Facilities for servicing of equipment. Information regarding Authorized Service Facility
locations can be obtained by calling Canon Customer Care Center.
(1-800-828-4040)
Rights of the Telephone Company
Should the equipment cause harm to the telephone network, the telephone company
may temporarily disconnect service. The telephone company also retains the right to
make changes in facilities and services which may affect the operation of this
equipment. When such changes are necessary, the telephone company is required to
give adequate prior notice to the user.
xix
Page 22

FCC Notice
FAXPHONE L120: Facsimile Transceiver, Model F147400
This device complies with Part 15 of the FCC Rules. Operation is subject to the
following two conditions:
(1) This device may not cause harmful interference, and
(2) this device must accept an interference received, including interference that may
cause undesired operation.
NOTE
This equipment has been tested and found to comply with the limits for a class B digital device, pursuant to
Part 15 of the FCC Rules. These limits are designed to provide reasonable protection against harmful
interference in a residential installation. This equipment generates, uses and can radiate radio frequency
energy and, if not installed and used in accordance with the instructions, may cause harmful interference
to radio communications. However, there is no guarantee that interference will not occur in a particular
installation. If this equipment does cause harmful interference to radio or television reception, which can
be determined by turning the equipment off and on, the user is encouraged to try to correct the
interference by one or more of the following measures:
• Reorient or relocate the receiving antenna.
What Can I Do with This Machine?
• Increase the separation between the equipment and receiver.
• Connect the equipment into an outlet on a circuit different from that to which the receiver is connected.
• Consult the dealer or an experienced radio/TV technician for help.
Use of shielded cable is required to comply with class B limits in Subpart B of Part 15
of FCC Rules.
Do not make any changes or modifications to the equipment unless otherwise
specified in this manual. If such changes or modifications should be made, you could
be required to stop operation of the equipment.
Canon U.S.A. Inc.
One Canon Plaza, Lake Success, NY 11042, U.S.A.
TEL No. 1-516-328-5600
xx
Page 23

The Telephone Consumer Protection Act of 1991 makes it unlawful for any person to
use a computer or other electronic device to send any message via a telephone fax
machine unless such message clearly contains in a margin at the top or bottom of
each transmitted page or on the first page of the transmission, the date and time it is
sent and an identification of the business or other entity, or other individual sending the
message and the telephone number of the sending machine or such business, other
entity, or individual.
In order to program this information into the machine, follow the instructions in the
Starter Guide.
What Can I Do with This Machine?
xxi
Page 24

Users in Canada
Pre-Installation Requirements for Canon Facsimile Equipment
A. Location
Supply a suitable table, cabinet, or desk. See p. 11-1 for the machine’s weight and
dimensions.
B. Order Information
1. Provide only a single-line to touch-tone or rotary telephone set terminated with a
standard 4-pin modular phone plug. (Touch-tone is recommended if available in your
area.)
2. Order an CA11A modular jack (USOC code), which should be installed by the
telephone company. If the CA11A jack is not present, installation cannot occur.
What Can I Do with This Machine?
3. Order a normal business line from your telephone company’s business representative.
The line should be a regular voice grade line or equivalent. Use one line per machine.
DDD (DIRECT DISTANCE DIAL) LINE
-or-
IDDD (INTERNATIONAL DIRECT DISTANCE DIAL) LINE IF YOU COMMUNICATE
OVERSEAS
NOTE
Canon recommends an individual line following industry standards, e.g., the 2500 (touch tone) or
500 (rotary/pulse dial) telephones. A dedicated extension off a PBX machine without “Camp On”
signals is also permissible with the machine. Key telephone systems are not recommended because
they send non-standard signals to individual telephones for ringing and special codes, which may
cause a fax error.
C. Power Requirements
The power outlet should be a three-prong grounded receptacle (Single or Duplex). It
should be independent from copiers, heaters, air conditioners or any electric equipment
that is thermostatically controlled. The rated value is 120 volts and 15 amperes. The
CA11A modular jack should be relatively close to the power outlet to facilitate installation.
xxii
Page 25

Notice
This equipment meets the applicable Industry Canada Terminal Equipment Technical
Specifications. This is confirmed by the registration number. The abbreviation, IC,
before the registration number signifies that registration was performed based on a
Declaration of Conformity indicating that Industry Canada technical specifications were
met. It does not imply that Industry Canada approved the equipment.
Cet appareil est conforme aux Spécifications techniques des équipements terminaux
de I’lndustrie du Canada.
Ceci est confirmé par le numéro d’enregistrement. L’abréviation IC précédant le
numéro d’enregistrement signifie que I’enregistrement a été effectué sur la base de la
Déclaration de conformité indiquant que le produit est conforme aux spécifications
techniques du Canada. Ceci n’implique pas que le produit ait été approuvé par
I’industrie du Canada.
Before installing this equipment, users should ensure that it is permissible to be
connected to the facilities of the local telecommunications company. The equipment
must also be installed using an acceptable method of connection. The customer
should be aware that compliance with the above conditions may not prevent
degradation of service in some situations.
Repairs to certified equipment should be coordinated by a representative designated
by the supplier. Any repairs or alterations made by the user to this equipment, or
equipment malfunctions, may give the telecommunications company cause to request
the user to disconnect the equipment.
Users should ensure for their own protection that the electrical ground connections of
the power utility, telephone lines and internal metallic water pipe system, if present, are
connected together. This precaution may be particularly important in rural areas.
What Can I Do with This Machine?
CAUTION
Users should not attempt to make such connections themselves, but should contact the appropriate
electric inspection authority, or electrician, as appropriate.
NOTE
This Class B digital apparatus meets all requirements of the Canadian Interference- Causing Equipment
Regulations.
Cet appareil numérique de la classe B respecte toutes les exigences du Règlement sur le matériel
brouilleur du Canada.
xxiii
Page 26

The Ringer Equivalence Number (REN) for this terminal equipment is 1.0. The REN
assigned to each terminal equipment provides an indication of the maximum number of
terminals allowed to be connected to a telephone interface. The termination on an
interface may consist of any combination of devices subject only to the requirement
that the sum of the Ringer Equivalence Numbers of all the devices does not exceed
five.
Le Nombre d’équivalence Ringer (REN) de cet appareil terminal est 1.0. Le REN
attribué à chaque équipement terminal fournit une indication sur le nombre maximum
de terminaux pouvant être connectés sur une interface téléphonique. La terminaison
sur une interface peut consister en n’importe quelle combinaison d’appareils, à la
condition seulement que la somme des Nombres d’équivalence Ringer de tous les
appareils ne soit pas supérieure à 5.
CANON CANADA INC.
1-800-263-1121
24 HOURS A DAY, SEVEN DAYS A WEEK
What Can I Do with This Machine?
xxiv
Page 27
Laser Safety
This machine complies with 21 CFR Chapter 1 Subchapter J as a Class 1 laser
product under the U.S. Department of Health and Human Services (DHHS) Radiation
Performance Standard according to the Radiation Control for Health and Safety Act of
1968. This means that the machine does not produce hazardous radiation.
Since radiation emitted inside the machine is completely confined within protective
housings and external covers, the laser beam cannot escape from the machine during
any phase of user operation.
CDRH Regulations
The Center for Devices and Radiological Health (CDRH) of the U.S. Food and Drug
Administration implemented regulations for laser products on August 2, 1976. These
regulations apply to laser products manufactured from August 1, 1976. Compliance is
mandatory for products marketed in the United States.
CAUTION
Use of controls, adjustments, or performance of procedures other than those specified in this manual may
result in hazardous radiation exposure.
What Can I Do with This Machine?
The label is attached to the laser scanner machine inside the machine and is not in a
user access area.
xxv
Page 28
Before Using the Machine
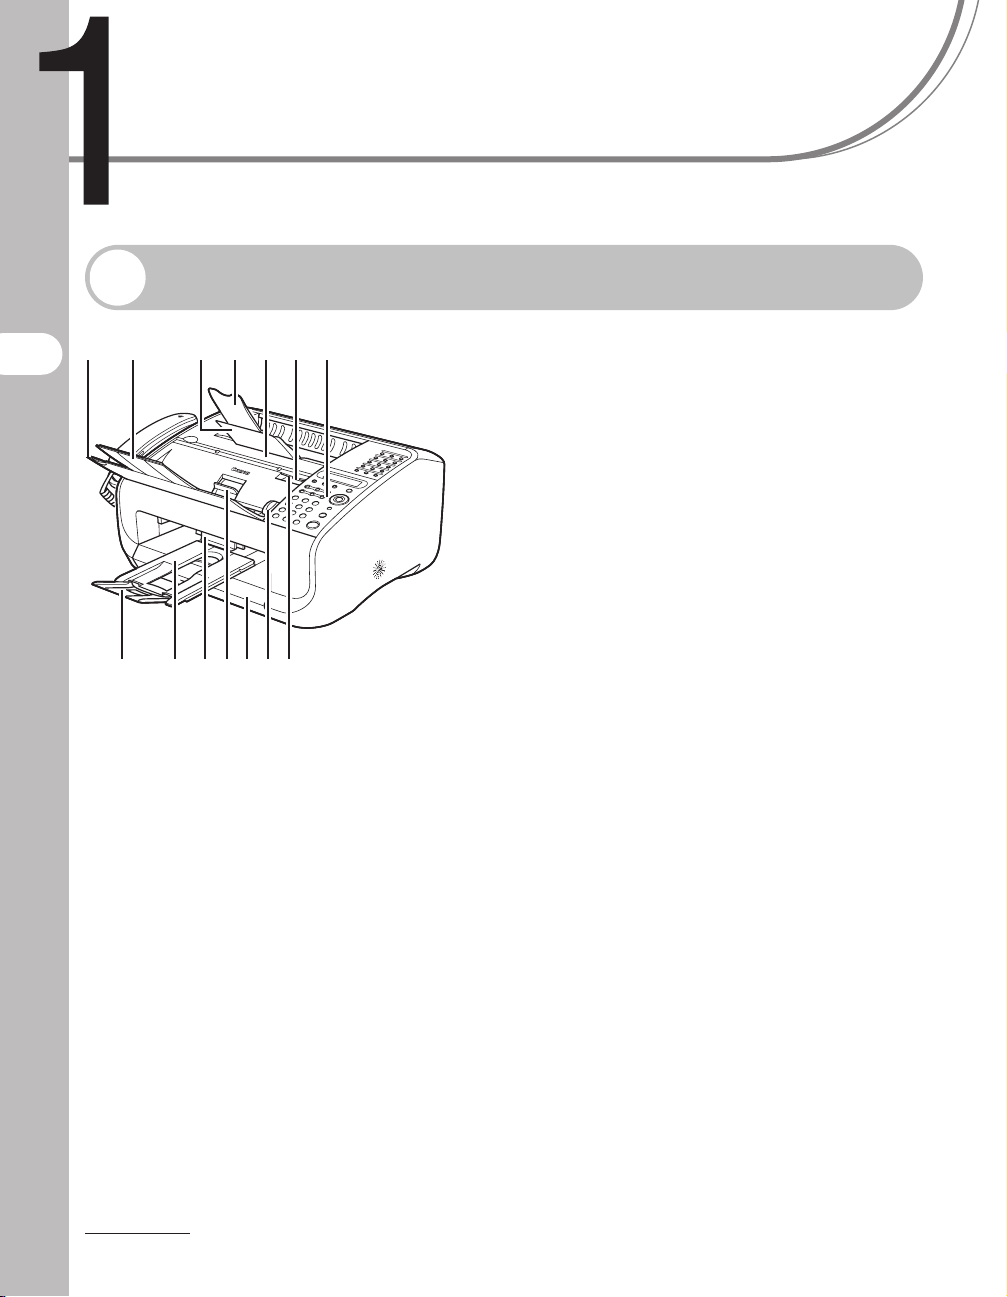
Machine Components
Before Using the Machine
AI JBC D E
GMK NL H
F
A Paper delivery tray
Outputs printouts.
B Paper delivery tray extension
Extension for the paper output tray.
C Cartridge cover
Open it when replacing the toner cartridge or
removing jammed paper.
DNotch
Used to open the cartridge cover.
E Operation panel
Controls the machine.
F Document release lever
Releases jammed document.
G Document guides
Set to the width of documents.
H Automatic document feeder (ADF)
Feeds documents automatically into the
machine for scanning.
I Document feeder tray
Holds documents.
J Document feeder tray extension
Extension for the document feeder tray.
K Document delivery tray
Outputs scanned documents. Part of paper
stack cover.
L Document delivery tray extension
Extension for the document delivery tray.
M Paper stack cover
Protects paper supply in the machine from
dirt and dust.
1-1
Page 29
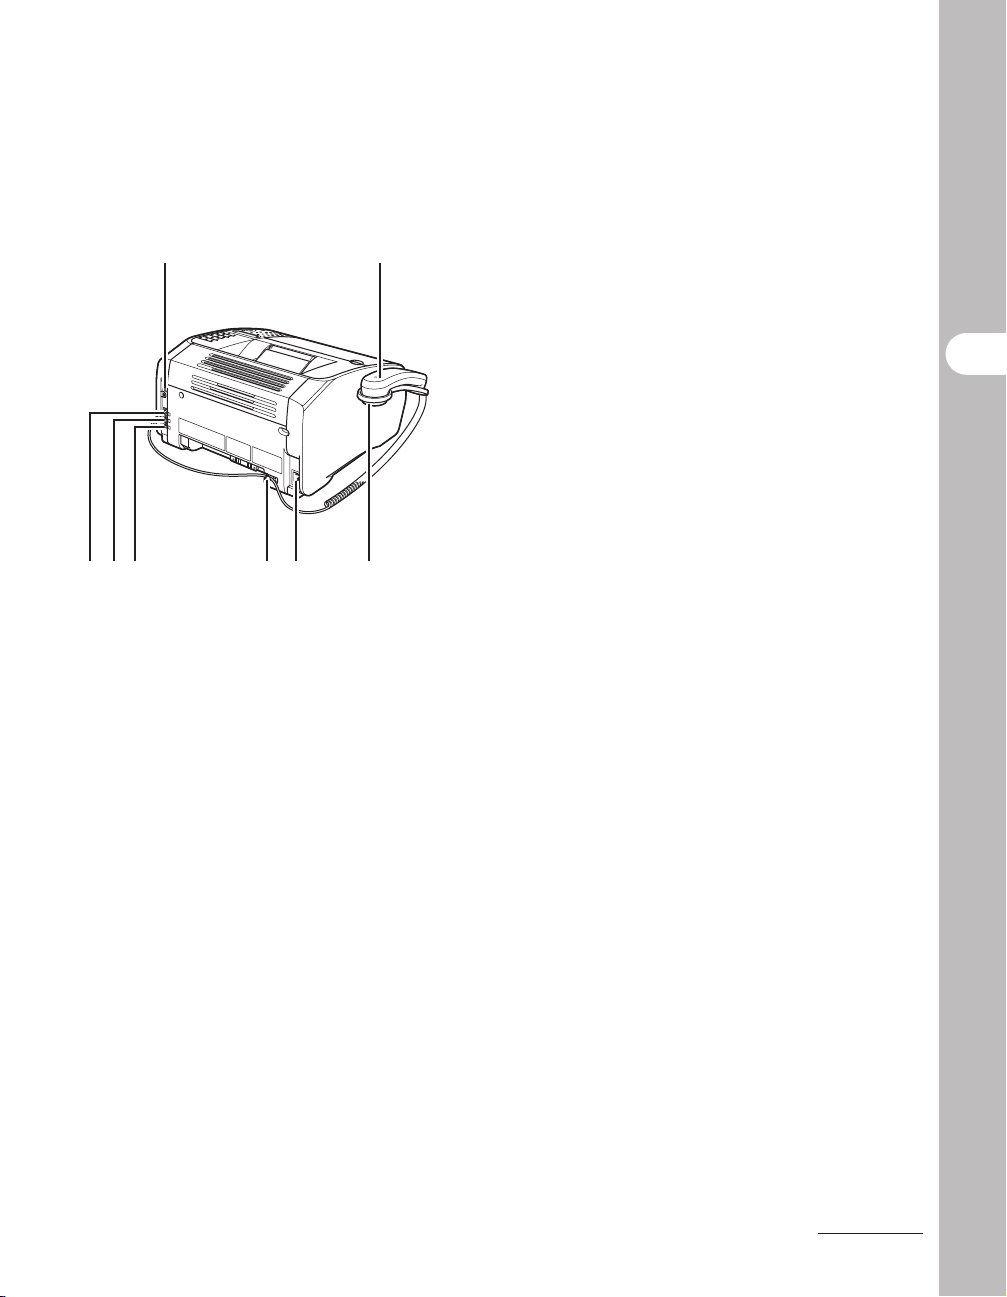
Q
O
N Scanning Platform
Scans document.
O Handset
For using the machine as a telephone or
receiving faxes remotely.
P Handset cradle
Cradle for the handset.
Before Using the Machine
Q USB port
Connect the USB cable.
R Handset jack
Connect the handset.
S External device jack
PVUSRT
Connect an external device if necessary.
T Line jack
Connect the telephone cable.
U Handset cable retainer
Hook the handset cable to retain the slack.
V Power socket
Connect the power cord.
1-2
Page 30
P
A
B
C
Before Using the Machine
D
F
G
I
J
L
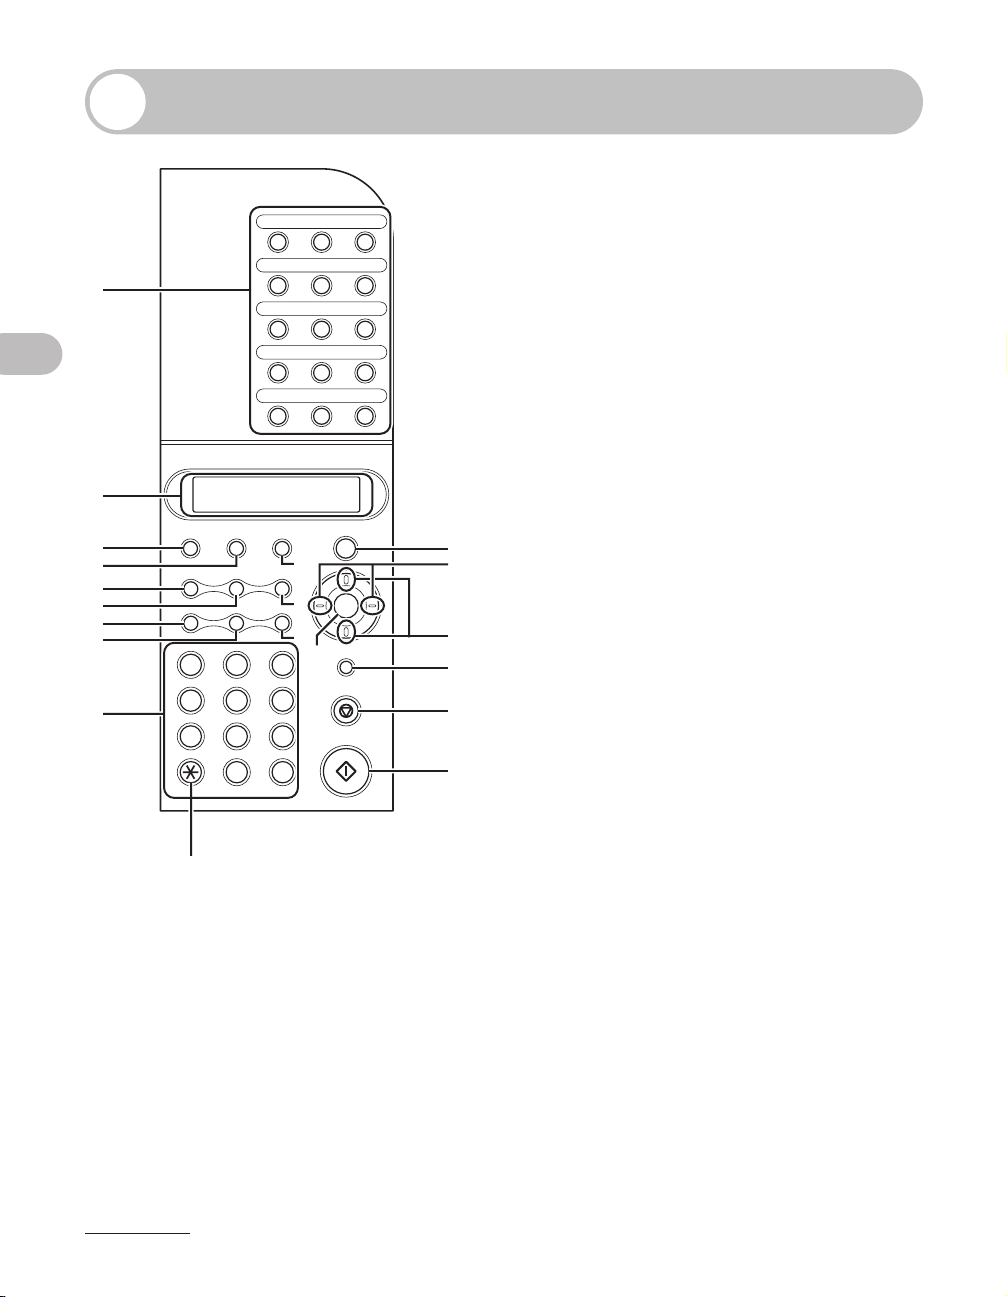
Operation Panel
01 02 03
04 05 06
07 08 09
10 11 12
13 14 15
FAXPHONE L120
Add.Mode Menu
Image Quality
Redial Pause
GHI
PQRS
OPER
Tone
M
Status Copy
Hook
E
H
K
Q
Directory Coded Dial
ABC DEF
213
JKL MNO
546
TUV WXYZ
879
SYMBOLS
#
0
Set
Clear
Stop/Reset
Start
A One-Touch Speed Dialing buttons
Enters recipients registered for one-touch
speed dialing or group dialing.
BLCD
Displays messages and prompts during
operation. Also displays selections, text, and
numbers when specifying settings.
C Additional Mode button
Accesses additional fax modes.
D Menu button
Accesses the setting menu for customizing
machine operations.
E Status button
Displays transaction results and prints
reports and lists.
N
O
F Image Quality button
Adjusts the image quality for scanning
documents.
P
R
G Directory button
Displays and searches the list of recipients
registered in the machine.
S
H Coded Dial button
Enters recipients registered for coded speed
T
dialing.
I Redial button
Redials the number last dialed.
J Pause button
Inserts paus when entering a fax number.
K Hook button
Opens and closes the line monitor.
L Numeric buttons
Enter letters and numbers.
M Tone button
Switches to tone dialing when in the pulse
mode.
NCopy button
Enters the copy standby mode.
1-3
Page 31

O Left/Right button
Selects menu items and moves cursors.
P Up/Down button
Scrolls through the setting menu and
registered recipients.
Q Set button
Confirms an operation or registers
information you enter.
R Clear button
Clears an entry in the LCD.
S Stop/Reset button
Cancels machine operations and returns to
the standby mode.
T Start button
Starts scanning documents for sending or
copying.
Before Using the Machine
1-4
Page 32

LCD (Standby Mode)
Fax Mode
A
16:00 STD 100%
-SET DOC.- FAX ONLY
ATime
B Image quality
C Memory available
D Message
Before Using the Machine
E Receive mode
D
B
E
C
Copy Mode
A
TEXT x1.00 3
LT
A Image quality
BZoom ratio
C Quantity
D Density
E Paper size and type (for non-plain paper)
B C
ED
1-5
Page 33

Handset
The handset is used to use the machine as a telephone and a fax machine, and to
receive faxes manually.
Use a sharp object (i.e., pen) to select the ring volume of the handset.
NOTE
For how to install the handset, see “Connect Telephone Cables and Install Handset,” in the Starter Guide.
Maintaining the Handset
– Do not leave the handset exposed to direct sunlight.
– Do not install the handset in hot or humid conditions.
– Do not spray aerosol polish on the handset as it may cause damage.
– Use a damp cloth to wipe clean the handset.
Before Using the Machine
1-6
Page 34

Toner Cartridge
The only component of the machine that needs to be replaced is the toner cartridge.
The machine comes with a starter cartridge, which yields approximately 1,000 pages
based on 5% coverage of an A4-size page. A Canon genuine replacement cartridge
yields approximately 2,000 pages based on 5% coverage of an A4-size page. To
purchase this cartridge, contact your local Canon dealer or Canon Customer Care
Center (1-800-828-4040).
Cartridge name:
Canon Cartridge 104
Maintaining the Toner Cartridge
● Keep the toner cartridge away from computer screens, disk drives, and floppy disks.
Before Using the Machine
The magnet inside the cartridge may harm these items.
● Avoid locations subject to high temperature, high humidity, or rapid changes in
temperature.
● Do not expose the cartridge to direct sunlight or bright light for more than five
minutes.
● Store the cartridge in its protective bag. Do not open the bag until you are ready to
install the cartridge in the machine.
● Save the cartridge’s protective bag in case you need to repack and transport the
cartridge at a later date.
● Do not store the cartridge in a salty atmosphere or where there are corrosive gases
such as from aerosol sprays.
● Do not remove the cartridge from the machine unnecessarily.
● Do not open the drum protective shutter on the cartridge. Print quality may
deteriorate if the drum surface is exposed to light or is damaged.
● Always hold the cartridge by its handle to avoid touching the drum protective shutter.
● Do not stand the toner cartridge on end, and do not turn it upside down. If toner
becomes caked in the cartridge, it may become impossible to free it even by shaking
the cartridge.
CAUTION
Do not place the toner cartridge in fire. Toner powder is flammable.
1-7
Page 35

Before Using the Machine
1-8
Page 36

Document Handling
Document Requirements
Size (W x L) Quantity (for 75 g/m2 paper) Weight
Max. 8.5 x 15.75 in.
(216 x 400 mm)
Min. 5.8 x 4.1 in.
(148 x 105 mm)
NOTE
Document Handling
If using fine art paper, it should be 0.004 in. (0.1 mm) or thicker per sheet.
● To prevent document jams, do not use any of the following:
– Wrinkled or creased paper
– Carbon paper or carbon-backed paper
– Curled or rolled paper
– Coated paper
– Torn paper
– Onion skin or thin paper
– Documents with staples or paper clips attached
– Paper with fresh glue, ink, or correction fluid that is not completely dry
Max. 30 A4- or letter-size sheets
Max. 10 legal-size sheets
or the stack height of 0.2 in. (5 mm)
17 to 28 Ib. (64 to
105 g/m
2
)
2-1
Page 37

Scanned Area
Make sure your document’s text and graphics fall within the shaded area in the
following diagram. Note that the margin widths listed are approximate and there
may be slight variations in actual use.
0.08" (2 mm)
0.08" (2 mm)
0.04" (1 mm)0.04" (1 mm)
Document Handling
2-2
Page 38

Loading Documents
1 Adjust the document guides to the width of the document.
2 Fan the document stack and even the edges.
Document Handling
3 Insert the document top edge first in the ADF with the printed side facing
up.
The document is ready for scanning.
2-3
Page 39

Document Handling
2-4
Page 40

Print Media
Paper Requirements
Paper Size Setting Size (W × L) Weight Quantity
<LT> (Letter) 8.5 × 11 in.
(216 × 279 mm)
<LG> (Legal) 8.5 × 14 in.
Print Media
<A4> 8.3 × 11.7 in.
Paper Type Setting Paper Type Weight
<PLAIN> Plain paper 16 to 24 lb.
<PLAIN L>*
<HEAVY> Heavy paper 24 to 43 lb.
<HEAVY H>*
<TRANSPARENCY> Transparencies
1
2
(216 × 356 mm)
(210 × 297 mm)
16 to 43 lb.
(60to163g/m
2
)
Max. stack height: 0.6 in.
(15 mm) (Approx.
150 sheets of 20 lb. (75 g/
2
m
) paper)
(60to90g/m
(91 to 163 g/m
2
)
2
)
*1 If paper curls excessively when printed with <PLAIN> selected, select <PLAIN L>.
*2 If print fixing is not sufficient when printed with <HEAVY> selected, select
<HEAVY H>.
NOTE
– If the size of paper loaded in the machine is not Letter (default), make sure to set a correct paper size.
(See “Setting Paper Type and Size,” on p. 3-7.)
– For transparencies, you can load only up to 100 sheets.
3-1
Page 41

Printable Area
The shaded area indicates the approximate printable area of Letter-size paper.
0.08" (2 mm)
0.20" (5 mm)
0.08" (2 mm)0.08" (2 mm)
Print Media
3-2
Page 42

Paper Guidelines
● To prevent paper jams, do not use any of the following:
– Wrinkled or creased paper
– Curled or rolled paper
– Coated paper
– Torn paper
– Damp paper
– Very thin paper
– Paper which has been printed on using a thermal transfer printer (Do not copy on
the reverse side.)
● The following types of paper do not print well:
– Highly textured paper
– Very smooth paper
– Shiny paper
● Make sure the paper is free from dust, lint, and oil stains.
Print Media
● Be sure to test paper before purchasing large quantities.
● Store all paper wrapped and on a flat surface until ready for use. Keep opened packs
in their original packaging in a cool, dry location.
● Store paper at 64.4°F–75.2°F (18°C–24°C), 40%–60% relative humidity.
● Use only the transparencies designed for laser printers.
3-3
Page 43

Loading Paper
For loading Letter-size paper, see “Load Paper,” in the Starter Guide.
Loading Envelopes
● Use standard envelopes with diagonal seams and flaps.
● To prevent jams, do not use the following:
– Envelopes with windows, holes, perforations, cutouts, and double flaps
– Envelopes made with special coated paper or deeply embossed paper
– Envelopes with peel-off sealing strips
– Envelopes with letters enclosed
– Make sure to set the correct envelope size in the printer driver. (See Chapter 2,
“Printing,” in the Software Guide.)
1 Place the stack of envelopes on a firm, flat surface, and press down firmly
on the edges to make the folds crisp.
Press all the way around the envelopes to remove any curls and expel air from inside the
envelopes. Make sure that the stack is flat before loading it in the machine.
Print Media
2 Lift the paper stack cover and pull it out completely.
3-4
Page 44

NOTE
Make sure the back end of the cover does not catch the front paper guide.
3 Pull out the paper guide rail.
4 Insert the envelope stack (up to 10 envelopes) with the print side facing up.
Print Media
5 Adjust the side paper guides to the size of the stack.
3-5
Page 45

6 Push back the paper guide rail to the front edge of the stack.
7 Pinch and slide the front paper guide to match the envelope size.
8 Insert the paper stack cover.
Print Media
NOTE
Make sure the back end of the cover does not catch and lower the scanning platform.
3-6
Page 46

Setting Paper Type and Size
#
213
546
879
0
Stop/Reset
Start
Clear
ABC DEF
JKL MNO
TUV WXYZ
GHI
PQRS
SYMBOLS
Directory Coded Dial
Hook
Set
FAXPHONE L120
Tone
OPER
The machine is factory-set to accept plain-type Letter-size paper. If you loaded
different type and/or size of paper in the machine, follow this procedure to
change the paper type/size setting.
Add.Mode Menu
Image Quality
Redial Pause
Print Media
Status Copy
[Set]
1 Press [Menu].
2 Use [Up/Down] to select <PAPER SOURCE SETUP?>, then press [Set].
3 Use [Left/Right] to select the paper type, then press [Set].
<PLAIN>: Plain paper.
<PLAIN L>: Light paper.
<HEAVY>: Heavy paper.
<HEAVY H>: Heavier paper.
<TRANSPARENCY>: Transparencies.
3-7
Page 47

#
213
546
879
0
Stop/Reset
Start
Clear
ABC DEF
JKL MNO
TUV WXYZ
GHI
PQRS
SYMBOLS
Directory Coded Dial
Hook
Set
FAXPHONE L120
Tone
OPER
Add.Mode Menu
Image Quality
Redial Pause
Status Copy
[Set]
4 Use [Left/Right] to select the paper size, then press [Set].
<LT>: Letter.
<LG>: Legal (not available for transparencies).
<A4>: A4.
5 Press [Stop/Reset] to return to standby mode.
Print Media
3-8
Page 48

Sending Faxes
Follow this procedure to send a fax.
Load a Document Adjust Image Quality
1 2
Add.Mode Menu
A
Sending Faxes
B
Adjust the document guides (A) to
the width of the document, and
insert the document top edge first
in the ADF (B) with the printed side
facing up.
For documents you can fax, see “Document
Requirements,” on p. 2-1.
Image Quality
Redial Pause
GHI
PQRS
OPER
Tone
Press [Image Quality]. Use [Left/
Right] to select resolution and
image type, and press [Set].
Select from the following:
<STD>: Standard
<FINE>: Fine
<S/F>: Superfine
<H/T>: Halftone (and select resolution)
For details, see “Scan Settings,” on p. 4-3.
Status Copy
Directory Coded Dial
Hook
ABC DEF
213
JKL MNO
546
TUV WXYZ
879
SYMBOLS
#
0
Set
Clear
Stop/Reset
Start
4-1
Page 49

Enter the Fax Number Send the Document
3
4
Add.Mode Menu
Image Quality
Redial Pause
1
GHI
4
PQRS
7
OPER
Tone
Status Copy
Directory Coded Dial
Hook
ABC DEF
23
JKL MNO
56
TUV WXYZ
89
SYMBOLS
0
Set
Clear
Stop/Reset
Start
#
Use the numeric buttons to enter
the recipient’s fax number.
Ex.
=0123XXXXXXX
SUB= (TX=START)
What if...
● You entered a wrong number:
Use [Left/Right] to move the cursor to
the wrong digit, then press [Clear]. Or
hold [Clear] to delete the entire entry
and try again.
Add.Mode Menu
Image Quality
Redial Pause
1
GHI
4
PQRS
7
OPER
Tone
Status Copy
Directory Coded Dial
Hook
ABC DEF
23
JKL MNO
56
TUV WXYZ
89
SYMBOLS
0
Set
Clear
Stop/Reset
Start
#
Press [Start].
What if...
● You want to cancel sending:
See Chapter 1, “Advanced Fax
Features,” in the Advanced Guide.
● The message <MEM. FULL/TX
CANCEL> is displayed:
Press any key. Wait until the machine
sends the document in memory and try
again.
Sending Faxes
4-2
Page 50

Scan Settings
#
213
546
879
0
Stop/Reset
Start
Clear
ABC DEF
JKL MNO
TUV WXYZ
GHI
PQRS
SYMBOLS
Directory Coded Dial
Hook
Tone
OPER
Set
FAXPHONE L120
Adjust contrast and image quality (resolution and image type) before sending a
fax. Note that a higher resolution image requires more memory and takes longer
to transmit. The image quality setting returns to the default value if no operation
is performed for one minute, if you press [Stop/Reset], or after the document is
scanned.
Contrast
Add.Mode Menu
Image Quality
Redial Pause
Sending Faxes
Status Copy
[Set]
1 Press [Menu].
2 Use [Up/Down] to select <TX SETTING?>, then press [Set].
3 Use [Up/Down] to select <1 SCAN CONTRAST?>, then press [Set].
4 Use [Left/Right] to adjust scan contrast, then press [Set].
[Right]: To send a darker image.
[Left]: To send a lighter image.
5 Press [Stop/Reset] to return to standby mode.
4-3
Page 51

Image Quality
Clear
Tone
OPER
Set
Add.Mode Menu
Image Quality
Redial Pause
Status Copy
#
213
546
879
0
Stop/Reset
Start
Clear
ABC DEF
JKL MNO
TUV WXYZ
GHI
PQRS
SYMBOLS
Directory Coded Dial
Hook
FAXPHONE L120
[Set]
1 Press [Image Quality].
2 Use [Left/Right] to select resolution (or half-tone image type), then press
[Set].
Sending Faxes
<STD>: Standard for text-only documents.
<FINE>: Fine for fine-print documents.
<S/F>: Superfine for very fine documents. Will be displayed as <S-FINE> on LCD.
<H/T>: For documents that contain half-tone images such as photographs.
4-4
Page 52

#
213
546
879
0
Stop/Reset
Start
Clear
ABC DEF
JKL MNO
TUV WXYZ
GHI
PQRS
SYMBOLS
Directory Coded Dial
Hook
FAXPHONE L120
Add.Mode Menu
Image Quality
Redial Pause
OPER
Tone
Status Copy
Set
Clear
[Set]
3 If you selected <H/T>, use [Left/Right] to select resolution, then press
[Set].
<STD>: Displayed as <STD/HT> in standby mode.
Sending Faxes
<FINE>: Displayed as <F/HT> in standby mode.
<S/F>: Displayed as <SF/HT> in standby mode.
4-5
Page 53

Speed Dialing
Speed dialing allows you to dial registered recipients quickly. There are three
types of speed dialing:
● One-Touch Speed Dialing (p. 4-7)
– Specify a registered recipient using a one-touch speed dialing button. You can
register up to 15 one-touch speed dialing buttons, including group dialing.
● Coded Speed Dialing (p. 4-15)
– Specify a registered recipient using [Coded Dial] followed by a three-digit code.
You can register up to 100 coded speed dialing codes.
● Group Dialing (p. 4-22)
– Specify multiple recipients (must be registered for one-touch speed dialing and/or
coded speed dialing) with a one-touch speed dialing button. You can register up to
50 recipients in a group dial.
Registering Recipients for Speed Dialing
For each recipient, you can register:
– Name (optional)
– Fax number (required)
– Subaddress (optional): A string of characters used to route a fax to one or more
numbers or extensions once it is received by the recipient’s machine.
– Password (optional): Used to restrict access to a subaddress and can be omitted.
Sending Faxes
4-6
Page 54

Registering One-Touch Speed Dialing
Copy Function Utility Copy
01 02 03
04 05 06
07 08 09
10 11 12
13 14 15
FAXPHONE L120
#
Clear
Tone
OPER
Set
Add.Mode Menu
Image Quality
Redial Pause
Status Copy
213
546
879
0
Stop/Reset
Start
Clear
ABC DEF
JKL MNO
TUV WXYZ
GHI
PQRS
SYMBOLS
Directory Coded Dial
Hook
FAXPHONE L120
[Set]
1 Press [Menu].
Sending Faxes
2 Use [Up/Down] to select <TEL REGISTRATION?>, then press [Set].
3 Use [Up/Down] to select <1 1-TOUCH SPD DIAL?>, then press [Set].
4 Press the one-touch speed dialing button (01 to 15) for this recipient.
5 Use the numeric buttons to enter the recipient’s name (up to 20
characters), then press [Set].
Ex.
NAME=CAN
4-7
OK= [A]
Page 55

#
213
546
879
0
Stop/Reset
Start
Clear
ABC DEF
JKL MNO
TUV WXYZ
GHI
PQRS
SYMBOLS
Directory Coded Dial
Hook
FAXPHONE L120
Add.Mode Menu
Image Quality
Redial Pause
OPER
Tone
Status Copy
Set
Clear
6 Use the numeric buttons to enter the recipient’s number (up to 50 digits).
Ex.
=0123XXXXXXX
YES=SET (SUB= )
– Press [Pause] to enter a pause. (See “Entering Pauses,” on p. 4-30.)
– If no subaddress or password is required, skip to step 9.
Sending Faxes
4-8
Page 56

#
213
546
879
0
Stop/Reset
Start
Clear
ABC DEF
JKL MNO
TUV WXYZ
GHI
PQRS
Tone
OPER
SYMBOLS
Directory Coded Dial
Hook
Set
FAXPHONE L120
Add.Mode Menu
Image Quality
Redial Pause
Status Copy
[Set]
7 Press [Down] and use the numeric buttons to enter the subaddress (up to
20 digits) for the recipient.
If no subaddress is required, skip to step 9.
Sending Faxes
Ex.
SUB=1234_
YES=SET (PWD= )
8 Press [Down] and use the numeric buttons to enter the password (up to 20
digits) for the subaddress.
If no password is required, skip to step 9.
Ex.
9 Press [Set].
4-9
PWD=1234_
YES=SET
Page 57

#
213
546
879
0
Stop/Reset
Start
Clear
ABC DEF
JKL MNO
TUV WXYZ
GHI
PQRS
Tone
OPER
SYMBOLS
Directory Coded Dial
Hook
Set
FAXPHONE L120
Add.Mode Menu
Image Quality
Redial Pause
Status Copy
[Set]
10 Repeat the procedure as necessary from step 4.
11 Press [Stop/Reset] to return to standby mode.
12 Use the supplied destination labels to label the registered one-touch
speed dialing buttons.
Sending Faxes
4-10
Page 58

Editing One-Touch Speed Dialing
Copy Function Utility Copy
01 02 03
04 05 06
07 08 09
10 11 12
13 14 15
FAXPHONE L120
#
213
546
879
0
Stop/Reset
Start
Clear
ABC DEF
JKL MNO
TUV WXYZ
GHI
PQRS
SYMBOLS
Directory Coded Dial
Hook
FAXPHONE L120
Add.Mode Menu
Image Quality
Redial Pause
OPER
Tone
Status Copy
Set
[Set]
1 Press [Menu].
Sending Faxes
2 Use [Up/Down] to select <TEL REGISTRATION?>, then press [Set].
3 Use [Up/Down] to select <1 1-TOUCH SPD DIAL?>, then press [Set].
4 Press the one-touch speed dialing button (01 to 15) for the recipient you
want to edit, then press [Clear].
4-11
Page 59

Tone
OPER
Set
Add.Mode Menu
Image Quality
Redial Pause
Status Copy
#
213
546
879
0
Stop/Reset
Start
Clear
ABC DEF
JKL MNO
TUV WXYZ
GHI
PQRS
SYMBOLS
Directory Coded Dial
Hook
FAXPHONE L120
[Set]
5 Use [Left/Right] to select <EDIT>, then press [Set].
6 Use [Left/Right], [Clear], and the numeric buttons to change the recipient’s
name, then press [Set].
If no change is necessary, press [Set] without making any change.
7 Use [Left/Right], [Clear], and the numeric buttons to change the recipient’s
number.
Sending Faxes
4-12
Page 60

#
213
546
879
0
Stop/Reset
Start
Clear
ABC DEF
JKL MNO
TUV WXYZ
GHI
PQRS
SYMBOLS
Directory Coded Dial
Hook
Tone
OPER
Set
Add.Mode Menu
Image Quality
Redial Pause
Status Copy
FAXPHONE L120
[Set]
8 If you want to change or enter the subaddress, press [Down].
If no subaddress is required, skip to step 11.
9 Use [Left/Right], [Clear], and the numeric buttons to change or enter the
Sending Faxes
subaddress, then press [Set].
10 Use [Left/Right], [Clear], and the numeric buttons to change or enter the
password if required.
If no password is required, skip to step 11.
11 Press [Set].
12 Repeat the procedure as necessary from step 4.
13 Press [Stop/Reset] to return to standby mode.
4-13
Page 61

Deleting One-Touch Speed Dialing
Copy Function Utility Copy
01 02 03
04 05 06
07 08 09
10 11 12
13 14 15
FAXPHONE L120
#
213
546
879
0
Stop/Reset
Start
Clear
ABC DEF
JKL MNO
TUV WXYZ
GHI
PQRS
SYMBOLS
Directory Coded Dial
Tone
OPER
Set
Add.Mode Menu
Image Quality
Redial Pause
Status Copy
Hook
FAXPHONE L120
[Set]
1 Press [Menu].
2 Use [Up/Down] to select <TEL REGISTRATION?>, then press [Set].
Sending Faxes
3 Use [Up/Down] to select <1 1-TOUCH SPD DIAL?>, then press [Set].
4 Press the one-touch speed dialing button (01 to 15) for the recipient you
want to delete, then press [Clear].
5 Use [Left/Right] to select <DELETE>, then press [Set].
6 Repeat the procedure as necessary from step 4.
7 Press [Stop/Reset] to return to standby mode.
4-14
Page 62

Registering Coded Speed Dialing
#
213
546
879
0
Stop/Reset
Start
Clear
ABC DEF
JKL MNO
TUV WXYZ
GHI
PQRS
Tone
OPER
SYMBOLS
Directory Coded Dial
Hook
Set
FAXPHONE L120
Add.Mode Menu
Image Quality
Redial Pause
Status Copy
[Set]
1 Press [Menu].
Sending Faxes
2 Use [Up/Down] to select <TEL REGISTRATION?>, then press [Set].
3 Use [Up/Down] to select <2 CODED DIAL?>, then press [Set].
4 Use the numeric buttons to enter the three-digit code (001 to 100) for this
recipient.
4-15
Ex.
CODED DIAL=001
Page 63

Tone
OPER
Set
Add.Mode Menu
Image Quality
Redial Pause
Status Copy
#
213
546
879
0
Stop/Reset
Start
Clear
ABC DEF
JKL MNO
TUV WXYZ
GHI
PQRS
SYMBOLS
Directory Coded Dial
Hook
FAXPHONE L120
[Set]
5 Use the numeric buttons to enter the recipient’s name (up to 20
characters), then press [Set].
6 Use the numeric buttons to enter the recipient’s number (up to 50 digits).
Ex.
=0123XXXXXXX
YES=SET (SUB= )
– Press [Pause] to enter a pause. (See “Entering Pauses,” on p. 4-30.)
– If no subaddress or password is required, skip to step 9.
Sending Faxes
4-16
Page 64

Tone
OPER
Set
Add.Mode Menu
Image Quality
Redial Pause
Status Copy
#
213
546
879
0
Stop/Reset
Start
Clear
ABC DEF
JKL MNO
TUV WXYZ
GHI
PQRS
SYMBOLS
Directory Coded Dial
Hook
FAXPHONE L120
[Set]
7 Press [Down] and use the numeric buttons to enter the subaddress (up to
20 digits) for the recipient.
If no subaddress is required, skip to step 9.
Sending Faxes
Ex.
SUB=1234_
YES=SET (PWD= )
8 Press [Down] and use the numeric buttons to enter the password (up to 20
digits) for the subaddress.
If no password is required, skip to step 9.
Ex.
PWD=1234_
YES=SET
9 Press [Set].
10 Repeat the procedure as necessary from step 4.
11 Press [Stop/Reset] to return to standby mode.
4-17
Page 65

Editing Coded Speed Dialing
#
213
546
879
0
Stop/Reset
Start
Clear
ABC DEF
JKL MNO
TUV WXYZ
GHI
PQRS
SYMBOLS
Tone
OPER
Set
Add.Mode Menu
Image Quality
Redial Pause
Status Copy
Directory Coded Dial
Hook
FAXPHONE L120
[Set]
1 Press [Menu].
2 Use [Up/Down] to select <TEL REGISTRATION?>, then press [Set].
Sending Faxes
3 Use [Up/Down] to select <2 CODED DIAL?>, then press [Set].
4 Use the numeric buttons to enter the three-digit code (001 to 100) for the
recipient you want to edit, then press [Clear].
Ex.
CODED DIAL=001
4-18
Page 66

Tone
OPER
Set
Add.Mode Menu
Image Quality
Redial Pause
Status Copy
#
213
546
879
0
Stop/Reset
Start
Clear
ABC DEF
JKL MNO
TUV WXYZ
GHI
PQRS
SYMBOLS
Directory Coded Dial
Hook
FAXPHONE L120
[Set]
5 Use [Left/Right] to select <EDIT>, then press [Set].
6 Use [Left/Right], [Clear], and the numeric buttons to change the
Sending Faxes
recipient’s name, then press [Set].
If no change is necessary, press [Set] without making any change.
7 Use [Left/Right], [Clear], and the numeric buttons to change the recipient’s
number.
4-19
Page 67

#
213
546
879
0
Stop/Reset
Start
Clear
ABC DEF
JKL MNO
TUV WXYZ
GHI
PQRS
SYMBOLS
Directory Coded Dial
Hook
Tone
OPER
Set
Add.Mode Menu
Image Quality
Redial Pause
Status Copy
FAXPHONE L120
[Set]
8 If you want to change or enter the subaddress, press [Down].
If no subaddress is required, skip to step 11.
9 Use [Left/Right], [Clear], and the numeric buttons to change or enter the
subaddress, then press [Set].
10 Use [Left/Right], [Clear], and the numeric buttons to change or enter the
password if required.
If no password is required, skip to step 11.
11 Press [Set].
12 Repeat the procedure as necessary from step 4.
13 Press [Stop/Reset] to return to standby mode.
Sending Faxes
4-20
Page 68

Deleting Coded Speed Dialing
#
213
546
879
0
Stop/Reset
Start
Clear
ABC DEF
JKL MNO
TUV WXYZ
GHI
PQRS
SYMBOLS
Tone
OPER
Set
Add.Mode Menu
Image Quality
Redial Pause
Status Copy
Directory Coded Dial
Hook
FAXPHONE L120
[Set]
1 Press [Menu].
Sending Faxes
2 Use [Up/Down] to select <TEL REGISTRATION?>, then press [Set].
3 Use [Up/Down] to select <2 CODED DIAL?>, then press [Set].
4 Use the numeric buttons to enter the three-digit code (001 to 100) for the
recipient you want to delete, then press [Clear].
5 Use [Left/Right] to select <DELETE>, then press [Set].
6 Repeat the procedure as necessary from step 4.
7 Press [Stop/Reset] to return to standby mode.
4-21
Page 69

Registering Group Dialing
Copy Function Utility Status
01 02 03
04 05 06
07 08 09
10 11 12
13 14 15
FAXPHONE L120
#
213
546
879
0
Stop/Reset
Start
Clear
ABC DEF
JKL MNO
TUV WXYZ
GHI
PQRS
SYMBOLS
Directory Coded Dial
Hook
FAXPHONE L120
Add.Mode Menu
Image Quality
Redial Pause
OPER
Tone
Status Copy
Set
[Set]
1 Press [Menu].
2 Use [Up/Down] to select <TEL REGISTRATION?>, then press [Set].
3 Use [Up/Down] to select <3 GROUP DIAL?>, then press [Set].
4 Press the one-touch speed dialing button (01 to 15) for this group.
Sending Faxes
5 Use the numeric buttons to enter the name for the group (up to 20
characters), then press [Set].
Ex.
GROUP NAME=GRP
YES=OK [A]
4-22
Page 70

Copy Function Utility
01 02 03
04 05 06
07 08 09
10 11 12
13 14 15
FAXPHONE L120
#
213
546
879
0
Stop/Reset
Start
Clear
ABC DEF
JKL MNO
TUV WXYZ
GHI
PQRS
SYMBOLS
Directory Coded Dial
Hook
FAXPHONE L120
Add.Mode Menu
Image Quality
Redial Pause
OPER
Tone
Status Copy
Set
[Set]
Copy
6 Press the required one-touch speed dialing button (01 to 15) or [Coded
Dial] followed by the three-digit coded speed dialing code (001 to 100),
then press [Set].
Sending Faxes
NOTE
You cannot enter recipients not registered for one-touch or coded speed dialing (i.e., with the
numeric buttons).
7 Repeat the previous step as necessary to register all required recipients
(up to 50) for the group.
8 Press [Start] to finish registering the group.
9 Repeat the procedure as necessary from step 4.
10 Press [Stop/Reset] to return to standby mode.
4-23
Page 71

Editing Group Dialing
Copy Function Utility
01 02 03
04 05 06
07 08 09
10 11 12
13 14 15
FAXPHONE L120
#
213
546
879
0
Stop/Reset
Start
Clear
ABC DEF
JKL MNO
TUV WXYZ
GHI
PQRS
SYMBOLS
Tone
OPER
Set
Add.Mode Menu
Image Quality
Redial Pause
Status Copy
Directory Coded Dial
Hook
FAXPHONE L120
[Set]
1 Press [Menu].
2 Use [Up/Down] to select <TEL REGISTRATION?>, then press [Set].
Sending Faxes
3 Use [Up/Down] to select <3 GROUP DIAL?>, then press [Set].
4 Press the one-touch speed dialing button (01 to 15) for the group you want
to edit, then press [Clear].
5 Use [Left/Right] to select <EDIT>, then press [Set].
4-24
Page 72

#
213
546
879
0
Stop/Reset
Start
Clear
ABC DEF
JKL MNO
TUV WXYZ
GHI
PQRS
SYMBOLS
Directory Coded Dial
Hook
FAXPHONE L120
Add.Mode Menu
Image Quality
Redial Pause
OPER
Tone
Status Copy
Set
[Set]
6 Use [Left/Right], [Clear], and the numeric buttons to change the name for
the group name, then press [Set].
If no change is necessary, press [Set] without making any change.
Sending Faxes
7 Press [Clear] to remove the displayed recipient from the group.
If no deletion is necessary, press [Set] to proceed to the next recipient in the group.
8 Repeat the previous step as necessary to remove all required recipients
from the group.
9 If required, register additional one-touch speed dialing buttons and/or
coded speed dialing codes (up to 50 total) in the group.
If no addition is necessary, skip to step 10.
10 Press [Start] to finish changing the group.
11 Repeat the procedure as necessary from step 4.
12 Press [Stop/Reset] to return to standby mode.
4-25
Page 73

Deleting Group Dialing
CopyCopy Function Utility
01 02 03
04 05 06
07 08 09
10 11 12
13 14 15
FAXPHONE L120
#
213
546
879
0
Stop/Reset
Start
Clear
ABC DEF
JKL MNO
TUV WXYZ
GHI
PQRS
SYMBOLS
Directory
Tone
OPER
Set
Add.Mode Menu
Image Quality
Redial Pause
Status Copy
Coded Dial
Hook
FAXPHONE L120
[Set]
1 Press [Menu].
2 Use [Up/Down] to select <TEL REGISTRATION?>, then press [Set].
Sending Faxes
3 Use [Up/Down] to select <3 GROUP DIAL?>, then press [Set].
4 Press the one-touch speed dialing button (01 to 15) for the group you want
to delete, then press [Clear].
5 Use [Left/Right] to select <DELETE>, then press [Set].
6 Repeat the procedure as necessary from step 4.
7 Press [Stop/Reset] to return to standby mode.
4-26
Page 74

Using Speed Dialing
01 02 03
04 05 06
07 08 09
10 11 12
13 14 15
FAXPHONE L120
Follow the procedure below to send faxes to registered recipients using speed dialing.
For easy reference, print out the list of recipients registered for speed dialing. (See
Chapter 3, “Reports and Lists,” in the Advanced Guide.)
Using One-Touch Speed/Group Dialing
Sending Faxes
1 Load a document.
2 Press the one-touch speed dialing button (01 to 15) for the required
recipient or group.
– The machine scans the document automatically.
– If you loaded the document after pressing a one-touch speed dialing button, press [Start] to
start scanning.
– Press [Stop/Reset], then [Set] to cancel sending the fax.
4-27
Page 75

Using Coded Speed Dialing
#
213
546
879
0
Stop/Reset
Start
Clear
ABC DEF
JKL MNO
TUV WXYZ
GHI
PQRS
SYMBOLS
Directory Coded Dial
Hook
FAXPHONE L120
Add.Mode Menu
Image Quality
Redial Pause
OPER
Tone
Status Copy
Set
1 Load a document.
2 Press [Coded Dial].
3 Use the numeric buttons to enter the three-digit coded speed dialing code
(001 to 100) for the required recipient.
Ex.
CODED DIAL=001
Sending Faxes
If you entered a wrong code, press [Clear] and try again.
4 Press [Start].
Press [Stop/Reset], then [Set] to cancel sending the fax.
4-28
Page 76

Manual Sending
#
213
546
879
0
Stop/Reset
Start
Clear
ABC DEF
JKL MNO
TUV WXYZ
GHI
PQRS
SYMBOLS
Directory Coded Dial
Hook
FAXPHONE L120
Manual sending using the handset or an external telephone allows you to talk to
the recipient before sending a fax. This is useful if the recipient must manually
prompt their machine to receive your document. You can also use [Hook] to
monitor the dialing process without using the handset.
Sending Faxes Manually
Add.Mode Menu
Image Quality
Redial Pause
Sending Faxes
OPER
Tone
Status Copy
Set
1 Load a document.
2 Pick up the handset or press [Hook] and dial the recipient’s number.
– You can dial from the operation panel or an external telephone.
– If you made a mistake, hang up the handset or press [Hook] again and start over.
3 When you hear a fax tone, press [Start] to start sending the document.
– If you pressed [Hook] instead of using the handset, you will not be able to talk to the recipient.
– Hang up the handset after pressing [Start].
4-29
Page 77

Entering Pauses
#
213
546
879
0
Stop/Reset
Start
Clear
ABC DEF
JKL MNO
TUV WXYZ
GHI
PQRS
SYMBOLS
Directory Coded Dial
Hook
FAXPHONE L120
Enter pauses if required when you dial or register an overseas number.
Add.Mode Menu
Image Quality
Redial Pause
OPER
Tone
Status Copy
Set
1 Press [Pause] to enter a pause in a fax number.
Each pause entered is 2.5 seconds.
2 Continue entering the rest of the fax number with the numeric buttons.
Sending Faxes
4-30
Page 78

Receiving Faxes
Follow this procedure to set the machine for receiving faxes.
For advanced receiving features, see Chapter 1, “Advanced Fax Features,” in the
Advanced Guide.
Enter the Setting Menu
1 2
Add.Mode Menu
Image Quality
Redial Pause
GHI
PQRS
OPER
Receiving Faxes
Tone
Status Copy
Directory Coded Dial
Hook
ABC DEF
213
JKL MNO
546
TUV WXYZ
879
SYMBOLS
#
0
Set
Clear
Stop/Reset
Start
Enter the Receive Mode Setting
Add.Mode Menu
Image Quality
Redial Pause
GHI
PQRS
OPER
Tone
Status Copy
Directory Coded Dial
Hook
ABC DEF
213
JKL MNO
546
TUV WXYZ
879
SYMBOLS
#
0
Set
Clear
Stop/Reset
Start
Press [Menu]. Use [Up/Down] to select
<RX SETTING?>, then press [5].
5-1
Page 79

Select the Receive Mode Exit the Setting Menu
3
4
Add.Mode Menu
Image Quality
Redial Pause
GHI
PQRS
OPER
Tone
Status Copy
Directory Coded Dial
Hook
ABC DEF
213
JKL MNO
546
TUV WXYZ
879
SYMBOLS
#
0
Set
Clear
Stop/Reset
Start
Use [Left/Right] to select the
receive mode, then press [Set].
<FAX/TEL>: Switches between fax and voice calls
automatically.
<MANUAL>: Does not answer any call. You have to
manually receive faxes.
<FAX ONLY>: Answers all calls as faxes and
disconnects voice calls.
<AnsMode>: Receives faxes automatically and records
voice messages.
<DRPD>: Distinguishes between fax and voice calls.
NOTE
– For <AnsMode>, make sure an answering
machine is connected to the machine.
– For <DRPD>, subscription to a DRPD
service is required.
Add.Mode Menu
Image Quality
Redial Pause
GHI
PQRS
OPER
Tone
Status Copy
Directory Coded Dial
Hook
ABC DEF
213
JKL MNO
546
TUV WXYZ
879
SYMBOLS
#
0
Set
Clear
Stop/Reset
Start
Press [Stop/Reset].
What if...
● You want to cancel receiving:
See Chapter 1, “Advanced Fax
Features,” in the Advanced Guide.
Receiving Faxes
5-2
Page 80

Copying
Follow this procedure to make a copy.
Load a Document Enter the Copy Mode
1 2
Copying
A
B
Adjust the document guides (A) to
the width of the document, and
insert the document face up in the
ADF (B).
For documents you can copy, see Chapter 2,
“Document Handling.”
Add.Mode Menu
Image Quality
Redial Pause
GHI
PQRS
OPER
Tone
Status Copy
Directory Coded Dial
Hook
ABC DEF
213
JKL MNO
546
TUV WXYZ
879
SYMBOLS
#
0
Set
Clear
Stop/Reset
Start
Press [Copy].
The copy mode automatically resets to the fax mode
after one minute of inactivity, or when you press [Stop/
Reset].
6-1
Page 81

Enter Quantity Start Copying
3
4
Add.Mode Menu
Image Quality
Redial Pause
1
GHI
4
PQRS
7
OPER
Tone
Status Copy
Directory Coded Dial
Hook
ABC DEF
23
JKL MNO
56
TUV WXYZ
89
SYMBOLS
0
Set
Clear
Stop/Reset
Start
#
Use numeric buttons to enter the
number of copies (up to 99). Skip if
you are making a single copy.
Ex.
TEXT x1.00 3
LT
What if...
● You entered a wrong number:
Press [Clear] and enter a new number.
Add.Mode Menu
Image Quality
Redial Pause
1
GHI
4
PQRS
7
OPER
Tone
Status Copy
Directory Coded Dial
Hook
ABC DEF
23
JKL MNO
56
TUV WXYZ
89
SYMBOLS
0
Set
Clear
Stop/Reset
Start
#
Press [Start].
Did you know...
● You can adjust image quality and
density:
See “Scan Settings,” on p. 6-3.
Copying
What if...
● You want to cancel copying:
See Chapter 1, “Advanced Fax
Features,” in the Advanced Guide.
6-2
Page 82

Scan Settings
#
213
546
879
0
Stop/Reset
Start
Clear
ABC DEF
JKL MNO
TUV WXYZ
GHI
PQRS
SYMBOLS
Directory Coded Dial
Hook
FAXPHONE L120
Before pressing [Start] to start copying, you can adjust scan settings to better
suit the document to be scanned. These settings return to the default values if
you press [Stop/Reset].
Image Quality
Copying
Add.Mode Menu
Image Quality
Redial Pause
OPER
Tone
Status Copy
Set
1 Press [Image Quality] to select either <TEXT> or <PHOTO>.
<TEXT>: For scanning text documents.
<PHOTO>: For documents that contain fine text and photographs.
6-3
Page 83

Density
#
213
546
879
0
Stop/Reset
Start
Clear
ABC DEF
JKL MNO
TUV WXYZ
GHI
PQRS
SYMBOLS
Directory Coded Dial
Hook
FAXPHONE L120
Add.Mode Menu
Image Quality
Redial Pause
OPER
Tone
1 Press [Left/Right] to adjust scan density.
[Right]: For a darker copy.
[Left]: For a lighter copy.
Status Copy
Set
Copying
6-4
Page 84

Zoom Ratio
#
213
546
879
0
Stop/Reset
Start
Clear
ABC DEF
JKL MNO
TUV WXYZ
GHI
PQRS
SYMBOLS
Directory Coded Dial
Hook
FAXPHONE L120
Add.Mode Menu
Image Quality
Redial Pause
OPER
Tone
Status Copy
Set
1 Press [Up/Down] to enlarge or reduce the copied image in 1% (0.01)
increments.
[Up]: Enlarge up to 200% (2.00) of the original size (1.00).
Copying
[Down]: Reduce down to 50% (0.50) of the original size (1.00).
6-5
Page 85

Copying
6-6
Page 86

Printing
Follow this procedure to print a document from your computer.
Make sure that the printer driver is installed.
For details on printer driver settings, see the Software Guide (in the User Software
CD).
Start the Print Command Select the Printer
1 2
Printing
From an open document on an
application, click [File] ➞ [Print].
7-1
Select the printer icon for the
machine ([Canon L120]).
Page 87

Adjust Preferences Print the Document
3
4
Printing
Click [Preferences] to open the
dialog box. After finished, click
[OK].
Click [Print].
What if...
● You want to cancel printing:
See Chapter 2, “Printing,” in the
Software Guide.
7-2
Page 88

Maintenance
Cleaning the Machine
Note the following before cleaning
your machine:
– Before cleaning the machine, print
or send any documents stored in
memory and disconnect the power
cord.
– Make sure to use a soft cloth to
avoid scratching the components.
– Do not use tissue paper, paper
towels, or similar materials for
cleaning; they can stick to the
components or generate static
charges.
CAUTION
Never use volatile liquids such as thinners,
benzene, acetone, or any other chemical cleaner to
Maintenance
clean the machine. These can damage the
machine components.
Exterior
1 Disconnect the power cord from
the machine.
2 Wipe the machine’s exterior with
a clean, soft, lint-free cloth
moistened with water or diluted
dishwashing detergent solution.
3 Wait for the machine to dry, and
reconnect the power cord.
8-1
Page 89

Interior
Clean the machine’s print area
periodically to prevent toner powder and
paper dust from accumulating inside.
1 Disconnect the power cord from
the machine.
2 Close the paper delivery tray
extension (A), and then the
paper delivery tray (B) itself.
AB
CAUTION
Do not close the paper delivery tray without
folding the extension first.
3 Open the cartridge cover by the
notch (A).
A
4 Remove the cartridge.
Maintenance
NOTE
– Always hold the cartridge by its handle.
– To avoid exposing the cartridge to light,
place it in its protective bag or wrap it in a
thick cloth.
8-2
Page 90

5 Use a clean, soft, dry, lint-free
cloth to remove any toner or
paper debris from the machine’s
interior.
CAUTION
– Do not touch the fixing assembly (A) as
it becomes very hot during use.
– Do not touch the pins (B) or the transfer
roller (C) as this can damage the
machine.
CBA
– If loose toner comes into contact with
your skin or clothing, wash with cold
water. Warm water will set the toner.
6 Hold the cartridge by its handle.
The arrow (A) on the cartridge should be
facing away from you and pointing down.
7 Insert the cartridge into the
machine as far as it will go.
Align the guide (A) on the left side of the
cartridge with the groove inside the
machine.
A
8 Close the cartridge cover.
NOTE
Be careful not to get your fingers caught.
9 Open the paper delivery tray and
the extension.
Maintenance
A
10 Reconnect the power cord.
8-3
Page 91

Scanning Area
Keep the scanning area clean to avoid
dirty copies or faxes to be sent.
4 Gently wipe the scanning glass
(A) and white sheet (B) with a
clean, soft, lint-free cloth
moistened with water.
1 Disconnect the power cord from
the machine.
2 Lift the paper stack cover and
pull it out completely.
NOTE
Make sure the back end of the cover does
not catch the front paper guide.
3 Lower the scanning platform (A)
in the document delivery slot.
B
A
5 After the scanning area
becomes dry, lift the scanning
platform back into place.
Maintenance
6 Insert the paper stack cover.
A
NOTE
Make sure the back end of the cover does
not catch and lower the scanning platform.
7 Reconnect the power cord.
8-4
Page 92

Replacing the Cartridge
When the LCD displays <CHANGE
TONER>, redistribute toner in the
cartridge. If the message persists,
replace the cartridge.
Redistributing Toner
1 Close the paper delivery tray
extension (A), and then the
paper delivery tray (B) itself.
AB
CAUTION
Do not close the paper delivery tray without
folding the extension first.
Maintenance
2 Open the cartridge cover by the
notch (A).
A
3 Remove the cartridge.
NOTE
Always hold the cartridge by its handle.
4 Gently rock it several times to
redistribute toner inside.
8-5
Page 93

5 Hold the cartridge by its handle.
The arrow (A) on the cartridge should be
facing away from you and pointing down.
A
6 Insert the cartridge into the
machine as far as it will go.
Align the guide (A) on the left side of the
cartridge with the groove inside the
machine.
A
8 Open the paper delivery tray and
the extension.
7 Close the cartridge cover.
NOTE
Be careful not to get your fingers caught.
Maintenance
8-6
Page 94

Replacing the Cartridge
1 Close the paper delivery tray
extension (A), and then the
paper delivery tray (B) itself.
AB
CAUTION
Do not close the paper delivery tray without
folding the extension first.
2 Open the cartridge cover by the
notch (A).
3 Remove the old cartridge.
NOTE
Always hold the cartridge by its handle.
4 Remove the new cartridge from
the protective material.
Maintenance
8-7
A
distribute toner inside.
5 Gently rock it several times to
Page 95

6 Hold the cartridge with one
hand, and pull out the seal
completely.
NOTE
Do not pull out the seal at an angle.
7 Hold the cartridge by its handle.
The arrow (A) on the cartridge should be
facing away from you and pointing down.
A
9 Close the cartridge cover.
NOTE
Be careful not to get your fingers caught.
10 Open the paper delivery tray and
the extension.
8 Insert the cartridge into the
machine as far as it will go.
Align the guide (A) on the left side of the
cartridge with the groove inside the
machine.
A
Maintenance
8-8
Page 96

Recycling Used Cartridges
Canon has instituted a worldwide recycling program for cartridges
called “The Clean Earth Campaign.” This program preserves
precious natural resources by utilizing a variety of materials found in
the used cartridges that are of no further use, to remanufacture new
cartridges which, at the same time, keeps the environment cleaner
by reducing landfill waste. Complete details concerning this program
are enclosed in each PC Cartridge box.
The Clean Earth Campaign
● THE Canon CARTRIDGE RECYCLING PROGRAM
The Canon Cartridge Recycling Program fulfills the first initiative of Canon’s Clean
Earth Campaign, which supports four critical environmental areas:
● Recycling in the Workplace
● Conserving Environmental Resources
● Scientific Research and Education
● Encouraging Outdoors Appreciation
The remaining “Clean Earth” initiatives are supported in the U.S. through sponsorships
of the National Park Foundation, the National Wildlife Federation, and The Nature
Maintenance
Conservancy and in Canada through donations to the World Wildlife Fund Canada and
The Nature Conservancy of Canada.
Since its inception, The Canon Cartridge Recycling Program has collected millions of
cartridges that otherwise would have been discarded into landfills or similar facilities.
Instead, this rapidly growing program returns used cartridges to the manufacturing
process, thus conserving an array of resources.
8-9
Page 97

Becoming a part of this worthwhile program is easy. When your cartridge is of no
further use, simply follow the instructions detailed for U.S. or Canadian residents.
We appreciate your support of The Canon Cartridge Recycling Program.
Working together we can make a significant contribution to a cleaner planet.
● Cartridges collected through this program are not refilled.
● You are not entitled to a tax deduction or rebate for the return of empty cartridges.
● This program may be modified or discontinued without notice.
U.S.A. PROGRAM
● Packaging
■ Option A-1: Single Box Return
● Repackage the empty cartridge utilizing the wrapper and pulp mould end-blocks
from the new cartridge’s box.
● Place the empty cartridge in the box of your new cartridge. Seal the box.
Maintenance
8-10
Page 98

■ Option B: Volume Box Return
We encourage you to use this option as a more efficient way to ship cartridges.
● Place as many cartridges as possible into one box.
Carefully seal the box with tape;
or
● Call 1-800-OK-Canon to receive your free eight cartridge collection box.
■ Option A-2: Multiple Box Return
We encourage you to use this option as a more efficient way to ship cartridges.
● Complete Option A-1.
● Bundle multiple cartridge boxes together securely with tape.
Maintenance
Please be sure that the shipment does not exceed UPS specifications.
Maximum weight = 70 lb. (31.8 kg)
Maximum length = 108 in. (2,743 mm)
Maximum girth (length + 2 x width + 2 x height) = 130 in. (3,302 mm)
If your shipment exceeds the above limits, please call 1-800-OK-Canon for special
shipping information.
Please Note:
Do not send defective cartridges for replacement.
Defective cartridges under warranty should be exchanged by an authorized dealer
or service facility as provided in the warranty.
8-11
Page 99

● Shipping
Apply the UPS authorized returning label provided in this guide.
Residents of Alaska and Hawaii: Do not use the UPS authorized returning label. For
Alaska and Hawaii Canon set up alternative mail service with the U.S. Postal Service.
Please call 1-800-OK-Canon to receive U.S. Postal Service merchandise returning
label.
■ Option A: UPS Pick-up
● Give the shipment to your UPS driver when you receive your next regular delivery;
or
● Take the shipment to your local UPS receiving point.
■ Option B: MBE Drop off
Take the shipment to a participating MBE (Mail Boxes, Etc.) Center.
For location, please call 1-800-949-6660.
By using either of the above methods of shipment, your used cartridge(s) will
be forwarded to the Canon Cartridge Collection Center at no charge to you.
For further information about the Clean Earth Campaign in the United States, please
call: 1-800-OK-Canon
Maintenance
8-12
Page 100

CANADA PROGRAM-CANADA PROGRAMME
■ Option A: Single Box Return
● Repackage the empty cartridge utilizing the wrapper and pulp mould end-blocks
from the new cartridge’s box.
● Place the empty cartridge in the box of your new cartridge. Seal the box.
● Apply the Canon Canada Inc./Canada Post label provided in this brochure.
Canon’s labels are specially marked so that Canon pays the postage.
● Deposit your empty cartridge in any full size street mailbox or take it to your local
Canada Post outlet or franchise.
■ Option B: Volume Box Return (eight or more cartridges)
We encourage you to use this option as a more efficient way to ship cartridges.
● Call 1-800-667-2666 to receive your free Canon collection box kit.
● The collection box can accommodate eight individual cartridge boxes.
● Place your eight individually packaged boxes of empty cartridges into the Canon
collection box. Seal the box.
● Apply the Canon Canada Inc./Canada Post label provided in this brochure.
Maintenance
● Canon’s labels are specially marked so that Canon pays the postage.
● Deliver to any local Canada Post outlet or franchise. Customers who hold a
Commercial pick-up agreement with Canada Post may have their collection box
picked up.
8-13
 Loading...