

Page 1
INSTRUCTION MANUAL
● The “Software Start Guide” is included at the end of this
manual.
● This manual is for the EOS 7D installed with firmware version
2.0.0 or later.
ENGLISH
INSTRUCTION
MANUAL
Page 2

Thank you for purchasing a Canon product.
The EOS 7D is a high-performance, digital SLR camera featuring a
fine-detail CMOS sensor with about 18.0 effective megapixels, Dual
“DIGIC 4”, approx. 100% viewfinder coverage, high-precision and highspeed 19-point AF (all cross-type), approx. 8 fps continuous shooting,
Live View shooting, and Full HD (Full High-Definition) movie shooting.
The camera is highly responsive to any shooting situation at anytime,
provides many features for demanding shoots, and expands shooting
possibilities with system accessories.
Take a Few Test Shots to Familiarize Yourself with the
Camera
With a digital camera, you can immediately view the image you have
captured. While reading this manual, take a few test shots and see how
they come out. You can then better understand the camera.
To avoid botched pictures and accidents, first read the Safety Warnings
(p.277,278) and Handling Precautions (p.12,13).
Testing the Camera Before Using and Liability
After shooting, playback and check whether the image has been
properly recorded. If the camera or memory card is faulty and the
images cannot be recorded or downloaded to a computer, Canon
cannot be held liable for any loss or inconvenience caused.
Copyrights
Copyright laws in your country may prohibit the use of your recorded
images of people and certain subjects for anything but private
enjoyment. Also be aware that certain public performances, exhibitions,
etc., may prohibit photography even for private enjoyment.
CF Card
In this manual, “card” refers to the CF card. The CF card (for
recording images) is not included. Please purchase it separately.
2
Page 3
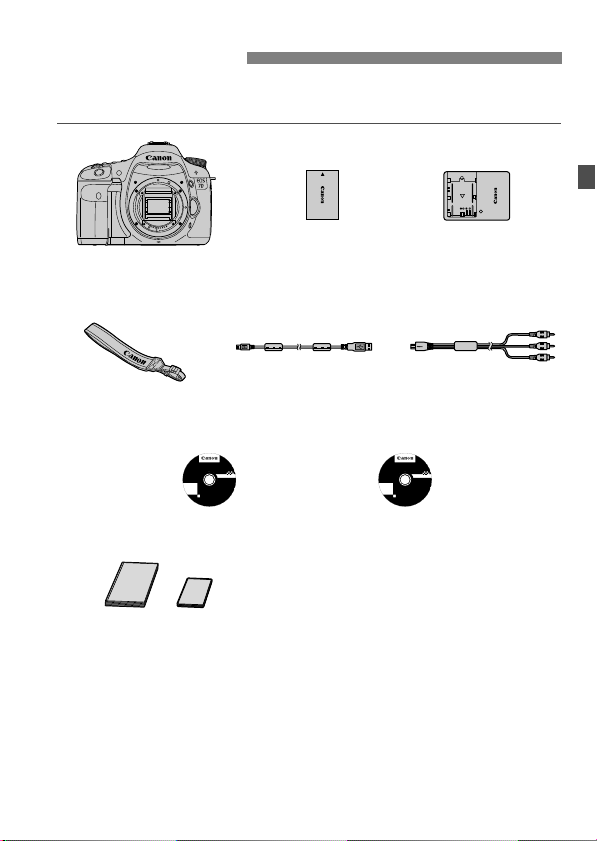
Item Check List
Battery Pack
LP-E6
(with protective cover)
Battery Charger
LC-E6/LC-E6E*
Interface Cable
IFC-200U
Stereo AV Cable
AVC-DC400ST
Camera
(with eyecup and
body cap)
Wide Strap
EW-EOS7D
EOS Solution Disk
(Software)
EOS Software
Instruction Manuals
Disk
(1) Camera Instruction Manual (this booklet)
(2) Pocket Guide
(1) (2)
Before starting, check that all the following items have been included
with your camera. If anything is missing, contact your dealer.
* Battery Charger LC-E6 or LC-E6E is provided. (The LC-E6E comes with a
EOS Solution Disk XXX
CEL-XXX XXX
XXXXX
XXXXX
XXXXX
XXXXX
XXXXX
Windows XXX XXX
Mac OS X XXX XXX
.
©
U
E
C
e
A
h
t
N
O
n
i
N
e
d
I
N
a
C
M
.
.
2
X
0
X
power cord.)
If you purchased a Lens Kit, check that the lens is included.
Depending on the Lens Kit type, the lens instruction manual might also be
included.
Be careful not to lose any of the above items
CEL-XXX XXX
XXXXX
XXXXX
XXXXX
XXXXX
XXXXX
.
EOS Software Instruction Manuals Disk XXX
©
C
A
N
O
N
I
N
C
.
2
.
0
X
X
.
U
E
e
h
t
n
i
e
d
a
M
3
Page 4

Conventions Used in this Manual
Icons in this Manual
<6> : Indicates the Main Dial.
<5> : Indicates the Quick Control Dial.
<9> : Indicates the Multi-controller.
<0> : Indicates the setting button.
0, 9, 7, 8: Indicates that the respective function remains
active for 4 sec., 6 sec., 10 sec., or 16 sec.
respectively after you let go of the button.
* In this manual, the icons and markings indicating the camera’s buttons, dials,
and settings correspond to the icons and markings on the camera and on the
LCD monitor.
3: Indicates a function which can be changed by pressing the
<M> button and changing the setting.
M : When shown on the upper right of the page, it indicates that the
function is available only when the Mode Dial is set to d, s,
f, a, or F.
* Function which cannot be used in the fully-automatic modes (1/C).
(p.**) : Reference page numbers for more information.
: Tip or advice for better shooting.
: Problem-solving advice.
: Warning to prevent shooting problems.
: Supplemental information.
Basic Assumptions
All operations explained in this manual assume that the power switch
is already set to <1> (p.27).
<5> operations explained in this manual assume that the Quick
Control Dial switch is already set to <J>.
It is assumed that all the menu settings and Custom Functions are
set to the default.
For explanatory purposes, the instructions show the camera attached
with an EF-S 15-85mm f/3.5-5.6 IS USM lens.
4
Page 5

Chapters
123
4
5
6
789
10
For first-time DSLR users, Chapters 1 and 2 explain the camera’s
basic operations and shooting procedures.
Introduction
Camera basics.
Getting Started
Basic Shooting
Fully automatic shooting.
Image Settings
Setting the AF and Drive Modes
Advanced Operations
Advanced shooting features.
Live View shooting
Shoot while viewing the LCD monitor.
Shooting Movies
Image Playback
Post-Processing Images
Sensor Cleaning
Printing Images
Customizing the Camera
Reference
2
23
51
59
87
99
135
153
165
191
199
205
219
243
Software Start Guide
281
5
Page 6

Contents
Introduction 2
Item Check List.................................................................................................. 3
Conventions Used in this Manual ...................................................................... 4
Chapters............................................................................................................ 5
Index to Features ............................................................................................ 10
Handling Precautions ...................................................................................... 12
Quick Start Guide ............................................................................................ 14
Nomenclature .................................................................................................. 16
Getting Started 23
1
Charging the Battery ....................................................................................... 24
Installing and Removing the Battery................................................................ 26
Turning on the Power ...................................................................................... 27
Installing and Removing the CF Card.............................................................. 29
Attaching and Detaching a Lens ..................................................................... 31
About the Lens Image Stabilizer...................................................................... 33
Basic Operation............................................................................................... 34
Q Using the Quick Control Screen ................................................................ 38
3 Menu Operations................................................................................... 40
Before You Start.............................................................................................. 42
Setting the Interface Language .................................................................... 42
Setting the Date, Time, and Zone ................................................................ 43
Formatting the Card ..................................................................................... 45
Set the Power-off Time/Auto Power Off ....................................................... 46
Reverting the Camera to the Default Settings.............................................. 47
Displaying the Grid and Electronic Level......................................................... 49
Basic Shooting 51
2
1 Fully Automatic Shooting .......................................................................... 52
1 Full Auto Techniques ................................................................................ 54
C Creative Auto Shooting ............................................................................. 55
Setting the Image Review Time ................................................................... 58
Image Settings 59
3
Setting the Image-recording Quality ................................................................ 60
i: Setting the ISO Speed ............................................................................. 64
A Selecting a Picture Style ......................................................................... 66
6
Page 7

A Customizing a Picture Style ..................................................................... 68
A Registering a Picture Style.......................................................................70
B: Setting the White Balance ....................................................................... 72
O Custom White Balance ...........................................................................73
P Setting the Color Temperature...............................................................74
u White Balance Correction ...........................................................................75
Auto Lighting Optimizer....................................................................................77
Lens Peripheral Illumination Correction ...........................................................78
Creating and Selecting a Folder.......................................................................80
Changing the File Name ..................................................................................82
File Numbering Methods ..................................................................................84
Setting the Color Space ...................................................................................86
Setting the AF and Drive Modes 87
4
f: Selecting the AF Mode..............................................................................88
S Selecting the AF Area ................................................................................91
AF Area Selection Modes ................................................................................93
When Autofocus Fails ......................................................................................96
MF: Manual Focusing ...................................................................................96
i Selecting the Drive Mode ...........................................................................97
j Using the Self-timer ....................................................................................98
Advanced Operations 99
5
d: Program AE..............................................................................................100
s: Shutter-Priority AE .................................................................................102
f: Aperture-Priority AE...............................................................................104
Depth of Field Preview................................................................................105
a: Manual Exposure.....................................................................................106
q Selecting the Metering Mode ...................................................................107
Setting Exposure Compensation....................................................................108
h Auto Exposure Bracketing (AEB) ............................................................109
A AE Lock ....................................................................................................110
F: Bulb Exposures ........................................................................................111
Mirror Lockup .................................................................................................113
R Remote Control Shooting............................................................................114
D Using the Built-in Flash ..............................................................................115
Setting the Flash ............................................................................................119
Using Wireless Flash .....................................................................................123
External Speedlites ........................................................................................133
Contents
7
Page 8

Contents
Live View Shooting 135
6
A Live View Shooting.................................................................................. 136
Shooting Function Settings ........................................................................... 139
z Menu Function Settings........................................................................... 140
Using AF to Focus ......................................................................................... 142
Focusing Manually......................................................................................... 149
Shooting Movies 153
7
k Shooting Movies...................................................................................... 154
Shooting Function Settings ........................................................................... 159
x Menu Function Settings......................................................................... 160
Image Playback 165
8
x Image Playback....................................................................................... 166
B Shooting Information Display............................................................. 167
H I Searching for Images Quickly ............................................................ 169
u/y Magnified View................................................................................... 171
b Rotating the Image ................................................................................... 172
Setting Ratings .............................................................................................. 173
Q Quick Control During Playback................................................................ 175
k Enjoying Movies ...................................................................................... 177
k Playing Movies ........................................................................................ 179
X Editing the Movie’s First and Last Scenes ............................................... 181
Slide Show (Auto Playback) .......................................................................... 182
Viewing the Images on TV............................................................................. 184
K Protecting Images.................................................................................... 186
L Erasing Images......................................................................................... 187
Changing Image Playback Settings............................................................... 189
Adjusting the LCD Monitor Brightness ....................................................... 189
Auto Rotation of Vertical Images................................................................ 190
Post-Processing Images 191
9
R Processing RAW Images with the Camera ........................................... 192
S Resize...................................................................................................... 197
Sensor Cleaning 199
10
f Automatic Sensor Cleaning ................................................................... 200
Appending Dust Delete Data ......................................................................... 201
Manual Sensor Cleaning ............................................................................... 203
8
Page 9

Printing Images 205
11
Preparing to Print ...........................................................................................206
wPrinting......................................................................................................208
Trimming the Image .................................................................................... 213
W Digital Print Order Format (DPOF) ...........................................................215
W Direct Printing with DPOF ........................................................................218
Customizing the Camera 219
12
Setting Custom Functions ..............................................................................220
Custom Functions ..........................................................................................221
Custom Function Settings ..............................................................................222
C.Fn I : Exposure ................................................................................222
C.Fn II : Image .....................................................................................224
C.Fn III : Autofocus/Drive......................................................................225
C.Fn IV : Operation/Others....................................................................231
C.Fn IV -1 : Custom Controls ....................................................................233
Registering My Menu .....................................................................................238
w Register Camera User Settings................................................................239
Setting Copyright Information.........................................................................241
Reference 243
13
B Button Functions....................................................................................244
Checking the Battery Information...................................................................246
Using a Household Power Outlet ...................................................................250
Replacing the Date/Time Battery ...................................................................251
System Map ...................................................................................................252
Function Availability Table .............................................................................254
Menu Settings ................................................................................................256
Troubleshooting Guide...................................................................................261
Error Codes....................................................................................................267
Specifications .................................................................................................268
Contents
Software Start Guide 281
14
Software Start Guide......................................................................................282
Index ..............................................................................................................286
9
Page 10

Index to Features
Power
Battery
• Charging p.24
• Battery check p.28
•
Battery information check
Power outlet p.250
Auto power off p.46
p.246
Lens
Attaching/Detaching p.31
Zoom p.32
Image Stabilizer p.33
Basic Settings
(Menu Functions)
Language p.42
Date/Time/Zone p.43
LCD brightness
adjustment p.189
Beeper p.256
Release shutter
without card p.29
Recording Images
Format p.45
Create/select a folder p.80
File name p.82
File No. p.84
Image Quality
Image-recording quality p.60
One-touch RAW+JPEG p.63
ISO speed p.64
Picture Style p.66
White balance p.72
10
Color space p.86
Image improvement features
• Auto Lighting Optimizer p.77
• Lens peripheral illumination
correction p.78
• Noise reduction
for long exposures p.224
• Noise reduction
for high ISO speeds p.224
• Highlight tone priority p.225
AF
AF mode p.88
AF point selection p.91
AF area selection mode p.93
• Limited p.228
Manual focusing p.96
Metering
Metering mode p.107
Drive
Drive modes p.97
Maximum burst p.62
Shooting
Electronic level p.50
Creative Auto p.55
Program AE p.100
Shutter-priority AE p.102
Aperture-priority AE p.104
Manual exposure p.106
Bulb p.111
Mirror lockup p.113
Quick Control screen p.38
Page 11

Index to Features
Self-timer p.98
Remote control p.114
Exposure adjustment
Exposure compensation p.108
AEB p.109
AE lock p.110
Flash
Built-in flash p.115
• Flash exposure
compensation p.117
• FE lock p.118
External flash p.133
Flash control p.119
• Wireless flash p.123
Live View shooting
Live View shooting p.135
AF p.142
Manual focusing p.149
Exposure simulation p.140
Grid display p.140
Silent shooting p.141
Movie shooting
Movie shooting p.153
Movie-recording size p.160
Sound recording p.162
Still photo shooting p.158
Image playback
Image review time p.58
Single image display p.166
• Shooting information
display p.167
Movie playback p.179
Movie first/last scene
editing p.181
Index display p.169
Image browsing
(Jump display) p.170
Magnified view p.171
Rating p.173
Auto playback p.182
Viewing the images
on TV p.184
Protect p.186
Erase p.187
Image Editing
RAW image processing p.192
Resize p.197
Customization
Custom Function (C.Fn) p.220
Custom Controls p.231
My Menu p.238
Camera user setting
registration p.239
Sensor cleaning/
Dust reduction
Sensor cleaning p.199
Add Dust Delete Data p.201
Viewfinder
Dioptric adjustment p.34
Grid display p.49
Electronic level p.237
11
Page 12

Handling Precautions
Camera Care
This camera is a precision instrument. Do not drop it or subject it to physical
shock.
The camera is not waterproof and cannot be used underwater. If you
accidentally drop the camera into water, promptly consult your nearest
Canon Service Center. Wipe off any water droplets with a dry cloth. If the
camera has been exposed to salty air, wipe it with a well-wrung wet cloth.
Never leave the camera near anything having a strong magnetic field such
as a magnet or electric motor. Also avoid using or leaving the camera near
anything emitting strong radio waves such as a large antenna. Strong
magnetic fields can cause camera misoperation or destroy image data.
Do not leave the camera in excessive heat such as in a car in direct sunlight.
High temperatures can cause the camera to malfunction.
The camera contains precision electronic circuitry. Never attempt to
disassemble the camera yourself.
Do not block the mirror operation with your finger, etc. Doing so may cause a
malfunction.
Use a blower to blow away dust on the lens, viewfinder, reflex mirror, and
focusing screen. Do not use cleaners that contain organic solvents to clean
the camera body or lens. For stubborn dirt, take the camera to the nearest
Canon Service Center.
Do not touch the camera’s electrical contacts with your fingers. This is to
prevent the contacts from corroding. Corroded contacts can cause camera
misoperation.
If the camera is suddenly brought in from the cold into a warm room,
condensation may form on the camera and internal parts. To prevent
condensation, first put the camera in a sealed plastic bag and let it adjust to
the warmer temperature before taking it out of the bag.
If condensation forms on the camera, do not use the camera. This is to avoid
damaging the camera. If there is condensation, remove the lens, card and
battery from the camera, and wait until the condensation has evaporated
before using the camera.
If the camera will not be used for an extended period, remove the battery
and store the camera in a cool, dry, well-ventilated location. Even while the
camera is in storage, press the shutter button a few times once in a while to
check that the camera is still working.
Avoid storing the camera where there are corrosive chemicals such as a
darkroom or chemical lab.
If the camera has not been used for an extended period, test all its functions
before using it. If you have not used the camera for some time or if there is
an important shoot coming up, have the camera checked by your Canon
dealer or check the camera yourself and make sure it is working properly.
12
Page 13

Handling Precautions
Contacts
LCD Panel and LCD Monitor
Although the LCD monitor is manufactured with very high precision
technology with over 99.99% effective pixels, there might be a few dead
pixels among the remaining 0.01% or less pixels. Dead pixels displaying
only black or red, etc., are not a malfunction. They do not affect the images
recorded.
If the LCD monitor is left on for a prolonged period, screen burn-in may occur
where you see remnants of what was displayed. However, this is only
temporary and will disappear when the camera is left unused for a few days.
In low or high temperatures, the LCD monitor display may seem slow or it
might look black. It will return to normal at room temperature.
Cards
To protect the card and its recorded data, note the following:
Do not drop, bend, or wet the card. Do not subject it to excessive force,
physical shock, or vibration.
Do not store or use the card near anything having a strong magnetic field
such as a TV set, speakers, or magnet. Also avoid places prone to having
static electricity.
Do not leave the card in direct sunlight or near a heat source.
Store the card in a case.
Do not store the card in hot, dusty, or humid locations.
Lens
After detaching the lens from the camera, attach the lens
caps or put down the lens with the rear end up to avoid
scratching the lens surface and electrical contacts.
Cautions During Prolonged Use
If you use continuous shooting, Live View shooting, or movie shooting for a
prolonged period, the camera may become hot. Although this is not a
malfunction, holding the hot camera for a long period can cause slight skin
burns.
13
Page 14
Quick Start Guide
For EF lens
For EF-S lens
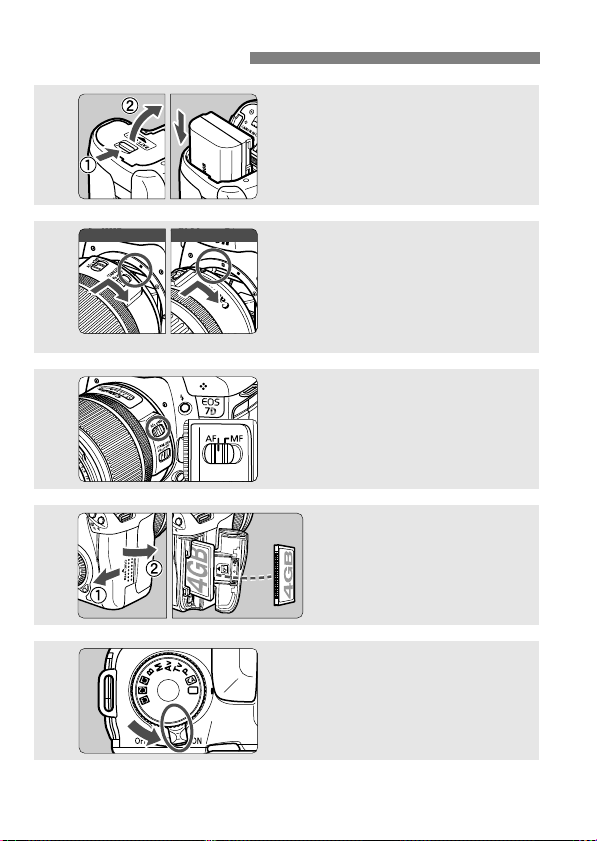
1
2
3
4
5
Insert the battery. (p.26)
To charge the battery, see page 24.
Attach the lens. (p.31)
When attaching an EF-S lens, align it
with the white index on the camera.
For other lenses, align it with the red
index.
Set the lens focus mode switch
to <AF>. (p.31)
Open the slot cover and
insert a card. (p.29)
Face the label side toward you
and insert the end with the
small holes into the camera.
Set the power switch to <1>.
(p.27)
14
Page 15
Quick Start Guide
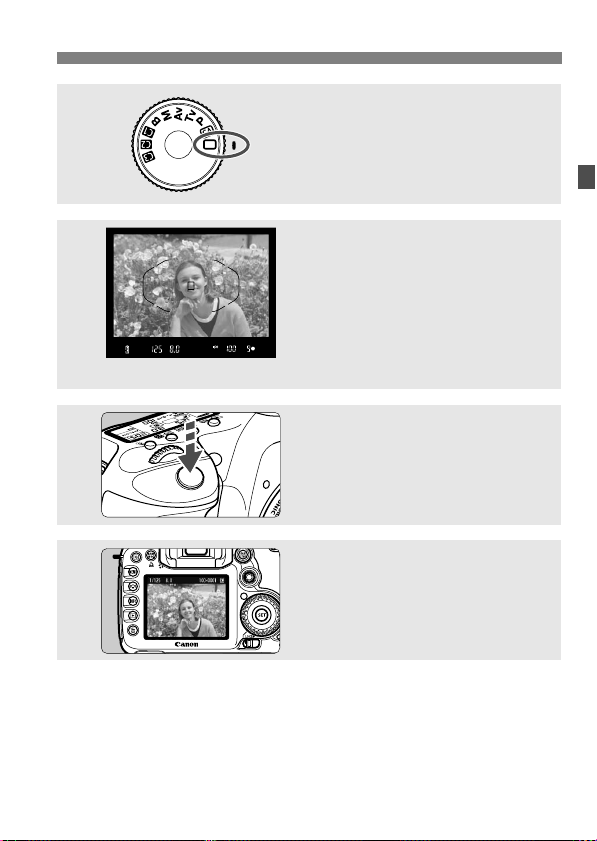
6
7
8
9
Set the Mode Dial to <1> (Full
Auto). (p.52)
All the necessary camera settings will
be set automatically.
Focus the subject. (p.35)
Look through the viewfinder and aim
the viewfinder center over the subject.
Press the shutter button halfway, and
the camera will focus the subject.
If necessary, the built-in flash will popup automatically.
Take the picture. (p.35)
Press the shutter button completely to
take the picture.
Review the picture. (p.58)
The captured image will be displayed
for about 2 sec. on the LCD monitor.
To display the image again, press the
<x> button (p.166).
To view the images captured so far, see “Image Playback” (p.166).
To delete an image, see “Erasing Images” (p.187).
15
Page 16
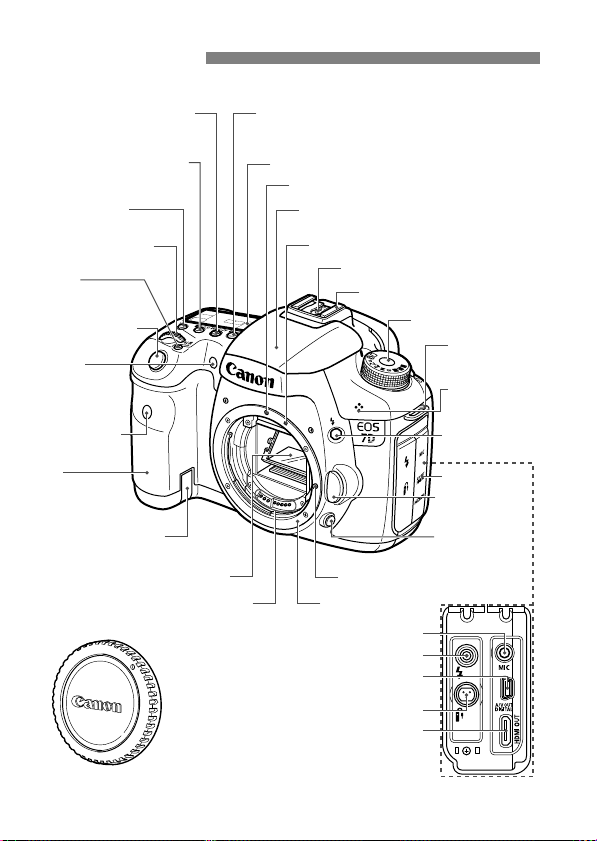
Nomenclature
For detailed information, reference page numbers are provided in parentheses (p.**).
<o> AF mode
selection/Drive mode
selection button (p.88/97)
<m>
ISO speed setting/
Flash exposure compensation
button (p.64/117)
<U> LCD panel
illumination button (p.37)
<6> Main Dial
(p.36)
<B>
Multi-function
button (p.92,118)
Shutter button
(p.35)
Red-eye
reduction/
Self-timer lamp
(p.116/98)
Remote control
sensor (p.114)
Grip
(Battery
compartment)
DC coupler cord
hole (p.250)
Mirror (p.113,203)
Audio/video OUT/Digital terminal (p.184,206)
Remote control terminal (p.112) (N3 type)
<n> Metering mode
selection/White balance
selection button (p.107/72)
LCD panel (p.18)
EF lens mount index (p.31)
Built-in flash/AF-assist beam
(p.115/90)
EF-S lens mount index (p.31)
Flash-sync contacts
Hot shoe (p.133)
Lens lock pin
Lens mountContacts (p.13)
External microphone IN terminal (p.155)
PC terminal (p.134)
HDMI mini OUT terminal (p.185)
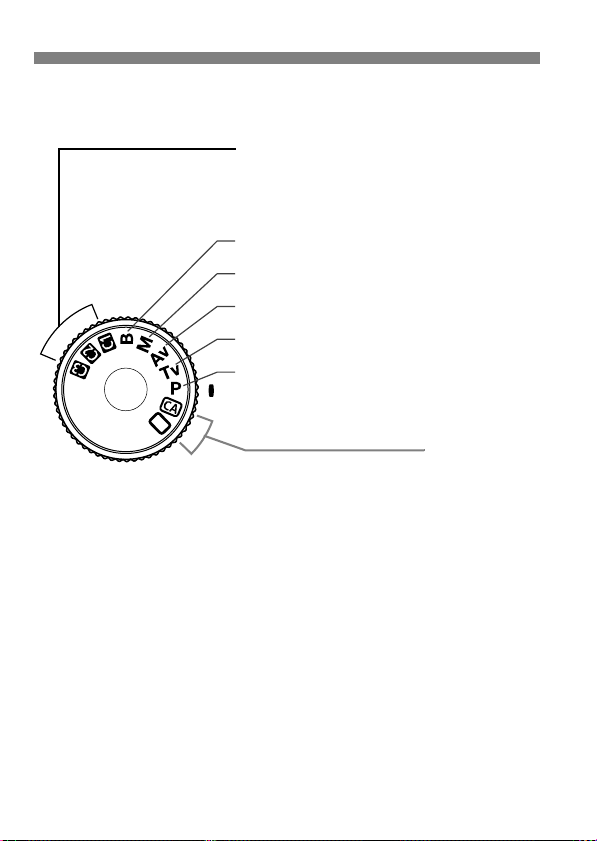
Mode Dial (p.20)
Strap mount
(p.23)
Microphone
(p.162)
<D> Flash
button (p.115)
Terminal cover
Lens release
button (p.32)
Depth-of-field
preview button
(p.105)
Body cap (p.31)
16
Page 17
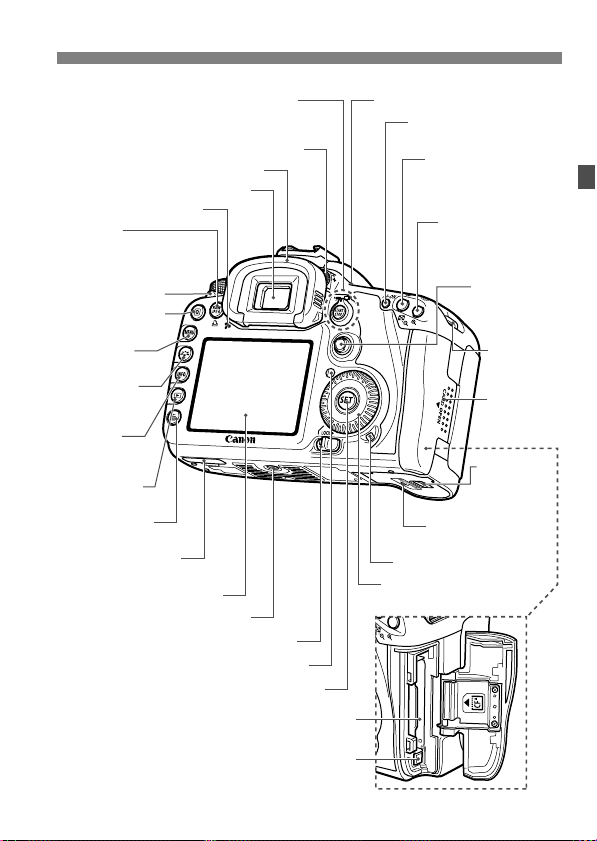
Nomenclature
<A/l> Live View shooting/
Movie shooting switch (p.135/153)/
<0> Start/Stop button (p.136,154)
Dioptric adjustment knob (p.34)
Viewfinder eyepiece
Speaker (p.179)
<P/l>
One-touch RAW+JPEG/
Direct print button
(p.63/211)
Power switch (p.27)
<Q> Quick Control
button (p.38)
<M> Menu
button (p.40)
<A> Picture
Style selection
button (p.66)
<B> Info
button (p.50,138,
156,166,244)
<x> Playback
button (p.166)
<L> Erase
button (p.187)
Extension system
terminal
LCD monitor (p.40, 189)
Quick Control Dial switch (p.37)
Eyecup (p.112)
Tripod socket
Light sensor (p.189)
<0> Setting button (p.40)
Card slot (p.29)
<V> Focal plane mark
<p> AF start button
(p.35,89,137,155)
<A/I>
AE lock button/
Index/Reduce button
(p.110/169/171,213)
<S/u>
AF point selection/
Magnify button
(p.91/171,213)
<9>
Multi-controller
(p.36)
Battery
compartment
cover release
lever (p.26)
Battery compartment
cover (p.26)
Access lamp (p.30)
<5> Quick Control Dial
(p.37)
Strap mount
(p.23)
Card slot
cover (p.29)
Card ejection button (p.30)
17
Page 18
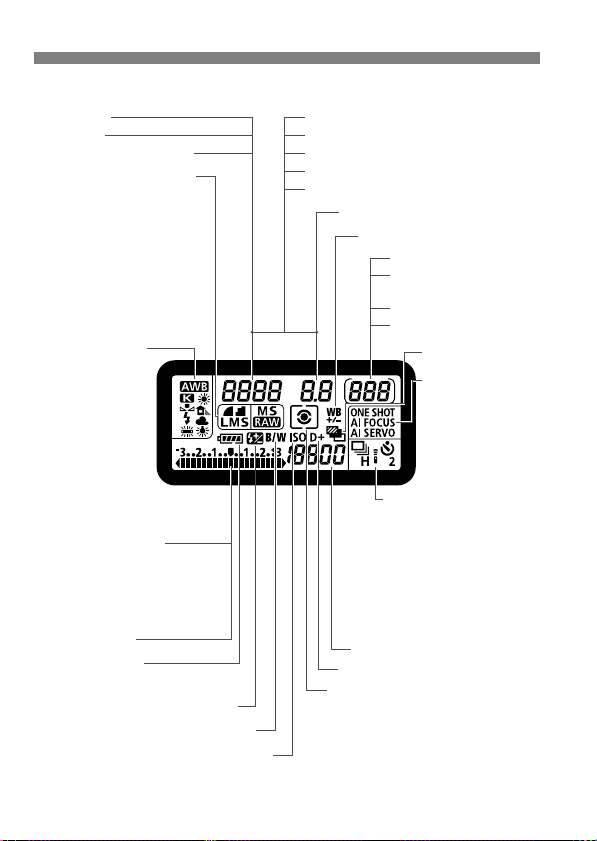
Nomenclature
Shutter speed
Busy (buSY)
Built-in flash recycling (buSY)
<A> Highlight tone priority (p.225)
Image-recording quality (p.60)
37 Large/Fine
38 Large/Normal
47 Medium/Fine
48 Medium/Normal
67 Small/Fine
68 Small/Normal
1 RAW
a1 Medium RAW
61 Small RAW
Flash exposure compensation (p.117)
Battery check (p.28)
zxcm
b
n
White balance (p.72)
Q Auto
W Daylight
E Shade
R Cloudy
Y Tungsten light
U
White
fluorescent light
I Flash
O Custom
P Color
temperature
White balance correction (p.75)
Aperture
Card full warning (FuLL CF)
Card error warning (Err CF)
No card warning (no CF)
Error code (Err)
Cleaning image sensor (CLn)
Shots remaining
Shots remaining
during WB bracketing
Self-timer countdown
Bulb exposure time
AF mode (p.88)
X
One-Shot AF
9
AI Focus AF
Z
AI Servo AF
Metering mode (p.107)
q Evaluative metering
w Partial metering
r Spot metering
e Center-weighted average metering
Drive mode (p.97)
u Single shooting
o High-speed continuous
shooting
i Low-speed continuous
shooting
Q 10 sec. Self-timer/
Remote control
k 2 sec. Self-timer/
Remote control
Exposure level indicator
Exposure compensation
amount (p.108)
AEB range (p.109)
Flash exposure compensation
amount (p.117)
<h> AEB (p.109)
<0> Monochrome shooting (p.67)
Card writing status
<g> ISO speed (p.64)
ISO speed (p.64)
LCD Panel
The display will show only the settings currently applied.
18
Page 19
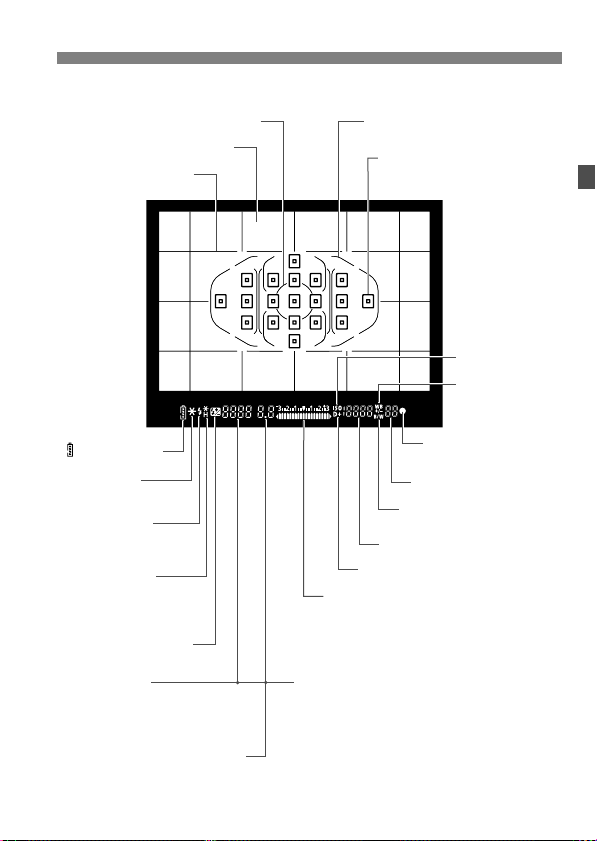
Viewfinder Information
Spot metering circle (p.107)
Focusing screen
Grid (p.49)
< > Battery check
<A> AE lock/
AEB in-progress
<D> Flash-ready
Improper FE lock
warning
<d> FE lock/
FEB in-progress
<e> High-speed sync
(FP flash)
<y> Flash exposure
compensation
Shutter speed
FE lock (FEL)
Busy (buSY)
Built-in flash recycling (D buSY)
Aperture
Card full warning (FuLL CF)
Card error warning (Err CF)
No card warning (no CF)
The display will show only the settings currently applied.
Area AF frame/
Zone AF frame (p.91)
<S> AF points
<O> Spot AF points (p.91)
ISO speed
<A> Highlight tone priority
Exposure level indicator
Exposure compensation amount
Flash exposure compensation amount
AEB range
Red-eye reduction lamp-on indicator
Nomenclature
<g> ISO speed
<u> White
balance
correction
<o> Focus confirmation
light
Max. burst
<0> Monochrome
shooting
19
Page 20
Nomenclature
Fully-Automatic Modes
All you do is press the shutter button.
Fully-automatic shooting suitable for the
subject.
1: Full Auto (p.52)
C: Creative Auto (p.55)
F : Bulb (p.111)
a : Manual exposure (p.106)
f: Aperture-priority AE (p.104)
s : Shutter-priority AE (p.102)
d : Program AE (p.100)
Camera User Settings
Most camera settings can be registered under w,
x, or y (p.239).
Mode Dial
20
Page 21
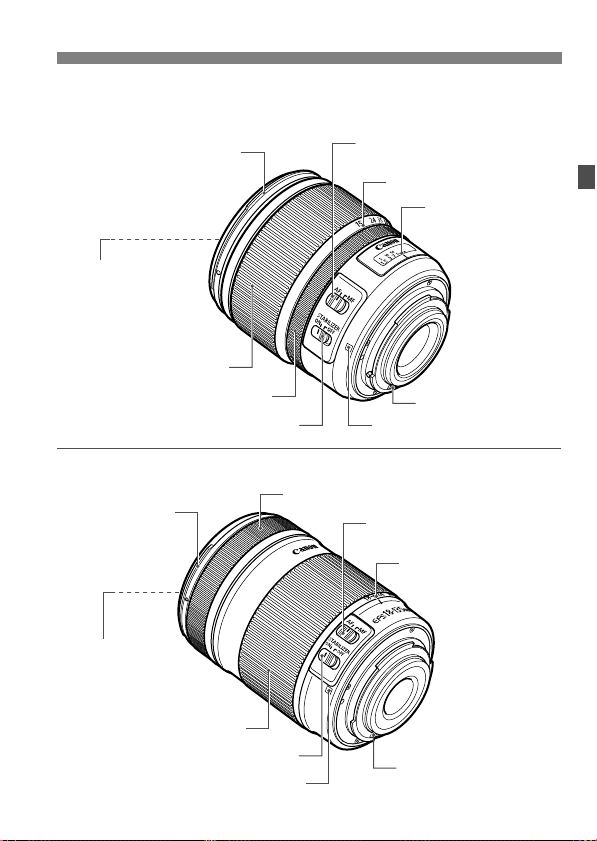
Lens
Lens with a distance scale
Hood mount
(p.274)
Filter thread
(front of lens) (p.274)
Zoom ring (p.32)
Focusing ring (p.96,149)
Image Stabilizer switch (p.33)
Lens without a distance scale
Hood mount
(p.274)
Nomenclature
Focus mode switch (p.31)
Zoom position index (p.32)
Distance scale
Contacts (p.13)
Lens mount index (p.31)
Focusing ring (p.96,149)
Focus mode switch (p.31)
Zoom position index (p.32)
Filter thread
(front of lens) (p.274)
Zoom ring (p.32)
Image Stabilizer switch (p.33)
Lens mount index (p.31)
Contacts (p.13)
21
Page 22
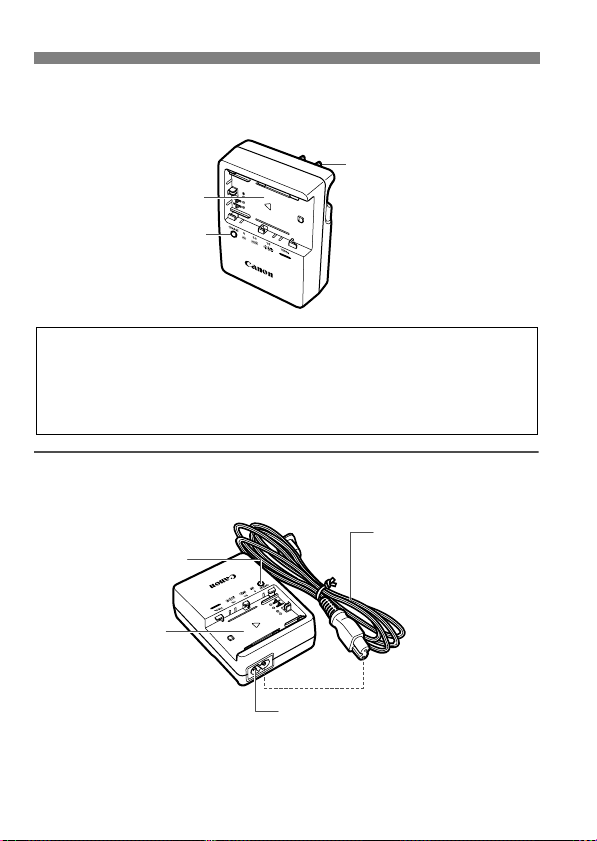
Nomenclature
Battery pack slot
Charge lamp
Power plug
IMPORTANT SAFETY INSTRUCTIONS-SAVE THESE INSTRUCTIONS.
DANGER-TO REDUCE THE RISK OF FIRE OR ELECTRIC SHOCK,
CAREFULLY FOLLOW THESE INSTRUCTIONS.
For connection to a supply not in the U.S.A., use an attachment plug adapter
of the proper configuration for the power outlet, if needed.
Power cord
Power cord socket
Battery pack slot
Charge lamp
Battery Charger LC-E6
Charger for Battery Pack LP-E6 (p.24).
Battery Charger LC-E6E
Charger for Battery Pack LP-E6 (p.24).
22
Page 23

1
Eyepiece cover
Getting Started
This chapter explains preparatory steps before you start
shooting and basic camera operations.
Attaching the Strap
Pass the end of the strap through
the camera’s strap mount eyelet
from the bottom. Then pass it
through the strap’s buckle as shown
in the illustration. Pull the strap to
take up any slack and make sure
the strap will not loosen from the
buckle.
The eyepiece cover is also
attached to the strap (p.112).
23
Page 24
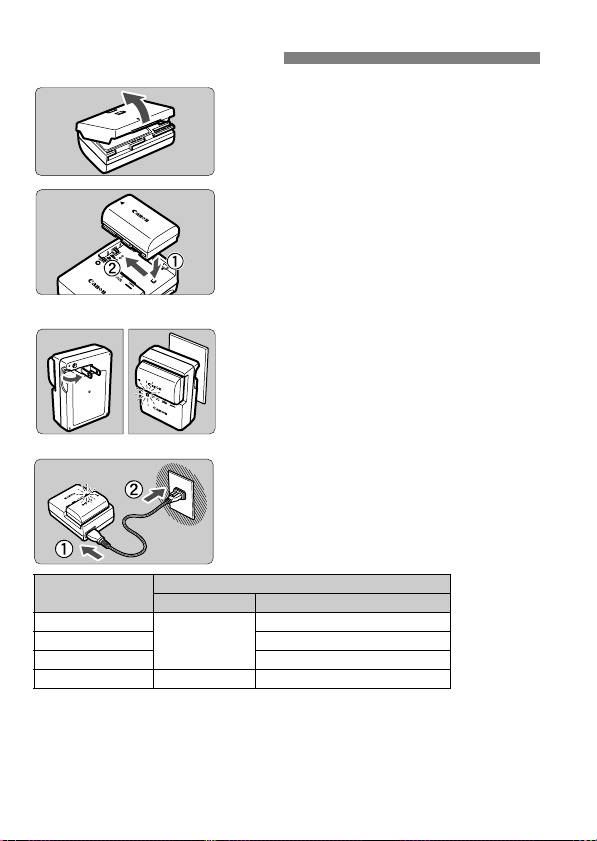
Charging the Battery
LC-E6
LC-E6E
Remove the protective cover.
1
Attach the battery.
2
As shown in the illustration, attach the
To detach the battery, follow the
Recharge the battery.
3
For LC-E6
As shown by the arrow, flip out the
For LC-E6E
Connect the power cord to the
Recharging starts automatically and
battery securely.
above procedure in reverse.
battery charger’s prongs and insert
the prongs into a power outlet.
charger and insert the plug into the
power outlet.
the charge lamp blinks in orange.
Charge Level
0 - 50%
50 - 75% Blinks twice per second
75% or higher Blinks three times per second
Fully charged Green Lights on
It takes about 2.5 hours to fully recharge a completely exhausted
battery at 23°C / 73°F. The time required to recharge the battery
depends on the ambient temperature and battery’s charge level.
For safety reasons, recharging in low temperatures (5°C - 10°C /
41°F - 50°F) will take a longer time (up to 4 hours).
Color Indicator
Orange
Charge Lamp
Blinks once per second
24
Page 25
Charging the Battery
If the battery’s remaining capacity (p.246) is 94% or higher, the battery
will not be recharged.
After disconnecting the charger’s power plug, do not touch the charger
power plug (prongs) for at least 3 sec.
The charger cannot charge any battery other than Battery Pack LP-E6.
Tips for Using the Battery and Charger
Recharge the battery on the day before or on the day it is to be used.
Even during non-use or storage, a charged battery will gradually
discharge and lose its power.
After recharging the battery, detach it and unplug the power
cord or prongs from the power outlet.
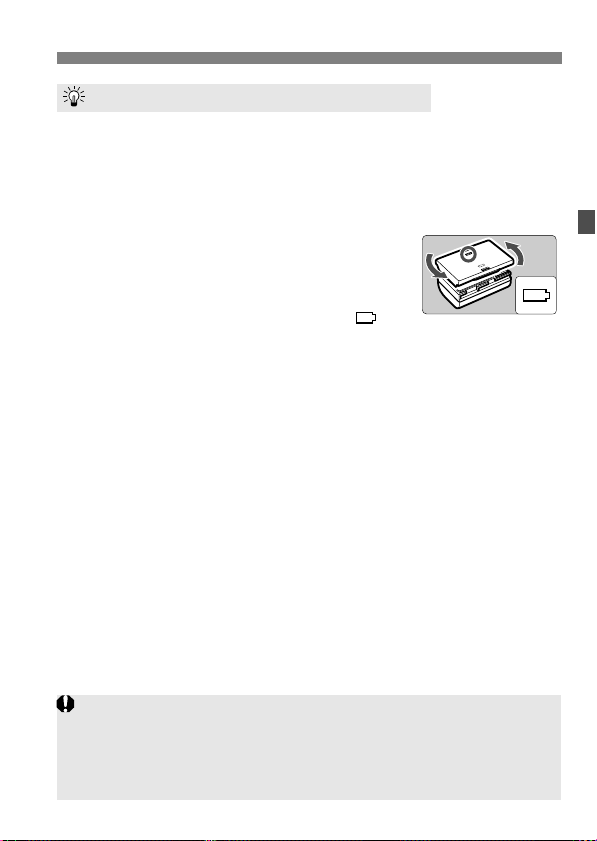
You can attach the cover in a different
orientation to indicate whether the battery
has been recharged or not.
If the battery has been recharged, attach the
cover so that the battery-shaped hole < > is
aligned over the blue sticker on the battery. If the battery is
exhausted, attach the cover in the opposite orientation.
When not using the camera, remove the battery.
If the battery is left in the camera for a prolonged period, a small amount
of power current is released, resulting in excess discharge and shorter
battery life. Store the battery with the protective cover attached. Storing
the battery after it is fully charged can lower the battery’s performance.
The battery charger can also be used in foreign countries.
The battery charger is compatible with a 100 V AC to 240 V AC 50/60 Hz
power source. If necessary, attach a commercially-available plug adapter for
the respective country or region. Do not attach any portable voltage
transformer to the battery charger. Doing so can damage the battery charger.
If the battery becomes exhausted quickly even after being fully
charged, the battery has worn out.
Check the battery’s recharge performance (p.246) and purchase a
new battery.
25
Page 26
Installing and Removing the Battery
Only the Battery Pack LP-E6 can be used.
Installing the Battery
Load a fully charged Battery Pack LP-E6 into the camera. The
camera’s viewfinder will become bright when a battery is installed,
and darken when the battery is removed.
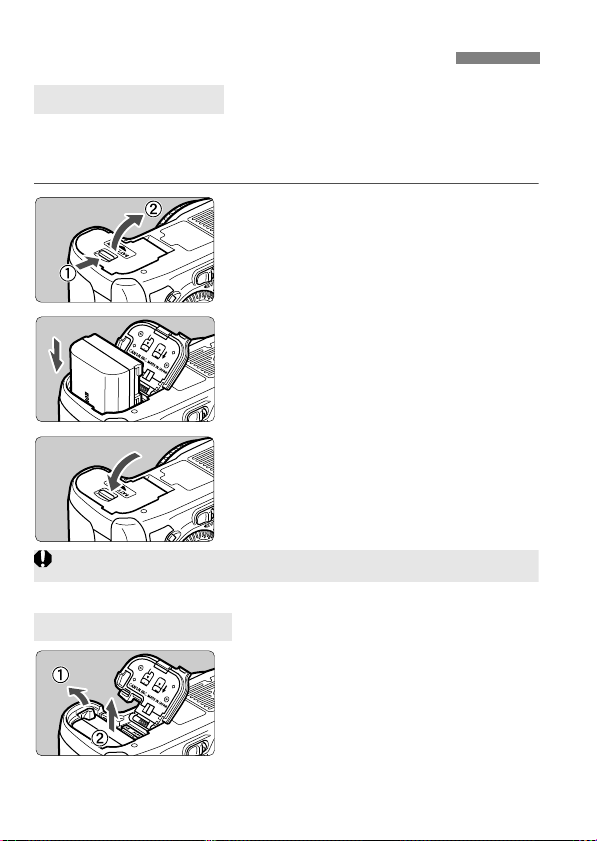
Open the battery compartment
1
cover.
Slide the lever as shown by the arrow
and open the cover.
Insert the battery.
2
Insert the end with the battery
contacts.
Insert the battery until it locks in
place.
Close the cover.
3
Press the cover to close it.
Removing the Battery
Open the cover and remove the
battery.
Press the battery release lever as shown
by the arrow and remove the battery.
To prevent short circuiting, be sure to
attach the protective cover to the
battery.
26
Page 27

Turning on the Power
If you set the power switch to <2> while an image is being recorded to
the card, [Recording ...] will be displayed and the power will turn off after
the card finishes recording the image.
<1> : The camera turns on.
<2> : The camera is turned off and
About the Automatic Self-Cleaning Sensor
Whenever you set the power switch to <1> or <2>, the sensor
cleaning will be executed automatically. During the sensor cleaning,
the LCD monitor will display <f>. Even during the sensor
cleaning, you can still shoot by pressing the shutter button halfway
(p.35) to stop the sensor cleaning and take a picture.
If you repeatedly turn the power switch <1>/<2> at a short
interval, the <f> icon might not be displayed. This is normal and
not a problem.
About Auto Power Off
To save battery power, the camera turns off automatically after about
1 minute of non-operation. To turn on the camera again, just press
the shutter button halfway (p.35).
You can change the auto power-off time with the menu’s [5 Auto
power off] setting (p.46).
does not operate. Set to this
position when not using the
camera.
27
Page 28
Turning on the Power
The number of possible shots will decrease with any of the following
operations:
• Pressing the shutter button halfway for a prolonged period.
• Often activating only the AF without taking a picture.
• Using the LCD monitor often.
• Using the lens Image Stabilizer.
The lens operation is powered by the camera’s battery. Depending on
the lens used, the number of possible shots may be lower.
For battery life with Live View shooting, see page 137.
See the [7 Battery info.] menu to further check the battery’s condition
(p.246).
If size-AA/LR6 batteries are used in Battery Grip BG-E7, a four-level
indicator will be displayed. ([ / ] will not be displayed.)
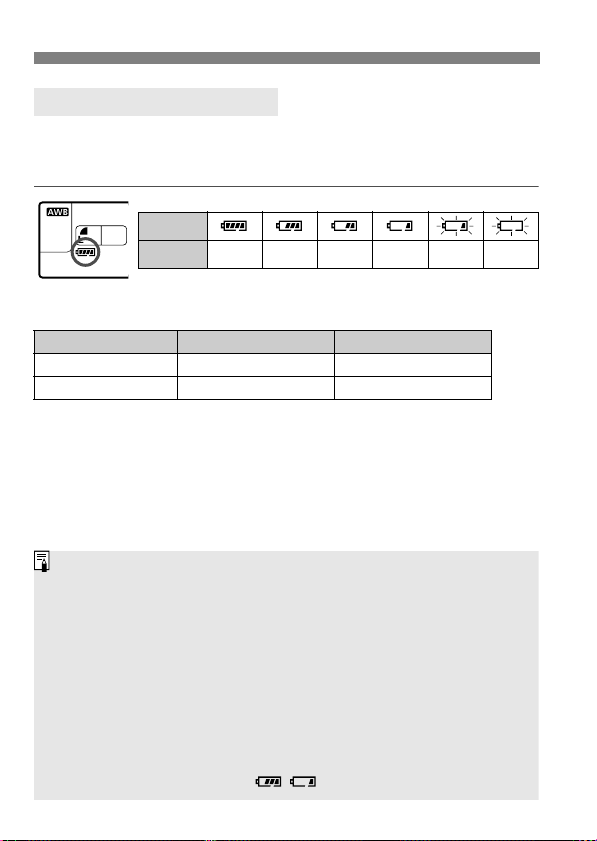
Checking the Battery Level
When the power switch is set to <1>, the battery level will be
indicated in one of six levels: A blinking battery icon (b) indicates
that the battery will be exhausted soon.
Icon
Level (%)
Battery Life
Temperature At 23°C / 73°F At 0°C / 32°F
No Flash Approx. 1000 Approx. 900
50% Flash Use Approx. 800 Approx. 750
The figures above are based on a fully-charged Battery Pack LP-E6, no Live
View shooting, and CIPA (Camera & Imaging Products Association) testing
standards.
Battery Grip BG-E7 approximately doubles the number of possible shots with
two LP-E6 batteries installed. With size-AA/LR6 alkaline batteries, the number
of possible shots at 23°C / 73°F is approx. 400 shots without flash use and
approx. 300 shots with 50% flash use.
28
100 - 70
69 - 50 49 - 20 19 - 10 9 - 1 0
Page 29
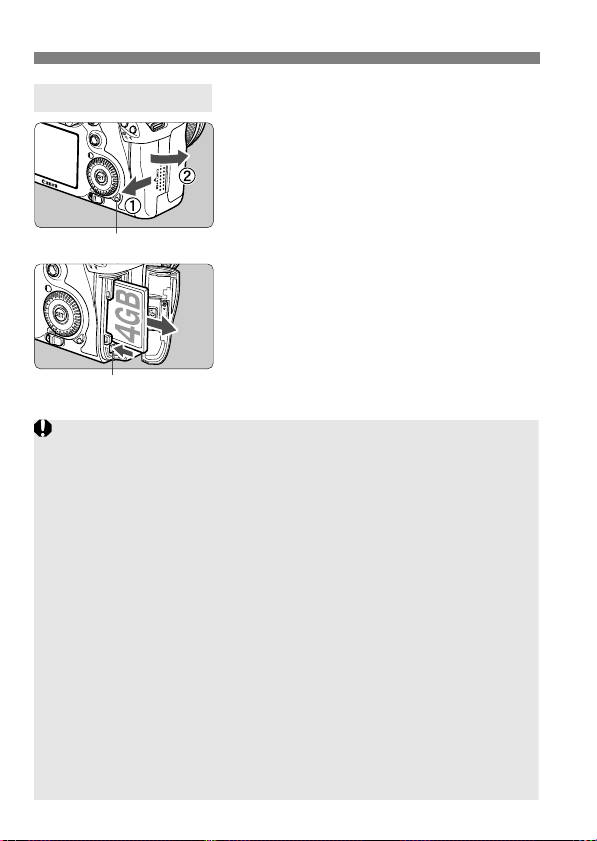
Installing and Removing the CF Card
Label side
Card ejection button
Shots remaining
The number of shots remaining depends on the remaining capacity of
the card, image-recording quality, ISO speed, etc.
Setting the [1 Release shutter without card] menu option to [Disable]
will prevent you from forgetting to install a card (p.256).
Although the thickness is different between the two types of CF
(CompactFlash) cards, the camera is compatible with both types. It is
also compatible with Ultra DMA (UDMA) cards and hard disk-type
cards.
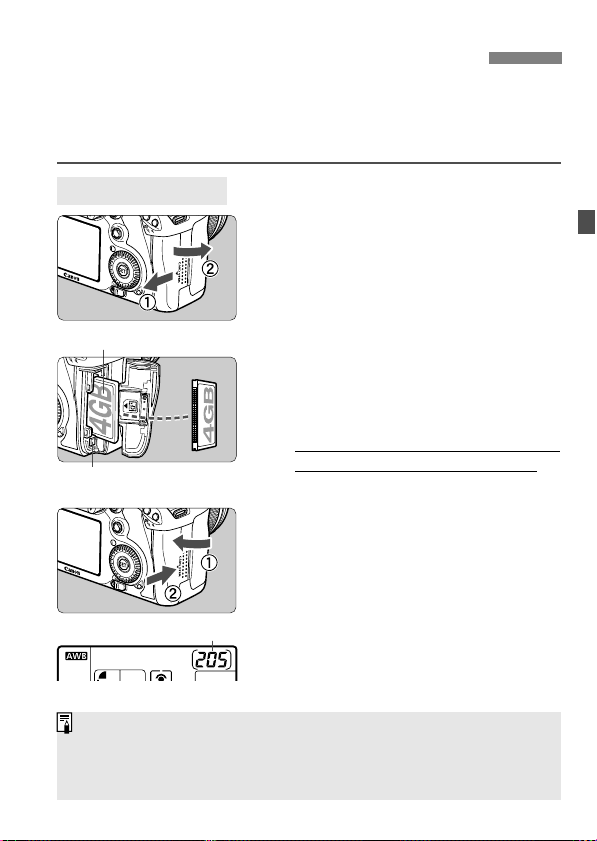
Installing the Card
Open the cover.
1
Slide the cover as shown by the
arrow to open it.
Insert the card.
2
As shown in the illustration, face
the label side toward you and
insert the end with the small holes
into the camera.
If the card is inserted in the wrong
way, it may damage the camera.
The card ejection button will stick out.
Close the cover.
3
Close the cover and slide it in the
direction shown by the arrow until it
snaps shut.
When you set the power switch to
<1>, the number of remaining shots
will be displayed on the LCD panel.
29
Page 30
Installing and Removing the CF Card
Access lamp
Card ejection button
The access lamp lights or blinks while the picture is taken, when
data is being transferred to the card and when data is being
recorded, read, or erased on the card. While the access lamp is lit
or blinking, never do any of the following. Doing so may damage
the image data. It may also damage the card or camera.
• Opening the card slot cover.
• Removing the battery.
• Shaking or banging the camera around.
If the card already contains recorded images, the image number might
not start from 0001 (p.84).
If a card-related error message is displayed on the LCD monitor, remove
and reinstall the card. If the error persists, use a different card.
If you can transfer all the images in the card to a computer, transfer all
the images and then format the card (p.45). The card may then return to
normal.
When holding a hard disk-type card, always hold its sides. You may
damage the card by holding its flat surfaces. Compared to CF cards, hard
disk-type cards are more vulnerable to vibration and physical shock. If
you use such a card, be careful not to subject the camera to vibration or
physical shock especially while recording or displaying images.
Removing the Card
Open the cover.
1
Set the power switch to <2>.
Make sure the access lamp is off,
then open the cover.
Remove the card.
2
Press the card ejection button.
The card will come out.
Close the cover.
30
Page 31

Attaching and Detaching a Lens
EF-S lens mount index
EF lens mount index
Minimizing Dust
When changing lenses, do it in a place with minimal dust.
When storing the camera without a lens attached, be sure to attach the
body cap to the camera.
Remove dust on the body cap before attaching it.
Attaching a Lens
Remove the caps.
1
Remove the rear lens cap and the
body cap by turning them as shown
by the arrow.
Attach the lens.
2
Align the EF-S lens with the camera’s
white EF-S lens mount index and turn
the lens as shown by the arrow until it
clicks in place.
When attaching a lens other than an
EF-S lens, align the lens with the red
EF lens mount index.
On the lens, set the focus mode
3
switch to <AF> (autofocus).
If it is set to <MF> (manual focus),
autofocus will not operate.
Remove the front lens cap.
4
31
Page 32

Attaching and Detaching a Lens
Do not look at the sun directly through any lens. Doing so may cause
loss of vision.
If the front part (focusing ring) of the lens rotates during autofocusing, do
not touch the rotating part.
Image Conversion Factor
Since the image sensor size is
smaller than the 35mm film
format, it will look like the lens
focal length is increased by 1.6x.
Image sensor size
(22.3 x 14.9 mm / 0.88 x 0.59 in.)
35mm image size
(36 x 24 mm / 1.42 x 0.94 in.)
About Zooming
To zoom, turn the zoom ring on the lens
with your fingers.
If you want to zoom, do it before
focusing. Turning the zoom ring after
achieving focus may throw off the
focus slightly.
Detaching the Lens
While pressing the lens release
button, turn the lens as shown by
the arrow.
Turn the lens until it stops, then detach it.
Attach the rear lens cap to the detached lens.
To owners of the EF-S 18-200mm f/3.5-5.6 IS lens:
You can prevent the lens from extending
out while you are carrying it around. Set
the zoom ring to the 18mm wide-angle
end, then slide the zoom ring lock lever
to <LOCK>. The zoom ring can be
locked only at the wide-angle end.
32
Page 33

About the Lens Image Stabilizer
The Image Stabilizer is not effective for moving subjects.
The Image Stabilizer may not be effective for excessive shaking such as
on a rocking boat.
With the EF 28-135mm f/3.5-5.6 IS USM lens, the Image Stabilizer will
not be very effective while you move the camera to take panned shots.
The Image Stabilizer can operate with the lens focus mode switch set to
either <AF> or <MF>.
If the camera is mounted on a tripod, you can save battery power by
switching the IS switch to <2>.
The Image Stabilizer can operate even when the camera is mounted on
a monopod.
Some IS lenses enable you to switch the IS mode manually to suit the
shooting conditions. However, the EF-S 15-85mm f/3.5-5.6 IS USM,
EF-S 18-135mm f/3.5-5.6 IS, and EF-S 18-200mm f/3.5-5.6 IS lenses
switch the IS mode automatically.
When you use the IS lens’ built-in Image Stabilizer, camera shake is
corrected to obtain a less blurred shot. The procedure explained here is
based on the EF-S 15-85mm f/3.5-5.6 IS USM lens as an example.
* IS stands for Image Stabilizer.
Set the IS switch to <1>.
1
Set the camera’s power switch to
<1>.
Press the shutter button halfway.
2
The Image Stabilizer will operate.
Take the picture.
3
When the picture looks steady in the
viewfinder, press the shutter button
completely to take the picture.
33
Page 34

Basic Operation
If the camera’s dioptric adjustment still cannot provide a sharp viewfinder
image, using Dioptric Adjustment Lens Eg (sold separately) is recommended.
Vertical shooting
Horizontal shooting
For shooting while looking at the LCD monitor, see page 135.
Adjusting the Viewfinder Clarity
Turn the dioptric adjustment
knob.
Turn the knob left or right so that the
AF points in the viewfinder look
sharp.
If the knob is difficult to turn, remove
the eyecup (p.112).
Holding the Camera
To obtain sharp images, hold the camera still to minimize camera
shake.
1. Wrap your right hand around the camera grip firmly.
2. Hold the lens bottom with your left hand.
3. Press the shutter button lightly with your right hand’s index finger.
4. Press your arms and elbows lightly against the front of your body.
5. Press the camera against your face and look through the viewfinder.
6. To maintain a stable stance, place one foot in front of the other.
34
Page 35

Basic Operation
In the d/s/f/a/F modes, pressing the <p> button will
execute the same operation as pressing the shutter button halfway.
If you press the shutter button completely without pressing it halfway first
or if you press the shutter button halfway and then press it completely
immediately, the camera will take a moment before it takes the picture.
Even during the menu display, image playback, and image recording,
you can instantly go back to shooting-ready by pressing the shutter
button halfway.
Shutter Button
The shutter button has two steps. You can press the shutter button
halfway. Then you can further press the shutter button completely.
Pressing halfway
This activates autofocusing and
automatic exposure metering that sets
the shutter speed and aperture.
The exposure setting (shutter speed and
aperture) is displayed on the LCD panel
and in the viewfinder (0).
Pressing completely
This releases the shutter and takes the
picture.
Preventing Camera Shake
Camera movement during the moment of exposure is called camera
shake. Camera shake can cause blurred pictures. To prevent camera
shake, note the following:
• Hold and steady the camera as shown on the previous page.
• Press the shutter button halfway to autofocus, then press the
shutter button completely.
35
Page 36

Basic Operation
6 Making Selections with the Main Dial
After pressing a button, turn the
(1)
<6> dial.
When you press a button, its function
remains selected for 6 seconds (9).
During this time, you can turn the <6>
dial to set the desired setting.
When the function turns off or if you
press the shutter button halfway, the
camera will be ready to shoot.
Use this dial to select or set the
metering mode, AF mode, ISO
speed, AF point, etc.
Turn the <6> dial only.
(2)
While looking at the viewfinder or LCD
panel, turn the <6> dial to set the
desired setting.
Use this dial to set the shutter speed,
aperture, etc.
9 Operating the Multi-controller
9> consists of eight direction
The <
keys and a button at the center.
Use it to select the AF point, correct
the white balance, move the AF point
or magnifying frame during Live View
shooting, scroll the playback image
during magnified view, operate the
Quick Control screen, etc.
You can also use it to select or set
menu options (except [3 Erase
images] and [5 Format]).
36
Page 37

Basic Operation
You can do step (1) even when the Quick Control Dial switch is set to
<R>.
5 Making Selections with the Quick Control Dial
Before using the <5> dial, set the Quick Control Dial switch to <J>.
(1)
After pressing a button, turn the
<5> dial.
When you press a button, its function
remains selected for 6 seconds (9).
During this time, you can turn the <
dial to set the desired setting.
When the function turns off or if you
press the shutter button halfway, the
camera will be ready to shoot.
Use this dial to select or set the white
balance, drive mode, flash exposure
compensation, AF point, etc.
(2)
Turn the <5> dial only.
While looking at the viewfinder or LCD
panel, turn the <
desired setting.
Use this dial to set the exposure
compensation amount, the aperture
setting for manual exposures, etc.
5> dial to set the
5>
U LCD Panel Illumination
Turn on (9)/off the LCD panel
illumination by pressing the <U> button.
During a bulb exposure, pressing the
shutter button completely will turn off the
LCD panel illumination.
37
Page 38

Q Using the Quick Control Screen
1 (Full Auto)
d/s/f/a/F
Regarding the <C> (Creative Auto) mode, see page 55.
The shooting settings are displayed on the LCD monitor where you can
directly select and set the functions. This is called the Quick Control
screen.
Display the Quick Control screen.
1
Press the <Q> button.
The Quick Control screen will appear
(7).
Set the desired setting.
2
Use <9> to select a function.
In the <1> (Full Auto) mode, the
image-recording quality (p.60) and
the drive mode for single shooting or
10-sec. self-timer/remote control
(p.97, 114) can be selected.
The selected function is displayed on
the screen’s bottom.
5> or <6> dial to
Turn the <
change the setting.
Take the picture.
3
Press the shutter button completely to
take the picture.
The LCD monitor turns off and the
captured image is displayed.
38
Page 39

Q Using the Quick Control Screen
Aperture (p.104)
Metering mode (p.107)
Flash exposure
compensation (p.117)
AF area selection mode
(p.91)
White balance (p.72)
Shutter speed (p.102)
ISO speed (p.64)
Drive mode (p.97)
AF mode (p.88)
Image-recording
quality (p.60)
Picture Style (p.66)
Exposure compensation/
AEB setting (p.109)
Shooting mode* (p.20)
Highlight tone priority*
(p.225)
Auto Lighting Optimizer (p.77)
Custom Controls (p.231)
Asterisked functions cannot be set with the Quick Control screen.
<0>
Quick Control Screen Nomenclature
Function Setting Display
On the Quick Control screen, select
the function and press <0>. The
respective setting screen will then
appear (except for the shutter speed
and aperture).
Turn the <
change the setting.
Press <0> to finalize the setting and
return to the Quick Control screen.
5> or <6> dial to
39
Page 40

3 Menu Operations
* Some menu tabs and menu items are not displayed in the fully-automatic
modes.
d/s/f/a/F Menu Screen
Ta b
Menu items
Menu settings
1 Shooting
5 Set-up
9 My Menu
Fully-Automatic Modes (1/C) Menu Screen
<5>
Quick Control Dial
<M> button
<6> Main Dial
LCD monitor
<0> button
8
Custom Functions
3 Playback
You can set various functions with the menus such as the imagerecording quality, date/time, etc. While looking at the LCD monitor, use
the <M> button on the camera back and the <6> <5> dials.
40
Page 41

Menu Setting Procedure
The explanation of menu functions hereinafter assumes that you have
pressed the <M> button to display the menu screen.
You can also use <9> to set menu settings. (Except for [3 Erase
images] and [5 Format].)
A list of menu functions is on page 256.
1
2
3
4
5
6
3 Menu Operations
Display the menu.
Press the <M> button to display
the menu.
Select a tab.
Turn the <6> dial to select a tab.
Select the desired item.
Turn the <5> dial to select the item,
then press <
Select the setting.
Turn the <5> dial to select the
desired setting.
The current setting is indicated in
blue.
Set the desired setting.
Press <0> to set it.
Exit the menu.
Press the <M> button to exit the
menu and return to camera shooting.
0>.
41
Page 42

Before You Start
3 Setting the Interface Language
Select [LanguageK].
1
Under the [6] tab, select
[LanguageK] (the third item from
the top), then press <0>.
Set the desired language.
2
Turn the <5> or <6> dial to select
the language, then press <0>.
The interface language will change.
42
Page 43

Before You Start
3 Setting the Date, Time, and Zone
When you turn on the power for the first time or if the date/time has
been reset, the Date/Time/Zone setting screen will appear. Follow steps
2 to 5 to set the current date, time, and time zone.
Note that the date/time appended to recorded images will be based
on this date/time setting. Be sure to set the correct date/time.
You can also set the time zone of your current address. Then if you
travel to another time zone, you can simply set your destination’s time
zone so that the correct date/time will be recorded.
Select [Date/Time/Zone].
1
Under the [6] tab, select [Date/
Time/Zone], then press <0>.
Set the time zone.
2
[London] is set by default.
Turn the <5> dial to select [Time
zone].
Press <0> so <r> is displayed.
Turn the <5> dial to select the time
zone, then press <0>.
Set the date and time.
3
Turn the <5> dial to select the
number.
Press <0> so <r> is displayed.
Turn the <5> dial to select the
desired setting, then press <0>
(Returns to <s>).
43
Page 44

Before You Start
When Updating Firmware 1.x.x to 2.x.x:
When you update the firmware from version 1.x.x to 2.x.x, the “Date/Time”
will be reset. You will have to set the “Date/Time/Zone” again.
The menu setting procedure is explained on pages 40-41.
The date/time that was set will start from when you press <0> in step 5.
In step 2, the time displayed on the upper right is the time difference
compared with UTC (Coordinated Universal Time). If you do not see your
time zone, set the time zone while referring to the difference with UTC.
Set the daylight saving time.
4
Set if necessary.
Turn the <5> dial to select [Y].
Press <0> so <r> is displayed.
Turn the <5> dial to select [Z], then
press <0>.
When the daylight saving time is set
to [Z], the time set in step 3 will
advance by 1 hour. If [Y] is set, the
daylight saving time will be canceled
and the time will go back by 1 hour.
Exit the setting.
5
Turn the <5> dial to select [OK],
then press <0>.
The Date/Time/Zone will be set and
the menu will reappear.
44
Page 45

Before You Start
When the card is formatted or data is erased, only the file management
information is changed. The actual data is not completely erased. Be aware
of this when selling or discarding the card. When discarding the card,
destroy the card physically to prevent personal data from being leaked.
The card capacity displayed on the card format screen might be smaller
than the capacity indicated on the card.
3 Formatting the Card
If the card is new or was previously formatted by another camera or
personal computer, formatting the card with the camera is recommended.
When the card is formatted, all images and data in the card will
be erased. Even protected images will be erased, so make
sure there is nothing you need to keep. If necessary, transfer
the images to a personal computer, etc., before formatting the
card.
Select [Format].
1
Under the [5] tab, select [Format],
then press <0>.
Select [OK].
2
Turn the <5> dial to select [OK],
then press <0>.
The card will be formatted.
When the formatting is completed,
the menu will reappear.
45
Page 46

Before You Start
Even if [Off] has been set, the LCD monitor will turn off automatically after
30 min. to save power. (The camera’s power does not turn off.)
3 Set the Power-off Time/Auto Power Off
You can change the auto power-off time for the camera to turn off
automatically after a certain period of non-operation. If you do not want
the camera to turn off automatically, set this to [Off]. After the power
turns off, you can turn on the camera again by pressing the shutter
button or other button.
Select [Auto power off].
1
Under the [5] tab, select [Auto
power off], then press <0>.
Set the desired time.
2
Turn the <5> dial to select the
setting, then press <0>.
46
Page 47

Before You Start
3 Reverting the Camera to the Default SettingsN
The camera’s shooting settings and menu settings can be reverted to the default.
Select [Clear all camera settings].
1
Under the [7] tab, select [Clear all
camera settings], then press <0>.
Select [OK].
2
Turn the <5> dial to select [OK],
then press <0>.
Setting [Clear all camera settings]
will reset the camera to the following
default settings:
Shooting Settings Image-recording Settings
AF mode One-Shot AF Quality 73
AF area
selection mode
Metering mode
ISO speed A (Auto)
ISO Auto
Drive mode
Exposure
compensation/AEB
Flash exposure
compensation
Custom Functions Unchanged File name IMG_
Auto selection
19-point AF
q (Evaluative
metering)
Max.: 3200
u (Single
shooting)
Canceled
0 (Zero)
One-touch
RAW+JPEG
Picture Style Standard
Auto Lighting Optimizer
Peripheral
illumination
correction
Color space sRGB
White balance Q (Auto)
WB correction Canceled
WB-BKT Canceled
File numbering Continuous
Auto cleaning Enable
Dust Delete Data Erased
1
73
Standard
Enable/
Correction
data retained
47
Page 48

Before You Start
Camera Settings Live View Shooting Settings
VF grid display Disable
Auto power off 1 min.
Beep On AF mode Live mode
Release shutter
without card
Review time 2 sec.
Highlight alert Disable Silent shooting Mode 1
AF point display Disable Metering timer 16 sec.
Histogram Brightness
Image jump w/
Auto rotate OnzD AF mode Live mode
LCD brightness Auto: Standard Grid display Off
Date/Time/Zone Unchanged
Language Unchanged
Video system Unchanged
INFO. button
display options
Camera user
setting
Copyright
information
My Menu settings Unchanged
Enable
10 images
6
All items selected
Unchanged
Unchanged
Live View
shooting
Grid display Off
Exposure
simulation
Enable
Enable
Movie Shooting Settings
Movierecording size
Sound recording
Silent shooting Mode 1
Metering timer 16 sec.
1920x1080 4
Auto
48
Page 49

Displaying the Grid and Electronic Level
The grid can also be displayed during Live View shooting and movie
shooting (p.140, 160).
The grid and electronic level can be displayed to help keep the camera
aimed straight. The grid is displayed in the viewfinder, and the
electronic level is displayed on the LCD monitor.
Displaying the Grid
Select [VF grid display].
1
Under the [6] tab, select [VF grid
display], then press <0>.
Select [Enable].
2
Turn the <5> dial to select [Enable],
then press <0>.
The grid will be displayed in the
viewfinder.
49
Page 50

Displaying the Grid and Electronic Level
Vertical level
Horizontal level
Even when the tilt is corrected, there is a margin of error of ±1°.
If the camera is significantly tilted, the electronic level’s margin of error
will be greater.
The electronic level can also be displayed during Live View shooting and
movie shooting (p.138, 156).
The electronic level can also be displayed in the viewfinder using the AF
point display (p.233, 234, 237).
Displaying the Electronic Level on the LCD Monitor
Press the <B> button.
1
Each time you press the <B>
button, the screen display will
change.
Display the electronic level.
If the electronic level does not
appear, set the menu’s [7 INFO.
button display options] option to
display the electronic level (p.244).
Check the camera’s roll and pitch.
2
The horizontal and vertical tilt are
displayed in 1° increments.
The red line turning green indicates
that the tilt is corrected.
50
Page 51

2
Fullyautomatic
modes
About the Auto Lighting Optimizer
In fully-automatic modes (1/C), the Auto Lighting Optimizer will
adjust the image automatically to obtain the optimum brightness
and contrast. The Auto Lighting Optimizer is also enabled by
default in all shooting modes (p.77).
Basic Shooting
This chapter explains how to use the fully-automatic
modes (1/C) on the Mode Dial for best results.
With the fully-automatic modes (1/C), all you do is point
and shoot and the camera sets everything automatically
(p.254). Also, to prevent botched pictures due to mistaken
operations, major shooting settings cannot be changed in the
fully-automatic modes.
51
Page 52

1 Fully Automatic Shooting
Area AF frame
Focus confirmation light
Set the Mode Dial to <1>.
1
Aim the Area AF frame over the
2
target subject.
All the AF points will be used to focus,
and generally the closest object will
be focused.
Aiming the center of the Area AF
frame over the subject will make
focusing easier.
Focus the subject.
3
Press the shutter button halfway, and
the lens focusing ring will rotate to
focus.
The AF point(s) which achieve(s)
focus will be displayed. At the same
time, the beeper will sound and the
focus confirmation light <o> in the
viewfinder will light.
Under low-light conditions, the
viewfinder will flash in red to
illuminate the AF point.
If necessary, the built-in flash will pop-
up automatically.
Take the picture.
4
52
Press the shutter button completely to
take the picture.
The captured image will be displayed
for about 2 sec. on the LCD monitor.
If the built-in flash has popped up,
you can push it back down with your
fingers.
Page 53

1 Fully Automatic Shooting
FAQ
The focus confirmation light <o> blinks and focus is not
achieved.
Aim the center of the Area AF frame over an area having good contrast,
then press the shutter button halfway (p.96). If you are too close to the
subject, move away and try again.
Sometimes multiple AF points light up simultaneously.
All those AF points have achieved focus. As long as the AF point
covering the desired subject lights up, you can take the picture.
The beeper continues to beep softly. (The focus confirmation
light <o> does not light.)
It indicates that the camera is focusing continuously on a moving subject.
(The focus confirmation light <o> does not light.) You can shoot a
moving subject in focus.
Pressing the shutter button halfway does not focus the subject.
If the focus mode switch on the lens is set to <MF> (Manual Focus), set it
to <AF> (Auto Focus).
Although it is daylight, the flash popped up.
For a backlit subject, the flash may pop up to help reduce the subject’s
dark shadow.
In low light, the built-in flash fired a series of flashes.
Pressing the shutter button halfway may trigger the built-in flash to fire a
series of flashes to assist autofocusing. This is called the AF-assist
beam. It is effective up to approx. 4 meters/13.1 feet away.
Although flash was used, the picture came out dark.
The subject was too far away. The subject should be within 5 meters/16.4
feet from the camera.
When flash was used, the bottom part of the picture came out
unnaturally dark.
The subject was too close to the camera, and a shadow was created by the lens
barrel. The subject should be at least 1 meter/3.3 feet away from the camera. If a
hood has been attached to the lens, remove it before taking the flash picture.
53
Page 54

1 Full Auto Techniques
Recomposing the Shot
Depending on the scene, position the subject toward the left or right to
create a balanced background and good perspective.
In the <1> (Full Auto) mode, while you press the shutter button
halfway to focus a still subject, the focus will be locked. You can then
recompose the shot and press the shutter button completely to take the
picture. This is called “focus lock”.
Shooting a Moving Subject
In the <1> (Full Auto) mode, if the subject moves (distance to camera
changes) during or after you focus, AI Servo AF will take effect to focus
the subject continuously. As long as you keep aiming the AF point on
the subject while pressing the shutter button halfway, the focusing will
be continuous. When you want to take the picture, press the shutter
button completely.
54
Page 55

C Creative Auto Shooting
If you change the shooting mode or if the power turns off via auto power off
(p.46) or by the power switch being set to <2>, the Creative Auto settings
will revert to the default. However, the image-recording quality, self-timer
and remote control settings will be retained.
The <1> Full Auto mode takes care of everything, whereas the <C>
Creative Auto mode enables you to easily change the picture’s
brightness, depth of field, color tone (Picture Style), etc. The default
settings are the same as the <1> (Full Auto) mode.
* CA stands for Creative Auto.
Set the Mode Dial to <C>.
1
The Creative Auto screen appears on
the LCD monitor.
Press the <Q> button.
2
You can use <9> to select a
function. (7)
For details about each function, see
page 56-57.
Set the desired setting.
3
Use <9> to select a function.
A brief description of the selected
function is displayed on the screen’s
bottom.
Turn the <
change the setting.
Take the picture.
4
Press the shutter button completely to
take the picture.
5> or <6> dial to
55
Page 56

C Creative Auto Shooting
Shutter speed and aperture
(1)
(2)
(3)
(5)
(6)
Battery check
Possible shots
(4)
Maximum burst
(1) Flash firing
<a> (Auto firing), <D> (Flash on), or <b> (Flash off) can be
selected.
(2) Blurring/sharpening the background
If you move the index mark toward the left, the background will look
more blurred. If you move it toward the right, the background will
look more in focus.
Depending on the lens and shooting conditions, the background
might not look so blurred. This setting cannot be set (grayed out)
while the built-in flash is popped up. When flash is used, it will not be
applied.
(3) Adjusting the picture brightness
If you move the index mark toward the left, the picture will look
darker. If you move it toward the right, the picture will look brighter.
56
Page 57

C Creative Auto Shooting
(4) Image effects
Besides the standard image effect, you can set it for portraits,
landscapes, or black-and-white photos. (p.66: Picture Style)
<P> (Standard): Standard image effect applicable to most
scenes.
<Q> (Smooth skin tones): Effective for close-ups of women or
children.
<R> (Vivid blues and greens): For impressive landscapes.
<V> (Monochrome image): Creates black-and-white photos.
(5) Single, continuous, and self-timer shooting
<i> (Low-speed continuous shooting): Shoot continuously at a
maximum of about 3 frames per second (fps).
<Q> (10-sec. self-timer/Remote control): See the “Using the Self-
timer” note ( ) on p.98. Remote control shooting is also
possible. (p.114)
* By pressing the <o> button, you can display the [Drive mode]
selection screen and set the same settings.
(6) Image-recording quality
To set the image-recording quality, see “Setting the Image-recording
Quality” on page 60-62. By pressing <0>, you can display the
[Quality] selection screen and set the same settings.
57
Page 58

C Creative Auto Shooting
If [Hold] is set, the image will be displayed until the auto power off time
elapses.
3 Setting the Image Review Time
You can set how long the image is displayed on the LCD monitor
immediately after capture. To keep the image displayed, set [Hold]. To
not have the image displayed, set [Off].
Select [Review time].
1
Under the [1] tab, select [Review
time], then press <0>.
Set the desired time.
2
Turn the <5> dial to select the
setting, then press <0>.
58
Page 59

3
Image Settings
This chapter explains image-related function settings:
Image-recording quality, ISO speed, Picture Style, white
balance, Auto Lighting Optimizer, lens peripheral
illumination correction, etc.
In fully-automatic modes (1/C), only the image-
recording quality, lens peripheral illumination correction,
and file numbering method can be set as explained in this
chapter. Folders can also be created and selected.
The M icon on the upper right of the page title indicates that
the function can be used when the Mode Dial is set to <
s/f/a/F
>.
d
/
59
Page 60

3 Setting the Image-recording Quality
73 only
61
+74
1+73
1 only
You can select the pixel count and the image quality. Six JPEG recording
quality settings are provided:
RAW recording quality settings are provided:
(p.62).
Image-recording Quality Setting Examples
73/83/74/84/76/86
Select [Quality].
1
Under the [1] tab, select [Quality],
then press <0>.
Select the image-recording quality.
2
To select a RAW setting, turn the
<6> dial. To select a JPEG setting,
turn the <5> dial.
On the upper right, the “
**** x ****
pixel count, and [
possible shots (displayed up to 999).
Press <0> to set it.
1, 41
” number indicates the recorded
***
] is the number of
. Three
, and
***M
(megapixels)
61
* If [–] is set for both RAW and JPEG, 73 will be set.
60
Page 61

3 Setting the Image-recording Quality
If you select both RAW and JPEG, the same image will be recorded
simultaneously to the card in both types at the selected image-recording
quality. The two images will be saved in the same folder with the same
file numbers (file extension .JPG for JPEG and .CR2 for RAW).
The icons are read as follows: 1 (RAW), 41 (Medium RAW),
61 (Small RAW), JPEG, 7 (Fine), 8 (Normal), 3 (Large), 4
(Medium), and 6 (Small).
Guide to Image-recording Quality Settings (Approx.)
Pixels
(megapixels)
18M A2 or larger
8.0M Around A3
4.5M Around A4
18M A2 or larger 25.1 300 23 (25)
10M Around A3 17.1 440 34 (36)
4.5M Around A4 11.4 670 48 (53)
18M
18M
10M
18M
4.5M
18M
JPEG
RAW
RAW
+
JPEG
Quality
73
83
74
84
76
86
1
41
61
1
73
41
73
61
73
Figures for the file size, possible shots, and maximum burst during continuous
shooting are based on Canon’s testing standards (ISO 100 and Standard
Picture Style) using a 8 GB card. These figures will vary depending on the
subject, card brand, ISO speed, Picture Style, Custom Functions, etc.
The maximum burst applies to high-speed continuous shooting. Figures in
parentheses apply to an Ultra DMA (UDMA), 128 GB card based on Canon’s
testing standards.
Printing
Size
A2 or larger
A2 or larger
Around A3
A2 or larger
Around A4
A2 or larger
File Size
25.1+6.6 240 17 (17)
17.1+6.6 320 19 (19)
11. 4+6 .6 420 19 (19)
Possible
(MB)
Shots
6.6 1150 11 0 ( 1 3 0)
3.3 2270 660 (36490)
3.5 2180 560 (35020)
1.8 4240 4240 (67910)
2.2 3380 3380 (54230)
1.1 6420 6420 (102770)
Maximum
Burst
61
Page 62

3 Setting the Image-recording Quality
Commercially-available software might not be able to display RAW images.
Using the provided software is recommended.
The maximum burst is displayed even when a card is not inserted in the
camera. Make sure that a card is loaded before taking a picture.
If [8C.Fn II -2: High ISO speed noise reduction] is set to [2: High],
the maximum burst will be greatly reduced (p.224).
If the viewfinder displays “99” for the maximum burst, it means the maximum
burst is 99 or higher. If the maximum burst decreases to 98 or lower and the
internal buffer memory becomes full, “buSY” will be displayed in the
viewfinder and on the LCD panel and shooting will be disabled temporarily.
If you stop the continuous shooting, the maximum burst will increase. After
all the captured images are written to the card, the maximum burst will be as
listed on page 61.
About RAW
A RAW image is raw data output by the image sensor converted to
digital data. It is recorded to the card as is, and you can select the
quality as follows: 1, 41, or 61.
A 1 image can be processed with [3 RAW image processing]
menu (p.192) and saved as a JPEG image. (41 and 61
images cannot be processed with the camera.) While the RAW image
itself does not change, you can process the RAW image according to
different conditions to create any number of JPEG images from it.
With all RAW images, you can use Digital Photo Professional (provided
software, p.282) to make various adjustments and then generate a
JPEG, TIFF, etc., image incorporating those adjustments.
Maximum Burst During Continuous Shooting
The maximum burst is displayed on the
bottom right in the viewfinder.
If the maximum burst for continuous shooting
is 99 or higher, “99” will be displayed.
62
Page 63

3 Setting the Image-recording Quality
This setting can also be combined with white balance bracketing and AEB shooting.
You can also cancel the setting by pressing the <Q>, <M>, <A>,
or <x> button or operating the Live View shooting/Movie shooting
switch or power switch.
One-touch RAW+JPEGN
If the current recording quality is JPEG only, you can press the <P>
button to also capture a RAW image (1 by default) at the same
time. If the current recording quality is RAW only, press the button to
also capture a JPEG image (73 by default).
This button will not work if the camera is already set (p.60) to
capture RAW and JPEG images at the same time.
Select [One-touch RAW+JPEG].
1
Under the [y] tab, select [One-
touch RAW+JPEG], then press
<0>.
Select RAW or JPEG.
2
Turn the <5> dial and select RAW or
JPEG, then press <0>.
Select the image-recording
3
quality.
Turn the <5> dial to select the image-
0
recording quality, then press <
Take the picture.
4
Press the <P> button.
The image-recording quality will blink
on the LCD panel. To cancel the
setting, press the <P> button again.
Press the shutter button completely to
take the picture.
After the picture is taken, the setting
will be canceled.
>.
63
Page 64

i: Setting the ISO SpeedN
If [8C.Fn II -3: Highlight tone priority] is set to [1: Enable], ISO 100/
125/160 and “H” (equivalent to ISO 12800) settings cannot be set
(p.225).
Using a high ISO speed or shooting in high-temperature conditions may
result in more grainy images. Long exposures can also cause irregular
colors in the image.
When you shoot at high ISO speeds, noise (horizontal banding, dots of
light, etc.) may appear.
With [8C.Fn I -3: ISO expansion] set to [1: On], “H” (equivalent to ISO
12800) can also be set (p.222).
Set the ISO speed (image sensor’s sensitivity to light) to suit the
ambient light level. In the fully-automatic modes (1/C), the ISO
speed is set automatically (p.65).
Press the <m> button. (9)
1
Set the ISO speed.
2
While looking at the LCD panel or
viewfinder, turn the <6> dial.
It can be set within ISO 100-6400 in
1/3-stop increments.
With “A” selected, the ISO speed will
be set automatically (p.65).
ISO Speed Guide
ISO Speed
100 - 400 Sunny outdoors
400 - 1600 Overcast skies or evening time
1600 - 6400, H Dark indoors or night
Shooting Situation
(No flash)
Flash Range
The higher the ISO speed,
the farther the flash range
will be (p.116).
64
Page 65

i: Setting the ISO SpeedN
ISO Auto
If the ISO speed is set to “A” (Auto), the
actual ISO speed to be set will be
displayed when you press the shutter
button halfway. As indicated below, the
ISO speed will be set automatically to
suit the shooting mode.
Shooting Mode ISO Speed Setting
1/C/d/s/f/a Automatically set within ISO 100 - 3200
F Fixed at ISO 400
With flash
*1: Depending on the maximum ISO speed that has been set.
*2: If fill flash results in overexposure, ISO 100 or a higher ISO will be set.
*3: If the shooting mode is <d> or fully-automatic (1/C) and bounce flash is
used with an external Speedlite, the ISO speed will be set automatically within
400 - 1600.
Fixed at ISO 400
*2*3
*1
3 Setting the Maximum ISO AutoN
For ISO Auto, you can set the maximum limit within ISO 400 - 6400.
Under the [y] tab, select [ISO Auto],
then press <0>. Select the ISO speed,
then press <0>.
65
Page 66

A
You can also use the [2 Picture Style] menu to select the Picture Style.
Selecting a Picture Style
By selecting a Picture Style, you can obtain image effects matching
your photographic expression or the subject.
In the <1> (Full Auto) mode, you cannot select the Picture Style.
Press the <A> button.
1
When the camera is ready to shoot,
press the <A> button.
The Picture Style screen will appear.
Select a Picture Style.
2
Turn the <6> or <5> dial to select
a Picture Style, then press <0>.
The Picture Style will take effect and
the camera will be ready to shoot.
Picture Style Effects
P Standard (C: Standard)
The image looks vivid, sharp, and crisp. This is a general-purpose
Picture Style suitable for most scenes. This is set automatically in
the <1> (Full Auto) mode.
Q Portrait (C: Smooth skin tones)
For nice skin tones. The image looks softer. Effective for close-ups
of women or children.
By changing the [Color tone] (p.68), you can adjust the skin tone.
R Landscape (C: Vivid blues and greens)
For vivid blues and greens, and very sharp and crisp images.
Effective for impressive landscapes.
N
66
Page 67

A Selecting a Picture StyleN
Black-and-white images shot in JPEG cannot be reverted to color. If
you want to later shoot pictures in color, make sure the
[Monochrome] setting has been canceled. When [Monochrome] is
selected, <0> will appear in the viewfinder and on the LCD panel.
S Neutral
This Picture Style is for users who prefer to process images with
their computer. For natural colors and subdued images.
U Faithful
This Picture Style is for users who prefer to process images with
their computer. When the subject is captured under a daylight color
temperature of 5200K, the color is adjusted colorimetrically to match
the subject’s color. The image is dull and subdued.
V Monochrome (C: Monochrome image)
Creates black-and-white images.
W User Def. 1-3
You can register a basic style such as [Portrait], [Landscape], a
Picture Style file, etc., and adjust it as desired (p.70). Any UserDefined Picture Style which has not been set will have the same
settings as the Standard Picture Style.
About the Symbols
The symbols on the top of the Picture Style selection screen refer to parameters
Sharpness
such as [
settings, such as [
] and [
Contrast
Sharpness
]. The numerals indicate the parameter
] and [
Contrast
], for each Picture Style.
Symbols
g Sharpness
h Contrast
Saturation
i
Color tone
j
k
Filter effect (Monochrome)
Toning effect (Monochrome)
l
67
Page 68

A
Customizing a Picture Style
You can customize a Picture Style by adjusting individual parameters
like [Sharpness] and [Contrast]. To see the resulting effects, take test
shots. To customize [Monochrome], see the next page.
Press the <A> button.
1
Select a Picture Style.
2
Turn the <6> or <5> dial to select
a Picture Style, then press the
<B> button.
Select a parameter.
3
Turn the <5> dial to select the
parameter, then press <0>.
Set the parameter.
4
Turn the <5> dial to set the
parameter as desired, then press
<0>.
Press the <M> button to save the
adjusted parameter. The Picture Style
selection screen will reappear.
Any settings different from the default
will be displayed in blue.
N
Parameter Settings and Effects
g Sharpness 0: Less sharp outline +7: Sharp outline
h Contrast -4: Low contrast +4: High contrast
i Saturation -4: Low saturation +4: High saturation
j Color tone -4: Reddish skin tone +4: Yellowish skin tone
68
Page 69

A Customizing a Picture StyleN
By selecting [Default set.] in step 3, you can revert the respective
Picture Style to its default parameter settings.
To shoot with the Picture Style you modified, follow step 2 on the
preceding page to select the modified Picture Style and then shoot.
Increasing the [Contrast] will make the filter effect more pronounced.
Monochrome Adjustment
For Monochrome, you can also set [Filter effect] and [Toning effect] in
addition to [Sharpness] and [Contrast] explained on the preceding
page.
kFilter Effect
With a filter effect applied to a
monochrome image, you can make
white clouds or green trees stand out
more.
Filter Sample Effects
N: None Normal black-and-white image with no filter effects.
Ye: Yell ow
Or: Orange
R: Red
G: Green
The blue sky will look more natural, and the white clouds will look crisper.
The blue sky will look slightly darker. The sunset will look more brilliant.
The blue sky will look quite dark. Fall leaves will look crisper and brighter.
Skin tones and lips will look fine. Tree leaves will look crisper and brighter.
lToning Effect
By applying a toning effect, you can
create a monochrome image in that
color. It can make the image look more
impressive.
The following can be selected: [N:None]
[S:Sepia] [B:Blue] [P:Purple]
[G:Green].
69
Page 70

A
Registering a Picture Style
You can select a base Picture Style such as [Portrait] or [Landscape],
adjust its parameters as desired and register it under [User Def. 1],
[User Def. 2], or [User Def. 3].
You can create Picture Styles whose parameter settings such as for sharpness
and contrast are different. You can also adjust the parameters of a Picture Style
which has been registered to the camera with the provided software.
Press the <A> button.
1
Select [User Def.].
2
Turn the <6> or <5> dial to select
[User Def. *], then press the <B>
button.
Press <0>.
3
With [Picture Style] selected, press
<0>.
Select the base Picture Style.
4
Turn the <5> dial to select the base
Picture Style, then press <0>.
To adjust the parameters of a Picture
Style which has been registered to the
camera with the provided software,
select the Picture Style here.
Select a parameter.
5
Select a parameter such as
[Sharpness], then press <0>.
N
70
Page 71

A Registering a Picture StyleN
If a Picture Style has already been registered under [User Def. *], changing
the base Picture Style in step 4 will nullify the parameter settings of the
registered Picture Style.
To shoot with the registered Picture Style, follow step 2 on the preceding
page to select [User Def. *] and then shoot.
Set the parameter.
6
Turn the <5> dial to set the
parameter as desired, then press
<0>.
For details, see “Customizing a
Picture Style” on pages 68-69.
Press the <M> button to register
the new Picture Style. The Picture
Style selection screen will then
reappear.
The base Picture Style will be
indicated on the right of [User Def. *].
71
Page 72

B: Setting the White BalanceN
You can also use the [2 White balance] menu to set the white balance.
White balance (WB) is for making the white areas look white. Normally,
the <
Q
> (Auto) setting will obtain the correct white balance. If natural-
Q
looking colors cannot be obtained with <
balance for each light source or set it manually by shooting a white object.
In the fully-automatic modes (1/C), <
Press the <n> button. (9)
1
Select the white balance.
2
While looking at the LCD panel, turn
the <5> dial.
Display Mode Color Temperature (Approx. K: Kelvin)
Q Auto 3000 - 7000
W Daylight 5200
E Shade 7000
R Cloudy, twilight, sunset 6000
Y Tungsten light 3200
U White fluorescent light 4000
I Flash use 6000
O Custom (p.73) 2000 - 10000
P Color temperature (p.74) 2500 - 10000
>, you can select the white
Q
> is set automatically.
About White Balance
To the human eye, a white object looks white regardless of the type of lighting.
With a digital camera, the color temperature is adjusted with software to make
the white areas look white. This adjustment serves as the basis for the color
correction. The result is natural-looking colors in the pictures.
72
Page 73

B: Setting the White BalanceN
O Custom White Balance
Custom white balance enables you to manually set the white balance
for a specific light source for better accuracy. Do this procedure under
the actual light source to be used.
Photograph a white object.
1
Look through the viewfinder and the
area within the dotted line should
cover a solid-white object.
Focus manually and set the standard
exposure for the white object.
You can set any white balance.
Select [Custom WB].
2
Under the [2] tab, select [Custom
WB], then press <0>.
The custom white balance selection
screen will appear.
Import the white balance data.
3
Turn the <6> or <5> dial to select
the image captured in step 1, then
press <0>.
On the dialog screen which appears,
select [OK] and the data will be
imported.
When the menu reappears, press the
<M> button to exit the menu.
Press the <n> button. (9)
4
Select the custom white balance.
5
Look at the LCD panel and turn the
<5> dial to select <O>.
73
Page 74

B: Setting the White BalanceN
If the exposure obtained in step 1 is way off, a correct white balance
might not be obtained.
If the image was captured while the Picture Style was set to
[Monochrome] (p.67), it cannot be selected in step 3.
Instead of a white object, an 18% gray card (commercially available) can
produce a more accurate white balance.
The personal white balance registered with the provided software will be
registered under <O>. If you do step 3, the data for the registered
personal white balance will be erased.
When setting the color temperature for an artificial light source, set white
balance correction (magenta or green) as necessary.
If you want to set <P> to the reading taken with a commercially-
available color temperature meter, take test shots and adjust the setting
to compensate for the difference between the color temperature meter’s
reading and the camera’s color temperature reading.
P Setting the Color Temperature
You can set the white balance’s color temperature numerically in Kelvin.
This is for advanced users.
Select [White balance].
1
Under the [2] tab, select [White
balance], then press <0>.
Set the color temperature.
2
Turn the <5> dial to select [P].
Turn the <6> dial to set the color
temperature, then press <0>.
The color temperature can be set
from 2500K to 10000K in 100K
increments.
74
Page 75

u White Balance CorrectionN
Sample setting: A2, G1
During the white balance correction, <u> will be displayed in the
viewfinder and on the LCD panel.
One level of the blue/amber correction is equivalent to 5 mireds of a color
temperature conversion filter. (Mired: Measuring unit indicating the
density of a color temperature conversion filter.)
You can correct the white balance that has been set. This adjustment
will have the same effect as using a commercially-available color
temperature conversion filter or color compensating filter. Each color
can be corrected to one of nine levels.
This is for advanced users who are familiar with using color temperature
conversion or color compensating filters.
White Balance Correction
Select [WB SHIFT/BKT].
1
Under the [2] tab, select [WB
SHIFT/BKT], then press <0>.
Set the white balance correction.
2
Use <9> to move the “ ” mark to the
desired position.
B is for blue, A is amber, M is
magenta, and G is green. The color in
the respective direction will be
corrected.
On the upper right, “SHIFT” indicates
the direction and correction amount.
Pressing the <B> button will
cancel all the [WB SHIFT/BKT]
settings.
Press <0> to exit the setting and
return to the menu.
75
Page 76

u White Balance CorrectionN
B/A bias ±3 levels
During WB bracketing, the maximum burst for continuous shooting will be
lower and the number of possible shots will also decrease to one-third the
normal number. Also, the white balance icon will blink on the LCD panel.
You can also set white balance correction and AEB together with white
balance bracketing. If you set AEB in combination with white balance
bracketing, a total of nine images will be recorded for a single shot.
Since three images are recorded for one shot, the card will take longer to record the shot.
“BKT” stands for Bracketing.
White Balance Auto Bracketing
With just one shot, three images having a different color tone can be recorded
simultaneously. Based on the color temperature of the current white balance
setting, the image will be bracketed with a blue/amber bias or magenta/green
bias. This is called white balance bracketing (WB-BKT). White balance
bracketing is possible up to ±3 levels in single-level increments.
Set the white balance bracketing
amount.
In step 2 for white balance correction, when
5
you turn the <
screen will change to “
> dial, the “” mark on the
”
(3 points).
Turning the dial to the right sets the B/A
bracketing, and turning it to the left sets the
M/G bracketing.
On the right side of the screen, “BKT”
indicates the bracketing direction and
the bracketing amount.
Pressing the <B> button will cancel
all the [
WB SHIFT/BKT
] settings.
Press <0> to exit the setting and
return to the menu.
Bracketing Sequence
The images will be bracketed in the following sequence: 1. Standard
white balance, 2. Blue (B) bias, and 3. Amber (A) bias, or 1. Standard
white balance, 2. Magenta (M) bias, 3. Green (G) bias.
76
Page 77

3 Auto Lighting OptimizerN
Sample of corrected brightness
B
Depending on the shooting conditions, noise might increase.
If a setting other than [Disable] is set and you use exposure
compensation, flash exposure compensation, or manual exposure to
darken the exposure, the image might still come out bright. If you want
the darker exposure, set this to [Disable] first.
In fully-automatic modes (1/C), [Standard] will be set automatically.
If the image comes out dark or the contrast is low, the brightness and
contrast can be corrected automatically. With JPEG images, the
correction is done when the image is captured. For RAW images, it can
be corrected with Digital Photo Professional (provided software).
The default setting is [Standard].
Select [Auto Lighting Optimizer].
1
Under the [2] tab, select [Auto
Lighting Optimizer], then press
<0>.
Set the correction setting.
2
Turn the <5> dial to select the
setting, then press <0>.
Take the picture.
3
The image will be recorded with the
brightness and contrast corrected if
necessary.
77
Page 78

3
Correction enabled Correction disabled
Lens Peripheral Illumination Correction
Due to the lens characteristics, the four corners of the picture might look
darker. This is called lens light fall-off or drop in peripheral illumination.
With JPEG images, the correction is done when the image is captured.
For RAW images, it can be corrected with Digital Photo Professional
(provided software).
The default setting is [Enable].
Select [Peripheral illumin.
1
correct.].
Under the [1] tab, select
[Peripheral illumin. correct.], then
press <0>.
Set the correction setting.
2
On the screen, check that the
attached lens’ [Correction data
available] is displayed.
If [Correction data not available] is
displayed, see “About the Lens
Correction Data” on the next page.
Turn the <5> dial to select [Enable],
then press <0>.
Take the picture.
3
The image will be recorded with the
corrected peripheral illumination.
78
Page 79

3 Lens Peripheral Illumination Correction
When Updating Firmware 1.x.x to 2.x.x:
When you update the firmware from version 1.x.x to 2.x.x, any “Lens
correction data” you registered in the camera with EOS Utility (provided
software) will be overwritten with the updated firmware’s Lens correction
data. If necessary, use EOS Utility to register your Lens correction data
again.
For JPEG images already captured, lens peripheral illumination
correction cannot be applied.
Depending on shooting conditions, noise might appear on the image
periphery.
When using a third-party lens, setting the correction to [Disable] is
recommended, even if [Correction data available] is displayed.
Lens peripheral illumination correction is applied even when an Extender
is attached.
If the correction data for the attached lens has not been registered to the
camera, the result will be the same as when the correction is set to
[Disable].
The correction amount applied will be slightly lower than the maximum
correction amount settable with Digital Photo Professional (provided
software).
If the lens does not have distance information, the correction amount will
be lower.
The higher the ISO speed, the lower the correction amount will be.
About the Lens Correction Data
The camera already contains lens peripheral illumination correction
data for about 25 lenses. In step 2, if you select [Enable], the peripheral
light correction will be applied automatically for any lens whose
correction data has been registered in the camera.
With the EOS Utility (provided software), you can check which lenses
have their correction data registered in the camera. You can also
register the correction data for unregistered lenses. For details, see the
PDF Software Instruction Manual on the CD-ROM for EOS Utility.
79
Page 80

3 Creating and Selecting a Folder
You can freely create and select the folder where the captured images
are to be saved.
This is optional since a folder will be created automatically for saving
captured images.
Create a Folder
Select [Select folder].
1
Under the [5] tab, select [Select
folder], then press <0>.
Select [Create folder].
2
Turn the <5> dial to select [Create
folder], then press <0>.
Create a new folder.
3
Turn the <5> dial to select [OK],
then press <0>.
A new folder with a higher one-up
folder number is created.
80
Page 81

3 Creating and Selecting a Folder
Number of images
in folder
Folder name
Lowest file number
Highest file number
About Folders
As with “100EOS7D” for example, the folder name starts with three digits
(folder number) followed by five alphanumeric characters. A folder can contain
up to 9999 images (file No. 0001 - 9999). When a folder becomes full, a new
folder with a higher one-up folder number is created automatically. Also, if
manual reset (p.85) is executed, a new folder will be created automatically.
Folders numbered from 100 to 999 can be created.
Creating Folders with a Personal Computer
With the card open on the screen, create a new folder named “DCIM”. Open
the DCIM folder and create as many folders as necessary to save and
organize your images. The folder name must follow the “100ABC_D” format
where the first three digits is 100 - 999 followed by five alphanumeric
characters. The five characters can be a combination of upper- or lower-case
letters from A to Z, numerals, and an underscore “_”. There can be no space in
the folder name. Also, folder names cannot have the same three-digit number
such as “100ABC_D” and “100W_XYZ” even if the letters are different.
Selecting a Folder
With the Select folder screen
displayed, turn the <5> dial to select
the desired folder, then press <0>.
The folder where the captured
images will be saved will be selected.
Subsequent captured images will be
recorded into the selected folder.
81
Page 82

3 Changing the File Name
(Ex.) IMG_10001.JPG
The file name has four alphanumeric
characters followed by a four-digit image
number (p.84) and extension. The first four
characters will be “IMG_” by default, but you
can change this.
With “User setting1”, you can change and register the four characters
as desired. With “User setting2”, if you register three characters, the
fourth character from the left will be appended automatically to indicate
the image size.
Registering or Changing the File Name
Select [File name].
1
Under the [7] tab, select [File
name], then press <0>.
Select [Change User setting*].
2
Turn the <5> dial to select [Change
User setting*], then press <0>.
Enter any alphanumeric
3
characters.
For User setting1, enter four
characters. For User setting2, enter
three characters.
Press the <L> button to delete any
unnecessary characters.
Press the <A> button, and the text
palette will be highlighted in a color
frame. Text can be entered.
Operate the <5> dial or <9> to
move the and select the desired
character. Then press <0> to enter
it.
82
Page 83

3 Changing the File Name
Settings
About User setting2
When you select the “*** + image size” registered with User setting2 and
take pictures, the image-recording quality character will be automatically
appended as the file name’s fourth character from the left. The meaning of
the image-recording quality characters is as follows:
“***L” = 73, 83, 1 “***M” = 74, 84, 41
“***S” = 76, 86, 61
When the image is transferred to a personal computer, the automatically
appended fourth character will be included. You can then see the image size
without having to open the image. RAW or JPEG images can be
distinguished with the extension.
The first character cannot be an underscore “_”.
The extension will be “.JPG” for JPEG images, “.CR2” for RAW images,
and “.MOV” for movies.
When you shoot a movie with User setting2, the file name’s fourth
character will be an underscore “_”.
4
Exit the setting.
Enter the required number of
alphanumeric characters, then press
the <M> button.
The new file name will be registered
and the screen in step 2 will reappear.
Select the registered file name.
5
Turn the <5> dial to select [File
name], then press <0>.
Turn the <5> dial to select the
registered file name, then press
<0>.
If User setting2 has been registered,
select “*** (the 3 characters
registered) + image size”.
83
Page 84

3 File Numbering Methods
(Ex.) IMG_0001.JPG
File numbering after
replacing the card
Next sequential file number
File numbering after
creating a folder
The four-digit file number is like the frame
number on a roll of film. The captured images
are assigned a sequential file number from
0001 to 9999 and saved in one folder. You can
change how the file number is assigned.
Select [File numbering].
1
Under the [5] tab, select [File
numbering], then press <0>.
Select the file numbering method.
2
Turn the <5> dial to select the
desired method, then press <0>.
Continuous
Continues the file numbering sequence even after the card is
replaced or a new folder is created.
Even after you replace the card or create a new folder, the file
numbering continues in sequence up to 9999. This is convenient when
you want to save the images numbered anywhere between 0001 to
9999 in multiple cards or folders into one folder in your personal
computer.
If the replacement card or existing folder already contains images
recorded previously, the file numbering of the new images might
continue from the file numbering of the existing images in the card or
folder. If you want to use continuous file numbering, you should use a
newly-formatted card each time.
Card-1
0051
84
Card-2
0052
Card-1
100
0051
101
0052
Page 85

3 File Numbering Methods
File numbering after
replacing the card
File numbering is reset
File numbering after
creating a folder
If the file number in folder No. 999 reaches 9999, shooting will not be
possible even if the card still has storage capacity. The LCD monitor will
display a message to replace the card. Replace with a new card.
Auto Reset
Restarting the file numbering from 0001 each time the card is
replaced or a new folder is created.
Whenever the card is replaced or a new folder created, the file
numbering starts from 0001. This is convenient if you want to organize
images according to cards or folders. If the replacement card or existing
folder already contains images recorded previously, the file numbering
of the new images might continue from the file numbering of the existing
images in the card or folder. If you want to save images with the file
numbering starting from 0001, use a newly formatted card each time.
Card-1
0051
Card-2
0001
100
0051
Card-1
101
0001
Manual Reset
To reset the file numbering to 0001 or to start from file number
0001 in a new folder.
When you reset the file numbering manually, a new folder is created
automatically and the file numbering of images saved to that folder starts
from 0001. This is convenient when you want to use different folders for
the images taken yesterday and the ones taken today, for example. After
the manual reset, the file numbering returns to continuous or auto reset.
85
Page 86

3 Setting the Color SpaceN
If the captured still photo was shot in the Adobe RGB color space, the
first character in the file name will be an underscore "_".
The ICC profile is not appended. The ICC profile is explained in the PDF
Software Instruction Manual on the CD-ROM.
The color space refers to the range of reproducible colors. With this
camera, you can set the color space for captured images to sRGB or
Adobe RGB. For normal shooting, sRGB is recommended.
In the fully-automatic modes (1/C), sRGB is set automatically.
Select [Color space].
1
Under the [2] tab, select [Color
space], then press <0>.
Set the desired color space.
2
Select [sRGB] or [Adobe RGB], then
press <0>.
About Adobe RGB
This color space is mainly used for commercial printing and other
industrial uses. This setting is not recommended if you do not know
about image processing, Adobe RGB, and Design rule for Camera File
System 2.0 (Exif 2.21). The image will look very subdued in the sRGB
personal computer environment and with printers not compatible with
Design rule for Camera File System 2.0 (Exif 2.21). Post-processing of
the image with software will therefore be required.
86
Page 87

4
<AF> stands for auto focus. <MF> stands for manual focus.
Setting the AF and
Drive Modes
The 19 AF points in the viewfinder
make AF shooting suitable for a
wide variety of subjects and
scenes.
You can also select the AF mode and drive mode best
matching the shooting conditions and subject.
The M icon on the upper right of the page title indicates
that the function can be used when the Mode Dial is set to
<d/s/f/a/F>.
In fully-automatic modes (1/C), the AF mode, AF point
selection, and drive mode are set automatically.
87
Page 88

f: Selecting the AF ModeN
Select the AF mode suiting the shooting conditions or subject. In fullyautomatic modes (1/C), “AI Focus AF” is set automatically.
On the lens, set the focus mode
1
switch to <AF>.
Press the <o> button. (9)
2
Select the AF mode.
3
While looking at the LCD panel, turn
the <6> dial.
X: One-Shot AF
9: AI Focus AF
Z: AI Servo AF
88
Page 89

f: Selecting the AF ModeN
Focus confirmation light
AF point
If focus cannot be achieved, the focus confirmation light <o> in the
viewfinder will blink. If this occurs, a picture cannot be taken even if the
shutter button is pressed completely. Recompose the picture and try to
focus again. Or see “When Autofocus Fails” (p.96).
If the [1 Beep] menu is set to [Off], the beeper will not sound when
focus is achieved.
With AI Servo AF, the beeper will not sound even when focus is achieved.
Also, the focus confirmation light <o> in the viewfinder will not light.
One-Shot AF for Still Subjects
Suited for still subjects. When you
press the shutter button halfway, the
camera will focus only once.
When focus is achieved, the AF point
which achieved focus will be
displayed, and the focus confirmation
light <o> in the viewfinder will also
light.
With evaluative metering, the
exposure setting will be set at the
same time focus is achieved.
While you hold down the shutter button halfway, the focus will be
locked. You can then recompose the shot if desired.
In the d/s/f/a/F shooting modes, AF is also possible by
pressing the <p> button.
AI Servo AF for Moving Subjects
This AF mode is for moving subjects when the focusing distance
keeps changing. While you hold down the shutter button halfway,
the subject will be focused continuously.
The exposure is set at the moment the picture is taken.
In the d/s/f/a/F shooting modes, AF is also possible by
pressing the <p> button.
89
Page 90

f: Selecting the AF ModeN
When focus is achieved in the AI Focus AF mode with the Servo mode
active, the beeper will sound softly. However, the focus confirmation light
<o> in the viewfinder will not light.
The built-in flash’s AF-assist beam is effective up to about 4 meters/13.1
feet.
In the d/s/f/a/F shooting modes, press the <I> button to pop-
up the built-in flash. Then it will fire the AF-assist beam when necessary.
AI Focus AF for Automatic Switching of AF Mode
AI Focus AF switches the AF mode from One-Shot AF to AI Servo
AF automatically if the still subject starts moving.
After the subject is focused in the One-Shot AF mode, if the subject
starts moving, the camera will detect the movement and change the
AF mode automatically to AI Servo AF.
AF-Assist Beam with the Built-in Flash
Under low-light conditions, when you press the shutter button halfway,
the built-in flash fires a brief burst of flashes. It illuminates the subject to
enable easier autofocusing.
90
Page 91

S Selecting the AF AreaN
Default AF Area Selection Modes
As default setting, the following three AF area selection modes can be
selected. See the next page for the selection procedure.
Single-point AF (Manual selection) (p.93)
Select one AF point to focus.
Zone AF (Manual selection of a zone) (p.94)
The 19 AF points are divided into five zones for
focusing.
Auto select 19-point AF (p.94)
All the AF points are used to focus. Set in fullyautomatic modes (1/C).
AF Area Selection Modes Added with Custom Functions
With [8C.Fn III -6: Select AF area selec. mode] (p.228), the following
two AF area selection modes can be added.
Spot AF (Manual selection) (p.93)
For pinpoint focusing.
AF point expansion (Manual selection) (p.93)
The manually-selected AF point <S> and adjacent
AF points <w> are used to focus.
91
Page 92

S Selecting the AF AreaN
With [8C.Fn III -7: Manual AF pt. selec. pattern], you can set either [0:
Stops at AF area edges] or [1: Continuous] (p.228).
Selecting the AF Area Selection Mode
Select the AF area selection
mode.
Press the <S> button. (9)
Look through the viewfinder and
press the <B> button.
Press the <B> button to change
the AF area selection mode.
By default, the button changes the
mode to single-point AF, Zone AF,
and 19-point AF.
Selecting the AF Point Manually
Press the <S> button. (9)
1
The 19 AF points will be displayed in
the viewfinder.
If Zone AF has been set, the selected
zone will also be displayed.
Select the AF point.
2
The AF point selection will change in
the direction you tilt the <9>. If you
press <9> straight down, the center
AF point (or zone) will be selected.
You can also use the <6> and
<5> dials to select the AF point. The
<6> dial selects an AF point in the
horizontal direction, and the <5>
dial selects an AF point in the vertical
direction.
92
Page 93

AF Area Selection Modes
The AF areas are explained starting with the smallest one.
(1) Spot AF (Manual selection)
Although this is the same as single-point AF, the
selected AF point <O> covers a smaller pinpoint
area to focus. Effective for pinpoint focusing
overlapping subjects such as an animal in a cage.
Since Spot AF covers a very small area, focusing
might be difficult during hand-held shooting or for a
moving subject.
C.Fn III -6
(2) Single-point AF (Manual selection)
Select one AF point <S> to be used to focus.
(3) AF point expansion (Manual selection)
The manually-selected AF point <S> and adjacent AF points <w> are
used to focus. Effective when it is difficult to track a moving subject with
just one AF point.
With AI Servo AF, the manually-selected AF point <S> must focustrack the subject first. However, it is easier to focus the target subject
than with Zone AF.
With One-Shot AF, when focus is achieved with the expanded AF point,
the expanded AF point <S> will also be displayed along with the
manually-selected AF point <S>.
C.Fn III -6
93
Page 94

AF Area Selection Modes
With 19-point AF and Zone AF, the active AF point will keep switching to
track the subject in AI Servo AF mode. However, under certain shooting
conditions (such as when the subject is small), it might not be able to track
the subject. Also, in low temperatures, the tracking response is slower.
(4) Zone AF (Manual selection of zone)
The 19 AF points are divided into five zones for focusing. All the AF
points in the selected zone are used for the automatic selection of the
AF point. It makes achieving focus easier than with single-point AF or
AF point expansion and it is effective for moving subjects. However,
since it is inclined to focus the nearest subject, focusing a specific target
is harder than with single-point AF or AF point expansion.
With One-Shot AF, the AF point <S> which achieved focus will be
displayed.
(5) 19-point AF auto selection
All the AF points are used to focus. Automatically set in fully-automatic
modes (1/C).
With One-Shot AF, pressing the shutter button
halfway will display the AF point(s) <S> which
achieved focus. If multiple AF points are displayed,
it means they all have achieved focus. This mode
tends to focus the nearest subject.
With AI Servo AF, the manually-selected (p.92) AF
point <S> is used first to achieve focus. This
cannot be set in fully-automatic modes (1/C).
94
Page 95

AF Area Selection Modes
If [8C.Fn III -12: Orientation linked AF point] is set to [1: Select
different AF points], you can set the AF area selection mode and
manually-selected AF point (or zone in the case of Zone AF) separately
for vertical and horizontal shooting (p.230).
If [8C.Fn III -10: Focus display in AI SERVO/MF] is set to [Disable],
the active AF points <S> during AI Servo AF will not be displayed.
List of the lenses with which peripheral AF points will become
vertical-line or horizontal-line sensitive
Cross-type AF
Vertical-line sensitive AF
Horizontal-line sensitive AF
With the lenses listed below, cross-type AF is not possible with < > and
< > AF points.
EF 35-80mm f/4-5.6, EF 35-80mm f/4-5.6 II, EF 35-80mm f/4-5.6 III, EF 3580mm f/4-5.6 USM, EF 35-105mm f/4.5-5.6, EF 35-105mm f/4.5-5.6 USM,
EF 80-200mm f/4.5-5.6 II, EF 80-200mm f/4.5-5.6 USM
Lens’ Maximum Aperture and AF Sensitivity
With lenses whose maximum aperture is larger than f/5.6
With all AF points, cross-type AF sensitive to both vertical and horizontal lines
is possible. With the following lenses, the peripheral AF points will be verticalline or horizontal-line sensitive only. (They will not work as cross-type points.)
With lenses whose maximum aperture is larger than f/2.8*
With the center AF point, high-precision, cross-type AF sensitive to both vertical
and horizontal lines is possible. The center AF point’s sensitivity to vertical and
horizontal lines is about twice as sensitive as the other AF points.
The remaining 18 AF points will work as cross-type points with lenses
brighter than f/5.6.
* Except with the EF 28-80mm f/2.8-4L USM and EF 50mm f/2.5 Compact Macro lenses.
95
Page 96

When Autofocus Fails
If you press the shutter button halfway during manual focusing, the AF point
which achieved focus will be displayed and the focus confirmation light
<o> will light in the viewfinder.
Autofocus can fail to achieve focus (the focus confirmation light <o>
blinks) with certain subjects such as the following:
Subjects difficult to focus
Very low-contrast subjects
(Example: Blue sky, solid-color walls, etc.)
Subjects in very low light
Extremely backlit or reflective subjects
(Example: Car with a highly reflective body, etc.)
Near and far subjects covered by an AF point
(Example: Animal in a cage, etc.)
Repetitive patterns
(Example: Skyscraper windows, computer keyboards, etc.)
In such cases, do one of the following:
(1) With One-Shot AF, focus an object at the same distance as the
subject and lock the focus before recomposing (p.54).
(2) Set the lens focus mode switch to <MF> and focus manually.
MF: Manual Focusing
Set the lens focus mode switch to
1
<MF>.
Focus the subject.
2
Focus by turning the lens focusing
ring until the subject looks sharp in
Focusing ring
the viewfinder.
96
Page 97

i Selecting the Drive ModeN
When the battery level is low, the continuous shooting speed will be
slightly slower.
In the AI Servo AF mode, the continuous shooting speed may become
slightly slower depending on the subject and the lens used.
In low-light areas or indoors, the continuous shooting speed may
become slower even if a fast shutter speed is set.
Single and continuous drive modes are provided. In the <1> (Full
Auto) mode, single shooting is set automatically.
Press the <o> button. (9)
1
Select the drive mode.
2
While looking at the LCD panel, turn
the <5> dial.
u : Single shooting
When you press the shutter button completely, one shot will be
taken.
o: High-speed continuous shooting (Max. 8 shots per sec.)
i : Low-speed continuous shooting
While you hold down the shutter button completely, shots will be
taken continuously.
Q : 10-sec. self-timer/Remote control
k: 2-sec. self-timer/Remote control
For self-timer shooting, see the next page. For remote control
shooting, see page 114.
(Max. 3 shots per sec.)
97
Page 98

j Using the Self-timer
The <k> 2-sec. self-timer enables you to shoot while not touching the
camera mounted on a tripod. This prevents camera shake while you
shoot still lifes or bulb exposures.
After taking self-timer shots, you should check the image for proper focus
and exposure (p.166).
If you will not look through the viewfinder when you press the shutter
button, attach the eyepiece cover (p.112). If stray light enters the
viewfinder when the picture is taken, it may throw off the exposure.
When using the self-timer to shoot only yourself, use focus lock (p.54) for
an object at about the same distance as where you will be.
To cancel the self-timer after it starts, press the <o> button.
Use the self-timer when you want to be in the picture. The <Q> (10
sec. timer) can be used in all shooting modes.
Press the <o> button. (9)
1
Select the self-timer.
2
Look at the LCD panel and turn the
<5> dial to select the self-timer.
Q : 10-sec. self-timer
k: 2-sec. self-timerN
Take the picture.
3
Look through the viewfinder, focus
the subject, then press the shutter
button completely.
You can check the self-timer
operation with the self-timer lamp,
beeper, and countdown display (in
seconds) on the LCD panel.
Two seconds before the picture is
taken, the self-timer lamp will stay on
and the beeper will sound faster.
98
Page 99

5
Be sure to first set the Quick Control Dial switch to <J>.
Advanced Operations
In the d/s/f/a/F
shooting modes, you can select
the shutter speed, aperture, and
other camera settings to change
the exposure and obtain the
desired result.
The M icon on the right of the page title indicates that the
function can be used when the Mode Dial is set to <d/s/
f/a/F>.
After you press the shutter button halfway and let go, the
LCD panel and viewfinder information will remain displayed
for about 4 sec. (0).
Functions which can be set in the d/s/f/a/F
shooting modes are listed in “Function Availability Table”
(p.254).
99
Page 100

d: Program AE
The camera automatically sets the shutter speed and aperture to suit
the subject’s brightness. This is called Program AE.
* <d> stands for Program.
* AE stands for Auto Exposure.
Set the Mode Dial to <d>.
1
Focus the subject.
2
Look through the viewfinder and aim
the selected AF point over the
subject. Then press the shutter button
halfway.
When focus is achieved, the focus
confirmation light <o> on the
viewfinder’s bottom right will light
(One-Shot AF mode).
The shutter speed and aperture will
be set automatically and displayed in
the viewfinder and on the LCD panel.
Check the shutter speed and
3
aperture display.
A correct exposure will be obtained
as long as the shutter speed and
aperture display do not blink.
100
Take the picture.
4
Compose the shot and press the
shutter button completely.
 Loading...