

Page 1
Page 2
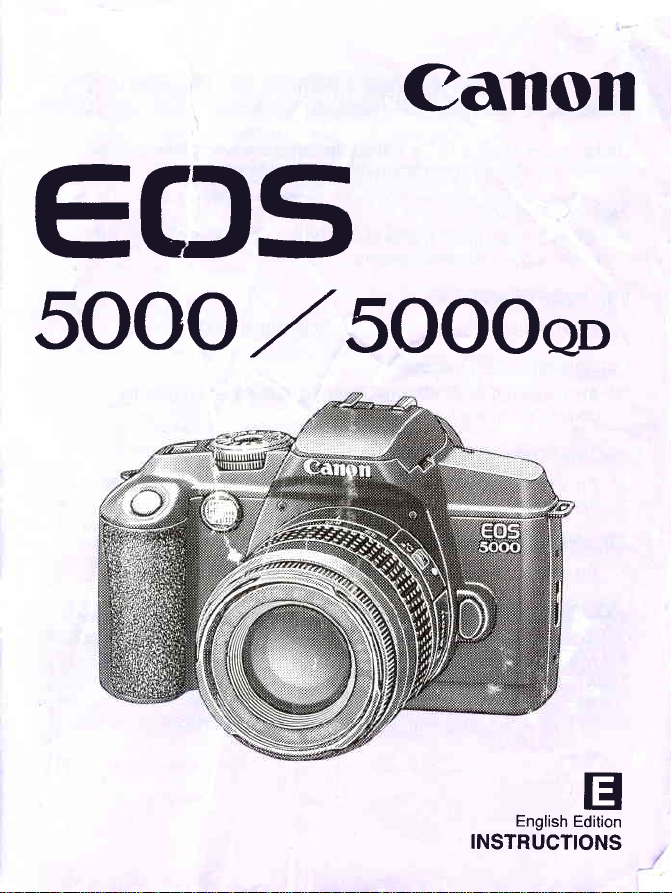
Canon
www.orphancameras.com
www.orphancameras.com
e(fs
5OOO,/5OOOoo
English
tr
Edition
INSTRUCTIONS
Page 3
r'!*hflZ
i
F
Read these instructions
instructions
l.
An
beginning to take
,
ll. Basic Operations
An
ill. ROuanced
An
camera's various functions.
consist
Prgparations
explanation of the
explanation
Operations
explanation
"
An
explanation of how to
f
i
functions.
v. optional BP-
An
explanation of
I
I
I
Vl.
An
avai
lnfo$matioh'#e
Other
explanation of basic
lable
accessories.
Rtter reading this instruction
!
i_:"::"r':________
carefully
the following
of
.
preparations
photographs.
the
of
basic ways of taking
,
of different
use the
'AA
Bii'ffiryW
how
to use the BP-8
photographic
before
six sections:
you
ways
of taking
lmffiTfriingi
self-timelr and
AA
manual,
using
shoulr!
photogr'4hs.
Battery
terminology
our
:
I
carcy
)
,
pf,rotographs
{
'
Pack
retain it
camera.
date imprinting
and
-------t
for future
out
using
guide
a
The
before
the
to
i
i
Page 4
Maiffiffi;
www.orphancameras.com
1.
Light-weight
2. A wide
.
AIM
AIM is
one of the three focusing
It
shutter button.
3. A simple dial
see them
4.
Silent operation.
NoteW
.
Your
instructions include
.
ln
this instruction
following
()
E
;fil: : Useful hints
.
The
Please
.
In
order to
"Precautions"
and compact
auto-focus/AlM" system
(Advanced
a system which
allows anyone to take
in
the image zone.
new EOS
meanings:
: lmportant notes
:
Camera operation notes
(-
page
see
read the related
prevent
single
Integrated Multi-Point
automatically sets
points
which
good
photos
operation which
camera can
an
explanation of how to mount EF lenses.
manual,
prevent
to
the
you
on camera
-)
operation or shooting.
mark indicates
information
faulty
on
page
shots
6.
reflex
(SLR)
'/
\--'
camera.
lens
Control)
the optimum exposure
achieved focus within
just
by
composing the
you
allows
be used with
following
malfunction
know
should
page
the
photographs
to take
any Canon EF lens. These
symbols
in
or misoperation.
about.
where
there is more information.
accordingly.
or camera malfunctions,
/\
flash
or
the wide focus
shot and
note boxes have
exposure
area.
pressing
exactly
please
read the
/\
as
\_
\
\
at
the
you
the
+'..9-rrywmffiry
IMPORTANT
This
lenses, flash
other accessories
therefore
camera as a result
INFORMATION
camera will
units and
suggest the
give
may result in
using incompatible
optimum
use of
r.g;;.sd$b&d{;
performance
other Canon-brand
unsatisfactory
Canon EF lenses and
...*,n*;+;al;s&ilE!&r,r*l*ril{*t&S.i*;.
together with
accessories. The
performance
products
may
specially designed
incompatible
use of
or damage to
accessories. Damage to
void its
warranty.
your
camera. We
your
Canon EF
lenses
or ,i
Canon
,,.#il|t*-e
'r
l
't
i
3/^
I
Page 5
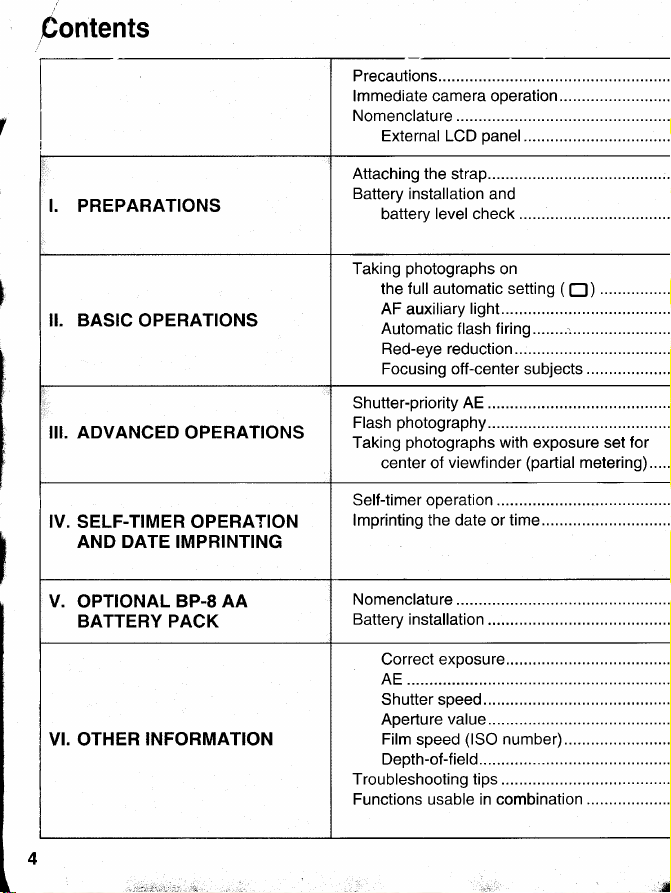
Contents
Precautions
lmmediate camera operation...
Nomenclature ..............
External LCD
panel
I. PREPARATIONS
BASIC
II.
OPERATIONS
III. ADVANCED OPERATIONS
IV. SELF-TIMER OPERATION
AND DATE IMPRINTING
V.
OPTIONAL
BP-8 AA
BATTERY PACK
VI. OTHER
INFORMATION
Attaching the
Battery
battery
Shutter-priority AE
Flash
Taking
center of
Self-timer operation
lmprinting the date or time.......
Correct
AE
Shutter speed........
Aperture
Film
Depth-of-fie|d...............
Troubleshooting tips
Functions usable in combination
strap....
installation and
level
check
photography.......
photographs
exoosure...
speed
with
viewfinder
va|ue.........
(lSO
number).............
exposure set
(partial
metering).....
...................
for
Page 6

......................
www.orphancameras.com
......................
......................1
6
I
0
......................12
Mounting
Shutter button and autofocus
Loading
.'...,'..'''...,...'''21
......................22
......................23
......................23
......................24
......................29
......................9s
......................36
......................45
......................46
......................48
......................48
......................48
......................49
......................49
......................50
......................51
'.....'.'.............52
Focusing
(center
(long
Bulb
Mid-rollfilm
Main
Canon speedlite flash
Remote
Eye-piece
Grip GR-8OTP............
Camera cases
Dioptric
Major specifications ..............
quick
A
removing
and
lenses..
and removing film
on a subject in the
focusing)
exposure)
photography...............
rewind
accessories........
units ............53
switch RS-60E3
extender
EP-EX15
adjustment lenses
guide
to function
settings .........59
operations..................................17
...........16
...................18
center of
the viewfinder
..........37
..........38
..............39
..........:...............53
................53
...............
...........53
....................54
..............54
.............55
................56
.\Jild:.
-&,uaxg*"l*;q-.#i:&.q
r.-:*r*.
Page 7
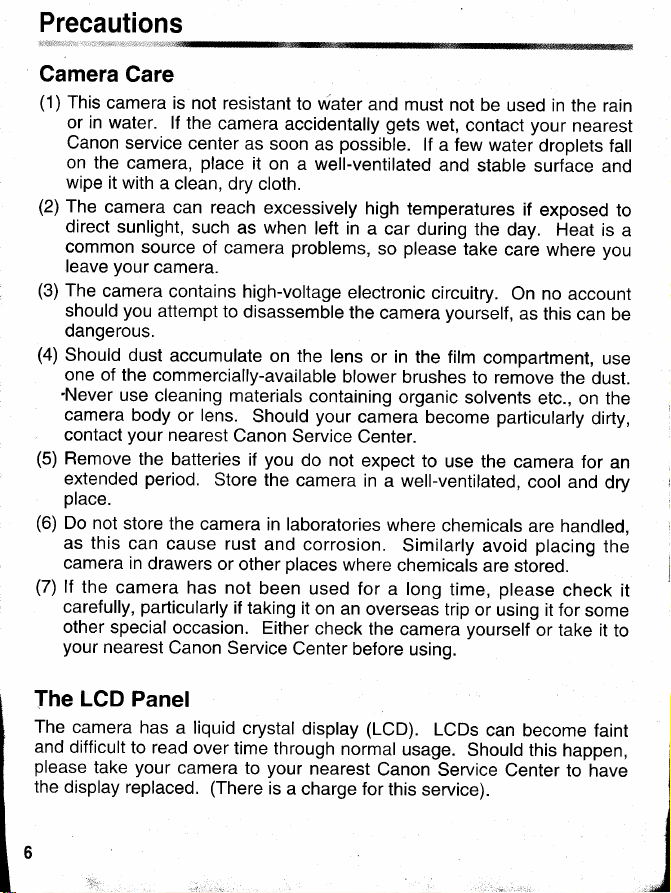
Precautions
Camera
(1)
This
camera
or in water.
Canon
on the
wipe
it with
(2)
The
camera
direct
sunlight,
common
your
leave
(3)
The
camera
should
dangerous.
(4)
should
one of
'Never
camera
contact
(5)
Remove
extended
place.
(6)
Do not
as this
camera in
(7)
lf
the
camera
carefully,
other
special
your
nearest
Care
is
not resistant
lf the
service
camera,
source of
camera.
you
dust
the commercially-available
use
cleaning
body
your
the
period.
store
can
drawers
particularly
camera
center
place
a
clean, dry
can reach
such
camera
contains
attempt
to
accumulate
materials
lens.
or
nearest
batteries
the
cause rust
occasion.
Canon
Canon
Store
camera
or
has
not
if
Service
to water
accidentally gets
as
soon
it
as
high-voltage
disassemble
Should
if
other
taking it
as
on
a well-ventilated
cloth.
excessively
when
left in
problems,
on the
you
the
in laboratories
and corrosion.
been
Either
lens
containing
your
Service
do not
camera
places
used for
on
check
Center before
possible.
electronic
the
blower
where
an overseas
and
must not
high
temperatures
a
car during
please
so
camera
or in
the film
brushes
organic
camera
Center.
expect
in
a well-ventilated,
where
similarly
chemicals
a long
the
camera
using.
be
wet,
contact
lf
a few water
and
stable
the
take
circuitry.
yourself,
to remove
solvents
become
to use
the camera
chemicals
time,
trip
or
yourself
used in
day. Heat
care
On no
compartment,
particularly
avoid
are stored.
prease
using it for
the rain
your
nearest
droplets
surface
if
exposed
where
account
as
this
can be
the
dust.
etc., on the
dirty,
for
cool and
are handled,
placing
-
check it
some
or take
fall
and
is
you
use
an
dry
the
it to
to
a
The
LCD Panel
The
camera
and
difficult
please
the
display replaced. (There
take
has
a
to read
your
camera
liquid
over
crystal
to
display
your
is
a
charge for
nearest
time through
(LcD).
normal
Canon
this
LCDs
usage.
Service
service).
can become
Should
this happen,
Center
faint
to have
Page 8

Precautions
www.orphancameras.com
LCDs
high temperatures
at
will operate
Lithium
Two
the camera to
respond more
also
normal.
as
Batteries
CR121NDL123A lithium
operate. Please
instances:
(1)
(2)
(3)
(4)
(5)
,
Using the
Even
photographs
auto film
replace
you
when
when
when the
when
when
.
When loading
avoid smearing them
drain.
.
Batteries
temperatures, shorted,
.
While these
considerably below the freezing
keep
photographs.
replace
the camera has not
shutter
you
are taking
particularly
taking
batteries into the
can be extremely
batteries can
a set of batteries warm in
Camera
when
the
d-r
the
can
still
advance and automatic
batteries
slowly
at
lower
temperatures
of 60'C. lf restored to a regular
batteries must first
check the
the
batteries
been used for
will
not release
photographs
important
camera, check that the
finger-prints.
with
dangerous if disassembled,
or disposed
serve
on
symbol
be
taken
in fire.
of
well
at low temperatures,
point.
your pocket
Low Power
on the LCD
when
rewind may
with
new
ones.
in very
photographs
This is
When
and
panel
the
be correctly installed
battery
level
an extended
cold temperatures
battery contacts
prevent poor
to
recharged,
install
the
camera
them
using the
blinks, correctly exposed
shutter is
be impossible. Please
and can turn
temperature,
in the following
period
are clean and
contact and battery
exposed to high
performance
in
just
released.
will
cold temperatures,
you
before
However,
black
drop off
take
they
for
your
Electronic
When
removing
and the
Contacts
lens
surface. Hold
the lens,
be sure
not
to
the lens with the
damage the electronic
contacts facing
upwards.
contacts
Page 9
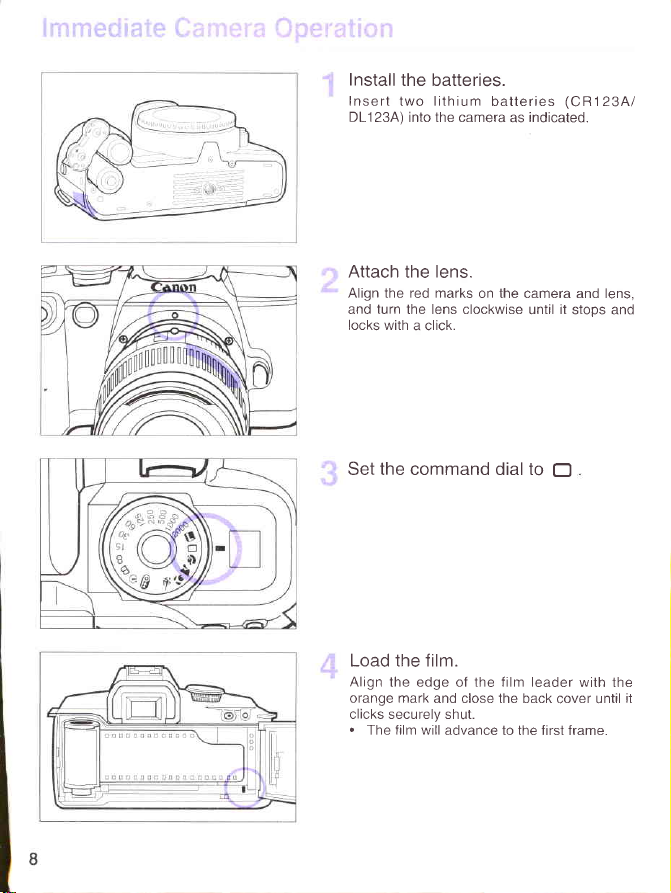
Install
the batteries.
Insert two lithium
DL123A)
into the camera
batteries
indicated.
as
(CR123A/
Attach
Align the red marks
and
locks with
Set the command dial to
lens.
the
turn
the lens clockwise
a click.
on the camera and lens,
until
it
E
Load the film.
Align the edge of the film leader
orange mark
clicks securely shut.
.
The film will
and close the back
advance to the first frame.
cover until
stops and
with the
it
Page 10

Focus
www.orphancameras.com
E
v
Compose the
(
[ ] )
focus.
lmmediate
the subject.
subject
press
and
the shutter
Camera
within
button
Operation
the AF frame
halfway
to
Take
6
v
'7
I
'
the
Press
the shutter button completely
the oicture.
.
In
dark or backlit
mark in
(-
see
Unload
When the last frame
taken,
the film will rewind
When
complete, open the back cover
remove
the
photograph.
the viewfinder blinks,
page
conditions
33
).
the film.
roll
on a
film.
to take
when
the AE
use the flash
of film has been
automatically.
and
Page 11

Nomenclature
www.orphancameras.com
Built-in
('see
flash
page
23)
Command dial
(-
see
panel
LCD
(-
see
Shutter
(-
see
Battery
Grip/
compartment
(-
see
AF
auxiliary light
(-
see
Red-eye reduction
(-
see
Selttimer lamp
(-
see
10
page
page
button
page
page
page
page
page
13)
12)
_-.'
17)
14)
22)
23)
40)
-l
I
lamp
Flash knob
Accessory
.
For
Speedlite flashes
optional
I
shoe
attaching Canon
Strap fixture
(-
Back
release
(-
Lens release
(-
see
Focus mode
(-
see
Zoom ring
Manualfocusing
(-
see
and other
accessories.
page
see
cover
page
see
button
page
16)
switch
page
16)
page
,
ring
51)
14)
18)
Page 12

Film check
www.orphancameras.com
window
Nomenclature
Eye
cup
Partial metering/
AE lock
(-
Center-focus button
(-
(-
button
page
see
see
Film rewind button
see
page
page
36)
37)
39)
i
jl
ir,,,.,
panel
pase
switch
pase
select
page
page
-
43)
--/
43)
---J
43)
43)
//
/ /
/
Quartz date
display
(-
see
euartz on"
mode
(-
see
Date
button
(-
see
Numeral
setting
button
(-
see
/ /
/ 7
/ /
Remote
jack
(.
Grip
hole
Battery cover
latch
(-
Back cover
Tripod socket
control
page
see
For connection
to the optional
RS-603
Remote Switch.
positioning
page
see
53)
14)
l
I
11
J
Page 13

Nomenclature
Viewf inder
The figure
Partial metering
Matte
Information
below shows
circle
screen
AE lock indicator
trf
External
The figure
-
66p[
(Lights
when
correct or when flash
been
second when
incorrect
should
exposure
completed. Blinks twice
exposure setting is
or to warn that
pe
used.)
LCD Panel
below
information
all the
ln-focus tamp
f-
I
I
I
is
setting
charge has
per
flash
shows all the information
- r- - r -
L
Red-eye reduction
that can
that
can be
Center AF frame
Wide
(When
using auto-focus,
lamp lights
lf focusing is not
blinks twice
manual focus,
focusing is
(When
lights, this
two
when focusing
achieved.)
the red-eye reduction
blinks twice
seconds.)
be displayed.
displayed.
AF frame
the in-focus
the lamp
indicator
per
is achieved.
second for
possible,
per
second. During
the lamp lights when
lamp
12
w
rE.-
Number
Self{imer operation indicator
Aperture value
Battery indicator
Indicates
remaining
of
battery
frames
level
film
of
(count-down)
Page 14

Command
www.orphancameras.com
Dial
The
tr
lock
(OFF)
position
is the reference
point
for the
command dial's
settings.
Shutter-priority zone
@gs'AN
'6),'E
'dYnil
lmage zone
(OFF)
Lock
(The
camera will not
when
operate
set to this
the dial is
position.)
lmage Zone
(-
:
Fully automatic
Q
qa
: Portrait
-l
: Landscape
r|l :
(
:
: Lock
[
Shutter-priority Zone
Sets the shutter speed in the shutter-priority AE mode.
The
2000 to 8 numerals correspond to speeds ranging from 1/2000th of a second to 1/8th of
secono.
Function
: Bulb
B
O : Self-timer
€F
: Mid-rollfilm rewind
Close-up
(-
SPorts
Setting
(-
(-'see page
(+
(-
see
see
see
Page
r
(
5s.
see
see
page
Page
Zone
38)
page
25)
page
28)
(-,
see
page
26)
27)
40)
21)
page
39)
a
E
When not
depressed
drain the batteries.
',
using
inadvertantly
.,..ii,*-....*-js:'
the camera
the
set
by any object
command
dial to
in
a camera bag, etc. A depressed shutter button
[l
. Make
sure
the
shutter button
f.-,.i4'
is not
will
13
Page 15

I. PREPARATIONS
An
explanation
photographs
The
camera uses two lithium
.
you
lf
have the BP-8 AA
preparations
of
and of the operation
Thread
through the
Before
that
Battery Pack,
batteries
which must
the
of
be carried
shutter
the ends
strap f ixture
using, tug the
it is
firmly
secured to the fixture.
(CR123A/DL123A).
please
refer
to
page
Slide the
direction
battery cover.
button.
out before taking
the neckstrap
of
as shown.
to make
strap
45
battery cover
indicated
latch
to
open the
sure
in the
'o
Insert
the
-
terminals
batteries
direction
battery
cover.
the
Close
battery cover.
pointing
indicated
as
with
the +
in
the correct
and
on the
Page 16

I. PREPARATIONS
www.orphancameras.com
Checking the Battery
o\
c
ra
\v,/
O
Service
film
of
Temperature
(+20'C)
Normal
(-10'C)
Low
-
Tests
are based
based on Canon's
-
The number
f=]
tJl
lf
nothing is
down.
Re-insert the
Always
check the battery level
Remember
have
an adequate
number
of
.g
@
life
of two
that
can be
on new
Standard Test
rolls
of
will
displayed
that
batteries
supply when traveling
photographs
Level
lithium
taken).
Without
Flash
1 10 Rolls
75 Rolls
batteries, using the
Method.
reduced
be
batteries
for
autofocus
on the LCD
the correct way
before using the
can sometimes
Release
1
'
command
image
The
)
-
displayed
the lock
zone
battery indicator
battery indicator
the
following:
: The
battery
@
@:
: Replace
@
: Please
@
.
The
before
CR123A/DL123A
Half
EF35-80mm
filmless
or
panel,
check
to see if the
up.
camera.
be difficult
overseas
power
Battery
batteries
both
see
command
a battery check
batteries
with Flash
45 Rolls
30 Rolls
f14.0-5.6 lll
camera operations
to obtain in
when
or
dial to
a setting
or shutter-priority
will
by turning
on the
LCD
panel.
variations
power
is
sufficient.
is low. Please
ready.
batteries with new
page
7.
dial lock must
can be
be released
carried out.
(number
With Flash
23 Rolls
15 Rolls
Lens and24-exp.
batteries
certain
you
expect to take
film Data
are inserted
areas. Be
the
in the
zone.
be
The
indicate
have new
ones.
of rolls
is
upside
to
sure
a large
15
Page 17

lVlounting
and
Removing
Lenses
Mounting
Removing
a Lens
the Lens
Remove the rear lens
1
'
body cap by turning
by the
arrow.
Align
I
-
Q
v
2[
-?
To remove
the red marks
camera. and turn the lens
direction
of the arrow until it
Set the focus mode
lens to AF.
.
lf the
switch is set to M,
be
used.
.
When
using autofocus,
part
rotating
Remove
of the lens.
the front lens
the lens,
down the lens release
the lens
as shown
them as shown
on the lens
press
button
the
by
stops.
cap
and the
and
in the
clicks.
switch
on the
autofocus can not
not
do
touch the
cap.
and hold
and turn
arrow until it
16
Page 18

SFrr";tiryr
www.orphancameras.com
ffi*tt*rI
&*t*f*cus
irffid
#ffierr*timns
The EOS
shutter button
shutter button
Pressing
Halfway
Pressing the
Completely
the
Shutter
Shutter Button
operates
Button
r
can be
follows.
as
pressed
Pressing
halfway
the
Shutter Button
Halfway
.
This initiates
When focusing
green
light in the
focus
lamp) lights
.
At
the same time,
speed
and aperture
(exposure
mark
setting) is
in the viewfinder
the aperture value
the LCD
Pressing
panel.
the
Shutter
Completely
.
This releases
picture
the
by one frame.
or all the way.
auto-focusing
is
achieved,
viewfinder
up.
the
combination
set.
lights
is displayed
Button
the
shutter to take
and the film
The
(AF).
a
(the
shutter
The
AE
up and
on
advances
t--=l
qJ
lf the
shutter speed is slow,
obtain
.
Avoid
.
Always hold
.
Use a fast-enough
photographs,
sharp
moving the
the shutter button
pictures
blurred
please
camera while taking
shutter speed
note the following
at the half-way
or use a tripod whe
may result
photograph.
a
point
due to
points:
three
before taking
using a slow
camera shake. In
photographs.
shutter speed.
order to
17
Page 19

When a roll
Then
frame
of film is loaded, it
as each
by
photograph
frame. The number
continually displayed.
is wound
is
taken, the film rewinds into
of frames remaining
completely on the take-up
on the roll of film is
Please
use DX-coded film,
the cartridge
camera uses this to automatically
detect and set the film
speed. Films
with a speed ranging from
may be used.
5000
spool.
as the
ISO 25 to
Infra-red film
cannot be used.
Release the
setting to
the back
Open
back cover release.
Tilt
the
film
the diagram to insert.
The shutter curtain is
mechanism
loading film,
film
or the
curtain.
damages or bent.
must
and
very
be
to come into contact with the
Otherwise,
command dial
position
any
cover by
cartridge
an extremely high-precision
never be touched. When
not
careful
the
to allow
shutter curtain may
lock
other than L.
raising
as shown
your
shutter
by
the
in
fingers
be
Page 20

2[
www.orphancameras.com
'
Align
with
.
.
I. PREPARATIONS
the
edge of the film leader'
the orange mark.
To ensure
lightly
lf too much
film cartridge
that the film lies
on the film
film is
slightly.
cartridge.
protruding,
press
flat,
rewind the
Correctly set
Incorrectlv
set
Make sure
I
v
the orange mark
back
cover.
The film will
and the number
will
begin to increase.
completed,
film
the
is
before closing
then
begin to advance,
of available
you
will hear
that of the shutter release,
number
appear on the LCD
.
of available frames
lf
the number of
appear,
been loaded
correctlv.
available frames
this means that the film
correctlv. Re-load
panel.
aligned with
the
frames
When
this is
sound like
and the
will
not
does
has not
the film
19
Page 21

PREPARATIONS
I.
Removing the
Film
LCD
the
film
is
panel.
the
film
page
After the last frame on the
taken, the
rewinding.
When the film has finished rewinding,
ffll
After
back cover and
cartridge.
To rewind the film in mid-roll, see
39.
film will
will appear on the
checking
automatically begin
the
display, open
remove
20
Page 22

II.
www.orphancameras.com
BASIC
For
simple,
dial.
photograph.
52 in the
combinations
The
basic
camera
The
section
are
OPERATIONS
operation, use
then takes
various
"Functions
possible.
the image
over, setting
automatic
Usable in
settings
zone
settings
everything
possible
combination".
automatically
are
the
on
shown
Note
command
your
for
page
on
that not
all
Taking
of all
the AF frame,
photographs
kinds
of subjects
anyone
Wide
AF Frame
in
the fully
with no
can obtain
automatic
fuss.
As
good
long
results
Set
Look
position
subject.
.
lf
subject
Fram
"Focusing
on
mode
as the
with
the
command
through
the
you
wish
e, see
page
24.
you
allows
subject is
ease.
Wide AF Frame
to focus
outside
Off-Center
dial to
the
viewfinder
the Wide
th e
to
take
covered
an off-center
shots
by
E.
and
on the
AF
sectio n
Subjects"
21
Page 23

II. BASIC
OPERATIONS
Press
3
The
subject is focused,
shutter speed
.
green
A
lamp)
.
The
LCD
the shutter
button halfway.
and aperlure are
lamp
lights up.
aperture value is
panel.
in the viewfinder
and the
set.
(focus
displayed on the
E
Blinking
AE Indicator
lf
a slow shutter
viewfinder will
AE indicator
The use
blinking.)
When
of a
Blinking in-focus lamp
the in-focus lamp
The AF Auxiliary
When focusing
on automatically
(camera
in
speed
(the
blink
blinks, hold
tripod
is recommended
conditions are
illuminate
to
shake warning)
the image zone
aperture value
the camera
blinks, the
Light
shutter cannot be released.
Emitter
difficult, the AF
the subject, making
'f-Aperture
Press
I
t
may result in
displayed
steady and take
(even
the shutter
to take the
on the LCD
with
a tripod, the AE
In-focus
E
button all the way
picture.
camera shake,
care when
auxiliary light
focusing
the
panel
will not blink). lf
pressing
mark will continue
Please see
value
lamp--1
AE
mark in the
the
shutter.
page
.
51
emitter turns
easier.
the
22
,lii,r;:
Page 24

Automatic Flash Firing
www.orphancameras.com
lf the AE indicator in the viewfinder
conditions,
automatically.
Automatic flash firing will function
please
use the flash
when an image zone
(see page
Red-eye Reduction
photographs
In
red. This is
phenomena
This
likely
to occur, the red-eye reduction lamp
momentarily
chance
for
red-eye.
of
shots taken in
people
of
due to
causes the
light from
is
called
person's
taken with
the flash reflected from
"red-eye."
pupils
The red-eye reduction function
fully
the
automatic
fiash,
For flash
to
(E3
)
II. BASIC
OPERATIONS
blinks under dark or back-lit
33). The flash will fire
setting is
the
subject's eyes
the
when
shots
lights
automatically and
contract, thereby reducing
operates
portrait
and
modes
set.
may
person's
appear
eyes.
red-eye is
the
aulomatically
tS I
When
the shutter
viewfinder will
lamp
turned
on.
When
the
viewfinder
take
.
The effectiveness
.
Red-eye
eye reduction lamp.
Tell
To reduce
.
Take
.
Move
,r.!dts!j:
shutter button is
stops blinking and reverts
photograph.
the
reduction will not work
person(s)
the
red-eye, the following measures
photo
the
to the
closer
blink
red-eye
of
look
to
under
person(s)
button is
for
at the red-eye reduction lamp
well-lit
pressed
2
seconds to
pressed
reduction may vary
unless the
conditions.
to be
:as;*"
will also help:
photographed.
indicate
halfway
normal,
to
person(s)
halfway,
the indicators in the
that the red-eye reduction
until the indicators in
press
depending on the
photographed
to
be
before taking the
the
person.
shutter
looks at the red-
picture.
the
button to
23
Page 25

When
frame,
photographs
taking
proceed
as follows.
of
off-center
This
method
subjects
is called focus
outside the wide
photography.
lock
AF
Position
subject
button halfway.
While
pressed
picture.
Press
to take the
the
and
keeping
halfway,
the
shutter
picture.
AF frame
press
the shutter
recompose
button all the way
the
on the
shutter
button
the
Page 26

LJs;ffi9
www.orphancameras.com
ih* ffmrtrr*${
flilt*de
{'ffi
}
rlr
-0).
lf the
subject's head
background
farther
away from
A more
effective background
lens,
set the lens to the
and shoulders fill
blur can be
the background.
Use
a
foreground
a blurred
.
.
Set the command
The
the fully
blur can
setting
up most
be achieved with
(80mm
achieved. Background
telephoto
this
setting when
photograph
with
clearly
background.
pressing
By
continuous shooting is
lf the
and
please
holding
subject is dark
the AE indicator in
use the flash.
dial to $.
picture-taking
automatic mode.
the
of
blur will improve
in
procedure
center of the viewfinder,
a telephoto lens lf it
the case of
a 35-80mm lens).
you
wish to
the
subject in the
emphasized
down the
or
(See page
shutter button,
possible.
in
back-lit conditions
the viewfinder
33)
is
the same
(See page
as the
21)
an
subject moves
effective
is a zoom
take
against
blinks,
with
as
25
Page 27

For
expansive landscapes,
shots and night-time
the landscape
photographs,
mode.
sUnset
use
-x-
;Y.
When
using a zoom lens,
lens). This will
l--=l
qr
When
gently
on
lf the
a blurred
Use of a tripod is recommended
create a feeling
you
set the
down
until it retracts. The
AE indicator
picture
use the wide-angle
of expansiveness
command dial to L with
blinks, the
Be
shutter
sure to hold
the
Set
picture-taking
The
the fully
setting
picture
the
(even
the
may not
speed setting is slow
camera steady and
with a tripod,
command
automatic mode
and add depth to
turn
procedure
(35
mm in the
pulled-up, press
flash
built-in
the way
out
and camera shake may cause
press
the AE mark will
-'A.
to
dial
is the same
page
(See
your photograph.
you
the
21)
case of a 35-80mm
want it
if the flash is
shutter button
continue blinking).
with
as
the flash
gently.
26
Page 28

the lens built-in
www.orphancameras.com
Use
close-up
photography
insects.
.
Under dark or back-lit
indicator in the
the flash.
(See page
macro feature
conditions
viewfinder
33)
plants
of
when the AE
blinks,
please
for
and
use
{f
as close to the subject
Get
With a zoom
setting
For
macro
ring light.
lens,
lens
the
macro
basic
photography,
to
your
as
you
achieve a
can
telephoto.
photography
we recommend
the command dial
Set
picture-taking procedure
The
the fully
automatic
permits.
lens
higher minimum focusing distance
we recommend
you
use Canon's
macro
Canon's
macro lenses and the
mode.
lenses,
to $ .
is
the same as
page
(See
magnification
and
with
21)
by
for advanced
ML-3 macro
27
Page 29

Use
this
freeze
etc.
.
For
continuous
the
shutter
setting
when
fast-moving
shooting,
button.
you
subjects
press
and hold
wish
in
sports,
to
down
28
-X-
;vr
.
ISO
400
'
'
'
or
Telephoto
etc
are also recommended.
,
t=
qr
you
When
gently
down
on.
lf
the
AE indicator
blurred
Use
of
picture.
a tripod
a
faster
films
lenses
set the
until it
are recommended.
such
as the
command
retracts.
blinks,
Be
sure
is recommended
EF80-20Omm
dial to
The
the
shutter
to hold
K
picture
speed
the
camera
(even
with
Set the
picture-taking
The
the fully
automatic
F4.5
with
the
may
built-in flash
not turn
setting
steady
a tripod,
command
procedure
mode.
-
5
6 or the
out the
way
is
slow
and
press
and
the
AE
mark
dial
Kt.
to
is
the
(See page
-
EFTS
300mm
pulled-up,
you
want
camera
shake
the
shutter
will
continue
same
21)
press
it if
the flash
may
button
blinking)
as with
-
F4
5.6,
the flash
is
cause
gen1y.
-
Page 30

ADVANCED
www.orphancameras.com
III.
The shutter-priority
various
advanced
zone settings
oPerations.
OPERATIONS
the command
on
dial
can
be
used
for
Fast shutter
shutter
Slow
rlz
,@.
you
the shutter
lf
set
.
When taking
tripod
a
photograph
a
speed
speed
speed
at
1115
of
you
sec
TV screen,
a
In the shutter-priority
shutter
speed
automatically
obtain
called
Faster
freeze
slower
with a
a suitable
shutter-prioritY
shutter
moving
shutter
feeling
.
For continuous
the shutter
can
be
take
sure
button
pictures
to hold
of
of
zone,
and
the apertu
sets
exposure.
AE.
speeds
subjects,
speeds
motion.
shooting,
your
television
the camera
you
the
allow
while
the subject
blur
press
and
screen
very steady
the
set
era
cam
re to
This
You
with
hold down
or use
is
to
29
Page 31

Turn the
command dial
desired shutter speed.
Press
the
focus
.
The
LCD
shutter button halfway
the
subject.
value
aperture
panel
will
be
and set
indicated
the
to
on the
t--=
tJl
lf the AE indicator in the viewfinder
halfway
button
.
lf the aperture value on the LCD
camera
aperture) of
happen,
until the
speed
.
lf
the aperture value on the LCD
camera
aperture) of the lens, the scene is
happen, turn the
speed until
and check the aperture value
is
to
set
the smallest aperture value
the lens,
turn the command dial and lower
AE indicator
will not result in
is
set to the
the AE indicator
the scene is too
stops blinking.
a blurred
largest
command dial and increase
30
blinks,
panel
Check that the
picture
due to
panel
aperture value
too bright.
stops blinking.
Check that the AE indicator
in-focus lamp
lit,
then take
press
the shutter
on the LCD
blinks when the
(i
e maximum
dark Should this
the shutter
camera shake
blinks when the
(i
minimum
e.
Should
the shutter
in the viewfinder
photograph.
the
panel.
speed
shutter
this
and the
are
Page 32

;@.
www.orphancameras.com
f-rangirigth*
il
Larger
(smaller
Smaller aperture
(larger
'*i
#*ptrx
aperture
aperture diameter)
re
apertu
{:t*ar,;
value
value
diameter)
lf
the shutter speed
aperture
change
value will
accordingly.
shutter speed,
aperture
value
aperture diameter)
rs
changed, the
automatically
The
slower the
the larger the
(i.e.the
will
smaller
The faster
be.
the
the shutter speed, the smaller the
(i.e.
aperture
value
aperture diameter)
you
way,
f
ield.
A larger
greater
for
everything
can change the depth of
aperture
depth of
expansive
field
landscapes, where
from nearby
background details are sharply
f
ocus.
With
a smaller aperture
depth of
field is
shallower, and
ideal for beautiful
larger the
the
will be.
value
and
objects to
value, the
portrait
In
this
gives
is
suitable
this is
shots set
a
in
off against a blurred background.
.
For information
page
49.
on aperture
values refer to
31
Page 33

Set any
shutter speed
command dial.
with the
Press
the shutter
and turn
change
the desired
displayed
the
command
the shutter speed
aperture
LCD
on
Press the shutter
halfway to
.
The
on
Check
the viewfinder
the
e4'
.tL
focus the subject.
value
aperture
panel.
the LCD
that the
photograph.
AE
is
button
value
panel.
will
be
indicator
lit,
then
halfway
to
dial
until
is
button
indicated
in
take
 Loading...