

Page 1
Canon
8mm VIDEO CAMCORDER
Instruction Manual
Page 2

Page 3

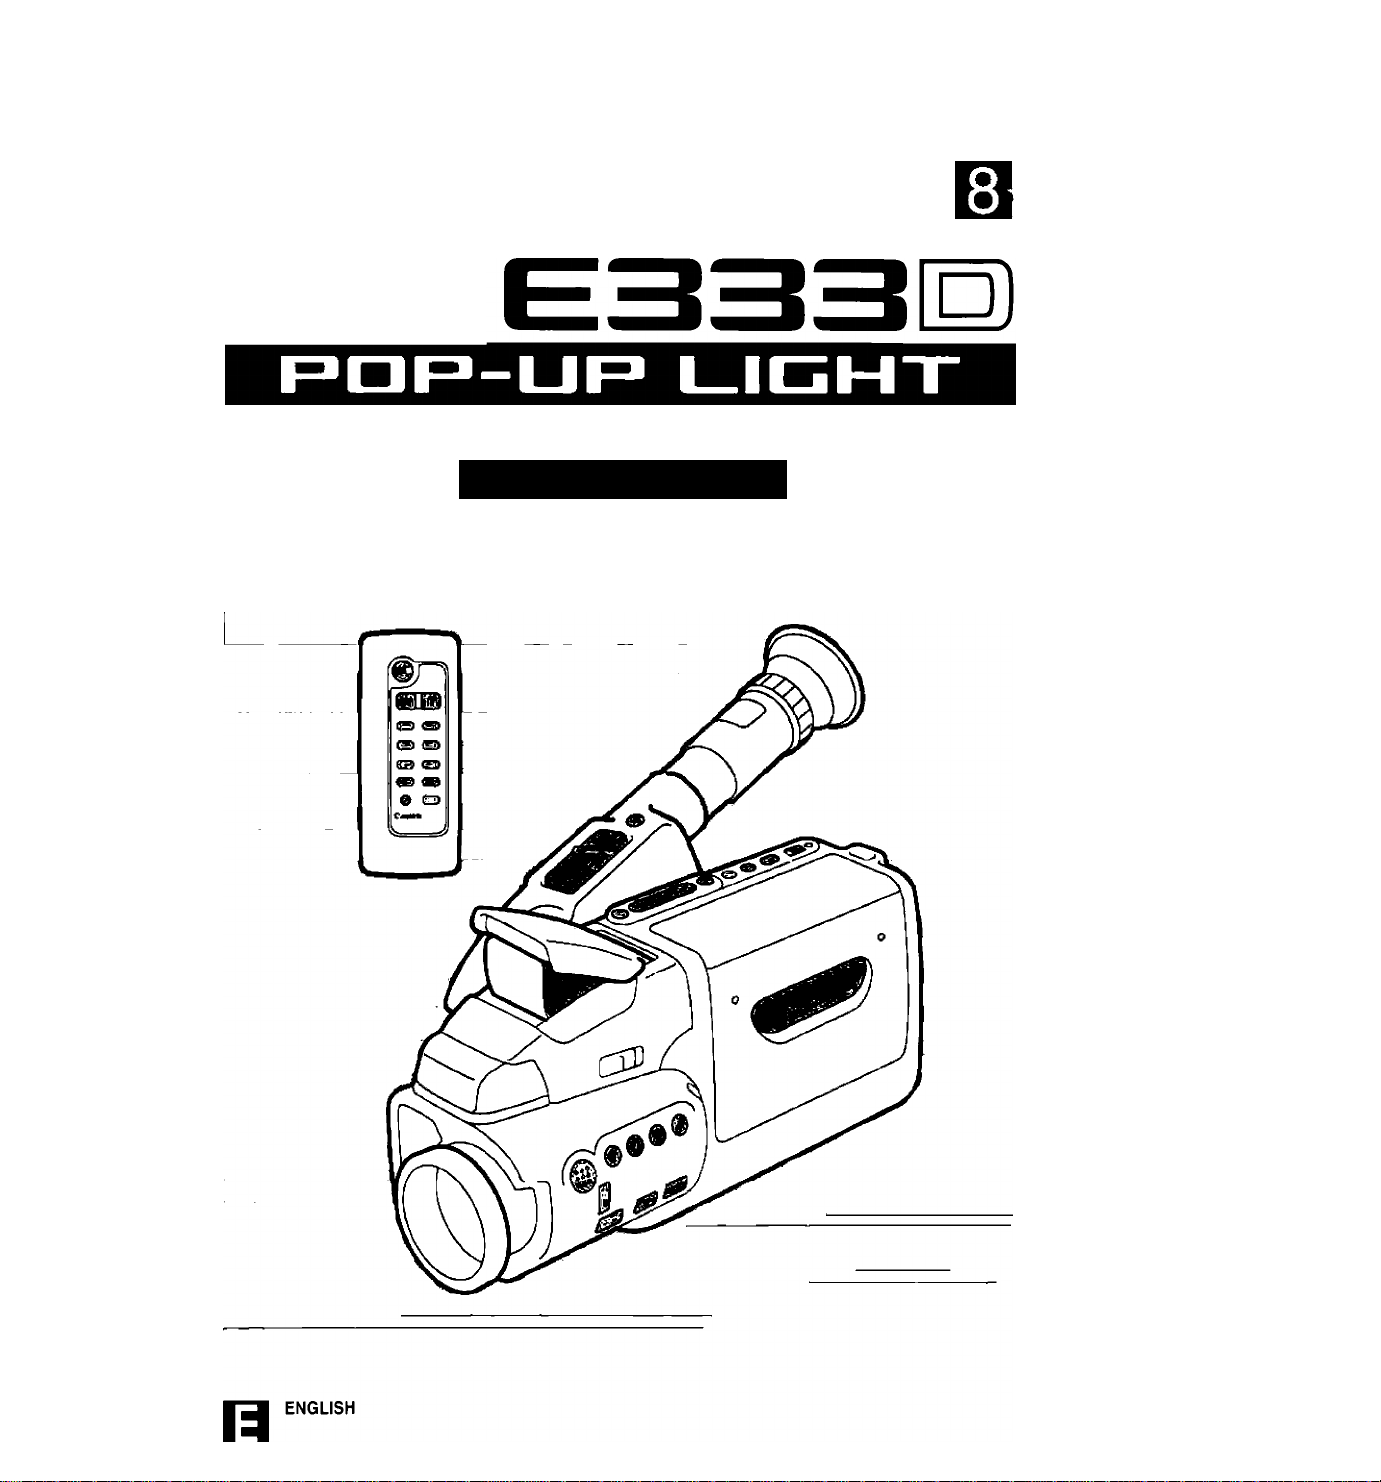
Thank you for purchasing the Canon 8mm Video Camcorder E333D.
The E333D can be used for both recording and playback of video cassettes in 8mm
format.
• Use 8mm vídeo-cassettes marked with an 0 (P5 type).
Piease check that this package contains the foiiowing items:
“ Lens Cap and Lens Cap Cord
E333D
Lens Hood
One Lithium Battery
WL-52 Wireless Controiier
L Two R03 AAA Batteries
Important Usage Instructions
CAUTION:
TO REDUCE THE RISK OF ELECTRIC SHOCK, DO NOT
REMOVE COVER (OR BACK). NO USER SERVICEABLE
PARTS INSIDE. REFER SERVICING TO QUALIFIED
SERVICE PERSONNEL.
WARNING:
TO REDUCE THE RISK OF FIRE OR ELECTRIC SHOCK,
DO NOT EXPOSE THIS PRODUCT TO RAIN OR
MOISTURE.
CAUTION:
TO REDUCE THE RISK OF ELECTRIC SHOCK AND TO
REDUCE ANNOYING INTERFERENCE, USE THE
RECOMMENDED ACCESSORIES ONLY.
DC-100 DC Coupler
BP-E77K Battery Pack
CA-100 Compact Power Adapter
PC-150 SCART Cable
SS-300 Shoulder Strap
i
Page 4

Table of Contents
Important Usage Instructions.......................................................................................3
Nomenclature............................................................................................................................ 6
Basic Recording......................................................................................................................10
Tape Counter...............................................................................................................12
Recording Reminder.................................................................................................. 12
Video Cassette Warnings...........................................................................................13
Battery Pack Warning.................................................................................................13
Recording Using Tripod.............................................................................................13
Viewfinder Dispiays................................................................................................................14
Power Sources............................................................................................................. is
Using AC Power..........................................................................................................15
Using Car Battery........................................................................................................15
Using Battery Pack.....................................................................................................16
Using Your Battery Packs Effectively.......................................................................19
Inserting New Lithium Battery...................................................................................22
Loading and Unloading Video Cassettes.........................................................................23
Video Cassette Notes.................................................................................................24
Camera Preparations..............................................................................................................25
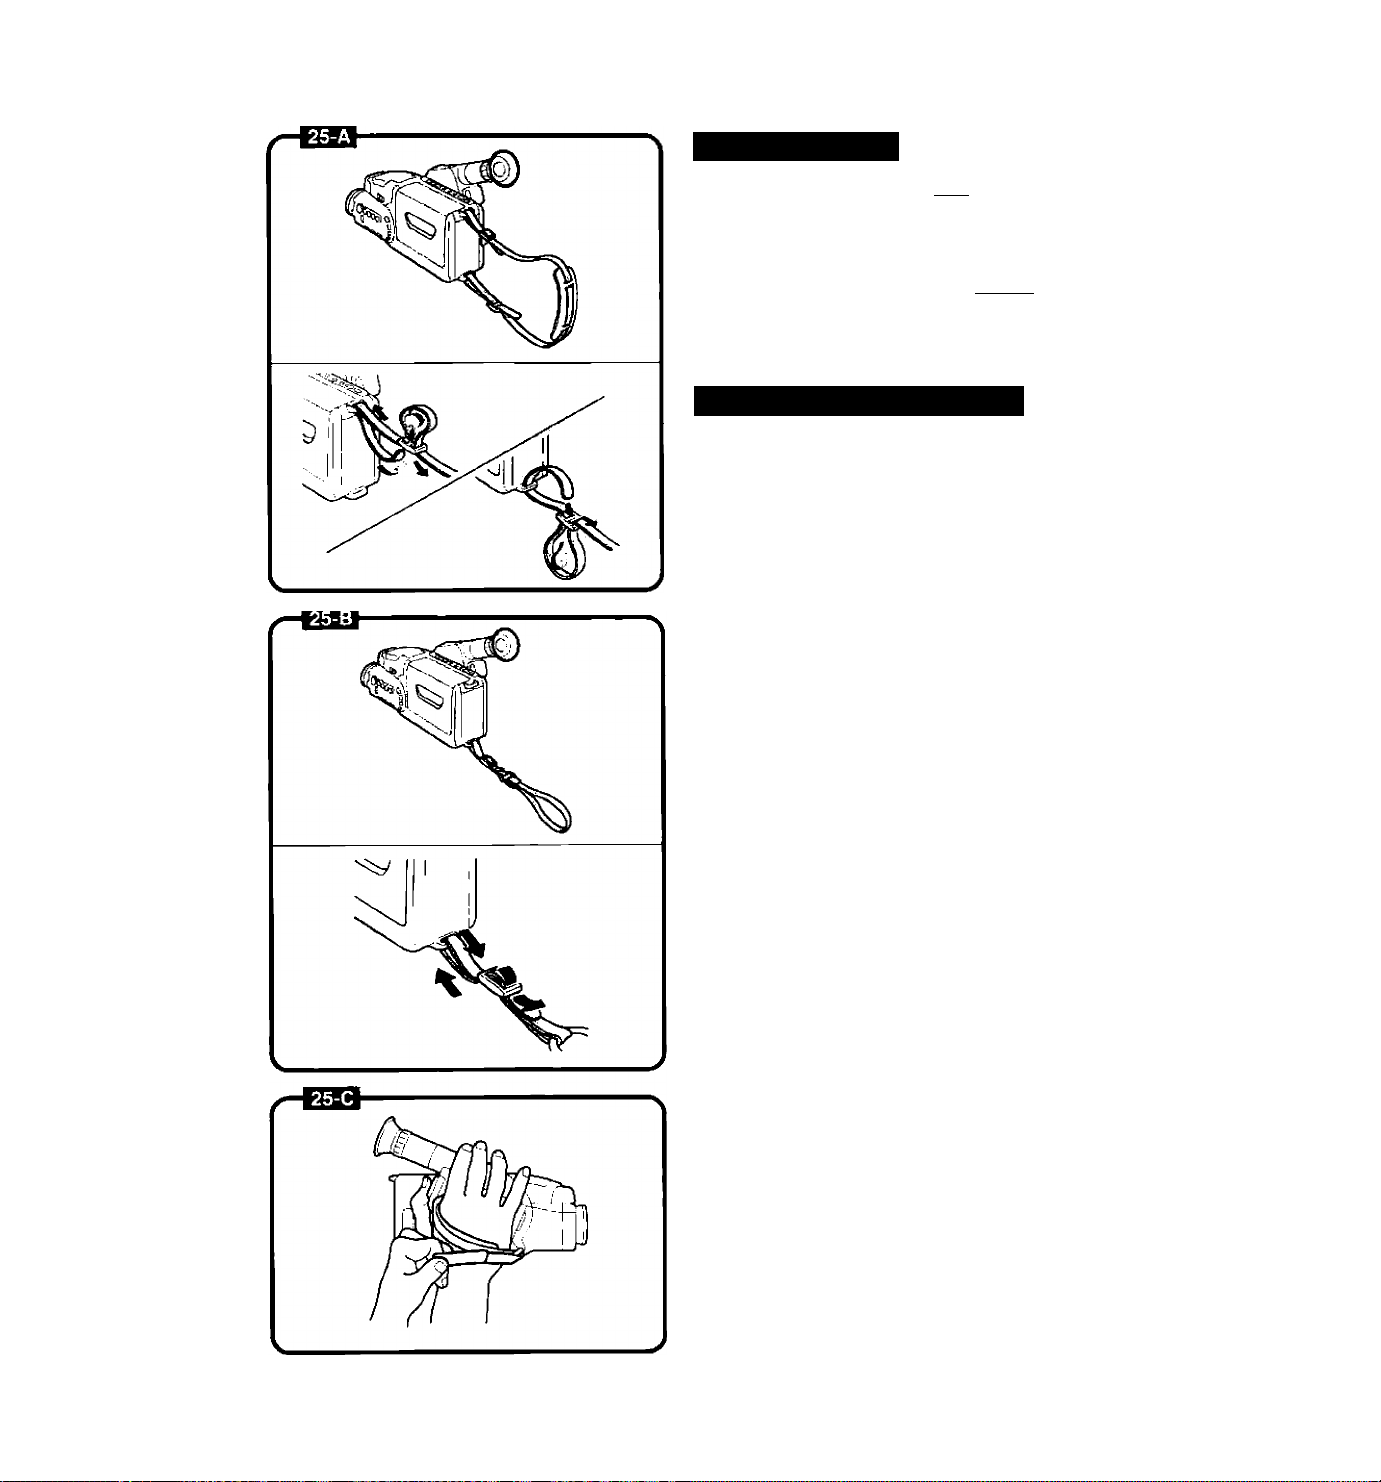
Attaching Straps.........................................................................................................25
Adjusting the Grip Belt...............................................................................................25
Attaching the Lens Cap Cord
Removing and Attaching the Lens Cap and Lens Hood
Using the Finder..........................................................................................................26
Adjusting the Dioptre..................................................................................................27
Adjusting the 180° FlexiGrip......................................................................................27
Removing and Attaching the Finder.........................................................................27
Zooming.....................................................................................................................................28
Power Zoom................................................................................................................28
Wireless Zoom.............................................................................................................28
Setting Date and Time............................................................................................................29
Recording Date and Time..................................................................................................... 33
Age insert.................................................................................................................................. 34
Registering a Birthday
Recording an Age.......................................................................................................37
...............................................................................................
WL-52 Wireless Controller....................................................................................................38
Playback Connection............................................................................................................. 40
Using a TV (or VCR) with a SCART Terminal...........................................................40
Using a TV (or VCR) with AudioA/ideo Input Terminals
Using a TV without AudioA/ideo Input Terminals...................................................41
Playback Procedure................................................................................................................45
Special Playback Methods.........................................................................................47
....................................................................................
........................................
.........................................
26
26
34
40
Page 5

ADVANCED OPERATIONS
Focusing....................................................................................................................................^
Autofocus......................................................................................................................................50 §
Manual Focus................................................................................................................................51 rn
Focus Lock....................................................................................................................................51 ^
Macro Recording........................................................................................................................................... 52 g
Program AE.................................................................................................................................................53
How to Use Program AE.......................................................................................................... 53
To Record a Backlit Subject (Backlight Compensation)
To Record a Spotlit Scene........................................................................................................55
To Record a Bright Scene (Beach or Snowy Location)
White Balance................................................................................................................................................ 56 5
Shooting with Pop-up Light..........................................................................................................................57 ^
Replacing Bulb..............................................................................................................................58 q
High-Speed Shutter.......................................................................................................................................59 S
Fade................................................................................................................................................................ 60 ^
Fade In...........................................................................................................................................60 q
Fade Out........................................................................................................................................61 ^
Wireless Fade.............................................................................................................................62
To Resume Recording................................................................................................................................63
Record Search............................................................................................................................63 e
Record Review..............................................................................................................................64 y.
Edit-erase......................................................................................................................................66 ^
Tape Return....................................................................................................................................................67 z
Adding Titles to Recordings.........................................................................................................................68 g
Creating Character Titles.............................................................................................................68 O
Recording Titles............................................................................................................................71 m
Editing to Another VCR.................................................................................................................................72 ^
Using a VCR with a SCART Terminal..........................................................................................72 O
Using a VCR with AudioA/ideo Input Terminals........................................................................72 w
.......................................................
.........................................................
................
50
55
55
03
>
ADDITIONAL INFORMATION
Canon E333D Video System Chart...............................................................................................................74 §
Carrying Cases...............................................................................................................................................75 5
Optional Accessories....................................................................................................................................76 >
Problems and Troubleshooting....................................................................................................................78 z
Condensation (DEW)......................................................................................................................................8i g
Cautions
Specifications.............................................................................................................................................85
......
.................................................................................................................................................82 i
During Use.....................................................................................................................................82 5
Maintenance..................................................................................................................................84 ^
>
Page 6
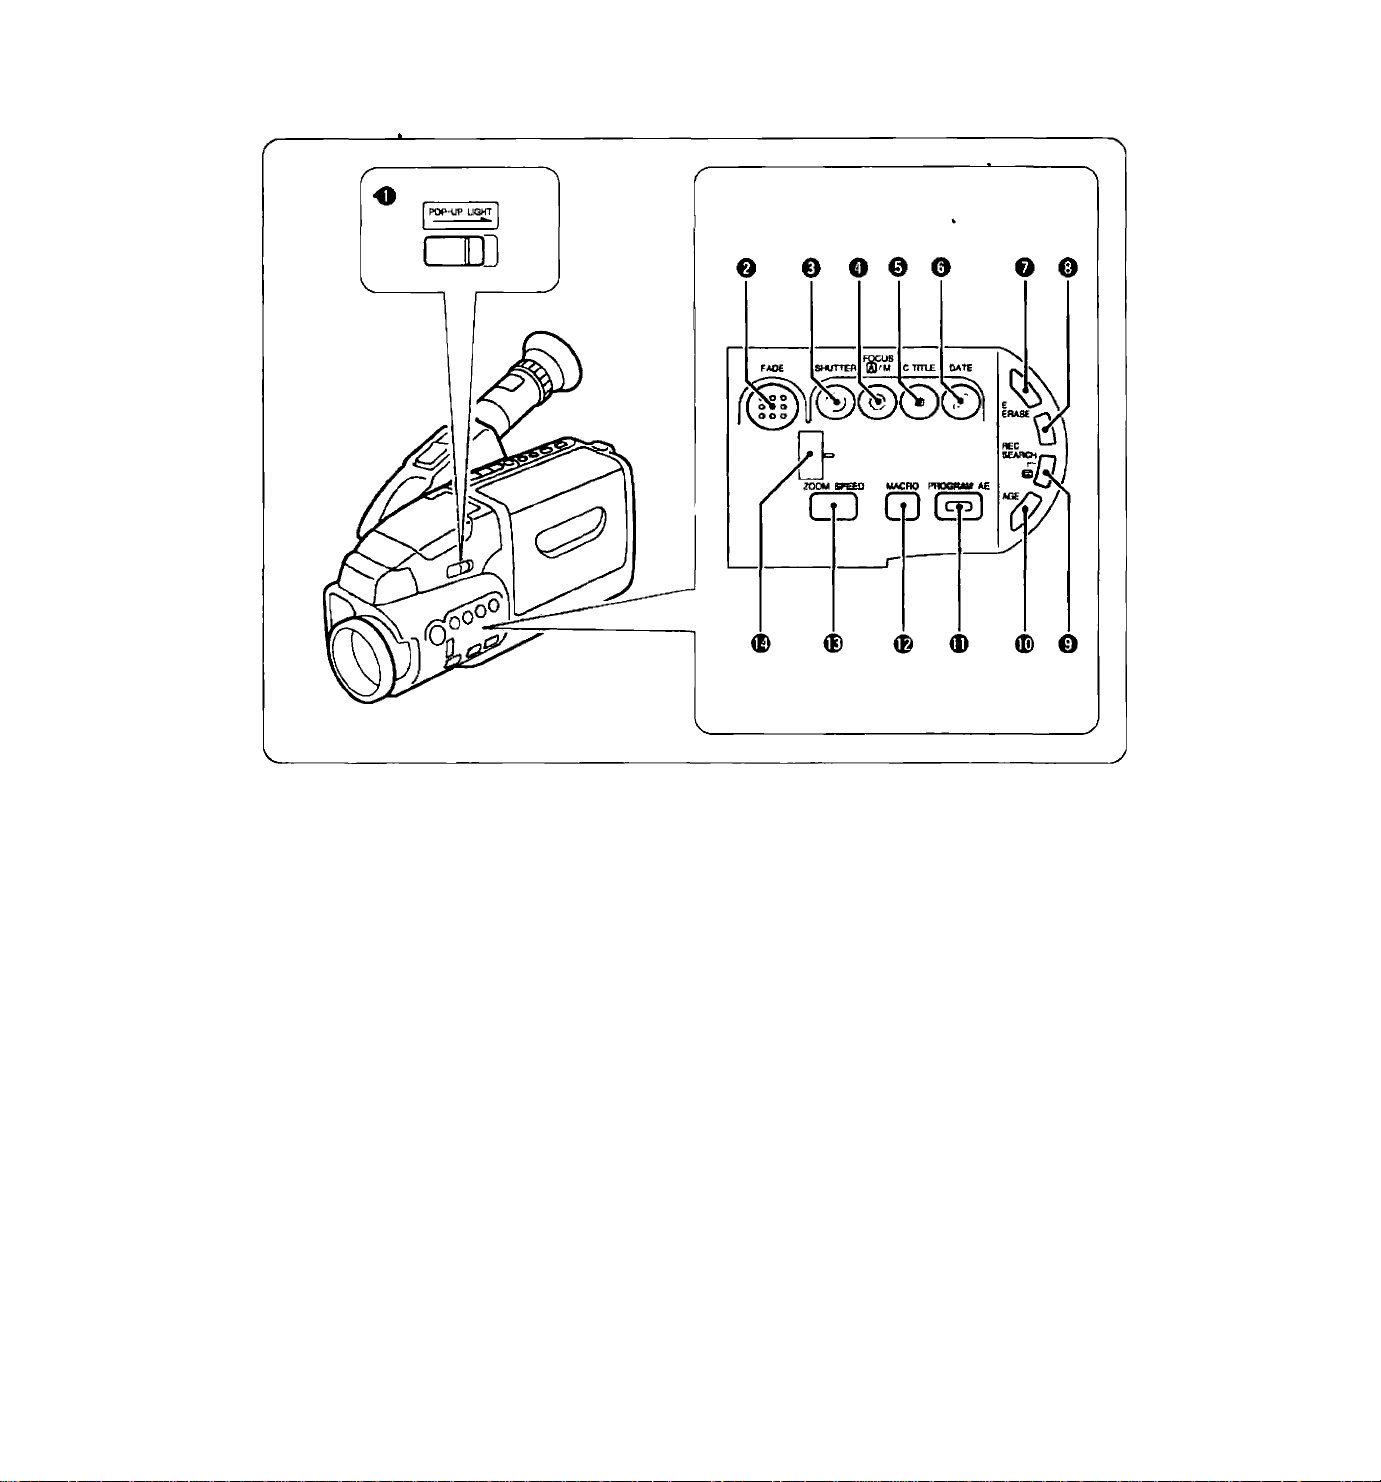
Nomenclature
O POP-UP LIGHT Switch
O FADE Button
O SHUTTER Button
O FOCUS IS/M (Auto/Manual) Button
0 C. (Character) TITLE Button
0 DATE Button
0
E. (Edit) ERASE Button
0 REC SEARCH + Button
0 REC SEARCH - Button
O (Record Review) Button
0 AGE Button
0 PROGRAM AE Button
0 MACRO Button
0 ZOOM SPEED Button
0
Zoom Window
Page 7
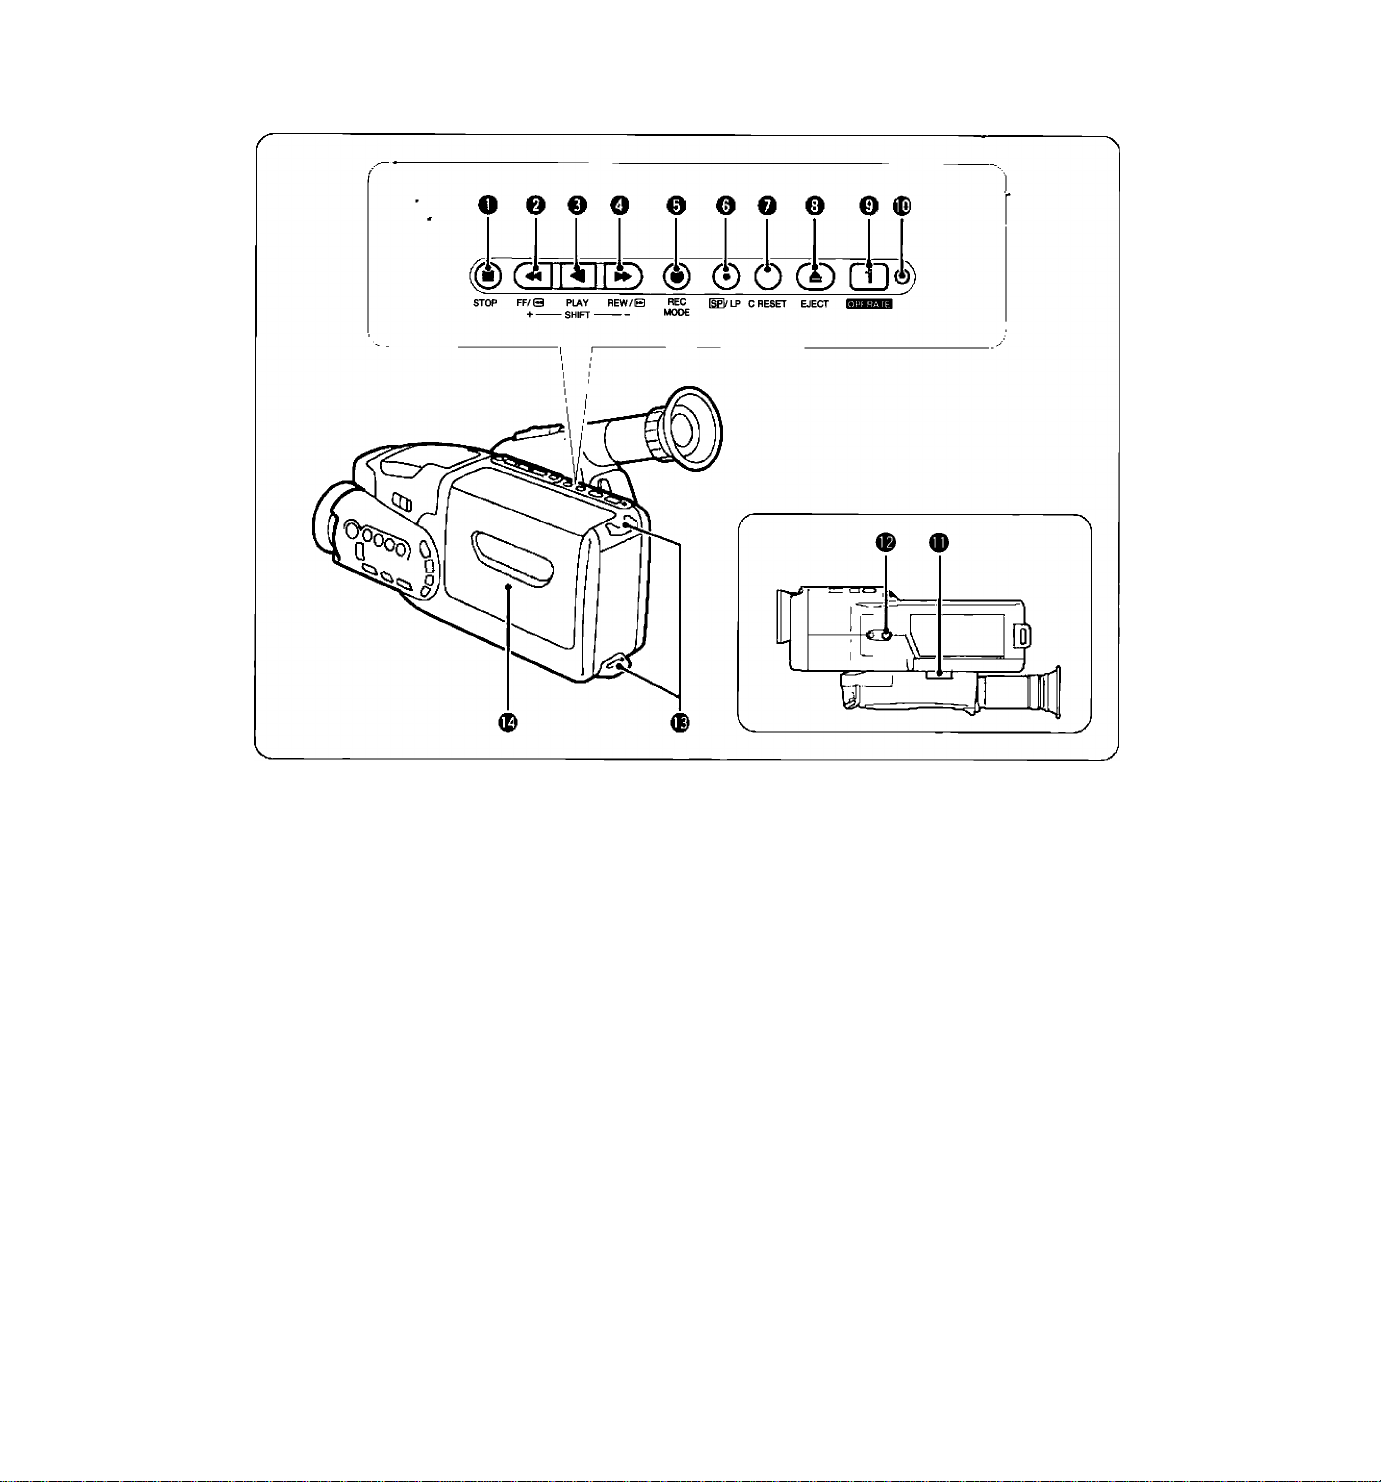
CD
m
•n
O
jj
m
c
CO
z
o
STOP Button
FF Button / + Button
Q ◄ PLAY Button / SHIFT Button
O ►► REW Button / - Button
0 # REC (Record) MODE Button
0 US / LP (Tape Speed) Button
0
C. (Counter) RESET Button
0
A EJECT Button
0 OPERATE Button
0 OPERATE Indicator
■ Lights up during normal operation.
• Flashes to warn that there is internal
condensation or a malfunction, or to indicate
that the battery pack is nearly exhausted.
Lithium Battery Compartment
® Tripod Socket
® Strap Attachment Bars
0
Cassette Compartment
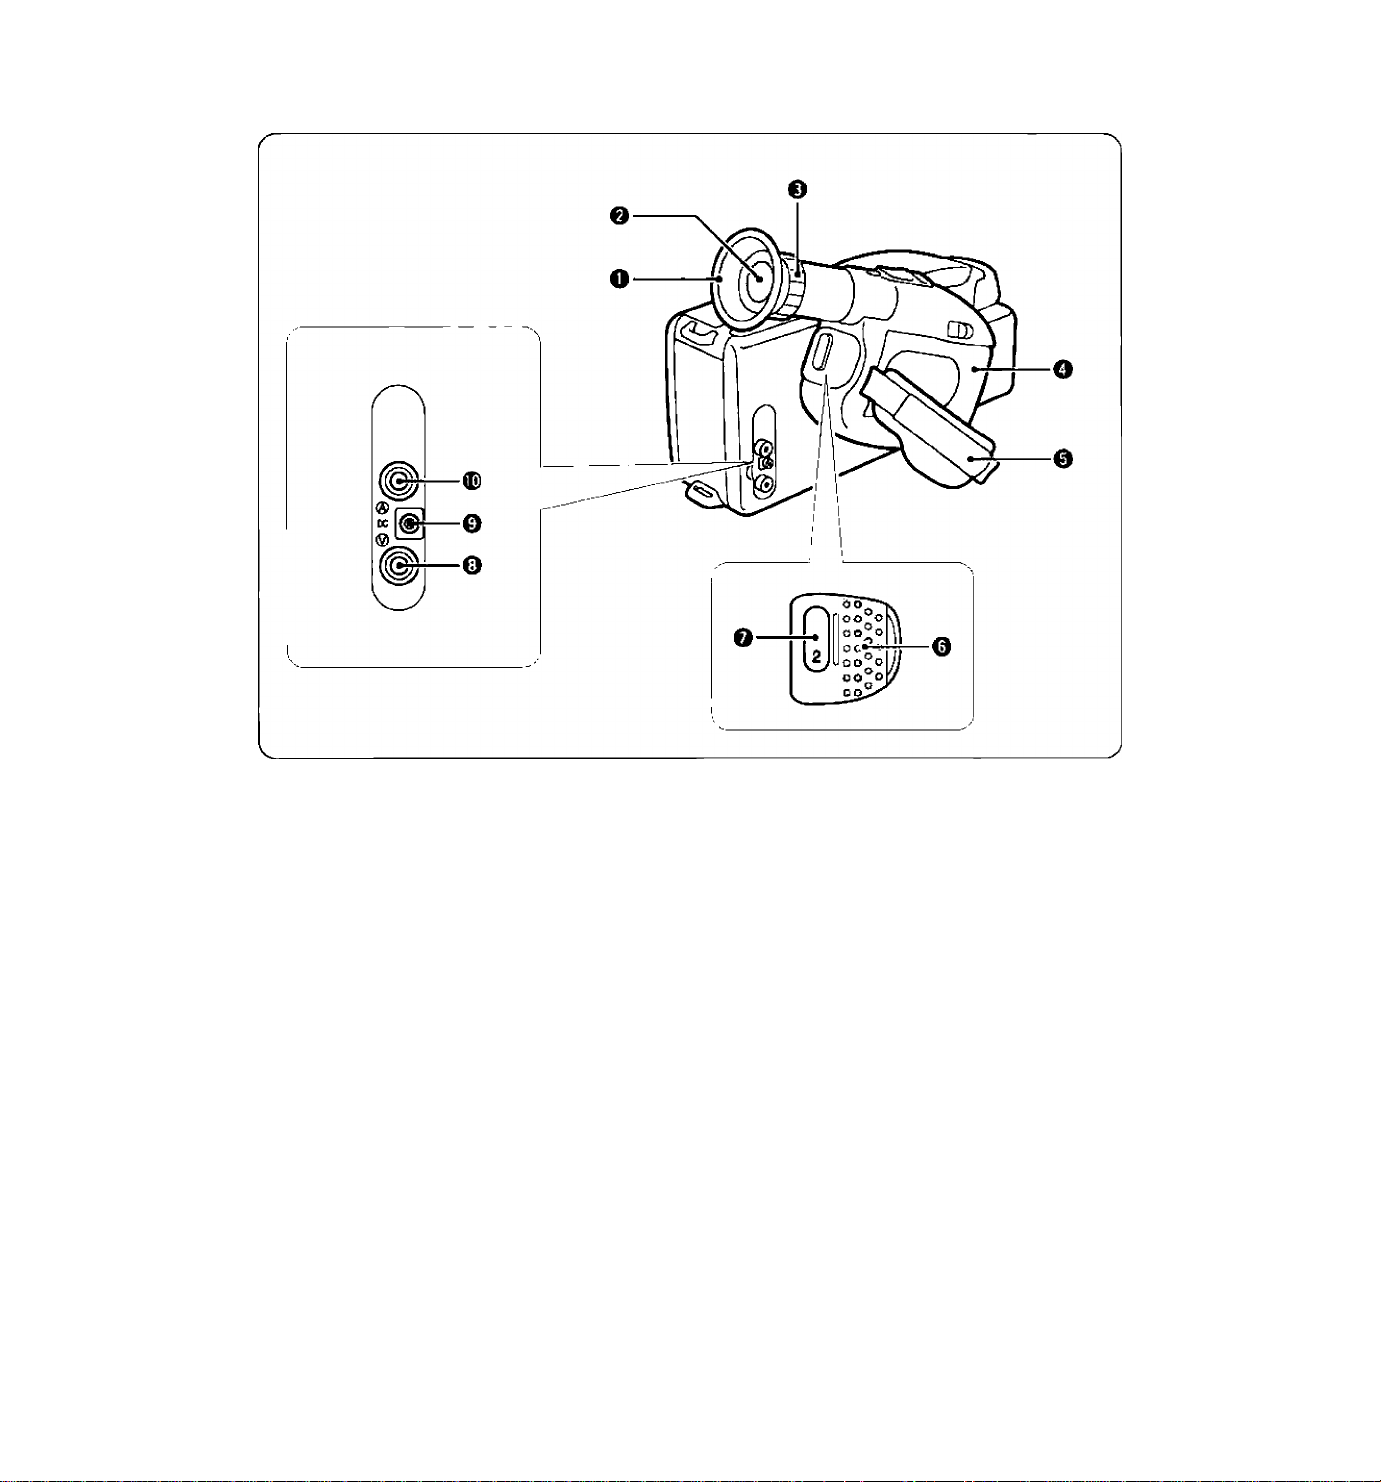
Page 8
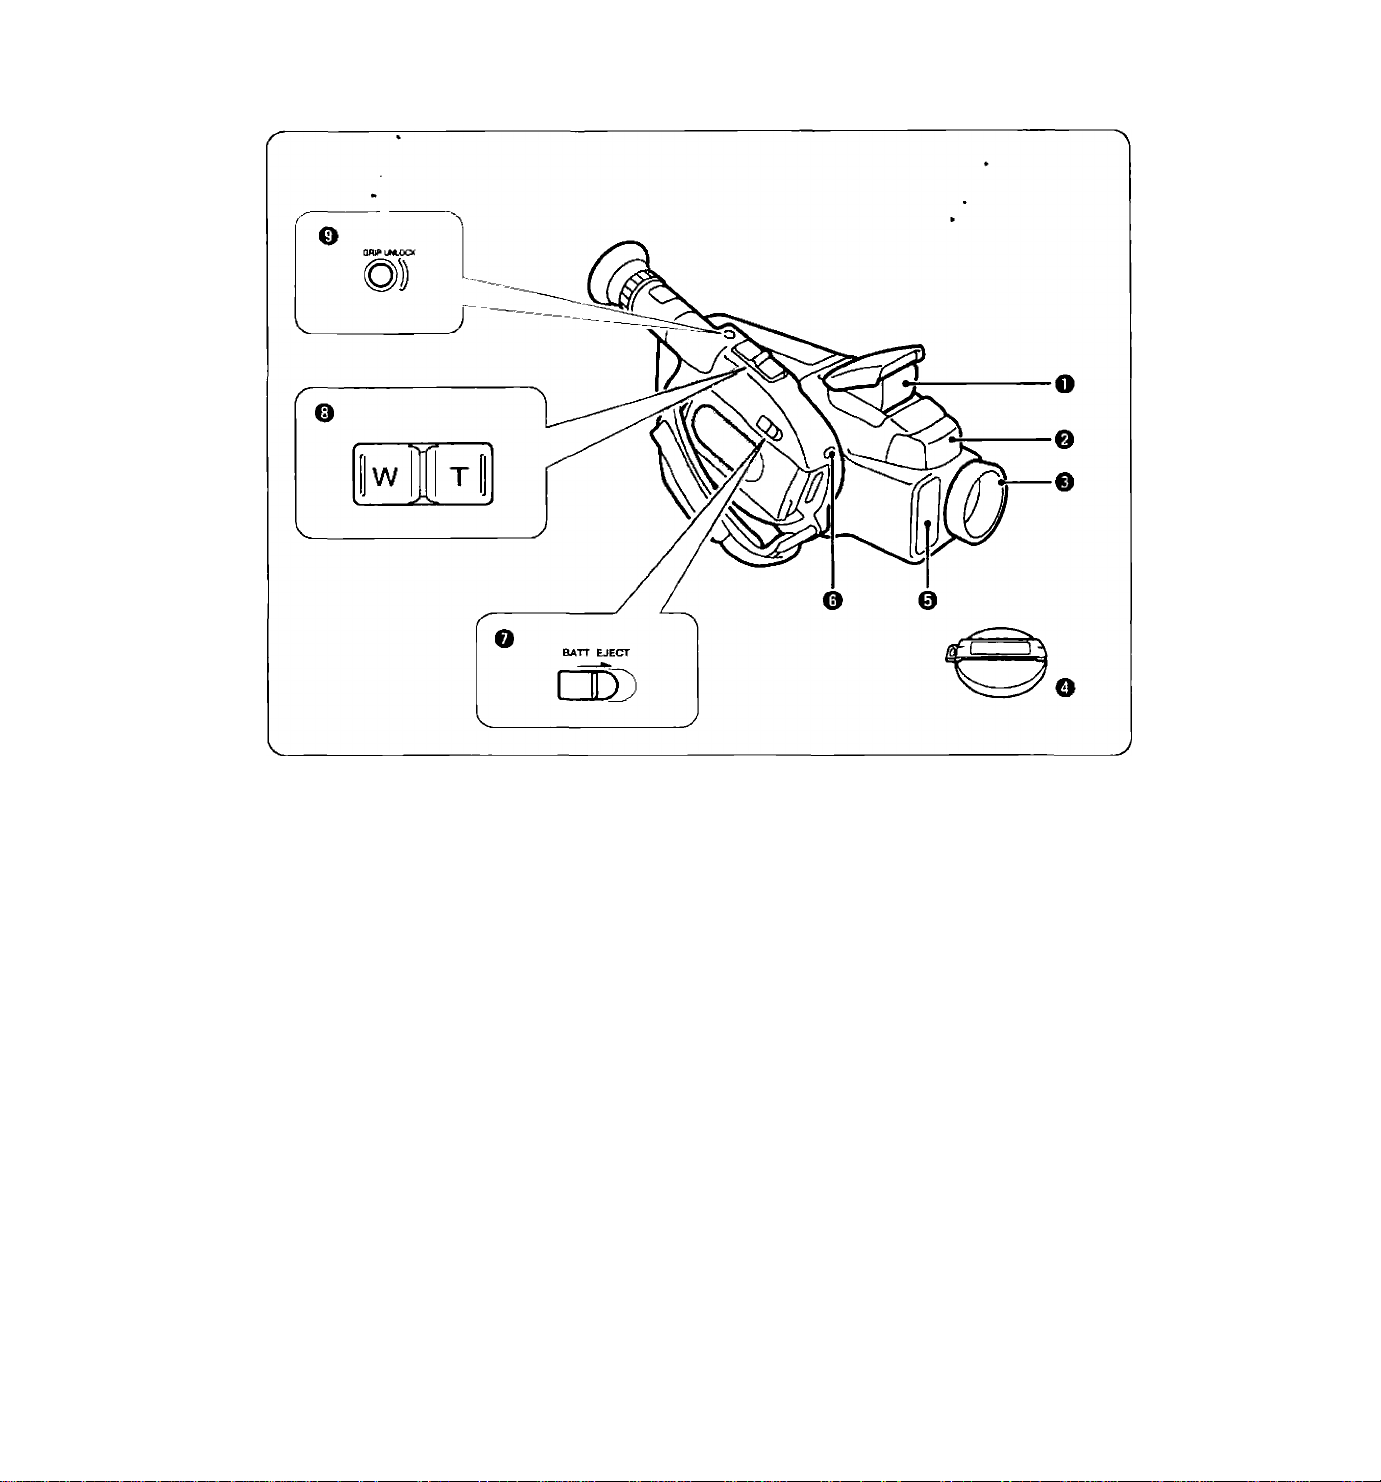
г
Q Pop-up Light
# Microphone
O Focusing Ring / Lens Hood
O Lens Cap
O Remote Sensor
Autofocus Window
Tally Lamp
• Flashes rapidly during recording.
• Lights up when a wireiess controiier signai is
received.
ВАТТ (Battery) EJECT Switch
Power Zoom Buttons
GRIP UNLOCK Button
8
Page 9
03
m
■n
O
33
m
c
OT
z
O Eyecup
9 Viewfinder
O Dioptre Adjustment Ring
O Power Source Compartment
O Grip Belt
Thumb Rest
Start/Stop Button
Video Output Terminal
DC Output Terminal
Audio Output Terminal
Page 10
Basic Recording
OPERATE
1. Attach a power source.
• See pp. 15-21 for using power sources.
2. Turn the camera on.
• The OPERATE indicator lights up.
• “TAPE” flashes in the viewfinder (see p. 13). Biffl
_____
3. Load a cassette.
• See p. 23 for loading/unloading cassettes.
• Use an 8mm video cassette marked with an B (P5 type).
• The camera goes into “record pause mode”. KfiBSl
4. Press the SP/LP button to select the tape speed.
• For best picture quality, select SP.
• For double recording time, select LP.
5. Pull out the finder.
• See p. 26 for using the finder.
6. Turn the grip to the desired position.
• See p. 27 for adjusting the grip.
10
Page 11

7. Press the start/stop button.
• Recording starts and “REC” appears in the viewfinder. KWl
• The tally lamp flashes rapidly.
• See “ADVANCED OPERATIONS” (pp. 50-73) for information on
making your recordings more effective.
CD
>
W
o
o
•0
m
33
>
w
REC *
8. Press the start/stop button again to pause
recording. IWil
• Press the start/stop button once again to resume recording.
• See “Record Review” (p. 64) to check your recording.
9. When recording has ended, remove the cassette.
• See p. 23 for loading/unloading cassettes.
PAUSE
10. Turn the camera off.
• The OPERATE indicator goes off.
Notes:
• The camera automatically turns off If record pause mode lasts more than approximately seven minutes.
To resume recording, turn the camera on and press the start/stop button.
• Avoid recording near sources of electric or magnetic fields, such as a TV tower, which can cause noise in
the picture or a camera malfunction.
• If the tape speed is changed during recording, the tape will contain noise at that point.
11
Page 12

Tape Counter
0:35:40
SP
to SEC
During recording, the tape counter in the
viewfinder indicates how long you have recorded.
In the case shown in the diagram, you have
recorded for approximately 35 minutes and 40
seconds (in SP mode). WRl
• The tape counter is reset to 0:00:00 when you
press the C. RESET button, or each time you
load a cassette.
• The tape counter also appears during playback
and record search, so you can use it to verify
how long the tape has run.
• Tape counter time and actual recording length
may be slightly different. Use the tape counter
only as an approximate guide.
• When recording in LP mode, actual recording
length is approximately twice the tape counter
time.
Recording Reminder
^ When you start to record, the camera counts off
the first 10 seconds of your recording and
displays from “0 SEC” to “10 SEC” in the
viewfinder. This is to help you make sure your
scenes aren’t too short, for easy viewing and
editing. Try to record for at least the full 10
seconds. IBKl
• Recording reminder time and actual recording
length may be slightly different. Use the
recording reminder only as an approximate
guide.
12
Page 13
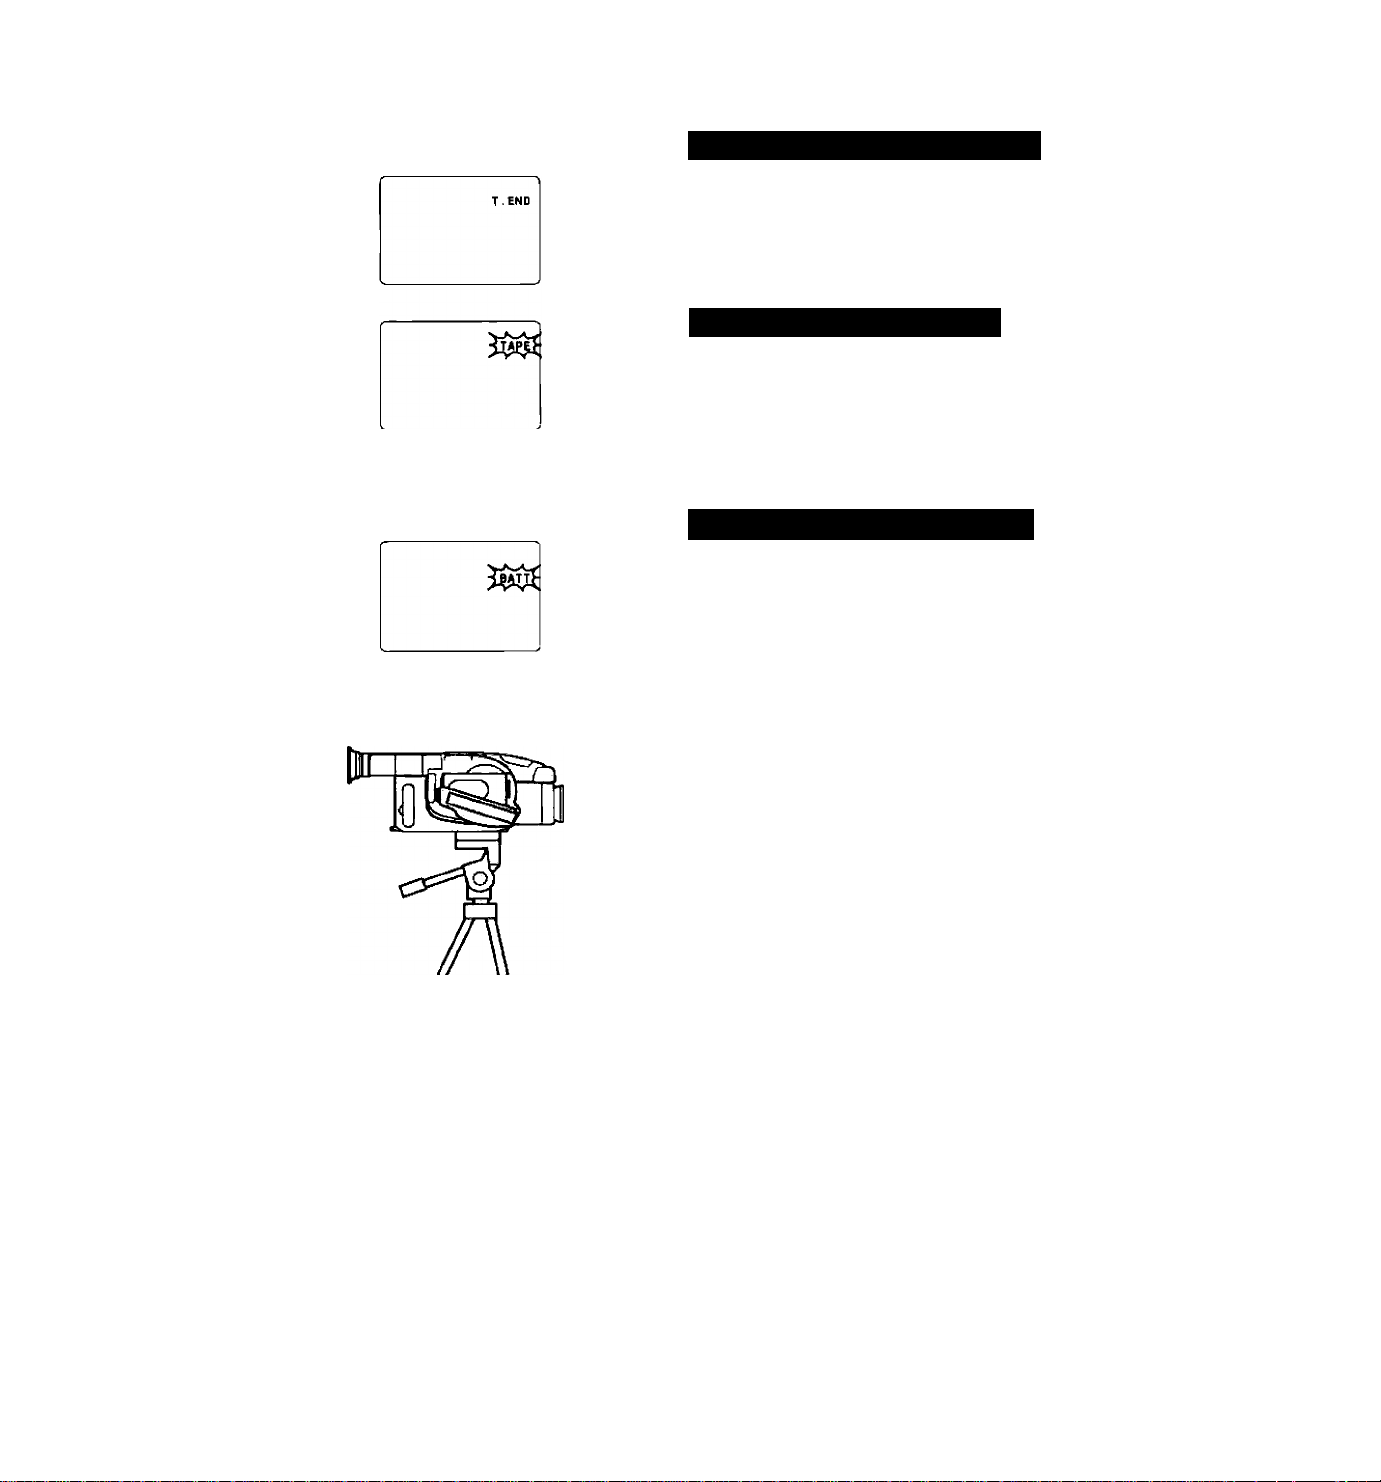
Vídeo Cassette Warnings i3-a
• “T. END” appears in the viewfinder when the
tape is compietely used up.
• ‘TAPE” fiashes in the viewfinder if the camera
is turned on and a cassette is not ioaded.
Battery Pack Warning 13-b
• “ВАТТ fiashes in the viewfinder when the
battery pack is neariy exhausted.
• if the camera is turned on with an exhausted
battery pack attached, it may turn off
immediateiy, without a “ВАТТ’ warning.
Recording Using Tripod 13-c
Use a tripod especiaiiy in the foiiowing cases:
• Telephoto recording
• Macro recording
• Recording using wireiess controiier
•
Note:
• Be sure to protect the viewfinder from direct sunlight,
otherwise the viewfinder will melt.
CD
>
w
О
О
■о
m
33
О
z
со
13
Page 14
Viewfinder Dispiays
Viewfinder displays provide information and warnings regarding camera operation.
• Press the ON SCREEN button O on the wireless controller to see the viewfinder displays
except ©, ® and ® on a connected TV screen.
• Press the C. TITLE button to see the character title on TV, the DATE button for date and time
and the AGE button for age. Only the title, date and time, and age are recorded with scenes.
No. Mode
© Recording Reminder
© Tape Counter
© Video Cassette Warning ....
© Battery Warning.................
© Condensation Warning
© Lithium Battery Warning ....
© Character Title
© Age Insert
.....................
...........................
.........
.....
...................
....
p. 12 © Date and Time
....
P-12
....
p. 13
....
p. 13 © Tape Speed
....
p. 81 © High-Speed Shutter........
....
p. 22 © Program AE
....
p. 68 © Manual Focus
....
p. 34
No. Mode
.................
© Edit-erase
© Tape Operations
........................
.....................
....................
.................
.............
........
........
........
........
........
........
........
PPPPPP-
P-
29, 33
66
10
10
59
53
51
14
Page 15
Power Sources
Using AC Power
CA-100 Compact Power Adapter iEffi
Plug into mains outlet.
Input voltage: 100—240 V AC, 50/60 Hz.
• Use together with the DC-100 DC Coupler.
• Refer to CA-100 instruction manual for further
details.
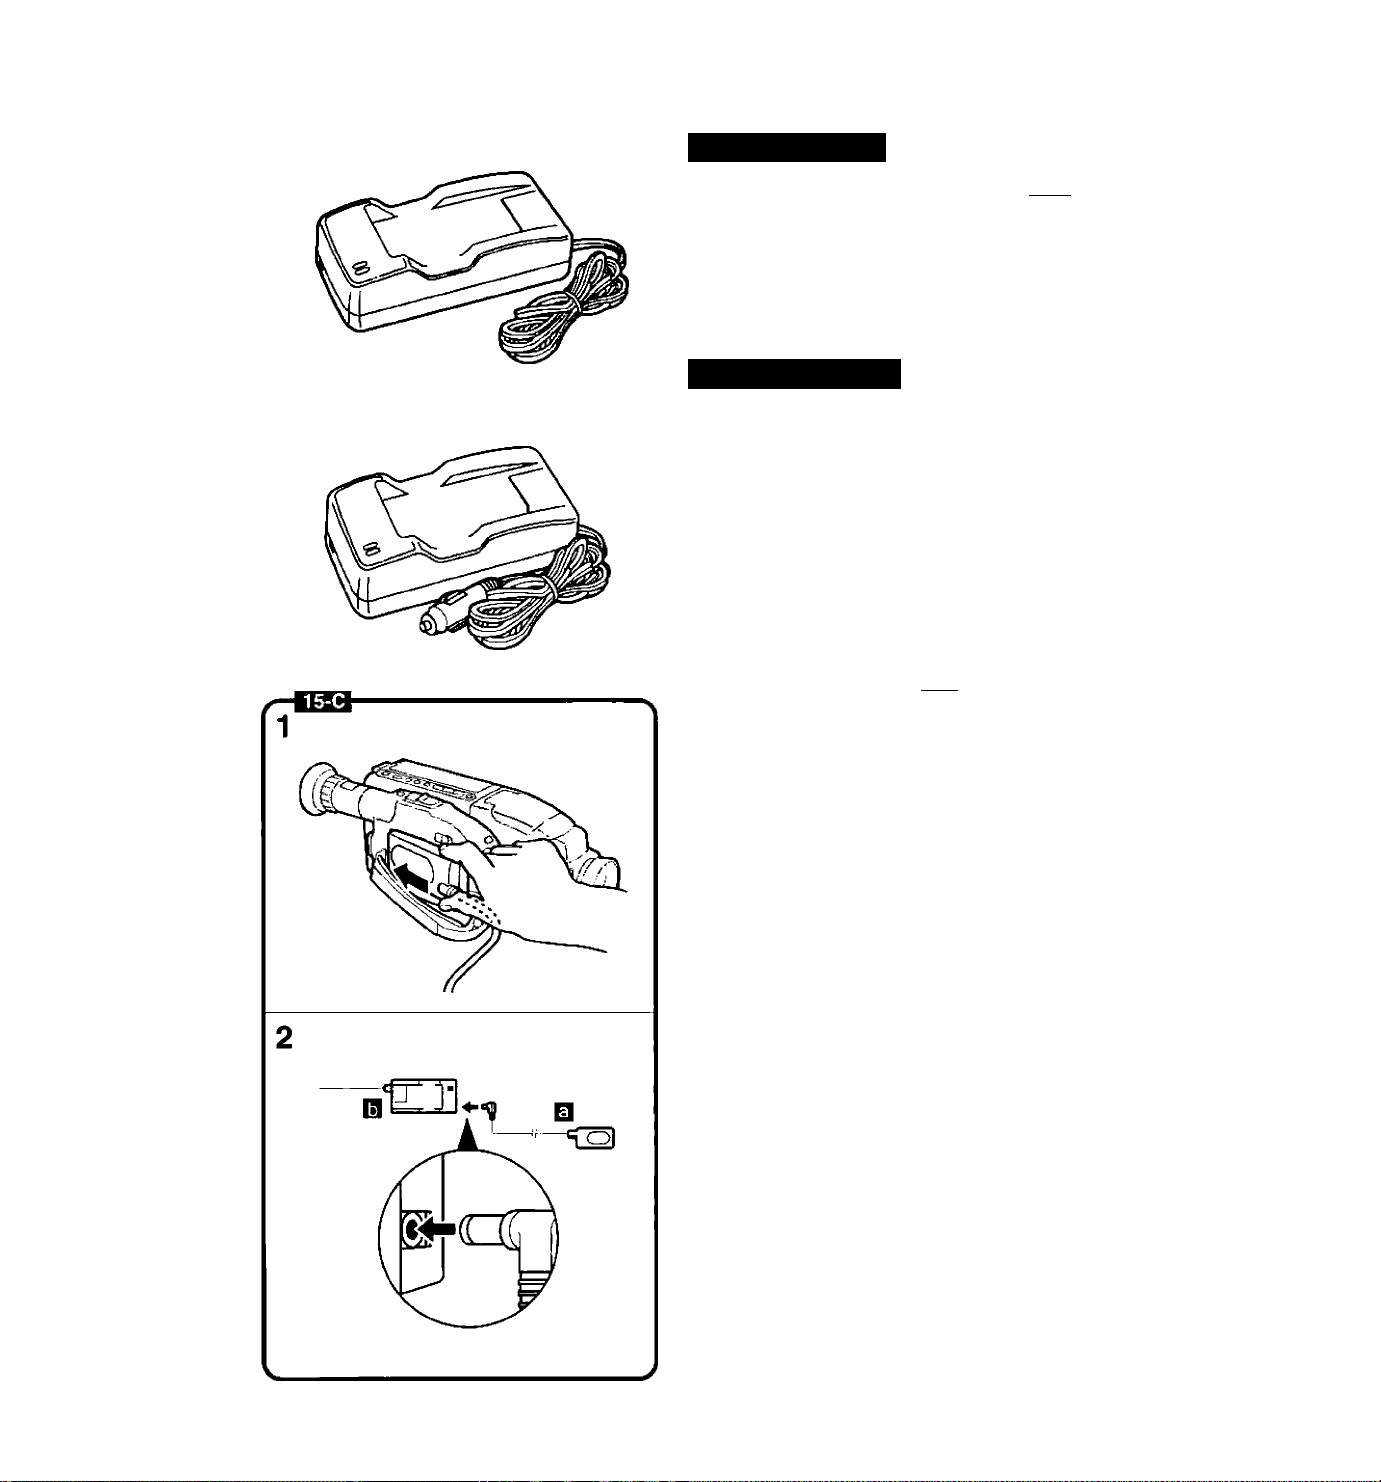
Using Car Battery
CB-110 Car Battery Adapter (option)
Plug into cigarette lighter socket.
For use only with 12 or 24 V DC negative-ground
car battery.
• Use together with the DC-100 DC Coupler.
• Use car battery adapter with the car engine
idling.
• Refer to CB-110 instruction manual for further
details.
Attaching DC Coupler lEiSI
To use the compact power adapter or car battery
adapter:
1. Insert the DC-100 DC Coupler into
the power source compartment.
• Insert and remove in the same way as the
battery pack (see p. 17).
2. Connect the DC-100 cable to the compact power adapter (or car battery adapter).
El DC-100
la CA-100 (CB-110)
CD
>
O
o
TD
m
JJ
>
H
o
z
CO
Caution------------------------------------------------------------
• Using the compact power adapter near the TV may
cause the TV to emit noise. If this occurs, move the
compact power adapter further away from the TV
or aerial cable.
15
Page 16
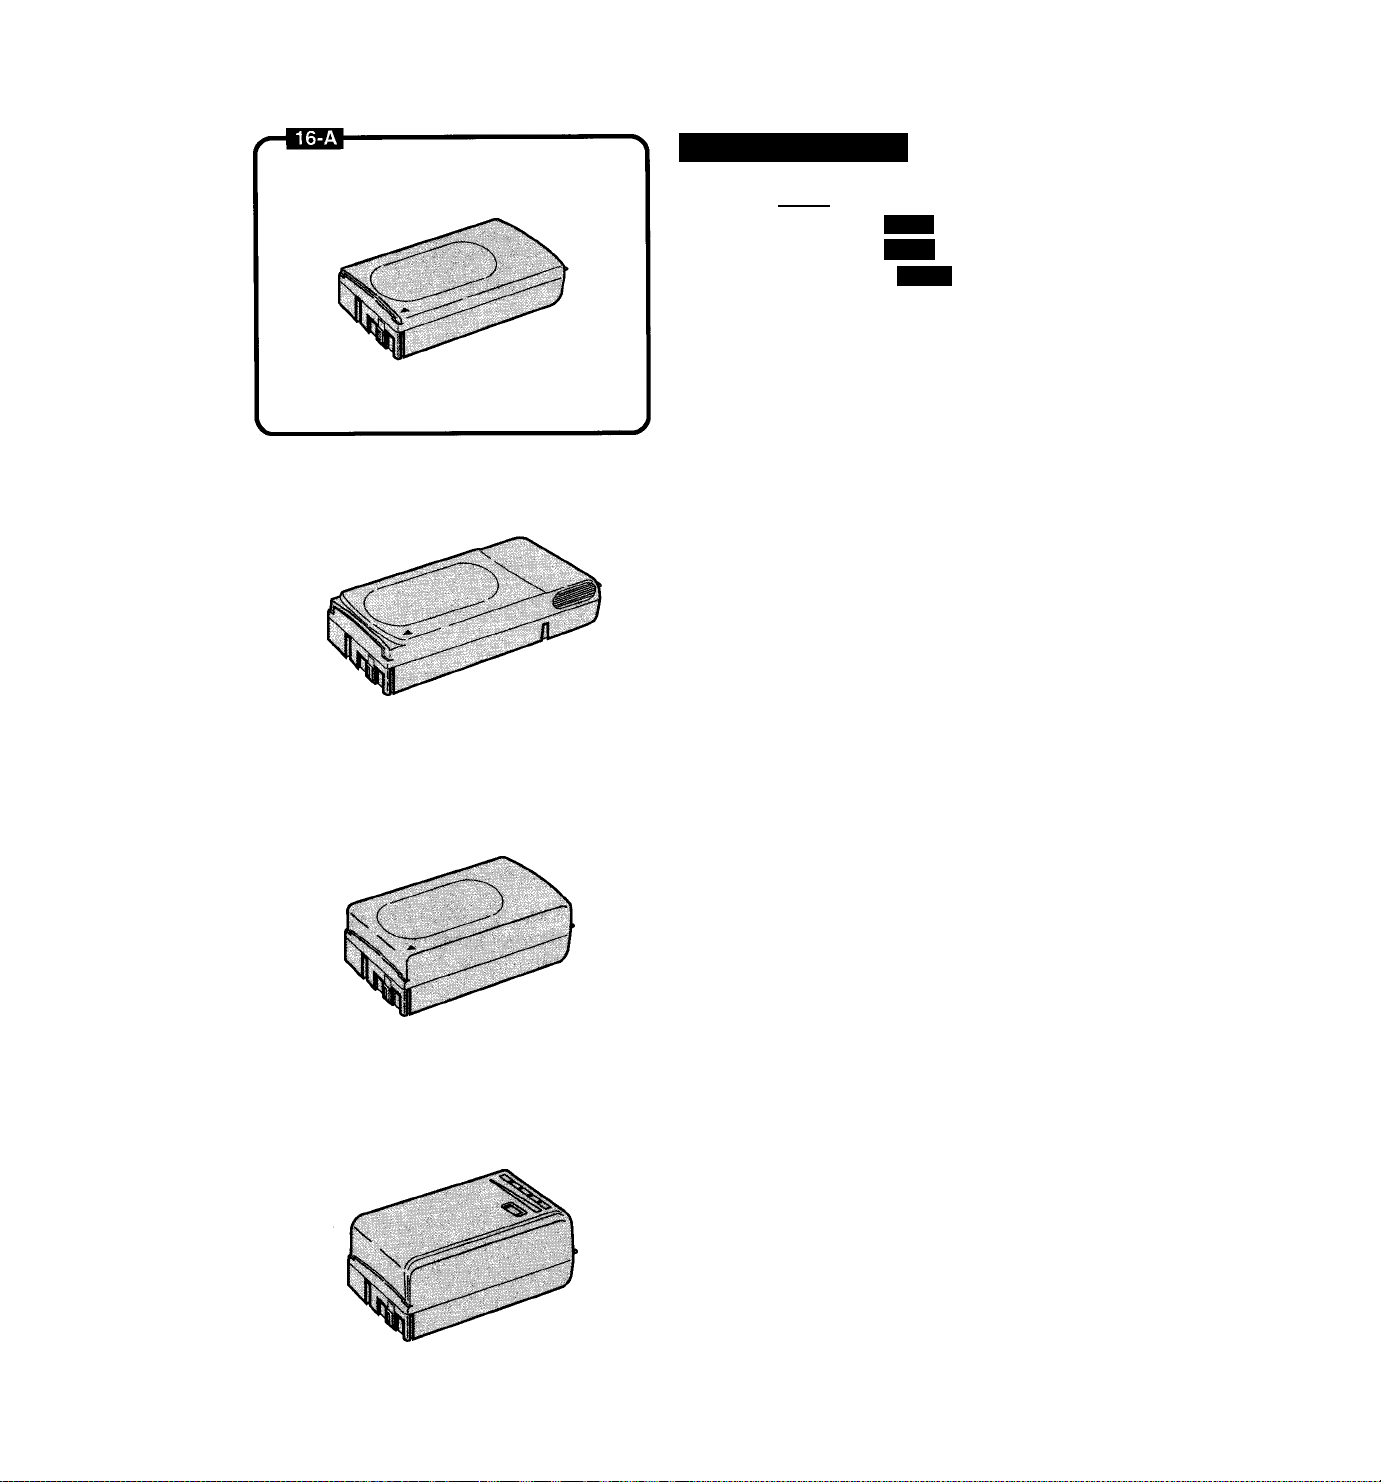
Using Battery Pack
BP-E77K warn
BP-E718 (option)
BP-E722 (option)
BP-E722D (option)
Make sure the battery pack is fully charged
before use.
Continuous recording time using the BP-E77K is
approximately 50 minutes.
• Some modes consume more power than
others, so actual recording time may be less
than 50 minutes.
• The safest policy is to have enough batteries to
cover two to three times the length of recording
time scheduled.
• Using the battery pack in cold temperatures will
shorten recording time.
• The battery pack normally becomes warm
during use.
• Use the optional BP-E718, BP-E722 or
BP-E722D Battery Pack for lengthy recording
(see p. 76).
• See the battery pack instruction manual for
further information regarding your battery pack.
• See p. 19 for Using Your Battery Packs
Effectively.
16-B
16-C
16-D
Battery Pack
16
• Canon camcorders and accessories are
manufactured with great care and strict quality
control. It is recommended that you use only
genuine Canon brand batteries and other
accessories for your camcorder to ensure
maximum performance.
"N
Page 17
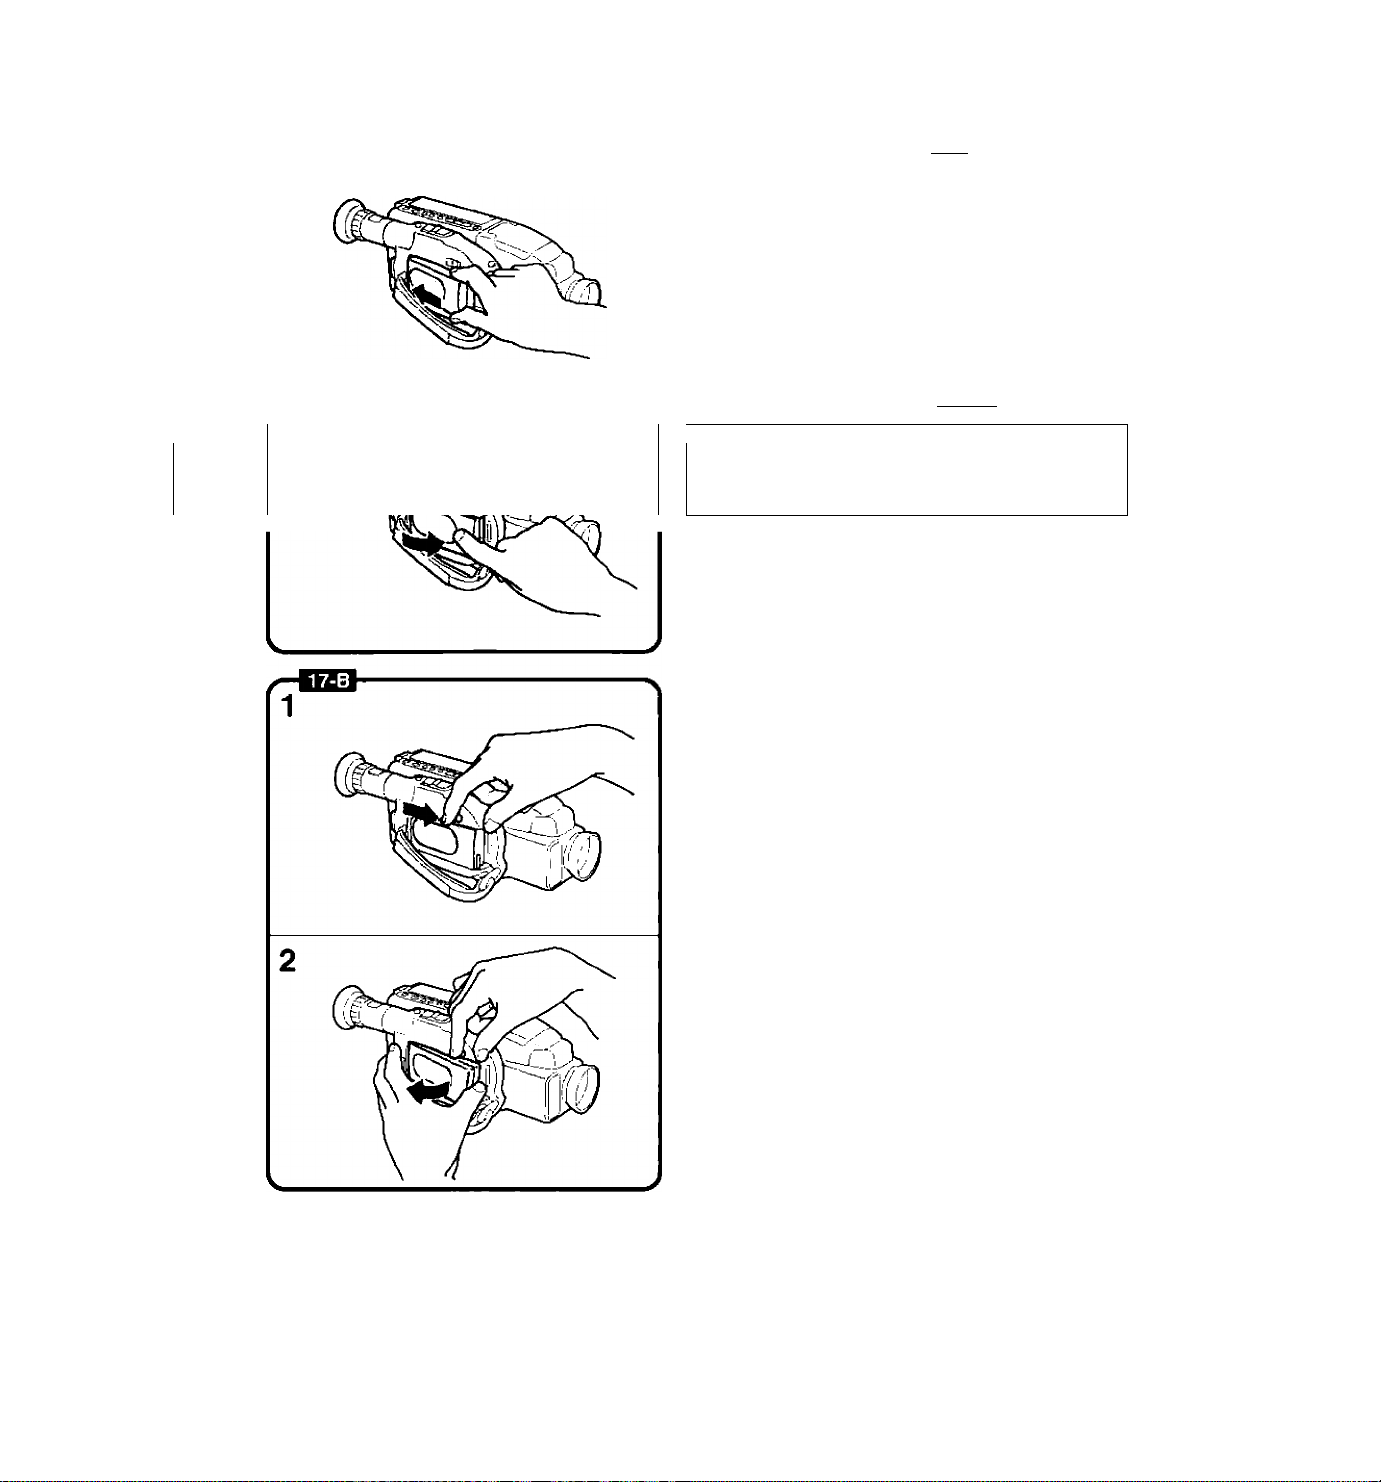
Attaching Battery Pack 1^1
1. Slide the battery pack into the
power source compartment.
• Insert the end marked with a triangle.
• Slightly loosen the grip belt and press it down
for easy battery loading.
2. Press the battery pack until it clicks
and locks in place.
Removing Battery Pack ICT51
-
ш ^ ?^. 1
-Caution--------------------------------------------------------------
Be sure to turn the camera off (the OPERATE
indicator goes off) before removing the battery pack.
Removal during operation may cause damage.
1. Slide and hold the ВАТТ EJECT
switch.
2. Pull the battery pack out as shown.
ro
>
о т
о
о
и
m
л
>
н
о
о т
17
Page 18
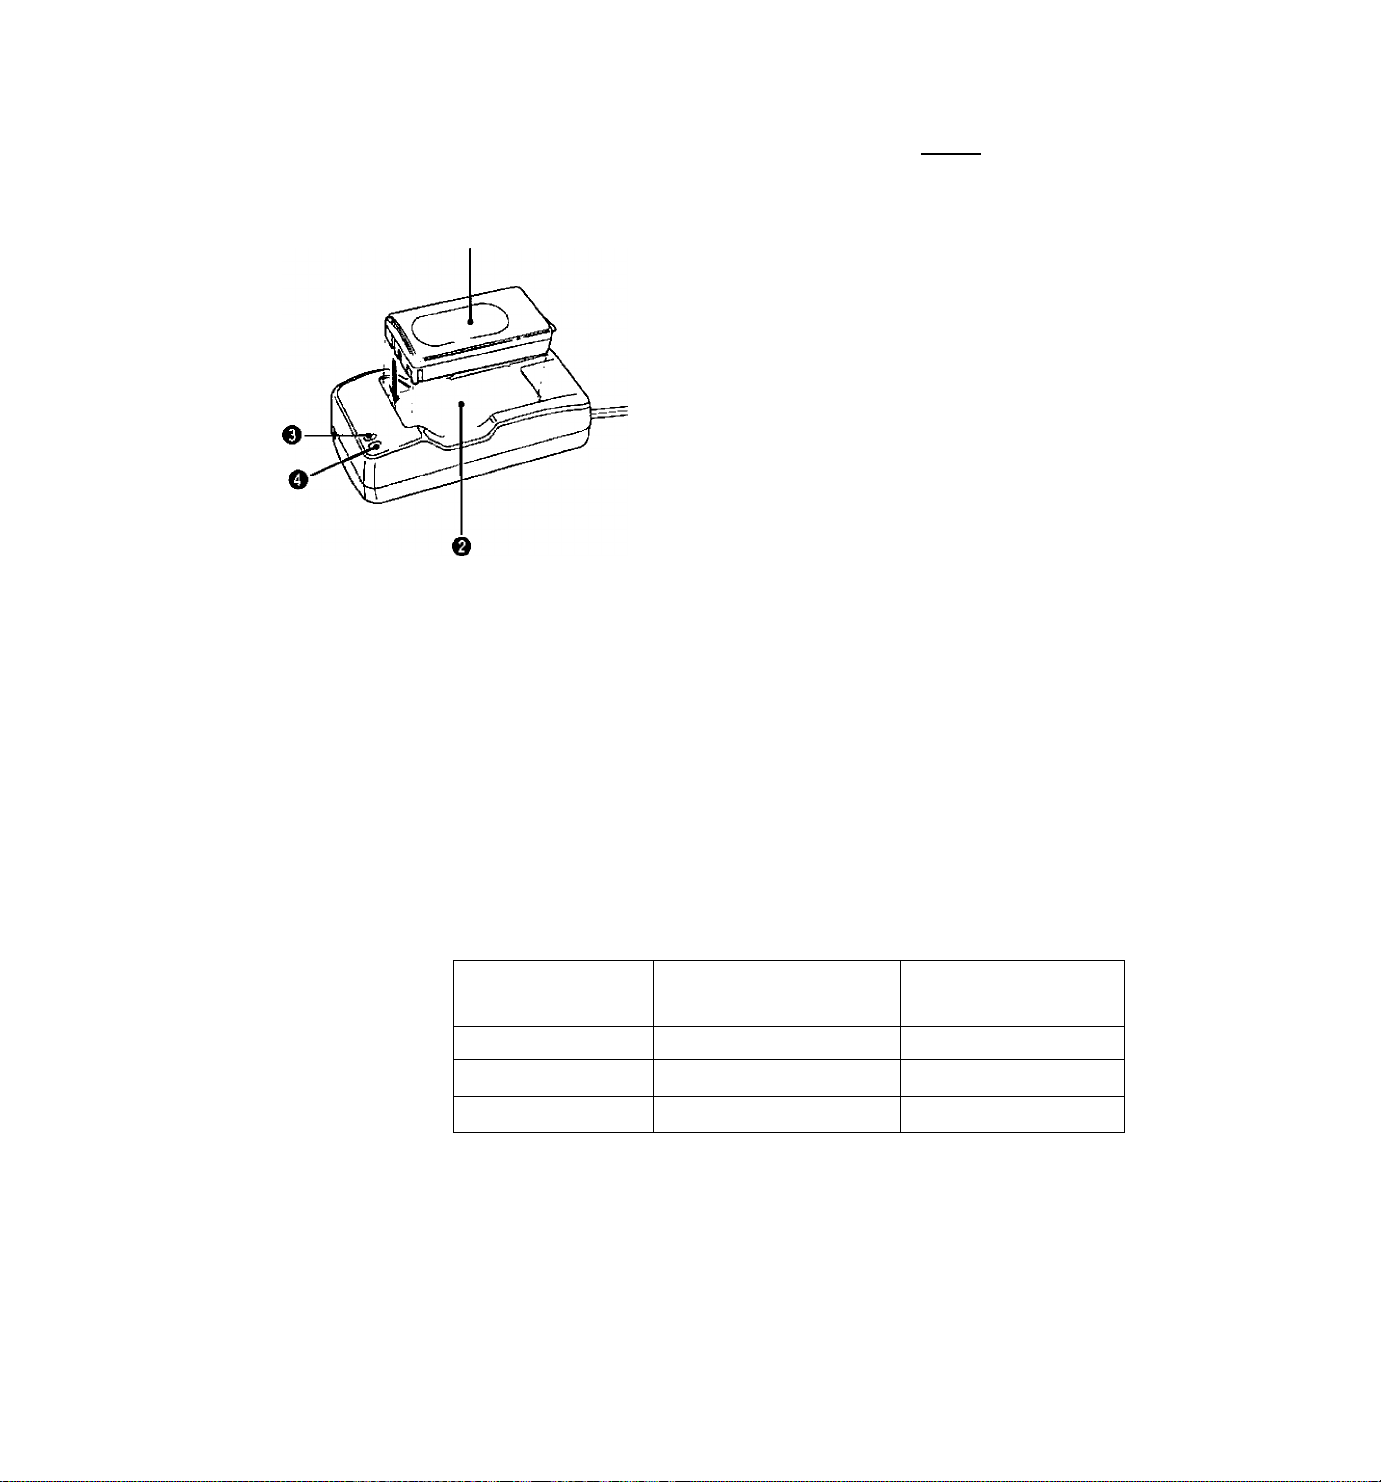
Charging Battery Pack KTTO
Use the CA-100 Compact Power Adapter or the
optional CB-110 Car Battery Adapter to charge
the battery pack.
Connect the battery pack to the CA-100 (or
CB-110) as shown and plug into a mains outlet
(or car cigarette lighter socket).
When the operate indicator (green) is glowing
steadily and the charge indicator (red) is blinking,
charging has begun. When the battery pack is
fully charged, the charge indicator will glow
steadily. Disconnect the battery pack from CA-
100 (or CB-110).
O Battery Pack
O CA-100 Compact Power Adapter or
CB-110 Car Battery Adapter
0 Charge Indicator
O Operate Indicator
• Always disconnect the DC-100 DC Coupler
from the CA-100 (or CB-110) before charging
the battery pack.
• Battery pack charging times are shown below.
Charging time will vary according to the
ambient temperature.
• When you don't expect to use the battery pack
for a long time (three months or more), store it
in a discharged condition. Storing the battery
pack in a charged condition will shorten its
operating life.
• The optional MC-100 Multi-battery Charger can
also be used.
For further information, see the adapter or
charger instruction manual.
18
Battery Pack
BP-E77K 55 70
BP-E718
BP-E722/BP-E722D
Continuous recording time
(approximate minutes) (approximate minutes)
100 120
115
Charging time
130
Page 19
Using Your Battery Packs Effectively
Keep the following in mind:
1. Charge a brand-new battery before using.
2. Discharge the battery for storage.
3. Recharge the battery only after discharging it
completely.
Read these instructions thoroughly before using
the battery pack. The battery pack is a
rechargeable nickel cadmium (NiCd) battery. It
can be used repeatedly after recharging. The
battery pack has not been charged before
shipping.
Charge the battery pack before using:
• Use only the battery charger(s) specified in this
manual.
• Refer to the battery charger instructions for
charging procedure and charging time.
• To maximize the capacity of the battery pack,
when using a brand-new battery pack for the
first time, charge it once (the charge lamp lights
up), remove it and charge it once again.
• The battery pack remains warm immediately
after charging or use. Though being warm has
no adverse effect on the performance of the
battery pack, charge the battery pack only after
it has cooled.
CD
>
CD
о
О
"О
m
J3
>
СЛ
Observe the following:
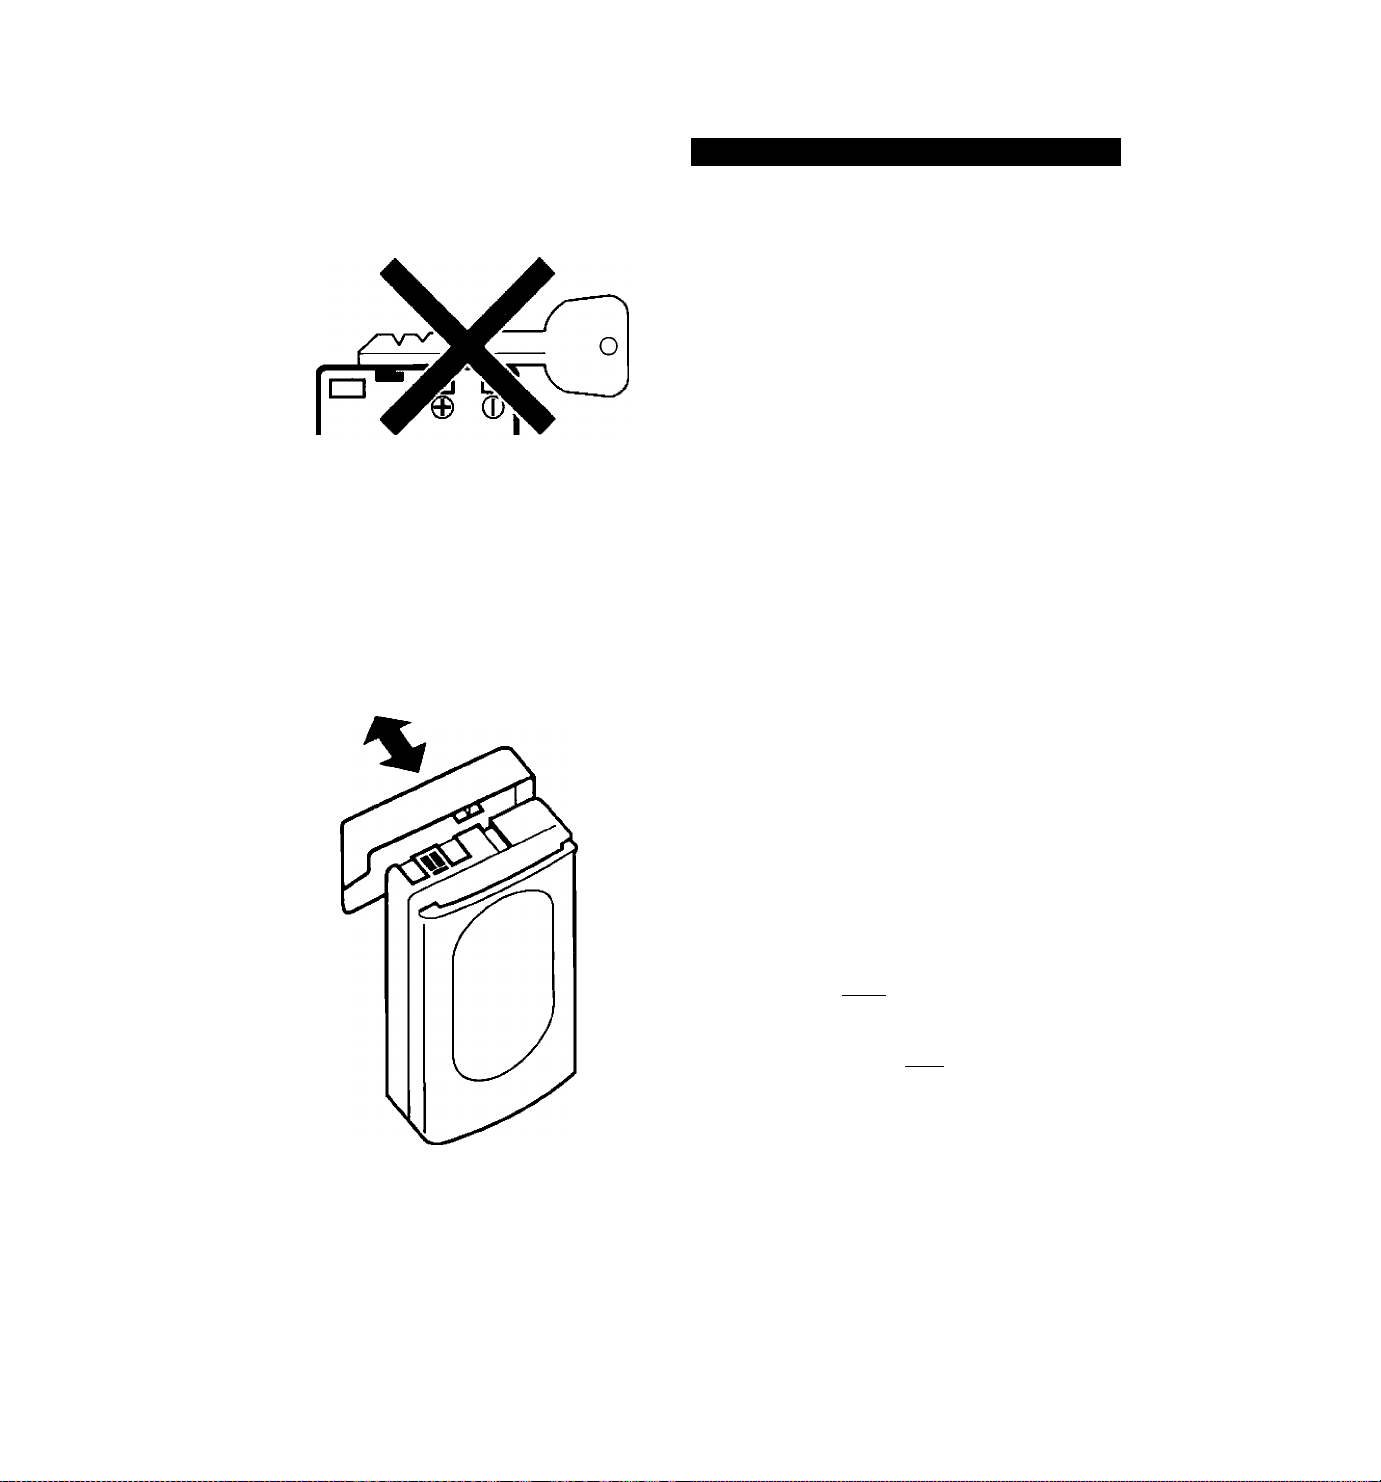
• Shorting the + and - terminals by touching them
with a metal object such as a key holder is
extremely dangerous, as it can cause fire or
other damage. ИЖ1
When carrying or storing the battery pack,
make sure to attach the inciuded short
circuit prevention cap. ДНЯ
• Do not expose the battery pack to fire. It might
explode .
• Do not disassemble or alter the battery pack.
• Do not drop the battery pack or subject it to
strong shocks.
• Do not get the battery pack wet.
19
Page 20

To charge battery packs effectively:
• Even a newly-charged battery pack naturally
discharges in time. Charge it within a couple of
days of when it is to be used.
• Charge the battery pack only after the power
supply of the camcorder automatically turns off.
• Repeated recharging of a battery pack which is
not fully discharged shortens the time that the
battery pack can be used before it needs
charging again.
DISCHARGE RECHARGE
When you haven’t used the battery pack for
several months, check the charge lamp 30
minutes after charging has begun. If the charge
lamp does not blink for at least 30 minutes, it
may mean that the time you will be able to use
the battery has decreased.
If the usage time has decreased try one of the
following procedures to restore the battery
pack:
• Discharge the battery pack with a Canon
product that has a discharge function, such as
the MC-100, then recharge the battery pack.
• Recharge the battery pack after the power
supply has automatically turned off while you
are using the camcorder. Repeated operation
in this way is also effective.
20
Page 21

COLD WEATHER USE:
Although the battery pack can be used at
temperatures between 0°C and 40°C, it is
recommended that the battery pack be used
between 10°C and 30°C in order to take
advantage of its full capacity.
To use the battery pack effectively:
• When a battery pack is kept attached to the
camcorder or video light, a very small
amount of current flows into the equipment,
resulting in an overdischarge. Since the
battery pack cannot be fully recharged once
it has overdischarged, always remove the
battery pack from video equipment after
use.
• Always keep the terminals clean. If they get
dirty, wipe them with a soft, dry cloth.
• Once camcorder is turned on, batttery
power is being consumed even when not
recording (pause, etc.). Turn the camcorder
off when not shooting.
• When the battery charge is low “BAIT”
flashes in the viewfinder, but the battery can
still operate the camcorder for several
seconds. Always fully discharge the battery
pack (the power supply cuts off
automatically) before storing.
CD
>
cn
о
О
“О
m
л
>
н
О
Z
сл
Terminology
Overcharging
Charging a battery pack after it has already
been fully charged.
Overdischarging
Continuing to discharge a battery pack after
its voltage level has fallen below a specified
level (5.0 V for the nickel-cadmium batteries
used by Canon 8mm video camcorders).
21
Page 22
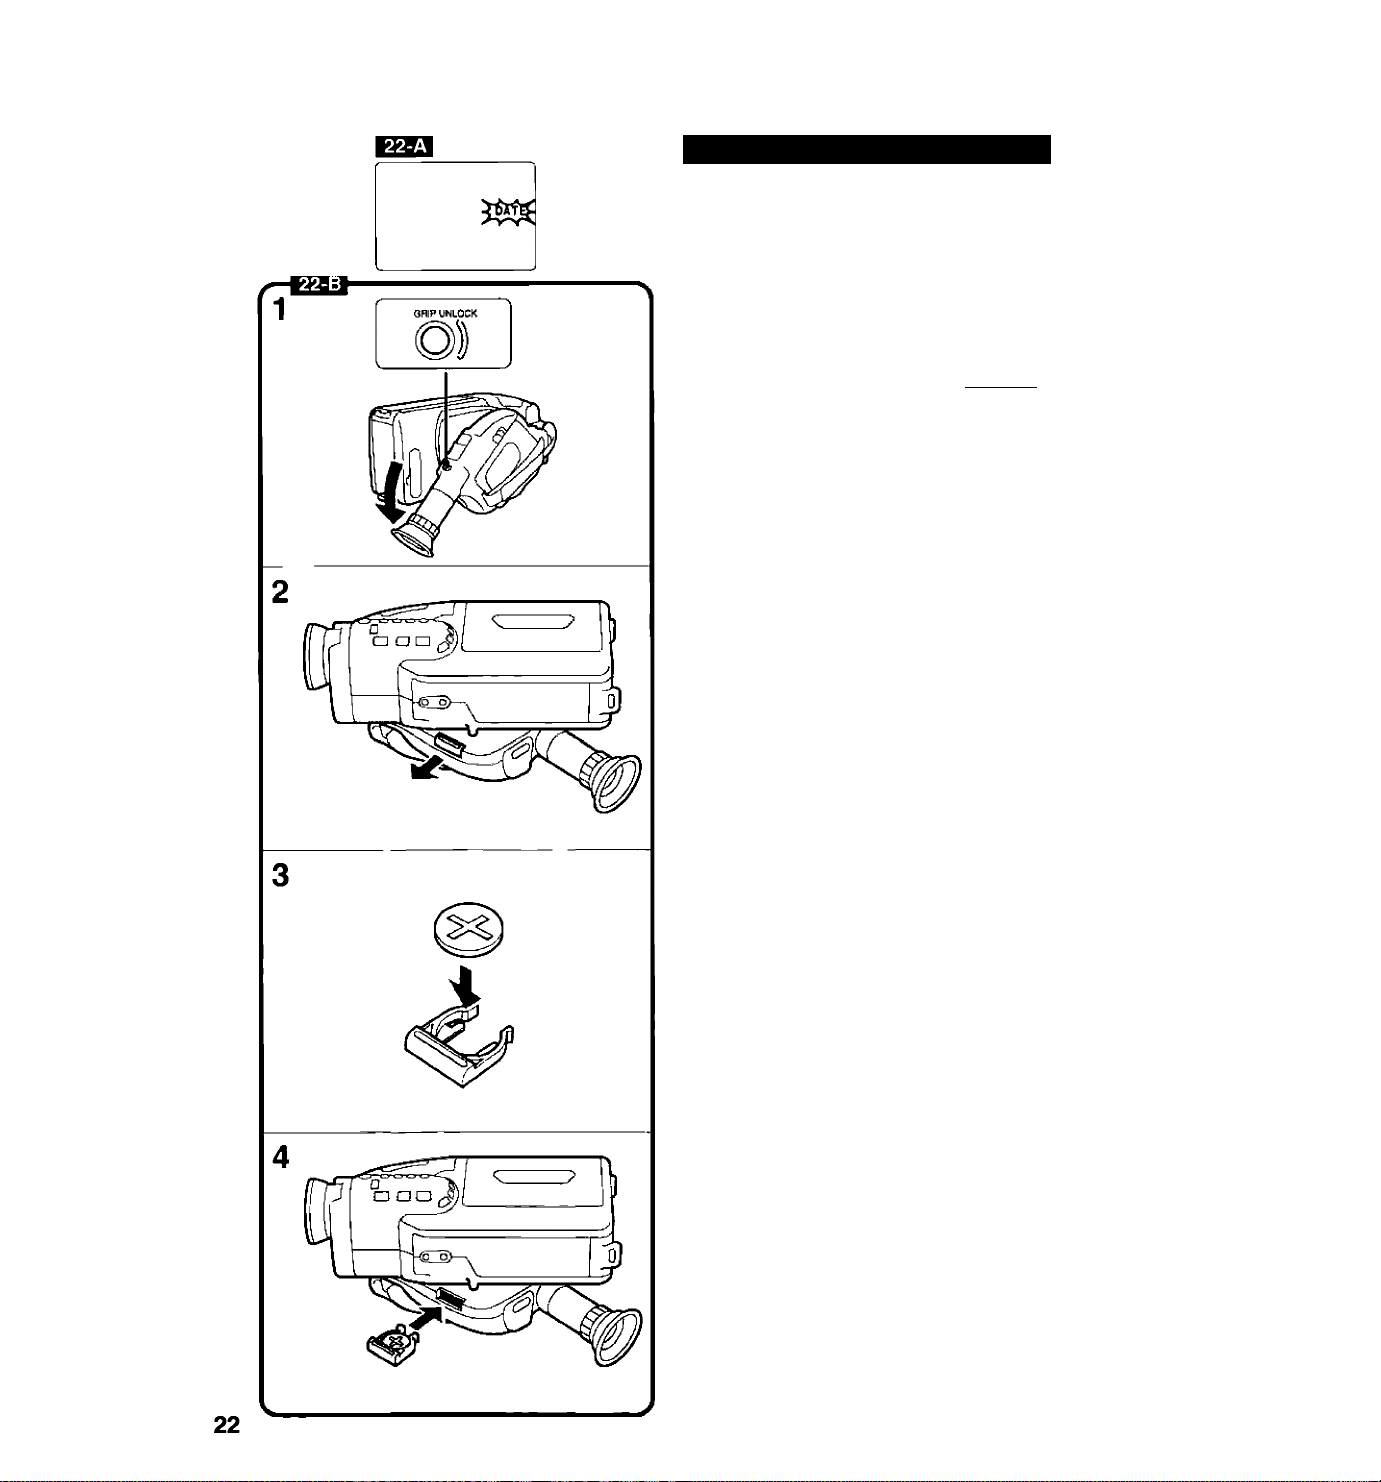
Inserting a New Lithium Battery
The CR2025 lithium battery provides your
camera with enough power to store character
tities, date and time, and an age, even when the
camera is turned off.
One iithium battery wiii iast approximately one
year. (Life span varies slightiy according to
ambient conditions.) When the iithium battery is
not in piace or is neariy exhausted, “DATE”
fiashes in the viewfinder indicating that the iithium
battery needs to be replaced.
Be sure to connect a power source to the camera
before changing the iithium battery, otherwise the
tities, date and time, and age will be cleared from
the camera’s memory and will have to be reset.
Inserting Procedure
1. Press the GRIP UNLOCK button
and rotate the grip downward.
2. Hold the camera with the battery
pack facing down, then draw out
the lithium battery holder.
• If the camera is heid with the battery pack
facing up, the iithium battery wili drop out
when the lithium battery hoider is removed.
3. Insert a new lithium battery into the
lithium battery holder with the +
side facing up.
4. Snap the lithium battery holder
back into the compartment.
Warning
The battery used in this device may present a fire or
chemical burn hazard if mistreated. Do not recharge,
disassemble, heat above 100°C or incinerate.
Replace the battery with Sanyo CR2025, Panasonic
CR2025 or Duraceli DL2025B. Use of another battery
may present a risk of fire or explosion. The used
battery should be handed back to the supplier for safe
disposal.
Caution
• Make sure the plus (+) side is facing up in the
lithium battery compartment.
• Keep the battery out of children’s reach. If
swallowed, contact physician immediately.
• To ensure proper contact, wipe the battery with the
clean, dry cloth before use.
• Do not pick up the battery using tweezers or other
metal tools which may cause short circuiting.
• Do not disassemble, heat or immerse in water, to
avoid risk of explosion.
-------------------------------------------------------------
Page 23
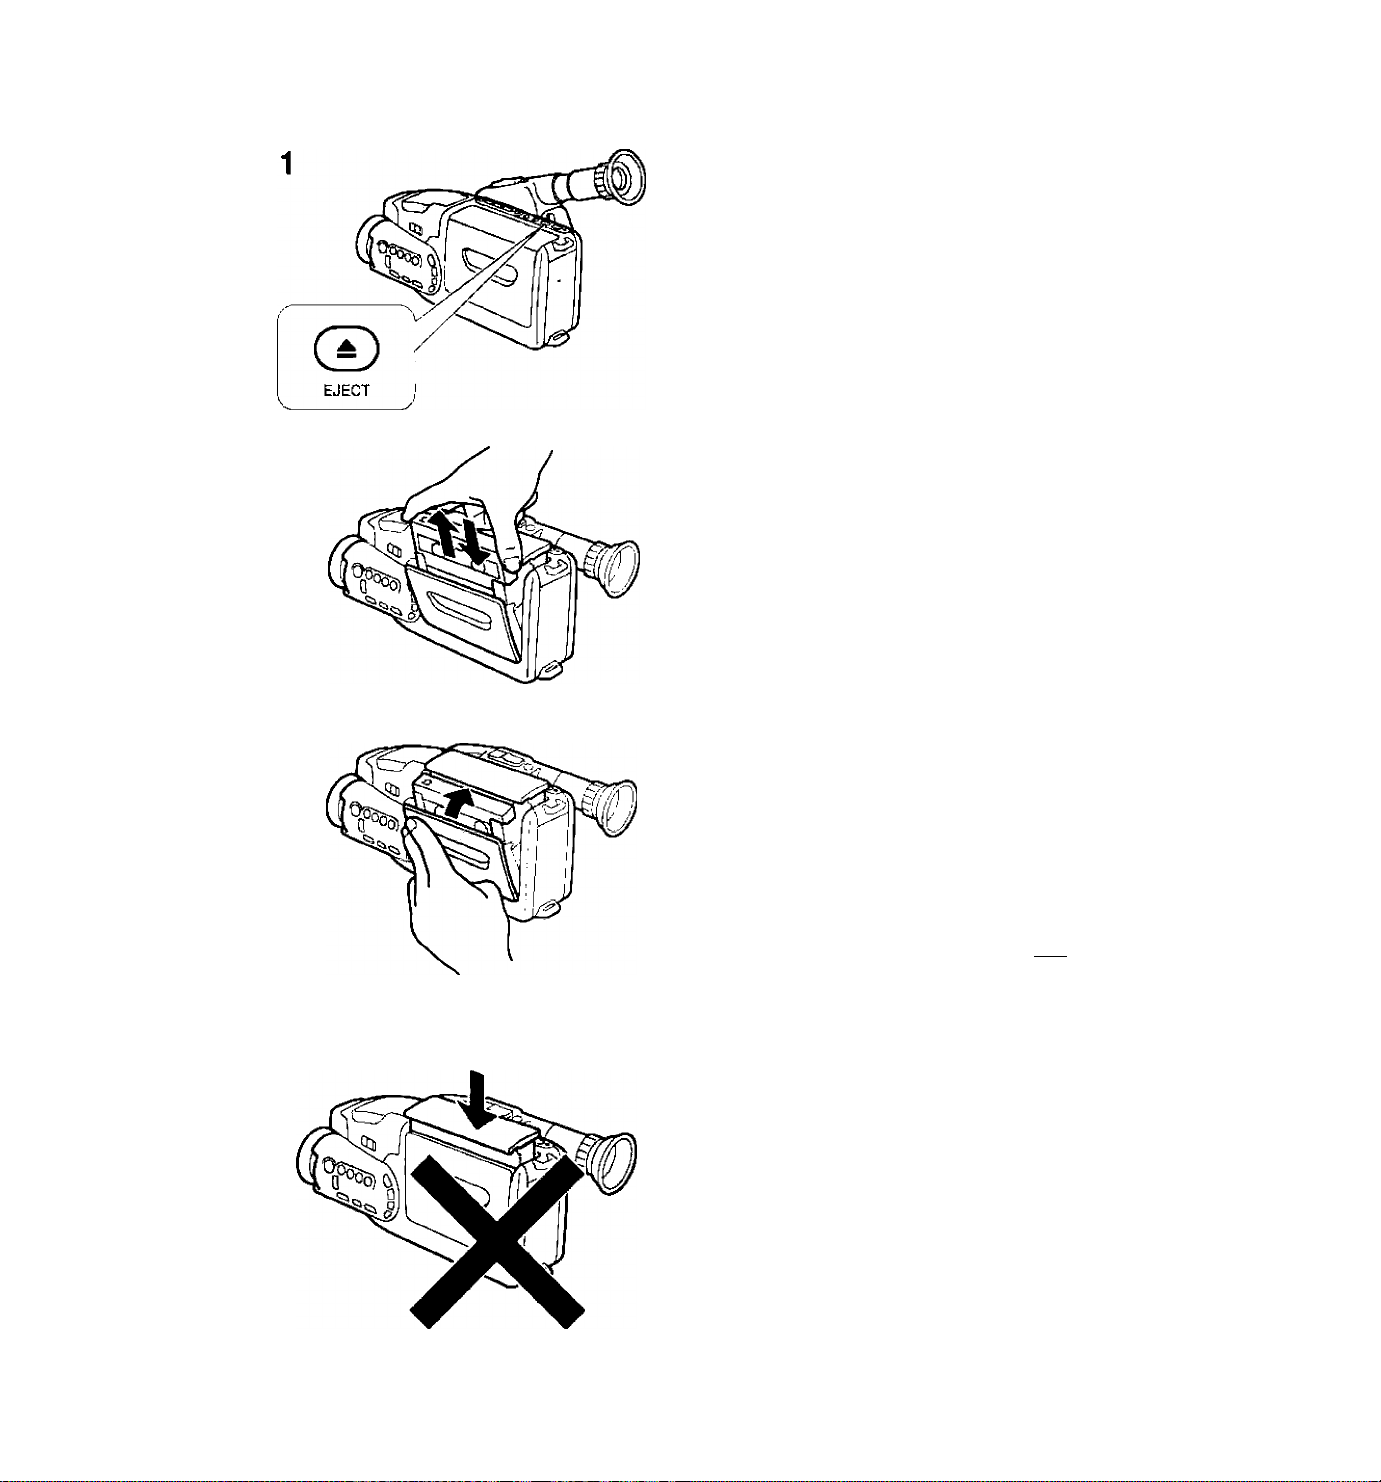
Loading and Unloading Video Cassettes
Use a video cassette with the m mark (P5
type). Be sure to attach a power source to the
camera before loading or unloading a video
cassette.
1. Press the A (EJECT) button.
• The cassette compartment lifts up and opens.
• The EJECT button works with the power
turned off, as long as a power source is
attached.
2. Load/unload the cassette.
• When loading, gently insert the cassette with
the window facing out.
• When unloading, remove the cassette by
pulling it straight out.
3. Close the cassette compartment.
• Press the PUSH mark on the compartment
until it clicks.
• The compartment closes automatically.
Notes:
• When the EJECT button is pressed, the
compartment opens automatically. Do not try to
open the compartment during this automatic stage,
as it may cause a malfunction.
• If a cassette is removed and then replaced, the tape
position will change slightly, therefore, after
reloading the cassette, use the record search
function to locate the desired starting point (see
page 63).
• When you close the video cassette compartment, do
not press down the top of the compartment. Bcffl
CD
>
CO
o
O
T)
m
X
>
CO
23
Page 24
Vìdeo Cassette Notes
• Do not leave a cassette in the camera after
use, especially when the camera will not be in
use for a long time.
• There are several holes on the cassette back,
which are used for transferring information. Do
not cover them.
• Do not use cassettes with damaged or spliced
tape or ones that do not meet standards.
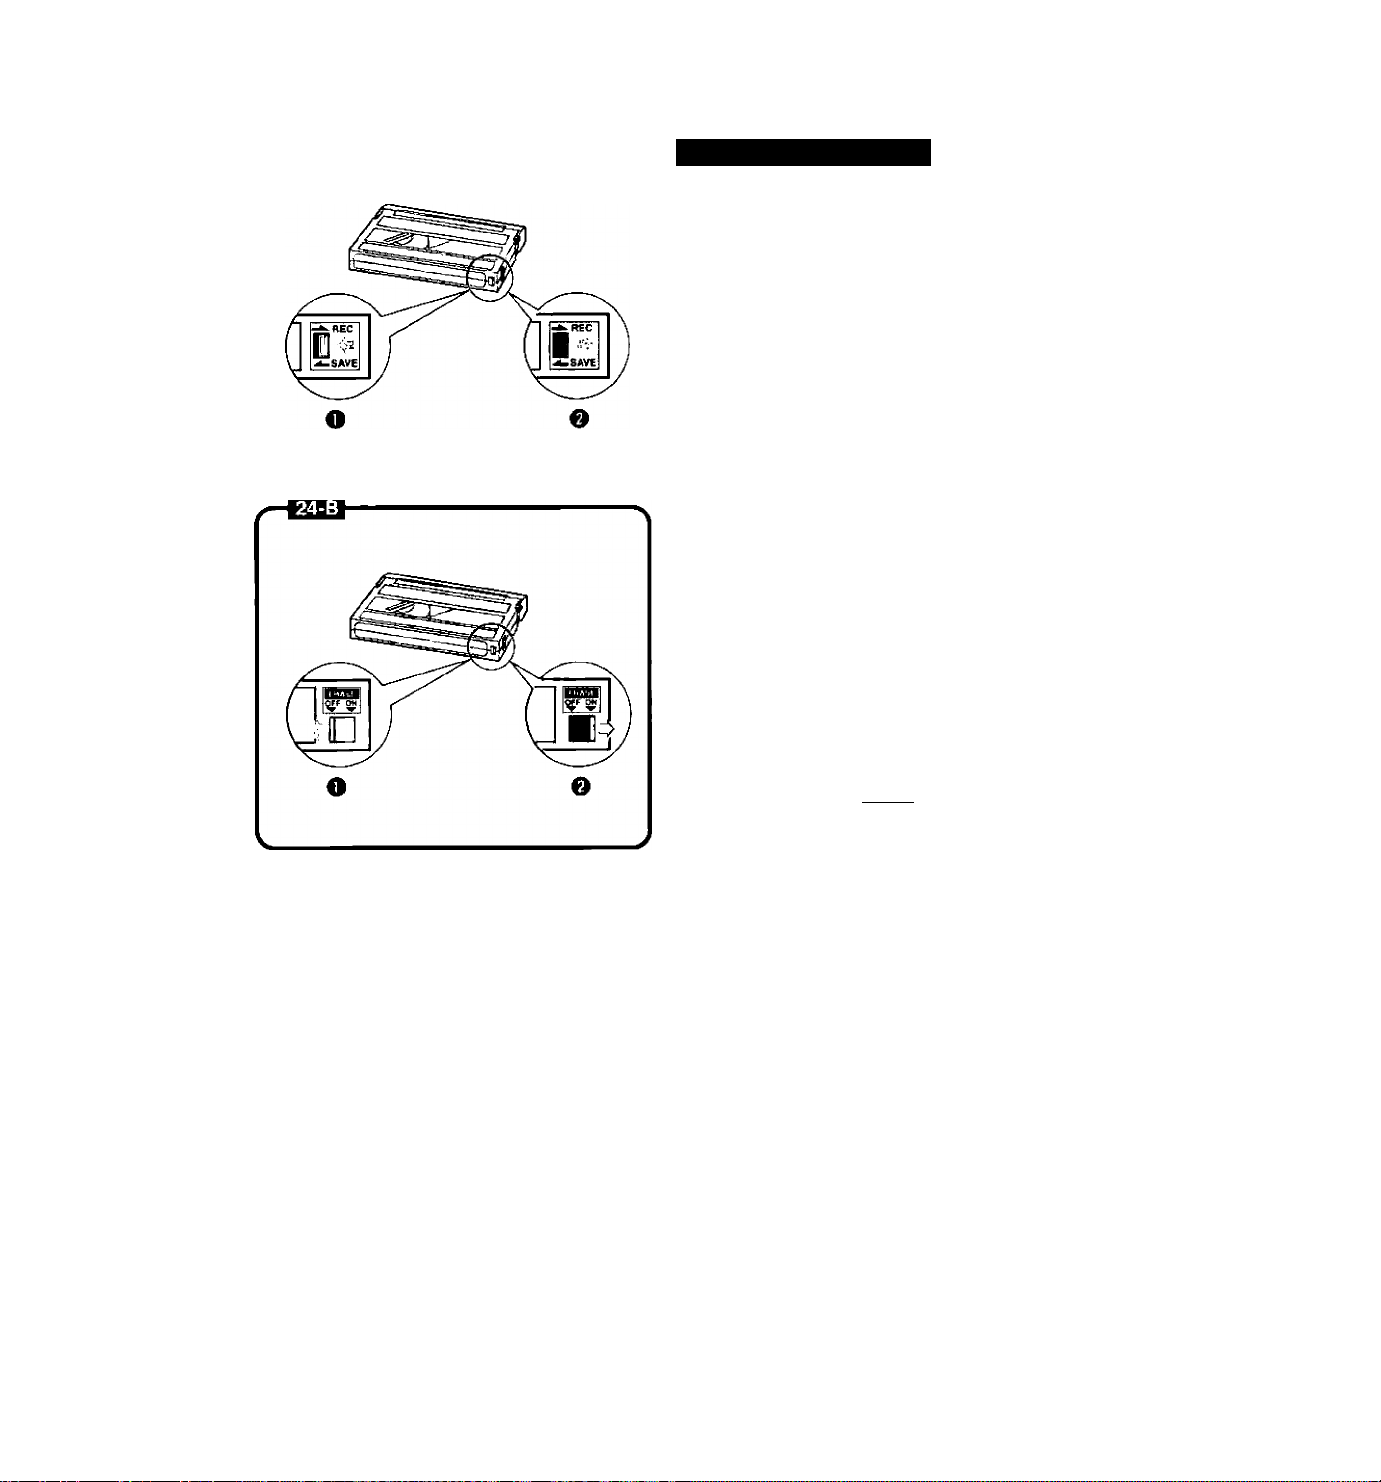
Video Cassette Erasure Prevention Switch
To prevent accidental erasure of recorded
material, slide the switch at the bottom of the
cassette to the “SAVE” or “ERASE OFF" position,
as shown.
Returning the switch to the “REC” or “ERASE
ON” position enables recording again.
Refer to the cassette instructions for further
information on erasure prevention.
• “TAPE” flashes in the viewfinder if you try to
record on a cassette that has been set for
erasure prevention. Use another cassette or set
the switch to enable recording.
Metal • HG
Standard 8 mm MP W151
O In the “SAVE” or “ERASE OFF” position:
Erasure Prevention
e In the “REC” or “ERASE ON” position:
Recording Possible
24
Page 25
Camera Preparations
Attaching Straps
SS-300 Shoulder Strap I3!gl
Attach the shoulder strap to the strap attachment
bars, and adjust it to the most comfortable length.
WS-20 Wrist Strap (option) BB151
The optional wrist strap can only be attached to
the lower strap attachment bar.
Adjusting the Grip Belt 25-c
Tighten or loosen the grip belt as necessary for a
comfortable fit. Hold the grip with your right hand
while adjusting the grip belt with your left.
GO
>
w
o
o
■D
m
33
>
H
o
z
CO
25
Page 26

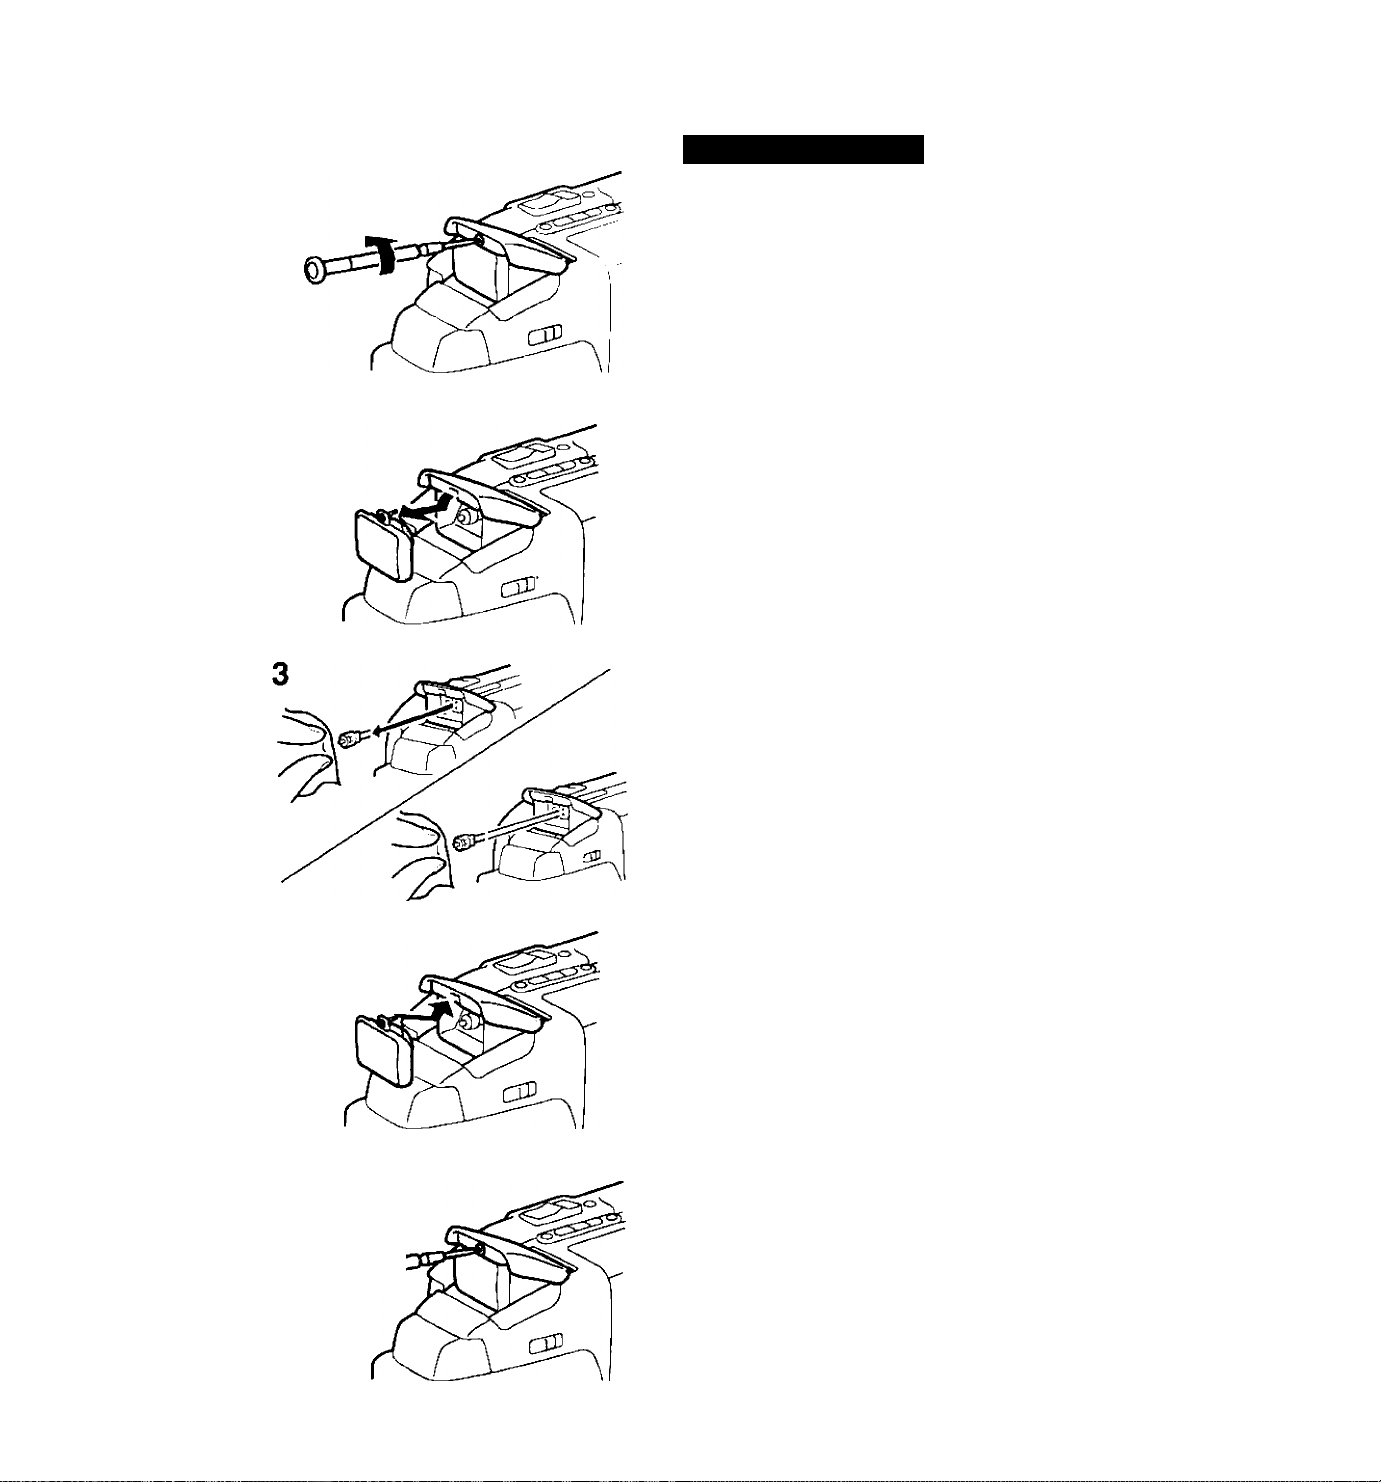
Attaching the Lens Cap Cord 26-a
1. Pass the cord through the eyelet on
the lens cap.
2. Pass the grip belt through the loop
on the cord as shown.
Removing and Attaching the Lens Cap and Lens Hood 26-b
Remove the lens cap before recording and hook
it onto the grip belt using the clip on the lens cap.
Replace the lens cap when you stop recording or
turn the camera off.
El Focusing Ring
19 Filter (option)
B Lens Hood
El Lens Cap
To remove the lens hood:
Gently rotate it anti-clockwise, as shown.
To attach the lens hood:
Gently rotate it ciockwise until it clicks into place.
• When using a filter, attach the lens hood in
front of the filter so that the lens cap can be
replaced.
Using the Finder 26-c
When using the finder, puil it out fully until it
stops.
When the finder is not pulled out, you can see
your recording from as much as an arm’s length
away.
26
Page 27

Adjusting the Dioptre 27-A
Adjust the dioptre when using the camera for the
first time, when changing camera operators, or
when changing eye distance from the finder.
To adjust the dioptre:
Turn the camera on and turn the dioptre
adjustment ring until the viewfinder displays are
clearly visible.
Adjusting the 180° FlexiGrip 27-B
The 180° FlexiGrip allows you to adjust the
camera angle to 9 click-positions (every 22.5°).
Turn the grip while pressing the GRIP UNLOCK
button and release the button in the most
convenient position for shooting.
O GRIP UNLOCK Button
Removing and Attaching the Finder
27-C
DO
>
w
O
O
"0
m
n
>
H
o
z
CO
To clean the viewfinder screen, remove the finder
then use a commercially available blower brush.
To remove:
Pull out to the mark O, rotate anti-clockwise, and
pull off.
To attach:
Align the mark O on the finder with the mark O
on the grip, push in, rotate clockwise, and push in
fully.
Notes:
• Be sure to protect the viewfinder from direct sunlight,
othenwise the viewfinder wili melt.
27
Page 28

Zooming
Zoom in on hard-to-catch subjects or add closeup personal touches to your recordings. Zoom
out to reveal a breathtaking view. The camera
has two zooming methods; power zoom and
wireiess zoom.
Power Zoom 28-a
Press the power zoom buttons on the grip.
• Press and hoid T to graduaily zoom in to
teiephoto.
• Press and hold W to gradually zoom out to wide
angie.
In record pause mode, you can increase the
zoom speed by holding down the ZOOM SPEED
button.
Wireless Zoom zb-b
The wireless controller allows you to control zoom
operation from a distance.
• Press and hoid the ZOOM T button to gradualiy
zoom in to teiephoto.
• Press and hoid the ZOOM W button to
graduaiiy zoom out to wide angie.
During wireiess zooming, mount the camera on a
tripod and monitor your recording on a connected
TV screen.
Notes:
• Even the slightest hand movement will appear in the
recording when shooting in the telephoto range. Use
a tripod for better resuits.
• Overuse of zooming may make recordings seem too
busy. Selective use of zooming is more effective.
28
Page 29

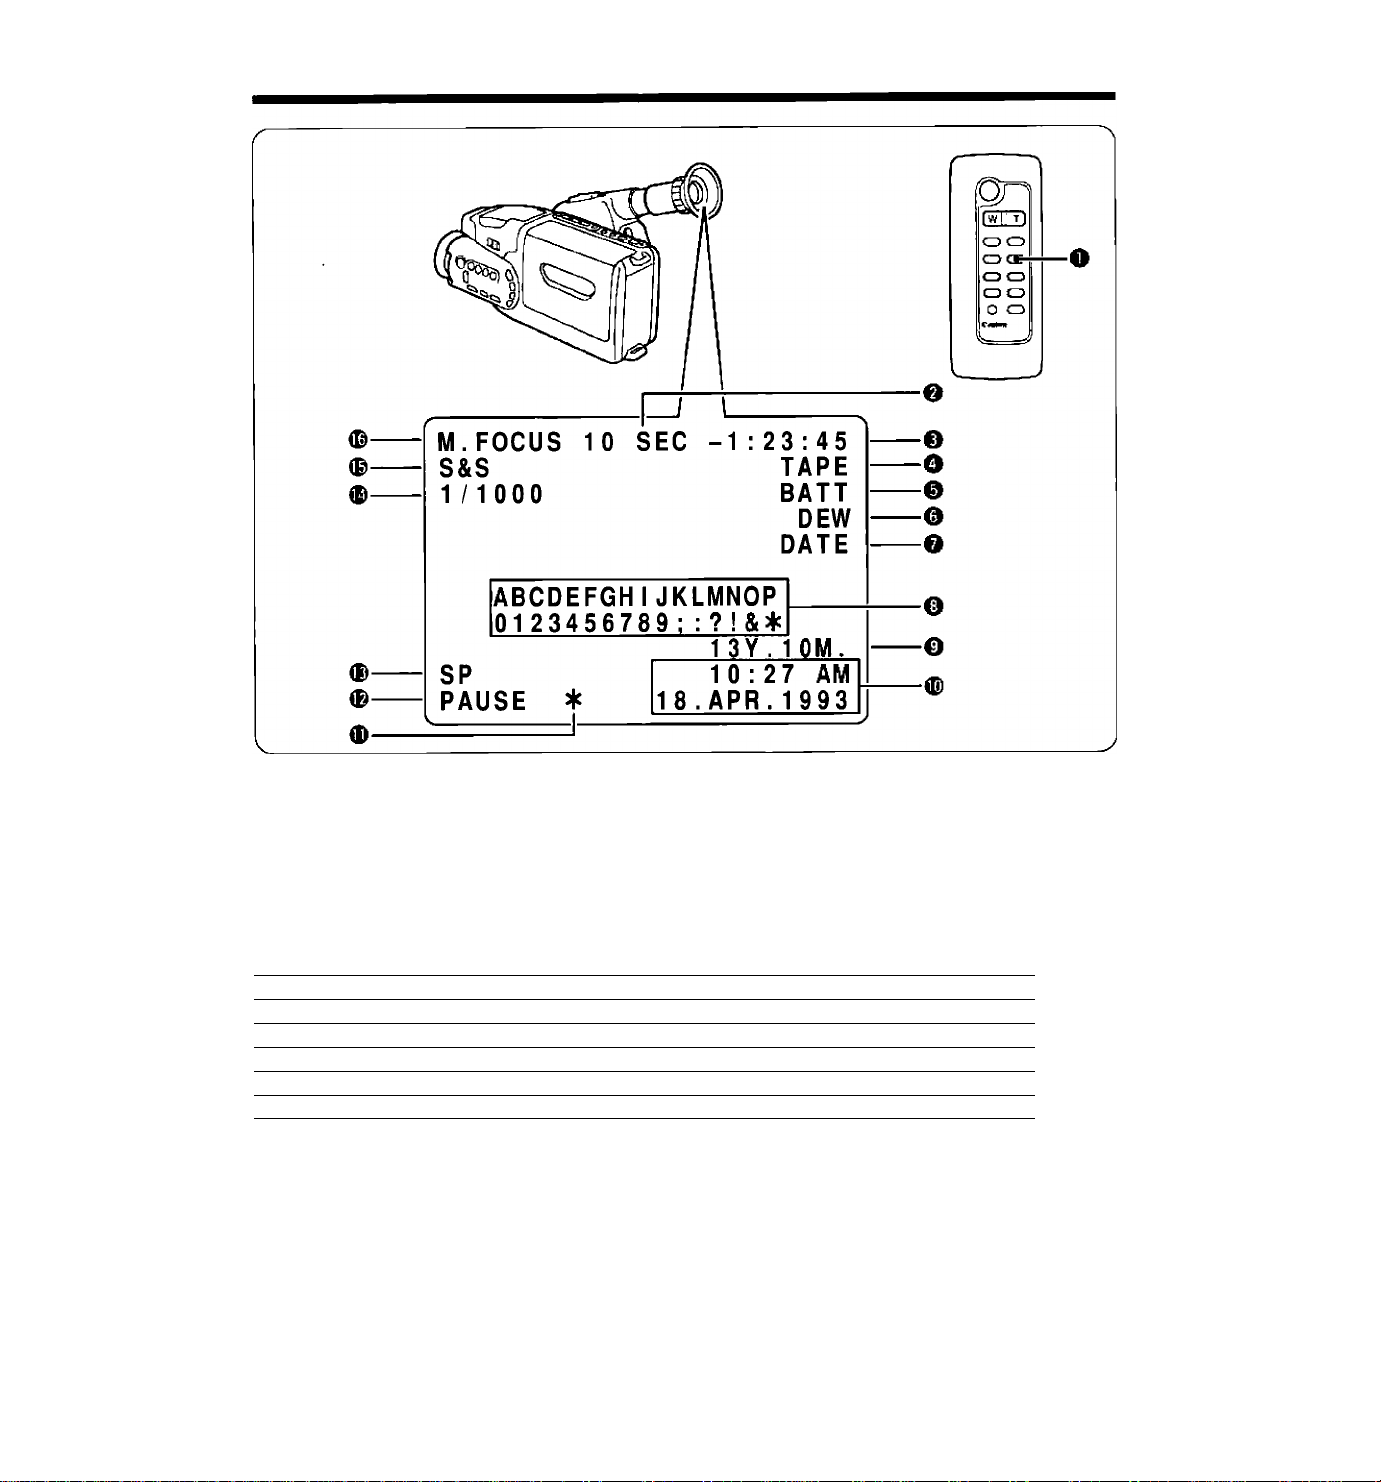
Setting Date and Time
CD
>
W
o
o
Tl
m
jj
>
H
o
z
CO
Set the date and time when you first begin using the camera and if
you change the lithium battery without back-up power.
See p. 33 for recording the date and time.
Exampie: Setting the date to 20 March, 1994 and the time to 2:35
p.m.
1. Turn the camera on by pressing the OPERATE
button.
• The OPERATE indicator iights up.
2. Press and hold the DATE button for more than 3
seconds. Bigi
• The date and time are displayed in the viewfinder.
• The year dispiay fiashes.
(continued on next page)
29
Page 30

30
Page 31

7. Press the + and - buttons to scan the day display.
• The camera knows the number of days in each month and which
years are ieap years.
ш
>
41
о
О
Т1
m
л
>
н
О
Z
со
3:00 AM
IAR. 1994
о liwrV
'{2:»0-^РМ
20.W№.1A
М
^
20
0203<-^4^5^'
t:
27 28 29 30 31
! l
8. Press the SHIFT button when the correct day is shown.
• The date is set and the hour display flashes. QB3
____
9. Press the + and - buttons to scan hour display.
• The hour display rotates through 24 hours. ВЯЯ
12AM о 1AM
.....
.........
^10PM^11PM<
!]
10. Press the SHIFT button when the correct hour is
shown.
• The hour is set and the minute display flashes. KIBSI
(continued on next page)
4
____
31
Page 32

Age Insert
The camera can calculate, superimpose and record one person's
age with a scene. You can also record the age with the date and
time and/or a title.
Registering a Birthday
Example: Registering 20 March, 1993 as a birthday (when the
current date is set to 20 March, 1994).
1. Turn the camera on.
2. Press and hold the AGE button for more than 3
seconds. ИК1
• If you have already registered a birthday, the birthday is
displayed in the viewfinder.
• The year flashes in the viewfinder.
34
Page 33

1 . JAh
M,
3. Press the + and - buttons to scan the year
display. KCgi
• Press once to scan one year at a time.
• Press and hold to scan the years quickly.
• Press the - button to scan the display in reverse order.
• You cannot set future years.
Only years from the current year back to 99 years ago can be
set.
>
w
o
o
Tl
m
X
>
H
o
z
w
—V.--W.
isss
—Y.-^M-
1993
1895^1896^'
^1992^1993^ 1994^
r
4. Press the SHIFT button when the correct year is shown.
• The year is set and the month display flashes. ^33
____
5. Press the + and - buttons to scan the month display, ictga
JAN O FEB ^ ' • ^ OCT ^ NOV ^ DEC
[!
!]
6. Press the SHIFT button when the correct month is shown.
• The month is set and the day display flashes.
(continued on next page)
____
35
Page 34

r
(3QH)
FF/S PLAY REW/S
+
---------
SHIFT
-------------
—Y,—H.
O^MAR. ia$^
1Y, DM,
7. Press the + and - buttons to scan the day display.
• The camera knows the number of days in each month and which
years are leap years.
.........
<^27 <-^28 <->29 <->30 <->31
! l
8. Press the AGE button when the correct day is
shown.
• The date display disappears.
• The age is automatically calculated and displayed in the
viewfinder. BHEl
• Press the AGE button again to make the display disappear from
the viewfinder.
Notes:
• The birthday cannot be set during recording or playback.
• If you change or remove the lithium battery without a power source attached, the birthday is cleared from
memory.
36
Page 35

Recording an Age
1. While recording or in record pause mode, press
the AGE button.
• The age appears in the viewfinder and is recorded with the
scene. IcHCT
• The age can also be recorded with the date and time and/or
titles.
2. Press the AGE button again to end age recording.
37
Page 36

WL-52 Wireless Controller
Using the wireless controller you can operate the
camera from a distance. KTIffl
O Transmitter
O F. (Fade) START/STOP Button
e ON SCREEN Button
O FF ►► Button
0 PLAY ► Button
O PAUSE II Button
O REC MODE Button
O STOP ■ Button
0 REW « Button
0 TAPE RETURN Button
0 COUNTER RESET Button
0 ZOOM Buttons
0 START/STOP Button
Operation B!151
Aim the wireless controller at the camera’s
remote sensor 0 and press the control buttons
to operate the camera. Use the wireless
controller within 4 metres of the camera. The tally
lamp © lights up when the remote sensor
receives a signal.
C3 CD
S S
o a
o o
------^
.©
Notes:
• When using the wireless controller, check that it
lights up the tally lamp. If the tally lamp lights, the
wireless controller can be used from that position.
• If you are too close to the camera when operating
the wireless controller, the camera may not respond
to the wireless controller's signal.
38
Page 37

Inserting Batteries into Wireiess
Control ier
The wireless controller operates on two
R03/AAA batteries.
1. Remove the cover from the back by
pressing down and sliding in the
direction of the arrow.
2. Insert two R03/AAA batteries
foiiowing the 0 and 0 markings.
Be carefui not to reverse the
poiarity of the batteries.
3. Siide the cover back into piace.
00
>
w
o
o
Tl
m
J3
>
0)
Notes:
• Autofocus function stops when remote sensor receives a signal from wireless controller.
• The wireless controller uses infrared beams to transmit signals, so sunlight or fluorescent light on the
remote sensor may shorten operating distance.
39
Page 38

Playback Connection
□
To play back a cassette on a TV, use the
DC-100 DC Coupler together with the CA-100
Compact Power Adapter or the BP-E77K
Battery Pack as a power source.
Playback connection depends on whether or
not the TV is equipped with a SCART terminal
or audio/video input terminals.
Using a TV (or VCR) with a SCART
Terminal
Connection Procedure ITW
You need the PC-150 SCART Cable.
0 To Audio Output Terminal (black)
Q To Video Output Terminal (yellow)
B PC-150 SCART Cable
B To SCART Terminal
B TV
Using a TV (or VCR) with Audio/ Video Input Terminals
M VSXO IN ^
Connection Procedure tTilSl
You need the optional C-150 AV Cable.
B To Audio Output Terminal (black)
B To Video Output Terminal (yellow)
□ C-150 (video=yellow, audio=white or black)
B To Audio Input Terminal
B To Video Input Terminal
B BNC Adapter*
B TV: Set the TVA/IDEO selector to VIDEO
* For a TV or VCR which has a BNC-type video input
terminal, use a commercially available BNC plug
adapter for connection.
40
Page 39

Using a TV without Audio/ Video
Input Terminals
The optional RU-100 RF Unit is required in order
to view cassettes on a TV which does not have
audio/video input terminals. There are two RU-
100 models, one for Europe and one for
Australia. The connection and setting procedures
for the two models differ.
European Model
RU-100 QQ
□ Connection Plug
13 G/l Selector
B Video Channel Selector
B FROM ANT. Terminal
B TO TV Terminal
Coaxial Cable with DIN-Connectors KBSl
B male
13 female
Connection Procedure IWSI
1. Connect the RF Unit to the camera.
2. Attach the aerial cable to the FROM
ANT. terminal, and connect the
female connector to the TO TV
terminal of the RF unit.
• Please note the difference between ‘male’ and
‘female’ type DIN-connectors on the coaxial
cable.
3. Connect the male connector to the
aerial input terminal of the TV.
CD
>
CO
o
O
Tl
m
>
CO
To View a Regular TV Programme
The RU-100 RF Unit has an automatic signal
selector which selects the signal from the video
camera whenever the camera is connected to the
RF unit and the power is turned on. To view a
regular TV programme, turn the camera off or
disconnect it from the RF unit.
41
Page 40

Selecting the Video Channel (European model)
The video channel means the channel in your area which is not
used by a broadcasting station (channel 30-39). If your TV does
not have audio/video input terminals, your TV set and the video
channel selector of the RU-100 RF Unit must be set to the video
channel in order to view playback.
1. Turn the TV on.
2. Turn the camera on.
42
Press the
(STOP) button to select playback
mode.
4. Press the M (PLAY) button to start playback.
5. Set the RF unit’s G/l selector using flat-edge
screwdriver.
I : England, South Africa, Hong Kong
G: Continental Europe
• If the G/l selector is not set properly, the picture will appear, but
no sound will be heard.
6. Set the TV and the video channel selector to the video channel (the video channel selector is factory-set to CH 32).
• For example, if the video channel in your area is channel 33,
tune the TV to channel 33, then use a flat-edge screwdriver to
set the video channel selector of the RU-100 to CH 33. Adjust it
by turning until the picture is clear.
Page 41

Australian Model
RU-100 Bcgj
m Connection Plug
13 Video Channel Selector
B TO TV Terminal
B FROM ANT. Terminal
Coaxial Cable with DIN-connectors KBsl
B male
13 female
Connection Procedure WtXSt
1. Connect the RF Unit to the camera.
2. Attach the aerial cable to the FROM
ANT. terminal, and connect the
female connector to the TO TV
terminal of the RF unit.
• Please note the difference between ‘male’ and
‘female’ type DIN-connectors on the coaxial
cable.
3. Connect the male connector to the
aerial input terminal of the TV.
To View a Regular TV Programme
The RU-100 RF Unit has an automatic signal
selector which selects the signal from the video
camera whenever the camera is connected to the
RF unit and the power is turned on. To view a
regular TV programme, turn the camera off or
disconnect it from the RF unit.
CD
>
o
O
T)
m
>
H
o
z
43
Page 42

Selecting the Video Channel (Australian model)
The video channel means the channel in your area which is not
used by a broadcasting station, and can be used for playback of
video cassettes (channel 0 or 1). If your TV does not have audio/
video input terminals, your TV and the video channel selector of
the RU-100 RF Unit must be set to the video channel in order to
view playback.
1. Turn the TV on.
2. Turn the camera on.
44
3. Press the
(STOP) button to select playback
mode.
4. Press the M (PLAY) button to start playback.
5. Set the TV and the video channel selector to the video channel (the video channel selector is factory-set to 1CH) using a flat-edge screwdriver.
• For example, if the video channel in your area is channel 0, set
the video channel selector of the RU-100 to 0 CM, then tune the
TV to channel 0.
Page 43

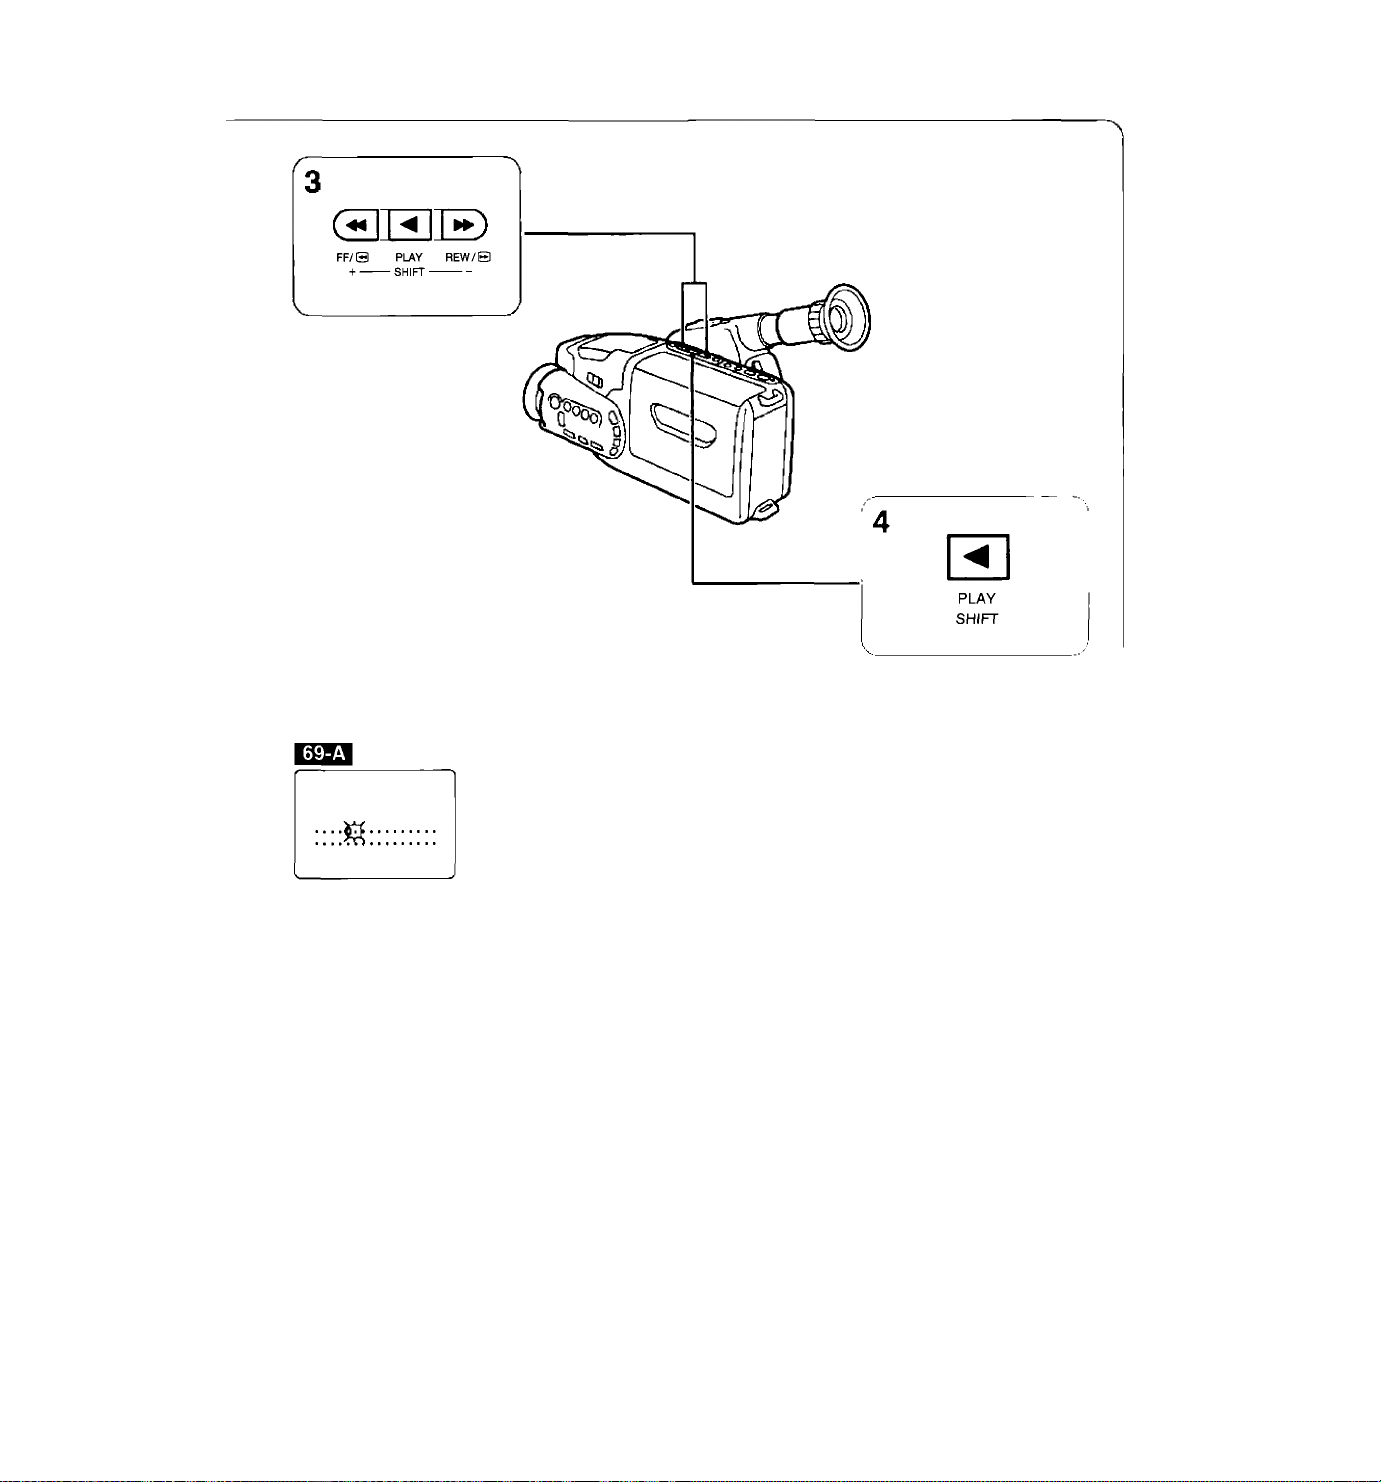
Playback Procedure
CD
>
CO
o
O
TD
m
J3
>
H
o
z
CO
2. Load the cassette.
• See p. 23 for loading/unloading cassettes.
3. Press the ■ (STOP) button to select playback
mode.
• Playback functions will not operate if you have not pressed the
■ (STOP) button.
4. Locate the playback start point.
• Use the REW or FF buttons to locate the start point or use high
speed search (see p. 48).
5. Press the PLAY button to start playback.
• You can also monitor playback in the viewfinder.
45
Page 44

6. Press the ■ (STOP) button to end playback.
7. Turn the camera off.
• The OPERATE indicator goes off.
High-Frequency Feedback
• High-frequency feedback may occur if the camera microphone is
too close to the TV speaker during recording or record pause
mode. Lower the TV volume.
46
Page 45

FF @
o
PLAY ►
O
PAUSE II
O
special Playback Methods
In addition to normal playback, your camera also has fast fon/vard,
rewind and still playback, plus high-speed search.
Playback is controlled by pressing buttons on the camera or by
using the wireless controller.
CD
>
W
o
o
Tl
m
J3
>
H
o
z
in
A. Fast Forward Playback
Press and hold the FF button during normal playback to view
scenes at 9 times normal speed.
• Release the FF button to resume normal playback.
B. Rewind Playback
Press and hold the REW button during normal playback to view
scenes in reverse at 7 times normal speed.
• Release the REW button to resume normal playback.
C. Still Playback
Press the PAUSE button on the wireless controller during
normal playback to pause the picture. Press the PAUSE button
again or the PLAY button to resume normal playback.
• The camera’s start/stop button can also be used.
47
Page 46

D. High-Speed Search
Press and hold the FF button during normal fast fonward mode to
view scenes at approximately 15 times (SP) or 30 times (LP)
normai speed. Reiease the FF button to resume normai fast
forward.
Press and hoid the REW button during normai rewind mode to
view scenes in reverse at approximately 15 times (SP) or 30
times (LP) normai speed. Reiease the REW button to resume
normal rewind.
48
Page 47

Notes:
• Several noise bars appear during special playback.
49-A
During fast forward and rewind playback modes.
49-B
During still playback.
The audio portion of the tape cannot be heard during special playback.
The camera automatically goes into stop mode after more than seven
minutes of continuous still playback.
The picture flickers a little during still playback.
When fast action scenes are shown during still playback, the picture may
blur.
Certain TVs may show the special playback picture in black and white, or
the picture may roll or divide.
Notes about special playback of tapes recorded in SP:
(1) The still playback picture will contain much more noise than on tapes
recorded in LP.
(2) During fast fon/vard or rewind playback, noise bars will be much wider
than on tapes recorded in LP.
The high-speed search picture might not appear on some TVs.
CD
>
CO
o
O
13
m
3)
>
H
o
z
CO
49
Page 48

Focusing
B
2^
1 m
12 m
There are two different ways of focusing:
autofocus and manual focus.
Autofocus
The camera can adjust the focus automatically by
bouncing infrared beams off the subject to work
out how far away it is.
As soon as you turn the camera on, autofocus
starts operating. Focus adjusts automatically to
suit the subject located in the centre of the
viewfinder.
In some cases, however, you will probably get
better results using manual focus.
Subject Not Suitable for Autofocus
A. The camera may not be able to focus on a
subject in the centre of the viewfinder during
telephoto-end recording of:
1. Very close subjects (closer than about 1
metre)
2. Distant subjects (further than about 12
metres)
n indicates the target area covered by the
camera’s infrared beams.
B. Subject behind glass
C. Subjects which reflect too much light (such as
a shiny car)
D.
Subjects which do not reflect enough light
(such as water surfaces or black clothes)
Notes:
• The autofocus mechanism focuses on subjects at a
distance of 0.6-12 metres. For more distant subjects
the focus locks at approx. 50 metres — this works
well in bright conditions, but in dim light manual
focus may give better results.
• Be careful not to cover the autofocus window with
your hand while recording.
• Do not touch the focusing ring during autofocus.
• Autofocus turns off while the camcorder is receiving
signals from the wireless controller, but infrared
signals from other wireless controllers being
operated nearby may cause a temporary
malfunction.
50
Page 49

Manual Focus
Use manual focus when you shoot subjects not suitable for
autofocus.
1. Press the FOCUS [A]/M button to select manual focus.
• “M. FOCUS” appears in the viewfinder. litWl
____
2. Press the T button to zoom into the telephoto end.
3. Look through the viewfinder and rotate the focusing ring to focus on the subject.
4. Use the zoom buttons to frame the subject
properiy.
• The camera automatically returns to autofocus after being turned
off or placed in playback mode.
• Press the FOCUS [A]/M button to stop manual focus and return to
autofocus (“M. FOCUS” disappears from the viewfinder).
Focus Lock
When you press the FOCUS [Aj/M button during autofocus, the
focus can tie locked on the subject focused at that time, even if the
subject moves to the right or left of centre. To focus on another
subject, adjust with the focusing ring or press the FOCUS [Âj/M
button again to return to autofocus.
>
D
<
>
z
o
m
D
o
-0
m
JO
>
H
o
z
œ
51
Page 50

Macro Recording
Macro recording allows you to record small subjects such as flowers
and insects close-up, to full screen, and achieve extremely fine
detail in your pictures.
1. Press the FOCUS [S/M button to select manual
focus.
• “M. FOCUS” appears in the viewfinder.
____
2. Press the W button to zoom into the wide-angle
end.
3. Hold the MACRO button down and press the W
button to enter macro range.
• ® mark appears in the zoom window.
4. Approach the subject until it reaches the desired
size in the viewfinder.
• Be sure there is adequate lighting.
• You can approach the subject as close as 4 mm.
5. Use the T/W button within macro range for fine
focusing.
6. When macro recording is complete, press the T
button to exit macro range.
Notes:
• Move the camera forward or backward slightly to change the subject image size and then fine focus again.
• A tripod is recommended for better recording stability.
• If necessary, remove the lens hood (see p. 26).
52
Page 51
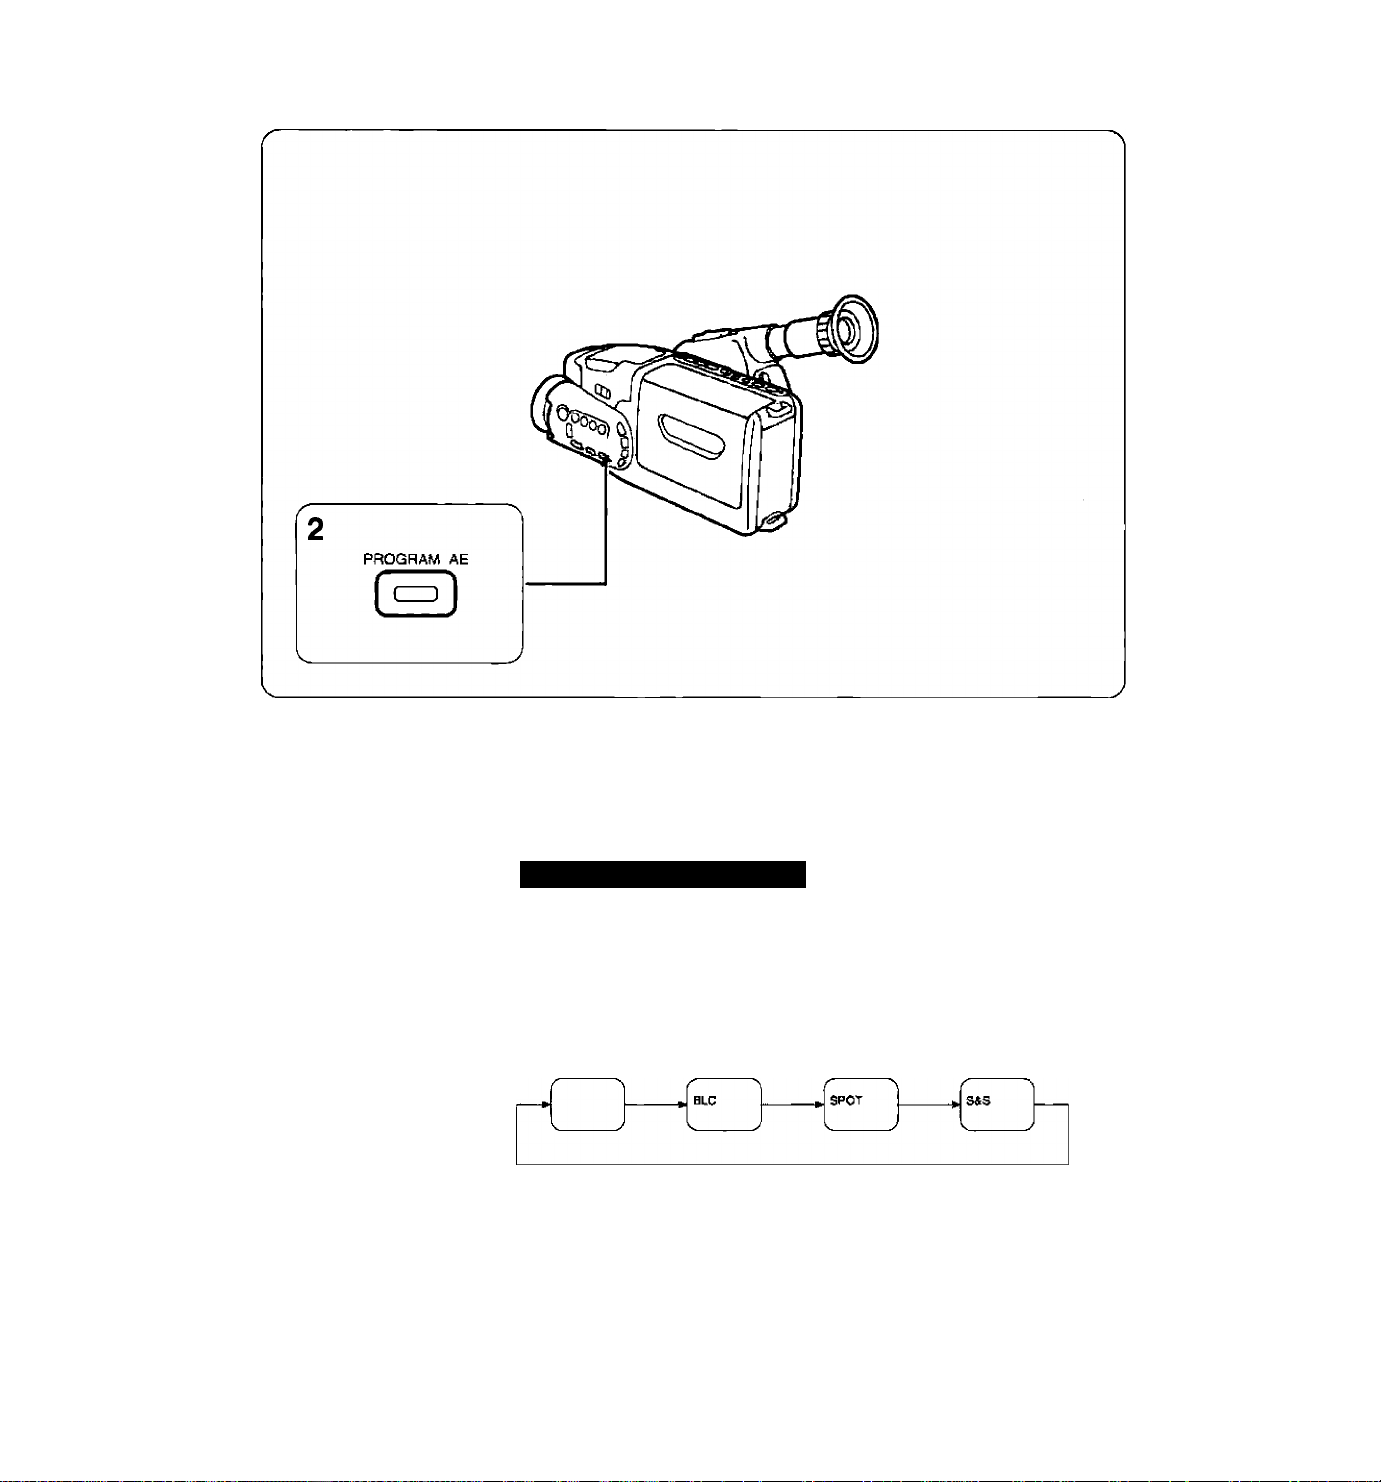
Program AE
Program AE allows you to use advanced recording techniques
easily.
There are three different Program AE modes in addition to auto
mode, to help you achieve the best recording results.
How to Use Program AE
1. Place the camera in record pause mode.
• The camera automatically enters auto mode.
2. Press the PROGRAM AE button.
• Each time the button is pressed, the viewfinder display changes
as follows:
No display : Auto mode (normal recording)
BLC (Backlight Compensation); To record a backlit subject
SPOT: To record a spotlit scene
S & S (Sand & Snow): To record a bright scene
>
a
<
>
z
o
m
D
O
Tl
m
zi
>
H
o
z
CO
53
Page 52

3. Make your recording.
4. When recording is complete, press the
PROGRAM AE button to return to auto mode.
Notes:
• When switching modes using the PROGRAM AE button, image brightness may change suddeniy. Switch
modes in record pause mode.
• When recording bright lights or reflections, a smear effect may occur.
• Flicker may occur with some sources of illumination.
• When using Program AE, except in auto mode, the High-Speed Shutter cannot be used.
• The Program AE setting is cancelled when you turn the camera off.
54
Page 53

To Record a Backlit Subject
(Backlight Compensation) ss a
Backlighting, caused for example by the sun or an
open window behind the subject, will make the
subject appear underexposed. Use this function
when the subject appears underexposed in the
viewfinder.
Press the PROGRAM AE button to
select “BLC.”
Note:
• If the picture angle is altered during backlight
compensation, the exposure may become
unsuitable. The Image in the viewfinder should
always be checked and compensation used only
when the subject appears underexposed.
To Record a Spotlit Scene 55-B
In SPOT mode, the iris is automatically adjusted
for effective, glare-free recordings of scenes
illuminated by spotlights or other concentrated
light sources.
Use this mode when recording spotlit scenes
such as on a stage.
Press the PROGRAM AE button to
select “SPOT.”
J
To Record a Bright Scene
(Beach or Snowy Location) 55-c
In S & S (Sand and Snow) mode, the shutter
speed and iris are automatically adjusted for clear
recordings. Subjects with excessively bright
backgrounds, such as a summer beach or snowy
ski resort, are not underexposed.
Use this mode in locations with strong light
reflection to obtain clear recordings and optimum
exposure of the subject.
>
D
<
>
Z
o
m
o
O
TJ
m
XI
>
w
Press the PROGRAM AE button to
select “S&S.”
55
Page 54

White Balance
Blue sky
Bluish light
1 L
White light
TV screen
Cloudy sky
Sunlight
White fluorescent light
Two hours after sunrise or before sunset
One hour after sunrise or before sunset
Eiectric halogen light
Thirty minutes after sunnse or before
sunset
White electric light bulb
Sunrise, sunset
Reddish light
I indicates the operating range of auto white
balance
Candleiight
The camcorder's auto white balance system
compensates for a wide range of lighting
conditions so that colours are recorded
naturally and whites really look white. (Colours
may vary slightly depending on the light
source.)
56
Page 55

Shooting with Pop-up Light
When shooting in a dark place, use the pop-up light.
• Use the pop-up light within approximately 2 metres of the subject
to ensure a clear picture.
1. Place the camera in record pause mode.
2. Slide the POP-UP LIGHT switch.
• The light pops up and turns on.
3. Make your recording.
4. When recording is complete, push the pop-up
light down.
• The pop-up light turns off.
>
a
<
>
z
o
m
a
O
■0
m
DO
>
H
o
z
w
Note:
• The pop-up light will only turn on during recording or in record pause mode.
• Bear in mind that shooting with the pop-up light consumes more power (the BP-E77K Battery Pack will
operate it for approximately 20 minutes).
57
Page 56
Replacing Bulb ss-a
Use only Canon Halogen Bulb MHL-5.7 V 4 W
(accessory).
• Before replacing the bulb, turn the power off
and allow sufficient time for the bulb to cool.
1. Loosen the screw of the protector.
2. Remove the protector.
3. Remove the old bulb and gentry
insert the new bulb as shown.
• Do not touch the new bulb with your bare
hands.
• If the bulb is dirty, wipe it with a soft, clean
cloth.
4. Attach the protector.
5. Tighten the screw.
58
Warning
Be careful not to touch the bulb during or
immediately after use; it becomes very hot.
Notes:
• Keep the hot iamp away from flammable or plastic
materials.
• Protect the pop-up light from impact or vibration
during use or the halogen lamp may burn out.
Page 57

High-Speed Shutter
JlAk
_____
y
The high-speed shutter allows you to capture sports and other fast
action scenes clearly. The camera has seven high-speed shutter
settings: 1/60th, 1/250th, 1/500th, 1/1000th, 1/2000th, 1/4000th and
1/10000th of a second. Select the correct shutter speed according to
subject speed and brightness. Normal shutter speed is 1/50th of a
second.
1. Point the camera at the subject and compose the
scene in the viewfinder.
2. Press the SHUTTER button.
• Each time the button is pressed, the viewfinder display changes
as follows:
/-----
\ >
/---------------
1/10000
V
________
Make your recording.
3.
4.
Press the SHUTTER button to return to normai
f
---------1/60
IrtOOD
—
f
J 1/pfifl
^
---------
1/2000
______
/
------
1^00
1/1000
L
__ _
J
shutter speed.
Notes:
• Use this function outdoors in bright light.
• You cannot change the shutter speed when using Program AE.
• Scenes shot with the high-speed shutter will appear somewhat jerky during normal playback.
• Scenes shot with the high-speed shutter work best with special playback. Use a VCR capable of noisefree special playback for best results.
• If you turn off the power or switch to playback mode, the shutter setting automatically returns to normal
(1/50).
>
D
<
>
z
o
m
D
o
Tl
m
X
>
H
O
z
CO
59
Page 58

Fade
The fade effect allows you to make scenes gradually appear or
disappear in smooth transition.
Fade In
The scene gradually appears from a blank white screen.
1. Place the camera in record pause mode. gTiH
2. Press and hold the FADE button until the scene
disappears compietely from the viewfinder.
3. Press the start/stop button to start recording and
then release the FADE button.
• The scene gradually fades in.
60
Page 59

Fade Out
The scene gradually disappears, fading to a blank white screen.
1. Press and hold the FADE button during recording.
• The scene gradually fades out.
2. Press the start/stop button when the scene has
disappeared completely.
• The camera goes into record pause mode.
3. Release the FADE button.
>
a
<
>
z
o
m
O
o
■0
m
>
H
o
z
CO
Notes:
• Sound fades along with the image.
• Titles, age, and date and time do not fade.
• The fade effect (but not wireless fade) can be used at any time during recording.
61
Page 60

Wireless Fade
To begin and end recording with a smooth fade in and fade out from
a distance and without camera shake.
1. Place the camera in record pause mode.
2. Press the F. START/STOP button.
• The scene disappears, recording begins about one or two
seconds later, and then the picture fades in.
3. When the scene is recorded, press the F. START/
STOP button again.
• The scene fades out, and the camera enters record pause mode
about four seconds later.
62
Page 61

To Resume Recording
Record Search
Use record search to locate the desired point to resume recording.
Record search can also be used to eliminate noise between different
scenes. Use this function when you make additional recordings on a
previously used cassette — there will be no noise between a
previously recorded scene and the new one.
1. Place the camera in record pause mode. BRl
2. Press the REC SEARCH + or - buttons to scroll
forwards or backwards to locate the recording
start position.
• Press and hold the + button to play the recording forward.
• Press and hold the - button to play the recording backward.
• The camera returns to record pause mode when you release the
buttons.
3. Press the start/stop button.
• Recording starts. BW51
• The tally lamp flashes rapidly.
>
o
<
>
z
o
m
a
O
Tl
m
X
o
z
CO
>
H
63
Page 62

Record Review
Press the O (Record Review) button during record pause mode to
play back the last segment of the recorded scene (approximately
three seconds) in the viewfinder. Once record review playback is
complete, the camera returns to record pause mode where it left off.
1. Place the camera in record pause mode. BgW
2. Press the © button.
• The scene plays back in the viewfinder.
• The camera returns to record pause mode after record review
has ended.
3. Press the start/stop button to resume recording.
• The tally lamp flashes rapidly.
64
Page 63

Explanation:
Record search (to resume recording)
Record pause mode
Release the - button to
enter record pause mode.
Tape
Press and
hold the button.
Desired section for searching
Release the + button to
enter record pause mode.
Press and
hold the +
button.
} Rewinding
A Playback i
-
Tape
///O///11 R«ooix)B(J Bedton//.■ •,■ /.///I
l/l ■■■ , I /a , : ; , , , 1 , : 1 , i!/ Ji>i
-------------------
About
3 seconds I
Record pause mode
Press the button
Searches the desired section to start recording, while
in record pause mode.
Explanation:
Record review BSgSl
Plays back your recording in the order O to 0 after
record pause mode is entered. The camera returns to
record pause mode after playback has ended.
>
D
<
>
Z
o
m
D
O
T3
m
>
H
o
z
CO
Hote:
• Noise or skew may appear on the
screen during record review mode or record search
mode. This is not a malfunction.
65
Page 64

Edit-erase
When an unwanted object or sound is recorded, such as someone
walking across the picture or the sound of a car horn, the edit-erase
function can be used to quickly return to the precise point where
recording began, and record the scene again. This function only
operates during the first 40 seconds or so of recording.
For about 40 seconds after starting to shoot a scene a mark
(asterisk) appears in the viewfinder next to the tape operations
display. The edit-erase function can be used while this mark is
displayed.
1. Make sure that ^ (asterisk) is displayed, then
press the start/stop button to pause recording.
2. Press the E. ERASE button.
• The tape is rewound to the recording start point at 3 times normal
speed, and the recorded picture is displayed (in reverse) in the
viewfinder. The camera returns automatically to record pause
mode at the start of the scene you want to record over.
• The asterisk disappears from the viewfinder.
3. Press the start/stop button to resume recording.
• The previously recorded scene is erased.
• The asterisk reappears.
66
Page 65

Tape Return
PLAY ►
O
Tape return allows you to quickly return to a desired scene on the
cassette.
• The camera does not have a TAPE RETURN button. Use the
wireless controller to operate tape return.
1. During playback, press the COUNTER RESET
PLAY
button if you come across a scene that you want
to watch again later.
• The tape counter is reset to 0:00:00.
Press the
(STOP) button when playback
____
finishes.
3. Press the TAPE RETURN button.
• The tape rewinds and stops automatically when the counter
reading nears 0:00:00.
4. Press the ► (PLAY) button.
• Playback starts at the point where you pressed the COUNTER
RESET button.
Notes:
• Every time you load a cassette, the tape counter is automatically reset to 0:00:00. This means that after
recording you can use the tape return to locate the recording start point.
• The tape counter reading is only approximate. Use it as a guide.
• Tape return does not function when the tape counter reading is near 0:00:00.
• Press the ■ (STOP) button to cancel tape return.
>
a
<
>
z
o
m
a
O
T)
m
>
H
o
z
in
67
Page 66

Adding Titles to Recordings
The camera allows you to create and store character titles, which
can be superimposed on recordings together with the date and time
and/or age.
Creating Character Titles
Remember to create your title before you start recording.
The title may be one or two lines of up to 16 characters each.
1. Press the C. TITLE button for more than 3 seconds
to display the title lines in the viewfinder.
• A flashing dot or character indicates that the cursor is present.
2. Press the SHIFT button to move the cursor to the
position where you want to start the title.
• Press once to move the cursor one space right.
• Press and hold to move the cursor continuously.
• The cursor does not move backwards.
68
Page 67
3. Use the + and - buttons to scan the list of title
characters.
• Press the + button to scan forward through the list.
• Press the - button to scan the list in reverse order.
• Press once to scan the characters one at a time.
• Press and hold to scan the characters quickly.
Title Characters List
ABCDEFGHI JKLMNOPQRSTUVWXYZ<
c
□ &5k!?;:”’-/.,987654321 OnEgN/EA0UOA^
------
• If you select □, a flashing dot appears in the viewfinder, but a
space will appear during actual recording and playback.
• Press the C. RESET button to erase all the characters at and to
the right of the cursor.
4. When the character you want is displayed, press the SHIFT button again to move to the next cursor position. QQ
>
a
<
>
z
o
m
D
O
■0
m
DO
>
H
o
z
0)
69
Page 68

O VL-20 Battery Video Light
O WD-37 Wide-converter
0 TL-37 Tele-converter
O WA-37 Wide Attachment
0 FS-37 Filter Set
0 FS-37U Filter Set
0
Tripod
0 RS-500 Rain Shield
0 SC-300 Soft Carrying Case
0 HC-500 System Case
0 SA-1 Adapter Bracket
0 WL-52 Wireless Controller
0 8mm Video Cassette
0 SS-300 Shoulder Strap
74
0 WS-20 Wrist Strap
0 BP-E77K, BP-E718, BP-E722 or
BP-E722D Battery Pack
0 CA-100 Compact Power Adapter
0 CB-110 Car Battery Adapter
0 DC-100 DC Coupier
0 MC-100 Muiti-battery Charger
0 Aerial
0 RU-IOORFUnit
0 TV
0 VCR
© C-150 AV Cable
0 PC-150 SCART Cable
0 E333D
Page 69

Carrying Cases
SC-300 Soft Carrying Case
The optional SC-300 Soft Carrying Case provides iightweight
protection for the camera and accessories.
HC-500 System Case
The optionai HC-500 System Case heips protect the camera
and its accessories during transportation and storage.
The HC-500 properly stores the following items:
O BP-E77K or BP-E722 Battery Pack
0 Camera with cassette and shouider strap / wrist strap
attached
0 CA-100 Compact Power Adapter or CB-110 Car Battery
Adapter
O BP-E718 Battery Pack
0
Coaxiai cabie or C-150 AV Cable, DC-100 DC Coupler,
PC-150 SCART Cable, RU-100 RF Unit, Wide-converter /
Teie-converter, etc.
0
WL-52 Wireiess Controiier
0
One additionai cassette
Opening the Case
Siide the iatches on both sides of the case as iiiustrated.
• Open the case with the “UP” sticker pointing upward.
Attaching the Shouider Strap
Attach the shoulder strap to the strap attachment bars, and
adjust it to the most comfortable length.
Notes:
• Do not leave the case in areas of extreme heat.
• Do not expose the case to strong vibrations or shock.
• Do not place heavy objects on top of the case.
• Two keys are provided with the HC-500 System Case.
• Power is slowiy drained while the battery pack is attached to the
camera, even when the camera is turned off. Remove the battery
pack when you don’t expect to use the camera.
>
D
g
H
o
z
>
o
DO
>
H
o
75
Page 70

Optional Accessories
CB-110
BP-E718
BP-E722
BP-E722D
CB-110 Car Battery Adapter
For recording using car battery.
Piug into cigarette iighter socket.
For use only with 12 or 24 V DC negative ground car battery.
BP-E718 Battery Pack
Use when shooting for long periods of time. The continuous
recording time of the BP-E718 is approximately 100 minutes.
BP-E722 Battery Pack
Used for lengthy recording, i^s capacity is about double the
BP-E77K. Hold the camera with both hands when using this
battery.
BP-E722D Battery Pack
The BP-E722D is a rechargeable nickel cadmium battery
equipped with five LED indicators for displaying the remaining
charge.
MC-100 Multi-battery Charger
The MC-100 Multi-battery Charger is a sequential high-speed
charger controlled by a microcomputer for charging up to four
Canon battery packs. Also the MC-100 automatically
performs charging, discharging and recharging to refresh
battery packs.
• Charging time: 45 min. (BP-E77K)
80 min. (BP-E718)
90 min. (BP-E722/BP-E722D)
76
RS-500 Rain Shield
A vinyl cover to protect the camera from light rain or mist.
MC-100
RS-500
Page 71

VL-20 Battery Video Light
This light, compact video light uses the BP-E77K or BP-E722
Battery Pack and is ideal for indoor or outdoor shooting.
TL-37 Tele-converter
This tele-converter is a magnification converter lens that
increases the focal length of the camera lens by a factor of
1.4. Switch to manual focus when using this lens. The zoom
can be operated as usual.
WD-37 Wide-converter
This wide converter decreases the focal length by a factor of
0.75. Switch to manual focus when using this lens. The
zoom can be operated as usual.
WA-37 Wide Attachment
This optional wide attachment decreases the focal length by
a factor of 0.75. When using this lens attachment, first switch
to macro recording.
FS-37 Filter Set
The FS-37 Filter Set contains three filters; multiple image
filter 5X, R-cross filter 6X and zoom-spot filter.
FS-37U Filter Set
The FS-37U Filter Set contains three filters: UV, ND8 and
circular PL. When using the PL filter, first zoom and switch to
manual focus. Then adjust the PL filter to minimize light
reflection.
SA-1 Adapter Bracket
When you want to use the VL-20 Battery Video Light, use the
SA-1 to attach it to the camera.
>
p
o
z
>
T1
O
O
z
g
H
D
77
Page 72

Problems and Troubleshooting
Use the following checklist for troubleshooting if you have problems with your camera. Consult
your local dealer or service outlet if probiems persist.
Be sure all connections are properly made when using the camera with other equipment.
The following warnings may appear in the viewfinder:
_ __ _ __ __
Warning Cause
The battery pack charge is low. Refer to “Battery Pack Notes”
Condensation has formed inside Refer to “Condensation”
the camera. (see p. 81).
The safety mechanism is
activated.
The lithium battery is not in place Insert a new lithium battery
properly or the charge is low. (see p. 22).
Remedy
(see p. 18).
Unload and reload the
cassette.
78
A cassette has not been loaded. Load a cassette
(see p. 23).
The tape has ended.
Rewind the tape or use another
cassette.
Page 73

Problem
Cause
Remedy
The camera does not turn on.
The camera turns off during
operation (using a battery
pack).
The cassette compartment
does not open.
The camera does not function
when an operation button is
pressed.
The start/stop button is
pressed, but recording does not
start.
The battery pack charge is low.
The battery pack charge is low.
Record pause mode has lasted
for more than 7 minutes.
The battery pack charge is low.
The camera is turned off.
A cassette has not been loaded.
The battery pack is not properly
attached to the camera.
The camera is turned off.
A cassette has not been loaded.
The tape has ended (“T. END’’
appears in the viewfinder).
The erasure prevention switch on
the cassette is set to prevent
recording
Replace it with a fully charged
battery pack.
Replace it with a fully charged
battery pack.
Turn the camera on again.
Replace it with a fully charged
battery pack.
Turn the camera on.
Load a cassette.
Attach the battery pack
securely to the camera
(see p. 17).
Turn the camera on.
Load a cassette.
Rewind the tape or use another
cassette.
Use another cassette or set the
switch to enable recording
(see p. 24).
No picture appears in the
viewfinder.
Focus can not be adjusted.
Playback does not start when
the PLAY button is pressed.
The camera is in playback mode.
The lens cap is attached.
The zoom lens is in macro range.
The viewfinder dioptre is not
properly adjusted.
The autofocus window is
obscured.
The camera is in record pause or
record mode.
The camera is turned off.
A cassette has not been loaded.
The tape has ended (“T. END”
appears in the viewfinder).
Press the • (REG MODE)
button.
Remove the lens cap.
Press the T button to exit macro
range.
Turn the dioptre adjustment ring
until the vie\^inder display
becomes clear (see p. 27).
Remove the obstacle from the
autofocus window.
Press the ■ (STOP) button.
Turn the camera on and press
the ■ (STOP) button.
Load a cassette.
Rewind the tape or use another
cassette.
>
D
g
H
o
z
>
r-
o
X
s
>
79
Page 74

Problem
Cause
Remedy
The tape is moving, but no
picture appears on the TV
monitor.
The pop-up light will not turn
on.
For a TV without audio/video
input terminals: the video
channel has not been set
properly on both the TV and the
RF unit.
For a TV with audio/video input
terminals: TheTV/VIDEO
selector on the TV has not been
set to VIDEO.
The video heads are dirty.
The battery pack is exhausted.
The camera is not in record
pause or record mode.
The camera is not turned on.
The bulb has burned out.
A cassette has not been loaded.
Set the TV and the RF unit to
the appropriate video channel.
Set the TV/VIDEO selector to
VIDEO.
Clean the video heads using
the optional CK-E1 Cleaning
Kit.
Charge the battery pack.
Place the camera in record
pause or record mode.
Turn the camera on.
Replace the bulb.
Insert a cassette and place the
camera in record pause or
record mode.
Smear BtiTO
A luminous bar appears vertically on the screen where an
excessively bright scene was recorded.
Smear is caused when:
• Spotlights are directly recorded, on a stage for example.
• Burning candles or other burning objects are recorded
directly.
• Objects reflecting light, such as car bodies and traffic signs,
are recorded directly.
Poor playback picture on TV monitor lltiMtl
Loss in video playback picture quality such as blurring,
distortion or noise usually means that the video heads have
become dirty. Use the optional Canon 8mm Video Head
Cleaning Cassette CC-8 included in the Canon 8mm Video
Cleaning Kit CK-E1 to clean the video heads. See the CC-8
instruction manual for details.
Note:
• This equipment contains a microprocessor. If external noise or interference occurs, random letters may
appear in the viewfinder or normal operation may be interrupted. In this case, remove and then replace
the power source (and if necessary, the lithium battery).
80
Page 75

Condensation (DEW)
B
What is condensation?
Condensation (DEW) means tiny droplets of
water that occasionally form on the camera
surface when it is moved from a cold place to a
warm place. Using the camera when
condensation is present may damage both tape
and camera.
Condensation is likely to occur when:
A. The camera is brought from a cold place to a
warm place.
B. A cold room is heated rapidly.
The camera is taken from an air-conditioned
room to a warm and humid place.
D. The camera is placed in a humid environment.
Preventing condensation
Remove the cassette and place the camera in a
plastic bag prior to bringing it into a warm area
where condensation is likely to occur. Wait until
the camera reaches room temperature before
removing it from the bag.
When condensation is detected
When condensation is detected in the camera,
the OPERATE indicator flashes, “DEW” flashes in
the viewfinder and the tape automatically stops.
Immediately remove the cassette, leave the
cassette compartment open and turn the camera
off. Leave the camera in a dry place until the
condensation evaporates.
• Sometimes “DEW” may not appear in the
viewfinder until 10-15 minutes after
condensation has formed.
To start using the camera again
Even if “DEW” and the OPERATE indicator no
longer flash when the camera Is turned on, wait at
least one more hour before attempting operation.
The time required for condensation to clear varies
with the surrounding conditions; it can be as long
as an hour.
>
a
o
o
z
>
O
33
O
n
81
Page 76

Cautions
During Use
A. Avoid High Temperatures and High
Humidity.
Do not expose the camera to high
temperatures or high humidity, such as inside
a car during hot weather, when all the doors
and windows are shut. Such exposure can
cause damage.
B
B. Avoid Exposure to Strong
Electromagnetic Waves.
Do not use the camera close to sources of
magnetic or electric fields (power plant, TV
tower, TV set, magnets, motors, audio
equipment, etc.).
C. Do Not Expose the Camera to Rain
or Water.
Place a protective covering over the camera if
you’ll be recording in the rain, to reduce the
risk of fire or electric shock. If, somehow,
water does get into the camera, contact
qualified service personnel as soon as
possible.
D. Avoid Pointing the Lens into Direct
Sunlight or Other Strong Light
Sources.
Do not aim the lens directly at the sun or other
strong light, or leave the lens aimed at a very
bright subject since this can cause damage.
82
E. Do Not Expose the Camera to
Excessive Heat:
When using lighting equipment be sure not to
expose the camera to too much heat radiating
from such equipment.
Page 77

H
F. Always Replace the Lens Cap.
Always replace the lens cap after use to
prevent sand and dust from getting on the
lens. Be especially careful to affix the cap on
windy days.
G. Do Not Expose the Camera to
Shock or Vibrations.
Be sure to handle the camera gently.
Vibration or shock can cause damage.
H. Avoid Sudden Changes in
Temperature.
If the camera is suddenly brought into a warm
place from a cold place, condensation can
form on the internal parts and lens. So take
appropriate care when moving the camera.
Do Not Disassemble the Camera.
I.
It is very dangerous to disassemble the
camera or touch any of its internal parts, as
you may risk electric shock or other hazards.
If the camera does not function properly, take
it to qualified service personnel.
1
J. Use the Battery Pack Correctly, and
Only Use Recommended
Accessories.
Carefully read the instructions that come with
the battery pack before use. And to reduce
the risk of electric shock and to reduce
annoying interference, use the recommended
accessories only.
o
>
o
o
z
>
z
■n
o
3
s
>
o
z
83
Page 78

r
Maintenance
Keep the Heads Clean.
The video heads should be cleaned only when
necessary, preferably with the Canon 8mm Video
Head Cleaning Cassette CC-8 included in the
Canon 8mm Video Cleaning Kit CK-E1.
Clean the Camera with a Soft, Dry Cloth.
The camera should be cleaned using a soft, dry
cloth. Do not use chemically treated cloth or
volatile solvents such as paint thinner, since this
can damage the unit.
Store the Camera Properly.
If you do not intend to use the camera for some
time, store it in an area free of moisture and dust,
and where the ambient temperature is no higher
than 30°C.
Store Cassette Tape Properly.
Do not place cassettes in areas exposed to direct
sunlight, near heat-radiating sources such as
stoves, or close to magnetic bodies such as
speakers, since these can cause tape
deformation and damage to valuable recordings.
Check the Operation of Each
Component.
If the camera has not been used for a long time,
be sure to check that each component functions
correctly before use.
84
Page 79

Specifications
E333D
Power supply (rated):
Power consumption:
Television system:
Video recording system:
Audio recording system:
Image sensor:
Tape format:
Tape speed:
Maximum recording time:
Lens:
Focusing system:
Minimum focusing distance:
Recommended illumination:
Minimum illumination:
Filter diameter:
Electronic viewfinder:
Microphone:
Output level:
Dimensions (W x D x H):
Weight:
6VDC
5.6 W (during recording in autofocus mode)
CCIR standard (625 lines, 50 fields)
PAL colour signal
2 rotary heads, helical scanning system
Luminance signal; FM azimuth recording
Colour signal: Converted subcarrier phase shift recording
(8mm video standard)
Frequency multiplexing with the video signal by 2 rotary heads
(1 channel)
320,000 pixels (300,000 effective pixels),
1/3-inch CCD (charge-coupled device)
8mm, metal particle*
20.051 mm/s (SP)
10.026 mm/s(LP)
3 hours with P5-90 video cassette, in LP mode.
f/2.0,10X power zoom, 6.7-67 mm focal length, macro
mechanism (wide/tele)
Active autofocus (using infrared beams), manual focusing possible
0.6 m or 4 mm in wide macro
More than 100 lux
2 lux
37 mm
0.6-inch monochrome CRT
Nondirectional electret condenser microphone
Video: 1 Vp-p/75 ohms, unbalanced (video output terminal)
Audio; -10 dBV/less than 3 kohms, unbalanced (audio output
terminal)
122 X 257 X 115 mm
920 g excluding battery pack
Pop-up Light
Central light intensity:
Illumination angle:
Central luminosity:
Colour temperature:
Power consumption:
Required bulb:
Bulb life:
Operating temperature range:
Power supply:
Illumination time:
Canon recommends metal particle tape.
Weight and dimensions are approximate. Errors and omissions excepted.
Subject to change without notice.
Approx. 120 cd
Approx. 35°
Approx. 35 lux (2 m)
Approx. 3200 K
4 W (6 V)
Canon Halogen Bulb MHL-5.7 V 4 W
Approx. 50 hours
0°C-40°C
Battery pack or DC coupler mounted on the main body
Approx. 20 min. (with BP-E77K in continuous use)
>
O
D
O
z
>
O
33
§
o
85
Page 80

MEMO
Page 81

1
Page 82

r
Canon
CANON INC. 30-2, Shimomamko 3-chome, Ohta-ku, Tokyo 146, Japan
Canon UK Ltd.
Units 4, S & 6, Brent Trading Centre, North Circular Road, London NW10 OJF, United Kingdom
Canon Europa N.V.
P.O. Box 2262,1180 EG Amstelveen, The Netherlands
PUB.DIEN-09a
0793AB10
) CANON INC. 1993
DY8-9020-049-00a
Printed on 40%
reused paper.
PRINTED IN JAPAN
IMPRIME AU JAPON
 Loading...