

Page 1
Getting Started
CEL-SP1ZA210
Photo of PowerShot A495
• Make sure you read this guide before using the camera.
• Store this guide safely so that you can use it in the future.
• Please use this guide along with the manuals included on the DIGITAL
CAMERA Manuals Disk (p. 2).
ENGLISH
Page 2
PRINTED IN THE EU © CANON INC. 2010
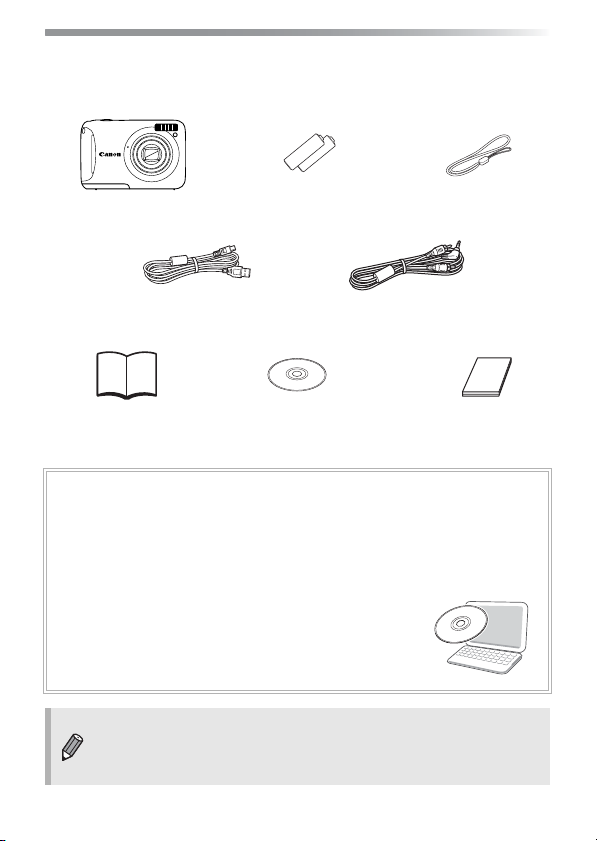
Checking the Package Contents
Camera
AA Alkaline Batteries (x2)
Interface Cable
IFC-400PCU
AV Cable
AVC-DC300
Wrist Strap WS-800
Getting Started
(This Guide)
DIGITAL CAMERA
Solution Disk
Warranty System
Booklet
Check if the following items are included in your camera package. If anything
is missing, contact the retailer from which you purchased the camera.
Using the Manuals
Also refer to the manuals on the DIGITAL CAMERA Manuals Disk.
• Camera User Guide
Once you have mastered the basics, use the camera’s many features to shoot
more challenging photos.
• Personal Printing Guide
Read when you want to connect the camera to a printer
(sold separately) and print.
• Software Guide
Read when you want to use the included software.
• A memory card is not included.
• Adobe Reader is required to view the PDF manuals. Microsoft Word/
Word Viewer can be installed to view the Word manuals (required only
for manuals for the Middle East).
2
Page 3

Read This First
Test Shots and Disclaimer
Take some initial test shots and play them back to make sure the images
were recorded correctly. Please note that Canon Inc., its subsidiaries and
affiliates, and its distributors are not liable for any consequential damages
arising from any malfunction of a camera or accessory, including memory
cards, that results in the failure of an image to be recorded or to be recorded
in a way that is machine readable.
Warning Against Copyright Infringement
The images recorded with this camera are intended for personal use. Do not
record images that infringe upon copyright laws without the prior permission
of the copyright holder. Please be advised that in certain cases the copying
of images from performances, exhibitions, or commercial properties by
means of a camera or other device may contravene copyright or other legal
rights even if the image was shot for personal use.
Warranty Limitations
For information on your camera's warranty, please refer to the Canon
Warranty System Booklet supplied with your camera.
For Canon Customer Support contacts, please see the Warranty System
Booklet.
LCD Monitor
• The LCD monitor is produced with extremely high-precision
manufacturing techniques. More than 99.99% of the pixels operate to
specification, but occasionally non-performing pixels may appear as bright
or dark dots. This is not a malfunction and has no effect on the recorded
image.
• The LCD monitor may be covered with a thin plastic film for protection
against scratches during shipment. If so, remove the film before using the
camera.
Camera Body Temperature
Please take care when operating the camera for an extended period as the
camera body may become warm. This is not a malfunction.
CANON INC.
30-2, Shimomaruko 3-chome, Ohta-ku, Tokyo 146-8501, Japan
CANON EUROPA N.V.
Bovenkerkerweg 59-61, 1185 XB Amstelveen, The Netherlands
3
Page 4

Safety Precautions
• Before using the camera, please ensure that you read the safety precautions
described below. Always ensure that the camera is operated correctly.
• The safety precautions noted on the following pages are intended to prevent injuries
to yourself and other persons, or damage to the equipment.
•
Be sure to also check the guides included with any separately sold accessories you use.
Warning
Caution
Caution
Denotes the possibility of serious injury or death.
Denotes the possibility of injury.
Denotes the possibility of damage to the equipment.
Warning
Camera
• Do not trigger the flash in close proximity to people’s eyes.
Exposure to the intense light produced by the flash could damage eyesight. In particular,
remain at least one meter (39 inches) away from infants when using the flash.
• Store this equipment out of the reach of children and infants.
Strap: Putting the strap around a child’s neck could result in asphyxiation.
Memory card, day/date battery: Dangerous if swallowed. If this occurs, contact a doctor
immediately.
• Do not attempt to disassemble or alter any part of the equipment unless
expressly indicated to do so in this guide.
• To avoid the risk of injury, do not touch the interior of the camera if it has been
dropped or otherwise damaged.
• Stop operating the camera immediately if it emits smoke, a strange smell, or
otherwise behaves abnormally.
• Do not use organic solvents such as alcohol, benzine, or thinner to clean the
equipment.
• Do not allow liquids or foreign objects to enter the camera.
The above could result in fire or electrical shock.
If liquid or foreign objects come into contact with the camera interior, immediately turn the
camera power off and remove the batteries.
• Use only recommended power sources.
Using other power sources could result in fire or electrical shock.
4
Page 5

Safety Precautions
Batteries
• Use only recommended batteries.
• Do not place the batteries near or in direct flame.
• Do not let the batteries come into contact with water (e.g. sea water) or other
liquids.
• Do not attempt to disassemble, alter or apply heat to the batteries.
• Avoid dropping or subjecting the batteries to severe impacts.
The above may cause explosions or leaks, resulting in fire, injury and damage to the
surroundings. In the event that a battery leaks and the eyes, mouth, skin or clothing
contacts these substances, immediately flush with water and seek medical assistance.
Other Warnings
• Do not play the supplied CD-ROM(s) in any CD player that does not support
data CD-ROMs.
It is possible to suffer hearing loss from listening with headphones to the loud sounds of
a CD-ROM played on a music CD player. Additionally, playing the CD-ROM(s) in an audio
CD player (music player) could damage the speakers.
Caution
• Be careful not to bang the camera or subject it to strong impacts or shocks
when hanging it by the strap.
• Be careful not to bump or push strongly on the lens.
This could damage the camera or lead to injury.
• Avoid using, placing or storing the camera in the following places.
- Places subject to strong sunlight.
- Places subject to temperatures above 40 °C (104 °F).
- Humid or dusty areas.
These could cause leakage, overheating or an explosion of the batteries, resulting in
electrical shock, fire, burns or other injuries. High temperatures may also cause
deformation of the casing.
• When using the flash, be careful not to cover it with your fingers or clothing.
This could result in burns or damage to the flash.
5
Page 6
Safety Precautions
Caution
• Do not aim the camera at bright light sources (the sun, etc.).
Doing so may cause malfunctions or damage the image sensor.
• When using the camera on a beach or at a windy location, be careful not to
allow dust or sand to enter the camera.
This may cause the camera to malfunction.
• In regular use, small amounts of smoke may be emitted from the flash.
This is due to the high intensity of the flash burning dust and foreign materials stuck to the
front of the unit. Please use a cotton swab to remove dirt, dust or other foreign matter from
the flash to prevent heat build-up and damage to the unit.
• Remove and store the batteries when you are not using the camera.
If the batteries are left inside the camera, damage caused by leakage may occur.
• Before you discard batteries, cover the terminals with tape or other insulators.
Contacting other metal materials in waste containers may lead to fire or explosions.
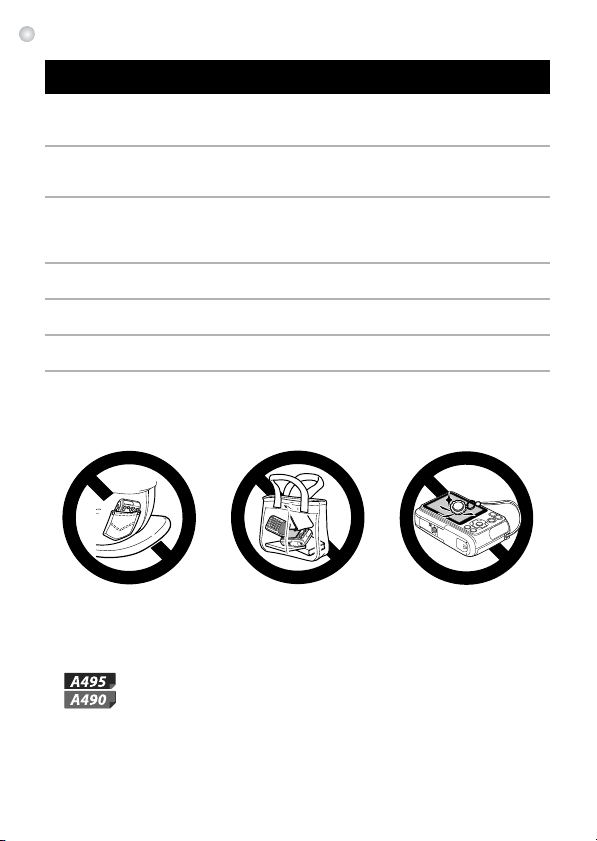
• Do not sit down with the camera in your pocket.
Doing so may cause malfunctions or damage the screen.
• When putting the camera in your bag, ensure that hard objects do not come into
contact with the screen.
• Do not attach accessories to the strap.
Doing so may cause malfunctions or damage the screen.
• Functions that differ depending on the camera model are indicated with
the following icons:
: Functions and precautions for the PowerShot A495 only
: Functions and precautions for the PowerShot A490 only
Explanations without these icons apply to both models.
• PowerShot A495 screenshots and illustrations are used for the
explanations in this guide.
6
Page 7

Table of Contents
Strap
Checking the Package Contents ........................................................... 2
Read This First ...................................................................................... 3
Safety Precautions ................................................................................ 4
Attaching the Strap/Holding the Camera............................................... 7
Compatible Memory Cards (Sold Separately)....................................... 8
Inserting the Batteries and Memory Card.............................................. 8
Setting the Date and Time................................................................... 11
Setting the Display Language ............................................................. 13
Formatting Memory Cards................................................................... 14
Pressing the Shutter Button ................................................................ 15
Taking Pictures (Smart Auto) .............................................................. 16
Viewing Images ................................................................................... 20
Erasing Images ................................................................................... 21
Shooting Movies.................................................................................. 22
Viewing Movies ................................................................................... 25
Transferring Images to a Computer for Viewing.................................. 26
Accessories ......................................................................................... 30
Separately Sold Accessories............................................................... 31
Attaching the Strap/Holding the Camera
• Be sure to attach the supplied strap to the camera and wrap it around your
wrist when shooting to avoid dropping the camera.
• Keep your arms tight against your body while holding the camera firmly by
the sides. Be sure that your fingers do not block the flash.
7
Page 8
Compatible Memory Cards (Sold Separately)
• SD memory cards (2 GB and less)*
• SDHC memory cards (More than 2 GB, up to and including 32 GB)*
• SDXC memory cards (More than 32 GB)*
• MultiMediaCards
• MMCplus memory cards
• HC MMCplus memory cards
* This memory card complies with the SD standards. Some cards may not operate
properly depending on the brand of card used.
Depending on your computer’s OS version, SDXC memory cards may
not be recognized when using a commercially available card reader.
Check to make sure that your OS supports this function beforehand.
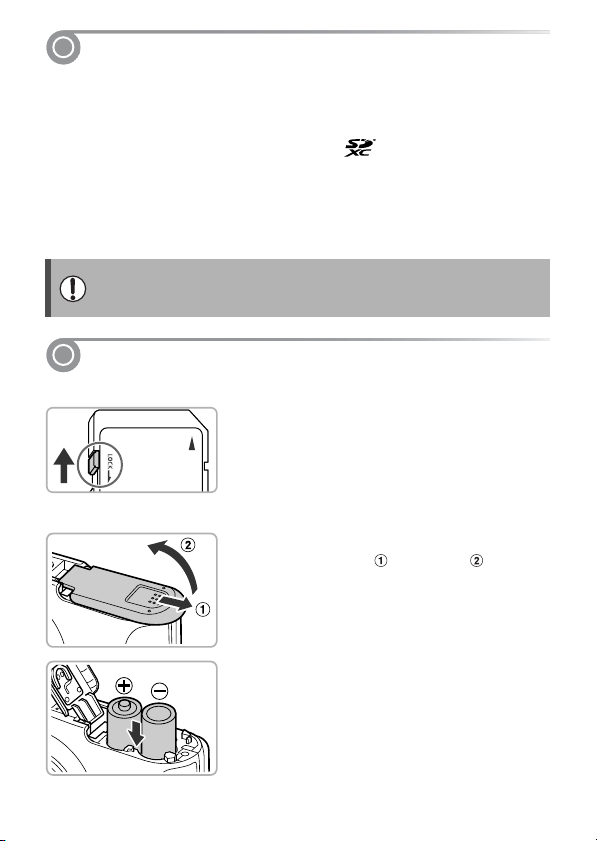
Inserting the Batteries and Memory Card
Insert the included batteries and a memory card (sold separately).
Check the card’s write-protect
1
tab.
● If the memory card has a write-protect tab,
you will not be able to record images if the
tab is in the locked position. Slide the tab up
until you hear a click.
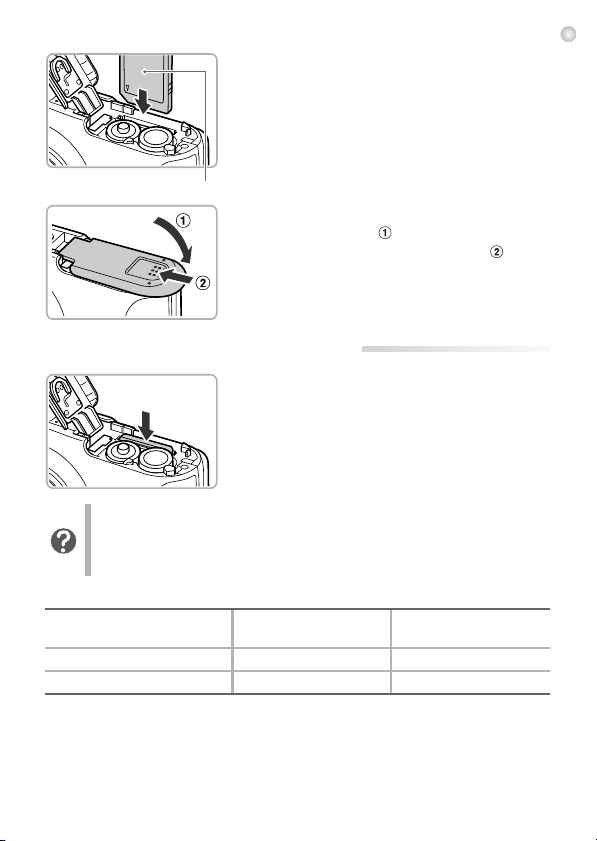
Open the cover.
2
● Slide the cover and open it .
Insert the batteries.
3
● Insert the batteries with (+) and (-) ends
oriented correctly.
8
Page 9
Inserting the Batteries and Memory Card
Label
Insert the memory card.
4
● Insert the memory card as shown until it
locks into place with a click.
● Be sure the memory card is oriented
correctly. Inserting the memory card in the
wrong direction could damage the camera.
Close the cover.
5
● Close the cover and press downward as
you slide it until it clicks into place .
● Removing the Memory Card
● Push the memory card in until you hear a
click, then slowly release it.
The memory card will pop up.
What if [Memory card locked] appears on the screen?
SD, SDHC and SDXC memory cards have a write-protect tab. If this tab
is in the locked position, [Memory card locked] will appear on the screen
and you will not be able to take or erase images.
Approximate Number of Shots That Can Be Taken
Power Source
Number of Shots* 150 400
Playback Time (Hours) 810
* The number of shots that can be taken is based on the Camera & Imaging Products
Association (CIPA) measurement standard.
• Under some shooting conditions, the number of shots that can be taken may be less
than mentioned above.
• Depending on the brand of alkaline batteries used, the number of shots that can be
taken may vary widely.
• The values for NiMH batteries are based on fully charged batteries.
Alkaline Batteries
(Supplied)
NiMH Batteries
(Sold Separately)
9
Page 10
Inserting the Batteries and Memory Card
Number of shots that can be taken
Compatible Batteries
AA alkaline batteries and Canon AA NiMH batteries (sold separately)
(pp. 30, 31).
Can any other batteries be used?
We cannot recommend the use of any other batteries than those listed
above because performance varies widely.
Why use NiMH batteries?
NiMH batteries last much longer than alkaline batteries, especially in cold
weather.
Battery Charge Indicator
When battery charge is low, an icon and message will appear on the screen.
If the batteries are charged, the icon and message will not appear.
Display Summary
Nearly depleted. Ready new batteries.
“Change the batteries” Depleted. Change the batteries.
Approximate Number of Shots per Memory Card
Memory Card
Number of Shots
• Values are based on the default settings.
• The number of shots that can be taken will vary depending on camera settings, the
subject and the memory card used.
4GB 16GB
1471 6026
Can you check the number of shots that can be taken?
You can check the number of shots that can be taken when the camera is
in a Shooting mode (p. 16).
10
Page 11
Setting the Date and Time
The Date/Time settings screen will appear the first time the camera is turned
on. Since the dates and times recorded into your images are based on these
settings, be sure to set them.
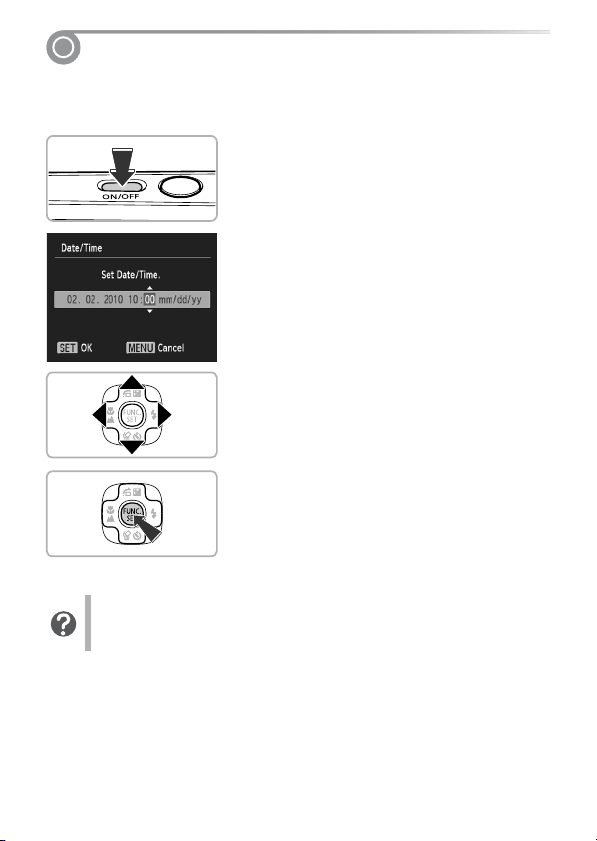
Turn on the camera.
1
● Press the ON/OFF button.
The Date/Time screen will appear.
Set the date and time.
2
● Press the qr buttons to choose an option.
● Press the op buttons to set a value.
Complete the setting.
3
● Press the m button.
Once the date and time have been set, the
Date/Time screen will close.
● Pressing the ON/OFF button will turn off the
camera.
Reappearing Date/Time screen
Set the correct date and time. If you have not set the date and time, the
Date/Time screen will appear each time you turn on the camera.
11
Page 12

Setting the Date and Time
● Changing the Date and Time
You can change the current date and time settings.
Display the menus.
1
● Press the n button.
Choose [Date/Time] in the 3 tab.
2
● Press the qr buttons to choose the 3 tab.
● Press the op buttons to choose [Date/
Time], then press the m button.
Change the date and time.
3
● Follow Steps 2 and 3 on p. 11 to adjust the
setting.
● Pressing the n button will close the
menu.
Date/Time battery
If the [Date/Time] screen appears even when the date/time have been
correctly set, insert a new date/time battery (see Camera User Guide).
12
Page 13

Setting the Display Language
You can change the language that displays on the screen.
Enter Playback mode.
1
● Press the 1 button.
Display the settings screen.
2
● Press and hold the m button, then press
the n button.
Set the display language.
3
● Press the opqr buttons to choose a
language, then press the m button.
Once the display language has been set,
the settings screen will close.
You can also change the display language by pressing the n button,
choosing the 3 tab, and choosing the [Language] menu item.
13
Page 14

Formatting Memory Cards
Before you use a new memory card or one that has been formatted in other
devices, you should format the card with this camera.
Formatting (initializing) a memory card erases all data on the memory card.
As you cannot retrieve the erased data, exercise adequate caution before
formatting the memory card.
Display the menu.
1
● Press the n button.
Choose [Format].
2
● Press the qr buttons to choose the 3 tab.
● Press the op buttons to choose [Format],
then press the m button.
Format the memory card.
3
● Press the qr buttons to choose [OK], then
press the m button.
A confirmation screen will appear.
● Press the op buttons to choose [OK] and
press the m button.
The memory card will be formatted.
14
Page 15

Pressing the Shutter Button
When formatting ends, [Memory card
formatting complete] will appear on the
screen.
● Press the m button.
Formatting or erasing data on a memory card merely changes the file
management information on the card and does not ensure its contents
are completely erased. Be careful when transferring or disposing of a
memory card. When disposing of a memory card, take precautions such
as physically destroying the card to prevent personal information leaks.
The total capacity of the memory card displayed in the formatting screen
may be less than indicated on the memory card.
Pressing the Shutter Button
To take images that are in focus, be sure to first press the shutter button
lightly (halfway) to focus, then press fully to shoot.
Press halfway (lightly to focus).
1
● Press lightly until the camera beeps twice
and AF frames appear where the camera
focused.
Press fully (all the way to shoot).
2
The camera plays the shutter sound and
takes the shot.
If you shoot without pressing the shutter button halfway, the image may
not be in focus.
15
Page 16

Taking Pictures (Smart Auto)
Zoom bar
Since the camera can determine the subject and shooting conditions, you
can let it automatically select the best settings for the scene and just shoot.
The camera can also detect and focus on faces, setting the color and
brightness to optimal levels.
Turn on the camera.
1
● Press the ON/OFF button.
The start-up screen will appear.
Choose » mode.
2
● Press the button, then press the qr
buttons to choose ».
● Press the m button.
● When you point the camera toward the
subject, the camera will make a slight noise
as it determines the scene.
The icon for the determined scene will
appear in the upper right of the screen.
The camera will focus on detected faces
and display frames on them.
Compose the shot.
3
● Pressing the zoom button toward i will
zoom in on your subject, making it appear
larger. Pressing the button toward j will
zoom out from your subject, making it
appear smaller (the zoom bar will appear).
16
Focus.
4
● Press the shutter button halfway to focus.
Page 17

Taking Pictures (Smart Auto)
AF Frame
When the camera focuses, it will beep twice
and AF frames will appear where the
camera focuses.
Several AF frames will appear when the
camera focuses on more than one point.
Shoot.
5
● Press the shutter button fully.
The camera will play the shutter sound and
shoot. The flash will automatically fire in low
light conditions.
The image will appear on the screen for
about two seconds.
● You can take a second picture even while
an image is displayed by pressing the
shutter button again.
● Scene Icons
The camera displays an icon for the scene it has determined and then
automatically focuses and selects the optimum settings for subject
brightness and color.
Background
Subject
People – *
Landscapes *
Close Subjects ––
Icon Background
Color
* Appears when the scene is dark and the camera is attached to a tripod.
Bright
Gray Light Blue Orange Dark Blue
Including Blue
Skies
Backlit Backlit
Sunsets
Dark
When
Using
Tripod
17
Page 18

Taking Pictures (Smart Auto)
Background
Subject Backlit Backlit
People *
Landscapes –– *
Close Subjects –– –
Icon Background
Color
* Appears when the scene is dark and the camera is attached to a tripod.
Bright
Gray Light Blue Dark Blue
Including Blue
Skies
Dark
When
Using
Tripod
Under certain conditions, the icon that appears may not match the actual
scene. Especially when there is an orange or blue colored background (a
wall for example), ( ) or the “Including Blue Skies” icons may
appear and it may not be possible to shoot with the appropriate color. If
this happens, try shooting in G mode (see Camera User Guide).
18
Page 19

Taking Pictures (Smart Auto)
What if...
• What if white and gray frames appear when you point the camera
toward a subject?
When faces are detected, a white frame appears on the face of the
main subject, while gray frames appear on other detected faces. The
frames will follow the subjects within a certain range (see Camera User
Guide).
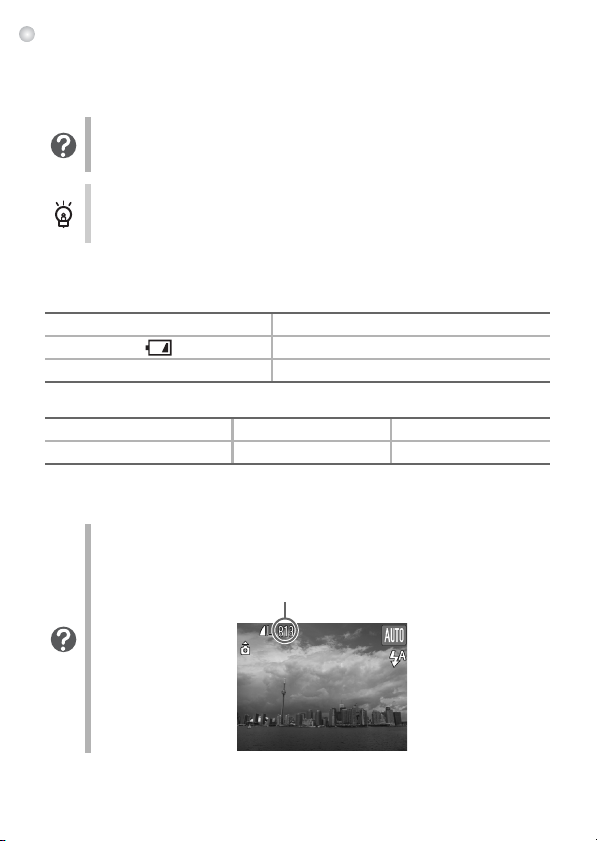
• What if a flashing appears?
Attach the camera to a tripod so that the camera does not move and
blur the image.
• What if the camera does not play any sounds?
Pressing the n button while turning on the camera power will turn
off all sounds except for warning sounds. To turn the sounds on, press
the n button, choose the 3 tab, and then choose [Mute]. Press the
qr buttons to choose [Off].
• What if the image comes out dark even if the flash fired when
shooting?
The subject is too far away for the flash to reach. Press the zoom button
toward j and hold it until the lens stops moving. The camera will be at
its maximum wide angle setting and you can shoot within the effective
flash range of approximately 30 cm – 3.0 m (12 in. – 9.8 ft.).
Press the zoom button toward i and hold it until the lens stops
moving. The camera will be at its maximum telephoto setting and you
can shoot within the effective flash range of approximately 30 cm –
2.0 m (12 in. – 6.6 ft.).
• What if the camera beeps once when the shutter button is pressed
halfway?
Your subject may be too close. Press the zoom button toward j and
hold it until the lens stops moving. The camera will be at its maximum
wide angle setting and you will be able to focus on subjects that are
approximately 5 cm (2.0 in.) or more away from the end of the lens.
Press the zoom button toward i and hold it until the lens stops
moving. The camera will be at its maximum telephoto setting and you
will be able to focus on subjects that are approximately 25 cm (9.8 in.)
or more away from the end of the lens.
• What if the lamp lights when the shutter button is pressed
halfway?
To reduce red-eye and to assist in focusing, the lamp may light when
shooting in dark areas.
• What if the screen turns off when you try to shoot?
When flash recharging begins, the screen turns off. The screen turns
on again when recharging ends.
19
Page 20

Viewing Images
You can view the images you have taken on the screen.
Enter Playback mode.
1
● Press the 1 button.
The last image you took will appear.
Choose an image.
2
● Pressing the q button will cycle through the
images in the reverse order they were
taken, from the newest image to the oldest.
● Pressing the r button will cycle through the
images in the order they were taken, from
oldest to newest.
● The images change more quickly if you
keep the qr buttons pressed, but they will
appear coarse.
The lens will retract after approximately 1
minute elapses.
● Pressing the 1 button again while the lens
is retracted will turn off the power.
Switching to Shooting mode
Pressing the shutter button halfway while in Playback mode switches the
camera to Shooting mode.
20
Page 21

Erasing Images
You can choose and erase images one at a time. Please note that erased
images cannot be recovered. Exercise adequate caution before erasing an
image.
Enter Playback mode.
1
● Press the 1 button.
The last image you took will appear.
Choose an image to erase.
2
● Press the qr buttons to display an image to
erase.
Erase the image.
3
● Press the p button.
[Erase?] appears on the screen.
● Press the qr buttons to choose [Erase],
then press the m button.
The displayed image will be erased.
● To exit instead of erasing, press the qr
buttons to choose [Cancel], then press the
m button.
21
Page 22

Shooting Movies
Shooting Time
The camera can automatically select all settings so that you can shoot
movies just by pressing the shutter button.
Enter E mode.
1
● Press the button, then press the qr
buttons to choose E.
● Press the m button.
Compose the shot.
2
● Pressing the zoom button toward i will
zoom in on your subject, making it appear
larger. Pressing the button toward j will
zoom out from your subject, making it
appear smaller.
Focus.
3
● Press the shutter button halfway to focus.
When the camera focuses, it will beep twice
and the indicator will light green.
Shoot.
4
● Press the shutter button fully.
22
Page 23

Shooting Movies
Elapsed Time
Microphone
Recording will start, and [ Rec] and the
elapsed time will appear on the screen.
● Once shooting begins, take your finger off
the shutter button.
● If you change the composition of your shot
during shooting, the focus will stay the
same, but the brightness and tone will
automatically adjust.
● Do not touch the microphone while shooting.
● Do not press any buttons other than the
shutter button while shooting. The sound the
buttons make will be recorded in the movie.
Stop shooting.
5
● Press the shutter button fully again.
The camera will beep once and stop
shooting the movie.
The movie will record to the memory card.
Shooting will automatically stop when the
memory card fills.
Magnifying the subject while shooting
Pressing the zoom button toward i while shooting will zoom in on the
subject. However, operation sounds will be recorded and the movie may
appear coarse.
23
Page 24

Shooting Movies
Estimated Shooting Times
Memory Card
Shooting Time 32 min. 26 sec. 2 hrs. 12 min. 50 sec.
• Shooting times are based on default settings.
• Recording will automatically stop when either the clip file size reaches 4 GB or the
recording time reaches approximately 1 hour.
• Recording may stop even if the maximum clip length has not been reached on some
memory cards. SD Speed Class 4 or higher memory cards are recommended.
4GB 16GB
24
Page 25

Viewing Movies
You can view the movies you have shot on the screen.
Enter Playback mode.
1
● Press the 1 button.
The last image you shot will appear.
appears on movies.
Choose a movie.
2
● Press the qr buttons to choose a movie,
then press the m button.
The movie control panel will appear.
Play the movie.
3
● Press the qr buttons to choose (Play),
then press the m button.
The movie will play.
● Press the m button again to pause the
movie or resume playback.
● Press the op buttons to adjust the volume.
After the movie finishes, appears.
25
Page 26

Transferring Images to a Computer for Viewing
You can use the included software to transfer images you have shot with the
camera to a computer for viewing. If you are already using ZoomBrowser
EX/ImageBrowser, install the software from the included CD-ROM,
overwriting your current installation.
● System Requirements
Windows
OS
Computer model
CPU Pentium 1.3 GHz or higher
RAM
Interface USB
Free Hard Disk
Space
Display 1,024 x 768 pixels or higher
* For Windows XP, Microsoft .NET Framework 3.0 or later (max. 500MB) must be
installed. Installation may take some time depending on your computer’s capabilities.
Macintosh
OS Mac OS X (v10.4 – v10.6)
Computer model
CPU PowerPC G4/G5 or Intel Processor
RAM
Interface
Free Hard Disk
Space
Display 1,024 x 768 pixels or higher
Windows 7
Windows Vista (including Service Pack 1 and 2)
Windows XP Service Pack 2, Service Pack 3
The above OS should be pre-installed on computers with built-in
USB ports.
Windows 7 (64 bit): 2 GB or more
Windows 7 (32 bit), Windows Vista: 1 GB or more
Windows XP: 512 MB or more
ZoomBrowser EX: 200 MB or more*
PhotoStitch: 40 MB or more
The above OS should be pre-installed on computers with built-in
USB ports.
Mac OS X v10.4 – v10.5: 512 MB or more
Mac OS X v10.6: 1 GB or more
USB
ImageBrowser: 300 MB or more
PhotoStitch: 50 MB or more
26
Page 27

Transferring Images to a Computer for Viewing
● Preparations
Windows Vista and Mac OS X (v10.5) are used for these explanations.
Install the Software.
1
Windows
Place the CD in the computer’s
CD-ROM drive.
● Place the supplied CD-ROM (DIGITAL
CAMERA Solution Disk) (p. 2) into the
computer’s CD-ROM drive.
Begin installation.
● Click [Easy Installation] and follow the
on-screen instructions to proceed with the
installation.
● If the [User Account Control] window
appears, follow the on-screen instructions to
proceed.
When the install finishes, click
[Restart] or [Finish].
Remove the CD-ROM.
● Remove the CD-ROM when your desktop
screen appears.
Macintosh
Place the CD in the computer’s
CD-ROM drive.
● Place the supplied CD-ROM (DIGITAL
CAMERA Solution Disk) (p. 2) into the
computer’s CD-ROM drive.
Begin installation.
● Double-click the on the CD.
● Click [Install], and follow the on-screen
instructions to proceed with the installation.
27
Page 28

Transferring Images to a Computer for Viewing
Connect the camera to the
2
computer.
● Turn off the camera.
● Open the cover, and insert the small end of
the plug firmly into the camera terminal in
the direction shown.
● Insert the cable’s larger plug into the
computer. For connection details, refer to
the user guide provided with the computer.
Turn on the camera.
3
● Press the 1 button to turn on the camera.
Open CameraWindow.
4
Windows
● Click [Downloads Images From Canon
Camera using Canon CameraWindow].
CameraWindow will appear.
● If CameraWindow does not appear, click the
[Start] menu and choose [All Programs],
followed by [Canon Utilities],
[CameraWindow] and [CameraWindow].
Macintosh
CameraWindow will appear when you
establish a connection between the camera
and computer.
● If CameraWindow does not appear, click the
CameraWindow icon on the Dock (the bar
which appears at the bottom of the desktop).
28
For Windows 7, use the following steps to display CameraWindow.
• Click on the task bar.
• In the screen that appears, click the link to modify the program.
• Click [Downloads Images From Canon Camera using Canon
CameraWindow], then click [OK].
• Double click .
Page 29

Transferring Images to a Computer for Viewing
● Transfer and View Images
● Click [Import Images from Camera], and
then click [Import Untransferred Images].
All images not previously transferred will
transfer to the computer. Transferred
images will be sorted by date and saved in
separate folders in the Pictures folder.
● When [Image import complete.] appears,
click [OK], then click [X] to close
CameraWindow.
● Turn off the camera and unplug the cable.
● For details on how to view images using a
computer, refer to the Software Gu ide.
You can transfer images without installing the included software by
simply connecting your camera to a computer. There are, however, the
following limitations.
• It may take a few minutes from when you connect the camera to the
computer until you can transfer images.
• Movies will not transfer correctly.
• Images shot in the vertical position may be transferred in the horizontal
position.
• Protection settings for images may be lost when transferred to a
computer.
• There may be problems transferring images or image information
correctly depending on the version of the operating system in use, the
file size, or the software in use.
29
Page 30

Accessories
Supplied with Camera
Wrist Strap WS-800 DIGITAL CAMERA
Solution Disk
AA Alkaline
Batteries (×2)
Interface Cable
IFC-400PCU*
AV Cable AVC-DC300*
Memory Card Card Reader
Windows/Macintosh
TV/Video
Canon-Brand PictBridge Compliant Printers
Compact Photo Printers
(SELPHY series)
Inkjet Printers
See the user guide supplied with the printer for more
information on the printer and interface cables.
* Also available for purchase separately.
30
Page 31

Separately Sold Accessories
The following camera accessories are sold separately. Some accessories
are not sold in some regions, or may no longer be available.
Power Supplies
AC Adapter Kit ACK800
This set includes Compact Power Adapter CAPS800 and power cord.
This kit lets you power the camera using
household power. Recommended for powering
the camera for an extended period of time or
when connecting to a computer or printer.
Cannot be used to charge the batteries inside
the camera.
Battery and Charger Kit CBK4-300
This dedicated battery charger kit includes both
Battery Charger CB-5AH and four NB-3AH
rechargeable AA NiMH (nickel metal hydride)
batteries. Recommended for powering the
camera for an extended period of time.
You can also purchase NiMH Battery NB4-300,
a set of four rechargeable AA NiMH batteries
separately. Battery and Charger Kit CBK4-200
can also be used.
CAUTION
RISK OF EXPLOSION IF BATTERY IS REPLACED BY AN INCORRECT TYPE.
DISPOSE OF USED BATTERIES ACCORDING TO LOCAL REGULATION.
Using accessories abroad
The battery and charger kit, and the AC adapter kit can be used in
regions that have 100 – 240 V (50/60 Hz) AC power. If the plug does not
fit the outlet, use a commercially available plug adapter. Do not use
devices such as electrical transformers for foreign travel because they
will cause malfunctions.
31
Page 32

Separately Sold Accessories
SELPHY series
Inkjet Printers
Flash
High-Power Flash HF-DC1
This attachable supplementary flash can
illuminate subjects that are too distant for the
light from the built-in flash to reach.
Printers
Canon-Brand PictBridge Compliant
Printers
By connecting your camera to a Canon-brand
PictBridge compliant printer, you can print your
images without having to use a computer.
For more information, visit your nearest Canon
retailer.
Use of genuine Canon accessories is recommended.
This product is designed to achieve excellent performance when used with genuine
Canon accessories. Canon shall not be liable for any damage to this product and/or
accidents such as fire, etc., caused by the malfunction of non-genuine Canon
accessories (e.g., a leakage and/or explosion of a battery pack). Please note that this
warranty does not apply to repairs arising out of the malfunction of non-genuine Canon
accessories, although you may request such repairs on a chargeable basis.
Trademark Acknowledgments
• SDXC Logo is a trademark of SD-3C, LLC.
• This device incorporates exFAT technology licensed from Microsoft.
32
Page 33

MEMO
33
Page 34

MEMO
34
Page 35

European Union (and EEA) only.
PRINTED IN THE EU © CANON INC. 2010
(Hg = Mercury, Cd = Cadmium, Pb = Lead) is present in this battery or accumulator
at a concentration above an applicable threshold specified in the Battery Directive.
This product should be handed over to a designated collection point, e.g., on an
authorized one-for-one basis when you buy a new similar product or to an
authorized collection site for recycling waste electrical and electronic equipment
(EEE) and batteries and accumulators. Improper handling of this type of waste could
have a possible impact on the environment and human health due to potentially
hazardous substances that are generally associated with EEE.
Your cooperation in the correct disposal of this product will contribute to the effective
usage of natural resources.
For more information about the recycling of this product, please contact your local
city office, waste authority, approved scheme or your household waste disposal
service or visit www.canon-europe.com/environment
(EEA: Norway, Iceland and Liechtenstein)
These symbols indicate that this product is not to
be disposed of with your household waste,
according to the WEEE Directive (2002/96/EC),
the Battery Directive (2006/66/EC) and/or your
national laws implementing those Directives.
If a chemical symbol is printed beneath the
symbol shown above, in accordance with the
Battery Directive, this indicates that a heavy metal
.
Page 36

CEL-SP1ZA210
 Loading...