

Page 1
See Warranty on page 12 for important information about commercial use of this product.
Operating Instructions PW182501, PW183501
Please read and save these instructions. Read carefully before attempting to assemble, install, operate or maintain the product described. Protect yourself and
others by observing all safety information. Failure to comply with instructions could result in personal injury and/or property damage! Retain instructions for
future reference.
Campbell Hausfeld Electric
Powered Pressure Washers
REGISTER YOUR PRODUCT ONLINE NOW! http://www.campbellhausfeld.com
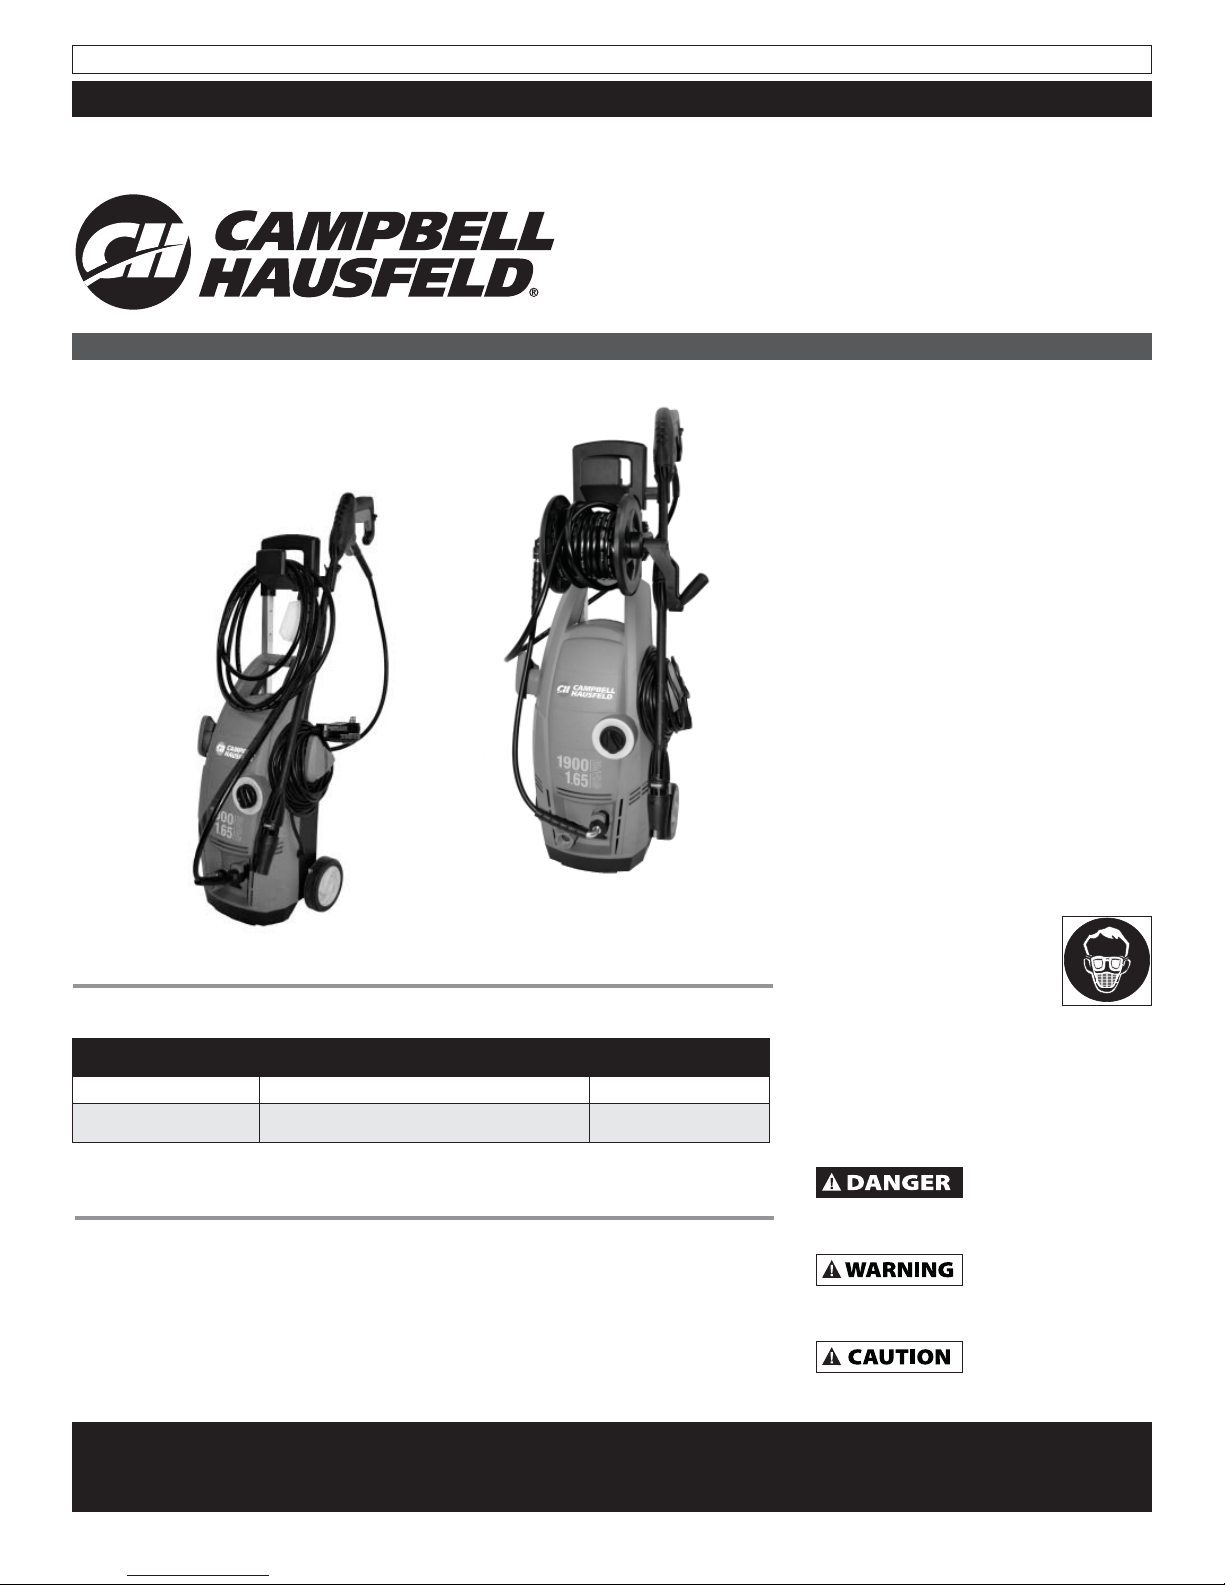
Description
These Campbell Hausfeld electric
pressure washers are perfect for all
around the home cleaning projects.
The units operate quietly, efficiently and
without fuel emissions. Each model
features “instant start stop” (ISS) which
shuts the motor off when the gun is not
engaged. This conserves water and
electricity, as well as extends the life of
the pump.
The pressure washers are powered by a
reliable universal motor and conveniently
plug into household 120V – 15 Amp
outlets. Both models are ETL approved to
meet UL and ETL standards in the US and
Canada.
Figure 1 - Model PW182501, and PW183501
Specifications
Model Pressure Volt
PW182501 1900 psi / 13,100 kPa 120
PW183501 1900 psi / 13,100 kPa 120
Please record Model Number and Serial Number for use when contacting the
manufacturer:
Model No.: __________________________________________________________________
Serial No.: __________________________________________________________________
Purchase Date: ______________________________________________________________
Purchase Place: ______________________________________________________________
For information about this product, call 1-800-330-0712.
READ & FOLLOW ALL INSTRUCTIONS
SAVE THESE INSTRUCTIONS
DO NOT DISCARD
Safety Guidelines
This manual contains
information that is very
important to know and
understand. If you have any
questions, please call 1-800-330-0712
for customer assistance. This information
is provided for SAFETY and to PREVENT
EQUIPMENT PROBLEMS. To help
recognize this information, observe the
following symbols.
Danger indicates an
imminently
hazardous situation which, if not avoided,
WILL result in death or serious injury.
Warning indicates
a potentially
hazardous situation which, if not avoided,
COULD result in death or serious injury.
Caution indicates
a potentially
hazardous situation which, if not avoided,
MAY result in minor or moderate injury.
REMINDER: Keep your dated proof of purchase for warranty purposes!
Attach it to this manual or file it for safekeeping.
READ AND FOLLOW ALL INSTRUCTIONS • SAVE THESE INSTRUCTIONS • DO NOT DISCARD
© 2014 Campbell Hausfeld/Scott Fetzer IN471200AV 11/14
For parts, product & service information
visit www.campbellhausfeld.com
Page 2
Operating Instructions
Safety Guidelines (Continued)
Notice indicates important information,
that if not followed, may cause damage to
equipment.
NOTE: Information that requires special attention.
Safety Symbols
The following Safety Symbols appear throughout this manual
to alert you to important safety hazards and precautions.
Read Manual
First
Risk of Falling
When using tools, basic precautions should
always be followed, including the following:
CALIFORNIA PROPOSITION 65
This product or its power cord
known to the State of California to cause cancer and birth
defects or other reproductive harm. Wash hands after handling.
You can create dust when you cut, sand,
metal, concrete, cement, or other masonry. This dust often
contains chemicals known to cause cancer, birth
defects, or other reproductive harm. Wear protective
gear.
GENERAL SAFETY
a. To reduce the risks of electric shock, fire,
and injury to persons, read all the instructions before
using the tool. Failure to follow warnings, dangers, and
cautions could result in DEATH or SERIOUS INJURY.
b. Be thoroughly familiar with the controls and the proper use of
the equipment. Follow all instructions. Contact your Campbell
Hausfeld representative if you have any questions, 1 (800)
330-0712.
c. Only persons well acquainted with these rules of safe
operation should be allowed to use the unit.
d. Follow all safety codes as well as the Occupational Safety
and Health Act (OSHA).
WORK AREA
a. Keep operation area clear of all persons.
b. To reduce the risk of injury, close supervision is necessary
when the product is used near children.
c. Do not operate the tool in explosive atmospheres, such as in
the presence of flammable liquids, gases, or dust. The tool
is able to create sparks resulting in the ignition of the dust or
fumes.
Risk of
Explosion
Risk of Personal
Injury
may contain chemicals, including lead,
drill or grind materials such as wood, paint,
Risk of Fire
Wear Eye
and Hearing
Protection
d. NEVER spray flammable liquids or use pressure
washer in areas containing combustible dust,
liquids, or vapors.
e. Never operate this machine in a closed building or
in or near an explosive environment.
PERSONAL SAFETY
a. Stay alert. Watch what you are doing and use
common sense when operating the tool. Do not use the
tool while tired or under the influence of drugs, alcohol, or
medication. A moment of inattention while operating the tool
increases the risk of injury to persons.
b. Dress properly. Wear closed toe shoes (no flip flops.) Do not
wear loose clothing or jewelry. Contain long hair. Keep hair,
clothing, and gloves away from moving parts. Loose clothes,
jewelry, or long hair increases the risk of injury to persons as a
result of being caught in moving parts.
c. Do not overreach. Keep proper footing and
balance at all times. Proper footing and balance
enables better control of the tool in unexpected
situations.
Risk of injection or severe injury. Keep clear
of nozzle. Do not discharge streams
at persons. This product is to be used only by trained
operators. Always remove lance from gun before cleaning
debris from nozzle.
d. Keep clear of nozzle. NEVER direct high pressure
spray at a person, animal, or yourself.
e. NEVER put hand or fingers over the spray nozzle while
operating the unit.
f. NEVER try to stop or deflect leaks with any body part.
Ensuring that the tool is used
only when the operator and all other
personnel in the work area are wearing ANSI Z87 eye
protection equipment, and when required, other appropriate
protection equipment such as head, hearing protection,
gloves, rubber boots, protective clothing when operating and
performing maintenance. Serious eye or permanent hearing
loss could result.
ELECTRICAL SAFETY
Risk of electrocution:
a. This product is provided with a ground fault circuit interrupter,
GFCI, built into the power cord plug. Be sure to inspect cord
and GFCI prior to use. Any repair or replacement of the power
cord must be performed by a qualified (licensed or certified)
electrical technician. If replacement of the plug or cord is
needed, use only identical replacement parts.
b. NEVER use an extension cord with this product.
c. Inspect cord before using - Do not use if cord is damaged.
d. Keep all electrical connections dry and off the ground.
e. Do not touch plug with wet hands.
f. Do not spray electrical apparatus and wiring.
www.campbellhausfeld.com
2
Page 3
Safety Guidelines (Continued)
TOOL USE AND CARE
Do not use pressure that exceeds the operating
pressure of any of the parts (hoses, fi ttings, etc.)
in the pressurized system. Ensure all equipment and accessories are
rated to withstand the maximum working pressure of the unit.
a. Maintain the tool with care. A properly maintained tool
reduces the risk of problems and is easier to control.
b. Ensure safety devices are operating properly before each
use. DO NOT remove or modify any part of the gun or unit.
c. NEVER operate the machine without all components properly
connected to the machine (handle, gun/wand assembly,
nozzle, etc.).
d. Point gun in safe direction. Unit will start spraying when
trigger is squeezed if “On/Off” switch is in “ON” position.
e. Know how to stop this product and bleed pressure quickly.
Be thoroughly familiar with the controls.
f. ALWAYS engage the trigger safety latch in the safe position
when spraying is stopped even if only for a few moments.
g. NEVER permanently engage the trigger mechanism on the
gun.
h. ALWAYS follow detergent manufacturer’s label
recommendations for proper use of detergents. Always
protect eyes, skin, and respiratory system from detergent
use.
i. NEVER disconnect the high pressure discharge hose from
the machine while the system is pressurized. To depressurize
machine, turn power and water supply off, then press the gun
trigger 2-3 times.
j. Unplug unit when not in use.
k. Follow the maintenance instructions specified in the manual.
l. ALWAYS turn water supply “ON” before turning pressure
washer “ON.” Running pump dry causes serious damage.
m. Do not operate the pressure washer with the inlet water
screen removed. Keep screen clear of debris and sediment.
n. NEVER operate pressure washer with broken or missing
parts. Check equipment regularly and repair or replace worn
or damaged parts immediately.
o. Use only the lances supplied with this machine.
p. NEVER leave the wand unattended while the machine is
running.
q. ALWAYS hold gun and wand firmly when starting and
operating the machine.
r. Release the trigger when changing from high to low pressure
modes. Failure to do so could result in damage to the nozzle.
s. NEVER store the pressure washer outdoors or where it could
freeze. Freezing temperatures can seriously damage the
pump.
t. Pressure washer is not meant to pump hot water. Do not
connect to hot water supply.
Equipment damage:
Models: PW182501, PW183501
SERVICE
a. When servicing a tool, use only identical replacement parts.
Use only authorized parts.
Servicing of a Double-Insulated Appliance
In a double-insulated product,
two systems of insulation are
provided instead of grounding.
No grounding means are provided
for a double-insulated product,
nor should grounding means be
added to the product. Servicing a
double-insulated product requires
extreme care and knowledge of
the system, and should be done
only by qualified service personnel.
Replacement parts for a doubleinsulated product must be identical to the original parts. A
double-insulated product is marked with the words “Double
Insulation” or “Double Insulated.” Product may also be marked
with symbol shown above.
The DANGER, WARNING, CAUTION, and NOTICE
notifications and instructions in this manual cannot cover
all possible conditions and situations that may occur.
It must be understood by the operator that caution is a
factor which cannot be built into this product, but must be
supplied by the operator.
SAVE THESE INSTRUCTIONS
DO NOT DISCARD
Double Insulated Symbol
3
www.campbellhausfeld.com
Page 4
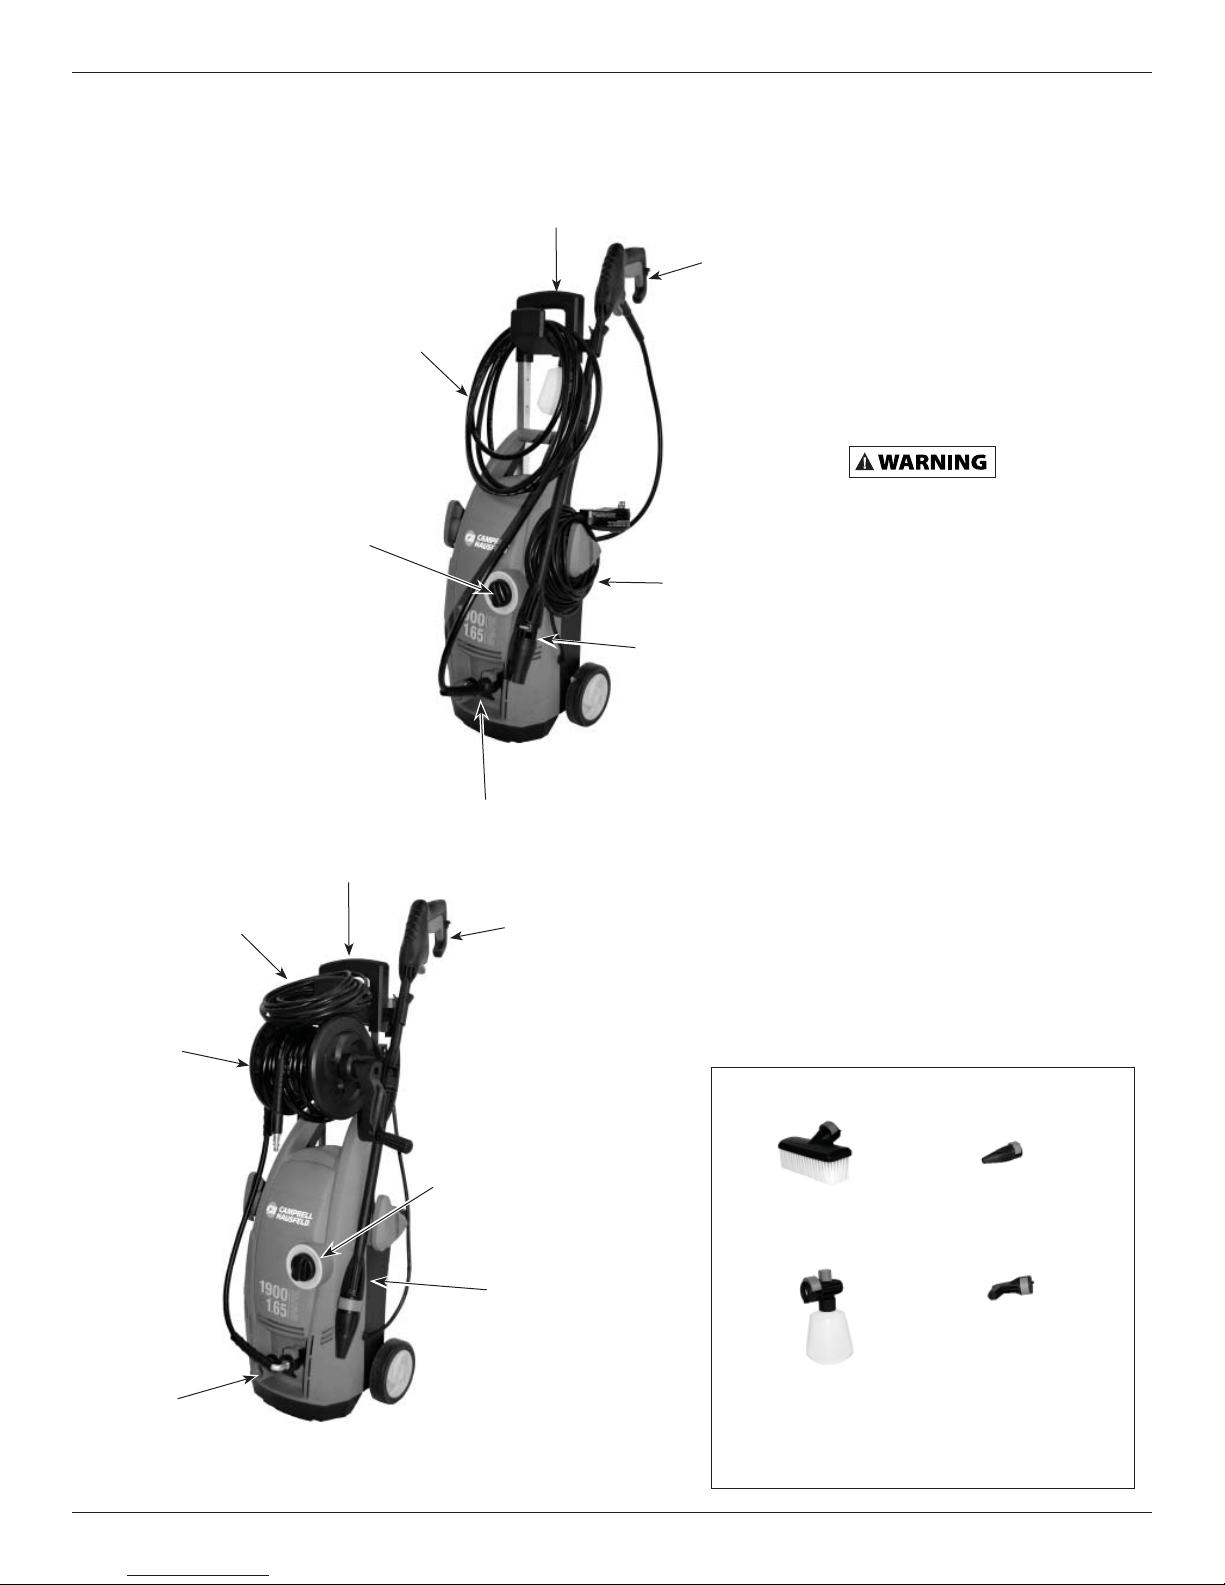
Operating Instructions
Unpacking
On/Off Switch
Power Cord
High Pressure
Hose
Handle
Handle
High Pressure
Hose Outlet
Gun with
Trigger
Power
Cord
Lance
PW182501
Gun with
Trigger
After unpacking the unit, inspect
carefully for any damage that may
have occurred during transit. Check
for loose, missing or damaged
parts. Make sure to tighten fittings,
bolts, etc., before using the pressure
washer. Check to be sure all supplied
accessories are enclosed with the
unit. If any parts are missing, DO
NOT RETURN THE UNIT TO THE
RETAILER. Know the unit’s model
number, serial number and date code
(located on the back of the pressure
washer) and call 1-800-330-0712 for
replacement parts.
Do not operate the
unit if it’s damaged
during shipping, handling, or use. Damage
could result in bursting and cause injury or
property damage.
RECOMMENDED USES FOR THIS
PRESSURE WASHER
◆ Deck
◆ Siding
◆ Vehicles
◆ Gutters (with right angle nozzle)
ADDITIONAL ITEMS NOT
INCLUDED
◆ ANSI Z87 Eye Protection
◆ Garden Hose
NOTE: For the PW183501 only - Hold
on to the handle of the unit while
unreeling the hose. This will prevent
the unit from toppeling over.
High Pressure
Hose
Water Hose
Outlet
Figure 2 - Components of the Pressure Washer
www.campbellhausfeld.com
PW183501
On/Off Switch
Lance
Accessories
Brush
(PW183501 only)
Turbo Nozzle
(PW183501 only)
Right Angle
Nozzle
Detergent Bottle
(PW183501 only)
(Both models)
Accessory kit available for purchase.
Part Number PW091400AV
4
Page 5

Assembly and Preoperation
Always make sure that
the garden hose is turned on before turning on
the pressure washer. Running the pressure washer without water will
damage the pumps seals.
Do not disassemble the lance or gun on this
pressure washer. Replacement parts are not available for the gun or
lance.
PW182501 & PW183501
1. Attach storage hooks.(see Figure 3)
2. Slide handle (1) onto unit, attach with 4 phillips screws. (see
Figure 4)
3. Attach high pressure hose to high pressure outlet (see Figure
8)
4. Attach high pressure hose to gun (see Figure 5).
5. Attach lance to gun, twist and lock. Attach nozzle or
detergent bottle to lance by pressing the Easy Connect
button and inserting into Quick Connect on lance. (see
Figures 6 & 7)
6. Attach garden hose to unit (see Figure 9).
7. Press Easy Connect button while inserting Quick Connect
fitting. (see Figure 5, 7 & 8)
Models: PW182501, PW183501
Figure 3 - Attach storage hooks
(PW182501 only)
Figure 6 - Attach lance to gun
1
2
3
4
Figure 4 -Attach phillips screws
(PW182501 only)
Figure 7- Attach nozzle to lance or detergent
bottle
Figure 5 - Attach high pressure hose to gun
Figure 8 - Attach high pressure hose
Water inlet
Figure 9 - Attach garden hose to unit
5
www.campbellhausfeld.com
Page 6

Operating Instructions
Assembly and Preoperation (Continued)
TRIGGER SAFETY LATCH
In the engaged position, the trigger safety latch prevents the gun
from being triggered accidentally. Push the button in to engage
it. (See Figure 10)
Always engage the trigger safety latch when the unit is not in
use.
Trigger
Safety Lock
Figure 10 - Trigger safety latch
OPERATION
! IMPORTANT !
This pressure washer is equipped with a microswitch
sensitive to water flow. This Instant Start/Stop switch
(ISS) senses water flow in the pump. When the trigger is
released, water stops flowing through the pump. The ISS
then automatically turns the motor off to protect pump
from overheating.
OPERATION
1. Turn on water.
2. Pull trigger on gun.
3. Turn the “ON/OFF” switch to “ON”.
4. Release trigger. The pressure washer motor will stop running.
5. To spray again, pull trigger and motor and pump will restart.
NOTE: Occasionally the motor may run for a short time
to bring fresh, cool water into the pump even if trigger is
released. This is part of normal operation and will not damage
the unit.
Always turn the “ON/OFF” switch
to “OFF” then trigger gun to release hose
pressure before unplugging power cord.
Risk of equipment damage. Always
make sure the “ON/OFF” switch on the unit is
“OFF” and unit is unplugged prior to storage.
Risk of Injection. Unit will start
spraying when trigger is squeezed if ON/OFF
switch is in “ON” position. Always point gun in safe direction.
SURFACE PREPARATION
The following cleaning procedure will help you organize your
cleaning task and ensures that you will achieve the best results in
the shortest amount of time. Gallons Per Minute (GPM), the more
water per minute can mean faster cleaning, especially when
washing off materials like mud and road tar. GROUND FAULT
CURRENT INTERRUPTER (GFCI) protects user from accidental
electrocution (for electric powered pressure washers only).
Remember to use the spraying / cleaning techniques mentioned
in the following section.
Before starting a pressure washer cleaning job, prepare the
surface you intend to clean. Clear furniture from the area and
make sure that all windows and doors are closed tightly. Also,
protect all plants and trees near the cleaning area with a drop
cloth. A covering ensures that your plants won’t be sprayed by
the detergents.
START UP
ALWAYS use this start up procedure to ensure that the unit is
started safely and properly.
If water has frozen in the pressure washer, thaw
the pressure washer in a warm room before
starting. DO NOT pour hot water on or into the pump; internal parts will
be damaged.Check for leaks.
1. Ensure that the power switch is in the “OFF” position.
2. Attach a garden hose to the inlet side of the pump and
connect it to the water supply. Use a hose with an internal
diameter (I.D.) of 5/8 in. (1.58 cm) and a length of 50 ft. (15 m)
or less.
Some local plumbing codes require backfl ow
prevention when connecting to a fresh water supply. Install a backfl ow
preventer upstream from the pump if necessary.
a. If inlet water pressure is over 100 psi, install a regulating
water valve at the garden hose connection.
b. Do not exceed 100˚ F (38˚ C) inlet water temperature.
NOTE: The inlet water supply must have a minimum flow rate of
5 gpm (19 lpm).
4. Turn the water supply ON.
Never run the unit dry. Be sure the water supply is
completely turned on before operating the unit.
5. Trigger the gun until water sprays from the nozzle indicating
that all air is purged from the system. Set the trigger safety
latch.
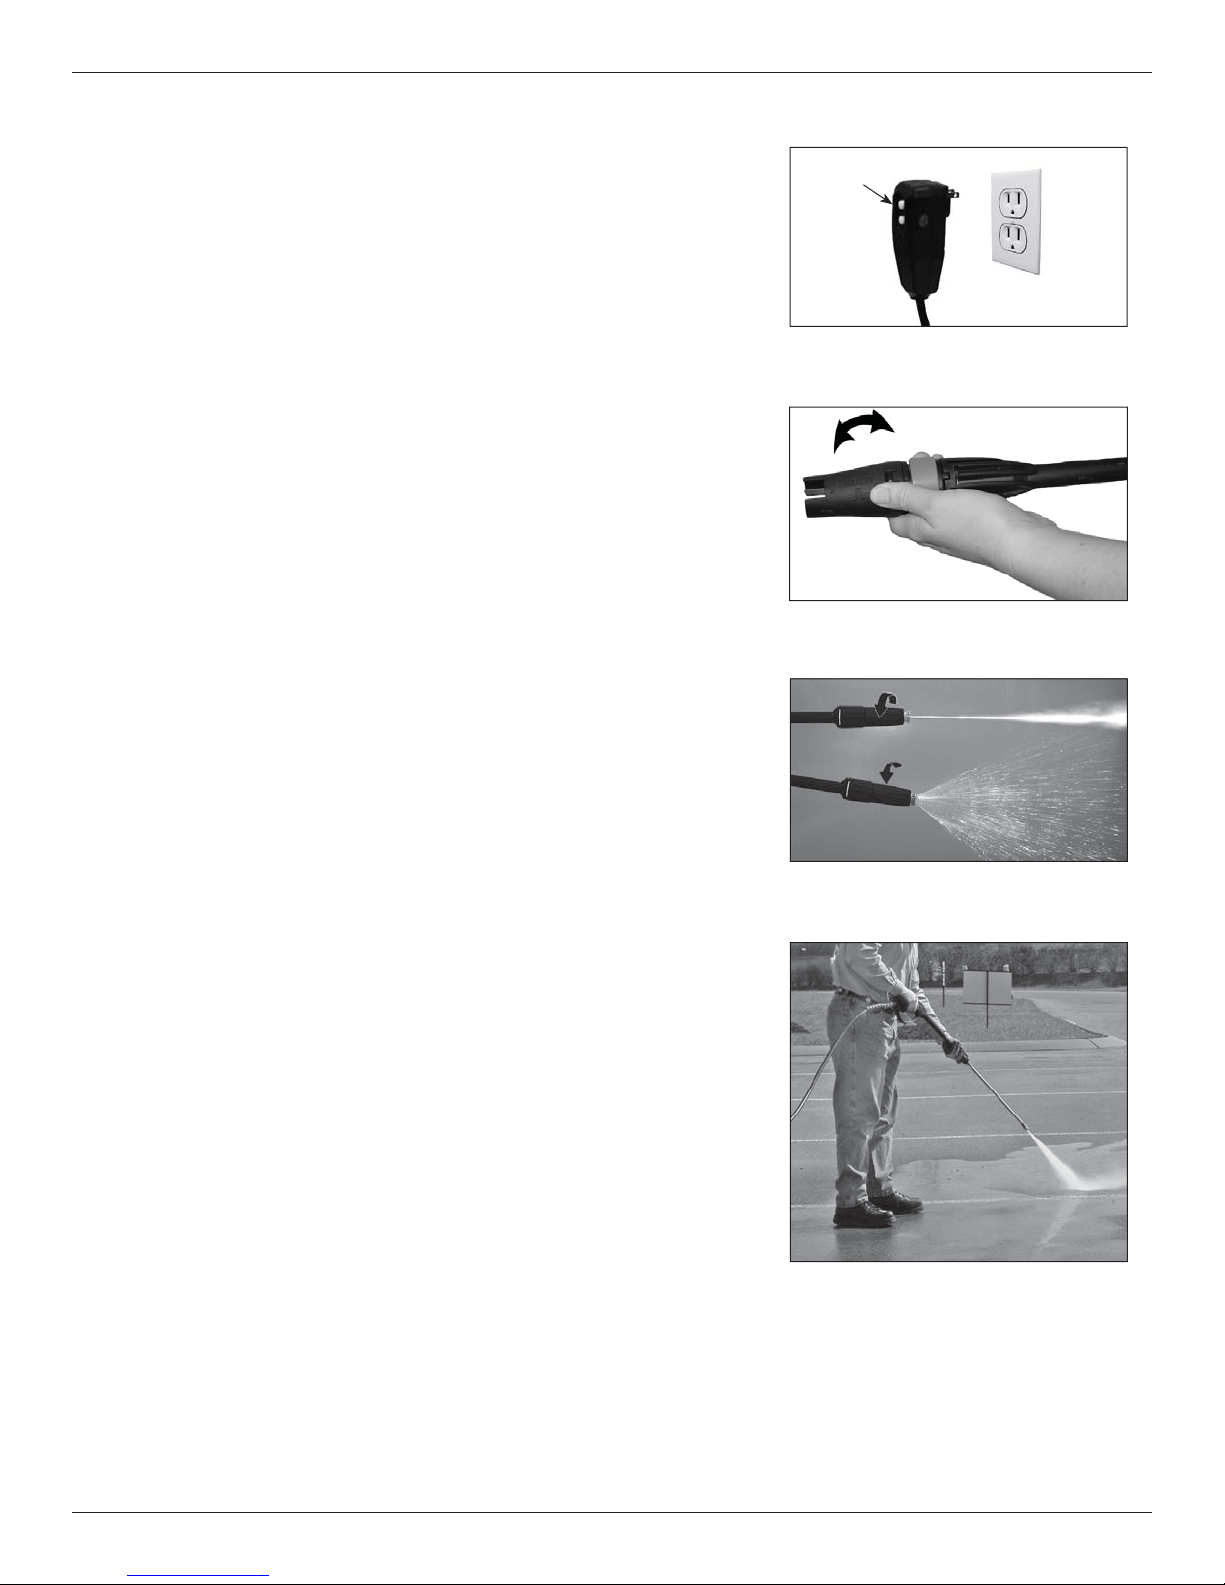
6. Plug the power cord into a grounded 120V outlet, that is on a
dedicated circuit. Do not use extension cord. Press the reset
button on the GFCI plug adapter. This must be done each
time the unit is plugged into an outlet. (Figure 11)
SYSTEM CONNECTION
(See page 5 for Assembly Instructions)
1. Plug the power cord into a grounded 120V outlet.
2. Turn water on.
3. Unlock trigger lock by moving lock right to left.
4. Depress and hold the trigger on the gun for one minute to
release pressure and remove any air trapped in the system.
5. Turn the “ON/OFF” switch to the “ON” position.
www.campbellhausfeld.com
6
Page 7
Operation (Continued)
INITIAL HIGH PRESSURE RINSE
Spray the cleaning surface with water to clear off any dirt or
grime that may have collected on the surface. Doing so allows
the detergent to attack the deep down dirt that has worked its
way into the cleaning surface.
Trigger the gun 3 to 5 times to get any trapped air out of the
system.
ADJUSTING THE SPRAY FAN ANGLE
1. The lance is affected by pressure during operation; therefore
hold it firmly with both hands and point the nozzle toward the
ground.
2. Activate by pulling the trigger of the gun/spray handle.
3. Adjust the distance to the cleaning surface, which will also
adjust your pressure of the nozzle.
4. Spray pattern shape and intensity can be changed by
twisting the spray adjuster at the end of the lance (see Figure
12 & 13). Keep hands clear of the front of the lance to prevent
injury.
Pressure can also be adjusted by moving closer or further away
from the cleaning surface and by adjusting the spray fan angle as
shown.
Models: PW182501, PW183501
Reset
Figure 11 - Grounded plug/reset button
Figure 12 - Spray Adjust
ANGLE TO THE CLEANING SURFACE
When spraying water against a surface, you can generate
maximum impact by striking the surface head on. However, this
type of impact can cause dirt particles to embed in the surface
and can prevent the desired cleaning action.
The optimum angle for spraying water against a cleaning surface
is 45 degrees to effeciently remove debris. (Figure 14)
Figure 13 - Adjust spray pattern
Figure 14 - Optimum angle to cleaning surface
7
www.campbellhausfeld.com
Page 8

Operating Instructions
Operation (Continued)
Distance From Cleaning Surface
The distance between the spray nozzle and the cleaning surface
is another factor that affects the impact force of the water. The
impact force of the water increases as the nozzle is moved closer
to the surface.
How to Avoid Damaging Surfaces
Damage to cleaning surfaces occurs because the impact force
of the water exceeds the durability of the surface. You can vary
the impact force by controlling the spray nozzle angle to the
cleaning surface and the distance from the cleaning surface
and by adjusting the spray nozzle. NEVER use a narrow high
impact stream on a surface that is susceptible to damage. Avoid
spraying windows with a narrow high impact stream. Doing so
may break the window. The most sure way to avoid damaging
surfaces is to follow these steps:
1. Place the spray nozzle approximately 4-5 feet (1,22-1,52 m)
away from the cleaning surface. Then hold the lance and
spray nozzle at a 45 degree angle to the cleaning surface.
Trigger the gun.
2. Vary the fan pattern spray angle and the distance to the
cleaning surface until optimum cleaning efficiency is achieved
without damaging the surface.
DETERGENT APPLICATION
NOTE: Use only detergents formulated for pressure washers.
Test detergent in an inconspicuous area before use. DO NOT use
bleach in pressure washer.
Detergents
The use of detergents can dramatically reduce cleaning time
and assist in the removal of difficult stains. Many detergents are
customized for pressure washer use on specific cleaning tasks.
Pressure washer detergents are as thick as water. Using thicker
detergents – like dish detergent – will clog the chemical injection
system and prevent the application of the detergent.
Once applied to a cleaning surface, detergents take time to
break down dirt and grime. Detergents work best when applied
at low pressure.
You can effectively clean surfaces by combining the chemical
action of detergents with high pressure rinses. On vertical
surfaces, apply the detergent starting at the bottom and work
your way upward. This method prevents the detergent from
sliding down and causing streaks. Begin high pressure rinsing
at the top and work your way down to surface. On particularly
tough stains, use a brush in combination with detergents and
high pressure rinsing.
1. Follow manufacturer’s label directions for mixing correct
concentrations of detergent/detergents. The detergent
detergent to water ratio through the pump is approximately
10% (1 to 10).
◆ PW182501 & PW183501: Pour detergent into detergent
container.
General Cleaning Tips
1. Apply the detergent so that it thoroughly covers the cleaning
surface. Apply the detergent from bottom to top to prevent
the detergent from sliding down and streaking. Wait a couple
of minutes for the detergent to break down the dirt and grime.
Use a brush to lightly scrub heavily soiled areas. Never allow
the detergent to dry on the cleaning surface.
2. Rinse with high pressure.
CLEANING POWER
The easiest way to regulate the cleaning power of your pressure
washer is by changing the distance from the surface you are
cleaning. Begin spraying with a wide fan pattern while standing
several feet from the surface. Slowly move closer to the object
you are cleaning, adjusting the spray pattern as necessary, until
you find the most effective cleaning technique.
FINAL RINSE
The final rinse should start at the top and work down to surface.
Make sure that you thoroughly rinse the surface and that you
remove all detergent.
PRESSURE RELIEF PROCEDURE
To reduce the risk of bodily injury or property damage, always
follow this procedure whenever spraying is stopped, when work
is completed, and before checking or repairing any part of the
system.
1. Engage the trigger safety latch.
2. Turn the unit off.
3. Shut off the water supply.
4. Disengage the trigger safety latch and trigger the gun to
relieve pressure.
5. Re-engage the trigger safety latch.
6. When checking or repairing unit, remove the wall outlet plug
from the wall.
7. Before overnight storage, long term storage, or transporting
unit, disconnect the water supply.
SHUTDOWN
1. Fully rinse detergent attachement with clean water.
2. Turn the motor OFF.
3 Turn the water supply OFF.
4. After the motor and water supply are turned off, trigger the
gun to depressurize the system.
www.campbellhausfeld.com
8
Page 9
Models: PW182501, PW183501
Operation (Continued)
NEVER turn the water supply off before turning
the engine/motor off. Serious damage could occur to the pump and/or
engine/motor.
NEVER disconnect the high pressure discharge
hose from the machine while the system is
pressurized. To depressurize, turn engine/motor off, turn water supply
off and squeeze gun trigger 2-3 times.
5. After each use, wipe all surfaces of the pressure washer with
a clean, damp cloth.
STORAGE
• Do not store the pressure washer outdoors.
• Do not store the pressure washer where it might freeze unless
it has been properly winterized.
Winterizing Instructions
1. Disconnect the high pressure hose from the pump.
2. Insert a 12 inch to 14 inch piece of garden hose into the
pump inlet.
3. Place a funnel in the other end of the garden hose.
Read the manufacturer’s instructions for safe
handling and disposal of RV antifreeze.
4. Pour approximately 6 oz. of RV antifreeze into the funnel.
5. Jog the On/Off Switch briefly until the RV antifreeze comes
out of the pump outlet.
6. Disconnect the high pressure hose from the gun and drain
the hose. Hold the gun and lance in a vertical position and
squeeze the trigger to drain the water out.
NOZZLE CLEANING INSTRUCTIONS
A clogged or partially clogged nozzle can cause a significant
reduction of water coming out of the nozzle and cause the unit to
pulsate while spraying.
To clean out the nozzle:
• Turn off unit.
• Turn off water supply. Relieve any pressure trapped in the
hose by squeezing trigger 2-3 times.
• Separate lance from gun.
• Rotate nozzle to the narrow stream setting. This opens up the
fan blades.
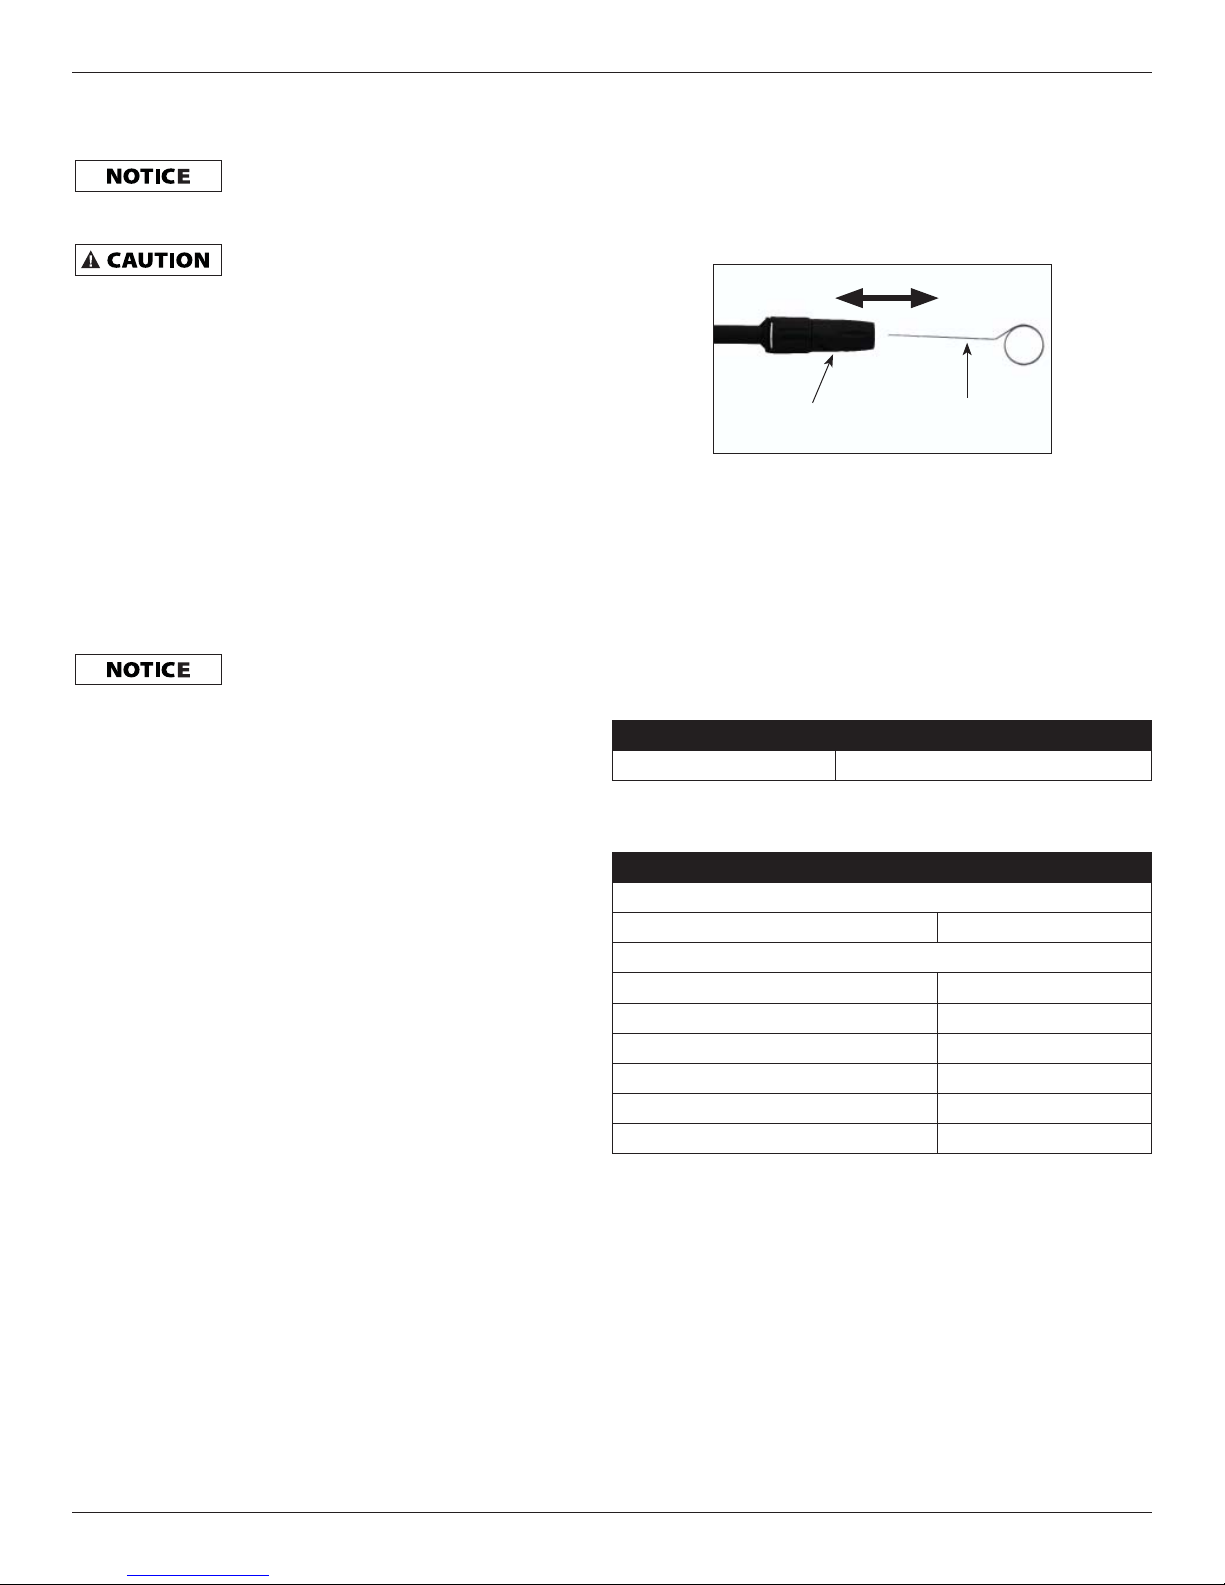
• Using the included nozzle cleaner, or an un-folded paper clip,
insert wire into the nozzle hole and move back and forth until
debris is dislodged (refer to Figure 15).
• Remove additional debris by back-flushing water through
the nozzle. To do this, remove the lance from the gun, place
end of a garden hose (with water running) nozzle to nozzle
pushing water and debris out the back opening of the lance.
TIPS FOR EXTENDING THE LIFE OF YOUR PRESSURE WASHER
1. Never operate the unit without water.
2. Your pressure washer is not meant to pump hot water. Never
connect your pressure washer to a hot water supply as it will
significantly reduce the life of the pump.
Nozzle Nozzle Cleaner
Figure 15
MAINTENANCE
Observe regular maintenance intervals to ensure maximum
performance and life from the pressure washer. Refer to the
schedule for recommended maintenance. If you operate the
pressure washer in dusty conditions, perform maintenance checks
more often.
MAINTENANCE SCHEDULE
Maintenance Schedule Action needed
Daily Check water inlet screen and filter.
TECHNICAL AND CONSUMER INFORMATION
Horizontal Oriented Pressure Washers
Pump Detergent Suction
Water to detergent ratio 10 to 1 (10% detergent)
Water Supply Requirements
Minimum inlet pressure 20 psi
Maximum inlet pressure 100 psi
Maximum inlet temperature 100˚ F
Minimum inlet flow rate 5 gpm
Inlet garden hose size 5/8 in. I.D.
Maximum inlet garden hose length 50 ft
9
www.campbellhausfeld.com
Page 10

Operating Instructions
Troubleshooting Guide
SYMPTOM CAUSE SOLUTION
Low pressure and/or pump
runs rough
Strong surging at the inlet and
low pressure
Fluctuating pressure 1. Pump drawing in air 1. Ensure hoses and fittings are tight. Purge air from
Pressure drops after period of
normal use
Pressure washer does not
start up
Motor stops suddenly 1. Extension cord ( see page 2 Electrical
Unit begins to smoke Overheated, overloaded or damaged
Pump noisy / pump runs
rough
Pressure washer will not spray
detergent
1. Worn nozzle 1. Replace nozzle
2. Inlet filter on pump clogged 2. Clean. Check more frequently
3. Restricted inlet 3. Check garden hose, may be collapsed or kinked.
Check inlet water flow
4. Leaking high pressure hose 4. Replace high pressure hose
5. Pump drawing in air 5. Ensure hoses and fittings are tight
1. Foreign particles in the inlet or
discharge valve or worn inlet and/or
discharge valves
2. Nozzle clogged 2. Clean or replace
1. Nozzle worn 1. Check and replace
1. GFCI has tripped 1. Push reset button on plug
2. Plug is not well connected or electric
socket is faulty
3. Extension cord ( see page 2 Electrical
Safety section b) or wire size too small
4. Main voltage supply too low 4. Check that main supply voltage is adequate
5. Thermal safety switch has tripped 5. Switch off unit and allow motor to cool down
Safety section b) or wire size too small
2. Thermal safety switch has tripped due
to overheating
motor
1. Pump drawing in air/low water supply 1. Ensure fittings are tight. Increase water pressure
2. Water too hot 2. Reduce temperature below 100° F
1. Not using detergent dispenser 1. Change nozzle and detergent dispenser
1. Call 1-800-330-0712
garden hose
2. Check plug, socket and fuses
3. Remove extension cord, product cannot be used
with extension cord
1. Remove extension cord, product cannot be used
with extension cord
2. Check that main supply voltage corresponds to
specifications
Turn off unit and call 1-800-330-0712
Continued on next page
www.campbellhausfeld.com
10
Page 11

Models: PW182501, PW183501
Troubleshooting Guide (Continued)
SYMPTOM CAUSE SOLUTION
Motor will not start The gun trigger is not being pulled while
starting
Low pressure testing Pump, gun or lance problem 1. Remove the black high-pressure hose from the
1. Turn the water supply off. Disconnect the garden hose
and the black high- pressure hose from the unit. This will
relieve any pressure from the pump.
2. Plug the unit in to the electrical outlet. Make sure the unit
is in the OFF position.
3. If your unit is equipped with a GFCI plug, push the top
button, then the bottom button and then top button
again. You should have a light showing on the small
window above these buttons. If no red light is showing,
you are not getting power to the unit. The unit can be
taken to a service center for repair.
4. Hook the water supply back to the unit and turn the
water on. Press the on button and see if it will start. If it
does, shut the water and the unit off, attach the gun and
hose and go to step 5.
5. With the unit in the OFF position, pull the trigger on the
gun and make sure a small stream of water is coming
out. Keep the trigger pressed while turning the unit ON.
pressure washer.
2. Hook up the garden hose.
3. Turn on the water supply the water should flow
through the pressure washer.
4. Turn on the pressure washer. The water should
shoot 8-10 feet from the pump out of the pipe
where the high-pressure hose hooks up.
5. If water does shoot 8-10 feet, then the pump is
fine. If not, then the pump needs to be cleaned.
Turn the water off to the pressure washer and call
Technical Support at 1-800-330-0712 for further
instructions.
6. If the pump is fine, then attach the black highpressure hose to the pressure washer. Remove the
nozzle from the lance.
7. Turn the water back on and trigger the gun. Water
should shoot 10-20 feet from the gun.
8. If water does not shoot 10-20 feet from the gun,
then the trigger valve in the gun is bad and the gun
needs to be replaced. If it does shoot 10-20 feet,
then the nozzle needs to be checked for clogs.
See page 9 for Nozzle Cleaning Instructions.
11
www.campbellhausfeld.com
Page 12

Operating Instructions
REGISTER YOUR PRODUCT ONLINE NOW!
http://www.campbellhausfeld.com
Limited Warranty
1. DURATION: From the date of purchase by the original purchaser as follows: One Year.
2. WHO GIVES THIS WARRANTY (WARRANTOR): Campbell Hausfeld / Scott Fetzer Company, 100 Production Drive, Harrison,
Ohio 45030, Telephone: (800) 330-0712.
3. WHO RECEIVES THIS WARRANTY (PURCHASER): The original purchaser (other than for purposes of resale) of the Campbell
Hausfeld pressure washer.
4. WHAT PRODUCTS ARE COVERED UNDER THIS WARRANTY: This PW1825/PW1835 Campbell Hausfeld Pressure Washer
supplied
5. WHAT IS COVERED UNDER THIS WARRANTY: Substantial defects on material and workmanship which occur within the
duration of the warranty period with the exceptions noted below. Warrantor will also cover normal wear items for a period of 90
days from the date of original purchase against defects in material and workmanship. These wear items include high pressure
hoses, water and oil seals, o-rings, valves, lances, and spray nozzles.
6. WHAT IS NOT COVERED UNDER THIS WARRANTY:
A. Implied warranties, including those of merchantability and FITNESS FOR A PARTICULAR PURPOSE ARE LIMITED FROM
THE DATE OF ORIGINAL PURCHASE AS STATED IN THE DURATION. If this pressure washer is used for commercial,
industrial or rental purposes, the warranty will apply for ninety (90) days from the date of purchase. Some States do not allow
limitation on how long an implied warranty lasts, so the above limitations may not apply to you.
B. ANY INCIDENTAL, INDIRECT, OR CONSEQUENTIAL LOSS, DAMAGE, OR EXPENSE THAT MAY RESULT FROM ANY
DEFECT, FAILURE, OR MALFUNCTION OF THE CAMPBELL HAUSFELD pressure washer. Some States do not allow the
exclusion or limitation of incidental or consequential damages, so the above limitation or exclusion may not apply to you.
C. Any failure that results from shipping damage, accident, purchaser’s abuse, neglect or failure to install and operate pressure
washer in accordance with instructions provided in the owner’s manual(s) supplied with product.
D. Pre-delivery service, e.g. assembly, oil or lubricants and adjustment.
E. Items or service normally required to maintain the pressure washer.
F. Gasoline engine and components are expressly excluded from coverage under this limited warranty. Such components
should be returned by the purchaser to the original manufacturer or to its authorized repair stations for service.
G. Additional items not covered under the warranty:
1. Motor brushes (Electric models only).
2. Cosmetic defects that do not interfere with functionality.
3. Rusted components.
4. Pump wear or valve damage caused by using improper oil, oil contamination or by failure to follow proper oil
maintenance guidelines.
7. RESPONSIBILITIES OF WARRANTOR UNDER THIS WARRANTY: Repair or replace, at Warrantor’s option, pressure washer or
component which is defective, has malfunctioned and/or failed to conform within duration of the warranty period.
8. RESPONSIBILITIES OF PURCHASER UNDER THIS WARRANTY:
A. Provide dated proof of purchase and maintenance records.
B. Call Campbell Hausfeld (800-330-0712) to obtain your warranty service options. Freight costs must be borne by the
purchaser.
C. Use reasonable care in the operation and maintenance of the pressure washer as described in the owner’s manual(s).
9. WHEN WARRANTOR WILL PERFORM REPAIR OR REPLACEMENT UNDER THIS WARRANTY: Repair or replacement will
be scheduled and serviced according to the normal work flow at the servicing location, and depending on the availability of
replacement parts.
This Limited Warranty applies in the U.S., Canada and Mexico only and gives you specific legal rights. You may also have other rights
which vary from state to state or country to country.
REMINDER: Keep your dated proof of purchase for warranty purposes!
www.campbellhausfeld.com
Attach it to this manual or file it for safekeeping.
12
Page 13

Voir la Garantie à la page 24 Fr pour de l’information importante sur l’utilisation commercial de ce produit.
Instructions d’Utilisation PW182501, PW183501
Veuillez lire et conserver ces instructions. Lire attentivement avant de commencer à assembler, installer, faire fonctionner ou entretenir l'appareil décrit.
Protégez-vous et les autres en observant toutes les informations sur la sécurité. Négliger d'appliquer ces instructions peut résulter en des blessures corporelles
et/ou en des dommages matériels ! Conserver ces instructions pour références ultérieures.
Nettoyeur haute
Pression à Électrique
ENREGISTREZ VOTRE PRODUIT EN LIGNE MAINTENANT ! http://www.campbellhausfeld.com
Description
Ces nettoyeurs électriques haute pression
de Campbell Hausfeld sont idéaux pour
tout projet de nettoyage domestique. Les
unités opèrent sans bruit, efficacement et
sans émissions de combustible. Chaque
modèle présente une fonction “marche-arrêt
immédiat” (ISS), qui arrête le moteur quand
le pistolet n’est pas engagé. Cela conserve
de l’eau et de l’électricité et rallonge la durée
de vie de la pompe.
Les nettoyeurs haute pression sont
actionnés par un moteur universel fiable
et peuvent être branchés commodément
dans les prises de la maison de 120V – 15
ampères. Deux modèles sont homologués
ETL pour satisfaire les normes ETL et UL aux
États-Unis et au Canada.
LIRE ET SUIVRE TOUTES LES
INSTRUCTIONS.
Figure 1 - Modèles PW182501, et PW183501
Spécifications
Modèle Pression Volt
PW182501 13,100 kPa/ 1900 psi 120
PW183501 13,100 kPa/ 1900 psi 120
Veuillez inscrire le No de modèle et le No de série à utiliser pour contacter le fabricant :
N° de modèle :
N° de série : ________________________________________________________________
Date d’achat : ______________________________________________________________
Lieu d’achat : ______________________________________________________________
Pour obtenir de l’information sur le produit, veuillez appeler le 1-800-330-0712.
______________________________________________________________
Conserver ces instructions
Ne les jetez pas
Directives De Sécurité
Ce manuel contient de l’information
très importante qui est fournie pour
la SÉCURITÉ et pour ÉVITER LES
PROBLÈMES D’ÉQUIPEMENT.
Rechercher les symboles suivants pour
cette information.
Danger
indique
une situation dangereuse
imminente qui MÈNERA à
la mort ou à des blessures
graves si elle n’est pas
évitée.
Avertissement
indique une situation
potentiellement dangereuse qui, si elle
n’est pas évitée, POURRAIT mener à la
mort ou à de graves blessures.
Attention indique
une situation potentiellement dangereuse
qui, si elle n’est pas évitée, PEUT mener à
des blessures mineures ou modérées.
MÉMENTO: Gardez votre preuve datée d'achat à fin de la garantie!
Joignez-la à ce manuel ou classez-la dans un dossier pour plus de sécurité.
LIRE ET SUIVRE TOUTES LES INSTRUCTIONS • CONSERVER CES INSTRUCTIONS • NE PAS JETER
© 2014 Campbell Hausfeld/Scott Fetzer IN471200AV 11/14
13 Fr
Page 14

Instructions d’Utilisation
Directives De Sécurité (suite)
Avis indique de l’information importante qui
pourrait endommager l’équipement si elle
n’est pas respectée.
IMPORTANT : Information qui exige une attention spéciale.
Symboles De Sécurité
Les symboles de sécurité suivants apparaissent dans
l’ensemble de ce manuel pour vous aviser des dangers et
précautions importants de sécurité.
Lire le manuel
d’abord
Risque de
blessure
INSTRUCTIONS PORTANT SUR UN RISQUE D’INCENDIE, UN
CHOC ÉLECTRIQUE OU DES BLESSURES AUX PERSONNES
Ce manuel contient des informations concernant la sécurité,
le fonctionnement et l’entretien. Si vous avez des questions,
appeler le 1-800-330-0712 pour le service à la clientèle.
En utilisant les outils, il faut suivre les
précautions de base, y compris ce qui suit :
PROPOSITION 65 DE CALIFORNIE
Ce produit ou son cordon peuvent contenir
des produits chimiques, y compris du plomb,
relevés par l’État de Californie comme cause de cancer, d’anomalies
congénitales ou d’autres problèmes reproductifs. Lavez-vous les
mains après toute manipulation.
GÉNÉRALITÉ
a. Pour réduire les risques de chocs électriques,
d’incendie ou de blessures aux personnes, lire toutes
les instructions avant d’utiliser l’outil. Ne pas suivre
les avertissements, les dangers et les mises en garde
pourrait causer la MORT ou de GRAVES BLESSURES.
b. Se familiariser avec ce produit, ses commandes et son
utilisation. Suivez toutes les instructions. Contacter votre
représentant Campbell Hausfeld si vous avez des questions.
1-800-330-0712
c. Seules les personnes familières avec ces règles
d’utilisation sans danger devraient utiliser cette
unité.
d. Suivez tous les codes de sécurité ainsi que l’Occupational
Safety and Health Act (OSHA).
AIRE DE TRAVAIL
a. Gardez le secteur d’opération libre de toutes personnes.
b. Garder l’aire de travail propre et bien éclairée. Les établis
encombrés et les coins sombres augmentent les
risques de chocs électriques, d’incendie et de
blessures aux personnes.
Risque
d’explosion
Protection
oculaire et
auditive
Risque
d’incendie
Risque de choc
électrique
Risque de
tomber
c. Ne pas faire fonctionner l’outil dans une atmosphère
explosive comme en présence de liquides, gaz ou poussières
inflammables. L’outil peut produire des étincelles
menant à une inflammation de poussières ou de
fumées.
d. NE pulvisérez JAMAIS de liquides inflammables
et n’utilisez jamais le pulvérizateur haute pression dans des
endroits contenant de la poussière, des liquides ou des
vapeurs combustibles.
e. Ne faites jamais fonctionner cet appareil dans un édifice
fermé ou dans ou près d’un environnement explosif.
SÉCURITÉ PERSONNELLE
a.
Rester vigilant. Il faut regarder ce que vous faites et utiliser
son sens commun en faisant fonctionner un outil. Ne pas
faire fonctionner l’appareil si vous êtes fatigué ou sous
l’influence de drogues, d’alcool ou de médicaments. Un
moment d’inattention en faisant fonctionner l’outil augmente
le risque de blessures.
b. Il faut s’habiller correctement. Fermer les orteils
chaussures (pas de tongs)
Ne pas porter de bijoux
ou de vêtements amples. Attacher les cheveux
longs. Garder les cheveux, les vêtements et les
gants loin des pièces mobiles. Les vêtements amples, les
bijoux ou les cheveux longs augmentent le risque
de blessures si quelque chose se prend dans les
pièces mobiles.
c. Ne pas trop se pencher. Garder bon pied et bon
équilibre en tout temps. Ceci permet d’avoir un
meilleur contrôle de l’outil dans les situations imprévues.
Risque d’injection ou de blessures
pas de jets vers les personnes. Ce produit doit être utilisé
seulement par un opérateur formé. Retirez toujours la tige
du pistolet avant de nettoyer les débris de l’embout.
graves. Restez loin du gicleur. Ne déchargez
d. Restez loin du gicleur. NE dirigez JAMAIS le jet
haute pression vers une personne, un animal, ou
vous-même.
e. Ne mettez jamais la main ou les doigts sur l’embout de
pulvérisartion en opérant l’appareil.
f. N’essayez jamais d’arrêter ou de dévier les fuites vers toute
partie du corps.
S’assurer que l’outil n’est utilisé
dans l’aire de travail portent un équipement de protection oculaire
ANSI Z87, et s’il y a lieu, d’autre équipement de protection approprié
comme une protection de la tête, auditive, des gants, des bottes de
caoutchouc, des vêtements protecteurs en utilisant et exécutant la
maintenance. De graves blessures oculaires ou une perte auditive
permanente pourraient en résulter.
que lorsque l’opérateur et tout autre personnel
g. Haute pression – le pistolet a un recul – Tenir le pistolet des
deux mains.
h. Garder le tuyau loin d’objets tranchants. Les tuyaux
qui éclatent peuvent causer des blessures. Examiner
régulièrement les tuyaux et les remplacer s’ils sont
endommagés. Ne jamais essayer de réparer un tuyau
endommagé.
SÉCURITÉ ÉLECTRIQUE
Risque d’électrocution :
a. Ce produit est fourni avec un disjoncteur de fuite à la terre
intégré dans la prise du cordon. Assurez-vous d’inspecter le
cordon et le disjoncteur de fuite à la terre avant de l’utiliser.
14 Fr
Page 15

Modèles PW182501, et PW183501
Directives De Sécurité (suite)
Toute réparation ou tout remplacement du cordon doit se
faire par un technicien électrique qualifié (agréé ou certifié).
S’il faut remplacer la fiche ou le cordon, utilisez seulement
des pièces de rechange identiques.
b. NE JAMAIS utiliser de rallonge avec ce produit.
c. Inspecter le cordon avant d’utiliser l’appareil - Ne pas utiliser
si le cordon est endommagé.
d. Garder toutes les connexions électriques sèches et loin du
sol.
e. Ne pas toucher la fiche avec les mains humides.
f. Ne pas pulvériser d’appareils électriques et de câblage.
UTILISATION ET ENTRETIEN DE L’OUTIL
N’utilisez pas de pression qui dépasse la
pression d’exploitation de toute pièce
(fl exibles, raccords, etc.) du système sous pression. Assurez-vous que
tout équipement et accessoires sont du calibre voulu pour résister à
la pression d’exploitation maximum de l’appareil.
a. Il faut entretenir l’outil avec soin. Un outil bien entretenu
réduit le risque de problèmes et est plus facile à contrôler.
b. Assurez-vous que tous les dispositifs de sécurité
fonctionnenet correctement avec chaque utilisation. NE
retirez PAS et ne modifiez pas toute pièce du pistolet ou de
l’appareil.
c. Ne jamais faire fonctionner la machine sans les appareils
branchés correctement la machine (poignée, Assemblée de
pistolet/lance, buse, etc..).
d. Pointer le pistolet dans une direction sans danger. L’unité
commencera à pulvériser lorsque la gâchette est pressée
si l’interrupteur « marche/arrêt » est à la position «ON»
(Pulvérisateur à pression (marche).
e. Sachez comment arrêter ce produit et dégager rapidement la
pression. Soyez bien au fait des contrôles.
f. Engagez toujours le verrou de sécurité de la gâchette en
position sûre à la fin de la pulvérisation même si ce n’est que
pour quelques instants.
g. N’engagez jamais en permanence le mécanisme de la
gâchette sur le pistolet.
h. Suivez toujours les recommandations du fabricant de
détergents pour la bonne utilisation du produit. Protégez
toujours les yeux, la peau et le système respiratoire du
détergent.
i. Ne débranchez jamais le flexible de décharge de haute
pression de la machine tandis que le système est sous
pression. Pour décompresser, coupez le courant et l’eau,
puis pressez la gâchette du pistolet 2 ou 3 fois.
j. Débrancher l’appareil lorsqu’il n’est pas utilisé.
k. Suivez les instructions d’entretien spécifiées dans le manuel.
o. Utilisez seulement le gicleur fourni avec l’appareil.
p. Ne laissez jamais la rallonge sans surveillance tandis que la
machine est en marche.
q. Tenez toujours le pistolet et la rallonge bien fermement en
démarrant et en faisant fonctionner l’appareil.
r. Ne laissez JAMAIS l’appareil fonctionner avec la gâchette
dégagée (arrêt) pendant plus d’une minute. L’accumulation de
chaleur pourrait endommager la pompe.
s. NE rangez JAMAIS le pulvérizateur haute pression à l’extérieur
ou à des endroits où il pourrait geler. Le gel peut endommager
gravement la pompe.
t. Le pulvérisateur à pression n’est pas conçu pour pomper l’eau
chaude. Ne pas brancher à l’alimentation d’eau chaude.
SERVICE
a. En réparant ou faisant l’entretien d’un outil, utiliser seulement
des pièces de rechange identiques. Utiliser seulement des
pièces autorisées.
Entretien d’un Appareil à Double
Isolation
Dans un appareil à double isolation,
deux systèmes d’isolation sont
fournis à la place d’une mise à la
terre. Aucun système de mise à la
terre n’est fourni sur un appareil à
double isolation et aucun moyen de
mise à la terre ne doit y être ajouté.
Faire l’entretien d’un appareil à
double isolation demande des soins
Symbole de double
isolement
attentifs et une connaissance parfaite du système et ne sera
exécuté que par des personnes compétentes. Les pièces de
rechange pour un appareil à double isolation doivent être identiques
aux pièces qu’elles remplacent. Un appareil à double isolation doit
porter l’inscription « DOUBLE ISOLATION » (Double Insulated). Le
symbole peut aussi se trouver sur l’appareil.
CONSERVER CES INSTRUCTIONS
NE LES JETEZ PAS
NOTE : Les symboles DANGER, AVERTISSEMENT, ATTENTION ET AVIS
ainsi que les instructions de ce manuel ne peuvent pas couvrir toutes
les conditions et situations qui pourraient se produire. L’opérateur doit
comprendre que le bon sens et des précautions sont des facteurs qui ne
peuvent pas être inclus dans ces produits, mais doivent être fournis par
l’opérateur.
Dommage à l’equipement.
l. Mettez TOUJOURS l’eau à “ON” avant de mettre le
pulvérizateur haute pression en marche“ON”. Faire
fonctionner la pompe à sec cause de graves dommages.
m. Ne faites pas fonctionner le pulvérizateur haute pression avec
l’écran d’entrée d’eau retiré. Gardez l’écran libre de tous
débris et sédiments.
n. NE faites JAMAIS fonctionner le pulvérizateur haute
pression avec des pièces brisées ou manquantes. Vérifiez
régulièrement l’équipement et réparez immédiatement toutes
pièces usées ou endommagées.
15 Fr
Page 16

Instructions d’Utilisation
Déballage
Tuyau haute
pression
Interrupteur
marche/arrêt
Prise du tuyau du
pistolet
Poignée
Cordon
d’alimentation
Lance
PW182501
Pistolet à
gâchette
Dès que l’appareil est déballé, inspectezle attentivement pour tout signe de
dommages en transit. Vérifiez s’il y a
des pièces desserrées, manquantes
ou endommagées. Assurez-vous de
resserrer tous les raccords, boulons, etc.
avant d’utiliser la laveuse à pression.
Vérifiez pour vous assurer que tous les
accessoires fournis sont inclus avec
l’appareil. S’il manque toute pièce, NE
RETOURNEZ PAS L’APPAREIL AU
DÉTAILLANT. Consultez le numéro de
modèle de l’appareil (sur l’étiquette du
numéro de série du cadre de la laveuse à
pression) et appelez le 1-800-330-0712
pour les pièces de rechange.
Ne faites pas
fonctionner l’appareil
s’il est endommagé pendant l’expédition, la
manipulation ou l’utilisation. Des dommages
peuvent mener à l’éclatement et provoquer des
blessures ou des dommages à la propriété.
UTILISATIONS RECOMMANDÉES POUR
CETTE LAVEUSE À PRESSION
◆ Terrasse
◆ Revêtement
◆ Véhicules
◆ Gouttières (avec buse à angle droit)
Cordon
Poignée
d’alimentation
Tuyau haute
pression
Interrupteur
marche/arrêt
Prise du tuyau
PW183501
d’eau
Figure 2 - Composants de laveuse à pression
Lance
Pistolet à
gâchette
AUTRES ARTICLES NON INCLUS
◆ ANSI Z87 Protection oculaire
◆ Boyau d’arrosage
NOTE: Seulement pour le PW183501 En déroulant le tuyau, tenez la poignée
de l’unité. Cela empèchera l’unité de se
renverser.
Accessories
BROSSE
(PW183501)
BUSE
TURBO(PW183501)
BUSE À ANGLE
DROIT (PW183501)
BOUTEILLE DE DÉTERGENT
(Deux modèles)
Ensemble de disponibles à l'achat
Numéro de pièce PW091400AV
16 Fr
Page 17

ASSEMBLAGE ET PRÉOPÉRATION
Assurez-vous toujours que le tuyau d’arrosage
est allumé avant d’allumer le nettoyeur haute pression. Faire marcher le
nettoyeur haute pression à sec endommagera les joints de la pompe.
Ne démontez pas la
lance ou le pistolet de ce nettoyeur haute
pression. Des pièces de rechange ne sont pas disponibles pour le
pistolet ou la lance.
Modèles PW182501, et PW183501
PW182501, et PW183501
1. Attachez les crochets de stockage (voir la figure 3).
2. Glisser la poignée sur l'unité (1), attachez avec 2 vis Phillips
(voir la figure 4).
3. Attachez le tuyau haute pression au la sortie haute pression
(voir la figure 8).
4. Attachez le tuyau haute pression au pistolet (voir la figure 5).
5. Attachez la lance au pistolet torsion et de verrouillage,
attachez la lance au embout en appuyant sur le bouton de
connexion facile (voir la figure 6 & 7).
6. Attachez le tuyau d’arrosage à l’unité (voir les figures 9).
7. Appuyez sur le bouton Easy Connect lors de l'insertion
raccord rapide(voir la figure 5, 7 & 8).
1
2
3
Figure 3 - Attachez les crochets de
stockage
(PW182501 seulement)
Figure 7- Attachez la lance au embout.
Figure 8 - Attachez le tuyau d’arrosage à l’unité
Entrée d’eau
4
Figure 9 - Attachez le tuyau d’arrosage à
l’unité
Figure 5 - Attachez le tuyau haute pression au
pistolet (tous les modèles)
Figure 4 - Glisser la poignée sur
(PW182501 seulement)
l'unité
Figure 6 - Attachez la lance au pistolet ou
bouteille de détergent
17 Fr
Page 18

Instructions d’Utilisation
ASSEMBLAGE ET PRÉOPÉRATION (SUITE)
VERROU DE SÉCURITÉ DE LA GÂCHETTE
En position engagée, le verrou de sécurité de la gâchette
empêche le déclenchement accidentel du pistolet. Poussez
entièrement le verrou vers le bas pour l’engager (voir les
figures 10).
Engagez toujours le verrou de sécurité de la gâchette lorsque
vous n’utilisez pas l’appareil.
Gâchette
Verrou de
Sécurité
Figure 10 - Verrou de sécurité de la gâchette
FONCTIONNEMENT
IMPORTANT !
Ce pulvérisateur de lavage est équipé d’un microrupteur
sensible au débit d’eau. Cet interrupteur de Marche/Arrêt
Instantané (Instant Start/Stop - ISS) est sensible au débit
d’eau dans la pompe. Quand la gâchette est lâchée, le
débit d’eau à travers la pompe s’arrête. Le ISS coupe le
moteur automatiquement afin de protéger la pompe contre
le surchauffage.
FONCTIONNEMENT
1. Faire circuler l’eau.
2. Tirez la gâchette du pistolet.
3. Tourner l’interrupteur à « ON » (en marche)
4. Lâcher la gâchette. Le moteur du pulvérisateur de lavage
s’arrêtera.
5. Pour pulvériser de nouveau, tirer sur la gâchette. Le moteur
et la pompe se remettront en marche.
REMARQUE: Le moteur pourrait fonctionner de temps en
temps afin de fournir de l’eau fraîche à la pompe (même
si la gâchette n’est pas actionnée). Ceci est normal et
n’endommagera pas le modèle.
Toujours tourner l’interrupteur « ON/
OFF » (marche/arrêt) à la position « OFF »
(arrêt), et ensuite appuyer sur la gâchette pour dissiper la pression
avant de débrancher le cordon d’alimentation.
Risque de dommage à l’équipement.
Assurez-vous toujours que l’interrupteur
ON/OFF (MARCHE/ARRÊT) de l’appareil est en position « OFF » et
que l’appareil est débranché avant de le ranger.
Risque d’injection. Le modèle
pulvérisera lorsque la gâchette est
actionnée si l’interrupteur « ON/OFF » (MARCHE/ ARRÊT) est dans la
position « ON » (EN MARCHE). Toujours pointer le pistolet dans une
direction hors de danger.
PRÉPARATION DE LA SURFACE
La procédure de nettoyage suivante vous aide à vous organiser
pour la tâche de nettoyage et pour vous assurer d’atteindre
les meilleurs résultats dans le temps le plus court. GALLONS
À LA MINUTE (G/MIN), plus d’eau à la minute peut se traduire
par un nettoyer plus rapide, tout particulièrement en lavant
des matériaux comme la boue et le goudron. DISJONCTEUR
DE FUITE À LA TERRE (GFCI), le disjoncteur de fuite à la terre
protège l’utilisateur de toute électrocution accidentelle (pour les
laveuses à pression alimentées par l’électricité seulement).
Rappelez-vous d’utiliser les techniques de pulvérisation/
nettoyage mentionnées dans les sections suivantes.
Avant de commencer un travail de nettoyage à haute pression,
préparez la surface à nettoyer. Enlevez les meubles et assurezvous que toutes les fenêtres et portes sont bien fermées.
Protégez aussi toutes vos plantes et arbres près du secteur à
nettoyer en couvrant d’une toile pour ne pas les pulvériser de
détergent.
DÉMARRAGE
Utilisez TOUJOURS cette procédure de démarrage pour assurer
un démarrage exact et sans danger.
Si l’eau a gelé dans le pulvérizateur à haute
pression, laissez-la dégeler à température
ambiante avant de commencer. NE versez PAS d’eau chaude sur ou
dans la pompe; les pièces intérieures seraient endommagées. Vérifi er
les fuites.
1. Assurez-vous que l’interrupteur de courant est à la position «
OFF » (arrêt).
2. Fixez un tuyau d’arrosage côté entrée de la pompe et
raccordez-le à l’alimentation d’eau. Utilisez un flexible de D.I.
de 5/8 po et d’une longueur de 50 pi (15 m) ou moins.
Certains codes de plomberie locaux exigent un
dispositif de prévention de retour d’eau en connectant à une source
d’eau fraîche. Installez un dispositif de prévention de retour en amont de
la pompe, au besoin.
a. Si la pression d’eau d’alimentation dépasse 690 kPa,
installez une soupape régulatrice d’eau au raccord du tuyau
d’arrosage.
b. Ne dépassez pas 38° C de température d’eau
d’alimentation.
NOTE : L’approvisionnement d’eau d’alimentation doit avoir un
débit minimum de 19 lpm.
4. Ouvrez l’alimentation d’eau.
Ne laissez jamais l’appareil fonctionner à sec.
Assurez-vous que l’alimentation d’eau est en
marche avant de faire fonctionner l’appareil.
5. Enfoncez et tenez la gâchette du pistolet jusqu’à ce que la
pulvérisation d’eau de la buse indique que tout l’air est sorti
du système. Placez le verrou de sécurité de gâchette.
6. Branchez le cordon d’alimentation dans une prise de courant
de 120 volts mise à la terre qui est sur un circuit réservé. Ne
pas utiliser de rallonges. Enfoncez le bouton de réinitialisation
sur l’adaptateur de fiche à disjoncteur de fuite à la terre. Vous
18 Fr
Page 19

FONCTIONNEMENT (SUITE)
devez faire cela chaque fois que l’appareil est branché dans
une prise. (Figure 18)
BRANCHEMENT DU SYSTÈME
1. Branchez le cordon dans la prise mise à la terre de 120V.
2. Faire circuler l’eau.
3. Déverrouiller le verrou de la gâchette en déplaçant le verrou
de droite à gauche.
4. Appuyer sur et tenir la gâchette du pistolet pendant
une minute afin de dissiper la pression et d’enlever l’air
emprisonné dans le système.
5. Tourner l’interrupteur « ON » (en marche).
RINÇAGE INITIAL À HAUTE PRESSION
Pulvérisez d’eau la surface à nettoyer pour enlever toute
poussière ou saleté accumulée sur la surface. Ceci permet
au détergent de s’attacher à la poussière en profondeur qui a
pénétré dans la surface à nettoyer.
Enfoncer la gâchette du pistolet 3 à 5 fois pour sortir tout air
enfermé dans le système.
Ajuster l’angle d’éventail de pulvérisation
1. Durant le travail, la lance est affectée par la pression ; alors, il
faut la tenir fermement à deux mains et pointer la buse vers le
plancher.
2. Activer en tirant de la gâchette du pistolet pulvérisateur/
poignée.
3. Ajustez la distance selon la surface à nettoyer ; ceci règlera
aussi la pression de l’embout.
4. Le motif de pulvérisation et l’intensité peuvent être changés
en tournant la buse de pulvérisation au bout de la lance (voir
la figure 12 & 13). Pour empêcher toute blessure, ne jamais
mettre les mains devant la lance.
La pression s’ajuste aussi en se déplaçant plus près ou plus loin
de la surface de nettoyage et en ajustant l’angle d’éventail de
pulvérisation tel qu’indiqué. (Figure 14)
Modèles PW182501, et PW183501
Réinitialisation
Figure 11 - Prise de terre/bouton de
réinitialisation
Figure 12 - Réglage de pulvérisation
Figure 13 - Ajustez le motif de pulvérisation
Figura 14 - Angle optimum par rapport à la
surface à nettoyer
19 Fr
Page 20

Instructions d’Utilisation
FONCTIONNEMENT (SUITE)
Angle à la surface de nettoyage
En pulvérisant l’eau contre une surface, vous pouvez obtenir
un impact maximum en frappant la surface directement. Ce
type d’impact peut toutefois faire pénétrer les particules de
poussières dans la surface et ainsi empêcher d’avoir l’action
recherchée.
L’angle optimum de pulvérisation d’eau contre une surface de
nettoyage est de 45 degrés.
Pulvérisez l’eau contre une surface à un angle de 45 degrés pour
atteindre le meilleur impact et retirer efficacement les débris.
Distance de la surface à nettoyer
La distance entre l’embout de pulvérisation et la surface de
nettoyage est un autre facteur qui affecte la force d’impact de
l’eau. La force d’impact de l’eau augmente lorsque l’embout se
rapproche de la surface.
Comment éviter d’endommager les surfaces
Les dommages aux surfaces à nettoyer se produisent à cause
de la force d’impact de l’eau qui dépasse la durabilité de la
surface. Vous pouvez varier la force d’impact en contrôlant
l’angle de la buse de pulvérisation sur la surface de nettoyage et
la distance de la surface de nettoyage et en changeant de buse
de pulvérisation. N’utilisez JAMAIS de jet étroit à fort impact sur
une surface qui pourrait être endommagée. Évitez de pulvériser
les fenêtres avec un jet étroit à fort impact. Ceci pourrait casser
la fenêtre. Le meilleur moyen d’éviter d’endommager les surfaces
est de suivre ces étapes :
1. Avant de tirer le pistolet, assurez-vous que la buse à
raccordement rapide que vous utilisez est appropriée pour
l’application.
2. Placez la buse de pulvérisation à environ 1,22 à 1,52 m (4 à 5
pieds) de la surface de nettoyage. Tenez ensuite la lance et la
buse de pulvérisation à un angle de 45 degrés sur la surface
de nettoyage. Tirer de la gâchette du pistolet.
3. Variez l’angle du jet à eventail et la distance à la surface à
nettoyer jusqu’à ce que vous atteigniez l’efficacité optimale
de nettoyage sans endommager la surface.
APPLICATION DE DÉTERGENT
NOTE : Utilisez seulement les détergents formulés pour les
pulvérizateurs haute pression. Testez le détergent dans un
endroit retiré avant de l’utiliser. NE PAS utiliser de javellisant dans
la laveuse à pression.
Détergents
Utiliser des détergents peut réduire de beaucoup le temps de
nettoyage et aider à retirer les taches rebelles. De nombreux
détergents sont faits pour le pulvérizateur haute pression
pour des tâches de nettoyage précises. Les détergents de
pulvérizateur haute pression sont aussi épais que l’eau. Le
fait d’utiliser des détergents plus épais - comme le savon
de vaisselle - bloquera le système d’injection chimique et
empêchera l’application de détergent.
Appliqués sur la surface, les détergents prennent du temps
pour s’attaquer à la poussière et à la saleté. Les détergents
fonctionnent mieux appliqués à basse pression.
Vous pouvez nettoyer efficacement les surfaces en combinant
l’action chimique des détergents avec les rinçages à haute
pression. Pour les surfaces verticales, appliquez le détergent
en commençant au bas pour aller vers le haut. La méthode
empêche le détergent de glisser vers le bas et de faire des
coulisses. Commencez le rinçage haute pression au bas et allez
vers le haut. Pour les taches particulièrement rebelles, utilisez
une brosse en plus des détergents et du rinçage haute pression.
1. Suivez les directives du fabricant sur l’étiquette pour les
bonnes concentrations de mélange de savon/détergents.
La proportion de détergent savon à eau dans la pompe est
d’environ 10% (1 à 10).
◆ PW182501 et PW183501: Versez du savon dans le récipient
à savon. Ajustez la lance selon la position du savon. Tourner
à basse pression (Figure 20)
Conseils Généraux de Nettoyage
1. Appliquez le détergent pour couvrir entièrement la surface à
nettoyer, de bas en haut pour éviter qu’il ne glisse vers le bas
et fasse des marques. Attendez quelques minutes pour que
le détergent s’attaque à la poussière et à la saleté. Utilisez
une brosse pour frotter un peu les endroits rebelles. Ne
laissez jamais le détergent sécher sur la surface à nettoyer.
2. Rincer à haute pression
PUISSANCE DE NETTOYAGE
Le moyen le plus facile de contrôler la puissance de nettoyage
de votre nettoyeur à pression est de changer la distance de la
surface à nettoyer. Commencez à pulvériser avec un motif large
d’éventail tout en vous plaçant à quelques pieds de la surface.
Rapprochez-vous lentement de l’objet que vous nettoyez et
ajustez le motif de pulvérisation au besoin jusqu’à ce que vous
trouviez la technique de nettoyage la plus efficace.
DERNIER RINÇAGE
Le dernier rinçage devrait commencer du bas vers le haut.
Assurez-vous de bien rincer toute la surface et de retirer toute
trace de détergent.
PROCÉDURE DE DÉCOMPRESSION
Pour réduire les risques de blessures ou de dommages à la
propriété, suivez toujours cette procédure lorsque la pulvérisation
est arrêtée, à la fin du travail et avant de vérifier ou réparer toute
pièce du système.
1. Engagez le verrou de sécurité de la gâchette.
2. Fermez l’appareil.
3. Coupez l’alimentation d’eau.
4. Désengagez le verrou de sécurité de la gâchette et pressez
sur la gâchette pour décompresser.
5. Réengagez le verrou de sécurité de la gâchette.
6. En vérifiant ou réparant l’appareil, retirez la fiche de la prise
murale du mur.
7. Avant de ranger pour la nuit, un rangement à long terme ou le
transport de l’appareil, coupez de l’alimentation d’eau.
ARRÊT
1. Assurez-vous que tout le détergent est vidé du système.
2. Coupez le moteur.
3 Fermez l’alimentation d’eau.
20 Fr
Page 21

Modèles PW182501, et PW183501
FONCTIONNEMENT (SUITE)
4. Après avoir coupé le moteur et l’alimentation d’eau, engagez
le pistolet pour retirer la pression du système.
NE fermez jamais l’alimentation d’eau avant
de couper le moteur. Cela pourrait endommager
la pompe et/ou moteur.
NE déconnectez jamais le fl exible de décharge
de haute pression de l’appareil tandis que
le système est sous pression. Décompressez en coupant le moteur,
fermant l’alimentation d’eau et pressant la gâchette 2 ou 3 fois.
5. Après chaque utilisation, essuyez les surfaces du
pulvérizateur haute pression avec un chiffon propre et
humide.
RANGEMENT
• Ne rangez pas le pulvérizateur haute pression à l’extérieur.
• Ne rangez pas le pulvérizateur haute pression à un endroit où
il pourrait geler à moins de le préparer pour l’hiver.
Instructions Pour L’hiver
1. Déconnectez le flexible haute pression de la pompe.
2. Insérez une longueur de tuyau d’arrosage de 12 à 14 po dans
l’entrée de la pompe.
3. Placez un entonnoir dans l’autre extrémité du tuyau
d’arrosage.
Lisez les instructions du fabricant pour
manipuler et éliminer correctement
l’antigel RV.
4. Versez environ 0,18 L d’antigel RV dans l’entonnoir.
5. Secouez un peu l’interrupteur marche/arrêt jusqu’à ce que
l’antigel RV sorte de la sortie de la pompe.
6. Déconnectez le flexible haute pression du pistolet et drainez
le flexible. Tenez le pistolet et la tige en position verticale et
pressez la gâchette pour drainer toute l’eau.
INSTRUCTIONS DE NETTOYAGE DE L’EMBOUT
Un embout bloqué ou partiellement bloqué peut provoquer une
réduction prononcée d’eau sortant de l’embout et alors l’appareil
aura une pulsion en pulvérisant.
Pour nettoyer l’embout :
• Éteindre l’appareil.
• Éteindre l’alimentation d’eau. Dégager toute pression dans le
tuyau en pressant la gâchette 2 à 3 fois.
• Retirer la lance du pistolet.
• Tourner l’embout à un réglage de jet étroit. Ceci ouvre les
lames en éventail.
• Utiliser le nettoyeur de buse inclus ou un trombone déplié et
insérer le fil dans le trou de l’embout pour ensuite utiliser un
mouvement de va et vient jusqu’à ce que les débris soient
débloqués (se reporter à la figure 15).
• Retirer tous autres débris en rinçant l’embout avec de l’eau.
Pour ce faire, retirer la lance du pistolet, mettre l’extrémité du
tuyau d’arrosage (l’eau courant) contre l’extrémité de la buse
pour pousser l’eau et les débris hors de l’ouverture arrière de
la lance.
CONSEILS POUR PROLONGER LA DURÉE DE VIE DE VOTRE
PULVERIZATEUR HAUTE PRESSION
1. Ne faites jamais fonctionner l’appareil sans eau.
2. Votre pulvérizateur haute pression ne doit pas pomper d’eau
chaude. Ne connectez jamais votre pulvérizateur haute
pression à une source d’eau chaude car cela réduira de
beaucoup la vie de la pompe.
3. Faire fonctionner l’appareil pendant plus d’une minute sans
pulvériser d’eau fera accumuler la chaleur dans la pompe.
Faire fonctionner l’appareil sans pulvériser d’eau pourrait
endommager les composants de la pompe.
ENTRETIEN
Respectez les intervalles d’entretien régulier pour assurer
une performance maximum et une longue durée de vie du
pulvérizateur. Reportez-vous à l’horaire d’entretien recommandé.
Si vous faites fonctionner votre pulvérizateur haute pression dans
des conditions poussiéreuses, faites les vérifications d’entretien
plus souvent.
HORAIRE D’ENTRETIEN
Horaire d’entretien Action nécessaire
Chaque jour Vérifiez le tamis d’entrée d’eau et le filtre
INFORMATION TECHNIQUE ET POUR LES
CONSOMMATEURS
Laveuses à pression à orientation horizontale
Aspiration de détergent de la pompe
Rapport d’eau à détergent 10 à 1 (10 % détergent)
Exigences d’alimentation d’air
Pression d’entrée minimale 138 kPa (20 lb/po²)
Pression d’entrée maximale 690 kPa (100 lb/po²)
Température d’entrée maximale 37,7 ˚C (100 ˚F)
Débit d’entrée minimal 5 g/min (19 l/min)
Taille de boyau d’arrosage
d’entrée
Longueur de boyau d’arrosage
15,9 mm (5/8 po) de
D.I.
15,24 m (50 pi)
d’entrée maximale
Embout Nettoyeur de
buse
Figure 15
21 Fr
Page 22

Instructions d’Utilisation
Guide De Dépannage
Symptôme Cause(s) possible(s) Action corrective
Faible pression et/ou pompe
tourne de manière irrégulière
Forte pompage à l’entrée et
faible pression
Pression fluctuante 1. Pompe aspire de l’air 1. Assurez-vous que les flexibles et raccords sont
Chutes de pression après la
période d’utilisation normale
Laveuse à pression ne
démarre pas
Le moteur s’arrête
soudainement
L’appareil commence à fumer Moteur surchauffé, surchargé ou
Pompe bruyante/pompe
fonctionne de manière
irrégulière
Ne tire pas de détergent 1. En n’utilisant pas la position du savon 1. Ajustez l’embout à la position du savon
Le moteur ne démarre pas La gâchette du pistolet n’est pas tirée au
1. Embout usé 1. Remplacez en utilisant un embout
2. Filtre d’entrée de la pompe bloquée 2. Nettoyez. Vérifiez plus souvent
3. Entrée restreinte 3. Vérifiez le tuyau d’arrosage qui pourrait être
4. Fuite de flexible haute pression 4. Remplacez le flexible haute pression
5. Pompe aspire de l’air 5. Assurez-vous que les tuyaux et raccords soient
Particules étrangères dans la soupape
d’entrée ou de décharge ou soupapes de
décharge et/ou entrée usées
2. Embout bloqué 2. Nettoyer ou remplacer.
1. Gicleur usé 1. Vérifiez et remplacez
2. Embout en position de faible kPa 2. Reculez l’embout à la position de haute pression
1. Le disjoncteur de fuite à la terre s’est
déclenché.
2. La fiche n’est pas bien branchée ou la
prise électrique est défectueuse
3. Rallonge trop (voir page 17Fr chiffre de
sécurité électrique b) ou taille du fil trop
petite
4. Alimentation de tension principale trop
basse
5. L’interrupteur de sécurité thermique a
été déclenché
1. Rallonge trop (voir page 17Fr chiffre de
sécurité électrique b ) ou taille du fil trop
petite
2. L’interrupteur de sécurité thermique a
été déclenché à cause de surchauffe
endommagé
1. Pompe aspire de l’air/faible alimentation
d’eau
2. Eau trop chaude 2. Réduisez la température sous 38°C
2. Blocage, tortillement ou trou dans le
flexible d’aspiration du détergent
3. Flexible trop long 3. Utilisez seulement la longueur fournie lors de
commencement
enfoncé ou tortillé. Vérifiez le débit d’eau d’entrée
bien serrés
Nettoyez ou remplacez les soupapes. Consultez le
centre de réparations.
serrés. Drainez l’air du tuyau d’arrosage
1. Enfoncez le bouton de réinitialisation sur la fiche
2. Vérifiez la fiche, la douille et les fusibles
3. Retirez la rallonge, NE JAMAIS utiliser de rallonge
avec ce produit.
4. Vérifier que la tension d’alimentation principale est
suffisante
5. Éteignez l’appareil et laissez le moteur refroidir
1. Retirez la rallonge NE JAMAIS utiliser de rallonge
avec ce produit.
2. Vérifiez que la tension d’alimentation principale
correspond aux spécifications
Éteignez l’appareil et appelez 1-800-330-0712
1. Assurez-vous que les raccords sont bien serrés.
Augmentez la pression d’eau
2. Si c’est propre, étirez ou remplacez le flexible.
l’achat initial du pulvérisateur haute pression.
L’aspiration de détergent ne fonctionne pas si plus
d’une section de flexible est fixé à l’appareil.
1. Coupez l’alimentation d’eau. Débranchez le tuyau
d’arrosage et le tuyau haute pression noir de
l’unité. Ceci soulagera toute pression de la pompe.
2. Branchez l’unité à la prise électrique. Assurez-vous
que l’interrupteur du compresseur est en position
de OFF (arrêt).
Suite à la page suivante
22 Fr
Page 23

Guide De Dépannage (Suite)
Symptôme Cause(s) possible(s) Action corrective
Le moteur ne démarre pas
(Suite)
Essai en basse pression Problèmes associés à la pompe, le
La gâchette du pistolet n’est pas tirée au
commencement
pistolet ou la lance
3. Si votre unité est équipée d’une prise de courant
GFCI, poussez le bouton supérieur, puis le bouton
inférieur et ensuite le bouton supérieur de nouveau.
Vous devriez voir une lumière s’allumer au-dessus de
ces boutons. Si aucune lumière rouge ne s’allume,
vous ne recevez pas d’électricité dans l’unité. L’unité
peut être amenée à un centre de service pour être
réparée.
4. Branchez l’alimentation d’eau derrière l’unité et
allumez l’eau. Appuyez le sur le bouton et voyez si
l’unité s’allume. Si l’unité s’allume, arrêtez l’eau et
éteignez l’unité, attachez le pistolet et le tuyau et
référez vous à l’étape 5.
5. Avec l’unité en position d’arrêt, tirez la gâchette du
pistolet et assurez-vous qu’un filet d’eau en sorte.
Gardez la gâchette enfoncée en allumant l’unité.
1. Retirez le tuyau haute pression noir du nettoyeur
haute pression.
2. Attachez le tuyau d’arrosage.
3. Ouvrir l'alimentation d'eau. L'eau devrait s'écouler à
travers la rondelle de pression.
4. Allumez le nettoyeur pression.
éjectée à 2.4-3 mètres (8-10 pieds) de la pompe
depuis le conduit d’où le tuyau haute pression est
accroché.
5. Si l’eau est éjectée à 2.4-3 mètres (8-10 pieds), la
pompe fonctionne donc correctement. Si cela n’est
pas le cas, la pompe a donc besoin d’être nettoyée.
Éteignez le nettoyeur haute pression et appelez
le support technique à 1-800-330-0712 pour plus
d’informations.
6. Si la pompe fonctionne correctement, attachez le
tuyau haute pression noir ainsi au nettoyeur haute
pression. La baguette ou la lance est l’extension
avec l’embout ajustable qui est connectée au centre
de votre pistolet.
7. Rallumez l’eau et tirez la gâchette du pistolet. L’eau
devrait être éjectée à 3-6 mètres (10-20 pieds) du
pistolet.
8. Si l’eau n’est pas éjectée à 3-6 mètres (10-20 pieds)
du pistolet, voyez si la valve dans le pistolet est
en mauvaise état et si le pistolet a besoin d’être
remplacé. Si l’eau est éjectée à 3-6 mètres (10-20
pieds), la baguette/lance a besoin d’être examinée.
Des caillaux peuvent en être la cause. Référez-vous
à la page 25 pour les instructions concernant le
nettoyage de l’embout.
Modèles PW182501, et PW183501
L’eau devrait être
23 Fr
Page 24

Instructions d’Utilisation
Garantie Limitée
1. DURÉE : De la date d’achat de l’acheteur original comme suit : un an.
2. QUI OFFRE CETTE GARANTIE (GARANT) : Campbell Hausfeld/ Scott Fetzer Company, 100 Production Drive, Harrision, Ohio
45030, Téléphone : (800) 330-0712.
3. BÉNÉFICIAIRE DE CETTE GARANTIE (ACHETEUR) : L’acheteur original (sauf en cas de revente) du pulvérisateur à pression
Campbell Hausfeld.
4. QUELS PRODUITS SONT COUVERTS SOUS CETTE GARANTIE : Tout pulvérisateur à pression PW1825/PW1835 Campbell
Hausfeld fourni ou fabriqué.
5. CE QUI EST COUVERT SOUS CETTE GARANTIE : Défauts importants de matériau et de main d’œuvre qui se produisent durant
la période de garantie à l’exception de ce qui est noté plus bas. La garantie couvre aussi les articles sujets à l’usure normale pour
une période de 90 jours de la date d’achat originale contre les défauts causés par matériau et main d’œuvre. Ces articles incluent
les tuyaux haute pression, les bagues d’étanchéité d’huile et eau, les joints toriques, les soupapes, les lances et les buses de
pulvérisation.
6. LA PRÉSENTE GARANTIE NE COUVRE PAS:
A. Les garanties implicites, y compris celles de commercialité et D’ADAPTATION À UNE FONCTION PARTICULIÈRE SONT
LIMITÉES À PARTIR DE LA DATE D’ACHAT INITIALE TELLE QU’INDIQUÉE DANS LA SECTION DURÉE. Si ce pulvérisateur à
pression est utilisé à des fins commerciales, industrielles ou de location, la garantie s’applique pendant quatre-vingt-dix (90)
jours de la date d’achat. Certains états n’acceptent pas de limites quant à la durée de la garantie implicite, il se peut donc que
les limites précédentes ne s’appliquent pas dans votre cas.
B. TOUT DOMMAGE, PERTE OU DÉPENSE FORTUIT, INDIRECT OU CONSÉCUTIF POUVANT RÉSULTER DE TOUT DÉFAUT,
PANNE OU MAUVAIS FONCTIONNEMENT DU pulvérisateur à pression CAMPBELL HAUSFELD. Certains États n’acceptent
pas de limite ou d’exclusion pour les dommages indirects ou consécutifs, donc il se peut que la limite ou l’exclusion
précédente ne s’applique pas dans votre cas.
C. Toute défaillance découlant de dommages durant l’expédition, d’accidents, de mauvais traitements de l’acheteur, de
négligence ou de défaillance au niveau de l’installation et du fonctionnement du pulvérisateur à pression conformément aux
instructions fournies dans le(s) manuel(s) de propriétaire fourni(s) avec le produit.
D. Service avant livraison; par ex. le montage, l’huile ou les lubrifiants et les réglages.
E. Articles ou services qui sont exigés pour l’entretien normal du pulvérisateur à pression.
F. Les moteurs à essence et les pièces détachées sont expressément exclus de cette garantie limitée. De tels composants
doivent être retournés par l’acheteur au fabricant original ou à son centre de service autorisé pour les réparations.
G. Articles supplémentaires qui ne sont pas couverts sous cette garantie:
1. Les balais de moteur (modèles électriques seulement).
2. Les défauts cosmétiques qui n’ont pas d’effet sur le fonctionnement de l’appareil.
3. Composants rouillés.
4. Usure de la pompe ou dommage aux soupapes causé(e) par la mauvaise huile, toute contamination d’huile ou par le fait
de ne pas suivre les directives d’entretien d’huile.
7. RESPONSABILITÉS DU GARANT AUX TERMES DE CETTE GARANTIE : Réparation ou remplacement, au choix du Garant, d’un
pulvérisateur à pression ou d’un composant qui s’est révélé défectueux, qui fonctionne mal et/ou qui n’est pas conforme pendant
la durée de validité de la garantie.
8. RESPONSABILITÉS DE L’ACHETEUR AUX TERMES DE CETTE GARANTIE :
A. Fournir une preuve d’achat datée et un état d’entretien.
B. Appelez Campbell Hausfeld (800-330-0712) pour obtenir vos options de service sous garantie. Les frais de transport sont la
responsabilité de l’acheteur.
C. Faire preuve de soins raisonnables durant le fonctionnement et l’entretien du pulvérisateur à pression tel que décrit dans le(s)
manuel(s) du propriétaire.
9. RÉPARATION OU REMPLACEMENT EFFECTUÉ(E) PAR LE GARANT AUX TERMES DE LA PRÉSENTE GARANTIE : La réparation
ou le remplacement sera prévu(e) et exécuté(e) en fonction de la charge de travail dans le centre de service et dépendra de la
disponibilité des pièces de rechange.
Cette Garantie Limitée s’applique aux É.-U., au Canada et au Mexique seulement et vous donne des droits juridiques précis. Vous
pourriez aussi avoir d’autres droits qui varient d’une juridiction à l’autre ou d’un pays à l’autre.
24 Fr
Page 25

Ver la Garantía en página 36 Es para información importante sobre el uso comercial de este producto.
Manual de Instrucciones PW182501, PW183501
Por favor lea y guarde estas instrucciones. Léalas cuidadosamente antes de tratar de montar, instalar, operar o dar mantenimiento al producto aquí descrito.
Protéjase usted mismo y a los demás observando toda la información de seguridad. ¡El no cumplir con las instrucciones puede ocasionar daños, tanto personales
como a la propiedad! Guarde estas instrucciones para referencia en el futuro.
Lavadoras a Presión
con Motor a Eléctricas
¡REGISTRE SU PRODUCTO EN LÍNEA AHORA MISMO! http://www.campbellhausfeld.com
Descripción
Estas lavadoras a presión eléctricas de
Campbell Hausfeld son ideales para
todos los proyectos de limpieza del
hogar. Las unidades funcionan silenciosa
y eficazmente, sin las emisiones del
combustible. Cada modelo presenta
“parada arranque inmediatos” (ISS)
que apaga el motor cuando la pistola
no está activada. Esto conserva agua
y electricidad, al mismo tiempo que
extiende la vida útil de la bomba.
Las lavadoras a presión son impulsadas
por un motor universal confiable, y
pueden enchufarse convenientemente
en los tomacorrientes domésticos de
120V – 15 amperios. Dos modelos están
homologados por ETL para satisfacer
los estándares UL y ETL en los EE.UU. y
Canadá.
Figura 1 - Modelos PW182501, y PW183501
Especificaciones
Modelo Presión Voltios
PW182501 13,100 kPa/ 1900 psi 120
PW183501 13,100 kPa/ 1900 psi 120
Sírvase registrar el Nº de modelo y el
Nº de serie para usarlos cuando se ponga en contacto con el fabricante:
Nº de modelo: _______________________________________________________________
Nº de serie: _________________________________________________________________
Fecha de compra: ____________________________________________________________
Lugar de compra: _____________________________________________________________
Para mayor información sobre este producto, comuníquese con el distribuidor de Campbell
Hausfeld más cercano a su domicilio.
RECORDATORIO: ¡Guarde su comprobante de compra con fecha para fines de la garantía!
Adjúntela a este manual o archívela en lugar seguro.
LEA Y SIGA TODAS LAS INSTRUCCIONES • GUARDE ESTAS INSTRUCCIONES • NO LAS DESECHE
LEA Y SIGA TODAS LAS
INSTRUCCIONES
GUARDE ESTAS INSTRUCCIONES –
NO LAS DESECHE
Medidas de Seguridad
Este manual contiene información que es
muy importante que sepa y
comprenda. Esta información
se la suministramos como
medida de SEGURIDAD y para
EVITAR PROBLEMAS CON EL
EQUIPO. Debe reconocer los siguientes
símbolos.
Ésto le indica que
hay una situación
inmediata que LE OCASIONARIA la
muerte o heridas de gravedad.
Ésto le indica
que hay una
situación que PODRIA ocasionarle la
muerte o heridas de gravedad.
© 2014 Campbell Hausfeld/Scott Fetzer
25 Es
IN471200AV 11/14
Page 26

Manual de Instrucciones
Medidas de Seguridad (Continuación)
Ésto le indica que hay una situación que
PODRIA ocasionarle heridas no muy graves.
Ésto le indica una información importante,
que de no seguirla, le podría ocasionar
daños al equipo.
NOTA: Nota indica información adicional referente al
producto o a su uso correcto.
Símbolos de Seguridad
Los siguientes símbolos de seguridad aparecen a lo largo
de este manual para advertirle de importantes peligros y
precauciones de seguridad.
Lea primero el
manual
Riesgo de
lesiones
personales
Riesgo de
explosión
Use protección
para los ojos y
los oídos
Riesgo de
incendio
Riesgo de
choque eléctrico
INSTRUCCIONES EN REFERENCIA AL PELIGRO
DE INCENDIOS, CHOQUE ELÉCTRICO O LESIONES
PERSONALES
Este manual contiene información sobre seguridad,
funcionamiento y mantenimiento. Si tiene preguntas, llame al
1-800-330-0712 para obtener asistencia al cliente.
Cuando se usen herramientas, siempre se
deberán seguir precauciones básicas, incluyendo
las siguientes:
PROPOSICIÓN 65 DE CALIFORNIA
Este producto o su cable de corriente pueden
contener químicos, incluido plomo, que es conocido por el Estado de
California como causante de cáncer y defectos de nacimiento u otros
daños reproductivos. Lávese las manos después de manipularlo.
GENERAL
a. Para reducir el riesgo de choque eléctrico,
incendio y lesiones personales, lea todas las
instrucciones antes de usar la herramienta. Si
no respeta las advertencias, los riesgos y las
recomendaciones, eso podría resultar en la
MUERTE o en LESIONES GRAVES.
b. Familiarísece con los controles y el uso adecuado del equipo.
Siga todas las instrucciones. Póngase en contacto con su
representante Campbell Hausfeld si tiene alguna pregunta.
1-800-330-0712
c. Sólo se les debe permitir usar esta unidad a aquellas
personas bien familiarizadas con estas reglas de manejo
seguro.
d. Cumpla con todos los códigos de seguridad así como
también con la Ley de salud y seguridad ocupacional
(OSHA).
Riesgo de caída
ÁREA DE TRABAJO
a. Mantenga a todas las personas alejadas del área de
funcionamiento.
b. Mantenga el área de trabajo limpia y bien iluminada. Los bancos
desordenados y las áreas oscuras aumentan el riesgo de
choque eléctrico, incendio y lesiones personales.
c. No haga funcionar la herramienta en entornos
explosivos, como por ejemplo cuando haya polvo,
líquidos o gases inflamables La herramienta puede
crear chispas y provocar la ignición de polvo o
vapores.
d. NUNCA rocíe líquidos inflamables ni use la lavadora
a presión en áreas que contengan polvo, líquidos o
vapores combustibles.
e. Nunca ponga esta máquina en funcionamiento en un
edificio cerrado o dentro o cerca de un entorno explosivo.
SEGURIDAD PERSONAL
a. Manténgase alerta. Mire lo que está haciendo y use el sentido
común cuando haga funcionar la herramienta. No use la
herramienta si está cansado o bajo la influencia de drogas,
alcohol o medicamentos. Un momento de desatención mientras
hace funcionar la herramienta aumenta el riesgo de lesiones
personales.
b. Vístase adecuadamente. Cerrar zapatos de punta (no chanclas)
No use alhajas ni vestimenta suelta. Sujétese el cabello largo.
Mantenga el cabello, vestimenta y guantes alejados de las
piezas móviles. La vestimenta suelta, las alhajas o el cabello
largo aumentan el riesgo de lesiones personales como resultado
de quedar atrapados en las piezas móviles.
c. No intente alcanzar lugares alejados. Mantenga
un buen soporte y equilibrio en todo momento.
Un soporte y equilibrio adecuados permiten un
mejor control de la herramienta en situaciones
inesperadas.
Riesgo de inyección o lesiones graves.
Manténgase alejado de la boquilla.
No descargue chorros hacia las personas. Este producto
está diseñado para que lo usen únicamente operadores
capacitados. Siempre retire la lanza de la pistola antes de
limpiar los residuos de la boquilla.
d. Manténgase alejado de la boquilla. NUNCA dirija el rociado de
alta presión a ninguna persona, animal ni a usted mismo.
e. NUNCA coloque la mano ni los dedos sobre la boquilla de
rociado mientras opera la unidad.
f. NUNCA intente detener ni desviar las pérdidas con partes de su
cuerpo.
Asegurarse de que la herramienta
se use únicamente cuando el operador y todo el
resto del personal en el área de trabajo estén usando equipo de protección
ocular ANSI Z87, y cuando sea necesario, demás equipo de protección
adecuado como para la protección de la cabeza, protección auditiva,
guantes, botas de goma, ropa de protección al operar el equipo y realizar
el mantenimiento. Pueden ocasionarse lesiones graves o permanentes de
ojos y oídos.
g. Alta presión – La pistola produce un contragolpe – Sostenga la
pistola con ambas manos.
h. Mantenga la manguera alejada de objetos afilados. Si la
manguera explota puede causar lesiones. Examine la manguera
regularmente y reemplácela si está dañada. No intente reparar
una manguera dañada.
26 Es
Page 27

Importantes Instrucciones De Seguridad (Continuación)
MODELOS: PW182501, PW183501
SEGURIDAD ELÉCTRICA
Riesgo de electrocución
a. Este producto se proporciona con un interruptor de circuito
de descarga a tierra, GFCI, incorporado en el enchufe del
cable de corriente. Asegúrese de inspeccionar el cable y
el GFCI antes de usar. Cualquier reparación o reemplazo
del cable de corriente deben ser realizados por un técnico
electricista calificado (licenciado o certificado). Si fuera
necesario reemplazar el enchufe o el cable, use sólo piezas
de repuesto idénticas.
b. NUNCA use un cable de extensión con este producto.
c. Inspeccione el cable antes de usar la unidad - No la use si el
cable está dañado.
d. Mantenga todas las conexiones eléctricas secas y
lejos del suelo.
e. No toque el enchufe con las manos mojadas.
f. No rocíe sobre aparatos eléctricos ni cableados.
USO Y CUIDADO DE LA HERRAMIENTA
No ejerza presión que exceda la presión de
(mangueras, accesorios, etc.) en el sistema presurizado. Asegúrese de
que todo el equipo y los accesorios estén clasifi cados para soportar la
máxima presión de funcionamiento de la unidad.
funcionamiento de cualquiera de las piezas
a. Cuide su herramienta. Una herramienta mantenida
adecuadamente reduce el riesgo de problemas y es más fácil
de controlar.
b. Asegúrese de que los dispositivos de seguridad estén
funcionando correctamente antes de cada uso. NO quite ni
modifique ninguna pieza de la pistola o la unidad.
c. NUNCA ponga la máquina en funcionamiento sin que los
componentes estén debidamente conectados a la máquina
(mango, pistola/ensamble de la varilla, boquilla, etc.).
d. Apunte la pistola en una dirección segura. La unidad
comenzará a rociar cuando se apriete el gatillo si el
interruptor de encendido y apagado (“On/Off”) se encuentra
en la posición de encendido de la lavadora a presión [“ON”].
e. Aprenda cómo detener este producto y liberar la presión
rápidamente. Familiarícese bien con los controles.
f. SIEMPRE enganche el pasador de seguridad del gatillo en
la posición segura cuando detiene el rociado, aunque sea
solamente por algunos minutos.
g. NUNCA enganche el mecanismo del gatillo en forma
permanente en la pistola.
h. SIEMPRE siga las recomendaciones que se encuentran en la
etiqueta del fabricante para el uso adecuado de detergentes.
Siempre protéjase los ojos, la piel y las vías respiratorias del
uso de detergentes.
i. NUNCA desconecte la manguera de descarga de alta presión
de la máquina mientras el sistema esté presurizado. Para
despresurizar la máquina, apague la corriente eléctrica y el
suministro de agua, luego presione el gatillo de la pistola 2 ó
3 veces.
j. Desenchufe la unidad cuando no la esté usando.
k. Siga las instrucciones de mantenimiento que se especifican
en el manual.
Daño al equipo:
l. SIEMPRE encienda el suministro de agua antes de
encender la lavadora a presión. El poner la bomba seca en
funcionamiento provoca graves daños.
m. No ponga en funcionamiento la lavadora a presión si se ha
quitado la rejilla de la entrada de agua. Mantenga la rejilla
libre de residuos y sedimentos.
n. NUNCA opere la lavadora a presión si tiene piezas rotas
o si le faltan piezas. Verifique el equipo periódicamente
y repare o reemplace las piezas desgastadas o dañadas
inmediatamente.
o. Use únicamente la boquilla que viene con esta máquina.
p. NUNCA deje la varilla de pulverización sin supervisión
mientras la máquina está en funcionamiento.
q. SIEMPRE sostenga la pistola y la varilla de pulverización
con firmeza cuando encienda y opere la máquina.
r. Suelte el gatillo cuando cambia de modos de alta presión
a baja presión. El no hacerlo puede causar daños a la
boquilla.
s NUNCA guarde la lavadora a presión a la intemperie
o donde pudiera congelarse. Las temperaturas de
congelación pueden dañar
seriamente la bomba.
t. La lavadora a presión no está
diseñada para bombear agua
caliente. No la conecte a un
suministro de agua caliente.
SERVICIO
a. Al realizarle un servicio
a la herramienta, utilice
únicamente piezas de
repuesto idénticas. Use sólo
Símbolo de aislamiento
doble
piezas autorizadas.
FORMA DE REPARAR UN APARATO DE DOBLE
AISLAMIENTO
Los productos de doble aislamiento contienen dos sistemas
de aislamiento en lugar de una conexión a tierra. No hay forma
de conectar a tierra un producto con doble aislamiento, ni se
le debe instalar ninguna forma de hacerlo. La reparación de
un producto con doble aislamiento requiere un gran cuidado
y conocimiento del sistema y se debe hacer solamente por
personal de servicio debidamente calificado. Las piezas de
repuesto para un producto con doble aislamiento deben
ser idénticas a las piezas que van a substituir. Un producto
con doble aislamiento, fabricado en los Estados Unidos,
está marcado con las palabras “DOUBLE INSULATION”
(DOBLE AISLAMIENTO) o “DOUBLE INSULATED” (AISLADO
DOBLEMENTE). El símbolo también puede estar marcado
sobre el producto.
GUARDE ESTAS INSTRUCCIONES –
NO LAS DESECHE
NOTA: Los símbolos de PELIGRO, ADVERTENCIA, PRECAUCIÓN,
y AVISO y las instrucciones en este manual no pueden posiblemente
cubrir todas las condiciones y situaciones posibles que puedan
presentarse. El usuario debe entender que las precauciones y el
sentido común son factores que no pueden incorporarse en este
producto: es el usuario mismo quíen debe contribuirlos.
27 Es
Page 28

Manual de Instrucciones
Desempaque
Salida de
manguera de la
pistola
Cable de
corriente
Manguera de
alta presión
Interruptor de
encendido/
apagado (on/off)
Manguera de
alta presión
Interruptor de
encendido/apagado
(on/off)
Mango
Mango
Lanza
PW182501
Pistola con
gatillo
Pistola
con gatillo
Cable de
corriente
Desempaque
Después de desempacar la unidad,
inspecciónela detenidamente para detectar
cualquier daño que pueda haber ocurrido
durante su traslado. Verifique que no
haya piezas sueltas, faltantes ni dañadas.
Cerciórese de apretar todas las conexiones,
pernos, etc. antes de usar la lavadora
a presión. Asegúrese de que todos los
accesorios proporcionados vengan con la
unidad. Si falta alguna de las piezas, NO
DEVUELVA LA UNIDAD AL VENDEDOR.
Busque el número de modelo de la unidad
(ubicado en la etiqueta del número de serie
en la estructura de la lavadora a presión) y
llame 1-800-330-0712 para obtener piezas
de repuesto.
No haga funcionar
la unidad si se ha
dañado durante el transporte, el manejo o
el uso. Los daños podrían ocasionar una
explosión y ocasionarle lesiones o daños a la
propiedad.
USOS RECOMENDADOS PARA ESTA
LAVADORA A PRESIÓN
◆ Plataformas
◆ Revestimientos exteriores
◆ Vehículos
◆ Canaletas (con boquilla de ángulo
recto)
ARTÍCULOS ADICIONALES NO
INCLUIDOS
◆ Protección para los ojos ANSI Z87
◆ Manguera de jardín
estructura de la lavadora a presión) y
llame 1-800-330-0712 para obtener
piezas de repuesto.
REMARQUE : Sólo para el PW183501 -
Sostenga el mango de la unidad mientras
desenrolla la manguera. Esto impedirá a la
unidad se vuelque.
Accesorios
Salida de manguera de la pistola
Figura 2- Componentes de la lavadora a presión
PW183501
Lanza
28 Es
CEPILLO
(PW183501)
BOTELLA DE DETERGENTE
(Dos modelos)
Conjunto de disponibles para su compra
Numéro de pièce PW091400AV
BOQUILLA TURBO
(PW183501 )
BOQUILLA EN
ÁNGULO RECTO
(PW183501)
Page 29

Ensamblaje y Antes del Funcionamiento
Asegúrese siempre que
la manguera de jardín esté abierta antes de encender la
lavadora a presión. Poner en marcha la lavadora a presión sin el agua daña los
sellos de la bomba.
No desarme la lanza o
la pistola de esta lavadora a presión. No hay piezas de
repuesto disponibles para la pistola o lanza.
PW182501, PW183501
1. Deslice de almacenamiento (ver la figura 3).
2. Deslice la manija hacia la unidad , sujete con 4 tornillos Phillips (ver
la figura 4).
3. Conecte la manguera de alta presión a la salida de alta presión (ver
la figura 8).
4. Conecte la manguera de alta presión a la pistola (ver la figura 5).
5. Conecte la lanza a la pistola, giro y bloqueo; Conecte la boquilla de
la lanza pulsando el botón de conexión fácil (ver la figura 6 & 7).)
6. Conecte la manguera de jardín a la unidad (ver la figura 14 y 9).
7. Pulse el botón fácil conectar al insertar acoplamiento rápido (ver la
figura 5, 7 & 8).
MODELOS: PW182501, PW183501
Figure 3 - Sujete el soporte del cordón
(PW182501)
Figura 6 – Conecte la lanza a la pistola.
1
2
3
4
Figure 4 - Deslice la manija hacia la
(PW182501)
unidad
Figure 7- Conecte la lanza a la pistola o
botella de detergente
Figura 5 - Conecte la manguera de alta presión
a la pistola (todos los modelos)
Figura 8 - Conecte la manguera de jardín a la
unidad
Entrada de agua
Figura 14 - Conecte la manguera de jardín a la
unidad
29 Es
Page 30

Manual de Instrucciones
Ensamblaje y Antes del Funcionamiento (Continuación)
SEGURO DEL GATILLO
En la posición de trabado, el seguro evita que la pistola se
dispare accidentalmente. Presione el seguro totalmente hacia
abajo para destrabarlo (Ver Figura 10).
Siempre trabe el seguro del gatillo cuando la unidad no se está
usando.
Gatillo
Traba de seguro
Figura 10 - Pasador de seguridad del gatillo
Funcionamiento
¡ IMPORTANTE !
Esta lavadora a presión está equipada con un
microinterruptor sensible al flujo del agua. Este interruptor
de arranque y parada instantáneos detecta el flujo del
agua en la bomba. Cuando se suelta el gatillo, el agua deja
de fluir por la bomba. Entonces, el interruptor de arranque
y parada instantáneos apaga el motor para proteger la
bomba del recalentamiento.
1. Abra el agua.
1. Presione el gatillo en la pistola.
2. Coloque el interruptor “ON/OFF” (“ENCENDIDO/APAGADO”)
en “ON” (“ENCENDIDO”).
3. Suelte el gatillo. El motor de la lavadora a presión se
detendrá.
4. Para rociar nuevamente, tire del gatillo, y el motor y la bomba
arrancarán otra vez.
NOTA: El motor puede ocasionalmente funcionar por un
corto tiempo para llevar agua fresca fría a la bomba, aunque
se haya soltado el gatillo. Esto es parte del funcionamiento
normal y no dañará la unidad.
Ponga siempre el interruptor “ON/OFF”
(ENCENDIDO/APAGADO) en “OFF”
(APAGADO) y luego presione el gatillo de la pistola para liberar la
presión en la manguera, antes de desenchufar el cordón de energía.
Riesgo de daño al equipo. Siempre
asegúrese de que el interruptor “ON/OFF”
(encedido/apagado) de la unidad se encuentre en la posición “OFF”
(apagado) y que la unidad esté desenchufada antes de guardarla.
Peligro de inyección. La unidad
comenzará a rociar al oprimir el gatillo
si el interruptor “ON/OFF” (“ENCENDIDO/APAGADO”) está en la
posición “ON” (encendido). Siempre apunte la pistola hacia una
posición segura.
PREPARACIÓN DE SUPERFICIE
El siguiente procedimiento de limpieza le ayudará a organizar
su tarea de limpieza y asegura que logrará el mejor resultado en
la menor cantidad de tiempo. GALONES POR MINUTO (GPM)
más agua por minuto puede signifi car una limpieza más rápida,
especialmente al lavar para quitar materiales como barro y
asfalto. INTERRUPTOR DE CORRIENTE CON DESCARGA A
TIERRA (GFCI) el GFCI protege al usuario de ser electrocutado
accidentalmente (únicamente para lavadoras a presión
eléctricas) Recuerde usar las técnicas de rociado/ limpieza que
se mencionan en las secciones siguientes.
Antes de comenzar un trabajo de limpieza de lavado a presión,
prepare la superficie que pretende limpiar. Despeje el mobiliario
del área y asegúrese de que todas las ventanas y puertas estén
bien cerradas. Además proteja todas las plantas y árboles
próximos al área de limpieza cubriéndolos con una tela. Al
cubrirlos se asegura que sus plantas no sean rociadas con los
detergentes.
ENCENDIDO
SIEMPRE use este procedimiento de encendido para asegurarse
de que la unidad sea iniciada adecuadamente y con seguridad.
Si el agua se ha congelado en la lavadora a
presión, descongele la lavadora a presión en
una habitación templada antes de encenderla. NO vierta agua caliente
sobre o dentro de la bomba; esto puede dañar las piezas interiores.
1. Asegúrese de que el interruptor de energía esté en la
posición de apagado (“OFF”).
2. Conecte una manguera de jardín al lado interno de la bomba
y conéctela al suministro de agua. Utilice una manguera con
un diámetro interior de 15,9 mm (5/8 inch) y un largo de 15 m
(50 pies) o menos.
Algunos códigos locales de plomería exigen
una prevención de retroceso cuando se realiza
una conexión a un suministro de agua fresca. Instale un dispositivo para
evitar el retroceso del fl ujo de agua de la bomba si fuera necesario.
a. Si la presión de entrada de agua es superior a 6,90 bar,
instale una válvula reguladora de agua en la conexión
de la manguera de jardín.
b. No supere una temperatura de entrada de agua de 38º
C (100ºF).
NOTA: El suministro de agua de entrada debe tener una
velocidad mínima de flujo de 19 lpm.
4. ABRA el suministro de agua.
Nunca haga funcionar la unidad sin agua.
Asegúrese de que el suministro de agua esté totalmente abierto antes
de hacer funcionar la unidad.
5. Apriete el gatillo de la pistola hasta que salga agua
pulverizada de la boquilla indicando que todo el aire se ha
purgado del sistema. Coloque el pasador de seguridad del
gatillo.
6. Enchufe el cable de corriente en un tomacorriente de 120
V con conexión a tierra, que se encuentre en un circuito
dedicado. No use un cable de extensión. Presione el botón
de reinicio en el adaptador de GFCI del enchufe. Esto
debe hacerse cada vez que la unidad se enchufa en un
tomacorriente.(
Figura 11)
CONEXIÓN DEL SISTEMA
1. Enchufe el cordón de corriente en un tomacorrientes de 120
V con conexión a tierra.
30 Es
Page 31

Funcionamiento (Continuación)
2. Abra la llave del agua.
3. Suelte el cierre del gatillo deslizando el cierre de la derecha a
la izquierda.(Figura 12)
4. Oprima el gatillo y manténgalo presionado por 1 minuto para
liberar la presión y liberar el aire atrapado en el sistema.
5. Coloque el interruptor “ON/OFF” (“ENCENDIDO/APAGADO”)
en la posición “ON” (“ENCENDIDO”).
MODELOS: PW182501, PW183501
Reinicio
ENJUAGUE INICIAL DE ALTA PRESIÓN
Rocíe la superficie a limpiar con agua para quitar la suciedad o
las manchas que puedan haberse acumulado sobre la superficie.
Hacer esto permite que el detergente ataque la suciedad
profunda que se ha introducido dentro de la superficie a limpiar.
Apriete el gatillo de la pistola entre 3 y 5 veces para eliminar
cualquier resto de aire que haya quedado en el sistema.
Ajuste del ángulo de rociado
1. Durante el funcionamiento, la presión afecta la lanza: téngala
firmemente con ambas manos y apunte la boquilla hacia el
suelo.
2. Accione jalando el gatillo de la pistola pulverizadora/mango.
3. Ajuste la distancia de la superficie a limpiar, lo cual ajusta
también la presión de la boquilla.
4. Se puede cambiar la forma del patrón de pulverización y la
intensidad girando al ajuste de rociado al extremo de la lanza
(ver la figura 13). Mantenga las manos alejadas del frente de
la lanza, para prevenir lesiones.
La presión también puede ajustarse acercándose o alejándose
de la superficie que se está limpiando y ajustando el ángulo de la
pulverización como se muestra.
Ángulo con respecto a la superficie a limpiar
Cuando rocíe agua contra una superficie, puede generar
un impacto máximo al apuntar a la superficie en un ángulo
perpendicular. Sin embargo, este tipo de impacto puede causar
que las partículas de suciedad se incrusten en la superficie
evitando así que se logre la acción deseada.
El mejor ángulo para rociar el agua contra la superficie de
limpieza es de 45º.(
Figura 14)
Rocíe agua contra una superficie en un ángulo de 45 grados
para lograr el impacto de mayor beneficio y quitar de esta forma
los restos eficientemente.
Figura 11 - Botón de reinicio/enchufe con
conexión a tierra
Figura 12 - Ajuste de pulverización
Figura 13 - Ajuste del patrón de rociado
Distancia a la superficie de limpieza
La distancia entre la boquilla de pulverización y la superficie que
se está limpiando es otro factor que afecta la fuerza de impacto
del agua. La fuerza de impacto del agua aumenta a medida que
se acerca la boquilla a la superficie.
Cómo evitar daños a la superficie
El daño a las superficies de limpieza ocurre cuando la fuerza
de impacto del agua excede la resistencia de la superficie.
Puede variar la fuerza de impacto controlando el ángulo de la
boquilla de pulverización con respecto a la superficie que se
limpia y la distancia de la superficie y cambiando la boquilla
de pulverización. NUNCA utilice un chorro angosto de alto
impacto sobre una superficie propensa a ser dañada. Evite rociar
ventanas con un chorro angosto de alto impacto. Si lo hace es
Figura 14 - Ángulo mejor para limpiar una
superficie
31 Es
Page 32

Manual de Instrucciones
Funcionamiento (Continuación)
posible que rompa la ventana. La forma más segura para evitar
daños a las superficies es siguiendo estos pasos:
1. Antes de presionar el gatillo de la pistola, asegúrese de que
la boquilla de conexión rápida que usa es adecuada para la
aplicación.
2. Coloque la boquilla de pulverización aproximadamente a 1,2
o 1,5 m (4-5 pies) de distancia de la superficie de limpieza.
Luego sostenga la lanza y la boquilla de pulverización en
un ángulo de 45º con respecto a la superficie de limpieza.
Presione el gatillo de la pistola.
3. Varíe el ángulo de rociado del patrón de abanico y la
distancia a la superficie de limpieza hasta que se logre una
eficiencia de limpieza.
APLICACIÓN DE DETERGENTE
NOTA: Use sólo detergentes formulados para lavadora a
presión. Pruebe el detergente en un área poco aparente antes de
usarlo. NO use lejía en esta lavadora a presión.
Detergentes
El uso de detergentes puede reducir en gran forma el tiempo de
limpieza y puede ayudar a quitar las manchas difíciles. Muchos
detergentes están diseñados para ser usados con lavadoras a
presión en tareas de limpieza específicas. Los detergentes para
lavadoras a presión son igual de espesos que el agua. Si se
utilizan detergentes más espesos, como por ejemplo detergentes
para lavar vajilla, obstruirán el sistema de inyección de productos
químicos y evitarán la aplicación de detergentes.
Una vez aplicados a la superficie a limpiar, los detergentes
toman un tiempo para ejercer una acción sobre la suciedad y las
manchas. Los detergentes funcionan mejor cuando se aplican a
baja presión.
Usted puede limpiar superficies de un modo efectivo
combinando la acción química de los detergentes junto con
los enjuagues de alta presión. Sobre superficies verticales,
aplique el detergente de abajo hacia arriba. Este método evita
que el detergente se deslice y provoque marcas. Comience el
enjuague con alta presión de abajo hacia arriba. En manchas
particularmente difíciles, utilice un cepillo en combinación con
los detergentes y el enjuague a alta presión.
1. Siga las indicaciones del fabricante, que aparecen en
la etiqueta, para utilizar las concentraciones de mezcla
correctas de los jabones/detergentes. La proporción de
jabón/detergente con respecto al agua para la bomba es de
aproximadamente 10% (1 a 10).
◆ PW1625: Sustituya la lanza por el dosificador de jabón. Añada
jabón a la botella y vuelva a colocar la botella en el dosificador.
◆ PW182501 y PW183501: Vierta jabón en el recipiente del
jabón. Ajuste la lanza a la posición de Jabón. Vuelta a baja
presión (
Consejos generales de limpieza
1. Aplique el detergente para que cubra totalmente la superficie
a limpiar. Aplique el detergente de abajo hacia arriba para
evitar que éste se deslice hacia abajo y deje marcas. Espere
un par de minutos para que el detergente actúe sobre la
suciedad y las manchas. Utilice un cepillo para cepillar
levemente las áreas más sucias. Nunca permita que el
detergente se seque sobre la superficie a limpiar.
2. Enjuague con alta presión.
Figura 20)
PODER DE LIMPIEZA
La forma más fácil de regular el poder de limpieza de su lavadora
a presión es cambiando la distancia a la superficie que está
limpiando. Comience a rociar con un patrón de abanico amplio
mientras se para a varios pies de la superficie. Acérquese
lentamente al objeto que está limpiando, mientras ajusta el
patrón de rociado según sea necesario, hasta que encuentre la
técnica de limpieza más eficaz.
ENJUAGUE FINAL
El enjuague final debe comenzar de abajo hacia arriba.
Asegúrese de enjuagar totalmente la superficie y de quitar todo
el detergente.
PROCEDIMIENTO DE LIBERACIÓN DE PRESIÓN
Para reducir el riesgo de lesiones corporales o daño a la
propiedad, siempre siga este procedimiento cuando detiene el
rociado, cuando finaliza el trabajo y antes de revisar o reparar
cualquier parte del sistema.
1. Coloque el seguro del gatillo.
2. Apague la unidad.
3. Cierre el suministro de agua.
4. Suelte el seguro del gatillo y apriete el gatillo de la pistola
para liberar la presión.
5. Vuelva a colocar el seguro del gatillo.
6. Cuando verifique o repare la unidad, quite el enchufe del
tomacorriente de pared.
7. Antes de guardar la unidad de un día para el otro, durante un
largo tiempo o para transportarla, desconecte el suministro
de agua.
APAGADO
1. Asegúrese de enjuagar todo el detergente del sistema.
2. Apague el motor.
3 Cierre el suministro de agua.
4. Después de apagar el motor y cerrar el suministro de agua,
apriete el gatillo para quitar la presión del sistema.
NUNCA cierre el suministro de agua antes de
apagar el motor. Pueden ocurrir daños graves a
la bomba y/o al motor.
Nunca desconecte la manguera de descarga de
alta presión desde la máquina mientras el
sistema está presurizado. Para despresurizar apague el motor, cierre el
suministro de agua y presione el gatillo 2-3 veces.
5. Después de cada uso, limpie todas las superficies con un
paño húmedo y limpio.
ALMACENAMIENTO
• Nunca vaya a guardar la lavadora a presión a la intemperie.
• No guarde la lavadora a presión en un lugar en el que
pueda congelarse, a menos que haya sido preparada
adecuadamente para el invierno.
Instrucciones de preparación para el invierno
1. Desconecte la manguera de alta presión de la bomba.
2. Introduzca un trozo de manguera de jardín de 30,48 cm (12”)
a 35,56 cm (14”) dentro de la entrada de la bomba.
3. Coloque un embudo en el otro extremo de la manguera de
jardín.
Lea las instrucciones del fabricante para
manejar y desechar con seguridad el
anticongelante RV.
32 Es
Page 33

Funcionamiento (Continuación)
4. Vierta aproximadamente 177 mL (6 oz.) de anticongelante RV
dentro del embudo.
5. Encienda y apague el interruptor brevemente hasta que salga
el anticongelante de la válvula de liberación de la salida de la
bomba.
6. Desconecte la manguera de alta presión de la pistola y
drene la manguera. Sostenga la pistola y la lanza en posición
vertical y presione el gatillo para drenar el agua.
INSTRUCCIONES PARA LIMPIAR LA BOQUILLA
Una boquilla obstruida o parcialmente obstruida puede provocar
una reducción significativa del agua que sale por la boquilla y
hacer que la unidad vibre al rociar.
Para limpiar la boquilla:
• Apague la unidad.
• Cierre el suministro de agua. Libere toda la presión atrapada
en la manguera apretando el gatillo 2 ó 3 veces.
• Quite la lanza de la pistola.
• Gire la boquilla a la posición de chorro angosto. Esto abre las
paletas de la turbina.
• Usando el limpiador de puntas que se incluye, o un sujetador
de papeles desdoblado, introduzca el alambre en el orificio
de la boquilla y muévalo hacia adelante y hacia atrás hasta
quitar la obstrucción (vea la figura 15).
• Quite las obstrucciones adicionales pasando agua en
dirección inversa a través de la boquilla. Para hacer eso,
quite la boquilla de la pistola, ponga un extremo de la
manguera de jardín (con el agua abierta) en la punta de la
boquilla para expulsar agua y residuos por el orificio trasero
de la lanza.
MODELOS: PW182501, PW183501
Boquilla
Figura 15
INFORMACIÓN TÉCNICA Y PARA EL CONSUMIDOR
Lavadoras a presión de orientación horizontal
Succión del detergente de la bomba
Proporción de agua/
detergente
Requisitos del suministro de agua
Presión mínima de entrada 1,38 bar
Presión máxima de entrada 6,90 bar
Temperatura máxima de
entrada
Mínimo caudal de entrada 19 l/m (5 gpm)
Tamaño de la manguera de
jardín de entrada
Largo máximo de la
manguera de jardín de entrada
Limpiador de
puntas
10 a 1 (10% de detergente)
37,7°C (100°F)
15,9 mm (5/8 pulg.) de
diámetro interno
15,2 m. (50 pies)
CONSEJOS PARA PROLONGAR LA VIDA DE SU LAVADORA A
PRESIÓN
1. Nunca haga funcionar la unidad sin agua.
2. Su lavadora a presión no está diseñada para bombear
agua caliente. Nunca conecte su lavadora a presión a un
suministro de agua caliente ya que esto reducirá en forma
significativa la vida de la bomba.
3. Hacer funcionar la unidad durante más de un minuto sin
rociar agua provoca que se acumule calor en la bomba.
Hacer funcionar la unidad sin rociar agua puede dañar los
componentes de la bomba.
Mantenimiento
Para asegurar una vida y un rendimiento máximos de la lavadora
a presión, cumpla con intervalos de mantenimiento regulares.
Remítase al plan de mantenimiento recomendado. Si usted hace
funcionar la lavadora a presión en ambientes con mucho polvo,
realice revisiones de mantenimiento con más frecuencia.
PLANIFICACIÓN DEL MANTENIMIENTO
Planifi cación del mantenimiento Acción necesaria:
A diario Verifique la rejilla y el
filtro de entrada del agua
33 Es
Page 34

Manual de Instrucciones
Tabla de Identificación de Problemas
Problema Causa
La presión baja y/o la bomba
funciona toscamente
Fuertes pulsaciones en la
entrada y baja presión
Presión fluctuante 1. La bomba aspira aire 1. Asegúrese de que las mangueras y los accesorios
Disminuye la presión luego de
un período de uso normal
La lavadora a presión no se
enciende
El motor se detiene
abruptamente
La unidad comienza a largar
humo
Bomba ruidosa / la bomba
funciona toscamente
No succiona detergente 1. No se está usando la boquilla para
1. Punta desgastada 1. Reemplácela con una punta
2. Filtro de entrada o bomba obstruida 2. Límpiela. Verifique con más frecuencia
3. Entrada restringida 3. Revise la manguera de jardín, puede estar
4. Manguera de alta presión con pérdidas 4. Reemplace la manguera de alta presión
5. Bomba aspira aire 5. Asegúrese de que las mangueras y los accesorios
1. Partículas extrañas en la válvula de
entrada o de descarga o válvulas de
entrada y/o de descarga desgastadas
2. Punta obstruida 2. Limpie o reemplace
1. Boquilla desgastada 1. Revise y reemplace
2. Boquilla en la posición de presión baja 2. Tire la boquilla hacia atrás a la posición de alta
1. Se disparó el GFCI 1. Presione el botón de reajuste en el enchufe
2. El enchufe no está bien conectado o el
tomacorriente eléctrico está defectuoso
3. El cable de extensión (ver página figura
31Es seguridad eléctrica b) o el tamaño
del cable es demasiado pequeño.
4. El suministro de voltaje principal es
demasiado bajo
5. Se disparó el interruptor térmico de
seguridad
1. El cable de extensión (ver página figura
31Es seguridad eléctrica b) o el tamaño
del cable es demasiado pequeño.
2. El interruptor térmico de
seguridad se disparó debido a un
sobrecalentamiento
Motor sobrecalentado, sobrecargado o
dañado
1. Bomba aspira aire/bajo suministro de
agua
2. Agua demasiado caliente 2. Reduzca la temperatura por debajo de 38° C
jabón
2. Hay una obstrucción, pliegue o
perforación en la manguera de succión
de detergente
3. La manguera es demasiado larga 3. Utilice únicamente el largo de manguera que se
SOLUTION
colapsada o plegada. Revise el flujo de entrada de
agua
estén ajustados
1. Limpie o reemplace las válvulas. Llame al 1-800330-0712
están ajustados. Purgue el aire de la manguera de
jardín
presión
2. Revise el enchufe, el tomacorriente y los fusibles
3. Quite el cable de extensión, NUNCA use un cable
de extensión con este producto.
4. Verifique si el voltaje de suministro principal es
adecuado
5. Apague la unidad y deje que el motor se enfríe
1. Quite el cable de extensión, NUNCA use un cable
de extensión con este producto.
2. Verifique que el voltaje de suministro principal
corresponda con las especificaciones
Apague la unidad y llame al 1-800-330-0712
1. Asegúrese de que las juntas están ajustadas.
Aumente la presión de agua
1. Ajuste la boquilla a la posición de jabón
2. Si está limpia, elimine los pliegues o cambie la
manguera.
proporcionó con la compra inicial de la lavadora a
presión. La succión del detergente no funciona si
se conecta más de una sección de manguera a la
unidad.
34 Es
Page 35

MODELOS: PW182501, PW183501
Tabla de Identificación de Problemas ( Continuación)
Problema Causa Solución
El motor no se enciende No se está jalando el gatillo de la pistola al
encendido
Pruebas de baja presión Problemas de bomba, pistola o de lanza 1. Quite la manguera negra de alta presión de la lavadora a
1. Cierre el suministro de agua (OFF). Desconecte la
manguera de jardín y la manguera negra de alta presión
de la unidad. Esto aliviará toda presión de la bomba.
2. Enchufe la unidad en el tomacorriente. Asegúrese de que
el interruptor esté en la posición OFF (apagado).
3. Si su unidad está equipada con un enchufe aterrado
(GFCI), oprima el botón superior, luego el botón inferior y
luego el botón superior otra vez. Usted debería ver una luz
en la pequeña ventana arriba de estos botones. Si no ve
ninguna luz roja, a la unidad no le llega corriente. Puede
llevar la unidad a un centro de servicio para su reparación.
4. Conecte el suministro de agua en la parte de atrás de la
unidad y encienda el agua. Presione el botón y observe
si se enciende. Si se enciende, cierre el agua y apague la
unidad, conecte la pistola y la manguera y vaya al paso 5.
5. Con la unidad en posición de APAGADO “OFF”, tire el
gatillo de la pistola y verifique que salga un pequeño
chorro de agua. Tenga presionado el gatillo mientras
enciende la unidad.
presión.
2. Conecte la manguera de jardín.
3. Abra el suministro de agua. El agua debe fluir a través del
agua a presión.
4. Encienda la lavadora a presión. El chorro de agua debería
llegar a 2,4 - 3 m (8-10 pies) de la bomba, desde el tubo
donde se conecta la manguera de alta presión.
5. Si el agua realmente llega a 2,4 - 3 m (8-10 pies), entonces
la bomba trabaja bien. Si no es así, entonces hay que
limpiar la bomba. Apague el suministro de agua a la
lavadora a presión y llame al apoyo técnico, al 1-800-3300712 para más instrucciones.
6. Si la bomba trabaja bien, entonces conecta la manguera
negra de alta presión a la lavadora a presión. La vara o
la lanza es la extensión con la boquilla ajustable, que se
conecta al centro de la pistola.
7. Vuelva a encender el agua y tire el gatillo de la pistola. El
agua debería llegar a 3 - 6 m (10-20 pies) de la pistola.
8. Si el agua no llega a 2,5 - 6 m (10-20 pies) de la pistola,
entonces la válvula de retención de la pistola está
defectuosa y es necesario reemplazar la pistola. Si el agua
llega a 2,5 - 6 m (10-20 pies), entonces hay que chequear
la vara/lanza para ver si está atascada. Ver la página 41
para Instrucciones de Limpieza de la Boquilla.
35 Es
Page 36

Manual de Instrucciones
¡REGISTRE SU PRODUCTO EN LÍNEA AHORA MISMO!
http://www.campbellhausfeld.com
Garantía Limitada
1. DURACIÓN : A partir de la fecha de compra por parte del comprador original del modo siguiente : Un año.
2. QUIÉN OTORGA ESTA GARANTÍA (GARANTE) : Campbell Hausfeld / Scott Fetzer Company, 100 Production Drive, Harrison, Ohio
45030, Teléfono: (800) 330-0712.
3. QUIÉN RECIBE ESTA GARANTÍA (COMPRADOR) : El comprador original (sin fines de reventa) de la lavadora a presión Campbell
Hausfeld.
4. QUÉ PRODUCTOS ESTÁN CUBIERTOS POR ESTA GARANTÍA : Toda lavadora a presión PW1825/PW1835 Campbell Hausfeld
proporcionada o fabricada.
5. QUÉ ESTÁ CUBIERTO POR ESTA GARANTÍA : Defectos importantes en el material y en la mano de obra que ocurran durante
la duración del período de garantía con las excepciones que se detallan a continuación. La garantía cubre también los artículos
de desgaste normal por un período de 90 días de la fecha de compra original contra defectos de material y mano de obra. Estos
artículos de desgaste normal incluyen mangueras de alta presión, sellos de agua y aceite, anillos en O, válvulas, lanzas y boquillas
de rociado.
6. QUÉ NO ESTÁ CUBIERTO POR ESTA GARANTÍA :
A. Las garantías implícitas, incluyendo aquellas de comercialización y APTITUD PARA UN PROPÓSITO ESPECÍFICO, ESTÁN
LIMITADAS DESDE LA FECHA DE COMPRA ORIGINAL SEGÚN SE ESTABLECE EN LA DURACIÓN. Si esta lavadora a
presión es empleada para uso comercial, industrial o alquiler, la garantía será aplicable durante 90 (noventa) días a partir de
la fecha de compra. En algunos estados no se permiten las limitaciones a la duración de una garantía implícita, por lo cual las
limitaciones antedichas pueden no ser aplicables en su caso.
B. CUALQUIER PÉRDIDA, DAÑO O GASTO INCIDENTAL, INDIRECTO O CONSECUENTE QUE PUEDA RESULTAR DE
CUALQUIER DEFECTO, FALLA O MAL FUNCIONAMIENTO DE LA LAVADORA A PRESIÓN CAMPBELL HAUSFELD. En
algunos estados no se permiten la exclusión ni la limitación de los daños incidentales o consecuentes, por lo cual la limitación
o exclusión antedichas pueden no ser aplicables en su caso.
C. Cualquier fallo que sea el resultado de daños de envío, accidente, abuso, negligencia por parte del comprador o si éste no
instala y hace funcionar la lavadora a presión de acuerdo con las instrucciones proporcionadas en el (los) manual(es) del
propietario que se entrega(n) con el producto.
D. Servicio previo a la entrega, p. ej. ensamblado, aceite o lubricantes y ajuste.
E. Artículos o servicios que normalmente se necesitan para el mantenimiento de la lavadora a presión.
F. El motor a gasolina y sus componentes que están expresamente excluidos de la cobertura según esta garantía limitada.
Dichos componentes deben ser devueltos por el comprador al fabricante original o a sus estaciones de reparación autorizadas
para servicio.
G. Artículos adicionales no cubiertos por la garantía:
1. Cepillos del motor (solo modelos eléctricos).
2. Defectos estéticos que no interfieren con la funcionalidad.
3. Componentes oxidados.
4. Desgaste de la bomba o daños de las válvulas causados por el uso de un aceite inadecuado, contaminación del aceite o
por no seguir las pautas de mantenimiento de lubricación adecuadas.
7. RESPONSABILIDAD DEL GARANTE EN VIRTUD DE ESTA GARANTÍA : Según elija el Garante, la reparación o el reemplazo de
la lavadora a presión o los componentes que estén defectuosos, que hayan funcionado en forma inadecuada o que no hayan
cumplido con su función dentro de la duración del período de la garantía.
8. RESPONSABILIDAD DEL COMPRADOR EN VIRTUD DE ESTA GARANTÍA :
A. Proporcionar comprobante de compra fechado y registros de mantenimiento.
B. Llame a Campbell Hausfeld (800-330-0712) por sus opciones de servicio incluidas en la garantía. Los costos de flete correrán
por cuenta del comprador.
C. Emplear un cuidado razonable para el manejo y el mantenimiento de la lavadora a presión, según se describe en el (los)
manual(es) del propietario.
9. EN QUÉ CASOS EL GARANTE PROPORCIONARÁ REPARACIÓN O REEMPLAZO EN VIRTUD DE ESTA GARANTÍA : La reparación
o el reemplazo serán establecerán y se llevarán a cabo de acuerdo con el flujo de trabajo normal en la instalación de servicio, y
dependerá de la disponibilidad de piezas de repuesto.
Esta garantía limitada se aplica únicamente en los EE.UU., Canadá y México, y le proporciona derechos legales específicos. Puede que
también tenga otros derechos que pueden variar de un estado a otro, o de un país a otro.
RECORDATORIO: ¡Guarde su comprobante de compra con fecha para fines de la garantía!
Adjúntela a este manual o archívela en lugar seguro.
36 Es
 Loading...