

Cabasse SANTORIN IW User Manual [de, en, fr]
SANTORIN IW
NOTICE D,INSTALLATION
OPERATING INSTRUCTIONS
INSTALLATIONS- UND BEDIENUNGSANLEITUNG
www.cabasse.com
f r a n c a i s d e u t s c he n g l i s h
1
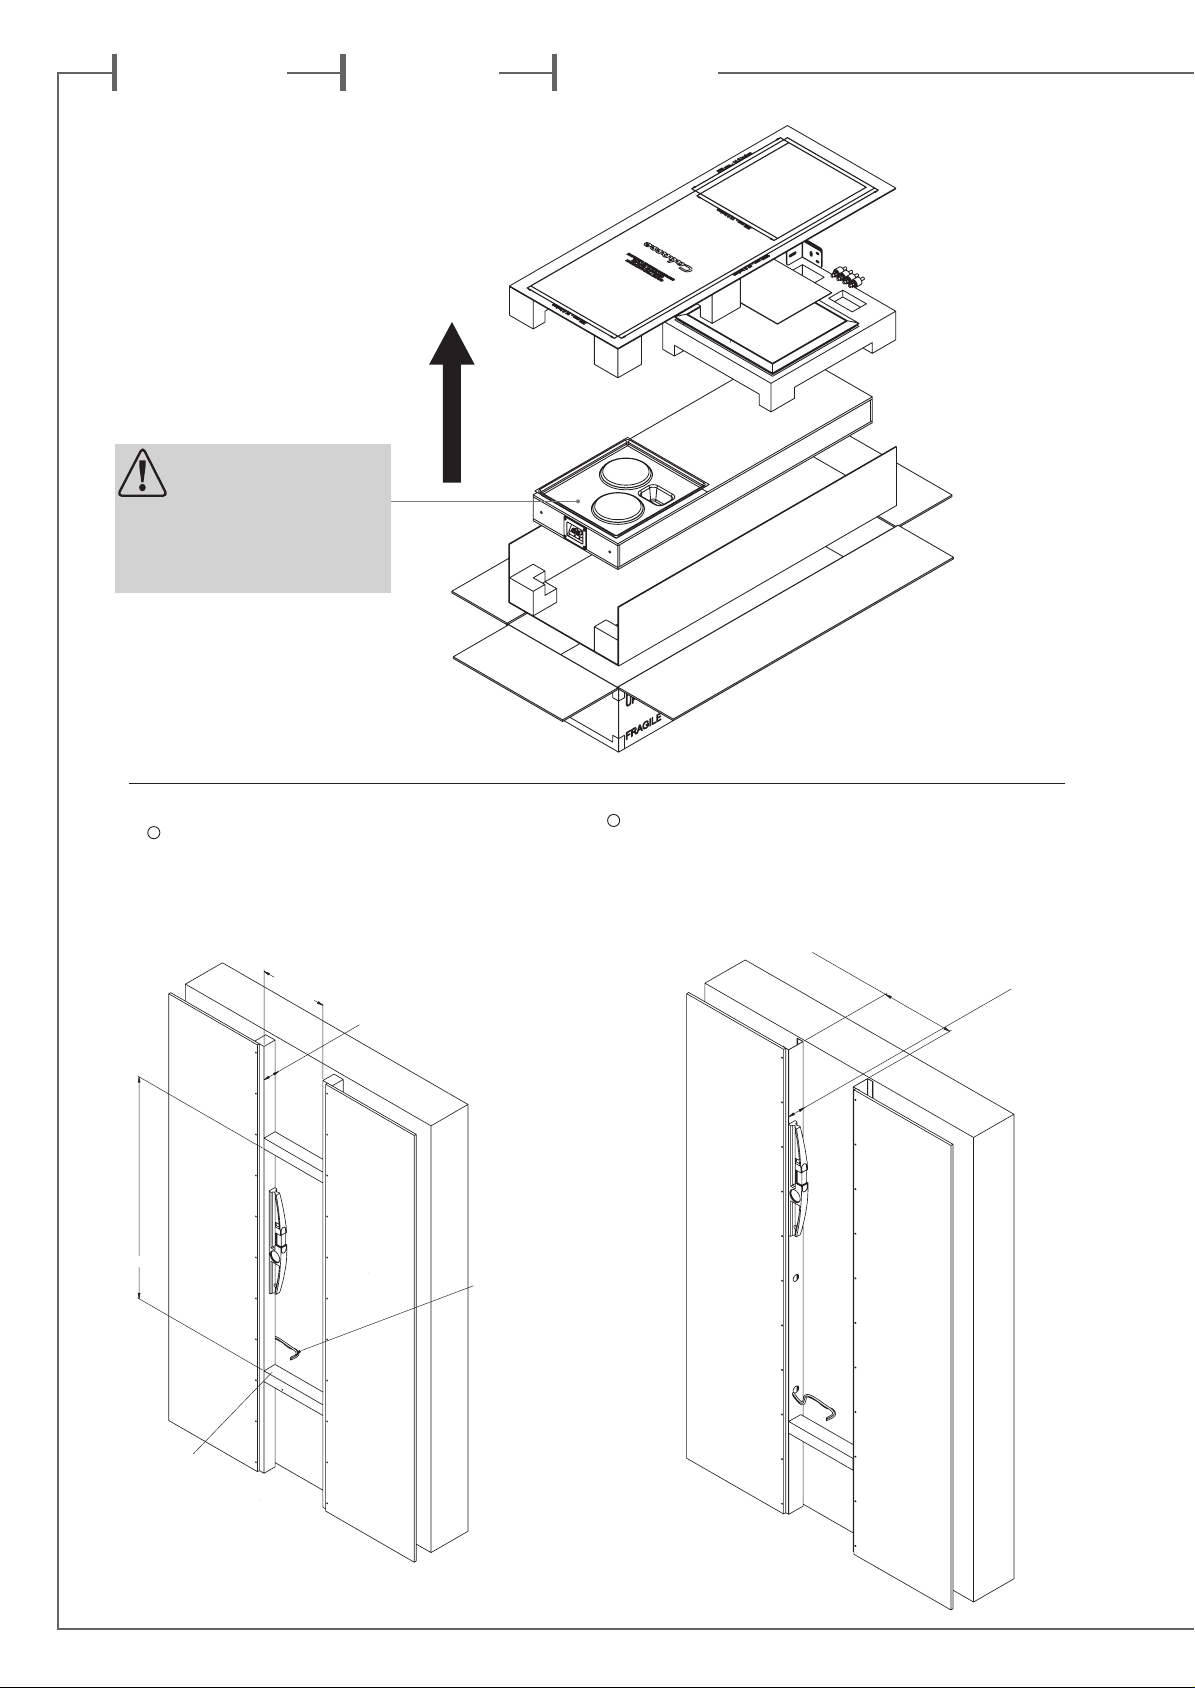
DEBALLAGE - UNPACKING
2a
preparaon ossature bois + panneau platre/bois/fibre
preparaon with wood frame and plaster/wood/fiber board
2b
preparaon ossature rail acier+ plaque de platre/fibre
preparaon with metal rail and plaster/fiber board
Déballage de Santorin IW
1
Unpacking of Santorin IW
Auspacken des Santorin IW
Veuiller maintenir le masque
de protection en place pendant
toute l’installation.
Keep the debris shield fitted throughout the
installation process.
Belassen Sie den Staubschutz während der
gesamten Installation über den Chassis.
Préparation ossature bois
2
a
+ panneau platre/bois/fibre
Preparation with wood frame
and plaster/wood/fibre board
Einbau-Vorbereitung mit Holzrahmen
und Gipskarton-/Holz-/Faserplatten
1300
min.
max.
398
mm
min. 360 mm
min.
100
mm
Câble haut-parleur à
hauteur du bornier
Loudspeaker cable at
terminals level
Lautsprecherkabel auf
Höhe Anschlussfeld-Höhe
Préparation ossature rail acier
2
b
+ plaque de platre/fibre
Preparation with metal rail and plaster/
fibre board
Einbau-Vorbereitung mit Metallschienen
und Gipskarton-/Faserplatten
min. 360 mm
Câble haut-parleur
Loudspeaker cable
Lautsprecherkabel
max.
398
mm
min.
100
mm
Renforts bois horizontaux
recommandés
Recommended horizontal
wood bracing
Horizontale HolzvzerSteifung (empfohlen)
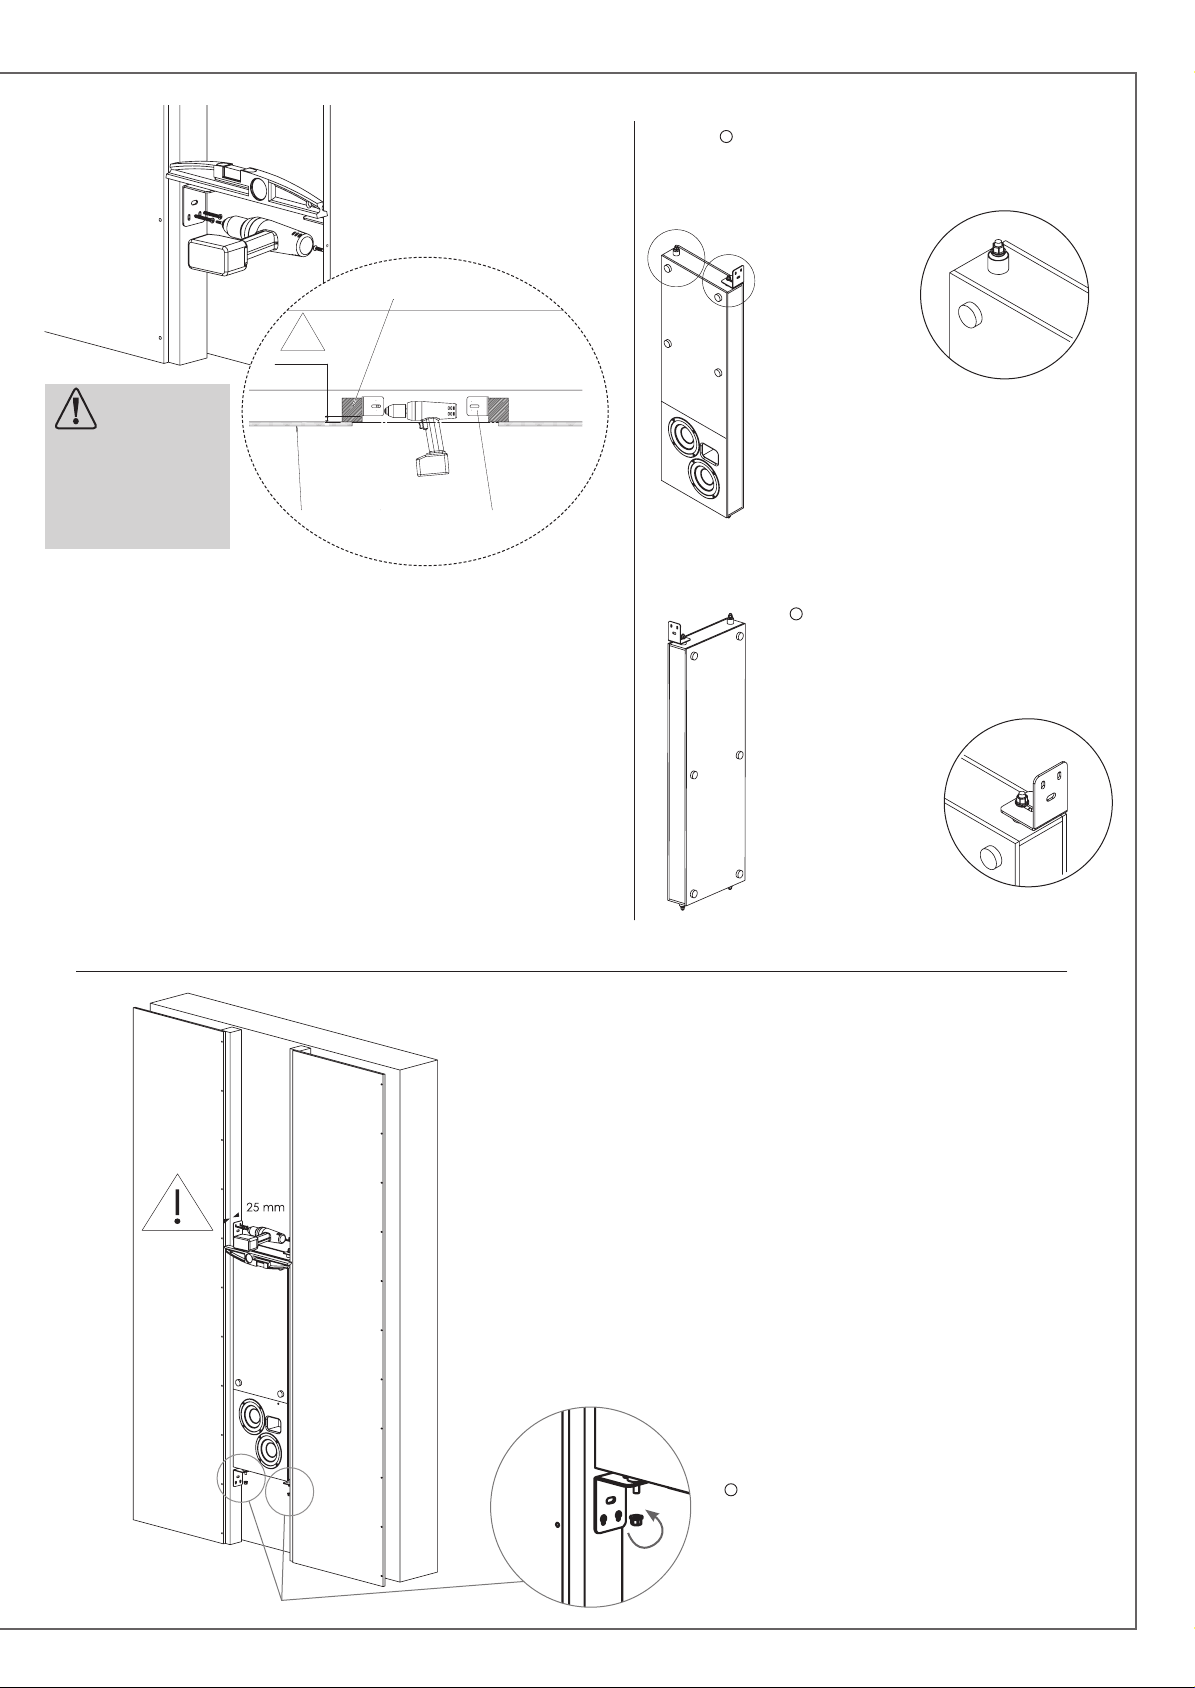
Montage des silent blocks et des patins pvc
3
25 +/-1mm
Cloison - Board - Platte
Equerre - Bracket
Montagewinkel
tasseau ou rail - stud or rail
Holz- oder Metallrahmen
!
A
B
4
a
Silent blocks and pads assembly
Montage der Silentblöcke und der Kunststoff-Pads
A
B
Espace de 25 mm
entre équerres et
panneau mural
25 mm gap between brackets
and front board
Zwischen Wandplatten und
Haltewinken 25mm Freiraum
lassen
Montage des équerres inférieures
3
sur ossature bois ou rails aciers de largeur 100 mm min :
- Mettre à niveau.
- Visser les équerres avec visserie adaptée au matériau.
- Prévoir l’arrivée du câble haut-parleur au niveau des ces équerres.
Assembly of the lower brackets on wood/metal frames with 100 mm minimum depth:
- Align both brackets with a spirit level.
- Mount both brackets with screws suitable for the support.
- Ensure the loudspeaker cable output is at the brackets’ level.
Montage der unteren Montagewinkel auf Holz-/Metallrahmen mit 100mm
minimaler Tiefe:
- Beide Montagewinkel mit Hilfe einer Wasserwaage auf gleicher Höhe
montieren.
- Montieren Sie die Montagewinkel mit für das Rahmenmaterial adäquaten
Schrauben.
- Sehen Sie am Rahmen eine Auslass-Öffnung für das Lautsprecherkabel
auf passender Höhe vor.
Visser les 4 silents blocks dans les inserts en bout
de caisse et coller les patins en PVC sur les parois
avant et arrière
Screw the 4 silent blocks in the inserts and stick
the PVC pads on the front and rear panels of the
enclosure
Schrauben Sie die vier Silentblöcke in die dafür
vorgesehenen Öffnungen und kleben Sie die
Kunststoff-Pads auf Front- und Rückseite des
Gehäuses.
Montage des équerres supérieures
4
b
Assembly of the upper brackets
Befestigung den oberen Montagewinkel
Fixer les équerres sur les
silent blocks
Mount the upper brackets
on the silent blocks
Befestigen sie die oberen
Montagewinkel auf den
Silentblöcken.
Mise en place du Santorin IW
5
Install of the Santorin IW
Einbau des Santorin IW
- Poser et visser le Santorin IW sur les équerres inférieures.
- Visser les équerres supérieures sur les montants en mettant l’ensemble de niveau.
ATTENTION à la cote de 25 mm par rapport au bord du montant.
- Place and screw the Santorin IW on the lower brackets.
- Align and screw the upper brackets to the frame.
ATTENTION: observe the 25 mm distance to the back of the front board.
- Platzieren und befestigen Sie den Santorin IW auf den unteren Montagewinkeln
- Richten Sie die oberen Montagewinkel aus und schrauben Sie sie am Rahmen fest.
ACHTUNG: Halten Sie den 25mm-Abstand zwischen Wandplatten und Montagewinkeln ein.
5
b
Visser les écrous sur les silent blocks inférieurs
Mount and thigthen the bolts of the lower silent blocks.
Befestigen Sie die unteren Montagewinkel auf den Silentblöcken.
f r a n c a i s d e u t s c he n g l i s h
installation dans un mur en brique
6
Install in a brick wall
Einbau in eine Ziegelwand
Fixation par l’avant et
encastrement sans silentblocks possibles.
Fixation avec équerres à plat
sur le mur et chevilles nylon
avant enduit ou pose d’un
panneau de plâtre.
Prévoir le branchement des
câbles haut-parleurs avant
montage.
Front fastening and installation
without pads is possible with
brackets facing the wall and
screwed in place with wall plugs
before coating.
Ensure the wiring of the
Santorin IW is in place before
mounting.
Frontbefestigung ohne
Silentblöcke möglich, die
Montagewinkel weisen dann
zur Wandfläche und werden
vor der Wandbeschichtung
mittels passender Dübel und
Schrauben fixiert. Führen Sie
vor der endgültigen Befestigung
die Verkabelung des Santorin
IW durch.
Branchement du câble haut-parleur
7
Connection of the loudspeaker cable
Anschluss an das Lautsprecherkabel
Respecter la phase, vérifier le bon serrage des bornes et bloquer le
câble haut-parleur par agrafage/collage pour éviter tout risque de
déconnections ou vibrations.
Observe correct polarity, check that the cables are correctly
tightened, secure the wires from vibrations by stapling or gluing.
Halten Sie die korrekte Polung ein, überprüfen Sie, ob die Kabel
sicher in den Terminals befestigt sind und schützen Sie das Kabel mit
Klammern oder Kleber vor Vibrationen.
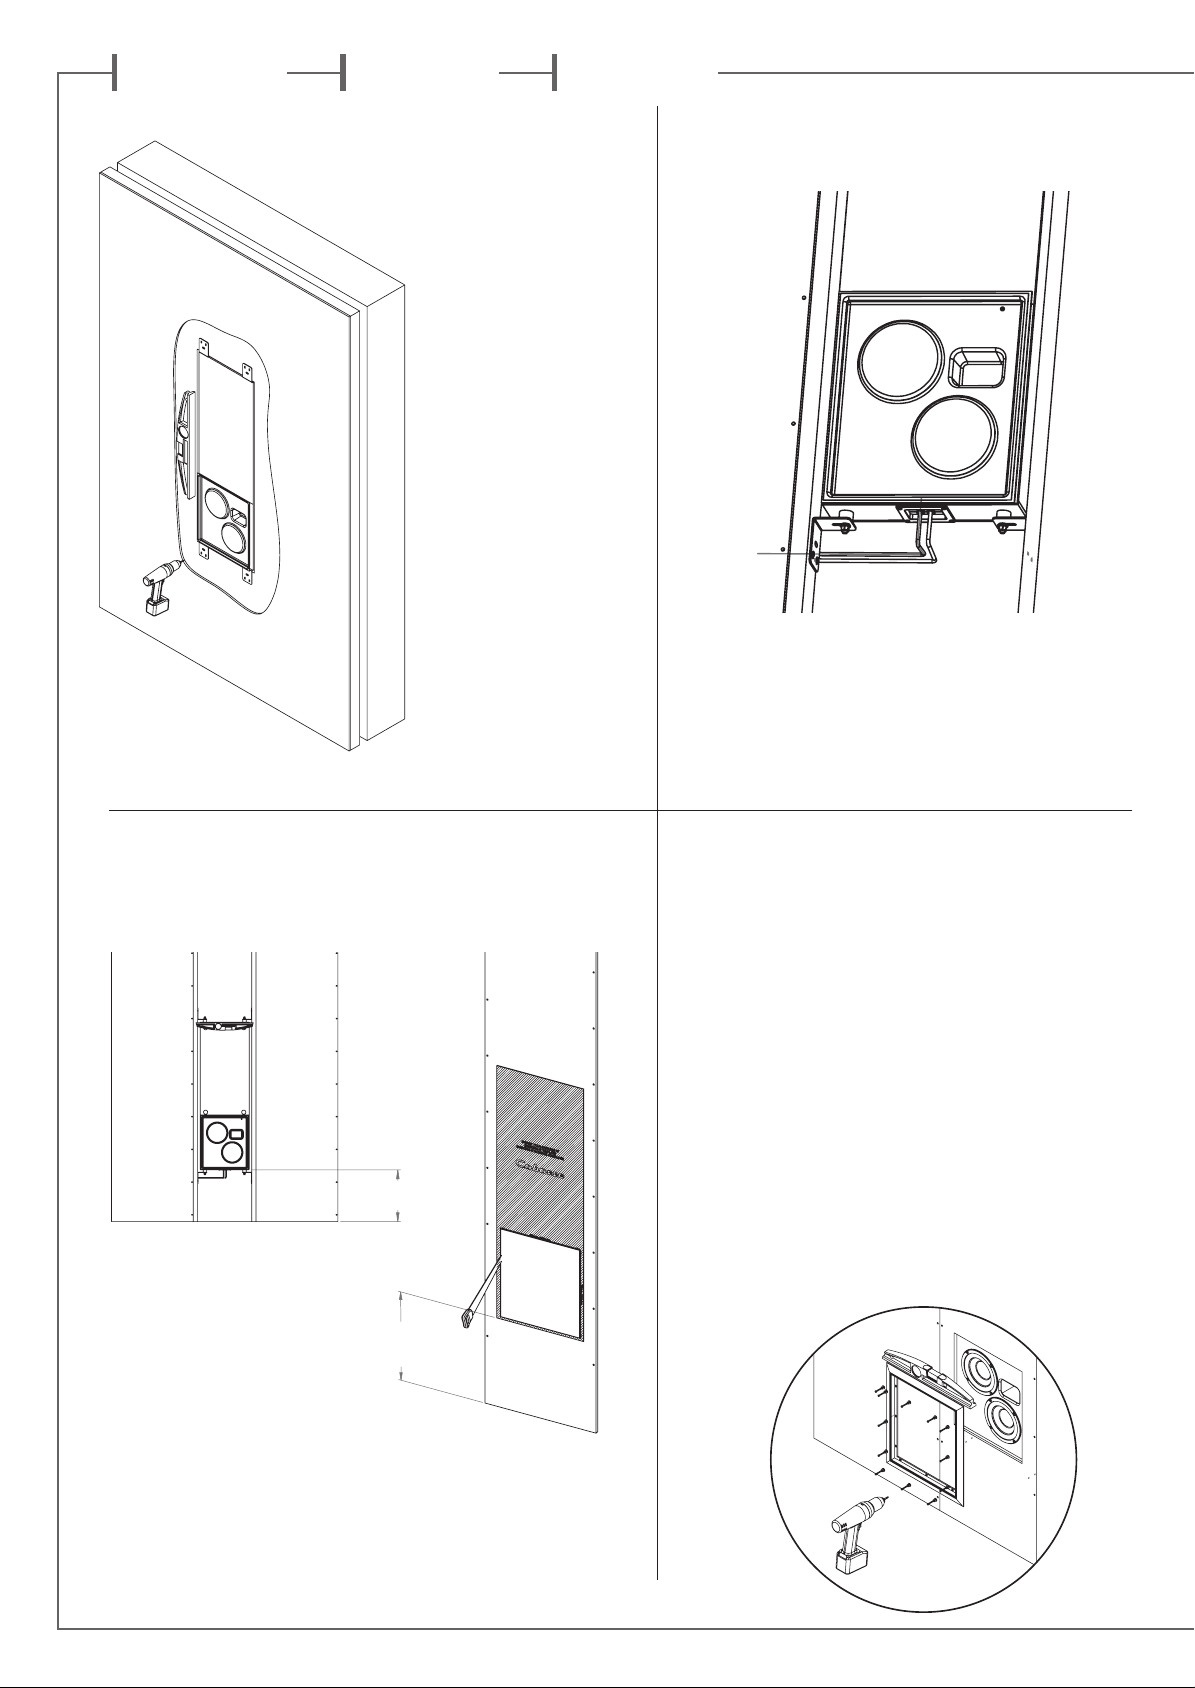
Découpe de l’encadrement de la grille
8 9
Cutting the frame for the grille out
Ausschneiden des Rahmens für das Frontgitter
hauteur au sol: X
X: distance to the floor
X: Abstand zum Boden
X : hauteur au sol
a reporter sur panneau
à découper
Pose du cadre de la grille
Assembly of the grille frame
Montage des Rahmens für das Frontgitter
Utiliser le gabarit de découpe pour réaliser l’ouverture pour la grille sur la
cloison de recouvrement (panneau bois ou plaque de plâtre). Enlever le cache
de protection. Coller les 4 bandes auto-adhésives amortissantes autour de
la découpe du panneau sur son coté interne. Fixer le panneau recouvrant le
Santorin IW, mettre en place le cadre avec les 12 vis, 12 rondelles acier et 12
rondelles caoutchouc (rondelle acier coté tête de vis et rondelle caoutchouc
coté cadre). Mettre la grille en place une fois les 12 vis serrées, rondelles
caoutchouc non écrasées.
Use the pattern to cut away the wood or plaster board for the grille. After the
board has been installed, place and screw the grill to the Santorin IW. Remove
the debris shield, stick the 4 self-adhesive stripes on the back of the board
around the cut out, mount the board, adjust and mount the frame with the
12 wood screws, 12 metal washers and 12 rubber washers (metal washer on
screw head side, rubber washer on frame side). Thigten the screws but not
fully to preserve the damping properties of the rubber washers.
Schneiden Sie mit Hilfe der Schablone die Öffnung für das Frontgitter komplett aus der Gipskarton- oder Holzplatte aus. Entfernen Sie den Staubschutz
und kleben Sie die 4 selbstklebenden Streifen auf die Rückseite der Platte
um den Ausschnitt herum fest. Montieren Sie die Platte, richten Sie den
Frontgitter-Rahmen aus und schrauben Sie ihn mit den mitgelieferten 12
Schrauben, 12 Metallscheiben und 12 Gummischeiben fest (Metallscheibe
auf Schraubekopfseite, Gummischeibe auf Rahmenseite. Montieren Sie zum
Abschluss das Frontgitter.
Positionner le bas du gabarit à la hauteur X du bas du
panneau et découper l’ouverture pour la grille.
Position the bottom of the pattern at the X distance to the
bottom of the board and cut out the grille shape.
Positionieren Sie die Unterseite der mitgelieferten
Schablone im Abstand X zur Unterseite der Frontplatte
und schneiden Sie die Umrisse für das Frontgitter ein.
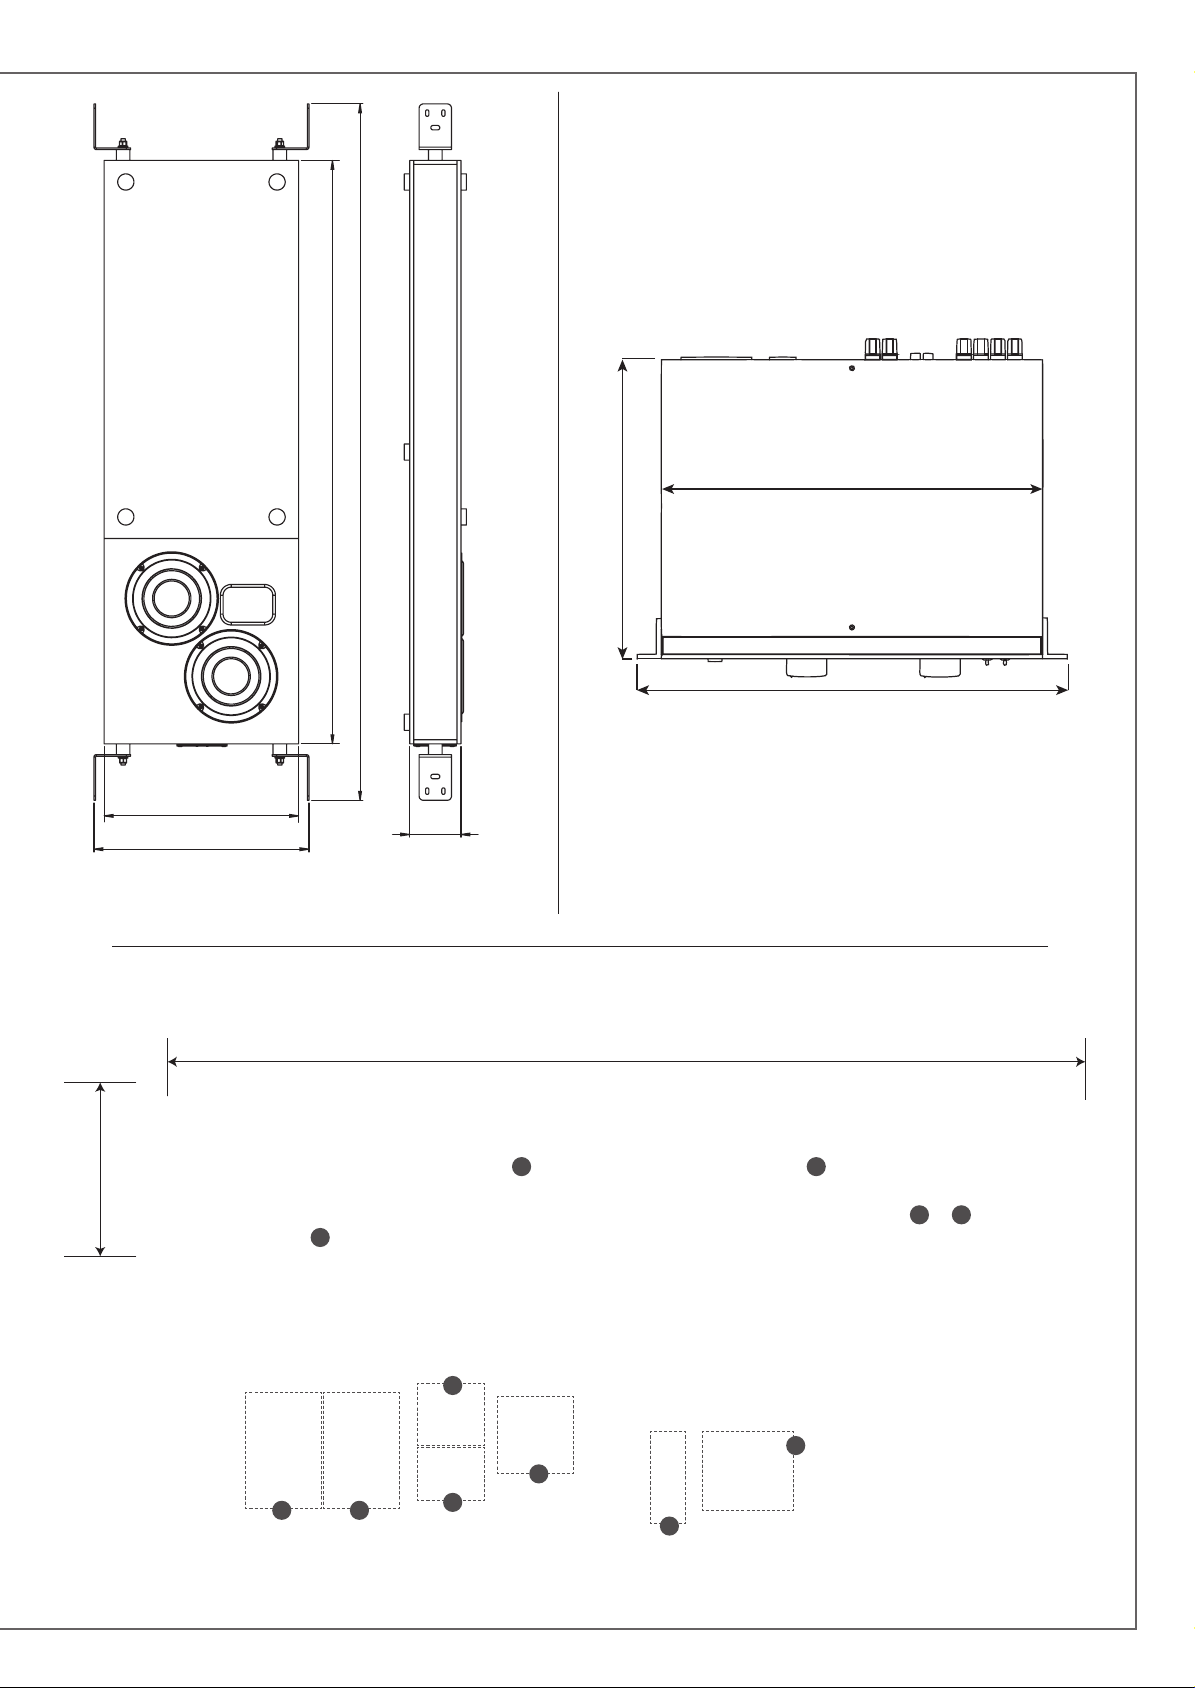
1289
Dimensions
0
Dimensions
Abmessungen
Min 360
Max 398
1080
427 mm
335 mm
482.6 mm
95
464 mm
88.2 mm
1
4 5
90
=-
7
3
8
6
2
 Loading...