

Page 1
STREAM
1
NOTICE D'INSTALLATION
OWNER'S MANUAL
BETRIEBSANLEITUNG
Page 2
f r a n c a i s e n g l i s h d e u t s c h
---1 ---1
2
Page 3
11
9
10
2 1
FONCTIONS SPECIALES :
- REINITIALISATION DU BLUETOOTH : appuyer sur
et
simultanément
3
- AFFICHAGE DES DIODES : appuyer sur
pour permuter entre l'affichage permanent et le mode flash.
KEYPAD SPECIAL FUNCTIONS:
- BLUETOOTH RESET: press
- LED DISPLAY: press
and flash display modes.
SPEZIELLE FUNKTIONEN DES TASTENFELDES:
- RESET DER BLUETOOT-FUNKTION: Betätigen Sie
und
- LED-ANZEIGE: Betätigen Sie erst
zwischen kontinuierlichen und blinkenden Modi umzuschalten.
3
gemeinsam
8
2
then
and
2
3
to switch between full time
8
und dann
2
puis sur
2
together
3
8
2
8
2
um
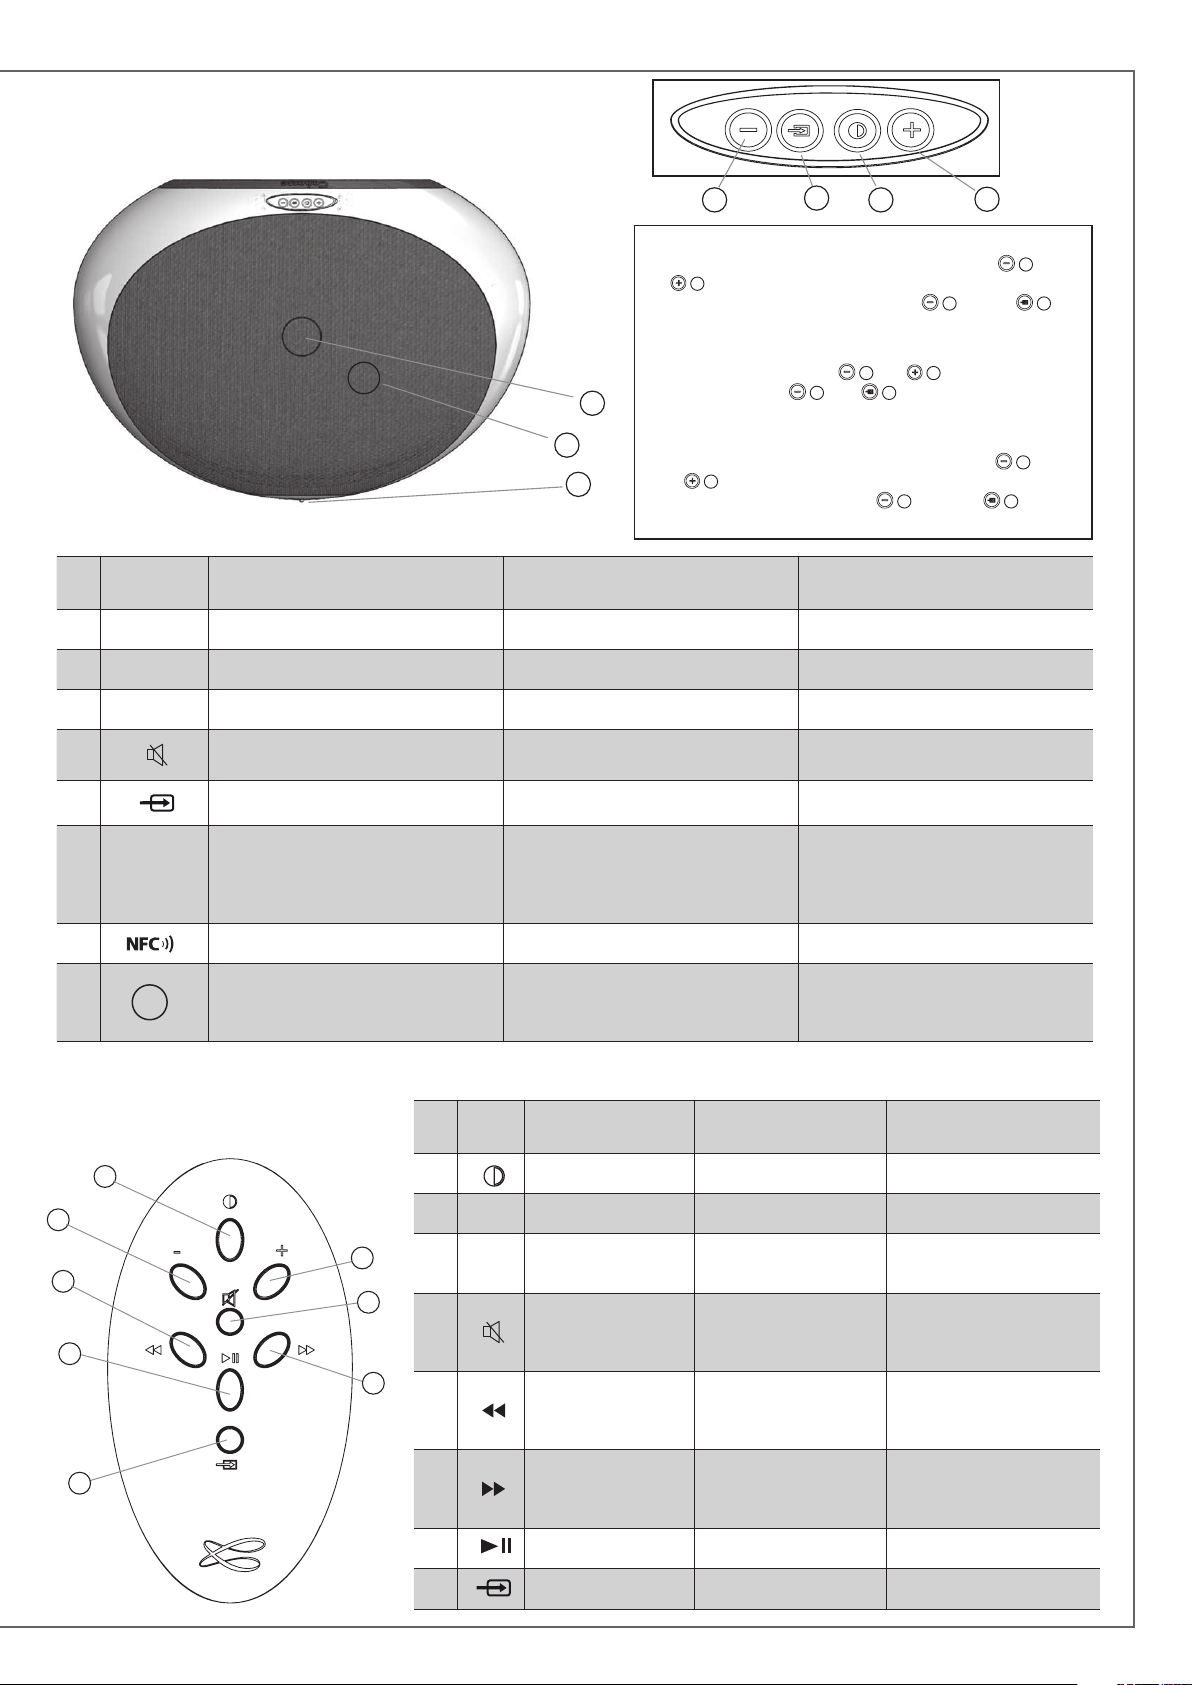
IDENTIFICATION
DES COMMANDES
1
LED DISPLAY MARCHE / ECO ON / ECO EIN/ECO
2 VOL - Diminution du volume Volume DOWN Lautstärke verringern
3 VOL + Augmentation du volume Volume UP Lautstärke erhöhen
4
8
SOURCE
9
10 Position du patch NFC Position of the NFC patch Position des NFC-Patch
11
LED
Active et désactive la coupure du son Mute on/off Stummschaltung Ein/Aus
Selection de la source Source selection Quellenwahl
Rouge: mode ECO
Bleu : Bluetooth
Orange : Wifi
Vert : analogique
Position du capteur infra-rouges et du
microphone du kit mains-libres Bluetooth
Red: ECO mode
Blue: Bluetooth
Orange: Wifi
Green: analogue
Position of the infrared sensor and
of the microphone for Bluetooth
handsfree use
DES COMMANDES
IDENTIFYING
CONTROLS
IDENTIFICATION
Rot: ECO-Modus
Blau: Bluetooth
Orange: WLAN
Grün: Analog
Position des Infrarot-Empfängers
und des Mikrofons für die BluetoothFreisprecheinrichtung
IDENTIFYING
CONTROLS
ERKLÄRUNG DER
BEDIENELEMENTE
ERKLÄRUNG DER
BEDIENELEMENTE
1
2
3
1
2 VOL - Diminution du volume Volume DOWN Lautstärke VERRINGERN
3 VOL +
5
4
7
4
6
5
8
6
7 Pause/Lecture Pause/Play Pause/Play
8
MARCHE / ECO ON / ECO EIN / ECO
Augmentation du
volume
Activation et et désactivation de la coupure
du son
Wifi : retour rapide
Bluetooth : titre précédent de l'album lu
Wifi : avance rapide
Bluetooth : titre suivant de l'album lu
Selection de la source Source selection Quellenwahl
Volume UP Lautstärke ERHÖHEN
Mute on/off Stummschaltung Ein/Aus
Wifi: reverse scanning
Bluetooth: previous title
of the played album
Wifi: forward scanning
Bluetooth: next title of the
played album
WLAN: abwärts scannen
Bluetooth: vorheriger Titel
des gerade gespielten Albums
WLAN: aufwärts scannen
Bluetooth: nächster Titel des
gerade gespielten Albums
3
Page 4
147 mm
f r a n c a i s e n g l i s h d e u t s c h
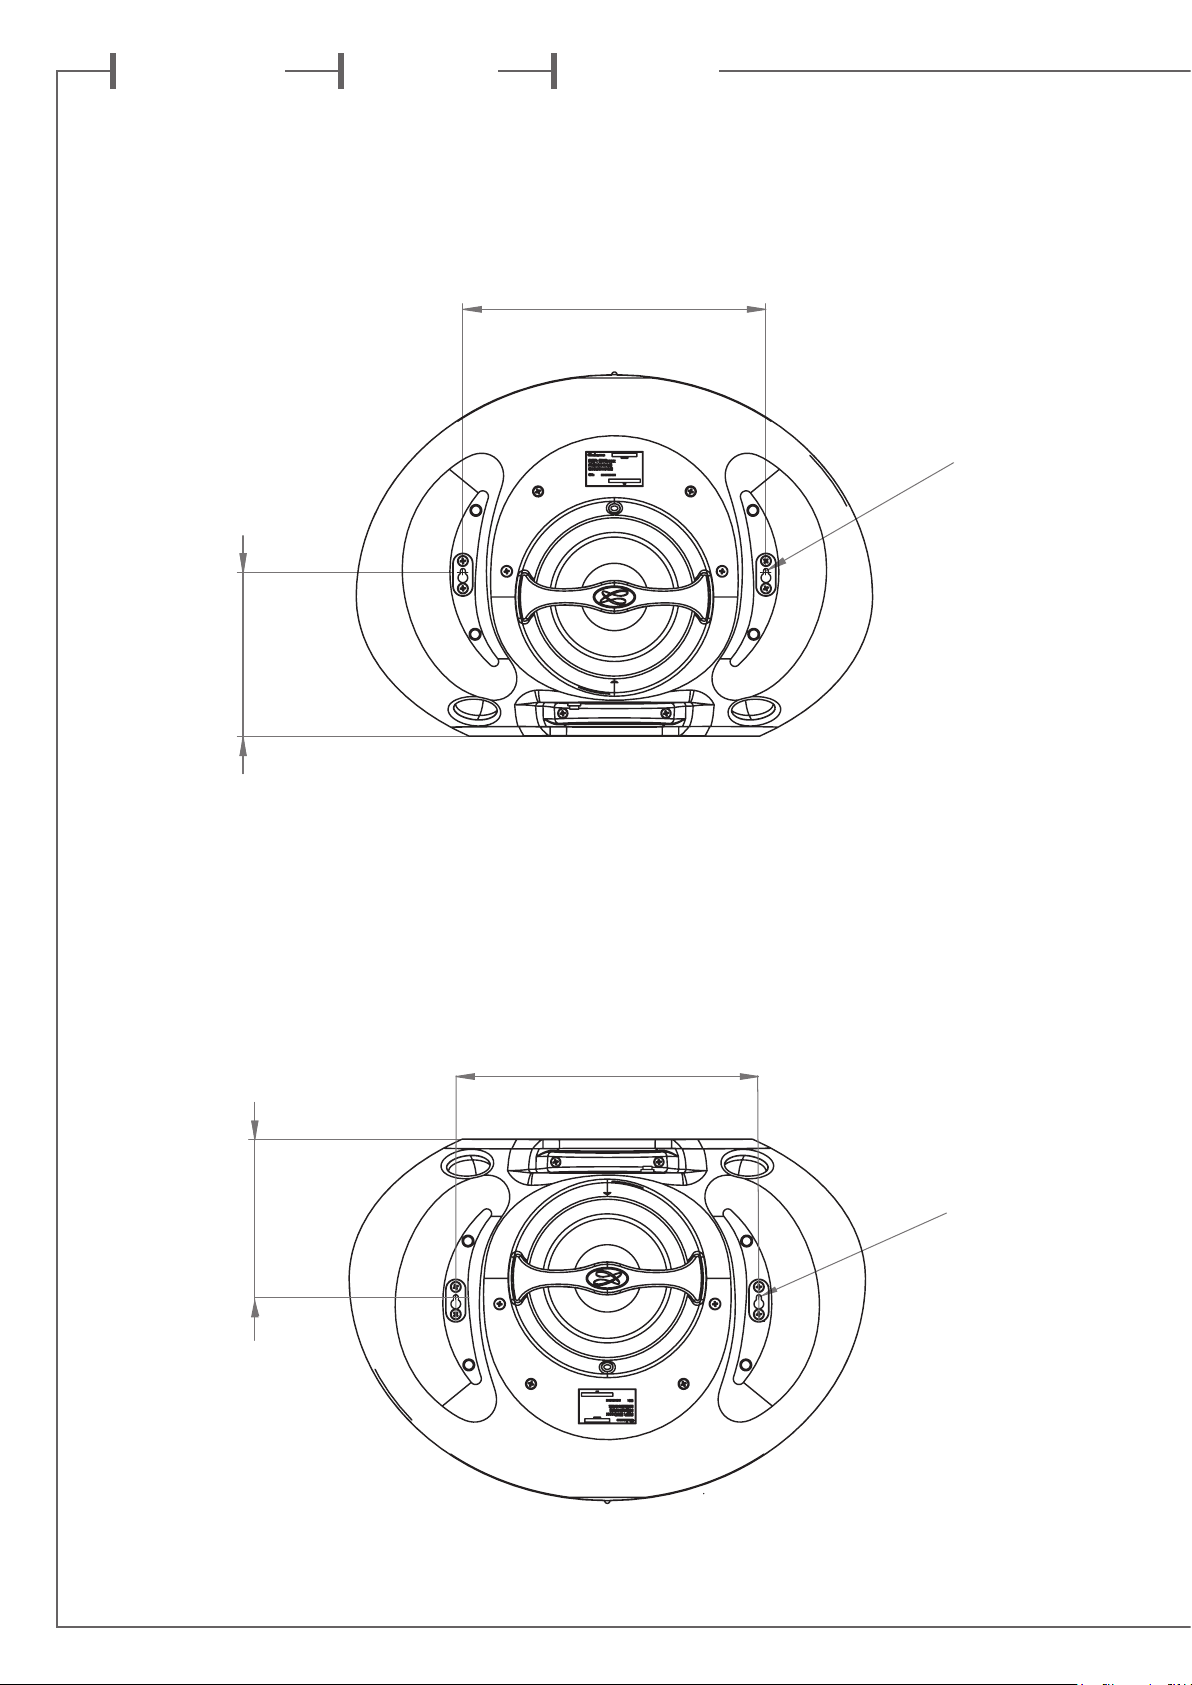
MONTAGE MURAL AVEC TOUCH PAD ET CONNECTIQUE EN BAS
WALL MOUNT WITH TOUCH PAD AND CONNECTIONS BOARD DOWN
WANDMONTAGE MIT NACH UNTEN WEISENDEM ANSCHLUSSFELD
270 mm
vis Ø 4mm
Ø 4 mm screw
Schraube Ø 4mm
MONTAGE MURAL AVEC TOUCH PAD ET CONNECTIQUE EN HAUT
WALL MOUNT WITH TOUCH PAD AND CONNECTIONS BOARD UP
WANDMONTAGE MIT NACH OBEN WEISENDEM ANSCHLUSSFELD
141 mm
270 mm
vis Ø 4mm
Ø 4 mm screw
Schraube Ø 4mm
4
Page 5
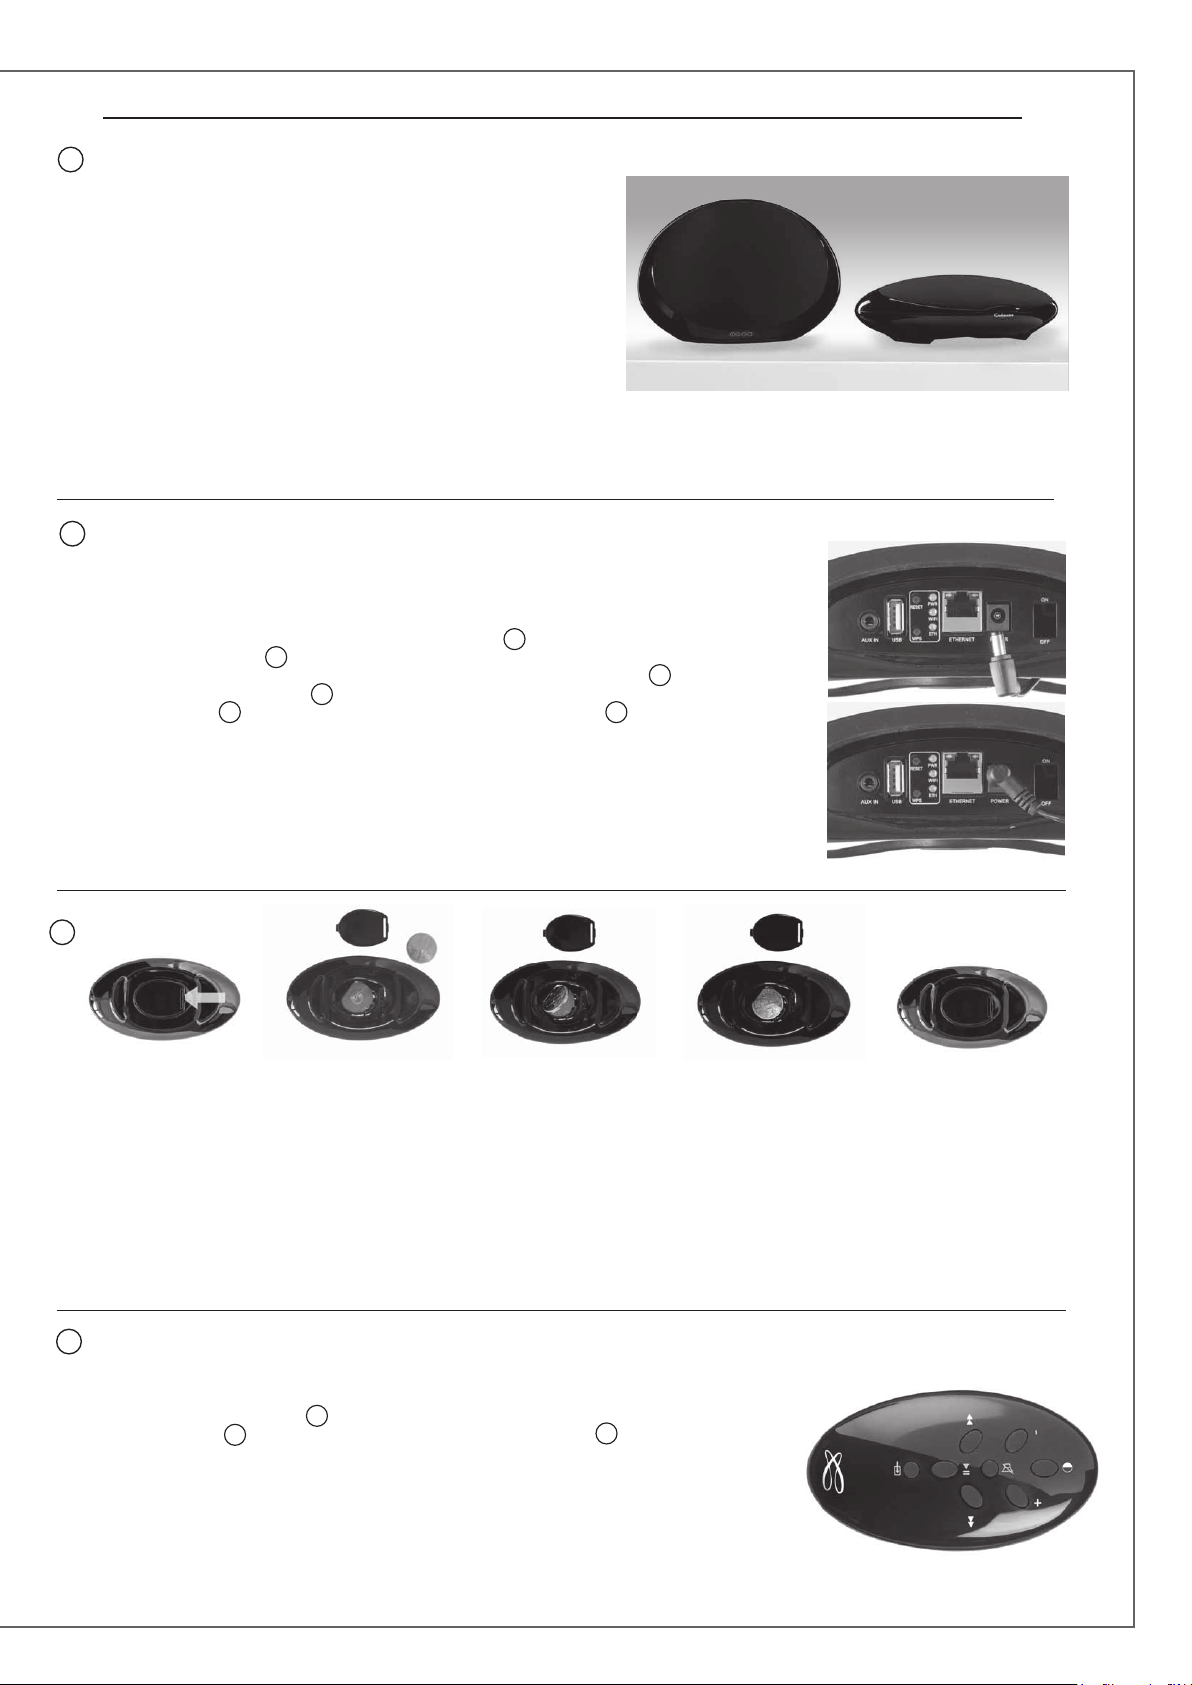
INSTALLATION RAPIDE / QUICK PLUG & PLAY / SCHNELLEINSTIEG
1
Installer votre Stream 1 à proximité d'une prise de courant, soit couché, soit
posé debout ou encore accroché au mur.
Prévoir un espace suffisant pour le cas échéant pouvoir poser brièvement
un smartphone NFC au milieu de la grille du Stream 1 et réaliser une liaison
Bluetooth automatique.
Cet espace est aussi nécessaire au bon fonctionnement des antennes Bluetooth
et wifi.
Place the Stream 1 close to a mains plug, either lying, standing or hanging,
with enough available headroom above the NFC patch for a smartphone and
the use of instant Blutooth connection. This headroom is also necessary for the
optimum efficiency of the Bluetooth and wifi antennas.
Platzieren Sie das Stream 1 entweder liegend, stehend oder an der Wand hängend in der Nähe einer Steckdose. Achten Sie darauf,
dass oberhalb des NFC-Patch genügend Freiraum für ein Smartphone und die Bluetooth-Sofortverbindung bleibt.
Dieser Freiraum ist für die optimale Wirkungsweise der Bluetooth-und WLAN-Antennen ebenfalls notwendig.
2
Connecter l'alimentation
externe au Stream 1, brancher
l'alimentation au secteur et
basculer l'interrupteur marche/
arrêt sur "on". Stream 1 est
opérationnel dès que la diode
s'allume en rouge (mode ECO).
Passer en mode MARCHE en
appuyant sur la touche
Stream 1 ou de la télécommande.
NOTE : la fonction wifi de
Stream 1 devient opérationnelle
lorsque la diode PWR (power) est
passée du rouge au vert, environ
40 secondes après la mise sous
tension.
9
1
du
Connect the power supply to the
Stream 1, plug it to the mains
and position the POWER ON/
OFF switch on "ON". Stream 1 is
ready to play when the LED
enlights red (ECO mode). Turn
the Stream 1 on by pressing the
1
key on the pad or the remote
control.
NOTE: the wifi mode of Stream
1 is available when the PWR
(Power) LED has turned from red
to green, around 40 seconds after
powering on the Stream 1.
Verbinden Sie das Netzteil mit
dem Stream 1 und mit einer
Steckdose. Bringen Sie den
Schalter POWER ON/OFF in
9
die „ON“-Position. Das Stream
1 ist zur Wiedergabe bereit,
sobald LED
(ECO Modus). Betätigen Sie die
Taste
Fernbedienung um auf „EIN“ zu
bringen.
Bemerkung: Der WLAN-Modus
des Stream 1 ist erst verfügbar,
wenn die Farbe der PWR-LED von
rot nach grün wechselt, etwa 40
Sekunden nach Einschalten des
Stream 1.
9
1
auf Stream 1 oder der
rot leuchtet
3
Avant la première utilisation : retirer la
languette de protection qui dépasse du
couvercle.
Remplacement de la pile bouton type
CR-2025:
retourner la télécommande, enlever le
couvercle, enlever la pile usagée, insérer la
pile neuve, coté marquée "+" vers l'extérieur,
remettre le couvercle.
4
Une fois les connexions
Bluetooth et Wi-Fi activées (voir
chapitres suivants), sélectionner
la source avec la touche
télécommande Stream:
- la LED s'allume bleue pour la
source Bluetooth
- Orange pour la source Réseau
(Wi-Fi / Ethernet)
- Vert pour la source analogique
(AUX IN).
8
Once the Bluetooth and Wi-Fi
connections activated, press the
8
de la
key of the remote control untl
you get the requested source:
- The LED enlights blue for the
Bluetooth source
- Orange for the Network source
(Wi-Fi / Ethernet)
- Green for the analog input
(AUX IN).
Before first use: remove the battery
protection tab to activate the battery.
Replacement of the CR-2025 type battery
in the Stream remote control: Insert your
thumbnail under the clasp and press to
realease it, remove the rear lid, remove the old
battery and load the new battery properly
with the "+" side on the clasp side, put the rear
cover back on.
Sobald die Bluetooth- und
WLAN-Verbindungen aktiviert
sind, betätigen Sie bitte die
8
Taste
um auf die gewünschte Quelle
umzuschalten:
- leuchtet blau die LED, ist
- leuchtet orange die LED, ist
- leuchtet grün die LED, ist
auf der Fernbedienung,
Bluetooth als Quelle aktiv.
WLAN als Quelle aktiv.
Analog Eingang als Quelle aktiv
(AUX IN).
Vor der ersten Benutzung der Fernbedienung
müssen Sie den Entladeschutz entfernen.
Ersetzen der Batterie (Typ CR-2025) bei der
Fernbedienung des Stream 1: Entriegeln
Sie den Verschluss auf der Rückseite der
Fernbedienung mit einem Fingernagel und
legen Sie den Deckel beiseite. Entfernen Sie
die alte Batterie und platzieren Sie die neue
Batterie mit der "+"-Markierung nach außen,
so dass sie sichtbar bleibt. Bringen Sie den
Deckel wieder an.
5
Page 6
f r a n c a i s e n g l i s h d e u t s c h
5
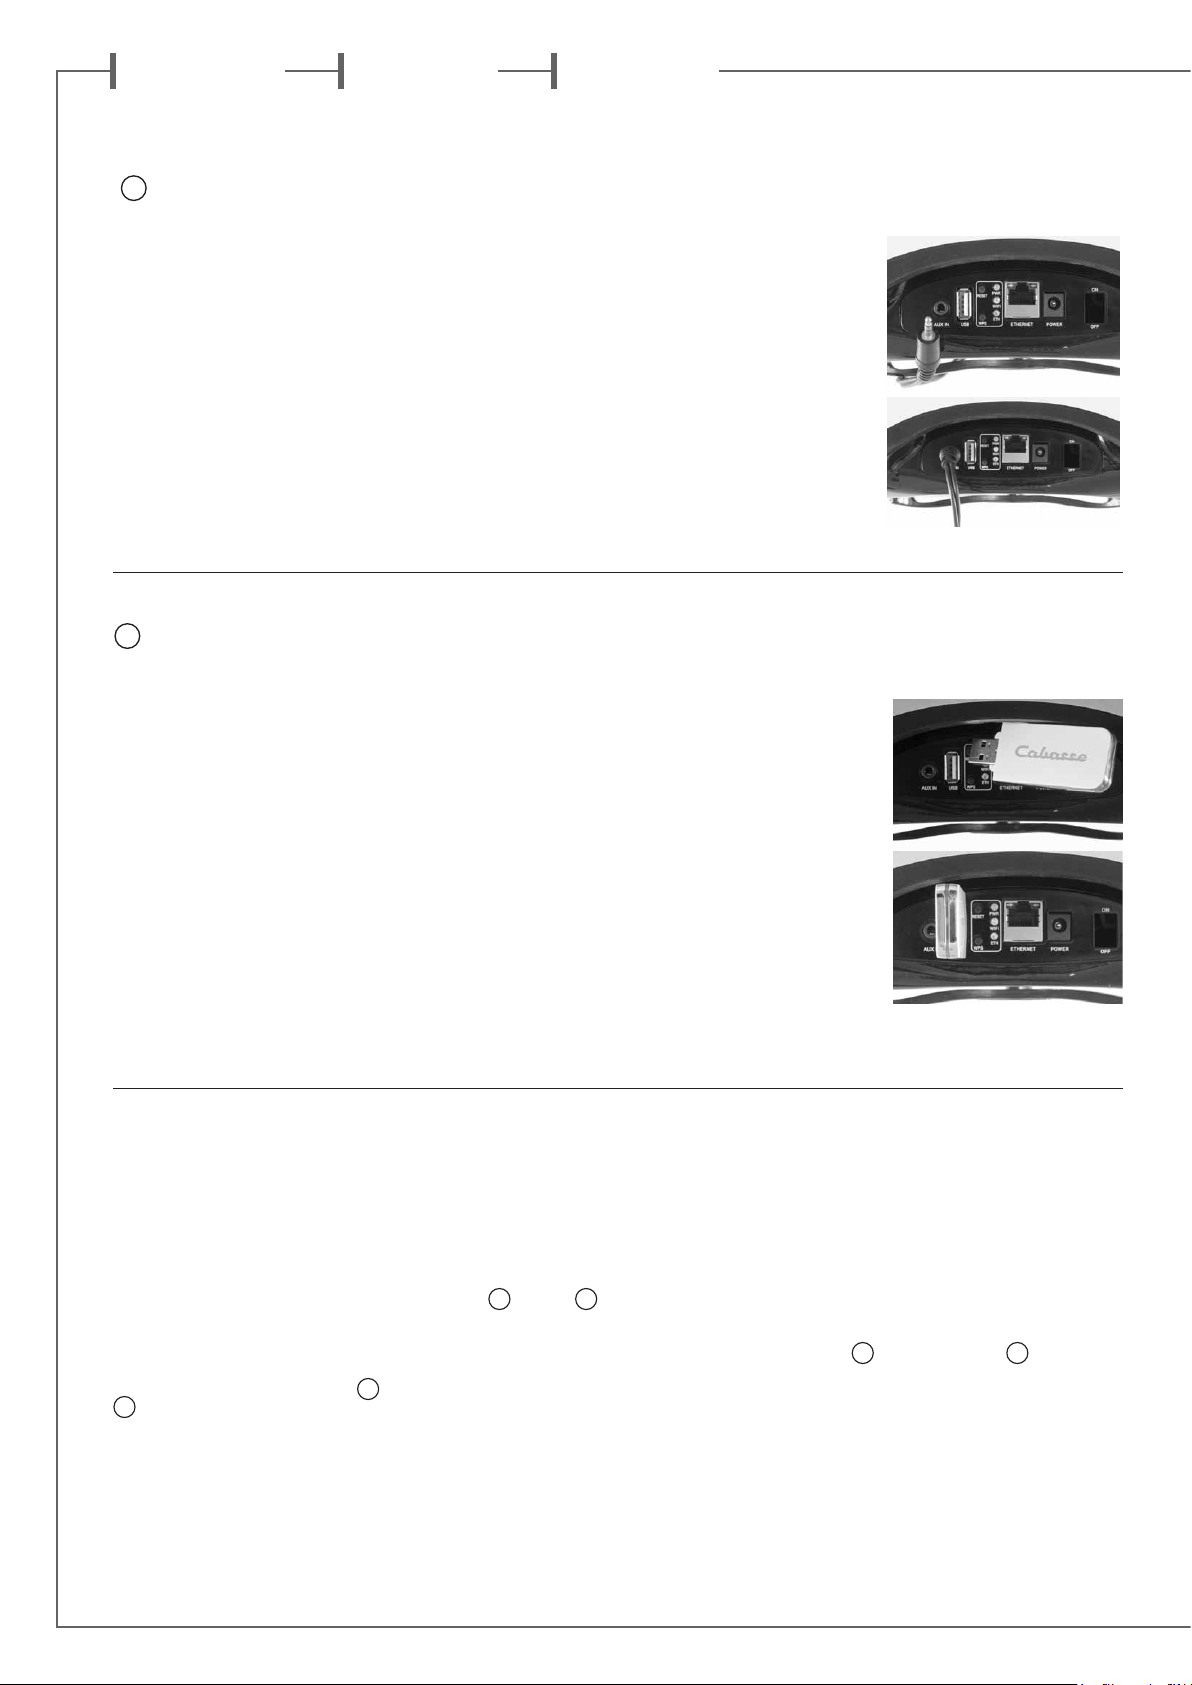
ENTREE
ANALOGIQUE AUX
Choisissez une source audio
(lecteur MP3, smartphone)
équipée d'une sortie analogique
type mini-jack ou RCA.
Pour un appareil équipé de sorties
RCA, faire correspondre la sortie
droite de la source (Right) avec
la fiche droite ( rouge et/ou
marquée R) du câble audio RCA/
mini-jack non fourni.
Connecter le câble de liaison à
l'entrée mini-jack "AUX IN" de
Stream 1.
6
ENTREE USB
Connecter une clé USB ou un
disque dur contenant des fichiers
audio à cette entrée pour les
mettre automatiquement en
réseau. Tous les fichiers aux
formats reconnus par le serveur
DLNA inclus dans Stream 1 sont
alors listés dans l'application
Stream Audio Control et peuvent
être lus par tous les lecteurs
Cabasse Stream connectés au
même réseau. La prise USB de
Stream 1 est pourvue d'une
alimentation de 1 ampère pour
l'utilisation d'un disque dur
nomade sans recours à une
alimentation externe.
AUX ANALOGUE
INPUT
Select an audio source fitted with
an analogue output, either minijack of RCA type. If the source
is fitted with RCA outputs, get a
RCA/mini-jack cable and plug the
right socket (red and or marked
R) in the right output of the audio
player. Plug the interconnect cable
in the mini-jack input (AUX IN) of
Stream 1.
USB INPUT
Plug in an USB stick or a harddrive to this input to get all the
stored audio files available on the
domestic network. All the audio
files, under formats compatible
with the built-in DLNA server
of Stream 1, will be listed in the
Stream Audio Control apps and
can be played by any Cabasse
Stream player connected to the
same domestic network. The USB
input is fitted with a 1 ampere
power output enabling the use of
a portable hard drive with no need
of an external power supply.
ANALOGER
EINGANG AUX
Dieser Anschluss dient zur
Verbindung mit einem Gerät mit
analogem Ausgang. Hat Ihr Gerät
Cinch-Ausgänge, benötigen Sie
einen Cinch-Miniklinken-Adapter
(nicht im Lieferumfang des
Stream 1). Schließen Sie den roten
Cinchstecker an die Buchse für
den rechten Kanal des Quellgeräts
an, die weiße (oder schwarze) an
die für den linken Kanal. Stecken
Sie dann den Miniklinken-Stecker
in den entsprechenden Eingang
(AUX IN) des Stream 1.
USB-EINGANG
Verbinden Sie einen USB-Stick
oder eine USB-Festplatte mit
diesem Anschluss und stellen Sie
alle darauf gespeicherten AudioDateien in Ihrem Heim-Netzwerk
bereit. Alle diese Dateien werden
– soweit ihr Format kompatibel
mit dem im Stream 1 integrierten
DLNA-Server ist – in den Stream
Audio Control Apps angezeigt
und können von jedem Gerät der
Cabasse-Stream-Reihe, das mit
dem gleichen Netzwerk verbunden
ist, wiedergegeben werden.
Der USB-Anschluss ist mit einem
Stromversorgungs-Ausgang mit
1 Ampere Stromlieferfähigkeit
ausgestattet, so dass auch
portable Festplatten ohne externes
Netzteil angeschlossen werden
können.
CONNEXION BLUETOOTH
Le Stream 1 est configuré en mode ouvert pour
les connexions Bluetooth. il suffit donc, dans le
menu de l'appareil à connecter, de sélectionner
"Cabasse Stream 1" dans la liste des appareils
Bluetooth disponibles. Sélectionner si
nécessaire la source Bluetooth en pressant
le bouton (8) de la télécommande "Stream"
jusqu'à ce que la diode bleue du module IR
s'illumine. Si un appareil est déjà connecté en
Bluetooth avec Stream 1, il faut interrompre
cette liaison avant d'en réaliser une nouvelle
avec un autre appareil. Il suffit d'appuyer
simultanément sur les touches "+"
3
du Stream 1 pour interrompre la liaison
Bluetooth en cours.
EXEMPLE DE CONNEXION BLUETOOTH
AVEC UNE TABLETTE ANDROID : voir la
version française en page 12
CONNEXION ET UTILISATION AVEC UN
ORDINATEUR APPLE: version française en
page 13.
2
et "-"
BLUETOOTH CONNECTION
Stream 1 is set in on open mode for
Bluetooth connections. Select "Cabasse
Stream 1" in the available Bluetooth
devices list. If a Bluetooth source is already
connected to Stream 1, disconnect this item
before selecting a new one. You can press
simultaneously the
2
and "-" 3 keys of the keypad to
"+"
achieve that.
BLUETOOTH CONNECTION WITH
AN ANDROID TABLET: see the English
explanation on page 21.
CONNECTION AND USE OF STREAM 1
WITH AN APPLE COMPUTER: see the English
version page 22.
6
BLUETOOTH -VERBINDUNG
Stream 1 befindet sich nach Einschalten im
Suchmodus für eine Bluetooth-Verbindung.
Zur Herstellung einer Verbindung wählen Sie
bitte "Cabasse Stream 1" in der BluetoothGeräteliste des Quellgerätes, das mit
dem Stream 1 verbunden werden soll. Ist
bereits eine Verbindung mit einem anderen
Quellgerät aktiv, müssen Sie diese vor
Erstellung einer neuen Verbindung zunächst
beenden. Zum Beenden betätigen Sie bitte
2
die "+"
Bedienfeld des Stream 1 gleichzeitig.
BLUETOOTH-VERBINDUNG MIT EINEM
ANDROID-GERÄT: Siehe deutsche Erklärung
auf Seite 29
VERBINDUNG UND NUTZUNG DES
STREAM 1 MIT EINEM APPLE-COMPUTER:
siehe deutsche Erklärung auf Seite 30.
-Taste und die "-" 3 -Taste am
Page 7
CONNEXION BLUETOOTH INSTANTANEE AVEC UN SMARTPHONE NFC
INSTANT NFC BLUETOOTH CONNECTION WITH A NFC SMARTPHONE
SOFORTIGE BLUETOOTH NFC-VERBINDUNG MIT EINEM NFC-SMARTPHONE
1) Installation de l'application NFC Cabasse
a) Activer le mode NFC dans le menu de votre
smartphone NFC.
b) Vérifier/activer la connexion du smartphone
à Internet (réseau cellulaire wifi ou 3G, 4G).
c) Approcher le smartphone du patch NFC
au sommet de la grille du Stream 1.
d) Valider la demande d'installation de
l'application Cabasse NFC via Google Play.
e) Votre smartphone est prêt pour sa première
connexion NFC.
2) Utilisation de l'application Bluetooth NFC
Cabasse
a) Approcher votre smartphone du patch NFC
10
pour établir la connexion Bluetooth : si
nécessaire le Stream 1 sort du mode veille,
la source Bluetooth est automatiquement
sélectionnée et le premier morceau de la
playlist de votre smartphone est joué par
Stream 1.
b) Approcher une nouvelle fois le smartphone
du patch NFC
connexion Bluetooth.
NOTE : Une fois installée sur votre
smartphone NFC, l'application NFC
Cabasse fonctionne en permanence de
manière invisible. Elle est présente dans la
liste des applications mais il n'y pas d'icône
correspondant sur le bureau.
10
pour interrompre la
10
1) Installation of the Cabasse NFC
application
a) Enable the NFC function in the set up of the
NFC smartphone.
b) Check/activate the wifi or 3G connection of
the smartphone to Internet.
c) Touch the smartphone together with the
NFC patch
d) Accept the installation of the Cabasse NFC
app from Google Play.
e) Your smartphone is now ready for instant
Bluetooth NFC connections.
2) Using the Cabasse Bluetooth NFC
application
a) Tap your smartphone on the NFC patch
10
instant Bluetooth pairing; if necessary the
Stream 1 turns on, then the Bluetooth input
is automatically selected and the first cut of
the smartphone’s playlist is being played by
Stream 1.
b) Tap again to unpair both items and before
pairing another smartphone to the Stream 1.
NOTE: The Cabasse NFC application
runs in background once installed in the
smartphone. This application can be found
in the list of applications, but there is no
icon on the desktop.
10
on top of the grille of Stream 1.
in the middle of the Stream 1 grille for
1)Installation der NFC-App von Cabasse
a) Aktivieren Sie NFC im Setup Ihres
Smartphones.
b) Prüfen/aktivieren Sie die WLAN- oder
3G-Verbindung Ihres Smartphones mit dem
Internet.
c) Berühren Sie mit Ihrem Smartphone den
NFC-Patch
Stream 1.
d) Akzeptieren Sie die Installation der NFC-App
von Google Play.
e) Ihr Smartphone ist nun bereit für eine NFCBluetooth-Verbindung.
2) Benutzung der Bluetooth-NFC-App von
Cabasse
a) Berühren Sie mit Ihrem Smartphone die
NFC Antenne
am Stream 1, um eine sofortige BluetoothVerbindung aufzubauen; wenn nötig schaltet
sich das Stream 1 ein, der Bluetooth-Eingang
wird automatisch ausgewählt und der erste
Track der Wiedergabeliste des Smartphones
wird vom Stream 1 wiedergegeben.
Anmerkung: Wurde die NFC-App einmal
auf dem Smartphone installiert, läuft sie
ständig im Hintergrund. Sie wird in der
Liste der Apps aufgeführt, besitzt aber kein
Icon auf der Bedienoberfläche.
10
auf der Oberseite Gitters am
10
in der Mitte des Gitters
MODE WIFI DIRECT
Ce mode de connexion permet de diffuser en
qualité wifi les fichiers audio présents dans la
tablette (ou le smartphone) et sur le support
(disque dur, clé) USB connecté à l'entrée USB
de Stream 1 sans avoir recours ou besoin d'un
réseau Wi-Fi. Il ne donne pas accès aux sources
internet (Vtuner, Deezer) ni aux fichiers audio
présents dans le réseau domestique et ne
permet pas les mises à jour du Stream 1.
Une fois l'application Stream Audio Control
installée sur la tablette ou le téléphone et le
Stream 1 activé, ouvrir l'application et choisir
"utiliser ce lecteur en mode d'accès direct".
Suivez les instructions et commencez à écouter
vos musiques préférées.
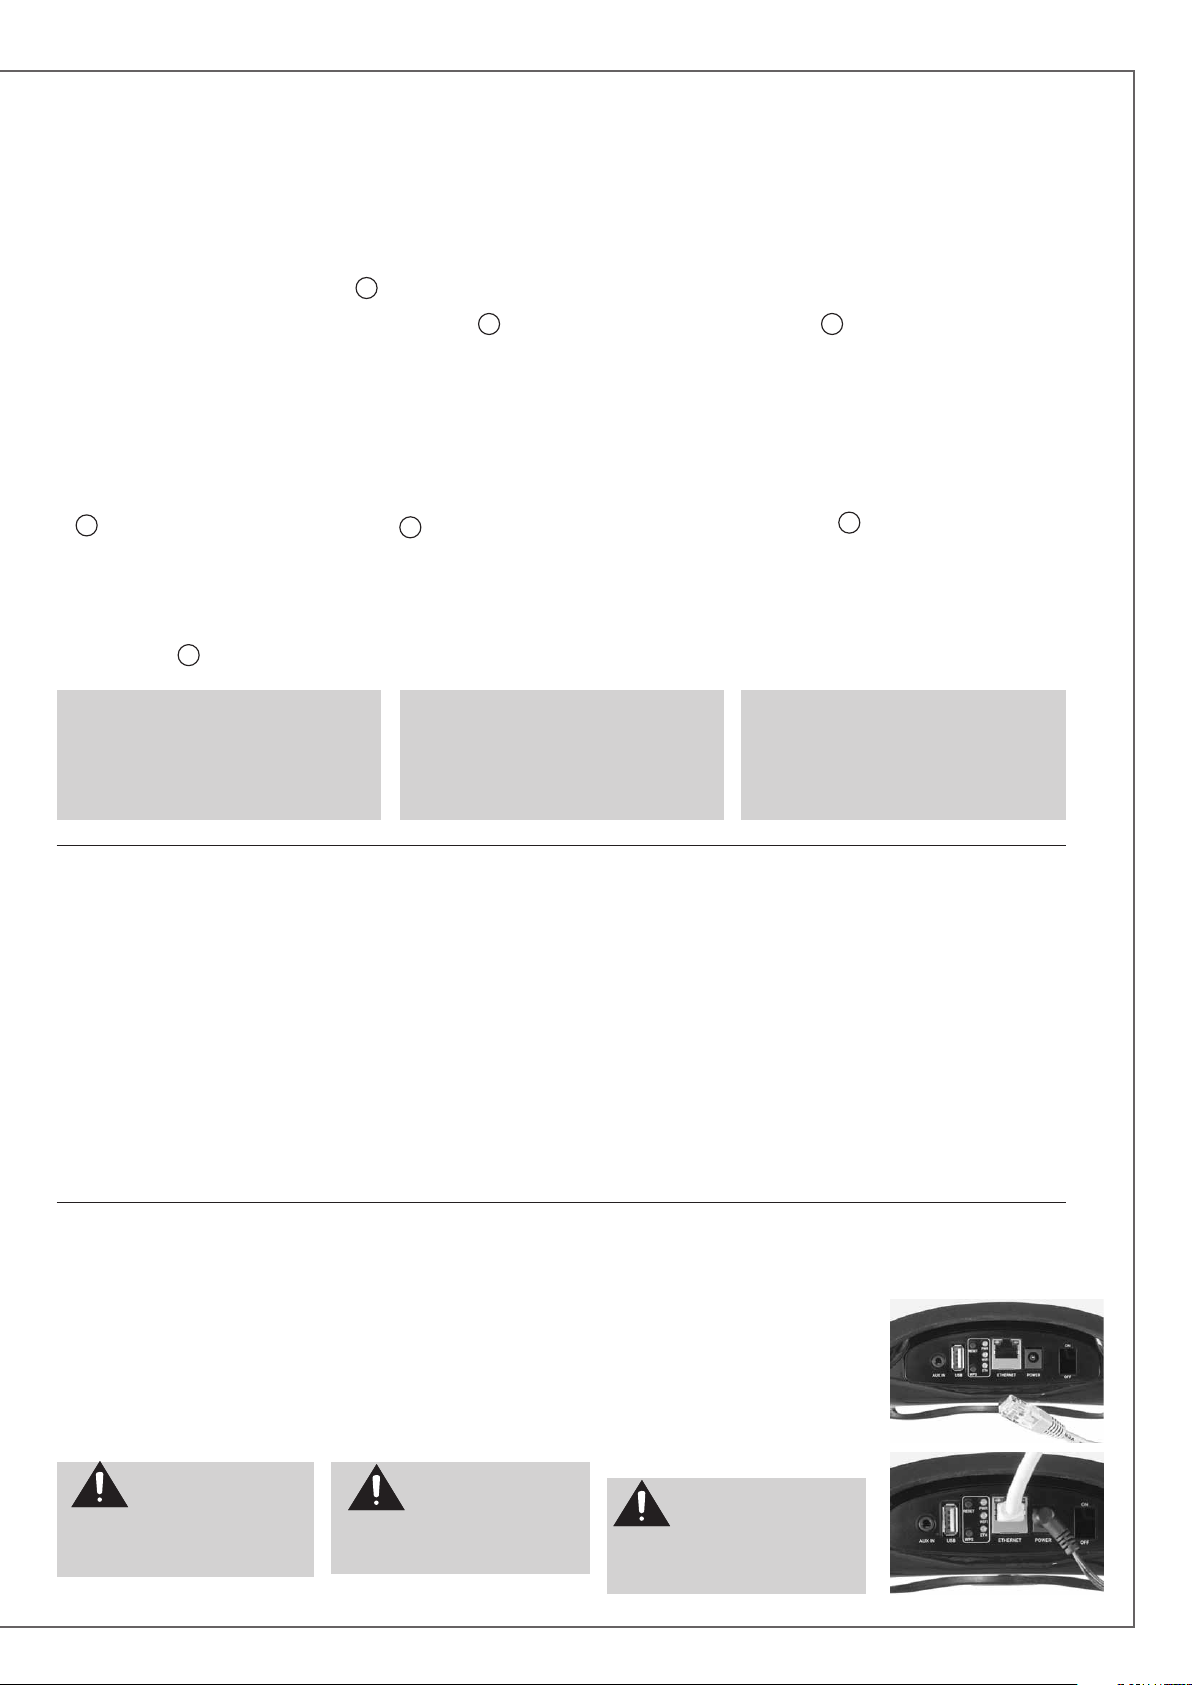
CONNEXION FILAIRE (LAN) AU RESEAU ETHERNET
LAN WIRE CONNECTION TO THE ETHERNET NETWORK
VERBINDUNG MIT EINEM DRAHTGEBUNDEN ETHERNET-NETZWERK
Connecter un câble RJ45 entre le
Stream 1 et votre routeur (ou Box
Internet). La connexion est établie
quand la diode ETH passe au bleu
fixe.
ATTENTION : le mode DHCP du
routeur doit être activé.
Appuyer sur le bouton
"RESET" avant d'utiliser
un nouveau mode de connexion wifi
(filaire, automatique, semi-auto,
manuelle) ou un nouveau routeur.
Use a RJ45 type cable to connect
Stream 1 to the domestic router.
The connection is running when the
blue LED "ETH" stops flashing and
remains on.
ATTENTION: set up the router on
DHCP mode.
process (wired, auto, easy, manual)
or connecting to a new router.
WIFI DIRECT MODE
Wi-Fi direct allows to play with wifi quality
all the audio tracks available in the tablet
or the smartphone as well as those availble
in the hard-disk or USB-stick connect to the
USB input of Stream 1, without need of a
wifi network. Internet sources such as Vtuner,
Deezer and the Stream 1 firmware updates are
not available.
Activate the Stream 1, Install and open the
Cabasse app on your tablet/smartphone and
select "Use this device in standalone mode"
instaid of "configure this audio device".
Folllow the instructions and start playing your
music.
Benutzen Sie ein handelsübliches
Netzwerkkabel mit RJ45-Steckern
zum Anschluss des Stream 1 an den
Netzwerk-Router. Die Verbindung
ist aufgebaut, wenn die blaue LED
"ETH" aufhört zu blinken und
kontinuierlich leuchtet.
ACHTUNG: Stellen Sie den Router in
seinem Konfigurationsmenü auf DHCP.
Press "RESET" before
starting a new connection
Verbindungsprozess einleiten (wired,
auto, easy oder manual) oder vor dem
Anschluss an einen neuen Router.
Betätigen Sie „Reset“,
bevor Sie einen neuen
WIFI DIREKT MODUS
Wi-Fi direct allows to play with wifi quality
all the audio tracks available in the tablet
or the smartphone as well as those availble
in the hard-disk or USB-stick connect to the
USB input of Stream 1, without need of a
wifi network. Internet sources such as Vtuner,
Deezer and the Stream 1 firmware updates are
not available.
Activate the Stream 1, Install and open the
Cabasse app on your tablet/smartphone and
select "Use this device in standalone mode"
instaid of "configure this audio device".
Folllow the instructions and start playing your
music.
7
Page 8
f r a n c a i s e n g l i s h d e u t s c h
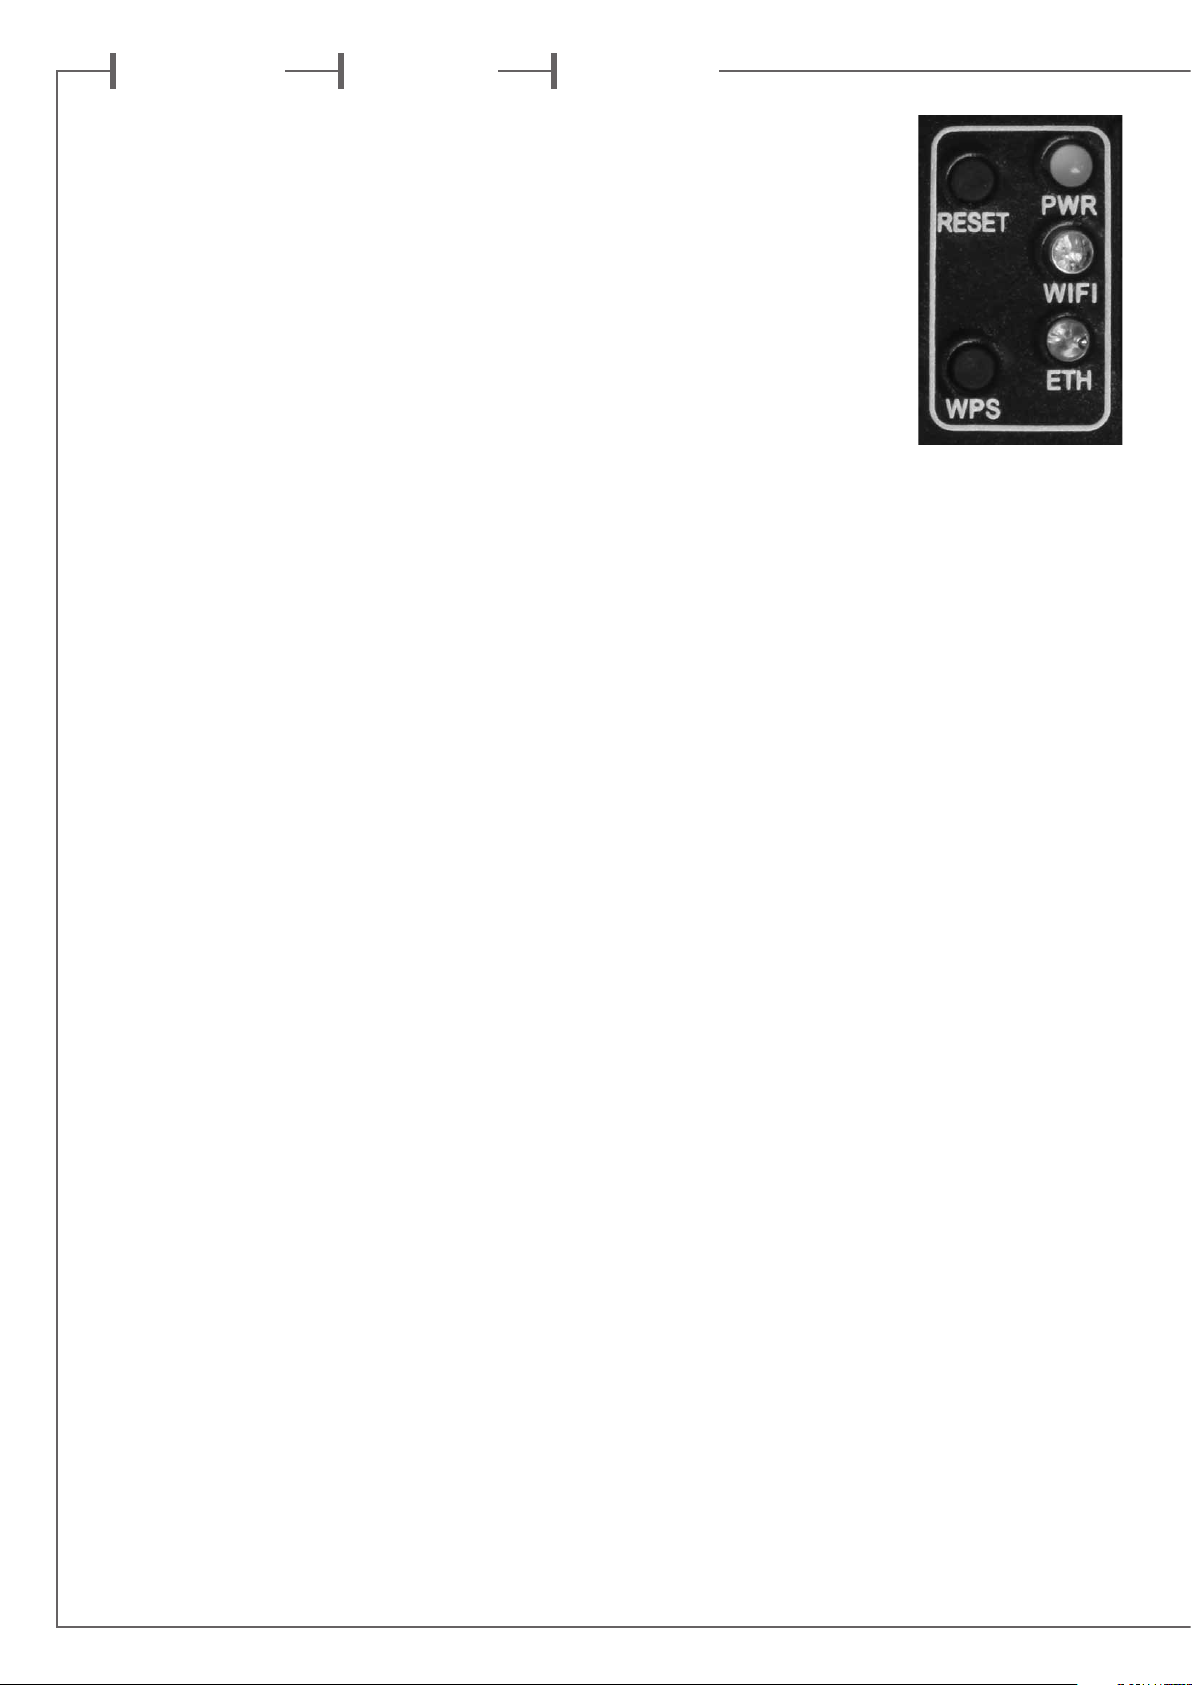
CONNEXION DLNA SANS FIL (WLAN) AU RESEAU WIFI
DLNA (WLAN) WIRELESS CONNECTION TO THE WIFI NETWORK
DRAHTLOSE DLNA-VERBINDUNG PER WLAN
IL EXISTE 3 SOLUTIONS POUR
CONNECTER LE STREAM 1 AU
RESEAU WIFI :
1) CONNEXION AUTOMATIQUE avec
l'utilisation des touches WPS du Stream 1 et
du routeur (ou box Internet) s'il en est équipé:
presser le bouton WPS du routeur pendant
au moins 2 secondes puis presser dans les
2 minutes (ces durées sont indicatives, à
vérifier dans le manuel du routeur) qui suivent
presser le bouton WPS du Stream 1. La diode
bleue "WIFI CONFIGURATION" s'allume, la
connexion est effective. Continuer à la page 14
avec l'installation de l'application Cabasse.
2) CONNEXION SEMI-AUTOMATIQUE avec
l’application Cabasse sur un smartphone ou
une tablette connecté(e) au réseau Wi-Fi.
a) Installer l’application Cabasse sur la
tablette/smartphone depuis “Play Store”
pour un appareil Android ou “App store”
pour un produit Apple.
b) Mettre le Stream 1 sous tension (ou
appuyer sur le bouton reset), activer le mode
wifi dans l’application “paramètres” du
smart phone ou de la tablette.
c) Sélectionner Stream 1 parmi les appareils
disponibles et demander la connexion.
d) Une fois la connexion établie, ouvrir
l’application Cabasse et choisir: "configurer
le réseau Wi-Fi pour ce lecteur". Suivre pas à
pas les instructions d'installation.
Note : vous pouvez lancer l'application Cabasse dès la fin de la phase b), et continuer
le processus de connexion, l'assistant de
configuration apparaissant automatiquement
pour la première utilisation.
e) Vérifier que la diode bleue Wifi à l’arrière
du Stream 1 clignote.
f) Après environ 30 secondes la diode Wifi
bleue est fixe : appuyer sur “Fermer la Page”.
Stream 1 est prêt à lire les fichiers audio
partagés de votre réseau ou les radios web
proposées par vTuner.
THERE ARE 3 SOLUTIONS TO
CONNECT STREAM 1 TO THE
WIFI NETWORK:
1) WPS CONNECTION: push the WPS
button of the wireless router for 2 seconds
or more and push the WPS button of the
Stream 1 within around 2 minutes (check for
precise delays in the router's manual) . The
connection is completed when the blue LED
"WIFI CONFIGURATION" is on. Now go to
page 23 to install the Cabasse application.
2) EASY WI-FI CONNECTION with the
Cabasse Stream app & with a smartphone
or tablet wi-fi connected to the domestic
network.
a) Install the Cabasse Stream App on an
Android or Apple tablet or smartphone from
"Play Store" or “App Store”.
b) Switch the Stream 1 on or press the reset
button if already on. Activate the Wi-Fi in the
"settings" application mode of the smartphone or tablet.
c) Select Stream 1 among the available items
and launch the connection.
d) Launch the Cabasse Stream app and select
"configure this audio device". Follow the setup instructions.
Note: from phase b), you may open the
Cabasse application and follow the instructions of the online guide, which is launched
automatically when connecting for the first
time.
e) The Wifi blue LED on the back of Stream 1
flashes for around 30 seconds.
f) The Wifi blue LED stops flashing and
remains on: press on "Close This Window".
Stream 1 is now ready to play all the shared
audio files in your network as well as all the
web radios proposed by vTuner.
ES GIBT DREI MÖGLICHKEITEN,
DAS STREAM 1 MIT EINEM
WLAN ZU VERBINDEN:
1) WPS-VERBINDUNG: Betätigen Sie
die WPS-Taste an Ihrem WLAN-Router für
mindestens zwei Sekunden und betätigen
Sie anschließend innerhalb von etwa zwei
Minuten (überprüfen Sie den genauen
Zeitraum in der Anleitung Ihres Routers). Die
Verbindungsaufbau ist dann abgeschlossen,
wenn die blaue LED "WIFI CONFIGURATION"
dauerhaft leuchtet. Führen Sie nun die auf
Seite 31 beschriebene Installation der CabasseApp durch.
2) EINFACHE WLAN-VERBINDUNG mit
einem Smartphone oder Tablet – jeweils mit
dem Heimnetz verbunden – mit Hilfe der
Stream-App von Cabasse
a) Installieren Sie die Cabasse-Stream-App auf
Ihrem Android- oder Apple Smartphone/Tablet
vom "Play Store" oder "App Store".
b) Schalten Sie das Stream 1 ein oder – falls
schon eingeschaltet – betätigen Sie die "Reset"Taste. Aktivieren Sie WLAN im Setup-Menü
Ihres Smartphones oder Tablets.
c) Wählen Sie aus den im Menü verfügbaren
Netzwerken "Stream 1" und stellen Sie die
Verbindung her.
d) Starten Sie die Stream-App. Wählen Sie
"configure this audio device" und folgen Sie
den weiteren Anweisungen.
Anmerkung: von Phase b) an können Sie die
Cabasse-App starten und den Online-Anweisungen folgen, die beim ersten Herstellen einer
Verbindung automatisch angezeigt werden.
e) Die blaue WLAN-LED auf der Rückseite des
Stream 1 blinkt für etwa 30 Sekunden.
f) die blaue WLAN-LED hört auf zu blinken
und leuchtet kontinuierlich: Betätigen Sie
"Close the Window". Das Stream 1 ist jetzt
bereit, alle Ihre im Netzwerk abrufbaren
Musikdateien abzuspielen und per vTuner
Internetradio-Stationen wiederzugeben.
8
Page 9
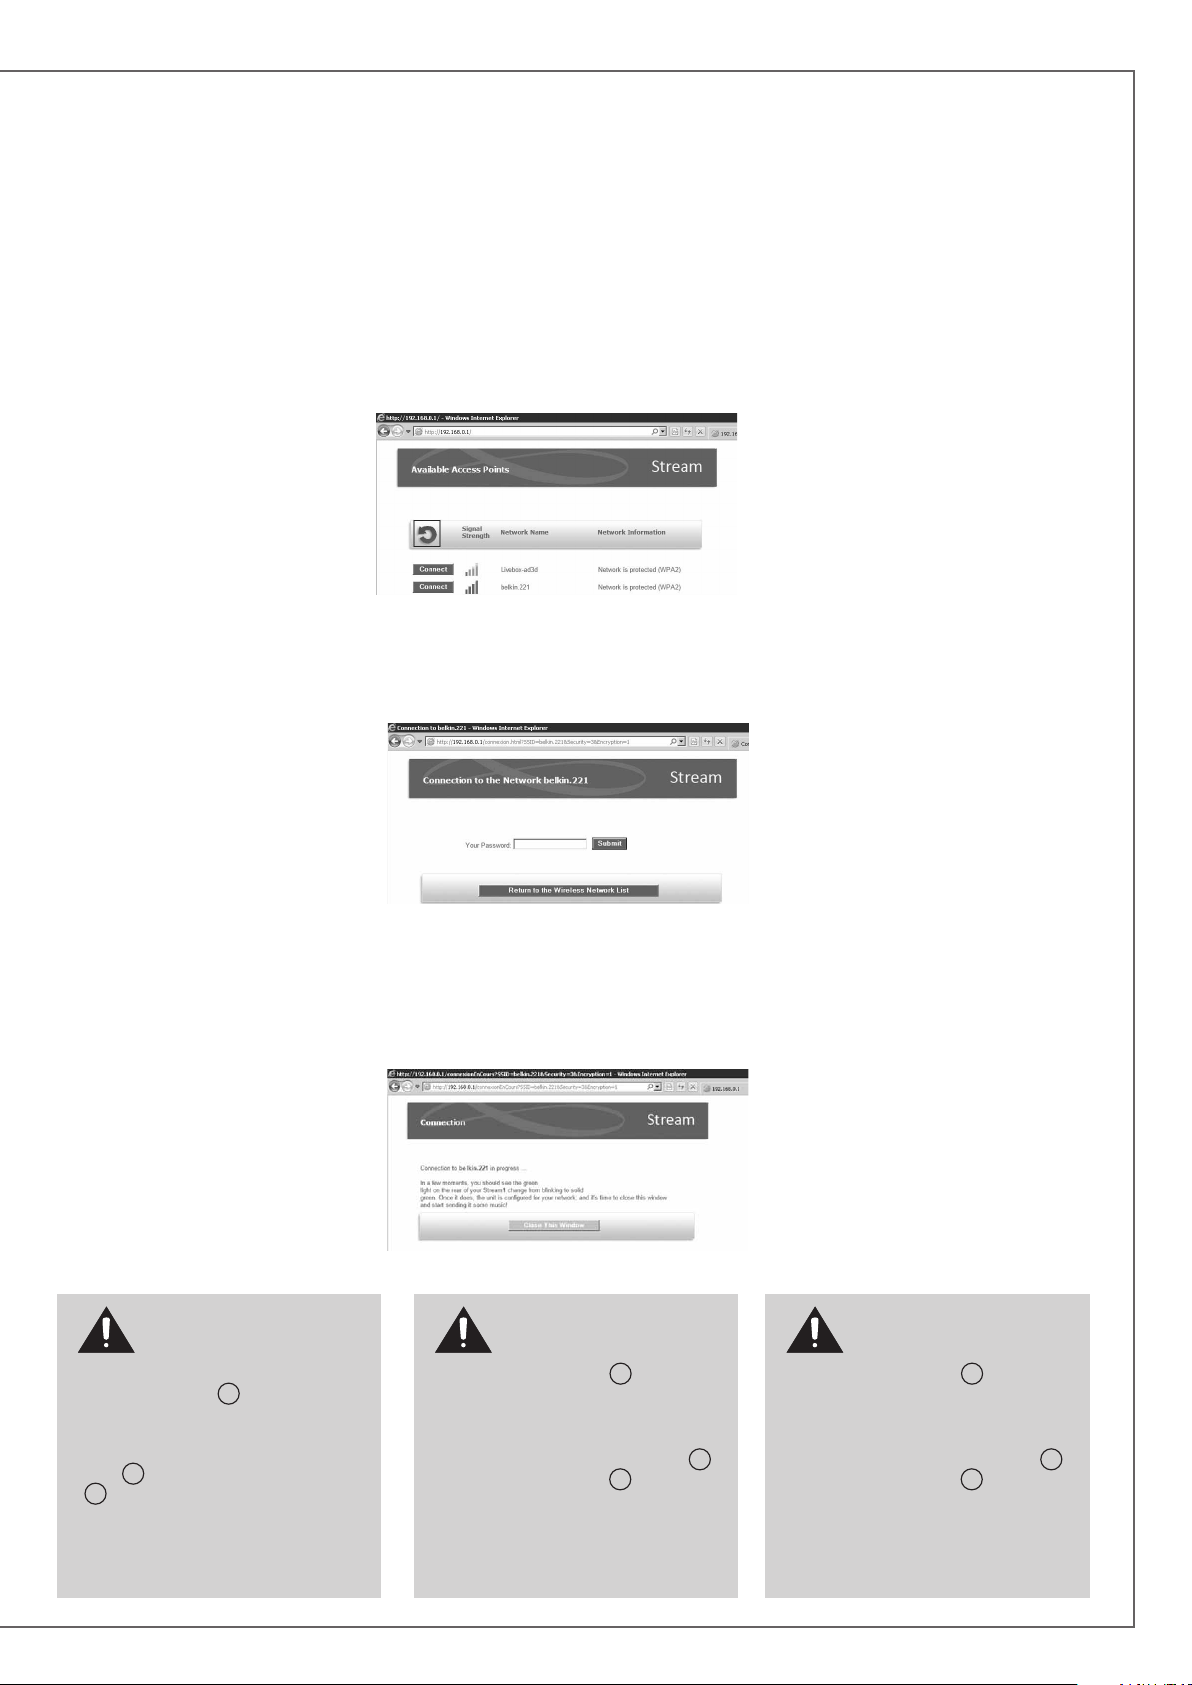
3 - CONNEXION MANUELLE avec un
ordinateur, un smartphone ou une tablette.
a) Mettre le Stream 1 sous tension et ouvrir la
fenêtre configuration réseau wifi de l'ordinateur
(ou smart phone, tablette):
b) Sélectionner Stream 1 parmi les réseaux
disponibles et demander la connexion.
c) Une fois la connexion établie, ouvrir votre
navigateur Internet, entrer : http://192.168.0.1
dans la fenêtre et valider.
d) Choisir parmi les réseaux disponibles celui
correspondant au serveur à connecter avec le
Stream 1 (ici "Belkin221")
3 - MANUAL CONNECTION with a computer,
a smartphone or a tablet:
a) Turn Stream 1 on and open the wi-fi network
configuration window of the computer (or
smartphone, tablet).
b) Select Stream 1 among the available
networks and ask for connection.
c) Once the connection is completed, open a
web browser, enter and validate in the search
window: http://192.168.0.1
d) Select among the available networks the one
of the router to be connected to Stream 1 (here
"Belkin 221")
3 - MANUELLE VERBINDUNG mit einem
Computer, einem Smartphone oder einem
Tablet:
a)Schalten Sie das Stream 1 ein und öffnen
Sie das Netzwerk-Konfigurationsmenü Ihres
Computers (oder Smartphone/Tablets).
b) Wählen Sie Stream 1 aus den verfügbaren
Netzwerken aus und initiieren Sie die
Verbindung
c) Ist die Verbindung hergestellt, öffnen Sie ein
Internet-Browserprogramm und geben Sie in
dessen Adresszeile ein: http://192.168.0.1
d) Wählen Sie aus den verfügbaren Netzwerk
dasjenige mit dem Router aus, mit dem das
Stream 1 verbunden werden soll (hier "Belkin
221")
e) Entrer et valider le mot de passe fourni
avec le serveur: la diode "wifi configuration"
clignote.
f) La connexion est établie quand la diode
passe au bleu fixe. Stream 1 fait maintenant
partie de votre réseau wifi. Fermer le navigateur
et continuer à la page 14 par l'installation de
l'application Cabasse.
e) Enter and validate the pass word for the
router : the “wifi configuration” LED flashes.
f) The connection is completed when the blue
LED stops flashing but remains on. Stream 1
is now part of your wireless network. Close the
browser and jump to page 23 for the install of
the Cabasse application.
e) Geben Sie das Passwort für den Router
ein und bestätigen Sie es. Die "Wifi
Configuration"-LED blinkt.
f) Die Verbindung ist hergestellt, wenn
die blaue LED aufhört zu blinken und
kontinuierlich leuchtet. Das Stream 1 ist nun
Teil Ihres drahtlosen Netzwerks. Schließen Sie
das Browser-Programm und installieren Sie die
Cabasse-App wie auf Seite 31 beschrieben.
ATTENTION ! Une mise à
jour du logiciel du Stream 1
peut démarrer automatiquement
dès qu'une connexion au réseau internet
est réalisée. la diode
clignote jusqu'à la fin de la mise à jour. Le
Stream 1 n'est pas fonctionnel durant cette
phase jusqu'au redémarrage en mode ECO,
9
diode
rouge fixe. Appuyer sur la touche
1
pour passer en mode actif et utiliser
Stream 1.
Ne pas éteindre ou déconnecter le Stream 1
durant les mises à jours qui peuvent durer
jusqu'à 15 minutes.
9
passe au blanc et
CAUTION! An automatic
update of the firmware might
start as soon as Stream 1 is
connected to the Web. The
white and flashes for 5 to 15 minutes until
the update is fully completed.
Do not try to use Stream 1 during the update,
wait until Stream 1 has restarted, when
LED is steady red. Press
Stream 1 on and carry on.
Do not shut down or unplug Stream 1
during updates.
9
LED turn to
1
to turn the
9
9
CAUTION! An automatic
update of the firmware might
start as soon as Stream 1 is
connected to the Web. The
white and flashes for 5 to 15 minutes until
the update is fully completed.
Do not try to use Stream 1 during the update,
wait until Stream 1 has restarted, when
LED is steady red. Press
Stream 1 on and carry on.
Do not shut down or unplug Stream 1
during updates.
9
LED turn to
1
to turn the
9
Page 10
f r a n c a i s
Vous venez d’acheter un produit Cabasse et nous vous remercions de votre confiance.
Dans le but d’optimiser au maximum votre installation, nous vous recommandons
de lire attentivement cette notice.
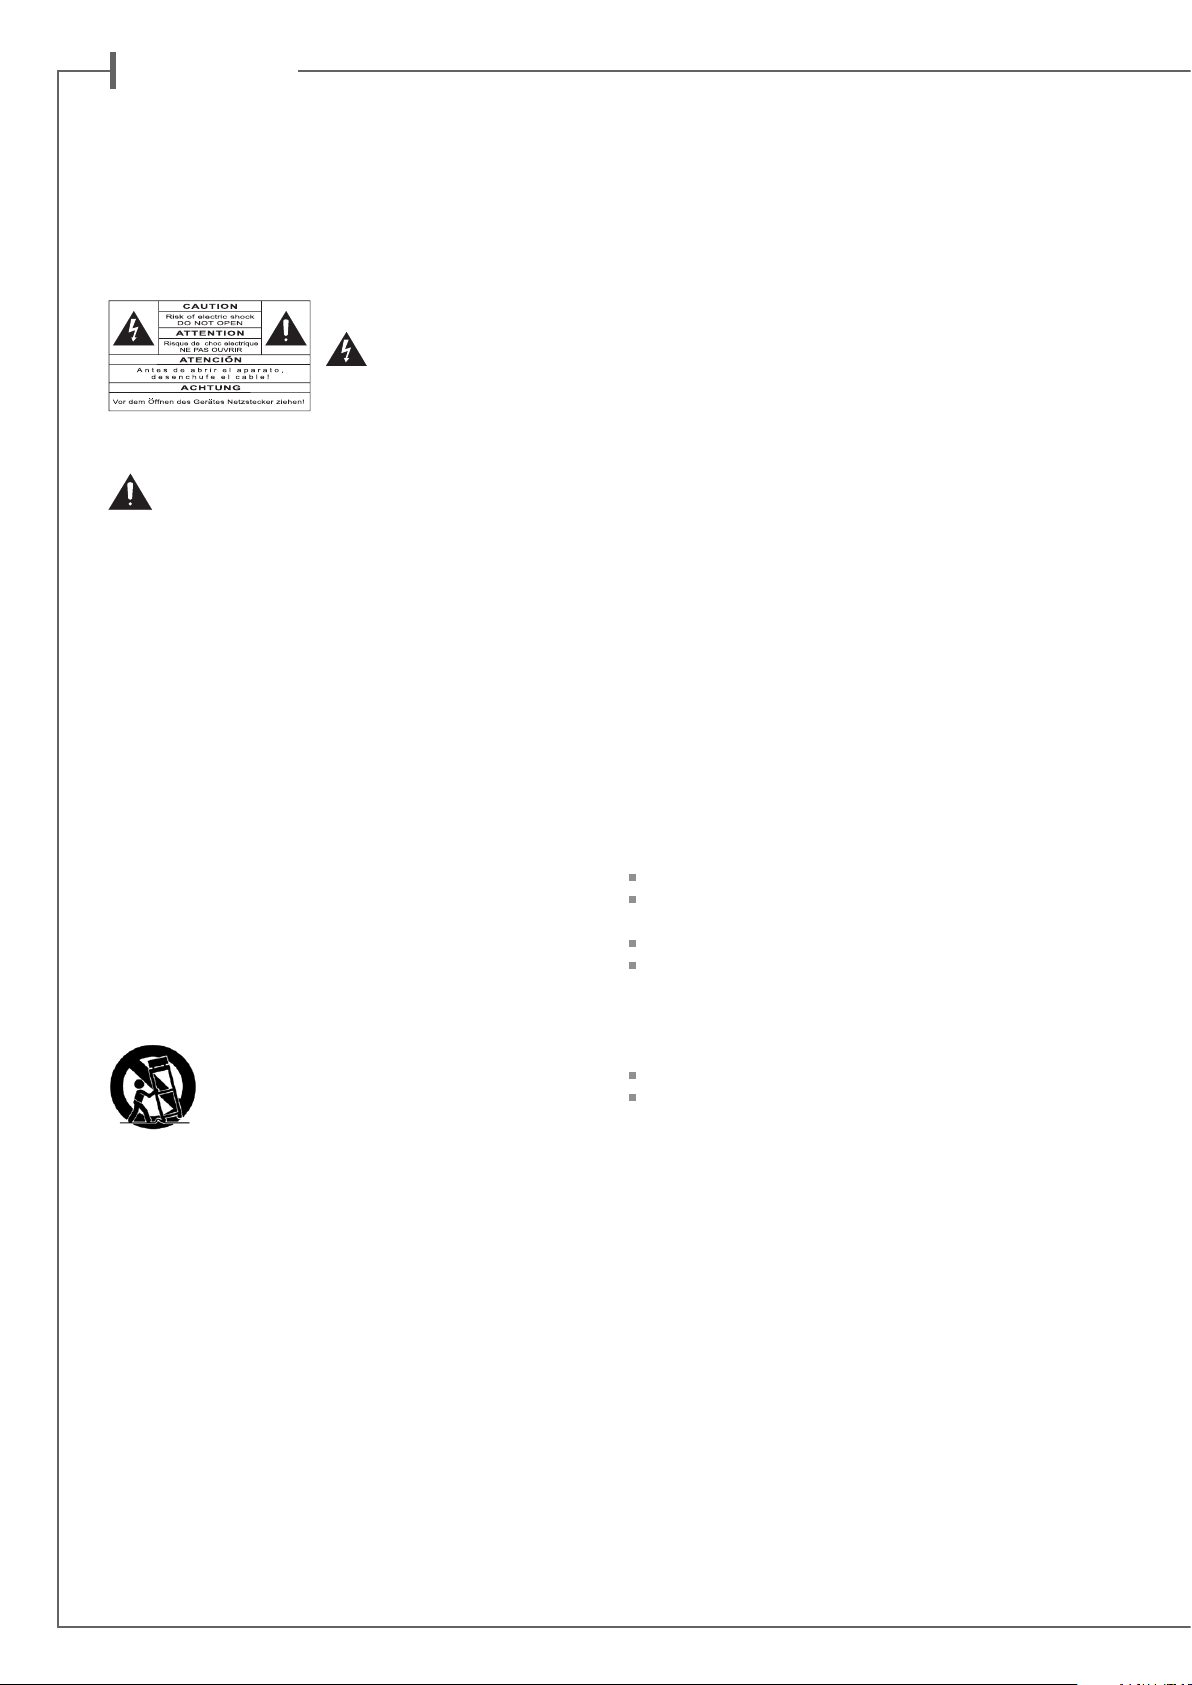
INSTRUCTIONS DE SECURITE
Explication des symboles
L’éclair dans un triangle
équilatéral avertit de
l’existence de tension élevée
dangereuse non isolée à l’inté-
rieur du coffret du produit, d’une valeur suffisante pour présenter un risque d’électrocution.
Le point d’exclamation dans un triangle équilatéral
avertit de l’existence d’instructions importantes quant
à l’utilisation et la maintenance dans la documentation jointe
à ce produit.
Instructions - Toutes les instructions de sécurité et d’utilisa-
tion doivent avoir été lues avant d’allumer tout appareil pour
la première fois.
Retenez les instructions - Elles doivent servir de référence
permanente pour tout ce qui suit.
Tenez compte des avertissements - Les avertissements
présents sur le produit ou dans les notices d’utilisation
doivent être pris en compte.
Suivez les instructions -
tion et de mise en oeuvre doivent être scrupuleusement suivies.
Toutes les instructions d’utilisa-
Nettoyage - Débranchez l’appareil avant tout nettoyage.
N’utilisez pas de solutions nettoyantes sous forme liquide ou
en aérosols. Employez de préférence un chiffon humide.
Accessoires - N’utilisez pas d’accessoires qui ne soient pas
explicitement recommandés par le constructeur, sous peine
de risquer divers accidents.
Eau et humidité - L’appareil ne doit pas être utilisé près
de l’eau, par exemple à proximité d’une baignoire, d’un évier,
dans un sous-sol humide, près d’une piscine, ou de tout ce
qui y ressemble de près ou de loin.
Chariots et supports - La manutention doit
être effectuée seulement avec des chariots et supports agréés par le fabricant.
> Attention aux chariots de manutention
Installation sur mobiliers et supports - Ne placez pas
cet appareil sur un support instable, qu’il s’agisse de pieds,
trépieds, tables, étagères, etc. Il pourrait tomber et causer des
blessures sérieuses à un enfant ou un adulte qui se trouverait
à proximité.
Ventilations - L’appareil doit être positionné de telle sorte
qu’il ne gêne pas sa propre ventilation. Par exemple, il ne
doit pas être installé sur un lit, un canapé, une couverture
ou des surfaces similaires qui pourraient bloquer ses orifices d’aération. Il ne doit pas non plus être encastré dans
des enceintes confinées comme des étagères étroites ou des
meubles qui pourraient limiter la quantité d’air disponible
aux entrées d’air.
Alimentation - L’appareil ne doit être relié qu’à une source
électrique du type écrit dans le mode d’emploi ou conforme à
la sérigraphie sur le produit. Si vous n’êtes pas sûr du type de
courant fourni à l’endroit où vous vous trouvez, adressez-vous
à votre revendeur ou à la compagnie électrique locale.
Protection des câbles d’alimentation - Le cheminement
des câbles d’alimentation doit être prévu de telle sorte qu’ils
ne puissent pas être piétinés, pincés, coincés par d’autres appareils posés dessus, et une attention toute particulière doit
être accordée à l’adéquation des prises et à la liaison du cordon avec l’appareil.
Foudre - Pour une meilleure protection de l’appareil pen-
dant les orages ou s’il doit rester inutilisé pendant une longue
période, débranchez le cordon d’alimentation et débranchez
la prise d’antenne, vous éviterez ainsi les risques de détérioration dus à la foudre ou aux surtensions.
Surcharges électriques - Ne surchargez pas les prises
d’alimentation, les prolongateurs ou les rappels d’alimentation. Il pourrait en résulter incendies ou électrocutions.
Corps et liquides étrangers - On doit être attentif à
ne jamais laisser entrer d’éléments ou de liquides étrangers
dans l’appareil. Ils pourraient occasionner incendies ou électrocutions. Ne versez jamais aucun liquide d’aucune sorte sur
l’appareil.
Entretien - L’utilisateur ne doit pas tenter de s’occuper des
opérations de maintenance au-delà de celles décrites dans
le mode d’emploi. Tout ce qui dépasse le simple niveau de
l’entretien doit être effectué par un personnel qualifié.
Maintenance - Dans les cas suivants, vous devez impéra-
tivement débrancher votre appareil et le faire vérifier par un
technicien qualifié :
l’alimentation ou la prise a été endommagée.
des corps étrangers ou du liquide se sont introduits dans
l’appareil.
l’appareil a été exposé à la pluie ou a été aspergé d’eau.
l’appareil ne semble pas marcher correctement alors que
vous l’utilisez dans le cadre de ses instructions de fonction-
nement normal. Ne manipulez que les contrôles couverts
par le mode d’emploi. Toute autre procédure pourrait le dé-
tériorer et nécessiter l’intervention d’un technicien qualifié.
l’appareil est tombé ou bien sa carrosserie est endommagée.
l’appareil affiche des performances nettement modifiées.
Dans un environnement secteur perturbé (orage etc…), le
produit peut parfois nécessiter l’arrêt et la remise en route
au moyen de l’interrupteur secteur ON/OFF situé sur le panneau arrière de l’appareil pour fonctionner correctement de
nouveau.
Pièces détachées - Si la réparation a nécessité l’utilisation
de pièces détachées, assurez-vous que le technicien a bien
utilisé les références préconisées par le fabricant ou présentant les mêmes caractéristiques que les pièces originales. Des
pièces non conformes peuvent provoquer incendies, électrocutions ou autres.
Vérifications - Après toute intervention sur l’appareil, de-
mandez au technicien d’effectuer des tests afin de garantir
que l’appareil fonctionne en toute sécurité.
Exposition aux fortes températures - L’appareil doit
être tenu éloigné de sources de chaleur comme radiateurs,
chauffage divers, amplificateurs, ou tous autres éléments susceptibles de le placer dans des conditions de températures
anormalement élevées.
10
Page 11
Valable aux USA, au Canada et autres pays concernés
Attention ! pour éviter les chocs électriques, introduire la lame la plus
large de la fiche dans la borne correspondante et pousser jusqu’au fond.
Sacs plastiques - Ne pas laisser les sacs plastiques de l’embal-
lage à portée des enfants afin d’éviter tout risque d’étouffement.
DÉBALLAGE
Ouvrir largement le carton puis sortez un à un les différents
éléments. Si l’un des éléments du carton vous semble endommagé, ne pas l’utiliser, le replacer dans le carton d’origine et
contactez immédiatement votre revendeur.
Conservez votre emballage pour un éventuel transport ultérieur
de votre système.
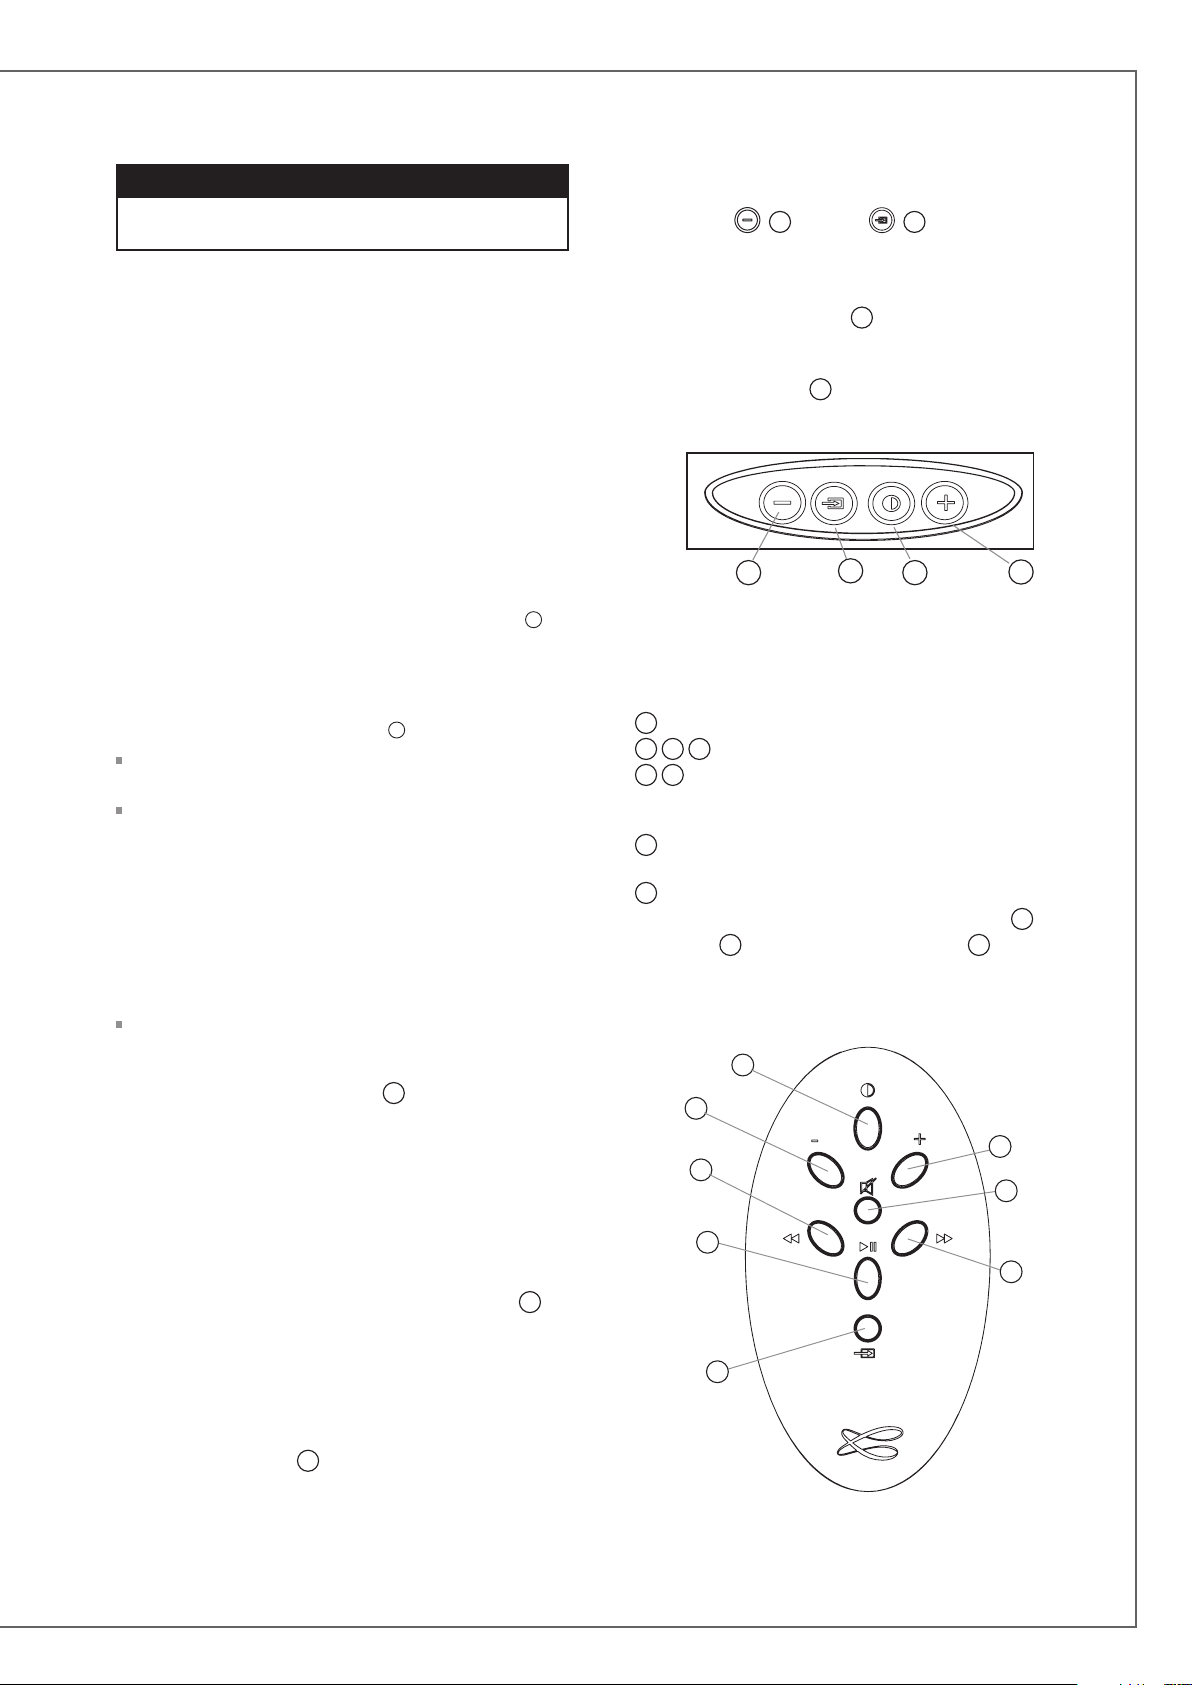
MoDE D'aFFICHaGE DEs DIoDEs
Appuyer sur
l'affichage permanent et le mode flash.
En mode flash, chaque commande, via l'application Cabasse,
la télécommande et/ou les touches du Stream 1, déclenche
un bref "éclair" de la diode
sélectionnée. Elle reste éteinte jusqu'à la commande suivante.
En mode permanent, une brève interruption ou un changement
de couleur de la diode
commande.
2
puis sur
8
9
, de la couleur de la source
9
confirme la prise en compte de la
pour permuter entre
InstallatIon
LES COMPOSANTS DE VOTRE SYSTÈME
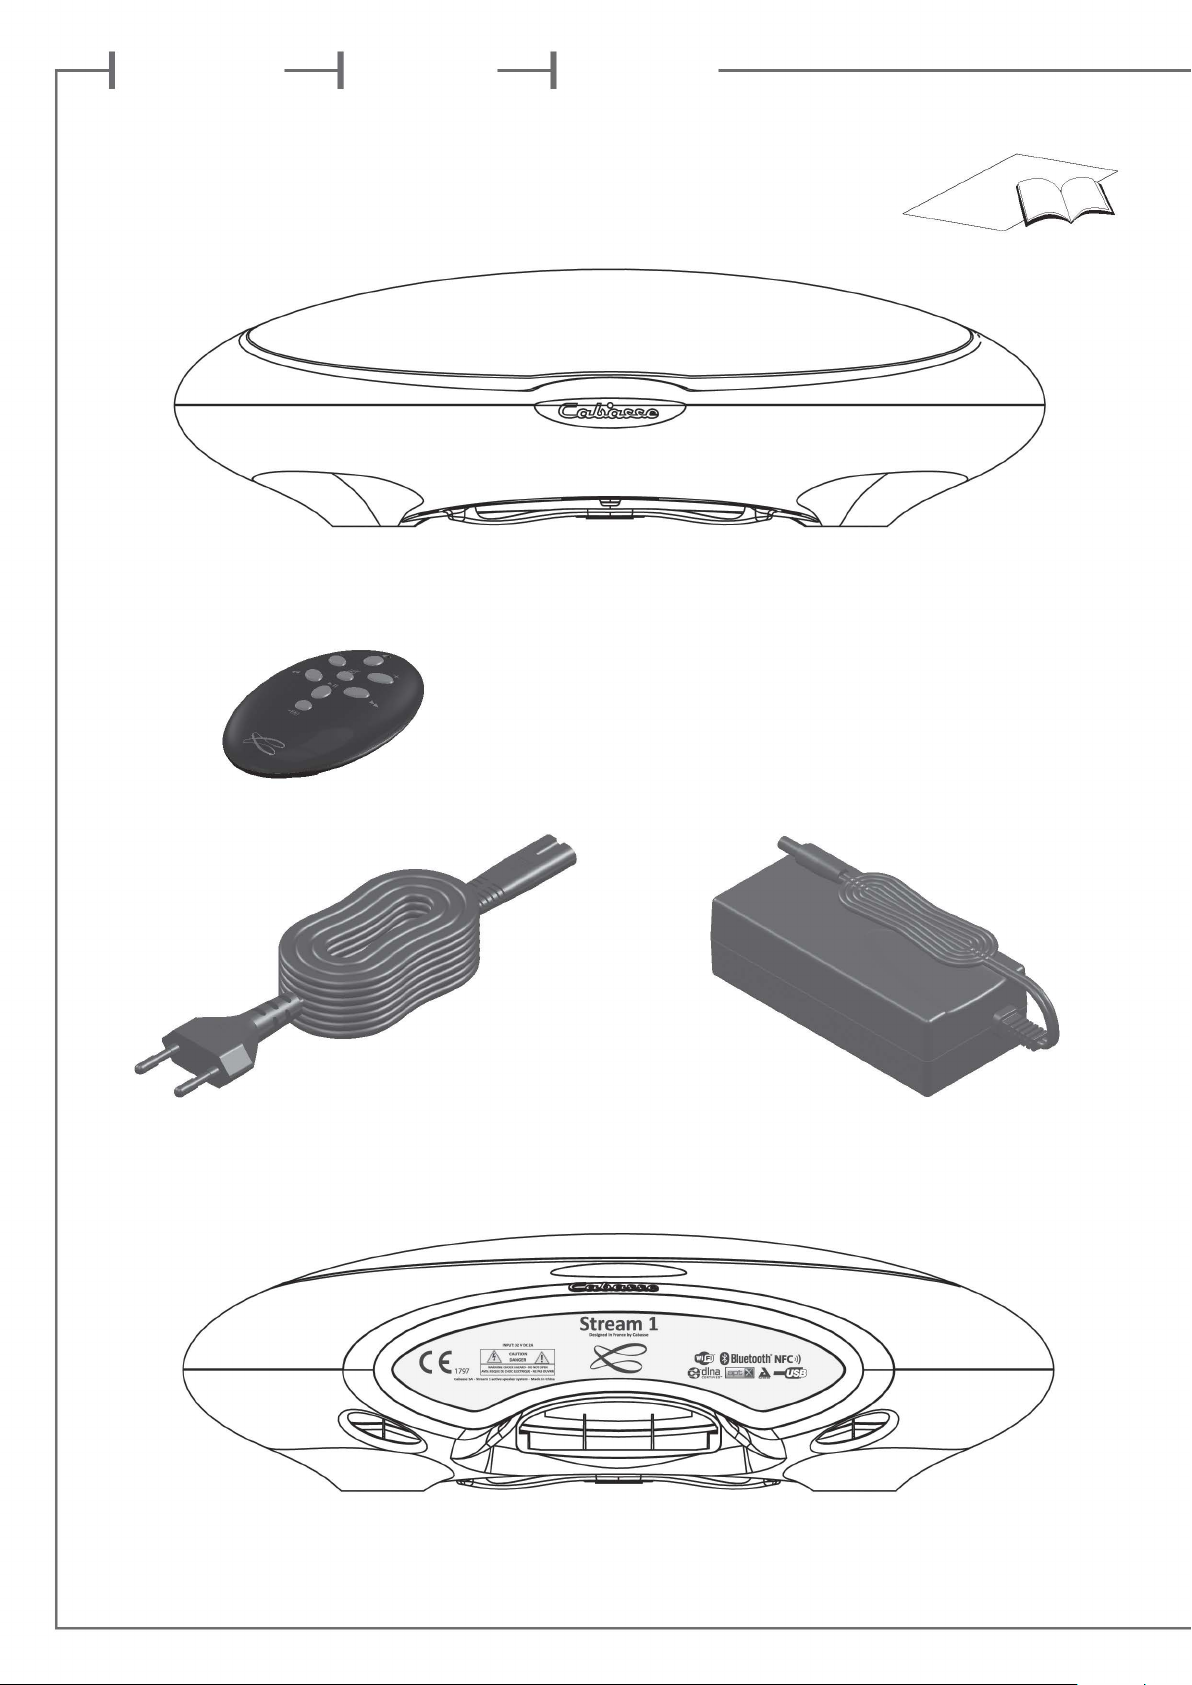
1 Stream 1, 1 alimentation, 1 télécommande, 1 notice et 1
carte de garantie.
PLACEMENT DU SYSTEME
Installer le Styream 1 couché, debout ou accroché au mur à
portée d'une prise électrique murale.
Laisser suffisamment d'espace au dessus et autour de
l'appareil pour :
- favoriser les transmissions wifi et Bluetooth,
- permettre le passage d'un smartphone pour la connexion
Bluetooth avec le patch NFC
- obtenir un bonne diffusion sonore.
BRANCHEMENT DU SYSTEME
Connecter l'alimentation externe au Stream 1, brancher l'ali-
mentation au secteur et basculer l'interrupteur marche/arrêt
sur "on". Stream 1 est opérationnel en mode ECO (basse
consommation) dès que la diode
NB:la fonction wifi de Stream 1 devient opérationnelle lorsque
la diode PWR (power) est passée du rouge au vert, environ 40
secondes après la mise sous tension.
1
:
5
:
9
s'allume.
2 1
8
3
UtIlIsatIon DEs CoMManDEs stREaM 1
Et DE la tElECoMManDE stREaM
1
Activer/désactiver le mode ECO
2 3 4
5 6
Bluetooth : titre précédent / suivant de l'album ou de la playlist en cours.
7
mains libres Bluetooth: décrocher/raccrocher.
8
sir entre les sources connectées: Bluetooth (diode
wifi (diode
contrôles + et - , marche/arrêt du volume.
Wifi : retour et avance rapide
Musique: lecture et pause en Bluetooth et wifi. Téléphone
sélection des sources : appuyer sur cette touche pour choi-
9
bleue),
9
orange) et analogique (diode 9 verte).
1
2
3
5
4
MaRCHE - ECo
a) Activation du mode ECO: appuyer sur la touche 1 de la
télécommande ou du Stream 1.
Sous ce mode, les fonctions wifi et Bluetooth sont disponibles.
L'électronique d'amplification audio est désactivée.
b) Passage en mode MARCHE:
- Appuyer sur la touche
1 ou
- Effectuer une connexion Bluetooth (NFC ou manuelle) ou
- Valider la lecture d'un fichier audio avec l'application Cabasse
Stream Audio Control.
1
de la télécommande ou du Stream
7
6
8
11
Page 12
f r a n c a i s
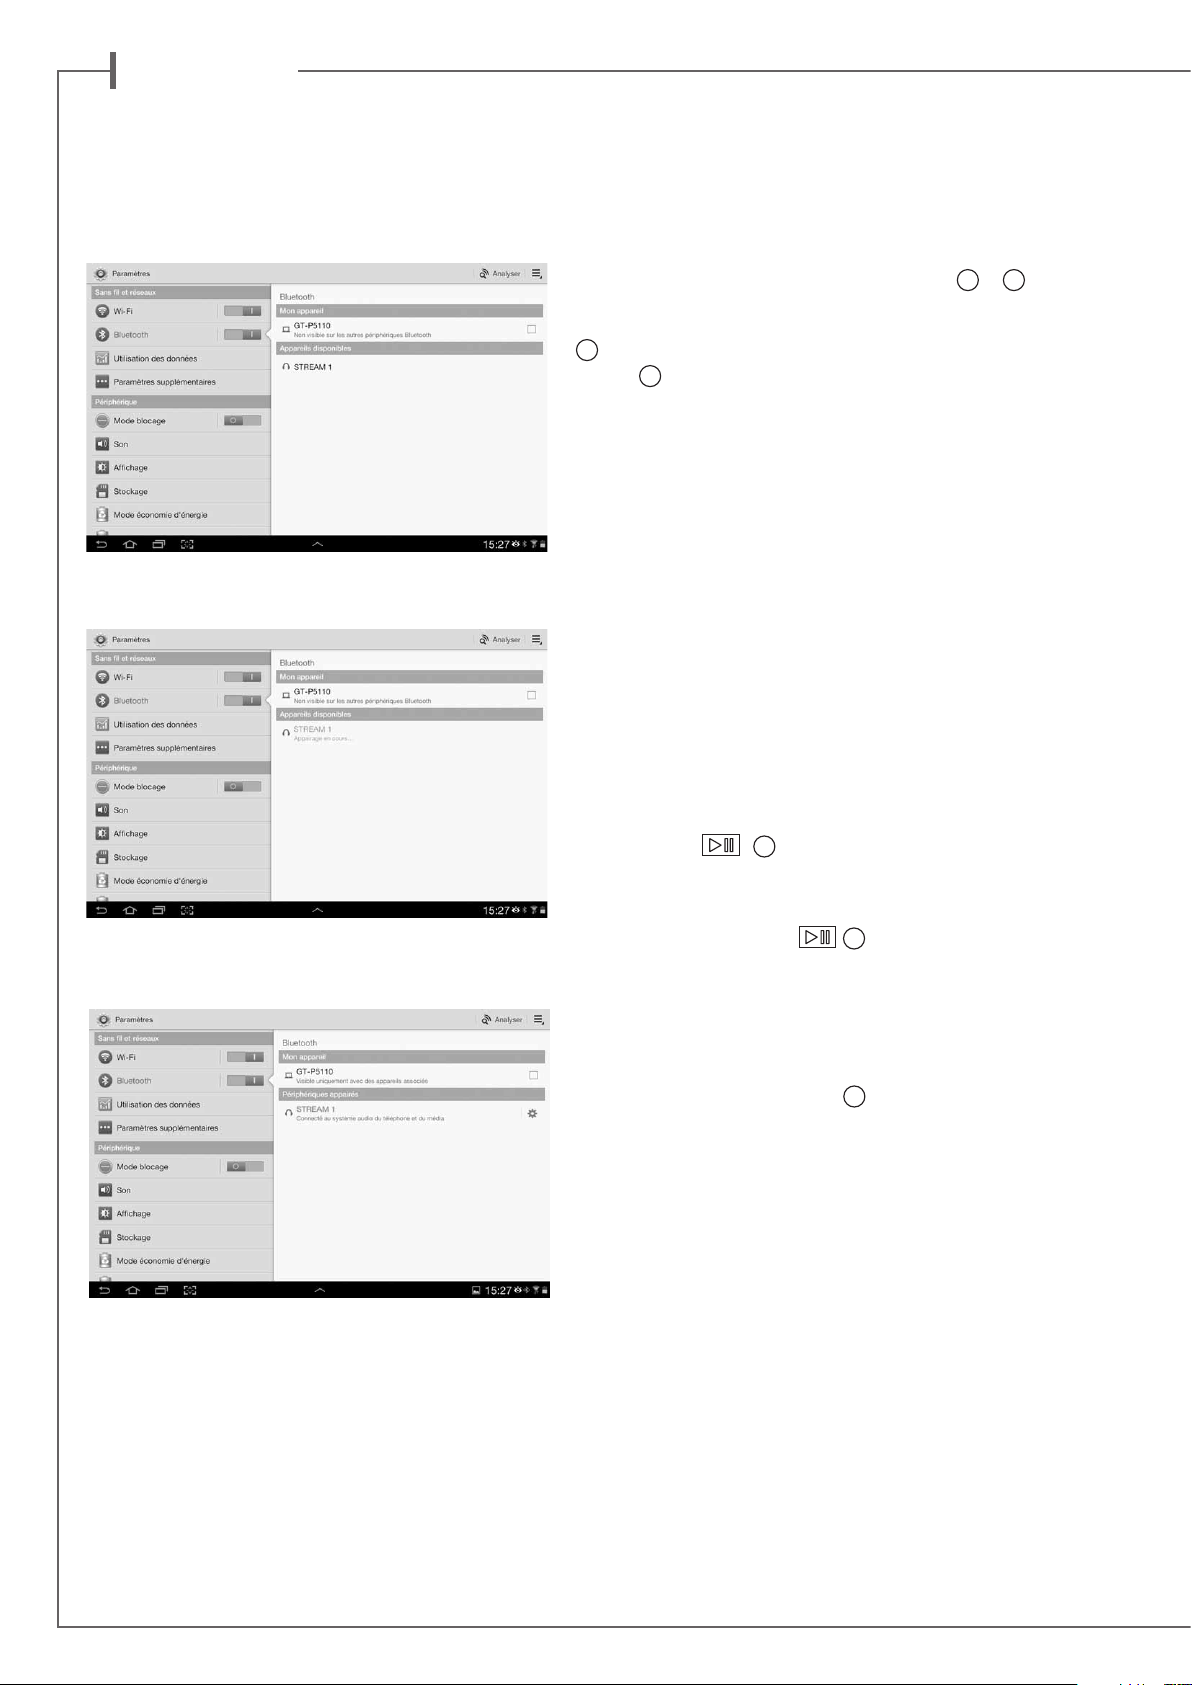
ConnEXIon BlUEtootH aVEC
UnE taBlEttE anDRoID non nFC
- Activer si ce n’est déjà fait la fonction Bluetooth dans le menu
paramètres de la tablette en appuyant sur le pavé OFF-ON
- Dans la liste des appareils disponibles, cliquer sur Cabasse
« Stream 1 ».
Votre Stream 1 est maintenant connecté.
Pour écouter les fichiers audio présents sur la tablette, ouvrir votre
application de lecture de fichiers audio et lancer une lecture. Si aucun son, vérifier que le contrôle général de volume de la tablette
ou du smartphone n’est pas sur mute ou au minimum, régler le
volume dans l’application si cette fonction existe, régler le volume
de Stream 1 avec sa télécommande ou les touches
Stream 1.
Enfin si une source wi-fi est active, changer de source avec la touche
8
de la télécommande ou sur Stream 1 jusqu’à ce que la diode
frontale
9
soit bleue.
2
et 3 sur le
ConnEXIon BlUEtootH InstantanEE
VIa nFC
Voir page 7
UtIlIsatIon En MaIns-lIBREs BlUEtootH
aVEC Un sMaRtPHonE
La fonction mains-libres de Stream 1 fonctionne par défaut dès
qu’un smartphone est utilisé pour lire des fichiers audio avec la
liaison Bluetooth.
Tout appel entrant sur le smartphone entraine la mise en pause de
la musique et déclenche la sonnerie téléphone du Stream 1 en sus
de celle du téléphone.
Si le Stream 1 n'est pas connecté en Bluetooth à un autre
appareil, la connection à la tablette suit automatiquement
l'appairage.
Si le message «Connexion...» n’apparait pas, vérifiez qu'un
autre appareil n'est pas déjà connecté au Stream 1. Déconnecter cet appareil et appuyer une nouvelle fois sur "Cabasse
Stream 1".
Pour prendre la communication en mains-libres, appuyer sur la
touche « Play »
touche « décrocher » du téléphone. La distance recommandée entre
l’interlocuteur et le Stream 1 est d’environ 1 m.
Appuyer sur la touche « Play »
ou utiliser le smartphone pour raccrocher, le Stream 1 reprend alors
la lecture du morceau musical là ou il a été mis en pause.
Pour utiliser la fonction mains-libres lors de l’écoute de sources wifi,
activer la connexion Bluetooth entre le smartphone et le Stream 1
puis utiliser la source wifi. Lors d’un appel entrant, basculer sur
la source Bluetooth avec la touche
Stream 1 pour activer la fonction mains-libres. Avant de basculer
sur la source Bluetooth, pensez à mettre la lecture wifi en cours
sur pause pour reprendre la lecture au même endroit après la
conversation mains-libres.
7
de la télécommande Stream ou sur la
7
de la télécommande Stream
8
de la télécommande ou du
12
Page 13
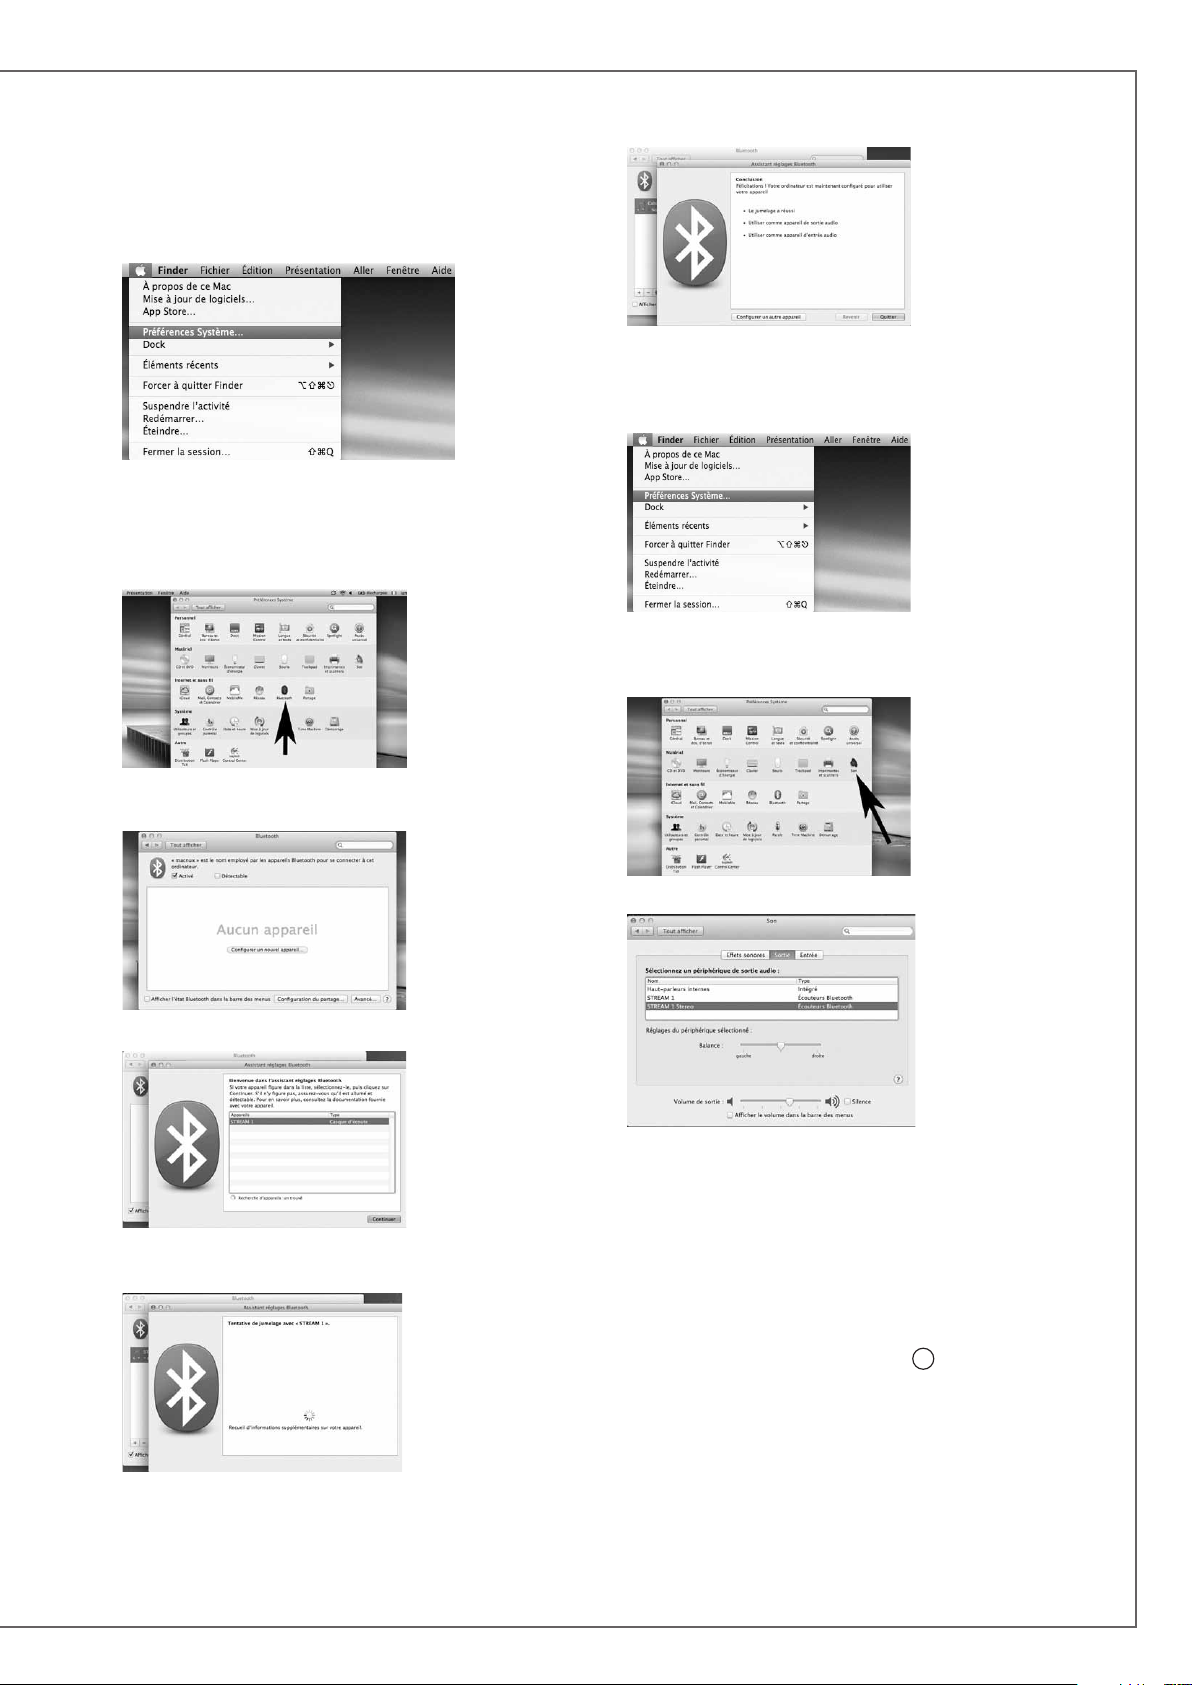
ConnECtIon BlUEtootH aVEC Un
oRDInatEUR aPPlE
1) ACTIVATION DE LA LIAISON BLUETOOTH
Connecter le Stream 1 au secteur. Interrompre toute liaison
Bluetooth active entre le Stream 1 et un autre appareil.
Activer, si ce n’est pas déjà fait, la fonctionnalité Bluetooth
de l’ordinateur en cliquant sur le menu « pomme » puis «
Préférences systèmes ».
Connexion réussie. Stream 1 est maintenant jumelé avec votre
Mac.
2) SÉLECTION DU PÉRIPHÉRIQUE DE SORTIE AUDIO
Pour écouter vos musiques avec votre Mac, vous devrez sélectionner votre Stream 1 en tant que périphérique de sortie audio dans les préférences système.
Une fois que la fenêtre de préférences s’affiche, cliquer sur
l’icône Bluetooth.
Cliquer sur « Activé » et sur « Configurer un nouvel appareil »
Stream 1 apparait dans la liste des appareils,
sélectionner le puis cliquer sur « Continuer »
Sélectionner « Son » dans la ligne « Matériel »
Sélectionner l’onglet "Sortie" puis la ligne "Stream 1 stereo".
Le lecteur "Stream 1" dans cette fenêtre correspond à la
configuration mains libres pour smartphones, inappropriée à
l'écoute musicale.
Régler le volume de sortie sur la position maximum. Fermer la
fenêtre.
Si le Stream 1 est actif et connecté à une source wi-fi, sélectionner la source Bluetooth avec la touche
ou du Stream 1 et ajuster le volume.
8
de la télécommande
Connexion en cours…
13
Page 14
f r a n c a i s
MUltIPlICatIon DEs soURCEs
aVEC l'IntEGRatIon D'Un stREaM 1
aU REsEaU WIFI-lan DoMEstIQUE
A) CONNEXION DU STREAM 1 AU RESEAU DLNA DOMESTIQUE
Après avoir connecté le Stream 1 à votre réseau wifi en suivant
une des 3 procédures exposées en page 9, connecter si ce n’est
déjà fait au réseau wifi la tablette ou le smartphone que vous
utiliserez avec l’application Cabasse Stream Audio Control.
B) INSTALLATION DE L'APPLICATION CABASSE
L’application Cabasse Stream Audio Control est téléchargeable
gratuitement, la version pour système Android étant disponible
sur Google Store, celle pour iPhone et iPad sur l'App Store.
Vous pouvez ainsi installer librement l’application Cabasse
Stream Audio Control sur plusieurs supports et les utiliser simultanément pour un même Stream 1 comme pour plusieurs Stream.
IMPORTANT : l’application n’est utilisable que si au moins un
Stream Cabasse se trouve à portée. Elle ne reconnait que les lecteurs audio associés à l’application Cabasse.
Télécharger et installer la version ad hoc de l’application Cabasse
Stream Audio Control sur le smartphone ou la tablette.
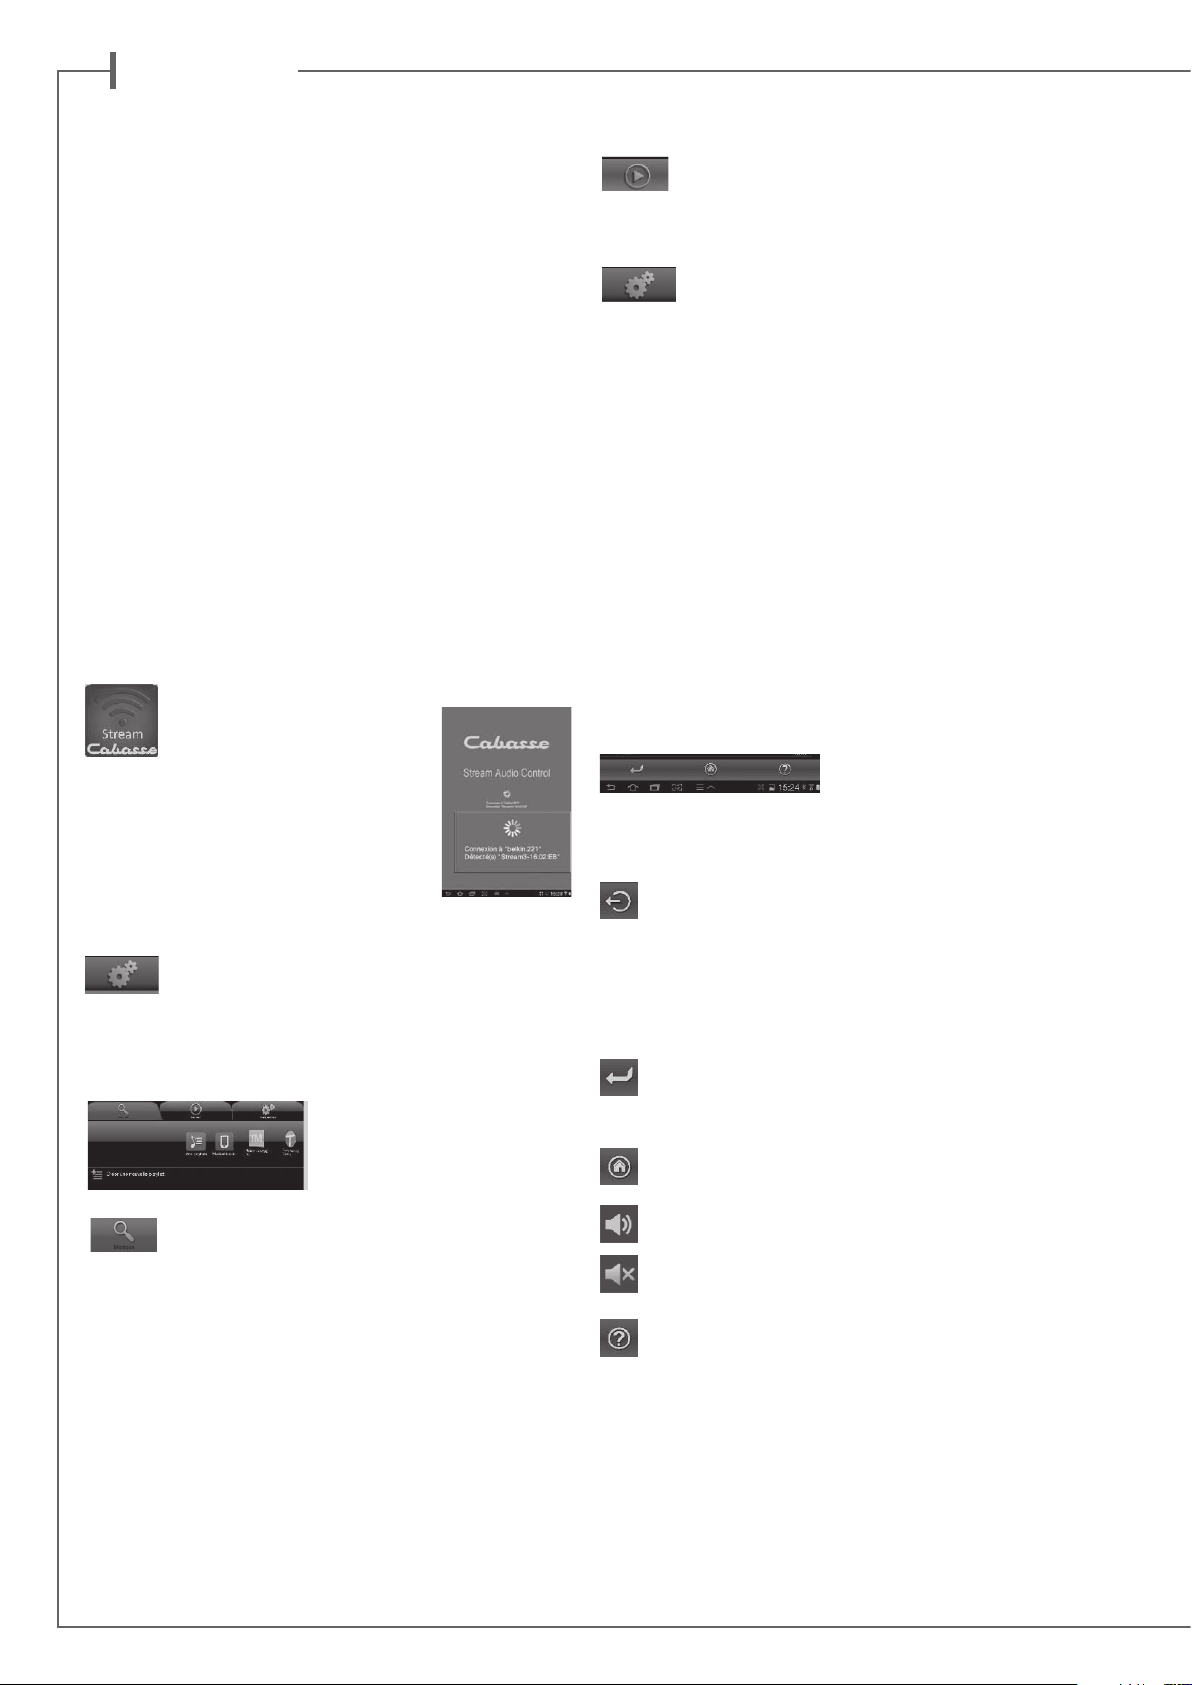
Lancer l’application en cliquant sur son icône.
2 lignes doivent apparaitre
sous l’engrenage au milieu
de la page de démarrage de
l’application :
- L’annonce de la connexion au routeur
(ou box internet) du réseau wi-fi, ici
“belkin.221”.
- L’annonce de la détection d’un lecteur
audio Stream, ici le “Stream3-16:02 : EB”.
ATTENTION : L’application peut détecter plusieurs lecteurs
audio, il faudra alors sélectionner dans le menu
“Paramètres ” de l’application le Stream 1 qui sera
utilisé comme lecteur audio par défaut.
La page « Lecture » affiche la lecture en cours et celles
sélectionnées en cours de lecture dans les sous-onglets
“Musique” en sélectionnant « Ajouter à la liste de lecture »
La page « Paramètres » comporte 4 sous-onglets :
o Le sous-onglet "Tablette" ou "Téléphone" permet
de choisir le mode d'affichage de la liste, soit comme
une liste soit par un icône, d'actualiser la liste des serveurs DMS
disponibles sur le réseau, d’actualiser la liste des sous-onglets de
"Musique", de restaurer les paramètres d’origine.
Si le support est un smartphone, le sous-onglet "Appel entrant"
permet de sélectionner l'option à appliquer en cas d'appel:
- ne rien faire: la diffusion de la musique continue
- couper le son: la lecture de la musique est maintenue avec le
son coupé
- mettre en pause et redémarrer la lecture une fois la communication terminée.
o Le sous-onglet "Lecteurs audio" affiche tous les lecteurs audio
Stream disponibles sur le réseau, permet de choisir le lecteur par
défaut pour la tablette et de renommer les lecteurs.
o Le sous-onglet "Zone" pour créer et gérer les groupes de lecteurs Stream (paragraphe J page 14).
o Le sous-onglet "Information" permet de vérifier la référence de
la version courante de l'application et la disponibilité d'une nouvelle version.
D) NAVIGATION DANS L’APPLICATION CABASSE
En sus des onglets et sous-onglets
en haut des pages de l’applica-
tion, utiliser les boutons présents
en bas de page. Les boutons proposés varient suivant la page et
le niveau de navigation.
Quitter : ce bouton permet de sortir de l’application. Il
ne se trouve que sur la page « Musique » qu’au plus haut
niveau de navigation, quel que soit le sous-onglet.
ATTENTION : si vous quittez l’application sans arrêter la lecture
avec la mise en PAUSE, la transmission wifi des fichiers de la liste
de la page “LECTURE” ne sera pas interrompue par la fermeture
de l’application comme la désactivation du support.
C) ARCHITECTURE DE L’APPLICATION CABASSE
L’application Cabasse donne un
accès rapide à toutes les sources
audio du réseau.
Elle est composée de 3 pages
communes aux versions Android
et IOS:
La page “Musique” affiche dans des sous-onglets
tous les serveurs disponibles:
- Dans toutes les configurations : les sous-onglets “ma
playlist”,“stream 1-xxx..” et le sous-onglet correspondant à la
tablette ou au smartphone hôte de l'application.
- Dans le cas ci-contre nous trouvons également quand ils sont
connectés au réseau:
o USB Belkin : une clé USB connectée sur le routeur Belkin
o Un disque dur multimédias, ici MyBookLive
o Un PC sous Windows 7 ou Windows 8
Retour : il remplace le bouton “Quitter” dès que vous descendez dans une catégorie et dans les sous catégorie. Il permet de revenir au niveau de navigation précédent
Maison : ce bouton permet de revenir directement au plus
haut niveau de navigation.
Son actif : la sortie son est activée.
Son coupé : la fonction Mute est active. Cliquer sur l’icône
pour activer la sortie son.
Aide : donne accès à des informations pour vous assister
dans l’utilisation de l’application en fonction de la page et
du niveau de navigation.
14
Page 15
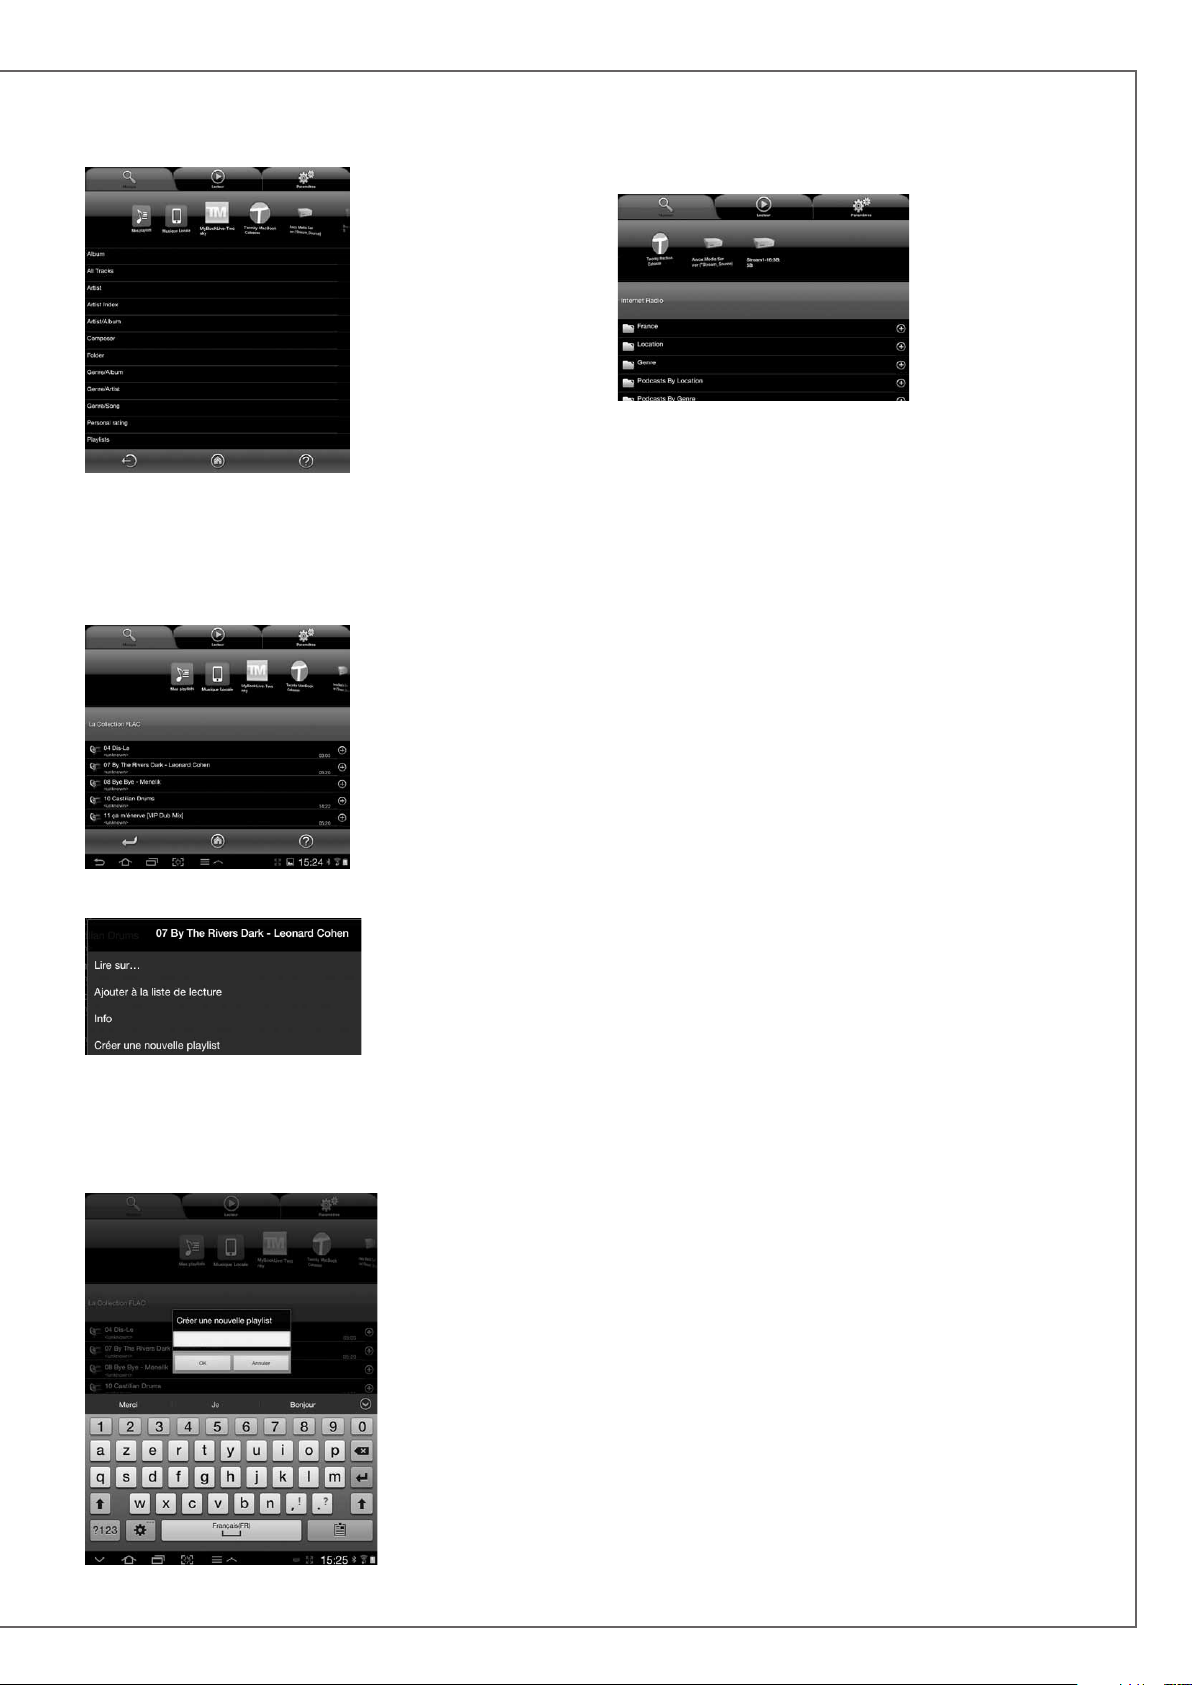
E) PAGE “MUSIQUE” : LECTURE DES FICHIERS PARTAGES
Toutes les sources audio
disponibles du réseau
DLNA (lecteurs Stream,
disque dur NAS, ordinateurs) sont représentées
par une icône en haut de la
page « Musique ». Il peut
être nécessaire de faire un
balayage horizontal pour
afficher la source recherchée.
Cliquer sur une des sources
pour accéder aux fichiers
audio partagés.
Les rubriques donnant accès aux fichiers varient suivant les supports et leur logiciel serveur
DLNA.
Cliquer sur la rubrique “Toute la musique” donne accès à tous
les fichiers audio partagés du support. Il s'agit ici de la tablette
hébergeant l'application Stream.
Cliquer directement sur
la ligne d’un fichier lance
sa lecture immédiate et
ouvre la page “Lecture”.
Le (ou les) fichier(s) listés
précédemment sur la page
“Lecture” sont effacés de
la page.
Cliquer sur le nom du fi-
chier déclenche sa lecture
directe. Cliquer sur un
autre titre remplacera la
lecture en cours.
Cliquer sur sur le signe
"+" à droite de la ligne du
fichier sélectionné donne
accès à 4 choix cliquables :
- Ajout à la liste de la page
“Lecture” :
le fichier sélectionné sera lu à la suite des autres fichiers listés sur
la page “Lecture”.
- Info : affiche les informations renseignées dans le fichier audio :
Titre, Artiste, Album, Genre, Date, Durée, Débit. A défaut la mention Inconnu apparaitra.
- Ajout à une playlist
existante (une ligne cliquable par playlist existante)
- Création d’une nouvelle playlist :
utiliser le clavier ou la
palette graphique pour
nommer la nouvelle
playlist puis cliquer sur
OK. Le fichier sélectionné devient le premier
fichier de la nouvelle
liste.
F) PAGE « MUSIQUE » :
MUSIQUE A PARTIR DES LECTEURS STREAM
Le lecteur audio Stream
1 est également une
source audio pour luimême et pour tous les
lecteurs Stream présents dans le même
réseau Wi-Fi/ DLNA.
Appuyer sur l’icône
d’un des lecteurs
Stream pour choisir
entre Vtuner et Deezer
pour Stream 3, Vtuner, Deezer et USB Storage pour Stream 1 et
Stream Source.
LECTURE DES RADIOS WEB
Cliquer sur l’onglet correspondant au Stream 1 puis sur Vtuner.
Procéder ensuite comme s’il s’agissait de chercher et de lire un
fichier audio partagé du réseau :
- Clic direct sur la station choisie pour lecture immédiate
- Clic sur la flèche de droite pour accéder aux options de lecture
et d’intégration à une playlist.
STREAMING AVEC DEEZER
Cliquez sur la ligne « Deezer » pour découvrir toutes les possibilités
proposées par ce site d’écoute de musique à la demande. Accédez
simplement sans téléchargement à vos artistes, titres, albums
favoris. Créer, échanger des playlists grâce à un catalogue de 30
millions de titres, issus de tous les genres musicaux.
Inscrivez-vous en ligne directement à partir de l’application
Cabasse ou saisissez vos codes d’accès aux services Deezer.
LECTURE DES FICHIERS AUDIO PAR LA PRISE USB
Cet onglet donne accès à toute la musique présente dans la clé
ou le disque dur connecté à la prise USB du Stream 1. Avec le
serveur DLNA intégré au Stream 1, tous les fichiers compatibles
sont répertoriés et sont accessibles par tous les lecteurs Stream
du réseau.
G) PAGE "MUSIQUE": MUSIQUE LOCALE
Ce sous-onglet permet de lire en qualité wifi avec l'application
Stream tous les fichiers audio présents sur la tablette ou le smartphone qui héberge l'application.
Les autres utilisateurs de l'application Stream agissant sur le
même réseau n'ont pas accès à la musique locale.
H) PAGE « LECTEUR »
Sur la page « Lecteur » figurent les fichiers audio sélectionnés
pour la lecture en cours. Appuyer sur l’icône « Lecteur » pour
permuter entre les 2 modes d’affichage :
- par liste avec défilement vertical
- par icône avec défilement horizontal, affichage de la barre de
défilement et des pochettes d’album (si ces dernières sont
accessibles).
Sauf écrasement de cette liste par une commande de lecture
directe dans une des pages “Musique”, cette liste reste affichée
même après avoir éteint l’appareil support de l’application
Cabasse.
15
Page 16
f r a n c a i s
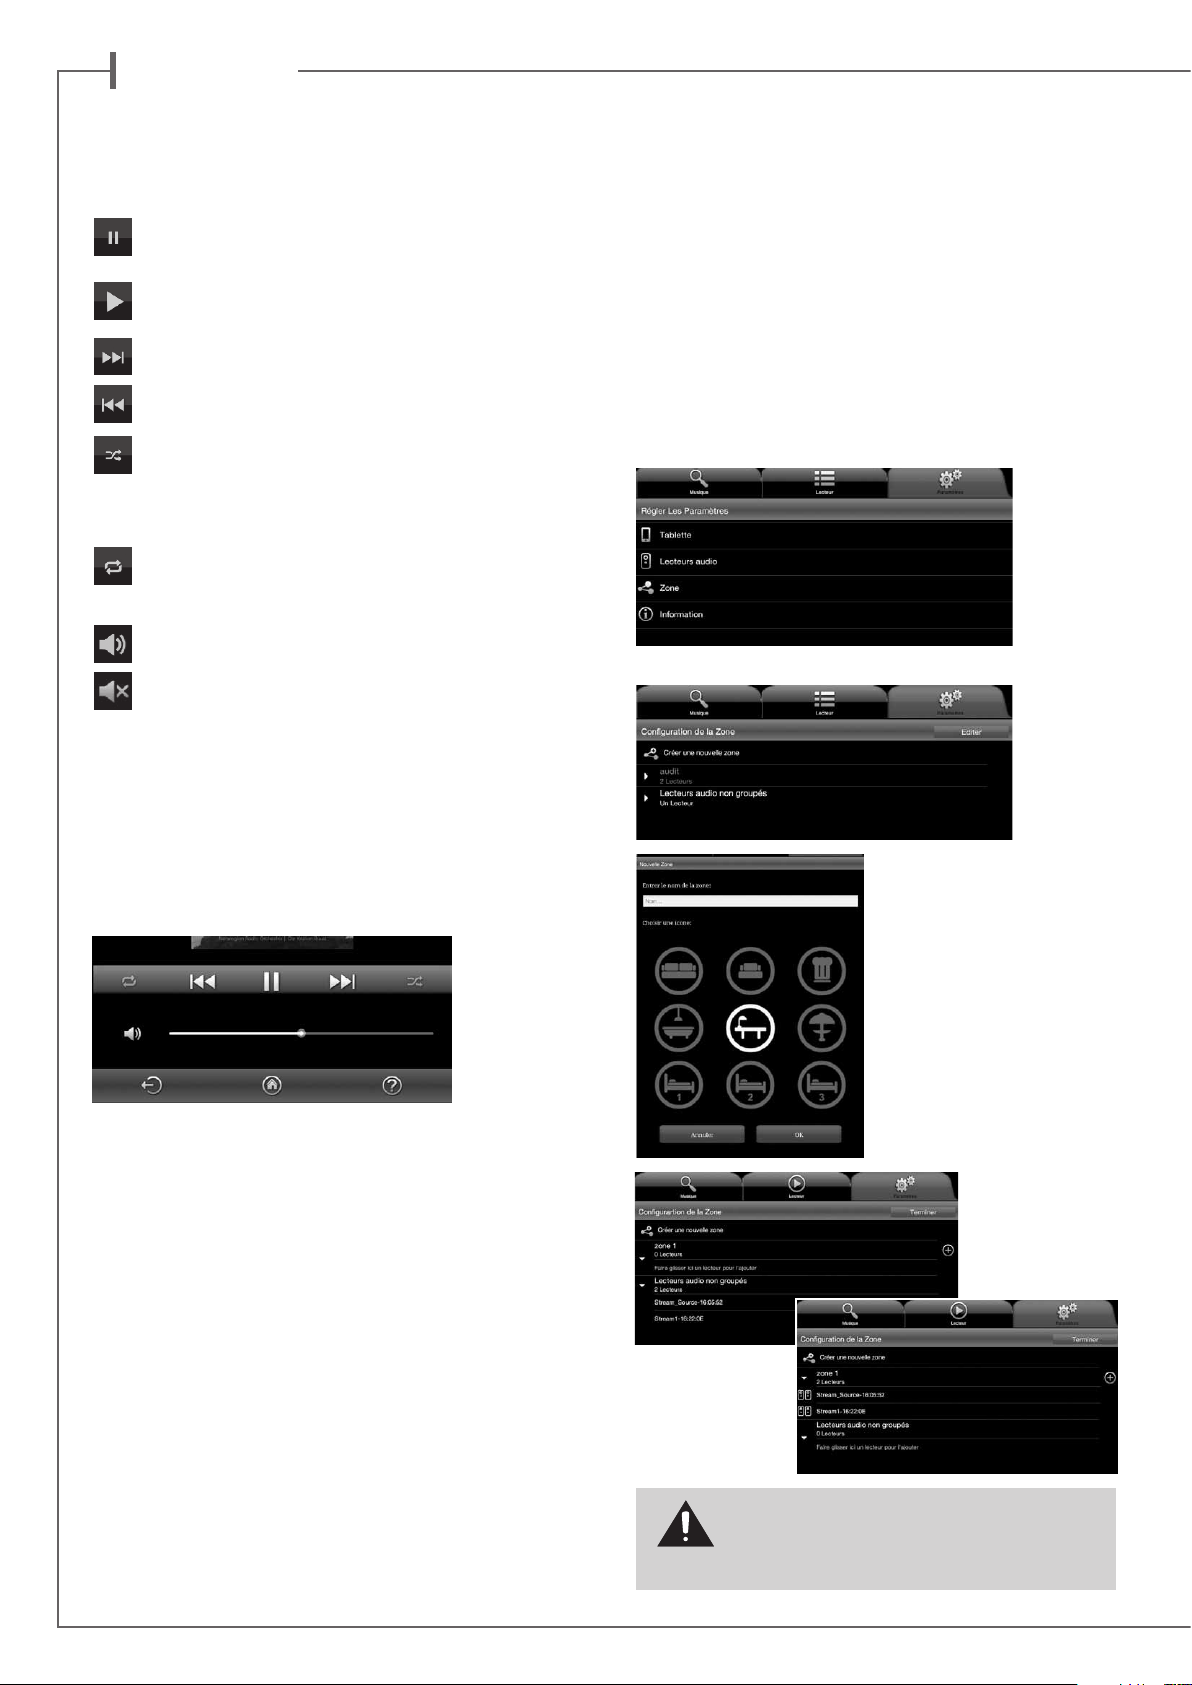
Le bas de la page “LECTURE” est pourvue de 7 icônes cliquables
ayant pour fonction :
PAUSE : appuyer sur l'icône pour passer du mode LECTURE au mode PAUSE.
LECTURE: appuyer sur l'icône pour passer du mode PAUSE
au mode LECTURE.
Lancer la lecture du titre suivant de la liste de lecture.
Lancer la lecture du titre précédent de la liste de lecture.
Mode Aléatoire. Cliquer sur l’icône pour enclencher la
lecture aléatoire des titres de la liste. Si l’icône est en surbrillance, cliquer sur cet icône pour revenir au mode de lecture
standard.
Mode Répétitif. Cliquer sur l’icône pour enclencher la lec-
ture répétitive de la liste. Si l’icône est en surbrillance, cliquer sur cet icône pour revenir au mode de lecture standard.
Son activé: appuyer sur l'icône pour couper le son
Son coupé: appuyer sur l'icône pour rétablir le son.
Réglage du volume. La barre de contrôle du volume s'affiche en
permanence sur la page "LECTURE".
GESTION SIMULTANEE INDEPENDANTE DE PLUSIEURS
LECTEURS
Si aucun des lecteurs présents n'est déterminé comme lecteur par
défaut, la page "Lecteur" listera les icônes de tous les lecteurs. Il
suffit de cliquer sur l’icône d’un lecteur pour activer son contrôle
(volume, déplacement dans sa liste de lecture). Lors de la sélection d’un morceau sur la page musique, l’application demandera
de sélectionner le lecteur concerné par cette modification de la
lecture en cours.
GROUPE SYNCHRONISE
Avant d’écouter le même programme simultanément sur plusieurs lecteurs Stream, il faut créer un groupe de lecteurs :
- Sélectionner "Zone" dans l'onglet "Paramètres"
- Appuyer sur « Créer une nouvelle zone »
Pour ajuster le volume avec la barre de contrôle, presser l'index
sur le point indiquant le volume et le déplacer par un glissement
du doigt ou tapoter du doigt sur la ligne de volume.
Utiliser indifféremment ce contrôle, les boutons de volume de la
tablette, du smartphone, de la télécommande Stream.
I) GESTION DES PLAYLISTS
Appuyer sur le bouton à droite de la liste pour accéder à 4 commandes:
- Lecture: démarre la lecture immédiatement en remplacement de
la playlist/titre en cours de lecture.
- Ajouter à la liste de lecture: ajoute la playlist à la liste en cours.
- Renommer la playlist
- Supprimer: permet la suppression de la playlist ou d'un titre
dans la playlist sans supprimer le titre du serveur.
J) LECTURE SUR PLUSIEURS LECTEURS STREAM
- Entrer le nom de la zone, choisir une icône, confirmer en
appuyant sur « OK »
- Sélectionner un lecteur de
la liste «Lecteurs audio non
groupés» et le transférer par
un «glisser-coller» dans le
groupe en cours de création,
appelé ici «zone 1». Ajouter
au moins un autre lecteur. Suivant la qualité du réseau, vous
pouvez grouper jusqu’à 4 lecteurs par liaison wi-fi et 5 en
liaison filaire Ethernet.
L'application Stream comprend des fonctions intéressantes dès
lors que plusieurs lecteurs Stream sont connectés sur un même
réseau.
LECTEUR PAR DEFAUT
Le sous-onglet "lecteurs audio" de la page "paramètres" permet
de sélectionner le lecteur par défaut. Une fois ce lecteur déterminé, tous les ordres lancés depuis l'application concerneront ce
lecteur dont l'icone sera marquée d'une étoile.
ATTENTION ! Ne pas associer dans un même groupe
des lecteurs connectés via le wifi et d’autres via Ethernet.
La synchronisation audio ne fonctionne qu'entre lecteurs
connectés au réseau via le même mode.
16
Page 17
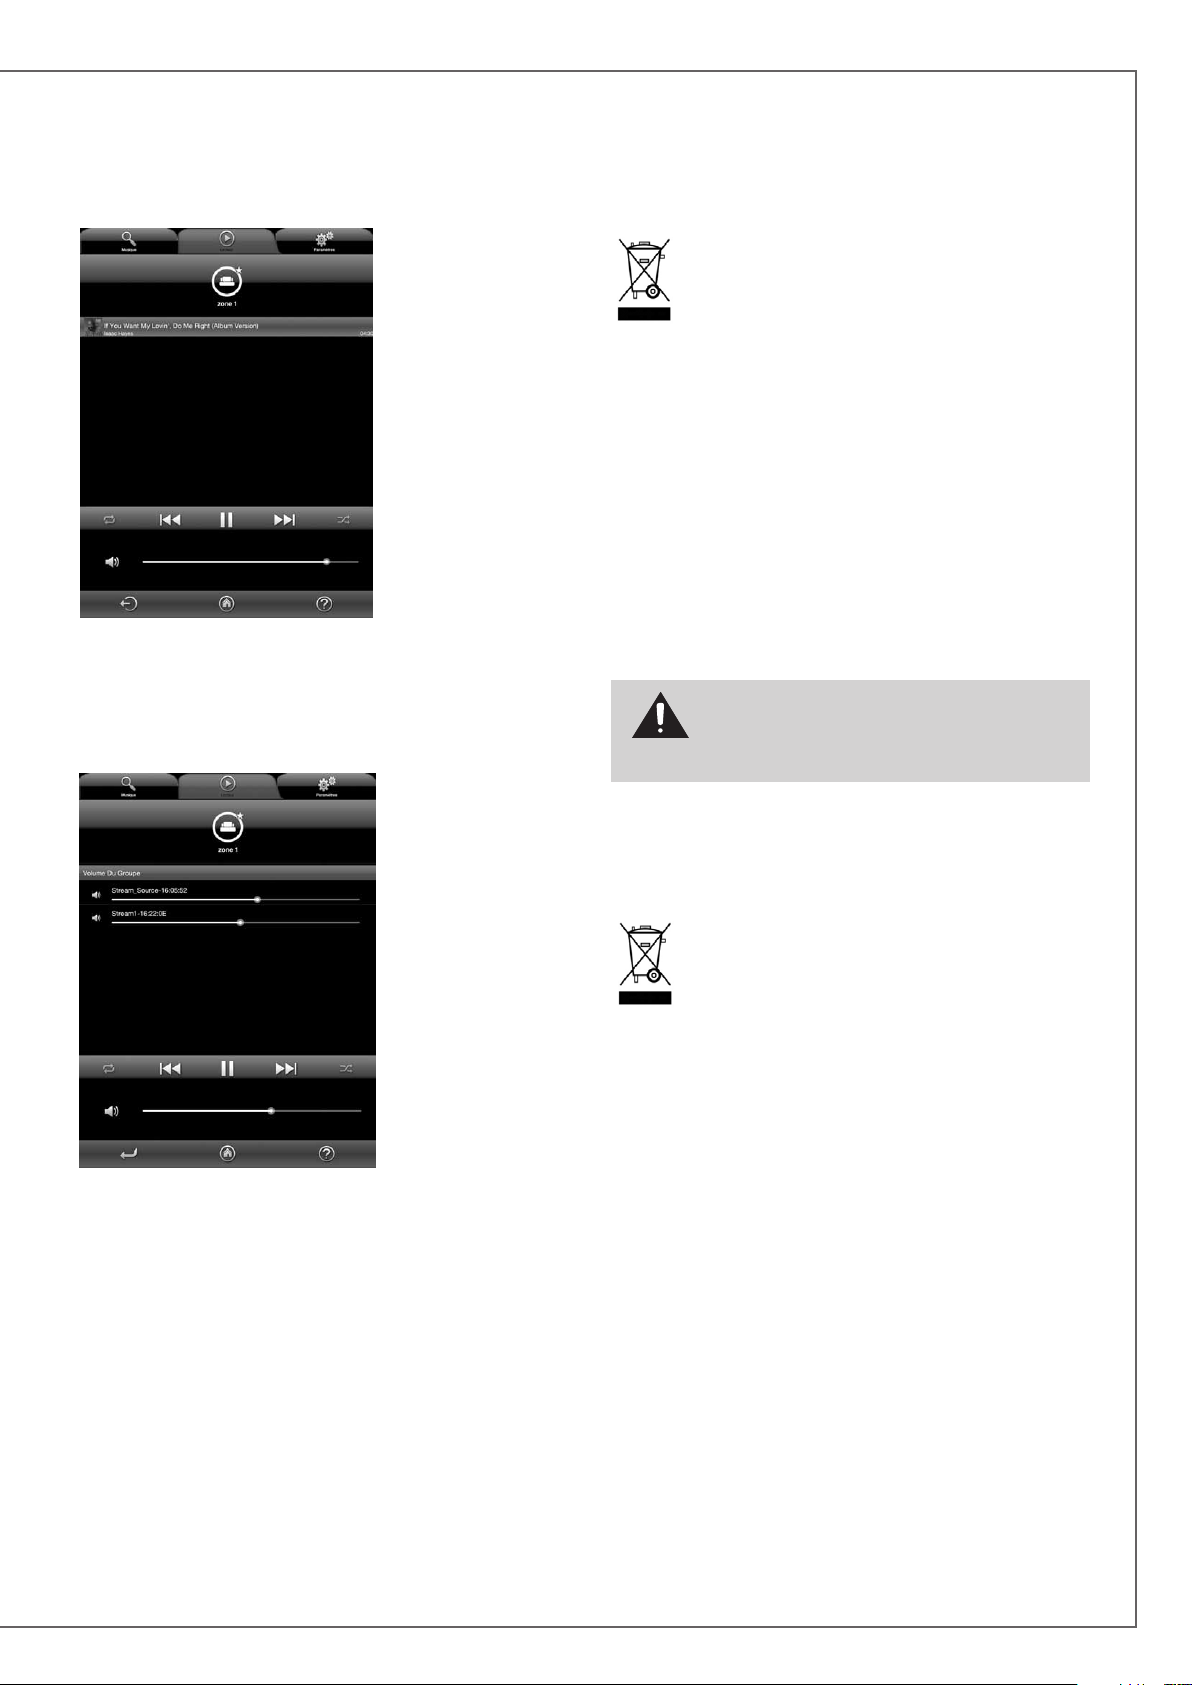
- Appuyer sur « Terminer » pour valider la nouvelle zone. L’icône
choisie apparait alors sur la page « Lecteur » parmi les lecteurs
disponibles, avec une étoile si le groupe est le lecteur par défaut.
Pour ajuster le volume de chaque lecteur du groupe, appuyer sur
l’icône de volume en bas de la page « Lecteur » pour faire apparaitre les commandes de volume de chaque lecteur. Vous pouvez
ainsi ajuster le volume relatif dans chaque pièce, puis ajuster le
volume général à la demande.
MARQUAGE DEEE
Traitement des appareils électriques et électroniques
en fin de vie (applicable dans les pays de l’Union
européenne).
Ce symbole, représentant une poubelle sur roues barrée d’une croix, apposé sur le produit, indique que ce
produit ne doit pas être traité avec les déchets ménagers. Il doit être remis à un point de collecte pour le
traitement des équipements électriques et électroniques en fin de vie. En s’assurant que ce produit est bien mis
au rebut de manière appropriée, vous aiderez à prévenir les
conséquences négatives potentielles pour l’environnement et la
santé humaine.
les ressources naturelles. Pour toute information supplémentaire
au sujet du recyclage de ce produit, vous pouvez contacter votre
municipalité, votre déchetterie ou le magasin où vous avez acheté
le produit.
Le recyclage des matériaux aidera à conserver
REMPLACEMENT DE LA PILE
DE LA TÉLÉCOMMANDE
Retourner la télécommande, coté face vers le sol. Enlever la pile
usagée et la remplacer par une autre pile bouton type CR-2025.
Mettre la pile usagée au rebut suivant les informations ci-dessous.
ATTENTION au danger d'explosion si la batterie n'est pas
correctement remplacée : utiliser seulement une batterie
identique ou équivalente. Ne pas exposer les batteries à
une source de chaleur excessive comme le soleil, un feu ou équivalent.
Informations sur les piles et accumulateurs présents
dans l’équipement (Applicable dans les pays de
l’Union européenne).
Ce symbole, représentant une poubelle sur roues barrée
d’une croix, apposée sur une pile ou un accumulateur,
indique que cette pile ou accumulateur ne doit pas être
éliminé comme un déchet ménager non trié mais qu’il
doit être collecté de manière séparée de sorte d’en faciliter le traitement et le recyclage. Il doit être remis à un point de
collecte pour le traitement des piles et accumulateurs usagés. En
s’assurant que ce produit est bien mis au rebut de manière appropriée, vous aiderez à prévenir les conséquences négatives potentielles pour l’environnement et la santé humaine. Le recyclage des
matériaux aidera à conserver les ressources naturelles. Pour toute
information supplémentaire au sujet du recyclage de ce produit,
vous pouvez contacter votre municipalité, votre déchetterie ou le
magasin ou vous avez acheté le produit.
17
Page 18
f r a n c a i s
STREAM 1
Entrées
digitales
Entrée analogique
Adaptateur secteur
Alimentation externe
Température
d’utilisation
Température
de stockage
Taux d’humidité
en utilisation
Réseau
Formats audio
Wifi/RJ45
- 1 entrée DLNA : soit filaire avec prise RJ45
soit WiFi
- 1 entrée Bluetooth APTX
- 1 entrée USB
- 1 minijack 3,5 mm
Patch NFC au centre de la grille
Connexion Bluetooth instantannée
100-240 V ~60/50 Hz, 2A
32 V/ 2 A
+5°C à +35°C
-5°C à +40°C
40% à 70%
10/100Mb Ethernet
MAC & PHY
Wireless LAN 802.11b/g/n
Sécurité WPS 2.0
Lecteur audio digital
(DMR sous DLNA 1.5)
MP3 (jusqu’à 320kbps)
WMA
(WMA9, CBR,CBR, jusqu'à 320kbps)
PCM (16 bits-44.1kHz, 24 bits-44/48/96
kHz, .wav, .aiff, .aif, aifc files, HTTP streams)
AAC-LC (jusqu’à 320kbps),
ALAC (.m4a), FLAC (16 bits-44.1kHz,
24 bits-44/48/96 kHz)
MISE A JOUR AUTOMATIQUE
Les mises à jour du logiciel de Stream 1 sont automatiques.
La durée de mise à jour est variable et peut durer
jusqu'à une demi-heure notamment lors de la première
connexion au réseau internet.
La diode
la mise à jour.
Le Stream 1 n'est pas fonctionnel durant cette phase.
Note: la référence de la version du logiciel en cours est
disponible via l'application Cabasse Stream: onglet "Paramètres" + sous-onglet "lecteurs audio"+ Stream 1.
9
passe au rouge et clignote jusqu'à la fin de
ATTENTION ! Ne pas éteindre ou déconnecter le
Stream 1 du secteur pendant les phases de mise à
jour! Une mise à jour peut durer jusqu'à environ
une demi-heure.
NETTOYAGE
le Stream 1 peut-être nettoyé à l’aide d’un linge doux, ne
pas utiliser de détergent ni de liquide pouvant couler à
l’intérieur de l'appareil.
N’utiliser aucun solvant, produit chimique ou solution
de nettoyage contenant de l’alcool, de l’ammoniaque ou
un abrasif.
Le tissu de Stream 1 peut être dépoussiéré en utilisant un
aspirateur adapté aux tissus délicats.
FAQ
Consultez nos réponses aux questions souvent posées
sur www.cabasse.com, à la page FAQ Stream 1.
1 coaxial 2 voies avec :
- 1 tweeter « softdome » de 2,9 cm
Haut-parleurs
Amplification
Taux de distorsion
plus bruit
(THD+N sur la bande
20-20 000 Hz pour une puissance de 100 mW et plus)
Dimensions
(h x l x p)
Poids
En suivant les conseils d’installation, de branchement et d’emploi explicités dans cette notice, vous êtes assurés d’un fonctionnement parfait de votre
Stream 1. Nous recevons tous les jours des lettres de clients satisfaits du choix de leurs enceintes et ces lettres sont pour nous la plus belle récompense
de nos efforts.
- 1 médium de 8 cm
1 woofer double bobine de 17 cm
tweeter : 10 W
médium : 10 W
grave : 2 x 20 W
Wifi : < 0,1%
Bluetooth : < 0,1%
Analogique : < 0,1%
à plat : 13,7 x 46 x 32,5 cm
debout : 32,5 x 46 x 13,7 cm
5 kg
SERVICE APRÈS VENTE
Cabasse dispose d’un réseau de revendeurs agréés qui
est à votre disposition pour assurer le service après vente
de votre matériel.
Pour connaître la liste des revendeurs agréés Cabasse,
contactez-nous ou consultez notre site Internet
www.cabasse.com.
18
Page 19
e n g l i s h
Thank you very much for choosing Cabasse speakers.
Please read these instructions carefully before setting up your speakers.
SAFETY INSTRUCTIONS
Explanation of graphical
symbols -
triangle, is intended to alert you
to the presence of uninsulated “dangerous voltage” within the
product’s enclosure that may be of sufficient magnitude to
constitute a risk of electric shock to persons.
The exclamation point within an equilateral triangle
is intended to alert you to the presence of important
operating and maintenance (servicing) instructions in the literature accompanying the appliance.
The lightning flash
with arrowhead symbol,
within an equilateral
Instructions - Carefully read through all the safety and ope-
rating instructions before switching on any device for the first
time.
Keep these instructions in mind - They will be constant-
ly referred to through this manual.
Pay special care to warnings - All the warning labels on
the product or warning notes in the user’s manual must be
followed.
Follow the instructions - Follow carefully all the installa-
tion and operation instructions.
Cleaning - Always remove the power cord before cleaning
the device. Do not use cleaning solvent, whether liquid or air
spray. Using a soft damp cloth is recommended.
Accessories - To avoid incidents, only use accessories ex-
pressly recommended by Cabasse.
Water and moisture -
damp or wet locations, such as humid basements, next to a
bathtub, sink, swimming pool or any other similar conditions.
The product shall not be used in
Carts and Stands - The appliance should be
used only with a cart or stand that is recommended by the manufacturer.
> Portable cart warning
Installation on a piece of furniture and stands - Do
not place this device on an unsteady surface, i.e. a stand, tripod, table, shelf, etc. It may fall and cause serious injury to a
nearby child or adult.
Ventilation outlets - The device shall not be placed in a
position that restrains the operation of its fans. Avoid installing the device on a bed, couch, blanket or other similar
surfaces that may prevent the appropriate air flow. Do not
install the device in a confined space, such as a book shelf or
other piece of furniture, that could prevent sufficient air from
flowing freely.
Power - The device shall only be connected to a source of
power compliant to the one described in this manual or on
relevant printed labels on the product. If you are not sure of
the type of power available, please contact your reseller or the
local power company.
Power cords - The power cords must be laid out in such
a way that they cannot be walked on, pinched, bent under
other devices. Also pay special attention to the matching of
the plugs and the connection of the cord to the device.
Lightning - For better protection against lightning or if the
device must remain unused for long stretches of time, unplug
the power adaptor. This minimizes potential damages due to
lightning or line surges.
Overloads - Avoid overloading the power plugs, extension
cords or power relays. This could result in fire or electric
shocks.
Foreign bodies and liquids - Avoid letting foreign mate-
rials or liquids enter the device. They could cause fire or electric shocks. Never spill any liquid on the device.
Maintenance - Users must never attempt to maintain the
device on their own, except for those maintenance operations
described in this manual. Any task beyond regular user maintenance must be performed by qualified service operators.
Troubleshooting - You must unplug your device from the
power supply and have it checked by a qualified technician if:
The power supply or the plug is damaged.
Foreign bodies or liquid penetrated the device.
The device was exposed to dripping or splashing.
The device does not seem to work correctly under normal
operating conditions. Only operate the controls described
in this manual. Any other operation could damage the de-
vice and require on-site visit of a qualified technician.
The device has fallen or its housing is damaged.
The performances of the device are strongly altered.
Under the environment with Electrical Fast Transient, the product may sometime need the user to reset the device for it to
work.
Spare parts - If spare parts are needed to repair the device,
make sure that the technician followed the manufacturer’s recommendations or that the replacing parts feature the same
specifications as the original ones. Non-compliant parts can
result in multiple damage, including fire or electric shocks.
Checks - After any servicing of the device, ask the technician
to perform appropriate testing to make sure that the device
works safely.
Exposure to high temperatures - The device should be
kept away from heating sources, such as radiators, heaters,
amplifiers or any other similar item likely to make the operating temperature rise excessively.
Applicable for USA, Canada or where approved for usage
Caution ! To prevent electric shock, match wide blade plug to wide
slot, insert fully.
19
Page 20
e n g l i s h
UNPACKING
Open carton flaps; remove all the components. If the speakers or the subwoofer appear damaged, do not use them.
Repack everything in the original packing and contact your
authorised Cabasse dealer immediately. We suggest you to
retain the packing for future use.
SETTING UP
THE COMPONENTS OF YOUR SYSTEM 1
1 Stream 1, 1 external power supply, 1 remote control, 1
manual and one warranty card.
INSTALLATION 5
Place Stream 1 lying, standing or hanging within reach of a
mains plug.
Leave enough free room above and around Stream 1 in
order to:
- allow good wifi and Bluetooth transmission,
- give access to a smartphone for easy NFC tap Bluetooth
connection.
- provide a good audio restitution.
:
:
POWER CONNECTION
Connect the power supply to the Stream 1, plug it into the
mains and position the POWER ON/OFF switch to "ON".
Stream 1 is ready to play when the LED
NOTE: the wifi mode of Stream 1 is available when the
PWR (Power) LED has turned from red to green, around 40
seconds after switching on the Stream 1.
9
turns on.
ON / ECO
a) Switching to ECO mode: press the
remote control or of the Stream 1 keypad. The wifi and
Bluetooth functions remain available. The audio section of
Stream 1 is no longer powered.
b) Getting back to ON mode:
- press the
Stream 1 keypad or
- launch a Bluetooth connection (NFC or other) or
- press "Play" on the Cabasse Stream Audio Control application.
1
key of the Stream remote control or of the
1
key of the Stream
LED DISPLAY MODES
Press
display modes.
When the flash mode is on, every control from the Cabasse
Stream Audio Control application, the Stream remote control
or the keypad of Stream 1, activates a flash of the LED
color of the flash confirms the nature of the active input. The
LED
When the full time mode is on, a brief fade out of the LED
or a modification of its color confirms the control.
then
2
9
remains off until next control confirmation.
2 1
to switch between full time and flash
8
8
9
. The
9
3
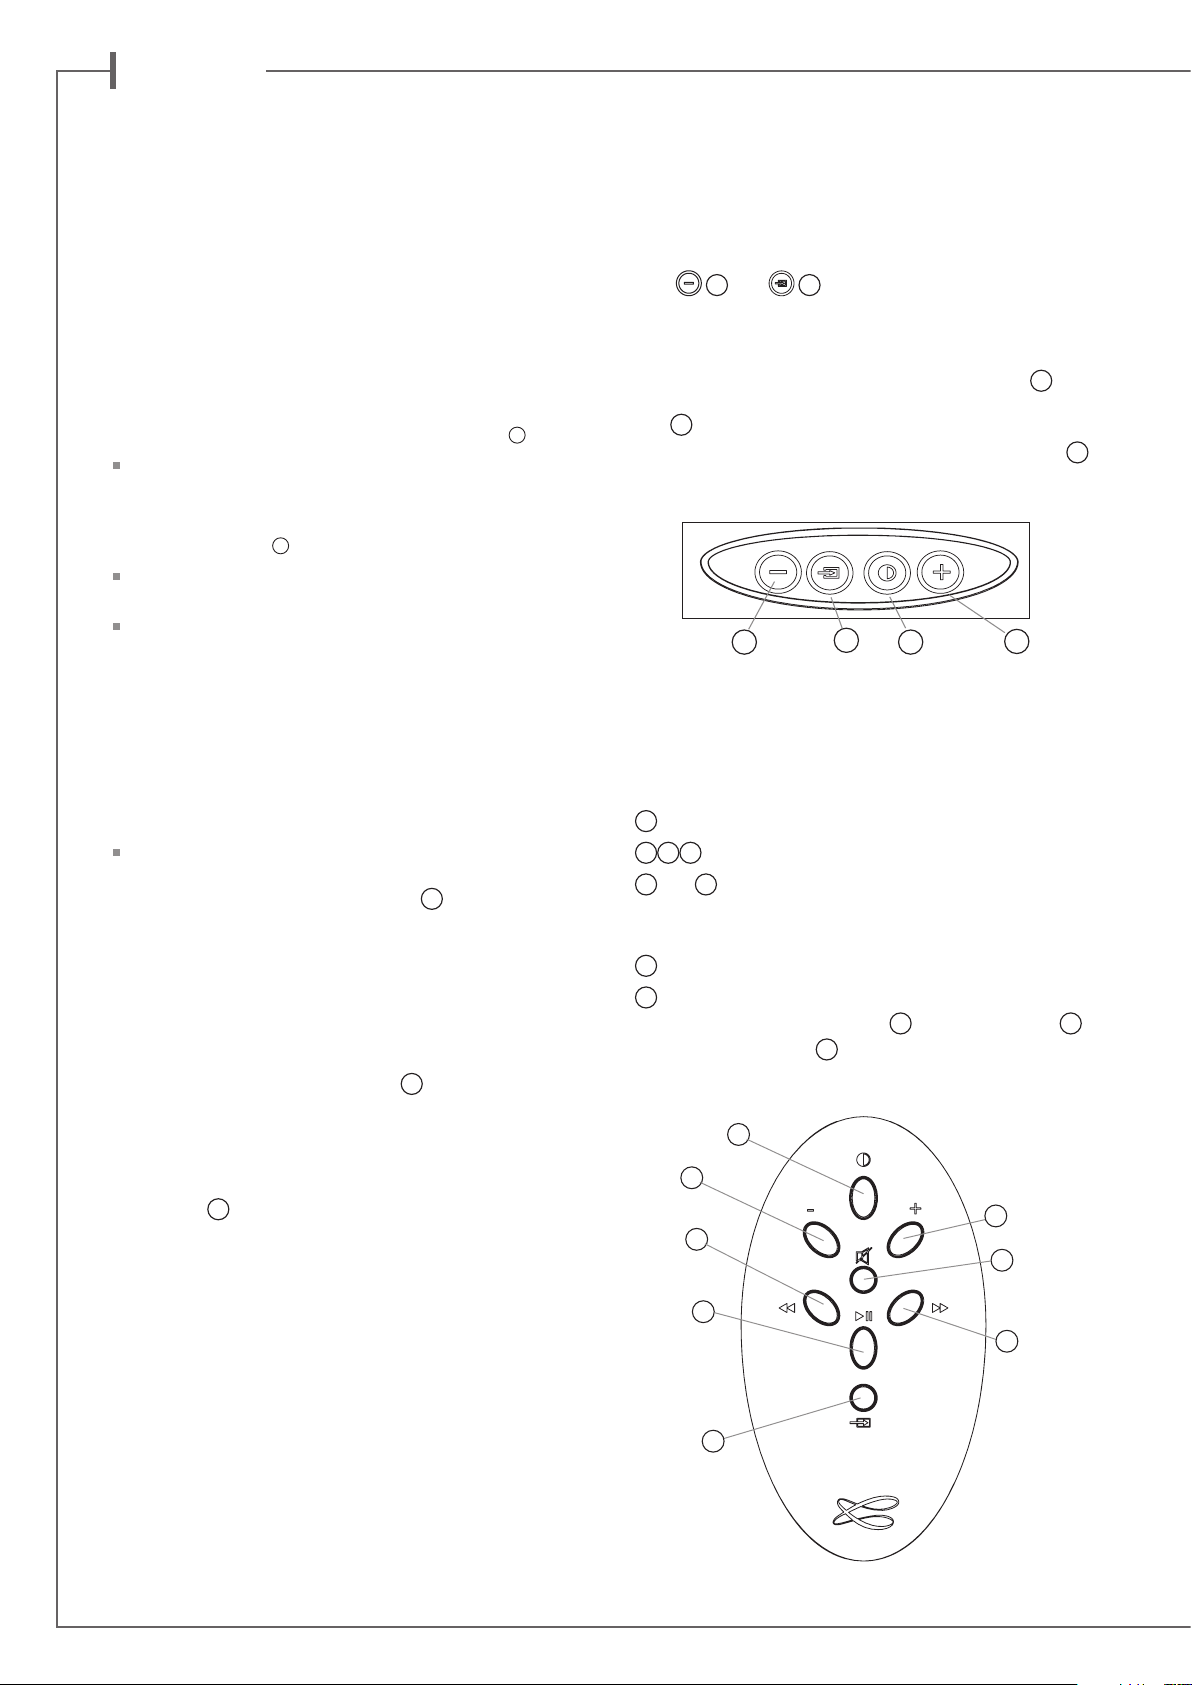
USE OF STREAM 1 WITH CONTROL KEYS
AND THE STREAM REMOTE CONTROL
1
ECO / ON mode selection
2 3 4
5
Bluetooth: previous and next title of the played album or
playlist.
7
8
ted sources: Bluetooth (blue LED
or analogue (green LED
VOL "+" and "-", Mute keys
and 6 wifi: reverse and forward scanning
Music: play or pause (wifi and Bluetooth)
Source selection: press this key to select one of the connec-
9
), wifi (orange LED 9)
9
).
1
2
3
5
4
7
6
20
8
Page 21
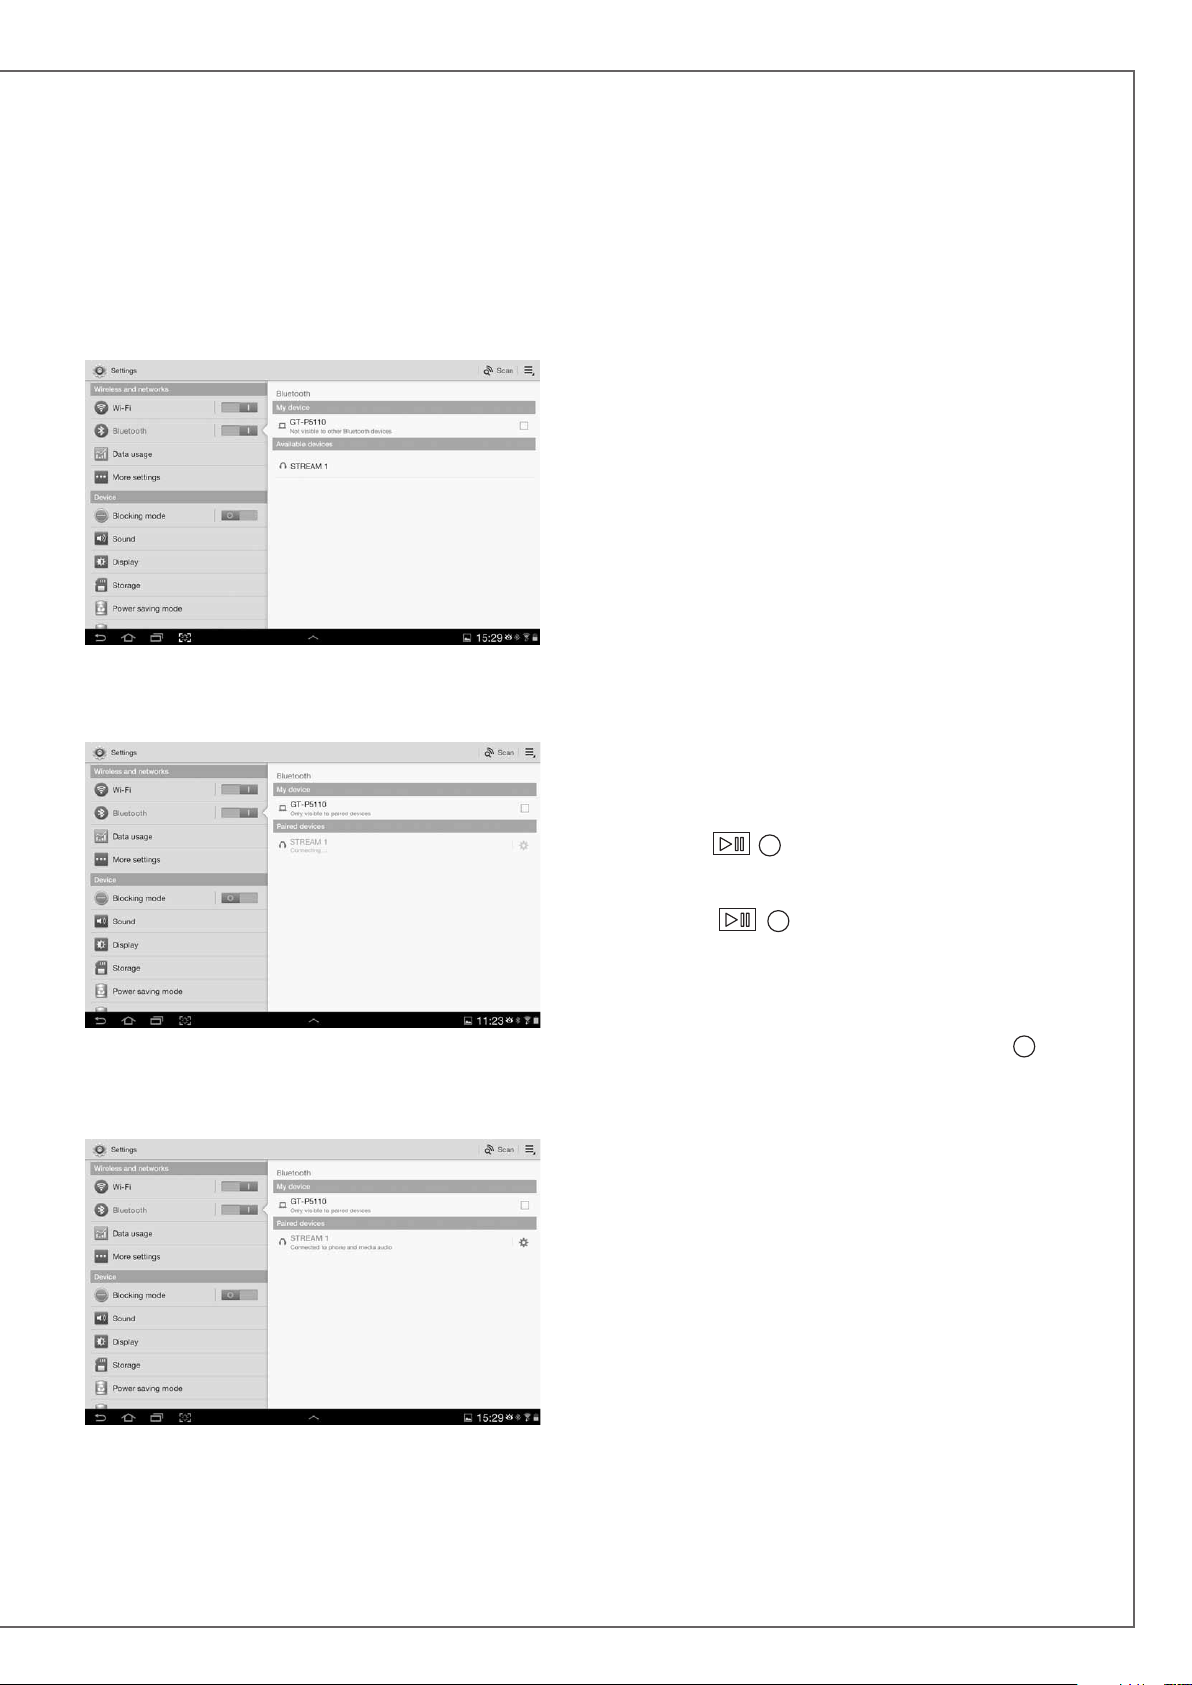
BLUETOOTH CONNECTION TO AN
ANDROID TABLET
- If not already done, activate the Bluetooth Function in the
« Settings » menu of your tablet by pressing on the ON-OFF
switch.
- Press “Scan for devices” and select « Cabasse Stream 1 »
among the available devices.
To play on Stream 1 the audio files stored in the tablet (or
smartphone), open the audio player application, select a file
and press on “play”.
If Stream 1 remains silent, first check that the main volume
of the tablet (or smartphone) is not down to zero level and
that « mute » is off. Adjust the volume in the player application and finally raise the volume of the Stream 1 with the
Stream remote. Finally select « Bluetooth » as the active
source on Stream 1 pressing the « 8 » key of the Stream
remote until the blue LED flashes.
INSTANT BLUETOOTH CONNECTION
VIA NFC TAGS
See page 7.
BLUETOOTH HANDSFREE USE
WITH A SMARTPHONE
The handsfree function included in Stream 1 is the by default mode active as soon as audio files are being played by
Stream 1 from a smartphone using the Bluetooth connection.
Any in-coming call pauses the music and activates the
Stream phone-ring together with the in-coming call tune of
the smartphone.
Stream 1 is now paired with the tablet and connected to
Stream 1 is no other Bluetooth connection to Stream 1 is
active.
Press « Play »
the green key of the phone to answer the call handsfree. We
recommend to talk around 1 meter away from the Stream 1.
Press « Play »
phone call and get the music back from where it paused.
To use the handsfree function when using wifi sources,
activate the Bluetooth connection from the smartphone
then switch to the wifi source with the source-key
the remote or the Stream 1. When getting a call, switch to
the Bluetooth source with the 8 source-key to activate the
handsfree function. Before switching to the Bluetooth input
of Stream 1, think about pausing the music if you wish to
carry on from there after the handsfree phone call.
7
on the Stream remote control or use
7
again or use the phone to end the
8
on
If the message « Connection.. » does not show up, stop the
running Bluetooth connection with another device, either
through the set up menu of the device either by switching
off and on the Stream 1. Press on « Cabasse Stream 1 »
again.
21
Page 22
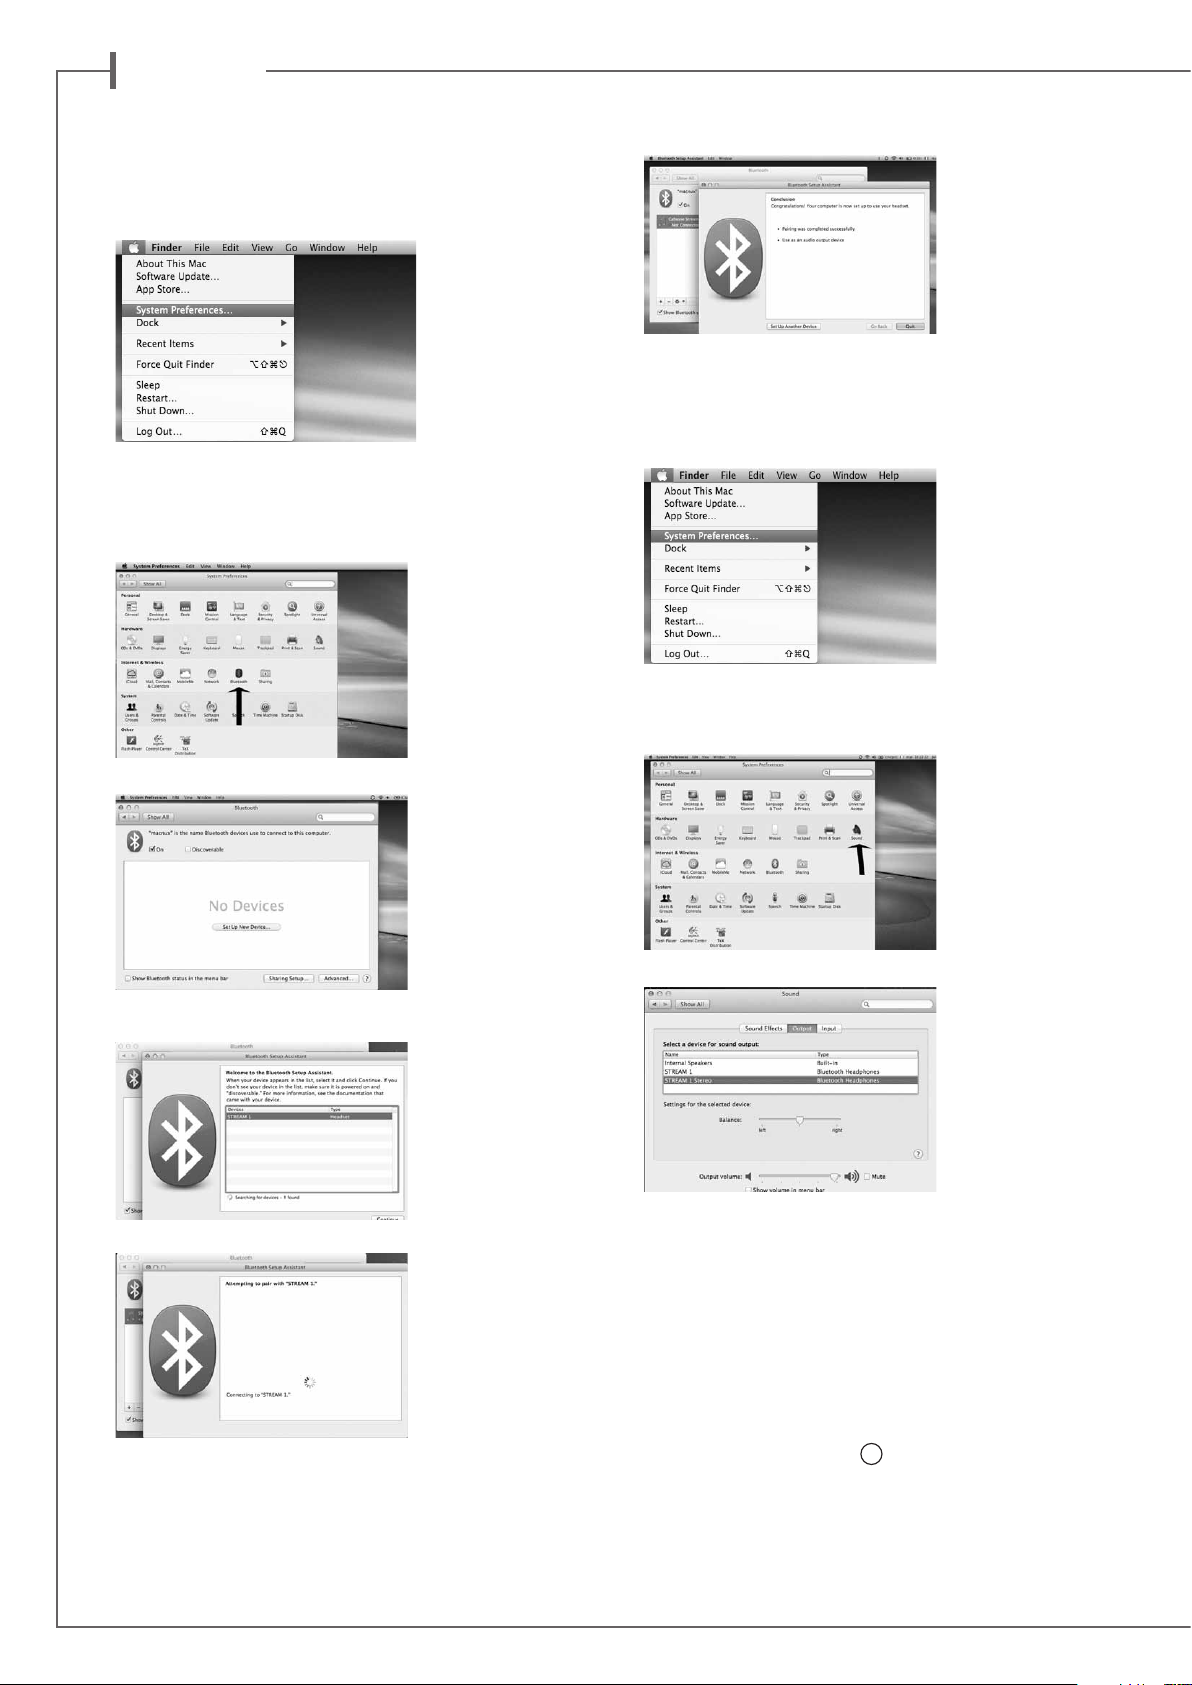
e n g l i s h
BlUEtootH ConnECtIon to an
aPPlE CoMPUtER
1) BLUETOOTH MODE ACTIVATION
Connect the Stream 1 to mains to power it on. Stop any Bluetooth
connection of the Stream with any other item.
Activate the Bluetooth function : open the « apple » menu and select
« Systems Preferences ».
Connection completed. Stream 1 is now paired with your Mac
computer.
2) SELECTION OF THE AUDIO OUTPUT DEVICE
Select « Bluetooth » in the window for the « Systems Preferences ».
Select « On » and click on « Set Up New Device”
Select « Stream 1 » in the list of items and click on “Continue”
To enjoy the musics stored on you Mac with Stream 1, set up
Stream 1 as your audio output device in the “System Preferences”
menu.
Select « Sound » in the « Hardware » section.
Select "Stream 1 Stereo" in the « Output » tab. The line "Stream 1"
stands for the hands free set up to be used only with a smartphone.
Set the volume control on far right position.
Close the “Sound” window.
Connecting…
22
If the Stream 1 is on stand-by mode, it will take around 6 seconds to
start playing, the Bluetooth input being automatically selected. Use
the Stream remote control to adjust the sound level.
If Stream 1 is active and connected to another active source (wifi,
analog or optical digital) use the Stream remote control and select
the Bluetooth input with the
8
key, then adjust the sound level.
Page 23
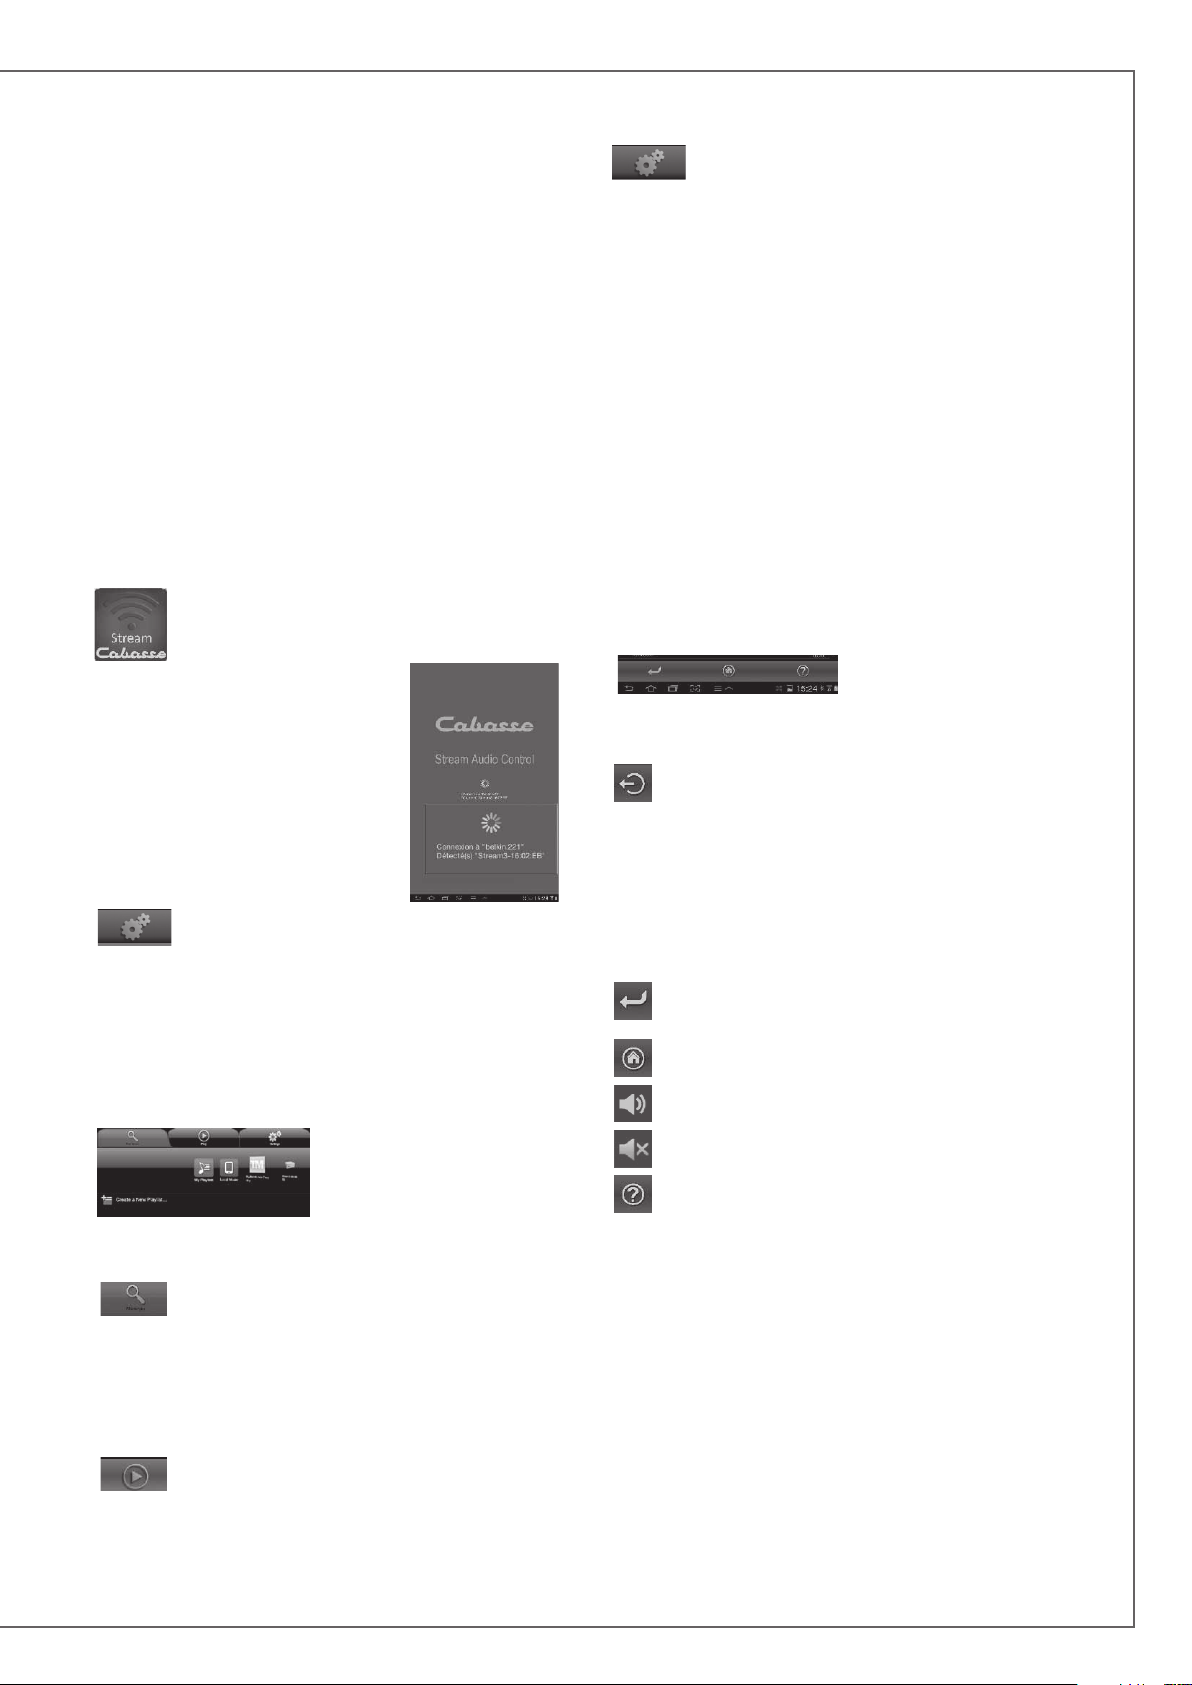
IntEGRatIon oF stREaM 1 to tHE HoME
WIFI-lan nEtWoRK
A) CONNECTING Stream 1 TO THE HOME DLNA
NETWORK
Be insured that Stream 1 does belong to your wifi network
(see page 9 if not). The smartphone or/and the tablet to be
used with the Cabasse Stream Audio Control application
must be also wifi connected to the same network.
B) INSTALL OF THE CABASSE APPLICATION
The Cabasse Stream Audio Control applications are available
for free on Google Store for the Android versions and on the
App Store for the iPhone and iPad versions.
You are free to install the application on several devices and
use them to drive one single Stream 1 or several ones.
IMPORTANT: the Cabasse Stream Audio Control application
can be opened only if minimum one Stream 1 or another audio player based on the Cabasse application is within reach.
Download and install the application for your tablet or smartphone. Launch the application with a
push on the white Cabasse icon displayed.
2 lines must appear under the
rotating wheel on the start window of the
application:
- The confirmation of the wifi connection: here “belkin.221”
- The confirmation that a Stream 1 system is being detected
ATTENTION: the application might
detect several players. If so select in “Settings/Audio Devices” the Stream 1 to be
used as the default audio
device.
“Settings” tab with 4 sub-tabs:
o The Tablet or Phone sub-tab enables to choose in the View
Mode between “Graphical View” and “List View”, to rescan
Digital Media Servers in the network, to reset application settings.
For a smartphone, the sub-tag "Incoming call" enables the following settings when the phone rings:
- do nothing: music continues to play at same level
- mute volume: the music continues to play but is muted
- pause: music is paused and start playing again once the call
has ended.
o The Audio Devices sub-tab lists all the Stream 1 systems available in the network, enables the identification of the default
player and the renaming of the players.
o "Zone" tab: create and set groups of Stream players
(J paragraph, page 25)
o "Information" tab: check if the reference number of the
downloaded version of the application matches with the one
of the latest version available.
D) NAVIGATION
The buttons on the bottom of
the application depends upon
the page displayed. Their use
in addition to the direct access by selecting tabs and sub-tabs
eases the navigation.
Exit: press this button to exit the application. This button appears only at the highest level of browsing of any
sub-tab.
ATTENTION: if you don’t pause the current track before
exiting the program or shutting down the tablet or smartphone, the wifi transmission of the files listed in the Queue on
the “Play” tab will carry on to the end of the list.
If no Stream 1 is being detected during the launch of the application the above window will be replaced by a warning signal.
Check that the Stream 1 is powered ON (Power LED green
enlightened) or on “FULL AUTO” stand-by mode (Power LED
red enlightened).
C) LAYOUT OF THE CABASSE STREAM APPLICATION
The application gives a quick
access to all the audio sources
available in the network.
The 3 tabs of both Android
and IOS versions of the application are:
“Music” tab : it lists all the available storage devices (Digital Media Servers):
- In any case the sub-tabs “My Play-list” and “Stream 1-xxx..”
- Other connected DMS such as shown here above:
o a USB stick: here connected to the USB connector
of the Belkin router
o a multimedia hard disk: here named MyBookLive
o a computer: here a Windows 7 based PC.
“Play” tab: it displays the file being played and the
ones selected in the sub-tabs of the “Music” tab
with the “Add to Queue” option.
Back: press this button to navigate back to the previous
view
Home: press Home to return to the entry level of the tab
Sound ON: press the button to Mute the sound
Mute: press the button to get the sound back on
Help: this button gives specific help and hints at each
level of navigation
23
Page 24
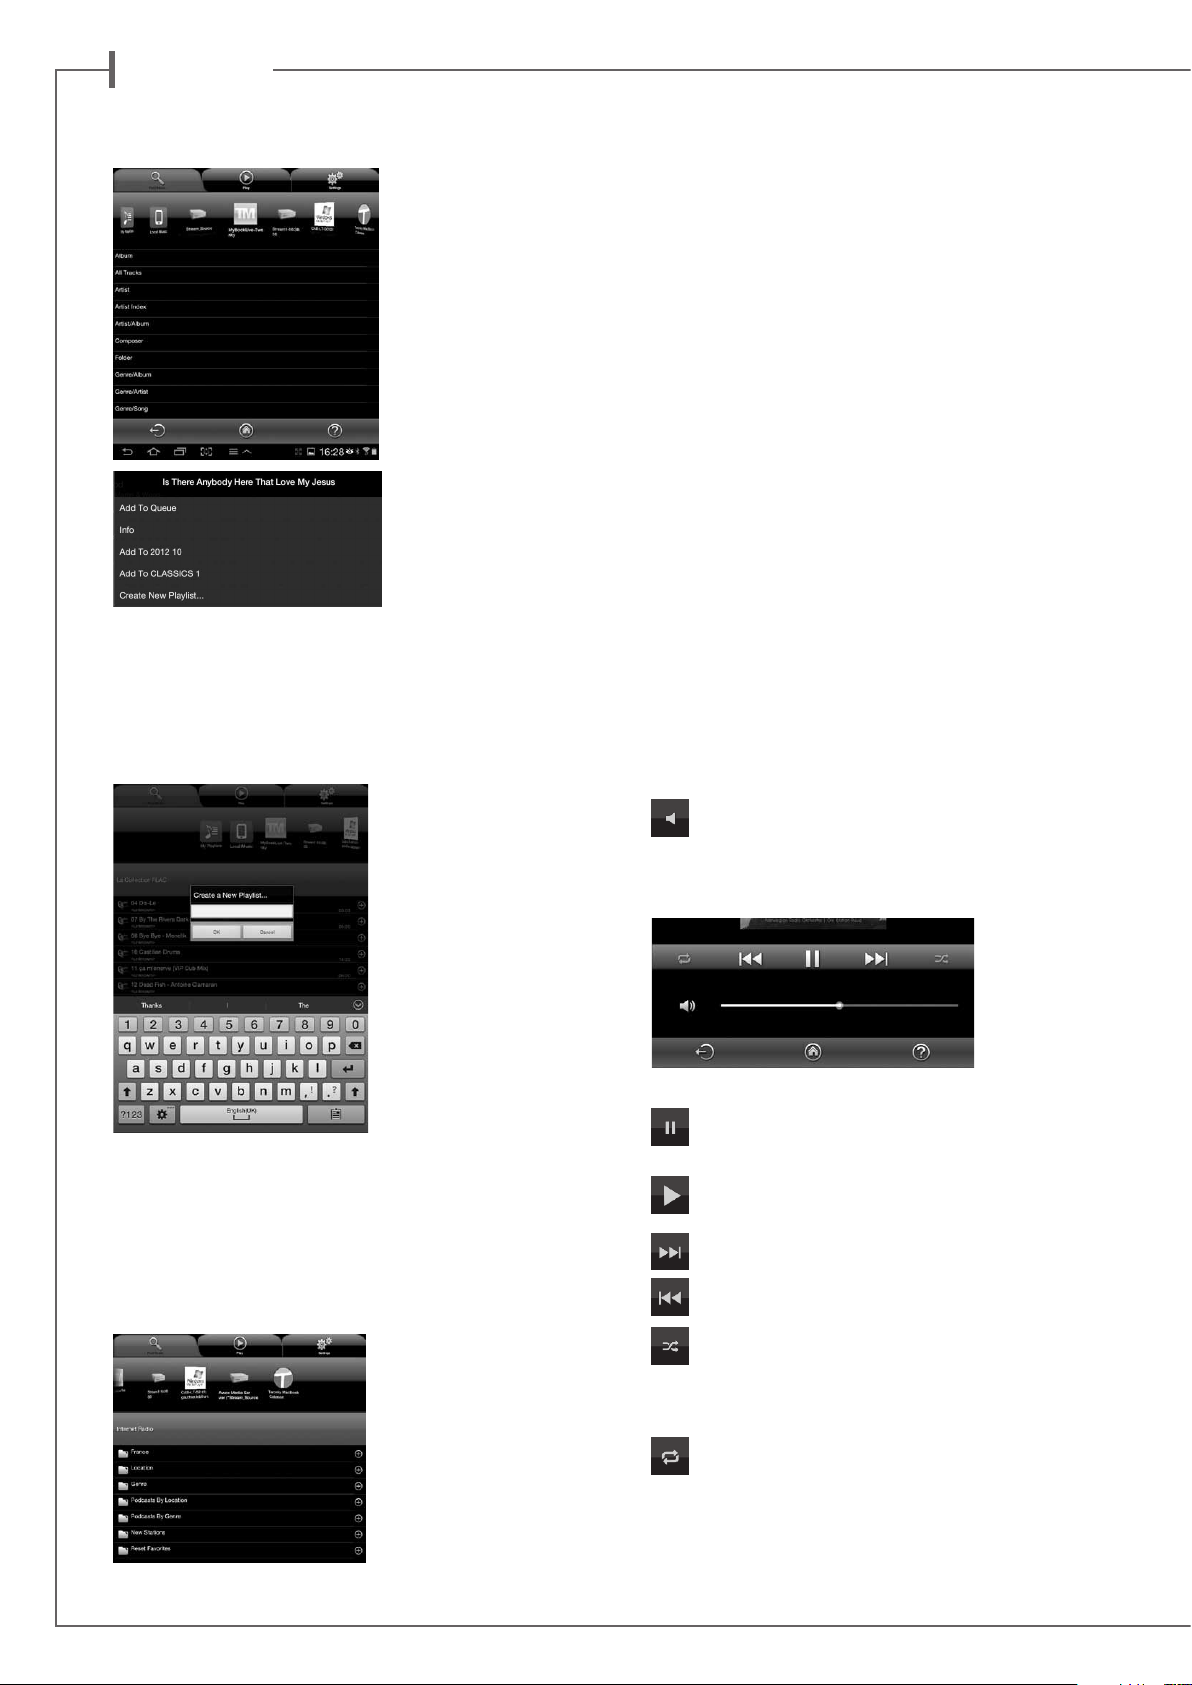
e n g l i s h
E) « MUSIC » TAG: PLAYING SHARED TRACKS
All the audio sources
connected to the local
network (Stream players,
NAS hardisks, computers...) are displayed on
top of the “Music” tab. A
left or right swipe might be
required to scroll to the expected icon. Press on it to
access to the shared tracks.
The available categories
easing the access depend
upon the DLNA servers.
Selecting “All Tracks” gives
access to all the shared
tracks in the server, here a
multimedia player.
Press on the line of the
track for immediate selection and play. This opens the “Play” tag and erases all the tracks
previously listed on the “Play” tag.
Press the "+" button on the right end of the track’s line to access
four options:
- Add to Queue: adds the track to the queue
- Add to Playlist: adds the track to the playlist named
STREAMING WITH DEEZER
Press the Deezer logo and get access to over 30 millions tracks on
line. You can have a try, subscribe on line with the Cabasse Stream
App, and/or enter your access codes.
USB STORAGE
Access to all the music stored in a stick or a hard disk connected to
the Stream 1 USB plug. Thanks to the DLNA server on board Stream
1, all the compatible tracks are listed and can be directed by any host
of the Cabasse application to all the Stream players in the network.
G) «MUSIC » TAG: LOCAL MUSIC
This sub-tag enables to play with the Cabasse application all the
audio tracks stored in the tablet/smartphone host of the application. The other users of the Cabasse application acting on the same
network do not have access to these audio contents.
H) « PLAY » TAG
This page shows the songs queue. Press on the “Play” icon to
switch between 2 display modes:
- the list mode with up/down scrolling
- the graphical mode with left/right scrolling that displays artworks icons (such as album covers when available) and the current playback position.
If not deleted with a direct track selection on the « Music » tag,
this list remains unmodified even if the tablet or smartphone hosting the application is switched off.
- Create New Playlist: allows
creating a new playlist.
Name it with the pop-up
keyboard and confirm. The
selected track becomes the
first item of the new playlist.
- Info: provides relevant
data for the track which
the DMS makes available
such as: Title, Artist, Album, Genre, Date, Duration, Bitrate.
F) «MUSIC » TAG:
The Stream 1 player is also an audio server for itself and all the other
Stream players connected to the network. Press on the icon of one of
the available Stream player to open and select between Vtuner and
Deezer for Stream 3, and Vtuner, Deezer and USB Storage for Stream
1 and Stream Source.
PLAYING WEB-RADIOS
Press the Stream 1 subtag
and select vTuner. Select a
radio the way you would
select a track on the network:
- Press the selected radio
station for direct play
- Press the arrow on the right
end of the line to get the
play and playlist options.
Volume control: Grab and drag the volume indicator to
the desired position and desired position and release. You
can use simultaneously this control, the volume control buttons
of most smartphones and tablets, and the ones on the Stream
remote control.
Pause: the current track is paused. Press the button to
playback the track.
Play: press on this icon to stop playback and get to Pause
mode.
Starts playback at the next song in the Queue.
Starts playback at the previous song in the Queue.
Shuffle icon: when on (illuminated), all songs in the cate-
gory play randomly. If the icon is illuminated, press it to
come back to standard playback. Shuffle and continuous play
cannot be selected simultaneously.
Repeat icon. When repeat is on, all songs in category keeps
continuous playing from the beginning once the last song
is completed. If the icon is illuminated, press it to come back to
standard playback.
24
Page 25
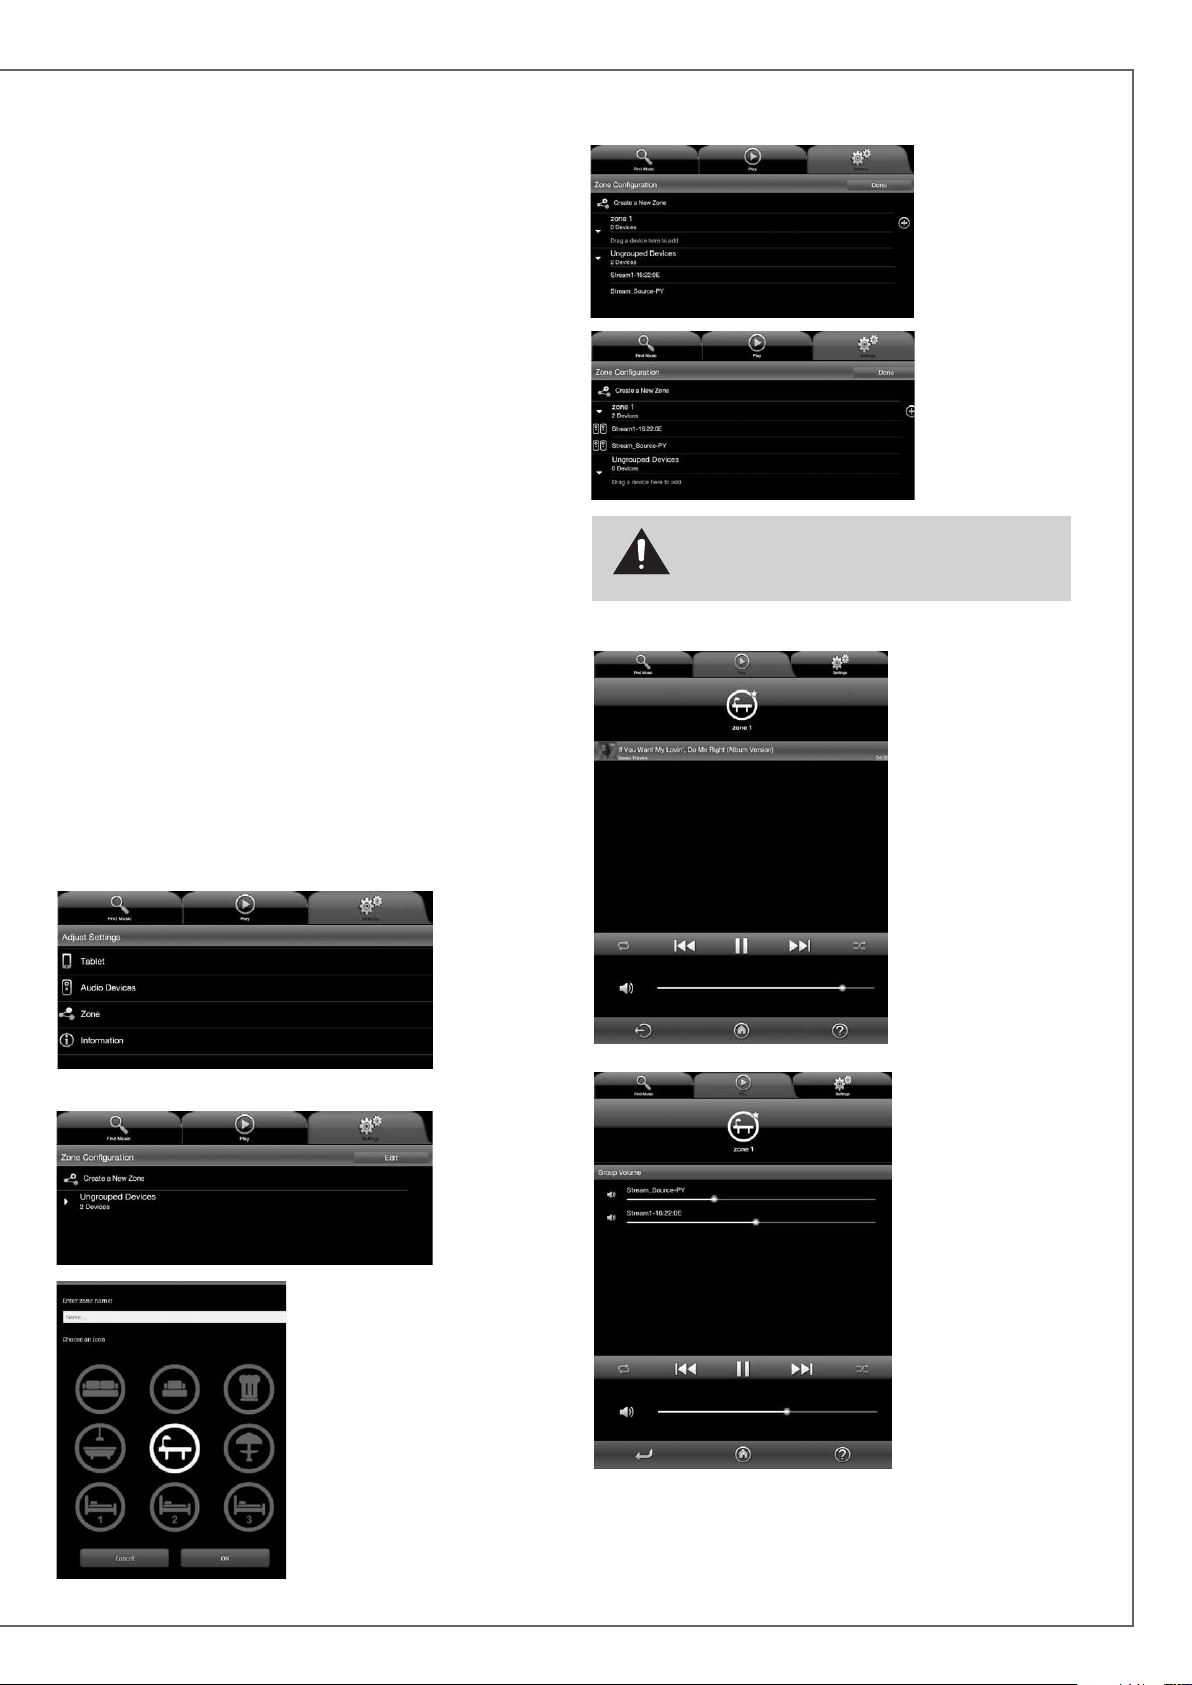
I) PLAYLISTS MANAGEMENT
Press the button on the right side to get the pop-up menu and
select one of the 4 possible actions:
- Play: start playing the playlist immediately and replaces the currently plying queue.
- Add to queue: adds the playlist to the queue
- Rename: brings up a dialog bow that allows you to rename the
playlist (function not available for songs)
- Delete: delete the playlist or remove a song from the playlist.
This action requires reconfirmation before deletion.
J) PLAYING MUSIC ON SEVERAL STREAM UNITS
The Cabasse application includes several functions that ease
playing music when several Stream players are connected to the
network.
- Select a first player
in the “Ungrouped
Devices” list and
drag it to the group
of your choice, here
named “zone 1”.
Add one or more
players in the same
group, maximum 4
if wi-fi connected,
up to 5 for a wired
Ethernet network.
DEFAULT STREAM PLAYER
Set the Default Audio Device in the « Audio Devices » subtag
of the « Settings » tag. Once done, all the orders sent from the
Cabasse application will apply to the default player, the one
which icon is marked with a star.
INDEPENDANT CONTROL OF SEVERAL PLAYERS
If no player is set up as the default player, all the players will be
listed on the “Play” tag. Press one icon to activate the control of
the related player (volume, choice in playing list). When selecting
a new track from the “Find Music” TAG, the application asks for
the selection of the player to be involved.
SYCHRONISED ZONE FOR « PARTY » MODE
A group of players must be created for simultaneous play of the
same program through several players:
- Select "Zone" in the "Settings" tag
- Press on “Create a New Zone”
- Enter the zone name and select
an icon, press “OK”
CAUTION ! Do not mix in the same group players connected
to the network via Wi-Fi and Ethernet.
Audio synchronization requires one connection mode only.
- Press “Done” to valid
the new zone. The selected icon of the group
is now listed among the
available players instead of the icons of the
individual players now
in the same zone. This
zone can be determined
as the default player.
Volume adjustments of
the zone: the individual
volume control of each
player from the Zone
appears when pressing the Volume icone
or the main volume
control of the “Play”
tag. Adjust the required relative volume for
each player, then adjust the main volume
on demand.
25
Page 26
e n g l i s h
BATTERIES REPLACEMENT
Take the remote control in your hand with the keyside facing the
floor. Lift the locker and pull out the battery. Remove the dead
battery and replace it with a new CR-2025 battery. Dispose of
the old batteries according to these instructions.
CAUTION: there is a danger of explosion if the battery
is incorrectly replaced. Replace only with the same or
equivalent type. The battery shall not be exposed to
excessive heat such as sunshine, fire or the like.
WEEE MARK
Disposal of Wastes of Electrical & Electronic
Equipment (Applicable in the European Union)
This symbol on the product, consisting of the crossedout wheeled bin, indicates that this product shall not be
treated as household waste. Instead it shall be handed
over to the applicable collection point for the disposal
of electrical and electronic equipment at the end of life.
By ensuring this product is disposed of correctly, you will help
prevent potential negative consequences for the environment and
human health, which could otherwise be caused by inappropriate
waste handling of this product. The recycling of materials will
help to preserve natural resources. For more detailed information
about recycling of this product, please contact your local city office, your household waste disposal service or the shop where you
purchased the product.
AUTO UPDATE
The updates of the firmware for Stream 1 are done automatically.
The duration of an update can vary from 5 minutes to half an
hour.
9
The
LED turns to red and flashes until the update is fully com-
pleted. Stream 1 cannot be used during the updates.
ATTENTION: Do not shut down Stream 1
during updates.
CLEANING STREAM 1
The Stream 1 may be cleaned with a soft damp cloth. Do not
use any sprays near the system or allow liquids to spill into any
openings. Also, do not use any solvents, chemicals, or cleaning
solutions containing alcohol, ammonia, or abrasives.
The grille may be carefully vacuumed, if necessary. Please note
that the drivers are located behind the grille cloth, and are easily
damaged if reasonable care is not taken.
By following the above information, your Stream 1 system is now properly
set up and we hope you will enjoy your speaker system for many years.
We receive letters every day from customers expressing the ever growing
satisfaction and musical emotion they have been getting with our speakers over the years. These letters are our first motivation.
FAQ
Looking for more information? Read our detailed answers to the
Frequency Asked Question on www.cabasse.com, page Stream 1.
CUSTOMER SUPPORT SERVICE
The Cabasse retailer network is at your disposal to ensure the after
sale service of your product. To get the list of Cabasse retailers,
contact us or consult our web site www.cabasse.com.
STREAM 1
Digital inputs
Analogue input
External power supply
Voltage
Useable
temperature range
Storage temperature
Useable humidity
range
Network
Audio formats
(WiFi/RJ45)
Drivers
Amplification
Distortion rate
and noise
(THD+N for the 20-20,000 Hz
bandwidth and for 100 mW
power output and more)
Dimensions
(h x l x p)
Weight
- 1 DLNA input: either wired with RJ45 cable
NFC patch in the center if the front grille
Instant Bluetooth Connection
100-240 V ~60/50 Hz, 2A
Wireless LAN 802.11b/g/n
(compliant with DLNA 1.5)
WMA (WMA9, CBR,CBR, up to 320kbps)
PCM (16 bits-44.1kHz, 24 bits-44/48/96 kHz,
.wav, .aiff, .aif, .aifc files, HTTP streams)
AAC-LC (up to 320kbps), ALAC (.m4a)
FLAC (16 bits-44.1kHz, 24 bits- 44/48/96 kHz)
1 x 2-way co-axial unit with:
1 x 2.9 cm "softdome" tweeter
1 x 8 cm midrange driver
1 x 17 cm woofer with double voice-coil
13.7 x 46 x 32.5 cm - 5.4 x 18.1 x 12.8 in
32.5 x 46 x 13.7 cm - 12.8 x 18.1 x 5.4 in
or Wifi
- 1 Bluetooth APTX input
- 1 USB input
1 3.5 mm minijack
32 V/ 2 A
+5 °C to +35 °C
-5 °C to +40 °C
40 % to 70 %
10/100Mb Ethernet
MAC & PHY
WPS 2.0 security
Digital media renderer
tweeter: 10 W
midrange: 10 W
woofer: 2 x 20 W
Wifi : < 0,1%
Bluetooth : < 0,1%
Analogue : < 0,1%
lying:
standing/hanging:
5 kg - 11 lbs
26
Page 27

FCC STATEMENT
This equipment has been tested and found to comply with the limits for a Class B digital
device, pursuant to Part 15 of the FCC Rules. These limits are designed to provide
reasonable protection against harmful interference in a residential installation. This
equipment generates uses and can radiate radio frequency energy and, if not installed
and used in accordance with the instructions, may cause harmful interference to radio
communications. However, there is no guarantee that interference will not occur in a
particular installation. If this equipment does cause harmful interference to radio or
television reception, which can be determined by turning the equipment off and on, the
user is encouraged to try to correct the interference by one or more of the following
measures:
-- Reorient or relocate the receiving antenna.
-- Increase the separation between the equipment and receiver.
-- Connect the equipment into an outlet on a circuit different from that to which the
receiver is connected.
-- Consult the dealer or an experienced radio/TV technician for help.
This device complies with part 15 of the FCC Rules. Operation is subject to the following
two conditions:
(1) This device may not cause harmful interference, and (2) this device must accept any
interference received, including interference that may cause undesired operation.
Changes or modifications not expressly approved by the party responsible for compliance
could void the user's authority to operate the equipment.
This equipment complies with FCC radiation exposure limits set forth for an uncontrolled
environment. This equipment should be installed and operated with minimum distance
20cm between the radiator & your body.
Page 28
d e u t s c h
Wir bedanken uns für den Kauf eines Lautsprechers von Cabasse.
Lesen Sie bitte die Betriebsanleitung durch, um sich mit dem Gerät vertraut zu machen.
Bewahren Sie die Anleitung auf, um auch zukünftig nachschlagen zu können.
SICHERHEITSHINWEISE
Erklärung der grafischen
Symbole -
soll den Anwender auf das
Vorhandensein von gefährlichen elektrischen Spannungen im
Inneren des Gehäuses dieses Produktes aufmerksam machen.
Derartige Spannungen sind hoch genug, um für Menschen
gefährliche Stromschläge zu bewirken.
Das Ausrufezeichen innerhalb eines gleichseitigen
Dreiecks soll den Anwender auf das Vorhandensein
von wichtigen Betriebs- oder Wartungshinweisen in der dem
Produkt beiliegenden Betriebsanleitung hinweisen.
Das Blitzsymbol
mit Pfeil innerhalb eines
gleichseitigen Dreiecks
Betriebshinweise - Lesen Sie vor der Inbetriebnahme alle
Sicherheits- und Verwendungshinweise aufmerksam.
Behalten Sie die Betriebshinweise im Hinterkopf –
auf sie wird in dieser Anleitung ständig Bezug genommen.
Achten Sie besonders auf Warnungen – Alle
Warnungs-Symbole auf dem Produkt und Warn-Hinweise in
dieser Anleitung müssen befolgt werden.
Beachtung der Betriebshinweise – befolgen Sie alle
Installations- und Bedienungs-Anweisungen sorgfältig.
Reinigung - Trennen Sie das Gerät vor jeder Reinigung vom
Stromnetz! Wir empfehlen die Reinigung mit einem feuchten
Tuch. Verwenden Sie niemals ätzende Produkte, Verdünner,
Spiritus, Waschbenzin oder chemische Lösungsmittel, da diese
die Oberfläche angreifen oder die Beschriftung ablösen können.
Zubehör - Verwenden Sie nur Zubehör, das von Cabasse
ausdrücklich empfohlen wird.
Wasser und andere Flüssigkeiten – Das Produkt darf
nicht an feuchten oder nassen Orten, wie zum Beispiel einem
feuchten Keller, neben einer Badewanne, einem Abfluss oder
einem Swimming Pool oder ähnlichen Bedingungen betrieben
werden.
Rollwagen und Standfüße – Das Gerät
sollten nur mit vom Hersteller empfohlenen
Rollwagen oder Standfüßen verwendet werden.
> Warnung für transportable Rollwagen
Standflächen: Das Gerät nicht auf unstabile Standflächen,
beispielsweise Standfüße, Stative, Tische, Regale oder
ähnliches. stellen, von denen es herabfallen und Verletzungen
verursachen könnte.
Belüftung - Gewährleisten Sie eine ausreichende Belüftung.
Decken Sie niemals vorhandene Lüftungsschlitze sowie
Öffnungen von Ventilatoren ab. Achten Sie darauf, dass bei
auf dem Boden stehendem Gerät durch eventuell vorhandene
hochflorige Teppiche die Luftzirkulation nicht blockiert wird.
Stellen Sie das Gerät ebenfalls nicht in z.B. geschlossenem
Mobiliar auf, dadurch wird verhindert, dass genügend Kühlluft
zirkulieren kann.
Netzanschluss - Das Gerät darf nur mit dem Stromnetz
verbunden werden, wenn die Netzspannung der Steckdose,
an der das Gerät betrieben werden soll, der Betriebsspannung
entspricht, welche in der dem Gerät beiliegenden
Betriebsanleitung und auf den am Gerät angebrachten
Hinweisen vorgeschrieben ist. Wenn Sie sich nicht sicher sind,
welche Versorgungsspannung bei Ihnen verfügbar ist, wenden
Sie sich an Ihren Händler oder den örtlichen Stromversorger.
Netzkabel - Greifen Sie das Netzkabel immer am Stecker -
ziehen Sie niemals am Kabel selbst! Stellen Sie nicht das Gerät
selbst oder Möbel auf das Netzkabel. Stellen Sie auch sicher,
dass das Kabel nicht eingeklemmt wird. Sorgen Sie dafür,
dass nicht auf das Netzkabel getreten werden kann und dass
es nicht abgeklemmt wird.
Gewitter - Wir empfehlen, bei Gewitter Netz- und
Antennenstecker aus den jeweiligen Anschlussdosen
herauszuziehen. Diese Maßnahmen sollten auch bei längerer
Nichtbenutzung, beispielsweise einem Urlaub, erfolgen.
Flüssigkeiten und Fremdkörper - Achten Sie darauf,
dass weder Flüssigkeiten noch kleine Gegenstände durch
vorhandene Öffnungen in das Gerät gelangen. Das könnte zu
Stromschlägen oder Bränden führen. Sorgen Sie dafür, dass
keine Flüssigkeit auf das Gerät tropft bzw. gespritzt wird.
Wartung - Bei Öffnen des Gehäuses besteht
Stromschlaggefahr! Im Geräteinneren befinden sich keine
vom Nutzer zu wartenden Teile. Wenden Sie sich im Servicefall
bitte an Ihren Händler.
Schäden, die eine Reparatur erfordern - Trennen Sie das
Gerät sofort vom Netz. Überprüfung und Reparatur darf
nur von geschultem Personal durchgeführt werden. Das ist
insbesondere dann der Fall, wenn das Netzkabel bzw. dessen
Stecker beschädigt ist.
Fremdkörper oder Flüssigkeiten ins Geräteinnere gelangt sind.
das Gerät hingefallen ist und/oder das Gehäuse sichtbare
Schäden aufweist.
das Gerät nass geworden ist (z.B. durch Regen oder Wasser).
das Gerät trotz Beachten von in dieser Anleitung
dokumentierten Bedienschritten nicht mehr erwartungsgemäß
funktioniert.
Das Verhalten des Geräts sich merklich geändert hat.
Ersatzteile - Verwenden Sie nur Original-Ersatzteile oder
Teile, die den Spezifikationen des Herstellers entsprechen.
Prüfung – Fordern Sie bei jedem Wartungs- oder
Reparaturvorgang den jeweiligen Servicetechniker dazu auf,
sich durch entsprechende Abschlussprüfungen vom in jeder
Hinsicht sicheren Betrieb des Gerätes zu überzeugen
Hohe Umgebungstemperaturen – Das Gerät sollte
von Wärmequellen wie Heizkörpern, Verstärkern und ähnlichen
Einrichtungen, die die Betriebstemperatur ansteigen lassen
können, ferngehalten werden.
27
Page 29
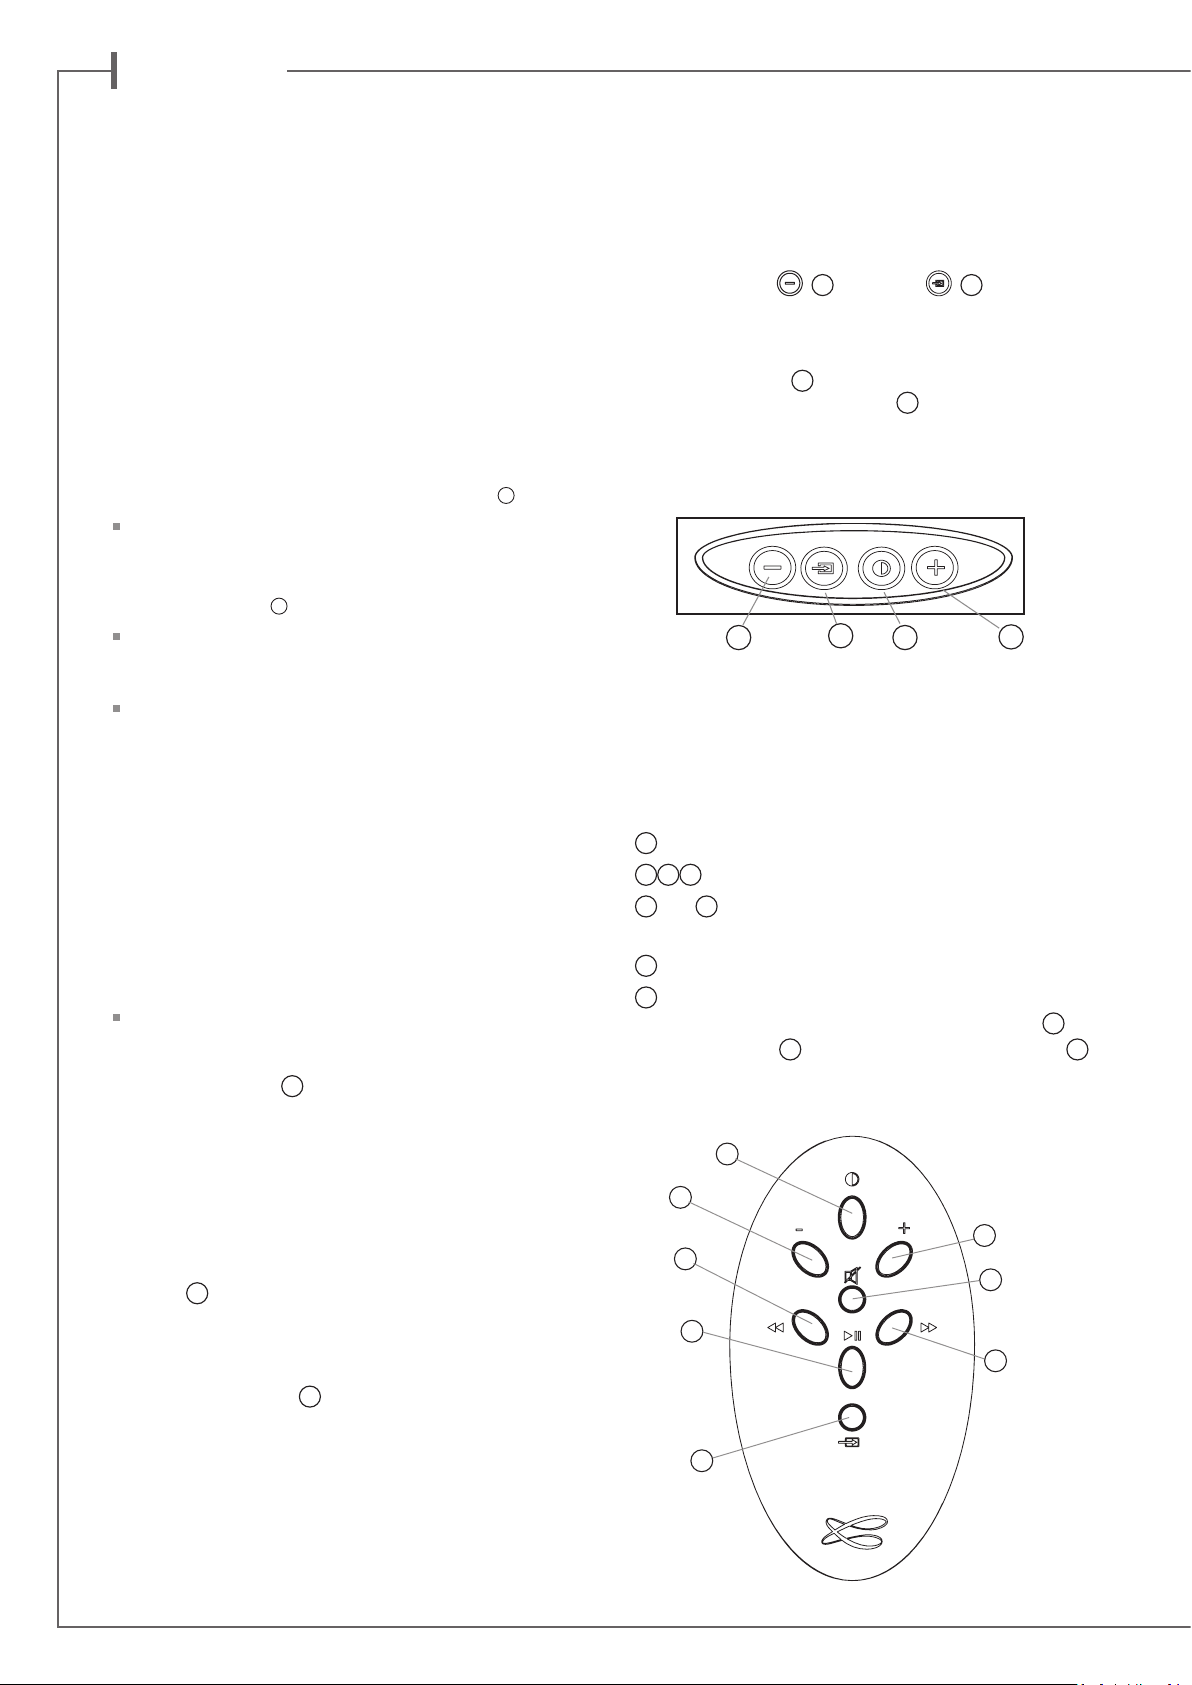
d e u t s c h
AUSPACKEN
Öffnen Sie den Karton und entnehmen Sie ihm die einzelnen
Komponenten Stück für Stück. Bewahren Sie die Originalverpackung für späteren Gebrauch auf.
Ist das Gerät augenscheinlich beschädigt, benutzen Sie sie
nicht. Packen Sie in diesem Fall sämtliche Komponenten in
der Originalverpackung wieder ein und informieren Sie unverzüglich Ihren Cabasse-Händler.
EINRICHTUNG
1
DIE KOMPONENTEN IHRES SYSTEMS
1 Stream 1, 1 externes Netzteil, 1 Fernbedienung,
1 Betriebsanleitung und Garantiekarte.
AUFSTELLUNG 5
Stellen, legen oder hängen Sie das Stream 1 an den
gewünschten Platz und sorgen Sie für eine Steckdose zur
Stromversorgung in Reichweite.
Lassen Sie genügend Freiraum über dem Stream 1 und um
die Einheit herum, damit:
- für Bluetooth und WLAN eine gute Übertragung gewährleistet ist,
- genügend Platz für Ihr Smartphone zur Herstellung einer
NFC-Verbindung bleibt,
- eine gute Klangqualität gewährleistet ist.
:
:
ANSCHLUSS DER STROMVERSORGUNG
Verbinden Sie das Netzteil mit dem Stream 1 und mit einer
Steckdose. Bringen Sie den Schalter „POWER ON/OFF“ in
die „ON“-Position. Das Stream 1 ist bereit zur Musikwieder-
gabe, wenn die LED
ANMERKUNG: Der WLAN-Modus des Stream 1 ist verfügbar,
wenn die PWR-LED etwa 40 Sekunden nach Einschalten des
Stream 1 von rot auf grün wechselt.
9
beginnt zu leuchten.
LED-ANZEIGEMODI
Betätigen Sie erst
kontinuierlichen und blinkenden Modi umzuschalten.
Ist der Blink-Modus aktiv, bewirkt jeder Bedienvorgang von der
Cabasse-App, der Fernbedienung und dem Gerätetastenfeld
ein Blinken von LED
des aktiven Eingangs an. Die LED
nächsten Bedienvorgang. Während der kontinuierlichen
Betriebs zeigt ein kurzes Dunklerwerden oder ein kurzer
Farbwechsel jeden Bedienvorgang an.
2 1
und dann
2
9
. Die Farbe des Blinkens zeigt die Art
8
9
bleibt dunkel bis zum
8
um zwischen
3
BENUTZUNG DES STREAM 1 MIT DER FERNBEDIENUNG
1
EIN / ECO
2 3 4
5
Bluetooth: vorheriger Titel, nächster Titel
7
8
geschlossenen Quellen zu aktivieren: Bluetooth (LED
blau), WLAN (LED
leuchtet grün).
VOL -, VOL +, Stummschaltung
und 6 WLAN: abwärts und aufwärts scannen
Pause/Play (WLAN und Bluetooth)
Quellenwahl: Betätigen Sie diese Taste, um eine der an-
9
ist
9
leuchtet orange) oder analog (LED
9
1
EINSCHALTEN / ECO-BETRIEB
a) Schalten in den ECO (Stromspar)-Modus: Betätigen Sie
die Taste
Stream 1. Die WLAN- und Bluetooth-Funktionen bleiben aktiviert. Die Audio-Sektion des Stream 1 wird ausgeschaltet.
b) Zurückkehren zum Normal(ON) –Modus :
- Betätigen Sie die Taste
Bedienfeld oder
- stellen Sie eine Bluetooth-Verbindung her oder
- betätigen Sie „Play“ in der Fernbedienungs-App von Cabasse
1
auf der Fernbedienung oder am Bedienfeld des
1
auf Fernbedienung oder Geräte-
2
3
5
4
7
6
8
28
Page 30
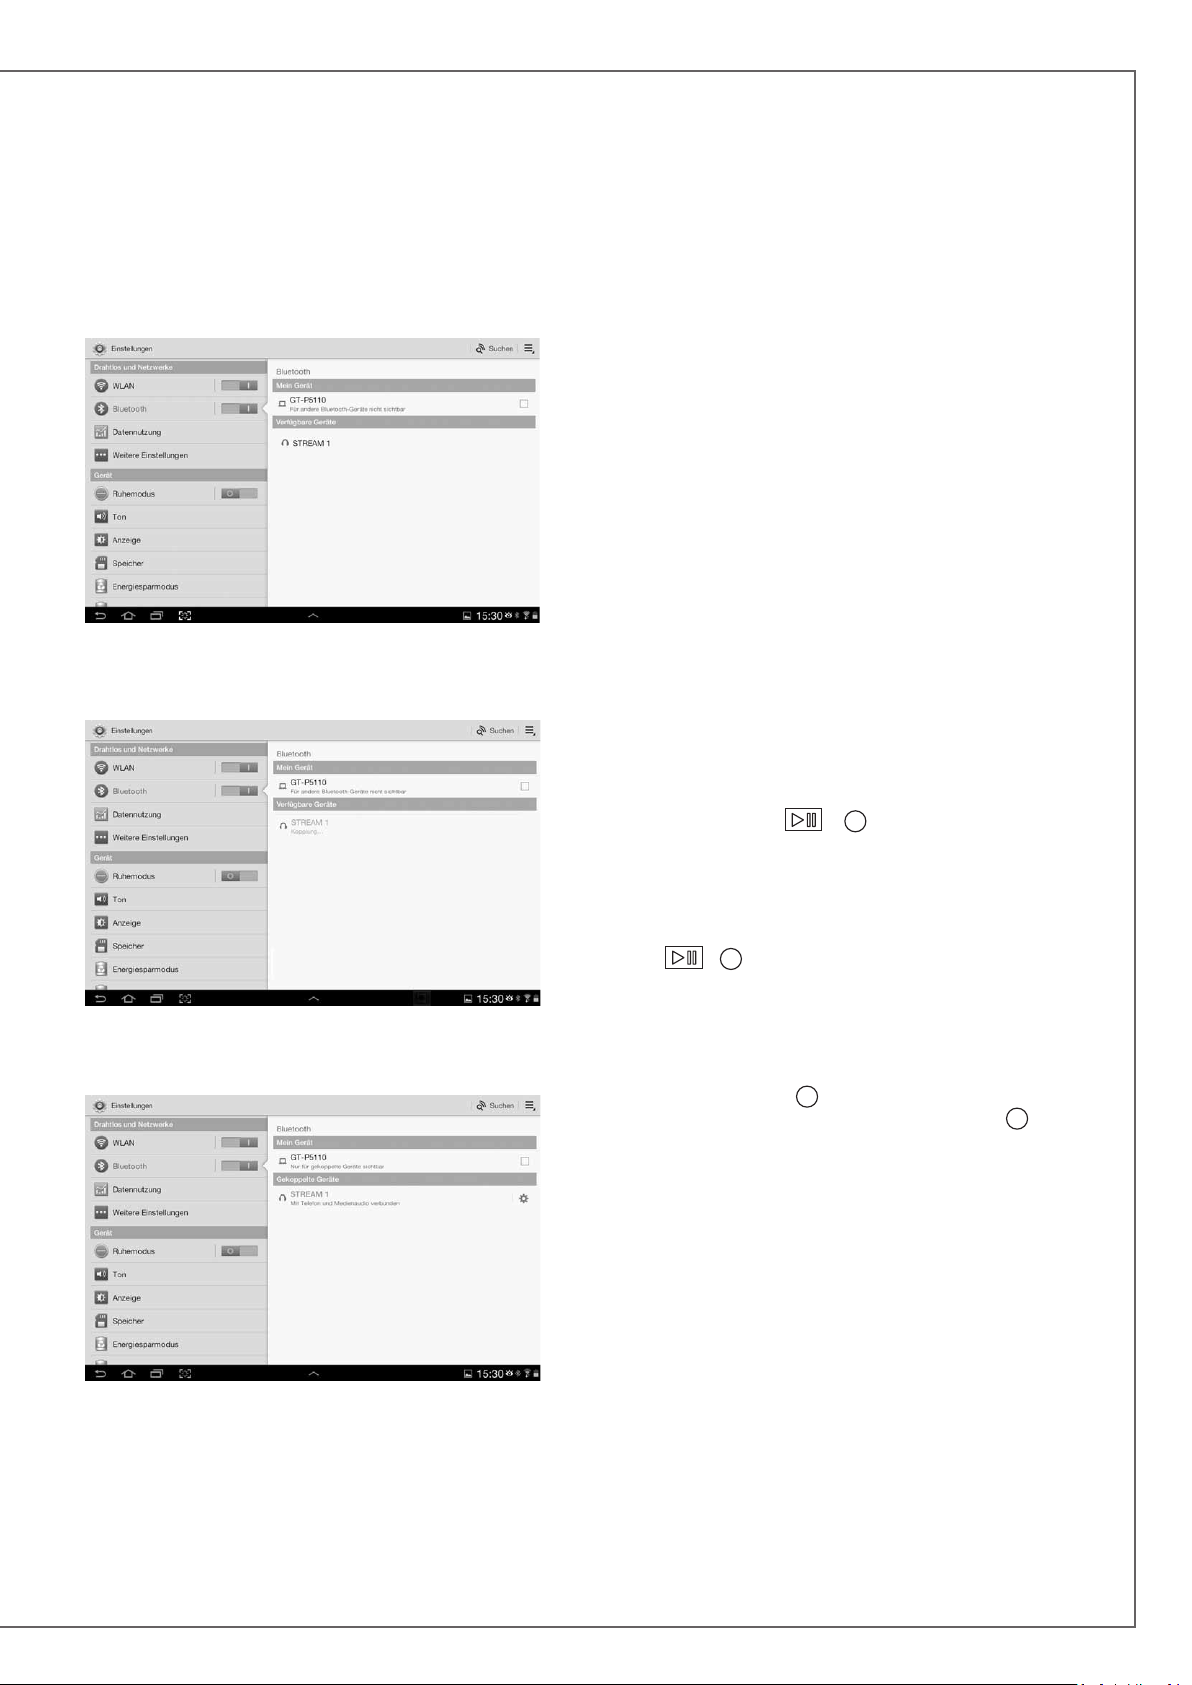
BLUETOOTH-VERBINDUNG MIT EINEM
ANDROID-SMARTPHONE/TABLET
- Wenn noch nicht erfolgt, aktivieren Sie im EinstellungsMenü Ihres Smartphones/Tablets Bluetooth.
- Betätigen Sie „Geräte suchen“ und wählen Sie „Cabasse
Stream 1“ aus den verfügbaren Geräten
Das Stream 1 ist nun mit dem Smartphone/Tablet gekoppelt,
wenn keine andere Bluetooth-Verbindung aktiv war.
Um auf dem Smartphone/Tablet gespeicherte Musiktitel
über das Stream 1 abzuspielen, öffnen Sie die AudioplayerApp auf Ihrem Smartphone/Tablet. Wählen Sie dort einen
Titel und betätigen Sie „play“. Ist nun trotzdem keine Musik zu hören, überprüfen Sie zunächst, ob nicht vielleicht
die Lautstärke des Smartphone/Tablets komplett heruntergeregelt oder die „Mute“-Funktion aktiv ist. Stellen Sie
die Lautstärke in der App ein und erhöhen nun auch die
Lautstärke am Stream 1 mit der Fernbedienung. Wählen
Sie nun „Bluetooth“ als die aktive Quelle, indem Sie auf der
Fernbedienung die Taste „8“ so lange gedrückt halten, bis
die blaue LED anfängt zu blinken.
SOFORTIGE NFC-VERBINDUNG MIT EINEM
NFC-SMARTPHONE
Erklärung auf Seite 7.
BENUTZUNG DER BLUETOOTH-FREISPRECHFUNTKION MIT EINEM SMARTPHONE
Die Freisprech-Funktion der Stream 1 ist aktiv, sobald
eine Audio-Datei von einem Smartphone über Bluetooth
wiedergegeben wird.
Jedes ankommende Gespräch pausiert die Musikwiedergabe
und aktiviert den Klingelton des Stream 1 zusammen mit
dem des Smartphone.
Betätigen Sie „Play“
oder die grüne Taste des Telefons, um den Anruf mit
Freisprechfunktion anzunehmen. Wir empfehlen, sich
beim Anruf in etwa einem Meter Umkreis um das Stream 1
aufzuhalten.
Um das Gespräch zu beenden, betätigen Sie erneut
„Play“
Musikwiedergabe startet erneut, von der Stelle, an der
pausiert wurde.
Die Freisprech-Funktion kann ebenfalls bei aktiver WLANQuelle benutzt werden. Aktivieren Sie dazu die BluetoothVerbindung von Ihrem Smartphone und schalten Sie dann
mit der „Source“-Taste
Anruf herein, aktivieren Sie mit der „Source“-Taste
Bluetooth-Eingang und damit die Freisprech-Funktion.
Bevor Sie auf Bluetooth schalten, sollten Sie daran denken,
die Wiedergabe auf Pause zu stellen, wenn Sie an der Stelle
weiterhören möchten, bei der der Anruf hereinkam.
7
oder die rote Taste des Telefons. Die
7
auf der Fernbedienung
8
zur WLAN-Quelle. Kommt ein
8
den
Wird die Nachricht „Connection...“ jetzt nicht angezeigt,
beenden Sie zunächst die Verbindung eines anderen Geräts
mit dem Stream 1, indem Sie entweder im EinstellungsMenüs dieses Geräts die Verbindung beenden oder indem
Sie das Stream 1 aus- und wieder einschalten. Betätigen
Sie nun beim zu verbindenden Gerät nochmals „Cabasse
Stream 1“.
29
Page 31
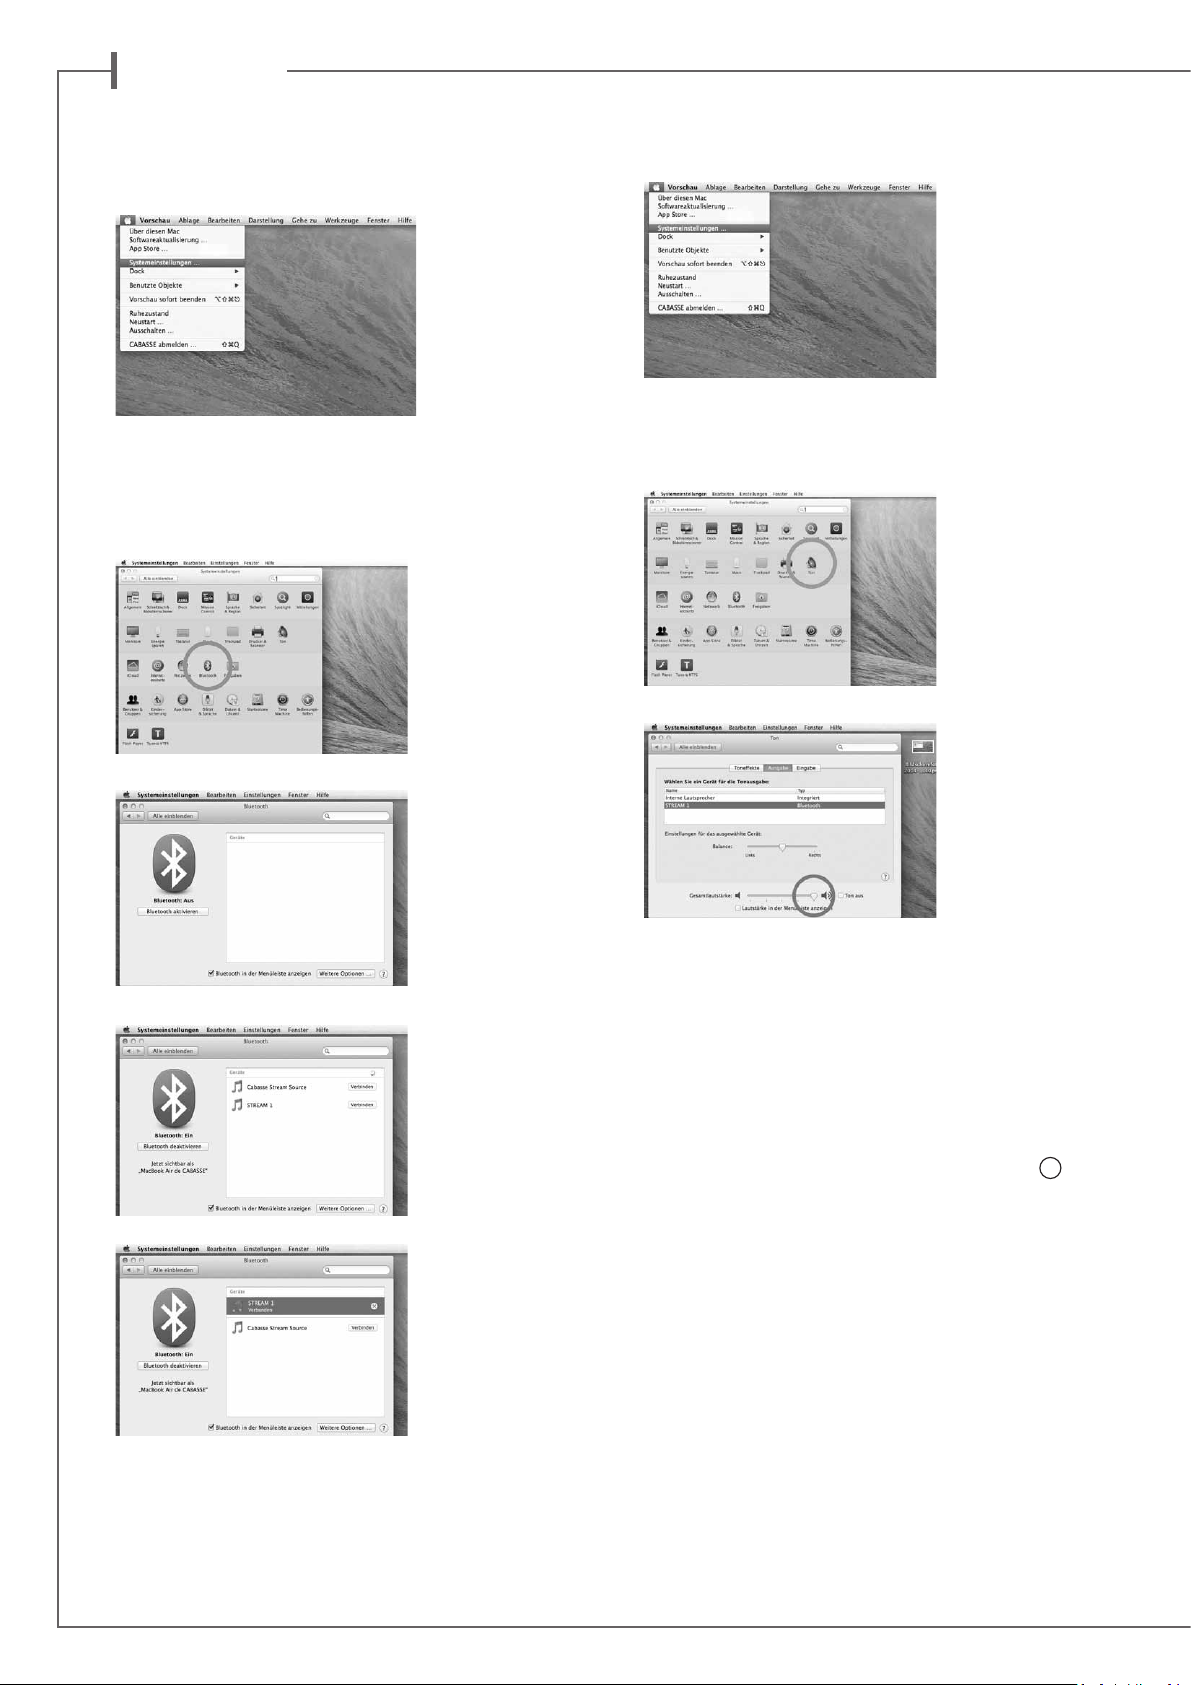
d e u t s c h
BlUEtootH-VERBInDUnG
MIt EInEM aPPlE-CoMPUtER
1) AKTIVIEREN DES BLUETOOTH-MODUS
Schalten Sie das Stream 1 ein. Beenden Sie eine etwaige BluetoothVerbindung mit einem anderen Gerät.
Aktivieren Sie Bluetooth auf Ihrem Apple-Computer: Wählen Sie im
„Apple“-Menü „Systemeinstellungen“.
2) AUSWAHL DES AUDIO-AUSGABEGERÄTS
Zur Wiedergabe der auf Ihrem Mac gespeicherten Musik mit
dem Stream 1 wählen Sie bitte im „Systemeinstellungen“-Menü
„Stream 1“ als Wiedergabegerät aus.
Wählen Sie im „Systemeninstellungen“-Menü „Ton“.
Wählen Sie dort „Bluetooth“.
Wählen Sie „Bluetooth aktieren" oder „Einschalten“
Wählen Sie „Stream 1 Verbinden“
Wählen Sie unter „Ausgang“ „Stream 1 Stereo“. Die Zeile „Stream 1“
dient nur zur Verwendung der Freisprech-Funktion mit einem Smartphone. Stellen Sie die Lautstärkeeinstellung ganz nach rechts.
Schließen Sie das „Sound“-Menü.
Befindet sich das Stream 1 im Bereitschaftsmodus, dauert es etwa
sechs Sekunden, bis die Wiedergabe startet. Der Bluetooth-Eingang
wird dann automatisch gewählt. Die Lautstärke lässt sich über die
Fernbedienung des Stream 1 einstellen.
Ist das Stream 1 eingeschaltet und gibt eine andere Quelle wieder
(WLAN, analog oder digital) wählen Sie mit der Taste
dienung den Bluetooth-Eingang und stellen Sie dann die gewünschte
Lautstärke ein.
8
der Fernbe-
Das Stream 1 ist nun mit Ihrem Mac-Computer gekoppelt.
30
Page 32
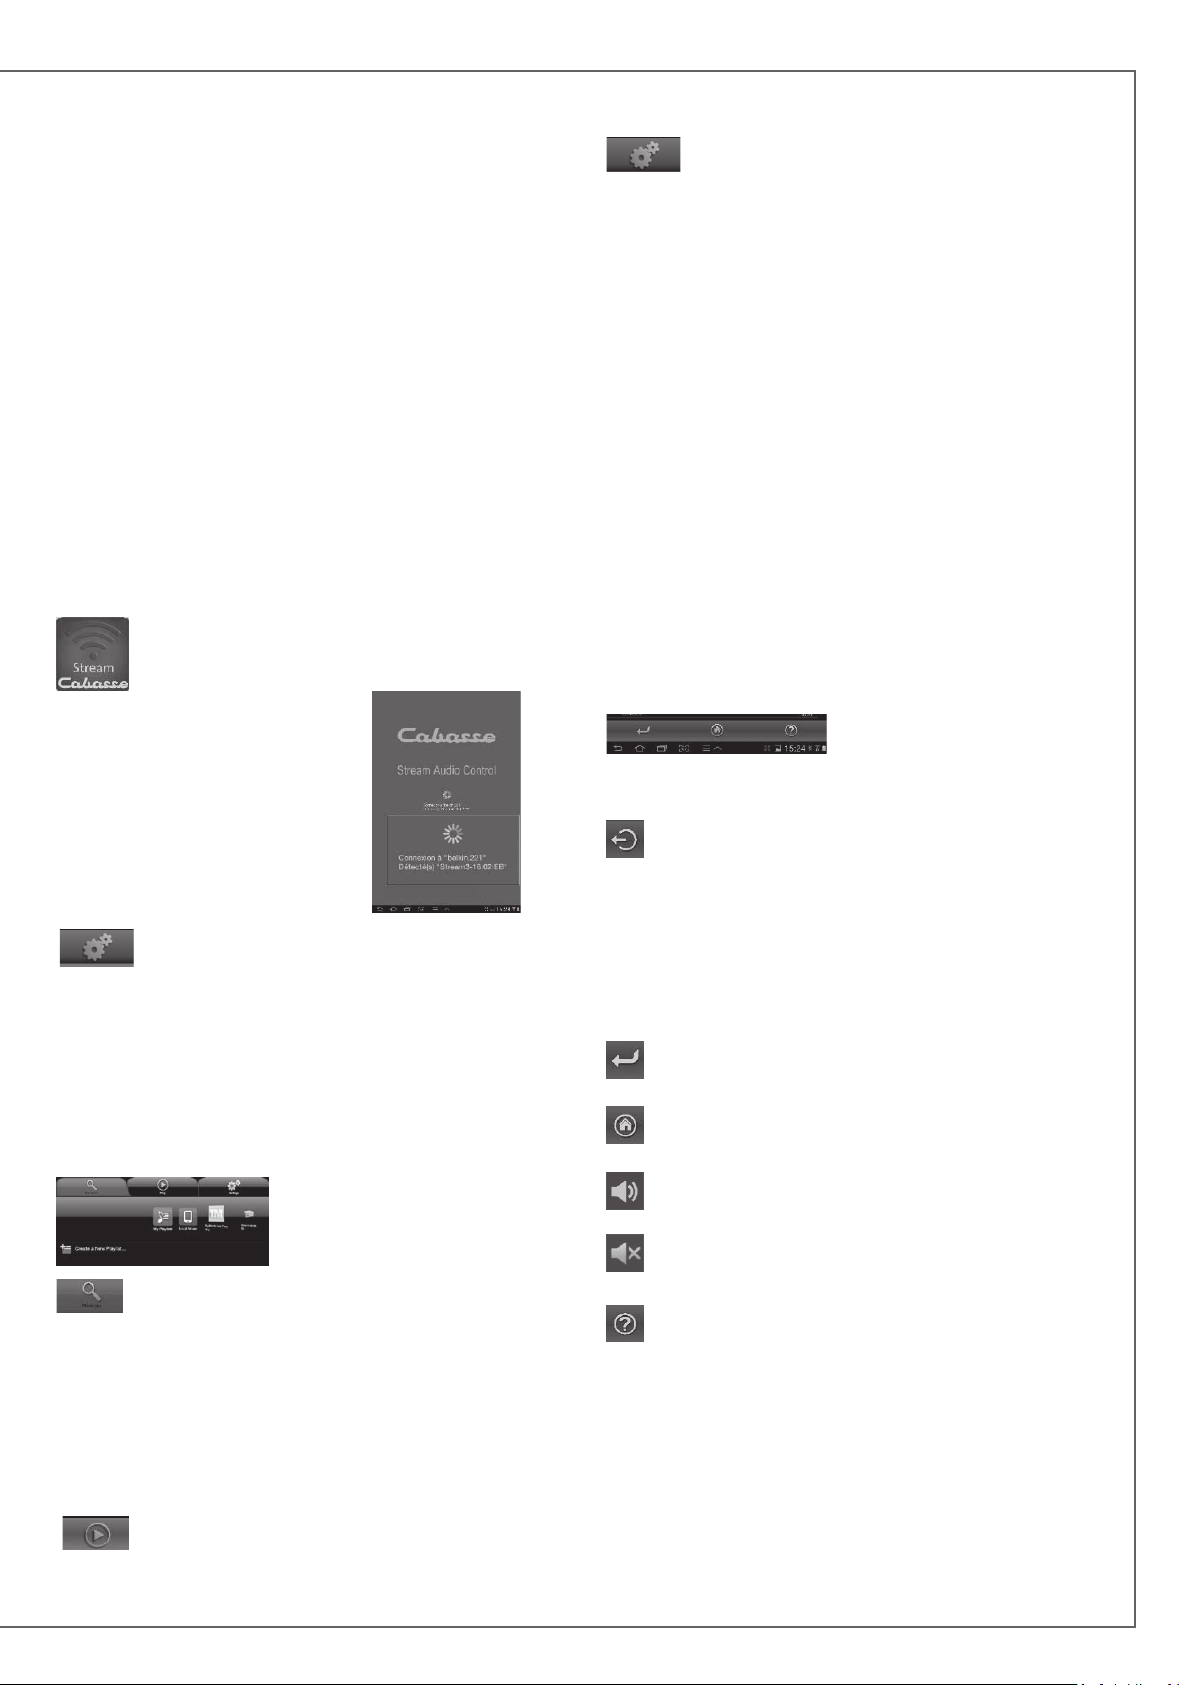
IntEGRatIon DEs stREaM 1
Ins HEIMnEtZWERK
A) VERBINDUNG DES STREAM 1 MIT DEM
HEIMNETZWERK
Stellen Sie sicher, dass das Stream 1 mit Ihrem WLAN-Netzwerk
verbunden ist. (Ist das nicht der Fall, siehe Seite 9.). Das
Smartphone/Tablet, auf dem die Stream-App von Cabasse
installiert ist, muss ebenfalls im WLAN angemeldet sein.
B) INSTALLATION DER CABASSE-APP
Die Stream App von Cabasse steht kostenfrei zum Download zur
Verfügung, für Android-Geräte im Google PlayStore, für Apple
Geräte im iTunes AppStore.
Sie können die App auf mehreren Geräten installieren und diese
zur Bedienung einer oder mehrere Stream 1-Systeme benutzen.
WICHTIG: Die Stream App von Cabasse kann nur dann geöffnet
werden, wenn mindestens ein Stream 1 oder ein anderer AudioPlayer, der auf der Cabasse-Anwendung basiert, installiert ist und
eine Netzwerkverbindung aufgebaut hat.
Laden Sie die App herunter und installieren Sie sie
auf Ihrem Tablet oder Smartphone. Starten Sie die
App mit einem Fingerdruck auf das angezeigte weiße
Cabasse-Icon.
Zwei Meldungen erscheinen unter dem
rotierenden Rad im Start-Menü der App:
- Die Bestätigung der WLAN-Verbindung,
hier „belkin.221“
- Die Bestätigung, dass ein Stream
1-System im WLAN gefunden wurde.
ACHTUNG: Die App könnte mehrere
Wiedergabegeräte finden. Ist das der Fall,
wählen Sie in Einstellungen/Audiogerät
das gewünschte Stream 1-System als StandardWiedergabegerät.
Wenn beim Start der App kein Stream 1 gefunden wurde, wird
das obige Menü durch eine Warnnachricht ersetzt. Stellen Sie
sicher, dass das Stream 1 eingeschaltet ist (die „Power“-LED
leuchtet grün) oder der „FULL AUTO“-Bereitschaftsmodus aktiv
ist (die „Power“-LED leuchtet rot).
C) DIE ELEMENTE DER CABASSE STREAM-APP
Die App ermöglich schnellen
Zugriff auf alle verfügbaren
Audioquellen im Netzwerk.
Die drei Hauptmenüs sowohl der
iOS- als auch der Android-Version
sind:
Das „Music“-Menü: Es listet alle verfügbaren
Speichergeräte im Netzwerk (Digital Media Servers) auf.
- In jedem Fall die Untermenüs „My Play-list“ und „Stream 1-xxx..“
- Andere Speichermedien wie oben gezeigt:
o einen USB-Stick: hier angeschlossen an die USB-Buchse des
Belkin-Routers
o eine Multimedia-Festplatte, hier die MyBookLive
o einen Computer: hier einen Computer mit Windows
7-Betriebssystem.
Das „Settings“-Menü mit vier Untermenüs:
o Das Tablet- oder Phone-Untermenü bietet für die Anzeige die
Auswahl zwischen „Graphical View“ und „List View“ sowie die
Option, die Netzwerkserver erneut zu durchsuchen und die AppEinstellungen zurückzusetzen.
Bei einem Smartphone ermöglicht das Untermenü „Incoming
call“ die folgenden Einstellungen, wenn ein Anruf hereinkommt:
- do nothing: Die Musik wird mit unveränderter Lautstärke weiter
wiedergegeben.
- mute volume: Die Musikwiedergabe wird fortgesetzt, aber ihr
Ton wird stummgeschaltet.
- pause: Die Musikwiedergabe pausiert und wird nach Beenden
des Gesprächs fortgesetzt.
o Das „Audio Devices“-Untermenü listet alle im Netzwerk
vorhandenen Stream 1-Systeme auf, ermöglich die Identifikation
des Standard-Wiedergabegeräts und die Umbenennung der
Geräte.
o „Zone“ Menü: Erstellt und konfiguriert Gruppen von StreamPlayern (Kapitel J, Seite 25)
o „Information“-Menü: Prüfen Sie, ob die Referenznummer
der gerade verwendeten Version der App mit der der neuesten
verfügbaren Version übereinstimmt.
D) NAVIGATION
Welche Tasten am unteren Rand
der App angezeigt werden, ist
von der gerade angezeigten Seite
abhängig. Zusammen mit dem direkten Zugriff durch die Auswahl
der Menüs und Untermenüs vereinfachen sie die Navigation.
Exit: Betätigen Sie diese Taste, um die App zu beenden.
Diese Taste erscheint nur in dem obersten Ebene jedes
Untermenüs.
ACHTUNG: Wenn Sie das gerade wiedergegebene Stück nicht
per „Pause“ anhalten, bevor Sie die App beenden oder das
Smartphone/Tablet herunterfahren, wird die WLAN-Übertragung
der Tracks, die in der „Queue“-Liste auf der „Play“-Seite aufgelistet
sind, solange fortgesetzt, bis das Ende der Liste erreicht ist.
Back: Betätigen Sie diese Taste, um zur vorangegangenen
Ansicht zu gelangen.
Home: Betätigen Sie „Home“, um zur ersten Seite des
jeweiligen Menüs zu gelangen.
Sound ON: Betätigen Sie diese Taste, um die Wiedergabe
stummzuschalten.
Mute: Betätigen Sie diese Taste, um die Wiedergabe wieder
einzuschalten.
Help: Bei Betätigung dieser Taste werden auf die jeweilige
Menüebene bezogene Hilfeinformationen angezeigt.
Das „Play“-Menü:Es zeigt die gerade wiedergegebene
Datei an sowie diejenigen, die im Untermenü des
„Music“-Menüs mit der Option „Add to Queue“ ausgewählt sind.
31
Page 33
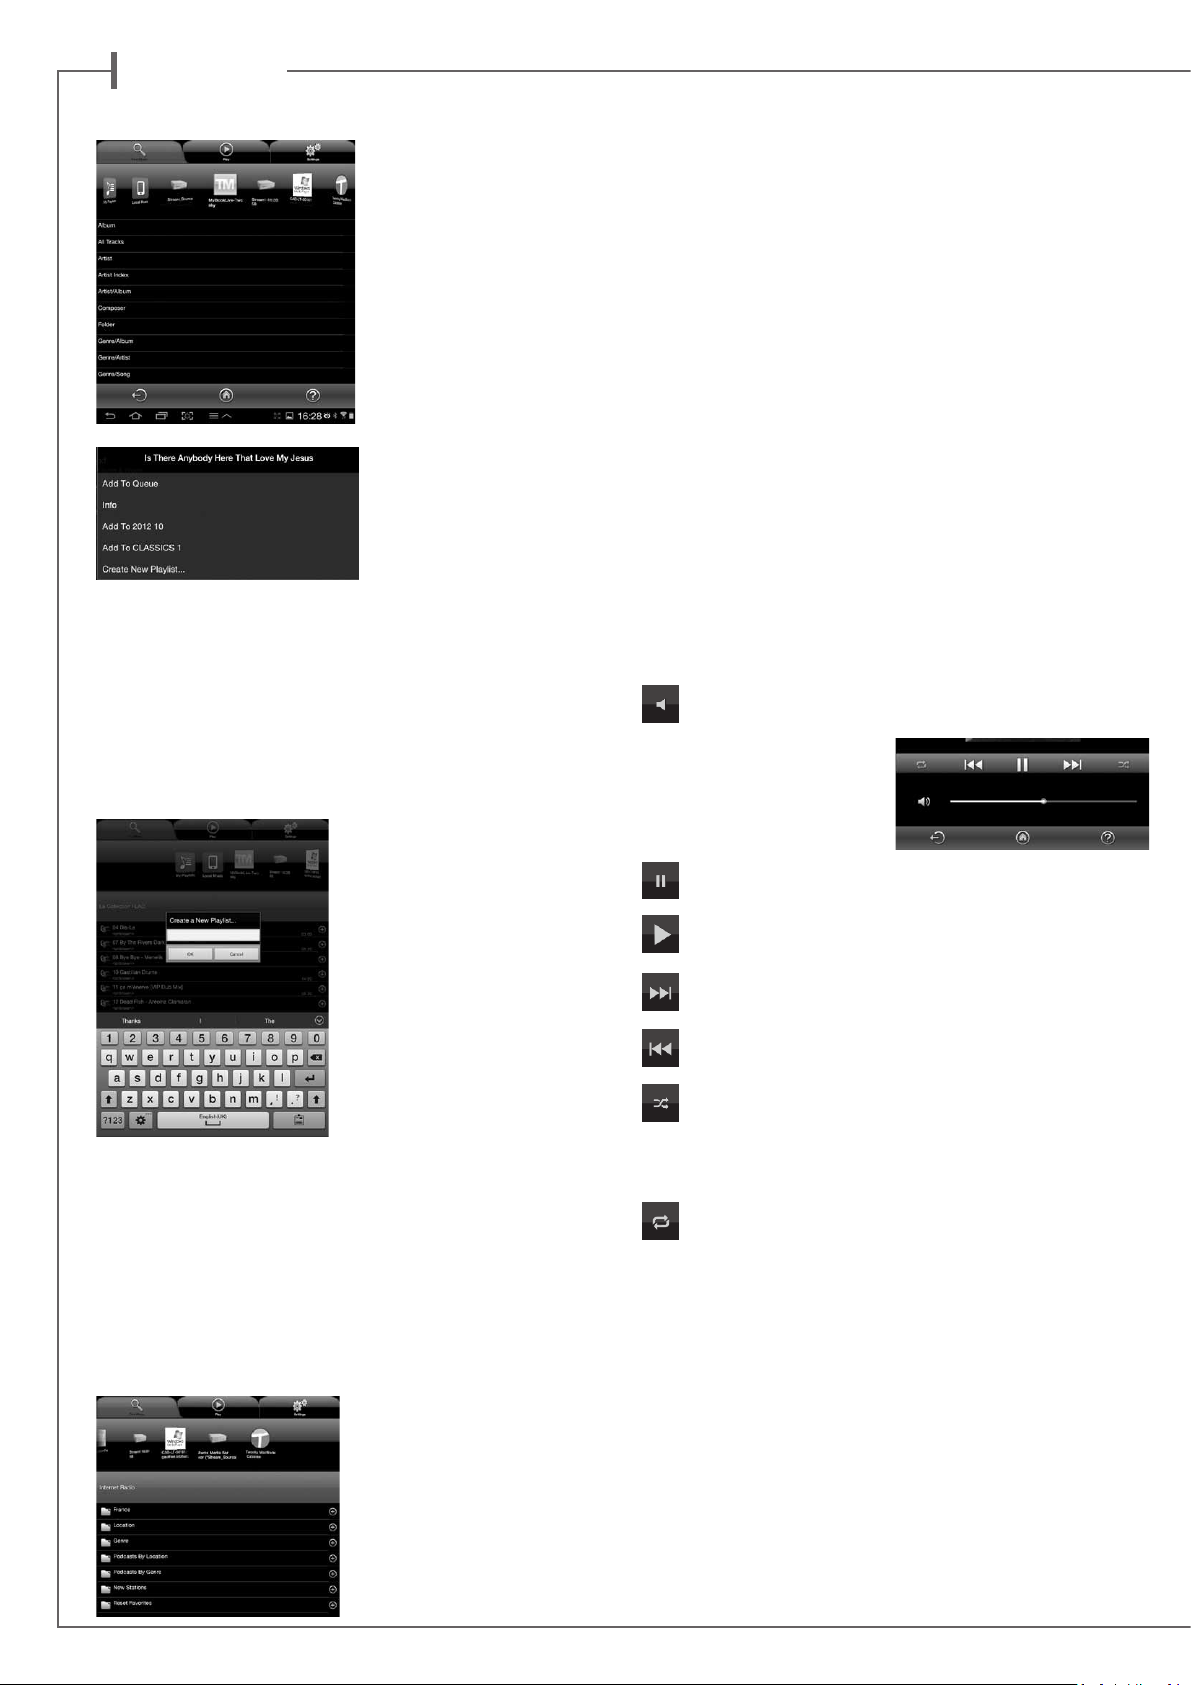
d e u t s c h
E) „MUSIC“-MENÜ: WIEDERGABE ÜBER DAS NETZWERK
Alle mit dem lokalen Netzwerk
verbundenen Audio-Quellen
(Stream-Player, NAS-Festplatten, Computer...) werden im
„Music“-Menü oben angezeigt.
Wischen nach links oder rechts
kann nötig sein, um zu dem
Icon des gewünschten Geräts
zu gelangen.
Gehen Sie in eines der „Music“Untermenüs, um auf die im
Netzwerk verfügbaren Musiktitel zuzugreifen. Die angezeigten Kategorien helfen bei der
Auswahl der Stücke; die Kategorien werden vom Server zur
Verfügung gestellt.
Die Wahl von „All Tracks“ beispielsweise erlaubt den Zugriff
auf alle Titel, die auf dem jeweiligen Server gespeichert sind
(hier ein Multimedia-Player).
Tippen Sie auf die Zeile mit dem gewünschten Titel, dieser beginnt
sofort zu spielen. Zugleich öffnet sich das „Play“-Menü, alle anderen
Titel, die vorher dort aufgelistet waren, werden gelöscht.
Wenn Sie auf die Taste "+" rechts in der Zeile jedes Musiktitels tippen, erscheint ein Menü mit vier Optionen:
- Add to Queue: fügt den Titel zur Liste der aktuell wiederzugebenden
Titel (Queue) hinzu
- Add to Playlist: fügt den Titel zu einer auswählbaren Wiedergabeliste hinzu
- Create New Playlist: ermöglicht
die Erstellung einer neuen Wiedergabeliste. Versehen Sie diese mit
Hilfe der Bildschirmtastatur Ihres
Geräts mit einem Namen. Der
ausgewählte Titel wir das erste Element der neuen Wiedergabeliste.
- Info: Zeigt die relevanten Daten
für den Musiktitel an, die vom Server zur Verfügung gestellt werden,
wie: Titelname, Interpret, Album,
Genre, Erstelldatum, Spieldauer,
Bitrate.
F) „MUSIC“-MENÜ:
Das Stream 1 funktionniert ebenfalls als Audio-Server, alle anderen
Stream-Player im Netz können auf das Stream 1 zugreifen. Tippen Sie
auf das Icon eines der verfügbaren Stream-Player, und wählen Sie in der
sich dann öffnenden Anzeige zwischen vTuner und Deezer beim Stream
3 sowie zwischen vTuner, Deezer und dem USB-Speicerh für das Stream
1 und das Stream Source.
BITTE PRUEFEN
WIEDERGABE VON INTERNETRADIO
Tippen Sie auf das Stream 1-Untermenü und wählen Sie vTuner.
Wählen Sie auf die gleiche Weise, wie Sie im Netzwerk einen Titel
auswählen, eine Radiostation
aus.
- Tippen Sie auf die ausgewählte
Radiostation, um diese
wiederzugeben.
- Tippen Sie auf den Pfeil rechts
neben der entsprechenden Zeile,
um Informationen zu Wiedergabeund Wiedergabelisten-Optionen
zu erhalten
STREAMING MIT DEEZER
Tippen Sie auf das Deezer-Logo und erhalten Sie Zugriff auf mehr als
30 Millionen Musiktitel im Internet. Sie können den Ausprobiermodus
wählen, mit der Stream App von Cabasse ein Abonnement kaufen und/
oder Ihren Zugangscode eingeben.
USB SPEICHER
Zugriff auf alle Musikdateien, die auf dem mit dem USB-Anschluss
verbundenen USB-Speichermedium (Stick oder Festplatte) abgespeichert
sind. Von dem DLNA-Server, der im Stream 1 enthalten ist, werden alle
kompatiblen Titel aufgelistet und können mit Hilfe der Cabasse-App auf
jedem Stream-Player im Netzwerk wiedergegeben werden.
G) «MUSIC » TAG: LOCAL MUSIC
This sub-tag enables to play with the Cabasse application all the
audio tracks stored in the tablet/smartphone host of the application.
The other users of the Cabasse application acting on the same
network do not have access to these audio contents.
H) „PLAY“-Menü
Dieses Menü zeigt die Liste der aktuell wiederzugebenden Titel (Queue).
Wird diese Liste nicht über eine direkte Titelauswahl im „Music“-Menü
gelöscht, bleibt ihr Inhalt auch erhalten, wenn das Smartphone oder
Tablet, auf dem die App läuft, ausgeschaltet wird.
Verwendung der sieben Icons unterhalb der „Playback“-Position:
Volume control: Ziehen Sie den Anzeigebalken mit dem Finger auf
die gewünschte Position. Sie können sie Lautstärke ebenfalls über
die mitgelieferte Fernbedienung
des Stream 1 oder über die
Lautstärkeregelung der meisten
Smartphone/Tablets einstellen.
Pause: Die Wiedergabe des aktuellen Titels pausiert. Tippen Sie
erneut, um die Wiedergabe wieder zu starten.
Play: Startet die Wiedergabe des gewünschten Titels. Ein erneutes
Tippen stoppt sie wieder.
Startet die Wiedergabe des nächsten Titels in der Liste der wiede-
rzugebenden Titel (Queue).
Startet die Wiedergabe des vorherigen Titels in der Liste der wie-
derzugebenden Titel (Queue).
Shuffle-Icon: wenn eingeschaltet (aktiv), werden alle Titel der
aktuellen Kategorie in zufälliger Reihenfolge wiedergegeben.
Um wieder auf die Wiedergabe in normaler Reihenfolge zurückzuschalten, tippen Sie erneut auf das Icon. Shuffle Play und Dauerwiedergabe
können nicht gleichzeitig aktiviert werden.
Repeat-Icon. Ist Repeat eingeschaltet, werden alle Titel der Kate-
gorie kontinuierlich wiedergegeben – nach Ende des letzten Titels
startet die Wiedergabe wieder beim ersten Titel. Um wieder auf normale
Wiedergabe zurückzuschalten, tippen Sie erneut auf das Icon.
I) VERWALTUNG VON WIEDERGABELISTEN
Tippen Sie auf die rechts dargestellte Taste und wählen Sie im dann
aufklappenden Menü zwischen vier Aktionen:
- Play: Startet die sofortige Wiedergabe der Wiedergabeliste und ersetzt
alle Titel der vorher wiedergegebenen Liste.
- Add to Queue: Fügt die Wiedergabeliste an die Liste wiederzugebender
Titel (Queue) an.
- Rename: Öffnet einen Dialog, mit dem die Wiedergabeliste umbenannt
werden kann (bei einzelnen Tracks nicht möglich).
- Delete: Löscht einen einzelnen Titel in der Wiedergabeliste oder die
gesamte Liste. Das Löschen erfolgt nicht sofort, sondern wird erst
nach der Bestätigung durch den Benutzer in einem aufklappenden
Menü durchgeführt.
32
Page 34
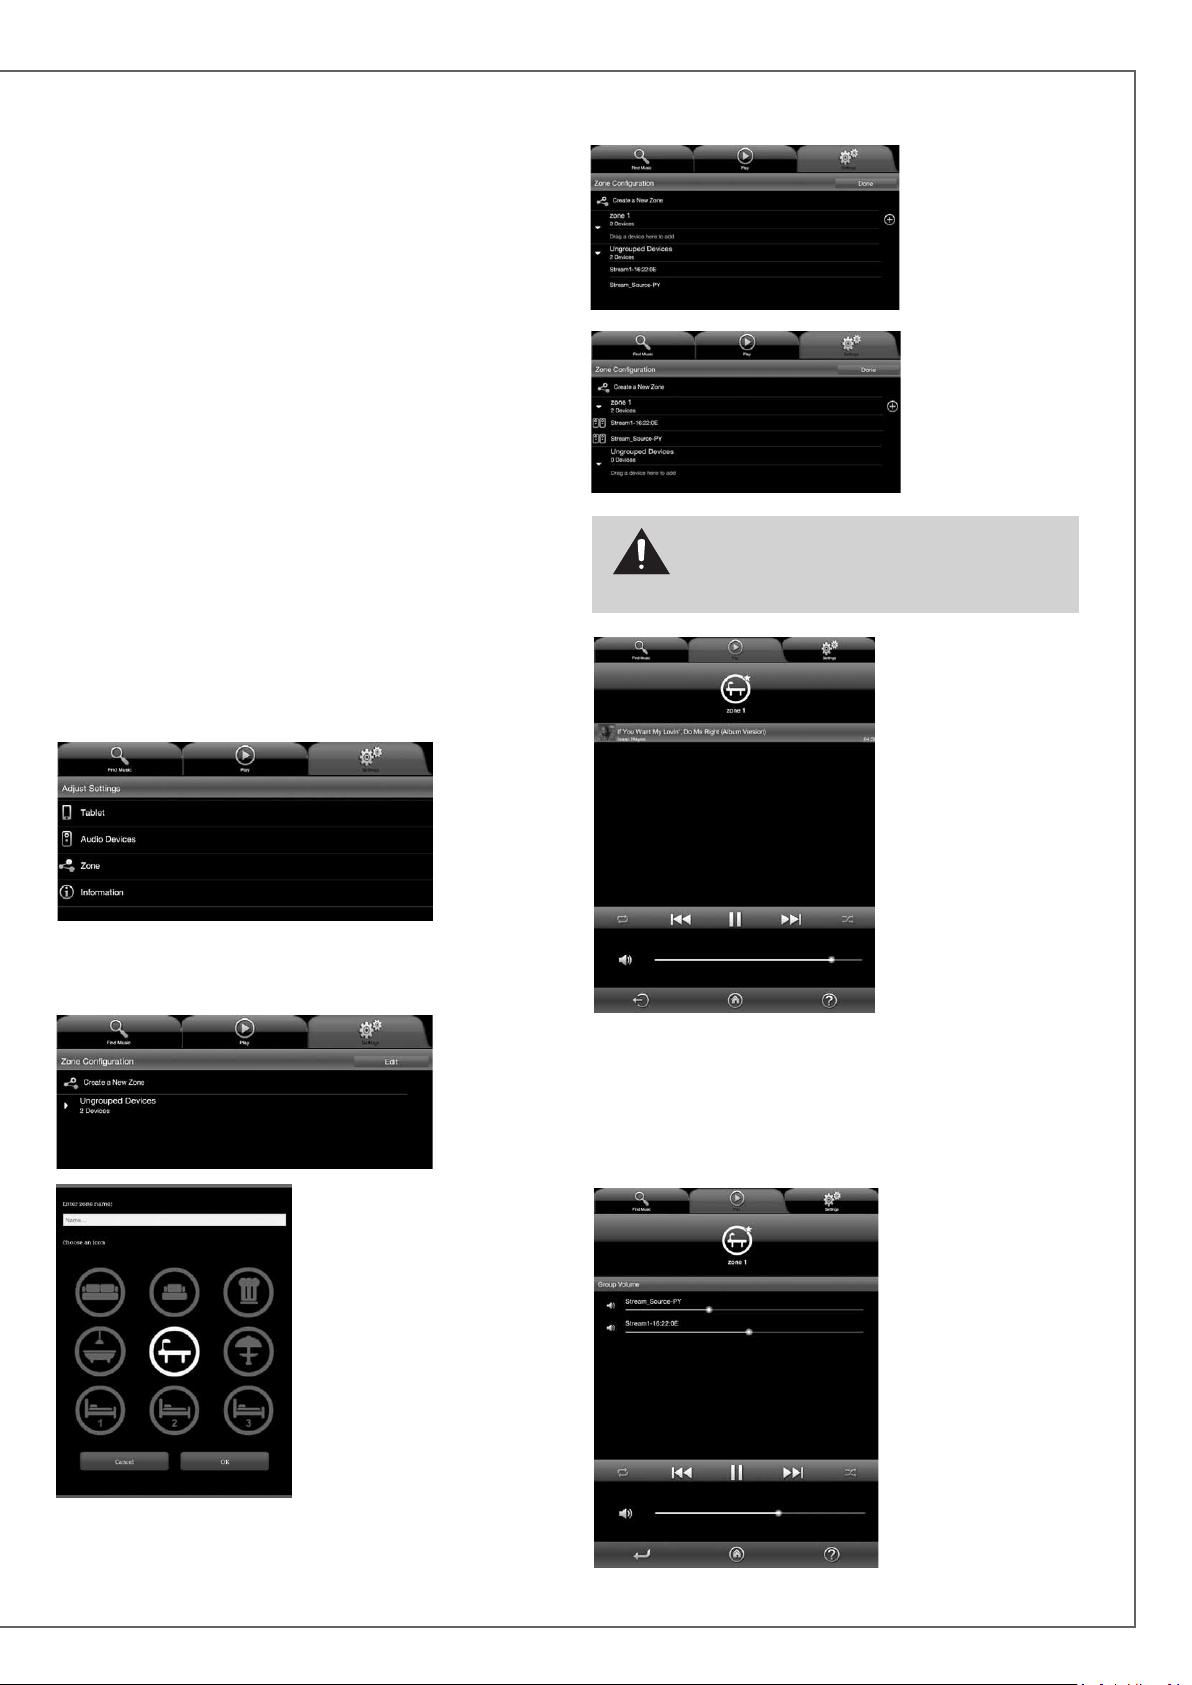
BITTE PRUEFEN
J) MUSIKWIEDERGABE AUF MEHREREN STREAM-GERÄTEN
Die Cabasse-App enthält mehrere Funktionen, die die Musikwiedergabe einfacher gestelten, wenn mehrere Stream-Player mit
dem gleichen Netzwerk verbunden sind.
STANDARD-STREAM-PLAYER
Das Standard-Audiogerät lässt sich im „Audio Devices“Untermenü des „Settings“-Menüs einstellen. Wurde diese
Einstellung durchgeführt, beziehen sich alle WiedergabeAnforderungen von der Cabasse-App auf diesen Standard-Player,
dessen Icon mit einem Stern markiert ist.
UNABHÄNGIGE BEDIENUNG MEHRERER PLAYER
Wurde kein Player als Standard-Player ausgewählt, werden im
„Play“-Menü alle vorhandenen Player aufgelistet. Tippen Sie
auf das Icon des gewünschten Players, um dessen Bedienung zu
aktivieren (Lautstärke, Wahl des wiederzugebenden Titels in der
Wiedergabeliste). Wählen Sie im „Find Music“-Menü einen neuen
Titel aus, fragt die App nach, auf welchen Playern der Track wiedergegeben werden soll.
- Wählen Sie in der
„Ungrouped Device“Liste den ersten Player
und ziehen Sie ihn
in die gewünschte
Gruppe, hier „Zone
1“ benannt. Fügen Sie
einen oder mehrere
Player zu dieser
Gruppe hinzu, maximal vier bei WLAN
und maximal fünf bei
drahtgebundenem
Ethernet.
ACHTUNG! Mischen Sie in einer Gruppe keinesfalls Player,
die per WLAN und per Ethernet mit dem Netzwerk verbunden
sind. Die Audio-Synchronisation erfordert, das alle Geräte der
Gruppe auf gleiche Art mit dem Netzwerk verbunden sind.
SYCHRONISIERTE ZONE FÜR „PARTY“-MODUS
Um das gleiche Programm auf mehreren Playern simultan wiederzugeben, muss eine Player-Gruppe erstellt werden:
- Wählen Sie im „Settings“-Menü „Zone“
- Tippen Sie auf „Create a New Zone“
- Vergeben Sie einen Namen für die Zone und wählen Sie ein Icon
dafür, tippen Sie dann auf „OK“.
- Tippen Sie auf „Done“,
um die neue Zone zu
bestätigen und zu aktivieren. Nun wir statt der
Icons der einzelnen Player
der Zone das von Ihnen
gewählte Gruppen-Icon
angezeigt. Diese Zone
kann auch als StandardPlayer gewählt werden.
Lautstärkeeinstellungen
der Zone: Die individuelle Lautstärkeeinstellung jedes einzelnen
Players erscheint, wenn
Sie auf das „Volume“-
Icon oder die HauptLautstärkeeinstellung im „Play“-Menü tippen. Stellen Sie die
gewünschte relative Lautstärke für jeden einzelnen Player ein. Nun
können Sie die Lautstärke der gesamten Gruppe wie gewünscht
einstellen.
33
Volume adjustments of
the zone: the individual
volume control of each
player from the Zone
appears when pressing
the Volume icone or the
main volume control of
the “Play” tag. Adjust
the required relative
volume for each player,
then adjust the main
volume on demand.
Page 35
d e u t s c h
BATTERIEWECHSEL BEI DER FERNBEDIENUNG
Heben Sie die Klammer auf der Rückseite des Gebers an und
entfernen Sie den Deckel. Entfernen Sie die verbrauchte Batterie,
legen Sie eine frische CR-2025-Batterien entsprechend der
Kennzeichnung im Batteriefach ein und schließen dann den
Deckel wieder.
Verbrauchte Batterien gehören nicht in den Hausmüll. Bitte entsorgen Sie Ihre alten Batterien bei einer Batteriesammelstelle,
die Sie in vielen Supermärkten und häufig auch in der Nähe von
Glas- und Altpapier-Containern angebracht finden.
VORSICHT: Wird die Batterie falsch in die Fernbedienung
eingelegt, besteht die Gefahr einer Explosion. Ersetzten
Sie die Batterie ausschließlich mit einer gleichen oder
äquivalenten Typs. Die Batterie darf NICHT starker Wärme wie zum
Beispiel direkter Sonneneinstrahlung, Feuer oder ähnlichem ausgesetzt
werden.
WEEE-ZEICHEN
Entsorgung von elektrischen und elektronischen
Produkten. (Gültig für die Europäischen Union)
Dieses Logo, angebracht an den Hauptkomponenten
des Lautsprechersystems (Rückseite des Steuergerätes
und der Lautsprecher sowie an der Innenseite des Batteriefachdeckels der Fernbedienung), der Verpackung
und/oder den Begleitdokumenten, weist darauf hin,
dass gebrauchte elektrische und elektronische Produkte nicht über
den Haushaltsmüll entsorgt werden dürfen. Zur richtigen Handhabung, Rückgewinnung und Wiederverwertung von Altprodukten
bringen Sie diese bitte zu den gemäß der nationalen Gesetzgebung
dafür zuständigen Sammelstellen. Mit der korrekten Entsorgung
dieser Produkte helfen Sie dabei, wertvolle Ressourcen zu schonen
und vermeiden mögliche negative Auswirkungen auf Gesundheit
und Umwelt, die durch eine unsachgemäße Behandlung des Abfalls entstehen könnten. Weitere Informationen zur Sammlung
und Wiederverwertung von Altprodukten erhalten Sie von Ihrer
örtlichen Gemeindeverwaltung, Ihrem Müllentsorger oder dem
Verkäufer, bei dem Sie die Ware erworben haben.
CLEANING STREAM 1
REINIGUNG DES STREAM 1
Ihr Stream 1-System kann mit einem weichen, feuchten Tuch
gesäubert werden. Bitte benutzen Sie keine Ätz- oder Reinigungsmittel, die in Geräte-Öffnungen fließen könnten. Bitte benutzen
Sie auch keine Lösungsmittel, Chemikalien oder Reinigungsmittel, die Alkohol, Salmiakgeist oder Scheuermittel enthalten. Den
Stoffbezug Ihrer Satelliten können Sie, falls notwendig, mit einem
Staubsauger reinigen. Vorsicht! Die Lautsprecher-Membranen
sitzen ganz nahe hinter dem Stoffbezug, ein zu starker Sog vom
Staubsauger kann die Membranen beschädigen.
FAQ
Suchen Sie weiterführende Informationen? Lesen Sie unsere detaillierten Antworten zu häufig gestellten Fragen auf der Seite des
Stream 1 von www.cabasse.com.
KUNDENDIENST
Cabasse verfügt über ein Netz zugelassener Händler, dessen Kundendienst Ihnen voll und ganz zur Verfügung steht. Wenn Sie die
Adressen eines Händlers erfahren wollen, rufen Sie uns an oder
besuchen Sie unsere Webseiten unter www.cabasse.com.
AUTO UPDATE
Ein Firmware-Updates für das Stream 1 wird automatisch in zwei
Schritten ausgeführt:
Schritt 1: Die neueste Version wird aus dem Internet heruntergeladen. Die „Power“-LED blinkt schnell. Die Wiedergabe über das
Stream 1 kann fortgesetzt werden.
Schritt 2 : Installation der neuen Firmware mit einem Neustart
des Netzwerkmoduls.
9
Die
LED wechselt für etwa 25 Sekunden auf Rot und wird
wieder grün, wenn die Installation abgeschlossen ist. Die Tonwiedergabe wird temporär stummgeschaltet und wird dann mit normalem Einschaltpegel (30%) wieder aktiv.
ACHTUNG: Das Stream 1 darf während
eines Firmware-Updates nicht ausgeschaltet
werden!
Wenn Sie die oben beschriebenen Einstellvorgänge der Anleitung gemäß durchgeführt haben, ist Ihr Stream 1 jetzt spielbereit. Wir hoffen, dass Sie über viele
Jahre Freude am Stream 1 haben. Wir erhalten jeden Tag Briefe, in denen uns Kunden berichten, wie zufrieden sie mit unseren Produkten sind und welch großer
Genuss die Musikwiedergabe von Cabasse-Lautsprechern ist. Diese Briefe sind eine große Motivation und Bestätigung für unsere Arbeit.
34
Page 36
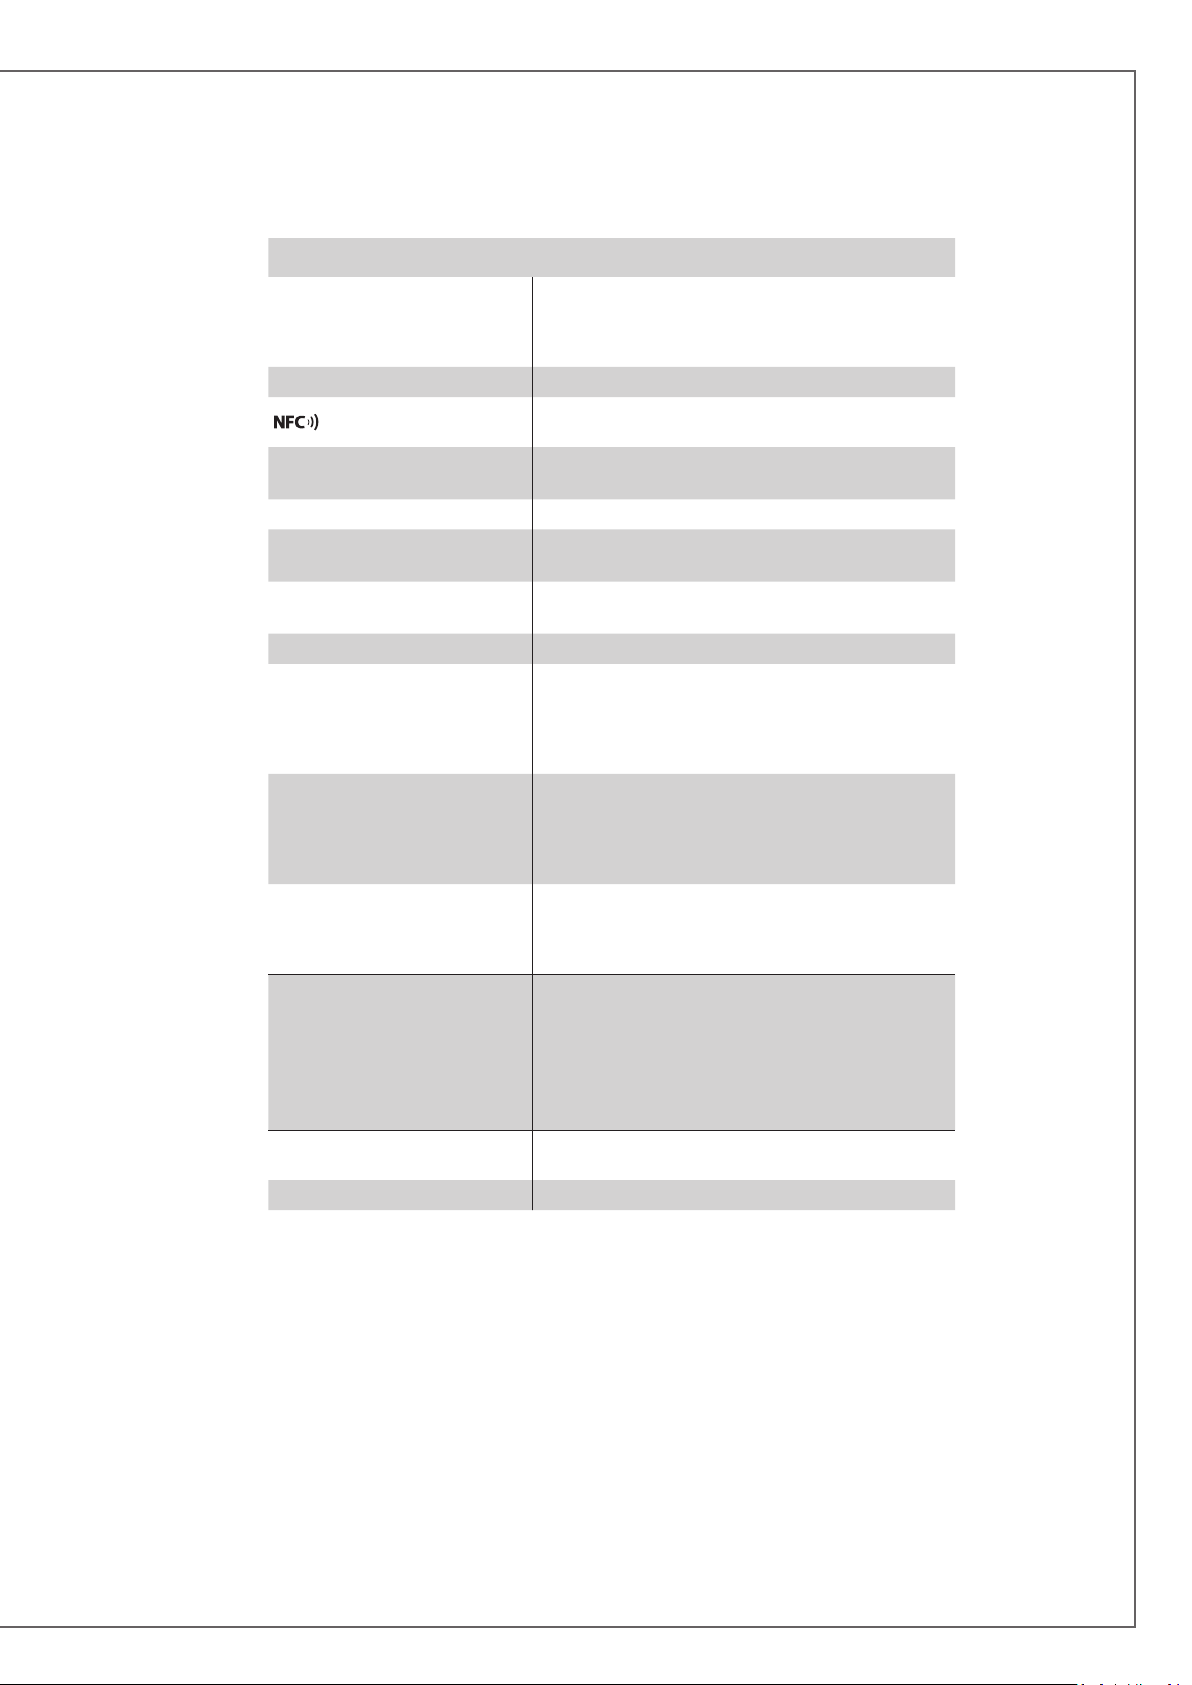
STREAM 1
Digitaleingänge
Analogeingang
Mitgeliefertes Netzteil
Netzspannung
Ausgangsspannung
spezifizierte Umgebungstemperatur
für Betrieb
spezifizierte Umgebungstemperatur
für Lagerung
Useable humidity range
Netzwerk
Audio-Formate
(WLAN/RJ45)
Lautsprecher-Chassis
Verstärkerleistungen
Verzerrungen und Rauschen
(THD+N von 20 bis 20.000Hz Bandbreite und
Verstärkerleistung oberhalb 100mW)
Abmessungen (H x B x T)
Gewicht
- 1 DLNA-Eingang, entweder über kabelgebundenes
Ethernet oder WLAN
- 1 Bluetooth-APTX-Eingang
- 1 USB-Eingang
3,5mm-Miniklinke
NFC-Patch im Zentrum des Frontgrills
Sofortige Bluetooth-Verbindung
100 – 240V Wechselspannung 50/60Hz, 2A Nennstrom
32 V Gleichspannung, 5A Nennstrom
+5 °C bis +35 °C
-5 °C bis +40 °C
40 % to 70 %
Ethernet 10/100 Mb
MAC & PHY
WLAN 802.11b/g/n
Sicherheit WPS 2.0
Digitaler Media-Renderer (kompatibel zu DLNA 1.5)
WMA (WMA9, CBR,CBR, up to 320kbps)
PCM (16 bits-44.1kHz, 24 bits-44/48/96 kHz, .wav,
.aiff, .aif, .aif-Dateien, HTTP-Streams)
AAC-LC (bis zu 320kbps), ALAC (.m4a)
FLAC (16 bits-44.1kHz, 24 bits- 44/48/96 kHz)
1 x Zweiweg-Koaxialchassis mit:
1 x 2,9cm-„Softdome“-Hochtöner
1 x 8cm Mitteltöner
1 x 17cm-Tieftöner mit Doppelschwingspule
Hochtöner: 10W
Mitteltöner: 10W
Tieftöner: 2 x 20W
WLAN : < 0,1%
Bluetooth : < 0,1%
Analog : < 0,1%
liegend : 13,7 x 46 x 32,5cm
Hängend/stehend : 32,5 x 46 x 13,7cm
5 kg
35
Page 37

Cabasse SA - 210, rue René Descartes - BP 10 - 29280 Plouzané
Tel +33 (0)2 98 05 88 88 - Fax +33 (0)2 98 05 88 99
www.cabasse.com
GPO; CABASSE - NOT 0355 - 1404
 Loading...