

Page 1
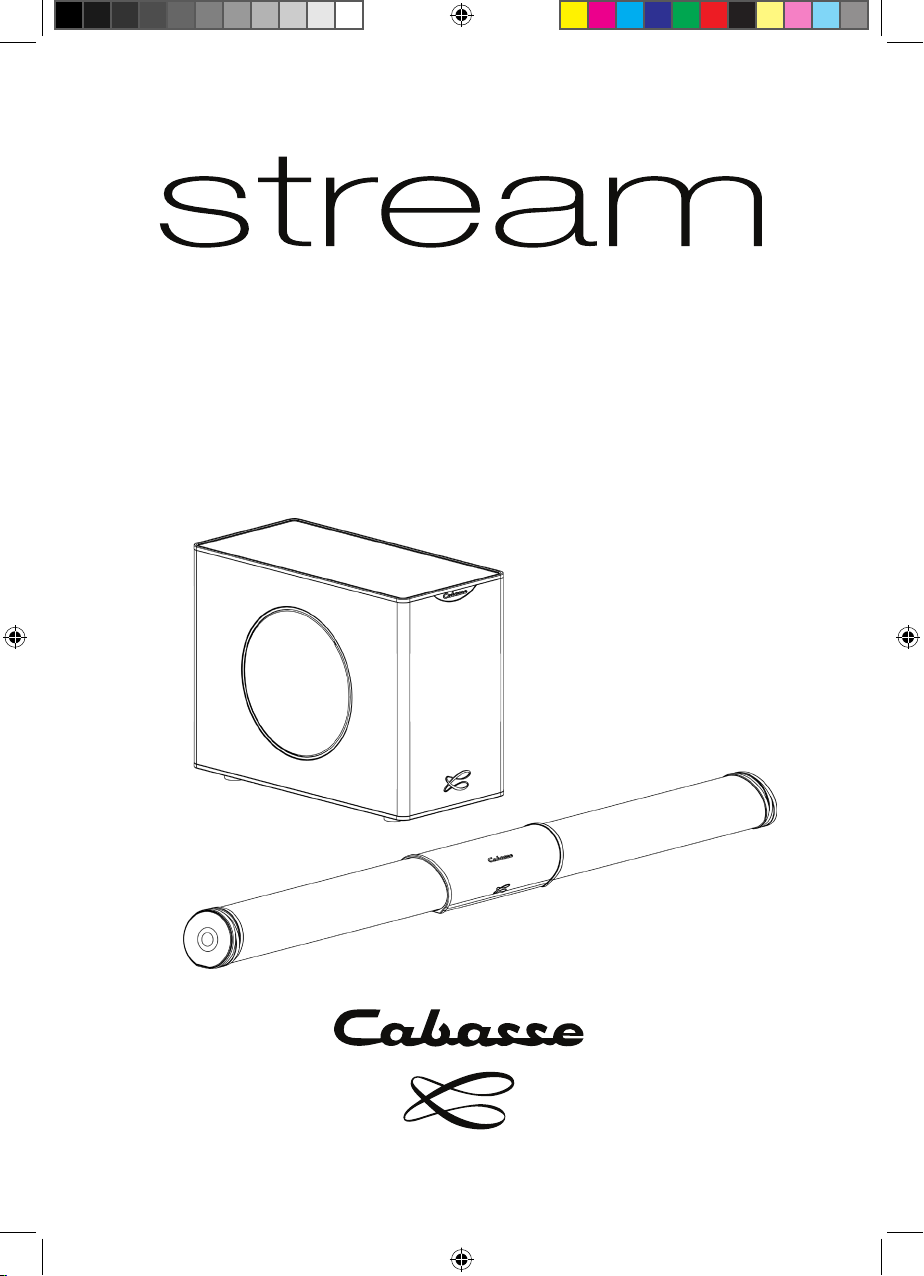
BAR
Notice d'installation
Owner's Manual
StreamBAR_manual_A4 V5.indd 1 6/10/2016 9:16:15 AM
Page 2
Vous venez d’acheter une Stream BAR et nous vous remercions de votre conance. Nous
recommandons de lire attentivement cette notice pour proter pleinement de toutes les possibilités
de Stream BAR.
INSTRUCTIONS DE SECURITE
Explication des symboles
L’éclair dans un triangle équilatéral aver-
tit de l’existence de tension élevée dangereuse non isolée à l’intérieur du coret du
produit, d’une valeur susante pour présenter
un risque d’électrocution.
Le point d’exclamation dans un triangle
équilatéral avertit de l’existence d’instructions importantes quant à l’utilisation et la
maintenance dans la documentation jointe à
ce produit.
Nettoyage - Débranchez l’appareil avant
tout nettoyage. N’utilisez pas de solutions nettoyantes sous forme liquide ou en aérosols.
Employez de préférence un chion humide.
Installation sur mobiliers et supports - Ne placez pas cet appareil sur un sup-
port instable, qu’il s’agisse de pieds, trépieds,
tables, étagères, etc. Il pourrait tomber et causer des blessures sérieuses à un enfant ou un
adulte qui se trouverait à proximité.
Ventilations - L’appareil doit être position-
né de telle sorte qu’il ne gêne pas sa propre
ventilation. Par exemple, il ne doit pas être installé sur un lit, un canapé, une couverture ou
des surfaces similaires qui pourraient bloquer
ses orices d’aération. Il ne doit pas non plus
être encastré dans des enceintes connées
comme des étagères étroites ou des meubles
qui pourraient limiter la quantité d’air disponible aux entrées d’air.
Alimentation - L’appareil ne doit être relié
qu’à une source électrique du type écrit dans
le mode d’emploi ou conforme à la sérigraphie
sur le produit. Si vous n’êtes pas sûr du type de
courant fourni à l’endroit où vous vous trouvez, adressez-vous à votre revendeur ou à la
compagnie électrique locale.
Surcharges électriques - Ne surchargez
pas les prises d’alimentation, les prolongateurs ou les rappels d’alimentation. Il pourrait
en résulter incendies ou électrocutions.
Corps et liquides étrangers - On doit
être attentif à ne jamais laisser entrer d’éléments ou de liquides étrangers dans l’appareil. Ils pourraient occasionner incendies ou
électrocutions. Ne versez jamais aucun liquide
d’aucune sorte sur l’appareil.
Maintenance - Dans les cas suivants, vous
devez impérativement débrancher votre appareil et le faire vérier par un technicien qualié :
l’alimentation ou la prise a été endommagée.
des corps étrangers ou du liquide se sont
introduits dans l’appareil.
l’appareil a été exposé à la pluie ou a été as-
pergé d’eau.
l’appareil ne semble pas marcher correcte-
ment alors que vous l’utilisez dans le cadre
de ses instructions de fonctionnement normal. Ne manipulez que les contrôles couverts
par le mode d’emploi. Toute autre procédure
pourrait le détériorer et nécessiter l’intervention d’un technicien qualié.
l’appareil est tombé ou bien sa carrosserie est
endommagée.
l’appareil ache des performances nette-
ment modiées.
Dans un environnement secteur perturbé
(orage etc…), le produit peut parfois nécessiter l’arrêt et la remise en route au moyen de
l’interrupteur secteur ON/OFF situé sur le panneau arrière de l’appareil pour fonctionner
correctement de nouveau.
2
StreamBAR_manual_A4 V5.indd 2 6/10/2016 9:16:15 AM
Page 3
Pièces détachées - Si la réparation a
nécessité l’utilisation de pièces détachées,
assurez-vous que le technicien a bien utilisé
les références préconisées par le fabricant ou
présentant les mêmes caractéristiques que les
pièces originales. Des pièces non conformes
peuvent provoquer incendies, électrocutions
ou autres.
CONSIGNES DE SÉCURITÉ IMPORTANTES !
Vérications - Après toute intervention sur
l’appareil, demandez au technicien d’eectuer
des tests an de garantir que l’appareil fonctionne en toute sécurité.
Sacs plastiques - Ne pas laisser les sacs
plastiques de l’emballage à portée des enfants
an d’éviter tout risque d’étouement.
1. LIRE ces consignes.
2. CONSERVER ces consignes.
3. RESPECTER tous les avertissements.
4. SUIVRE toutes les consignes.
5. NE PAS utiliser cet appareil à proximité
de l’eau.
6. NETTOYER UNIQUEMENT avec un chion
sec.
7. NE PAS OBSTRUER les orices de ventilation. Installer conformément aux
instructions du constructeur.
8. NE PAS installer à proximité de sources
de chaleur telles que les radiateurs, les
grilles de chauage, les cuisinières et les
autres appareils (notamment les amplicateurs) dégageant de la chaleur.
9. NE PAS neutraliser le dispositif de
sécurité que constitue la che polarisée ou à broche de terre. Une che
polarisée a une lame plus large que
l’autre. Une che à broche de terre est
munie de deux lames et d’une troisième
broche pour la terre. La lame large ou
la troisième broche est prévue pour la
sécurité de l’utilisateur. Si la che fournie
ne rentre pas dans la prise de courant,
demander à un électricien de remplacer
cette prise d’un type trop ancien.
10. PROTÉGER le cordon d’alimentation
en s’assurant qu’il ne risque pas d’être
piétiné ou écrasé, en particulier près
des ches, des blocs multiprises et de
son point de sortie de l’appareil.
11. UTILISER UNIQUEMENT les accessoires
préconisés par le constructeur.
12. DÉBRANCHER cet appareil en cas
d’orage ou lorsqu’il reste inutilisé pendant une longue durée.
13. CONFIER tout travail de dépannage
à un réparateur professionnel compétent. Faire réparer l’appareil en cas
de dommages, par exemple : che ou
cordon d’alimentation endommagé,
liquide renversé sur l’appareil ou objet
inséré dans l’appareil, appareil exposé
à la pluie ou à l’humidité, mauvais fonctionnement ou après une chute.
14. RUISSELLEMENT/HUMIDITE: pour éviter
les risques d’incendie ou de choc électrique, ne jamais exposer l’appareil à l’eau
ou à l’humidité. L’appareil ne doit pas être
exposé à un risque de fuites de liquide,
aucun objet tell un vase ne sera poser sur
ou au dessus de l’appareil.
Attention : ne pas ingérer la pile, risque mortel de brûlure chimique dans les
2 heures. Toujours garder les piles boutons, neuves et usagées, hors d’accès
des enfants. Trouver immédiatement une assistance médicale si vous pensez
que des piles aient pu être avalées ou insérées où que ce soit dans le corps.
3
StreamBAR_manual_A4 V5.indd 3 6/10/2016 9:16:15 AM
Page 4
f r a n c a i s
DÉBALLAGE
Ouvrir largement le carton puis sortez un à un les diérents éléments. Si l’un des éléments du carton vous semble endommagé, ne pas l’utiliser, le replacer dans le carton
d’origine et contactez immédiatement votre revendeur.
Conservez votre emballage pour un éventuel transport ultérieur de votre système.
INSTALLATION
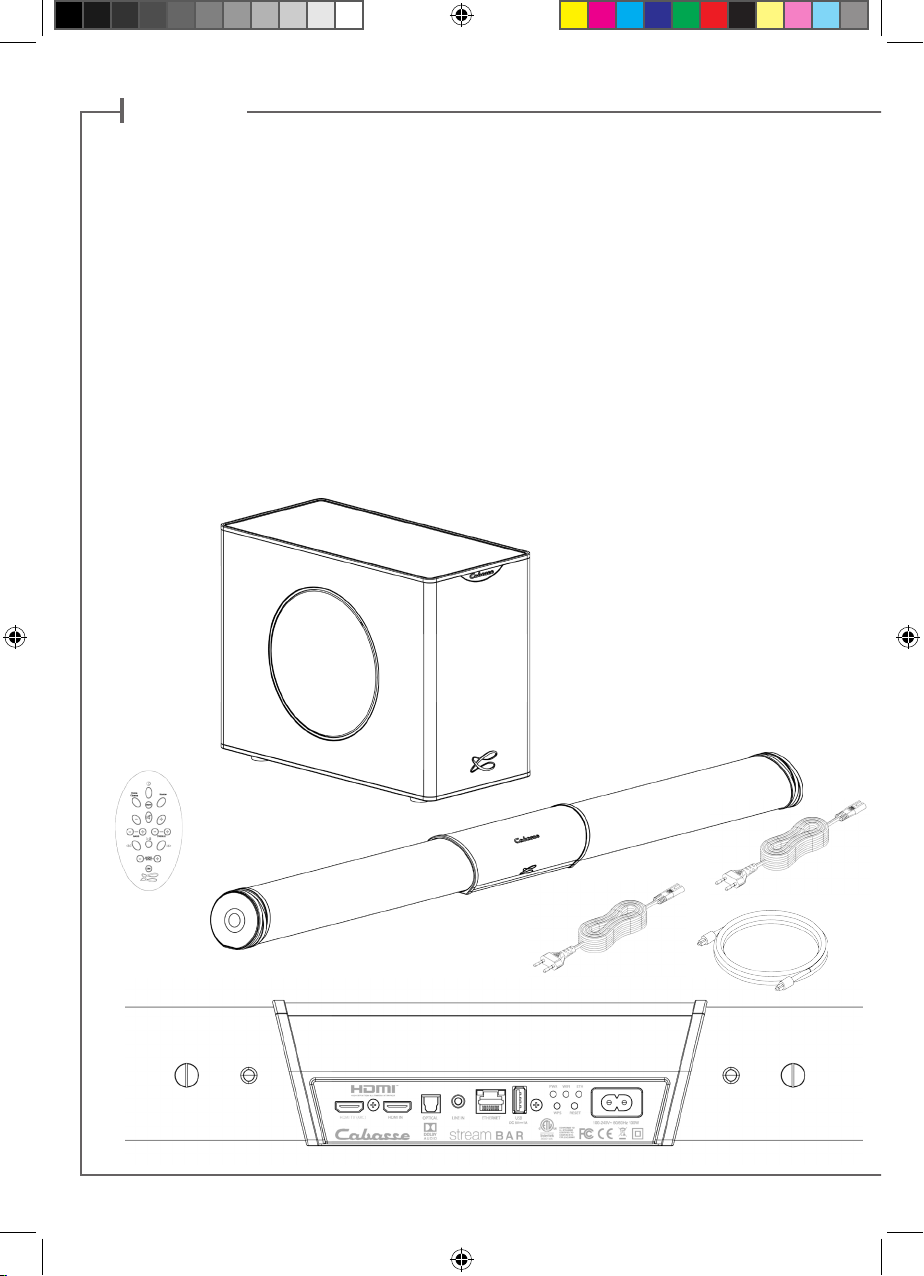
LES COMPOSANTS DE VOTRE SYSTÈME :
1 barre et un caisson de grave Stream BAR, un kit de xation murale pour la barre,
2 cordons d'alimentation, 1 télécommande, 1 cordon optique, 1 notice et 1 carte de
garantie.
4
StreamBAR_manual_A4 V5.indd 4 6/10/2016 9:16:18 AM
Page 5
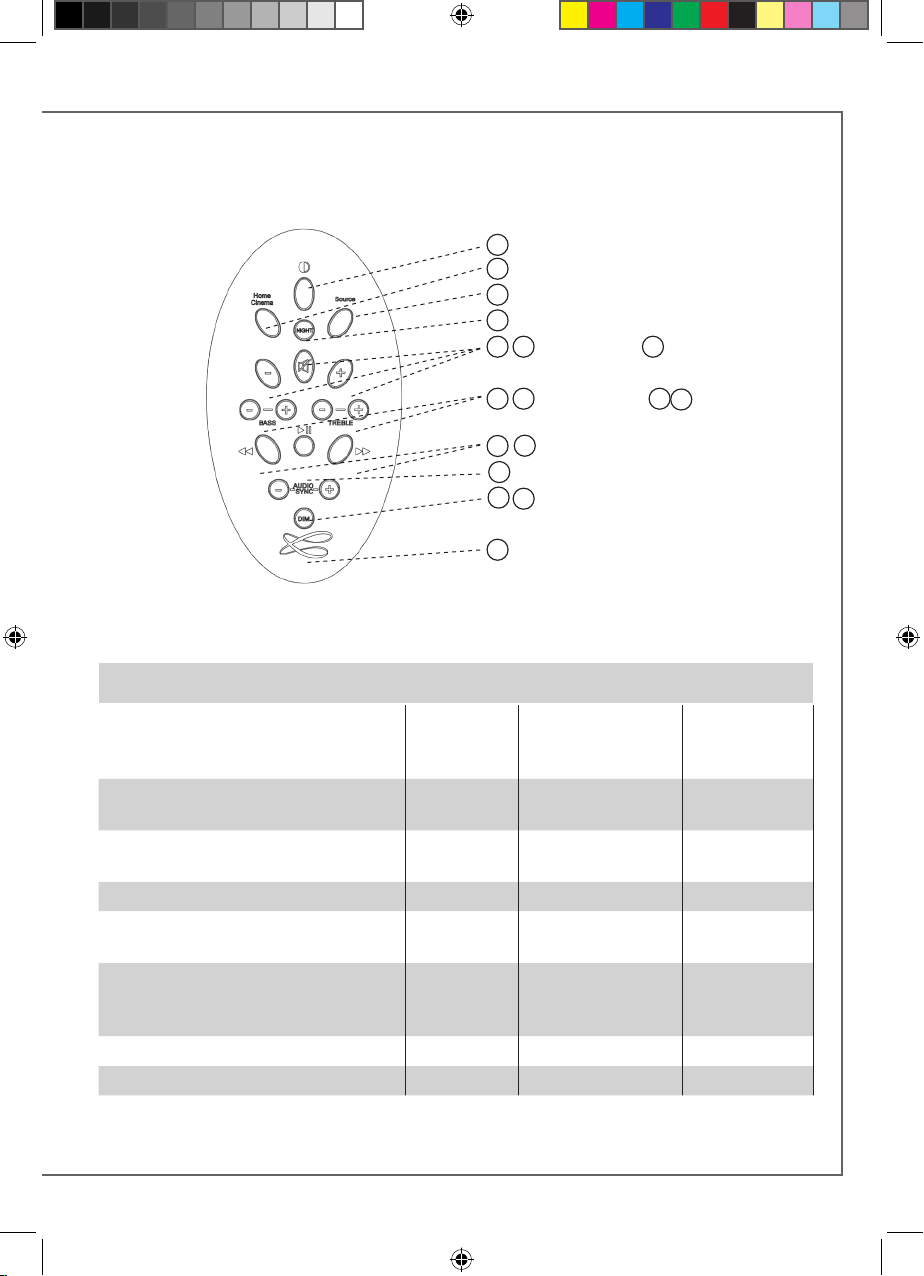
Activer/désactiver le mode ECO
1
2
Activer/désactiver le mode surround
4
Sélection des sources
3
Activer/désactiver le mode nuit
5 7
Volume + et -
6
Pause
8 9
réglage grave 10 réglage aigu
14
13
Titre précédent / suivant
12
Lecture /Pause
15
16
Synchronisation son / image
17
Intensité achage
TOUCHES DE LA TELECOMMANDE
STREAM HC
FONCTIONS STREAMING ENTREES "BT" ET "LAN"
Diusion audio non compressé ou
compressé sans perte
Accès à tous les supports audio
depuis le reseau WIFI (ordinateur…)
Multi-room
Diusion des contenus audio
smartphone/tablette
Diusion application audio
(youtube…) depuis smartphone/
tablette
Diusion à partir de supports USB
Radios et services musicaux web
Connexion
Bluetooth
OUI OUI OUI
OUI
WIFI/ETHERNET
via routeur internet / box internet
OUI OUI
OUI
OUI
OUI OUI
OUI
11
WIFI direct
smartphone/
tablette
5
StreamBAR_manual_A4 V5.indd 5 6/10/2016 9:16:19 AM
Page 6
INSTALLATION
CONFIGURATION
1
1- Poser la barre soit devant le téléviseur, soit sur une étagère sous le téléviseur, ou xer la au mur
sous le téléviseur avec le kit fourni (voir montage mural page 10) une fois toutes les connections
réalisées. Bien centrer la barre sonore par rapport au téléviseur.
2- Poser le caisson de grave à proximité du téléviseur, le long du mur coté téléviseur de préférence
ou le long d'un mur latéral, entre le téléviseur et la zone d'écoute principale.
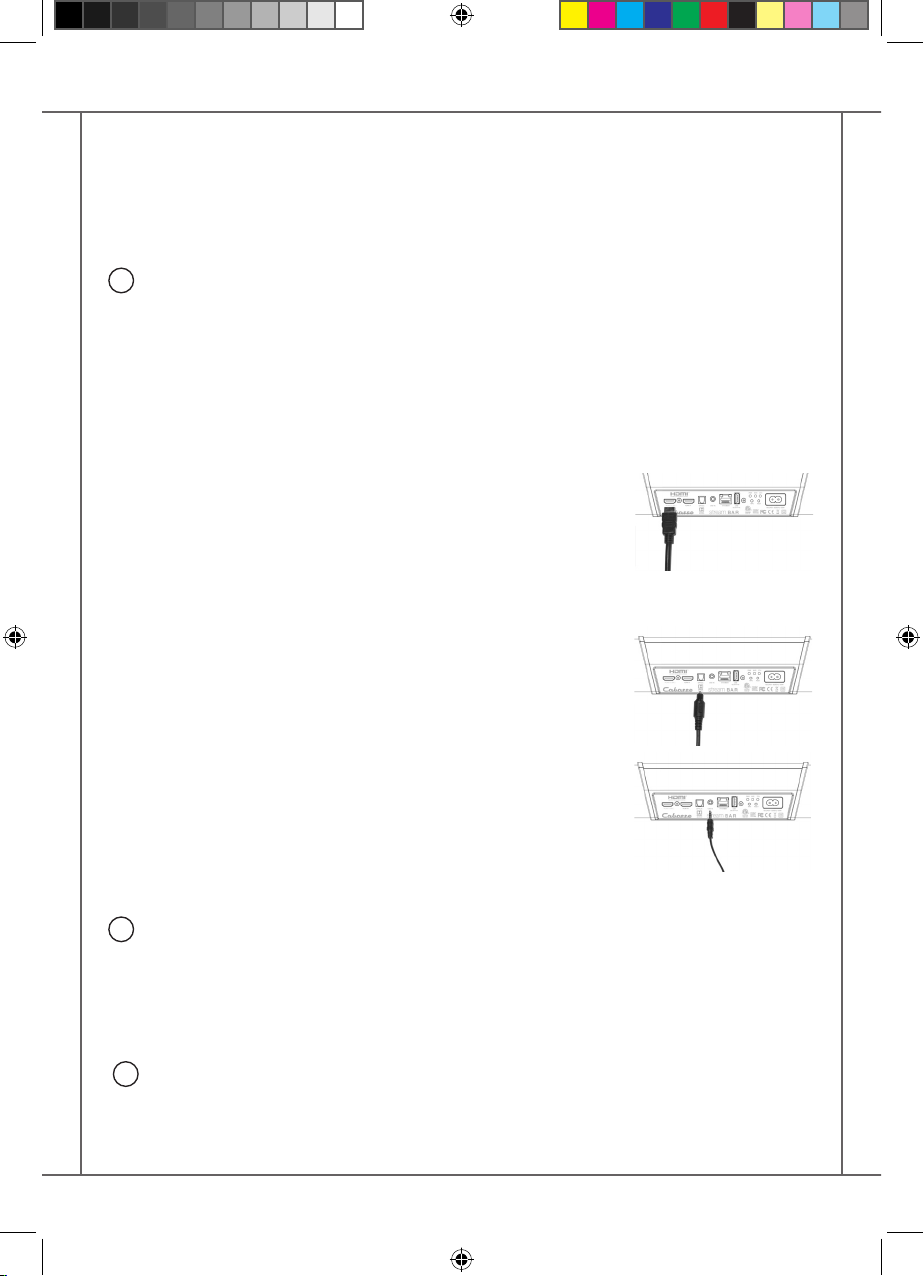
3- Connecter la barre Stream BAR au téléviseur avec une des 3 entrées disponibles. Privilégier la
solution HDMI ARC:
- Connexion HDMI ARC: relier le connecteur HDMI TV de la barre
avec le connecteur HDMI ARC du téléviseur avec un cable HDMI
(non fourni) à la norme 1.4 ou supérieure. Cette norme est
conçue pour désactiver automatiquement les haut-parleurs du
téléviseur et permettre le contrôle du volume de Stream BAR
avec la télécommande du téléviseur.
- Entrée HDMI IN: ce connecteur permet de raccorder Stream BAR à
sources, notamment un récepteur câble/satellite, une lecteur Blu-ray
et ou DVD, un enregistreur vidéo numérique.
- Entrée optique SPDIF : connecter l'entrée "OPTICAL" à la sortie TV
audio du téléviseur (TV Audio OUT) avec le cable optique fourni
ou un équivalent. Veiller à ce que les bouchons de protections aux
extrémités du câble optique soient bien enlevés.
- Entrée analogique Jack 3,5 mm : si le téléviseur ne possède pas
de sortie optique SPDIF, connecter l'entrée "LINE IN" soit à la
sortie stéréo analogique du téléviseur (RCA TV Audio out) avec un
câble RCA-Jack 3,5 mm, soit à la sortie casque du téléviseur avec
un cordon Jack-Jack 3,5 mm (non fournis).
DESACTIVATION DES HAUT-PARLEURS DU TELEVISEUR
2
Mettre le téléviseur sous tension, ouvrir le menu du téléviseur et rechercher un onglet du type
Audio, Son ou Enceintes. Utiliser la fonction du menu qui permet de désactiver les haut-parleurs
du téléviseur. Cet élément de menu peut par exemple être intitulé "Speaker On/O" pour hautparleurs activés / désactivés. Si cette fonction n'existe pas, amener le volume du son du téléviseur
avec la télécommande du téléviseur au niveau minimum.
ACTIVATION DE LA SORTIE OPTIQUE DU TELEVISEUR
3
En l'absence de son en phase 5 avec une liaison optique, paramétrer si nécessaire dans le menu
du téléviseur la sortie optique choisie.
6
StreamBAR_manual_A4 V5.indd 6 6/10/2016 9:16:20 AM
Page 7
ACTIVATION DE LA TELECOMMANDE
4
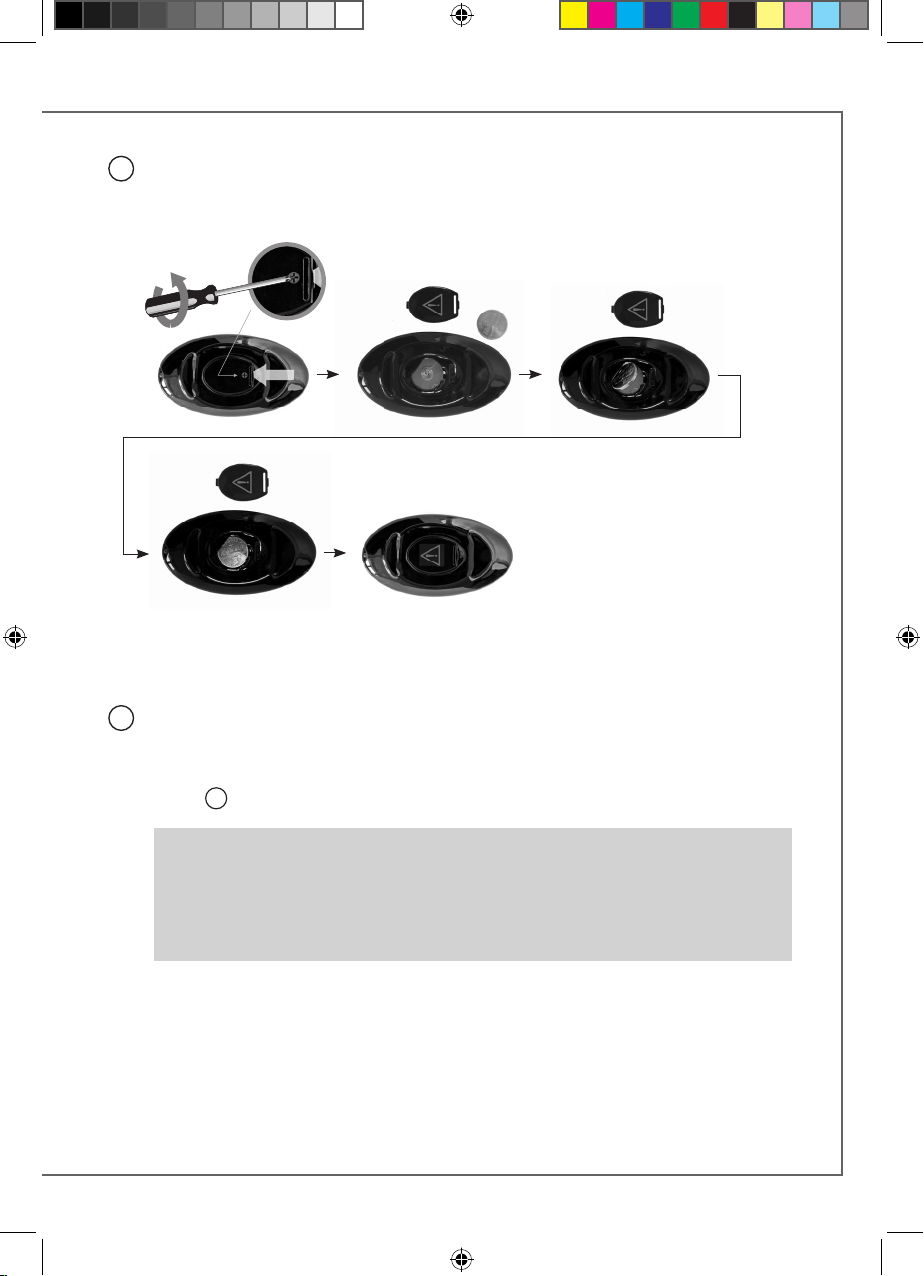
Avant la première utilisation, dévisser la vis (tournevis PH00), enlever le couvercle,
retirer la languette de protection, remettre le couvercle et resserrer la vis.
Remplacement de la pile bouton type CR-2025 : retourner la télécommande, dévisser la
vis, enlever le couvercle, enlever la pile usagée, insérer la pile neuve, coté marquée "+" vers
l'extérieur, remettre le couvercle, resserrer la vis.
PREMIERE UTILISATION
5
Connecter la barre sonore et le caisson de grave au secteur avec les cordons d'alimentation
aproprié au réseau électrique. STREAM BAR est opérationnel dès que la diode de l'écran de
Stream BAR s'allume en rouge (mode ECO). Passer en mode MARCHE en appuyant sur la
touche
ache "ON" puis la dernière entrée utilisée.
INITIALISATION DE LA LIAISON SANS FIL BAR - CAISSON DE GRAVE
a) Appuyer sur le bouton "PAIRING" au dos du caisson de grave
b) Appuyer pendant 5 secondes sur la touche "DIM" de la télécommande, télécommande
orientée vers la barre de son. Un engrenage à l'écran montre que l'initialisation est en cours.
c) l'écran ache OK, la laison sans l est active.
de la télécommande. La diode de l'écran de Stream BAR s'allume en vert, l'écran
1
NOTE : la fonction DLNA pour l'utilisation en réseau Wi-Fi / Ethernet de STREAM BAR
devient opérationnelle lorsque la diode PWR (power), à l'arrière de Stream BAR, est passée
du rouge au vert, environ 40 secondes après la mise sous tension.
Téléviseur allumé, sélectionner l'entrée connectée au téléviseur par pressions successives
soit sur la touche 3 de la télécommande, soit sur celle à droite de la barre, jusqu'à son
achage à l'écran de Stream BAR : - "HDMI TV" pour l'entré HDMI ARC
- "HDMI IN" pour l'entré HDMI
- "OPT" pour l'entrée optique S/PDIF- "AUX"
pour l'entrée analogique.
7
StreamBAR_manual_A4 V5.indd 7 6/10/2016 9:16:21 AM
Page 8
VOLUME : Utiliser les touches "-" et "+" de la barre de son, les touches 5 et 7 de la
télécommande Stream HC pour ajuster le volume sonore, ou également celles de la
télécommande du téléviseur en mode HDMI ARC.
OPTIMISATION DE LA RESTITUTION SONORE
6
La Stream BAR est équipée de plusieurs fonctions pour obtenir une restitution sonore
optimisée et adaptée à chaque situation:
- MODE HI-FI / SURROUND: la touche 2 de la télécommande permet d'activer ou désactiver le mode surround. Le mode Hi-Fi est recommandé pour l'écoute musicale et les
émissions où le dialogue prime, le mode surround pour le cinéma.
- MODE NUIT: le mode "NIGHT" de la touche 3 optimise le système pour une écoute
confortable avec un niveau sonore faible.
- REGLAGES GRAVE / AIGU : ils permettent d'adapter l'équilibre sonore en fonction de
l'acoustique de la pièce, de la source sonore, de vos préférences
- REGLAGE DE LA SYNCHRONISATION: utiliser les touches "-" et "+" pour caler le son sur le
mouvement des lèvres. Le décalage peut varier suivant les chaines ou les sources.
UTILISATION AUDIO
Stream BAR n'est pas seulement une barre sonore pour téléviseur. Elle est équipée pour
pouvoir proter de ses qualités audios en connectant
1
d'autres sources dont des sources Bluetooth et
Wi-/Ethernet.
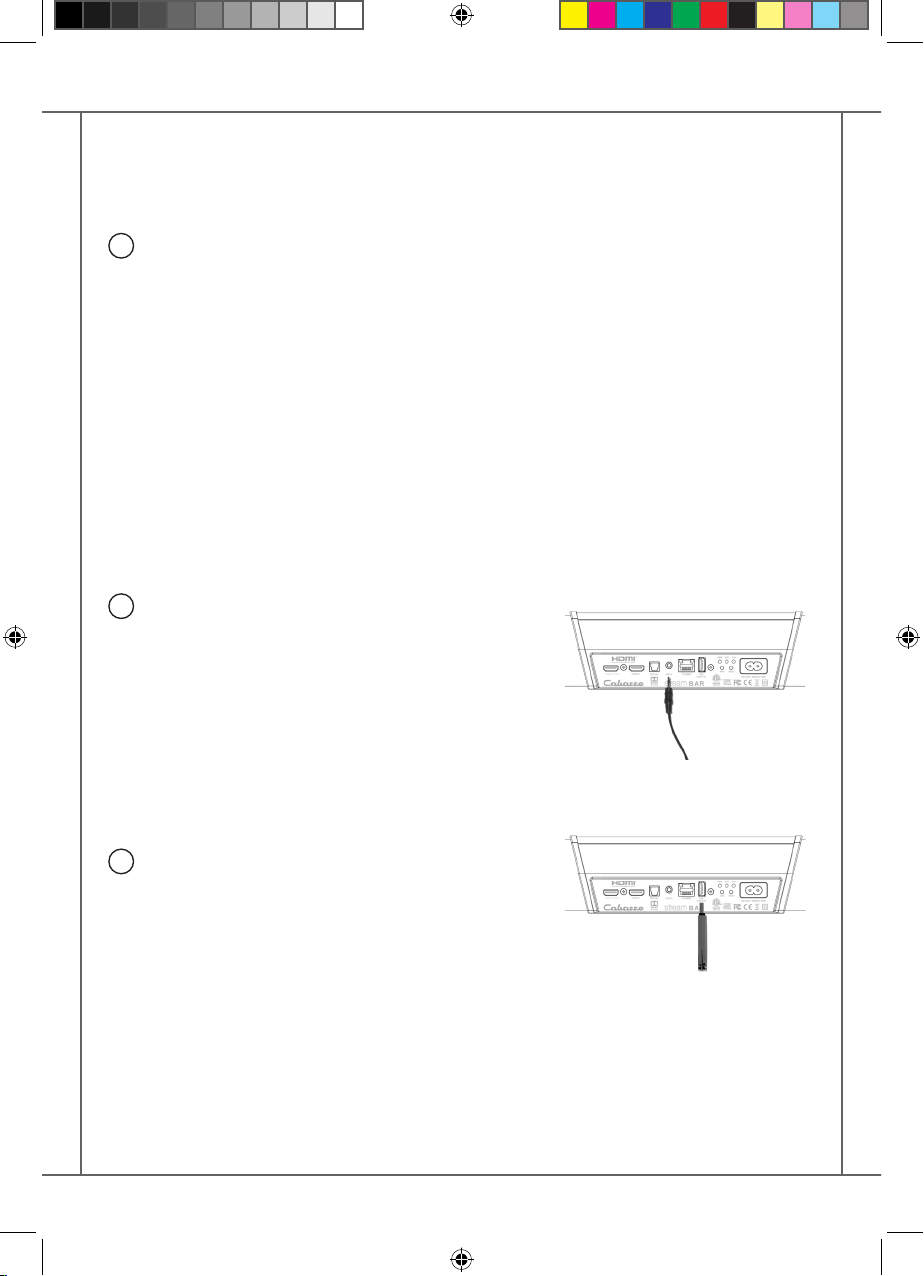
ENTREE ANALOGIQUE AUX IN
Si cette entrée n'est pas utilisée pour le téléviseur, elle
pourra être connectée à une source audio (lecteur
CD, lecteur MP3, smartphone) équipée d'une sortie
analogique type RCA ou mini-jack. Utiliser un cordon
RCA/mini-jack ou un cordon mini-jack/mini-jack
(non fournis)
ENTREE USB
2
Cette entrée n'est utile que pour l'utilisation en
mode Wi-Fi/Ethernet ( paragraphes 4,5,6 ci-après).
Connecter une clé USB ou un disque dur contenant
des chiers audio à cette entrée pour les mettre
automatiquement en réseau. Tous les chiers aux
formats reconnus par le serveur DLNA inclus dans
STREAM BAR sont alors listés dans l'application
Stream Audio Control et peuvent être lus par
tous les lecteurs Cabasse Stream connectés au
même réseau. La prise USB de STREAM BAR est
pourvue d'une alimentation continue 5 V - 1 A pour
l'utilisation d'un disque dur nomade sans recours à
une alimentation externe.
8
StreamBAR_manual_A4 V5.indd 8 6/10/2016 9:16:21 AM
Page 9
CONNEXION BLUETOOTH
alors automatiquement désactivée.
3
La STREAM BAR est congurée en mode ouvert pour les connexions Bluetooth. il sut donc,
dans le menu de l'appareil à connecter, de sélectionner "Cabasse STREAM BAR" dans la liste des
appareils Bluetooth disponibles. Sélectionner si nécessaire la source Bluetooth en pressant le
bouton 4 de la télécommande "Stream HC", ou le bouton "S" sur Stream BAR, jusqu'à ce que
"BT" s'ache à l'écran. Si un appareil est déjà connecté en Bluetooth avec STREAM BAR, il faut
interrompre cette liaison avant d'en réaliser une nouvelle avec un autre appareil.
EXEMPLE DE CONNEXION BLUETOOTH AVEC UNE TABLETTE ANDROID : voir la version française
en page 16.
CONNEXION ET UTILISATION AVEC UN ORDINATEUR APPLE: version française en page 17.
DESACTIVATION DU BLUETOOTH: avec la télécommande, sélectionner l'entrée BT, puis
appuyer successivement sur les touches "Home Cinema" ou "NIGHT", puis "MUTE", puis "NEXT".
Pour activer la fonction Bluetooth, sélectionner l'entrée BT, puis appuyer successivement sur les
touches "Home Cinema" ou "NIGHT", puis "MUTE", puis "PREV".
CONNEXION FILAIRE (LAN) AU RESEAU ETHERNET
4
La liaison laire Ethernet garantit un débit de transfert optimum et constant dans tout
environnement. Utilisez la si le fonctionnement en mode Wi-Fi présente des coupures ou
arrêts intempestifs de la musique, signes d’un réseau Wi-Fi saturé ou d’une distance routeurStream trop importante.
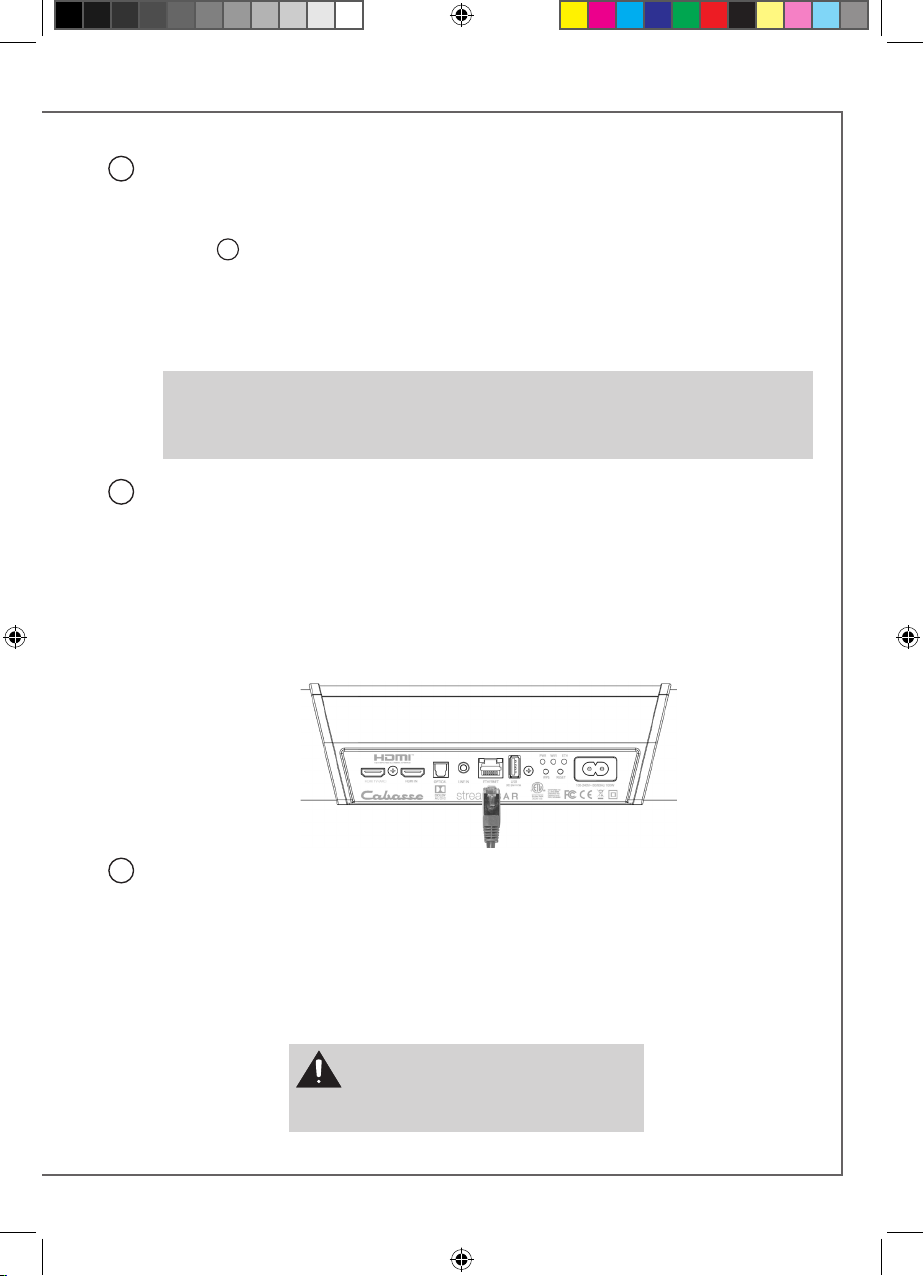
Connectez un câble RJ45 entre STREAM BAR et votre routeur (ou Box Internet). La
connexion est établie quand la diode ETH passe au bleu xe. La connexion WIFI est
ATTENTION : le mode DHCP du routeur doit être activé.
MODE WIFI DIRECT
5
Ce mode de connexion permet de diuser en qualité wi les chiers audio présents dans la tablette (ou
le smartphone) et sur le support (disque dur, clé) USB connecté à l'entrée USB de STREAM BAR sans avoir
recours ou besoin d'un réseau Wi-Fi. Il ne donne pas accès aux sources internet (Vtuner, Deezer...) ni aux
chiers audio présents dans le réseau domestique et ne permet pas les mises à jour de STREAM BAR.
Une fois l'application StreamCONTROL installée sur la tablette ou le téléphone et le STREAM BAR activé,
ouvrir l'application et choisir "utiliser ce lecteur en mode d'accès direct".
Suivez les instructions et commencez à écouter vos musiques préférées.
Appuyer sur le bouton "RESET" avant d'utiliser un nouveau
mode de connexion wi (laire, automatique, semi-auto,
manuelle) ou un nouveau routeur.
9
StreamBAR_manual_A4 V5.indd 9 6/10/2016 9:16:21 AM
Page 10
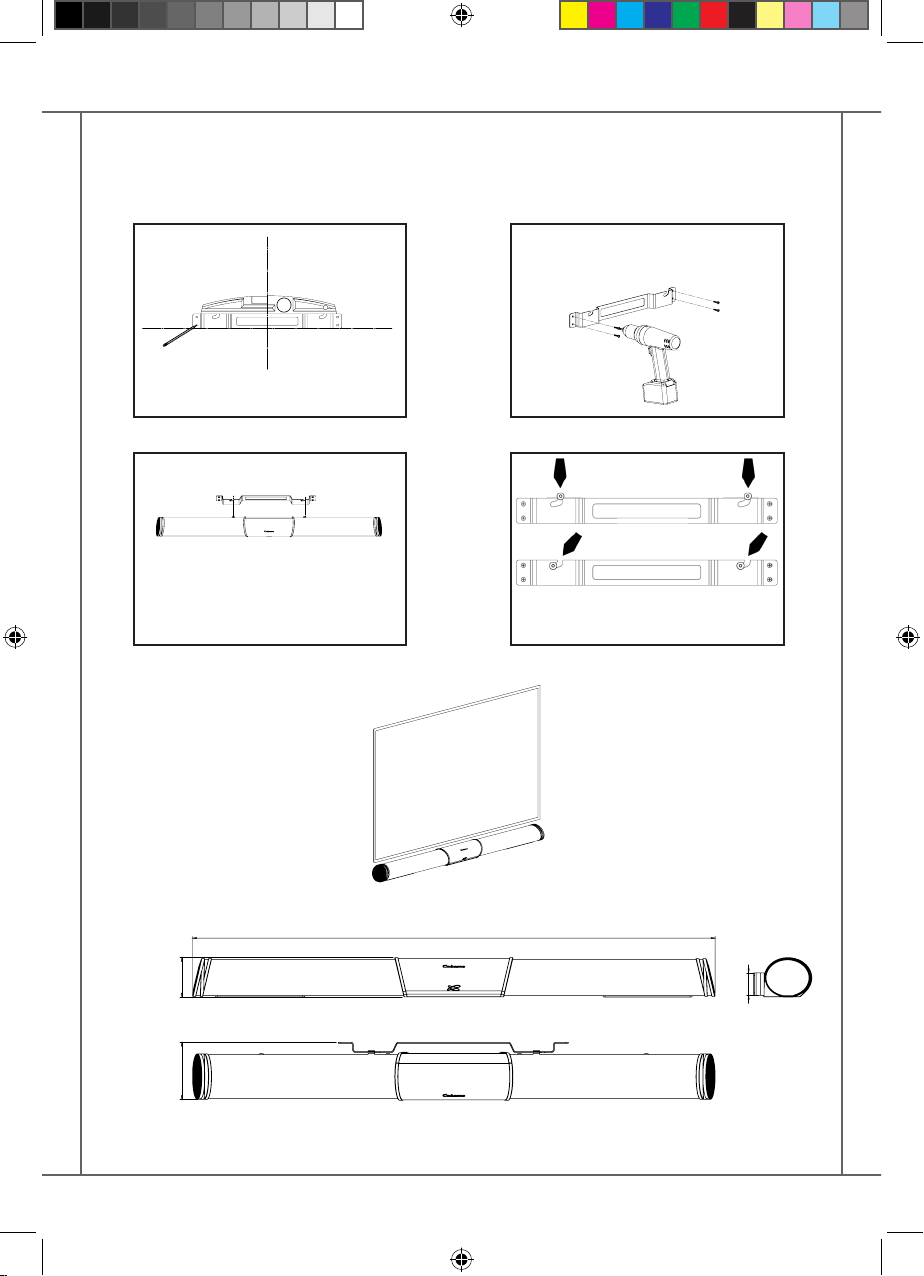
MONTAGE MURALE DE LA BARRE DE SON
La xation murale étant horizontale
et centrée sous le téléviseur, marquer les points de perçage.
Visser la xation murale.
Présenter la barre de son devant la
xation, insérer les boutons de xation dans les encoches.
79
114
Faire glisser les boutons jusqu'au
fond de chaque encoche.
1045
45
10
StreamBAR_manual_A4 V5.indd 10 6/10/2016 9:16:24 AM
Page 11
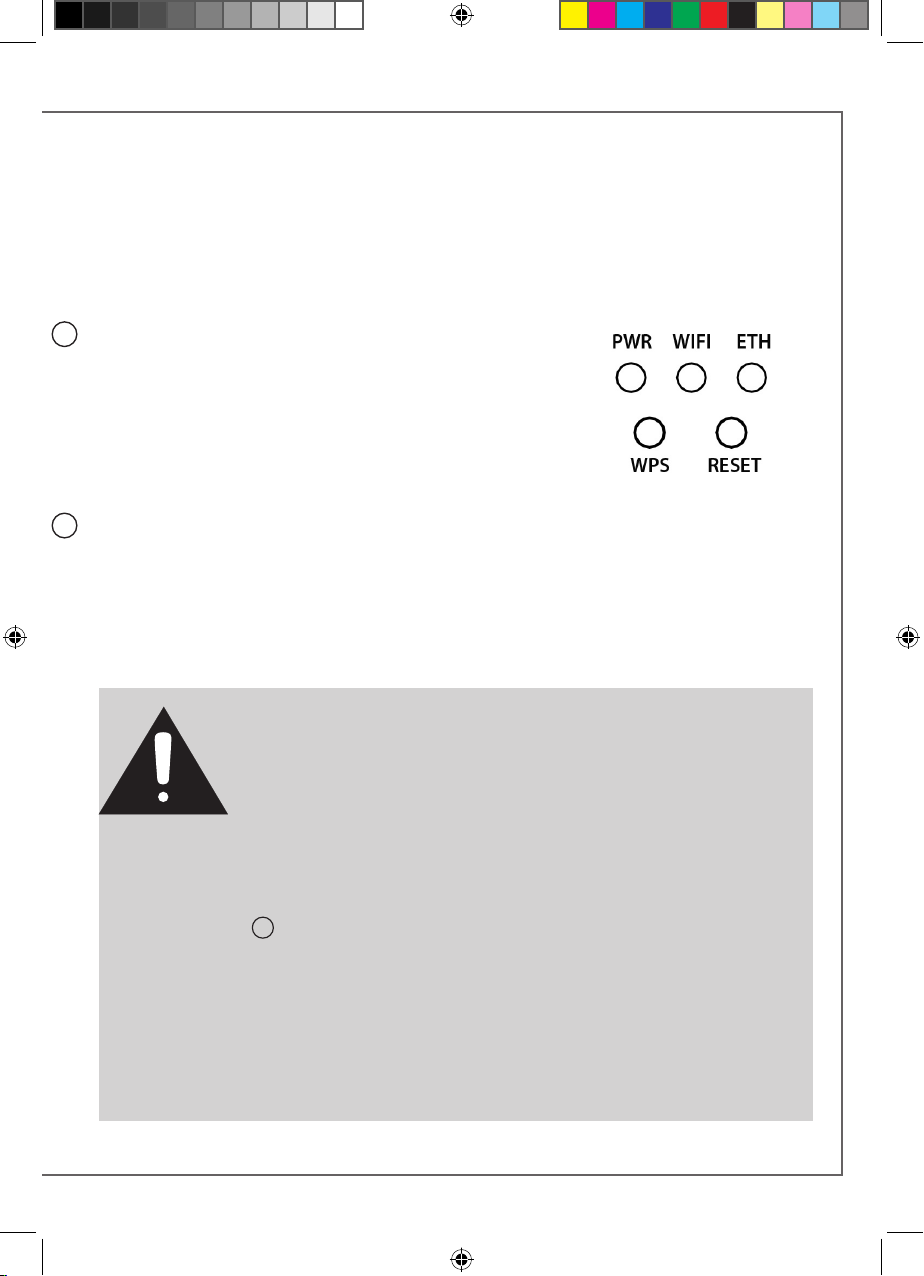
CONNEXION DLNA SANS FIL (WLAN) AU RESEAU WIFI
IL EXISTE 2 SOLUTIONS POUR CONNECTER LA STREAM BAR AU RESEAU
WIFI :
CONNEXION WPS AUTOMATIQUE avec l'utilisation des touches
1
WPS de la STREAM BAR et du routeur (ou box Internet) s'il en est
équipé: presser le bouton WPS du routeur pendant au moins
2 secondes puis presser dans les 2 minutes (ces durées sont
indicatives, à vérier dans le manuel du routeur) qui suivent
presser le bouton WPS de la STREAM BAR. La connexion est
eective quand la diode bleue "WIFI" cesse de clignoter et reste
allumée. Continuer avec l'installation de l'application Cabasse.
CONNEXION SEMI-AUTOMATIQUE AVEC L’APPLICATION STREAM CONTROL CABASSE sur un
2
smartphone ou une tablette connecté(e) au réseau Wi-Fi.
a) Installer l’application Stream CONTROL sur la tablette/smartphone depuis “Play Store” pour un appareil
Android ou “App store” pour un produit Apple.
b) Mettre la STREAM BAR sous tension (ou appuyer sur le bouton reset), activer le mode wi dans
l’application “paramètres” du smart phone ou de la tablette.
c) Lancer l'application et suivre les indications pas à pas.
ATTENTION ! Une mise à jour du logiciel de STREAM
BAR peut démarrer automatiquement dès qu'une
connexion au réseau internet est réalisée. L'écran
ache "UPDTE" (pour update = mise à jour) jusqu'à
la n de la mise à jour. La STREAM BAR n'est pas
fonctionnelle durant cette phase jusqu'au redémarrage
en mode ECO, diode rouge xe. Appuyer sur la touche
1
pour passer en mode actif et utiliser STREAM BAR.
Ne pas éteindre ou déconnecter STREAM BAR
durant les mises à jour qui peuvent nécessiter
plusieurs minutes.
11
StreamBAR_manual_A4 V5.indd 11 6/10/2016 9:16:24 AM
Page 12
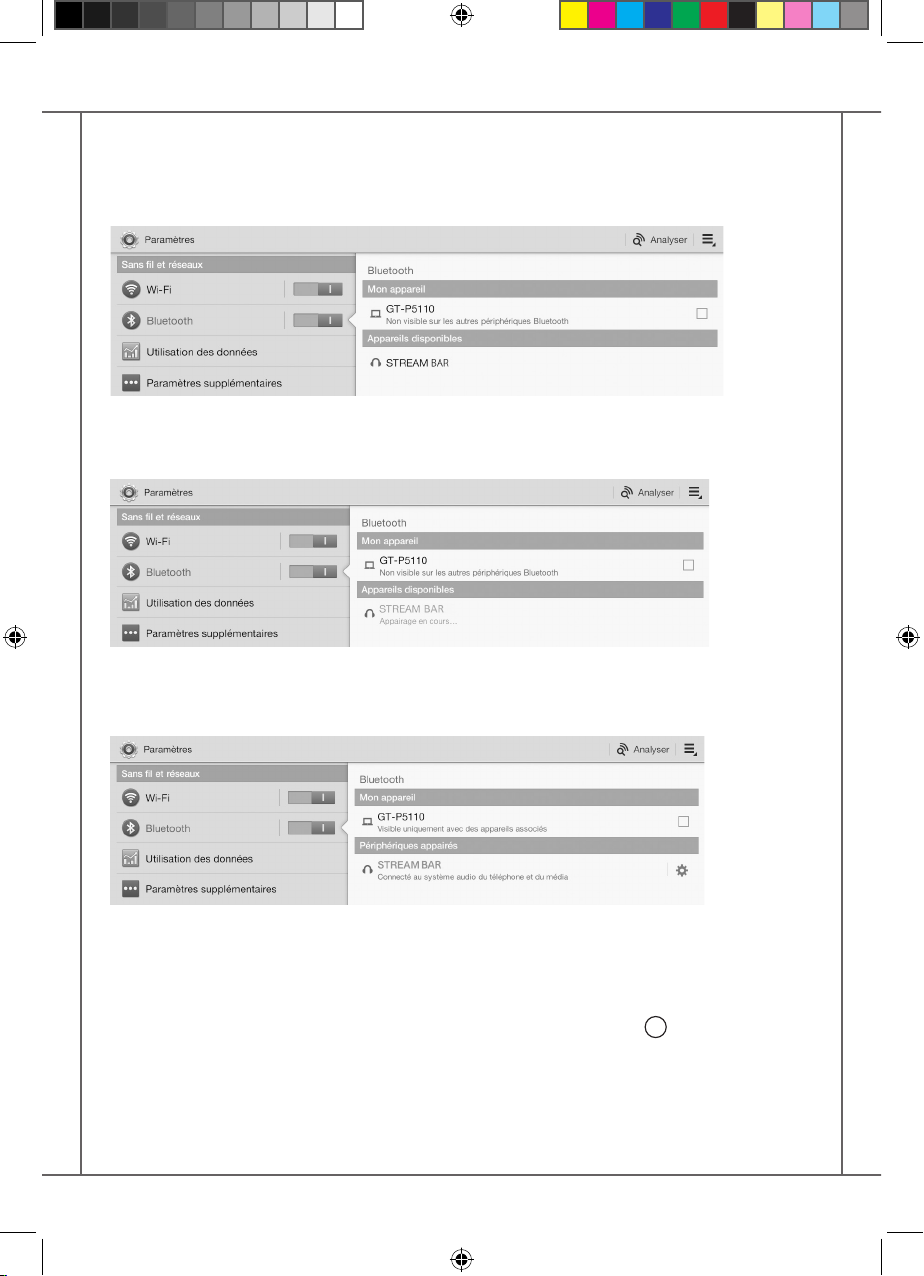
CONNEXION BLUETOOTH
- Activer si ce n’est déjà fait la fonction Bluetooth dans le menu paramètres de la tablette en appuyant sur le pavé OFF-ON
- Dans la liste des appareils disponibles, cliquer sur Cabasse « STREAM BAR ».
Si la STREAM BAR n'est pas connectée en Bluetooth à un autre appareil, la connection à la tablette
suit automatiquement l'appairage.
Si le message «Connexion...» n’apparait pas, vériez qu'un autre appareil n'est pas déjà connecté
au STREAM BAR. Déconnecter cet appareil et appuyer une nouvelle fois sur "Cabasse STREAM BAR".
Votre STREAM BAR est maintenant connectée.
Pour écouter les chiers audio présents sur la tablette, ouvrir votre application de lecture de
chiers audio et lancer une lecture. Si aucun son, vérier que le contrôle général de volume de la
tablette ou du smartphone n’est pas sur mute ou au minimum, régler le volume dans l’application si cette fonction existe, régler le volume de STREAM BAR avec sa télécommande.
Enn si une source wi- est active, changer de source avec la touche 4 de la télécommande
jusqu’à ce que "BT" s'ache à l'écran de Stream BAR.
12
StreamBAR_manual_A4 V5.indd 12 6/10/2016 9:16:24 AM
Page 13
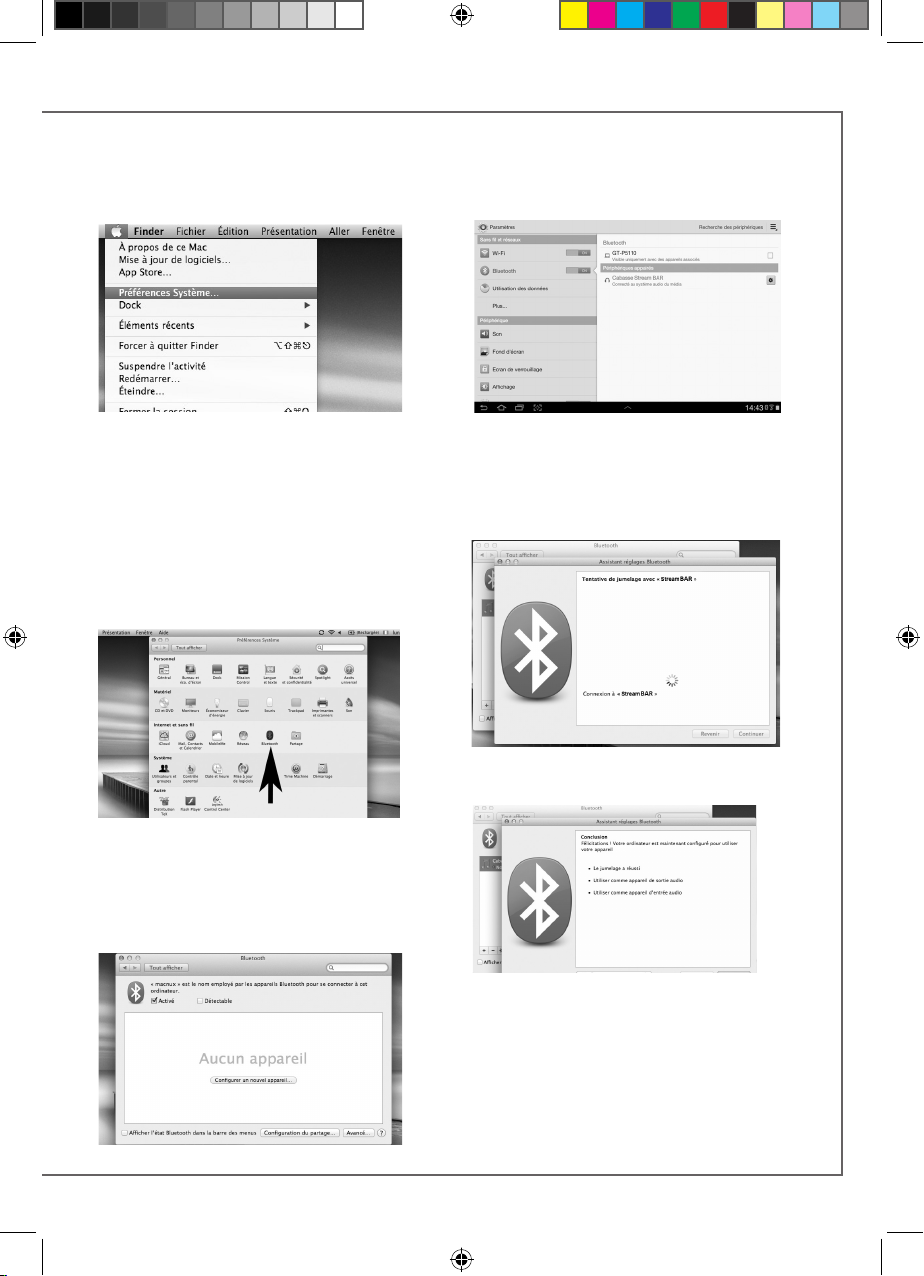
CONNECTION BLUETOOTH AVEC UN ORDINATEUR APPLE
1 ACTIVATION DE LA LIAISON BLUETOOTH
Connecter STREAM BAR au secteur. Si STREAM
BAR est déjà sous tension, interrompre si elle
existe toute liaison Bluetooth active entre
STREAM BAR et un autre appareil.
Activer, si ce n’est pas déjà fait, la fonctionnalité
Bluetooth de l’ordinateur en cliquant sur
le menu « pomme » puis « Préférences
systèmes».
Une fois que la fenêtre de préférences
s’ache, Cliquer sur l’icône Bluetooth.
Cliquer sur « Activé » et sur « Congurer un
nouvel appareil »
STREAM BAR apparait dans la liste des appareils, sélectionner le puis cliquer sur «Continuer »
Connexion en cours…
Connexion réussie. STREAM BAR est maintenant jumelée avec votre Mac.
13
StreamBAR_manual_A4 V5.indd 13 6/10/2016 9:16:24 AM
Page 14
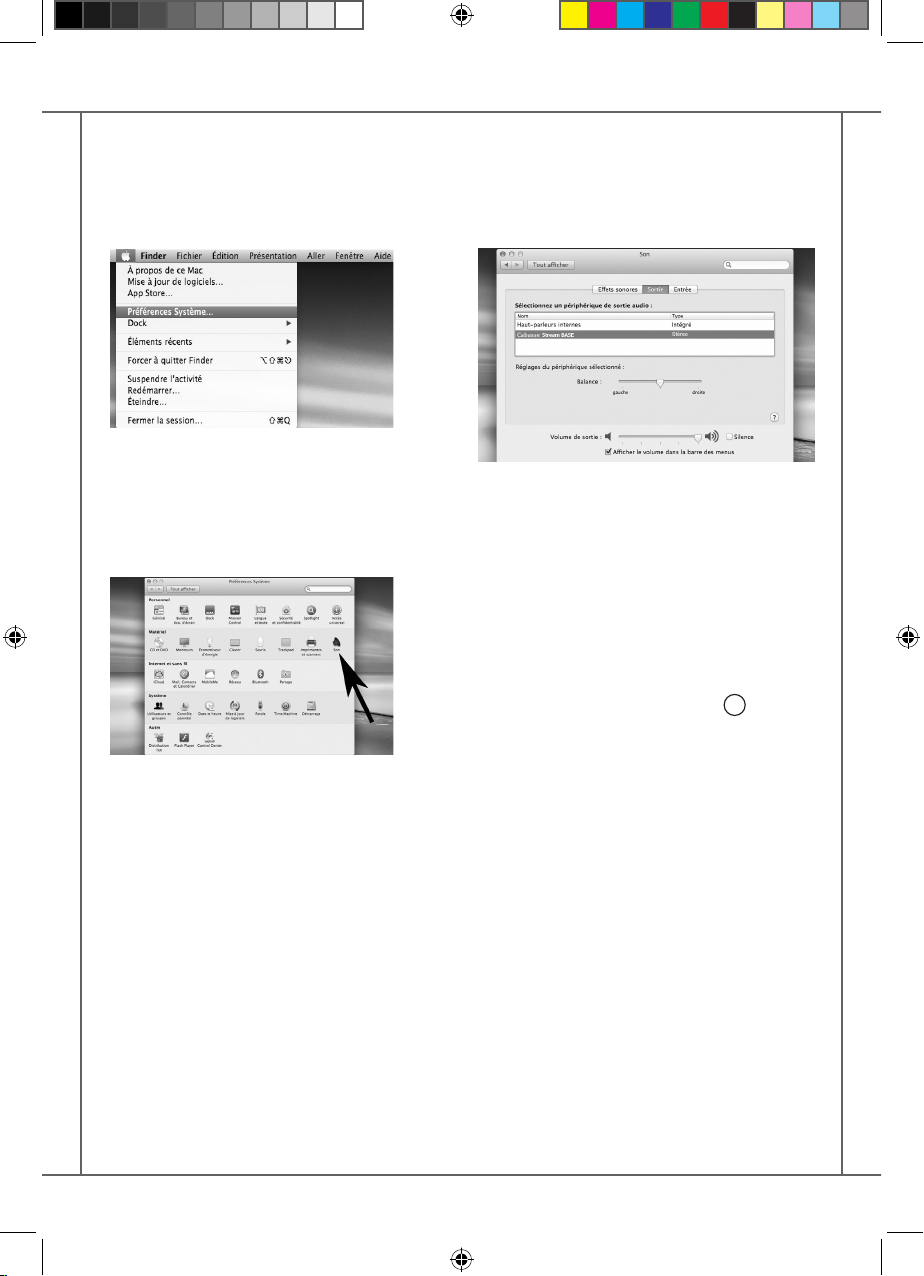
2 SÉLECTION DU PÉRIPHÉRIQUE DE SORTIE AUDIO
Pour écouter vos musiques avec votre Mac,
vous devrez sélectionner votre STREAM BAR
en tant que périphérique de sortie audio dans
les préférences système.
Sélectionner « Son » dans la ligne « Matériel »
Sélectionner l’onglet "Sortie" puis la ligne
"STREAM BAR stereo". Le lecteur "STREAM BAR"
dans cette fenêtre correspond à la conguration mains libres pour smartphones, inappropriée à l'écoute musicale.
Régler le volume de sortie sur la position maximum. Fermer la fenêtre.
Si STREAM BAR est actif et connecté à une
source wi- ou analogique, sélectionner la
source Bluetooth avec la touche 8 de la télécommande ou de STREAM BAR et ajuster le
volume.
14
StreamBAR_manual_A4 V5.indd 14 6/10/2016 9:16:24 AM
Page 15
UTILISATION DE STREAM BAR
AVEC L'APPLICATION StreamCONTROL
1 - Connecter la Stream BAR au secteur. Stream BAR est opérationnel dès que la diode s'allume
en rouge (mode ECO). Passer en mode MARCHE en appuyant sur la touche 1 de la
télécommande.
2 - La tablette ou le smartphone supportant l’application StreamCONTROL doit être sur le même
réseau wi que vous que votre Stream et vos sources audios.
3 - Télécharger gratuitement l'application Cabasse StreamCONTROL sur Playstore pour les
appareils Android, sur l'App Store pour les appareils Apple.
Installer l’application StreamCONTROL sur le smartphone ou la tablette.
Vous pouvez installer librement l’application StreamCONTROL sur plusieurs supports et les
utiliser simultanément avec STREAM BAR comme avec plusieurs Stream.
4- Lancer l’application en cliquant sur son icône et suivre les instructions pour naliser la
première mise en route d'un appareil Stream.
A l'invite au démarrage, choisir entre le mode Wi direct (cf page 10) et le mode réseau si
Stream BAR n’est pas déjà connecté au réseau (cf pages 11).
L'utilisation de l'application est intuitive.
Cependant, où que vous soyez dans l'application, appuyer sur "?" vous donnera un accès direct
au mode d'emploi de l'application et aux options oertes pour la page concernée.
Avec Stream BAR sur l'entrée réseau "LAN", vous pouvez maintenant lire les chiers audio présents
dans la tablette ou le smartphone, dans les disques durs reliés au réseau (NAS, ordinateurs PC et
Mac), à une source digitale connectée à une entrée USB d'un Stream BAR, Stream 1 ou Stream
Source, écouter des radios internet et faire du streaming avec Deezer, Spotify, Tidal, Qobuz...
Plusieurs appareils Stream peuvent être contrôlés simultanément par un ou plusieurs
smartphones et tablettes. Des groupes d'appareils connectés de façon identique au réseau
(Ethernet ou Wi-Fi) peuvent être créés pour la diusion simultanée dans plusieurs pièces.
15
StreamBAR_manual_A4 V5.indd 15 6/10/2016 9:16:24 AM
Page 16
MARQUAGE DEEE
Traitement des appareils élec-
triques et électroniques en n de vie
(applicable dans les pays de l’Union
européenne).
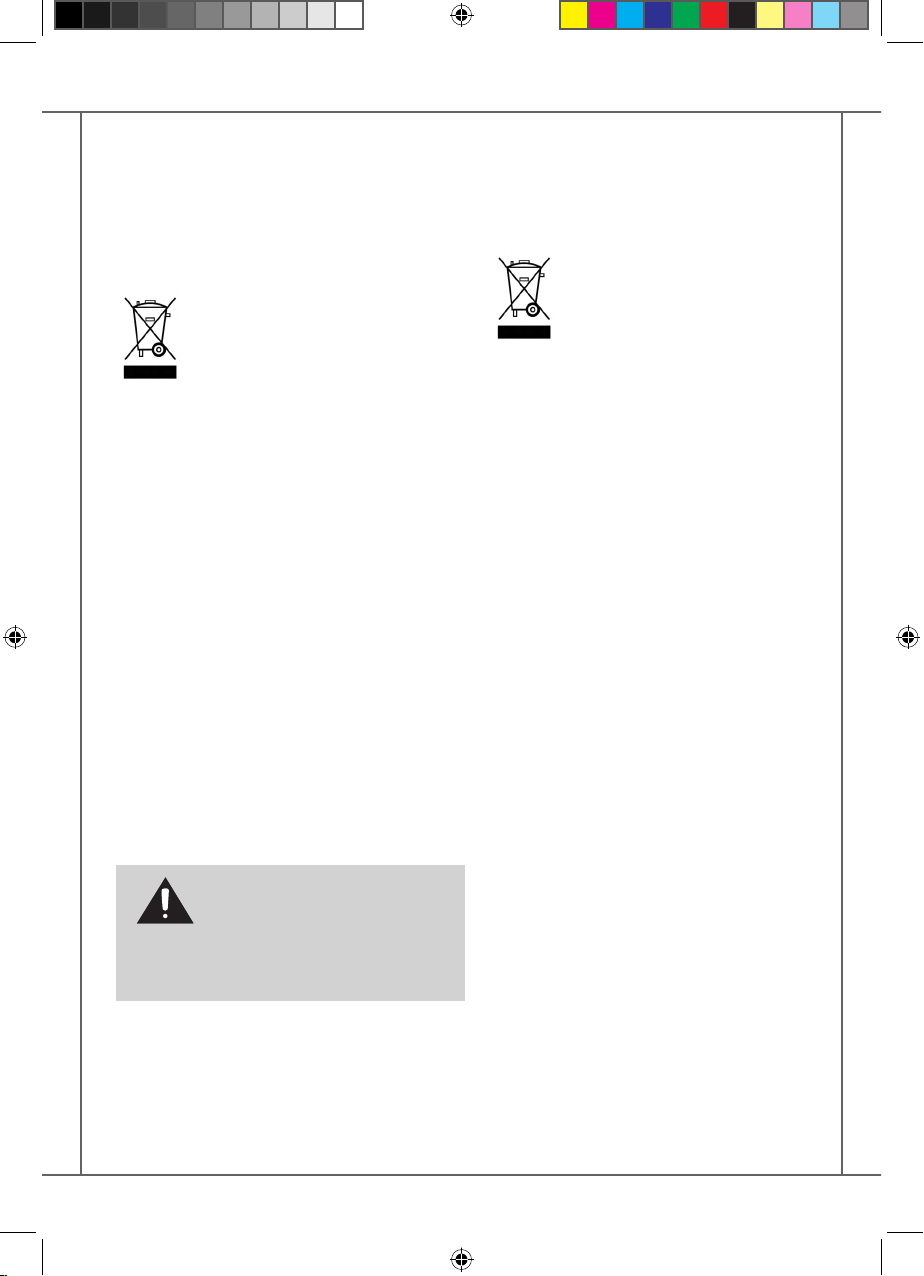
Ce symbole, représentant une poubelle sur roues barrée d’une croix,
apposé sur le produit, indique que
ce produit ne doit pas être traité avec
les déchets ménagers. Il doit être
remis à un point de collecte pour le traitement
des équipements électriques et électroniques
en n de vie. En s’assurant que ce produit est
bien mis au rebut de manière appropriée, vous
aiderez à prévenir les conséquences négatives
potentielles pour l’environnement et la santé
humaine.
conserver les ressources naturelles. Pour toute
information supplémentaire au sujet du recyclage de ce produit, vous pouvez contacter
votre municipalité, votre déchetterie ou le magasin où vous avez acheté le produit.
Le recyclage des matériaux aidera à
REMPLACEMENT DE LA PILE
DE LA TÉLÉCOMMANDE
Retourner la télécommande, coté face vers le
sol. Enlever la pile usagée et la remplacer par
une autre pile bouton type CR-2025. Mettre la
pile usagée au rebut suivant les informations
ci-dessous.
ATTENTION au danger d'explosion si la
batterie n'est pas correctement remplacée :
utiliser seulement une batterie identique ou
équivalente. Ne pas exposer les batteries à une source de
chaleur excessive comme le soleil, un feu ou équivalent.
Informations sur les piles et accumulateurs présents dans l’équipement (Applicable dans les pays de
l’Union européenne).
Ce symbole, représentant une poubelle sur roues barrée d’une croix,
apposée sur une pile ou un accumulateur, indique que cette pile ou ac-
cumulateur ne doit pas être éliminé
comme un déchet ménager non trié mais qu’il
doit être collecté de manière séparée de sorte
d’en faciliter le traitement et le recyclage. Il doit
être remis à un point de collecte pour le traitement des piles et accumulateurs usagés. En s’assurant que ce produit est bien mis au rebut de
manière appropriée, vous aiderez à prévenir les
conséquences négatives potentielles pour l’environnement et la santé humaine. Le recyclage
des matériaux aidera à conserver les ressources
naturelles. Pour toute information supplémentaire au sujet du recyclage de ce produit, vous
pouvez contacter votre municipalité, votre déchetterie ou le magasin ou vous avez acheté le
produit.
DESACTIVATION / ACTIVATION DE LA
FONCTION BLUETOOTH
La fonction Bluetooth peut être déactivée : avec
la télécommande, sélectionner l'entrée BT, puis
appuyer successivement sur les touches "Home
Cinema" ou "NIGHT", puis "MUTE", puis "NEXT".
Pour activer la fonction Bluetooth, sélectionner
l'entrée BT, puis appuyer successivement sur les
touches "Home Cinema" ou "NIGHT", puis "MUTE",
puis "PREV".
16
StreamBAR_manual_A4 V5.indd 16 6/10/2016 9:16:25 AM
Page 17
MISE A JOUR AUTOMATIQUE
Les mises à jour du logiciel de STREAM BAR sont
automatiques.
La durée de mise à jour est variable et peut durer jusqu'à une demi-heure notamment lors de
la première connexion au réseau internet.
La diode
la n de la mise à jour.
STREAM BAR n'est pas fonctionnel durant cette
phase.
Note: la référence de la version du logiciel en
cours est disponible via l'application Cabasse
Stream: onglet "Paramètres" + sous-onglet "lecteurs audio"+ STREAM BAR.
1
passe au rouge et clignote jusqu'à
ATTENTION ! Ne pas éteindre ou
déconnecter STREAMBAR du secteur
pendant les phases de mise à jour!
Une mise à jour peut durer plusieurs minutes
NETTOYAGE
La barre et la caisson de STREAM BAR peuvent
être nettoyée à l’aide d’un linge doux, ne pas
utiliser de détergent ni de liquide pouvant
couler à l’intérieur de l'appareil.
N’utiliser aucun solvant, produit chimique ou
solution de nettoyage contenant de l’alcool, de
l’ammoniaque ou un abrasif.
FAQ
Consultez nos réponses aux questions souvent
posées sur www.cabasse.com, à la page FAQ
STREAM.
SERVICE APRÈS VENTE
Cabasse dispose d’un réseau de revendeurs
agréés qui est à votre disposition pour assurer
le service après vente de votre matériel.
Pour connaître la liste des revendeurs agréés
Cabasse, contactez-nous ou consultez notre site
Internet www.cabasse.com.
17
StreamBAR_manual_A4 V5.indd 17 6/10/2016 9:16:25 AM
Page 18
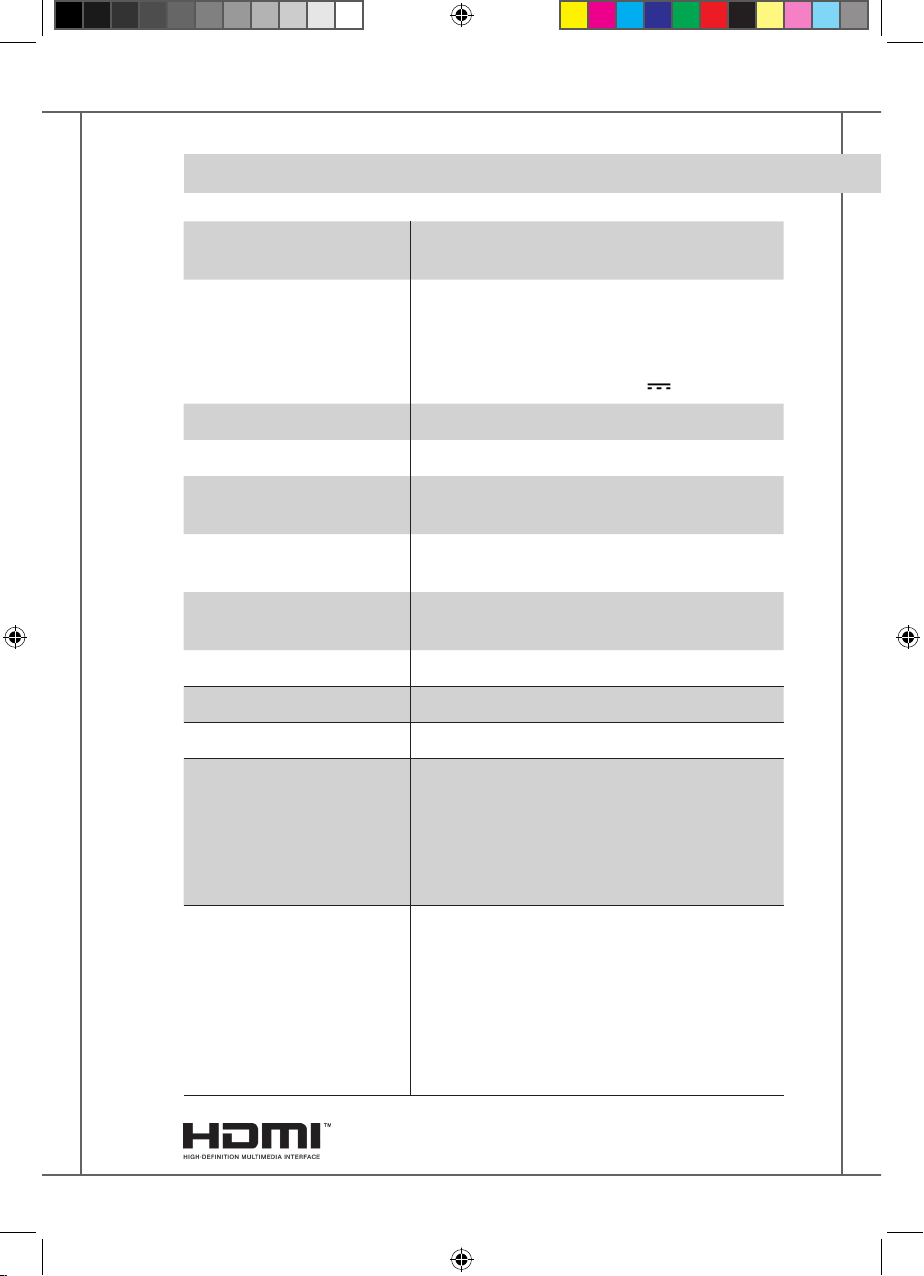
STREAM BAR
Connecteurs HDMI
1 x sortie vidéo / entrée audio ARC
1 x entrée
- 1 entrée DLNA : soit laire avec prise RJ45
soit Wi-Fi
Entrées digitales
- 1 entrée Bluetooth APTX
- 1 entrée optique S/PDIF
- 1 entrée USB 2.0 5V 1A
Entrée analogique 1 mini-Jack 3,5 mm stéréo
Alimentation 110-240 V ~60/50 Hz, 2 A
Consommation
Consommation en mode Eco
Connexion réseau
2,43 W @ 110-240 VAC~50/60Hz
en permanence active pour visibilité produit par
l'application StreamCONTROL
barre: 100 W
caisson de grave : 100 W
Température d’utilisation +5°C à +35°C
Température de stockage
Taux d’humidité en utilisation
-5°C à +40°C
40% à 70%
10/100Mb Ethernet
MAC & PHY
Réseau
Wireless LAN 802.11b/g/n
Sécurité WPS 2.0
Lecteur audio digital
(DMR sous DLNA 1.5)
MP3 (jusqu’à 320kbps)
WMA
(WMA9, CBR,CBR, jusqu'à 320kbps)
Formats audio
Wi/RJ45
PCM (16 bits-44.1kHz, 24 bits-44/48/96 kHz,
.wav, .ai, .aif, aifc les, HTTP streams)
AAC-LC (jusqu’à 320kbps),
ALAC (.m4a), FLAC (16 bits-44.1kHz,
24 bits-44/48/96 kHz)
Les termes HDMI et HDMI High-Denition Multimedia Interface (Interface multimédia haute dénition) et le logo HDMI sont des marques de commerce ou des
marques déposées de HDMI Licensing LLC aux États-Unis et dans d’autres pays.
18
StreamBAR_manual_A4 V5.indd 18 6/10/2016 9:16:25 AM
Page 19
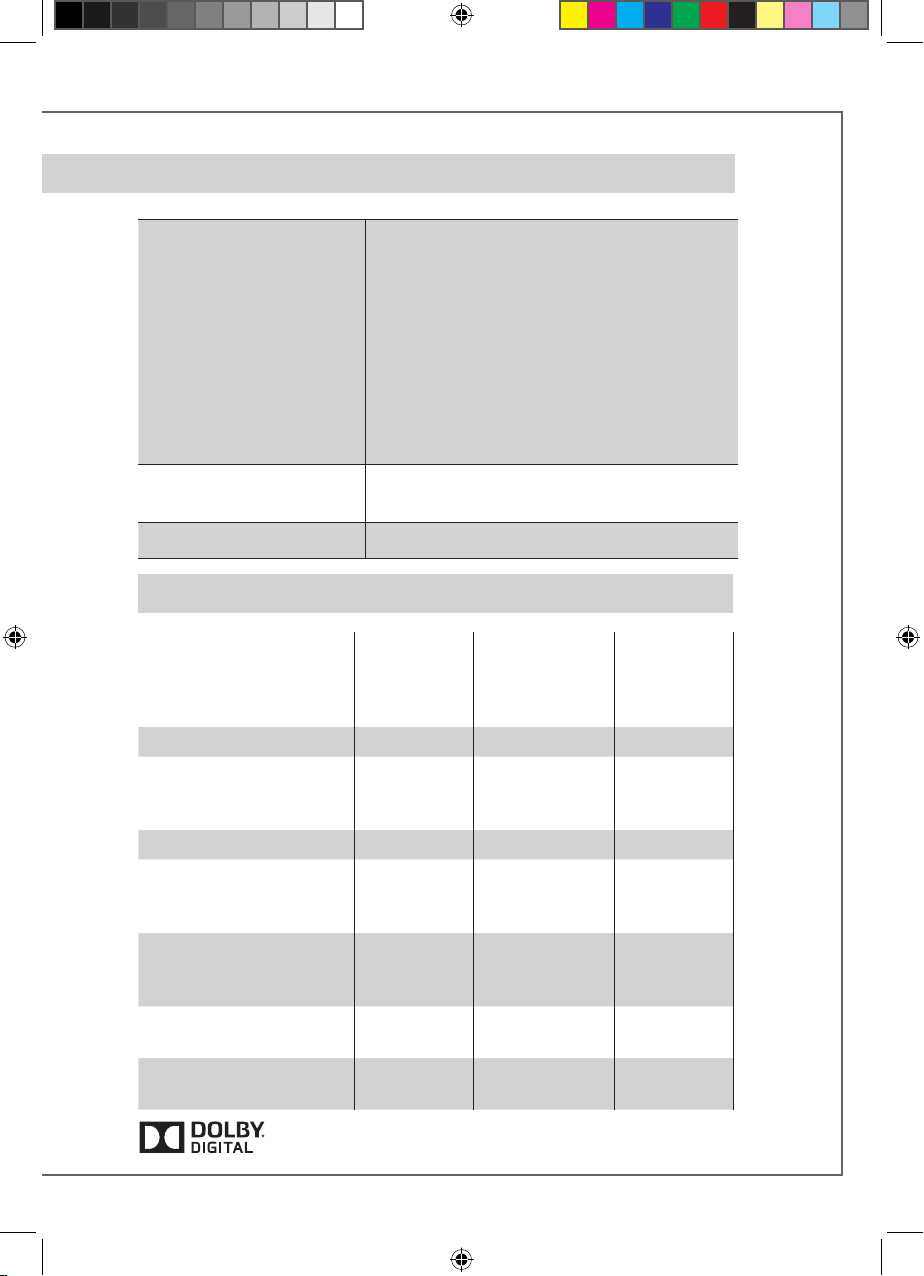
Haut-parleurs
Puissance amplication
(crête)
barre: 2 x tweeter + 6 x bas-medium/medium
caisson de grave: 1 x 17 cm
barre: 2 x 15 W + 2 x 30 W + 2 x 15 W
caisson de grave: 100 W
Taux de distorsion plus
bruit
(THD+N sur la bande
20-20 000 Hz pour une puissance de
100 mW et plus)
Dimensions
(h x l x p)
caisson de grave: 330 x 200 x 400 mm
Wi : < 0,2%
Bluetooth : < 0,2%
Analogique : < 0,2%
Optique < 0,2%
barre: 66 x 1047 x 83 mm
Poids barre : 3,5 kg - caisson: 8,5 kg
FONCTIONS STREAMING ENTREES "BT" ET "LAN"
Connexion
Bluetooth
Diusion audio loss less OUI OUI
Accès à tous les supports
audio depuis le reseau
WIFI (ordinateur…)
Multi-room OUI
Diusion des contenus
audio smartphone/
OUI OUI OUI
tablette
Diusion application au-
dio (youtube…) depuis
OUI
smartphone/tablette
Diusion à partir de
supports USB
Radios et services musi-
caux internet
Fabriqué sous licence de Dolby Laboratories. Dolby , Dolby Audio et le symbole du double D sont des marques déposées de Dolby Laboratories.
WIFI/ETHER-
NET via routeur
internet / box
internet
OUI
OUI OUI
OUI
WIFI
direct smart-
phone/
tablette
19
StreamBAR_manual_A4 V5.indd 19 6/10/2016 9:16:25 AM
Page 20
Thank you very much for choosing Cabasse Stream BAR.
Please read these instructions carefully before setting it up.
IMPORTANT SAFETY INSTRUCTIONS
Explanation of graphical symbols
- The lightning ash with arrowhead
symbol, within an equilateral triangle,
is intended to alert you to the presence of
uninsulated “dangerous voltage” within the
product’s enclosure that may be of sucient
magnitude to constitute a risk of electric shock
to persons.
The exclamation point within an equi-
lateral triangle is intended to alert you
to the presence of important operating and
maintenance (servicing) instructions in the
literature accompanying the appliance.
Cleaning - Always take o the power cord
before cleaning the device. Do not use cleaning solvent, whether liquid or air spray. Using
a soft cloth is recommended.
Installation on a piece of furniture
and stands - Do not place this device on
an unsteady surface, i.e. a stand, tripod, table,
shelf, etc. It may fall and cause serious injury to
a nearby child or adult.
Ventilation outlets - The device shall not
be placed in a position that restrains the operation of its fans. Avoid installing the device on
a bed, couch, blanket or other similar surfaces
that may prevent the appropriate air ow. Do
not install the device in a conned space, such
as a book shelf or other piece of furniture, that
could prevent sucient air from owing freely.
Power - The device shall only be connected
to a source of power compliant to the one described in this manual or on relevant printed
labels on the product. If you are not sure of the
type of power available, please contact your
reseller or the local power company.
Easy access to mains plug - To comple-
tely disconnect this product from the mains,
disconnect the plug from the wall socket outlet. The mains plug is used to completely interrupt the power supply to the unit and must be
within easy access by the user.
Overloads - Avoid overloading the power
plugs, extension cords or power relays. This
could result in re or electric shocks.
Foreign bodies and liquids - Avoid
letting foreign materials or liquids enter the
device. They could cause re or electric shocks.
Never spill any liquid on the device.
Troubleshooting - You must unplug your
device from the power supply and have it checked by a qualied technician if:
The power supply or the plug is damaged.
Foreign bodies or liquid penetrated the de-
vice.
The device was exposed to dripping or
splashing.
The device does not seem to work correctly
under normal operating conditions. Only
operate the controls described in this manual. Any other operation could damage the
device and require on-site visit of a qualied
technician.
The device has fallen or its housing is da-
maged.
The performances of the device are strongly
altered.
20
StreamBAR_manual_A4 V5.indd 20 6/10/2016 9:16:25 AM
Page 21
Spare parts - If spare parts are needed to
repair the device, make sure that the technician followed the manufacturer’s recommendations or that the replacing parts feature the
same specications as the original ones.
IMPORTANT SAFETY INSTRUCTIONS
1. READ these instructions.
2. KEEP these instructions.
3. HEED all warnings.
4. FOLLOW all instructions.
5. DO NOT use this apparatus near water.
6. CLEAN ONLY with dry cloth.
7. DO NOT block any ventilation openings.
Install in accordance with the manufacturer’s instructions.
8. DO NOT install near any heat sources
such as radiators, heat registers, stoves, or
other apparatus (including ampliers) that
produce heat.
9. DO NOT defeat the safety purpose of the
polarized or grounding type plug. A polarized plug has two blades with one wider
than the other. A grounding type plug has
two blades and a third grounding prong.
The wider blade or the third prong are provided for your safety. If the provided plug
does not t into your outlet, consult an
electrician for replacement of the obsolete
outlet.
10. PROTECT the power cord from being
walked on or pinched, particularly at plugs,
convenience receptacles, and the point
where they exit from the apparatus.
11. ONLY USE attachments/accessories specied by the manufacturer.
Non-compliant parts can result in multiple
damages, including re or electric shocks.
Checks - After any servicing of the device,
ask the technician to perform appropriate testing to make sure that the device works safely.
12. UNPLUG this apparatus during lightning
storms or when unused for long periods of
time.
13. REFER all servicing to qualied service
personnel. Servicing is required when the
apparatus has been damaged in any way,
such as power-supply cord or plug is damaged, liquid has been spilled or objects
have fallen into the apparatus, the apparatus has been exposed to rain or moisture,
does not operate normally, or has been
dropped.
14. RAIN / MOISTURE: To reduced the risk
of re or electric shock, do not expose this
apparatus to rain or moisture. The apparatus shall not be exposed to dripping or
splashing and that no objects lled with
liquids, such as vases, shall be placed on
the apparatus.
15. CELL BATTERY: The remote control supplied with a coin/button cell battery. If the
coin/button cell battery is swallowed, it can
cause severe internal burns in just 2 hours
and can lead to death. Keep new and used
batteries away from children. If the battery
compartment does not close securely, stop
using the product and keep it away from
children.
If you think batteries might have been swallowed or placed inside any part of the body,
seek immediate medical attention.
The mains plug is used as the disconnect
device, the disconnect device shall
remain readily operable.
21
StreamBAR_manual_A4 V5.indd 21 6/10/2016 9:16:25 AM
Warning: don't ingest battery,
chemical burn hazard
Page 22
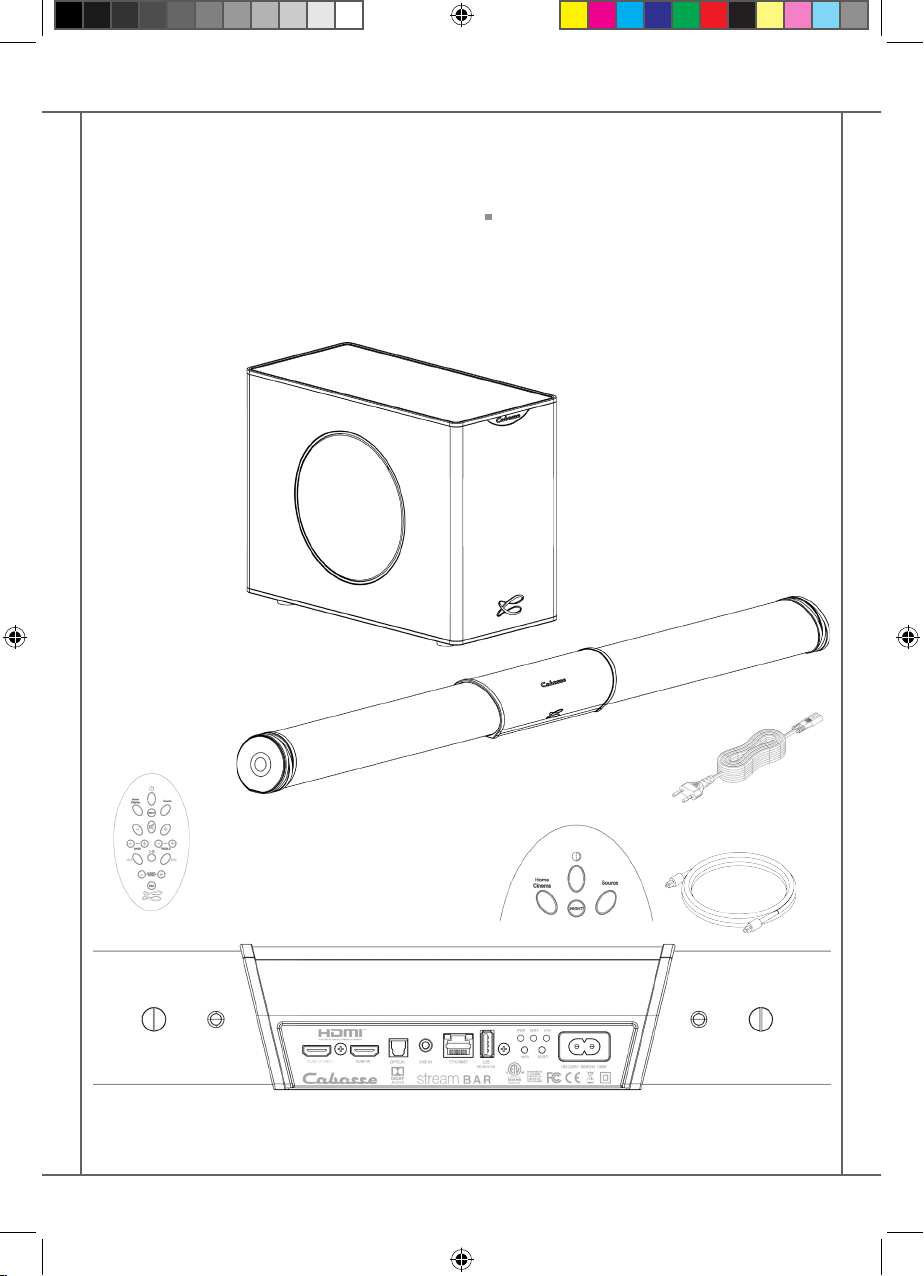
UNPACKING
Open carton aps; remove all the components.
If the sound bar or the subwoofer appears damaged, do not use it. Repack everything in the
original packing and contact your authorised
Cabasse dealer immediately. We suggest you
to retain the packing for future use.
SETTING UP THE COMPONENTS
OF YOUR SYSTEM
1 STREAM BAR set consisting of 1 sound bar
and 1 subwoofer, 2 power cords, 1 optical
cable, 1 remote control, 1 manual and 1
warranty card.
22
StreamBAR_manual_A4 V5.indd 22 6/10/2016 9:16:28 AM
Page 23
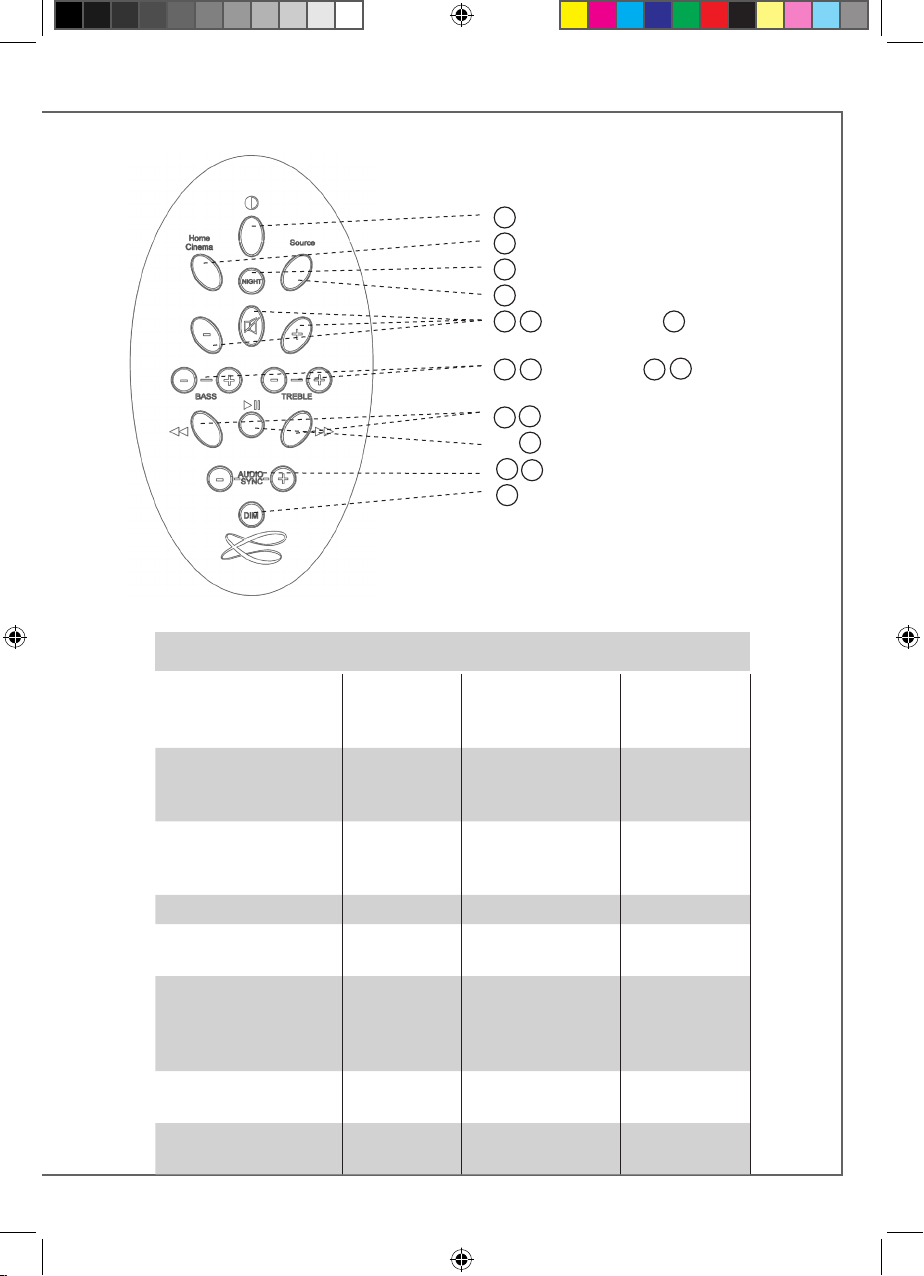
1
ECO mode on / o
2
Surround mode on / o
3
Night mode on / o
4
Sources selection
5 7
Volume - and +
6
Mute
8 9
Bass control 10 trebble control
14
12
Reverse and forward (Wi-Fi)
13
Play /Pause
15
16
Audio/Video sync control
17
Display light intensity
USE OF THE CONTROL KEYS OF THE
HC STREAM REMOTE CONTROL
STREAMING FEATURES "BT" AND "LAN" INPUTS
Bluetooth
connection
Uncompressed and
loss less compressed
audio playback
Access to any audio
from WLAN network
(desktop...)
Multi-room Yes
Tracks playback from
smartphone/tablet
Playback smart-
phone/tablet a audio
applications
(youtube…)
Playback from USB
device
Web radio /Music
services
Yes Yes Yes
Yes
WIFI/ETHERNET
via internet
router
Yes Yes
Yes
Yes Yes
Yes
WIFI direct to
smartphone/
11
tablet
23
StreamBAR_manual_A4 V5.indd 23 6/10/2016 9:16:29 AM
Page 24
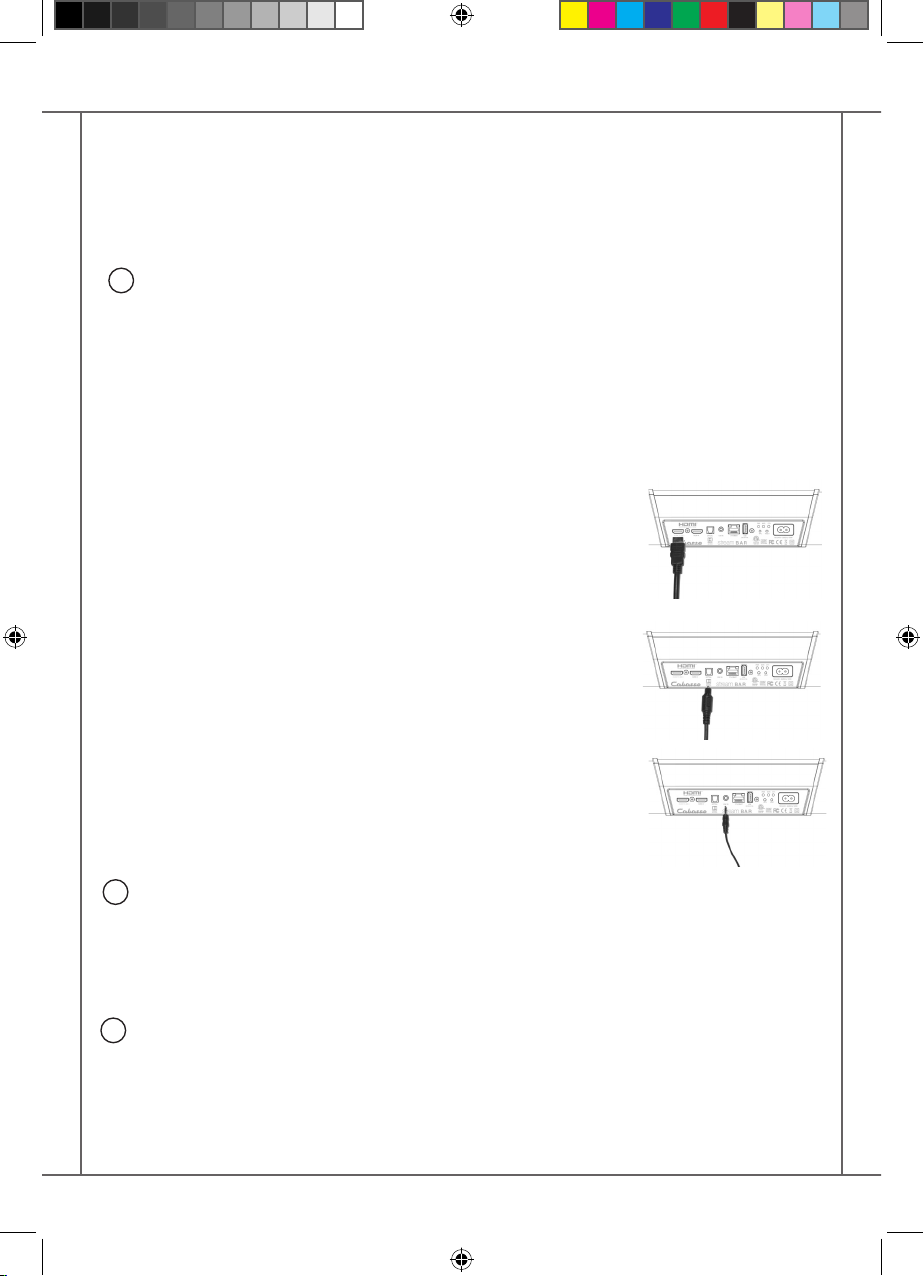
PLUG & PLAY WITH TV
SETTING UP
1
1- Place the sound bar of Stream BAR in front of the TV or underneath the TV either on a shelf or
wall mounted thanks to the supplied bracket (instructions on page 28) . All connections achieved,
be sure to align the center of the sound bar with the center of the TV.
2- Place the subwoofer along the same wall as the TV, or along any other wall in the front third of
the room.
3- Connect the Stream BAR with the TV using one of the 3 inputs available on the back panel of the
bar. We recommend the HDMI ARC input for best performance and friendlier use:
- HDMI TV socket: connect this socket to the ARC HDMI output
of the TV. Use a HDMI cable (not included in the packing) with the 1.4
( or higher) specication. This specication should on every TV
turn o the TV speakers automatically and allow to use the TV
remote to control the volume of the Stream BAR.
- HDMI socket: use this input to connect a source to Stream BAR,
such as a cable/satellite box, DVD or Blu-ray Disc™ player, a digital
video recorder.
- OPTICAL IN: use the supplied optical cable to connect it to the
TV Audio OUT . Be sure to remove both the caps on both ends
of the cable. Firmly push the plugs into the connectors until
hearing or feeling a click.
- LINE IN: if the TV is not tted with an optical output, connect
the RCA analog output of the TV with an RCA-mini-jack cable
(not supplied). If there is no RCA output, use the headphone
output and a Jack-mini-jack cable (not supplied).
TURNING OFF THE TV SPEAKERS
2
Turn on the TV, go to the TV menu and select Audio, Sound, or Speaker Settings. Look for the menu
item that allows you to turn o the TV speakers. If there is no setting for turning the TV speakers
o, adjust the TV volume to its lowest setting. Using a ARC connection turns o the TV speakers
automatically.
ENABLING DIGITAL AUDIO OUT
3
If there is no TV sound when on phase 4, look for the menu item that allows to enable the digital
audio output and select the optical setting.
24
StreamBAR_manual_A4 V5.indd 24 6/10/2016 9:16:29 AM
Page 25
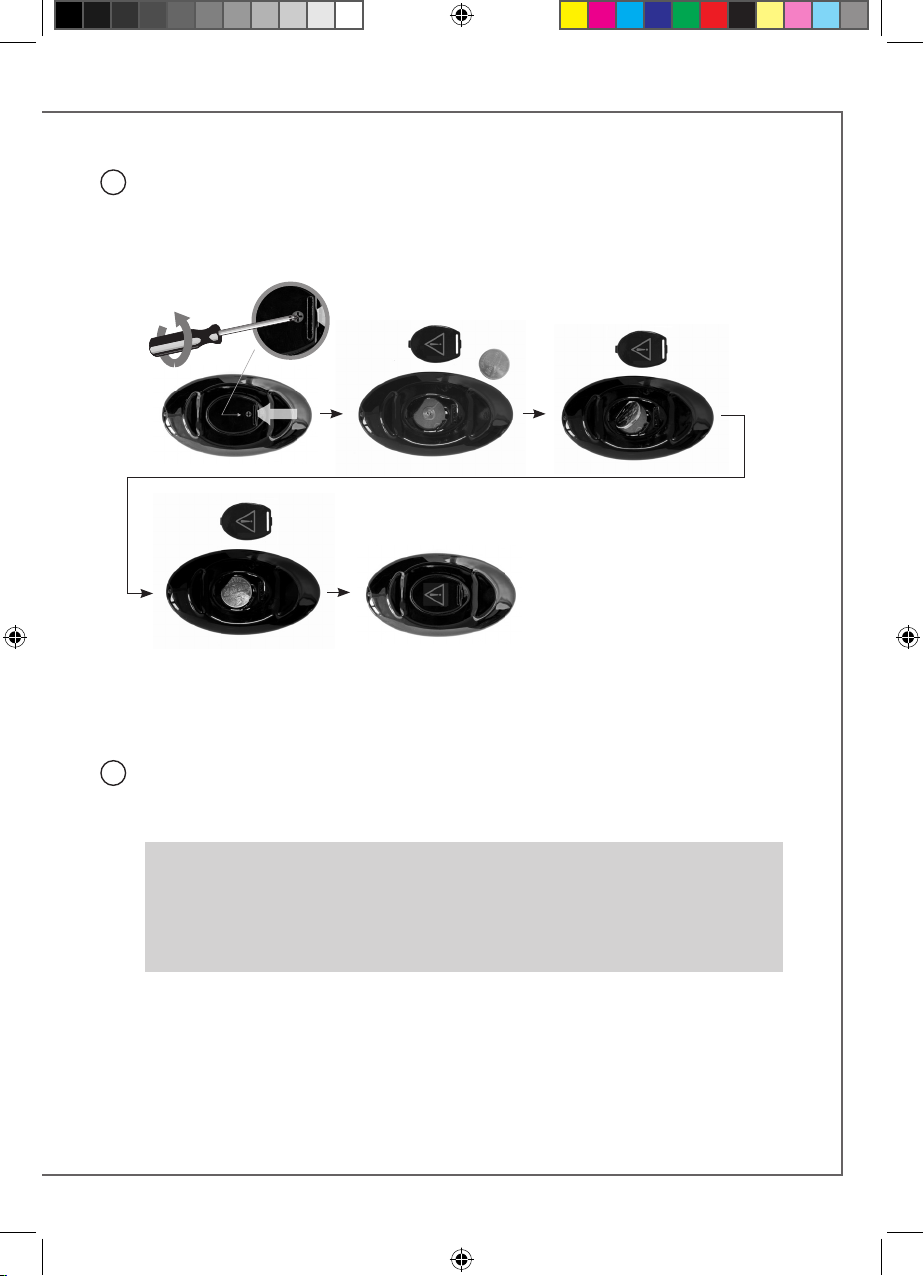
POWERING ON THE REMOTE CONTROL
4
Before rst use, loosen the screw (PH00 screwdriver), remove the back cover, remove the
battery protection tab, replace the cover, retighten the screw.
Replacement of the CR-2025 type battery in the Stream remote control: loosen the screw,
remove the rear lid, remove the old battery and load the new battery properly with the "+" side
on the clasp side, put the rear cover back on, retighten the screw.
CHECKING FOR TV SOUND
Plug one end of the power cord in the POWER connector at the back of the Stream BAR and the
5
other end into a live AC outlet. Stream BAR is ready to use as soon as the LED of the front display
turns red. Press the ECO on/o key of the remote to power the Stream BAR on. The LED turns
green, the screen displays "ON" followed by the name of the selected input.
INITIALIZATION OF THE WIRELESS CONNECTION BETWEEN BAR AND SUBWOOFER
a) Press the "PAIRING" switch at the back of the Subwoofer
b) Press and release after 5 secondes the "DIM" key of the remote control, the remote aiming
at the sound bar. A wheel on the screen shows that the set up is running.
c) The screen on the bar displays OK, the connection is eective.
Note: the DLNA fonction for Wi-Fi / Ethernet (WLAN/LAN) network use of Stream BAR is activated
when the PWR power LED at the back of Stream BAR has turned from red to green, around 40
seconds after having powered the Stream BAR on.
TV being on, select the Stream BAR input connected to the TV by pressing the key 3 of the remote
or the input selector of the bar until the screen displays the name of the right input:
- "HDMI TV" for the HDMI ARC input - "HDMI IN" for the HDMI input
- "OPT" for the optical input - "AUX" for the analog input
25
StreamBAR_manual_A4 V5.indd 25 6/10/2016 9:16:30 AM
Page 26
VOLUME : To adjust the sound level, use keys 5 (-) and 7 (+) of the remote or the "-" and
"+" keys of the bar. Use the TV remote control when the HDMI ARC connection is being
used.
5
1
2
SOUND OPTIMIZING FUNCTIONS
Stream BAR is tted with several functions oering smart sound optimizations:
- HI-FI / SURROUND MODE: press key 2 of the remote to change mode. the HI-FI mode
is recommended for pure audio and for TV programs in which dialogs are dominant, the
SURROUND mode is recommended for movies and ctions.
- NIGHT MODE: the key 3 mode optimizes the system for a confortable listening at low level.
- BASS / TREBLE ADJUSTMENTS: use these settings to adapt the sound balance to room
acoustics, the source, your preference.
- LIPS SYNCHRONIZATION: adjust the sound delay with the "-" and "+" AUDIO SYNC keys of
the remote
PLAYING AUDIO
Stream BAR is not only a high quality sound bar. It is tted with wired and wireless
connections enabling to benet from its sound qualities with various sources, including
Bluetooth and LAN/WLAN ones.
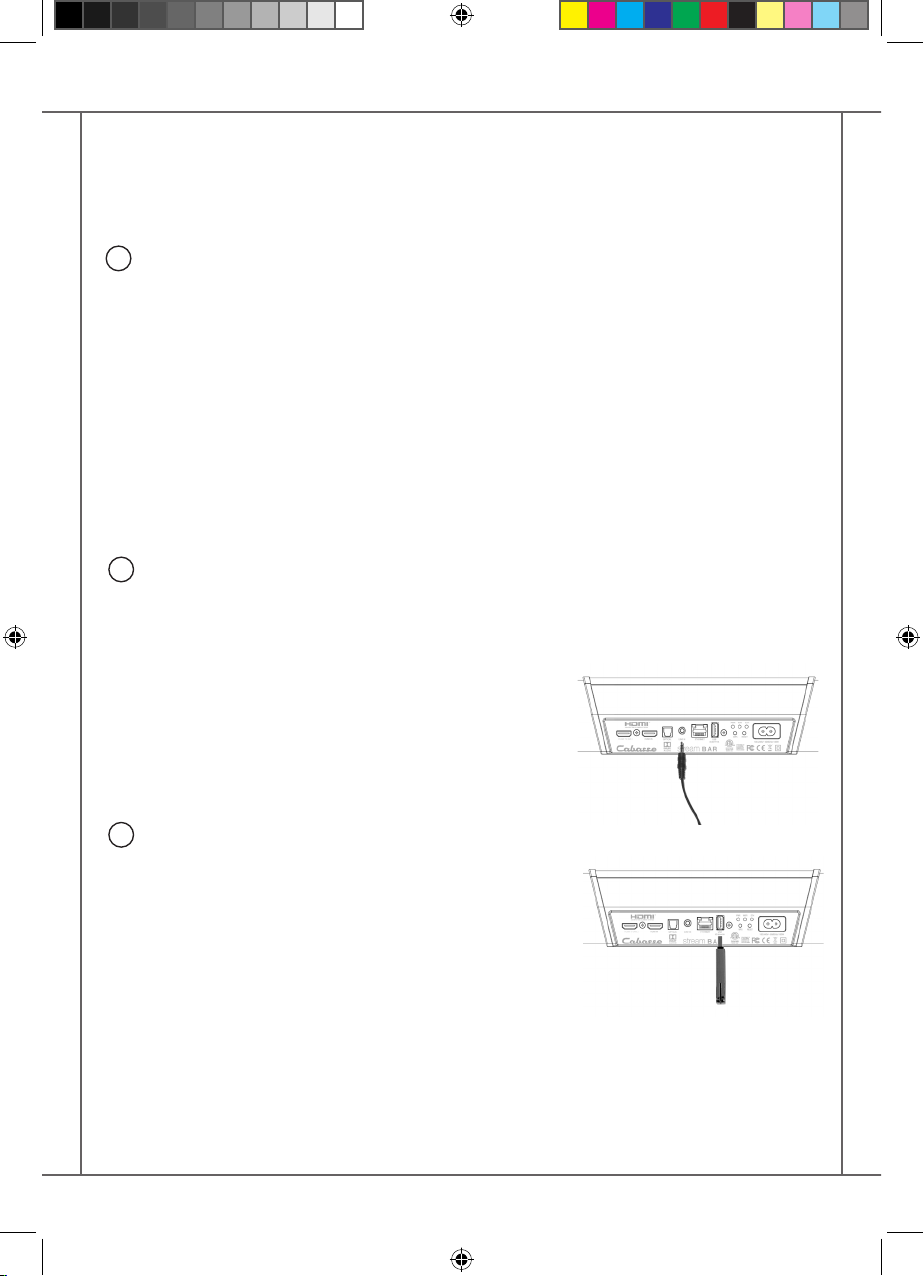
AUX ANALOG INPUT
If not connected to the TV, use this input to get
music from an audio source (CD-player, MP3-player,
smartphone) tted with an analog connector, RCA or
mini-jack type. A RCA/mini-Jack or a mini-Jack/miniJack cord will be necessary (not supplied).
USB INPUT
Use this input only in WIFI mode ( see next § 4,5,6). Plug
in an USB stick or a hard-drive to this input to get all the
stored audio les available on the domestic network.
All the audio les, under formats compatible with the
built-in DLNA server of STREAM BAR, will be listed in
the Stream Audio Control apps and can be played by
any Cabasse Stream player connected to the same
domestic network. The USB input is tted with a 5V
-1A direct current power output enabling the use of a
portable hard drive with no need of an external power
supply.
26
StreamBAR_manual_A4 V5.indd 26 6/10/2016 9:16:30 AM
Page 27
3
BLUETOOTH CONNECTION
STREAM BAR is set in on open mode for Bluetooth connections.
Select "Cabasse STREAM BAR" in the available Bluetooth devices list.
Select the BLUETOOTH input "BT" with the key "4" on the Stream HC remote or with the "S"
key of Stream BAR. If a Bluetooth source is already connected to STREAM BAR, disconnect
this item before selecting a new one.
BLUETOOTH CONNECTION WITH AN ANDROID TABLET: see the English explanation on
page 38.
CONNECTION AND USE OF STREAM BAR WITH AN APPLE COMPUTER: see the English
version page 39.
TO DESACTIVATE THE BLUETOOTH FUNCTION: select the BT input with the remote control,
then press successively the following keys: "Home Cinema" or "NIGHT", then "MUTE", then
"NEXT".
To activate the Bluetooth function , select the BT input with the remote control, then press
successively the following keys: "Home Cinema" or "NIGHT", then "MUTE", then "PREV".
3
4
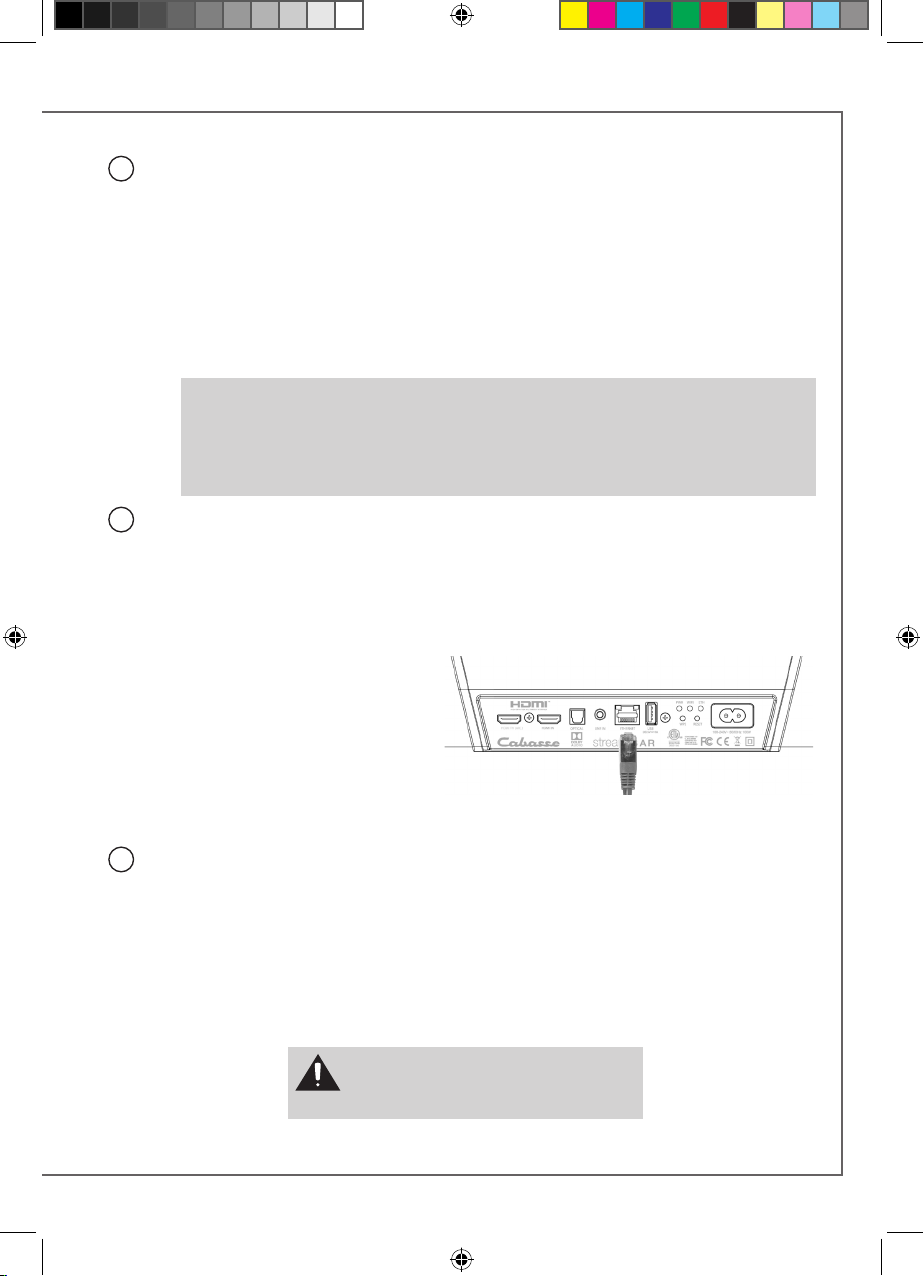
LAN WIRE CONNECTION TO THE ETHERNET NETWORK
The LAN (Ethernet) wire connection ensures a constant and optimum transfer rate. Use
it if music reproduction stops or is erratic under Wi-Fi mode, because of a saturated Wi-Fi
bandwidth or the distance between the router and the Stream unit being too long.
Use a RJ45 type cable to connect STREAM BAR to the domestic router.
The connection is running when the blue LED “ETH” stops ashing and remains on. The WIFI
connection is then automatically
turned o.
ATTENTION:
set up the router on DHCP mode.
WIFI DIRECT MODE
Wi-Fi direct allows to play with wi quality all the audio tracks available in the tablet or the
smartphone as well as those availble in the hard-disk or USB-stick connect to the USB input of
STREAM BAR, without need of a wi network. Internet sources such as Vtuner, Deezer and the
STREAM BAR rmware updates are not available.
Activate the STREAM BAR, Install and open the StreamCONTROL app on your tablet/
smartphone and select "Use this device in standalone mode" instead of "congure this audio
device". Follow the instructions and start playing your music.
Press "RESET" before starting a new connection process
(wired, auto, easy, manual) or connecting to a new
router.
27
StreamBAR_manual_A4 V5.indd 27 6/10/2016 9:16:31 AM
Page 28
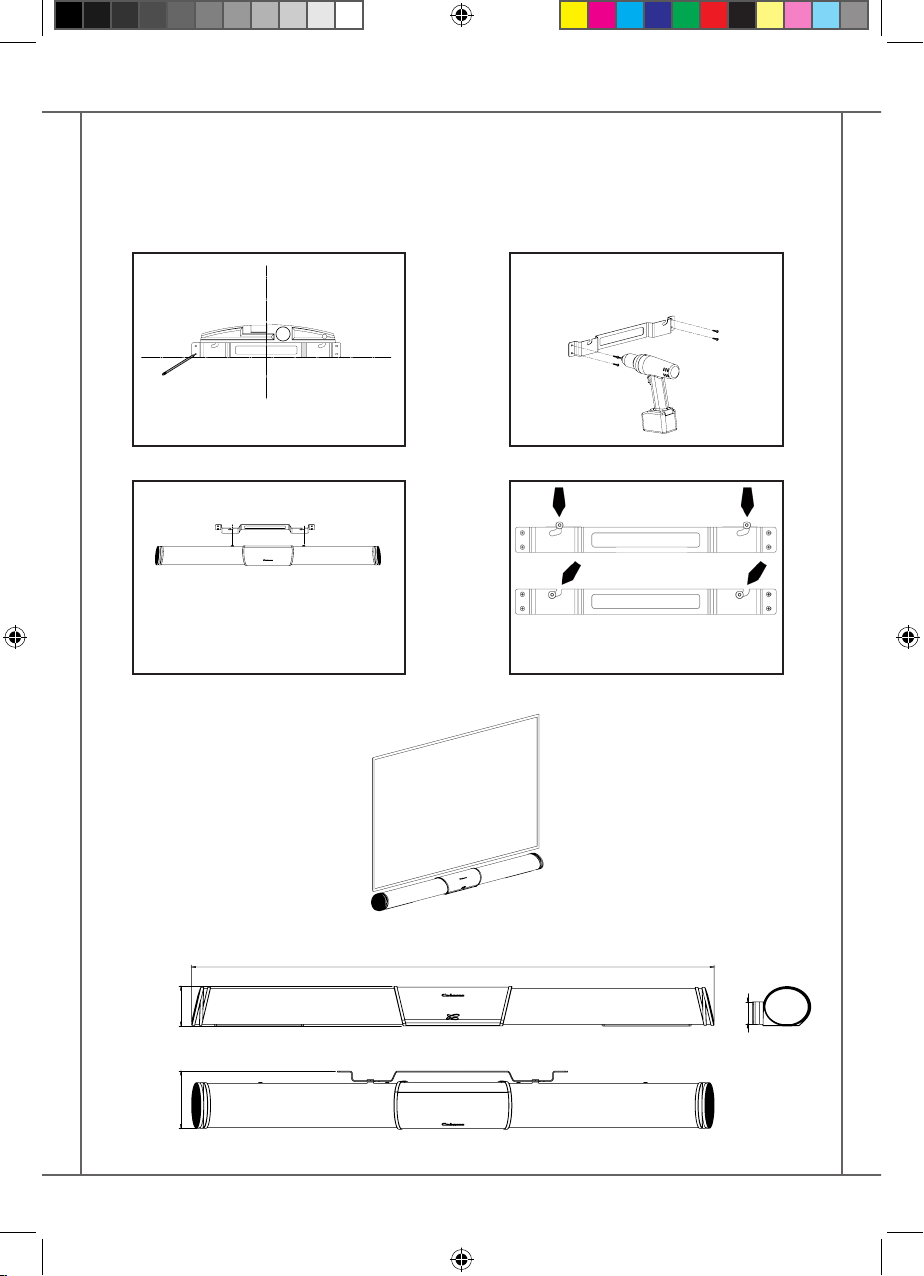
ON WALL MOUNT OF THE SOUND BAR
The bracket being horizontal and
centered under the TV set, mark the
4 holes and install proper inserts.
Screw the bracket on the wall.
Position the buttons of the sound
bar above the notches.
79
114
Slide both buttons down to the end
of each notch.
1045
45
28
StreamBAR_manual_A4 V5.indd 28 6/10/2016 9:16:33 AM
Page 29
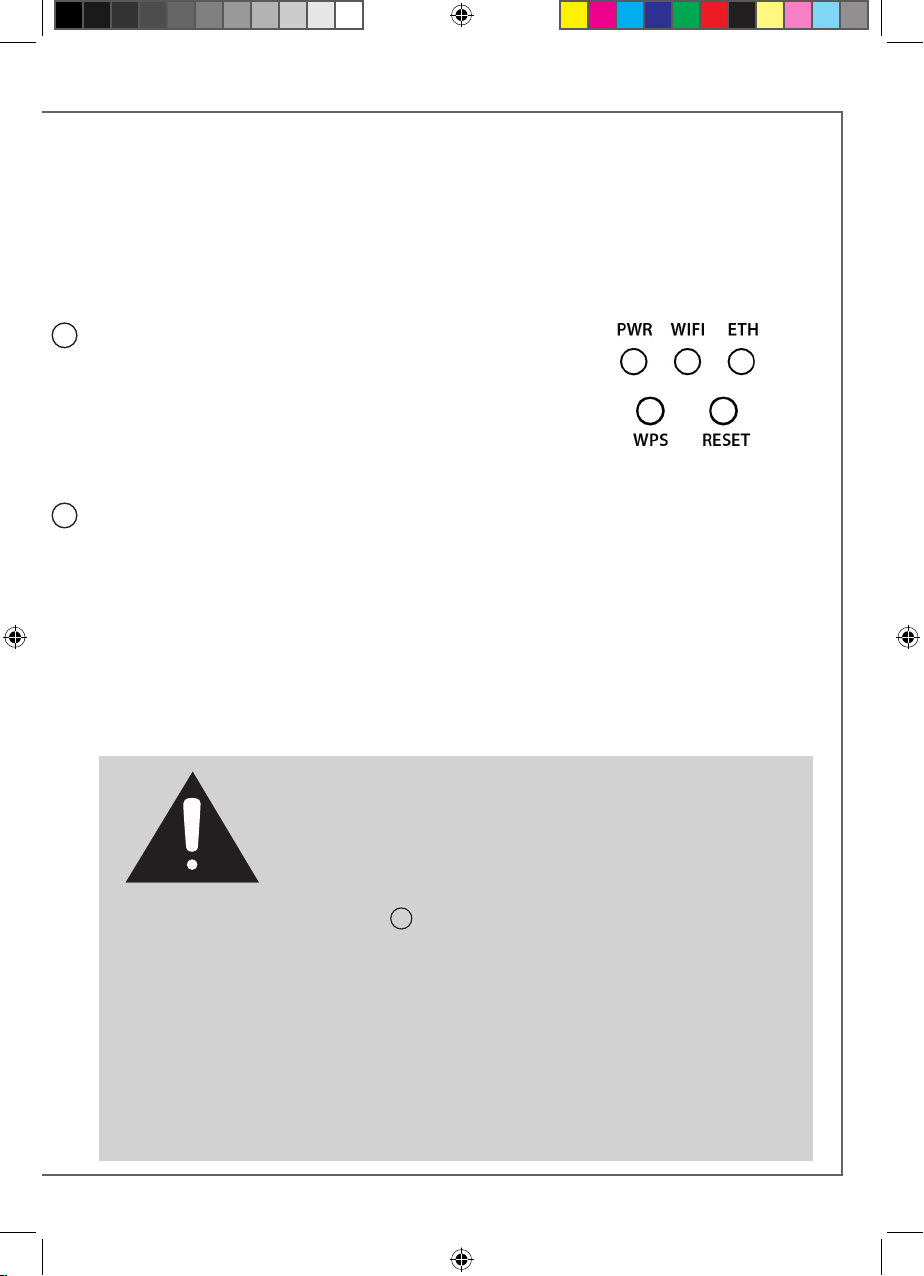
DLNA (WLAN) WIRELESS CONNECTION TO THE WIFI NETWORK
THERE ARE 2 SOLUTIONS TO CONNECT STREAM BAR TO THE WIFI
NETWORK:
WPS CONNECTION: push the WPS button of the wireless router for
1
2 seconds or more and push the WPS button of the STREAM BAR
within around 2 minutes (check for precise delays in the router's
manual). The connection is completed when the blue LED "WIFI"
is on. Now go to page 41 to install the Cabasse StreamCONTROL
application.
EASY WI-FI CONNECTION WITH THE CABASSE STREAMCONTROL APP with a smartphone or tablet
2
wi- connected to the domestic network.
a) Install the Cabasse Stream App on an Android or Mac tablet or smartphone from “Play Store” or “App
S to re”.
b) Switch the STREAM BAR on or press the reset button if already on. Activate the Wi-Fi in the “settings”
application mode of the smartphone or tablet.
c) Launch the Cabasse STREAM CONTROL App and folow the set up instructions.
STREAM BAR is now ready to play all the shared audio les in your network as well as all the web radios
proposed by vTuner.
CAUTION! An automatic update of the rmware might
start as soon as STREAM BAR is connected to the Web. The
screen displays "UPDTE" for update until the update is fully
completed.
Do not try to use STREAM BAR during the update, wait until
STREAM BAR has restarted, when the front LED is steady
red. Press 1 to turn the STREAM BAR on and carry on.
Do not shut down or unplug STREAM
BAR during updates. They might require
several minutes.
29
StreamBAR_manual_A4 V5.indd 29 6/10/2016 9:16:33 AM
Page 30
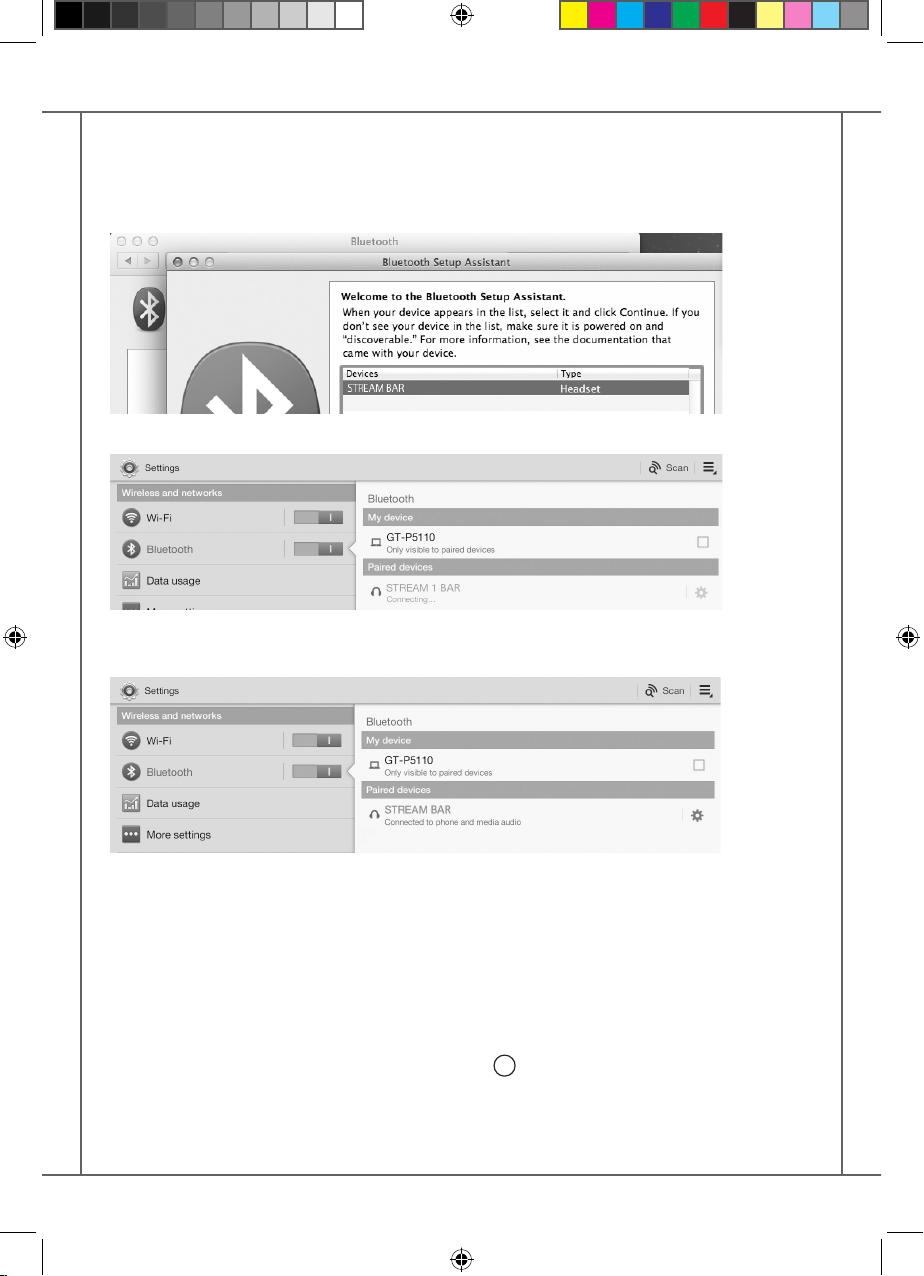
BLUETOOTH CONNECTION TO AN ANDROID TABLET
- If not already done, activate the Bluetooth Function in the « Settings » menu of your tablet by
pressing on the ON-OFF switch.
- Press “Scan for devices” and select « Cabasse STREAM BAR » among the available devices.
STREAM BAR is now paired with the tablet and connected to STREAM BAR is no other Bluetooth connection to STREAM BAR is active.
If the message « Connection.. » does not show up, stop the running Bluetooth connection with
another device, either through the set up menu of the device or by switching o and on the
STREAM BAR. Press on « Cabasse STREAM BAR » again.
To play on STREAM BAR the audio les stored in the tablet (or smartphone), open the audio
player application, select a le and press on “play”.
If STREAM BAR remains silent, rst check that the main volume of the tablet (or smartphone) is
not down to zero level and that « mute » is o. Adjust the volume in the player application and
nally raise the volume of the STREAM BAR with the Stream remote. Finally select « Bluetooth »
as the active source on STREAM BAR pressing the 4 key of the Stream remote until the blue
LED ashes.
30
StreamBAR_manual_A4 V5.indd 30 6/10/2016 9:16:33 AM
Page 31
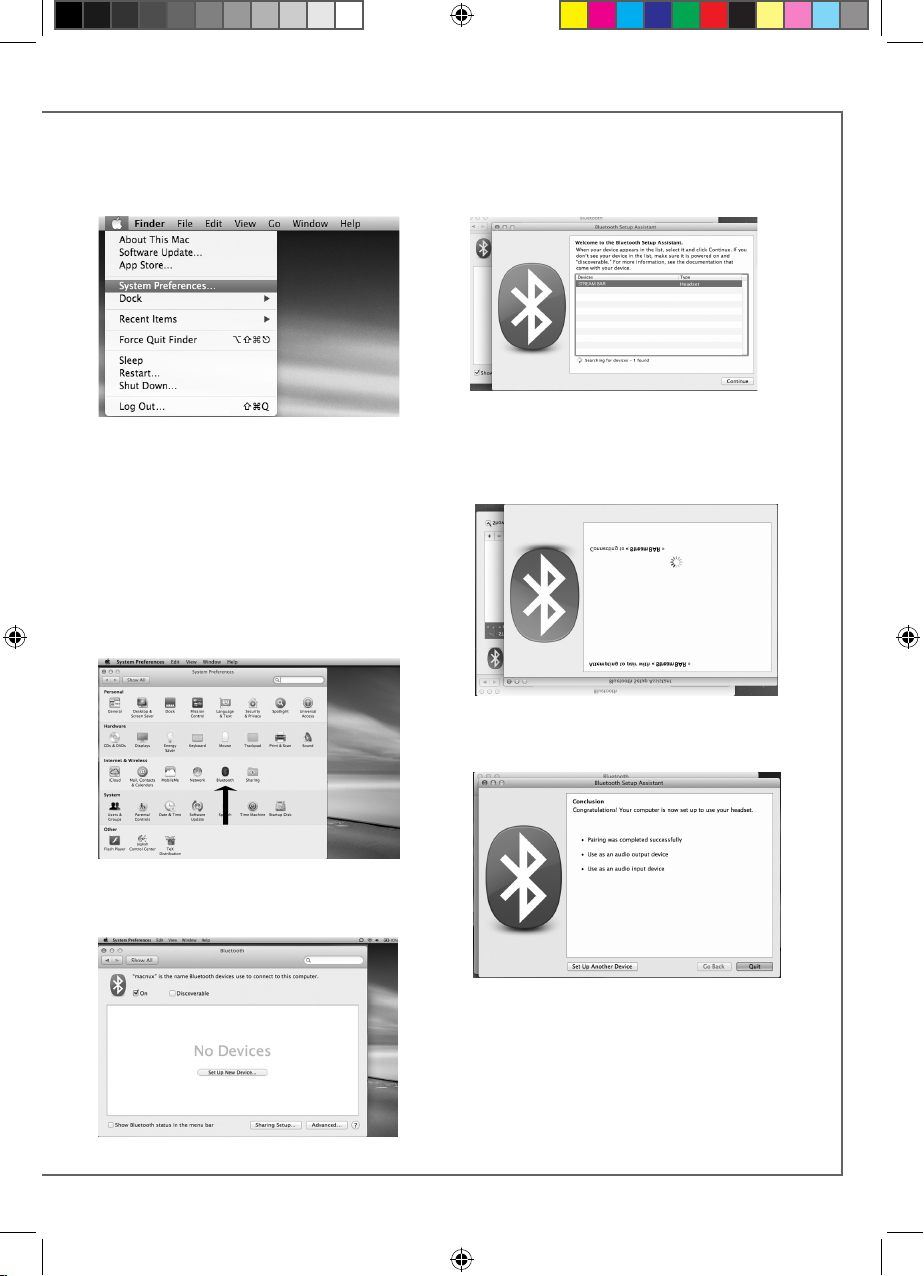
BLUETOOTH CONNECTION TO AN APPLE COMPUTER
1 BLUETOOTH MODE ACTIVATION
Connect the STREAM BAR to mains to
power it on. If STREAM BAR is already
on, stop any running Bluetooth connection between STREAM BAR and any
other item.
Activate the Bluetooth function of the
computer: open the « apple » menu and
select « Systems Preferences ».
Select « Bluetooth » in the window for the
«Systems Preferences ».
Select « On » and click on « Set Up New
Device”
Select « STREAM BAR » in the list of items and
click on “Continue”
Connecting…
Connection completed. STREAM BAR is now
paired with your Mac computer.
31
StreamBAR_manual_A4 V5.indd 31 6/10/2016 9:16:33 AM
Page 32
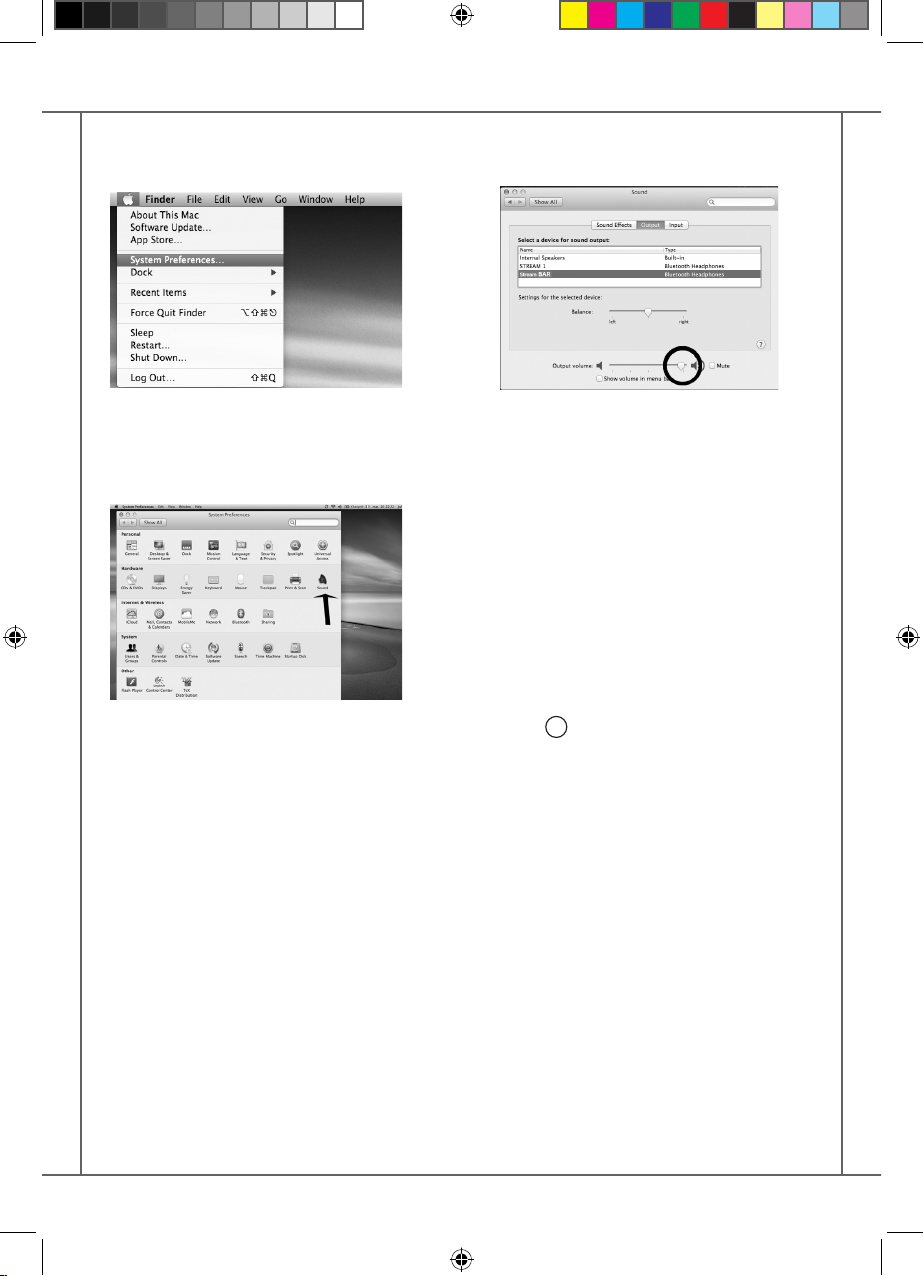
2 SELECTION OF THE AUDIO OUTPUT DEVICE
To enjoy the musics stored on you Mac with
STREAM BAR, set up STREAM BAR as your audio output device in the “System Preferences”
menu.
Select « Sound » in the « Hardware » section.
Select "STREAM BAR Stereo" in the « Output»
tab. The line "STREAM BAR" stands for the
hands free set up to be used only with a smartphone.
Set the volume control on far right position.
Close the “Sound” window.
If the STREAM BAR is on Eco mode, it will take
around 6 seconds to start playing, the Bluetooth input being automatically selected. Use
the Stream remote control to adjust the sound
level.
If STREAM BAR is active and connected to another active source (wi, analog) use the Stream
remote control and select the Bluetooth input
with the 8 key, then adjust the sound level.
32
StreamBAR_manual_A4 V5.indd 32 6/10/2016 9:16:34 AM
Page 33
USE OF STREAM BAR WITH THE STREAMCONTROL APPLICATION
1 - Switch ON the POWER button on the back of the STREAM BAR. STREAM BAR is ready to play
when the LED 1 illuminates red (stand-by mode), press key 1 on the front board of STREAM
BAR or on the remote control to get STREAM BAR on.
2 - Connect the smartphone or the tablet to the WLAN network to be used with STREAM BAR.
3 - Download and install the free application names StreamCONTROL on Playstore for Android or
on the App Store for iOS.
4 - Launch the application and follow the instructions from the setup wizard. Choose between
direct Wi-Fi (see page 32) or network mode (see pages 33) upon request.
With the Stream BAR on the network input "LAN", you can now play all the audio les listed
in your smartphones or tablets, PC and Mac computers, NAS hard disks, as well as the HD or
USB sticks directly connected to any Stream BAR, Stream Source or Stream 1 connected to the
network, discover thousands of web radios and stream with Deezer, Spotify, Tidal, Qobuz.
All the Stream players of the same network can be controlled by one or several smartphones and
tablets. Groups of Stream players connected the same way (LAN or WLAN) can be created to play
synchronised music with individual level control.
33
StreamBAR_manual_A4 V5.indd 33 6/10/2016 9:16:34 AM
Page 34
BATTERY REPLACEMENT
Take the remote control in your hand with
the keyside facing the oor. Lift the locker
and pull out the battery. Remove the dead
battery and replace it with a new CR-2025
battery. Dispose of the old batteries accor-
ding to these instructions.
CAUTION: there is a danger of explosion if the
battery is incorrectly replaced. Replace only with
the same or equivalent type. The battery shall not
be exposed to excessive heat such as sunshine, re or the
like.
WEEE MARK
Disposal of Wastes of Electrical &
Electronic Equipment (Applicable
in the European Union)
This symbol on the product, consisting of the
crossed-out wheeled bin, indicates
that this product shall not be
treated as household waste. Instead
it shall be handed over to the
applicable collection point for the
disposal of electrical and electronic
equipment at the end of life. By ensuring this
product is disposed of correctly, you will help
prevent potential negative consequences for
the environment and human health, which
could otherwise be caused by inappropriate
waste handling of this product. The recycling
of materials will help to preserve natural
resources. For more detailed information about
recycling of this product, please contact your
local city oce, your household waste disposal
service or the shop where you purchased the
product.
DISACTIVATE/ACTIVATE THE
BLUETOOTH FUNCTION: this function
can turn on or o. To disactivate the function,
select the BT input with the remote control, then
press successively the following keys: "Home
Cinema" or "NIGHT", then "MUTE", then "NEXT".
To activate the function , select the BT input with
the remote control, then press successively the
34
following keys: "Home Cinema" or "NIGHT", then
"MUTE", then "PREV".
AUTO UPDATE
The updates of the rmware for STREAM BAR
are done automatically. The duration of an
update can vary from 5 minutes to half an
hour.
The screen displays "UPDTE" continuously until the update is fully completed. STREAM BAR
cannot be used during the updates.
WARNING : Do not shut down
STREAM BAR during updates.
CLEANING STREAM BAR
The STREAM BAR components may be cleaned
with a soft damp cloth. Do not use any spray
near the system or allow liquids to spill into
any openings. Also, do not use any solvents,
chemicals, or cleaning solutions containing
alcohol, ammonia, or abrasives.
FAQ
Looking for more information? Read our detailed answers to the Frequency Asked Question on www.cabasse.com, page STREAM.
CUSTOMER SUPPORT SERVICE
The Cabasse retailer network is at your disposal
to ensure the after sale service of your product.
To get the list of Cabasse retailers, contact us or
consult our web site www.cabasse.com.
By following the above instructions, your
STREAM BAR system is now properly set up
and we hope you will enjoy your speaker
system for many years. We receive letters
every day from customers expressing the ever
growing satisfaction and musical emotion
they have been getting with our speakers over
the years. These letters are our rst motivation.
StreamBAR_manual_A4 V5.indd 34 6/10/2016 9:16:34 AM
Page 35
STREAM BAR
HDMI connectors
1 x TV ARC video out / audio in
1 x input
- 1 DLNA input: either WAN, wired with RJ45 cable
or WLAN - Wi-Fi
Digital inputs
- 1 Bluetooth APTX input
- 1S/PDIF optical
- 1 USB 2.0 input DC 5V 1A
Analog input 1 stereo 3.5 mm mini-Jack
Voltage 100-240V~60/50 Hz, 2A
Max power consumption
Eco power consumption
Connection to network
Useable temperature range
Storage temperature
Useable humidity range
2.43 W @ 100-240 VAC~50/60Hz
always active to get the product listed in the
StreamCONTROL application
150 W
+5 °C to +35 °C
-5 °C to +40 °C
40 % to 70 %
10/100Mb Ethernet
MAC & PHY
Network
Wireless LAN 802.11b/g/n
WPS 2.0 security
Digital media renderer
(compliant with DLNA 1.5)
WMA (WMA9, CBR,CBR, up to 320kbps)
WMA (WMA 9, CBR, up to 320 kbps)
Audio formats
(WiFi/RJ45)
PCM (16 bits-44.1kHz, 24 bits- 44/48/96 kHz,
.wav, .ai, .aif, .aifc les, HTTP streams)
AAC-LC (up to 320kbps), ALAC (.m4a)
FLAC (16 bits-44.1kHz, 24 bits- 44/48/96 kHz)
Manufactured under licence from Dolby Laboratories. Dolby, Dolby
Audio and the double D symbol are trademarks of Dolby Laboratories.
The terms HDMI and HDMI High-Denition Multimedia Interface, and the
HDMILogo are trademarks or registered trademarks of HDMI Licensing LLC in the
United States and other countries.
35
StreamBAR_manual_A4 V5.indd 35 6/10/2016 9:16:34 AM
Page 36
Drivers
sound bar: 2 x tweeters + 6 x low-midrange/midrange
subwoofer: 1 x 17 cm woofer
Amplication
sound bar: 2 x15 W + 2 x 30 W + 2 x 15 W
subwoofer: 100 W
Distortion rate
and noise
(THD+N for the 20-20,000 Hz bandwidth
and for 100 mW power output and more)
Dimensions (H x W x D)
sound bar: 66 x 1047 x 83 mm / 2.6 x 41.2 x 3.3 in
subwoofer: 330 x 200 x 400 mm / 13 x 7.9 x 15.7 in
Wi : < 0.2%
Bluetooth : < 0.2%
Analogue : < 0.2%
Optical < 0.2%
Weight sound bar: 3.5 kg / 7.7 lbs - subwoofer: 8.5 kg / 18.7 lbs
STREAMING FEATURES "BT" AND "LAN" INPUTS
Bluetooth
connection
Loss less audio
playback
Access to any audio
from WLAN network
(desktop...)
Multi-room Yes
Tracks playback from
smartphone/tablet
Yes Yes Yes
Playback smartphone/tablet a audio
applications
Yes
(youtube…)
Playback from USB
device
Web radio /DEEZER Yes
WIFI/ETHERNET
via internet
router
Yes Yes
Yes
Yes Yes
WIFI direct to
smartphone/
tablet
36
StreamBAR_manual_A4 V5.indd 36 6/10/2016 9:16:34 AM
Page 37
FCC STATEMENT
This equipment has been tested and found to comply with the limits for a
Class B digital device, pursuant to Part 15 of the FCC Rules. These limits are
designed to provide reasonable protection against harmful interference in
a residential installation. This equipment generates uses and can radiate
radio frequency energy and, if not installed and used in accordance with
the instructions, may cause harmful interference to radio communications.
However, there is no guarantee that interference will not occur in a particular
installation. If this equipment does cause harmful interference to radio or
television reception, which can be determined by turning the equipment o
and on, the user is encouraged to try to correct the interference by one or
more of the following measures:
-- Reorient or relocate the receiving antenna.
-- Increase the separation between the equipment and receiver.
-- Connect the equipment into an outlet on a circuit dierent from that to
which the receiver is connected.
-- Consult the dealer or an experienced radio/TV technician for help.
This device complies with part 15 of the FCC Rules. Operation is subject to the
following two conditions :(1) This device may not cause harmful interference,
and (2) this device must accept any interference received, including
interference that may cause undesired operation.
Changes or modications not expressly approved by the party responsible
for compliance could void the user's authority to operate the equipment.
This equipment complies with FCC radiation exposure limits set forth for an
uncontrolled environment. This equipment should be installed and operated
with minimum distance 20cm between the radiator & your body.
This device contains a WIFI module “FCC ID: PPQ-AWOXMII2”,
a wireless module “FCC ID: XCO-HSDWAM83, IC: 7756A-HSDWAM83”.
37
StreamBAR_manual_A4 V5.indd 37 6/10/2016 9:16:34 AM
Page 38
e n g l i s h
38
StreamBAR_manual_A4 V5.indd 38 6/10/2016 9:16:34 AM
Page 39
39
StreamBAR_manual_A4 V5.indd 39 6/10/2016 9:16:34 AM
Page 40

CABASSE - NOT0377 - 1603
Cabasse SAS - 210, rue René Descartes - BP 10 - 29280 Plouzané
Tel +33 (0)2 98 05 88 88 - Fax +33 (0)2 98 05 88 99
www.cabasse.com
StreamBAR_manual_A4 V5.indd 40 6/10/2016 9:16:34 AM
 Loading...