

BTC 9001BRF Quick Guide
無線鍵盤滑鼠組快速安裝指南
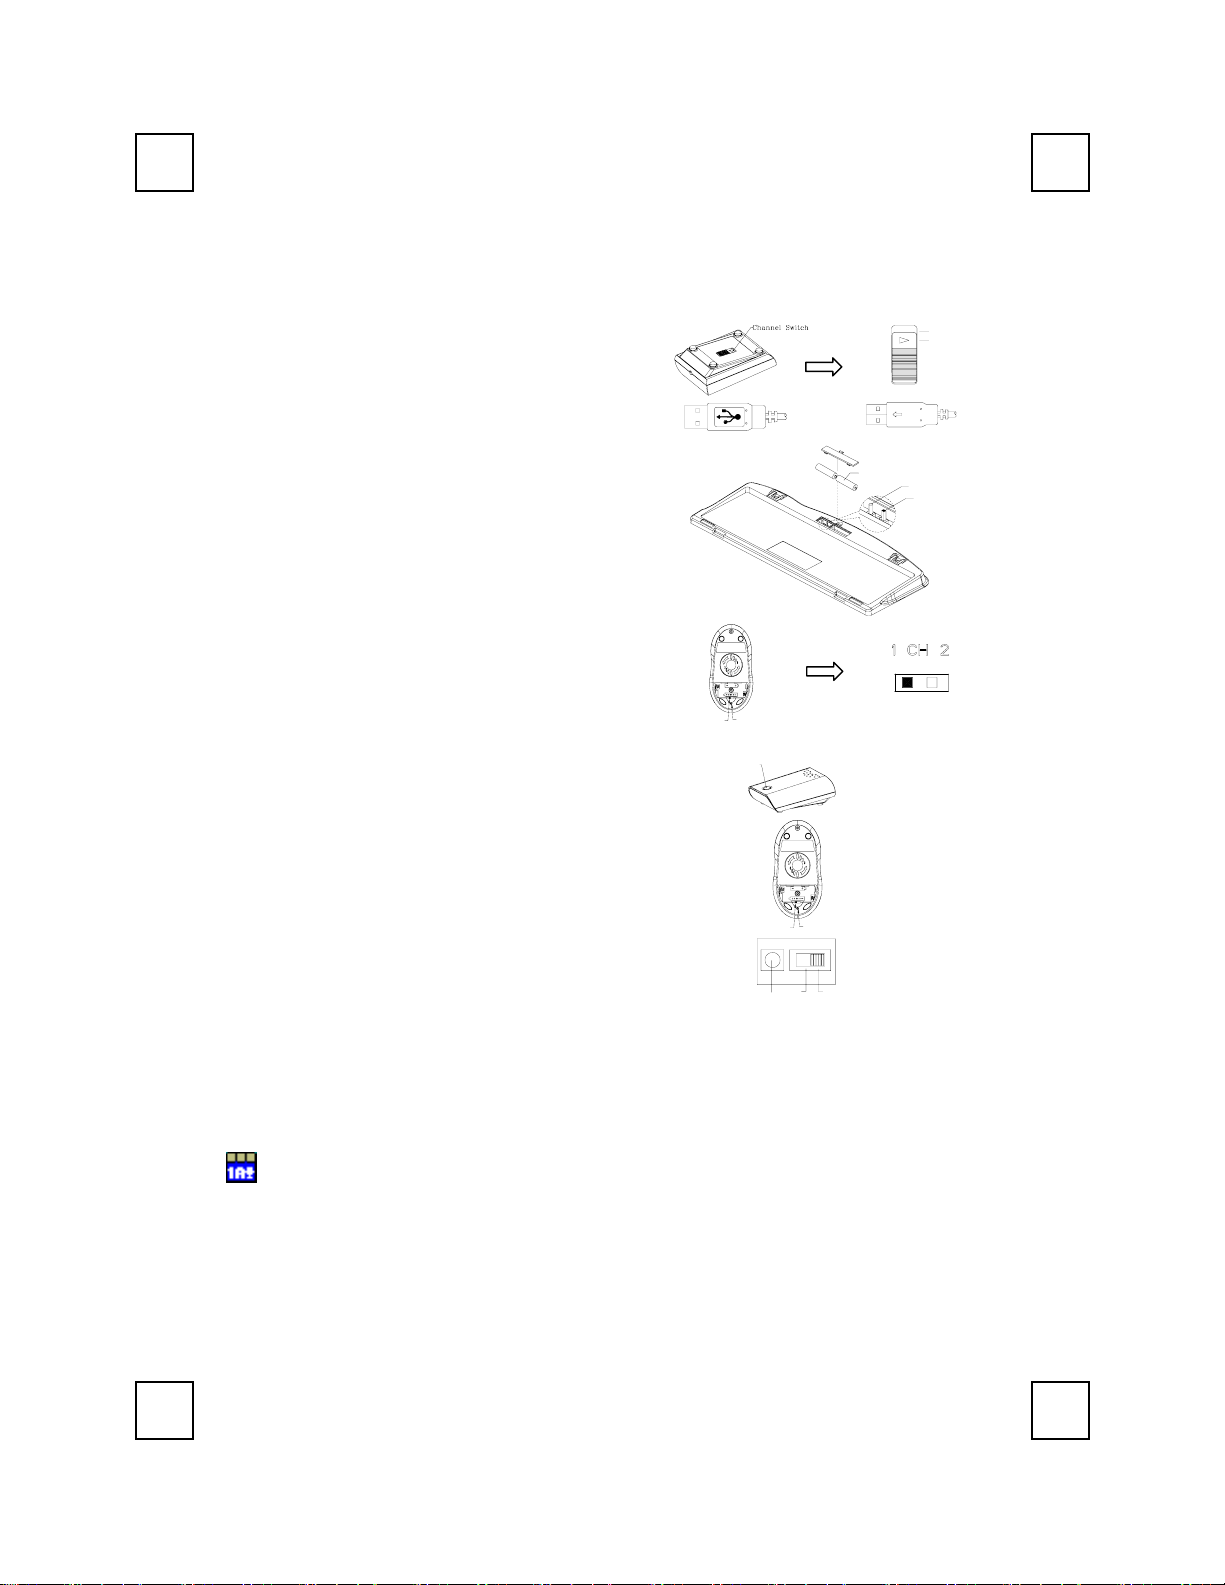
硬體安裝
頻道切換
1. 用接收器後面的頻道切換開關,設定您所選擇的頻
道 CH1 或 CH2。設定後請記住您的選擇。
2. 將接收器連接到電腦上,接收器的接頭連接到電腦
的連接埠。
3. 安裝鍵盤的電池,並請注意電池正負極方向。
4. 在鍵盤背面也有一個頻道切換開關,請設定與接收
器相同的頻道。
5. 安裝滑鼠的電池,請注意電池的正負極方向。
6. 設定滑鼠的頻道,請設定與接收器和鍵盤相同的頻
道。
接收器接頭正面
CH2
CH1
(-)
接收器接頭背面
Battery 1.5V 2pcs
ID Button
(+)
Slide Switch
CHANNEL
ID BUTTON
ID 設定
這個 ID 辨識功能有助於防止相同環境中 RF 鍵盤的干
擾。在您更換電池後,或當您的鍵盤組無法正常工作
時,請您務必重新設定鍵盤組的 ID。
SWITCH
滑鼠底部示意圖
ID Button
接收器的 ID 設定鈕
接收器、滑鼠和鍵盤上會有 CONNECT 字樣以標示 ID
設定鈕的位置。
滑鼠的 ID 設定鈕
在接收器下方的 LED 燈顯示信號接受狀態。
1. 電腦為開機狀態下,才可設定 ID。
CHANNEL
SWITCH
ID BUTTON
2. 按一次接收器側邊的 ID 設定鈕。
3. 按一次滑鼠底部的 ID 設定鈕。
4. 按一次鍵盤底部的 ID 設定鈕。
ID Button
CH2
鍵盤的 ID 設定鈕
CH1
注意事項:
1. 您可以至控制台的滑鼠選項中,改變連按兩次滑鼠的速度。
軟體安裝
鍵盤驅動程式安裝
為使您的鍵盤發揮最大的功能,請安裝 KeyMaestro 驅動程式,KeyMaestro 驅動程式位於包裝
內所附的磁片中。
1. 請先移除電腦中其他的鍵盤驅動程式。
2. 將驅動程式磁片插入您的電腦中並找出"SetupKey.exe"檔名上點二下以執行。
3. 依照螢幕上的指示,以完成安裝的步驟。內定的安裝路徑為
在安裝過程中改變路徑。
c:\Program Files\KMaestro
滑鼠底部的頻道
切換開關
,您可以
9001BRF QIG 中
3100505140 v1.2
Wireless Keyboard & Mouse Kit Quick Installation Guide
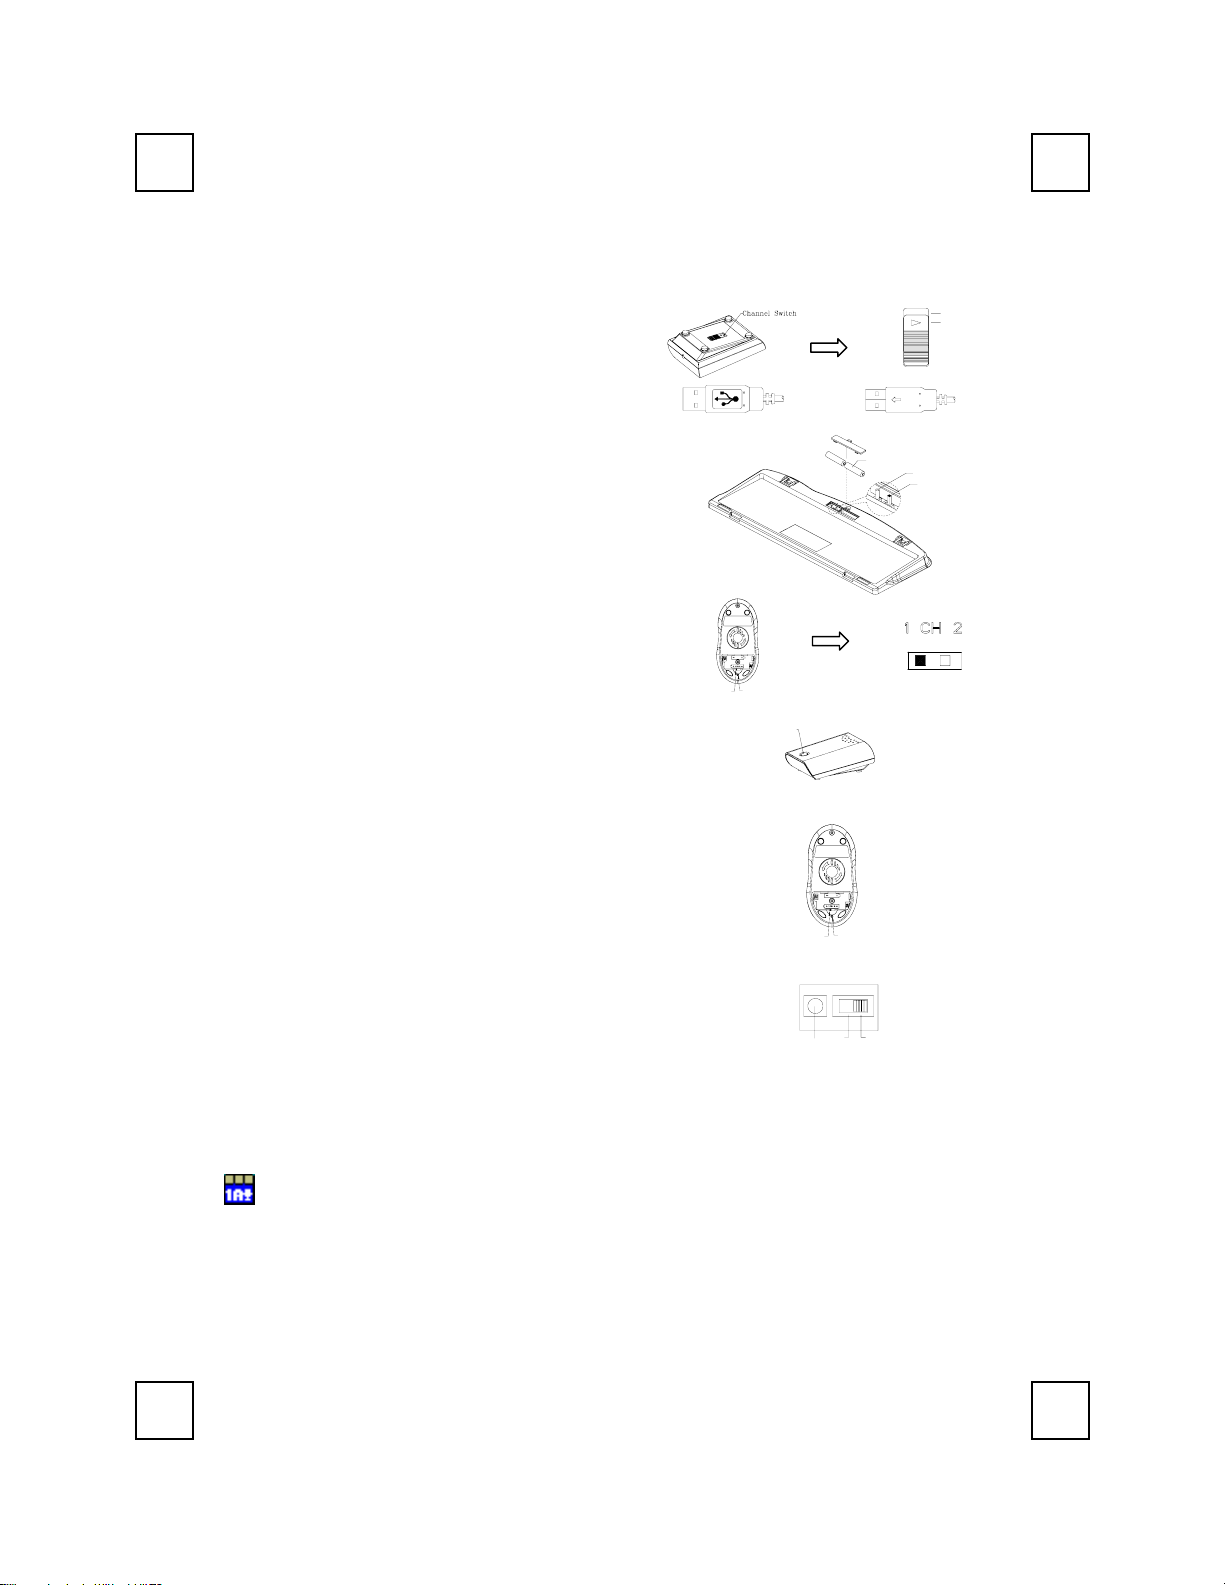
Hardware Installation
Slide Switch Setting
1. Connect the receiver to your PC by plugging in
the receiver connector into your PC.
2. Take the receiver and select channel CH1 or
CH2 by using the slide switch on the back of the
receiver. (Remember your selection.)
3. Take the keyboard and make sure the batteries
on the back are installed correctly. (Follow the
polarity signs in the battery compartment.)
Front View of Receiver Plug
Back View of Receiver Plug
(-)
Battery 1.5V 2pcs
(+)
4. Use the slide switch on the back of the
keyboard to select the same channel as the one
selected in step 3 on the receiver.
5. Take the mouse and make sure the batteries on
the back are installed correctly. (Follow the
polarity signs in the battery compartment.)
6. Use the slide switch on the back of the mouse to
select the same channel as the one selected in
step 3 and 5.
ID Setting
This ID-recognition function helps to protect against
CHANNEL
ID BUTTON
SWITCH
Bottom View of Mouse
ID Button
Slide Switch Setting
interference from other RF keyboards in the same
environment. Remember to set the ID when you replace
the batteries or your key board kits do not work properly.
The word CONNECT labels the ID button on each unit.
The LED under ID button of receiver shows connecting
condition.
1. Your PC must be on to change the ID setting.
2. Press ID button on the side of the receiver once.
3. Press ID button on the bottom of the mouse once.
4. Press ID button on the bottom of the keyboard battery
CHANNEL
ID BUTTON
SWITCH
compartment once.
CH1
CH2
ID Button
Important:
1. You can adjust the double-click speed of mouse by opening up the Mouse Properties in the
Windows Control Panel and changing the speed.
Software Installation
Keyboard Driver Installation
In order to take advantage of the special button functionality of the keyboard, you have to
install the keyboard driver disk included in the box.
1. Remove any existing keyboard software from the computer.
2. Insert the driver disk in your computers, and run "SetupKey.exe".
3. Follow the on screen instructions to finish the installation procedure. The driver by default will
be installed at C:\Program Files\KMaestro.
CH2
CH1
ID Button
Slide Switch
of Mouse
ID Button of Receiver
ID Button of Mouse
ID Button of Keyboard
9001BRF QIG 英
3100505140 v1.2
Kit Souris et Clavier Sans Fil Guide d’Installation Rapide
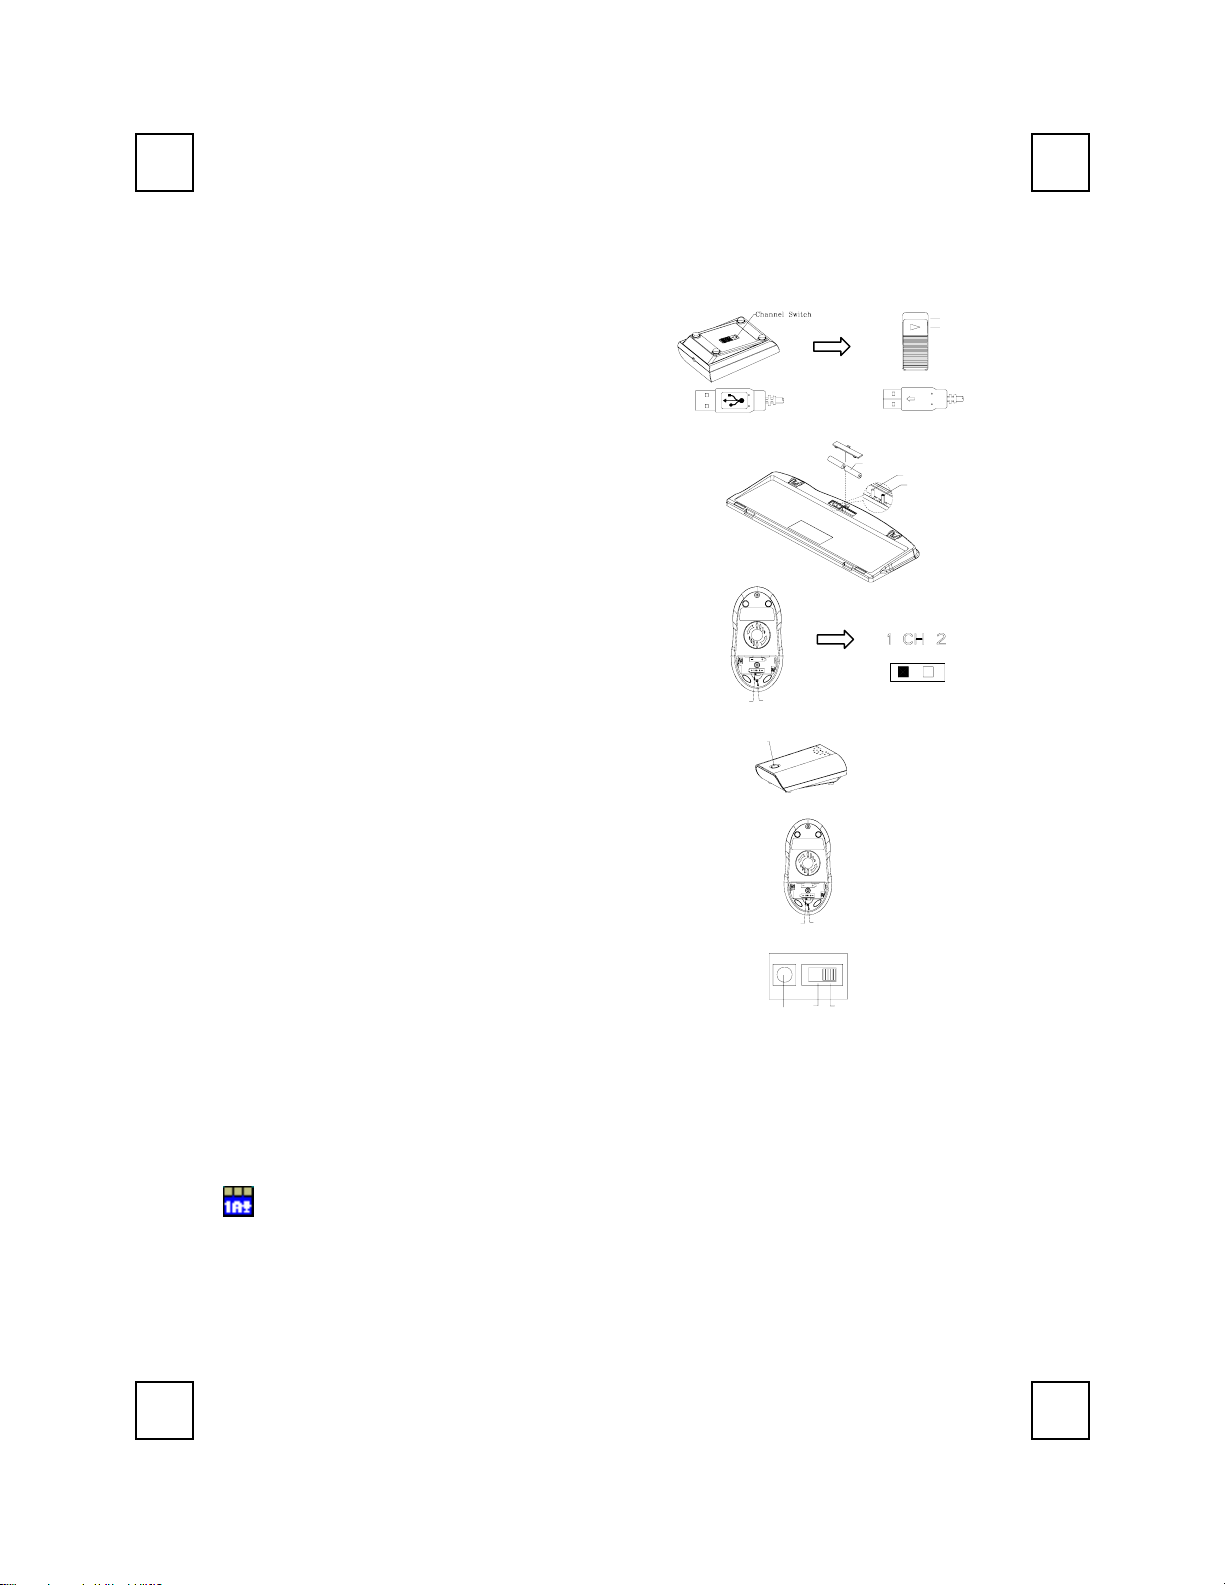
Installation Matérielle
Réglage du curseur de sélection
Vue Arrière
ID Button
Slide Switch
du réglage
CH2
CH1
1. Connectez le récepteur à votre PC en branchant le
connecteur du récepteur sur votre PC.
2. Prenez le récepteur et sélectionnez le canal CH1
ou CH2 en utilisant l’interrupteur à l’arrière de votre
récepteur. (Rappelez-vous votre sélection.)
3. Prenez le clavier et assurez-vous que les piles à
l’arrière sont installées correctement. (Suivez les
signes de polarité dans le compartiment des piles.)
Fiche du Récepteur –
Vue avant
Fiche du Récepteur –
(-)
Battery 1.5V 2pcs
(+)
4. Utilisez l’interrupteur à l’arrière du clavier pour
sélectionner le même canal que celui réglé sur le
récepteur à l’étape 3
5. Prenez la souris, et assurez-vous que les piles à
l’arrière sont installées correctement. (Suivez les
signes de polarité dans le compartiment des piles.)
6. Utilisez l’interrupteur à l’arrière de la souris pour
sélectionner le même canal que celui sélectionné à
l’étape 3 et 5.
CHANNEL
ID BUTTON
Réglage ID
Vue de dessous de la souris
La fonction de reconnaissance-ID vous aide à vous protéger
des interférences provenant des autres claviers RF dans le
même environnement. Pensez à régler l’ID lorsque vous
remplacez les piles sinon votre clavier ne fonctionnera pas
SWITCH
ID Button
Curseur de sélection
Bouton d’ID du Récepteur
correctement.
Le mot CONNECT désigne le bouton ID de chaque unité.
Le témoin LED sous le bouton ID du récepteur indique l'état
Bouton d’ID de la Souris
de la connexion.
CHANNEL
1. Votre PC doit être mis en marche pour modifier le
Réglage d’ID.
2. Pressez une fois le bouton ID situé sur le côté latéral
du récepteur.
3. Pressez une fois le bouton ID situé sous la souris.
ID Button
SWITCH
ID BUTTON
Bouton d’ID du Clavier
CH1
CH2
4. Pressez une fois le bouton ID situé sous le
compartiment des piles du clavier.
Important
1. Vous pouvez régler la vitesse du double-clic de la souris en ouvrant les Propriétés de la Souris
dans le Panneau de Configuration Windows et en modifiant la vitesse.
Installation Logicielle
Installation du Pilote Clavier
Afin de profiter de la fonctionnalité spéciale du bouton du clavier, vous devrez installer le pilote du
clavier se trouvant sur le disk de pilotes livré dans la boîte.
1. Retirez tous les logiciels pour clavier existants sur l’ordinateur.
2. Insérez le disque des pilotes dans votre ordinateur, et exécutez le fichier "SetupKey.exe".
3. Suivez les instructions à l’écran pour terminer la procédure d’installation. Le chemin d’accès par
défaut du pilote sera C:\Program Files\KMaestro.
9001BRF QIG 法
3100505140 v1.2
 Loading...