

Page 1

BCP 8000
series
Portable
CD-ReWritable Drive
User’s Manual
Page 2

Page 3

DANGER INVISIBLE LASER RADIATION WHEN OPEN AVOID DIRECT EXPOSURE TO BEAM
VORSICHT INSICHTBARE LASERSTRAHLUNG WENN ABDECKUNG GEÖFFNET NICHT DEM STRAHL
ATTENTION RADIATION DU FAISCEAU LASER INVISIBLE EN CAS D’OUVERTURE. EVITER TOUTE EXPOSITION
AUSSETSEN
AUX RAYONS.
CLASS 1 LASER PRODUCT
APPAREIL A LASER DE CLASSE 1
LASER KLASSE 1
LUOKAN 1 LASERLAITE
PRODUIT LASER
CATEGORIE 1
Copyright Statement
It is a criminal offence, under applicable copyright laws, to make unauthorised copies of
copyright-protected material, including computer programs, films, broadcasts and sound
recordings. This equipment should not be used for such purposes.
All brand and product names mentioned in this user manual are trademarks or registered
trademarks of their respective owners. All rights reserved.
Diclaimer
The manufacturer reserves the right to make changes in specifications and other
information contained in this product without prior written notice. The specifications and
information provided herein are subject to change without notice. There shall be no liability
for any incident, indirect or consequential damages arising out of or related to the
information contained in this product.
Page 4

FCC Compliance Statement
This device complies with Part 15 of the FCC Rules. Operation is subject to the following
two conditions:
1. this device may not cause harmful interference, and
2. this device must accept any interference received, including interference that may
cause undesired operation.
FCC Warning Statement
This equipment has been tested and found to comply with the limits for a Class B digital
device, pursuant to Part 15 of the FCC Rules. These limits are designed to provide
reasonable protection against harmful interference in a residential installation. This
equipment generates, uses and can emit radio frequency energy and, if not installed or used
in accordance with the instructions, may cause interference to radio communications.
However, television reception interference can be determined by turning the equipment off
and on. The user is encouraged to correct the interference by one or more of the following
measures:
• Reorient or relocate the receiving antenna
• Increase the separation between the equipment and the receiver
• Connect the equipment into an outlet different from that to which the receiver is
connected
• Consult the dealer or an experienced radio/TV technician for help.
FOR EUROPE
“The drive is in conformity with the EMC directive and low-voltage directive.”
NOTE
: If this drive is detached from the host due to Electrostatic Discharge, normal
operation may be resumed by re-connecting the data cable to the host.
Page 5

Warranty and Limited Liability
This product is sold with a limited warranty and specific remedies are available to the
original purchaser in the event that the product fails to conform to the limited warranty.
Manufacturer’s liability may be further limited in accordance to the sales contract.
In general, the manufacturer shall not be responsible for product damages caused by natural
disasters, fire, static discharge, misuse, abuse, negligence, improper handling or installation,
unauthorized repair, alternation or accident.
The manufacturer accepts no liability for the loss of any data or any problems caused as a
result of use of this product.
Further, the warranty does not apply to:
• Damaged laser gear and CD Cover not due to normal wear and tear.
• Damages or problems resulting from misuse, abuse, accident, alternation or incorrect
electrical current or voltage.
• Any product with a tampered or damaged warranty seal or serial number label.
• Any product without a warranty or serial number label.
Please be aware that cracked, deeply scratched or other poor quality discs used in this drive
may cause damage to the drive and data in the disc. Such discs may break at high speed
rotation if full care is not exercised in relation to this matter, you may void the warranty to
this product.
Page 6

Warning
To prevent fire or shock hazard, do not expose the unit to rain or moisture.
To avoid electrical shock and damage to the eyes due to the laser beam, servicing
must be carried out by a trained technician.
Safety Precaution
1. The unit should only be operated with the supplied power adapter.
2. Power supply cord should be routed carefully such that it will not
obstruct the way of any moving things.
3. Do not drop the unit or apply shock to it. Damages arise from here will
not be covered by warranty.
4. Do not touch or poke at the lens as it may damage the lens and the
drive will not operate properly.
5. Do not put anything in the CD cover latch as it will turn on the laser
with the lid is opened.
6. Avoid hindering the ventilation of the unit.
7. If an abnormal smell or smoke is detected, turn the power OFF
immediately and pull out the power cord. Contact your nearest service
center.
8. Avoid placing the unit under direct sunlight or near a source of heat.
Particularly, never leave it in an automobile or on the dashboard.
9. The unit may not function properly if used at extreme low or freezing
temperatures. The ideal ambient temperature is above +5°C(41°F).
10. The unit should not be used near water, e.g. near a bathtub, washbowl,
kitchen sink, laundry tub, in a wet basement, or near a swimming pool,
etc.
11. Avoid places where it is dusty or where the humidity is high.
12. Avoid placing the unit on an unstable place such as a shelf or in a place
subject to vibrations.
13. Keep the unit away from sources of magnetic fields such as TV sets,
speaker systems, radio, motorised toys or magnetised objects.
14. Avoid prolong hours of listening from earphones as this may impair
your ears.
15. The power cord of the unit should be unplugged from the outlet when
left unused for a long period of time.
16. All damages or failure in operation should be attended by a trained
technician.
Page 7

Table of Contents
INTRODUCTION 1
SYSTEM REQUIREMENTS 1
PACKAGE CONTENTS 2
CD-RW DRIVE CONTROLS 3
INSTALLATION 7
HOST INTERFACE CONNECTIONS 7
For USB Interface 7
For FireWire (IEEE 1394) Interface 8
HARDWARE INSTALLATION 9
Power Cable Connection 9
Data Cable Connection 11
USB connection 11
FireWire (IEEE 1394) Connection 12
To Insert a CD into the CD-RW Drive 14
To Remove a CD from the CD-RW Drive 15
To Remove a CD during a Power Failure 15
To Use the CD-RW Drive as a Audio CD Player 16
D
RIVER INSTALLATION 18
S
OFTWARE INSTALLATION 19
TECHNICAL DATA 20
TROUBLESHOOTING 22
Page 8

Page 9

Portable CD-RW Drive
INTRODUCTION
Congratulations on the purchase of your portable USB2.0 (or USB2.0 /
FireWire IEEE1394) CD-ReWritable Drive. This drive supports
maximum 40x speed write ability on CD-R discs, 12x speed rewrite on
CD-RW discs and 48x speed reading performance. The drive writes all
CD formats and recognises the media placed in the drive, whether a CD,
a CD-R or a CD-RW. With the bundled CD-RW mastering software, this
CD-RW Drive is an ideal model for creating customised audio and data
CDs, and for archiving or distributing big files to achieve data
interchange and backup. These are the important features to note:
♦ 8X, 16X, 20X, 24X, 32X and 40X writing speed on CD-R media
♦ 4X, 8X, 10X and 12X writing speed on CD-RW media
♦ Adopts Buffer Underrun Prevention technology
♦ Supports MultiRead function
♦ Supports writing modes of TAO, DAO, SAO and packet writing
♦ Large internal buffer: 2MB
♦ Low power consumption
♦ USB2.0 interface / FireWire (IEEE1394) interface
System Requirements
For IBM compatible PCs, the system requirements recommended
are as follows:
♦ Pentium II 266MHz above with at least 64MB of memory
♦ Operating system: Microsoft Windows 98/98SE/Me/2000/XP
♦ Fast and sufficient hard disk space (minimum 200MB for
installation, 1GB or more is recommended.)
1
Page 10

Portable CD-RW Drive
♦ USB2.0 Hi-Speed PCI card installed on your computer
♦ FireWire IEEE 1394 PCI card installed on your computer or built-
in IEEE 1394 controller on your computer. (For IEEE 1394
models only).
Package Contents
♦ External CD-ReWritable drive
♦ AC/DC Power Adapter
♦ USB cable
♦ FireWire (IEEE 1394) cable (only for IEEE 1394 models)
♦ Application software disc (optional)
♦ 12X CD-RW blank disc (optional)
2
Page 11
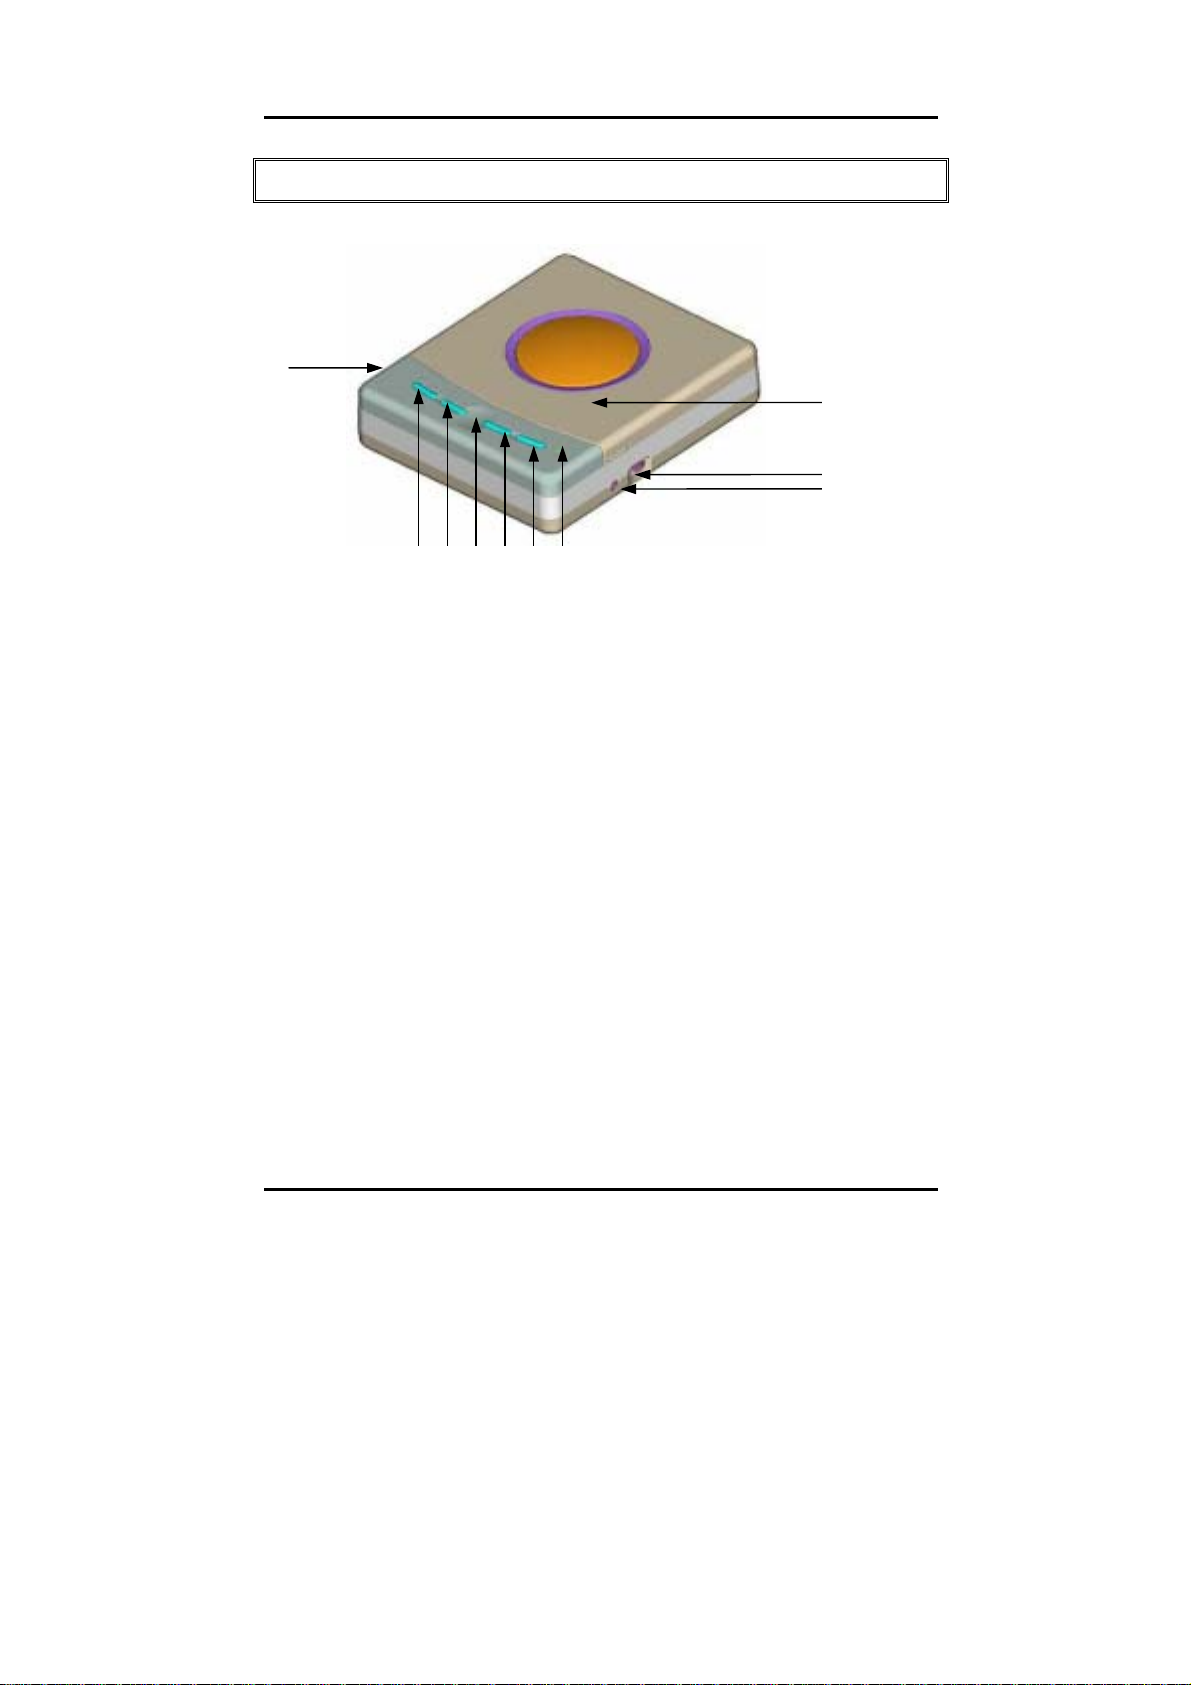
CD-RW DRIVE CONTROLS
N
Portable CD-RW Drive
A
B
C
A. CD Cover
B. Volume Control
C. Headphone Jack
D. Previous Track Button
D E F G H I
The CD Cover is used in conjunction with the Stop/Open Button
(H) to insert or remove discs. When the CD disc is loaded into the
CD-RW drive, push the cover firmly down to close the cover.
There will be a click sound to indicate that the cover is properly
closed and locked.
This knob adjusts the audio output level. Turn the wheel counterclockwise to increase the audio volume of your headphone or
speakers.
You can playback and listen to audio CD (CD-DA disc) directly from the CD-RW drive by plugging in the headphone here.
This allows you to recall the previous track of an audio CD to be
playback when in stand-alone mode.
3
Page 12
Portable CD-RW Drive
E. Next Track Button
Press this button to skip to next track while playing an audio CD
when in stand-alone mode.
F. Power / Locking LED (dual color)
When power is turned on, this LED will be lighted blue to indicate
drive is receiving power. Once the drive is locked, the red LED
light is on.
G. Play Button
Press this button to play audio CD when in stand-alone mode.
H. Stop/Open (Locking) Button
This button locks / unlocks the CDRW drive to insert / remove a
disc.
Press this button once to stop and unlock the drive when the drive
is reading a non-audio CD.
For an audio CD, press this button once to stop the drive from
playing the current track. Press the button again to unlock the
drive. You will hear a click sound and the locking LED turn to blue
light (F) when the CD Cover is unlocked.
You must wait for the yellow LED light (I) to go off before liftingup the side taps to open the CD Cover.
This button is used to lock the drive whenever an application
software unlocks (ejects) it and the CD Cover has not been
opened.
Note: the CD Cover does not eject or open
automatically like other Tray type drives.
Open the CD Cover only when the locking LED is blue
and yellow LED is off.
Do not open the CD Cover when the locking LED is still
red or when the yellow LED is still flashing.
4
Page 13
I. Activity Status LED (dual color)
This LED indicates Read / Write status according to the operation
of the drive.
Flashes “yellow” light while verifying or reading a disc.
Flashes “red” while writing a CD-R/CD-RW disc.
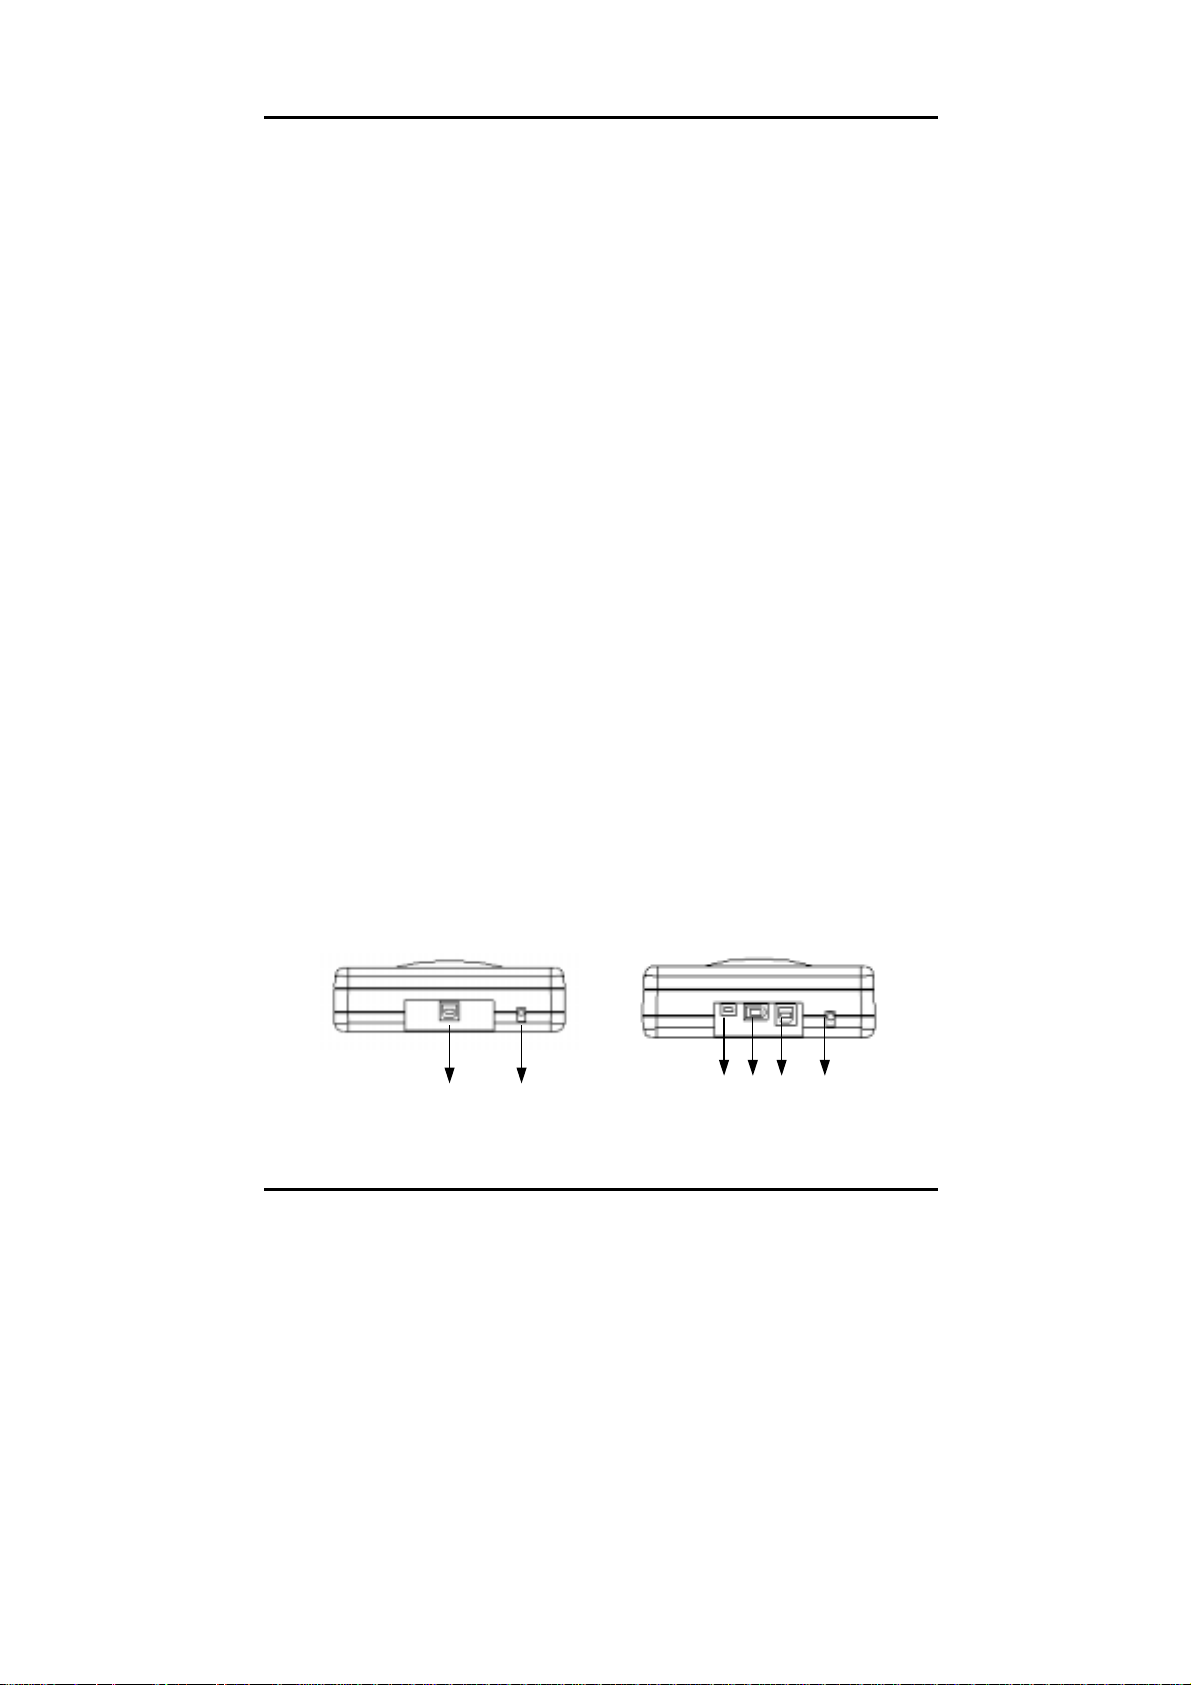
J. USB Port
It is used to connect one end of the USB cable to the CD-RW
drive.
K. DC Jack
It is used to connect the power cable located at the back of the
CD-RW Drive.
L. Mini IEEE 1394 Port (4-pin)
It is used to connect one end of the MiniIEEE1394 (4-pin) cable to
the CD-RW Drive.
Portable CD-RW Drive
M. IEEE 1394 Port (6-pin)
It is used to connect one end of the IEEE1394 (6-pin) cable to the
CD-RW Drive.
For Models with USB only For Models with IEEE 1394 & USB
Rear View of CDRW Rear View of CDRW with
with USB Port IEEE 1394 & USB Port
J K L M J K
5
Page 14

Portable CD-RW Drive
N. Emergency Eject Hole
When the Stop/Open button can’t work properly and the CD
Cover can’t be opened, you can insert a paper clip or a small rod
into this hole for manual ejection. Please make sure to power off
the drive and the system before you do that.
6
Page 15
Portable CD-RW Drive
INSTALLATION
Host Interface Connections
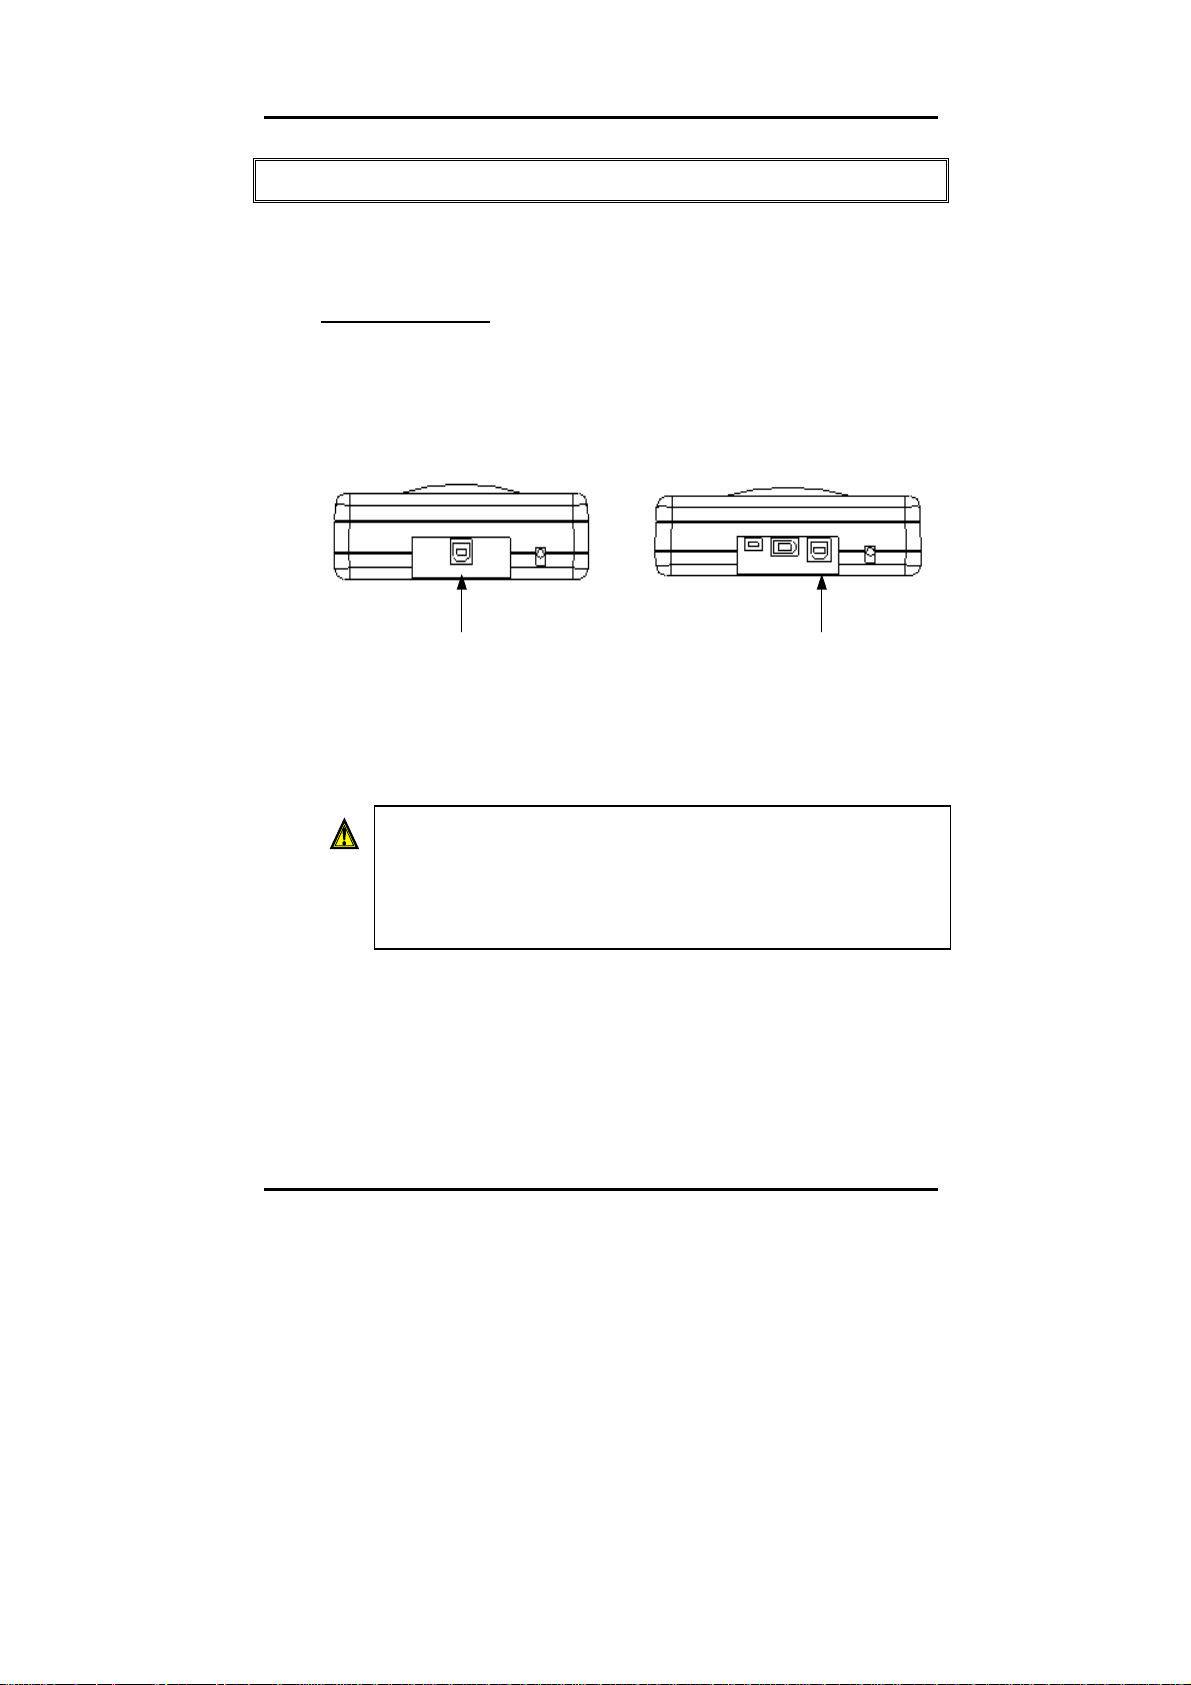
For USB Interface
If your computer do not have built-in controller support for USB2.0, you will need to install a USB2.0 Host adapter card on your computer to operate the CD-RW drive at USB2.0 speeds.
USB Port USB Port
Rear View of CD-RW Drive Rear View of CD-RW Drive
(for USB only - U models) (for USB + FireWire (IEEE1394) - C models)
Note: If your computer does not have USB2.0
interface port, you can use standard USB1.1
connection, but the drive will be limited to only
USB1.1 speed.
7
Page 16
Portable CD-RW Drive
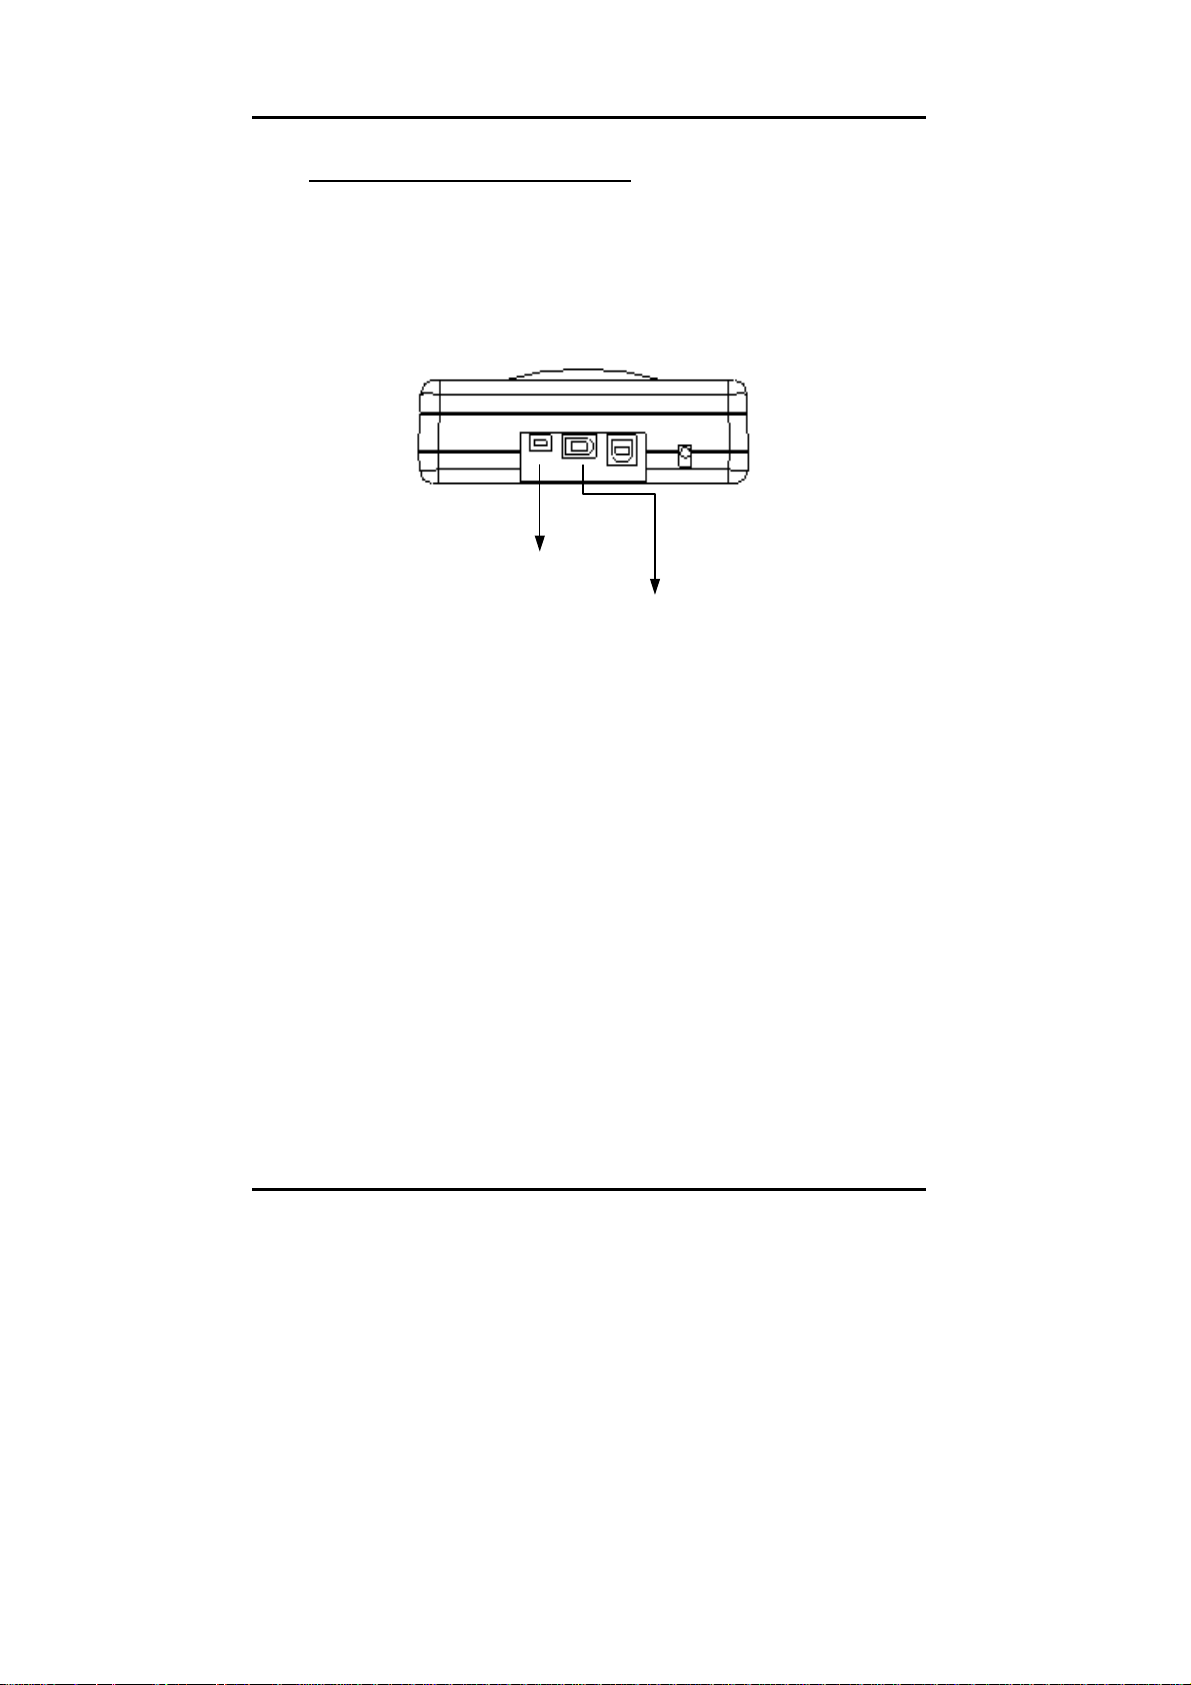
For FireWire (IEEE 1394) Interface
If your computer do not have built-in FireWire IEEE 1394 controller support, you will need to install a FireWire IEEE 1394 Host adapter card on your computer to operate the CD-RW drive at IEEE 1394 speeds.
IEEE1394 Port (6 pin)
MiniIEEE1394 Port (4-pin)
8
Page 17
F
Hardware Installation
Note: This drive needs to receive power in order for
the CD Cover to be opened. Do not attempt to force
open the CD Cover when there is no power to the
drive. The Cover will be locked and cannot be opened
at this stage.
Portable CD-RW Drive
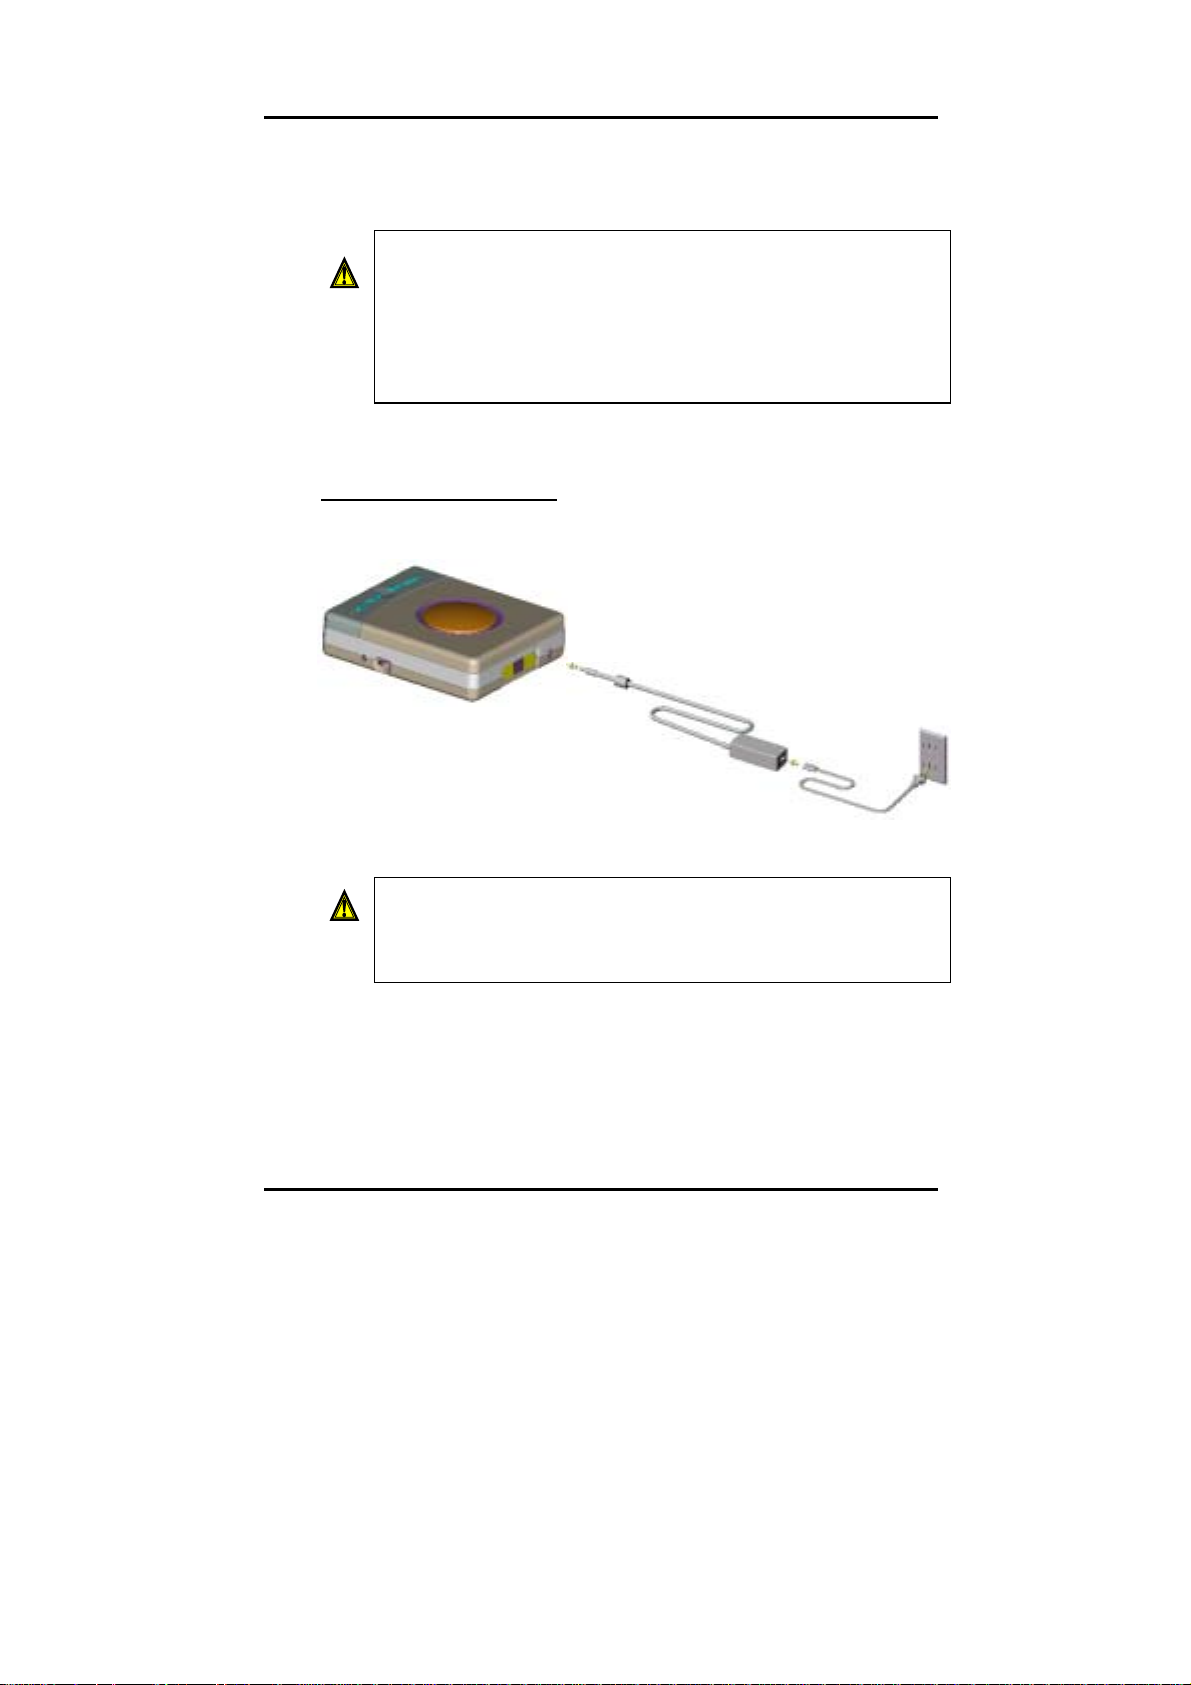
Power Cable Connection
CAUTION: Please ensure that the Mains switch is OF
before connecting the Power cable to the CD-RW
drive.
♦ Connect the power cable to the DC Jack on the CD-RW Drive,
then the AC/DC adapter to an electrical outlet.
9
Page 18

Portable CD-RW Drive
♦ Turn on the power.
♦ When the drive is receiving power, the power / locking LED will be
lighted blue (if there is no CD loaded); otherwise it will be lighted
red (with CD loaded) after the drive completes the power up
initialisation.
10
Page 19
Data Cable Connection
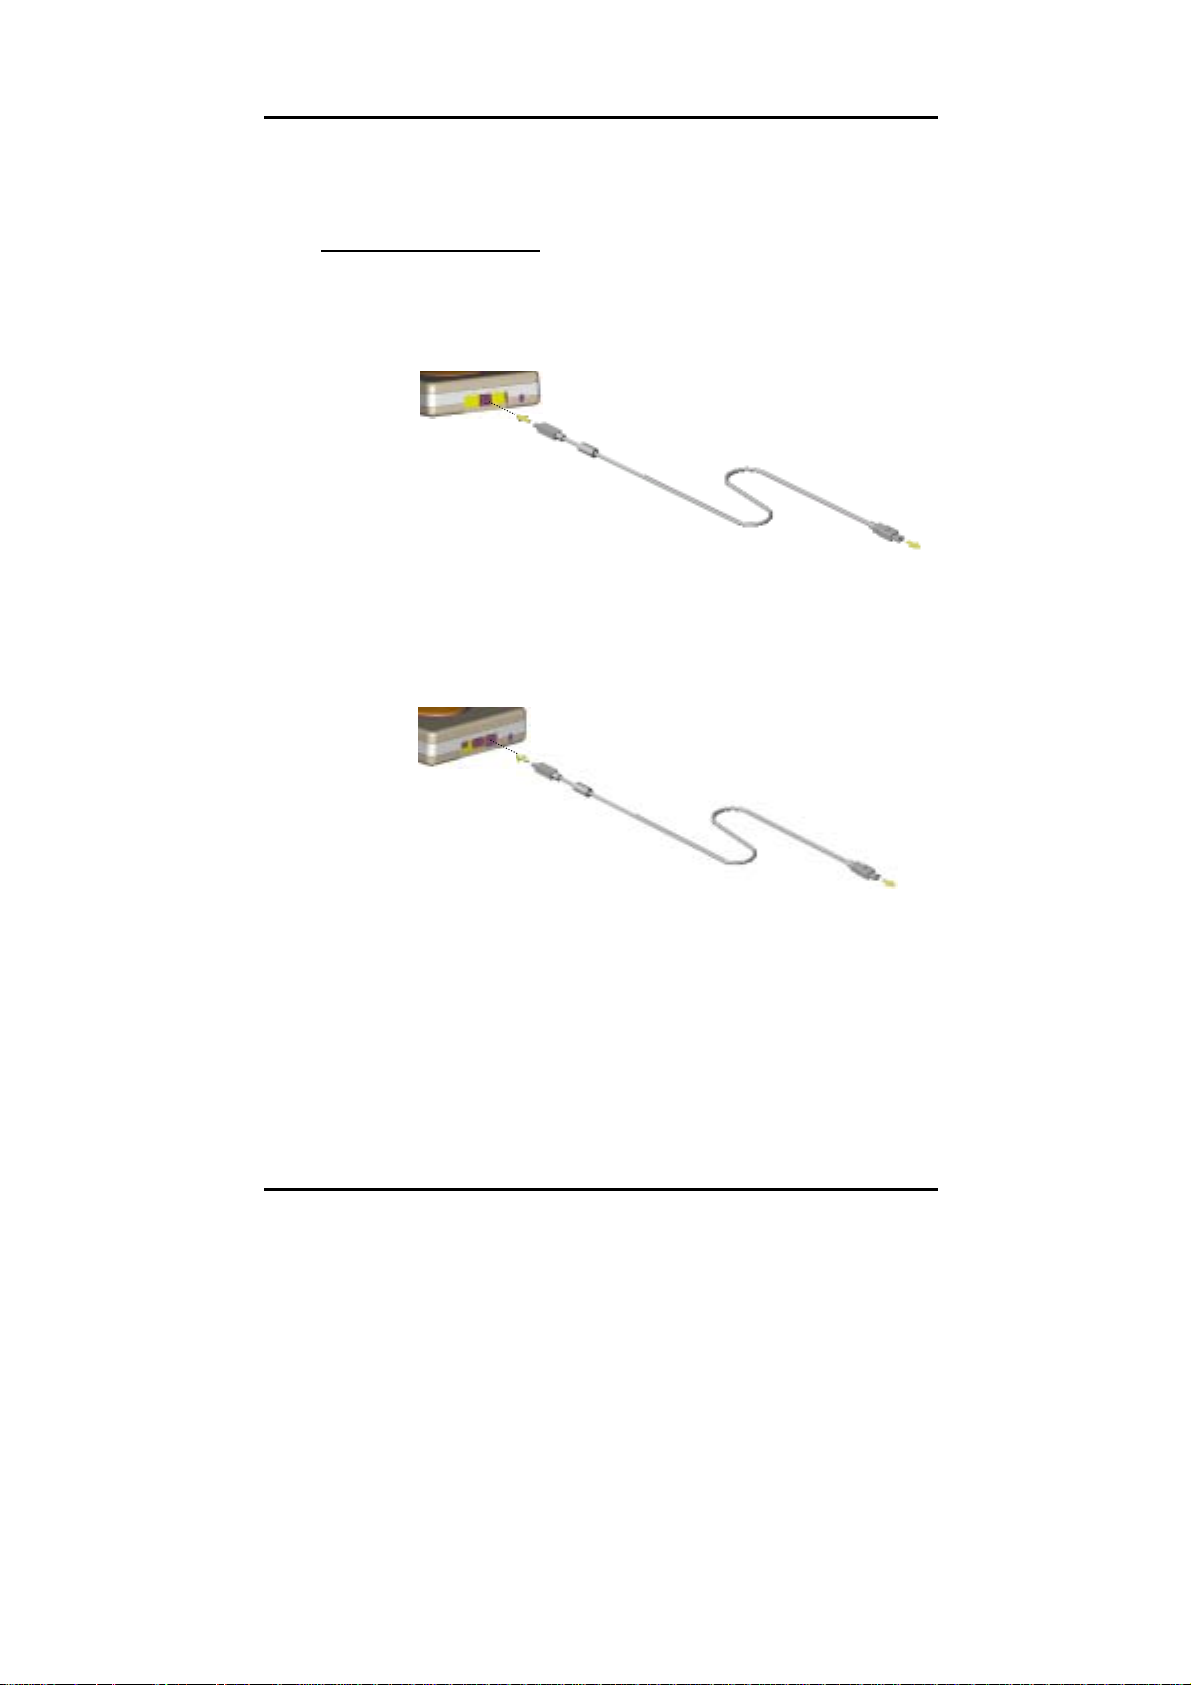
1. USB connection
a. For –U model
b. For –C model
Portable CD-RW Drive
♦ Turn on power to your computer.
♦ Connect the USB cable to the USB2.0 port on the CD-RW
drive.
♦ Connect the other end of the cable to the USB2.0 port on your
USB2.0 adapter card installed on your computer.
11
Page 20
Portable CD-RW Drive
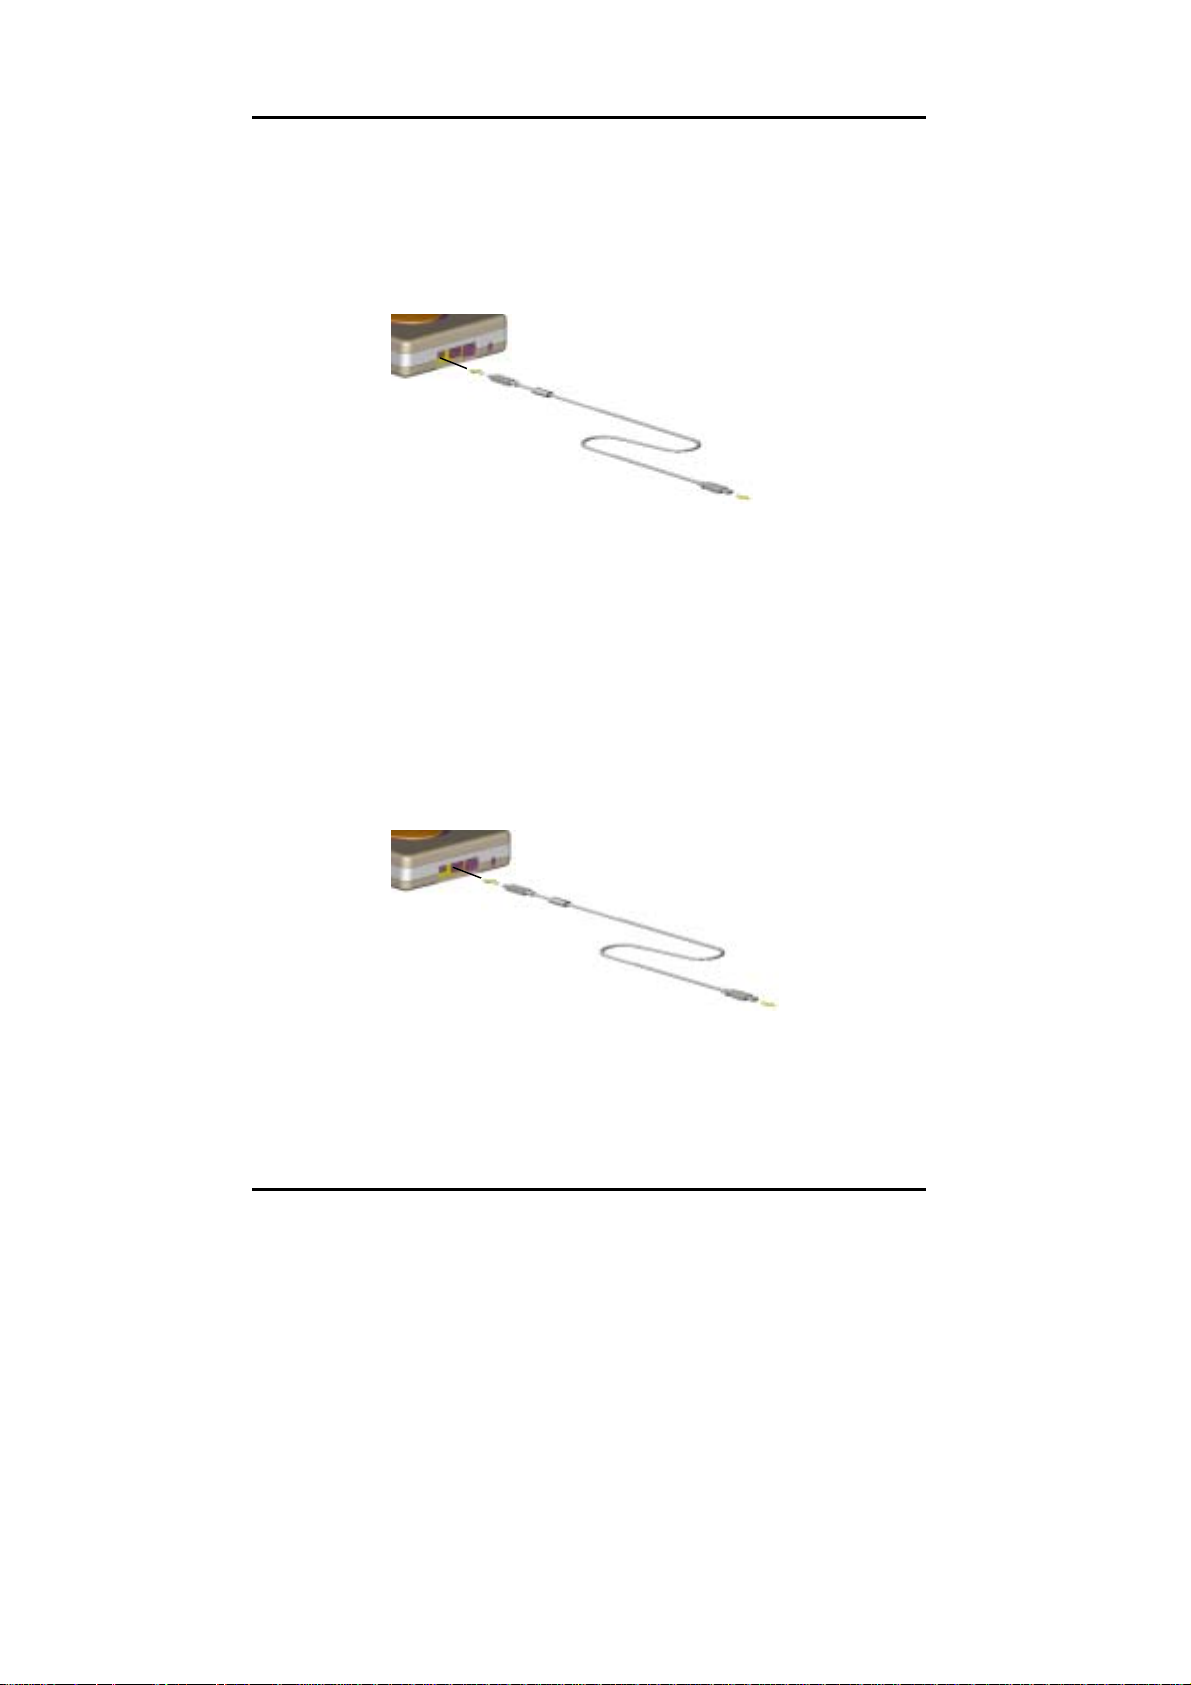
2. FireWire (IEEE 1394) connection
a. for mini FireWire (IEEE 1394)
♦ Turn on power to your computer.
♦ Connect the 4-pin mini FireWire cable to the mini FireWire
port on the CD-RW drive.
♦ Connect the other end of the cable (6-pin) to the FireWire port
to your computer.
b. for FireWire (IEEE 1394)
♦ Turn on power to your computer.
♦ Connect the 6-pin FireWire cable to the FireWire port on the
CD-RW drive.
12
Page 21

Portable CD-RW Drive
♦ Connect the other end of the cable (4-pin) to the mini FireWire
port to your computer.
Note:
1) Connect only one type of interface, either USB or
FireWire. Do not use both connections at the same
time.
2) Connect only one FireWire port to the CD-RW drive
only. Do not connect both FireWire cables at the
same time.
13
Page 22
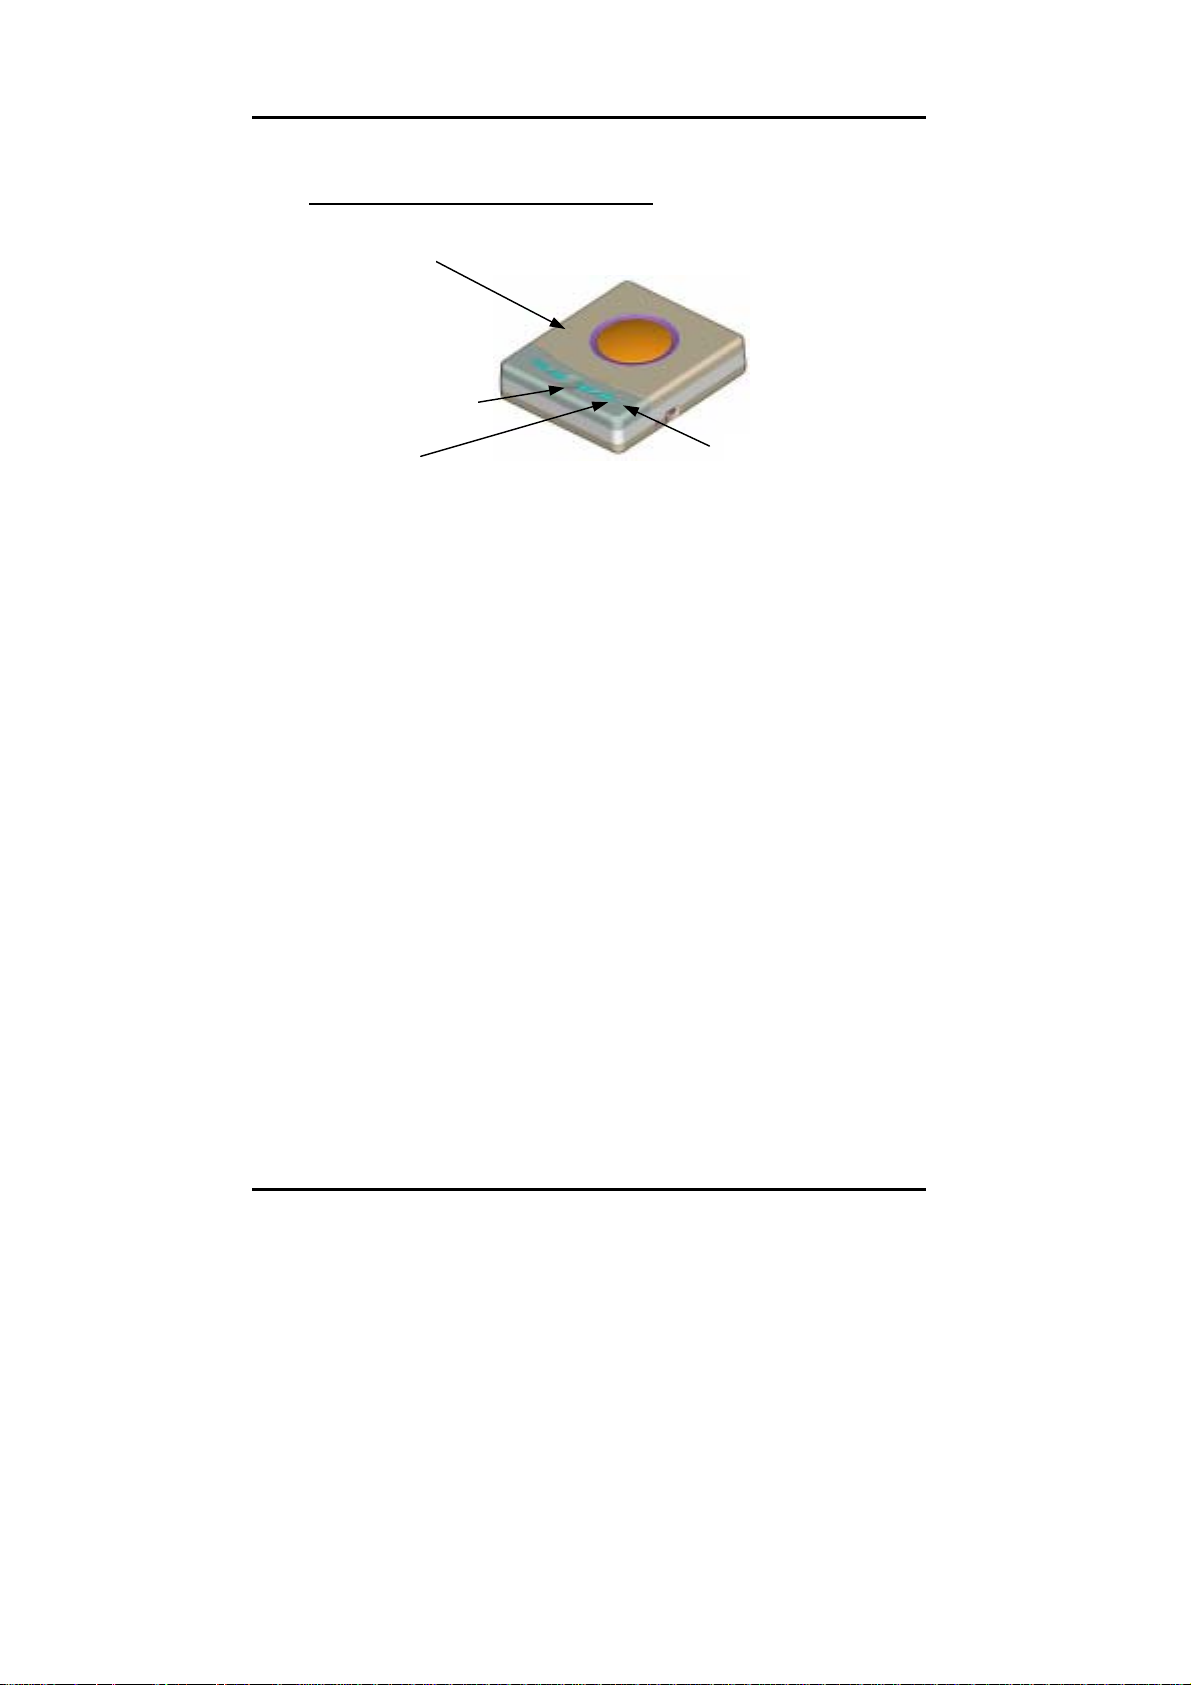
Portable CD-RW Drive
A
To Insert a CD into the CD-RW Drive
CD Cover
Power/Locking
LED
Stop / Open
Button
ctivity LED
♦ Press the Stop/Open button once. The drive will first lock the CD
Cover and the locking LED turns to red.
♦ The drive will then unlock automatically and locking LED changes
to blue.
♦ You will hear a click sound when the CD Cover has been
unlocked. Wait for the activity indicator status LED light to turn off.
♦ Open the CD Cover to remove the CD by gently lifting-up the side
taps.
♦ Place CD into the CDRW Drive and ensure that the CD label on
the CD is facing upwards.
♦ Now, press the cover firmly down to close the CD Cover, which
will be locked automatically. You will hear a click sound and the
locking LED turns to red on when the drive is properly locked.
♦ Wait for the yellow activity LED light to flash and turn off.
♦ The drive is now ready.
14
Page 23
Portable CD-RW Drive
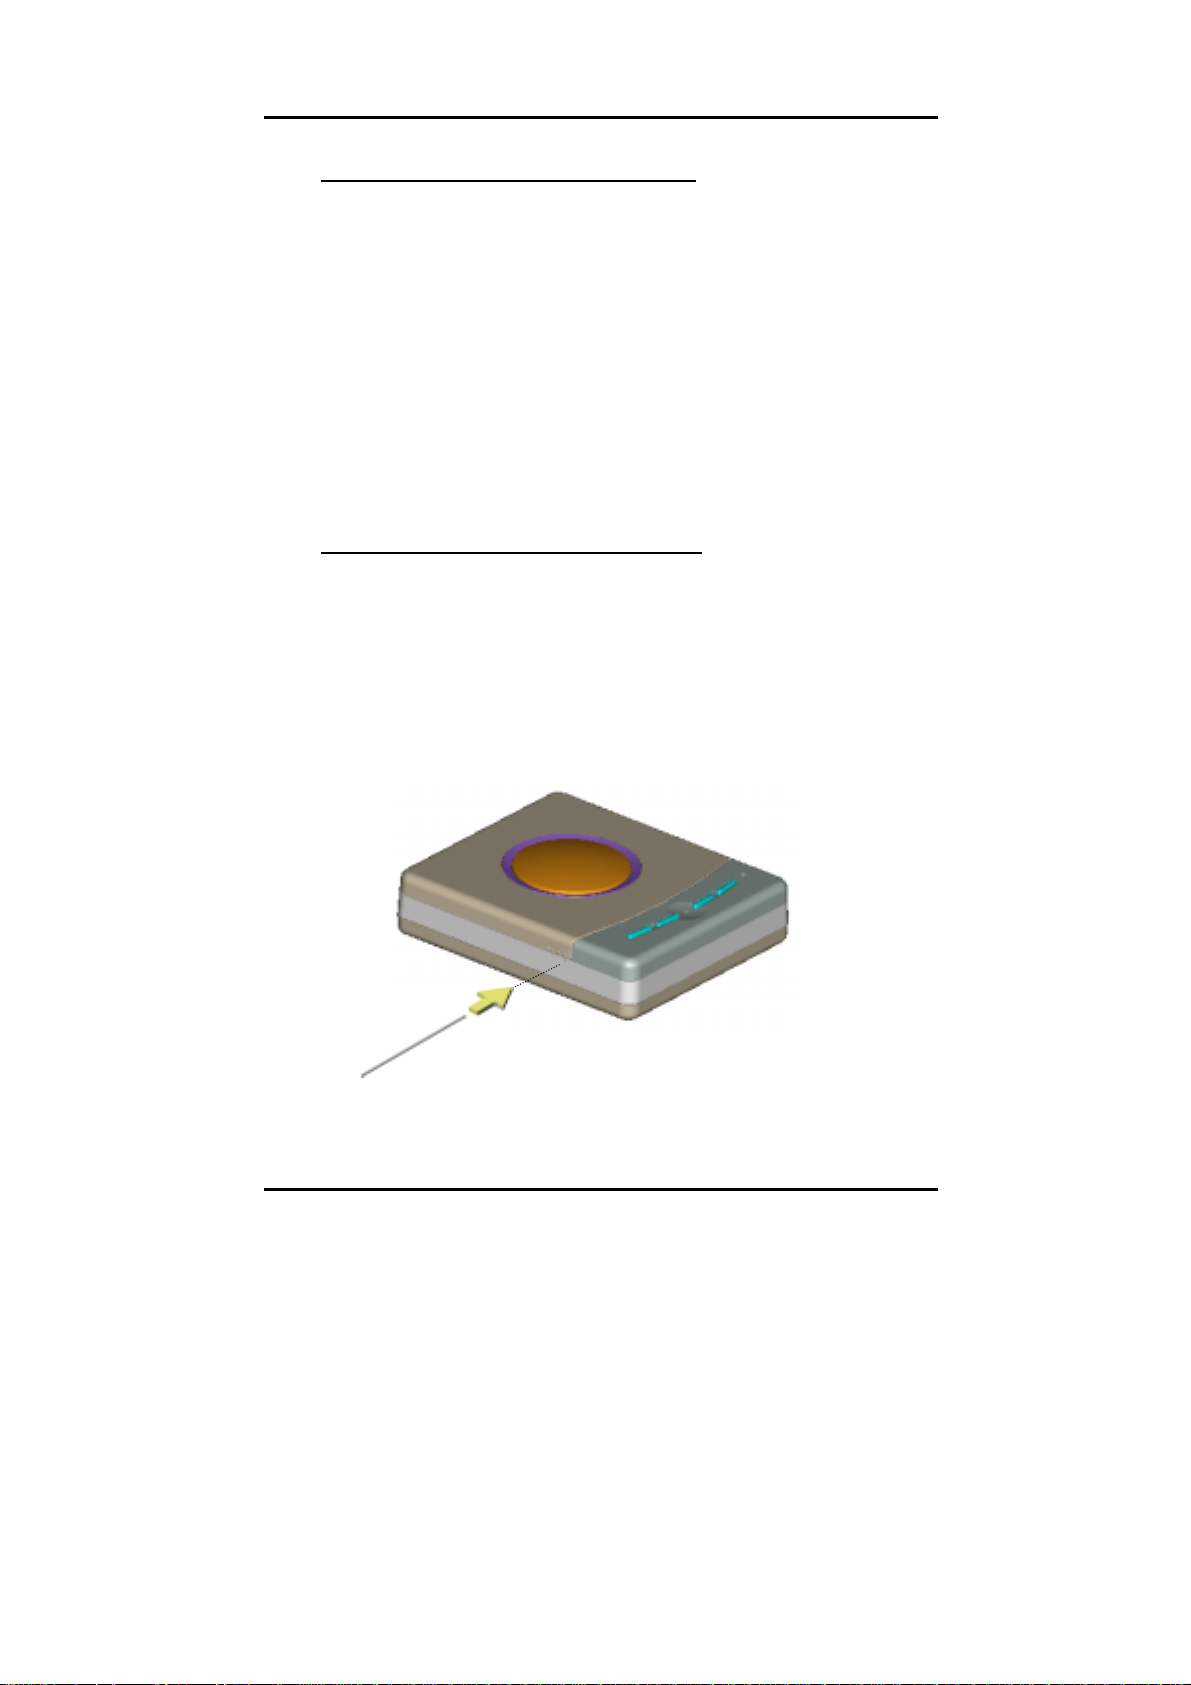
To Remove a CD from the CD-RW Drive
♦ Press the Stop/Open button once to stop the disc from spinning
and to unlock the drive. To stop and unlocks an audio CD in
playing mode, press the Stop/Open button twice.
♦ You will hear a click sound when the CD Cover has been
unlocked. Wait for the locking LED to turn blue and the yellow
activity LED to turn off.
♦ Open the CD Cover to remove the CD by gently lifting-up the side
taps.
♦ Remove the CD.
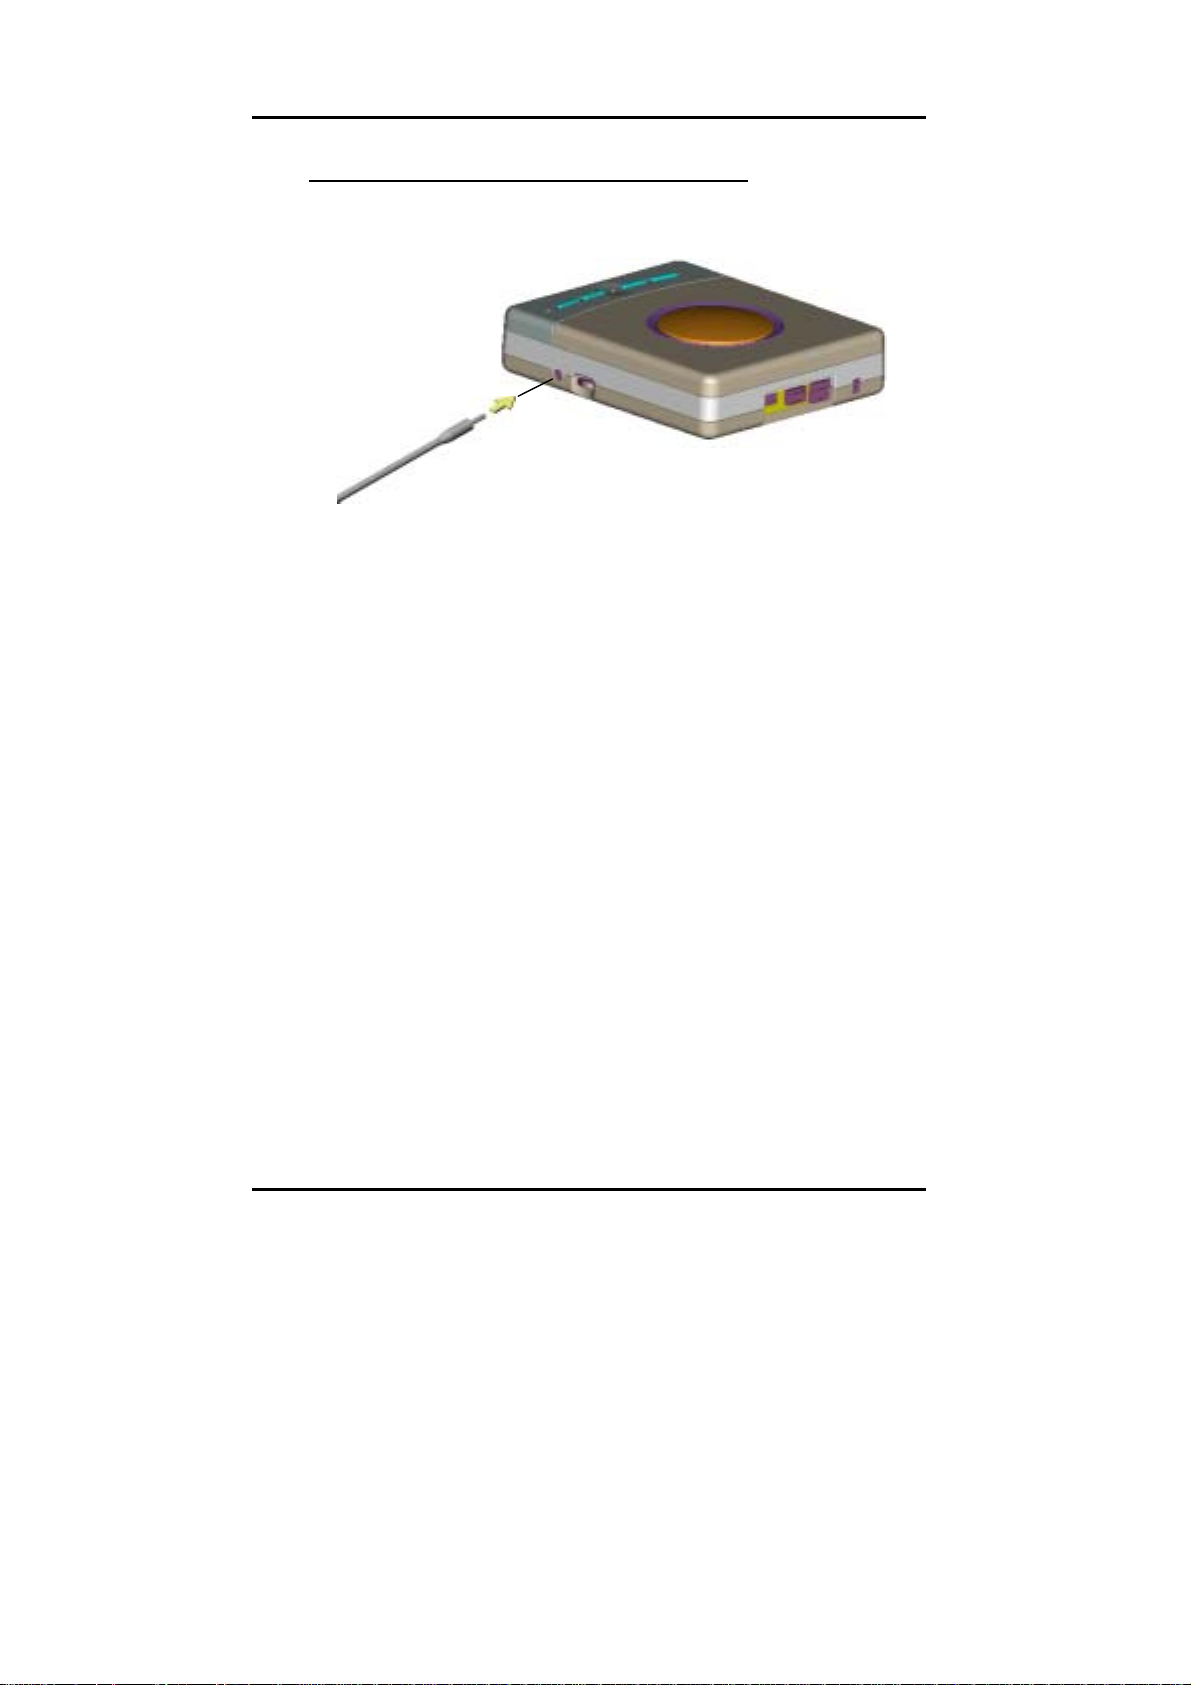
To Remove a CD during a Power Failure
In the case of a power failure, you may open the CD Cover to
remove a disc by inserting a paper clip into the Emergency Eject
Hole as shown. You will need to insert approximately 3 cm into the
hole to release the CD locking mechanism. Please remember to turn
off power to your computer system.
15
Page 24
Portable CD-RW Drive
To Use the CD-RW Drive as a Audio CD Player
You may listen to audio CDs when the CDRW drive is not connected
to a computer (in stand-alone mode),
♦ Turn off power to your computer and to the CD-RW drive.
♦ Connect the headphone to the headphone jack at the side of
the drive.
♦ Re-connect the power to the CD-RW drive only.
♦ Insert an audio CD into the CD-RW drive.
♦ Press the Play Button once to start the audio playback.
♦ The control buttons (Play, Prev, Next) on the front-top of the
drive are active only when the drive is used as a stand-alone.
♦ The volume control knob located at the side of the drive is used
to control the volume.
16
Page 25

Portable CD-RW Drive
You may also listen to audio CDs through your computer speakers if
you have installed audio sound card on your computer or if your
main-board is integrated with built-in sound system.
♦ Turn off power to your computer and to the CD-RW drive.
♦ Connect the speakers to Audio In of your sound card or main-
board.
♦ Re-connect the power to your computer and CD-RW drive.
17
Page 26

Portable CD-RW Drive
Driver Installation
For USB Interface:
Windows ME / XP / 2000 Environment
This CD-RW drive is a PnP device and Windows ME/XP/2000 can
automatically detect the drive and load the appropriate driver. If
Windows cannot detect the drive, you can operate manually:
1. Click the Control Panel Icon in My Computer and then click
Add New Hardware. The Add New Hardware window appears.
2. The program will automatically search for your new drive and
load the appropriate driver.
3. There is no need to re-start the computer for WinXP and Win
ME except Win 2000 where a system reboot is required to
complete installation.
Windows 98 / 98SE Environment
The Windows Hardware Wizard will automatically ask for the driver
support for the new Portable CDRW Drive.
Insert the software disc into the Portable CDRW Drive and follow
the instructions on the screen to complete the installation process.
18
Page 27

Portable CD-RW Drive
For IEEE1394 Interface:
Windows ME / XP / 2000 / 98 / 98SE Environment
1) Windows can automatically detect the drive and load the appropriate driver under MS default driver.
Software Installation
The bundled mastering software gives you the complete solution for
making audio/data CDs right from your desktop. It allows you to copy
files from your computer to a recordable compact disc. In addition,
the audio CDs you create can be played in your home or car CD
player. For the CD-RW media, you can write and erase data on the
CD as you do with a floppy disk.
Windows Environment
(1) Run install.exe or setup.exe
or
(2) Refer to the manual in the software disc.
19
Page 28

Portable CD-RW Drive
TECHNICAL DATA
Performance
Transfer rate Read: 7200kb/s (48X max)
4800kb/s (32X max, CDRW)
Write: CD-R 6000kb/s (40X max)
CD-RW 1800kb/s (12X max)
Access time (one-third stroke) 100ms
(full stroke) 200ms
Data buffer 2MB
CD format support CD-Audio, CD-EXTRA, CD-ROM,
CD-ROM XA, CD-I, Video CD,
Photo CD, CD-Text
Writing modes TAO (Track at once), DAO (Disc at
Once), SAO (Session at once),
Multi-session, Incremental Packet
Writing (fixed and variable packet
size)
Writing speed CD-R: 8X/16X/20X/24X/32X/40X
CD-RW: 4X/8X/10X/12X
Specification
Interface USB 2.0 / FireWire (IEEE1394)
Form factor Mini CDRW Drive
Disc loading Top load (magnetic clamping)
Audio output level Headphone out = 0.6± 10%Vrms
Power 12VDC
20
Page 29

Portable CD-RW Drive
Dimensions
Height 40.4 mm
Width 136.0 mm
Depth 160.7 mm
Weight (approx). 600 g (excluding power adapter
and cables)
21
Page 30

Portable CD-RW Drive
TROUBLESHOOTING
To help you get more familiar with your CDRW Drive, the following FAQ
lists some common problems you might encounter. Please read it for
reference before you request RMA support from your dealer.
Q1. External CDRW DRIVE cannot be recognized.
(1) The drive might not be connected properly. Please check whether the
USB or IEEE1394 cable and power connector are tightly connected.
(2) If Windows can’t detect external CDRW DRIVE, click on the “Add New
Hardware” in the Control Panel. Windows will start detecting.
Q2. The external speaker doesn’t have sound when playing music CD.
(1) Please check if the audio cable is connected to the audio jack properly.
(2) Check both rear side of the CD-RW drive and sound card on M/B (If
Audio chipset is on board). If they are well connected, check if the
sound card is working.
Q3. The drive can’t read former session(s) of the CD-R disc which has
been written twice or more times.
Before writing CD-R discs with data copy, remember to choose “Import
session” so as to read the former sessions.
Q4. There is noise while reading.
If the disc is eccentric or the label sticks on the disc surface, it will cause
noise.
Q5. The CDRW DRIVE doesn’t have power.
Please check if the power cord is connected securely.
22
Page 31

Portable CD-RW Drive
Q6. The CD Cover cannot be opened.
There are three possible reasons:
(1) The CD Cover is locked automatically.
The internal mechanism will lock the CD-RW drive automatically when it
first detects that the CD Cover is closed. The drive will automatically
unlock again when it detects there is no CD inside the drive.
(2) Need to be released by the application.
Some of the burning or playing application will lock the drive. You have
to eject by application and close it so as to restore the use of control
buttons.
(3) The CD is inserted incorrectly.
Please insert a paper clip or small rod into the emergency eject hole on
the side of the drive for manual ejection.
Q7. The CD-RW drive cannot read some general discs.
Please check if the disc has deep scratches, fingerprints, or other
contaminants on the discs surface. Clean the disc if it’s necessary.
Q8. The CDRW DRIVE drive cannot write.
We suggest as follows:
(1) Use the burning software which is provided by original supplier bundled
with this CD-ReWritable drive or download the update file from internet.
(2) More capacity of hard disk is needed if using hard disk as temporary
buffer.
(3) Place the disc correctly.
(4) The blank disc needs full format first if using packet writing software.
23
Page 32

Portable CD-RW Drive
Q9. “Buffer underrun” always occurs while writing discs.
Here are some suggestions:
(1) Close the screen saver & TSR (Terminate and Stay Resident).
(2) Quit other redundant application when burning.
(3) Select good quality and high-speed supported blank discs.
(4) Increase main memory capacity.
(5) Select other burning software.
(6) De-fragment the hard disk.
(7) Keep the source & destination discs clean. (no scratches, fingerprints or
contamination.)
(8) Copy data as image file to hard drive to avoid buffer underrun.
(9) Keep the system clean. Do not install redundant driver or application to
reduce system loading as well as confliction.
(10) Enable Buffer Underrun Protection mode if your software supports it.
Q10. Does this CD-RW drive support over-burning?
Yes, but please use burning software which supports this function.
Q11. What burning software supports this CD-RW drive?
Software such as Adaptec EasyCD Creator, Ahead Nero-Burning
ROM, …etc.
Q13. Does the CD-RW DRIVE support CD-Text & SAO (Session At
Once) function?
Yes, it does support CD-Text & SAO function and you may edit the title or
content into your music CD.
24
Page 33

Page 34

3100551051
Version 1.0
Nov. 2002
 Loading...