

Page 1

Internet Fax and Fax to Server features
NETWORK
USER’S GUIDE
MFC-7440N
MFC-7840N
MFC-7840W
The Brother Solutions Center (http://solutions.brother.com) is
your one stop resource for all your printing needs. Download the
latest drivers and utilities for your machine, read FAQs and
troubleshooting tips or learn about special printing solutions.
Note: Not all models are available in all countries.
Version B
ENG
Page 2

Definitions of warnings, cautions, and notes
We use the following icon throughout this User’s Guide:
Notes tell you how you should respond to a situation that may arise or give tips about how the
operation works with other features.
Trademarks
Brother and the Brother logo are registered trademarks and BRAdmin Light and BRAdmin Professional are
trademarks of Brother Industries, Ltd.
UNIX is a registered trademark of The Open Group.
Macintosh is a registered trademark of Apple Inc.
Windows Vista is either a registered trademark or a trademark of Microsoft Corporation in the United States
and other countries.
Microsoft, Windows, Windows Server and Outlook are registered trademarks of Microsoft Corporation in the
United States and/or other countries.
SecureEasySetup and the SecureEasySetup logo are trademarks or registered trademarks of Broadcom
Corporation.
AOSS is a trademark of Buffalo Inc.
Wi-Fi is a registered trademark and Wi-Fi Protected Setup is a trademark of Wi-Fi Alliance.
All other terms, brand and product names mentioned in this User’s Guide are registered trademarks or
trademarks of their respective companies.
Compilation and publication notice
Under the supervision of Brother Industries Ltd., this manual has been compiled and published, covering the
latest product’s descriptions and specifications.
The contents of this manual and the specifications of this product are subject to change without notice.
Brother reserves the right to make changes without notice in the specifications and materials contained
herein and shall not be responsible for any damages (including consequential) caused by reliance on the
materials presented, including but not limited to typographical and other errors relating to the publication.
©2008 Brother Industries Ltd.
i
Page 3

IMPORTANT NOTE
This product is approved for use in the country of purchase only. Do not use this product outside the
country of purchase as it may violate the wireless telecommunication and power regulations of that
country.
Windows
Edition and Windows
Windows
x64 Edition. Go to the Brother Solutions Center (http://solutions.brother.com
Windows
®
XP in this document represents Windows® XP Professional, Windows® XP Professional x64
®
XP Home Edition.
®
Server 2003 in this document represents Windows® Server 2003 and Windows® Server 2003
) for more information on
®
Server 2003 x64 Edition support.
ii
Page 4

Brother numbers
IMPORTANT
For technical and operational assistance, you must call the country where you purchased the machine.
Calls must be made from within that country.
For Customer Service
In USA 1-877-BROTHER (1-877-276-8437)
1-901-379-1215 (fax)
In Canada 1-877-BROTHER
(514) 685-4898 (fax)
In Brazil helpline@brother.com.br
In Europe Visit http://www.brother.com
for contact information on your local Brother office.
Service center locator (USA)
For the location of a Brother authorized service center, call 1-877-BROTHER (1-877-276-8437).
Service center locations (Canada)
For the location of a Brother authorized service center, call 1-877-BROTHER.
If you have any comments or suggestions, please write to us at:
In USA Customer Support
Brother International Corporation
100 Somerset Corporate Boulevard
Bridgewater NJ 08807-0911
In Canada Brother International Corporation (Canada), Ltd.
- Marketing Dept.
1 Hôtel de Ville
Dollard des Ormeaux, QC
H9B 3H6
Canada
In Brazil Brother International Corporation do Brasil Ltda.
Av. Paulista, 854 - 15 and. - Ed. Top Center
CEP: 01310-100 - São Paulo - SP - Brasil
In Europe European Product & Service Support
1 Tame Street
Audenshaw
Manchester, M34 5JE, UK
iii
Page 5
Internet address
Brother Global Web Site: http://www.brother.com
For Frequently Asked Questions (FAQs), Product Support, Driver Updates and Utilities:
http://solutions.brother.com
Ordering accessories and supplies
In USA: 1-877-552-MALL (1-877-552-6255)
1-800-947-1445 (fax)
http://www.brothermall.com
In Canada: 1-877-BROTHER
http://www.brother.ca
iv
Page 6

Table of Contents
1 Internet fax 1
Overview....................................................................................................................................................1
Getting connected ...............................................................................................................................1
Control panel key functions .................................................................................................................2
Sending an Internet fax .......................................................................................................................2
Manually entering text .........................................................................................................................3
Receiving E-mail or Internet fax ..........................................................................................................3
Receiving an Internet fax to your computer.........................................................................................4
Forwarding received E-mail and fax messages...................................................................................4
Relay broadcasting..............................................................................................................................4
TX Verification Mail..............................................................................................................................7
Setup Mail TX......................................................................................................................................7
Setup Mail RX......................................................................................................................................7
Error mail.............................................................................................................................................7
Important information on Internet fax...................................................................................................8
2 Fax operation 9
Storing numbers ........................................................................................................................................9
Storing a pause ...................................................................................................................................9
Storing one touch dial numbers...........................................................................................................9
Storing speed dial numbers...............................................................................................................11
Changing one touch and speed dial numbers ...................................................................................12
Broadcasting ...........................................................................................................................................13
Setting up groups for broadcasting....................................................................................................14
3 Control panel setup 16
LAN menu................................................................................................................................................16
TCP/IP ...............................................................................................................................................16
Ethernet (wired network only)............................................................................................................25
Setup Wizard (MFC-7840W wireless network only) ..........................................................................25
SES/WPS/AOSS (MFC-7840W wireless network only) ....................................................................26
WPS w/PIN Code (MFC-7840W wireless network only) ...................................................................26
WLAN Status (MFC-7840W wireless network only) ..........................................................................26
Set to Default (MFC-7840W only) .....................................................................................................28
Wired Enable (MFC-7840W wired network only) ..............................................................................29
WLAN Enable (MFC-7840W wireless network only) .........................................................................29
Setup Internet (from the Setup IFAX menu) ......................................................................................30
Setup Mail RX (from the Setup IFAX menu)......................................................................................35
Setup Mail TX (from the Setup IFAX menu) ......................................................................................37
Setup Relay (from the Setup IFAX menu) .........................................................................................39
Scan to E-mail (E-mail server)...........................................................................................................41
Scan to FTP.......................................................................................................................................43
Fax to Server .....................................................................................................................................44
Time Zone .........................................................................................................................................46
Restoring the network settings to factory default.....................................................................................47
Printing the Network Configuration List ...................................................................................................47
v
Page 7

A Appendix 48
Function table and default factory settings ..............................................................................................48
MFC-7440N and MFC-7840N ...........................................................................................................48
MFC-7840W ......................................................................................................................................52
Entering Text ...........................................................................................................................................58
B Index 60
vi
Page 8
1
Note
Intenet Fax
E-mail
E-mail
Relay Fax
(G3 TX)
Relay E-mail
Internet
Internet
Internet fax 1
Overview 1
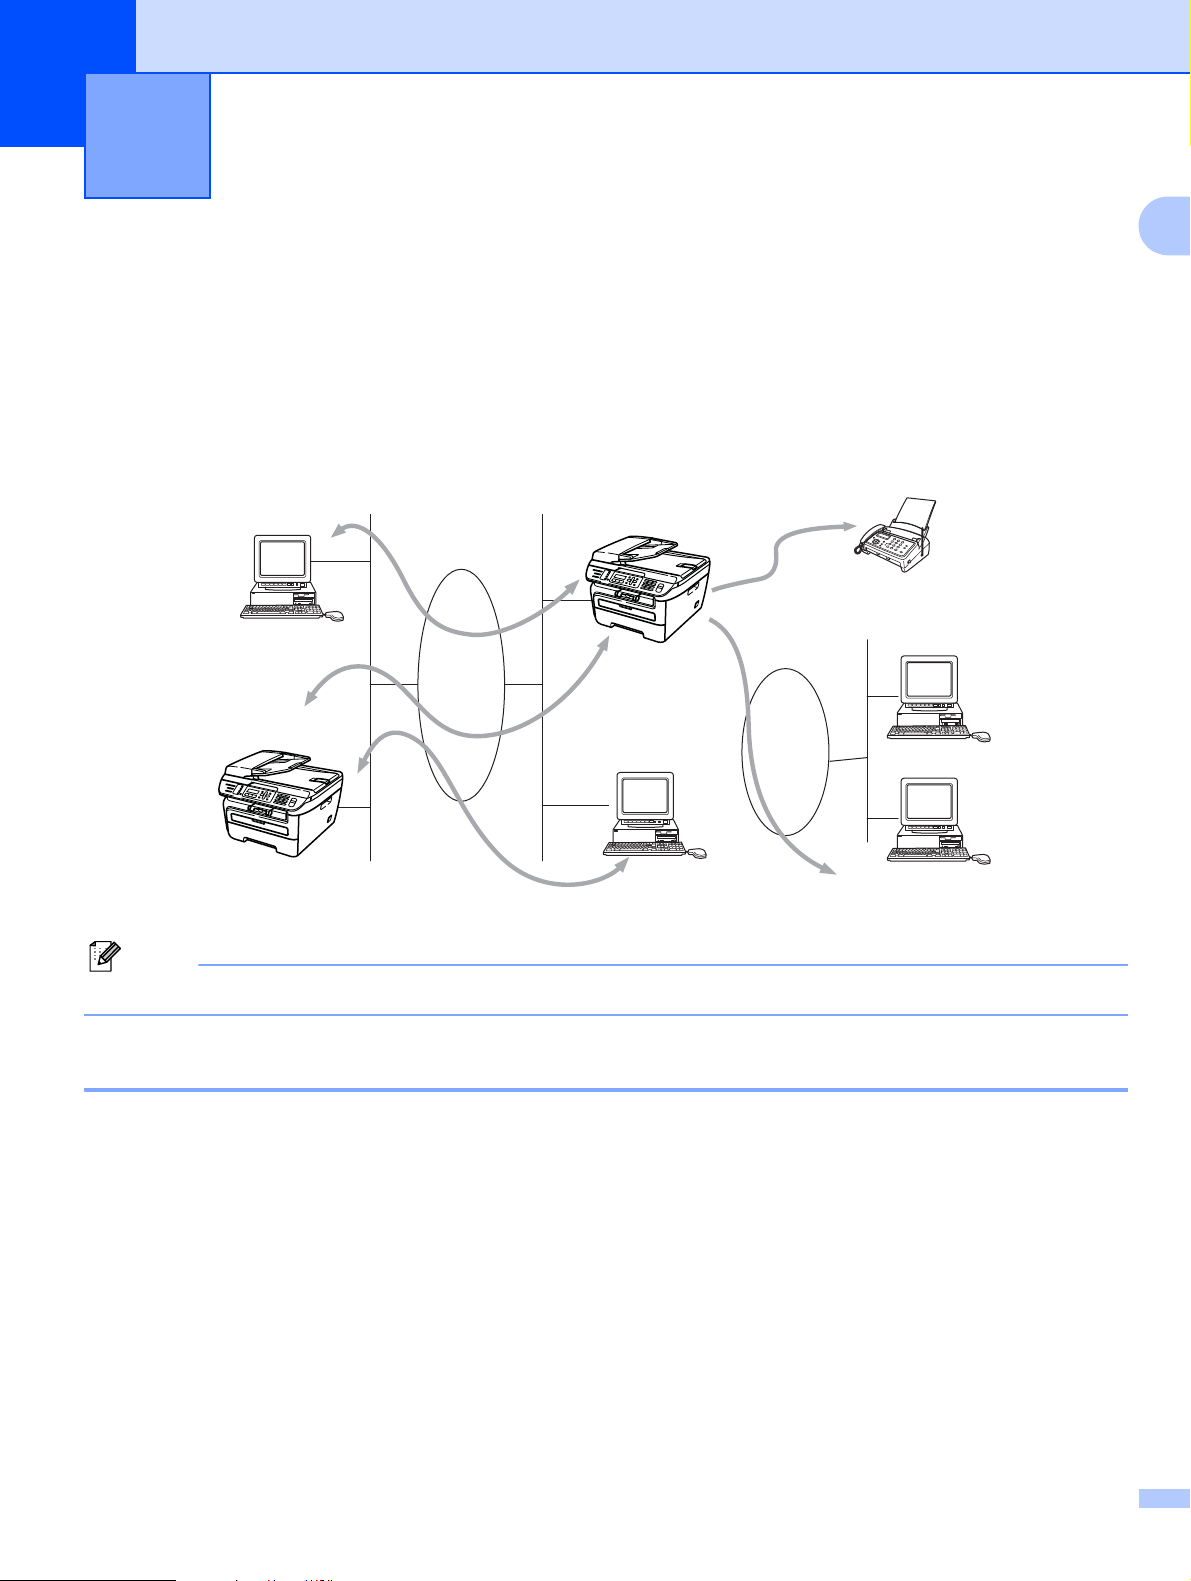
Internet faxing (IFAX) allows you to send and receive fax documents using the Internet as the transport
mechanism. Documents are transmitted in E-mail messages as attached TIFF-F files. This means that
computers are also able to receive and send documents, providing that the computer has as an application
that can generate and view TIFF-F files, you can use any TIFF-F viewer application. Any documents sent via
the machine will automatically be converted into a TIFF-F format. If you wish to send and receive messages
to and from your machine, your mail application on the computer must be able to support the MIME format.
1
Internet Fax is available in Black & White only.
Getting connected 1
Before sending or receiving an Internet fax you must configure your Brother machine to communicate with
your network and mail server. You must ensure the following: a correctly configured IP address for your
machine, an E-mail address for your machine, the mail server(s) IP address, mailbox name and password for
your Brother machine. If you are unsure of any of these items, please contact your systems Administrator.
For details of how to configure this information, see Setup Internet (from the Setup IFAX menu) on page 30.
1
Page 9

Internet fax
Control panel key functions 1
Shift + 1 1
Used to change input mode. You can use dial pad keys as Standard alphabet character keys.
1
Dial Pad
Used to enter Standard Alpha characters (26 letters), as well as @. space ! “ # % & ’ () + / : ; < > = ? [ ] ^ - $
, l _ and Numbers.
d or c
Moves the LCD cursor to the left or right when you enter text.
OK
Used to store multiple numbers.
Start
Begins transmitting the document.
Stop/Exit
Deletes entered data and stops the scanning or transmitting process.
One Touch
Search/Speed-Dial
These functions work the same way as with conventional machine’s.
However, please note that you cannot use chain dialing for E-mail address.
1
1
1
1
1
1
Shift + Start
Used to receive E-mail from the POP3 server manually.
Sending an Internet fax 1
Sending an Internet fax is the same as sending a normal fax. If you have already programmed the addresses
of the destination Internet fax machines as One Touch or Speed-Dial locations, you can send the Internet fax
by loading the document into the machine, use the Fax Resolution key to set the preferred resolution and
choose a Speed Dial or One Touch number and press Start.
If you wish to manually enter the Internet fax address, load the document into the machine and press Shift
and 1 simultaneously to change into the “alphabet” dialing mode.
To manually enter the Internet fax address, see Entering Text on page 58.
1
2
Page 10

Internet fax
Manually entering text 1
Press Shift and 1 simultaneously to change into the “alphabet” dialing mode.
You can use the Dial Pad to enter the E-mail address. For more information, see Entering Text on page 58.
Please note that also you can connect to the machine using a web browser and store the E-mail address
information to a Speed Dial or One Touch location through Web Based Management. For more information
on Web Based Management, see the Network User’s Guide on the CD-ROM we have provided with the
machine.
As you enter an Internet fax address, the address will appear character by character on the LCD panel. If you
specify more than 16 characters, the LCD panel will scroll the name to the left character by character. You
can enter up to 60 characters.
Press Start to send the document.
After the document is scanned, it is transmitted to the recipient Internet fax machine automatically via your
SMTP server. You can cancel the send operation by pressing the Stop/Exit key during scanning. After the
transmission is finished, the machine will return to standby mode.
Some E-mail servers do not allow you to send large E-mail documents (the System Administrator will often
place a limit on the maximum E-mail size). With this function enabled, the machine will display
Out of Memory when trying to send E-mail documents over 1 Mbyte in size. The document will not be sent
and an error report will be printed. The document you are sending should be separated into smaller
documents that will be accepted by the mail server. (For your information, a 42 page document based on the
ITU-T Test Chart #1 test chart is approximately 1 Mbyte in size.)
1
Receiving E-mail or Internet fax 1
There are 2 ways you can receive E-mail messages:
POP3 receiving (manually initiated)
POP3 receiving at regular intervals
Using POP3 receiving the machine must poll the E-mail server to receive the print jobs. This polling can occur
at set intervals (for example, you can configure the machine to poll the E-mail server at 10 minute intervals)
or you can manually poll the server by pressing the Shift + Start keys.
If your machine starts to receive E-mail print jobs, the LCD panel will reflect this activity. For example, you
will see Receiving on the LCD panel followed by xx E-mail(s). If you press the Shift + Start keys to
manually poll the E-mail server for E-mail print jobs and there are no mail documents waiting to be printed,
the machine will display No Mail on the LCD panel for two seconds.
If your machine is out of paper when receiving data, the received data will be held in the machine's memory.
This data will be printed automatically after paper is re-inserted into the machine. (For European, Asian and
Oceanic machines, Memory Receive must be switched On.)
If the received mail is not in a plain text format or an attached file is not in the TIFF-F format, the following
error message will be printed: “ATTACHED FILE FORMAT NOT SUPPORTED. FILE NAME:XXXXXX.doc”
If the received mail is too large, the following error message will be printed: "E-MAIL FILE TOO LARGE". If
Delete POP Receive Error Mail is ON (default) then the error mail is automatically deleted from the E-mail
server.
3
Page 11

Internet fax
Receiving an Internet fax to your computer 1
When a computer receives an Internet fax document, the document is attached to a mail message that
informs the computer that it has received a document from an Internet fax. This is notified in the subject field
of the received mail message.
If the computer to which you wish to send a document is not running Windows
2003 or Windows Vista
software that can view TIFF-F files.
®
operating system, please inform the computer's owner that they must install some
®
2000/XP, Windows Server®
Forwarding received E-mail and fax messages 1
You can forward received E-mail or standard fax messages to another E-mail address or fax machine.
Received messages can be forwarded via E-mail to a computer or Internet fax. They can also be forwarded
via standard phone lines to another machine.
The setting can be enabled using a web browser or through the front panel of the machine. The steps for
configuring fax forward can be found in the User’s Guide supplied with your machine.
Please see the User’s Guide included with the machine to check that this feature is supported.
Relay broadcasting 1
This function allows the Brother machine to receive a document over the Internet, and then relay it to other
fax machines through conventional telephone lines.
1
If you wish to use your machine as a relay broadcast device, you must specify the domain name that you trust
at the machine, in other words, the portion of the name after the “@” sign.
A trusted domain refers to the E-mail address. For example, if the other party’s address is bob@brother.com,
then we identify the domain as brother.com. If the E-mail address is jack@brother.co.uk, then we identify the
domain as brother.co.uk.
Use care in selecting a trusted domain since any user on a trusted domain will be able to send a relay
broadcast. You can register up to 10 domain names.
Relay broadcast can support the relay of a document up to a maximum of 48 fax machines through
conventional telephone lines.
4
Page 12
Internet fax
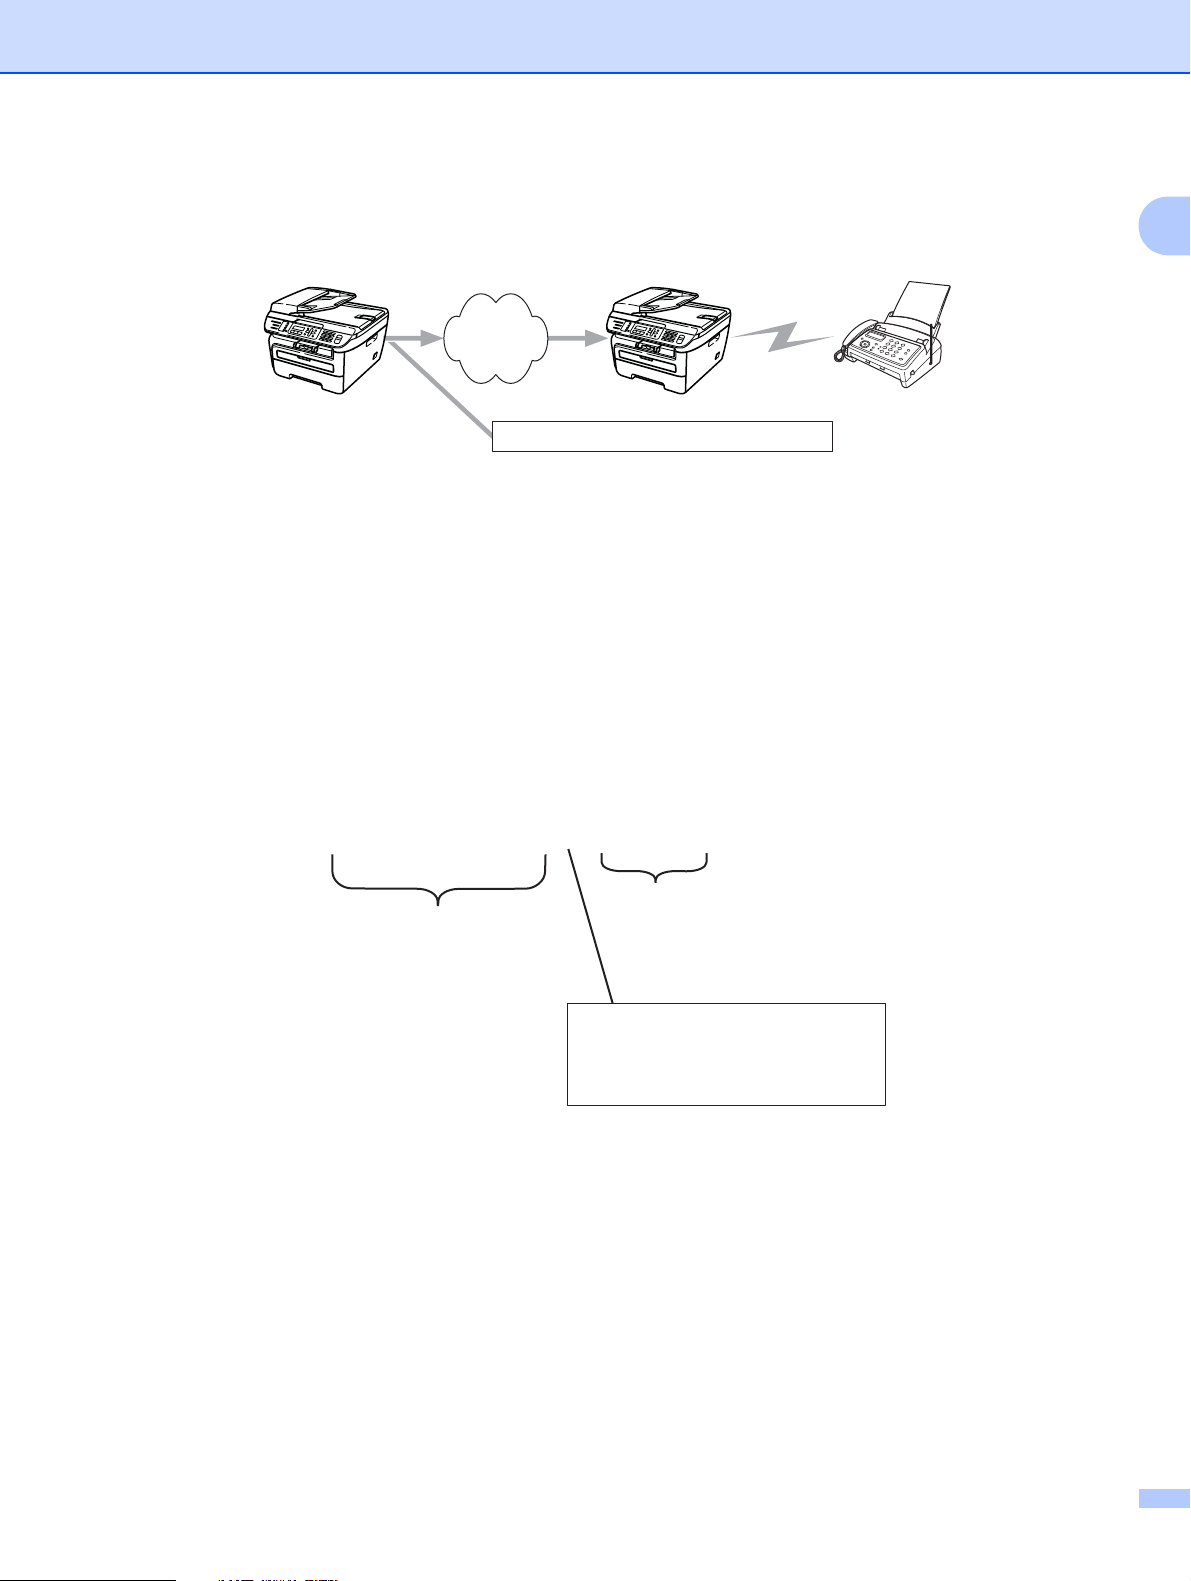
Relay broadcast from a machine 1
FAX@brother.com UKFAX@brother.co.uk 123456789
Internet
UKFAX@brother.co.uk(fax#123456789)
In this example, your machine has an E-mail address of FAX@brother.com, you wish to send a document
from this machine to another machine in England with an E-mail address of UKFAX@brother.co.uk, this
machine will then forward the document to a standard fax machine using a conventional telephone line. If
your E-mail address is FAX@brother.com, you must configure a trusted domain name of brother.com on the
machine in England that will broadcast the document to the conventional fax machine. If you do not enter the
domain name information, then the machine in the middle (the machine that will broadcast the document) will
not trust any internet jobs that it receives from the machine in the @brother.com domain.
1
After the trusted domain is set you can send the document from your machine [e.g. FAX@brother.com] by
entering the E-mail address of the machine [e.g. UKFAX@brother.co.uk] that will forward the document
followed by the phone number of the fax that will receive the document. The following is an example of how
to enter the E-mail address and phone number
UKFAX@brother.co.uk(fax#123456789)
Fax Phone Number
E-mail address
The word "fax#" must be
included with the phone
number inside the parenthesis.
5
Page 13
Internet fax
Sending to multiple phone numbers: 1
If you want to have the document relayed to more than one standard fax machine the address can be entered
using the following method:
a Enter the phone number of the first Fax machine UKFAX@brother.co.uk(fax#123).
b Press OK.
c Enter the phone number of the second Fax machine UKFAX@brother.co.uk(fax#456).
d Press Start.
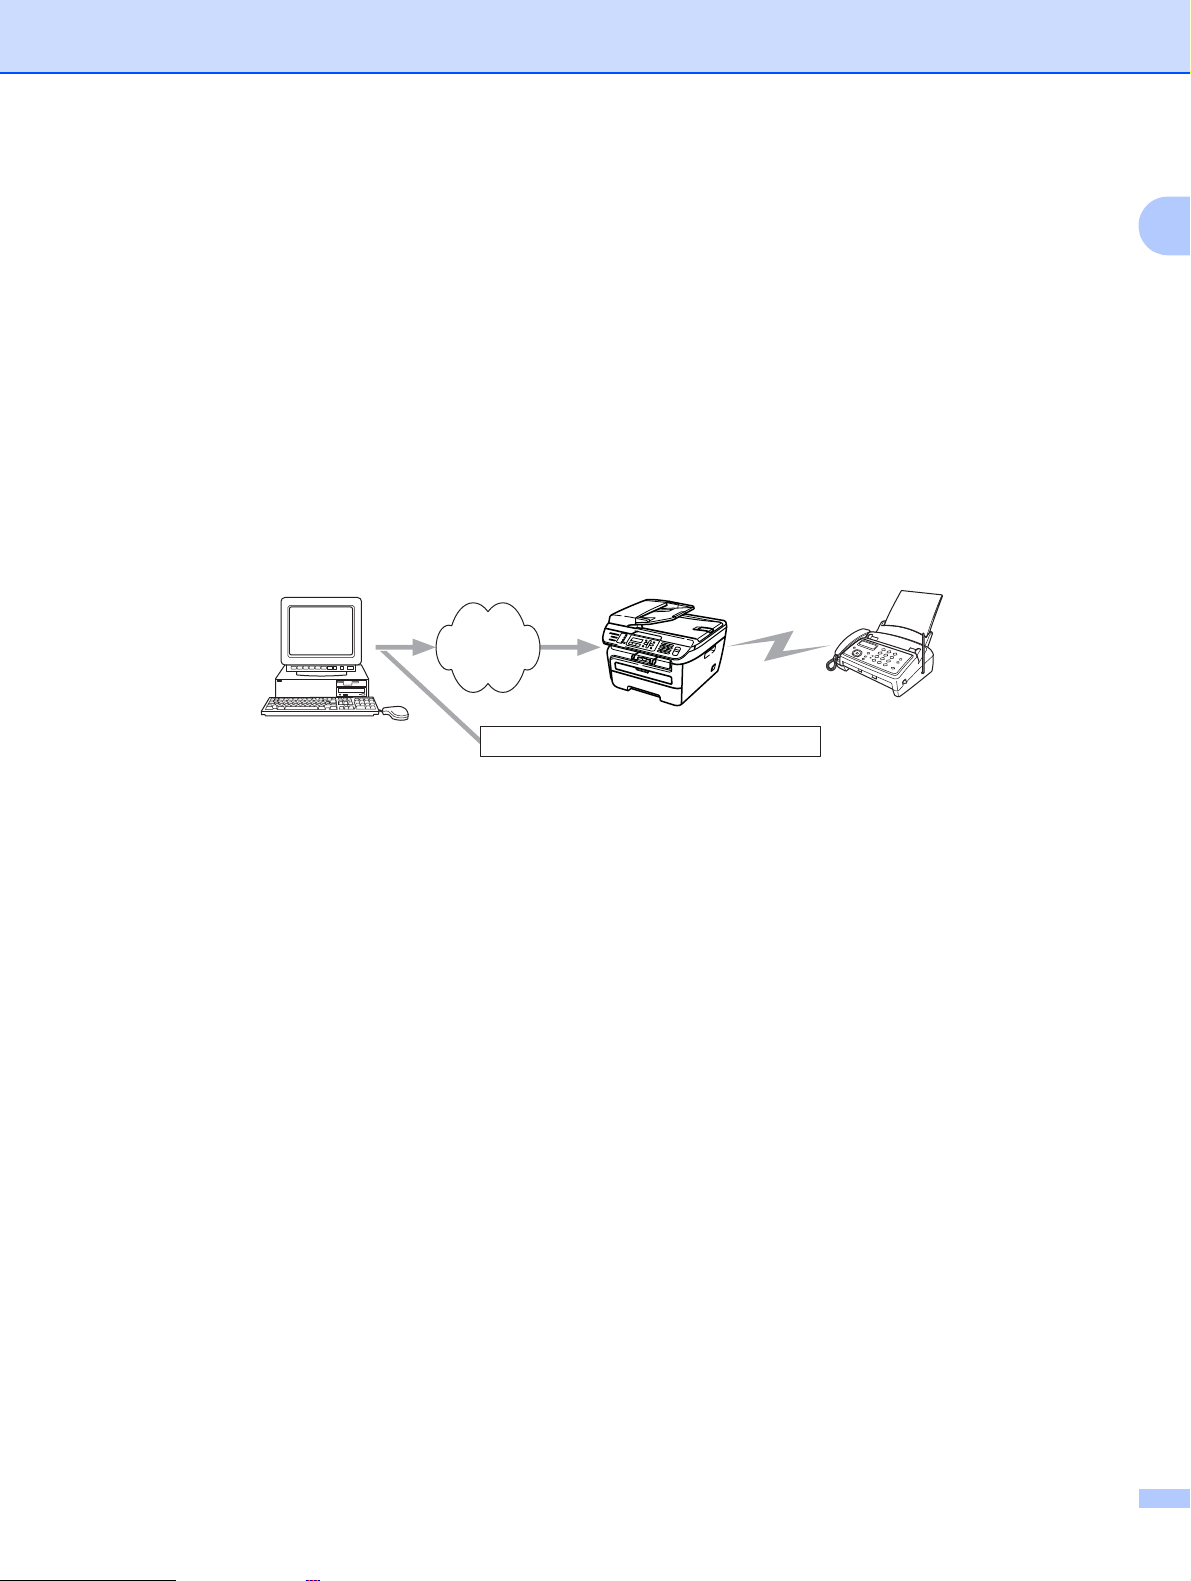
Relay broadcast from a computer 1
Your PC
Internet
UKFAX@brother.co.uk(fax#123456789)
UKFAX@brother.co.uk 123456789
1
You can also send E-mail from your computer and have it relayed to a conventional fax machine. The method
of entering the phone number of the conventional fax machine that will receive the relayed E-mail will vary
depending on the mail application you are using. The following are some examples of different mail
applications:
Some E-mail applications do not support sending to multiple phone numbers. If your E-mail application
cannot support multiple phone numbers you will only be able to relay to one fax machine at a time.
Enter the address of the relay machine and phone number of the fax in the “TO” box using the same method
used when sending from an machine.
UKFAX@brother.co.uk(fax#123456789)
Microsoft® Outlook®: 1
For Microsoft® Outlook® 97 or greater, the address information must be entered into the address book as
follows:
Name: fax#123456789
E-mail address: UKFAX@brother.co.uk
6
Page 14

Internet fax
TX Verification Mail 1
Transmission Verification Mail supports two separate functions. Verification Mail for sending allows you to
request notification from the receiving station that the Internet Fax or E-mail was received and processed.
Verification Mail for receiving allows you to transmit a default report back to the sending station after
successfully receiving and processing an Internet Fax or E-mail.
To use this feature you must set the Notification option within the Setup Mail RX and
Setup Mail TX options.
Setup Mail TX 1
You can set the Notification option in the Setup Mail TX option to either On or Off. When switched
to On an additional field of information is sent with the image data. This field is named “MDN”.
MDN (Mail Disposition Notification):
This field requests the status of the Internet Fax/E-mail message after delivery through the SMTP (Send Mail
Transfer Protocol) transport system. Once the message has arrived at the receiving station this data is used
when the machine or user reads or prints the received Internet Fax or E-mail. For example, if the message is
opened for reading or is printed the receiving station sends back a notification to the original sending machine
or user.
The receiving station must support the MDN field in order to be able to send a notification report, otherwise
the request will be ignored.
1
Setup Mail RX 1
There are three possible settings for this option On, MDN or Off.
Receive Notification “On”
When switched to “On” a fixed message is sent back to the sending station to indicate successful reception
and processing of the message. These fixed messages depend on the operation requested by the sending
station.
Report messages consist of:
SUCCESS: Received From <mail address>
Receive Notification “MDN”
When switched to “MDN” a report as described above is sent back to the sending station if the originating
station sent the “MDN” field to request confirmation.
Receive Notification “Off”
Off switches all forms of receive notification Off, no message are sent back to the sending station regardless
of the request.
Error mail 1
If there is a mail delivery error while sending an Internet fax, the mail server will send an error message back
to the machine and the error message will be printed. If there is an error while receiving mail, an error
message will be printed (Example: “The message being sent to the machine was not in a TIFF-F format.”).
7
Page 15

Internet fax
Important information on Internet fax 1
Internet fax communication on a LAN system is basically the same as communication via E-mail; however, it
is different from fax communication using standard phone lines. The following is important information for
using Internet fax:
Factors such as the receiver’s location, structure of the LAN system, and how busy the circuit (such as the
internet) is, may cause the system to take a long time to send back an error mail. (normally 20 sec. to 30
sec.).
In the case of transmission through the Internet, due to its low level of security, we recommend that you
use standard phone lines to send confidential documents.
If the receiver’s mail system is not compatible with the MIME format, you cannot transmit a document to
the receiver. Depending on the receiver’s server, there may be some cases in which the error mail will not
be sent back.
If the size of a document’s image data is too large, there is a possibility of unsuccessful transmission.
You cannot change the font or character size of Internet mail that you received.
1
8
Page 16
2
You can follow instructions in the User’s Guide we have provided with the machine for how to use your
machine as a fax after installing the internet fax software. This chapter explains some operations which are
unique for the internet fax capable machine.
Fax operation 2
Storing numbers 2
You can set up your machine to do the following types of easy dialing: One Touch, Speed-Dial and Groups
for Broadcasting faxes. You can also specify the default resolution for each One Touch and Speed Dial
number. When you dial a quick dial number, the LCD shows the name, if you stored it, or the number. A scan
profile can also be stored along with the fax number.
If you lose electrical power, the quick dial numbers stored in the memory will not be lost.
A scan profile is the resolution and other scan settings that you choose when you store a number.
Storing a pause 2
Press Redial/Pause to insert a 3.5-second or 2.8-second (for UK and Ireland) pause between numbers. You
can press Redial/Pause as many times as needed to increase the length of the pause.
2
Storing one touch dial numbers 2
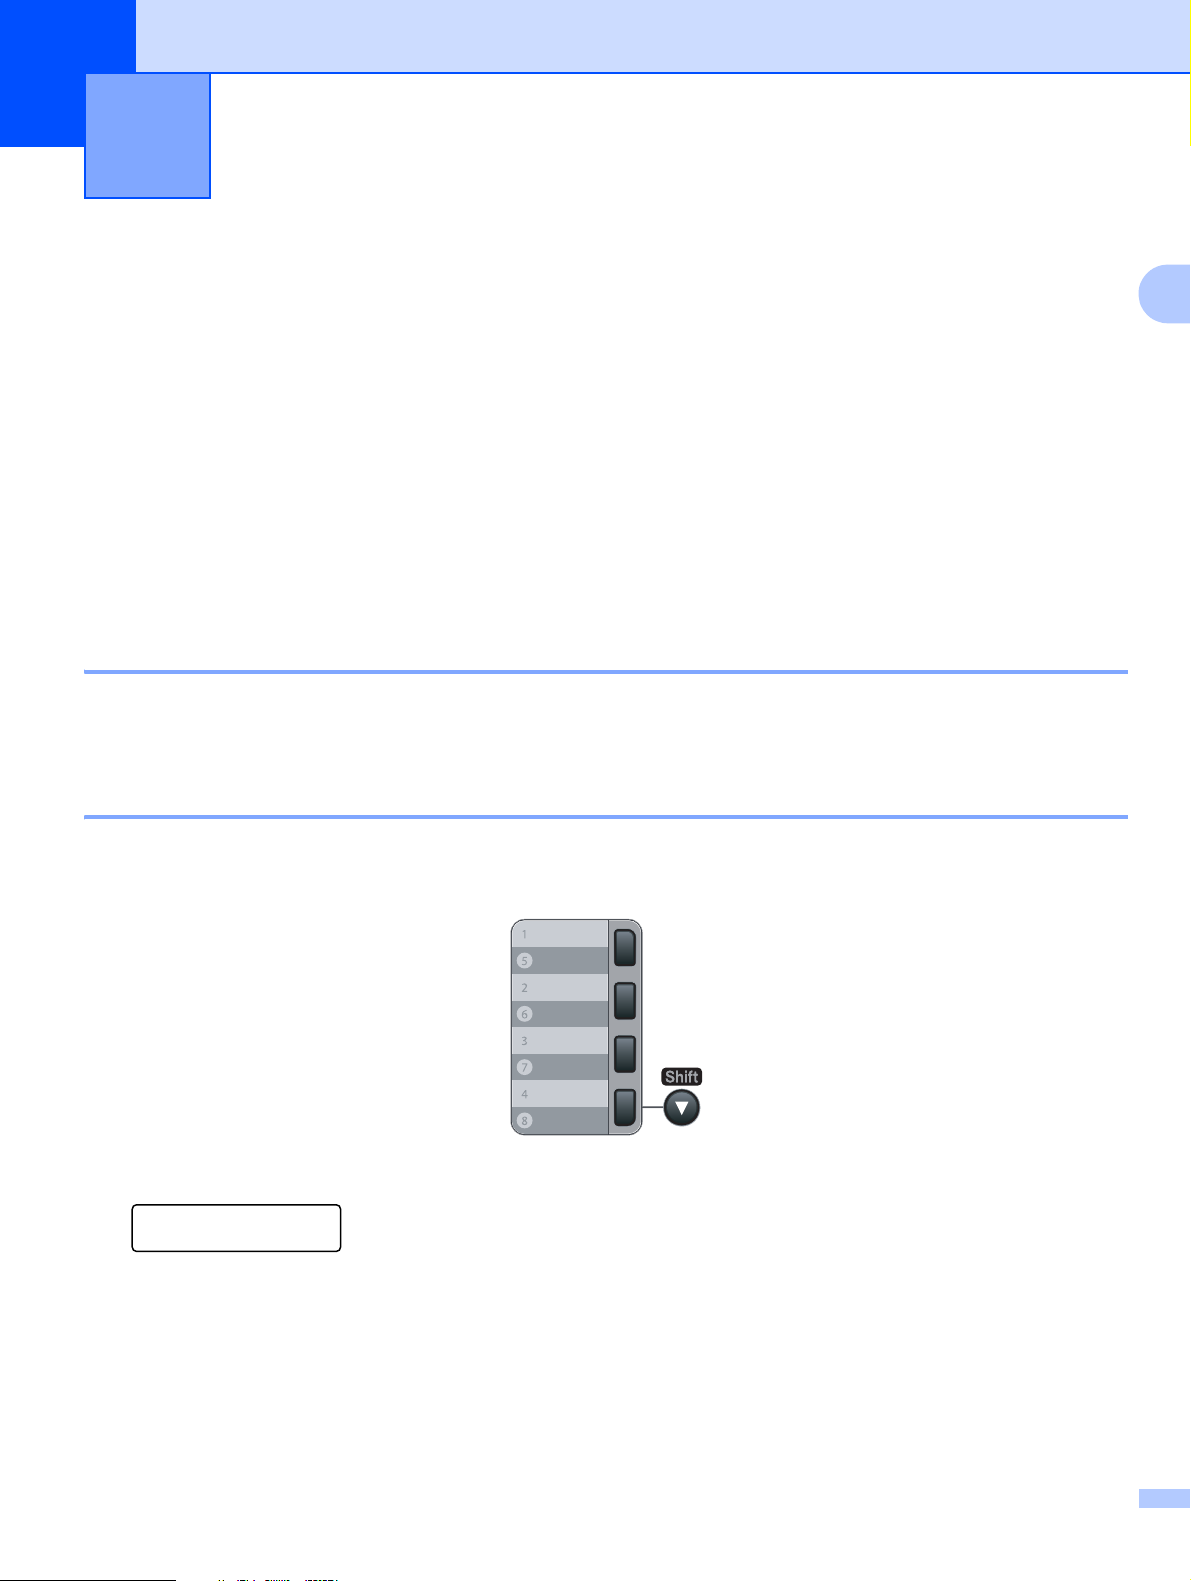
Your machine has 4 One Touch keys where you can store 8 fax or telephone numbers for automatic dialing.
To access numbers 5 to 8, hold down Shift as you press the One Touch key.
a Press Menu, 2, 3, 1.
Set Quick Dial
1.One Touch Dial
b Press the One Touch key where you want to store a number.
c Press a or b to choose Fax/Tel, E-Mail or IFAX.
Press OK.
9
Page 17

d Choose one of the options below:
Note
Note
Enter the number (up to 20 characters) if you chose Fax/Tel.
Press OK.
Fax operation
Enter the E-mail address (up to 60 characters) if you chose E-Mail or IFAX. Use the chart in
Entering Text on page 58 to help you enter letters.
Press OK.
If you chose E-Mail and save the E-mail address, you can only use the E-mail address when you are in
Scan mode. If you chose IFAX and save the E-mail address, you can only use the E-mail address when
you are in Fax mode.
e Choose one of the options below:
Enter the name using the dial pad (up to 15 characters). Press OK.
Press OK to store the number or E-mail address without a name.
f If you want to save a fax/scan resolution along with the number, choose one of the options below:
If you chose Fax/Tel in c, press a or b to choose Std, Fine, S.Fine or Photo.
Press OK and then go to h.
If you chose E-Mail in c, press a or b to choose Color150dpi, Color300dpi, Color600dpi,
Gray100dpi, Gray200dpi, Gray300dpi, B&W200dpi (B/W200dpi) or B&W200x100
(B/W200x100).
Press OK and then go to g.
2
If you chose IFAX in c, press a or b to choose Std, Fine or Photo.
Press OK and then go to h.
Press OK if you don’t want to change the default resolution. Go to h.
g Choose one of the options below:
If you chose Color150dpi, Color300dpi, Color600dpi, Gray100dpi, Gray200dpi or
Gray300dpi in f, choose the file format (PDF or JPEG) that will be used to send to your PC.
If you chose B&W200dpi (B/W200dpi) or B&W200x100 (B/W200x100) in f, choose the file format
(TIFF or PDF) that will be used to send to your PC.
Press OK.
h Choose one of the options below:
To store another One Touch number go to b.
To finish storing One Touch numbers, press Stop/Exit.
When you do a broadcast and you have saved a scan profile along with the number or E-mail address,
the scan profile of the One Touch, Speed Dial or Group number you choose first will be applied to the
broadcast.
10
Page 18

Fax operation
Note
Storing speed dial numbers 2
You can store your frequently used numbers as Speed Dial numbers, so that when you dial you will only have
to press a few keys (Search/Speed Dial, the three-digit number and Start). The machine can store 200
Speed Dial numbers (001-200).
a Press Menu, 2, 3, 2.
Set Quick Dial
2.Speed Dial
b Use the dial pad to enter a three-digit Speed Dial location number (001-200).
Press OK.
c Press a or b to choose Fax/Tel, E-Mail or IFAX.
Press OK.
d Choose one of the options below:
Enter the number (up to 20 characters) if you chose Fax/Tel.
Press OK.
Enter the E-mail address (up to 60 characters) if you chose E-Mail or IFAX. Use the chart on
Entering Text on page 58 to help you enter letters.
2
Press OK.
If you chose E-Mail and save the E-mail address, you can only use the E-mail address when you are in
Scan mode. If you chose IFAX and save the E-mail address, you can only use the E-mail address when
you are in Fax mode.
e Choose one of the options below:
Enter the name using the dial pad (up to 15 characters).
Press OK.
Press OK to store the number or E-mail address without a name.
f If you want to save a fax/scan resolution along with the number, choose one of the options below:
If you chose Fax/Tel in c, press a or b to choose Std, Fine, S.Fine or Photo.
Press OK and then go to h.
If you chose E-Mail in c, press a or b to choose Color150dpi, Color300dpi, Color600dpi,
Gray100dpi, Gray200dpi, Gray300dpi, B&W200dpi (B/W200dpi) or B&W200x100
(B/W200x100).
Press OK and then go to g.
If you chose IFAX in c, press a or b to choose Std, Fine or Photo.
Press OK and then go to h.
Press OK if you don’t want to change the default resolution. Go to h.
11
Page 19
Fax operation
Note
g Choose one of the options below:
If you chose Color150dpi, Color300dpi, Color600dpi, Gray100dpi, Gray200dpi or
Gray300dpi in f, choose the file format (PDF or JPEG) that will be used to send your PC.
If you chose B&W200dpi (B/W200dpi) or B&W200x100 (B/W200x100) in f, choose the file format
(TIFF or PDF) that will be used to send to your PC.
Press OK.
h Choose one of the options below:
To store another Speed Dial number go to b.
To finish storing Speed Dial numbers, press Stop/Exit.
When you do a broadcast and you have saved a scan profile along with the number or E-mail address,
the scan profile of the One Touch, Speed Dial or Group number you choose first will be applied to the
broadcast.
Changing one touch and speed dial numbers 2
2
If you try to store a One Touch or Speed Dial number over an existing number, the LCD will show the name
or number already stored there. If your machine has a scheduled job or you have set a fax forwarding number,
the LCD will ask you if you want to change the number.
a Do one of the following:
To change the stored number, press 1.
To exit without making a change, press 2.
#005:MIKE
1.Change 2.Exit
b Press a or b to choose Fax/Tel, E-Mail or IFAX.
Press OK.
c Enter a new number or character.
Press OK.
d Press d or c to position the cursor under the character you want to change, and then press Clear/Back
to delete it. Repeat for each character you want to delete.
12
Page 20
Fax operation
Note
Note
Broadcasting 2
Broadcasting lets you send the same fax message to more than one fax number. You can include Groups,
One Touch, Speed Dial numbers and up to 50 manually dialed numbers in the same broadcast.
You can broadcast up to 258 different numbers. This will depend on how many groups, access codes or credit
card numbers you have stored, and on how many delayed or stored faxes are in memory.
Use the Search/Speed Dial to help you choose numbers easily.
a Make sure you are in Fax mode .
b Load your document.
c Enter a number.
Press OK.
You can use either a One Touch, Speed Dial, a Group number, or a number manually entered using the
dial pad.
d Repeat c until you have entered all the fax numbers you want to broadcast to.
2
e Press Start.
After the broadcast is finished the machine will print a broadcast report to let you know the results.
• You can only send to IFAX numbers in Standard, Fine or Photo resolution.
• The scan profile of the One Touch, Speed Dial, a Group number you choose first will be applied to the
broadcast.
• If the fax resolution of the fax number you choose first is S.Fine and you enter a stored IFAX number,
Select Std/Fine will appear on the LCD. Press Stop/Exit. Press Resolution and choose Standard,
Fine or Photo, then re-enter the IFAX number. If you want to enter other numbers, go back to c.
13
Page 21

Fax operation
Setting up groups for broadcasting 2
If you often want to send the same fax message to many fax numbers you can set up a group.
Groups are stored on a One Touch key or a Speed Dial number. Each group uses up a One Touch key or a
Speed Dial location. You can then send the fax message to all the numbers stored in a group just by pressing
a One Touch key or entering a Speed Dial number, and then pressing Start.
Before you can add numbers to a group, you need to store them as One Touch or Speed Dial numbers. You
can have up to 8 small groups, or you can assign up to 207 numbers to one large group.
a Press Menu, 2, 3, 3.
Set Quick Dial
3.Setup Groups
b Choose an empty location where you want to store the group in one of the following ways:
Press a One Touch key.
Press Search/Speed Dial and then enter the three-digit Speed Dial location.
Press OK.
c Use the dial pad to enter a group number (01 to 08).
Press OK.
d Press a or b to choose Fax/IFAX or E-Mail.
Press OK.
e To add One Touch or Speed Dial numbers follow the instructions below:
2
For One Touch numbers, press the One Touch keys one after the other.
For Speed Dial numbers, press Search/Speed Dial, and then enter the three-digit Speed Dial
location.
The LCD will display your chosen One Touch numbers with a l and Speed Dial numbers with a # (for
example l006, #009).
f Press OK when you have finished adding numbers.
g Do one of the following:
Enter the name using the dial pad (up to 15 characters). Use the chart on Entering Text on page 58
to help you enter letters.
Press OK.
Press OK to store the group without a name.
14
Page 22

h You can save a fax/scan resolution along with the number. Do one of the following:
Note
Note
If you chose Fax/IFAX in d, press a or b to choose Std, Fine, S.Fine or Photo.
Press OK and then go to j.
Fax operation
If you chose E-Mail in d, press a or b to choose Color150dpi, Color300dpi, Color600dpi,
Gray100dpi, Gray200dpi, Gray300dpi, B&W200dpi (B/W200dpi) or B&W200x100
(B/W200x100).
Press OK and then go to i.
Press OK if you don’t want to change the default resolution. Go to j.
If you have chosen Fax/IFAX in d and added One Touch or Speed Dial numbers that are stored as
‘IFAX’, you cannot chose S.Fine.
i Choose one of the options below:
If you chose Color150dpi, Color300dpi, Color600dpi, Gray100dpi, Gray200dpi or
Gray300dpi in h, choose the file format (PDF or JPEG) that will be used to send your PC.
If you chose B&W200dpi (B/W200dpi) or B&W200x100 (B/W200x100) in h, choose the file format
(TIFF or PDF) that will be used to send to your PC.
Press OK.
j Do one of the following:
To store another group for broadcasting. Go to b.
To finish storing groups for broadcasting, press Stop/Exit.
2
Fax broadcasting is for black & white only.
15
Page 23

3
Note
Control panel setup 3
LAN menu 3
Before using your Brother product in a network environment, you need to configure the correct TCP/IP
settings.
In this chapter, you will learn how to configure the network settings using the control panel, located on the
front of the machine.
The LAN menu selections of the control panel allow you to set up the Brother machine for your network
configuration. Press Menu, then press a or b to choose LAN. Proceed to the menu selection you wish to
configure. See Function table and default factory settings on page 48.
Please note that the machine is supplied with the BRAdmin Light utility and Remote Setup applications, which
also can be used to configure many aspects of the network.
TCP/IP 3
If you connect the machine with an Ethernet cable to your network, use the Wired menu selections. If you
connect the machine to a wireless Ethernet network, use the WLAN menu selections.
3
This menu has ten sections: BOOT Method, IP Address, Subnet Mask, Gateway, Node Name,
WINS Config, WINS Server, DNS Server, APIPA and IPv6.
BOOT Method 3
This selection controls how the machine obtains an IP address. The default setting is Auto.
If you do not want your print server configured via DHCP, BOOTP or RARP, you must set the BOOT
Method to Static so that the print server has a static IP address. This will prevent the print server from
trying to obtain an IP address from any of these systems. To change the BOOT Method, use the machine’s
control panel, BRAdmin Light utility, Remote Setup or Web Based Management (web browser).
a Press Menu.
b Press a or b to choose LAN.
Press OK.
(MFC-7440N and MFC-7840N) Go to d.
(MFC-7840W) Go to c.
c (MFC-7840W only)
(For Wired) Press a or b to choose Wired.
(For Wireless) Press a or b to choose WLAN.
Press OK.
d Press a or b to choose TCP/IP.
Press OK.
16
Page 24

e Press a or b to choose BOOT Method.
Press OK.
Control panel setup
f Press a or b to choose Auto
1
, Static2, RARP3, BOOTP4 or DHCP5.
Press OK.
If you chose Auto, RARP, BOOTP or DHCP, go to g.
If you chose Static, go to h.
g Enter how many times the machine tries to obtain the IP address. We recommend you to enter 3 or more.
Press OK.
h Press Stop/Exit.
1
Auto mode
In this mode, the machine will scan the network for a DHCP server, if it can find one, and if the DHCP server is configured to allocate an IP address
to the machine, then the IP address supplied by the DHCP server will be used. If no DHCP server is available, then the machine will scan for a
BOOTP server. If a BOOTP server is available, and it is configured correctly, the machine will take its IP address from the BOOTP server. If a
BOOTP server is not available, the machine will scan for a RARP server. If a RARP server also does not answer, the IP Address is set using the
APIPA protocol. After the machine is initially powered ON, it may take a few minutes for the machine to scan the network for a server.
2
Static mode
In this mode the machine’s IP address must be manually assigned. Once entered the IP address is locked to the assigned address.
3
RARP mode
The Brother print server’s IP address can be configured using the Reverse ARP (RARP) facility on your host computer. This is done by editing
the /etc/ethers file (if this file does not exist, you can create it) with an entry similar to the following: (“BRN” below is “BRW” for a wireless
network.)
00:80:77:31:01:07 BRN008077310107
Where the first entry is the Ethernet address of the print server and the second entry is the name of the print server (the name must be the same
as the one you put in the /etc/hosts file).
If the RARP daemon is not already running, start it (depending on the system the command can be rarpd, rarpd -a, in.rarpd -a or
something else; type man rarpd or refer to your system documentation for additional information). To verify that the RARP daemon is running
on a Berkeley UNIX
ps -ax | grep -v grep | grep rarpd
For AT&T UNIX
ps -ef | grep -v grep | grep rarpd
The Brother print server will get the IP address from the RARP daemon when the printer is powered on.
4
BOOTP mode
BOOTP is an alternative to RARP that has the advantage of allowing configuration of the subnet mask and gateway. In order to use BOOTP to
configure the IP address make sure that BOOTP is installed and running on your host computer (it should appear in the /etc/services file on
your host as a real service; type man bootpd or refer to your system documentation for information). BOOTP is usually started up via the
/etc/inetd.conf file, so you may need to enable it by removing the “#” in front of the bootp entry in that file. For example, a typical bootp entry
in the /etc/inetd.conf file would be:
#bootp dgram udp wait /usr/etc/bootpd bootpd -i
Depending on the system, this entry might be called “bootps” instead of “bootp”.
®
based system, type the following command:
®
-based systems, type:
3
17
Page 25

Control panel setup
Note
Note
In order to enable BOOTP, simply use an editor to delete the “#” (if there is no “#”, then BOOTP is already enabled). Then edit the BOOTP
configuration file (usually /etc/bootptab) and enter the name, network type (1 for Ethernet), Ethernet address and the IP address, subnet mask
and gateway of the print server. Unfortunately, the exact format for doing this is not standardized, so you will need to refer to your system
documentation to determine how to enter this information (many UNIX
use for reference). Some examples of typical /etc/bootptab entries include: (“BRN” below is “BRW” for a wireless network.)
BRN008077310107 1 00:80:77:31:01:07 192.168.1.2
and:
BRN008077310107:ht=ethernet:ha=008077310107:\
ip=192.168.1.2:
Certain BOOTP host software implementations will not respond to BOOTP requests if you have not included a download filename in the
configuration file. If this is the case, simply create a null file on the host and specify the name of this file and its path in the configuration file.
As with RARP, the print server will load its IP address from the BOOTP server when the printer is powered on.
5
DHCP mode
Dynamic Host Configuration Protocol (DHCP) is one of several automated mechanisms for IP address allocation. If you have a DHCP server in
®
your network (typically a UNIX
, Windows® 2000/XP, Windows Vista® network) the print server will automatically obtain its IP address from a
DHCP server and register its name with any RFC 1001 and 1002 compliant dynamic name services.
• If you do not want your print server configured via DHCP, BOOTP or RARP, you must set the BOOT Method to static so that the print server has
a static IP address. This will prevent the print server from trying to obtain an IP address from any of these systems. To change the BOOT Method,
use the machine’s control panel LAN menu, BRAdmin applications, Remote Setup or Web Based Management (web browser).
• On smaller networks, the DHCP server may be the router.
®
systems also have template examples in the bootptab file that you can
3
18
Page 26

Control panel setup
IP Address 3
This field displays the current IP address of the machine. If you have chosen a BOOT Method of Static, enter
the IP address that you wish to assign to the machine (check with your network administrator for the IP
address to use). If you have chosen a method other than Static, the machine will attempt to determine its IP
address using the DHCP or BOOTP protocols. The default IP address of your machine will probably be
incompatible with the IP address numbering scheme of your network. We recommend that you contact your
network administrator for an IP address for the network the unit will be connected on.
a Press Menu.
b Press a or b to choose LAN.
Press OK.
(MFC-7440N and MFC-7840N) Go to d.
(MFC-7840W) Go to c.
c (MFC-7840W only)
(For Wired) Press a or b to choose Wired.
(For Wireless) Press a or b to choose WLAN.
Press OK.
3
d Press a or b to choose TCP/IP.
Press OK.
e Press a or b to choose IP Address.
Press OK.
f Press 1 to choose Change.
g Enter the IP address.
Press OK.
h Press Stop/Exit.
Subnet Mask 3
This field displays the current subnet mask used by the machine. If you are not using DHCP or BOOTP to
obtain the subnet mask, enter the desired subnet mask. Check with your network administrator for the subnet
mask to use.
a Press Menu.
b Press a or b to choose LAN.
Press OK.
(MFC-7440N and MFC-7840N) Go to d.
(MFC-7840W) Go to c.
c (MFC-7840W only)
(For Wired) Press a or b to choose Wired.
(For Wireless) Press a or b to choose WLAN.
Press OK.
19
Page 27

Control panel setup
d Press a or b to choose TCP/IP.
Press OK.
e Press a or b to choose Subnet Mask.
Press OK.
f Press 1 to choose Change.
g Enter the Subnet Mask address.
Press OK.
h Press Stop/Exit.
Gateway 3
This field displays the current gateway or router address used by the machine. If you are not using DHCP or
BOOTP to obtain the gateway or router address, enter the address you wish to assign. If you do not have a
gateway or router, leave this field blank. Check with your network administrator if you are unsure.
a Press Menu.
b Press a or b to choose LAN.
Press OK.
(MFC-7440N and MFC-7840N) Go to d.
(MFC-7840W) Go to c.
3
c (MFC-7840W only)
(For Wired) Press a or b to choose Wired.
(For Wireless) Press a or b to choose WLAN.
Press OK.
d Press a or b to choose TCP/IP.
Press OK.
e Press a or b to choose Gateway.
Press OK.
f Press 1 to choose Change.
g Enter the Gateway address.
Press OK.
h Press Stop/Exit.
20
Page 28

Control panel setup
Node Name 3
You can register the machine name on the Network. This name is often referred to as a NetBIOS name; it will
be the name that is registered by the WINS server on your network. Brother recommends the name
“BRNxxxxxxxxxxxx” for a wired network or “BRWxxxxxxxxxxxx” for a wireless network.
a Press Menu.
b Press a or b to choose LAN.
Press OK.
(MFC-7440N and MFC-7840N) Go to d.
(MFC-7840W) Go to c.
c (MFC-7840W only)
(For Wired) Press a or b to choose Wired.
(For Wireless) Press a or b to choose WLAN.
Press OK.
d Press a or b to choose TCP/IP.
Press OK.
e Press a or b to choose Node Name.
Press OK.
f Press 1 to choose Change.
g Enter the Node Name.
Press OK.
h Press Stop/Exit.
WINS Config 3
3
This selection controls how the machine obtains the IP address of the WINS server.
a Press Menu.
b Press a or b to choose LAN.
Press OK.
(MFC-7440N and MFC-7840N) Go to d.
(MFC-7840W) Go to c.
c (MFC-7840W only)
(For Wired) Press a or b to choose Wired.
(For Wireless) Press a or b to choose WLAN.
Press OK.
d Press a or b to choose TCP/IP.
Press OK.
e Press a or b to choose WINS Config.
Press OK.
21
Page 29

f Press a or b to choose Auto or Static.
Press OK.
g Press Stop/Exit.
Control panel setup
Auto
Automatically uses a DHCP request to determine the IP addresses for the primary and secondary WINS
servers. You must set the BOOT Method to Auto for this feature to work.
Static
Uses a specified IP address for the primary and secondary WINS servers.
WINS Server 3
Primary WINS Server IP Address 3
This field specifies the IP address of the primary WINS (Windows® Internet Name Service) server. If set to a
non-zero value, the machine will contact this server to register its name with the Windows
Service.
Secondary WINS Server IP Address
This field specifies the IP address of the secondary WINS server. It is used as a backup to the Primary WINS
server address. If the Primary server is unavailable, the machine still can register itself with a secondary
server. If set to a non-zero value, the machine will contact this server to register its name with the Windows
Internet Name Service. If you have a primary WINS server, but no secondary WINS server, simply leave this
field blank.
®
Internet Name
®
3
3
3
3
a Press Menu.
b Pressa or b to choose LAN.
Press OK.
(MFC-7440N and MFC-7840N) Go to d.
(MFC-7840W) Go to c.
c (MFC-7840W only)
(For Wired) Press a or b to choose Wired.
(For Wireless) Press a or b to choose WLAN.
Press OK.
d Press a or b to choose TCP/IP.
Press OK.
e Press a or b to choose WINS Server.
Press OK.
f Press a or b to choose Primary or Secondary.
Press OK.
22
Page 30

g Press 1 to choose Change.
h Enter the WINS Server address.
Press OK.
i Press Stop/Exit.
Control panel setup
DNS Server 3
Primary DNS Server IP Address 3
This field specifies the IP address of the primary DNS (Domain Name System) server.
Secondary DNS Server IP Address
This field specifies the IP address of the secondary DNS server. It is used as a backup to the Primary DNS
server address. If the Primary server is unavailable, the machine will contact the Secondary DNS server. If
you have a primary DNS server, but no secondary DNS server, simply leave this field blank.
a Press Menu.
b Press a or b to choose LAN.
Press OK.
(MFC-7440N and MFC-7840N) Go to d.
(MFC-7840W) Go to c.
c (MFC-7840W only)
(For Wired) Press a or b to choose Wired.
(For Wireless) Press a or b to choose WLAN.
Press OK.
d Press a or b to choose TCP/IP.
Press OK.
3
3
e Press a or b to choose DNS Server.
Press OK.
f Press a or b to choose Primary or Secondary.
Press OK.
g Press 1 to choose Change.
h Enter the DNS Server address.
Press OK.
i Press Stop/Exit.
23
Page 31

Control panel setup
APIPA 3
The setting of On will cause the print server to automatically allocate a Link-Local IP address in the range
(169.254.1.0 - 169.254.254.255) when the print server cannot obtain an IP address through the BOOT
Method you have set (see BOOT Method on page 16). Choosing Off means the IP address doesn’t change,
when the print server cannot obtain an IP address through the BOOT Method you have set.
a Press Menu.
b Press a or b to choose LAN.
Press OK.
(MFC-7440N and MFC-7840N) Go to d.
(MFC-7840W) Go to c.
c (MFC-7840W only)
(For Wired) Press a or b to choose Wired.
(For Wireless) Press a or b to choose WLAN.
Press OK.
d Press a or b to choose TCP/IP.
Press OK.
e Press a or b to choose APIPA.
Press OK.
f Press a or b to choose On or Off.
Press OK.
g Press Stop/Exit.
IPv6 3
3
This machine is compatible with IPv6, the next generation internet protocol. If you want to use the IPv6
protocol, choose On. The default setting for IPv6 is Off. For more information on the IPv6 protocol, visit
http://solutions.brother.com
.
a Press Menu.
b Press a or b to choose LAN.
Press OK.
(MFC-7440N and MFC-7840N) Go to d.
(MFC-7840W) Go to c.
c (MFC-7840W only)
(For Wired) Press a or b to choose Wired.
(For Wireless) Press a or b to choose WLAN.
Press OK.
d Press a or b to choose TCP/IP.
Press OK.
24
Page 32

Control panel setup
Note
Note
e Press a or b to choose IPv6.
Press OK.
f Press a or b to choose On or Off.
Press OK.
g Press Stop/Exit.
After you choose IPv6 On, this setting will be applied to both the wired and wireless LAN interface.
Ethernet (wired network only) 3
Ethernet link mode. Auto allows the print server to operate in 100BASE-TX full or half duplex, or in 10BASE-T
full or half duplex mode by auto negotiation.
You can fix the server link mode to 100BASE-TX Full Duplex (100B-FD) or Half Duplex (100B-HD) and
10BASE-T Full Duplex (10B-FD) or Half Duplex (10B-HD). This change is valid after the print server has been
reset (default is Auto).
3
If you incorrectly set this value, you may not be able to communicate with your print server.
a Press Menu.
b Press a or b to choose LAN.
Press OK.
c Press a or b to choose Wired.
Press OK.
d Press a or b to choose Ethernet.
Press OK.
e Press a or b to choose Auto, 100B-FD, 100B-HD, 10B-FD or 10B-HD.
Press OK.
f Press Stop/Exit.
Setup Wizard (MFC-7840W wireless network only) 3
The Setup Wizard guides you through the wireless network configuration. For more information, see the
Quick Setup Guide or Network User’s Guide on the CD-ROM we have provided with the machine.
25
Page 33

Control panel setup
SES/WPS/AOSS (MFC-7840W wireless network only) 3
If your wireless access point supports either SecureEasySetup™, Wi-Fi Protected Setup™ (PBC1) or
AOSS™ (one-push method), you can configure the machine easily without a computer. Your Brother
machine has the SES/WPS/AOSS menu on the control panel. This feature automatically detects which mode
your access point uses, SecureEasySetup™, Wi-Fi Protected Setup™ or AOSS™. By pushing a button on
the wireless LAN router / access point and the machine, you can setup the wireless network and security
settings. See the user’s guide for your wireless LAN router / access point for instructions on how to access
one-push mode. For more information, see the Quick Setup Guide and Network User’s Guide on the CDROM we have provided with the machine.
1
Push Button Configuration
WPS w/PIN Code (MFC-7840W wireless network only) 3
If your wireless access point supports Wi-Fi Protected Setup™ (PIN Method), you can configure the machine
easily without a computer. The PIN (Personal Identification Number) Method is one of the connection
methods developed by the Wi-Fi Alliance. By inputting a PIN which is created by an Enrollee (your machine)
to the Registrar (a device that manages the wireless LAN), you can setup the wireless network and security
settings. See the user’s guide for your wireless LAN router / access point for instructions on how to access
the Wi-Fi Protected Setup™ mode. For more information, see the Network User’s Guide on the CD-ROM we
have provided with the machine.
3
WLAN Status (MFC-7840W wireless network only) 3
Status 3
This field displays the current wireless network status; Active(11b), Active(11g), Wired LAN Active,
WLAN OFF, AOSS Active or Connection NG / Connection error.
a Press Menu.
b Press a or b to choose LAN.
Press OK.
c Press a or b to choose WLAN.
Press OK.
d Press a or b to choose WLAN Status.
Press OK.
e Press a or b to choose Status.
Press OK.
f The current wireless network status will be displayed; Active(11b), Active(11g), Wired LAN
Active, WLAN OFF, AOSS Active or Connection NG / Connection error.
g Press Stop/Exit.
26
Page 34

Control panel setup
Signal 3
This field displays the current wireless network signal strength; Strong, Medium, Weak or None.
a Press Menu.
b Press a or b to choose LAN.
Press OK.
c Press a or b to choose WLAN.
Press OK.
d Press a or b to choose WLAN Status.
Press OK.
e Press a or b to choose Signal.
Press OK.
f The current wireless network signal strength will be displayed; Strong, Medium, Weak or None.
g Press Stop/Exit.
3
SSID 3
This field displays the current wireless network SSID. The display shows up to 32 characters of the SSID
name.
a Press Menu.
b Press a or b to choose LAN.
Press OK.
c Press a or b to choose WLAN.
Press OK.
d Press a or b to choose WLAN Status.
Press OK.
e Press a or b to choose SSID.
Press OK.
f The current wireless network SSID will be displayed.
g Press Stop/Exit.
Comm.Mode 3
This field displays the current wireless network communication mode; Ad-hoc or Infrastructure.
a Press Menu.
b Press a or b to choose LAN.
Press OK.
27
Page 35

Control panel setup
c Press a or b to choose WLAN.
Press OK.
d Press a or b to choose WLAN Status.
Press OK.
e Press a or b to choose Comm. Mode.
Press OK.
f The current wireless network communication mode will be displayed; Ad-hoc or Infrastructure.
g Press Stop/Exit.
Set to Default (MFC-7840W only) 3
The Set to Default allows you to reset each wired or wireless settings to the default. If you want to reset
both wired and wireless settings, see Restoring the network settings to factory default on page 47.
a Press Menu.
b Press a or b to choose LAN.
Press OK.
3
c (For Wired) Press a or b to choose Wired.
(For Wireless) Press a or b to choose WLAN.
Press OK.
d Press a or b to choose Set to Default.
Press OK.
e Press 1 to choose Reset.
f Press Stop/Exit.
28
Page 36

Control panel setup
Wired Enable (MFC-7840W wired network only) 3
If you want to use the wired network connection, set Wired Enable to On.
a Press Menu.
b Press a or b to choose LAN.
Press OK.
c Press a or b to choose Wired.
Press OK.
d Press a or b to choose Wired Enable.
Press OK.
e Press a or b to choose On or Off.
Press OK.
f Press Stop/Exit.
3
WLAN Enable (MFC-7840W wireless network only) 3
If you want to use the wireless network connection, set WLAN Enable to On.
a Press Menu.
b Press a or b to choose LAN.
Press OK.
c Press a or b to choose WLAN.
Press OK.
d Press a or b to choose WLAN Enable.
Press OK.
e Press a or b to choose On or Off.
Press OK.
f Press Stop/Exit.
29
Page 37

Control panel setup
Setup Internet (from the Setup IFAX menu) 3
This menu has nine selections: Mail Address, SMTP Server, SMTP Port, Auth. for SMTP,
POP3 Server, POP3 Port, Mailbox Name, Mailbox Pwd and APOP. As this section requires you to
enter a lot of text characters, you may find that it is more convenient to use Web Based Management and
your favorite web browser to configure these settings (see the Network User’s Guide on the CD-ROM we
have provided with the machine). For more details about Internet fax, see Internet fax on page 1.
You can also access the character you want by repeatedly pressing the appropriate number key using the
machine’s control panel. For more information, see Entering Text on page 58.
Mail Address 3
a Press Menu.
b Press a or b to choose LAN.
Press OK.
c Press a or b to choose Setup IFAX.
Press OK.
3
d Press a or b to choose Setup Internet.
Press OK.
e Press a or b to choose Mail Address.
Press OK.
f Press 1 to change. Enter the mail address.
Press OK.
g Press Stop/Exit.
SMTP Server 3
This field displays the node name or IP address of an SMTP mail server (outgoing E-mail server) on your
network.
(Ex, “mailhost.brothermail.net” or “192.000.000.001”)
a Press Menu.
b Press a or b to choose LAN.
Press OK.
c Press a or b to choose Setup IFAX.
Press OK.
d Press a or b to choose Setup Internet.
Press OK.
e Press a or b to choose SMTP Server.
Press OK.
30
Page 38

Control panel setup
f Press a or b to choose Name or IP Address.
Press OK.
g Enter the SMTP server address (up to 64 characters).
Press OK.
h Press Stop/Exit.
SMTP Port 3
This field displays the SMTP port number (for outgoing E-mails) on your network.
a Press Menu.
b Press a or b to choose LAN.
Press OK.
c Press a or b to choose Setup IFAX.
Press OK.
d Press a or b to choose Setup Internet.
Press OK.
3
e Press a or b to choose SMTP Port.
Press OK.
f Enter the SMTP port number.
Press OK.
g Press Stop/Exit.
Auth. for SMTP 3
You can specify the security method for E-mail notification. For details on security the methods for E-mail
notification, see the Network User’s Guide on the CD-ROM we have provided with the machine.
a Press Menu.
b Press a or b to choose LAN.
Press OK.
c Press a or b to choose Setup IFAX.
Press OK.
d Press a or b to choose Setup Internet.
Press OK.
e Press a or b to choose Auth. for SMTP.
Press OK.
f Press a or b to choose None, SMTP-AUTH or POP bef.SMTP.
Press OK.
31
Page 39

Control panel setup
g If you chose None or POP bef.SMTP in f, go to k.
If you chose SMTP-AUTH in f, go to h.
h Enter the account name for SMTP authentication.
Press OK.
i Enter the account password for SMTP authentication.
Press OK.
j Enter the account password again.
Press OK.
k Press Stop/Exit.
POP3 Server 3
This field displays the node name or IP address of the POP3 server (incoming E-mail server) used by the
Brother machine. This address is necessary for the Internet fax features to function correctly.
(Ex, “mailhost.brothermail.net” or “192.000.000.001”)
a Press Menu.
3
b Press a or b to choose LAN.
Press OK.
c Press a or b to choose Setup IFAX.
Press OK.
d Press a or b to choose Setup Internet.
Press OK.
e Press a or b to choose POP3 Server.
Press OK.
f Press a or b to choose Name or IP Address.
Press OK.
g Enter the POP3 server address (up to 64 characters).
Press OK.
h Press Stop/Exit.
32
Page 40

Control panel setup
POP3 Port 3
This field displays the POP3 port number (for incoming E-mails) used by the Brother machine.
a Press Menu.
b Press a or b to choose LAN.
Press OK.
c Press a or b to choose Setup IFAX.
Press OK.
d Press a or b to choose Setup Internet.
Press OK.
e Press a or b to choose POP3 Port.
Press OK.
f Enter the POP3 port number.
Press OK.
g Press Stop/Exit.
3
Mailbox Name 3
You can specify a mailbox name on the POP3 server where the internet print jobs are to be retrieved.
a Press Menu.
b Press a or b to choose LAN.
Press OK.
c Press a or b to choose Setup IFAX.
Press OK.
d Press a or b to choose Setup Internet.
Press OK.
e Press a or b to choose Mailbox Name.
Press OK.
f Enter the user account name assigned to the Brother machine that will login to the POP3 server (up to
32 characters).
Press OK.
g Press Stop/Exit.
33
Page 41

Control panel setup
Note
Mailbox Pwd 3
You can specify the password for the POP3 server account where the internet print jobs are to be retrieved.
a Press Menu.
b Press a or b to choose LAN.
Press OK.
c Press a or b to choose Setup IFAX.
Press OK.
d Press a or b to choose Setup Internet.
Press OK.
e Press a or b to choose Mailbox Pwd.
Press OK.
f Enter the user password assigned to the machine that will login to the POP3 server (up to 32 characters).
Please note that this password is case sensitive.
Press OK.
3
g Enter the password again.
Press OK.
h Press Stop/Exit.
To set for no password, enter a single space.
APOP 3
You can enable or disable the APOP (Authenticated Post Office Protocol).
a Press Menu.
b Press a or b to choose LAN.
Press OK.
c Press a or b to choose Setup IFAX.
Press OK.
d Press a or b to choose Setup Internet.
Press OK.
e Press a or b to choose APOP.
Press OK.
f Press a or b to choose On or Off.
Press OK.
g Press Stop/Exit.
34
Page 42

Control panel setup
Setup Mail RX (from the Setup IFAX menu) 3
This menu has five selections: Auto Polling, Poll Frequency, Header, Del Error Mail and
Notification.
Auto Polling 3
When set to On, the machine automatically checks the POP3 server for new messages.
a Press Menu.
b Press a or b to choose LAN.
Press OK.
c Press a or b to choose Setup IFAX.
Press OK.
d Press a or b to choose Setup Mail RX.
Press OK.
e Press a or b to choose Auto Polling.
Press OK.
f Press a or b to choose On or Off.
Press OK.
g Press Stop/Exit.
Poll Frequency 3
Sets the interval for checking for new messages on the POP3 server (default is 10Min).
3
a Press Menu.
b Press a or b to choose LAN.
Press OK.
c Press a or b to choose Setup IFAX.
Press OK.
d Press a or b to choose Setup Mail RX.
Press OK.
e Press a or b to choose Poll Frequency.
Press OK.
f Enter the polling frequency (up to 60 minutes).
Press OK.
g Press Stop/Exit.
35
Page 43

Control panel setup
Header 3
This selection allows the contents of the mail header to be printed when the received message is printed.
a Press Menu.
b Press a or b to choose LAN.
Press OK.
c Press a or b to choose Setup IFAX.
Press OK.
d Press a or b to choose Setup Mail RX.
Press OK.
e Press a or b to choose Header.
Press OK.
f Press a or b to choose All, Subject+From+To or None.
Press OK.
g Press Stop/Exit.
3
Del Error Mail 3
When set to On, the machine automatically deletes error mails that the machine cannot receive from the POP
server.
a Press Menu.
b Press a or b to choose LAN.
Press OK.
c Press a or b to choose Setup IFAX.
Press OK.
d Press a or b to choose Setup Mail RX.
Press OK.
e Press a or b to choose Del Error Mail.
Press OK.
f Press a or b to choose On or Off.
Press OK.
g Press Stop/Exit.
36
Page 44

Control panel setup
Notification 3
The notification feature allows a confirmation of receipt message to be transmitted to the sending station
when the Internet Fax has been received.
This feature only works on Internet Fax machines that support the “MDN” specification.
a Press Menu.
b Press a or b to choose LAN.
Press OK.
c Press a or b to choose Setup IFAX.
Press OK.
d Press a or b to choose Setup Mail RX.
Press OK.
e Press a or b to choose Notification.
Press OK.
f Press a or b to choose On, MDN or Off.
Press OK.
3
g Press Stop/Exit.
Setup Mail TX (from the Setup IFAX menu) 3
This menu has three selections: Sender Subject, Size Limit and Notification.
Sender Subject 3
This field displays the subject that is attached to the Internet fax data being sent from the Brother machine to
a computer (default is “Internet Fax Job”).
a Press Menu.
b Press a or b to choose LAN.
Press OK.
c Press a or b to choose Setup IFAX.
Press OK.
d Press a or b to choose Setup Mail TX.
Press OK.
e Press a or b to choose Sender Subject.
Press OK.
f If you want to change the Sender Subject, press 1 to choose change to change the Sender Subject.
Go to g.
If you don’t want to change the Sender Subject, press 2 to choose Exit.
Go to h.
37
Page 45

Control panel setup
g Enter the subject information (up to 40 characters).
Press OK.
h Press Stop/Exit.
Size Limit 3
Some E-mail servers do not allow you to send large E-mail documents (the System Administrator will often
place a limit on the maximum E-mail size). With this function enabled, the machine will display
Out of Memory when trying to send E-mail documents over 1 Mbyte in size. The document will not be sent
and an error report will be printed. The document you are sending should be separated into smaller
documents that will be accepted by the mail server. (For your information, a 42 page document based on the
ITU-T Test Chart #1 test chart is approximately 1 Mbyte in size.)
a Press Menu.
b Press a or b to choose LAN.
Press OK.
c Press a or b to choose Setup IFAX.
Press OK.
d Press a or b to choose Setup Mail TX.
Press OK.
e Press a or b to choose Size Limit.
Press OK.
f Press a or b to choose On or Off.
Press OK.
3
g Press Stop/Exit.
Notification 3
The notification feature allows a confirmation of receipt message to be transmitted to the sending station
when the Internet Fax has been received.
This feature only works on Internet Fax machines that support the “MDN” specification.
a Press Menu.
b Press a or b to choose LAN.
Press OK.
c Press a or b to choose Setup IFAX.
Press OK.
d Press a or b to choose Setup Mail TX.
Press OK.
e Press a or b to choose Notification.
Press OK.
38
Page 46

Control panel setup
f Press a or b to choose On or Off.
Press OK.
g Press Stop/Exit.
Setup Relay (from the Setup IFAX menu) 3
This menu has three selections Rly Broadcast, Relay Domain and Relay Report. For more
information on Relay Broadcast, see Relay broadcasting on page 4 of this User’s Guide.
Rly Broadcast 3
This function allows the machine to receive a document over the Internet, and then relay it to other fax
machines through conventional analog landlines.
a Press Menu.
b Press a or b to choose LAN.
Press OK.
c Press a or b to choose Setup IFAX.
Press OK.
3
d Press a or b to choose Setup Relay.
Press OK.
e Press a or b to choose Rly Broadcast.
Press OK.
f Press a or b to choose On or Off.
Press OK.
g Press Stop/Exit.
39
Page 47

Control panel setup
Relay Domain 3
You can register the Domain Names (Max. 10) that are allowed to request a Relay Broadcast.
a Press Menu.
b Press a or b to choose LAN.
Press OK.
c Press a or b to choose Setup IFAX.
Press OK.
d Press a or b to choose Setup Relay.
Press OK.
e Press a or b to choose Relay Domain.
Press OK.
f Press a or b to choose Relay (01 - 10).
Press OK.
g Enter the Relay Domain name for the Domain that is being allowed to request a Relay Broadcast.
Press OK.
3
h Press Stop/Exit.
Relay Report 3
A Relay Broadcast Report can be printed at the machine that will act as a Relay Station for all Relay
Broadcasts.
Its primary function is to print reports of any relayed broadcasts that have been sent through the machine.
Please note: In order to use this function, you must assign the relay domain in the “Trusted Domains” section
of the Relay function settings.
a Press Menu.
b Press a or b to choose LAN.
Press OK.
c Press a or b to choose Setup IFAX.
Press OK.
d Press a or b to choose Setup Relay.
Press OK.
e Press a or b to choose Relay Report.
Press OK.
f Press a or b to choose On or Off.
Press OK.
g Press Stop/Exit.
40
Page 48

Control panel setup
Note
Scan to E-mail (E-mail server) 3
You can choose the default color file type for the Scan to E-mail (E-mail server) function.
a Press Menu.
b Press a or b to choose LAN.
Press OK.
c Press a or b to choose Scan to E-mail.
Press OK.
d Press a or b to choose Color 150 dpi, Color 300 dpi, Color 600 dpi, Gray 100 dpi,
Gray 200 dpi, Gray 300 dpi, B&W 200 dpi or B&W 200x100 dpi.
Press OK.
e If you chose Color 150 dpi, Color 300 dpi, Color 600 dpi, Gray 100 dpi, Gray 200 dpi
or Gray 300 dpi in d, press a or b to choose PDF or JPEG.
If you chose B&W 200 dpi or B&W 200x100 dpi in d, press a or b to choose PDF or TIFF.
Press OK.
3
f Press Stop/Exit.
How to operate Scan to E-mail (E-mail server) 3
When you choose Scan to E-mail (E-mail Server) you can scan a black and white or color document and send
it directly to an E-mail address from the machine. You can choose PDF or TIFF for Black and White and PDF
or JPEG for color.
Scan to E-mail (E-mail Server) requires SMTP/POP3 mail server support. (See the Network User’s Guide
on the CD-ROM.)
a Put the document face up in the ADF, or face down on the scanner glass.
b Press (Scan).
c Press a or b to choose Scan to E-mail.
Press OK.
d Press a or b to choose your E-mail Server.
Press OK.
Go to f if you have set up only one E-mail server.
e Go to f if you want to change quality settings.
If you want to send your document, press a or b to choose Enter Address.
Press OK and go to j.
41
Page 49

Control panel setup
Note
Note
f Press a or b to choose Change Setting.
Press OK.
If you don’t have to change the quality, press a or b to choose Enter Address.
Press OK and then go to j.
g Press a or b to choose Color 150 dpi, Color 300 dpi, Color 600 dpi, Gray 100 dpi,
Gray 200 dpi, Gray 300 dpi, B&W 200 dpi or B&W 200x100 dpi.
Press OK.
If you chose Color 150 dpi, Color 300 dpi, Color 600 dpi, Gray 100 dpi, Gray 200 dpi
or Gray 300 dpi, go to h.
If you chose B&W 200 dpi or B&W 200x100 dpi, go to i.
h Press a or b to choose PDF or JPEG. Press OK and go to j.
i Press a or b to choose PDF or TIFF. Press OK and go to j.
j The LCD prompts you to enter an address. Enter the destination E-mail address from the dial pad or use
the One Touch key or Speed Dial number. Press Start. The machine starts the scanning process.
You can only choose a One Touch key or Speed Dial number that has an E-mail address registered as
the scan profile.
3
Using One Touch or Speed Dial number 3
You can also scan a document directly to an address you registered in a One Touch or Speed Dial number.
When you scan the document, the settings you registered with the One Touch or Speed Dial will be used for
the quality and the file type. Only One Touch or Speed Dials with an E-mail address registered can be used
when you scan data using One Touch or Speed Dial. (Internet Fax addresses are not available for use.)
a Put the document face up in the ADF, or face down on the scanner glass.
b Press (Scan).
c Choose One Touch or Speed Dial number.
d Press Start. The machine starts the scanning process.
You can store the scan resolution (scan profile) for each E-mail address if you store the E-mail address in
a One Touch or Speed Dial number.
42
Page 50

Control panel setup
Note
Scan to FTP 3
You can choose the default color file type for the Scan to FTP function.
a Press Menu.
b Press a or b to choose LAN.
Press OK.
c Press a or b to choose Scan to FTP.
Press OK.
d Press a or b to choose Color 150 dpi, Color 300 dpi, Color 600 dpi, Gray 100 dpi,
Gray 200 dpi, Gray 300 dpi, B&W 200 dpi or B&W 200x100 dpi.
Press OK.
e If you chose Color 150 dpi, Color 300 dpi, Color 600 dpi, Gray 100 dpi, Gray 200 dpi
or Gray 300 dpi in d, press a or b to choose PDF or JPEG.
If you chose B&W 200 dpi or B&W 200x100 dpi in d, press a or b to choose PDF or TIFF.
Press OK.
3
f Press Stop/Exit.
For how to operate Scan to FTP, see Network Scanning of the Software User’s Guide on the CD-ROM we
have provided with the machine.
43
Page 51

Control panel setup
Note
Fax to Server 3
The Fax to Server feature allows the machine to scan a document and send it over the network to a separate
fax server. The document will then be sent from the server as fax data to the destination fax number over
standard phone lines. When the Fax to Server feature is set to On all automatic fax transmissions from the
machine will be sent to the fax server for fax transmission. You can continue to send a fax directly from the
machine using the manual fax feature (For more information, see Sending a fax manually in the User’s
Guide).
To send a document to the fax server the correct syntax for that server must be used. The destination fax
number must be sent with a prefix and a suffix that match the parameters used by the fax server. In most
cases the syntax for the prefix is “fax=” and the syntax for the suffix would be the domain name of the fax
server E-mail gateway. The suffix must also include the “@” symbol at the beginning of the suffix. The prefix
and the suffix information must be stored in the machine before you can use the fax to server function.
Destination fax numbers can be saved in the One Touch or Speed Dial locations or entered using the dial
pad (up to 20 digit numbers). For example if you wanted to send a document to a destination fax number of
123-555-0001 the following syntax would be used.
3
Your fax server application must support an E-mail gateway.
Setting Fax to Server to On 3
You can store the prefix/suffix address for the fax server in the machine.
a Press Menu.
b Press a or b to choose LAN.
Press OK.
c Press a or b to choose Fax to Server.
Press OK.
d Press a or b to choose On.
Press OK.
e Press a or b to choose Prefix.
Press OK.
f Enter the prefix using dial pad.
g Press OK.
44
Page 52

h Press a or b to choose Suffix.
Note
Press OK.
i Enter the suffix using dial pad.
j Press OK.
Control panel setup
k Press Stop/Exit.
You can enter the prefix and suffix address using up to a total of 40 characters.
How to operate Fax to Server 3
a Place the document in the ADF or on the scanner glass.
b Enter the fax number.
c The machine will send the message over a TCP/IP network to the fax server.
3
45
Page 53

Control panel setup
Time Zone 3
This field displays your country time zone. The time shown is the time difference between your country and
Greenwich Mean Time. For example, the Time Zone for Eastern Time in the USA and Canada is UTC-05:00.
a Press Menu.
b Press a or b to choose LAN.
Press OK.
c Press a or b to choose Time Zone.
Press OK.
d Press a or b to choose the time.
Press OK.
e Press Stop/Exit.
Windows® Time Zone setting 3
You can see the time difference for your country by using the Time Zone setting in Windows®.
a For Windows Vista
Click the Start button, Control Panel, Date and Time, and then Change time zone.
For Windows
Click the Start button, Control Panel, Date and Time, and then choose Time Zone.
For Windows
Click the Start button, Settings, Control Panel, Date/Time, and then choose Time Zone.
®
:
®
XP and Windows Server® 2003:
®
2000:
b Change the data and time. Verify your time zone settings from the pull-down menu (this menu displays
the time difference from GMT).
3
46
Page 54

Control panel setup
Note
Note
Restoring the network settings to factory default 3
If you wish to reset the print server back to its default factory settings (resetting all information such as the
password and IP address information), please follow these steps:
This function restores all wired and wireless network settings to the factory default.
a Press Menu.
b Press a or b to choose LAN.
Press OK.
c Press a or b to choose Factory Reset.
Press OK.
d Press 1 to choose Reset.
e Press 1 to choose Yes for reboot.
f The machine will re-start. You can now reconnect the network cable and configure the network settings
to work with your network.
Printing the Network Configuration List 3
Node name: Node name appears in the Network Configuration List. The default node name is
“BRNxxxxxxxxxxxx” for a wired network or “BRWxxxxxxxxxxxx” for a wireless network.
The Network Configuration List prints a report listing all the current network configuration including the
network print server settings.
3
a Press Reports.
b Press a or b to choose Network Config.
Press OK.
47
Page 55

A
Appendix A
Function table and default factory settings A
MFC-7440N and MFC-7840N A
The factory settings are shown in Bold with an asterisk.
Main menu Submenu Menu selections Options
4.LAN 1.TCP/IP 1.BOOT Method Auto*
Static
RARP
BOOTP
DHCP
(If you choose Auto, RARP, BOOTP or DHCP, you will be
asked to enter how many times the machine tries to obtain
the IP address.)
2.IP Address [000-255].[000-255].[000-255].[000-255]
[000].[000].[000].[000]*
3.Subnet Mask [000-255].[000-255].[000-255].[000-255]
[000].[000].[000].[000]*
4.Gateway [000-255].[000-255].[000-255].[000-255]
[000].[000].[000].[000]*
5.Node Name BRNxxxxxxxxxxxx
(up to 15 characters)
6.WINS Config Auto*
Static
7.WINS Server Primary [000-255].[000-255].
Secondary [000-255].[000-255].
8.DNS Server Primary [000-255].[000-255].
Secondary [000-255].[000-255].
A
1
1
[000-255].[000-255]
[000].[000].[000].[000]*
[000-255].[000-255]
[000].[000].[000].[000]*
[000-255].[000-255]
[000].[000].[000].[000]*
[000-255].[000-255]
[000].[000].[000].[000]*
48
Page 56

Main menu Submenu Menu selections Options
4.LAN
(continued)
1.TCP/IP
(continued)
2.Ethernet — Auto*
9.APIPA On*
Off
0.IPv6 On
Off*
100B-FD
Appendix
3.Setup
IFAX
1.Setup
Internet
100B-HD
10B-FD
10B-HD
1.Mail Address —
2.SMTP Server Name (Up to 64 characters)
IP Address
[000-255].[000-255].
[000-255].[000-255]
3.SMTP Port [00001-65535]
4.Auth. for SMTP None*
SMTP-AUTH
POP bef.SMTP
5.POP3 Server Name (Up to 64 characters)
IP Address
[000-255].[000-255].
[000-255].[000-255]
6.POP3 Port [00001-65535]
A
7.Mailbox Name (Up to 32 characters)
8.Mailbox Pwd (Up to 32 characters)
9.APOP On
Off*
2.Setup Mail RX 1.Auto Polling On*
Off
2.Poll Frequency 10Min*
(01Min to 60Min)
3.Header All
Subject+From+To
None*
49
Page 57

Main menu Submenu Menu selections Options
4.LAN
(continued)
3.Setup
IFAX
(continued)
2.Setup Mail RX
(continued)
3.Setup Mail TX 1.Sender Subject (Up to 40 characters)
4.Setup Relay 1.Rly Broadcast On
4.Del Error Mail On*
5.Notification On
2.Size Limit On
3.Notification On
2.Relay Domain RelayXX:
Appendix
Off
MDN
Off*
A
Off*
Off*
Off*
4.Scan to
E-mail
5.Scan to
FTP
3.Relay Report On
— Color 150 dpi*
Color 300 dpi
Color 600 dpi
Gray 100 dpi
Gray 200 dpi
Gray 300 dpi
B&W 200 dpi
B&W 200x100 dpi
— Color 150 dpi*
Color 300 dpi
Color 600 dpi
Gray 100 dpi
Gray 200 dpi
Gray 300 dpi
B&W 200 dpi
B&W 200x100 dpi
Off*
(If you choose Color option)
PDF*
JPEG
(If you choose Gray option)
PDF
JPEG*
(If you choose B&W option)
PDF*
TIFF
(If you choose Color option)
PDF*
JPEG
(If you choose Gray option)
PDF
JPEG*
(If you choose B&W option)
PDF*
TIFF
50
Page 58

Main menu Submenu Menu selections Options
4.LAN
(continued)
6.Fax to
Server
7.Time
Zone
0.Factory
Reset
—— On
Off*
—— UTC+XX:XX
UTC-XX:XX
1.Reset 1.Yes
2.No
2.Exit —
1
On connection to the network, the machine will automatically set the IP address and Subnet Mask to values appropriate for your network.
Appendix
A
51
Page 59

Appendix
MFC-7840W A
The factory settings are shown in Bold with an asterisk.
Main Menu Submenu Menu Selections Options
5.LAN 1.Wired 1.TCP/IP 1.BOOT Method Auto*
Static
RARP
BOOTP
DHCP
(If you choose Auto, RARP, BOOTP
or DHCP, you will be asked to enter
how many times the machine tries to
obtain the IP address.)
2.IP Address [000-255].[000-255].
[000-255].[000-255]
[000].[000].[000].[000]*
3.Subnet Mask [000-255].[000-255].
[000-255].[000-255]
[000].[000].[000].[000]*
4.Gateway [000-255].[000-255].
[000-255].[000-255]
1
1
A
[000].[000].[000].[000]*
5.Node Name BRNxxxxxxxxxxxx
(up to 15 characters)
6.WINS Config Auto*
Static
7.WINS Server (Primary)
[000-255].[000-255].
[000-255].[000-255]
[000].[000].[000].[000]*
(Secondary)
[000-255].[000-255].
[000-255].[000-255]
[000].[000].[000].[000]*
52
Page 60

Main Menu Submenu Menu Selections Options
5.LAN
(continued)
1.Wired
(continued)
1.TCP/IP
(continued)
8.DNS Server (Primary)
[000-255].[000-255].
[000-255].[000-255]
[000].[000].[000].[000]*
(Secondary)
[000-255].[000-255].
[000-255].[000-255]
[000].[000].[000].[000]*
9.APIPA On*
Off
0.IPv6 On
Off*
2.Ethernet — Auto*
100B-FD
100B-HD
Appendix
A
10B-FD
10B-HD
3.Set to Default 1.Reset —
2.Exit —
4.Wired Enable — On*
Off
2.WLAN 1.TCP/IP 1.BOOT Method Auto*
Static
RARP
BOOTP
DHCP
(If you choose Auto, RARP, BOOTP
or DHCP, you will be asked to enter
how many times the machine tries to
obtain the IP address.)
2.IP Address [000-255].[000-255].
[000-255].[000-255]
[000].[000].[000].[000]*
3.Subnet Mask [000-255].[000-255].
[000-255].[000-255]
[000].[000].[000].[000]*
1
1
53
Page 61

Main Menu Submenu Menu Selections Options
5.LAN
(continued)
2.WLAN
(continued)
1.TCP/IP
(continued)
4.Gateway [000-255].[000-255].
[000-255].[000-255]
[000].[000].[000].[000]*
5.Node Name BRWxxxxxxxxxxxx
(up to 15 characters)
6.WINS Config Auto*
Static
7.WINS Server (Primary)
[000-255].[000-255].
[000-255].[000-255]
[000].[000].[000].[000]*
(Secondary)
[000-255].[000-255].
[000-255].[000-255]
[000].[000].[000].[000]*
8.DNS Server (Primary)
[000-255].[000-255].
[000-255].[000-255]
[000].[000].[000].[000]*
Appendix
A
(Secondary)
[000-255].[000-255].
[000-255].[000-255]
[000].[000].[000].[000]*
9.APIPA On*
Off
0.IPv6 On
Off*
2.Setup Wizard ——
3.SES/WPS/AOSS ——
4.WPS w/PIN Code ——
5.WLAN Status 1.Status Active(11b)
Active(11g)
Wired LAN Active
WLAN OFF
AOSS Active
Connection NG
or
Connection error
54
Page 62

Main Menu Submenu Menu Selections Options
5.LAN
(continued)
2.WLAN
(continued)
5.WLAN Status
(continued)
2.Signal Strong
Medium
Weak
None
3.SSID —
Appendix
3.Setup
IFAX
4.Comm. Mode Ad-hoc
Infrastructure
6.Set to Default 1.Reset —
2.Exit —
7.WLAN Enable — On
Off*
1.Setup Internet 1.Mail Address —
2.SMTP Server Name (Up to 64 characters)
IP Address
[000-255].[000-255].
[000-255].[000-255]
3.SMTP Port [00001-65535]
4.Auth. for SMTP None*
SMTP-AUTH
POP bef.SMTP
5.POP3 Server Name (Up to 64 characters)
IP Address
[000-255].[000-255].
[000-255].[000-255]
6.POP3 Port [00001-65535]
A
7.Mailbox Name (Up to 32 characters)
8.Mailbox Pwd (Up to 32 characters)
9.APOP On
Off*
2.Setup Mail RX 1.Auto Polling On*
Off
55
Page 63

Main Menu Submenu Menu Selections Options
5.LAN
(continued)
3.Setup
IFAX
(continued)
4.Scan to
E-mail
2.Setup Mail RX
(continued)
3.Setup Mail TX 1.Sender Subject (Up to 40 characters)
4.Setup Relay 1.Rly Broadcast On
— Color 150 dpi*
2.Poll Frequency 10Min*
(01Min to 60Min)
3.Header All
Subject+From+To
None*
4.Del Error Mail On*
Off
5.Notification On
MDN
Off*
2.Size Limit On
Off*
3.Notification On
Off*
Off*
2.Relay Domain RelayXX:
3.Relay Report On
Off*
(If you choose Color option)
Color 300 dpi
Color 600 dpi
Gray 100 dpi
Gray 200 dpi
Gray 300 dpi
B&W 200 dpi
B&W 200x100 dpi
PDF*
JPEG
(If you choose Gray option)
PDF
JPEG*
(If you choose B&W option)
PDF*
TIFF
Appendix
A
56
Page 64

Main Menu Submenu Menu Selections Options
5.LAN
(continued)
5.Scan to
FTP
— Color 150 dpi*
Color 300 dpi
Color 600 dpi
Gray 100 dpi
Gray 200 dpi
Gray 300 dpi
B&W 200 dpi
B&W 200x100 dpi
(If you choose Color option)
PDF*
JPEG
(If you choose Gray option)
PDF
JPEG*
(If you choose B&W option)
PDF*
TIFF
6.Fax to
Server
—— On
Off*
7.Time Zone —— UTC+XX:XX
UTC-XX:XX
0.
Factory
Reset
1.Reset — 1.Yes
2.No
2.Exit ——
Appendix
A
1
On connection to the network, the machine will automatically set the IP address and Subnet Mask to values appropriate for your network.
57
Page 65

Appendix
Entering Text A
When setting certain menu selections, such as the E-mail address, you will need to type text characters. The
dial pad keys have letters printed on them. The keys: 0, # and l do not have printed letters because they are
used for special characters.
Press the appropriate dial pad key the required number of times to access the characters below:
For setting an E-mail address, Scan to FTP menu options and Setup IFAX menu options
Press
Key
1 @. / 1@. / 1@
2 abcABC2ab
3 defDEF3de
4 ghiGHI4gh
5 jklJKL5jk
6 mnoMNO6mn
7 pqr sPQRS7
8 tuvTUV8tu
9 wx yzWXYZ9
one
time
two
times
three
times
four
times
five
times
six
times
seven
times
eight
times
nine
times
For setting other menu selections
Press
Key
2 ABC2A
3 DEF3D
4 GH I 4G
5 JKL5J
6 MNO6M
7 PQRS7
8 TUV8T
9 WX YZ 9
one
time
two
times
three
times
four
times
five
times
A
Inserting spaces
To enter a space in a fax number, press c once between numbers. To enter a space in a name, press c twice
between characters.
Making corrections
If you entered a letter incorrectly and want to change it, press d to move the cursor to the incorrect character,
and then press Clear/Back.
58
A
A
Page 66

Appendix
Repeating letters A
To enter a character on the same key as the previous character, press c to move the cursor right before
pressing the key again.
Special characters and symbols
Press l, # or 0, and then press d or c to move the cursor to the symbol or character you want.
Press OK to choose it. The symbols and characters below will appear depending on your menu selection.
Press l for (space) ! “ # $ % & ’ ( ) l + , - . / m
Press # for : ; < = > ? @ [ ] ^ _ ¥ ~ ‘ | { }
Press 0 for (For USA) É À È Ê Î Ç Ë Ö 0
(For UK) Ä Ë Ö Ü À Ç È É 0
A
A
59
Page 67

B
Index
A
AOSS ........................................................................ 26
....................................................................... 24
APIPA
B
BOOTP ..................................................................... 17
Broadcasting
setting up groups for
............................................................. 13
.............................................. 14
D
DHCP ........................................................................ 18
Dialing
a pause
groups (broadcasting)
DNS server
.................................................................... 9
............................................ 13
............................................................... 23
F
Factory default .......................................................... 47
Fax, stand-alone
sending
broadcasting
....................................................... 13
G
Gateway .................................................................... 20
Groups for broadcasting
........................................... 14
I
IP address ................................................................. 19
........................................................................... 24
IPv6
N
Network Configuration List ........................................ 47
Node name
............................................................... 21
O
One touch
changing
setting up
................................................................ 12
................................................................. 9
Q
Quick dial .................................................................... 9
broadcasting
using groups
group dial
changing
setting up groups for broadcasting
one touch dial
changing
custom scan profile
setting up
speed dial
changing
custom scan profile
setting up
.......................................................... 13
....................................................... 13
............................................................. 12
..................... 14
............................................................. 12
............................................... 9
.............................................................. 9
............................................................. 12
............................................. 11
............................................................ 11
R
RARP ........................................................................ 17
Redial/Pause key
Restoring the network settings
........................................................ 9
.................................. 47
S
Search/Speed Dial key ............................................. 14
SecureEasySetup
Speed dial
changing
setting up
Subnet mask
................................................................ 12
..................................................... 26
............................................................... 11
............................................................. 19
T
TCP/IP ...................................................................... 16
Text
entering
special characters
Trademarks
.................................................................. 58
.................................................. 59
.................................................................. i
W
Wi-Fi Protected Setup ............................................... 26
WINS Config
WINS Server
............................................................. 21
............................................................. 22
B
P
PBC ........................................................................... 26
PIN Method
............................................................... 26
60
 Loading...