

Page 1

Online User's Guide
MFC-L8610CDW
MFC-L8900CDW
MFC-L8895CDW
MFC-L8905CDW
© 2017 Brother Industries, Ltd. All rights reserved.
Page 2

Home > Table of Contents
Table of Contents
Before You Use Your Brother Machine ............................................................................................... 1
Definitions of Notes ........................................................................................................................................ 2
Notice - Disclaimer of Warranties (USA and Canada) ................................................................................... 3
Trademarks .................................................................................................................................................... 4
Important Note ...............................................................................................................................................5
Introduction to Your Brother Machine................................................................................................. 6
Before Using Your Machine ........................................................................................................................... 7
Control Panel Overview .................................................................................................................................8
Touchscreen LCD Overview........................................................................................................................... 9
How to Navigate the touchscreen LCD ........................................................................................................ 16
Settings Screen Overview............................................................................................................................19
Setting the Main Home Screen .................................................................................................................... 20
Customization of Your Machine ................................................................................................................... 21
Access Brother Utilities (Windows) .............................................................................................................. 22
Uninstall the Brother Software and Drivers (Windows) ...................................................................... 24
Paper Handling.................................................................................................................................... 25
Load Paper................................................................................................................................................... 26
Load and Print Using the Paper Tray ................................................................................................. 27
Load and Print Using the Multi‑purpose Tray (MP Tray) .................................................................... 31
Paper Settings.............................................................................................................................................. 40
Change the Paper Size and Paper Type............................................................................................ 41
Select the Tray to Be Used For Printing............................................................................................. 42
Change the Check Paper Size Setting............................................................................................... 43
Recommended Print Media ......................................................................................................................... 44
Load Documents .......................................................................................................................................... 45
Load Documents in the Automatic Document Feeder (ADF) ............................................................. 46
Load Documents on the Scanner Glass............................................................................................. 48
Unscannable and Unprintable Areas ...........................................................................................................49
Using Special Paper..................................................................................................................................... 50
Print ...................................................................................................................................................... 51
Print from Your Computer (Windows)........................................................................................................... 52
Print a Document (Windows).............................................................................................................. 53
Print Settings (Windows) .................................................................................................................... 55
Secure Print (Windows)...................................................................................................................... 59
Change the Default Print Settings (Windows) .................................................................................... 60
Print a Document Using the BR-Script3 Printer Driver (PostScript® 3™ Language Emulation)
(Windows) .......................................................................................................................................... 62
Monitor the Status of the Machine from Your Computer (Windows) .................................................. 63
Print from Your Computer (Mac) ..................................................................................................................64
Print a Document (Mac) ..................................................................................................................... 65
Print Options (Mac) ............................................................................................................................ 66
Secure Print (Mac) ............................................................................................................................. 72
Print a Document Using the BR-Script3 Printer Driver (PostScript® 3™ language emulation)
(Mac) ..................................................................................................................................................73
Monitor the Status of the Machine from Your Computer (Mac) .......................................................... 74
i
Page 3

Home > Table of Contents
Cancel a Print Job........................................................................................................................................76
Test Print ...................................................................................................................................................... 77
Scan...................................................................................................................................................... 78
Scan Using the Scan Button on Your Brother Machine ............................................................................... 79
Scan Photos and Graphics................................................................................................................. 80
Save Scanned Data to a Folder as a PDF File .................................................................................. 82
Save Scanned Data to a USB Flash Drive......................................................................................... 84
Scan to an Editable Text File (OCR) .................................................................................................. 86
Scan to Email Attachment .................................................................................................................. 88
Send Scanned Data to an Email Server............................................................................................. 90
Scan to FTP ....................................................................................................................................... 92
Scan to SSH FTP (SFTP) .................................................................................................................. 97
Scan to Network (Windows) ............................................................................................................. 105
Scan to SharePoint ...........................................................................................................................111
Web Services for Scanning on Your Network (Windows 7, Windows 8 and Windows 10) .............. 116
Change Scan Button Settings from ControlCenter4 (Windows)....................................................... 120
Change Scan Button Settings from ControlCenter2 (Mac) .............................................................. 124
Change Scan Button Settings from Brother iPrint&Scan ................................................................ 128
Configure Certificate for Signed PDF ............................................................................................... 129
Disable Scanning from Your Computer ............................................................................................ 130
Scan from Your Computer (Windows)........................................................................................................131
Scan Using ControlCenter4 Home Mode (Windows) ....................................................................... 132
Scan Using ControlCenter4 Advanced Mode (Windows)................................................................. 149
Scan Using Brother iPrint&Scan (Windows/Mac)............................................................................. 165
Scan Using Nuance™ PaperPort™ 14SE or Other Windows Applications....................................... 166
Scan Using Windows Photo Gallery or Windows Fax and Scan...................................................... 171
Scan from Your Computer (Mac)................................................................................................................ 174
Scan Using ControlCenter2 (Mac) ................................................................................................... 175
Scan Using TWAIN-Compliant Applications (Mac)........................................................................... 190
TWAIN Driver Settings (Mac) ........................................................................................................... 192
Configure Scan Settings Using Web Based Management......................................................................... 194
Set the Scan File Name Using Web Based Management................................................................ 195
Set the Scan Job Email Report Using Web Based Management .................................................... 196
Copy ................................................................................................................................................... 197
Copy a Document ......................................................................................................................................198
Enlarge or Reduce Copied Images ............................................................................................................ 200
Make N in 1 Copies Using the Page Layout Feature ................................................................................. 201
Sort Copies ................................................................................................................................................203
Copy an ID Card ........................................................................................................................................204
Copy on Both Sides of the Paper (2-sided Copy) ...................................................................................... 205
Copy Options .............................................................................................................................................207
Fax ...................................................................................................................................................... 209
Send a Fax.................................................................................................................................................210
Send a Fax ....................................................................................................................................... 211
Send a 2-sided Fax from the ADF.................................................................................................... 213
Send a Fax Manually........................................................................................................................ 214
Send a Fax at the End of a Conversation ........................................................................................ 215
ii
Page 4

Home > Table of Contents
Send the Same Fax to More than One Recipient (Broadcasting) .................................................... 216
Send a Fax in Real Time.................................................................................................................. 218
Send a Fax at a Specified Time (Delayed Fax)................................................................................ 219
Add a Cover Page to Your Fax.........................................................................................................220
Cancel a Fax in Progress ................................................................................................................. 223
Check and Cancel a Pending Fax.................................................................................................... 224
Fax Options ...................................................................................................................................... 225
Receive a Fax ............................................................................................................................................ 226
Receive Mode Settings .................................................................................................................... 227
Memory Receive (Remote Fax) Options .......................................................................................... 237
Remote Fax Retrieval....................................................................................................................... 245
Voice Operations and Fax Numbers .......................................................................................................... 250
Voice Operations.............................................................................................................................. 251
Store Fax Numbers ..........................................................................................................................259
Set up Groups for Broadcasting ....................................................................................................... 263
Dial Access Codes and Credit Card Numbers ................................................................................. 267
Telephone Services and External Devices................................................................................................. 268
Voice Mail......................................................................................................................................... 269
Distinctive Ring................................................................................................................................. 270
External TAD (Telephone Answering Device)................................................................................... 274
External and Extension Telephones ................................................................................................. 277
Multi-line Connections (PBX) ........................................................................................................... 283
Fax Reports................................................................................................................................................ 284
Print a Transmission Verification Report .......................................................................................... 285
Print a Fax Journal ........................................................................................................................... 286
PC-FAX ...................................................................................................................................................... 287
PC-FAX for Windows ....................................................................................................................... 288
PC-FAX for Mac .............................................................................................................................. 311
Print Data Directly from a USB Flash Drive .................................................................................... 314
Compatible USB Flash Drives.................................................................................................................... 315
Print Data Directly from a USB Flash Drive or Digital Camera Supporting Mass Storage.........................316
Create a PRN File for Direct Printing (Windows) ....................................................................................... 318
Network .............................................................................................................................................. 319
Supported Basic Network Features ........................................................................................................... 320
Network Management Software and Utilities ............................................................................................. 321
Learn about Network Management Software and Utilities ............................................................... 322
Additional Methods of Configuring Your Brother Machine for a Wireless Network ....................................323
Before Configuring Your Brother Machine for a Wireless Network................................................... 324
Configure Your Machine for a Wireless Network..............................................................................325
Configure Your Machine for a Wireless Network Using the One Push Method of Wi-Fi Protected
Setup™ (WPS).................................................................................................................................. 326
Configure Your Machine for a Wireless Network Using the PIN Method of Wi-Fi Protected
Setup™ (WPS).................................................................................................................................. 327
Configure Your Machine for a Wireless Network Using the Machine's Control Panel Setup Wizard330
Configure Your Machine for a Wireless Network When the SSID Is Not Broadcast ........................ 332
Configure Your Machine for an Enterprise Wireless Network .......................................................... 334
Use Wi-Fi Direct®............................................................................................................................. 337
iii
Page 5

Home > Table of Contents
Advanced Network Features......................................................................................................................346
Print the Network Configuration Report............................................................................................ 347
Configure Your Mail Server Settings Using Web Based Management............................................. 348
Configure the Brother Machine for Email or Internet Fax (I-Fax) ..................................................... 351
I-Fax Options.................................................................................................................................... 366
Use the Send Fax to Server Feature................................................................................................ 371
Print the WLAN Report..................................................................................................................... 375
Configure and Operate LDAP Search .............................................................................................. 378
Synchronize Time with the SNTP Server Using Web Based Management ..................................... 381
Technical Information for Advanced Users................................................................................................. 385
Gigabit Ethernet (Wired Network Only) ............................................................................................ 386
Reset the Network Settings to the Factory Settings......................................................................... 388
Security .............................................................................................................................................. 389
Lock the Machine Settings ......................................................................................................................... 390
Setting Lock Overview...................................................................................................................... 391
Network Security Features.........................................................................................................................396
Before Using Network Security Features ......................................................................................... 397
Secure Function Lock 3.0................................................................................................................. 398
Use Active Directory Authentication ................................................................................................. 405
Use LDAP Authentication................................................................................................................. 410
Manage Your Network Machine Securely Using SSL/TLS...............................................................414
Manage Your Network Machine Securely Using IPsec .................................................................... 447
Send or Receive an Email Securely................................................................................................. 465
Use IEEE 802.1x Authentication for a Wired or a Wireless Network ............................................... 471
Store Print Log to Network ............................................................................................................... 476
Mobile/Web Connect......................................................................................................................... 482
Brother Web Connect................................................................................................................................. 483
Brother Web Connect Overview....................................................................................................... 484
Online Services Used with Brother Web Connect............................................................................ 485
Conditions for Using Brother Web Connect...................................................................................... 486
Set Up Brother Web Connect........................................................................................................... 490
Scan and Upload Documents Using Brother Web Connect............................................................. 499
Download and Print Documents Using Brother Web Connect ......................................................... 500
FaxForward to Cloud or E-mail ........................................................................................................ 503
AirPrint .......................................................................................................................................................506
AirPrint Overview.............................................................................................................................. 507
Before Using AirPrint........................................................................................................................ 508
Print Using AirPrint ........................................................................................................................... 511
Scan Using AirPrint ..........................................................................................................................515
Send a Fax Using AirPrint (For MFC Models).................................................................................. 518
Mopria® Print Service................................................................................................................................. 521
Near-Field Communication (NFC).............................................................................................................. 522
Register an External IC Card Reader............................................................................................... 523
Brother iPrint&Scan.......................................................................................................................... 524
Brother iPrint&Scan Overview for Windows and Mac ................................................................................ 525
ControlCenter .................................................................................................................................... 526
ControlCenter4 (Windows).........................................................................................................................527
iv
Page 6

Home > Table of Contents
Change the Operation Mode in ControlCenter4 (Windows) ............................................................ 528
Scan Using ControlCenter4 Home Mode (Windows) ....................................................................... 530
Scan Using ControlCenter4 Advanced Mode (Windows)................................................................. 531
Set Up the Brother Machine Using ControlCenter4 (Windows) ....................................................... 532
Create a Custom Tab Using ControlCenter4 Advanced Mode (Windows)....................................... 534
ControlCenter2 (Mac)................................................................................................................................. 536
Scan Using ControlCenter2 (Mac) ................................................................................................... 537
Set Up the Brother Machine Using ControlCenter2 (Mac) ............................................................... 538
Troubleshooting................................................................................................................................ 540
Error and Maintenance Messages ............................................................................................................. 541
Transfer Your Faxes or Fax Journal Report ..................................................................................... 548
Error Messages When Using the Brother Web Connect Feature .............................................................. 552
Document Jams ......................................................................................................................................... 554
Document is Jammed in the Top of the ADF Unit ............................................................................ 555
Document is Jammed under the Document Cover .......................................................................... 556
Remove Small Scraps of Paper Jammed in the ADF ...................................................................... 557
Paper Jams ................................................................................................................................................ 558
Paper is Jammed in the MP tray ...................................................................................................... 559
Paper is Jammed in the Paper Tray................................................................................................. 560
Paper is Jammed in the Back of the Machine .................................................................................. 562
Paper is Jammed Inside the Machine .............................................................................................. 564
Paper is Jammed underneath the Paper Tray.................................................................................. 567
Printing Problems.......................................................................................................................................569
Improve the Print Quality............................................................................................................................ 572
Telephone and Fax Problems ....................................................................................................................578
Set Dial Tone Detection....................................................................................................................582
Set Telephone Line Compatibility for Interference and VoIP Systems ............................................. 583
Network Problems......................................................................................................................................584
Error Messages ................................................................................................................................ 585
Use the Network Connection Repair Tool (Windows) ...................................................................... 587
Where Can I Find My Brother Machine's Network Settings? ........................................................... 588
I Cannot Complete the Wireless Network Setup Configuration........................................................ 589
My Brother Machine Cannot Print, Scan, or PC-FAX Receive over the Network............................. 591
I Want to Check that My Network Devices are Working Correctly ................................................... 593
AirPrint Problems ....................................................................................................................................... 594
Other Problems .......................................................................................................................................... 595
Check the Machine Information .................................................................................................................597
Reset Your Brother Machine ...................................................................................................................... 598
Reset Functions Overview ............................................................................................................... 599
Routine Maintenance ........................................................................................................................ 600
Replace Supplies ....................................................................................................................................... 601
Replace the Toner Cartridge ............................................................................................................ 603
Replace the Drum Unit ..................................................................................................................... 606
Replace the Belt Unit........................................................................................................................ 610
Replace the Waste Toner Box..........................................................................................................613
Reset the Drum Counter .................................................................................................................. 617
Reset the Belt Unit Counter.............................................................................................................. 618
v
Page 7

Home > Table of Contents
Clean the Machine ..................................................................................................................................... 619
Clean the Scanner............................................................................................................................ 621
Clean the Laser Scanner Windows .................................................................................................. 622
Clean the Touchscreen LCD ............................................................................................................ 625
Clean the Corona Wires ................................................................................................................... 626
Clean the Drum Unit......................................................................................................................... 628
Clean the Paper Pick-up Rollers ...................................................................................................... 633
Calibrate Color Output ...............................................................................................................................635
Reset the Machine's Calibration Settings.........................................................................................636
Correct Color Print Alignment (Color Registration) .................................................................................... 637
Check the Remaining Part Life ..................................................................................................................638
Pack and Ship Your Brother Machine ........................................................................................................639
Replace Periodic Maintenance Parts ......................................................................................................... 641
Machine Settings............................................................................................................................... 642
Change Machine Settings from the Control Panel ..................................................................................... 643
In the Event of Power Failure (Memory Storage) ............................................................................. 644
General Settings............................................................................................................................... 645
Save Your Favorite Settings as a Shortcut.......................................................................................662
Print Reports .................................................................................................................................... 666
Settings and Features Tables...........................................................................................................669
Change Machine Settings from Your Computer......................................................................................... 706
Change Machine Settings Using Web Based Management ............................................................ 707
Change the Machine Settings Using Remote Setup ........................................................................ 711
Appendix............................................................................................................................................ 722
Specifications ............................................................................................................................................. 723
How to Enter Text on Your Brother Machine .............................................................................................. 731
Supplies .....................................................................................................................................................732
Important Information About Toner Cartridge Life...................................................................................... 734
Accessories................................................................................................................................................735
Brother Help and Customer Support..........................................................................................................736
vi
Page 8

Home > Before You Use Your Brother Machine
Before You Use Your Brother Machine
• Definitions of Notes
• Notice - Disclaimer of Warranties (USA and Canada)
• Trademarks
• Important Note
1
Page 9
Home > Before You Use Your Brother Machine > Definitions of Notes
Definitions of Notes
We use the following symbols and conventions throughout this User's Guide:
WARNING
CAUTION
IMPORTANT
NOTE
Bold Bold style identifies buttons on the machine's control panel or computer screen.
Italics Italicized style emphasizes an important point or refers you to a related topic.
Courier New
WARNING indicates a potentially hazardous situation which, if not avoided, could
result in death or serious injuries.
CAUTION indicates a potentially hazardous situation which, if not avoided, may
result in minor or moderate injuries.
IMPORTANT indicates a potentially hazardous situation which, if not avoided, may
result in damage to property or loss of product functionality.
NOTE specifies the operating environment, conditions for installation, or special
conditions of use.
Tips icons indicate helpful hints and supplementary information.
Electrical Hazard icons alert you to possible electrical shock.
Fire Hazard icons alert you to the possibility of a fire.
Hot Surface icons warn you not to touch hot machine parts.
Prohibition icons indicate actions you must not perform.
Courier New font identifies messages shown on the machine's LCD.
Related Information
• Before You Use Your Brother Machine
2
Page 10
Home > Before You Use Your Brother Machine > Notice - Disclaimer of Warranties (USA and Canada)
Notice - Disclaimer of Warranties (USA and Canada)
BROTHER’S LICENSOR(S), AND THEIR DIRECTORS, OFFICERS, EMPLOYEES OR AGENTS
(COLLECTIVELY BROTHER’S LICENSOR) MAKE NO WARRANTIES, EXPRESS OR IMPLIED, INCLUDING
WITHOUT LIMITATION THE IMPLIED WARRANTIES OF MERCHANTABILITY AND FITNESS FOR A
PARTICULAR PURPOSE, REGARDING THE SOFTWARE. BROTHER’S LICENSOR(S) DOES NOT
WARRANT, GUARANTEE OR MAKE ANY REPRESENTATIONS REGARDING THE USE OR THE RESULTS
OF THE USE OF THE SOFTWARE IN TERMS OF ITS CORRECTNESS, ACCURACY, RELIABILITY,
CURRENTNESS OR OTHERWISE. THE ENTIRE RISK AS TO THE RESULTS AND PERFORMANCE OF THE
SOFTWARE IS ASSUMED BY YOU. THE EXCLUSION OF IMPLIED WARRANTIES IS NOT PERMITTED BY
SOME STATES IN THE USA AND SOME PROVINCES IN CANADA. THE ABOVE EXCLUSION MAY NOT
APPLY TO YOU.
IN NO EVENT WILL BROTHER’S LICENSOR(S) BE LIABLE TO YOU FOR ANY CONSEQUENTIAL,
INCIDENTAL OR INDIRECT DAMAGES (INCLUDING DAMAGES FOR LOSS OF BUSINESS PROFITS,
BUSINESS INTERRUPTION, LOSS OF BUSINESS INFORMATION, AND THE LIKE) ARISING OUT OF THE
USE OR INABILITY TO USE THE SOFTWARE EVEN IF BROTHER’S LICENSOR HAS BEEN ADVISED OF
THE POSSIBILITY OF SUCH DAMAGES. BECAUSE SOME STATES IN THE USA AND SOME PROVINCES IN
CANADA DO NOT ALLOW THE EXCLUSION OR LIMITATION OF LIABILITY FOR CONSEQUENTIAL OR
INCIDENTAL DAMAGES, THE ABOVE LIMITATIONS MAY NOT APPLY TO YOU. IN ANY EVENT BROTHER’S
LICENSOR’S LIABILITY TO YOU FOR ACTUAL DAMAGES FROM ANY CAUSE WHATSOEVER, AND
REGARDLESS OF THE FORM OF THE ACTION (WHETHER IN CONTRACT, TORT (INCLUDING
NEGLIGENCE), PRODUCT LIABILITY OR OTHERWISE), WILL BE LIMITED TO $50.
Related Information
• Before You Use Your Brother Machine
3
Page 11

Home > Before You Use Your Brother Machine > Trademarks
Trademarks
BROTHER is either a trademark or a registered trademark of Brother Industries, Ltd.
Microsoft, Windows, Windows Server, SharePoint, Internet Explorer, Outlook, PowerPoint, Excel, Active
Directory, OneNote and OneDrive are either registered trademarks or trademarks of Microsoft Corporation in the
United States and/or other countries.
Apple, Mac, macOS, Safari, AirPrint, the AirPrint logo, iPad, iPhone and iPod touch are trademarks of Apple Inc.,
registered in the United States and other countries.
Nuance and PaperPort are trademarks or registered trademarks of Nuance Communications, Inc. or its affiliates
in the United States and/or other countries.
PostScript and PostScript 3 are either registered trademarks or trademarks of Adobe Systems Incorporated in
the United States and/or other countries.
Wi-Fi, Wi-Fi Alliance and Wi-Fi Direct are registered trademarks of Wi-Fi Alliance®.
WPA, WPA2, Wi-Fi CERTIFIED, Wi-Fi Protected Setup and Wi-Fi Protected Setup logo are trademarks of Wi-Fi
Alliance®.
Android, Gmail, Google Drive, Google Chrome, Chrome OS and Google Play are trademarks of Google Inc. Use
of these trademarks is subject to Google Permissions.
Mopria® is a registered trademark and a service mark of Mopria Alliance, Inc. in the United States and other
countries. Unauthorized use is strictly prohibited.
Mozilla and Firefox are registered trademarks of the Mozilla Foundation.
Intel is a trademark of Intel Corporation in the U.S. and/or other countries.
Evernote is a trademark of Evernote Corporation and used under a license.
The Bluetooth® word mark is a registered trademark owned by the Bluetooth SIG, Inc. and any use of such
marks by Brother Industries, Ltd. is under license.
WordPerfect is a registered trademark of Corel Corporation and/or its subsidiaries in Canada, the United States
and/or other countries.
PictBridge is a trademark.
Each company whose software title is mentioned in this manual has a Software License Agreement specific to its
proprietary programs.
Any trade names and product names of companies appearing on Brother products, related documents
and any other materials are all trademarks or registered trademarks of those respective companies.
Related Information
• Before You Use Your Brother Machine
4
Page 12
Home > Before You Use Your Brother Machine > Important Note
Important Note
• Do not use this product outside the country of purchase as it may violate the wireless telecommunication and
power regulations of that country.
• Not all models are available in all countries.
• Windows 10 in this document represents Windows 10 Home, Windows 10 Pro, Windows 10 Education and
Windows 10 Enterprise.
• Windows Server 2008 in this document represents Windows Server 2008 and Windows Server 2008 R2.
• The screens in this User's Guide are for illustration purposes only and may differ from the actual screens.
• Unless otherwise specified, the screens in this manual are from Windows 7 and macOS v10.10.5 Screens on
your computer may vary depending on your operating system.
• The contents of this guide and the specifications of this product are subject to change without notice.
• Not all features are available in countries subject to applicable export restrictions.
Related Information
• Before You Use Your Brother Machine
5
Page 13

Home > Introduction to Your Brother Machine
Introduction to Your Brother Machine
• Before Using Your Machine
• Control Panel Overview
• Touchscreen LCD Overview
• How to Navigate the touchscreen LCD
• Settings Screen Overview
• Setting the Main Home Screen
• Customization of Your Machine
• Access Brother Utilities (Windows)
6
Page 14
Home > Introduction to Your Brother Machine > Before Using Your Machine
Before Using Your Machine
Before attempting any printing operation, confirm the following:
• Make sure you have installed the Brother software and drivers.
• For USB or network cable users: Make sure the interface cable is physically secure.
Simultaneous printing, scanning and faxing
Your machine can print from your computer while sending or receiving a fax into memory or while scanning a
document into the computer. Fax sending will not be stopped during printing from your computer. However, when
the machine is copying or receiving a fax on paper, it pauses the printing operation, and then continues printing
when copying or fax receiving has finished.
Firewall (Windows)
If your computer is protected by a firewall and you are unable to network print, network scan, or PC-FAX, you
may need to configure the firewall settings. If you are using the Windows Firewall and you installed the drivers
using the steps in the installer, the necessary firewall settings have been already set. If you are using any other
personal firewall software, see the User's Guide for your software or contact the software manufacturer.
Related Information
• Introduction to Your Brother Machine
7
Page 15
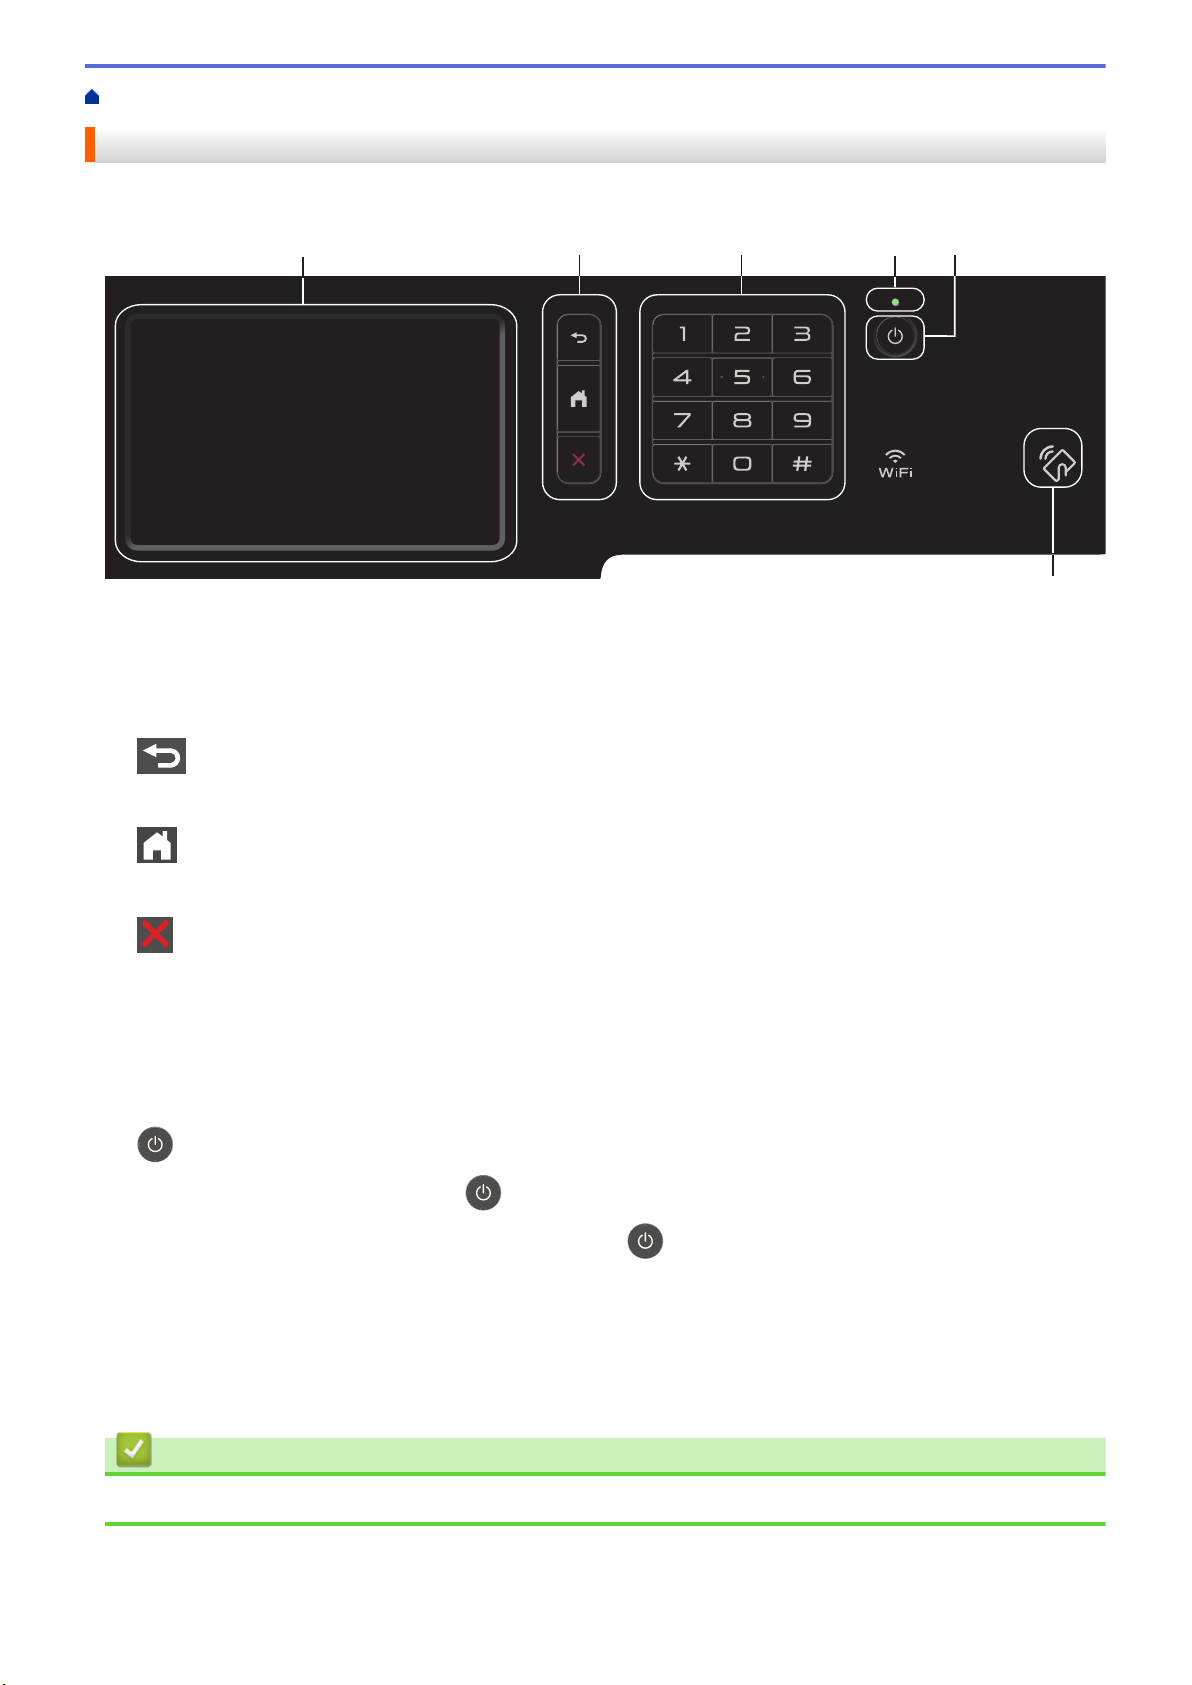
Home > Introduction to Your Brother Machine > Control Panel Overview
1 2 3 4 5
6
Control Panel Overview
The control panel may vary depending on your model.
1. Touchscreen Liquid Crystal Display (LCD)
Access menus and options by pressing them on the touchscreen.
2. Menu Buttons
(Back)
Press to go back to the previous menu.
(Home)
Press to return to the Main Home screen.
(Cancel)
Press to cancel an operation.
3. Dial Pad (Numerical buttons)
Press the Numerical buttons to dial telephone or fax numbers and to enter the number of copies.
4. LED Power Indicator
The LED lights up depending on the machine’s power status.
5.
6. Near Field Communication (NFC) Reader (MFC-L8900CDW/MFC-L8895CDW/MFC-L8905CDW)
Power On/Off
• Turn on the machine by pressing .
• Turn off the machine by pressing and holding down
seconds before going off. If you have an external telephone or TAD connected, it is always available.
. The LCD displays [Shutting Down] for a few
You can use card authentication by touching the IC card to the NFC Reader on the control panel.
If your Android™ device supports the NFC feature, you can print from your device or scan documents to your
device in the same way.
Related Information
• Introduction to Your Brother Machine
8
Page 16
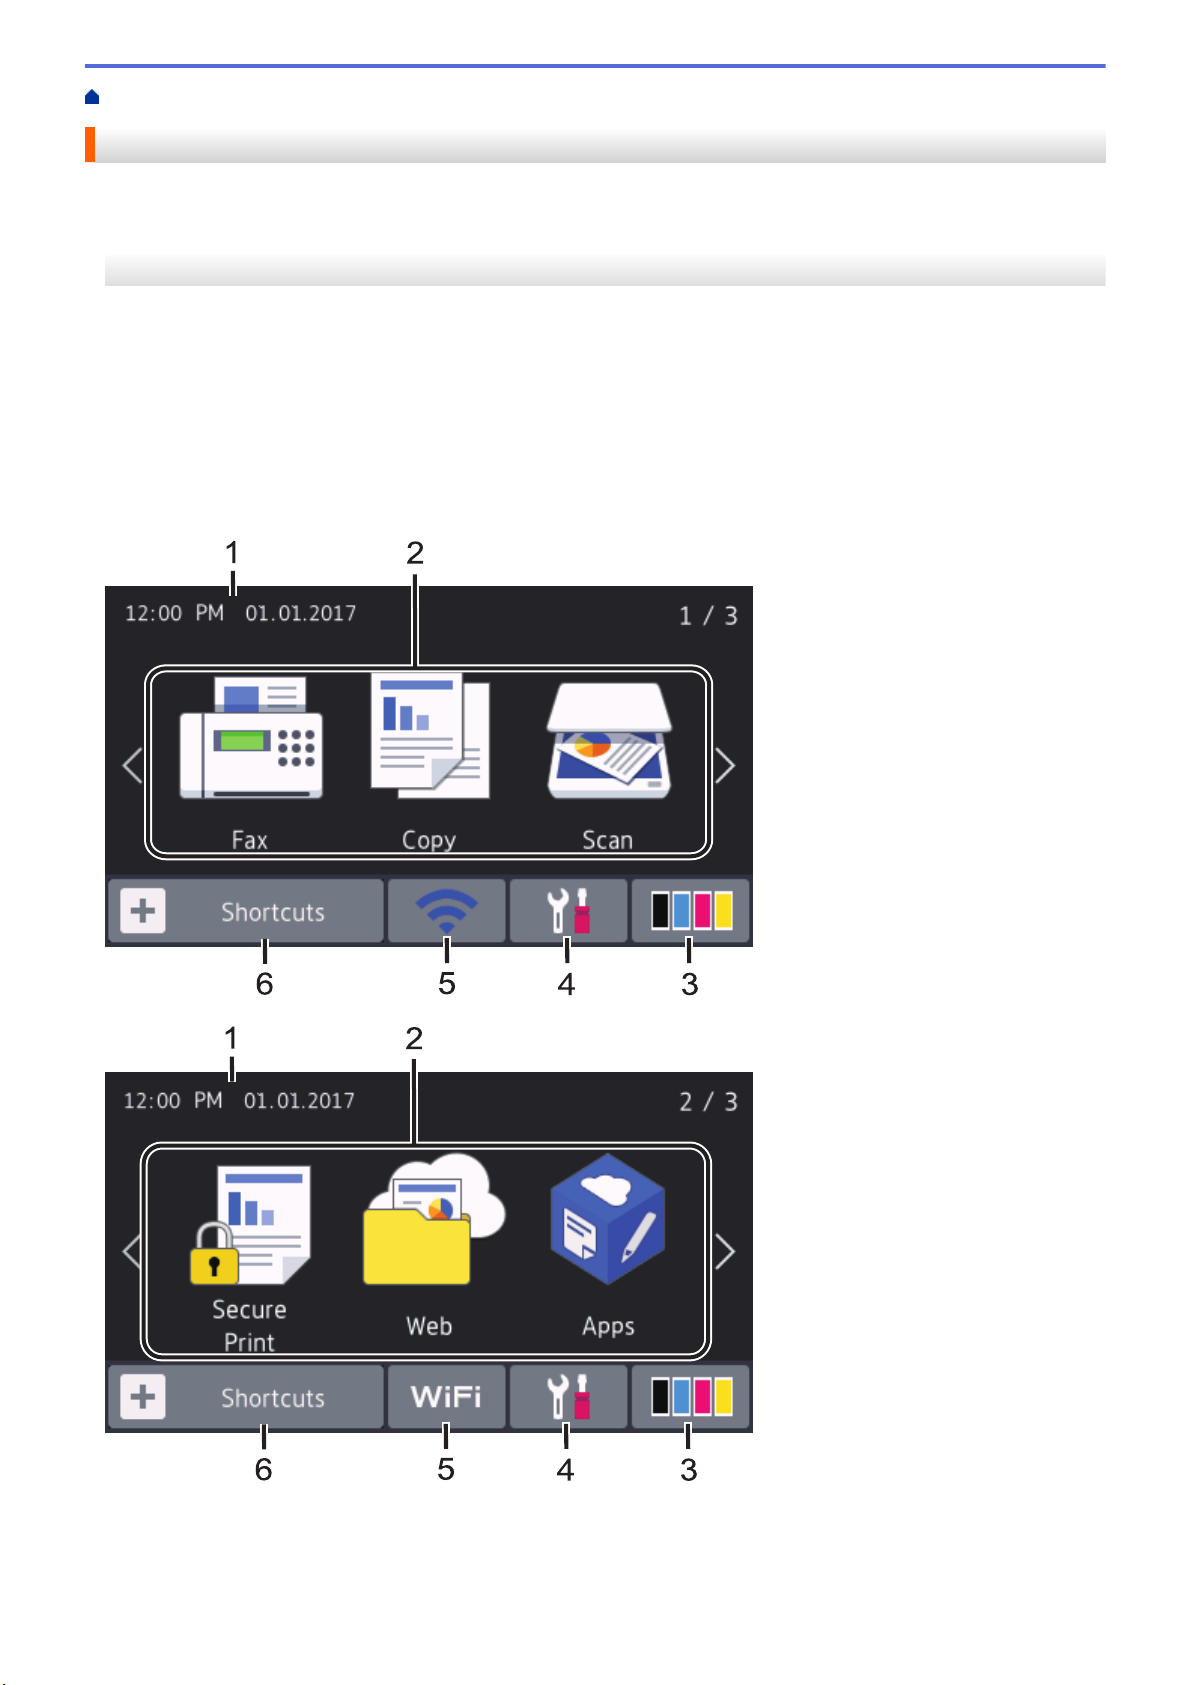
Home > Introduction to Your Brother Machine > Touchscreen LCD Overview
Touchscreen LCD Overview
>> MFC-L8610CDW
>> MFC-L8900CDW/MFC-L8895CDW/MFC-L8905CDW
MFC-L8610CDW
You can select from two types of screens to set as the Main Home screen: Home screens and Shortcuts
screens. When a Home screen is displayed, swipe left or right or press d or c to display the other Home screens.
The Main Home screen displays the machine's status when the machine is idle. When displayed, this screen
indicates that your machine is ready for the next command.
If Active Directory Authentication or LDAP Authentication is enabled, the machine's control panel is locked.
The available features vary depending on your model.
Home screen: Screen 1
The Home screens provide access to features, such as Fax, Copy and Scan.
Home screen: Screen 2
9
Page 17
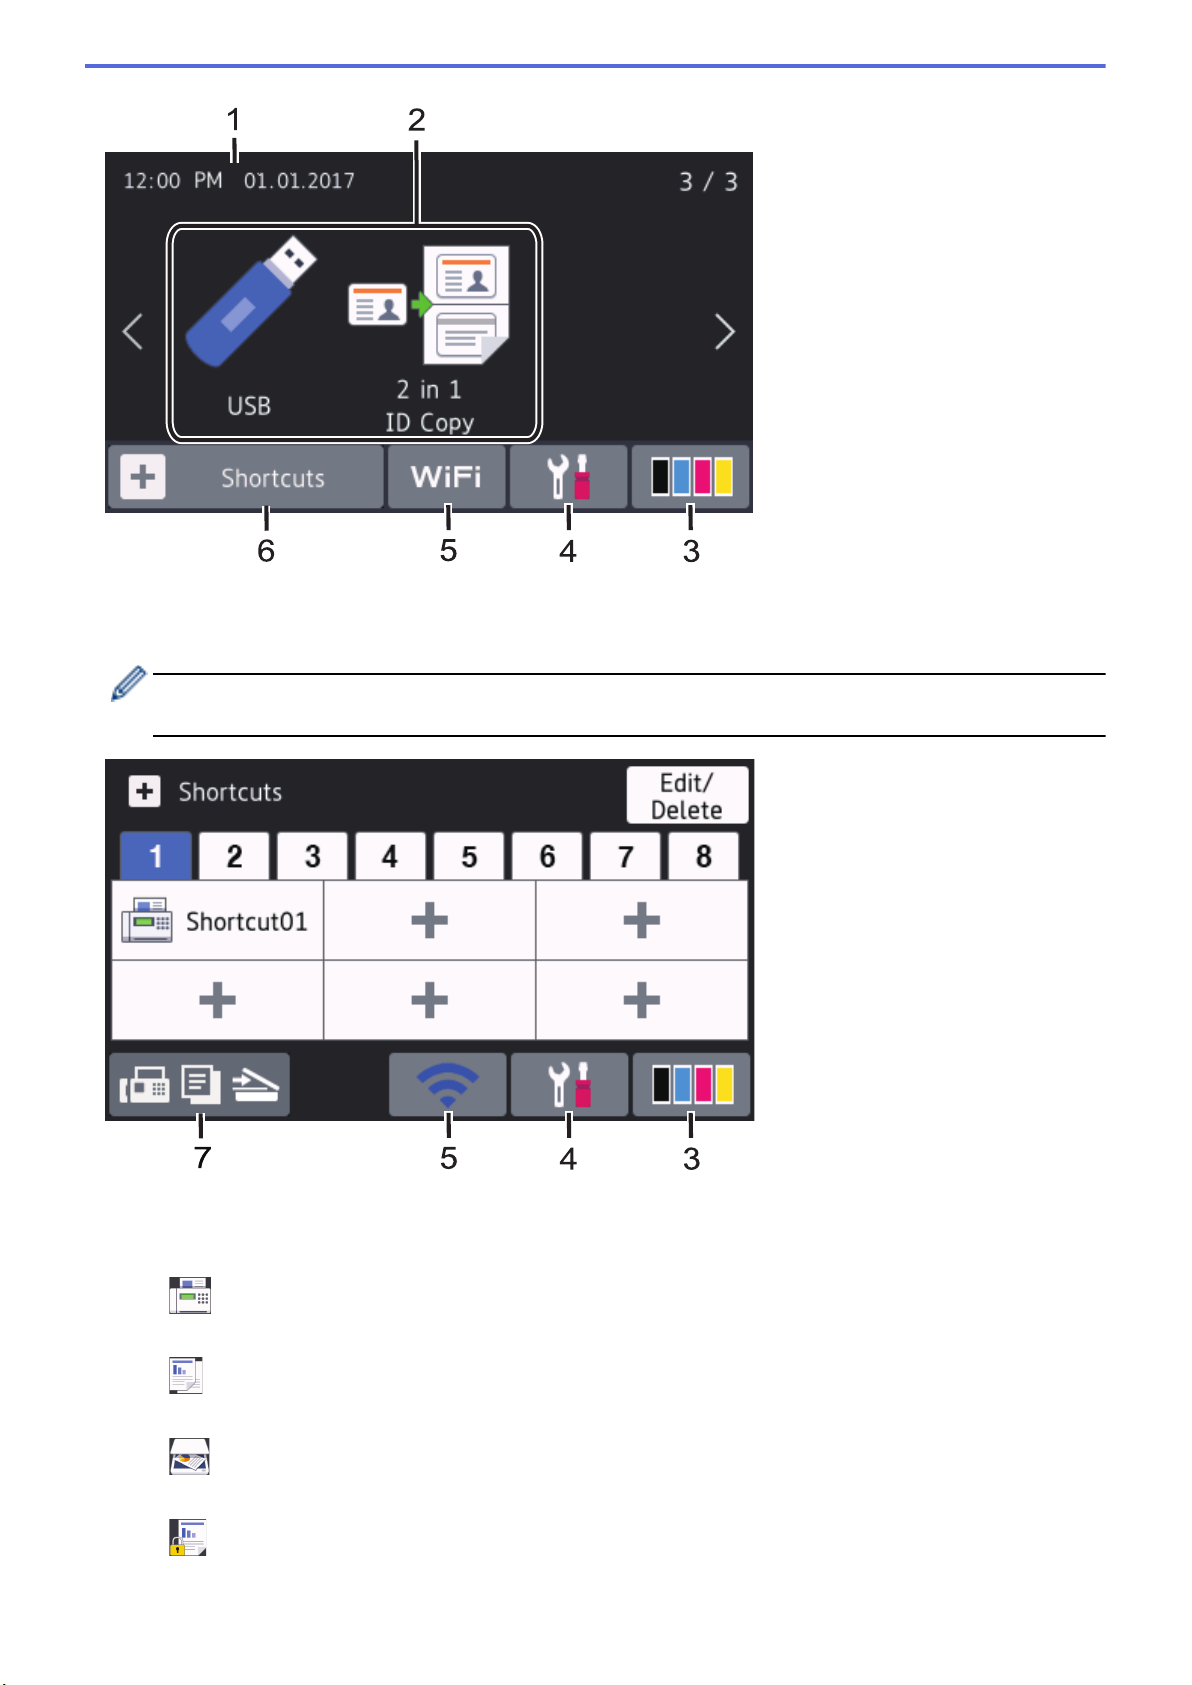
Home screen: Screen 3
Shortcuts screen
Create Shortcuts for frequently-used operations, such as sending a fax, copying, scanning and using Web
Connect.
Eight Shortcuts tabs are available with six Shortcuts on each Shortcuts tab. A total of 48 Shortcuts are
available.
1. Date & Time
Displays the date and time set on the machine.
2. Modes
•
[Fax]
Press to access Fax mode.
•
[Copy]
Press to access Copy mode.
•
[Scan]
Press to access Scan mode.
• [Secure Print]
Press to access the [Secure Print] option.
10
Page 18
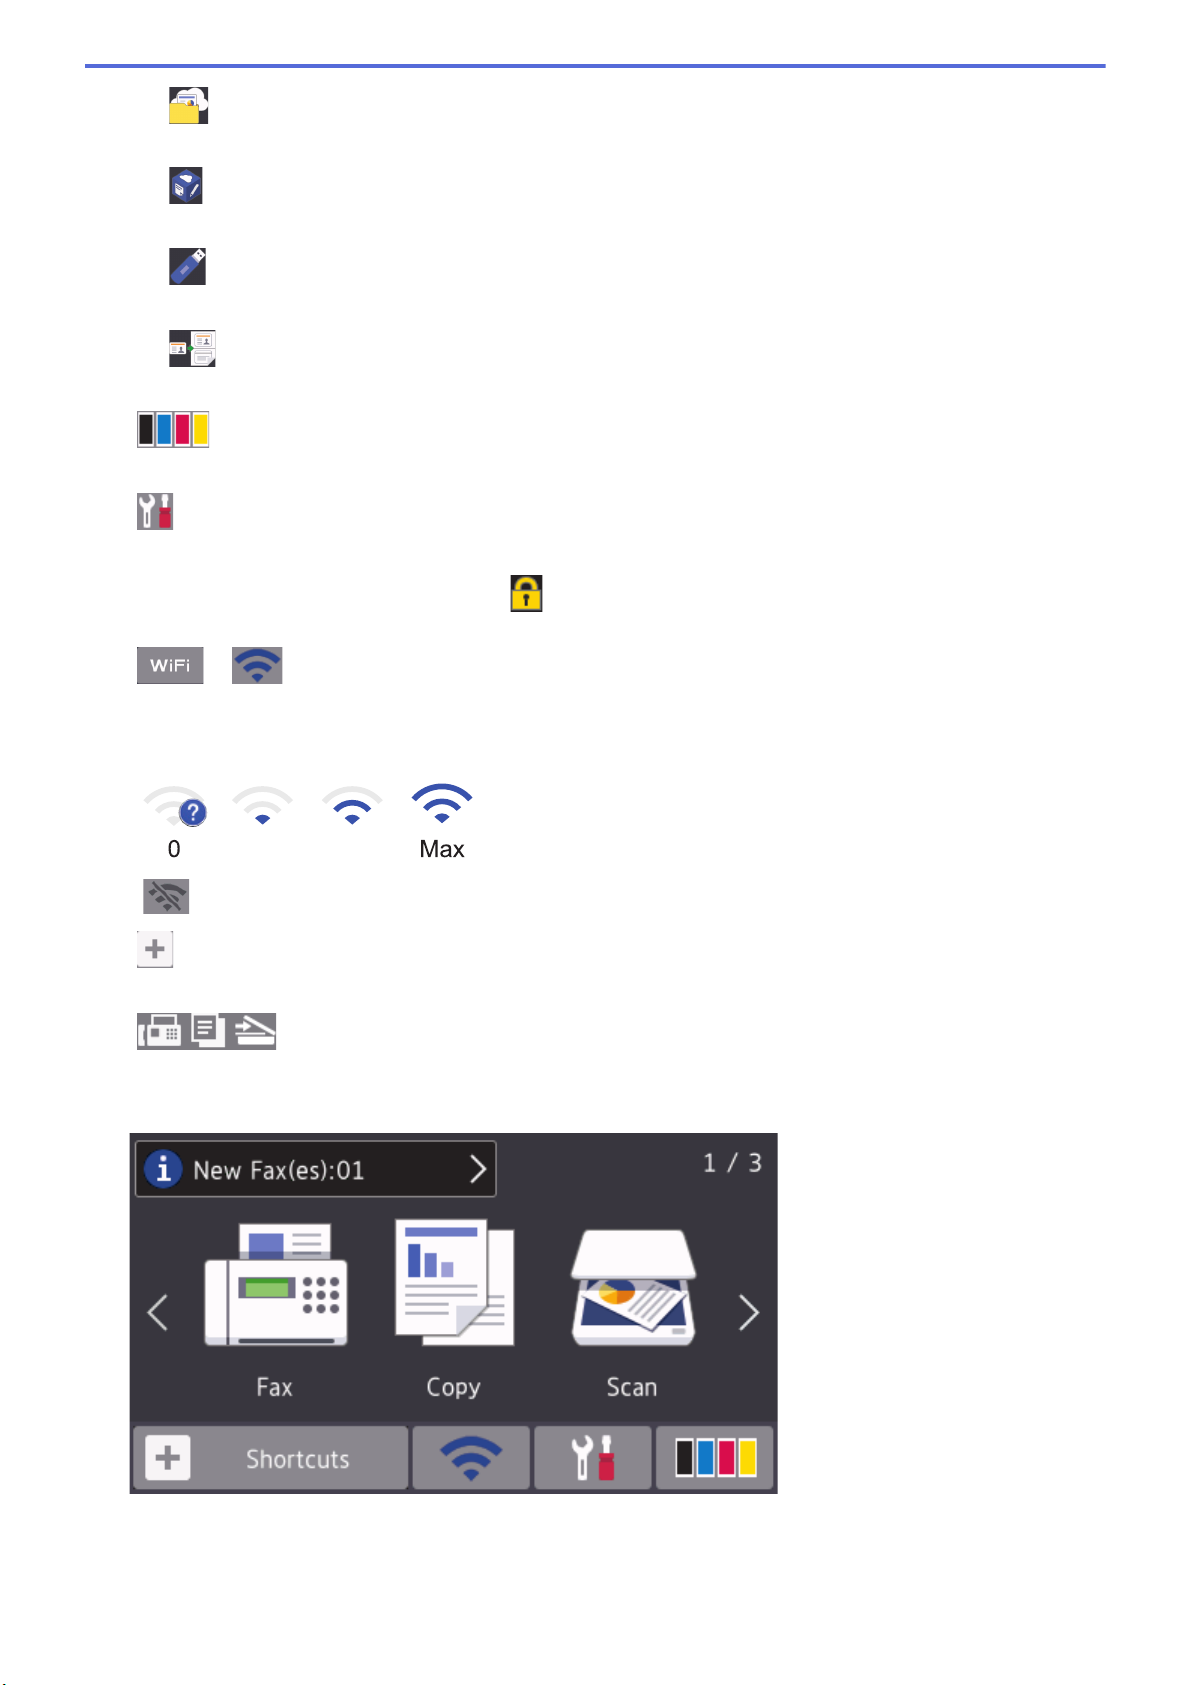
• [Web]
0 Max
Press to connect the Brother machine to an Internet service.
•
[Apps]
Press to connect the Brother machine to the Brother Apps service.
• [USB]
Press to access the USB menu and select [Scan to USB] or [Direct Print] options.
• [2 in 1 ID Copy]
Press to access the 2 in 1 ID Copy option.
3.
(Toner)
Displays the remaining toner life. Press to access the [Toner] menu.
4. (Settings)
Press to access the [Settings] menu.
If Setting Lock has been turned on, a lock icon appears on the LCD. You must unlock the machine to
change settings.
5.
or (Wireless Status)
Press to configure wireless settings.
If you are using a wireless connection, a four-level indicator displays the current wireless signal strength.
Wireless LAN Disabled
6. [Shortcuts]
Press to access the [Shortcuts] screen.
7. (Home screen)
Press to access the Home screens.
New Fax
When [Fax Preview] is set to [On], the number of new faxes you received into the memory appears at the
top of the screen.
11
Page 19
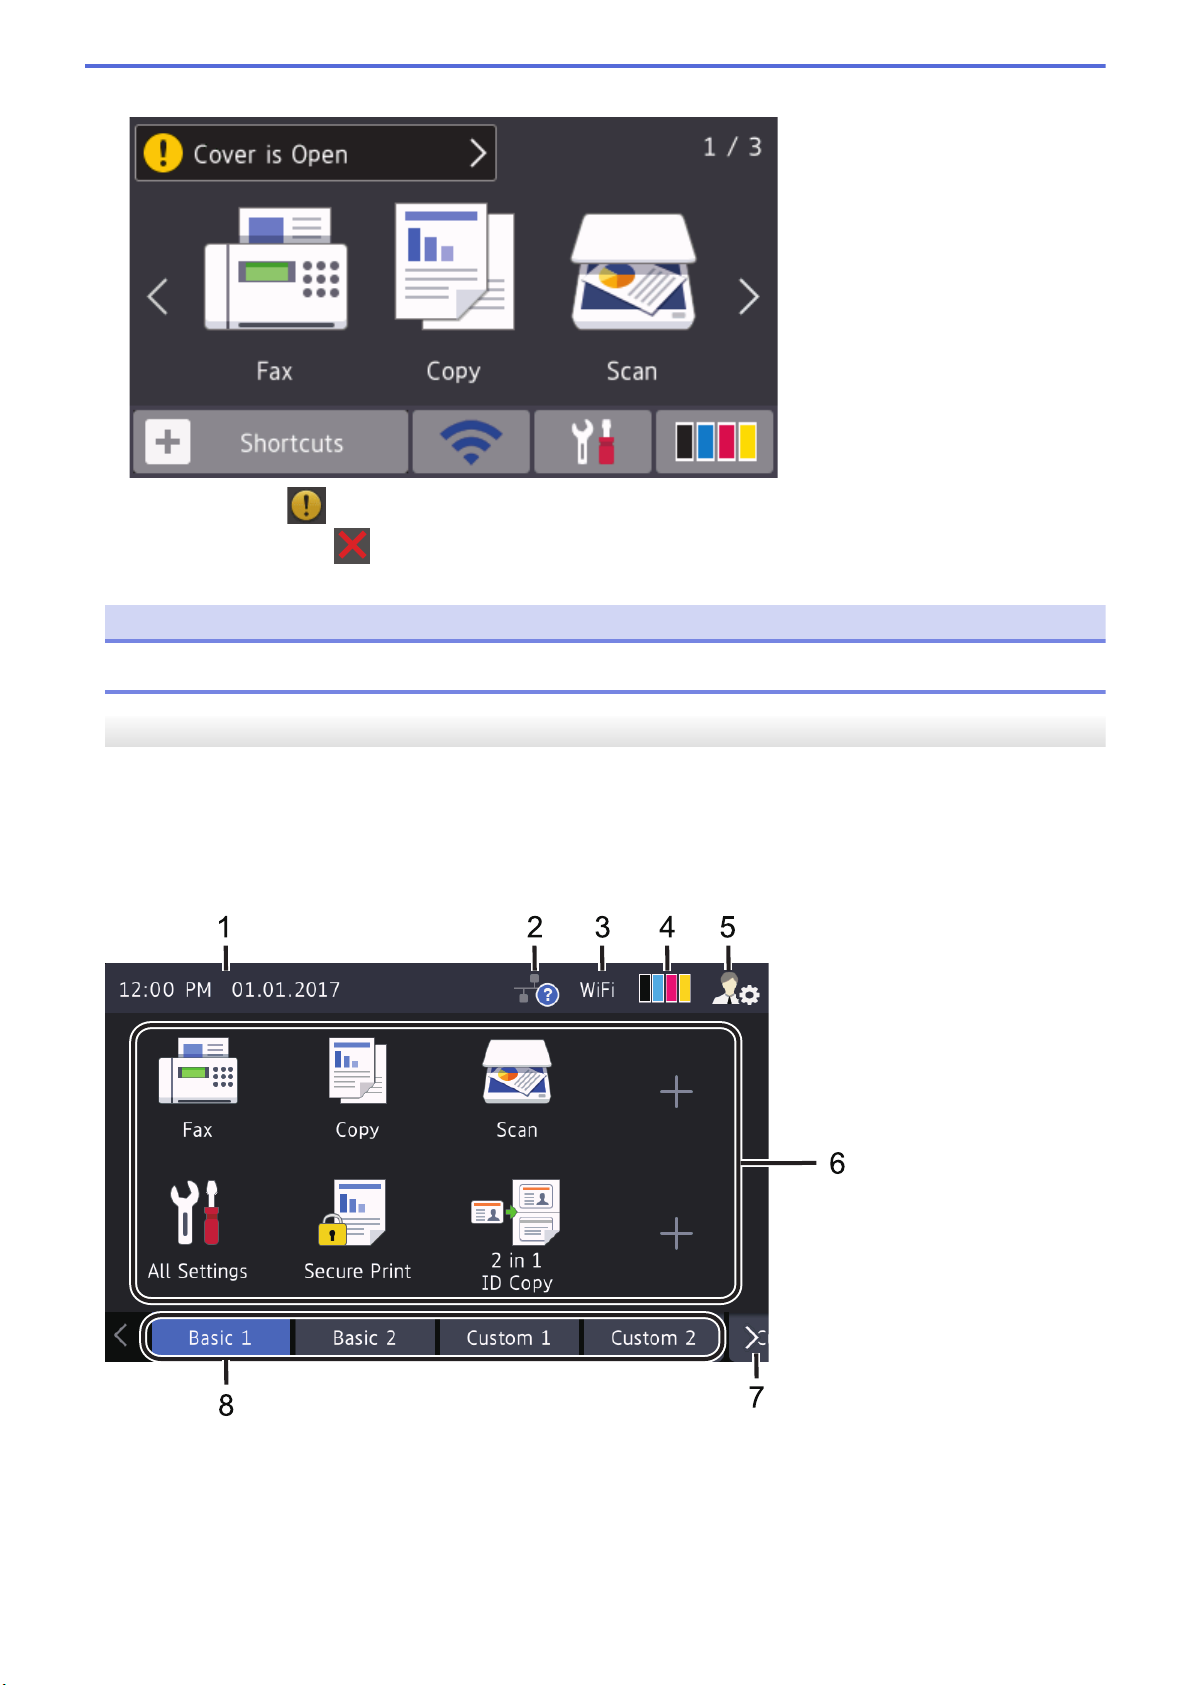
Warning icon
The warning icon appears when there is an error or maintenance message. Press the message area to
view it, and then press to return to the Main Home screen.
NOTE
This product adopts the font of ARPHIC TECHNOLOGY CO.,LTD.
MFC-L8900CDW/MFC-L8895CDW/MFC-L8905CDW
Your machine has eight tabbed screens (referred to as Home screens). Each Home screen can hold up to eight
icons which can be used for functions, machine settings and shortcuts. A total of 64 icons can be placed on the
Home screens as needed.
The Main Home screen can be selected from the Home screens.
Use the [Admin Settings] menu to names on the tabs and rearrange the icons.
1. Date & Time
Displays the date and time set on the machine.
This area is also used to display error or maintenance messages.
12
Page 20
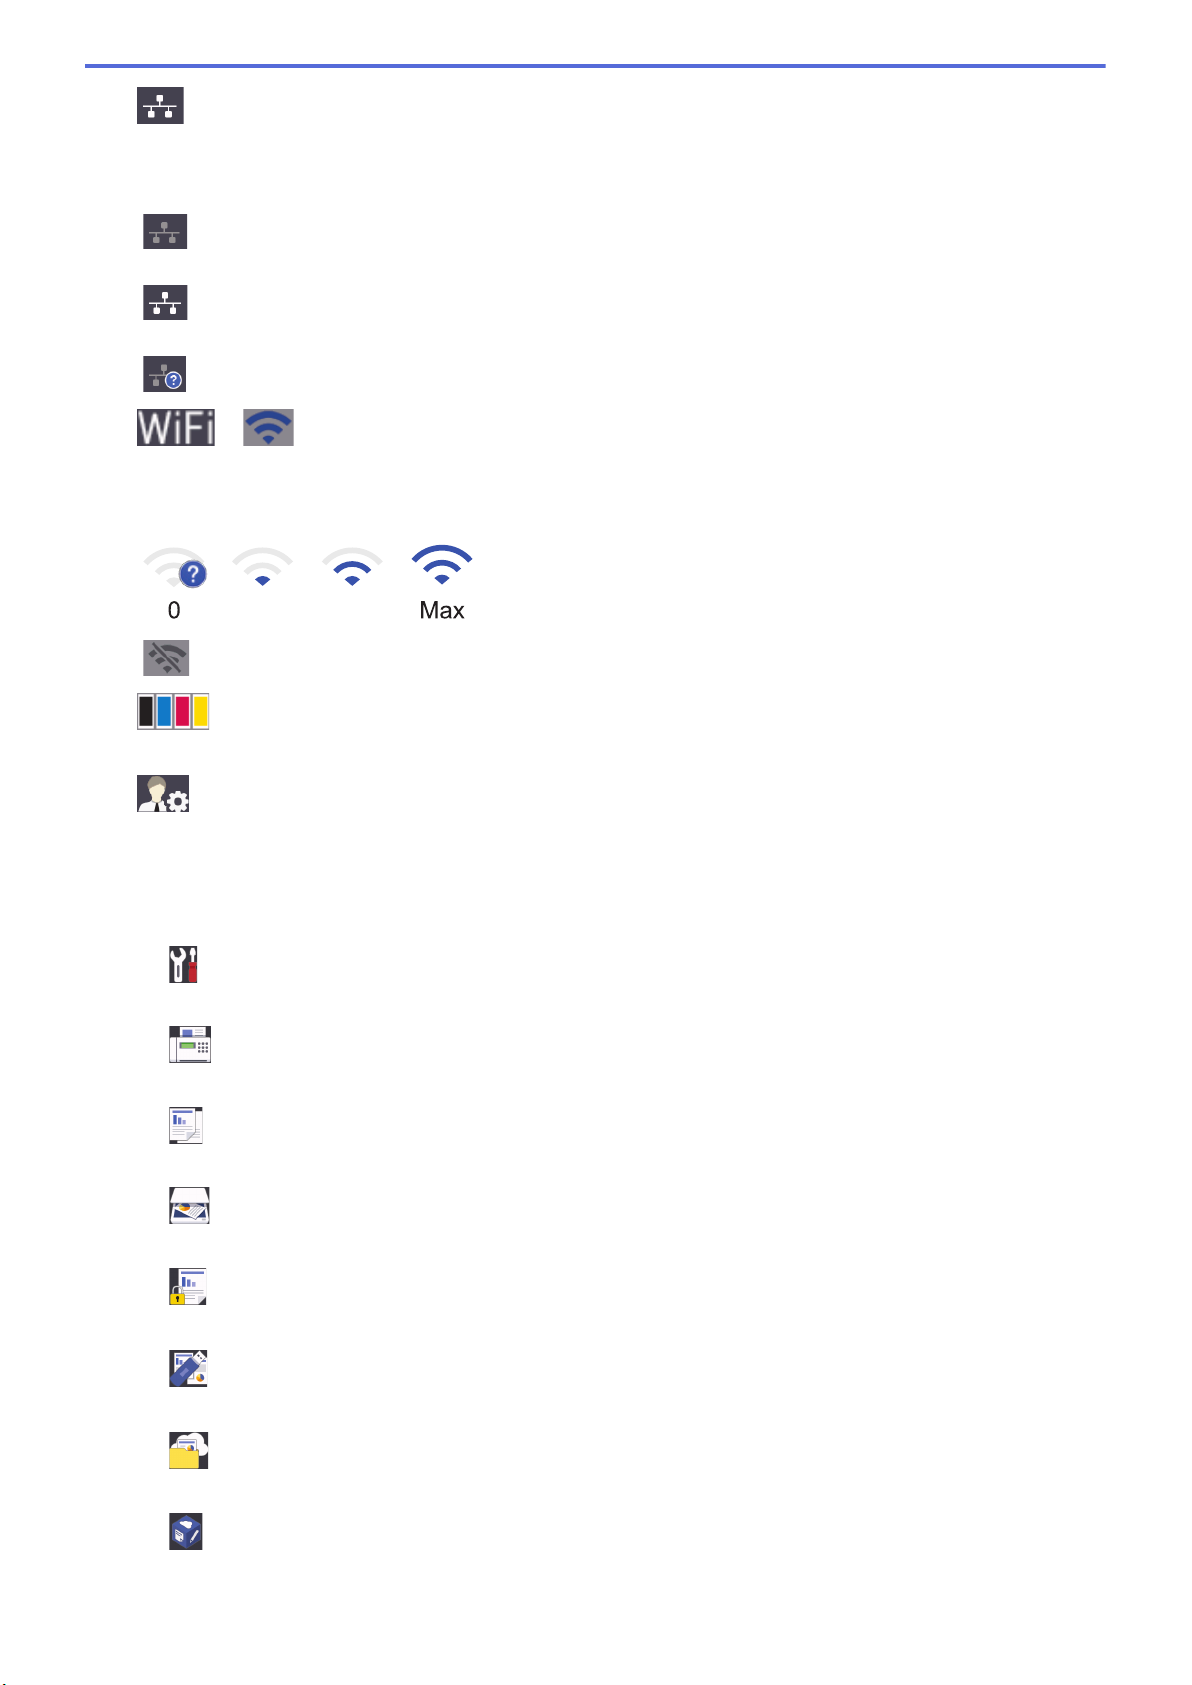
2. (Wired LAN Status)
0 Max
Press to configure the Wired LAN settings.
The icon displays the current wired network status.
Wired LAN Disabled
(Gray)
Wired LAN Enabled
(White)
No cable connection or Wireless LAN connected
3. or (Wireless Status)
Press to configure wireless settings.
If you are using a wireless connection, a four-level indicator displays the current wireless signal strength.
Wireless LAN Disabled
4.
(Toner)
Displays the remaining toner life. Press to access the [Toner] menu.
5. (Admin Settings)
Press to access the [Admin Settings] menu.
6. Function Icons, Setting Icons and Shortcut Icons
The following descriptions explain basic icons and features. The available features vary depending on your
model.
•
[All Settings]
Press to access the machine's settings menu.
•
[Fax]
Press to access Fax mode.
• [Copy]
Press to access Copy mode.
•
[Scan]
Press to access Scan mode.
•
[Secure Print]
Press to access the [Secure Print] option.
• [USB]
Press to access the USB menu and select [Scan to USB] or [Direct Print] options.
• [Web]
Press to connect the Brother machine to an Internet service.
•
[Apps]
Press to connect the Brother machine to the Brother Apps service.
13
Page 21
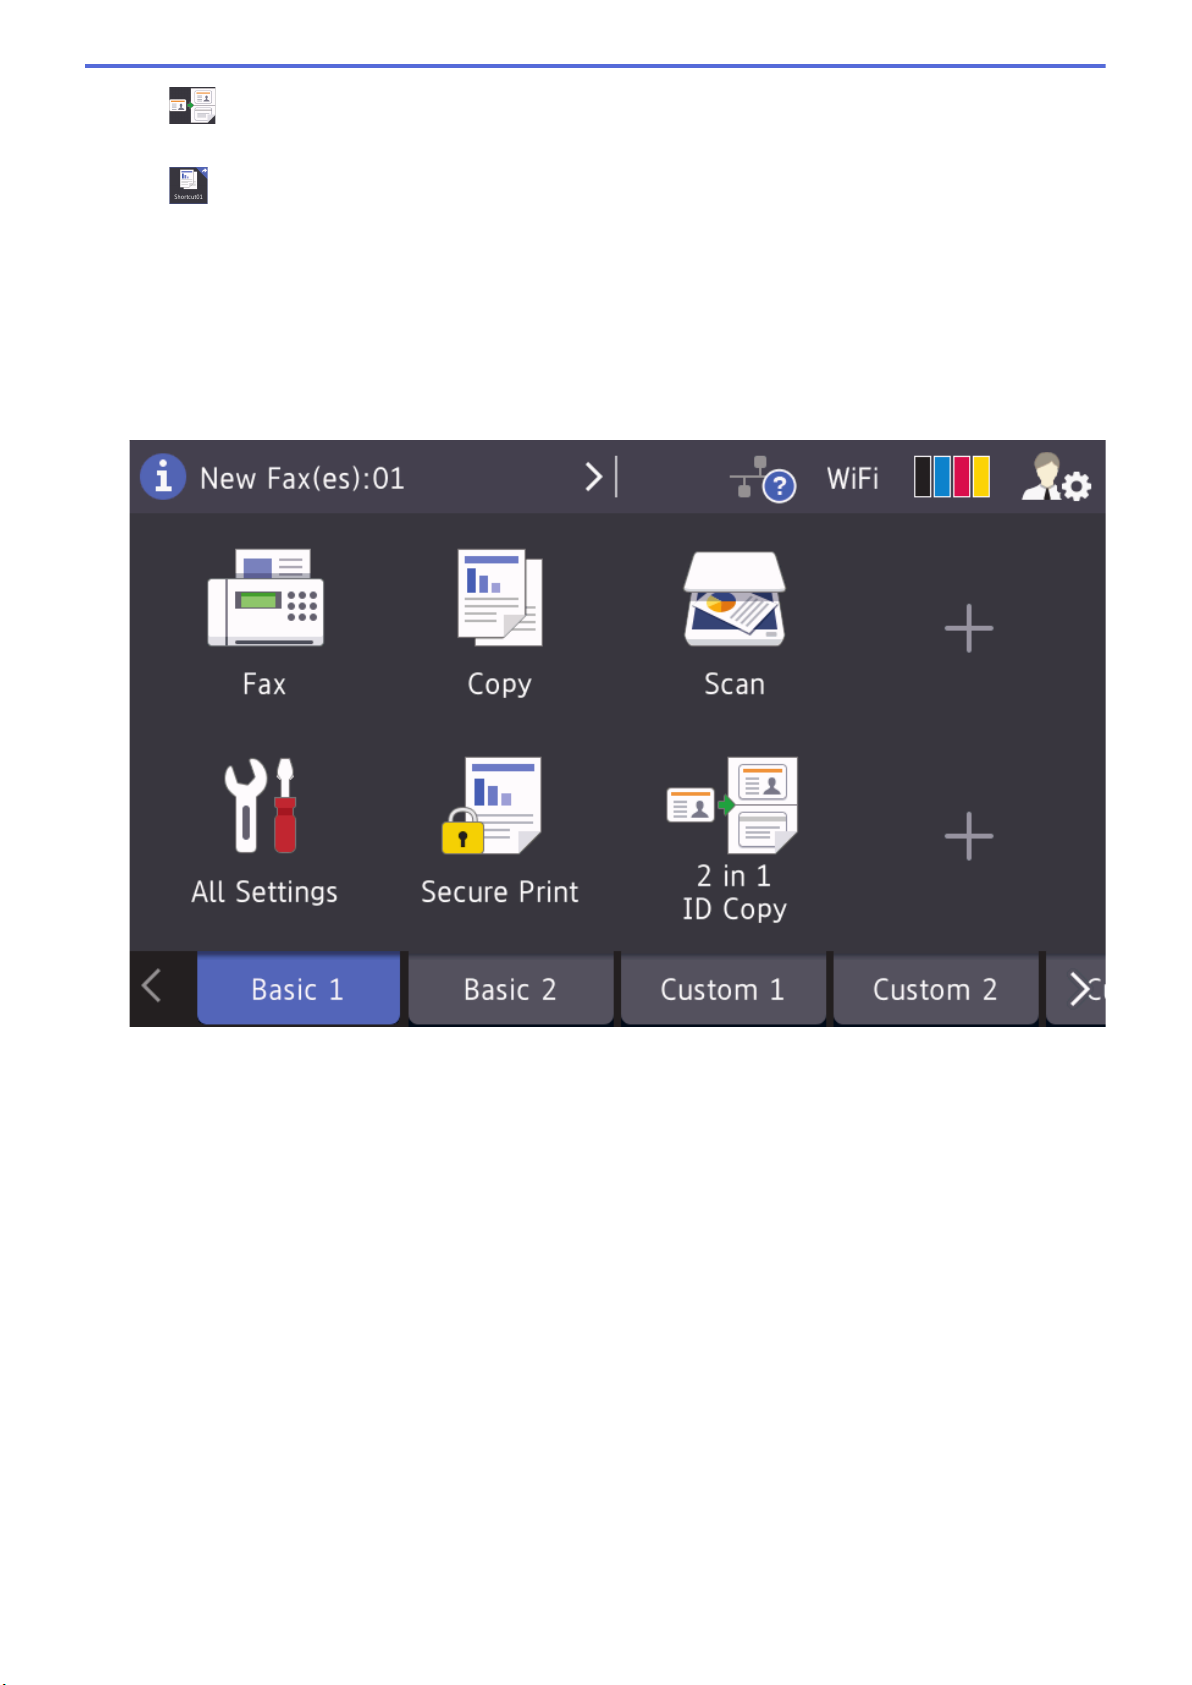
• [2 in 1 ID Copy]
Press to access the 2 in 1 ID Copy option.
•
7. Tabs Scroll Buttons
Press to display and access all the tabs.
8. Home Tabs
Press to display the screen for the Home.
New Fax
(Shortcuts)
Press to access the created Shortcuts for frequently-used operations, such as sending a fax, copying,
scanning and using Web Connect.
When
[Fax Preview] is set to [On], the number of new faxes you received into the memory appears at the
top of the screen.
14
Page 22
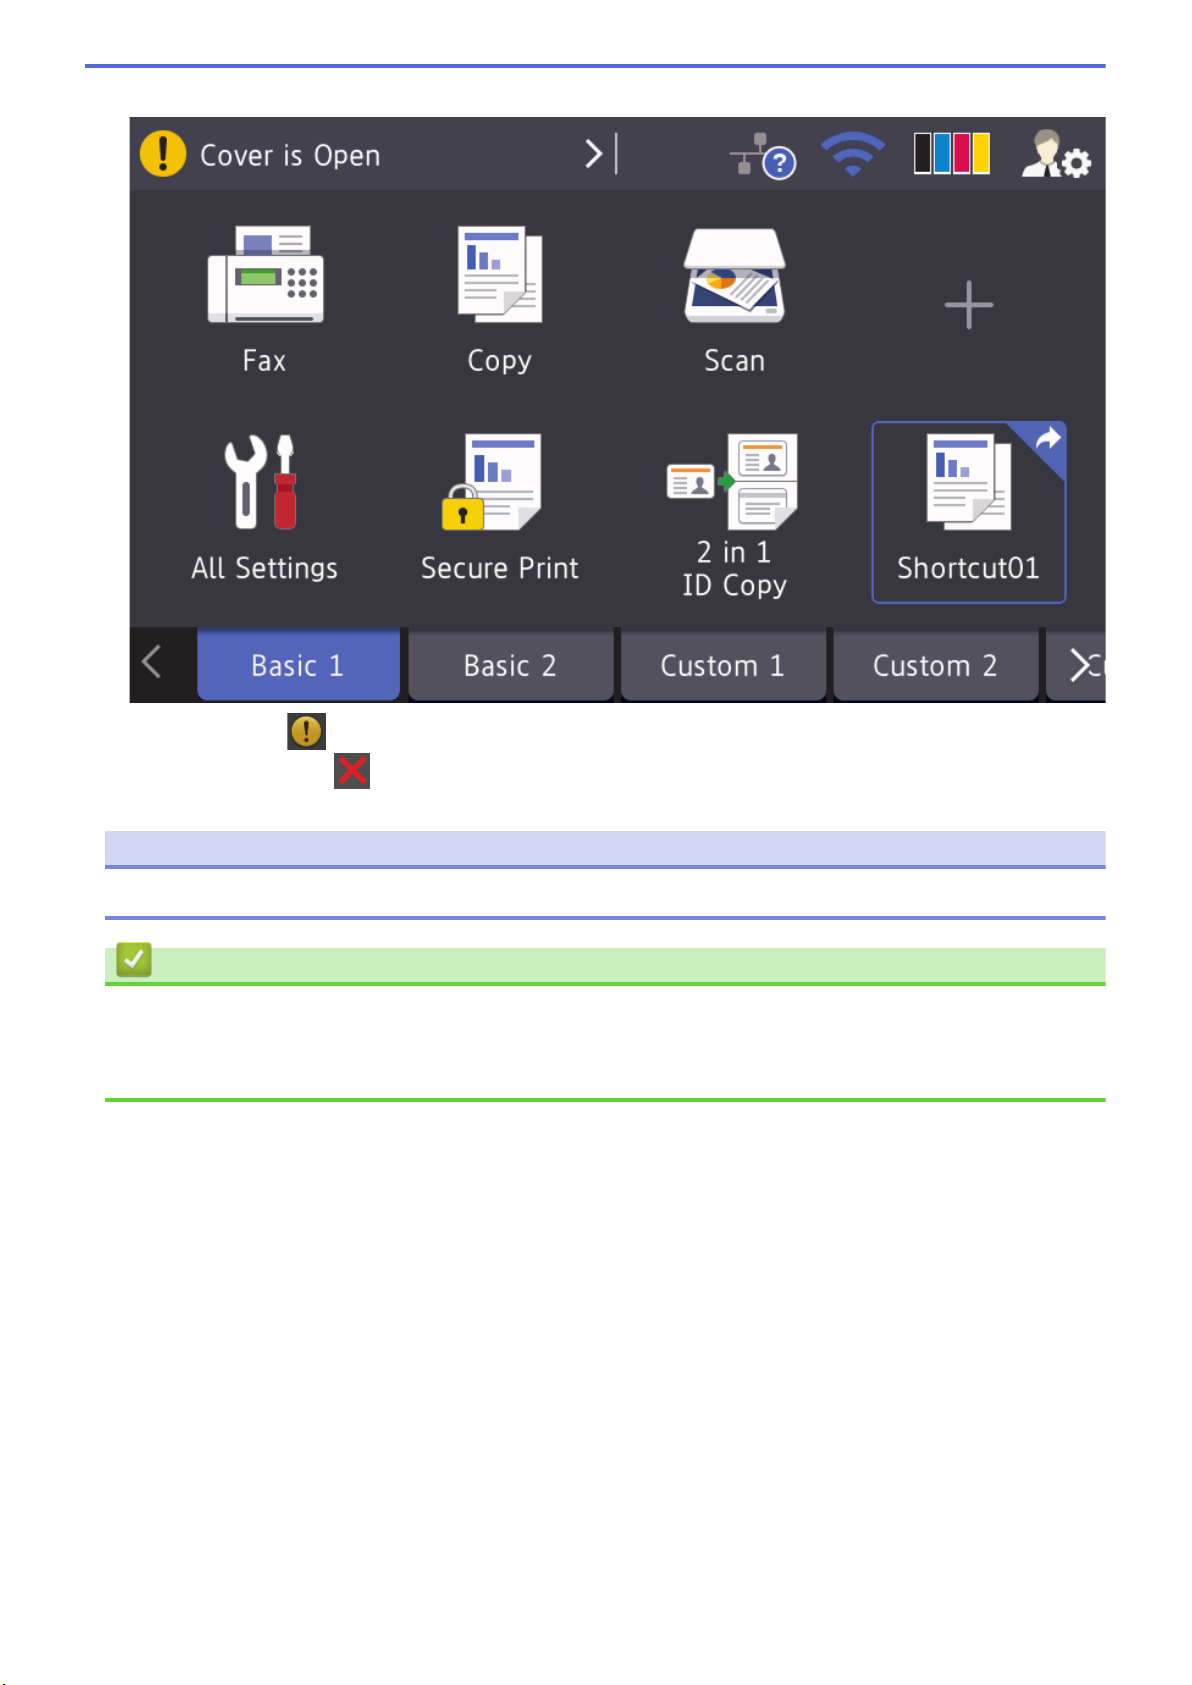
Warning icon
The warning icon appears when there is an error or maintenance message. Press the message area to
view it, and then press to return to the Main Home screen.
NOTE
This product adopts the font of ARPHIC TECHNOLOGY CO.,LTD.
Related Information
• Introduction to Your Brother Machine
Related Topics:
• Customization of Your Machine
15
Page 23
Home > Introduction to Your Brother Machine > How to Navigate the touchscreen LCD
How to Navigate the touchscreen LCD
Press your finger on the LCD to operate it. To display and access all the options, swipe left, right, up, down or
press d c or a b on the LCD to scroll through them.
The following steps explain how to change a machine setting. In this example, the LCD Backlight setting is
changed from [Light] to [Med].
IMPORTANT
DO NOT press the LCD with a sharp object, such as a pen or stylus. It may damage the machine.
NOTE
DO NOT touch the LCD immediately after plugging in the power cord or turning on the machine. Doing this
may cause an error.
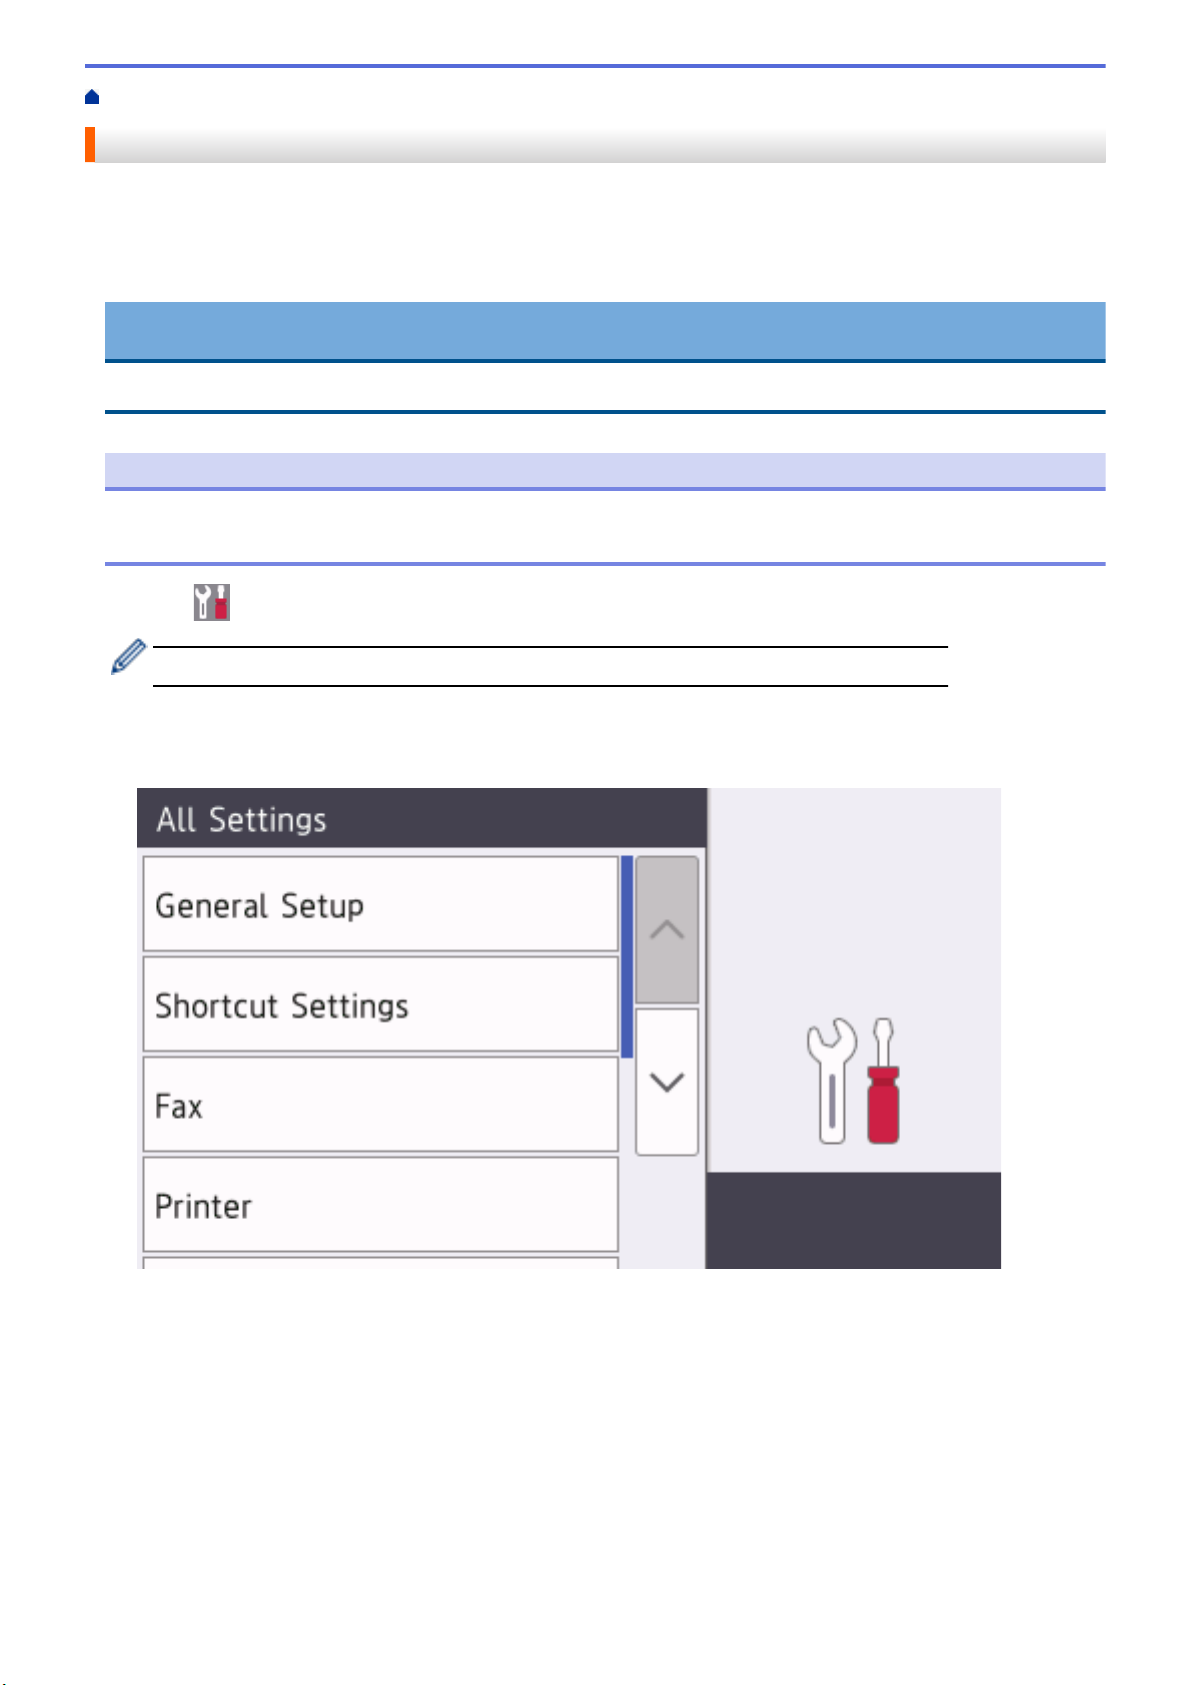
1. Press [Settings].
If your machine displays the [All Settings] menu on the Home screen, skip this step.
2. Press [All Settings].
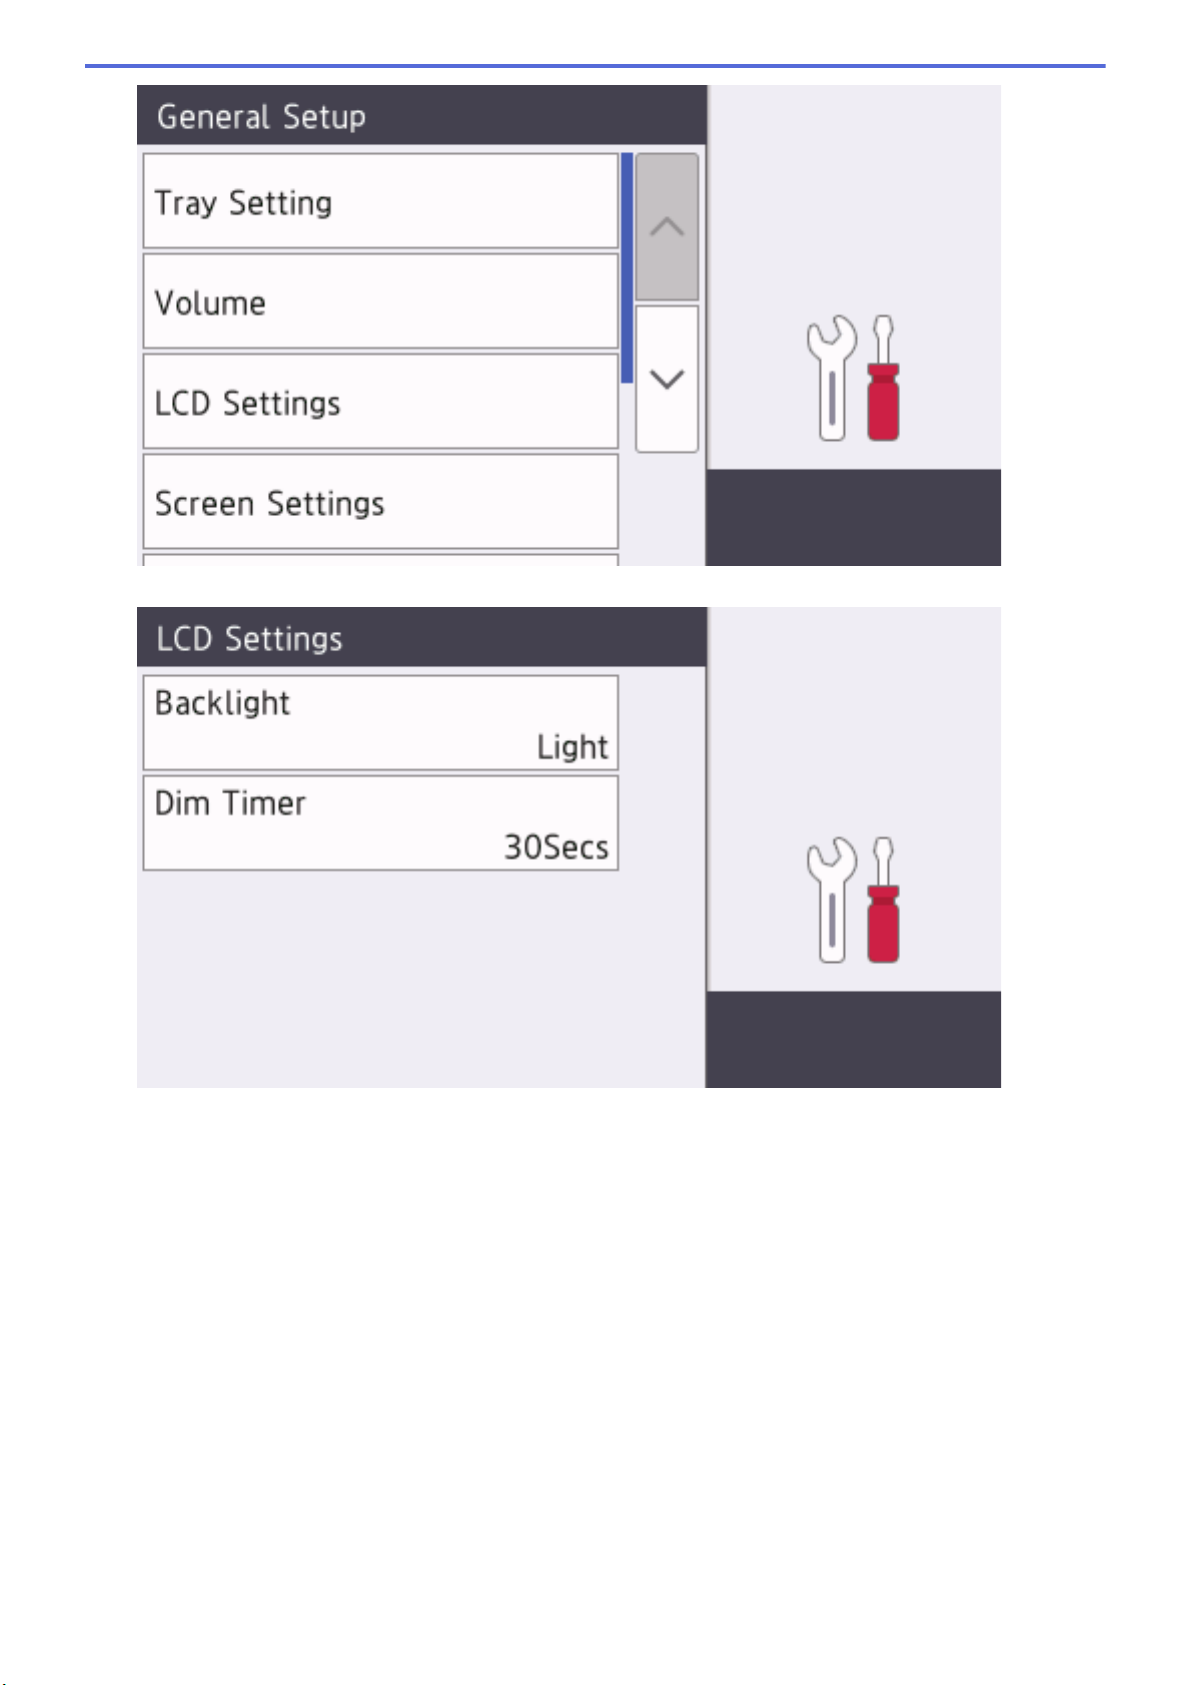
3. Swipe up or down or press a or b to display the [General Setup] option, and then press [General
Setup].
4. Swipe up or down or press a or b to display the [LCD Settings] option, and then press [LCD
Settings].
16
Page 24
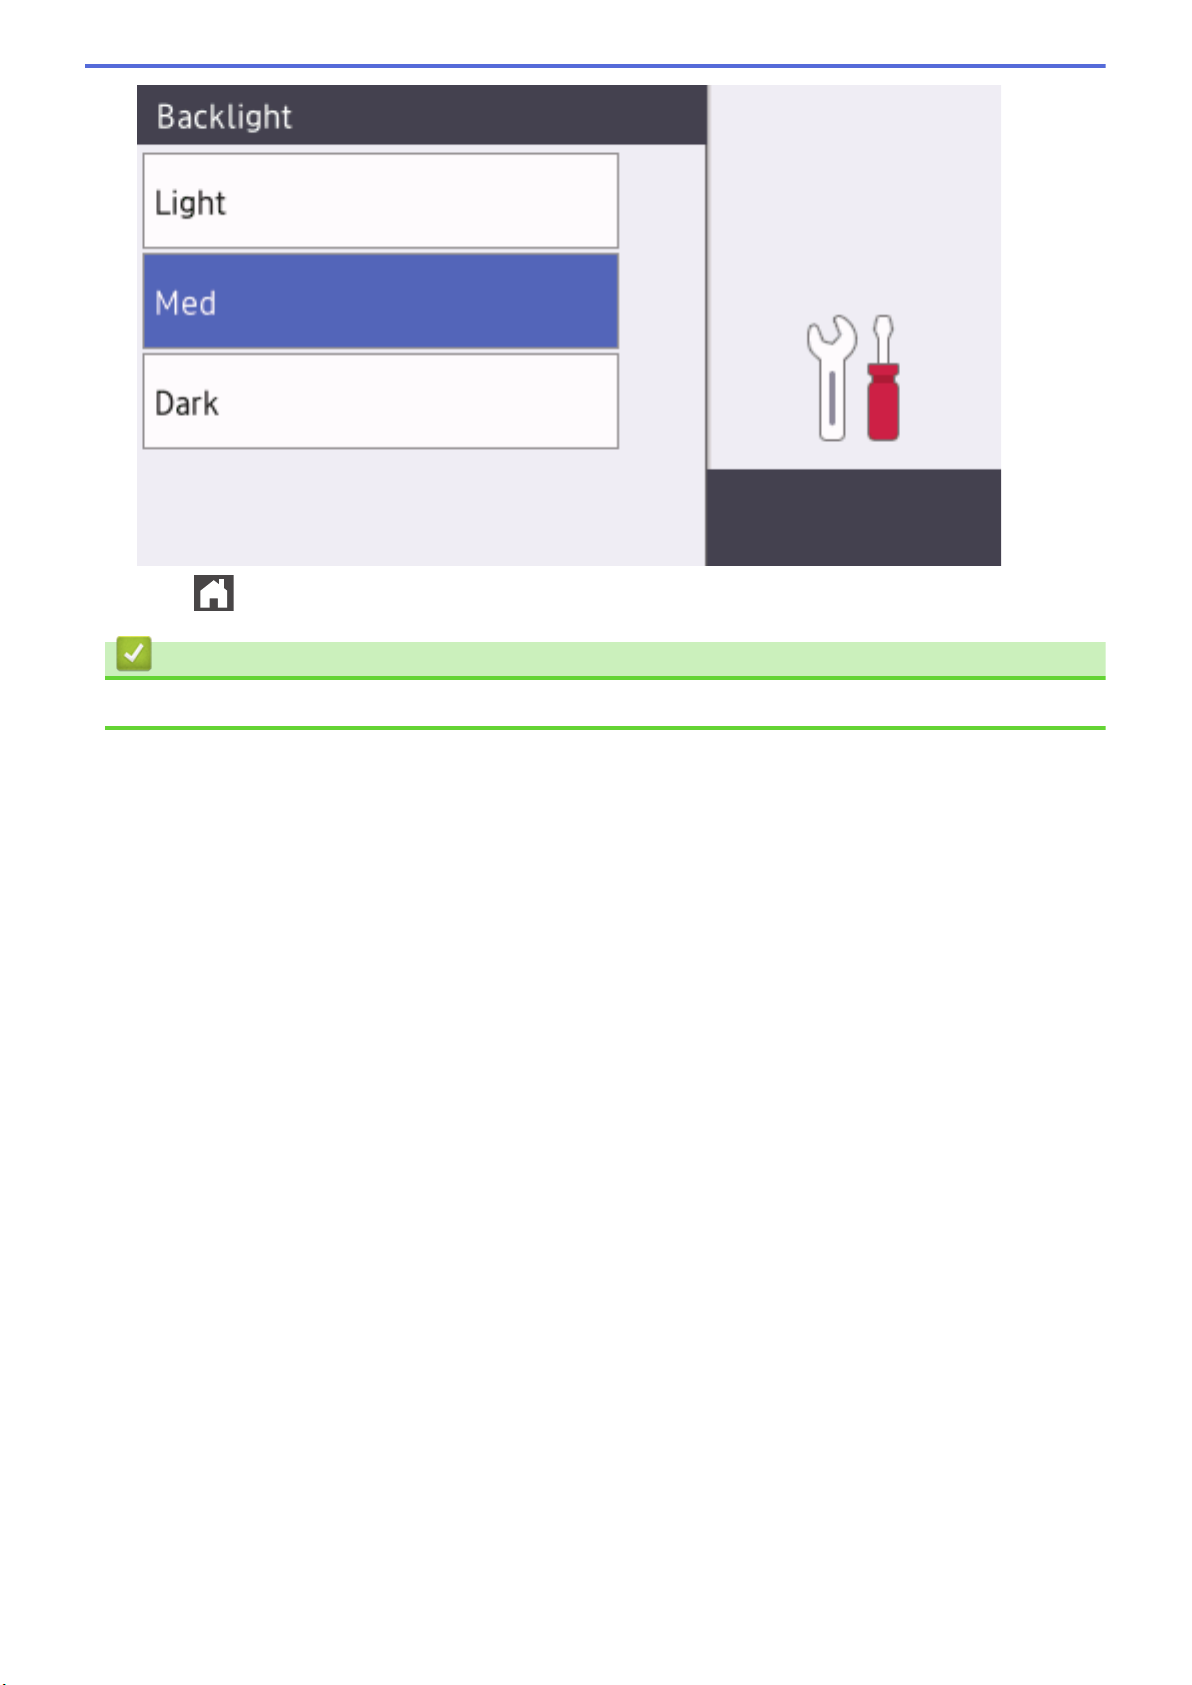
5. Press [Backlight].
6. Press [Med].
17
Page 25
7. Press .
Related Information
• Introduction to Your Brother Machine
18
Page 26
Home > Introduction to Your Brother Machine > Settings Screen Overview
Settings Screen Overview
Related Models: MFC-L8610CDW
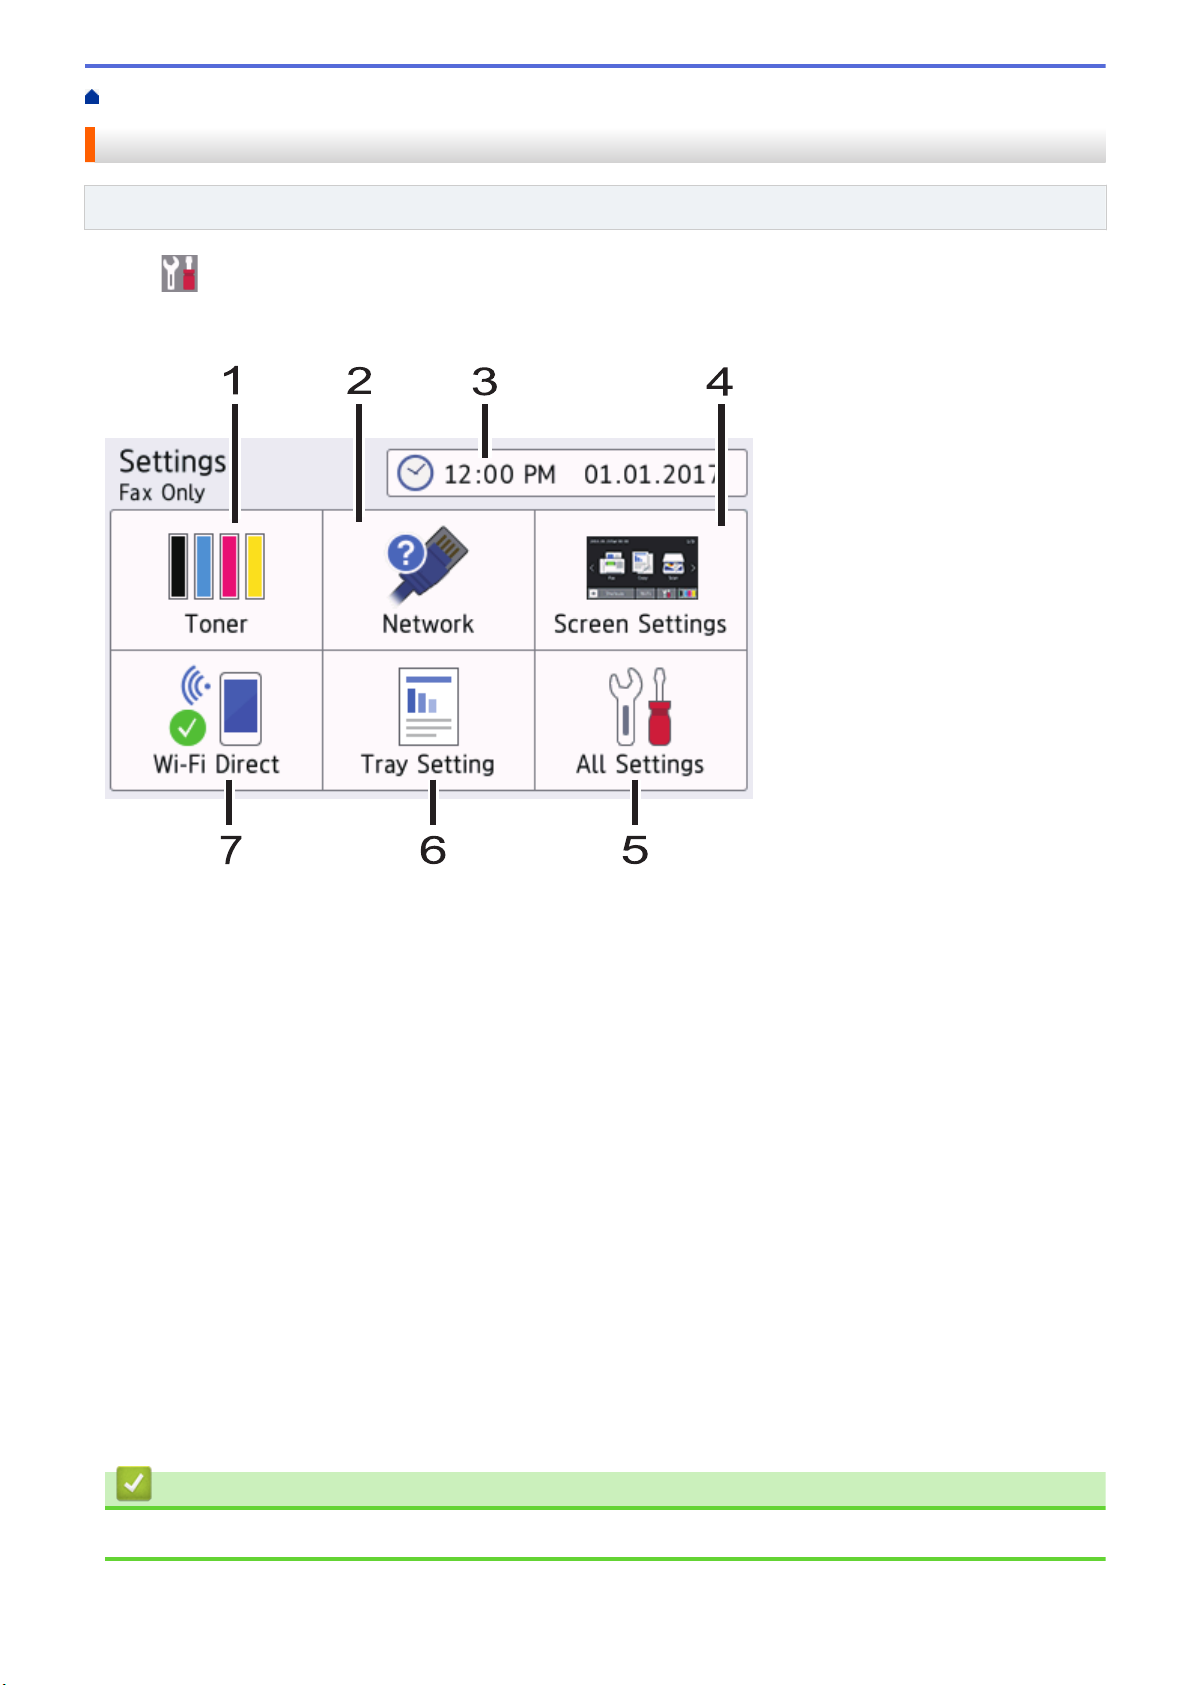
Press to view the current machine status on the LCD.
Use the Settings menu to access all of your Brother machine's settings.
The available features vary depending on your model.
1. Toner
• Displays the remaining toner life.
• Press to access the [Toner] menu.
2. Network
• Press to set up a network connection.
• A four level indicator on the screen displays the current wireless signal strength if you are using a wireless
connection.
3. Date & Time
Displays the date and time set on the machine.
Press to access the [Date & Time] menu.
4. Screen Settings
Press to access the [Screen Settings] menu.
5. All Settings
Press to access a menu of all machine settings.
6. Tray Setting
Press to access the [Tray Setting] menu.
7. Wi-Fi Direct
Press to set up a Wi-Fi Direct network connection.
Related Information
• Introduction to Your Brother Machine
19
Page 27
Home > Introduction to Your Brother Machine > Setting the Main Home Screen
Setting the Main Home Screen
Related Models: MFC-L8610CDW
Set the Main Home screen to either [Home Screen 1], [Home Screen 2], [Home Screen 3],
[Shortcuts 1], [Shortcuts 2], [Shortcuts 3], [Shortcuts 4], [Shortcuts 5], [Shortcuts 6],
[Shortcuts 7] or [Shortcuts 8].
When the machine is idle or you press , the touchscreen will return to the screen you set.
1. Press
2. Swipe up or down or press a or b to display the screen settings, and then press the setting you want.
3. Press .
The machine will go to your chosen screen.
[Settings] > [Screen Settings] > [Main Home Screen].
Related Information
• Introduction to Your Brother Machine
20
Page 28
Home > Introduction to Your Brother Machine > Customization of Your Machine
Customization of Your Machine
Related Models: MFC-L8900CDW/MFC-L8895CDW/MFC-L8905CDW
When you press , the machine displays the [Admin Settings] menu. To restrict access to this menu,
you can set an administrator password to protect it.
This password is the same as the administrator password for Web Based Management.
The [Admin Settings] menu allows you to customize Home screen names and the arrangement of icons on
the screens.
The [Home Screen Settings] menu and the [Other Screen Settings] menu provide the following
functions:
• Renaming Home screen tabs
• Adding, removing and repositioning icons on Home screens
• Setting your Main Home screen
• Selecting screen background color
• Changing the default functions for the Copy screen and the Scan screen
The [Admin Settings] menu allows you to manage permissions and restrictions.
The [Restriction Management] menu provides the following functions:
• User Restriction
- Secure Function Lock
- Active Directory Authentication
- LDAP Authentication
• Setting Lock (detailed settings are available.)
For more information, see Related Information. Network Security Features and Lock the Machine Settings.
Related Information
• Introduction to Your Brother Machine
Related Topics:
• Touchscreen LCD Overview
• Network Security Features
• Lock the Machine Settings
21
Page 29
Home > Introduction to Your Brother Machine > Access Brother Utilities (Windows)
Access Brother Utilities (Windows)
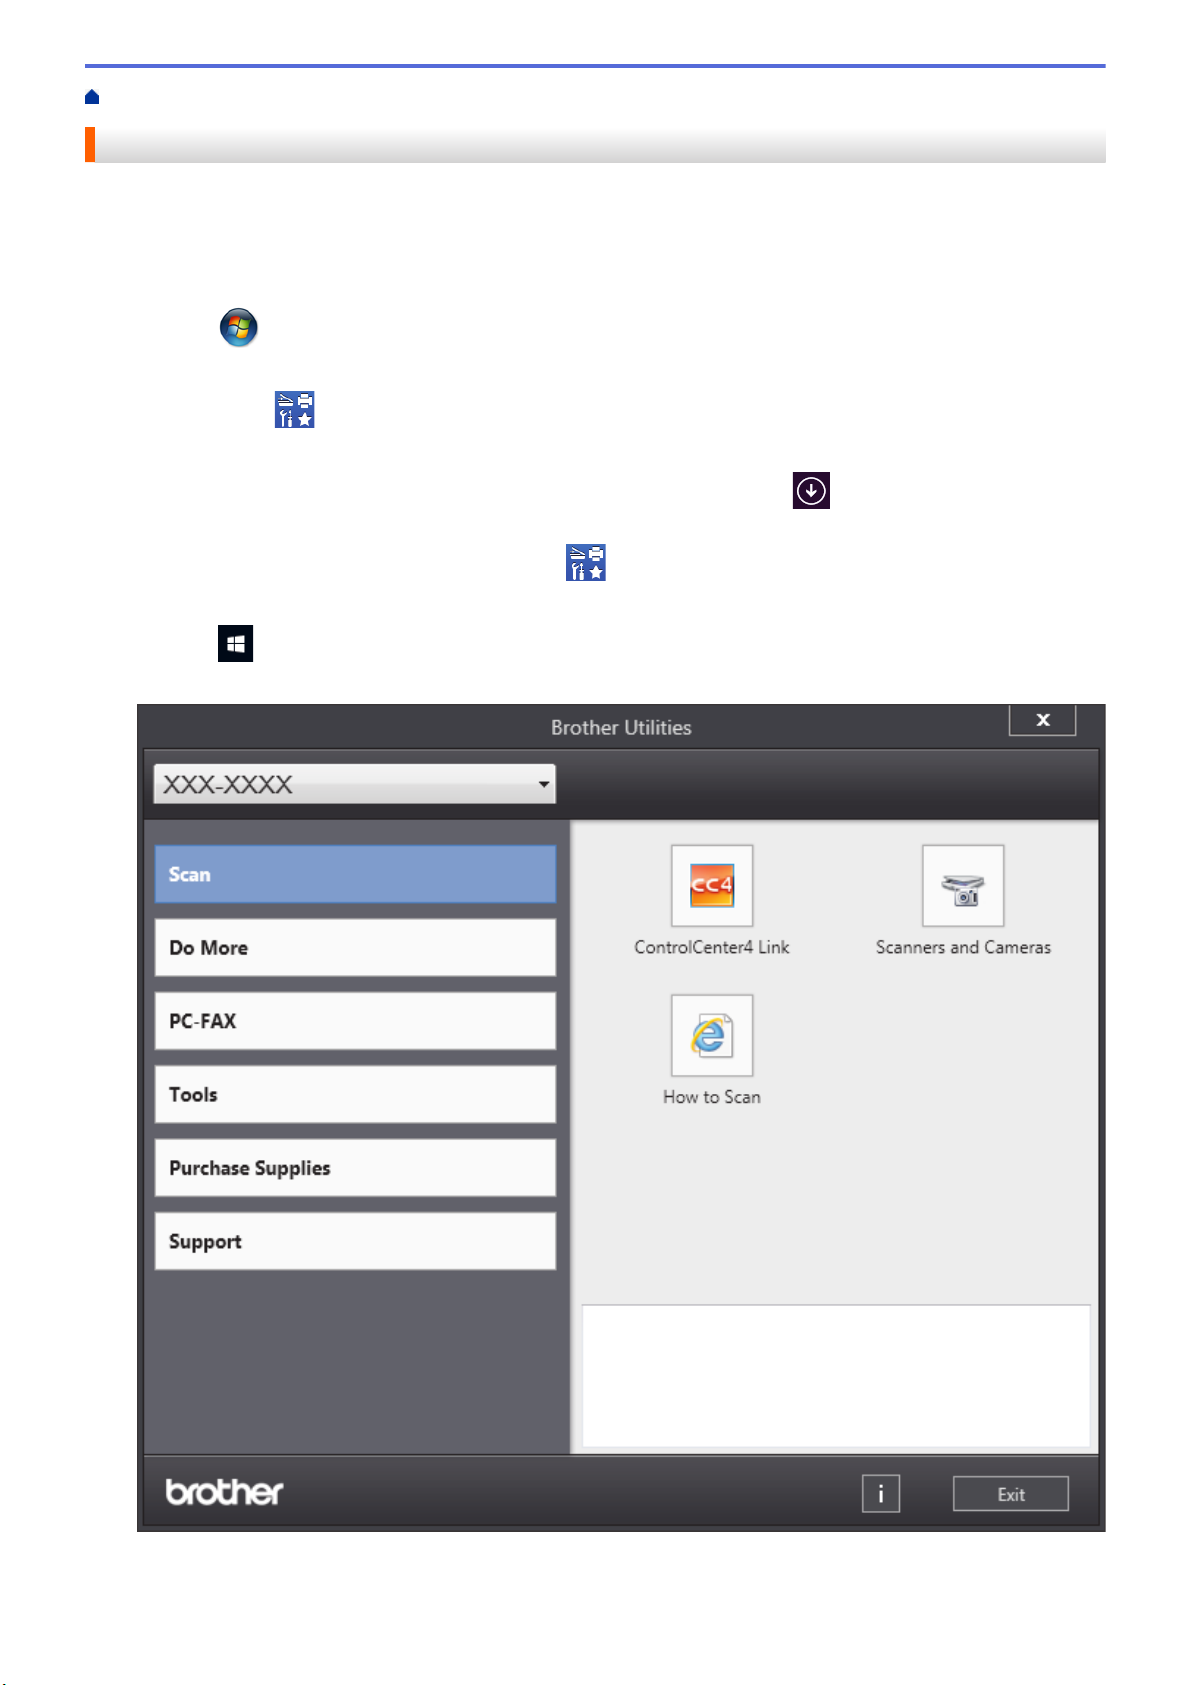
Brother Utilities is an application launcher that offers convenient access to all Brother applications installed on
your computer.
1. Do one of the following:
• (Windows 7)
Click
• (Windows 8)
Tap or click (Brother Utilities) either on the Start screen or the desktop.
• (Windows 8.1)
Move your mouse to the lower left corner of the Start screen and click
based device, swipe up from the bottom of the Start screen to bring up the Apps screen).
When the Apps screen appears, tap or click (Brother Utilities).
• (Windows 10)
Click
2. Select your machine (where XXXX is the name of your model).
(Start) > All Programs > Brother > Brother Utilities.
Brother > Brother Utilities.
(if you are using a touch-
3. Choose the operation you want to use.
22
Page 30

Related Information
• Introduction to Your Brother Machine
• Uninstall the Brother Software and Drivers (Windows)
23
Page 31
Home > Introduction to Your Brother Machine > Access Brother Utilities (Windows) > Uninstall the Brother
Software and Drivers (Windows)
Uninstall the Brother Software and Drivers (Windows)
1. Do one of the following:
• (Windows 7)
Click
• (Windows 8)
Tap or click (Brother Utilities) either on the Start screen or the desktop.
• (Windows 8.1)
Move your mouse to the lower left corner of the Start screen and click
based device, swipe up from the bottom of the Start screen to bring up the Apps screen).
When the Apps screen appears, tap or click (Brother Utilities).
• (Windows 10)
Click
2. Click the drop-down list, and then select your model name (if not already selected). Click Tools in the left
navigation bar, and then click Uninstall.
Follow the instructions in the dialog box to uninstall the software and drivers.
(Start) > All Programs > Brother > Brother Utilities.
(if you are using a touch-
Brother > Brother Utilities.
Related Information
• Access Brother Utilities (Windows)
24
Page 32

Home > Paper Handling
Paper Handling
• Load Paper
• Paper Settings
• Recommended Print Media
• Load Documents
• Unscannable and Unprintable Areas
• Using Special Paper
25
Page 33

Home > Paper Handling > Load Paper
Load Paper
• Load and Print Using the Paper Tray
• Load and Print Using the Multi‑purpose Tray (MP Tray)
26
Page 34

Home > Paper Handling > Load Paper > Load and Print Using the Paper Tray
Load and Print Using the Paper Tray
• Load Paper in the Paper Tray
• Printing Problems
• Error and Maintenance Messages
27
Page 35
Home > Paper Handling > Load Paper > Load and Print Using the Paper Tray > Load Paper in the Paper
Tray
Load Paper in the Paper Tray
• If the Check Size setting is set to On and you pull the paper tray out of the machine, a message appears
on the LCD asking if you want to change the paper size and paper type. Change the paper size and paper
type settings if needed, following the LCD instructions.
• When you load a different size and type of paper in the tray, you must also change the Paper Size and
Paper Type settings in the machine, or on your computer.
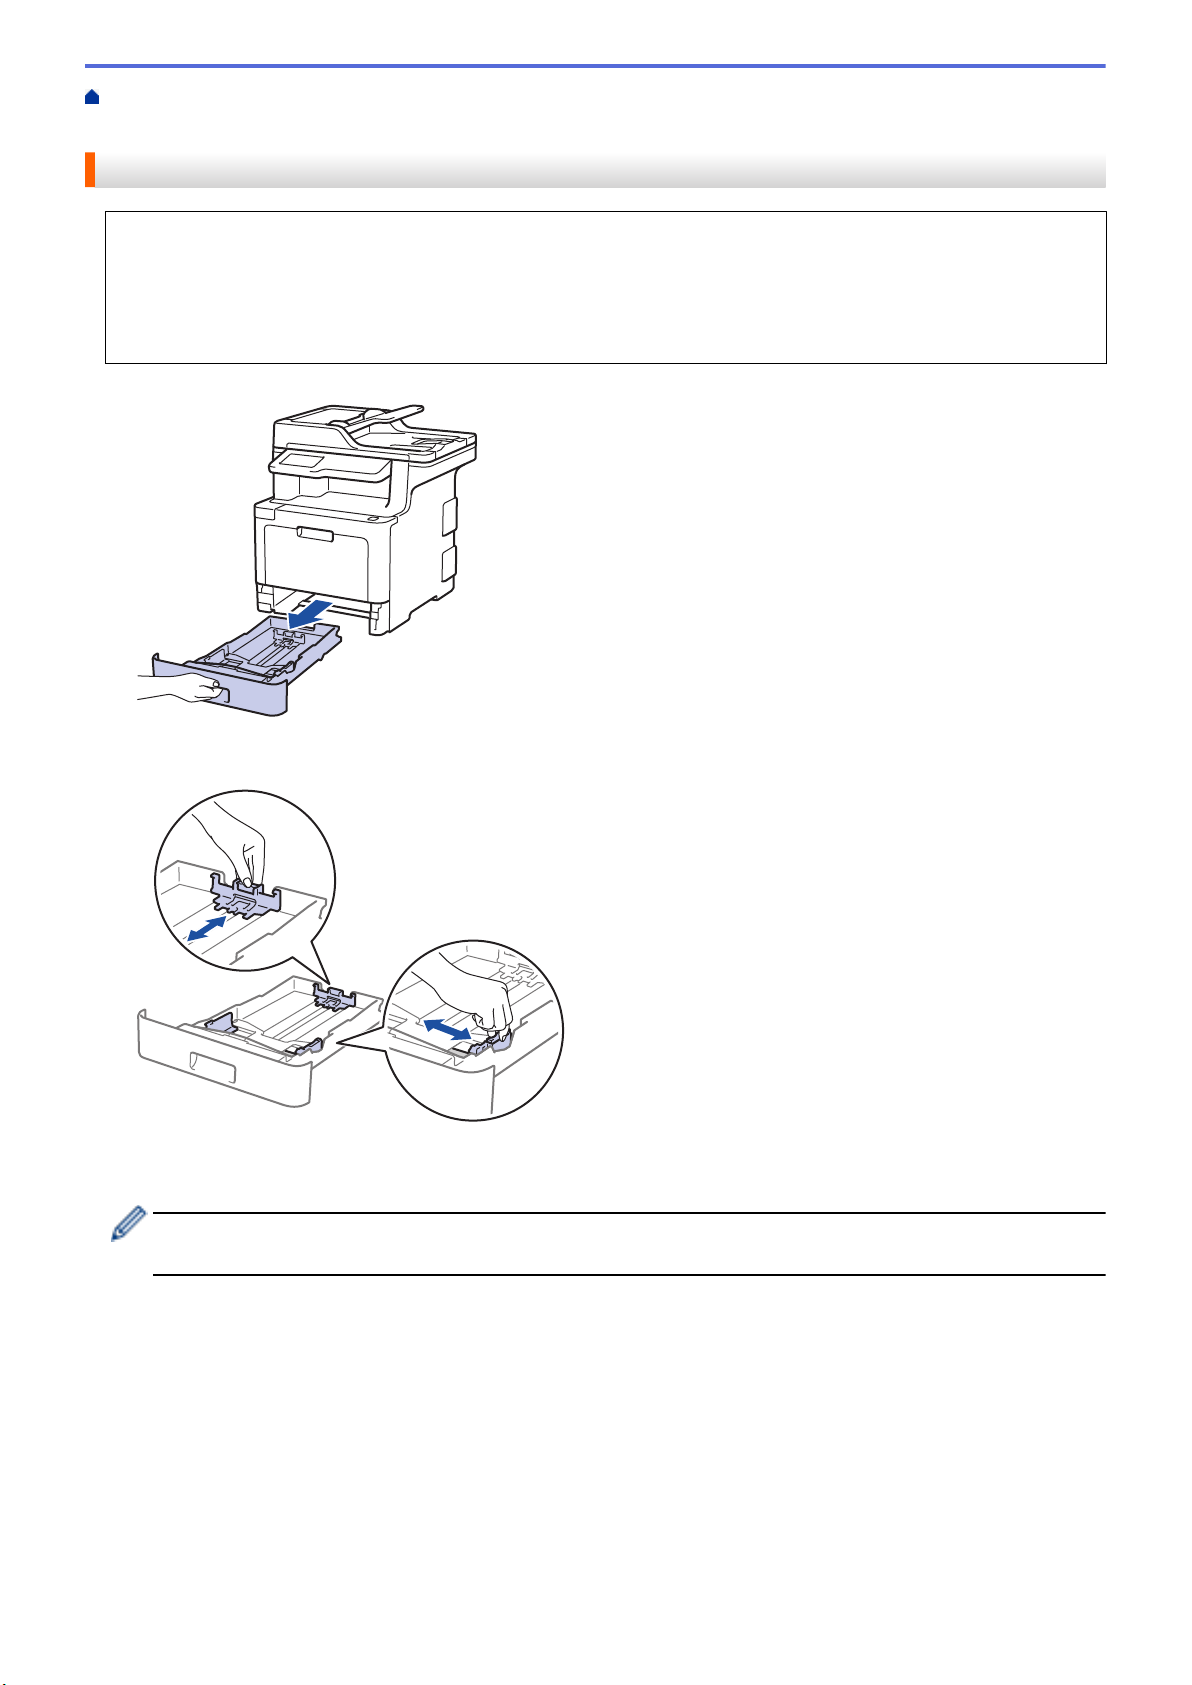
1. Pull the paper tray completely out of the machine.
2. Press and slide the paper guides to fit the paper.
Press the green release levers to slide the paper guides.
3. Fan the stack of paper well.
4. Load paper in the paper tray with the printing surface face down.
When you use letterhead or preprinted paper, load the paper in the correct orientation.See Related
Information: Change Machine Settings to Print on Letterhead or Preprinted Paper Using the Paper Tray.
28
Page 36
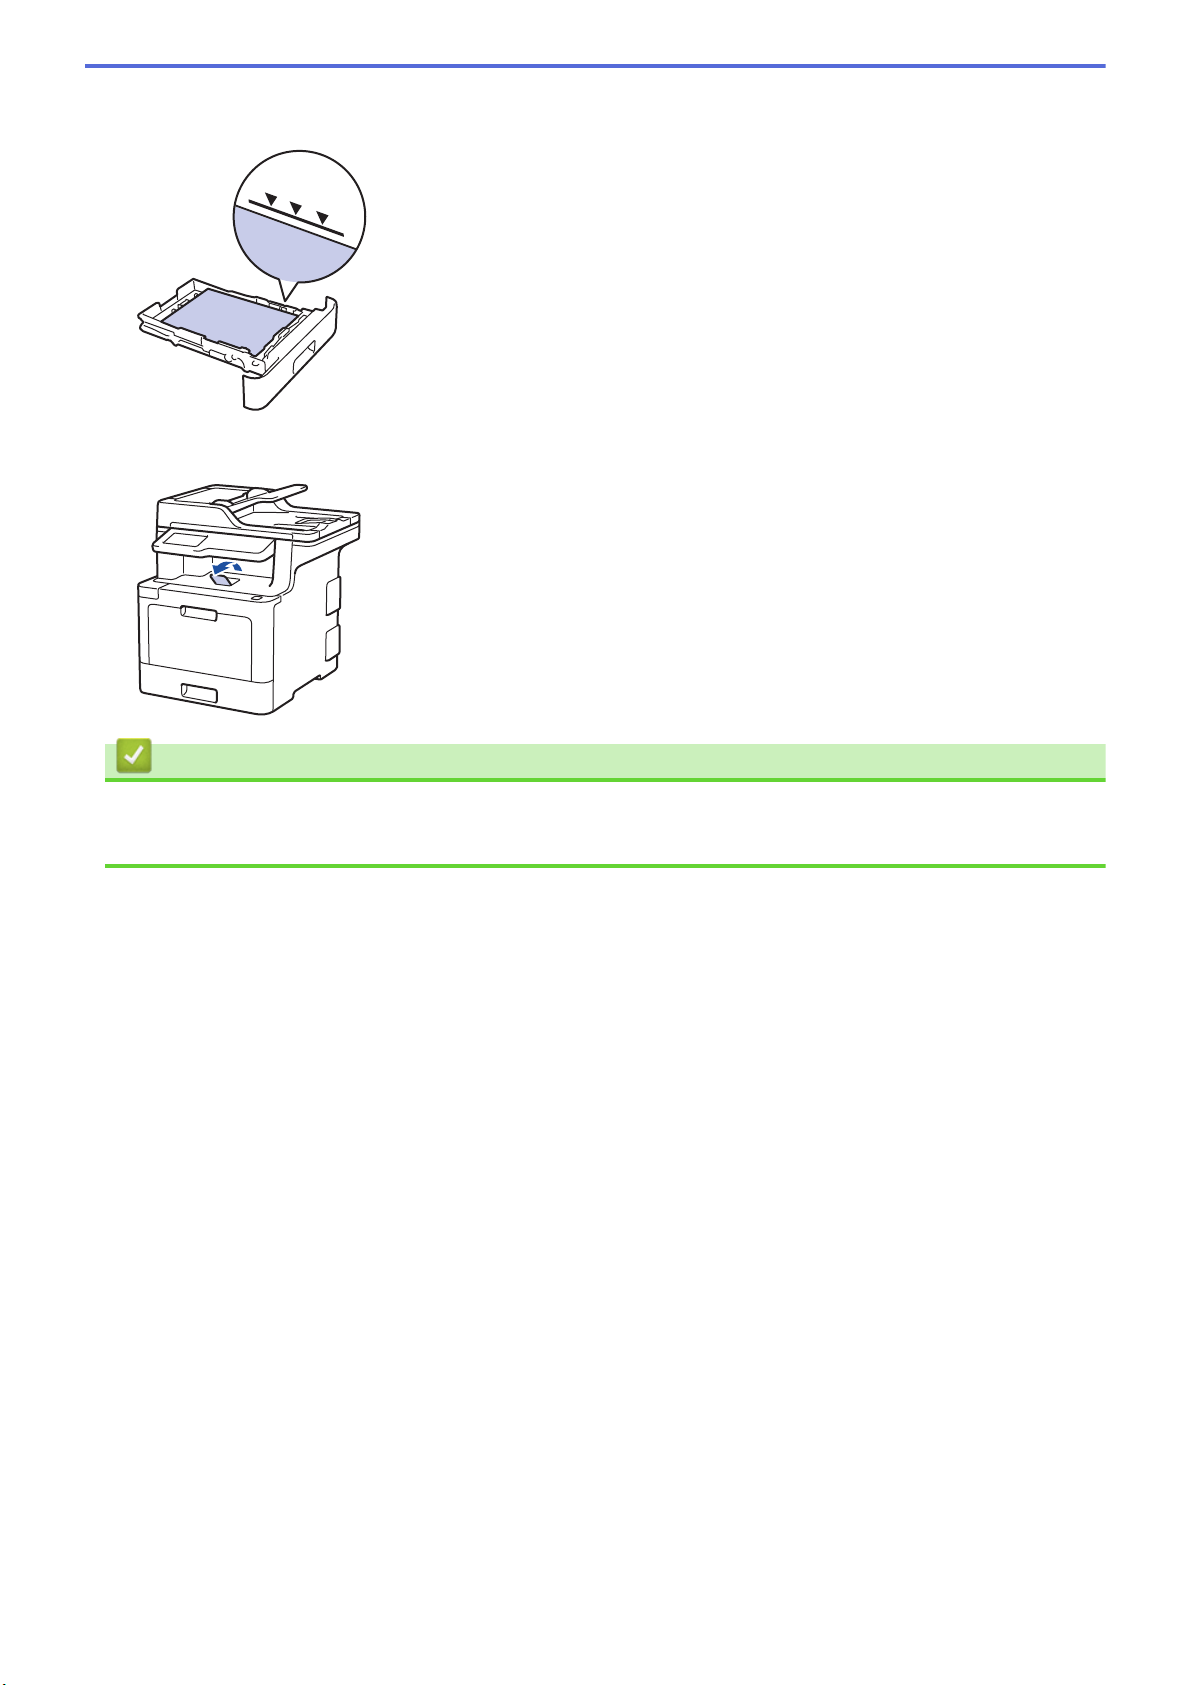
5. Make sure the paper is below the maximum paper mark (b b b).
Overfilling the paper tray will cause paper jams.
6. Slowly push the paper tray completely into the machine.
7. Lift the support flap to prevent paper from sliding off the output tray.
Related Information
• Load and Print Using the Paper Tray
• Change Machine Settings to Print on Letterhead or Preprinted Paper Using the Paper Tray
29
Page 37
Home > Paper Handling > Load Paper > Load and Print Using the Paper Tray > Load Paper in the Paper
Tray > Change Machine Settings to Print on Letterhead or Preprinted Paper Using the Paper Tray
Change Machine Settings to Print on Letterhead or Preprinted Paper Using the Paper Tray
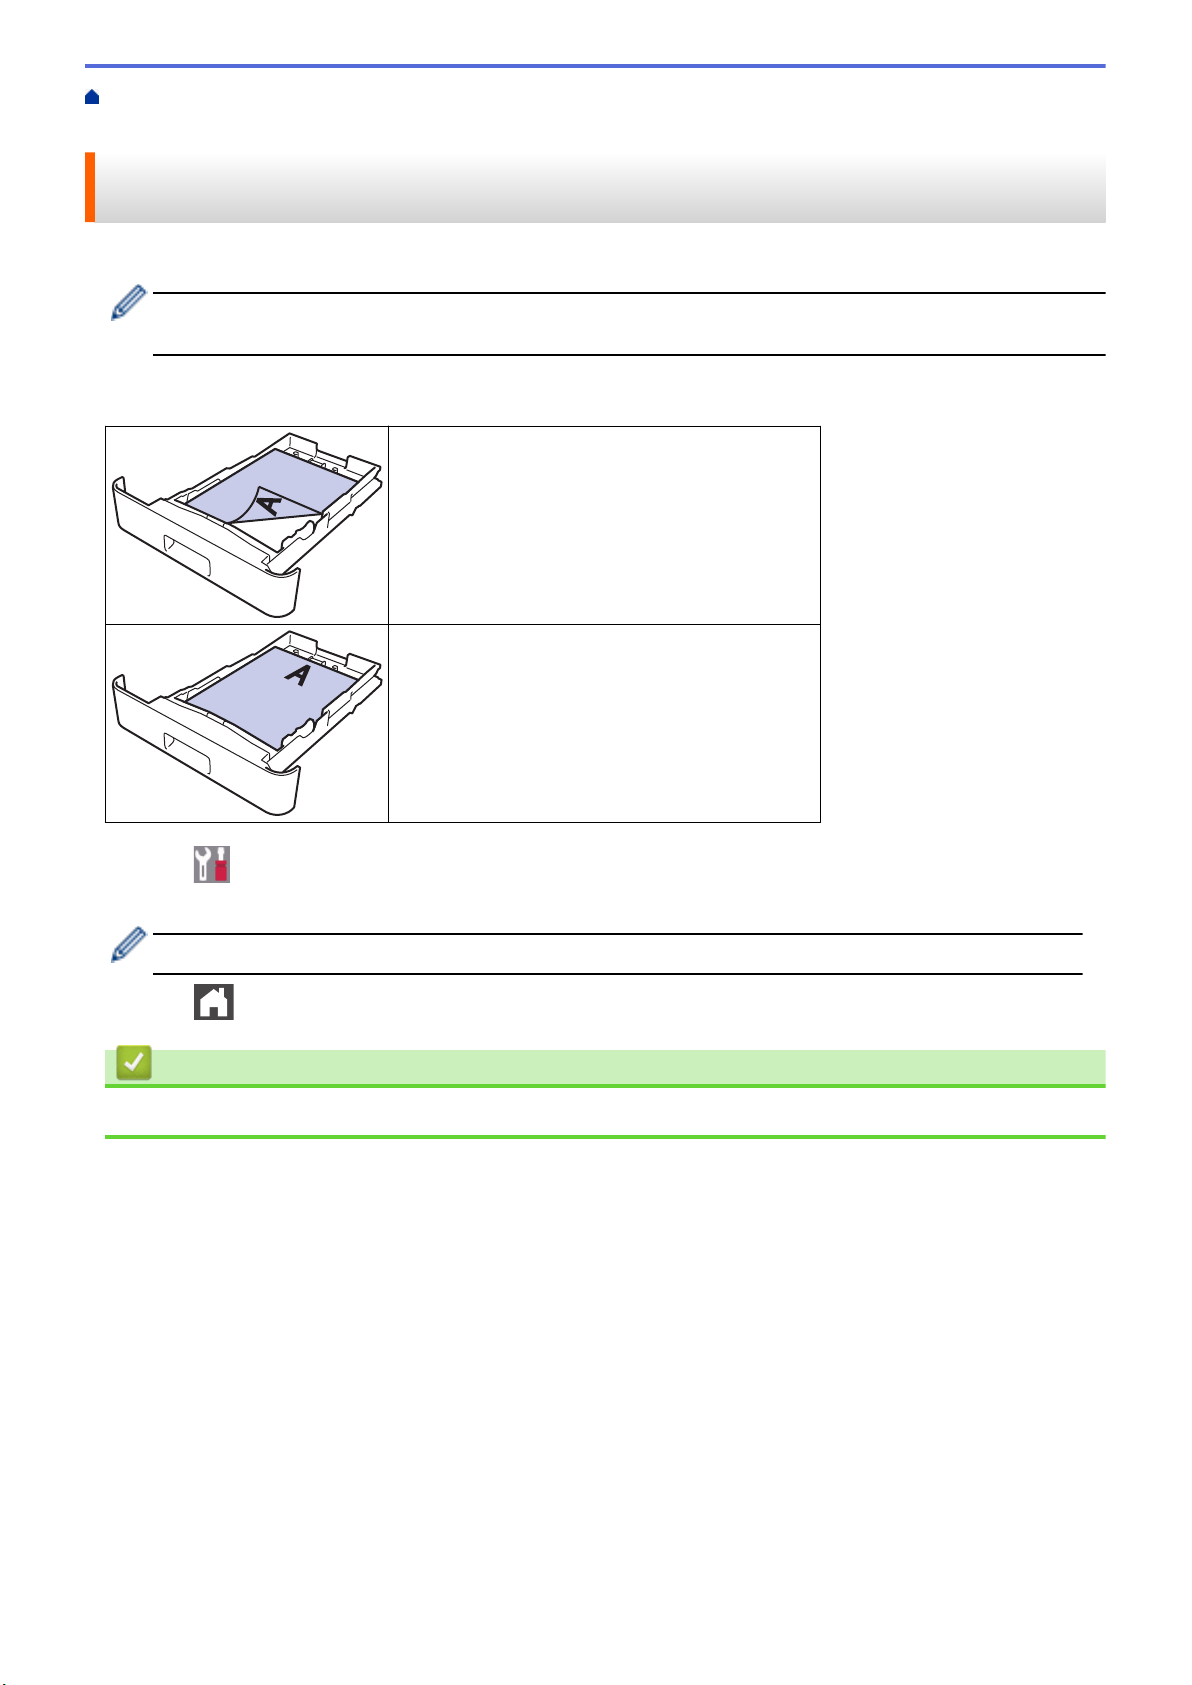
When you use letterhead or preprinted paper for 2-sided printing, change the machine's settings.
DO NOT load different sizes and types of paper in the paper tray at the same time. Doing this may cause
the paper to jam or misfeed.
Orientation
For 1-sided printing
• face down
• top edge toward the front of the paper tray
For automatic 2-sided printing (long edge binding)
• face up
• bottom edge toward the front of the paper tray
1. Press [Settings] > [All Settings] > [Printer] > [2-sided] > [Single Image] > [2-
sided Feed].
If your machine displays the [All Settings] menu on the Home screen, skip the [Settings] menu.
2. Press .
Related Information
• Load Paper in the Paper Tray
30
Page 38

Home > Paper Handling > Load Paper > Load and Print Using the Multi‑purpose Tray (MP Tray)
Load and Print Using the Multi‑purpose Tray (MP Tray)
You can load letterhead, colored paper, thin paper, thick paper, recycled paper, bond paper, labels, glossy paper,
up to 50 sheets of plain paper, or up to ten envelopes in the MP tray.
• Load Paper in the Multi‑purpose Tray (MP Tray)
• Load and Print Labels Using the MP Tray
• Load and Print Envelopes Using the MP Tray
• Printing Problems
• Error and Maintenance Messages
31
Page 39
Home > Paper Handling > Load Paper > Load and Print Using the Multi‑purpose Tray (MP Tray) > Load
2
1
Paper in the Multi‑purpose Tray (MP Tray)
Load Paper in the Multi‑purpose Tray (MP Tray)
When you load a different size and type of paper in the tray, you must also change the Paper Size and Paper
Type settings in the machine, or on your computer.
• Plain Paper
• Letterhead
• Colored Paper
• Thin Paper
• Thick Paper
• Recycled Paper
• Bond
• Glossy Paper
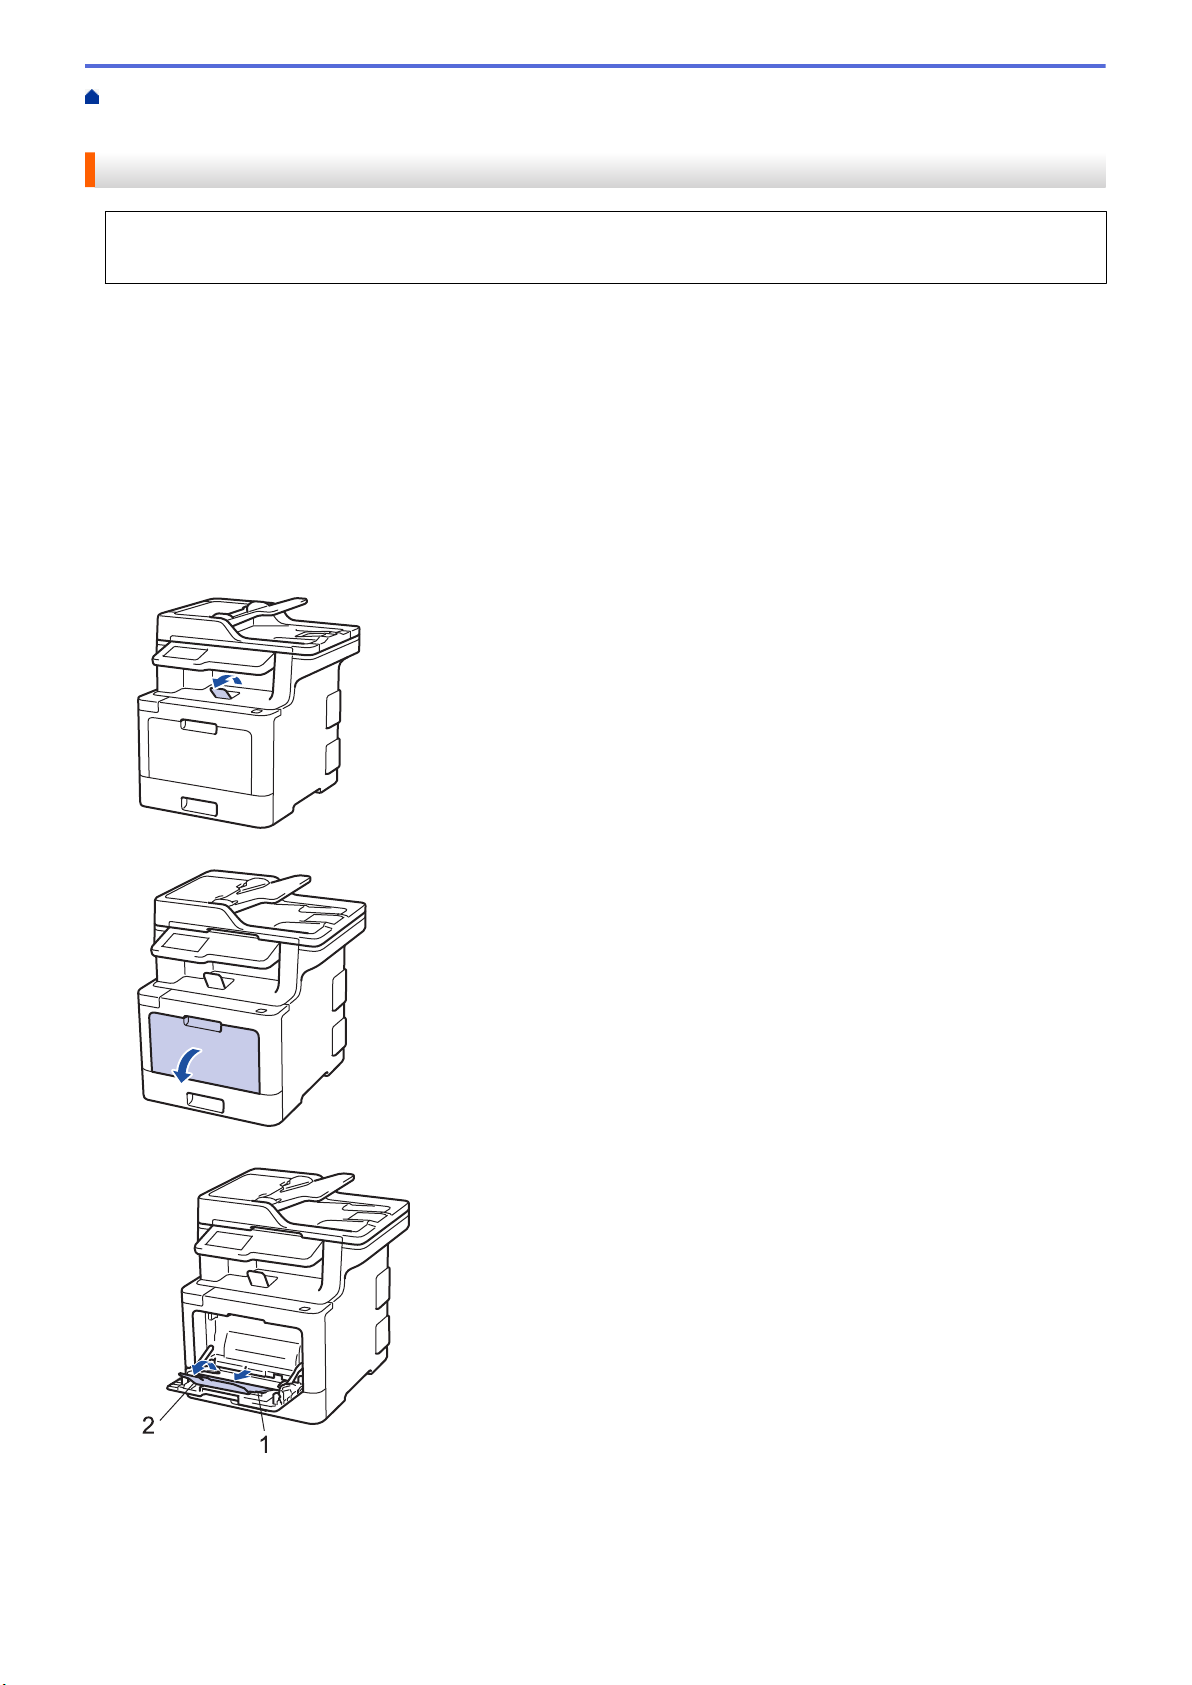
1. Lift the support flap to prevent paper from sliding off the face down output tray.
2. Open the MP tray and lower it gently.
3. Pull out the MP tray support (1) and unfold the flap (2).
4. Slide the MP tray paper guides to fit the width of the paper you are using.
32
Page 40
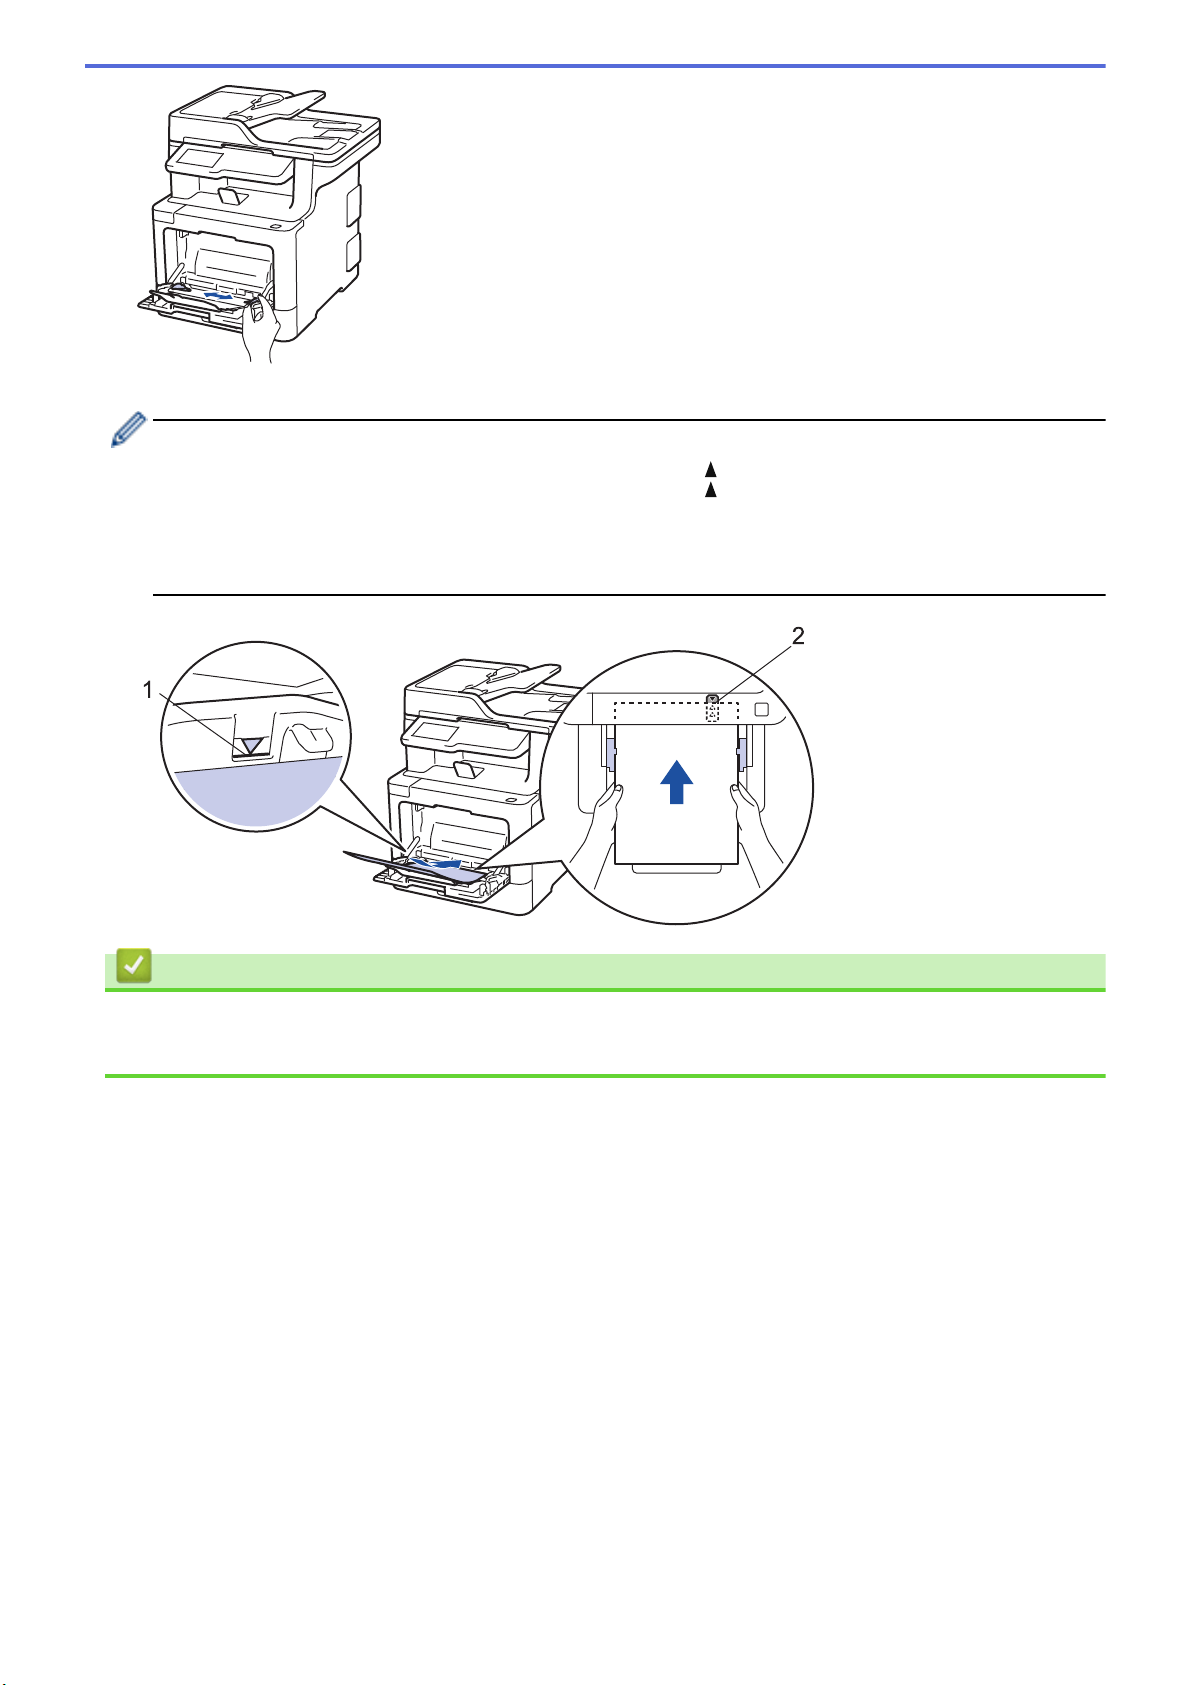
5. Load paper with the printing surface face up in the MP tray.
2
• Make sure the paper is below the maximum paper mark (1).
• Place the paper's leading edge (top of paper) between the and b arrows (2).
• When using glossy paper, load only one sheet at a time in the MP tray to avoid a paper jam.
• When you use letterhead or preprinted paper, load the paper in the correct orientation.See Related
Information: Change Machine Settings to Print on Letterhead or Preprinted Paper Using the MP Tray.
Related Information
• Load and Print Using the Multi‑purpose Tray (MP Tray)
• Change Machine Settings to Print on Letterhead or Preprinted Paper Using the MP Tray
33
Page 41
Home > Paper Handling > Load Paper > Load and Print Using the Multi‑purpose Tray (MP Tray) > Load
Paper in the Multi‑purpose Tray (MP Tray) > Change Machine Settings to Print on Letterhead or Preprinted
Paper Using the MP Tray
Change Machine Settings to Print on Letterhead or Preprinted Paper Using the MP Tray
When you use letterhead or preprinted paper for 2-sided printing, change the machine's settings.
DO NOT load different sizes and types of paper in the paper tray at the same time. Doing this may cause
the paper to jam or misfeed.
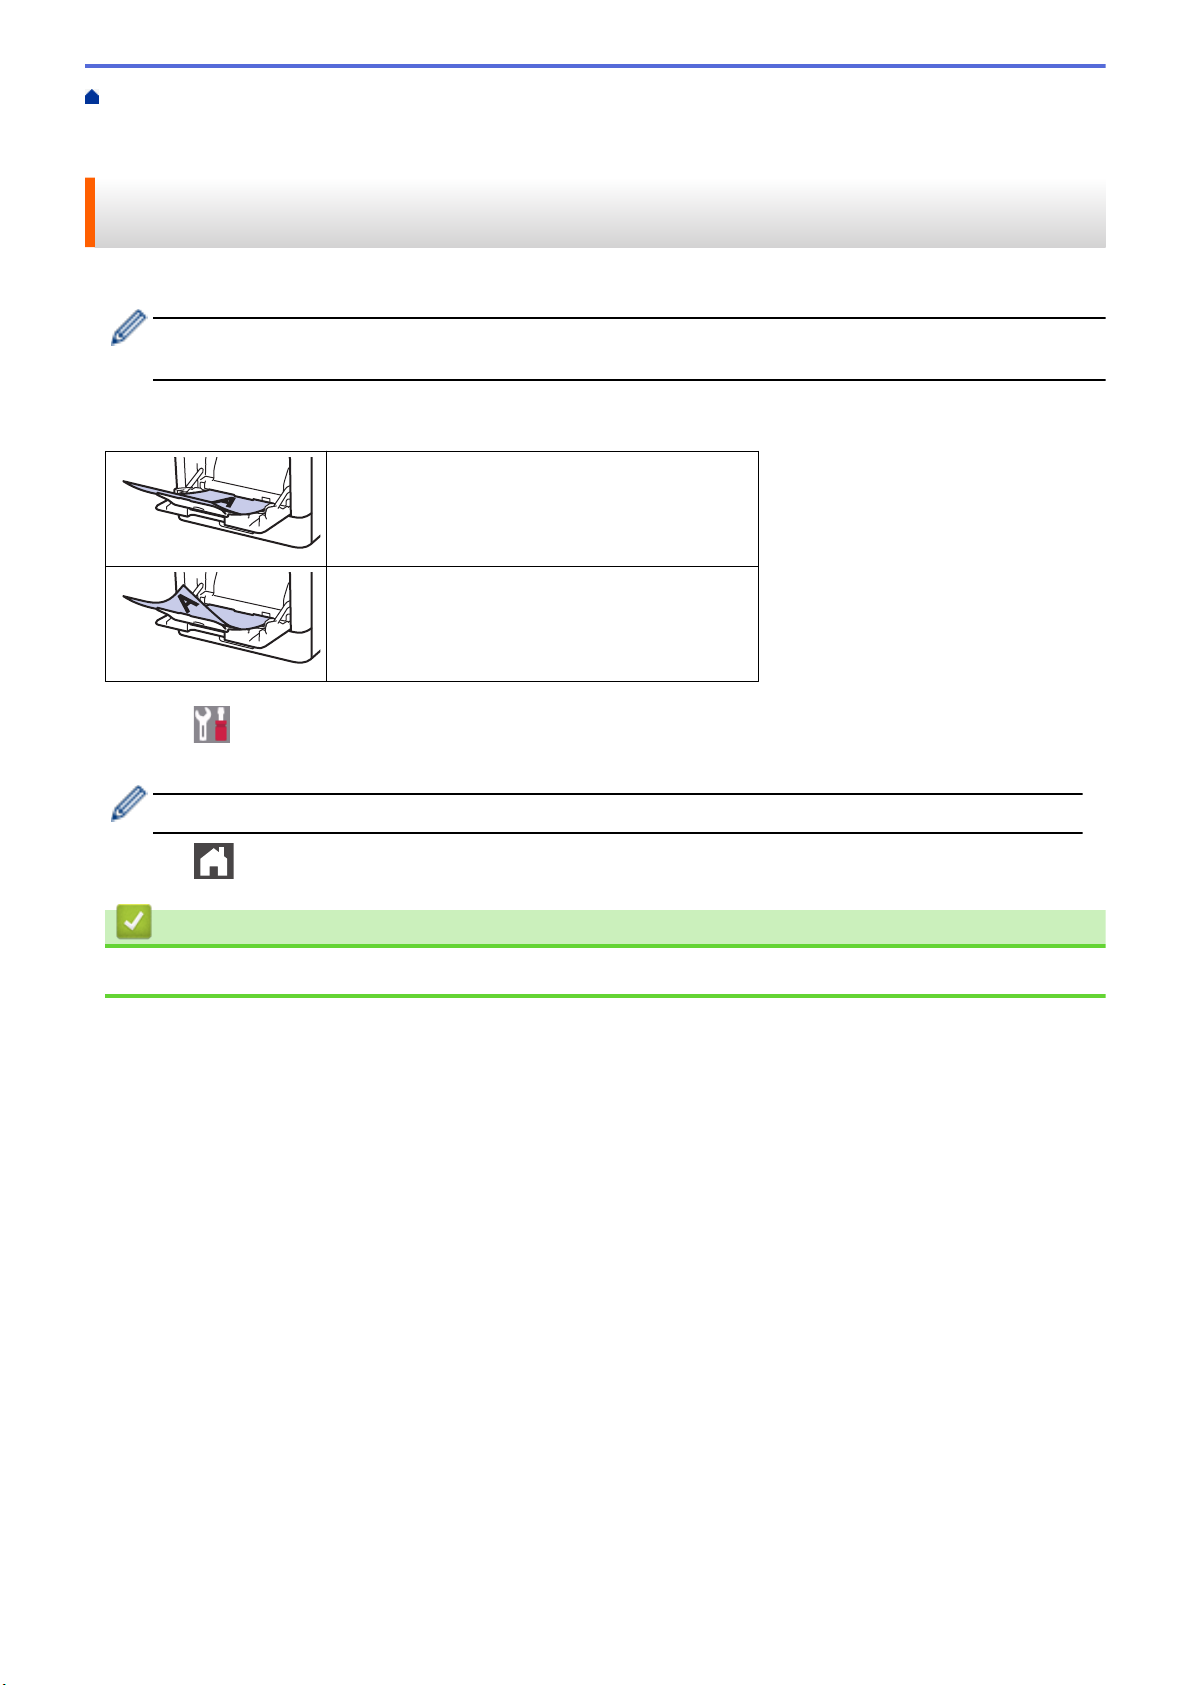
Orientation
For 1-sided printing
• face up
• top edge first
For automatic 2-sided printing (long edge binding)
• face down
• bottom edge first
1. Press [Settings] > [All Settings] > [Printer] > [2-sided] > [Single Image] > [2-
sided Feed].
If your machine displays the [All Settings] menu on the Home screen, skip the [Settings] menu.
2. Press .
Related Information
• Load Paper in the Multi‑purpose Tray (MP Tray)
34
Page 42
Home > Paper Handling > Load Paper > Load and Print Using the Multi‑purpose Tray (MP Tray) > Load
2
1
and Print Labels Using the MP Tray
Load and Print Labels Using the MP Tray
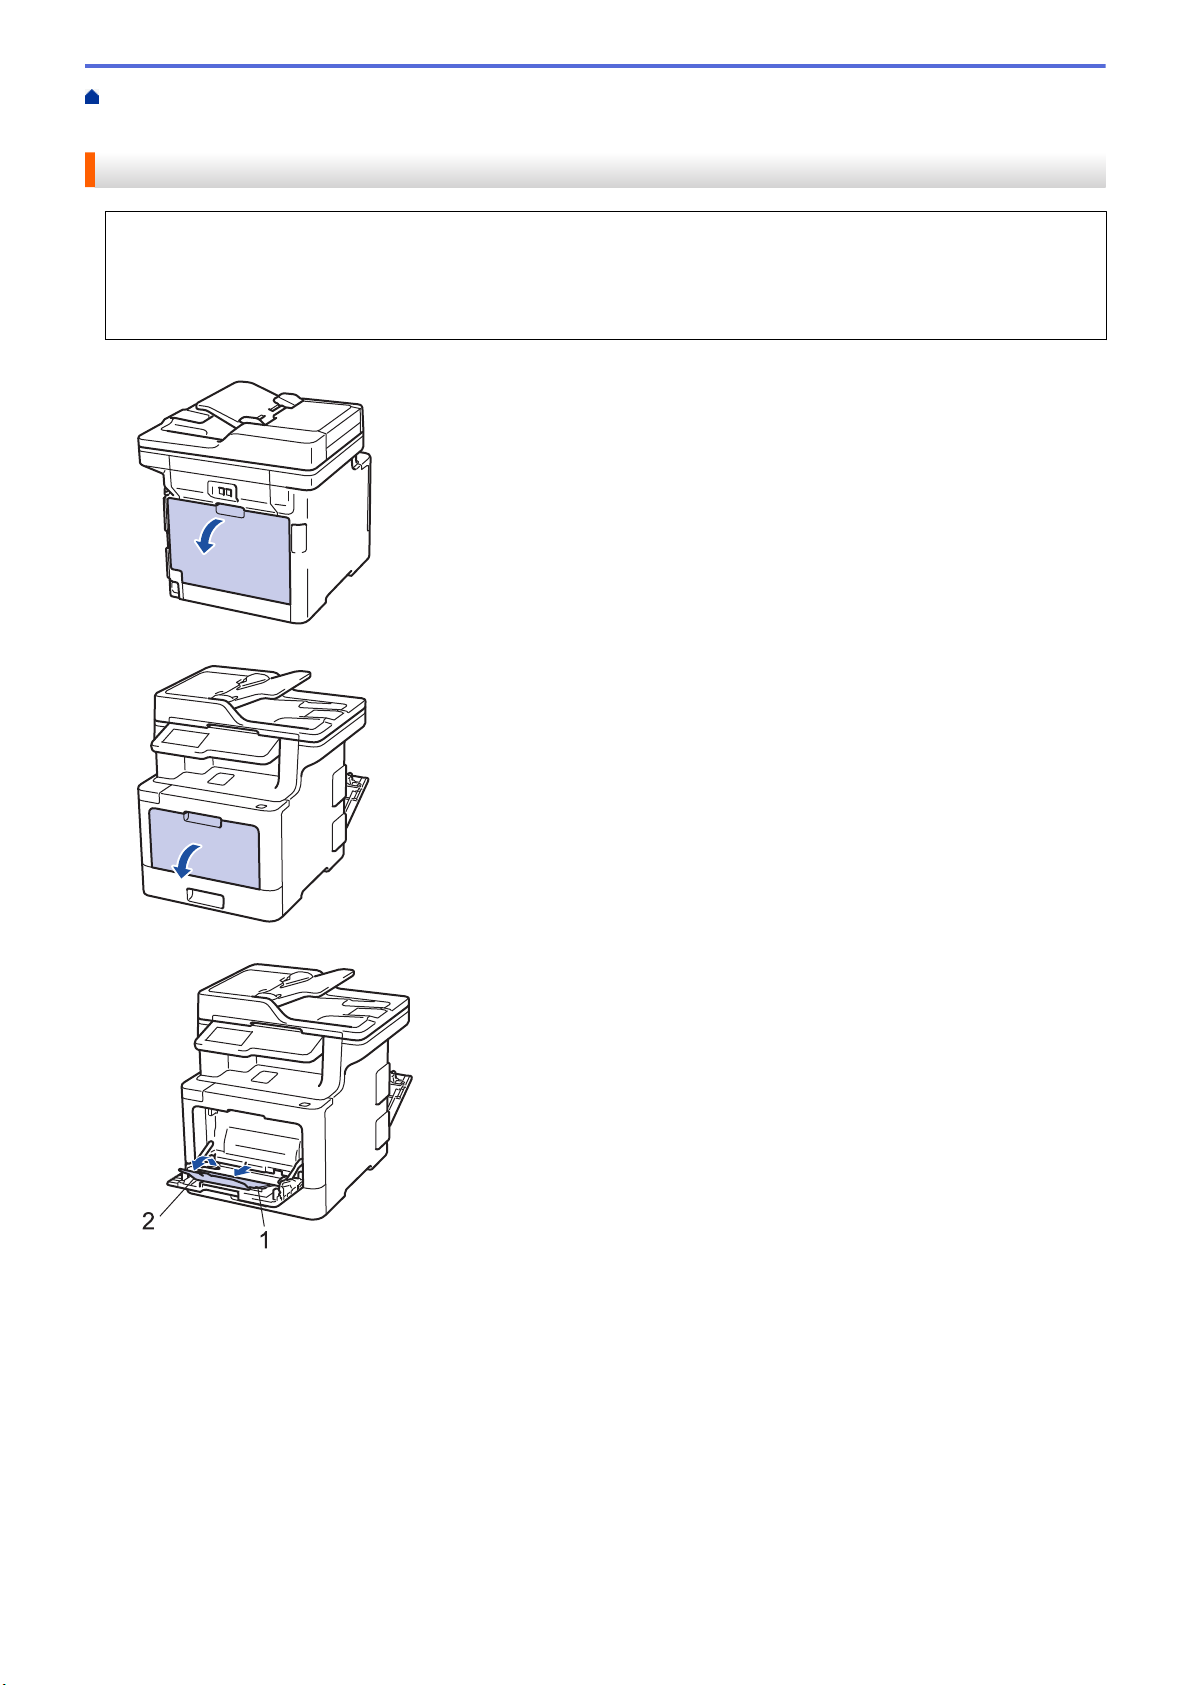
When the back cover (face up output tray) is pulled down, the machine has a straight paper path from the MP
tray through to the back of the machine. Use this paper feed and output method when you print on labels.
When you load a different size and type of paper in the tray, you must also change the Paper Size and Paper
Type settings in the machine, or on your computer.
1. Open the machine's back cover (the face up output tray).
2. On the front of the machine, open the MP tray and lower it gently.
3. Pull out the MP tray support (1) and unfold the flap (2).
4. Slide the MP tray paper guides to fit the width of the paper you are using.
5. Load paper with the printing surface face up in the MP tray.
35
Page 43
1
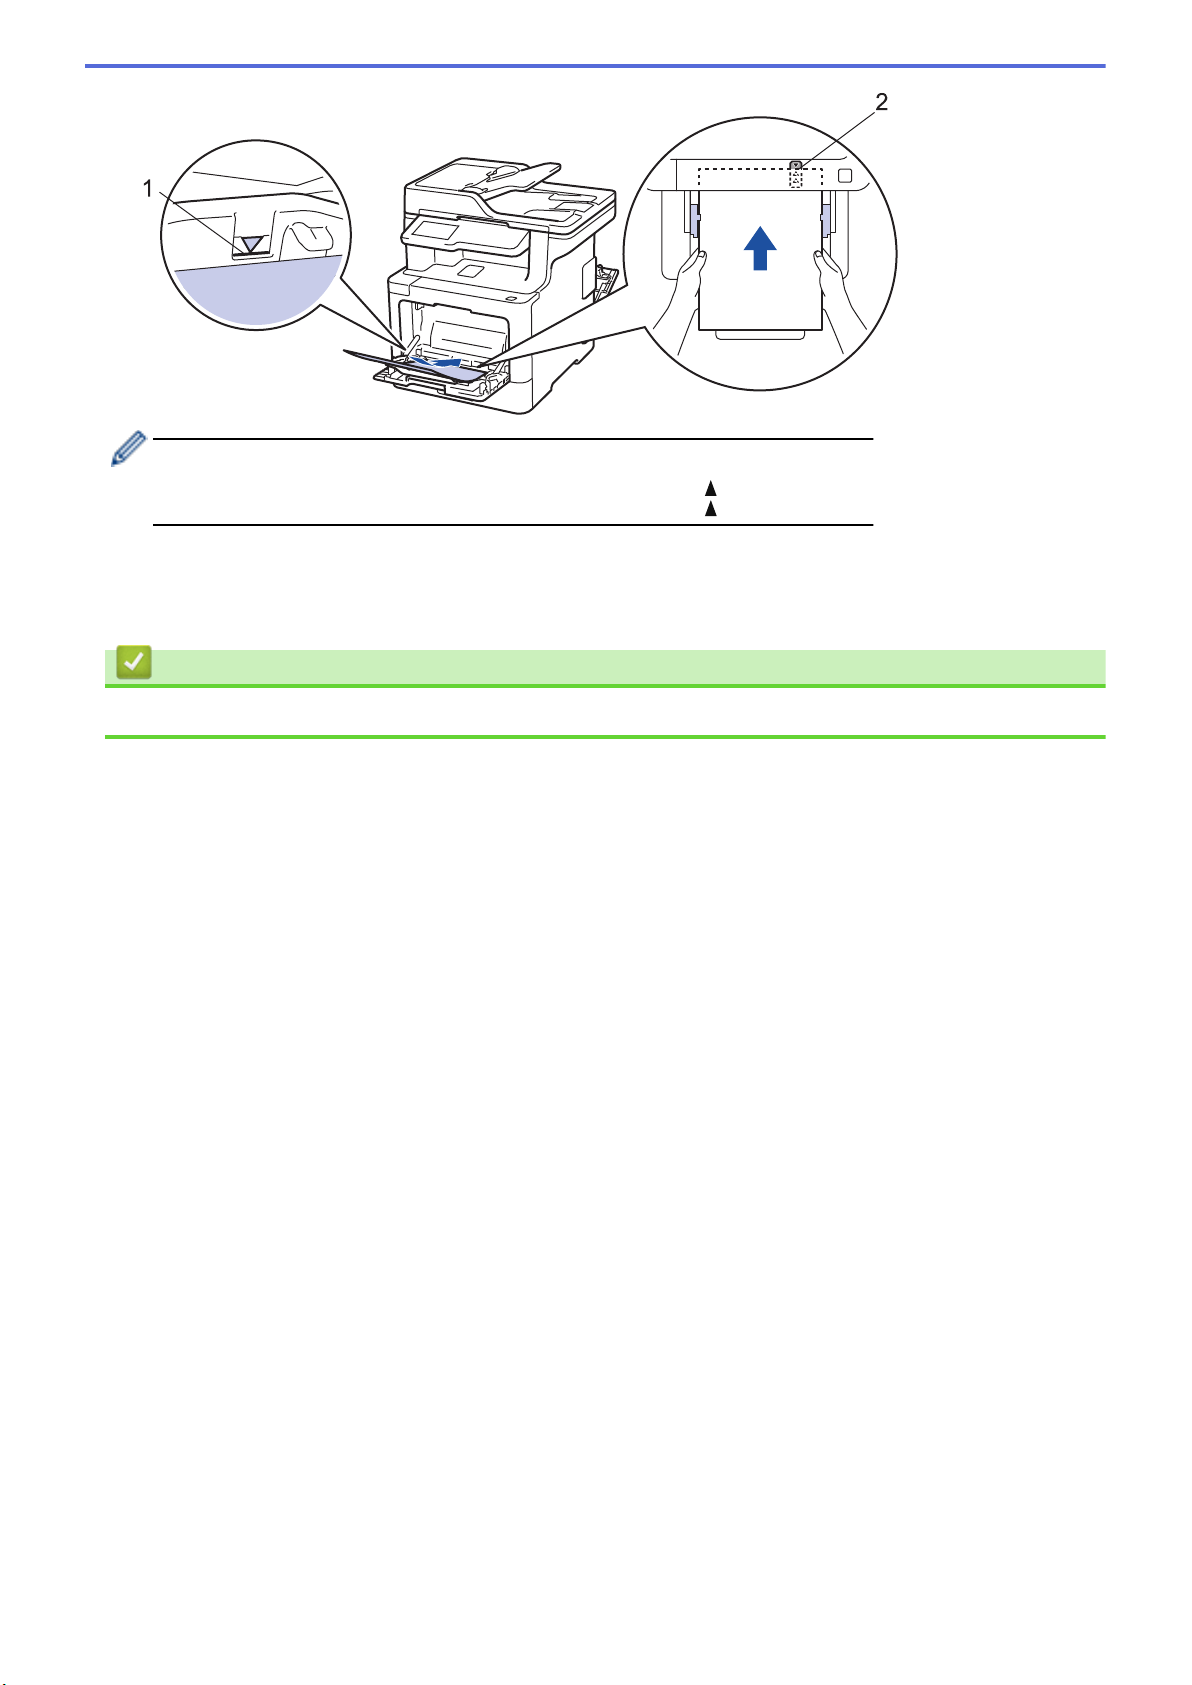
2
• Make sure the paper is below the maximum paper mark (1).
• Place the paper's leading edge (top of paper) between the and b arrows (2).
6. Change your print preferences in the Print screen before sending the print job from your computer.
7. Send your print job to the machine.
8. Close the back cover (the face up output tray) until it locks in the closed position.
Related Information
• Load and Print Using the Multi‑purpose Tray (MP Tray)
36
Page 44
Home > Paper Handling > Load Paper > Load and Print Using the Multi‑purpose Tray (MP Tray) > Load
and Print Envelopes Using the MP Tray
Load and Print Envelopes Using the MP Tray
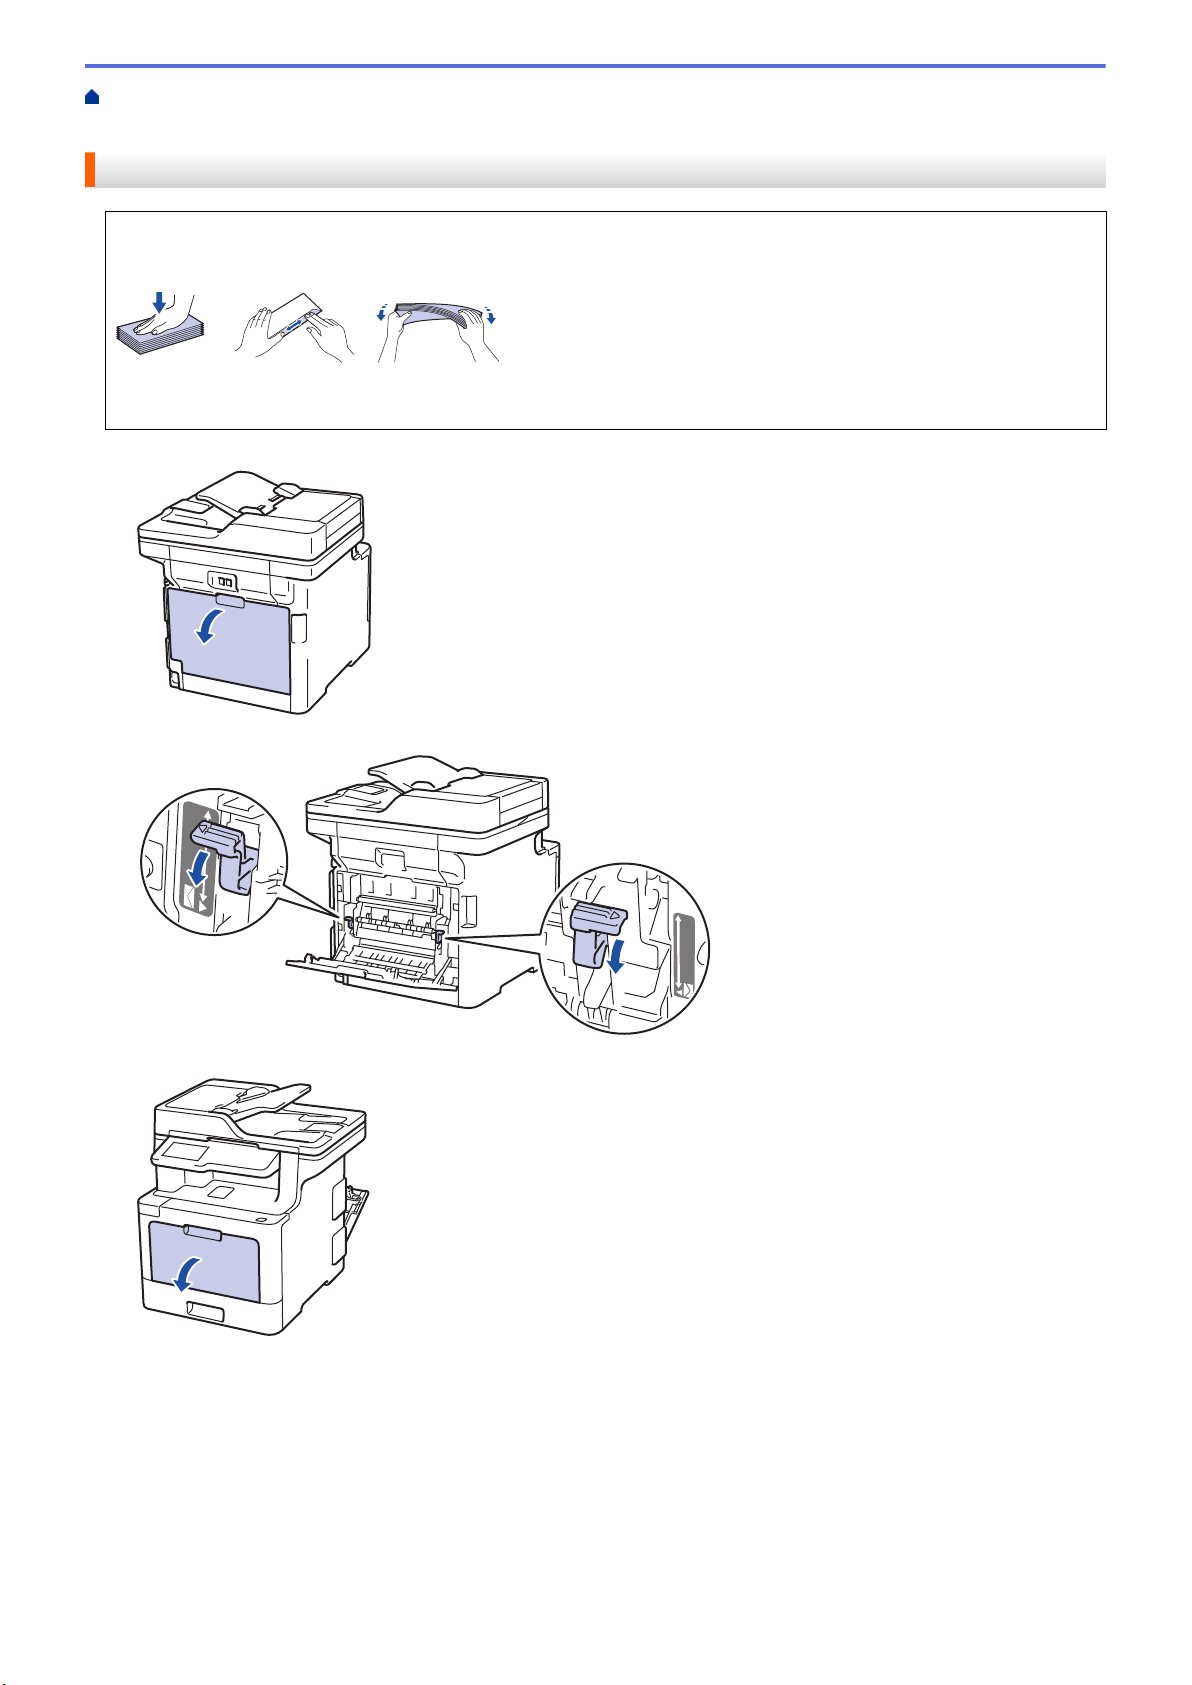
You can load up to ten envelopes in the MP tray.
Before loading, press the corners and sides of the envelopes to make them as flat as possible.
When you load a different size and type of paper in the tray, you must also change the Paper Size and Paper
Type settings in the machine, or on your computer.
1. Open the machine's back cover (the face up output tray).
2. Pull down the two gray levers, one on the left side and one on the right side, as shown in the illustration.
3. On the front of the machine, open the MP tray and lower it gently.
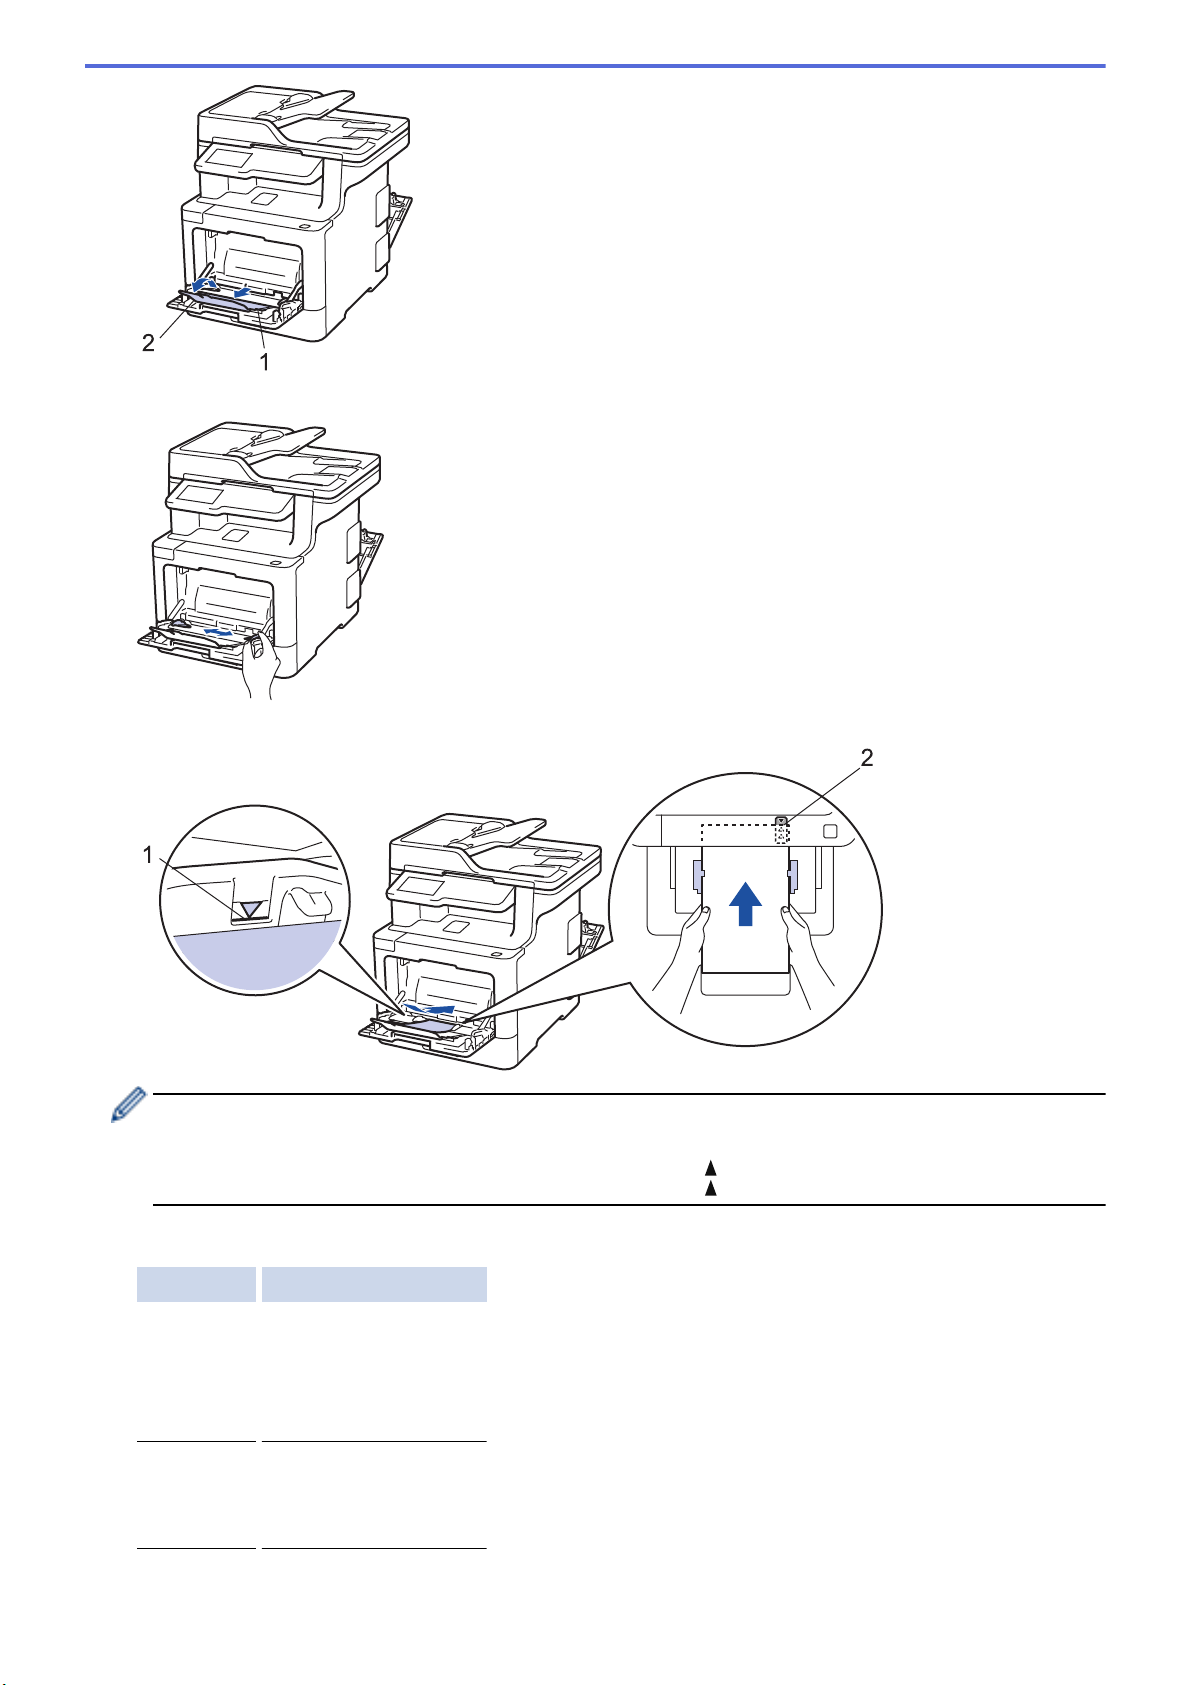
4. Pull out the MP tray support (1) and unfold the flap (2).
37
Page 45
2
1
5. Slide the MP tray paper guides to fit the width of the envelopes that you are using.
2
1
6. Load paper with the printing surface face up in the MP tray.
• Load up to 10 envelopes in the MP tray with the printing surface face up. Make sure the envelopes are
below the maximum paper mark (1). Loading more than 10 envelopes may cause paper jams.
• Place the paper's leading edge (top of paper) between the and b arrows (2).
7. Change your print preferences in the Print dialog box before sending the print job from your computer.
Settings Options for Envelopes
Paper Size Com-10
DL
C5
Monarch
Media Type Envelopes
Env. Thick
Env. Thin
8. Send your print job to the machine.
38
Page 46

9. When you have finished printing, return the two gray levers you adjusted in the earlier step back to their
original positions.
10. Close the back cover (the face up output tray) until it locks in the closed position.
Related Information
• Load and Print Using the Multi‑purpose Tray (MP Tray)
39
Page 47

Home > Paper Handling > Paper Settings
Paper Settings
• Change the Paper Size and Paper Type
• Select the Tray to Be Used For Printing
• Change the Check Paper Size Setting
40
Page 48
Home > Paper Handling > Paper Settings > Change the Paper Size and Paper Type
Change the Paper Size and Paper Type
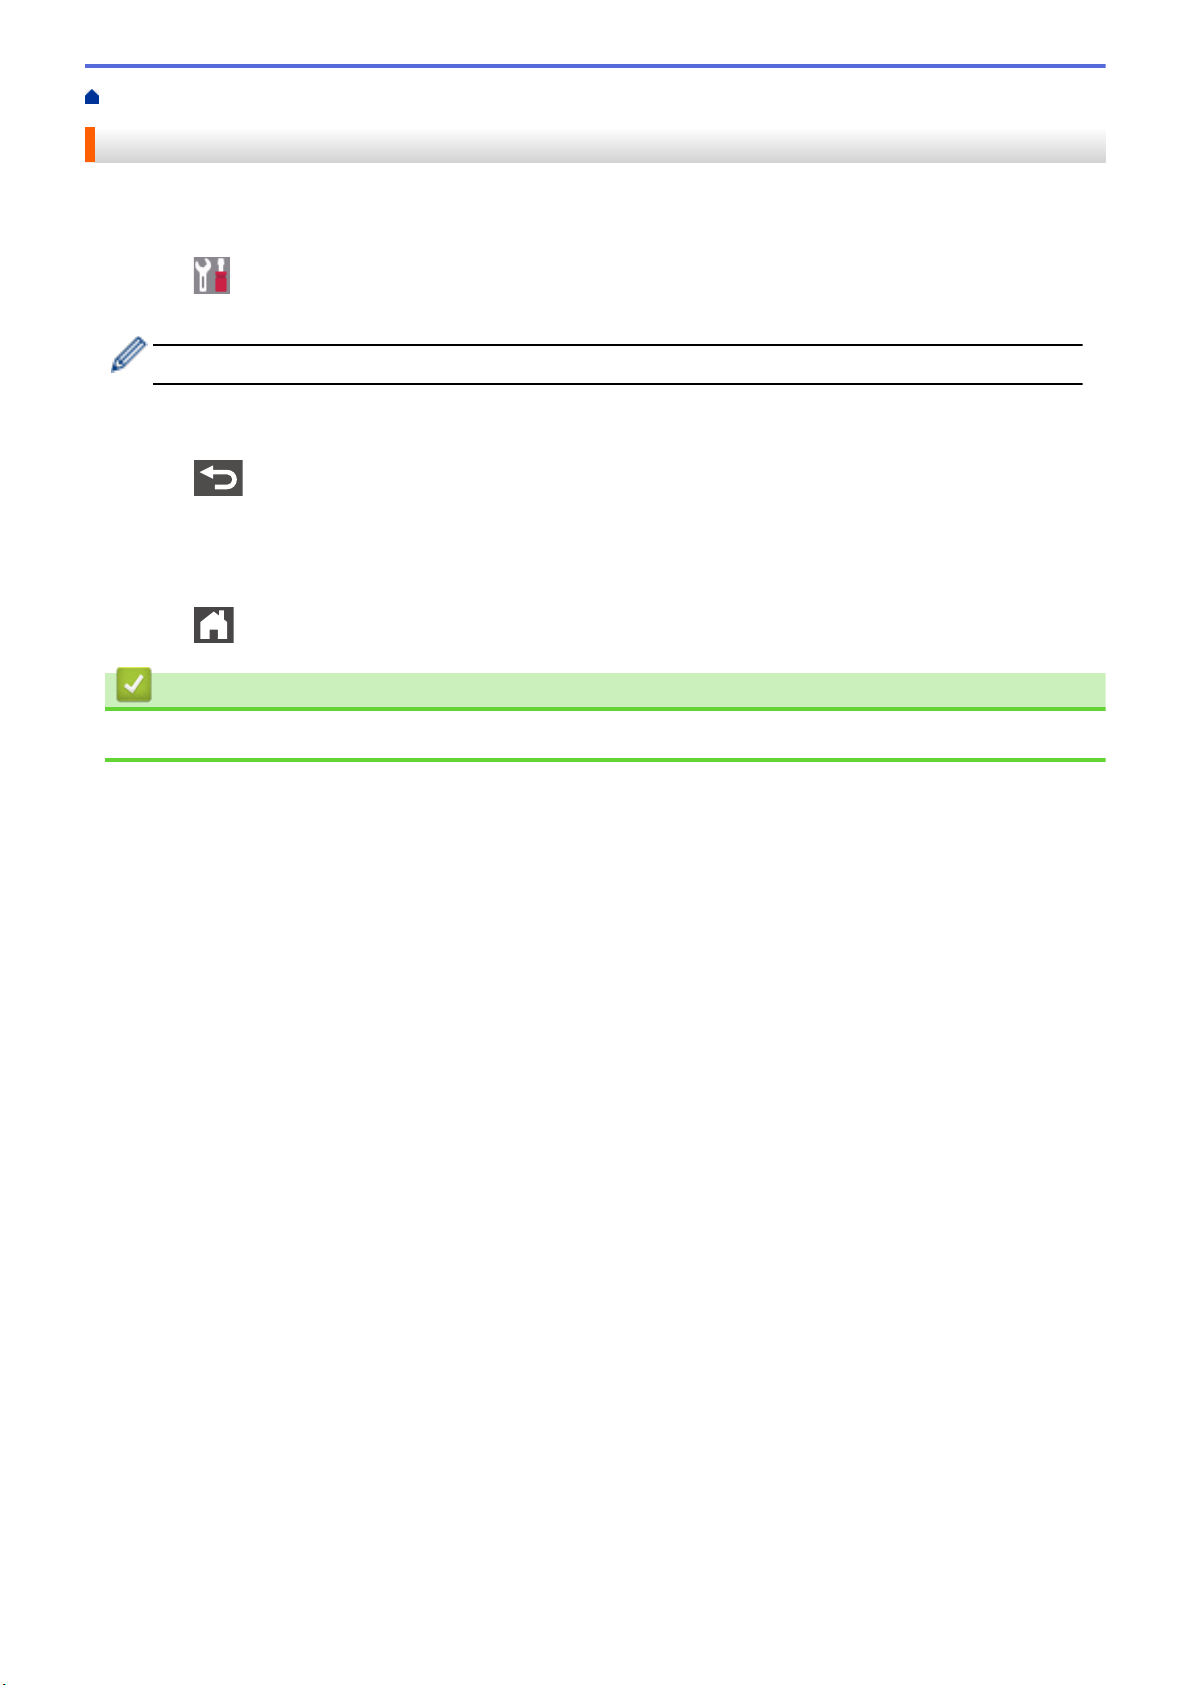
When you change the size and type of the paper you load in the tray, you must change the Paper Size and
Paper Type settings on the LCD at the same time.
1. Press
Type].
If your machine displays the [All Settings] menu on the Home screen, skip the [Settings] menu.
2. Press the option you want.
3. Swipe up or down or press a or b to display the paper type options, and then press the option you want.
4. Press
5. Press [Paper Size].
6. Press the option you want.
7. Swipe up or down or press a or b to display the paper size options, and then press the option you want.
8. Press .
[Settings] > [All Settings] > [General Setup] > [Tray Setting] > [Paper
.
Related Information
• Paper Settings
41
Page 49
Home > Paper Handling > Paper Settings > Select the Tray to Be Used For Printing
Select the Tray to Be Used For Printing
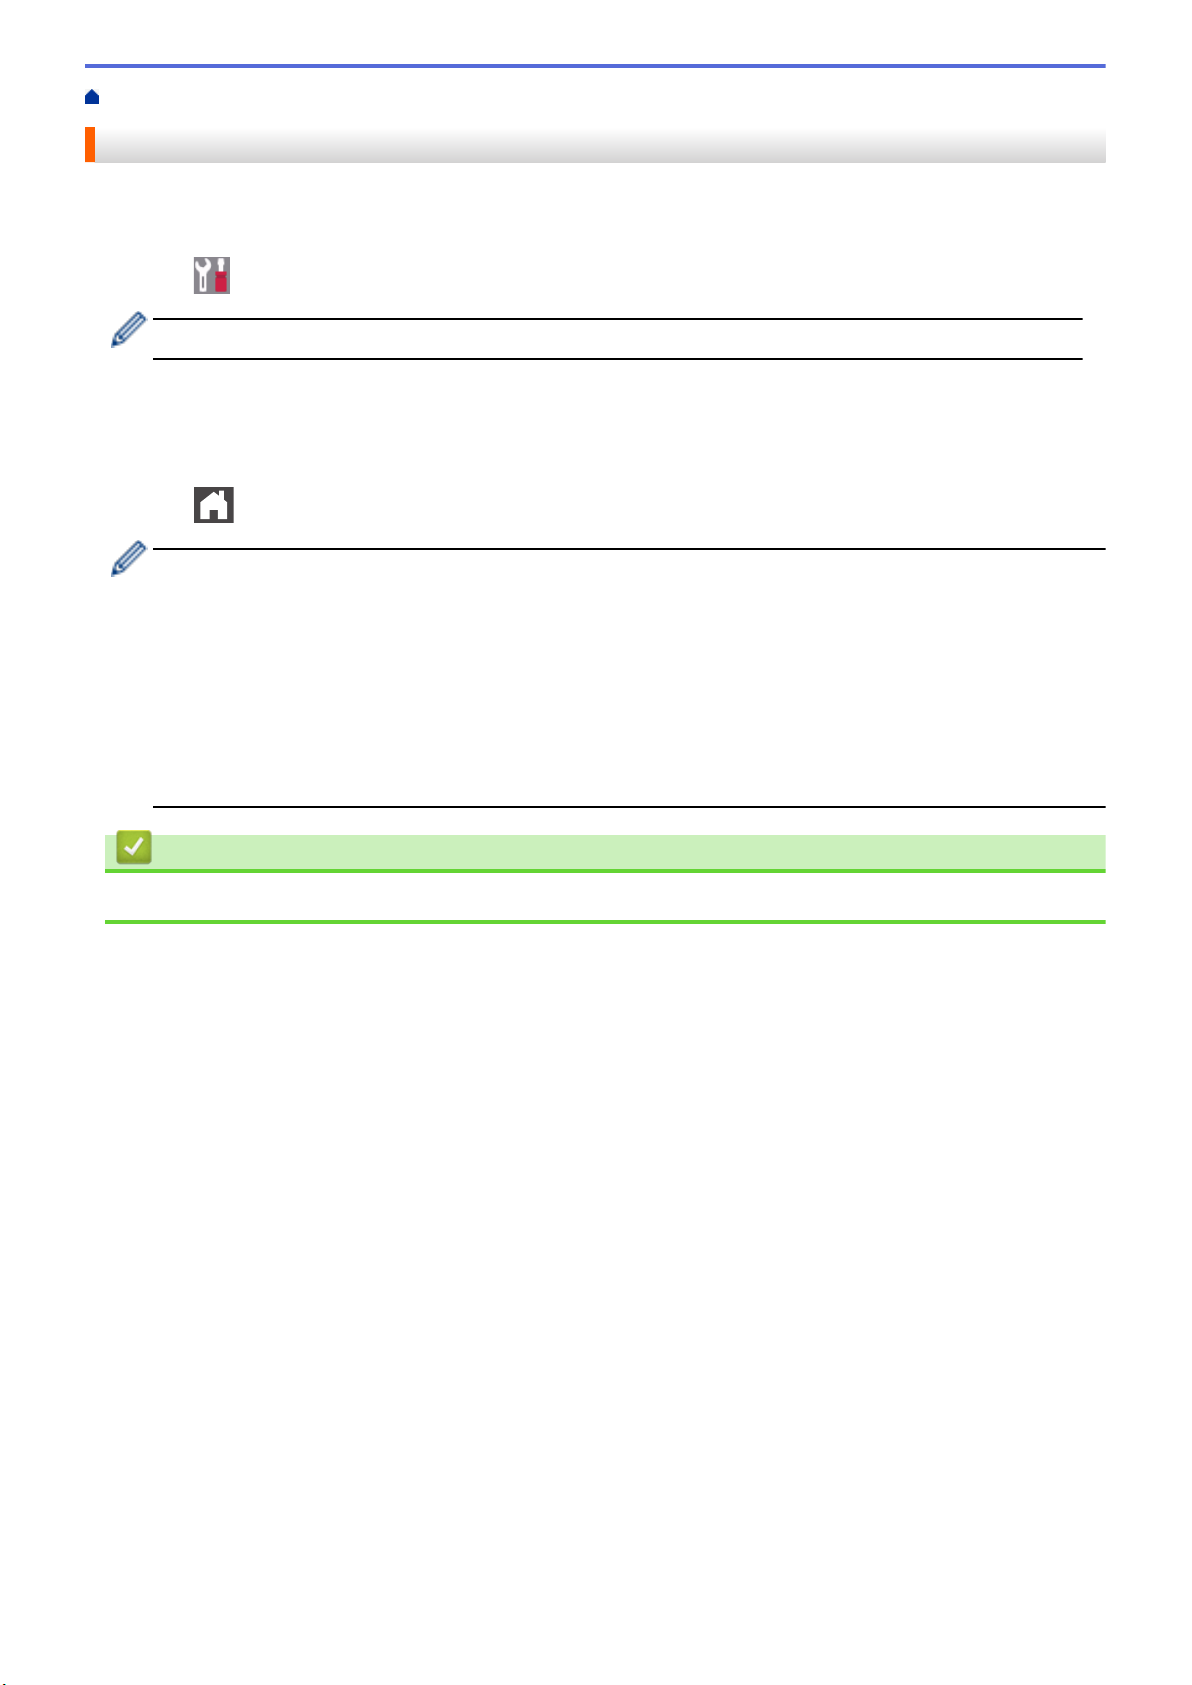
Change the default tray the machine will use for printing copies, received faxes, and print jobs from your
computer.
1. Press
If your machine displays the [All Settings] menu on the Home screen, skip the [Settings] menu.
2. Swipe up or down or press a or b to display the [Tray Use: Copy], [Tray Use: Fax], or [Tray Use:
Print] option, and then press the option you want.
3. Swipe up or down or press a or b to display the option you want, and then press it. For example, when you
select the [MP>T1] option, the machine pulls paper from the MP tray until it is empty, and then from Tray 1.
4. Press
• When you make a copy using the ADF and give priority to multiple trays, the machine looks for the tray
• When you make a copy using the scanner glass, your document is copied from the higher priority tray
• (For models with facsimile function) Use the following sizes of paper for printing faxes: Letter, A4, Legal,
• (For models with facsimile function) If the tray is out of paper and received faxes are in the machine’s
[Settings] > [All Settings] > [General Setup] > [Tray Setting].
.
with the most suitable paper and pulls paper from that tray.
even if more suitable paper is in another paper tray.
Folio or Mexico Legal. When an appropriate size is not in any of the trays, the machine stores received
faxes and [Size Mismatch] appears on the touchscreen.
memory, [No Paper] appears on the touchscreen. Load paper in the empty tray.
Related Information
• Paper Settings
42
Page 50
Home > Paper Handling > Paper Settings > Change the Check Paper Size Setting
Change the Check Paper Size Setting
When you turn on your machine's Check Size setting, the machine displays a message when you remove a
paper tray or load paper using the MP tray, asking if you changed the paper size and paper type.
The default setting is On.
1. Press
Size].
If your machine displays the [All Settings] menu on the Home screen, skip the [Settings] menu.
2. Press [On] or [Off].
3. Press
[Settings] > [All Settings] > [General Setup] > [Tray Setting] > [Check
.
Related Information
• Paper Settings
43
Page 51
Home > Paper Handling > Recommended Print Media
Recommended Print Media
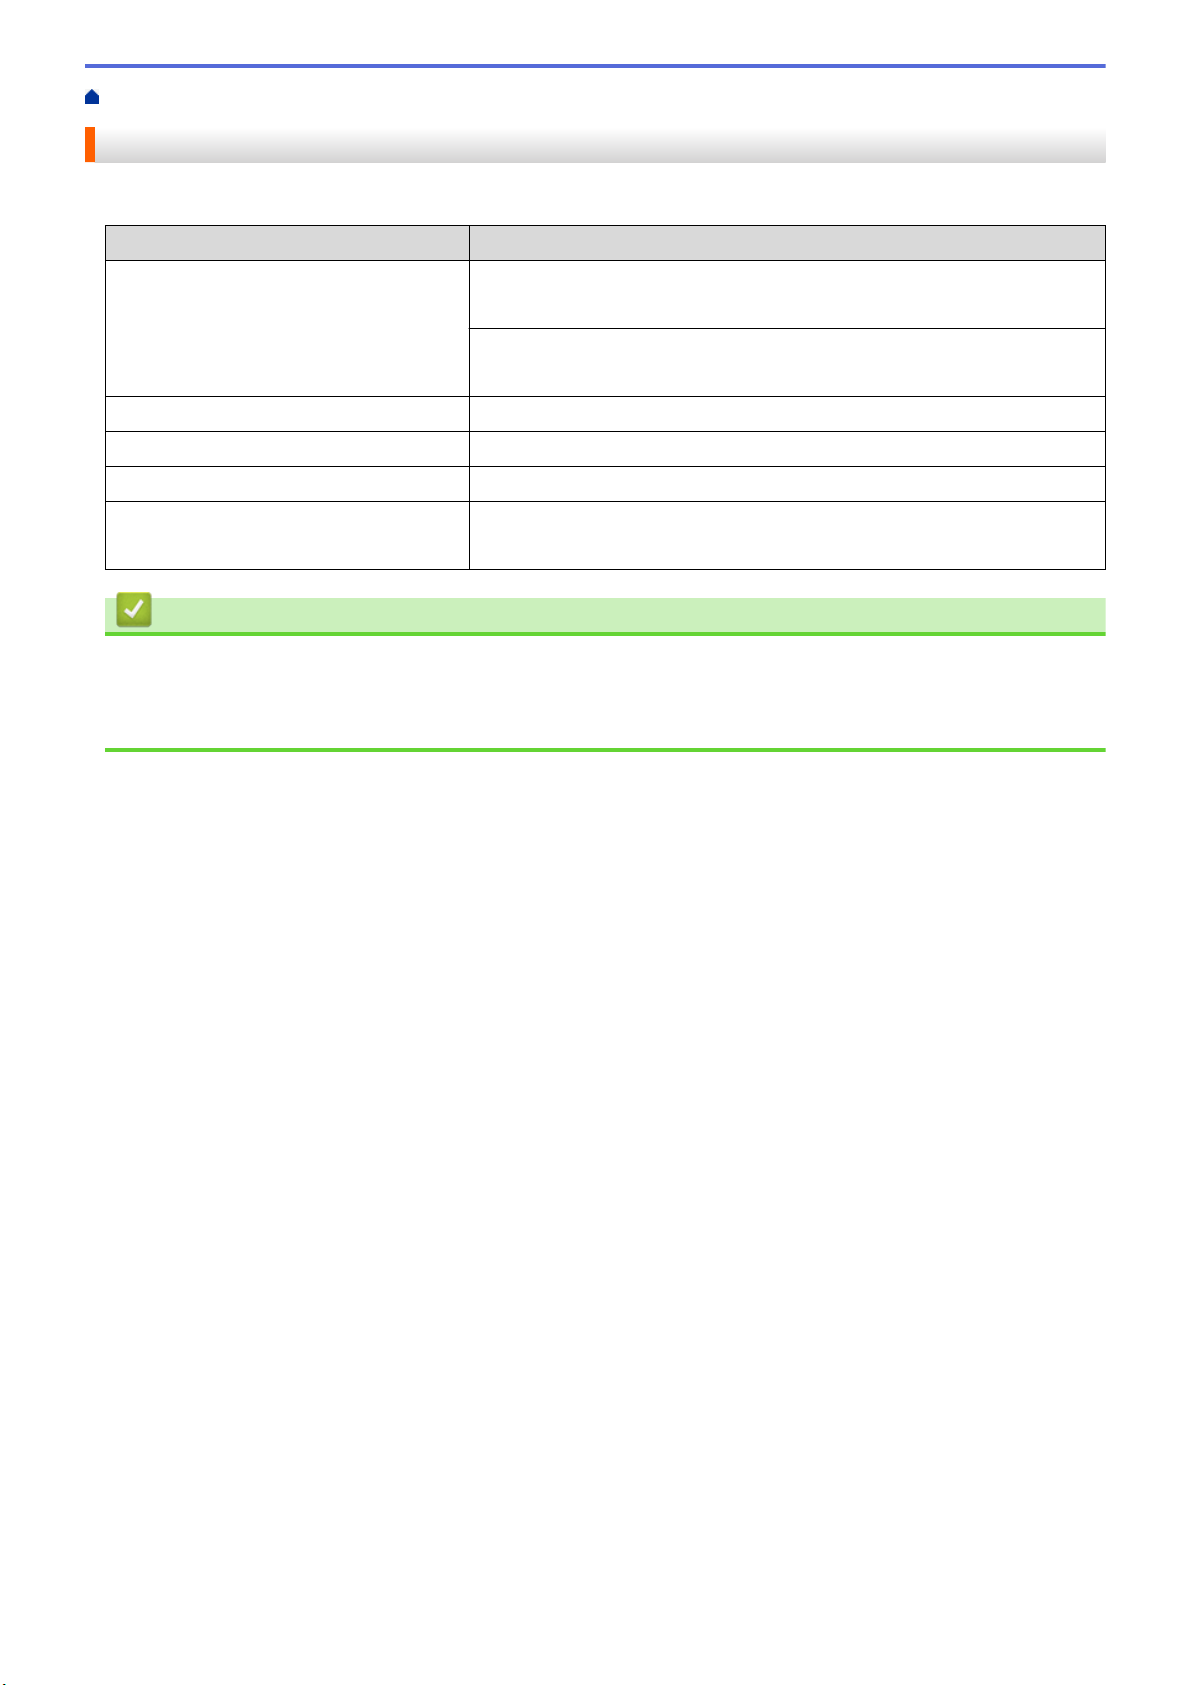
To get the best print quality, we recommend using the paper listed in the table.
Paper Type Item
Plain Paper Xerox Vitality Multipurpose Printer Paper, 20 lb
(20 lb = 75 g/m2)
Hammermill Laser Print
(24 lb = 90 g/m2)
Recycled Paper No specific brand recommended
Labels Avery laser labels white #5160
Envelopes No specific brand recommended
Glossy Paper NewPage Futura Laser Gloss 80 lb Text
(80 lb =118 g/m2)
Related Information
• Paper Handling
Related Topics:
• Improve the Print Quality
44
Page 52

Home > Paper Handling > Load Documents
Load Documents
You can send a fax, make copies and scan from the Automatic Document Feeder (ADF) and from the scanner
glass.
• Load Documents in the Automatic Document Feeder (ADF)
• Load Documents on the Scanner Glass
45
Page 53
Home > Paper Handling > Load Documents > Load Documents in the Automatic Document Feeder (ADF)
Load Documents in the Automatic Document Feeder (ADF)
Use the ADF when copying or scanning multiple-page, standard-sized documents.
• The ADF can hold the following pages and feed each sheet individually:
- (MFC-L8610CDW)
Up to 50 sheets
- (MFC-L8900CDW/MFC-L8895CDW/MFC-L8905CDW)
Up to 70 sheets
• Use standard 20 lb (80 g/m2) paper.
• Make sure documents with correction fluid or written in ink are completely dry.
IMPORTANT
• DO NOT leave thick documents on the scanner glass. If you do this, the ADF may jam.
• DO NOT use paper that is curled, wrinkled, folded, ripped, stapled, paper-clipped, pasted, or taped.
• DO NOT use cardboard, newspaper, or fabric.
• To avoid damaging your machine while using the ADF, DO NOT pull on the document while it is feeding.
Document Sizes Supported
Length:
Width: 4.1 in. to 8.5 in. (105 mm to 215.9 mm)
Weight:
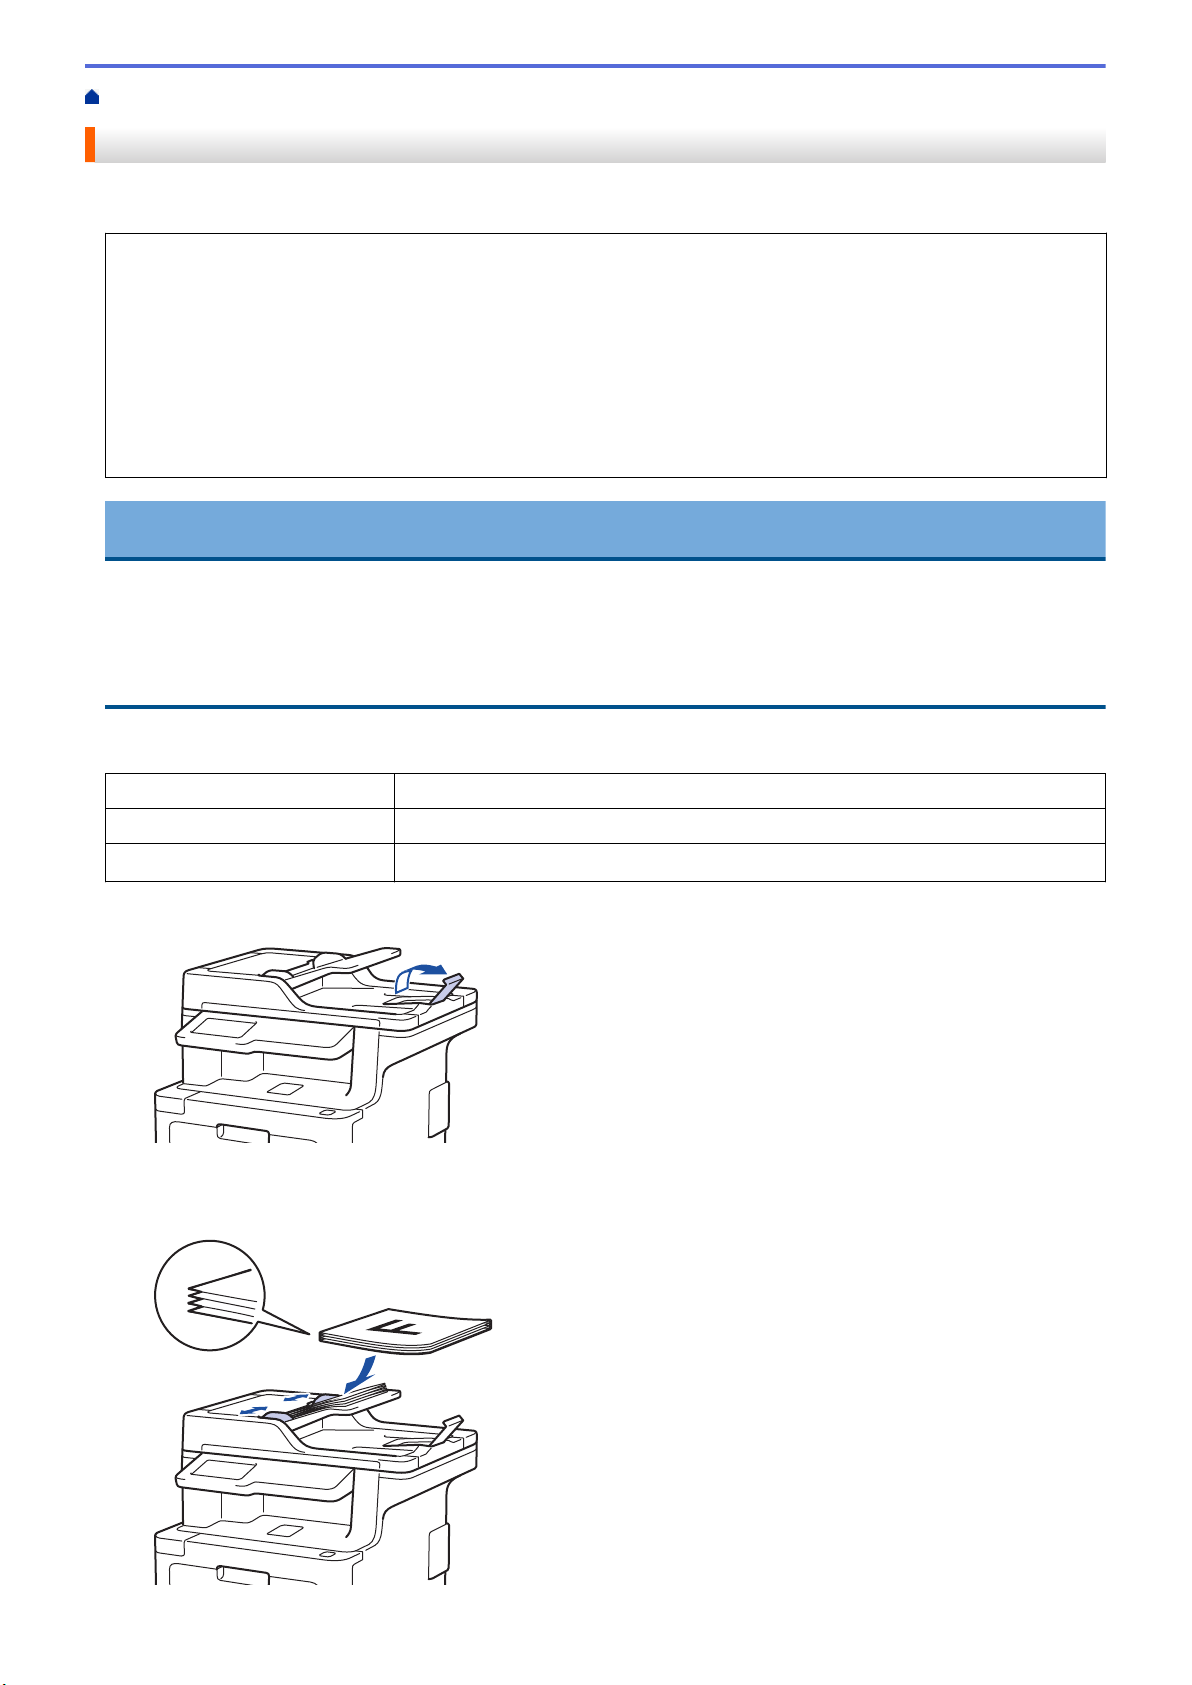
1. Unfold the ADF document output support flap.
2. Fan the pages well.
3. Stagger the pages of your document and load it face up and top edge first, into the ADF as shown in the
illustration.
5.8 to 14.0 in. (147.3 to 355.6 mm)
17 to 24 lb (64 to 90 g/m2)
46
Page 54

4. Adjust the paper guides to fit the width of your document.
Related Information
• Load Documents
47
Page 55
Home > Paper Handling > Load Documents > Load Documents on the Scanner Glass
Load Documents on the Scanner Glass
Use the scanner glass to fax, copy, or scan one page at a time.
Document Sizes Supported
• (MFC-L8610CDW)
Length:
Width: Up to 8.5 in. (215.9 mm)
Weight: Up to 4.4 lb (2 kg)
To use the scanner glass, the ADF must be empty.
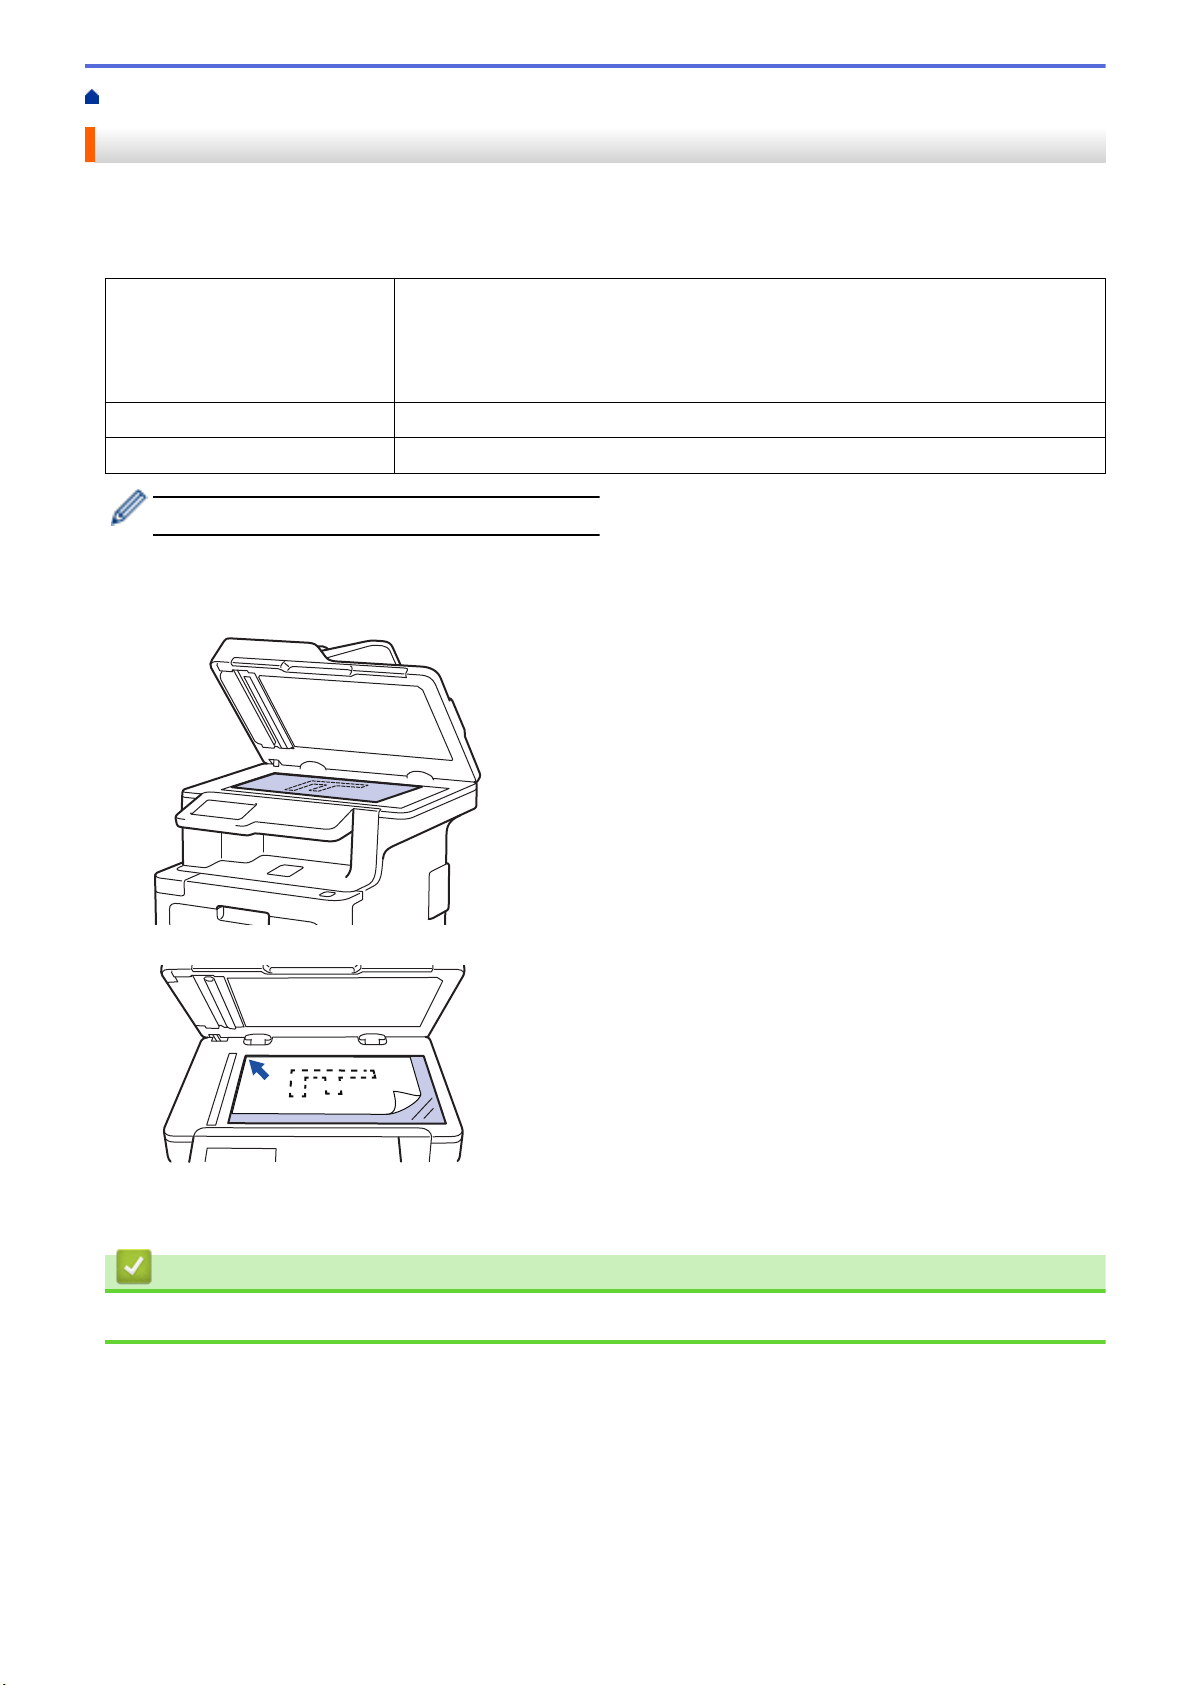
1. Lift the document cover.
2. Place the document on the scanner glass face down.
Up to 11.8 in. (300 mm)
• (MFC-L8900CDW/MFC-L8895CDW/MFC-L8905CDW)
Up to 14 in. (355.6 mm)
3. Place the corner of the page in the upper left corner of the scanner glass.
4. Close the document cover.
If the document is a book or is thick, gently press on the document cover.
Related Information
• Load Documents
48
Page 56
Home > Paper Handling > Unscannable and Unprintable Areas
1
3
24
Unscannable and Unprintable Areas
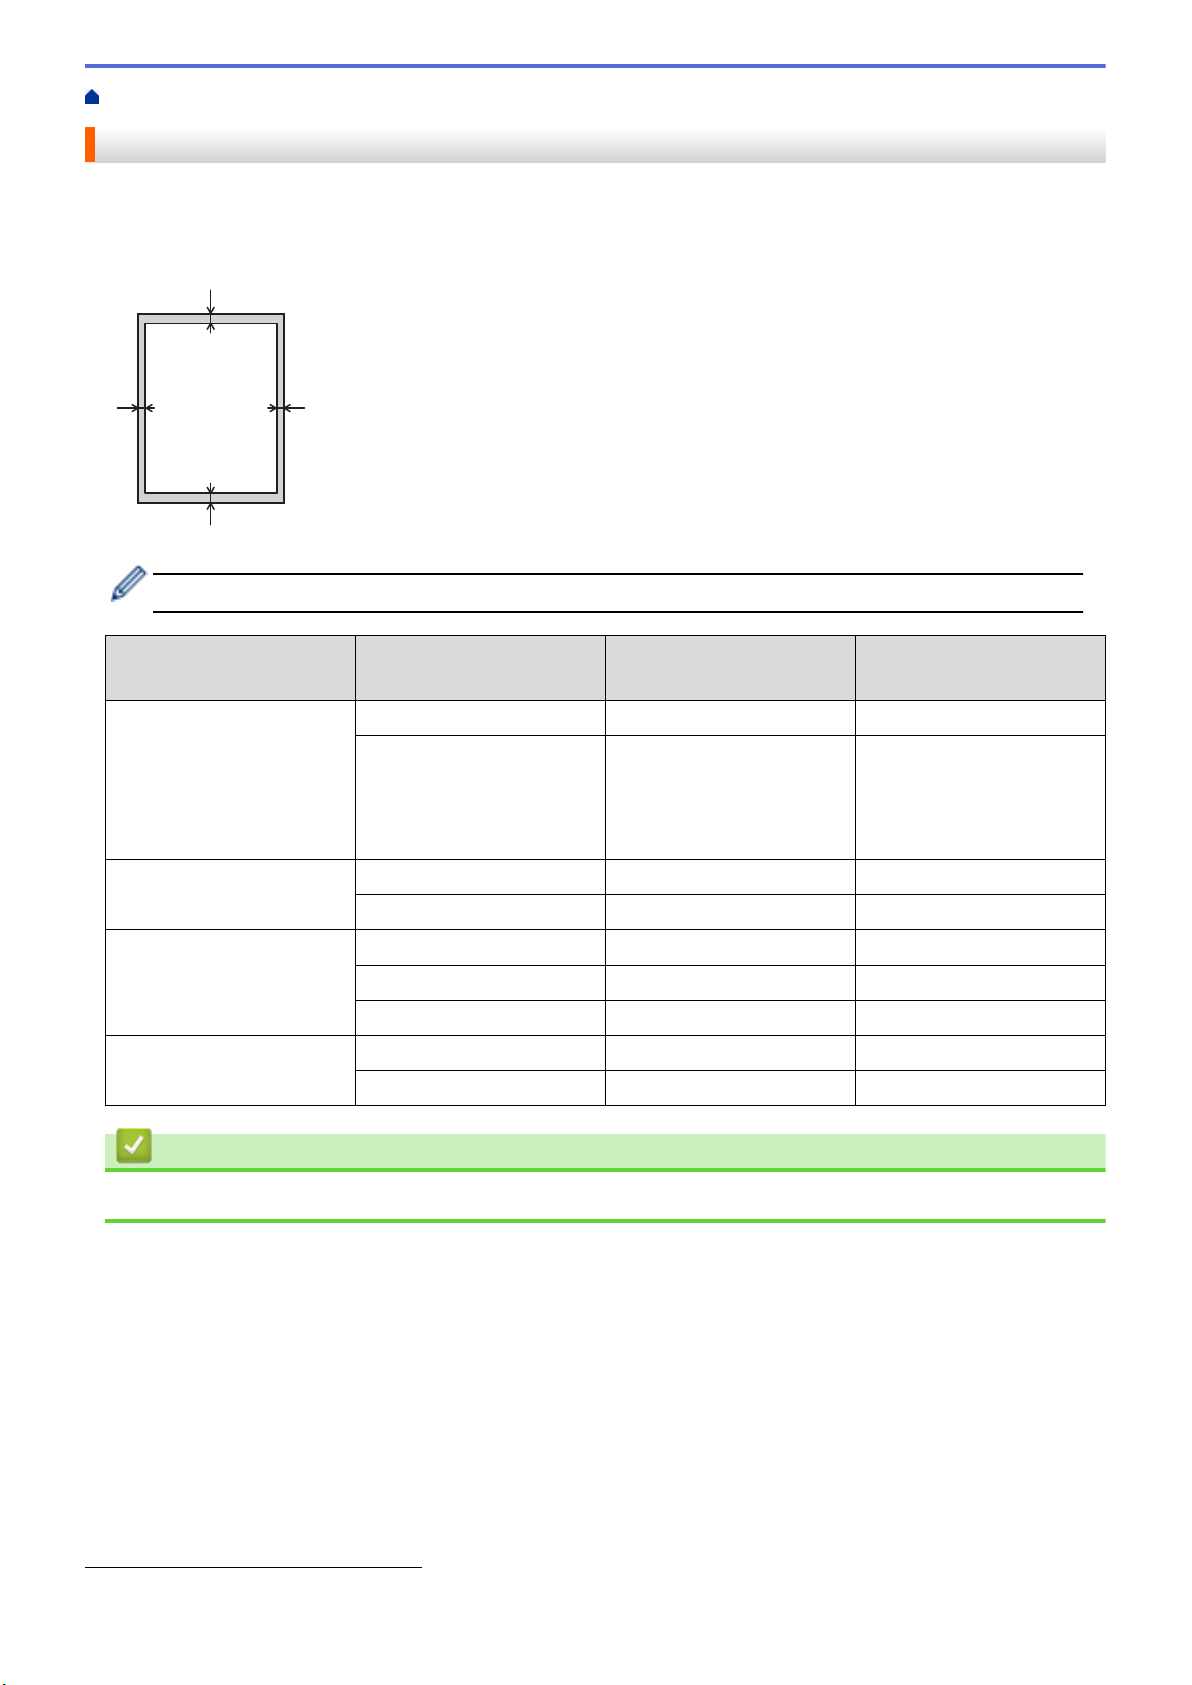
The measurements in the table below show maximum unscannable and unprintable areas from the edges of the
most commonly-used paper sizes. These measurements may vary depending on the paper size or settings in the
application you are using.
Do not attempt to scan, copy, or print into these areas; your output will not reflect anything in these areas.
Usage Document Size Top (1)
Bottom (3)
Fax (Sending) Letter, Legal 0.12 in. (3 mm) 0.16 in. (4 mm)
A4 0.12 in. (3 mm) (ADF)
1
Copy
Scan Letter 0.12 in. (3 mm) 0.12 in. (3 mm)
Print Letter, Legal 0.16 in. (4.2 mm) 0.16 in. (4.2 mm)
Letter, Legal 0.16 in. (4 mm) 0.16 in. (4 mm)
A4 0.16 in. (4 mm) 0.12 in. (3 mm)
A4 0.12 in. (3 mm) 0.12 in. (3 mm)
Legal 0.12 in. (3 mm) 0.12 in. (3 mm)
A4 0.16 in. (4.2 mm) 0.16 in. (4.2 mm)
Left (2)
Right (4)
0.04 in. (1 mm)
(Scanner Glass)
0.12 in. (3 mm)
Related Information
• Paper Handling
1
a 1 in 1 copy and 100% document size copy
49
Page 57
Home > Paper Handling > Using Special Paper
Using Special Paper
Always test paper samples before purchasing them to ensure desirable performance.
• DO NOT use inkjet paper; it may cause a paper jam or damage your machine.
• If you use bond paper, paper with a rough surface, or paper that is wrinkled or creased, the paper may exhibit
degraded performance.
Store paper in its original packaging and keep it sealed. Keep the paper flat and away from moisture, direct
sunlight and heat.
IMPORTANT
Some types of paper may not perform well or may cause damage to your machine.
DO NOT use paper:
• that is highly textured
• that is extremely smooth or shiny
• that is curled or warped
• that is coated or has a chemical finish
• that is damaged, creased or folded
• that exceeds the recommended weight specification in this guide
• with tabs and staples
• with letterheads using low temperature dyes or thermography
• that is multipart or carbonless
• that is designed for inkjet printing
If you use any of the types of paper listed above, they may damage your machine. This damage is not
covered under any Brother warranty or service agreement.
Related Information
• Paper Handling
50
Page 58

Home > Print
• Print from Your Computer (Windows)
• Print from Your Computer (Mac)
• Cancel a Print Job
• Test Print
51
Page 59

Home > Print > Print from Your Computer (Windows)
Print from Your Computer (Windows)
• Print a Document (Windows)
• Print Settings (Windows)
• Secure Print (Windows)
• Change the Default Print Settings (Windows)
•
Print a Document Using the BR-Script3 Printer Driver (PostScript® 3™ Language
Emulation) (Windows)
• Monitor the Status of the Machine from Your Computer (Windows)
52
Page 60
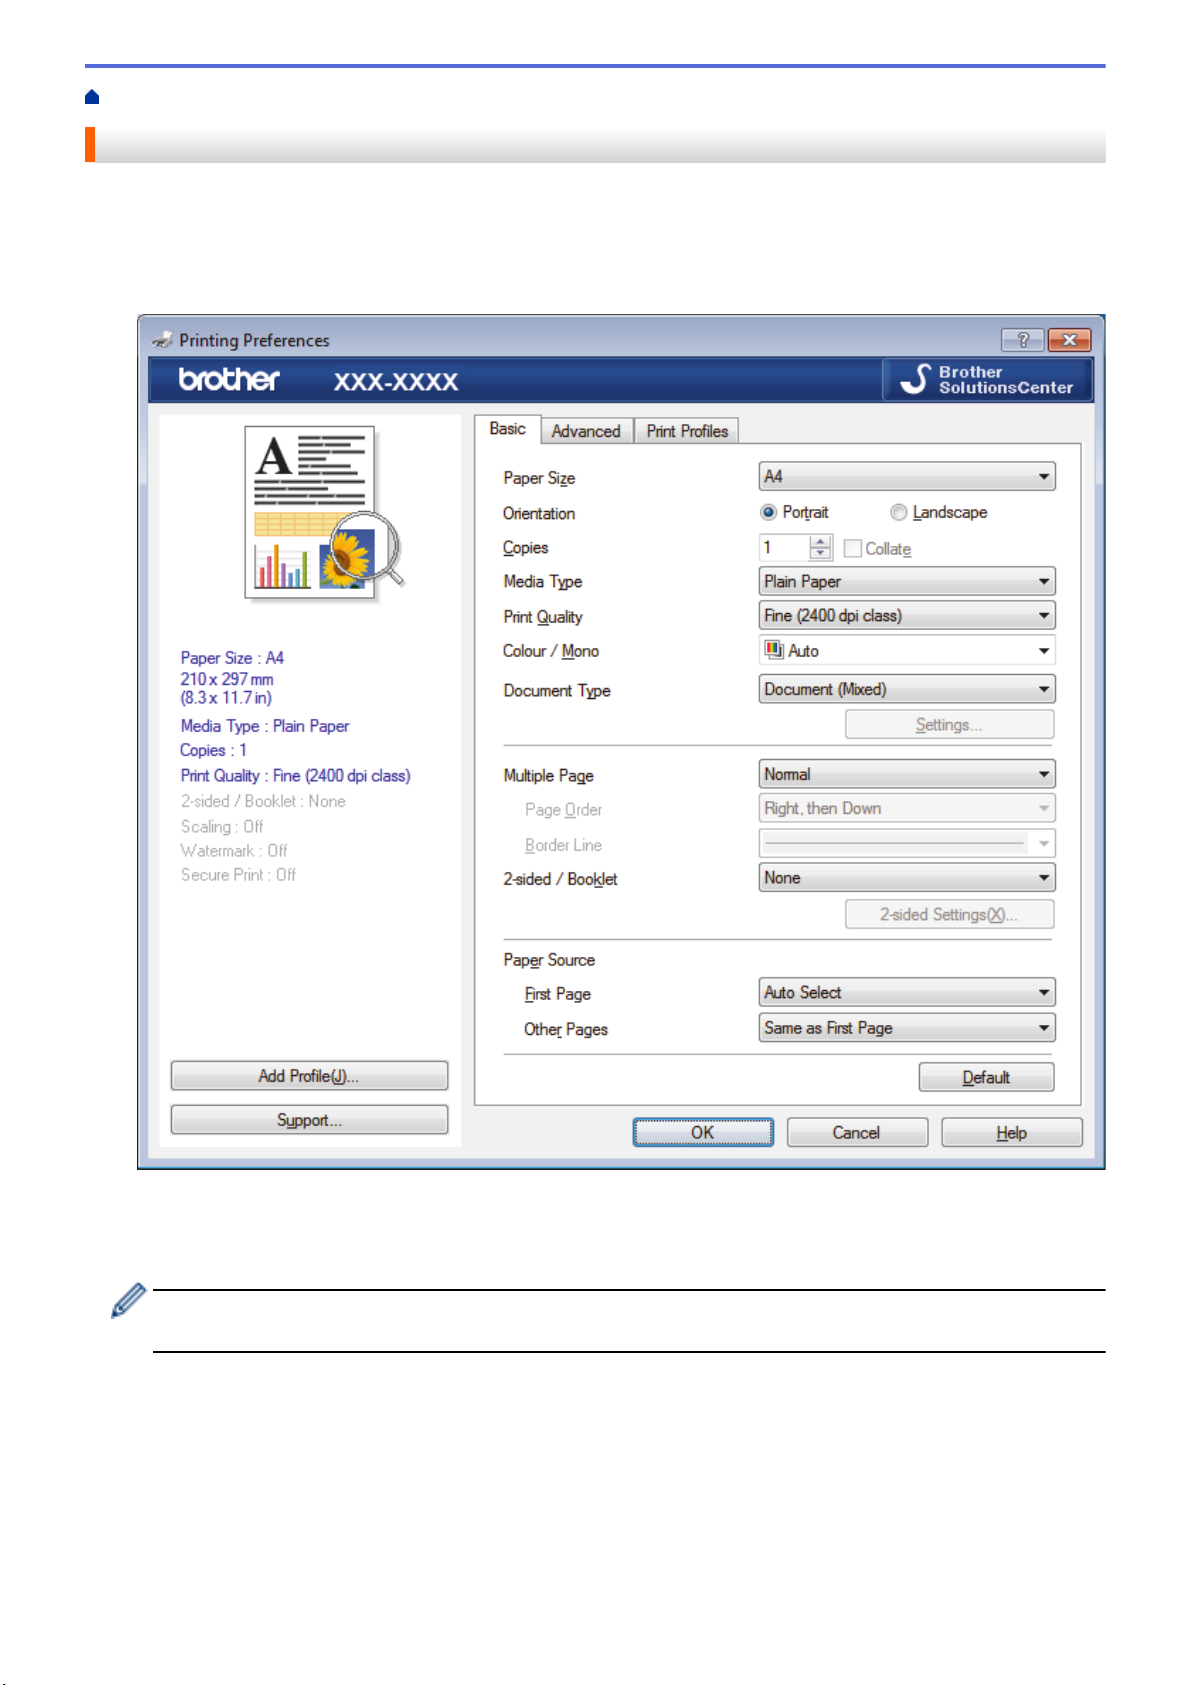
Home > Print > Print from Your Computer (Windows) > Print a Document (Windows)
Print a Document (Windows)
1. Select the print command in your application.
2. Select Brother XXX-XXXX (where XXXX is the name of your model), and then click the printing properties or
preferences button.
The printer driver window appears.
3. Make sure you have loaded the correct size paper in the paper tray.
4. Click the Paper Size drop-down list, and then select your paper size.
5. In the Orientation field, select the Portrait or Landscape option to set the orientation of your printout.
If your application contains a similar setting, we recommend that you set the orientation using the
application.
6. Type the number of copies (1-999) you want in the Copies field.
7. Click the Media Type drop-down list, and then select the type of paper you are using.
8. To print multiple pages on a single sheet of paper or print one page of your document on multiple sheets,
click the Multiple Page drop-down list, and then select your options.
9. Change other printer settings, if needed.
10. Click OK.
11. Complete your print operation.
53
Page 61

Related Information
• Print from Your Computer (Windows)
Related Topics:
• Print Settings (Windows)
54
Page 62
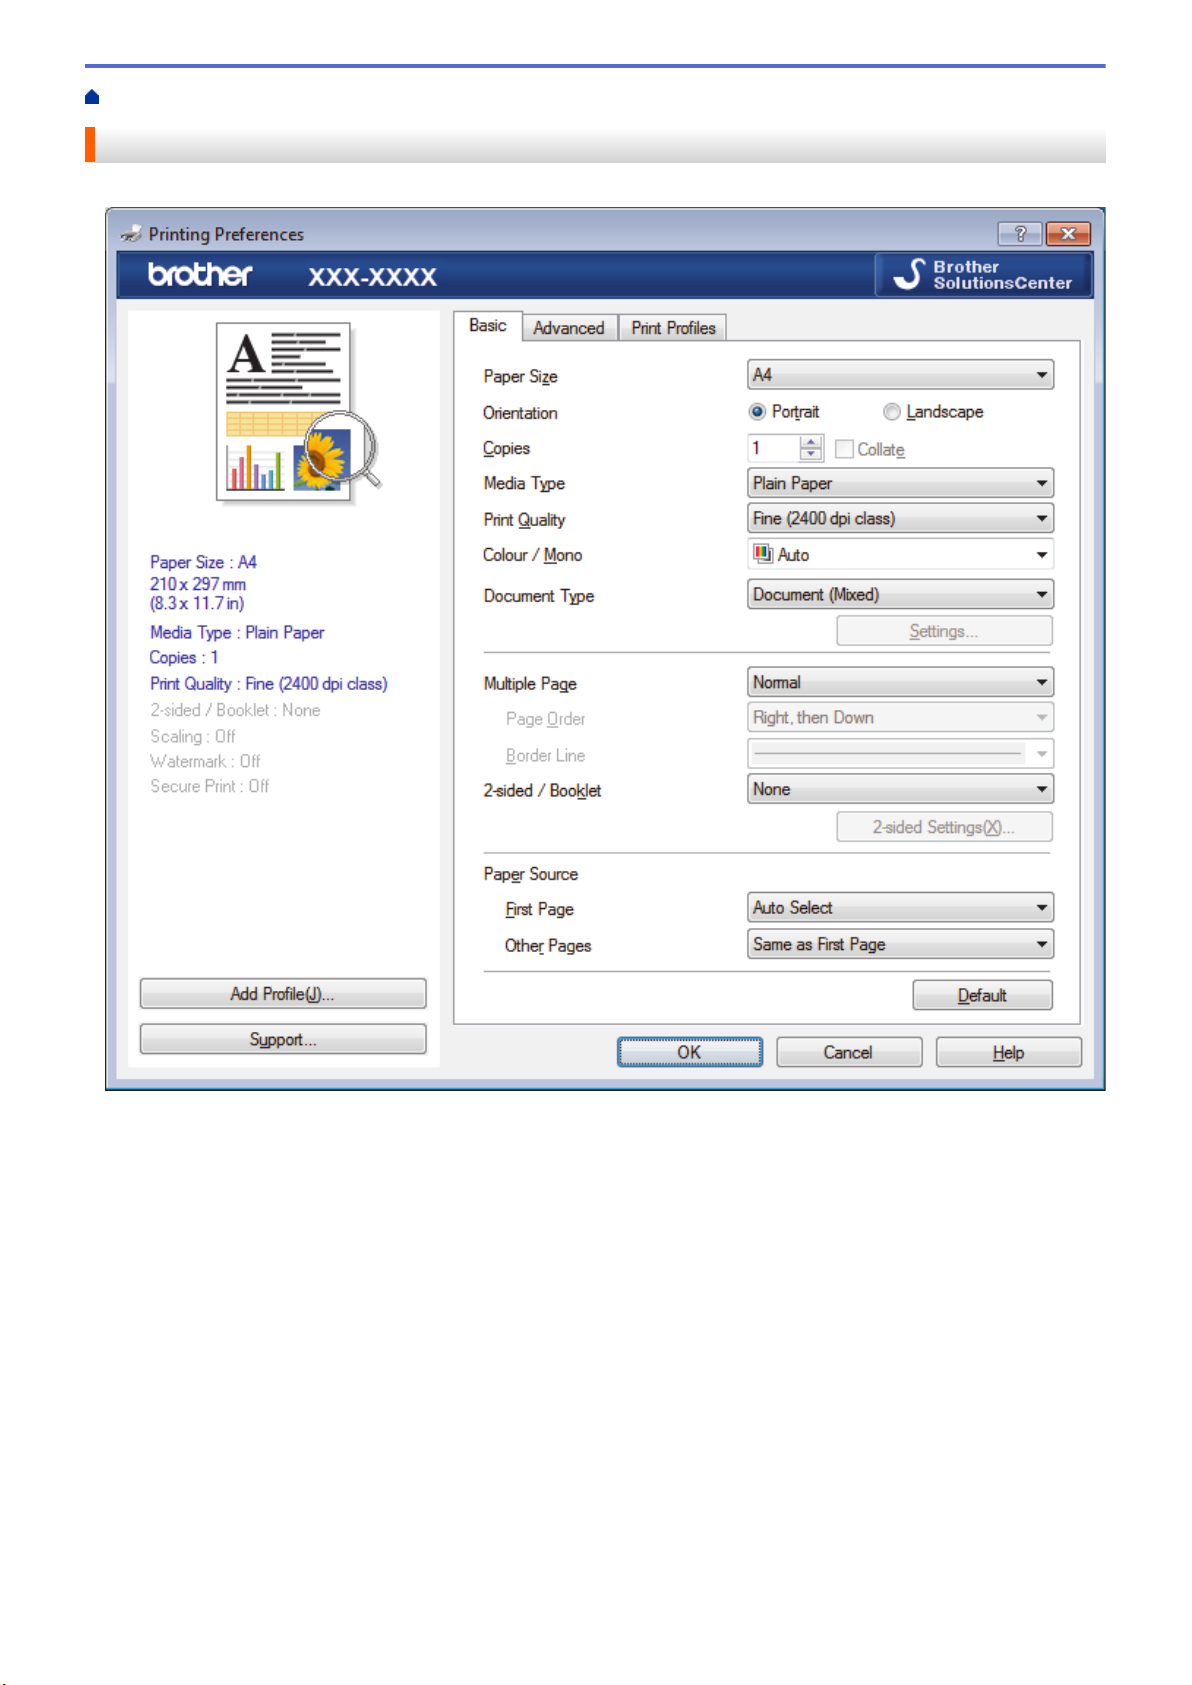
Home > Print > Print from Your Computer (Windows) > Print Settings (Windows)
Print Settings (Windows)
Basic Tab
1. Paper Size
Select the size of the paper you want to use. You can either choose from standard paper sizes or create a
custom paper size.
2. Orientation
Select the orientation (portrait or landscape) of your printout.
If your application contains a similar setting, we recommend that you set the orientation using the application.
3. Copies
Type the number of copies (1-999) that you want to print in this field.
Collate
Select this option to print sets of multi-page documents in the original page order. When this option is
selected, one complete copy of your document will print, and then reprint according to the number of
copies you choose. If this option is not selected, then each page will print according to the number of
copies chosen before the next page of the document is printed.
4. Media Type
Select the type of media you want to use. To achieve the best print results, the machine automatically adjusts
its print settings according to the selected media type.
55
Page 63

5. Print Quality
Select the print resolution you want. Because print quality and speed are related, the higher the quality, the
longer it will take to print the document.
6. Color / Mono
Select the Color/Mono settings to use.
NOTE
• The machine’s color sensor is very sensitive and may perceive faded black text or an off-white
background as color. If you know that your document is black and white and you want to conserve
color toner, select Mono mode.
• If either the Cyan, Magenta or Yellow toner reaches the end of its life while printing a color document,
the print job cannot be completed. Cancel your print job and select to start the print job again in Mono
mode, as long as Black toner is available.
7. Document Type
Select the type of document you want to print.
Settings button
Specify advanced settings, such as color mode and other settings.
Color Mode
Select the color mode to suit your preference.
Import
To adjust the print configuration of a particular image, click Settings. When you have finished
adjusting the image parameters, such as brightness and contrast, import those settings as a print
configuration file. Use the Export option to create a print configuration file from the current settings.
Export
To adjust the print configuration of a particular image, click Settings. When you have finished
adjusting the image parameters, such as brightness and contrast, export those settings as a print
configuration file. Use the Import option to load a previously exported configuration file.
Improve Gray Color
Select this option to improve the image quality of shaded areas.
Enhance Black Printing
If a black graphic does not print correctly, select this setting.
Improve Pattern Printing
Select this option to improve the pattern printing if printed fills and patterns are different from the fills
and patterns you see on your computer screen.
8. Multiple Page
Select this option to print multiple pages on a single sheet of paper or print one page of your document on
multiple sheets.
Page Order
Select the page order when printing multiple pages on a single sheet of paper.
Border Line
Select the type of border to use when printing multiple pages on a single sheet of paper.
9. 2-sided / Booklet
Select this option to print on both sides of the paper or print a document in booklet format using 2-sided
printing.
56
Page 64
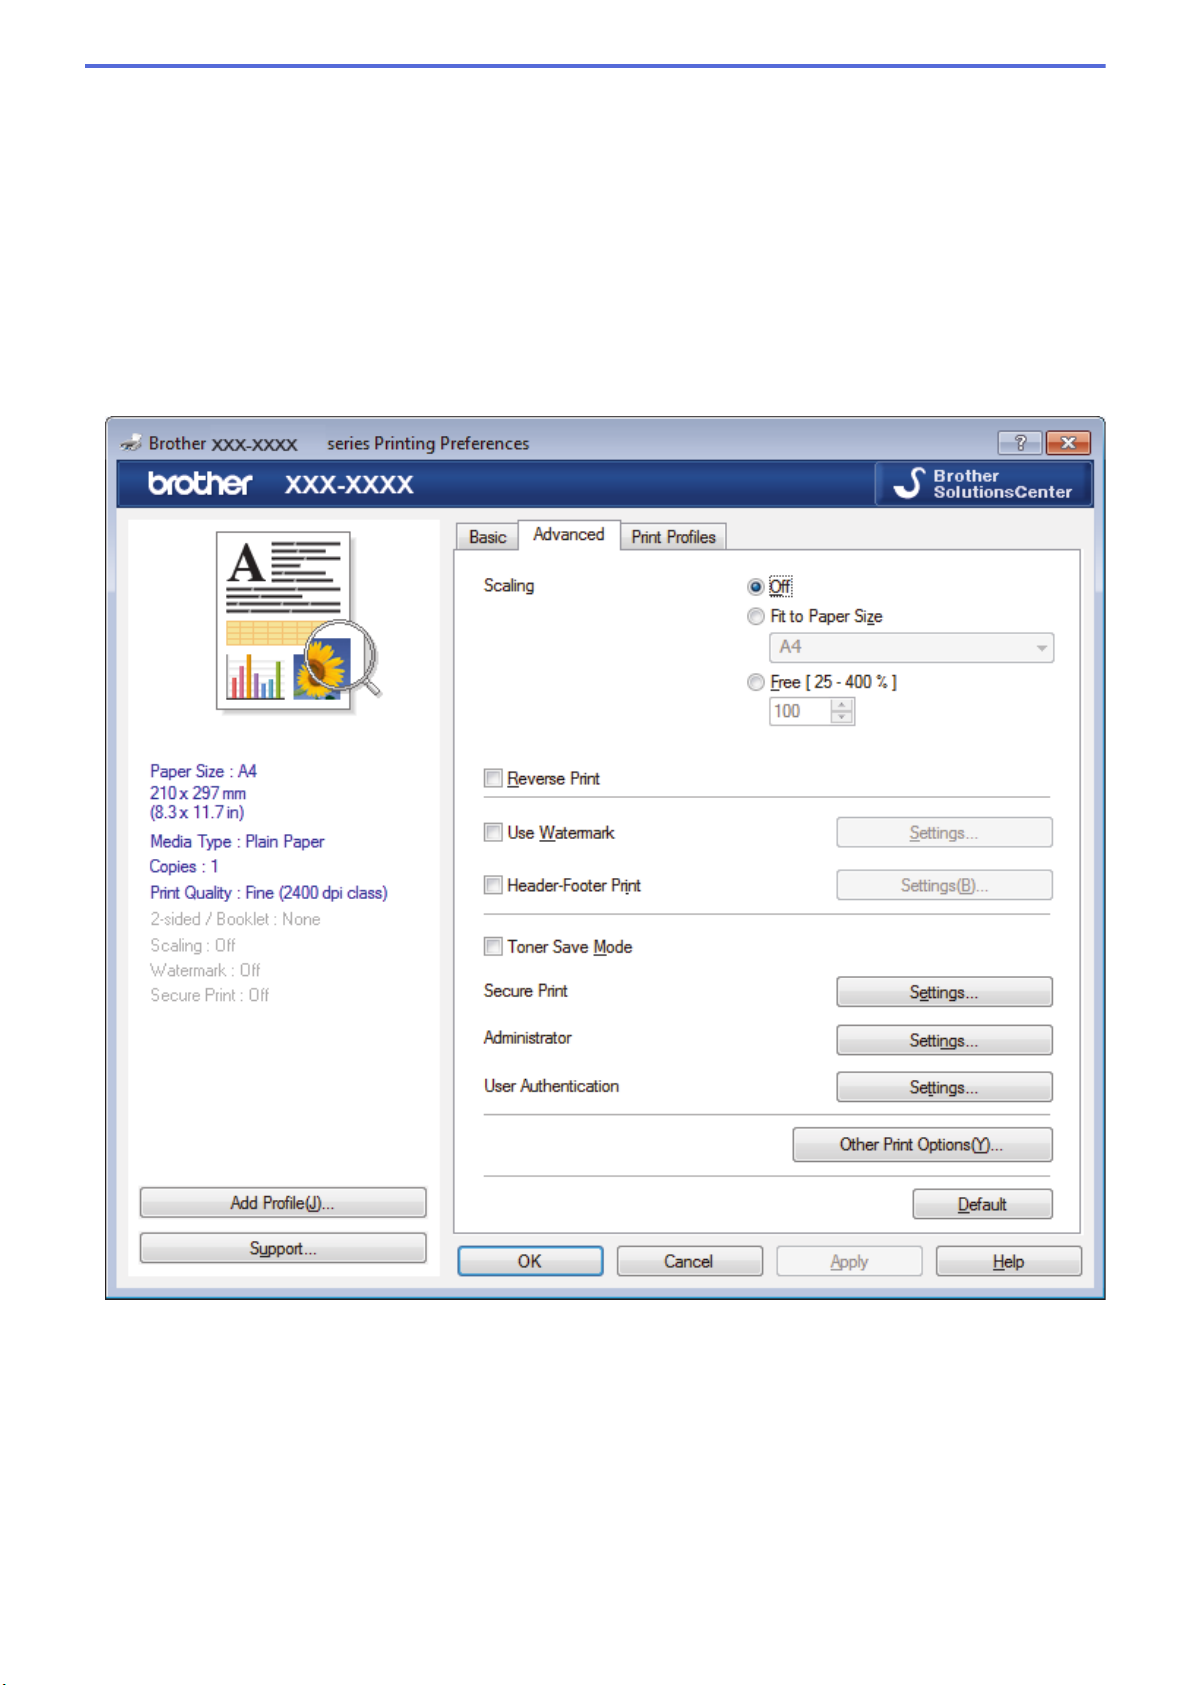
2-sided Settings button
Click this button to select the type of 2-sided binding. Four types of 2-sided bindings are available for each
orientation.
10. Paper Source
Select the paper source setting according to your print conditions or purpose.
First Page
Select the paper source to use for printing the first page.
Other Pages
Select the paper source to use for printing the second and subsequent pages.
Advanced Tab
1. Scaling
Select these options to enlarge or reduce the size of the pages in your document.
Fit to Paper Size
Select this option to enlarge or reduce the document pages to fit a specified paper size. When you select
this option, select the paper size you want from the drop-down list.
Free
Select this option to enlarge or reduce the document pages manually. When you select this option, type a
value into the field.
57
Page 65

2. Reverse Print
Select this option to rotate the printed image 180 degrees.
3. Use Watermark
Select this option to print a logo or text on your document as a watermark. Select one of the preset
watermarks, add a new watermark, or use an image file you have created.
4. Header-Footer Print
Select this option to print the date, time and PC login user name on the document.
5. Toner Save Mode
Select this feature to conserve toner by using less toner to print documents; printouts appear lighter, but are
still legible.
6. Secure Print
This feature ensures that confidential or sensitive documents do not print until you enter a password on the
machine's control panel.
7. Administrator
This feature allows you to change the administrator password and restrict various printing functions.
8. User Authentication
This feature allows you to confirm the restrictions for each user.
9. Other Print Options button
Improve Print Output
Select this option to reduce the amount of paper curling and improve the toner fixing.
TrueType Mode
Mode
Select how the fonts are processed for printing.
Use Printer TrueType Fonts(available only for certain models)
Select whether to use built-in fonts for the font processing.
Eco settings
Select this option to reduce printing noise.
Related Information
• Print from Your Computer (Windows)
Related Topics:
• Print a Document (Windows)
58
Page 66
Home > Print > Print from Your Computer (Windows) > Secure Print (Windows)
Secure Print (Windows)
Use Secure Print to ensure that confidential or sensitive documents do not print until you enter a password on
the machine's control panel.
• The secure data is deleted from the machine when you turn off the machine.
1. Select the print command in your application.
2. Select Brother XXX-XXXX (where XXXX is the name of your model), and then click the printing properties or
preferences button.
The printer driver window appears.
3. Click the Advanced tab.
4. Click the Settings button in the Secure Print field.
5. Select the Secure Print check box.
6. Type your four-digit password in the Password field.
You must set a separate password for each document.
7. Type the User Name and Job Name in the text field, if needed.
8. Click OK, to close the Secure Print Settings window.
9. Click OK.
10. Complete your print operation.
11. On the machine's control panel, swipe left or right or press d or c to display the [Secure Print] option,
and then press [Secure Print].
12. Swipe up or down or press a or b to display user names, and then press your user name.
The LCD displays the list of secured jobs for your name.
13. Swipe up or down or press a or b to display the print job, and then press it.
14. Enter your four-digit password, and then press [OK].
15. Enter the number of copies you want.
16. Press [Start].
The machine prints the data.
After you have printed the secured data, it will be cleared from the machine's memory.
Related Information
• Print from Your Computer (Windows)
59
Page 67
Home > Print > Print from Your Computer (Windows) > Change the Default Print Settings (Windows)
Change the Default Print Settings (Windows)
When you change an application's print settings, the changes only apply to documents printed with that
application. To change print settings for all Windows applications, you must configure the printer driver
properties.
1. Do one of the following:
• For Windows Server 2008
Click
• For Windows 7 and Windows Server 2008 R2
Click (Start) > Devices and Printers.
• For Windows 8
Move your mouse to the lower right corner of your desktop. When the menu bar appears, click Settings,
and then click Control Panel. In the Hardware and Sound group, click View devices and printers.
• For Windows 10, Windows Server 2016 and Windows Server 2019
Click
and printers.
• For Windows Server 2012
Move your mouse to the lower right corner of your desktop. When the menu bar appears, click Settings,
and then click Control Panel. In the Hardware group, click View devices and printers.
• For Windows Server 2012 R2
Click Control Panel on the Start screen. In the Hardware group, click View devices and printers.
2. Right-click the Brother XXX-XXXX icon (where XXXX is your model name), and then select Printer
properties. If printer driver options appear, select your printer driver.
3. Click the General tab, and then click the Printing Preferences... or Preferences... button.
The printer driver dialog box appears.
(Start) > Control Panel > Hardware and Sound > Printers.
> Windows System > Control Panel. In the Hardware and Sound group, click View devices
• To configure the tray settings, click the Device Settings tab.
• To change the printer port, click the Ports tab.
4. Select the print settings you want to use as defaults for all of your Windows programs.
5. Click OK.
6. Close the printer properties dialog box.
Related Information
• Print from Your Computer (Windows)
• Configure the Optional Tray Settings (Windows)
60
Page 68
Home > Print > Print from Your Computer (Windows) > Change the Default Print Settings
(Windows) > Configure the Optional Tray Settings (Windows)
Configure the Optional Tray Settings (Windows)
Access your machine's Properties to auto-detect your machine's Optional Tray and serial number.
The printer driver automatically detects the Optional Tray during the driver installation. If you added the
Optional Tray after the driver installation, follow these steps:
1. Do one of the following:
• For Windows Server 2008
Click (Start) > Control Panel > Hardware and Sound > Printers.
• For Windows 7 and Windows Server 2008 R2
Click
• For Windows 8
Move your mouse to the lower right corner of your desktop. When the menu bar appears, click Settings,
and then click Control Panel. In the Hardware and Sound group, click View devices and printers.
• For Windows 10, Windows Server 2016 and Windows Server 2019
Click
and printers.
• For Windows Server 2012
Move your mouse to the lower right corner of your desktop. When the menu bar appears, click Settings,
and then click Control Panel. In the Hardware group, click View devices and printers.
• For Windows Server 2012 R2
Click Control Panel on the Start screen. In the Hardware group, click View devices and printers.
2. Right-click the Brother XXX-XXXX icon (where XXXX is your model name), and then select Printer
properties. If printer driver options appear, select your printer driver.
3. Click the Device Settings tab.
4. Click the Auto Detect button.
The Optional Tray and the machine's serial number are automatically detected.
5. Click the Apply button.
6. Close the printer properties dialog box.
(Start) > Devices and Printers.
> Windows System > Control Panel. In the Hardware and Sound group, click View devices
The Auto Detect function is not available under the following machine conditions:
• The machine power switch is off.
• The machine is in a network shared environment.
• The cable is not connected to the machine correctly.
Related Information
• Change the Default Print Settings (Windows)
61
Page 69
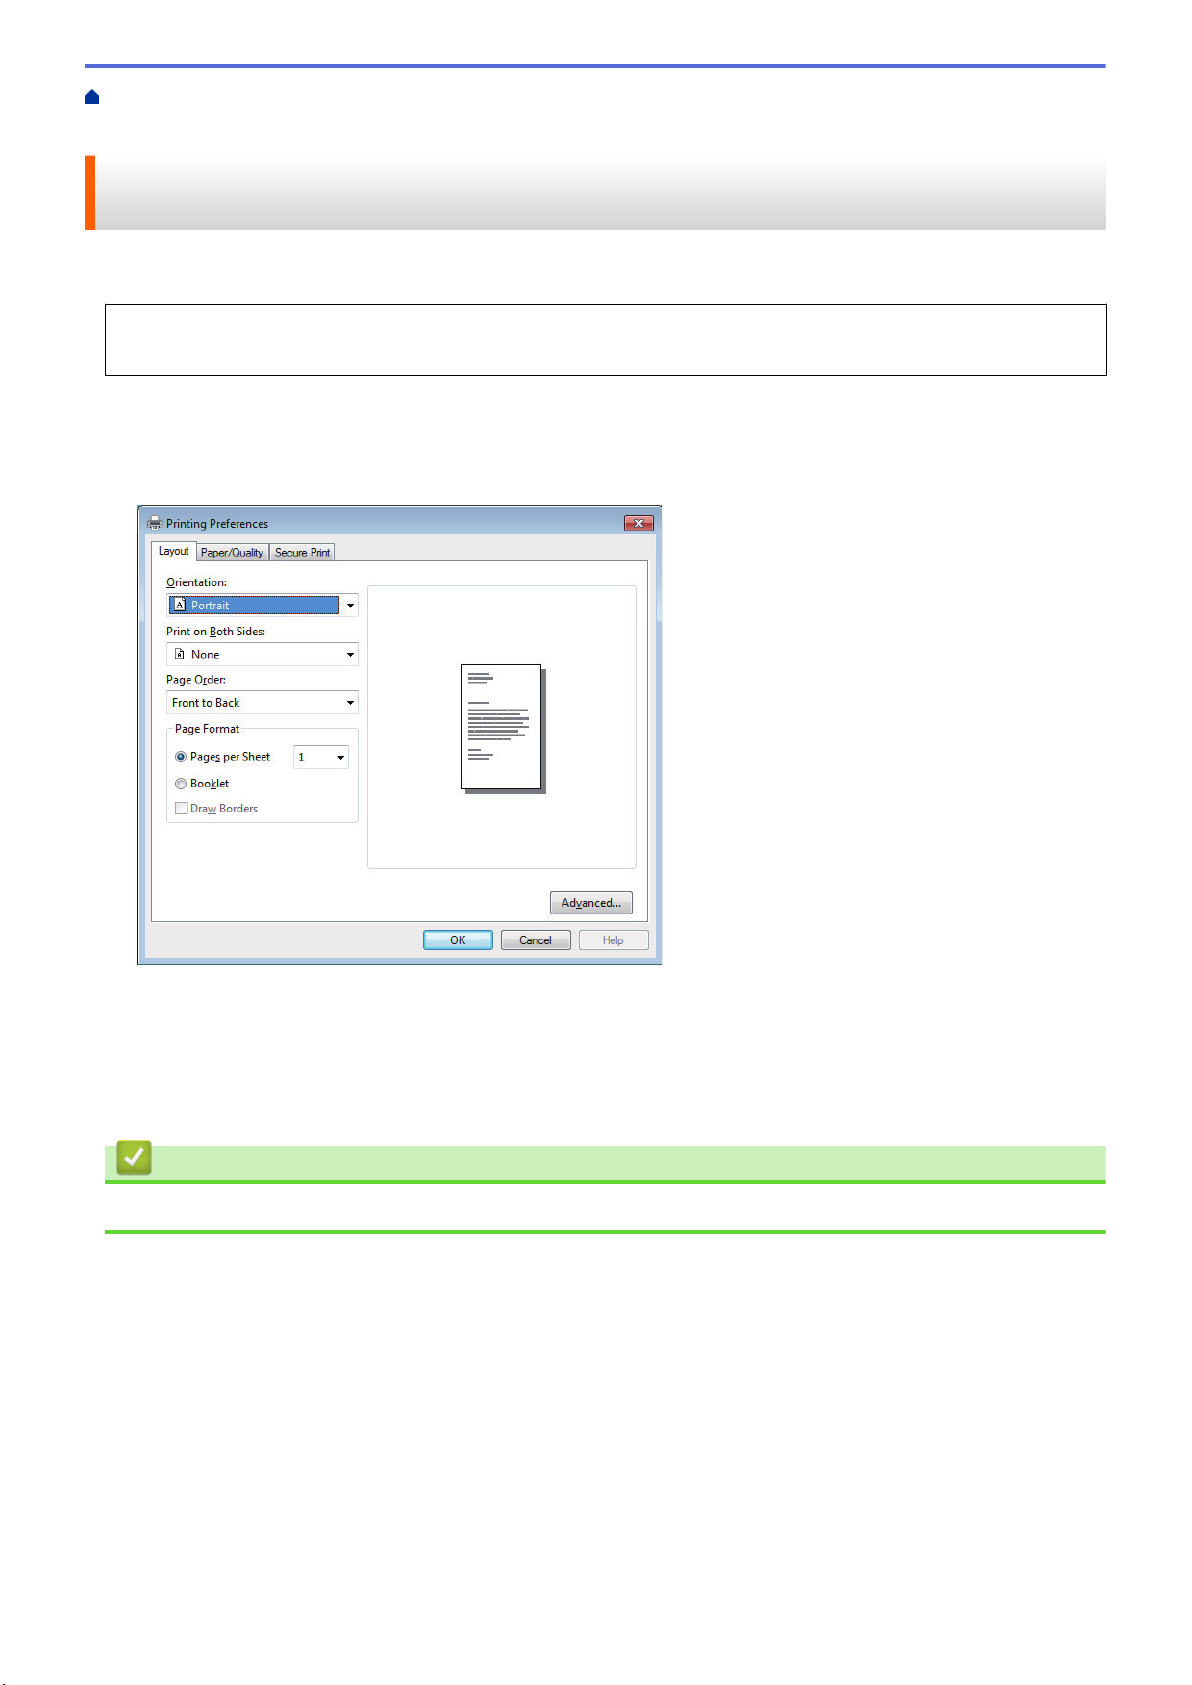
Home > Print > Print from Your Computer (Windows) > Print a Document Using the BR-Script3 Printer
Driver (PostScript® 3™ Language Emulation) (Windows)
Print a Document Using the BR-Script3 Printer Driver (PostScript® 3
™
Language Emulation) (Windows)
The BR-Script3 printer driver lets you print PostScript® data more clearly.
To install the PS driver (BR-Script3 printer driver), launch the Brother installation disc, select Custom in the
Select Machine section, and then select the PS Driver check box.
1. Select the print command in your application.
2. Select Brother XXX-XXXX BR-Script3 (where XXXX is the name of your model), and then click the printing
properties or preferences button.
The printer driver window appears.
3. Click the Layout, Paper/Quality, or Secure Print tab to change basic print settings.
Click the Layout or Paper/Quality tab, and then click the Advanced... button to change advanced print
settings.
4. Click OK.
5. Complete your print operation.
Related Information
• Print from Your Computer (Windows)
62
Page 70
Home > Print > Print from Your Computer (Windows) > Monitor the Status of the Machine from Your
Computer (Windows)
Monitor the Status of the Machine from Your Computer (Windows)
The Status Monitor utility is a configurable software tool for monitoring the status of one or more devices,
allowing you to get immediate notification of errors.
• Do one of the following:
- Double-click the
- (Windows 7)
Click (Start) > All Programs > Brother > Brother Utilities.
Click the drop-down list and select your model name (if not already selected). Click Tools in the left
navigation bar, and then click Status Monitor.
- (Windows 8)
Click
already selected). Click Tools in the left navigation bar, and then click Status Monitor.
- (Windows 8.1)
Move your mouse to the lower left corner of the Start screen and click
based device, swipe up from bottom of the Start screen to bring up the Apps screen). When the Apps
screen appears, tap or click (Brother Utilities), and then click the drop-down list and select your
model name (if not already selected). Click Tools in the left navigation bar, and then click Status
Monitor.
- (Windows 10)
Click Brother > Brother Utilities.
Click the drop-down list and select your model name (if not already selected). Click Tools in the left
navigation bar, and then click Status Monitor.
(Brother Utilities), and then click the drop-down list and select your model name (if not
icon in the task tray.
(if you are using a touch-
Troubleshooting
Click the Troubleshooting button to access the troubleshooting website.
Visit the Genuine Supplies website
Click the Visit the Genuine Supplies website button for more information on Brother genuine supplies.
Related Information
• Print from Your Computer (Windows)
Related Topics:
• Printing Problems
• Calibrate Color Output
63
Page 71

Home > Print > Print from Your Computer (Mac)
Print from Your Computer (Mac)
• Print a Document (Mac)
• Print Options (Mac)
• Secure Print (Mac)
•
Print a Document Using the BR-Script3 Printer Driver (PostScript® 3™ language
emulation) (Mac)
• Monitor the Status of the Machine from Your Computer (Mac)
64
Page 72
Home > Print > Print from Your Computer (Mac) > Print a Document (Mac)
Print a Document (Mac)
Not available for macOS v11.
1. Make sure you have loaded the correct size paper in the paper tray.
2. From an application, such as Apple TextEdit, click the File menu, and then select Print.
3. Select Brother XXX-XXXX (where XXXX is your model name).
4. Type the number of copies you want in the Copies field.
5. Click the Paper Size pop-up menu, and then select your paper size.
6. Select the Orientation option that matches the way you want the document to print.
7. Click the application pop-up menu, and then select Print Settings.
The Print Settings options appear.
8. Click the Media Type pop-up menu, and then select the type of paper you are using.
9. Change other printer settings, if needed.
10. Click Print.
Related Information
• Print from Your Computer (Mac)
Related Topics:
• Print Options (Mac)
65
Page 73
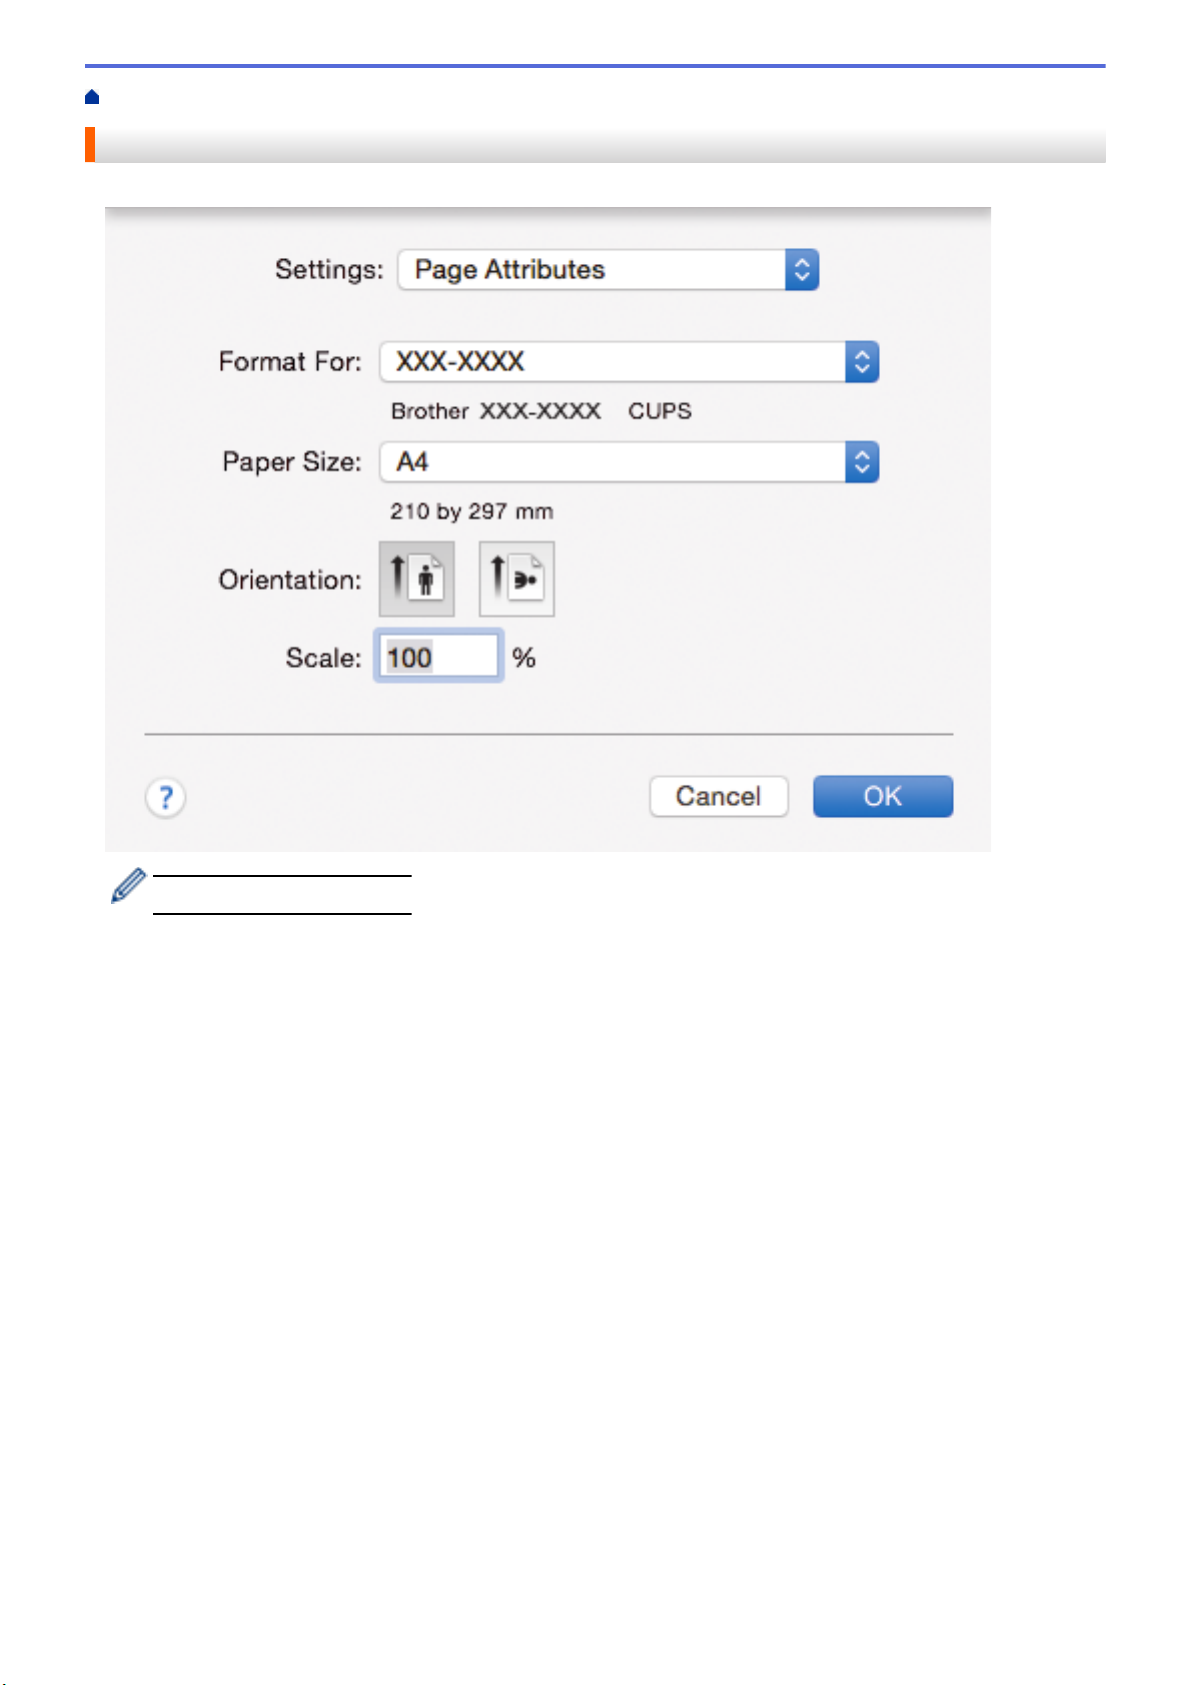
Home > Print > Print from Your Computer (Mac) > Print Options (Mac)
Print Options (Mac)
Page Setup
Not available for macOS v11.
1. Paper Size
Select the size of the paper you want to use. You can either choose from standard paper sizes or create a
custom paper size.
2. Orientation
Select the orientation (portrait or landscape) of your printout.
If your application contains a similar setting, we recommend that you set the orientation using the application.
3. Scale
Type a value into the field to enlarge or reduce the pages in your document to fit the selected paper size.
66
Page 74
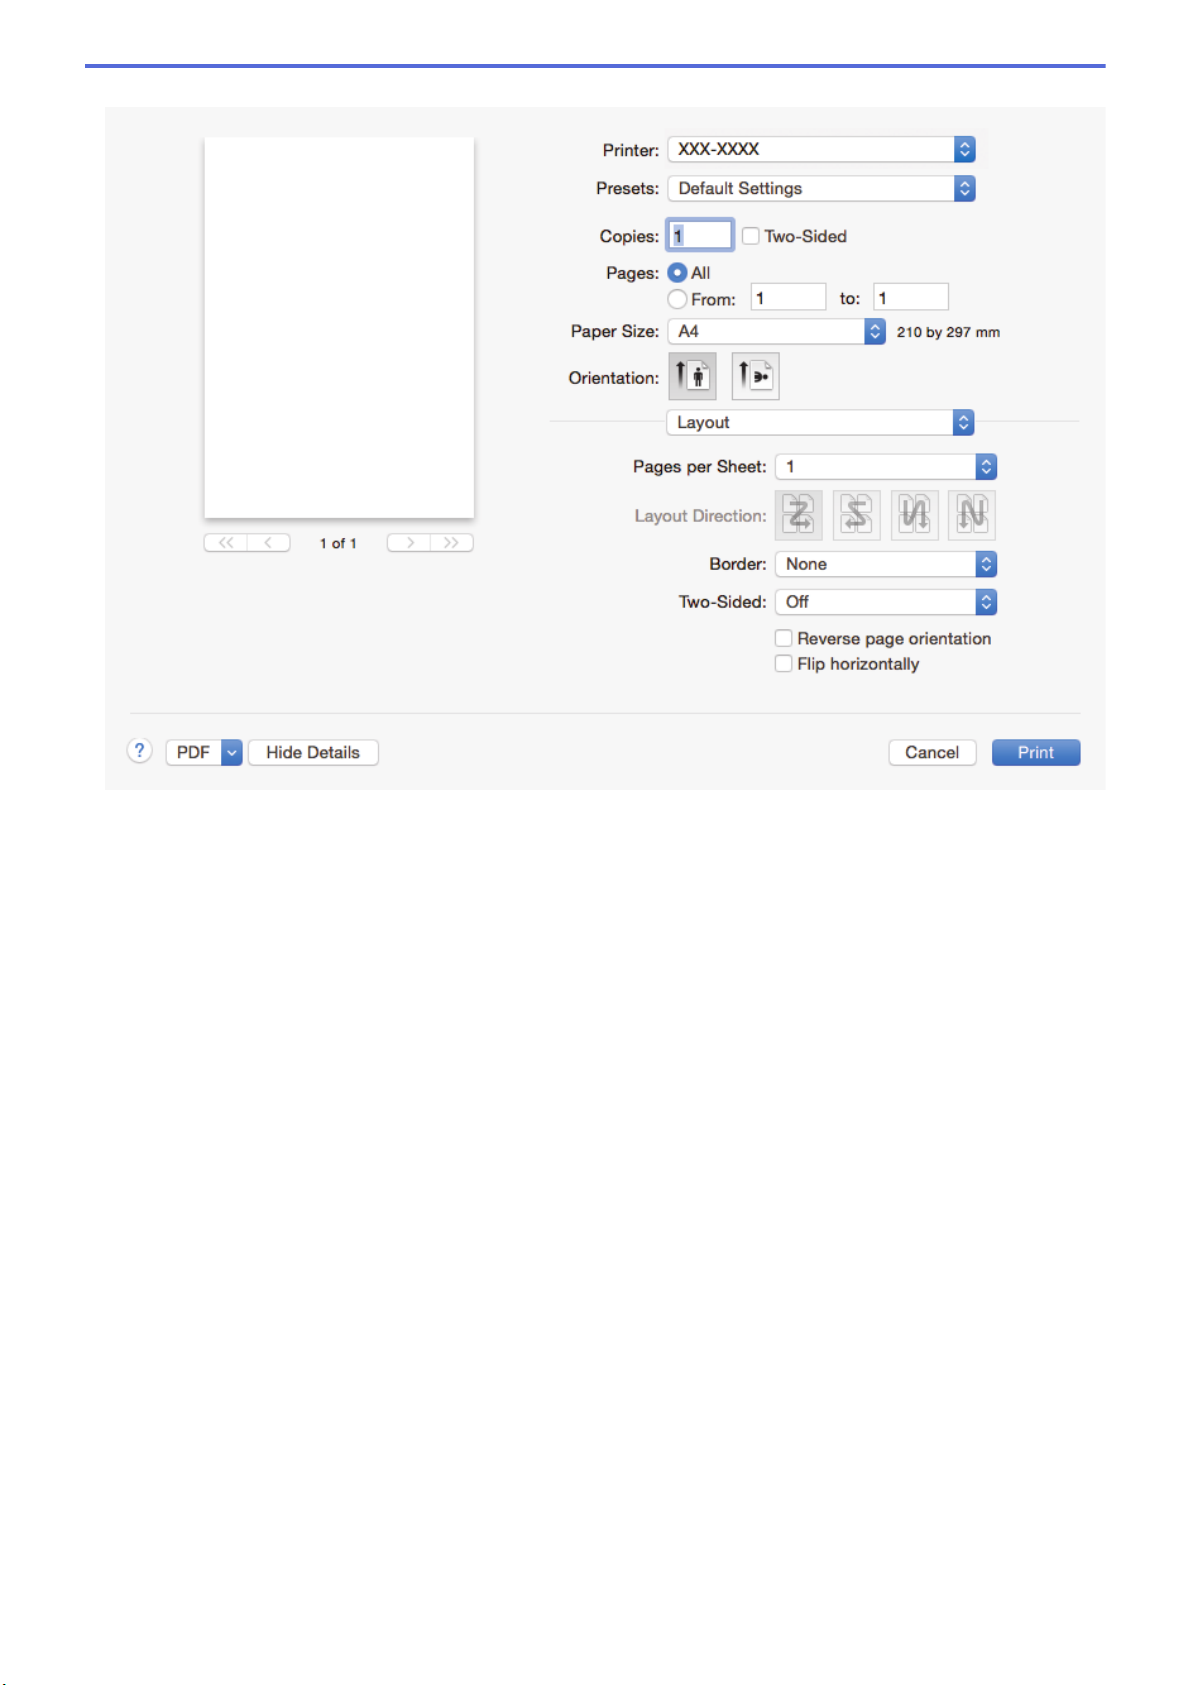
Layout
1. Pages per Sheet
Select the number of pages to print on a single sheet of paper.
2. Layout Direction
Select the page order when printing multiple pages on a single sheet of paper.
3. Border
Select the type of border to use when printing multiple pages on a single sheet of paper.
4. Two-Sided
Select whether to print on both sides of the paper.
5. Reverse page orientation
Select this option to rotate the printed image 180 degrees.
6. Flip horizontally
Select this option to reverse the printed image on the page horizontally from left to right.
67
Page 75
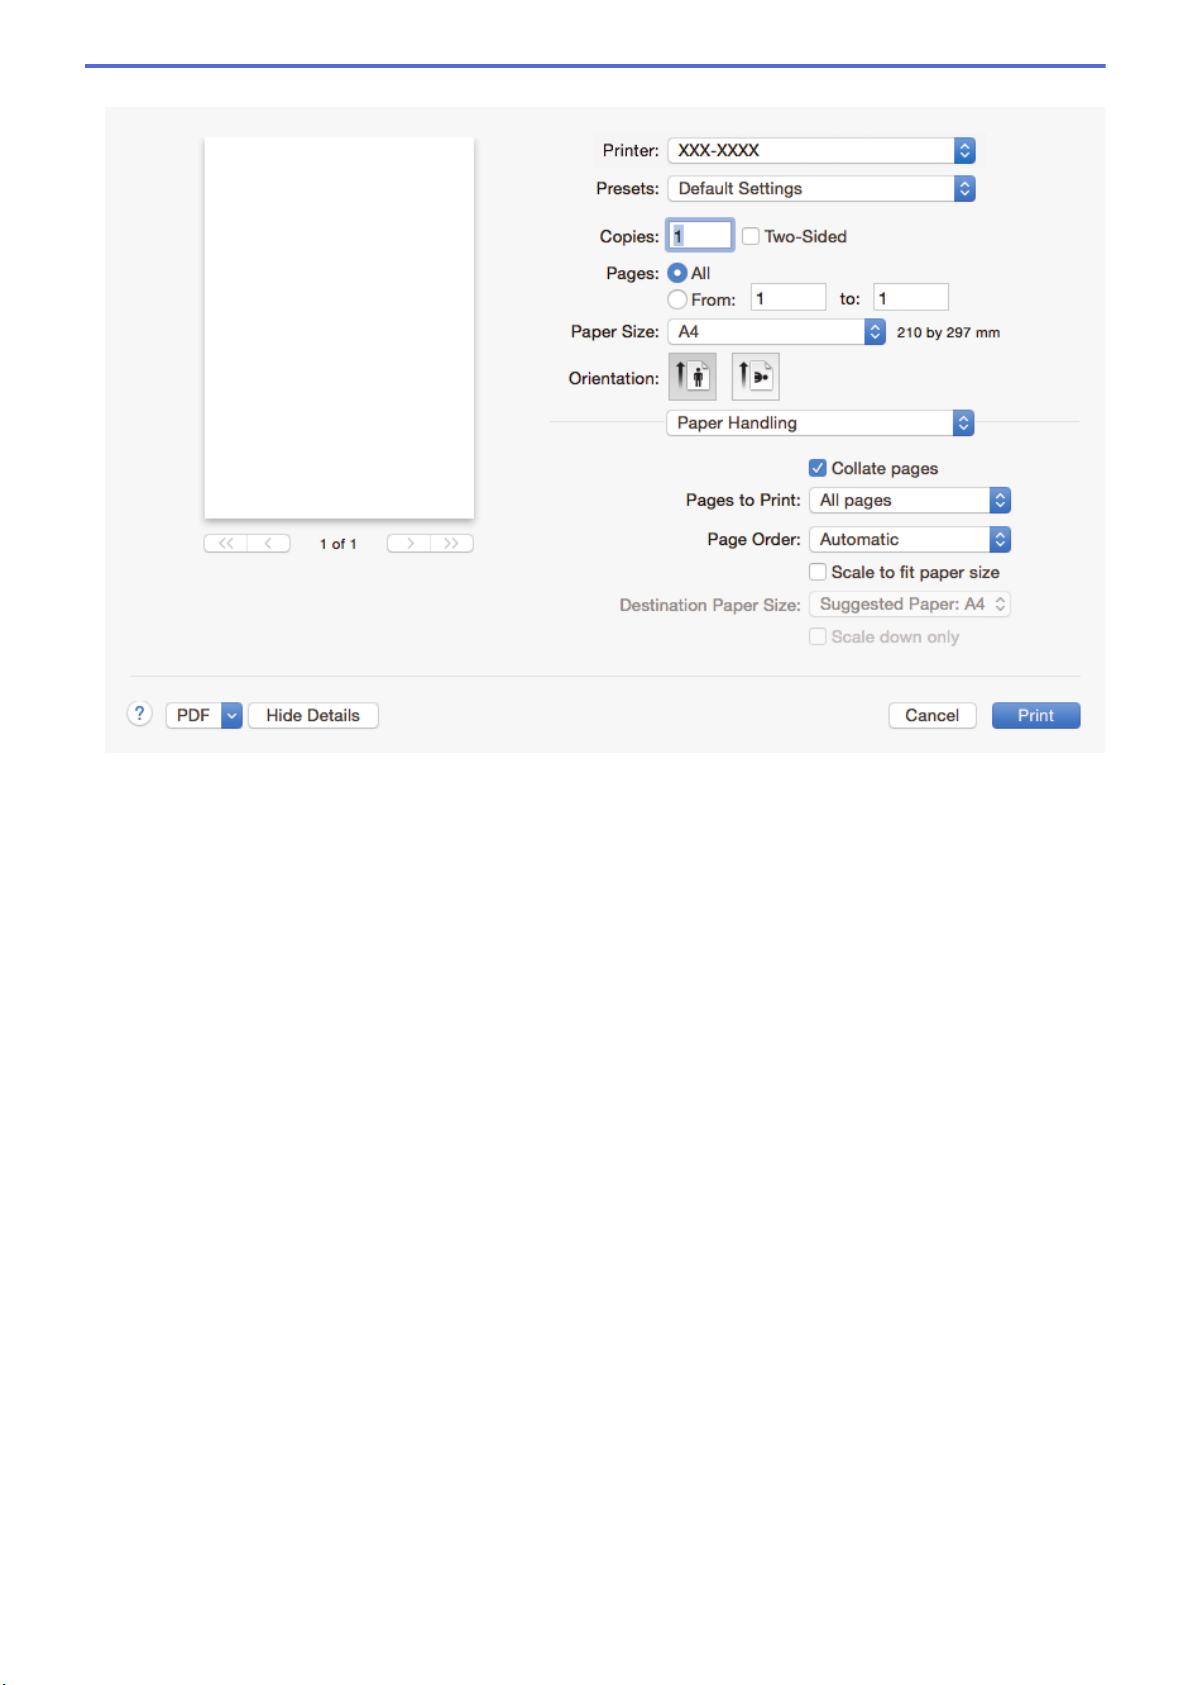
Paper Handling
1. Collate pages
Select this option to print sets of multi-page documents in the original page order. When this option is
selected, one complete copy of your document will print, and then reprint according to the number of copies
you choose. If this option is not selected, then each page will print according to the number of copies chosen
before the next page of the document is printed.
2. Pages to Print
Select which pages you want to print (even pages or odd pages).
3. Page Order
Select the page order.
4. Scale to fit paper size
Select this option to enlarge or reduce the pages in your document to fit the selected paper size.
5. Destination Paper Size
Select the paper size to print on.
6. Scale down only
Select this option if you want to reduce the pages in your document when they are too large for the selected
paper size. If this option is selected and the document is formatted for a paper size that is smaller than the
paper size you are using, the document will be printed at its original size.
68
Page 76
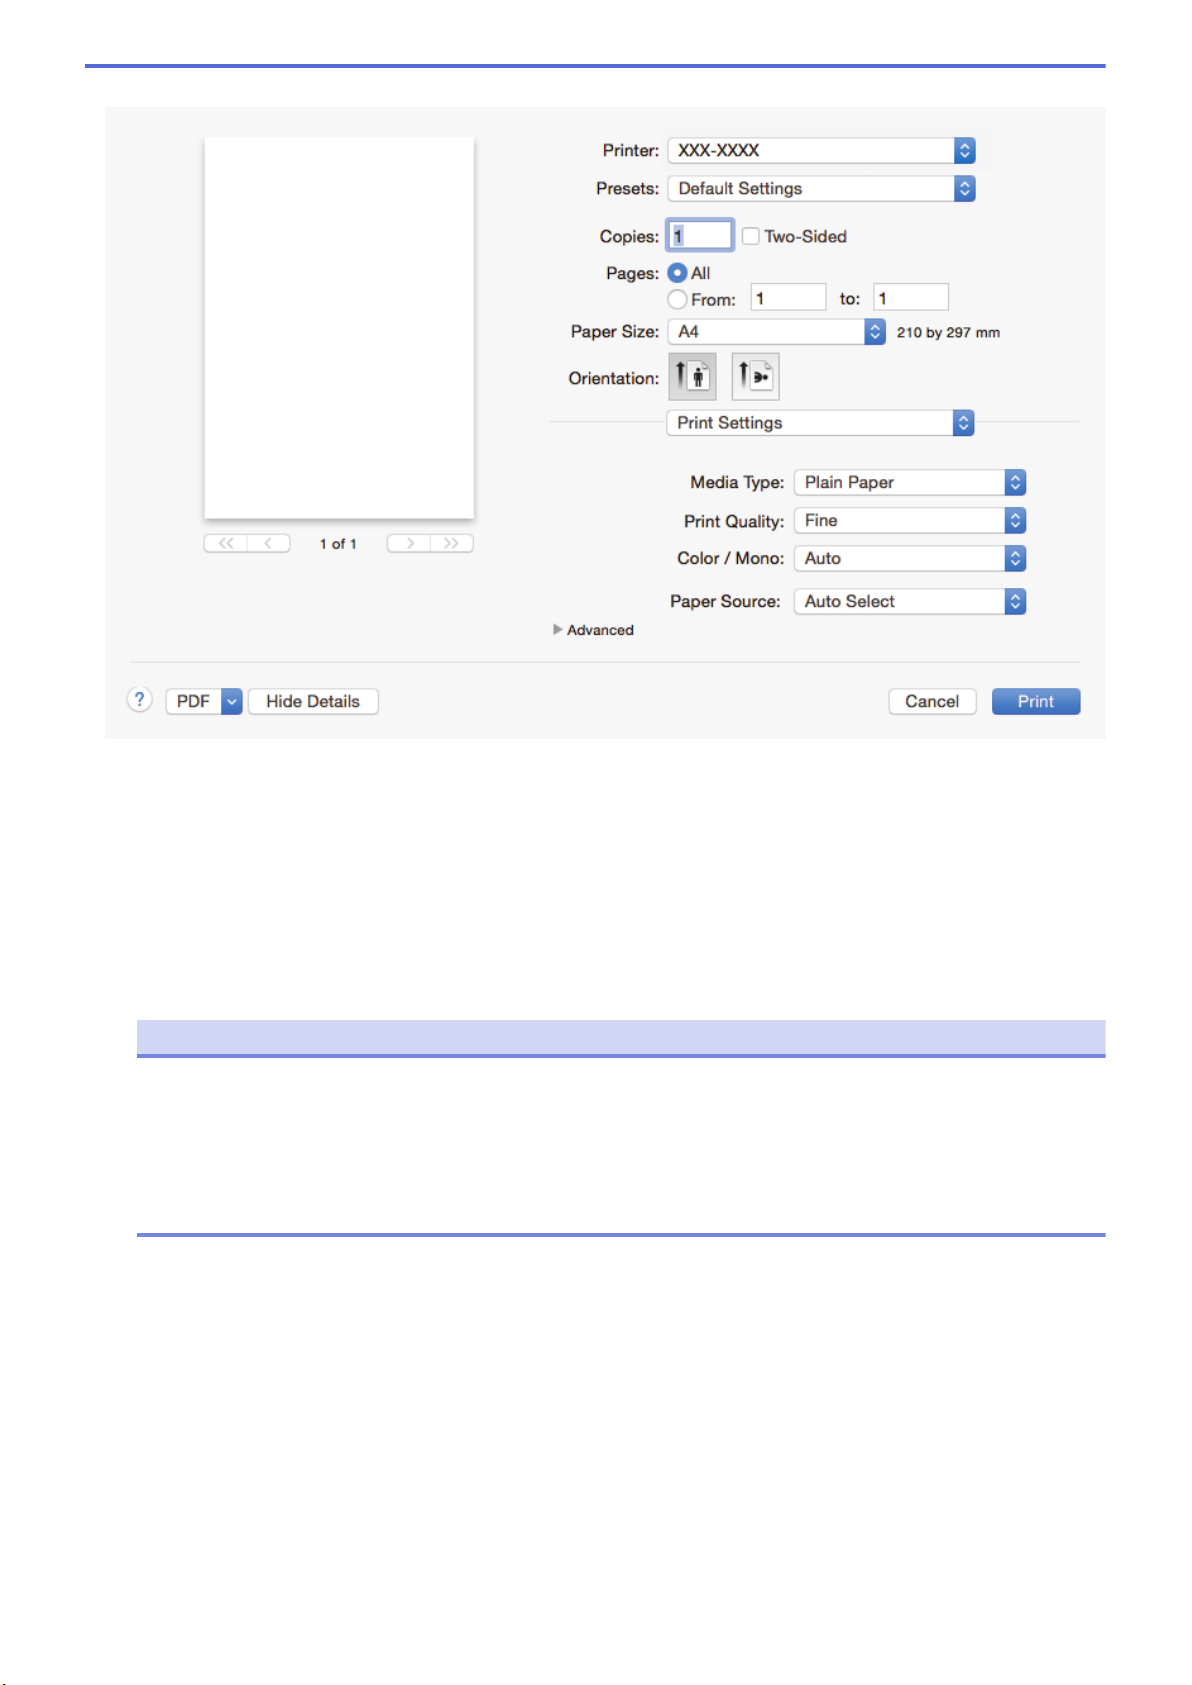
Print Settings
1. Media Type
Select the type of media you want to use. To achieve the best print results, the machine automatically adjusts
its print settings according to the selected media type.
2. Print Quality
Select the print resolution you want. Because print quality and speed are related, the higher the quality, the
longer it will take to print the document.
3. Color / Mono
Select the Color/Mono settings to use.
NOTE
• The machine’s color sensor is very sensitive and may perceive faded black text or an off-white
background as color. If you know that your document is black and white and you want to conserve
color toner, select Mono mode.
• If either the Cyan, Magenta or Yellow toner reaches the end of its life while printing a color document,
the print job cannot be completed. Cancel your print job and select to start the print job again in Mono
mode, as long as Black toner is available.
4. Paper Source
Select the paper source setting according to your print conditions or purpose.
5. Advanced
Toner Save Mode
Select this feature to conserve toner by using less toner to print documents; printouts appear lighter, but
are still legible.
Improve Print Output
Select this option to reduce the amount of paper curling and improve the toner fixing.
Quiet Mode
Select this option to reduce printing noise.
69
Page 77
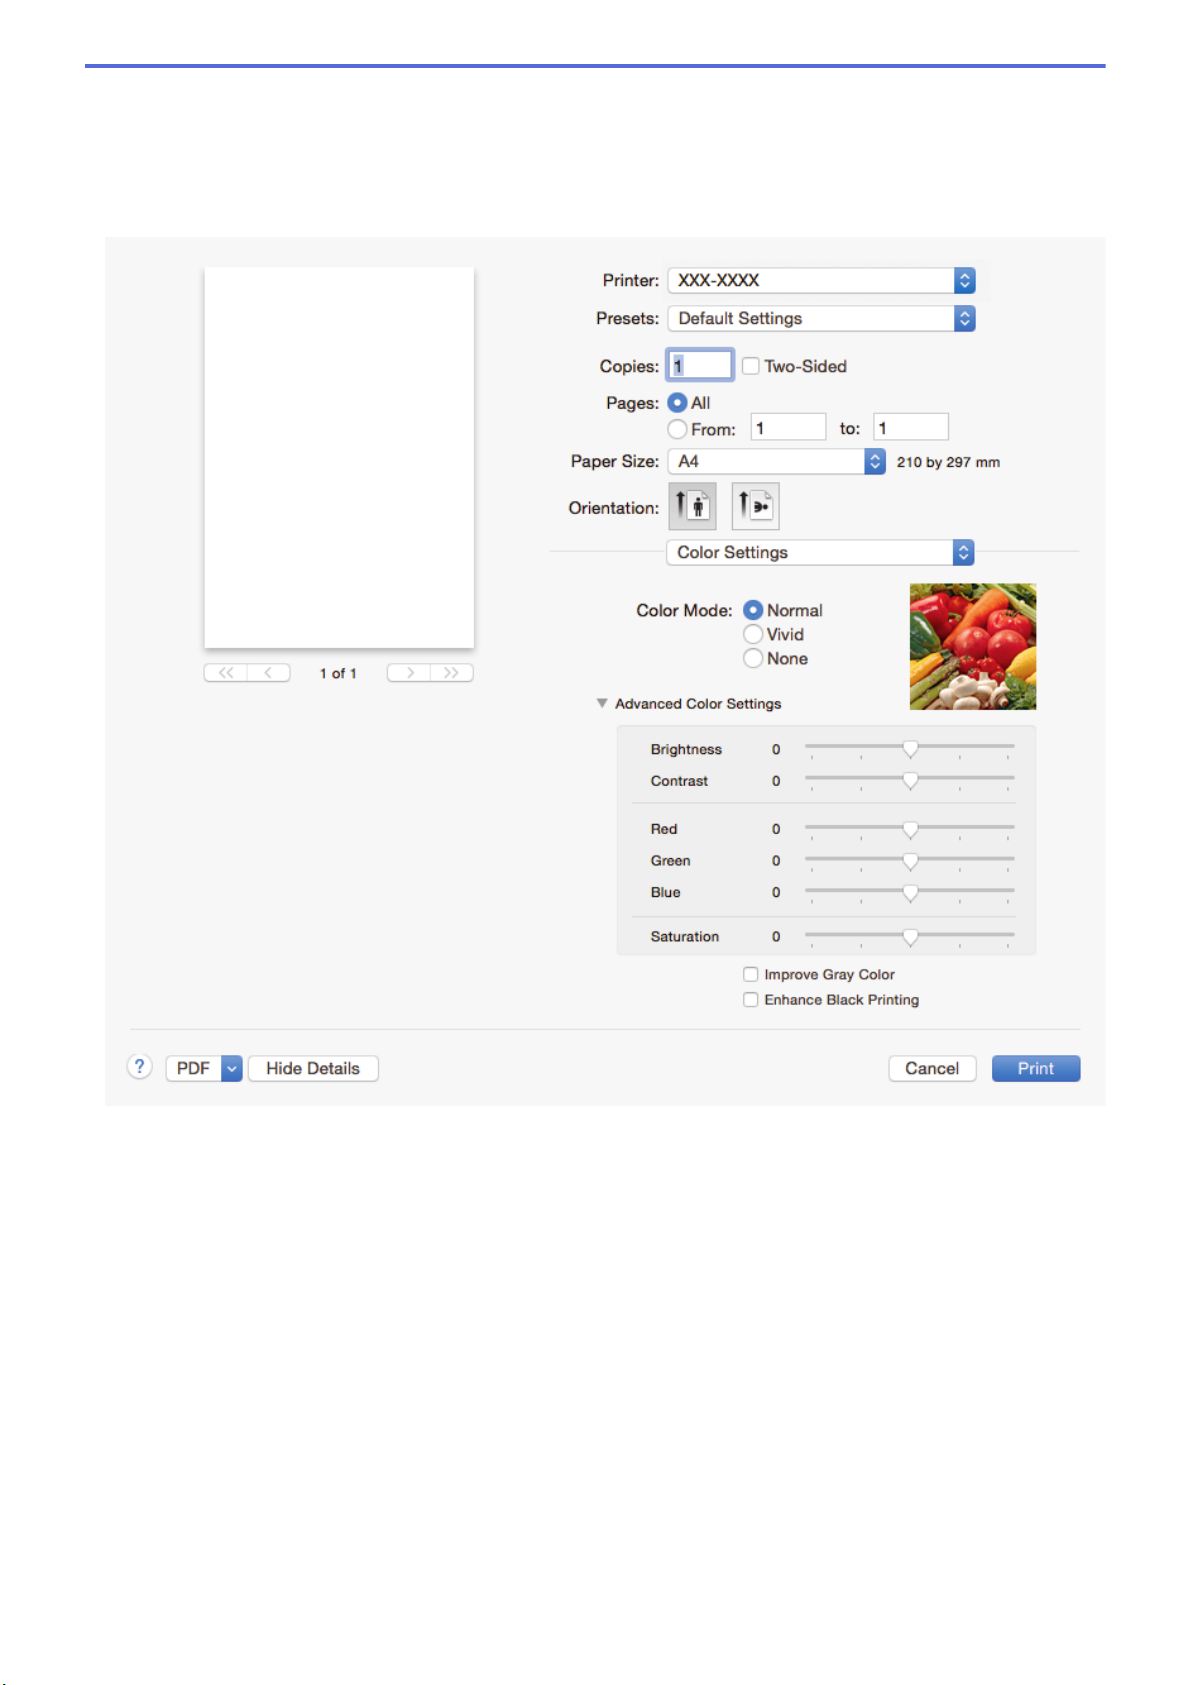
Other Print Options
Skip Blank Page
Select this option to allow the printer driver to automatically detect blank pages and exclude them from
printing.
Color Settings
1. Color Mode
Select the color mode to suit your preference.
2. Advanced Color Settings
Click the disclosure triangle to select the Color Enhancement feature. This feature analyzes your image to
improve its sharpness, white balance and color density. This process may take several minutes depending on
the size of the image and the specifications of your computer.
70
Page 78
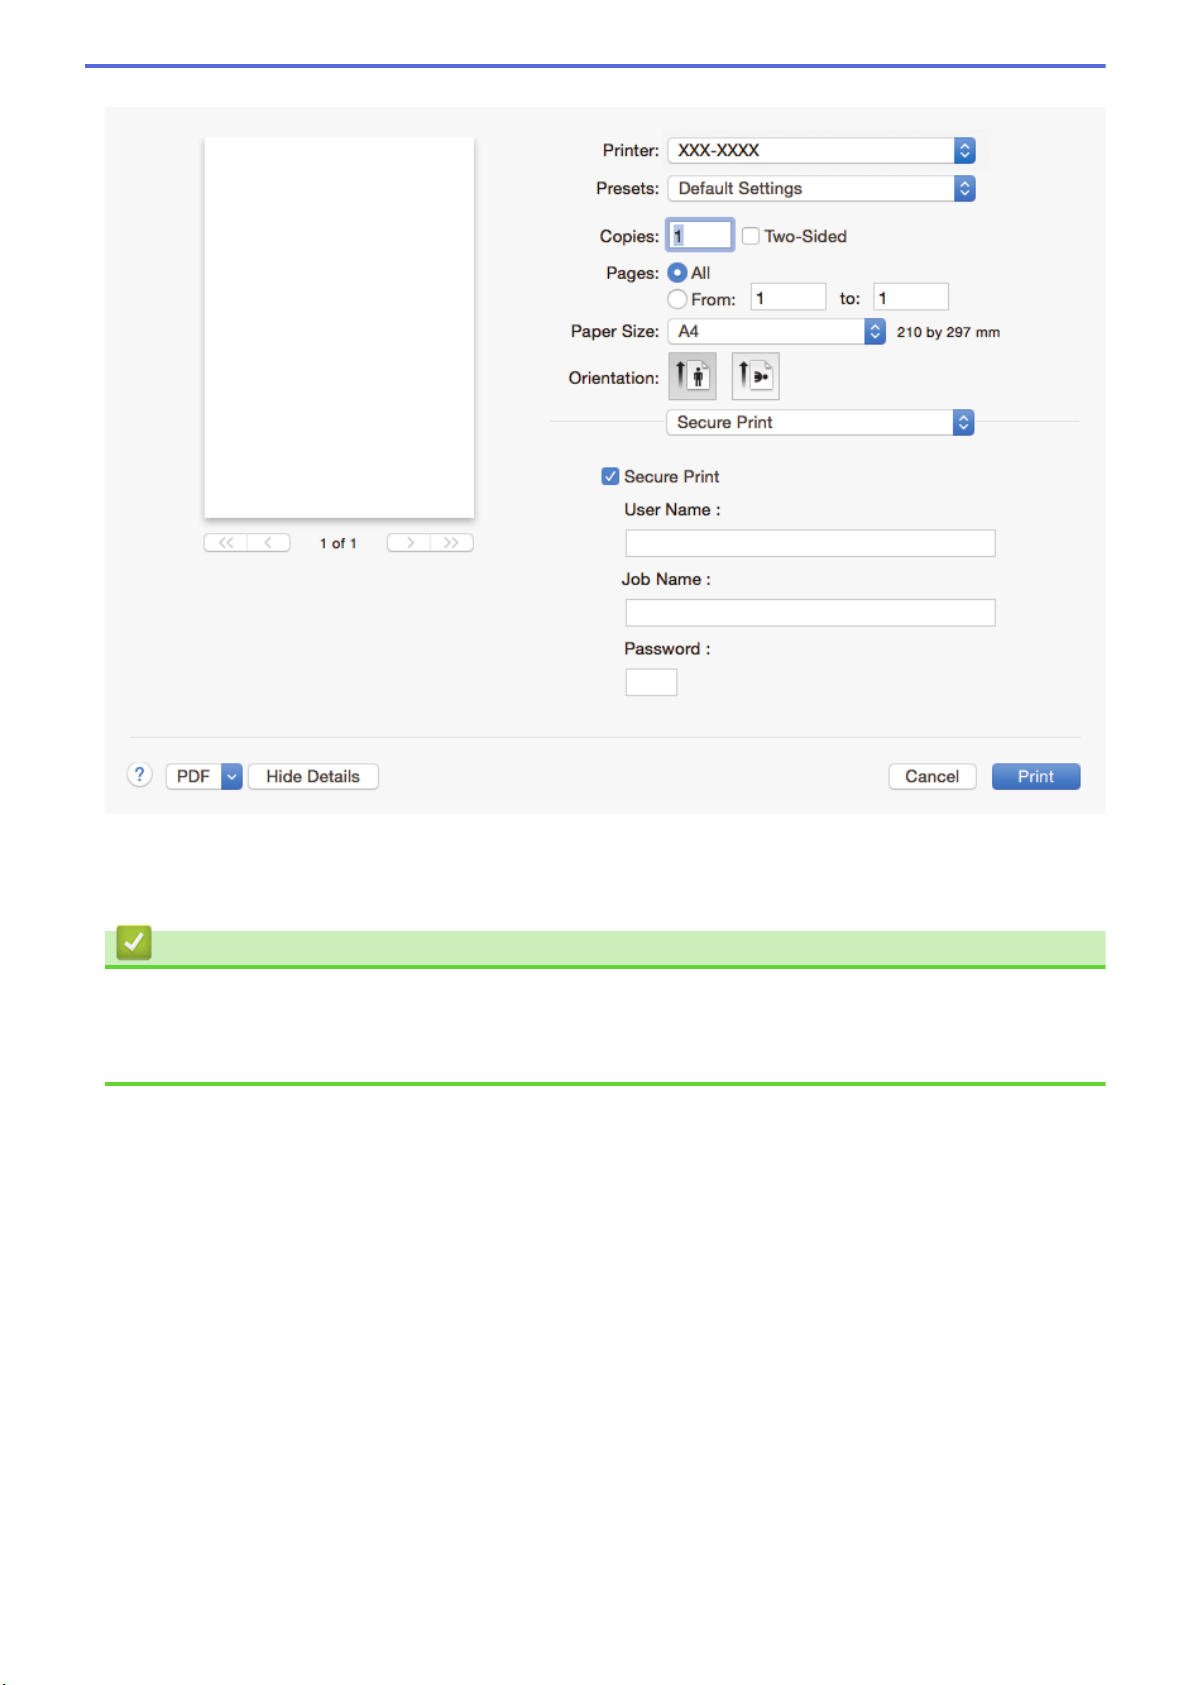
Secure Print
1. Secure Print
This feature ensures that confidential or sensitive documents do not print until you enter a password on the
machine's control panel.
Related Information
• Print from Your Computer (Mac)
Related Topics:
• Print a Document (Mac)
71
Page 79
Home > Print > Print from Your Computer (Mac) > Secure Print (Mac)
Secure Print (Mac)
Use Secure Print to ensure that confidential or sensitive documents do not print until you enter a password on
the machine's control panel.
• Not available for macOS v11.
• The secure data is deleted from the machine when you turn off the machine.
1. From an application, such as Apple TextEdit, click the File menu, and then select Print.
2. Select Brother XXX-XXXX (where XXXX is your model name).
3. Click the application pop-up menu, and then select the Secure Print option. The Secure Print options
appear.
4. Select the Secure Print check box.
5. Type your user name, job name and a four-digit password.
6. Click Print.
7. On the machine's control panel, swipe left or right or press d or c to display the [Secure Print] option,
and then press [Secure Print].
8. Swipe up or down or press a or b to display user names, and then press your user name.
The LCD displays the list of secured jobs for your name.
9. Swipe up or down or press a or b to display the print job, and then press it.
10. Enter your four-digit password, and then press [OK].
11. Enter the number of copies you want.
12. Press [Start].
After you have printed the secured data, it will be cleared from the machine's memory.
Related Information
• Print from Your Computer (Mac)
72
Page 80
Home > Print > Print from Your Computer (Mac) > Print a Document Using the BR-Script3 Printer Driver
(PostScript® 3™ language emulation) (Mac)
Print a Document Using the BR-Script3 Printer Driver (PostScript® 3
™
language emulation) (Mac)
The BR-Script3 printer driver lets you print PostScript® data more clearly.
• Not available for macOS v11.
• Go to your model's Downloads page on the Brother Solutions Center at
the PS driver (BR-Script3 printer driver).
• Make sure you have added the BR-Script3 printer driver from Print & Scan or Printers & Scanners in the
System Preferences list on your Mac.
1. Make sure you have loaded the correct size paper in the paper tray.
2. From an application, such as Apple TextEdit, click the File menu, and then select Print.
3. Select your machine.
4. Type the number of copies you want in the Copies field.
5. Click the Paper Size pop-up menu, and then select your paper size.
6. Select the Orientation option that matches the way you want the document to print.
7. Click the print options pop-up menu, and then click Printer Features.
The Printer Features options appear.
8. Click the Print Quality pop-up menu, and then select the print quality.
9. Click the Media Type pop-up menu, and then select the type of paper you are using.
10. Select the Auto, Color, or Mono option for the Color / Mono print setting.
11. Change other printer settings, if needed.
12. Click Print.
support.brother.com to download
Related Information
• Print from Your Computer (Mac)
73
Page 81
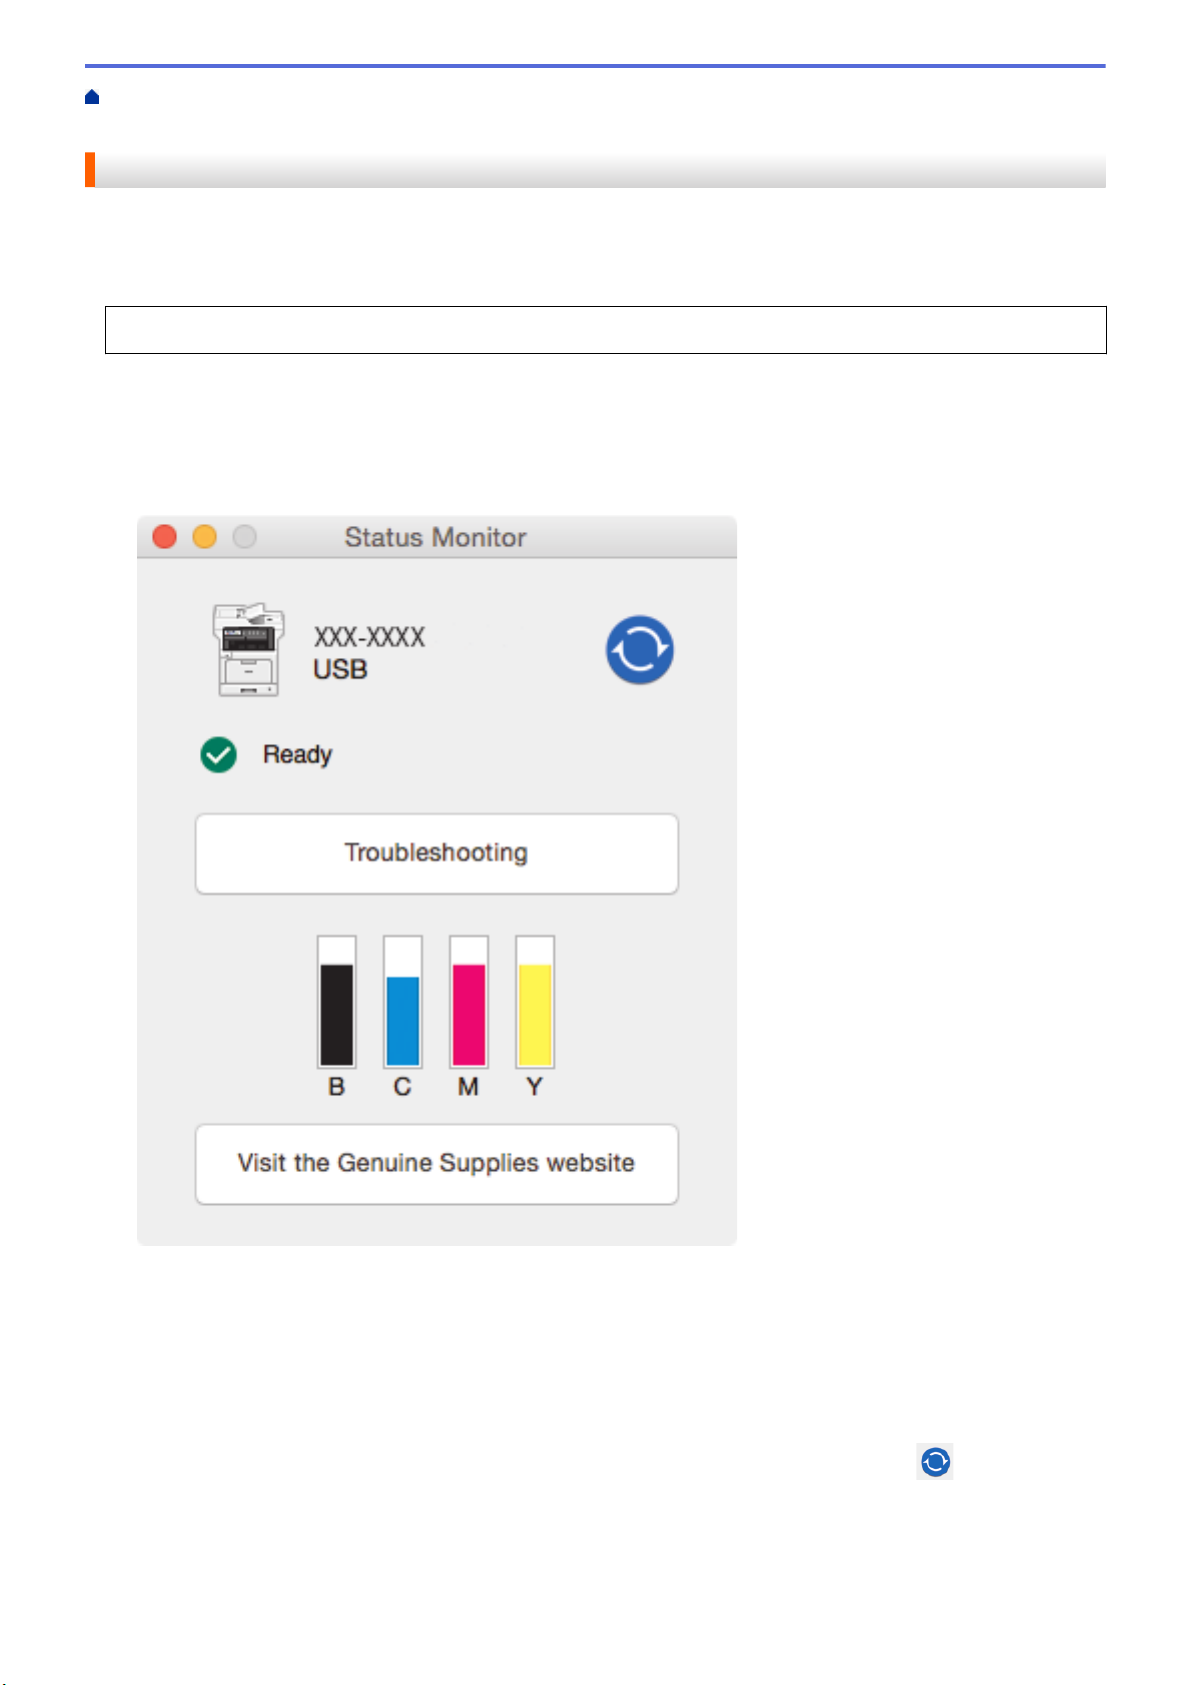
Home > Print > Print from Your Computer (Mac) > Monitor the Status of the Machine from Your Computer
(Mac)
Monitor the Status of the Machine from Your Computer (Mac)
The Status Monitor utility is a configurable software tool for monitoring the status of a device, allowing you to get
immediate notification of error messages, such as paper empty or paper jam, at preset update intervals. You can
also access Web Based Management.
Not available for macOS v10.15.x and v11.
1. Click the System Preferences menu, select Print & Scan or Printers & Scanners, and then select your
machine.
2. Click the Options & Supplies button.
3. Click the Utility tab, and then click the Open Printer Utility button.
Status Monitor starts.
Troubleshooting
Click the Troubleshooting button to access the troubleshooting website.
Visit the Genuine Supplies website
Click the Visit the Genuine Supplies website button for more information on Brother genuine supplies.
Updating the machine's status
To view the latest machine status while the Status Monitor window is open, click the
set the interval at which the software updates machine status information. Click Brother Status Monitor in
the menu bar, and then select Preferences.
icon. You can
74
Page 82

Web Based Management (Network Connection Only)
Access the Web Based Management System by clicking the machine icon on the Status Monitor screen.
You can use a standard Web Browser to manage your machine using HTTP (Hyper Text Transfer
Protocol).
Related Information
• Print from Your Computer (Mac)
Related Topics:
• Printing Problems
• Calibrate Color Output
75
Page 83

Home > Print > Cancel a Print Job
Cancel a Print Job
1. Press .
To cancel multiple print jobs, press and hold for about four seconds.
Related Information
• Print
Related Topics:
• Printing Problems
76
Page 84

Home > Print > Test Print
Test Print
If there are problems with print quality, follow these instructions to do a test print:
1. Press
If your machine displays the [All Settings] menu on the Home screen, skip the [Settings] menu.
2. Press [Yes].
3. Press .
[Settings] > [All Settings] > [Printer] > [Print Options] > [Test Print].
Related Information
• Print
Related Topics:
• Improve the Print Quality
77
Page 85

Home > Scan
Scan
• Scan Using the Scan Button on Your Brother Machine
• Scan from Your Computer (Windows)
• Scan from Your Computer (Mac)
• Configure Scan Settings Using Web Based Management
78
Page 86

Home > Scan > Scan Using the Scan Button on Your Brother Machine
Scan Using the Scan Button on Your Brother Machine
• Scan Photos and Graphics
• Save Scanned Data to a Folder as a PDF File
• Save Scanned Data to a USB Flash Drive
• Scan to an Editable Text File (OCR)
• Scan to Email Attachment
• Send Scanned Data to an Email Server
• Scan to FTP
• Scan to SSH FTP (SFTP)
• Scan to Network (Windows)
• Scan to SharePoint
• Web Services for Scanning on Your Network (Windows 7, Windows 8 and Windows 10)
• Change Scan Button Settings from ControlCenter4 (Windows)
• Change Scan Button Settings from ControlCenter2 (Mac)
• Change Scan Button Settings from Brother iPrint&Scan
• Configure Certificate for Signed PDF
• Disable Scanning from Your Computer
79
Page 87
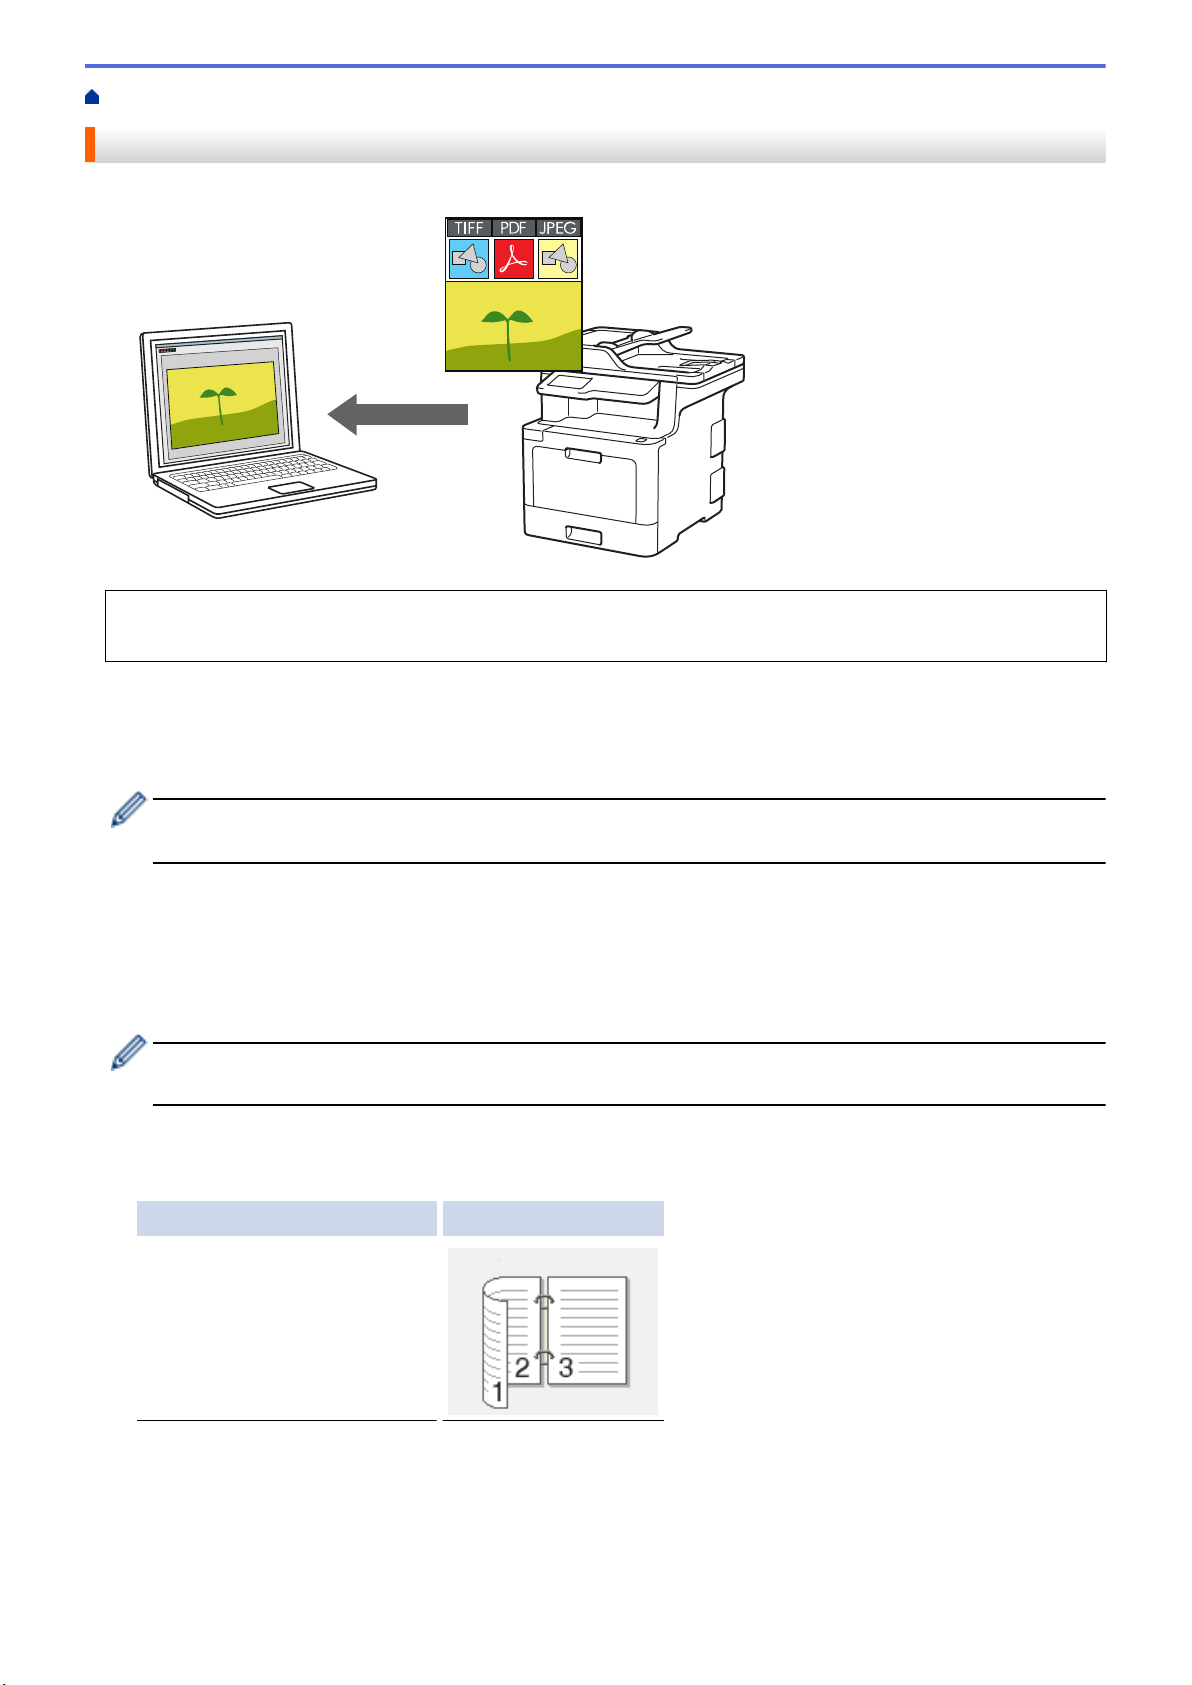
Home > Scan > Scan Using the Scan Button on Your Brother Machine > Scan Photos and Graphics
Scan Photos and Graphics
Send scanned photos or graphics directly to your computer.
Use the Scan button on the machine to make temporary changes to the scan settings. To make permanent
changes, use Brother's ControlCenter software.
1. Load your document.
2. Press [Scan] > [to PC] > [to Image] .
3. If the machine is connected over the network, select the computer name you want to send data.
If the LCD prompts you to enter a PIN for the computer, enter the four-digit PIN on the LCD, and then press
[OK].
4. Do one of the following:
• To change the scan settings, press [Options], and then go to the next step.
• To use the default scan settings, press [Start].
The machine starts scanning. If using the machine's scanner glass, follow the touchscreen instructions to
complete the scanning job.
To change scan settings, a computer with Brother's ControlCenter software installed must be connected to
the machine.
5. To scan both sides of the document (MFC-L8900CDW/MFC-L8895CDW/MFC-L8905CDW):
• Press [2-sided Scan], and then select the document type.
Option Description
2-sided Scan: Long Edge
80
Page 88
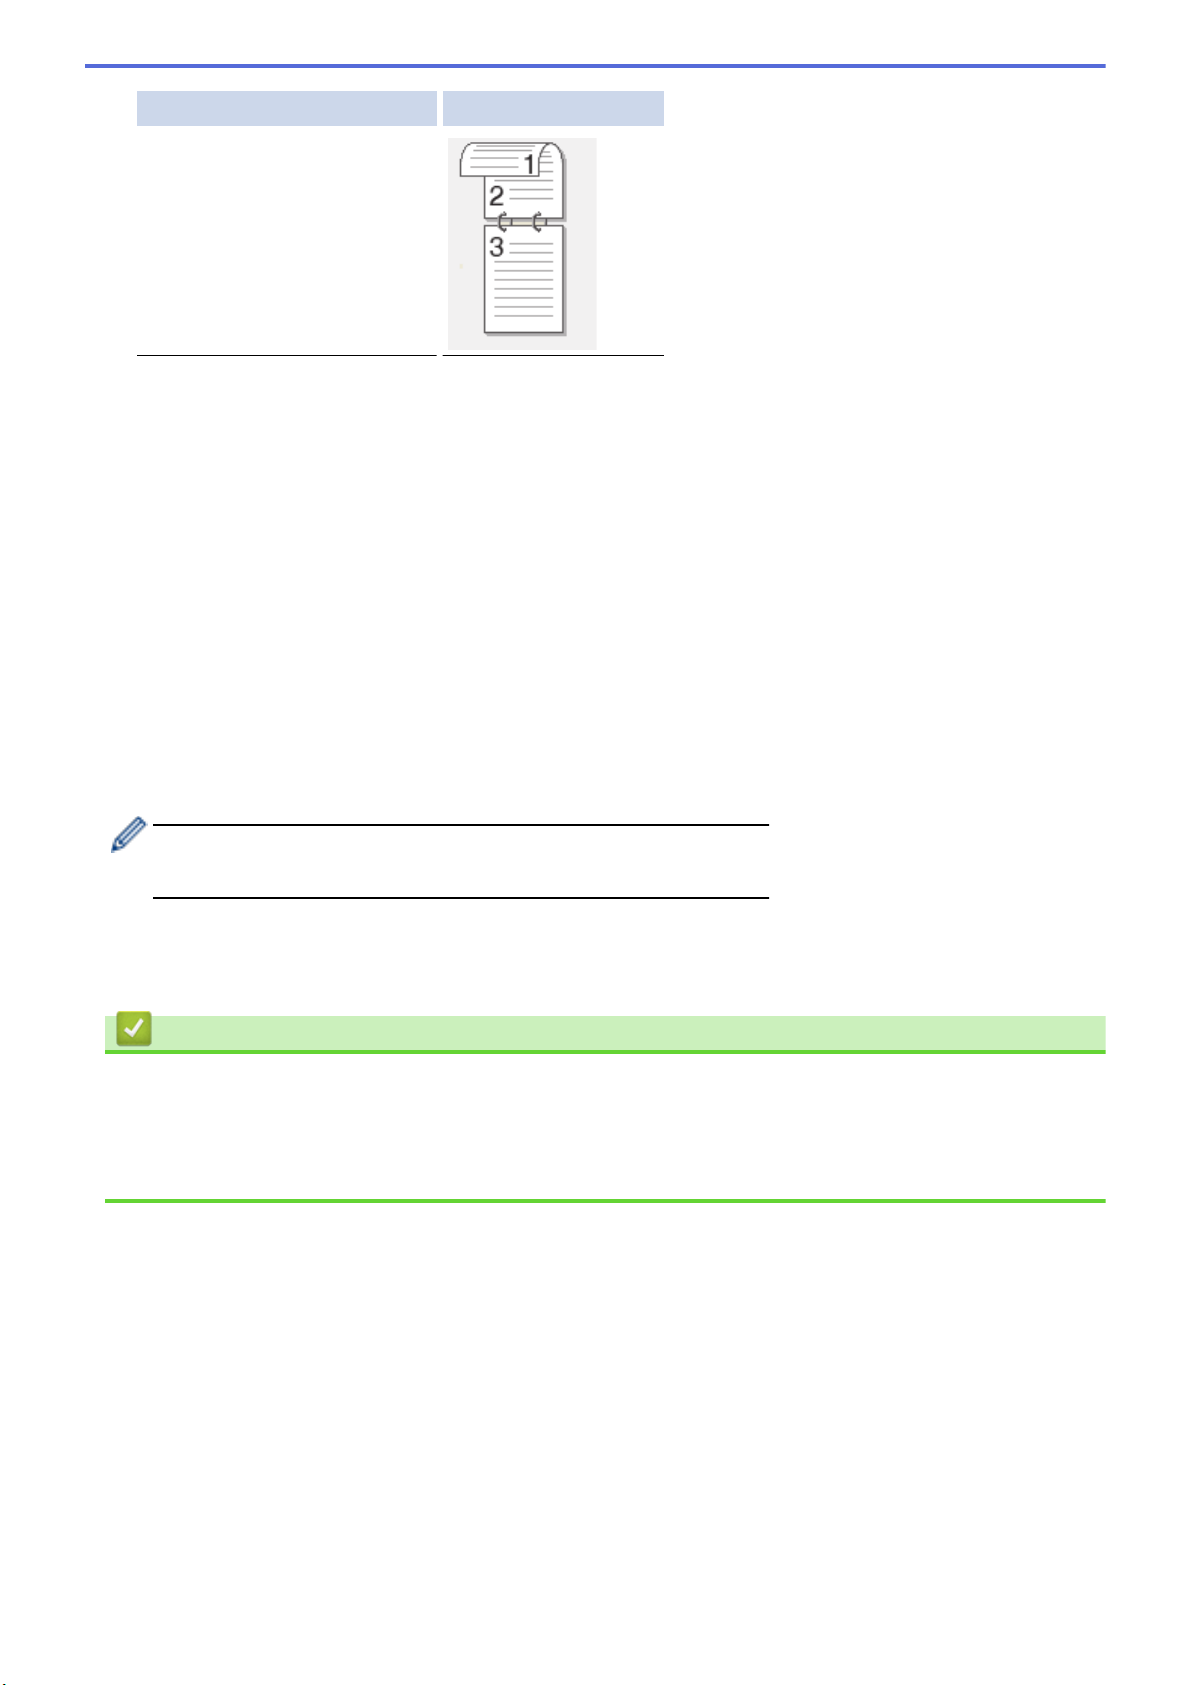
Option Description
2-sided Scan: Short Edge
6. Select the scan settings you want to change:
• [Resolution]
• [File Type]
• [Scan Type]
• [Document Size]
• [Scan Settings]
• [Brightness]
• [Contrast]
(available only for the [Color] and [Gray] options)
• [ADF Auto Deskew]
• [Skip Blank Page]
• [Remove Background Color]
(available only for the [Color] and [Gray] options)
• If your machine displays the [OK] button, press [OK].
• To save the settings as a shortcut, press [Save as Shortcut].
7. Press [Start].
The machine starts scanning. If using the machine's scanner glass, follow the touchscreen instructions to
complete the scanning job.
Related Information
• Scan Using the Scan Button on Your Brother Machine
Related Topics:
• Change Scan Button Settings from ControlCenter4 (Windows)
• Change Scan Button Settings from ControlCenter2 (Mac)
81
Page 89
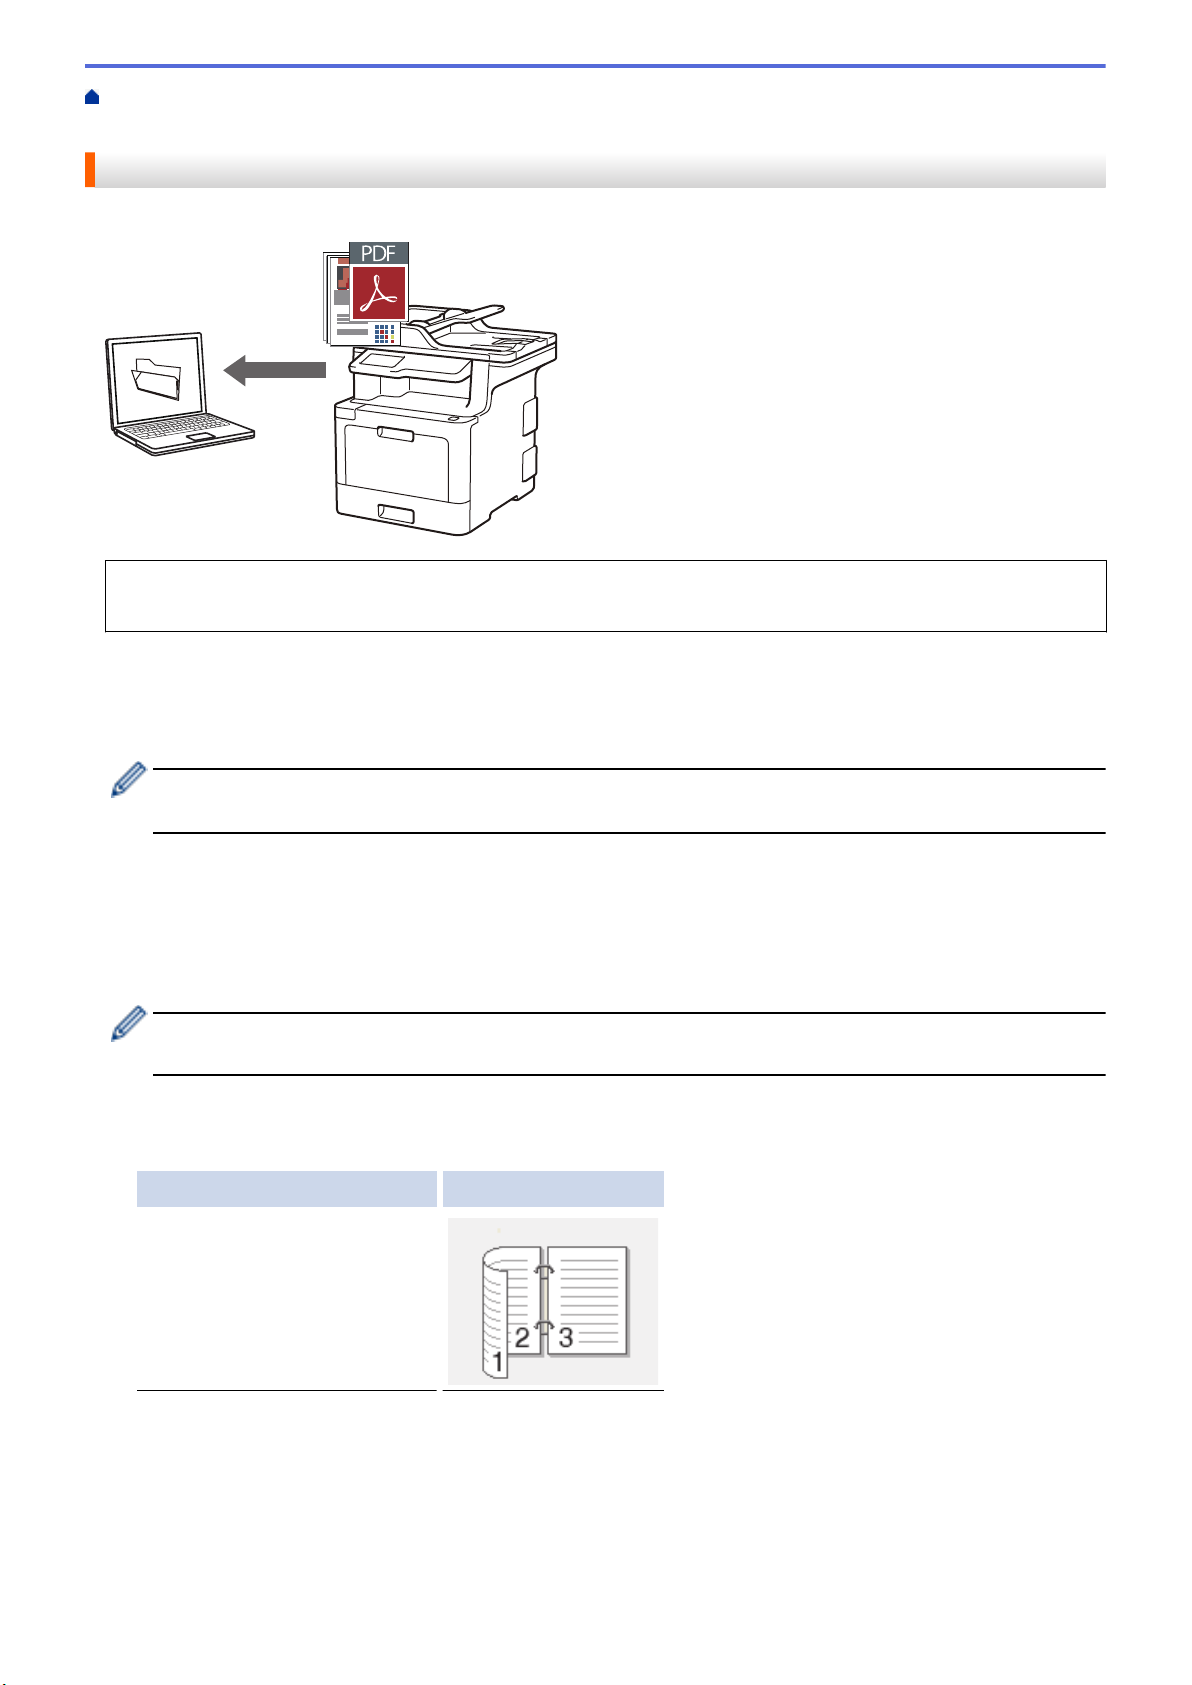
Home > Scan > Scan Using the Scan Button on Your Brother Machine > Save Scanned Data to a Folder as
a PDF File
Save Scanned Data to a Folder as a PDF File
Scan documents and save them to a folder on your computer as PDF files.
Use the Scan button on the machine to make temporary changes to the scan settings. To make permanent
changes, use Brother's ControlCenter software.
1. Load your document.
2. Press [Scan] > [to PC] > [to File] .
3. If the machine is connected over the network, select the computer name you want to send data.
If the LCD prompts you to enter a PIN for the computer, enter the four-digit PIN on the LCD, and then press
[OK].
4. Do one of the following:
• To change the scan settings, press [Options], and then go to the next step.
• To use the default scan settings, press [Start].
The machine starts scanning. If using the machine's scanner glass, follow the touchscreen instructions to
complete the scanning job.
To change scan settings, a computer with Brother's ControlCenter software installed must be connected to
the machine.
5. To scan both sides of the document (MFC-L8900CDW/MFC-L8895CDW/MFC-L8905CDW):
• Press [2-sided Scan], and then select the document type.
Option Description
2-sided Scan: Long Edge
82
Page 90
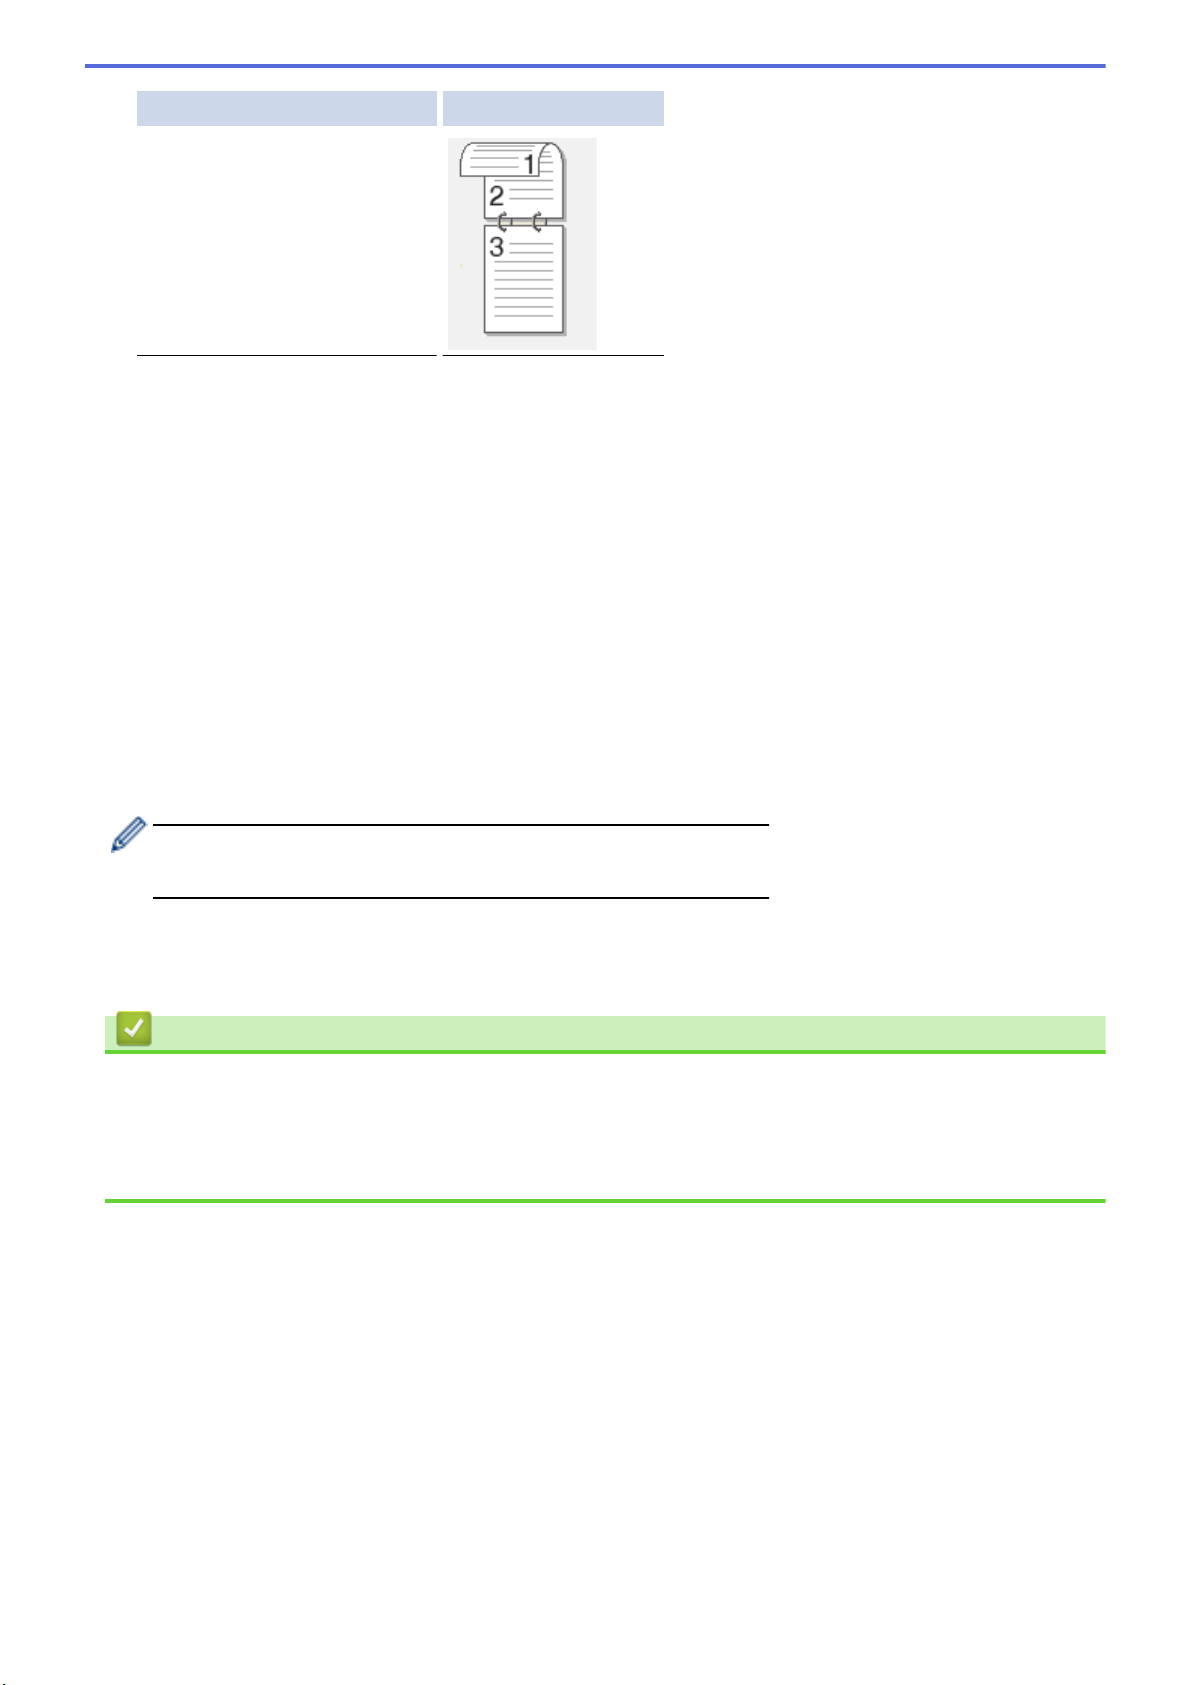
Option Description
2-sided Scan: Short Edge
6. Select the scan settings you want to change:
• [Resolution]
• [File Type]
• [Scan Type]
• [Document Size]
• [Scan Settings]
• [Brightness]
• [Contrast]
(available only for the [Color] and [Gray] options)
• [ADF Auto Deskew]
• [Skip Blank Page]
• [Remove Background Color]
(available only for the [Color] and [Gray] options)
• If your machine displays the [OK] button, press [OK].
• To save the settings as a shortcut, press [Save as Shortcut].
7. Press [Start].
The machine starts scanning. If using the machine's scanner glass, follow the touchscreen instructions to
complete the scanning job.
Related Information
• Scan Using the Scan Button on Your Brother Machine
Related Topics:
• Change Scan Button Settings from ControlCenter4 (Windows)
• Change Scan Button Settings from ControlCenter2 (Mac)
83
Page 91
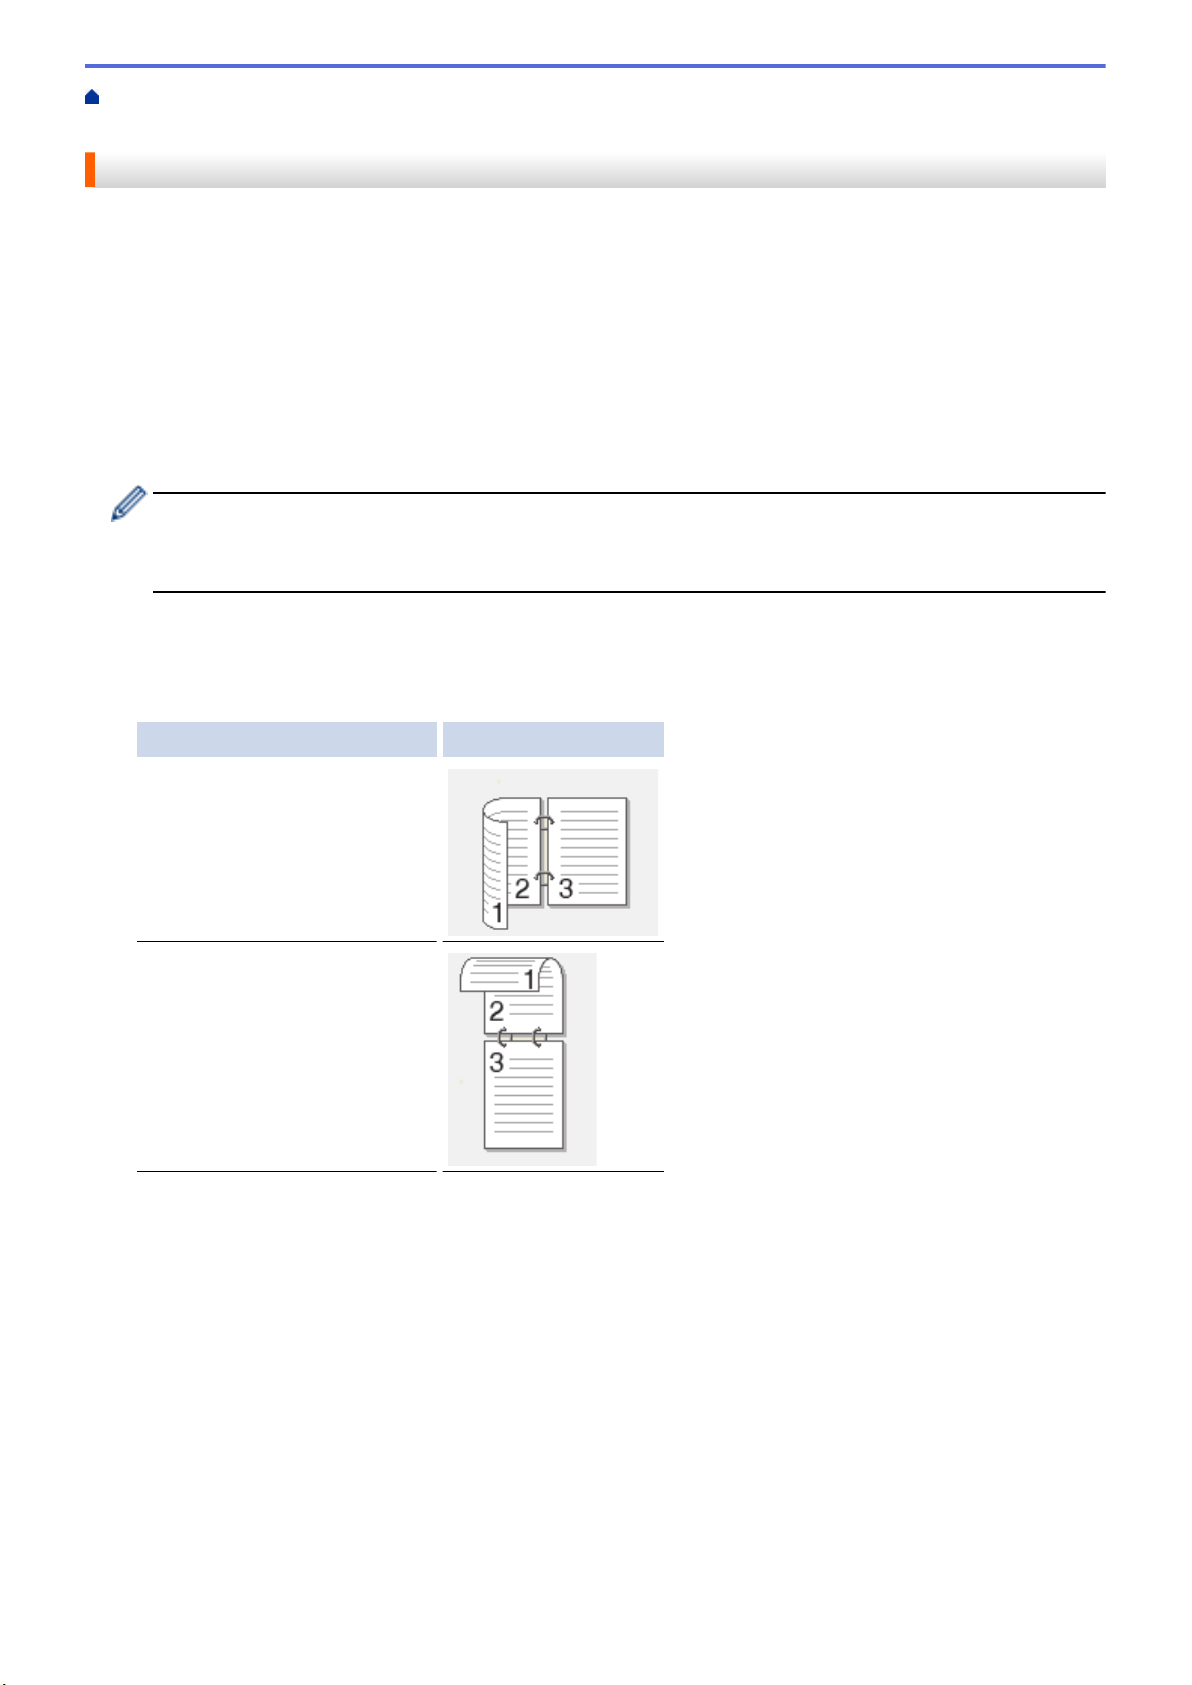
Home > Scan > Scan Using the Scan Button on Your Brother Machine > Save Scanned Data to a USB
Flash Drive
Save Scanned Data to a USB Flash Drive
Scan documents directly to a USB flash drive.
1. Load your document.
2. Insert a USB flash drive into your machine.
The LCD automatically changes.
3. Press [Scan to USB].
4. Do one of the following:
• To change the settings, press [Options], and then select the button you want to change. Follow the
machine's instructions.
- To set your own default settings: after making changes to settings, press the [Set New Default]
option, and then press [Yes].
- To restore the factory settings: press [Factory Reset], and then press [Yes].
• Press [Start] to start scanning without changing additional settings.
5. To scan both sides of the document (MFC-L8900CDW/MFC-L8895CDW/MFC-L8905CDW):
• Press [2-sided Scan], and then select the document type.
Option Description
2-sided Scan: Long Edge
2-sided Scan: Short Edge
6. Select the scan settings you want to change:
• [Resolution]
• [File Type]
• [Scan Type]
• [Document Size]
• [Brightness]
• [Contrast]
(available only for the [Color] and [Gray] options)
• [File Name]
• [File Name Style]
• [File Size]
• [ADF Auto Deskew]
84
Page 92
• [Skip Blank Page]
• [Skip Blank Page Sensitivity]
• [Remove Background Color]
(available only for the [Color] and [Gray] options)
• If your machine displays the [OK] button, press [OK].
• To save the settings as a shortcut, press [Save as Shortcut].
7. Press [Start].
The machine starts scanning. If using the machine's scanner glass, follow the touchscreen instructions to
complete the scanning job.
IMPORTANT
The LCD displays a message while reading the data. DO NOT unplug the power cord or remove the USB
flash drive from the machine while it is reading the data. You could lose your data or damage the USB
flash drive.
Related Information
• Scan Using the Scan Button on Your Brother Machine
85
Page 93
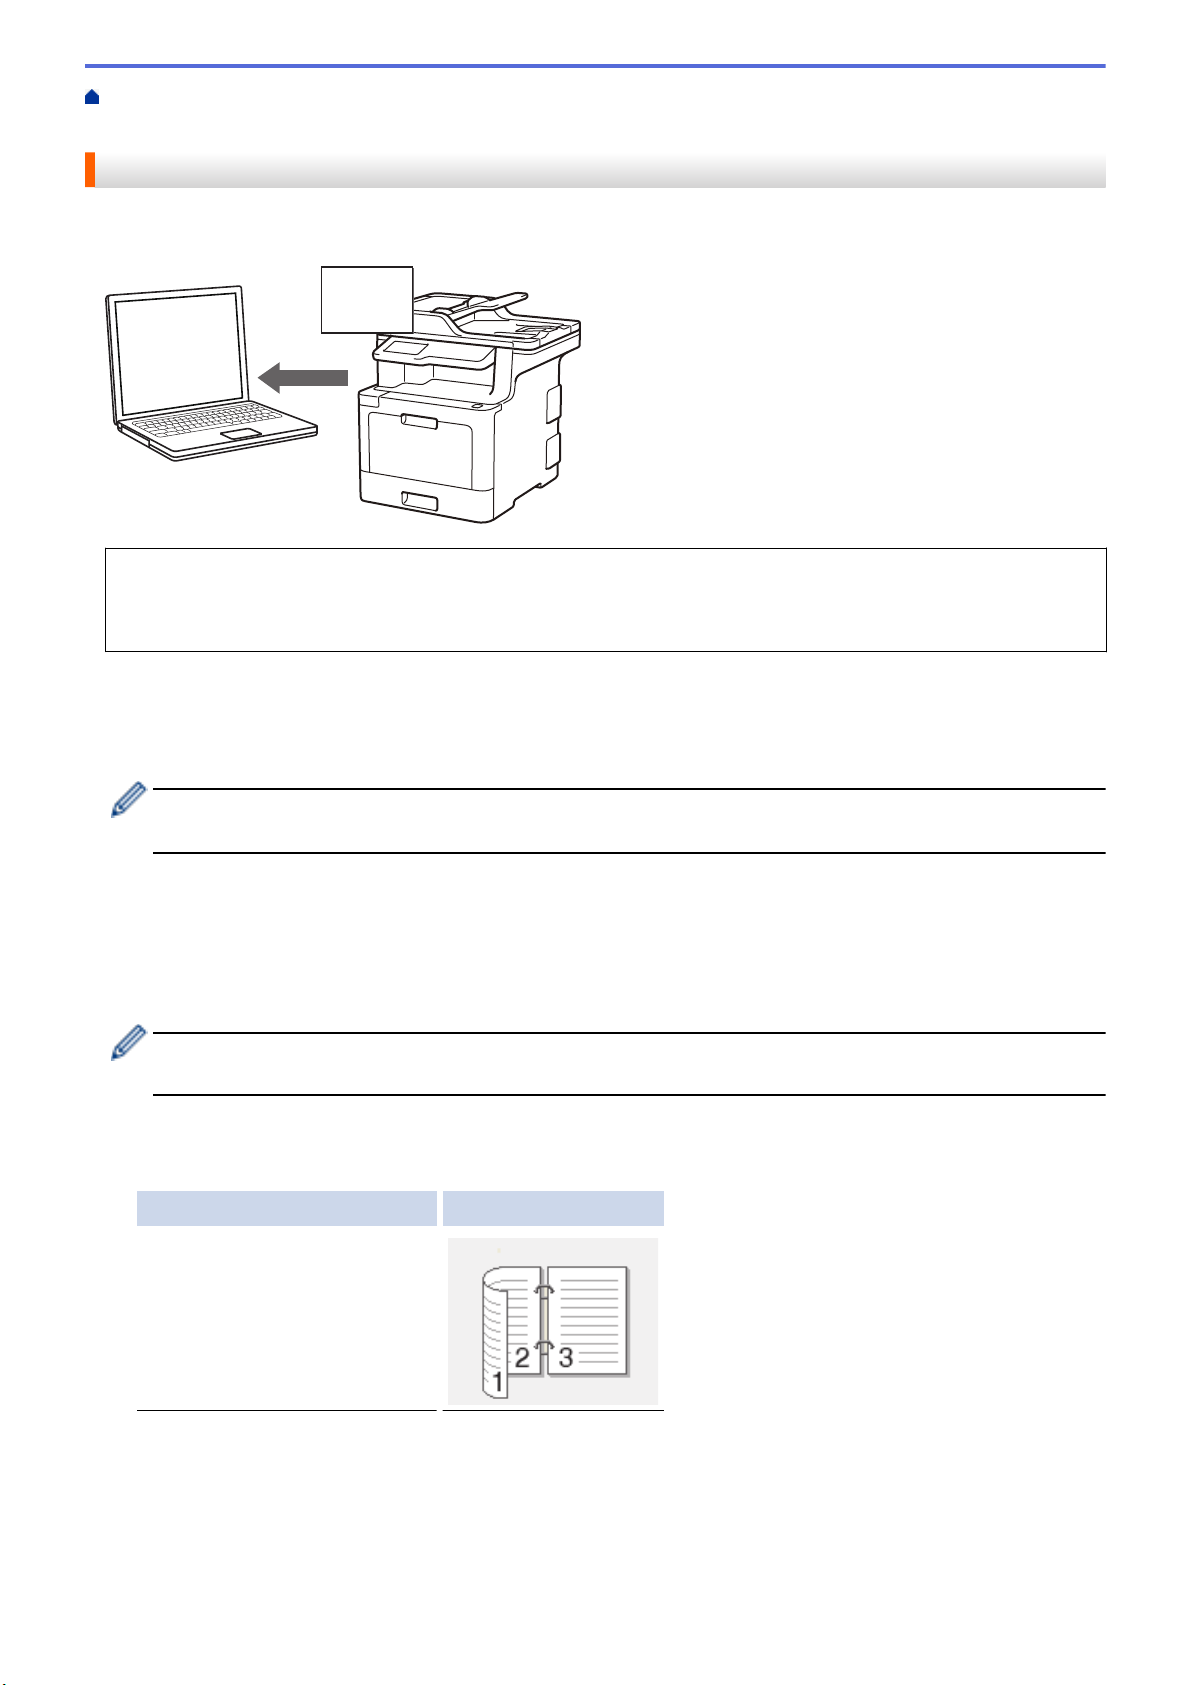
Home > Scan > Scan Using the Scan Button on Your Brother Machine > Scan to an Editable Text File
ABC
ABC
(OCR)
Scan to an Editable Text File (OCR)
Your machine can convert characters in a scanned document to text using optical character recognition (OCR)
technology. You can edit this text using your preferred text-editing application.
• The Scan to OCR feature is available for certain languages.
• Use the Scan button on the machine to make temporary changes to the scan settings. To make permanent
changes, use Brother's ControlCenter software.
1. Load your document.
2. Press [Scan] > [to PC] > [to OCR] .
3. If the machine is connected over the network, select the computer name you want to send data.
If the LCD prompts you to enter a PIN for the computer, enter the four-digit PIN on the LCD, and then press
[OK].
4. Do one of the following:
• To change the scan settings, press [Options], and then go to the next step.
• To use the default scan settings, press [Start].
The machine starts scanning. If using the machine's scanner glass, follow the touchscreen instructions to
complete the scanning job.
To change scan settings, a computer with Brother's ControlCenter software installed must be connected to
the machine.
5. To scan both sides of the document (MFC-L8900CDW/MFC-L8895CDW/MFC-L8905CDW):
• Press [2-sided Scan], and then select the document type.
Option Description
2-sided Scan: Long Edge
86
Page 94
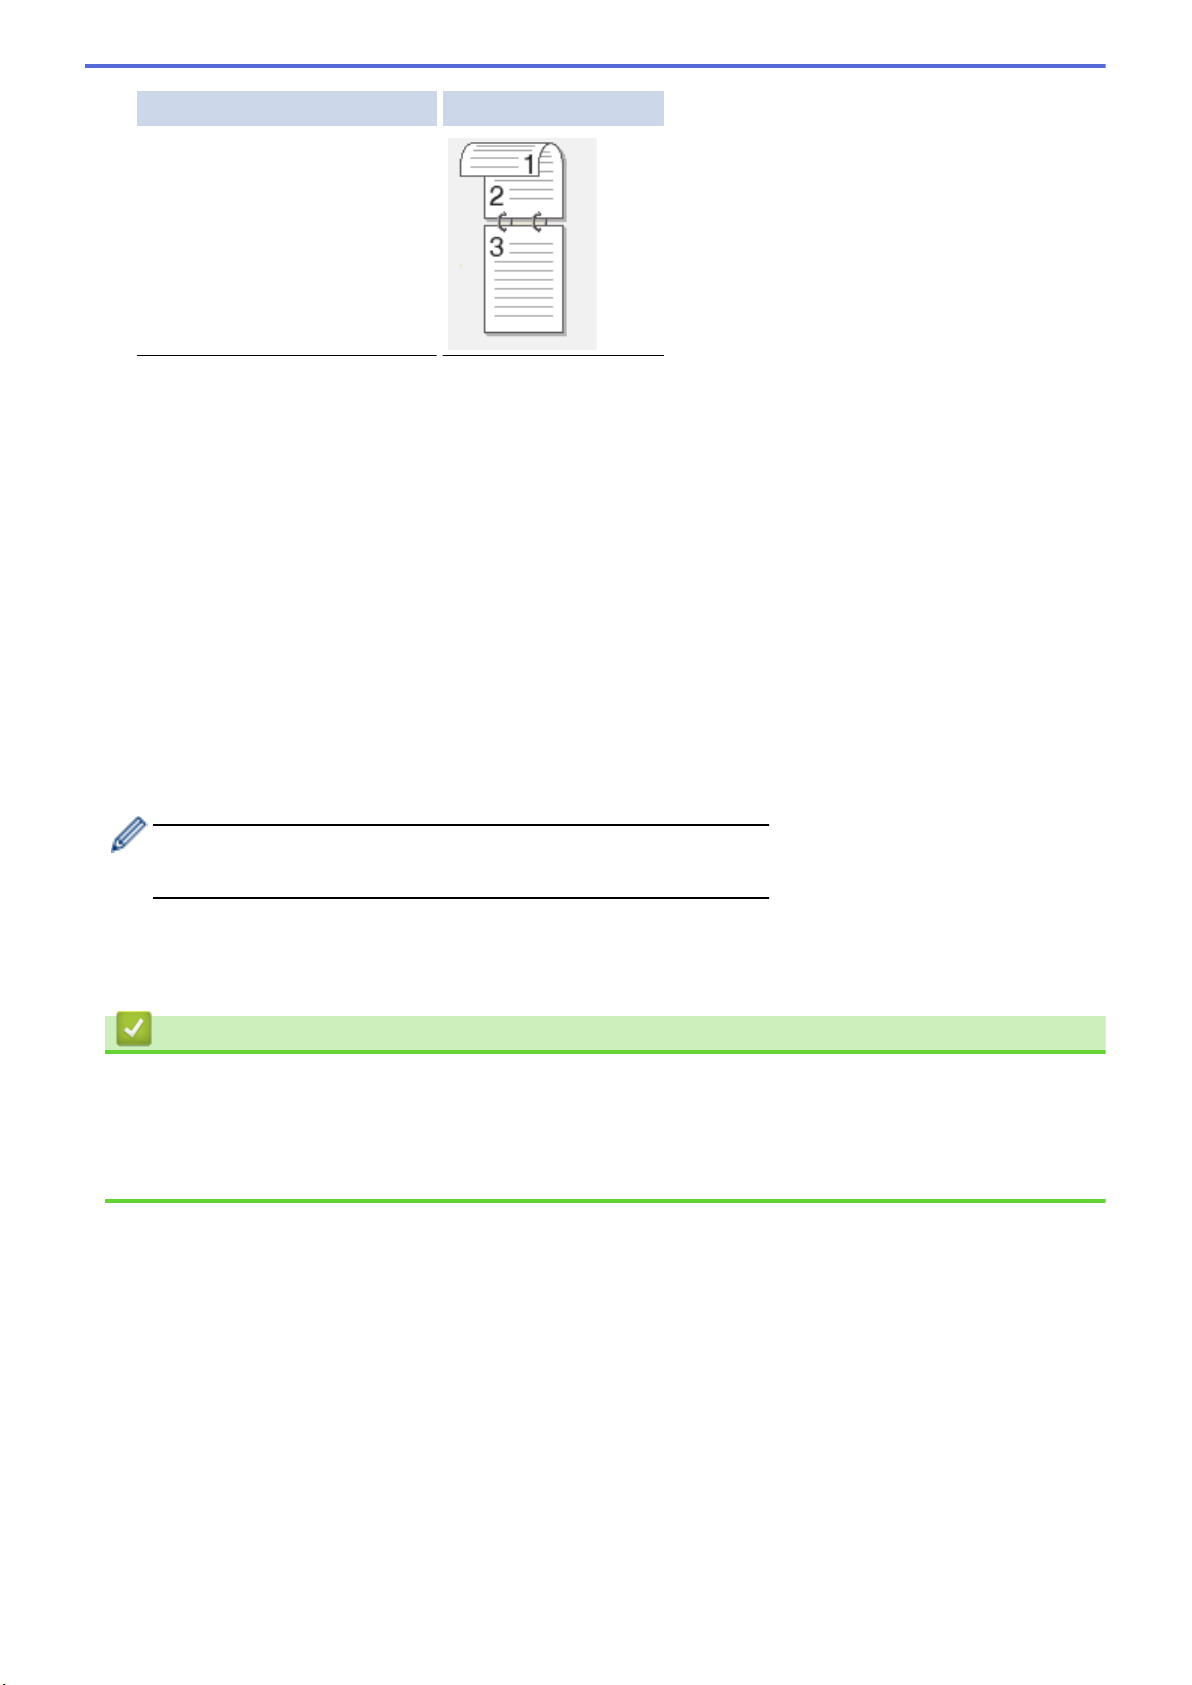
Option Description
2-sided Scan: Short Edge
6. Select the scan settings you want to change:
• [Resolution]
• [File Type]
• [Scan Type]
• [Document Size]
• [Scan Settings]
• [Brightness]
• [Contrast]
(available only for the [Color] and [Gray] options)
• [ADF Auto Deskew]
• [Skip Blank Page]
• [Remove Background Color]
(available only for the [Color] and [Gray] options)
• If your machine displays the [OK] button, press [OK].
• To save the settings as a shortcut, press [Save as Shortcut].
7. Press [Start].
The machine starts scanning. If using the machine's scanner glass, follow the touchscreen instructions to
complete the scanning job.
Related Information
• Scan Using the Scan Button on Your Brother Machine
Related Topics:
• Change Scan Button Settings from ControlCenter4 (Windows)
• Change Scan Button Settings from ControlCenter2 (Mac)
87
Page 95
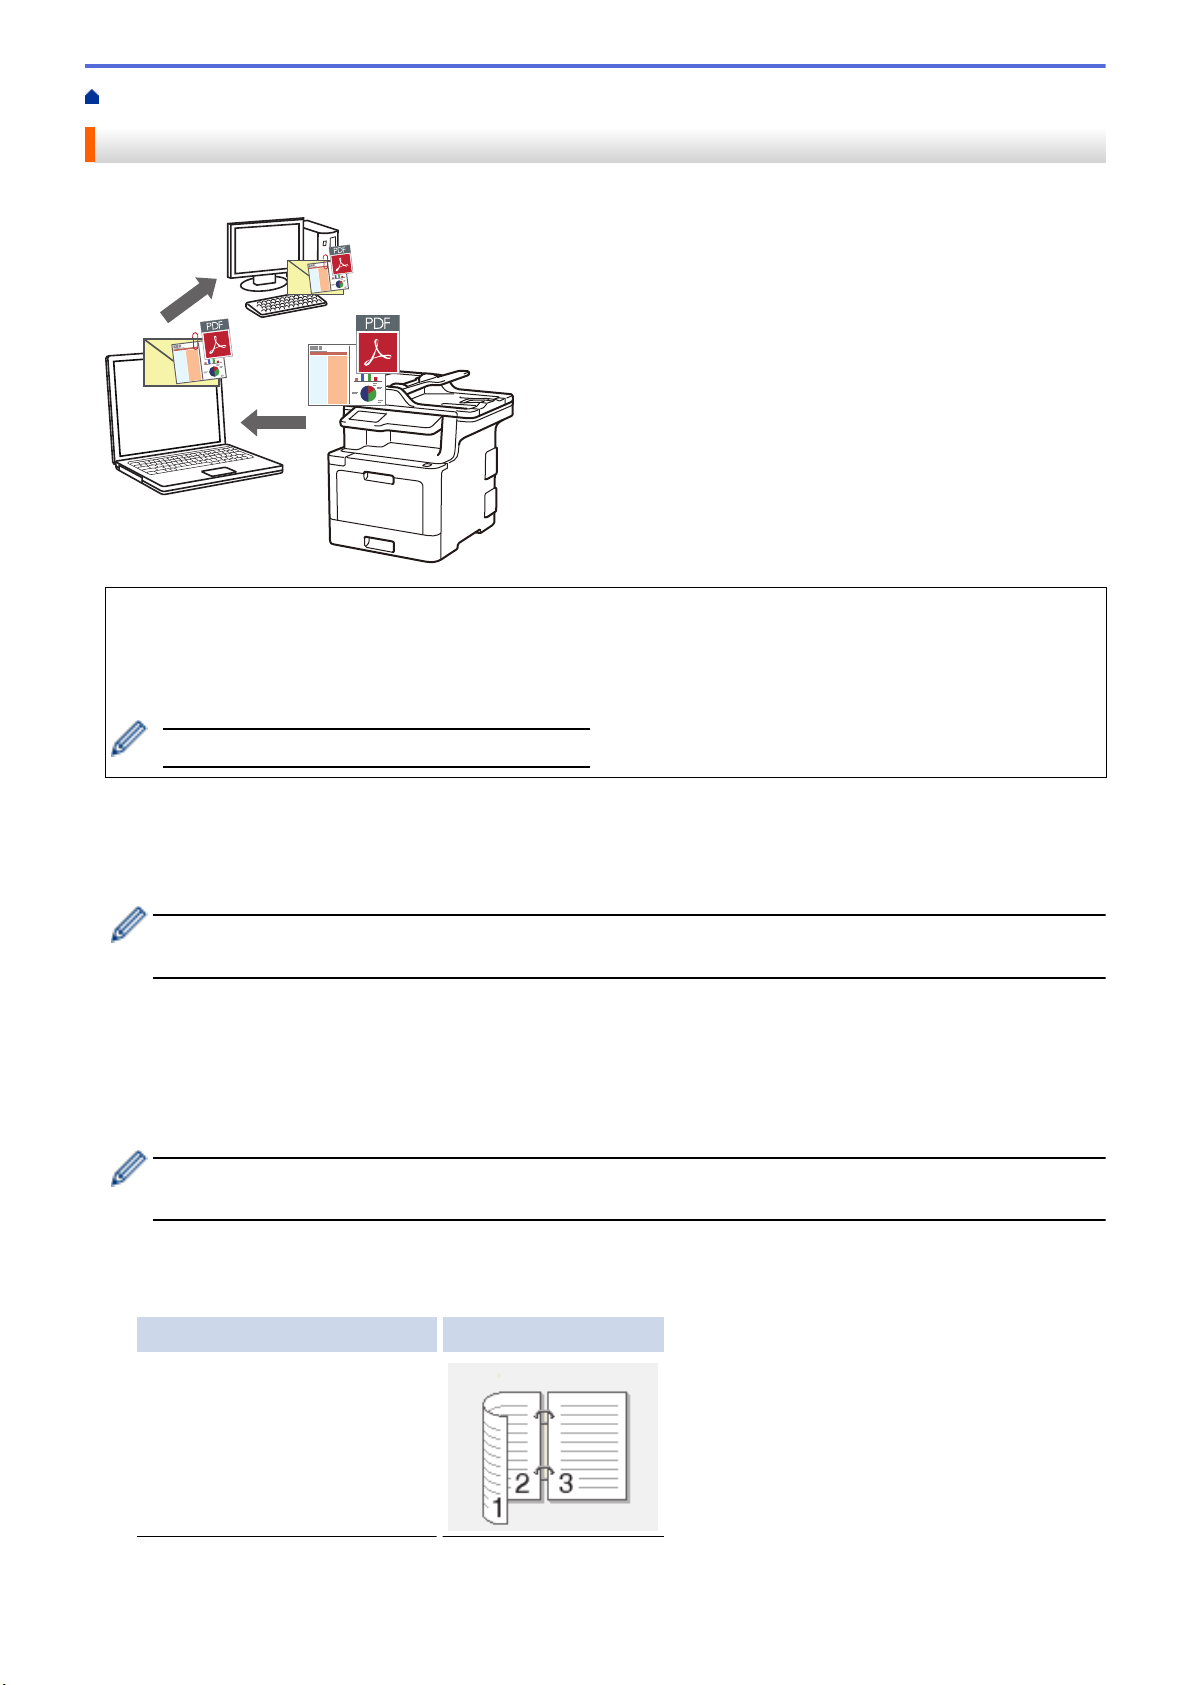
Home > Scan > Scan Using the Scan Button on Your Brother Machine > Scan to Email Attachment
Scan to Email Attachment
Send a scanned document as an email attachment.
• Use the Scan button on the machine to make temporary changes to the scan settings. To make permanent
changes, use Brother's ControlCenter software.
• The Scan to Email feature does not support Webmail services. Use the Scan to Image or Scan to File
feature to scan a document or a picture, and then attach the scanned file to an email message.
The machine scans to your default email client.
1. Load your document.
2. Press [Scan] > [to PC] > [to E-mail] .
3. If the machine is connected over the network, select the computer name you want to send data.
If the LCD prompts you to enter a PIN for the computer, enter the four-digit PIN on the LCD, and then press
[OK].
4. Do one of the following:
• To change the scan settings, press [Options], and then go to the next step.
• To use the default scan settings, press [Start].
The machine starts scanning. If using the machine's scanner glass, follow the touchscreen instructions to
complete the scanning job.
To change scan settings, a computer with Brother's ControlCenter software installed must be connected to
the machine.
5. To scan both sides of the document (MFC-L8900CDW/MFC-L8895CDW/MFC-L8905CDW):
• Press [2-sided Scan], and then select the document type.
Option Description
2-sided Scan: Long Edge
88
Page 96
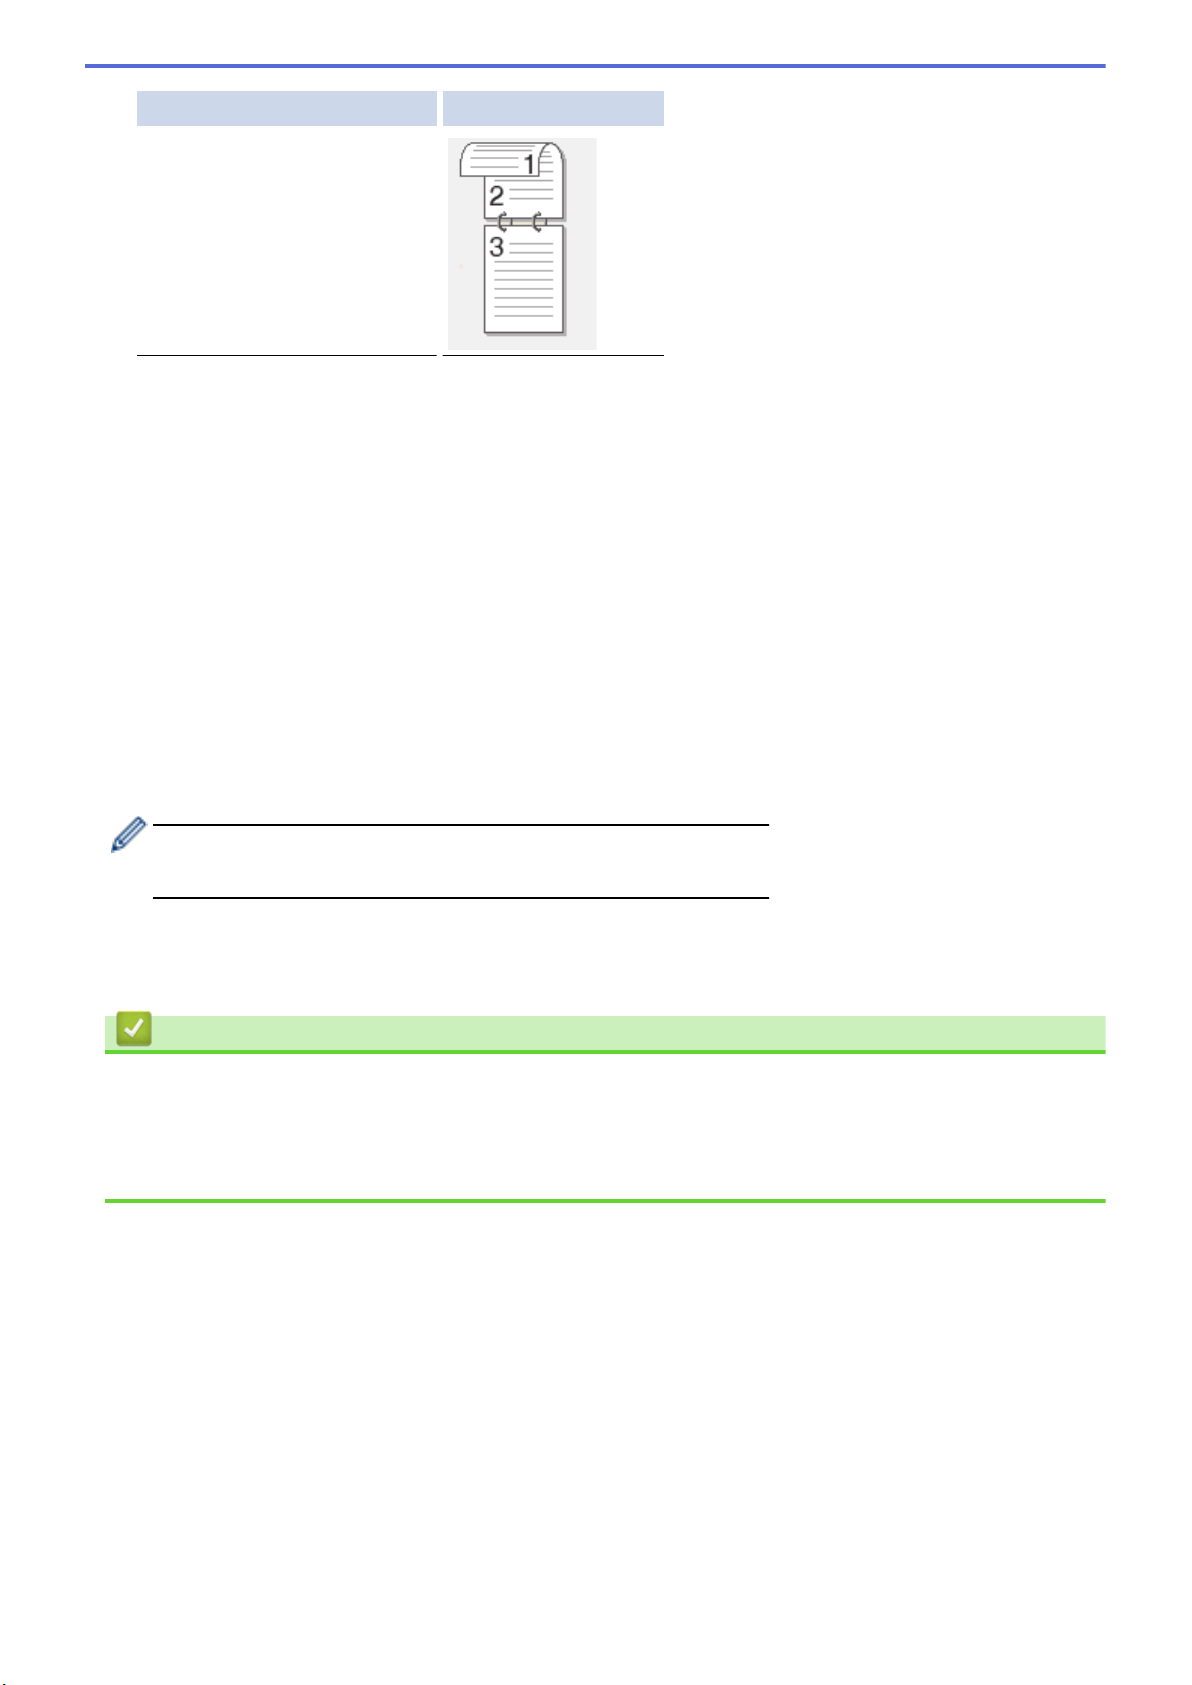
Option Description
2-sided Scan: Short Edge
6. Select the scan settings you want to change:
• [Resolution]
• [File Type]
• [Scan Type]
• [Document Size]
• [Scan Settings]
• [Brightness]
• [Contrast]
(available only for the [Color] and [Gray] options)
• [ADF Auto Deskew]
• [Skip Blank Page]
• [Remove Background Color]
(available only for the [Color] and [Gray] options)
• If your machine displays the [OK] button, press [OK].
• To save the settings as a shortcut, press [Save as Shortcut].
7. Press [Start].
The machine starts scanning. If using the machine's scanner glass, follow the touchscreen instructions to
complete the scanning job.
Related Information
• Scan Using the Scan Button on Your Brother Machine
Related Topics:
• Change Scan Button Settings from ControlCenter4 (Windows)
• Change Scan Button Settings from ControlCenter2 (Mac)
89
Page 97
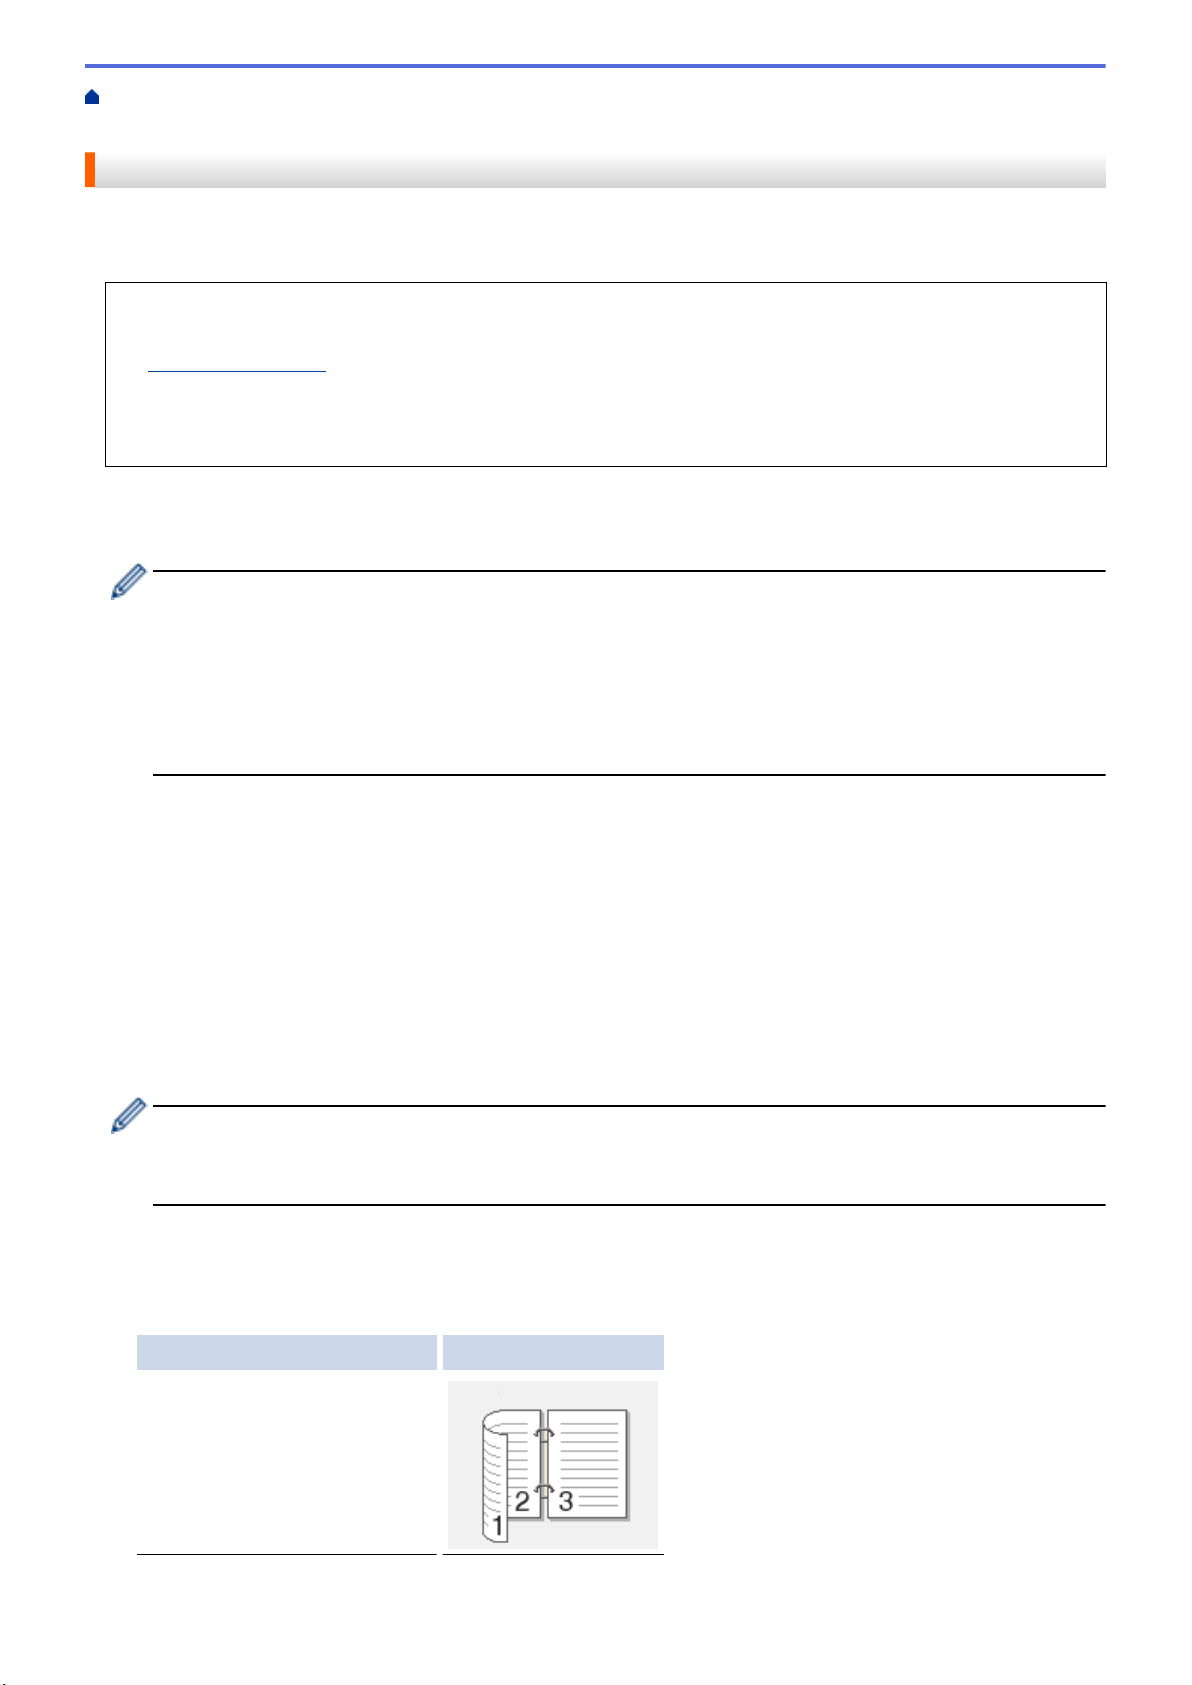
Home > Scan > Scan Using the Scan Button on Your Brother Machine > Send Scanned Data to an Email
Server
Send Scanned Data to an Email Server
Send scanned data from your Brother machine directly to your email server, for delivery to an email recipient
without using a computer.
• (MFC-L8610CDW)
To use this function, go to your model's Downloads page on the Brother Solutions Center at
support.brother.com to update your machine's firmware or the program in your machine.
• To send scanned data to an email server, you must configure your machine to communicate with your
network and mail server. You can configure these items from the machine's control panel, Web Based
Management, Remote Setup, or BRAdmin Professional.
1. Load your document.
2. Press [Scan] > [to E-mail Server] .
• If you registered your email address with your user ID, the [to My E-mail] option appears when you
log on to the machine using Secure Function Lock, Active Directory Authentication, or LDAP
Authentication.
• To send scanned data to your email address, press [to My E-mail]. When your email address
appears on the LCD, press [OK].
• To enable this feature in Web Based Management, click the Scan tab, and then click the Scan to E-
mail Server menu in the left navigation bar. In the Send to My E-mail field, select On.
3. Do one of the following to enter the destination email address:
• To enter the email address manually, press [Manual], and then enter the email address using the
keyboard on the LCD. When finished, press [OK].
• If the email address is stored in the machine's address book, press [Address Book], and then select
the email address.
Press [OK].
4. Confirm the email address, and then press [Next].
5. Do one of the following:
• To change the settings, press [Options], and then select the button you want to change. Follow the
machine's instructions.
- To set your own default settings: after making changes to settings, press the [Set New Default]
option, and then press [Yes].
- To restore the factory settings: press [Factory Reset], and then press [Yes].
• Press [Start] to start scanning without changing additional settings.
6. To scan both sides of the document (MFC-L8900CDW/MFC-L8895CDW/MFC-L8905CDW):
• Press [2-sided Scan], and then select the document type.
Option Description
2-sided Scan: Long Edge
90
Page 98
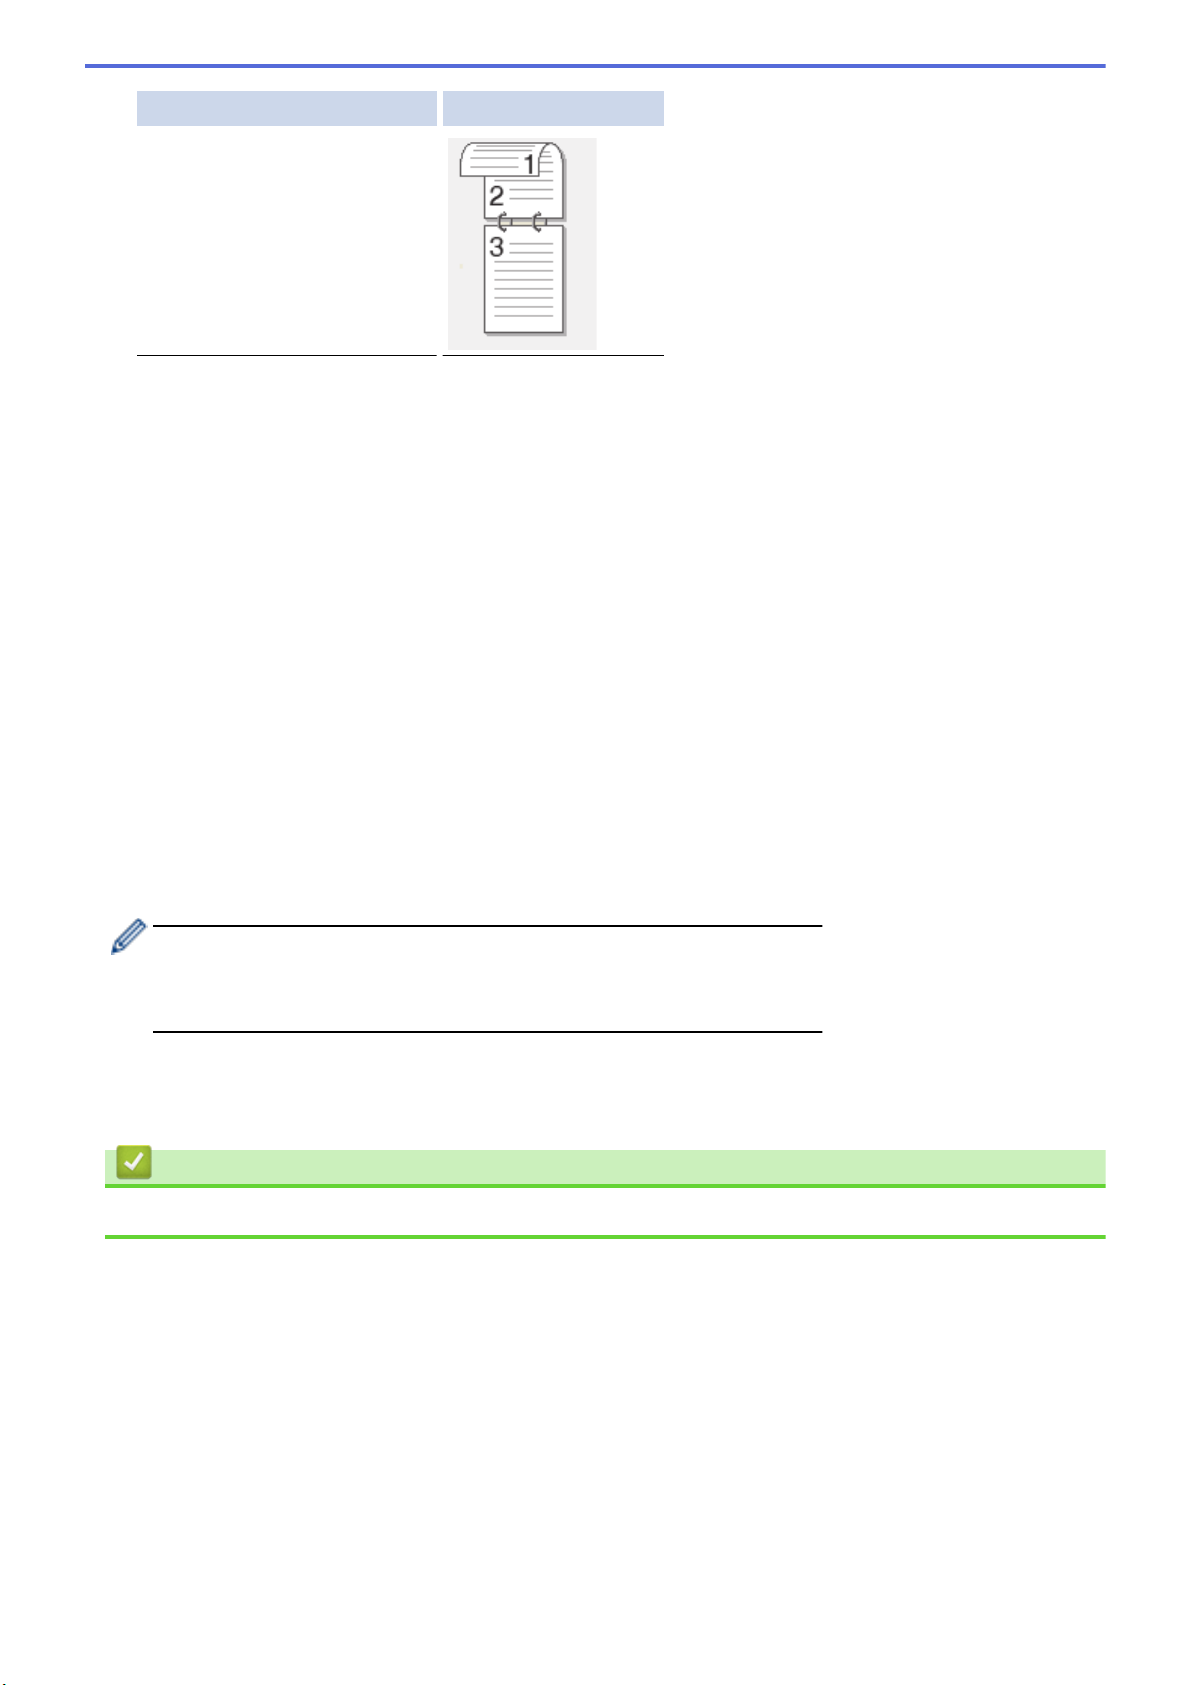
Option Description
2-sided Scan: Short Edge
7. Select the scan settings you want to change:
• [Resolution]
• [File Type]
• [Scan Type]
• [Document Size]
• [Brightness]
• [Contrast]
(available only for the [Color] and [Gray] options)
• [File Name]
• [File Name Style]
• [File Size]
• [ADF Auto Deskew]
• [Skip Blank Page]
• [Skip Blank Page Sensitivity]
• [Remove Background Color]
(available only for the [Color] and [Gray] options)
• If your machine displays the [OK] button, press [OK].
• To save the settings as a shortcut, press [Save as Shortcut].
(This function may not be available depending on your machine conditions.)
8. Press [Start].
The machine starts scanning. If using the machine's scanner glass, follow the touchscreen instructions to
complete the scanning job.
Related Information
• Scan Using the Scan Button on Your Brother Machine
91
Page 99
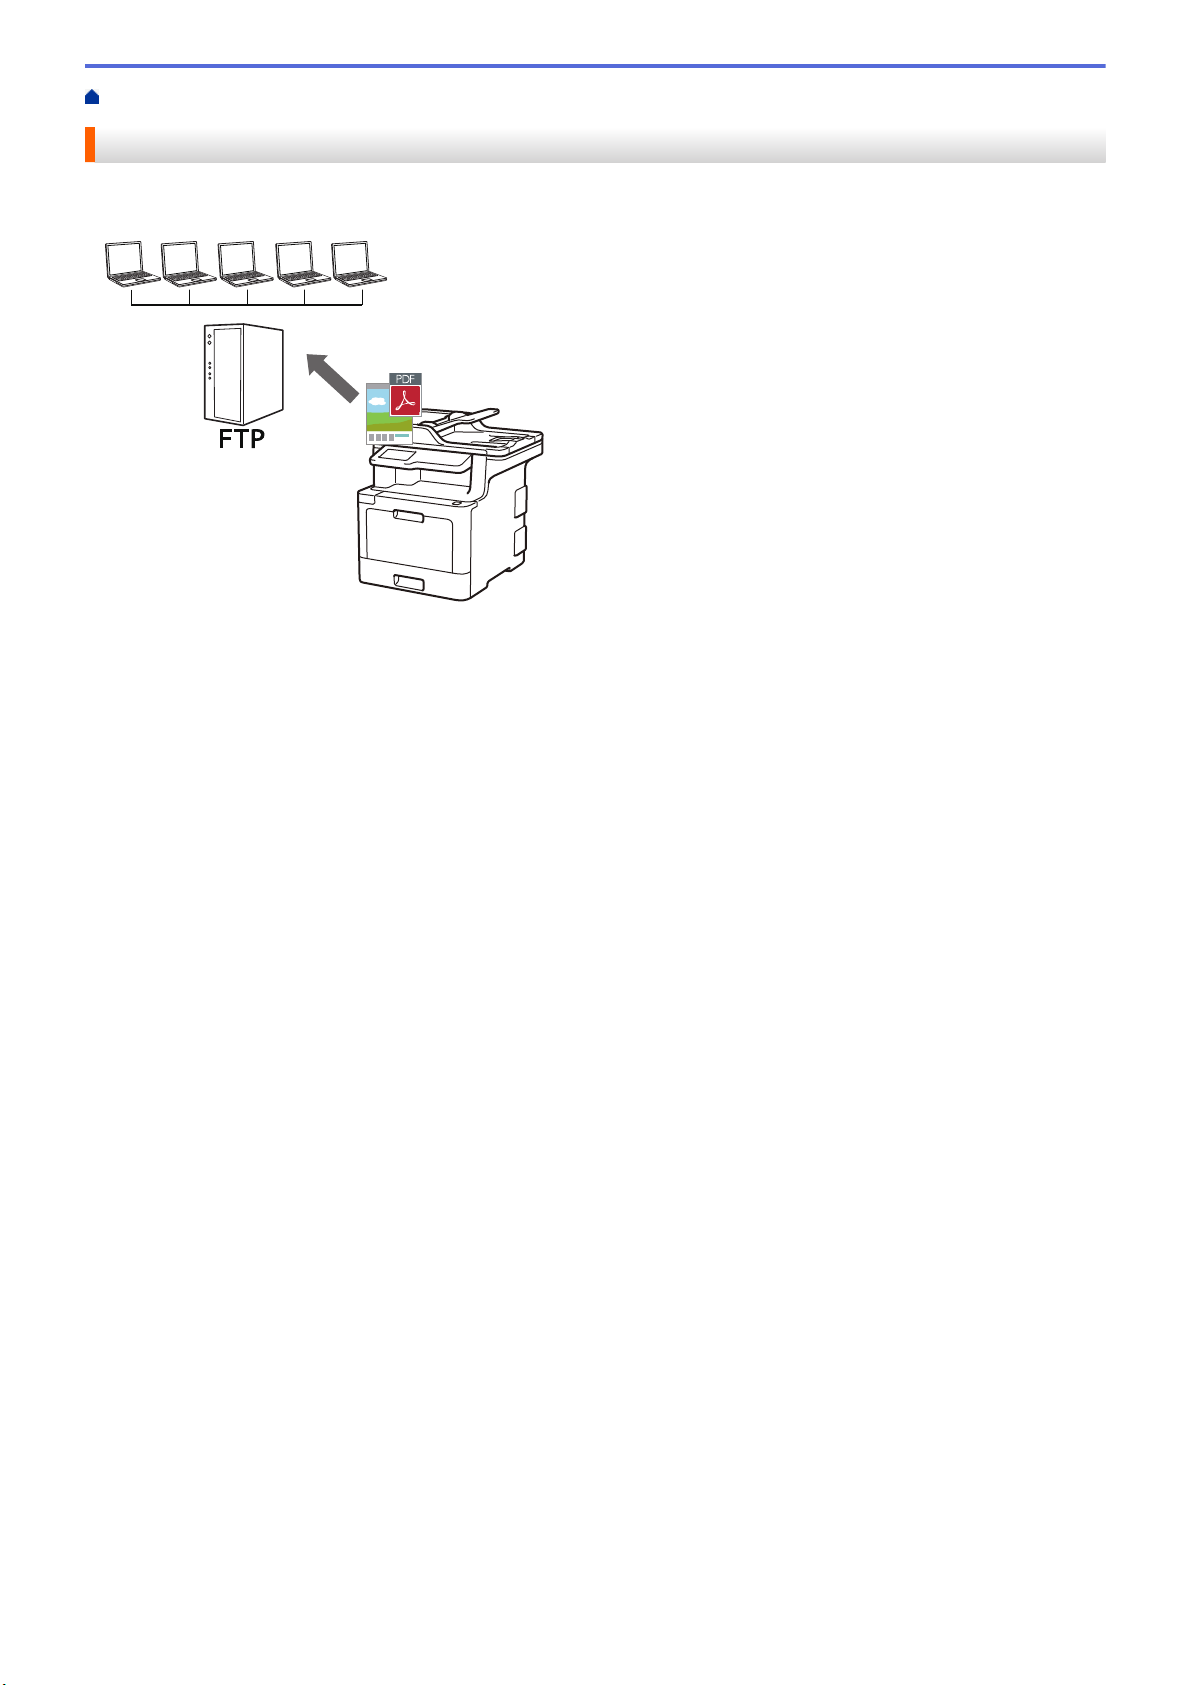
Home > Scan > Scan Using the Scan Button on Your Brother Machine > Scan to FTP
Scan to FTP
Scan documents directly to an FTP server when you need to share the scanned information. For added
convenience, configure different profiles to save your favorite Scan to FTP destinations.
• Set up a Scan to FTP Profile
• Upload Scanned Data to an FTP Server
92
Page 100

Home > Scan > Scan Using the Scan Button on Your Brother Machine > Scan to FTP > Set up a Scan to
FTP Profile
Set up a Scan to FTP Profile
Set up a Scan to FTP Profile to scan and upload the scanned data directly to an FTP location.
We recommend Microsoft Internet Explorer 11 for Windows and Safari 9 for Mac. Make sure that JavaScript
and Cookies are always enabled in whichever browser you use.
1. Start your web browser.
Type "http://machine's IP address" in your browser's address bar (where "machine's IP address" is the IP
address of the machine or the print server name). For example: http://192.168.1.2
No password is required by default. If you have previously set a password, type it, and then click .
2. Click the Scan tab.
3. Click the Scan to FTP/SFTP/Network/SharePoint menu in the left navigation bar.
4. Select the FTP option, and then click Submit.
93
 Loading...