

Page 1
User’s Guide
Brother Laser Printer
HL-L8250CDN
HL-L8350CDW
HL-L8350CDWT
For visually-impaired users
You can read this manual with Screen Reader ‘text-to-speech’ software.
You must set up the hardware and install the driver before you can use the machine.
Please use the Quick Setup Guide to set up the machine. You can find a printed copy in the box.
Please read this User's Guide thoroughly before you use the machine.
Please visit http://solutions.brother.com/
answers to frequently asked questions (FAQs) and technical questions.
Note: Not all models are available in all countries.
Visit the Brother Solutions Center at http://solutions.brother.com/
other manuals.
where you can get product support, the latest driver updates and utilities, and
and click Manuals on your model's page to download
Version 0
USA/CAN
Page 2
User's Guides and where do I find them?
Which Guide? What's in it? Where is it?
Product Safety Guide Read this Guide first. Read the Safety Instructions
before you set up your machine. See this Guide for
trademarks and legal limitations.
Quick Setup Guide Follow the instructions for setting up your machine
and installing the drivers and software for the
operating system and connection type you are using.
User's Guide Learn the print operations and how to replace
supplies and perform routine maintenance. See
troubleshooting tips.
Network User's Guide This Guide provides useful information about wired
and wireless network settings and security settings
using the Brother machine. You can also find
supported protocol information for your machine and
detailed troubleshooting tips.
Google Cloud Print
Guide
Mobile Print/Scan
Guide for Brother
iPrint&Scan
This Guide provides information about how to
configure your Brother machine to a Google account
and use Google Cloud Print services for printing over
the Internet.
This Guide provides useful information about printing
from your mobile device and scanning from your
Brother machine to your mobile device when
connected on a Wi-Fi network.
Printed / In the Box
Printed / In the Box
For USA:
PDF file / Brother Solutions Center
at http://solutions.brother.com/
For Other Countries:
PDF file / CD-ROM / In the box
For USA:
HTML file / Brother Solutions Center
at http://solutions.brother.com/
For Other Countries:
HTML file / CD-ROM / In the box
PDF file / Brother Solutions Center
at http://solutions.brother.com/
PDF file / Brother Solutions Center
at http://solutions.brother.com/
i
Page 3

Using the documentation
Thank you for buying a Brother machine! Reading the documentation will help you make the most of your
machine.
Symbols and conventions used in the documentation
The following symbols and conventions are used throughout the documentation:
WARNING
WARNING indicates a potentially hazardous situation which, if not avoided,
could result in death or serious injuries.
IMPORTANT
IMPORTANT indicates a potentially hazardous situation which, if not avoided,
may result in damage to property or loss of product functionality.
NOTE
Notes tell you how to respond to a situation that may arise or give tips about
how the operation works with other features.
Electrical Hazard icons alert you to possible electrical shocks.
Fire Hazard icons alert you to the possibility of a fire.
Hot Surface icons warn you not to touch machine parts that are hot.
Prohibition icons indicate actions that must not be performed.
Bold Bold style identifies buttons on the machine's control panel or computer
screen.
Italics Italicized style emphasizes an important point or refers you to a related topic.
Courier New Courier New font identifies the messages shown on the LCD of the machine.
ii
Page 4
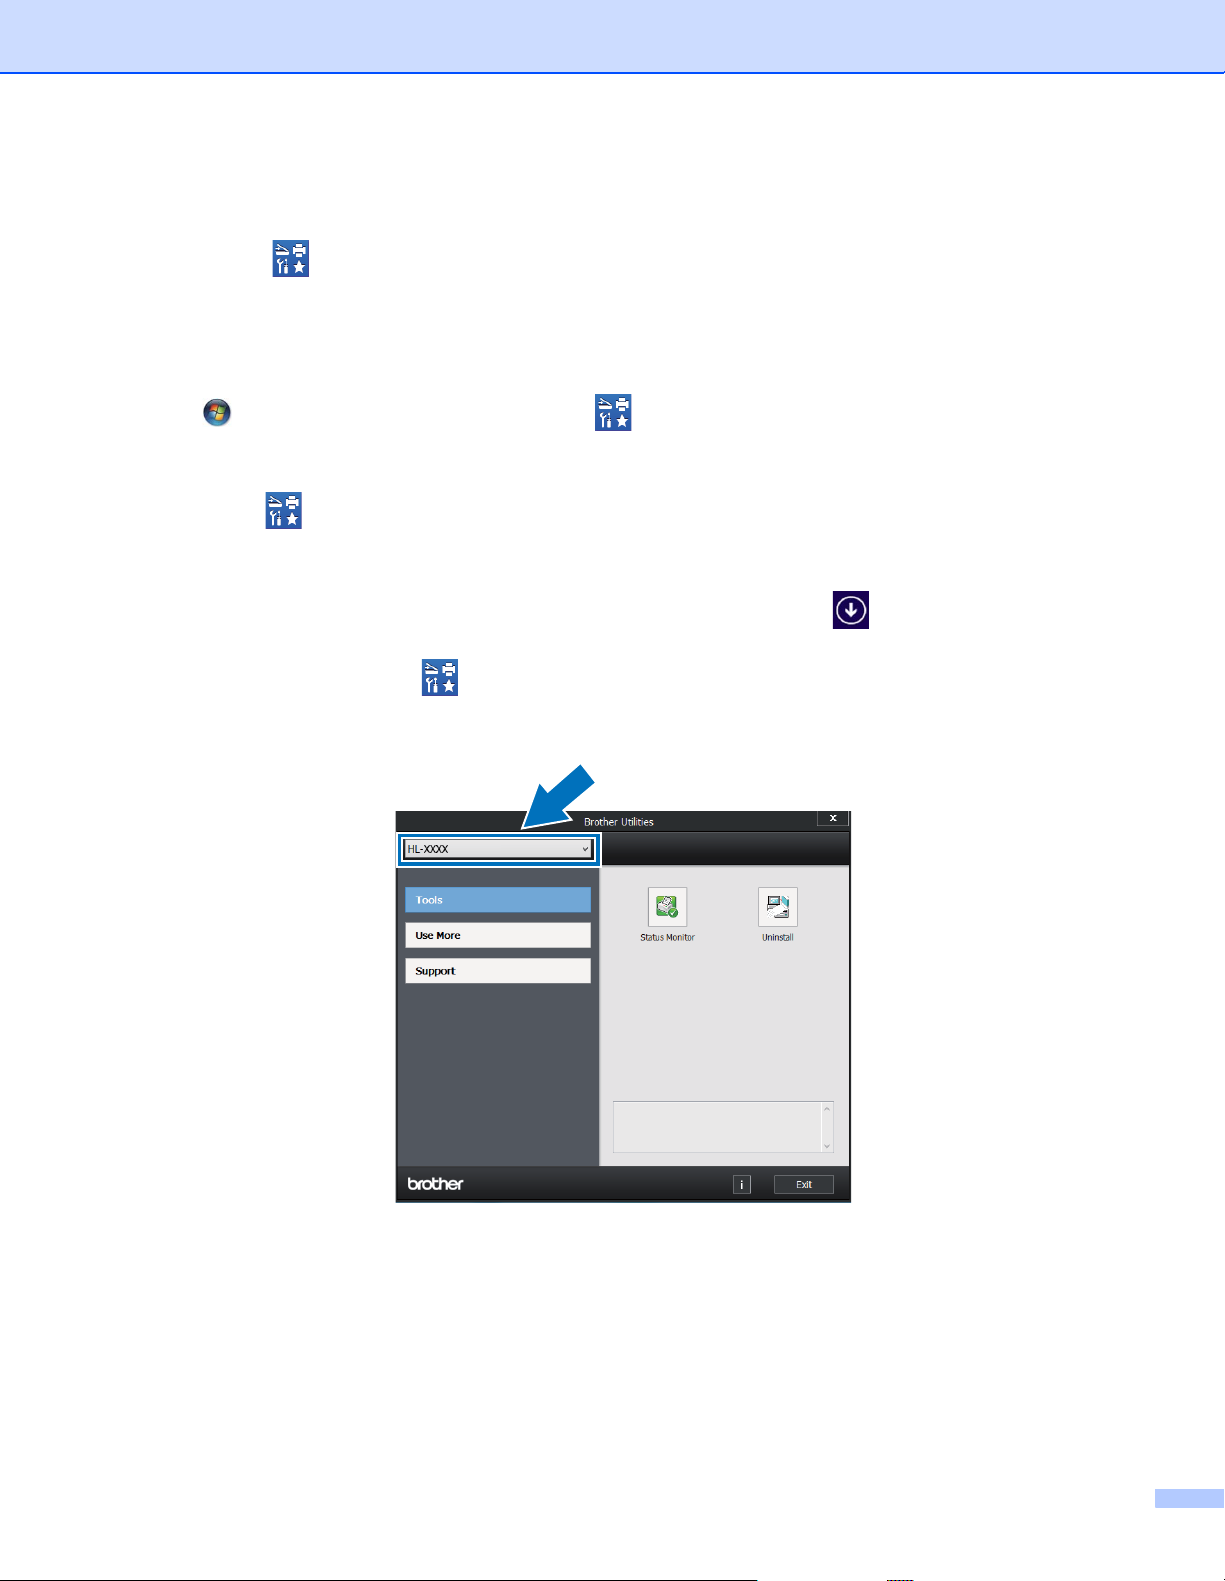
Accessing Brother Utilities (Windows®)
Brother Utilities is an application launcher that offers convenient access to all Brother applications
installed on your device.
a (Windows
Windows Server
Click (Start) > All Programs > Brother > Brother Utilities.
(Windows
Tap or click (Brother Utilities) either on the Start screen or the desktop.
(Windows
Move your mouse to the lower left corner of the Start screen and click (if you are using a touchbased device, swipe up from the bottom of the Start screen to display the Apps screen). When the Apps
screen appears, tap or click (Brother Utilities).
b Select your machine.
®
XP, Windows Vista®, Windows® 7, Windows Server® 2003, Windows Server® 2008 and
®
2008 R2)
®
8 and Windows Server® 2012)
®
8.1 and Windows Server® 2012 R2)
c Choose the operation you want to use.
iii
Page 5

Table of Contents
1 Printing Methods 1
About this Machine ....................................................................................................................................1
Front view and Back view....................................................................................................................1
Acceptable paper and other print media....................................................................................................2
Recommended paper and print media ................................................................................................2
Paper type and size.............................................................................................................................2
Handling and using special paper .......................................................................................................4
Unprintable area when printing from a computer ................................................................................7
Loading paper............................................................................................................................................8
Loading paper and print media............................................................................................................8
Loading paper in the standard paper tray and the optional lower tray ................................................8
Loading paper in the multi-purpose tray (MP tray) ............................................................................12
2-sided printing ........................................................................................................................................20
Guidelines for printing on both sides of the paper .............................................................................20
Automatic 2-sided printing .................................................................................................................21
Manual 2-sided printing .....................................................................................................................23
Printing from a USB flash drive or digital camera supporting mass storage............................................24
Creating a PRN file for direct printing ................................................................................................25
Printing directly from the USB flash drive or digital camera supporting mass storage ......................26
2 Driver and Software 29
Printer driver ............................................................................................................................................29
Printing a document...........................................................................................................................30
Printer driver settings.........................................................................................................................31
Windows
Macintosh ................................................................................................................................................66
Software ..................................................................................................................................................84
®
................................................................................................................................................32
Accessing the printer driver settings..................................................................................................32
Features in the Windows
Basic tab............................................................................................................................................33
Advanced tab.....................................................................................................................................41
Print Profiles tab ................................................................................................................................50
Device Settings tab............................................................................................................................52
Support ..............................................................................................................................................53
BR-Script 3 printer driver features (PostScript
Uninstalling the printer driver.............................................................................................................63
Status Monitor ...................................................................................................................................64
Features in the printer driver (Macintosh)..........................................................................................66
Choosing page setup options ............................................................................................................66
Features in the BR-Script3 printer driver (PostScript
Removing the printer driver ...............................................................................................................81
Status Monitor ...................................................................................................................................82
Software for networks .......................................................................................................................84
®
printer driver............................................................................................33
®
3™ language emulation) .......................................55
®
3™ language emulation) .............................76
iv
Page 6

3 General Information 85
Control panel ...........................................................................................................................................85
Control panel overview ......................................................................................................................85
LED indications..................................................................................................................................87
Machine status messages .................................................................................................................87
Settings table.....................................................................................................................................88
Entering Text for Wireless Settings .......................................................................................................103
Printing Secure documents....................................................................................................................104
Secure documents...........................................................................................................................104
How to print Secure documents ......................................................................................................104
Security features....................................................................................................................................105
Setting Lock.....................................................................................................................................105
Secure Function Lock 3.0................................................................................................................106
IPSec ...............................................................................................................................................107
Ecology features ....................................................................................................................................108
Toner Save ......................................................................................................................................108
Sleep Time ......................................................................................................................................108
Deep Sleep mode............................................................................................................................108
Auto Power Off ................................................................................................................................109
Quiet mode feature ................................................................................................................................110
Turning Quiet mode on/off...............................................................................................................110
Color Correction.....................................................................................................................................111
Color Calibration..............................................................................................................................111
Color Registration............................................................................................................................112
Auto Correction................................................................................................................................112
4 Options 113
Lower tray (LT-320CL)...........................................................................................................................114
SO-DIMM...............................................................................................................................................115
SO-DIMM types ...............................................................................................................................115
Installing extra memory ...................................................................................................................116
5 Routine Maintenance 118
Replacing supplies.................................................................................................................................118
Replacing the toner cartridges.........................................................................................................122
Replacing the drum unit...................................................................................................................128
Replacing the belt unit .....................................................................................................................135
Resetting the belt counter................................................................................................................140
Replacing the waste toner box ........................................................................................................141
Cleaning and Checking the machine .....................................................................................................148
Cleaning the outside of the machine ...............................................................................................148
Cleaning the inside of the machine .................................................................................................150
Cleaning the corona wires ...............................................................................................................154
Cleaning the drum unit ....................................................................................................................157
Cleaning the paper pick-up roller.....................................................................................................164
Replacing periodic maintenance parts...................................................................................................165
Packing and shipping the machine ........................................................................................................166
v
Page 7

6 Troubleshooting 170
Identifying the problem ..........................................................................................................................170
Error and maintenance messages.........................................................................................................171
Paper jams ......................................................................................................................................176
If you are having difficulty with your machine ........................................................................................188
Improving the print quality......................................................................................................................192
Machine Information ..............................................................................................................................200
Checking the Serial Number............................................................................................................200
Default settings................................................................................................................................200
A Appendix 202
Machine specifications...........................................................................................................................202
General............................................................................................................................................202
Print media ......................................................................................................................................204
Printer ..............................................................................................................................................205
Interface...........................................................................................................................................205
Network (LAN) .................................................................................................................................206
Direct Print feature...........................................................................................................................206
Computer requirements...................................................................................................................207
Important information for choosing your paper................................................................................208
Supplies...........................................................................................................................................209
Important information for the toner cartridge life..............................................................................210
Brother numbers....................................................................................................................................212
B Index 215
vi
Page 8
1
NOTE
Printing Methods 1
About this Machine 1
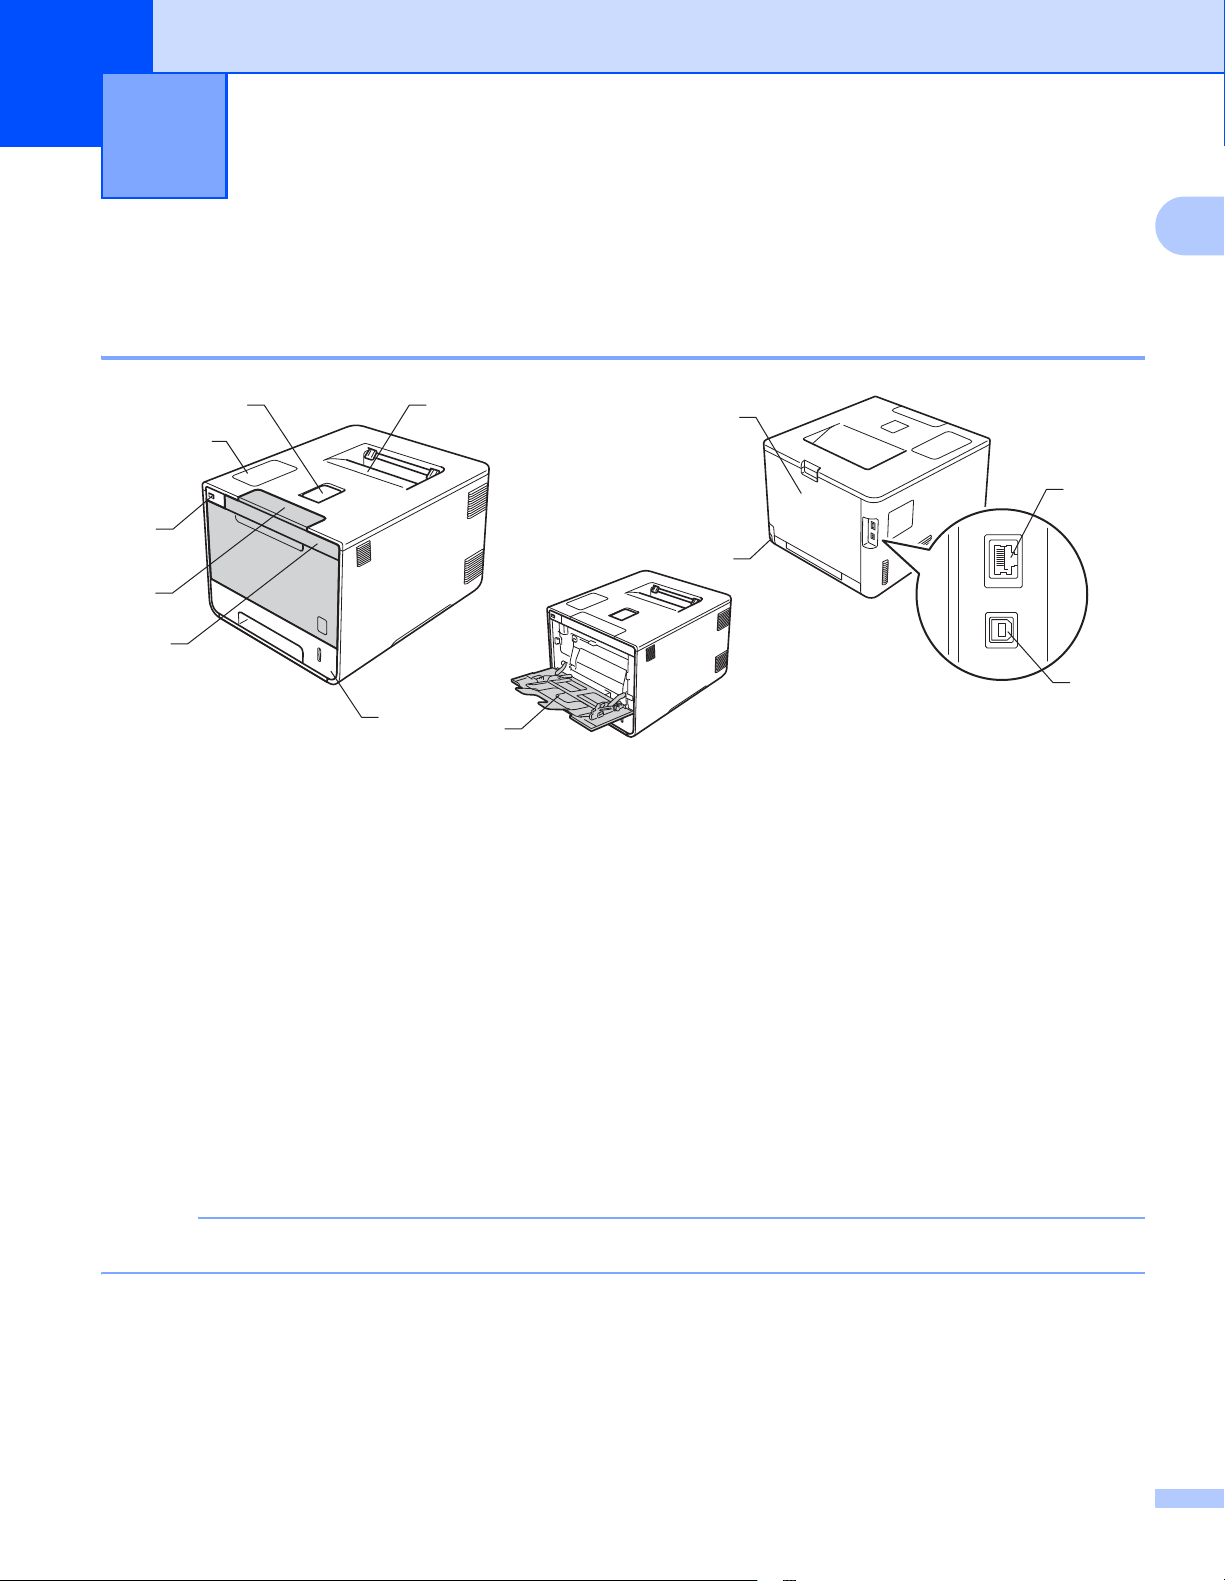
Front view and Back view 1
1
2
3
4
5
7
6
8
9
12
10
11
1
1 Face-down output tray support flap (support flap)
2 Control panel with a Liquid Crystal Display (LCD)
3 USB direct print interface
4 Front cover release button
5 Front cover
6 Paper tray
7 Face-down output tray
8 Multi-purpose tray (MP tray)
9 Back cover (Face-up output tray when open)
10 AC power connector
11 USB connector
12 10BASE-T/100BASE-TX port
Most of the illustrations in this User's Guide show the HL-L8350CDW.
1
Page 9
Printing Methods
Acceptable paper and other print media 1
Print quality may vary according to the type of paper you are using.
You can use the following types of print media: plain paper, thin paper, thick paper, thicker paper, bond paper,
recycled paper, labels, envelopes or glossy paper (see Print media on page 204).
For best results, follow the instructions below:
DO NOT load different types of paper in the paper tray at the same time because it may cause paper jams
or misfeeds.
For correct printing, you must choose the same paper size in your software application as the paper in the
tray.
Avoid touching the printed surface of the paper immediately after printing.
Before you buy a lot of paper, test a small quantity to make sure that the paper is appropriate for the
machine.
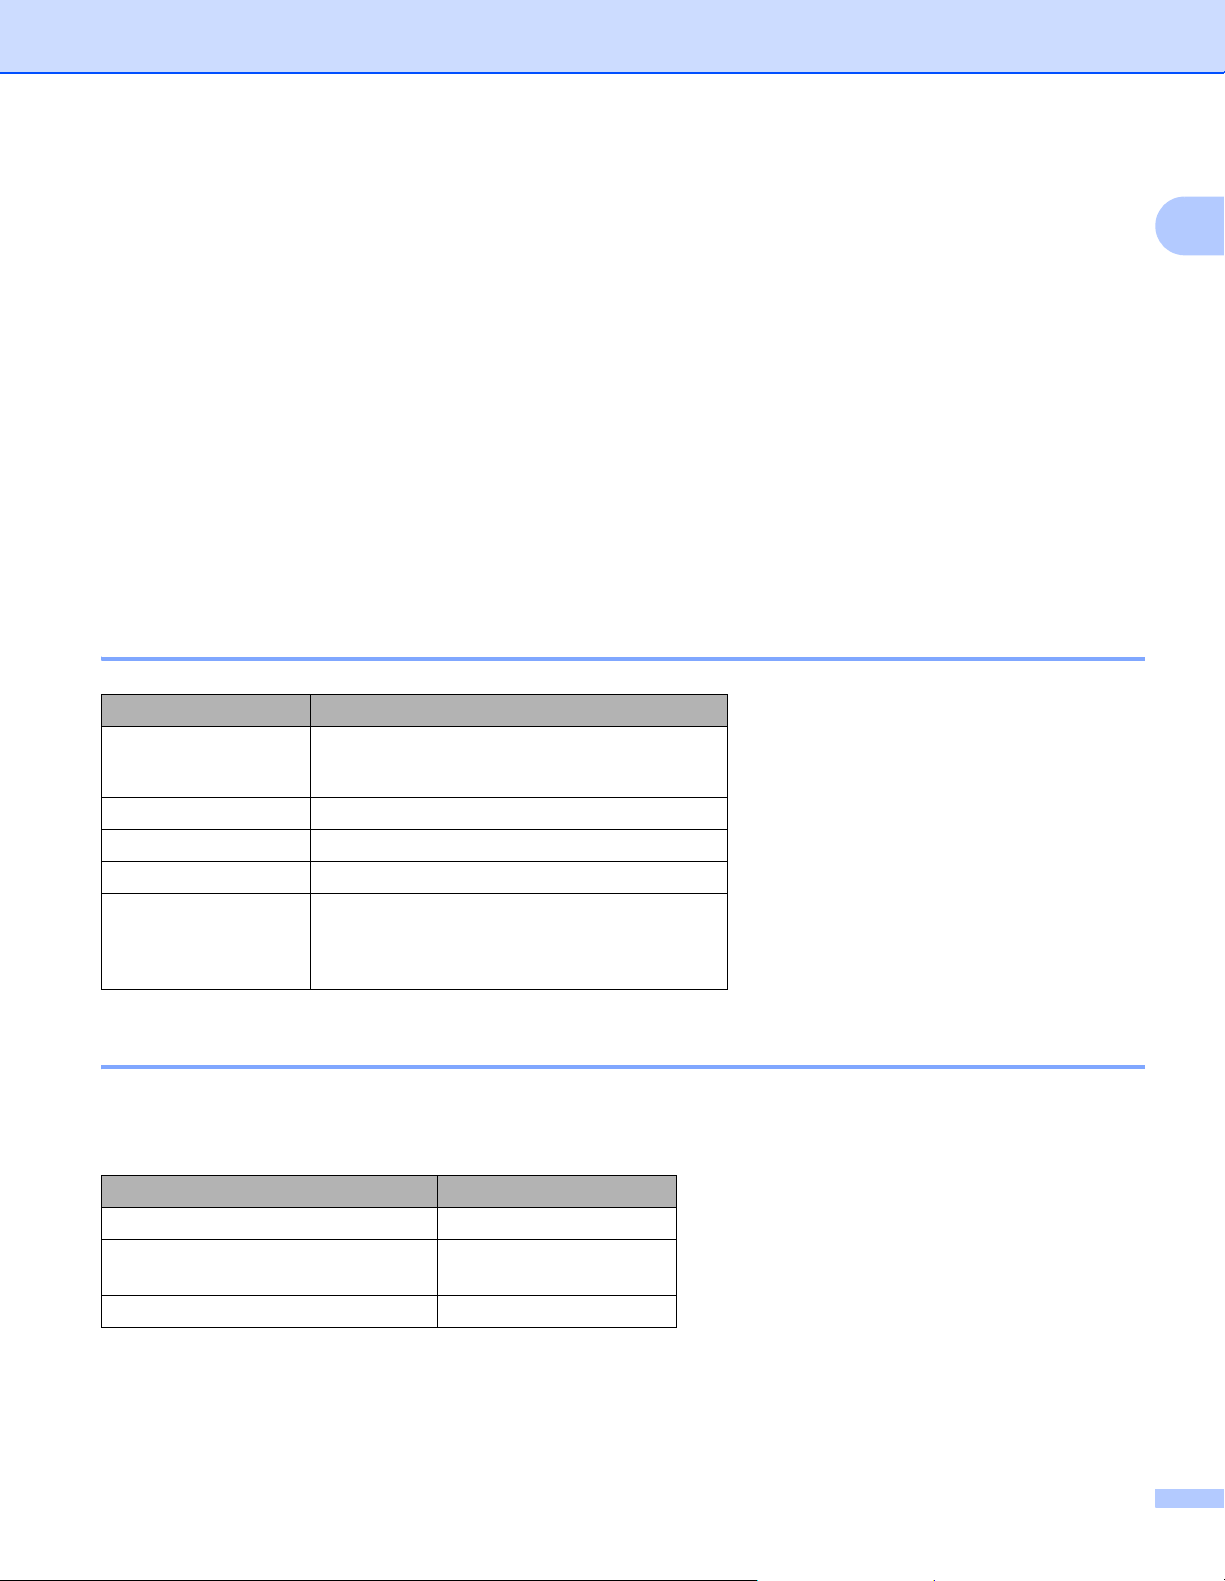
Recommended paper and print media 1
1
Paper Type Item
Plain Paper Xerox 4200 20 lb
Hammermill Laser Print 24 lb (90 g/m
Recycled Paper (No specific brand recommended)
Labels Avery laser labels white #5160
Envelopes (No specific brand recommended)
Glossy Paper NewPage Futura Laser Gloss
80 lb Text/32 lb Bond (118 g/m
Xerox Digital Color Elite Gloss
2
)
2
)
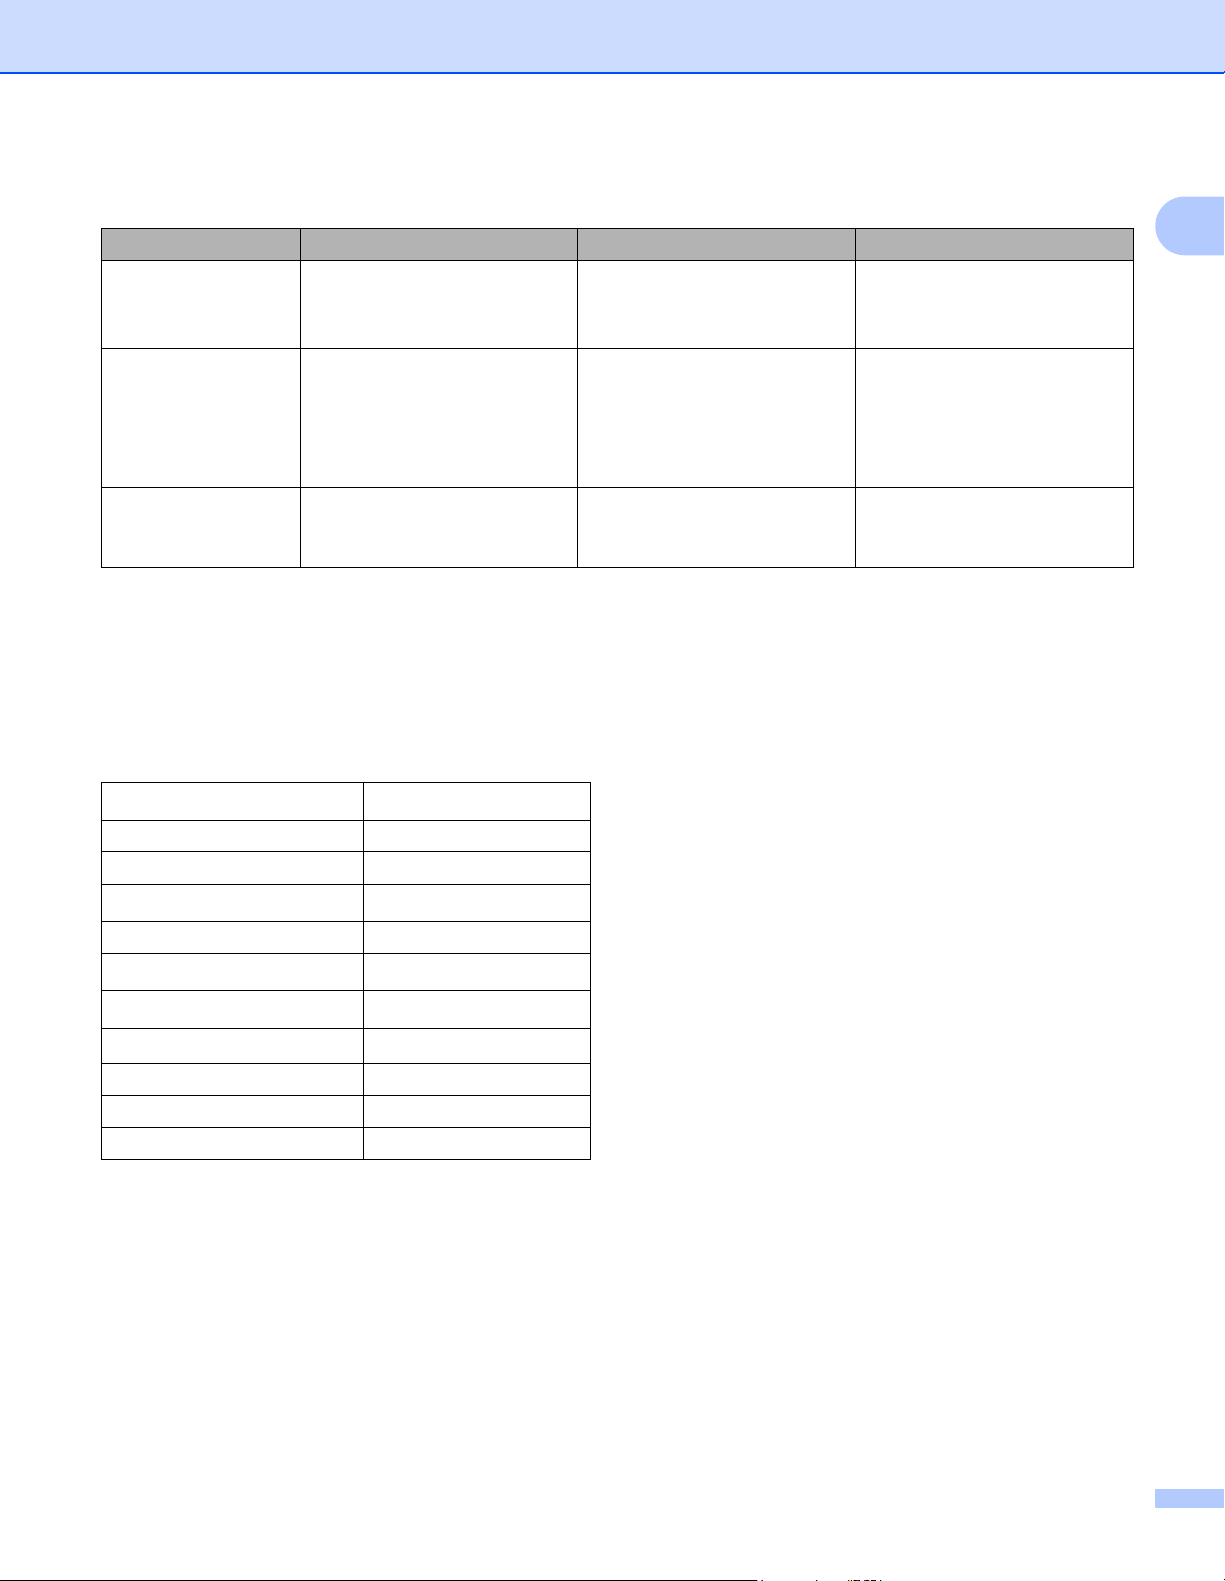
Paper type and size 1
The machine feeds paper from the installed standard paper tray, multi-purpose tray or optional lower tray.
The names for the paper trays in the printer driver and this Guide are as follows:
Tray Name
Paper Tray Tray 1
Optional Lower Tray Unit (Standard
equipment for HL-L8350CDWT)
Multi-purpose Tray MP Tray
Tray 2
2
Page 10
Printing Methods
Paper Tray Capacity
Paper size Paper types No. of sheets
Paper Tray
(Tray 1)
Multi-purpose Tray
(MP Tray)
Optional Lower Tray
(Tray 2)
1
2
3
3
Folio size is 8.5 in. 13 in. (215.9 mm x 330.2 mm).
Load only one sheet of Glossy in the MP tray.
Tray 2 is standard on HL-L8350CDWT.
Letter, A4, Legal, B5 (JIS),
Executive, A5,
A5 (Long Edge), A6, Folio
Width: 3.0 to 8.5 in.
(76.2 to 215.9 mm)
Length: 5 to 14 in.
(127 to 355.6 mm)
Letter, A4, Legal, B5(JIS),
Executive, A5, Folio
1
Plain Paper, Thin Paper and
Recycled Paper
1
Plain Paper, Thin Paper,
Thick Paper, Thicker Paper,
Recycled Paper, Bond Paper,
Labels, Envelopes, Env. Thin,
Env.Thick and Glossy Paper
Plain Paper, Thin Paper and
1
Recycled Paper
up to 250 sheets
20 lb (80 g/m
up to 50 sheets
20 lb (80 g/m
3 Envelopes
2
1 Glossy paper
up to 500 sheets
20 lb (80 g/m
2
)
2
)
2
)
Recommended paper specifications 1
The following paper specifications are appropriate for this machine:
Basis Weight
20-24 lb (75-90 g/m
Thickness 80-110 m
Roughness Higher than 20 sec.
Stiffness
90-150 cm
3
/100
Grain Direction Long Grain
Volume Resistivity
Surface Resistivity
Filler
9
-10e11 ohm
10e
9
-10e12 ohm-cm
10e
CaCO
(Neutral)
3
Ash Content Below 23 wt%
Brightness Higher than 80%
Opacity Higher than 85%
Use plain paper that is appropriate for laser machines to make copies.
Use paper that is 20 to 24 lb (75 to 90 g/m
Use long grain paper with a neutral Ph value, and a moisture content of approx. 5%.
2
)
2
).
This machine can use recycled paper that meets DIN 19309 specifications.
(Before you load paper in this machine, see Important information for choosing your paper on page 208.)
3
Page 11

Printing Methods
IMPORTANT
Handling and using special paper 1
The machine is designed to work well with most types of xerographic and bond paper. However, some paper
variables may have an effect on print quality or handling reliability. Always test samples of paper before
purchasing to ensure desirable performance. Store paper in its original packaging and keep it sealed. Keep
the paper flat and away from moisture, direct sunlight and heat.
Some important guidelines when selecting paper are:
DO NOT use inkjet paper because it may cause a paper jam or damage your machine.
Preprinted paper must use ink that can withstand the temperature of the machine’s fusing process 392 F
(200 C).
If you use bond paper, paper having a rough surface, or paper that is wrinkled or creased, the paper may
exhibit degraded performance.
Types of paper to avoid 1
Some types of paper may not perform well or may cause damage to your machine.
DO NOT use paper:
1
• that is highly textured
• that is extremely smooth or shiny
• that is curled or warped
1
1
1 A curl of 0.08 in. (2 mm) or greater may cause jams to occur.
• that is coated or has a chemical finish
• that is damaged, creased or folded
• that exceeds the recommended weight specification in this guide
• with tabs and staples
• with letterheads using low temperature dyes or thermography
• that is multipart or carbonless
• that is designed for inkjet printing
If you use any of the types of paper listed above, they may damage your machine. This damage is not
covered under any Brother warranty or service agreement.
4
Page 12

Printing Methods
IMPORTANT
Envelopes 1
Most envelopes can be used with your machine. However, some envelopes may have feed and print-quality
problems because of the way they have been made. Envelopes should have edges with straight,
well-creased folds. Envelopes should lie flat and not be of baggy or flimsy construction. Use only quality
envelopes from a supplier who understands that you will be using the envelopes in a laser machine.
We recommend printing a test envelope to make sure the print results are what you want.
Types of envelopes to avoid 1
DO NOT use envelopes:
• that are damaged, curled, wrinkled or an unusual shape
• that are extremely shiny or textured
• with clasps, staples, snaps or tie strings
• with self-adhesive closures
• that are of a baggy construction
• that are not sharply creased
• that are embossed (have raised writing on them)
• that were previously printed by a laser printer
• that are pre-printed on the inside
1
• that cannot be arranged neatly when stacked
• that are made of paper that weighs more than the paper weight specifications for the machine
• with edges that are not straight or consistently square
• with windows, holes, cut-outs or perforations
• with glue on the surface as shown in the figure below
• with double flaps as shown in the figure below
5
Page 13

Printing Methods
IMPORTANT
• with sealing flaps that are not folded down when purchased
• with each side folded as shown in the figure below
If you use any of the types of envelopes listed above, they may damage your machine. This damage may
not be covered under any Brother warranty or service agreement.
Labels 1
Most labels can be used with your machine. Labels should have an adhesive that is acrylic-based since this
material is more stable at the high temperatures in the fuser unit. Adhesives should not come in contact with
any part of the machine, because the label stock may stick to the drum unit or rollers and cause jams and
print quality problems. No adhesive should be exposed between the labels. Labels should be arranged so
that they cover the entire length and width of the sheet. Using labels with spaces may result in labels peeling
off and causing serious jams or print problems.
All labels used in this machine must be able to withstand a temperature of 392 F (200 C) for a period of 0.1
seconds.
1
Types of labels to avoid 1
Do not use labels that are damaged, curled, wrinkled or an unusual shape.
• DO NOT feed partially used label sheets or labels with the carrier sheet exposed because your machine
will be damaged.
• DO NOT reuse or insert labels that have been used previously or are missing a few labels on the sheet.
• Label sheets should not exceed the paper weight specifications described in this User's Guide. Labels
exceeding this specification may not feed or print correctly and may cause damage to your machine.
6
Page 14
Printing Methods
1
3
24
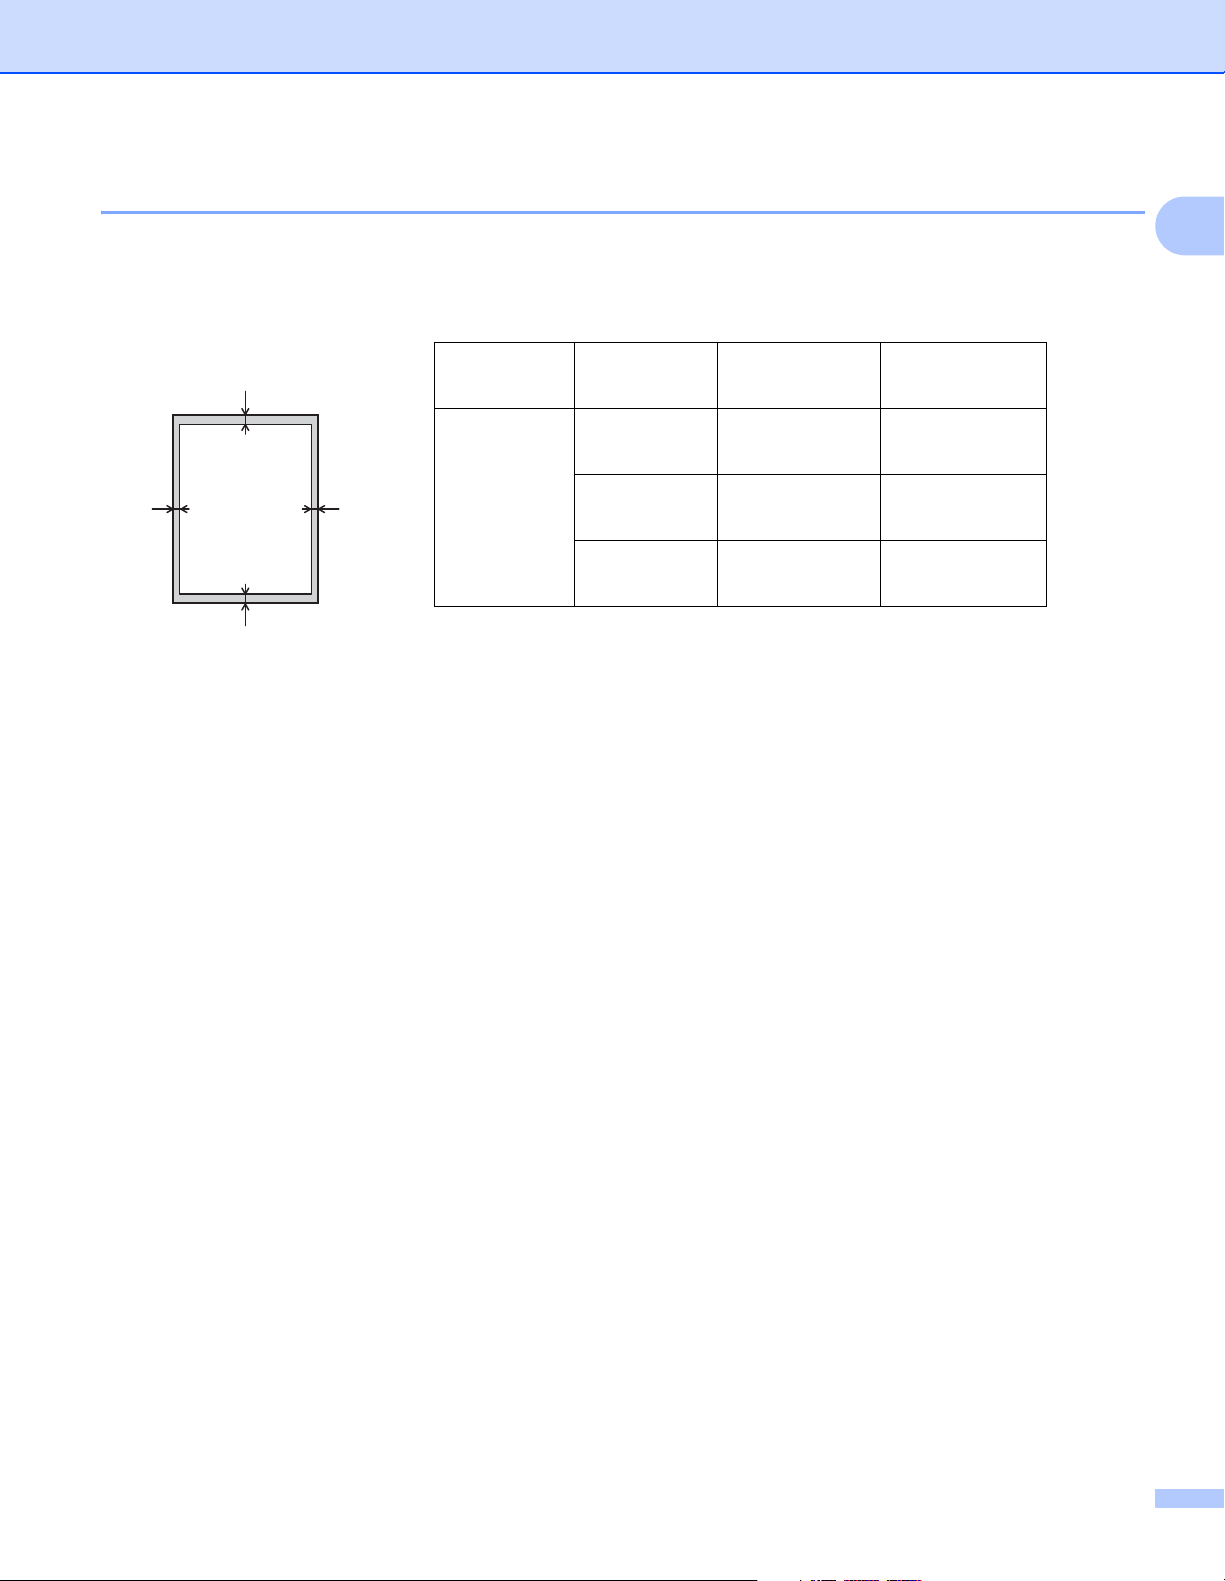
Unprintable area when printing from a computer 1
The figures below show maximum unprintable areas. The unprintable areas may vary depending on the
paper size or settings in the application you are using.
1
Usage Document
Size
Top (1)
Bottom (3)
Print Letter 0.16 in.
(4.23 mm)
A4 0.16 in.
(4.23 mm)
Legal 0.16 in.
(4.23 mm)
Left (2)
Right (4)
0.16 in.
(4.23 mm)
0.16 in.
(4.23 mm)
0.16 in.
(4.23 mm)
7
Page 15
Printing Methods
Loading paper 1
Loading paper and print media 1
The machine can feed paper from the standard paper tray, multi-purpose tray or optional lower tray.
When you load paper into the paper tray, note the following:
If your application software supports paper size selection on the print menu, you can select it through the
software. If your application software does not support it, you can set the paper size in the printer driver or
by using the control panel buttons.
Loading paper in the standard paper tray and the optional lower tray 1
Load up to 250 sheets of paper in the standard paper tray (Tray 1). You can also load up to 500 sheets in the
1
optional lower tray (Tray 2)
of the paper tray. (For the recommended paper to use, see Acceptable paper and other print media
on page 2.)
1
Tray 2 is standard on HL-L8350CDWT.
. Paper can be loaded up to the maximum paper mark ( ) on the right side
1
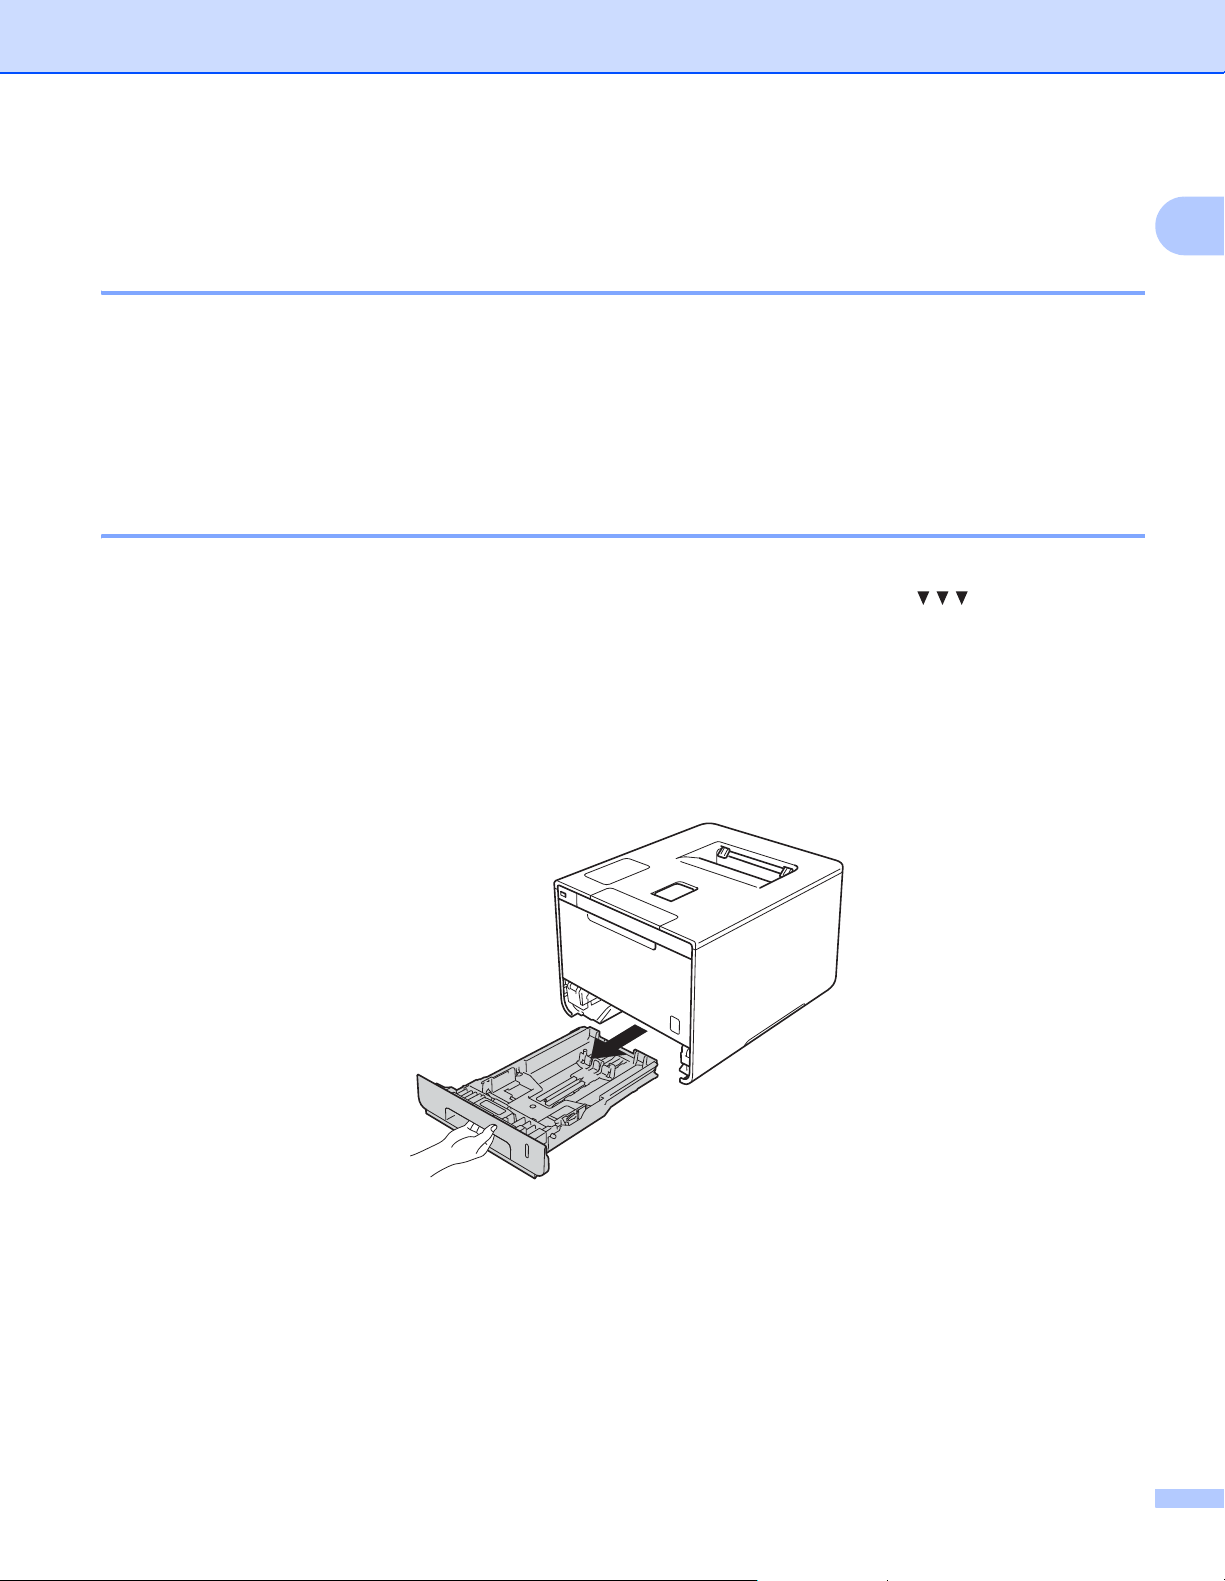
Printing on plain paper, thin paper, or recycled paper from Tray 1 and Tray 2 1
a Pull the paper tray completely out of the machine.
8
Page 16
Printing Methods
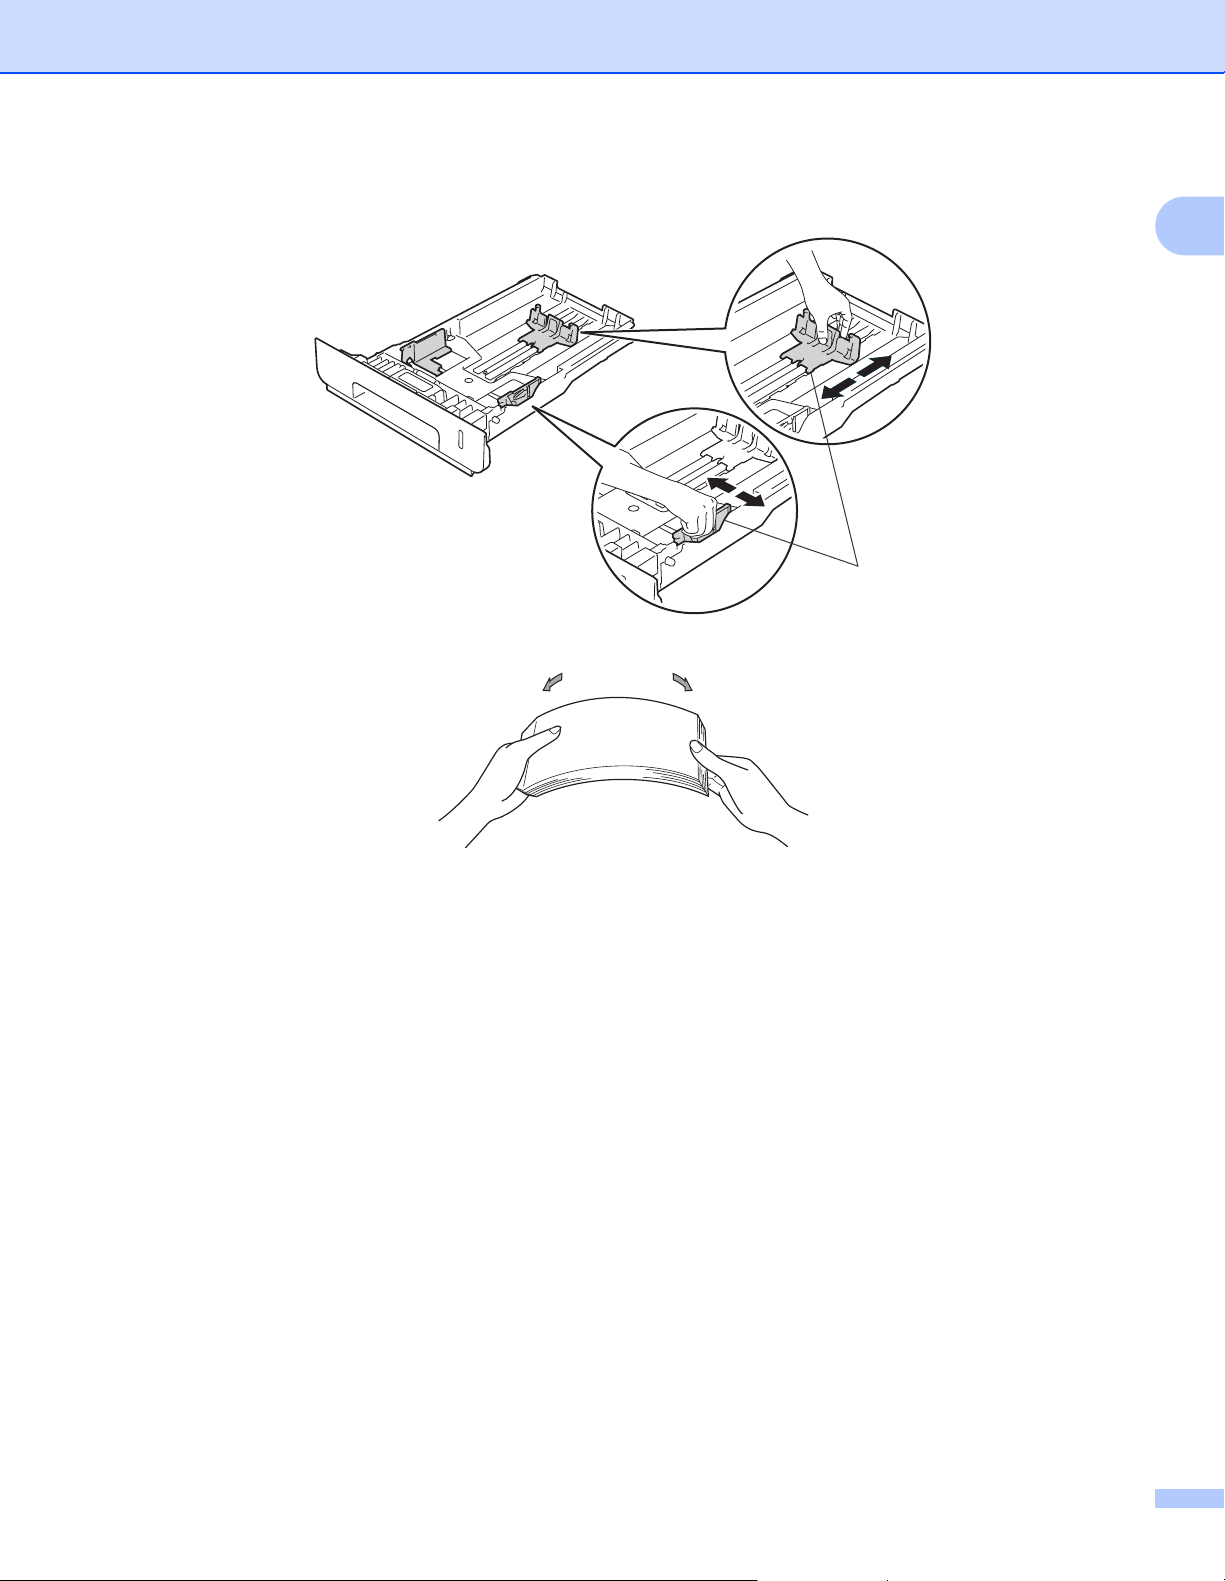
b While pressing the blue paper-guide release levers (1), slide the paper guides to fit the size of paper you
are loading in the tray. Make sure that the guides are firmly in the slots.
1
c Fan the stack of paper well to avoid paper jams and misfeeds.
1
9
Page 17
Printing Methods
1
1
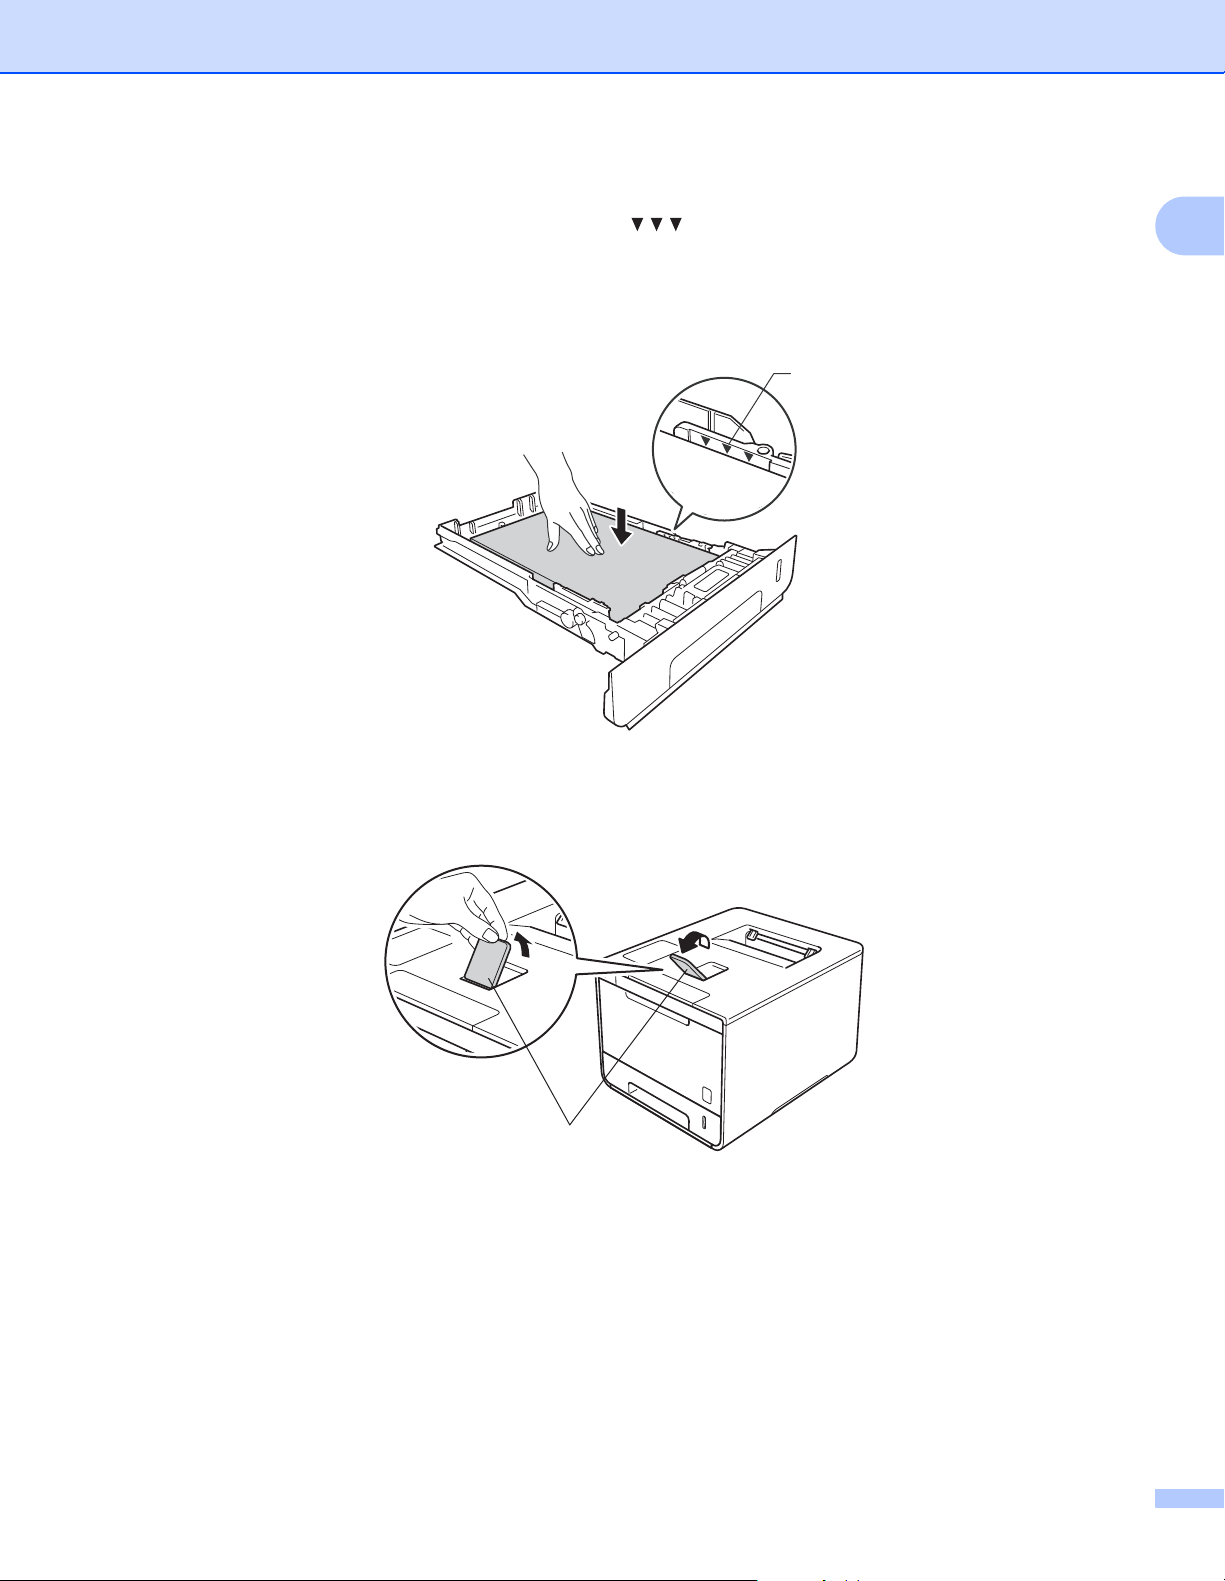
d Load paper in the tray and make sure:
The paper is below the maximum paper mark ( ) (1).
Over filling the paper tray will cause paper jams.
The side to be printed on is face down.
The paper guides touch the sides of the paper so it will feed correctly.
e Put the paper tray firmly back in the machine. Make sure that it is completely inserted into the machine.
1
f Lift up the support flap (1) to prevent paper from sliding off the face-down output tray, or remove each
page as soon as it comes out of the machine.
10
Page 18

Printing Methods
NOTE
g Change the printer driver settings for your operating system (for details, see Chapter 2: Driver and
Software).
Choose the option you want from each of the following drop-down lists:
Paper Size
A4
Letter
Legal
Executive
A5
JIS B5
Folio
A5 Long Edge
A6
For the acceptable paper sizes, see Paper type and size on page 2.
1
Media Type
Plain Paper
Thin Paper
Recycled Paper
Paper Source
Tray1
Tray2 (if available)
For other settings, see Chapter 2: Driver and Software.
The name of options in the drop-down lists may vary depending on your operating system and its version.
h Send the print job to the machine.
11
Page 19
Printing Methods
Loading paper in the multi-purpose tray (MP tray) 1
You can load up to three envelopes, one sheet of glossy paper, other special print media, or up to 50 sheets
of plain paper in the MP tray. Use this tray to print on thick paper, bond paper, labels, envelopes or glossy
paper. (For the recommended paper to use, see Acceptable paper and other print media on page 2.)
Printing on plain paper, thin paper, recycled paper, bond paper, or glossy paper from the MP tray 1
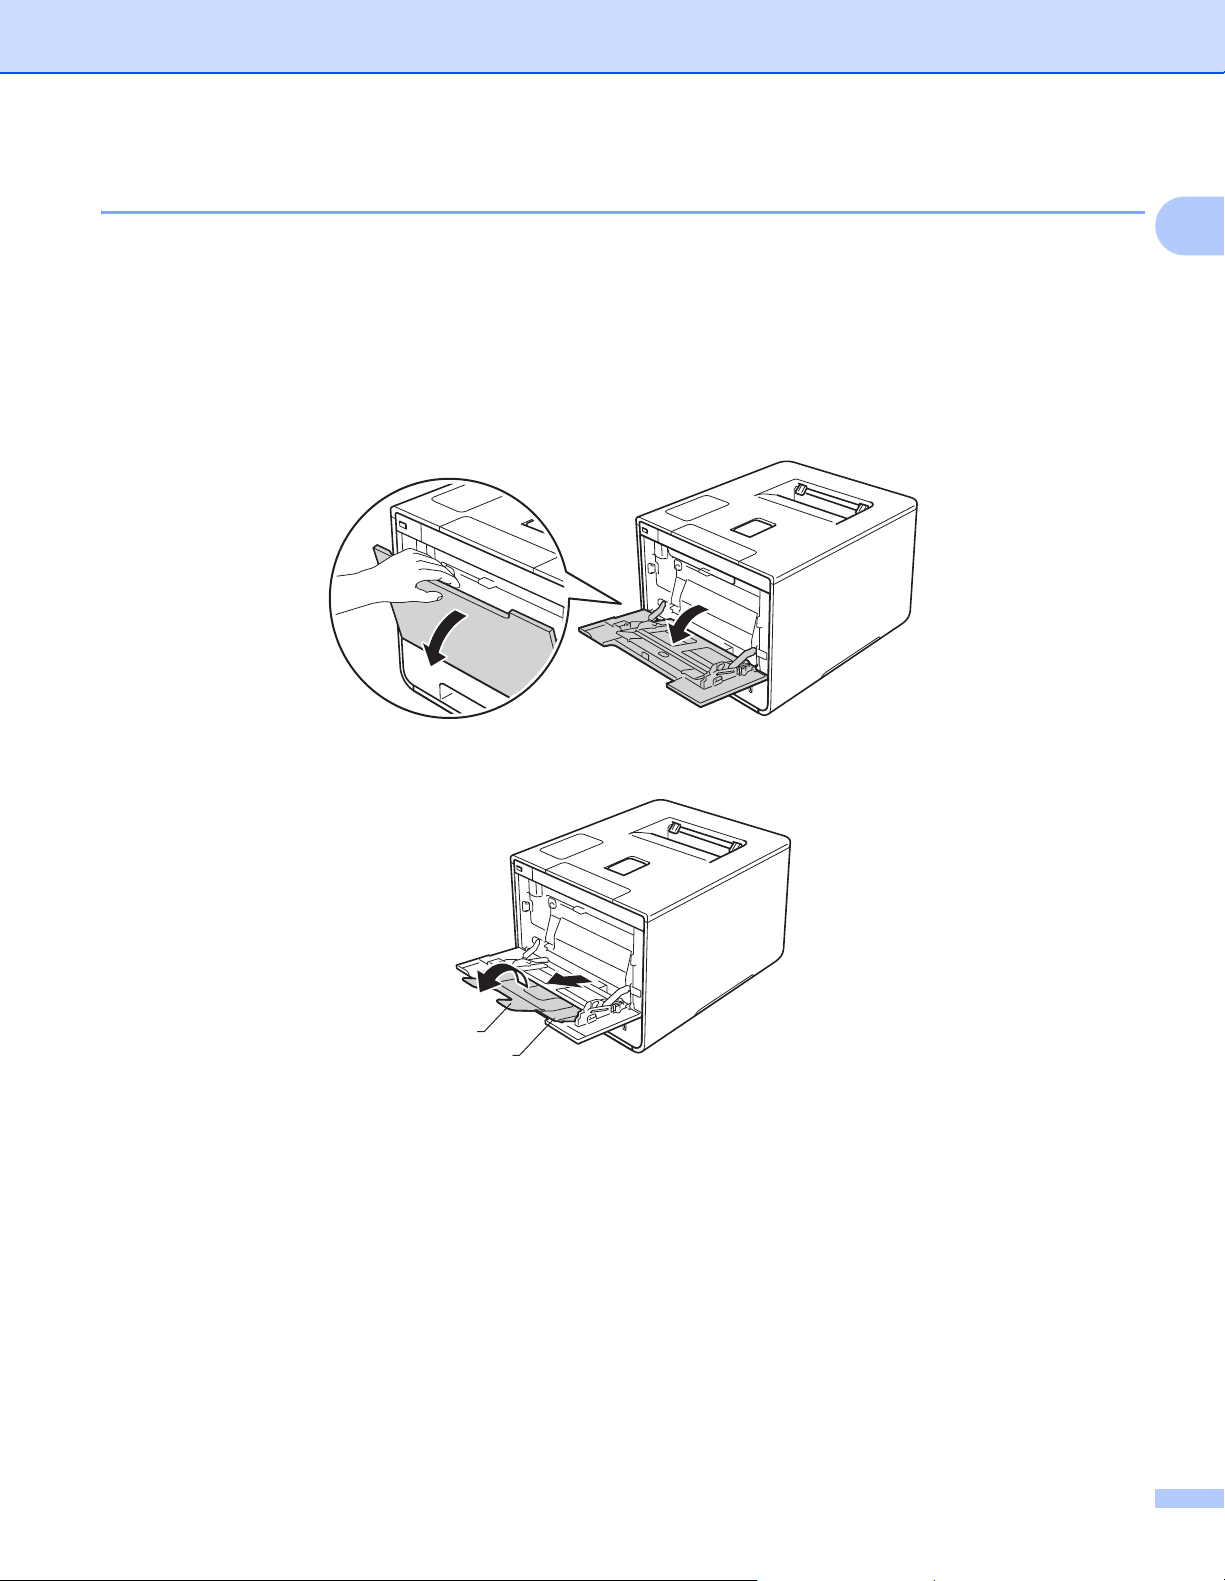
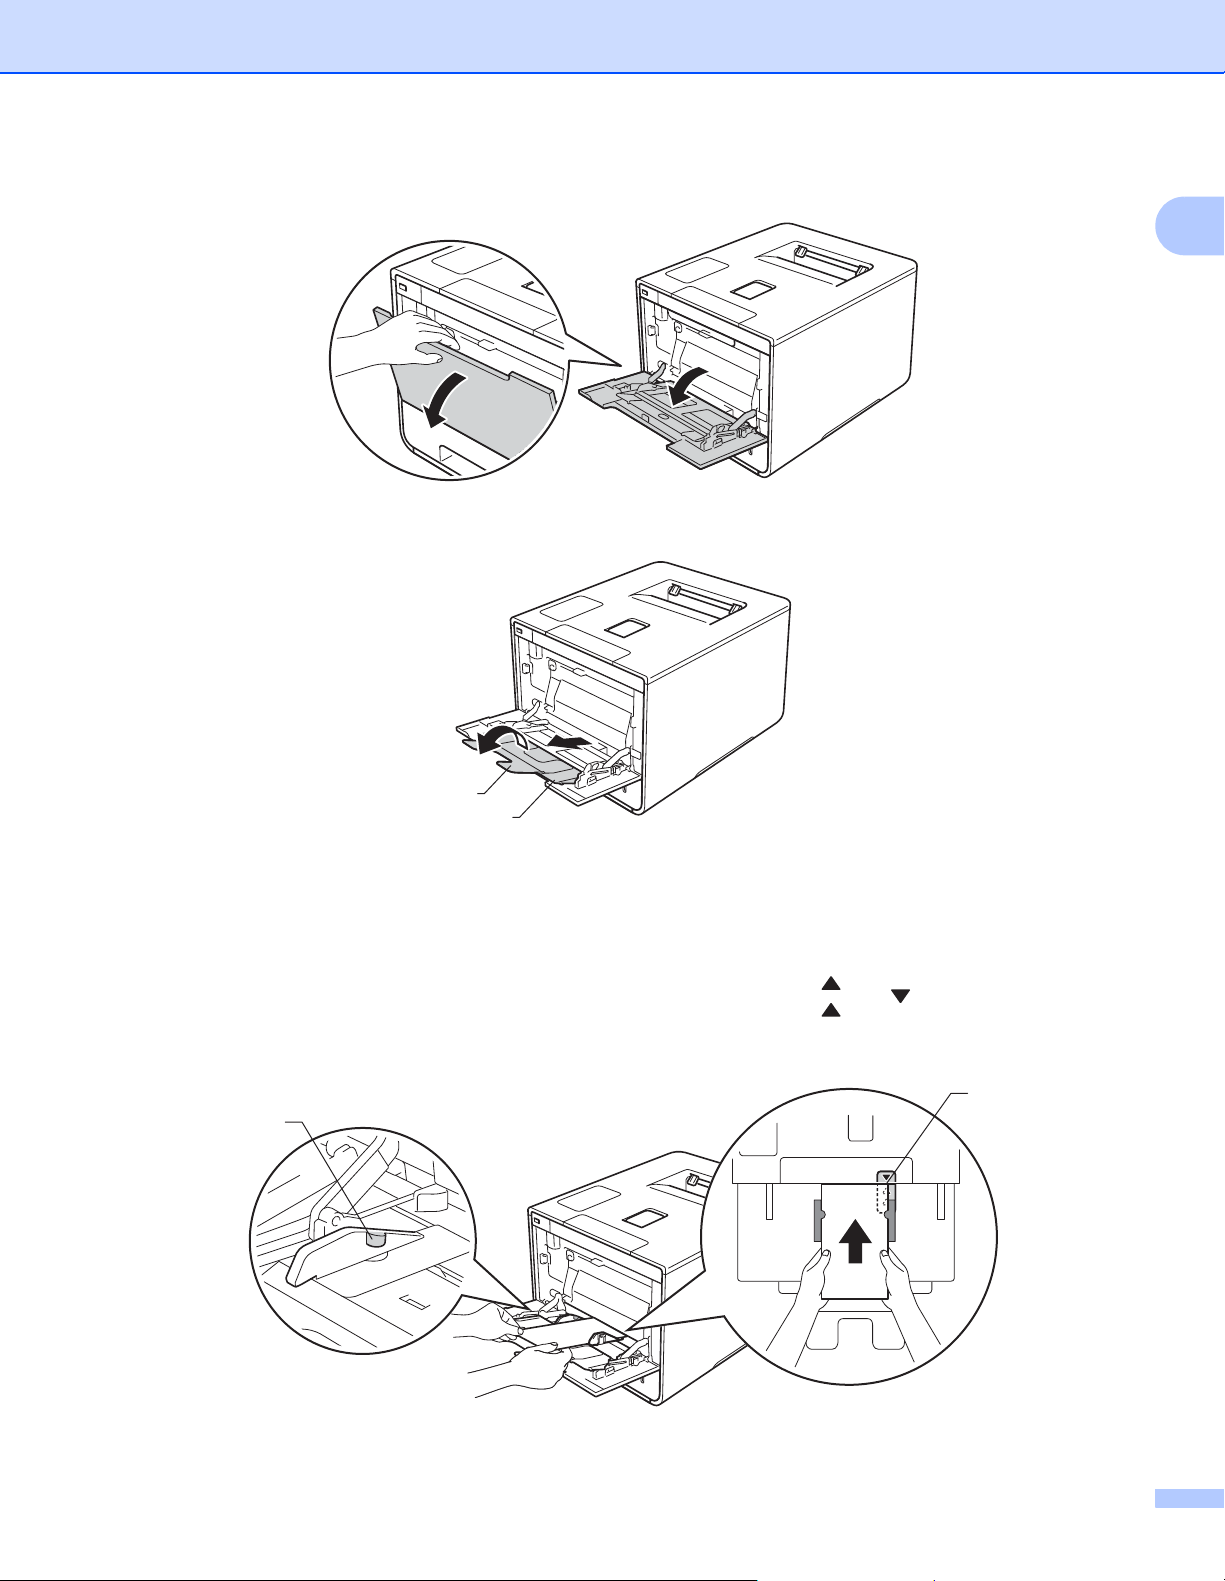
a Open the MP tray and lower it gently.
1
b Pull out the MP tray support (1) and unfold the flap (2).
2
1
12
Page 20
Printing Methods
NOTE
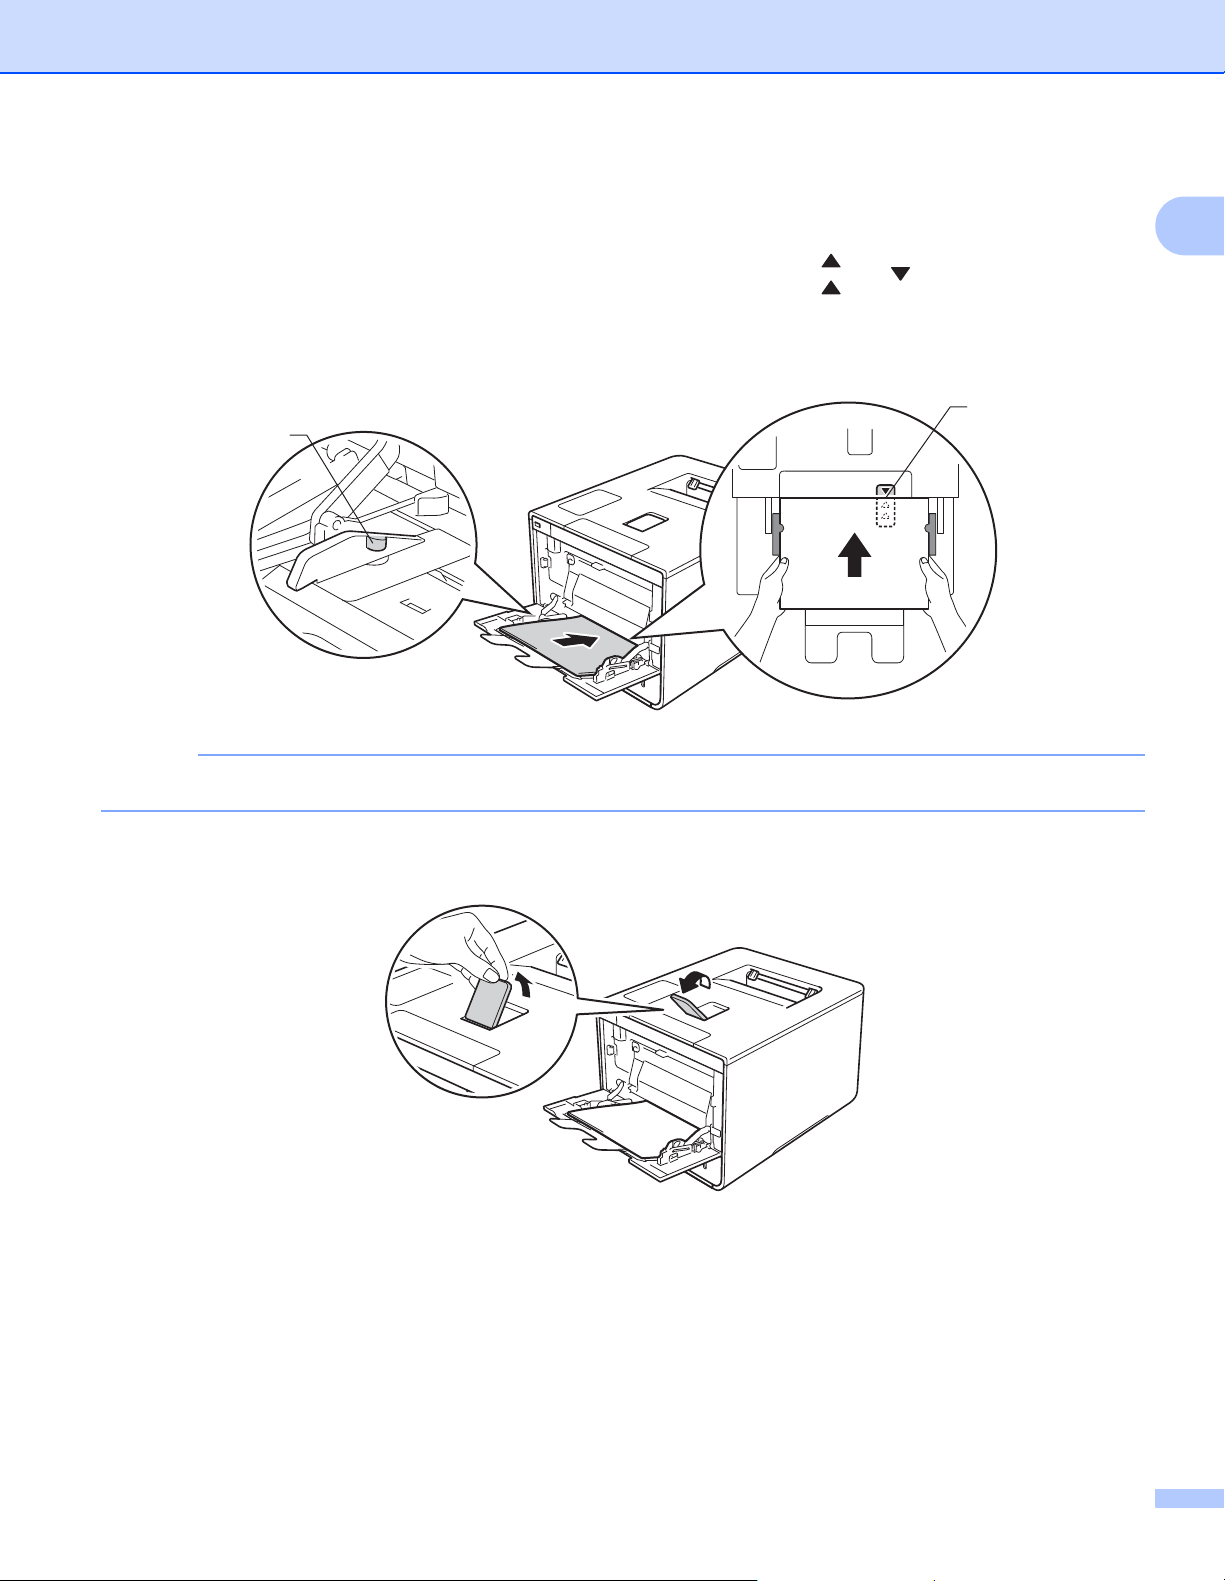
c Load paper in the MP tray, making sure:
The paper stays under the maximum paper tab (1).
The paper's leading edge (top of paper) is positioned between the and arrows (2).
The side to be printed on must be face up with the leading edge in first.
The paper guides touch the sides of the paper so it will feed properly.
2
1
When you are using glossy paper, load only one sheet at a time in the MP tray to avoid a paper jam.
d Lift up the support flap to prevent paper from sliding off the face-down output tray, or remove each page
as soon as it comes out of the machine.
1
13
Page 21

Printing Methods
NOTE
e Change the printer driver settings for your operating system (for details, see Chapter 2: Driver and
Software).
Choose the option you want from each of the following drop-down lists:
Paper Size
A4
Letter
Legal
Executive
A5
A5 Long Edge
A6
B5
JIS B5
3 x 5
1
Folio
Customized paper size
1
You can define your original paper size by choosing User Defined... in Windows® printer driver, PostScript Custom Page Size in
BR-Script printer driver for Windows
1
®
, or Manage Custom Sizes... in Macintosh printer drivers.
For the acceptable paper sizes, see Paper type and size on page 2.
Media Type
Plain Paper
Thin Paper
Recycled Paper
Bond Paper
Glossy Paper
Paper Source
MP Tray
For other settings, see Chapter 2: Driver and Software.
The names of options in the drop-down lists may vary depending on your operating system and its version.
f Send the print job to the machine.
14
Page 22

Printing Methods
Printing on thick paper, labels and envelopes from the MP tray 1
When the back cover (face-up output tray) is pulled down, the machine has a straight paper path from the MP
tray through to the back of the machine. Use this paper feed and output method when you print on thick paper,
labels, or envelopes. (For the recommended paper to use, see Acceptable paper and other print media
on page 2 and Envelopes on page 5.)
Before loading, press the corners and sides of the envelopes to make them as flat as possible.
a Open the back cover (face-up output tray).
1
b (For printing envelopes only)
Pull down the two gray levers, one on the left side and one on the right side, toward you as shown in the
illustration.
15
Page 23
Printing Methods
1
2
c Open the MP tray and lower it gently.
d Pull out the MP tray support (1) and unfold the flap (2).
1
2
1
e Load paper, labels, or envelopes in the MP tray, making sure:
The number of envelopes in the MP tray does not exceed three.
The paper, labels or envelopes stay under the maximum paper tab (1).
The paper's leading edge (top of paper) is positioned between the and arrows (2).
The side to be printed on is face up.
16
Page 24

Printing Methods
f Change the printer driver settings for your operating system (for details, see Chapter 2: Driver and
Software).
Choose the option you want from each of the following drop-down lists:
Paper Size
For printing thick paper or labels
A4
Letter
Legal
Executive
A5
A5 Long Edge
A6
B5
JIS B5
1
3 x 5
Folio
Customized paper size
1
For printing envelopes
Com-10
DL
C5
Monarch
Customized paper size
1
You can define your original paper size by choosing User Defined... in Windows® printer driver, PostScript Custom Page Size in
BR-Script printer driver for Windows
1
®
, or Manage Custom Sizes... in Macintosh printer drivers.
For the acceptable paper sizes, see Paper type and size on page 2.
17
Page 25

Printing Methods
NOTE
NOTE
Media Type
For printing thick paper
Thick Paper
Thicker Paper
For printing labels
Label
For printing envelopes
Envelopes
Env. Thin
Env. Thick
Paper Source
MP Tray
For other settings, see Chapter 2: Driver and Software.
1
• The name of options in the drop-down lists may vary depending on your operating system and its version.
• When you use Envelope #10, choose Com-10 (for Windows
®
) or Envelope #10 (for Macintosh) from the
Paper Size drop-down list.
• For other envelopes that are not listed in the printer driver, such as Envelope #9 or Envelope C6, choose
User Defined... (for Windows
®
for Windows
), or Manage Custom Sizes... (for Macintosh printer driver).
®
printer driver), PostScript Custom Page Size (for BR-Script printer driver
g Send the print job to the machine.
• Remove each envelope as soon as it has been printed. Stacking the envelopes may cause them to jam
or curl.
• If envelopes or thick paper get smudged during printing, set the Media Type to Env. Thick or Thicker
Paper to increase the fixing temperature.
• If the envelopes are creased after they are printed, see Improving the print quality on page 192.
• If your thick paper curls during printing, load only one sheet at a time in the MP tray.
• Envelope joints that are sealed by the manufacturer should be secure.
• All sides of the envelope should be properly folded without wrinkles or creases.
18
Page 26

Printing Methods
h (For printing envelopes only)
When you have finished printing, reset the two gray levers that you pulled down in step b back to their
original positions.
i Close the back cover (face-up output tray).
1
19
Page 27

Printing Methods
NOTE
2-sided printing 1
The supplied printer drivers all enable 2-sided printing.
Guidelines for printing on both sides of the paper 1
If the paper is thin, it may wrinkle.
If paper is curled, straighten it and put it back in the paper tray. If the paper continues to curl, replace the
paper.
If the paper is not feeding correctly, it may be curled. Remove the paper and straighten it. If the paper
continues to curl, replace the paper.
When you use the manual 2-sided setting, it is possible that there may be paper jams or poor print quality.
(If the paper jams, see Paper jams on page 176. If you have a print quality problem, see Improving the
print quality on page 192.)
Make sure that the paper tray is completely inserted in the machine.
1
20
Page 28

Printing Methods
NOTE
Automatic 2-sided printing 1
If you are using the Macintosh Printer Driver, see 2-sided Printing on page 75.
1
Automatic 2-sided printing using the Windows
a
Change the printer driver settings for your operating system (for details, see
Choose the option you want from each of the following drop-down lists:
Paper Size
Letter
Legal
Folio
Media Type
Plain Paper
Recycled Paper
Thin Paper
Glossy Paper (MP Tray only)
Paper Source
Tray1
®
printer driver 1
Chapter 2: Driver and Software).
MP Tray
Tray2 (if available)
2-sided / Booklet
2-sided
2-sided Type in 2-sided Settings
There are four options for each orientation (see 2-sided / Booklet on page 38).
Binding Offset in 2-sided Settings
Specify the offset for binding (see 2-sided / Booklet on page 38).
• Do not use bond paper.
• The name of options in the drop-down lists may vary depending on your operating system and its version.
For other settings, see Chapter 2: Driver and Software.
b Send the print job to the machine. The machine will print on both sides of the paper automatically.
21
Page 29

Printing Methods
NOTE
Automatic 2-sided printing using the BR-Script printer driver for Windows
a
Change the printer driver settings for your operating system (for details,
see Chapter 2: Driver and Software).
Choose the option you want from each of the following drop-down lists:
Paper Size
Letter
Legal
Folio
Media Type
Plain Paper
Recycled Paper
Thin Paper
Glossy Paper (MP Tray only)
Paper Source
Tray1
®
1
1
MP Tray
Tray2 (if available)
Print on Both Sides
Flip on Short Edge
Flip on Long Edge
Page Order
Front to Back
Back to Front
• Do not use bond paper.
• The name of options in the drop-down lists may vary depending on your operating system and its version.
For other settings, see Chapter 2: Driver and Software.
b Send the print job to the machine. The machine will print on both sides of the paper automatically.
22
Page 30

Printing Methods
NOTE
Manual 2-sided printing 1
The BR-Script printer driver for Windows® does not support manual 2-sided printing.
If you are using the Macintosh Printer Driver, see Manual 2–sided Printing on page 75.
1
Manual 2-sided printing using the Windows
a
Change the printer driver settings for your operating system (for details, see
Choose the option you want from each of the following drop-down lists:
Paper Size
You can use all the paper sizes specified for the tray you are using.
Media Type
You can use all the media types that are specified for the tray you are using, except envelopes and
labels, which have only one print side.
Paper Source
Tray1
MP Tray
Tray2 (if available)
2-sided / Booklet
®
printer driver 1
Chapter 2: Driver and Software).
2-sided (Manual)
2-sided Type in 2-sided Settings
There are four options for each orientation (see 2-sided / Booklet on page 38).
Binding Offset in 2-sided Settings
Specify the offset for binding (see 2-sided / Booklet on page 38).
For other settings, see Chapter 2: Driver and Software.
b Send the print job to the machine. The machine will print all the even-numbered pages on one side of
the paper first. Then, the Windows
to print the odd-numbered pages.
Before reinserting the paper, straighten it well, or you may get a paper jam. Very thin or thick paper is not
recommended.
®
driver instructs you (with a pop-up message) to reinsert the paper
23
Page 31

Printing Methods
NOTE
Printing from a USB flash drive or digital camera supporting mass storage 1
With the Direct Print feature, you do not need a computer for printing. You can print by just plugging your USB
flash drive into the machine’s USB direct interface. You can also connect and print directly from a camera set
to USB mass storage mode.
You can use a USB flash drive that has the following specifications:
USB Class USB Mass Storage Class
USB Mass Storage Sub Class SCSI or SFF-8070i
Transfer protocol Bulk transfer Only
Format
Sector size Max. 4096 Byte
Encryption Encrypted devices are not supported.
1
1
NTFS format is not supported.
FAT12/FAT16/FAT32
1
• Some USB flash drives may not work with the machine.
• If your camera is in PictBridge mode, you cannot print from it. See the documentation supplied with your
camera to switch from PictBridge mode to mass storage mode.
24
Page 32

Printing Methods
NOTE
Creating a PRN file for direct printing 1
The screens in this section may vary depending on your application and operating system.
a From the menu bar of an application, click File, then Print.
b Choose Brother HL-XXXX Printer (1) and check the Print to file box (2). Click Print.
1
2
1
c Choose the folder you want to save the file to and type the file name if prompted.
If you are prompted for a file name only, you can also specify the folder you want to save the file in by
typing the directory name. For example: C:\Temp\FileName.prn
If a USB flash drive is connected to your computer, you can save the file directly to the USB flash drive.
25
Page 33

Printing Methods
NOTE
NOTE
Printing directly from the USB flash drive or digital camera supporting mass storage 1
• Make sure your digital camera is turned on.
• Your digital camera must be switched from PictBridge mode to mass storage mode.
a Connect your USB flash drive or digital camera to the USB direct interface (1) on the front of the machine.
The LCD displays the Checking Device message.
1
1
1
• When the machine is in the Deep Sleep mode, the LCD does not show any information even if you
connect a USB flash drive to the USB direct interface connector. Press any of the Menu buttons to wake
up the machine.
• If your machine has been set to Secure Function Lock On, you may not be able to access Direct Print
(see the Network User's Guide).
26
Page 34

Printing Methods
NOTE
NOTE
b Press a or b ( + or -) to choose the folder name or file name you want to print.
If you have selected the folder name, press OK. Press a or b ( + or -) to choose the file name, and then
press OK.
To print an index of the files, press a or b ( + or -) to choose Index Print. Press OK or Go to start
printing.
c Do one of the following:
To change the current settings, Go to step d.
If you do not want to change the current settings, press Go. Go to step f.
d
Press aorb ( + or -) to display the setting you want to change, and then press
to select the option you want, and then press
• You can choose the following settings:
Paper Size
Media Type
OK
.
OK. Press aorb
1
( + or -)
Multiple Page
Orientation
2-sided
Collate
Tray Use
Print Quality
PDF Option
Output Color
• Depending on the file type, some of these settings may not appear.
e Do one of the following:
To change another setting, repeat step d.
If you do not want to change other settings, press Go and go to step f.
f Press a or b ( + or -) to enter the number of copies you want.
27
Page 35

Printing Methods
IMPORTANT
NOTE
g Press OK or Go to start printing.
• To prevent damage to your machine, DO NOT connect any device other than a digital camera or USB
flash drive to the USB direct interface.
• DO NOT remove the USB flash drive or digital camera from the USB direct interface until the machine
has finished printing.
You can change the default settings for Direct Print by using the control panel when the machine is not in
the Direct Print mode. Press a or b ( + or -) to enter the Direct Print menu. (See Direct Print
on page 102.)
1
28
Page 36

2
Driver and Software 2
Printer driver 2
A printer driver is software that translates data from the format used by a computer to the format that a
particular printer needs. Typically, this format is page description language (PDL).
®
The printer drivers for the supported versions of Windows
®
supplied (Windows
only) or on the Brother Solutions Center website at http://solutions.brother.com/. Install
the drivers by following the steps in the Quick Setup Guide. The latest printer drivers can be downloaded from
the Brother Solutions Center website at:
http://solutions.brother.com/
and Macintosh are on the CD-ROM we have
2
For Windows
®
Windows® printer driver (the recommended printer driver for this product)
BR-Script printer driver (PostScript
1
Install the driver using the Custom Install from the CD-ROM.
For Macintosh
1
®
3™ language emulation)
1
Macintosh printer driver (the recommended printer driver for this product)
BR-Script printer driver (PostScript
1
To download the printer driver for Macintosh, please visit your model page at http://solutions.brother.com/.
2
For the installation instruction of the driver, visit http://solutions.brother.com/.
For Linux
®12
®
3™ language emulation)
2
LPR printer driver
CUPS printer driver
1
For more information and to download the printer driver for Linux, please visit your model page at http://solutions.brother.com/ or use the link on
the CD-ROM we have supplied.
2
Depending on Linux distributions, the driver may not be available or it may be released after the initial release of your model.
2
2
2
29
Page 37

Driver and Software
NOTE
Printing a document 2
When the machine receives data from your computer, it begins printing by picking up paper from the paper
tray, multi-purpose tray or optional lower tray. The multi-purpose tray can feed many types of paper and
envelopes (see Paper Tray Capacity on page 3).
a From your application, choose the Print command.
If other printer drivers are installed on your computer, choose Brother HL-XXXX series (where XXXX
is your model name) as your printer driver from the Print or Print Settings menu in your software
application, and then click OK or Print to begin printing.
b Your computer sends the print job to the machine. The Data LED will blink and the LCD will show
Printing.
c When the machine finishes printing all the jobs, the Data LED finishes blinking.
• Select the paper size and orientation in your application software.
• If your application software does not support your custom paper size, choose the next largest paper size.
• Then adjust the print area by changing the right and left margins in your application software.
2
30
Page 38

Driver and Software
Printer driver settings 2
You can change the following printer settings when printing from your computer:
Paper Size
Orientation
Copies
Media Type
Print Quality
Document Type
Color/Mono
Multiple Page
2–sided1 / Booklet
Paper Source
Scaling
Reverse Print
Use Watermark
Header-Footer Print
Toner Save Mode
Secure Print
Administrator
User Authentication
Color Calibration
Sleep Time
Improve Print Output
Skip Blank Page
Print Text in Black
Print Archive
Print Profile
Windows® printer
driver
2
BR-Script printer
driver for
Windows
®
Macintosh Printer
Driver
BR-Script printer
driver for
Macintosh
2
1
Manual 2-sided printing is not available with the BR-Script printer driver for Windows®.
2
Booklet is not available with the Macintosh printer driver and the BR-Script printer driver for Macintosh.
31
Page 39

Driver and Software
Windows
®
Accessing the printer driver settings 2
a (For Windows
Click Start > Printers and Faxes.
(For Windows Vista
Click the (Start) button > Control Panel > Hardware and Sound > Printers.
(For Windows
Click the (Start) button > Devices and Printers.
(For Windows
Move your mouse to the lower right corner of your desktop. When the menu bar appears, click Settings
> Control Panel. In the Hardware and Sound (Hardware) group, click View devices and printers.
(For Windows Server
Click Control Panel on the Start screen. In the Hardware group, click View devices and printers.
®
XP and Windows Server® 2003)
®
and Windows Server® 2008)
®
7 and Windows Server® 2008 R2)
®
8 and Windows Server® 2012)
®
2012 R2)
b Right-click the Brother HL-XXXX series icon (where XXXX is your model name) and select
Printer properties (Properties), and Brother HL-XXXX series if needed. The printer properties dialog
box appears.
2
2
c Click the General tab, and then click Preferences... (Printing Preferences...). To configure the tray
settings, click the Device Settings tab.
32
Page 40

Driver and Software
NOTE
NOTE
Features in the Windows® printer driver 2
For more information, see the Help text in the printer driver.
• The screens in this section are from Windows®7. The screens on your computer will vary depending on
your operating system.
• To access the printer driver settings, see Accessing the printer driver settings on page 32.
• For HL-L8350CDWT users, please read HL-L8350CDW as HL-L8350CDWT.
Basic tab 2
Change the Page Layout settings by clicking the illustration on the left side of the Basic tab.
2
1
4
2
3
5
a Choose the Paper Size, Orientation, Copies, Media Type, Print Quality, Color / Mono and
Document Type (1).
b Choose Multiple Page and 2-sided / Booklet (2).
c Choose the Paper Source (3).
d Review the displayed list of settings (4).
e Click OK to confirm the settings.
To return to the default settings, click Default, then OK.
To preview your document before printing, select the Print Preview check box (5).
33
Page 41

Driver and Software
Paper Size 2
From the drop-down list choose the Paper Size you are using.
Orientation 2
Orientation selects the position of how your document will be printed (Portrait or Landscape).
Portrait (Vertical) Landscape (Horizontal)
Copies 2
Click a or b to enter the number of copies to be printed.
Collate
2
With the Collate check box selected, one complete copy of your document will be printed and then
repeated for the number of copies you selected. If the Collate check box is not selected, then each page
will be printed for all the copies before the next page of the document is printed.
Collate selected
Collate cleared
Media Type 2
You can use the following types of media in your machine. For the best print quality, select the type of media
that matches the paper you are using.
Plain Paper
Thin Paper
Thick Paper
Thicker Paper
Bond Paper
Envelopes
Env. Thick
Env. Thin
Recycled Paper
Label
Glossy Paper
34
Page 42

Driver and Software
NOTE
NOTE
• When using ordinary plain paper 16 to 28 lb (60 to 105 g/m2) choose Plain Paper. When using heavier
weight paper or rough paper choose Thick Paper or Thicker Paper. For bond paper, choose
Bond Paper.
• When using envelopes, choose Envelopes. If the toner is not fixed to the envelope correctly when
Envelopes is selected, choose Env. Thick. If the envelope is crumpled when Envelopes is selected,
choose Env. Thin. For more information, see Paper Tray Capacity on page 3.
• When Label is selected in the printer driver, the machine will feed the paper from the MP tray, even if MP
Tray is not selected as the paper source.
Print Quality 2
Choose one of the following print quality settings:
Normal (600 x 600 dpi)
600600 dpi. Recommended for ordinary printing. Use this mode for good print quality with reasonable
print speeds.
Fine (2400 dpi class)
2
2400 dpi class. The finest print mode. Use this mode to print precise images such as photographs. Since
the print data is much larger than in Normal mode, processing time / data transfer time and print time will
be longer.
The print speed will change depending on the print quality setting you choose. Higher print quality takes
longer to print, while lower print quality takes less time to print.
Color / Mono 2
You can change the Color/Mono settings in the printer driver as follows:
Auto
The machine checks the content of the document for color. If color is detected anywhere in the document,
it will print the whole of the document using all the colors. In other words, it will mix some of the toners to
help achieve every shade detected in the document, increasing the density of toner applied to the page.
If no color content is detected, it will print the document in monochrome. The default setting on your
machine is Auto.
Color
Whether the document contains color or just monochrome, your machine will print the document using all
the colors.
Mono
Select Mono if the document has only black and grayscale text and objects. If your document contains
color, this mode prints the document in 256 levels of gray using the black toner.
35
Page 43

Driver and Software
NOTE
NOTE
NOTE
• The machine’s color sensor is very sensitive and may perceive faded black text or an off-white background
as color. If you know that your document is black and white and you want to conserve color toner, select
Mono mode.
• If either the Cyan, Magenta or Yellow toner reaches the end of its life while printing a color document, the
print job cannot be completed. You can cancel your print job and choose to start the print job again in
Mono mode, as long as Black toner is available.
Document Type 2
Use Document Type to select the optimal settings for printing the relevant type of data.
Document (Standard)
Use this mode for printing a combination of graphics and text.
Photo / Image
Use this mode for printing photos or images.
Document (Mixed)
Use this mode for printing combinations of graphics/text and photos/images.
2
This mode takes longer to print the data.
Manual
Choosing Manual allows you to select the settings manually by clicking the Settings button.
Settings dialog box 2
To change the following settings, click Settings... in the Basic tab.
Color Mode
The following options are available in color Matching mode:
• Normal
This is the default color mode.
• Vivid
The color of all elements are adjusted to become a brighter color.
• Auto
The printer driver selects the Color Mode type.
Choosing this option may take longer to print the data.
• None
36
Page 44

Driver and Software
Import...
To adjust the print configuration of a particular image, click Settings. When you have finished adjusting
the image parameters, such as brightness and contrast, import those settings as a print configuration file.
Use the Export... option to create a print configuration file from the current settings.
Export...
To adjust the print configuration of a particular image, click Settings. When you have finished adjusting
the image parameters, such as brightness and contrast, export those settings as a print configuration file.
Use the Import... option to load a previously exported configuration file.
Improve Gray Color
You can improve the image quality of a shaded area.
Enhance Black Printing
If a black graphic does not print correctly, choose this setting.
Improve Thin Line
You can improve the image quality of thin lines.
Improve Pattern Printing
Select this option if printed fills and patterns are different from the patterns and fills you see on your
computer.
2
Multiple Page 2
The Multiple Page selection can reduce the image size of a page to allow multiple pages to be printed on one
sheet of paper or to enlarge the image size for printing one page on multiple sheets of paper.
Page Order
When the N in 1 option is selected, the page order can be selected from the drop-down list.
Border Line
When using the Multiple Page feature to print multiple pages on one sheet, you can choose to have a solid
border, dash border or no border around each page on the sheet.
Print cut-out line
When the 1 in NxN pages option is selected, the Print cut-out line option can be selected. This option
allows you to print a faint cut-out line around the printable area.
37
Page 45

Driver and Software
2-sided / Booklet 2
To print a booklet or do 2-sided printing, use this option.
None
Disable 2-sided printing.
2-sided / 2-sided (Manual)
To do 2-sided printing, use these options.
• 2-sided
The machine prints on both sides of the paper automatically.
• 2-sided (Manual)
The machine prints all the even numbered pages first. Then the printer driver will stop and show the
instructions required to reload the paper. When you click OK the odd numbered pages will be printed.
When you choose 2-sided or 2-sided (Manual), the 2-sided Settings... button becomes available to
choose. You can choose from the following options in the 2-sided Settings dialog box:
• 2-sided Type
There are four types of 2-sided binding directions available for each orientation.
2
Portrait
Long Edge (Left)
Landscape
Long Edge (Top)
• Binding Offset
Long Edge (Right)
Long Edge (Bottom)
Short Edge (Top)
Short Edge (Right)
Short Edge (Bottom)
Short Edge (Left)
When you check Binding Offset, you can also specify the offset for binding in inches or millimeters.
38
Page 46

Driver and Software
Booklet / Booklet (Manual)
Use this option to print a document in booklet format using 2-sided printing; it will arrange the document
according to the correct page number and allow you to fold at the center of the print output without having
to change the order of the page numbers.
• Booklet
The machine prints on both sides of the paper automatically.
• Booklet (Manual)
The machine prints all the even numbered sides first. Then the printer driver will stop and show the
instructions required to reload the paper. When you click OK the odd numbered sides will be printed.
When you choose Booklet or Booklet (Manual), the 2-sided Settings... button becomes available to
choose. You can choose the following settings in the 2-sided Settings dialog box.
• 2-sided Type
There are two types of 2-sided binding directions available for each orientation.
Portrait Landscape
Left Binding
Right Binding
Top Binding
Bottom Binding
2
• Booklet Printing Method
When Divide into Sets is selected:
This option allows you to print the whole booklet in smaller individual booklet sets, and it still allows you
to fold at the center of the smaller individual booklet sets without having to change the order of the page
numbers. You can specify the number of sheets in each smaller booklet, from 1 to 15. This option is
helpful for folding a printed booklet that has a large number of pages.
• Binding Offset
Check Binding Offset to specify the offset for binding in inches or millimeters.
39
Page 47

Driver and Software
NOTE
Paper Source 2
You can choose Auto Select, Tray1, Tray2,12 or MP Tray and specify separate trays for printing the first
page and for printing from the second page onward.
1
Available if the optional tray is installed.
2
Tray 2 is standard on HL-L8350CDWT.
Print Preview 2
Preview a document before it is printed. If you check the Print Preview check box the Print Preview Viewer
window will open before printing starts.
1
2
2
(1) Page List Area
The Page List Area displays the page numbers for the actual pages that will be printed. If you choose a
page in this list, a preview of the print results for the page will be displayed in the Preview Area. If you do
not want to print a page, clear the check box.
(2) Preview Area
The Preview Area displays a preview of the print results for the pages chosen in the Page List Area.
• If the Booklet setting was selected in the Printer driver settings, you cannot use the Print Preview option.
• If the 2-sided setting was selected in the Printer driver settings, you cannot delete pages using the Page
List Area.
40
Page 48

Driver and Software
Advanced tab 2
1
2
3
4
5
6
7
8
9
2
Change the tab settings by clicking the following settings:
(1) Scaling
(2) Reverse Print
(3) Use Watermark
(4) Header-Footer Print
(5) Toner Save Mode
(6) Secure Print
(7) Administrator
(8) User Authentication
(9) Other Print Options
Scaling 2
Select an option to change the scale of the printed image.
Reverse Print 2
Select Reverse Print to rotate the page 180 degrees.
41
Page 49

Driver and Software
Use Watermark 2
Add a logo or text to your document as a watermark. Choose one of the preset Watermarks, or use an image
file that you have created. Check Use Watermark, and then click the Settings... button.
Watermark Settings 2
Bring To Front
Select this check box to overlay the selected characters or image onto your printed document.
2
In Outline Text
Select this check box if you want to print only an outline of a text watermark.
Custom Settings
Select this check box if you want to print one watermark on the first page and a different watermark on the
following pages.
42
Page 50

Driver and Software
Edit Watermark
Click the Add button to add the watermark settings, and then choose Use Text or Use Image File in
Watermark Style.
2
• Title
Type an appropriate title for the watermark.
• Text
Type your Watermark Text into the Text box, and then choose the Font, Style, Size and Choose
Color....
• Image File
Type the file name and location of the Image File you want to use as the Watermark in File, or click
Browse to search for the file. Bitmap, JPEG and PNG file formats are supported. The scaling of the
image can be adjusted from 25 - 999%.
• Position
Use this setting to control the position of the watermark on the page.
43
Page 51

Driver and Software
NOTE
Header-Footer Print 2
When this feature is enabled, it will print the date and time on your document from your computer’s system
clock and the computer login user name or the text you typed. Click Settings to customize.
2
ID Print
Select Login User Name to print your computer login user name. To print a different name, select Custom
and type a name in the Custom text box.
Toner Save Mode 2
Conserve toner use with this feature. When you set Toner Save Mode to On, print appears lighter. The
default setting is Off (unchecked).
We do not recommend Toner Save Mode for printing photo or grayscale images.
44
Page 52

Driver and Software
Secure Print 2
2
Secure documents are documents that are password-protected when they are sent to the machine. Only the
people who know the password will be able to print them. Since the documents are secured at the machine,
you must enter the password using the control panel of the machine to print them.
To send a secured document:
a Click Settings... from Secure Print and check Secure Print.
b Enter your password and click OK.
c To print a secured document, you must enter your password using the control panel of the machine
(see Printing Secure documents on page 104).
To delete a secured document:
You must use the control panel of the machine to delete a secured document (see Printing Secure documents
on page 104).
45
Page 53

Driver and Software
NOTE
Administrator 2
Administrators have the authority to limit access to settings such as scaling and watermark.
Password
Type the password in this box.
2
Click Set Password... to change the password.
Copies Lock
Select this check box to lock the Copies selection in the Basic tab to prevent users from printing multiple
copies.
Multiple Page & Scaling Lock
Select this check box to lock the multiple page and scaling settings.
Color / Mono Lock
Select this check box to lock the Color/Mono settings as Mono to prevent color printing.
Watermark Lock
Select this check box to lock the settings of the Watermark option to prevent changes being made.
Header-Footer Print Lock
Select this check box to lock the settings of the Header-Footer Print option to prevent changes being
made.
User Authentication 2
If you are restricted from using computer to print by the Secure Function Lock feature, you can check your
current print status. Click Check Print Status to see your computer login name information, such as the
restricted features and the remaining number of pages you are allowed to print when you are using the
machine on a network. The Authentication result dialog box appears.
To cause the Authentication result dialog box to open each time you print, check the Show print status
before printing check box.
For more information about Secure Function Lock, see the Network User's Guide
46
Page 54

Driver and Software
Other Print Options 2
2
You can set the following in Printer Function:
Color Calibration
Sleep Time
Improve Print Output
Skip Blank Page
Print Text in Black
Print Archive
Color Calibration 2
The output density of each color may vary depending on the temperature and humidity of the machine's
environment. This setting helps you improve color density by letting the printer driver use the color calibration
data stored in your machine.
Use Calibration Data
If you select this check box, the printer driver will use the calibration data retrieved from the machine to set
color matching in the printer driver. This will ensure consistent print quality.
Get Device Data Automatically
If you select this check box, the printer driver will use the color calibration data from your machine.
Start Color Calibration
If you click this button, your machine will start the color calibration process, and then the printer driver will
use the calibration data from your machine.
47
Page 55

Driver and Software
NOTE
NOTE
Sleep Time 2
When the machine does not receive data for a certain period of time, it enters Sleep mode. In Sleep mode,
the machine acts as though it were turned off. When you choose Printer Default, the timeout setting will be
reset to the specific time set at the factory; this can be altered in the driver. Intelligent Sleep mode adjusts to
the most appropriate timeout setting depending on the frequency of your machine use.
While the machine is in Sleep mode, the LCD displays Sleep, but the machine can still receive data.
Receiving a print job will wake up the machine to start printing.
Improve Print Output 2
This feature allows you to improve a print quality problem.
Reduce Paper Curl
Select this setting to reduce paper curl.
If you are printing only a few pages, you do not have to choose this setting. We recommend changing the
printer driver setting in Media Type to a thin setting.
This operation will decrease the temperature of the machine's fusing process.
Improve Toner Fixing
2
Select this setting to improve the toner fixing capabilities. If this selection does not provide enough
improvement, change the printer driver setting in Media Type to a thick setting.
This operation will increase the temperature of the machine's fusing process.
48
Page 56

Driver and Software
NOTE
NOTE
NOTE
Skip Blank Page 2
If Skip Blank Page is selected, the printer driver detects blank pages and excludes them from printing.
This option does not work with the following options:
• Use Watermark
• Header-Footer Print
• N in 1 and 1 in NxN Pages in Multiple Page
• 2-sided (Manual), Booklet, Booklet (Manual) and 2-sided with Binding Offset in 2-sided / Booklet
Print Text in Black 2
Select this option to print all text in Black only.
It may not work with certain characters.
Print Archive 2
A copy of your printout can be saved as a PDF file to your computer. To change the file size, move the File
Size slider to the right or left. The resolution is set according to the file size.
By enabling this feature, there may be a longer wait before your machine begins printing.
2
49
Page 57

Driver and Software
Print Profiles tab 2
Print Profiles are editable presets designed to give you quick access to frequently used printing
configurations.
5
1
2
2
4
(1) Print profile list box
(2) Delete Profile
(3) Always show Print Profiles tab first
(4) Add Profile
(5) Current print profile view
3
a Choose your profile from the print profile list box.
b To display the Print Profiles tab at the front of the window every time you print, click Always show Print
Profiles tab first.
c Click OK to apply your chosen profile.
Add Profile 2
Click the Add Profile button to display the Add Profile dialog box. Add up to 20 new profiles with your
preferred settings.
a Type a title in Name.
b Choose an icon you want to use from the Icon list, then click OK.
c The settings shown on the left side of the printer driver window will be saved.
50
Page 58

Driver and Software
Delete Profile 2
Click Delete Profile to display the Delete Profile dialog box. You can delete any of the profiles you have
added.
a Choose your profile from the print profile list box.
b Click Delete.
c The selected profile will be deleted.
2
51
Page 59

Driver and Software
NOTE
NOTE
Device Settings tab 2
To access the Device Settings tab, see Accessing the printer driver settings on page 32.
You can define the paper size for each paper tray and auto detect the serial number in the Device Settings
tab as follows.
1
3
4
2
2
(1) Available Options / Installed Options
You can manually add and remove the options that are installed on the machine. Tray settings will match
the installed options.
(2) Paper Source Setting
Click the Auto Detect (4) button to detect and display the machine's serial number and paper size setting
for the paper trays.
(3) Serial No.
By clicking Auto Detect (4), the printer driver will probe the machine and display its serial number. If it fails
to receive the information, the screen displays “---------------”.
(4) Auto Detect
The Auto Detect setting finds the currently installed optional devices and displays the available options in
the printer driver. When you click Auto Detect, options that are installed on the machine will be listed in
Available Options (1). Manually add or remove the options by choosing an optional device you want to
add or remove, and then clicking Add or Remove.
The Auto Detect (4) setting is not available under the following machine conditions:
• The machine is turned off.
• The machine is in an error state.
• The machine is connected to the print server using a USB cable in a shared network environment.
• The cable is not connected to the machine correctly.
52
Page 60

Driver and Software
Support 2
Click Support... in the Printing Preferences dialog box.
2
1
2
3
4
5
6
(1) Brother Solutions Center
Click this button to visit the Brother Solutions Center website (http://solutions.brother.com/
) for information
about your Brother product including FAQs (Frequently Asked Questions), User’s Guides, driver updates
and tips for using your machine.
53
Page 61

Driver and Software
(2) Genuine Supplies website
Click this button to visit our website for genuine Brother supplies.
(3) Brother CreativeCenter
Click this button to visit our website for free online solutions for business and home users.
(4) Print Settings
Click this button to print pages that show how the internal settings of the machine have been configured.
(5) Check Setting...
Click this button to check the printer driver settings.
(6) About...
Click this button to view a list of the printer driver files and version information.
2
54
Page 62

Driver and Software
NOTE
NOTE
BR-Script 3 printer driver features (PostScript®3™ language emulation) 2
The screens in this section are from Windows®7. The screens on your computer may vary depending on
your operating system.
Printing Preferences 2
To access the Printing Preferences dialog box, click Preferences... in the General tab of the Brother
HL-XXXX BR-Script3 Properties dialog box.
Layout tab
Change the layout by choosing the settings for Orientation, Print on Both Sides (2-sided), Page Order
and Pages Per Sheet.
2
• Orientation
Portrait
Landscape
Rotated Landscape
Orientation selects the position of your document on the printed page.
• Print on Both Sides
To do 2-sided printing, choose Flip on Short Edge or Flip on Long Edge.
• Page Order
Specify the order in which the pages of your document will be printed. Front to Back prints the
document so that page 1 is on top of the stack. Back to Front prints the document so that page 1 is on
the bottom of the stack.
55
Page 63

Driver and Software
• Pages Per Sheet
Click Pages Per Sheet to reduce the image size of a page by allowing multiple pages to be printed on
one sheet of paper. Click Booklet to print a document in the booklet style.
• Draw Borders
Select this check box to add a border.
Paper/Quality tab
Choose the Paper Source.
2
• Paper Source
Automatically Select
Auto Select by Printer
Tray1
Tray2
12
MP Tray
Automatically Select
Select this option to pull paper from any paper source that has a paper size defined in the printer driver
that matches your document.
Auto Select by Printer
Select this option to pull paper from any paper source that has a paper size defined in the machine that
matches your document.
Tray1
Select this option to pull paper from Tray 1.
Tray2
Select this option to pull paper from Tray 2. (Available if the optional tray is installed.)
2
56
Page 64

Driver and Software
MP Tray
Select this option to pull paper from the multi-purpose tray. The paper size in the multi-purpose tray
must match the size defined in the printer driver.
1
Available if the optional tray is installed.
2
Tray 2 is standard on HL-L8350CDWT.
• Color
Select either Black & White or Color.
Secure Print tab
2
Secure documents are documents that are password protected when they are sent to the machine. Only
the people who know the password will be able to print them. Since the documents are secured at the
machine, you must enter the password using the control panel of the machine to print them.
To send a secured document:
a Check Secure Print.
b Type your password and click OK.
c To print the secured document, you must enter your password using the control panel of the machine
(see Printing Secure documents on page 104).
To delete a secured document:
You must use the control panel of the machine to delete a secured document (see Printing Secure
documents on page 104).
57
Page 65

Driver and Software
Advanced options 2
Access the Advanced options by clicking the Advanced... button on the Layout tab or Paper/Quality tab.
1
2
2
a Choose the Paper Size and Copy Count (1).
Paper Size
From the drop-down list choose the size of paper you are using.
Copy Count
The copy selection sets the number of copies that will be printed.
b Set the Image Color Management, Scaling and TrueType Font settings (2).
Image Color Management
Specify how to print your color graphics.
• If you don’t want to enable Image Color Management, click ICM Disabled.
• If you want the calculations for color matching to be performed on the host computer before it
sends the document to the machine, click ICM Handled by Host System.
• If you want the calculations for color matching to be performed on your machine, click ICM
Handled by Printer using printer calibration.
Scaling
Specify whether to reduce or enlarge documents, and by what percentage.
TrueType Font
Specify the TrueType font options. Click Substitute with Device Font (the default) to use equivalent
printer fonts for printing documents that contain TrueType fonts. This will permit faster printing;
however, you might lose special characters not supported by the printer font. Click Download as
Softfont to download TrueType fonts for printing instead of using printer fonts.
58
Page 66

Driver and Software
c Change settings by choosing a setting in the Printer Features list (3):
Print Quality
2
3
Choose one of the following print quality settings:
• Normal (600 x 600 dpi)
600 dpi class. Recommended for ordinary printing. Use this mode for good print quality with
reasonable print speeds.
• Fine (2400 dpi class)
2400 dpi class. The finest print mode. Use this mode to print precise images such as photographs.
Since the print data is much larger than in Normal mode, processing time, data transfer time, and
print time will be longer.
Media Type
You can use the following types of media in your machine. For the best print quality, select the type
of media you are using.
• Plain Paper
• Thin Paper
• Thick Paper
• Thicker Paper
• Bond Paper
• Envelopes
• Env. Thick
• Env. Thin
• Recycled Paper
• Label
• Glossy Paper
59
Page 67

Driver and Software
NOTE
NOTE
Toner Save Mode
Conserve toner use with this feature. When you set Toner Save Mode to On, print appears lighter.
The default setting is Off.
We do not recommend Toner Save Mode for printing Photo or grayscale images.
Sleep Time [Min.]
When the machine does not receive data for a certain period of time, it enters Sleep mode. In Sleep
mode, the machine acts as though it were turned off. When you choose Printer Default, the timeout
setting will be reset to the specific time set at the factory; this can be altered in the driver.
While the machine is in Sleep mode, the LCD displays Sleep, but the machine can still receive data.
Receiving a print job will wake up the machine to start printing.
Color / Mono
You can change the Color/Mono settings in the printer driver as follows:
• Auto
The machine checks the content of the document for color. If color is detected anywhere in the
document, it will print the whole of the document using all the colors. In other words, it will mix some
of the toners to help achieve every shade detected in the document, increasing the density of toner
applied to the page. If no color content is detected, it will print the document in monochrome. The
default setting on your machine is Auto.
2
• Color
Whether the document contains color or just monochrome, your machine will print the document
using all the colors.
• Mono
Select this mode if the document has only black and grayscale text and objects. If your document
contains color, this mode prints the document in 256 levels of gray using the black toner.
• The machine’s color sensor is very sensitive and may perceive faded black text or an off-white background
as color. If you know that your document is black and white and you want to conserve color toner, select
Mono mode.
• If either the Cyan, Magenta or Yellow toner reaches the end of its life while printing a color document, the
print job cannot be completed. You can cancel your print job and choose to start the print job again in
Mono mode, as long as Black toner is available.
60
Page 68

Driver and Software
NOTE
NOTE
Color Mode
The following options are available in Color Matching mode:
• Normal
This is the Default color mode.
• Vivid
The color of all elements are adjusted to become a more vivid color.
• None
Improve Gray Color
You can improve the image of a shaded area.
Enhance Black Printing
If a black graphic does not print correctly, choose this setting.
Halftone Screen Lock
This lock stops other applications from modifying the Halftone settings. The default setting is On.
High Quality Image Printing
You can get high quality image printing. If you set High Quality Image Printing to On, the print speed
will be slower.
Improve Print Output
This feature allows you to improve a print quality problem.
• Reduce Paper Curl
If you choose this setting, the paper curl may be reduced. If you are printing only a few pages, you
do not have to choose this setting. We recommend changing the printer driver setting in Media
Type to a thin setting.
2
This operation will decrease the temperature of the machine's fusing process.
• Improve Toner Fixing
If you choose this setting, the toner fixing capabilities may be improved. If this selection does not
provide enough improvement, change the printer driver setting in Media Type to a thick setting.
This operation will increase the temperature of the machine's fusing process.
61
Page 69

Driver and Software
Ports tab 2
To change the port where your machine is connected or the path to the network machine you are using,
choose or add the port you want to use.
2
62
Page 70

Driver and Software
NOTE
Uninstalling the printer driver 2
Uninstall the printer driver that you have installed with the following steps.
• UnInstall is not available if you originally installed the printer driver from the Windows Add a printer
setting.
• After uninstalling, we recommend restarting your computer to remove files that were in use during the
uninstall.
(Windows® XP, Windows Vista® and Windows® 7)
a Click the Start button, point to All Programs, Brother, and then to your machine name.
b Click UnInstall.
c Follow the instructions on the screen.
(Windows
®
8)
2
a Click (Brother Utilities). Brother Utilities screen appears.
b Click the drop-down list and select your model name (if not already selected).
c Click Tools in the left navigation bar.
d Click Uninstall.
63
Page 71

Driver and Software
Status Monitor 2
The Status Monitor utility is a configurable software tool for monitoring the status of one or more devices,
allowing you to get immediate notification of errors.
If you selected the Enable Status Monitor on startup check box during installation, you will find the
button or the Status Monitor icon on the taskbar.
2
To show the Status Monitor icon on your taskbar, click the button. The Status Monitor icon appears
in the small window. Drag the icon to the taskbar.
Do one of the following:
Double-click the icon in the task tray.
®
(Windows
XP, Windows Vista® and Windows® 7)
a Click Start > All Programs > Brother > Brother Utilities. The Brother Utilities screen appears.
b Click the drop-down list and select your model name (if not already selected).
c Click Tools in the left navigation bar.
d Click Status Monitor.
(Windows
®
8)
a Click (Brother Utilities). The Brother Utilities screen appears.
b Click the drop-down list and select your model name (if not already selected).
c Click Tools in the left navigation bar.
d Click Status Monitor.
64
Page 72

Driver and Software
NOTE
Troubleshooting 2
Click the Troubleshooting button to access the Brother Solutions Center at http://solutions.brother.com/ and
visit FAQs on your model page for instructions.
Visit the Genuine Supplies website 2
Click the Visit the Genuine Supplies website button for more information on Brother genuine supplies.
The automatic firmware update is active when the status monitor feature is enabled.
Monitoring the machine’s status 2
When you start up your computer, the Brother Status Monitor icon appears on the tasktray.
A green icon indicates the normal stand-by condition.
A yellow icon indicates a warning.
A red icon indicates an error has occurred.
2
A gray icon indicates the offline condition.
The Status Monitor can be displayed in the tasktray or on the desktop of your computer.
65
Page 73

Driver and Software
NOTE
Macintosh 2
Features in the printer driver (Macintosh) 2
This machine supports Mac OS X 10.7.5, 10.8.x, 10.9.x.
The screens in this section are from OS X v10.7.x. The screens on your Macintosh will vary depending on
your operating system version.
Choosing page setup options 2
Select the Paper Size, Orientation and Scale.
a From an application such as TextEdit, click File, then Page Setup. Make sure Brother HL-XXXX (where
XXXX is your model name.) is chosen in the Format For pop-up menu. Select the settings for Paper
Size, Orientation and Scale, then click OK.
2
66
Page 74

Driver and Software
NOTE
b From an application such as TextEdit, click File, then Print to start printing.
For more page setup options, click the Show Details button.
2
Save the current settings as a preset by choosing Save Current Settings as Preset... from the Presets
pop-up menu.
67
Page 75

Driver and Software
Choosing printing options 2
To control special printing features, choose Print Settings from the Print dialog box. For more information
about the available options, see the following descriptions:
Cover Page 2
2
You can choose the following cover page settings:
Print Cover Page
To add a cover page to your document, use this setting.
Cover Page Type
Choose a template for the cover page.
Billing Info
To add the billing information to the cover page, type text in the Billing Info text box.
68
Page 76

Driver and Software
Layout 2
Pages per Sheet
The Pages per Sheet selection can reduce the image size of a page by allowing multiple pages to be
printed on one sheet of paper.
2
Layout Direction
When you specify the pages per sheet, you can also specify the direction of the layout.
Border
To add a border, use this setting.
Two-Sided
See 2-sided Printing on page 75.
Reverse page orientation
Select Reverse page orientation to rotate the page 180 degrees.
Flip horizontally
Select Flip horizontally to print the page as a reflection flipped left-to-right.
69
Page 77

Driver and Software
Secure Print 2
Secure Print:
2
Secure documents are documents that are password protected when they are sent to the machine. Only
the people who know the password will be able to print them. Since the documents are secured at the
machine, you must enter the password using the control panel of the machine to print them.
To send a secured document:
a Select Secure Print.
b Type your password, user name and job name, and then click Print.
c To print a secured document, you must enter your password using the control panel of the machine
(see Printing Secure documents on page 104).
To delete a secured document, you must use the control panel of the machine to delete it (see Printing
Secure documents on page 104).
70
Page 78

Driver and Software
NOTE
Print Settings 2
Choose your settings in the Print Settings list:
Media Type
2
Select one of the following media types:
• Plain Paper
• Thin Paper
• Thick Paper
• Thicker Paper
• Bond Paper
• Envelopes
• Env. Thick
• Env. Thin
• Recycled Paper
• Label
• Glossy Paper
When Label is selected in the printer driver, the machine will feed the paper from the MP tray, even if MP
Tray is not selected as the paper source.
71
Page 79

Driver and Software
NOTE
NOTE
Print Quality
Choose one of the following print quality settings:
• Normal
600 dpi class. Recommended for ordinary printing. Use this mode for good print quality with reasonable
print speeds.
• Fine
2400 dpi class. The finest print mode. Use this mode to print precise images such as photographs.
Since the print data is much larger than in Normal mode, processing time, data transfer time, and
printing time will be longer.
The print speed will change depending on the print quality setting you choose. Higher print quality takes
longer to print, while lower print quality takes less time to print.
Color / Mono
You can change the Color/Mono settings in the printer driver as follows:
• Auto
The machine checks the content of the document for color. If color is detected anywhere in the
document, it will print the whole of the document using all the colors. In other words, it will mix some of
the toners to help achieve every shade detected in the document, increasing the density of toner
applied to the page. If no color content is detected, it will print the document in monochrome. The default
setting on your machine is Auto.
• Color
2
Whether the document contains color or just monochrome, your machine will print the document using
all the colors.
• Mono
Select this mode if the document has only black and grayscale text and objects. If your document
contains color, this mode prints the document in 256 levels of gray using the black toner.
• The machine’s color sensor is very sensitive and may perceive faded black text or an off-white background
as color. If you know that your document is black and white and you want to conserve color toner, select
Mono mode.
• If either the Cyan, Magenta or Yellow toner reaches the end of its life while printing a color document, the
print job cannot be completed. You can cancel your print job and choose to start the print job again in
Mono mode, as long as Black toner is available.
Paper Source
Choose Auto Select, Tray1, Tray2,
1
Available if the optional tray is installed.
2
Tray 2 is standard on HL-L8350CDWT.
12
or MP Tray.
72
Page 80

Driver and Software
NOTE
NOTE
NOTE
Advanced print settings
When you click the triangle mark (c) beside Advanced, the advanced print settings appear.
2
Toner Save Mode
Conserve toner use with this feature. When you select the Toner Save Mode check box, print appears
lighter. The default setting is off (unchecked).
We do not recommend Toner Save Mode for printing Photo or grayscale images.
Improve Print Output
This feature allows you to improve a print quality problem.
• Reduce Paper Curl
If you choose this setting, the paper curl may be reduced.
If you are printing only a few pages, you do not have to choose this setting. We recommend changing
the printer driver setting in Media Type to a thin setting.
This operation will decrease the temperature of the machine's fusing process.
• Improve Toner Fixing
If you choose this setting, the toner fixing capabilities may be improved. If this selection does not
provide enough improvement, change the printer driver setting in Media Type to a thick setting.
This operation will increase the temperature of the machine's fusing process.
73
Page 81

Driver and Software
Sleep Time
When the machine does not receive data for a certain period of time, it enters Sleep mode. In Sleep mode,
the machine acts as though it were turned off. If you choose Printer Default, the timeout setting will be
reset to the specific time set at the factory; this can be altered in the driver. To change the Sleep Time,
select Manual, and then type the time in the text box.
While the machine is in Sleep mode, the LCD displays Sleep, but the machine can still receive data.
Receiving a print job will wake up the machine to start printing.
Other Print Options
• Skip Blank Page
If Skip Blank Page is selected, the printer driver detects blank pages and excludes them from printing.
Color Settings 2
Color Mode
The following options are available in Color Matching mode:
• Normal
This is the Default color mode.
2
• Vivid
The color of all elements are adjusted to become a more vivid color.
• None
Improve Gray Color
You can improve the image of a shaded area.
Enhance Black Printing
If a black graphic does not print correctly, choose this setting.
74
Page 82

Driver and Software
2-sided Printing 2
Automatic 2–sided Printing
Select Layout.
Choose Long-Edge binding or Short-Edge binding in Two-Sided.
2
Manual 2–sided Printing
Select Paper Handling.
• Choose Even Only and Print. Reload the printed paper into the tray (blank side face down in Tray 1
Tray 2, or blank side face up in the MP tray). Choose Odd Only and Print.
75
Page 83

Driver and Software
Features in the BR-Script3 printer driver (PostScript®3™ language emulation) 2
This section introduces the distinctive operations of the BR-Script3 printer driver. For the basic operations of
the BR-Script3 printer driver, see Features in the printer driver (Macintosh) on page 66 for Page Setup,
Cover Page, Paper Source and Layout.
Choosing printing options 2
To control special print features, choose Printer Features in the Print dialog box.
2
76
Page 84

Driver and Software
Printer Features 2
Feature Sets: General 1
Print Quality
Select one of the following resolutions from the Print Quality pop-up menu:
2
• Normal
600600 dpi. Recommended for ordinary printing. Use this mode for good print quality with reasonable
print speeds.
• Fine
2400 dpi class. The finest print mode. Use this mode to print precise images such as photographs.
Since the print data is much larger than in Normal mode, processing time / data transfer time and print
time will be longer.
Media Type
Select the media type that matches the type of paper you loaded in the machine.
• Plain Paper
• Thin Paper
• Thick Paper
• Thicker Paper
• Bond Paper
• Envelopes
• Env. Thick
• Env. Thin
• Recycled Paper
• Label
• Glossy Paper
• Hagaki
1
Postcard with the size specified by Japan Post Service Co., LTD
1
77
Page 85

Driver and Software
NOTE
NOTE
Toner Save Mode
When you select the Toner Save Mode check box, print appears lighter. The default setting is Off
(unchecked).
We do not recommend Toner Save Mode for printing Photo or grayscale images.
Sleep Time [Min.]
When the machine does not receive data for a certain period of time, it enters Sleep mode. In Sleep mode,
the machine acts as though it were turned off. If you choose Printer Default, the timeout setting will be
reset to the specific time set at the factory; this can be altered in the driver. To change the Sleep Time,
choose 2, 10 or 30.
While the machine is in Sleep mode, the LCD displays Sleep, but the machine can still receive data.
Receiving a print job will wake up the machine to start printing.
Color / Mono
You can change the Color/Mono settings in the printer driver as follows:
• Auto
The machine checks the content of the document for color. If color is detected anywhere in the
document, it will print the whole of the document using all the colors. In other words, it will mix some of
the toners to help achieve every shade detected in the document, increasing the density of toner
applied to the page. If no color content is detected, it will print the document in monochrome. The default
setting on your machine is Auto.
2
• Color
Whether the document contains color or just monochrome, your machine will print the document using
all the colors.
• Mono
Select this mode if the document has only black and grayscale text and objects. If your document
contains color, this mode prints the document in 256 levels of gray using the black toner.
• The machine’s color sensor is very sensitive and may perceive faded black text or an off-white background
as color. If you know that your document is black and white and you want to conserve color toner, select
Mono mode.
• If either the Cyan, Magenta or Yellow toner reaches the end of its life while printing a color document, the
print job cannot be completed. You can cancel your print job and choose to start the print job again in
Mono mode, as long as Black toner is available.
Color Mode
The following options are available in Color Matching mode:
• Normal
This is the Default color mode.
• Vivid
The color of all elements are adjusted to become a more vivid color.
• None
78
Page 86

Driver and Software
NOTE
NOTE
Feature Sets: General 2
Improve Gray Color
You can improve the image of a shaded area.
Enhance Black Printing
2
If a black graphic does not print correctly, choose this setting.
Halftone Screen Lock
This lock stops other applications from modifying the Halftone settings. The Default setting is On
(checked).
High Quality Image Printing
You can increase the quality of the printed image. If you set High Quality Image Printing to On (checked),
the print speed will be slower.
Improve Print Output
This feature allows you to improve a print quality problem.
• Reduce Paper Curl
If you choose this setting, the paper curl may be reduced.
If you are printing only a few pages, you do not have to choose this setting. We recommend changing
the printer driver setting in Media Type to a thin setting.
This operation will decrease the temperature of the machine's fusing process.
• Improve Toner Fixing
If you choose this setting, the toner fixing capabilities may be improved. If this selection does not
provide enough improvement, change the printer driver setting in Media Type to a thick setting.
This operation will increase the temperature of the machine's fusing process.
79
Page 87

Driver and Software
Secure Print 2
Secure documents are documents that are password protected when they are sent to the machine. Only the
people who know the password will be able to print them. Since the documents are secured at the machine,
you must enter the password using the control panel of the machine to print them.
To create a secure print job, select Secure Print and select the Secure Print check box. Type a password
in the Password text box and click Print.
2
(For more information about Secure Print, see Printing Secure documents on page 104.)
80
Page 88

Driver and Software
Removing the printer driver 2
a Log on as an ‘Administrator’.
b From the Apple menu, choose System Preferences. Click Print & Scan or Printers & Scanners
select the printer you want to remove and remove it by clicking the - button.
c Click Delete Printer.
1
Printers & Scanners for OS X v10.9.x users
1
, then
2
81
Page 89

Driver and Software
Status Monitor 2
The Status Monitor utility is a configurable software tool for monitoring the status of the machine; it lets you
see error messages such as paper empty or paper jam at pre-set update intervals and access the Web Based
Management utility. Check the device status by following these steps to Launch the Brother Status Monitor:
For OS X v10.7.5 and 10.8.x
a Run System Preferences, select Print & Scan, and then choose the machine.
b Click Options & Supplies.... Click the Utility tab, and then click Open Printer Utility. The Status
Monitor will start up.
For OS X v10.9.x
a Run System Preferences, select Printers & Scanners, and then choose the machine.
b Click Options & Supplies.... Click the Utility tab, and then click Open Printer Utility. The Status
Monitor will start up.
Updating the machine’s status 2
2
If you want the latest machine status while the Status Monitor window is open, click the Refresh icon.
If the toner level is low or there is a problem with the toner cartridge, the following icons appear:
The toner level is low.
The toner cartridge is empty.
You can set the interval at which the software will update the machine's status information. Go to the menu
bar, Brother Status Monitor and select Preferences.
82
Page 90

Driver and Software
Hiding or showing the window 2
After starting the Status Monitor, you can hide or show the window. To hide the window, go to the menu bar,
click Brother Status Monitor and select Hide Status Monitor. To show the window, click the Brother
Status Monitor icon in the dock.
Quitting the window 2
Click Brother Status Monitor in the menu bar, and then select Quit Status Monitor from the pop-up menu.
Web Based Management (Network Connection only) 2
Access the Web Based Management System by clicking the machine icon on the Status Monitor screen. A
standard Web Browser can be used to manage your machine using HTTP (Hyper Text Transfer Protocol).
For information about the Web Based Management System, see the Network User's Guide.
2
83
Page 91

Driver and Software
Software 2
Software for networks 2
For information about network utility software, see the Network User's Guide.
2
84
Page 92

3
General Information 3
Control panel 3
This machine has one Liquid Crystal Display (LCD), eight buttons and two Light Emitting Diodes (LEDs) on
the control panel. The LCD is a 16 character two-line display.
Control panel overview 3
The illustration is based on HL-L8350CDW.
1
2
3
3
4
5
6
7
8
1LCD
The LCD displays messages to help you set up and use your machine.
A four level indicator displays the wireless signal strength if you are using a wireless connection.
0Max
85
Page 93

General Information
2 Power On/Off
You can turn the machine on and off.
Press to turn the machine on.
Press and hold down to turn the machine off. The LCD displays Shutting Down and stays on for a
few seconds before going off.
3 Menu Buttons:
a or b ( + or -)
Press a or b ( + or -) to scroll through the menus and options.
Press a or b ( + or -) to enter a number, or to increase or decrease the number. Hold down a or b ( + or -)
to move faster to the number you want, and then press OK.
OK
Press OK to store your settings in the machine. After changing a setting, the machine returns to the
previous menu level.
Back
Press Back to go back one level in the menu structure.
Back lets you choose the previous digit while entering numbers.
4 Secure
You can print jobs saved in the memory when you enter your four-digit password. (For more information,
see Printing Secure documents on page 104.)
5Go
You can clear some error messages by pressing Go. To clear all other errors follow the control panel
instructions or see Error and maintenance messages on page 171.
Press Go to print jobs remaining in the machine's memory.
This button lets you choose the displayed option in the last menu level. After a setting is changed, the
machine returns to Ready mode.
3
6 Cancel
Press Cancel to cancel the current setting.
This button cancels a programmed print job and clears it from the machine’s memory.
7 Error LED
The Error LED blinks in orange when the LCD displays an error or an important status message. (For
details, see LED indications on page 87.)
8 Data LED
The Data LED will blink depending on the machine status. (For details, see LED indications on page 87.)
86
Page 94

General Information
LED indications 3
The LEDs are lights that show the machine's status.
Data LED (Green)
LED indication Meaning
On Data is in the machine's memory.
Blinking The machine is receiving or processing data.
Off There is no remaining data in the memory.
Error LED (Orange)
LED indication Meaning
Blinking There is a problem with the machine.
Off There is no problem with the machine.
Machine status messages 3
3
The following table explains the machine's status messages during normal operation:
Machine Status Message Meaning
Cooling Down The machine is cooling down.
Cancel Printing The machine is canceling the job.
Calibrate The machine is calibrating the color density.
Ignore Data The machine is ignoring data processed using the PS driver.
Please Wait The machine is warming up.
The machine is performing the calibration process.
Printing The machine is printing.
Ready The machine is ready to print.
Sleep In Sleep mode (power save mode) the machine acts as though it were turned
off, but the machine can still receive data. Receiving a print job will wake up
the machine to start printing.
Deep Sleep In Deep Sleep mode (reducing more power consumption than Sleep mode),
the machine acts as though it were turned off. If the machine does not receive
data for a certain length of time while it is in Sleep mode, it enters Deep Sleep
mode. The machine will wake up when the machine receives a print job.
Registration The machine is adjusting the print position.
87
Page 95

General Information
NOTE
Settings table 3
How to access the menu mode 3
a Press any Menu buttons (a, b, OK or Back) to take the machine offline.
b Scroll through each menu level by pressing a or b ( + or -) for the direction you want.
c Press OK when the option you want appears on the LCD. The LCD will then show the next menu level.
d Press a or b ( + or -) to scroll to your next menu selection.
e Press OK or Go.
When you have finished setting an option, the LCD will show Accepted.
Menu table 3
There are seven menus. For more information about the selections available in each menu, see the following
tables.
If no control panel operations are performed for 30 seconds, the LCD returns to Ready mode.
The LCD displays the tray names as follows:
• Standard paper tray: Tray1
• Multi-purpose tray: MP Tray
• Optional lower tray
1
Tray 2 is standard on HL-L8350CDWT.
1
: Tray2 and T2
3
88
Page 96

General Information
Machine Info.
Submenu 1 Submenu 2 Menu
Selections
Print Settings - - - Prints the Printer Settings page.
Print NetSetting - - - Prints the Network Configuration Report.
Print WLANReport
(HL-L8350CDW and
HL-L8350CDWT)
Test Print - - - Prints the test page.
Demo Print - - - Prints the demonstration sheet.
Drum Dot Print - - - Prints the drum dot check sheet.
Print Font HP LaserJet - - Prints the font list and samples of HP
Serial No. - - - Displays the machine's serial number.
Version Main Version - - Displays the main firmware version.
Page Count Total - - Displays the total printed pages.
- - - The WLAN Report shows the wireless
BR-Script 3 - - Prints the font list and samples of
Sub1 Version - - Displays the sub firmware version.
Sub4 Version - - Displays the sub firmware version.
RAM Size - - Displays the size of memory in this
Color - - Displays the total color printed pages.
Monochrome - - Displays the total monochrome printed
Options Descriptions
LAN connectivity diagnosis.
LaserJet.
BR-Script.
machine.
pages.
3
The factory settings are shown in Bold with an asterisk.
89
Page 97

General Information
Machine Info. (continued)
Submenu 1 Submenu 2 Menu
Selections
Parts Life Toner Life Black(BK) - Displays the remaining life for each toner
Cyan(C) -
Magenta(M) -
Yellow(Y) -
Drum Life - - Displays the remaining life for the drum
Belt Life - - Displays the remaining life for the belt unit.
PF Kit MP Life - - Displays the pages left to print with the PF
PF Kit 1 Life - - Displays the pages left to print with the PF
PF Kit 2 Life - - Displays the pages left to print with the PF
Fuser Life - - Displays the pages left to print with the
Laser Life - - Displays the pages left to print with the
Reset Parts Life
(Appears only when
the drum unit or belt
unit has exceeded its
rated life.)
Drum Unit - - Resets the drum unit life. Appears when
Belt Unit - - Resets the belt unit life. Appears when
Options Descriptions
cartridge.
For example, if the remaining life for the
black toner cartridge is 20%, the LCD
displays the following:
BK oonnnnnnnn
unit.
kit MP.
kit 1.
kit 2.
fuser unit.
laser unit.
you replace the drum unit.
you replace the belt unit.
3
The factory settings are shown in Bold with an asterisk.
90
Page 98

General Information
Paper Tray
Submenu Options Descriptions
Tray Use Auto* / MP Only / Tray1 Only /
Tray2 Only
1
Priority (Without Tray2 installed)
MP>T1* / T1>MP
(With Tray2 installed)
MP>T1>T2 / MP>T2>T1 /
T1>T2>MP / T2>T1>MP
2-sided On(Long Bind) / On(Short
Bind) / Off*
MP Size
A4 / Letter* /JIS B5 / B5 / A5 /
A5 L / A6 / Executive / Legal /
Folio / 3X5 / Com-10 /
Monarch / C5 / DL
Tray1 Size A4 / Letter* /JIS B5 / A5 / A5
L / A6 / Executive / Legal /
Folio
Tray2 Size
1
A4 / Letter* / JIS B5 / A5 /
Executive / Legal / Folio
Check Size Off / On* Select whether to display the message telling you
Select the tray that will be used.
When Auto is chosen in Tray Use, the machine
chooses the order in which it uses the paper trays
that contain paper of the same size.
Select whether to print on both sides of the paper.
Select the size of paper you are loading in the MP
tray.
Choose the size of paper you loaded in the
standard paper tray.
Choose the size of paper you loaded in the
2
optional lower tray (Tray 2)
.
to check that the size of the paper in the machine
and the machine's Paper Size setting match.
3
The factory settings are shown in Bold with an asterisk.
1
When Tray 2 is installed.
2
Tray 2 is standard on HL-L8350CDWT.
91
Page 99

General Information
General Setup
Submenu Menu Selections Options Descriptions
Local Language - English* / Français... Select the LCD language for your
country.
Ecology Toner Save On / Off* Increases the page yield of the toner
cartridge.
Sleep Time 0 / 1 / 2 / 3* / 4 / 5 / ... Min Set the time to return to Power Save
mode.
Quiet Mode On / Off* Decreases printing noise.
Auto Power Off Off* / 1 hour / 2 hours /
4 hours / 8 hours
Panel Control Button Repeat 0.1* / 0.4 / 0.6 / 0.8 /
1.0 / 1.4 / 1.8 / 2.0 Sec
Message Scroll Level1* / Level2 / ... /
Level10
LCD Contrast -nnonn+ Adjusts the contrast of the LCD.
Auto Online On* / Off Set the machine to return to Ready
Setting Lock - On / Off* Turn the lock panel settings On or
Interface Select Auto* / USB / Network Choose the interface to use.
Sets the number of hours that the
machine will remain in Deep Sleep
mode before going into Power Off
mode. Choose Off if you do not
want the machine to go into Power
Off mode.
Sets the time for the LCD message
to change when holding a or b at
intervals.
Sets the time in seconds that an LCD
message will scroll across the LCD.
From Level 1=0.2 sec to Level
10=2.0 sec.
mode after it has been idle for 30
seconds. If you select Off, the
machine cannot receive print jobs if it
has been left in Menu mode.
Off by using the password.
3
Auto IF Time 1 / 2 / 3 / 4 / 5* / ... / 99Sec You must set the time-out period for
Input Buffer Level 1 / 2 / 3 / 4* / ... / 7 Increases or decreases the input
The factory settings are shown in Bold with an asterisk.
If you select Auto, the machine
changes the interface to USB or
Ethernet depending on which
interface is receiving data.
the auto interface selection.
buffer capacity.
92
Page 100

General Information
Print Menu
Submenu Menu Selections Options Descriptions
Emulation - Auto* / HP LaserJet /
BR-Script 3
Auto Continue - On* / Off Select this setting if you want the
Output Color - Auto* / Color / Mono Sets the output color.
Media Type - Plain Paper* / Thick
Paper / Thicker Paper /
Thin Paper / Recycled
Paper / Bond Paper /
Label / Envelope / Env.
Thick / Env. Thin /
Glossy Paper
Paper - A4 / Letter* / JIS B5 /
B5 / A5 / A5 L / A6 /
Executive / Legal /
Folio / 3X5 / Com-10 /
Monarch / C5 / DL
Copies - 1* / 2 / ... / 999 Sets the number of printed pages.
Orientation -
Print Position X Offset -500 / -499 / ... / -1 / 0* /
Y Offset -500 / -499 / ... / -1 / 0* /
Auto FF - On / Off* Allows the machine to print any
HP LaserJet Font No. I000 / ... / I059* / ... / I071 Sets the font number.
Font Pitch 0.44 / ... / 10.00* / ... /
Font Point 4.00 / ... / 12.00* / ... /
Portrait* / Landscape This machine can print pages in
1 / ... / 499 / 500Dots
1 / ... / 499 / 500Dots
99.99
999.75
Chooses the emulation mode you
use.
machine to clear paper size errors.
Sets the type of paper.
Sets the size of paper.
portrait or landscape orientation.
Moves the print start position (at the
top-left corner of pages) horizontally
up to -500 (left) to +500 (right) dots in
300 dpi.
Moves the print start position (at the
top-left corner of pages) vertically up
to -500 (up) to +500 (down) dots in
300 dpi.
remaining data automatically.
Sets the font pitch.
The Font Pitch menu will appear
when you choose I059 to I071 in
Font No. setting.
Sets the font size.
The Font Point menu will appear
when you choose I000 to I058 in
Font No. setting.
3
The factory settings are shown in Bold with an asterisk.
93
 Loading...