

Page 1
Quick Setup Guide
Read the Product Safety Guide first, then read this guide for the correct installation procedure.
DCP-T520W / DCP-T720DW
DCP-T725DW / DCP-T820DW
1
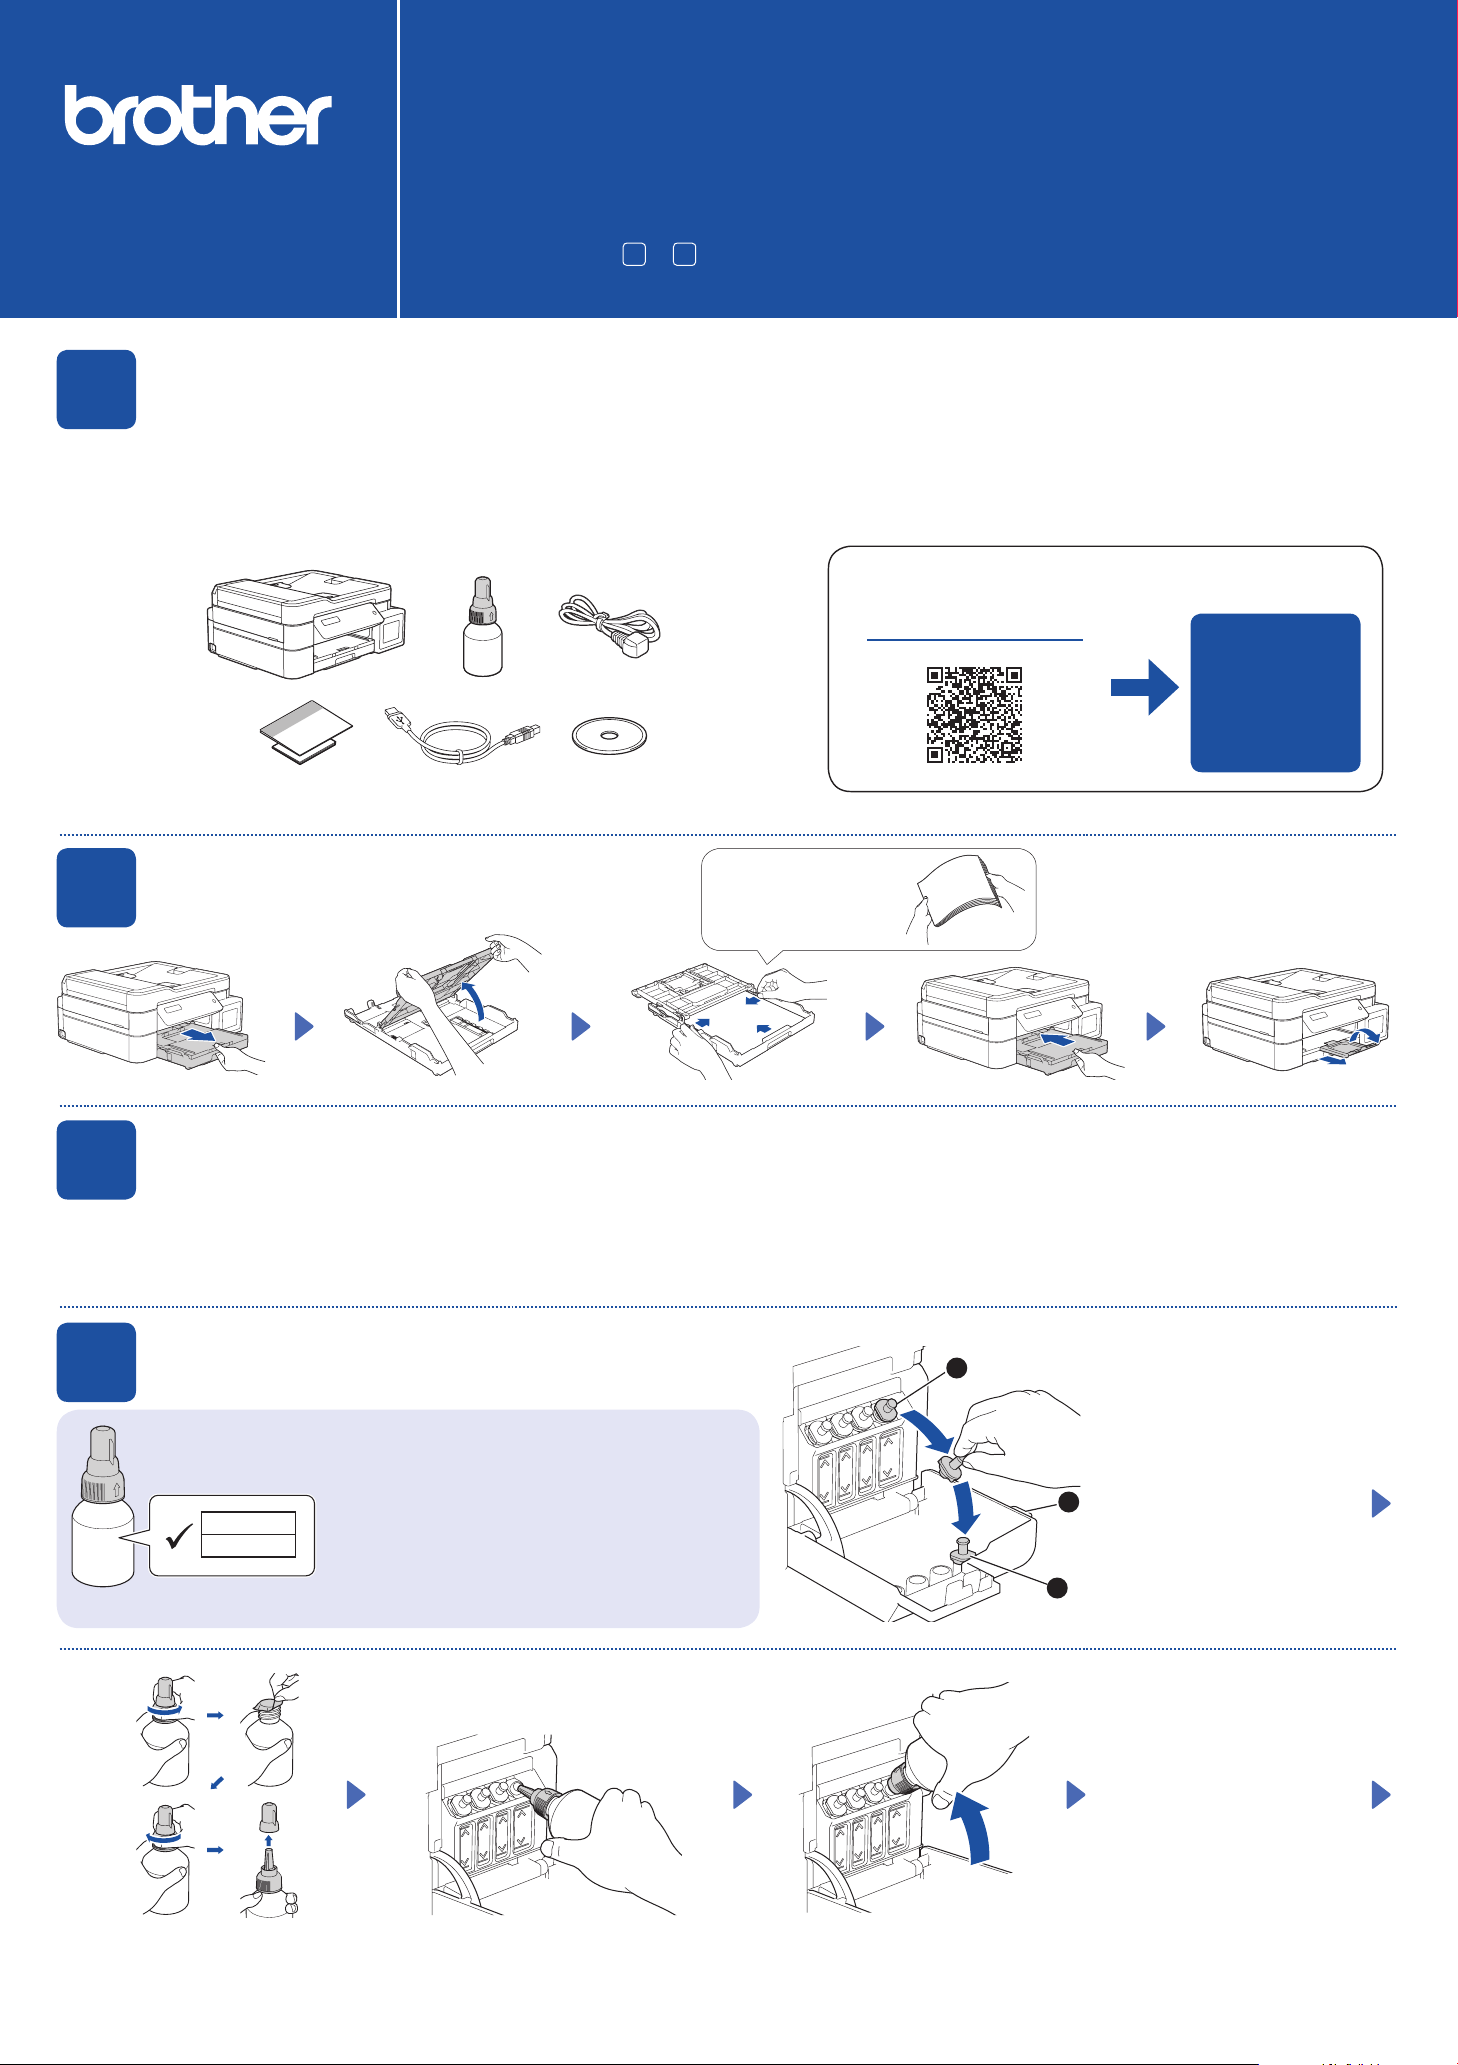
Remove the protective tape and the film covering the machine.
Unpack the machine and check the components
Keep this guide next to your machine for quick reference.
You must follow steps 1 to 7 to complete the setup.
CHN-ENG
Version 0
NOTE
• The illustrations in this Quick Setup Guide show the DCP-T720DW.
• Save all packing materials and the box in case you must ship your
machine.
• We recommend using a USB 2.0 cable (Type A/B) that is no more than
2 meters long.
• Use a straight-through Category 5 (or greater) twisted-pair cable for
10BASE-T or 100BASE-TX Fast Ethernet Network (not included).
(DCP-T820 DW)
2
Inbox Ink Bottles*4
Load plain A4 paper in the paper tray
Operation Videos
www.95105369.com
Installation
& Using
Videos
Fan the paper well.
3
Connect the power cord. The machine powers on automatically.
4
Connect the power cord
Fill the ink tanks with inbox ink
IMP O RTANT
BTD60BK
BT5009CMY
Check the ink bottle model name on the label.
Using the incorrect ink may cause damage to the
machine.
2
Open the ink tank cover a,
1
remove the cap b, and place
it on the back of the cover c.
3
Remove the film and tighten the cap firmly.
The bottle is self-standing and
the ink fills automatically until
the bottle is empty. To fill the
ink tank faster, squeeze the
bottle on both sides.
Remove the nozzle cap and insert the bottle nozzle firmly into the ink tank so that
the ink does not spill.
Page 2
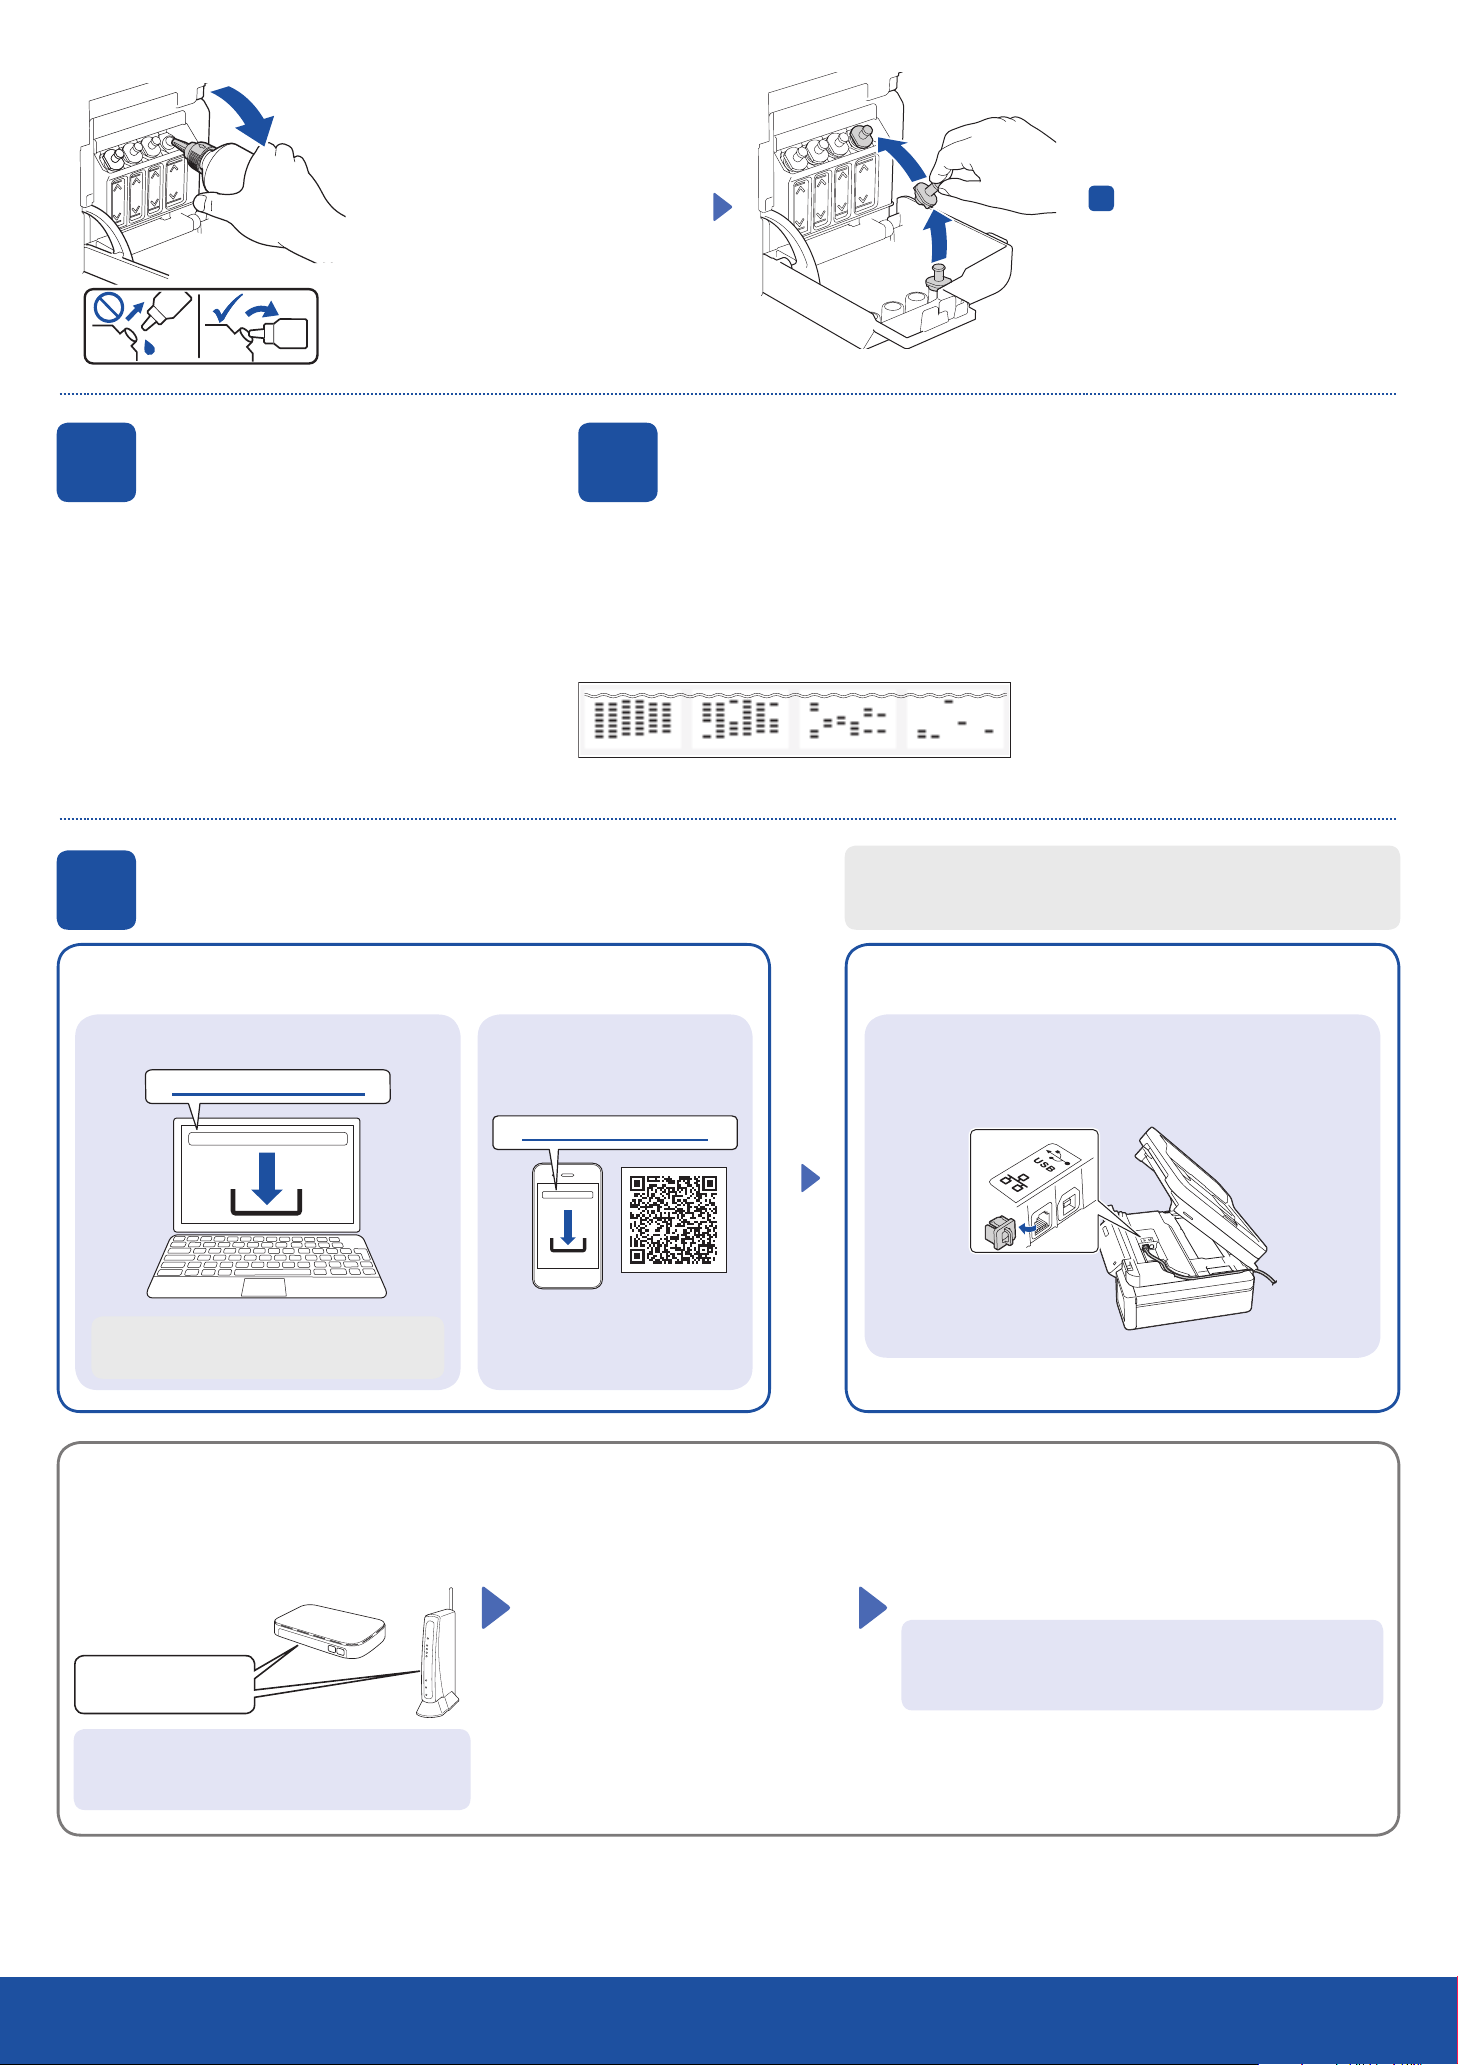
When finished, remove the bottle,
pointing the nozzle upward so the ink
does not spill.
Replace the ink tank cap. Repeat step
for the other ink tanks, and then
4
close the ink tank cover.
5
1. Press OK to set the date and time.
2. Press a or b to select the number, and then press
OK to set the date and time.
7
Install Brother software to use your machine. Visit one of the following websites:
For Computers:
Set the date and time
6
When the machine has finished the initial cleaning process, follow the steps on the LCD to configure
the machine settings.
• Check the print quality DCP-T820DW:
None A Few About Half Many
Connect your computer or mobile device
For Mobile Devices:
setup.brother.com
Machine settings
• Configure the paper tray settings
Connect your Brother machine and computer/mobile device to the
same network.
Follow the on-screen instructions.
For Wired Network Connection* and USB Connection:
Use the correct port (based on the cable you are using)
inside the machine, as shown.
For Windows only, CD installation is also
available.
Manual wireless setup (if needed)
Find the SSID (Network Name) and Network Key
(Password) on your wireless access point/router.
SSID: XXXXXXX
Network Key: XXXX
brother.com/apps
Install the Brother iPrint&Scan
application.
1. Go to your machine and press WiFi.
2. Press OK to select [Find
Network].
The [WLAN Enable?] message
appears on the LCD.
3. Press a to select [On].
*D CP-T820DW
Select the SSID (Network Name) for your access point/
router and enter the Network Key (Password).
To enter the Network Key, hold down or repeatedly press a
or b to select a character from the list below:
abcdefghijklmnopqrstuvwxyzABCDEFGHIJKLMNOPQR
STUVWXYZ0123456789(space)!”#$%&’()*+,-./:;<=>?@
[\]^_`{|} ~
If you cannot find this information, ask your
network administrator or wireless access point/
router manufacturer.
When the wireless setup is successful, the LCD displays
[Connected].
1
Setup Complete
Page 3

兄弟畅享印(WeChat Mini Program)
Your machine can print through an applet of WeChat, which is called "兄弟畅享印"."兄弟畅享
印" lets you wirelessly print photos and documents without the need to install an app or a
dr iver.
Binding your printer before using above print function for the first time.
Please scan the QR code on the right for operation instructions.
Reference and Troubleshooting
www.95105369.com
For detailed machine operation, see the Online
User’s Guide:
Control Panel Overview
Using &
Troubleshooting
n Copy
1. Place the document face down on the scanner glass.
2. Press Mono Start or Color Start.
Note: For multiple Copy, press a or b to select the number of Copies.
n Copy Options
Enlarge or reduce copies, adjust density, ID copy and so on
settings, press Enlarge/Reduce or Copy Quality or
Copy/Scan Options(ID) in advance.
n Scan
1. Place the document face down on the scanner glass.
2. Press SCAN.
3. Follow the on-screen instructions, press a or b to select scanning file
format and the computer where you send data, and then press OK.
4. Press Mono Start or Color Start.
n Scan Options
There are Scan type, Resolution, File Type, Document Size, Remove
background colour and so on settings.
Press SCAN, and then press Copy/Scan Options(ID) for more scan
settings.
Machine Settings
The machine’s settings are set from the application (Brother iPrint&Scan or Brother Utilities) on your computer or mobile device.
Important Notice for Network Security: The default password to manage this machine’s settings is located on the back of the machine and marked “Pwd”. We
recommend immediately changing the default password to protect your machine from unauthorized access. See the Online User’s Guide.
Page 4

Check Ink Volume
Improve Print Quality
Clean the print head.
DO NOT fill the ink tank past the maximum fill mark.
When the ink level reaches the lower line, refill the ink tank as soon as possible.
Press a or b to select [Maintenance] >
Press Menu.
[Cleaning] > [Blac k], [Color] or [A ll]
> [Nor m a l], [S t r o n g] or [Str o n g e s t],
and then press OK.
Remove Jammed Paper
Press Mono Start or Color Start.
Avoid getting ink on your
hands.
For more information about paper jams, see the Online User’s Guide.
2
For FAQs, Troubleshooting, and to download software and manuals, visit www.95105369.com. © 2020 Brother Industries, Ltd. All rights reserved.
 Loading...