

Page 1
0
INSTRUCTION MANUAL
082-007100
BEDIENUNGSANLEITUNG
MANUEL D'INSTRUCTIONS
SINGLE
NEEDLE DIRECT
DR
MANUAL
· STRAIGHT LOCK STITCHER WITH THREAD
DE
INSTRUCCIONES
TRIMMER
Please read this manual before using the machine.
Please keep this manual within easy reach
EINNADEL-GERADSTEPPSTICHMASCHINE
for
quick reference.
MIT
DIREKTANTRIEB
UNO
FADENABSCHNEIDER
Bitte vor Gebrauch der Maschine diese Anleitung lesenl
Bitte halten Sie diese Anleitung stets griffbereit
zur
schnellen Orientierungl
MACHINE 1 AIGUILLE, POINT NOUE, AVEC MOTEUR INCORPORE ET COUPE-FIL
Veuillez lire ce manuel avant d'utiliser Ia machine.
Veuillez garder ce manuel pres de vous pour une verification rapide.
PUNTADA RECTA 1 AGUJA CON DIRECCION DIRECT A Y CORTA HILOS
Por favor lea este manual antes de usar
Por favor guarde este manual
al alcance de
Ia
maquina.
Ia
mano para una rapida referencia.
Page 2
Thank you very much
instructions below and the explanations given
for
buying a
BROTHER
sewing machine. Before using your new machine, please read the safety
in
the instruction manual.
With industrial sewing machines,
the needle and thread take-up lever, and consequently there is always a danger
Follow the instructions from training personnel and instructors regarding safe and correct operation before operating the
machine so that you will know
, 1 : Safety indications and their meanings
This instruction manual and the indications and symbols that are used
ensure safe operation
these indications and symbols are given below.
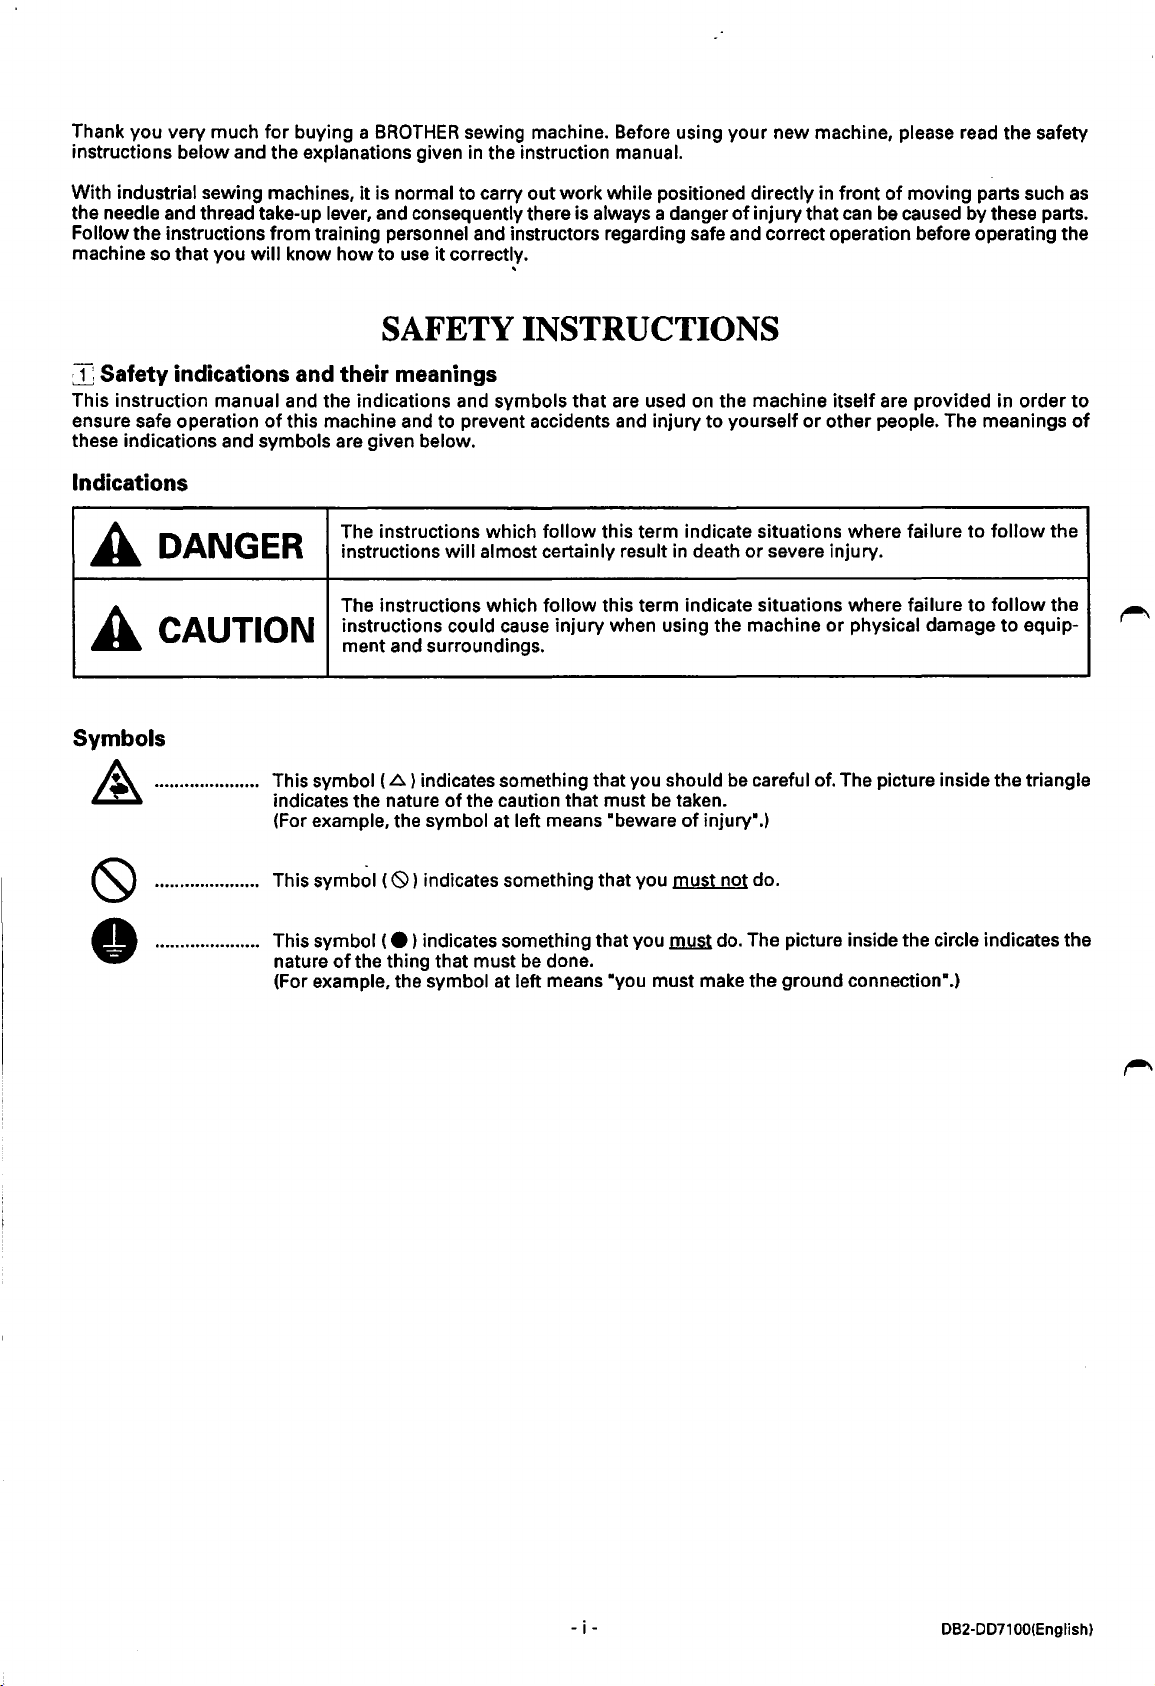
Indications
A
A
Symbols
DANGER
CAUTION
of
this machine and to prevent accidents and injury to yourself
it
is normal to carry out work while positioned directly in front
of
injury that
how
to
use
it
correctly .
SAFETY
The instructions which follow this term indicate situations where failure to
instructions will almost certainly result
The instructions which follow this term indicate situations where failure
instructions could cause injury when using the machine
ment and surroundings.
.
INSTRUCTIONS
on
the machine itself are provided in order
in
death
or
severe injury.
or
of
moving parts such
can
be
caused by these parts.
other people. The meanings
or
physical damage to equip-
to
follow
follow
as
to
of
the
the
~
(S)
•
...................
...................
....................
This symbol
..
indicates the nature
(For example, the symbol at left means "beware
This symbol (
..
This symbol
.
nature
(For example, the symbol at left means "you must make the ground connection".)
(A)
indicates something that you should
of
~)
indicates something that you must not do .
(e)
indicates something that you
of
the thing that must
the caution that must
be
done.
be
.m.Yn
be
careful of. The picture inside the triangle
taken.
of
injury•
.)
do. The picture inside the circle indicates the
i-
-
DB2·DD71
OO(English)
Page 3
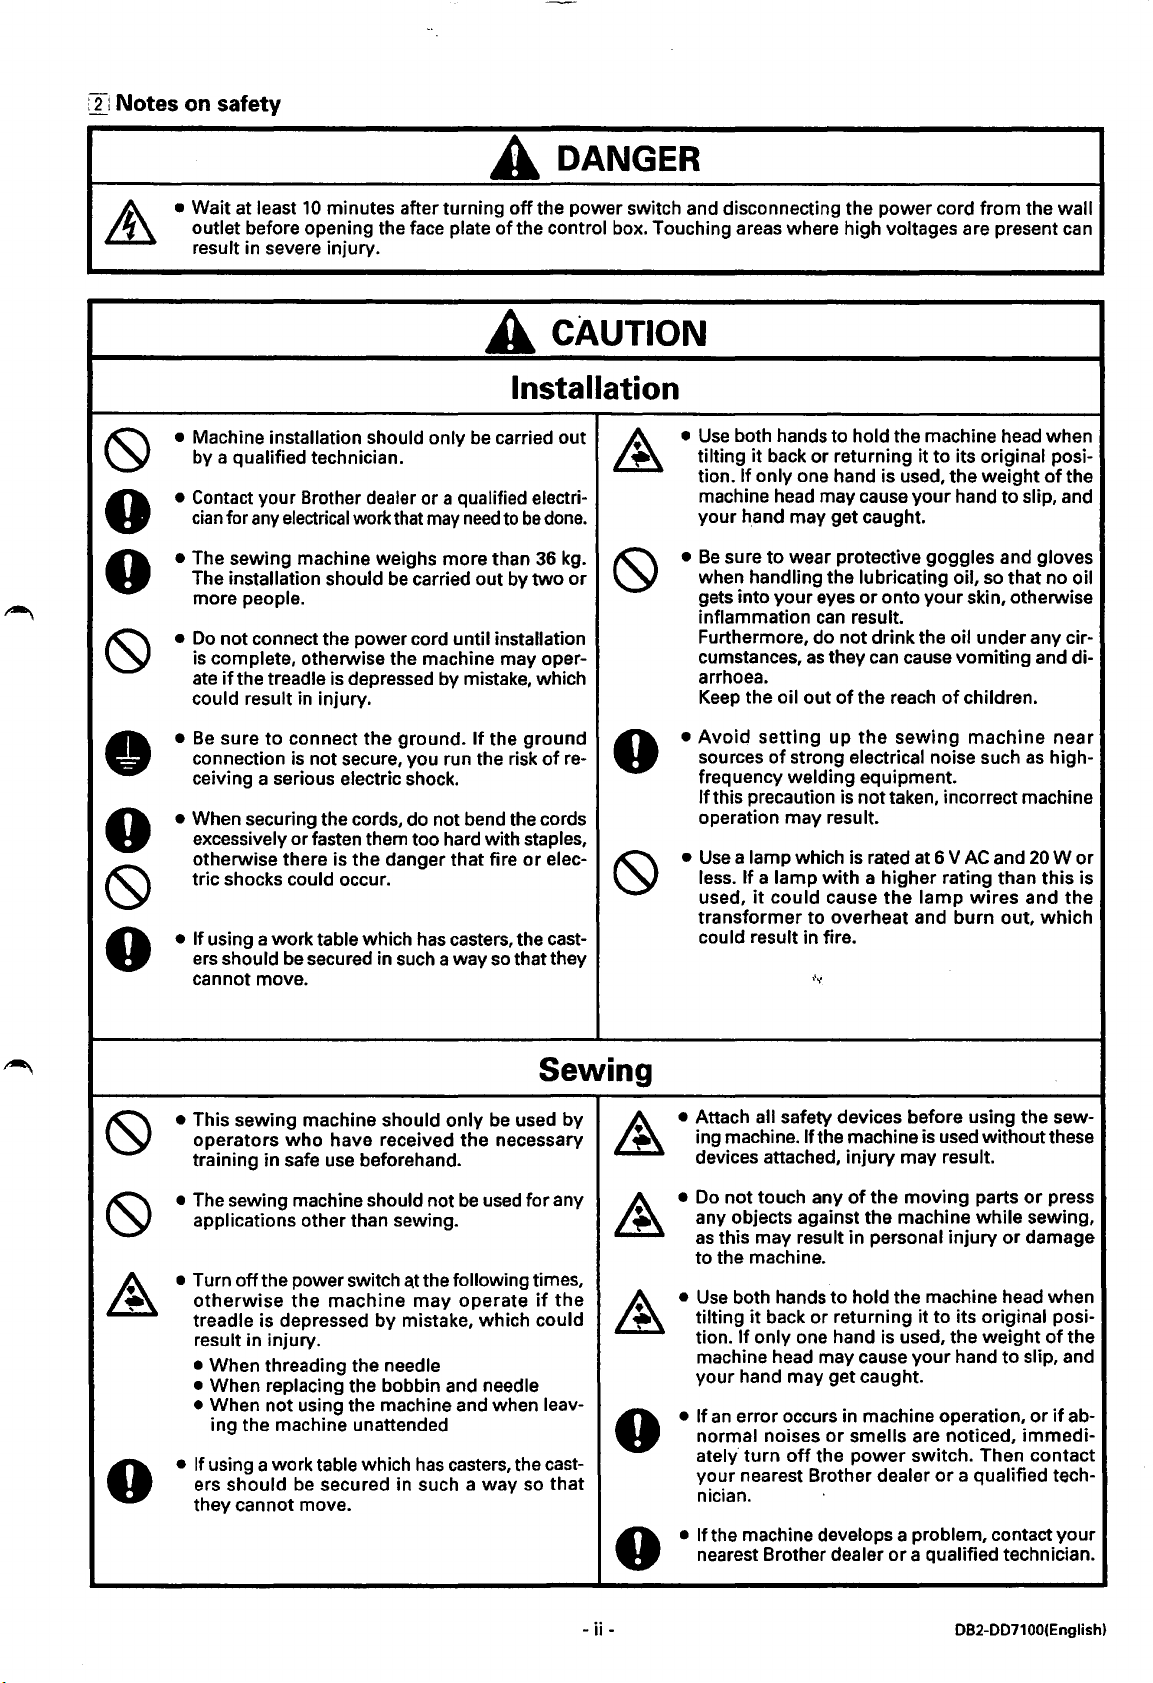
t 2 : Notes on safety
• Wait at least
• Machine installation should only
(9
• Contact your Brother dealer or a qualified electri-
0
• The sewing machine weighs more than 36 kg.
0
(9
•
•
•
• When securing the cords, do not bend the cords
0
(9
• If using a work table which
0
A
10
minutes after turning
before opening the face plate
outlet
result in severe injury.
off
of
the control box. Touching areas where high voltages are present
A CAUTION
Installation
be
by a
qualified technician.
cian
for
any
electrical
The installation should
more people.
Do
not connect the power cord until installation
is
complete, otherwise the machine may oper-
ate
if
the treadle is depressed by mistake, which
could result
Be
sure
to
connection
ceiving a serious electric shock.
excessively
otherwise there is the danger that fire
tric shocks could occur.
ers
should
cannot move.
connect the ground.
is
or fasten them too hard with staples,
be
work
that
may
be
carried
in
injury.
not secure, you run the risk
secured in such a way
has
carried out
need
to
be
out
by
two
If
the ground
or
casters, the cast-
so
that they
DANGER
the power switch and disconnecting the power cord
•
Use
both hands to hold the machine head when
tilting
it
back or returning it to its original posi-
If only one hand is used, the weight
your
hand
sure
to
wear protective goggles and gloves
or
can
as
the oil out
setting
of
strong electrical noise such
welding equipment.
a lamp which is rated at 6 V
it
could
to
,
..
onto your skin, otherwise
result.
they
can
cause vomiting and di-
of
the reach
up
the
is
nottaken, incorrect machine
result.
with
a higher rating than
cause
overheat and burn out,
sewing
the
lamp
of
done.
or
of
re-
elec-
~
•
(9
•
0
•
(9
tion.
machine head may cause
your hand may get caught.
Be
when handling the lubricating oil, so that no oil
gets into your eyes
inflammation
Furthermore, do not drink the oil under any circumstances,
arrhoea.
Keep
Avoid
sources
frequency
If this precaution
operation may
Use
less. If a lamp
used,
transformer
could result in fire.
from
the wall
to
slip, and
children.
machine
as
AC
and
wires
and
can
of
the
near
high-
20 W or
this
is
the
which
(9
• This sewing machine should only
(9
~
0
be
who
operators
training in safe
The sewing machine should not
•
applications other than sewing.
• Turn
• If using a work table which
off
the power switch
otherwise
treadle is depressed
result in injury.
• When threading the needle
• When replacing the bobbin and needle
• When not using the machine and when leav-
ing the machine unattended
ers
should
they cannot move.
have received the necessary
use
beforehand.
a.t
the following times,
the
machine
be
secured in such a
may
by
mistake, which could
has
casters, the cast-
used
be
used
operate
way
for any
so
Sewing
by
~
~
if
the
~
0
that
0
- ii -
• Attach all safety devices before using the sewing machine.
devices attached, injury may
• Do not touch any
any objects against the machine
as
this may result in personal injury
to
the machine.
•
Use
both hands
tilting
tion.
If
machine head may cause your hand
your hand may get caught.
• If
an
error occurs in machine operation,
normal noises
ately
your nearest Brother dealer
nician.
• If the machine develops a problem, contact
nearest Brother dealer
If the machine
of
the moving parts
to
it
back or returning it
only one hand
turn
off
hold the machine head when
or
smells are noticed,
the power switch. Then contact
is
used withoutthese
result.
or
while
or
to
is
or
its original posi-
used, the weight
to
slip, and
immedi-
or
a qualified tech-
a qualified technician.
DB2-DD7100(English)
press
sewing,
damage
of
the
or
if
ab-
your
Page 4
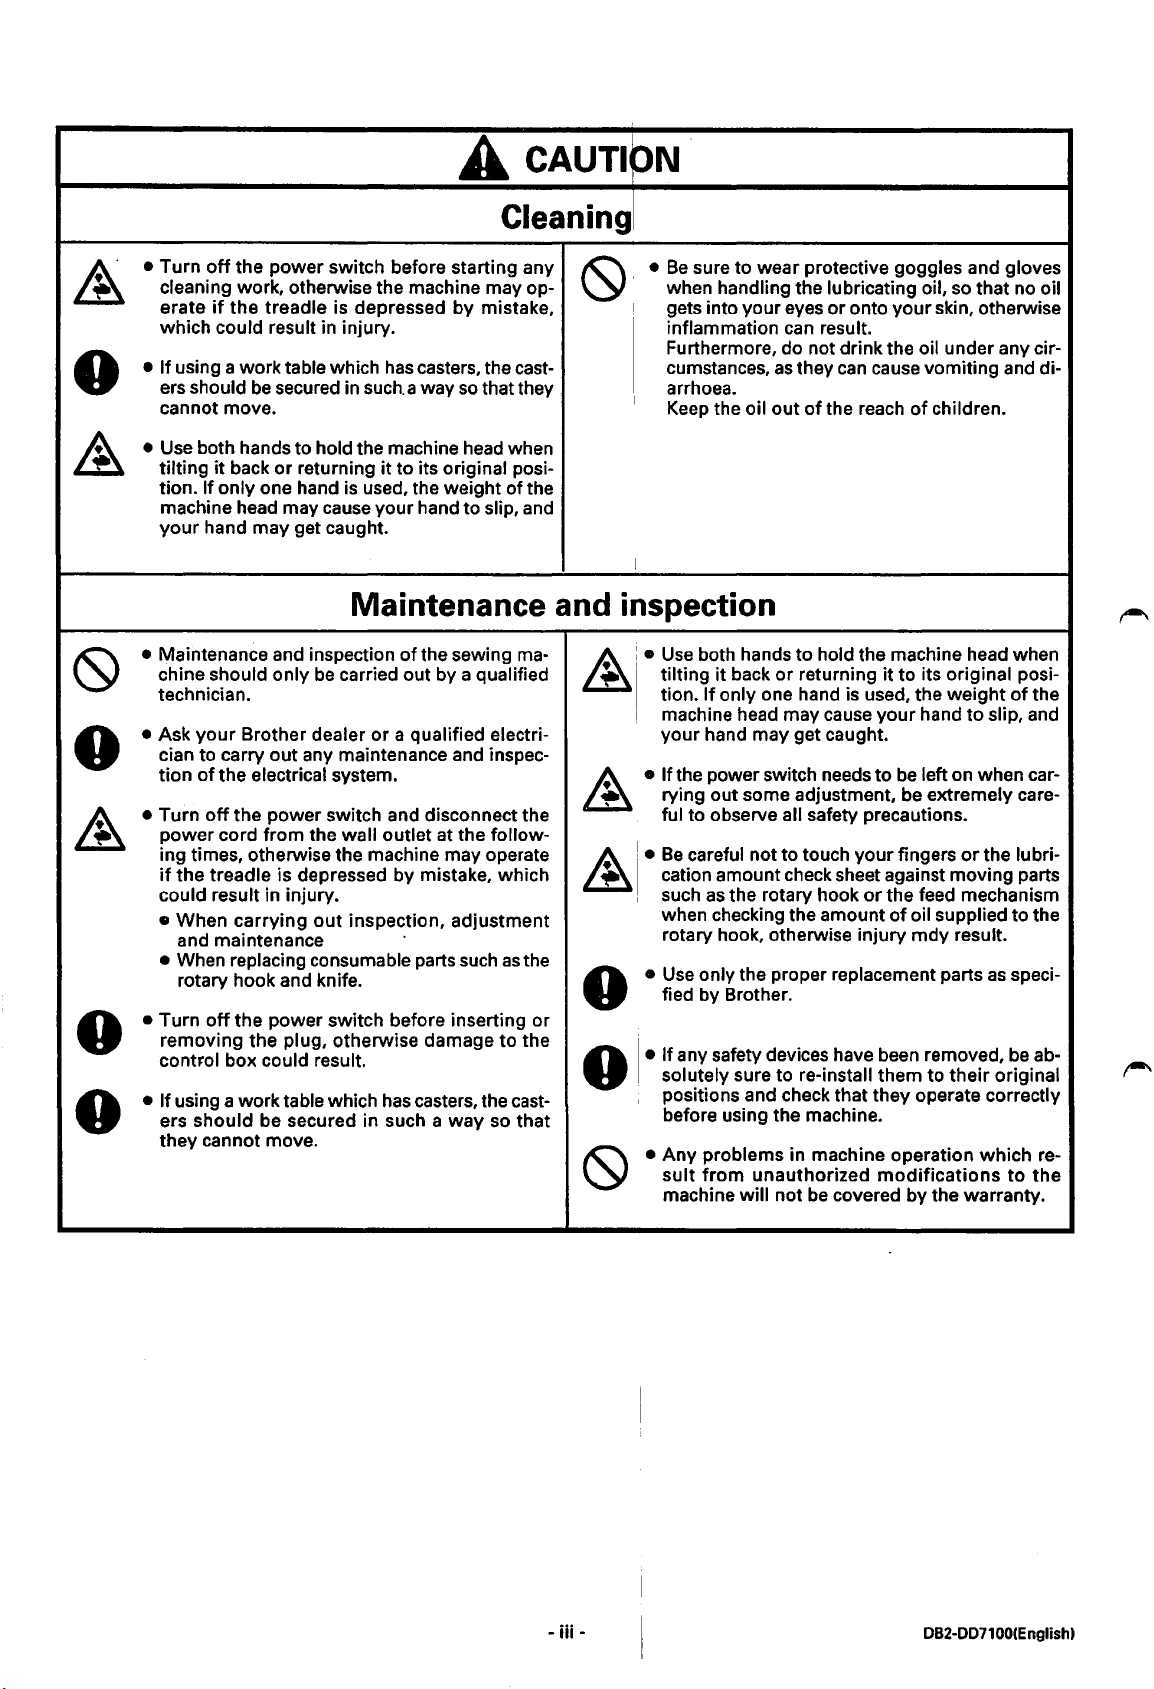
A CAUTION
Cleaning
0
0
• Turn
• If using a work table which
• Use both hands to hold the machine head when
off
the power switch before starting any
cleaning work, otherwise the machine may op-
if
erate
which could result in injury.
ers should
cannot move.
tilting
tion.
machine head may cause your hand to
your
the treadle is depressed by mistake,
has
be
secured in
it
back
or
If only one hand
hand may get caught.
returning
is
casters, the cast-
such.
a way
so
that they
it
to its original posi-
used, the weight of the
slip,
and
Maintenance and inspection
• Maintenance and inspection
chine should only
technician.
• Ask
your
Brother dealer
cian to carry
of
the electrical system.
tion
• Turn
• Turn
• If using a work table which
off
power cord from the
ing times, otherwise the machine may operate
if
could result in injury.
• When carrying
• When replacing consumable parts such
removing the plug, otherwise damage
control box could result.
ers should be secured in such a
they cannot move.
the power switch and disconnect the
the treadle is depressed by mistake, which
and maintenance
rotary hook and knife.
off
the power switch before inserting or
be
out
any maintenance and inspec-
out
of
carried out by a qualified
wall outlet at the follow-
inspection, adjustment
the sewing
or
a qualified electri-
has
casters, the cast-
way
ma-
as
the
to
the
so that
•
Be
sure to wear protective goggles and gloves
when handling the lubricating oil, so that no
gets into your eyes
inflammation
Furthermore, do not drink the
cumstances,
arrhoea.
Keep
the oil
A ' •
~
Use
both hands
tilting
it
back
If
only one hand is used, the weight
tion.
machine head may cause your hand
your hand may get caught.
A • If the power switch needs
~
A !
~
AI•
rying out some adjustment, be extremely careful to observe
•
Be
careful not to touch your fingers
cation amount check sheet against moving parts
1
, such
•
as
when checking the amount
rotary hook, otherwise injury
Use
fied by Brother.
If any safety devices have been removed,
the rotary hook
only the proper replacement parts
or
onto
your
skin, otherwise
can
result.
as
they
can
out
of
the reach
to
hold the machine head when
or
returning
all safety precautions.
oil under any cir-
cause vomiting and di-
of
children.
it
to
its original posi-
to
be
left on when car-
or
the feed mechanism
of
oil supplied to the
mdy
V . solutely sure to re-install them to
, positions and check that they operate correctly
before using the machine.
•
Any
problems in machine operation
sult
from
unauthorized
machine will not
be
modifications
covered by the warranty.
to
or
the lubri-
result.
their
which
oil
of
the
slip, and
as
speci-
be
ab-
original
re-
to
the
-iii
-
DB2-DD71001Englishl
Page 5
Vielen Dank, daB Sie sich
neuen Nahmaschine die nachstehenden Sicherheitshinweise und die in der Bedienungsanleitung angegebenen Erklarungen
durch.
Bei industriellen Nahmaschinen ist
eine gewisse Verletzungsgefahr durch die Nadel und den Fadenabnahmehebel. Befolgen Sie bitte aile die Anweisungen
und lnstruktionen
der Maschine vertraut.
ffir
eine BROTHER-Nahmaschine entschieden haben.
es
iiblich direkt
fiir
eine sichere und fehlerfreie Bedienung sorgfaltig und machen Sie sich
vor
sich bewegenden Teilen
Lesen
zu
arbeiten und deshalb besteht
Sie bitte
vor
der lnbetriebnahme der
vor
der lnbetriebnahme
immer
mit
SICHERHEITSHINWEISE
[I] Sicherheitshinweise und ihre Bedeutung
Diese Bedienungsanleitung und die Hinweise und Symbole auf der Maschine sollen einen sicheren Betrieb der Maschine
sicherstellen und die
nachstehend erklart.
Hinweise
Unfall- und Verletzungsgefahr verringern. Die Bedeutung dieser Hinweise und Symbole
wird
A
A
Symbole
~
....................
GEFAHR
ACHTUNG
Bei
diesem Symbol (
.
Natur der Gefahr hin.
(Zum Beispiel waist das linksstehende
Dieses
Dieses Symbol
einen Hinweis darauf, was gemacht warden muB.
(Zum Beispiel bedeutet
Die Anweisungen, die diesem Ausdruck folgen, sind
MiBachtung eine hohe Verletzungsgefahr oder sogar Lebensgefahr besteht.
Diese
Anweisungen,
MiBachtung Verletzungsgefahr fi.ir das Bedienungspersonal vorhanden ist
Nahgut und die Maschinenteile beschadigt warden konnen.
~)
Symbol (
(S))
waist darauf hin, daB Sie etwas njcht machen dljrfen.
(e)
waist darauf hin, daB Sie etwas machen mi.issen.
die diesem Ausdruck
miissen Sie Sorgfalt anwenden.
Symbol auf eine Verletzungsgefahr hin.)
das
stehende Symbol, daB der ErdungsanschluB gemacht warden muB.)
folgen,
Das
fiir
Gefahrensituationen, bei deren
sind
fiir
Situationen,
Symbol
im
Dreieck
Das
Symbol im Kreis
bei deren
oder
waist
auf
das
die
gibt
-
iv-
DB2-007100(Germanl
Page 6
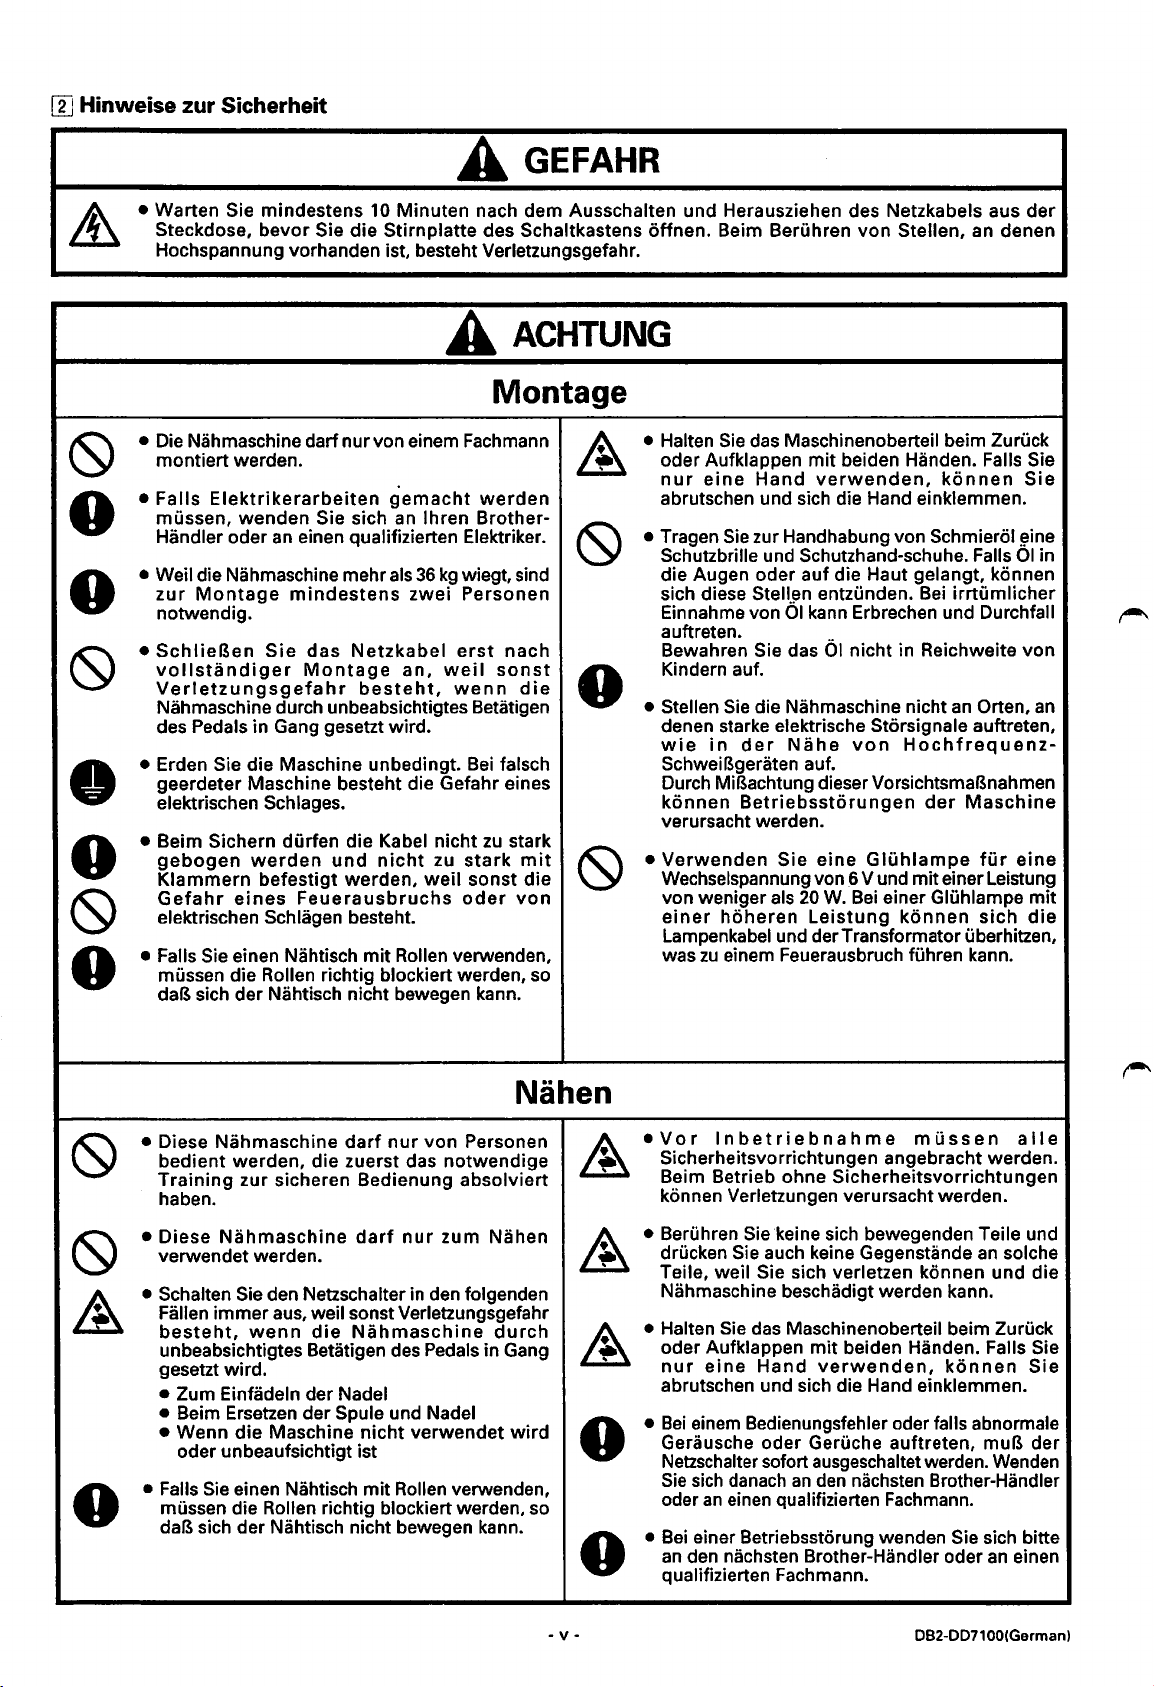
[Ij Hinweise zur Sicherheit
• Warten Sie mindestens
• Die Nahmaschine dart nur von einem Fachmann
•
• Weil die Nahmaschine mehr als
•
• Erden Sie die Maschine unbedingt.
•
• Beim Sichern durfen die Kabel nicht
0
~
• Falls Sie einen Nahtisch
0
A
10
Steckdose, bevor Sie die Stirnplatte des Schaltkastens offnen. Beim Beruhren
Hochspannung vorhanden ist, besteht Verletzungsgefahr.
Minuten nach dem Ausschalten und Herausziehen des Netzkabels aus
A
GEFAHR
ACHTUNG
Montage
montiert werden.
Falls
Elektrikerarbeiten
mussen, wenden Sie sich an lhren BrotherHandler oder
zur
Montage
notwendig.
SchlieBen
vollstandiger
Verletzungsgefahr
Nahmaschine durch unbeabsichtigtes Betatigen
des Pedals in Gang gesetzt wird.
geerdeter Maschine besteht die Gefahr eines
elektrischen Schlages.
gebogen
Klammern
Gefahr
elektrischen Schlagen besteht.
mussen die
daB sich der Nahtisch nicht bewegen kann.
an
einen qualifizierten Elektriker.
mindestens
Sie
das
Montage
werden
befestigt
eines
Feuerausbruchs
Rollen richtig blockiert werden, so
gemacht
Netzkabel
besteht,
und
nicht
werden,
mit
werden
36
kg
wiegt, sind
zwei
Personen
erst
an,
weil
zu
weil
Rollen verwenden,
nach
sonst
wenn
Bei
falsch
zu
stark
stark
sonst die
oder
die
mit
von
0
• Halten
• Tragen
• Stellen
•
Sie
oder Aufklappen
nur
abrutschen und sich die Hand einklemmen.
Schutzbrille und Schutzhand-schuhe. Falls
die Augen oder
sich diese
Einnahme von
auftreten.
Bewahren Sie das
Kindern auf.
denen starke elektrische Storsignale auftreten,
wie
SchweiBgeraten auf.
Durch
konnen
verursacht werden.
Verwenden
Wechselspannung von 6 V und mit einer Leistung
von weniger als
einer
Lampenkabel und derTransformator uberhitzen,
was
das Maschinenoberteil beim Zuruck
eine
Sie
mit
Hand
zur Handhabung von Schmierol
Stellen entzunden.
verwenden,
auf
die Haut gelangt, konnen
01
kann
01
Sie
die Nahmaschine nicht
in
der
Nahe
MiBachtung dieser VorsichtsmaBnahmen
Betriebsstorungen
Sie
eine
20
hoheren
zu
einem Feuerausbruch fUhren kann.
W.
Leistung
01
Orten,
fur
eine
sich
der
Sie
~ine
in
an
mit
die
von
Stellen, an denen
beiden Handen. Falls Sie
Erbrechen und Durchfall
nicht in Reichweite von
von
GIUhlampe
Bei
konnen
Bei
irrtumlicher
an
Hochfrequenz-
der
Maschine
einer Gluhlampe
konnen
Nahen
•Vor
• Beruhren Sie keine sich bewegenden Teile und
• Halten
•
•
0
• Diese Nahmaschine
bedient werden, die zuerst das
Training
haben.
• Diese
verwendet werden.
• Schalten Sie den Netzschalter
Fallen
besteht,
unbeabsichtigtes Betatigen
gesetzt wird.
• Zum Einfadeln der Nadel
• Beim Ersetzen der Spule und Nadel
• Wenn
oder unbeaufsichtigt ist
• Falls
mussen die
daB sich der Nahtisch nicht bewegen kann.
zur sicheren Bedienung absolviert
Nahmaschine
immer
aus, wei I sonst Verletzungsgefahr
wenn
die
Maschine
Sie
einen Nahtisch
Rollen richtig blockiert werden, so
dart
dart
die
Nahmaschine
nicht
mit
nur
von Personen
notwendige
nur
zum Nahen
in
den folgenden
des
Pedals in Gang
verwendet
Rollen verwenden,
durch
wird
0
0
-
v-
lnbetriebnahme
Sicherheitsvorrichtungen angebracht werden.
Beim Betrieb ohne Sicherheitsvorrichtungen
konnen Verletzungen verursacht warden.
drucken Sie auch keine Gegenstande
Teile,
weil Sie sich verletzen konnen und die
Nahmaschine
Sie
oder Aufklappen
nur
eine
abrutschen und sich die Hand einklemmen.
Bei
einem Bedienungsfehler oder falls abnormale
Gerausche oder Geruche auftreten,
Netzschalter sofort ausgeschaltet werden.
Sie
sich
oder
an
Bei
einer Betriebsstorung wenden Sie sich bitte
an
den nachsten Brother-Handler oder
qualifizierten Fachmann.
mussen
an
beschadigt werden kann.
das Maschinenoberteil beim Zuruck
danach
einen qualifizierten Fachmann.
Hand
an
mit
beiden Handen. Falls Sie
verwenden,
den
nachsten Brother-Handler
konnen
muB der
DB2-DD7100(Germanl
Wenden
an
aile
solche
Sie
einen
Page 7
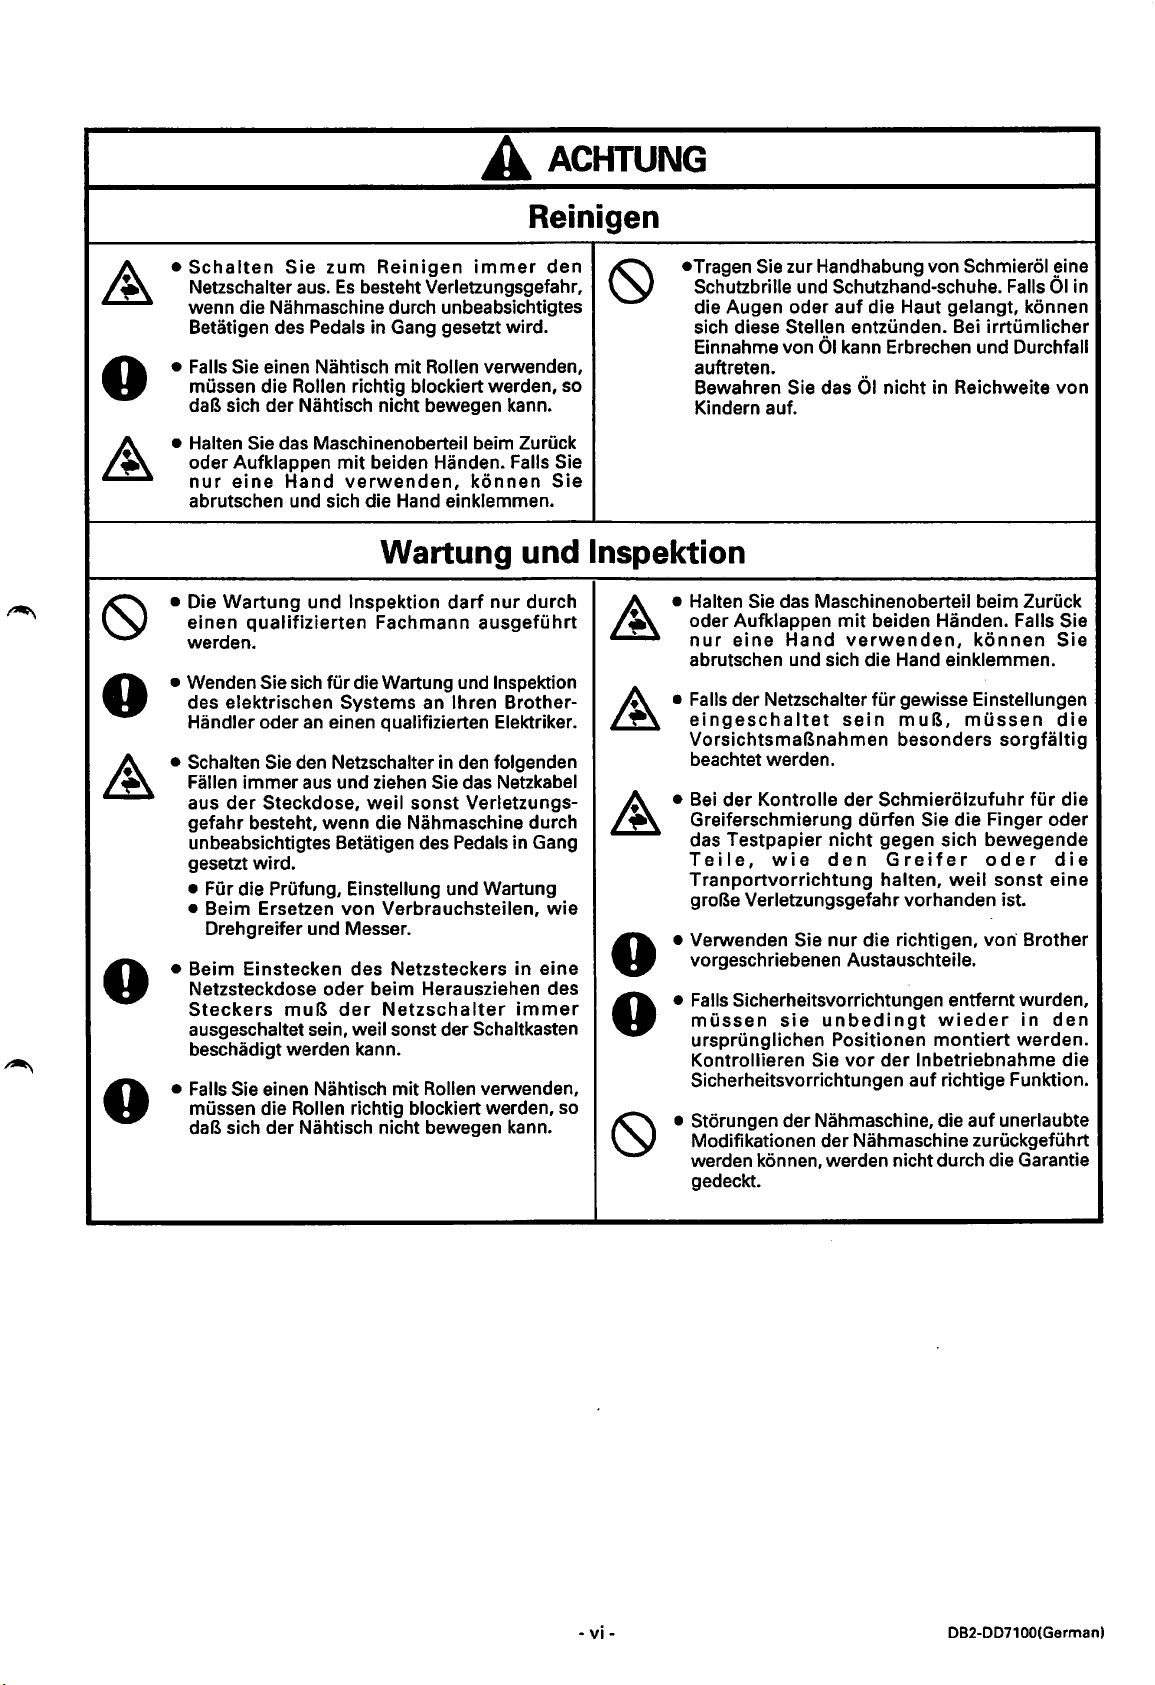
A
ACHTUNG
Reinigen
•
Schalten
Netzschalter
wenn die Nahmaschine durch unbeabsichtigtes
Betatigen des
• Falls Sie einen Nahtisch mit Rollen verwenden,
mussen die
daB sich der Nahtisch nicht bewegen kann.
• Halten Sie das Maschinenoberteil beim Zuruck
oder Aufklappen
nur
abrutschen und sich die Hand einklemmen.
eine
Sie
zum
Reinigen
aus.
Es
besteht Verletzungsgefahr,
Pedals in Gang gesetzt wird.
Rollen richtig blockiert warden,
mit
Hand
beiden Handen. Falls Sie
verwenden,
immer
konnen
den
so
Sie
Wartung und lnspektion
Sie
•Tragen
Schutzbrille und Schutzhand-schuhe. Falls
die Augen oder
sich diese
Einnahme von
auftreten.
Bewahren
Kindern auf.
zur Handhabung von Schmierol eine
auf
Stellen entzunden. Bei irrtumlicher
Sie das
die Haut gelangt, konnen
61
kann Erbrechen und Durchfall
61
nicht in Reichweite von
61
in
• Die
Wartung
einen
qualifizierten
werden.
• Wenden Sie
des elektrischen Systems an lhren BrotherHandler
• Schalten
• Beim Einstecken des Netzsteckers
• Falls Sie einen Nahtisch mit Rollen verwenden,
immer a
Fallen
aus
der
gefahr besteht, wenn die Nahmaschine durch
unbeabsichtigtes Betatigen des
gesetzt wird.
• Fur die Prufung, Einstellung und Wartung
• Beim Ersetzen
Drehgreifer und Messer.
Netzsteckdose oder beim Herausziehen des
Steckers
ausgeschaltet sein, weil sonst der Schaltkasten
beschadigt werden kann.
mussen die
daB sich der Nahtisch nicht bewegen kann.
und lnspektion
Fachmann
sich
fUr
die Wartung und lnspektion
oder
an
einen qualifizierten Elektriker.
Sie
den
Netzschalter in
us
und ziehen Sie
Steckdose,
muB
Rollen richtig blockiert werden,
weil
von
Verbrauchsteilen,
der
Netzschalter
dart
den
das
sonst Verletzungs-
Pedals
nur
durch
ausgefuhrt
folgenden
Netzkabel
in Gang
wie
in
eine
immer
so
0
0
• Halten
oder Aufklappen
nur
abrutschen und sich die Hand einklemmen.
• Falls
eingeschaltet
VorsichtsmaBnahmen besonders
beachtet warden.
•
Bei
Greiferschmierung durfen
das Testpapier
Teile,
Tranportvorrichtung
groBe Verletzungsgefahr vorhanden ist.
• Verwenden Sie
vorgeschriebenen
•
• Sttirungen der Nahmaschine, die auf unerlaubte
werden konnen, werden nicht durch die Garantie
Sie
das
Maschinenoberteil beim Zuruck
mit
eine
Hand
der Netzschalter fur gewisse Einstellungen
der Kontrolle der Schmiertilzufuhr
wie
Falls
Sicherheitsvorrichtungen entfernt wurden,
mussen
ursprunglichen Positionen
Kontrollieren Sie
Sicherheitsvorrichtungen auf richtige Funktion.
Modifikationen der Nahmaschine zuruckgefuhrt
gedeckt.
sie
beiden Handen. Falls Sie
verwenden,
sein
muB,
nicht
gegen sich bewegende
den
Greifer
halten,
nur
die richtigen,
Austauschteile.
unbedingt
vor
der lnbetriebnahme die
konnen
mussen
Sie die Finger oder
weil
wieder
montiert
sorgfaltig
fur
oder
sonst
von·
Brother
in
werden.
Sie
die
die
die
eine
den
-vi-
DB2-DD7100(Germanl
Page 8
Nous vous remercions d'avoir achete une machine a coudre
attentivement les instructions de securite ci-dessous
lire
et
BROTHER.
les explications donnees dans
Avant d'utiliser votre nouvelle machine, veuillez
le
manuel d'instructions.
utiliser les machines a coudre industrielles, l'operateur doit
Pour
l'aiguille et le levier de releveur de fil; par consequent,
utiliser
personnel
Ia
machine correctement et
de formation.
en
toute securite,
ces
se
conformer aux instructions donnees par les instructeurs et le
INSTRUCTIONS
OJ
Indications de securite
Ce
manuel d'instructions et les indications et symboles figurant sur
chine en toute
ces
indications et de
securite et d'eviter des accidents et des blessures a votre entourage
ces
et
leur signification
symboles sent indiquees ci-dessous.
se
trouver justa en face des parties mobiles telles que
pieces presentent un risque permanent de blessures. Pour
DE
SECURITE
Ia
machine elle-meme permettent d'utiliser
eta
vousmeme.
Indications
Ce
A
A
DANGER
A1TENTION
terme designe
provoquer
Ces
terme designe
des blessures lors de !'utilisation de
objets environnants.
les
instructions qui, faute d'etre respectees,
un
deces ou des blessures graves.
les
instructions qui, faute d'etre respectees, risqueraient de provoquer
ont
Ia
machine, ou d'endommager
de grandes chances de
Symboles
Ce
~·····················
symbole (
triangle
(Par
exemple, le symbole a gauche signifie "Risque de blessures•
.t:::.)
indique
indique
Ia
nature de
Ia
chose a laquelle vous devez faire attention. L'image contenue dans le
Ia
precaution a prendre.
.)
Les
significations de
Ia
machine et les
Ia
ma-
Ce
symbole (
Ce
symbole
Ia
nature de
(Par
exemple, le symbole a gauche signifie "Vous devez effectuer le branchement de terre".)
0)
indique une chose que vous
(e)
indique une chose que vous
Ia
chose a effectuer.
ne
deyez
pas
fa
ire.
~
faire. L'image contenue dans
le
cercle indique
-vii-
082-0071
OO(French)
Page 9
~
Remarques concernant Ia securite
• Attendre
• L'.installation de
•
•
•
• Veiller a bien brancher
•
• Lors
•
A
au
mains
10
minutes apres avoir mis l'interrupteur d'alimentation sur
debranche le cordon d'alimentation de
commande.
Si
on touche des zones sous haute tension, on risque de
A
DANGER
Ia
prise murale, avant
ATTENTION
Installation
Ia
machine
exclusivement
S'adresser a votre revendeur Brother ou a un
electrician
reparation eventuelle du systeme electrique.
La
machine a coudre
L'installation necessite done
personnes ou plus.
Ne
pas brancher le cordon d'alimentation avant
d'avoir
sinon
Ia
marche si on
risquera alors de
le
branchement de terre est mal fait, il y aura
risque d'electrocution grave.
de
excessivement les cAbles et
trop fort avec
d'incendie ou d'electrocution.
Si
on utilise une table de travail equipee de roulettes,
maniere
immobilisees.
il
a un personnel qualifie.
qualifie
completement
machine
Ia
fixation
taut
qu'elles
risquera de se
relache
Ia
se
blesser.
des cables, ne pas
les agrafes, sinon il y aura risque
veiller a fixer
doit
etre confiee
pour
effectuer
pese
plus
le
concours
termine
pedale par erreur, et on
Ia
machine a
scient
!'installation,
ne
pas les serrer
les roulettes de
parfaitement
toute
de 36 kg.
de
deux
mettre
Ia
terre.
plier
en
Si
0
Ia
position d'arret et avoir
d'ouvrir
• Saisir
• Veiller a mettre des lunettes et des gants de pro-
• Eviter d'installer
• Utiliser une lampe d'une tension nominate de 6
Ia
lorsqu'on
remet a
une seule main,
d'etre pincee car
tection
lubrifiante, afin de preserver les yeux et
tout
de
que d'inflammation.
De
plus, !'ingestion
absolument,
vomissements et des diarrheas.
Ranger l'huile hors de portae des enfants.
bruit
electrique intense, telles que des appareils
de soudure haute frequence.
Si on
n'observe
anomalie
s'ensuivre.
V
CA
et d'une puissance nominate de
mains.
superieures
le transformateur risqueront de surchauffer et
griller, et done de provoquer un incendie.
de
Ia
plaque frontale du
se
blesser gravement.
U~te
de machine avec les deux mains
!'incline
sa
position initiate. Si on
lors
contact avec l'huile, et d'eviter
de
Si
les valeurs nominates de
aces valeurs, les fils de
vers
l'arriere
Ia main risquera de glisser et
Ia
tete de machine est lourde.
de
Ia
manipulation
de
l'huile
car
ella
pourrait
Ia
machine pres de sources de
pas cette
fonctionnement
ou
Ia
est a proscrire
causer
precaution,
risque
Ia
lampe sont
Ia
boitier
saisit avec
de
qu'on
Ia
d'huile
Ia
peau
tout
ris-
des
une
de
20
W ou
lampe et
Couture
(9
• Cette
• Cette machine ne
(9
• Mettre l'interrupteur d'alimentation sur
~
•
0
machine a coudre
seulement
prealablement
!'utilisation
d'autres usages que
sition d'arret aux moments suivants, sinon
machine risquera de
relache
de se blesser.
• Lors de l'enfilage de l'aiguille
•
Lors du remplacement de
l'aiguille
•
Lorsqu'on
lorsqu'on laisse
Si
on utilise une table de travail equipee de roulettes,
maniere
immobilisees.
par
des
re~u
sOre
de
Ia
doit
Ia
pedale par erreur, et on risquera alors
n'utilise
Ia
machine sans surveillance
il
taut
veiller a fixer
qu'elles
doit
litre
operateurs
Ia
formation necessaire a
machine.
pas
Ia
se
litre
couture.
mettre en marche si on
Ia
pas Ia
scient
les roulettes de
parfaitement
utilisee
qui
utilisee
canette
machine
Ia
et
pour
ont
po-
Ia
de
et
-viii-
•
~
• Ne toucher aucune des parties mobiles, et ne
~
• Saisir
~
•
0
•
0
Fixer
machine a coudre.
d'abord
pas
Ia
couture, car
ou endommager
lorsqu'on
a
sa
main,
car
Si
une
si
on
mettre immediatement l'interrupteur d'alimentation
en
concessionnaire
En
cas
concessionnaire
to
us
les
dispositifs
fixe
ces
dispositifs,
presser d'objets centre
ceci
Ia
tllte de machine avec les deux mains
!'incline vers l'arriere ou qu'on
position initiate. Si on
Ia
main risquera de glisser et d'etre pincee
Ia
tllte de machine est lourde.
anomalie
remarque
position
d'anomalie
des
d'arret.
de
Si
de
Brother
de
Brother
securite
on
utilise
on
pourrait causer des blessures
Ia
machine.
fonctionnement
bruits
ou
S'adresser ensuite a un
ou a un
fonctionnement,
ou a un
avant
Ia
machine
risquera
Ia
Ia
saisit avec une seule
des
de
machine pendant
se
odeurs anormaux,
technician qualifie.
s'adresser a un
technician
DB2-DD7100(French)
d'utiliser
sans
avoir
se
blesser.
Ia
remet
produit,
qualifie.
Ia
ou
Page 10

A
ATTENTION
Nettoyage
• Mettre l'interrupteur d'alimentation sur
~
•
0
~
~
• Saisir
• L'entretien et
• S'adresser a un concessionnaire Brother
0
• Mettre l'interrupteur d'alimentation sur
~
'
• Mettre l'interrupteur d'alimentation sur
0
•
0
Ia
posi-
tion
d'arr~t
nettoyage.
marche
risquera alors de
Si
on utilise une table de travail equipee de roulettes,
maniere
immobilisees.
lorsqu'on
remet a
une seule main,
d'etre pincee car
avant d'entreprendre les travaux
La
machine risquera de
si
on
relache
il
faut
qu'elles
Ia
ti3te
de machine avec les deux mains
!'incline
sa
position initiale.
Ia
pedale par erreur,
se
blesser.
veiller a fixer
scient
vers l'arriere ou
Ia
main risquera de glisser et
Ia
tete de machine est lourde.
les roulettes de
parfaitement
Si
on
se
Ia
saisit avec
Entretien
Ia
verification
coudre doivent
technician
electrician qualifie pour effectuer
un
d'entretien
electrique.
sition
d'alimentation
suivants, sin
en
on risquera alors
• Lorsqu'on effectue des verifications, des
• Lars du remplacement des accessoires tels
sition
fiche,
boitier de commande.
Si
lettes,
qu'elles scient parfaitement iromobilisees.
d'arret
marche
reglages ou des operations d'entretien.
le
que
d'arret avant d'introduire ou de retirer
sinon
on
utilise une table
il taut veiller a fixer
etre confies exclusivement a un
qualifie.
ou de
on
si
crochet rotatif et le couteau.
verification
et
debrancher
de
Ia
prise murale aux moments
Ia
machine risquera de
on relache
de
se
on risquera
de
de
Ia
machine a
des
du systeme
le
Ia
pedale par erreur,
blesser. crochet rotatif ou le dispositif d'entrainement
d'endommager
travail equipee
les
roulettes
de
de
mettre
en
et
on
qu'on
Ia
et
ou
travaux
Ia
po- les precautions de securite.
cordon
se
mettre
et
Ia
po-
Ia
le
de
rou-
maniere
• Veiller a mettre
~
taction
lubrifiante, afin de preserver les yeux
de tout contact avec l'huile, et d'eviter
que d'inflammation.
De
absolument,
vomissements et
Ranger l'huile hers de portae
verification
• Saisir
~
a car
A
A
0
0
~
lorsqu'on
a
sa
main,
• S'il taut laisser l'interrupteur d'alimentation sur
Ia
reglages, veiller absolument a respecter toutes
• Veillez a
verification
touchent
Iars
lubrification parvenant
vous risqueriez de vous blesser.
•
Utiliser
recommandees par Brother.
•
Si
veiller absolument a les remettre a leur place
initiale
correctement avant d'utiliser
• Toute anomalie de fonctionnement de
chine
autorisees de
par
des
lunettes et
Iars
de
Ia
manipulation
plus, !'ingestion de
car
ella
des
diarrheas.
Ia
tete de machine avec les deux mains
!'incline vers l'arriere ou qu'on
position initiale.
Ia
main risquera de glisser et d'etre pincee
Ia
tete de machine est lourde.
position de marche lorsqu'on effectue des
ce
pas
de
Ia
verification
seulement
des dispositifs de securite ont ete deposes,
et
resultant
Ia
garantie.
Si
on
que vos
de
les parties mobiles telles que le
verifier
Ia
doigts
quantite
les pieces de rechange
de
transformations
machine ne sera
des
gants de pro-
et
l'huile
pourrait
au
qu'ils
est a proscrire
causer
des
enfants.
Ia
saisit
avec
une seule
ou
Ia
de
de
crochet rotatif, car
Ia
feuille
lubrification
Ia
quantite
fonctionnent
machine.
pas
d'huile
Ia
peau
tout
ris-
des
Ia
remet
de
ne
de
Ia
ma-
non
couverte
-
ix-
082-0071
OO(French)
Page 11
Muchas gracias
instrucciones
AI
usar maquinas de coser industriales,
y
Ia
palanca del tirahilos, y por consiguiente siempre existe peligro de sufrir heridas ocasionadas por estas partes. Siga las
instrucciones para entrenamiento del personal y las instrucciones de seguridad y funcionamiento correcto antes de usar
Ia
maquina de manera de usarla correctamente.
por
haber adquirido una maquina de coser
de
seguridad a continuaci6n y las explicaciones
es
normal trabajar ubicado directamente delante de piezas m6viles como
BROTHER.
en
este manual.
Antes de usar
su
nueva maquina, por favor lea las
Ia
aguja
ITJ
lndicaciones
Las indicaciones y
funcionamiento seguro de
se
indica a continuaci6n.
de
seguridad y sus significados
slmbolos
INSTRUCCIONES
usados
Ia
maquina y para evitar accidentes y heridas.
en
este manual de instrucciones y
DE
SEGURIDAD
en
Ia
El
significado de estas indicaciones y slmbolos
misma maquina son para asegurar el
lndicaciones
Las
instrucciones a continuaci6n de este termino representan situaciones
A
A
PELIGRO
AlENCION
no respetar las instrucciones seguramente resultara
el
Las
instrucciones a continuaci6n de este termino representan situaciones
no respetar las instrucciones podrla causar heridas durante el usa de Ia maquina o
el
daliar
Ia
podrian
maquina y otros objetos a su alrededor.
en
muerte o heridas serias.
Simbolos
Este
~-····················
indica
(Par
Este
slmbolo (
Ia
ejemplo,
sfmbolo (
.t:::.)
naturaleza de
indica alga con lo que usted debe tener cuidado.
el
slmbolo a
~)
indica alga que
Ia
precauci6n que
Ia
izquierda significa "cuidado puede resultar herido".)
se
.D.Q...M
hacer.
debe tener.
Esta
figura dentro del triangulo
en
las cuales
en
las cuales
Este
sfmbolo
acci6n a realizar.
(Par ejemplo,
(e)
el
indica alga
slmbolo a
que~
Ia
izquierda significa "debe hacer
hacer.
La
figura dentro del cfrculo indica
Ia
conexi6n a tierra".)
Ia
naturaleza de
Ia
-x-
082-0071
OO(Spanishl
Page 12
:1J
Notas sobre seguridad
A PELIGRO
• Despues de desconectar
•
(9
•
0
•
0
o No conectar el cable de alimentacion hasta
(9
• Asegurarse
•
• AI asegurar los cables, no torcer los cables
0
(9
•
0
el
interrupter principal y desenchufar
Ia
pared esperar
areas donde exista alto voltaje puede ocasionar heridas graves.
al
menos
10
minutos antes de abrir
A
ATENCION
Ia
el
placa delantera de
lnstalacion
La
maquina debe ser instalada solo por personal
especializado.
Consultar
electricista calificado por cualquier trabajo de
electricidad que
La
maquina de coser pesa mas de
instalacion debe ser realizada por dos o
son
as.
haber completado
Ia
maquina podria comenzar a funcionar
descuido se pisara el pedal, lo que podria
resultar
conexion a tierra no fuera segura,
peligro de sufrir golpes electricos serios.
excesivamente ni apretarlos demasiado con
grapas,
ocurra
Si
se
ruedas deben estar trancadas de manera que
no
se
a su
distribuidor
se
debiera realizar.
Ia
instalacion,
en
heridas.
de
hacer
Ia
conexion a tierra.
de
lo contrario existe
un
incendio o golpes electricos.
usa
una mesa de trabajo con ruedas, las
puedan mover.
Brother
de
el
peligro
lo contra rio
se
36
mas
corre
o un
kg.
si
de
La
per-
por
Si
que
Ia
el
A
(9
0
(9
• Usar
Ia
su
el
que
Ia
• Asegurarse de usar anteojos de seguridad y
guantes
manera que
ojos o
inflamados.
Ademas, bajo
lubricante pues podria ocasionar
diarrea.
Mantener
de los
o Evitar instalar
fuentes de
equipos
Si
Ia
• Usar
Si
Ia
cableado de
cual pod
cable de alimentacion del tomacorriente
Ia
caja de controles.
am
bas
maquina
posicion original.
peso
se
mano.
no
maquina podria funcionar mal.
se
indicada,
manos para sostener
al
inclinarla hacia atras o volverla a
Si
solo
de
Ia
cabeza
resbale de
al
manipular aceites lubricantes • de
el
Ia
piel, de lo contrario podrian resultar
el
niflos .
de
soldadura de alta frecuencia.
se
tienen
una
lam
usa
una lampara de mayor potencia que
ria
resultar
de
Ia
maquina podria hacer
su
mano y
aceite lubricante no salpique sus
ningun
aceite lubricante lejos del alcance
Ia
ruidos
en
para
se
podria recalentar y quemar
Ia
lampara y
concepto beba aceite
maquina de coser proxima a
electricos
cuenta estas precauciones,
de
6 V
deCAy
el
en
un incendio.
El
tocar las
Ia
cabeza de
se
usa
una mano,
se
podria apretar
vomitos
fuertes
20 W o menos.
transformador, lo
en
y
como
el
Costura
• Solo operarios que hayan sido entrenados
(9
(9
~
0
especialmente deben usar esta maquina de
coser.
•
La
maquina de coser no debe ser usada para
otro uso que no
Desconectar el
•
siguientes casos, de lo contrario
podria comenzar a funcionar si por descuido
se
pisara el pedal,
heridas.
•
AI
enhebrar
•
AI
cambiar
• AI no usar
dejandola sin cuidado
•
Si
se
usa una mesa de trabajo con ruedas, las
ruedas deben estar trancadas de manera que
no
se
puedan mover.
sea
coser.
interrupter
lo
Ia
aguja
Ia
bobina y
Ia
maquina y alejarse de ella
principal
Ia
maquina
que podria resultar
Ia
aguja
en
los
en
~
~
A
0
0
-xi-
• lnstalar todos los dispositivos
tes de usar
de
coser
podria resultar herido.
• No
tocar
presionar ningun objeto contra
coser, pues
maquina podria
• Usar ambas manos para sostener
Ia
maquina
su
posicion original.
peso de
que
se
Ia
mano.
•
Si
se
comete
escuchan ruidos extranos o
extranos,
interrupter
Brother
•
Si
Ia
maquina no funcionara correctamente,
consultar
un
tecnico calificado.
a
de
Ia
maquina de coser.
se
usa
sin los dispositivos de seguridad
ninguna
al
Ia
cabeza de
resbale de
un
desconectar
principal.
mas
cercano
al
distribuidor Brother mas cercano o
de las piezas
podria
resultar
resultar daflada.
inclinarla hacia atras o volverla a
Si
solo
Ia
maquina podria hacer
su
mano y
error
al
usar
Luego
consultar
o a
un
seguridad anSi
Ia
moviles
Ia
maquina al
en
heridas o Ia
Ia
se
usa
una mano,
se
podria apretar
Ia
maquina, o
se
sienten olores
inmediatamente
tecnico calificado.
al
DB2-DD7100(Spanishl
maquina
o
cabeza de
el
si
se
distribuidor
el
Page 13
A ATENCION
Limpieza
• Desconectar
•
0
•
•
~
•
0
•
&.
• Desconectar el interrupter principal antes de
0
•
0
el
interrupter principal antes de
comenzar cualquier trabajo de limpieza.
maquina podria comenzar a funcionar
descuido
resultar
Si
se
ruedas deben estar trancadas de manera que
no
se
Usar
maquina
posici6n original.
de
Ia
resbale
se
pisara el pedal, lo que
en
heridas.
usa una mesa de trabajo con ruedas, las
puedan mover.
ambas manos
al
inclinarla
cabeza
de
su
para
sostener
hacia
Si
s61o
de
Ia
maquina podrla hacer que
mano y
atras 0 volverla a
se
usa
una
se
podrla apretar
Ia
cabeza
mano,
si
podrla
el
Ia
mano.
La
por
de
Ia
su
peso
se
• Asegurarse de usar anteojos de seguridad y
guantes
manera que
ojos o
inflamados.
Ademas, bajo
lubricante pues
diarrea.
Mantener
de los ninos.
al
manipular aceites lubricantes, de
el
Ia
piel, de lo contrario podrlan resultar
el
aceite lubricante lejos del alcance
Mantenimiento e inspecci6n
El
mantenimiento y
debe
ser
realizado
calificado. posici6n original.
Consulter
electricista calificado por cualquier trabajo de
mantenimiento e inspecci6n electrica que
debiera realizer. conectado
Desconectar
desenchufar
tomacorriente en
casos, de
comenzar a funcionar
el
pedal, lo que podrla resultar
• AI
mantenimiento
• AI
cuchilla
conectar o desconectar
contrario
Si
se
ruedas deben estar trancadas de manera que
se
no
a su
lo
inspeccionar,
cambiar
se
usa una mesa de trabajo con ruedas, las
puedan mover.
Ia
inspecci6n
s61o
distribuidor
el
interrupter
el cable de
Ia
pared
contrario
si
por descuido
ajustar o realizer
piezas como
podria danar
de
Ia
maquina
por
un
tecnico
Brother o un
principal
alimentaci6n
en
los siguientes
Ia
maquina
se
en
heridas.
Ia
lanzadera y
el enchufe, de
Ia
caja
de controles.
• Usar
£
se
&.
y precauciones.
del
podrla
pi
sara
£
el
Ia
0
lo
0
~
maquina
de
resbale
• Si el
mucho cuidado de tener
• Asegurarse de no tocar con sus dedos o
de
movimiento
mecanisme
cantidad
giratorio, de
• Usar
por Brother.
• Si se
dispositivos de seguridad, asegurarse
a
funcionan
maquina.
•
Los
no autorizadas
por
ambas
Ia
verificaci6n
instalarlos a
problemas que resultaran de modificaciones
Ia
manos
al
inclinarla hacia atras o volverla a
cabeza
de
de
su
mano y
interruptor
al
realizer un ajuste,
como
de
de aceite
lo contrario podrla sufrir una herida.
s61o
las piezas de repuesto especificadas
hubieran
su
correctamente
garantia.
aceite lubricante no
ningun
Si
Ia
alimentaci6n
desmontado
posici6n original y verificar que
en
concepto beba aceite
podrla ocasionar
para
sostener
s61o
se
usa
maquina podrla hacer que
se
podrla apretar
principal
en
cuenta las siguientes
de
lubricante
el
garfio
suministrado
Ia
maquina no seran cubiertos
Ia
una
mano,
debiera
se
giratorio
al
alguno
antes
sal
pique
v6mitos
cabeza
el
Ia
mano.
estar
debe tener
Ia
partes
verificar
al
garfio
de los
de
volver
de usar
sus
de
Ia
su
peso
se
hoja
en
o el
Ia
Ia
y
xii-
-
DB2-DD7100(Spanishl
Page 14
· 3
~
Warning labels
:a'
Warnschilder
~~-
Etiquettes d'avertissement
3-,
Etiquetas de advertencia
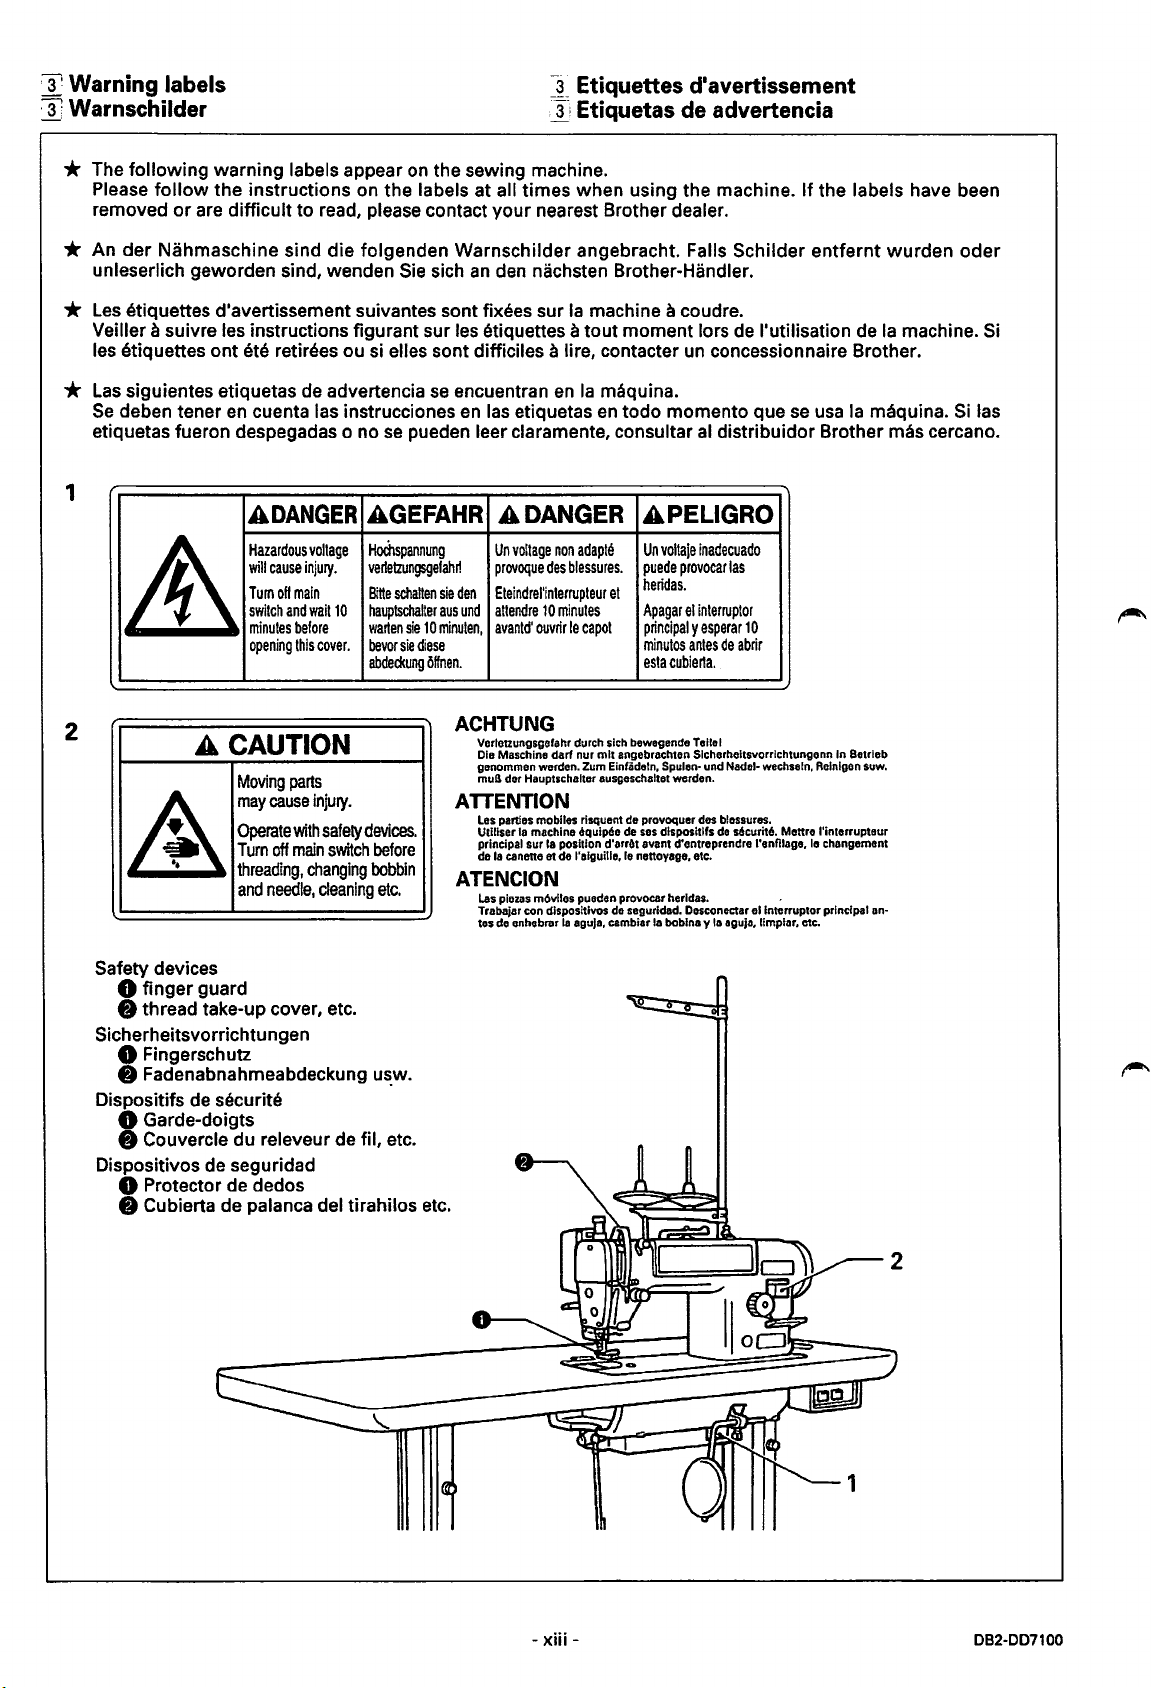
* The following warning labels appear on the sewing machine.
Please
removed
* An
unleserlich geworden sind, wenden
*
Les
Veiller a suivre les instructions figurant sur les etiquettes a tout moment lors de I' utilisation de
les
*
Las
Se
etiquetas fueron despegadas o no
1
follow
the instructions on the labels at all times when using the machine. If the labels have been
or
are difficult to read, please contact your nearest Brother dealer.
der
Nahmaschine sind die folgenden Warnschilder angebracht. Falls Schilder entfernt wurden
etiquettes d'avertissement suivantes sont fixees sur
etiquettes ont ete retirees ou si elles sont difficiles a lire, contacter
siguientes etiquetas de advertencia
deben tener en cuenta las instrucciones
A
DANGER
it
Hazardous
will
TumoHmain
switch
minutes
opening
voltage
cause
injury.
and
wait1 0 hauptschatter
before
this
cover.
Sie
sich
an
den nachsten Brother-Handler.
Ia
machine a coudre.
un
concessionnaire Brother.
se
encuentran
en
las etiquetas
se
pueden leer claramente, consultar al distribuidor Brother mas cercano.
AGEFAHR A DANGER
Hochspannung
vedetzungsgefaM
Bille
schal!en
sie
den
aus
sie
diese
10
und
minuten,
oHnen.
wart
en
bevor
sie
abdeckung
en
Ia
maquina.
en
todo momento que se
Un
voltage
non
des
10
minutes
ouvrir
adapte
blessures.
et
le
capot
provoque
Eteindrel'interrupteur
attendre
avantd'
APELIGRO
Un
vol!aje
inadecuado
puede
provocar
heridas.
Apagar
principal y esperar
minutes
esta
cubierta.
las
el
interrupter
antes
de
10
abrir
usa
Ia
Ia
maquina.
oder
machine. Si
Si
las
2
&.
Safety devices
A CAUTION
Moving
parts
may
cause
injury.
Operate
with
off
main
changing
needle,
safety
switch
cleaning
Tum
threading,
and
0 finger guard
8 thread take-up cover, etc.
Sicherheitsvorrichtungen
0 Fingerschutz
8 Fadenabnahmeabdeckung
Dispositifs de securite
0 Garde-doigts
8 Couvercle du releveur de fil, etc.
Dispositivos de seguridad
0 Protector de dedos
8 Cubierta de palanca del tirahilos etc.
devices.
before
bobbin
etc.
u~w.
ACHTUNG
Vorlotzungsgolohr durch slch bewegende Tello I
Die Maschino
gonommen worden. Zum Einfiidoln, Spulon· und Nadel- wechseln, Rolnlgen suw.
muB dor
ATTENTION
Los parties mobiles risquent de provoquor des blossures.
Utlliser Ia
principal sur
de
ATENCION
Las
Trabejar con dispositivos do
los
dart
nur
mit
angobrachten Slcherheitsvorrlchtungenn
HauptschaUor ausgeschaltot warden.
machine clqulpeo de ses dlsposltlls do sclcurit6. Mottre l'intorruptour
Ia position d'arr6t avant d'entreprendre l'anfllage,
Ia canette
et
de
l'olguitlo,le nettoyage, etc.
plazas m6vlles puadon provocar horldaa. .
do
onhebrar
Ia
segurldad. Doaconoctar
aguja, cambiar Ia boblna y Ia aguja, llmplar, etc.
ellnterruptor
to
changement
principal an·
in
Botrlob
-
xiii-
082-007100
Page 15
c.!,
About
, 4, Erdungssymbol
the
ground symbol
! 4 i A propos du symbole de terre
[!j
Acerca del simbolo de conexion a tierra
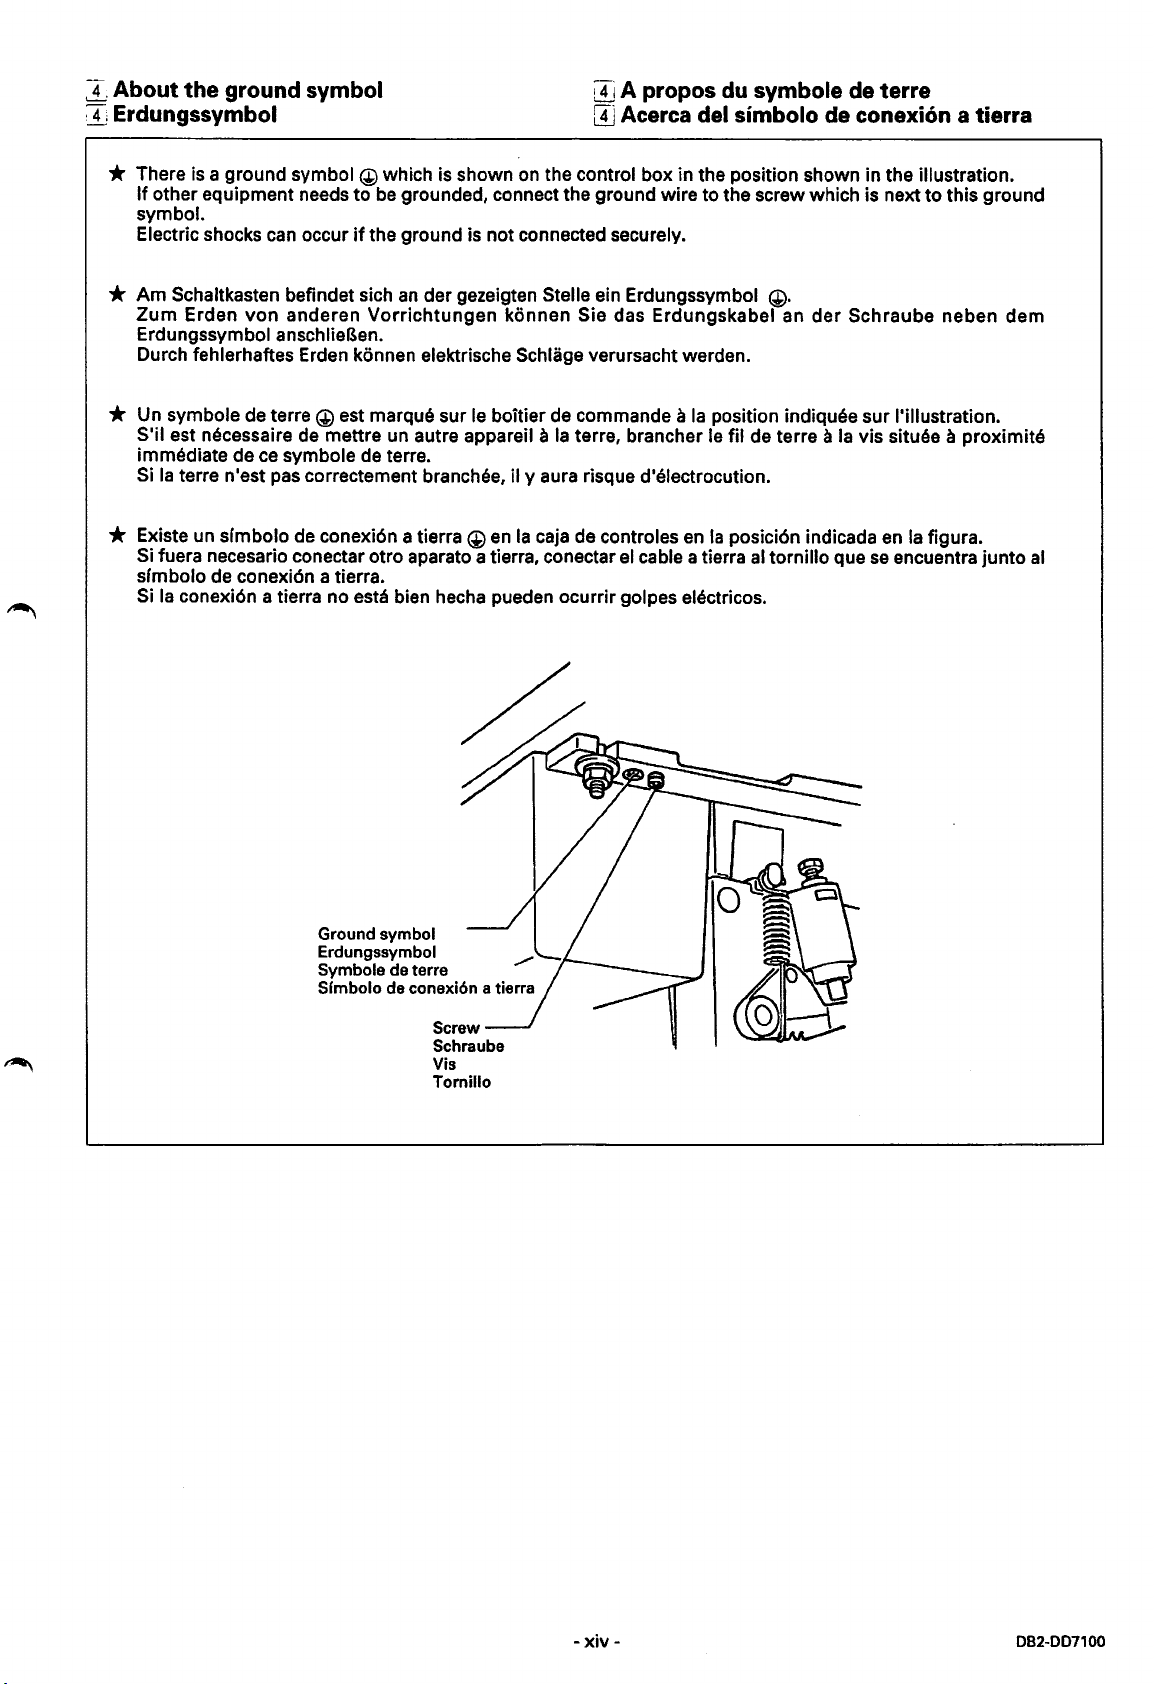
* There is a ground symbol
If
other equipment needs
symbol.
Electric shocks
*
Am
Schaltkasten befindet sich
Zum
Erden
Erdungssymbol
Durch fehlerhaftes Erden konnen elektrische SchUige verursacht warden.
can
von
anderen
anschlieBen.
occur
@which
to
be
if
the ground is not connected securely.
Vorrichtungen
is shown on the control box in the position shown in the illustration.
grounded, connect the ground wire
an
der gezeigten Stelle ein Erdungssymbol
konnen Sie das Erdungskabel an
* Un symbole de terre @ est marque sur le boitier de commande a
S'il
est necessaire de mettre un autre appareil a
immediate de ce symbole de terre.
Si
Ia
terre n'est pas correctement branchee, il y aura risque d'electrocution.
* Existe un sfmbolo de conexi6n a tierra
Si fuera necesario co nectar otro aparato a tierra, conectar el cable a tierra
sfmbolo de conexi6n a tierra.
Si
Ia
conexi6n a tierra no esta bien hecha pueden ocurrir golpes electricos.
@en
Ia
terre, brancher le fil de terre a
Ia
caja de controles
to
the screw which is next
@·
der
Ia
position indiquee
en
Ia
posici6n indicada en
al
tornillo que
to
this ground
Schraube neben dem
sur
!'illustration.
Ia
vis situee a proximite
Ia
figura.
se
encuentra junto
al
Ground symbol
Erdungssymbol
Symbole
Slmbolo de conexi6n a tierra
de terre
-
xiv-
082-007100
Page 16
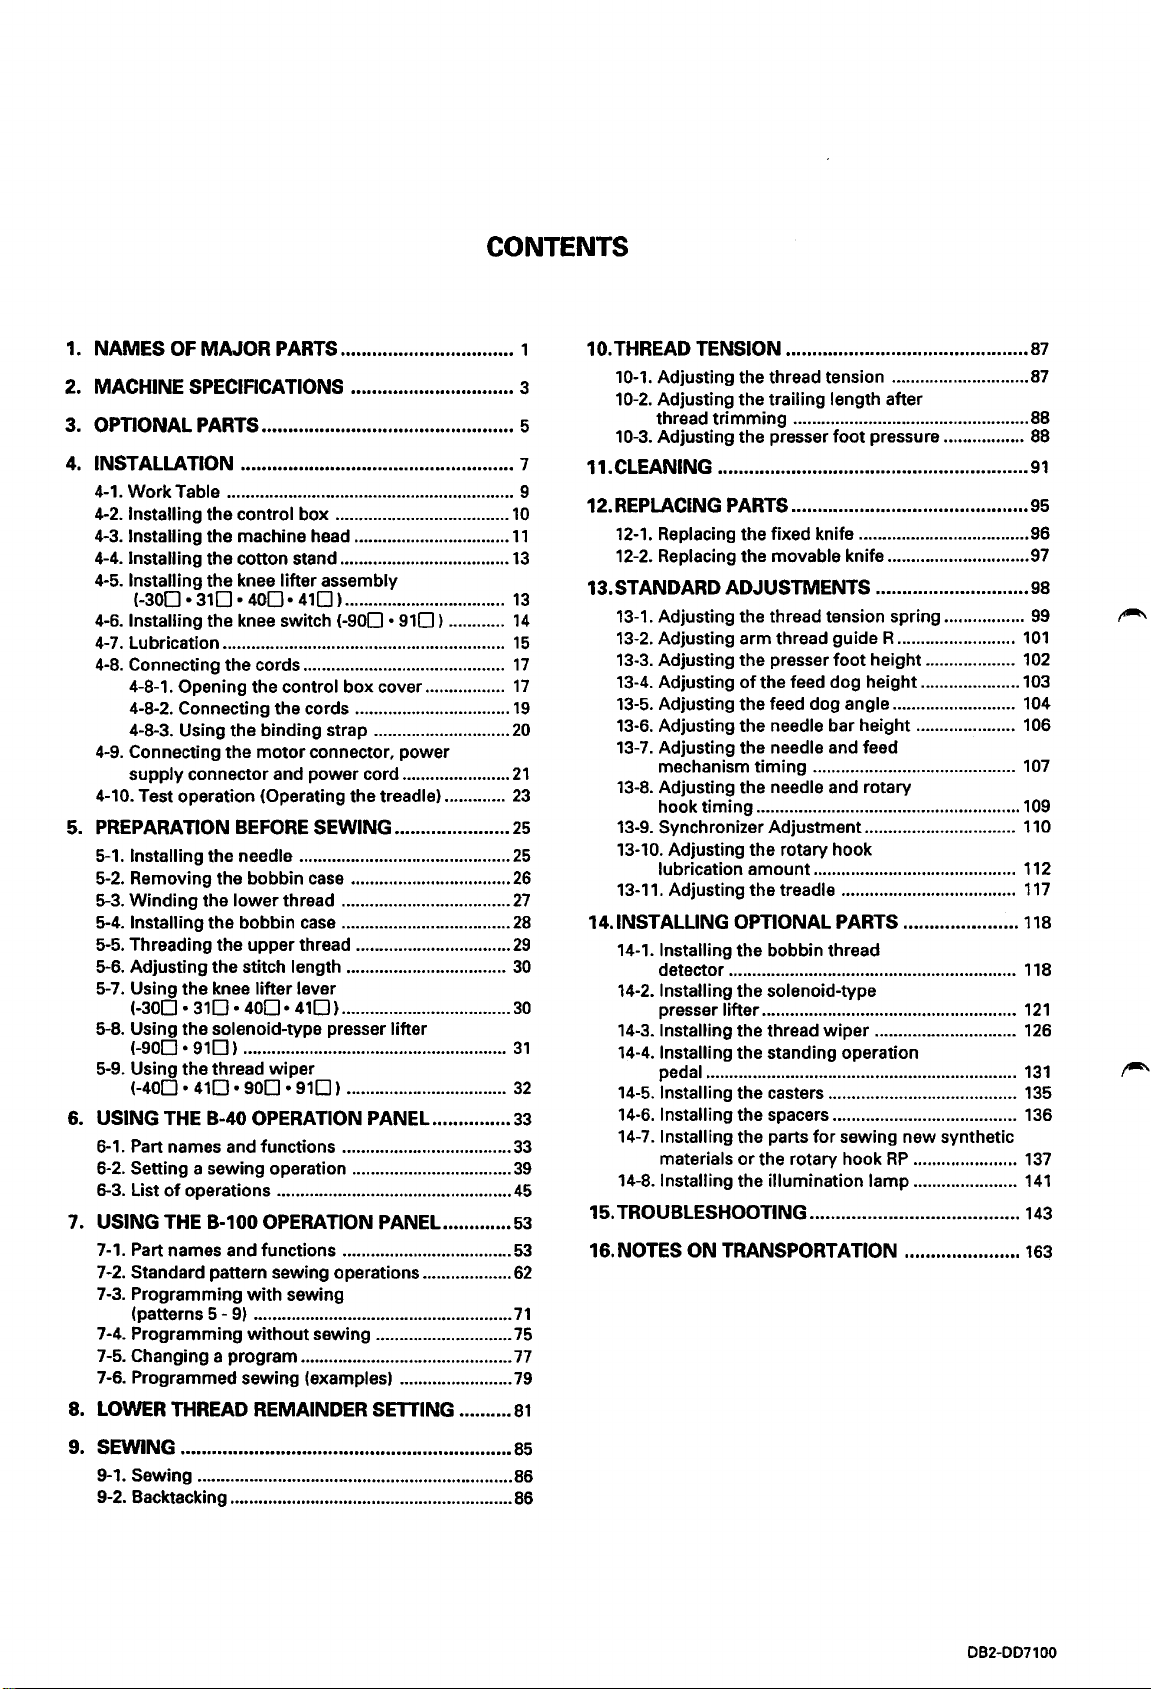
CONTENTS
1. NAMES OF
2. MACHINE SPECIFICATIONS
MAJOR
PARTS ................................. 1 10.THREAD TENSION ..............................................
•••••••••••.•••••••••••••••••••
3. OPTIONAL PARTS ................................................ 5
4.
INSTALLATION .................................................... 7
4-1.
Work
Table ............................................................. 9
4-2.
Installing the control box .....................................
4-3.
Installing the machine head .................................
4-4. Installing the cotton stand ....................................
4-5. Installing the knee lifter assembly
(-300.
4-6. Installing the knee switch
4-7.Lubrication .........•..................................................
4-8.
Connecting the cords ...........................................
4-8-1. Opening the control
4-8-2. Connecting the cords ...•.........•.•.................
4-8-3. Using the binding strap .............................
4-9.
Connecting the
supply connector and power cord .......................
4-10. Test operation (Operating the treadle) .............
5. PREPARATION
5-1.
Installing the needle .............................................
5-2. Removing the bobbin
5-3.
Winding
5-4. Installing the bobbin
5-5. Threading the upper thread ...........................•.....
5-6. Adjusting the stitch length ..................................
5-7. Using the knee lifter lever
(-300.
5-8. Using the solenoid-type presser lifter
(-900.
5-9. Using the thread
(-400.
310.
400•
410
) ..................................
(-900 • 910)
box
cover .................
motor
connector, power
BEFORE
the lower thread ....................................
310.
400•
910)
........................................................
410.
900.
SEWING ......................
case
..................................
case
....................................
410)
....................................
wiper
910)
•.................................
............
10
11
13
13
14
15
17
17
19
20
21
23
25
25
26
27
28
29
30
30
31
32
6. USING THE B-40 OPERATION PANEL ............... 33
6-1.
Part names and functions ....................................
6-2. Setting a sewing operation ..................................
6-3. List
of
operations ...................................•............•.
1. USING THE B-100 OPERATION PANEL. ............
7-1. Part names and functions ....................................
7-2. Standard pattern sewing operations ...................
7-3. Programming
(patterns
7-4. Programming
7-5. Changing a program .............................................
7-6. Programmed sewing (examples) ........................
with
5-
sewing
9)
•...•......................•............•..............
without
sewing .•...........................
8. LOWER THREAD REMAINDER SETTING ..........
33
39
45
53
53
62
71
75
77
79
81
87
10-1.
3
Adjusting the thread tension .............................
10-2.
Adjusting the trailing length after
thread
10-3. Adjusting the presser foot pressure .................
trimming
...•..............................................
11.CLEANING ...........................................................
12. REPLACING PARTS .............................................
12-1.
Replacing the fixed knife ....................................
12-2. Replacing the movable knife ..............................
13.STANDARD ADJUSTMENTS .............................
13-1.
Adjusting the thread tension spring .................
13-2.
Adjusting arm thread
13-3.
Adjusting the presser
13-4.
Adjusting
13-5. Adjusting the feed dog angle .......................... 104
13-6.
Adjusting the needle bar height ..................... 106
13-7.
Adjusting the needle and feed
mechanism
13-8.
Adjusting the needle and rotary
hook timing ........................................................
13-9.
Synchronizer Adjustment ................................ 110
13-10. Adjusting the rotary hook
lubrication amount ...........................................
13-11. Adjusting the treadle .....................................
of
the feed dog height .....................
timing
guideR
foot
...........................................
.........................
height ...................
87
88
88
91
95
96
97
98
99
101
102
103
107
109
112
117
14.1NSTALLING OPTIONAL PARTS ...................... 118
14-1. Installing the bobbin thread
detector ................................. .......... ...........•......
14-2.
Installing the solenoid-type
presser lifter ......................................................
14-3.
Installing the thread
14-4.
Installing the standing operation
pedal ..................................................................
14-5.
Installing the casters ........................................
14-6.
Installing the spacers ....................................... 136
14-7.1nstalling the parts
materials
14-S.Installing the illumination lamp ......................
or
the rotary hook
wiper
..............................
for
sewing new synthetic
RP
......................
15.TROUBLESHOOTING ........................................
16.NOTES ON TRANSPORTATION ......................
118
121
126
131
135
137
141
143
163
9. SEWING ...............................................................
9-1. Sewing ...................................................................
9-2. Backtacking ............................................................
85
86
86
082-007100
Page 17
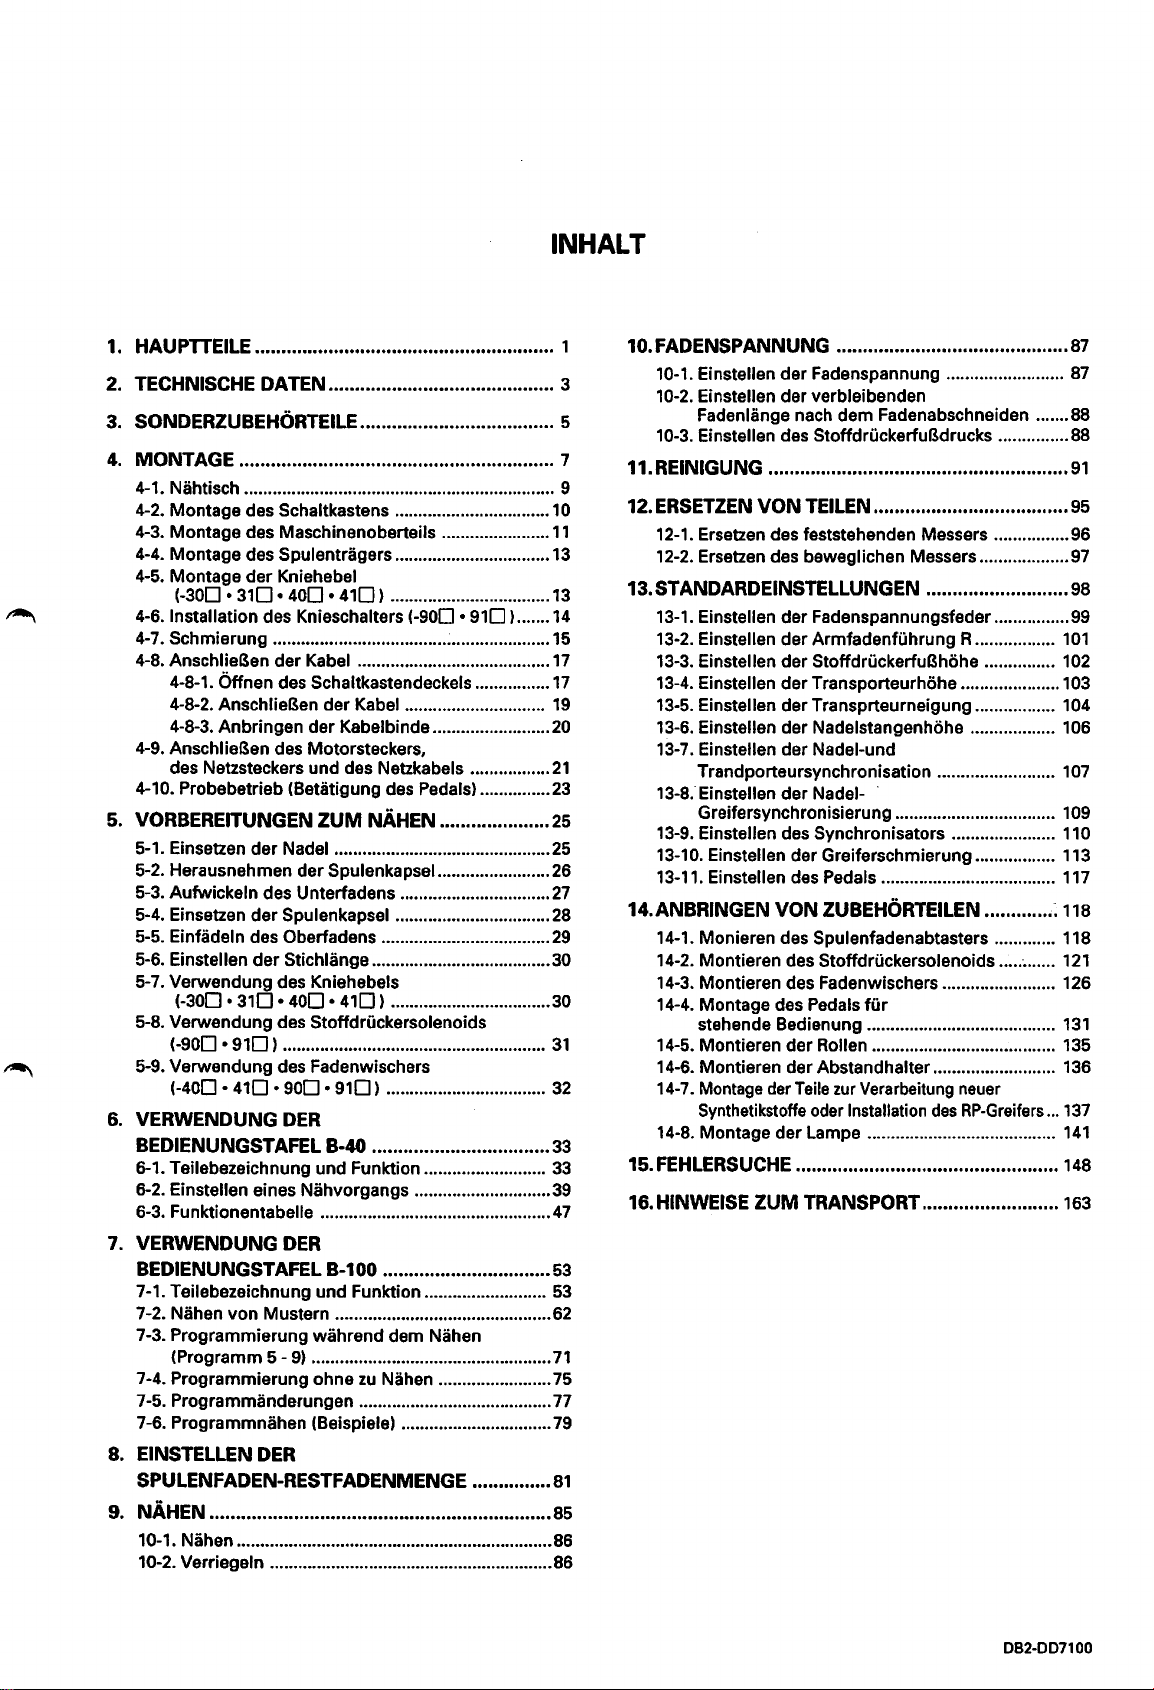
INHALT
1.
HAUPTTEILE
2.
TECHNISCHE
3.
SONDERZUBEHORTEILE
4.
MONTAGE
4-1. Nahtisch ......................•.........................................•. 9
4-2. Montage des
4-3. Montage des Maschinenoberteils .......................
4-4. Montage des
4-5. Montage
(-300.
4-6.1nstallation des Knieschalters
4-7. Schmierung ...........................................................
4-8. AnschlieBen
4-8-1. Offnen des Schaltkastendeckels ................
4-8-2. AnschlieBen der Kabel ..............................
4-8-3. Anbringen der Kabelbinde .........................
4-9. AnschlieBen des Motorsteckers,
des Netzsteckers
4-10. Probebetrieb (Betiitigung des Pedals) ...............
5.
VORBEREITUNGEN
5-1. Einsetzen
5-2. Herausnehmen der Spulenkapsel ........................ 26
5-3. Aufwickeln des Unterfadens ................................
5-4. Einsetzen
Einfadeln des Oberfadens ....................................
5-5.
Einstellen
5-6.
5-7. Verwendung des Kniehebels
(-300.
5-8. Verwendung des Stoffdruckersolenoids
(-900 • 910)
5-9. Verwendung des Fadenwischers
(-400.
6.
VERWENDUNG
BEDIENUNGSTAFEL
6-1. Teilebezeichnung
6-2.
Einstellen eines Nahvorgangs .............................
6-3. Funktionentabelle .................................................
7.
VERWENDUNG
BEDIENUNGSTAFEL
7-1. Teilebezeichnung und Funktion .......................... 53
Nahen
7-2.
7-3. Programmierung wahrend dem Nahen
(Programm
7-4. Programmierung ohne
7-5. Programmanderungen ......................................... 77
7-6. Programmnahen
8.
EINSTELLEN
SPULENFADEN-RESTFADENMENGE
9.
NAHEN
10-1. Nahen ...................................................................
10-2. Verriegeln ............................................................ 86
......................................................... 1
DATEN
........................................... 3
..................................... 5
............................................................ 7
Schaltkastens .................................
Spulentragers .................................
der
Kniehebel
310.
400.
410)
..................................
(-900 • 910
der
Kabel .........................................
und
des Netzkabels .................
ZUM
NAHEN
der
Nadel ..............................................
der
Spulenkapsel .................................
der
Stichlange ...................................... 30
310.400.410)
........................................................
410.900.910)
..................... 25
.................................. 30
..................................
DER
B-40
.................................. 33
und
Funktion ..........................
DER
B-100
................................
von
Mustern ..............••.•.••.•.•...•......•..........
5-9)
...................................................
zu
Nahen ........................ 75
(Beispiele) ................................
DER
...............
.................................................................
) .......
10
11
13
13
14
15
17
17
19
20
21
23
25
27
28
29
31
32
33
39
47
63
62
71
79
81
85
86
10.FADENSPANNUNG ............................................
10-1. Einstellen der Fadenspannung .........................
10-2. Einstellen der verbleibenden
Fadenlange nach dem Fadenabschneiden ....... 88
10-3. Einstellen des StoffdruckerfuBdrucks ............... 88
11.REINIGUNG .........................................................
12.
ERSETZEN
12-1. Ersetzen des feststehenden Messers ................ 96
12-2. Ersetzen des beweglichen Messers ...................
13.
STANDARDEINSTELLUNGEN
13-1. Einstellen der Fadenspannungsfeder ................
13-2. Einstellen der ArmfadenfUhrung A
13-3. Einstellen der StoffdruckerfuBhohe ............... 102
13-4. Einstellen der Transporteurhohe ..................... 103
13-5. Einstellen der Transprteurneigung ................. 104
13-6. Einstellen der Nadelstangenhohe .................. 106
13-7.
Trandporteursynchronisation .........................
13-8. Einstellen der Nadei-
13-9. Einstellen des Synchronisators ...................... 110
13-10. Einstellen
13-11.
14.ANBRINGEN VON
14-1. Monieren des Spulenfadenabtasters ............. 118
14-2. Montieren des Stoffdri.ickersolenoids ..... ~ ......
14-3. Montieren des Fadenwischers ........................ 126
14-4. Montage des Pedals
14-5. Montieren der Rollen ....................................... 135
14-6. Montieren der
14-7.
14·8. Montage der Lampe ........................................
15.FEHLERSUCHE
16.
HINWEISE
VON
TEILEN
.....................................
........................... 98
....••.••.•..•••.
Einstellen der Nadel-und
Greifersynchronisierung ..................................
der Greiferschmierung ................. 113
Einstellen des Pedals .....................................
ZUBEHORTEILEN
fur
stehende Bedienung ........................................
Abstandhalter .......................... 136
Montage
Synthetikstoffe oder Installation
der
Teile
zur
Verarbeitung neuer
des
RP-Greifers
............. : 118
.................................................. 148
ZUM
TRANSPORT
..........................
...
87
87
91
95
97
99
101
107
109
117
121
131
137
141
163
082-007100
Page 18
TABLE DES MATIERES
1.
NOM
DES PIECES PRINCIPALES ......................•. 1
2. SPECIFICATIONS DE LA MACHINE .................... 3
3. PIECES EN OPTION ••••••••••••..........•.............•.•••.•••• 5
4.
INSTALLATION .................................................... 7
4-1. Table de travail ........................................................ 9
Installation
4-2.
4-3. Installation de
4-4. Installation
4-5. Installation de l'ensemble de releveur
au
genou
4-6.
Installation de l'interrupteur
(-900.
4-7.
Lubrification ...........................................................
4-8.
Banchement des cilbles .......................................
4-8-1. Ouverture du couvercle du
4-8-2. Banchement des cilbles .............................
4-8-3. Utilisation de
4-9. Branchement du connecteur de moteur,
du connecteur d'alimentation et
cordon d'alimentation ..........................................
4-10. Essai de fonctionnement
(utilisation
5. PREPARATIFS
Installation
5-1.
5-2. Retrait de
5-3. Bobinage du
5-4. Installation de
5-5. Enfilage du fil superieur ......................................
5-6. Reglage de Ia longueur de point .........................
5-7. Utilisation du levier de releveur
(-300.
5-8. Utilisation du releveur de pied presseur de
type
5-9. Utilisation du tire-fils
(-400.
6. UTILISATION DU PANNEAU DE
COMMANDE
6-1. Noms et fonctions des pieces ..............................
6-2. Reglage d'une couture .........................................
6-3. Liste des fonctions ...............................................
UTILISATION DU PANNEAU
7.
COMMANDE
7-1. Noms et fonctions des pieces ..............................
7-2. Operations de couture de motifs standard ........
7-3. Programmation avec couture (motifs 5-9)
7-4. Programmation sans couture ..............................
7-5. Modification
7-6. Couture programmes (examples) .......................
8. REGLAGE DU FIL INFERIEUR RESTANT ...........
du
boitier de commands .................
Ia
t~te
de machine ........................
de
Ia broche porte-bobine ................
(-300 • 310 • 400 • 410)
au
910)
........................................................
boitier de commands ................................
Ia
sangle d'attache ............. 20
de
Ia
pedale) ......................................
AVANT
de
Ia
boite a canette .................................
til
310.
solenoids
410.900.910)
LA COUTURE ................
l'aiguille .......................................
inferieur ......................................
Ia
boite a canette .........................
400.
410)
..................................
(-900 • 910)
..................................
.................
genou
du
au
genou
..............................
B-40 ...............................................
DE
B-100 .............................................
........
d'un
programme .............................
10
11
13
13
14
15
18
18
19
22
23
25
25
26
27
28
29
30
30
31
32
33
33
39
49
53
53
62
73
75
77
79
83
10.TENSION DU FIL .................................................
10-1. Reglage
10-2. Reglage de
apres
10-3. Reglage
de
Ia
tension du fil ................................
Ia
Ia
longueur de fil residual
coupe des fils .......................................
de
Ia
pression du pied presseur .......... 90
11. NETTOYAGE ........................................................
12. REM PLACEMENT DES
12-1. Remplacement du couteau fixe .........................
12-2. Remplacement du couteau mobile ....................
PIECES
..........................
13.REGLAGES STANDARD .....................................
13-1.
Reglage du ressort de tension du fil ..............
13-2.
Reglage de guide-til D du bras .......................
13-3.
Reglage
13-4. Reglage
13-5. Reglage de l'angle de
d'entrainement .................................................
13-6. Reglage de Ia hauteur de
barre a aiguille .................................................. 106
13-7. Reglage de
et du dispositif d'entrainement ....................... 108
13-8. Reglage de
l'aiguille
13-9. Reglage
13-10. Reglage
du crochet rotatif ............................................... 1 14
'13-11. Reglage de Ia Pedale ..................................... 117
de
Ia
hauteur du pied presseur ........ 102
de
Ia
hauteur des griffes ...................
Ia
griffe
Ia
Ia synchronisation de l'aiguille
Ia
synchronisation de
et
crochet rotatif ................................ 109
du
synchroniseur ..............................
de
Ia
quantite de lubrification
89
89
90
91
95
96
97
98
100
101
103
105
111
14.1NSTALLATION DES PIECES EN OPTION ....... 118
14-1.
Installation du detecteur de
fil de canette ..................................................... 1 18
14-2.
Installation du releveur de pied
presseur de type
14-3. Installation du tire-fils ...................................... 126
14-4.
Installation de Ia pedale
operation debout ...............................................
14-5.
Installation des roulettes .................................. 135
14-6.
Installation des entretoises .............................. 136
14-7.1nstallation
materiaux
14-S.Installation de
synthlltiques
15. RESOLUTION
soleno'ide ..............................
pour
des
pieces
pour
Ia
couture
des
ou
du
crochet
rotatif
Ia
lampe ...................................
DES
PROBLEMES ..................... 153
nouveaux
RP
......
121
131
139
141
16. REMARQUES CONCERNANT
LE
TRANSPORT ................................................. 163
9. COUTURE ............................................................
9-1. Couture ..................................................................
9-2. Point d'arret ...........................................................
85
86
86
082-007100
Page 19
CONTENIDO
1. NOMBRES
2. ESPECIFICACIONES
DE
LAS PIEZAS PRINCIPALES ....•.••. 1
DE
LA
MAQUINA
..•..•......•• 3
3. PARTES OPCIONALES ......................................... 5
4.
INSTALACION
4-1. Mesa de trabajo ..................................................... 9
4-2. lnstalaci6n de
4-3. lnstalaci6n de
4-4. lnstalaci6n del soporte del carrete .....................
4-5.
lnstalaci6n del conjunto
de rod ilia
4-6. lnstalaci6n del interrupter de rodilla
(-900.
4-7.
Lubricaci6n ............................................................
4-8.
Conexi6n de los cables .........................................
4-8-1. Apertura de
4-8-2. Conexi6n de los cables ..............................
4-8-3. Uso de
4-9. Conexi6n del conector del motor,
conector de
cable de alimentaci6n ...........................................
4-10. Funcionamiento de prueba
(Usando el pedal) ...............................................
5. PREPARATIVOS ANTES
5-1. Colocaci6n de
5-2. Man era de sacar
5-3. Bobinado del
5-4. lnstalaci6n de
5-5. Enhebrado del hilo superior .................................
5-6. Ajuste del largo de puntada .................................
5-7. Usando
de rodilla
5-8. Uso del levantador de prensatelas de
tipo
solenoide
5-9. Uso del retirador de hilo
(-400.
6. USO DEL TABLERO
6-1. Denominaci6n de las piezas
funcionamiento .................................................... 33
6-2. Programaci6n
6-3. Lista de funciones .................................................
7.
USO
DEL TABLERO
7-1. Denominaci6n
funcionamiento ....................................................
7-2. Costura de diserios normales ..............................
7-3. Programaci6n de costura (diseiios
7-4. Programaci6n sin costura .................................... 75
Cambio de un programa ......................................
7-5.
7-6. Costura programada (ejemplos) ......................... 79
8. AJUSTE DEL HILO INFERIOR RESTANTE .........
••••••••.•••.••••....•••••••.•••••••••••••••••••••••••
Ia caja
de
controles .....................
Ia
cabeza de
(-300 • 310 • 400 • 410)
910)
........................................................
Ia
caja de controles .........................................
Ia
correa de sujeci6n ..................... 20
Ia fuente de alimentaci6n y
Ia aguja ......................................... 25
Ia
caja de
hilo
inferior .....................................
Ia
caja de
Ia
palanca
(-300 • 310 • 400 • 410)
410.900.910)
dellevantador
(-900 • 910)
DE
de
Ia
DE
de
las piezas v
Ia
maquina ............... 1 1
dellevantador
cubierta de
DE
COSER .................. 25
Ia
Ia
bobina ..................... 28
................................
..................................
.................
Ia
bob ina ................. 26
................. 30
CONTROLES B-40 .......
y
costura .................................
CONTROLES B-100 .....
5-9)
............ 73
10
13
13
14
15
18
18
19
22
23
27
29
30
31
32
33
39
51
53
53
62
77
83
10. TENSION DEL HILO ............................................
10-1. Ajuste
10-2. Ajuste del largo libra de
10-3. Ajuste de
7
11.LIMPIEZA .............................................................
de
Ia
tensi6n del
de cortar el hilo ................................................... 90
Ia
presi6n del prensatelas .................
hilo
..............................
hilo
despues
12.CAMBIO DE PARTES ..........................................
Cambio de
12-1.
12-2. Cambiar
Ia
cuchilla fija .................................. 96
Ia
cuchilla
m6vil
..................................
89
89
90
91
95
97
13.AJUSTES ESTANDARES .................................... 98
13-1. Ajuste del resort del tirahilos ..........................
13-2. Ajuste de guiahilos R del brazo ......................
13-3. Ajuste de
13-4. Ajuste de
13-5. Ajuste del angulo del alimentador ................. 105
13-6. Ajuste de
13-7. Ajuste de sincronizaci6n de
el mecanismo de alimentaci6n ....................... 108
13-8. Ajuste de sincronizaci6n de Ia aguja y
Ia
lanzadera ........................................................ 109
13-9. Ajuste del sincronizador .................................. 1 1 1
13-10. Ajuste de
13-11. Ajuste del Pedal ............................................. 117
Ia
altura del prensatelas ................. 102
Ia
altura del alimentador .................
Ia
altura de
Ia
lubricaci6n del cangrejo ........... 115
Ia
barra de aguja ......... 106
Ia
aguja y
100
101
103
14.1NSTALACION DE PIEZAS OPCIONALES ........ 118
14-1.1nstalaci6n del detector de
hilo de bobina ................................................... 1 18
14-2. lnstalaci6n
prensatelas
14-3.1nstalaci6n del retirador de hilo ...................... 126
14-4.1nstalaci6n del pedal para hacer
funcionar de pie ...............................................
14-5.1nstalaci6n de ruedas ....................................... 135
14-6.1nstalaci6n de los espaciadores ...................... 136
14-7.1nstalaci6n de las partes para coser materiales
sinteticos nuevos o el garfio giratorio
14-8. lnstalaci6n de
dellevantador
tipo
solenoide ..............................
Ia
lam para ................................
de
RP
......
121
131
139
141
15.LOCALIZACION DE AVERIAS ........................... 158
16.NOTAS SOBRE EL TRANSPORTE ................... 163
9. COSTURA ............................................................
10-1. Costura ................................................................ 86
10-2. Rematado ............................................................ 86
85
082·007100
Page 20
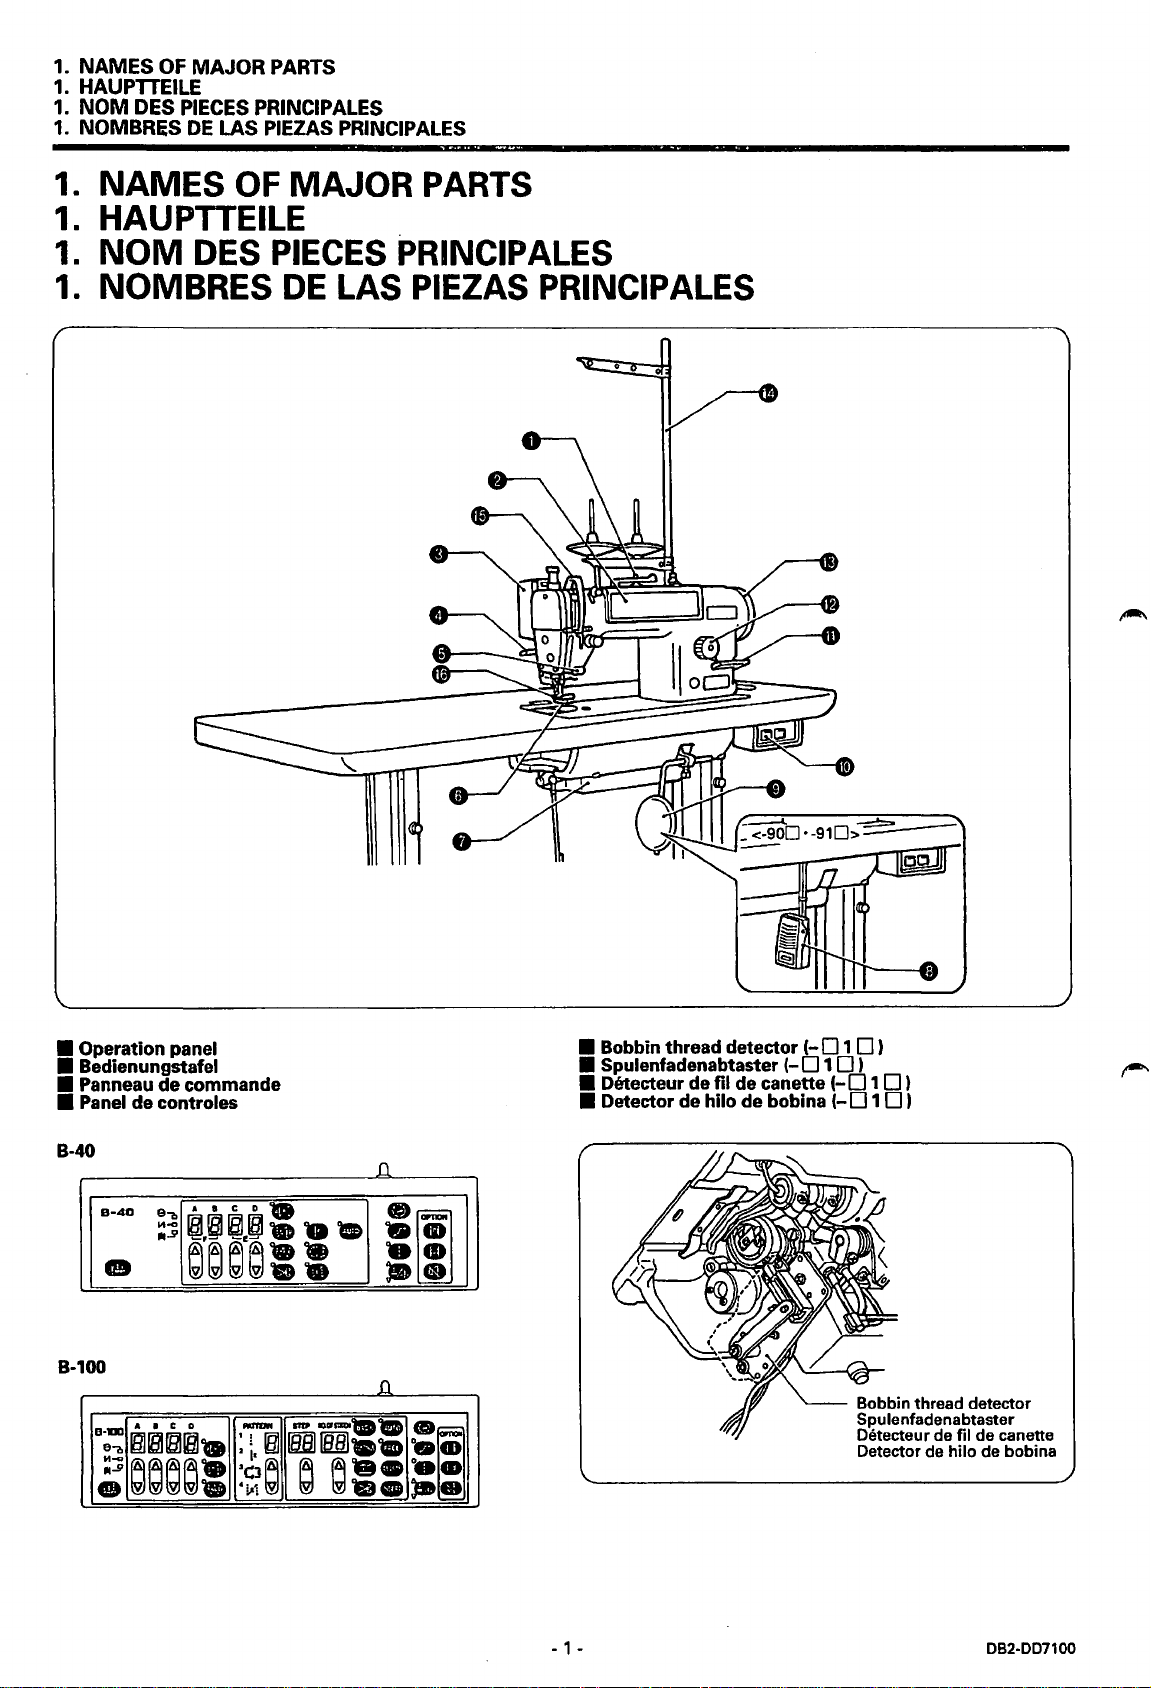
1.
NAMES
1. HAUPTTEILE
1.
NOM
1. NOMBRES
1.
1.
1.
1.
OF
MAJOR
DES PIECES PRINCIPALES
DE
NAMES
HAUPTTEILE
NOM
DES PIECES PRINCIPALES
NOMBRES
PARTS
LAS PIEZAS PRINCIPALES
OF MAJOR PARTS
DE
LAS PIEZAS PRINCIPALES
• Operation panel
Bedienungstafel
•
• Panneau
• Panel
B-40
B-100
B·Dl
•
de
commande
de
controles
B-40
•
e.,
~Hb11811Bl'O
......
111.5'
A I C D •
e.,
......
~.~!@.~-
111.5'
~~~~==
A • C D
~~~~=
••
....
.,
..
___
,,
~
-
•
j.
raBIIBBl••
:~~
~~==
D.
••
...
·;
••
.D.
"a
CD
•••
-~
••
• Bobbin thread
• Spulenfadenabtaster
• Detecteur
• Detector de hilo
de
fil
detector
de canette
de
bobina
(-
(-
0 1 0 )
0 1 0 )
(-
0 1 0 )
(-
0 1 0 )
Bobbin
thread
Spulenfadenabtaster
Detecteur
Detector
de
de
hilo
detector
fil
de
de
canette
bobina
- 1 -
DB2-DD7100
Page 21
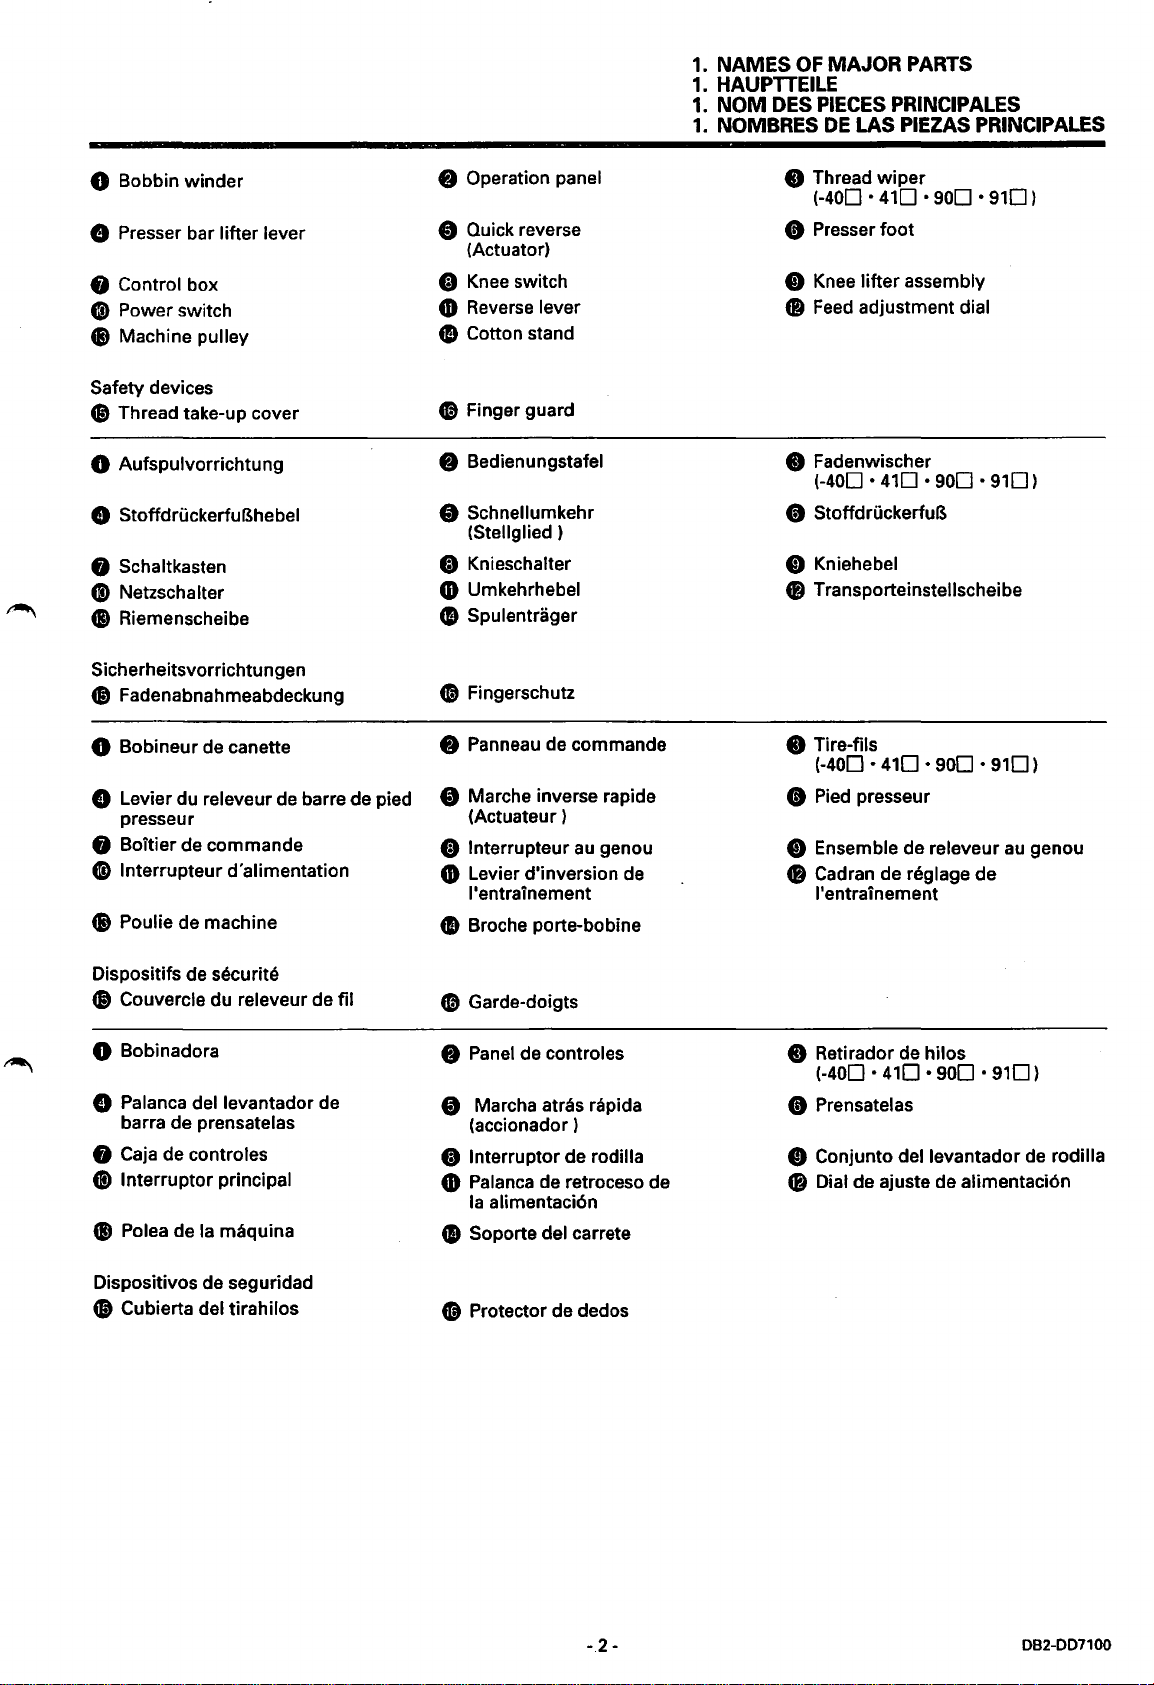
1.
NAMES
1.
HAUPTTEILE
1.
NOM
1.
DES
NOMBRES
OF
MAJOR
PIECES
DE
PARTS
PRINCIPALES
LAS
PIEZAS
PRINCIPALES
0 Bobbin winder
8 Presser bar lifter lever
f)
Control box
8 Power switch
8 Machine pulley
Safety devices
8 Thread take-up cover
0 Aufspulvorrichtung
8 StoffdruckerfuBhebel
0 Schaltkasten
0)
Netzschalter
8 Riemenscheibe
Sicherheitsvorrichtungen
8 Fadenabnahmeabdeckung
0 Bobineur de canette
8 Levier du releveur
presseur
de
barre de pied
0 Boitier de commande
0)
lnterrupteur d'alimentation
8 Poulie de machine
8 Operation panel
8 Quick reverse
(Actuator)
0
Knee
switch
4D
Reverse lever
0 Cotton stand
8 Finger guard
8 Bedienungstafel
8 Schnellumkehr
(Stellglied
)
0 Knieschalter
4D
Umkehrhebel
0 Spulentrager
8 Fingerschutz
8 Panneau de commande
8 Marche inverse rapide
(Actuateur)
0 lnterrupteur
4D
Levier d'inversion
l'entrainement
au
genou
de
0 Broche porte-bobine
8 Thread wiper
(-400.
0 Presser
410.900.910)
foot
0 Knee lifter assembly
8
Feed
adjustment dial
8 Fadenwischer
(-400.
410.900.910)
0 StoffdruckerfuB
0 Kniehebel
41
Transporteinstellscheibe
8 Tire-fils
0
(-400.
Pied
410.900.910)
presseur
0 Ensemble de releveur
4J
Cadran de reglage de
l'entrainement
au
genou
Dispositifs de
securite
8 Couvercle du releveur de fil
0 Bobinadora
8 Palanca del levantador de
barra de prensatelas
0 Caja de controles
G)
Interrupter principal
8 Polea de
Dispositivos de seguridad
8 Cubierta del tirahilos
Ia
maquina
8 Garde-doigts
8
Panel
de controles
8 Marcha atras rapida
(accionador )
0 Interrupter de rodilla
4D
Palanca de retroceso de
Ia
alimentaci6n
0 Soporte del carrete
G Protector de dedos
8 Retirador de hilos
(-400.
0 Prensatelas
f)
Conjunto dellevantador
41
Dial de ajuste de alimentaci6n
410.900.910)
de
rodilla
-.2-
082-007100
Page 22
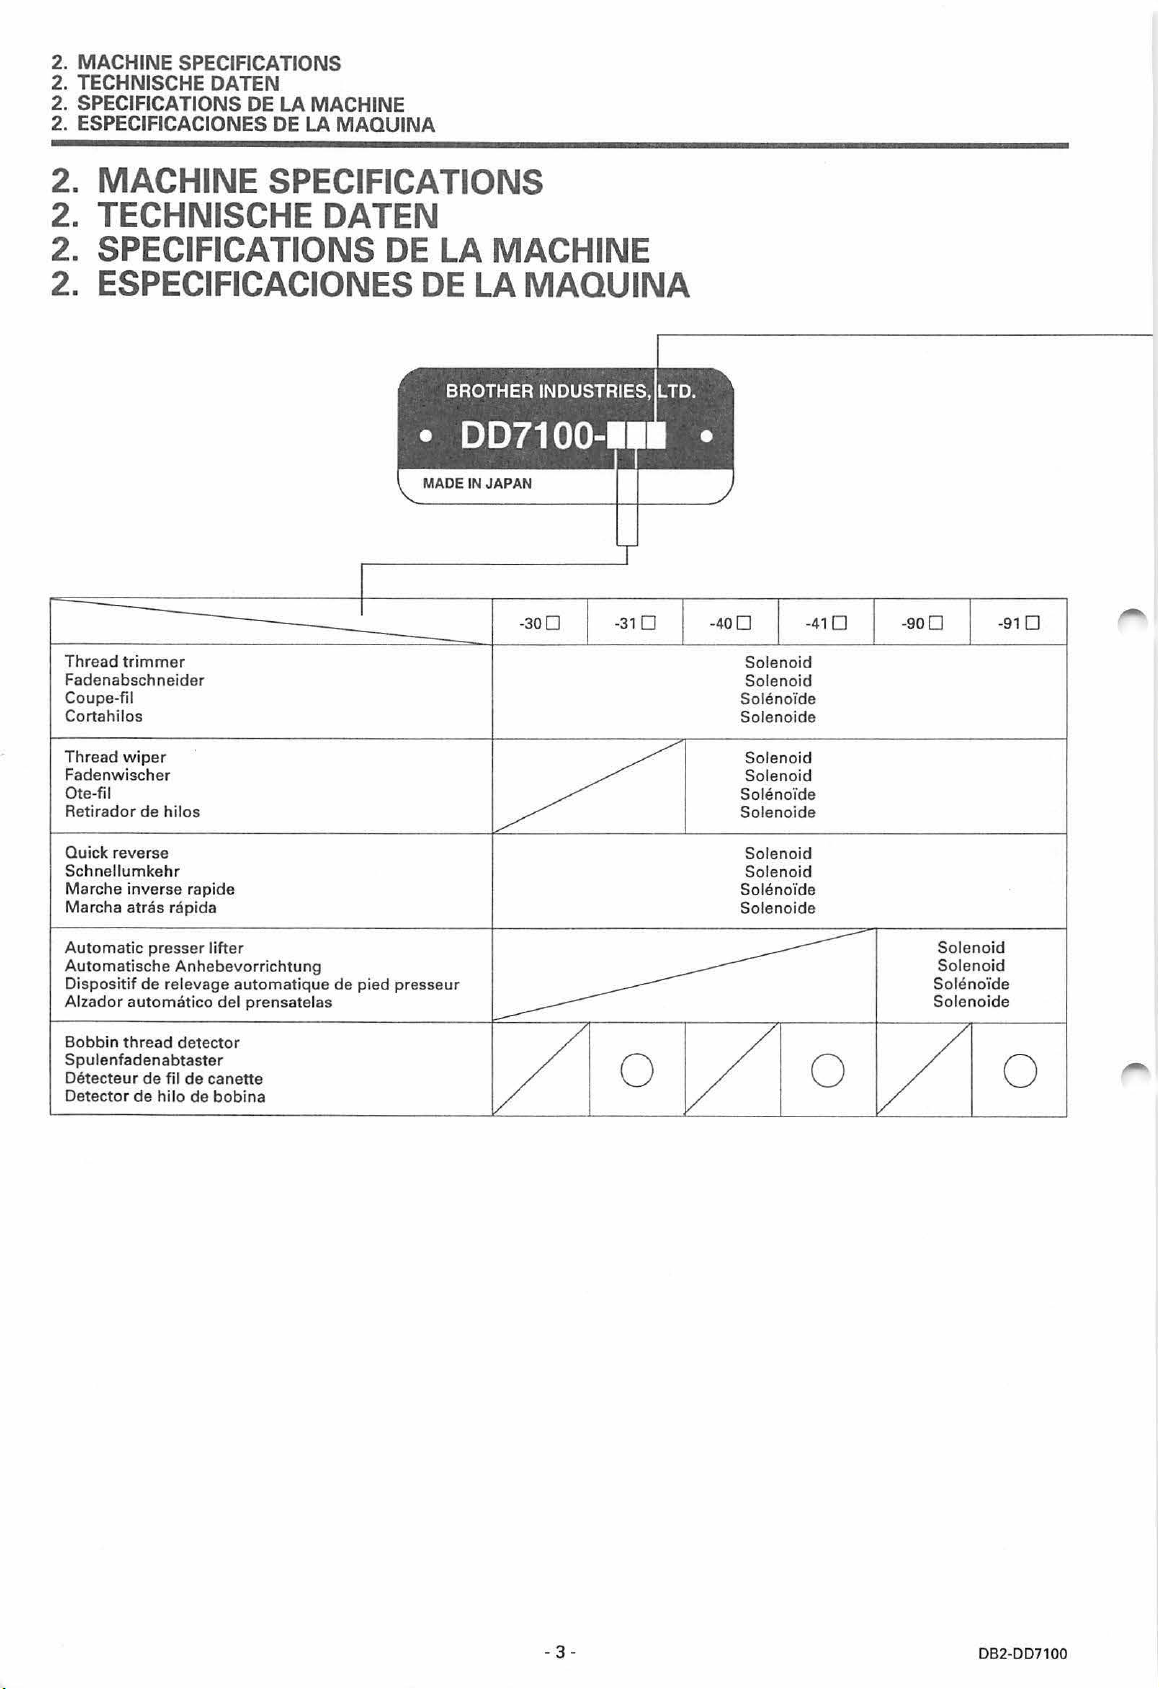
2. MACHINE SPECIFICATIONS
2. TECHNISCHE DATEN
2. SPECIFICATIONS
2. ESPECIFICACIONES
DE
LA MACHINE
DE
LA
MAQUINA
2. MACHINE SPECIFICATIONS
2. TECHNISCHE DATEN
2.
SPECIFICATIONS
DE
LA MACHINE
2. ESPECIFICACIONES
Thread
trimmer
Fadenabschneid
C
oupe-fi
Cortahilos
Thre
ad
wip
enwischer
Fad
Ot
e-fil
Retirador
Quick reverse
Schnellumkehr
Marche
Marcha atras rapida
inver
er
l
er
de
hi l
os
se rap
ide
DE
LA
MAOUINA
-300
Soleno
id
Solenoid
Soh~no"ide
Sol
enoide
Solenoid
Solenoid
Soh~no"id
Sole
Soleno
Solenoid
Soh~no"ide
Solenoide
noid
e
e
id
-910
Automatic
Automatische
Dispositif
Alzador
bbin
Bo
Sp
ulenfad
Detecte
Detector
pre
de relevage
aut
o matico del prensatelas
thr
ead
enabtaster
ur
de
de
sser l
Anhebevo
detector
fil
de
hilo
de
ifter
rrichtung
automatique
canette
bobina
de
pied
presseur
0
0
Soleno
id
Sol
eno
id
Soleno"ide
lenoid
So
e
0
- 3 -
082-007100
Page 23
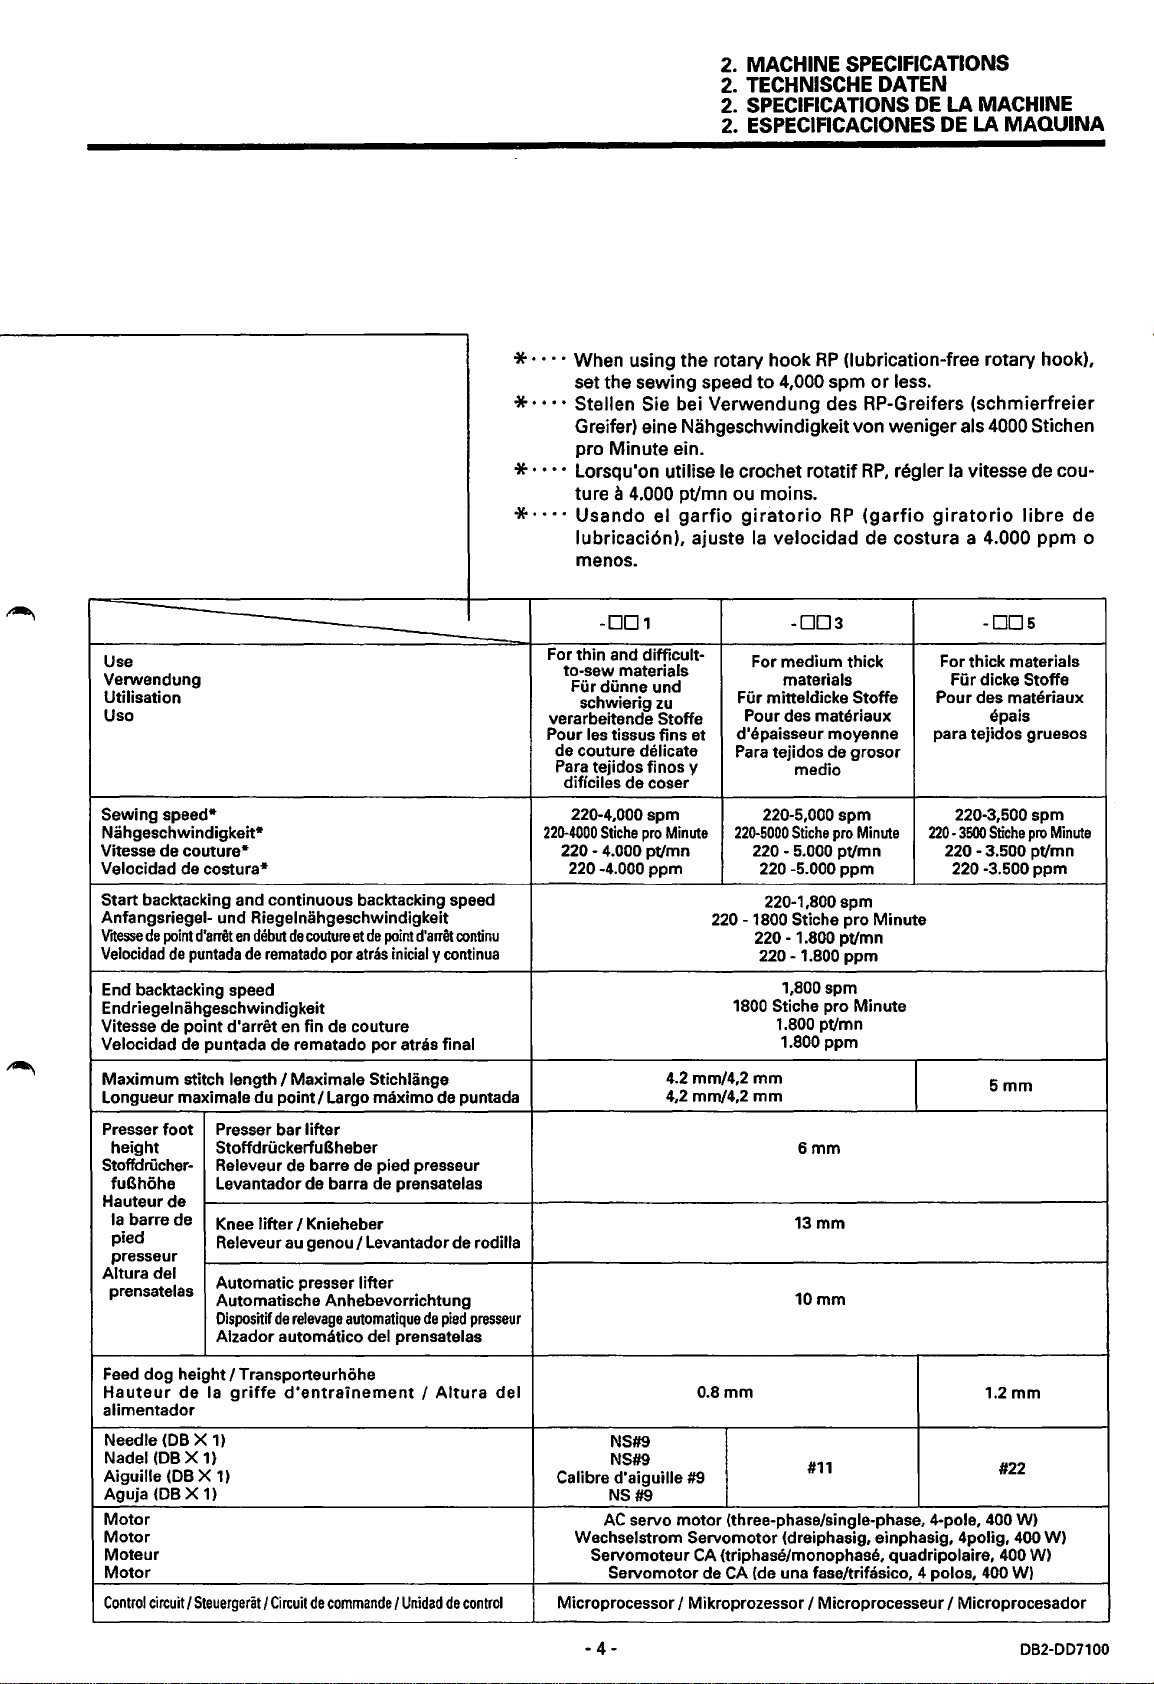
2. MACHINE SPECIFICATIONS
2. TECHNISCHE DATEN
SPECIFICATIONS DE LA MACHINE
2.
2. ESPECIFICACIONES DE LA
MAOUINA
~
~
* · · · ·
Use
Verwendung
Utilisation
Uso
Sewing speed*
Nahgeschwindigkeit"
Vitesse de couture* 220 - 4.000 pt/mn
Velocidad de
Start backtacking and continuous backtacking speed
Anfangsriegel- und Riegelniihgeschwindigkeit
Vrtesse
Velocidad
End backtacking speed
Endriegelniihgeschwindigkeit
Vitesse de
Velocidad de puntada de rematado por
Maximum
Longueur maxi male du point I Largo maximo de puntada
Presser
height
Stoffdriicher-
fuBhohe Levantador de barra de prensatelas
Hauteur
Ia
barre de
pied
presseur
Altura del
prensatelas
costura"
de
point
d'arret
en
debut
de
couture
de
puntada
de
rematado
point
d'arret en fin de couture
stitch length I Maxi male Stichliinge
foot
Presser bar lifter
StoffdriickerfuBheber
Releveur de barre de pied presseur
de
Knee lifter
Releveur au genou
Automatic presser lifter
Automatische Anhebevorrichtung
Oispositif
de
Alzador automatico del prensatelas
relevage
et
por
atras
I Knieheber
I Levantador de rod ilia
automatique
de
point
d'arret
inicial y continua
atras final
de
continu
pied
presseur
When
using
set
the
* · · · ·
* · · · ·
* · · · ·
Stell
en
Greifer)
pro
Minute
Lorsqu'on
ture
a 4.000
Usando
lubricaci6n),
me
nos.
-001
For thin and difficult-
to-sew materials
Fiir
diinne und
schwierig
verarbeitende
Pour les tissus fins et
de couture
Para
tejidos finos y
dificiles de coser
220-4,000 spm
220-4000
Stiche
220 -4.000
sewing
Sie
bei
eine
ein.
utilise
el
garfio
zu
Stoffe
delicate
pro
Minute
ppm
4.2
4,2 mrn/4,2
the
rotary
hook
RP
(lubrication-free
speed
to
4,000
spm
or
less.
Verwendung
Nahgeschwindigkeit
le
crochet
pt/mn
ou
moins.
giratorio
ajuste
Ia
For medium thick For thick materials
Fiir mitteldicke Stoffe Pour des materiaux
Pour des materiaux epa is
d'epaisseur moyenne para tejidos gruesos
Para
220-5,000 spm 220-3,500 spm
220-5000
220 - 5.000 pt/mn 220 - 3.500 pt/mn
220 -5.000
220-1,800 spm
220
-1800 Sticha pro
220-1.800 pt/mn
220 - 1.800
1800
mml4,2
mm
mm
des
RP-Greifers
von
weniger
rotatif
RP,
regler
RP
(garfio
velocidad
-003 -005
materials
tejidos de grosor
medio
Stiche
1,800spm
Sticha pro Minute
1.800 pt/mn
1.800 ppm
6mm
13mm
10mm
pro
ppm
ppm
de
Minute
Minute
costura
als
Ia
giratorio
Fiir
220 -3500
220 -3.500
rotary
hook),
(schmierfreier
4000
Stich
vitesse
a 4.000
de
cou-
libre
ppm
dicke Stoffe
Stiche
pro
Minute
ppm
5mm
en
de
o
Feed
dog
Hauteur
alimentador
Needle
Nadel
Aiguille
Aguja
Motor
Motor
Moteur
Motor
Control
height I Transporteurhohe
de
Ia
griffe
d'entrainement I Altura
(DB X 11
(DB
X 1 I
(DB X 11
(DB
X 1 I
circuit I Steuergeriit I Circuit
de
commande I Unidad
de
del
control
0.8mm
NS#9
NS#9
Calibre d'aiguille
NS#9
AC
Wechselstrom Servomotor (dreiphasig, einphasig, 4polig, 400
Servomoteur
Servomotor de CA (de una fase/trifasico, 4 polos,
Microprocessor I Mikroprozessor I Microprocesseur I Microprocesador
servo
#9
motor
CA
(triphase/monophase, quadripolaire, 400 WI
-4-
1.2mm
#11
(three-phase/single-phase, 4-pole, 400
#22
400
WI
WI
WI
082-007100
Page 24

3.
OPTIONAL
3.
SONDERZUBEHORTEILE
3.
PIECES
3.
PARTES
PARTS
EN
OPTION
OPCIONALES
3. OPTIONAL PARTS
3. SONDERZUBEHORTEILE
3. PIECES EN OPTION
3. PARTES OPCIONALES
The following optional parts are available
die
082
Fur
Les
pieces
Las
siguientes partes opcionales estan disponibles para
Presser
Solenoidsatz
Conjunto aereo dellevantador del pie A
Conjunto solenoide
007100 ist das folgende SonderzubehOr erhaltlich.
en
option suivantes sont disponibles pour
Part name I Bezeichnung I Nom des pieces I Nombre de parte
foot
lifting solenoid set A
fur
die anhebung des stoffdruckerfuBes A
del levantador A
for
the 082-007100.
le
modele 082-007100.
Ia
082-007100.
With knee switch
mit
Knieschalter
Avec interrupteur
Con
interruptor de rodilla
au
genou
Part code
Piece
I Teilecode I
N• I C6digo de parte
183959-001
Presser
Solenoidsatz
Conjunto
Conjunto solenoide dellevantador B
Spulenfadenabtaster
Jeu de detecteur de fil de canette
Juego de detector de
Thread
Tension gauge set
Jeu de jauge de tension
Juego de calibrador de tensi6n
•
• Bei der Umstellung der Modelle
• Pour changer les modeles
foot
lifting solenoid sat B
fUr die anhebung des stoffdruckerfuBes B
aereo dellevantador del pie B
Bobbin thread detector set
hilo de bobina
wiper
Fadenspannvorrichtung
Mecanisme de tire-til
Mecanismo del Jimpiador de
Fadenspannungslehrensatz
Set
for
Satz fur neue Synthetikstoffe*
pour
Jeu
Juego para fibras sinteticas nuevas*
If
changing -DO 1 models to new synthetic fabric specifications,
but
with
(Refer
mit
Teile verwendet warden. (Siehe Seite
set
hilo
Part name
new
synthetic fabric*
nouveaux tissus synthetiques*
I Bezeichnung I Nom des pieces I Nombre de parte
1
1
1
1
the rotary hook replaced by the rotary hook
to
page
137.)
-001
zur Verarbeitung von neuen Synthetikstoffen oder wenn bei einer Nahmaschine
Standardeinstellung der Greifer durch den RP-Greifer (schmierfreier Greifer) ersetzt wird, mussen die folgenden
137.)
-001
aux specifications des nouveaux tissus synthetiques, ou si l'on utilise
specifications standard mais avec le crochet rotatif rem
utiliser les pieces suivantes.
• Si cambia los modelos
(Se
reporter a
-001
a especificaciones de materiales sinteticos nuevas, o si
Ia
estandar pero con el garfio giratorio cambiado
siguientes partes. (Consulte
Ia
pagina
139.)
Rotary hook box assembly 544338-901*
Without knee switch
ohne Knieschalter
Sans
interrupteur
Sin interruptor de rodilla
For -DO 3 models
fur
Modelle-
Pour les modeles -DO 3
Para
modelos -DO 3
RP
(lubrication-free rotary hook), please use the following parts.
place par
page 139.)
por
el garfio giratorio
1
au
genou
DO 3
or
if
using the machine with standard specifications
183960-001
183955-001
183956-001
183922-001
Part code
Piece
I Teilecode I
N• I C6digo de parte
183910-101
Ia
le
crochet rotatif
RP
(garfio giratorio libre de lubricaci6n), use las
RP
(crochet rotatif sans lubrification),
usa
Ia
maquina con especificaciones
Greifersatz
Ensemble de boitier de crochet rotatif
Conjunto de caja de garfio giratorio
machine aux
Cap screw
Schraube
535786-001
Vis a capuchon
Tornillo tapa
*1· · · · When using the rotary hook
RP
(lubrication-free rotary hook), set the sewing speed
to
4,000 spm
or
*1· · · · Stellen Sie bei Verwendung des RP-Greifers (schmierfreier Greifer) eine Nahgeschwindigkeit von weniger als
4000 Stichen pro Minute ein.
*1· · · · Lorsqu'on utilise le crochet rotatif
*1· · · · Usando el garfio giratorio
RP
RP,
regler
Ia
vitesse de couture a
4.000
(garfio giratorio libre de lubr'icaci6n), ajuste
pt/mn ou moins.
Ia
velocidad de costura a 4.000 ppm o
me nos.
-5-
less.
082-007100
Page 25
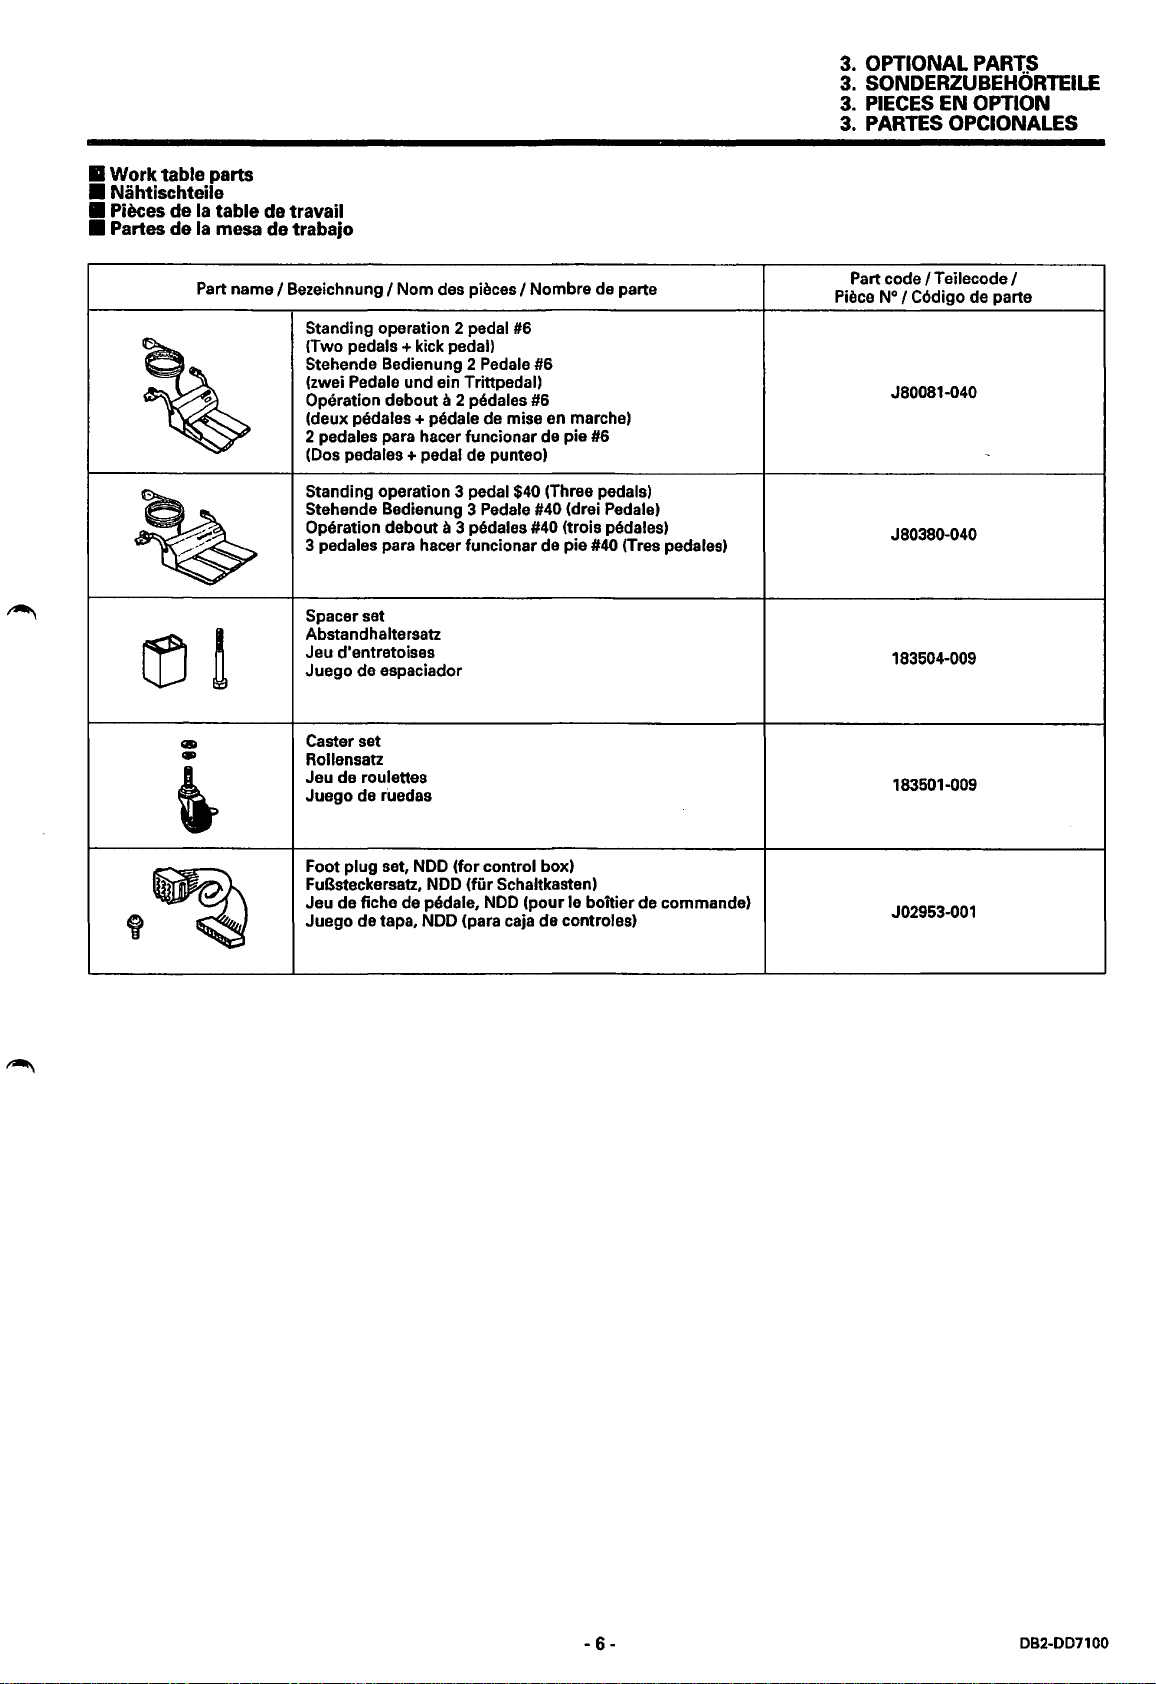
• Work table parts
• Nahtischteile
• Pieces
•
Partes
de
Ia
table de travail
de
Ia
mesa de trabajo
3. OPTIONAL
3. SONDERZUBEHORTEILE
3.
PIECES
3. PARTES OPCIONALES
PAR"(~
EN OPTION
Part name I Bezeichnung I Nom des pieces I Nombre de parte
Standing operation 2 pedal
(Two pedals + kick pedal)
Stehende Bedienung 2 Pedale #6
(zwei Pedale und ein
Operation
(deux
~
.
2 pedales para hacer funcionar de pie #6
(Dos pedales
Standing operation 3 pedal $40 (Three pedals)
Stehende Bedienung 3 Pedale
Operation debout a 3 pedales #40 (trois pedalesl
3 pedales para hacer funcionar de pie #40 (Tres pedalesl
~
Spacer set
Abstandhaltersatz
Jeu d'entretoises
m
~
QD
..
Juego de espaciador
Caster set
Rollensatz
Jeu de roulettes
Juego de
#6
Trittpedal)
debout a 2 pedales #6
pedales + pedale de mise en marchel
+ pedal de punteo)
#40 (drei Pedalel
ruedas
Part code I Teilecode I
Piece N• I C6digo de parte
J80081-040
J80380-040
183504-009
183501-009
•
Foot plug set,
FuBsteckersatz,
Jeu de fiche de
Juego
de tapa, NOD (para caja de controles)
'~
NOD
(for control box)
NOD
(fur
pedale,
Schaltkastenl
NOD
(pour le boitier de commandel
J02953-001
-6-
082-007100
Page 26
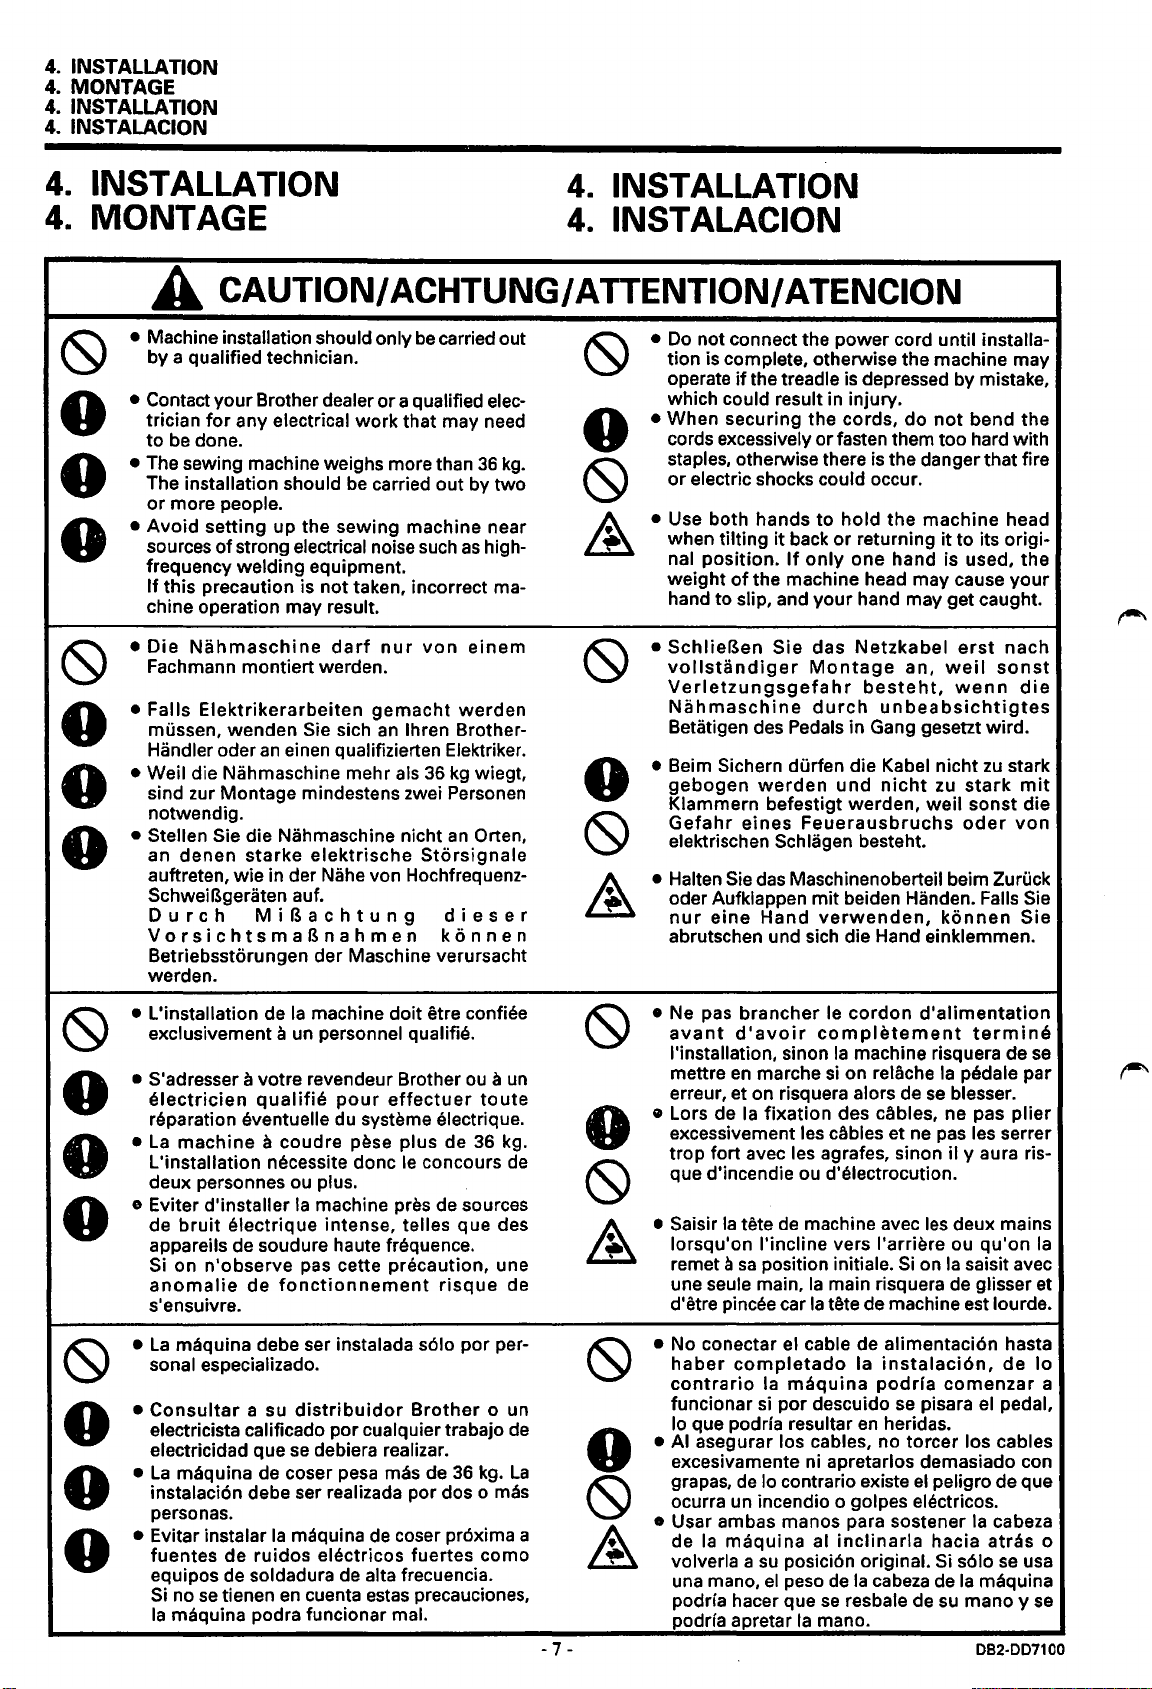
4.
INSTALLATION
4.
MONTAGE
4.
INSTALLATION
4.
INSTALACION
4.
INSTALLATION
4.
MONTAGE
A CAUTION/ ACHTUNG/ ATTENTION/ ATENCION
4.
INSTALLATION
4.
INSTALACION
• Machine installation should only
~
• Contact your Brother dealer
0
• The sewing machine weighs more than
0
•
0
• Die
~
• Falls
0
• Weil die Nahmaschine mehr
0
• Stellen Sie die Nahmaschine nicht
0
be
by a qualified technician.
or
trician
for
be
to
The installation should
or
more people.
Avoid
sources
frequency welding equipment.
If
this precaution is
chine operation may result.
Fachmann montiert werden.
mussen, wenden Sie sich
Handler oder
sind zur Montage mindestens zwei Personen
notwendig.
an denen starke
auftreten, wie in der Nahe von HochfrequenzSchweiBgeraten auf.
Durch
VorsichtsmaBnahmen
Betriebsstorungen der Maschine verursacht
warden.
any electrical work that may need
done.
be
carried out by two
setting
Nahmaschine
Elektrikerarbeiten
up
of
strong electrical noise
the sewing machine near
not
taken, incorrect ma-
darf
an
einen qualifizierten Elektriker.
elektrische
MiBachtung
gemacht
an
carried out
a qualified
such
nur
von
werden
lhren Brother-
als
36
kg
an
Storsignale
dieser
konnen
elec-
36
kg.
as
high-
einem
wiegt,
Orten,
•
Do
not connect the power cord until installation is complete, otherwise the machine may
operate
which could result in injury.
• When securing the cords, do
cords excessively
staples, otherwise there
or
• Use both hands to hold the machine head
when
nal position.
weight
hand to slip, and your hand may get caught.
•
SchlieBen
vollstandiger
Verletzungsgefahr
Nahmaschine
Betatigen des Pedals in Gang gesetzt wird.
• Beim Sichern durfen die Kabel nicht
gebogen
Klammern befestigt warden, weil sonst die
Gefahr
elektrischen Schlagen besteht.
• Halten
oder Aufklappen
nur
abrutschen und sich die Hand einklemmen.
if
the treadle
electric shocks could occur.
tilting
it
of
the machine head may cause
Sie
warden
eines
Sie
das
eine
Hand
is
depressed by mistake,
or
fasten them too hard with
is
the danger that fire
back
or
If
Maschinenoberteil beim Zuruck
returning
only
one hand is used, the
das
Netzkabel
Montage
durch
und
Feuerausbruchs
mit
verwenden,
an,
besteht,
unbeabsichtigtes
nicht
beiden Handen. Falls Sie
not
bend the
it
to its origi-
erst
weil
wenn
zu
zu
stark
oder
konnen
your
nach
sonst
die
stark
mit
von
Sie
• L'installation de
~
• S'adresser a votre revendeur Brother
0
•
0
e Eviter d'installer
0
•
~
•
0
•
0
• Evitar instalar
0
Ia
machine doit etre confiee
a
un
exclusivement
electrician
reparation eventuelle du systeme electrique.
La
machine a coudre pese plus de
L'installation necessite done
deux personnes ou plus.
de
bruit
appareils de soudure haute frequence.
Si
on n'observe pas cette precaution, une
anomalie
s'ensuivre.
La
maquina debe ser instalada
sonal especializado.
Consultar
electricista calificado por cualquier trabajo
electricidad que
La
maquina de coser pesa mas de
instalaci6n debe ser realizada por dos o
personas.
fuentes de ruidos electricos fuertes como
equipos de soldadura
Si
no
Ia
maquina podra funcionar mal.
qualifie
electrique intense, telles que des
de
a su
se
tienen
personnel qualifie.
pour
effectuer
le
Ia
machine pres de sources
fonctionnement
distribuidor
se
debiera realizar.
Ia
maquina de coser proxima a
de
alta frecuencia.
en
cuenta
estas
ou a un
toute
36
concours
risque
s61o
por per-
Brother
36
kg.
precauciones,
kg.
de
de
o un
de
La
mas
-
7-
• Ne pas brancher le
avant
!'installation, sinon
mettre
erreur, et on risquera alors de
e Lors de
excessivement les cflbles et
trop fort avec les agrafes, sinon
que d'incendie ou d'electrocution.
• Saisir
• No conectar el cable de alimentaci6n hasta
• AI asegurar los cables, no torcer los cables
• Usar ambas manos para sostener
Ia
lorsqu'on
remet a
une seule
d'etre pincee car
haber
contrario
funcionar
lo que podria resultar
excesivamente ni apretarlos demasiado con
grapas,
ocurra un incendio o golpes electricos.
de
Ia
maquina
volverla a
una mano,
podria hacer que
podrfa apretar
cordon
d'avoir
en
marche
Ia
tete
sa
main,
completado
si
de
su
completement
Ia
machine risquera de
si
on relache
fixation des cflbles, ne pas plier
de
machine avec
!'incline vers l'arriere ou qu'on
position initiale.
Ia
main risquera de glisser et
Ia
tete de machine est lourde.
al
Ia
mano.
de
se
Ia
en
inclinarla
Ia
resbale de
Ia
maquina
por descuido
lo contra rio existe
posicion original.
el
peso
d'alimentation
Ia
se
blesser.
ne
pas
il y aura ris-
les
deux mains
Si
on
Ia
instalaci6n,
podria
cabeza
comenzar
se
pisara
heridas.
el
peligro de que
hacia atras o
Si
de
su
termine
pedale par
les serrer
saisit avec
Ia
s61o
Ia
mano y
se
Ia
de
lo
a
el
pedal,
cabeza
se
usa
maquina
se
082·007100
Page 27
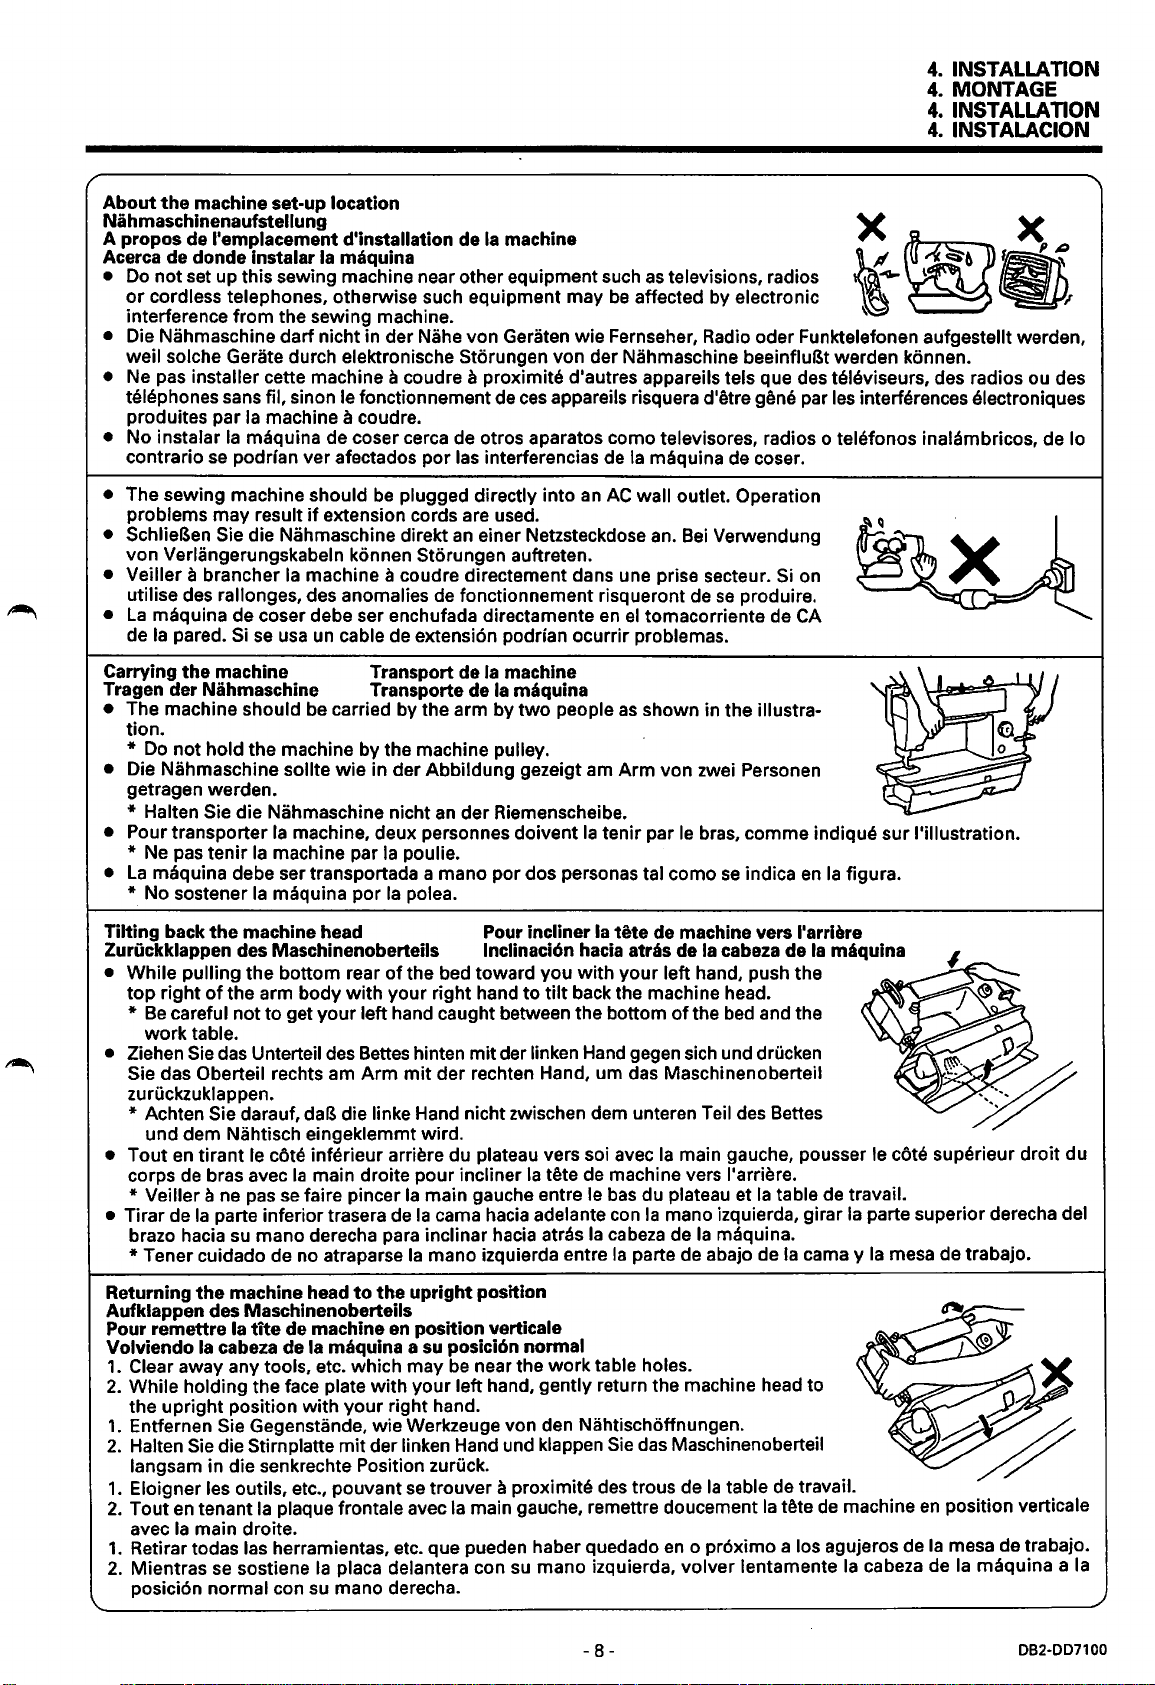
4.
INSTALLATION
4.
MONTAGE
4.
INSTALLATION
4.
INSTALACION
About
the
Nahmaschinenaufstellung
A propos de !'emplacement d'installation de
Acerca de donde instalar
•
Do
or
interference from the sewing machine.
• Die Nahmaschine dart nicht in der Nahe von Geraten wie Fernseher, Radio oder Funktelefonen aufgestellt warden,
wei
• Ne pas installer cette machine a coudre a proximite d'autres appareils tels que des televiseurs, des radios ou des
telephones sans fil, sinon le fonctionnement de
produites par
• No instalar
contrario
machine set-up location
Ia
Ia
not set up this sewing machine near other equipment such
cordless telephones, otherwise such equipment may
I solche Gerate durch elektronische Storungen von der Nahmaschine beeinfluBt warden konnen.
Ia
machine a coudre.
Ia
maquina de coser cerca de otros aparatos como televisores, radios o telefonos inalambricos, de lo
se
podrian ver afectados por las interferencias de
maquina
machine
as
televisions, radios
be
affected by electronic
ces
appareils risquera d'etre gene par
Ia
maquina de coser.
les
interferences electroniques
• The sewing machine should
problems may result
• SchlieBen Sie die Nahmaschine direkt
von
VerUingerungskabeln konnen Storungen auftreten.
• Veiller a brancher
utilise des rallonges, des anomalies de fonctionnement risqueront de
•
La
maquina de coser debe ser enchufada directamente
de
Ia
pared.
Si
Carrying
Tragen der Nahmaschine Transporte de
• The machine should be carried by the arm by
• Die Nahmaschine sollte
• Pour transporter
•
Tilting back
Zuriickklappen des Maschinenoberteils lnclinaci6n hacia
•
• Ziehen
the
machine Transport de
tion.
Do
not hold the machine by the machine pulley.
*
getragen warden.
* Halten
*
La
* No sostener
While pulling the bottom rear
top
*
Sie das Oberteil rechts am
zuruckzuklappen.
Sie die Nahmaschine nicht
Ne
pas tenir
maquina debe ser transportada a mano por dos personas tal como
the
machine head Pour incliner Ia tete de machine vers l'arriere
right
of
the arm body
Be
careful not
work table.
Sie
das Unterteil des Bettes hinten
if
Ia
machine a coudre directement dans une prise secteur. Si on
se
usa
un
Ia
machine, deux personnes doivent
Ia
machine par
Ia
maquina por
to
get your left hand caught between the bottom
be
extension cords are used.
cable de extension podrian ocurrir problemas.
wie
plugged directly into
an
einer Netzsteckdose an.
Ia
machine
Ia
maquina
two
in der Abbildung gezeigt am
an
der Riemenscheibe.
Ia
poulie.
Ia
polea.
of
the bed toward you
with
your right hand
mit
der lin
Arm
mit
der rechten Hand, um das Maschinenoberteil
an
AC
wall outlet. Operation
en
el
tomacorriente de
to
people
tilt
ken
as
shown in the illustra-
Arm
Ia
tenir par
atras de
with
your
back the machine head.
Hand
gegen sich und drucken
Bei
von zwei Personen
le
left hand, push the
of
Verwendung
se
produire.
bras, com me indique sur !'illustration.
se
indica
Ia
cabeza de
the
bed
* Achten Sie darauf, daB die Iinke Hand nicht zwischen dem unteren Teil des Bettes
und dem Nahtisch eingeklemmt wird.
• Tout
• Tirar de
en
tirant le cote inferieur arriere du plateau vers soi avec
de
corps
Veiller a
*
brazo hacia
*Tener
bras avec
Ia
cuidado de no atraparse
Ia
main droite pour incliner
ne
passe faire pincer
parte inferior trasera
su
mano derecha para inclinar hacia atras
Ia
main gauche entre le
de
Ia
cama hacia adelante
Ia
mano izquierda entre
Ia
main gauche, pousser le cote superieur
Ia
tete de machine vers l'arriere.
bas
du plateau et
con
Ia
mano izquierda, girar
Ia
cabeza
de
Ia
maquina.
Ia
parte de abajo de
Ia
CA
en
Ia
figura.
Ia
maquina
and the
table de travail.
Ia
Ia
cama y
droit
du
parte superior derecha del
Ia
mesa de trabajo.
the
Returning
Aufklappen des Maschinenoberteils
Pour remettre Ia
Volviendo
1.
Clear away any tools, etc. which may
2.
While holding the face plate with your left hand, gently return the machine head to _
the upright position with
1.
Entfernen Sie Gegenstande, wie Werkzeuge von den Nahtischoffnungen.
2.
Halten
Iangsam in die senkrechte Position zuriick.
1.
Eloigner les outils, etc., pouvant
2.
Tout
avec
1.
Retirar todas las herramientas, etc. que pueden haber quedado
2.
Mientras
posicion normal con su mano derecha.
machine head
tite
Ia
cabeza de Ia maquina a su posici6n normal
Sie
die Stirn platte
en
tenant
Ia
main droite.
se
de machine
Ia
plaque frontale avec
sostiene
to
the
upright
en
position verticale
your
right hand.
mit
der linken Hand und klappen
se
Ia
placa delantera con su mano izquierda, volver lentamente
position
be
near the work table holes.
Sie
das Maschinenoberteil
trouver a proximite des trous de
Ia
main gauche, remettre doucement
en
o proximo a los agujeros de
-
8-
Ia
table de travail.
Ia
tete
de
machine
Ia
en
Ia
cabeza de
(")
~..-::1
~~
position verticale
mesa de trabajo.
Ia
maquina a
082-007100
Ia
Page 28
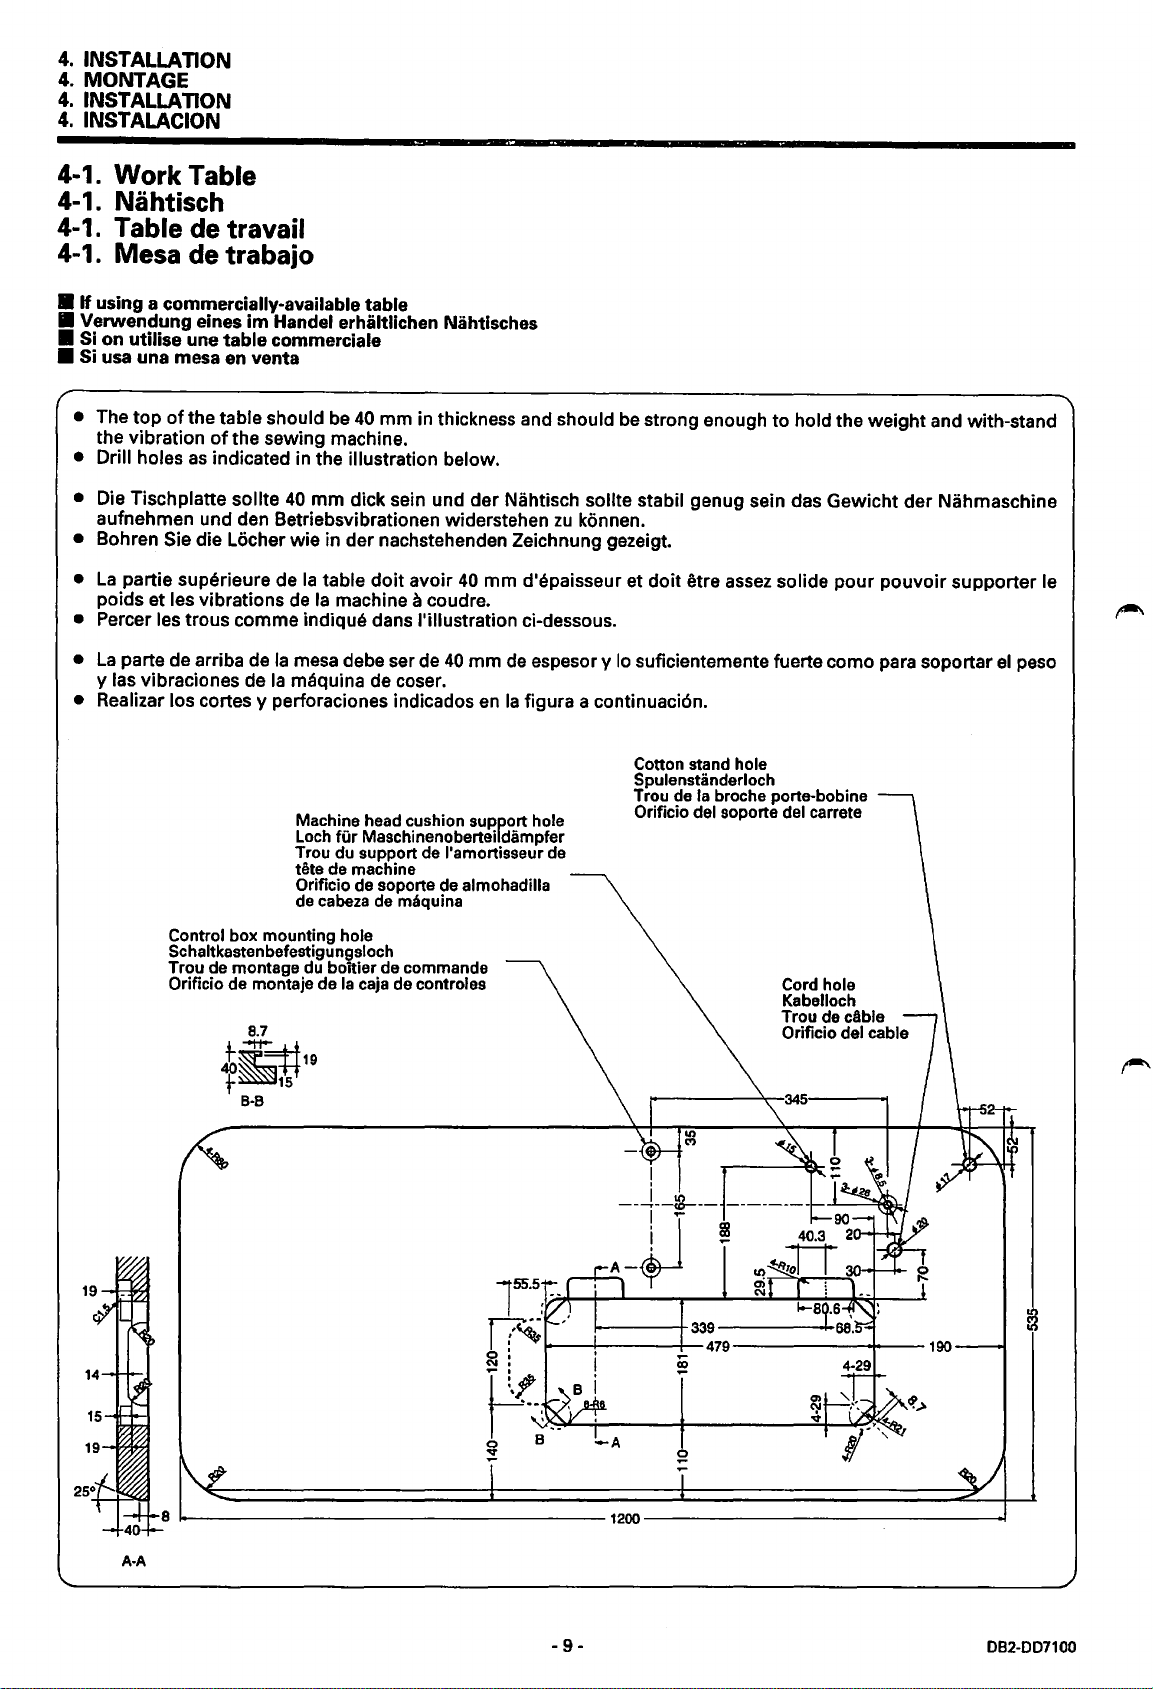
4.
INSTALLATION
4.
MONTAGE
4.
INSTALLATION
4.
INSTALACION
4-1.
Work
Table
4-1. Nahtisch
4-1. Table de
travail
4-1. Mesa de trabajo
•
If
using a commercially-available table
•
Verwendung
• Si
on
• Si usa una mesa en venta
utilise
• The
top
the vibration
• Drill holes
eines
im
une
ofthe
of
as
indicated in the illustration below.
Handel erhaltlichen Nahtlsches
table
commerciale
table should be
the sewing machine.
40
mm
in thickness and should be strong enough
to
hold the
weight
and with-stand
• Die Tischplatte sollte
aufnehmen und den Betriebsvibrationen widerstehen
• Bohren Sie die Locher
•
La
partie superieure de
poids et les vibrations de
• Percer les trous comma indique dans ('illustration ci-dessous.
•
La
parte de arriba de
y las vibraciones de
• Realizar los cortes y perforaciones indicados en
Control box mounting hole
Schaltkastenbefestigungsloch
Trou de montage du boitier de commands
Orificio de montaje de
40
mm
dick sein und
wie
in der nachstehenden Zeichnung gezeigt.
Ia
table
doit
avoir
Ia
machine a coudre.
Ia
mesa debe ser de
Ia
maquina de coser.
Machine head cushion support hole
Loch
fur
Trou du support de l'amortisseur de
tete de machine
Orificio de soporte de
de cabeza de maquina
8.7
Maschinenoberteildampfer
Ia
caja
de control
40
40
der
Nahtisch sollte stabil genug sein das
zu
konnen.
mm
d'epaisseur et
mm
de espesor y lo suficientemente fuerte como para soportar
Ia
figura a continuaci6n.
almohadilla
as
i~=tt19
f~15
B·B
doit
etre assez so fide
Cotton stand hole
Spulenstiinderloch
Trou de
Orificio
Ia
broche porte-bobine
del soporte del carrete
Gewicht
pour
pouvoir
Cord hole
Kabelloch
Trou de cAble
Orificio del cable
der
Nahmaschine
supporter
el
le
peso
-A
8
~-----------------------------------1200-------------------------------
A-A
-9-
082-007100
Page 29
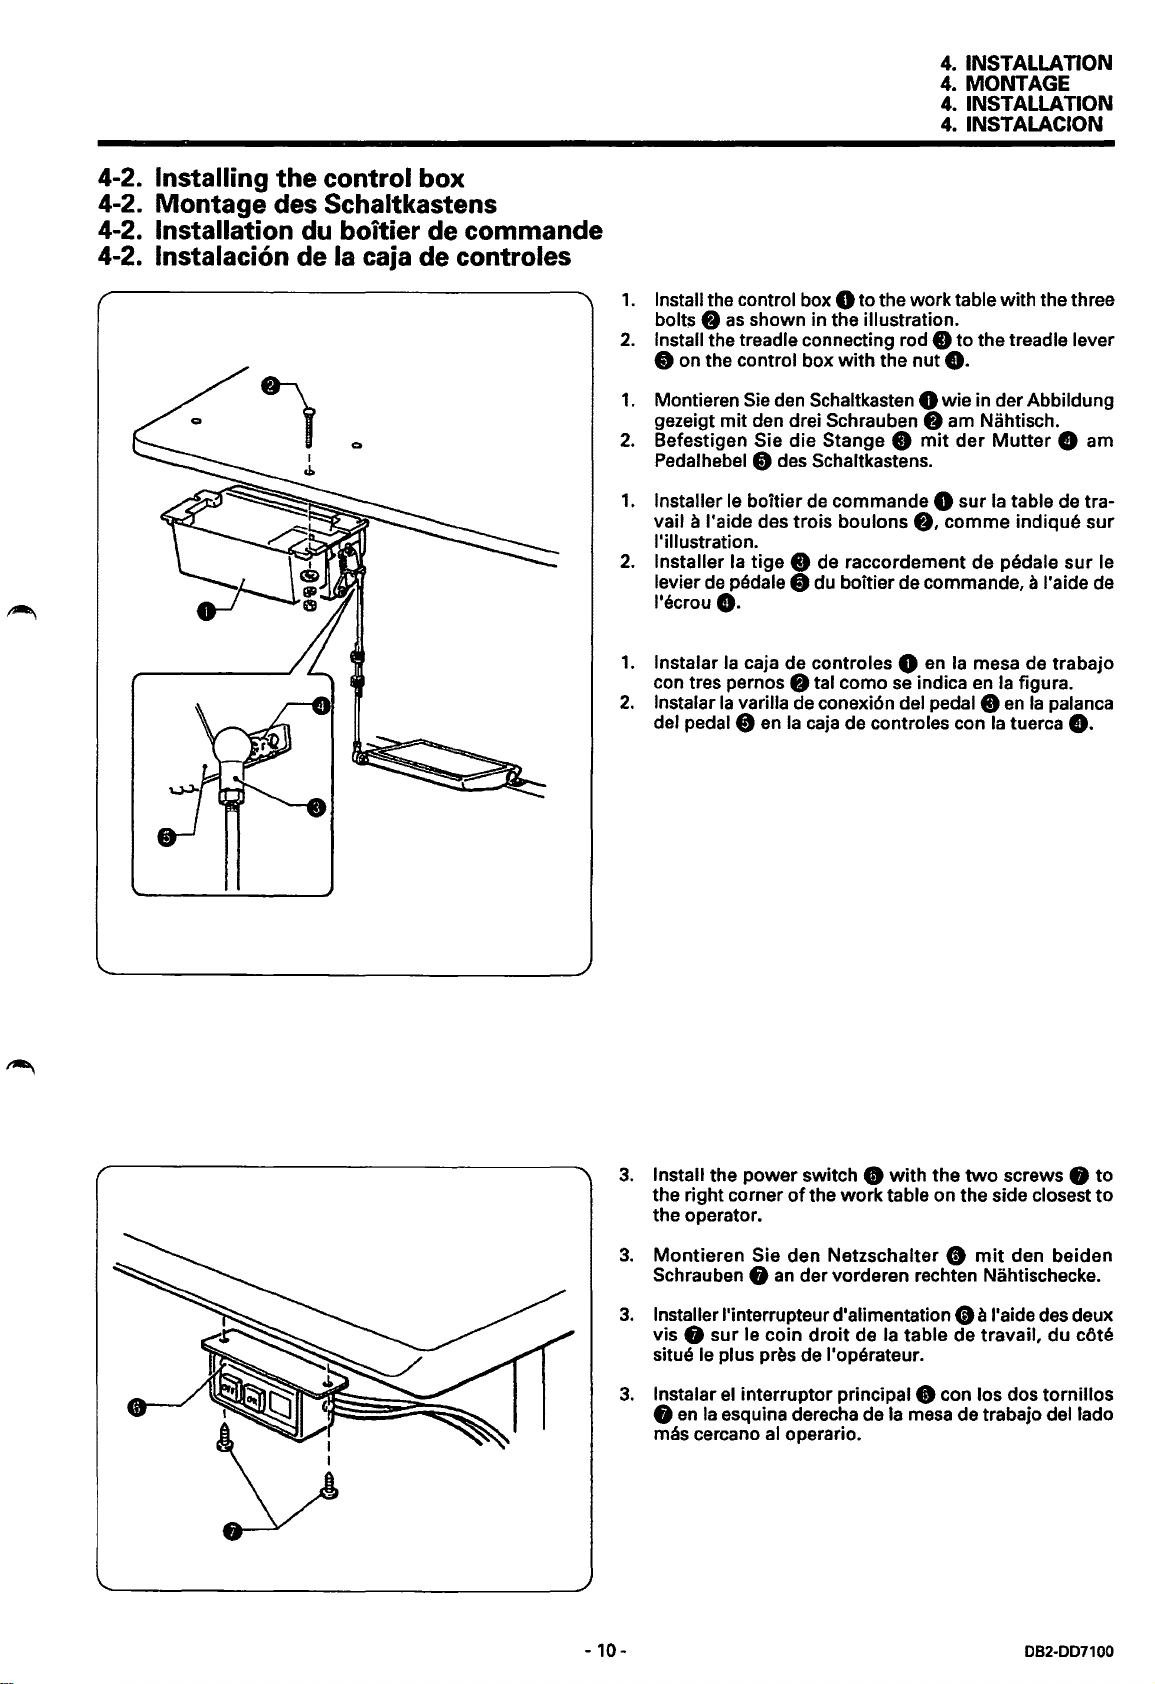
4-2. Installing the control box
4-2. Montage des Schaltkastens
4-2.
Installation
4-2. lnstalaci6n de
du
boitier de commande
Ia caja de controles
4.
INSTALLATION
4. MONTAGE
4.
INSTALLATION
4.
INSTALACION
1.
Install the control box 0 to the work table with the three
8
as
bolts
2.
Install the treadle connecting rod 8 to the treadle lever
8 on the control box with the nut
1.
Montieren
gezeigt mit den drei
2.
Befestigen Sie
Pedalhebel
1.
Installer le boitier
vail a I' aide des trois boulons
!'illustration.
2.
Installer
levier
l'ecrou
shown in the illustration.
e.
Sie
den Schaltkasten 0 wie in der Abbildung
Schrauben 8
die
Stange 8
mit
am
Nahtisch.
der
Mutter
8 des Schaltkastens.
de
commande 0 sur
8,
Ia
tige 8 de raccordement de pedale sur le
de
pedale 8 du boitier de commande, a I' aide de
Ia
table de tra-
comma indique
e.
8 am
sur
1.
lnstalar
con tres pernos
2.
lnstalar
del pedal
3.
Install the power switch
the right corner
the operator.
Ia
caja de controles 0
Ia
varilla de conexi6n del pedal 8
8
en
en
Ia
mesa de trabajo
8 tal como
Ia
caja
of
the work table on the side closest
se
indica
en
de controles con
ct
with
the
two
Ia
figura.
en
Ia
Ia
tuerca
screws 8
palanca
e.
to
to
3.
Montieren Sie den Netzschalter
Schrauben 8
3.
Installer l'interrupteur d'alimentation
8 sur le coin
vis
le plus pres de l'operateur.
situe
3.
lnstalar
8
m~s
-10-
el
en
Ia
esquina derecha de
cercano
ct
mit
an
der vorderen rechten Nahtischecke.
droit
de
Ia
table de travail, du c6te
interrupter principal 8 con los dos tornillos
al
operario.
Ia
mesa
den beiden
ct
a l'aide
de trabajo
082-007100
des
deux
dellado
Page 30
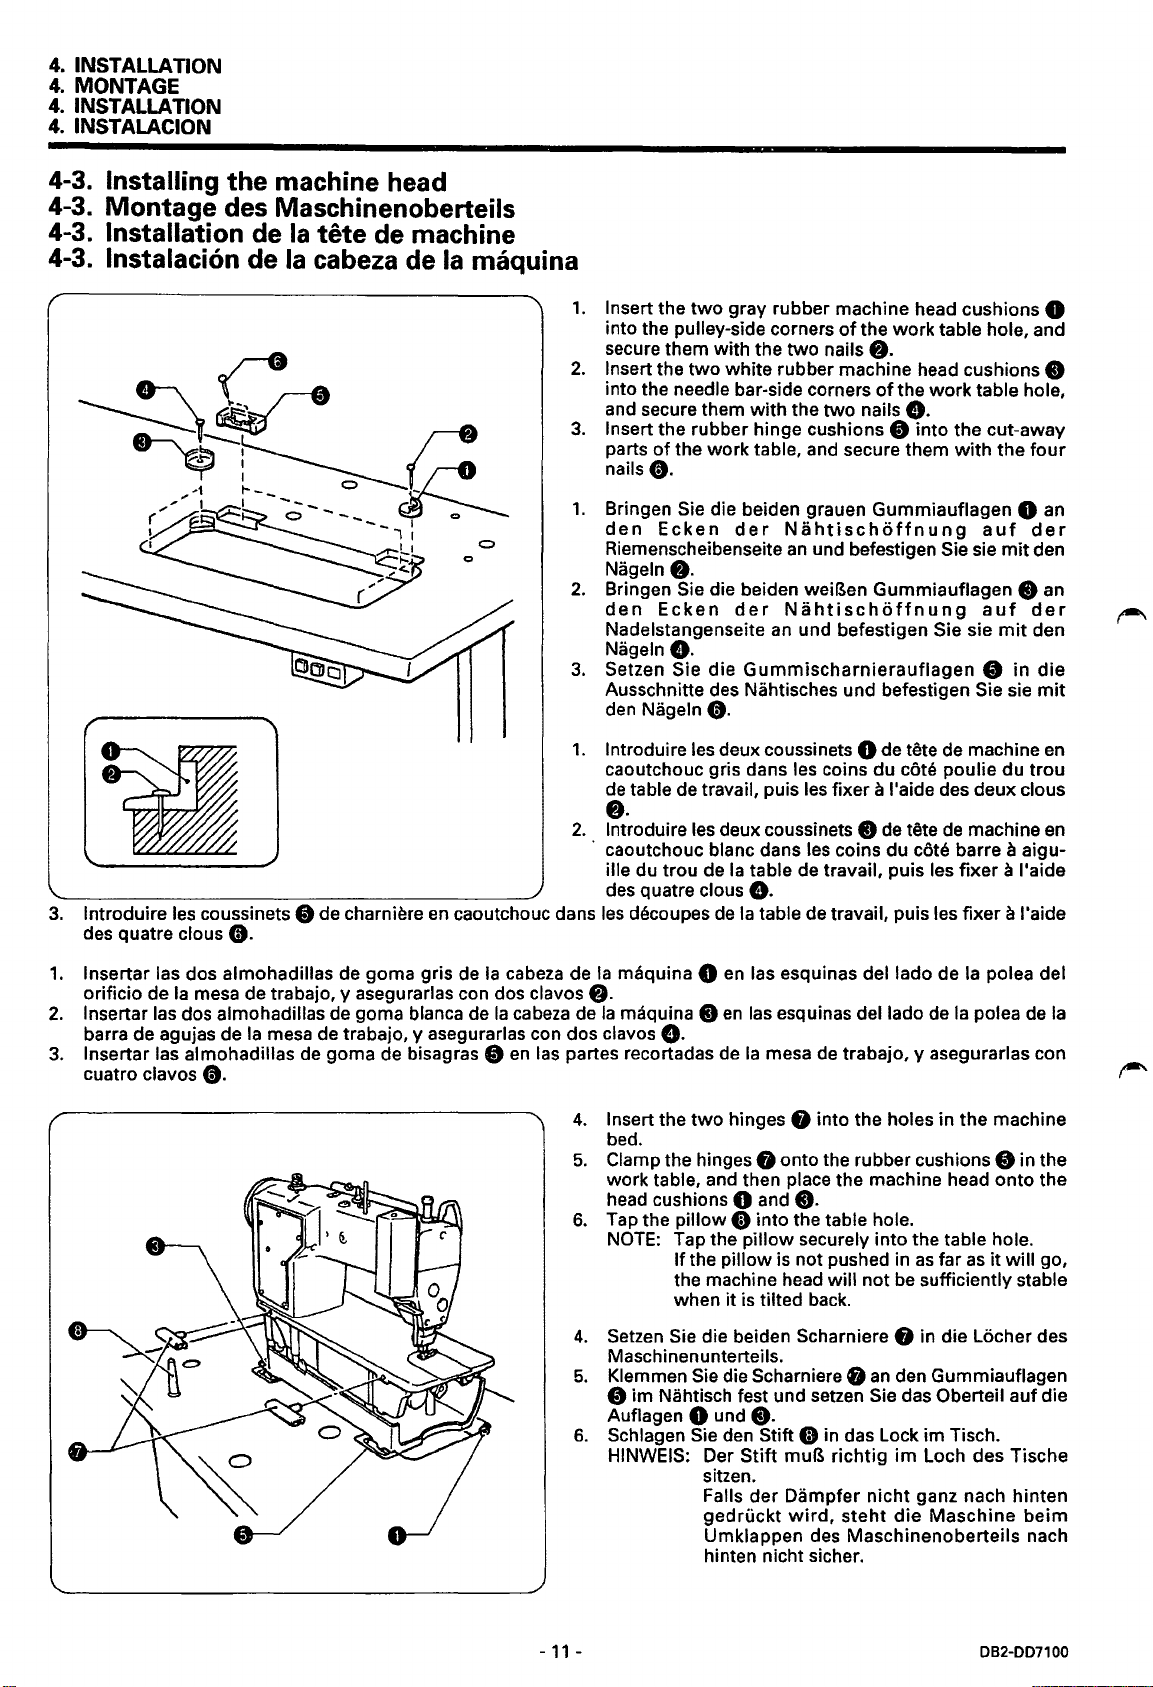
4.
INSTALLATION
4.
MONTAGE
4.
INSTALLATION
4.
INSTALACION
4-3. Installing the machine head
4-3. Montage des Maschinenoberteils
4-3.
Installation de
4-3.
lnstalaci6n de
Ia
tete
Ia
cabeza de
de machine
Ia
maquina
1.
Insert the
into the pulley-side corners
secure them with the
2.
Insert the
into the needle bar-side corners
and secure them
3.
Insert the rubber hinge cushions 8
parts
nailsO.
1.
Bringen Sie die heiden grauen Gummiauflagen 0
den
Riemenscheibenseite
Nageln &.
2.
Bringen Sie die heiden weiBen Gummiauflagen 8 an
den
Nadelstangenseite an und befestigen Sie sie
Nageln
3.
Setzen Sie die
Ausschnitte des Nahtisches und befestigen Sie sie
den Nageln
two
gray rubber machine head cushions 0
of
two
two
white
rubber machine head cushions 8
with
the
of
the work table, and secure them
Ecken
Ecken
der
Nahtischoffnung
an
der
Nahtischoffnung
the work table hole, and
nails
f).
of
two
nails
und befestigen Sie sie
e.
Gummischarnierauflagen
0.
the
e.
into
work
table hole,
the cut-away
with
the
auf
mit
auf
mit
8 in
four
an
der
den
der
den
die
mit
3.
lntroduire les coussinets 8 de charniere
des quatre claus
1.
lnsertar las dos almohadillas de goma gris de
orificio de
2.
lnsertar las dos almohadillas de goma blanca de
barra de agujas de
3.
lnsertar las almohadillas de goma de bisagras 0
cuatro clavos
0.
Ia
mesa de trabajo, y asegurarlas con dos clavos
Ia
mesa de trabajo, y asegurarlas con dos clavos
0.
1.
lntroduire les deux coussinets 0 de tete de machine
caoutchouc gris dans les coins du cote poulie du
de
table de travail, puis les fixer a l'aide des deux claus
••
2.
lntroduire les deux coussinets 8
. caoutchouc blanc dans les coins du cote barre a aigu-
ille du trou de
des quatre claus
en
caoutchouc dans les decoupes
Ia
cabeza de
Ia
maquina 0
f).
Ia
cabeza
en
de
Ia
maquina 8
las partes recortadas de
4.
Insert the
bed.
5.
Clamp the hinges 8 onto the rubber cushions 8 in the
work table, and then place the machine head
head cushions
6.
Tap the pillow 0 into the table hole.
NOTE:
de
tete
de
machine
Ia
table de travail, puis les
fixer
e.
de
Ia
table de travail, puis les fixer a l'aide
en
las esquinas del lado de
en
las esquinas
dellado
8.
Ia
mesa de trabajo, y asegurarlas con
two
hinges 0 into the holes in the machine
0 and
Tap the pillow securely into the table hole.
If
the pillow is not pushed in
the machine head
it
when
e.
will not
is tilted back.
be
Ia
polea del
de
Ia
polea
onto
as
far
as
it
sufficiently stable
en
trou
en
a l'aide
de
Ia
the
will
go,
4.
Setzen Sie die heiden Scharniere 8 in die Locher des
Maschinenunterteils.
5.
Klemmen Sie die Scharniere 8
8
im
Nahtisch fest und setzen Sie das Oberteil auf die
Auflagen
6.
Schlagen Sie den Stitt 0 in das Lock
HINWEIS: Der
-
11
-
0 und
sitzen.
Falls
gedruckt
Umklappen des Maschinenoberteils nach
hinten nicht sicher.
an
den Gummiauflagen
8.
im
Tisch.
Stitt
muB
richtig
der
Dampfer nicht ganz nach hinten
wird,
steht
im
Loch des Tische
die
Maschine
beim
082-007100
Page 31

4.
lnserer
de machine.
5.
Accrocher les charnieres 8 sur les tampons
ouc
chine sur
6.
lntroduire
tapotant.
REMARQUE:
4.
lnsertar las dos bisagras 8
de trabajo.
5.
Enganchar
8
maquina
6.
Colocar a presi6n
NOTA: Asegurarse
8 de
en
les
deux charnieres 8 dans les trous du plateau
Ia
table de travail, puis placer
les
tampons de
Ia
broche 0 dans le
Tapoter
fermement
Ia
Si
fond,
suffisamment stable lorsqu'on l'inclinera
vers l'arriere.
las
bisagras 8
Ia
mesa
de trabajo, y luego colocar
en
las
almohadillas de
el
colocado
Si
el
orificio de
no
en
el
soporte no
quedara bien astable
t~te
8 et
Ia
broche
en
place dans
broche
Ia
soporte 0
de
el
n'est
tllte
de
machine
en
los orificios
en
las
almohadillas
Ia
en
que el soporte a quedado bien
orificio de
ha
quedado bien colocado
Ia
mesa,
Ia
cabeza de
al
4.
INSTALLATION
4.
MONTAGE
4.
INSTALLATION
4.
INSTALACION
en
caoutch-
Ia
tllte de ma-
8.
trou
de table en Ia
pour
Ia
mettre
le
trou de table.
pas poussee bien a
ne sera pas
en
Ia
mesa
de
caucho
Ia
cabeza
cabeza
el
Ia
inclinarla hacia atras.
8 y
orificio
mesa.
e.
de
Ia
mesa.
Ia
maquina
de
Ia
en
7.
Incliner
Ia
8.
Retirer
* Garder
* Si on retire
9.
Remettre
Ia
t~te
de
tete de machine vers l'arriere,
Ia
goupille a encliquetage
Ia
encliquetage
8 de
tomber
Ia
machine vers l'arriere et retirer l'autocollant
goupille a encliquetage
Ia
tete
G>
lorsque
tete de machine a
de
machine de
sur le verrou
Ia
machine a coudre est deplacee.
se
reporter a
G).
G>
dans
Ia
table de travail afin de deplacer
CD
du couvercle de
sa
position initiale.
Ia
page
8.)
un
lieu sur ou elle
Ia
base
(Se
reporter a
7.
Tilt
back the machine head and remove the sticker
f).(Refer
machine head.)
8.
Remove the snap pin
*
Keep
not get lost.
to
page 8
the snap pin
for
details
of
how
G).
G)
in a safe place where
to
tilt
* If removing the machine head from the work table
order to move the sewing machine, install the snap
O to the latch
pin
This
IS
to prevent the bed cover
when the sewing machine is moved.
9.
Return the machine head to its original position. (Refer
to page
7.
Klappen
entfernen Sie den Aufkleber
Zuruckklappen des Maschinenoberteils
Seite 8 verwiesen.)
8.
Entfernen Sie den Sicherungstift
8.)
Sie
das
* Bewahren Sie den Sicherungstift
sicheren
Ort auf,
* Falls das Maschinenoberteil wegen
der Maschine
entfernt
die
Unterteilabdeckung
Nahmaschine nicht
9.
Klappen Sie das Maschinenoberteil
(Siehe Seite
f).(Pour
ne
de plateau.
Ia
wir~mussen
6ffnung..,
8.)
plus
de
risque pas d'etre perdue.
Ia
machine a coudre, installer
Ceci
pageS.)
CD
of
the bed base cover.
Maschinenoberteil nach hinten urn und
CB
G.(Fur
from falling down
Einzelheiten zum
wird
G).
G>
an
so
daB er nicht verlorengehen kann.
an
einem anderen Ort
stecken, so daB sich die
Sie den Sicherungsstift
einem
der
Aufstellung
vom
Nahtisch
8 beim Umstellen der
losen kann.
details concernant
afin
d'emp~cher
le
wieder
Ia
maniere d'incliner
Ia
couvercle du plateau
goupille a
back the
it
will
in
auf
die
G>
in
zuruck.
7.
lnclinar
inclinar
8.
Retirar el pasador
* Guardar el pasador
* Si
9.
Volver
se
G>
Esto
en
Ia
cabeza
Ia
cabeza de
de
Ia
maquina hacia atras y retirar
Ia
maquina.)
G).
G>
desmonta
el
seguro
se
realiza para evitar que
Ia
cabeza de
Ia
cabeza
CD
de
Ia
maquina a
en
un Iugar seguro donde no
de
Ia
Ia
maquina de
cubierta de
Ia
cubierta
su
posici6n inicial. (Consultar
Ia
base
de
Ia
etiqueta G.IConsultar
se
pi
-
CB
12-
erda.
se
caiga
Ia
al
mover
pagina
Ia
mesa de trabajo para mover
de
Ia
cama.
Ia
cama
Ia
pagina 8 par mas detalles sabre c6mo
Ia
maquina de coser, instalar el pasador
Ia
maquina de coser.
8.)
DB2-DD7100
Page 32

4.
INSTALLATION
4.
MONTAGE
4.
INSTALLATION
4.
INSTALACION
4-4. Installing
4-4.
Montage
4-4. Installation de
the
cotton
stand
des Spulentragers
Ia
broche porte-bobine
4-4. lnstalacion del soporte del carrete
Assemble the cotton stand 8 while referring to the cotton
stand instruction
8 to the far right corner
* Securely tighten the nut 8
and
the washer 8 are securely clamped and
cotton stand does not move.
Setzen Sie den
beschrieben, zusammen und bringen Sie den Spulentrager
8
an
der rechten
* Serrer fermement l'scrou
en
caoutchouc 8 et
pinces et que
Assembler
manuel d'instructions de
staller
Ia
droite
* Serrer fermement l'ecrou
Armar
instrucciones
carrete 8
*
broche porte-bobine 0 sur
de
Ia
en
caoutchouc 8 et
pinces et que
el
soporte del carrete 0 consultando
Apretar
almohadilla
apretadas y de manera que
mueva.
manual, and then install the cotton stand
of
the work table.
so
that the rubber cushion 8
Spulentrager
Ecke
des Nahtisches
Ia
Ia
broche porte-bobine
Ia
broche porte-bobine 8
table
de
travail.
Ia
del soporte, y luego instalar
en
Ia
esquina derecha de
bien
de caucho 8 y
Ia
broche porte-bobine
con
Ia
8,
wie
in
8,
de maniere que
rondelle 8 scient fermement
Ia
broche porte-bibine, puis in-
8,
de maniere que
rondelle 8
tuerca
Ia
el
an.
ne
bouge
en
se
le
coin situs a !'extreme
scient
ne
bouge pas.
Ia
mesa
8 de
arandela 8 queden bien
soporte del carrete
manera
so
that the
der
Anleitung
le
coussinet
pas.
reportant
le
coussinet
fermement
el
manual de
el
soporte del
de trabajo.
que
au
Ia
nose
4-5. Installing
4-5.
Montage
the
knee
lifter
der Kniehebel
assembly
(-300 • 310 • 400 • 410
(-300 • 310 • 400 • 410)
4-5. Installation de a•ensemble de releveur au genou
4-5. lnstalacion del conjunto
dellevantador
Push
the
* Remove the
DrOcken
der Unterseite
*
Pousser le levier 8 de releveur
releveur
* Retirer le levier 0 de releveur
Empujar
levantador
maquina.
* Desmontar
de rodilla
the knee lifter lever 0 into the knee lifter shaft 8 in
base
of
the machine head.
chine head.
Sie den Kniehebel 0 in die Kniehebelachse 8
Entfernen
Maschinenoberteil nach hinten umklappen.
au
genou situs a
cline
Ia
tete de machine vers l'arriere.
Ia
palanca dellevantador de rodilla 8
de rodilla 8 en
inclinar
Ia
)
(-300 • 310 • 400 • 410)
(-300 • 310 • 400 • 410)
knee
lifter lever 0 when tilting back the ma-
des
Maschinenoberteils.
Sie
den
Kniehebel
Ia
base
Ia
palanca del levantador de rodilla 0 al
cabeza
de
Ia
maquina hacia atras.
0,
wenn
au
genou dans l'arbre 8 de
de
Ia
tete de machine.
au
genou lorsqu'on
en
Ia
base de
Ia
cabeza de
Sie
el
eje del
an
das
in-
Ia
-
13-
DB2-DD7100
Page 33

4.
INSTALLA
4.
MONTAGE
4.
INSTALLATION
4.
INSTALACION
TJON
4-6. Installing
4-6. Installation des Knieschalters
4-6. Installation de 1•interrupteur au genou
4-6. lnstalaci6n del
~~-------~·1
18
the
knee
switch
(-900 • 910
(-900 • 910
interruptor
360
Knee switch installation position
lnstallationsposition des .Knieschalters
Position
Posici6n de instalaci6n deHnterruptor de rod
d'installation de l'interrupteur au genou
de rodilla
}
(-900 • 910}
(-900 • 910)
Install the
screwO.
Bringen Sie
8
am
Installer l'interrupteur
I' aide de
lnstalar
con
ilia
}
knee
switch 0 to the work table with the round
den
Knieschalter 0
Nahtisch
el
el
tornillo redondo
an.
Ia
vis ronde
interrupter de rodilla 0
au
genou 0 sur
f).
f).
mit
der Rundkopfschraube
Ia
table de travail a
en
Ia
mesa de trabajo
-14-
DB2-DD7100
Page 34

4.
INSTALLATION
4.
MONTAGE
4.
INSTALLATION
4.
INSTALACION
4-7. Lubrication
4-7. Schmierung
A
•
Do
the treadle is pressed by mistake, which could result in injury.
•
Be
eyes
Furthermore, do not drink the
Keep the oil
o SchlieBen Sie das Netzkabel erst nach dem Schmieren an, weil eine hohe Verletzungsgefahr besteht, wenn
die Maschine durch unbeabsichtigtes Betatigen des Pedals in Gang gesetzt wird.
• Tragen Sie zur Handhabung von Schmierol eine Schutzbrille und Schutzhand-schuhe. Falls
oder
Erbrechen und
Bewahren
• Ne pas brancher le cordon d'alimentation avant d'avoir termine
se
• Veiller a mettre des lunettes et des gants
preserver
De
diarrheas.
Ranger l'huile hors
CAUTION/
not connect the power cord until lubrication
sure to wear protective goggles and gloves when handling the lubricating oil,
or
onto your skin, otherwise inflammation can result.
auf
die Haut gelangt, konnen sich diese Stellen entzunden.
Sie das
mettre
en
Jes
plus, !'ingestion
4-7. Lubrification
4-7. Lubricaci6n
ACHTUNG/
out
of
the reach
Durghfall auftreten. .
01
nicht in Reichweite von Kindem auf.
marche si on appuie accidentellement sur
yeux et
Ia
de
l'huile est a proscrire absolument, car elle pourrait causer des vomissements
de
portae des enfants.
oil under any circumstances,
of
children.
de
peau
de
tout
contact avec l'huile, et d'eviter tout risque d'inflammation.
ATTENTION/
has
been
protection lors de
ATENCION
completed, otherwise the machine may operate
so
that no oil gets into your
as
they
can
cause vomiting and diarrhoea.
01
in
Bei
irrtumlicher
Ia
lubrification, sinon
Ia
pedale et done de provoquer des blessures.
Ia
manipulation
Einnahme von
Ia
machine risquera
d'huile
lubrifiante, afin de
di~.Augen
01
kann
et
if
de
des
• No conectar
podria funcionar si par descuido
• Asegurarse de usar anteojos
aceite lubricante no salpique
Ademas, bajo ningun concepto beba aceite lubricante pues podria ocasionar v6mitos y diarrea.
Mantener
•
The sewing machine should always be lubricated and the oil supply replenished before
also after long periods
• Use
• Vor der ersten lnbetriebnahme oder wenn die Maschine langere Zeit nicht verwendet wurde, muB die Maschine
• Verwenden Sie nur das von Brother vorgeschriebene Schmierol (Nisseki Sewing
•
• Utiliser seulement l'huile de lubrification (Nisseki Sewing
•
• Usar
only
the lubricating oil (Nisseki Sewing
geschmiert und
II
faut toujours effectuer
Ia
premiere fois, et aussi lorsque
La
maquina de coser debe ser lubricada y
despues de no usarla durante periodos largos
s61o
aceite Jubricante (Nisseki Sewing
el
cable de alimentaci6n antes
el
aceite lubricante lejos del alcance
of
non-use.
01
nachgeflillt werden.
Ia
Jubrification de
Ia
se
de
seguridad y guantes
sus
machine n'a
de
pisara
ojos o
lube
Ia
machine a coudre et faire le plein d'huile avant d'utiliser
se
le debe agregar aceite antes
de
lube
haber terminado con
el
pedal, lo que podria resultar
al
manipular aceites lubricantes, de manera que
Ia
piel,
de
lo contrario podrian resultar inflamados.
de
los nines.
10) specified by Brother.
pas
ete utilisee pendant une longue periode.
lube
10) recommandee par Brother.
tiempo.
10) especificado por Brother.
1.
For
-3!0/310/4!0/410
0
lever
2.
Remove the bed cover
1.
Ziehen Sie bei den Modellen
Kniehebel
2.
Entfernen Sie die Abdeckung des Maschinenunterteils
Ia
lubricaci6n,
en
lube
de
ser usada
to
remove it.
0 heraus, um ihn
de
heridas.
Jo
it
is
used
10).
por
models, pull
f).
-300/310/400/410
zu
contrario
for
primera vez,
entfernen.
Ia
the first time, and
Ia
machine pour
out
the knee lifter
maquina
tambien
el
immer
den
••
1.
Pour les modeles
0 de releveur
2.
Deposer
1.
Para
dellevantador de
2.
Desmontar
-
15-
Je
couvercle
los modelos
Ia
cubierta de
-3C0/30/4([]/40,
au
genou
en
le
de
plateau &.
-3!0/310/4!0/410,
rodilla
0.
Ia
cama
tirant vers l'exterieur.
deposer
sacar
Je
Ia
palanca
levier
&.
082-007100
Page 35

Reference line
Bezugslinie
Ligne de
Lfnea de referencia
reference
4.
INSTALLATION
4.
MONTAGE
4.
INSTALLATION
4.
INSTALACION
3.
Tilt back the machine head.(Refer to page
4.
Remove the oil tank
cating oil from the accessory oil bottle
(Use the reference line
5.
Replace the oil tank
6.
Install the bed cover
to
head
of
tion.)
7.
Check that the oil gauge comes to the upper reference
line in the oil sight glass
*
8.
For
leverO.
3.
Klappen
um.(Siehe Seite
4.
Entfernen Sie die Olbehalterkappe 8 und fullen Sie
ml
(J~eachten
Olstand.)
5.
Bringen Sie die Olbehalterkappe 8 wieder an.
6.
Bringen
an
zuruck.(Fur Einzelheiten zum senkrechten Aufklappen
des Maschinenoberteils wird auf die
7.
Kontrollieren Sie, daB sich
Bezugslilien auf
its original position.(Refer
how
to return the machine head
Be
sure
lower reference line.
01
to
-300/310/400/410
Sie das
aus der Olflasche G im Zubehor ein.
Sie beim Einfullen die Bezugslinie
Sie
die Abdeckung des Maschinenunterteils
und
klappen Sie das
cap
C), and pour in
as
cap
C).
f),
and then return the machine
8.
add more oil
models, install the knee lifter
Maschinenoberteil
8.)
d~m
Sichtglas 8 befindet.
a quide when pouring.)
to
if
the oil gauge is below the
Maschinenoberteil
der
Olstand
8.)
120
cc
G.
page 8 for details
to
the upright posi-
nach
Seite 8 verwiesen.)
an
der oberen
* Wenn sich der Qlstand unter der unteren Bezugslinie
muB
01
nachgefullt werden.
die Modelle
-300/310/400/410
an.
8.
Bringen Sie
Kniehebel
befindet,
fur
0 wieder
of
lubri-
hinten
120
fur
den
f)
wieder
den
X
0
3.
Upper roforonco line
obcra
Ugno
Unaa
&l~~':l'e
Jau
M~or
Lcwar
untere
Ligna do n!fl!roncolnfl!riauro
Ll'nao
llnle
=f'8nco
supd:rloura
do
rafcrencla
superior
d'huUa
~nee
Bozugslinie
do reforonclolnforior
I
do
acoita
line
4.
5.
6.
7.
8.
3.
4.
5.
6.
7.
8.
Incliner
Ia
Retirer
120 em_ d'huile lubrifiante a l'aide du flacon
fourni
(Pourverser, utiliser
Remettre le capuchon 8 du reservoir d'huile
Installer
de machine a
concernant
en
Verifier
superieure marquee sur
* Si
Pour les modeles
Ia
page
tete de machine vers l'arriere.(Se reporter a
8.)
le
capuchon 8 du reservoir d'huile, et verser
Q.
Ia
ligne de reference comme guide.)
le
couvercle de plateau
sa
position initiale.(Pour plus de details
Ia
position verticale,
Ia
inferieure, rajouter de l'huile.
maniere de remettre
si
Ia
jauge d'huile atteint
le niveau
se
d'huile
-3dJ/3'0/4dJ/410,
reporter a
Ia
fenetre de niveau d'huile
est du-dessous de
f),
puis remettre
Ia
tete de machine
Ia
page
8.)
Ia
ligne de reference
installer
0 de releveur de pied presseur.
lnclinar hacia atras
Ia
pagina
Desmontar
120 cc de aceite
accesoria
(Usar
Volver a colocar
lnstalar
cabeza
pagina 8 par mas detalles sabre c6mo volver
de
Verificar que el
referencia superior
8.)
Ia
0.
Ia
linea de referencia como gufa
Ia
cubierta de
de
Ia
Ia
maquina a
* Asegurarse de agregar mas aceite si
esta par debajo de
aceite
rior.
Para los
palanca dellevantador de rodilla
modelos
Ia
cabeza
tapa del tanque de aceite C), y agregar
lubricante
Ia
tapa del tanque de aceite C).
maquina a su posici6n iniciai.(Consultar
su
posici6n normal.)
medidor
en
-300/310/400/410,
de
Ia
de
Ia
Ia
cama
f),
de aceite indica
Ia
mirilla de aceite
Ia
linea de referencia infe-
maquina.(Consultar
botella
al
y fuego
de aceite
agregar aceite.)
Ia
8.
el
medidor
instalar
0.
d'huile
en
place.
Ia
tete
Ia
ligne
le
levier
volver
Ia
cabeza
linea de
e.
Ia
Ia
de
Ia
-
16-
082-007100
Page 36

4.
INSTALLATION
4. MONTAGE
4.
INSTALLATION
4.
INSTALACION
4-8. Connecting
AnschlieBen der Kabel
4-8.
• Wait at least
£
£
outlet before opening the face plate
result in severe injury.
• Warten Sie mindestens
Steckdose,
Hochspannung vorhanden ist, besteht Verletzungsgefahr.
• Contact your Brother dealer
the
0
•
Do
not turn on the power supply until all cords have
~
0
the treadle is pressed by mistake, which could result in injury.
• Falls Elektrikerarbeiten gemacht werden miissen, wenden Sie sich
qualifizierten Elektriker.
cords
A
10
minutes after turning
bevor
Sie die Stirnplatte des Schaltkastens offnen. Beim Beruhren von Stellen,
A
DANGER/GEFAHR
off
the power switch and disconnecting the power cord from the wall
of
the control box. Touching areas where high voltages are present
10
Minuten nach dem Ausschalten und Herausziehen des Netzkabels aus der
CAUTION/
or
a qualified electrician for any electrical work that may need to
ACHTUNG
been
connected, otherwise the machine may operate
an
lhren Brother-Handler oder
be
an
denen
done.
an
can
if
einen
• Schalten Sie den Netzschalter erst ein, nachdem Sie aile Kabel angeschlossen haben, weil sonst eine
~
4-8·1. Qpening
4-8-1. Offnen des Schaltkastendeckels
Verletzungsgefahr vorhanden ist, wenn die Maschine durch unbeabsichtigtes Drucken des Pedals in Betrieb
gesetzt wird.
the
control box cover
1.
For
-3QJ/310/4QJ/410
lever
2.
3.
0 to remove it.
Tilt
back
the machine head.(Refer to page 8.)
Loosen the screw
toward you to open it.
models, pull out the knee lifter
8.
and then gently pull the cover 8
* Carry out the above three steps in reverse
the cover
Be
box
1.
Fiir die Madelle
herausziehen, um ihn
2.
Klappen Sie das
um.(Siehe Seite
3.
Losen Sie die Schraube 8 und ziehen Sie den Deckel
• zum Offnen sorgfaltig
•.
careful not to clamp the cords inside the control
at
this time.
-3((]/310/4((]/410
zu
entfernen.
Maschinenoberteil
8.)
nach
den Kniehebel 0
nach
verne.
* Fuhren Sie zum SchlieBen des Deckels 8
obenstehenden
Reihenfolge aus.
Sind Sie vorsichtig,
eingeklemmt werden.
drei
Schritte
daB keine Kabel im Schaltkasten
in
umgekehrter
to
close
hinten
die
-
17-
DB2-DD7100
Page 37

4-8. Banchement des cables
4-8. Conexion de los cables
4.
INSTALLATION
4.
MONTAGE
4.
INSTALLATION
4.
INSTALACION
• Attendre
~
• Despues de desconectar
Lh
• S'adresser a votre revendeur Brother ou a un electrician qualifie pour effectuer toute reparation eventuelle
8
•
<9
• Consultar a
8
• No conectar
<9
A
au
moins
debranche le cordon d'alimentation de
commande.
Ia
pared esperar al menos
areas donde exista alto voltaje puede ocasionar heridas graves.
10
Si
on touche des zones sous haute tension, on risque de se blesser gravement.
A
du systeme electrique.
Ne
pas etablir I' alimentation electrique avant que tous les
risquera de
debiera realizar.
comenzar a funcionar
se
mettre
en
su
distribuidor Brother o un electricista calificado por cualquier trabajo de electricidad que
Ia
corriente hasta que todos los cables hayan sido conectados,
DANGER/PELIGRO
minutes apres avoir mis l'interrupteur d'alimentation sur
el
interrupter principal y desenchufar
10
minutos antes de abrir
ATTENTION/
marche
si
si
on enfonce accidentellement
por descuido
Ia
prise murale, avant
se
pisara
el
pedal, lo que podrfa resultar en heridas.
Ia
el
placa delantera de
ATENCION
cAbles
Ia
Ia
d'ouvrir
cable de alimentaci6n del tomacorriente en
aient bien eta branches, sinon
pedale,
Ia
Ia
ce
qui pourrait causer des blessures.
de
position d'arret et avoir
plaque frontale du
caja de controles.
lo contrario
Ia
maquina podrfa
boitier
El
tocar las
Ia
machine
de
se
4-8-1. Ouverture
4-8-1. Apertura de
du
couvercle du boitier de commande
Ia
cubierta de
Ia
caja de controles
1.
Pour
les
0 du releveur
2.
Incliner
Ia
page
3.
Desserrer
modeles
Ia
tete de machine vers l'arriere.(Se reporter a
8.)
Ia
-3a:J/3'0/4C0/4'0,
au
genou en
vis
8.
puis
tirer
le
tirant vers l'exterieur.
doucement le couvercle
deposer le levier
8 vers soi pour l'ouvrir.
* Effectuer les trois etapes ci-dessus dans l'ordre in-
verse pour refermer le couvercle
Veiller alors a
dans le boitier de commande.
1.
Para
los modelos
dellevantador de rodilla
2.
lnclinar hacia atras
Ia
pagina
3.
Aflojar
cubierta 0 hacia adelante para abrirla.
el
8.)
tornillo
ce
que
les
cordons nescient
-3((]/310/4C0/410,
0.
Ia
cabeza
8.
y luego
* Realizar los tres pasos anteriores al inverse para
Ia
cerrar
Asegurarse de no apretar los cables dentro de
de controles
cubierta
al
cerrar
e.
Ia
cubierta.
8.
sacar
de
Ia
maquina.(Consultar
tirar
suavemente de
pas
Ia
pinces
palanca
Ia
Ia
caja
-
18-
082-007100
Page 38

4.
INSTALLATION
4.
MONTAGE
4.
INSTALLATION
4.
INSTALACION
4-8-2. Connecting
AnschlleBen der Kabel
4-8-2.
the
cords
4-8-2. Banchement des
4-8-2. Conexi6n de los cables
cables
1.
Connect
thread detector connector
2.
Align the male end
then insert the male connector
3.
Connect
4.
Pass
the control circuit board
5.
After connecting all
to
6.
Close the control box
1.
SchlieBen Sie den 14poligen Maschinenstecker
8poligen Stecker
2.
Richten Sie den 16poligen Synchronisatorstecker 8 auf die Schaltplatinenbuchse 8 a
the
the
the cords
page 20.
14-pin machine connector
0.
the 4-pin solenoid-type presser lifter connector
0.
of
the 16-pin synchronizer connector 8
e securely until the
20-pin operating panel connector 8
for
the 16:£in synchronizer
conn.
CJ.
of
the connectors, secure the cords to the cord holder
cover$.
e des Spulenfadenabtasters an.
f)
and the 8-pin bobbin
with
tab.
to
the circuit board connector 0 in the same
ector 8 and the 20-pin operating panel connector 8
the female end
on the female
of
connector.
the circuit board connector
closes.
way
.
«D
with
the binding strap 8
0.
den 4poligen Stecker
f)
fur
das StoffdruckerfuBsolenoid und den
us
und schlieBen Sie den Stecker
as
over
while
in step
the
8 an, so daB die Lasche 8 der Buchse 8 geschlossen ist.
3.
SchlieBen Sie den 20poligen Bedienungsfeldstecker 8
Schaltplatinenbuchse
4.
Fuhren Sie die Kabel des 16poligen Synchronisatorsteckers 8 und des 20poligen Bedienungsfeldsteckers 8 auf die
obere Seite der Schaltplatine
5.
Binden Sie nach dem AnschlieBen aller Stecker die Kabel
am Kabel halter
6.
SchlieBen Sie den Schaltkastendeckel 8 wieder.
1.
Brancher le connecteur de machine a
broches
2.
Aligner l'extremite
carte
femelle
3.
Brancher le connecteur de panneau de commands a
maniere qu'a l'etape
4.
Fairs passer les cables du connecteur de synchroniseur a
a
5.
Brancher
reportant
6.
Refermer le couvercle 8 du boitier de com man de.
f)
et le connecteur du detecteur de fil de canette a 8 broches
a circuits
8
se
referme.
20
broches 8 par-desssus le haut de
taus
a
Ia
page
0
an.
C!).
CD.
wie
auf Seite
mi31e
8.
les connecteurs, puis
du connecteur de synchroniseur a
puis introduire fermement le connecteur male 8 jusqu'a
2.
20.
20
gezeigt.
14
broches
Ia
carte a circuits de commands
fixer
0.
les cables au support ci3bles G a l'aide de
auf
die gleiche Weise
mit
der Kabelbinde
le connecteur du releveur de pied presseur de type soleno"ide a 4
wie
im
Punkt 2 beschrieben an der
G)
zusammen und befestigen Sie diese
&.
16
broches 8 avec l'extremite femelle du connecteur de
20
broches 8 au connecteur de carte a circuits 0 de
16
broches 8 et du connecteur de panneau de commands
Ci).
ce
que
Ia
languette 8 du connecteur
Ia
sangle d'attache
8,
and
2.
top
of
referring
Ia
meme
t)
en se
1.
Conectar el conector de
clavijas
2.
Alinear el extrema macho del conector sincronizador de
8.
3.
Conectar el conector del panel de controles de
paso
4.
Pasar los cables
par
5.
Despues de conectar todos los conectores, asegurar los cables del so porte
consultando
6.
Cerrar
8 y el co nectar del detector de hila de bobina de 8 clavijas C).
y luego insertar bien
2.
encima del circuito de control
Ia
cubierta de
par
Ia
pagina
Ia
maquina de
el
conector macho 8 hasta que las lenguetas 0 en
el
conector de sincronizador de
14
clavijas
0.
20
clavijas 8
16
el conector
16
clavijas 8 con
al
clavijas 8 y
8.
20.
Ia
caja de controles
$.
-
19-
dellevantador
el
extrema hembra del conector del circuito
conector del circuito
el
conector de panel de controles de
de
de prensatelas
el
conector hem bra 8 queden cerradas.
6)
de
Ia
cables G con
tipo
solenoids de 4
misma manera que
20
clavijas 8
Ia
correa de sujeci6n 8
DB2-DD7100
en
el
Page 39

4-8-3. Using the binding strap
4-8-3. Anbringen der Kabelbinde
4-8-3. Utilisation de
4-8-3. Uso de
Ia
Ia
sangle d'attache
correa de sujecion
Cords
Kabel
CAbles
Cables
4.
INSTALLATION
4.
MONTAGE
4.
INSTALLATION
4.
INSTALACION
1.
While pressing the tab
2.
Bind the cords together inside the strap, and then pull
the end
to tighten it.
of
the strap through
0.
pull out the end
as
shown in the illustration
of
the strap.
* Bind the cords in such a way that the connector does
not get pulled out.
NOTE:
1.
Drucken Sie die Lasche
herauszuziehen.
2.
Binden
ziehen
in
zusammenzubinden.
All cords that come
should
binding strap, otherwise vibration
sewing machine may cause the cords
come disconnected, which
with the operation
Sie
Sie das Ende der Binde durch die Offnung, wie
der
be
secured to the cord holder using the
die
Kabel
Abbildung
mit dar Kabelbinde zusammen und
out
from the control box
can
cause problems
of
the control box.
0.
urn das Ende der Binde
gezeigt,
urn
die
* Beim Zusammenbinden der Kabel durfen keine
Stecker
HINWEIS:
gelost warden.
Aile Kabel vom Schaltkasten sollten
Kabelbinde
warden,
Vibrationen
Storungen
verursachen konnen.
am
Kabelhalter festgebunden
weil
sich
sonst
Stecker
des
losen
Schaltkastenbetriebs
konnen
durch
from
to
Kabel
mit
the
be-
der
die
und
1.
Tout
en
appuyant sur
de
Ia
2.
sangle.
Attacher les cables ensemble a l'interieur de
puis tirer l'extremite de
de
Ia
sangle comma indique sur !'illustration afin de
serrer.
Ia
languette
Ia
sangle a travers l'ouverture
0,
* Attacher les cables de maniere que
pas
puisse
REMARQUE:Tous
1.
Presionar
2.
Sujetar los cables juntos dentro de
apretarla
se
indica
* Sujetar los cables
nose
NOTA:
sortir.
les cables
commande doivent
au
support cables a l'aide de
d'attache, sinon les cables risqueront
d'etre debranches sous l'effet des vibrations
de
Ia
pourrait
fonctionnement du boitier
Ia
lengueta 0 y sacar
luego pasar
en
Ia
salgan.
Todos
controles deben ser sujetados
cables usando
contrario
podrfa hacer que
podrfa
cual
funcionamiento de
el
figura.
de
los cables
Ia
vibraci6n de
ocasionar
tal manera que los conectores
sortant
etre fixes ensemble
machine a coudre,
causer
extremo de
Ia
los cables
des
el
extremo de
que
salen
correa de sujeci6n, de lo
Ia
problemas
Ia
caja de controles.
tirer
l'extremite
Ia
sangle,
Ia
le
connecteur ne
du
boitier
anomalies
de
commande.
Ia
correa, y para
Ia
correa tal como
de
Ia caja de
del soporte de
maquina de coser
se
desconecten, lo
Ia
sangle
ce
Ia
correa.
con
de
qui
de
el
-20-
082-007100
Page 40

4.
INSTALLATION
4.
MONTAGE
4.
INSTALLATION
4.
INSTALACION
4-9. Connecting
AnschlieBen des Motorsteckers, des Netzsteckers und des Netzkabels
4-9.
• Contact your Brother dealer
8
trician
to
be
•
Be
sure to connect the ground.
connection
receiving a serious electric shock.
the
motor connector, power supply connector and power cord
A
for
any electrical work that may need
done.
is
not secure, you run the risk
CAUTION/
or
a qualified
If
elec-
the ground
of
ACHTUNG
•
Do
not turn
\9
have been connected, otherwise the machine
may operate
take, which
on
the power supply until all cords
if
the treadle is pressed by mis-
could result
•
• Falls
8
• Erden Sie die Maschine unbedingt.
Elektrikerarbeiten
mussen, wenden Sie sich
Handler oder
geerdeter Maschine besteht die Gefahr eines
elektrischen
an
einen qualifizierten Elektriker.
Schlages.
gemacht
an
lhren Brother-
werden
Bei
falsch
\9
•
Schalten
nachdem Sie aile
wei
I sonst eine Verletzungsgefahr vorhanden
ist, wenn die Maschine durch unbeabsichtigtes
Drucken des
Sie
den
Kabel
Pedals in Betrieb gesetzt wird.
•
1.
Connect the 4-pin
power
supply connector 8 to the control box
in the
illustration.
2.
Attach
an
appropriate plug to the power cord
green and
3.
Insert the plug into a properly-grounded
ply.
NOTE:
yellow wire
Do
not
operation
motor
connector 0 and the 6-pin
is
the ground wire.)
use
extension cords, otherwise machine
problems may result.
in
injury .
Netzschalter
angeschlossen haben,
erst
as
e.
AC
power sup-
ein,
shown
(The
Green and yellow wire
(ground wire)
grunes
(Erdungskabel)
und
gelbes
Kabel
1
1.
SchlieBen Sie den 4poligen Motorstecker 0 und den
6poligen Netzstecker 8
Abbildung gezeigt
2.
Bringen Sie
Stecker an. (Das
Erdungskabel.)
3.
SchlieBen Sie den Stecker
Netzsteckdose an.
HINWEIS: Verwenden Sie keine Verlangerungskabel,
am
Netzkabel 8 einen entsprechenden
weil
dadurch Betriebsstorungen verursacht
werden konnen.
an.
grune
am
Schaltkasten
und
das
gelbe
Kabel
an
einer richtig geerdeten
wie
in
sind
der
-
21
-
DB2-DD7100
Page 41

4.
INSTALLATION
4. MONTAGE
4.
INSTALLATION
4.
INSTALACION
4-9. Branchement du connecteur de moteur,
cordon d'alimentation
4-9. Conexi6n
del conector del motor, conector de
de alimentaci6n
ATTENTION/
effectuer
Ia
machine a
ou a un
toute
Ia
terre.
il
~
y
8
A
• S'adresser a votre revendeur Brother
electrician
reparation eventuelle du systeme electrique.
• Veiller a bien brancher
Si
le branchement de terre est mal fait,
aura risque d'electrocution grave.
qualifie
pour
•
•
8
Consultar
electricista calificado por cualquier trabajo
electricidad que
• Asegurarse
conexi6n a tierra no fuera segura,
peligro de sufrir golpes electricos serios.
a su
de
se
hacer
distribuidor
debiera realizar.
Ia
conexi6n a tierra.
Brother
se
corre
o un
de
Si
Ia
el
~
•
1.
2.
3.
du
connecteur d'alimentation
Ia
fuente de alimentacion y cable
et
du
ATENCION
•
Ne
pas
etablir !'alimentation electrique avant
que tous
sinon
marche si on enfonce accidentellement
pedale,
• No conectar
cables hayan sido conectados,
Ia
maquina podrfa comenzar a funcionar
descuido
resultar
Brancher le connecteur de moteur a 4 broches 0 et le
connecteur d'alimentation a 6 broches 8
commande, comme indique sur
Fixer une fiche adequate
(le
fil vert et jaune est le til de terre.)
lntroduire
correctement mise a
REMARQUE:
les c&bles aient bien ete branches,
Ia
machine risquera de
ce
qui pourrait causer des blessures.
Ia
corriente hasta que todos los
se
pisara el pedal, lo que podrfa
en
heridas.
l'illustratiori.
au
cordon d'alimentation
Ia
fiche dans une prise
Ia
se
produire.
terre.
de
fonctionnement risqueront
Ne pas utiliser de rallonges, sinon des
anomalies
de
se
mettre
de
lo contrario
si
au
boitier de
d'alimentation
en
Ia
por
e.
Fil
vert
et
(fil
Cable verde y amarillo
(cable
jaune
de
terre)
de
conexi6n a tierra)
1
1.
Conectar el conector del
conector de
Ia
caja de controles tal como
2.
Colocar
e.
3.
(EI
lnsertar
CA
con una conexi6n a tierra adecuada.
NOTA:
Ia
fuente
un
enchufe apropiado
cable verde y amarillo
el
enchufe
No usar cables de extensi6n de lo contrario
podrfan ocurrir problemas.
motor
de
alimentaci6n de 6 clavijas 8 a
en
una fuente de alimentaci6n de
de 4 clavijas 0 y
se
indica
en
Ia
al
cable
de
es
el
alimentaci6n
cable a tierra.)
figura.
el
-22-
082-007100
Page 42

4. INSTALLATION
4.
MONTAGE
4.
INSTALLATION
4. INSTALACION
4-10. Test operation (Operating
4-10.
4-10.
Probebetrieb (Betatigung des Pedals)
Essai
de
fonctionnement
(utilisation
the
de
treadle)
Ia
pedale)
4-10. Funcionamiento de prueba (Usando el pedal)
A CAUTION/ ACHTUNG/ ATTENTION/
• Do
not
touch any
result in personal injury
• Beruhren Sie keine sich bewegenden Teile und drucken Sie auch keine Gegenstande
sich
verletzen konnen und die Nahmaschine beschadigt werden kann.
• Ne toucher aucune des parties mobiles, et
ceci pourrait causer des
• No tocar ninguna de las piezas m6viles o presionar ningun objeto contra
resultar
For machines
to
page 81.)
Bei Maschinen
Probebetrieb beginnen. (Siehe Seite 81.)
les machines equipees
Pour
l'essai de fonctionnement.
en
with
a bobbin thread detector, set the lower thread remainder
mit
einem Spulenfadenabtaster mussen Sie die untere Restfadenmenge festlegen, bevor Sie
of
heridas o
d'un
(Se
reporter a
the moving parts
or
damage
blessures ou endommager
Ia
maquina podrfa resultar dafiada.
detecteur de til de canette, regler
Ia
to
page
or
press any objects against the machine
the machine.
ne
pas
presser d'objets contre
83.)
Ia
machine.
Ia
limite de til inferieur restant avant d'entreprendre
limit
before carrying
ATENCION
while
sewing, as
an
solche Teile, wei I Sie
Ia
machine pendant
Ia
maquina
al
coser, pues podrla
out
test operation. (Refer
this
Ia
couture, car
mit
may
dem
Para
maquinas con detector de hilo de bobina, ajustar
Ia
pagina 83.)
ellimite
de sobrante de hilo antes de realizar
• Turning
• Einschalten der Stromversorgung
• Mise so us tension de
• Conexi6n
Press
illuminate.
Drucken
Netzanzeige e aufleuchtet.
Appuyer sur l'interrupteur
d'alimentation
Oprimir
alimentaci6n e
the
ON
el
on
the
power
de
Ia
corriente
power switch
Sie
den
e s'allume.
interrupter
se
Ia
machine
0.
Netzschalter
d'alimentation
principal
encendera.
The
"ON"
ON
Ia
prueba. (Consulter
power
indicator e will
0,
so
ON
0.
Le
0.
El
indicador
daB
temoin
die
de
-23-
082-007100
Page 43

4.
INSTALLATION
4.
MONTAGE
4.
INSTALLATION
4.
INSTALACION
R Test operation
• Probebetrleb
g Essal de fonctionnement
• Funcionamiento de prueba
1.
Check that the machine sews at
treadle
that
pressed to position
2.
After
needle is lowered
the treadle
needle down stopping has been set).
3.
If
pressed to position
position
needle then rises above the needle plate and stops.
1.
Kontrollieren
Nahgeschwindigkeit eingeschaltet
Pedal
Kontrollieren
Nahgeschwindigkeit
sorgfaltig in die Position © drucken.
2.
DrOcken
Sie,
wenn
zurOckgestellt
tiefgestellter Nadel eingestellt ist).
3.
Beim Drucken des Pedals 0
wenn
Neutralposition
abgeschnitten,
angehoben und stoppt.
0 is gently pressed
it
sews at high
pressing
s.e_eed
when the treadle 0 is gently
(Q.
the
treadle G forward, check
to
the
top
0 is returned to the neutral position ® (when
the
treadle 0 is
@),
0
Iangsam
Sie das
ob
die Nadel auf die Stichplatte abgesenkt
das
Pedal
es
in die Position @ gedruckt und
thread
Sie,
Sie,
Pedal
wird
.Q.ressed
(Q)
and then returned
trimming
ob
die
in
die
ob
die
lauft,
0 nach vorne und kontrollieren
0
in
(wenn
® zuruckgestellt wird),
die
Nadel
low
speed when the
to
position @. Then check
of
the needle plate when
to
position @ (or
is carried
Maschine
Position
Maschine
wenn
die
Neutralposition
die
in
die Position @ (oder
wird
Ober
to
mit
wird,
wenn Sie das
@
Sie
das
Stopposition
wieder
wird
die
that
the
if
the neutral
out
mit
Stichplatte
it
and
the
niedriger
drucken.
hoher
Pedal 0
wird,
mit
in die
der Faden
is
®
1.
S'assurer que
enfonce doucement
S'assurer ensuite qu'elle coud a vitesse rapide lorsqu'on
enfonce doucement
2.
Enfoncer
l'aiguille s'abaisse jusqu'en haut de
lorsqu'on ramene
(lorsque
reglee).
3.
Si on enfonce
on l'enfonce jusqu'a
a
Ia
position neutre @), le til est coupe puis
s'eleve au-dessus de
1.
Verificar que
se
pisa suavemente
verificar
suavemente el pedal
2.
Despues de pisar el pedal 0 hacia adelante, verificar
Ia
que
placa de aguja cuando el pedal 0 vuelve a
neutral
parada con
3.
Si
se
pisa el pedal 0 a
posici6n @ y fuego
se
cortara el hilo y
placa de aguja y
Ia
machine coud a vitesse lente lorsqu'on
Ia
pedale 0 jusqu'a
Ia
pedale 0 jusqu'a
Ia
pedale 0 vers l'avant, puis s'assurer que
Ia
pedale 0 a
Ia
position d'arrAt inferieure de l'aiguille a ete
Ia
pedale 0 jusqu'a
Ia
position@
Ia
plaque a aiguille
Ia
maquina cose a baja velocidad cuando
el
pedal 0 a
que
cose a alta
0 a
Ia
aguja ha bajado hasta
® (cuando
Ia
se
haya ajustado
aguja abajo).
Ia
se
vuelve a
Ia
aguja se levantara encima de
se
parara.
Ia
velocidad
posici6n
Ia
parte de arriba de
posici6n @ (o si
Ia
Ia
position @.
Ia
position
Ia
plaque a aiguille
Ia
position neutre ®
Ia
position @ (ou si
puis qu'on
posici6n @. Luego
Ia
et
s'arrete.
cuando
©.
Ia
Ia
posici6n
posici6n neutral @),
se
©.
ramene
l'aiguille
se pisa
Ia
posici6n
de
pisa a
Ia
Ia
-24-
082-007100
Page 44

5. PREPARATION BEFORE SEWING
5. VORBEREITUNGEN
5. PREPARATIFS
5. PREPARATIVOS ANTES DE COSER
ZUM
AVANT
NAHEN
LA
COUTURE
5. PREPARATION
5. VORBEREITUNGEN
5. PREPARATIFS
BEFORE
ZUM
AVANT
LA COUTURE
5. PREPARATIVOS ANTES
5-1. Installing the needle
5-1. Einsetzen der Nadel
5·1. Installation de l'aiguille
5·1. Colocaci6n de
A
• Turn
pressed by mistake, which could result in injury.
• Schalten Sie den Netzschalter
Betatigung des Pedals die Maschine in Gang gesetzt und Verletzungen verursachen kann.
• Mettre l'interrupteur d'alimentation sur
de
• Desconectar
funcionar
CAUTION/
off
the power switch before installing the needle, otherwise the machine will operate
se
mettre
Ia
aguja
ACHTUNG/
en
marche
el
interrupter principal antes
si
por descuido
si
on enfonce accidentellement
se
pisara
vor
dem Einsetzen der Nadel aus, weil sonst durch eine unbeabsichtigte
el
SEWING
NAHEN
DE
COSER
ATTENTION/ ATENCION
Ia
position d'arret avant d'installer l'aiguille, sinon
Ia
pedale, et done de causer des blessures.
de
colocar
pedal, lo que podrfa resultar
Ia
aguja, de lo contrario
en
heridas.
Ia
maquina podria comenzar a
if
the treadle is
Ia
machine risquera
X 0
Long groove in needle
Lange
Nut
Rainure longue
Ranura larga en Ia aguja
de
l'aiguille
.,.....,..,_Front
...,......
vorne
Avant
·Adelante
1.
Turn the machine pulley to move the needle bar to its
highest position.
2.
Loosen the screw
3.
Insert the needle 8 in a straight line
making sure that the long groove on the needle is at
the left, and then securely tighten the screw
1.
Stellen
Nahmaschinenriemenscheibe in die hochste Position.
2.
Losen Sie die Schraube
3.
Stecken Sie die Nadel 8
linken Seite ganz hinein und ziehen Sie die Schraube
Ofest.
1.
Tourner
barre a aiguille a
2.
Desserrer
3.
lnserer completement l'aiguille 8
veillant ace que
a gauche, puis serrer fermement
1.
Girar
aguja hasta quede
2.
Aflojar
3.
lnsertar
asegurandose que
Ia
Sie
Ia
Ia
Ia
polea de
el
tornillo
Ia
izquierda, y luego apretar fuertemente el tornillo
0.
as
far
as
0 .
die
Nadelstange
0.
mit
poulie de machine de maniere a amener
sa
position
vis
0.
Ia
rainure longue de l'aiguille soit situee
Ia
maquina para levantar
en
Ia
posici6n mas alta.
0.
aguja 8 derecha tanto como
Ia
ranura larga
durch
der Iangen
Ia
plus haute.
en
Ia
vis
en
Drehen
Nut
ligne droite,
0.
Ia
sea
Ia
aguja quede a
it
will go,
der
auf
der
barra de
posible,
Ia
en
0.
-25-
082-007100
Page 45

5. PREPARATION BEFORE
5. VORBEREITUNGEN
5. PREPARATIFS
AVANT
SEWING
ZUM
NAHEN
LA COUTURE
5. PREPARATIVOS ANTES DE COSER
5-2. Removing
5-2. Herausnehmen der
the
bobbin case
Spulenkapsel
5-2. Retrait de Ia boite a canette
5-2. Manera de sacar
A
A
A
A
A
•
Turn
treadle
• Schalten Sie den Netzschalter
ki:innen,
•
Mettre
risquera de
•
Desconectar el
comenzar a
CAUTION/
off
the
is
pressed by mistake,
wenn
l'interrupteur
se
funcionar
Ia caja de
ACHTUNG/
power
switch before remov
which
vor
sich die Maschine durch unbeabsichtigtes Dri.icken des Pedals in Gang setzt.
d'alimentation
mettre
en
marche si on enfonce accidentellement Ia pedale, et done de causer des blessures.
interrupter
si por descuido
principal antes de sacar
Ia
bobina
ATTENTION/
ing
the
bobbin
could result in injury.
dem Herausnehmen
en
position d'arret avant de retirer
se
pisara el pedal,
1.
2.
3.
case,
der
Ia
caja de
lo
Turn
above the needle plate.
Pull the latch 0
move
re
The bobbin 8
leased.
ATENCION
otherwise
Spulenkapsel aus, weil Verletzungen entstehen
Ia
bobina, de lo
que podria resultar en heridas.
the mac
the bobbin case.
the machine
Ia
boite a canette, sinon
contrario
hine pulley
of
will
the
bobbin
come
to
out
may
operate
Ia
maquina podria
raise the needle
case
upward
when the latch 0 is re-
Ia
machine
until
and then
if
the
it
is
For
thick
Fur
dicke
Pour les
te
Para
materials
Stoffe
tissus
epa is
las gruesas
1.
Heben Sie die Nadel durch Drehen
riemenscheibe bis i.iber die Stich platte an.
2.
Ziehen Sie die Lasche 0 nach oben
die Spulenkapsel heraus.
3.
Die Spule 8 tal It heraus, wenn Sie die Sperrlasche 0
loslassen.
1.
Tourner
l'aiguille jusqu'a
plaque a aiguille.
2.
Soulever le verrou 0 de
Ia
3.
La
1.
Girar
quede encima de
2.
Tirar del seguro 0
Ia
3.
La
seguro
Ia
poulie
boite a canette.
ca
nette 8
Ia
polea de Ia maquina para levantar
caja
de
Ia bobina.
bobina 8 saldra hacia afuera
de
machine
ce
qu'elle soit placee au-dessus de
Ia
boite a canette puis deposer
sortira
lorsqu'on relache le verrou
Ia placa de aguja.
de
Ia
caja de
0.
der
Nahmaschinen-
und
nehmen
de
maniere a relever
Ia
aguja hasta
Ia
bobina y luego sacar
cuando
se
0.
libere
Sie
Ia
el
- 26 -
062-007100
Page 46

5. PREPARATION BEFORE SEWING
5. VORBEREITUNGEN
5. PREPARATIFS
5. PREPARATIVOS ANTES
ZUM
AVANT
NAHEN
LA
COUTURE
DE
COSER
5-3. Winding the lower thread
5-3.
Aufwickeln des Unterfadens
A
• Do not touch any
result in personal injury
• Beri.ihren Sie keine sich bewegenden Teile und dri.icken
sich verletzen konnen und die Nahmaschine beschadigt werden kann.
• Ne toucher aucune des parties mobiles, et
ceci pourrait causer des blessures au endommager
• No tocar ninguna de
resultar en heridas o
CAUTION/
of
the moving parts
or
damage to the machine.
las
piezas m6viles o presionar ningun objeto contra
Ia
maquina podrfa resultar dariada.
ACHTUNG/
fil
5-3. Bobinage du
5-3. Bobinado
del hilo inferior
ATTENTION/
or
press any objects against the machine while sewing,
Sie
auch keine Gegenstande
ne
pas
presser d'objets centre
Ia
machine.
1.
Turn on the power switch.
2.
Place
3.
4.
5.
6.
7.
8.
the bobbin 0 onto the bobbin winder
Wind the thread several times around the bobbin in
the direction indicated by the arrow.
Push
the bobbin presser 8 toward the bobbin.
Raise
the presser foot
Depress
Once
bobbin presser arm
After the thread
and
the treadle. Lower thread winding will then start.
winding
cut the thread with the thread trimming knife
of
has
the
inferieur
ATENCION
an
seiche Teile, weil Sie
Ia
machine pendant
Ia
maquina
with
lower
e
will
been
wound on, remove the bobbin
al
the presser foot lifter.
thread is completed, the
return automatically.
* Loosen the screw 8 and move the bobbin presser 8
to
adjust the amount
Note: The amount
should be a
capacity.
of
thread wound onto the bobbin.
of
thread wound onto the bobbin
maximum
of
as
this may
Ia
couture, car
coser, pues podrfa
shaft,.
0.
80 %
of
the bobbin
Less
thread
weniger Faden
Moins de
Manos hilo
til
~
'c::~~~
More thread
mehrFaden
Plus
defil
Mas hilo
1.
Mettre l'interrupteur d'alimentation sur
marc he.
2.
3.
4.
5.
6.
7.
8.
*
Ia
Placer
Bobiner plusieurs fois
le sens indique par
Pousser le presseur de canette
Soulever le pied presseur a l'aide du releveur
presseur.
Enfoncer
mence alors.
Une fois que le fil inferieur a
le
automatiquement a
Une fois que le fil a
Couper le fit
Desserrer
afin de regler
Remarque:
canette 0 sur l'arbre 8 du bobineur de canette.
le
fil auteur de
Ia
fleche.
$ vers
bras
Ia pedale.
8
a l'aide du
Ia
vis 8 et deplacer
Le
bobinage du
ete completement bobine,
du
presseur
sa
ete bobine, deposer
Ia
quantite
La
quantite de fil enroule sur
doit
iltre au plus de SO% de
de
Ia
canette.
de
place.
COUteau
le
de
fil bobinee sur
canette
•.
presseur
Ia
position
Ia
canette 0 dans
Ia
canette.
de
fil
inferieur com-
reviendra
Ia
canette et
de
canette 8
Ia
canette.
Ia
canette
Ia
capacite
de
pied
1.
Schalten Sie den Netzschalter ein.
2.
Setzen Sie die Spule 0 auf die Spulenachse
3.
wickeln Sie den Faden einige Male in Pfeilrichtung urn
dieSpule
4.
Drucken Sie den Spulenhebel e gegen die Spule.
5.
Heben
Stoffdri.ickerfuBheber an.
6.
Dri.icken
aufzuwickeln.
7.
Nach vollstandigem Aufwickeln wird der Spulenarm 8
automatisch zuri.ickgestellt.
8.
Entfernen Sie nach dem Aufwickeln des Fadens die
Spule
Fadenabschneidemesser 8 a
0.
Sie
sie
und
das
den
Stoffdri.ickerfuB
Pedal, urn den Unterfaden auf die Spule
schneiden
Sie
den
b.
Faden
8.
mit
mit
den
dem
* Losen Sie die Schraube 8 und verschieben Sie den
e.
Spulenhebel
Fadens einzustellen.
Hinweis: Der Faden
1.
Conectar
Colocar
2.
3.
Enrollar
en
Empujar
4.
Levantar
5.
prensatelas.
Pisar
6.
inferior.
7.
Una vez que
inferior,
automaticamente a
B.
Despues de bobinar
hila con
Aflojar
*
para ajustar
Nota:
el
Ia
bobina 0
el
Ia
direcci6n indicada por
el
el
pedal. Entonces comenzara
el brazo
Ia
el
tornillo 8 y mover
La
ser un
bobina.
urn die Menge des aufgewickelten
sollte
Spulenkapazitat aufgewickelt warden.
interrupter principal.
hilo varias veces alrededor de
prensor de
el
se
cuchilla cortahilos
Ia
cantidad
en
prensatelas
cantidad de hilo bobinado
maximo
Ia
haya terminado el bobinado del hilo
del
prensor
su
posici6n original.
el
hila, retirar
de
hila a bobinar
hochstens
el
eje
de bobinador
Ia
flecha.
bobina e hacia
con
el
de bobina e
Ia
C).
el
prensor de
de
80
% de
zu
SO
8.
Ia
bobina 0
Ia
bobina.
levantador
el
bobinado del hilo
volvera
bobina y cortar el
Ia
bobina 8
en
Ia
en
Ia
Ia
capacidad de
bobina.
bobina debe
%
der
del
Ia
-27-
DB2-DD7100
Page 47

5. PREPARATION
5. VORBEREITUNGEN
5. PREPARATIFS
5. PREPARATIVOS ANTES
BEFORE
ZUM
AVANT
SEWING
NAHEN
LA COUTURE
DE
COSER
5-4. Installing
the
5-4. Einsetzen der
A
• Turn
is pressed by mistake, which could result in injury.
• Schalten Sie den Netzschalter
wenn sich die Maschine durch unbeabsichtigtes Drucken des Pedals in Gang setzt.
• Mettre l'interrupteur d'alimentation sur
chine risquera de
blessures.
• Desconectar
comenzar a funcionar si por descuido
CAUTION/
off
the power switch before installing the bobbin case, otherwise the machine may operate
el
bobbin case
Spulenkapsel
ACHTUNG/ A TIENTION/
vor
dem Einsetzen der Spulenkapsel a
Ia
position d'arret avant d'installer
se
mettre
interruptor principal antes de instalar
en
marche si on enfonce accidentellement
se
pisara el pedal, lo que podrra resultar en heridas.
5-4. Installation de Ia boite a canette
lnstalacion de Ia caja de Ia bobina
5-4.
ATENCION
if
the treadle
us,
wei I Verletzungen entstehen konnen,
Ia
boite a canette sinon Ia ma-
Ia
pedale, et done de causer des
Ia
caja de
1.
While holding the bobbin so
the right, insert the bobbin into the bobbin case.
2.
Pass
sion spring
3.
Pull the thread
tension spring
4.
Check
is pulled.
5.
Hold the latch 8 on the bobbin
bin
*
Ia
bobina,
the thread through the slot 0 and under the ten-
de
lo contrario
that
the thread
Ia
m~quina
podrra
winds
0.
out
through the hole
in
the
end
0.
that the bobbin turns clockwise when the thread
case
and insert the bob-
case
into the rotary hook.
If
using the bobbin thread detector, you
use a special bobbin case.
will
need
of
to
the
to
1.
Tout
en
tenant
Ia
vers
Ia
droite, inserer
2.
Passer le fil a travers
tension
3.
Tirer le fil vers l'exterieur a travers le trou
du ressort de tension
4.
Verifier que
illes
5.
Tanir le verrou 8 de
0.
d'une montre lorsqu'on tire
canette de maniere que le fil
Ia
canette dans
Ia
fente 0 et sous le ressort de
0.
Ia
canette tourne bien dans
Ia
boite a canette
Ia
boite a canette.
le
le
fil.
et
inserer
de
sens des aigu-
a canette dans le crochet rotatif.
* Si l'on utilise le detecteur de fil de canette, il faut
utiliser une boite
a canette speciale.
se
bobine
l'extremite
Ia
boite
1.
Halten Sie
rechten Seite aufgewickelt wird und
in die Spulenkapsel.
2.
Ziehen Sie den Faden durch den Schlitz 0 und fuhren
Sie ihn unter die Spannungsfeder
3.
Ziehen Sie den Faden aus
Spannungsfeder
4.
Kontrollieren Sie, ob sich die Spule beim Herausziehen
des Fadens nach rechts dreht.
5.
Halten
Sie sie in den Drehgreifer ein.
*
Bei
spezielle Spulenkapsel verwendet warden.
1.
Sosteniendo
hacia
Ia
bobina.
2.
Pasar
detensi6n
3.
Tirar
extrema del resorte de tensi6n
4.
Verificar que
tira del hilo.
5.
Sostener el seguro 8
Ia
caja
* Si
usar una caja de bobina especial.
die
Spule, so daB sich
der
setzen
Faden
Sie die Spule
0.
dem
Loch am Ende
0.
Sie
die Spulenkapsel
Verwendung des Spulenfadenabtasters muB eine
Ia
bobina de manera que el hila
Ia
derecha, insertar
el
hilo a traves
de
an
der Lasche 8 und setzen
Ia
bobina dentro de
Ia
ranura
OY
debajo del resorte
se
Ia
0.
del
hilo
hacia afuera a traves del
orificio
0.
Ia
de
Ia
bobina dentro de
se
usa
el
bobina gira hacia
en
Ia
detector de hilo de bobina,
caja de
Ia
lanzadera.
Ia
derecha cuando
Ia
bob ina e insertar
se
debera
auf
die
der
enrrolle
caja de
del
se
-28-
082-007100
Page 48

5. PREPARATION BEFORE SEWING
5. VORBEREITUNGEN
5. PREPARATIFS
5. PREPARATIVOS ANTES
ZUM
AVANT
NAHEN
LA
COUTURE
DE
COSER
5-5. Threading
5-5.
Einfadeln des Oberfadens
Enfilage du fil superieur
5-5.
5-5. Enhebrado
_A
• Turn
treadle is pressed by mistake, which could result in injury.
• Schalten Sie den Netzschalter vor dem Einfadeln
Betatigung des Pedals die Maschine in Gang gesetzt und Verletzungen verursachen kann.
• Mettre l'interrupteur d'alimentation sur
risquera de
• Desconectar
comenzar a funcionar
the
upper thread
del hilo superior
CAUTION/
off
the power switch before threading the upper thread, otherwise the machine
se
mettre
el
interrupter principal antes de enhebrar
ACHTUNG/
en
marche
si
par descuido
si
on
ATTENTION/
des
Oberfadens
Ia
position d'arret avant d'enfiler le fil superieur, sinon
enfonce accidentellement
el
se
pisara
el
pedal, lo que podria resultar
• Turn the machine pulley and raise the thread take-up le-
ver 0 before threading the upper thread. This will make
threading easier and
ing out at the sewing start.
• Pull the thread out from the needle hole
approximately
aus,
Ia
pedale, et done de causer des blessures.
hila superior, de lo contrario
35 -40
ATENCION
wei I sonst durch eine unbeabsichtigte
en
heridas.
it
will prevent the thread from com-
mm.
will
operate
Ia
machine
Ia
maquina podrla
to
a length
if
the
of
Pass
the
Den Faden von
Passer
Pasar
thread through
le
fil
par le chas de gauche a droite.
el hilo
por
13
14
1.
35-40mm
links nach rechts durch das Nadelohr ziehen.
el
ojo de
.1
the
needle eye
Ia
aguja de izquierda a derecha.
from
left
to
right.
• Drehen Sie die Riemenscheibe und heben Sie
einfadeln des Oberfadens den Fadenabnahmehebel 0
an, um das Einfadeln
dadurch verhi.itet,
• Ziehen Sie den Faden ungefahr
Nadelohr.
•
Tourner
releveur de fil avant d'enfiler
l'enfilage
ture.
• Tirer environ
!'orifice
•
Girar
tirahilos
permitira enhebrarlo
se
•
Tirar
aproximadamente unos
Ia
poulie de machine et elever le levier 0 de
et empechera le fil de sortir
35-
d'aiguille.
Ia
polea de
0 antes de enhebrar
salga
al
comienzo de
del
hila
hacia afuera del
zu
daB
40
Ia
erleichtern. AuBerdem
def
Faden
am Nahbeginn vorsteht.
35 -40
le fil superieur.
mm
de fil vers l'exterieur a partir de
maquina y levantar
mas facilmente y evitara que
Ia
costura.
35-
40
el
orificio
mm.
en
hila
vor
mm
aus dem
Ceci
facilitera
debut de cou-
Ia
palanca del
superior. Esto
de
Ia
dem
wird
el
hila
aguja
-29-
082-007100
Page 49

5.
PREPARATION BEFORE SEli,VING
5.
VORBEREITUNGEN
5. PREPARATIFS
5. PREPARATIVOS ANTES DE COSER
ZUM
AVANT
NAHEN
LA
COUTURE
5-6. Adjusting
the
stitch
length
5-6. Einstellen der Stichlange
5-6. Reglage de
Ia
longueur de
point
5-6. Ajuste del largo de puntada
_j
I·
Turn the stitch length dial 0 clockwise
wise
so
position on the dial.
that the desired stitch length is at the uppermost
or
counterclock-
* The larger the number, the longer the stitch length
be.
will
Stellen sie die Stichlange mit der Einstellscheibe 0 ein,
daB sich
befindet.
die
gewunschte
Stichlangenzahl
ganz oben
so
* Mit zunehmender Zahl wird eine gr6Bere Stich lange
eingestellt.
Ia
Tourner
des aiguilles d'une montre ou dans le sens contraire des
aiguilles d'une montre de maniere que
desiree soit placee
* Plus le numero est grand, plus
Girar
izquierda de manera que
encuentre indicado
* Cuanto
molette 0 de longueur de point dans le sans
Ia
longueur
tout
en
haut de
sera
grande.
el
dial de largo de puntada 0 hacia
el
en
Ia
posici6n mas alta del dial.
puntada.
mayor
sea el
Ia
molette.
Ia
longueur de point
Ia
largo de puntada deseado
numero,
mas larga sera
de
point
derecha o
se
Ia
5-7. Using
the
knee
lifter
lever
(-300 • 310 • 400 • 410)
5-7. Verwendung des Kniehebels
5-7.
Utilisation
5-7. Usando
du
levier de releveur
Ia
palanca de.llevantador de rodilla
(-300 • 310 • 400 • 410)
au
genou
(-300 • 310 • 400 • 410)
(-300 • 310 • 400 • 410)
The
presser foot 8 can be raised by pressing the knee lifter
leverO.
Der
StoffdruckerfuB
angehoben warden.
Le
pied presseur 8 peut litre eleve
0 de releveur
El
prensatelas 8
dellevantador de rodilla
au
8 kann
genou.
se
puede levantar presionando
0.
mit
dem
Kniehebel
en
appuyant sur le levier
Ia
0
palanca
-30-
082-007100
Page 50

5. PREPARATION BEFORE SEWING
5. VORBEREITUNGEN
5. PREPARATIFS
5. PREPARATIVOS ANTES DE COSER
ZUM
AVANT
NAHEN
LA COUTURE
5-8. Using
Verwendung
5-8.
5-8.
Utilisation
5-8. Uso
dellevantador
the
solenoid-type presser
des Stoffdruckersolenoids
du
releveur de pied presseur de
de prensatelas de
lifter ( -900
(-900
tipo
solenoide
/910
/910)
type
)
soleno"ide
(-900
(-900
/910)
/910)
The vertical movement
out
from the knee switch
• Plug connections
A:
to
B:
drop.
white-white
foot
white-red
Contact
When the treadle is in the neutral position, the presser foot is in the down position; pressing the knee switch
the presser
Contact
When the treadle is set
foot
* When the power switch is turned on, the presser foot 0
the knee switch 0 is pressed once, the presser foot 8 will not move even
of
the presser foot
0.
to
rise.
to
can
be
changed over by switching over the 1-pin connector 8 which is coming
neutral, the presser foot
is
in the up position; pressing the knee switch
can
be
raised
or
lowered by releasing the treadle. Moreover,
if
the treadle is released.
will
will
cause the presser
Use
the knee switch
cause
0 to control the presser foot 8 in this way.
Die senkrechte Bewegung des
umgeschaltet wird.
• Steckerverbindungen
Kontakt A:
der
In
StoffdruckerfuB angehoben.
Kontakt
der
In
StoffdruckerfuB abgesenkt.
weiB-weiB
Neutralstellung des Pedals ist der StoffdruckerfuB abgesenkt; durch Drucken des Knieschalters
B:
weiB-rot
Neutralstellung des Pedals ist der StoffdruckerfuB angehoben; durch Drucken des Knieschalters
StoffdruckerfuBes kann geandert werden, wenn der 1polige Stecker
* Bei eingeschaltetem Netzschalter laBt sich der StoffdruckerfuB 8 durch Loslassen des Pedals anheben oder absenken.
Falls
der
Knieschalter 0 einmal gedrl.ickt wird, bewegt sich der StoffdruckerfuB 0 auch beim Loslassen des Pedals
Auf
nicht.
diese Weise laBt sich der StoffdruckerfuB 0
mit
dem Knieschalter 0 steuern.
f)
am Knieschalter 0
wird
wird
der
der
if
-
31
- DB2-DD7100
Page 51

II
est possible de modifier
au
l'interrupteur
• Raccords des prises
Contact
Lorsque Ia pedale est
l'interrupteur
Contact
Lorsque
l'interrupteur
* Lorsqu'on
presseur
se
deplacera pas, meme si on relache
cette maniere.
El
movimiento vertical del prensatelas puede ser cambiado cambiando
rodillaQ.
de
• Conexiones del enchufe
Contacto A:
Cuando el pedal esta
rodilla
se
Contacto
Cuando
de rodilla, bajara
genou
A:
blanc-blanc
au
B:
blanc-rouge
Ia
pedale est en position neutre
au
met
l'interrupteur d'alimentation sur
8
en
relachant
blanco-blanco
levantara el pie del prensatelas.
B:
blanco-rojo
el
pedal
se
* Si el interrupter principal esta conectado,
si
se
embargo,
Usar el interrupter de rodilla 0 para controlar
pedal.
oprime una
le
mouvement vertical du pied presseur
Q.
en
genou, on provoque
genou, on provoque
coloca
el pie del prensatelas.
position neutre
Ia
pedale.
en
Ia
posici6n neutral, el pie del prensatelas esta
en
vez
De
Ia
posicion neutral,
el interrupter de rodilla
(arr~t),
Ia
remontee du pied presseur.
(arr~t),
Ia
descente du pied presseur.
plus, si on appuie une fois sur l'interrupteur
Ia
pedale. Utiliser l'interrupteur
se
le pied presseur est en position abaisse.
le pied presseur est en position relevee.
Ia
position de marche,
el
pie del prensatelas quedara
podra levantar o bajar
0.
el prensatelas 8 no
el
prensatelas 8 de esta manera.
5.
PREPARATION
5.
VORBEREITUNGEN
5.
PREPARATIFS
5.
PREPARATIVOS
en
commutant
au
genou 0 pour contrOier
el
conector de 1 clavija 8 que sale del interrupter
en
el
le
connecteur a 1 broche 8 qui sort de
il
est possible d'elever ou d'abaisser le pied
au
genou
Ia
posici6n baja; al oprimir el interrupter de
en
Ia
posici6n alta;
prensatelas 8 dejando de pisar el pedal. Sin
se
movera incluso
BEFORE
ZUM
AVANT
LA
ANTES
En
appuyant alors
En
appuyant alors
0.
le
pied presseur 8
le
pied presseur 8 de
al
oprimir el interrupter
si
se
deja de pisar el
SEWING
NAHEN
COUTURE
DE
COSER
sur
sur
ne
5-9. Using the thread wiper
5-9. Verwendung
5-9. Utilisation
5-9.
Uso
del
retirador de hilo
des
du
tire-fils (
Fadenwischers
(-400
-400
(-400
/410/900/910}
/41 D
(-400
/900
/410/900/910)
/91 0 )
/410/900/910)
Press the thread
done, the thread
trimmed.
Drucken Sie den Fadenwischerschalter
In
dieser Position
Abschneiden des Fadens betatigt.
Appuyer sur l'interrupteur de tire-fils
tire-fils 8 se mettra alors
ete coupe.
Qprimir
l.!]. Entonces,
funcione
-32-
el
interrupter del retirador de hilo 0 hacia
el cortahilos.
wiper
switch 0 to the
wiper 8 will
wird
el
retirador de hilo 8 funcionara despues que
operate after
der
Fadenwischer 8 nach dem
en
marche une fois que
[!]
side.
the
0
auf
0 vers le
If
this
thread is
die Seite
cOte
[!].
le
fil aura
ellado
DB2-DD7100
is
[!].
Le
Page 52

6.
USING
6. VERWENDUNG DER
6. UTILISATION
6.
USO
THE B-40 OPERATION PANEL
BEDIENUNGSTAFEL B-40
DU
DEL TABLERO
PANNEAU DE COMMANDE B-40
DE
CONTROLES B-40
6. USING THE B-40 OPERATION PANEL
6. VERWENDUNG
6. UTILISATION DU PANNEAU
6.
USO
DEL TABLERO
DER
BEDIENUNGSTAFEL B-40
DE
COMMANDE B-40
DE
CONTROLES B-40
6-1. Part names and functions
6-1. Teilebezeichnung und Funktion
6-1.
Noms
6-1. Denominaci6n de
* Key operations and the number
stitch number before beginning
However, end backtack sewing can
*With
*To
*Wah
* Bei eingeschalteten Tasten leuchtet die entsprechende Anzeige. Bei nicht leuchtenden Anzeigen sind die Tasten
*
*
* Pour toutes
* Appuyer sur
all keys, the indicator
set the stitch number, press the
rend dem Nahan konnen keine Tasten betatigt oder Stichzahlen eingestellt werden. Daher muB
genau
Das
Endriegelnahen kann auch wahrend dem Nahen geandert oder aufgehoben warden.
ausgeschaltet.
Zum Einstellen der Stichzahl kann die Zahl
II
n'est pas possible de modifier le fonctionnement des touches
consequent
Toutefois,
et
fonctions des pieces
las piezas y funcionamiento
of
stitches cannot
to
sew.
be
changed
will
light when the key is
.t:::.
key
to
kontrolliert warden, ob die Tasten und Stichzahlen richtig eingestellt sind.
be
changed while sewing.
or
canceled while sewing is being carried out.
ON
and go out when
increase, and the '\1 key
mit
den Tasten
.t:::.
bzw. '\1 erhoht bzw. verringert werden.
et
Be
sure to confirm all key settings and the
OFF.
to
decrease the setting.
le nombre de points en cours de couture. Veiller par
a verifier le reglage de toutes les touches et le nombre de points avant de commencer a coudre.
il est possible de changer ou d'annuler
les touches, le temoin s'allume lorsque
Ia
touche
.t:::.
pour augmenter
le
Ia
couture de point d'arret
Ia
touche est enclenchee et s'eteint lorsqu'elle est desenclenchee.
nombre de points,
et
en
fin de couture pendant que
sur
Ia
touche '\1 pour le diminuer.
vor
dem Nahbeginn
l'on
coud.
Nose
*
*
*
pueden hacer cam bios
Ia
costura.
Sin embargo,
En
todas las teclas, el indicador
El
numero de puntadas
Se
deben confirmar todas las posiciones de las teclas y
el
rematado por atras final
en
el funcionamiento
se
encendera
se
puede programar con
de
Ia
maquina con las teclas, o
se
puede cambiar o cancelar al realizar
al
activar
las
teclas
Ia
tecla y
.t:::.
el
numero de puntadas antes de comenzar a coser.
se
apagara
para aumentar y '\1 para disminuir
en
el numero de puntadas, durante
Ia
costura.
al
desactivarla.
Ia
cantidad programada.
-33-
DB2-DD7100
Page 53

0
6.
USING THE B-40 OPERATION PANEL
6.
VERWENDUNG DER BEDIENUNGSTAFEL B-40
6.
UTILISATION
6.
USO DEL TABLERO
DU
PANNEAU
fr
DE
DE
CONTROLES B-40
COMMANDE
Power indicator
Netzanzeige
Te .
d'
mom a •men
lndicador
r tation
de alim
B-40
entaci6n
B-40
E>-c
111-o
llftl_51
A B C D •
0
~F~~E~-.
~~~~--
vvvv
y y
••
...
-
•
•
The
power
Die Netzanzeige leuchtet, wenn der Netzschalter
Le
temoin d'alimentation s'allume lorsqu'on appuie sur l'interrupteur d'alimentation
El
indicador de alimentaci6n
0
LED
A B C D
~~~~
'--F___.
indicator
display/LED-Anzeige/Affichage LED/Pantalla
'--E--'
will
illuminate when the
ON
power switch is pressed.
·ow gedruckt wird.
se
encendera cuando
• Displays the number
(E
and
F),
the sewing speed, the backtack sewing speed and the amount
•
Auf
dieser
festeingestellte Stichzahl
Spulenfaden Restfadenmenge angezeigt.
• lndique le nombre
de longueur fixe
til inferieur restant.
de
• Exhibe el numero de puntadas de comienzo y de rematado
de puntadas fijas
cantidad de hila inferior restante.
Anzeige
de
(E
(E y F),
et
se
oprima
LED
of
start and end backtack stitches
wird
die Stichzahl
(E
und
points d'arrllt
F),
Ia
vitesse de couture,
Ia
velocidad de costura,
el
interrupter principal
fur
den
F),
die Nahgeschwindigkeit, die Riegelnahgeschwindigkeit und die
en
debut et
en
Ia
(A,
Anfangs
fin de couture
vitesse de couture de points d'arr6t
Ia
velocidad de costura de rematado por atras y
0
OPTION
0.
0 •
•
ON.
ON.
B,
C and
D),
the number
of
und Endriegel (A,
(A,
B,
C et
por
atras final (A,
•
•
•
of
lower thread remaining.
D),
fixed stitches
B,
C und D),
le nombre de points
et
Ia
B,
C y
D),
die
quantite
el numero
Ia
8Stitch
.
number
"
~" ~" ~"
v.
v
.v
~
setting keys/Stichtasten/Touches de nombre
• These keys are used
number
lower
v.
•
•
• Estas teclas
thread remaining •
Press
L::J.
Mit
diesen Tasten kann die Stichzahl fi.ir den
festeingestellte Stichzahl
Spulenfaden-Restfadenmenge eingestellt warden.
Zum Erhohen der Stichzahl 0-9 die Taste
'V
betatigen.
Ces
touches sont utilisees pour regler le nombre de points
8, C et
D),
de points
Appuyer sur
a
o.
B,
C y
D),
rematado
Oprimir
0.
of
fixed stitches
to
increase the display
le nombre de points de longueur fixe
d'arrllt et
L::J.
se
el numero de puntadas fijas
por
atras y
el
L::J.
para aumentar
to
set
the
(E
and
(E
und
Ia
quantite de
pour augmenter le nombre de 0 a
usan para ajustar
Ia
cantidad de hila inferior restante.
Ia
exhibici6n de 0 a
de
points/Teclas de numero de puntadas
number
F),
the sewing speed, the backtack sewing speed and the amount
from 0-9.
F),
til
el
of
start and end backtack stitches (A,
Press
'V
to
decrease the display
Anfangs
die Nahgeschwindigkeit, die Riegelnahgeschwindigkeit und die
L::J.
betatigen. Zum Verringern der
(E
et
F),
inferieur restant.
numero de puntadas de comienzo y rematado por atras final
(E y F),
9.
Appuyer sur
Ia
velocidad de costura,
9.
Oprimir el
und
Endriegel
d'arr~t
en
Ia
vitesse de couture,
'V
debut et
'V
pour diminuer le nombre de 9
Ia
para disminuir
velocidad de costura de
B,
C and D),
from
9 -
(A, B, C
Stichzahl9-
0.
und
en
fin de couture (A,
Ia
vitesse de couture
Ia
exhibici6n de 9 a
0 die Taste
D),
the
of
die
(A,
-34-
082-007100
Page 54

6.
USING
6.
VERWENDUNG
6.
UTILISATION
6.
USO
THE
DEL
B-40
OPERATION
DER
DU
PANNEAU
TABLERO
PANEL
BEDIENUNGSTAFEL
DE
COMMANDE
DE
CONTROLES
B-40
B-40
B-40
8 Start
•
8
End
•
B-40
backtack
backtack key/Zurucknahtaste fur
key/Zuriicknahtaste fur
• Press
•
• Appuyer de facon
• Oprimir para que
• Press to
• Die Taste drucken,
• Appuyer de facon
• Oprimir para que
to
backtack stitch
Die Taste drucken,
B
cousu avec le
B
backtack stitch .
(0 -9)
cousu avec le point
(0 -9)
light
(0 -9)
zuruckgenaht.
(0-
9)
comenzando con un rematado por atras inicial.
light
zuruckgenaht.
con un rematado par atras final.
den
Anfang/Touche
the
indicator. The
•
so
daB die Anzeige aufleuchtet.
ace
point
das
the indicator. The number
que le temoin s'allume.
d'arret
se
encienda
Ende/Touche
so
daB die Anzeige aufleuchtet.
ace
que le temoin s'allume.
d'arrllt
se
encienda el indicador.
de
points d'arret
number
en
debut de couture.
el
indicador.
de
points d'arret
en
fin de couture.
•
••
0
••
OPTION
••
en
debut
de
couture/Tecla
of
stitches set
Le
Se
cosera el numero de puntadas programado
en
of
stitches set
Le
Se
cosera el numero de puntadas program ado
for
A • B
Am
Anfang werden die eingestellten Sticha
nombre de points choisi pour
fin
de
couture{fecla
for
C • D
Am
Ende werden die eingestellten Sticha C • D
nombre de points choisi pour C • D
(0-
(0-
de
rematado
9)
will
be sewn
de
rematado par atras final
9)
will
be
par
atras
with
A· B (0 a 9)
sewn
with
(0 a 9)
a start
por
an
por
inicial
A·
sera
A·
end
sera
C • D
8Continuous
por
atras continuo
•
0
Fixed
•
backtack key/Taste
stitch
key/Taste
fur
kontinuierliches Zurucknahen/Touche de couture
•
Press
to light the indicator. A continuous backtack
• B • C and
at A
completed.
• Die Taste drucken, so daB die Anzeige aufleuchtet. Die eingestellte Stichzahl (0 - 9) fUr das
Zurucknahen A • B • C • D
wird
• Appuyer de facon
• Oprimir para que
• Press to sew the number
• Drucken Sie diese Taste, urn die
• Appuyer sur
•
der Faden automatisch abgeschnitten.
regie
(0 a 9)
de puntadas
vez completado
furfesteingestellte Stichzahi/Touche
is illuminated. After sewing is completed, the machine automatically stops
The number
will
be
B and A.
leuchtet die Anzeige. Nach dem Nahen der Sticha stoppt die Maschine automatisch.
Die Stichzahl
A genaht.
cousus pendant que le
automatiquement.
Le
nombre
couture sera B et A.
Oprimir
mientras el
automaticamente.
El
numero de puntadas de rematado por atras inicial cosidas sera A y
de rematado
D.
Thread
ace
pour
A·
se
(0-
9)
el
ciclo A • B • C •
of
start backtack stitches sewn will
fur
den Anfangsriegel
Ia
touche
de
points d'arret
para coser el numero
indicador
par
atras final sera B y A.
trimming
wird
kontinuierlich genaht. Nach abgeschlossenem Zyklus
que le temoin s'allume. Une couture continue du nombre de points d'arret
B • C • D sera effectuee.
encienda
programado
el
indicador.
en
of
stitches
fur
pour
coudre le nombre de points
temoin
en
debut de couture sera A et
esta encendido. Despues de
de
will
be
Se
A • B • C •
D.
de
couture
(1 -99)
E eingestellte Stichzahl
wird
als A und B und die Stichzahl
est allume. Une fois
puntadas
-
35-
will
automatically performed after the A • B • C • D cycle is
Les
cosera un rematado par atras continuo para
D.
de
set
for
(1
be sewn
fils seront coupes a
Se
realizara automaticamente el corte del hila una
longueurfixe/Tecla
E.
These stitches
be
A and
B,
Ia
B,
- 99) ajustado para
completar
en
points d'arrllt/Tecla de rematado
for
the number
Ia-
fin du cycle
de
fijaci6n
will
be sewn while the indicator
and the number
(1 -99)
(1
couture
zu
nahan. Wahrend dem Nahan
fur
den Endriegel als B und
- 99) regie
et
le
nombre de points d'arret
pour
terminee, Ia machine s'arrete
E.
Estas puntadas
Ia
costura,
B, y el
of
stitches
de
longitud
•
of
end backtack stitches
E.
Ces
Ia
maquina
numero de puntadas
(0-
A·
B • C • D
A·
B • C
el
numero
de
costura
points seront
en
se
coseran
se para
082-007100
9)
set
·D.
fin de
Page 55

6. USING THE B-40 OPERATION PANEL
6.
VERWENDUNG DER BEDIENUNGSTAFEL
6.
UTILISATION
6. USO DEL TABLERO
8Th
read
trimming
key/Fadenabschneidetaste{rouche de coupe des fils{recla de cortahflos
•
Press
to
fixed stitch
When this key has been pressed, the thread
• Drucken Sie diese Taste, um den Faden am Ende abzuschneiden. Verwenden Sie diese Taste
zusammen
Wenn diese Taste gedruckt wird, so
drucken
• Appuyer sur cette touche pour activer
cette touche concurremment avec
denomO.
Lorsqu'on appuie sur cette touche, le fil sera coupe sans qu'il soit necessaire d'appuyer sur l'arriere
de
• Oprimir para activar
de puntada fija
AI
activate thread
zu
Ia
pedale.
oprimir
key.
mit
der Taste fUr festeingestellte Stichzahl(!) oder der Etiketttaste 6).
mussen.
8 o
esta tecla, el hilo sera cortado sin tener que pisar
trimming
or
the name label key
el
cortahilos despues de completar
Ia
tecla de etiqueta
after sewing is completed. Use this key in conjunction
8.
will
wird
der Faden abgeschnitten ohne das Pedal nach hinten
Ia
coupe du fil une fois que
Ia
touche de points de longueur fixe
0.
be
trimmed
0 Name label key/Etikettasterrouche d'etiquette d'identiterrecla de etiquetas
•
• Press
•
•
• Oprimir para que
to
and end backtack, press the backtack key; the stitch number is fixed at 4 stitches
Die Taste drucken, so daB die Anzeige aufleuchtet.
wiederholt
Stichzahl
Appuyer de faoon
repete. Pour les points d'arrl!t
Ia
para E
programara
light the indicator. The number
genaht.
fur
longueur est fixee a 4 points.
•
F.
Para
Ia
Zum
Zurucknahen am Anfang und Ende
das Zurucknahen ist fest auf 4 Sticha eingestellt.
ace
que le temoin s'allume.
en
se
encienda el indicador.
el
rematado
longitud de
por
Ia
costura
debut et
of
stitches
en
fin de couture, appuyer sur
atras inicial y final,
Se
en
4 puntadas.
(1 -99)
Die
Le
nombre de points regles
repetira el numero de puntadas
DU
PANNEAU DE
DE
CONTROLES B-40
without
Ia
costura. Usar esta tecla junto con
el
set
eingestellte Stichzahl
oprimir
having
Ia
couture est terminee. Utiliser
pedal hacia atras.
forE
• F
die
Zurucknahtaste betatigen. Die
Ia
tecta del rematado
COMMANDE
to
reverse the treadle.
(t
ou
Ia
touche d'etiquette
will
be
repeated. For start
•
(1
- 99)
(1 a 99)
Ia
touche de points d'arrl!t:
(1 -99)
8·40
B-40
with
the
Ia
tecla
fur
E • F
wird
pour E • F sera
programado
por
atras;
se
f)
Pleat presser sewing key/Faltennahtasterrouche
• Press
• Die Taste drucken,
•
• Appuyer de faoon
• Oprimir para que
G)
AUTO key/AUTO-Taste{rouche AUTO{recla AUTO
• Press
• Drilcken Sie diese Taste, um die eingestellte Stichzahl durch einfaches einmaliges Drilcken des
•
• Appuyer sur cette touche pour coudre automatiquement le nombre de points regles (points
• Oprimir
to
light
the indicator. Seam E
actuator is pressed .
The number
will
be
Taste
Die Stichzahl
A genaht.
arriere lorsque le dispositif
Le
nombre de points d'arrl!t
en fin de couture sera B et
hacia
El
numero de puntadas de rematado inicial sera A y
sera
By
stitches and thread
while
Pedals
Wah rend dem Nahen dieser Sticha leuchtet die Kontrolleuchte.
en
debut et
fois sur
atras inicial y final, puntadas fijas y corte de hilo) simplemente pisando una vez
puntadas
of
start backtack stitches sewn
B and
A.
so
daB die Anzeige aufleuchtet. Der Saum E
ruckwarts genaht.
atras
to
the indicator is illuminated.
fUr den Anfangsriegel
ace
se
encienda
at
oprimir
A.
automatically sew the
zu
nahan (Anfangs und Endriegel, festeingestellte Stichzahl und Fadenabschneiden).
en
Ia
pedale.
para coser automaticamente
saran cosidas mientras el indicador este encendido.
el impulsor.
trimming)
fin de couture, points
Ces
points seront co usus pendant que le temoin est allume.
de
couture
que le temoin s'allume.
de
commande est enclenche.
en
debut de couture cousu sera A et
A.
el
indicador.
number
simply
de
froncesrrecla de costura de plisados
(1 -99
stitches)
will
wird
als A und B und die Stichzahl
Se
cosera
of
stitches set (start and end backtacking stitches, fixed
by pressing the treadle once. These stitches
de
longueur fixe et coupe du til), simplement
el
numero de puntadas ajustadas (puntadas de rematado
be
La
A and
will
be
sewn
with
reverse stitching when the
B,
and the number
(1-
couture E
Ia
B,
(1 a 99
B,
costura E
y el numero de puntadas de rematado final
(1 -99
of
end backtack stitches
99
Sticha)
fur
points) est cousue
et le nombre de points d'arrl!t
wird
bei gedruckter
den Endriegel als B und
en
puntadas) con una costura
will
en
appuyant une
el
pedal. Estas
points
be
sewn
d'arrit
por
CD
Half stitch key/Halbstichtasterrouche de demi-point/Tecla de media puntada
• Used to raise or lower the needle when machine operation is interrupted.
• Zum Anheben oder Absenken der Nadel bei unterbrochenem Nahvorgang .
• Sert a relever ou a abaisser l'aiguille lorsque le fonctionnement
•
Se
usa para levantar o bajar
•
Ia
aguja con
-36-
Ia
maquina parada.
de
Ia
machine est interrompu.
082-007100
Page 56

6. USING THE B-40 OPERATION PANEL
6. VERWENDUNG DER BEDIENUNGSTAFEL
6. UTILISATION
6. USO DEL TABLERO
DU
PANNEAU
DE
COMMANDE B-40
DE
CONTROLES B-40
B-40
fJ
Sewing
B-40
•
speed key/Nahgeschwindigkeitstaste/Touche
• Press to display
this
time. You can then set
keys8.
•
If
this
key is pressed once
backtack sewing speed
•
If
this
key
and backtack indicator (Ill) will switch off, and the sewing speed display will also be switched off.
• Driicken Sie diese Taste, urn die
Nahgeschwindigkeitsanzeige
mit
kann
•
Beim
Riegelnahgeschwindigkeit (220 -1800 Stiche pro Minute)
•
Beim nochmaligen Drucken der Taste
die
Nahgeschwindigkeitsanzeige
•
Appuyer
de
maxi
• Si
sible
nombre
• Si
vitesse
couture disparaitra aussi.
•
Oprimir
de
usando las teclas de ajuste de
• Si
se
las teclas de ajuste de
• Si
costura
costura
den Stichzahltasten
nochmaligen
Nahgeschwindigkeits-
couture
male pt/mn)
l'on
appuie a nouveau
de regler
de
l'on
appuie a nouveau
de
para exhibir
velocidad de costura
se
oprime
podra ajustar
se
oprime
191
tam
the
sewing speed at A,B,C and
the
sewing speed
more,
(220-
1,800 spm) using
is pressed once more, or
(9)
f)
eingestellt werden.
Driicken
der
191
wird
sur
cette touche
191
s'allume.
en
Ia
vitesse
points
8.
couture
una vez mas esta tecla, el indicador de rematado
Ia
una vez mas esta tecla, o
y el
indicador
bien se apagara.
pour
afficher
II
utilisant les touches de reglage
19)
Ia
velocidad
est alors possible
sur
cette touche, le
de
point
sur
cette
et le
temoin
velocidad de costura
191.
Entonces
numero
de
numero
de puntadas
de rematado
OPTION
•
•
•
de
vitesse de couture/Tecla
D.
The sewing speed indicator
(200-
maximum
the
backtack
if
the sewing machine is operated, the sewing speed indicator
Niihgeschwindigkeit
leuchtet. Die Nahgeschwindigkeit
Taste
oder
und
die
ebenfalls ausgeschaltet.
Ia
d'arret
touche,
de
point
se
de
costura de rematado
indicator
the
stitch
leuchtet
wenn die Nahmaschine in Betrieb gesetzt
Riegelnahkontrolleuchte
vitesse de couture
(200 - 1.800 pt/mn) en
ou si
en
podra ajustar
puntadas
de
regler
temoin
Ia
d'arrllt
A,B,C
die
de
de
machine a coudre
(Ill)
yD.
8.
por
8.
si
se
usa
Ia
maquina
por
atras (Ill)
se
de
velocidad de costura
191
spm) using
(Ill)
will
number
fUr A,B,C und D anzuzeigen, so daB
Riegelnahanzeige
mit
Ia
nombre
point
s'eteindront,
En
Ia
velocidad de costura (200
apagaran, y
illuminate.
setting keys
(200
den Stichzahltasten 8 einstellen.
pour
A,B,C
vitesse
de points
d'arrllt
utilisant
este momenta
por
atras (Ill) se encendera. Entonces
atras
(220-
de
coser, el
the
Sticha pro
(Ill)
ausgeschaltet
et
de
point
(Ill) s'allume.
les touches
fonctionne,
et
l'affichage
se
1.800
indicador
Ia
exhibici6n
will
stitch
number
You
can
f).
Minute-
(Ill). Sie
D.
Le
temoin
d'arrllt
(200 - vitesse
f).
II
de
encendera el indicador
ppm
ppm
maximo)
de
de
illuminate
then
at
setting
set
the
191
so
wird
und
de
vitesse
vitesse
maximo)
usando
die
die
die
de
de
de
de
Maximum)
konnen
wird,
est alors pos-
reglage de
le
temoin
de
velocidad
velocidad
8Siow
start
key/Langsamstarttaste/Touche de demarrage a vitesse lente/Tecla
If
this
•
•
• Si I' on appuie
• Si
key is pressed,
sewing start
continues
Wenn
Stiche
eingestellt). Nach den ersten zwei Stichen ,kann die Nahgeschwindigkeit
warden.
points
points
se
oprime
al comienzo de
puntadas,
will
at
the
Sie diese Taste drucken, leuchtet die Langsamstartkontrolleuchte
am
Nahbeginn
seront cousus a vitesse lente en
sont
cousus,
esta tecla, el indicador de comienzo Iento <GI se encendera y las primeras puntadas
Ia
costura continua a
the
be sewn
speed determined
sur
Ia
slow
atlow
warden
cette touche, le
Ia
couture continue a
costura
se
coseran lentamente (fijas
start
indicator
speed (fixed
by
mit
langsamer
temoin
Ia
velocidad determinada
-
37-
at
the
treadle position.
de
debut
Ia
vitesse determinee
!GI
will
two
debut
de
illuminate
stitches).
Nahgeschwindigkeit
de
couture
couture (fixee a
en
de
comienzo Iento
and
the
first
After
these stitches are sewn,
genaht(fest
lent
!GI
deux
par
Ia
position
dos puntadas). Despues
por
Ia
posici6n del pedal.
stitches sewn
IGI
und die ersten beiden
mit
dem
s'allume
points). Une
de
at
the
sewing
auf
zwei
Pedal eingestellt
et
Ia
pedale.
de
Stiche
les
premiers
fois
que
coser estas
082-007100
ces
Page 57

6.
USING THE B-40 OPERATION PANEL
6.
VERWENDUNG DER BEDIENUNGSTAFEL B-40
6.
UTILISATION
6.
USO DEL TABLERO
DU
PANNEAU
DE
DE
CONTROLES B-40
COMMANDE
B-40
4DCorrection key/Korrekturtaste/Touche de correction/Tecla
•
If
this key is pressed, the correction stitch indicator
pressed while the machine is stopped, correction stitches are sewn (at
(However, backtack stitches are sewn
ing.)
• The correction key
illuminated.
•
Beim Dri.icken dieser Taste leuchtet die Korrekturstichanzeige
stillstehender Maschine betatigt wird, warden Korrekturstiche
(Falls das Stellglied wahrend dem Nahen betatigt wird, warden Riegelstiche genaht.)
• Wenn die Anzeige fi.ir die Faltennahtaste
werden.
•
Si
l'on appuie sur cette touche,
sur l'actuateur pendant que
mn).
(Toutefois,
fonctionne.)
•
II
n'est pas possible d'utiliser
couture de presseur de plis
Si
se
•
se
oprime mientras
(Sin embargo,
Ia
maquina de coser esta funcionando.)
•
La
tecla de correcci6n e no
f)
esta encendido.
les points d'arret sont cousus si l'on appuie
oprime
4D
cannot be used while the indicator
Ia
machine
f)
esta
tecla,
el
indicador del interrupter de correcci6n
Ia
maquina esta parada,
las
puntadas de rematado por atras
se
de
correcci6n
<Ol
will
illuminate.
if
the actuator
f)leuchtet,
le
temoin de point de correction
est
a
l'arr~t.
Ia
touche de correction
est allumee.
is
pressed while the sewing machine is operat-
for
the pleat presser sewing key
(220
kann
die Korrekturstichtaste
<Ol
les
points de correction seront co usus
sur
l'actuateur pendant que
4D
pendant que le temoin de
<Ol
se
coseran puntadas de correcci6n
se
coseran
puede usar mientras el indicador de
si
se
If
the actuator is then
220 spm).
<Ol.
Wenn das
Sticha pro Minute) ausgefi.ihrt.
s'allume.
se
oprime el accionador mientras
Ia
Si
encendera. Si el accionador
tecla de costura de plisados
Stellglied
4D
nicht verwendet
l'on appuie ensuite
(a
220 ppm).
8 Needle up/down key/Nadeltaste/Touche d'elevement/abaissement de l'aiguille/Tecla de aguja arriba/abajo
• Press
• Drucken Sie diese Taste zum Andern der Nadelstopposition. Wenn die Anzeige A leuchtet, stoppt
• Appuyer sur cette touche pour changer
• Oprimir
to
above the
needle
die Maschine
abgesenkter Nadel.
l'aiguille
I est allume, l'aiguille
se
'V
change the needle stop position.
top
of
the needle plate when the machine stops;
will
stop below the top
mit
angehobener Nadel; falls die Anzeige '\1 leuchtet,
s'arr~tera
para cambiar
parara encima
esta
encendido,
au-dessus du haut de
de
Ia
of
the needle plate.
s'arr~tera
Ia
posici6n de parada de
Ia
parte de arriba
aguja
au-dessous du haut
se
parara debajo de
If
the A indicator is illuminated,
Ia
position
Ia
plaque a aiguille lorsque
de
Ia
placa de aguja cuando
d'arr~t
de
Ia
aguja.
Ia
parte de arriba de
the
if
the '\1 indicator is illuminated, the
stoppt
de l'aiguille. Si le temoin A est allume,
Ia
plaque a aiguille.
Si
el
Ia
machine
indicador A esta encendido,
se
para
Ia
Ia
placa de aguja.
needle
die Maschine
s'arr~te;
maquina; si el indicador
f)
(a
220
Ia
machine
Ia
touche de
will
stop
si le temoin
Ia
aguja
is
bei
pt/
mit
Options I Optionen I Options I Opciones
0 Lower thread remaining key/Spulenfaden-Restfadentaste(l'ouche de fil inferieur restant/Tecla de hilo inferior restante
•
If
this key is pressed, the lower thread remaining indicator (Ifill) will illuminate.
Refer
to
page
81
•
•
Ia
pagina
esta
for details on
tecla,
83
para mas detalles sobre como ajustar el Hmite de hilo inferior restante.
•
•
Beim Drucken dieser Taste leuchtet die Spulenfaden Restfadenanzeige (
• Zum Einstellen der Spulenfaden-Restfadenmenge wird auf die Seite
• Si l'on appuie sur cette touche,
Pour plus de details concernant le reglage de
•
83.
• Si
se
oprime
• Consultar
how
to
set the lower thread remainder
le
temoin de fil inferieur restant
Ia
limite du fil inferieur restant,
el
indicador de hilo inferior restante ( ~ )
81
(Iii)
s'allume.
se
encendera.
limit
•
lfi!l
).
verwiesen .
se
reporter a
Ia
page
-38-
082-007100
Page 58

6. USING THE B-40 OPERATION PANEL
6. VERWENDUNG DER
6. UTILISATION
6. USO DEL TABLERO
DU
BEDIENUNGSTAFEL B-40
PANNEAU
DE
DE
COMMANDE 8-40
CONTROLES B-40
6-2.
Setting a sewing
operation
6-2. Einstellen eines Nahvorgangs
• Setting a
• Einstellen des Zuruckniihens am Anfang und Ende
start
and end backtack
I
I B /
A I /
v
1.
Press the start backtack key
2.
Press
the stitch number setting keys 8 to set the number
between 1 and
3.
Press
the end backtack key
4.
Press
the stitch number setting
between 1and
Sewing
1.
When the treadle is pressed, the number
continues while the treadle is pressed.
2.
When the treadle is reversed, the number
trimmed.
9.)
9.)
0.
The backtack indicator
0.
keys
8 to set the number
of
start backtack stitches set by A and 8 are sewn, and then normal sewing
of
end backtack stitches set
Reglage
6-2.
6-2. Programacion de
• Reglage des points d'arret
• Programaci6n del rematado
Illuminates
leuchtet
S'allume
Encendido
B-40
•
will
illuminate.
of
stitches
of
stitches for C and D.(The number
for
A and
by
C and
d'une
B.
(The number
Dare
couture
Ia
costura
en
debut
et
en
por
atras inicial y final
fin de couture
--
--
--
of
stitches
of
stitches can
sewn, and then the thread is
can
be set
be
set
to
to
1.
Drucken Sie die Anfangsriegeltaste 0-Die Riegelanzeige leuchtet.
2.
Stellen Sie
eingestellt werden.)
3.
Drucken Sie die Endriegeltaste
4.
Stellen Sie
werden.)
Niihen
1.
Wenn das
wird
2.
Wenn das Pedal nach hinten gedri.ickt wird, so werden die fi.ir C und D eingestellten Stiche als Endriegel genaht und
danach
1.
Appuyer sur
2.
Appuyer sur
de points peut
3.
Appuyer sur
4.
Appuyer sur
points peut
Couture
1.
Lorsqu'on appuie sur
couture normale continue pendant que l'on appuie sur
2. Lorsqu'on appuie sur
puis le fil est
1.
Oprimir
2. Oprimir las teclas de ajuste de numero de puntadas
puntadas
3.
Oprimir
4.
Oprimir las teclas de ajuste de numero de puntadas 8 para ajustar el numero de puntadas para C
puntadas
Costura
1.
AI
pisar el pedal,
normal continuara mientras
2.
AI
pisar hacia atras el pedal,
se
cortara el hila.
mit
den Stichzahltasten 8 die Stichzahlen fUr A und 8 ein. (Die Stichzahlen konnen zwischen 1 und 9
e.
mit
den Stichzahltasten 8 die Sticlzahlen fi.ir C und D ein.(Die Stichzahlen konnen zwischen 1 und 9 eingestellt
Pedal
das Nahen durch Dri.icken des Pedals fortgesetzt.
wird
Ia
Ia
gedri.ickt wird, werden die fur A und B eingestellten Stiche fi.ir den Anfangsriegel genaht und danach
der Faden abgeschnitten.
Ia
touche de point
les
touches de reglage
etre regie entre 1 et
Ia
touche de point d'arret
les
touches de reglage de nomdre de points 8 pour regler
etre regie entre 1et
Ia
pedale, le nombre
Ia
coupe.
tecla de rematado par atras inicial
pedale vers l'arriere, le nombre de points d'arrl!t
d'arr~t
9.)
en
debut
de
nombre de points & pour regler
9).
en
fin de couture
de
couture
de
points d'arret
0.
El
indicador de rematado por atras
8 para ajustar el numero de puntadas para A y
se
puede ajustar entre 1 y
tecla de rematado par atras final
se
puede ajustar entre 1 y
se
cosera
el
numero
se
se
9.)
e.
9.)
de
mantenga pisando
cosera
puntadas de rematado par atras inicial ajustadas
el
numero
el
de
puntadas
0.
Ia
pedal.
-39-
0.
Le
temoin
en
debut de couture
pedale.
de
rematado por atras final ajustadas en C y
de
le
nombre
le
nombre de points pour C et D.(le nombre de
en
fin
point d'arrl!t s'allume.
de
points pour A
regh~s
pour A et B est cousu, puis
de
couture regie pour C et D est cousu,
se
encendera.
en
A y
et
B.
yD.
B,
y luego
B.
(le
(EI
numero de
(EI
numero de
DB2-DD7100
nombre
Ia
costura
D,
y luego
Ia
Page 59

6.
USING THE B-40 OPERATION PANEL
6.
VERWENDUNG
6.
UTILISATION
6.
USO DEL TABLERO
DER
DU
PANNEAU
BEDIENUNGSTAFEL B-40
DE
DE
CONTROLES
COMMANDE
8-40
B-40
• Setting a fixed stitch and thread
II
Einstellen einer festelngestellten Stichzahl und des Fadenabschneidens
II
Reglage d'une couture de longueur fixe et de
II
Programacion de una costura de longitud fijada y corte de hilo
trimming
Ia
coupe des fils
B-40
E
l
•
Thread
trimming___.
Fadenabschneiden
Coupe des fils
Cortahilos
1.
Press
the fixed stitch key
2.
Press
the stitch number setting
(The number
3.
Press
Sewing
The number
the thread trimming key
* If the AUTO key 8
to
keep the treadle continually pressed down.
If backtack sewing
but in the order
of
stitches
of
stitches set by E
is
has
Band
0.
keys
0 to set the number
can
be
set to between 1 and
0.
is
sewn while the treadle is pressed, and then the thread
pressed, the number
been set, the number
A.
99.)
of
fixed stitches will
of
end
backtack stitches sewn will be the number
of
stitches
be
sewn
for
E.
and
the thread will
is
trimmed.
be
trimmed without having
of
start backtack stitches,
1.
Drucken Sie die Taste fur die festeingestellte Stichzahl
2.
Stellen Sie die Stichzahl
(Die
Stichzahl kann zwischen 1 und
3.
Drucken Sie die Fadenabschneidetaste
Nahen
Die
fur
E eingestellte Stichzahl
* Wenn die AUTO-Taste 8 gedruckt wird,
daB Sie das Pedal gedruckt
ohne
Bei eingestelltem Endriegelnahen entspricht die Endriegelstichzahl der Anfangsriegelstichzahl, nur in der Reihenfolge
BundA.
1.
Appuyer sur
2.
Appuyer sur les touches de reglage de nombre de points 8 pour regler
(II
est possible de regler le nombre de points entre 1 et
3.
Appuyer sur
Couture
Le
nombre de points regie pour E est cousu pendant qu'on appuie sur
* Si l'on appuie sur
necessaire de maintenir
Si
Ia
couture de points d'arret a ete reglee,
dans l'ordre B
1.
Oprimir
2.
Oprimir
(EI
numero
3.
Oprimir
Costura
El
numero de puntadas ajustado
*
Si
se
oprime
continuamente
Si
se
ha
numero de puntadas de rematado por atras, pero
Ia
touche de couture
Ia
touche de coupe du til
Ia
etA.
Ia
tecla de puntadas fijas
las
teclas de ajuste
de
puntadas
Ia
tecla de cortahilos
Ia
tecla AUTO
el
ajustado
pedal.
fUr E mit
touche AUTO
Ia
pedale enfoncee.
den Stichzahltasten 8 ein.
wird
genaht und danach
zu
halten brauchen.
de
8.
Q.
de
numero
se
puede ajustar entre 1 y
$.
en E se
8,
se
cosera
Ia
costura de rematado
99
eingestellt warden.)
e.
so
werden die festeingestellten Sticha genaht und der
points
de
longueur fixe
e.
le
nombre
de
cosera mientras
el
de
le
nombre de points d'arret de fin cousus sera le nombre de depart, mais
puntadas 8 para ajustar
numero
por
atras, el numero de puntadas de rematado
0.
wird
der Faden abgeschnitten.
0.
le
nombre de points pour
99.)
Ia
points de longueur fixe sera cousu et
99.)
se
pisa
de
puntadas fijas y
en
el
el
arden B y
pedale, puis
el
numero de puntadas para
pedal, y luego
el
hila
se
A.
le
se
cortara el hila.
cortara sin tener que mantener pisando
Faden
wird abgeschnitten,
E.
til est coupe.
le
til sera coupe sans qu'il soit
E.
par
atras cosidas sera el
-40-
DB2-DD7100
Page 60

6. USING THE B-40 OPERATION PANEL
6. VERWENDUNG DER BEDIENUNGSTAFEL B-40
6.
UTIUSATION
6. USO DEL TABLERO
DU
PANNEAU
DE
COMMANDE B-40
DE
CONTROLES B-40
• Name label + thread
Etikett
•
Etiquette d'identitie + coupe des fils + AUTO
•
•
Etiqueta + cortahHos + AUTO
+ Fadenabschneiden + AUTO
trimming
+ AUTO
r--------------,
I F I
I I
if
E E I i
I F I
I I
L-------------J
1.
Press the name label key
2.
Press the stitch number setting keys
be
set
to
between 1 and
3. Press the thread
4.
Press
the AUTO key
Sewing
When the treadle is pressed, the number
pressed once more,
stitches set by F
trimming
the
has
been sewn twice, the thread is trimmed.
0.
99.)
key
G.
number
f)
t).
of
stitches set by F
B-40
e
to set the number
of
stitches set by E is sewn, and then the machine stops. When the treadle is
is
of
stitches
sewn, and then the machine again stops. After the
forE
and
F.
(The number
of
stitches
for
both can
number
of
1.
Dri.icken Sie die Etiketttaste
2.
Stellen Sie
werden.)
3.
Dri.icken Sie die Fadenabschneidetaste
4.
Dri.icken Sie die AUTO-Taste
Nahen
Beim Dri.icken des Pedals werden die fOrE eingestellten Stiche genaht und danach stoppt die Maschine. Wenn das
nochmals gedri.ickt
zweimaligen
1.
Appuyer
2.
Appuyer
de points pour
3.
Appuyer sur
4.
Appuyer sur
Couture
Lorsqu'on appuie sur
nouveau sur
nombre de points
1.
Oprimir
2.
Oprimir las teclas de ajuste de numero de puntadas
puntadas para ambos
3. Oprimir
4.
Oprimir
Costura
AI
pisar
vez
una
el numero de puntadas ajustadas
veces
mit
den Stichzahltasten
wird,
Nahen
sur
sur
Ia
Ia tecta de etiqueta
Ia
Ia
el
pedal,
mas,
der
Ia
touche d'etiquette de nom
les touches de reglage de nombre de points
to
us deux peut etre regie entre 1
Ia
touche de coupe de til
Ia
touche AUTO
pedale, le nombre de points regie pour F est cousu, puis
regie pour
tecla de cortahilos
tecla AUTO G.
se
cosera
se
cosera el numero de puntadas ajustadas
fUr
Ia
pedale, le nombre de points regie pour E est cousu, puis
0.
f)
die Stichzahlen fOrE und Fein. (Die Stichzahlen konnen von 1 bis
99
eingestellt
e.
G.
werden die eingestellten Stiche genaht und danach stoppt die Maschine wieder. Nach dem
F eingestellten Stiche
wird
der Faden abgeschnitten
0.
f)
et
pour regler
99.)
le
nombre de points pour E et
F.
(Le
e.
G.
Ia
machine s'arrete. Lorsqu'on appuie a
Ia
machine s'arrete a nouveau. Une fois que le
Fa
ete cousu deux fois,
0.
se
puede ajustar entre 1 y
t).
el
numero de puntadas ajustadas
en
F,
se
le
99.)
cortara
til est coupe
f)
para ajustar el numero de puntadas para E y
en
F,
el
hilo.
en
E,
y fuego
..
y fuego
Ia
maquina
Ia
maquina volvera a parar. Despues de coser dos
se
parara. Cuando
F.
(EI
numero de
se
pise el pedal
Pedal
nombre
-
41
-
062-007100
Page 61

• Pleat presser sewing
•
Faltennihen
• Couture de fronces
• Tecla
de
costura de plisados
SeamE
SaumE
Couture E
Costura E
6. USING THE B-40 OPERATION PANEL
6. VERWENDUNG DER
6.
UTILISATION DU PANNEAU DE
6.
USO DEL TABLERO
B-40
9-o
1.1-<J
1f4..9
A
B
~~
'--F--'
BEDIENUNGSTAFEL B-40
DE
CONTROLES B-40
~~
•
COMMANDE
B-40
1.
Press the pleat presser sewing key
2.
Press the stitch number setting keys
Sewing
If
the
treadle is pressed and sewing starts, and the actuator is then pressed, seam E
will
and feed
The settings
then return
for
A and B are used
to
normal.
* The AUTO key and the thread trimming key cannot
to be trimmed.
1.
Die Faltennahtaste 0 drucken.
2.
Die Stichzahl fUr E
Niihen
Beim Drucken des Pedals beginnt der Nahvorgang. Wenn die Taste gedruckt wird,
wird
danach
Die Sticheinstellungen
Wieder vorwarts genaht.
* Die AUTO-Taste
Abschneiden des Fadens das Pedal nach hinten.
1.
Appuyer sur
2.
Appuyer sur les touches de nombre de points
regler de 1 a
Couture
Lorsque
est cousue en points arriere, et l'entrainement redevient ensuite normal.
l'on
appuie sur
mit
den Stichtasten
fur
A und B warden zum Nahen des Anfangs- und Endriegels verwendet.
und
die
Fadenabschneidetaste konnen
Ia
touche de couture
99
points.)
Ia
pedale,
0.
f),
and set the
for
start and end backtacking.
f)
einstellen. (Die Stichzahl kann von 1 - 99 eingestellt warden.)
de
frances
Ia
couture commence; si I' on appuie alors sur le dispositif de commande,
0.
f)
number
be
used at this time. Reverse the treadle
pour
of
stitches
nicht
regler le nombre de points de
for
E.
gleichzeitig
(From 1 -
wird
verwendet
99
stitches can
will
be
sewn
with
if
you would like the thread
die Stichzahl E ruckwarts genaht,
warden.
Ia
couture
be
a backward stitch,
Drucken Sie zum
E.
(II
est possible de
set.)
Ia
couture E
pour
Les reglages
*
La
touche AUTO et
de
Ia
pedale.
1.
Oprimir
2.
Oprimir
Costura
Si
se
alimentarse de
Los ajustes para A y B
*
La
hilo.
Ia
las teclas de
programar entre 1 -
pisa el pedal, se comienza a coser y
tecla AUTO y
A et B sont utilises pour les points d'arret
Ia
touche de coupe de
tecla de costura de plisados
Ia
numero
99
puntadas.)
forma normal.
se
usan para rematado por atras inicial y final.
Ia
tecla
de
fil
ne peuvent pas etre utilisees alors. Pour couper le fil, appuyer sur l'arriere
0.
de puntadas
cortahilos no pueden ser usadas
se
oprime
f)
para
el
en
debut et
programer
impulsor,
en
-42-
en
fin de couture.
los numeros de puntada de
se
cosera
este momenta. Pisar el pedal hacia atrils para cortar el
Ia
Ia
costura
costura E hacia atras para despues
E.
(Se puede
082-007100
volver
a
Page 62

6. USING THE 8-40 OPERATION PANEL
6. VERWENDUNG DER
6. UTILISATION DU PANNEAU
6. USO DEL TA8LERO
8EDIENUNGSTAFEL 8-40
DE
DE
CONTROLES 8-40
COMMANDE 8-40
• Setting
• Einstellen der Niihgeschwindigkeit
• Reglage de Ia vitesse de couture
• Ajuste de velocidad de costura
the
sewing speed
B-40
llluminates/leuchtet
S'allume/Encendido
~~~
Vl-o
l!iil_51
•
1.
Press the sewing speed key(@))
2.
Use
the
stitch
number
3.
The sewing speed can
During sewing, the sewing speed display
will
remaining
be shown in its place.
setting keys 8
be
set between
4~
A B C D •
~F~~E~-
••
86~~--
~~
~
~
••
•
0.
The sewing speed indicator
to
set the desired sewing speed in the
220
and the maximum sewing speed.
will
disappear and the stitch number setting
(9)
will
illuminate.
LED
no
~
OG
•
•
display
or
OPTION
•
•
•
8.
the amount
of
lower
thread
1.
Drucken Sie die Nahgeschwindigkeitstaste
2.
Stellen Sie die gewunschte Nahgeschwindigkeit auf der LED-Anzeige 8
3.
Die Nahgeschwindigkeit kann zwischen
Wahrend
Spulenfaden Restfadenanzeige angezeigt.
1.
Appuyer
2.
Utiliser les touches de reglage de nombre de
diodes8.
3.
II
est possible de regler
Pendant
de
Ia
1.
Oprimir
2. Usar las teclas de ajuste de numero de puntadas
••
3.
La
velocidad de costura puede ser ajustada entre
Durante
puntadas o
dem
Nahen
sur
Ia
touche de vitesse de couture(@))
Ia
couture, l'affichage de
quantite de fil inferieur restant sera indique a
Ia
tecla de velocidad de costura
Ia
costura,
Ia
cantidad de hilo inferior restante
wird
anstelle
Ia
vitesse
Ia
pantalla de velocidad de costura de rematado por atras desaparecera y
de
Ia
vitesse de couture de points d'arret disparait et le reglage du nombre de points
(@))
0.
so
daB die Nahgeschwindigkeitsanzeige
220
Stichen pro Minute und der Maximalgeschwindigkeit eingestellt warden.
der
Nahgeschwindigkeitsanzeige
0.
Le
temoin de vitesse de couture
points.
couture entre
(@))
0.
El
pour
220
pt/mn et
sa
place.
indicador
de
8 para ajustar
220 y Ia
se
indicaran
velocidad maxima de costura.
en
mit
den Stichzahltasten 8 ein.
die
Stichzahleinstellung
(9)
regler
Ia
vitesse de couture desiree
Ia
vitesse de couture maxi male.
velocidad de costura
Ia
velocidad de costura deseada
Iugar de
Ia
anterior.
(9)
(9)
leuchtet.
s'allume.
sur
se
enciende.
en
Ia
exhibici6n
el
ajuste del numero de
oder
die
l'affichage a
ou
LED
-43-
082-007100
Page 63

•
Setting
• Einstellen der Riegelnihgeschwindigkeit
• Reglage de Ia vitesse de couture de points
• Ajuste de velocidad de costura de remate
the
backtack sewing speed
llluminates/leuchtet llluminates/leuchtet
S'allum
IE
d'd
e ncen 1 o
I
S'
II
e/E
a
um
d'd
ncen1o
d'arrit
O
6. USING THE B-40 OPERATION PANEL
6.
VERWENDUNG DER BEDIENUNGSTAFEL B-40
6. UTILISATION
6. USO DEL TABLERO
DU
PANNEAU
DE
DE
CONTROLES B-40
COMMANDE
.o_O
B-40
.-...
B-40
e~
~~~~
1fitl...9
A B c D •
~F~~El§J
~~~~-0-
•••
..,
0 •
0 •
OPTION
•
•
~
•
~~
•
1.
Press the sewing speed key (@)) 0 twice. The sewing speed indicator
2.
Use the stitch
3.
The backtack sewing speed can be set between
During sewing,
lower
thread remaining
1.
Drucken Sie die Nahgeschwindigkeitstaste (@)) 0 zweimal, so daB die Nahgeschwindigkeitsanzeige
Riegelnahanzeige
2.
Stellen Sie die gewunschte Riegelnahgeschwindigkeit auf der LED-Anzeige 8
3.
Die Riegelnahgeschwindigkeit kann zwischen
Wahrend
Spulenfaden Restfadenanzeige angezeigt.
Appuyer
1.
2.
d'arr~t
points
Utiliser les touches de
a diodes
II
est possible de regler
3 .
Pendant
quantite de fil inferieur restant sera indique a
number
dem Nahen
deux fois
(Ill) s'allume.
setting keys 0
the
backtack sewing speed display
will
(Ill) leuchtet.
wird
sur
Ia
touche de vitesse de couture (@))
reglage de nombre de points 8 pour regler
e.
Ia
vitesse de couture de points
Ia
couture, l'affichage de
to
set the desired backtack sewing speed in the
be shown in its place.
anstelle
der
Riegelnahgeschwindigkeitsanzeige
Ia
vitesse de couture de points
~
••
(9)
and backtack indicator
220
and 1,800 spm.
will
disappear and the backtack stitch setting
220
und 1800 Stichen pro Minute eingestellt werden.
0.
Le
temoin de vitesse de couture ({9)
Ia
vitesse de couture de points d'arrtlt sur l'affichage
sa
d'arrit
place.
entre
d'arrit
220
et 1.800 pt/mn.
disparait
•
LED
mit
den Stichzahltasten 0 ein.
die
Riegelsticheinstellung
et
le reglage des points
•
display
(1;1)
e.
or
will
illuminate.
the
amount
(9)
et
le
temoin
d'arrit
und die
oder
die
ou
of
de
Ia
Oprimir
1.
rematado por
Usar las teclas de ajuste de
2.
deseada
La
3.
Durante
rematado por
dos veces
en
velocidad de costura de rematado por atras puede ser ajustada entre
Ia
costura,
atras (Ill)
Ia
exhibici6n
atras o
Ia
tecla de velocidad de costura (@))
se
encienden.
numero
LED
f).
Ia
pantalla
Ia
de
cantidad de hilo inferior restante
de puntadas 0 para ajustar
velocidad de costura de rematado por atras desaparecera y
0.
-44-
El
indicador
se
indicaran
Ia
velocidad de costura de rematado
en
de
velocidad
220
y 1.800 ppm.
Iugar de
de
Ia
anterior.
costura
(9)
y el indicador de
el
ajuste de puntadas de
por
atras
082-007100
Page 64

6.
USING
THE B-40 OPERATION PANEL
6. VERWENDUNG DER BEDIENUNGSTAFEL B-40
6. UTILISATION
6.
USO
DEL TABLERO
DU
PANNEAU
DE
COMMANDE B-40
DE
CONTROLES B-40
6-3. List of operations
Application
Fixed stitch
sewing
OFF
Fixed stitch
sewing
ON
(Thread
trimmin9
activate
setting
to
Fixed
sewir;pwith
three
trimming
(Thread
trimming
performed
with
pressed
forward)
Nama
Pleat presser
Continuous
(automatic
after
treadle
reverse)
switch
treadle
label
cycle
by
ON
Normal
stitch
Start
backtack
End
backtack
Start/end
backtack
Fixed
sewing
Start
backtack
End
backtack
Start/end
backtack
Fixed stitch
sewing
Start
backtack
End
backtack
Start/end
backtack
Name
only
End
backtack
sewing
backtack
thread
trimming
completed)
Start End Fixed Thread
backtack
key key
lock
stitch
label
backtack stitch key
OFF
ON
OFF
ON ON
OFF OFF
ON
OFF
ON ON
OFF OFF
ON
OFF
ON
OFF
OFF
OFF
OFF OFF
OFF
OFF
ON
OFF
ON ON
OFF
ON ON
ON ON
OFF OFF OFF
ON
OFF
trimming
key
OFF
OFF OFF
OFF
OFF
ON
ON
ON
ON
ON
OFF
OFF
OFF OFF
OFF
OFF
OFF
OFF
OFF
OFF
OFF
Continuous
backtack
key key
OFF
OFF
OFF OFF OFF
OFF OFF OFF
OFF OFF OFF
OFF
OFF
OFF
ON
ON
ON
ON
ON
OFF
OFF
OFF OFF
OFF OFF
OFF
OFF
OFF
OFF
ON
Name
label key presser
Pleat
sewing
OFF OFF
OFF
OFF
OFF
OFF
OFF
OFF
ON
ON
OFF
OFF OFF
OFF
OFF
OFF
OFF
OFF
OFF
OFF
OFF
OFF
OFF
ON
Stitch
number
setting
A B c D
F E
0 0
0 0
0
0
0 0
0 0
0 0 0 0
0 0 0 0
0
0 0 0
0 0
0
0
0
0 0 0
0 0
0 0
0 0 0 0
0
0 0 0
0 0
0 0 0 0
Reference
figure
No.
1
2
3
4
5
6
7
8
9
10
0
11
0
12
13
14
15
16
Note
End backtackB
·A
End backtackB
·A
End backtack B
·A
End backtack B
·A
End backtack fixed
at 4
stitches
NOTE:
• The 0 symbol indicates that you should set the number
•
For
• If
the
No. 5-No. 8 in
correction
key
the
is
table,
normal
pressed
so
that
sewing
the
indicator
will
be
carried
is
out after
illuminated,
of
stitches to
fixed
correction
be
stitch
stitches
sewn.
sewing
can
is
completed
then
be
until
sewn
the
by
pressing
thread
is
the
trimmed.
actuator.
-45-
082-007100
Page 65

6. USING THE B-40 OPERATION PANEL
6. VERWENDUNG DER BEDIENUNGSTAFEL B-40
No.1
Normal lock stitch
No.2
Start backtack
6. UTIUSATION
6. USO DEL TABLERO DE CONTROLES B-40
No.3
End
backtack
DU
PANNEAU DE
No.4
Start/end backtack
COMMANDE
:a/
A I /
v
Thread
trimming
No.5 Fixed stitch sewing only
Thread trimming activated by reversing treadle. Thread trimming activated after end backtack by reversing treadle.
No.9 Fixed stitch and thread
trimming
activated by reversing treadle.
I
stitch
E I
I
I
I
j
I
I
I
I
Fixed
•
I
E ! l
I
I
I
I
•
No.6 Start backtack
sewing
I
A I
8/
I/
v
Fixed
stitch
....,
E I
and
I
I
I
I
I
I
I
fixed stitch
I
Thread trimming activated after end backtack
No.7
Fixed stitch sewing and end
backtack
Fixed
stitch
I
I
I
El
I
:
I / I
v
8/1
I
A
by
reversing treadle.
No.8
Start/end backtack and fixed
stitch sewing
I
A I
I/
V
Fixed
stitch
•
'
No.10 Start backtack, fixed stitch and
thread trimming thread trimming and thread trimming
I
-1
A I
8/
I
I/
I
V
El
I
I
I
I
I
I
I
•
Sewing completed through thread trimming by holding treadle depressed.
No.11
Fixed stitch, end backtack
I
I
I
E I
I
I
I
I
1/
v
8/1
I A
I
•
I
and
No.12 Start/end backtack.
I
I
8/
AI/
v
8/
E I
-1
,.,
El
I
I
I
I
I
I
1/
v
I
I
I
I
8/~
I
/ I A
I
v
A I
8/
I
I A
I
•
~
I
fiXed
B-40
stitch
No.13 Name label only
r~-------F-=-
lE
I I
l - F l
L-------------"'
Thread
trimming
reversing treadle.
• ....... Thread
*
......
Indicated thread trimming following fixed stitch sewing
out
pressing the treadle to the reverse position.)
~~
El
activated by
trimming
No.14 Name
Thread trimming activated after end Thread trimming activated by
backtack. reversing treadle.
(Thread trimming will
label, end backtack and No.15 Pleat presser sewing
thread trimming
..
-----
---------~
l!
E
---,--
: F :
L---~----J
be
*
'I!
performed when the treadle is pressed
or
end backtack. (Thread
No.16 Continuous backtack
f\
\
8/\
\ I \
A\ I
c\
\ I \ I
v v
Sewin~
completed
trlmmmg
pressed.
to
the reverse position.)
trimming
by
holding
will be performed with-
* \
I
I l
o/
I
through
treadle
thread
de-
-46-
082-007100
Page 66

6.
USING
THE B-40 OPERATION PANEL
6. VERWENDUNG DER BEDIENUNGSTAFEL B-40
6. UTILISATION
6.
USO
DEL TABLERO
DU
PANNEAU
DE
COMMANDE B-40
DE
CONTROLES B-40
6-3. Funktionentabelle
Anwendung
Normaler
Verriegelungsstich
und
der
Zuriickniihen
am
Anfang
Zuriickniihen
amEnde
Zuriickniihen
am
Anfang/
Ende
Normaler
Verriege-
lungsstich
Zuriickniihen
am
Anfang
Zuriickniihen
amEnde
Zuriickniihen
am
Anfang/
End a
Normaler
Verriege·
lungsstich
Zuriickniihen
amAnfang
Zuriickniihen
amEnde
Zuriickniihen
amAnfang/
Ende
Nur
Etikett
Zuriickniihen
amEnde
Faden
Niihen
ohne
fest~esetzte
Stic zahl
Niihen
mit
fest~esetzter
Stic zahl
(Faden
wird
beim
Zuriickdrucken
des Ful3pedals
abgeschnittenl
Niihen
mit
festgesetzter
Stichzahl
eingeschaltetem
Fadenabschne1de
(Faden
wird
beim
Vorwiirtsdriicken
des Ful3pedals
abgeschnittenl
Etikett
Faltenniihen
Kontinuierliches Zuriickniihen
lnach
ab~eschlossenem
Zyklus w1rd
abgeschnittenl
Schalter
fUr
Zuriick·
niihen
am
Anfang
Schalter
des
fiir
des
Zuriick·
niihen
amEnde
OFF
ON
OFF
ON ON
OFF OFF
ON
OFF
ON
OFF
ON
OFF
ON ON
OFF
OFF
OFF OFF OFF OFF
OFF OFF
Stichzahl·
schalter
OFF OFF
OFF OFF OFF
ON
OFF
ON
ON ON
OFF
OFF
ON ON ON
OFF OFF OFF
ON
OFF OFF
OFF OFF
ON
ON
ON
ON ON
ON
ON
OFF
OFF
Fadenabschneideschalter
OFF
OFF
OFF
OFF
OFF
ON
ON
ON
OFF
Schalter
fiir
ununter-
brochenes
Zuriick·
niihen
OFF
/
OFF
OFF OFF
OFF
OFF
OFF
OFF
OFF
OFF
OFF
OFF
OFF
OFF
OFF
OFF
ON
Etikett
schalter
OFF
OFF OFF
OFF
OFF
OFF
OFF OFF
OFF OFF
OFF
OFF
OFF
OFF
ON
ON
OFF
OFF
Felten·
niihen
schalter
OFF
OFF
OFF
OFF
OFF
OFF
OFF
OFF
OFF
OFF
OFF
ON
OFF
Stichzahleinstellung
A B
0
c D
F E
0
0 0
0
0
0
0
0
0
0 0 0 0
0 0
0 0
0
0
0
0
0
0
0 0 0 0
0 0 0 0
0 0
0
0
0 0 0 0
0 0 0 0
0 0
0 0
0
0
Abbidung
1
2
3
4
5
6
7
8
9
10
11
12
13
14
15
16
Berner·
kung
1
£~ruck:
nilhen B·
A amEnde
Zuriick·
nahen
B·
A
amEnde
1
Zuruck:
niihen
B·
A
amEnde
Zuriick·
niihen
B·
A
amEnde
Zuriick·
niihen
am
Ende
auf
4
Sticha
fest
eingesteiiL
HINWEIS:
•
Das
Symbol 0 bedeutet, daB
Sie
die
zu
nahende Stichzahl einstellen mussen.
• Fur die Nummern 5 bis 8 in der Tabella wird nach dem Nahen der festeingestellten Stichzahl bis zum Abschneiden des
Fadens
normal genaht.
• Wenn die Korrekturstichtaste gedruckt wird, so daB die Anzeige leuchtet, konnen durch Betatigen des Stellglieds
Korrekturstiche genaht warden.
.
47-
DB2-DD7100
Page 67

Nr.l
Normaler Verriegelungsstich
Nr.2
l
Faden
wird beim Zuriickdriicken des Pedals abgeschnitten.
Nr.5 Nur
Niihen einer festgesetzten
Stichzahl
Nr.6
Zuriickniihen am Anfang
I
/1
8
A I /
tt
l
Zuriickniihen am Anfang und
Niihen
der
Stichzahl
festgesetzten
6.
USING THE B-40 OPERATION PANEL
6.
VERWENDUNG DER BEDIENUNGSTAFEL B-40
UTIUSATION
6.
6.
USO DEL TABLERO
Nr.3
Zuriickniihen am
DU
PANNEAU
Ende
DE
DE
CONTROLES B-40
Nr.4 Zuriickniihen
COMMANDE
:a/
AI/
v
am
j
II
C/1
~./
Faden
wird
am
abgeschnitten.
Nr.7
Ende des Zuriickniihens beim Zuriickdriicken des Pedals
Niihen
der
Stichzahl und Zuriichniihen
am
Enda
I D
•
festgesetzten
Nr.8 Zuriickniihen am Anfang und
Ende
festgesetzten Stichzahl
t/
und
c/
Niihen
B-40
Anfang/Ende
j
1'1
I
I D
•
dar
Festgesetzte :
Stichzahl
E I
I
I
I
I
I
I
I
I
A I
I/
V
Festgesetzte :
Stichzahl
!
Faden
wird beim Zuriickdriicken
Nr.9 Festgesetzte
Fadenabschneiden festgesetzte Stichzahl
Stichzahl und Nr.10
I
I
I
E I
I
I
l
I
I
I
I
des
Pedals abgeschnitten.
Zuriickniihen
Fadenabschneiden
A I
I
8/
I/
V I
•
Ourch Driicken des FuBpedals wird der Niihvorgang bis zum Fadenabschneiden ausgefiihn.
Zuriickniihen
Etikett,
Nr.13
Nur Etikett
Nr.14
und Fadenabschnaiden
8/
11
E I
I
I
!II
El
I
I
I
I
I
II
I
I
I
1
I
I
I
•
am
l
Anfang,
und
am
Ende
am
I
I
I
E I
I
I
I
I
1/
v I
E I
Enda
B/
I
1
I
I
I
I /
v
Festgesetzte 1
Stichzahl
Faden
wird
abgeschnitten.
Nr.11
Festgesetzte
Zuriickniihen am Ende und
Fadenabschneiden
Nr.15 Faltenniihen
I
11
A I
8/
I
I/
I
V E I
I
1'1
B/
I
lA
•
des Zuriickniihens beim Zuriickdriickan des Pedals
Stichzahl,
I
A I
I
I A
•
Festgesetzte I
Stichzahl
Nr.12 Zuriickniihen am
Ende, festgesetzte
und Fadenabschneiden
I
I
AI/
v
8/
A
E I
I
I
I
I
I
1/
1
I
1/
v
B/
v
Nr.16 Kontinuierlichas
I
1'1
8
1' I
I A
•
Anfan~
Stic zahl
I
A
I
I A
I
lit
Zuriickniihan
und
~
:,------T=.---1~
1 I
:E
I I
I I
I - F 1
L-------------
Faden
wird
Pedals abgeschnitten.
• ....... Abschneiden des Fadens (Der Faden
*
......
beim Zuriickdriicken
Bezeichnet Abschneiden des Faden am Ende einer fest eingestellten Stichzahl oder am Ende des Zurucknahens.
(Der Faden
Ei
..
des
wird
ohne FuBpedalbetatigung abgeschnitten.)
,-----..::..=.::=.;:---1
I F I
lt
E E
: F :
L---===-==-----1
Faden
Zuriickniihens abgeschnitten.
wird
am
wird
~
l!
Faden
des
En
de
abgeschnitten, wenn das Ful!pedal nach hinten gedruckt wird.)
Pedals abgeschnitten.
-48-
'I
EJJ!ll
u
EJJj,
ilJ!1
u
il
I
wird
beim Zuriickdriicken des
\
\
B I \
"
\
I
A\
I
\ I
\ I
v
I
Durch Driicken des FuBpedals
dar
Niihvorgang
Fadenabschneiden ausgefiihn.
c\
\
*
I
ol
I
I
\ I
v
bis
082·007100
I
wird
zum
Page 68

6.
USING
6. VERWENDUNG DER
6. UTILISATION
6.
USO
THE B-40 OPERATION PANEL
BEDIENUNGSTAFEL B-40
DU
PANNEAU DE COMMANDE B-40
DEL TABLERO DE CONTROLES B-40
6-3. Liste des fonctions
Application
Points
noues
normaux
Points
d'arret en
debut
Sans couture
de
points
fin
fils
en
de
se
sur
de
de
sur
cycle)
en
fait
Ia
fait
nombre
reglable
Avec couture
de points en
nombre
reglable
(lecoupage
des fils
lorsqu'on
appuie
l'arriere
pedale)
Couture
points
nombre
reglable avec
coupage
des
Uecoupage
des fils se
lorsqu'on
appuie
!'avant de Ia
pedale)
Etiquette
d'identite
Couture de fronces
Couture continue en points
d'arret
(coupe automatique des fils
en
de
couture
Points
d'arret en
de couture
Points
d'arret en
debut/fin
couture
Points
noues
norrnaux
Points
d'arrtlt en
debut
de
couture
Points
d'arret en fin
de couture
Points
d'arret en
debut/fin
couture
Points
noues
normaux
Points
d'arrtlt en
debut
de
couture
Points
d'arrtlt en
de
couture
Points
d'arret en
debut/fin de
couture
Etiquette
d'identite
uniquement
Points
d'arret en
de
couture
lnterrupteur
de point
d'arret point points
en
de en fin de
couture couture
fin
de
de
fin
fin
lnterrup-
teur
de
debut
d'arret nombre des fils
OFF OFF OFF
ON
OFF
ON
OFF
ON
OFF
ON
OFF
ON
OFF
ON
OFF
OFF
OFF
OFF
OFF
ON
ON
OFF
OFF
ON
ON
OFF
OFF
ON
ON
OFF
ON
OFF
OFF
lnterrup- lnterrupteur
de teur de
en
coupage
reglable
OFF
OFF
OFF
OFF
ON
ON
ON
ON
ON
ON
ON
ON ON
OFF
OFF
OFF
OFF
OFF
OFF
OFF
OFF
OFF
OFF
OFF
ON
ON
ON
OFF
ON
OFF
OFF
lnterrup- lnterrupteurde
couture
continue d'identite
de points
d'arret
teur
d'etiquette
OFF
OFF
OFF OFF
OFF OFF
OFF
OFF
OFF
OFF
OFF
OFF OFF
OFF
OFF
OFF
OFF
OFF
ON
OFF
OFF
OFF
OFF
OFF
OFF
OFF
OFF
OFF
ON
ON
OFF
OFF
lnterrup-
teur de
couture
de
fronces
OFF
OFF
OFF
OFF
OFF
OFF
OFF
OFF
OFF
OFF
OFF
OFF
OFF
OFF
ON
OFF
Regla11e
du
de potnts
A B
0
nombre
c D
F E
0
N• de
figure de
reference
0 0 3
0 0 0 0
0 0
0 0 0 0 6
0
0 0 0
0 0 0
0
0 0
0
0
0 0
0 0 0
0
0 0
0 0
0
0
0
0
0 0 0 0
0
0
0 0 0
0
Remarque
1
2
4
5
Points
d'arret
en
7
couture
B·A
Points
d'arrAt
8 en
couture
B·A
9
10
Points
d'arrtlt
en
11
couture
B·A
Points
d'arrtlt
en
12
couture
B·A
13
Points
d'arret
en
14
couture
fixe
points.
15
16
fin
fin
fin
fin
fin
de
de
de
de
de
a 4
REMARQUE:
•
Le
symbole 0 indique qu'il faut regler le nombre
• Pour les points No. 5 - No. 8 du tableau,
fixe est terminee jusqu'a
Si
l'on
etre
appuie
cousus si
•
sur
l'on
Ia
Ia
coupe du fil.
touche de correction de maniere que l'indicateur s'allume, les points de correction pourront alors
appuie sur l'actuateur.
Ia
couture normale sera effectuee une fois que
de
points a coudre.
-49-
Ia
couture de points de longueur
082-007100
Page 69

N"1
Points noues normaux
N"2
Points d'arret
couture
en
debut
de
6.
USING THE 8-40 OPERATION PANEL
6.
VERWENDUNG DER 8EDIENUNGSTAFEL
6.
UTILISATION DU PANNEAU
6.
USO DEL TA8LERO
N"3
Points d'arret
en
fin de couture N"4 Points d'arret
DE
DE
COMMANDE
CONTROLES
couture
8-40
en
8-40
8-40
debut/fin de
Appuyer sur
N"5
Appuyer sur l'arrillre de
N"9
Couture
reglable
Point
en
reglabie
Points
coupage
l'arrillre de
de
points
seulement
nombre:
en
nombre reglable et
des
fils
I
I
I
E I
I
I
!
I
I
I
I
ill
Ia
pedale pour couper
en
nombre N"6
I
I
E I
j
I
I
I
•
Ia
pedale pour couper les fils.
N"10
La
couture
se
terrnine par le coupage
les
fils.
Points
d'arret
en
I
I
B/
A I /
v
nombre
debut de
II
I
I
E I
I
I
I
I
I
I
I
couture et couture de points
en
nombre reglable
Point
en
reglabie
•
Points d' arret
ture,
reglable et coupage
A I
points
I
II
a/
I/
V I
E I
en
I
1
I
I
I
I
I
!II
debut
en
I
de
de
nombre
des
fils en appuyant
Les
fils sont coupes aprlls
en
appuyant sur l'arrillre de
N•7
Point
reglabie
Les
fils sont coupes agres
en appuyant sur l'arri
N"11
cou-
fils
et
II
C/1
/ I D
I'
•
Couture de points
et
en
cou
points d'arret
nombre
page
E I
I I
:
I
E I
I
I
I
I
v
re
en
nombre reglable,
en
des
fils reglable, coupage des fils
I
I
I
I
I
I
A
B/
I
1/
.,
reglable
de couture
Points
points d'arret
et
•
maintenant
en
position enfonceela pedale.
11
c/
/ I D
I'
•
Ia
realisation des points d'arrat en fin de couture,
Ia
pedale.
en
nombre N"8
en
fin
Points
d'arret en debut/fin de
et
couture
en
couture de points
nombre reglable
11
A I
B/
I/
I
I
V E I
Point
en
.11
B/
I
I'
1 A
•
Ia
realisation
de
Ia
pedale.
fin
de
couture couture,
reglabie
des
N•12
l
I
I A
I
nombre
points d'arret en fin de couture,
Points d'arret en debut/fin de
I
B/
I
At/
v
points
A
I
I
I
E I
I
I
I
1/
v
B/
I I
1
I
1/
v
A
•
I
I
B/
en
nombre
I
I
I A
I
-1
I
I A
•
j
Etiquette d'identite
N"13
uniquement
:,------T:._:---~1
1 I
:E
I I
I I
I
- F 1
L-------------•
Appuyer surl'arrillre
couper
las
fils. realisation
.......
Coupage
•
*
......
Indication
d'arret
en
E:
de
Ia
pedale pour Les
des
fils
(les
d'un
coupage
fin
de
couture.
N"14 Etiquette d'identlte
uniquement, points d'arret
en
fin de couture et coupage
des
fils
I
r--------------~
l
~
!l
E
: F :
'----~----J
fils
sont
coupes a pres
des
coupes
fils
apres
coupage
points d'arret
lorsqulon
une
des
couture. position enfoncee
fils
sent
des
(le
*
Eli
en
couture
fils
se
N"15
Couture de fronces
:
[
u
Ia Appuyer surl'arrillrede
fin
de
couper
les
appuie
fait
de
sans
sur
points
que
l'arriere
en
ElJ~~
El_j~~
fils. de fils
de
nombre
l'on a it
-50-
I
I
Ia
besoin
Ia
pedale
pedale)
reglable
N"16 Couture continue en points
pour
La
ou
d'appuyer
d'arret
' " I
\ I \
\ a'' I I
A\
,c, I
\ I \ I
v v
couture
se
terrnine par le coupage
en
appuyant et maintenant
Ia
pedale.
apres
une
sur
couture
l'arriere
de
*
o/
de
points
Ia
pedale.)
082-007100
en
Page 70

6.
USING
6.
VERWENDUNG
6.
UTIUSATION
6.
USO
THE
DEL
TABLERO
B-40
OPERATION
DER
DU
PANNEAU
BEDIENUNGSTAFEL
DE
CONTROLES
6-3. Lista de funciones
PANEL
DE
COMMANDE
B-40
B-40
B-40
Usos
Pespunte
normal
Rematado
per
de
de
de
de
ON
de
atras)
plisados
per
de
completar
micial
Rematado
per
final
Rematado
r,or atras
nicial/flnal
Costura
f.untadas
jades
Rematado
per
micial
Rematado
f.or
nal
Rematado
per
miciallfinal
Costura
puntadas
fijadas
Rematado
per
1nicial
Rematado
per
final
Rematado
por
micial final
S61o
etiqueta
Rematado
per
continuo
atras
Costura
puntadas
OFF
fijadas
Costura
puntadas
fijadas ON
(se activa el
cortahllos
pisandoel
pedal
ala
posici6n
marcha
atrasl
Costura
puntadas
fijadas con el
cortahilos
(el cortahllos
funciona
cuando se pisa
elpedalala
posici6n
marcha
Etiqueta
costura
de
Rematado
(cortahllos automatico
despues
ciclol
lntetruptor
del
rematado
r,or atras
nlclal
atras ON
atras
de
atras
atras
atras
de
atras
atras
atras ON ON ON
atras
continuo
el
lntemlptor
del
rematado
f.or
atras
nal
OFF
OFF
ON ON
OFF
ON
OFF
ON
OFF
ON
OFF
OFF OFF
OFF
OFF
OFF
OFF
OFF OFF
ON
OFF
OFF
ON ON
ON
OFF
OFF
ON ON ON
ON
OFF OFF
OFF OFF
lntetruptor
de
puntadas
fijadas
OFF
OFF
OFF
ON
ON
ON.
ON
ON ON
OFF
OFF
lntemlptor
del
cortahRos
OFF
OFF
OFF
OFF
OFF
OFF
OFF
OFF
ON
ON
OFF
ON
OFF
OFF
lntetruptor
del
rematado
per
atras
continuo
OFF OFF
OFF
OFF
OFF
OFF
OFF
OFF
OFF
OFF
OFF
OFF
OFF
OFF
OFF
OFF
ON
Etlqueta
OFF
OFF
OFF
OFF
OFF
OFF
OFF
OFF
OFF
OFF
OFF
ON
ON
OFF
OFF
Programs del numero
de
Costura
de
plisados A B
OFF
OFF
OFF
OFF
OFF
OFF
OFF
OFF
OFF
OFF
OFF
OFF
OFF
OFF
ON
OFF
puntadas
F E
0 0
0 0 0 0
0 0 0 0
0
0
0 0 0 0
0 0 0 0
0 0 0
0 0 0 0
0 0 0
0 0 0 0
Consultar
Ia
D N•
c
figura
Nota
1
2
0 0
0 0
0
0
0
0 0
0
3
4
5
6
Rematado
per
7
0
8
9
0
atras
final
B·A
Rematado
f.or
atras
naiB·A
10
Rematado
por
11
12
0
atras
final
B·A
Rematado
per
atras
final
B·
A
13
Rennatado
gor
atras
nal
14
0
0
0
15
16
fijado
en
4
puntadas.
NOTA:
•
El
simbolo
•
Para
hasta que se corte
Si
se
•
al
oprimir
0 indica que debe ajustar el numero de puntadas a coser.
los No. 5
oprime
-No.8
en
el
cuadro,
Ia
costura normal
el hilo.
Ia
tecla de correcci6n de manera que
el
accionador.
se
llevara a cabo despues de completar
el
indicador
-51
se
encienda, se podran coser las puntadas de correcci6n
-
Ia
costura de puntadas fijas
082-007100
Page 71

6.
USING THE B-40 OPERATION PANEL
6.
VERWENDUNG
6. UTILISATION
6. USO DEL TABLERO
DER
BEDIENUNGSTAFEL B-40
DU
PANNEAU DE
DE
CONTROLES B-40
COMMANDE
B-40
--..
N"1
Pespunte normal
N"2
l
Cortahilos activado por
N"5
Solo puntadas fijadas
Puntadas
fijadas
Cortahllos activado por
N"9
Puntadas fijadas y cortahilos N"10 Rematado
'!
I
I
I
I
I
•
'
I
I
I
E I
I
I
I
I
•
l
el
pedal en
l
el
pedal
Ia
posicion
N"6
en
Ia
posicion de marcha atrlis
Rematado por atras inicial
I
B//
A I /
Rematado por atras final N"4
N"3
v
l
1/
de
marcha atras Cortahilos activado luego del rematado por atras final, con
Rematado por atras inicial y
puntadas fijadas
I
A
A I
8/
I
I/
I
V
El
Puntadas
fijadas
:
1
I
I
I
I
•
por
II
a/
I
I
I
I
I
I
I
I
*
Ia
costura cuando
atras inicial,
l
puntadas fijadas, cortahllos
I
A I
I/
v E I
Se
complete
posicion
de
marcha atrlis
Puntadas fijadas y rematado
N"7
por
atras final
Puntadas:
fijadas
El
Cortahilos activado luego del rematado
posicion
de
marcha atrlis
N"11
Puntadas fijadas, y rematado N"12 Rematado por atrlis inicial/
atrlis, cortahllos
por
I
I
I
E I
I
I
I
I
1/
v
se
corta
el
hilo pisando
I
A
C/1
lo
•
I
1
I
I
B/~
I
I
I 1 A
v
•
l
11
B/
I
I A
I
• •
el
pedal
Rematado
:a/
AI/
v
Rematado por atras inicial/
N"B
final
I
A I
I/
V E I
Puntadas
fijadas
pur
atrlis final, con
final,
cortahllos
I
I
B/
AI/
v
por
atras
inicial/final
I
II
c/
I
I 0
II
~
el
pedal
y puntadas fijadas
;1
B/
I
I
I
I/
I
I
I
v
l
II
8
I'
I
I A
•
el
pedal en
puntadas
11
I
I
I
E I
I
I
B/
I
1/
v I
11
I
lA
fijadas,
l
en
Ia
Ia
N"13 Solo etiqueta N"14
r;-----F-
lE
I I
: - F I
'--------------·
Cortahilos activado por
posicion
• ....... Cortahflos
*
de
......
Indica que
(EI
-=---n
E:
el
pedal
en
Ia
marcha atrlis rematado por atrlis final posicion
(EI
cortahflos funcionara cuando
se
cortahilos funcionara aunque no se pise
corta el hila fuego de coser
Cortahilos
Etiqueta, Rematado por atrlis
final y cortahilos
I
r----===---;
1 F
!l
E E i
I F :
l.---~----1
activado
*
!'
luego
del
se
pise el pedal a
el
numero de puntadas fijadas o del rematado
el
pedal a
-52-
Costura
de
N"15
u
plisados
'I
ED'!I
E
lJ'll
[
Eu!
1
I
I
Cortahilos activado por
de
marcha atrlis corta
Ia
posici6n de marcha atras.)
Ia
posici6n de marcha atras.)
el
pedal
en
Rematado por atrlis continuo
N"16
\
A\
Ia
Se
complete Ia costura cuando se
el
por
A
\
B I \
\
I
c\
I
\1
\
\ I
v
\ I
hilo pisando el pedal
atras final.
*
I
o'
I
I
I
v
082-007100
Page 72

1. USING
7.
VERWENDUNG
1.
UTILISATION
1.
USO
THE
DEL
TABLERO
B-100
DER
DU
OPERATION
PANEL
BEDIENUNGSTAFEL
PANNEAU
DE
DE
COMMANDE
CONTROLES
B-100
B-100
B-100
7. USING THE B-100 OPERATION PANEL
7. VERWENDUNG
DER
7. UTILISATION DU PANNEAU
7.
USO
DEL TABLERO
BEDIENUNGSTAFEL B-100
DE
COMMANDE B-100
DE
CONTROLES B-100
7·1. Part names and functions
7-1. Teilebezeichnung und Funktion
Noms
7-1.
7-1. Denominaci6n de
* Key operations and the number
number
stitch
However, end backtack sewing can
*With
*To
*Wah
all keys, the indicator
set the number
'V
key
rend dem Nahen konnen keine Tasten betatigt oder Stichzahlen eingestellt werden. Daher muB
genau
Das
Endriegelnahen kann auch wah rend dem Nahen geandert oder aufgehoben warden.
et
fonctions des pieces
las piezas
of
bfore beginning
will
of
to
decrease the setting.
kontrolliert werden, ob die Tasten und Stichzahlen richtig eingestellt sind.
stitches and the pattern display and step display, press the
stitches cannot
to
sew.
be
light when the key is
Y.
changed
funcionamiento
be
changed while sewing.
or
canceled while sewing is being carried out.
ON
and go out when
Be
OFF.
sure
.L:::.
to
confirm all key settings and the
key
to
increase the setting and the
vor
dem Nahbeginn
* Bei eingeschalteten Tasten leuchtet die entsprechende Anzeige. Bei nicht leuchtenden Anzeigen sind
ausgeschaltet.
D.
* Drucken Sie die Taste
zum Erhohen bzw. die Taste
* lln'est pas possible de modifier le fonctionnement des touches et le nombre
consequent
Toutefois,
* Pour toutes
*Pour
regler le nombre
le reglage et sur
a verifier
il est possible de changer ou d'annuler
les touches, le temoin s'allume lorsque
Ia
touche
le
reglage
de
de
toutes les touches et le nombre de points avant de commencer a coudre.
points, l'affichage des motifs et l'affichage des etapes, appuyer sur
'V
pour diminuer le reglage.
'V
zum Vermindern der Stichzahl und der Muster-und Schrittanzeige.
de
points
en
cours
de
couture. Veiller par
Ia
couture de point d'arret
Ia
touche est enclenchee et s'eteint lorsqu'elle
en
fin de couture pendant que
Ia
e~.t
touche
desenclenchee.
Ypour
die
Tasten
l'on
coud.
augmenter
*
Nose
pueden hacer cambios
Ia
costura.
Sin embargo,
En
todas las teclas, el indicador
*
Para
*
el ajuste y
Se
deben confirmar todas las posiciones
el
rematado por atras final
ajustar el numero de puntadas y
Ia
tecla
'V
en
el
se
para disminuir
funcionamiento
se
puede cambiar o cancelar
encendera
Ia
el
ajuste.
al
activar
exhibici6n de diseno y
de
Ia
maquina con las teclas, o
de
las teclas y
Ia
tecla y
el
numero de puntadas antes
se
apagara
Ia
exhibici6n
al
realizar
en
Ia
costura.
al
desactivarla.
de
paso, oprimir
el numero de puntadas, durante
de
comenzar a coser.
Ia
tecla D. para aumentar
-53-
082-007100
Page 73

8·100
9-o
1.;1-o
1fb1...9
e
7. USING THE B-100 OPERATION PANEL
7. VERWENDUNG
7. UTILISATION DU PANNEAU
7.
USO
DEL TABLERO
DER
BEDIENUNGSTAFEL B-100
DE
DE
CONTROLES B-100
COMMANDE
Power indicator
Netzanzeige
Temoin
lndicador
d'alimentation
de alimentaci6n
B-100
The power indicator
Die Netzanzeige leuchtet, wenn der Netzschalter
Le
temoin d'alimentation s'allume lorsqu'on appuie sur l'interrupteur d'alimentation
El
indicador de alimentaci6n
0
LED
display/LED-Anzeige/Affichage LED/Pantalla
will
illuminate when the
se
encendera cuando
• Displays the number
backtack sewing speed and the amount
•
Auf
dieser
Nahgeschwindigkeit,
angezeigt.
• Affiche le nombre de points d'arrflt
Ia
vitesse de couture de points d'arrflt et
• Exhibe el numero de puntadas
velocidad de costura de rematado per atras y
Anzeige
ON
power switch is pressed.
aow
gedruckt wird.
se
oprima
LED
of
start and end backtack stitches (A, 8, C and D), the sewing speed, the
wird
die Stichzahl
die Riegelnahgeschwindigkeit
en
debut et
de
rematado inicial y final (A,
ON.
el
interrupter principal
of
lower thread remaining.
fur
den Anfangs
en
fin
de
Ia
quantite de fil inferieur restant.
Ia
cantidad de hilo inferior restante.
ON.
und
und
die Spulenfaden Restfadenmenge
couture
(A,
B,
Endriegel (A, 8, C und D),
8, C et
D),
Ia
C y
vitesse
D),
Ia
velocidad de costura,
de
couture,
die
Ia
8 Backtack stitch number keys/Zurucknahstichtasten/Touches de nombre de points d'arrflt/Teclas de numero de puntada
del rematado final
• These keys are used to set the number
speed, the backtack sewing speed and the amount
Press ~ to
Mit
•
Nahgeschwindigkeit,
eingestellt warden.
Zum Erhohen der Stichzahl 0-9 die Taste '\7 betatigen. Zum Verringern der Stichzahl 9-0 die Taste
increase the diaplay from 0 -
diesem Tasten kann die Stichzahl
die Riegelnahgeschwindigkeit
of
9.
start
Press '\7
fur
and
end backtack stitches (A,
of
lower thread remaining.
to
decrease the display from 9 - 0.
den Anfangs-
und
und
die Spulenfaden Restfadenmenge
B,
C and
Endriegel (A,
D),
the sewing
B, C und
D),
die
v betatigen.
•
Ces
touches sent utilisees pour regler
8,
C et
D),
Ia
vitesse de couture,
restant.
Appuyer
a
o.
• Estas teclas
C y
inferior restante.
Oprimir el ~ para
sur~
pour augmenter le nombre de 0 a
se
usan para ajustar el numero de puntadas de rematado
D),
Ia
velocidad de costura,
aumentar
Ia
exhibici6n de 0 a
le
Ia
Ia
nombre de points d'arrAt
vitesse de couture de points d'arret et
9.
Appuyer sur '\7 pour diminuer le nombre de 9
velocidad de costura de rematado por atras v
9.
Oprimir el '\7 para disminuir
en
debut et
Ia
por
en
fin de couture (A,
quantite de fil inferieur
atras inicial y final (A,
Ia
cantidad de hilo
Ia
exhibici6n de 9 a
B,
0.
0 Start backtack key/Zuri.icknahtaste fur den Anfang/Touche de points d'arrAt en debut de couture/Tecta de rematado
atras inicial
•
• Press to
backtack stitch .
•
Die
B
• Appuyer de fayon
cousu avec le point
• Oprimir para que
B
light
the indicator. The number
Taste drucken, so daB die Anzeige aufleuchtet. Am Anfang werden die eingestellten Sticha A •
(0 -9)
zuruckgenaht.
(0-
9)
comenzando con
ace
que le temoin s'allume.
d'arrflt
se
en
encienda el indicador.
debut de couture.
un
rematado por atras inicial.
-54-
of
stitches set
Le
nombre de points choisi pour A • B
Se
cosera el numero de puntadas programado por A •
for
A • B
(0 -9)
will
be
sewn
with
a start
(0 a 9)
sera
082-007100
por
Page 74

7.
USING
7.
VERWENDUNG
7.
UTIUSATION
7.
USO
THE
DEL
B-100
OPERATION
DER
DU
PANNEAU
TABLERO
PANEL
BEDIENUNGSTAFEL
DE
COMMANDE
DE
CONTROLES
B-100
B-100
B-100
B-100
eo
1;1-o
A B C
~~~
l!iJI..9
~~~~
•
8 End backtack key/ZurOcknahtaste
final
• Press
• Die Taste dri.icken,
•
•
f)
Continuous backtack key {Taste
atras continuo
por
• Oprimir para que
•
• Die Taste dri.icken, so daB
• Appuyer de
• Oprimir para que
to
backtack stitch .
(0 -9)
Appuyer de
cousu avec le point
(0 -9)
Press
at A
completed.
Zuri.icknahen A • 8 • C • D
wird
regie
de puntadas
vez
light
zurOckgenaht.
con un rematado por atras final.
fOr
to light the indicator. A continuous backtack will
• 8 • C and
der Faden automatisch abgeschnitten.
(0 a 9)
completado
fOr
das Ende{Touche de points
the indicator. The number
so
daB die Anzeige aufleuchtet. Am Ende werden die eingestellten Stiche C • D
fa~on
a
ce
que le temoin s'allume.
d'arr~t
se
kontinuierliches ZurOcknahen{Touche de couture
D.
Thread
fa~on
ace
pour
A·
se
(0-
9)
program ado
el
ciclo A • B • C •
en
fin de couture.
encienda
8 • C • D sera effectuee
encienda
el
indicador.
trimming
die
wird
que le temoin s'allume. Une couture continue du nombre
will
Anzeige aufleuchtet. Die eingestellte Stichzahl (0 - 9) fi.ir das
kontinuierlich genaht. Nach abgeschlossenem Zyklus A • 8 • C • D
el
indicador.
en
A • 8 • C •
D.
d'arr~t
of
stitches set
Se
be
automatically performed after the
Se
en
fin de couture{Tecla de rematado por atras
for
Le
nombre de points choisi
cosera
Les
cosera un rematado por atras continuo para
el
numero de puntadas program ado por C • D
be
sewn
fils seront coupes a
D.
Se
realizara automaticamente el corte del hilo una
C • D
en
for
(0-
9)
will
be sewn
pour
C • D
points
d'arr~tfTecla
the number
Ia
of
stitches
A·
B • C • D cycle is
de
fin du cycle A • 8 • C •
with
an end
(0 a 9)
sera
de rematado
(0-
9)
set
points
d'arr~t
D.
el
numero
8 Pattern display/Musteranzeige/Affichage des motifs/Exhibici6n
•
If
the
pattern selection keys are pressed, the number
played.
• Beim Dri.icken der Musternahtasten
• Si l'on appuie sur les touches de selection de motif, le numero du
a l'affichage.
• Si
se
oprimen las teclas de selecci6n de diseno,
-55-
wird
de
die
Nummer
diseno
se
exhibira
of
the pattern
der Nahmuster
to
be
sewn
(1 -9)
(1 -9)
angezeigt.
motif
a coudre
el
numero de disenos a coser
(1 -9)
will
be
dis-
apparaitra
(1 -9).
DB2·DD7100
Page 75

7. USING THE B-100 OPERATION PANEL
7.
VERWENDUNG
7. UTILISATION DU PANNEAU DE
7. USO DEL TABLERO
DER
BEDIENUNGSTAFEL B-100
COMMANDE
DE
CONTROLES B-100
B-100
OPATIERN
selection keys/Programmtastenrrouches de selection de motifrreclas de selecci6n del diseiio
• Used
to
Press
Press V to
select the desird sewing pattern
L::..
to increase
from
1 -
decrease from 9 -
9.
(1 • 9}.
1.
* Set the sewing pattern after thread trimming.
•
Mit
diesen Tasten kann das Programm
L::..
Die Taste
Die Taste V ist zum Verringern der Zahl bon 9 bis
*
Das
• Servant a
Appuyer sur
Appuyer sur 'V pour diminuer de 9 a
* Regier le
•
Se
usa para seleccionar el diseiio de costura deseado
Oprimir
Oprimir v para bajar
ist zum Erhohen der Zahl von 1 bis
Programm nach dem Abscheiden des Fadens einstellen.
selectionner le
L::..
pour augmenter de 1 a
motif
de couture apres
L::..
para aumentar de 1 -
de
motif
de couture souhaite
9.
9 •
1.
(1 -9}
9.
1.
Ia
coupe des fils.
eingestellt werden.
* Programar el diseiio de costura despues del corte de hilo.
0 Step display/Schrittanzeige/Affichage des etapes/Exhibici6n de paso
STEP
m
• Shows the current step when sewing patterns 2 -
current step is displayed
program sewing.
The number
•
Auf
dieser Anzeige
Drucken der
als E oder
Stichzahl
Die
• lndique l'etape
Lorsqu'on appuie sur les touches de selection d'etape, l'etape actuelle apparait a l'affichage sous
forme
20 pendant
Le
nombre de points
• Muestra el paso actual al coser los disenos 2 Cuando
costura de puntadas fijas, o como un numero entre 1 El
numero de puntadas
of
stitches
Schrittaste wird der gegenwartige Schritt beim Nahen einerfesteingestellten Stichzahl
F,
bzw. beim Programmnahen als Nummer 1 -20 angezeigt.
(1 -99)
en
deE
ou F pendant
Ia
couture programmee.
se
oprimen las teclas
as E or
(1 -99)
wird
beim Nahen eines Musters 2
wird
cours lors de
(1 -99)
(1 -99)
F during fixed stitch sewing,
will
appear in the
auf der LED-Anzeige angezeigt.
Ia
couture des motifs 2-9.
Ia
couture a longueur fixe, ou sous forme d'un nombre compris entre 1
apparait alors sur l'affichage a diodes.
de
selecci6n de pasos,
aparecera
en
9.
Ia
9.
1.
(1 a 9}.
(1 -9}.
9.
When the step selection keys are pressed, the
or
as
a number between 1 -
LED
display at this time.
-9
der gegenwartige Schritt angezeigt. Beim
el
paso actual
20
exhibici6n
durante
LED
se
exhibe como E o F durante
Ia
costura programada.
en
este memento.
20
during
et
Ia
8STEP
Ci)
selection keys/Schrittasten/Touche de selection d'etape/Teclas de selecci6n de pasos
• Used to set the step display
A·
L.l
V
Stitch number display/Stichzahlanzeige/Affichage du nombre de points/Exhibici6n de numero
NO.
OF
STITCH
m
Press
L::..
to
Press
• Diese Tasten werden zum Einstellen der Schrittanzeige
Drucken
Mit
der Taste
auf E zuruckzuschalten.)
• Utilisee pour regler l'affichage des etapes
Appuyer sur
Appuyer sur
•
Se
usa para ajustar
Oprimir
Oprimir V para disminuir
• Shows the number
and program sewing.
The number
•
Auf
Stichzahl, das Nahen von Etiketten, das Faltennahen und das Programmnahen angezeigt.
Die
• lndique le nombre de points regie pour
de nom,
Le
nombre de points est affichl! sous forme d'un nombre compris entre 1 et
• Muestra el numero de puntadas ajustadas para
costura de plisados y costura programada.
El
numero de puntadas
change from E to
'V
to
decrease
Sie die Taste, um von E auf F oder eine Zahl von 1 - 9 einzustellen.
L::..
Ia
Ia
L::..
para cambiar
of
dieser Anzeige werden die eingestellten Stichzahlen
Stichzahl
Ia
couture
wird
from
konnen Sie die
touche Y pour passer
touche/pour
Ia
of
stitches is displayed
als Zahl von 1 bis
de
(E, F or
For
9 -
exhibici6n de paso
de
E a F o para aumentar de 1 -9.
de 9-1.
stitches set
presseur de plis et
se
exhibe como un numero entre 1 y 99.
1 -
20).
to
increase from 1 -
1.
(Press the
Nummer
diminuer de 9 a
for
L::..
von 9-1 zuruckstellen. (Drucken Sie die Taste, um von F
(E,
de
E a F ou pour augmenter de 1 a
(E,
(Oprimir
as
Ia
fixed stitch sewing, name label sewing, pleat presser sewing
a number from 1
99
angezeigt.
Ia
couture de points de longueur fixe,
Ia
couture programmee.
key
F ou 1 -
1.
F o 1 -
9.
to
return from F
20).
(Appuyer sur
20).
tecla
L::..
Ia
costura de puntadas fijas, costura de etiquetas,
to
(E,
F oder 1 - 20) verwendet.
Ia
touche Y pour retourner de
para volver de
to
99.
fur
das Nahen einer festeingestellten
E.)
Fa
9.
E.)
de
puntadas
Ia
couture d'etiquettes
99.
Fa
E.)
-56-
082-007100
Page 76

7.
USING
7. VERWENDUNG DER
7. UTILISATION
7. USO DEL TABLERO DE CONTROLES B-100
THE B-100 OPERATION PANEL
BEDIENUNGSTAFEL B-100
DU
PANNEAU
DE
COMMANDE
B-100
CD
NO.
OF
~Back
key/
B-100
e-o
V1-a
lful
e
STITCH keys /Stichtasten(Touches de
Umk
A B
~~[BJ~
_5l
~~~~-
""
• Used
•
• Sert a regler le
• Se u
ehrtaste(Touche de points ar riere(Tec
to
sewing and each separate step in
Mit
dieser Taste konnen Sie die Stichzahlen
das Etikettnahen, das Faltennah
d'tHiqu
programm
sa
etiquetas, costura de plisados y costura program ada.
D
c
o-
\7.
set the
ettes
para ajusta r el
ee.
number
nombr
de
nom,
e de
PATTERN
1 i
2
Je
E E
'-F~
'·
h
4 0
..
:
E:
tl
•
nombre
of
stitches
en
points
Ia
couture
numero de puntad
la
STEP
[aJ
[BB][8E]
~
"
de
points(Teclas de
(1-
99)
program
und fUr jeden einzeln
(1
- 99)
de
presseur
de inversion
NO.
~
•
•
num
ero de puntadas.
for
fixed stitch sewing, name label
sewing .
(1
- 99)
fur
das Nahen einer festeingestellten Stichzahl,
en
Schritt des Progr
pour
Ia
as
de pli
(1-
couture
99) para
de points de
s, et c
costu
haque
ra
@
OPTION
OG
•
0.
•
~-
"
etape separee
de
a
sew
amm
longueur
puntadas
ing, pleat presser
nahens einstellen.
fijas, costura
fixe,
de
Ia
couture
Ia
couture
de
• Used
• Durch Betatigen dieser Taste kann
• Sert a coudre
• Se u
G)
Continue key/Continue-Taste(Touche de couture continue(Tecla de costura continua
• Used
•
•
• Permet Ia couture continue des etapes consecutives dans les
• Permite coser continuamente los pasos
for
9.
eingeste
motifs
disnfios 5 ·
without
However, thread
Durch
kontinuierlich weitergena ht werden. (Nach Beendigung eines Schritts
nachsten Schri
Wenn das fortlaufende
sans interruption par
Toutefois, it n'est pas possible de regler
que
S
in
backward sewing
llte St
ichzahl ruckwarts genaht werden.
en point
5 a
9.
sa
para
et
rematado
9.
to
enable
pause by the next step instead
Betatigung
normalmente
embargo, el cortahilos no puede ser ajustado si
continuous
trimming
tt
weitergefahren.)
se
of the
number
s arriere le
dieser
Nahen eingestellt ist, kann das Fadenabschneiden nicht eingestellt werden.
l'etape suivante,
hacian.
por
sewing
can
Ta ste
nombre
atras del
not
be set
kon
of
stitches set for each step
die
fur
die einzelnen
de points regie pour chaque etape
numero
of
consecutive steps in patterns
of
nen
au
Ia
de
de puntadas
pausing after each s
if
continuous sewing has been set.)
aufeinanderfolgende
lieu
de
marquer
coupe
du
fit si Ia couture continue a ete choisie.)
los disefios
se
5-9.
ha
programmed
Programmschritte
programado
5-9.
tep
is completed .
Schitte
motifs
une pause a
(Se continuan los pasos s
ajustado Ia costura continua.)
5 a
der
programmee
para cada paso en los
(Each step is con
der
wird
9.
(Chaque etape est suivie
Ia
fin de chaque etape.
in patterns
Programme
Programme
ohne Pause
in las pausas
dans l
tinued
5-9
mit
5-
5-9
es
dem
-
57-
082-007
100
Page 77

7.
USING THE B-100 OPERATION PANEL
7. VERWENDUNG DER BEDIENUNGSTAFEL B-100
7.
UTILISATION DU PANNEAU
7.
USO
DEL TABLERO DE CONTROLES B-100
DE
COMMANDE
B-100
eAUTO
~FREE
key/Freitaste(fouche FREE(fecla
•
key AUTO-Taste(fouche AUTOffecla AUTO
•
When this key
automatically when the treadle is pressed once.
• Wenn diese Taste gedruckt
des Pedals die eingestellte Stichzahl genaht.
• Lorsqu'o n appuie
se
ra
cousu automatiquement lorsqu'on appuie une fois
•
Cuando se
ajustadas
Used
•
•
•
•
•
•
• Se usa
• Si
for
If this key is pressed halfway through a step when a pattern from 5
will
illuminate
then be sewn.
Di
ese
Taste
Wenn diese Taste in einem Schritt
das Nahprogramm
Utilis
ee
Si
l'on
appuie sur cett
s'all
ume
points non
par
se
oprime
el indicador
puntadas no programadas.
is
pressed
sur
oprime
se
cosera automaticamente cuando
sewing non-programmed stitch
and
wird
zum Nahen
pour
Ia couture
et le
programme sera
programm
a coser puntadas no programadas.
esta tecla en Ia mitad de un paso cuand o
se
encendera y el programa
so
that
wird,
cette touche de maniere que le temoin s'allume, le
esta tecla de manera que el
FREE
the
program
wird
zum Nahen von nicht
de
points non pro
e touche au cou
es.
the indicator illuminates, the set
so
daB die Anzeige leuchtet, so
sur
Ia pedale.
indicador se
se
pise el pedal una vez.
es
.
will
be
momentarily
von
nicht programmierten Stichen verwendet .
der
Programme 5 bis 9 gedruckt
rs
moment
programmierten
gramm
d'une
anement inte
se
suspendera momentaneamente. Luego
es
.
etape
suspended.
lorsqu'un
rrompu.
se
encienda, el
Stichen unterbrochen. ·
motif
II
est alors possib le de coudre des
haya seleccionado un diseno entre 5 y
number
wird
to
Non-programmed
of
stitches will
durch einmaliges Druck
nombre
9 has been set. the
wird,
leuchtet die Anzeige und
5 a 9 a ete regi
de points regie
numero
se
be
sewn
en
de
puntadas
ind
icator
stitches can
e,
le
temoin
9,
pod ran coser
~Automatic
de levanta
0T
hread
presser lifter key/Automatische StoffdruckerfuBtaste(fouche de releveur de pied presseur automatique(fecla
dor
trimming
de prensatel
•
• Diese Taste kann zum automat
• Sert a elever automatiqueme
• Se
key/Fadenabschneidetaste(fouche de coupe des fils(fecla del cortahflos
•
•
• Sert a couper les fils lorsque les
•
as
automatico
Used
to
aut
patterns 2 and 3
set.)
Nahmuster 2 und 3 und 5 bis 9 verwendet werden. (Falls das fortgesetzte Nahen eingestellt ist, laBt
sich diese Taste nicht verwenden.)
pour
touche
usa para levantar automaticamente
cuando
se ha ajustado a costura continua.)
Used
patterns 5 -
* Thread
pattern 3.
Bei
Betatigung dieser Taste
der Programme 5-9
omatically
Ia
couture des motiffs 2 et 3 ou des motifs
si
Ia
couture continue a ete reglee.)
se
cosen los disenos 2 y 3 o los disenos
for
thread
9.
trimm
* Beim Annahen
Schritts abgeschnitten.
motifs
5 a 9.
*
Les
fils sont coupes a
le
motif
Se
usa para cortar el hilo despues de terminar los disenos 2 y 3 y despues de terminar cada paso
los disenos 5-9.
*
Se
3.
corta el hila al terminarse el cuarto paso de
raise the presser
or
patterns 5
trimming
ing occurs after completion
der
von
-9.
(However, this key cannot be used
ischen Anheben des StoffdruckerfuBes am Ende eines Schritts
nt
le pied presse
after completion
wird
nach
Faden automatisch abgeschnitten.
Etiketten
Ia
mit
fin de
foot
el
prensatelas despues
Been
dem Programm 3
moti
fs 2 et 3 sont
Ia
quatrieme etape lorsqu'une etiquette d'identite est fixee selon
after sewing of one step is completed
ur
une fois que
5-9
. (Toutefois, il n'est pas possible
5-9
. (Sin embargo, no
of
patterns 2 and
of
the
fourth
dig
en
des Programms 2 und 3 und
termi
Ia
costura
3,
step when attaching
wird
der
nes,
if
continuous sewing has been
Ia
couture d'une etape est accomplie
de
completar
and after completion
Faden nach AbschluB des vierten
eta
Ia fin
de
etiquetas en el diseno
Ia
se
puede usar esta tecla si
der
de chaque etape dans les
when
d'utiliser cette
costura de un paso
of
name
einzelnen Schritte
sewing
der
each step in
labels
with
en
3.
-58-
082-007100
Page 78

7.
USING
7. VERWENDUNG DER BEDIENUNGSTAFEL B-100
7.
UTILISATION
USO
7.
THE B-100 OPERATION PANEL
DU
DEL TABLERO DE CONTROLES B-100
PANNEAU
DE
COMMANDE B-100
B-100
9-o
111-o
lliii_5J
G)
DELETE
key/DELETE-TastefTouche DELETE(Tecla
• Used
•
to
cancel the displayed step in patterns 5 -
* When a step
Mit
dieser Taste konnen die angezeigten Schritte in den Program men 5-9 geloscht werden.
is
cancelled, the
DELETE
* Beim Loschen eines Schritts ruckt der nachfolgende Schritt an diese Stelle, um
fUll en.
•
• Sert a annuler !'operation affichee dans les motifs 5 a
* Lorsqu'une etape est annulee,
•
Se
usa para canceler el paso exhibido en los diserios 5-9.
* Cuando se cancela un paso, se adelanta el siguiente paso para
programaci6n.
9.
following
Ia
step is brought forward
9.
machine passe directement a l'etape suivante.
to
fill the gap .
cubrir
die
Lucke
el vacfo creado en
zu
Ia
CD)
INSERT key/INSERT-Taste(Touche INSERT(Tecla INSERT
• Used to insert a
new
step before the displayed step in patterns 5-9.
* When a step is inserted, the displayed step is placed one back in the sewing order .
•
Mit
dieserTaste kann ein neuer Schritt
5 - 9 eingefugt werden.
* Beim Einfugen eines neuen Schritts
•
Platz nach hinten geruckt.
• Sert a inserer une nouvelle etape avant l'etape affichee dans les motifs 5 a
* Lorsqu'une etape est repetee, l'etape affichee est reculee dans l'ordre de couture.
•
Se
usa para agregar un nuevo paso antes del paso que aparece en
9.
* Cuando
de
tJ)
Half stitch key/Halbstichtaste(Touche de demi-pointfTecla de media puntada
• Used
•
Zum
• Sert a relever ou a abaisser l'aiguille lorsque
e
• Se usa para levantar o bajar
se
Ia
to
Anheben oder Absenken der Nadel bei unterbrochenem Nahvorgang.
agrega un paso,
costura.
raise
or
lower
the needle when machine operation is interrupted.
el
Ia
aguja con
vor
dem in der Anzeige angezeigten Schritt der Programme
wird
der angezeigte Schritt in der Nahreihenfolge
paso que aparece en
le
fonctionnement de
Ia
maquina parada.
9.
Ia
exhibici6n,
Ia
exhibici6n se retrasa un Iugar en
Ia
machine est interrompu.
en
um
einen
los diserios
el
orden
5-
-59-
DB2-DD7100
Page 79

7.
USING THE B-100 OPERATION PANEL
7. VERWENDUNG DER
7. UTILISATION
DU
BEDIENUNGSTAFEL B-100
PANNEAU
DE
COMMANDE
7. USO DEL TABLERO DE CONTROLES B-100
B-100
GSewing
@)Slow start key/Langsamstartta
speed key/Nahgeschw
• Press
•
• If th
• Drucken Sie diese Taste, um die Nahgeschwind
• Beim
• Beim nochmaligen Drucken der Taste oder wenn die Nahmaschine in Betrieb gesetzt
• Appu
• Si l'on appuie a nouveau s
• Si
• Oprimir para exhibir
• Si
• Si
•
• Wenn Sie diese Taste drucken, leuchtet die Langsamstartkontrolleuchte
• Si
• Si
to display the sewing speed
tim
this
keys
If
backtack sewing speed
and backtack indicator
Nahgeschwindigkeitsanzeige
kann
Riegelnahgesc
d
Nahgeschwindigkeitsanzeige
de couture
maxima
sible de regler
nombre de points
v
couture dispara
de
usando las teclas de ajuste de
se
las tecl
costura (E)) y el indi cador de rematad o
costura tambien
If
sewing start
continues at the speed determined by the treadle position.
Stiche
Nach den ersten zwei Stichen ,kann d
po i
al comienzo de
e. You can then set the sewing speed (200 -
f).
this key is pressed once more, the backtack
is
key
mit
nochmaligen Drucken
ie
Nahgeschwind
yer
l'on
appuie a nouveau
it
esse de couture (E)) et le
veloci dad de costura (19). Entonces
se
opr
podra ajustar
as
se
oprime
this key is pressed, the
am
l'on
appuie
nts
seront cousus a vitesse lente en
points sont cousus,
se oprime
puntadas,
ind
igkeitstaste{Touche de vitesse de couture{Tecla de velocidad de costura
at
A.B,C and D. The sewing speed indicator (19)
is
pressed once more, or
den
Stichzahltasten 8 eingestellt we
hwindigkeit
sur cette touc he
(E)) s'allum
le pt/mn) en utilisant l
Ia
it
ime
un a vez mas esta tecla, el indicador de rematado
de ajuste de numero
una vez mas esta tecla, o si
ste!fo
uche de demarrage a vitesse l
wi
ll
Nahbeginn werden
sur
esta tecla, el indicador de comienzo Iento
Ia
Ia
costura continua a Ia velocidad determinada
(220- 1,800 spm) using the stitch
(V1)
will switch off,
igkeits-
pour
e.
II
vitesse de point
f)
ra
Ia
velocidad de costura de rematado
se
be
cette touch
costura
ur cette touch
.
sur
aussi.
Ia
velocidad
apagara.
slow
sewn
atlow
Ia
couture co
se
if
the sewing machine is operat
and
(19)
leuchtet.
der
(22
0 -1800 Stiche
(19)
wird
afficher
est alors possible de regl
es
touches de reglage de n
cette touche, ou si
temoin
de
numero
de
start indicator
speed (fixed at
mit
langsamer Nahg
e,
le
nt
coseran lentamente (fijas
Die
Taste
leuchtet
und
die
ebenfalls ausgeschaltet.
d'arr
costura
puntadas
temoin
Riegelnahkontrolleu
Ia
vitesse de couture
e,
le temoin
et
(200-
de point
en
se
podra ajustar
de puntadas
se
por
ie
Nahgeschwindigkeit
de
debut
inue a
Ia
maximum
indicator
the sewing
igk
Nahgeschwindigkeit
rd
pro
d'arret
A,B,C
eit
en.
die
Minute)
de point
1.800 pt/mn) en utilisant l
Ia
machine a cou
(V1)
yD.
spm) using the stitch
(V1) will
numb
spee
fur
Riegelnahanzeige
mit
er
Ia
omb
s'eteindront, et l'affichage de vitesse de
En
Ia
velocidad de costura (200
illumin
er setting keys
ed,
d display will also
A,B,C und D anzuzeigen, so daB die
(200
den Stichzahltasten 8 einstellen.
chte (V1)
pour
vitesse de point
re
de
d'arret
este memento
ate. You can then set the
the sewing speed indicator (E))
Sticha pro
A,B,C et
points
(V1)
s'allume.
es
dre fonctionne,
se
f).
por
atras
por
f)
.
usa
Ia
maquina de coser, el indicador de velocidad de
atras
(V1)
ente!f
(G)
will
two
esc
hwindigkeit genaht(fest a
debut
de
couture (
vitesse determinee
atras (220- 1.800
se
apagaran, y Ia exhibic
ecla de comienzo Iento
illuminat
stitches). After these stitches are sewn, sewing
de couture le
(G)
en
e and
mit
dem
fi
xee a deu x points). Une
se
encendera y las primeras
dos puntadas). Despu
porIa
(V1)
the
(G)
Peda
l eingestellt werden.
nt
(G
)
par
Ia
position de
posicion del pedal.
will
illuminate at
number
sett
f).
be
switched off.
Minute-Maximum)
(V1). Sie
ausgeschaltet
D.
Le
d'arr
konnen die
wird,
so
und
temoin de vitesse
iH (200 - vitesse
f).
II
touches de reglage de
encendera el indicador
se
encendera. Entonces
ppm maximo) usando
first
und die ersten heiden
uf
zwei Stic
s'allume
est alors pos-
le
temoin
ppm
maximo)
i6n
de velocidad de
stit
ches sewn at the
he
eingestelltl.
et les premiers
fois que
Ia
pedale.
es
puntada
de coser estas
ing
wird
die
de
ces
s
@)Correction key/Korrekturtaste!fouche de correctio
• If this
0.
• The correction key@) cannot be used
•
• Die Kor rekturstichtaste@) kann beim Nahen des Musters 4 (Faltennahen) nicht verwe ndet
•
•
• Si
•
key
while
(However, backtack stitches are sewn
Beim
stillstehend
(Falls das Stellglied wah rend dem Nahen betatigt
Si
I' on appuie sur cette touche,
l'actuateur pendant que Ia machine
(To
II
n'est pas possible d'util iser
de plis) est cousu.
se
se
(Sin embargo, l
Ia
La
is pressed, the correction stitch indicator
the machine
Druc
ken
er
utefois, les points d'arret sont cousus
oprime esta tecla, el indicador del interrupter de correcci6n
oprime mientras
maquina de coser esta funcionando .)
tecla de correcci6n@)
is
stopped, correction stitches are sewn (at
die
ser
Maschine betatigt wird, werden Korrekturstiche (220 Stiche pro Minute) ausgefUhrt.
Ia
as
maquina esta parada,
puntadas de rematado
n!fe
Taste
leuchtet
le
Ia
touche de correction @)pendant que le
nose
puede usar mientr
cla de
if
temoin
es
t a I' arret, l
- 60 -
cor
recci6n
(0)
the actuator
while
die
de
point
si
l'on appuie sur l'actuateur pendant que Ia machine fonctionne.)
por
is
pattern 4 (pleat presser sewing) is being
Korrekturst
pressed while the sewing machine
wird, we
de correction
es
points
se
coseran puntadas de correcci6n
atras
se
as
se
este cosiendo el diser'io 4 (costura de plisados).
will illuminate.
ichanzeige (0 ).
rden Riegelstiche genaht.)
(0)
de
correction seront cousus
coseran si
220
spm).
s'allume.
(0)
se oprim
If
the actuator
Wenn
motif
se
encendera.
e el accionador mientras
is
then pressed
is
operating
sew
das Stel
Si
l'on appuie ensuite sur
4 (couture de presseur
(a
n.
lgli
ed bei
werde
(a
220
pt/mn).
Si
el accionador
220 ppm).
082-00710
.)
n.
0
Page 80

1.
USING
7. VERWENDUNG DER BEDIENUNGSTAFEL B-100
1. UTILISATION
1.
USO
THE B-100 OPERATION PANEL
DU
PANNEAU
DEL TABLERO DE CONTROLES B-100
DE
COMMANDE
B-100
G Needle up/down key/Nadeltaste{fouche d'elevement/abaissement de l'aiguille{fecla de aguja arriba/abajo
• Press to change the needle stop position. If the
top
of
above the
needle
• Drucken
die Maschine
abgesenkter Nadel.
• Appuyer sur cette touche pour changer
l'aiguille s'arrfltera
/est
• Oprimir para cambiar
se parara encima de
'V
will
Sie
allume, l'aiguille s'arretera au-dessous du haut de
esta encendido,
the needle plate when the machine stops;
stop below the top
diese Taste
mit
angehobener Nadel; falls die Anzeige
au-dessus du haut de
Ia
Ia
parte
Ia
aguja
of
the needle plate.
zum
Andern der Nadelstopposition. Wenn die Anzeige
Ia
Ia
posici6n de parada
de
arriba de
se
parara debajo de
Ia
f:::..
indicator is illuminated, the needle
if
the
'V
indicator is illuminated, the
f:::..
'V
leuchtet,
position d'arret de l'aiguille. Si le temoin
plaque a aiguille lorsque
Ia
plaque a aiguille.
de
Ia
aguja.
Si
el
placa
de aguja cuando
Ia
parte de arriba de
indicador
se
stoppt
Ia
machine s'arrete;
f:::..
para
Ia
Ia
placa de aguja.
die Maschine
esta encendido,
maquina;
leuchtet, stoppt
f:::..
will
est allume,
si
le temoin
Ia
si
aguja
el indicador
stop
mit
Options
I Optionen I Options I Opciones
8 Lower thread remaining key/Spulenfaden-Restfadentaste{fouche de fil inferieur restant/Tecla de hilo inferior restante
•
If
this
key
•
•
is pressed, the lower thread remaining indicator (
• Refer
• Beim Drucken dieser Taste leuchtet die Spulenfaden Restfadenanzeige (
• Zum Einstellen der Spulenfaden-Restfadenmenge wird auf die Seite
• Si l'on appuie sur cette touche,
• Pour plus de details concernant le reglage
83.
to
page
81
for details on how
to
set the lower thread remainder limit.
le
temoin de fil inferieur restant (
de
Ia
limite du fil inferieur restant, se reporter a
lfitl)
will
illuminate .
llill
) s'allume.
llill
).
81
verwiesen .
Ia
page
81
• Si
se
• Consultar
oprime esta tecla, el indicador
Ia
pagina
83
para mas detalles sobre como ajustar
de
hila inferior restante (
ltiii
)
se
encendera.
ellimite
de hilo inferior restante.
-
61
-
DB2-DD7100
Page 81

7. USING THE B-100 OPERATION PANEL
7. VERWENDUNG DER BEDIENUNGSTAFEL B-100
7. UTILISATION DU PANNEAU
.7.
USO DEL TABLERO
DE
DE
CONTROLES B-100
COMMANDE
B-100
8-2. Standard
Nahen
8-2.
pattern
von
sewing
Mustern
8-2. Operations de couture de
Costura de disefios normales
8-2.
• Start/end backtack
• Zuruckniihen am Anfang und Ende
B Points d'arret en
II
Rematado por atras inicial/final
I
I
8/
A I /
v
debut/fin
de couture
*Standard
*Start
for start and end backtacking.
* Bedienung
*
Das
bis
Zuriicknahen am Anfang und Ende
zu
* Fonctionnement normal pour
*
Les
premieres donnees programmees sent celles concernant
d'arret
en
debut et
* Funcionamiento normal para
*
Se
programa primero el rematado par atras inicial y final.
hasta 9 puntadas en
•
Press
the start/end
backtack keys.
• Die Zuriicknahtasten
1
Anfang und Ende
drucken.
• Appuyer sur les
touches de points
d'arret
de couture.
• Oprimir las teclas
en
debut/fin
rematado par
inicial/final.
de
atn3s
• Set the number
stitches.
2
• Die Stichzahl
einstellen.
• Regier
de points.
• Programar
numero
puntadas.
operations
motifs
operation for pattern sewing
and
end
9 Stitche vorprogrammieren.
en
debut et
le nombre
de
standard
backtacking
fur das Nahen eines Programms
en
fin de couture.
of
el
are
programmed first. Up to 9 stitches can be programmed
Ia
en
fin
de
couture.
Ia
Ia
programaci6n del rematado par atras inicial y final.
•.
Sew.
Mit
3
beginnen.
• Coudre.
• Coser.
wird
zuerst programmiert.
couture de motifs
On
pourra programmer jusqu'a 9 points d'arret
costura del diselio
dem Nahen
Es
lassen sich je
Ia
realisation
Se
pueden programar
de
points
A B c
~
, •
•
• The indicator
• Die Anzeige leuchtet.
•
Le
temoins s'allume.
Se
encendera el
•
indicador.
1.
When the treadle
2.
For end backtacking, press the treadle back.
1.
Wenn
2.
Fur das Zurucknahen am Ende muB das
1.
Lorsqu'on appuie sur
reprendre
2.
Ramener
1.
AI
pisar
2.
Para
will
light.
is
pressed
das
Pedal
gedruckt wird und der Anfangsriegel genaht ist, wird normal weitergenaht (beim Nahen
(lorsqu'on coud le
Ia
pedale
el
pedal y terminar con el rematado par atras inicial,
el rematado
Ia
en
arriere pour effectuer les points d'arret
par
atras final, pisar el pedal hacia atras.
8]8]8]8]
~~~~
• The number
• Die Stichzahl wird durch die Anzeigen
•
Le
nombre de points est affiche sur les affichages A-8-C-D.
•
El
numero de puntadas aparecera
and
the start
pedale et que le point d'arret
motif
1).
of
stitches
backtack
Pedal
D
~
will
be
shown in the A • B • C • D displays.
is completed, normal sewing will
nach hinten gedruckt warden.
en
debut de couture est termine,
se
A,
B,
C und D angezeigt.
en
las exhibiciones A • B • C •
en
fin de couture.
continuara con
D.
be
resumed (when sewing pattern
des
Musters
Ia
couture normale peut
Ia
costura normal (al coser el diselio
1).
1).
1).
-62-
082-007100
Page 82

7. USING THE B-100 OPERATION PANEL
7. VERWENDUNG DER BEDIENUNGSTAFEL
7. UTILISATION DU
7.
USO
DEL TABLERO
• Continuous backtack
• Mehrmaliges Vor-
•
Couture continue en
• Rematado
por
PANNEAU
DE
CONTROLES B-100
und
Zurucknahen
points
atras continuo
d'arret
DE
COMMANDE
*The
continuous backtack can be used ith pattern
* Up to 9 stitches can be programmed
B-1
00
B-100
for
each step.
1,
normal sewing.
\
\
B I \
"'
\
I \
A \
I
c \ I
\ I
\ I
v
• Press the continu-
ous backtack key.
• Die Vor- und
1
Zuruckni:ihtaste
drukken.
•
Appuyer
touche de couture
continue en points
d'arret.
•
Oprimir
rematado continuo
para que.
D I
\ I
v
sur
Ia
tecla del
Ia
I
!II
I
l
*
Das
kontinuierliche Zurucknahen kann
gemacht werden.
Es
lassen sich je bis
*
*La
couture continue
normal
*On
Se
*
Se
*
e.
pourra programmer jusqu'a 9 points pour chaque operation.
puede usar
pueden programar hasta 9 puntadas
• Set the number
stitches.
2
• Die Stitchzahl
einstellen.
• Regier le nombre
de points.
• Programar el
numero de
puntadas.
A
B c
zu
9 Stiche vorprogrammieren.
en
points
el
rematado por
of
3
D
d'arret
atn3s
continuo con el disefio
•.
Sew.
Mit
dem Nahen
beginnen.
• Coudre.
o Coser.
mit
dem
Programm 1 fUr normales Nahen
peut etre utilisee avec le
1,
costura normal.
en
cada paso.
motif
1,
conture
,
•
• The indicator
• Die Anzeige leuchtet.
•
Le
temoin
•
Se encendera
indicador.
will
light.
s'allume.
el
[]DJDJOl
~
~~~~
• The
• Die Stichzahl
o
•
number
will
be
8 • C • D displays.
die Anzeigen A, 8,
D angezeigt.
Le
nombre de points est
affiche sur les affichages
A-8-C-D.
El
numero
aparecera
exhibiciones A • 8 • C •
of
stitches
shown in the A •
wird
durch
C und
de puntadas
en
las
D.
•
When
pressed and the continu-
ous
pleted, thread
will
•
Wenn
beendetem
lichem
gedruckt
Faden abgeschnitten.
• Les
lorsque
enfoncee
continue
terminee.
• Cuado se pisa
se
por
cortara el hilo.
the
backtack
be
performed.
das
Zurucknahen
wird,
fils
Ia
en
termina
atras
treadle
is
trimming
Pedal
kontinuier-
wird
sent
coupes
pedale
et
Ia
couture
points d'arret
el
el
rematado
continuo,
com-
nach
pedal y
is
der
est
se
* When the AUTO key is used, the set number
* 8ei beti:itigter AUTO-Taste wird die eingestellte Stichzahl automatisch genaht. sobald das Pedal einmal gedruckt wird.
* Lorsque
* Cuando
pedal.
Ia
touche AUTO est uti Iisee, il suffit d'appuyer une fois sur
se
usa
Ia
tecla AUTO, se cosera automaticamente
of
stitches
will
be sewn automatically by simply pressing the treadle once.
Ia
-63-
pedale
el
numero de puntadas programado pisando una vez el
pour
coudre le
nombre
de points regie.
DB2-DD7100
Page 83

7.
USING
7.
VERWENDUNG
7.
UTILISATION
7.
USO
THE
DEL
B-100
OPERATION
DER
DU
TABLERO
PANNEAU
PANEL
BEDIENUNGSTAFEL
DE
DE
CONTROLES
COMMANDE
B-100
B-100
B-100
• Normal sewing (pattern
• Normales Nahen (Programm 1 I
• Couture normale (motifs 1)
• Costura normal (diseiios 1)
• Select pattern
normal sewing.
•
Das
1
• Selectionner le
• Diseno de costura
Programm 1
normales Nahen
einstellen.
1,
couture normale.
costura normal.
PATTERN
1 !
2
·~·~
• I
lE
E E
._F_,
4•
~E
[J]
~
1'.
v
i
I
I
I
I
I !
I
I
I
~
1,
fUr
motif
1)
2
1,
* Start/end backtack
Pattern selection is made using the
tion panel.
*
Das
Zurucknahen am Anfang und Ende kann
kombiniert werden.
Das
Programm kann
werden.
*
les
points d'arret
coutur normale.
La
selection des motifs est effectuee a I' aide des touches
de [PATTERN] sur le panneau de commande.
*
Se
puede programar conjuntamente
costura normal.
Se
realiza
Ia
tablero de controles.
can
be
set together with normal sewing.
mit
den entsprechenden Programmtasten
en
debut/fin de couture peuvent regles en meme
selecci6n de diselio con las teclas
1:::.
and
el
rematado por atras inicial/final
• Sew.
•
Mit
dem Nahen
beginnen.
• Coudre.
• Coaser.
•
Press
the treadle. After normal sewing is completed, press
the treadle back
•
Das
Pedal
drucken. Nach AbschluB des normalen Nahens
das Pedal zum Abschneiden des Fadens nach
drucken.
• Appuyer sur
terminee, appuyer sur
• Pisar el pedal. Despues de terminar
~
pisar
el pedal hacia atras para cortar
Ia
'V
keys under [PATTERN] on the opera-
mit
dem normalen Nahen zusammen
1:::.
und
'V
eingestellt
temps
L::.
et
'V
situees au-dessous
junto
1:::. y 'V
for
thread trimming.
pedale.
debajo del [PATTERN] en
lorsque
Ia
pedale pour couper les fils.
Ia
couture normale est
Ia
costura normal,
el
hilo.
que
Ia
con
Ia
el
hinten
• A [ 1]
• A [
• A [
•
will
be
displayed in
the pattern display.
1]
wird
auf der Anzeige
angezeigt.
11
est
l'affichage de motif.
Aparecera
exhibici6n
affiche
un
[1]
de
diselio.
en
sur
Ia
-64-
062-007100
Page 84

7. USING THE B-100 OPERATION PANEL
7. VERWENDUNG DER
7.
UTIUSATION
7.
USO DEL TABLERO
DU
BEDIENUNGSTAFEL B-100
PANNEAU
DE
DE
COMMANDE B-100
CONTROLES B-100
• Fixed
•
• Couture avec nombre de points determine a l'avance (motifs
• Costura con numero de puntadas
Nihen
stitch
sewing (pattern
mit
festeingestellter Stichzahl (Programm
I
I
I
E
I !
I
I
I
2)
fijo
*Fixed
ing, thread trimming, and automatic sewing.
Seam E in fixed stitch can
Pattern
tion
Setting the number
on the operation panel.
* Eine festeingestellte Stitchzahl, das Zurucknahen
des
zusammen kombiniert warden.
Die
Das
werden.
Die
*
Les
d'arret en
coupe de fils et
Dans
points.
La
de [PATTERN] sur
Le
dessous de
2)
(disefios
panel.
StoffdruckerfuBes, das Fadenabschneiden und das automatische Nahen kann
festeingestellte Stichzahl E kann
Programm kann
Stichzahl kann
coutures de longueur fixe peuvent
selection des motifs est effectuee a I' aide des touches
reglage du nombre de points est effectue a l'aide des touches
2)
stitch can
selection is made using the
le mode de couture de longueur fixe,
be
set together
of
stitches is done using the
mit
den entsprechenden Programmtasten
mit
den Stichtasten
debut et en fin de couture, relevement automatique du pied presseur,
Ia
couture automatique.
le panneau
[NO.
OF
STITCH) sur le panneau de commande.
2)
be
set
with
start and end backtack, automatic presser lift-
for
1 -
99
stitches.
1::::.
and
\1
keys under [PATTERN] on the opera-
1::::.
and
\1
keys under !NO.
am
Angang und Ende, das Anheben
fur
1 bis
99
Stiche eingestellt werden.
1::::.
und
1::::.
und
\1
eingestellt werden.
~tre
de
commande.
reglees
Ia
en
marne temps que les points
couture E peut etre reglee de 1 a
L:::.
et
\1
situees au-dessous
1::::.
et
OF
STITCH]
\1
eingestellt
\1
situees au-
Ia
99
*
Se
puede programar una costura con longitud fijada conjuntamente con el rematado
atras inicial/final, levantador de prensatelas auto matico, el cortahflos y
por
automatica.
Se
puede programar
Se
realiza
Ia
selecci6n de diseno con las teclas
tablero
Se
STITCH]
de controles.
puede programar
en
el
tablero
Ia
costura de longitud fijada E entre 1 -
el
numero
de
de
controles.
puntadas con las teclas
1::::.
y
\1
99
1::::.
y
puntadas.
\1
debajo de [NO.
debajo del [PATTERN) en el
Ia
costura
OF
-65-
082-007100
Page 85

7. USING THE B-100 OPERATION PANEL
7. VERWENDUNG DER
7. UTILISATION DU PANNEAU
7. USO DEL TABLERO
BEDIENUNGSTAFEL B-100
DE
COMMANDE
DE
CONTROLES B-100
B-100
o Select pattern
fixed stitch sewing.
Das
o
1
•
• Seleccionar
Programm 2 fUr
festeingestellte
Stitchzahl einstellen.
Selectionner le
2,
couture de
longueur fixe.
diseiio
longitud fijada.
PATTERN
1 i
f2)
2
Je
E E
'-F_.
·--~
~
4·
I(! v
~Ei
2,
motif
el
2,
costura de
STEP
U1
~
Set the number
stitches for the
fixed stitch sewing.
•
Die
Stichzahl
das
Nahan
festeingestellter
Stichzahl
einstellen.
• Regier
de
points pour
couture de
longueur fixe.
• Programar
numero de
puntadas para
costura con
longitud fijada.
NO.
le
OF
STITCH
mit
nombre
el
~
~
fUr
Ia
Ia
of
•.
Sew.
Mit
3
dem Nahen
beginnen.
• Coudre.
• Coser.
~
• [2) will appear in the pattern display.
lEI will appear in the step
display.
• In der Anzeige erscheint
[2).
In
der
erscheint
• [21
l'affichage de motif.
!E)
l'affichage d'etape.
• Aparecera un [2] en
exhibici6n
Aparecera
exhibici6n de pasos.
*
If
setting the number
Schrittanzeige
[E).
apperait
apparait
de
un
you would like to set automatic presser lifting, thread trimming
diseiio
lEI
en
of
sur
sur
• The
•
• Le
•
Ia
Ia
stitches
* Zum Einstellen des automatischen Anhebens
Nahens drucken
Taste.
* Si l'on desire regler
les touches correspondantes
* Si
se
desea ajustar ellevantador de prensatelas automatico,
respectivas
Sie
nach
dem Einstellen der Stichzahl fi.ir
le
relevement automatique du pied presseur,
despues de ajustar
number
will appear in the number
of
stitches display.
In
der Stichzahlanzeige
wird
die
angezeigt.
nombre
apparait sur l'affichage de
nombre de points.
El
numero de puntadas
aparecera
exhibici6n de numero de
puntadas.
for
the fixed stitch sewing.
apres avoir regie le nombre de points pour
el
numero de puntadas para
of
stitches
Anzahl Sticha
de
points
en
Ia
des
StoffdruckerfuBes,
•
Press
the treadle. The set
of
number
sewn and
will stop.
•
Das
eingestelte Stichzahl
nahan.
Maschine.
• Appuyer sur
nombre de points regie
est cousu et
s'arr~te.
• Pisar
el numero de puntadas
programado y
Ia
maquina.
das
Nahan einer festeingestellten Stichzahl die entsprechende
Ia
el
cortahilos o
Ia
costura de puntadas fijas.
stitches will
the
Pedal
drlicken um die
Danach
el
or
automatic sewing, press the respective keys after
des
coupe du fil ou
stoppt die
Ia
pedal
Ia
pedal.
Se
Fadenabschneidens oder des automatischen
Ia
couture de points de longueur fixe.
be
machine
zu
e.
Le
machine
cosera
se
parara
Ia
couture automatique, appuyer sur
Ia
costura automatica,
oprimir
las teclas
-66-
062·007100
Page 86

7. USING THE B-100 OPERATION PANEL
7. VERWENDUNG DER BEDIENUNGSTAFEL
7. UTILISATION
7. USO DEL TABLERO
DU
PANNEAU
DE
COMMANDE
DE
CONTROLES B-100
B-100
B-100
• Attaching name labels (pattern
• Anniihen
• Select pattern
•
1
• Selectionner le
• Seleccionar el
von
Etiketten (Programm 3)
r--
-
F
I
I
I
: E
I I
I F I
t
_____________
name labels.
Das Programm 3
zum Annahen von
Etikketten
3, etiquettes
d'identite.
diseno 3, etiquetas.
---~
I
I
El
I
J
3,
einstellen.
motif
2
3)
*The
name label sewing pattern can be set
foot
presser
Seam E in fixed stitch sewing can
Pattern
tion panel.
Setting the step is done using the
panel.
Setting the number
on the operation panel.
lifting, thread trimming, and automatic sewing.
selection is made using the
of
stitches is done using the
be
1:::.
1:::.
* Das Programm zum Annahen von Etiketten kann
und
Ende,
Fadenabschneiden und dem automatischen Nahen kombiniert werden.
festeingestellte Stichzahl E kann fUr 1 bis 99 Stitch eingestellt werden.
Die
Das
Programm kann
werden.
Die Schritte konnen
dem Bedienungsfeld befinden, eingestellt werden.
Die
Stichzahl kann
• Set the number
stitches
• Die Stichzahl
einstellen.
o Regier le nombre
de points
couture
• Programar el
numero de
puntadas para
costura
for
E.
E.
dem
seam
pour
automatischen
mit
den entsprechenden Programmtasten
mit
den Tasten
mit
den Stichtasten
of
E.
fur
E
3
Ia
Ia
b.
•.
Press
selection
Die Schrittaste
drucken.
• Appuyer sur
touche de selection
d'etape.
• Oprimir
selecci6n
with
set
for
1-99
and
'V
and
'V
Anheben
und
'V,
b.
und
the step
key.
Ia
Ia
tecla
de
pasos.
start/end backtacking, automatic
stitches.
keys under IPATIERNI on the opera-
keys under [STEP) on
1:::.
and
'V
keys under I
mit
dem Zurucknahen am Anfang
des
Stoffdruckerfusses,
b.
die sich unter der Anzeige
'V
eingestellt werden.
• Set the number
4
de
stitches
• Die Stichzahl
einstellen.
• Regier le
points
couture
• Programar el
numero de puntadas
para
the
NO.
und
pour
Ia
operation
OF
STITCH)
'V
eingestellt
[STEP)
for
seam
fur
nombre de
Ia
F.
costura
dem
auf
of
F.
F
F.
PATTERN
1 i
~
2
Je
E E
'-F~
·--~
~
4·
ol!
~E
i
•
131
will
tern display, and lEI
appear
play.
• In
erscheint
Schrittanzeige erscheint
IE].
• [3) apparait sur l'affichage
de
l'affichage d'etape.
•
Aparecera
exhibici6n
un
pasos.
appear in the pat-
in
der Programmanzeige
motif
lEI en
STEP
[£)
v
[3)
Ia
~
the
step
und
in
et
IEJ
un
[3) en Ia
de disenos y
exhibici6n de
will
dis-
der
sur
NO.
OF
STITCH
1121
~
• The
•
•
• Aparecera el
number
for E will
number
play.
Die Stichzahl
der
Stichzahlanzeige
angezeigt.
Le
nombre
E apparait sur
de nombre de points.
puntadas
exhibici6n de numero de
puntadas.
of
stitches
appear
of
stitches dis-
fur
E wird in
de
points pour
l'affichage
numero
para E en Ia
in
the
de
STEP
[E]
~
• IFI
will
display.
• In
erscheint IF].
•
[F)
d'etape.
•
Aparecera
exhibici6n de pasos.
appear in the step
der
Schrittanzeige
apparait sur l'affichage
un
IFJ
en Ia
NO.OF
STJTal
1181
~
• The
•
•
• Aparecera el
number
for F will
number
play.
Die Stichzahl
der
Stichzahlanzeige
angezeigt.
Le
nombre de points pour
F apparait sur
de nombre de points.
puntadas
exhibici6n de numero de
puntadas.
of
stitches
appear
of
stitches dis-
fur F wird
l'affichage
numero
para
F en Ia
in
the
in
de
-67-
082-007100
Page 87

7.
USING
7.
VERWENDUNG
7.
UTILISATION
7.
USO
THE
DEL
B-100
OPERATION
DER
DU
PANNEAU
TABLERO
PANEL
BEDIENUNGSTAFEL
DE
COMMANDE
DE
CONTROLES
B-100
B-100
B-100
• Fixation d'etiquettes
• Colocacion de etiquetas (diseiios
*
II
est possible de n3gler le
relevage automatique du presseur,
Dans le mode de couture de longueur fixe,
La
selection des motifs est effectuee a !'aide des touches
commande.
Le
reglage du pas est effectue
Le
reglage du nombre
panneau de commande.
*
Se
puede programar
automatico, cortahilos y costura automatica.
Se
puede programar
Se
realiza
Ia
selecci6n de diseno con las teclas
El
ajuste del paso
Se
puede programar el numero de puntadas con las teclas
••
Sew.
Mit
5.
dem Nahen geginnen.
Coudre.
• Coser.
d'identite
de
el
diseno para
Ia
costura de longitud fijade E entre 1 - 99 puntadas.
se
realiza usando las teclas D. y
(motifs 3)
3)
motif
de couture d'etiquette d'identite avec les points
Ia
coupe des fils et
Ia
en
utilisant les touches
points est effectue a !'aide des touches D.
Ia
costura de etiquetas con
Ia
couture automatique.
couture E peut etre reg lee
D.
y
D.
et
'V
situees au-dessous de [PATTERN) sur le panneau de
D.
et
'V
sous [STEP] sur le panneau
et
'V
el
rematado por atras inicial/final, elevaci6n
'V
debajo del [PATTERN] en
'V
debajo de [STEP]
.t:::.
y
'V
debajo
d'arret
de
1 a
99
points.
situees au-dessous de [NO.
el
tablero de controles.
en
el tablero de controles.
de
[NO.
OF
en debut/fin de couture, le
de
commande.
STITCH)
en
OF
STITCH)
de
el
tablero de controles.
sur le
prensatelas
•
Press
the treadle. Seams E and F will
If
the thread
will
STEP
NO.OFS11TCH
[B[J2]
~
• Drucken Sie das Pedal, urn nacheinander E und F
Faden nach dem zweiten
Das
*1)
*2)
*3) Nach der Einstellung der Stichzahl kann das Fadenabschneiden und das automatische Nahen eingestellt werden.
*4)
• Appuyer sur
*11
*2)
*3) Regier
*4)
Nahen beginnt
Zum
Umschalten
werden.
Falls die eingestellte Stichzahl
til, le til sera
La
couture commence a partir de l'etape indiquee
Utiliser le selecteur d'etape
l'affichage.
Ia
Si le nombre de points depasse
~
Nahen von F abgeschnitten.
mit
dem in der Anzeige angezeigten Schritt.
von
E nach F die Schrittaste
99
Ia
pedale.
coupe une fois que
couture automatique et
Les
coutures E et F seront effectuees alternativement. Si l'on a appuye sur
Ia
.t:::.
pour modifier
zu
nahen. Falls die Fadenabschneidetaste gedruckt wurde,
D.
verwenden.
uberschreitet,
seconde couture F aura ete accomplie.
Ia
coupe des fils apres avoir selectionne le nombre de points.
99,
l'affichage retourne a
wird
die Anzeige auf 0 zuruckgestellt.
sur
Ia
selection des coutures E et
l'affichage d'etape.
be
*1) Sewing starts
*2) Use the
selection;
*3) Set automatic sewing and thread
ting the number
If the set number
*4)
be
reset
Mit
0.
trimming
carried out after the second F seam has been sewn.
.t:::.
step selector
'V
cannot
to
0.
der Taste
F;
key
was pressed, thread
from
the step shown in the step display.
to
be
used to change the display.
of
stitches.
of
stitches exceeds
'V
kann die Anzeige nicht umgeschaltet
'V
ne
peut pas etre uti Iisee pour changer
be
sewn alternately.
change the E and F seam
trimming
99,
Ia
touche de coupe du
trimming
after set-
the display
wird
will
der
• Pisar el pedal.
realizara despues
*1)
La
costura comienza
*2) Usar el selector de pasos
exhibici6n.
*3) Programar
Si
el
*4)
numero de puntadas programado
Se
coseran las costuras E y F alternadamente. Si se oprime
de
coser
Ia
en
Ia
costura automatica y el cortahllos despues de programar el numero
segunda costura
el paso que aparece
.t:::.
para cambiar
F.
en
Ia
exhibici6n de pasos.
Ia
selecci6n de costuras E y
es
de mas de 99,
Ia
-68-
exhibici6n volvera al 0.
Ia
tecta de cortahilos,
F;
no
se
puede usar
de
puntadas.
el
corte del hilo
el
'V
para cambiar
se
Ia
082-007100
Page 88

7. USING THE
7. VERWENDUNG DER
7. UTILISATION
7. USO DEL TABLERO
8~100
OPERATION PANEL
DU
PANNEAU
BEDIENUNGSTAFEL B-100
DE
COMMANDE B-100
DE
CONTROLES B-100
• Pleat presser sewing (pattern
• Faltennahen (Programm
• Select pattern
pleat presser
1
sewing.
• Das Programm 4 fUr
das Faltennahen
einstellen.
41
4,
41
* Pleat presser sewing can also
Seam E in pleat presser sewing
is
Pattern selection
tion panel.
Setting the number
on the operation panel.
made using the
of
stitches is done using the
be
can
* Das Faltennahen kann ebenfalls
kombiniert warden.
Die Stichzahl E zum Faltennahen kann von 1 Das
Programm kann
werden.
Die Stichzahl kann
• Set the number
2
stitches.
• Die Stichzahl
einstellen.
mit
den entsprechenden Programmtasten
mit
den Stichtasten
of
Sew.
Mit
beginnen.
set with start and end backtacks.
be
1:::,.
mit
and
1:::,.
set for 1 -
dem
und
99
stitches.
"\1
keys under [PATTERN] on the opera-
1:::,.
and
"\1
keys under [NO.
Zurucknahen am
99
Stichen eingestellt warden.
"\1
eingestellt werden.
Anfang
1:::,.
• Press
dem Nahen
0
4
presser sewing.
• Fur das Faltennahen
muBdie
Betatigungstaste 0
gedruckt werden.
OF
und
und
"\1
eingestellt
the
actuator
to
begin pleat
STITCH]
Ende
• [4]
will
tern display, and
appear
play.
• In der Programmanzeige
erscheint
Schrittanzeige erscheint
[E).
*1)
*2)
*3) Correction sewing
appear in the pat-
in
the
[4)
Press
the treadle back
ming.
If
the set number
be reset
to
0.
[E)
will
step
dis-
und
in
der
of
stitches exceeds
with
for
NO.Of
STITCH
IOYI
~
• The
•
end backtack and thread trim-
the actuator is not possible.
number
for E will
number
play.
Die
der
angezeigt.
appear in the
of
Stichzahl
Stichzahlanzeige
99,
the display
of
stitches
stitches dis-
fur
E wird in
•
Normal
when
pressed.
• Wenn das Pedal gedruckt
wird,
normale Nahen.
Fur
*1)
will
chneiden das Pedal nach hinten drucken.
*2) Falls die eingestellte Stichzahl99 uberschreitet,
Anzeige
Das
*3)
moglich.
sewing
the
beginnt
das Zurucknahen am Ende
auf
Korrekturnahen
begins
treadle
0 zuruckgestellt.
is
das
mit
der Betatigungstaste
•
After
seam
resumed.
•
Nach
sstichen
normale Vorwartsnahen
fortgesetzt.
reverse
E,
den
und
stitching
normal sewing is
Ruckwart-
E
wird
das Fadenabs-
wird
ist
nicht
das
die
-69-
082-007100
Page 89

7. USING THE B-100 OPERATION PANEL
7. VERWENDUNG DER
7. UTILISATION DU PANNEAU DE
7. USO DEL TABLERO
BEDIENUNGSTAFEL B-100
COMMANDE
DE
CONTROLES B-100
B-100
• Couture de fronces (motifs
• Costura de plisados (diseiios
*
II
est aussi possible de regler
Dans
Ia
couture de fronces, E peut litre regie de 1 a
La
selection des motifs est effectuee a I' aide des touches
commande.
Le
reglage du nombre
panneau de commande.
*
Se
puede programar para coser plisados con el rematado por atras inicial y final.
Se
puede programar
Se
realiza
Se
puede programar el numero de puntadas con las teclas
• Selectionner le
1
• Seleccionar el
Ia
4,
couture de
fronces.
diseiio
plisados.
4,
selecci6n de diseiio con las teclas
motif
costura de
4)
4)
Ia
couture de fronce avec les points d'arrflt
de
points est effectue a l'aide des touches
Ia
costura E para plisados entre 1 -
99
L:::. y 'V
debajo del [PATTERN]
• Regier le nombre
de points.
2
• Programar
numero de
puntadas.
el
points.
L:::.
et
99
puntadas.
L:::. y 'V
'V
situees au-dessous
L:::.
debajo
Coudre.
Coser.
en
debut et
et
'V
situees au-dessous de [NO.
en
de
[NO.
en
fin de couture.
de
[PATTERN] sur le panneau de
el
tablero de controles.
OF
STITCH]
OF
STITCH] sur le
en el tablero de controles.
Appuyer sur
dispositif de
commande
commencer
couture de fronces.
•
Oprimirel
accionador 0 para
comenzar
de plisados.
le
0 pour
Ia
Ia
costura
• [4] apparait sur l'affichage
de
motif
l'affichage d'etape.
•
Aparecera
exhibici6n de diseiios v
un lEI
pasos.
*1) Ramener
d'arrflt
*2)
Si le nombre de points depasse
et
[E)
un
[4]
en
Ia
exhibici6n de
Ia
pedale
en
fin de couture et
sur
en Ia
en
ao.
*3)
II
est impossible de corriger
de commande.
NO.OFSTITCH
lOY
I
~
•
Le
nombre de points pour
E apparait sur l'affichage
de nombre de points.
• Aparecera el numero de
puntadas
exhibici6n de numero de
puntadas.
arriere pour effectuer les points
Ia
coupe des fils.
99,
Ia
couture avec le dispositif
para E en Ia
l'affichage retourne
•
La
couture normale commence
appuie sur
• La
comienza
pedal.
*1) Pisar el pedal hacia atras para el rematado
final y el corte de hilo.
Si el numero de puntadas programado es de mas de
*2)
99,
*3) No se puede hacer une costura de correcci6n con el
accionador.
lorsque
Ia
costura
Ia
al
exhibici6n volvera al 0.
l'on
pedale.
normal
pisar
•
Lorsque
points
terminee,
normale reprend.
el
• Despues de coser hacia
atras
a coserse
mal.
Ia
couture
arriere E est
Ia
Ia
costura
en
el mode nor-
couture
E,
vuelve
por
atras
en
-70-
082-007100
Page 90

7.
USING
7.
VERWENDUNG
7.
UTILISATION
7.
USO
THE
DEL
B-100
OPERATION
DER
DU
PANNEAU
TABLERO
PANEL
BEDIENUNGSTAFEL
DE
COMMANDE
DE
CONTROLES
B-100
B-100
B-100
7-3. Programming with sewing (patterns
5-9)
7-3. Programmierung wahrend dem Nahen (Programm
• Select pattern
• Das Programm 5
1
einstellen.
PATTERN
1 !
[5]
2
}E
5.
STEP
D
* Patterns 5 - 9 can
*Programs
*
Start and end backtack, backward stitch, automatic presser foot lifting, thread
ming, and automatic sewing
*When
to
completely clear the memory contents before proceeding.
*Pattern
tion panel.
*Setting
panel.
* Setting the number
on the operation panel.
can
entering a new program, display [1] in the step display and press the clear key
selection is made using the .6. and
the step is done using the .6. and
• Sew
•
Mit
2
dem Nahen
beginnen.
be
used
to
store five different sewing programs.
be
entered
as
you sew.
can
each
of
stitches is done using the .6. and
•.
The number
stitches is displayed.
Die Anzahl
3
wird
angezeigt.
NO.
OF
STITCH
[S5]
be
entered
5-9)
as
individual steps in the program.
'7
keys under [PATTERN) on the opera-
'7
keys under ISTEPI on the operation
'7
keys under [NO.OF
•
Press
of
Sticha
• Die Schrittaste .6.
4
step key .6. •
drucken.
STEP
[2]
trim-
STITCH
I
3,4~
~
E E
'-f
...
4.
I!
v
~El
•
111
appears
display.
•
In
der
erscheint
Schrittanzeige
111.
~
in
the
step
~
• The number
STITCH
• Die Anzahl genahter Stiche
dar Stichzahlanzeige angezeigt.
of
stitches sewn
display starting from
will
appears in the
·oo·.
wird
beginnend von
~
NO.
OF
·oo·
auf
•
121
appears in
display.
•
In
der
erscheint [2).
~
the
step
Schrittanzeige
-
71-
DB2-DD7100
Page 91

*Die
Programme 5 bis 9 konnen zum Abspeichern von fUnf verschiedenen Nahprogrammen verwendet werden.
Das
Programm kann wah rend dem Nahen programmiert werden.
*
Das
Zuriicknahen am Anfang und Ende, das Riickwartsnahen, das automatische Anheben des Stoffdriickerfusses, das
*
Fadenabschneiden und das automatische
Zum Eingeben eines neuen Programms die Schrittanzeige
*
zu
Programmspeicher
*
Das
Programm kann
*Die
Schritte konnen
eingestellt warden.
* Die Stichzahl kann
• Sew.
• Weiternahen.
5
loschen.
mit
den entsprechenden Programmtasten
mit
den Tasten
mit
den Stichtasten
• The number
6
• Die Anzahl Sticha
Nahan konnen als einzelne Programmschritte eingegeben werden.
L::.
und
'V,
die sich unter der Anzeige [STEP] auf dem Bedienungsfeld befinden,
.t::.
und
'V
eingestellt warden.
stitches is dis-
played.
wird angezeigt.
of
7.
USING
7.
VERWENDUNG
7.
UTIUSATION
7.
USO
THE
DEL
auf
[1]
stellen und die Loschtaste driicken, urn den
L::.
und
'V
Press
Die Schrittaste
driicken.
B-100
OPERATION
DER
BEDIENUNGSTAFEL
DU
TABLERO
eingestellt warden.
step key
PANNEAU
DE
CONTROLES
L::.
•
L::.
PANEL
DE
COMMANDE
• Return
• Zum 1. Schritt
8
zuriickkehren.
B-100
to
step 1.
B-100
B-100
NO.
OF
STITCH
[TI]
I
[311001
~
~
• The number
stitches display.
• In
der
Sticha angezeigt.
• The program is completed
*1) Make sure the number
*2)
If
more than
will
*3)
*
*5)
*6)
be
Thread
4)
On
-900,
knee lifter switch. Proceed with the next step after lifting the presser foot.
If
step
To terminate a procedure, make sure the number
of
stitches sewn appears in the number
Stichzahlanzeige
99
stitches is sewn
programmed.
trimming
-910
20
is exceeded when
will
models, a presser foot lifting operation
wird
die Anzahl
with
of
be
the above steps.
stitches is [00] before starting
for
automatically programmed when the treadle is pressed back.
L::.
is pressed, the programmer
der
genahten
a single step, the next step
of
• Make sure the number
of
stitches
stitches
is
[00].
•
Kontrollieren,
Stichzahlanzeige
nachsten
betragt.
to
sew.
will
will
be programmed when the presser foot is raised with the
will
for
STEP
NO.OFSTJTal
STEP
NO.OFSTJTal
D~
~
be
return to step
the next step is
~
of
for
the next step
ob
fiir
Schritt
automatically selected and the continuous key
[001
1.
[001.
• Press
•
die
den
and return to step
~
.t::.
the step display to [
Die
driicken,
Schrittanzeige auf [1]
schalten.
once
Taste
~
to
return
1].
L::.
einmal
um
die
zu
1.
• Nach Ausfiihrung der obigen Schritte ist die Programmeingabe abgeschlossen.
*1) Vor dem Beginn des Nahens kontrollieren, ob die Stichzahlanzeige
*2)
Falls bei einem Schritt
und die Fortsetzungsfunktion programmiert.
*3)
Durch das Zuriickdriicken des Pedals
*4) Bei den Modellen
Stoffdriickerfu~
Schritt weiterfahren.
*5) Falls die Schrittzahl von
*6)
Beim
Abschlu~
Schritt 1 zuriickkehren.
mehr
als
99
Sticha genaht warden,
wird
-900,
mit
der Programmeingabe kontrollieren, ob die Stichzahl
-910
dem Knieschalter angehoben wird. Nach dem Anheben des Stoffdriickerfusses
20
wird
durch Betatigen der Taste
automatisch das Fadenabschneiden programmiert.
das Anheben des Stoffdriickerfusses automatisch
wird
.t::.
iiberschritten wird wieder zum Schritt 1 zuriickgekehrt.
-72.
[001
automatisch auf den nachsten Schritt umgeschaltet
betragt.
fiir
programmiert,
dem nachsten Schritt
mit
dem nachsten
[001
betragt und zum
082-007100
wenn
der
Page 92

7.
USING
7.
VERWENDUNG
7.
UTILISATION
7.
USO
THE
DEL
B-100
OPERATION
DER
DU
PANNEAU
TABLERO
PANEL
BEDIENUNGSTAFEL
DE
COMMANDE
DE
CONTROLES
B-100
B-100
B-100
7-3. Programmation avec couture (motifs
7-3. Programacion de costura (disefios
*
Les
motifs 5 a 9 peuvent servir a memoriser cinq differents programmes de couture.
*II
est possible d'entrer les programmes
5-9)
* Chaque operation (points d'arret
automatique du presseur et couture automatique) peut
individuelle du programme.
* Lors de !'entree d'un nouveau programme, commencer par afficher
d'etape et appuyer sur
• Selectionner le
5.
• Seleccionar el
1
diselio
PATTERN
1 !
2
lE
[5]
5.
motif
STEP
D
contenu de
*
.t:::.
et v situees au-dessous de !PATTERN] sur le panneau de commande.
*
Le
reglage du pas est effectue
panneau de commande.
*
Le
reglage du nombre de points est effectue a l'aide des touches
dessous de (NO.
• Coudre.
• Coser.
2
Ia
memoire.
OF
STITCH] sur le panneau de commande.
5-9)
en
en
debut et
Ia
touche d'annulation de
en
utilisant les touches
Le
nombre de points
est affiche.
3:
Aparecera
de puntadas.
l«l.OFSTJTat
cours de couture.
en
el numero
~
fin de couture, points arriere, relevage
etre entree
fa~on
a completement effacer le
.t:::.
et V sous (STEP)
en
111
L::.
et v situees au-
• Appuyer sur
touche d'etape
4
• Oprimir
pasos
STEP
.t:::..
tant qu'etape
sur l'affichage
sur
le
Ia
.t:::.
Ia
tecla de
•
[2]
'i..FJ'
·--~
~
4
E', v
:
;,
.
•
111
apparait sur l'affichage
d'etape.
•
Aparecera
exhibici6n de pasos.
~
un I
11
en Ia
~
•
Le
nombre de points cousus apparaitra
!NO.
of
STITCH] a partir
El
numero de puntadas cosidas aparecera
•
NO.
OF
STITCH
comenzando por
de
"00".
·oo·.
~
sur
l'affichage
en
Ia
exhibici6n
~
•
121
apparait sur l'affichage
d'etape.
•
Aparecera
exhibici6n de pasos.
un
121
en Ia
-73-
082-007100
Page 93

*
Se
pueden usar los disenos
*
Se
puede memorizar automaticamente
*
Se
pueden memorizar individual mente
automatico,
* Cuando
borrado para limpiar
*
Se
realiza
*
El
ajuste del paso
*
Se
puede programar
cortahflos y
se
memoriza un nuevo programa, hacer que aparezca un
Ia
selecci6n de diseno con
Ia
Ia
memoria antes de comenzar.
se
realiza usando las teclas A y
el
numero de puntadas con
7.
USING
7.
VERWENDUNG
7.
UTIUSATION
7.
USO
5-9
para memorizar cinco diferentes programas de costura.
Ia
costura que
el
costura automatica en
rematado por atras inicial y final, costura hacia atras, elevaci6n de prensatelas
las
teclas A y
se
esta realizando
el
programa.
'V
debajo del [PATTERN]
'V
debajo
las
teclas A y'V debajo de [NO.
de
DEL
111
[STEP]
THE
B-100
TABLERO
en
en
Ia
en
el
OPERATION
DER
BEDIENUNGSTAFEL
DU
PANNEAU
DE
CONTROLES
el programa.
exhibici6n de pasos y
en
el
tablero de controles.
tablero de controles.
OF
STITCH]
PANEL
DE
COMMANDE
en
el tablero de controles.
B-100
oprimir
B-100
B-100
Ia
tecla de
• Coudre.
• Coser.
5
~
•
Le
nombre de points cousus apparait sur l'affichage de
nombre de points.
• Aparecera el numero de puntadas
numero de puntadas.
•
Le
programme est alors acheve.
*1) Avant de commencer a coudre, verifier si le nombre de points est de [00].
*2)
Si plus de
de couture continue est programmee.
*3) Losque
*4)
Sur
l'interrupteur de releve-presseur au genou. Passer
*5)
Si on depasse l'etape
*6) Pour terminer une procedure, verifier si
99
points sent cousus dans une seule etape, l'etape suivante est selectionnee automatiquement et
Ia
pedale est ramenee
Jes
modeles
-900,-910,
20
•
6
• Aparecera el
en
le relevage
lorsque
Le
nombre de
points est affiche.
numero de
puntadas.
NO.OFSmCH
[]]]
I
~
en
Ia
exhibici6n de
arriere,
Ia
Ia
coupe des fils est automatiquement programmee.
du
pied presseur est programme lorsque
a l'etape suivante apres le relevage du presseur.
touche A est enfoncee,
le
nombre de points est de [00] et retourner a l'etape
Appuyer sur
touche d'etape A .
7:
Oprimir
pasos
STEP
D)IOOI
~
• Verifier si le
points
suivante est de [00].
• Verificar
de
siguiente paso muestra
[00].
le
programmateur repasse a l'etape
pour
que el numero
puntadas
Ia
Ia
tecla de
A.
NO.OFSTITQI
~
nombre
l'etape
para
de
el
• Retourner a etape
• Volver al paso
8
STEP
NO.OFSTITQI
DlS5J
~
•
Appuyer
pour ramener J'affichage
a
111.
• Oprimir A para volver
exhibici6n de pasos a (1].
ce
dernier est releve a l'aide de
1.
1.
~
une
fois
Ia
touche
1.
sur
1.
A
Ia
•
Se
completa
*1) Verificar que el numero de puntadas
Si se cosen mas de 99 puntadas en un solo paso,
*2)
Ia
tecla de costura continua.
Se
*3)
*4)
*5)
*6) Para terminar un precedimiento, verificar primero que el numero de puntadas para
programara automaticamente el cortahflos
En
los modelos
rodilla. Realizar el siguiente paso despues de levantar el prensatelas.
de
Si
se
volver
Ia
programaci6n con los pasos anteriores.
-9([],
realizan mas de
al paso
1.
-910,
20
pasos
es
[00] antes de comenzar a coser.
se
seleccionara automaticamente
al
se
programara una elevaci6n de prensatelas allevantar el prensatelas con el interrupter
al
presionar el
pisar el pedal hacia atras.
A,
el programa volvera
-74-
al
paso
el
siguiente paso y se programara
1.
el
siguiente paso muestre [00] y
082-007100
Page 94

7.
USING
7. VERWENDUNG DER BEDIENUNGSTAFEL B-100
7. UTILISATION
7.
USO
THE B-100 OPERATION PANEL
DU
PANNEAU
DEL TABLERO DE CONTROLES B-100
DE
COMMANDE B-100
7-4. Programming
Programmierung ohne zu Nahen
7-4.
without
sewing
7-4. Programmation sans couture
7-4.
Programacion sin costura
* Programming
* Start and end backtack, backward stitch, automatic presser
ming, and automatic sewing
the program by the number
• Select pattern
• Das Programm 6
1
einstellen.
e Selectionner le
6.
• Seleccionar el
diseflo
6.
6.
motif
*When
*Pattern
*Setting
* Setting the number
* Das Programmieren ohne Nahen ist ebenfalls m6glich.
* Das
*
*
* Die Schritte konnen
* Die
o Set the number
o Die
2
• Regier le
• Programar el numero
entering a new program, display [ 1) in the step display and press the clear key
to
completely clear the memory contents before proceeding.
tion
panel.
on the operation panel.
Anheben des Stoffdruckerfusses, das Fadenabschneiden
Nahen k6nnen
Zum Eingeben eines neuen Programms die Schrittanzeige
loschtaste drucken,
Das
warden.
dem Bedienungsfeld befinden,
selection is made using the
panel. .
the step is done using the
Zurucknahen am Anfang und Ende, das Ruckwartsnahen, das automatische
Programm kann
Stichzahl kann
stitches.
Stichzahl
einstellen.
points.
de puntadas.
without
of
als
einzelne Programmschritte eingegeben werden.
mit
mit
of
nombre de
sewing is also possible.
can
each
be
L:::..
L:::.
L:::..
and
and
und
L:::..
Ia
L:::..
entered
und
tecla de
of
stitches.
stitches is done using the
um
den Programmspeicher
mit
den entsprechenden Programmtasten
den Tasten
den Stichtasten
eingestellt warden.
•
Press step key
0
Die Schrittaste
3
drucken.
• Appuyer sur
touche d'etape
• Oprimir
pasos
as
individual steps when entering
'V
keys under [PATTERN) on the opera-
'V
keys under [STEP) on the operat1on
L:::..
and
zu
loschen.
'V,
die sich unter der Anzeige
'V
eingestellt werden.
L:::..
•
L:::..
Ia
L:::...
foot
lifting, thread
'V
keys under [NO.
und
das automatische
auf
[1) stellen und
L:::..
und
• Set the
stitches.
4
• Die Stichzahl
einstellen.
• Regier le
points.
• Programar el numero
de puntadas.
number
trim-
OF
STITCH)
'V
eingestellt
!STEP)
nombre de
die
auf
of
NO.
OF
PATTERN
1 i
(5]
2
Je
E E
'-F_.
3--~
4 I
,1!
~Ei
• [
11
appears
display.
•
In
der
erscheint [ 1
• [ 1 J apparait sur l'affichage
d'etape.
•
Aparecera
exhibici6n de pasos.
• The program is completed
*1)
*2)
• Nach den obigen Schritten ist die Programmierung abgeschlossen.
*1)
*2) Falls beim Drucken der Taste
Schrittanzeige
Up
to
99
remaining number
If
step
20
Fiir jeden Schritt k6nnen bis
verbleibenden
STEP
D
v
stitches can
~
in
the
step
).
un
[1)
en Ia
be
of
stitches in the next step.
is exceeded when
Sticha
im
• The
set appears in the number
• Die Stichzahl erscheint in
der Stichzahlanzeige.
• l'affichage de nombre de
points indique
de points.
•
El
numero
cosidas aparecera
exhibici6n de numero de
puntadas.
with
the above steps.
set
for
each step.
L:::..
is pressed, the programmer
99
Sticha programmiert warden.
nachsten Schritt programmieren.
L:::..
die Schrittzahl von 20 liberschritten wird,
STITCH
1201
~
number
of
stitches display.
of
le
de puntadas
If
more than
stitches
nombre
en
Ia
• [2) appears in
display.
• In der Anzeige erscheint
[2).
•
[2)
apparait sur l'affichage
d'etape.
• Aparecera un
exhibici6n de pasos.
99
stitches must
will
return
Bei
STEP
[2]
~
the
step
121
en
be
set, press the continuous key, and enter the
to
step 1.
mehr Stichen die Fortsetzungstaste drucken und die
wird
wieder zum 1. Schritt zuruckgekehrt.
• The
• Die Stichzahl erscheint in
• l'affichage de nombre de
Ia
•
NO.OF
STITCH
1301
~
number
set appears in the
ber
of
stitches display.
der Stichzahlanzeige.
points indique le nombre
de points.
El
numero
cosidas aparecera en
exhibici6n de numero de
puntadas.
of
stitches
num-
de puntadas
Ia
-75-
DB2-DD7100
Page 95

*
II
est egalement possible de
* Les
points
automatique
points.
* Lors de
d'annulation de facon a completement effacer le contenu de
*La
selection des
commande.
*
Le
reglage du pas est effectue en utilisant les touches
*
Le
reglage du
panneau de commande.
d'arret
l'entree
en debut et en
peuvent
d'un
nouveau programme, commencer par afficher [1) sur l'affichage d'etape et appuyer
motifs
nombre
programmer
etre entres en
est effectuee a l'aide des touches
de
points est effectue a l'aide des touches
fin
sans coudre.
de couture, les points arriere, le relevage automatique
tant
qu'etape
individuelle
7. USING THE B-100 OPERATION PANEL
7. VERWENDUNG DER
7. UTILISATION
7. USO DEL TABLERO
lors de l'entree
Ia
memoire.
L::.
et
"V
situees au-dessous de [PATTERN)
L::.
et "V sous [STEP) sur le panneau de commande.
L::.
et "V situees au-dessous de [NO.
DU
BEDIENUNGSTAFEL B-100
PANNEAU
DE
du
programme
DE
CONTROLES B-100
COMMANDE B-100
du
presseur et Ia
salon le
nombre
sur
Ia
sur
le panneau de
OF
STITCH) sur le
couture
de
touche
*Tam
*
bien se puede programar sin coser.
Se
pueden memorizar individual mente el rematado
automatico, cortahilos y
Ia
costura automatica en los programas al programar el
por
atras inicial y final, costura hacia atras, elevaci6n de prensatelas
* Cuando se memoriza un nuevo programa, hacer que aparezca un
borrado para
*
Se realiza
*
El
ajuste del paso se realiza usando las teclas
*
Se
puede programar el numero de puntadas con las teclas
• Press step key
• Die Schrittaste
5
drucken.
•
Appuyer
touche d'etape
•
Oprimir
pasos
STEP
[]]IDOl
limpiar
Ia
selecci6n de disei'io con las teclas
L::.
L::.
Ia
•
memoria
antes de comenzar.
•.
6
sur
Ia
L::.
•
Ia
tecla de
L::..
NO.OFSnTCH
~
~
• Retourner a etape
• Volver al paso 1.
L::.
y "V debajo del [PATTERN) en
L::.
y "V debajo de [STEP) en el tablero de controles.
Return
Zum
zuruckkeh ren.
STEP
to
step
Schritt 1
NO.OFS'IIIOI
1.
01201
~
~
L::.
y "V debajo de [NO.
1.
[1)
numero
en
Ia
exhibici6n de pasos y
el
tablero de controles.
OF
STITCH) en el tablero de controles.
de puntadas.
oprimir
Ia tecla
de
• Make sure the
stitches
is
[00).
•
Kontrollieren,
Stichanzeige
nachsten
betragt.
•
Verifier
points
suivante est de [00).
•
Verificar
de
puntadas
siguiente
[00).
•
Le
programme
*1)
II
est possible de regler jusqu'a
sur
Ia
*2) Si on depasse l'etape 20 lorsque
•
Se
completa una programaci6n con los pasos anteriores.
*1)
Se pueden
Ia
tecla de costura continua y memorizar
*2)
Si
hay mas de
number
for
the
next
Schritt
si le
nombre
pour
que el
paso
est alors acheve.
touche de couture continue et entrer le
programar
step
ob
die
fur
den
[00)
l'etape
numero
para
esta en
20
pasos al
of
• Press
• Die Taste
•
de
•
el
hasta 99 puntadas para cada paso. Si fuera necesario programar mas de
oprimir
L::.
the step display
zur
zuruckzukehren.
Appuyer
pour
a
111.
Oprimir
exhibici6n de pasos a [1).
once
L::.
une
L::.
para volver
touche
tecla L::.,
drucken
fois
pour
L::.
Ia
cantidad de puntadas faltante
Schrittanzeige
ramener l'affichage
99
points
Ia
Ia
to
return
to
[ 1).
um
[1)
sur
L::.
Ia
chaque etape. S'il s'avere necessaire de depasser
nombre
est enfoncee,
el
de points restant dans l'etape suivante.
le
programmateur
programa volvera al paso
-76-
repasse a l'etape
en
el siguiente paso.
1.
99
points,
1.
99
puntadas,
appuyer
oprimir
082-007100
Page 96

7.
USING
7.
VERWENDUNG
7.
UTILISATION
7.
USO
THE
DEL
B-100
OPERATION
DER
DU
PANNEAU
TABLERO
PANEL
BEDIENUNGSTAFEL
DE
COMMANDE
DE
CONTROLES
B-100
B-100
B-100
7-5. Changing a
7-5.
Programmanderungen
7-5.
Modification
7-5.
Cambio
• Deleting a step
• Loschen eines
• Suppression
•
Borrado
d'une
de
un paso
-r--------(.'/
1-----1
Step
Schritt 3 Paso 2
Etape
Paso 3
• Select step
• Den Schritt 2
einstellen.
1
• Selectionner l'etape
• Seleccionar
program
de
un
Schritts
etape
,~
1
V Schritt 2
3 Etape 2
3
2.
el
paso
d•un
programme
programa
r
1
Step
1
Schritt 1
:
1
Etape 1
i Paso 1
l>s
tep
2
•.
2
2.
2.
• Appuyer sur
•
Press
CLEAR.
Die Loschtaste
drucken.
CLEAR.
Oprimir
cancelaci6n.
Ia
tecla de
r
I
I
I
I
I
I
r--------+
Step2
Schritt 2
Etape 2
Paso2
•.
Return
Zum Schritt 1
zuruckkehren.
3
• Retourner a l'etape
• Volver al paso
Step
1
Schritt 1
Etape
1
Paso 1
to
step
1.
1.
1.
STEP
NO.OFSTITat
[2J[Q5]
STEP
D
•
~
• The
•
•
• Aparecera el numero de puntadas programado.
* When srep 2 is deleted, the procedure stored in step 3 is moved forward and becomes step
* Durch das Loschen des
* Lorsque l'etape 2 est supprimee, !'operation memorisee a l'etape 3 deviant l'etape
* AI borrar el paso
number
Die eingestellte Stichzahl
Le
reglage
2.
~
of
stitches set is displayed.
du
nombre
2,
wird
de points est affiche.
2.
Schritts
el procedimiento memorizado
angezeigt.
wird
der
3.
Schritt vorgeruckt, so daB
en
el paso 3
se
~
er
als
2.
Schritt abgespeichert ist.
2.
mueve hacia adelante y se convierte en el nuevo paso
2.
-77-
082-007100
Page 97

7.
USING
7.
VERWENDUNG
7.
UTIUSATION
7.
USO
THE
DEL
B-100
OPERATION
DER
DU
PANNEAU
TABLERO
PANEL
BEDIENUNGSTAFEL B-100
DE
COMMANDE B-100
DE
CONTROLES
B-100
• Inserting a
• Elnfugen eines Schritts
• Insertion d'une etape
• lntroducci6n
step
de un paso
r--------±
Step2
Schritt 2
Etape 2
Paso 2
• Select step
• Den Schritt 2
1
einstellen.
• Selectionner l'etape
2.
• Seleccionar el paso
2.
2.
ir-
1 Step 1
: Schritt 1
1 Etape 1
1 Paso 1
2
•
Press
• Die
• Appuyer sur
• Oprimir
INSERT.
INSERT
drucken.
INSERT.
INSERT.
Ia
tecla de
r
1 Step 1
Schritt 1
:
1
Etape 1
: Paso 1
~~
r---------~:"'
1----l
Step 3 Etape 2
Schritt 3 Paso 2
Etape 3
Paso 3
taste
3
>s
tep2
V Schritt 2
•.
Stitch number [00) is
displayed.
Stichzahl
Die
angezeigt.
•
Le
nombre de points
[001
est affiche.
• Aparecera un
numero de puntadas
[00).
wird
• Set the number
stitches.
4
• Die Stichzahl
einstellen.
• Regier le nombre de
points.
• Programar el
numero de
puntadas.
of
STEP
NO.OFSIJTCH
~~
•
~
• The number
• Die eingestellte Stichzahl
•
Le
reglage du nombre de points est affiche.
• Aparecera el numero de puntadas programado.
• Return
• Zum Schritt 1
5
zuruckkehren.
• Retourner a l'etape
• Volver al paso 1.
D
~
of
stitches set is displayed.
to
step 1.
1.
STEP
~
wird
angezeigt.
• Set the number
• Die Stichzahl
• Regier le nombre de points pour
• Programar el numero de puntadas para el nuevo paso 2.
* When a
become step
Be
sure
* Beim Einfugen eines
zuruckgeruckt, so daB der
Nach der Eingabe
* Lorsqu'une nouvelle etape est inseree, l'ancienne etape 2 deviant l'etape
Veiller a retourner a l'etape 1 apres avoir entre toutes
* Cuando
el nuevo paso
Asegurarse de regresar al paso 1 despues de agregar todos los pasos.
fur
new
step is inserted, the procedure
3.
to
return to step 1 after all
se
agrega un nuevo paso, el procedimiento del paso 2 anterior
STEP
NO.OFSIJTCH
~lOOl
~
of
stitches
den einzufugenden
aller Schritte mussen Sie wieder zum Schritt 1 zuruckkehren.
3.
for
Schritt
2.
Schritt zum
the new step
2.
Ia
nouvelle etape
of
the steps have been entered.
warden
~
2.
Schritt einstellen.
aile nachfolgenden
3.
Schritt wird.
2.
of
the original step 2 is
ces
STEP
~00
~
Schritte
etapes.
urn einem Platz
NO.OFSIJTCH
~
moved
se
back
3.
convierte en
to
-78-
DB2-DD7100
Page 98

7.
USING
7. VERWENDUNG DER BEDIENUNGSTAFEL B-100
7. UTILISATION
7.
USO
THE B-100 OPERATION PANEL
DU
PANNEAU
DEL TABLERO DE CONTROLES 8-100
DE
COMMANDE 8-100
7-6. Programmed sewing (examples)
7-6. Programmnahen (Beispiele)
7-6.
Couture programmee (exemples)
Costura programada (ejemplos)
7-6.
G
F
1.
Press
2.
3.
4.
5.
6.
7.
8.
*
*
*
1.
2.
3.
4.
5.
6.
7. Bis zum Ende von H weiternahen.
8.
*
*
*
pattern key
Press
the cancel key 8 until the step display 8 shows
Sew part
Sew 3 stitches at
Similarly enter the procedures
Sew 3 stitches at
Sew
After thread trimming, press step key
The programmed pattern
On
The number
If the
sewing can
Die Programmtaste 0
Die Loschtaste 8 driicken, so
Den
anzeigt.
Die drei Stiche von B nahen, den StoffdriickerfuB anheben und die Schrittaste
[3) anzeigt.
Die Nahschritte
Die drei Stiche von G nahan, den StoffdrGckerfuB anheben und die Schrittaste
8
Nach dem Abschneiden des Fadens die
Das
Bei Maschinen
betatigt werden.
lm
Falls nach dem Schritt [1) die Umkehrtaste gedrGckt wird,
umgekehrt, um einfacher
A,
to
the end at
machines with
BACK
Teil A nahen, den StoffdrGckerfuB anheben und die Schrittaste
!81
anzeigt.
eingegebene Programm kann jetzt beliebig oft wiedergenaht warden.
Schritt [9) muB die Stichzahlanzeige
0,
and select one pattern,
lift
the presser foot, and press step
B,
lift
the presser foot, and press step
G,
lift
the presser foot, and press step key
H.
can
an
of
key
be
automatic presser foot lifter, press the presser foot lifter key after each step.
stitches display must show
is pressed after step I
done more easily.
drGcken
C,
D,
E und F auf die gleiche Weise ausfiihren.
mit
automatischem StoffdruckerfuBheber muB nach jedem Schritt die StoffdruckerfuBanhebetaste
B
c
for
C,
D,
E,
CD
twice to return the step display 8 to [1).
now
be
sewn repeatedly.
11
has
und ein Programm von
daB
die Schrittanzeige 8
Schrittaste
[001
nahan
zu
konnen.
A .... Step 1/Schritt 1/Etape 1/Paso 1
Step 2/Schritt 2/Etape 2/Paso 2
B ....
C .... Step 3/Schritt 3/Etape 3/Paso 3
D ....
Step 4/Schritt 4/Etape 4/Paso 4
.•..
Step 5/Schritt 5/Etape 5/Paso 5
E
F ....
Step 6/Schritt 6/Etape 6/Paso 6
G
...•
Step 7/Schritt 7/Etape 7/Paso 7
H ....
Step 8/Schritt 8/Etape 8/Paso 8
5-9.
key
and
F.
[001
after step [9).
been entered, the feed direction
betragen.
[1)
and the number
Ci)
to display
key
5-9
!11
CD
zweimal driicken um die Schrittanzeige 8 auf [1) zuruckzustellen.
[2)
in
8 to display
CD
to display
einstellen.
und die Stichzahlanzeige e [00) betragt.
so
wird
of
stitches display e shows [00).
the step display
[3)
in the step display
[8)
in the step display
is
reversed when sewing section
CD
driicken, so daB die Schrittanzeige 8 [2)
CD
drucken,
CD
beim Nahen des Teils A die Transportrichtung
8.
so
daB
driicken, so
f).
8.
A,
so that
die Schrittanzeige 8
daB
die Schrittanzeige
-79-
082-007100
Page 99

1.
Appuyer sur
2.
Appuyer sur
3.
Coudre
indique8.
4.
Coudre 3 points a
Ia
Ia
CLEAR
partie
touche
de
motif
8 jusqu'a
A,
relever
B,
le
relever le pied presseur et appuyer sur
8 indique [3).
5.
Entrer les operations
6.
Coudre 3 points a
G,
C,
D,
relever
E et F
8 indique [8).
7. Coudre jusqu'a l'extremite a
Appuyer deux fois sur
8.
Le
motif
programme peut desormais etre cousu de facon repetee.
Sur
*
*
*
1.
2.
3.
4.
5.
6.
7.
8.
*
*
* Si
les machines equipees d'un releve-presseur automatique, appuyer sur
chaque etape.
L'affichage du nombre
Si l'on appuie sur
couture de
Oprimir
Oprimir
[00].
Coser
Coser 3 puntadas
pasos8.
De
Ia
Coser 3 puntadas
de pasos
Coser hasta el final
Despues
Se
puede volver a repetir el diser'io programado todas las veces que
En
las maquinas con levantador de prensatelas automatico, oprimir
cade paso.
La
exhibici6n de numero de puntadas debe mostrar [00] despues del paso [9).
se
A, de manera que
Ia
Ia
tecla de diseflo 0 , y seleccionar un diser'io,
Ia
tecta de borrado 8 hasta que
Ia
parte A, levantar el prensatelas y oprimir
misma forma memorizar los procedimientos para
8.
de
cortar
oprime
Ia
section
tecla
Ia
touche d'etape 8 pour ramener l'affichage d'etape 8 a [1) lorsque les fils
de
points doit indiquer
Ia
touche
A,
de maniere a faciliter
en
B,
levantar el prensatelas y
en
G,
levantar
en
H.
el
hilo, oprimir
BACK
despues
se
pueda coser mas facilmente.
7. USING THE B-100 OPERATION PANEL
7. VERWENDUNG DER
7. UTILISATION
7.
USO
DEL TABLERO
0 et selectionner
ce
que l'affichage d'etape 8 indique [1) et que l'affichage de points
pied presseur et appuyer sur
de
Ia
meme maniere.
le
pied presseur et appuyer sur
H.
BACK
apres avoir entre l'etape (1],
Ia
el
pie del prensatelas y oprimir
Ia
tecla de pasos 8 dos veces para volver
de
ingresar
un
motif, de 5 a
Ia
[00)
a l'etape [9).
Ia
couture.
5-
9.
exhibici6n de pasos 8 muestre
Ia
tecla de pasos 8 para exhibir el
oprimir
el
paso [1),
C,
Ia
D,
Ia
9.
touche d'etape 8 de facon a
Ia
touche d'etape 8 de facon a
Ia
touche d'etape 8 de facon a
Ia
direction d'entrainement sera inversee lors de
tecla
de
E y
F.
Ia
tecla
Ia
direcci6n de alimentaci6n
DU
!11
pasos 8 para exhibir el [3]
de
pasos 8 para exhibir el
sea
necesario.
tecla dellevantador de prensatelas despues de
BEDIENUNGSTAFEL B-100
PANNEAU DE
DE
CONTROLES B-100
Ia
touche de releve-presseur a
y el numero de puntadas
!21
Ia
exhibici6n de pasos 8 a [1].
COMMANDE
6)
indique [00).
ce
que l'affichage d'etape 8
ce
que l'affichage d'etape
ce
que l'affichage d'etape
ont
ete coupes.
6)
en
Ia
exhibici6n de pasos
en
Ia
exhibici6n de
[8]
en
Ia
exhibici6n
se
invertira
al
coser
B-100
Ia
fin de
muestre
Ia
secci6n
Ia
8.
-80-
DB2·DD7100
Page 100

8.
LOWER
8.
EINSTELLEN
8.
REGLAGE
8.
AJUSTE
THREAD
DER
DU
FIL
DEL
HILO
REMAINDER
SETTING
SPULENFADEN
INFERIEUR
INFERIOR
REST
REST
RESTFADENMENGE
ANT
ANTE
8. LOWER THREAD REMAINDER SETTING
8. EINSTELLEN DER SPULENFADEN-RESTFADENMENGE
* The
amount
chine is used for the first time.
* Use the bobbin case which is specially designed for use with the bobbin thread detector.
*
lfthe
bobbin condition (remaining thread
be
displayed.
* When the lower thread runs out, a buzzer sounds and the
treadle is pressed. (The machine can
the
of
lower
thread remaining must always
be
set
to
0%
by the
0%)
is not set properly, the correct amount
LED
be
operated by pressing the buzzer key
display 8 flashes, and the machine
following
0.)
procedure before
of
lower thread remaining will
the
sewing ma-
will
not operate when
not
* Die Spulenfaden Restfadenmenge muB
warden.
* Verwenden Sie
fur
den Spulenfadenabtaster die Spezial Spulenkapsel.
vor
der ersten lnbetriebnahme der Nahmaschine
immer
auf
0%
eingestellt
* Falls der Spulenzustand nicht richtig eingestellt wird (Restmenge 0%), kann die richtige Restfadenmenge nicht angezeigt
warden.
* Wenn der Spulenfaden aufgebraucht ist, ertont ein akustisches Signal und die
kann durch Drucken des
Pedals nicht in Betrieb gesetzt warden. (Die Maschine kann durch Drucken der Signaltontaste
LED
Anzeige 8 blinkt. Die Maschine
0 betatigt warden.)
-
81
-
Special
bobbin
Speziai-Spulenkapsel
case
062-007100
 Loading...