

Page 1
INSTRUCTION
FOR
MANUAL
BROTHER
SINGLE NEEDLE ADJUSTABLE TOP
LOCK
[~=
M
=
A
=
~
=
H
=
*
Au
to thread trimming machine DB2- B792 h
$BROTHER
DB2 -
MADE
ODD
Thread trimmer Single needle lock stitch machine
Thr
ea
d wiper
Quick rever
P
resse
r foot
Shi
rr
ing devi
STITCH
~
=
N
~:=
s
=
P
=
E
INDUSTRIES
B792-
IN JAPAN
se
li
ft
ce
~
C
=
IF
=
IC
=A=
ODD
j-"'
------
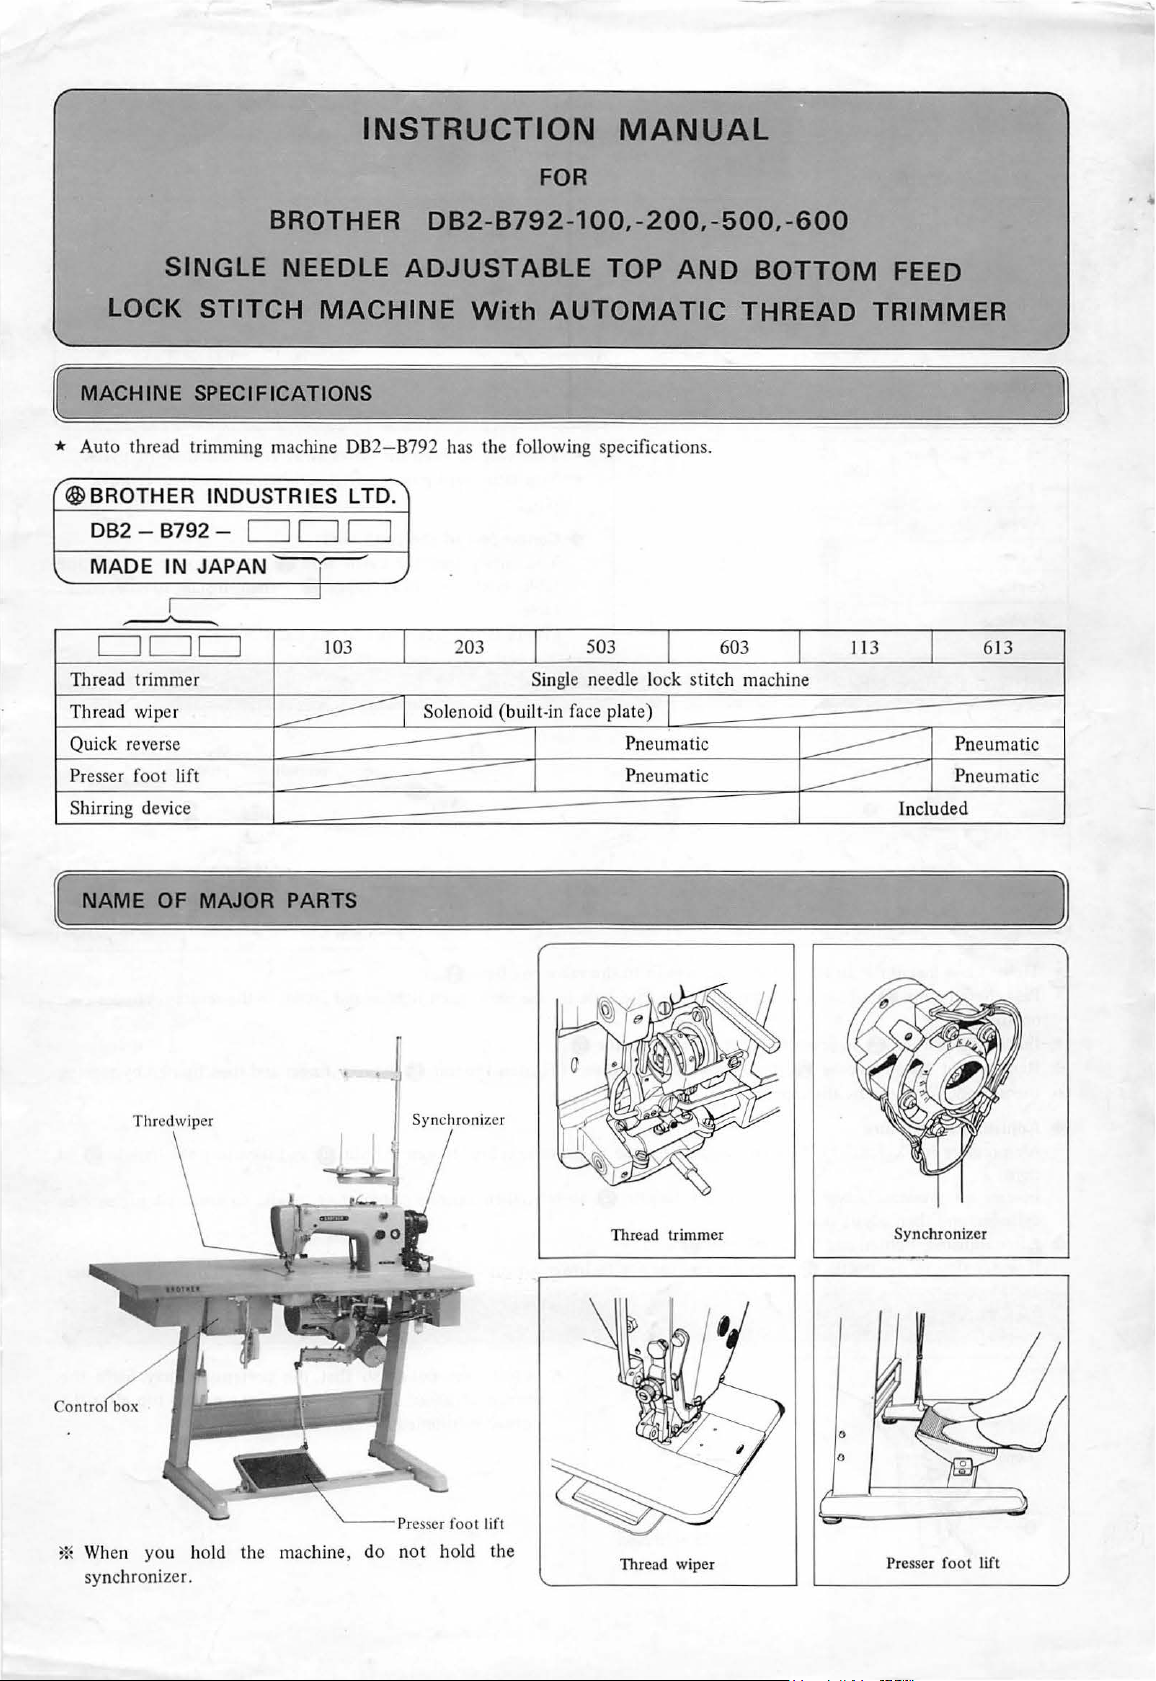
MACHINE
T
=
I
=
O
=
N
=
S
LTD
I
103
--
-----
DB2-B792-100,-200,-500,-600
With
AND
AUTOMATIC
BOTTOM
THREAD
==========~==============================~
.
I
~
Soleno
--
as the followin
203
id (buil
g specifications.
503
t-in
face plate) I
I
Pn
eumatic
Pneumatic
60
3
FEED
TRIMMER
11
3 613
Pn
---------------
~
Pn
Included
eumat
ic
eumatic
]
[~=
N
=
A
=M=
E
==
O
=
F
=M=
Thrcdwipcr
AJ
==
O
=
R
~
P
=
A
~
R
=
T
~
S
========~==============~~==~==========
Sy
nchronizer
Thread trimmer
Synchronizer
(}
6
~]
Presser foot lift
*
Wh
en you hold the
sy
nchronizer.
mac
hine, do not hold the
Threa d wi
per
Presser
foot
lift
Page 2
[~=
CO
=
N
=
N
=
E
=
C
=
TI
=
O
=
N
*
You
pas
s the plug th rough
©
For
motor
MD
-932.
=
O
=
F
==
W
®
=
IR
=
E
=
S
======~====~========~==============
the
wire hole
on
the
table,
then
install as following figures.
~]
g
~
A
plu
g
B plug
C plu!!
D plug
[~=
C
=
O
=
N
=
N
=
E
=
C
=
T
=
IO
* Tigh
* Pass the air
* Insta
* Remove
nec
the
ten
tor
ll
nut
@ .
the
and install
tube 8 of
air
nut
once
- 100
0 0
0 0
~
~
=
N
==
O
=
F
the
tube 9 to
(3
and sleeve
or
twice by
-2
00
-
500
0 0
0 0
~
~
=
A
=
I
=
R
==
T
air hose
of
the valve
presser lift cylinder co nnec
fj
, then fix as above
the
spanner.)
0
0
~
=
U
=
BE
==
(
the
compressor
box
into
=
Fo
=
r
- 600
0
0
=
-
=
5
=
00
the wire hole on
* Take care
* You must
ttl Conn
=
,
=~=
0
=
0)
====
to
the valve box
tor
@)
.
fi
gure. (Tighten
to
keep
the
wires away from the r
turn
power swit ch
plug.
ec
tion
of the
ear
th
Y
ou
surely pass
tab le from the
tab le.
(There is
the
th
~
~==========~~==========~]
base 0 .
table,
the
the
earth
head
e green wire in
3-S
then
tighten and insta
nut
(3
by
off
before
wire
wire 0 in to
hin
ge
8 ,
then insta
the
parts
box.)
Less M
pressure pressure
~
mm
ll
to the reverse cylinder con-
your
finger and then tighten by
insta
the
ore
- 0
otat
ing parts.
ll
or
removal the
wire hole
ll
to the
0
on
the
motor
turning
Ill
Adjusting air pressure
Air pressure is 5 kg/cm
righ
t.
In
case air pressure
cylinder, and
*
After
adjusted, tighten
If
water stay
[~
P
~
R
~
ET
~
th
in
EN
~
SI
=
ON
==
2
±
0.5
kg/cm2 in use. In case air pressu
is
high, once
en adjust again.
and
install the
the
bott
le
4D>
, s
top
turn
the handle 0
nut ~ .
the compre
ssor to lower air pressure, raise
==========~~
re
to left,
then
==
======~==
*
Adjust
thread
th
read is trimmed.
is
low
operate
the
of
, loosen
nut 0 so
abo
the
actuater
the
ut
35 -40
nut~
and then turn the handle 0
or tread le
drain cock
======
that
mm
the
pretension
on
to
lower air pressure in
4D
and
then
let o
==~]
may
the
needle
top
ut
leave
after
to
water.
the
the
Page 3

[ OPERATION OF TREADLE PEDAL
®
@1----~
Ill Trea
Ill Treadle
2. Make sure whether sl
3.
4. When the
5. In case
dl
e (- 100, - 200)
1. Make sure
Pressing
2. Make sure
(when
3.
In
case
the rear
1. Lightly depress the
Pressing
Make sure
(when
the rear
whether
the
treadle pedal 0 again
whether
you
release the treadle pedal 0 ) @
the
treadle pedal 0
end
@ ), thread trimmer is once t
(-
500, -600)
the
treadle pedal 0 again
whether
you
release
upper
the
tr
eadle pedal 0 is pressed at
end
@), thread trimmer is
~
~~
slow speed
the sewing machine stops
upper
ow
the sewing machine stops
the
treadle pedal 0 )@
plate 8
motor
to
is
pressed
plate
f}
of
speed
motor
to
of
the
treadle pedal 0 is positioned
once
~
runs
smoothly,
@ ,
then
after
at
the rear
urn
the
treadle pedal 0
runs smoothly, pressing
@ ,
then
after
the
turn
--
pressing the treadle pedal 0 lightly
high speed
at
the
pressing
and
the
high speed
at
the
pressing
rear
and the needl e is
motor
needle down position,
the
end
@(o
needle is
to
mot
needle down po sition,
the
end
@(o
runs.
the
treadle pedal 0 is positioned
treadle pedal 0
r back
at
up
and
position
the
or
treadle pedal 0
at
r back
@,
treadle pedal 0 lightly
runs.
® , pre sser foo t lifts up.
at
up
and
at
the front.
the
neutral @
then
the
machine is stop.
the presser foot come
the
treadle pedal 0 is positioned
at
the neutral @after
then the machine is
after
the front.
to
®.
at
the
treadle pedal 0
s down.
to®.
the
treadle pedal 0 is pressed at
sto
p.
is
at
@
the
neutral
pressed
the neutral
at
]
[ ADJUSTING SYNCHRONIZER
Adjusting
1)
Turn
2) Remove
3)
Turn the pulley towa
~
the t
In
moving the
(4)
Turn on the power switch a
the position of
If the needle bar
hole I.C @ .
(5)
Sto p the machine at the needle
above the
If th e needle
the ho
*
Ym.1
I.C
position
off
hr
ead trimming the
case
of
le
move the hole I.C @ ,
@ ,
f}
of
thr
ead
trimming
the power switch by all means. (In case
th
e cover
upp
I.C
of
the synchronizer.
rd you and place the need le bar lowes t position. At th
the magnet 0 is not in line with the th read t
thr
ead trimm ing the hole I.C.
I 8-22 mm above the upper face
is
er face
po
sition
f}
.
to the rever
ho
not stop
of
the needl e plate.
is
se
signal
le I.C 8 .
nd
stop the machine at th e needle down position.
at
the fixe
up
not s
top
f}
to the machine rotating direction, then the needle
direction, then the needle bar is raised.
at
Needle
down
pos
ition
1
8-22
mm
---
of
adjust each the hole l. C, turn off
ri
mming the hole
of
d position, loosen
position. At this tim
the fixed position, loosen clamp ing screw
the needle plate.
cl
amping screw 0 and adju
e,
the needle point should st
I.
C 8 , loosen clamping screw
Needle
up
posi
tion
9-11
the
powe r switch
is
tim
e,
the magnet 0 must be in line with
At
this time, the needle bar should stop at
st
by
moving the needle down the
op
at the position
(3
and adjust
bar
is down. When you move the hole
by
all means.)
@)
and adjust by
of
9 - I I mm
by
moving the needle up
mm
*
For
prevent the bobbin run idle wh
is
the
there
*
Wh
en
0
by moving the bobbin presser 0 back
bo
thr
ead trimmed, loosen cla
0
bbin presser O.
en
thread trimmed,
mp
ing screw 8 and adju
or forth
.
st
Page 4

ADJUSTING
FOOT
LIFT
PRESSER
(-500
, -
600)
[~=
A
=
D
=
JU
=
S
=
T
=
IN
=
G
==
~
Lightly O
~::;
0
·
~
T
=
R
=
E
=
A
=
D
~
H
eavi
ly A 0 •
~..,~
=
L
=
E
=
P
=
E
=
D
=
A
~
. r.::
C:::J 9
Lightly 1 Heavily
L-
=
L
~=======~]
O
*
Turn
the
kn
ob 0 and adjust
presser fo
[~=
C
=
H
Abo
About0.5
=
A
=
N
=
"'
~
ot.
G
=
IN
=
G
==
08
mm
Rotary hook
T
=
H
=
E
==
K
The
the
=
N
=
IF
=
E
==
0
f)
ax
is
of the n eedle
TI1e
knife
lifting up speed
of
the
~==================
How
to
(1)
Turn
(2)
Turn
remove
Turn
(3)
(4) Tilt the machine head back .
(5)
Loo
cover 8 -
(6)
Push
pull
w
ith
(7) Remove the scr
3:!~
After
H
ow
to insta
*
Let the point
reversely with your hand and make sure
be positioned
scr
ew
knife ~ to be 3
* Make sure
finger
abo
*
Turn
so th
1. Adjusting its weight
Slow spee d sewing
the treadle pedal
you
press
the
the
nut
0 and adjus t by turning
2. Adju sting its weig
Loosen the
nut
====
remove the knife
off
the
power
switc
h.
the
pulley and place the needle
the
needle plate.
the pull
sen the clamping screw 0 and remove the
ey
ease.
ut
at
ey
and place the needle
the thread trimming
toward you until the position
ew
e I kni
fe
the knife ~ is
ll
the kni fe
changed, install
of
the
knife ~ m
at the axis
e for the clearance b
mm.
that
the
clearance between the knife ~ and lower
fj
and
that
between lower thread finge r
0.5
mm.
(Eno
ugh for usable thr
the pull
ey towa
the kn i
rd you and get the knife
fe ~ is not
touch
at slow
speed sewing
is
done
when
you
put
your
foot
and
slow speed sewing is
treadle pedal lightly. In such cases, loosen
the bo
ht
at back
@)
and a
dju
st
by
~==~
stopper
~
I
spacer
eet
of
the needle as figure.
et
wee n the lower thread
at
============~]
at
the
highest position and
at the lowest positi
@)
with
your finger and turn the
of
you
may
(3
and lower thread finger
them
reverse
with t
he
needle, turn the pulley
that
point
ead
to
pass
~
the needle.
not
done wh
lt 8 .
turning the bolt
on.
thr
ead trimming
remove the screw e
order.
of
the
knif
e ~ may
Then
tigh
ten
finger
fj
and
thr
fj
and the h
smoothly.)
at
it
s original position
ook
on
en
0 .
then
fj
the
the
ead
is
.
@ BROTHER
-
INDUSTRIES,
NAGOYA, JAPAN
LTD.
117-792-100,
192792-0-1
Pr
inted
- 200,- 500,-600
2
in
Japan
 Loading...