

Page 1
INSTRUCTION
FOR
BROTHER
SINGLE
ADJUSTABLE
LOCK
NEEDLE
STITCH
TOP
MACHINE
MANUAL
082-8792
AND
BOTTOM
FEED
Ill
Th
ank you very much
pur
cha
se
machine
The
se
wing machine depend s, a b
on
Be
followi
of a BROTH
.
full pe
correct op
sure to
ng ins
rform
eration.
care
tructions before use.
ance
of your
fully read
for your
ER sewing
new
ove
all,
the
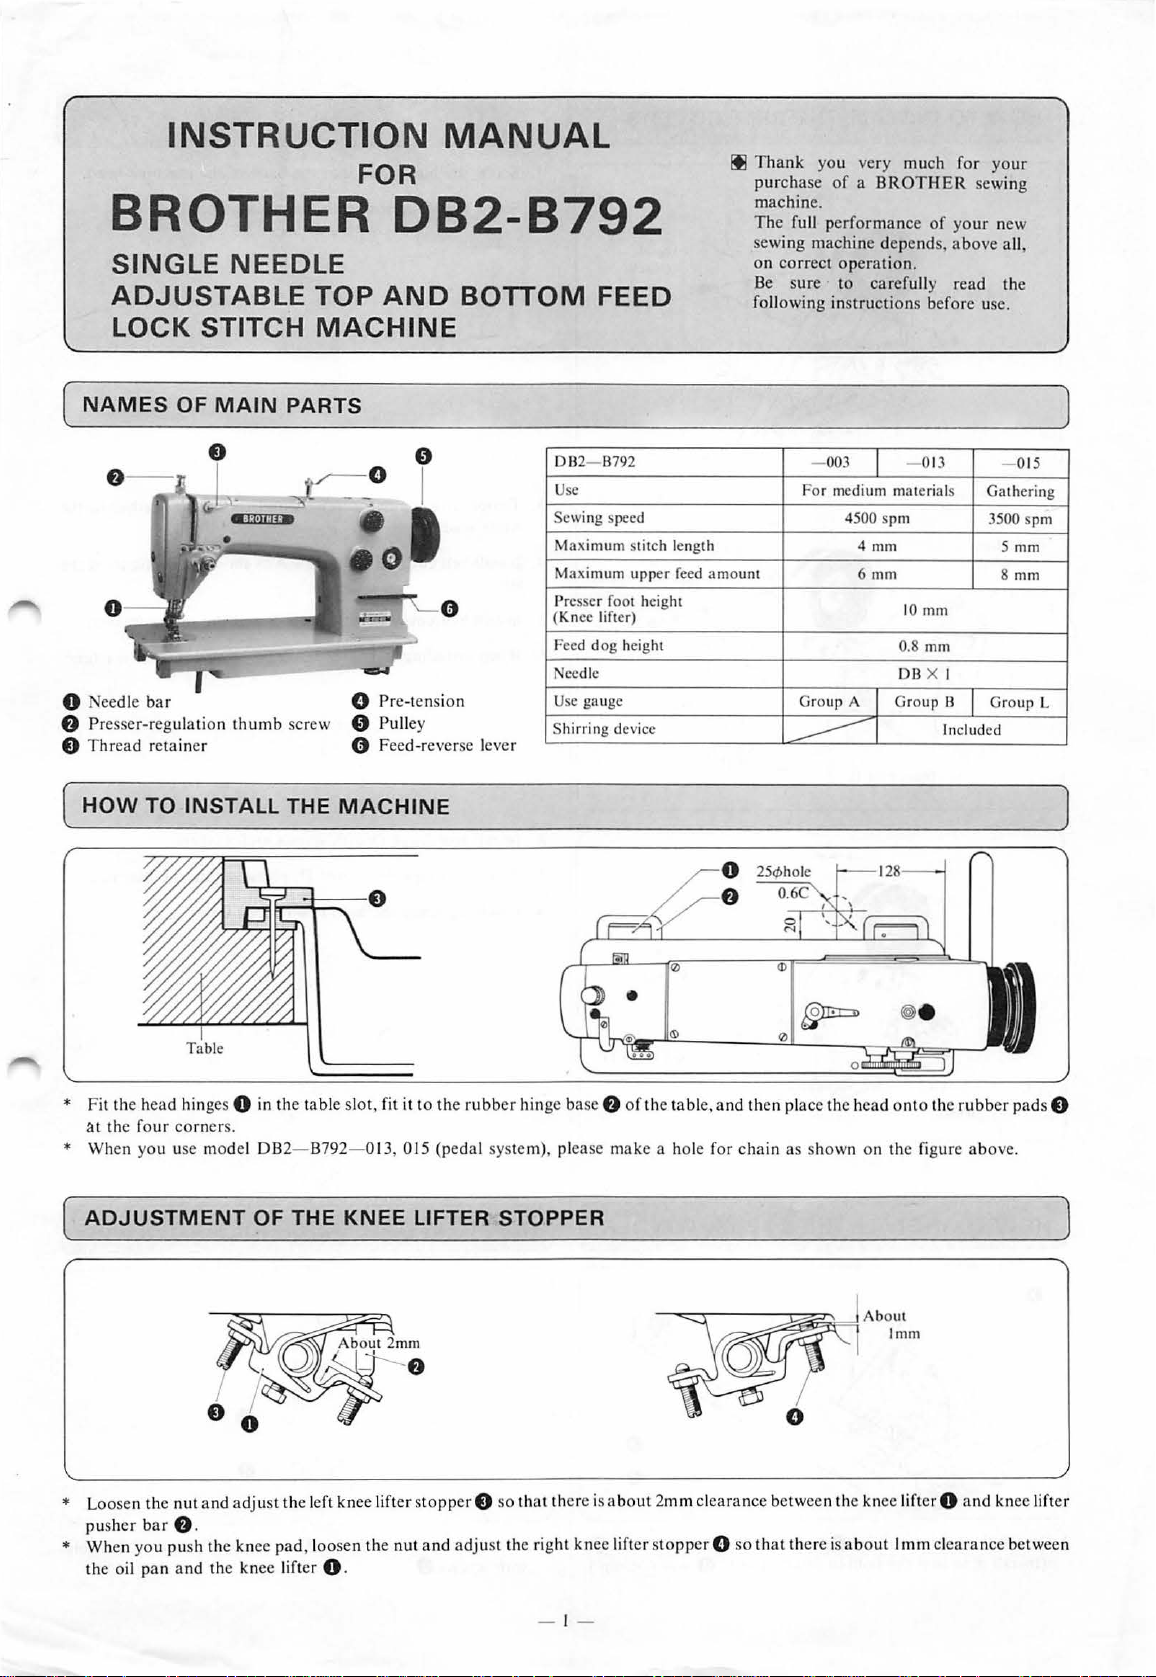
NAMES
0 Nee
dle bar
f)
Presser-regulati on
0
Thread retain
(
HOW
TO INSTALL THE
OF
er
MAIN
thumb
PARTS
0
scr
ew
0 Pulley
0 Fee
MACHINE
Pr
e-t
d-r
ens
ion
everse lever
DB2-
B792
Usc
Sewing speed
Maximum stitch length
Maximum upper
Presser foot heig
(Knee lifter)
Feed
dog
ccdlc
Usc gau
ge
Shirring device
feed
ht
height
amou
-
003
For medium materials
nt
Group A I
--------1
I
4500 spm
4
mm
6
mm
Group B
- 013
10
mm
0.8
mm
DB X I
In
cluded
- 015
Gathering
3500 spm
5
mm
8
mm
Group L
)
Table
* Fit the h
at the
* When yo u u
(
ADJUSTMENT
* L
pusher
*
Wh
the oil
ead
hinges 0 in the table slot, fit it to
four corners.
se mode
oosen th
e nut and a
bar
f)
en you push the knee pad, loosen the nut
pan
and
l DB2- 8792- 013, 015 (p
OF
THE
dju
st
the left knee lifter
.
the knee lifter 0 .
KNEE
the
rubb
er hinge base
eda
l sys tem), please make a hole
LIFTER
stoppe
and
STOPPER
rO
so
that there
adjust the right knee lifter st
- 1-
is a
f)
of
bout
the tabl
2mm clea
oppe
e,
and then place
for
chain
rance betw
rO
so that
the head onto the
as show
n on the figure
een the knee lifter 0
there
is
about I
rubb
mm cleara
er
pad
above
.
and
knee lifter
nce between
s 0
)
Page 2
[
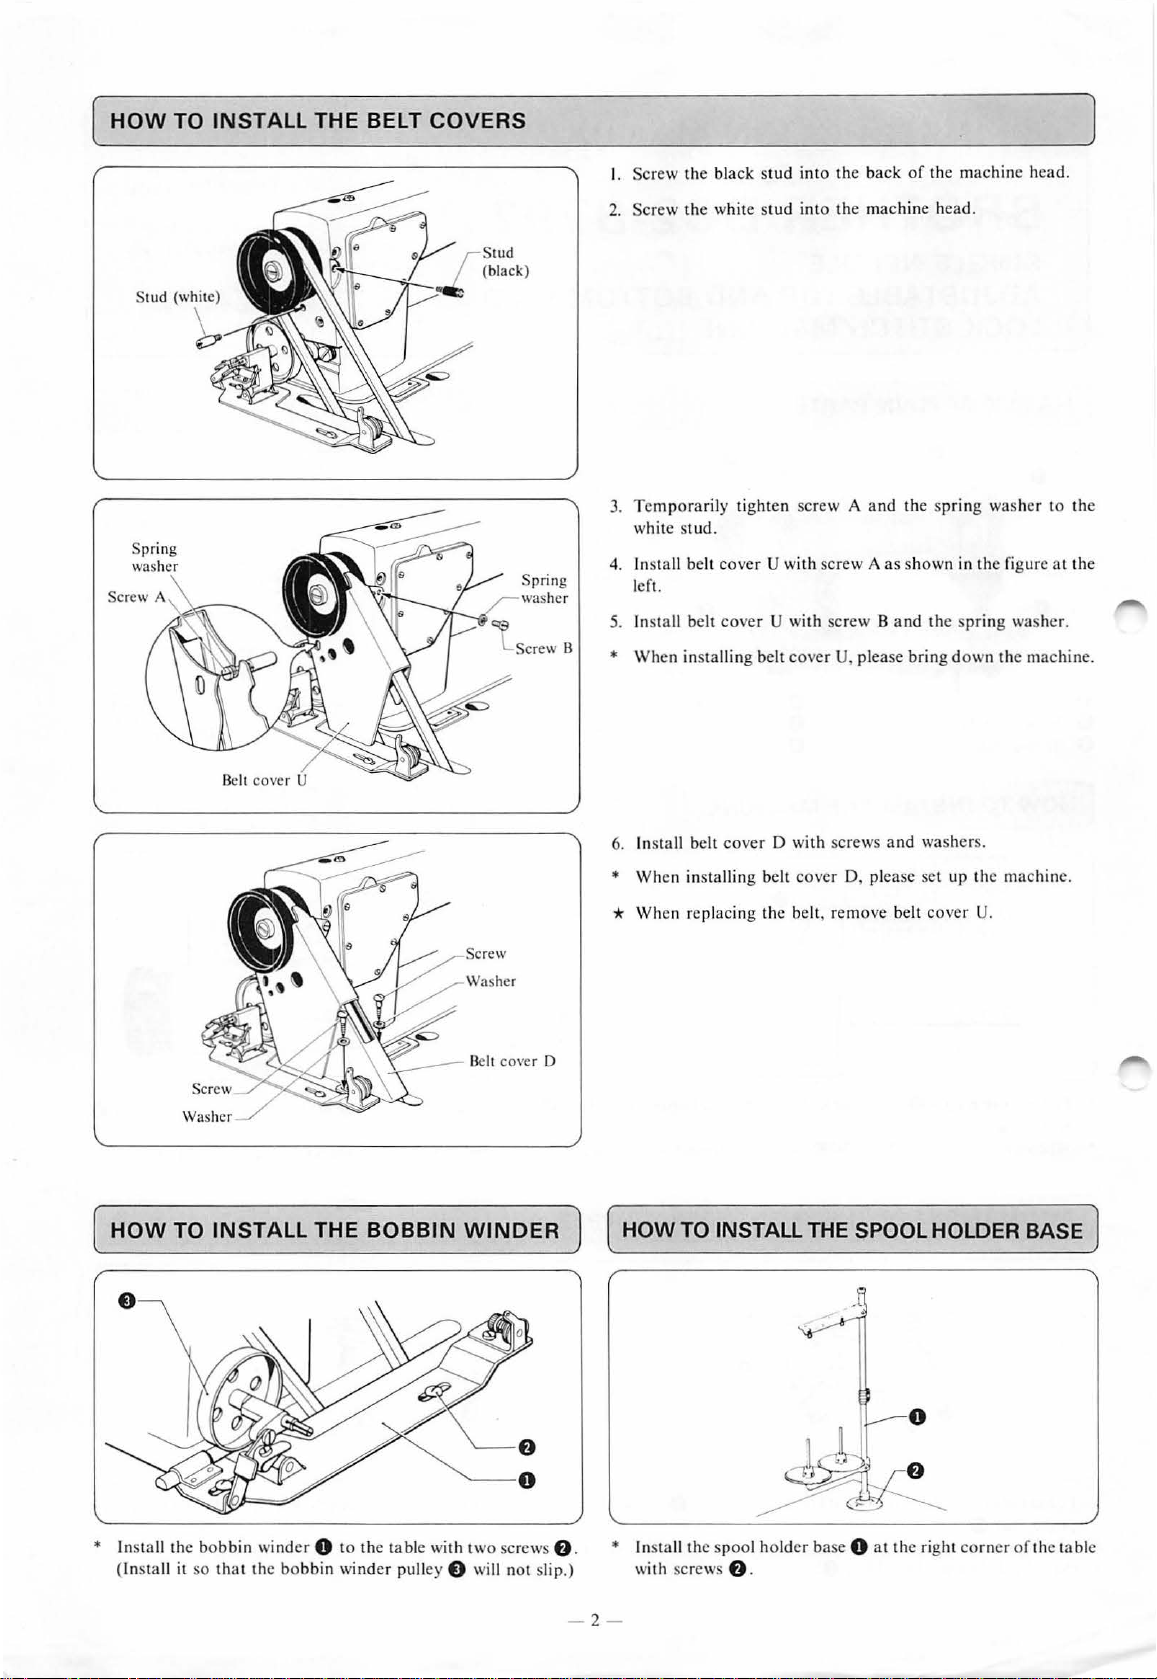
HOW
TO
INSTALL THE BELT
COVERS
Stud
(black)
Spring
wash
er
I. Scr
ew
2.
Screw
3.
Temporarily
white s
4.
Install belt
left.
5.
Install
•
When insta
the black
the
white stud
tighten
tud.
cove
belt
cover
lling belt
stud
r U
U with
with
cover
into
the
back
into
the
machine head.
screw A and
screw A as
screw B and
U, please
of
the
machine
the spring
shown
in
the
spr
bring
down
washer
the
figure
ing
the
head
to
at
washer.
machine.
.
the
the
HOW
TO
INSTALL THE BOBBIN
WINDER
6. Install belt
•
*
)
(
HOW
cover
When
installing belt
When replacing
D with screws
cover
the belt,
D, pl
rem
and
ease
ove belt
washers.
set up
the
cover
U.
TO INSTALL THE SPOOL HOLDER BASE )
machine.
* Install
the
(Ins tall it
bobbin wind
so
that
the
er 0 to
bobbin winder
the
tabl
e with
two
pulley 0 will
screws
not
slip.)
f)
.
• Install the
with screws
spool
- 2 -
f)
holder
.
base 0
at
the
right
corner of
the
table
Page 3

[ LUBRICATION
1 . Lubrication
( I) Supply oil slowly
If the o
il
level falls bel
oi
l.
to
the
ow
mark
the
at
the left ("HIG H").
mark
at the right
("LOW"), add
ADJUSTMENT
OF OIL SUPPLY
AMOUNT
(2) If the o
oil cover
(3) Wipe
* Use
2. Oiling
* Before using
o
TO
ARM
* Re
sh
Lower
*
hook
il
becomes
sc
away
th
e oil specified
il
to
the
SHAFT
mo
ve
the f
aft
by
turning
the head
by
turni
contaminated,
rew G.
contaminat
the
mach
point
ind
icated by th e
AND
ace plate, and
the scr
, and adju
ng the scr
ion fr
om
by
BROTHER:
ine,
be
sure to supply one
ROTATING
adju
ew
0 .
st the lubri
ew
G.
rem
ove
the
oil
cap
the magnet
arrow
f)
Hi-White 70.
or
.
HOOK
st the lubrication
cation for the
0 and
.
two
for
drop
the
rotat
th
of
arm
ing
e
€1D
More oil
ROTATION
CID
Le
ss oil
DIRECTION
OF
THE
MACHINE
- 3 -
* The
*
* When
correct
co
unterclockwise as viewed
Press
th
e belt 0 ,
G so th at
the
the
mach
rota
and
belt
ine
can
runs id
ting direct
ion
from
the pulley side.
adjust the belt
be
pushed
le, be sure to raise the
ten
inward
of
the m
sion by
about
achine
turn
ing the nut
15 - 20mm.
presser foot.
)
is
Page 4
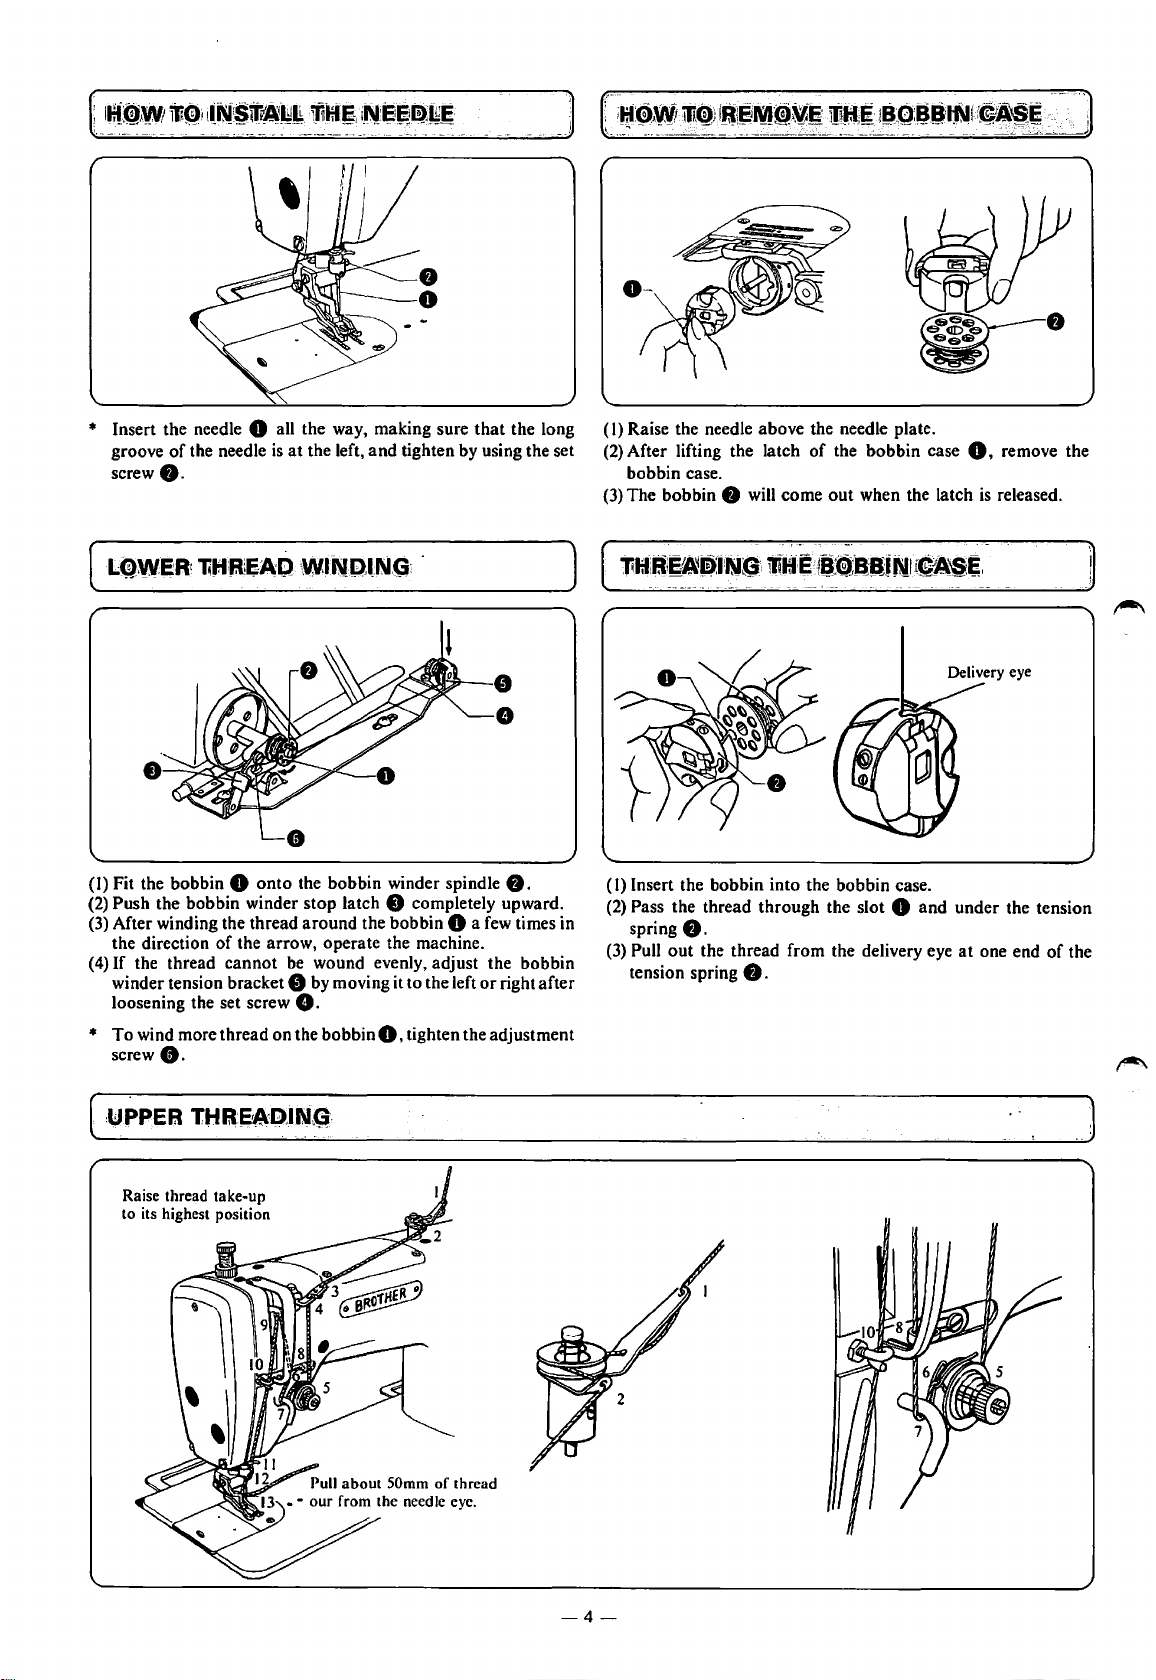
* Insert the needle 0 all the way, making sure that the long
of
groove
screw
the needle
8.
is
at
the left, and tighten by using the set
iJif:f>wiliQJ•fB1~Jl\11§)._~fi
(I)
Raise the needle above the needle plate.
(2)
After lifting the latch of the bobbin case
bobbin case.
(3)
The bobbin 8 will come
m_f.liE:·-~a~o:~JIJ:t:Nc:~~~;
-
.....
_
---~
--"''
-.
- -
-·
·-· ·-·
0,
remove the
out
when the latch
is
released.
J
Delivery eye
(I)
Fit the bobbin 0 onto the bobbin winder spindle
(2)
Push the bobbin winder stop latch 8 completely upward.
(3)
After winding the thread around the bobbin 0 a
the direction
(4)
If
the thread cannot be wound evenly, adjust the bobbin
winder tension bracket
loosening the set screw
* To wind more thread on the bobbin
screw
Raise thread take-up
to its highest position
0.
of
the arrow, operate the machine.
8 by moving it to the left
0.
0,
tighten the adjustment
few
or
8.
times in
right after
(I) Insert the bobbin into the bobbin case.
(2)
Pass the thread through the slot 0 and under the tension
8.
spring
(3)
Pull
out
the thread from the delivery eye
tension spring
8.
at
one end
of
the
J
-4-
Page 5
(
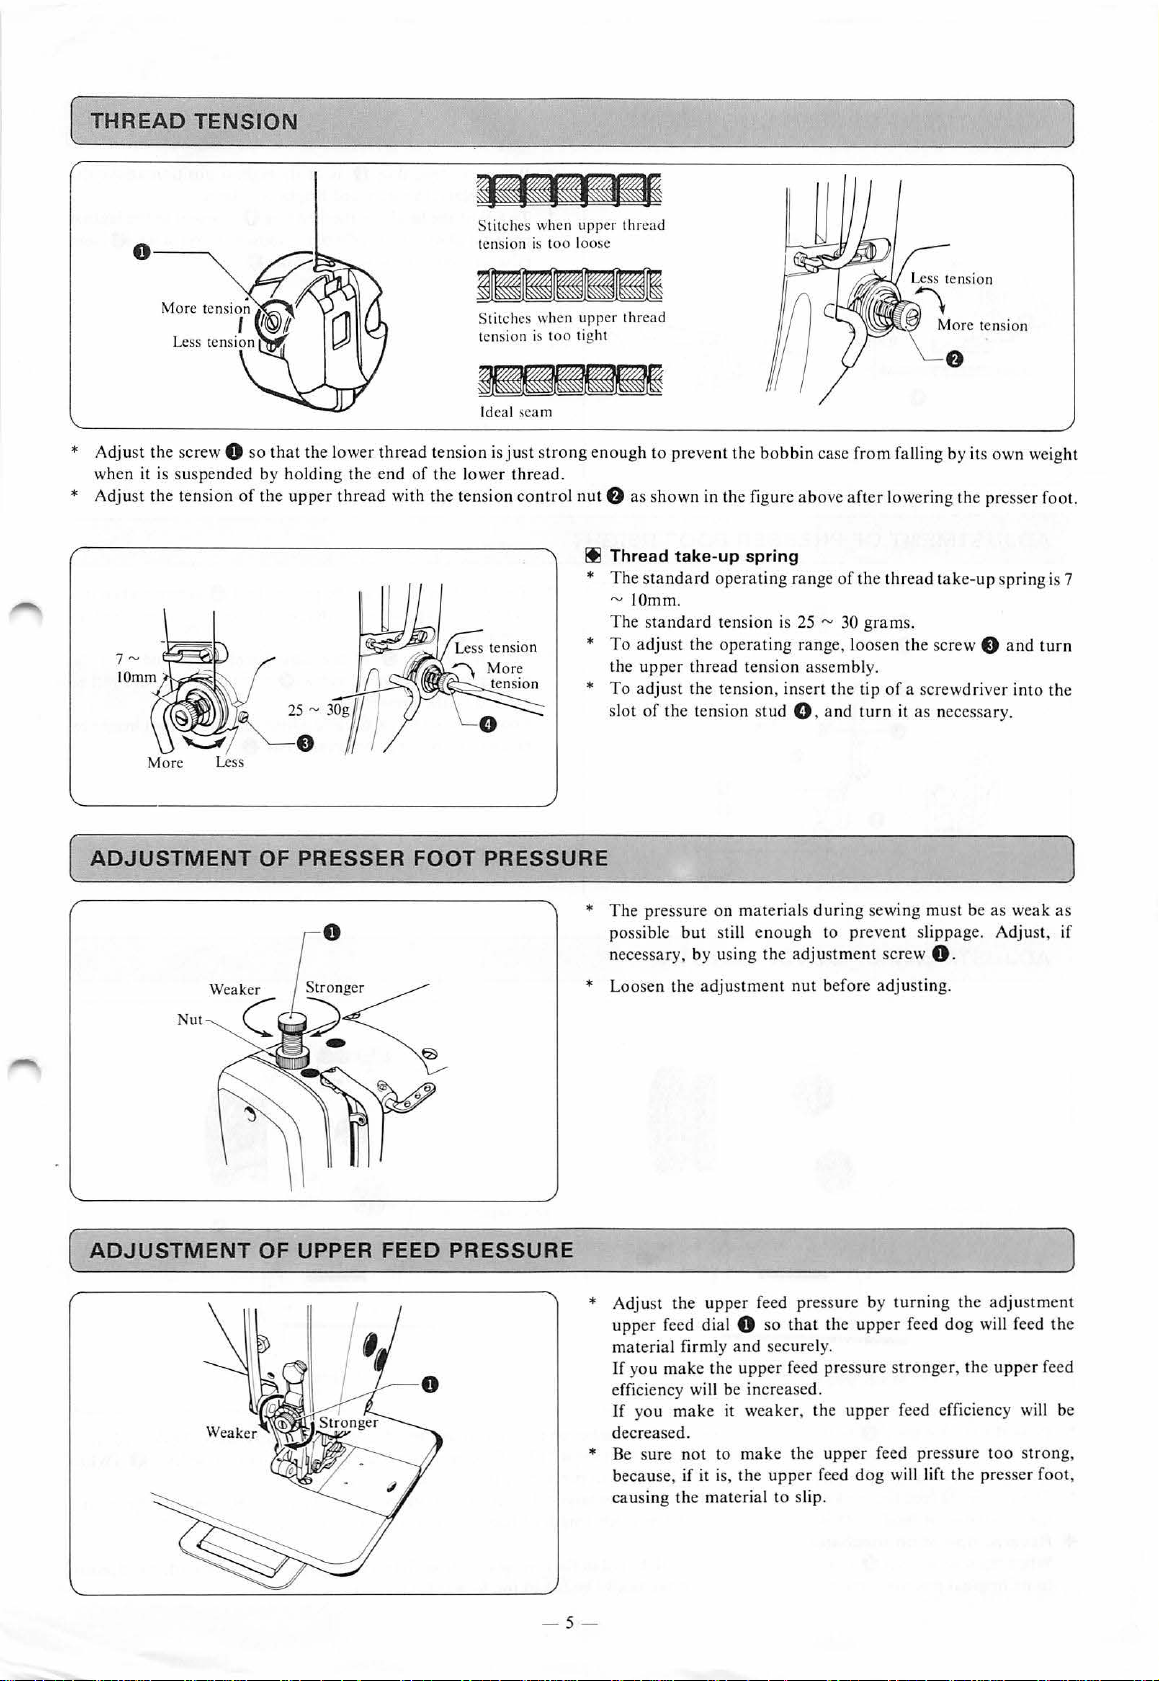
THREAD
o-
TENSION
~
* Adjust the screw 0
when it is suspe nd
*
Adjust the tensio n
so
that
the lower thread tension is
ed
by holding the
of
the
upper
end
of
thread with
Stitches
tension
Stitches
-
tension
I
deal seam
-
the lower
the tension
when
is
too
loose
when
is too
tight
just strong
thread.
control nut
upper thread
upper
thr
ead
enough to
f)
as shown
prevent the bo
in the figure
bbin
above
case
More
tension
from
falling by its
after
lowering the presser foot.
own
weig
J
ht
Ill Thread
*
The
~ lOmm.
The standard
*
To
the
*
To
sl
[
~_A_D_J_U_S_T_M_E_N_T_O
__
F_P_R_E_S_S_E_R
_F_O_O_T
__
PR
__
Es_s_u_R
__ E __
*
Th
possible
necessary,
* Loosen the
Nut
adju
upper
adjust
ot
sta
nda rd op
of
the
take-up
st the
spring
era
ting
range of
ten
sion
is 25 ~ 30
operat
ing range, loosen
thread
tension assembly.
the tension, in
tension stud 0 , and tu
sert
the tip
the
thread
grams.
of
rn
it
__________________________
e press
ure
on
materials
but
still
by
using the adjus t
adjustment
enough
nut
dur
ing sewing must be
to prevent slippage. Adjust,
ment
screw 0 .
before
adjusti
take-up
the
scr
ew
f)
a screwdriver
as
necessary.
as
ng.
spring is 7
and
turn
into
the
~
weak
as
)
if
(
ADJUSTMENT
OF
UPPER
FEED
PRESSURE
- 5 -
* Adjust the
upp
er
material fi
If
you
efficiency will be increased.
If
you
decrea
* Be s
because, if
causing
upper
feed dial 0 so
rmly
make
the u
make
it weaker,
se
d.
ure not
to
it
is,
th
e material
feed pressure by t
that
the
upp
and
securel
y.
pper
feed pressure stronger, the
the
upper
make
the
upper
the
upper
feed
dog will li
to
slip.
urning
the
adjustmen
er
feed
dog
will feed
upp
feed efficiency will be
feed pressure too st
ft
the
presser foot,
)
t
the
er feed
rong,
Page 6

ADJUSTMENT
(
'----·
----------
OF FEED
0.8mm
!
DOG
HEIGHT
*
When
needle pl
*
To adju
position
raise
the
feed
dog
0 is
ate, the
st the height
above
or lower the feed
standard
of
the
needle
the
lift
at
its highest
height
feed
plate,
ing
arm
dog
loose
is
0.8mm.
0 ,
0 .
position
move
n the set
above
the
it to the highest
sc
rew 8 ,
and
]
ADJUSTMENT
(
ADJUSTMENT
OF PRESSER
e
0
0
OF STITCH LENGTH
-·
FOOT
6mm
HEIGHT
*
The
sta
raised by using
topper
s
*
Loo
sen
presser
app
lied
sen the
Loo
ng
raisi
ndard
height of
the
f)
.
the
nut 0 of
foot
adjustment
to
the presser foot.
set
screw 0 ,
or lowering
the presser
knee lifter, an
the
adjustment
scr
ew e so
and
adjust
the presse r
foot
0 is
d locked by th e
screw
that
no
the
presser
bar
0 .
6mm
when
presser
and
pressure
foot
heig
then
will be
it is
foot
ht
the
by
Feed adjustment
dial assembly
*
Pr
ess
th
leng
se
tting the
*
The
amo
the maximum
Ill
Reve
When
to
its original posi
the
reverse l
(I - 4 on
unt
rse-operation
the
reverse le
ever 0 to
mode
reverse l
of
feed becomes
of
model 01
tion, and
_.......
Model
ls 003
ever
mec
ver
0 is
082-
8792- 003
the
center
and
013,
and
in
the
cent
er
greater
5 is 5 mm. The
hanism
pr
essed,
the
material will
position,
position,
as the
the
set the
I - 5 on model 0 15)
be certain
number
maxim
ma terial will be fed in
becomes l
um
automaticall
numb
er
to
the"
to press it a
arger.
stitch leng
the
y be fed
Feed adjustment
dial assembly
on the feed
12
th
reverse direction. Wh
adjustment
o'clock" position,
ll
the way into position.)
The
ma xi
mum
of bac
ktack
in
the
forward
Model
sewing, however, is
-6-
013
2- 8792-
dial which corresponds to
and then release
stitch lengt h
en
the
direction
.
013.0
of
mode
approximate
reve rse lever is released, it will
0
15
the
the
reverse lever 0 .
ls 003
and 013 is 4 mm , and
ly 2 mm.
desired stitch
(When
return
Page 7

(~_
A_D_J_U_S_T_M_E_N_
T
__
O_F_U_P_P_E_R
__
F_E_
ED
__
A_M
__
O_U_N_T
__________
____________
__________
~)
Upper feed adjustment dial asse mbly
\
--
Feed
a d
justmen~·
dial assembly
Model 0 82- 8792- 003 Model 082-8792-013.015
© Model
*
Pr
assembly to th e
*
Th
Ma
© Mod el
* Align the nu
Pr
the i
*
Th
© Model
* Align the
Press the reverse lever 0 to the cent
pin, a nd then rel
*
The
082-8792-00
ess the reve rse l
e upper feed
ximum feed amo
082-8792-013
mber
ess the reverse l
ndi
cation
pin
e up
per
feed a mou nt b
082-8792-015
number 8 on the upper-f
amo
unt
of upper feed be
eve
r 0 to
" 12 o'clock" position, release the r
amo
unt becomes larger
unt
= 6
6 (on the
ever
0 to the center pos ition,
, release the rever
eco
ease
the reverse l
@
~
,______,
3
th
e center positio n, and after settin
mm
upp
er feed stopper dial) wi
mes gre
eed
ever
comes
as
se
lever.
ate
r as th e n
stoppe
er positio
0 .
greater
0
eve
the
numb
and
afte r aligning the
umb
r dial with the indi
n, align th e desired
as the number
Upper feed stopper dial
g the desi
rse lev
er
O.
er becomes la rg
th th
e i
ndicati
er b
eco
mes larger.
catio
num
beco
mes l
er.
on
numb
n pin .
ber (I-
arge
red numb
pin
.
er (I ~ 6)
8) of the u
r.
Indication pin
er
( I ~ 6)
of
the u ppe r feed
pper
-feed
Upper feed adjustment dial asse mbly
on
the uppe r feed adj ust
adj
ustme
nt
adju
stme
nt
dia
l with the in
d ial assembly wi
men
t dial
dication
th
[~_
A_D_J_U_S_T_M_E_N_
Upper feed adjustme
dial assembly
Feed adjustme
dl
ol mombly
nt
1
Mo
* If the lowe r mat
nt
adjust me
* If th e
adjust me
* If the
u
pp
er feed
*
Turn the upper
lag.
dial assembl y to a l
upper
materia
nt
dia l assembly
uppe
r feed
adjustment
T
__
O_F_S_E_W
nt
\\ .
\
r-
del 082- 8792- 003
er
ial is long when sewing is finished , set th e u
l is l
adjustment
feed a djust me
__ IN_G
(~
arger
ong when sewi
to
a small
dial
is
dial.
nt
dial
__
LA
__ G ____
Fe
ed adjustment
dial
ass
embt
Model
num
ber.
ng is finished, set the u
er num
ber.
to be turned , first
assemb ly and the feed adjust me
____________________________________
feed
Upper
dia l assem
y
082
- 8792- 0 13.015
ppe
pper
turn the
adjustment
bl
y
~
~~
r f
eed adjustmen
feed adjust ment dial assembly
upper feed s
nt
dial
t di
topp
er
assem
bly little by little
al
dial
ass
to
The lower material is long.
Th
e upper ma terial is long.
emb
ly to a smaller num
to a larg
the
maximum numbe
to the plac
ber, or se t the feed
er numbe
r, and t
e wh
en
r,
or
there
set the feed
hen
turn
is
no
sewing
~)
the
-
7-
Page 8

(
GATHER
---
Model
* Use
the gather
* Use gr
The
tuck separato
SEWING
- ·---...
oup B or
Upper
feed a
assembly
for
es
djustment
gather
beautifu
sewing.
l tuck sewing.
dial
type
gauge
group L replacement parts
r e nsur
Model DB2
for
tuck
sewin
8792
g.
Upper
assembly
013.015
feed
adjustment
)
0
INSTALLING
Gath
er sewing
THE
GATHERING-SEPARATOR
Ill Sew ing me
I.
Turn the feed
2.
Set
the
amoun
3. B
ecause
of
material
factors, the
sing
by u
©
Partial
and
- 015
I.
Set the
Set
the
2.
3. Use the
lag.
When
4.
will begin
mach
(Use
desired
*
When
be
se wn wi
dial.
the amount
th
od
adjustment
upp
er feed
adjustment
t of
upper
feed
is
larger
the
amount
appropriate
the
gathering
feed
upp
er
upper
the gath
gather sewing, When the pe
ine will
the
upper-feed stopper
amount.)
the
gathe
th the amount
When
the
of feed
of gath
being used,
amount must be
adjustment
adjustment
feed s
feed
er
resume normal sewing
r-sewing
peda
dial.
is possible
dial to
topper
adjustment
sewing
pedal
pedal
of
l is relea s
set
by
dial
ering
the length
dial
feed
the
[Standard equipment on
to
set the
desired stitch
dia l
to a position
than
that
of the
differs
according
of the stit
with
model
the
desired s
to the maximum
dial
to e
0 is
depressed.
dal 0 is
.
dial
to
adjust
is
depr
essed, the
set
by the
ed,
the
material will
upper-feed adjustment
ch
determined
s
082
- 8792- 013
titc
limin
ate any s
the
gather
upp
er feed st
082-8792-015]
length
in which
lower
to
the
and oth
and set
h le
ngth
number.
the
machin
releas
ed.
material
be
sewn
dial.
the
feed.
type
er
.
ewing
the
to
th
will
oppe
with
.
e
e
r
/
Separator-p
I. Insta
ll
the guide
(I
nstall the guide b
2. Fit the se
3.
Adjust the
* R
efer to
figure A
(Install the sepa r
bar 0 by
ar 0 so
parator-plate assemb
sew
ing
mar
for the alig
ator-plate
using the
gi n by us
so
screw
that
it is in
dire
ly 0
on
to
the guide
ing the
grip scr
nment
of
the
that the needle wi
f)
and the wash
ct
contact with the
bar.
ew
0.
and then ti
front end
of the se
ll
not come
er
and
then
parator-plate.
into
0 .
proj
ecting
temporari
ghten the
con
tact
part.)
grip
with
ly
tight
it.)
8 -
0
late
en with the
sc
rew 0 firmly.
Fig. A
grip scr
Separator-plate
ew
0 .
Page 9

Model
082-8792-003
I. Turn the upper feed adjustment dial assembly to set the upper feed amount to maximum.
2.
Turn the machine pulley slowly.
3.
The minimum clearance between the upper feed dog and the presser foot should be approximately
is
type upper feed dog
~
4. Loosen the screw
0.
used, and
and
2.5
mm when the gathering type upper feed dog
adjust the clearance by moving the upper feed
Model
082-8792-013,
015
arm
1. Needle bar lift amoung
0
f)
is
used.
forward
1.0
or
backward.
mm when the forward-pulling
i :
I '
• j
I /
* Turn the machine pulley toward you. When the need
and adjust so that the rotating hook point 0
2.2mm
is
at
leO
is
at
·the center
the position
of
the needle
2.2mmabove
0.
* Adjust so that the clearance between the rotating hook point 0 and the needle 0
2.
Needle bar height
0
•
* Loosen the set screw
rotating hook point
* Refer to figure A for the lowest position of the needle bar
8.
and raise
0
is
about 0.5 mm when the rotating hook point coincides with the center line
or
lower the needle bar 0 so that the clearance between the upper edge
0.
and to figure B to raise the needle
Reference line
the lowest position, loosen
is
0.05
"'
0.1
mm.
Reference line
of
of
the needle
bar
0 by 2.2 mm.
Fig. A
thesetscrewf),
Fig. B
the needle hole and
0.
-9-
Page 10

~~·1i~*
~..;.:.:;__;~~-
1.
How
me~
:~i~~-~·~t~~tse
. i '
to remove the presser foot, upper feed dog, needle plate and feed dog
-'"---~·
~~*a~s:
· · · -
2.
(I) Loosen the set screw
(2)
Remove the set
(3)
Remove the hexagonal bolt
feed dog
(4)
Remove the cap screw
•
•
How
to attach the presser foot, upper feed dog, needle plate and feed
0
•
-----
•
..
---:~--
r----
I
• •
(5)
Remove the set screw
* For model
and then remove the upper feed dog
(I) Temporarily tighten the
(2)
Attach the needle plate 0 by using the cap screw
* Turn the machine pulley to move the feed
secure it
front/back and left/right margins
0.
plate
* Confirm the height
(3)
Attach the upper feed dog 0 by using the hexagonal bolt
(4)
Attach the presser foot 8
* Confirm the height
-~jii
Jl,
~
~
'-8
__
F.
* Confirm the clearance between the upper feed dog 0 and the
presser foot
(5)
Attach the needle 8 by using the set screw
0,
and then remove the needle
screw8,and
0.
DB2-B792-015,
in
place, by using the set screw
of
of
G. Refer to page
then remove the
0,
8,
and then remove the needle plate
f),
and then remove the
loosen the hexagonal bolt
dog
feed
dog(!)
the feed dog. Refer to page 6 .
by
using the set screw
the presser foot
8.
8.
presserfootG.
and then remove the upper
feed
dog(!).
0,
0.
by
using the set screw
dog(!),
f),
so that there are
in
the grooves
8.
Refer to page
0.
ofthe
f).
8.
and then
needle
0.
8.
6.
Slide plate
•
•
6mm
-10-
Page 11

3. Gauge parts
* Select the gauge
*
Group A of
with model
the replacement
OB2- B792- 015.
parts
(presser foot,
upp
er
feed dog, feed dog, needle plate) from
parts
is included with model
OB2
- B792
-003, group
tho
se
B with
show
n below.
model OB2
- B
792-0
13,
and
group
L
Replacement
parts code
Replacement parts
Group
A ·
1
83
041
- 0- 01
For str
etching
Men
's
jacket
Model
OB2- B792-003
Presser
151277- 0- 0 1 15 1383- 0-
e
Th
ese parts arc used to prevent sewing l
mater
e
The use
must
e
Th
ese
there will be no
* These
(Examples)
foot
ial as well
of
be
are
par
as
these
matched. ·
forward -pulling type parts. Becau
bu
ts
arc
not suitable for ga
For
sleeve caps,
clothes
Upper feed dog
parti
cularly s
parts
is especially effective when decorative sti tching is desired,
nchin g even when sew ing togeth er materials
01
ag
and puckeri ng whe n sewing
mooth materials which tend
ther
sewing.
underarms,backs,
15
se
the uppe r feed
shou
lders
Feed dog
1324- 0- 0 I
to
slip.
dog
of
and
side seams
Needle
151261- 0-
thin
or medium thickness
or
when
is located behind
different thic knesses.
of
men's
the
and
plate
01
patt
erns
needle,
women's
Replaceme
Gro
up B
183042- 0-
For
shirring
Attachment
Attachment
Girl's dress
Model
DB2- B792
nt
part
01
of rufncs
-0
of
13
s
e These
e These
cuffs
e If these pa rts
(Examples)
151281
- 0-
01
parts are
parts
materials (linings,
should be used togeth
an
adver
and
used in
are effective for the prevention
leather
are
used especially for gathering,
se effect on the bottom material (when the material
Attachment of
(Effective in preventing sewing lag when sewing different materia ls together).
151384- 0-
order
to
gat
and cloth,
er
with them.
yokes, gathered cuffs
01
her or tuck materia ls
knitted material
By
using the
151325- 0- 0 I
of
sewing lag.
the
gathering attachment (gathe ring se p
se
pa rts, th e
or
of
thin
or
medium thickness.
They
are also useful when differe
and
cloth, etc.)
amou
facing to children's
are
nt
of
ga thering can be increased,
is
thin)
151262- 0- 0 I
sewn together.
can
be prevented.
or
women's clothing
nt
arator)
11
-
-
Page 12

Replacement parts
Group C
183043-0-01
For
tucking prevention
Plain belt seam
Plain waist-lining seam
Presser
foot
Decorative stitches
pocket openings
Men's slacks
Replacement parts
Group D
183044-0-0
For
materials which
need large feeding
capacity
Attachment
of
Plain collar seam
sleeve
151286-0-01 151384-0-01
151326-0-01
151263-0-01
e These parts are used for gathering, decorative stitching and preventing sewing lag in medium
that
thickness materials. The fact
for partial gathering
of
bias materials as well.
(Examples)
of
Sewing princess lines on women's blazers, underarm seams of two-layered sleeves,
decorative stitches
waist-lining seams.
and for the prevention of puckering. They are very effective for the attachment
the area pressed by these parts
of
pocket openings on men's slacks, plain belt seams and plain
I
151324-0-01
Side
seam
151288-0-01
e A large feed dog
of
151385-0-01
the same length as the presser foot operates on both sides
e Materials that are difficult to feed, such as quilting materials, polyurethane, materials containing
elastic, vinyl, and bonded material, can be sewn easily without uneven feed
is
very large also makes them ideal
151261-0-01
of
the needle.
or
sewing lag.
Sewing underarm seam
Leather jacket
Replacement parts
GroupE
183045-1-0
For
hemming
I
(Examples)
151290-0-01
Underarm seams, shoulder seams, sleeves,
raincoats, etc.
151386-0-01
or
side seams
153200-0-01
of
e These parts are used for sewing a double-folded hem on lining materials
e Adjustment
e A double-fold wrapper
of
the amount
of
upper feed eliminates twisting even in the sewing of flared skirts.
is
necessary for this operation.
ski wear, leather jackets,
153199-0-0
of
skirts, dresses, etc.
I
-12-
Page 13

Replacement
parts
code
Presser
foot
Upper
feed
dog
Feed
dog
Needle
plate
Replacement
Group
F
183046
- 1- 0 I
For
top
stitching
uff stitches
C
Repl
aceme
Group
FD
1
83108
- 0- 0 I
part
nt pa rts
s
151387
- 0-
151292
e T h
e If
and
e
The
(Examp
153983
e A s
e
Co
- 1-
01
ese
parts are
the
stitch
the n use a file
se
parts are also
le)
used for s
widt
Collar and
- 0- 01 151
tep
presser is
nsiste nt stit
ch
titchin
h is less
than 7 mm
to
decrease
used for
attached
widths can be o
hem
cuff stit
to the righ t side
g wit h a
, m
easure the width
the
width
stit ch
es
ches
on
387
- 0- 01
btained when
01
width
of
on
dre
silk
ss shirts.
of
151
327
- 0- 01
of 7 mm.
from
the
the right
portion
cotton material, etc. ,
15132
7- 0-
the F-group pre sse r
sew
ing
patches
point
of
the presser f
as
01
foo
or hems.
where
well
t.
as
151264-0- 0
the needle
oot
for
151
descen
accordingl
general
264
- 0- 0 I
stitches.
I
ds,
y.
C
uff stitches
Replacement
Group
G R
183047
- 0- 01
For
attachment
ri
ght zipp
er
!
Re
placem
ent
Gro
up
GL
183048
- 0 01
For
attachme
left z
ipp
er
part
of
parts
nt
of
s
(Example)
151
293
e T he se
ee
th of the z
t
e Su
ita
ble for sewi
e
Th
is
group ca
(Ex
ampl
es)
Colla
- 0-
01
parts arc
ipp
Rea r zi
Front zippe
r a
nd cuff stitch
151
used
for
sewi ng
er
facing
rig
ng
bias
materials (when a free-pr
n a lso be used f
ppers
of skirts a nd one-piece d resses.
rs
of slacks an
es
on dress s
388
- 0- 01
medium
ht
and the material
or
sewing extremely
d pa nts.
hirt
s.
151
thickness mat
to
be s
esser
close
328
- 0- 01
erial
on
the
left s
ewn
facing left, a nd then
is used).
to
the
edges
1
51265
ide
of
zippe
of material s.
- 0-01
rs. Pl
ace
sew them.
the
151
296
.
I
.
.
.
l
e
Th
ese
teeth of the zi
e S
uitabl
e T his g
(Example}
- 0- 01
part
s a rc used f
pper
e fo r sewing
roup can al
Sid e z
so
ipp
151389
or
sewing
facing left
bias material
be used
ers
of skirts and one-
- 0- 0 I
medium
and
for
thickness m
the material to be sewn faci ng ri
s when a fr
sew
ing extr
ee-presser
emely
piece
dre
- 13 -
1
51329
ate
rial on the right
is used.
close
to the
sses .
0 01
edges
side
of zipp
ght. and th
of mate ria ls .
151266
en
sew them.
- 0-
01
ers. Place
the
Page 14

Replacement
parts code
Repl
ace
ment
part
Gro
up
H
Fo r p
oc
ket welting
"S
uisei" LOT o.A 10
Presser
s
foot
Upper feed dog
Feed dog
Needle plate
L{J LIJ
Wrapped hem
/
L_f=!
Double-fol
hem
Piping
Rep
Group
183064- 0- 0 I
For
C
ollar stitch
Folded hem
//
j
~
ded
Bin
/ fold ed hems, bi nd ing he m
laceme
nt
J
stretch
ing
,...:'
/ e
Th
e C o
ding hem e By
part
s
e
Th
e
Th
is used .
e
If the stitch wi
and then use a
e
(Ex
Th
amp
es
151299
- 0- 01 151
ese
par
ts a rc used
mm
ercially sold needle plat
com
bi ni
ng
diff
151622- 0- 01
ese parts a rc used
ere is no
ese
le)
part
bun
chin g eve n when layered edges are sewn becau
dth
fi
le
s arc a l
Co
llar
"S
uis
s.
as well
kir
ei"(LOT
1
5132
of 10 mm.
idth
ht
portio n o f the presser foot accord ingly.
ts.
383
- 0-
01
for
sewing w
erent wrappers, the following hem stitc hes a re possibl e: folded he ms, do
s,
for
sewing stitches w
is less t
han
to
decrea se the wi
so
used for sewing h
and cuff stitches on dress s
rapp
ed
hem
es a nd feed dogs
pipin g (groove processing necessary), etc.
5162
1- 0- 01
1
ith a width
10
mm
, measu re the w
dth
of the rig
em
stitches on silk cotton. etc. as we
o. A 1
0)
"Suis
ei'
as wrappers can be used.
4- 0- 0 I
se
the forwa rd-
from the po
int
15126
pulling upp
where the needle descends,
ll
as for gener
'(L
OT No. A
1- 0-01
er feed dog
al stitches.
ubl
10
)
e-
Repl
aceme
nt
Group
J O
183109- 0- 01
C
ollar
stit ches
eplace
3065
r s
hirring
nd
era rm seam
U
me nt
- 0- 0 I
R
Group K
18
Fo
part
part
s
e A ste p presser is
e
Examp
(
s
e
e
e T he upper f
s
153984- 0- 01 151621- 0- 01
attached to the right side
Co
nsistent stitch widt hs ca n be obtain ed by using these part
Collar
and c
uff
le)
153170- 0- 0 I
Attaching z
Th
ese parts arc used for a tt ac hing the type of z
pla
ce
ipp
ers to thi ck materials such
ee
d d
og
has te
d o n the left side of the needle.
stitches o n dr
153171- 0- 01 151329- 0-
eth
only on the right s
of
ess
as
151
the
F-g
skirts.
jersey,
quiltin
ipp
er that can be separa ted .
ide
of the needl
32
4- 0- 01
roup presser foot.
s when sewing pa tches
01
g,
etc.
e.
The teeth
151
26
1- 0- 01
or
hem
s.
151266- 0- 0 I
of the zipper should be
- 14 -
Page 15

Replacement
parts code
Presser foot Upper feed dog
Feed dog
Needle plate
Replacement
Group
L
1
83085
- 0-
For
shi
rring
Attachmcm
Gir
l's
dre
Model
D
B2-B
792-0 15
Replaceme
Group
M
183107
- 0- 01
nt
ss
01
part
of
part
s
cuffs
s
1
e
These part
e
The
diffe
e If
s
hould
and
e
There
s
ewn.
(Examp
53575
se
rent
the
se
an
is
les)
- 0- 0 I
s a rc used fo r
parts arc
materia
parts arc
be used t
adverse
no
groove
Attaching yoke
diff
effective
ls t
oget
used
ogethe
effect
on
ere
nt
mate
1
5358
1- 0-
gathering or tucking
for the preven
her (l
inings. leather
especially for
r with
them
. By us
on
the bott
the
om
presser
s.
gathered cuff
rials
arc sewn
mater
foot
01
tion
of sewin g
and
gathering.
ing
the
ial
to
prevent the
s,
togethe
thin
or medium
cloth.
the gatheri
se
part
(when
or
insi
r).
1
53577
s. the
the
bunching of
0- 01
lag
and
knitted
ng
amount
mater
de
linings (sewing l
151
263-0-0
thickness
arc part
mat
attachment (gathering separator)
ial is thin) can be preve
icular
erial and
of gat
materia
materials.
ly useful for sewin g
cloth
, etc .).
hering
can
be
l when
thin material
ag
is
prevent
1
increased,
nted
.
ed
when
is
I
I I
I
I
I
GATHERING
SEPARATOR
183084- 0- 0 I
I
I
I
1
e
The
the edges
e Slide
e T wists in the
dog.
e Both
153978- 0 01
se
parts ar
c used
of
materials.
th
e presse r
ma
thin
mat
erial
[Standard
e T he
bct
e The usc
whe n
e
!\
stitc h g uide is
e
To be.:
1539
for stitching do
foot
to t
he
teria l are
s. such
prevent
as
equipment
amount of gath
wco.:n
the
top
of
the gathering separa to r prevents the bott
thin materia
used with
82
- 0- 01 151324 0 01 1
uble z
ippers and
left
and
righ t in
ed
by
these
crepe.
and
medi
on
8792-015
erin g can be incr
and bottom material s.
ls
arc gath
attached.
type B o r type L
ere
order
part
um
d.
arc also
to
s beca u
thickne
eased
gauge
eff
ective
opera te.
se
the needle moves be
ss
mat
erial s
typ
e]
by inserting
om material fro m puckering
part
>.
5126
fo r sewing extr
hind
can
be se wn.
the
gath
eri ng se
1- 0-
eme
the
upper
01
ly close to
feed
parator
15 -
Page 16

$ BROTHER
INDUSTRIES,
NAGOYA,JAPAN
LTD.
117-792
192792-1-02
Printed in Japan 1
I
l
 Loading...