

Page 1
HTML
Version 0
USA
©2012 Brother Industries, Ltd. All rights reserved.
file:///C|/Documents%20and%20Settings/mcampbell.AM/My%20Documents/ADS2000solutions/index.html[3/11/2013 10:23:20 AM]
Page 2
USER’S GUIDE
USER’S GUIDE
General Information
1 General Information
2 Before Scanning
3 Scan From Your Computer
4 Scan Using the Scan Key
on the Control Panel of the
Machine
5 Managing the Machine
from Your Computer
6 Routine Maintenance
7 Troubleshooting
A Specifications
B Appendix
Index
USER’S GUIDE
ADS-2000
Version 0
USA
©2012 Brother Industries, Ltd. All rights reserved.
file:///C|/Documents%20and%20Settings/mcampbell.AM/My%20Documents/ADS2000solutions/index-1.html[3/11/2013 10:23:24 AM]
Page 3
cover1
USER’S GUIDE
ADS-2000
Version 0
USA
file:///C|/Documents%20and%20Settings/mcampbell.AM/My%20Documents/ADS2000solutions/cover1d.html[3/11/2013 10:23:24 AM]
Page 4
General Information
General Information
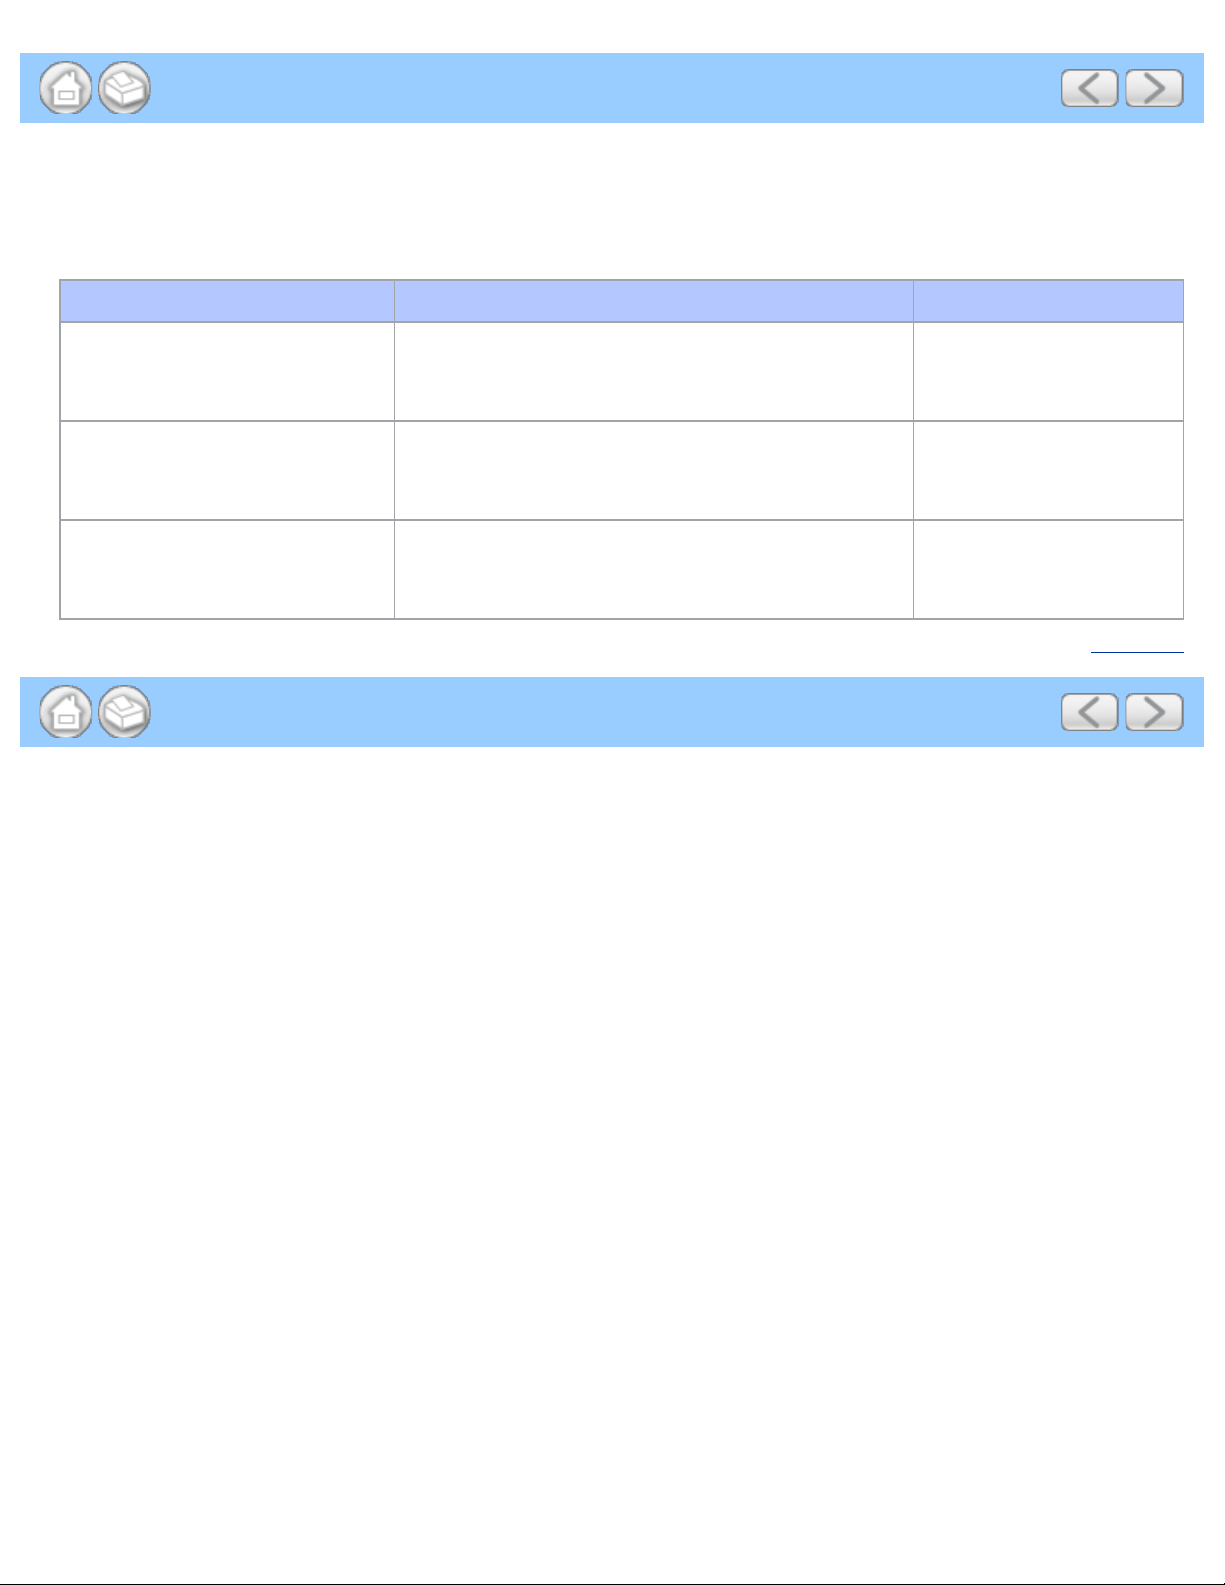
User's Guides and where to find them?
Which manual ? What's in it? Where is it ?
Product Safety Guide Read this Guide first. Please read the Safety
Instructions before you set up your machine. See this
Guide for trademarks and legal limitations.
Quick Setup Guide Follow the instructions for setting up your machine
and installing the drivers and software for the
operating system and connection type you are using.
User’s Guide Learn the Scan operations and security features,
learn how to perform routine maintenance, and see
troubleshooting tips.
Printed / In the box
Printed / In the box
HTML file / DVD-ROM
Page Top
file:///C|/Documents%20and%20Settings/mcampbell.AM/My%20Documents/ADS2000solutions/intro1.html[3/11/2013 10:23:25 AM]
Page 5
General Information
1 General Information
Using the Documentation
Thank you for buying a Brother machine! Reading the documentation will help you make the most of your machine.
Symbols and Conventions Used in the Documentation
The following symbols and conventions are used throughout the documentation.
CAUTION
Important
Note
Bold Bold style identifies keys on the machine control panel or computer screen.
Italics Italicized style emphasizes an important point or refers you to a related topic.
CAUTION
result in minor or moderate injuries.
Important
result in damage to property or loss of product functionality.
Notes tell you how you should respond to a situation that may arise or give tips
about how the operation works with other features.
Electrical Hazard icons alert you to possible electrical shock.
indicates a potentially hazardous situation which, if not avoided, may
indicates a potentially hazardous situation which, if not avoided, may
Page Top
file:///C|/Documents%20and%20Settings/mcampbell.AM/My%20Documents/ADS2000solutions/chapter1.html[3/11/2013 10:23:25 AM]
Page 6

Before Scanning
2 Before Scanning
Before Scanning
Before using the Scan to PC key, the Scan to USB key or attempting any other scanning operation, confirm the
following:
• Make sure you have installed the Brother software (MFL-Pro Suite) by following the steps in the Quick Setup
Guide.
• Make sure that the interface cable is physically secure.
Page Top
file:///C|/Documents%20and%20Settings/mcampbell.AM/My%20Documents/ADS2000solutions/chapter2.html[3/11/2013 10:23:26 AM]
Page 7
Scan From Your Computer
• Advanced Mode
3 Scan From Your Computer
Change the User Interface of ControlCenter4 (Windows®)
ControlCenter4 has two operation modes: Home Mode and Advanced Mode. You can change the mode at any time.
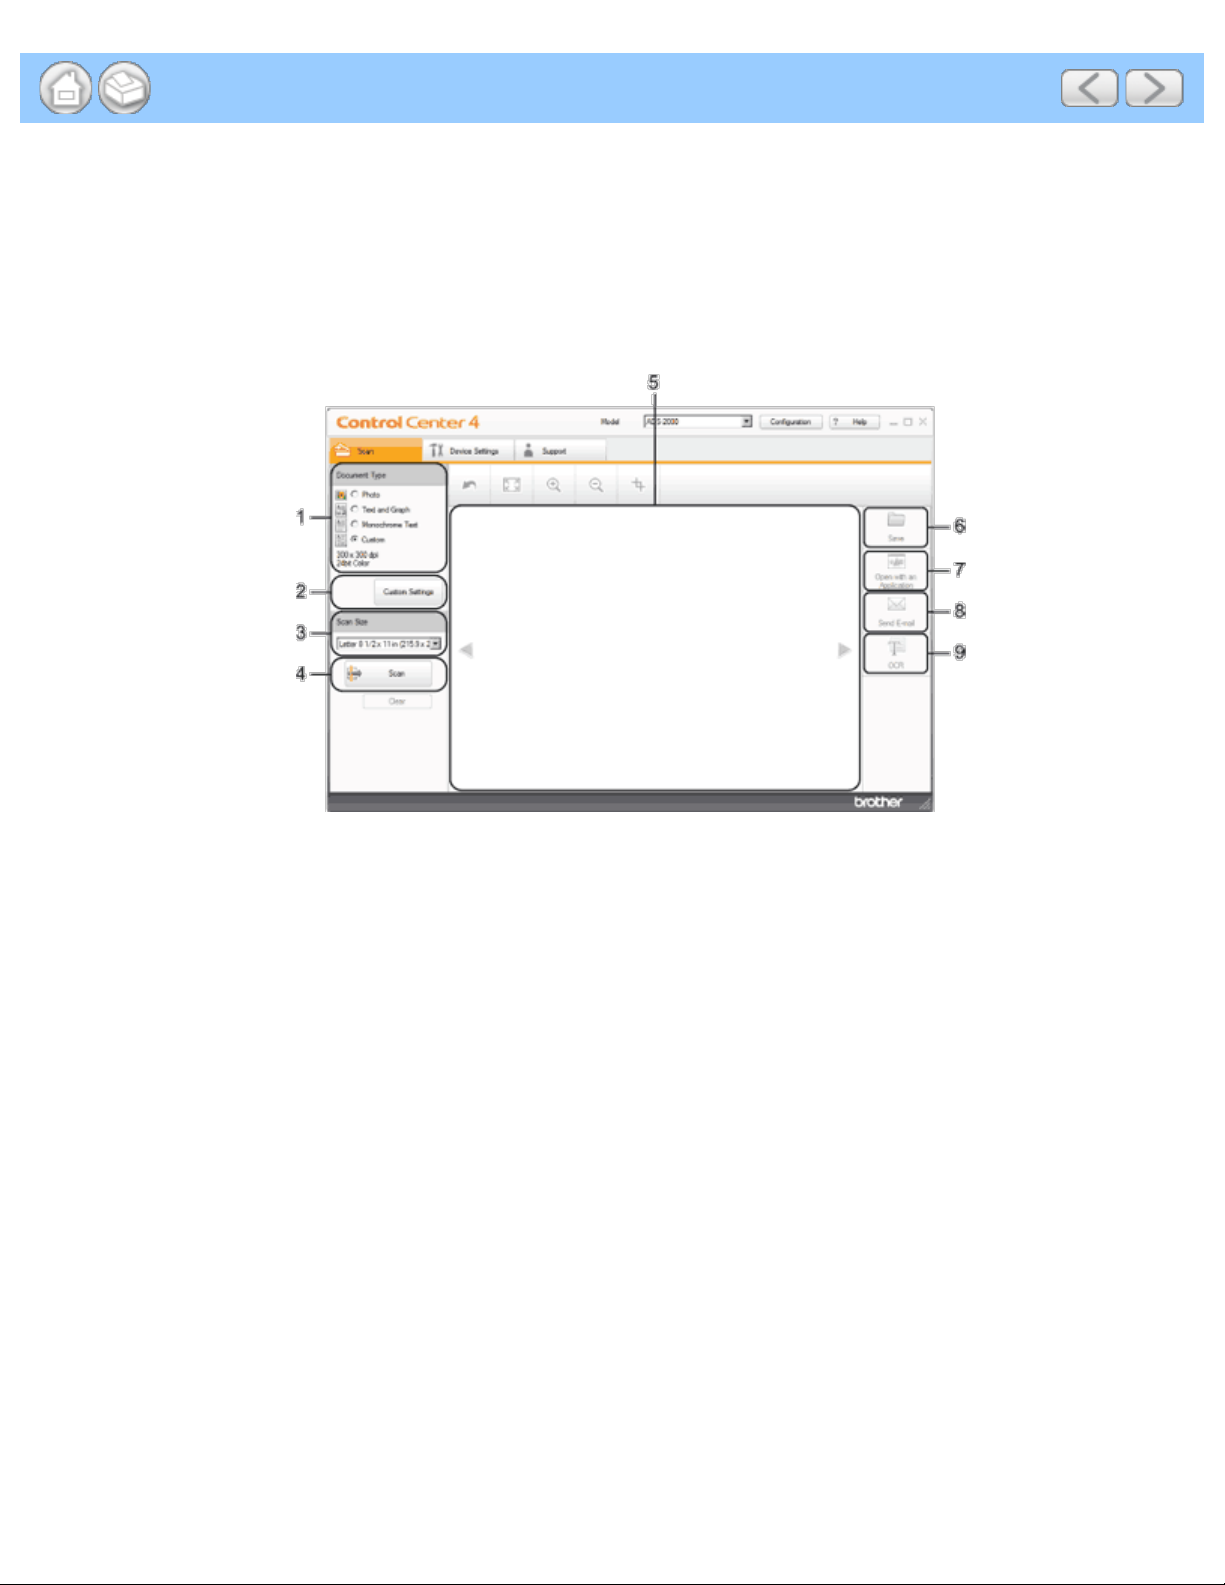
• Home Mode
Lets you access your machine's main functions easily. You can intuitively use the functions without any settings.
1. Document Type option
Lets you select a document type.
2. Custom Settings button
Lets you configure scan settings.
3. Scan Size drop -down list
Lets you select a scan size.
4. Scan button
Lets you start scanning.
5. Image viewer
Displays a scanned image.
6. Save button
Lets you save a scanned image to a folder on your hard disk in one of the file types shown in the file
attachment list.
7. Open with an Application button
Lets you scan an image directly into your graphics application for image editing.
8. Send E-mail button
Lets you scan a document to your default E-mail application.
9. OCR button
Lets you scan a document and convert it to text.
file:///C|/Documents%20and%20Settings/mcampbell.AM/My%20Documents/ADS2000solutions/chapter3.html[3/11/2013 10:23:27 AM]
Page 8

Scan From Your Computer
Gives you more control over the details of your machine's functions. You can also customize one-button scan
actions as you like.
1. Image button
Lets you scan a document directly into any graphic viewer/editor application.
2. OCR button
Lets you scan a document and convert it to text.
3. E-mail button
Lets you scan a document to your default E-mail application.
4. File button
Lets you save a scanned image to a folder on your hard disk in one of the file types shown in the file
attachment list.
To change the operation mode, perform the following steps.
Click the (ControlCenter4) icon in the task tray and then select Open from the menu.
1
The ControlCenter4 window will appear.
Note
You can also start ControlCenter4 by doing one of the following:
•
(Windows
Double- click the
file:///C|/Documents%20and%20Settings/mcampbell.AM/My%20Documents/ADS2000solutions/chapter3.html[3/11/2013 10:23:27 AM]
®
XP, Windows Vista®)
(ControlCenter4) icon in the task tray.
Page 9

Scan From Your Computer
• Click ControlCenter4 located in Start/All Programs/Brother/ADS-XXXX (where XXXX is your model
name).
Click Configuration and then select Mode Select .
2
Select Home Mode or Advanced Mode in the mode dialog box.
3
Page Top
file:///C|/Documents%20and%20Settings/mcampbell.AM/My%20Documents/ADS2000solutions/chapter3.html[3/11/2013 10:23:27 AM]
Page 10
Scan Using the Scan Key on the Control Panel of the Machine
4 Scan Using the Scan Key on the Control Panel of the Machine
Scan Using the Scan Key on the Control Panel of the Machine (Windows®)
• Scan to PDF
• Scan Photos and Graphics
• Scan to E-mail attachment
• Scan to an Editable Text File (OCR)
• Change the Feature Assigned to the Scan to PC Key to set the Default Scan-to Action
• Save Scanned Documents to a USB Flash Memory Drive
• Save Scanned Documents on Mobile Devices
Scan to PDF
You can scan and save documents as PDF files using the Scan to Image feature.
Click the (ControlCenter4) icon in the task tray and then select Open from the menu.
1
The ControlCenter4 window will appear.
Note
You can also start ControlCenter4 by doing one of the following:
•
(Windows
Double- click the
• Click ControlCenter4 located in Start/All Programs/Brother/ADS-XXXX (where XXXX is your model
name).
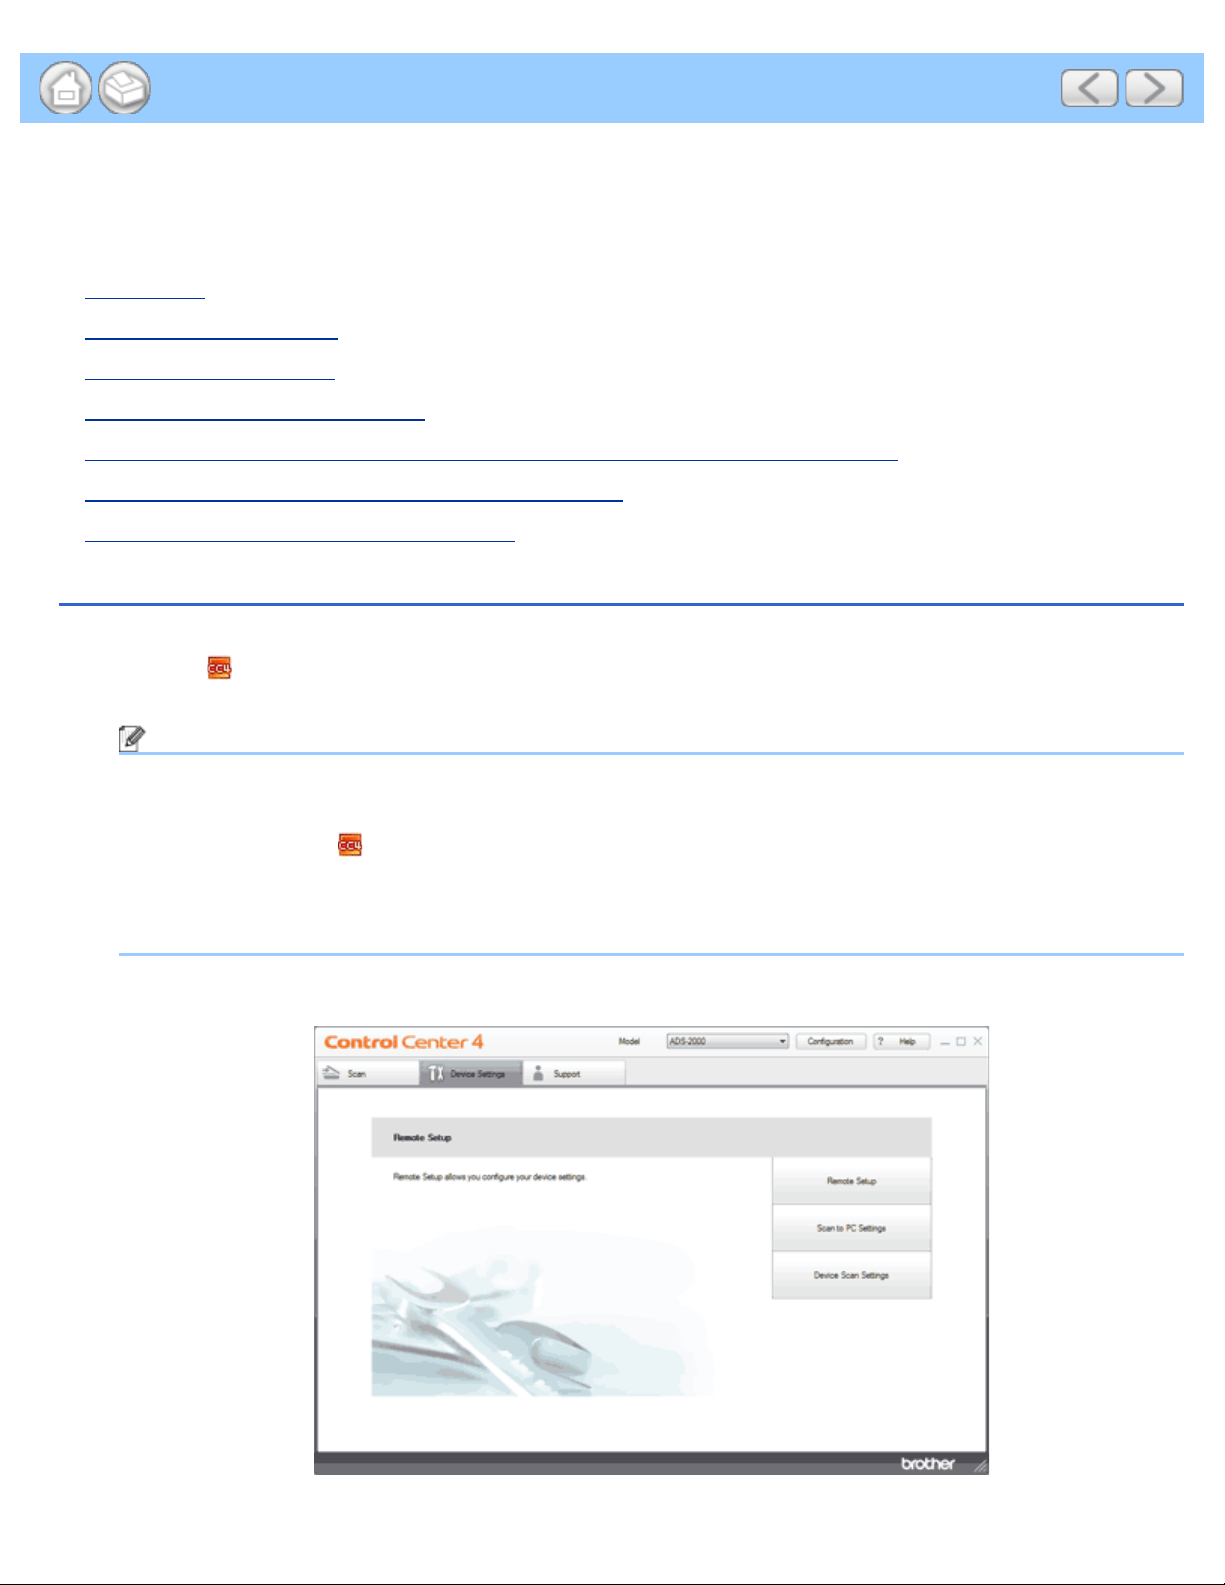
Click the Device Settings tab (the example below uses Home Mode).
2
®
XP, Windows Vista®)
(ControlCenter4) icon in the task tray.
file:///C|/Documents%20and%20Settings/mcampbell.AM/My%20Documents/ADS2000solutions/chapter4.html[3/11/2013 10:23:28 AM]
Page 11
Scan Using the Scan Key on the Control Panel of the Machine
3
Click the Scan to PC Settings button. The Remote Setup window will appear.
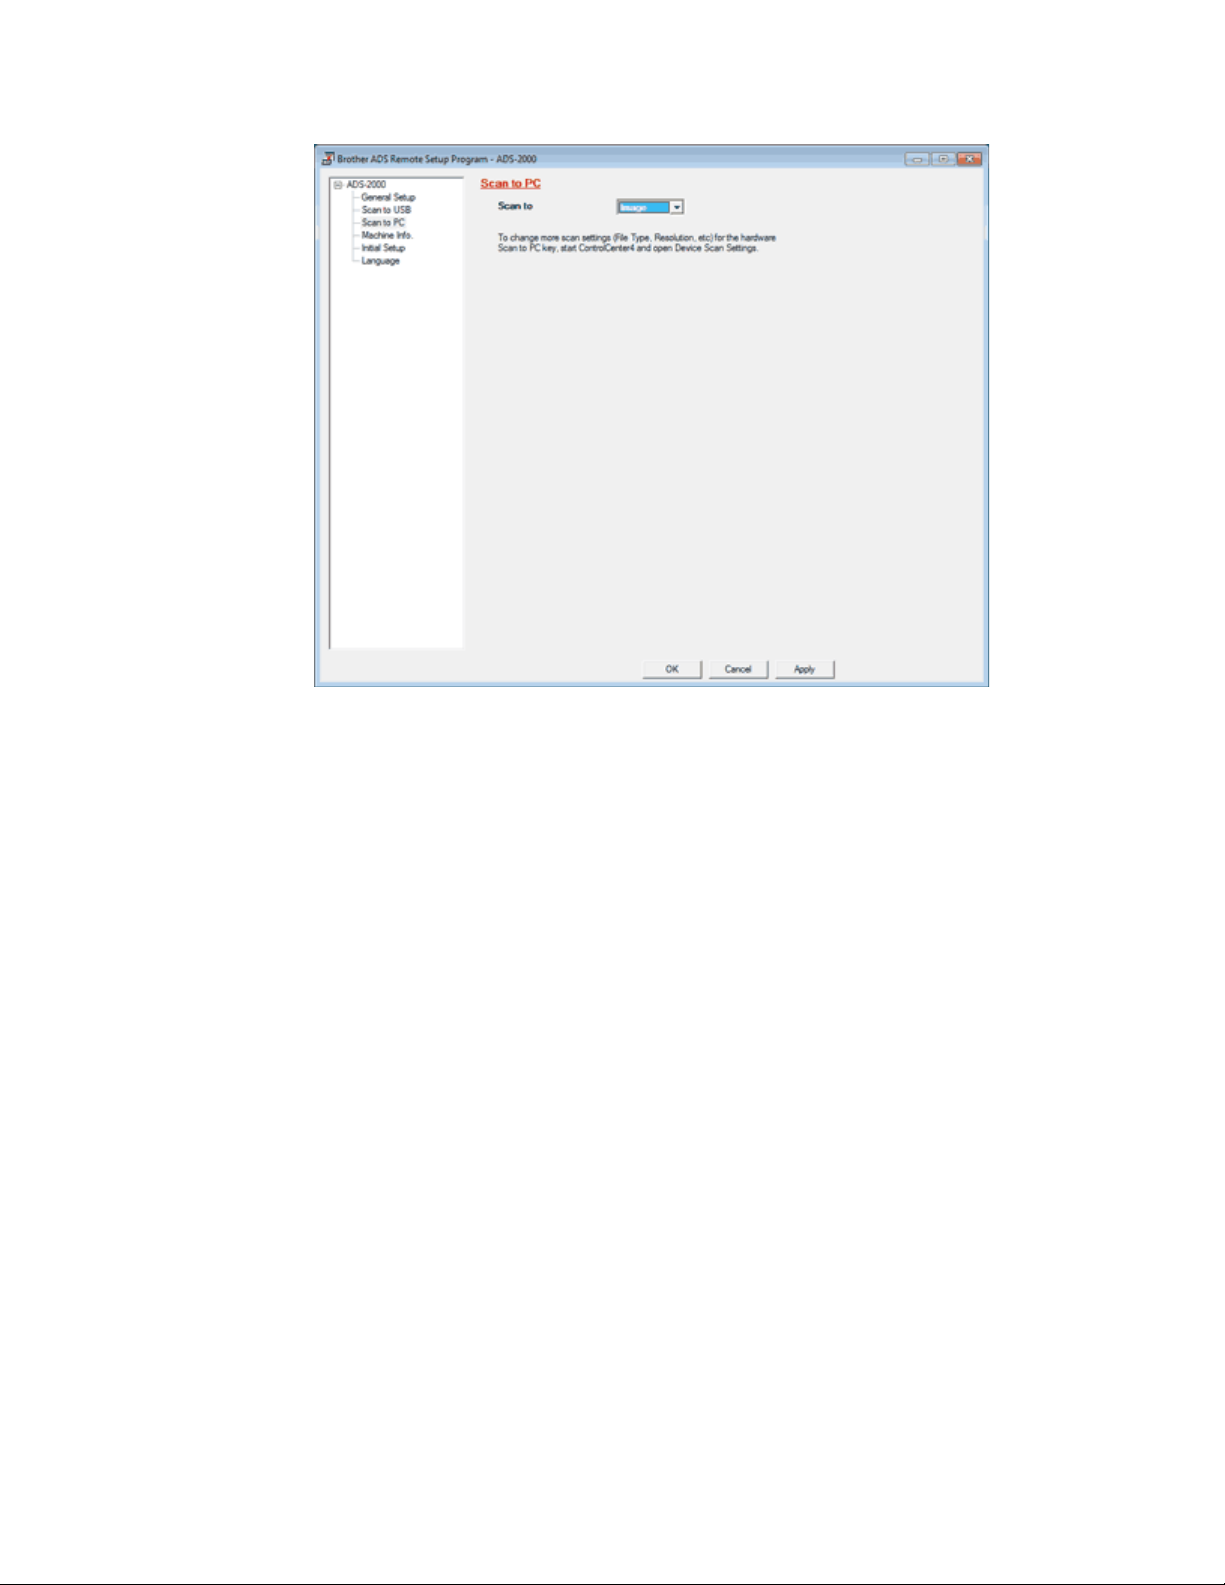
Select Image from the drop-down list.
4
Click the OK button to close the Remote Setup window.
5
Click the Device Scan Settings button on the Device Settings tab. The Device Scan Settings dialog box will
6
appear.
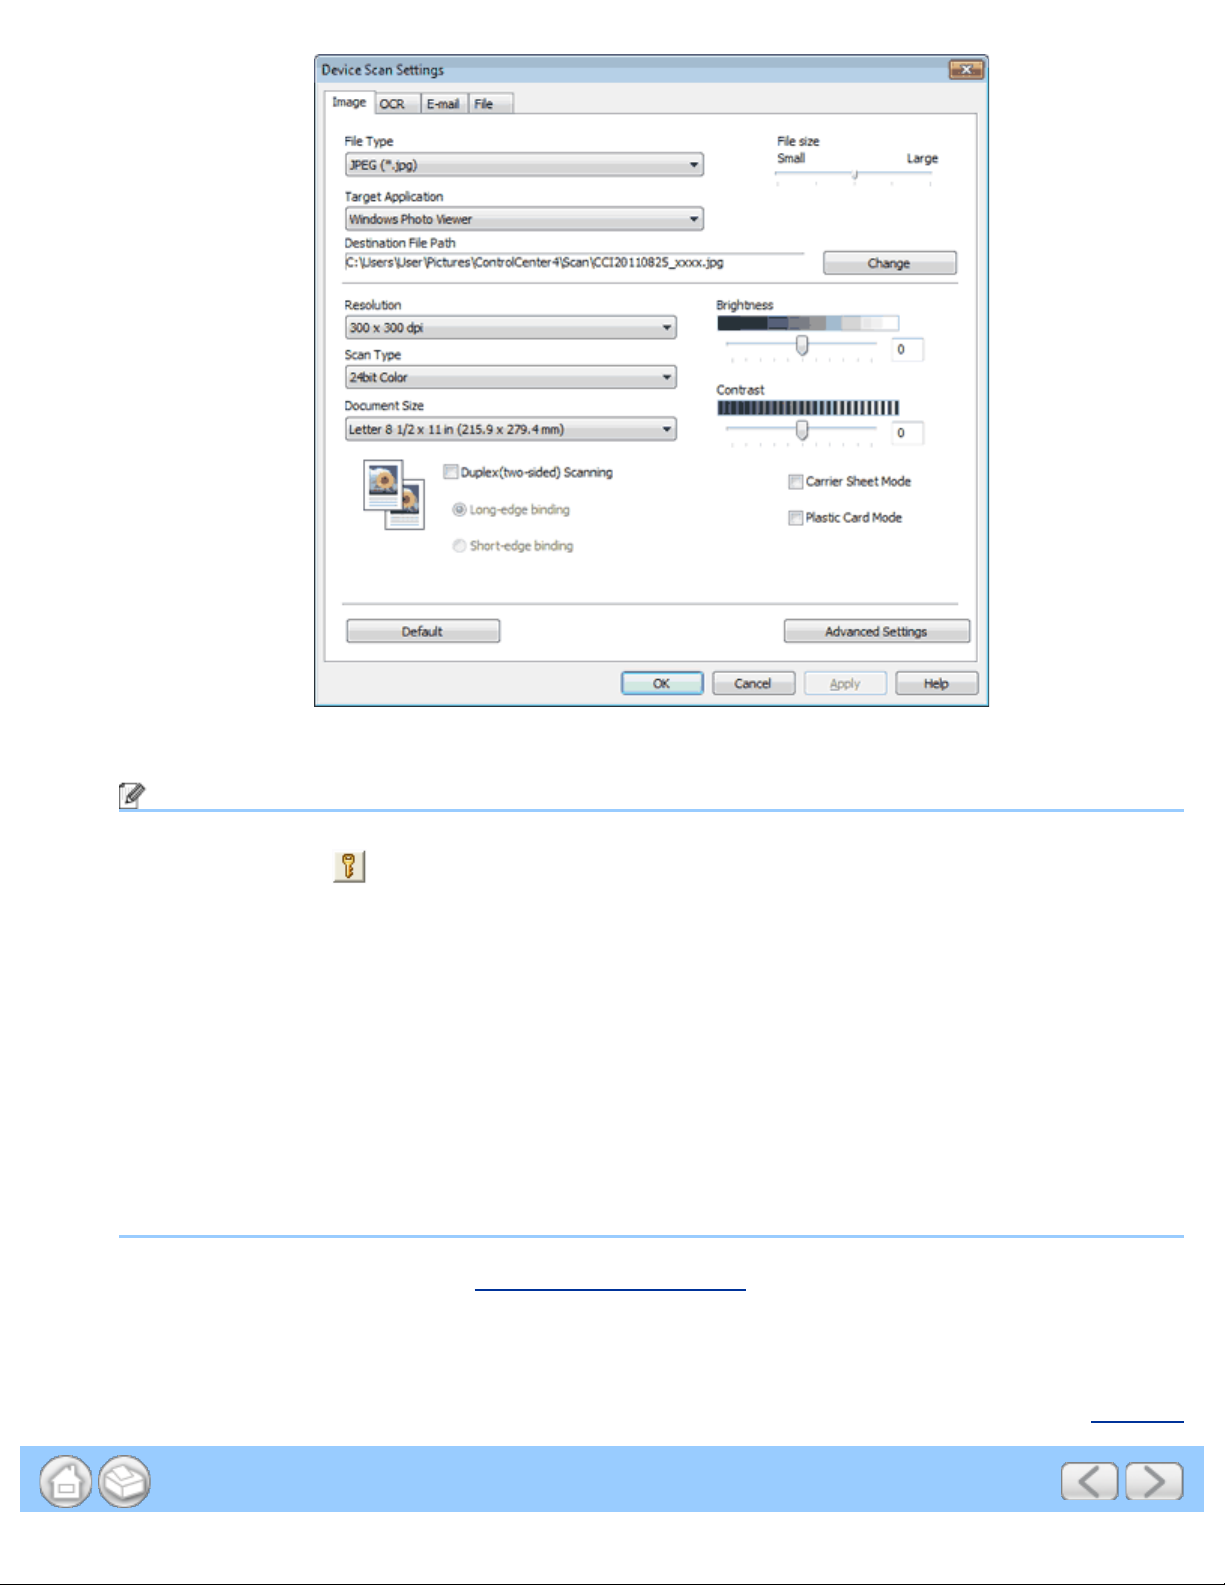
Click the Image tab.
7
file:///C|/Documents%20and%20Settings/mcampbell.AM/My%20Documents/ADS2000solutions/chapter4.html[3/11/2013 10:23:28 AM]
Page 12
Scan Using the Scan Key on the Control Panel of the Machine
Select PDF from the File Type drop-down list.
8
Note
To save the document as a password-protected PDF, select Secure PDF (*.pdf) from the File Type drop-
•
down list, click the
• Searchable PDF is a file format that includes the text data layer over a scanned image. This layer allows
you to search the text on the image data. The OCR language setting must be set to match the language
you want to make the searchable PDF for.
• To save the document as a searchable PDF, select Searchable PDF (*.pdf) from the File Type drop-down
list.
• To save the document as a searchable PDF, Nuance™ PaperPort™12SE must be installed on your
computer.
• Several file types such as TIFF, TIFF Multi-Page, PDF, Secure PDF and JPEG support file size
compression. Select Uncompressed or Compressed to adjust the file size for TIFF or TIFF Multi-Page. For
PDF, Secure PDF and JPEG, use the slider to adjust the file size.
Change other settings if needed (see Change Scan to PC Settings).
9
Load your document.
10
(Set PDF Password) button, and enter the password.
Press Scan to PC. The machine starts scanning.
11
file:///C|/Documents%20and%20Settings/mcampbell.AM/My%20Documents/ADS2000solutions/chapter4.html[3/11/2013 10:23:28 AM]
Page Top
Page 13

Scan Using the Scan Key on the Control Panel of the Machine
file:///C|/Documents%20and%20Settings/mcampbell.AM/My%20Documents/ADS2000solutions/chapter4.html[3/11/2013 10:23:28 AM]
Page 14
Managing the Machine from Your Computer
5 Managing the Machine from Your Computer
Monitor the Status of the Machine from Your Computer (Windows®)
The Status Monitor utility is a configurable software tool for monitoring the status of one or more devices, allowing you
to get immediate notification of error messages such as document jam.
• Monitor the Status of the Machine from Your Computer
• Turn Off the Status Monitor
• What are the Status Monitor Indicators?
Monitor the Status of the Machine from Your Computer
Do one of the following:
1.
Double- click the
icon in the task tray.
2. Select Status Monitor located in Start/All Programs/Brother/ADS-XXXX on your computer.
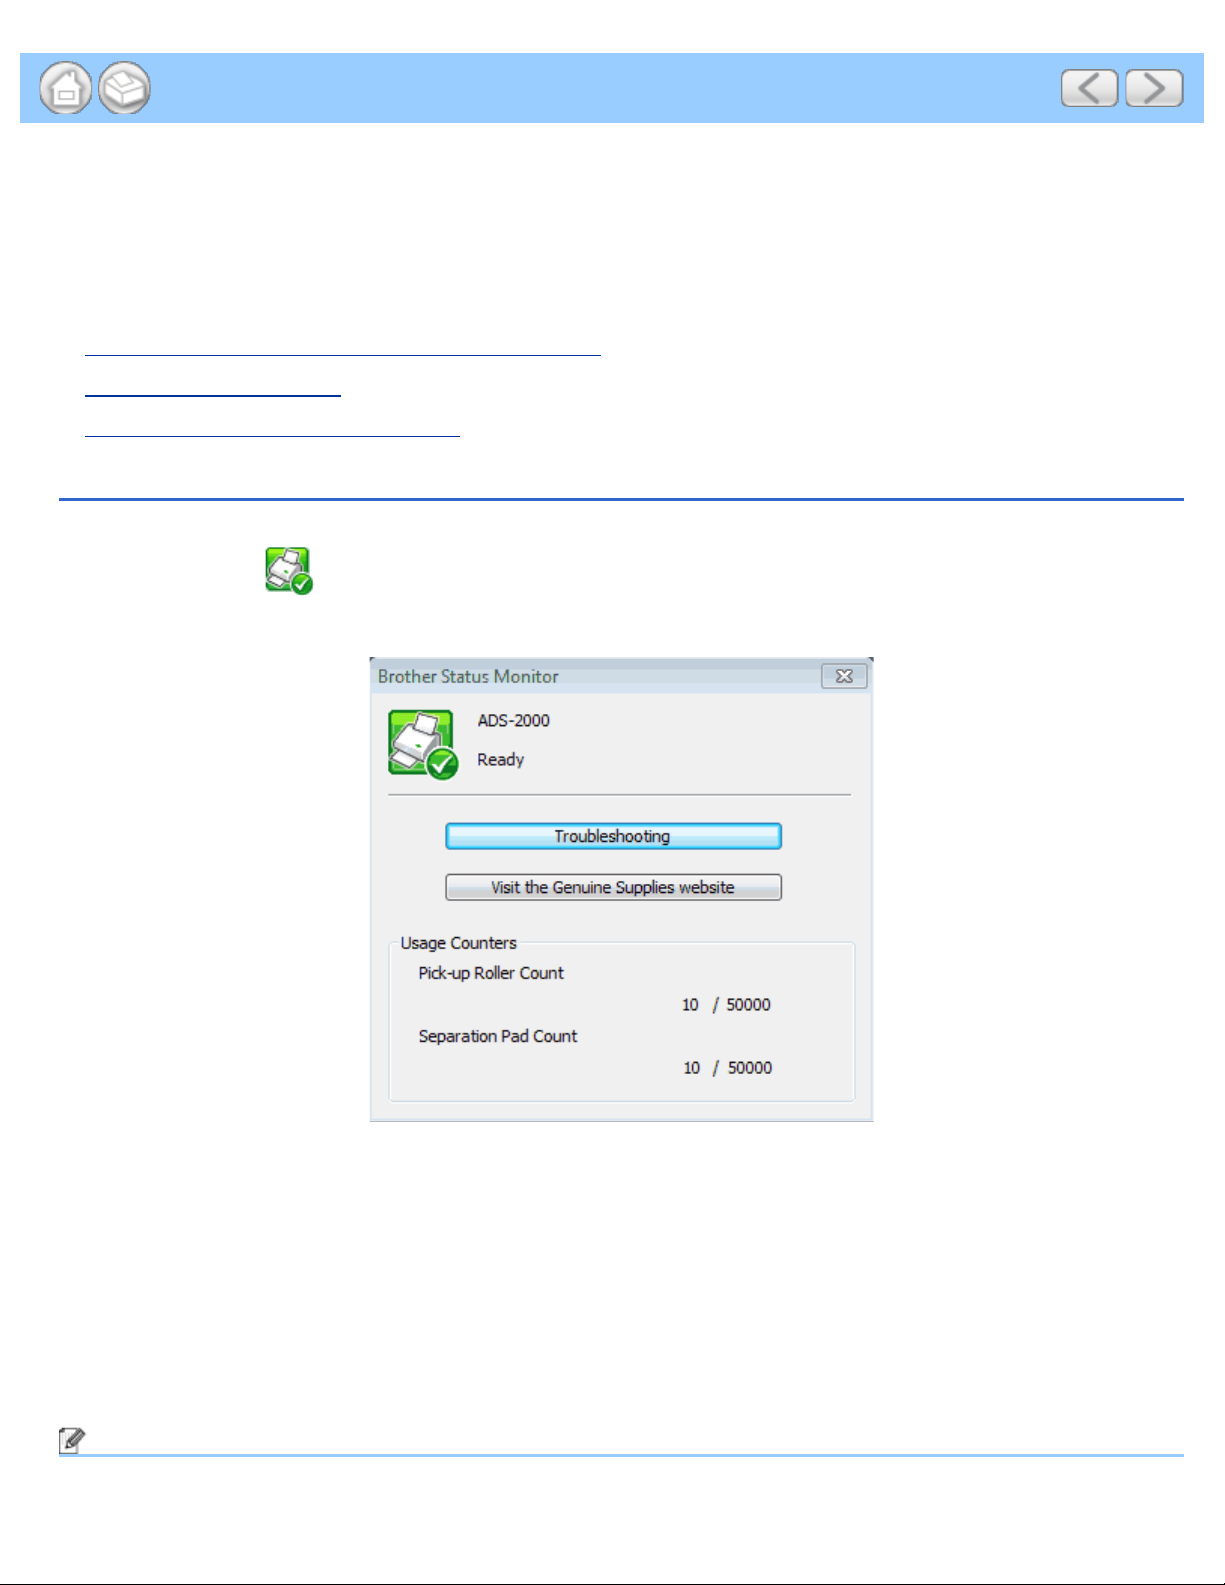
• Troubleshooting
Lets you access the troubleshooting web site by clicking the Troubleshooting button.
• Visit the Genuine Supplies website
Lets you access the Brother genuine supplies web site by clicking the Visit the Genuine Supplies website button.
• Pick-up Roller Count
Displays the Pick-up Roller replacement cycle.
• Separation Pad Count
Displays the Separation Pad replacement cycle.
Note
For more information about using the Status Monitor software, right-click the Brother Status Monitor icon and
file:///C|/Documents%20and%20Settings/mcampbell.AM/My%20Documents/ADS2000solutions/chapter5.html[3/11/2013 10:23:28 AM]
Page 15

Managing the Machine from Your Computer
select Help.
Page Top
file:///C|/Documents%20and%20Settings/mcampbell.AM/My%20Documents/ADS2000solutions/chapter5.html[3/11/2013 10:23:28 AM]
Page 16
Routine Maintenance
6 Routine Maintenance
Clean the Outside of the Machine
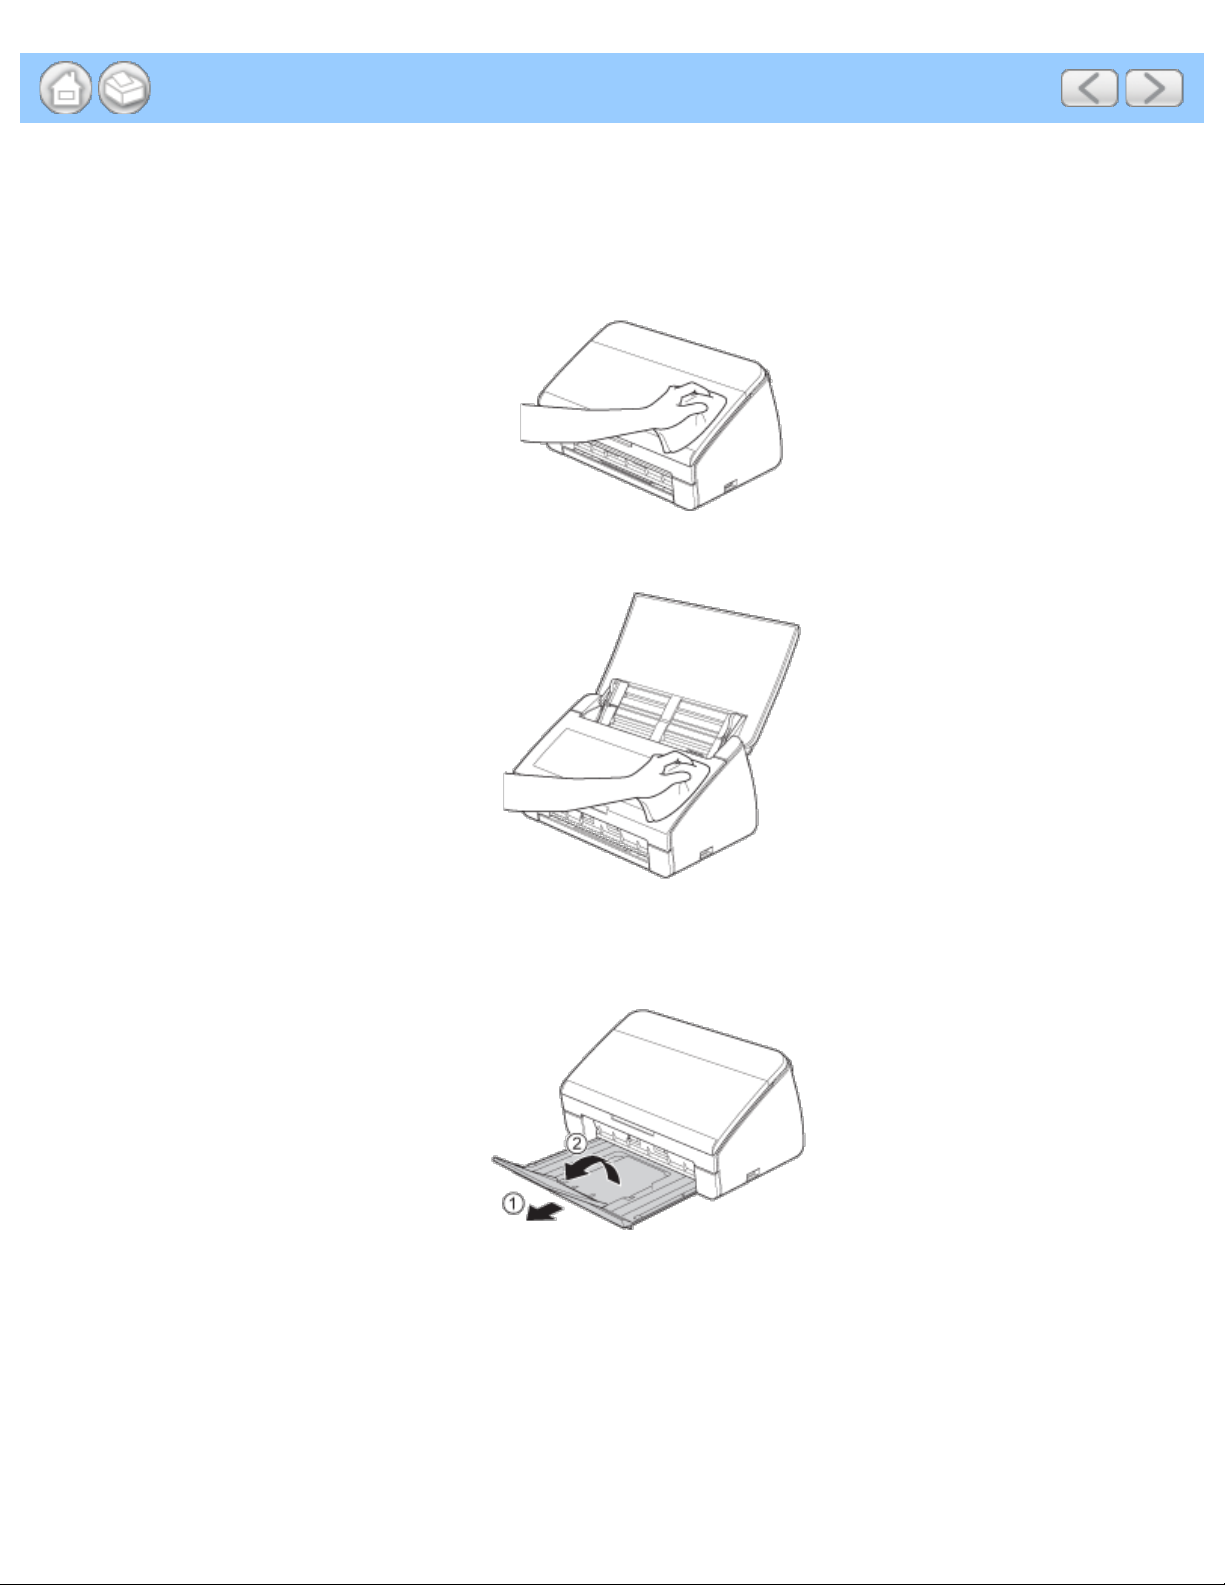
Wipe the outside of the machine with a dry, soft, and lint-free cloth to remove dust.
1
Open the Top Cover. Wipe the Control Panel with a dry, soft, and lint -free cloth to remove dust.
2
Close the Top Cover.
3
Pull the Output Tray (1) out and unfold the Document Stopper (2).
4
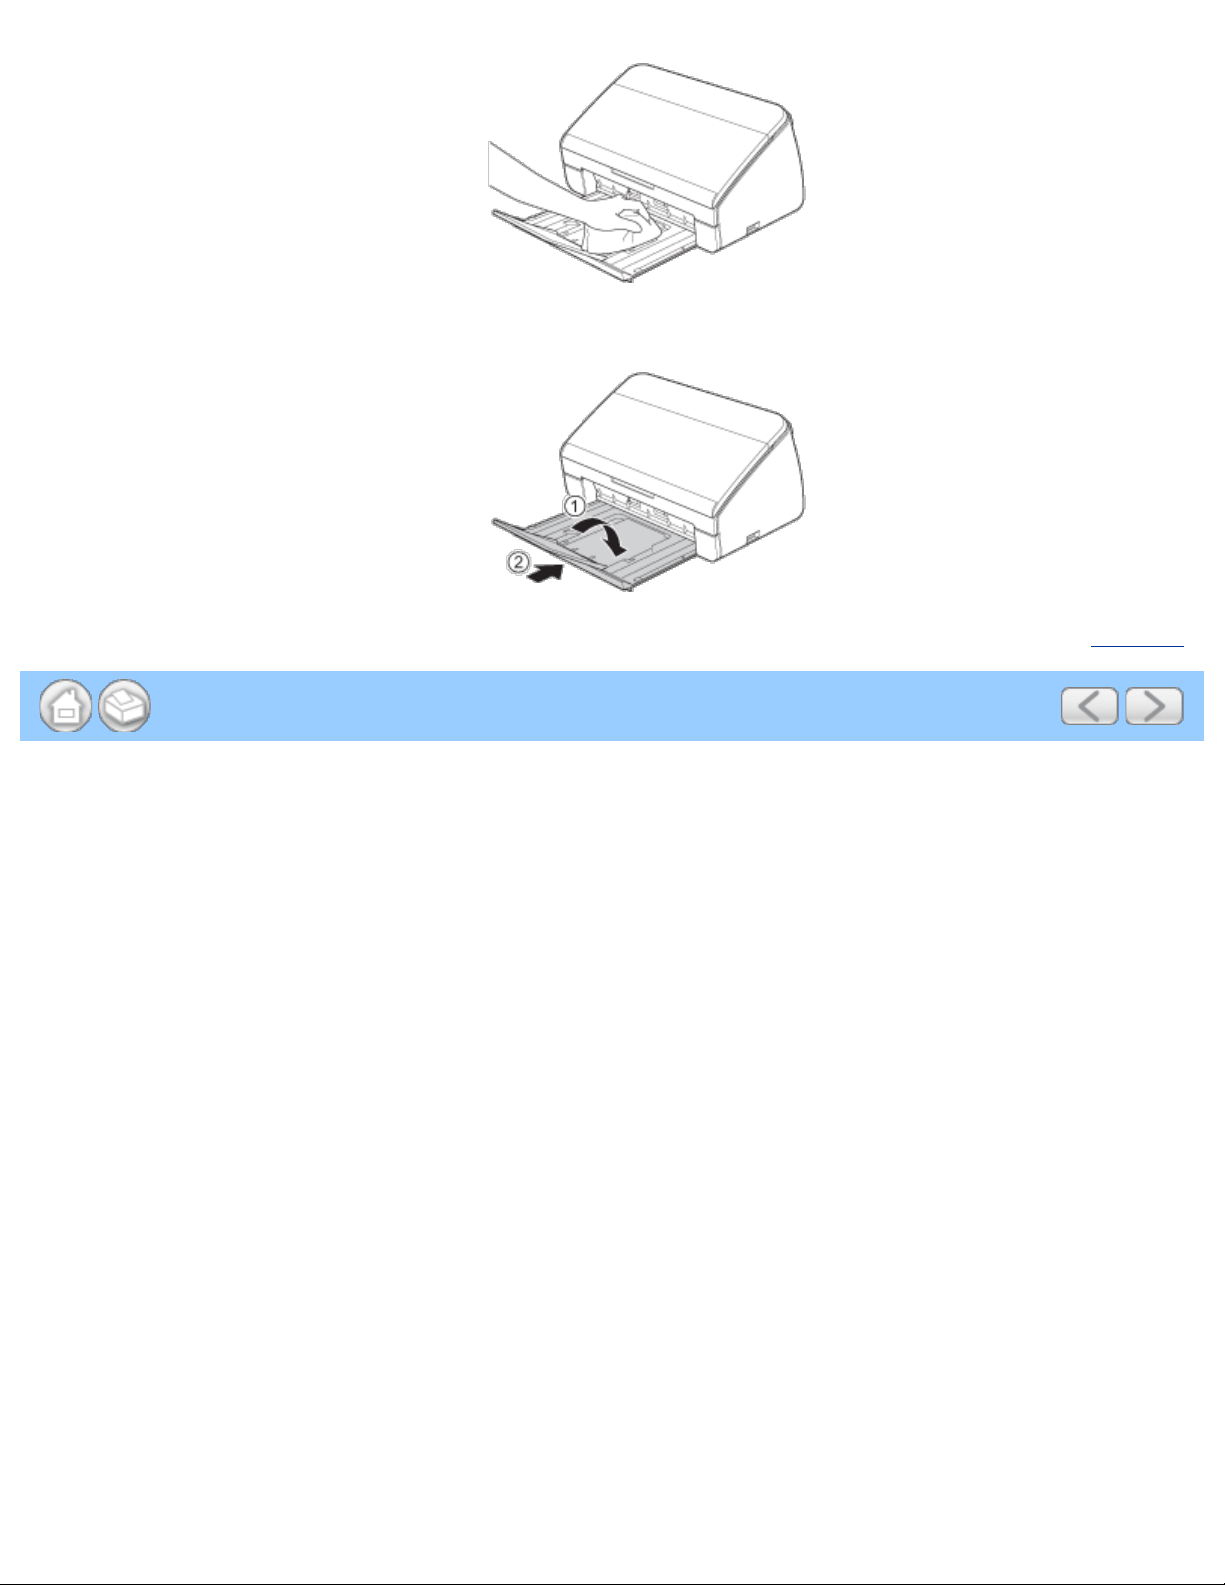
Wipe the inside of the Output Tray with a dry, soft, and lint-free cloth to remove dust.
5
file:///C|/Documents%20and%20Settings/mcampbell.AM/My%20Documents/ADS2000solutions/chapter6.html[3/11/2013 10:23:29 AM]
Page 17
Routine Maintenance
Fold the Document Stopper and firmly insert the Output Tray into the machine.
6
Page Top
file:///C|/Documents%20and%20Settings/mcampbell.AM/My%20Documents/ADS2000solutions/chapter6.html[3/11/2013 10:23:29 AM]
Page 18

Troubleshooting
7 Troubleshooting
Identifying Your Problem
First, check the following:
• The AC power cord is connected properly and the machine is turned on.
• All of the protective parts have been removed.
• The Front Cover, Separation Pad Cover and Pick-up Roller Cover are completely closed.
• The interface cable is securely connected to the machine and the computer.
• The correct driver for the machine has been installed.
• The computer is connected to the correct port on the machine.
Machine does not scan:
If you did not solve your problem with the above checks, identify your problem and then go to the page suggested
below.
• Machine’s LEDs are blinking
See LED Indications
• Status Monitor Error Message appears
See Error Messages in the Status Monitor
• Other scanning difficulties
See Scanning Difficulties
.
.
.
Other difficulties:
• Software difficulties
See Software Difficulties
• Other difficulties
See Other Difficulties
.
.
Page Top
file:///C|/Documents%20and%20Settings/mcampbell.AM/My%20Documents/ADS2000solutions/chapter7.html[3/11/2013 10:23:30 AM]
Page 19
Specifications
A Specifications
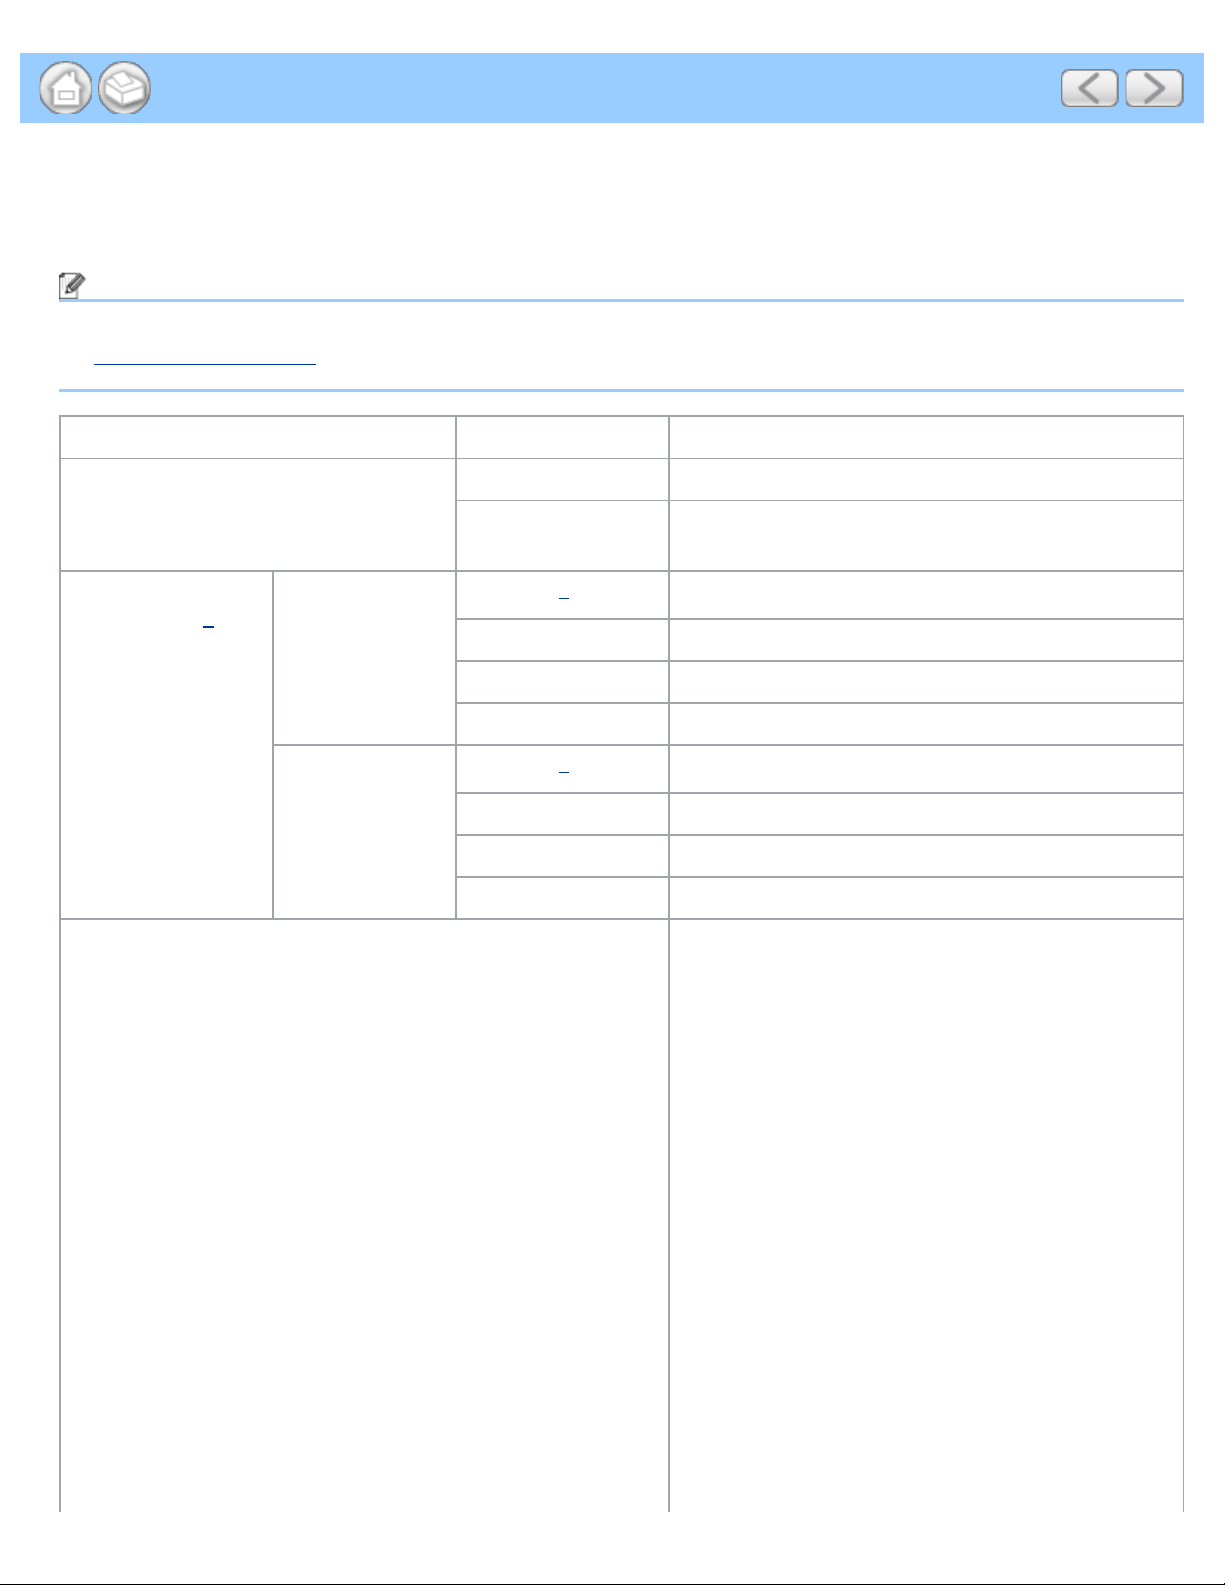
General
Note
This chapter provides a summary of the machine’s specifications. For additional specifications, visit
http://www.brother.com/
Memory Capacity Standard 256 MB
Power Source USA 100 - 120 V AC 50/60 Hz
for details.
Power
Consumption
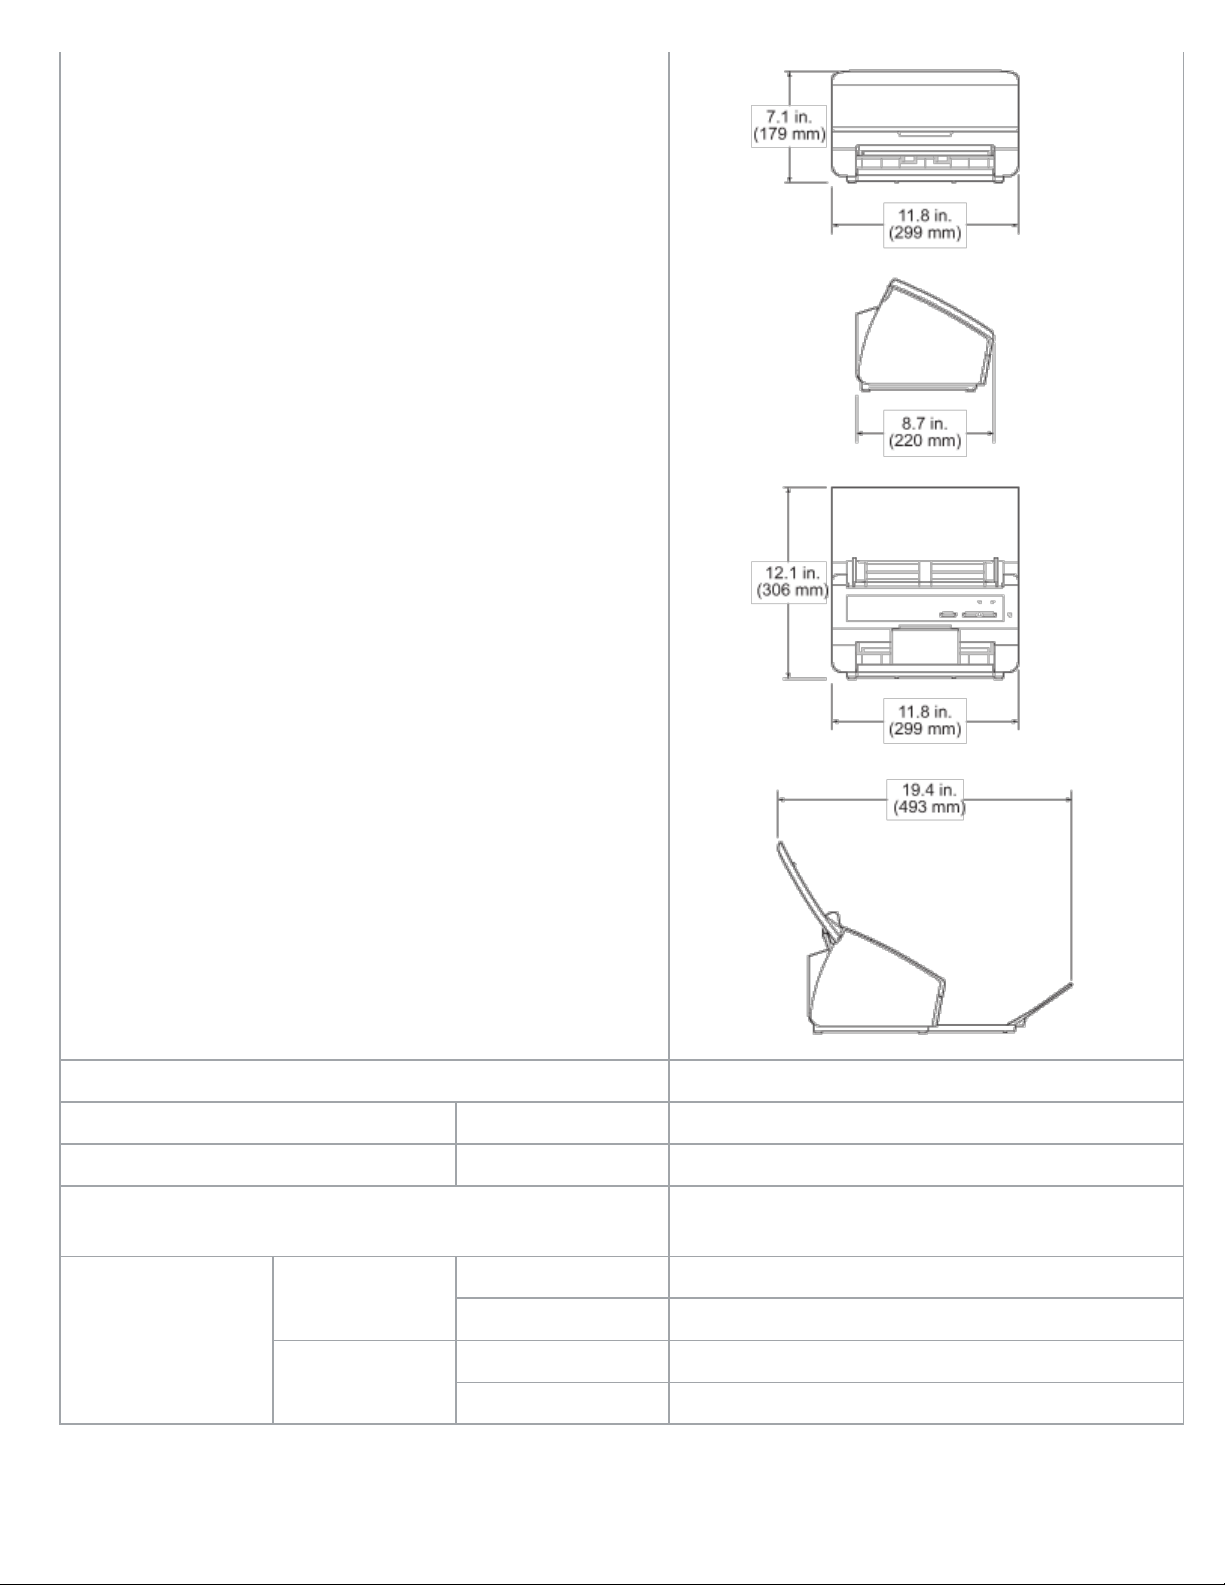
Dimensions
Latin American
Countries
USA/Canada
1
Latin American
Countries
Scanning
Ready Approx. 7 W
Sleep Approx. 1.5 W
Power Down Approx. 0.25 W
Scanning
Ready Approx. 7 W
Sleep Approx. 1.5 W
Power Down Approx. 0.3 W
2
2
220 - 240 V AC 50/60 Hz
Approx. 18 W
Approx. 18 W
file:///C|/Documents%20and%20Settings/mcampbell.AM/My%20Documents/ADS2000solutions/appendix11.html[3/11/2013 10:23:30 AM]
Page 20
Specifications
Weights Approx. 7.3 lb (3.3 kg)
Temperature Operating 41 to 95 °F (5 to 35 °C)
Humidity Operating 20 to 80 %
ADF (automatic document feeder)
Up to 50 pages (Paper: 20 lb (80 g/m
size, or less than 0.2 in. (5 mm))
Document Size Multiple Paper Width 2.0 in. to 8.5 in. (51 mm to 215.9 mm)
Length 2.76 in. to 11.7 in. (70 mm to 297 mm)
Single Paper Width 2.0 in. to 8.5 in. (51 mm to 215.9 mm)
Length 2.76 in. to 34.0 in. (70 mm to 863 mm)
1
Measured when the machine is connected to your computer.
2
When 2- sided (duplex) scanning.
file:///C|/Documents%20and%20Settings/mcampbell.AM/My%20Documents/ADS2000solutions/appendix11.html[3/11/2013 10:23:30 AM]
2
) Letter or A4
Page 21

Specifications
Page Top
file:///C|/Documents%20and%20Settings/mcampbell.AM/My%20Documents/ADS2000solutions/appendix11.html[3/11/2013 10:23:30 AM]
Page 22

Appendix
B Appendix
Brother Numbers
Important
For technical help, you must call the country where you bought the machine. Calls must be made from within that
country.
• Register Your Product
• FAQs (frequently asked questions)
• For Customer Service
Register Your Product
By registering your product with Brother International Corporation, you will be recorded as the original owner of the
product. Your registration with Brother:
• may serve as confirmation of the purchase date of your product should you lose your receipt;
• may support an insurance claim by you in the event of product loss covered by insurance; and,
• will help us notify you of enhancements to your product and special offers.
Please complete and fax the Brother Warranty Registration And Test Sheet or, for your convenience and most efficient
way to register your new product, register on-line at
http://www.brother.com/registration/
Page Top
file:///C|/Documents%20and%20Settings/mcampbell.AM/My%20Documents/ADS2000solutions/appendix12.html[3/11/2013 10:23:31 AM]
Page 23

index
Index
B
Brother
Brother numbers
Customer Service For Customer Service
FAQs (frequently asked questions) FAQs (frequently asked questions)
product support For Customer Service
Solutions Center FAQs (frequently asked questions)
Brother Numbers
C
ControlCenter2
Macintosh
Scan Using ControlCenter2 (Macintosh)
Scan Using the Scan Key on the Control
Panel of the Machine (Macintosh)
Change Scan to PC Key Settings (Macintosh)
Change Scan to USB Key Settings
(Windows® and Macintosh)
Monitor the Status of the Machine from Your
Computer (Macintosh)
ControlCenter4
Windows
D
Drivers
Macintosh
®
Change the User Interface of ControlCenter4
(Windows®)
Scan Using ControlCenter4 Home Mode
(Windows®)
Scan Using ControlCenter4 Advanced Mode
(Windows®)
Scan Using the Scan Key on the Control
Panel of the Machine (Windows®)
Change Scan to PC Key Settings (Windows®)
Change Scan to USB Key Settings
(Windows® and Macintosh)
file:///C|/Documents%20and%20Settings/mcampbell.AM/My%20Documents/ADS2000solutions/keyindex.html[3/11/2013 10:23:32 AM]
Page 24

index
ICA Scan Using Apple Image Capture
(ICA Driver - Mac OS X 10.6.x, 10.7.x)
TWAIN Scan Using Presto! PageManager or TWAIN
Applications (Macintosh)
Windows
TWAIN Scan Using Nuance™ PaperPort™12SE or
WIA Scan Using Nuance™ PaperPort™12SE or
®
Other Windows® Applications
Other Windows® Applications
N
Nuance™ PaperPort™12SE (Windows®)
Scan Using Nuance™ PaperPort™12SE or
Other Windows® Applications
P
Presto! PageManager (Macintosh) Scan Using Presto! PageManager or TWAIN
Applications (Macintosh)
R
Remote Setup Change Scan to USB Key Settings
(Windows® and Macintosh)
S
Scan
Set Up the Brother Machine from Your
Computer
Replace the Separation Pad
Replace the Pick-up Roller
Macintosh
ICA compliant
Presto! PageManager Scan Using Presto! PageManager or TWAIN
TWAIN compliant Scan Using Presto! PageManager or TWAIN
Scan key
PC
Scan Using Apple Image Capture
(ICA Driver - Mac OS X 10.6.x, 10.7.x)
Applications (Macintosh)
Applications (Macintosh)
Scan Using the Scan Key on the Control
Panel of the Machine (Windows®)
Change Scan to PC Key Settings (Windows®)
Scan Using the Scan Key on the Control
file:///C|/Documents%20and%20Settings/mcampbell.AM/My%20Documents/ADS2000solutions/keyindex.html[3/11/2013 10:23:32 AM]
Page 25

index
Panel of the Machine (Macintosh)
Change Scan to PC Key Settings (Macintosh)
USB Save Scanned Documents to a USB Flash
Memory Drive
Save Scanned Documents on Mobile Devices
Save Scanned Documents to a USB Flash
Memory Drive
Save Scanned Documents on Mobile Devices
Change Scan to USB Key Settings
(Windows® and Macintosh)
Windows
®
Nuance™ PaperPort™12SE Scan Using Nuance™ PaperPort™12SE
TWAIN Compliant Scan Using Nuance™ PaperPort™12SE or
Other Windows® Applications
WIA Compliant Scan Using Nuance™ PaperPort™12SE or
Other Windows® Applications
Status Monitor
Macintosh
Monitor the Status of the Machine from Your
Computer (Macintosh)
Windows
®
Monitor the Status of the Machine from Your
Computer (Windows®)
file:///C|/Documents%20and%20Settings/mcampbell.AM/My%20Documents/ADS2000solutions/keyindex.html[3/11/2013 10:23:32 AM]
Page 26
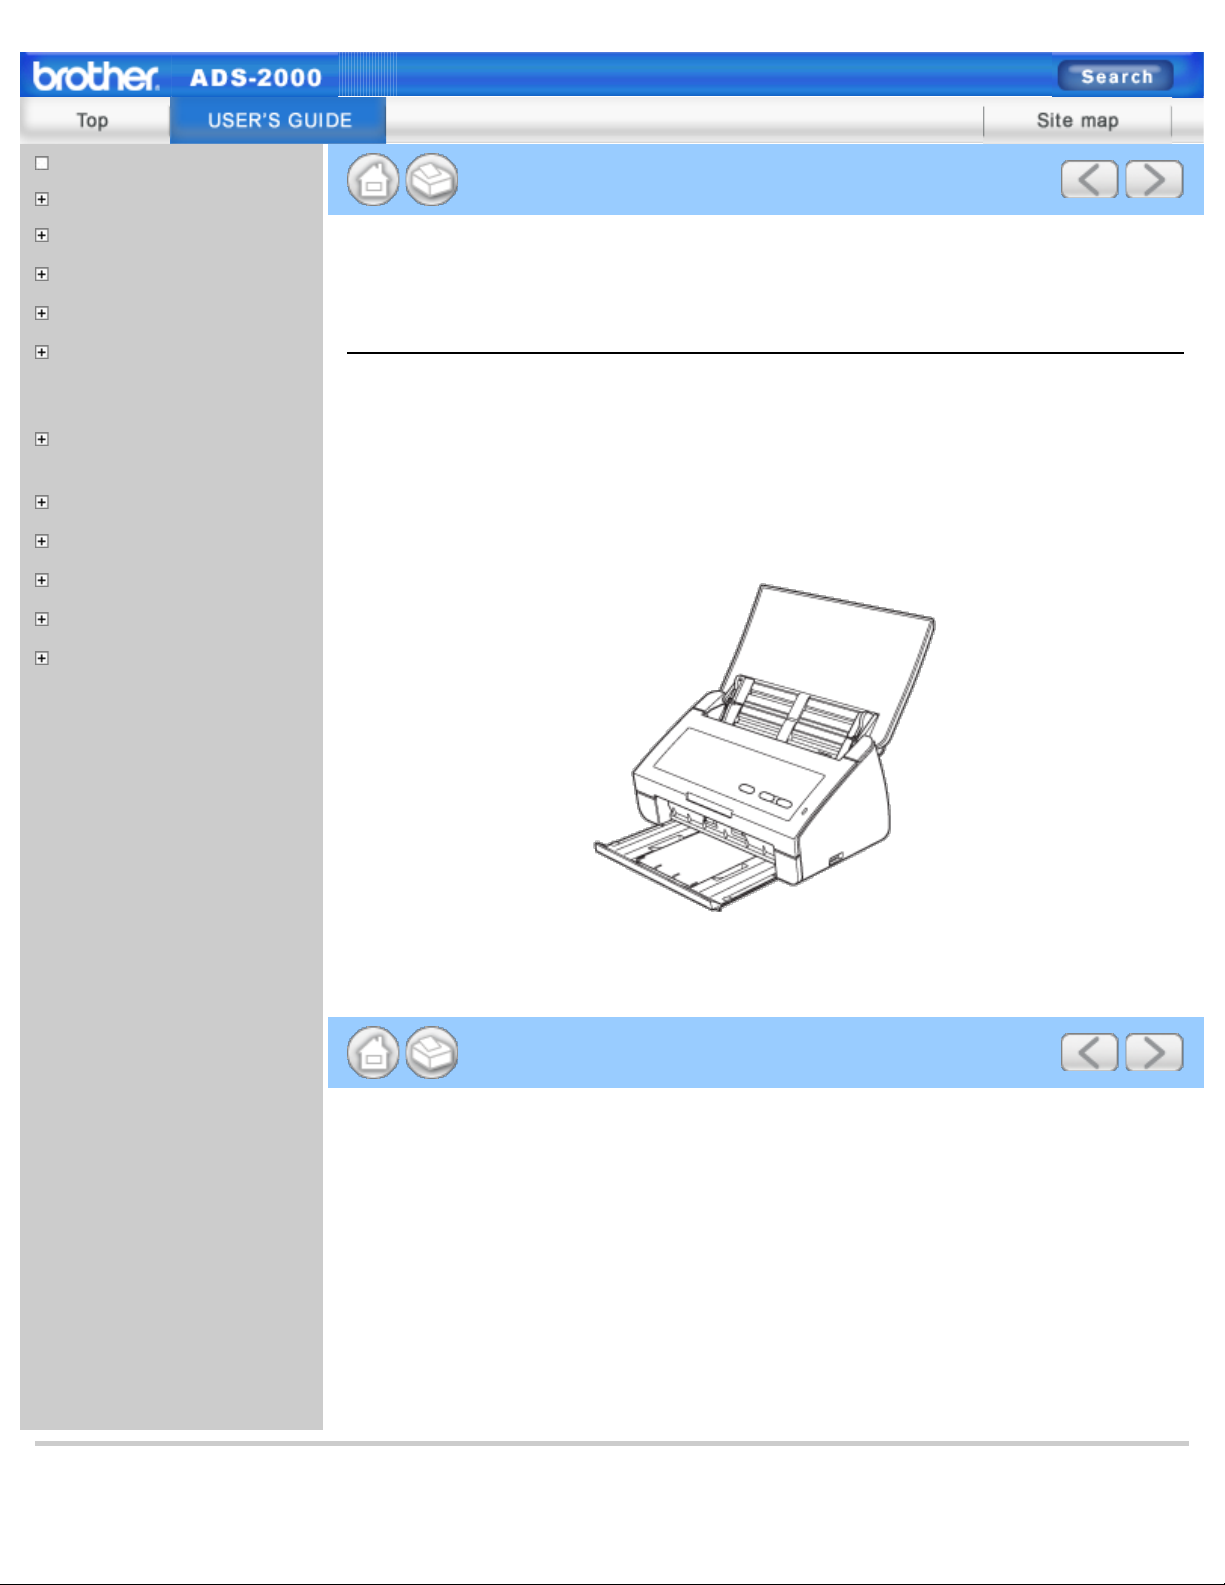
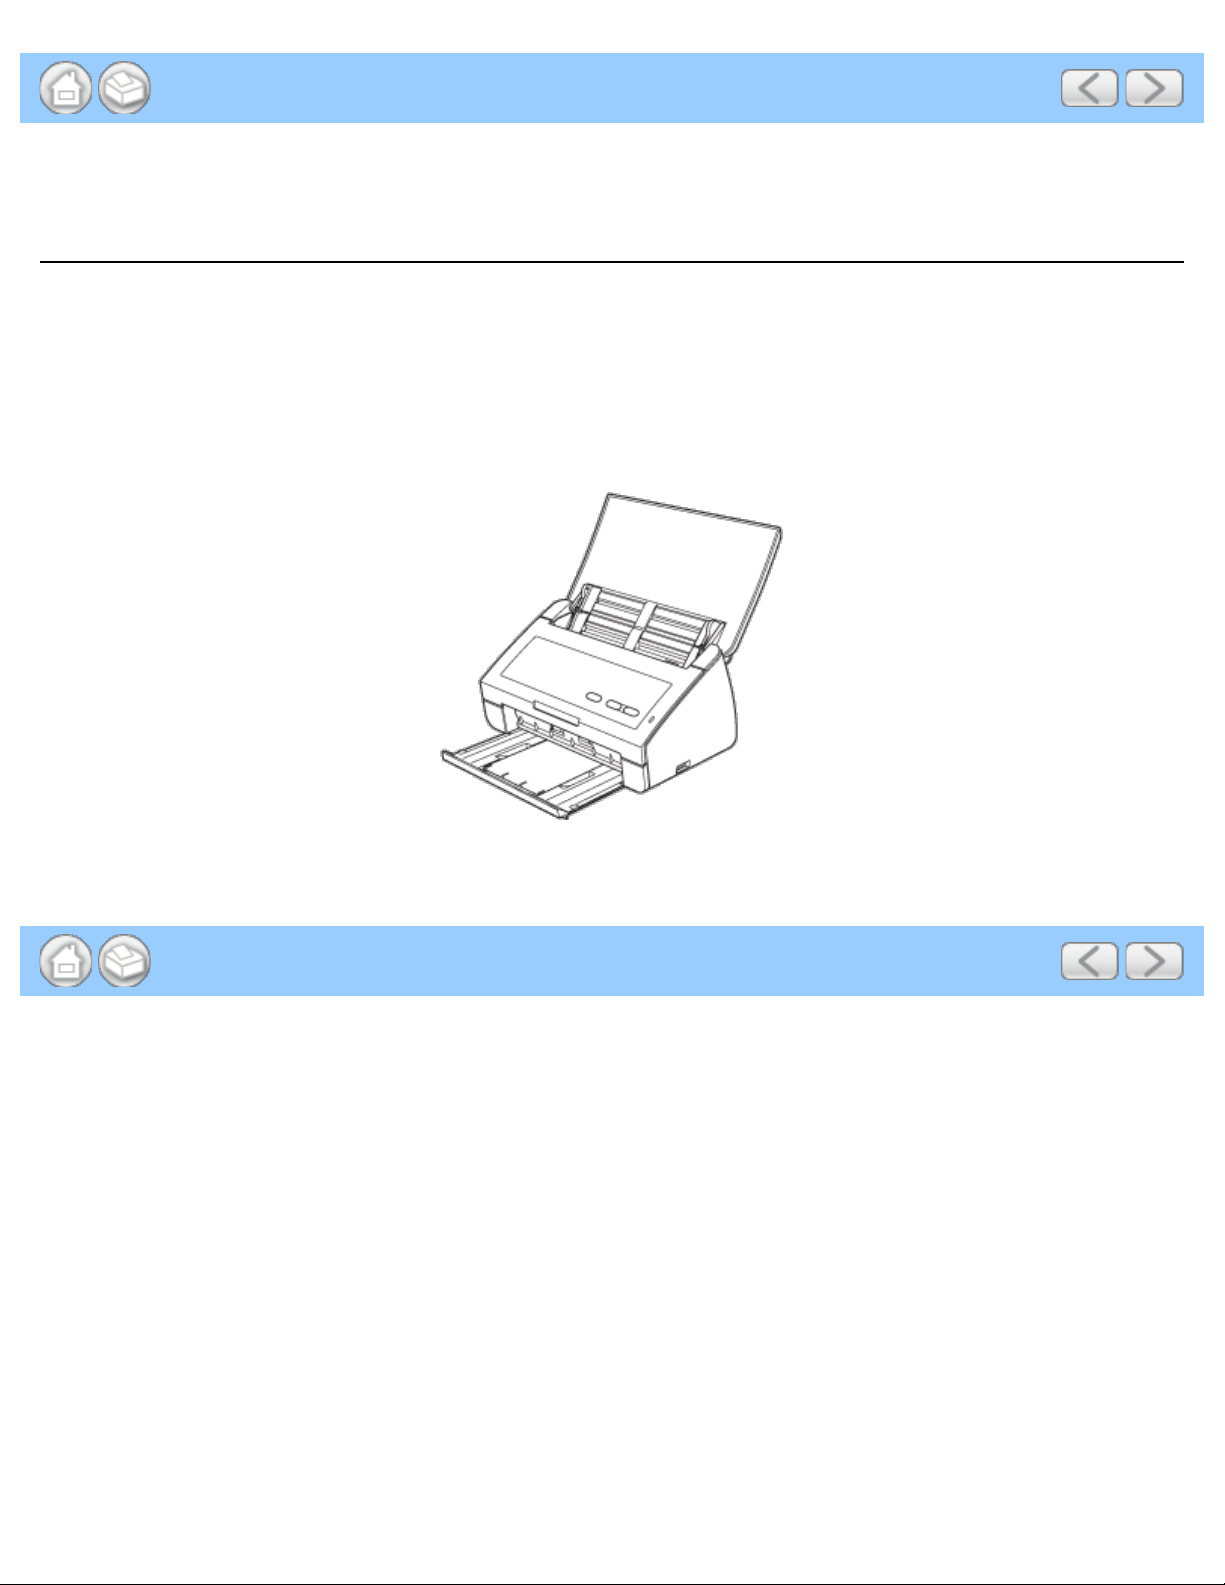
About This Machine
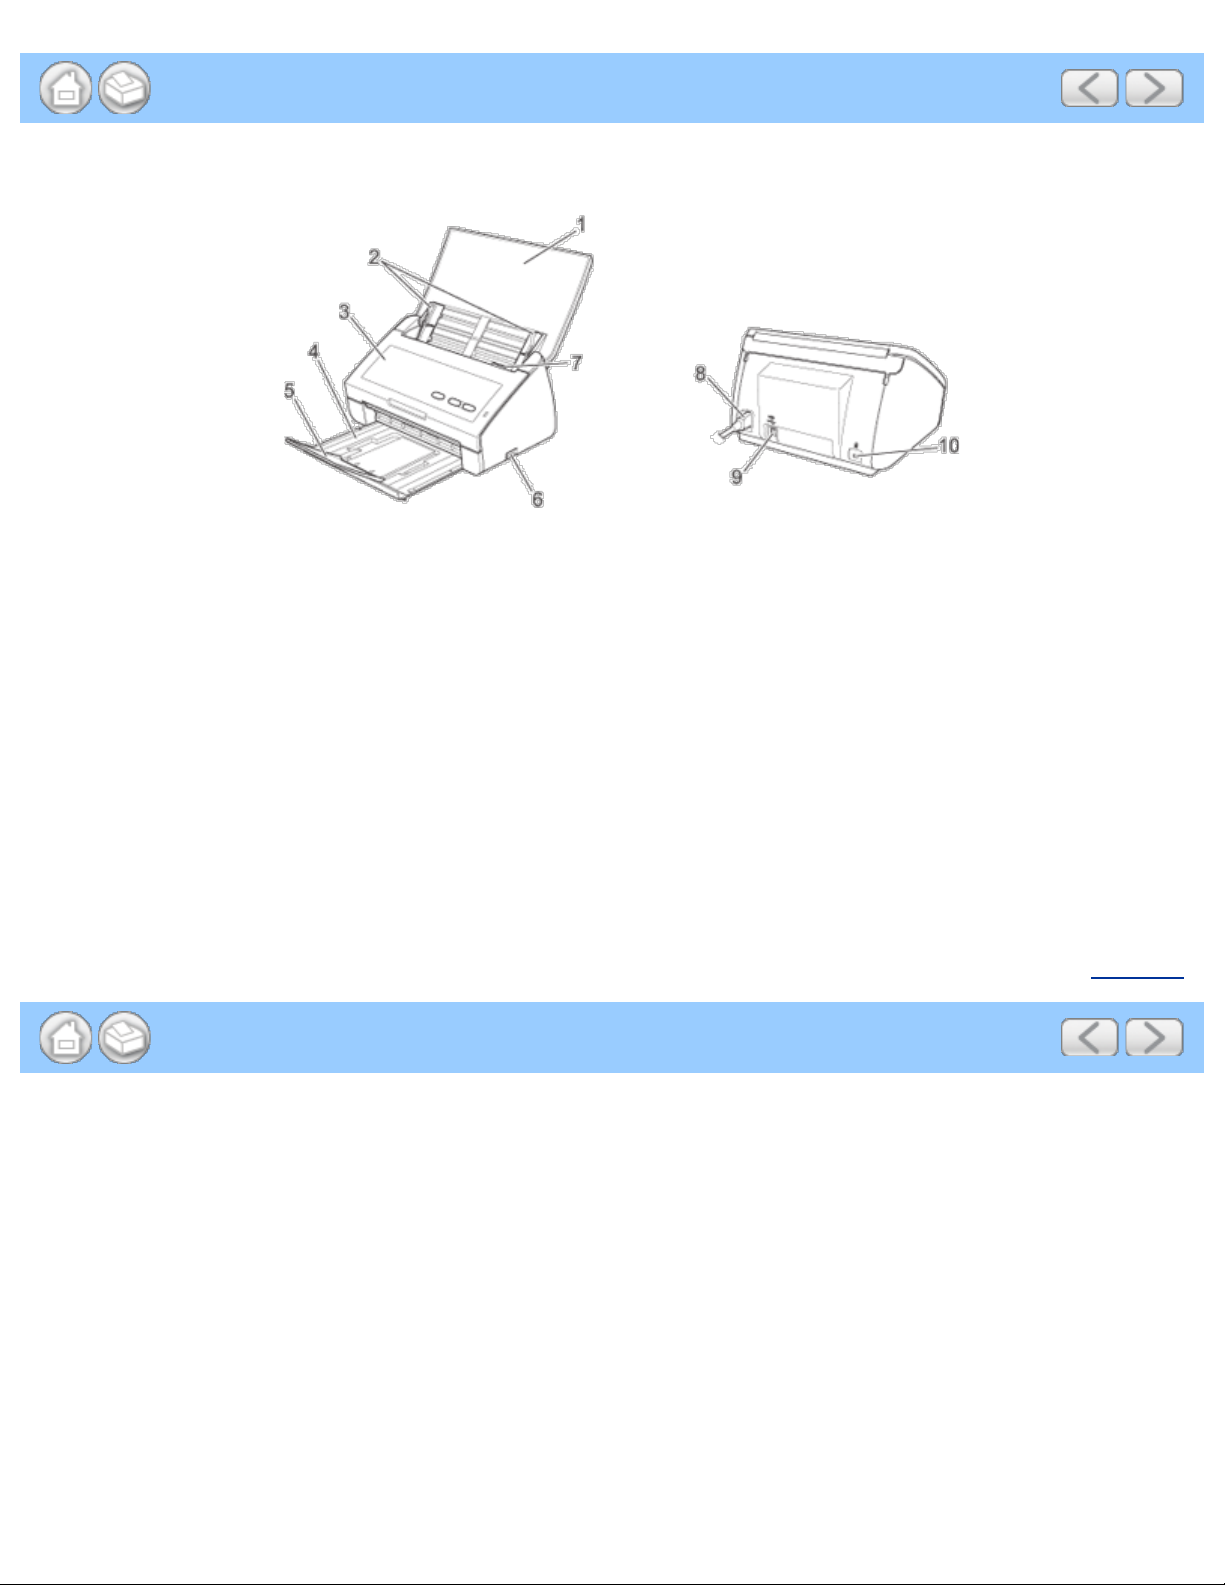
About This Machine
1. Top Cover
The machine is turned on by opening the Top Cover.
2. Document Guides
3. Front Cover
4. Output Tray
5. Document Stopper
6. USB Direct Interface
7. Cover Release Lever
8. AC Power Connector
9. USB Connector
10. Kensington Security Slot
Page Top
file:///C|/Documents%20and%20Settings/mcampbell.AM/My%20Documents/ADS2000solutions/chapter1_2.html[3/11/2013 10:23:32 AM]
Page 27

Loading Receipts and Other Thin Documents
Loading Receipts and Other Thin Documents
Make sure documents with ink or correction fluid are completely dry.
Open the Top Cover (1).
1
Insert the document into the Carrier Sheet.
2
Note
Set the document in the center of the Carrier Sheet and align the top of the document with the top of the
Carrier Sheet.
Adjust the Document Guides (1) to fit the width of the Carrier Sheet.
3
Place the Carrier Sheet in the document feeder between the Guides until you feel it touch the inside of the
4
file:///C|/Documents%20and%20Settings/mcampbell.AM/My%20Documents/ADS2000solutions/chapter1_5_7.html[3/11/2013 10:23:33 AM]
Page 28
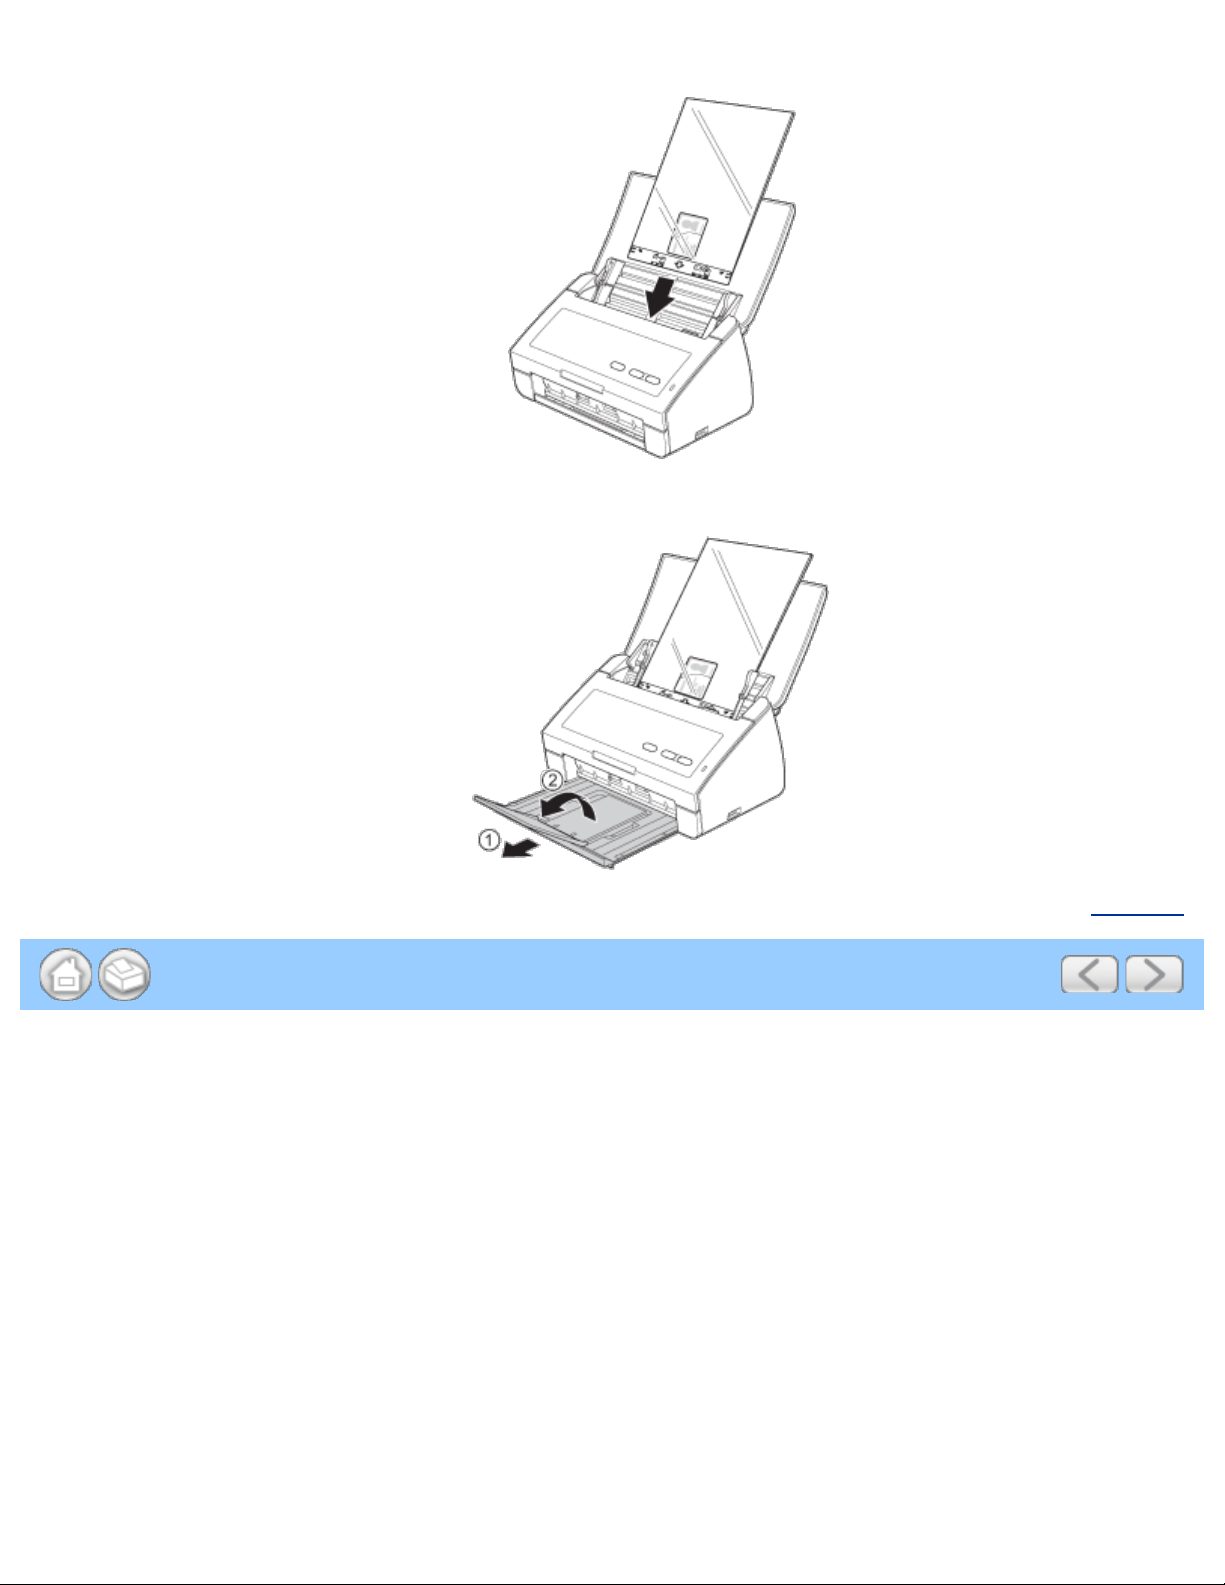
Loading Receipts and Other Thin Documents
machine.
Pull the Output Tray out of the machine and then unfold the Document Stopper.
5
Page Top
file:///C|/Documents%20and%20Settings/mcampbell.AM/My%20Documents/ADS2000solutions/chapter1_5_7.html[3/11/2013 10:23:33 AM]
Page 29

Scanning Methods
Scanning Methods
There are two ways to scan using your Brother machine.
• Scan to PC
• Scan to USB
Scan to PC
The Scan to PC feature lets you scan your document and save the scanned image into your computer. Before using
the Scan to PC feature, you must install MFL-Pro Suite from the supplied DVD-ROM and the machine must be
connected to the computer.
There are 2 ways to initiate the scan when scanning to your computer:
• Initiate the scan from your computer (see Scan From Your Computer
• Configure the scan settings from your computer and then initiate the scan with the Scan to PC key on your machine
(see Scan Using the Scan Key on the Control Panel of the Machine
)
)
The Scan to PC feature provides four scanning modes:
• Scan to Image
Lets you scan an image directly into a graphics application for image editing.
• Scan to OCR
Lets you scan a document and convert it to text. This text can be edited using your favorite word processing
software.
• Scan to E-mail
Lets you scan a document to your default E-mail application, so you can send the scanned job as an attachment.
• Scan to File
Lets you scan an image and save it to a folder on your hard disk in one of the file types shown in the file attachment
list.
Page Top
file:///C|/Documents%20and%20Settings/mcampbell.AM/My%20Documents/ADS2000solutions/chapter2_2.html[3/11/2013 10:23:34 AM]
Page 30

Scan to USB
Scan to USB
The Scan to USB feature lets you scan your document and save the scanned image into a USB device. You can start
scanning using the Scan to USB feature by pressing the Scan to USB key. Before scanning, you can configure the
settings from your computer. To configure the settings, you must install MFL-Pro Suite from the supplied DVD-ROM
and the machine must be connected to the computer. The Remote Setup application helps you configure the settings
(see Save Scanned Documents to a USB Flash Memory Drive
Windows®, or Save Scanned Documents to a USB Flash Memory Drive and Save Scanned Documents on Mobile
Devices for Macintosh).
and Save Scanned Documents on Mobile Devices for
Page Top
file:///C|/Documents%20and%20Settings/mcampbell.AM/My%20Documents/ADS2000solutions/chapter2_2_2.html[3/11/2013 10:23:34 AM]
Page 31

Scan Using ControlCenter4 Home Mode (Windows®)
Scan Using ControlCenter4 Home Mode (Windows®)
Brother provides a software interface for your machine called ControlCenter. You can use this software to quickly scan
photos and save them as JPEGs or PDFs, as well as other file formats. You can also scan single-sided and two-sided
documents and save them as PDFs or use OCR (Optical Character Recognition) to convert them to editable text.
• Scan Photos and Graphics
• Scan Documents (Scan to PDF)
• Scan Documents (Other File Types)
• Scan Color and Black- and-White Pages at the Same Time
• Scan Pages of Different Sizes at the Same Time
• Scan Business Cards
• Scan Two Pages and Combine Them on One Page (2 in 1)
• Scan Documents Wider than Letter Size
• Scan Documents Longer than Letter Size
• Scan Documents with More than 50 Pages
• Scan Both Sides of a Page Automatically
• Scan Specific/irregular-sized Documents Using the Carrier Sheet
• Scan Plastic Cards
• Correct Page Skew
• Delete Blank Pages
• Change Document Orientation to Match the Text
• Detect Overlapping (Multifeed) Pages
• Scan Pages Laid on Top of Each Other
• Scan Envelopes
• Prevent Bleed Through
• Remove the Background Color (Base Color Removal) and Make Documents Easier to Read
• View the Number of Scanned Pages
• Scan to an Application
• Scan to E-mail Attachment
• Scan to Editable Text File (OCR)
Scan Photos and Graphics
Load your document.
1
Click the (ControlCenter4) icon in the task tray and then select Open from the menu.
2
The ControlCenter4 window will appear.
file:///C|/Documents%20and%20Settings/mcampbell.AM/My%20Documents/ADS2000solutions/chapter3_2.html[3/11/2013 10:23:35 AM]
Page 32

Scan Using ControlCenter4 Home Mode (Windows®)
Note
You can also start ControlCenter4 by doing one of the following:
•
(Windows
Double- click the
• Click ControlCenter4 located in Start/All Programs/Brother/ADS-XXXX (where XXXX is your model
name).
Select the Scan tab.
3
®
XP, Windows Vista®)
(ControlCenter4) icon in the task tray.
Do one of the following:
4
• Select Photo, Text and Graph, or Monochrome Text in the Document Type option for the type of original
you want to scan.
• Photo: 600 × 600 dpi, 24bit Color
• Text and Graph: 300 × 300 dpi, 24bit Color
• Monochrome Text: 200 × 200 dpi, Black and White
• Select Custom in the Document Type option and then configure the scan settings in detail. See Custom
Scan Settings.
Change the scan size if needed (see Change the Scan Size ).
5
Click the (Scan) button.
6
The machine starts scanning, and then the Scanning Completed dialog box will appear and display the number
of scanned pages. The scanned image appears in the image viewer.
Note
If the Scanning Completed dialog box does not appear and you want to display the number of scanned
pages, check the Display Scanning Results check box.
Click the left or right arrow buttons to preview each scanned document.
7
file:///C|/Documents%20and%20Settings/mcampbell.AM/My%20Documents/ADS2000solutions/chapter3_2.html[3/11/2013 10:23:35 AM]
Page 33

Scan Using ControlCenter4 Home Mode (Windows®)
8
Crop the scanned image if needed (see Crop Scanned Image).
Do one of the following:
9
•
Click the
•
Click the
(Save) button to save the scanned data. See Save Scanned Documents.
(Open with an Application) button to open the scanned data in another application. See
Scan to an Application
•
Click the (Send E-mail) button to attach the scanned data to an E-mail. See Send E-mail .
.
Custom Scan Settings
If you select Custom in the Document Type option, you can change advanced scan settings.
Select Custom and then click the Custom Settings button. The Custom Scan Settings dialog box will appear.
1
You can change the following settings:
Option Description
Resolution You can select a scanning resolution from the Resolution drop-down list.
Higher resolutions take more memory and transfer time, but produce a
finer scanned image.
Scan Type
Black and White
Use for text or line art images.
Gray (Error Diffusion)
Use for photographic images or graphics. (Error Diffusion is a method
for creating simulated gray images without using true gray dots. Black
dots are put in a specific pattern to give a gray appearance.)
True Gray
Use for photographic images or graphics. This mode is more exact due
to using up to 256 shades of gray.
24bit Color
Uses up to 16.8 million colors to scan the image. Although using 24bit
Color creates an image with the most accurate color reproduction, it
requires the most memory and has the longest transfer time.
file:///C|/Documents%20and%20Settings/mcampbell.AM/My%20Documents/ADS2000solutions/chapter3_2.html[3/11/2013 10:23:35 AM]
Page 34

Scan Using ControlCenter4 Home Mode (Windows®)
Auto
Automatically selects suitable colors for your document.
Brightness Adjust the setting ( -50 to 50) to get the best image. The default value of 0
Contrast Adjust the setting ( -50 to 50) to get the best image. The default value of 0
represents an average and is usually suitable for most images. You can
set the Brightness level by dragging the slider to the right or left to lighten
or darken the image. You can also enter a value in the box to set the level.
If the scanned image is too light, set a lower Brightness level and scan the
document again. If the image is too dark, set a higher Brightness level and
scan the document again.
represents an average and is usually suitable for most images. You can
increase or decrease the contrast level by moving the slider to the right or
left. An increase emphasizes dark and light areas of the image, while a
decrease reveals more details in gray areas. You can also enter a value in
the box to set the Contrast.
Note
The Contrast setting is only available when setting Scan Type to
Auto, Gray (Error Diffusion), True Gray or 24bit Color.
Continuous Scanning Lets you scan multiple pages. After the page is scanned, you can select to
continue scanning or finish. Using this method, you can scan more pages
than the maximum capacity of the document feeder.
Duplex(two- sided) Scanning If you check this box, the machine scans both sides of the document.
When using the automatic 2-sided (duplex) scan feature, you must select
Long-edge binding or Short-edge binding depending on the layout of
your original to make sure that the data file created appears correctly in
the scanned document.
Note
The 2-sided (duplex) scanning feature is available with lengths up to
Legal size.
Carrier Sheet Mode You can scan the following documents using the Carrier Sheet. For this
mode, you can select any setting other than Auto from the Scan Size
drop -down list.
• Large-sized Documents (A3, B4 and Ledger)
Fold the document in half and insert it in the Carrier Sheet for 2-sided
(duplex) scanning, then both front and back pages will be combined
into a single page.
• Important documents (photos, contracts)
• Thin paper (receipts)
• Irregular-shaped paper (clippings)
Note
• Load only one Carrier Sheet at a time.
file:///C|/Documents%20and%20Settings/mcampbell.AM/My%20Documents/ADS2000solutions/chapter3_2.html[3/11/2013 10:23:35 AM]
Page 35

Scan Using ControlCenter4 Home Mode (Windows®)
• Set the document in the center of the Carrier Sheet and align the top
Plastic Card Mode Lets you scan non-embossed cards, such as driver's licenses or insurance
of the document with the top of the Carrier Sheet.
cards, using these automatic settings:
• Resolution: 600 x 600 dpi
• Scan Size: 2 in 1 (Business Card)
• Duplex(two- sided) Scanning: On (Short-edge binding)
• Auto Deskew : Off
• Multifeed Detection: Off
• Automatic Image Rotation: Off
Note
• If you want to scan a plastic card with different settings, set Plastic
Card Mode off, Resolution to 600 dpi, and Multifeed Detection to
Off.
• Load only one plastic card at a time.
Click the Advanced Settings button. The Advanced Settings dialog box will appear.
2
Change the settings.
3
The following settings can be changed.
Setting Description
Auto Deskew Corrects the skew (within 5 degrees) of the scanned data.
Automatic Image Rotation Changes the direction of the document based on the text orientation.
Bleed Through Prevention/Base
Color Removal
Blank Page Skip Removes blank pages of the document from the scanning results.
Multifeed Detection Uses a ultrasonic sensor to detect when a multifeed has occurred. When
file:///C|/Documents%20and%20Settings/mcampbell.AM/My%20Documents/ADS2000solutions/chapter3_2.html[3/11/2013 10:23:35 AM]
Prevents the Bleed Through phenomenon on a two-sided document, and
also allows you to remove the base color of documents such as
newspapers to make the scanned data more recognizable.
Page 36

Scan Using ControlCenter4 Home Mode (Windows®)
this function detects a multifeed, confirm that the data scanned before the
multifeed has been saved, and then start scanning again at the next page
or the beginning of the document.
Display Scanning Results Shows the numbers of total pages saved and blank pages skipped on
your computer screen.
Click the OK button to close the Advanced Settings dialog box.
4
Click the OK button to close the Custom Scan Settings dialog box.
5
Change the Scan Size
Scan Size is set to Auto by default. You can scan documents of any size without making any adjustments to Scan
Size. For faster scan speeds you can select the exact size of your document from the Scan Size drop down menu.
Note
• Each Long Paper option can scan a large document up to following:
Long Paper (Normal Width): 8 1/2 × 34.0 in. (215.9 × 863.0 mm)
Long Paper (Narrow Width): 4 1/4 × 34.0 in. (107.9 × 863.0 mm)
Page Top
• If you cannot select Long Paper, uncheck the Duplex(two-sided) Scanning and Auto Deskew check box.
• If you select a 1 to 2 document size, the scanned image will be divided into two documents that are half the size of
the setting. If you select 1 to 2 (A4), the scanned image will be divided into two 5.8 × 8.3 in. documents.
Original Layout Scan Result
• To do 1 to 2 scanning, uncheck the Automatic Image Rotation check box in the Advanced Settings dialog box.
• If you select a 2 in 1 document size, two scanned images will be combined into one document.
Original Layout Scan Result
Crop Scanned Image
The crop tool on the Image Editing Toolbar lets you trim unwanted areas from your scanned image, to help view the
image to be cropped you can use the zoom in and zoom out image editing tools.
file:///C|/Documents%20and%20Settings/mcampbell.AM/My%20Documents/ADS2000solutions/chapter3_2.html[3/11/2013 10:23:35 AM]
Page Top
Page 37

Scan Using ControlCenter4 Home Mode (Windows®)
Image Editing Toolbar
1. Restart
Cancels all the edits applied to the selected image. The edited image returns to its original state.
2. Fit to Window
Displays the scanned image so that the entire image fits in the window.
3. Zoom In
Zooms in on the scanned image.
4. Zoom Out
Zooms out of the scanned image.
5. Crop
Lets you crop the image. Click the
cropping.
(Crop) button, then change the frame to the area you want to keep after
Note
If you have scanned multiple pages, you can see the next or previous scanned page by clicking the left or right
arrow buttons.
1
Click the (Crop) button.
The Crop - ControlCenter4 window will appear.
Edit the scanned image.
2
1. Displays the image so that the entire image fits in the window.
file:///C|/Documents%20and%20Settings/mcampbell.AM/My%20Documents/ADS2000solutions/chapter3_2.html[3/11/2013 10:23:35 AM]
Page 38

Scan Using ControlCenter4 Home Mode (Windows®)
2. Zooms in on the image.
3. Zooms out of the image.
4. Rotates the image counter-clockwise by 90 degrees.
5. Rotates the image clockwise by 90 degrees.
6. Drag the frame to adjust the area to be cropped.
Click the OK button.
3
The edited image is displayed in the image viewer.
Save Scanned Documents
The (Save) button lets you save a scanned image to a folder on your hard disk in one of the file types shown in
the file attachment list.
Click the (Save) button.
1
The Save dialog box will appear.
Page Top
Select a file type from the File Type drop- down list.
2
Note
• If you select Secure PDF (*.pdf) from the File Type drop-down list, click the (Set PDF Password)
button, and enter the password.
• Searchable PDF is a file format that includes the text data layer over a scanned image. This layer allows
you to search the text on the image data. The OCR language setting must be set to match the language
you want to make the searchable PDF for.
• To save the document as a searchable PDF, select Searchable PDF (*.pdf) from the File Type drop-down
list.
• To save the document as a searchable PDF, Nuance™ PaperPort™12SE must be installed on your
computer.
• Several file types such as TIFF, TIFF Multi-Page, PDF, Secure PDF and JPEG support file size
compression. Select Uncompressed or Compressed to adjust the file size for TIFF or TIFF Multi-Page. For
PDF, Secure PDF and JPEG, use the slider to adjust the file size.
In the File Name field, enter a prefix for the file name if needed.
3
In the Destination Folder field, click the folder icon and browse to the folder you would like to save your
4
file:///C|/Documents%20and%20Settings/mcampbell.AM/My%20Documents/ADS2000solutions/chapter3_2.html[3/11/2013 10:23:35 AM]
Page 39

Scan Using ControlCenter4 Home Mode (Windows®)
scanned document to.
Click the OK button.
5
The scanned document is saved in the destination folder.
Open with an Application
The (Open with an Application) button lets you scan an image directly into your graphics application for image
editing.
Click the (Open with an Application) button.
1
Select the application from the drop-down list and click the OK button.
2
The image will be opened in the application you have chosen.
Send E-mail
The (Send E-mail) button lets you scan a document to your default E- mail application, so you can send the
scanned document as an attachment.
Page Top
Page Top
Click the (Send E-mail) button.
1
Configure the attached file settings and click the OK button.
2
Your default E- mail application will open and the image will be attached to a new, blank E-mail.
Page Top
file:///C|/Documents%20and%20Settings/mcampbell.AM/My%20Documents/ADS2000solutions/chapter3_2.html[3/11/2013 10:23:35 AM]
Page 40

Scan Using Captiva QuickScan Pro™ or ISIS™ Applications (Windows®)
Scan Using Captiva QuickScan Pro™ or ISIS™ Applications (Windows®)
You can use the free trial version of Captiva QuickScan Pro™ or other applications, which support ISIS™
specifications, for scanning. Before scanning using the ISIS™ applications, you must install the ISIS™ scanner driver.
Note
To install the ISIS™ scanner driver, internet access is required.
Installing ISIS™ Scanner and Captiva QuickScan Pro™
Insert the supplied DVD-ROM into your DVD-ROM drive.
1
The DVD-ROM top menu will appear automatically. Select the desired language and then click Advanced.
2
Click the ISIS Scanner Driver & Application button.
Click the ISIS Scanner Driver button. Follow the on-screen instructions.
3
Click the Captiva QuickScan Pro Trial button. Follow the on- screen instructions.
4
Note
• The web site where you can download the free trial version of Captiva QuickScan Pro™ is operated by EMC
corporation. If you have any questions about Captiva QuickScan Pro™, contact EMC corporation.
• For information about how to scan using your ISIS™ application, see Captiva QuickScan Pro™’s help.
Page Top
file:///C|/Documents%20and%20Settings/mcampbell.AM/My%20Documents/ADS2000solutions/chapter3_13.html[3/11/2013 10:23:37 AM]
Page 41

Scan Photos and Graphics
Scan Photos and Graphics
To scan photos or graphics, you should select the Scan to Image feature. Your document will be scanned and sent
directly to your computer. The ControlCenter4 software will launch the default graphics application on the designated
computer.
Click the (ControlCenter4) icon in the task tray and then select Open from the menu.
1
The ControlCenter4 window will appear.
Note
You can also start ControlCenter4 by doing one of the following:
•
(Windows
Double- click the
• Click ControlCenter4 located in Start/All Programs/Brother/ADS-XXXX (where XXXX is your model
name).
®
XP, Windows Vista®)
(ControlCenter4) icon in the task tray.
Click the Device Settings tab (the example below uses Home Mode).
2
Click the Scan to PC Settings button. The Remote Setup window will appear.
3
Select Image from the drop-down list.
4
file:///C|/Documents%20and%20Settings/mcampbell.AM/My%20Documents/ADS2000solutions/chapter4_1_2.html[3/11/2013 10:23:37 AM]
Page 42

Scan Photos and Graphics
8
Click the OK button to close the Remote Setup window.
5
Click the Device Scan Settings button on the Device Settings tab. The Device Scan Settings dialog box will
6
appear.
Click the Image tab.
7
Change other settings if needed (see Change Scan to PC Settings).
file:///C|/Documents%20and%20Settings/mcampbell.AM/My%20Documents/ADS2000solutions/chapter4_1_2.html[3/11/2013 10:23:37 AM]
Page 43

Scan Photos and Graphics
9
Load your document.
Press Scan to PC. The machine starts scanning.
10
Page Top
file:///C|/Documents%20and%20Settings/mcampbell.AM/My%20Documents/ADS2000solutions/chapter4_1_2.html[3/11/2013 10:23:37 AM]
Page 44

Scan to E-mail attachment
Scan to E-mail attachment
You can scan a document and add it as an attachment to a message in your default E-mail application.
Click the (ControlCenter4) icon in the task tray and then select Open from the menu.
1
The ControlCenter4 window will appear.
Note
You can also start ControlCenter4 by doing one of the following:
•
(Windows
Double- click the
• Click ControlCenter4 located in Start/All Programs/Brother/ADS-XXXX (where XXXX is your model
name).
Click the Device Settings tab (the example below uses Home Mode).
2
®
XP, Windows Vista®)
(ControlCenter4) icon in the task tray.
Click the Scan to PC Settings button. The Remote Setup window will appear.
3
Select E-mail from the drop-down list.
4
file:///C|/Documents%20and%20Settings/mcampbell.AM/My%20Documents/ADS2000solutions/chapter4_1_3.html[3/11/2013 10:23:38 AM]
Page 45

Scan to E-mail attachment
8
Click the OK button to close the Remote Setup window.
5
Click the Device Scan Settings button on the Device Settings tab. The Device Scan Settings dialog box will
6
appear.
Click the E-mail tab.
7
Change other settings if needed (see Change Scan to PC Settings).
file:///C|/Documents%20and%20Settings/mcampbell.AM/My%20Documents/ADS2000solutions/chapter4_1_3.html[3/11/2013 10:23:38 AM]
Page 46

Scan to E-mail attachment
9
Load your document.
Press Scan to PC. The machine starts scanning the document, creates a file attachment, and launches your E-
10
mail application displaying the new message waiting to be addressed.
Page Top
file:///C|/Documents%20and%20Settings/mcampbell.AM/My%20Documents/ADS2000solutions/chapter4_1_3.html[3/11/2013 10:23:38 AM]
Page 47

Scan to an Editable Text File (OCR)
Scan to an Editable Text File (OCR)
Your machine can convert characters in a scanned document to text data by using optical character recognition (OCR)
technology. This text can be edited using your favorite word processing software.
Note
Nuance™ PaperPort™12SE must be installed on your PC.
Click the (ControlCenter4) icon in the task tray and then select Open from the menu.
1
The ControlCenter4 window will appear.
Note
You can also start ControlCenter4 by doing one of the following:
•
(Windows
Double- click the
®
XP, Windows Vista®)
(ControlCenter4) icon in the task tray.
• Click ControlCenter4 located in Start/All Programs/Brother/ADS-XXXX (where XXXX is your model
name).
Click the Device Settings tab (the example below uses Home Mode).
2
Click the Scan to PC Settings button. The Remote Setup window will appear.
3
Select OCR from the drop-down list.
4
file:///C|/Documents%20and%20Settings/mcampbell.AM/My%20Documents/ADS2000solutions/chapter4_1_4.html[3/11/2013 10:23:39 AM]
Page 48

Scan to an Editable Text File (OCR)
8
Click the OK button to close the Remote Setup window.
5
Click the Device Scan Settings button on the Device Settings tab. The Device Scan Settings dialog box will
6
appear.
Click the OCR tab.
7
Change other settings if needed (see Change Scan to PC Settings).
file:///C|/Documents%20and%20Settings/mcampbell.AM/My%20Documents/ADS2000solutions/chapter4_1_4.html[3/11/2013 10:23:39 AM]
Page 49

Scan to an Editable Text File (OCR)
9
Load your document.
Press Scan to PC. The machine scans the document, converts it into editable text, then sends it to your default
10
word processing application.
Page Top
file:///C|/Documents%20and%20Settings/mcampbell.AM/My%20Documents/ADS2000solutions/chapter4_1_4.html[3/11/2013 10:23:39 AM]
Page 50

Change the Feature Assigned to the Scan to PC Key to set the Default Scan-to Action
Change the Feature Assigned to the Scan to PC Key to set the Default Scan-to Action
Click the (ControlCenter4) icon in the task tray and then select Open from the menu.
1
The ControlCenter4 window will appear.
Note
You can also start ControlCenter4 by doing one of the following:
•
(Windows
Double- click the
• Click ControlCenter4 located in Start/All Programs/Brother/ADS-XXXX (where XXXX is your model
name).
Click the Device Settings tab (the example below uses Home Mode).
2
®
XP, Windows Vista®)
(ControlCenter4) icon in the task tray.
Click the Scan to PC Settings button. The Remote Setup window will appear.
3
Select a Scan-to action you want to assign (Image, OCR, E-mail, or File) from the drop-down list (the example
4
below uses Image).
file:///C|/Documents%20and%20Settings/mcampbell.AM/My%20Documents/ADS2000solutions/chapter4_1_5.html[3/11/2013 10:23:40 AM]
Page 51

Change the Feature Assigned to the Scan to PC Key to set the Default Scan-to Action
Click the OK button.
5
Page Top
file:///C|/Documents%20and%20Settings/mcampbell.AM/My%20Documents/ADS2000solutions/chapter4_1_5.html[3/11/2013 10:23:40 AM]
Page 52

Save Scanned Documents to a USB Flash Memory Drive
Save Scanned Documents to a USB Flash Memory Drive
Click the (ControlCenter4) icon in the task tray and then select Open from the menu.
1
The ControlCenter4 window will appear.
Note
You can also start ControlCenter4 by doing one of the following:
•
(Windows
Double- click the
• Click ControlCenter4 located in Start/All Programs/Brother/ADS-XXXX (where XXXX is your model
name).
Click the Device Settings tab (the example below uses Home Mode).
2
®
XP, Windows Vista®)
(ControlCenter4) icon in the task tray.
Click the Remote Setup button. The Remote Setup window will appear.
3
Select Scan to USB in the folder tree.
4
file:///C|/Documents%20and%20Settings/mcampbell.AM/My%20Documents/ADS2000solutions/chapter4_1_6.html[3/11/2013 10:23:40 AM]
Page 53

Save Scanned Documents to a USB Flash Memory Drive
Change other settings if needed (see Change Scan Settings).
5
Insert a USB flash memory drive into your machine.
6
Load your document.
7
Press Scan to USB on the control panel. The machine starts scanning.
8
Important
DO NOT remove the USB flash memory drive while the Scan to USB key is blinking to avoid damaging the drive or
the data stored on it.
Page Top
file:///C|/Documents%20and%20Settings/mcampbell.AM/My%20Documents/ADS2000solutions/chapter4_1_6.html[3/11/2013 10:23:40 AM]
Page 54

Save Scanned Documents on Mobile Devices
Save Scanned Documents on Mobile Devices
The machine can save the scanned data on a mobile device.
Note
• This feature can be used with mobile devices that use the USB mass storage standard.
• The machine does not support charging any USB devices.
• Brother Image Viewer for Android™, which is available for download from the Android™ Market, enables users to
view or edit the scanned data. For details, download the Brother Image Viewer for Android™.
Connect the machine to a mobile device with a USB cable.
1
Load your document.
2
Press the Scan to USB key. The machine starts scanning, and then the scanned data is saved on the mobile
3
device.
Page Top
file:///C|/Documents%20and%20Settings/mcampbell.AM/My%20Documents/ADS2000solutions/chapter4_1_7.html[3/11/2013 10:23:41 AM]
Page 55

Change Scan to PC Settings
Change Scan to PC Settings
Click the (ControlCenter4) icon in the task tray and then select Open from the menu.
1
The ControlCenter4 window will appear.
Note
You can also start ControlCenter4 by doing one of the following:
•
(Windows
Double- click the
• Click ControlCenter4 located in Start/All Programs/Brother/ADS-XXXX (where XXXX is your model
name).
Click the Device Settings tab (the example below uses Home Mode).
2
®
XP, Windows Vista®)
(ControlCenter4) icon in the task tray.
Click the Device Scan Settings button. The Device Scan Settings dialog box will appear.
3
file:///C|/Documents%20and%20Settings/mcampbell.AM/My%20Documents/ADS2000solutions/chapter4_2_19.html[3/11/2013 10:23:42 AM]
Page 56

Change Scan to PC Settings
Select the tab for the Scan -to action you want to change (Image, OCR, E-mail, or File).
4
Change the settings.
5
The following settings can be changed.
Setting Description Applicable Feature
Image OCR E-mail File
File Type Select the file type you want to use for the scanned
data.
Yes Yes Yes Yes
Note
To save the document as a password-protected
•
PDF, select Secure PDF (*.pdf) from the File
Type drop-down list, click the
Password) button, and enter the password.
• Searchable PDF is a file format that includes the
text data layer over a scanned image. This layer
allows you to search the text on the image data.
The OCR language setting must be set to match
the language you want to make the searchable
PDF for.
(Set PDF
• To save the document as a searchable PDF,
select Searchable PDF (*.pdf) from the File Type
drop -down list.
• To save the document as a searchable PDF,
file:///C|/Documents%20and%20Settings/mcampbell.AM/My%20Documents/ADS2000solutions/chapter4_2_19.html[3/11/2013 10:23:42 AM]
Page 57

Change Scan to PC Settings
Nuance™ PaperPort™12SE must be installed on
your computer.
• Several file types such as TIFF, TIFF Multi-Page,
PDF, Secure PDF and JPEG support file size
compression. Select Uncompressed or
Compressed to adjust the file size for TIFF or
TIFF Multi -Page. For PDF, Secure PDF and
JPEG, use the slider to adjust the file size (not
available for Scan to OCR).
Target
Application
Select the destination application from the drop-down
list.
OCR Language Set to match the language of the scanned document’s
text.
File Name Click the Change button for Image, OCR or E-mail.
Enter a prefix for the file name if needed.
Destination File
Path
Click the Change button and then the folder icon to
change the folder you would like to save your scanned
document to.
Destination
Folder
Click the folder icon and browse to the folder you
would like to save your scanned document to. Check
Show Folder to automatically display the destination
folder after scanning.
File size You can adjust the File size by moving the slider to
the right or left.
Note
File size can be adjusted depending on your
selected File Type.
Yes Yes - -
- Yes - -
Yes Yes Yes Yes
Yes Yes Yes -
- - - Yes
Yes - Yes Yes
Resolution You can select a scanning resolution from the
Yes Yes Yes Yes
Resolution drop-down list. Higher resolutions take
more memory and transfer time, but produce a finer
scanned image.
Scan Type Lets you select from a range of scan color depth.
Yes Yes Yes Yes
Black and White
Use for text or line art images.
Gray (Error Diffusion)
Use for photographic images or graphics. (Error
Diffusion is a method for creating simulated gray
images without using true gray dots. Black dots are
put in a specific pattern to give a gray appearance.)
True Gray
Use for photographic images or graphics. This mode
is more exact due to using up to 256 shades of
gray.
file:///C|/Documents%20and%20Settings/mcampbell.AM/My%20Documents/ADS2000solutions/chapter4_2_19.html[3/11/2013 10:23:42 AM]
Page 58

Change Scan to PC Settings
24bit Color
Uses up to 16.8 million colors to scan the image.
Although using 24bit Color creates an image with
the most accurate color reproduction, it requires the
most memory and has the longest transfer time.
Auto
Uses suitable colors for your document
automatically.
Document Size Document size is set to Auto by default. You can scan
documents of any size without making any adjustments
to Document Size. For faster scan speeds you can
select the exact size of your document from the
Document Size drop down list.
Note
• If you select a 1 to 2 document size, the scanned
image will be divided into two documents that are
half the size of the setting. If you select 1 to 2
(A4), the scanned image will be divided into two
5.8 × 8.3 in. documents.
• To do 1 to 2 scanning, uncheck the Automatic
Image Rotation check box in the Advanced
Settings dialog box.
• If you select a 2 in 1 document size, two scanned
images will be combined into one document.
Brightness Adjust the setting ( -50 to 50) to get the best image.
The default value of 0 represents an average and is
usually suitable for most images. You can set the
Brightness level by dragging the slider to the right or
left to lighten or darken the image. You can also enter
a value in the box to set the level. If the scanned
image is too light, set a lower Brightness level and
scan the document again. If the image is too dark, set
a higher Brightness level and scan the document
again.
Yes Yes Yes Yes
Yes Yes Yes Yes
Contrast Adjust the setting (-50 to 50) to get the best image.
The default value of 0 represents an average and is
usually suitable for most images. You can increase or
decrease the contrast level by moving the slider to the
right or left. An increase emphasizes dark and light
areas of the image, while a decrease reveals more
details in gray areas. You can also enter a value in the
box to set the Contrast.
Yes Yes Yes Yes
Note
The Contrast setting is only available when
file:///C|/Documents%20and%20Settings/mcampbell.AM/My%20Documents/ADS2000solutions/chapter4_2_19.html[3/11/2013 10:23:42 AM]
Page 59

Change Scan to PC Settings
setting Scan Type to Auto, Gray (Error
Duplex(twosided) Scanning
Default Restore all settings to their factory default values. Yes Yes Yes Yes
Diffusion), True Gray or 24bit Color.
If you check this box, the machine scans both sides of
the document. When using the automatic 2-sided
(duplex) scan feature, you must select Long-edge
binding or Short-edge binding depending on the
layout of your original to make sure that the data file
created appears correctly in the scanned document.
Note
The 2-sided (duplex) scanning feature is available
with lengths up to Legal size.
Yes Yes Yes Yes
Carrier Sheet
Mode
You can scan the following documents using the
Carrier Sheet. For this mode, you can select any
setting other than Auto from the Document Size dropdown list.
• Large-sized Documents (A3, B4 and Ledger)
Fold the document in half and insert it in the Carrier
Sheet for 2-sided (duplex) scanning, then both front
and back pages will be combined into a single page.
• Important documents (photos, contracts)
• Thin paper (receipts)
• Irregular-shaped paper (clippings)
Note
• Load only one Carrier Sheet at a time.
• Set the document in the center of the Carrier
Sheet and align the top of the document with the
top of the Carrier Sheet.
Yes Yes Yes Yes
Plastic Card
Mode
file:///C|/Documents%20and%20Settings/mcampbell.AM/My%20Documents/ADS2000solutions/chapter4_2_19.html[3/11/2013 10:23:42 AM]
Lets you scan non-embossed cards, such as driver's
licenses or insurance cards, using these automatic
settings:
• Resolution: 600 x 600 dpi
• Document Size: 2 in 1 (Business Card)
• Duplex(two- sided) Scanning: On (Short-edge
binding)
• Auto Deskew : Off
• Multifeed Detection: Off
• Automatic Image Rotation: Off
Yes Yes Yes Yes
Page 60

Change Scan to PC Settings
Note
8
Click the Advanced Settings button. The Advanced Settings dialog box will appear.
6
• If you want to scan a plastic card with different
settings, set Plastic Card Mode off, Resolution
to 600 dpi, and Multifeed Detection to Off.
• Load only one plastic card at a time.
Change the settings.
7
The following settings can be changed.
Setting Description Applicable Feature
Image OCR E-mail File
Auto Deskew Corrects the skew (within 5 degrees) of the scanned
data.
Automatic Image
Rotation
Bleed Through
Prevention/Base
Color Removal
Blank Page Skip Removes blank pages of the document from the
Multifeed
Detection
Changes the direction of the document based on the
text orientation.
Prevents the Bleed Through phenomenon on a twosided document, and also allows you to remove the
base color of documents such as newspapers to make
the scanned data more recognizable.
scanning results.
Uses a ultrasonic sensor to detect when a multifeed
has occurred. When this function detects a multifeed,
confirm that the data scanned before the multifeed has
been saved, and then start scanning again at the next
page or the beginning of the document.
Yes Yes Yes Yes
Yes Yes Yes Yes
Yes Yes Yes Yes
Yes Yes Yes Yes
Yes Yes Yes Yes
Display
Scanning
Results
Click the OK button to close the Advanced Settings dialog box.
file:///C|/Documents%20and%20Settings/mcampbell.AM/My%20Documents/ADS2000solutions/chapter4_2_19.html[3/11/2013 10:23:42 AM]
Shows the numbers of total pages saved and blank
pages skipped on your computer screen.
Yes Yes Yes Yes
Page 61

Change Scan to PC Settings
Click the OK button to close the Device Scan Settings dialog box.
9
Page Top
file:///C|/Documents%20and%20Settings/mcampbell.AM/My%20Documents/ADS2000solutions/chapter4_2_19.html[3/11/2013 10:23:42 AM]
Page 62

Change Scan Settings
Change Scan Settings
Start the ControlCenter application.
1
•
Windows
(1)
(2)
®
Click the (ControlCenter4) icon in the task tray and then select Open from the menu.
The ControlCenter4 window will appear.
Note
You can also start ControlCenter4 by double-clicking the (ControlCenter4) icon in the task tray.
Click the Device Settings tab (the example below uses Home Mode).
• Macintosh
Click the (ControlCenter2) icon in the menu bar and then select Open.
(1)
The ControlCenter2 window will appear.
Note
If (ControlCenter2) icon is not displayed in the menu bar, double-click the ControlCenter icon.
The ControlCenter icon is in Macintosh HD/Applications/Brother.
The
Click the DEVICE SETTINGS tab.
(2)
file:///C|/Documents%20and%20Settings/mcampbell.AM/My%20Documents/ADS2000solutions/chapter4_5_8.html[3/11/2013 10:23:43 AM]
(ControlCenter2) icon will appear in the menu bar.
Page 63

Change Scan Settings
Click the Remote Setup button. The Remote Setup window will appear.
2
Note
You can also start Remote Setup by following the instructions below:
•
Windows
Click Start, All Programs, Brother, ADS-XXXX, and Remote Setup.
• Macintosh
Double- click the RemoteSetup icon located in Macintosh HD/Applications/Brother.
Select Scan to USB in the folder tree.
3
•
Windows
®
®
• Macintosh
file:///C|/Documents%20and%20Settings/mcampbell.AM/My%20Documents/ADS2000solutions/chapter4_5_8.html[3/11/2013 10:23:43 AM]
Page 64

Change Scan Settings
Change the settings.
4
The following settings can be changed.
Setting Description
Scan Type Lets you select from a range of scan color depth.
• B&W
Use for text or line art images.
• Gray
Use for photographic images or graphics.
• Color
Uses up to 16.8 million colors to scan the image. Although using 24bit
Color creates an image with the most accurate color reproduction, it
requires the most memory and has the longest transfer time.
• Auto
Uses suitable colors for your document automatically.
File Type(B&W) Lets you select a file type for scanning in black & white.
Select a file type you want to use for the scanned data.
Note
To save the document as a password-protected PDF, select Secure
PDF from the File Type(B&W) drop-down list, and then enter the
password (the default value is “0000”) in the Password for Secure
PDF field.
File Type(Gray) Lets you select a file type for scanning in gray.
Select a file type you want to use for the scanned data.
Note
file:///C|/Documents%20and%20Settings/mcampbell.AM/My%20Documents/ADS2000solutions/chapter4_5_8.html[3/11/2013 10:23:43 AM]
Page 65

Change Scan Settings
To save the document as a password-protected PDF, select Secure
File Type(Color) Lets you select a file type for scanning in color.
File Type(Auto) Lets you select a file type when you have selected Auto from the Scan
PDF from the File Type(Gray) drop-down list, and then enter the
password (the default value is “0000”) in the Password for Secure
PDF field.
Select a file type you want to use for the scanned data.
Note
To save the document as a password-protected PDF, select Secure
PDF from the File Type(Color) drop-down list, and then enter the
password (the default value is “0000”) in the Password for Secure
PDF field.
Type drop-down list. Select a file type you want to use for the scanned
data.
Note
To save the document as a password-protected PDF, select Secure
PDF from the File Type(Auto) drop-down list, and then enter the
password (the default value is “0000”) in the Password for Secure
PDF field.
Resolution You can select a scanning resolution from the Resolution drop-down list.
Higher resolutions take more memory and transfer time, but produce a
finer scanned image.
Document Size Lets you choose from a selection of preset scan sizes.
Auto Deskew Corrects the skew (within 5 degrees) of the scanned data.
Blank Page Skip Removes blank pages of the document from the scanning results.
Multifeed Detection Uses a ultrasonic sensor to detect when a multifeed has occurred. When
this function detects a multifeed, confirm that the data scanned before the
multifeed has been saved, and then start scanning again at the next page
or the beginning of the document.
Note
The data scanned before the multifeed occurred is saved if you have
selected JPEG as the file type.
Duplex Scanning If you select On : Long-edge binding or On : Short-edge binding, the
machine scans both sides of the document. You must select On : Long-
edge binding or On : Short-edge binding depending on the layout of
your original to make sure that the data file created appears correctly in
the scanned document.
File Name Enter a prefix for the file name (up to 64 characters). The file name will be
the prefix you registered and sequential number. If the prefix is not
file:///C|/Documents%20and%20Settings/mcampbell.AM/My%20Documents/ADS2000solutions/chapter4_5_8.html[3/11/2013 10:23:43 AM]
Page 66

Change Scan Settings
entered, the file name will be the date and a sequential number.
File Size(Gray) Lets you select a file size for scanning in gray.
File Size(Color) Lets you select a file size for scanning in color.
Password for Secure PDF Enter a 4-digit PIN number.
Click the OK button.
5
Select a file size you want to use for the scanned data.
Select a file size you want to use for the scanned data.
Page Top
file:///C|/Documents%20and%20Settings/mcampbell.AM/My%20Documents/ADS2000solutions/chapter4_5_8.html[3/11/2013 10:23:43 AM]
Page 67

Turn Off the Status Monitor
Turn Off the Status Monitor
Right-click the Brother Status Monitor icon and then click Load Status Monitor on Startup to clear the check
1
mark.
Right-click again then click Exit.
2
Page Top
file:///C|/Documents%20and%20Settings/mcampbell.AM/My%20Documents/ADS2000solutions/chapter5_1_2.html[3/11/2013 10:23:44 AM]
Page 68

What are the Status Monitor Indicators?
What are the Status Monitor Indicators?
Once you start up your computer, the Brother Status Monitor icon appears on the tasktray.
A green icon indicates the normal stand-by condition.
A yellow icon indicates a warning.
A red icon indicates an error has occurred.
A gray icon indicates the offline condition.
Page Top
file:///C|/Documents%20and%20Settings/mcampbell.AM/My%20Documents/ADS2000solutions/chapter5_1_3.html[3/11/2013 10:23:44 AM]
Page 69

Change the Language on Remote Setup
Change the Language on Remote Setup
Start the ControlCenter application.
1
•
Windows
(1)
(2)
®
Click the (ControlCenter4) icon in the task tray and then select Open from the menu.
The ControlCenter4 window will appear.
Note
You can also start ControlCenter4 by double-clicking the (ControlCenter4) icon in the task tray.
Click the Device Settings tab (the example below uses Home Mode).
• Macintosh
Click the (ControlCenter2) icon in the menu bar and then select Open.
(1)
The ControlCenter2 window will appear.
Note
If (ControlCenter2) icon is not displayed in the menu bar, double-click the ControlCenter icon.
The ControlCenter icon is in Macintosh HD/Applications/Brother.
The
Click the DEVICE SETTINGS tab.
(2)
file:///C|/Documents%20and%20Settings/mcampbell.AM/My%20Documents/ADS2000solutions/chapter5_3_3.html[3/11/2013 10:23:45 AM]
(ControlCenter2) icon will appear in the menu bar.
Page 70

Change the Language on Remote Setup
Click the Remote Setup button. The Remote Setup window will appear.
2
Note
You can also start Remote Setup by following the instructions below:
•
Windows
Click Start, All Programs, Brother, ADS-XXXX, and Remote Setup.
• Macintosh
Double- click the RemoteSetup icon located in Macintosh HD/Applications/Brother.
Select Language in the folder tree.
3
•
Windows
®
®
• Macintosh
file:///C|/Documents%20and%20Settings/mcampbell.AM/My%20Documents/ADS2000solutions/chapter5_3_3.html[3/11/2013 10:23:45 AM]
Page 71

Change the Language on Remote Setup
Select a language from the Language on Remote Setup drop-down list.
4
Click the OK button.
5
Note
After you change the language in the Remote Setup window, restart Remote Setup to see the change.
Page Top
file:///C|/Documents%20and%20Settings/mcampbell.AM/My%20Documents/ADS2000solutions/chapter5_3_3.html[3/11/2013 10:23:45 AM]
Page 72

Clean the Scanner
Clean the Scanner
A spot of dirt or correction fluid on the glass strip may cause poor-quality scans. Clean the inside of the scanner if a
vertical line appears in the scanned data or if areas are missing in the scanned data.
Unplug the machine from the AC power outlet.
1
Open the Top Cover (1) and the Front Cover (2).
2
In the document feeder unit, clean the glass strips (1) (2) with a lint- free cloth moistened with a non- flammable
3
glass cleaner.
Press and hold the buttons (1) on the inside of the Front Cover and then pull the Separation Pad Cover (2)
4
down.
file:///C|/Documents%20and%20Settings/mcampbell.AM/My%20Documents/ADS2000solutions/chapter6_2.html[3/11/2013 10:23:46 AM]
Page 73

Clean the Scanner
Press and hold the green buttons (1) of the Separation Pad and then pull the Separation Pad (2) upward.
5
CAUTION
DO NOT touch the metal part of the Separation Pad Cover. Doing this may cause injury to you and serious
damage to the machine.
Clean the Separation Pad with a lint-free cloth moistened with a nonflammable glass cleaner.
6
Attach the Separation Pad in the Separation Pad Cover.
7
Close the Separation Pad Cover until it clicks.
8
file:///C|/Documents%20and%20Settings/mcampbell.AM/My%20Documents/ADS2000solutions/chapter6_2.html[3/11/2013 10:23:46 AM]
Page 74

Clean the Scanner
9
Hold both sides of the Pick-up Roller Cover (1) and then pull the cover down.
Slide the Pick-up Roller (1) to the right edge.
10
The holder of the Pick-up Roller has a narrow opening that is designed to avoid dropping the roller, and the
11
shape of the shaft of the Pick-up Roller matches the opening. Turn the Pick-up Roller around until the shape of
the shaft matches the opening of the holder.
Pinch and pull the Pick-up Roller out of the machine.
12
Clean the Pick-up Roller with a lint-free cloth moistened with a nonflammable glass cleaner.
13
Place the Pick-up Roller into the machine.
14
Note
Confirm the left and right sides of the Pick-up Roller before attaching it.
file:///C|/Documents%20and%20Settings/mcampbell.AM/My%20Documents/ADS2000solutions/chapter6_2.html[3/11/2013 10:23:46 AM]
Page 75

Clean the Scanner
Slide the Pick-up Roller (1) to the left edge while turning the Pick-up Roller.
15
Close the Pick-up Roller Cover.
16
Close the Front Cover and the Top Cover.
17
CAUTION
DO NOT touch the metal part of the Separation Pad Cover. Doing this may cause injury to you and serious
damage to the machine.
file:///C|/Documents%20and%20Settings/mcampbell.AM/My%20Documents/ADS2000solutions/chapter6_2.html[3/11/2013 10:23:46 AM]
Page 76

Clean the Scanner
Note
In addition to cleaning the glass strips with a non-flammable glass cleaner, run your fingertip over the glass to see
if you can feel anything on it. If you feel dirt or debris, clean the glass again concentrating on that area. You may
need to repeat the cleaning process three or four times. To test, scan a document after each cleaning attempt.
When there is a spot of dirt or
correction fluid on the glass
strip the scanned sample shows
a vertical line.
After the glass strip is cleaned
the vertical line is gone.
Page Top
file:///C|/Documents%20and%20Settings/mcampbell.AM/My%20Documents/ADS2000solutions/chapter6_2.html[3/11/2013 10:23:46 AM]
Page 77

Packing and Shipping the Machine
Packing and Shipping the Machine
When you transport the machine, use the packing materials that came with your machine. If you do not pack the
machine properly, any damage that may occur in transit may not be covered by your warranty. The machine should be
adequately insured with the carrier.
Close the Panel Cover gently.
1
Push the Output Tray firmly back into the machine.
2
Wrap the machine in the bag it originally came in.
3
Pack the machine and the printed materials in the original carton with the original packing material as shown
4
below.
file:///C|/Documents%20and%20Settings/mcampbell.AM/My%20Documents/ADS2000solutions/chapter6_4.html[3/11/2013 10:23:47 AM]
Page 78

Packing and Shipping the Machine
Note
If you are returning your machine to Brother as part of the Exchange Service, pack only the machine. Keep
all separate parts (power cord, carrier sheet and USB cable) and printed materials to use with your
“Exchange” machine.
Close the carton and tape it shut.
5
Page Top
file:///C|/Documents%20and%20Settings/mcampbell.AM/My%20Documents/ADS2000solutions/chapter6_4.html[3/11/2013 10:23:47 AM]
Page 79

Error Messages in the Status Monitor
Error Messages in the Status Monitor
The Status Monitor will report problems with the machine. Take the proper action by referring to the following table.
If you want to turn the status monitor on, see Monitor the Status of the Machine from Your Computer (Windows
Monitor the Status of the Machine from Your Computer (Macintosh)
Error message Cause Action
Ready — The machine is ready to scan.
.
®
) or
Sleep The machine is idle and the amount of
time specified by the Sleep Time setting
has elapsed.
Offline The machine is not connected to the
computer.
Out of Memory The machine's memory is full. Do one of the following:
Replace Pad The Separation Pad has been used over
50,000 times.
Replace Roller The Pick-up Roller has been used over
50,000 times.
Do one of the following:
• Press any key.
• Open the Top Cover.
• Load your document.
Connect the machine to the computer and turn on
the machine by opening the Top Cover.
• Press any key.
• Turn the machine off and then on by
unplugging the machine from the AC power
outlet and then plugging the machine in again.
Replace the Separation Pad with a new one.
Scanning errors may occur if you do not replace
the part. See Replace the Separation Pad
Replace the Pick-up Roller with a new one.
Scanning errors may occur if you do not replace
the part. See Replace the Pick-up Roller
.
.
Replace Parts Both the Separation Pad and the Pick-up
Roller have been used over 50,000
times.
Cover is Open Front Cover is open. Do one of the following:
Scan Unable The machine is warming up. Correct the error. See LED Indications
Unusable Device An unusable device is inserted in the
USB port.
file:///C|/Documents%20and%20Settings/mcampbell.AM/My%20Documents/ADS2000solutions/chapter7_2.html[3/11/2013 10:23:48 AM]
Replace the Separation Pad and the Pick-up
Roller with new ones. Scanning errors may occur
if you do not replace the parts. See Replace the
Separation Pad and Replace the Pick-up Roller.
• If the error occurred while the machine was in
standby mode, see Front Cover is Open in LED
Indications.
• If the error occurred while scanning, see Front
Cover is Open in LED Indications
Service Call Indications
Disconnect the device. Turn the machine off and
then on by unplugging the machine from the AC
power outlet and then plugging the machine in
.
.
and
Page 80

Error Messages in the Status Monitor
again.
Document Jam
• The Document Guides are not set to
the correct document size.
• The settings are not suitable for your
document.
Clear the document jam (see Document Jam) and
then do the following:
• Adjust the Document Guides to fit the width of
the document. When Scan Size is set to Auto
and you are scanning a document that contains
• Paper dust has accumulated on the
surface of the Pick-up Roller or
Separation Pad.
multiple page sizes, insert narrow pages
straight and as close to the center of the
machine as possible. If the document will not
be fed straight, use Continuous Scanning.
• Confirm the settings. See Important in
Document Jam
.
• Clean the Pick-up Roller and Separation Pad.
.
.
Multifeed Multiple pages were fed at the same
See Clean the Scanner
Clear the Multifeed. See Multifeed
time.
Page Top
file:///C|/Documents%20and%20Settings/mcampbell.AM/My%20Documents/ADS2000solutions/chapter7_2.html[3/11/2013 10:23:48 AM]
Page 81

Control Panel Overview
Control Panel Overview
1. Error Indicator (with LED)
The Error Indicator indicates that the machine is in one of the following states:
Document Jam / Front Cover is Open / Unusable Device / Unsupported Device / Multifeed Detection etc.
2. Power Indicator (with LED)
It will blink depending on the status of the machine.
3. Stop key
Job Cancel / Wake-up / Error Recovery / Disconnect Remote Setup
4. Scan to PC key (with LED)
Scan to PC / Wake-up etc.
5. Scan to USB key (with LED)
Scan to USB / Wake -up etc.
• LED Indications
• Service Call Indications
LED Indications
The LED indications shown in the table below are used in the illustrations in this chapter.
or
The LED is off.
or or
or or
LEDs Machine Status
file:///C|/Documents%20and%20Settings/mcampbell.AM/My%20Documents/ADS2000solutions/chapter1_3.html[3/11/2013 10:23:49 AM]
The LED is on.
The LED is blinking.
Ready
Page 82

Control Panel Overview
The machine is ready to scan.
Ready (PC connected)
The machine is connected to your computer and ready to scan.
Ready (USB connected)
The USB device is connected to the machine and ready to scan.
Ready (PC and USB connected)
The machine is connected to your computer and a USB device and is ready to scan.
Sleep
The machine is in Sleep mode (Power Save mode). The machine acts as though it is
turned off.
Do one of the following to wake up the machine:
• Press any key.
• Open the Top Cover.
• Load your document.
The machine will enter Ready mode.
Remote Setup
Remote Setup is in process. To cancel Remote Setup, click the Cancel button in the
Remote Setup window on your computer.
file:///C|/Documents%20and%20Settings/mcampbell.AM/My%20Documents/ADS2000solutions/chapter1_3.html[3/11/2013 10:23:49 AM]
Page 83

Control Panel Overview
Scanning to PC
Scan to your computer is in process.
Note
The Scan to USB key lights up when the USB flash memory drive is connected
to the machine.
Scanning to USB
Scan to your USB device is in process.
Note
The Scan to PC key lights up when your computer is connected to the machine.
Ejecting Paper
The machine is ejecting paper. If there is no document loaded in the ADF or the paper
ejection was temporarily stopped, press the Stop key to finish ejecting the paper.
Checking Device
The machine is checking the connected USB device.
Note
The Scan to PC key lights up when your computer is connected to the machine.
Downloading Program
The machine is downloading the latest program.
file:///C|/Documents%20and%20Settings/mcampbell.AM/My%20Documents/ADS2000solutions/chapter1_3.html[3/11/2013 10:23:49 AM]
Page 84

Control Panel Overview
Replace Separation Pad
Replace the Separation Pad with a new one. See Replace the Separation Pad
Replace Pick-up Roller
Replace the Pick-up Roller with a new one. See Replace the Pick-up Roller
.
.
Replace Separation Pad and Pick-up Roller
Replace the Separation Pad and the Pick-up Roller with new ones. See Replace the
Separation Pad and Replace the Pick-up Roller.
Front Cover is Open
Close the Front Cover of the machine.
Document Jam
Clear the document jam (see Document Jam
) and then do the following:
• Load the card vertically when scanning cards.
• Select Long Paper (Normal Width) or Long Paper (Narrow Width) from the Scan
Size or Document Size drop-down list when scanning a long document.
To change the settings, do one of the following:
file:///C|/Documents%20and%20Settings/mcampbell.AM/My%20Documents/ADS2000solutions/chapter1_3.html[3/11/2013 10:23:49 AM]
Page 85

Control Panel Overview
•
See Custom Scan Settings
to scan using ControlCenter4 Home Mode (Windows®)
and follow the steps.
See Change Scan Settings to scan using ControlCenter4 Advanced Mode
•
(Windows®) and follow the steps.
• See Change Scan Settings
to scan using ControlCenter2 (Macintosh) and follow the
steps.
•
See Change Scan to PC Settings to scan using the Scan to PC key (Windows®)
and follow the steps.
• See Change Scan Settings
to scan using the Scan to PC key (Macintosh) and
follow the steps.
Out of Memory
The machine’s memory is full and the machine cannot scan the entire document. Do
one of the following:
• Press any key.
• Turn the machine off and then on by unplugging the machine from the AC power
outlet and then plugging the machine in again.
Unusable Device
Disconnect any unusable devices, such as a fan, from the USB port. Turn the machine
off and then on by unplugging the machine from the AC power outlet and then
plugging the machine in again.
Multifeed Detection
Multiple documents have fed at the same time. Press Stop (see Multifeed
do the following:
• Uncheck the Multifeed Detection check box when scanning business cards.
• Check the Plastic Card Mode check box when scanning a plastic card.
• Check the Carrier Sheet Mode check box when scanning using the Carrier Sheet.
To change the settings, do one of the following:
•
See Custom Scan Settings
to scan using ControlCenter4 Home Mode (Windows®)
and follow the steps.
See Change Scan Settings to scan using ControlCenter4 Advanced Mode
•
(Windows®) and follow the steps.
• See Change Scan Settings
file:///C|/Documents%20and%20Settings/mcampbell.AM/My%20Documents/ADS2000solutions/chapter1_3.html[3/11/2013 10:23:49 AM]
to scan using ControlCenter2 (Macintosh) and follow the
) and then
Page 86

Control Panel Overview
steps.
The connected USB flash memory drive is write-protected. Disconnect the protected
•
See Change Scan to PC Settings
and follow the steps.
to scan using the Scan to PC key (Windows®)
• See Change Scan Settings
to scan using the Scan to PC key (Macintosh) and
follow the steps.
Confirm that the data scanned before the multifeed occurred has been saved, and
start scanning again from the next page or from the beginning.
Note
The data scanned before the multifeed occurred is not saved when scanning
using the Scan to USB key on the control panel unless the file type is JPEG.
Unsupported Device
Remove the unsupported USB device, such as a mouse or mobile device that does
not support USB flash memory drive mode, from the USB direct interface.
Hub is Unusable
A Hub or USB Flash memory drive with Hub has been connected to the USB direct
interface. Disconnect any unsupported devices, such as a USB hub or a USB flash
memory drive that contains a hub.
Storage Full
The connected USB flash memory drive is full. Press any key and then do one of the
following:
• Delete unused files or folders from the USB flash memory drive and then try again.
• Use a USB flash memory drive that has available space.
Access Error
The USB flash memory drive was disconnected when being accessed. Press any key.
Protected Device
file:///C|/Documents%20and%20Settings/mcampbell.AM/My%20Documents/ADS2000solutions/chapter1_3.html[3/11/2013 10:23:49 AM]
Page 87

Control Panel Overview
•
USB flash memory drive, press any key and then do one of the following:
• Turn off the USB flash memory drive's write-protection and then try again.
• Use a USB flash memory drive that has write- protection turned off.
Too Many Files
Your machine cannot save to a USB flash memory drive if it contains too many files.
Disconnect the USB flash memory drive, press any key and then do one of the
following:
• Delete unused files or folders from the root folder of the USB flash memory drive
and then try again.
• Use a USB flash memory drive that contains fewer than 999 files.
Rename the File
Press any key and then do one of the following:
• Delete unused files from the USB flash memory drive and then try again.
• Change the file name by doing one of the following:
See Save Scanned Documents
•
to scan using ControlCenter4 Home Mode
(Windows®) and follow the steps.
See Change Scan Settings
•
to scan using ControlCenter4 Advanced Mode
(Windows®) and follow the steps.
• See Change Scan Settings
to scan using ControlCenter2 (Macintosh) and follow
the steps.
•
See Change Scan to PC Settings to scan using the Scan to PC key (Windows®)
and follow the steps.
• See Change Scan Settings
to scan using the Scan to PC key (Macintosh) and
follow the steps.
• See Change Scan Settings
to scan using the Scan to USB key and follow the
steps.
All Blank Page Skipped
All scanned pages were skipped as blank pages. Press any key and then do one of
the following:
• Place your document, face down, top edge first in the document feeder.
• Set Blank Page Skip to Off by doing one of the following:
See Custom Scan Settings
•
to scan using ControlCenter4 Home Mode
(Windows®) and follow the steps.
See Change Scan Settings
•
to scan using ControlCenter4 Advanced Mode
(Windows®) and follow the steps.
• See Change Scan Settings
to scan using ControlCenter2 (Macintosh) and follow
the steps.
file:///C|/Documents%20and%20Settings/mcampbell.AM/My%20Documents/ADS2000solutions/chapter1_3.html[3/11/2013 10:23:49 AM]
®
Page 88

Control Panel Overview
See Change Scan to PC Settings to scan using the Scan to PC key (Windows )
and follow the steps.
• See Change Scan Settings
to scan using the Scan to PC key (Macintosh) and
follow the steps.
Machine Error
Make a note of the LED indication and report the indication to your dealer or to
Brother Customer Service.
Page Top
file:///C|/Documents%20and%20Settings/mcampbell.AM/My%20Documents/ADS2000solutions/chapter1_3.html[3/11/2013 10:23:49 AM]
Page 89

Scanning Difficulties
Scanning Difficulties
Difficulty Cause Suggestions
TWAIN or WIA errors
appear when starting
to scan. (Windows
TWAIN or ICA errors
appear when starting
to scan. (Macintosh)
OCR does not work. The scanner resolution is too low.
TWAIN or WIA driver has not been
chosen as the primary source in your
®
)
scanning application.
TWAIN or ICA driver has not been
chosen as the primary source in your
scanning application.
(Macintosh users)
Presto! PageManager has not been
installed on your computer.
Make sure the Brother TWAIN or WIA driver is
chosen as the primary source in your scanning
application. For example, in Nuance™
PaperPort™12SE, click Scan Settings and then
Select to select the Brother TWAIN/WIA driver.
Make sure the Brother TWAIN driver is chosen as
the primary source.
In PageManager, click File, Select Source and
select the Brother TWAIN driver.
Mac OS X 10.6.x and 10.7.x users can also scan
documents using the ICA Scanner Driver.
• Increase the scanner resolution by doing one of
the following:
See Custom Scan Settings
•
ControlCenter4 Home Mode (Windows®) and
follow the steps.
See Change Scan Settings to scan using
•
ControlCenter4 Advanced Mode (Windows®)
and follow the steps.
to scan using
Vertical lines are seen
in the scanned image.
The scanned image is
missing.
Paper dust has accumulated on the
surface of the glass strips.
• The Document Guides are not
adjusted to fit the width of the
• See Change Scan Settings
ControlCenter2 (Macintosh) and follow the
steps.
See Change Scan to PC Settings
•
using the Scan to PC key (Windows®) and
follow the steps.
• See Change Scan Settings
Scan to PC key (Macintosh) and follow the
steps.
• See Change Scan Settings
Scan to USB key and follow the steps.
• (Macintosh users)
Make sure you have installed Presto!
PageManager from the supplied DVD-ROM on
your computer.
Clean the glass strips inside the machine. See
Clean the Scanner
• Adjust the Document Guides to fit the width of
the document. When Scan Size is set to Auto
.
to scan using
to scan
to scan using the
to scan using the
file:///C|/Documents%20and%20Settings/mcampbell.AM/My%20Documents/ADS2000solutions/chapter7_5.html[3/11/2013 10:23:51 AM]
Page 90

Scanning Difficulties
document.
and you are scanning a document that contains
• The Auto Deskew feature was set to
On when the document was
scanned.
• The settings are not suitable for your
document. For example, a Letter-size
document was fed when Legal was
selected as document size.
• The card was loaded horizontally.
multiple page sizes, insert narrow pages straight
and as close to the center of the machine as
possible. If the document does not stay straight
while feeding, use Continuous Scanning.
• Set Auto Deskew to Off by doing one of the
following:
See Custom Scan Settings
•
to scan using
ControlCenter4 Home Mode (Windows®) and
follow the steps.
See Change Scan Settings to scan using
•
ControlCenter4 Advanced Mode (Windows®)
and follow the steps.
• See Change Scan Settings
to scan using
ControlCenter2 (Macintosh) and follow the
steps.
See Change Scan to PC Settings
•
to scan
using the Scan to PC key (Windows®) and
follow the steps.
• See Change Scan Settings
to scan using the
Scan to PC key (Macintosh) and follow the
steps.
The scanned image is
skewed.
• The Document Guides are not
adjusted to fit the width of the
document.
• The Auto Deskew feature was set to
Off when the document was
scanned.
• See Change Scan Settings
to scan using the
Scan to USB key and follow the steps.
• Make sure the document size settings are
suitable for your document.
• Load the card vertically.
• Adjust the Document Guides to fit the width of
the document. When Scan Size is set to Auto
and you are scanning a document that contains
multiple page sizes, insert narrow pages straight
and as close to the center of the machine as
possible. If the document does not stay straight
while feeding, use Continuous Scanning.
• Set Auto Deskew to On by doing one of the
following:
See Custom Scan Settings
•
to scan using
ControlCenter4 Home Mode (Windows®) and
follow the steps.
See Change Scan Settings to scan using
•
ControlCenter4 Advanced Mode (Windows®)
and follow the steps.
• See Change Scan Settings
to scan using
ControlCenter2 (Macintosh) and follow the
steps.
file:///C|/Documents%20and%20Settings/mcampbell.AM/My%20Documents/ADS2000solutions/chapter7_5.html[3/11/2013 10:23:51 AM]
Page 91

Scanning Difficulties
•
See Change Scan to PC Settings
to scan
using the Scan to PC key (Windows®) and
follow the steps.
• See Change Scan Settings
to scan using the
Scan to PC key (Macintosh) and follow the
steps.
The scan speed is too
slow.
The resolution is not suitable for your
document.
• See Change Scan Settings
to scan using the
Scan to USB key and follow the steps.
Decrease the scanner resolution by doing one of
the following:
See Custom Scan Settings to scan using
•
ControlCenter4 Home Mode (Windows®) and
follow the steps.
See Change Scan Settings to scan using
•
ControlCenter4 Advanced Mode (Windows®)
and follow the steps.
• See Change Scan Settings
to scan using
ControlCenter2 (Macintosh) and follow the steps.
See Change Scan to PC Settings
•
to scan using
the Scan to PC key (Windows®) and follow the
steps.
• See Change Scan Settings
to scan using the
Scan to PC key (Macintosh) and follow the
steps.
The document was not
fed.
A multifeed occurs.
• Paper dust has accumulated on the
surface of the Pick-up Roller or
Separation Pad.
• Too many documents are loaded in
the document feeder at a time.
• There are foreign objects in the
document feeder.
• Your document is too thin or too
thick.
• Remote Setup is in process.
• Paper ejection has paused.
• Paper dust has accumulated on the
surface of the Pick-up Roller or
Separation Pad.
• Too many documents are loaded in
the document feeder at a time.
• See Change Scan Settings
to scan using the
Scan to USB key and follow the steps.
• Clean the Separation Pad and Pick -up Roller.
See Clean the Scanner
.
• Make sure your document is acceptable for the
machine. See Acceptable Document
.
• Remove any foreign objects or ripped paper from
the document feeder.
• Make sure your document is acceptable for the
machine. See Acceptable Document
.
• Cancel Remote Setup. See Remote Setup in
LED Indications
.
• Finish ejecting the paper. See Ejecting Paper in
LED Indications
.
• Clean the Separation Pad and Pick -up Roller.
See Clean the Scanner
.
• Load no more than 50 pages at a time. See
Acceptable Document
.
file:///C|/Documents%20and%20Settings/mcampbell.AM/My%20Documents/ADS2000solutions/chapter7_5.html[3/11/2013 10:23:51 AM]
Page 92

Scanning Difficulties
• Use the Carrier Sheet to scan the overlapped
The document is
jammed.
The scan quality is
poor.
• The document is sticky or has a
sticky note on it, which caused an
overlap.
• Paper dust has accumulated on the
surface of the Pick-up Roller or
Separation Pad.
• There are foreign objects in the
document feeder.
• Your document is not acceptable for
the machine.
• Paper dust has accumulated on the
surface of the Pick-up Roller or
Separation Pad.
• Paper dust has accumulated on the
surface of the glass strips inside the
machine.
• Newspapers or magazines were
scanned with the Bleed Through
Prevention/Base Color Removal
feature and with a low resolution.
document.
• Clean the Separation Pad and Pick -up Roller.
See Clean the Scanner
.
• Remove any foreign objects or ripped paper from
the document feeder.
• Make sure your document is acceptable for the
machine. See Acceptable Document
.
• Clean the Separation Pad and Pick -up Roller.
See Clean the Scanner
.
• Clean the glass strips inside the machine. See
Clean the Scanner
.
• Increase the scanner resolution by doing one of
the following:
See Custom Scan Settings
•
to scan using
ControlCenter4 Home Mode (Windows®) and
follow the steps.
See Change Scan Settings to scan using
•
ControlCenter4 Advanced Mode (Windows®)
and follow the steps.
The machine pauses
for about 3 seconds
between each page
when scanning.
The machine has entered motor save
mode. If you scan continuously, the
internal temperature of the machine
may increase, causing the machine to
enter motor save mode.
Note
The length of the pause may vary
depending on the scanning
conditions.
• See Change Scan Settings
to scan using
ControlCenter2 (Macintosh) and follow the
steps.
See Change Scan to PC Settings
•
to scan
using the Scan to PC key (Windows®) and
follow the steps.
• See Change Scan Settings
to scan using the
Scan to PC key (Macintosh) and follow the
steps.
• See Change Scan Settings
to scan using the
Scan to USB key and follow the steps.
This is normal and you may continue to scan. If you
scan continuously, the internal temperature of the
machine may increase, causing the machine to
enter motor save mode.
file:///C|/Documents%20and%20Settings/mcampbell.AM/My%20Documents/ADS2000solutions/chapter7_5.html[3/11/2013 10:23:51 AM]
Page 93

Scanning Difficulties
Bleed through is seen
in the scan data.
Colors in the scanned
data are dark.
A page that is not a
blank page is skipped.
The settings are not appropriate for the
type of document being scanned.
The settings are not appropriate for the
type of document being scanned.
• The document is too light.
• Blank Page Skip is set to On.
Check the Bleed Through Prevention/Base Color
Removal check box.
Do one of the following:
• Check the Bleed Through Prevention/Base Color
Removal check box and then scan from your
computer.
• Change Brightness higher and then scan from
your computer.
• Change Contrast higher and then scan from your
computer.
• Change Scan Type to Gray or Color and then
scan from your computer.
Set Blank Page Skip to Off.
Page Top
file:///C|/Documents%20and%20Settings/mcampbell.AM/My%20Documents/ADS2000solutions/chapter7_5.html[3/11/2013 10:23:51 AM]
Page 94

Software Difficulties
Software Difficulties
Difficulty Suggestions
Cannot install software.
(Windows
Run the Repair MFL-Pro Suite program on the DVD-ROM. This program will
repair and reinstall the software.
®
users only)
Page Top
file:///C|/Documents%20and%20Settings/mcampbell.AM/My%20Documents/ADS2000solutions/chapter7_6.html[3/11/2013 10:23:52 AM]
Page 95

Other Difficulties
Other Difficulties
Difficulty Cause Suggestions
The machine is not
turned on.
Cannot start Remote
Setup.
The machine was plugged in within 60
seconds after pulling out the plug.
• The machine is turned off.
• The machine is not connected to
your computer.
• The machine is in Auto PowerDown
mode.
• An error is occurring.
• The machine is scanning.
Turn off the machine, wait 60 seconds, and then
turn on the scanner.
• Turn on the machine and then try again.
• Connect the machine to your computer and then
try again.
• Press any key or open the Top Cover, and then
try again.
• Clear all errors and then try again.
• Wait until scanning has finished and try again.
Page Top
file:///C|/Documents%20and%20Settings/mcampbell.AM/My%20Documents/ADS2000solutions/chapter7_7.html[3/11/2013 10:23:52 AM]
Page 96

Check the ROM Version
Check the ROM Version
Start the ControlCenter application.
1
•
Windows
(1)
(2)
®
Click the (ControlCenter4) icon in the task tray and then select Open from the menu.
The ControlCenter4 window will appear.
Note
You can also start ControlCenter4 by double-clicking the (ControlCenter4) icon in the task tray.
Click the Device Settings tab (the example below uses Home Mode).
• Macintosh
Click the (ControlCenter2) icon in the menu bar and then select Open.
(1)
The ControlCenter2 window will appear.
Note
If (ControlCenter2) icon is not displayed in the menu bar, double-click the ControlCenter icon.
The ControlCenter icon is in Macintosh HD/Applications/Brother.
The
Click the DEVICE SETTINGS tab.
(2)
file:///C|/Documents%20and%20Settings/mcampbell.AM/My%20Documents/ADS2000solutions/chapter7_8_2.html[3/11/2013 10:23:53 AM]
(ControlCenter2) icon will appear in the menu bar.
Page 97

Check the ROM Version
Click the Remote Setup button. The Remote Setup window will appear.
2
Note
You can also start Remote Setup by following the instructions below:
•
Windows
Click Start, All Programs, Brother, ADS-XXXX, and Remote Setup.
• Macintosh
Double- click the RemoteSetup icon located in Macintosh HD/Applications/Brother.
Select Machine Info. in the folder tree. The window will display the Main Controller Main ROM Version .
3
•
Windows
®
®
• Macintosh
file:///C|/Documents%20and%20Settings/mcampbell.AM/My%20Documents/ADS2000solutions/chapter7_8_2.html[3/11/2013 10:23:53 AM]
Page 98

Check the ROM Version
Page Top
file:///C|/Documents%20and%20Settings/mcampbell.AM/My%20Documents/ADS2000solutions/chapter7_8_2.html[3/11/2013 10:23:53 AM]
Page 99

Scanner
Scanner
Color/Black Yes/Yes
TWAIN Compliant
Windows
Macintosh
WIA Compliant
Windows
ICA Compliant Macintosh
ISIS™ Compliant
Windows
®
®
®
Windows® XP1/Windows Vista®/Windows® 7
Mac OS X 10.5.8, 10.6.x, 10.7.x
2
Windows® XP1/Windows Vista®/Windows® 7
Mac OS X 10.6.x, 10.7.x
2
Windows® XP1/Windows Vista®/Windows® 7
Color Depth Input 30 bit color Processing
Output 24 bit color Processing
Resolution Interpolated Up to 1200 × 1200 dpi
Optical Up to 600 × 600 dpi
Scanning Width Up to 8.34 in. (212 mm)
Gray Scale 256 levels
1
Windows® XP in this User’s Guide includes Windows® XP Home Edition and Windows® XP Professional.
2
For the latest driver updates for the Mac OS X you are using, visit us at http://solutions.brother.com/.
Page Top
file:///C|/Documents%20and%20Settings/mcampbell.AM/My%20Documents/ADS2000solutions/appendix11_2.html[3/11/2013 10:23:54 AM]
Page 100

Computer Requirements
Computer Requirements
SUPPORTED OPERATING SYSTEMS AND SOFTWARE FUNCTIONS
Computer Platform &
Operating System
Version
Windows
Operating
System
®
Windows
Home (SP2
or greater)
Windows® XP
Professional
(SP2 or
greater)
Windows
®2
Vista
Windows
®
2
® 72
Supported
PC
Software
Functions
Scanning USB
XP
2
PC
Interface
Processor
Minimum
Speed
®
Intel
Pentium® II
or equivalent
®
Intel
Pentium® 4
or equivalent
64-bit (Intel
64 or
AMD64)
supported
CPU
Hard Disk Space to
Minimum
RAM
Recommended
RAM
Drivers
install
For
Applications
128 MB 256 MB 150 MB 1.5 GB
512 MB 1 GB 500 MB 1.5 GB
1 GB (32
®
bit)
1 GB (32 bit)
2 GB (64 bit)
650 MB 1.5 GB
2 GB (64
bit)
For
Macintosh
Operating
System
Mac OS X
10.5.8
Scanning
USB
1
PowerPC
G4/G5
Intel
®
512 MB 1 GB 80 MB 580 MB
®
Processor
Mac OS X
10.6.x
Mac OS X
®
Intel
Processor
1 GB 2 GB
2 GB 2 GB
10.7.x
Conditions:
1
Third party USB ports are not supported.
2 Nuance™ PaperPort™12SE supports
For the latest driver updates, visit us at
(in USA) www.brother.com/
Windows® XP Home (SP3 or greater), XP
Professional (SP3 or greater), Windows
®
Vista
(SP2 or greater) and Windows® 7.
(in Canada) www.brother.ca/
All trademarks, brand and product names are the property of their
respective companies.
Page Top
file:///C|/Documents%20and%20Settings/mcampbell.AM/My%20Documents/ADS2000solutions/appendix11_4.html[3/11/2013 10:23:54 AM]
 Loading...