

Page 1
■ I-. ■' : . ■'•■ Í'■" ■T''" ■'■■.?.■■! ■ ; •: Í-".. ■
■ 'О- i :\iv■■.'■■:i;V, '
:: : ■ : ■ . \,\ ^ ■ ■ ■ ■ ;■ .; лJ ;■ ■ - ■ ^. ; ■ ■ : ■ ■ ;" : . :.v*- x:■ ;: = ■ .. .£■ .
W
!.i -X'«■'■ ;■■■■• ■ ' . ■
■-■■ ■ -J
•J,
! ■ Г''
4%
■■■ " ■.. ■ ■■ ■' ■ . ■ ■ ■i-').- i'; ?
■■■■ ='. -¡V'-V . ^ ^^4 . ■;! ¡
,Н- ■
•:-v:'
iÿj--;/
%
■■ÏS:;.
'■■V ’y-.; -'-'ß:-.
■■‘■■'i:;
'j'i-
Page 2

Page 3

Thank you for purchasing a Brother fax machine. This fax machine has been designed
to be simple to use, but you can utilize it to its fullest potential by taking some time to
read this owner’s manual. You will be ready to use the fax machine as soon as you read
the first four chapters. Then you can refer to topics in the remaining chapters, as
needed.
Structure of the Manual
■ Chapters 1-4
How to set up the fax machine and what you need to know before you use it.
■ Chapters 5-8
Basic operations, how to send and receive faxes.
9
Chapters 9-12
Advanced operations.
Finding information in the Owner’s Manual
• Use the table of contents. This side of the manual is coded so you can find topics
easily.
• If there is a key on the fax machine you are not familiar with, refer to chapter
2.
• To find information about a function, refer to the ‘function Selection Table” in
chapter 3.
• If you have trouble, refer to chapter 13 on troubleshooting.
• Use the chapter 15 index.
Test Sheet Procedure________________________________________
Please fill out the TEST SHEET and fax it to 1-908-469-4547 as your first transmission.
This will verify that your fax machine is properly installed.
When this document is received at Brother Diagnostic Center, a confirmation sheet will
be sent back to your machine from Brother Automatic Fax Back Response System. Be
sure to set up your “Station ID” . (See page 4-3.)
FAX NO. : 1-908-469-4547 (Fax Transmission Only)
TEL NO. : 1-800-284-4FAX (Voice Phone Only)
1-800-284-4329
Page 4

Page 5

iiiilll
CONTENTS
iiSiiiii
FOR YOUR INFORMATION
Chapter L ❖ SETUP & PREPARATION BEFORE USE M
Chapter 2.
Chapter 3.
Choosing a Suitahie Place for Your Fax Machine
The Good Places............................................................................................M
And the Bad Places
Packing List.........................................................................................................U2
Setting up Your Fax Machine..............................................................................¡ -2
* About the Recording Paper.......................................................................1-ii
* Multi Line Connections (PBXs).................................................................L13
* ConnectingtoaPrivateBranchExchange
.....................................................................................
❖ THE CONTROL PANEL KEYS 2-1
TELEPHONE AREA.........................................................................................2-2
ONE-TOUCH AREA....................................................................................... 2-3
LCD & USER SETTING AREA.......................................................................2-4
❖ HOW TO USE ON-SCREEN PROGRAMMING (OSP)
............................................
.....................................................
1-1
I -1
1-13
AND HELP KEY 3-1
User-friendly Programming
On-screen Programming (OSP).........................................................................3-1
Using the Function Mode to Access On-screen Programming (OSP)
Alternating Displays for On-screen Programming (OSP)
Function Selection Table....................................................................................3-2
Help Key ( Advanced)...................................................................................... 3-7
How to Print a Help List
How to Enter Text in Function Mode
How to Enter Special Characters, Symbols and Punctuation
Marks in Function Mode
...............................................................................
..............
...............................
....................................................................................
..............................................................
..................................................................................
3-1
3-1
3-2
3-7
3 11
3-12
Chapter 4. ❖ TELEPHONE FUNCTION SETTINGS 4-1
Setting the Dialing Mode (Tone/Pufse).............................................................4-1
Setting the Beeper Sound Level........................................................................ 4-1
Setting the Date and Time..................................................................................4-2
Setting the Station ID.........................................................................................4-3
Storing One'Touch Dial Numbers......................................................................4-4
* Types of Numbers........................................................................................
* Chain Dialing................................................................................................4-6
Storing Speed-Dial Numbers..............................................................................4-6
» When You Wish to Change the Stored One-Touch and Speed-Dial
Numbers (During Step 4 on Page 4-4,7)
® Memory Storage
Setting Up Number Groups................................................................................4-8
............................................................................................
.....................................................
4-6
4-8
4-8
Chapter BÚ ❖ USING THE UNIT AS A TELEPHONE 5-1
Manual Dialing...................................................................................................5-1
One-Touch Dialing
Speed Dialing......................................................................................................5-Í
® Using Keys with the Telephone.....................................................................5-1
* On Hook Dialing...........................................................................................5- Í
Telephone Index.................................................................................................5-2
............................................................................................
5-1
Page 6

CONTENTS
Chapter 6,
Chapter 7,
SENDING FAXES 6-1
A) DOCUMENT BASICS....................................................................................6-1
The Size of Your Documents
How to Insert the Document.............................................................................6-1
The Auto Document Feeder (ADF)..................................................................6-2
Getting Ready to Send a Fax
RESOLUTION...........................................................................................6-2
CONTRAST...............................................................................................6-3
B) BASIC FAX TRANSMISSIONS.....................................................................6-4
• Sending a Fax.............................................................................................
• Talking to the Other Party When Sending a Fax .......................................6-4
Sending a Fax Automatically............................................................................6-4
Sending a Fax Manually...................................................................................6-5
Automatic and Manual Re-dialing
Setting the Auto Re-dial...................................................................................6-5
» Possible Settings When You Send a Fax Manually.......................................6-6
• Printing Page Headers................................................................................6-6
C) ADVANCED FAX TRANSMISSIONS..........................................................6-7
Sending a Fax by Using Super Quick-Scan (Memory Transmission)
• If You Get a MEMORY FULL Message When Trying to Send a Fax
by Using Super Quick-Scan.......................................................................6-7
Delayed Transmission
Setting the Daily Timer (for Delayed Transmissions)
Broadcasting......................................................................................................6-9
• Getting Familiar with the Broadcasting Function
Sending by Multi-Transmission (Only for FAX-2400ML/2500ML)
Interrupting the Timer and Polled Job
Canceling a Job
D) FAX TRANSMISSION OPTIONS................................................................6-13
Setting the Overseas Mode........................................................................... 6-13
Setting Your Fax Machine for Multiple Resolution Transmission
Gray Scale.......................................................................................................6-15
Sending a Fax with a Cover Page...................................................................6-15
• The Comments Selection on the Cover Page...........................................6-16
Customizing Your Cover Page Comment
Printing the Cover Page..................................................................................6-17
Setting Cover Page ON/OFF..........................................................................6-17
• Sending an Automatic Cover Page.................................................;
Sending a Fax When the Cover Page Is ON
When Using the Cover Page Temporarily......................................................6-18
Sending a Fax with Call Reservation .............................................................6-19
• Using the Call Reservation Function.......................................................6-20
Printing the Cali Back Message......................................................................6-20
ECM (Error Correction Mode) Feature (Only for FAX-2400ML/2500ML).. 6-21
Error Re-Transmission
Next-FAX Reservation
...............................................................................................6-12
...........................................................................
............................................................................
..................................................................
.............
......................................................................................
.....................................
.....................................
..................
...........................................................
...............
......................................................
........
...................................................
..................................................................................
...................................................................................
6-1
6-2
6-5
6-10
6-11
^ 6-14
6-16
6-18
6-18
6_21
6-22
RECEIVING FAXES AND OTHER CALLS 7-1
A) BASIC SETUP TO RECEIVE FAXES.........................................................7-1
6-4
6-7
6-8
6-8
6-9
Page 7

CONTENTS
Selecting an Answer Mode
Manual Reception (MANUAL Mode)
Automatic Fax Reception (AUTO Mode)........................................................7-2
Setting the Ring Delay......................................................................................7-2
The F/T Switch (F/T Mode)
Setting the F/T Ring Tinne
Smoothing.........................................................................................................7-4
Setting the Size of the Recording Paper...........................................................7-5
Printing a Reduced Copy of the Incoming Document
Auto Reduction
Fixed Reduction.........................................................................................7-6
• The Ratios of Fixed Reduction..................................................................7-7
Toner Save Function.........................................................................................7-8
Speaker Volume............................................................................................ 7-9
Ring Volume.....................................................................................................7-9
• Reception into Memory............................................................................7-10
B) REMOTE ACTIVATION..............................................................................7-11
What is Remote Activation
• Connecting an External or Extension Telephone to the Unit
Using Remote Codes......................................................................................7-11
“ Limitation of Using External (or Extension) Phones
Registering Remote Codes..............................................................................7-12
C) CONNECTION TO A TELEPHONE ANSWERING DEVICE (TAD) 7-13
The TAD Mode...............................................................................................7-13
• Connecting an External TAD to the Unit
• Sequence of TAD Mode Reception.........................................................7-14
D) DISTINCTIVE RINGING..............................................................................7-15
Distinctive Ringing.........................................................................................7-15
What Is Distinctive Ringing?...................................................................7-15
Can My Fax Machine Utilize Distinctive Ringing?
Can I Change the Setting Later?............................................................7-15
How Will the Fax Machine Treat All Other Distinctive Ringing? ... 7-15
How Does the Distinctive Ringing Function Work?...............................7-15
What’s the Advantage of Using the Distinctive Ringing Function? , 7-15
Setting the Distinctive Ringing Function
• Wliile You Are Setting the Distinctive Ringing Function:......................7-17
• Once You Have Finished Setting the Distinctive Ringing Function: 7-17
How to Turn the Distinctive Ringing Function ON or OFF
..............................................................................
.....................
.............................................................................
.....................................................
..........................................................................................
............................................................................
.......................................................
-.......................................7-2
..........................
......................................
..................
..................................
................................................
................................
...........................
7-1
7-3
7-3
7-6
7-6
7-11
7-11
7-12
7-13
7-15
7-16
7-18
Chapter s. ❖ HOW TO USE THE COPY FUNCTION 8-1
Making Single and Multiple Copies
Making Reduced and Enlarged Copies...................................................................8-2
....................................................................
8-1
Chapters. ❖ POLLING 9-1
* What Is Polling?
* How Does It Work?..........................................................................................9-1
* When to Use Polling?.......................................................................................9.1
Polling Another Fax Machine..................................................................................9-2
Setting up Polled Waiting.......................................................................................9_2
...............................................................................................9_]
Page 8

Sv'^^s i
CONTENTS
i
Chapter W,
Chapter IL
Chapter Æ
Chapter 13,
Chapter 14.
Chapter IS.
Chapter 16.
■-Æ
...
:•• - T..i-i■ j--;h;- ■'
Secure Polling..........................................................................................................9-3
Polling Another Fax Machine with Secure Code....................................................9-3
Setting up Polled Waiting with Secure Polling..................................................... 9-4
Delayed Polling........................................................................................................9-5
Setting up Polled Waiting with Super Quick-Scan
Sequential Polling....................................................................................................9-6
.................................................
9-5
❖ PASSWORD 10-1
* What Is Password?....................................................................................... 10-1
® How Does It Work?...........................................................................................10-1
* When to Use Password Plus?
Sending Faxes with a Password
Receive Password...................................................................................................10-2
.........................................................................
............................................................................
10-i
10-2
<♦ REMOTE FAX OPTIONS (ONLY FOR FAX-2400ML/2500ML) 11-1
Setting the Fax Storage
Paging/Fax Forwarding..........................................................................................11"2
Setting Up Paging and Registering the Paging Number........................................11-3
Setting Up Fax Forwarding and Registering the Fax Forwarding Number... 11-4
What Is Remote Control Access?..........................................................................11-5
Setting the Remote Access Code...........................................................................
How to Use Remote Access and Control Codes
Remote Retrieval....................................................................................................11-6
* When to Press the Remote Access Code.........................................................11-6
Remote Control Commands..................................................................................11-7
How to Receive the Memory Status Last and Retrieve a Fax
Message Remotely.................................................................................................11-8
How to Change the Fax Foiwarding Number Remotely.......................................11-8
..........................................................................................
...................................................
11-1
11-5
11-6
❖ PRINTING REPORTS AND LISTS 12-1
Activity Report Interval........................................................................................ 12-2
Printing the All Dial List................................................................................... 12-3
Transmission Verification (Xmit) Report..............................................................12-4
Memory Status List................................................................................................12-5
❖ REGULAR MAINTENANCE AND TROUBLESHOOTING 13-1
Regular Maintenance............................................................................................ 13-1
Paper Jams..............................................................................................................13-3
Fixing a Document Jam..................................................................................13-3
Fixing a Recording Paper Jam...................................................................... 13-3
Troubleshooting................................................................................................... 13-5
Error Messages................................................................................................13-5
Other Problems................................................................................................13-7
IMPORTANT INFORMATION 14-1
Standard Telephone and FCC Notices (.Applies only to 120V model)
Important Safety Instructions................................................................................14-3
................
14-1
❖ INDEX 15-1
❖ SPECIFICATIONS 16-1
::-: j Sr ■
Page 9

Never install telephone wiring during a lightning storm.
Never install telephone jacks in wet locations unless the jack is
specifically designed for wet locations.
Never touch uninsulated telephone wires or terminals unless the
telephone line has been disconnected at the network interface.
Use caution when installing or modifying telephone lines.
Avoid using a telephone (other than a cordless type) during an
electrical storm. There may be a remote risk of electric shock
from lightning.
Do not use the telephone to report a gas leak in the vicinity of the
leak.
Page 10

btIUH & HKbHAI^AIIUN
1. SETUP & PREPARATION BEFORE USE
:USE
Choosing a Suitable Place for Your Fax Machine _______________
Use the following list as a guide to find a suitable place for your fax machine.
_____
The Good Places,,.
Place your fax machine on a flat, stable surface, such as a desk.
Select a place that is free from vibration and shocks.
Locate it near a telephone jack and a standard, grounded power outlet.
For PLUGGABLE EQUIPMENT, the socket-outlet should be installed near the equipment and
should be easily accessible.
And the Bad Places...
Avoid setting it up in a high-traffic area.
Avoid setting up the machine near heaters, air conditioners, water, chemicals, or refrigerators.
Do not select a place that exposes your fax machine to direct sunlight, excessive heat, moisture,
or dust.
Do not connect your fax machine to electrical outlets controlled by wall switches or automatic
timers. Disruption of power can wipe out information in the unit’s memory.
Do not connect your fax machine to electrical outlets on the same circuit as large appliances or
other equipment that might disturb the power supply.
Avoid interference sources, such as speakers or the base units of cordless phones.
1-1
Page 11
. ■'%
- Ji' ...:iv\.-
:^™:aN::i»iiB|iiislil**
IB^
Remote control
access card
Setting up Your Fax Machine
Follow these steps to set up your fax machine:
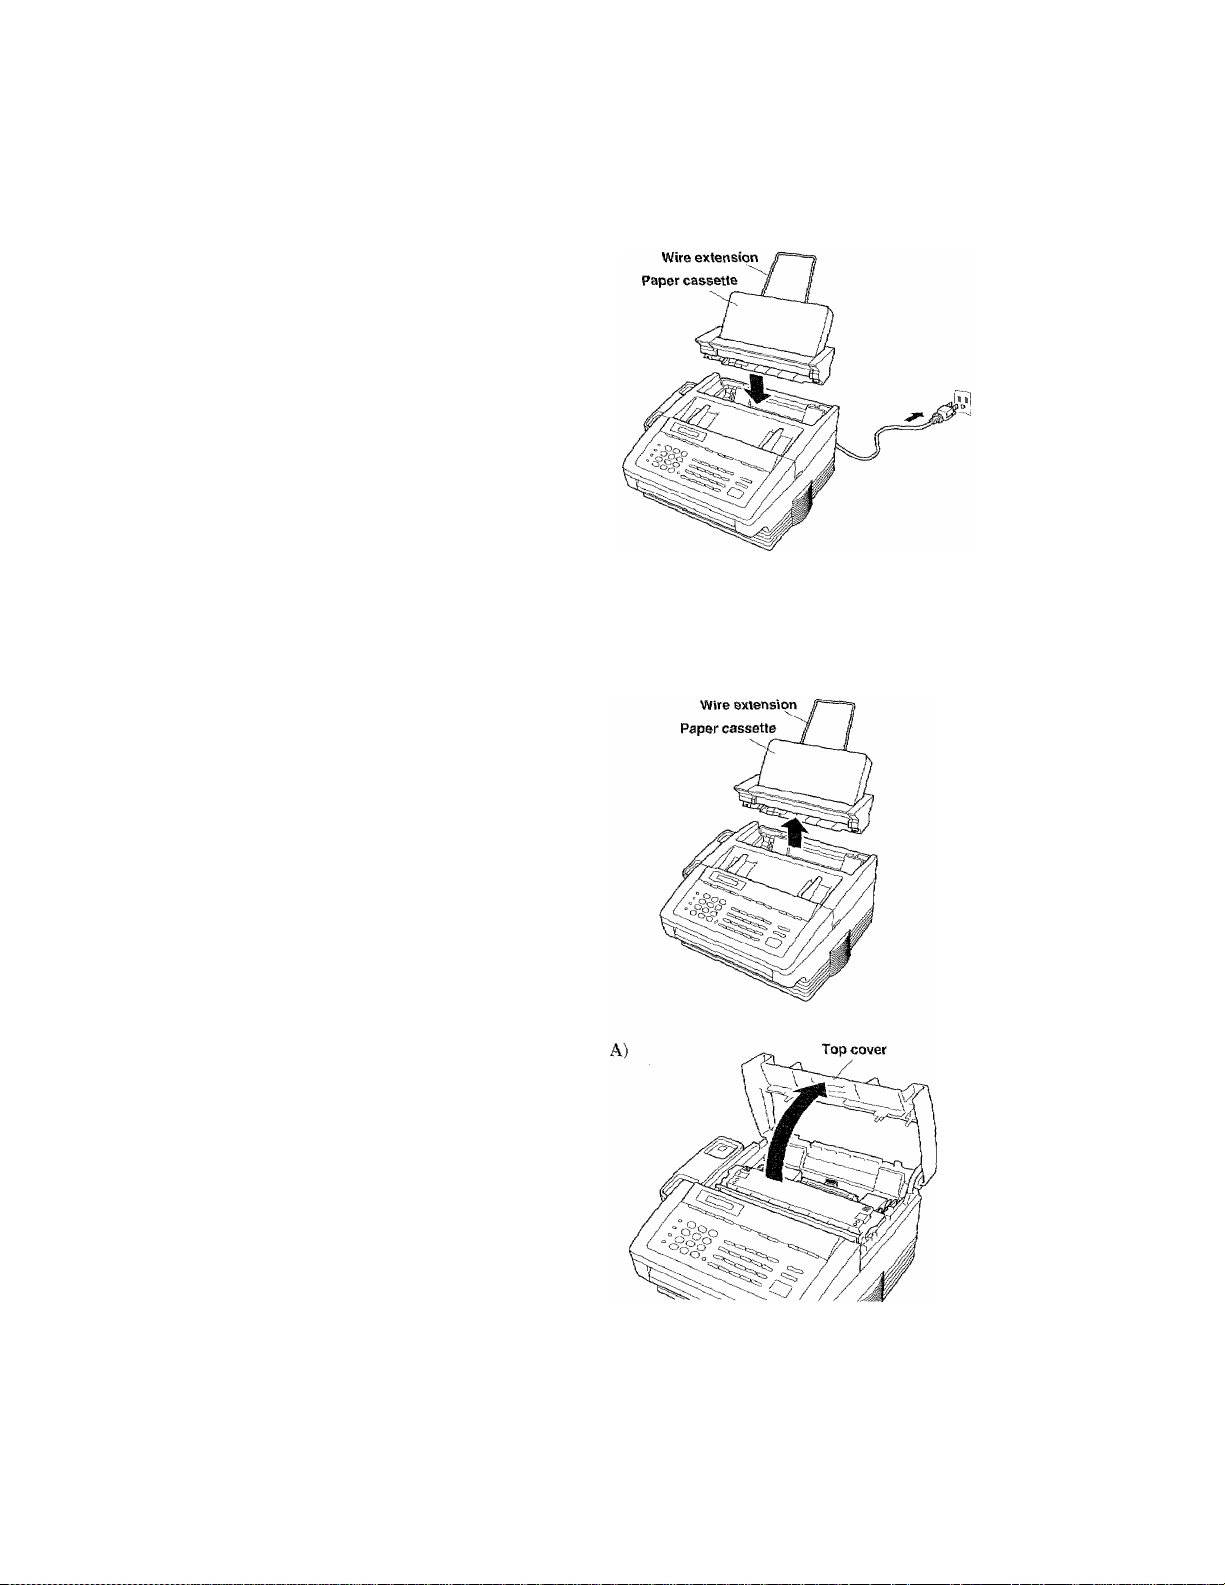
STEP 1. Attach the document and paper trays.
Page 12

atiUK «< KkbKAkAIIUN BbhORE
STEP 2. Install the drum unit.
Use this same procedure for replacement.
.
aSigaiifcgaaiM^^^^^
.
...............................................
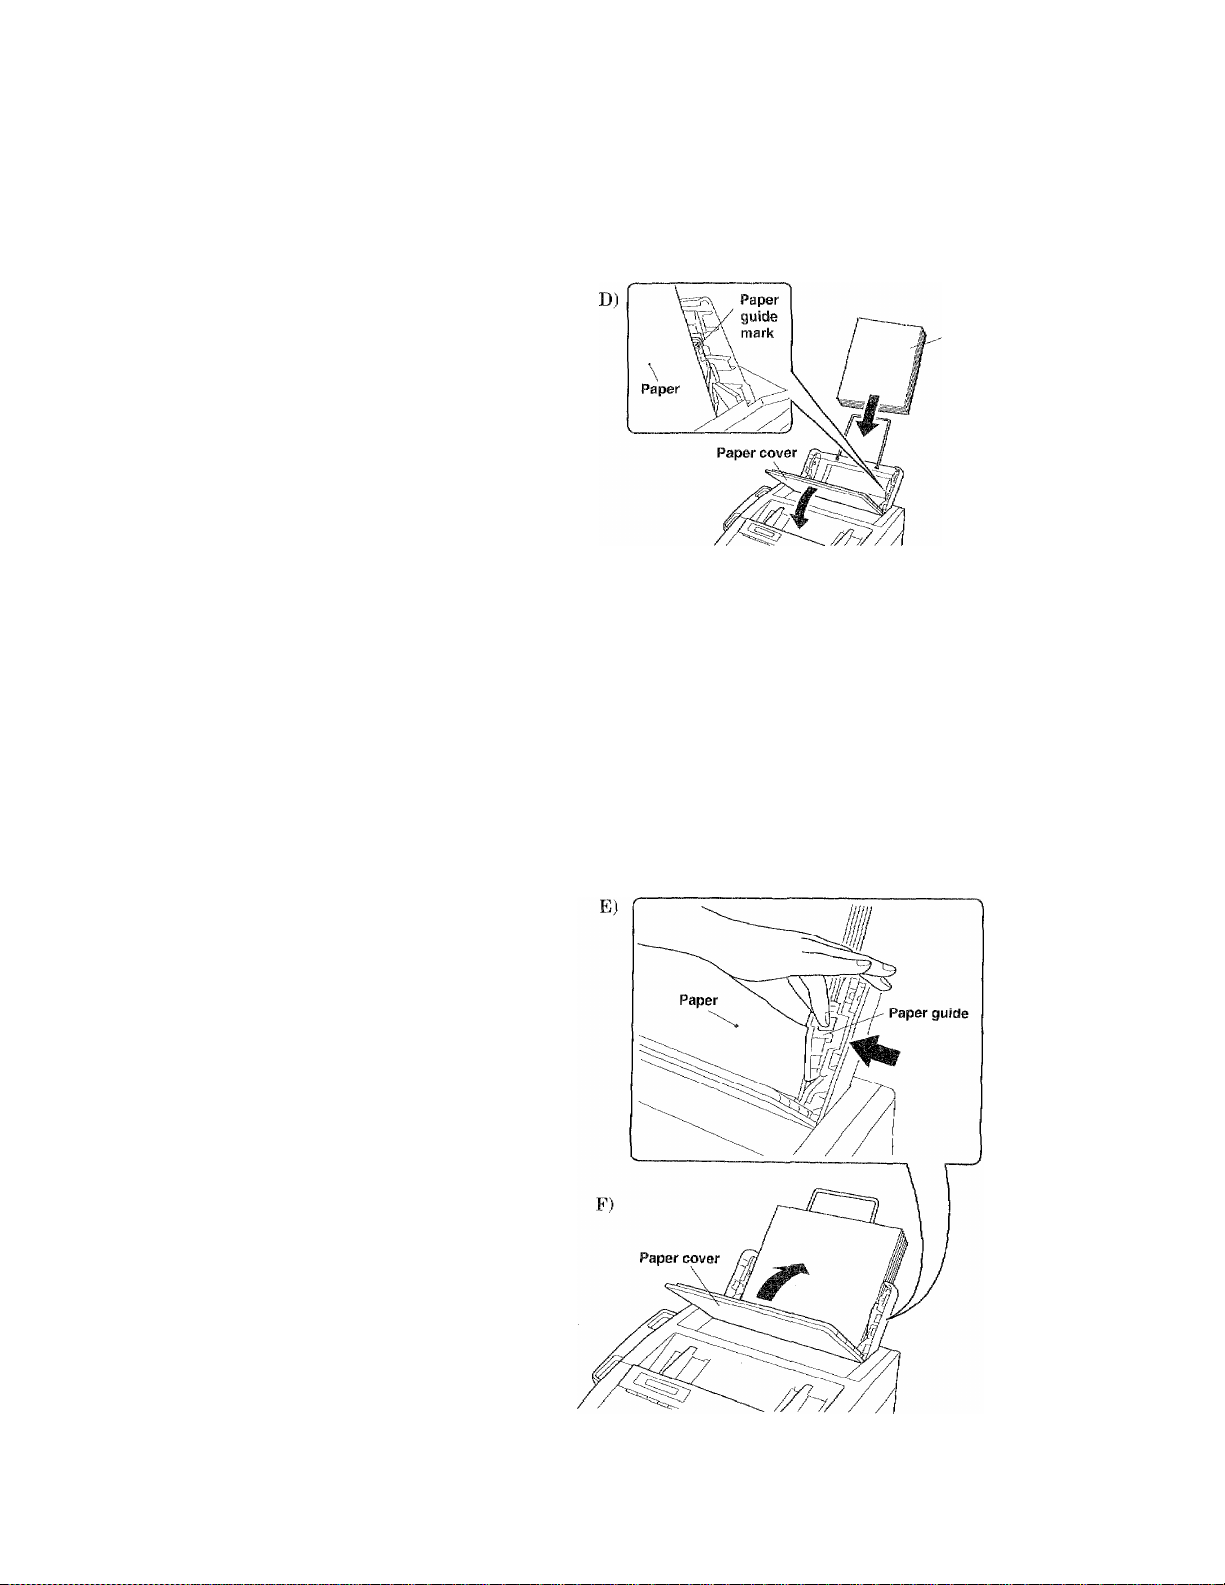
Page 13
C) Slide the blue levers on both sides in
the direction of the arrows, and lift the
drum cover up.
- WARNING
-----------------------------------------
After you have used the machine, some
internal parts of the machine are
extremely hot. So please be careful.
D) Take the drum unit out of the wrapper. D)
Unwrap the drum unit just before
installing it in your machine.
Wrapper
^ WARNING
---------------------------------------
When the drum unit is directly exposed
to sunlight or indoor light, it may become
unusable, so please be careful.
^ IF YOU ARE REPLACING THE DRUM UNIT
Place the used drum unit into the
aluminum bag and discard it according to
local regulations.
New drum unit
1-4
Page 14

ii bhIUP & PktPAI^>^ _
E) Shake the new drum unit i'rom side to
side several times.
(Try to keep the drum unit flat while
shaking.)
F) Remove the protective parts in order
of®-®. Make sure that you remove
all the protective parts from the unit.
E)
it straight down and then check to see
that it is secure.
H) Close the drum cover by pressing the
= mai'ks on both sides of the cover,
until you hear both blue levers “click”
into place.
1-5
Page 15
yh I UP & PREPARATION BEFORE
IF YOU ARE REPLACING THE DRUM UNIT
Reinstall the toner cartridge inside the
drum unit with the “A” sign pointing
toward back of the unit and then check to
see that it is secure.
Pull the shutter lever on the toner
cartridge toward you until the two red
arrows line up.
IIMIIIl i ii
I) Close the top cover.
1-6
Page 16
— IF YOU ARE REPLACING THE DRUM UNIT
Reinstall the paper cassette into the
machine, and check to see that it is secure.
Then plug in the power cord.
STEP 3. instali the toner cartridge.
* Use this same procedure for replacement.
If the paper cassette is attached,
remove it.
iMIilill
A) Open the top cover.
i»7
Page 17
btiUP & PRBmRW№lBFORE
№
■^5 .-¿1
B) Take the new toner cartridge out of
the wrapper just before installing it.
— WARNING
If you leave the toner cartridge
unwrapped, you may find its product life
shortened, so please be careful.
— IF YOU ARE REPLACING THE TONER CARTRIDGE
Place the used toner cartridge into the
aluminum bag and discard it according to
local regulations.
---------------------------------------
1-8
Page 18
iiiia
¡■■■■I
i( HkbKAKAl !QN
IÌ::::"''ÌÌlllSÌÌ:|MMÌIÌÌÌlÌÌ|^
C) Shake the new toner cartridge well.
Then remove the protective plastic
seal.
D) Install the new toner cartridge inside
the drum unit with the “A” sign
pointing toward the back of the unit
and then check to see that it is secure.
E) Pull the shutter lever on the toner
cartridge toward you until the two red
arrows line up.
1-9
Page 19
Igni;;
: * % -H SETUP & PREPARATION BEFORE USE
F) Close the top cover.
— IF YOU ARE REPLACING THE TONER CARTRIDGE
Reinstall the paper cassette into the
machine, and check to see that it is secure.
...
'-.Ì
i'i"!
* The LCD display “CHANGE TONER” or “TONER EMPTY” or Toner Empty LED will
reset. If not please remove the toner cartridge and repeat the steps.
STEP 4. Install the paper cassette.
Page 20
1 y dc tJSE
C) To install the paper, fan the paper
well and then make sure the leading
edge of the papers are even.
D) Next open the paper cover and insert
the paper into the paper cassette.
— WARNING
If you insert the paper past the v mark,
it may cause a paper jam.
About the Recording Paper...
Please use standard copier paper for the recording paper as below ;
---------------------------------------
, rOR YOUR INFORMATION
Width ; 216mm(8.5'’)/210ram(8.3")
Length : Letter/Legal/A4
Weight : 171b. to 241b.
Paper
The feeder can. accept letter, A4, and legal sized paper. The default setting of the
recording paper size is letter. If you insert the A4 or legal paper, change the setting.
(See page 7-5.)
E) Adjust the paper guide according to
the width of the paper.
F) Close the paper cover.
1-11
Page 21
PREPARATION BEFORE USE
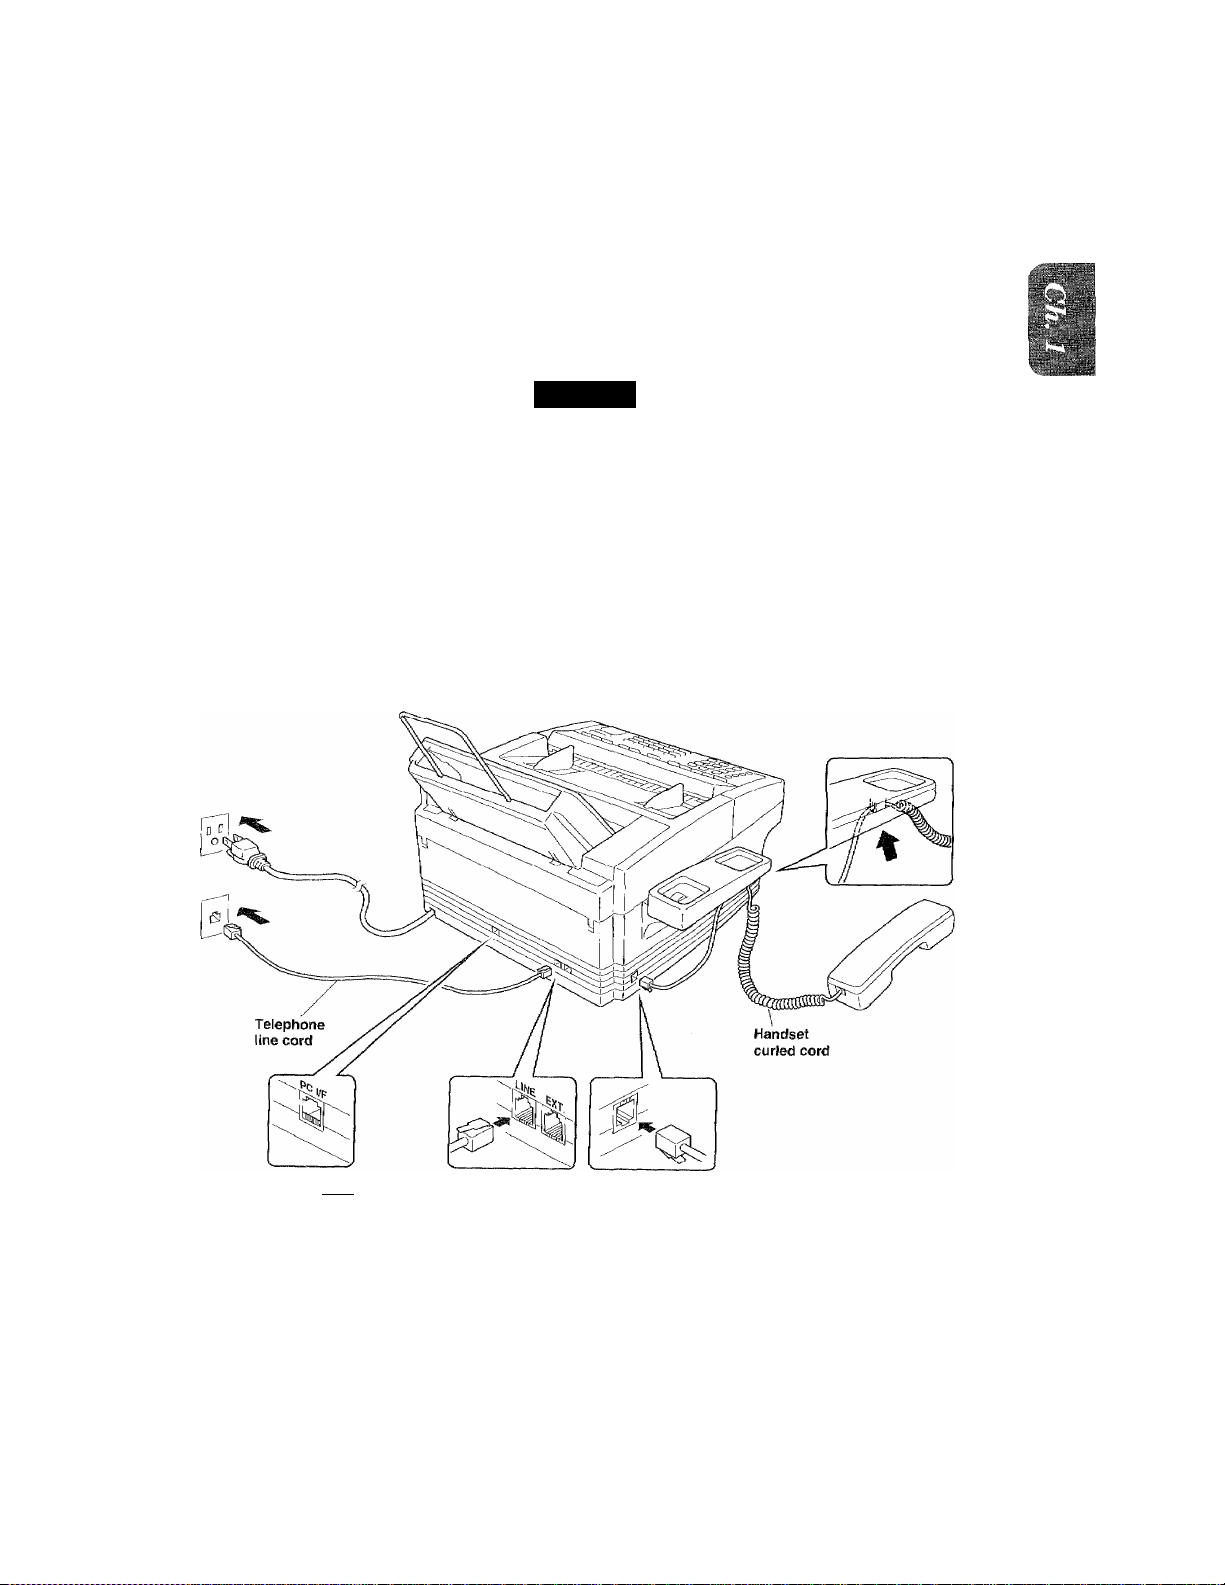
STEP 5. Connect the handset.
STEP 6. Connect the power cord.
When you connect the power cord, your fax machine will automatically print a power failure
report, and the display will show “01/01/1995 00:00”.
NOTIGE
1. This fax machine must be grounded using a 3-prong plug.
2. Since the machine is grounded through the power outlet, you can protect yourself
from potentially hazardous electrical conditions on the telephone network by
plugging in the power cord before you connect it to the telephone line.
Similarly, you can protect yourself when you want to move your machine, by
disconnecting the telephone line first, and then the power cord.
STEP 7. Connect the telephone line.
* This part is only for use
with the Brother Missing
Link option. Tf you have
not purchased this option
then ignore this part .
1-12
Page 22

iiili
lili
FOR YOliR INFORMATION
Multi Line Connections (PBXs)
Most offices use a central telephone system. While it is often relatively simple to
connect the machine to a key system or a PBX (private branch exchange), we suggest
that you contact the company that installed your telephone system and ask them to
connect the fax machine for you.
It is advisable to have a separate line for the fax machine. You can then leave the
machine in AUTO Answer Mode to receive faxes at any time of the day or night.
If the fax machine is to be connected to a multi-line system, ask your installer to
connect the unit to the last line on the system. This will prevent the unit from being
activated each time a telephone call is received.
• As with all fax units this machine must be connected to a two wire system. If your
line has more than two wires, proper connection of the fax machine can not be
made.
If you have Call Waiting, Ring Master, or any other custom calling feature on your
telephone line, it may create a problem in operation of your fax unit.
Connecting to a Private Branch Exchange
The following points should be kept in mind if you are installing the machine to work
with a private branch exchange(PBX).
1) It is not guaranteed that the unit wall operate correctly under all circumstances
with PBXs. Any cases of difficulty should be reported first to the company that
handles your PBX.
2) If all incoming calls will be answered by a switchboard operator, it is recom
mended that the Answer Mode be set to MANUAL. (Seepage 7-1-2.) All incoming
calls should initially be regarded as telephone calls.
3) The unit may be used with either pulse or tone dialing telephone types.
1-13
Page 23
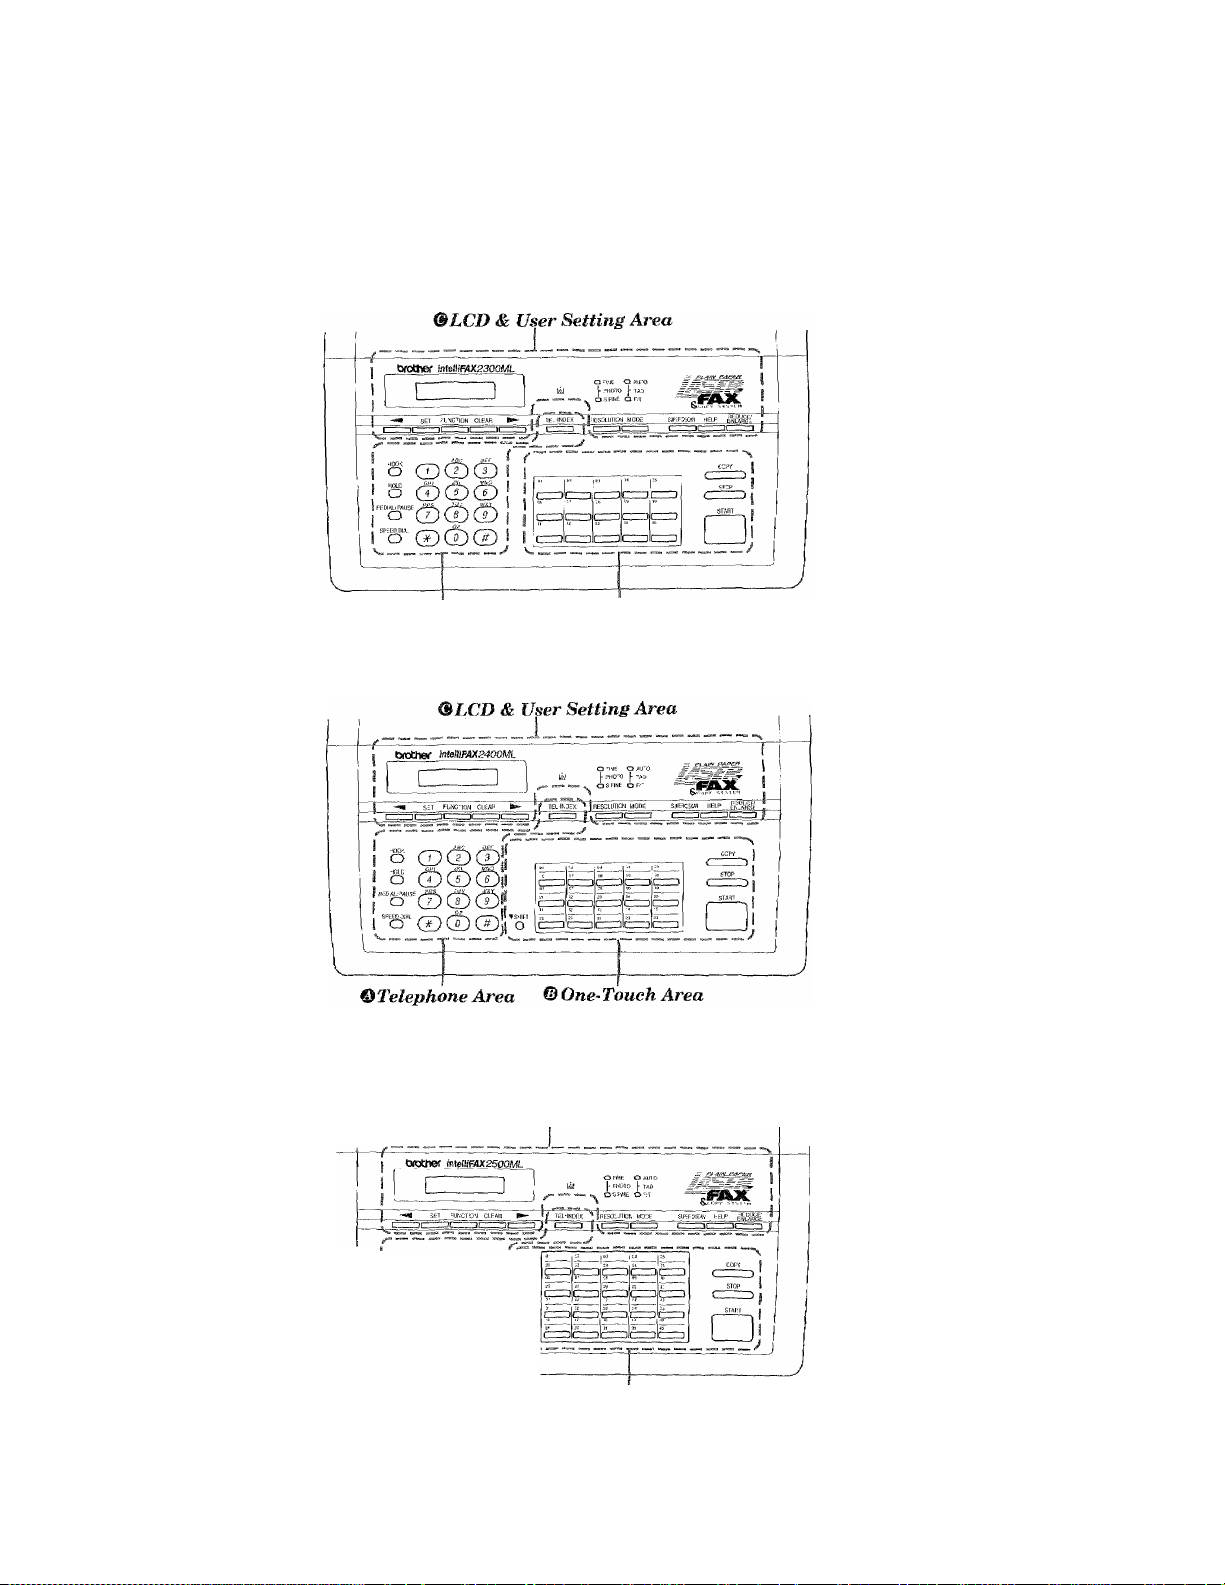
2. THE CONTROL PANEL KEYS
FAX-2300ML
© Telephone Area © One-Touch Area
FAX-2400ML
THE CONTROL PANEL KEYS
illiill"
I
FAX-2500ML
®LCD & User Setting Area
s CD(S®!
o cS©®
i;o“©cD(Z)Ji o
© Telephone Area © One-Touch Area
2~1
Page 24
IMt UUIN'IkULKANtL
® TELEPHONE AREA
1. Number Keys
These twelve keys are used to
dial phone and fax numbers {see
page 5-1), and can also be used as
an alphanumeric keyboard for
entering information into the fax
machine. (See page 3-ll~12.)
2, BOOK
This key lets you dial telephone
and fax numbers withoiit lifting
the handset. (See page 5-1.)
3. HOLD
You can use this key to put a call
on hold. To take the call off hold,
you must pickup the fax handset.
(See page 5-1.)
4, REDIAL/PAUSE
This key re-dials the last number
called. (See page 6-5.) This key is
also used to insert a pause in
autodial numbers. (See page 4-5,
5-1.)
5. SPEED DIAL
This key lets you access
previously stored speed-dial
phone numbers with a two-digit
number. (See page 4-6-7, 5-1.)
;©cD(f>
"S Cil (D (5)
■ O iCD ® ®
SPEED niht z' N
p
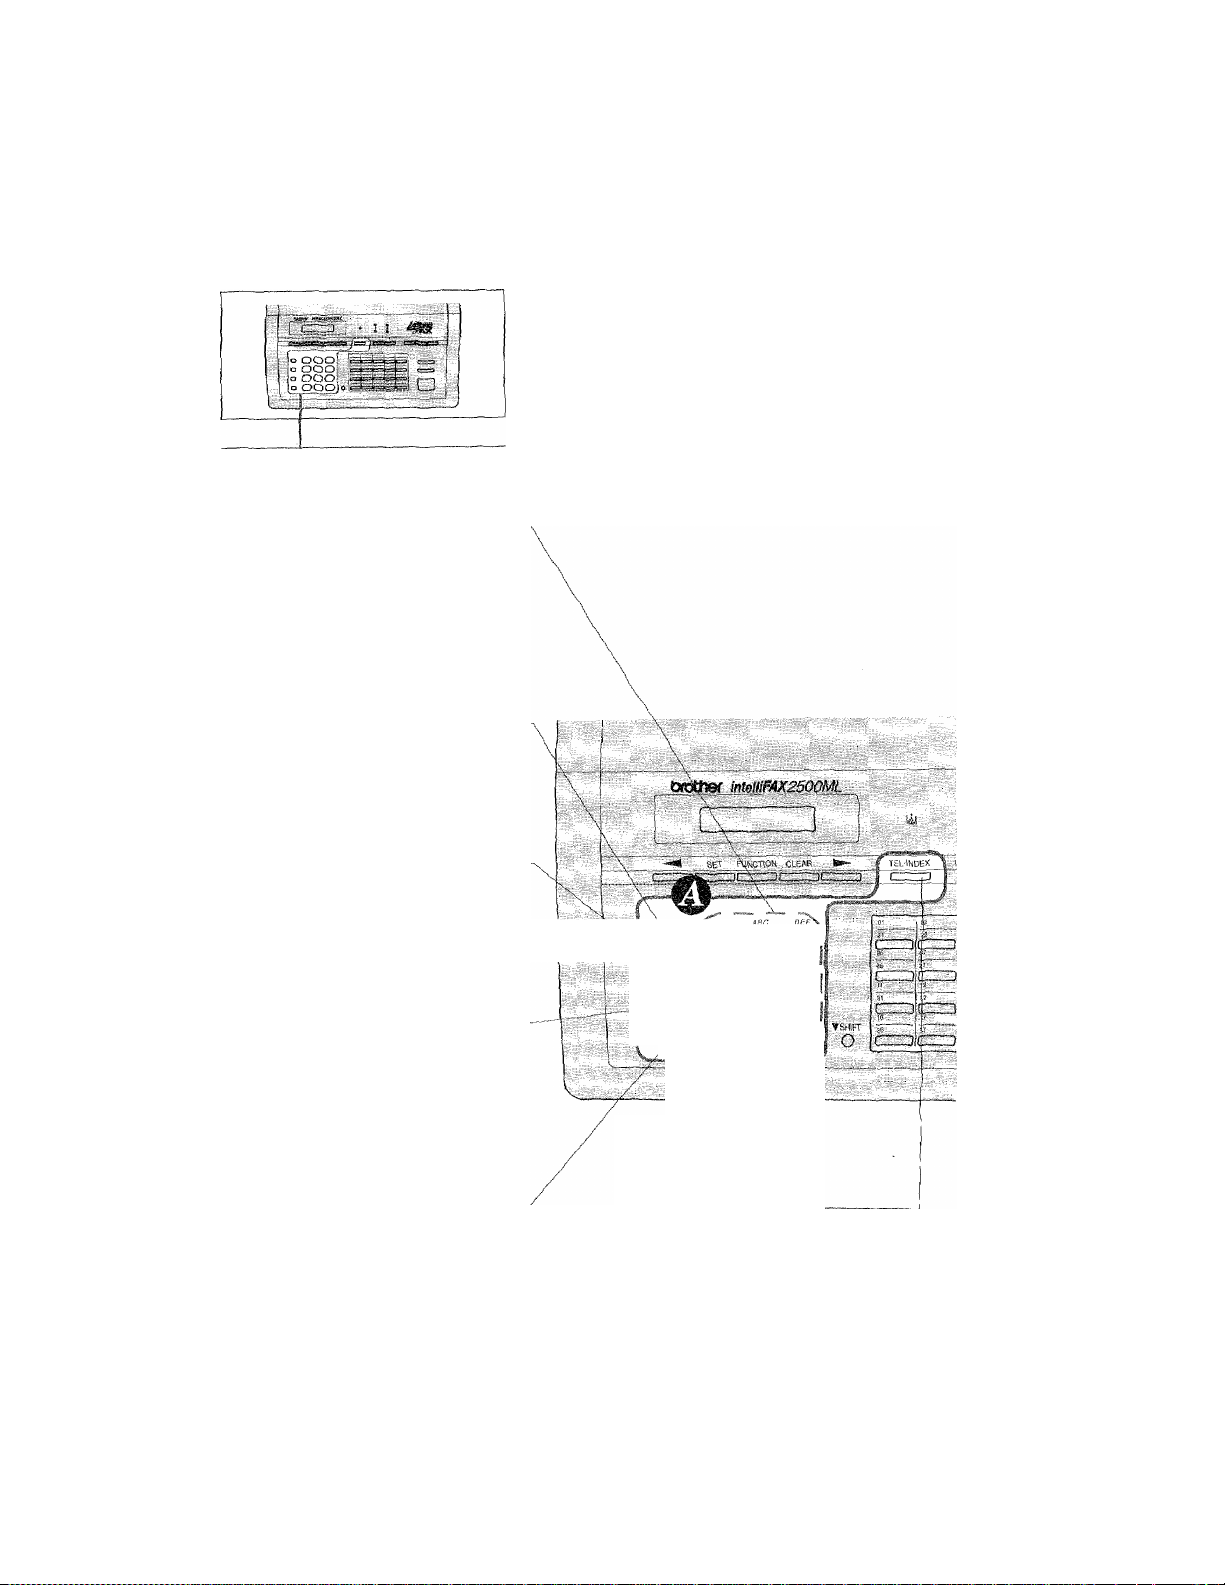
6. TEL -INDEX
This key allows you to alphabetically
look up numbers stored in the dialing
memory. (See page 5-2.)
2^2
Page 25
© ONE-TOUCH AREA
THE mNECKEYS
Page 26
:1-
fciis
IHh CONTROL I
® LCD & USER SETTING AREA
12,
This key moves the LCD cursor to the
left. It also allows you to back up one
step when you are in function mode
(see page 3-1) or Telephone Index.
(Left Arrow)
14, Liquid Crystal Display
The LCD displays messages that will
help you set up and operate your fax
machine (On-Screen Programming).
(See page 3-1.)
IS,
This key moves the LCD cursor to the
right, and it also lets you advance one
step when you are in function mode
(see page 3-1) or Telephone Index.
(Right Arrow)
15, Toner Empty
This LED will start flashing when
the amount of toner drops to a low
level, and when there is no toner, the
LED will stay lit. (See page 1-10.)
This key accesses the function and
programming mode (OSP), so you can alter
various settings. (See page 3-1.)
2-4
This key deletes entered data or backs
up one step in function mode. (See
page 3-2.)
Page 27
(B LCD & USER SETTING AREA
THE CONTROL PANEL KEYS
19. MODE
This key is used to specify how the
fax machine will handle incoming
calls. (See page 7-1.)
21. RESOLUTION
This key is used to set the i
resolution requirements when j
sending a fax. (See page 6-2.) j
lil |- PHOTO TAC
i;-..-INDEX
O FINE I O AUTO
O S.FIN^ O F/T
■j
RESOLUTION MODE
m
i
^
------------
20. HELP (Advanced)
Press this key whenever you want a
quick reference Help List printed. This
Help Lists tell you information on how
to perform settings for a function, how
to register information, or how to get
some basic information for sending or
receiving faxes. (See page 3-7~10.)
SUPERQ.SCAN I^ELP enlTrge
H.. ■■ M '■ ^ -
22
. SUPER q.SCAN
This key enables you to scan in your
originals at three times the normal speed,
by storing them in the memoiy befoi’e
actual transmission. (See page 6-7. ) When
it is pressed. Broadcasting is available.
(See page 6-9.) When SUPER Q.SCAN is
pressed together with SHIFT, Multi TX is
available. (Only for FAX-2400ML/
2500ML.) (See page 6-10.)
2S. REDUCE!
ENLARGE
This key is for selecting reduction or
enlargement in copying. You can select
one of the following ratios: 150%, 125%,
120%, 100%, 93%, 87%, and 75%. You
can also use the Auto Reduction
function to have the machine
automatically calculate the reduction
ratio to fit documents to the size of your
recording paper. (See page 8-2.)
2-5
Page 28

MUVV tu Ubt UINf-SCREEN PROGRAMMING AMD HEtP KÉY
3. HOW TO USE ON-SCREEN PROGRAMMING (OSP) AND HELP KEY
User-friendly Programming
We have designed your fax machine with on-screen programming and a HELP key, user-friendly
programming that help you take full advantage of all the functions your fax machine has to offer.
On-screen Programming (OSP)
Since jmur fax programming is done on the LCD, we created step-by-step on-screen prompt
messages to help you program your fax machine. All you need to do is follow the prompt
instructions as they guide you through the function menu selections and programming options
and settings,
Using the Function Mode to Access On-screen Programming (OSP)
You can access the function mode by pressing FUNCTION found in the Function and User
Setting Area of your fax Control Panel. (See page 2-4.)
When you enter function mode, your fax machine will display a list of Level One Functions to
choose from (see pages 3-2 through 3-6 for these Level One Functions), as seen below.
Left arrow
sequence
Press FUNCTION
_________
i
(TiiTER NO. & SET ~1
*
fl .TEMP.SETTINGS 1
♦
________
_____
i (
t
__________
QC.S.E3:.....:A.U№
I *
rr. rO'N X
....
:DM;A;L...
t
' )
.....^.
D
t t
(~6 .TEL ^OPTIONS : :: 1
^
________
i
(?LfExallllstt.AS3
♦
________
Cd.SE G»ÌÌÌIiìl3piaiM.i^
i
(9.REMOTE FAX0Pt3
roTTNTERRUPT
I
^
Right arrow or
auto scroll
sequence
(Only for FAX-2400ML/
2500ML)
3-1
Page 29

ML^vv l U MSt UIN-5UNtEN:PI^(aeRAMMiN© AN ffitP K£y:
These function options will appear one after the other on the display. You can then choose one of
these options by pressing SET when your desired option appears on the LCD.
You can also move through the function menu options at a faster rate by pressing (right
arrow). (See page 2-4 to locate this key on your Control Panel.) \%en you find the option you want,
press SET.
You can simply press the Level One Function number associated with each option (refer to pages
3-2 through 3-6).
Helpful Hints If you want to exit function mode, simply press STOP. Also, if you select the
wrong menu, and wish to return to the previous step, press CLEAR.
Alternating Displays for On-screen Programming (OSP)
When you see alternating displays, the LCD will
usually alternate between the currently selected
option, and a help message giving brief instruc
tions on how to proceed. The example shows the
:)
current speaker volume is high and prompts you
to use (left arrow) and (right arrow) to
change the setting, and then to press SET to store
it.
C
CsIE&cr.:
ALTERNATE
.
li. :'5iaP
Function Selection Table
If you have a basic understanding of how to program a fax machine, you can perform most of the
progi’amming settings without the owner's manual. To help you understand the function
selections, options, and setting’s that are found in your fax programs, we have the following
Function Selection Table.
Read through this table to gain a basic understanding of what your new fax model can do, and
then the next section wall begin instructing you how to use on-screen programming.
Level one
function
1. TEMP.
(TEMPOMRY)
SETTINGS
________
Level two
function
1. TIMER
2. POLLING
3. CALL
RESERVE I
Eicpianatlon of Options
Use this for sending documents at a later
time.
Polling is the process of retrieving faxes
from another machine. You can also choose
whether you want your polling secured or
not.
STANDARD/SECURE
You can send a fax and then talk to the
recipient using the CALL RESERVE
function. ON/OFF. I
Factory
setting
—
STAN
DARD
OFF
Page
6-8
9-1-6
6-19-20
I
3-2
Page 30

fmm -to USh PI^©R/^PI1# AND HELP KEY
ilil:
Level one
function
1.TEMP.
(TEMPORARY)
SETTINGS
2. CANCEL
JOB
Level two
function
4. CONTRAST
5. RESOLUTION
6. OVERSEAS
MODE
7. COVERPAGE
Explanation of Options
There are three types of contrast settings.
Usually the AUTO setting is acceptable. But
if you want to send an especially light or dark
document, you should change this setting.
AUTO: Default setting is AUTO. Contrast
setting always reverts to AUTO after
one transmission.
S. LIGHT; To send very light documents.
S. DARK: To send very dark documents.
If you need to send a set of originals at
various resolutions, this function will allow
you to set the required resolution page by
page. (If all documents are the same
resolution, use the RESOLUTION key. See
page 2-5 #21.)
STANDARD/FINE/S. FINE/PHOTO
If you have trouble when sending overseas,
you may want to set OVERSEAS MODE to
ON.
ON/OFF
An automatic Cover Page will allow you to
send details of who the fax is going to, who it
is from and when it was sent. ON/OFF
If you wish to cancel a job that has been set
with the timer, a polled job etc., use this
function.
Factory
setting
AUTO
STAN
DARD
OFF 6-13
OFF
/
/
/
Page
6-3
6-14
6-18-19
6-12
3. PRINT
REPORTS
4. SET AUTO
DIAL
3-3
See page 12-1 for
a list of reports.
1. ONE-TOUCH
DIAL
2, SPEED-DIAL
3. SETUP
GROUPS
You can print several different lists and
reports, which are available under function
item 3. PRINT REPORTS.
If you register names and numbers on OneTouch dial keys, you can dial a number
automatically just by pressing a One-Touch
key. (Max. of 15 locations for FAX-2300ML,
30 locations for FAX-2400ML and 40
locations for FAX-2500ML)
If you register names and numbers as SpeedDial numbers, you can dial a number
automatically just by pressing SPEED DIAL
and a two-digit number. (Max. of 45 locations
for FAX-2300ML, 30 locations for FAiX2400MLand 100 locations for FAX-25 OOML)
This is used for setting up a group number
used for broadcasting.
—
-------------------------------------
------------
/
12-1-5
/
—
4-4-5
4-6-7
—
4-8-9
Page 31

MUVV IU
..
■■■"" Y ‘ . I, ■■■,
Level one
function
5. USER
OPTIONS
Level two
function
1. SMOOTHING
2. BEEPER
3. COVERPG
ON/OFF
4. GRAY SCALE
5. ERROR RE-TX
Explanation of Options
Smoothing enhances the appearance of
incoming faxes.
If you set SMOOTHING to ON, you will
receive messages with the smoothing
enhancement.
ON/OFF
Y ou can adjust the volume of the beeper with
this function.
OFF/LOW/HIGH
If you set CO VERPAGE to ON, you can send
your documents with a Cover Page generated
by your machine. When the COVERPAGE
setting is ON, you can select a Cover Page
comment.
ON/OFF
You can select a GRAY SCALE level.
16/32
If you set ERROR RE-TRANSMISSION to
ON, the machine automatically resends the
page once an error occurs.
ON/OFF
Factory
setting
ON
LOW 4-1-2
OFF
32 6-15
OFF
Page
7-4
6-17
6-21
6. TEL
OPTIONS
6. REDUCTION
7. RCD PAPER
8. TONER SAVE
1. TONE/PULSE
2. RING DELAY
You can avoid having your incoming data
separated by printing a reduced copy of the
incoming document. The reduction methods
are AUTO or Fixed ratio:
AUTO/100%/93%/87%/75%
You can select one of 3 sizes of recording
paper. The machine will automatically adjust
the size of the incoming document or original
document so that it fits the paper size you
have selected.
LETTER/LEGAL/A4
You can extend the life of the toner by
conserving its use.
ON/OFF
There are two different dial types and you
must select the type of signal suitable for
your telephone line.
TONE/PULSE
The number of rings before the fax machine
answers the call when in F/T or AUTO '
Answer Mode.
0/1/2/3/4 rings
AUTO
LETTER.
OFF
TONE
2
7-6-7
7-5
7-8
4-1
7-2
3-4
Page 32

MUW I и Ubh PROGRAMM^NCT1ЧDда^ KEY
Level one
function
6. TEL
OPTIONS
Level two
function
3. AUTO REDIAL
4. SPEAKER
VOLUME
5. F/T RING
TIME
6. RING VOLUME
7. DISTINCTIVE
Explanation of Options
If you set AUTO REDIAL to ON, your
machine will automatically re-dial the last
number called if the number was busy or the
call failed.
ON/OFF
You can adjust the speaker volume with this
function.
OFF/LOW/HIGH
F/T RING TIME sets the time for simulated
ringing in F/T mode.
10/20/30/60 seconds
The settings are OFF/LOW/HIGH.
If you have di stincti ve ringing service from
your phone company, you can use this
function to register the ringing pattern of
your fax number. And if you set it to ON, you
can use the registered number as a fax
number only.
OFF/ON/SET
Factory
setting
ON
LOW
20
HIGH
OFF
Page
6-5-6
7-9
7-3-4
7-9-10
7-15-18
7. SETUP
SYSTEM
1. DATE/TIME
2. DAILY TIMER
3. INTERVAL
4. STATION ID
5. REMOTE
CODE
If you enter the date and time in 24-hour
format, the LCD will display the date and
time and they will also be printed on outgoing
faxes.
If you frequently have delayed jobs, all for
execution at same time each day, you can
program that time. Once you register it, you
do not need to enter that time, just set Timer
Transmission in temporary settings.
You can select the time interval at which the
activity report is printed.
6/12/24 hours, 2/4/7 days, OFF
You can enter your name or company name,
fax number and telephone number in
STATION ID.
It is printed at the top of each page of every
outgoing fax. It is also printed on the
automatic Cover Page.
If you enter REMOTE CODE, you can
activate or deactivate the fax machine from
a remote telephone.
ON/OFF
____________________
________
01/01/1995
00:00
00:00
OFF
—
4-2
6-8-9
12-2
4-3
ON
*51 (ACT,)
7-11-12
#51(DEACT.)j
3~3
Page 33

nuvv lU РШСЗК-АМШЫВ ЖГ1Р №
Level one
function
7. SETUP
SYSTEM
8. SECURITY
MENU
9. REMOTE
FAX OPT
(Only for
FAX2400ML/
2500ML)
Level two
function
6, SET
COVERPAGE
1. SET
PASSWORD
2. PASSWRD TX
1. FAX STORAGE
2. FAX FWD/
PAGING
3. REMOTE
ACCESS
Explanation of Options
You can register your own two programmable
comments on the Cover Page.
You can set up the password for receiving
documents.
ON/PLUS/OFF
You can send a fax with a four-digit password.
You can store the incoming fax messages in
the memory. Then you can use the convenient
remote control functions.
ON/OFF
You can choose among PAGING, FAX
FORWARDING or OFF. PAGING ON will
cause the fax machine to page you when it
receives a fax message. FAX FORWARDING
ON will cause the fax machine to send any
stored faxes that are received to another
predetermined fax number.
OFF/PAGING/FAX FORWARDING
You can register REMOTE ACCESS ID (3
digits) allowdng you remotely operate the
machine. (Example; Retrieving an incoming
fax message)
Factory
setting
—
OFF
—
OFF
OFF
159Ж
Page
6-16
10-2-3
10-2
11-1
11-2-5
11-5-8
0. INTERRUPT
You can send a fax without canceling the
timer or polled waiting, even if there are
documents in the feeder, by “interrupting”
it.
_____________________________
—
6-11
3-6
Page 34

. .
IO «at UN-aUkhhIM tkOOIxIAIVIIVIIIMO AINU HtLP KtY
..... .
.... ......... ..................................
Help Key (Advanced)
Press this key whenever you need a quick reference Help List printed. This Help List will tell you
how to perform settings for a function, how to register information, or how to get some basic
information for sending or receiving faxes. When you don’t have the owner’s manual with you or
when you want some information quickly, you can press
procedures.
How to Print a Help List
Just press HELP. You will see the LCD scroll through the available Help Lists. {There are 10
available lists on FAX-2300ML and 11 on PAX-2400ML/2500ML as shown below.) To print a list,
you can wait until the list you want appears on the display and press SET, or you can just go ahead
and press a number 0-8 (for FAX-2300ML) or 0-9 (for FAX-2400ML/2500ML), * for the list you
wmnt. Finally, you will see “PRESS START KEY” on the display, so press START and the list
will be printed.
Press HELP
•
.....................
HELP to get a list of basic operating
Left arrow
sequence
I \
f I
Ì5;ilfcÌÌTOlllm^^
I )
Che l p : 3 f p rIhj reKH
I
(WbL P •
^ I
t HE LP¡T...SETUF..
^i
(; H E E P r 8r. S EC URI
I: H E L P;:^ J hiTE P
______
^ I
Right arrow or
auto scroll
sequence
(Only for FAX-2400ML/
2500ML)
3-7
Page 35

1 14-/VV I Ч-/ VJOd 4^1 NI”0'v^K[IC!N
ri<L^Vc7KMIVliVIIN'c7 AINU MtLK KhY
Example One (How to get help on general instructions)
If you choose to print the “HELP;*.GENERAL” Help List, you will get the following print out,
which shows you a chart of the functions and some basic steps for operating the fax machine.
HELP I 1ST ******‘*'**'^'^*** *■
<STEPS rOR KEY FUNCTJSNS>
DPRESS FUHCTIOH
f i
EISFLECT A EEVEE OME nifJCTIOh
BY PRESSING NUMBER KEY ^
(FROM T"E SELECTION
CHART ON THE RICH i)
3
)SELECT A LEVEL TWO FUNCTION
BY PRESSING NUMBER KEY q
4
;SELECT THE C'ESl RED,.SETTING
USING THE ARROW KEvS
5
IPRESS SET
□
6
)FRESS STOP TO EXIT
NOTE;
MAKE SURE YOU FIRST SEI
TONE/FULSE(FUNCTION 6-1),
0
АТЕ/ПМ£{ FUNCTION 7-1) ANC'
STATIUM !C(EIJNCT10N 7-4;.
1FVET ONE
1.TEMP.SETTINGS--
2.CANCEL JOB
3.PR I NT REPORTS--
4.SET AUTO DIAL--
5.USER OPTIONS --
6.TEL OPTIONS --
/.SETUP SYSTEM --
8, SECURITY MENU--
9. REMOTE FAX OPT-
0.INTERRUPT
<FUNCTIO‘l SELECTION
LEVEL TWO
-1. riMEK
2.POLLING
3.CA: L RESERVE
4.CONTRAST
5,RESOLUTION
6.OVERSEAS MODE
7.C0VERPAGE
-1 .ACT.REPORT
2. ALL DIAL
3. TEL.INDEX
4. C0VERFAGE
S .CA. L B.ACK MSG
6. USER OPTIONS
7,XMrr REPORT
S.MEMORP SIA^US
-1.ONE-TOUCH DIAL
2. SPEED-DIAL
3.SETUP GROUPS
-1.SMOOTH IMG
2.BEEPER
3.C0VERFE ON/OF-
4.GRAY SCALE
5.ERROR RE-TX
6.REDUCTION
7.RCD PAPER
S.TONER SAVE
-l.TONE/PU:SE
2.RING OE AY
3.AUT0 RtDIAi
4.SPEAKER VOlUME
5.F/T RING TIME
6.RING VOLUME
/.DIS-^INCTIVE
-l.DA'"E/TIME
2.DAI El TIMER
3.INTERVAL
4.STATION ID
5.REMOTE CODE
6.SET COVERPAGE
-l.SET password
2.PASSWRD TX
-l.FAX STOR.AGE (OR/OFF)
2. FAX FWD/PAGING
3. REMOTE .ACCESS
CHART>
OPTIONS
ISTANDARD/SECURE)
(ON/OFF)
(AUTG/S.LIGHT/S.DARK)
(STD/FINF.,'S.FINE/PHOIO)
(ON/OFF)
CON/OEEj
(ON/OFF)
(OK/OFF)
(OFF,aC','l/HIGH)
(ON/OFF)
(16,-'32)
■;gn.igff) , ^ ,
(AJT0/10Og/S3S/37’C,'75%)
!LETTER/LEGAL/A4;
(ON/OFF)
(TONE/PULSE)
(0/1/2/3,-'4)
(ON/OF-)
{OFF/LOW/ЫСН)
(10/20/30/50)
('OFF/lOI-(/HIGH;
(OFF/ON/SET)
(CFF/6H/i2H/24K/2D/4D/7D)
(FAX/TEL/NAME)
(ON/OFF.SFT CODE)
(014/P LUS/OFF)
(OFF/FAGING/FAX FORWARDING)
■■ilii
CSTORIMG ONE-rOUC4>
ONE-TOUCH NUMBER
FUNCTION 1-
[=] !□ О ^
PHONE
SPRINT!NO A LtST/REPORi
FUNCTION
TO SELECT
REPORT TYPE
NUMBER
KEY
0-0
<FAX RECEPTION SETTINGS/
MANUAL MODE j
AUTO MODE
*rO R
*EOR OFOtCATED
FAX USE ONLY.
OEOIC.ATEC
TEuEPHGNE USE
ONLY.
f/T MODE
SETALPHA SET
! KEYS
'
- -- -
* TO e nter то ENTER
□
if
KEYS
-Я О Я
NAME
cu
TAD MODE
'-FOR BOTH FAX AND
TELEPHONE.
___________
*1'IHEN CONNECTING
EXTERNAL TELEPHONE
ANSWERING DEVICE.
(HELP LIST of FAX-2500ML)
3^8
Page 36

Example Two (How to get help on using a function)
If you choose to print a Help List for a specific function (Help Lists 0-9), you will get a printout
that briefly explains a function.
Example: If you select 4, (“HELP:4. AUTO DIAL”) you will get a printout as follows:
*****-**-*>.*-** HELP LIST *-*^**^<**-*'"**■*“**
t=] ^
cm
+
TWO
DIGITS
О
SET
FACTORY
SETTING
SET
□
LEVEL ONE
FUNCTION
4.SET A©0
DIAL
^JNCTIOH PRESS
t=3 ^ ©
ARROW KEYS
LEVEL. TWO
PUNOT I ON
1.ONE-TOUCH
DIAL
2.SPEED-DIAL
3. SETUP
GROUPS
ALLOWS YOU TO DIAu AU^'OMATICAl.LY 3V
STORING TELEPHONE OR ^АХ NUMBERS IN ONETOUCH KEYS. YOU CAN AlSO STORE NAMES
WITH THE NUMBERS.
SPEED-DIAI IS TWO-DIGH NUMBER FROM 01
TO 00, SPEED -H TWO DIGITS NUMBER
i^NARI FS YOU TO DIAI ADTOMATICALEY BY
STORING TELEPHONE OR FAX NUMBERS. YOU
CAN ALSO STORE NAMES WITH THE NUMBERS.
AaOWS YOU TO ASSIGN A ONE-TOUCH KEY
AS A. GROUP(S) OF STORED FAX NUMBERS (UP
TO D GROUPS) FOR BROADCASTING THE SAME
DOCUMENT.
PRESS ORE-TOUCH RUHBEF
©
EXPLANATION OF OPTIONS
LSTC'RIHG DNË-TQLICH>
KEY KE'ES
01 - 40
STOP
I—I CZZl
ScLECT
DIAL TYPE
FUNCTION
^RESS
I —I (i) -© О
ARROW KEYS
cm CTD ^
TO SELECT
DIAL TYPE
-UNCTION
^RESS PRESS
-©
SET
^ cm
TO SELECT TO EXIT FROK
OPTION FUhCTIOI',
PRESS
^ ^ UI - 0Ü
SET
cm
TO SELECT TO EXIT FROM
OPTION FONCTION
ALPHA
KEYS
О
TO ENTER
NAME
<STQRING 5PEEC- DIAL)
SPEED DIAL
NUMBERS
STOP
©STORING GR0SPS>
ONE-TOUCH
KEY
□
01 - 40 TO ENTER
TO SELECT ONE- GROUP #
TOUCH KEY USED 1-6
AS A GROUP
SET
cm ^
TO EXIT FROM
О
TO EWTER
PHONE
NUMBER
KEYS
TO ENTER
PHONE #
STOP
FUNCTION
NUMBER
KEY
О
SET
AL^Hi
□
TO ENTER
SET
-> О ^
ONE-TOUCH SPEED
KEY DIAL
О
01 - 40
OPTIONS
KEYS
О
NAME
ALPHA
K.-YS
Г0 ENTER
NAME
©■
OR
(HELP LIST of FAX-2500ML)
Helpful Hints An easy way to remember how to get help on using the functions is to access
the function first and then press HELP. For example, if you want to get
information on how to use the Auto Dial function, (as above), press
FUNCTION, number 4 and then HELP.
3-9
Page 37

MUW
■■■Я|
• Example Three (How to get a list of available functions)
Press FUNCTION and you will see the Level 1 Function Menu scroll on the display. Press
HELP and you will get a printout of the available functions.
UP LIST
< ST EPS FOR KEY FUNCTIO‘IE>
)PRESS FUNCTION
2) SELECT A LEYEL ONE FUNCTION
press:NO NUMBER KEY
(FROM TFE SELECTIOH M
CHART ON THE RIGHT) ^
3) SELECT A level TWO FUNCTION
BY PRESSING NUMBER KEY q
TjSelect the desired setting
USING THE ARROW KEYS
SjPRESS SET
bjORESS STOP TO EXIT
MOTE;
MAKE SURE YOU FIRST SET
TONE/PULSE( FUNCTION 6U),
DATE/T:F£(FIJNCTI0N 7-1) AND
STATION ID(FUNCTION 7-A).
KFUNCTIOH SELTCTION
LEVEL ONE
l.TEEP.SE,TINGS--
2,CANCEL JOB
3.PRINT REPORTS--
4.SET AUTO DIAE--
5.USER OPTIONS --
6,TEL OPTIONS --
7.SETUP SYSTEM --
8.SECURITY MENU--
9.REMOTE FAX OPT- -I. FAX STORAGE (ON/OFF)
0.INTERRUPT
LEVEL TWO
-1. TIMER
2. polling
3.CALL RESERVE .
4.CONTRAST
5.RE SOLUTION
5.OVERSEAS MODE
7.COVERPAGE
-1.ACT.REPORT
2. ALL DIAL
3. TEL.INDEX
4. COVERPAGE
5. CALL BACK MSG
6. USER OPTIONS
T.XMn REPORT
8.MEMORY STATUS
-1.ONE-TOUCH DIAL
2.SPEED-DIAL
3.SETUP GROUPS
-1.SMOOTHING
2,BEEPER
3.C0VERPG ON/OFF
5.ERROR RE-TX
5.REDUCTION
7.RCD PAPER
8.TONER SAVE
-1.TONE,''PULSE
2.RING DELAY
3.AUT0 REDIAL
4.SPEAKER VOLUME
5.F/T RING TIME
6.RING VOLUME
/.DISTINCTIVE
-i.uat£/t;m£
2.DAIU'' TIMER
3,INTERVAI
4.STATION ID
5.REMOTE CODE
6.SET COVERPAGE
-l.SET PASSWORD
2.PASSWRD T.X
2, FAX EWD/PAGIMG
3. REMOTE ACCESS
CHARTS
OPTIONS
I STANDARD/SECURE)
{0 N /OFF.)
(AUT07S.LIGHT7S.DARK)
(SiD/=IMt/3.FINE/PHOTO)
(0N70FF)
;0N/0FE)
(ON/OFF.)
(OM/OFF)
(OFF/LOW/HIGH)
(ON/OFF)
(16732)
(ОК/ОЕП
f AUTO/1 DOS/9 3S/87S/7 5 S J
fLETTER/LEGAL/A4)
(ON/CFF)
(TGNE/PULSE)
{071./2/3/4Ì
(ON/OFF)
fOFF/LOW/HIGH)
(10/20730/60)
;0EU''L0W/HIGH)
(OFF/ON/SET)
(0FF/6H/12H/24H/2D/4D/7D)
(FAX/TEL/NAME)
(ON/OFF,SET CODE)
(ON/PLUS/OFF)
(OFF/nAGlNG/FAX FORWARDING)
(HELP LIST of FAX-2500ML)
3-10
Page 38

HOWiiO USE ON-SCREEN PROGR/i^MIN© AND HELP KEY
How to Enter Text in Function Mode
Each number key has two or three letters printed above it. The following keys “1”, and
have no printed letters because they have special characters.
ABC
CD
GHi
(D
PRS
(D
(D
JKL
d)
TUV
®
QZ
®
By pressing the appropriate number key the correct number of times, you can access
the character you want. When you are making certain settings, such as the Station ID, you
need to enter text into your fax machine.
Key
2
3
4 G
5 J
6
7
8
9
0
once
A
D
M
P
T
W
Q
twice
B
E
H I 4
K
N
R
U
X Y
______?_______
DBF
d)
MNO
d)
WXY
d)
d)
three times
I
four times
C 2
F
L
0
S
V
0
3
5
6
7
8
9
Q
Let’s say that you want to enter the initials “BR.” Follow the example below.
( NAME
C
Center & set
1. Press 2 twice to enter the letter B.
2. Press 7 twice to enter the letter R.
CNAME:B
: NAME:BR
3. Press SET.
3-11
D
Page 39

.MOW lO USb OIM-iiU^bbN PI^OGRAMMING AND HELP
EOfYOUt iSFfRi\^A|ipf .;i:
1. If you want to enter a blank space, press (right arrow) twice.
2. If you entered a letter incorrectly and want to change it, you can use (left
arrow) to move the cursor back. When you reach the letter, you can enter a new
one in ihs place. You can only overwrite letters, not insert them, so you may have
to go back and overwrite a lot of letters if you forget to enter a letter.
3. If you need to enter a character that is assigned to the same number key as the
previous chai'acter, pi'ess (right arrow) to move the cursor to the right.
.
How to Enter Special Characters, Symbols and Punctuation
Marks in Function Mode
1
key--—-................ AEOUAgEEl
^ key -—
#key
The “1” key contains all the accented characters. The and the key are used for punctuation
marks and symbols. Let's say that you want to enter the Symbol Follow the example below.
-------
------
------------------
(space) !”#$%&’()*+?-•/
:;<=>?@[]^_
-’i-i'..V ■ t:' -i -v; 1:--
I
1. Press * to show a list of characters.
2. Press * (6 times).
3. Press (right arrow).
[ _NAMEl_JAME_S
( NAME : JAMES &'
.
I
yiT)
D
3-12
Page 40

tLtKMUINt hUINUIIUN bhi lINGS
wms±.: -
............
.............
-saS:“SNSEiiNs ■ ^
§■■■■
4. TELEPHONE FUNCTION SETTINGS I ^
There are some settings, such as the date and time, you should make to your fax machine before
you begin using it. Once entered, these settings will remain in the machine until you change them.
You can begin customizing the settings by pressing FUNCTION on the control panel. This
activates the function mode and On - Screen Programming prompts. You can complete a variety
of settings in this mode.
Setting the Dialing Mode (TonelPulse)
Your fax machine supports both tone (or multi-frequency) and pulse (or rotary) dialing. It is
initially set to TONE, so you do not need to change the setting if you use that kind of line. If you
are using a pulse dial line, you can change the setting to PULSE by following the steps below;
STATUS OF LCD DISPLAY
________________
s:-:^
f : g i / o a/1,9 O P i Mh
1. Press FUNCTION.
You will see scrolling options on the dis
play. You can choose one.
2. Press 6.
3. Press 1.
After two seconds you will be automati
cally prompted to select pulse or tone.
f1 . IFMP.SEH INGS )
f FLL OPTIONS
fe
.
( D'IWI-|№G
c
y ^EtreT;>;'^ ,:SElO
....
....
TQENiEr :r PT]
!)
4. Press (left arrow) or (right
( giyitMi PiitS E
arrow) to find the dialing mode
that matches your telephone line.
Example: PULSE.
5. Press SET.
r i_-.IOne/pulse‘
6. Press STOP to return to the date
and time.
Setting the Beeper Sound Level
If the beeper setting is LOW or HIGH, it will “beep” every time you press a key, make
or at the end of sending or receiving a fax.
The initial setting on your fax machine for the beeper is LOW. If you do not want the beeper
select OFF, and if you want it loud, select HIGH.
4-1
an error.
on.
Page 41

1. Press FUNCTION.
2. Press 5.
lililí
STATUS OF LCD DISPLAY
ÍÍÓÍ/01/Í995 00:00 1
3. Press 2.
i. 2 . В E E P E R
C3j;_E_PER:_LqW
c
4. Press (left arrow) or (right
arrow) until you get the setting you
want.
Example; OFF.
5. Press SET.
6. Press STOP to return to the date
and time.
Setting the Date and Time
Your fax machine shows the date and time on the display and prints it on every fax page you send.
You can set the date and time in function mode.
1. Press FUNCTION.
2. Press 7.
3. Press 1.
4. Enter the last two digits of the year.
Example; 94.
5. Enter two digits for the month.
(JAN = 01, OCT = 10, etc.)
Example: 09.
f beepI-rToff
: 2.BEEPER
STATUS OF LCD DISPLAY
(01/ Ó1./1995 ,0 to §11]
3
(; r.,T£Ht-j;S£TTi#Q;s^
( 7: ■ SrvO;P-^'SY'S"rEW^~Y3
C.l". DATE/TIME
( ENTER_.yEAR: XX YQ
( rWTER:>EAR|94:; ~(3
(enter MONTH:XX
( (enter/мокТнТЩ^: : j
( ERTER.'DAY :XX
3
3
:)
I
6. Enter two digits for the day.
Example; 12.
7. Enter the time in 24-hour format.
Example; 15:25 (d:25 P.M.).
8. Wait for two seconds.
9. Press STOP to exit and view the
new date and time.
'Renter day; 12
( enter TIME :XX ;XX 3
P*PNTCT“"TT'ilTT5 Tgl~3
( 1.DATE/tIME
(1 09/] ^>/199 4::::i;5 ■............
3
3
4-2
Page 42

TELEPHONE FUNCTION SETTINGS
IIIM
Setting the Station ID
The Station ID is for identification purposes. Here you can store your name, fax number, and
telephone number. Your machine then prints this information on the electronic Cover Page and
every fax page you send.
IIIK
KEYS TO BE PRESS
1. Press FUNCTION.
2. Press 7.
3. Press 4,
You will then be prompted to enter your
fax number.
4. Enter your fax number (up to 20
digits).
Example: 4155554444.
5. Press SET.
You will now be prompted to enter your
telephone number.
6. Enter your telephone number (up
to 20 digits).
If your telephone number and fax
number share the same line, enter the
same number again.
Example; 4155554445.
ATUS OF LCD DISPL
rro5/12/1994 15:25 )
r 1 .TEMP°:'=S£TTTM.GS^::i::3
hJl ■ SLTUP SYSTEM )
I 4.STATION
c
c
r ENTER
tiilAX'T415
c
r'ENTER & SET
Í TEL:4i&S$S4445„
............‘Set
IT
3
D
D
7. Press SET.
You will be prompted to enter your name
or company's name.
8. Enter your name by using the
number keys (up to 20 characters).
Example; BROTHER.
Refer to the section “How to Enter Text
in Function Mode” on pages 3-ll~12.
9. Press SET to confirm the entry.
10. Press STOP to return to the date
and time.
4-3
[ NAME:
c
( ENTER & SET
C ÑAMÉ¡BROTHER
' 4. STATION^ id“
3
Page 43

TELEPHONimyNSTp
Helpful Hints 1. The telephone number that you stored above is only used for the Call Back
Message and the Cover Page features.
2. If you do not enter a fax number, no additional information can be entered.
3. When you enter a space, use (right arro^v). Then it will be registered as a
blank space.
4. If Station ID has already been programmed, then after Step 3 the name will be
displayed with the prompt “1” to change “2” to exit. Press “1” if you need to
change any information. Pressing “2” to exit will take you out of the function.
NOTIGE
The Telephone Consumer Protection Act. of 1991 makes it unlawful for any person
to use a computer or electronic device to send any message via a telephone fax
machine unless such messages clearly contain in a margin at the top or bottom of
each transmitted page or on the first page of the transmission, the date and time it
is sent and an identification of the business or other entity, or other individual
sending the message and the telephone number of the sending machines or such
business, other entity, or individual.
In order to program this information into your fax machine, you should complete the
steps on the previous page.
Storing One-Touch Dial Numbers
You can dial numbers automatically by storing telephone or fax numbers as One-Touch dial
numbers. You can also store names with the numbers so that when you call, you can verify the
destination on the displa}^ You can store a maximum of 15 phone numbers for FAX-2300ML, 30
numbers for FAX-2400ML and 40 numbers for FAX-2500ML. To use 16 to 30 One-Touch number
locations on FAX-2400ML and 21 to 40 on FAX-2500ML, you need to press SHIFT. For example,
One-Touch location “21” is accessed by pressing SHIFT+One-Touch “01” simultaneously on FAX-
2500ML. Here is how to store a telephone number as a One-Touch dial number (See page
2-3};
STATUS OF LCD DISPLAY
[ 09 /12/1994 1F>: 2S~}
1. Press FUNCTION.
2. Press 4.
3. Press 1.
4. Press the One-Touch key you want to use to store a number.
Example: One - Touch 05.
The One-Touch keys are not the number
keys.
r..TEa>::-srTTrNGs''' 1
i W.'SET':>AUT'0 1
( St L E C t: ONt'- TOU cin
( *05: t ^ )
c
L ENTER_& SET
!)
4-4
Page 44

latKMUNt PUWCIION SETTINGS
5. Enter a number (up to 20 digits).
Example: 14155551212.
6. Press SET.
You then will be prompted to enter the
name or company associated with this
number,
7. Enter the name by using the
number keys (up to 15 characters).
Example: NJ OFFICE.
(See page 3-11-12 for how to enter text. )
8. Press SET.
9. Select the type of number (FAX,
TEL, F/T, CHAIN) by using
(left arrow) or (right arrow) to
display the type you want.
(See For Your Information on page 4-6.)
Example: FAX.
10. Press SET.
11. Return to step 4 to enter another
number, or press STOP to return to
the date and time.
C" * ggy1415:55 5 mi 2^.1
t MAHg :m=a ,ror FtC£ i)
f TYPE:
c
1-SCLECr'
IlKWPPliil'liiilililillll
r s E l: :E C T ' O N E -10 U C Hp
.....
E » ■:&''i:S:Efn
D
Helpful Hints If you have to wmit for a dial tone to access an outside line, you should use
REDIAL/PAUSE. When you press REDIAL/PAUSE, a dash will appear
on the display. By storing the numbers with a pause, you can create a delay of
3,5 seconds.
4-5
Page 45

lilil
¡■II
iOR¥OyfiifQ»RIV!MION
llllill
Types of Numbers
When you store a number as a One-Touch or as a Speed-Dial number, you have a
choice of choosing the type of number. There are 4 options:
1. FAX (A fax number).
2. TEL (A telephone number).
3. F/T (Both a fax number and a telephone number)
4. CHAIN (A number, usually an access code, for chain dialing).
Chain Dialing
Sometimes you may want to choose from among several long-distance carriers when
you make a call. This is because rates may vary depending on the time and
destination. To take advantage oflow rates, you can register the access code of a long
distance carrier as a One-Touch or a Speed-Dial number for chain dialing. To do this,
you store the access code as you would a regular number and register it as a “chain”
number. (See step 9 on page 4-5.) Then, when you want to make a call, you use this
number in combination with the regular number, which also may be a One-Touch or
a Speed-Dial number.
This is also important for transmissions using credit cards.
If you want to store a phone/credit card number to be used in your dialing sequence,
you must store that phone/credit card number as a “chain” number. You can start a
chain dialing call by pressing a One-Touch key or Speed-Dial number where your
chain number is stored. Next you press another One-Touch or Speed-Dial number for
the regular phone number (either FAX, TEL or F/T number), or enter the number
manually. And then press START to begin calling.
NOTE: * When you send a fax using your credit card number in chain dialing, do NOT
send a cover page because your credit card number will be on it.
*The last number(s) in the dialing sequence must not be “chain” and the last
number can be any other type.
Storing Speed-Dial Numbers
When you store a phone or fax number as a Speed-Dial number, you need to enter a two-digit
number, from 01 to 45 for FAX-2300ML, from 01 to 30 for FAX-2400ML and from 01 to 00 for
FAX-2500ML using the number keys. For example, you cannot enter “5”. You need to enter “05”.
You can store as many as 45 numbers (FAX-2300ML) or 30 numbers (PAX-2400ML) or 100
numbers (FAX-2500ML) as Speed-Dial numbers.
STATUS OF LCD Dl
i QS/ l Z /r 9 94i:l 5IXB
1. Press FUNCTION.
2. Press 4.
3. Press 2.
f 1 - TEMP ■ SETTI N'6S~~)
f 4 .SET AUTO PrAilTl
f 2.SPFED-DIAI
r^$':PE£.D-4B:J ACT‘
1
4-6
Page 46

ffettPMONK hW
4. Use the number keys to enter a
two-digit number.
Example; 05.
5. Enter the number (up to 20 digits).
Example: 5555151.
6. Press SET.
You then will be prompted to enter the
name or company associated with this
number.
7. Use the number keys to enter a
name (up to 15 characters).
Example; MANCHESTER.
(See page 3-11-12 for entering text. )
8. Press SET.
9. Select the type of number (FAX,
TEL, F/T, CHAIN) by using ^
(left arrow) or (right arrow) to
display the type you want.
Example: TEL.
( SPEED-DIAL?
C
f ENtE;R & SET
NAME r
c
ENTER &SET
fllAMEiMAHBHESTEr]
FAX .:
c
( SELECT &_
C~t Y P E :_IE L
7
7
3
7
10. Press SET.
11. You are ready to enter another
Speed-Dial number, or press STOP
to return to the date and time.
Helpful Hints 1. Print the All Dial List to make sure you have stored the correct numbers. (See
page 12-3-4.) This list wall contain the type of number: FAX, TEL, F/T, or
CHAIN.
2. Even if there should be a loss of electrical power to your fax machine,
the telephone and fax numbers you have stored will not be lost.
i- Srl EP- EUAt? -C
4-7
Page 47

.
........
.pi
■
FOR YOUR INFORMATION
When You Wish to Change the Stored One-Touch and Speed-Dial
Numbers (During Step 4 on Page 4-4, 7)_________________________________
When you access the function for a One-Touch key or Speed-Dial number, that is
already in use, you will be asked if you wish to change it or to exit and select a
different One-Touch or Speed-Dial number. This display does not appear if the OneTouch key or Speed-Dial number you chose is not assigned.
1. Press 1 to assign a new number to the One-Touch key or Speed-Dial number, or
press 2 to choose a different One-Touch key or Speed-Dial number.
A'
2. If you ai'e replacing an existing number with a new one, the old number and name
will appear in the display. Press CLEAR to erase the old number and name. Then,
enter the new number and name and press SET to store the entry.
0 F;F PC
Memory Storage
Your fax machine is equipped with an internal battery that will keep the date and
time information for up to two hours after power has been cut off, After that time, the
date and time will be lost and you will have to re-enter the information. All other
settings in the SET AUTO DIAL, USER OPTIONS and SETUP SYSTEM functions
are stored permanently and will be retained even in the event of a power failure.
However, the data stored in the memory such as Out-of-Paper Received and Memory
Transmission will be lost after the power is disconnected.
Helpful Hints If your fax machine is connected to a PBX, you may need to insert an additional
number before each fax or telephone number to access an outside line.
Setting Up Number Groups
Number Group allows you to send the same fax message to many fax numbers by pressing only
one One-Touch key. (Broadcasting,) You must store each fax number first as a One-Touch or
Speed-Dial number. Then you can combine them into a Group.
You can have up to 6 Groups and can assign up to 59 numbers on FAX-2300ML/2400ML and 139
numbers on FAX-2500ML to be in a Group. You can use the same stored number in several groups.
They can have a name up to 15 characters long.
1. Press FUNCTION.
2. Press 4.
3. Press 3.
f n n /
u y /
!, 1 .T
i 4.S
i; 3.S
i SELI
k
............
' ■i-D : Z D J
EMP.SLTTINGS )
ETUr:;fiROUPS : J
ECT'.ON6'"'rOUeH )
4-8
Page 48

tLtrMUINt hUNCMUN
4. Press one of the One-Touch keys to
be the stored group number.
Example: select “One-Touch 1” as a group.
5. After two seconds enter the group
number by using the number keys.
Example; 1.
6. Enter the One-Touch or Speed-Dial
numbers in this group.
7. Press SET.
8. Enter the group’s name.
Example: ALL BROTHER.
9. Press SET.
10. Press STOP to return to date and
time.
Helpful Hints You can print a list of all One-Touch numbers and Speed-Dial numbers. Group
numbers will be listed under One-Touch numbers. (See page 12-3~4.)
t s ETO P; GRoaffTSo
C
f r.N.t£'ftSET
U.::R,d6№flrsar" A)
I' G Q1 :
c
c
EATER & SET
r G'orr#Q3#Q 5*02
f NAMEj
( ENTER & SET
f- NAME; ALL 1, RROKES3
i %::,SErur SROiiPS^n
3
3
:)
3)
4-9
Page 49

5. USING THE UNIT AS A TELEPHONE
Your fax machine can be used to make regular telephone calls. You can dial numbers manually,
by pressing the number keys, or by using One-Touch or Speed-Dialing.
mm
Manual Dialing
1. Pick up the handset, or press HOOK.
2. When you hear a dial tone, you can begin dialing by pressing the number keys.
3. If you used HOOK, pick up the handset when the call is answered.
One-Touch Dialing
1. Pick up the handset, or press HOOK.
2. When you hear a dial tone, press the desired One-Touch key.
3. If you used HOOK, pick up the handset when the call is answered.
If you try to use a One-Touch number that has not been registered, you will hear a warning sound
and the display will carry a message reading/‘NOT REGISTERED”. The display will return to
normal after 2 seconds.
__________________________________________________
___________
____________
_________________________
_
Speed Dialing
1. Pick up the handset or press HOOK.
2. When you hear a dial tone, press SPEED DIAL and then the two-digit Speed-Dial number.
3. If you used HOOK, pick up the handset when the call is answered.
FOR YOUR INFORMATION
Using Keys with the Telephone
- Use REDIAL / PAUSE for putting a pause between numbers.
- Use HOLD to put a call on hold. You can put down the handset without
disconnecting the call. You must pick up the fax handset to release the call from
HOLD.
- Use # to switch the dialing type from “pulse” to “tone”. This key is also used for
push-button services, such as those offered by banks, credit card companies, or
paging services.
On Hook Dialing
When you make a call using HOOK, you can listen to the other end of the line, but
they can’t hear you unless you pick up the handset. Also, if you press HOOK again
before you pick up the handset, the call will be disconnected.
5-1
Page 50

mt UNI I Ab A ItLtKHUIMt
IIHl
Telephone Index
Once you have registered a name and number as a One-Touch number or as a Speed-Dial number,
you can search for that name alphabetically using the Telephone Index. You can also dial a
number directly from the Telephone Index.
STATUS OF LCD DISP
[
.
1. Press TEUNDEX.
2. Use the number keys to input the
first character of the stored name,
and press (left arrow) or
(right arrow) to find the name.
3. Pick up the handset, or press
HOOK.
4. Press START to begin dialing.
Return the handset to its cradle
or press HOOK to cancel the call.
L TEl.'. INDEX
f N.J OFFTCh
[ NJ OFFIC E
3
5-2
Page 51

■ mQUMENTmsi№
6. SENDING FAXES
A) DOCUMENT BASICS
The Size of Your Documents
The size of the documents you want to send by fax should not be larger (or smaller) than your fax
machine can accommodate. The documents should each be between 148 and. 216 mm (5.8 and 8.5
inches) wide and between 100 and 900 mm (3.9 and 35.4 inches) long.
fmm
The maximum width of the scanned area is 208 mm (8.2 inches), which can be printed on the
recording paper of the recepient’s fax.
How to Insert the Document
To send a fax, first insert the document you wish to send, face down, in the
document feeder. The top edge of the document should go in first, or the fax
will be received up side-down.
To pi'event the document from, going crooked as it is fed, adjust the paper
guides to fit the width of the document.
NOTIGE
About the Documents You Send...
Do not use documents that are curled, wrinkled, folded, ripped, or that contain
staples, paper clips, paste, or tape. Also, do not use cardboard, newspaper, or fabric.
curled
folded
staples
tape
V
dOi
wrinkled
ripped
paper clip
6-1
Page 52

SE N DIN SiFSXES IfeO/ basics
The Auto Document Feeder (ADF)
The Auto Document Feeder (ADF) automatically feeds documents (up to 30 pages) into the fax
machine, one at a time. The thickness and weight of the documents should fall into the following
categories:
Thickness: For one sheet: 0,07 to 0.12 mm (2.8 x lO'^ to 4.7 x 10inches).
For multiple sheets: 0.07 to 0.10 mm (2.8 x 10'^ to 3.9 x 10 ® inches).
Weight; For one sheet; 52 to 85 g/m^ (0.07 x 10'® to 0.121 x 10'® Ibs/inch^).
For multiple sheets: 52 to 80 g/m^ (0.07 x 10 ® to 0.114 x 10® Ibs/inch®).
As a reference, please note that the paper on which this is printed has the following thickness and
weight:
Thickness: 0.10mm (3.9 x 10 ® inches)
Weight: 80g/m^ (0.114 x 10 ® Ibs/inch®)
Before inserting documents into the document feeder, fan the sheets of paper to make sure the
documents are not stuck together. Then tap the leading edge on a table so that all the pages are
even when placed in the feeder. Make sure you always put the documents in face down.
Getting Ready to Send a Fax
RESOLUTION
You can choose a setting (STANDARD, FINE, SUPERFINE, or PHOTO) for the resolution any
time before you press START or COPY. You can choose a setting by pressing RESOLUTION
key. ( O means light off.
STANDARD
FINE
O ™e
|- PHOTO
O S.F1NE
9 FINE
1- PHOTO
O S.FINE
3 /
means light on.)
The STANDARD resolution can be used for most typewritten
text. When the STANDARD setting is on, both lights are off.
Transmission speed is normal.
The FINE resol ution is an ideal setting to use if you want to send
documents that have small print. When the FINE setting is on,
the FINE light will be lit.
Transmission speed is slower than STANDARD.
SUPERFINE
O FINE
h PHOTO
• S.FINE
The SUPERFINE re.solution is a good setting to use for documents
with very small print or artwork. When the SUPERFINE setting
is on, the S. FINE light will be lit.
Transmission speed is slower than PINE.
PHOTO
\\
^ RNE
|— PHOTO
fli S.FINE
The PHOTO resolution is ideal for sending documents that have
varying shades of gray, such as photographs. The PHOTO setting
is on when both lights are lit.
Transmission speed is slower than FINE.
To set different resolutions for each page, refer to “Multiple Resolution Transmission”
14,
on page 6-
6-2
Page 53

DOi^JMKiYr BASICS ШИШ© FAXES
CONTRAST
The fax machine has automatic contrast control, but if you need to send a document that is very
light or very dark, you may want to set the contrast yourself.
Use SUPER LIGHT to send a very light document.
Use SUPER DARK to send a very dark document.
1. Insert the documents face down
into the feeder.
2. Press FUNCTION.
3. Press 1.
4. Press 4.
The display will alternate messages.
5. Use (left arrow) or (right
arrow) to select one of the settings,
AUTO, S.LIGHT, or S. DARK.
Example: S.LIGHT.
6. Press SET.
7. Press STOP to exit.
Then start the fax sending operation (see page 6-4) or copy (see page 8-1).
f FAxUnO..
C
f СОРУ : PRESS i COPU]
plTrEMP.SETTINGS
В;д:!Р"таа.тзм:§а
г 4.“contrast
c
И11|И11И1Я!Д1§Д1
(T'CONTRASitT S..
r4.eQN;TRASr
j
c
FebPY : T^RESS COPY 1
!)
El BirR
1
:NeT ■ & START :)
:)
%j4-’
6-3
Page 54

■1SEN0>iM<S II^XES;?- ^
B) BASIC FAX TRANSMISSIONS
Sending a Fax
There are 3 basic ways of sending a fax:
1) Manual transmission;
You can talk or listen to the other party before you send a fax by picking up the
handset and dialing the number. After the other party has finished talking and
has pushed its START button, you will be able to send your fax by pressing your
START key and putting the handset back down in its cradle. (If you call and all
you hear is the chirping sound of a fax machine, you can go ahead and press your
START key, and then put down the handset.)
2} Automatic transmission;
You can send a fax without picking up the handset or without pressing HOOK
by dialing the fax number and then pressing START.
a. One-Touch Dialing
Press one of the One-Touch keys. (The numbers must be stored beforehand. See
page 4-4.) Then press START.
b. Speed-Dialing
Press SPEED DIAL, then use the number keys to enter a two-digit number.
For example, press “05” for 5. (The numbers must be stored beforehand. See page
4-6.) Then press START.
c. Telephone Index
You can use the Tel-Index to make telephone or fax calls.(See page 5-2.)
3) Timer transmission;
It is possible to send documents at a later time by using the TIMER function. (See
page 6-7.)
FOi? YOUR INFORMATJON
Talking to the Other Party When Sending a Fax
When you are sending a fax manually and you hear the recipient’s voice instead of
fax tones, you can use the handset to have a conversation. When or if you want to then
send a fax, ask the person on the other line to press START on his/her fax machine
and when you hear fax tones you can press START to begin sending your fax.
Sending a Fax Automatically
1. Insert the documents face down
into the feeder.
^ fiBliyipy A::s:fAE
^ s--COP wl
6-4
:)
Page 55

BASIC FAX TRANSMISSIONS
2. Enter a fax number.
Example: One-Touch dialing.
3. Press START.
Sending a Fax Manually
1, Insert the documents face down
into the feeder,
2, Pick up the handset or press HOOK
and listen for the dial tone.
3, Enter the fax number.
You can use manual dialing, One-Touch
dialing, Speed Dialing, or Tel-Index.
4, When you hear a fax tone, press
START.
Your fax machine will begin sending the
documents.
r NJ OF FICE
r DIALING
r SENDING
STATUS OF LCD DISPLAY
I 09/12/1 994 15:?5 ]
(FAX: № &rYrARX )
C
(^YoPY :; ;pFESS "CORY }
I_§NTER FA X NO.
C
TFIJ OFFfC E
( s’en dj ng
3
J
:)
D
5, Return the handset to its cradle, if
you did not use HOOK.
Automatic and Manual Re-dialing
If a number you have dialed is busy or your call did not go through for some other reason, you can
re-dial that number. There are two ways to re-dial, “automatic” and “manual.” Automatic
redialing can only be used for faxes that were sent using automatic transmission—not for
telephone calls. The factory setting is “auto re-dial on”, but you can change it to “auto re-dial off’,
if needed. If the re-dial function is set to “auto re-dial on”, it will automatically re-dial the number
3 times at 5 minutes intervals before giving up. Whether the setting is on or off, the fax machine
will re-dial the last dialed number when you press REDIAL/PAUSE (manual re-dialing).
Setting the Auto Re-dial
1
■
■ ,1 ■ Y. ii.■- ^ " Kbu
( 09/12/1994 1&72Y1
1. Press FUNCTION.
2. Press 6.
f 1.TEM P.SETTINGS ]
(6.TEL OPfTON S ]
6-5
Page 56

bbNUINB hAXtS JiASIC FAX TRANSMISSIONS
3. Press 3.
4. Use (left arrow) or s»»- (right
arrow) to turn the auto re-dial func
( 3.AUI0 RFOIAI 1
p^ttr~RTdxTl : 0N ]
C
tion ON or OFF.
Example:OFF.
5. Press SET.
[ AU 10 ftEHlALiOF^l [ 3-.AUTQ;': REOtAL,
6. Press STOP to exit.
FOR YOUR INFORMATION
Possible Settings When You Send a Fax Manually
» Resolution (See page 6-2, 6-14.)
• Cover Page (See page 6-18.)
* Call Reservation (See page 6-19. )
Printing Page Headers
Your fax machine can print a page header on top of every document you send. It is
printed on the receiving party’s fax paper. It contains the date and time of
transmission, your fax number and name (Station ID), and page number. Of course
you need to register your Station ID beforehand for that information to be available.
Contrast (See page 6-8.)
Overseas Mode (See page 6-13.)
Transmission Date and Time Station ID Page Number
09/12/1994 15:25 4155554-444 BROTHER
PAGE 01
6-6*
Page 57

ADVA NCED FAX TRANSMISSIONS SENDING FAXES
C) ADVANCED FAX TRANSMISSIONS
Sending a Fax by Using Super Quick-Scan (Memory Transmission)
If you are faxing a set of documents that are confidential in nature or you just need your original
documents right away, you don't have to stand at the machine and wait for the transmission of
each page to be completed. You can use Super Quick-Scan in order to get your original documents
quickly before transmission.
STATUS OF LCD DISPLAY
i 09/l?/1994 ]b:rs )
1. Insert the documents into the
feeder.
2. Press SUPER Q.SCAN.
The display indicates how much memory
is available.
3. Enter the fax number,
4. Press START to begin scanning the
t FAX: NJ3., START '
C
( COPY; PRESS COPY '
r "memory
c
[' ENTER FAX NO
f Fj'~of~eice y]
r MEMORY
documents into memory. Once
completed,the fax machine will dial
the destination.
FOR YOUR INFORMATION
If You Get a MEMORY FULL Message When Trying to Send a Fax by
Using Super Quick-Scan
If the memory becomes full when scanning page one, the display showes “PRESS
STOP KEY”, then press STOP to abort the job.
If the memory becomes full on page 2 or more of a multi-page document, you will be
prompted to press START to send the portion already scanned, or STOP to abort the
job.
100% )
33
:)
6-7
Page 58

btlMUINCj I AXti) ‘ADVMctDFAXTRANSMmSlOm
Delayed Transmission
You can set the timer to send documents at a later time (up to 24 hours later). Your fax machine
will also produce a report, the “Delayed Sending Report”, after the fax is sent. You can set up to
three different documents for delayed transmission.
iV=5L--
I
r09/l2/l994 15:25n
1. Insert the documents into the
feeder.
^reOPY: PRESS COPY ]
^ fTIxYlo. & stArtD
2. Press SUPER Q.SCAN if you use ^ f MEMORY : 100% 0
memory transmission, or not you
kyEMTER FAX NO. ^ . )
can send your fax normally.
3. Press FUNCTION.
4. Press 1.
5. Press 1.
6. Enter the time in 24-hour format
using the number keys.
Example: 19:45 (7:45 P.M.).
7. Wait for two seconds.
8. Press STOP.
9. Enter the fax number.
i^ 1 . TEMpTslrr I ngYT)
f 1".TEMP.SETTINGS ]
riTtlMER^-- ^
C:::S:ET:- .■
i SET TIME=19:45 )
......a.
.
.......
^ gritt isjtAis:« d;p=:-is:)
^ CEEMO.RY.,..
...i ........
;i.aQ%3
r NO OFFICE- .2 .................]
-isaii)
:)
:)
:)
10. Press START,
The fax machine waits until the
specified time to call.
Setting the Daily Timer (for Delayed Transmissions)
The Daily Timer function lets you send a fax at a set time every day. This is handy for sending
delayed jobs that must go out at the same time daily. Once you make this setting, you don’t have
to enter the time everyday. The setting will stay the same until you change it. So you can use
it everyday, or only on days when j^ou want to.
STATUS OF LCD DISPLAY
i 09/12/1994 15:25^
1. Press FUNCTION.
2. Press 7.
3. Press 2.
fTTflMP ■ S EfrlNGS"^
i 7 ■ S EnTp~Yy~S'fEM~^~n
(' 2.DArLY rfMEft ~]
6-8
Page 59

SENDING FAXES
4. Enter the time in 24-hour format
using the number keys.
Example: 19:45 (7:45 P.M.).
5. Wait for two seconds, press STOP
rËNTER f lME,:0Q~:00 ~)
CENIER TIME
^
..
to exit.
Broadcasting
By using the numbers you have stored for One-Touch dialing, Speed-Dialing, or group dialing, you
can autom atically send faxes to a maximum of 60 different locations (FAX-2300ML/2400ML ) or
140 locations (FAX-2500ML) at once.
15:25)
START J
COPY )
OL )
3
0
1. Insert the documents into the
feeder.
2. Press SUPER Q.SCAM.
3. Enter the One-Touch, Speed-Dial,
or group number, one after the
other.
Example; Group number.
[ 09/12/1994
( FAX:fN0. &
C
1 COPY: PRESS
C MEMORY i: ::: ïyÔSn
C
fENTER FAX N
1 ALL BROlHER
4. Press START and the fax machine
will read the documents into
memory, and then start sending
faxes to all the numbers you en
(MEMORY
( DIALING,t
( SEND!HO i
tered.
FOR YOUR INFORMATION
Getting Familiar with the Broadcasting Function
1. To stop the broadcast in progress, press STOP.
2. Enter the chain dialing numbers as you normally would, but keep in mind that
each key counts as one location, so the number of locations you can call becomes
limited. (You have up to 60 locations on FAX-2300ML/2400ML or 140 locations on
FAX-2500ML you can call with One-Touch, Speed-Dialing, and group numbers.)
3. If the line is busy or for some other reason a connection could not be made during
broadcasting, the fax machine will automatically re-dial the number. (See page 6-
5.)
4. If the memory is full, press STOP to abort the job or press START to send the
portion that is in the memory (if more than one page has been scanned.) (See page
6-7.)
100% ]
■i
....
P.Ol )
}
6-9
Page 60

Helpful Hints Use the Telephone Index to help you choose the numbers you want to broadcast
to. (See page 5-2.)
* After transmission is completed, a Broadcast Report will be printed
automatically to let you know the result of transmission.
Sending by Multi-Transmission (Only for FAX-2400ML /2500ML)
Use multi-transmission for sending several different faxes to several distinations at once. For
example, you can automatically fax “Document A" to one destination and “Document B” to
another destination.
This is not to be confused with Broadcasting, which is sending one documentts) to many
destinations.
If you desire, you can combine this function with broadcasting so that you can fax different
documents to different lists of people at the same time. To do this, you store various sets of
documents in memory. Then, for example, you can automatically fax “Document A” to one list of
people and “Document B” to another list of people. Y ou can preset 3 different documents including
timer transmission in memory.
STATUS OF LCD DISPLAY
1 09/l?/l994 Jb:?5 '
1. Insert “Document A’’ into the
feeder.
2. Press SHIFT + SUPER Q.SCAN to
gether to send by multiple transmis
sion.
The display shows remaining memory.
3. Enter the fax number. (Or a series
of numbers if you are broadcast
ing.)
4. Press START to start scanning
documents.
5. Insert “Document B” whithin 30
seconds after “Document A” has
been scanned. (After 30 seconds if
there are no further documents,
the fax machine starts sending
what it has.)
6. Repeat the step 1, 2, 3, 4 for the
third document.
7. After 30 seconds, your fax machine
will start sending them in scanned
order.
& SrART )
COrUTP R E SS^lCOP Yh
^ r MULTI TX uoo^
kfyWflR FAX,?mo) V 1
[ Nj office;
rMULTI TX loom
■ ENTER FAX NO. U
c
( PREgy KEWU
rMULTUTX ; 70%1
UDTATfNG"^ —
:)
:)
3
6-10
Page 61

After scanning documents, your fax machine will start sending them in scanned order.
Helpful Hints 1. If you press only SUPER Q.SCAN instead of SHIFT + SUPER Q.SCAN for the
last document, your fax machine will start dialing without waiting for 30
seconds.
2. Multi-transmission is available for up to three destinations, however the total
number includes Timer transmissions. If you set one timer transmission, multi
transmission is available for two destinations.
Interrupting the Timer and Polled Job
You can send a fax without canceling the timer (see page 6-8} or polled waiting (see page 9-2 ) with
documents in the feeder by “interrupting” it. When you interrupt the timer to send a “new” set
of documents, the fax machine does not avitomatically re-dial the number if it i.s busy. Also, you
cannot use the function mode when you are interrupting the timer or polled waiting.
Example: TIMER WAITING with a document in the feeder.
( TIMER WAITING ]
1. Press FUNCTION.
2. Press 0.
3. Wait for two seconds.
4. Remove documents from the fax
machine.
5. Place the “new” documents into the
feeder.
6. Enter the new number to send the
documents to, then press START.
7. After the transmission is finished,
place the “old” documents back into
the feeder.
8. Press FUNCTION and 0 to restore
the timer.
■' I ■ I hMI> . SETTING S )
f 0,. IWrE^BRUPT y " ]
(We Mpffir) opupE
rTNSTRT DOCUMENT )
r~FAX OR copy
c
rrUNC 0: TO RESET )
r~D Fa L ins"
f SEND I NS
tToI)
( INS ERT DOCUMENT )
QjAx hR' copY
c
(FUNC 0 to" RESET }
f" "oTlTf E R R U ET"
r TIM E ITI ;N.G :
:)
D
D
3
6-11
Page 62

btlNIJiiNKc^
Canceling a Job
Use the cancel job function to permanently remove scheduled tasks such as polling or polled job
(see page 9-2) and timer job (see page 6-8) from your fax machine.
Example; TIMER WAITING with documents in the feeder.
( TtMERWAiriNG- j
1. Press FUNCTION.
2. Press 2.
Any waiting jobs that have been set up
will appear in the display.
If no jobs are waiting to be processed, a
“NO JOB WAITING” message will appear
in the display.
3. Use (left arrow) or ^ (right arrow) to select the job you wish to cancel.
4. Press SET.
5. Press 1 to cancel the selected job, or 2 to exit without canceling.
If 1 is selected, the job will be canceled
and the next job in the queue will appear
in the display.
6. To cancel the next job, press 1 again.
To exit, simply press 2.
[, 1.,..:.3:,EM,P-,.S1T-T INGU^I
(2.CANCEL JOB
^ri9:45. ( NJ OFFIC)^
f ; Of
hu,a.:.ASt,..... ....iu...
c
D
mnnimj
3
6-12
Page 63

FAX TRANSMISSION OPTIONS SEKiraRSf^KXES
D) FAX TRANSMISSION OPTIONS
Setting the Overseas Mode
If you experience difficulty with sending faxes overseas, you may want to use the Overseas mode.
Using the Overseas mode is an effective way to send faxes overseas.
{ Q971I7i994 15:25]
1. Insert the documents into the ^ ( E A)^ N O . & STA RT"^ ^
feeder. L ( .-
2. Press FUNCTION. ( 1 ■ TEMP ■ SETTI NGS 1
3. Press 1. [ 3i.TEWP . SETTINGS~~1
4. Press 6. fcs:aiEg51ASia:Bi.ifh
g «of e#ill§JiPi»gi ^
.
J
5. Press (left arrow) or (right { 01/ERS EA$:: Ql^ r ~ T )
arrow) to switch to ON.
6. Press SET. f 6.0VERSEAS MODE 1
7. Press STOP to exit. ^ UeNTER FAX NO, j
V f~ p~RESX St ARUTE? ] ^
8. Then start the fax sending opera
tion. (See page 6-4.)
After sending your fax, the overseas mode
will switch itself OFF.
6^13
Page 64

bkIMDINC:? ^AXigS
Setting Your Fax Machine for Multiple Resolution Transmission
This is a temporary setting for the current transmission.
You can set the resolution of the documents you send by pressing RESOLUTION. Once you set
the resolution, all the pages will be sent at the same resolution. However, there may be times
when you want to send some pages at one resolution, such as “standard”, and other pages in
another resolution, such as “photo.” If you send all pages in photo resolution, for instance, it would
take a great deal of time. It would be better to specify the resolution for each page to minimize
transmission time. This is made possible by using the l.TEMP. SETTINGS function.
f 09/12/X994:15:25)
1. Insert the documents into the
feeder.
2. Press FUNCTION.
3. Press 1.
4. Press 5.
5. Press (left arrow) or(right
arrow) to find the resolution you
want for the first page of your
documents.
Example: FINE.
6. Press SET,
Return to step 5 for setting the resolution
for page 2 and the following pages.
7. When you finish setting the resolu
tion for all your pages, press STOP.
8. Enter the fax number.
f FAX,; N0.1. :& :::SrARTl-N
C
rc 0 P Y: i P R E SS COP yT
Í 1 .tempTsettings )
f irrEHrTsETTINGS 1
f !).RESOI.UI ION -
^ I PAGE 0 I :STANPARD ] ^
SELECT <- V &~§ET
pPAGE rC'l trlNE ^ 1
( PÀGE~mg:FINE
f FAX: NO, & STARTI
c
r coPYi^TH'ssmirpW)
ID
I
9. Press START.
The resolution will revert to STAND
ARD after the documents have been sent.
6-14
Page 65

FAX 7'RANSMISSION OP'i'IONS SEN01NGFAXES
Gray Scale
You can set the initial gray scale level to either 16 or 32. The default setting is 32. This is the initial
level of photo mode, which is best for sending photographs. If you try to send a document with 32
level photo mode and the receiving machine does not have super fine mode, the machine will fall
back to the 16 level automatically. Therefore, if you send frequently to such a machine, you may
want to set the initial gray scale level to 16,
( TO’/12/m94 : 15l25 1
1. Press FUNCTION.
2. Press 5.
3. Press 4.
t
.
.................
f
....
ymsfff
.............
( 4.&RAY SCALE
D
Í GRAY :$CALE:32 :~3
3
4. Press (left arrotv) or (right
c
f s geer T'~ •g
( "GRWf^,SCA‘LE?lfr
arrow) to choose either 16 or 32.
Example: 16.
5. Press SET.
C 4.GRAY SCALE
6. Press STOP to exit.
Sending a Fax with a Cover Page
An automatic Cover Page will allow you to send details of who the fax is going to, who it is from
and when it was sent. This is what the Cover Page looks like:
09/12/1994 1;
=== COVER PAGE
TO:
FROM: BROTHER
COMMENT; PLEASE CALL
(1) The “TO” information comes from the One-Touch or the Speed-Dial memory. If you are
dialing manually, the name of the destination will be left blank.
(2) The “FROM” information comes from the Station ID.
NJ OFFICE
FAX;14L55551212
FAX: 4155554444
I EL: 4155554445
03 PAGE[S] TO FOLLOW
(1)
Í2)
(3)
(4)
6-15
Page 66

ShNDING HAXtS
(3) The number of pages you are sending. When Cover Page is sent each time by using the
automatic settings (see page 6-17), the number of pages will be left blank.
(4) Your comments. You may customize the comments.
FOR YOUR INFORMATION
The Comments Selection on the Cover Page
You can choose one comment from among 6 options. The first option is to send no
comment at all. The next 3 are built-in comments, and the last two are ones you can
enter yourself. (For more information see below “Customizing Your Cover Pag'e
Comment”.)
1. COMMENT OFF
2. PLEASE CALL
3. URGENT
4. CONFIDENTIAL
5. (Your own customized comment).
6. (Your own customized comment).
Customizing Your Cover Page Comment
You can customize the comment on 3^our Cover Page as follows;
( 09712/1994 15 : ZSU
1. Press FUNCTION.
2. Press 7.
3. Press 6.
rY.TEMP ■ settTngWI
Y/Ts E T U P~~S Y S T E M Y
CeTSET PAvERPyGE^ )
A
4. Press (left arrow) or (right
arrow) to select 5 or 6 where you
wish to store a comment.
Example: 5.
5. Press SET.
6. Enter your customized comment
by using the number keys (up to 27
characters).
(See page 3-11-12 for more details.)
Example: TOP SECRET.
7. Press SET.
8. Press STOP to exit.
6-16
rru. ..
SELEim-^.^ & SET K
r~57
( 5.
f bItopWecret
fli . SET COVERPAGE )
.
3
Page 67

FAX TnjXNSMISSION OPTIONS SEND ING FAXES
Printing the Cover Page
You can print a Cover Page to check the format.
STATUS OF LCD DISPLAY
i..=-B.9./1:27^.1:99:4::,
1. Press FUNCTION.
2. Press 3.
3. Press 4.
fr..t:EMfc
ii:.r R.1 N'"B£Poaj.sno
...............
sifTi|i6'S?d
[ 4.Cbv|R_PAG7E
3
i PRKSS SIAR1 KFY j
4. Press START.
r PRINTING
3
Setting Cover Page ON ¡OFF
If you often send an automatic Cover Page, you can set it to ON to avoid having to set up the
details of the Cover Page each time. Here is how you can switch the setting for the automatic
Cover Page to ON or OFF;
1. Press FUNCTION.
2. Press 5.
3. Press 3.
i 1 .urMR:.,Mrri,ii..i..s:..:.. )
( 3 .jCOVE-RP G: GNybtt: i
4. Press (left arrow) or (right
arrow) to choose ON or OFF.
Example; ON.
5. Press SET.
6. If you selected ON, you need to
select a comment, by pressing
(left arrow) or (right arrow).
Example; 2.PLEASE CALL. (See page 6-
16)
7. Press SET.
8. Press STOP to exit.
^f :SEeECTv^»i->: & SET ] ^
f_CbVERPAGE:ON
( 1 .coM MNT or r- ~ ;
c
fatrCEAgE CAtt - :3
( 3.COVERPG ON/OPP 1
3
:)
6-17
Page 68

SBIMUtINC:? hAXbb FAX TRANSMISSION OPTIONS
Sending an Automatic Cover Page
If you have the Cover Page ON/OFF setting to ON, the total number of pages will not
be printed on the Cover Page. Also, the comment you selected when you set it to ON
will be printed on all the Cover Pages you send.
mm
FOR YOUR information:.:::. :V
Sending a Fa^ When the Cover Page Is ON
KEYS TO BE P
1. Insert the documents into the
feeder. The display will say
“COVERPAGE ON” for one second.
2. Enter the fax number.
3. Press START.
Your machine will begin transmit
ting the Cover Page and original
document.
When Using the Cover Page Temporarily
KEYS TO BE PRESS
1. Insert the documents into the
feeder,
2. Press FUNCTION.
3. Press 1.
4. Press 7.
STATUS OF LCD DISPLAY
[;::::;0:9/l,2/1994 15:2^
[ COVCRPAGC ON
f ■ FAXf & 'SIk Sn
C
(.;;:.C.09Y:..?::::-r«ES-S;:C:0:f»Y j
r NJ 0FFICE
f
........................................ :1
[ SENDING
[ 09/12:/a994 15 ?290
f FSXy"'’NUSTARin
C
i COPYi^ COPYO
1. rt:M P%S E rr iWa S~n
( 1 .TEMP.SETTINGS^C
f ■ "7. CO VE:R:P AGE
D
:)
3
:)
5. Press (left arrow) or (right
arrow) to select ON or OFF,
Example: ON.
6. Press SET.
6-18
[ COVERPAGE:OFF 4
C
i ..:...S;E C:EG:r:..:g..:G"ET 1
f eOVERPAGE:ON J
ii ................aiiMiiiiiMiiitiiiPj
c
..
a:iiiPjS;ii
:)
:)
Page 69

j ■'"P^)(ES ■
7. Press ^«i (left arrow) or ► (right
arrow) to select the comment you
want.
Example; 2.PLEASE CALL.
8. Press SET.
9. Enter the number of pages you are
sending. (Enter “0”, “0” to leave the
number of pages blank.)
10. Wait for two seconds.
11. Press STOP to exit.
12. Enter the fax number.
13. Press START.
( 2 ..PPEASiE .PAl-rv: LV)
( TOTAL PAGES? :O0_ 1
t....................................
f 7.COVERPAGE
( ENTER FAX NO
c
( PRESS START KeCL)
Tnj office
( SEND VO¥ER:PAGE^l
f SENDING^
FHED
D
3
D
Sending a Fax with Call Reservation
You can send a fax and then talk to the recipient using the Call Reservation feature. After your
fax has been printed on the receiving end, the receiving fax machine will ring as if it were receiving
a telephone call. If the recipient picks up the handset, your fax machine will ring. Then you can
pick up your handset and start a conversation. If you have both Call Reservation and Call Back
Message set to ON and the recipient does not pick up the handset when it rings, your fax machine
will leave a fax message asking them to call you.
1. Insert the documents into the
feeder.
2. Press FUNCTION.
3. Press 1.
4. Press 3.
5. Press (left arrow) or ^ (right
arrow) to select Call Reservation
ON or OFF.
Example: Call Reserve ON.
STATUS OF LCD DISPLAY
(: 09/12/1994 15 feSL
( FAX: NO. & START j
c
t COM t LRESS :C0PY )
t...................................]
r 3.CAI.L RESERVE )
CALC RESERVE; OFF ) ^
.
...................
,y,
.......
j
.
-j
6-19
3
Page 70

г5 5ЕЬ1Р1^0-РДХШ::*"' :::|
6. Press SET.
7. Press (left arrow) or (right arrow) to select Call Back Message ON or OFF.
Example: Call Back Message ON.
8. Press SET.
9. Press STOP.
10. Enter the fax number.
11. Press START.
12. Pick up your handset if it rings.
=== CALL BACK MESSAGE
09/12/1994 15:25
TO
FROM:
NJ OFFICE
FAX: 14155551212
BROTHER
r в A C к : OFF
Г CAL L BACK:UN
II
I
Г 3.CALL RfSERVE : 1
rCeWeITTa'x no. 1
^HFrESS 5TART~KEY^n
jj 0FFI~CE'
LD IDLING
3
:)
PLEASE CALL AT[TEL] 4155554445
Printing the Call Back Message
You can print a Call Back Message to check the format.
[FAX] 4155554444
FO.R.:Y©URINFORMAI^^
Using the Call Reservation Function
1. There are some fax machines that will not respond to this function.
2. When you use auto re-dialing, you cannot use the Call Reservation function, but
if Call Back Message is ON, your fax machine will leave a Call Back Message to
ask the other party call you.
3. You cannot use Call Reservation with the timer or with the polling function.
4.
You
must register
page 4-3.)
Station ID number to
set
Call Back Message: ON, (See
ilililllflag 4
.....................
rs j
...
iii)
1. Press FUNCTION.
6-20
iiilMilMilMiMiiMl
Page 71

2. Press 3.
FAX TRANSMISSION OPTIONS SENDING FAXES
3. Press 5.
4. Press START.
(IK
(..fP’ReSg 'START
Tprinting'
...... KEf~)
5
ECM (Error Correction Mode) Feature (Only for FAX-2400ML j2500ML)
The Error Correction Mode (ECM) is a means for checking the integrity of a fax transmission
while it is in progress. ECM transmissions are possible only between machines that both have the
ECM feature. You can then send and receive a fax message that is continually checked for its
integrity.
Sufficient memory must be available for this feature to work.
Error Re-Transmission
Error Re-Transmission is helpful when the receiving machine does not have ECM. Even though
your machine cannot check the integrity of the message, it will send the page(s) again after
occurrances of accidental noise have caused an error.
_________
____________________________________
STATUS OF LCD DISPLAY
t‘09 /12/1994 1 5:P5 )
1. Press FUNCTION.
2. Press 5.
flVr fcMP.S ETTIN GS 1
'0''Pt.rQ<i:...:
.....
3. Press 5.
^ ( ERROR RE-TX,:0FF :j 1 ^
L jpfig) J
4. Press (left arrow) or (right
iiiiioBiiRRiiiiaasia
arrow) to choose either ON or OFF.
Example; ON.
5. Press SET.
f 5;ERR0R RE-tX
6. Press STOP to exit.
This feature is only available for memory transmission using Super Quick-Scan (see
page 6-7~ll).
6-21
Page 72

SIM DI N© FWi lS FAX TRANSMISSION OPTIONS
Next-FAX Reservation
You can use Next-FAX Reservation for sending a fax when the fax machine is busy receiving or
memory transmitting. This function saves you from having to wait until the incoming fax has
finished coming through or the fax stored in the memory has finished transmission. All you have
to do is insert the documents as you normally would and follow a few other simple steps.
EYS TO BE PRESSED
STATUS
[ RECEIVIWG >,01^
1. Insert the documents into the
f ENTER No & StAR'TI
feeder.
2. Enter a fax number.
3. Press START.
4. Press SET.
f 14155551^34
[ PRESS SET
f TgE^T- FAX RrSFRVL) I
( Fq 9 /12/199 4 15 : 2 5 )
[ DIALING
- If a One-Touch or SPEED DIAL number is selected that is not stored, a warning beep will
sound.
;; F OR YOUR INEGRI^AJIQM^
1. Next-FAX Reservation cannot be used when there are documents in the document
feeder awaiting timer transmission or polled waiting or when the interrupt
function is in use.
2. When you are making a call using Next-FAX Reservation, you can dial manually,
or use One-Touch, Speed-Dial, Redial, or Chain dialing. However, when you use
One-Touch dialing, the screen will display the number of the One-Touch number
you are using, such as and not the name of the person you are calling.
Similarly, if you use Speed- dialing, the screen will show you only the Speed-Dial
number, such as “#02”.
h:.
3. You can set the resolution for Next-FAX Reservation by using RESOLUTION,
but you cannot change any settings using the FUNCTION key. (For example you
cannot change a setting for multiple resolution transmission by using fuxiction
mode.)
4. To cancel a Next-FAX Reservation, remove the documents and press STOP.
6^22
Page 73

-BASIC SETUP TO RECEÌVÉ É&BSf j
7. RECEIVING FAXES AND OTHER CALLS ^
A) BASIC SETUP TO RECEIVE FAXES
Selecting an Answer Mode
There are 4 answer modes for your fax machine. You can choose one by pressing MODE
repeatedly until you find the mode you want. Choose one that suits your needs. If you need more
information about a particular mode, refer to the page number given.
4 i
( O means light off.
means light on.)
Answer Mode
1. MANUAL O AUTO
1- TAD
O FA
For
You must answer each call manually.
Use this mode mainly for the telephone
use.
See Page
If you want to answer each incoming call, choose MANUAL mode.
2. AUTO
fP AUTO
[~ TAD
O Fn-
Dedicated fax use. Telephone line and fax 7-2
line are separate.
If you use your telephone line exclusively for sending and receiving faxes, you may want to use
AUTO mode. In this mode, you can receive all your incoming faxes automatically.
3. F/T
O AUTO
1~ TAD
Both fax and telephone use. When you
share one line for your telephone and
fax machine.
If you want to use your telephone line for both fax and telephone, you may want to choose
F/T mode. In F/T mode, your fax machine will answer incoming faxes automatically.
s'*
4. TAD
W AUTO
|— TAD
® F/T
For use with an external TAD (Telephone 7-12
Answering Device). When you are not at
home.
7-2
7-3
- When you want to use your fax machine together with a telephone answering machine,
choose TAD mode.
- The TAD must be a physical device that is connected to the “EXT.” jack on the back of the fax
machine. (See page 7-13.)
- TAD mode will not work with, an outside telephone answering service.
7-1
Page 74

BASIC SETUP TO DECEIVE FAXES'-
Manual Reception (MANUAL Mode)___________
When you set the Answer Mode to manual, you must answer each incoming call yourself. Here
is what you should do when using MANUAL Mode:
If You Get a... Then You Should...
1. Regular phone call
2. Phone call and request
to send a fax
3. Fax tone...
Talk as you normally would.
Press START when finished talking, and replace the handset.
Note: Sender must also press START.
Press START, and replace the handset.
_____________________
Automatic Fax Reception (AUTO Mode)
You can automatically receive all your faxes in Automatic Fax Reception mode (AUTO mode),
Select this mode by pressing MODE.
Setting the Ring Delay
You can set up the number of rings before the fax machine will receive automatically in AUTO
and F/T mode.
KEYS TO BE PRESSED
STATUS OF LCD DISPLAY
1. Press FUNCTION.
2. Press 6.
3. Press 2,
4. Press (left arrow) or (right
arrow) repeatedly until you find
the number of rings you want.
Example: 00.
When you set 00, you can receive your
incoming faxes without a ring delay.
5. Press SET.
6. Press STOP to exit.
Fogyi'Z/199.4 ..IgrfcSU
f 1 . 'Ì
( 6:Uir-
.......
Options
( 2.R ING DELAY
C
LECf ,SE.^fU
( RrWG •DELAY :0’0
D
1)
7-2
Page 75

¡msic$w0B^iíEC^ RbChIVING FAXES AND OTHER CALLS
iliill
The FIT Switch (FIT Mode)
When you share one line for your telephone and fax machine, in the F/T switch mode, the fax
machine can determine whether an incoming call is a fax or a telephone call. (See Chart below.)
Setting the FIT Ring Time
You can specify the maximum time you want the fax machine to ring when set to telephone. There
are four predefined settings; 10, 20, 30, or 60 seconds.
KEYS TO BE PRESS
1. Press FUNCTION.
2. Press 6.
STATUS OF LCD DfSPLAY
7-3
Page 76

RfcCtIVIN&i-AXES AND OTHER CAUS ' BaMo SETUP TO MECEWE EmM ,
3. Press 5,
Ell
irMESfO :S'EC
C
:)
4. Press ^ (left arrow) or ►(right
arrow) repeatedly until you find
the setting you want.
Example: 10 sec.
5. Press SET.
6. Press STOP to exit.
[ S ■ F/ I RING TIME )
TIMeEIO SEC 1
Smoothing
The smoothing feature enhances the appearance of incoming faxes by making the lines smooth
and takes no additional time. This function does not apply to outgoing faxes, or to lists or reports
you print. The initial setting is ON.
■ STATUS OF LCD DISPLAY
1. Press FUNCTION.
2. Press 5.
3. Press 1.
4. Press (left arrow) or ► (right
arrow) to choose ON or OFF.
Example: OFF.
5. Press SET.
6. Press STOP to exit.
09/12/1994 1!
i l.TEMP.SETTIf
f 5.USER OPTIOI
[ 1.SMOOTHING
r < M no T W T w 0•n M
^ ollU'JInilNti.VJlN
*; SELECT > > &
SMOOTHINGiOFf
( Li. SMOOTHING :
5:25 )
iSS'T;)
IS ]
^ - 1
...
.
^SET )
IBPH
:)
7-4
Page 77

BA£IC SEmF W MmMWE^..li^^^
Setting the Size of the Recording Paper
There are three different settings for the size of the recording paper. The machine automatically
reduces and prints the incoming data according to the size setting of the recording paper.
1^
1. Press FUNCTION.
2. Press 5.
3. Press 7.
4. Press (left arrow) or (right arrow) to select either LETTER, LEGAL or A4.
Example ; A4
5. Press SET.
Go to the REDUCTION setting in
Function menu 5-6. (See page 7-6.)
6. Press (left arrow) or (right arrow) to select either AUTO, 100%, 93%, 87%, or 75%.
Example: AUTO
7. Press SET.
8. Press STOP to exit.
(
( 5 . USER OPTI
f y:RCD pa:per
tzyf 9g4 - 15: 25: )
REDUCTION:AUI0
c
i t ■» & seU~)
hREDUCTlQNLAOTO U
hZ- RCP .VPAPER
.....
m
J
11
7
NOTICE
Regardless of the actual size of the recording paper, the machine will calculate the
reduction ratio by this setting. So when you change the recording paper, you must
also change this setting to get the correct reduction.
7-5
Page 78

SMVP'№uÉmivE FkmB
ilili
Printing a Reduced Copy of the Incoming Document
You can avoid separating data even if the document is longer than the recording paper by using
this function to print a reduction of the document. There are two types of reduction: Auto
Reduction and Fixed Reduction.
Auto Reduction
Regardless of the original size of the incoming document, it will be reduced so that it fits on one
page of recording paper. The machine will automatically calculate the reduction ratio by taking
into account the size of the incoming document and the size of the recording paper you selected
in Function menu 5-7. (See page 7-5.)
Fixed Reduction
The incoming document will be reduced at a fixed reduction ratio regardless of the size of the
recording paper. The reduction ratios can be selected from among four choices: 100%, 93%, 87%',
or 75%.
idi.-i
1. Press FUNCTION.
2. Press 5.
3. Press 6.
4. Press (left arrow) or (right
arrow) to select the reduction ratio
you want :
- If you want Auto Reduction,
choose “AUTO”.
- Choose 93%, 87%, or 75% if you
want Fixed Reduction.
- Choose 100%ifyouwanttorecord
the same size.
Example; 93%
5. Press SET.
6. Press STOP to exit.
I 09/12/1994 15:£5 ;
f I.TEHP.SETTINGS 1
P b.USER OPTIONS ;
[ 6TREDUCTION
( RE0UCTI0N:AUr0 )
c
r~RlDirCTi ON : 9~a% ~~1
[, 6 . REDUCf'l ON
D
:)
7-6
Page 79

BMmEm^wmmgmvEF^
. ;
....
When you use Auto Reduction to reduce incoming documents to fit on one page of
recording paper, you can do so only as long as the original document is not longer
than legal size. If the original is longer than legal size, the data will not be reduced
and will carry over to print on a second page.
When you use Auto Reduction and you receive an incoming document that is
smaller than your recording paper, no reduction will take place, and you will get
the same size recorded.
When selecting Fbced Reduction, you must consider the size of the recording paper
as registered in Function menu 5-7. (See page 7-5.) If you selected letter size, you
can choose a reduction of 93%, 87%, or 75%. If you selected A4 size, you can choose
a reduction of only 93%' or 87%. And if you selected legal size, you can choose only
93%.
The Ratios of Fixed Reduction
. ir'
NOTICE
......
INFORMATION
>i^NPQ;r№
Other party sends you the size of...
Your receiving paper size
Letter document (8.5"xH")
(mostly Domestic communication)
A4 document (8.2’'x11.6")
(mostly International communication)
Legal document (8.5"x14")
Letter'
A4, Legal
Letter
A4
Legal
Letter
Legal
Recommended Reduction
Ratio
93%
100%'
87%
93%
100%'
75%
93%
7-7
Page 80

Toner Save Function
This function lets you extend the life of the toner by conserving its use. When the Toner Save is
set to ON, the print appears somev^^hat lighter. This feature is also available in copying. The
default setting is OFF.
TO
1. Press FUNCTION.
2. Press 5.
3. Press 8.
4. Press (left arrow) or (right
arrow) to select either ON or OFF,
Example'. ON.
5. Press SET.
6. Press STOP to exit.
STATUS OF LCD DISPLAY
i 09/1P/1994 15:?5 1
: j ■ I IMP .SETT tNGs
f 5.USER OPTfONS )
f "8 . t O'N E R'"S~A V E
c
f
..
i a.tONER ’SAVE
3
:)
7-8
Page 81

BASIC SETUP TO BEmim^mxEs " f INC5? !i^Kfc:S:^NP 0^^ 0^LLS
Speaker Volume
There are three settings available for the speaker volume, OFF, LOW, or HIGH. This setting
controls the loudness of the fax machine's speaker, which is connected to the phone line. The
initial setting is LOW.
1. Press FUNCTION.
2. Press 6.
3. Press 4.
4. Press -««i (left arrows) or (right
:■ .-.v^
[THTEWg'.
iiiiii
.........................................................
[................
k t S EtE CT'
r SPEAKER:HIGH
-Lki-'
.....
s:ETffka:5. T
........ 5&' -::fEfT
arrow) to choose a setting either
OFF, LOW, or HIGH.
Example: HIGH.
5. Press SET.
i:- 4 : SP EA KER ]
6. Press STOP to exit.
Ring Volume
You can set the ring volume to either OFF, LOW or HIGH. The initial setting is HIGH.
...
.
:)
D
1. Press FUNCTION.
2. Press 6.
3. Press 6.
4. Press (left arrow) or ^ (right
arrow) to choose either OFF, LOW,
or HIGH.
Example; LOW.
5. Press SET.
6. Press STOP to exit.
( Q 9:/1:2 /19V4^ 15 : ¿5, 1
Ti.tehpIsettingsn
[ 6.TEL OPTIONS 1
( 6 . RING V^)LUME ■ )
^ [ RI NG VOLUME:HIGH 1 ^
SE.L.£C.r.
(~rTNG~^^LUHE : L0W~^
(6.RIN6 VOLUME ~ ]
.
SlfT-^
7-9
Hi
Page 82

MtlCil HI'JU u I H t K U ALLÒ BASIC SETUP TO RECEIVE EAXES
Helpful Hints Even if you select OFF, the ring volume is set LOW for F/T ringing, Call
Reservation ringing and when the Distinctive ringing mode is SET.
FQR YQUR INFORI^ATiON
Reception into Memory
If the paper cassette becomes empty, the LCD will display the message “PAPER
EMPTY”. Then please add more recording paper. (See page 1-10.)
Your fax machine will automatically store any incoming faxes in its memory if it runs
out of paper. The contents of the memory will be printed when you replace the new
recording paper. The memory will not be lost as long as you do not turn off the
machine or disconnect the power.
7-10
Page 83

CJI Htk UALLb
B) REMOTE ACTIVATION
What is Remote Activation
If you are using a touch tone phone, you can remotely activate or deactivate your fax machine from
an external phone (a phone connected to your fax machine) or from an extension phone (a phone
connected to the same line as your fax machine).
11 ................................................................................................................
Connecting an External or Extension Telephone to the Unit
You may connect an external or extension telephone to your fax machine, as shown
below. Use the “EXT.” jack on your fax machine.
Alternatively, you may wish to use this “EXT. 'jack to connect a telephone answering
device (TAD).
Extension
Telephone
If the external telephone is in use, the warning message “EXT. TEL IN USE” will be
displayed. When the handset on the fax machine is picked up, an alarm will sound.
You can disconnect the external phone and switch to the fax machine by pressing
HOOK.
Using Remote Codes
If you are on an external phone (or extension phone), and you receive an incoming fax call, you
can transfer the call back to your fax machine by entering a remote activation code. In the same
situation, if you get a telephone call from someone who requests that you switch on your fax, you
can transfer the call back to your fax machine with this code. Also, you can deactivate the fax
machine with another remote code during the F/T ringing from an extension phone. In essence
you have one remote code to activate your fax machine and one remote code to deactivate it. The
remote code to activate is “skSl”, and the remote code to deactivate is “#51”.Ifyou want
to set your own code, see the following section, “Registering Remote Codes”.
You should check other equipment that will be on the .same telephone line to insure that there
is no conflict with our codes. (Our codes can be changed, see page 7-12.)
7-11
Page 84

KigblVIW^ UlHbk CALLS
■Ill
Limitation of Using External (or Extension) Phones
1. If you accidentally pick up an extension phone when a fax is coming in, you may
disrupt the transmission or render some portions unreadable. Error codes maybe
encountered.
2. The remote activation and deactivation codes may not work with some telephone
systems or telephone sets.
Registering Remote Codes
REMOTE ACTJVA'nON
-m:.
( 09/1271994 15:25 ]
1. Press FUNCTION.
2. Press 7.
3. Press 5.
4. Press (left arroty) or (right
arrow) to choose ON or OFF.
Example; ON.
5. Press SET.
6. Enter new remote code to activate.
(Factory setting is Then
wait for 2 seconds.
7. Enter new remote code to deacti
vate. (Factory setting is “#51”.)
8. Wait for 2 seconds.
9. Press STOP to exit.
f 1 . T€HrVSErTJJl!SS; )
.
..............
r i "№EM'8:TE"
^ Siiilliiiil*
i ACT^ C00£ :*51
i
..
D£A:c r..,C0:P EV15 rVJ
..........
ACTy: d:N...
.....
:)
7-12
Page 85

CALLS ■■ ■■■■■■■"■
C) CONNECTION TO A TELEPHONE ANSWERING DEVICE
(TAD)
The TAD Mode
When you leave your fax machine set in TAD mode, phone calls will be forwarded to the externally
connected telephone answering device, and your fax calls will be received automatically.
___________________________________
_________________
Helpful Hints When You Use TiU) Mode
1. You can inform callers beforehand that if they call manually and get your
telephone answering device when they want to send a fax, all they have to do
is press your remote code (>l<51 unless you have changed it) to activate your fax
machine from a touch tone phone,
2. Another alternative is to record a TAD message that says, for example, “This
answering machine is connected to a fax unit. If you wish to leave a voice
message, please speak after the beep. If you wish to send a fax message, please
press (your remote activation code) after the heep. Thank you.”
3. You need to erase the incoming messages on your external telephone answering
device when it's full, or TAD mode will not answer any call s, faxe s or otherwise.
7-13
Page 86

:REeEIVlNe«^ES AND^EReALL5
Sequence of TAD Mode Reception
FOR YOUR INFORMAÍION
Incoming Call
The call is picked up
by the external TAD.
(Recommended short
TAD ring delay such
as 1 or 2 rings.)
Fax reception is
automatically
activated by
fax tone.
The fax message
is received on
paper.
Auto dial
fax call
The external TAD
outgoing message
begins (recommended
length of less than
20 seconds).
Voice call
The caller leaves a
voice message on the
external TAD.
Manual
fax call
The caller
can also
send a fax message.
The caller must
press your remote
activation code
to activate the
fax machine.
The fax message is
received on paper.
Telephone Answering Device
1. Set the telephone answering device so that it is ready to record incoming telephone
calls.
2. Set the number of rings to one or two on your telephone answering device.
3. Try to record the shortest possible message on your telephone answering device
(up to 20 seconds).
Please note that some faxes that are sent manually cannot be received automatically
because some fax machines do not send a fax tone in manual mode.
So you must indicate a remote activation code for the caller to enter. (See page 7-12.)
7-14
Page 87

DlSTINCTlfERINGINB UI Hhl^ CALIiS
D) DISTINCTIVE RINGING
Distinctive Ringing
r
FOR YOUR INFORMATION
Vfhat Is Distinctive Ringing?
Distinctive ringing is a service offered by telephone carriers that allows you to have
several different numbers on one line, each with its own distinctive ring. This way,
when you get an incoming call, you can identify what number is being called by the
ring pattern. Your local telephone carrier can provide you with more information
about this service. This service is usually offered as a monthly charge to your normal
phone bill.
Can My Fax Machine Utilize Distinctive Ringing?
Yes, it has a distinctive ringing function that allows you to register one additional
distinctive ring pattern. (See page 7-16-17.) The ring pattern you register should be
for the number you want to use as your dedicated fax number. Once you register the
pattern, your fax machine will be able to identify its own incoming calls and
automatically start to receive faxes, regardless of how you last set the answer mode.
You can only register one additional ring pattern.
Can I Change the Setting Later?
Yes, you can change or cancel the distinctive ringing setting anytime.
How Will the Fax Machine Treat All Other Distinctive Ringing?
It will act the way it normally does. In other words, the fax machine will treat all the
other unregistered, distinctive rings according to the machine's answer mode setting
(MANUAL, AUTO, F/T, or TAD). For instance, if a call comes in that is not for your
(registered) dedicated fax number, and the machine is set to MANUAL, the fax
machine will respond as per the MANUAL mode.
How Does the Distinctive Ringing Function Work?
s«v,a.-.
When you receive an incoming call, the fax machine compares the ring pattern with
the one that is registered. If the two are identical, then the fax machine automatically
accepts the call as an incoming fax. Otherwise, the fax machine will treat the call in
the usual way, depending on the machine's answer mode setting (MAN UAL, AUTO,
FTT, or TAD). The function has 3 modes: (ON, SET, OFF). Set it to ON when you want
to use it, and to OFF when you do not want to use it. Use the SET mode for registering
a number.
WhaFs the Advantage of Using the Distinctive Ringing Function?
By registering a ring pattern (see page 7-16-17) you may operate your fax machine
in the most efficient way possible should you require the distinctive ringing service.
With the distinctive function ON, you can receive your faxes automatically, and
people who call you on one of your other numbers do not have to talk to your fax
machine. It basically gives you two independent numbers by using only one line.
7-lS
Page 88

l|t:^ ElX/trsl^ msTiNcrm^ ringing
H©lpful Hints If You Do Not Have a Distinctive Ringing Service...
Your phone carrier can give you more information about it. If you are not
currently using a distinctive ringing service, don’t try to set up your
distinctive ring feature. It may cause your machine to malfunction. If
your phone carrier provides this service and you decide to use it, it’s a good idea
to use one of the new numbers you receive for your fax number and keep the old
number for it’s original purpose. Remember to tell your customers and
colleagues your new fax number.
If You Already Have a Distinctive Ringing Service...
It is a good idea to register the ring pattern of your existing dedicated fax
number. Use the registration mode under the distinctive ringing function. You
will not be able to use the fax machine’s distinctive ringing feature until this
pattern has been registered. (See this page.)
Setting the Distinctive Ringing Function
If you currently have a distinctive ringing service (a telephone ser\nce that provides you with
multiple numbers, each with a distinctive ring, on one line), you can register any one of the ring
patterns of your line with your fax machine so that it can immediately identify a call as an
incoming fax by the distinctive ring pattern it uses. You also will need to arrange to have someone
call your fax machine to do this.
You may have difficulty registering a distinctive ring pattern if your fax machine is
connected to a telephone answering device. Disconnect it before you set this function.
- ■■ ;.L:-
■■■ ■ . Fi. I .
1. Press FUNCTION.
2. Press 6.
3. Press 7.
4. Press (left arrow) or (right
arrow) to find the SET mode.
5. Press SET.
6. Press STOP.
IMPORTANT:
- “D/R SET MODE” sta3^s on screen
until set.
-Answer mode LED is flashing.
- You now must wait for someone to
call the corresponding fax number
with distinctive pattern or ask a
friend to call your specific
distinctive ring fax number.
;a0 /rg'/ tag 4 .■ i;5 .aU)
[i:> TiMV .IS Exr.
f 6.TEL OPflONS r~l
Caaaiiii^^
c
rolYri NCfTvfTs ET Y
:)
7-16
Page 89

'DlSTINCTIVEWNgiNG.^ KECJEIVING P
7. Oncp. Romoone, calls, listen carefully
fTO SET ]
and see if the ring- pattern is the
one correspondinp to the number
you want to register. If it is and the
LCD shows the message “PICKUP
TO SET"’, after two or more rings
lift up the handset on the fax ma
chine.
8. Press START to set (or STOP to
C
( 5TOPTQ-■ ■
r R?fnSTF~RFP'
.
:7rO.,.;$ET-:
cancel).
9. Press START again to receive the
rVrEtEPHONE/FKX 1
incoming fax, or if the call is a voice
call, talk into the handset.
FOR^0URdNFORMATION^:i
While You Are Setting the Distinctive Ringing Function:
1. When someone calls your fax machine, it will continue to ring until you pick up the
handset or press HOOK, even if you have set the number of rings.
2. If you get a call and the ring pattern is NOT the one you want to register, press
STOP. (See step 8 above.)
3. There are some ring patterns that cannot be registered.
4. Answer mode is automatically switched to JVIAN UAL during registration. The
answer mode that you had set before distinctive ringing registration now flashes.
D
:)
D
NOTE: Some Telephone Answering Devices may pick up a call before your fax
machine finishes detecting the ringing pattern. We suggest you set your
Answering Device ring delay to its maximum setting.
Once You Have Finished Setting the Distinctive Ringing Function:
1. The Distinctive Ringing function will be set to ON, and you will be ready to use
this function.
2. You will not hear the first two rings of all incoming calls on the fax machine.
However, other extension phones connected to the same line, or any external
phones connected to the fax machine will ring. If the fax machine recognizes the
ring pattern, it will automatically accept the call as an incoming fax, and you will
not hear any further ringing. Otherwise, you will hear the phones continue to ring,
and the fax machine will also ring,
3. You can receive faxes on numbers other than the one you registered. The fax
machine will respond to these calls according to how you have set the answer mode
(MANUAL, AUTO, F/T, or TAD).
Hsipful Hints Remember that you should let your phone ring at least twice before answering
to allow the fax machine to pick up first if necessary. Answering an incoming
call before two rings will defeat the purpose of the distinctive ringing function.
You should turn the distinctive ringing function to OFF if you move and/or get
a new number. To turn off the distinctive ringing set-up go into function mode.
(See page 7-18.)
7-i7
Page 90

ii
lillM
AND OI HhR CAtLS^ ^ BiWgjgiiMlMiii:
How to Turn the Distinctive Ringing Function ON or OFF
The distinctive ringing function is designed to accommodate the distinctive ringing service (a
telephone service that provides you with multiple numbers, each with a distinctive ring, on one
line). Please note that you need to register the ring pattern of your fax number before you can set
the distinctive ringing mode ON. (See page 7-16.)
KEYS TO BE PRESSED
_____________
-iij
( 09/12/1994 15,jgyj
1. Press FUNCTION.
( lyrEM P . StTTI;H6§^
2. Press 6.
3. Press 7.
f"=-7 ■ DISTIN&T:,I..V=E':;..,t^
( DISTIN CTitfr_:rff;r~n
3
4. Press (left arrow) or (right
c
( 5KIFCT & SEtT)
( OrSTlNCTIVEiON^]
arrow) to find the mode (OFF, SET,
ON) you want.
Example: ON.
5. Press SET.
i /iPISTINCTIy£
6. Press STOP to exit.
- :BOiYOURINFORN«OTION.rfi"’
• If you wish to use an external Telephone Answering Device (TAD) and the
distinctive ringing feature with your fax machine:
1. You must use the distinctive ringing pattern for your fax number, otherwise both
the TAD and fax may conflict in picking up the call.
2. Select the TAD mode on your fax machine (see page 7-1).
3. Connect the external TAD into EXT. jack of your fax machine (see page 7-13). Do
not parallel connect the external TAD into other wall jack.
4. You must set the external TAD to its maximum ring delay setting (minimum 4
rings).
5. You can not use the Toll Saver feature of the external TAD when using the
distinctive ringing feature.
• If you do not use an external Telephone Answering Device (TAD ) with your fax
machine:
Select the MANUAL mode on your fax machine (see page 7-1).
7-18
Page 91

8. HOW TO USE THE COPY FUNCTION
Making Single and Multiple Copies
Use this function to make a single copy or multiple copies.
mowTOJJSEIHf^PY^lJNCTI
STATUS OF LCD DISPLAY
1 ag4J 15
1. Insert the documents face down into the feeder.
2. Press COPY.
3. Enter two digits for the number of
^ { FA m № ■ & Ig TA RT )
^ iiijfl-iiiii
^ p NOrOF COrl ESTTQl i
^
...........................
[:.mvPn::::M.giySrttS::; /1
...........
:-Flig#wippyiJ
copies you want using the number
keys (Max. 99 copies).
Example; 05
4, Press COPY or just wait for 5
( -CPBY:' STACK: f
seconds.
Helpful Hints 1. Set the resolution to either PHOTO or FINE. If you select STANDARD or S.
FINE, the resolution will automatically change to FINE. However, if you have
an outgoing document in memory and you haven’t selected the PHOTO
setting, the resolution may automatically change to STANDARD regardless
of the setting you selected.
2. When you want to change the resolution for each page, you can use Function
menu 1-5 (see page 6-14) to set the resolution for each page.
3. When you want to make a copy, make sure the text or image on the original
document is not too close to the edge. Your fax machine cannot read anything
closer than 4 mm (1/8 inch) from the edge.
:)
3
^
4. Do not pull on the paper while copying is in progress. This may distort the
copied image and damage your machine.
NOTE: 1. When making Multiple Copies, do not let the receiving tray overstacked. Remove
copied paper from receiving tray frequently.
2. When making Multiple Copies, make sure there is enough recording paper in the
machine.
3. Original documents should be straight, non wrinkled, to be correctly fed. Otherwise
the documents may occasionally jam.
8-1
Page 92

HOW i о USE THE есш eJNCTIOM
Making Reduced and Enlarged Copies
Use this function to make reduced or enlarged copies of a document. Select Auto Reduction
(AUTO) if you want to reduce the size of the original, regardless of its size, to the size of the
recording paper. To enlarge or reduce a document, select one ofthe enlarge me nt/reduction ratios:
150%, 125%', 120%', 93%, 87%, or 75%. If you want to reproduce the same size, select 100%.
STATUS OF LCD DISPLAY
B09/12/U9ff4 15:25 )
1. Insert the documents face down
into the feeder.
2. Press REDUCE/ENLARGE.
3. Press (left arrow) or (right
arrow) to choose the setting.
- If you want Auto Reduction, select
“AUTO”.
- If you want to reproduce the same
size, choose 100%.
- For Fixed Enlargement or
Reduction, choose one of the
following settings: 150%', 125%,
120%, 93%, 87%, or 75%.
Example: 93%'
4. Press COPY.
5. Enter two digits for the number of
copies you want using the number
keys (Max. 99 copies).
Example: 05
^ ( FAX: NO.'~~&~U%RT~~l
[ COPY:. PRESS POPY l
f ELG/RDC:AU'T0
c
f EL-G/RDCr 9 3%
11МИ1И1М11ИМ11||В
( Щ. ОР COPI ES: 09; 1
О
:)
6. Press COPY or just wait for 5
seconds.
8-2
( 00РГ stack"
Page 93

NOTICE
When enlarging, any portion that extends outside the edge of the recording paper
will be cut off.
The selection you made under Function menu 5-7 (see page 7-5) will not effect
enlargements, but it will effect reductions, as follows: If the recording paper is
letter size, you can select a reduction ratio of 93%, 87%, or 75%'. If it is A4 size, you
can select a reduction I’atio of 93% or 87%, and if it is legal size, you can select 93%
only. (See page 7-6~7.)
8-3
Page 94

POLUNG
9. POLLING
FOR YOUR INFORMATION
What Is Polling'^
Polling is the process of retrieving faxes from another fax machine. You may use
your machine to “poll” other machines, or you may ask someone to poll your machine.
The party who polls pays for the cost of the call.
How Does It Work?
First two parties set up their fax machines so that they can accommodate polling.
Then one party leaves documents in the fax machine so that the other party can call
up and have the documents sent to them.
When to Use Polling?
Use polling to control the cost of sending a fax.
1. If you want to pay for the cost of the call: Send out faxes to other parties as you
normally would, and if another party has documents to send you, ask if you can
poll for them.
2. If you want others to pay for the cost of the call; Ask them to poll your fax machine
for documents they want, and have them fax any documents that you want.
* There are some fax machines that will not respond to this function.
Helpful Hints Using Polling Effectively (Examples)
Problem No. 1: You want another party to send you a long fax, but they do not
want to pay for the call.
Solution: Ask them to leave the document in their fax machine so you can
poll for it.
Problem No. 2: Sales representatives have difficulty sending in faxes to the
head office’s fax machine because it is busy so much of the time.
Solution: Head office can poll the sales representatives’ fax machines.
Problem No. 3: Because of the time or location, it is cheaper for someone else to
call you than it is for you to make the call.
Solution; Ask the other party to poll for the documents and offer to pay for
Lhe call at their lower rate.
9-1
Page 95

POLLING
Polling Another Fax Machine
Once you have set up polling, as described below, and the other party has set their fax machine
to “POLLED WAITING”, you can automatically receive their documents.
Make sure no documents are in the
r09/12/1994 15:25)
feeder.
1. Press FUNCTION.
2. Press 1.
3. Press 2.
4. Wait for two seconds.
5. Press SET.
6. Press STOP.
r i.temp.sEttings“T
L
.
iliiiilieiiii:'.....................
^ 0 L LI N G : ST^N D ARD
C ¿.POLLING 1
^ { ENTER FAX-NO.“ )
^rTRESS START KEY )
7, Enter the fax number.
Example: One-touch dialing.
8. Press START.
nWhrficL''■■■■■ )
nhALING ^
•; RFCLTVING P.Ol )
Setting up Polled Waiting
Polled Waiting is when you place a document in
another fax machine to retrieve that document. Your fax machine will print a Polled Report
after the transmission.
your fax machine and set your machine to allow
:)
1. Place the documents into the feeder.
2. Press FUNCTION.
3. Press 1.
4. Press 2.
5. Wait for two seconds.
6. Press SET.
( 09/12/1994 15:25 )
^ (~TAX: NO . & START )
^ ( COPY : ^ ^ PRESS ~C0Wd
ri.TEMP.SETIiNGS 1
ni.TEMP.SEtTINGS 1
[ 2.POLLING “n
POILI-NG : STANDARD )
SELECT ^ & SET 1
rTTPTLLING : 1
:)
-.■■i
:)
9~2
Page 96

POLLING
7. Press STOP.
8. Press START and wait for the poll
: PRFSS STAR I KEP~D („POLLED
ing call to come in.
Secure Polling
Secure Polling is a way to keep your documents and others' from falling into the wrong hands
while the fax machines are set up for polling. You can use Secure Polling only with another
Brother fax machine. Your four-digit ID number must be entered on the fax machine that polls
for your documents.
Polling Another Fax Machine with Secure Code
You can poll another fax machine that has Secure Polling by following the steps below:
You need to make sure you are using the same ID number as the other party.
Make sure no documents are in the
feeder.
1. Press FUNCTION.
2. Press 1.
3. Press 2.
4. Wait for two seconds.
.
............
.
; 1 ■ fhMP■SETTINGS )
( 2 . POLLING;
(01.LI NdrVSTANDA RWJ
c
( SELFCI ^ & SET '
:)
5. Press (left arrow) or (right
arrow) to find the POLLING
SECURE setting.
6. Press SET.
7. Enter a four-digit number. This is
the security code of the fax machine
you are polling.
Example: 1234,
8. Wait for two seconds.
9. Press STOP.
10. Enter the fax number.
Example: One-Touch dialing.
11. Press START.
9-3
( P0LLING:SECIJ
(—POLLING ID:X -XXX )
( POI.I TNG 10:1
( 2 .POLLING
„( ENTER FAX N0
:sTAliT'
[ m OFPLCE" ■'■■■
( DIALI-NG
f RECEIVING
'RE ;)
2-34-}
mmrn
.
......
KEY )
............
P.Ol )
.
3
.
Page 97

Setting up Polled Waiting with Secure Polling
Secure Polling allows you to create a Polling ID number to protect your documents during polled
waiting mode. Anyone who polls your machine must enter this polling ID number.
________________
STATUS OF LCD DISPLAY
( 09/12/1994 15
_____ __
1. Insert the documents into the
feeder.
2. Press FUNCTION.
3. Press 1.
4. Press 2.
5. Wait for two seconds.
6. Press (left arrow) or (right
arrow) to find the POLLING
SECURE setting.
7. Press SET.
8. Enter a four-digit number.
Example: 1234.
9. Wait for two seconds.
10. Press STOP.
11. Press START and wait for the
polling call to come in.
^ f~ FAx F NOi ’ &
COPY: Press copyI
ГТ. TEMP. SETTINGS )
(1.TEMP.SETTINGS- 1
( 2. POLLING- - ; . )
^ f POEErNG ; STANDARD ;i
^ f $ E L Ё C T <- ^ & S E T )
: POLLING:SECURE )
( POiEING JD:XXXX ]
Я1||1М|Ш1РЖ1РЯЗ
i 2. POLLING
(".PRESS“....STApy
( POLLED WAITING )
3
:)
9 4
Page 98

POLLING
liill
Delayed Polling
After you select STANDAED or SECURE, press SET, then press 1 and use the number keys to
enter the time at which you want polling to take place.
STATUS OF LCD DISPLAY
Make sure no documents are in the
feeder.
1. Press FUNCTION.
2 Press 1.
3. Press 2.
4. Wait for two seconds.
5. Press (left arrow) or (right
arrow) to select STANDARD or
SECURE.
Example: STANDARD.
6. Press SET.
7. Press 1,
8. Enter the time.
Example: 19:45 (7:45P.M.).
9. Wait for two seconds.
10. Press STOP,
gq|ii|i|ilij|
rr . T E M pTse T T I N g U~1
Si .tempTsettings U
fU.. roiLllG
EiliicUUUliiiZQ
i: 2-polling
F StJ 1
i Sit
i l.tiM
.
...........................
...
................A
D
J
V FTlrss Ls3W:RT""keX: ^
11. Enter the fax number.
Example: One-touch dialing.
12. Press START.
The fax machine waits until the specified
time to call.
Setting up Polled Waiting with Super Quick-Scan
Before pressing START, press SUPER Q.SCAN so that you can store your polled waiting
document in the memory.
H©lpilJl Hints If you use SUPER Q.SCAN to place the Polled Waiting documents into the
memory, they will not be erased automatically after they are polled. To erase
them you must use the Cancel Job function. (See page 6-12.)
9-5
Cnj^office'
( 09/1,2/19^ lb : 25 ~)
ED
Page 99

aaigeiB:
POLLING
Sequential Polling
This function is the reverse of Broadcasting, in which your machine sends a document to several
destinations. In a sequential polling operation, your machine will request documents from
several fax units in a single operation.
n9/'l?/1994 15:25 !
1. Make sure there are no documents
in the feeder.
2. Press FUNCTION.
3. Press 1.
■Bi
4. Press 2.
5. Press (left arrow) or 9^ (right
arrow) to select STANDARD or
SECURE.
Example; STANDARD
6. Press SET.
7. Press STOP.
8. Specify the destination fax
machines, which you wish to poll
by using One-Touch, Speed-Dial,
or Group keys.
Example: Group key.
9. Press START. Your machine polls
each number or group member in
turn for a document.
”2_. polling'
f, P>BteqNfci'sTANDARD )
C
U P 0 L411^6 iJr AW D^RO^
[ 2 ■ POLL!
[ENTER FAX
c
L-:p%gSyf-iSTt№-TO
f 'bi'a'l fng
D
:)
3
:)
NOTICE
After all the polling operations are finished, a Sequential Polling Report will be
printed automatically.
9-6
Page 100

PASSWORD
10. PASSWORD r
What Is Passwordì
The password is provided for use in a closed network of fax machines. It will prevent
reception of “junk faxes” that can interfere with your daily operations. It can also
help you avoid the transmission of faxes to the wrong parties.
How Does It Work?
First the receiving party sets up “SET PASSWORD” to “ON” and then enters a four
digit password.
When you send a fax message, you must enter the same four-digit password. If the
four-digit password is the same for both the sending and receiving machines, you will
be able to send and receive messages. Also, both machines should be a Brother (or
compatible).
When to Use Password Plus?
If you have activated the password function, only people who have set the correct
password code on their Brother fax machine can exchange faxes with your machine.
To help avoid difficulties, you can use the Password Plus feature. It prevents
reception of “junk faxes”. If you choose “Password Plus” in “SET PASSWORD”, your
machine will receive not only faxes sent by parties using your password but also faxes
sent without your password, if the sending machine’s number is registered as one of
your One-Touch numbers. (Your machine compares the last four-digits of the
sending fax machine’s number to numbers listed in your One-Touch keys.) In this
case, the sending machine need not be Brother fax machine.)
SllÌÌ:Ì:!;Ì
FOR YOUR INPORMATION
10-1
 Loading...