

Page 1

2300/2310
USER’S GUIDE
GUÍA DE USUARIO
• Read this User’s Guide before you start using your P-touch.
• Keep this User’s Guide in a handy place for future reference.
• Antes de usar su equipo por primera vez, lea cuidadosamente esta Guía de Usuario.
• Guarde esta Guía de Usuario para futuras referencias.
Page 2

CONTENTS
Getting Started
GENERAL DESCRIPTION ...................................................................................1
GENERAL PRECAUTIONS ..................................................................................2
BATTERIES .........................................................................................................3
OPTIONAL AC ADAPTOR ................................................................................. 4
TAPE CASSETTE .................................................................................................5
CONNECTING THE P-TOUCH TO A COMPUTER ............................................6
INSTALLING P-TOUCH EDITOR .......................................................................7
STARTING P-TOUCH EDITOR .........................................................................20
ATTACHING LABELS .......................................................................................24
PRINT HEAD & ROLLERS .................................................................................25
For Your Information
POWER KEY .....................................................................................................26
CURSOR KEYS .................................................................................................26
CODE, ALT & SHIFT KEYS ...............................................................................27
SPACE KEY ....................................................................................................... 30
RETURN KEY ....................................................................................................30
TAB FUNCTION ..............................................................................................31
DELETE KEY .....................................................................................................33
LINE OUT FUNCTION .....................................................................................34
CLEAR FUNCTION ..........................................................................................35
ACCENT FUNCTION .......................................................................................37
SYMBOL FUNCTION .......................................................................................38
AUTO FORMAT FUNCTION ...........................................................................40
STAMP FUNCTION ..........................................................................................41
FONT FUNCTION ...........................................................................................44
SIZE & WIDTH FUNCTIONS ............................................................................45
STYLE FUNCTION ...........................................................................................47
UNDERLINE FUNCTION .................................................................................49
FRAME FUNCTION ..........................................................................................50
TAPE MARGIN FUNCTION .............................................................................51
HORIZONTAL ALIGNMENT FUNCTION ........................................................52
i
Page 3

MIRROR PRINTING FUNCTION ......................................................................53
LENGTH FUNCTION ....................................................................................... 54
AUTO CUT FUNCTION ...................................................................................56
PRINT KEY .......................................................................................................57
FEED & CUT FUNCTION ................................................................................. 57
NUMBERING FUNCTION ...............................................................................58
REPEAT PRINTING FUNCTION .......................................................................59
MEMORY FUNCTIONS ....................................................................................61
TROUBLESHOOTING ......................................................................................65
ERROR MESSAGE LIST ..................................................................................... 66
SPECIFICATIONS .............................................................................................69
ACCESSORIES (For USA Only) .........................................................................70
PT-2300/2310 CONTACT INFORMATION (For USA Only) .............................74
ii
Page 4

iii
Page 5
Getting Started
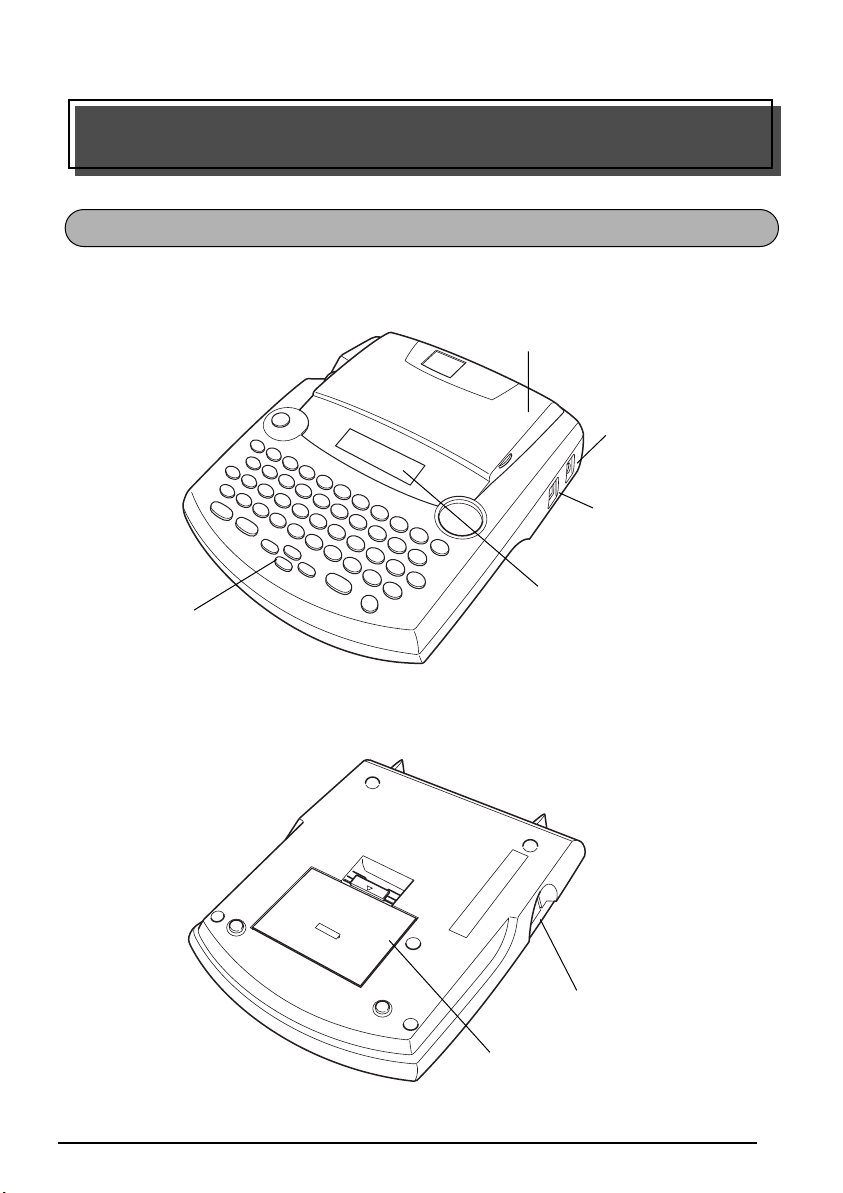
GENERAL DESCRIPTION
TOP VIEW
Keyboard
Tape compartment
cover
AC adaptor
connector
USB port
LCD display
BOTTOM VIEW
Tape exit slot
Battery compartment cover
1
Page 6
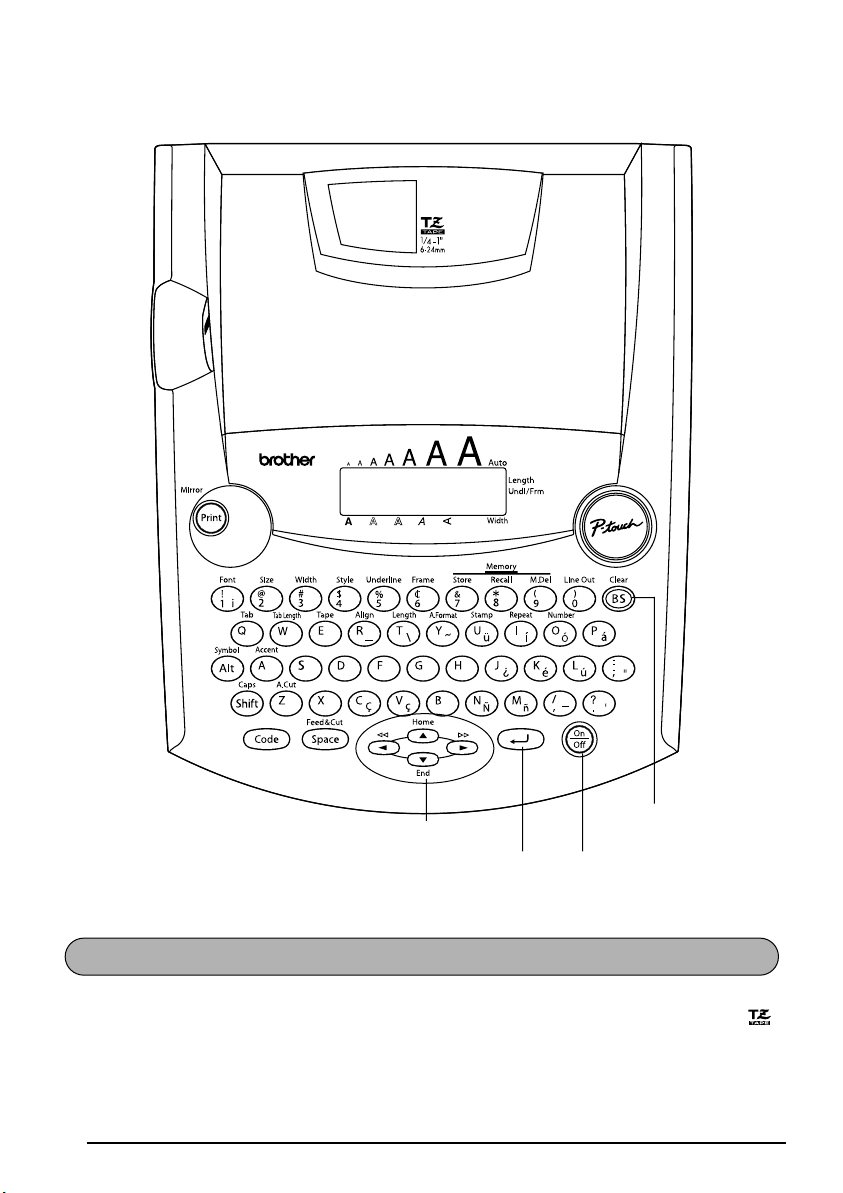
KEYBOARD & LCD DISPLAY
Cursor keys
Power keyReturn key
Delete key
GENERAL PRECAUTIONS
● Use only Brother TZ tapes with this machine. Do not use tapes that do not have the
mark.
● Do not pull on the tape being fed from the P-touch. This may damage the tape cassette.
● Do not use the machine in dusty places, and keep it out of both direct sunlight and rain.
2
Page 7

● Do not expose the machine to high temperatures or high humidity. Never leave it on the
dashboard or in the back of your car.
● Do not leave any rubber or vinyl on the machine for an extended period of time. Doing
so may cause staining.
● Do not clean the machine with alcohol or other organic solvents. Use a soft, dry cloth
only.
● Do not put any foreign objects into or anything on the machine.
● To avoid injuries, do not touch the cutter’s edge.
● Use only the AC adaptor (model AD-60) designed exclusively for this machine. Use of
any other adaptor will void the warranty.
● Do not try to disassemble the AC adaptor.
● When the machine is not being used for a long period of time and it is not necessary to
keep the text files stored in the memory, disconnect the AC adaptor, and remove the batteries to prevent them from leaking and damaging the machine.
● When the AC adaptor is connected, unplugging the adaptor from the electrical outlet
before unplugging it from the machine can delete all text files in the memory, even if batteries are installed.
• Use eight AA alkaline batteries in this machine.
BATTERIES
This portable machine can be used anywhere by installing eight (8) AA alkaline batteries
When you change the batteries, always replace all eight at the same time.
To change the batteries:
1 Remove the battery compartment cover on the back of the machine. 2 If batteries are already installed, remove them. 3 Insert eight new AA alkaline batteries, making sure that their poles point in the correct
direction.
4 Attach the battery compartment cover.
☞ Be sure to insert the new batteries within five minutes of removing the old ones,
otherwise the text shown in the display and any text files stored in the memory will
be lost (unless the machine is plugged into an AC outlet with the AC adaptor).
Remove the batteries and disconnect the AC adaptor if you do not intend to use this
machine for an extended period of time. When the power is disconnected, all text
shown in the display and stored in the memory will be lost.
If the batteries are not installed with their positive and negative poles pointing in
the correct direction, the batteries may leak, overheat or burst, or the print head
may overheat.
.
3
Page 8
OPTIONAL AC ADAPTOR
The AC adaptor (model AD-60) allows you to use this machine wherever there is an electrical
outlet.
To connect the optional AC adaptor:
1 Insert the plug on the adaptor cord into the connector marked DC IN 9.5V on the right
side of the machine.
2 Insert the plug on the adaptor into the nearest standard electrical outlet.
☞ Only use the AC adaptor designed exclusively for this machine.
Remove the batteries and disconnect the AC adaptor if you do not intend to use this
machine for an extended period of time. When the power is disconnected, all text
shown in the display and stored in the memory will be lost.
When the AC adaptor is connected, unplugging the adaptor from the electrical outlet before unplugging it from the machine can delete all text files in the memory,
even if batteries are installed.
It is recommended that you use the AC adaptor when printing large fonts on
1” (24 mm)-wide tape since this operation can quickly drain the batteries.
4
Page 9
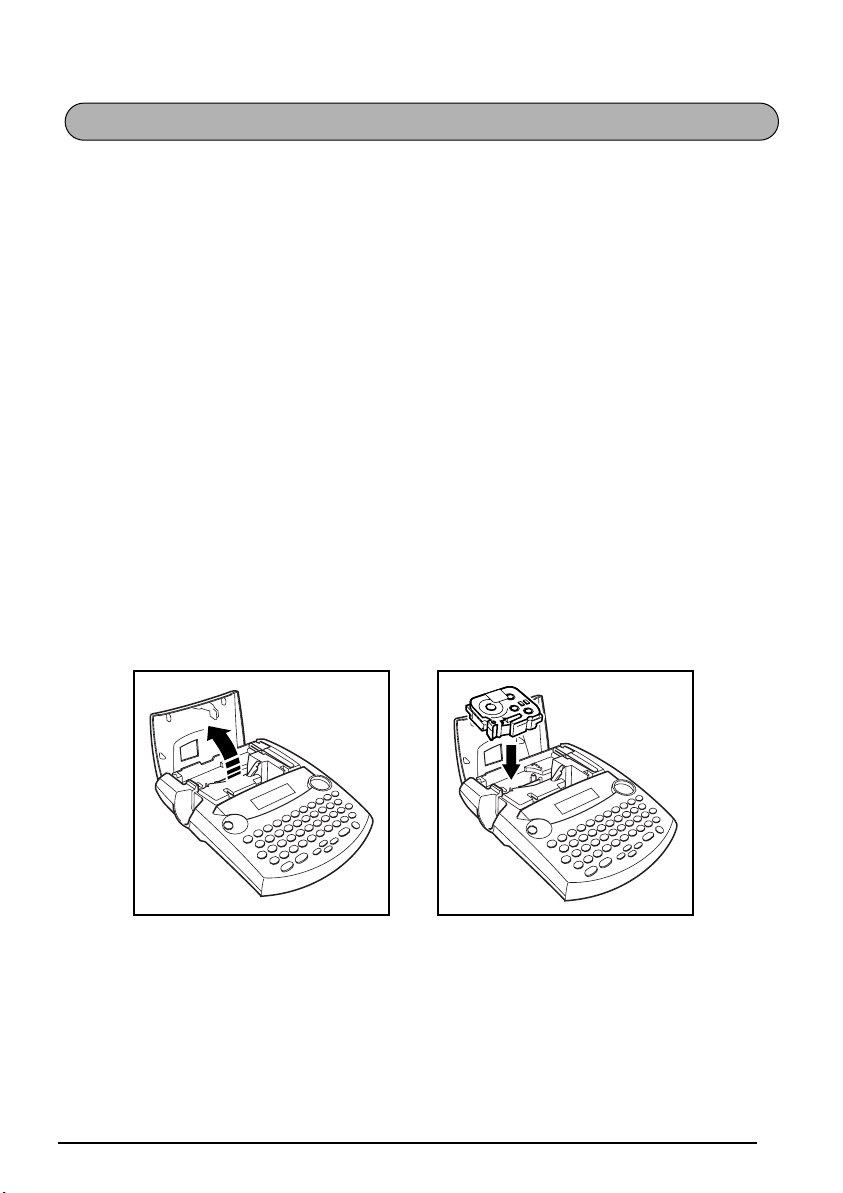
TAPE CASSETTE
A single TZ tape cassette is supplied with this unit. However, since TZ tape cassettes are available for this machine in a wide variety of colors and sizes, it is possible to make distinctive
color-coded and stylized labels.
In addition, this machine has been designed to allow you to change the tape cassettes quickly
and easily.
To change the tape cassette:
1 Lift open the tape compartment cover. The installed cassette is also released. 2 If a tape cassette is already installed, remove it by pulling it straight up. 3 If the ink ribbon in the other tape cassette is loose, use your finger to wind the toothed
wheel in the direction of the arrow on the cassette until there is no slack in the ribbon.
Also, make sure that the end of the tape feeds under the tape guides.
☞ If you are using a new tape cassette provided with a stopper, be sure to remove the
stopper.
4 Insert the tape cassette firmly into the tape compartment, making sure that the entire back
of the cassette touches the bottom of the compartment.
☞ When inserting the tape cassette, make sure that the inner ribbon does not catch on
the corner of the metal guide.
5 Close the compartment cover, then turn on the machine if it is off.
6 Hold down c and press _ once to advance the tape and remove any slack.
5
Page 10
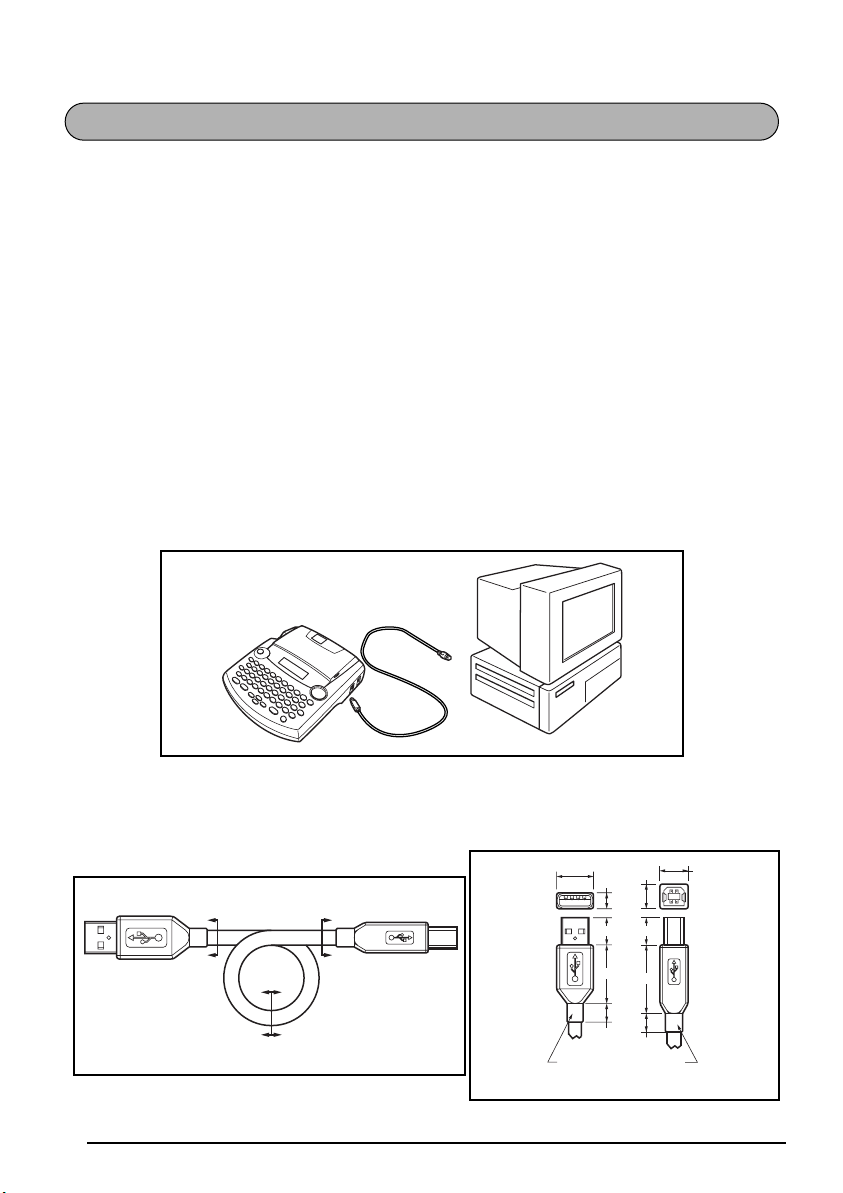
CONNECTING THE P-TOUCH TO A COMPUTER
This machine is equipped with a USB port, allowing you to connect the P-touch to your IBM
PC-compatible or Macintosh computer, and print labels and stamps created using the P-touch
Editor software.
☞ The P-touch Editor software and the printer driver must be installed before the P-touch is
connected to the computer or turned on. Follow the installation procedure on pages 7
through 19 to install the P-touch Editor software and the printer driver, and connect the
P-touch to the computer when you are instructed to do so.
A USB interface cable is not included with the PT-2300/2310. When connecting the
P-touch to a computer, use a standard USB cable (high-speed compatible with series A
and B connectors).
To connect the P-touch to the computer:
1 Insert the flat (A) connector on the USB cable into the USB port on the computer. 2 Insert the square (B) connector on the USB cable into the USB port on the right side of the
P-touch.
3 Turn on the P-touch.
☞ The USB cable needed for connecting the P-touch to the computer is not included. Be
sure to use a cable that meets the following specifications.
Overmolded
Series “A” Plug
6
15.7
A
A
CCC
B
B
Overmolded
Series “B” Plug
C
Detail A-A
(Series
“A” Plug)
Optional Molded
10.5
7.5
12.0 12.0
27.0
32.0
9.0
Strain Relief
11.5
Detail B-B
(Series
“B” Plug)
9.0
Page 11

INSTALLING P-TOUCH EDITOR
The P-touch Editor software adds even more illustration and layout features to the label-making possibilities available with your PT-2300/2310.
☞ Do not connect the PT-2300/2310 to the computer before installing the P-touch Editor
software, otherwise it may not be installed correctly. Be sure not to connect the PT2300/2310 until you are instructed to do so.
On an IBM PC-Compatible Computer
To Install the P-touch Editor Software:
1 Check that your system configuration meets the following requirements.
Computer: IBM PC or compatible
Operating system: Pre-installed with Microsoft
sional or XP
Hard disk free space: At least 20 MB
☞ A few hundred megabytes of additional free space may be needed when printing
long labels or large amounts of data.
☞ For installation on Windows
®
2000, administrator privileges are required.
In addition, printing requires power user or administrator privileges.
This software cannot be operated in Users groups.
This software is not compatible with the Windows
☞ With Windows
®
XP, printing and installation is only possible from an account with
administrator privileges. These operations cannot be performed from an account
with limited privileges.
Available memory: Minimum 32 MB
Monitor: VGA or higher graphics card
USB port
CD-ROM drive
2 Insert the P-touch Editor Version 3.1 CD-
ROM into the computer’s CD-ROM drive. A
dialog box automatically appears, allowing
you to select what to install.
☞
If the dialog box does not automatically
appear, double-click “My Computer” on
the desktop, and then double-click the
CD-ROM drive containing the CD-ROM.
(For Windows® XP, click “My Computer” in
the Start menu, and then double-click the
CD-ROM drive containing the CD-ROM.)
Next, double-click “Setup.exe” to
display the dialog box.
®
Windows® 98, 98SE, Me, 2000 Profes-
®
2000 Server operating system.
7
Page 12
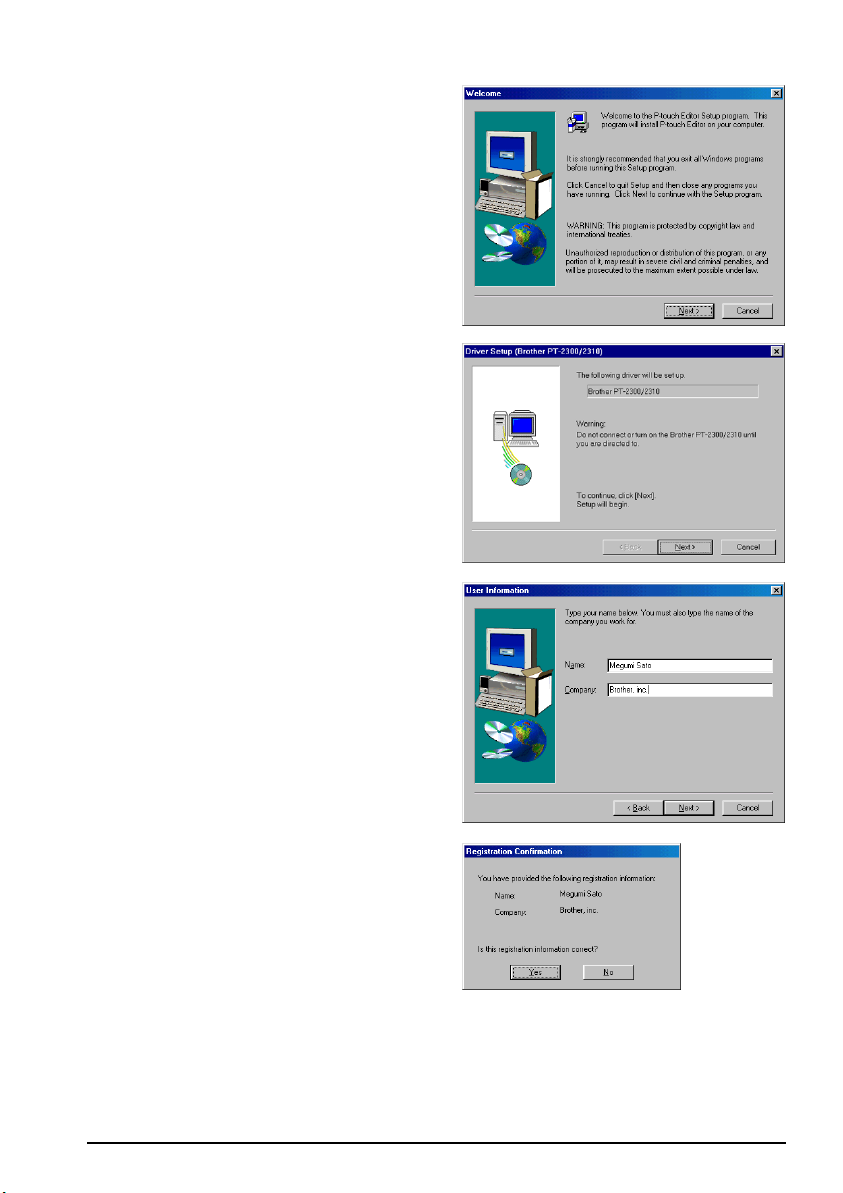
3 Click the top button (P-touch Editor). The
InstallShield
®
Wizard for installing the
P-touch Editor software starts up, and then
the Welcome dialog box appears.
☞ To install just the printer driver, click
the lower button (Printer driver). The
first Driver Setup dialog box appears,
informing you that the PT-2300/2310
printer driver will be installed.
Continue with the procedure in “To
install the USB printer driver ”on page
10.
4 Carefully read the contents of the dialog box,
and then click the Next button to continue.
The User Information dialog box appears.
5 Type the necessary information into the
appropriate boxes (If the information has
already been registered in Windows
®
, it will
automatically appear.), and then click the
Next button. A dialog box appears, asking for
confirmation of the entered information.
8
Page 13
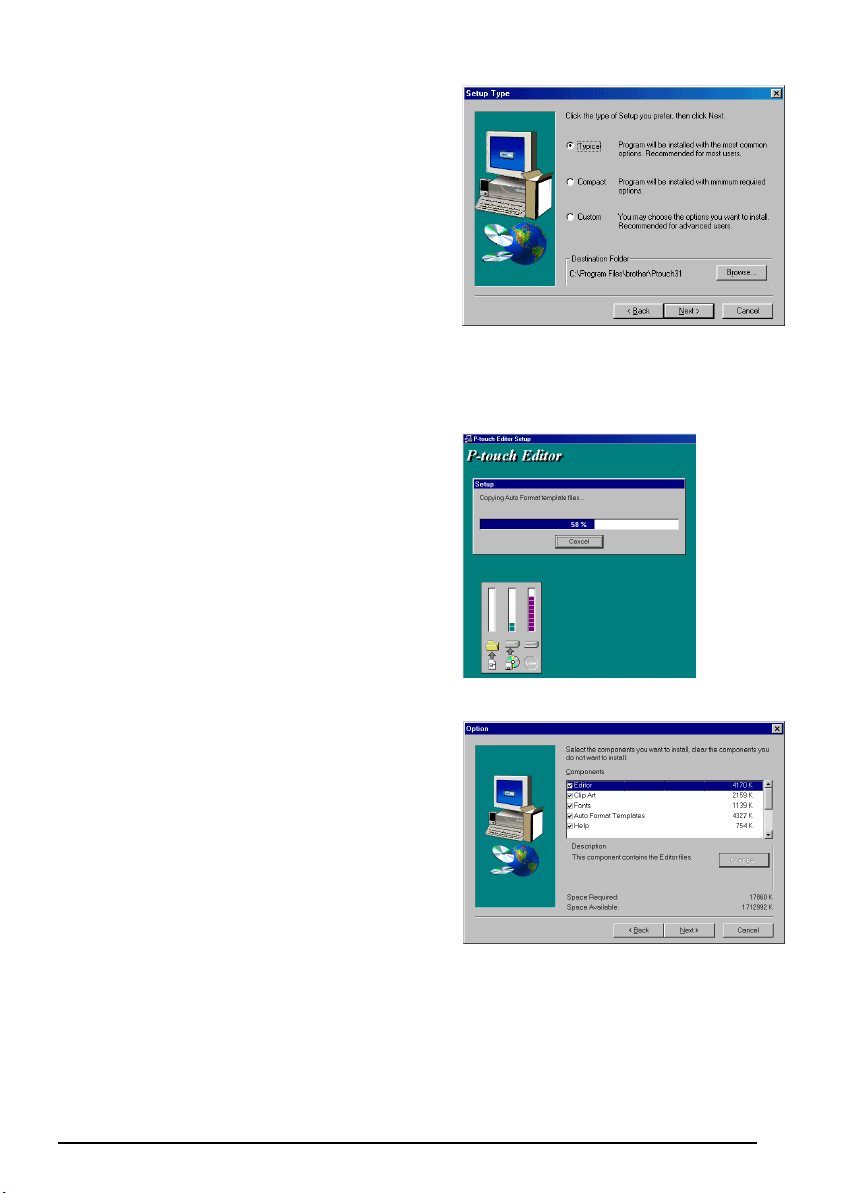
6 Click the Yes button to register the entered
information. The Setup Type dialog box
appears.
☞ To change the information, click the
No button, and then return to step 5.
7 Select the installation method, and then click
the Next button.
• For a Typical or Compact Installation
Select “Typical” or “Compact”, then
clicking the Next button immediately
starts installation.
Typical: All of the basic options
(P-touch Editor Version 3.1, clip
art, Auto Format templates, Help,
and 13 fonts) are installed.
Compact: Only P-touch Editor Version
3.1 is installed.
• For a Custom Installation
Selecting “Custom”, then clicking the
Next button displays a dialog box that
allows you to select which options to
install. Only the options with a check
mark beside them will be installed. In
addition to the basic options listed for a
Typical installation, the User’s Guide can
also be installed.
9
Page 14
1) Select which options to install.
Editor: The P-touch Editor Version 3.1 software
Clip Art: The illustrations for the P-touch Editor Version 3.1 Clip Art func-
tion
Fonts: The 13 fonts
Auto Format Templates:
The templates for the Auto Format function
User’s Guide: The User’s Guide (HTML) for the P-touch Editor Version 3.1 (The
User’s Guide can also be viewed from the CD-ROM.)
Help: The help files for P-touch Editor Version 3.1
If the Change button can be clicked while an option is selected, sub-components
can be selected. Click the Change button to display the Select Sub-components
dialog box, and then select the sub-components that you wish to install by putting
a check mark beside them. If certain options or sub-components are not installed,
some P-touch Editor functions may not be available. After selecting the desired
sub-components, click the Continue button.
2) Click the Next button to begin installation.
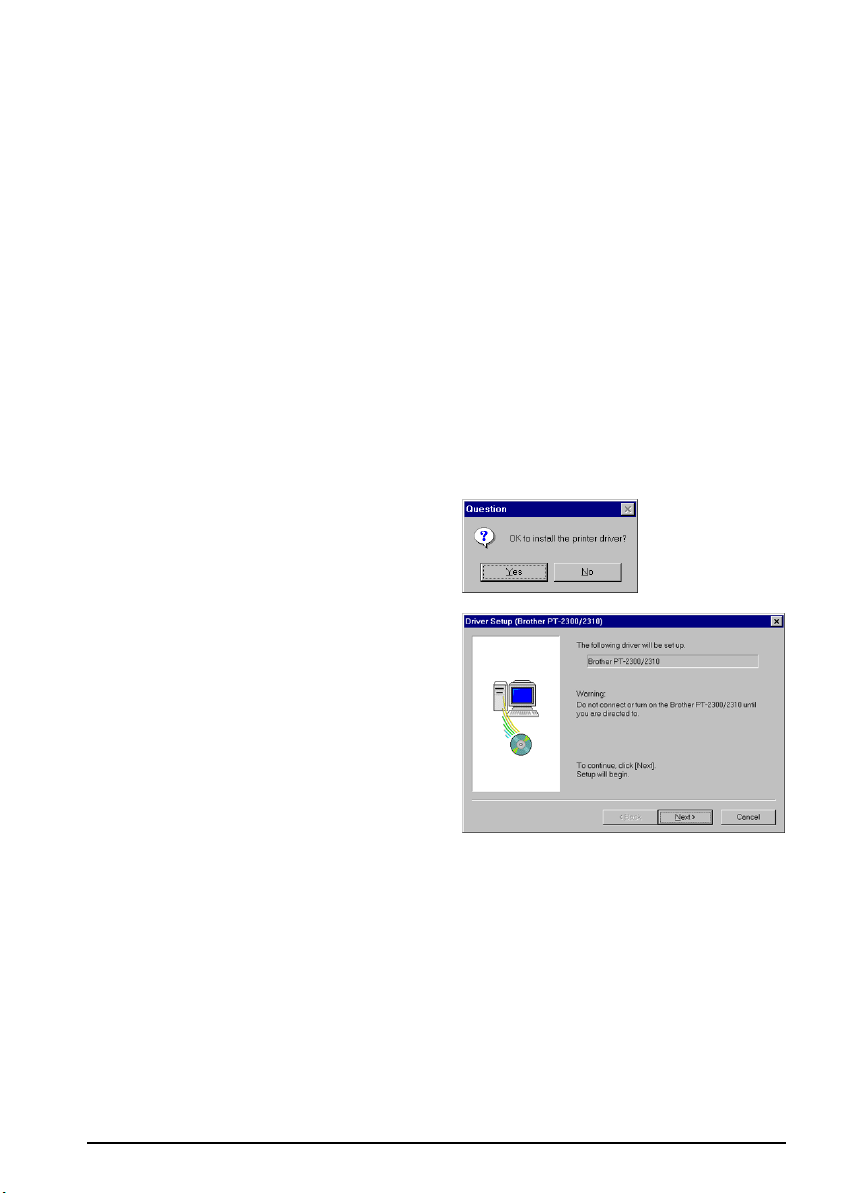
8 After P-touch Editor is installed, a dialog box
appears, allowing you to select whether or
not to install the printer driver.
To install the printer driver, click the Yes button. The first Driver Setup dialog box
appears, informing you that the
PT-2300/2310 printer driver will be installed.
Continue with the procedure in
“To install the USB printer driver ” below.
If the printer driver is already installed, click
the No button, restart the computer, and then
remove the CD-ROM from the CD-ROM
drive.
To Install the USB Printer Driver:
With Plug-and-Play, new devices connected to the system are detected, and their drivers are
automatically installed. If the PT-2300/2310 is to be connected through the USB port, its
driver will be installed with Plug-and-Play. Be sure to read the installation instructions
described below before installing the file supplied on the CD-ROM.
☞ Do not connect the P-touch 2300/2310 to the computer until you are instructed to do
so, otherwise the PT-2300/2310 printer driver may not be installed correctly.
10
Page 15
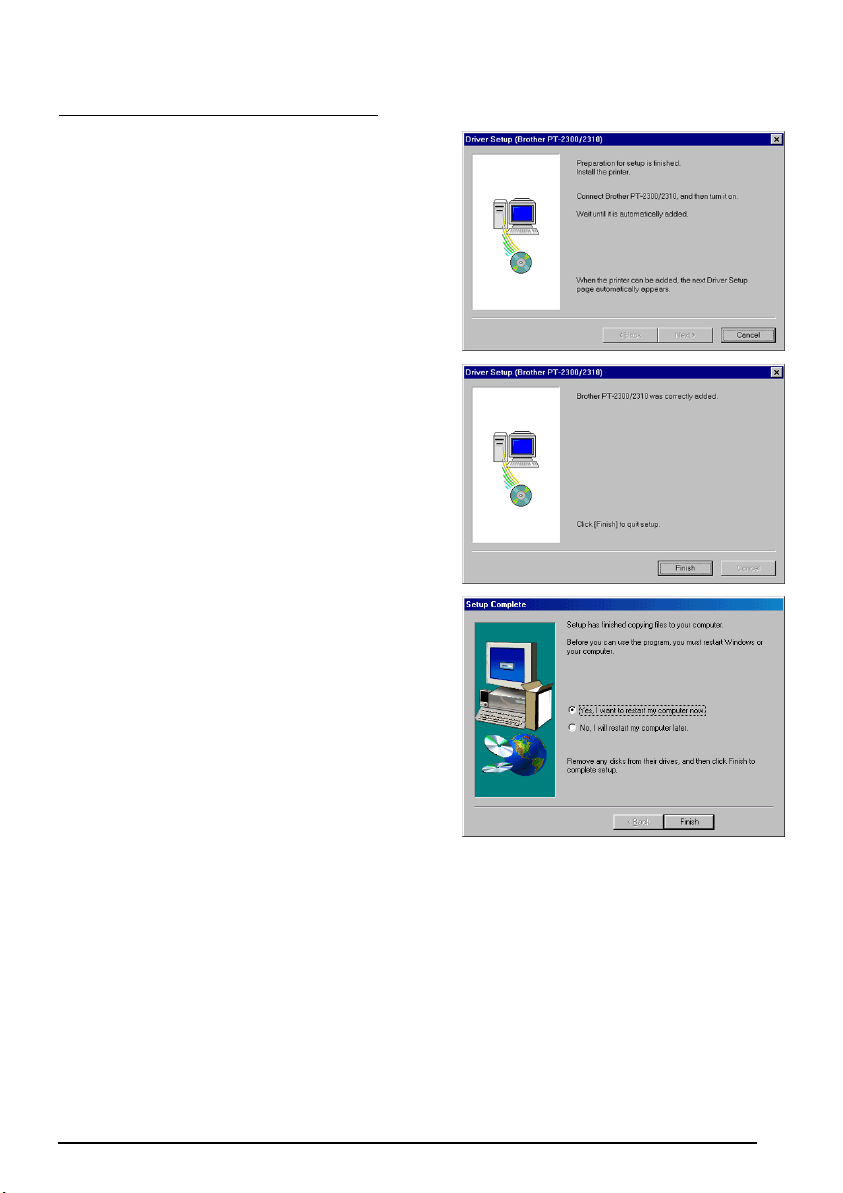
With Windows® 98/98SE/ME/2000:
1 Click the Next button. A dialog box appears,
instructing you to connect the PT-2300/2310
to the computer.
2 Connect the PT-2300/2310 to the computer
using a USB interface cable as described on
page 6, and then turn on the PT-2300/2310.
A dialog box appears, showing that the
printer driver has been installed.
3 Click the Finish button. A dialog box
appears, showing that the installation is finished.
4 Select “Yes, I want to restart my computer
now.”, click the Finish button to restart the
computer, and then remove the CD-ROM
from the computer.
11
Page 16
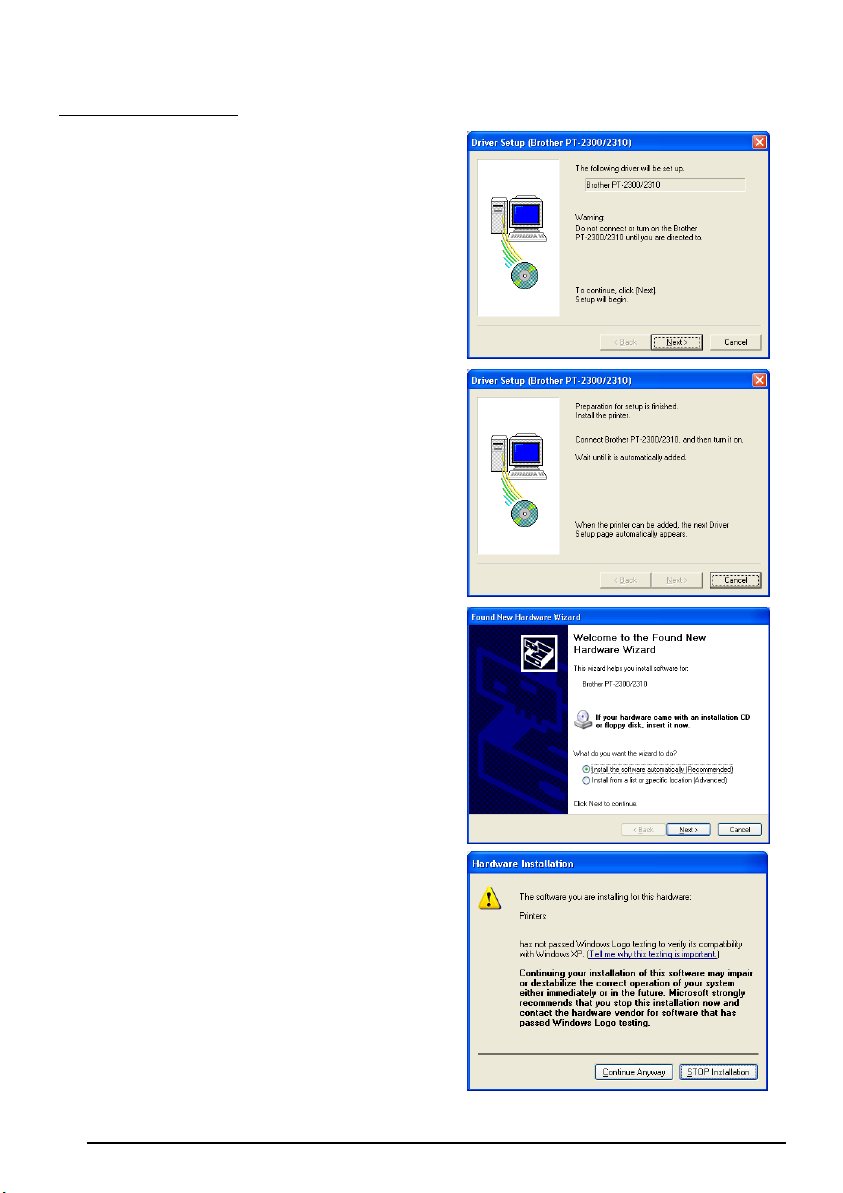
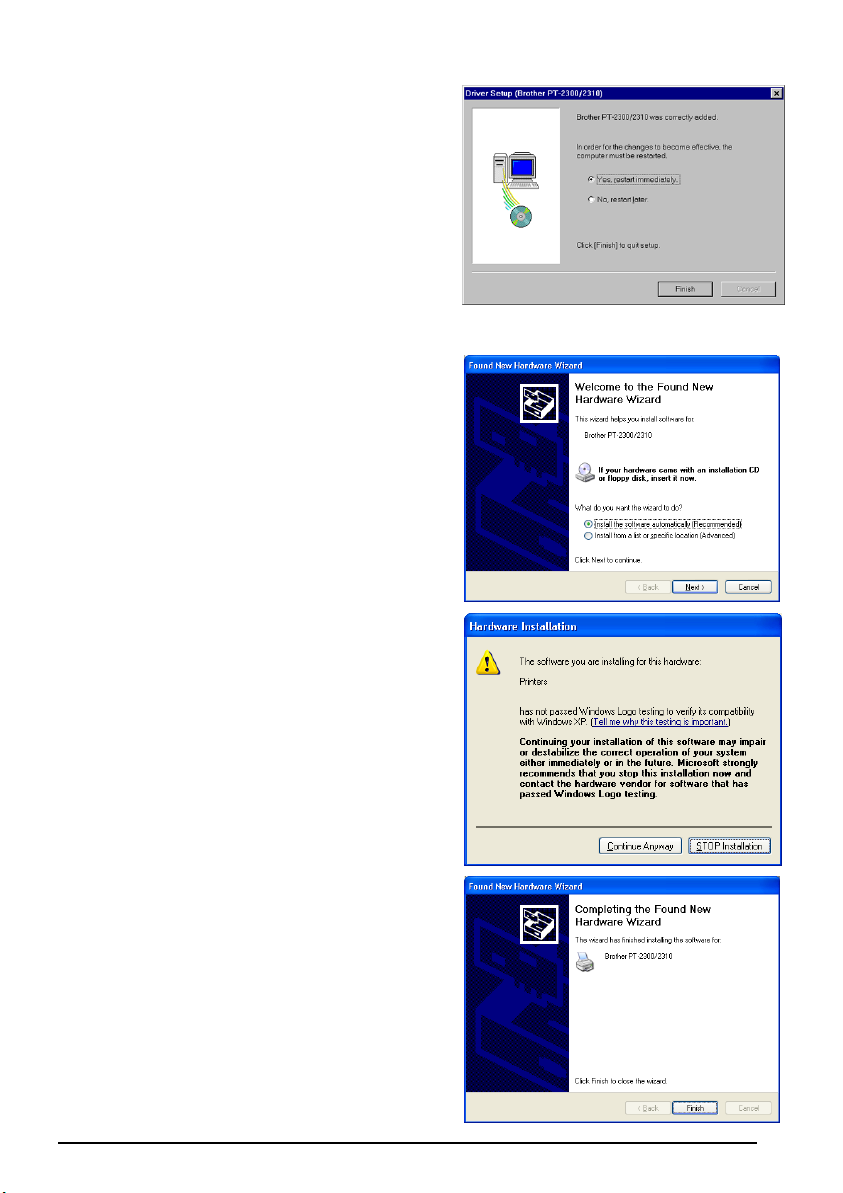
With Windows® XP:
1 In the dialog box that appears, informing you
that the PT-2300/2310 printer driver will be
installed, click the Next button.
2 After the dialog box appears, instructing you
to connect the P-touch 2300/2310 and turn
it on, connect the P-touch 2300/2310 to the
computer using the enclosed USB interface
cable as described on page 6, and then turn
on the P-touch 2300/2310.
3 In the first Found New Hardware Wizard dia-
log box that appears, select “Install the software automatically (Recommended)”, and
then click the Next button.
4 If a dialog box warning appears indicating
that the software has not passed Windows
Logo testing, simply continue with the installation.
12
Page 17
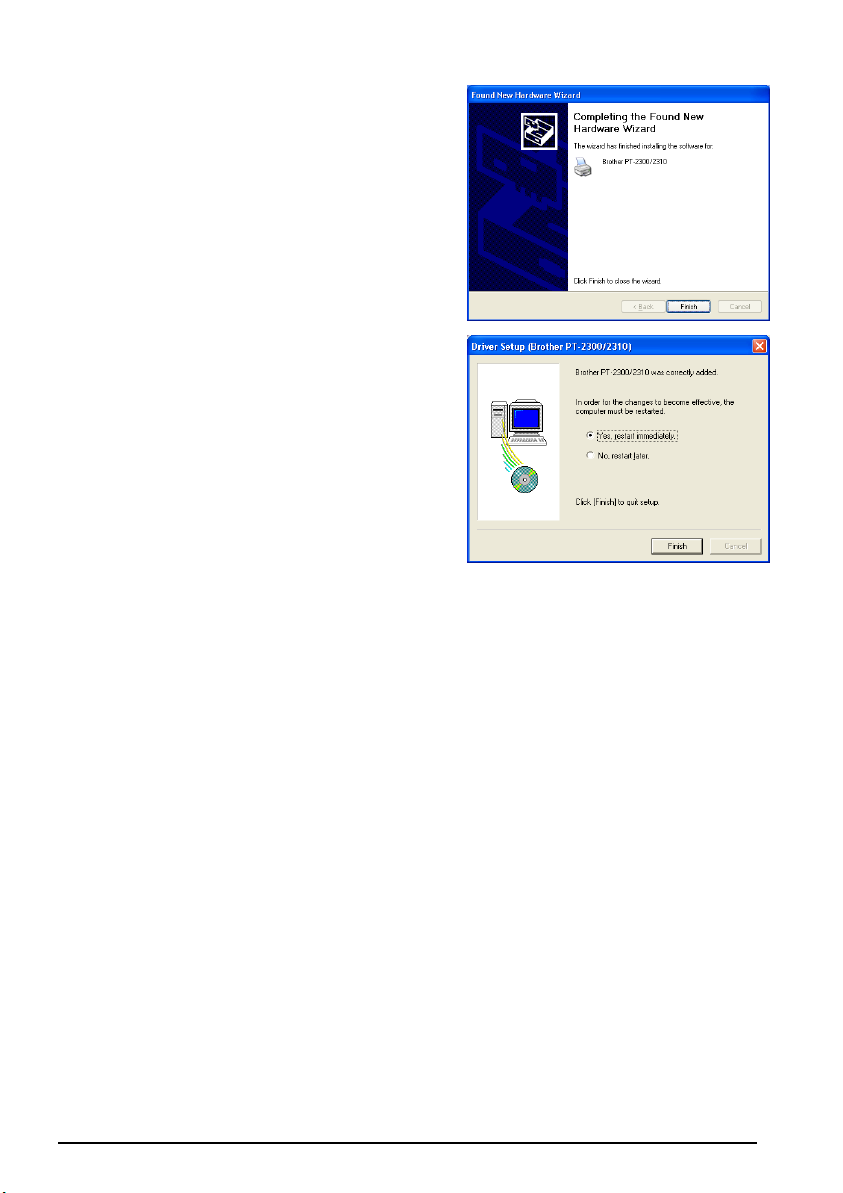
5 In the Found New Hardware Wizard dialog
box that appears, indicating that installation
of the PT-2300/2310 and the Found New
Hardware Wizard are finished, click the Finish button.
6 In the dialog box that appears, indicating that
installation is finished, select “Yes, restart
immediately.”, and then click the Finish button. After the computer is restarted, the
installation is fully completed.
7 Remove the CD-ROM from the computer.
Reading the User’s Guide
The P-touch Editor User’s Guide can be viewed either by inserting the CD-ROM into the drive
each time you wish to refer to it or by installing it onto your hard disk so that it is quickly available at any time. Since the User’s Guide is an HTML document, a browser is needed to read it.
• From the CD-ROM:
1 Start up Windows Explorer. 2 Select the CD-ROM drive. 3 Double-click “Main.htm” in the Manual folder within the P-touch folder on the CD-
ROM.
• From the P-touch Editor 3.1 group window:
● Double-click The User’s Guide P-touch Editor Ver 3.1 icon.
• With the Start button:
1 Click the Start button in the taskbar to display the Start menu. 2 Select “Programs”. 3 Select “P-touch Editor 3.1”. 4 Click “The User’s Guide P-touch Editor Ver 3.1”.
13
Page 18
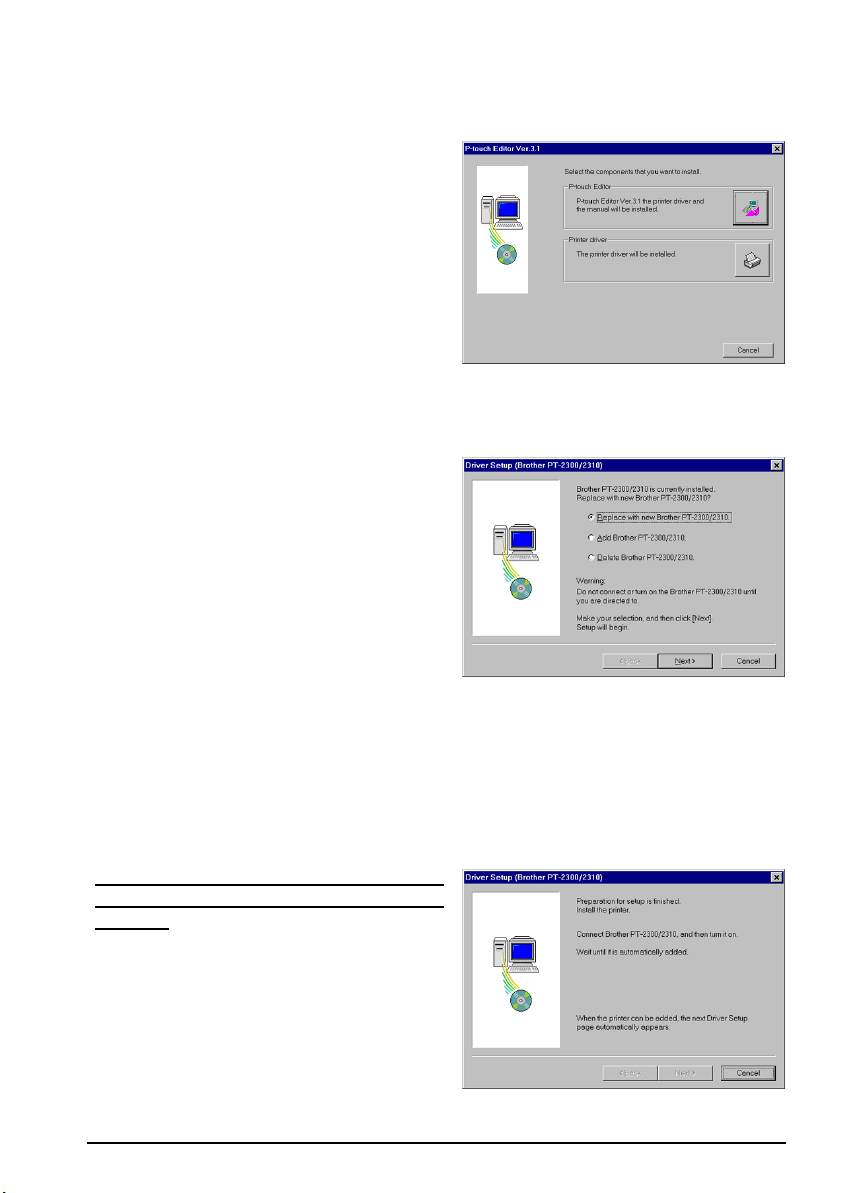
To Replace, Add or Delete the Printer Driver:
1 Turn off the PT-2300/2310, and then disconnect it from the computer. 2 Insert the P-touch Editor Version 3.1 CD-ROM
into the computer’s CD-ROM drive. A dialog
box automatically appears, allowing you to
select what to install.
☞
If the dialog box does not automatically
appear, double-click “My Computer” on
the desktop, and then double-click the
CD-ROM drive containing the CD-ROM.
(For Windows® XP, click “My Computer”
in the Start menu, and then double-click
the CD-ROM drive containing the CDROM.)
Next, double-click “Setup.exe” to
display the dialog box.
3 Click the bottom button (Printer driver). A
Driver Setup dialog box appears, allowing
you to select whether to replace, add or
delete the PT-2300/2310 printer driver.
4 Select the desired operation, and then click
the Next button.
☞ If “Replace with new Brother PT-2300/
2310” is selected, the previously
installed printer driver is deleted, and
replaced with a new one. Select this
option when upgrading the printer
driver, or when running Windows
2000/XP and changing to a PT-2300/
2310 with a different serial number.
If “Add Brother PT-2300/2310” is selected, a new printer driver is added. With a
USB connection on Windows
new printer. Select this option when connecting and using multiple PT-2300/2310s
with the same computer.
5 If “Replace with new Brother PT-2300/
2310” or “Add Brother PT-2300/2310” was
selected:
With Windows® 98/98SE/ME/2000:
A dialog box appears, instructing you to connect the PT-2300/2310 to the computer.
®
98/Me, only a port is added without adding it as a
14
Page 19
Connect the PT-2300/2310 to the computer
using a USB interface cable as described on
page 6, and then turn on the PT-2300/2310.
A dialog box appears, showing that the
printer driver has been installed.
Select “Yes, restart immediately.”, and then
click the Finish button to restart the computer.
With Windows
®
XP:
In the first Found New Hardware Wizard dialog
box that appears, select “Install the software automatically (Recommended)”, and then click the
Next button.
If a dialog box warning appears indicating that
the software has not passed Windows Logo testing, simply continue with the installation.
In the Found New Hardware Wizard dialog box
that appears, indicating that installation of the
PT-2300/2310 and the Found New Hardware
Wizard are finished, click the Finish button.
15
Page 20
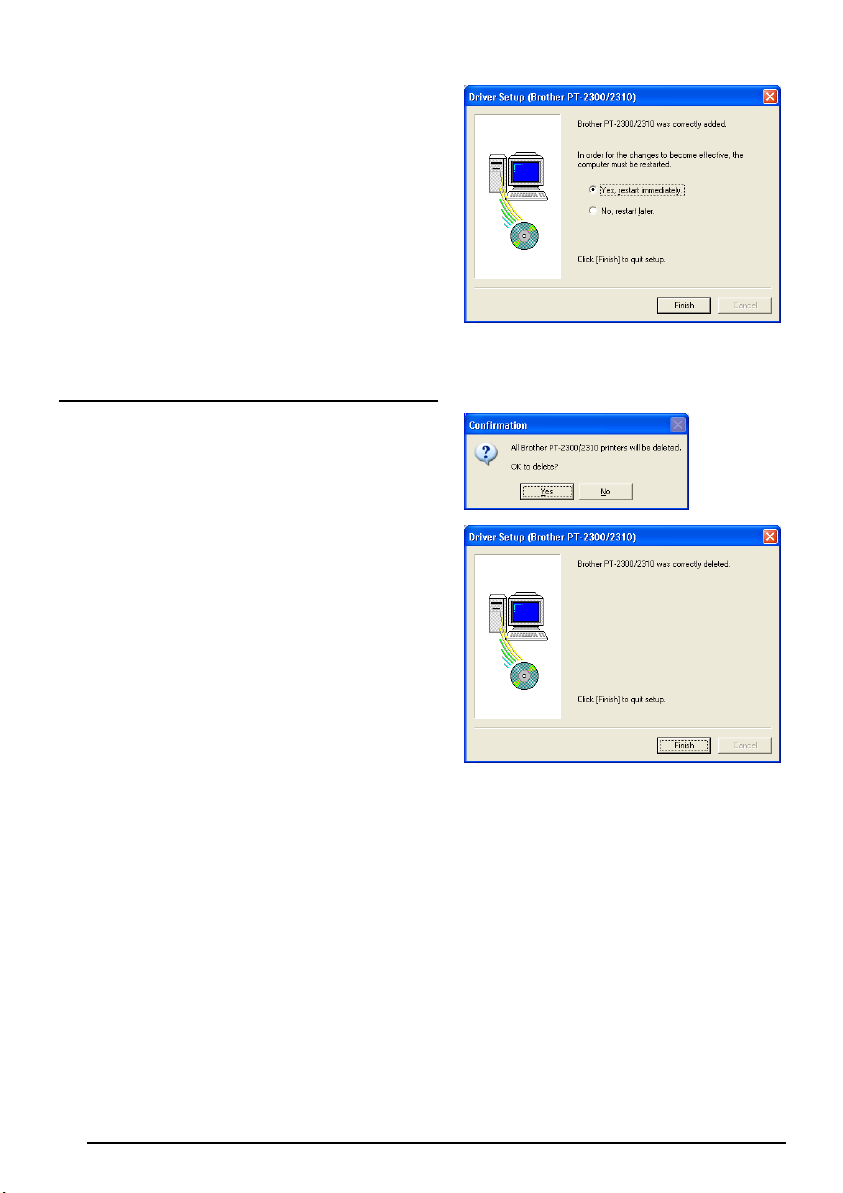
In the dialog box that appears, indicating that
installation is finished, select “Yes, restart immediately.”, and then click the Finish button. The
computer is restarted.
Remove the CD-ROM from the computer.
If “Delete Brother PT-2300/2310” was selected:
A dialog box appears, asking for confirmation to
delete all PT-2300/2310 printer drivers.
Click the Yes button. A dialog box appears, showing that the printer drivers have been deleted.
☞ Click the Finish button. If a dialog box
appears, explaining that the computer
should be restarted, select the option for
restarting the computer, and then click the
Finish button.
16
Page 21
On a Macintosh Computer
The Mac version of the software is for a Mac with an English operating system. If the software is
installed on a Mac with an operating system in a different language, the software may not run properly.
To Install the P-touch Editor Software:
1 Check that your system configuration meets the following requirements.
Computer: Macintosh, Power Macintosh or iMac
Operating system: Mac OS 8.6 or later
*This software is only compatible with Mac OS X classic.
Hard disk free space: At least 20 MB
☞ A few hundred megabytes of additional free space may be needed when printing
long labels or large amounts of data.
Available memory free space: Minimum 24 MB
USB port
CD-ROM drive
*The application is supplied on a CD-ROM; therefore, the computer should be equipped
with a CD-ROM drive.
2 Connect the PT-2300/2310 to the Macintosh using a USB interface cable. Be sure to leave
the PT-2300/2310 turned off.
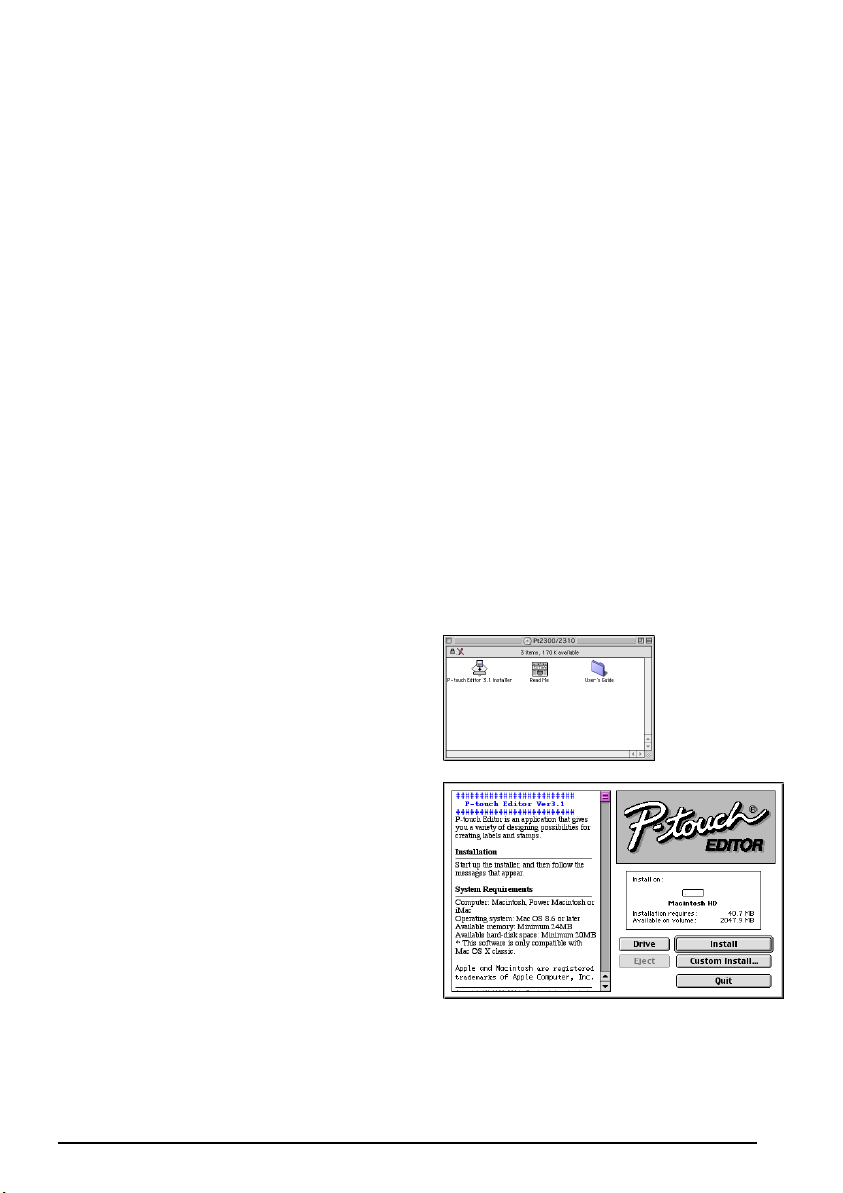
3 Turn on the Macintosh. 4 Insert the P-touch Editor Version 3.1 CD-ROM into the computer’s CD-ROM drive. 5 Double-click the P-touch Editor 3.1
Installer icon in the folder that appears.
6 After the installer starts up, select the
installation method.
• For a Basic Installation
Clicking the Install button immediately
starts installing the most basic options.
(Some clip art illustrations are not
installed.)
About 20 MB of available hard-disk
space is needed to begin installation. In
order to install all options, about 120
MB of available hard-disk space is
needed. If enough hard-disk space is
available, click the Install button.
17
Page 22
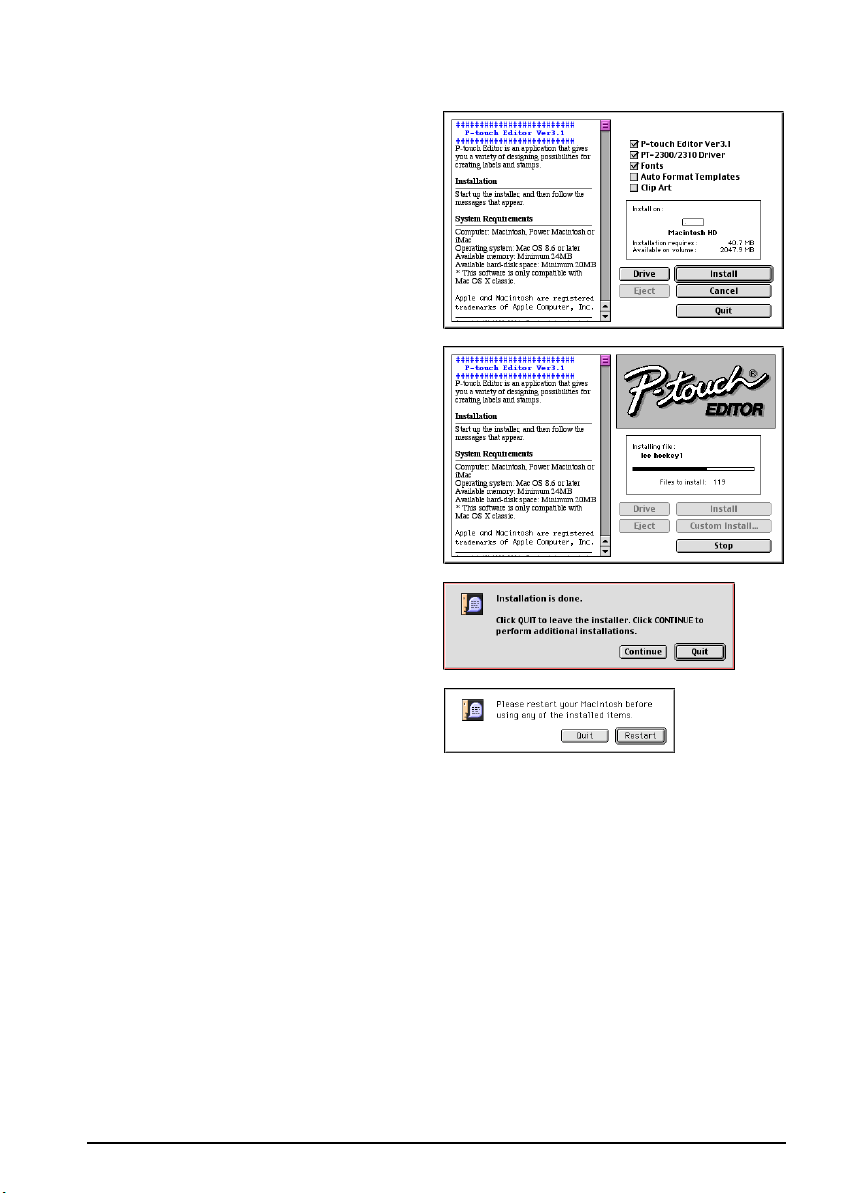
• For a Custom Installation
Clicking the Custom Install button displays a dialog box that allows you to
select which options to install.
Only the options with a check mark
beside them are installed. Select the
options that you wish to install, and
then click the Install button.
☞ In order to print from the PT-2300/
2310, “PT-2300/2310 Driver” must
be selected for installation.
7 When the installation is finished and the
following dialog box appears, click the
Quit button.
8 When the dialog box appears, asking if
you wish to restart the computer, click the
Restart button to restart the computer.
18
Page 23
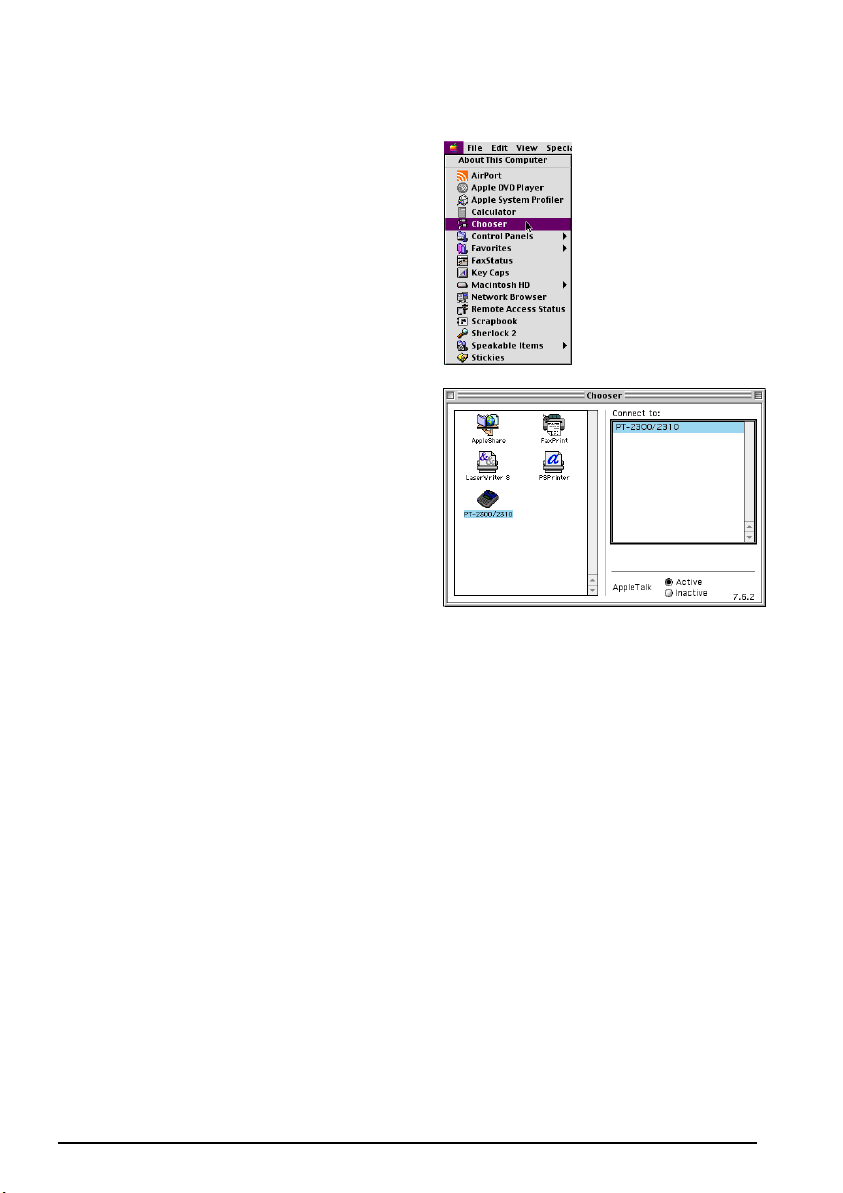
To Select the PT-2300/2310 as the Printer:
1 Turn on the PT-2300/2310. 2 Pull down the Apple menu and select
“Chooser” to display the Chooser window.
3 In the list on the left, click the PT-2300/
2310 icon. Then, select the appropriate
printer from the list on the right.
4 Close the Chooser window to confirm
your settings.
Reading the User’s Guide
The P-touch Editor User’s Guide can be viewed either by inserting the CD-ROM into the drive
each time you wish to refer to it or by installing it onto your hard disk so that it is quickly available at any time. Since the User’s Guide is an HTML document, a browser is needed to read it.
• From the CD-ROM:
● Double-click “Main.htm” in the User’s Guide folder within the P-touch Editor Ver 3.1
folder on the CD-ROM.
• With the Start button:
● Double-click “Main.htm” in the User’s Guide folder within the P-touch Editor Ver 3.1
folder installed on the hard disk.
To Delete P-touch Editor Version 3.1 and the Printer Driver:
☞ When deleting the printer driver, be sure that the P-touch is turned off and unplugged.
1 Drag the P-touch Editor Ver 3.1 folder to the Trash icon. 2 In the System Folder, open the Extensions folder. 3 Drag the PT-2300/2310 icon and the USB PT-2300/2310 Extension icon to the Trash icon. 4 In the System Folder, open the Preferences folder. 5 Drag the PT-2300/2310 Prefs icon to the Trash icon.
19
Page 24
STARTING P-TOUCH EDITOR
The P-touch Editor application makes it easy for anyone to design and print labels for almost
any need imaginable.
On an IBM PC-Compatible Computer
To Start Up P-touch Editor:
• By clicking the P-touch Editor icon:
• Double-click the “P-touch Editor 3.1” icon in the “P-touch Editor 3.1” group window.
• With the Start button:
1 Click the Start button in the taskbar to display the Start menu. 2 Select “Programs”. 3 Select “P-touch Editor 3.1”. 4 Click “P-touch Editor 3.1”.
• With Windows Explorer:
1 Start up Windows Explorer. 2 Select the drive and directory where P-touch Editor is installed. 3 Double-click “Ptedit3.exe”.
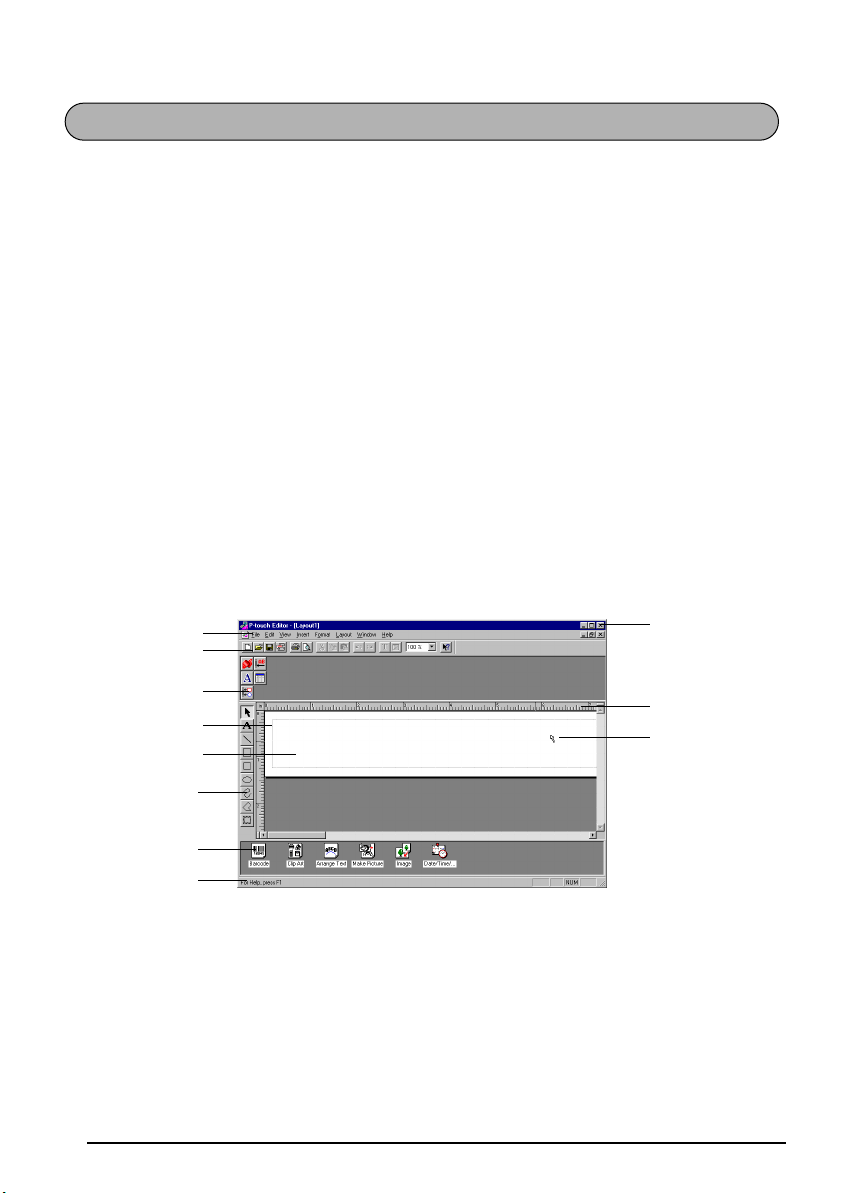
After P-touch Editor is started, the following window is displayed.
Menu bar
Standard toolbar
Title bar
Property dock
Layout area
Print area
Draw toolbar
Object dock
Status bar
20
Rulers
Cursor
Page 25
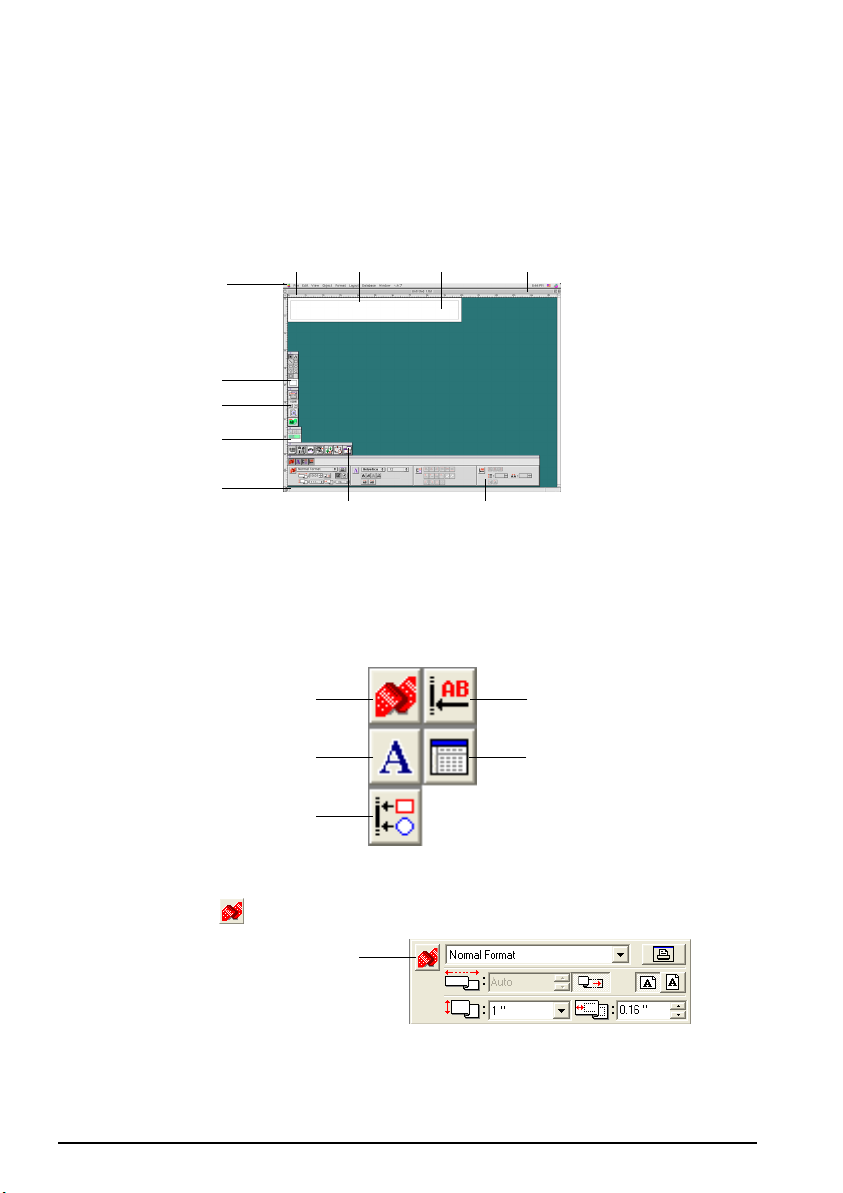
On a Macintosh Computer
To Start Up P-touch Editor:
● Double-click the “P-touch Editor Ver 3.1” icon in the “P-touch Editor Ver 3.1” folder
installed on the computer.
After P-touch Editor is started, the following window is displayed.
Layout
area
Menu bar
Draw toolbar
Print toolbar
Database toolbar
Status bar
Displaying the Properties
Although the screens shown in the following explanations are for Windows® 95/98/98SE/Me,
the operations for Windows
mentioned.
The desired Properties can be displayed by clicking the icon in the property dock.
®
NT4.0/2000/XP and Macintosh are the same unless specifically
Print
area
Property dockObject dock
Title barRulers
Page Properties icon
Font Properties icon
Layout Properties icon
Click an icon to display its Properties.
• Page Properties ( )
Click this button to
hide the Properties.
Text Properties icon
Database Properties icon (not
available on the Macintosh
version of the software)
When using the P-touch 2300/2310
21
Page 26
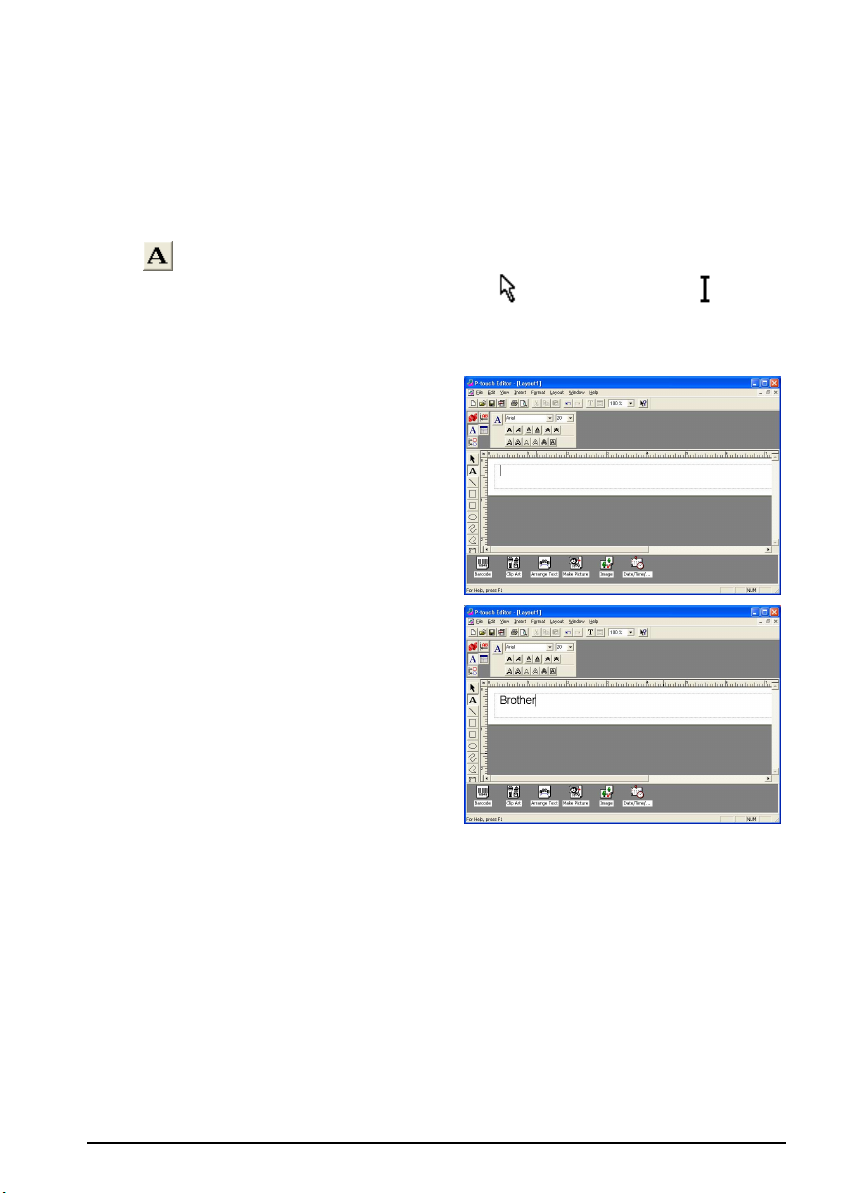
Creating a New Layout
Although the screens shown in the following explanations are for Windows® 95/98/98SE/Me,
the operations for Windows
mentioned.
• Entering text
1 Click (Text button) on the draw toolbar.
Text can be typed in, and the pointer changes from (selection pointer) to (I-beam
pointer).
2 Move the I-beam pointer to the position in the layout area where you wish to type in text,
and then click the left mouse button.
3 The cursor flashes in the layout area to indi-
cate that you can now type in text.
4 Use the computer keyboard to type in the
text.
®
NT4.0/2000/XP and Macintosh are the same unless specifically
5 To create a new line of text, press the keyboard’s Enter key.
☞ With P-touch Editor version 3.1, text is always typed in using the insert mode. The
overwrite mode cannot be used to type in text.
☞ To change the font and text size, click the appropriate icon in the property dock,
and then select the desired settings from the Properties that appear.
☞ For details, refer to “Reading the User’s Guide” on page 13 for Windows and on
page 19 for Macintosh computers.
22
Page 27

Notes on Usage
Barcodes
Keep the following points in mind when using P-touch Editor Version 3.1 to print barcodes.
• Barcodes should be printed on white tape. If other colors of tape are used, the barcode
reader may not be able to read the barcode correctly.
• Be sure to test the barcode reader to make sure that it can read printed barcodes in the
environment where you plan to use them.
• The QR Code protocol can only be used with English. If data in any other language is
entered, the barcode may not be read correctly.
Databases
Keep the following points in mind when using the database functions of P-touch Editor Version 3.1.
☞ For general details, refer to the User’s Guide supplied on the P-touch Editor Version 3.1
CD-ROM.
• The database function of P-touch Editor Version 3.1 (Windows version) uses database files
that are compatible with Microsoft Access 97. By upgrading P-touch Editor Version 3.1
using a program available on the CD-ROM, P-touch Editor will become compatible with
Access 2000. Refer to the Readme file located at English\Ptouch\Editor\Ac2k on the CDROM (the folder name for French is “Francais”), and start up the program.
• P-touch Editor Version 3.1 can import files other than mdb files, such as csv files. Files
saved as csv files with an application such as Microsoft Excel can be used with P-touch
Editor. Refer to the User’s Guide supplied on the P-touch Editor Version 3.1 CD-ROM for
more details.
• Using a function available with Microsoft Access 97, Excel files can be linked to mdb files.
With this function, data changed in Excel is automatically updated with the P-touch Editor.
23
Page 28
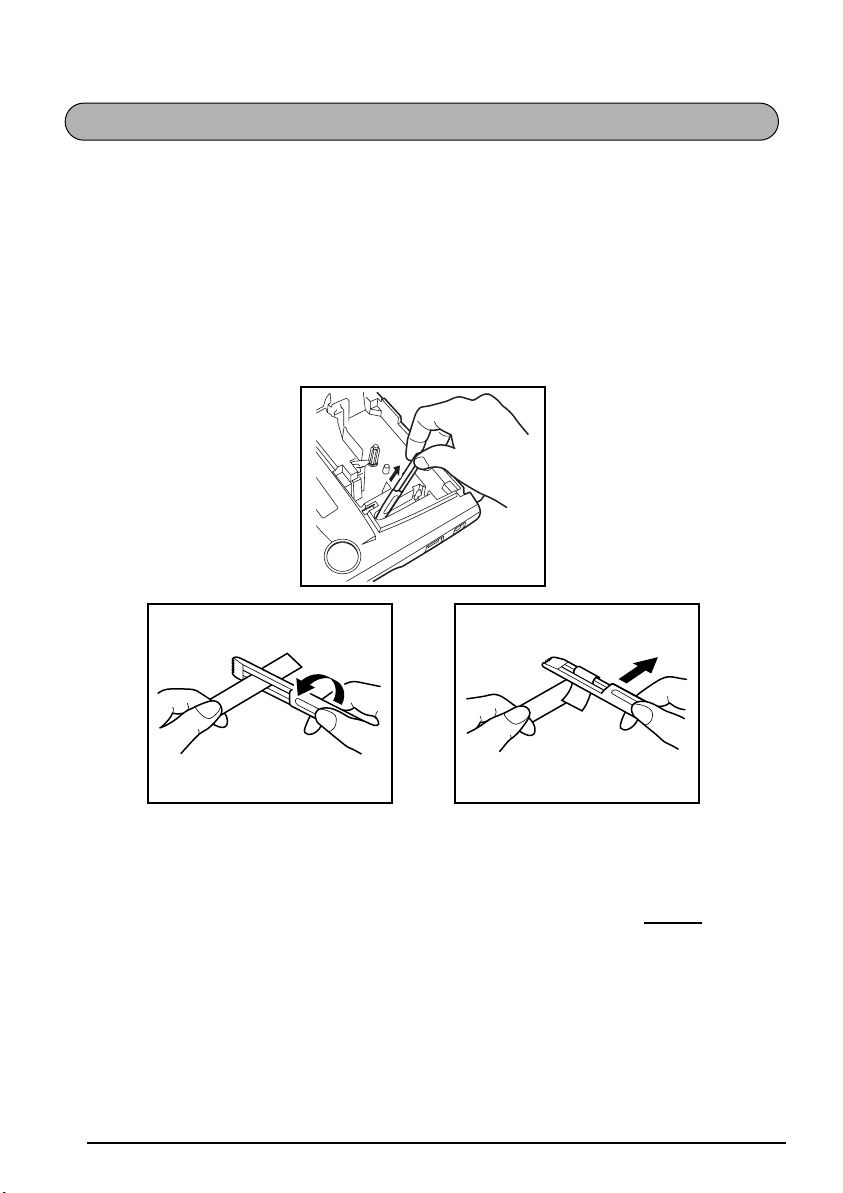
ATTACHING LABELS
ABCDEF
LAMINATED TAPE
The enclosed stick enables you to easily remove the backing from labels printed on laminated tapes.
1 Hold the tape in your left hand, with the printed surface facing up, and hold the stick in
your right hand.
2 Pass the tape halfway through the long narrow hole in the stick. 3 Turn the stick three-quarters of a turn towards you and pull the stick away from you as
shown below.
4 Peel off the label backing.
GH
ABCDEF
FABRIC TAPE
Fabric tape is used to attach a piece of fabric printed with your text onto garments using an
iron. After printing the text onto fabric tape and cutting off the label using scissors
, place the
label on an ironed garment at the location where you wish to attach it in such a way that the
printed text can be read correctly. Cover the label with another piece of cloth and use an iron
set to a medium-high temperature (320 to 356 ˚F (160 to 180 ˚C)) to press down firmly for 10
to 15 seconds. For more details, refer to the instructions included with the fabric tape cassette.
STAMP TAPE
Refer to pages 41 through 43 for a detailed explanation on using the stamp tape to make stamps.
24
Page 29
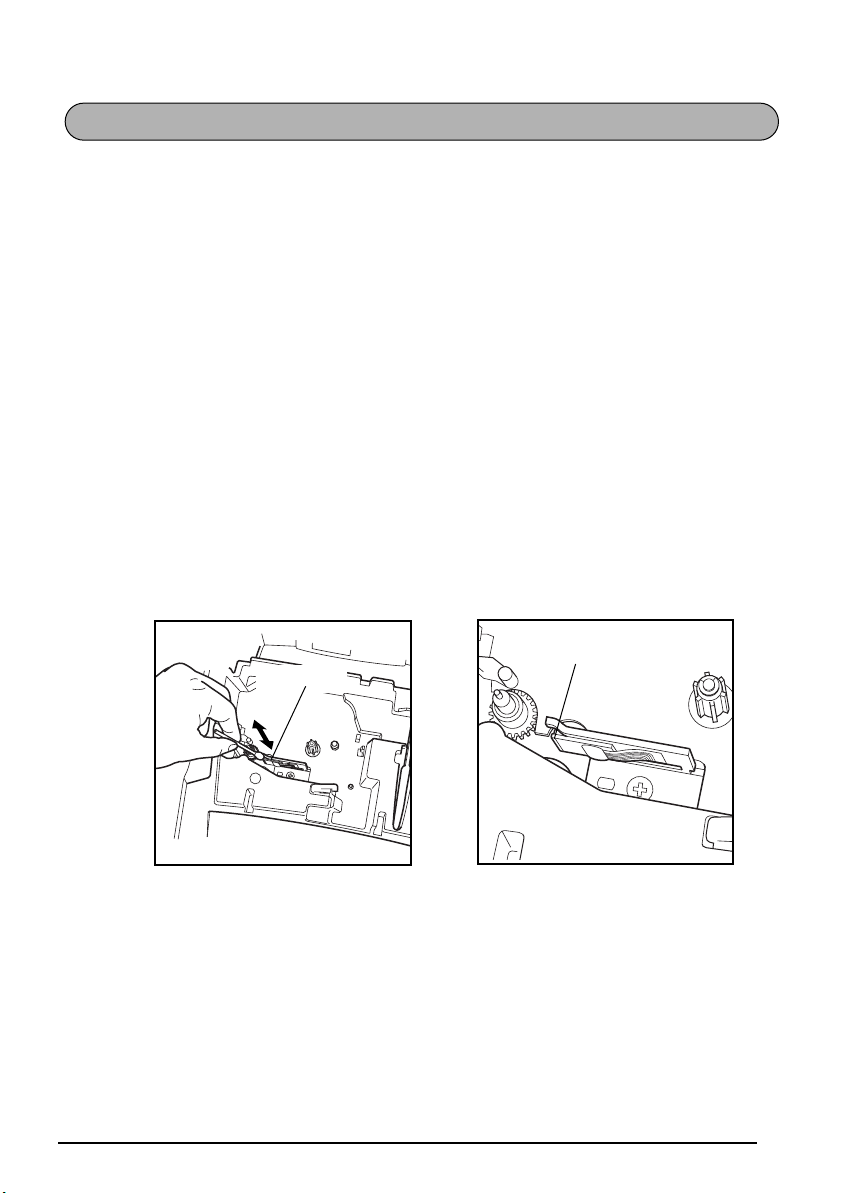
PRINT HEAD & ROLLERS
Occasionally, specks of dust or dirt become attached to the machine’s print head and rollers.
This is particularly likely when you are using the unit outdoors or in a very dusty environment.
If a section of the print head is covered with dust, a blank horizontal streak may appear
through the label text. Therefore, as with a tape recorder, the machine’s head may need to be
cleaned from time to time.
To clean the print head and rollers:
1 Turn off the machine. 2 Open the tape compartment cover, then remove the tape cassette if one is installed. The
print head and rollers are located in the tape compartment.
3 Print head: Use a dry cotton swab to gently wipe the print head with an up-and-down
motion.
Rollers: Use a dry cotton swab to wipe each roller with an up-and-down motion while
rotating them with your finger.
4 Install a tape cassette, close the tape compartment cover, and then try printing again. 5 If a blank streak still appears in the label, repeat steps 3 and 4 using a cotton swab
dipped in isopropyl (rubbing) alcohol.
If none of the above works, contact your service representative.
Print head
Print head
☞ The print head can be cleaned more easily if the optional print head cleaning cassette
(TZ-CL4) is used.
25
Page 30

For Your Information
POWER KEY
The power key ( o ) is located in the lower-right corner of the keyboard. If batteries have
been installed or the machine has been plugged in using the optional AC adaptor, the previous session’s information is displayed when the machine is turned on. This feature allows you
to stop work on a label, turn off the machine, and return to it later without having to re-enter
the text.
The machine will automatically turn off if no key is pressed within 5 minutes (30 minutes if the
machine is connected to a computer). The machine’s internal memory stores the current session’s information and displays it when you turn on the machine again.
To turn on the machine:
● Press o. The previous session’s information appears in the LCD display.
To turn off the machine:
● Press o. The current session’s information is stored in the internal memory.
CURSOR KEYS
The machine’s LCD display shows two rows of 9 characters; however, the text that you create
can be up to 99 characters long. You can review and edit your text by using the cursor keys to
move the cursor so that different parts are shown in the display.
LEFT CURSOR KEY
To move the cursor one character to the left:
● Press f once.
To move the cursor several characters to the left:
● Hold down f until the cursor moves to the desired position.
To move the cursor to the beginning of the current line:
● Hold down c and press f.
26
Page 31

RIGHT CURSOR KEY
To move the cursor one character to the right:
● Press w once.
To move the cursor several characters to the right:
● Hold down w until the cursor moves to the desired position.
To move the cursor to the end of the current line:
● Hold down c and press w.
UP CURSOR KEY
To move the cursor up to the previous line:
● Press h once.
☞ If the cursor is in the first line of text, it will move to the beginning of the line.
To move the cursor up several lines:
● Hold down h until the cursor moves to the desired position.
To move the cursor to the beginning of the entire text:
● Hold down c and press h.
DOWN CURSOR KEY
To move the cursor down to the following line:
● Press e once.
☞ If the cursor is in the last line of text, it will move to the end of the line.
To move the cursor down several lines:
● Hold down e until the cursor moves to the desired position.
To move the cursor to the end of the entire text:
● Hold down c and press e.
CODE, ALT & SHIFT KEYS
Most characters can be entered simply by pressing their keys. However, to use special functions or to enter capital letters, accented characters and some symbols, the following special
keys are necessary.
CODE KEY
To use a function printed above a key:
● Hold down c and press the key immediately below the desired function.
27
Page 32

EXAMPLE
To start the Symbol function:
Alt
Caps
1:
DANGER_
● Hold down c and press a once.
Alt
Caps
ÆæÃã
Ü
ALT KEY
To type in characters printed in color on the right-hand side of the keys:
● Hold down a and press the key of the desired character written in color. The Alt indi-
cator on the left side of the display comes on while a is held down.
EXAMPLE
To type in “–”:
● Hold down a and press / once. The Alt indicator comes on while a is held
down.
Alt
Caps
1:
012_
Alt
Caps
1:
012–_
28
Page 33

SHIFT KEY
To type in a capital letter or a symbol printed in the top left-hand corner of a key:
● Hold down s and press the key of the desired letter or symbol.
EXAMPLE
To type in “%”:
Alt
Caps
1:
5 _
● Hold down s and press 5.
Alt
Caps
1:
5%_
The Caps mode is similar to holding down s. It allows you to type capital letters continu-
ously.
To type in many capital letters:
1 Hold down c and press s. The Caps indicator on the left side of the display
comes on.
Alt
Caps
1:
_
2 Press the keys of the desired letters or symbols.
3 To exit Caps mode, hold down c and press s. The Caps indicator goes off.
29
Page 34

SPACE KEY
The Space key ( _ ) lets you add blank spaces between characters in your text. It is different from the right cursor key ( w ), which just moves the cursor without adding blank
spaces.
To add a space:
● Press _.
EXAMPLE
To add a space:
Alt
Caps
1:
J._
● Press _.
Alt
Caps
1:
J. _
RETURN KEY
Like on a typewriter or word processor, this machine’s return key ( r ) is used to end a line
of text and start another one. When you have finished entering one line, press the return key to
make a new line and move the cursor to it.
☞ The text can only contain a maximum of six lines. If you press r when six text lines
already exist, the error message “6 LINE LIMIT!” will appear.
30
Page 35

Tape widths Maximum number of lines that can be printed
1/4" (6 mm) 2
3/8" (9 mm) 2
1/2" (12 mm) 3
3/4" (18 mm) 6
1" (24 mm) 6
Stamp 3/4" (18 mm) 3
Stamp 1" (24 mm) 5
The return key can also be used to select an item from a list (e.g., add a symbol or accented
character to the text) or to apply a selected setting.
Some questions asking you to confirm a command may appear on the LCD display, especially
when the function that you have chosen will delete or affect files. In these cases, pressing
r is like answering “yes”.
☞ To answer “no”, press *. Refer to DELETE KEY on page 33.
To add a new line:
● Press r. The return mark ( ) appears to indicate the end of the line.
To select an item from a list:
● Press r.
To answer “yes”:
● Press r.
TAB FUNCTION
This function allows you to separate sections of a line of text by adding tabs. This enables you
to create perfectly aligned columns without having to type in several spaces. All tabs have the
same length and are measured from either the beginning of the line or the previous tab if there
is more than one. The tab length can be set between 0.0” and 11.8” (0.0 and 30.0 cm).
☞ The text can contain no more than 50 tabs. If the maximum number of tabs has already
been added to the text when c is held down and Q is pressed, the error message
“TAB LIMIT!” appears.
31
Page 36

To set the tab length:
1 Hold down c and press W once. The current tab length is displayed. 2 Press h or e until the desired length is displayed or use the number keys to type in
the length.
☞ To change the units (inches or centimeters) used to display the tab lengths, press
M until the desired units are displayed.
3 Press r.
To add a tab:
● Hold down c and press Q once. The tab mark ( ) appears in the text to indi-
cate the position of the tab.
☞ If the text in front of a tab extends past the point where the next section of text
should start, the text will instead start at the following tab position.
For example, if the tab length is set to 1.2” (3.0 cm) and the following text is typed
in:
1:
ABC DEF GHI
2:
JKLMNOPQRST U
The label shown below will be printed
Margin Tab (1.2” (3.0 cm)) Tab (1.2” (3.0 cm)) Margin
EXAMPLE
To set the tab length to 1”:
Hold down c and press W once.
1
32
Alt
TAB LENGTH
Caps
1.2inch
Page 37

Press e until 1.0 is displayed.
2
Alt
TAB LENGTH
Caps
1.Oinch
3 Press r.
To add a tab:
● Hold down c and press Q once.
Alt
Caps
1:
art NO. _
DELETE KEY
The delete key ( * ) allows you to remove characters to the left of the cursor’s current position. It differs from the left cursor key ( f ), which only moves the cursor without deleting
any characters.
The delete key can also be used to quit most functions and return to the previous display without changing the text.
Some questions asking you to confirm a command may appear on the LCD display, especially
when the function that you have chosen will delete or affect files. In these cases, pressing *
is like answering “no”.
☞ To answer “yes”, press r. Refer to RETURN KEY on page 30.
To delete one character:
1 Press f, w, h or e to position the cursor below the character immediately to
the right of the character that you wish to delete.
2 Press * once.
33
Page 38

To delete a sequence of characters:
1 Press f, w, h or e to position the cursor below the character immediately to
the right of the last character that you wish to delete.
2 Hold down * until all of the characters that you wish to delete are deleted.
To quit a function without changing your text:
● Press * to return to your text.
To answer “no”:
● Press *.
LINE OUT FUNCTION
With the Line Out function, you can easily remove an entire line of text.
To delete a line of text:
1 Press f, w, h or e to position the cursor within the line of text that you wish
to delete.
2 Hold down c and press 0 once.
☞ Each time 0 is pressed while c is held down, one line of text is deleted.
EXAMPLE
To delete “012-345-6789”:
● Hold down c and press 0 once.
34
Alt
1:
Garden
Caps
2:
345–6789_
Alt
1:
K’s Garde
Caps
2:
_
Page 39

CLEAR FUNCTION
When clearing the display before entering new text, the Clear function can be used to choose
whether all of the text is erased and all format functions (Font, Size, Width, Style, Underline,
Frame, Tape margin, Alignment, Tab length, Mirror printing, and Length) are returned to their
default settings, or whether just the text is erased.
To delete all of the text and return all formats to their default settings:
1 Hold down c and press *. 2 Press h or e until TXT&FORMAT is selected (flashing).
☞ To return to the text without erasing anything, press *.
3 Press r.
EXAMPLE
To clear the text and formats:
Alt
1:
Garden
Caps
2:
345–6789_
Hold down c and press *.
1
Alt
TXT&FORMAT
Caps
TEXT ONLY
2 Press h until TXT&FORMAT is flashing.
3 Press r.
Alt
TXT&FORMAT
Caps
TEXT ONLY
Alt
Caps
1:
_
35
Page 40

To delete just the text:
1 Hold down c and press *. 2 Press h or e until TEXT ONLY is selected (flashing).
☞ To return to the text without erasing anything, press *.
3 Press r.
EXAMPLE
To clear just the text:
Alt
1:
Caps
2:
Hold down c and press *.
1
Alt
TXT&FORMAT
Caps
TEXT ONLY
Garden
345–6789_
2 Press e until TEXT ONLY is flashing.
3 Press r.
36
Alt
TXT&FORMAT
Caps
TEXT ONLY
Alt
Caps
1:
_
Page 41

ACCENT FUNCTION
The Accent function can also be used to add accented characters to your text. Many of these
characters can also be typed in using the Symbol function.
The accented characters are grouped according to the capital or small letter that they are combined with. The following accented characters are available:
Letters Accented characters Letters Accented characters
a à á ä â ã æ I Í Ï Î
A À Á Ä Â Ã Æ n ñ
c ç N Ñ
C Ç o ó ö ô õ
e è é ë ê e˜ O Ó Ö Ô Õ
E È É Ë Ê Eu ù ú ü û
i í ï î U Ù Ú Ü Û
To type in an accented character:
1 Hold down c and press A. The message “ACCENT a – u / A – U?” appears on the
display.
2 Press the key of the letter in the desired accented character.
☞ To type a capital letter, hold down s (or hold down c and press s to turn
on Caps mode) before pressing the letter key.
˜
3 Press f or w until the desired accented character appears enlarged within the frame
in the middle of the display.
4 Press r. The accented character is added to the text.
☞ To type in a series of accented characters, hold down c before pressing r.
Then, continue adding accented characters by selecting them as explained in steps
2
and
3
, and holding down c while pressing r. Press just r after
selecting the last character in the series.
37
Page 42

EXAMPLE
To add the accented character “É”:
1
Hold down c and press A.
Alt
ACCENT
Caps
a–u/A–U?
2 Hold down s and press E.
Alt
Caps
ÉËÊE
È
˜
3 Press w until É appears in the frame.
Alt
Caps
È ËÊE
É
˜
4 Press r.
Alt
Caps
1:
RESUMÉ_
SYMBOL FUNCTION
In addition to the letters, symbols and numerals on the key tops, there are 53 additional marks
available with the Symbol function.
The following symbols are available:
38
Page 43

R
Group Symbol
☞
˜
E
23
☞
234
C
1 ÜÆæà ã e˜Õõ °
2+×÷= §
3
TM
[]
4
5
♥ ★
To type in a symbol:
1 Hold down c and press a. A row of symbols appear in the display. 2 Press h or e to display different rows of symbols and press f or w until the
desired symbol appears enlarged within the frame in the middle of the display.
3 Press r. The symbol is added to the text.
☞ To type in a series of symbols, hold down c before pressing r. Then, con-
2
tinue adding symbols by selecting them as explained in steps
ing down c while pressing r. Press just r after selecting the last
symbol in the series.
EXAMPLE
To add the symbol “ ”:
1
Hold down c and press a.
2 Press h or e until the row containing
Alt
Caps
ÆæÃã
and 3, and hold-
Ü
“ ” appears, then press
“ ” appears in the frame.
f or w until
Alt
Caps
39
Page 44

3
Press r.
Alt
Caps
1:
DANGER _
AUTO FORMAT FUNCTION
With the Auto Format function, you can select from a variety of preset formats perfect for your
specific need. This function automatically adjusts the label length, tape margins and horizontal alignment without changing the text or any other formats, allowing you to create labels
faster and easier.
The following preset formats are available:
Auto Format setting
Label length
setting
Tape margin
setting
Horizontal
alignment setting
DEFAULT OFF FULL LEFT
3.5”FLOPPY 2.8” (7.0 cm) NONE CENTER
miniDV 1.7” (4.3 cm) NONE CENTER
VHS SPINE 5.5” (14.0 cm) NONE CENTER
VHS 3.0” (7.7 cm) NONE CENTER
VCR8mm CASE 3.6” (9.2 cm) NONE CENTER
VCR8mm 2.9” (7.3 cm) NONE CENTER
VHS-C SPINE 1.8” (4.5 cm) NONE CENTER
VHS-C 2.3” (5.8 cm) NONE CENTER
AUDIO CASSETTE 3.5” (8.9 cm) NONE CENTER
DAT CASSETTE 2.2” (5.6 cm) NONE CENTER
MINI DISK 2.0” (5.2 cm) NONE CENTER
ORGANIZER L 3.2” (8.2 cm) NONE CENTER
ORGANIZER S 2.6” (6.5 cm) NONE CENTER
FILE LONG 7.2” (18.3 cm) NONE CENTER
FILE SHORT 3.7” (9.4 cm) NONE CENTER
40
Page 45

To select a preset format:
1 Hold down c and press Y once. The currently selected setting appears in the dis-
play.
2 Press h or e to select the desired setting.
☞ To return to default settings, press _.
3 Press r to apply the selected setting.
☞ The Length indicator comes on if any setting other than DEFAULT is selected.
EXAMPLE
To select the AUDIO CASSETTE setting:
1
Hold down c and press Y.
Alt
DEFAULT
Caps
2 Press h or e until the AUDIO CASSETTE
setting is displayed.
Alt
AUDIO
Caps
CASSETTE
3 Press r.
STAMP FUNCTION
The Stamp function allows you to quickly and easily create your own stamp stencil films for
customized stamps. After inserting a stamp film cassette, select this function to automatically
center the text and adjust the tape length and margins to a perfect format for the pre-inked
stamp film holders. Since the stamp holder is reusable, just make a new stamp stencil film and
replace the one in the holder.
To make a stamp:
1 Type in the text, and then insert a medium (3/4” (18-mm)-wide) or a large (1” (24-mm)-
wide) stamp film cassette.
2 Hold down c and press U once. The message “STAMP FORMAT?” appears in the
display.
41
Page 46

3 Press r. The text is automatically formatted for the installed stamp: centered within
the preset message area with the tape length and margins automatically adjusted.
4 Press p to cut the text out of the stamp stencil film.
5 After the stamp stencil film is cut off, remove the backing paper from the stamp stencil
film and affix it to the ink pad of a stamp film holder.
☞ After setting the stamp format for a large (1” (24-mm)-wide) stamp cassette, be sure to
use the Clear function to return all format functions to their default settings
(TXT&FORMAT) before creating the next label.
EXAMPLE
To cut a stamp:
1
Enter the text and insert a stamp film cassette in the tape compartment.
2 Hold down c and press U.
Alt
STAMP
Caps
FORMAT?
3 Press r.
Alt
1:
J Smith
Caps
2:
1234 Main
_
4 Press p to engrave the stamp stencil film, and then automatically cut off.
Alt
COPIES
Caps
1/1
To affix a stamp:
5
Remove the stamp frame from around the stamp
film holder ink pad, one side at a time, then
remove the protective seal covering the ink pad
and the backing paper from the stamp stencil film.
6 With the glossy side of the stamp stencil film
upward, align one of its ends with the slit on the
side of the stamp film holder.
Tape end
42
Glossy side
Slit
Page 47

7 Hold the end of the stamp stencil film in place
with your thumb, then pass the tape through the
guides while pulling it tight.
Guides
8 Fold the other end of the stamp stencil film over
the other side of the stamp film holder and hold it
in place with your finger.
9 Fit the stamp frame over the stamp stencil film and
push it into place.
0 Insert the stamp film holder straight into its cap.
☞ Be sure that the stamp is correctly covered in order
to prevent ink spills.
Fold over
43
Page 48

FONT FUNCTION
With the Font function, you can choose one of four fonts for your text.
The following font settings are available:
The default font setting is FONT 1.
To change the font setting:
1 While holding down c, press 1 once, and keep c held down to display the
current font setting.
2 While still holding down c, continue pressing 1 until the desired font setting is
displayed.
3 Release c to apply the selected font setting to the entire text.
EXAMPLE
To select the FONT 2 font setting:
1
While holding down c, press 1 once, and keep c held down.
Alt
FONT
Caps
1
2 While still holding down c, continue pressing
1 until FONT 2 is displayed.
3 Release c.
44
Alt
FONT
Caps
2
A
Page 49

SIZE & WIDTH FUNCTIONS
The character size can be adjusted using both the Size and Width functions. Since the character size that can be used depends on the width of the tape, the following table shows the character sizes that can be used with each tape width.
Tape widths Sizes (in points)
1/4” (6 mm) 6, 9, 12
3/8” (9 mm) 6, 9, 12, 18
1/2” (12 mm) 6, 9, 12, 18, 24
3/4” (18 mm) 6, 9, 12, 18, 24, 36, 42
1” (24 mm) 6, 9, 12, 18, 24, 36, 42
The default size setting is AUTO and the default width setting is MEDIUM. The currently
selected size setting is always shown by the indicators above the display. In addition, when a
width setting other than MEDIUM is selected, the Width indicator comes on.
With the AUTO size setting, the machine compares your text with the width of the installed
tape and automatically adjusts the characters to the largest possible size. However, seven other
point sizes are also available, and each can be printed with any of the three width settings.
Size
setting
(in points)
6
Width setting
NARROW
Width setting
MEDIUM
Width setting WIDE
12
18
24
36
42
9
45
Page 50

To change the size setting:
1 While holding down c, press 2 once, and keep c held down to display the
current size setting.
2 While still holding down c, continue pressing 2 until the desired size setting is
displayed.
☞ The current size setting is shown by the size indicators at the top of the display.
3 Release c to apply the selected size setting to the entire text.
☞ With the AUTO setting selected and 3/4” (18-mm) or 1” (24-mm)-wide tape
installed, text consisting of just one line of only capital letters (and no accented
characters) will be printed with a character size of 52 points. If 1/2” (12-mm)-wide
tape is installed, the text will be printed with a character size of 29 points.
EXAMPLE
To select the 24 point size setting:
While holding down c, press 2 once,
1
and keep c held down.
Alt
SIZE
Caps
AUTO
2 While still holding down c, continue pressing
2 until 24 is displayed.
3 Release c.
46
Alt
SIZE
Caps
24
Page 51

To change the width setting:
1 While holding down c, press 3 once, and keep c held down to display the
current width setting.
2 While still holding down
c
, continue pressing 3 until the desired width setting is displayed.
☞ The Width indicator comes on when a setting other than MEDIUM is selected.
3 Release c to apply the selected width setting to the entire text.
EXAMPLE
To select the WIDE width setting:
1
While holding down c, press 3 once, and keep c held down.
Alt
WIDTH
Caps
MEDIUM
2 While still holding down c, continue pressing
3 until WIDE is displayed.
Alt
WIDTH
Caps
WIDE
3 Release c.
STYLE FUNCTION
You can choose from nine different character styles to apply to your text.
☞ Characters printed using the smaller sizes may be difficult to read if certain style settings
(e.g., I+SHAD) are selected.
The following style settings are available:
NORMAL, BOLD, OUTLINE, SHADOW, ITALIC, I+BOLD (italic & bold), I+OUTL (italic &
outline), I+SHAD (italic & shadow), VERT (vertical)
The default style setting is NORMAL. The style indicator at the bottom of the display shows the
current style setting when any setting other than NORMAL is selected.
Refer to Reference at the end of this section for samples of the available settings.
To change the style setting:
1 While holding down c, press 4 once, and keep c held down to display the
current style setting.
47
Page 52

2 While still holding down c, continue pressing 4 until the desired style setting is
displayed.
☞ The current style setting is shown by the style indicator at the bottom of the display.
3 Release c to apply the selected style setting to the entire text.
EXAMPLE
To select the I+SHAD style setting:
While holding down c, press 4 once,
1
and keep c held down.
2 While still holding down c, continue pressing
4 until I+SHAD is displayed.
3 Release c.
REFERENCE
REFERENCE
Font
setting
NORMAL BOLD OUTLINE SHADOW ITALIC
FONT 1
FONT 2
Style setting
Alt
STYLE
Caps
NORMAL
Alt
STYLE
Caps
I+SHAD
FONT 3
FONT 4
48
Page 53

Font
setting
FONT 1
FONT 2
FONT 3
FONT 4
I+BOLD I+OUTL I+SHAD
Style setting
VERT
UNDERLINE FUNCTION
You can emphasize your text by underlining it.
The default underline setting is OFF. When the Underline function is set to UNDL ON, the
Undl/Frm indicator on the right side of the display comes on.
UNDL
ON
To turn on or off the Underline function:
1 While holding down c, press 5 once, and keep c held down to display the
current underline setting.
2 While still holding down c, continue pressing 5 until the desired underline set-
ting is displayed.
☞ The Undl/Frm indicator comes on when the UNDL ON setting is selected.
3 Release c to apply the selected underline setting to the entire text.
49
Page 54

EXAMPLE
To select the UNDL ON underline setting:
While holding down c, press 5 once,
1
and keep c held down.
Alt
UNDL
Caps
OFF
2 While still holding down c, continue pressing
5 until UNDL ON is displayed.
Alt
UNDL
Caps
ON
3 Release c.
FRAME FUNCTION
With the Frame function, you can choose from various frames and highlights to design a more
decorative or emphasized label.
The default setting is FRAME OFF; however, the following six settings are also available.
When any setting other than FRAME OFF is selected, the Undl/Frm indicator on the right side
of the display comes on.
To change the frame setting:
1 While holding down c, press 6 once, and keep c held down to display the
current frame setting.
50
Page 55

2 While still holding down c, continue pressing 6 until the desired frame setting is
displayed.
☞ The Undl/Frm indicator comes on when any setting other than FRAME OFF is
selected.
3 Release c to apply the selected frame setting to the entire text.
EXAMPLE
To select the candy frame setting:
1
While holding down c, press 6 once, and keep c held down.
2 While still holding down c, continue press-
ing 6 until the candy frame is displayed.
3 Release c.
Alt
FRAME
Caps
OFF
Alt
Caps
TAPE MARGIN FUNCTION
The Tape margin function allows you to adjust the size of the margins on the left and right
sides of your text.
The default tape margin setting is FULL; however, three other settings are also available.
FULL (1” (24 mm margins)) NARROW (1/3” (8 mm margins))
NONE (1/6” (4 mm margins)) HALF (1/2” (12 mm margins))
☞ When a setting other than FULL is selected, extra tape is fed out before printing starts.
The extra tape is cut off if the Auto cut function is set to ON, so that the left and right
margins are equal.
51
Page 56

To change the tape margin setting:
1 While holding down c, press E once, and keep c held down to display the
current tape margin setting.
2 While still holding down c, continue pressing E until the desired tape margin set-
ting is displayed.
3 Release c to apply the selected tape margin setting to the entire text.
EXAMPLE
To select the HALF tape margin setting:
1
While holding down c, press E once, and keep c held down.
Alt
MARGIN
Caps
FULL
2 While still holding down c, continue press-
ing E until HALF is displayed.
Alt
MARGIN
Caps
HALF
3 Release c.
HORIZONTAL ALIGNMENT FUNCTION
You can choose to align the text in one of three ways. In addition, if the Length function was
used to set the length of the label, the text will align within the label according to the selected
horizontal alignment setting.
The default setting is LEFT; however, two other settings are also available.
LEFT RIGHT
CENTER
52
Page 57

To change the horizontal alignment setting:
1 While holding down c, press R once, and keep c held down to display the
current horizontal alignment setting.
2 While still holding down c, continue pressing R until the desired horizontal align-
ment setting is displayed.
3 Release c to apply the selected horizontal alignment setting to the entire text.
EXAMPLE
To select the RIGHT horizontal alignment setting:
1
While holding down c, press R once, and keep c held down.
Alt
ALIGN
Caps
LEFT
2 While still holding down c, continue press-
ing R until RIGHT is displayed.
Alt
ALIGN
Caps
RIGHT
3 Release c.
MIRROR PRINTING FUNCTION
With this function, you can print your text so that the characters can be read from the tape side
of the tape. If mirror-printed labels are attached to glass or some other clear material, they can
be read correctly from the opposite side.
☞ When using the Mirror printing function, the text should be printed on clear tape.
The default mirror printing setting is OFF.
ON
53
Page 58

To turn on or off the mirror printing setting:
1 While holding down c, press p once, and keep c held down to display the
current mirror printing setting.
2 While still holding down c, continue pressing p until the desired mirror printing
setting is displayed.
3 Release c to apply the selected mirror printing setting to the entire text.
EXAMPLE
To select the ON mirror printing setting:
1
While holding down c, press p once, and keep c held down.
Alt
MIRROR
Caps
OFF
ABC
2 While still holding down c, continue press-
ing p until ON is displayed.
Alt
MIRROR
Caps
ON
ABC
3 Release c.
LENGTH FUNCTION
Although the length of the printed label automatically adjusts to fit the length of the entered
text, there may be times when you will want to make a label with a specific length. The
Length function allows you to set the label length between 1.6” and 11.8” (4.0 cm and 30.0
cm).
The default length setting is OFF. When the Length function is set to ON, the Length indicator
on the right side of the display comes on.
54
Page 59

To turn on or off the Length function:
1 While holding down c, press T once, and keep c held down to display the
current length of the label (the text and both margins) briefly, then display the current
label length setting (ON or OFF).
2 While still holding down c, continue pressing T until the desired label length set-
ting is displayed.
☞ The Length indicator comes on when ON is selected.
3 Release c. If ON was selected, the current label length setting is displayed. 4 Press h or e to select the desired length or use the number keys to enter a length.
☞ To change the units (inches or centimeters) used to display the label length, press
M until the desired units are displayed.
To change the length in 1” (1.0-cm)-steps, hold down either h or e, and then
release the key when the desired setting is displayed.
5 Press r.
EXAMPLE
To select a label length of 5”:
While holding down c, press T once, and keep c held down.
1
Alt
LENGTH
Caps
5.3inch
2 While still holding down c, continue press-
ing T until ON is displayed.
3 Release c.
Alt
LENGTH
Caps
OFF
Alt
LENGTH
Caps
ON
Alt
LENGTH
Caps
4.0inch
55
Page 60

4
Press h until 5.0inch is displayed.
Alt
LENGTH
Caps
5.0inch
5 Press r.
AUTO CUT FUNCTION
The Auto cut function allows you to set whether or not the machine will automatically cut off
each label after it is printed. Turn on the Auto cut function before starting to print in order to
cut off the labels automatically after printing them.
To turn on or off the Auto cut function:
☞ After printing a label with the Auto cut function set to OFF, hold down c and press
_ once to feed the tape, then cut it.
1 While holding down c, press Z once, and keep c held down to display the
current auto cut setting.
2 While still holding down c, continue pressing Z until the desired auto cut setting
is displayed.
3 Release c to apply the selected auto cut setting.
EXAMPLE
To turn on the Auto cut function:
While holding down c, press Z once,
1
and keep c held down.
56
Alt
AUTO CUT
Caps
OFF
Page 61

2
While still holding down c, continue pressing
Z until ON is displayed.
Alt
AUTO CUT
Caps
ON
3 Release c.
PRINT KEY
After you have entered your text and chosen the desired format settings, you are ready to print.
☞ If the Auto cut function is set to ON, the label will automatically be cut off after it is
printed.
To print a label:
● Press p once. The message “COPIES” followed by the number of the label being
printed is displayed.
EXAMPLE
To print a label and cut it off:
● Press p once.
Alt
COPIES
Caps
1/1
FEED & CUT FUNCTION
The Feed & Cut function is used to feed out 1” (24 mm) of tape and automatically cut it off, for
example after printing with the Auto cut function set to OFF or when printing has been interrupted.
To feed and cut off 1” (24 mm) of tape:
● Hold down c and press _ once. 1” (24 mm) of tape is fed out and cut off.
57
Page 62

NUMBERING FUNCTION
This function can be used to print many copies of the same text while increasing a certain
number in the text by 1 after each label is printed.
To use the Numbering function:
1 Press f, w, h or e to position the cursor below the number that you wish to
increase.
2 Hold down c and press O. The message “NUMBER UNTIL” appears in the display
with the current setting.
3 Press a number key between 1 and 9 (or press h or e) to select the last num-
ber that is to be printed.
☞ To cancel the Numbering, hold down c and press O (or press just * ).
4 Press p (or r) to begin printing the labels. The number of each copy is displayed
while it is being printed.
☞ If the Auto cut function is set to ON, each label is automatically cut off after it is
printed.
EXAMPLE
To print three labels with numbers 1, 2 and 3:
Position the cursor below “1”.
1
2 Hold down c and press O.
58
Alt
Caps
1:
STUDIO _
Alt
NUMBER
Caps
UNTIL
1
1
Page 63

3
Press 3.
4 Press p (or r ).
Alt
NUMBER
Caps
UNTIL
3
Alt
COPIES
Caps
1/3
Alt
COPIES
Caps
3/3
Alt
COPIES
Caps
2/3
REPEAT PRINTING FUNCTION
This function allows you to print up to 9 copies of the same text.
To use the Repeat printing function:
1 Hold down c and press I. The message “COPIES” appears in the display with the
current setting.
2 Press a number key between 1 and 9 (or press h or e) to select the number
of copies that are to be printed.
☞ To cancel the Repeat printing, hold down c and press I (or press just * ).
59
Page 64

3 Press p (or r ) to begin printing the labels. The number of each copy is displayed
while it is being printed.
☞ If the Auto cut function is set to ON, each label is automatically cut off after it is
printed.
EXAMPLE
To print three copies of a label:
Hold down c and press I.
1
Alt
COPIES
Caps
1
2 Press 3.
Alt
COPIES
Caps
3
3 Press p (or r ).
Alt
COPIES
Caps
1/3
Alt
COPIES
Caps
3/3
Alt
COPIES
Caps
2/3
☞ If the Auto cut function is set to ON, each label is automatically cut off after it is printed.
60
Page 65

MEMORY FUNCTIONS
You can use the memory to store your most frequently used text files. The text remains in the
memory, along with its formatting, even after all characters are removed from the display
using the Clear function (holding down c and pressing * ).
When each file is stored, it is given a number to make recalling it easier. Up to 10 text files or
approximately 300 characters can be stored in the memory. (A single text file can have a maximum of 91 characters.)
Since a copy of the stored text file is recalled when the Recall function is used, the text can be
edited or printed without changing the originally stored file. When a file is no longer needed
or more space is necessary, the Memory delete function can be used to delete it.
☞ When inserting new batteries, be sure to insert the new ones within five minutes of
removing the old ones, otherwise any text files stored in the memory will be lost (unless
the machine is plugged into an electrical outlet with the AC adaptor).
STORING TEXT
To store a text file:
1 Hold down c and press 7. The message “STORE” appears on the display with the
currently selected file number.
☞ If the maximum number of characters has already been stored, the error message
“MEMORY FULL!” appears in the display. If this occurs, an existing text file must be
deleted before the new one can be stored.
To quit the Store function without storing the text, hold down c and press 7
(or press just * ).
2 Press a number key (or press h or e) to select the file number where you wish to
store the text.
3 Press r. The text is stored under the selected file number and the text previously
shown in the display reappears.
☞ If a file is already stored under the selected file number, the message “OVER-
WRITE?” appears in the display and you must decide whether or not to overwrite it
(delete it from the memory and store the new one).
To overwrite the stored file with the new one:
● Press r to delete the previously stored file and store the new one under the selected
number.
☞ To go back and choose another file number without overwriting the text file, press
*, and then select a different file number.
61
Page 66

RECALLING TEXT
To recall a text file:
1 Hold down c and press 8. The message “RECALL” appears on the display with
the file number and beginning of the most recently stored or recalled text.
☞ To quit the Recall function without recalling text, hold down c and press 8
(or press just * ).
2 Press a number key (or press h or e) to select the file number containing the text
that you wish to recall. The text stored under the selected file number is shown.
☞ To see other parts of the selected text file, press f or w.
To display the text stored under other file numbers, press h or e, or the key of
a different file number.
3 Press r. Any text previously entered in the display is erased and the text stored under
the selected file number is recalled into the display.
DELETING A FILE
To delete a text file:
1 Hold down c and press 9. The message “CLEAR” appears on the display with the
file number and beginning of the most recently stored or recalled text.
☞ To cancel the Memory delete function without deleting the text file, hold down
c and press 9 (or press just * ).
2 Press a number key (or press h or e) to select the file number containing the text
that you wish to delete. The text stored under the selected file number is shown.
☞ To see other parts of the selected text file, press f or w.
To display the text stored under other file numbers, press h or e, or the key of
a different file number.
3 Press r. The message “OK TO CLEAR?” appears.
☞ To go back and select a different text file, press *.
4 Press r to delete the text file that was selected.
62
Page 67

EXAMPLE
To store text under file number 4:
1
Hold down c and press 7.
2 Press 4.
3 Press r.
To recall the text from file number 1:
1
Hold down c and press 8.
Alt
STORE
Caps
[0]
Alt
STORE
Caps
[4]
Alt
Caps
1:
J. Smith_
2 Press 1.
3 Press r.
Alt
RECALL
Caps
[9]J. Smit
Alt
RECALL
Caps
[1]Bill Re
Alt
Caps
1:
_ill Reyn
B
63
Page 68

EXAMPLE
To delete the text stored under file number 4:
1
Hold down c and press 9.
2 Press 4.
3 Press r.
4 Press r.
Alt
CLEAR
Caps
[1]Bill Re
Alt
CLEAR
Caps
[4]J. Smit
Alt
OK TO
Caps
CLEAR?
Alt
Caps
1:
_ill Reyn
B
64
Page 69

TROUBLESHOOTING
Problem Remedy
1. The display stays blank after you have
turned on the machine.
2. The machine does not print or the
printed characters are blurred.
3. The text files that you stored in the memory are no longer there.
4. The printed characters are not formed
properly.
5. A blank horizontal line appears through
the printed label.
6. Striped tape appears. • You have reached the end of the tape.
7. The machine has “locked up” (i.e., nothing happens when a key is pressed).
• Check that the AC adaptor is connected
correctly.
• If you are using alkaline batteries, check
that they are correctly inserted.
• If the batteries are low, replace them with
new ones.
• Check that the tape cassette has been
inserted properly.
• If the tape cassette is empty, replace it
with a new one.
• Make sure that the tape compartment
cover has been closed.
• If the batteries are low, replace them with
new ones.
• If you are using alkaline batteries, they
may be low. Try using the AC adaptor or
replace the batteries with new ones.
• Clean the print head as explained on
page 25.
Replace the tape cassette with a new
one.
• Turn off the machine, and then while
holding down c and R, turn the
machine back on. The text and formats
in the display and all text files stored in
the memory are erased.
65
Page 70

ERROR MESSAGE LIST
Error Message Cause Remedy
6 LINE
LIMIT!
BATTERIES
WEAK!
BUFFER
EMPTY!
BUFFER
FULL!
CAN’T
HERE
CASSETTE
CHANGED!
This message appears if six lines
already exist when you press r.
This message appears when the
installed alkaline batteries become
weak.
• This message appears if you hold
down c and press T, but
no text has been entered in the display.
• This message appears if you try to
print or store a text file in the
memory, but no text has been
entered in the display.
This message appears if you try to
enter a character, symbol, return or
space after the maximum number of
characters has already been entered.
This message appears if the cursor is
at the end of the text when you hold
down c and press O.
This message appears if the tape cassette is changed while the P-touch is
receiving data from the computer.
Limit the number of lines to six.
Replace the batteries or use the
AC adaptor.
• Enter some text before starting
the function.
• Enter text before printing or
storing.
Delete some existing text so that
more text can be entered.
Move the cursor below a
number before holding down
c and pressing O.
Cancel the print job, install the
correct tape cassette, and then
try printing again.
CHANGE
ADAPTOR!
COOLING
DOWN
66
This message appears if a high-voltage adaptor is being used.
This message appears when the print
head is used extensively (for example, when printing multiple copies of
a large amount of text).
Remove the high-voltage adaptor and connect the adaptor
designed exclusively for this
machine.
Wait until printing continues.
Page 71

Error Message Cause Remedy
CUTTER
ERROR!
EEPROM
ERROR!
INTERFACE
ERROR!
INVAL.
CHRS!
LENGTH
LIMIT!
This message appears if the tape cutter is closed when you try to print or
feed the tape.
This message appears if a checksum
error occurred when the P-touch was
turned on or if the keyword was damaged and it failed to initialize.
This message appears if an error
occurs while data is being sent from
the computer to the P-touch.
This message appears if the cursor is
not below a number when you hold
down c and press O.
• This message appears if the text is
longer than 3’ 3 1/3” (1 meter) when
you try to print.
• This message appears if the Length
function is used to set a label
length that is less than 1.6” (4.0
cm) or more than 11.8” (30.0 cm).
• This message appears if the Tab
Length function is used to set a tab
length that is more than 11.8”
(30.0 cm).
Turn the P-touch off, then on
again.
Contact your service representative.
Cancel the print job, and then
try printing again.
Move the cursor below a
number before holding down
c and pressing O.
• Shorten the text to less than 3’
3 1/3” (1 meter) before trying
to print.
• Set the label length between
1.6” (4.0 cm) and 11.8” (30.0
cm).
• Set the tab length so that it is
less than 11.8” (30.0 cm).
LINE
LIMIT!
MEMORY
FULL!
NO
FILES!
This message appears if the number
of lines in the text is greater than the
maximum number of lines possible
for the installed tape.
This message appears if you try to
store a text file after the maximum
number of characters has already
been stored in the memory.
This message appears if you try to
recall or delete a text file from the
memory when none are stored.
Reduce the number of lines or
install a tape of greater width.
Delete an unwanted file to make
room for the new one.
Store a text file first.
67
Page 72

Error Message Cause Remedy
NO
TAPE!
REPLACE
BATTERIES!
ROM
PROBLEM!
SOLDER X This message appears if there is a
TAB
LIMIT!
TEXT
TOO HIGH!
This message appears if you try to print
a label or feed the tape when no tape
cassette is installed.
This message appears if the installed
alkaline batteries are about to run
out.
This message appears if there is a
problem with the machine’s read
only memory.
problem with the machine’s software.
This message appears if the maximum
number of tabs has already been added
to the text when you hold down c
and press Q.
This message appears if the size of
the text is larger than the width of the
installed tape.
Install a tape cassette and try
again.
Replace the batteries or use the
AC adaptor.
Contact your service representative.
Turn off the machine, and then
while holding down c and
R, turn the machine back on.
Contact your service representative.
Limit the number of tabs in the
text to 50.
Reduce the size of the characters
or install a wider tape.
TEXT
TOO LONG!
68
This message appears if the length of
the text is longer than the label length
that has been set using the Length
function.
Delete some of the text, reduce
the character width or increase
the set label length.
Page 73

SPECIFICATIONS
HARDWARE
Input Device: Keyboard - 51 keys
LCD: 10 characters × 2 lines (semi-graphical)
20 indicators (including Alt and Caps)
Print Tape: Pressure-sensitive, Adhesive-based
26’ 3” (8 m) long
Five widths available:
1/4” (6 mm)
3/8” (9 mm)
1/2” (12 mm)
3/4” (18 mm)
1” (24 mm)
Power Supply: Eight AA alkaline batteries (AM3, LR6) or optional AC adaptor
(model AD-60)
Auto power-off if no key is pressed for 5 minutes
Print Head: 128 dot / 180 dpi
Dimensions: 7 3/5” (W) × 9 1/2” (D) × 2 1/2” (H)
(194 × 242 × 65.5 mm)
Weight: 1.83 lbs (830 g) (without a tape cassette and batteries installed)
SOFTWARE
Buffer Size: Maximum 91 characters
Maximum six lines
Memory Size: Approximately 300 characters
Character Size: Six sizes (6, 9, 12, 18, 24, 36 and 42 points) + 52 point (capital letters
only)
All are available in narrow, medium and wide widths
Print Styles: Normal, Outline, Bold, Shadow
(each can be combined with Italic), and Vertical
69
Page 74

ACCESSORIES (For USA Only)
● Supplies
Obtain tape cassettes from your nearest authorized dealer.
Use only Brother TZ tapes with this machine. Brother cannot be held responsible for trouble
caused by the use of unauthorized supplies. Do not use tapes that do not have the mark.
*all tapes are 26.2’ long unless otherwise noted
Stock No. Description
Extra Strength Adhesive Tapes:
Super Adhesive Strength: laminated tapes with twice the adhesive strength
Ideal for textured surfaces and harsh environmants
TZ-S111
TZ-S121
TZ-S131
TZ-S135
TZ-S141
TZ-S145
TZ-S151
TZ-S155
TZ-S211
TZ-S221
TZ-S231
TZ-S241
TZ-S251
TZ-S611
TZ-S621
TZ-S631
TZ-S641
TZ-S651
TZ-S941
TZ-S951
Flexible ID Tapes:
Special Adhesive for Bending, Wrapping & Flagging
TZ-FX231
TZ-FX241
TZ-FX251
Tamper Evident Tapes:
Security Pattern Appears If Removed
TZ-SE4 Black characters on 3/4” (18 mm) security adhesive 1 $29.99
1/4” (6 mm) strong adhesive black characters on clear adhesive
3/8” (9 mm) strong adhesive black characters on clear adhesive
1/2” (12 mm) strong adhesive black characters on clear adhesive
1/2” (12 mm) strong adhesive white characters on clear adhesive
3/4” (18 mm) strong adhesive black characters on clear adhesive
3/4” (18 mm) strong adhesive white characters on clear adhesive
1” (24 mm) strong adhesive black characters on clear adhesive
1” (24 mm) strong adhesive white characters on clear adhesive
1/4” (6 mm) strong adhesive black characters on white adhesive
3/8” (9 mm) strong adhesive black characters on white adhesive
1/2” (12 mm) strong adhesive black characters on white adhesive
3/4” (18 mm) strong adhesive black characters on white adhesive
1” (24 mm) strong adhesive black characters on white adhesive
1/4” (6 mm) strong adhesive black characters on yellow adhesive
3/8” (9 mm) strong adhesive black characters on yellow adhesive
1/2” (12 mm) strong adhesive black characters on yellow adhesive
3/4” (18 mm) strong adhesive black characters on yellow adhesive
1” (24 mm) strong adhesive black characters on yellow adhesive
3/4” (18 mm) strong adhesive black characters on silver (matte) adhesive
1” (24 mm) strong adhesive black characters on silver (matte) adhesive
1/2” (12 mm) flexible ID tape (black characters on white adhesive)
3/4” (18 mm) flexible ID tape (black characters on white adhesive)
1” (24 mm) flexible ID tape (black characters on white adhesive)
QTY/
PACKAGE
1 $15.99
1 $17.99
1 $18.99
1 $18.99
1 $21.99
1 $21.99
1 $25.99
1 $25.99
1 $15.99
1 $17.99
1 $18.99
1 $21.99
1 $25.99
1 $15.99
1 $17.99
1 $18.99
1 $21.99
1 $25.99
1 $25.99
1 $27.99
1 $18.99
1 $21.99
1 $25.99
PRICE
70
Page 75

Stock No. Description
Fabric Iron-On Tapes:
TZ-FA3
Print Head Cleaning Cassette:
TZ-CL4 Print Head Cleaning Cassette approx. 100uses 1 $20.99
Standard Laminated Tapes:
Stock No. Description
1” (24mm)-wide laminated tapes
TZ-151 Black characters on clear adhesive 1 $22.99
TZ-251 Black characters on white adhesive 1 $23.99
TZ-451 Black characters on red adhesive 1 $23.99
TZ-651 Black characters on yellow adhesive 1 $23.99
TZ-252 Red characters on white adhesive 1 $23.99
TZ-354 Gold characters on black adhesive 1 $26.99
TZ-355 White characters on black adhesive 1 $26.99
TZ-B51
3/4” (18mm)-wide laminated tapes
TZ-141 Black characters on clear adhesive 1 $18.99
TZ-145 White characters on clear adhesive 1 $20.99
TZ-241 Black characters on white adhesive 1 $20.99
TZ-242 Red characters on white adhesive 1 $20.99
TZ-243 Blue characters on white adhesive 1 $20.99
TZ-344 Gold characters on black adhesive 1 $23.99
TZ-345 White characters on black adhesive 1 $23.99
TZ-441 Black characters on red adhesive 1 $20.99
TZ-541 Black characters on blue adhesive 1 $20.99
TZ-545 White characters on blue adhesive 1 $23.99
TZ-641 Black characters on yellow adhesive 1 $20.99
TZ-741 Black characters on green adhesive 1 $20.99
TZ-B41
TZ-M41 Black characters on clear (matte) adhesive 1 $20.99
TZ-WB41 Black characters on Bugs Bunny adhesive 1 $23.99
TZ-WT41 Black characters on Taz adhesive 1 $23.99
TZ-WS41 Black characters on Tweety & Sylvester adhesive 1 $23.99
Blue characters on 1/2” (12 mm) white fabric adhesive 9.8’ tape length
Black characters on fluorescent orange adhesive 16.4’ tape length
Black characters on fluorescent orange adhesive 16.4’ tape length
QTY/
PACKAGE
1 $24.99
QTY/
PACKAGE
1 $28.99
1 $24.99
PRICE
PRICE
71
Page 76

Stock No. Description
1/2” (12mm)-wide laminated tapes
TZ-131 Black characters on clear adhesive 1 $16.99
TZ-135 White characters on clear adhesive 1 $17.99
TZ-231 Black characters on white adhesive 1 $17.99
TZ-232 Red characters on white adhesive 1 $17.99
TZ-334 Gold characters on black adhesive 1 $20.99
TZ-335 White characters on black adhesive 1 $20.99
TZ-631 Black characters on yellow adhesive 1 $17.99
3/8” (9mm)-wide laminated tapes
TZ-121 Black characters on clear adhesive 1 $14.99
TZ-221 Black characters on white adhesive 1 $16.99
TZ-325 White characters on black adhesive 1 $18.99
TZ-421 Black characters on red adhesive 1 $16.99
1/4” (6mm)-wide laminated tapes
TZ-111 Black characters on clear adhesive 1 $12.99
TZ-211 Black characters on white adhesive 1 $14.99
TZ-315 White characters on black adhesive 1 $17.99
Stamp kit
Stock No. Description
SK-LB Stamp-making kit for Large stamp with black ink 1 $39.99
SK-MB Stamp-making kit for Medium stamp with black ink 1 $37.99
SH-LB Additional stamper for Large stamp with black ink 1 $27.99
SH-MB Additional stamper for Medium stamp with black ink 1 $24.99
QTY/
PACKAGE
QTY/
PACKAGE
PRICE
PRICE
Options
Stock No. Description
AD-60 AC Adaptor 1 $24.99
6994 Protective carrying case 1 $29.99
* For purchasing accessorises on the Internet, please visit our website:
http: //www.brothermall.com
72
QTY/
PACKAGE
PRICE
Page 77

73
Page 78

PT-2300/2310 CONTACT INFORMATION (For USA Only)
Service Center Locations
If you need a local service center, please call 1-800-284-HELP (4357)
to locate the authorized service center closest to you.
Note: Be sure to call the Service Center before your visit.
Service centers do not provide operational assistance. See “Operational Assistance”.
Operational Assistance
For technical and operational assistance you may call Brother Customer Service at:
Voice 1-877-4-PTouch, or Fax 1-901-379-1210
Assistance on the Internet
For product information and downloading the latest drivers: http://www.brother.com
For purchasing accessories and certain Brother products: http://www.brothermall.com
Accessories and Supplies
To order Brother accessories or supplies by Visa, MasterCard, Discover or American Express,
you may call toll tree 1-888-879-3232, or complete the order form in your user’s guide and
fax both sides of the form to 1-800-947-1445.
For purchasing accessories on the Internet: http://www.brothermall.com
To order by mail or pay by check, please complete the accessory order form and mail it along
with payment to:
Brother International Corporation
Attn: Consumer Accessory Division
P.O. Box 341332
Bartlett, TN 38133-1332
Fax-Back System
Brother Customer Service has installed an easy-to-use Fax-Back System so you can get
instant answers to common technical questions and product information for all Brother products.
This system is available 24 hours a day, 7 days a week. You can use the system to send the
information to any fax machine, not just the one you are calling from.
Please call 1-800-521-2846 and follow the voice prompts to receive faxed instructions on how
to use the system and an index of Fax-Back subjects.
Save Time - Register On-Line!
Don't stand in line at the post office or worry about lost mail. Visit us on-line at
www.registermybrother.com
Your product will immediately be registered in our database and you can be on your way!
Also, while you're there, look for contests and other exciting information!
74
Page 79

P-TOUCH ACCESSORY ORDER FORM (For USA Only)
Dear Customer:
This order form is provided for your convenience should your retailer not stock the item(s)
needed. To order by mail, send this completed form along with proper payment to the address
below OR credit card holders: call toll-free 1-888-879-3232, fax completed order form to
1-800-947-1445, or visit our web site at http://www
Accessories listing in your User’s Guide for stock no. and price.
Stock # Description Quantity Price
.brothermall.com. Please refer to the
To complete the Order Form:
1. Review the reverse side of this form and
select the desired items.
2. Complete the form above, indicating the
quantity of each item.
3. Total the columns and enter the total on the
“Supply/Accessory Subtotal” line.
4. Add the appropriate Sales Tax and Shipping/
Handling Charge.
5. Clearly print your name and address in the
space below.
6. Place your order
a. Call toll free anytime 1-888-879-3232
b. Order on line at www.brothermall.com
c. Fax completed form to 1-800-947-1445
d. Mail completed form along with proper
payment to
BROTHER INTERNATIONAL CORP.
Attn: Consumer Accessory Div.
P.O.Box 341332
Bartlett, TN 38184-1332
Name: ( ) Visa ( ) Master Card ( ) Discover
Address: ( ) Check/Money Order ( ) American Express
City:
State: Account Number
Zip: Expiration Date
Daytime Phone #: Signature
Daytime Fax #:
Email:
Your Model Number:
✂
Prices subject to change without notice.All prices quoted in US Dollars.
Supply / Accessory Subtotal: $
AZ, CA, CO, CT, FL, GA, IL, LA,
MA, MD,MI, MN, MO, NC, NJ, NV,
NY, OH, PA, TN, TX, VA, WA, WI
residents add applicable sales tax:
Shipping and Handling Options $
Please choose one:
•Standard Freight:
•Continental U.S. ($5.75)
Alaska and Hawaii ($8.75)
GU, PR, VI ($15.75)
•2nd Day Air Freight
(Continental U.S. only): $8.75
•Overnight Delivery
(Continental U.S. only): $14.75
TOTAL DUE $
No C.O.D. orders
Method of Payment (check one)
Billing Address (if different from shipping address at left)
$
Page 80

PT-2300/2310 CONTACT INFORMATION (For USA Only)
Service Center Locations
If you need a local service center, please call 1-800-284-HELP (4357)
to locate the authorized service center closest to you.
Note: Be sure to call the Service Center before your visit.
Service centers do not provide operational assistance. See “Operational Assistance”.
Operational Assistance
For technical and operational assistance you may call Brother Customer Service at:
Voice 1-877-4-PTouch, or Fax 1-901-379-1210
Assistance on the Internet
For product information and downloading the latest drivers: http://www.brother.com
For purchasing accessories and certain Brother products: http://www.brothermall.com
Accessories and Supplies
To order Brother accessories or supplies by Visa, MasterCard, Discover or American Express,
you may call toll tree 1-888-879-3232, or complete the order form in your user’s guide and
fax both sides of the form to 1-800-947-1445.
For purchasing accessories on the Internet: http://www.brothermall.com
To order by mail or pay by check, please complete the accessory order form and mail it along
with payment to:
Brother International Corporation
Attn: Consumer Accessory Division
P.O. Box 341332
Bartlett, TN 38133-1332
Fax-Back System
Brother Customer Service has installed an easy-to-use Fax-Back System so you can get
instant answers to common technical questions and product information for all Brother products.
This system is available 24 hours a day, 7 days a week. You can use the system to send the
information to any fax machine, not just the one you are calling from.
Please call 1-800-521-2846 and follow the voice prompts to receive faxed instructions on how
to use the system and an index of Fax-Back subjects.
Save Time - Register On-Line!
Don't stand in line at the post office or worry about lost mail. Visit us on-line at
www.registermybrother.com
Your product will immediately be registered in our database and you can be on your way!
Also, while you're there, look for contests and other exciting information!
Page 81

P-TOUCH ACCESSORY ORDER FORM (For USA Only)
✂
Dear Customer:
This order form is provided for your convenience should your retailer not stock the item(s)
needed. To order by mail, send this completed form along with proper payment to the address
below OR credit card holders: call toll-free 1-888-879-3232, fax completed order form to
1-800-947-1445, or visit our web site at http://www
Accessories listing in your User’s Guide for stock no. and price.
Stock # Description Quantity Price
.brothermall.com. Please refer to the
To complete the Order Form:
1. Review the reverse side of this form and
select the desired items.
2. Complete the form above, indicating the
quantity of each item.
3. Total the columns and enter the total on the
“Supply/Accessory Subtotal” line.
4. Add the appropriate Sales Tax and Shipping/
Handling Charge.
5. Clearly print your name and address in the
space below.
6. Place your order
a. Call toll free anytime 1-888-879-3232
b. Order on line at www.brothermall.com
c. Fax completed form to 1-800-947-1445
d. Mail completed form along with proper
payment to
BROTHER INTERNATIONAL CORP.
Attn: Consumer Accessory Div.
P.O.Box 341332
Bartlett, TN 38184-1332
Name: ( ) Visa ( ) Master Card ( ) Discover
Address: ( ) Check/Money Order ( ) American Express
City:
State: Account Number
Zip: Expiration Date
Daytime Phone #: Signature
Daytime Fax #:
Email:
Your Model Number:
Prices subject to change without notice.All prices quoted in US Dollars.
Supply / Accessory Subtotal: $
AZ, CA, CO, CT, FL, GA, IL, LA,
MA, MD,MI, MN, MO, NC, NJ, NV,
NY, OH, PA, TN, TX, VA, WA, WI
residents add applicable sales tax: $
Shipping and Handling Options $
Please choose one:
•Standard Freight:
•Continental U.S. ($5.75)
Alaska and Hawaii ($8.75)
GU, PR, VI ($15.75)
•2nd Day Air Freight
(Continental U.S. only): $8.75
•Overnight Delivery
(Continental U.S. only): $14.75
TOTAL DUE $
No C.O.D. orders
Method of Payment (check one)
Billing Address (if different from shipping address at left)
Page 82

GUIA DE
INSTRUCCIONES
Page 83

INTRODUCCIÓN
Gracias por adquirir el P-touch 2300/2310!
El nuevo P-touch le permitirá diseñar y crear etiquetas y membretes para cualquier tipo de
aplicación. Su versatilidad le permitirá crear etiquetas personales seleccionando distintos
diseños de marcos y muchos tamaños y estilos de caracteres. Además, los cinco diferentes
anchos de cinta (1/4″ (6 mm), 3/8″ (9 mm), 1/2″ (12 mm), 3/4″ (18 mm) y 1″ (24 mm)) y la
variedad de los colores de la cintas le hará posible imprimir etiquetas personales.
Ya no hay por qué preocuparse por tareas urgentes que requieren impresión profesional. En la
oficina, fábrica, laboratorio, o en casa, la calidad y el rendimiento del P-touch 2300/2310 la
convierten en una máquina muy práctica.
Para terminar, puesto que esta guía del usuario le será de gran utilidad, le aconsejamos que la
guarde en un lugar accesible para poder consultar en cualquier momento.
(Los modelos PT-2300 y PT-2310 disponen de las mismas funciones. Sin embargo, solamente
el modelo PT-2310 incluye un estuche de transporte y cinta adicional.)
AVISO DE LA FCC
Este equipo ha sido probado y cumple con los límites de un aparato digital de la Clase B,
siguiendo el apartado 15 de las normas de la FCC. Estos límites están pensados para proporcionar una protección razonable contra interferencias nocivas dentro de una instalación residencial. Este equipo podría interferir de forma nociva con comunicaciones por
radio si no se instala y utiliza siguiendo las instrucciones. No obstante, no existe ninguna
garantía de que no vayan a suceder interferencias en una instalación concreta. Si este
equipo causara interferencias nocivas con la recepción de radio o televisión, lo cual
puede determinarse poniendo el equipo en ON u OFF, se recomienda que el usuario
intente corregir dichas interferencias mediante una de las siguientes medidas:
- Reoriente o ponga la antena receptora en otro lugar.
- Aumente la separación entre el equipo y el receptor.
- Conecte el equipo en una toma de un circuito diferente de la que esté conectada el
receptor.
- Consulte a su distribuidor o a un técnico experimentado de radio/televisión.
- Los cambios o modificaciones no aprobados expresamente por Brother Industries, Ltd.
podrán invalidar la autorización que el usuario tiene para utilizar el equipo.
A continuación se indican los números de patente y de publicación de patente relacionados con este producto:
USP4839742 USP4983058 USP5120147
USP4927278 USP5009530
USP4976558 USP5069557
Page 84

ÍNDICE
CUIDADOS Y PRECAUCIONES GENERALES......................................................1
PILAS...................................................................................................................2
ADAPTADOR DE CA OPCIONAL.......................................................................3
CASETES DE CINTA ............................................................................................4
CONEXIÓN DE LA P-TOUCH A UN PC .............................................................5
INSTALACIÓN DEL P-TOUCH EDITOR..............................................................6
INICIO DEL P-TOUCH EDITOR........................................................................19
COLOCACIÓN DE ETIQUETAS ........................................................................23
CABEZA DE IMPRESIÓN Y RODILLOS .............................................................24
TECLA DEL CURSOR ........................................................................................25
TECLAS CODE, ALT Y SHIFT.............................................................................26
TECLA DE RETORNO........................................................................................27
TABULACIÓN...................................................................................................28
TECLA DE BORRADO (DEL) .............................................................................29
FUNCIÓN DE BORRADO DE LÍNEA (LINE OUT).............................................30
FUNCIÓN DE REPOSICIÓN (CLEAR)................................................................30
FUNCIÓN DE ACENTOS ..................................................................................31
FUNCIÓN DE SÍMBOLOS.................................................................................32
FUNCIÓN DE FORMATO AUTOMÁTICO........................................................33
FUNCIÓN DE SELLOS ......................................................................................34
FUNCIÓN DEL TIPO DE CARACTERES.............................................................35
FUNCIONES DE TAMAÑO Y DE ANCHURA ...................................................35
FUNCIÓN DE ESTILO.......................................................................................37
FUNCIÓN DE SUBRAYADO.............................................................................37
FUNCIÓN DE MARCOS ...................................................................................38
FUNCIÓN DE CINTA........................................................................................39
FUNCIÓN DE LA ALINEACIÓN HORIZONTAL................................................39
FUNCIÓN DE IMPRESIÓN EN MODO ESPEJO.................................................40
FUNCTIÓN DE LONGITUD .............................................................................41
FUNCIÓN DE CORTE AUTOMÁTICO..............................................................42
TECLA DE IMPRESIÓN......................................................................................42
FUNCIÓN DE AVANCE Y CORTE.....................................................................42
FUNCIÓN DE NUMERACIÓN..........................................................................43
FUNCIÓN DE IMPRESIÓN REPETIDA...............................................................43
i
Page 85

FUNCIONES DE LA MEMORIA.........................................................................44
SOLUCIÓN DE PROBLEMAS............................................................................46
LISTA DE MENSAJES DE ERROR .......................................................................47
ESPECIFICACIONES ..........................................................................................50
ACCESORIOS (Sólo para EE.UU.)......................................................................51
INFORMACIÓN PARA CONTACTAR CON PT-2300/2310 (Sólo para EE.UU.)
.....54
ii
Page 86

CUIDADOS Y PRECAUCIONES GENERALES
●
Con esta máquina emplee sólo cintas TZ Brother. No emplee cintas que no tengan la
marca .
●
No tire de la cinta que se alimenta desde la P-touch. Podría dañar el casete de cinta.
No utilice la máquina en lugares polvorientos, y manténgala alejada de la luz solar
●
directa y la lluvia.
●
No exponga la máquina a altas temperaturas ni humedad. No la deje nunca en el tablero
de instrumentos ni en la parte trasera de su automóvil.
●
No deje nada que sea de goma o vinyl encima de la máquina durante períodos prolongados. Podría producir manchas.
●
No limpie la máquina con alcohol ni con otros solventes orgánicos. Emplee solamente un
paño suave y seco.
●
No ponga ningún objeto encima ni dentro de la máquina.
●
Para evitar daños, no toque el borde de la cuchilla.
●
Utilize sólo el adaptador de CA (modelo AD-60) exclusivamente diseñado para esta
máquina. El empleo de otro cancelaría la garantía.
●
No intente desmontar el adaptador de CA.
●
Cuando el equipo no se utilice durante períodos prolongados de tiempo y no sea necesario conservar los archivos de texto en la memoria, desenchufe el adaptador de CA, y
saque las pilas para evitar fugas de las mismas que podrían ser causa de daños en la
máquina.
●
Cuando el adaptador de CA esté enchufado en el equipo, si se desenchufa el adaptador
de la toma de CA se correrá el riesgo de perder todos los archivos de texto de la memoria,
aunque las pilas estén insertadas.
• Este equipo utiliza, utilice ocho pilas alcalinas o de manganeso de tamaño AA.
1
Page 87

PILAS
Este rotulador es portátil puede utilizarse en cualquier lugar instalando ocho (8)
o de manganeso de tamaño AA
mismo tiempo.
. Cuando cambie las pilas, reemplace siempre las ocho pilas al
pilas alcalinas
Para cambiar las pilas:
1
Extraiga la cubierta del compartimiento de las pilas de la parte posterior de la máquina.
2
Si ya hay pilas instaladas, extráigalas.
3
Inserte ocho pilas alcalinas AA nuevas, asegurándose de que sus polos queden orientados
en la dirección correcta.
4
Coloque la cubierta del compartimiento de las pilas.
Asegúrese de insertar las pilas nuevas antes de que transcurran cinco minutos
☞
desde que se extraen las pilas gastadas, porque de lo contrario el texto que se
visualiza en la pantalla y los archivos de texto almacenados en la memoria se perderían (a menos que la máquina esté enchufada a una toma de CA con el adaptador de CA).
Si las pilas no están instaladas con sus polos positivo y negativo orientados en la
dirección correcta, podrán producirse fugas en ellas, recalentarse o reventar, o el
cabezal de impresión podrá recalentarse.
2
Page 88

ADAPTADOR DE CA OPCIONAL
El adaptador de CA (modelo AD-60) le permite emplear esta máquina siempre que disponga
de una toma de corriente eléctrica.
Para conectar el adaptador de CA opcional:
1
Inserte el conector del adaptador que tiene la marca DC IN 9.5V al lado derecho de la máquina.
2
Inserte la clavija del adaptador de CA en la toma de corriente más cercana.
☞
Emplee sólo el adaptador de CA diseñado exclusivamente para esta máquina.
Extraiga las pilas y desconecte el adaptador de CA si no se propone utilizar el
equipo durante períodos de tiempo prolongados. Cuando se desconecta la alimentación, se pierden el texto que se muestra en la pantalla y el que está almacenado
en la memoria.
Cuando el adaptador de CA esté enchufado en la máquina, si se desenchufa el
adaptador de la toma de CA se correrá el riesgo de perder todos los archivos de
texto de la memoria, aunque las pilas estén insertadas.
Se recomienda emplear el adaptador de CA para imprimir tipos de caracteres grandes y códigos de barras con cintas de 1” (24 mm) porque esta operaciónes pueden
gastar las pilas con rapidez.
3
Page 89

CASETES DE CINTA
Un casete de TZ se suministra con la unidad. Sin embargo, para esta máquina hay disponibles
una amplia gama de cintas TZ de distintos colores y tamaños, es posible crear etiquetas diferentes codificadas por colores o tamaños.
Además, este equipo ha sido diseñado para permitirle cambiar los casetes de cinta rápida y
fácilmente.
Para cambiar el casete de cinta:
1
Levante la cubierta del compartimiento de la cinta para abrirla. Se libera también entonces el casete instalado.
2
Si ya hay un casete instalado, extráigalo tirando del mismo recto hacia arriba.
3
Si la cinta entintadora del otro casete se afloja, utilice un dedo para bobinar la rueda dentada en el sentido de la flecha de dicho casete hasta tensar la cinta. Además, cerciórese
de que el extremo de la cinta esté debajo de las guías de la misma.
☞
Si está utilizando un casete de cinta nuevo provisto de retén, cerciórese de extraer
éste.
4
Inserte firmemente el casete de cinta en el compartimiento de la cinta asegurándose de
que toda la parte posterior del casete está en contacto con la inferior del compartimiento.
Cuando inserte el casete de cinta, asegúrese de que la cinta interior no esté engan-
☞
chada en la esquina de la guía metálica.
5
Cierre la cubierta del compartimiento y conecte la alimentación de la máquina si estaba
desconectada.
6
Mantenga pulsada
con la tensión óptima.
c
y presione
_
una vez para que la cinta avance y así quede
4
Page 90

CONEXIÓN DE LA P-TOUCH A UN PC
Esta máquina dispone de un puerto USB, que le permite conectar la P-touch a su PC compatible con IBM u PC Macintosh, e imprimir etiquetas y sellos creados utilizando el software Ptouch Editor.
Antes de conectar la P-touch al PC o encenderla deberán estar instalados el software P-
☞
touch Editor y el controlador de impresora. Para conectar el software P-touch y el controlador de impresora, siga el procedimiento de instalación de las páginas 7 a 14, y
conecte la P-touch al PC cuando se le pida que lo haga.
Las PT-2300/2310 no incluyen un cable de interface USB. Cuando conecte la P-touch a
un PC, utilice un cable USB estándar (conectores de alta velocidad compatibles con la
serie A y B).
Para conectar la P-touch al PC:
1
Inserte el conector plano (A) del cable USB en el puerto USB del PC.
2
Inserte el conector cuadrado (B) del cable USB en el puerto USB del lado derecho de la P-touch.
3
Encienda la P-touch.
☞
El cable USB que se necesita para conectar la P-touch al PC no está incluido. Asegúrese
de utilizar un cable que cumpla con las siguientes especificaciones.
Clavija serie “A”
sobremoldeada
15.7
A
A
CCC
B
B
Clavija serie “B”
sobremoldeada
C
Detalle A-A
(Clavija
serie “A”)
Protección contra
moldeada opcional
10.5
7.5
12.0 12.0
27.0
32.0
9.0
9.0
los tirones
11.5
Detalle B-B
(Clavija
serie “B”)
5
Page 91

INSTALACIÓN DEL P-TOUCH EDITOR
El software P-touch Editor añade aún más ilustraciones y funciones de diseño a las posibilidades de creación de etiquetas disponibles con su PT-2300/2310.
☞
No conecte la PT-2300/2310 al PC antes de instalar el software P-touch Editor, de lo
contrario, éste podrá no instalarse correctamente. Asegúrese de no conectar la PT-2300/
2310 hasta que se le indique que lo haga.
En un PC compatible con IBM
Para Instalar el Software P-touch Editor:
1
Compruebe que la configuración de su sistema satisface los siguientes requisitos.
PC:
PC IBM o compatible
Sistema operativo:
Espacio libre en el disco duro:
☞
Puede que sean necesarios unos cuantos centenares de megabytes adicionales de espacio
libre en el disco duro cuando se impriman etiquetas largas o grandes cantidades de datos.
☞
Para instalar en Windows® 2000, se requieren privilegios de administrador.
Además, imprimir requiere usuario avanzado o privilegios de administrador.
Este software no se puede utilizar en Grupo de usuarios.
Este software no es compatible con el sistema operativo Windows® 2000 Server.
☞
Con Windows® XP, la impresión e instalación solamente son posibles desde una
cuenta con privilegios de administrador. Estas operaciones no se pueden realizar
desde una cuenta con privilegios limitados.
Memoria disponible:
Monitor:
Puerto USB
Unidad de CD-ROM
2
Introduzca el CD-ROM del P-touch Editor Version 3.1 en la unidad de CD-ROM del PC.
Aparecerá un cuadro de diálogo que le permitirá seleccionar lo que quiera instalar
☞
6
VGA o tarjeta de gráficos superior
Si el cuadro de diálogo no apareciera
automáticamente, haga clic sobre “My
Computer” en el escritorio, y después
doble clic sobre el icono de la unidad de
CD-ROM que contenga el CD-ROM.
(Para Windows® XP, haga clic sobre “My
Computer en el menú” Start, y después
haga doble clic sobre el icon de la unidad
de CD-ROM que contenga el CD-ROM.)
A continuación haga doble clic sobre
“Setup.exe” para visualizar el cuadro de
diálogo.
Microsoft® Windows® 98, 98SE, ME, 2000 Prefessional o XP.
Como mínimo 20 MB
Como mínimo 32 MB
.
Page 92

3
Haga clic sobre el botón superior (P-touch
Editor). Se iniciará el asistente “InstallShield
Wizard” para instalar el software P-touch Editor, y a continuación aparecerá el cuadro de
diálogo “Welcome”.
Para instalar solamente el controlador
☞
de impresora, haga clic sobre el botón
inferior (Printer Driver). Aparecerá el
primer cuadro de diálogo “Driver
Setup”, informándole que se va a instalar el controlador de impresora de la PT2300/2310.
Continúe con el procedimiento “Para
Instalar el Controlador de Impresora
USB:” de la página 9.
4
Lea atentamente el contenido del cuadro de
diálogo y a continuación haga clic sobre el
botón “Next” para continuar. Aparecerá un
cuadro de diálogo “User Information”.
®
5
Ingrese la información necesaria en los
cuadros apropiados (Si la información ya ha
sido registrada en Windows
®
, aparecerá
automáticamente.), y a continuación haga clic
sobre el botón “Next”. Aparecerá un cuadro
de diálogo pidiéndole que confirme la información ingresada.
7
Page 93

6
Haga clic sobre el botón “Yes” para registrar la
información ingresada. Aparecerá un cuadro
de diálogo “Setup Type”.
☞
Para cambiar la información, haga clic
sobre el botón “No” y a continuación
vuelva al paso 5.
7 Seleccione el método de instalación y a con-
tinuación haga clic sobre el botón “Next”.
• Para una Instalación “Typical” o “Compact”
Seleccione “Typical” o “Compact”, y a
continuación haga clic sobre el botón
“Next”, comenzará inmediatamente la
instalación.
Typical: Se instalan todas las opciones bási-
cas (P-touch Editor Version 3.1,
clips de arte, plantillas Auto Format, Ayuda, y 13 fuentes).
Compact: Solamente se instala el P-touch
Editor Version 3.1.
• Para una Instalación “Custom”
Al seleccionar “Custom”, y a continuación
hacer clic sobre el botón “Next”, aparecerá un cuadro de diálogo que le permite
seleccionar las opciones que quiera instalar. Solamente se instalarán las opciones
que tengan una marca de verificación
junto a ellas. Además de las opciones básicas listadas para una instalación “Typical”,
también se puede instalar la guía de
usuario “User’s Guide”.
8
Page 94

1) Seleccione las opciones que quiera instalar.
Editor: El software P-touch Editor Version 3.1
Clip Art: Las ilustraciones para la función Clip Art del P-touch Editor Ver-
sion 3.1
Font: Las 13 fuentes Auto Format Templates:
Las plantillas para la función de autoformato
User’s Guide: La Guía de Usuario (HTML) para el P-touch Editor Version 3.1 (La
Guía de Usuario también se puede ver desde el CD-ROM.)
Help: Los archivos de ayuda para el P-touch Editor Version 3.1
Si se puede hacer clic sobre el botón “Change” mientras se selecciona una opción,
se podrán seleccionar subcomponentes. Haga clic sobre el botón “Change” para
visualizar el cuadro de diálogo “Select Sub-components” y a continuación seleccione los subcomponentes que desee instalar poniendo una marca de verificación
junto a ellos. Si ciertas opciones o subcomponentes no están instalados, algunas
funciones del P-touch Editor podrán no estar disponibles. Una vez seleccionados
los subcomponetes deseados, haga clic sobre el botón “Continue”.
2) Haga clic sobre el botón “Next” para comenzar la instalación.
8 Después de instalar el P-touch Editor, apare-
cerá un cuadro de diálogo que le permitirá
seleccionar si quiere o no instalar el controlador de impresora.
Para instalar el controlador de impresora, haga
clic sobre el botón “Yes”. Aparecerá el primer
cuadro de diálogo “Driver Setup”, informándole que se va a instalar el controlador de
impresora de la PT-2300/2310.
Continúe con el procedimiento “Para instalar
el controlador de impresora USB” de más
adelante.
Si el controlador de impresora ya está instalado,
haga clic sobre el botón “No”, reinicie el PC, y a
continuación extraiga el CD-ROM de la unidad
de CD-ROM.
Para Instalar el Controlador de Impresora USB:
Con Plug-and-Play, el PC detecta los nuevos dispositivos conectados al sistema, y sus controladores se instalan automáticamente. Si la PT-2300/2310 va a ser conectada a través de un puerto
USB, su controlador será instalado con Plug-and-Play. Asegúrese de leer las instrucciones de instalación descritas más abajo antes de instalar el archivo suministrado en el CD-ROM.
☞ No conecte la P-touch 2300/2310 al PC hasta que se le pida que lo haga, de lo con-
trario, el controlador de impresora PT-2300/2310 podrá no instalarse correctamente.
9
Page 95

Con Windows® 98/98SE/ME/2000:
1 Haga clic sobre el botón “Next”. Aparecerá un
cuadro de diálogo indicándole que conecte la
PT-2300/2310 al PC.
2 Conecte la PT-2300/2310 al PC utilizando el
cable de interface USB suministrado como se
describe en la página 5, y a continuación
encienda la PT-2300/2310. Aparecerá un
cuadro de diálogo mostrándole que el controlador de impresora ha sido instalado.
3 Haga clic sobre el botón “Finish”. Aparecerá
un cuadro de diálogo mostrándole que la
instalación ha terminado.
4 Seleccione “Yes, I want to restart my computer
now”, haga clic sobre el botón “Finish” para
reiniciar el PC y a continuación extraiga el
CD-ROM del PC.
10
Page 96

Con Windows® XP:
1 En el cuadro de diálogo que aparece,
informándole de que se va a instalar el controlador de impresora PT-2300/2310, haga
clic sobre el botón “Next”.
2 Cuando aparezca el cuadro de diálogo,
indicándole que conecte la P-touch 2300/
2310 y que la encienda, conecte la P-touch
2300/2310 al PC utilizando el cable de interface USB suministrado como se describe en
las página 5, y después encienda la P-touch
2300/2310.
3 En el primer cuadro de diálogo “Found New
Hardware Wizard” que aparece, seleccione
“Install the software automatically
(Recomended)”, y después haga clic sobre el
botón “Next”.
4 Si aparece un cuadro de diálogo de aviso
indicando que el software no ha pasado la
prueba del logotipo Windows, simplemente
continúe con la instalación.
11
Page 97

5 En el cuadro de diálogo “Found New Hard-
ware Wizard” que aparece, indicando que la
instalación del PT-2300/2310 y de “Found
New Hardware Wizard” han finalizado,
haga clic sobre el botón “Finish”.
6 En el cuadro de diálogo que aparece, indi-
cando que la instalación del PT-2300/2310
ha finalizado, seleccione “Yes, restart immediatelly.”, y después haga clic sobre el botón
“Finish”. Después de que se haya reiniciado
el PC, la instalación se habrá completado
totalmente.
7 Extraiga el CD-ROM del PC.
Lectura de la Guía del Usuario
La Guía de usurario del P-touch Editor puede leerse introduciendo el CD-ROM en la unidad
cada vez que desee consultarla o bien instalándola en el disco duro para tenerla disponible
rápidamente en cualquier momento. Dado que la Guía del usuario es un documento HTML,
es necesario un navegador para poder leerla.
• Desde el CD-ROM:
1 Inicie el Windows Explorer. 2 Seleccione la unidad de CD-ROM. 3 Haga doble clic sobre “Main.htm” en la carpeta “Manual” que hay dentro de la car-
peta “Ptouch” del CD-ROM.
• Desde la ventana de grupo P-touch Editor 3.1:
● Haga doble clic sobre el icono “The User’s Guide P-touch Editor Ver 3.1”.
• Con el botón “Start”:
1 Haga clic sobre el botón “Start” en la barra de tareas para visualizar el menú de inicio. 2 Seleccione “Programs”. 3 Seleccione “P-touch Editor 3.1”. 4 Haga clic sobre “The User’s Guide P-touch Editor Ver 3.1”.
12
Page 98

Para Sustituir, Agregar o Eliminar el Controlador de Impresora:
1 Apague la PT-2300/2310, y después desconéctela del PC. 2 Introduzca el CD-ROM del P-touch Editor Ver-
sion 3.1 en la unidad de CD-ROM del PC.
Aparecerá un cuadro de diálogo que le permitirá seleccionar lo que quiera instalar.
☞
Si el cuadro de diálogo no apareciera
automáticamente, haga clic sobre “My
Computer” en el escritorio, y después
doble clic sobre el icono de la unidad de
CD-ROM que contenga el CD-ROM.
(Para Windows
Computer en el menú” Start, y después
haga doble clic sobre el icon de la unidad
de CD-ROM que contenga el CD-ROM.)
A continuación haga doble clic sobre “Setup.
exe” para visualizar el cuadro de diálogo.
3
Haga clic sobre el botón inferior (Printer
Driver). Aparecerá un cuadro de diálogo
“Driver Setup” que le permitirá seleccionar si
quiere sustituir, agregar o eliminar el controlador de impresora de la PT-2300/2310.
4 Seleccione la operación deseada y a continu-
ación haga clic sobre el botón “Next”.
☞
Si se selecciona “Replace with new Brother
PT-2300/2310”, el controlador de impresora
que haya sido instalado antes será eliminado
y sustituido con uno nuevo. Seleccione esta
opción cuando quiera actualizar un controlador de impresora, o cuando esté trabajando con
Windows 2000/XP y cambiando a una PT-2300/2310 con diferente número de serie.
Si se selecciona “Add Brother PT-2300/2310”, se agregará un nuevo controlador de
impresora. Con una conexión USB en Windows
nuevo puerto sin agregarlo como impresora nueva. Seleccione esta opción cuando
conecte o utilice múltiples PT-2300/2310 con el mismo PC.
5
Si se seleccionó “Replace with new Brother PT2300/2310” o “Add Brother PT-2300/2310”:
Con Windows® 98/98SE/ME/2000:
Aparecerá un cuadro de diálogo indicándole
que conecte la PT-2300/2310 al PC.
®
XP, haga clic sobre “My
®
98/Me, solamente se añadirá un
13
Page 99

Conecte la PT-2300/2310 al PC utilizando el
cable de interface USB suministrado como se
describe en la página 5, y a continuación
encienda la PT-2300/2310. Aparecerá un
cuadro de diálogo mostrándole que el controlador de impresora ha sido instalado.
Seleccione “Yes, restart immediatelly” y a
continuación haga clic sobre el botón “Finish”
para reiniciar el PC.
Con Windows
®
XP:
En el primer cuadro de diálogo “Found New Hardware Wizard” que aparece, seleccione “Install the
software automátically (Recomended)”, y después
haga clic sobre el botón “Next”.
Si aparece un cuadro de diálogo de aviso indicando que el software no ha pasado la prueba del
logotipo Windows, simplemente continúe con la
instalación.
En el cuadro de diálogo “Found New Hardware
Wizard” que aparece, indicando que la instalación del PT-2300/2310 y de “Found New Hardware Wizard” han finalizado, haga clic sobre el
botón “Finish”.
14
Page 100

En el cuadro de diálogo que aparece, indicando
que la instalación ha finalizado, seleccione “Yes,
restart immediatelly.”, y después haga clic sobre
el botón “Finish”. Se reiniciará el PC.
Extraiga el CD-ROM del PC.
Si se seleccionó “Delete Brother PT-2300/2310”:
Aparecerá un cuadro de diálogo pidiéndole que
confirme que quiere eliminar todos los controladores de impresora PT-2300/2310.
Haga clic sobre el botón “Yes”. Aparecerá un
cuadro de diálogo mostrándole que los controladores de impresora han sido eliminados.
☞ Haga clic sobre el botón “Finish”. Si
aparece un cuadro de diálogo explicando
que el PC ha de ser reiniciado, seleccione
la opción para reiniciarlo y a continuación
haga clic sobre el botón “Finish”.
15
 Loading...