

Page 1

MODELS 15WH • 15BL • 15SS • 15WT • 15TT
Trash Compactor
Installation, Use & Care Guide
READ AND SAVE THESE INSTRUCTIONS
Page 1
IMPORTANT SAFEGUARDS
READ ALL INSTRUCTIONS CAREFULLY BEFORE OPERATING
COMPACTOR.
Basic precautions should always be taken when using an electrical
appliance – including the following:
1. Close supervision is necessary when any appliance is
operated near children. Do not allow the appliance to be
used as a toy, or to run unattended at any time. Turn key to
“OFF” and remove it to lock the compactor. Store the key
out of reach to prevent children or others from operating or
tampering with the compactor.
2. Do not push trash into compactor drawer with hands or
feet. Trash might contain broken glass, sharp pieces of
metal, etc., which would cause injury.
3. Do not compact volatile material. Paint, oily rags, lighter fluid
cans, and paint thinner cans could combust spontaneously
and cause an explosion and/or fire.
4. Do not compact aerosol cans or any other containers still
holding toxic chemicals, insecticides, or combustible
contents. Fumes may be released which are hazardous to
health.
5. Do not compact lighted cigarettes, cigars, or other hot or
burning items.
6. Do not overload the compactor.
7. Be careful when removing and carrying bag. Broken glass or
other sharp objects may pierce bag. Do not overload trash
bag with heavy material such as glass.
8. Do not operate this unit with an extension cord.
9. Use only Broan approved accessories.
10. Do not touch moving parts.
11. Do not take this appliance apart. Incorrect reassembly can
cause electrical shock when operated.
12. Do not operate with a damaged power cord, plug, motor, or
after damage of any kind. Have the compactor examined,
and all repairs made, by an authorized serviceman.
13. This compactor is FOR HOUSEHOLD USE ONLY. Use it
only as described in this manual.
14. Unplug the appliance from outlet before servicing.
GROUNDING INSTRUCTIONS
IMPORTANT: TO REDUCE THE RISK OF ELECTRIC SHOCK - PLEASE
READ CAREFULLY.
FOR PERSONAL SAFETY, THIS APPLIANCE MUST BE
PROPERLY GROUNDED. The power cord on this appliance is
equipped with a three-prong (grounding) plug which mates with a
standard three-prong (grounded) receptacle as illustrated above.
If there is a two-prong outlet located where you will install the
compactor, it is your responsibility to have it replaced with a
properly grounded three-prong wall receptacle. No adapter shall
be used with this product.
DO NOT, UNDER ANY CIRCUMSTANCES, CUT OR REMOVE THE
THIRD (GROUND) PRONG FROM THE POWER CORD PLUG.
The GREEN (or GREEN & YELLOW) conductor in the cord is
the grounding wire. Never connect the GREEN (or GREEN &
YELLOW) wire to a live terminal.
A 120 volt, 60 Hz., A.C., 15 amp fused and grounded electrical
supply is required (time-delay fuse or circuit breaker is
recommended). It is recommended that a SEPARATE CIRCUIT
serving only this appliance be provided.
DO NOT USE AN EXTENSION CORD WITH THIS APPLIANCE.
Page 2

MODELS 15WH • 15BL • 15SS • 15WT • 15TT
Opening
15" Wide
34-1/2" High
22" Deep
Page 2
TABLE OF CONTENTS
SECTION PAGE
INSTALLATION
Unpacking the Trash Compactor ............... 2
Free Standing ........................................ 2
Built-in Installations ............................... 2
Leveling the Compactor ........................... 3
Reversing the Door (optional) ............... 3, 4
Installation
Tile and Wood Door Assembly .................. 4
PREPARATION
1. How the Compactor Works .................. 5
2. Use of Key Lock Switch ...................... 6
3. Install Odor Control Disk ..................... 6
4. Install Bag ......................................... 6
5. Cutting Board (optional) ...................... 6
OPERATION
6. Compacting ........................................ 7
7. Compacting Tips ................................. 7
8. Bag Removal ...................................... 7
MAINTENANCE
9. Cleaning ........................................ 8, 9
10. Troubleshooting ................................ 9
11. Warranty ....................................... 10
BUILT-IN INSTALLATIONS
MOUNTING STRAPS
TOP OF
COMPACTOR
FRONT OF
COMPACTOR
Two under-counter mounting straps are provided. Use
these straps to secure the compactor to the underside of
a countertop. Fasten the slotted end of the straps to the
compactor using the holes in the top of the compactor
cabinet as shown.
NOTE: When installing compactor under granite or solidsurface countertops, bend the mounting straps so they can
be secured to the adjacent cabinetry.
15” W
22” D
34½” H
UNPACKING THE TRASH
COMPACTOR
The trash compactor is shipped from the factory with
packing material in the trash bucket and the ram in the down
position. Return the ram to the up position by plugging the
unit in, turning the key lock switch to the “ON” position
and closing the door. Once the door is closed the unit will
run and the ram will travel to the “UP” position. Open the
trash bucket and remove the packing material.
Your Broan Elite Compactor has been designed to require
minimum space without loss of capacity whether freestanding or built-in.
FREE-STANDING
As shipped, the Compactor is only configured for built in
installations. This appliance can be converted from builtin to free-standing with the use of Toe Kick Accessory Kit
Model 15TCTK (sold separately). If additional cord length
is required for free-standing installation, remove the cord
clamp and wire tie on the back of the unit.
CAUTION: Failure to use Toe Kick Accessory Kit Model
15TCTK in a free-standing installation may cause the
compactor to be unstable during operation.
ELECTRICAL
OUTLET
12” MIN.
UNDER-COUNTER OPENING
The compactor requires a minimum under-counter opening
15-in. wide, 34½-in. high, and 22-in. deep.
Plan to provide an electrical
outlet in the opening that
meets all applicable electrical
codes and requirements. See
“Grounding Instructions”
section on Page 1 for specific
information.
CORD CLAMP
The compactor is equipped
with a 6-ft. long power cord.
Use the cord clamp to prevent
excess power cord from being
pinched beneath the cabinet
during installation or service.
CORD
CLAMP
Page 3

MODELS 15WH • 15BL • 15SS • 15WT • 15TT
Page 3
LEVELING THE COMPACTOR
Your compactor has four adjustable levelers; (2) rollers in
the rear and (2) legs in the front. They allow you to adjust
for uneven floors and also trim the unit up to fit an undercounter installation.
BACK OF
COMPACTOR
ADJUSTING
SCREWS
ROLLERS
To level the back of the compactor:
Tip the back of compactor up and onto a wood block. Loosen
the adjusting screws only far enough to move the rollers to
a higher or lower slot. Retighten the adjusting screws and
remove the wood block.
SLOTS
WOOD
BLOCK
REVERSING THE DOOR (optional)
Door Reversal Instructions for all doors (except
wood and tile).
As shipped, the compactor door is hinged on the right
(when looking at the unit).
DOOR
LOWER HINGE
BRACKET
SCREWS
To change door to be hinged on the left:
1. With the door closed, use a 3/16” allen wrench to
remove the lower hinge pin.
2. Carefully remove door by opening and sliding the
bottom of the door away from the cabinet.
3. Use a 3/16” allen wrench to remove the lower hinge
bracket from the cabinet (2 screws).
LOWER
HINGE PIN
Installation
FRONT OF
COMPACTOR
WOOD
BLOCK
LEVELING
LEGS
To level the front of the compactor:
Tip the front of compactor up and onto a wood block. Turn
the leveling legs in or out to the desired position. Remove
the wood block.
4. Turn the bracket over and install the
bracket on the opposite side of the
cabinet using the same screws.
TRIM PIECE
UPPER
HINGE
PIN
5. Use a screwdriver to remove the upper hinge pin from the
trim piece and reinstall the pin on the opposite side.
Page 4

CAP
BUSHING
Installation
DOOR
6. Being careful not to scratch the door, remove the
plastic door bushing and cap from the top and bottom
of the door using a small flat screwdriver. Install the
bushings on the side of the door panel that will be
hinged and install the cap on the opposite side.
7. Install the door on the cabinet by inserting the upper
hinge pin into the upper door bushing while moving the
door into place. Insert the lower hinge pin from Step 1
and tighten securely.
TILE AND WOOD DOOR
ASSEMBLY
Use the following instructions if you have a trash
compactor with a tile or wood door kit.
It is recommended you remove the door pan from the
compactor to install the custom tile or wood panel.
To remove door pan:
DOOR
PAN
LOWER HINGE
BRACKET
SCREWS
1. Use a 3/16” allen wrench to remove the lower hinge
bracket from the cabinet (2 screws).
2. Remove the door pan from the cabinet.
MODELS 15WH • 15BL • 15SS • 15WT • 15TT
Page 4
3. Consider where
the compactor
will be installed
and determine
whether to
hinge the door
on the left or
right side of the
cabinet. Since
the hinge pins
are permanently
attached to the
door pan, simply rotate the door pan until the hinge
pins are on the desired side. You may want to mark the
inside of the door pan to indicate the top.
4. To prevent damage to the
actuator on the back of door,
remove the (2) screws that
hold it in place. Save the
actuator and screws.
ACTUATOR
For wood door:
5. The wood door pan is designed
to accommodate a ¾” thick
wood panel that is 14-7/8”
wide by 29-1\4” tall. It is
recommended that you verify
the height of the
door pan prior to
cutting the wood
panel to size.
Center the door
pan on the wood
panel and fasten
together using
hardware provided
in the compactor
parts bag.
For tile door:
5. The tile door
pan comes
preassembled with cement backer board. Tile and
grout the door pan using traditional tiling methods and
materials.
6. Purchase a door handle to match your cabinet
hardware and install per handle instructions.
7. If the door will be hinged on the left side of the
compactor, it will be necessary to reverse the lower
hinge bracket removed in Step 1. Remove the plastic
bushing from the hinge bracket and install on the
opposite side of the bracket. Install the door onto the
compactor cabinet by reversing the procedure from
Step 1.
8. Re-install the actuator removed in Step 4. Make sure
the door opens and closes smoothly with the actuator
entering and exiting the door interlock switch on the
compactor.
DOOR
BUSHING
SCREWS
BACK
OF
DOOR
LOWER
HINGE
BRACKET
Page 5

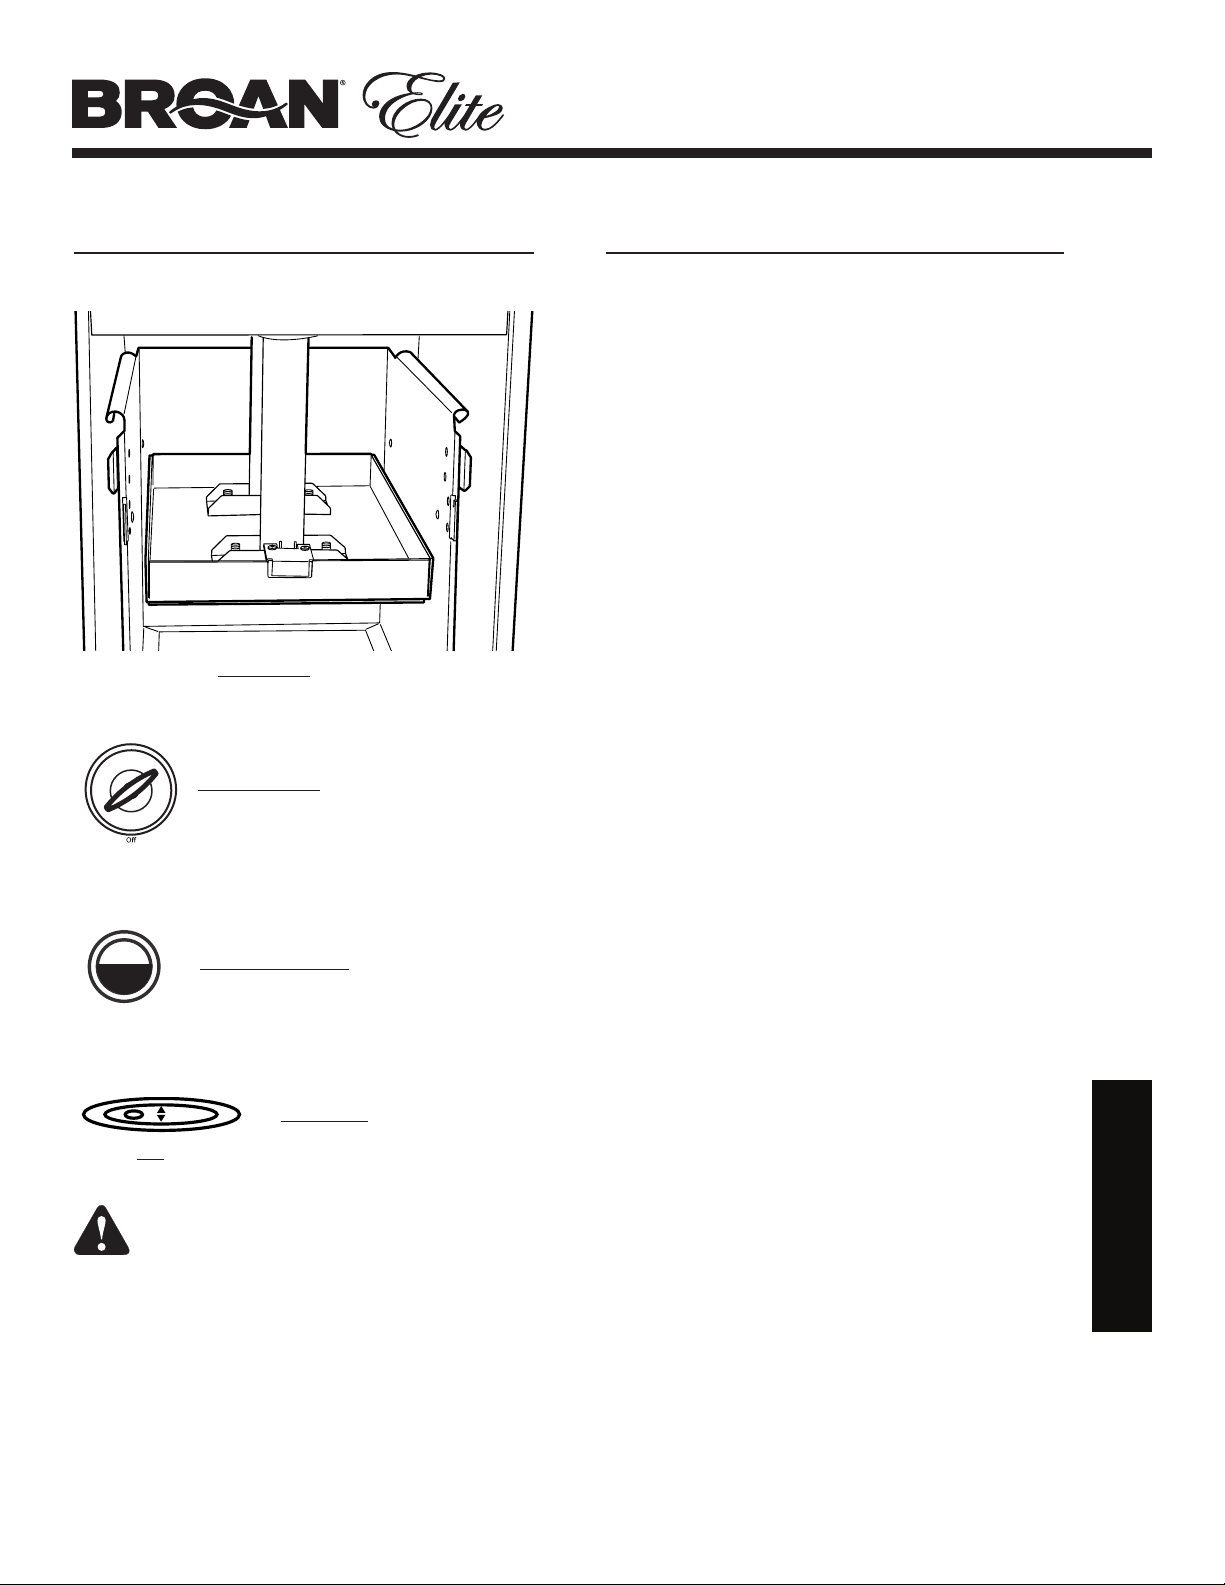
Start Button (with Ram Status LED)
Door Interlock
Interlock Actuator
Key Lock
Compact Mode Switch
Bag Storage Area
Odor Disk
Ram
Compaction Plate Release Tab
Compaction Plate
Trash Bucket Latches (2)
MODELS 15WH • 15BL • 15SS • 15WT • 15TT
Page 5
Preparation
Sliding Trash Bucket
Leveling Rollers
Leveling Legs
1. HOW THE COMPACTOR WORKS
The Broan compactor compresses household trash up to
1/6 of its original volume. It will compact normal household
trash including milk cartons, glass and plastic bottles,
containers and jars, tin cans, wrappings, boxes, food wastes,
etc.
When you start the compactor, an electrically powered
ram moves down into the trash bucket, compresses the
trash and then returns to the “UP” position and shuts off
automatically.
NOTE: The ram travels about 2/3 of the way down into the
trash bucket. Because of this, the trash bucket must be at
least 1/3 full before you will notice any compression.
Page 6

MODELS 15WH • 15BL • 15SS • 15WT • 15TT
Compact Mode
On
Normal
Hold
Compact Mode
Normal
Hold
Compact Mode
On
Normal
Hold
Page 6
2. USE OF KEY LOCK SWITCH
The key lock switch on your compactor is provided for your
protection as a safety measure.
When the key lock switch is in the “OFF”
position, the compactor will not operate.
Lock your compactor, and remove the key
to keep children from operating the unit or
to prevent anyone from tampering with it.
When the key lock switch is in the “ON”
position, the compactor is ready for
operation. The key cannot be removed
when in the “ON” position.
NOTE: Opening the door during operation will stop the
unit. If the compactor is stopped during its cycle, it will
always move back UP when the door is closed.
Preparation
3. INSTALL ODOR CONTROL DISK
Your Compactor is equipped with an odor control disk
that will last up to six months when installed in the trash
compactor. The odor disk comes packaged in a foil pouch
and is activated once the pouch is opened.
Write dates on the odor disk labels in this manner:
• When pouch is opened, write the “Activation Date” on top of disk
in space provided.
• Write dates on the GREEN month indicator labels in this manner:
Month 1 Label “Advance Date” = 1 month from “Activation Date”
Month 2 Label “Advance Date” = 2 months from “Activation Date”
Month 3 Label “Advance Date” = 3 months from “Activation Date”
Month 4 Label “Advance Date” = 4 months from “Activation Date”
Month 5 Label “Advance Date” = 5 months from “Activation Date”
• Write date on the RED month indicator label in this manner:
Month 6 Label “Replacement Date” = 6 months from “Activation
Date”
Caution: The odor control disk contains material that may
cause moderate eye irritation. Avoid contact with eyes.
Harmful if swallowed. Wash skin or clothing thoroughly
with soap and water after handling. Do not reuse empty
foil pouch.
After a month has
passed, rotate the
disk from right to
left with your finger.
Repeat every
month.
On the 6th month,
the label in the
window will be RED
- indicating that the
odor disk needs to be replaced after 30 days.
Odor disk, Model 15TCOD, is available from your Broan
Distributor.
4. INSTALL BAG
With the door open
and the trash bucket
extended to the furthest
position, place a bag
into the bucket. Fold
the bag over the top
rim of the bucket, on
all sides.
Press the bag into all
corners of the bucket
and smooth the bottom.
Smooth and shape the
bag carefully - this will
prevent the bag from
being torn by the ram
during compaction.
Secure the bag in
place over the 2
buttons on each side
of the bucket. The bag
has prepunched slots
for this purpose.
Remove the disk
from the foil
5. CUTTING BOARD (optional)
pouch, swing
open the odor disk
door, and place
disk face down on
tray so that the
GREEN Month
“1” is visible in
the window when
the odor disk door
is closed.
If your compactor will not be installed under a counter you can order an optional cutting board, Model 15TCBB,
from your Broan Distributor.
The cutting board rests on the top of the compactor, and
features non-marring rubber feet and a gravy groove on the
top.
To keep your wood cutting board from warping, wash with a
mild detergent and apply a thin coat of mineral oil.
Page 7

MODELS 15WH • 15BL • 15SS • 15WT • 15TT
Compact Mode
Normal
Hold
Compact Mode
Normal
Hold
Compact Mode
Normal
Hold
Compact Mode
On
Normal
Hold
Page 7
6. COMPACTING
The compactor is now ready to use.
1. Slide trash bucket closed completely.
2. Turn Key Lock Switch to “ON” position.
3. Select 1 of the 2 compact modes:
4. Close the door.
5. Press the “Start” button at the top-center of the
6. The compacting cycle may be stopped at any time
FOR BEST RESULTS, ALWAYS FILL
EACH NEW BAG COMPLETELY BEFORE
OPERATING THE COMPACTOR. DOING
SO WILL MINIMIZE BAG PULL-UP AND
TEARING.
Key Lock Switch
Normal Compact Mode
After the door is closed and the “Start”
button is pressed - the ram will travel
downward into the trash bucket and
compact the trash. At the bottom of
the ram stroke, the ram automatically
reverses and moves upward out of the
trash bucket. Total cycle time will be 45
seconds or less. At the top of the stroke,
the compactor automatically shuts itself
off and is ready to receive more trash.
Hold Compact Mode
After the door is closed and the “Start”
button is pressed - the ram will travel
downward into the trash bucket and
compact the trash. This setting is helpful
for compressing trash completely to
allow for greater capacity. At the bottom
of the ram stroke, the ram will shut off.
Press the “Start” button again to reverse
the ram upward out of the trash bucket.
At the top of the stroke, the compactor
automatically shuts itself off and is ready
to receive more trash.
unit to begin compacting. The compactor will
automatically shut itself off when the compaction
cycle is completed. The “Ram Status LED” is
GREEN when the ram is in the up position and
ready to receive trash. The LED will turn RED when
the ram is moving or stopped in any other position.
Start Button
Ram Status LED
by opening the door. Once stopped, the ram will
always move upward when the door is closed.
7. COMPACTING TIPS
• Although it is not necessary to compact until the drawer is full or
nearly so, it is suggested that for maximum compaction, you start the
compactor each time a significant amount of trash is added.
• At full stroke, the ram does not travel all the way to the bottom of the
trash bucket. Trash in the bottom 1/3 of the bucket will be crushed
during subsequent compacting.
• Glass bottles can make a loud noise when they break during
compaction. This is normal. Bottles do not always break during the first
cycle. Breaking glass and associated noise may occur several cycles
later depending on type and volume of trash.
• Bottles and large cans compact best when laid flat near the center of
the trash bucket.
• Place a couple of folded sheets of newspaper, or a large paper grocery
bag on top of the load to be compacted when :
compacting large or several glass bottles or jars (or any
•
items that might shatter). This will help prevent glass
fragments and particles from flying out of bucket into
mechanism.
compacting unwrapped messy food waste. This will
•
help keep the power ram clean.
• Compacting extreme uneven loads may cause the trash bucket to shift
forward which may cause the door to open and interrupt the compaction
cycle. Gently push and hold door closed to activate the ram until it
returns to the up position. Open the trash bucket and reposition any
objects that may be causing the uneven load. Close the door and reactivate the compaction cycle by pressing the start button.
• There are certain types of trash that create exceptionally strong odors
such as raw meat, fish, grapefruit rinds, personal hygiene items, and
disposable diapers. You may not wish to put such items into your
compactor.
• If the compactor will not be used for an extended period of time, such
as during vacation, remove the bag to prevent a build-up of undesirable
odor.
CAUTION: DO NOT COMPACT AEROSOL CANS OR ANY OTHER
CONTAINERS STILL HOLDING OR WHICH HELD TOXIC CHEMICALS,
INSECTICIDES, OR COMBUSTIBLE CONTENTS. FUMES MAY BE
RELEASED THAT ARE HAZARDOUS TO HEALTH OR MAY RESULT IN
FIRE OR EXPLOSION.
Do not put paint, oily rags, lighter fluid cans, paint thinner cans,
etc., in your compactor. Doing so could result in spontaneous
combustion causing a fire and/or explosion.
NEVER PUSH TRASH INTO THE BUCKET WITH HANDS OR FEET.
Trash might contain broken glass, sharp pieces of metal, etc.,
which could cause injury.
8. BAG REMOVAL
1. Slide out trash bucket.
2. Release bucket latches
and lower front of bucket.
3. Unbutton bag from bucket
and close by twisting bag
top. Fasten with twist-tie
provided.
4. Lift and slide bag from
bucket.
Operation
Page 8

MODELS 15WH • 15BL • 15SS • 15WT • 15TT
EXCEPT FOR CLEANING DESCRIBED IN THE FOLLOWING SECTION, ALL SERVICE SHALL BE PERFORMED BY AN AUTHORIZED
SERVICE REPRESENTATIVE.
9. CLEANING
Your compactor has been designed with easy access for
cleaning when required.
The interior and exterior of the cabinet are finished with a
durable baked-on enamel finish.
Do not use harsh or gritty cleanser or scouring pads
which may mar the finish of the compactor. Use a mild
detergent solution on these surfaces.
CAUTION: Glass fragments and other sharp trash
pieces may be on or around the surfaces to be
cleaned. Carefully remove these objects before
wiping down any surfaces.
REMOVE TRASH BUCKET
AND CLEAN INTERIOR
1. Pull out trash bucket until it stops.
2. Remove (1) screw from each of the bucket slides.
3. Press down on left and right bucket slide release tabs
while pulling the bucket out of the unit.
4. Vacuum and clean cabinet base, track channels, and
bucket, particularly in corners.
5. Wash the cabinet interior with a mild detergent
solution.
6. When finished cleaning the cabinet, install the trash
bucket by reversing steps 2 and 3.
CLEAN COMPACTION PLATE
Page 8
Maintenance
1.
2.
3.
BUCKET SLIDE
RELEASE TAB
SCREW
RAM
RELEASE
TAB
COMPACTION
PLATE
1. The ram is equipped with a compaction plate that can
be removed for easy cleaning.
2. Make sure the trash bucket is empty and without a
bag.
3. Push the trash bucket into the cabinet. Unlatch and
lower the bucket front.
4. Press the compaction plate release tab on the front
of the ram to disengage the plate. The plate can be
removed by pulling down and away from the ram.
5. Once removed the compactor plate can be washed in
a mild detergent solution or placed in a dishwasher.
6. Re-install the compactor plate by inserting the tab
(on the rear of the plate) into the slot (at in the rear
of the ram). Press up on the front of the plate until it
securely latches in place.
Page 9
MODELS 15WH • 15BL • 15SS • 15WT • 15TT
Compact Mode
Normal
Hold
Compact Mode
Normal
Hold
Compact Mode
On
Normal
Hold
Page 9
9. CLEANING (continued)
CLEAN RAM
1. Make sure the trash bucket is empty and pushed into
2. Turn the Key Lock Switch to “ON” position.
3. Select the “Hold” compact mode.
4. Close the door.
5. Press the “Start” button.
The ram will travel downward into the trash bucket and
6. Open the door. Unlatch and lower the bucket front.
7. When finished cleaning:
TRASH
BUCKET
RAM
the cabinet.
Key Lock Switch
Hold Compact Mode
Start Button
stop at the bottom of its stroke.
CAUTION: Glass fragments and other sharp trash
pieces may be on or around the surfaces to be
cleaned. Carefully remove these objects before
wiping down any surfaces.
Vacuum top of ram and clean with a mild detergent
solution.
Raise and re-latch bucket front, close door, and press
“Start” button. The ram will return to the top of its
stroke and automatically shut itself off. Open door,
slide bucket out, install bag, and select compact
mode. Compactor is now ready to receive trash.
10. TROUBLESHOOTING
Before you call for service, check these handy hints which
may save you the cost of a service call:
1. Is electric cord plugged in securely?
2. Has a house fuse blown or a circuit breaker tripped?
3. Is the door pushed firmly shut?
4. Is the key switch in the “ON” position?
5. Did you press the “Start” button long enough to start
the compaction cycle?
6. If trash bucket is difficult to close, check to see if any
trash has fallen behind the bucket - preventing it from
closing completely.
7. The motor has an automatic thermal cutout. If you
have compacted repeatedly, this protector may have
opened the circuit. Wait a few minutes and the cutout
will reset automatically.
8. The trash bucket must be at least 1/2 full of trash
before any appreciable amount of compacting will
be apparent - as the ram does not travel all the way
to the bottom of the bucket. Trash in the bottom 1/3
of the bucket will be crushed during subsequent
compacting.
9. On rare occasions, a large can placed near the outer
edge of the trash bucket may become wrapped around
the edge of the ram. This could interfere with proper
ram operation. To correct, simply open the door,
unlatch and open the front of the bucket, and remove
the can. BE CAREFUL WHEN HANDLING SHARP
OBJECTS!
10. In the unlikely event that the interlock actuator (on the
inside of the door) breaks off, the compactor will not
operate. DO NOT ATTEMPT TO OPERATE COMPACTOR
IN ANY OTHER MANNER. A replacement actuator can
be ordered from your Broan Distributor.
11. To obtain service, provide the unit model number,
serial number and nature of any defect in the product
or part. The model number, serial number and all other
data is shown on the model plate, which is located on
the inside wall of cabinet. When requesting warranty
service, evidence of the original purchase date must be
presented. To obtain the name of the warranty service
center serving your location, contact the dealer who
sold you your compactor or Broan-NuTone LLC.
Maintenance
Page 10

11. WARRANTY
BROAN-NUTONE ONE YEAR LIMITED WARRANTY
Broan-NuTone warrants to the original consumer
purchaser of its products that such products will be
free from defects in materials or workmanship for a
period of one year from the date of original purchase.
THERE ARE NO OTHER WARRANTIES, EXPRESS
OR IMPLIED, INCLUDING, BUT NOT LIMITED TO,
IMPLIED WARRANTIES OF MERCHANTABILITY OR
FITNESS FOR A PARTICULAR PURPOSE.
During this one-year period, Broan-NuTone will, at its
option, repair or replace, without charge, any product
or part which is found to be defective under normal use
and service.
THIS WARRANTY DOES NOT EXTEND TO
FLUORESCENT LAMP STARTERS AND TUBES.
This warranty does not cover (a) normal maintenance
and service or (b) any products or parts which have
been subject to misuse, negligence, accident,
improper maintenance or repair (other than by BroanNuTone), faulty installation or installation contrary to
recommended installation instructions.
The duration of any implied warranty is limited to the
one-year period as specied for the express warranty.
Some states do not allow limitation on how long an
implied warranty lasts, so the above limitation may not
apply to you.
BROAN-NUTONE’S OBLIGATION TO REPAIR OR
REPLACE, AT BROAN-NUTONE’S OPTION, SHALL
BE THE PURCHASER’S SOLE AND EXCLUSIVE
REMEDY UNDER THIS WARRANTY. BROANNUTONE SHALL NOT BE LIABLE FOR INCIDENTAL,
CONSEQUENTIAL OR SPECIAL DAMAGES ARISING
OUT OF OR IN CONNECTION WITH PRODUCT USE
OR PERFORMANCE. Some states do not allow the
exclusion or limitation of incidental or consequential
damages, so the above limitation or exclusion may
not apply to you. This warranty gives you specic legal
rights, and you may also have other rights, which vary
from state to state. This warranty supersedes all prior
warranties.
To qualify for warranty service, you must (a) notify
Broan-NuTone at the address or telephone number
below, (b) give the model number and part identication
and (c) describe the nature of any defect in the product
or part. At the time of requesting warranty service, you
must present evidence of the original purchase date.
Broan-NuTone LLC Hartford, Wisconsin
www.broan.com 800-558-1711
Broan-NuTone Canada Mississauga, Ontario
www.broan.ca 877-896-1119
MODELS 15WH • 15BL • 15SS • 15WT • 15TT
Page 10
Warranty
99526805A
Page 11

MODÈLES 15WH • 15BL• 15SS• 15WT • 15TT
Guide d’installation et
d’utilisation du compacteur à déchets
LIRE CES DIRECTIVES ET LES CONSERVER
Page 11
CONSIGNES DE
SÉCURITÉ IMPORTANTES
LIRE ATTENTIVEMENT CES INSTRUCTIONS AVANT D’UTILISER LE
COMPACTEUR
Des précautions élémentaires devraient toujours être prises lors de
l’utilisation d’un appareil électrique, dont celles-ci :
1. Une étroite surveillance est nécessaire lorsqu’un enfant utilise un
appareil électrique. Ne pas permettre que l’appareil soit utilisé
comme un jouet ni le laisser en marche sans surveillance. Mettre
la clé sur « ARRÊT » et la retirer du compacteur. Ranger la clé hors
de portée des enfants pour les empêcher d’utiliser ou d’abîmer le
compacteur.
2. Ne pas pousser les déchets dans le tiroir du compacteur avec les
mains ou les pieds. Les déchets peuvent contenir du verre brisé,
des pièces de métal tranchantes, etc., risquant de vous blesser.
3. Ne pas compacter les substances volatiles. La peinture, les
chiffons huileux, les contenants d’essence à briquet et de diluant
à peinture peuvent s’enflammer spontanément et provoquer une
explosion et/ou un incendie.
4. Ne pas compacter les boîtes d’aérosol ni tout autre contenant
pouvant contenir encore des matières toxiques, des insecticides
ou des combustibles. Des vapeurs dangereuses pour la santé
peuvent se dégager.
5. Ne pas compacter les cigarettes ou cigares allumés ni tout autre
objet chaud ou en train de brûler.
6. Ne pas surcharger le compacteur.
7. Faire attention en sortant le sac. Du verre brisé ou d’autres objets
coupants pourraient le percer. Ne pas surcharger le sac à déchets
d’objets lourds, tel que du verre.
8. Ne pas utiliser cet appareil avec une rallonge électrique.
9. N’utiliser que les accessoires approuvés par Broan.
10. Ne pas toucher aux pièces mobiles.
11. Ne pas démonter cet appareil. Un mauvais remontage pourrait
causer un choc électrique lors de son fonctionnement.
12. Ne pas faire fonctionner l’appareil si le cordon électrique, la fiche
ou le moteur est endommagé, ni après quelque dommage que ce
soit. Confier l’examen ou toute réparation du compacteur à un
technicien autorisé.
13. Ce compacteur est conçu UNIQUEMENT POUR UN USAGE
DOMESTIQUE. Ne l’utiliser que tel qu’expliqué dans ce manuel.
14. Débrancher l’appareil de la prise de courant avant l’entretien.
INSTRUCTIONS
DE MISE À LA TERRE
IMPORTANT : POUR RÉDUIRE LES RISQUES DE CHOC ÉLECTRIQUE,
LIRE CECI ATTENTIVEMENT.
POUR VOTRE SÉCURITÉ PERSONNELLE, CET APPAREIL DOIT ÊTRE
CORRECTEMENT MIS À LA TERRE. Le cordon électrique de cet appareil
comporte une fiche à trois broches (pour mise à la terre) qui convient aux
prises de courant standard (avec mise à la terre), tel qu’illustré ci-dessus.
Si la prise de courant à l’emplacement du compacteur ne comporte que
deux broches, il est de votre responsabilité de la faire remplacer par
une prise à trois broches correctement mise à la terre. Ne pas utiliser
d’adaptateur avec ce produit.
SOUS AUCUN PRÉTEXTE, NE JAMAIS COUPER NI ENLEVER LA
TROISIÈME BROCHE (FIL DE TERRE) DE LA FICHE DU CORDON
ÉLECTRIQUE.
Le conducteur VERT (ou VERT et JAUNE) du cordon est le fil de terre. Ne
jamais connecter le fil VERT (ou VERT et JAUNE) à une borne sous tension.
Une alimentation électrique de 120 volts, 60 Hz., C.A., avec un fusible
de 15 A est requise (il est recommandé d’utiliser un fusible temporisé
ou un disjoncteur). Il est également conseillé d’utiliser un CIRCUIT
DISTINCT réservé à l’appareil.
NE PAS UTILISER UNE RALLONGE ÉLECTRIQUE AVEC CET APPAREIL.
Page 12

MODÈLES 15WH • 15BL• 15SS• 15WT • 15TT
Opening
15" Wide
34-1/2" High
22" Deep
Page 12
TABLE DES MATIÈRES
SECTION PAGE
INSTALLATION
Déballage du compacteur à déchets .......... 12
Installations encastrées ........................... 12
Nivellement du compacteur ..................... 13
Inversion de la porte (facultatif) .......... 13,14
Porte en bois ou à carreaux .................... 14
Installation
PRÉPARATION
1. Fonctionnement du compacteur ........... 15
2. Utilisation de l’interrupteur à clé .......... 16
3. Installation du disque anti-odeurs ......... 16
4. Installation du sac .............................. 16
5.
Planche à découper (en option)
FONCTIONNEMENT
6. Compactage ....................................... 17
7. Conseils pour le compactage ................ 17
8. Retrait du sac ..................................... 17
ENTRETIEN
9. Nettoyage ..................................... 18, 19
10. Dépannage ....................................... 19
11. Garantie .......................................... 20
............... 16
INSTALLATIONS ENCASTRÉES
BRIDES DE MONTAGE
DESSUS DU
COMPACTEUR
AVANT DU
COMPACTEUR
Deux brides de montage à fixer sous le comptoir sont fournies.
Utilisez ces brides pour fixer le compacteur en dessous du
comptoir. Fixez l’extrémité fendue des brides dans les trous sur le
dessus du compacteur, tel qu’illustré.
REMARQUE : Lors de l’installation du compacteur sous un
comptoir de granite ou massif, pliez les brides de montage pour
pouvoir les fixer aux armoires adjacentes.
38,1 CM
(15 PO)
DE LARG.
55,9 CM
(22 PO) DE PROF.
87,6 CM (34½ PO)
DE HAUT.
DÉBALLAGE DU COMPACTEUR
À DÉCHETS
Le compacteur à déchets est expédié de l’usine avec des matériaux
d’emballage dans le bac à ordures et avec le vérin abaissé. Ramenez
le vérin à la position du haut en branchant l’appareil, en tournant
l’interrupteur à clé à la position « ON » (marche) et en refermant
la porte. Dès que la ferme est fermée, l’appareil démarre et le
vérin remonte à la position du « HAUT ». Ouvrez le bac à ordures
et enlevez le matériel d’emballage.
Votre Compacteur Broan Elite est conçu pour occuper un
minimum d’espace sans réduire sa capacité, qu’il soit autonome
ou encastré.
APPAREIL AUTONOME
Tel que livré, le compacteur n’est configuré que pour les
installations encastrées. Il peut être converti en un appareil
autonome à l’aide de l’adaptateur coup de pied, modèle 15TCTK
(vendu séparément). Si un cordon électrique plus long est
nécessaire pour une installation autonome, enlever la l’attache du
cordon à l’arrière de l’appareil.
ATTENTION : Négliger d’utiliser l’Adaptateur coup de pied modèle
15TCTK dans une installation autonome peut rendre le compacteur
instable pendant son fonctionnement.
PRISE DE
COURANT
MIN. 30,5 CM
(12 PO)
OUVERTURE SOUS LE COMPTOIR
Le compacteur nécessite une ouverture minimale sous le comptoir
de 38,1 cm (15 po) de largeur, 87,6 cm (34½ po) de hauteur et
de 55,9 cm (22 po) de profondeur.
Planifiez l’installation d’une
prise de courant dans l’ouverture
conformément aux codes et
aux exigences d’électricité en
vigueur. Consultez la section
« Instructions de mise à la
terre » pour des renseignements
plus précis.
ATTACHE DE CORDON
Le compacteur est muni d’un
cordon électrique de 1,83 m
(6 pi) de longueur. Utilisez
l’attache de cordon pour
empêcher celui-ci de se
coincer sous l’appareil lors
de l’installation ou de travaux
d’entretien.
ATTACHE
DE CORDON
Page 13

MODÈLES 15WH • 15BL• 15SS• 15WT • 15TT
Page 13
NIVELLEMENT DU COMPACTEUR
Votre compacteur comporte quatre appuis réglables : (2) rouleaux à
l’arrière et (2) pieds à l’avant. Ils permettent de régler le niveau de
l’appareil sur un plancher inégal et d’ajuster sa hauteur pour une
installation sous un comptoir.
ARRIÈRE DU
COMPACTEUR
VIS DE
RÉGLAGE
ROULEAUX
Pour régler le niveau de l’arrière du compacteur :
Soulevez l’arrière du compacteur et appuyez-le sur un bloc de
bois. Desserrez les vis de réglage juste assez pour régler les
rouleaux une fente plus haut ou plus bas. Resserrez les vis de
réglage et retirez le bloc de bois.
FENTES
BLOC
DE BOIS
INVERSION DE LA PORTE (facultatif)
INSTRUCTIONS POUR INVERSER TOUS LES TYPES DE PORTE
(SAUF CELLES EN BOIS OU À CARREAUX).
Tel que livré, les charnières de la porte du compacteur se
trouvent à droite (en regardant face à l’appareil).
PORTE
SUPPORT
INFÉRIEUR
VIS
Pour que la porte ouvre à gauche :
1. La porte étant fermée, enlevez le pivot inférieur à l’aide d’une
clé hexagonale de 3/16 po.
2. Enlevez soigneusement la porte en éloignant le bas de celle-ci
du boîtier de l’appareil.
3. À l’aide d’une clé hexagonale de 3/16 po, enlevez le support
inférieur de la charnière (2 vis).
PIVOT
INFÉRIEUR
Installation
AVANT DU
COMPACTEUR
BLOC
DE BOIS
PIEDS DE
NIVELLEMENT
Pour régler le niveau de l’avant du compacteur :
Soulevez l’avant du compacteur et appuyez-le sur un bloc de bois.
Serrez ou desserrez les pieds de nivellement à la position voulue.
Retirez le bloc de bois.
4. Retournez le support et posez-le du côté opposé de l’appareil
avec les mêmes vis.
BORDURE
DU HAUT
PIVOT
SUPÉRIEUR
5. À l’aide d’un tournevis, enlevez le pivot supérieur de la bordure
du haut et reposez-le de l’autre côté de l’appareil.
Page 14

CAPUCHON
COUSSINET
Installation
PORTE
6. Tout en faisant attention de ne pas égratigner
la porte, enlevez le coussinet et le capuchon de
plastique du haut et du bas de la porte à l’aide
d’un petit tournevis plat. Reposez les coussinets
de la porte du côté où se trouveront les charnières
et le capuchon du côté opposé.
7.
Installez la porte sur l’appareil en insérant le pivot
supérieur dans le coussinet supérieur tout en
replaçant la porte. Reposez le pivot inférieur enlevé à
l’étape 1 et serrez-le fermement.
PORTE EN BOIS OU
À CARREAUX
Utilisez les instructions suivantes si votre compacteur
comprend un ensemble de porte en bois ou de porte
à carreaux.
Il est conseillé d’enlever la structure de porte du
compacteur pour installer le panneau à carreaux ou le
panneau de bois.
MODÈLES 15WH • 15BL• 15SS• 15WT • 15TT
3. Réfléchissez à l’emplacement
du compacteur et déterminez
si les charnières de la
porte seront à gauche ou à
droite. Puisque les pivots
de charnière sont fixés en
permanence à la structure de
porte, tournez-la simplement
pour que les pivots soient
du bon côté. Vous pouvez
marquer l’intérieur de la
structure de porte pour
indiquer le haut.
4. Pour éviter d’endommager
l’actionneur à l’arrière de
la porte, enlevez les (2) vis
qui le maintiennent en place.
Conservez l’actionneur et
les vis.
Pour une porte en bois :
5. La structure de porte est
conçue pour accueillir une
porte en bois de 19 mm
(¾ po) d’épaisseur et de
37,8 cm (14-7/8 po) de
largeur par 74,3 cm
(29-1/4 po) de hauteur.
Il est conseillé de vérifier
la hauteur de la structure
de porte avant de couper
le panneau de porte à la
bonne dimension. Centrez
la structure de porte sur
le panneau de porte et
fixez-les ensemble avec
la quincaillerie incluse
dans le sac de pièces
du compacteur.
ACTIONNEUR
PORTE
COUSSINET
ARRIÈRE
Page 14
DE LA
PORTE
SUPPORT
INFÉRIEUR
Pour enlever la
structure de porte :
STRUCTURE
DE PORTE
SUPPORT DE
PIVOT
INFÉRIEUR
1. À l’aide d’une clé hexagonale de 3/16 po, enlevez
le support de pivot inférieur de la charnière (2 vis).
2. Enlevez
la structure de porte de
l’appareil
VIS
.
Pour une porte à carreaux :
5. La structure de porte pour
carreaux est préassemblée
avec un endos de ciment. Posez les carreaux et le coulis sur la structure
de porte à l’aide des matériaux et méthodes traditionnels.
6. Procurez-vous une poignée de porte assortie à celles de vos armoires de
cuisine et installez-la conformément aux instructions.
7. Si les charnières seront du côté gauche du compacteur, il sera nécessaire
de retourner le
coussinet de plastique du support de charnière et posez-le du côté opposé
du support. Fixez la porte sur le boîtier du compacteur en inversant la
marche à suivre de l’étape 1.
8. Réinstallez l’actionneur enlevé à l’Étape 4. Assurez-vous que la porte
s’ouvre et se ferme en douceur et que l’actionneur entre et ressort de
l’interrupteur de sécurité du compacteur.
support de pivot inférieur
VIS
, enlevé à l’étape 1. Retirez le
Page 15

Bouton « Commencer »
(avec DEL de position du vérin)
Interrupteur de sécurité de la porte
Actionneur de sécurité
Serrure à clé
Commutateur de mode de compactage
Logement pour sacs
Disque anti-odeurs
Vérin
Ergot de dégagement de la plaque de compactage
Plaque de compactage
Loquets du bac à ordures (2)
MODÈLES 15WH • 15BL• 15SS• 15WT • 15TT
Page 15
Préparation
Bac à ordures coulissant
Rouleaux de nivellement
Pieds de nivellement
1.
FONCTIONNEMENT DU COMPACTEUR
Le Compacteur Broan Elite comprime les ordures ménagères
jusqu’à 1/6 de leur volume original. Il compacte les ordures
ménagères ordinaires comme les cartons de lait, les bouteilles
en verre et en plastique, les pots et contenants, les boîtes de
conserve, les emballages, boîtes en carton, restes d’aliment, etc
Lorsque vous mettez le compacteur en marche, un vérin
électrique s’abaisse dans le bac à ordures, comprime les
déchets puis revient à sa position du « HAUT » et s’arrête
automatiquement.
REMARQUE : Le vérin descend jusqu’aux deux tiers du bac
à ordures. C’est pourquoi le bac doit être au moins rempli du
tiers avant d’observer tout compactage.
.
Page 16

MODÈLES 15WH • 15BL• 15SS• 15WT • 15TT
Compact Mode
On
Normal
Hold
Compact Mode
Normal
Hold
Compact Mode
On
Normal
Hold
Page 16
2. UTILISATION DE L’INTERRUPTEUR À CLÉ
Le compacteur comporte un interrupteur à clé pour votre protection
et comme dispositif de sécurité.
Lorsque l’interrupteur à clé est sur « ARRÊT »
(OFF), le compacteur ne peut pas fonctionner.
Verrouillez le compacteur et enlevez la clé pour
empêcher les enfants de le faire fonctionner et
éviter que quiconque ne l’endommage.
Lorsque l’interrupteur à clé est sur « MARCHE » (ON),
le compacteur est prêt à fonctionner. La clé ne peut
être enlevée en position « MARCHE » (ON).
REMARQUE : L’appareil s’arrête dès que l’on ouvre la porte. Si le
compacteur est arrêté au milieu d’un cycle, il reprend sa position
du HAUT une fois la porte refermée.
3. INSTALLATION DU DISQUE
ANTI-ODEURS
Préparation
Votre compacteur est muni d’un disque anti-odeurs qui durera jusqu’à
six mois une fois installé dans l’appareil. Ce disque se présente dans
un sachet d’aluminium et est activé à l’ouverture du sachet.
Notez les dates sur les étiquettes de disque comme suit :
• Lorsque vous ouvrez le sachet, écrivez la « Date d’activation » sur
le dessus du disque dans l’espace prévu à cet effet.
• Écrivez les dates sur les étiquettes VERTES d’indication du mois
comme suit :
Étiquette du mois 1 « Date d’avancée » = 1 mois de la
« Date d’activation »
Étiquette du mois 2 « Date d’avancée » = 2 mois de la
« Date d’activation »
Étiquette du mois 3 « Date d’avancée » = 3 mois de la
« Date d’activation »
Étiquette du mois 4 « Date d’avancée » = 4 mois de la
« Date d’activation »
Étiquette du mois 5 « Date d’avancée » = 5 mois de la
« Date d’activation »
• Écrivez la date sur l’étiquette ROUGE d’indication comme suit :
Étiquette du mois 6 « Date de remplacement » = 6 mois de la
« Date d’activation »
Attention : Le disque anti-odeurs contient une substance pouvant
causer une irritation modérée des yeux. Éviter tout contact avec les
yeux. Nocif si avalé. Laver soigneusement la peau ou les vêtements
à l’eau et au savon après la manipulation. Ne pas réutiliser le
sachet vide.
Sortez le disque
de son sachet,
ouvrez la porte du
compartiment à
disque et placez le
disque face vers le
bas sur le plateau,
de sorte que le
Mois VERT « 1 »
soit visible dans la
fenêtre, une fois la
porte refermée.
Une fois le premier
mois écoulé, tournez
le disque de droite à
gauche avec le doigt.
Faites de même
chaque mois.
Au 6e mois, l’étiquette
dans la fenêtre sera
ROUGE - indiquant
que le disque antiodeurs doit être
remplacé après
30 jours.
Le disque anti-odeurs modèle 15TCOD est disponible chez votre
distributeur Broan.
4. INSTALLATION DU SAC
La porte étant ouverte et
le bac sorti au maximum,
placez un sac dans
le bac. Repliez le sac sur
le rebord du bac,
des quatre côtés.
Pressez le sac dans
les coins du bac et
lissez le fond.
Lissez et formez le sac
soigneusement, ce qui
évitera qu’il soit déchiré
par le vérin lors du
compactage.
Fixez le sac en place
sur les deux boutons
de chaque côté du bac.
Le sac comporte des
fentes conçues exprès.
5. PLANCHE À DÉCOUPER (en option)
Si votre compacteur ne doit pas être installé sous un comptoir vous pouvez commander une planche à découper modèle 15TCBB
offerte en option chez votre distributeur Broan.
Cette planche repose sur le dessus du compacteur et comporte
des pieds en caoutchouc anti-égratignure et une rigole pour la
sauce sur le dessus.
Pour empêcher le gauchissement de la planche de bois, lavez-la
avec un détergent doux et huilez-la avec une légère couche d’huile
minerai.
Page 17

MODÈLES 15WH • 15BL• 15SS• 15WT • 15TT
Compact Mode
Normal
Hold
Compact Mode
Normal
Hold
Compact Mode
Normal
Hold
Compact Mode
On
Normal
Hold
Page 17
6. COMPACTAGE
Le compacteur est maintenant prêt à utiliser.
1. Refermez complètement le bac en le poussant.
2. Placez l’interrupteur à clé sur « MARCHE » (ON).
3. Sélectionnez l’un des deux modes de compactage :
4. Refermez la porte.
5. Appuyez sur le bouton « Commencer » situé au centre,
6. Le cycle de compactage peut être interrompu en tout
POUR OBTENIR LES MEILLEURS RÉSULTATS,
REMPLISSEZ TOUJOURS LE NOUVEAU SAC
COMPLÈTEMENT AVANT D’ACTIONNER LE
COMPACTEUR. CECI RÉDUIT LE RISQUE DE
DÉPLACEMENT ET DE DÉCHIRURE DU SAC.
Interrupteur à clé
Mode de compactage (Compact Mode)
« Normal » (Normal)
Après avoir refermé la porte et appuyé sur
le bouton « Commencer », le vérin s’abaisse
dans le bac et compacte les déchets.
Au bas de sa course, le vérin inverse
automatiquement son mouvement, remonte
et sort du bac. La durée totale du cycle
est de 45 secondes ou moins. Revenu au
sommet de sa course, le compacteur s’éteint
automatiquement et est prêt à recevoir
d’autres déchets.
Mode de compactage (Compact Mode)
« Maintenir » (Hold)
Après avoir refermé la porte et appuyé
sur le bouton « Commencer », le vérin
s’abaisse dans le bac et compacte les
déchets. Ce réglage est utile pour comprimer
complètement les déchets et permettre une
capacité accrue. Au bas de sa course, le vérin
s’arrête. Appuyez de nouveau sur le bouton
« Commencer » pour faire remonter le vérin
hors du bac. Revenu au sommet de sa course,
le compacteur s’éteint automatiquement et
est prêt à recevoir d’autres déchets.
en haut de l’appareil, pour commencer le compactage.
Le compacteur s’éteindra automatiquement une fois
le cycle de compactage terminé. L’indicateur « DEL de
position du vérin » est VERT lorsque le vérin est en haut
et prêt à recevoir d’autres déchets. L’indicateur DEL
passe au ROUGE lorsque le vérin s’abaisse ou s’arrête
dans toute autre position.
Bouton Commencer
DEL de position du vérin
temps en ouvrant la porte. Une fois le vérin arrêté, il
remonte toujours lorsque la porte est refermée.
7. CONSEILS POUR LE COMPACTAGE
• Bien qu’il ne soit pas nécessaire de compacter le contenu du tiroir
tant qu’il n’est pas rempli ou presque rempli, il est conseillé, pour
obtenir un compactage optimal, de compacter chaque fois qu’une
quantité appréciable de déchets est ajoutée.
• Au bas de sa course, le vérin ne s’abaisse pas jusqu’au fond du bac à
ordures. Les déchets se trouvant sans le premier tiers du bac seront
comprimés lors des compactages suivants.
• Les bouteilles de verre peuvent faire du bruit lors du compactage, ce
qui est normal. Elles ne se brisent pas toujours lors du premier cycle.
Le bruit de verre cassé peut se produire plusieurs cycles après, selon
le type et la quantité de déchets.
• Les bouteilles et les grosses boîtes de conserve se compactent mieux
lorsqu’elles sont posées à plat au centre du bac à ordures.
• Placez quelques feuilles de papier journal repliées ou un grand sac
d’épicerie en papier sur le dessus de la charge à compacter lorsque :
vous compactez de grosses bouteilles ou plusieurs
•
bouteilles ou pots de verre (ou tout objet pouvant
éclater). Vous éviterez ainsi que des éclats de verre
soient projetés hors du bac, dans le mécanisme.
vous compactez des résidus de cuisine non enveloppés.
•
Cela contribuera à maintenir la propreté du vérin.
• Le compactage de charges extrêmement inégales peut faire glisser le
bac vers l’avant, ce qui peut forcer la porte à s’ouvrir, interrompant
le cycle de compactage. Poussez doucement sur la porte pour la
refermer, ce qui fera remonter le vérin. Ouvrez le bac à ordures et
replacez tout objet ayant causé une répartition inégale de la charge.
Refermez la porte et recommencez le cycle de compactage en
appuyant sur le bouton « Commencer ».
• Certains types de déchets produisent des odeurs exceptionnellement
fortes comme la viande et le poisson cru, les pelures de pamplemousse,
les articles d’hygiène personnelle et les couches jetables. Il peut être
préférable de ne pas mettre de tels déchets dans le compacteur.
• Si le compacteur reste inutilisé pendant une longue période de temps,
comme durant les vacances, retirez le sac pour éviter la formation
d’odeurs indésirables.
ATTENTION : NE PAS COMPACTER LES BOÎTES D’AÉROSOL NI TOUT
AUTRE CONTENANT POUVANT CONTENIR ENCORE DES MATIÈRES
TOXIQUES, DES INSECTICIDES OU DES COMBUSTIBLES. DES VAPEURS
DANGEREUSES POUR LA SANTÉ PEUVENT SE DÉGAGER OU ENTRAÎNER
UN INCENDIE OU UNE EXPLOSION.
Ne pas mettre de la peinture, des chiffons huileux, ni des contenants
d’essence à briquet ou de diluant à peinture dans le compacteur. Ils
risquent de s’enflammer par combustion spontanée et de provoquer un
incendie et/ou une explosion.
NE JAMAIS POUSSER LES DÉCHETS DANS LE BAC AVEC LES MAINS OU
LES PIEDS. Les déchets peuvent contenir du verre brisé, des pièces de
métal tranchantes, etc., risquant de vous blesser.
8.
RETRAIT DU SAC
1. Ouvrez le bac complètement.
2. Libérez les loquets et abaissez
l’avant du bac.
3.
Détachez le sac des boutons du
bac et refermez le haut du sac
en le tordant. Fermez le sac avec
l’attache fournie à cet effet.
4.
Soulevez et glissez le sac hors du bac.
Fonctionnement
Page 18

MODÈLES 15WH • 15BL• 15SS• 15WT • 15TT
À L’EXCEPTION DES DIRECTIVES DE NETTOYAGE DE LA SECTION SUIVANTE, TOUT ENTRETIEN DOIT ÊTRE CONFIÉ À UN
REPRÉSENTANT AGRÉÉ POUR LE SERVICE.
9. NETTOYAGE
Votre compacteur est conçu pour offrir un accès facile lorsqu’il
est nécessaire de le nettoyer.
L’intérieur et l’extérieur du boîtier ont un fini en émail cuit durable.
N’utilisez pas de nettoyants corrosifs ou abrasifs ni de tampons
à récurer, au risque de rayer le fini du compacteur. Utilisez une
solution de détergent doux sur ces surfaces.
ATTENTION : Des éclats de verre et d’autres
morceaux coupants peuvent se trouver autour ou sur
les surfaces à nettoyer. Enlevez soigneusement ces
objets avant d’essuyer toute surface.
RETIREZ LE BAC À ORDURES
ET NETTOYEZ L’INTÉRIEUR
1. Sortez complètement le bac.
2. Enlevez une (1) vis de chaque côté des glissières du bac.
3. Appuyez sur les ergots de dégagement du bac à gauche et
à droite tout en tirant le bac hors de l’appareil.
4. Aspirez et nettoyez la base du boîtier, les glissières et le bac,
particulièrement dans les coins.
5.
Lavez l’intérieur du boîtier avec une solution de détergent doux.
6. Une fois le nettoyage du boîtier terminé, installez le bac en
inversant les étapes 2 et 3.
NETTOYAGE DE LA PLAQUE DE COMPACTAGE
Page 18
Entretien
1.
3.
DÉGAGEMENT
VIS
ERGOT DE
DU BAC
VÉRIN
ERGOT DE
DÉGAGEMENT
PLAQUE DE
COMPACTAGE
1. Le vérin comporte une plaque de compactage amovible pour
faciliter le nettoyage.
2. Vérifiez que le bac à ordures est vide et sans sac.
3. Poussez le bac dans le boîtier. Ouvrez les loquets et abaissez
l’avant du bac.
4. Appuyez sur l’ergot de dégagement à l’avant du vérin pour
libérer la plaque. La plaque s’enlève en la tirant vers le bas
et en l’éloignant du vérin.
5. Une fois enlevée, la plaque de compactage peut être
lavée avec une solution de détergent doux ou mise au
lave-vaisselle.
6. Reposez la plaque de compactage en insérant l’ergot
(à l’arrière de la plaque) dans la fente (à l’arrière du vérin).
Relevez l’avant de la plaque jusqu’à ce qu’elle s’enclenche
en place.
2.
Page 19

MODÈLES 15WH • 15BL• 15SS• 15WT • 15TT
Compact Mode
Normal
Hold
Compact Mode
Normal
Hold
Compact Mode
On
Normal
Hold
Page 19
9. NETTOYAGE (suite)
NETTOYAGE DU VÉRIN
BAC À
ORDURES
VÉRIN
1. Vérifiez que le bac à ordures est vide et poussé dans le
boîtier.
2. Placez l’interrupteur à clé sur « MARCHE » (ON).
Interrupteur à clé
10. DÉPANNAGE
Avant d’appeler le service à la clientèle, vérifiez ces quelques
conseils qui pourraient vous épargner un appel :
1. Le cordon électrique est-il bien branché?
2. Un fusible ou un disjoncteur s’est-il déclenché?
3. La porte est-elle bien fermée?
4. L’interrupteur à clé est-il sur « MARCHE » (ON)?
5. Avez-vous appuyé sur le bouton « Commencer » assez
longtemps pour amorcer le cycle de compactage?
6. Si le bac à ordures est difficile à fermer, vérifiez si des
déchets ne sont pas tombés derrière, l’empêchant de se
fermer complètement.
7. Le moteur comporte un coupe-circuit thermique. Si vous
avez effectué plusieurs compactages de suite, ce protecteur
peut avoir coupé le circuit. Attendez quelques minutes, le
temps que le coupe-circuit se referme automatiquement.
8. Le bac à ordures doit être au moins à moitié plein avant
que l’effet du compactage soit visible, puisque le vérin ne
s’abaisse pas jusqu’au fond du bac. Les déchets se trouvant
sans le premier tiers du bac seront comprimés lors des
compactages suivants.
3. Sélectionnez le mode de compactage « Maintenir » (Hold).
4. Refermez la porte.
5. Appuyez sur le bouton « Commencer ».
Le vérin s’abaisse dans le bac et s’arrête au bas de sa course.
6. Ouvrez la porte. Ouvrez les loquets et abaissez l’avant du bac.
7. Une fois le nettoyage terminé :
Mode de compactage (Compact Mode)
« Maintenir » (Hold)
Bouton Commencer
ATTENTION : Des éclats de verre et d’autres
morceaux coupants peuvent se trouver autour ou sur
les surfaces à nettoyer. Enlevez soigneusement ces
objets avant d’essuyer toute surface.
Aspirez le dessus du vérin et nettoyez-le avec une solution
de détergent doux.
Relevez et enclenchez l’avant du bac, refermez la porte et
appuyez sur le bouton « Commencer ». Le vérin remonte en
haut de sa course et s’arrête automatiquement. Ouvrez la
porte, faites coulisser le bac hors du boîtier, installez le sac
et sélectionnez le mode de compactage. Le compacteur est
maintenant prêt à recevoir des déchets.
9. En de rares occasions, une grosse boîte de conserve placée
contre le bord du bac peut s’être repliée sur le rebord du
vérin, nuisant à son bon fonctionnement. Pour corriger le
problème, ouvrez simplement la porte, ouvrez les loquets
de l’avant du bac et enlevez la boîte de conserve. FAITES
ATTENTION EN MANIPULANT DES OBJETS COUPANTS!
10. Dans l’éventualité peu probable que l’actionneur de
sécurité (à l’intérieur de la porte) se brise, le compacteur ne
fonctionnera pas. N’ESSAYEZ PAS DE FAIRE FONCTIONNER
LE COMPACTEUR D’UNE AUTRE MANIÈRE. Commandez
un nouvel actionneur auprès de votre distributeur Broan.
11. Pour toute demande de service, indiquez le numéro de
modèle de l’appareil, son numéro de série et la nature de
la défectuosité du produit ou de la pièce. Le numéro de
modèle, le numéro de série et tous les autres renseignements
de l’appareil se trouvent sur la plaque signalétique située sur
la paroi intérieure du boîtier. Pour demander un service sous
garantie, vous devez présenter la preuve d’achat originale.
Pour obtenir le nom du centre de service le plus près de
chez vous, contactez le détaillant où vous avez acheté votre
compacteur Broan-NuTone LLC.
Entretien
Page 20

11. GARANTIE
GARANTIE LIMITÉE D’UN AN DE BROAN-NUTONE
Broan-NuTone garantit à l’acheteur consommateur
original de ses produits qu’ils sont exempts de vice
de matériaux ou de fabrication pour une période
d’un an à compter de la date d’achat original.
IL N’Y A PAS D’AUTRES GARANTIES, EXPRIMÉES OU
IMPLICITES, INCLUANT MAIS NON LIMITÉES AUX
GARANTIES IMPLICITES DE QUALITÉ MARCHANDE ET
DE CONVENANCE DANS UN BUT PARTICULIER.
Durant cette période d’un an, Broan-NuTone, à sa discrétion,
réparera ou remplacera gratuitement tout produit ou pièce
qui s’avèrera défectueux et ayant été utilisé normalement et
d’une manière non abusive.
CETTE GARANTIE NE COUVRE PAS LES STARTERS
DE TUBES FLUORESCENTS NI LES TUBES FLUORESCENTS. Cette garantie ne couvre pas (a) l’entretien et le
service normal ou (b) tout produit ou pièce endommagé
à la suite d’un mauvais usage, d’une négligence, d’un
accident, d’un entretien inadéquat ou d’une réparation
(autre que par Broan-NuTone), d’une mauvaise installation
ou d’une installation non conforme au mode d’installation
recommandé.
La durée de toute garantie implicite est limitée à une période
d’un an tel que spécié pour la garantie exprimée. Certains
États ou provinces ne permettent pas de limitation de la
durée d’une garantie implicite. Cette condition ne s’applique
donc peut-être pas dans votre cas.
L’ENGAGEMENT DE BROAN-NUTONE À RÉPARER OU
À REMPLACER, AU CHOIX DE BROAN-NUTONE, SERA
LA SEULE OBLIGATION EXCLUSIVE SOUS CETTE
GARANTIE. BROAN-NUTONE NE SE TIENDRA PAS
RESPONSABLE DES DOMMAGES DIRECTS, INDIRECTS
OU SPÉCIAUX AYANT UN LIEN DIRECT OU INDIRECT
AVEC L’UTILISATION OU LA PERFORMANCE DE SES
PRODUITS. Certains États ou provinces ne permettent pas
l’exclusion ou la limitation de dommages directs ou indirects.
Cette condition ne s’applique donc peut-être pas dans votre
cas. Cette garantie vous donne des droits spéciques et il se
peut que vous ayez d’autres droits qui varient d’une province
à l’autre ou d’un État à l’autre. Cette garantie annule toutes
les garanties précédentes.
Pour le service sous garantie, vous devez (a) aviser BroanNuTone à l’adresse ou numéro de téléphone mentionnée
ci-dessous, (b) donner le numéro de modèle et l’identication
de la pièce et (c) décrire la nature de tout défaut dans le
produit ou la pièce. Au moment de la demande de service
sous garantie, vous devez présenter une preuve de la date
d’achat original du produit en question.
Broan-NuTone LLC Hartford, Wisconsin
www.broan.com 800-558-1711
Garantie
Broan-NuTone Canada Mississauga, Ontario
www.broan.ca 877-896-1119
MODÈLES 15WH • 15BL• 15SS• 15WT • 15TT
Page 20
99526805A
Page 21

MODELOS 15WH • 15BL• 15SS• 15WT • 15TT
Compactador de basura
Guía de instalación, uso y cuidado
LEA Y CONSERVE ESTAS INSTRUCCIONES
Página 21
MEDIDAS DE
PROTECCIÓN IMPORTANTES
LEA TODAS LAS INSTRUCCIONES DETENIDAMENTE ANTES DE PONER A
FUNCIONAR EL COMPACTADOR
Al usar un aparato electrodoméstico, deben siempre tomarse precauciones
básicas, entre ellas:
1. Es necesario mantener una supervisión constante cuando hay
niños cerca de un aparato que esté en funcionamiento. No permita
que el aparato se use como juguete, ni lo deje jamás desatendido
mientras esté funcionando. Apague el compactador y sáquele
la llave para impedir su funcionamiento. Guarde la llave del
compactador en un lugar que no sea de fácil acceso, a fin de evitar
su uso o manipulación por parte de niños o de otras personas.
2. No empuje la basura del cajón del compactador con las manos o
los pies. La basura podría contener vidrios rotos, piezas metálicas
cortantes, etc., que podrían causarle lesiones.
3. No compacte materiales volátiles. Las pinturas, trapos aceitosos,
latas de líquido para encendedores y latas de diluyentes de pintura
podrían encenderse de manera espontánea y causar una explosión
o un incendio (o ambos).
4. No compacte latas de aerosoles ni de ningún otro recipiente
que tenga restos de productos químicos tóxicos, insecticidas o
combustibles, porque se podrían emitir vapores peligrosos para la
salud.
5. No compacte cigarrillos o puros prendidos ni otros artículos
calientes o quemándose.
6. No ponga un exceso de carga en el compactador.
7. Tenga cuidado al sacar y transportar la bolsa. Los vidrios rotos u
otros objetos cortantes podrían perforar la bolsa. No sobrecargue
la bolsa de basura con materiales pesados, como el vidrio.
8. No utilice esta unidad con un cable de extensión.
9. Utilice únicamente los accesorios aprobados por Broan.
10. No toque las piezas móviles.
11. No desarme este aparato. Si el aparato se llegara a armar de forma
incorrecta, podría provocar descargas eléctricas al ponerse en
funcionamiento.
12. No haga funcionar este aparato con un cordón de alimentación,
enchufe o motor dañados, o después de que se hayan dañado de
cualquier manera. Toda inspección o reparación del compactador
deben estar a cargo de un técnico de servicio autorizado.
13. Este compactador es SÓLO PARA USO DOMÉSTICO. Use este
aparato únicamente de la manera descrita en este manual.
14. Desenchufe el aparato del tomacorriente antes de efectuar el
servicio.
INSTRUCCIONES
PARA LA PUESTA A TIERRA
IMPORTANTE: PARA REDUCIR EL RIESGO DE DESCARGAS ELÉCTRICAS, LEA
ESTE MATERIAL INFORMATIVO DETENIDAMENTE.
PARA FINES DE SEGURIDAD PERSONAL, ESTE APARATO DEBE ESTAR
ADECUADAMENTE CONECTADO A TIERRA. El cordón de alimentación
de este aparato tiene un enchufe de tres patas (tierra) que encaja en
un receptáculo estándar de tres patas (conectado a tierra), como se
ilustra arriba.
Si hay un tomacorriente de dos patas en el lugar donde se va a instalar
el compactador, usted debe encargarse de que se lo cambien por un
receptáculo de pared de tres patas que esté adecuadamente conectado a
tierra. No debe usarse un adaptador con este producto.
BAJO NINGUNA CIRCUNSTANCIA, NUNCA CORTE NI QUITE LA TERCERA
PATA (TIERRA) DEL ENCHUFE DEL CORDÓN DE ALIMENTACIÓN.
El conductor VERDE (o VERDE y AMARILLO) del cordón es el cable a
tierra. No conecte nunca el cable VERDE (o VERDE y AMARILLO) a una
terminal viva.
Se requiere un circuito de alimentación de CA conectado a tierra de
120 V y 60 Hz con fusible de 15 A (se recomienda un fusible de retardo
o un interruptor automático de circuitos). Se recomienda tener un
CIRCUITO SEPARADO que alimente únicamente a este aparato.
NO HAGA FUNCIONAR ESTE APARATO CON UN CABLE DE EXTENSIÓN.
Page 22

MODELOS 15WH • 15BL• 15SS• 15WT • 15TT
Opening
15" Wide
34-1/2" High
22" Deep
Página 22
ÍNDICE
SECCIÓN PÁGINA
INSTALACIÓN
Desempaque del compactador de basura ... 22
Instalación empotrada .............................. 22
Nivelación del compactador ...................... 23
Cambio de orientación
de la puerta (opcional) ....................... 23, 24
Instalación
Instrucciones de instalación de
puertas azulejos y madera ....................... 24
PREPARACIÓN
1.
Modo de funcionamiento del compactador
2. Uso del interruptor del seguro de llave ... 26
3. Instalar el disco de control de olores ...... 26
4. Instale la bolsa .................................... 26
5. Tabla para cortar (opcional) .................. 26
FUNCIONAMIENTO
6. Compactación ..................................... 27
7. Sugerencias para la compactación ........ 27
8. Retiro de la bolsa ................................ 27
MANTENIMIENTO
9. Limpieza ......................................28, 29
10. Resolución de problemas ................... 29
11. Garantía ........................................... 30
25
INSTALACIÓN EMPOTRADA
FLEJES DE MONTAJE
PARTE SUPERIOR
DEL COMPACTADOR
PARTE FRONTAL
DEL COMPACTADOR
Se suministran dos flejes para montaje debajo de la cubierta.
Utilícelos para afianzar el compactador a la cara inferior de una
cubierta. Sujete el extremo ranurado de los flejes al compactador
mediante los orificios de la parte superior del gabinete del
compactador, tal como se muestra.
NOTA: Cuando instale el compactador sobre superficies sólidas
de gabinetes, doble las correas de montaje de tal manera que se
puedan fijar a los gabinetes adyacentes.
38.1 CM
(15 PULG.)
ANCHO
55.9 CM
(22 PULG.)
PROFUNDIDAD
87.6 CM
(34.5 PULG.) ALTO
DESEMPAQUE DEL COMPACTADOR
DE BASURA
El compactador de basura se envía de la fábrica con material de
empaque en el cubo de basura y en el pistón en la posición hacia
abajo. Regrese el pistón a la posición hacia arriba conectando la
unidad, girando el interruptor del seguro de la llave a la posición
de “ENCENDIDO” y cerrando la puerta. Una vez que la puerta esté
cerrada, la unidad funcionará y el pistón se moverá a la posición
hacia “ARRIBA”. Abra el cubo de basura y retire el material de
empaque.
El compactador Broan Elite está diseñado para ocupar un mínimo
espacio sin pérdida de capacidad, ya sea como instalación
independiente o empotrada.
INSTALACIÓN INDEPENDIENTE
El compactador se envía configurado únicamente para instalación
empotrada. La configuración de este aparato puede convertirse de
empotrada a independiente mediante el juego accesorio de zócalo
modelo 15TCTK (que se vende por separado). Si se requiere un
cordón más largo para una instalación independiente, quite la
pinza para el cordón y la atadura de cables de la parte posterior
de la unidad.
PRECAUCIÓN: De no usar el juego accesorio de zócalo modelo
15TCTK en una instalación independiente puede ocasionar que el
compactador esté inestable durante su funcionamiento.
TOMACORRIENTE
12 PULG.
(30. 5 CM) MÍN.
ABERTURA DEBAJO DE LA CUBIERTA
El compactador requiere una abertura debajo de la cubierta de las
siguientes dimensiones: 38.1 cm (15 pulg.) de ancho, 87.6 cm
(34.5 pulg.) de alto y 55.9 cm (22 pulg.) de espesor.
En la abertura debe haber un
tomacorriente que cumpla con
todos los requisitos y códigos
eléctricos aplicables. Si desea
información específica, vea el
apartado “Instrucciones para la
puesta a tierra”.
PINZA PARA EL CORDÓN
El compactador está equipado
con un cordón de alimentación
de 1.83 metros (6 pies) de largo.
Utilice la pinza para el cordón
para evitar que el exceso de
cordón quede atascado detrás
del gabinete durante las labores
de instalación o servicio.
PINZA PARA
EL CORDÓN
Page 23

MODELOS 15WH • 15BL• 15SS• 15WT • 15TT
Página 23
NIVELACIÓN DEL COMPACTADOR
El compactador tiene cuatro niveladores ajustables: (2) rodillos en
la parte de atrás y (2) patas en la parte de adelante; esto permite
ajustarlo para pisos desnivelados y también para “recortar”
la unidad a fin de que quepa en una instalación debajo de la
cubierta.
PARTE POSTERIOR
DEL COMPACTADOR
TORNILLOS
DE AJUSTE
RODILLOS
Para nivelar la parte posterior del compactador:
Incline la parte posterior del compactador hacia arriba y sobre un
bloque de madera. Afloje los tornillos de ajuste sólo lo suficiente
para mover los rodillos a una ranura superior o inferior. Vuelva a
apretar los tornillos de ajuste y saque el bloque de madera.
RANURAS
BLOQUE
DE MADERA
PARTE FRONTAL
DEL COMPACTADOR
CAMBIO DE ORIENTACIÓN DE LA
PUERTA (opcional)
INSTRUCCIONES PARA EL CAMBIO DE ORIENTACIÓN DE TODAS
LAS PUERTAS (EXCEPTO LAS DE MADERA Y DE AZULEJOS).
La puerta del compactador se envía de fábrica para que las bisagras
queden del lado derecho (al mirar de frente la unidad).
PUERTA
SOPORTE DE
LA BISAGRA
INFERIOR
TORNILLOS
Para cambiar la posición de las bisagras hacia la izquierda:
1. Con la puerta cerrada, saque el pasador de la bisagra inferior con
una llave Allen de 3/16 pulg.
2. Saque cuidadosamente la puerta abriendo y deslizando la parte
inferior de la puerta hacia afuera del gabinete.
3. Con una llave Allen de 3/16 pulg., saque el soporte de la bisagra
inferior del gabinete (2 tornillos).
PASADOR DE
LA BISAGRA
INFERIOR
Instalación
BLOQUE
DE MADERA
PATAS
NIVELADORAS
Para nivelar la parte frontal del compactador:
Incline la parte frontal del compactador hacia arriba y sobre un
bloque de madera. Gire las patas niveladoras hacia adentro o hacia
afuera a la posición deseada. Saque el bloque de madera.
4. e instálelo en el lado opuesto
del gabinete con los mismos tornillos.
PIEZA DE
ADORNO
PASADOR
DE LA
BISAGRA
SUPERIOR
5. Con un destornillador, saque el pasador de la bisagra superior de
la pieza de adorno y reinstale el pasador en el lado opuesto.
Page 24

TAPA
MANGUITO
Instalación
PUERTA
6. Teniendo cuidado de no rayar la puerta, saque los manguitos y
tapas de plástico de la parte superior e inferior de la puerta con
un destornillador plano pequeño. Instale los manguitos en el
lado del panel de la puerta que se va a bisagrar e instale la tapa
en el lado opuesto.
7. Instale la puerta en el gabinete insertando el pasador de la
bisagra superior en el manguito para puerta superior al mismo
tiempo que pone la puerta en su sitio. Inserte el pasador de la
bisagra inferior del paso 1 y apriete bien.
INSTRUCCIONES DE
INSTALACIÓN DE PUERTAS
DE AZULEJOS Y MADERA
Las siguientes instrucciones se aplican para compactadores de
basura que tengan un juego de puerta de azulejos o de madera.
Se recomienda sacar la base de la puerta del compactador para
instalar el panel especial de azulejos o madera.
Para sacar la base de la puerta:
BASE
DE LA
PUERTA
SOPORTE DE
LA BISAGRA
INFERIOR
1. Con una llave Allen de 3/16 pulg., saque el soporte de la bisagra
inferior del gabinete (2 tornillos).
2. Saque la base de la puerta del gabinete.
TORNILLOS
MODELOS 15WH • 15BL• 15SS• 15WT • 15TT
Página 24
3. Piense dónde se
va a instalar el
compactador y
determine dónde
deben estar las
bisagras de la
puerta (es decir,
a la izquierda o
a la derecha del
gabinete). Ya que
los pasadores
de bisagra están
permanentemente
acoplados a la base
de la puerta, basta con girar ésta hasta que los pasadores de
bisagra estén en el lado deseado. Quizás sea conveniente marcar
el interior de la base de la puerta para indicar la parte superior.
4. Para prevenir daños al accionador
en la parte trasera de la puerta,
retire los dos (2) tornillos que lo
sostienen en su lugar. Guarde el
accionador y los tornillos.
ACCIONADOR
Para puertas de madera:
5. La base de la puerta de madera
está diseñada para adaptarse a un
panel de madera de ¾ pulg.
(19 mm) de espesor, y de
14 7/8 pulg. (37.8 cm) de ancho
por 29 1/4 pulg. (74.3 cm) de
alto. Se recomienda que verifique
la altura de la
base de la puerta
antes de cortar el
panel de madera
al 27tamaño.
Centre la base de
la puerta sobre el
panel de madera
y sujete utilizando
los herrajes
incluidos en la
bolsa de piezas
del compactador.
Para instalar
azulejos en la
PUERTA
MANGUITO
TORNILLOS
base de la puerta:
5. La base de la puerta de azulejos se entrega pre-armada con un
tablero de soporte de cemento. Coloque los azulejos y lechada
en la base de la puerta mediante los métodos y materiales
tradicionales.
6. Compre una manija de puerta que haga juego con las piezas
de su gabinete e instálela siguiendo las instrucciones
correspondientes.
7. Si la puerta va a tener las bisagras al lado izquierdo del
compactador, será necesario invertir el soporte de la bisagra
inferior que se quitó en el paso 1. Retire el manguito de
plástico del soporte de la bisagra e instálelo en el lado opuesto
del soporte. Instale la puerta en el gabinete del compactador
siguiendo en sentido contrario las instrucciones del paso 1.
8. Instale de nuevo el accionador que quitó en el Paso 4.
Asegúrese de que la puerta se abra y cierre sin problemas, y
que el accionador entre y salga del interruptor de entrecierre
de seguridad en el compactador.
PARTE
POSTERIOR
DE LA
PUERTA
SOPORTE
DE LA
BISAGRA
INFERIOR
Page 25

Botón de inicio (con LED de estado del pistón)
Entrecierre de la puerta
Accionador del entrecierre
Seguro de llave
Interruptor de modo de compactación
Área de almacenamiento de bolsas
Disco de control de olores
Pistón
Lengüeta de liberación de la placa de compactación
Placa de compactación
Trabas del cubo de basura (2)
MODELOS 15WH • 15BL• 15SS• 15WT • 15TT
Página 25
Preparación
Cubo de basura deslizante
Rodillos niveladores
Patas niveladoras
1. MODO DE FUNCIONAMIENTO DEL
COMPACTADOR
El compactador Broan Elite comprime la basura doméstica hasta
a 1/6 de su volumen original. Compacta basura doméstica normal,
como cartones de leche, botellas de vidrio y de plástico, recipientes y
jarras, latas de estaño, envolturas, cajas, desechos de alimentos, etc.
Al encender el compactador, un pistón eléctrico desciende en el cubo
de basura, comprime la basura, regresa a la posición de arriba y se
apaga automáticamente.
NOTA: El pistón baja hasta 2/3 de la profundidad del cubo de basura.
Debido a esto, el cubo de basura tiene que estar al menos 1/3 lleno
antes de que se note cualquier compresión.
Page 26

MODELOS 15WH • 15BL• 15SS• 15WT • 15TT
Compact Mode
On
Normal
Hold
Compact Mode
Normal
Hold
Compact Mode
On
Normal
Hold
Página 26
2. USO DEL INTERRUPTOR DEL
SEGURO DE LLAVE
El compactador tiene un interruptor de seguro de llave que sirve
como medida de seguridad para su protección.
El compactador no funciona cuando el
interruptor del seguro de llave está en la posición
de “APAGADO” (OFF). Bloquee su compactador
y saque la llave para impedir que la unidad
sea operada por niños o prevenir que otros la
manipulen de manera indebida.
Cuando el interruptor del seguro de llave está en la
posición de “ENCENDIDO” (ON), el compactador
está listo para funcionar. No se puede sacar la
llave en la posición de “ENCENDIDO” (ON).
NOTA: La unidad dejará de funcionar si se abre la puerta durante
su funcionamiento. Si el compactador se para durante su ciclo,
siempre se moverá hacia ARRIBA al cerrarse la puerta.
3. INSTALE EL DISCO DE CONTROL
Preparación
DE OLORES
El compactador está equipado con un disco de control de olores que
dura hasta 6 meses, cuando se instala en el compactador de basura.
El disco de control de olores viene empacado en una bolsa de lámina
metálica y se activa una vez que se abre la bolsa.
Escriba las fechas en las etiquetas del disco de control de olores de
esta manera:
• Cuando se abra la bolsa, escriba la “Fecha de activación” en el
espacio incluido en la parte superior del disco.
• Escriba las fechas en las etiquetas VERDES indicadoras de
meses de esta manera:
Etiqueta de “Fecha de avance” del mes 1 = A 1 mes de la
“Fecha de activación”
Etiqueta de “Fecha de avance” del mes 2 = A 2 meses de la
“Fecha de activación”
Etiqueta de “Fecha de avance” del mes 3 = A 3 meses de la
“Fecha de activación”
Etiqueta de “Fecha de avance” del mes 4 = A 4 meses de la
“Fecha de activación”
Etiqueta de “Fecha de avance” del mes 5 = A 5 meses de la
“Fecha de activación”
• Escriba las fechas en la etiqueta ROJA indicadora de meses de
esta manera: Etiqueta de “Fecha de reemplazo” del mes 6 =
A 6 meses de la “Fecha de activación”
Precaución: El disco de control de olores contiene material que
puede provocar una irritación moderada en los ojos. Evite el
contacto con los ojos. Nocivo si se ingiere. Lave la piel o la ropa
meticulosamente con
agua y con jabón después
de manipular el producto.
No reutilice la bolsa vacía
de lámina metálica.
Saque el disco de la bolsa
de lámina metálica, abra
la puerta del disco de
control de olores y ponga
el disco de cara hacia
abajo en la bandeja, de
manera que el mes “1”
VERDE esté visible cuando
se cierre la puerta del
disco de control de olores.
Al cabo de 1 mes, gire
el disco de la derecha
la izquierda con el dedo.
Repita este
procedimiento cada
mes.
En el sexto mes,
la etiqueta de la
ventana estará ROJA,
lo cual indica que es
necesario reemplazar
el disco de control de
olores después de que
transcurran 30 días.
El disco de control de olores, modelo 15TCOD, puede conseguirse
a través de su distribuidor de productos Broan.
a
4. INSTALE LA BOLSA
Con la puerta abierta y
el cubo de basura en la
posición más hacia afuera,
coloque una bolsa en el
cubo. Doble la bolsa sobre
el borde superior del cubo,
en todos los lados.
Presione la bolsa dentro
de las esquinas del cubo y
alise el fondo.
Alise y dele forma a la
bolsa con cuidado; eso
evitará que el pistón
rompa la bolsa durante
la compactación.
Asegure la bolsa en su
sitio con los 2 botones
que están a cada lado del
cubo. La bolsa viene con
ranuras ya hechas para
este propósito.
5. TABLA PARA CORTAR (opcional)
Si su compactador no se instalará debajo de una superficie de
cubierta, puede ordenar una tabla de cortar opcional, Modelo
15TCBB a su Distribuidor Broan.
La tabla para cortar se apoya sobre la parte superior del
compactador y está diseñada con patas de caucho protectoras y
una ranura para salsa en la parte superior.
Para evitar que la tabla para cortar se deforme, lávela con un
detergente suave y aplíquele una capa delgada de aceite mineral.
Page 27

MODELOS 15WH • 15BL• 15SS• 15WT • 15TT
Compact Mode
On
Normal
Hold
Compact Mode
Normal
Hold
Compact Mode
Normal
Hold
Página 27
6. COMPACTACIÓN
El compactador está ahora listo para usar.
PARA OBTENER MEJORES RESULTADOS,
SIEMPRE LLENE TOTALMENTE CADA BOLSA
NUEVA ANTES DE HACER FUNCIONAR EL
COMPACTADOR. SI LO HACE ASÍ, REDUCIRÁ AL
MÍNIMO LA PROBABILIDAD DE QUE LA BOLSA
SE LEVANTE Y SE ROMPA.
1. Deslice y cierre completamente el cubo de basura.
2. Gire el interruptor del seguro de llave a la posición
de “ENCENDIDO” (OFF).
Interruptor del seguro de llave
3. Seleccione 1 de los 2 modos de compactación:
Modo de compactación (Compact Mode)
normal (Normal)
Una vez cerrada la puerta y presionado el
botón de “Inicio”, el pistón baja hacia el
cubo de basura y compacta la basura. Al
llegar al final de la carrera, el pistón invierte
la marcha automáticamente y sube hasta
salirse del cubo de basura. El ciclo total dura
45 segundos o menos. Al llegar arriba, el
compactador se apaga automáticamente y
está listo para recibir más basura.
Modo de compactación (Compact Mode) de
espera (Hold)
Una vez cerrada la puerta y presionado el
botón de “Inicio”, el pistón baja hacia el cubo
de basura y compacta la basura. Este ajuste
ayuda a comprimir la basura totalmente, para
permitir mayor capacidad. Al llegar al fondo
de la carrera, el pistón se apaga. Presione
nuevamente el botón de “Inicio” para invertir
la marcha del pistón de modo que suba y
salga del cubo de basura. Al llegar arriba, el
compactador se apaga automáticamente y
está listo para recibir más basura.
4. Cierre la puerta.
5. Presione el botón de “Inicio” en la parte superior
central de la unidad para comenzar la compactación.
El compactador se apagará automáticamente al finalizar
el ciclo de compactación. El “indicador LED de estado
del pistón” es de color VERDE cuando el pistón está
arriba y listo para recibir basura. El indicador LED
cambia a color ROJO cuando el pistón se está
moviendo o se para en cualquier otra posición.
7.
SUGERENCIAS PARA LA COMPACTACIÓN
• Aunque no es necesario hacer funcionar el compactador antes de que
el cajón esté lleno o casi lleno, para lograr una máxima compactación
se sugiere arrancar el compactador cada vez que se agregue una
cantidad considerable de basura.
• En la carrera completa, el pistón no baja hasta el fondo del cubo de
basura. La basura que esté en el último tercio del cubo se aplastará
durante las compactaciones subsiguientes.
• Las botellas de vidrio hacen bastante ruido al romperse durante la
compactación; esto es normal. Las botellas no siempre se rompen
durante el primer ciclo. La rotura del vidrio y el ruido correspondiente
podrían ocurrir unos cuantos ciclos después, según el tipo y el volumen
de la basura.
• Las botellas y las latas grandes se compactan mejor cuando se colocan
acostadas cerca del centro del cubo de basura.
• Ponga un par de hojas dobladas de papel periódico o una bolsa de
papel (de supermercado) encima de la carga en los siguientes casos:
Cuando vaya a compactar botellas o frascos de gran tamaño
•
o varios frascos o botellas (o cualquier artículo que podría
hacerse añicos). Esto evitará que los fragmentos y partículas
de vidrio salgan despedidos desde el cubo hacia el mecanismo
del compactador.
Cuando vaya a compactar desechos de alimentos que no estén
•
envueltos. Esto ayudará a mantener limpio al pistón eléctrico.
• La compactación de cargas sumamente diferentes podría causar que
el cubo de basura se mueva hacia delante, y eso podría ocasionar
que la puerta se abra, interrumpiendo el ciclo de compactación. Con
cuidado, presione y mantenga cerrada la puerta para activar el pistón
hasta que regrese a la posición de arriba. Abra el cubo de basura y
cambie la posición de cualquier objeto que pudiera estar ocasionando
las diferencias de la carga. Cierre la puerta y presione el botón de
inicio (“Start”) para volver a activar el ciclo de compactación.
• Ciertos tipos de basura crean olores sumamente fuertes, por ejemplo:
carne y pescado crudos, cáscara de toronja, artículos de higiene
personal y pañales desechables. Se aconseja no poner dichos artículos
en el compactador.
•
Si el compactador no va a utilizarse durante un tiempo largo, por ejemplo,
durante unas vacaciones, saque la bolsa para evitar los olores indeseables.
PRECAUCIÓN: NO SE DEBEN COMPACTAR LATAS DE AEROSOLES
NI DE NINGÚN OTRO RECIPIENTE QUE CONTENGA O QUE HAYA
CONTENIDO PRODUCTOS QUÍMICOS TÓXICOS, INSECTICIDAS O
COMBUSTIBLES. LA COMPACTACIÓN DE DICHOS ARTÍCULOS PODRÍA
PROVOCAR LA EMANACIÓN DE VAPORES PELIGROSOS PARA LA
SALUD O PODRÍA PROVOCAR UN INCENDIO O UNA EXPLOSIÓN.
No ponga pinturas, trapos aceitosos, latas de líquido para
encendedores, latas de diluyentes de pintura, etc. en el
compactador. Dichos artículos podrían encenderse de manera
espontánea y causar un incendio o una explosión (o ambos).
NO EMPUJE NUNCA BASURA DEL CUBO CON LAS MANOS O LOS
PIES. En la basura podría haber vidrios rotos, piezas metálicas
cortantes, etc., que podrían causarle lesiones.
8. RETIRO DE
LA BOLSA
Funcionamiento
6.
Botón de inicio
LED de estado del pistón
El ciclo de compactación puede interrumpirse en cualquier
momento abriendo la puerta. Una vez que se detenga, el
pistón se moverá siempre hacia arriba al cerrar la puerta.
1. Saque el cubo de basura
deslizándolo hacia afuera.
2. Afloje las trabas del cubo y
baje el frente del cubo.
3. Desabotone la bolsa del cubo
y ciérrela torciendo la parte de
arriba. Amárrela con el alambre
de amarre suministrado.
4. Levante la bolsa y deslícela hacia
afuera del cubo.
Page 28

MODELOS 15WH • 15BL• 15SS• 15WT • 15TT
EXCEPTO PARA LA LIMPIEZA DESCRITA EN LA SIGUIENTE SECCIÓN, TODO SERVICIO DEBERÁ REALIZARLO UN
REPRESENTANTE DE SERVICIO AUTORIZADO.
9. LIMPIEZA
El compactador está diseñado con acceso fácil para limpiarlo
cuando sea necesario.
El interior y el exterior del gabinete tienen un acabado de
esmalte duradero.
No use esponjas ni limpiadores abrasivos que podrían dañar el
acabado del compactador. Utilice una solución detergente suave
para estas superficies.
PRECAUCIÓN: Es posible que haya fragmentos de
vidrio u otros objetos o residuos cortantes en las
superficies que se vayan a limpiar o alrededor de
ellas. Elimine cuidadosamente tales objetos antes
de limpiar cualquier superficie.
SAQUE EL CUBO DE BASURA Y
LIMPIE EL INTERIOR
1. Jale hacia afuera el cubo de basura hasta que se detenga.
2. Quite (1) tornillo de cada uno de los mecanismos de
deslizamiento del cubo.
3. Presione las lengüetas de liberación del mecanismo deslizante
del cubo a la izquierda y a la derecha, al mismo tiempo que
jala el cubo hasta sacarlo de la unidad.
4. Aspire y limpie la base del gabinete, los canales de guía y el
cubo, especialmente en las esquinas.
5. Lave el interior del gabinete con una solución detergente
suave.
6. Al terminar de limpiar el gabinete, instale el cubo de basura
siguiendo los pasos 2 y 3 en sentido contrario.
LIMPIE LA PLACA DE COMPACTACIÓN
Página 28
Mantenimiento
1.
2.
3.
LENGÜETA DE LIBERACIÓN
DEL MECANISMO
DESLIZANTE DEL CUBO
TORNILLO
PISTÓN
LENGÜETA DE
LIBERACIÓN
PLACA DE
COMPACTACIÓN
1. El pistón está equipado con una placa de compactación
que puede quitarse para facilitar la limpieza.
2. Asegúrese de que el cubo de basura este vacío y sin
una bolsa.
3. Empuje el cubo de basura hacia dentro del gabinete.
Desenganche y baje el frente del cubo.
4.
Presione la
en el frente del pistón para desenganchar la placa. La placa
puede sacarse jalándola hacia abajo y hacia afuera del pistón.
5. Al sacarla, la placa del compactador se puede lavar
con una solución detergente suave, o colocarse en una
máquina lavaplatos.
6. Vuelva a instalar la placa del compactador insertando la
lengüeta (en la parte posterior de la placa) en la ranura
(en la parte posterior del pistón). Levante y presione el frente
de la placa hasta que se enganche firmemente en su sitio.
lengüeta de liberación
de la placa de compactación
Page 29

MODELOS 15WH • 15BL• 15SS• 15WT • 15TT
Compact Mode
Normal
Hold
Compact Mode
On
Normal
Hold
Página 29
9. LIMPIEZA (cont.)
LIMPIE EL PISTÓN
CUBO DE
BASURA
PISTÓN
1. Asegúrese de que el cubo de basura esté vacío y se
haya metido en el gabinete.
2. Gire el interruptor del seguro de llave a la posición
de “ENCENDIDO” (ON).
Interruptor del seguro de llave
10. RESOLUCIÓN DE PROBLEMAS
Ante de llamar para solicitar servicio, repase los pasos siguientes
que podrían ahorrarle el costo de una llamada de servicio:
1. ¿Está el cordón eléctrico bien enchufado?
2. ¿Se fundió un fusible o se disparó un interruptor de
circuitos?
3. ¿Está la puerta bien cerrada?
4.
¿Está el interruptor de la llave en la posición de “ENCENDIDO”
(ON)?
5. ¿Presionó el botón de “Inicio” lo suficiente como para
comenzar el ciclo compactación?
6. Si es difícil cerrar el cubo de basura, revise para ver si detrás
del cubo hay basura que podría estar impidiendo el cierre.
7. El motor tiene un mecanismo de corte térmico automático.
Si el aparato ha estado compactando repetidamente, es
posible que este protector haya abierto el circuito. Espere
unos cuantos minutos para que el mecanismo se reinicie
automáticamente.
8. El cubo de basura tiene que estar lleno al menos a la mitad
antes de que pueda observarse una cantidad de compactación
apreciable, ya que el pistón no viaja hasta el fondo del cubo.
La basura que esté en el último tercio del cubo se aplastará
durante las compactaciones subsiguientes.
3. Seleccione el modo de compactación de “Espera” (Hold).
Modo de compactación (Compact Mode) de espera (Hold)
4. Cierre la puerta.
5. Presione el botón de “Inicio”.
Botón de inicio
El pistón viajará al fondo del cubo de basura y se detendrá al
finalizar la carrera.
PRECAUCIÓN: Es posible que haya fragmentos de
vidrio u otros objetos o residuos cortantes en las
superficies que se vayan a limpiar o alrededor de
ellas. Elimine cuidadosamente tales objetos antes
de limpiar cualquier superficie.
6. Abra la puerta. Desenganche y baje el frente del cubo.
Aspire la parte superior del pistón y limpie con una solución
detergente suave.
7. Al terminar de limpiar:
Levante y vuelva a enganchar el frente del cubo, cierre la
puerta y presione el botón de “Inicio”. El pistón regresará a
la parte superior de la carrera y se apagará automáticamente.
Abra la puerta, deslice y saque el cubo, ponga la bolsa y
seleccione el modo de compactación. El compactador está
ahora listo para recibir basura.
9. En raras ocasiones, es posible que una lata grande que se
haya puesto cerca del borde exterior del cubo de basura
esté envuelta alrededor del borde del pistón. Esto podría
obstaculizar el funcionamiento apropiado del pistón.
Para corregir este problema, simplemente abra la puerta,
desenganche y abra el frente del cubo y saque la lata.
¡TENGA CUIDADO AL MANIPULAR OBJETOS CORTANTES!
10. El compactador no funcionará en el caso improbable de
que el accionador de entrecierre (en la parte interior de la
puerta) se rompa. NO TRATE DE HACER FUNCIONAR EL
COMPACTADOR DE NINGUNA OTRA MANERA. Comuníquese
con su distribuidor de Broan para hacer el pedido de un
accionador de repuesto.
11. Para solicitar servicio, debe suministrar el número de modelo
de la unidad, el número de serie y la naturaleza del defecto
del producto o pieza. El número de modelo, número de serie
y todos los demás datos se muestran en la placa del modelo
localizada en la pared interior del gabinete. Al solicitar
servicio de garantía, deberá presentar un comprobante con la
fecha de compra original. Para obtener el nombre del centro
de servicio de garantía en su localidad, comuníquese con
el distribuidor donde adquirió su compactador o con BroanNuTone LLC.
Mantenimiento
Page 30

11. GARANTÍA
GARANTIA BROAN-NUTONE LIMITADA POR UN AÑO
Broan-NuTone garantiza al consumidor comprador original
de sus productos que dichos productos carecerán de
defectos en materiales o en mano de obra por un período de
un año a partir de la fecha original de compra. NO EXISTEN
OTRAS GARANTIAS, EXPLICITAS O IMPLICITAS,
INCLUYENDO, PERO NO LIMITADAS A, GARANTIAS
IMPLICITAS DE COMERCIALIZACION O APTITUD PARA
UN PROPOSITO PARTICULAR.
Durante el período de un año, y a su propio criterio, BroanNuTone reparará o reemplazará, sin costo alguno cualquier
producto o pieza que se encuentre defectuosa bajo
condiciones normales de servicio y uso.
ESTA GARANTIA NO SE APLICA A TUBOS Y
ARRANCADORES DE LAMPARAS FLUORESCENTES.
Esta garantía no cubre (a) mantenimiento y servicio
normales o (b) cualquier producto o piezas que hayan sido
utilizadas de forma errónea, negligente, que hayan causado
un accidente, o que hayan sido reparadas o mantenidas
inapropiadamente (por otras compañías que no sean BroanNuTone), instalación defectuosa, o instalación contraria a
las instrucciones de instalación recomendadas.
La duración de cualquier garantía implícita se limita a un período
de un año como se especica en la garantía expresa.
Algunos estados no permiten limitaciones en cuanto al
tiempo de expiración de una garantía implícita, por lo que la
limitación antes mencionada puede no aplicarse a usted.
LA OBLIGACION DE BROAN-NUTONE DE REPARAR O
REEMPLAZAR, SIGUIENDO EL CRITERIO DE BROANNUTONE, DEBERA SER EL UNICO Y EXCLUSIVO
RECURSO LEGAL DEL COMPRADOR BAJO ESTA
GARANTIA. BROAN-NUTONE NO SERA RESPONSABLE
POR DAÑOS INCIDENTALES, CONSIGUIENTES, O POR
DAÑOS ESPECIALES QUE SURJAN A RAIZ DEL USO
O DESEMPEÑO DEL PRODUCTO. Algunos estados no
permiten la exclusión o limitación de daños incidentales o
consiguientes, por lo que la limitación antes mencionada
puede no aplicarse a usted. Esta garantía le proporciona
derechos legales especícos, y usted puede también tener
otros derechos, los cuales varían de estado a estado. Esta
garantía reemplaza todas las garantías anteriores.
Para calicar en la garantía de servicio, usted debe (a)
noticar a Broan-NuTone al domicilio o al número de teléfono
que se menciona abajo, (b) dar el número del modelo y la
identicación de la pieza, y (c) describir la naturaleza de
cualquier defecto en el producto o pieza. En el momento
de solicitar servicio cubierto por la garantía, usted debe de
presentar evidencia de la fecha original de compra.
Broan-NuTone LLC Hartford, Wisconsin
www.broan.com 800-558-1711
Broan-NuTone Canada Mississauga, Ontario
Garantía
www.broan.ca 877-896-1119
MODELOS 15WH • 15BL• 15SS• 15WT • 15TT
Página 30
99526805A
Page 31

Page 32

99526805A
 Loading...