

Page 1
15000 SERIES
RANGE HOOD
READ AND SAVE THESE INSTRUCTIONS
!
INTENDED FOR DOMESTIC COOKING ONLY
WARNING
TO REDUCE THE RISK OF FIRE, ELECTRIC SHOCK, OR INJURY TO PERSONS,
OBSERVE THE FOLLOWING:
1. Use this unit only in the manner intended by the manufacturer. If you have
questions, contact the manufacturer at the address or telephone number listed
in the warranty.
2. Before servicing or cleaning unit, switch power off at service panel and lock
the service disconnecting means to prevent power from being switched on
accidentally. When the service disconnecting means cannot be locked, securely
fasten a prominent warning device, such as a tag, to the service panel.
3. Installation work and electrical wiring must be done by a qualified person(s)
in accordance with all applicable codes and standards, including fire-rated
construction codes and standards.
4. Sufficient air is needed for proper combustion and exhausting of gases through
the flue (chimney) of fuel burning equipment to prevent backdrafting. Follow the
heating equipment manufacturer's guideline and safety standards such as those
published by the National Fire Protection Association (NFPA), and the American
Society for Heating, Refrigeration and Air Conditioning Engineers (ASHRAE),
and the local code authorities.
5. When cutting or drilling into wall or ceiling, do not damage electrical wiring and
other hidden utilities.
6. Ducted fans must always be vented to the outdoors.
7. Do not use this unit with an additional speed control device.
8. To reduce the risk of fire, use only metal ductwork.
9. Use with approved cord-connection kit only.
10.This unit must be grounded.
TO REDUCE THE RISK OF A RANGE TOP GREASE FIRE:
1. Never leave surface units unattended at high settings. Boilovers cause smoking
and greasy spillovers that may ignite.
2. Always turn hood ON when cooking at high heat or when cooking flaming foods.
3. Clean ventilating fans frequently. Grease should not be allowed to accumulate
on fan or filter.
4. Use proper pan size. Always use cookware appropriate for the size of the surface
element.
!
WARNING
TO REDUCE THE RISK OF INJURY TO PERSONS IN THE EVENT OF A RANGE
TOP GREASE FIRE, OBSERVE THE FOLLOWING:
1. SMOTHER FLAMES with a close-fitting lid, cookie sheet, or metal tray, turn off
the burner. BE CAREFUL TO PREVENT BURNS. If the flames do not go out
immediately, EVACUATE AND CALL THE FIRE DEPARTMENT.
2. NEVER PICK UP A FLAMING PAN - You may be burned.
3. DO NOT USE WATER, including wet dishcloths or towels - a violent stream
explosion will result.
4. Use an extinguisher ONLY if:
A. You know you a Class ABC extinguisher and you already know
how to operate it.
B. The fire is small and contained in the area where it started.
C. The fire department is being called.
D. You can fight the fire with your back to an exit.
*Based on “Kitchen Firesafety Tips” published by NFPA.
CAUTION
1. For indoor use only.
2. For general ventilating use only. Do not use to exhaust hazardous or explosive
materials and vapors.
3. To avoid motor bearing damage and noisy/and or unbalanced impellers, keep
drywall spray, construction dust, etc. off power unit.
4. When using a thermostat with this product, fan may start automatically. To reduce
the risk of injury, switch power off at service panel and lock service panel to
prevent power from being switch on accidentally.
5. Your hood motor has thermal overload which will automatically shut off the motor
if it becomes overheated. The motor will restart when it cools down. If the motor
continues to shut and restart, have the hood serviced.
6. Please read specification label on product for further information and
requirements.
!
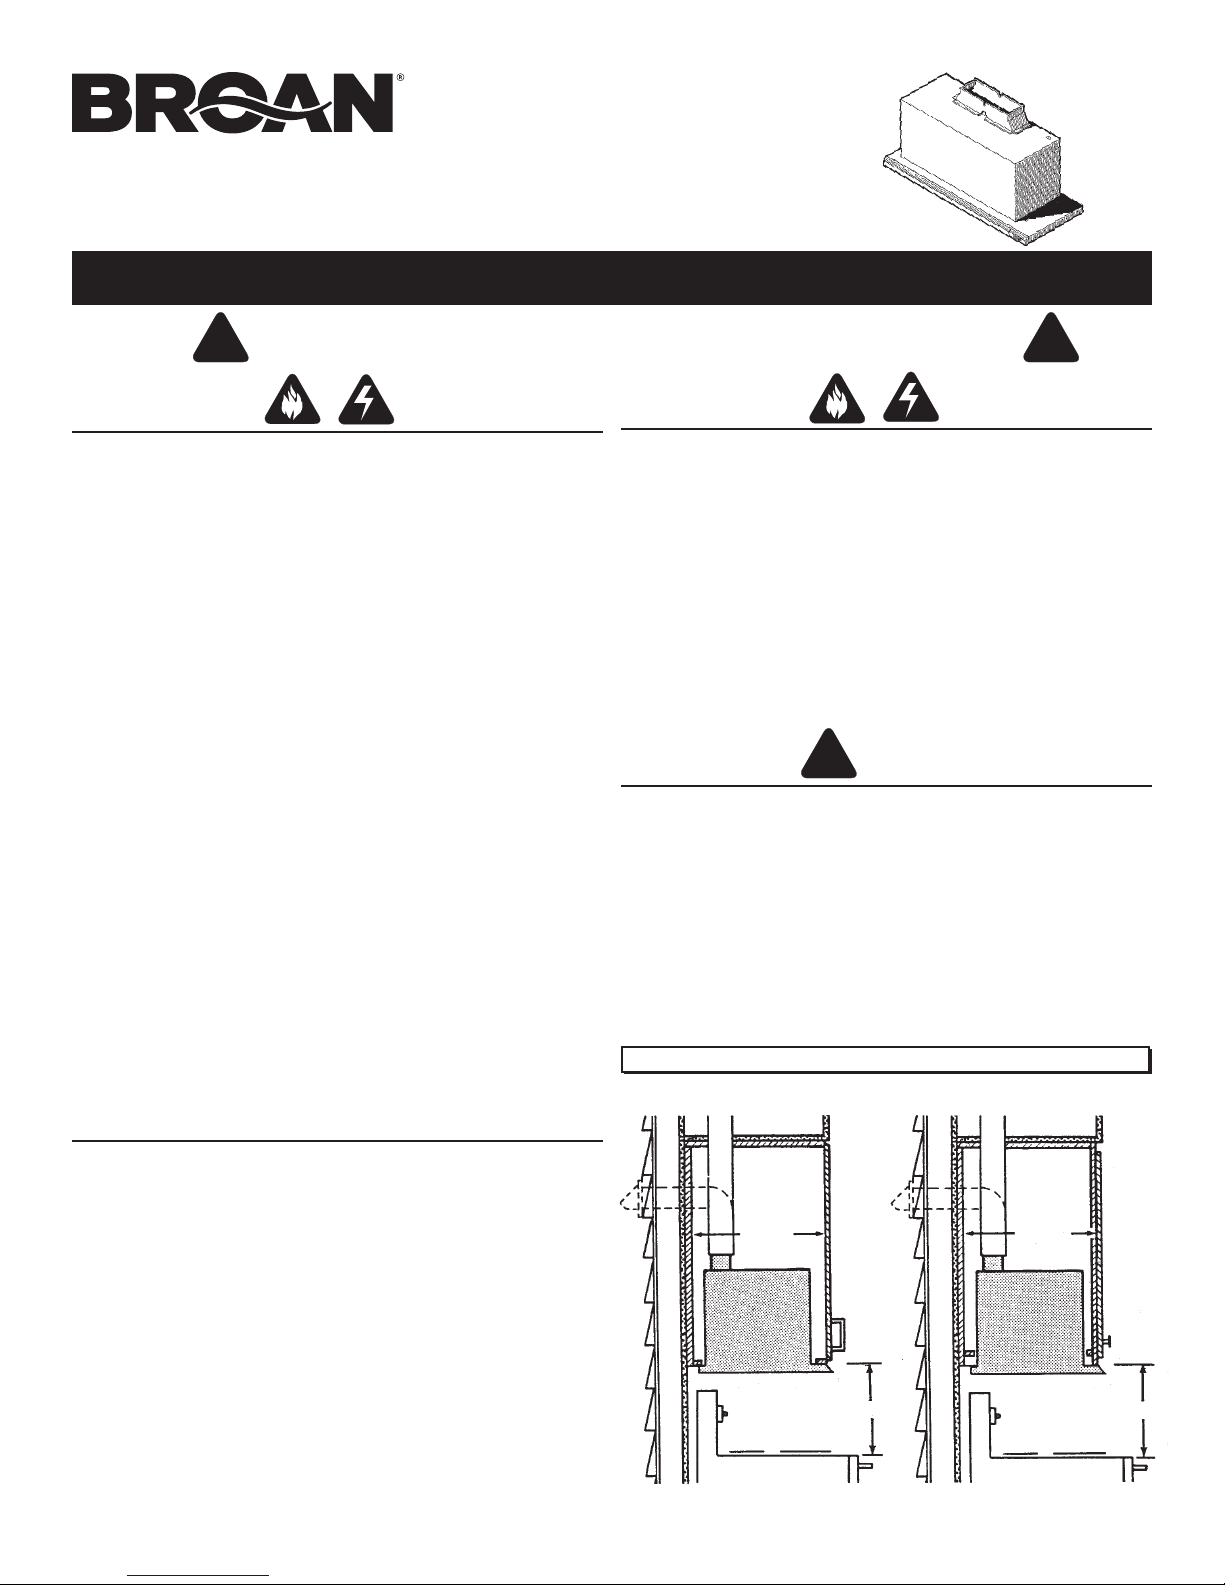
PLAN THE INSTALLATION
Your new hood will fit a standard 30" wide, flush bottom or recessed
bottm, framed or frameless kitchen cabinet, which has a minimum
depth of 11" from face to inside of back wall.
The unit is ducted vertically. Horizontal ducting can be accomplished
as shown.
For safe operation, the mounted hood must be a minimum of 20"
above the cooking surface.
For easiest installation, range hood should be installed in cabinet
before mounting cabinet to wall.
NOTE: Remove glass drawer from unit before installing hood in
cabinet to protect drawer from damage. See Step 13 on page 4.
This hood can easily be installed by following these basic steps:
• Mark and cut out cabinet bottom.
• Secure hood to cabinet.
• Mount cabinet on wall.
• Connect ductwork and power cable.
Register your product online at: www.broan.ca/register
11"
MIN.
(INSIDE)
FLUSH BOTTOM CABINET
20" MIN.
RECESSED BOTTOM CABINET
11"
MIN.
(INSIDE)
20" MIN.
Page 2
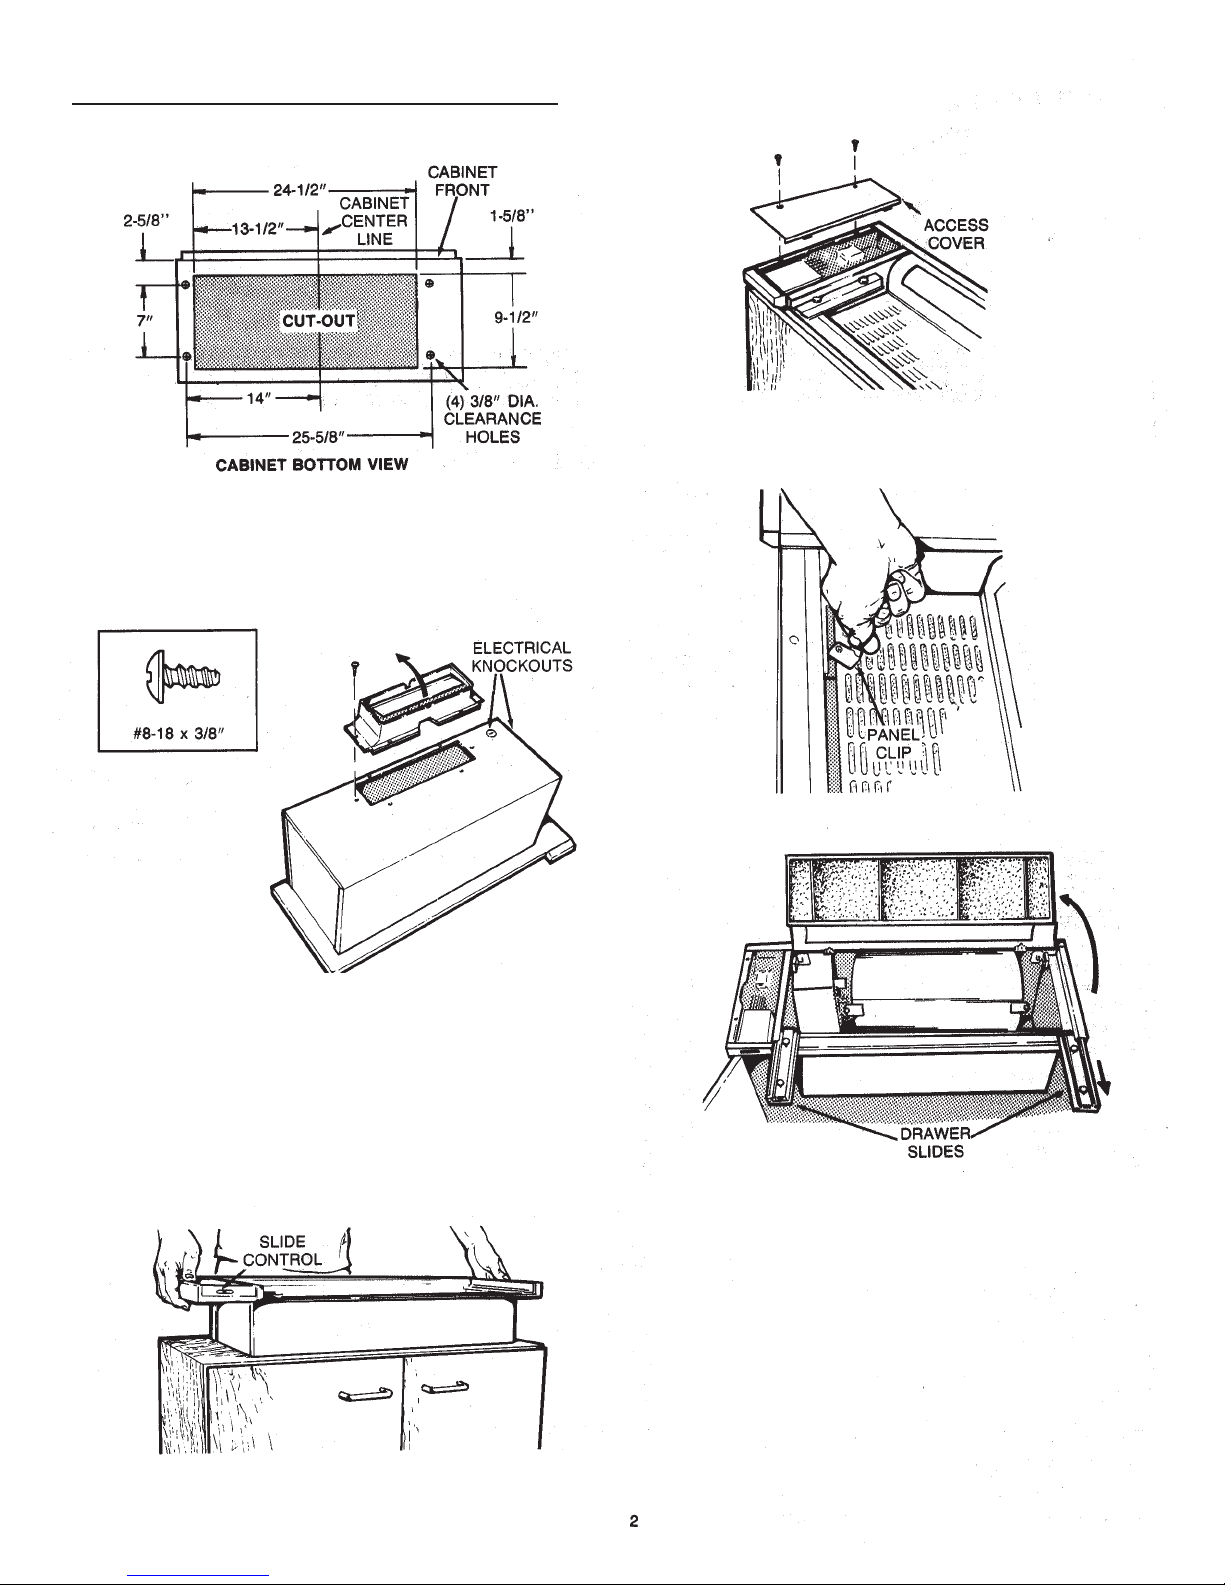
INSTALL THE HOOD
1. Mark and cut-out cabinet bottom.
Prepare the cabinet bottom as shown above. Be sure to locate the cut-out and four holes from the front of the cabinet
to assure a flush mount.
2. Attach damper/duct connector.
5. Remove access cover.
6. Open filter panel.
Use two (2) screws (provided) to attach connector to housing.
Damper flap should open in direction indicated by arrow.
3. Remove electrical knockout.
Choose either the top or side of housing for electrical cable
entrance. Remove the appropriate knockout.
4. Set housing into opening.
Carefully lower housing into cabinet opening with slide control
to the front.
Pull drawer slides out. Rotate panel clips and swing panel
open.
Page 3
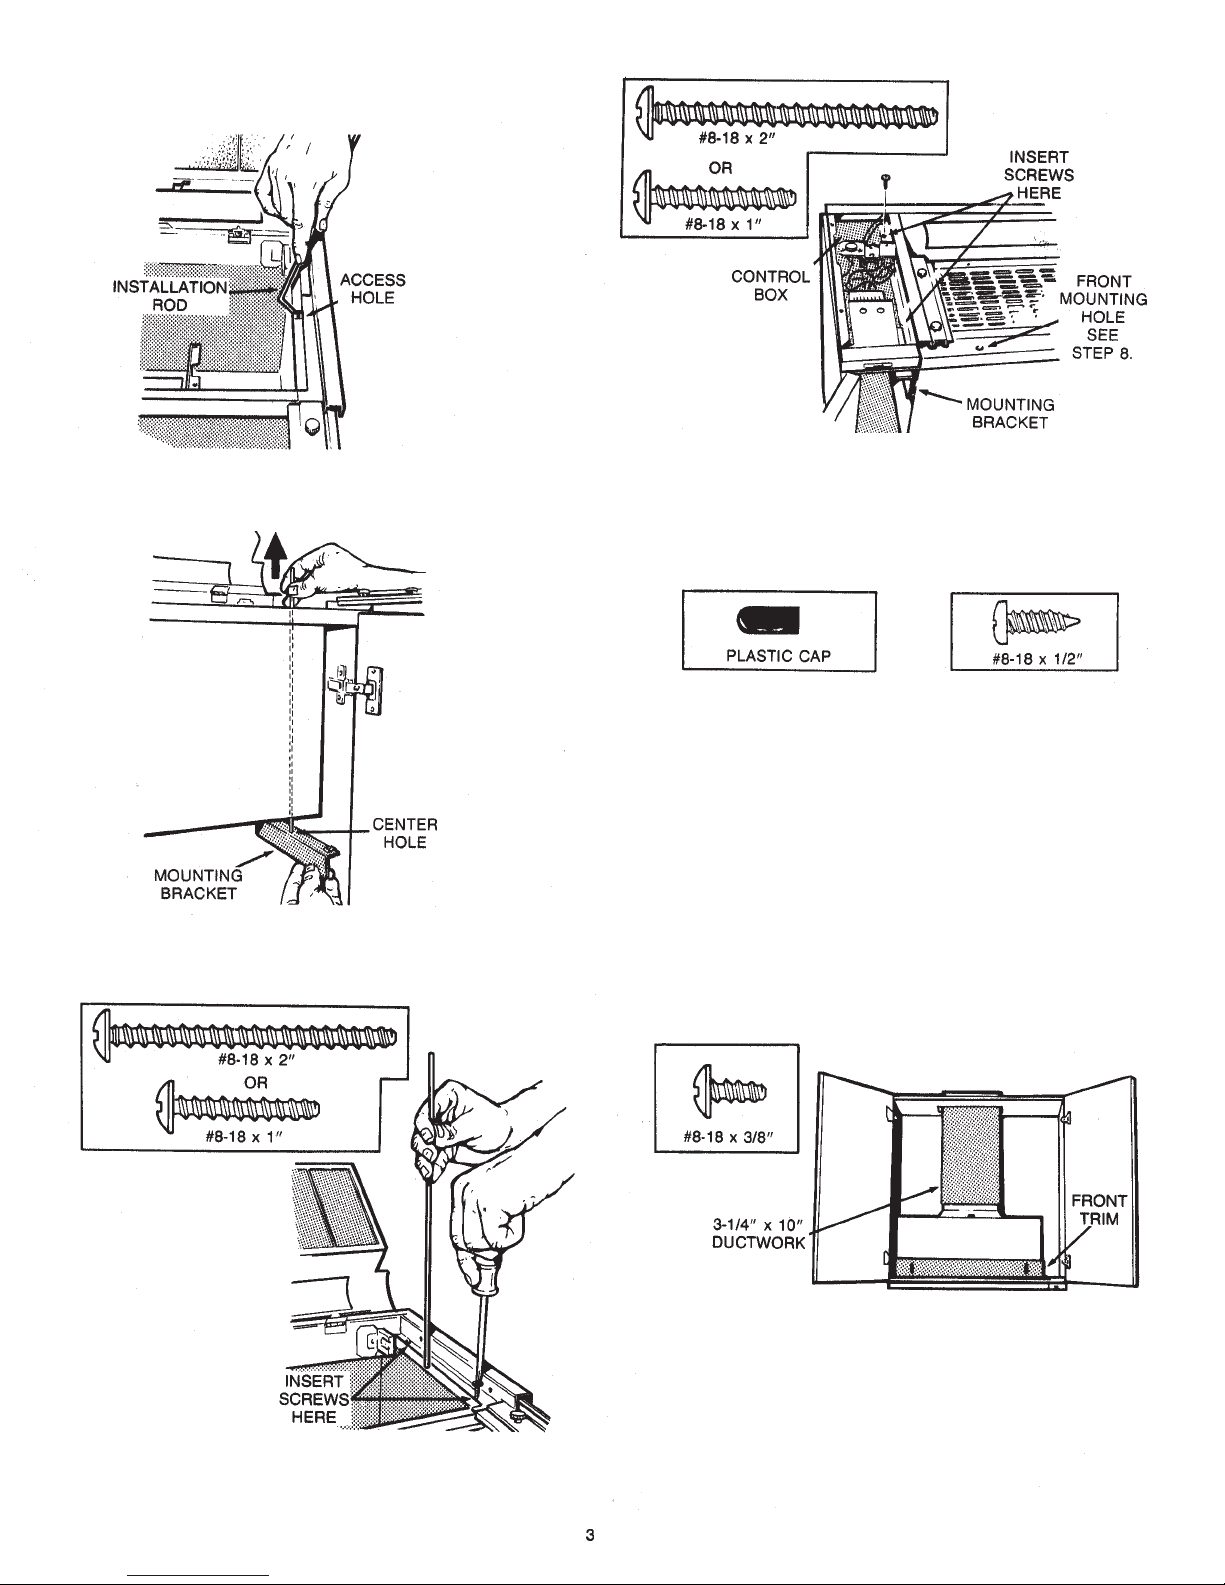
7. Install mounting brackets.
Insert bent end of installation rod into access hole in housing.
Choose the mounting bracket with the center hole. Hang the
bracket from the rod, through this center hole, as shown. Pull
bracket up between cabinet and housing.
Insert two (2) screws, short or long as appropriate, through
control box and into other mounting bracket. Do not tighten
screws completely.
8. Secure hood to cabinet.
Align hood with sides and front edge of cabinet. Tighten screws
in each mounting bracket. Place plastic caps (provided) over
the ends of these screws from inside of cabinet.
Install two (2) additional screws into cabinet bottom, through
holes along the front edge of hood (See Step 7 illustration.)
9. Replace access cover.
Secure access cover with two (2) screws removed in step 5.
10. Mount cabinet on wall.
Make sure cabinet is securely attached to the wall and/or
adjoining cabinets. Mounted cabinet must be able to support
the added weight of the hood.
11. Attach ductwork and front trim.
Hold mounting bracket in place with rod. Two sets of screws are
provided. Use short screws for flush bottom cabinets or long
screws for recessed bottom cabinets. Insert two (2) screws
through housing and into mounting bracket. Do not tighten
screws completely.
Complete the ductwork from the hood, to the outside, using
a roof cap or elbow and wall cap. Tape all joints. Shelves may
be installed if trimmed to clear ductwork.
The front trim piece covers the gap between the housing and
the front edge of cabinet cut-out. Mount front trim to housing
with two (2) screws. (provided).
Page 4
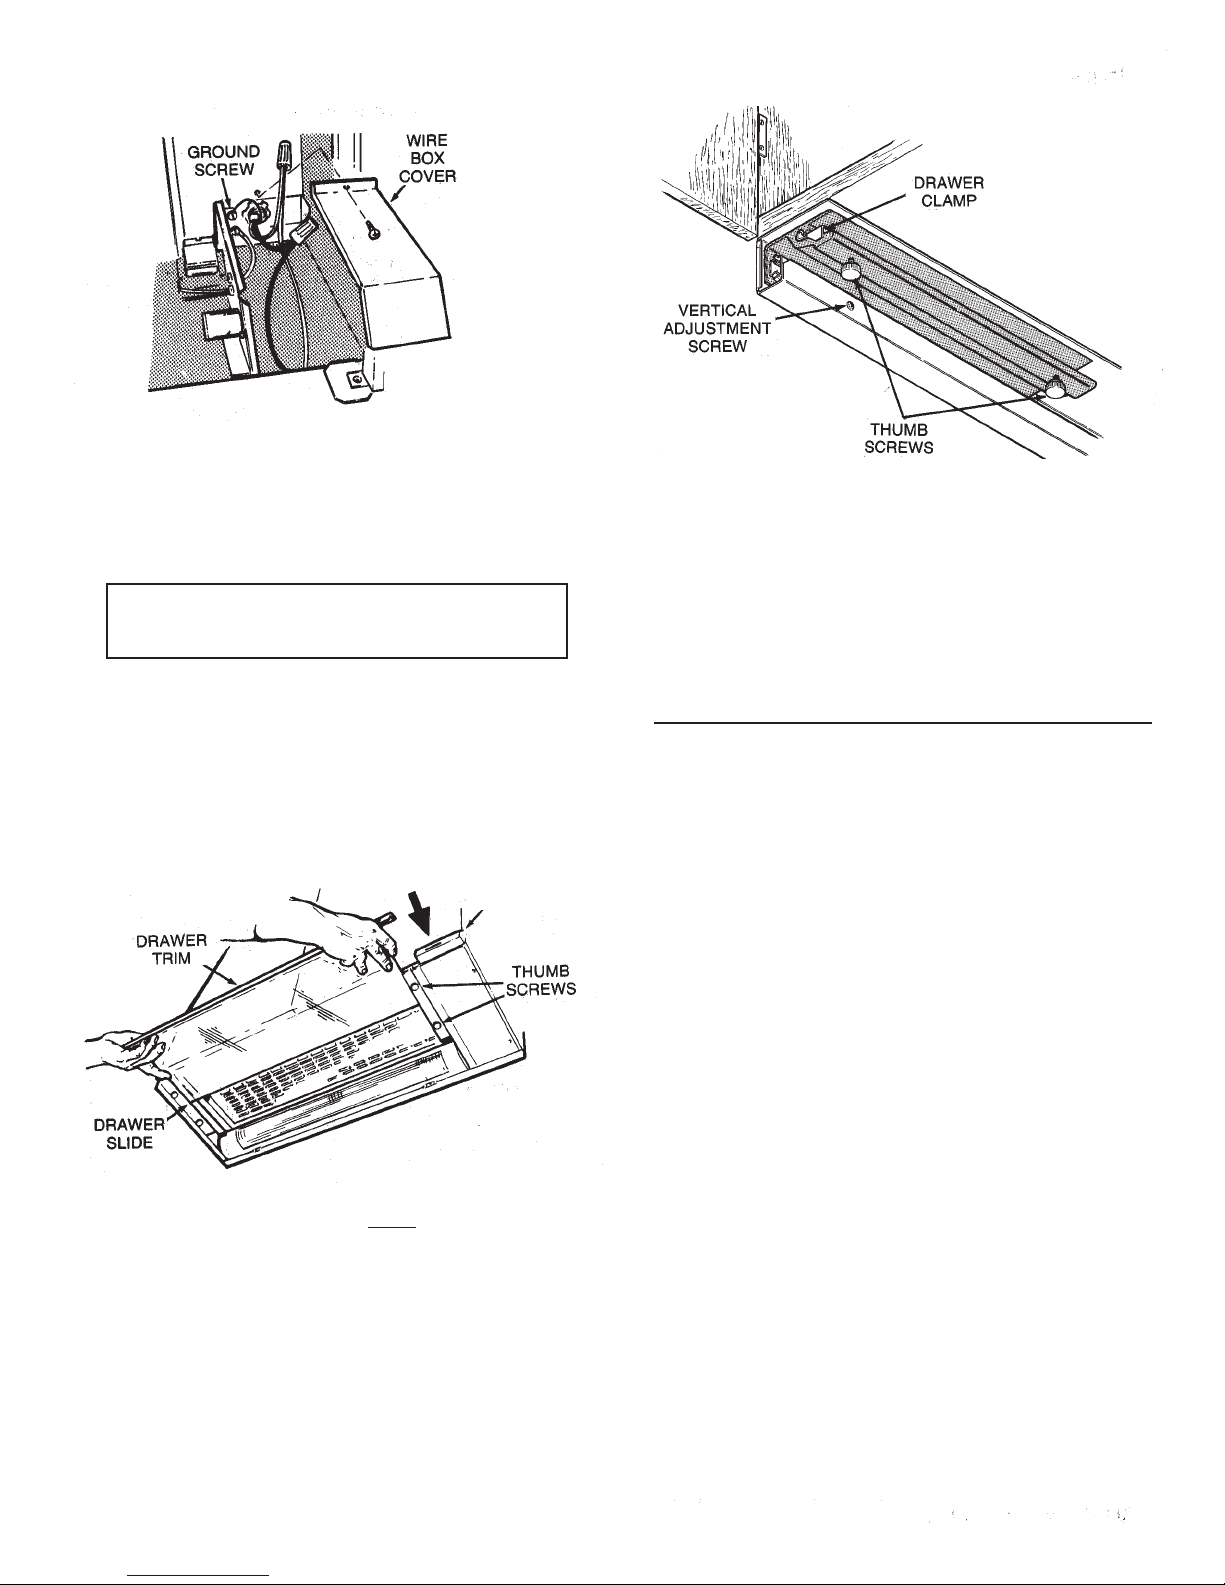
12. Connect electrical wiring.
14. Fine adjustments to drawer trim position.
Remove the wire box cover. Attach power cable to hood using
proper connector Connect black to back, white to white and
green or bare wire to ground screw. Replace wire box cover.
CAUTION
DO NOT CONNECT POWER AT SERVICE ENTRANCE
AT THIS TIME.
13. Install glass drawer assembly.
CONTROL
TRIM
The drawer slides each have a screw for adjusting the height
of the drawer trim, if necessary. The vertical adjustment
screw allows the top and bottom edges of the drawer trim to
be matched with the control trim.
15. Connect power at service entrance.
16. Check operation.
OPERATING INSTRUCTIONS
Always turn your hood on before you begin cooking to establish
an air flow in the kitchen. Let the hood run for a few minutes to
clean the air after you turn the range off. This will keep the whole
kitchen cleaner and brighter.
Controls
The hood is "OFF" when the drawer is pushed completely in.
LIGHT - The light will turn "ON" when the drawer is pulled and
out approximately 1/2 inch.
BLOWER - The blower will turn "ON" when the drawer is pulled
out approximately 1-1/2 inches.
The blower speed is set using the slide control, located to the
right of the drawer.
Slide the glass into the drawer slides, above each drawer clamp
(see illustration in Step 14). Align drawer trim and tighten thumb
screws to secure drawer.
To remove glass drawer:
Simply loosen thumb screws and pull glass from drawer slides.
4
Page 5
Cleaning
WARNING
ALWAYS DISCONNECT ELECTRIC POWER SUPPLY
BEFORE SERVICING HOOD.
Use a mild detergent suitable for painted surfaces. DO NOT USE
ABRASIVE CLOTH, STEEL WOOL PADS, OR SCOURING
POWDERS. Vacuum blower to clean. Do not immerse blower in
water.
Wash the foam filter in a mild detergent solution
The glass drawer assembly and light lens are easily removable
for cleaning:
See Step 13 on page 4 for removal of glass drawer assembly.
DO NOT clean in a dishwasher.
Remove the light lens by opening the filter panel (Step 6, page
2) and rotating the 2 metal clips holding the lens in place.
Light Bulb Replacement
Your hood uses a 24" long F20T12 fluorescent tube and an FS-2
starter, which are available at most hardware stores or home centers.
To check or replace tube: 1). Pull drawer out. 2). Rotate filter panel
clips and lower filter panel.
If the tube flickers or does not light, check the prongs on the ends of
the tube to make sure that are properly seated in the tube holders.
If the tube continues to flicker or does not light, replace the tube.
Slide the tube into the holders and rotate the tube so that the
prongs in the holders grip the tube and hold it in place.
If the ends of the tube light but the center does not, the starter
may require replacement. The starter is located behind the filter
panel on the right hand side. Install the new starter by pushing
the starter in and turning it clockwise.
If the tube still does not light, order a 99270651 Ballast Transformer
available from your Broan distributor.
.
HOW TO AVOID A COMMON RANGE-TOP GREASE FIRE
Your range hood provides a protective barrier between
the cooking surface and the cabinets.
Keep fan, filters and grease laden surfaces. CLEAN according
to instructions.
Always turn hood ON when cooking at high heat to keep the
cooking area clean and the hood cooler.
Use high heat settings only when necessary.
Never leave cooking surface unattended. Boil-over causes
smoking and greasy spillovers that may ignite.
Always use adequate-sized utensils.
If preparing flaming foods, such as Cherries Jubilee, always
turn hood ON to high to prevent a high heat situation which
can cause damage or fire.
HOW TO EXTINGUISH A COMMON RANGE-TOP FIRE
Never pick up a flaming pan. If dropped, flames can spread
quickly.
DO NOT USE WATER! A violent stream explosion may result.
Wet dishcloths or towels are also dangerous.
Smother flames with a close fitting lid, cookie sheet or metal
tray.
Flaming grease can also be extinguished with baking soda
or a multi-purpose dry chemical extinguisher.
Turn off surface units - If you can do so without getting burned.
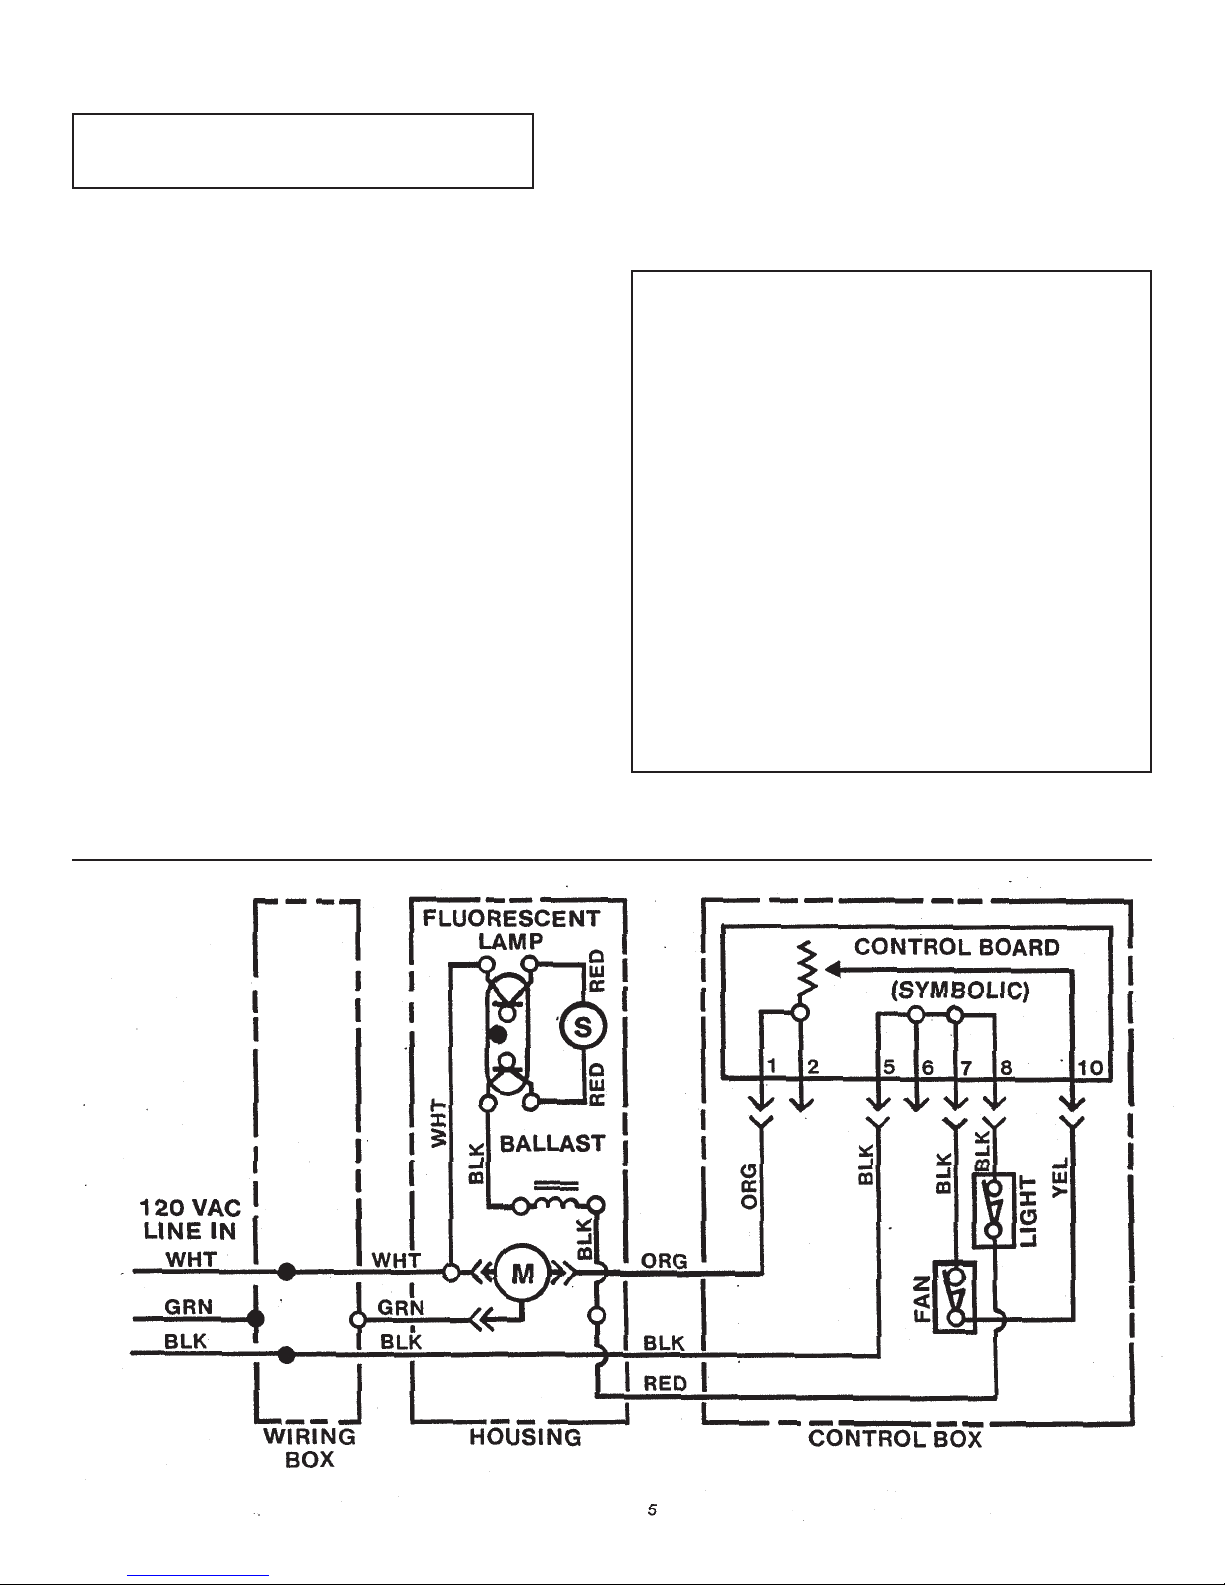
WIRING DIAGRAM
Page 6

SERVICE PARTS
15000 SERIES
RANGE HOOD
KEY BLACK WHITE STAINLESS
NO. PART NO. PART NO. PART NO. DESCRIPTION
1 98010015 98010015 98010015 Front Trim
2 99150526 99150478 99150478 Screw #8-18 x 3/8 (14 Required)*
3 99090677 99090697 99091030 Control Trim
4 99360133 99360140 99360249 Control Knob
5 99170245 99170245 99170245 Screw #8-18 x 3/8 (8 Required)*
6 97006078 97006078 97006078 Damper Assembly (Includes Key Nos. 7 & 8)
7 98005221 98005221 98005221 Damper Flap
8 99100379 99100379 99100379 Damper Bushing
9 97015950 97015950 97015950 RH Mounting Bracket (Includes Key No. 10)
** 97015949 97015949 97015949 LH Mounting Bracket (Includes Key No. 10)
10 93260454 93260454 93260454 #8 Sheet Metal Nut "U" Type (11 Required)
12 97008578 97008578 97008578 Control Board
13 97008916 97008916 97008916 Control Harness
14 99160344 99160344 99160344 Screw #8-32 x 3/16 (5 Required)*
15 99150525 99150538 99150538 Screw #8-18 x 2 (4 Required)*
** 99150530 99150537 99150537 Screw #8-18 x 1 (4 Required)*
16 97009434 97009434 97009434 Blower Switch/Light Switch Assembly
17 99230345 99230342 99230342 Rivet (12 Required)
18 99160319 99160319 99160319 Screw #6-32 x 3/8 (4 Required)*
19 98005860 98005860 98005860 Lampholder Bracket (2 Required)
20 99270550 99270550 99270550 Lampholder (2 Required)
21 99270651 99270651 99270651 Ballast Transformer
22 99270553 99270553 99270553 Starter FS-2*
23 97015775 97015775 97015775 Light Harness
24 99400042 99400042 99400042 Strain Relief Bushing SR-4N-4 (2 Required)
25 98006937 98007164 98010173 Access Cover
26 98006938 98006938 98006938 Wire Box Cover
27 99100463 99100463 99100463 Drawer Stop (2 Required)
28 97008971 97008979 97016556 LH Drawer Bracket Assembly (Includes Key Nos. 32 & 33)
** 97009436 97009435 97016555 RH Drawer Bracket Assembly (Includes Key Nos. 32 & 33)
29 99250932 99250932 99250932 Washer (2 Required)*
30 97008929 97009054 97016559 Drawer Assembly (Includes Key Nos. 14 & 31)
31 99110683 99110699 -------- Drawer End Cap
32 99420602 99420603 99420602 Thumb Screw (4 Required)
33 98007155 98007155 98007155 Drawer Clamp (2 Required)
34 99020139 99020139 99020139 Blower Wheel, Counterclockwise
35 98005212 98005212 98005212 Motor Retaining Ring (2 Required)
36 99100491 99100491
37 99080359 99080359 99080359 Motor
38 99260476 99260476 99260476 Blower Mounting Rod Nut (2 Required)
39 99420464 99420464 99420464 Blower Mounting Rod (2 Required)
40 97007314 97007314 97007314 Blower Scroll Housing
41 99020138 99020138 99020138 Blower Wheel, Clockwise
42 99140156 99140156 99140156 Filter Spring (2 Required)
43 99010175 99010175 99010175 Filter Foam
44 97011138 97011139 97016557 Filter Panel
46 99050018 99050018 99050018 Light Lens
48 99150492 99150492 99150492 Screw #8-18 x 1/2 (2 Required)*
49 99100408 99100464 99100408 Plastic Cap (4 Required)
50 99150471 99150471 99150471 Screw #10-32 x 1/2 Green (2 Required)
** 97008628 97008628 97008628 Green Wire Assembly
** 97005985 97005985 97005985 Complete Blower Assembly (Includes Key Nos. 5, 34, 35, 36, 37, 40, 41)
** Fluorescent Light Tube F20T12* (Not Included)
99100491 R
ubber Motor Mount (4 Required)
*Standard Hardware. May be purchased locally.
**Not Illustrated.
6
Page 7

15000 SERIES
RANGE HOOD
Page 8

BROAN-NUTONE LLC ONE YEAR LIMITED WARRANTY
Broan-NuTone LLC warrants to the original consumer purchaser of its products that such products will be free from defects in materials or workmanship for a period of one year from the date of original purchase. THERE ARE NO OTHER
WARRANTIES, EXPRESS OR IMPLIED, INCLUDING, BUT NOT LIMITED TO, IMPLIED WARRANTIES OF MERCHANTABILITY OR FITNESS FOR A PARTICULAR PURPOSE. During this one year period, Broan-NuTone LLC will, at its option, repair or replace, without charge, any product or part which is found to be defective under normal use and service.
THIS WARRANTY DOES NOT EXTEND TO FLUORESCENT LAMP STARTERS AND TUBES. This warranty does not
cover (a) normal maintenance and service or (b) any products or parts which have been subject to misuse, negligence,
accident, improper maintenance or repair (other than by Broan-NuTone LLC), faulty installation or installation contrary
to recommended installation instructions. The duration of an implied warranty is limited to the one-year period as specified for the express warranty. Some states do not allow limitation on how long an implied warranty lasts, so the above
limitation may not apply to you.
BROAN-NUTONE LLC’S OBLIGATION TO REPAIR OR REPLACE, AT BROAN-NUTONE LLC’S OPTION, SHALL BE
THE PURCHASER’S SOLE AND EXCLUSIVE REMEDY UNDER THIS WARRANTY. BROAN-NUTONE LLC SHALL
NOT BE LIABLE FOR INCIDENTAL, CONSEQUENTIAL OR SPECIAL DAMAGES ARISING OUT OF OR IN CONNECTION WITH PRODUCT USE OR PERFORMANCE. Some states do not allow the exclusion or limitation of incidental or
consequential damages, so the above limitation may not apply to you. This warranty gives you specific legal rights, and
you may also have other rights, which vary from state to state. This warranty supersedes all prior warranties.
To qualify for warranty service, you must (a) notify the appropriate company at the address or phone number stated below
(b) give the model number and part identification and (c) describe the nature of any defect in the product or part. At the
time of requesting warranty service, you must present evidence of the original purchase date.
Broan-NuTone LLC Hartford, Wisconsin www.broan.com 800-558-1711
Broan-NuTone Canada Mississauga, Ontario www.broan.ca 877-896-1119
8
99043896C
Page 9

HOTTE DE CUISINÈRE
SÉRIE 15000
LISEZ ET CONSERVEZ CES INSTRUCTIONS
!
CONÇUE POUR LA CUISSON DOMESTIQUE SEULEMENT
AVERTISSEMENT
AFIN DE DIMINUER LES RISQUES D’INCENDIE, D’ÉLECTROCUTION OU DE
BLESSURES, SUIVEZ CES DIRECTIVES :
1. Utilisez ce produit en suivant les recommandations du manufacturier. Pour toute
question, contactez le manufacturier à l’adresse ou au numéro de téléphone
indiqués dans la garantie.
2. Avant de réparer ou de nettoyer cette hotte, coupez le courant au panneau
d’alimentation et verrouillez-en l’accès afin d’éviter que le courant ne soit
accidentellement remis en fonction. S’il vous est impossible de le verrouiller,
apposez un indicateur voyant sur le panneau comme, par exemple, une étiquette
de couleur vive.
3. L’installation de la hotte ainsi que le câblage électrique doivent être effectués
par une ou des personnes compétentes selon les normes et les règles en
vigueur, incluant celles qui régissent la prévention des incendies.
4. Une circulation d’air efficace est requise afin d’assurer la combustion et
l’évacuation complète des gaz par le tuyau d’évacuation (cheminée) des
équipements à combustion et pour prévenir les retours d’air. Conformez-vous
aux normes et mesures de sécurité pour les manufacturiers d’appareils de
chauffage publiées par la National Fire Protection Association (NFPA) et par
l'American Society for Heating, Refregiration and Air Conditioning Engineers
(ASHRAE), ainsi qu’aux normes en vigueur dans votre région.
5. Lorsque vous coupez ou percez un mur ou un plafond, prenez garde
d’endommager les fils électriques ou autres installations qui pourraient y être
dissimulés.
6. Ne pas utiliser cet appareil avec une autre com mande de vitesse .
7. Les installations avec conduits doivent toujours rejeter l’air à l’extérieur.
8. Afin de diminuer les risques d’incendie, n’utilisez que des conduits de métal.
9. Cette hotte ne doit être utilisée qu'avec un ensemble de cordon d'alimentation
approuvé.
10. Cet appareil doit être relié à une mise à la terre.
AFIN DE RÉDUIRE LES RISQUES DE FEU DE CUISINIÈRE:
1. Ne jamais laisser les appareils de cuisson sans surveillance lorsqu'ils sont
réglés à feu vif. Les débordements engendrent de la fumée et des déversements
graisseux pouvant s'enflammer. Chauffer les huiles lentement, à feu doux ou
moyen.
2. Toujours mettre en marche la hotte lorsque vous cuisinez à feu vif ou que vous
cuisinez des mets flambés.
3. Nettoyer régulièrement les roues du ventilateur. On ne doit tolérer aucune
accumulation de graisse sur le ventilateur ou sur le filtre.
4. Utiliser le bon format de casserole. Servez-vous toujours de casseroles et
d'ustensiles appropriés à la dimension de la surface chauffante.
!
AVERTISSEMENT
AFIN DE DIMINUER LES RISQUES DE BLESSURES POUVANT SURVENIR
LORSQU’UN FEU SE DÉCLENCHE SUR LA SURFACE DE CUISSON, SUIVEZ
CES DIRECTIVES:
1. ÉTOUFFEZ LES FLAMMES avec un couvercle hermétique, une tôle à biscuits
ou un plateau en métal puis éteignez la cuisinière. PRENEZ GARDE AUX
BRÛLURES. Si vous ne parvenez pas à éteindre immédiatement les flammes,
ÉVACUEZ LES LIEUX ET APPELEZ LES POMPIERS.
2. NE VOUS EMPAREZ JAMAIS D’UN PLAT QUI S’EST ENFLAMMÉ – Vous
risqueriez de vous brûler.
3. N’UTILISEZ JAMAIS D’EAU, incluant les linges à vaisselles ou serviettes
mouillés car cela peut provoquer une violente explosion de vapeur.
4. Utilisez un extincteur SEULEMENT si :
A. Il s’agit d’un extincteur de classe ABC et que vous savez comment
vous en servir.
B. Il s’agit d’un petit feu qui ne se propage pas ailleurs que sur
la cuisinière.
C. Vous avez appelé les pompiers.
D. Vous pouvez combattre le feu tout en ayant accès à une sortie.
* Basé sur le Kitchen Fire Safety Tips édité par la NFPA.
ATTENTION
1. Pour l’usage d’intérieur seulement.
2. Pour usage domestique seulement. Ne pas utiliser pour évacuer des matières
ou des vapeurs dangereuses ou explosives.
3. Afin d'éviter d'endommager le mécanisme du moteur et de débalancer et/ou de
rendre bruyant le fonctionnement des roues, protégez l'appareil des poussières
de placoplâtre et de construction.
4. Cet appareil est muni d'un thermostat pouvant faire démarrer le ventilateur
automatiquement. Afin de réduire le risque de blessures, coupez le courant au
panneau électrique et verrouillez-le ou apposez un avertissement sur le panneau de service pour éviter que la hotte ne démarre accidentellement.
5. Le moteur de votre hotte est muni d'une protection thermique qui arrêtera
automatiquement le moteur s'il devient surchauffé. Le moteur démarrera de
nouveau une fois refroidi. Dans le cas où le moteur continue à arrêter et à se
remettre en marche, faites-le vérifier.
6. Veuillez lire l'étiquette de spécifications sur le produit pour d'autres renseignements et exigences.
Registre su producto en línea en : www.fr.broan.ca/register
!
PLANIFIER L'INSTALLATION
Votre nouvelle hotte conviendra à une armoire de cuisine standard de 30 po
de largeur, à base lisse ou en retrait, d'une profondeur minimale de 11 po à
partir de l'avant vers le mur arrière intérieur.
Les conduits de cet appareil sont verticaux. La pose de conduits horizontaux
peut être effectuée telle qu'illustrée.
Pour un fonctionnement sécuritaire, la hotte doit être installée à un minimum
de 20 po au dessus de la surface de cuisson.
Pour faciliter l'installation, la hotte de cuisinère doit être installée dans l'armoire
avant de monter celle-ci sur le mur.
NOTE : Démonter le tiroir de verre de l'ensemble avant d'installer la hotte dans
l'armoire pour éviter de l'endommager. Voir l'étape 13, en page 12.
Cette hotte peut facilement être installée en suivant les étapes de
base suivantes :
• Marquer et découper la base de l'armoire.
• Assembler la hotte à l'armoire.
• Monter l'armoire au mur.
• Relier les conduits et brancher le fil d'alimentation électrique.
MIN.
(INTÉRIEUR)
ARMOIRE À BASE LISSE
9
11"
11"
MIN.
(INTÉRIEUR)
20" MIN.
ARMOIRE À BASE EN RETRAIT
20" MIN.
Page 10

INSTALLER LA HOTTE
1. Marquer et découper la base de l'armoire.
DEVANT DE
LIGNE DE
CENTRE DE
L'ARMOIRE
DÉCOUPE
VUE DU DESSOUS DE L'ARMOIRE
Préparer le dessous de l'armoire tel qu'illustré ci-dessus.
S'assurer de localiser la découpe et les quatre trous à partir
de l'avant de l'armoire afin que le montage arrive juste au
bord de l'armoire.
2. Assembler l'adaptateur/volet.
L'ARMOIRE
4 TROUS
DE 3/8''
DE DIAMÈTRE
OUVERTURES
PRÉ-AMORCÉES
POUR FIL ÉLECTRIQUE
5. Enlever le couvercle.
COUVERCLE
6. Ouvrir le panneau du filtre.
No. 8-18 x 3/8''
Utilisez les deux (2) vis (fournies) pour assembler l'adaptateur/
volet au caisson. Le volet de l'adaptateur doit ouvrir dans la
direction indiquée par la flèche.
3. Défoncer l'ouverture pré-amorcée pour le fil électrique.
Choisir soit le dessus ou le côté du caisson pour l'entrée
du câble d'alimentation électrique. Enlever l'ouverture
pré-amorcée correspondante.
4. Glisser le caisson dans l'ouveture.
COMMANDE
COULISSANTE
ATTACHE
DU PANNEAU
COULISSES
DU TIROIR
Sortir les coulisses du tiroir. Tourner les attaches du panneau
et ouvrir le panneau.
Descendre le caisson avec soin dans l'ouverture de l'armoire.
La commande coulissante doit se trouver à l'avant.
10
Page 11

7. Installer les supports de montage.
TIGE
D'INSTALLATION
TROU
D'ACCÈS
Insérer l'extrémité courbée de la tige d'installation dans le trou
d'accès du caisson.
TROU DU
CENTRE
SUPPORT DE
MONTAGE
Choisir le support de montage avec le trou du centre. Suspen-
dre le support par la tige, par le trou du centre, tel qu'illustré.
Tirer le support vers le haut entre l'armoire et le caisson.
No. 8-18 x 2''
OU
No. 8-18 x 2''
OU
No. 8-18 x 1''
BOÎTE DE
COMMANDE
INSÉREZ
LES VIS
ICI
TROU DE
MONTAGE
SUR LE
DEVANT VOIR
ÉTAPE 8
SUPPORT DE
MONTAGE
Insérer deux (2) vis, courtes ou longues, telles qu'appropriées,
à travers la boîte de commande et dans l'autre support de
montage. Ne pas serrer complètement les vis.
8. Assembler la hotte à l'armoire.
CAPUCHON EN PLASTIQUE
No. 8-18 x 1/2''
#8-18 x 1/2"
Aligner la hotte avec les côtés et le bord avant de l'armoire.
Serrer les vis dans chaque support de montage. Installer les
capuchons en plastique (fournis) sur les bouts de ces vis à
partir de l'intérieur du cabinet.
Installer deux (2) autres vis dans le fond de l'armoire,
à travers les trous le long du bord avant de la hotte.
(Voir I'ill. de l'étape 7)
9. Remettre le couvercle.
Fixer le couvercle avec les deux (2) vis retirées à l'étape 5.
10. Monter l'armoire sur le mur.
S'assurer que l'armoire est bien fixée au mur et / ou aux
armoires adjacentes. Une fois montée, l'armoire doit pouvoir
supporter le poids supplémentaire de la hotte.
11. Relier les conduits et fixer la moulure avant.
No. 8-18 x 1''
INSÉRER
LES VIS
ICI
Tenir le support de montage en place avec la tige. Deux en-
sembles de vis sont fournis. Utiliser les vis courtes pour les
armoires à base lisse ou les vis longues pour les armoires
à base en retrait. Insérez deux (2) vis à travers le caisson et
dans le support de montage. Ne pas serrer complèment les
vis.
No. 8-18 x 3/8''
CONDUITS
3-1/4'' x 10''
Finir l'installation des conduits à partir de la hotte jusqu'à
l'extérieur, en utilisant un capuchon de toit ou un coude et
un capuchon de mur. Sceller tous les joints avec du ruban
adhésif en toile. Des tablettes peuvent être installées si elles
sont découpées de façon à ne pas toucher aux conduits.
La moulure avant couvre l'espace entre le caisson et le bord
avant de la découpe. Assembler la moulure au caisson avec
11
deux (2) vis (fournies).
Page 12

12. Connecter le fil d'alimentation électrique.
VIS DE
MISE À
LA TERRE
Enlever le couvercle du boîtier électrique. Fixer le fil
d'alimentation électrique à la hotte en utilisant le connecteur
approprié. Connecter le fil noir au fil noir, le fil blanc au blanc
et le fil vert ou dénudé à la vis de mise à la terre. Réinstaller
le couvercle du boîtier électrique.
ATTENTION
NE PAS RÉTABLIR TOUT DE SUITE LE COURANT À
L'ENTRÉE DE SERVICE.
COUVERCLE
DU BOÎTIER
ÉLECTRIQUE
14. Réglage de précision de la moulure du tiroir.
ATTACHE
DU TIROIR
VIS
D'AJUSTEMENT
VERTICAL
VIS À
TÊTE MOLETÉE
Chaque coulisse de tiroir est munie d'une vis pour le réglage
éventuel de la hauteur de la moulure du tiroir. La vis de réglage vertical permet d'ajuster la moulure du tiroir à la même
hauteur que la moulure de la boîte de commande.
15. Rétablir le courant à l'entrée de service.
16. Vérifier le fonctionnement.
13. Installer le tiroir de verre.
MOULURE
DE LA BOÎTE
DE COMMANDE
MOULURE
DU TIROIR
COULISSE
DU TIROIR
Glisser la plaque de verre dans les coulisses de tiroir, en passant par-dessus toutes les attaches (voir l'illustration de l'étape
14). Aligner la moulure du tiroir et serrer les vis à tête moletée
pour fixer le tiroir.
VIS
À TÊTE
MOLETÉE
MODES DE
FONCTIONNEMENT
Toujours faire fonctionner la hotte avant de commencer la cuisson
pour établir une circulation d'air dans la cuisine. Laisser la hotte
fonctionner pendant quelques minutes pour nettoyer l'air après
avoir terminé la cuisson d'aliments; la cuisine demeurera ainsi
plus propre et brillante.
Commandes
La hotte est "ARRÊTÉE" lorsque le tiroir est poussé jusqu'au fond.
ÉCLAIRAGE - La lampe "S'ALLUME" lorsque le tiroir est ouvert
d'environ 1/2 pouce.
VENTILATEUR - Le ventilateur "FONCTIONNE" lorsque le tiroir
est ouvert d'environ 1-1/2 pouce.
La vitesse du ventilateur est réglée en utilisant le contrôle coulissant, qui se trouve à la droite du tiroir.
Pour démonter le tiroir de verre :
Desserrer les vis à tête moletée et retirer la plaque de verre
des coulisses.
12
Page 13

Entretien
AVERTISSEMENT
TOUJOURS COUPER L'ALIMENTATION ÉLECTRIQUE
AVANT D'EFFECTUER L'ENTRETIEN DE LA HOTTE.
Utilisez un détergent doux convenant aux surfaces peintes.
N'UTILISEZ PAS DE CHIFFONS ABRASIFS, TAMPONS EN LAINE
D'ACIER OU POUDRES À RÉCURER. Nettoyez le ventilateur à
l'aspirateur. N'immergez pas le ventilateur dans l'eau.
Lavez le filtre en mousse dans une solution de détergent doux.
Le tiroir de verre et le couvercle en verre de la lampe sont facilement démontables pour le nettoyage.
Voir étape 13, page 12 pour les instructions relatives
au démontage du tiroir de verre. NE PAS le nettoyer au
lave-vaisselle.
Pour démonter le couvercle en verre de la lampe, ouvrir le
panneau du filtre (étape 6, page 10) et tourner les 2 attaches
de fixation métalliques retenant le couvercle en verre.
Remplacement du tube fluorescent
Votre hotte requiert un tube fluorescent F20T12 de 24 po (61 cm)
et un démarreur FS-2 qui peuvent être achetés dans la plupart
des quincailleries ou centres de rénovation.
Pour examiner ou remplacer le tube: 1) Ouvrir le tiroir. 2) Faire
pivoter les attaches du panneau du filtre et abaisser le panneau
du filtre.
Si le tube clignote ou ne s'allume pas, vérifier les branches aux
extrémités du tube pour assurer qu'elles sont proprement assises
dans le porte-tube.
S'il continue à clignoter ou à ne pas s'allumer, le remplacer. Faire
glisser le tube dans le porte-tube et le tourner de façon à ce que
les branches dans les porte-tubes agrippent le tube et le retiennent en place.
Si les extrémités du tube s'allument tandis que le centre ne s'allume
pas, il faudra peut-être remplacer le démarreur. Le démarreur se
SCHÉMA ÉLECTRIQUE
situe derrière la panneau du filtre, côté droit. Monter le démarreur
neuf en l'enfoncant et en le tournant dans le sens des aiguilles
d'une montre.
Si le tube ne s'allume pas, commandez un transformateur à régulateur
de puissance 99270651 disponible chez votre distributeur Broan.
COMMENT ÉVITER UN FEU DE CUISINIÈRE
Votre hotte dresse une barrière de protection entre la surface
de cuisson de vos aliments et les armoires de votre cuisine.
Veillez à maintenir le ventilateur, les filtres et les surfaces
réceptrices de matières grasses PROPRES, conformément
aux instructions fournies.
Allumez toujours votre hotte lorsque vous cuisinez à température
élevée, de façon à maintenir la zone de cuisson propre et la
hotte relativement froide.
N'utilisez les réglages de température élevée que lorsqu'ils
sont absolument nécessaires.
Surveillez toujours la surface de cuisson. Les débordements
engendrent de la fumée et les débordements graisseux risquent
de s'enflammer.
Utilisez toujours des casseroles de format approprié.
Si vous préparez des mets flambés, des cerises jubilé, par
exemple,
réglez toujours votre hotte en haute vitesse afin d'éviter qu'une
trop grande chaleur puisse causer des dommages ou un in-
cendie.
COMMENT ÉTEINDRE UN FEU DE CUISINIÈRE
Ne saisissez jamais une casserole en feu. Si vous la laissiez
tomber, les flammes se répandront rapidement.
N'UTILISEZ PAS D'EAU! Vous provoqueriez une violente
exposion de vapeur. Les serviettes ou torchons humides sont
également dangereux.
Étouffez les flammes à l'aide d'un couvercle hermétique, d'une
plaque à biscuits ou d'un plateau métallique.
Les feux de matières grasses peuvent également être éteints
à l'aide de bicarbonate de soude ou d'un extincteur polyvalent
à base de poudre chimique.
Éteignez les surfaces chauffantes - si vous pouvez le faire
sans danger de brûlure.
BOÎTIER
ÉLECTRIQUE
CAISSON
13
Page 14

PIÈCES DE RECHANGE
HOTTE DE CUISINIÈRE
SÉRIE 15000
NO. DE NO. DE NO. DE
NO. DE PIÈCE PIÈCE PIÈCE
REP. (NOIRE) (BLANCHE) (INOXYDABLE) DESCRIPTION
1 98010015 98010015 98010015 Moulure avant
2 99150526 99150478 99150478 Vis no. 8-18 x 3/8 po (14 requises)*
3 99090677 99090697 99091030 Moulure de boîte de commande
4 99360133 99360140 99360249 Bouton de commande
5 99170245 99170245 99170245 Vis no. 8-18 x 3/8 po(8 requises)*
6 97006078 97006078 97006078 Adaptateur/volet (Nos. 7 et 8 inclus)
7 98005221 98005221 98005221 Volet de l'adaptateur
8 99100379 99100379 99100379 Coussinet de l'adaptateur
9 97015950 97015950 97015950 Support de montage droit (No. 10 inclus)
** 97015949 97015949 97015949 Support de montage gauche (No. 10 inclus)
10 93260454 93260454 93260454 Écrou à pince de type "U" no. 8 (11 requis)
12 97008578 97008578 97008578 Carte de commande
13 97008916 97008916 97008916 Harnais de commande
14 99160344 99160344 99160344 Vis no. 8-32 x 3/16 po (5 requises)*
15 99150525 99150538 99150538 Vis no. 8-18 x 2 po (4 requises)*
** 99150530 99150537 99150537 Vis no. 8-18 x 1 po (4 requises)*
16 97009434 97009434 97009434 Ensemble interrupteur ventilateur/interrupteur éclairage
17 99230345 99230342 99230342 Rivet (12 Requis)
18 99160319 99160319 99160319 Vis no. 8-32 x 3/8 po (4 requises)*
19 98005860 98005860 98005860 Support de douille de lampe (2 requis)
20 99270550 99270550 99270550 Douille de lampe (2 requises)
21 99270651 99270651 99270651 Transformateur à régulateur de puissance
22 99270553 99270553 99270553 Démarreur FS-2*
23 97008619 97008619 97015775 Harnais de lampe
24 99400042 99400042 99400042 Bague anti-traction SR-4N-4 (2 requises)
25 98006937 98007164 98010173 Couvercle
26 98006938 98006938 98006938 Couvercle du boîtier électrique
27 99100463 99100463 99100463 Butée du tiroir (2 requis)
28 97008971 97008979 97016556 Ens. du support à tiroir gauche (Nos. 32 & 33 inclus)
** 97009436 97009435 97016555 Ens. du support à tiroir droit (Nos. 32 & 33 inclus)
29 99250932 99250932 99250932 Rondelle (2 requises)
30 97008929 97009054 97016559 Ensemble du tiroir (Nos. 14 & 31 inclus)
31 99110683 99110699 -------- Embout pour tiroir
32 99420602 99420603 99420602 Vis à tête moletée (4 requises)
33 98007155 98007155 98007155 Attache du tiroir (2 requises)
34 99020139 99020139 99020139 Roue du ventilateur (sens contraire des aiguilles d'une montre)
35 98005212 98005212 98005212 Anneau de retenue du moteur (2 requis)
99100491 99100491 99100491 Coussinet en caoutchouc pour moteur (4 requis)
36
37 99080359 99080359 99080359 Moteur
38 99260476 99260476 99260476 Écrou de tige de montage du ventilateur (2 requis)
39 99420464 99420464 99420464 Tige de montage du ventilateur (2 requises)
40 97007314 97007314 97007314 Volute du ventilateur
41 99020138 99020138 99020138 Roue du ventilateur, sens des aiguilles d'une montre
42 99140156 99140156 99140156 Ressort du filtre (2 requis)
43 99010175 99010175 99010175 Mousse du filtre
44 97011138 97011139 97016557 Panneau du filtre
46 99050018 99050018 99050018 Couvercle en verre pour lampe
48 99150492 99150492 99150492 Vis no. 8-18 x 1/2 po (2 requises)
49 99100408 99100464 99100408 Capuchon en plastique (4 requis)
50 99150471 99150471 99150471 Vis no.10-32 x 1/2 po Verte (2 requises)
** 97008628 97008628 97008628 Ensemble de fil vert
** 97005985 97005985 97005985
** Tube fluorescent F20T12* (Non inclus)
Ensemble complet du ventilateur (Nos. 5, 34, 35, 36, 37, 40, et 41 inclus)
*Quincaillerie standard. Peut être achetée localement.
**Non illustré.
14
Page 15

HOTTE DE CUISINIÈRE
SÉRIE 15000
15
Page 16

GARANTIE LIMITÉE D’UN AN DE BROAN-NUTONE
Broan-NuTone garantit à l’acheteur consommateur original de ses produits qu’ils sont exempts de vice de matériaux ou de fabrication
pour une période d’un an à compter de la date d’achat original. IL N’Y A PAS D’AUTRES GARANTIES, EXPRIMÉES OU IMPLICITES,
INCLUANT MAIS NON LIMITÉES AUX GARANTIES IMPLICITES DE QUALITÉ MARCHANDE ET DE CONVENANCE DANS UN BUT
PARTICULIER.
Durant cette période d’un an, Broan-NuTone, à sa discrétion, réparera ou remplacera gratuitement tout produit ou pièce qui s’avèrera
défectueux et ayant été utilisé normalement et d’une manière non abusive.
CETTE GARANTIE NE COUVRE PAS LES STARTERS DE TUBES FLUORESCENTS NI LES TUBES FLUORESCENTS. Cette
garantie ne couvre pas (a) l’entretien et le service normal ou (b) tout produit ou pièce endommagé à la suite d’un mauvais usage, d’une
négligence, d’un accident, d’un entretien inadéquat ou d’une réparation (autre que par Broan-NuTone), d’une mauvaise installation ou
d’une installation non conforme au mode d’installation recommandé.
La durée de toute garantie implicite est limitée à une période d’un an tel que spécifié pour la garantie exprimée. Certains États ou provinces
ne permettent pas de limitation de la durée d’une garantie implicite. Cette condition ne s’applique donc peut-être pas dans votre cas.
L’ENGAGEMENT DE BROAN-NUTONE À RÉPARER OU À REMPLACER, AU CHOIX DE BROAN-NUTONE, SERA LA SEULE
OBLIGATION EXCLUSIVE SOUS CETTE GARANTIE. BROAN-NUTONE NE SE TIENDRA PAS RESPONSABLE DES DOMMAGES
DIRECTS, INDIRECTS OU SPÉCIAUX AYANT UN LIEN DIRECT OU INDIRECT AVEC L’UTILISATION OU LA PERFORMANCE DE
SES PRODUITS. Certains États ou provinces ne permettent pas l’exclusion ou la limitation de dommages directs ou indirects. Cette
condition ne s’applique donc peut-être pas dans votre cas.
Cette garantie vous donne des droits spécifiques et il se peut que vous ayez d’autres droits qui varient d’une province à l’autre ou d’un
État à l’autre. Cette garantie annule toutes les garanties précédentes.
Pour le service sous garantie, vous devez (a) aviser Broan-NuTone à l’adresse ou le numéro ci-dessous, (b) donner le numéro ou le
modèle et l’identification de la pièce et (c) décrire la nature de tout défaut dans le produit ou la pièce. Au moment de la demande de
service sous garantie, vous devez présenter une preuve de la date d’achat original du produit en question.
Broan-NuTone LLC Hartford, Wisconsin www.broan.com 800-558-1711
Broan-NuTone Canada Mississauga, Ontario www.fr.broan.ca 877-896-1119
16
99043896C
 Loading...