

Page 1
Sommelier
KF 610
www.braun.com/register
Type 3106
Page 2
c
j
a
e
n
d
f
v
o
E
F
G
n
t
c
o
p
e
s
g
u
a
w
a
e
b
m
a
r
a
p
r
m
a
y
l
j
u
u
j
n
r
e
t
t
l
i
e
f
r
D
C
auto-off
H
r
e
i
l
me
m
o
B
S
B
I
A
on
f
of
J
K
ab c
2
1
1
d
e
n
o
off
on
2
2
f
Nr.4
-off
auto
on
f
of
E
E
j
c
a
e
n
d
v
o
n
t
c
o
p
e
s
g
u
a
w
a
t
f
e
b
m
a
r
a
p
r
m
a
y
j
l
u
u
n
j
r
e
t
l
i
e
f
r
Page 3

345
Page 4

Page 5

English
Our products are engineered to meet the highest
standards of quality, functionality and design.
We hope you thoroughly enjoy your new Braun
coffeemaker.
Caution
• Please read the use instructions carefully and
completely before using the appliance.
• This appliance is not intended for use by children
or persons with reduced physical or mental
capabilities, unless they are given supervision by
a person responsible for their safety. In general,
we recommend that you keep the appliance out of
reach of children.
• Before plugging into a socket, check that your
voltage corresponds with the voltage printed on
the bottom of the appliance.
• Never place the thermal carafe on a hotplate or
other heated surfaces, as this would damage the
carafe base.
• Caution: During and after operation, the metal
surfaces will get hot. Avoid touching hot surfaces,
especially the carafe base, to prevent burns or
scalds. Always use the handle to carry the carafe
and keep it upright.
• Do not use the thermal carafe in a microwave.
• Never submerge the thermal carafe in water, nor
clean it in a dishwasher.
• Before you start preparing a new carafe of coffee,
always allow the coffeemaker to cool down for
approximately five minutes (switch off the appliance), otherwise steam can develop when filling
the water tank with cold water.
• Braun electric appliances meet applicable
safety standards. Repairs on electric appliances
(including cord replacement) must only be carried
out by authorized Braun service centers. Faulty,
unqualified repair work may cause accidents or
injury to the user.
• This appliance was constructed to process normal
household quantities.
• Always use cold water to make coffee.
Maximum cups
10 cups (125 ml each)
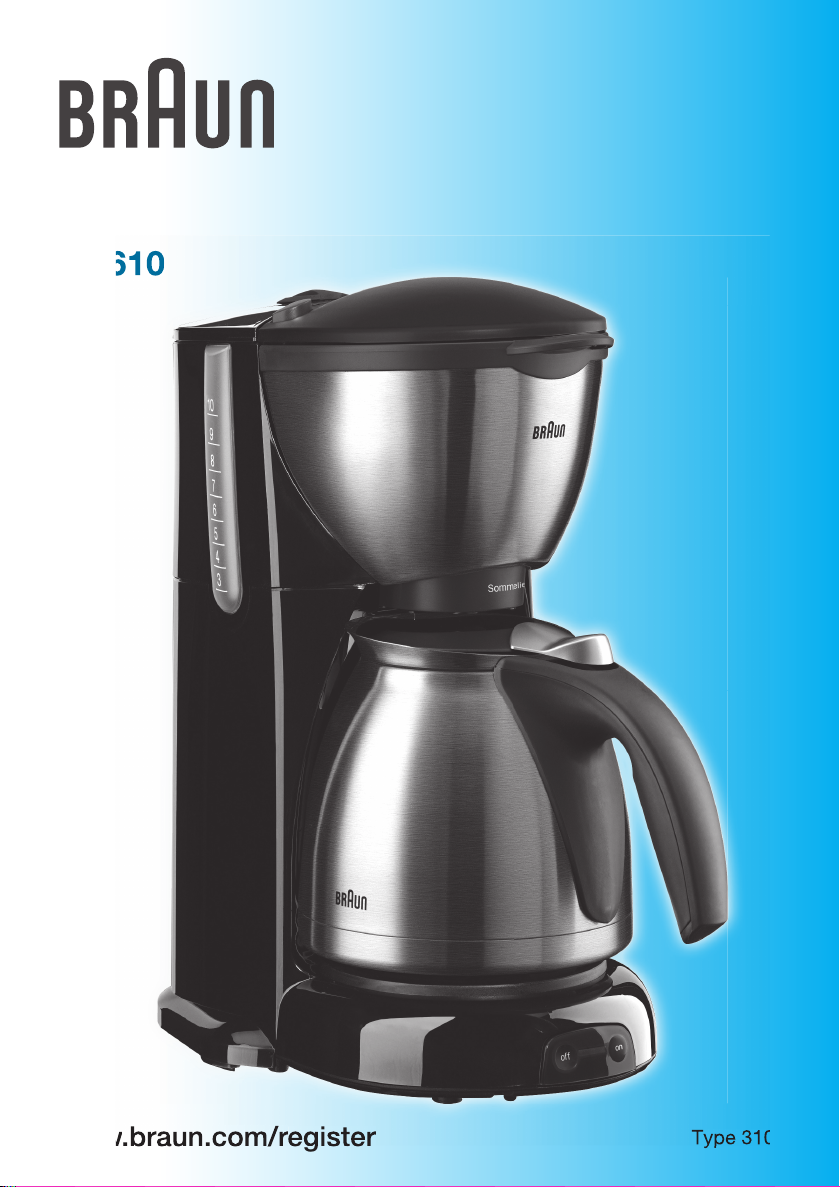
Description
A Cord/cord storage
B Space compensator
C Water level indicator
D Water tank
E Water filter cartridge
F Water filter exchange dial
G Filter basket release button
H Filter basket with drip stop
I Carafe stand
J «on/off» switch
K Thermal carafe
I Setting into operation
By means of the cord storage facility (A), you can
adjust the cord length by pulling it out of or pushing
it in.
Water filter
This product includes an exclusive Brita® water filter
especially designed for Braun coffeemakers. The
water filter improves coffee flavor by significantly
reducing chlorine and also prevents calcification
(scale) buildup. Provided that the cartridge is replaced regularly (every two months), it not only brews
better tasting coffee, but can also extend the life of
your coffeemaker by preventing calcification buildup.
Braun water filter cartridges are available at your local
retailer or Braun service centres.
Installing the water filter cartridge
1. Unpack the water filter cartridge (E) and follow
the instructions given on the pack.
2. Remove the space compensator (B) from the
water tank.
3. Insert the water filter cartridge (E). (Be certain
to keep the space compensator as it must be
installed in the water tank whenever the water filter
cartridge is removed.)
4. The water filter should be exchanged every
two months. To remind you, set the water filter
exchange dial (F) so that the current month is
shown in the left space (start month). The month
you should replace the water filter will then be
shown in the right space (end month).
Note:
Before using the coffeemaker for the first time, after
a long period of not using it, or after installing a new
water filter cartridge, run the coffeemaker through
one brewing cycle using a maximum of 8 cups of
cold, fresh water without any ground coffee.
Thermal carafe
The thermal carafe (K) is made of high-quality, double
walled, vacuum stainless steel. Your coffee will be
kept warm even longer if you pre-warm the thermal
carafe by rinsing with hot water before brewing.
• To remove the lid, turn the grip anti-clockwise (a)
and take it off.
• To close it again, place it on the carafe with the
grip located at the right of the carafe handle (b)
and turn it clockwise until it locks into place.
• During brewing, the coffee runs through a special
opening of the closed lid.
• If you want to serve coffee after brewing is
finished, press the raised end of the silver lid grip
(c) and keep it pressed as long as you are pouring
out.
Page 6

II Making coffee
Fill the tank with cold, fresh water (d), press the filter
basket release button (G) to open the filter basket (H),
insert a 1x4 or No. 4 paper filter, put in ground coffee
and close the filter basket. Place the carafe on the
carafe stand (I) and switch on the coffeemaker (J). For
more convenience, when filling with or disposing of
ground coffee, the filter basket can be easily taken off
its hinge (e). The drip stop feature prevents dripping
when the carafe is removed to pour a cup before
brewing is finished. Carafe should be immediately
returned to its stand to prevent the filter basket from
overflowing.
Brewing time per cup: approximately one minute.
Auto-off:
safety, the appliance will switch off automatically
15 minutes after switching on.
If brewing takes longer and your coffeemaker automatically switches off, although there is still water in
the water tank, it has to be decalcified (see IV).
For your convenience and also additional
III Cleaning
Always unplug the appliance before cleaning.
Never clean the appliance under running water,
nor immerse it in water.
Clean the metal surfaces of the thermal carafe and
filter basket with a damp cloth only (f). You may use
small amounts of dishwashing liquid. Do not use steel
wool pads or any abrasive cleaners. Never use any
solvents such as alcohol and benzene.
Do not clean the thermal carafe in a dishwasher.
Use a soft brush, hot water and small amounts of
dishwashing liquid to clean the carafe inside. After
cleaning, rinse it with hot water.
• If you are using vinegar, please proceed as
follows: Fill the tank to the 6 cup level with vinegar.
Do not mix the vinegar with water or any other
liquid. Turn on the coffeemaker and allow half
of the vinegar to flow through. Switch off the appliance and leave for 10 minutes. Switch it on
again and allow the rest of the vinegar to flow
through.
Repeat either procedure as many times as necessary
in order to reduce the brewing time per cup to a
normal level.
Allow a maximum of 8 cups of fresh cold water to run
through at least twice to clean the coffeemaker after
decalcification.
Best practices for best results
This coffeemaker is designed to deliver maximum
coffee aroma. Therefore, Braun recommends:
• Use only fresh ground coffee.
• Store ground coffee in a cool, dry and dark place
(e.g. closed shelf or refrigerator) in an airtight
container.
• Use only Braun water filters and exchange every
two months with regular use.
• Clean and decalcify the coffeemaker regularly as
described in parts III and IV.
Subject to change without notice
This product conforms to the European
Directives EMC 2004/108/EC and Low
Voltage 2006/95/EC.
Please do not dispose of the product in the
household waste at the end of its useful life.
Disposal can take place at Braun Service
Centre or at appropriate collection points
provided in your country.
IV Decalcifying
If you have hard water and you use your coffeemaker
without a water filter, it has to be decalcified regularly.
When using the water filter cartridge and exchanging
it regularly, you ordinarily will not need to decalcify.
However, if your coffeemaker takes longer than usual
to brew it should be decalcified.
Important:
compensator during any decalcification procedure.
You can either use a commercially available decalcifying agent which does not affect aluminum or white
household vinegar (4 - 5 % acid).
• If you are using decalcifying agent, follow the
6
Replace water filter with the space
manufacturer's instructions.
Internet:
www.braun.com
www.service.braun.com
Braun GmbH
Frankfurter Straße 145
61476 Kronberg / Germany
98831564/XI-08
Korea/GB
 Loading...