

Page 1
AromaSelect
12
KF 185
Coffeemaker
English
Use Instructions
Guarantee
Service Centers
Type 3116
Helpline
Should you require any further assistance please call
Braun (UK) Customer Relations on
0 19 32 / 79 22 33.
Internet:
http://www.braun.com
Page 2
●
●
●
●
●
●
●
●
●
32
English
Our products are engineered to meet the highest
standards of quality, functionality and design.
We hope you thoroughly enjoy the new Braun
appliance.
Caution
Read all instructions before using this product.
This appliance must kept out of the reach of
children! Before plugging into a socket, check
whether your voltage corresponds with the voltage
printed on the bottom of the appliance.
Do not put the carafe on other heated surfaces
(such as stove plates, hot trays, etc.).
Before you start preparing coffee a second time,
always allow the coffeemaker to cool down approximately for 5 minutes between brewing (switch the
appliance off), otherwise steam can develop when
you pour cold water into the water container and this
could cause scalding.
The hotplate
switched on. Avoid touching it and never let the cord
come into contact with it.
Braun electric appliances meet applicable safety
standards. Repairs on electric appliances must only
be done by authorised service personnel. Faulty,
unqualified repair work may cause accidents or
injury to the user.
The cord of the appliance may only be replaced by
an authorised Braun Service Centre as a special tool
is required.
Important
This appliance was constructed to process normal
household quantities. Always use cold water to
make coffee. Warm water or other liquids could
cause damage to the coffeemaker.
Before using the first time, or when the coffeemaker
has not been used for some time, fill the water
container
(i.e. without coffee and without a filter). Turn on the
coffeemaker and allow the water to flow through.
Maximum cups
12 cups (125 ml each)
18 cups ( 83 ml each)
Functions
AromaSelect feature
Time display (24 hour clock)
Manual operation
Automatic operation (24 hours)
Brewing small amounts (1-3 cups – 125 ml each)
9
heats up when the appliance is
3
to the maximum level with cold water
Audio-visual «coffee ready» signal
Automatic hotplate switch-off
(from 3.59 hours to 0.00 hours)
Adjustable heating temperature (+/– 5°C)
Descaling/decalcifying control
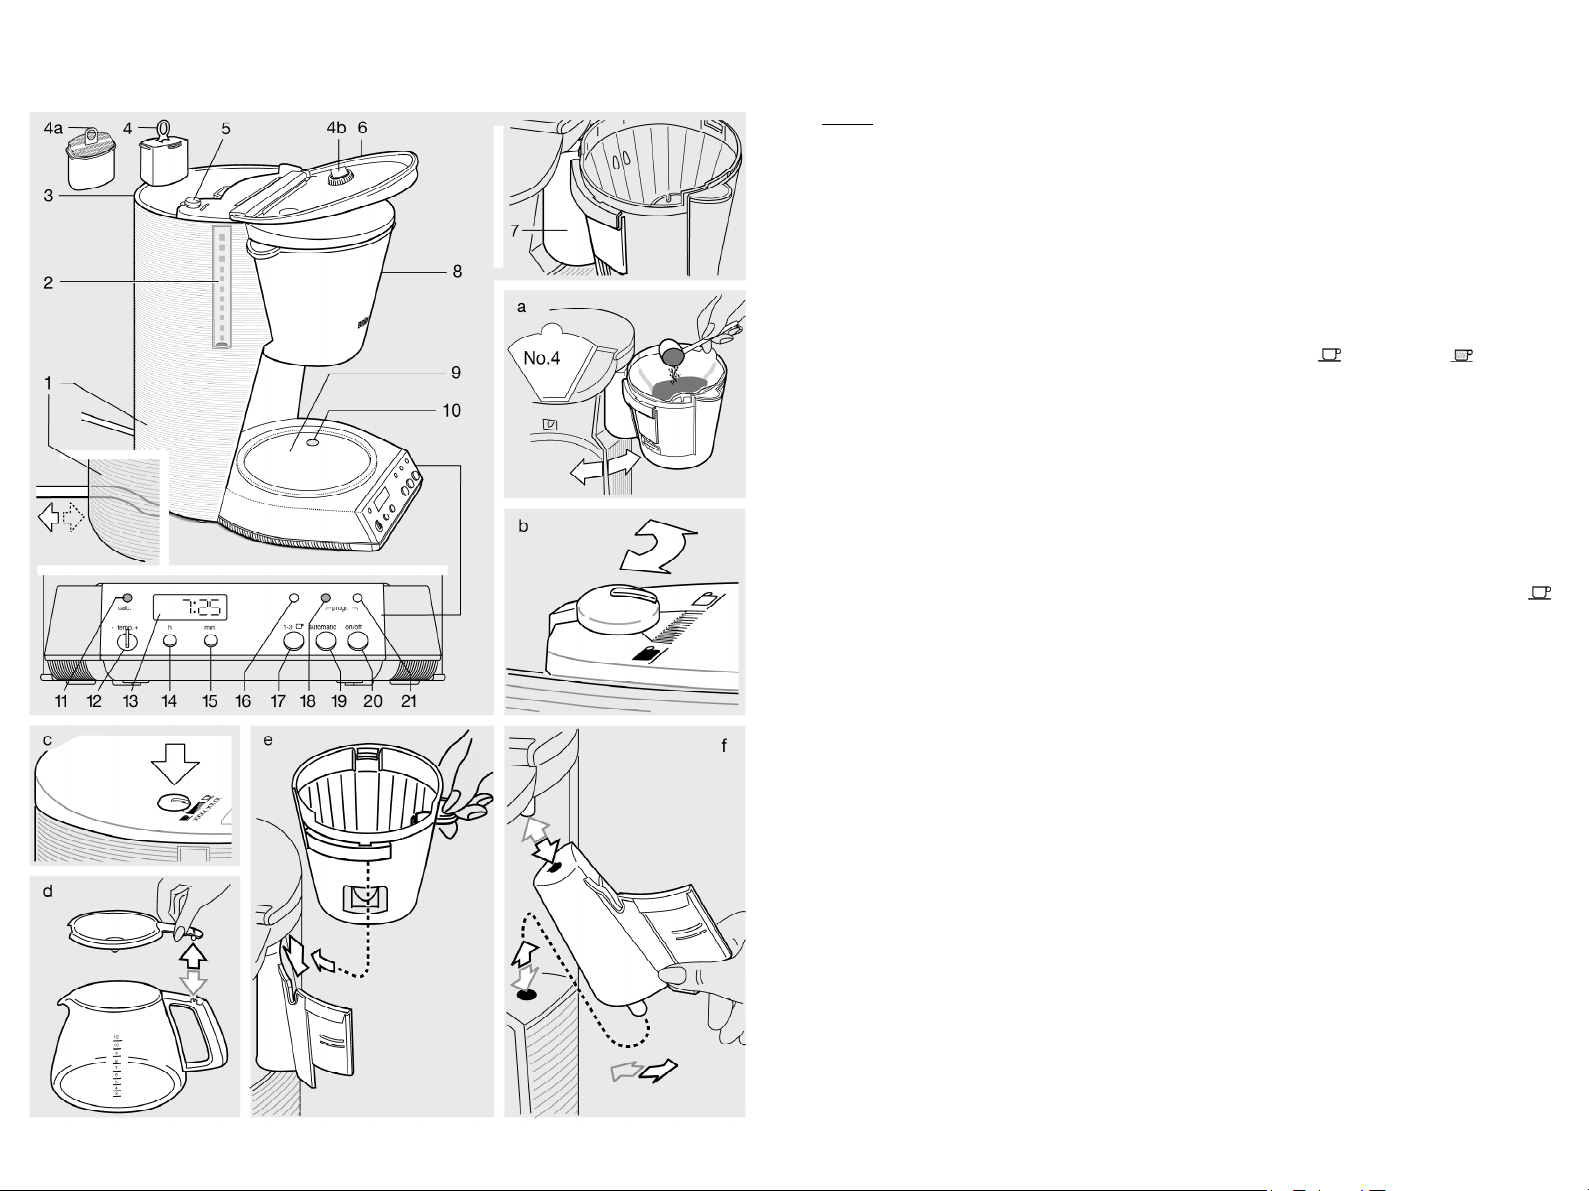
Description
1
Cord storage
2
Water level indicator
3
Water container
4
Space compensator
D
Water filter cartridge
d
Dial for water filter exchange
5
AromaSelect dial
(mild taste = /strong taste = )
6
Cover for the water container
7
Filter support bracket
8
Filter holder
9
Hotplate
j
Temperature sensor
k
Decalcifying indicator «calc»
l
Temperature selector «–temp.+»
(for the hotplate
m
Display
n
Button «h» (for setting the hours)
o
Button «min» (for setting the minutes)
p
Yellow control lamp
(for the small amounts operation)
q
Button for the small amounts operation «1-3 »
r
Green control lamp
(for the automatic operation)
s
Button for the «automatic» operation
t
«On/off» button
u
Red/green control lamp (for on/off setting and the
automatic hotplate switch-off feature)
Setting the clock
Plug the appliance in. Three noughts appear on the
display
m
of the electronic digital clock.
To activate the timer, both buttons
pressed for at least 2 seconds each. Then press the
buttons «h»
the correct time of day appears on the display
5 seconds after the last adjustment, the coffeemaker
will automatically return to the previous mode of
operation.
To set the correct time of day, first press the button
«h»
n
to programme the hours.
Then press the button «min»
minutes. Recommendation: Just before reaching the
correct time, repeatedly press the buttons «h» and
«min» without holding down to avoid going past the
time required.
The dots between the hours and minutes will flash
once the clock has been programmed.
n
or «min»
9
)
n
o
as described below until
o
to programme the
and
o
must be
m
.
Page 3

.
Note: If the power supply is interrupted or the plug
is pulled out of the socket, the clock will run for a further 15 minutes. All programmed function are also
stored for 15 minutes.
Filling with coffee grounds
Swing out the filter holder
Put coffee grounds (not ground too finely) into the
filter and close the filter holder again (a) until it
snaps in place. Measure coffee according to the
strength desired.
Filling with water
Important: When filling with water and during coffee
preparation either the space compensator
water filter cartridge
water container
tor
2
will not function correctly and the carafe may
overflow.
Fill the water container with as much cold water as
coffee is required. To do this, lift the cover for the
water container
water container
the water level indicator
125 ml each).
Space compensator
The space compensator
takes up the space which is intended for the water
filter cartridge
installed in the water container, the space compensator must always be inside the water container
when filling with water and brewing to avoid overfilling. Keep the space compensator
installed in the water container if you have to decalcify your coffeemaker.
Water filter cartridge
The water filter cartridge
water only. It gives your purer tasting coffee by
removing chlrorine, bad tastes and odors as well as
scale. Provided the cartridge is regularly replaced,
it provides not only better tasting coffee, but also
can increase the life of your coffeemaker by preventing calcification.
Installing the water filter cartridge
Unpack the water filter cartridge
ter cartridge for 10 minutes in a receptable filled with
water.
Remove the space compensator
container and replace it by the water filter cartridge
D
. Make sure to keep the space compensator
as it could be needed if you do not use the water filter
any longer at a future point in time or for
decalcification.
3
6
3
D
. Unless the water filter cartridge is
8
(a) and insert the filter.
4
D
must be installed in the
. Otherwise the water level indica-
and pour the cold water into the
. The amount of water is shown on
2
(maximum 12 cups –
4
in the water container
as it has to be
D
is suitable for drinking-
D
. Then put the fil-
4
or the
3
from the water
After having installed a new water filter cartridge,
allow the maximum amount of fresh, cold water to
run through the coffeemaker.
In order to ensure the proper functioning of the filter
cartridge, exchange it after 2 months of regularly
using the coffeemaker. In order to remind you to
replace the filter in time, you may set the dial
incorporated in the cover of the water container to
the month when the cartridge has to be exchanged.
Dial for water filter exchange
After having installed a new filter cartridge, set the
dial
d
2 months furhter by turning it from the reverse
side of the water container cover.
Pre-selecting the taste – AromaSelect dial
By adjusting the AromaSelect dial
the taste of your coffee to suit your personal preference – milder with less bitter aftertaste or stronger,
but always with the same full flavour. The AromaSelect dial
both before you turn on the coffeemaker. With the
water container lid closed, grasp the dial by the two
raised grip points and turn in the desired direction.
Alternatively, with the water container lid open, turn
the dial with the attached L-shaped grip.
If you prefer milder coffee with less bitter aftertaste,
turn the AromaSelect dial
taste, turn the AromaSelect dial towards the
symbol. Regardless of the position you select, the
coffee will always have the same full coffee flavour
only a milder or stronger aftertaste. With the cover
of the water container closed, the selected setting
can always be seen (c).
Manual operation
To switch on, press the «on/off» button
The control lamp
the coffeemaker is switched on and brewing is in
process. To switch off the coffeemaker, press the
«on/off» button
briefly flash and all control lamps will go off.
Automatic operation
To programme the automatic operation, press the
«automatic» button
begins to flash. Three noughts or the previously programmed time appear on the display
When the green control lamp
release the button
«Setting the clock», programme the time for
automatic operation by pressing the buttons «h»
and «min»
green control lamp
5
can be adjusted in two different ways,
symbol (b). Should you prefer a more stronger
u
will light up red indicating that
t
. The red control lamp
s
until the green control lamp
s
and, as described under
o
. After programming is completed, the
r
will go off after 5 seconds.
5
, you can adjust
5
in the direction of the
t
m
.
r
begins to flash,
To activate automatic operation, briefly press the
button «automatic»
lights up, the pre-set brewing, time is briefly shown
on the display
the pre-set time.
When the brewing process begins, the green control
lamp
r
goes off and the control lamp
d
.
u
will
r
n
to indicate that brewing has begun.
If, for instance, you want to make coffee at the same
time on the following day, you must activate the
automatic operation again (see above). However,
this should only be done after brewing is finished or
the programmed time for the hotplate switch-off
(when none of the control lamps are on), as you
could otherwise interrupt brewing or switch off the
hotplate
9
Making coffee
Place the carafe with the lid on onto the hotplate
and snap the filter holder
coffeemaker on as described. Brewing time is
approx. 50 seconds per cup (including dripping).
A «drip stop» prevents dripping when lifting off the
Carafe shortly
grounds (see section «Cleaning»).
Brewing small amounts
(1-3 cups – 125 ml each)
Switch the coffeemaker on with the «on/off» button
t
. The control lamp
Press the button «1-3 »
lamp
p
lights up.
This indicates that the function for brewing small
amounts is activated and the coffeemaker is in
operation. Brewing will begin.
The facility for brewing small amounts can be pre-set
in the automatic operation mode. Press briefly the
«automatic» button
green. Then press the button «1-3 »
yellow control lamp
The coffeemaker will only brew small amounts of
coffee in this mode if both the «1-3 cups» facility
and the timing are pre-set.
This function can be switched on or off during the
brewing process. To switch off the function for small
amounts, press the button «1-3 »
control lamp
Audio-visual «coffee ready» signal
The signal indicates that brewing is finished and the
water has run through the filter. The coffeemaker
beeps 5 times and the control lamp
red to green. To switch off the coffeemaker
s
. The green control lamp
m
. Brewing automatically begins at
u
lights up red
8
in place. Switch the
. Remove the filter holder
u
lights up red.
q
. The yellow control
s
. The control lamp
p
ligts up.
p
will go off.
8
r
q
. The yellow
u
changes from
to empty
lights up
q
and the
manually, press the «on/off» button
lamp
r
9
u
lights up red briefly and all control lamps
then go off.
Ajustable heating temperature
The heating temperature can be adjusted approximately 5 °C using the knob «–temp.+»
the temperature, turn the knob anti-clockwise. To
increase the temperature, turn the knob clockwise.
Keeping the coffee hot
The carafe can remain on the hotplate
begins to heat up when the coffeemaker is switched
on and will keep the coffee hot until the coffeemaker
is switched off (red control lamp goes out).
Automatic hotplate switch-off
The temperature sensor
lates the temperature of the coffee irrespective of
the amount in the jug. The coffeemaker can be set
to stay hot after brewing for up to 4 hours. Press
the «on/off» button
begins to flash red and the heating time appears on
the display
set the desired heating time with the buttons «h»
and «min»
minutes. When the control lamp
off, the pre-set heating time is stored in the memory
and the display shows the time of day again.
After the brewing process, the control lamp
up green until the coffeemaker is automatically
switched off at the end of the heating time. A double
beep can be heard and all control lamps go off.
Cleaning
Always pull the plug out of the socket before cleaning (all programmed functions are stored for approximately 15 minutes). The appliance should never be
immersed into water. Swing out the filter holder
and pull it off upwards from the filter support bracket
m
. Release the «on/off» button t and
o from 3 hours 59 minutes to 0 hour 00
j
in the hotplate
t
until the control lamp u
7 (e). To replace, set the curved protruding rim of
the filter holder
sure that the rib under the rim of the filter holder
fits snugly into the groove on the support bracket
so that the filter holder
so the filter holder closes easily into the machine.
To wash, take the lid off the carafe (d). The carafe,
lid
and filter holder can be cleaned in the dishwasher
All other parts should be cleaned will a damp cloth
only. After cleaning, put the lid back on the carafe
(d). Clean the hotplate
Do not use abrasive cleansers. The filter support
bracket
push it up and pull it off diagonally downwards (f).
To replace, insert the top first.
8 on top of support bracket 7. Be
8 fits nearly into place and
9 with liquid cleansers only.
7 can be taken off for cleaning. Swing it out,
t
. The control
l
. To reduce
9
which
9
regu-
n
u shining red goes
u lights
8
8
7
.
4
5
Page 4

Decalcifying
If you have hard water and you use your coffeemaker without a water filter, it has to be decalcified
regularly. The frequency depends on the hardness
of your water and how often you use your coffeemaker. When using the water filter cartridge
exchanging it regularly, you normally will not need to
decalcify.
However, if it is necessary to decalcify the coffeemaker, the decalcifying indicator «calc»
red when the coffeemaker is switched on. When the
programmed heating time is over or the coffeemaker
is switched off manually, the indicator «calc» will go
off, together with the control lamps.
Important
compensator
When decalcifying, turn the AromaSelect dial
the symbol.
You can either use a commercially available decalcifying agent which does not affect aluminium, or vinegar essence, available in food stores.
1. Follow the instructions of the manufacturer of the
2. Repeat the procedure at least twice with a newly
3. Allow the maximum amount of fresh cold water
: Replace the water filter by the space
4 for any decalcifying procedure.
decalcifying agent.
prepared decalcifying solution, in order to ensure
that all calcium residues have been removed.
to run through at least twice to cleanse the
machine.
D and
k will flash
5 to
If you are using vinegar essence, please proceed as
follows:
1. Fill the water container
with cold water.
2. Add vinegar essence to the mark for 6 cups.
3. Place the carafe with the lid onto the hotplate
close the filter holder
and switch on the coffeemaker.
4. Allow the decalcifying solution to run through.
5. Repeat this procedure at least three times with a
newly prepared descaling solution, in order to
remove all calcium residues.
6. Allow the maximum amount of fresh cold water
to run through at least twice to cleanse the
machine.
Subject to change without notice.
This product conforms to the
EMC-Requirements as laid down by the
Council Directive 89/336/EEC
3 to the mark for 3 cups
9,
8 (without any type of filter)
Guarantee
We grant a 1 year guarantee on the product commencing on the date of purchase.
Within the guarantee period we will eliminate, free of
charge, any defects in the appliance resulting from
faults in material or workmanship either by repairing,
or exchanging parts or exchanging the whole
appliance as we may choose.
Not covered by this guarantee: damage arising from
improper use (operation with incorrect current/
voltage, plugging it into an unsuitable power point,
breakage), normal wear and defects which have a
negligible effect on the value or operation of the
appliance.
The guarantee becomes void if repairs are undertaken by unauthorized persons and if original Braun
parts are not used.
The guarantee only comes into force if the date of
purchase is confirmed by the dealer's stamp and signature on the guarantee card and registration card.
This guarantee extends to every country where this
appliance is supplied by Braun or its appointed distributor and where no import restrictions or other
legal regulations hinder or prevent service being
given under guarantee.
Service under the guarantee does not affect the
expiry date of the guarantee. The guarantee on parts
or entire appliances which are exchanged ends
when the guarantee on this appliance expires.
In the event of a claim under this guarantee, hand in
the complete appliance with the valid guarantee
card to your dealer, or send both to the nearest
Braun Customer Service Centre.
All other claims including for damages resulting from
this guarantee are excluded unless our liability is
legally mandatory.
Those claims arising out of the sales contract with
the vendor are not affected by this guarantee.
For UK only:
This guarantee in no way affects your rights under
statutory law.
6 7
 Loading...