

Page 1
Multiquick 3
Leporello, 210x297 mm, 14 pages, 1/1c = black
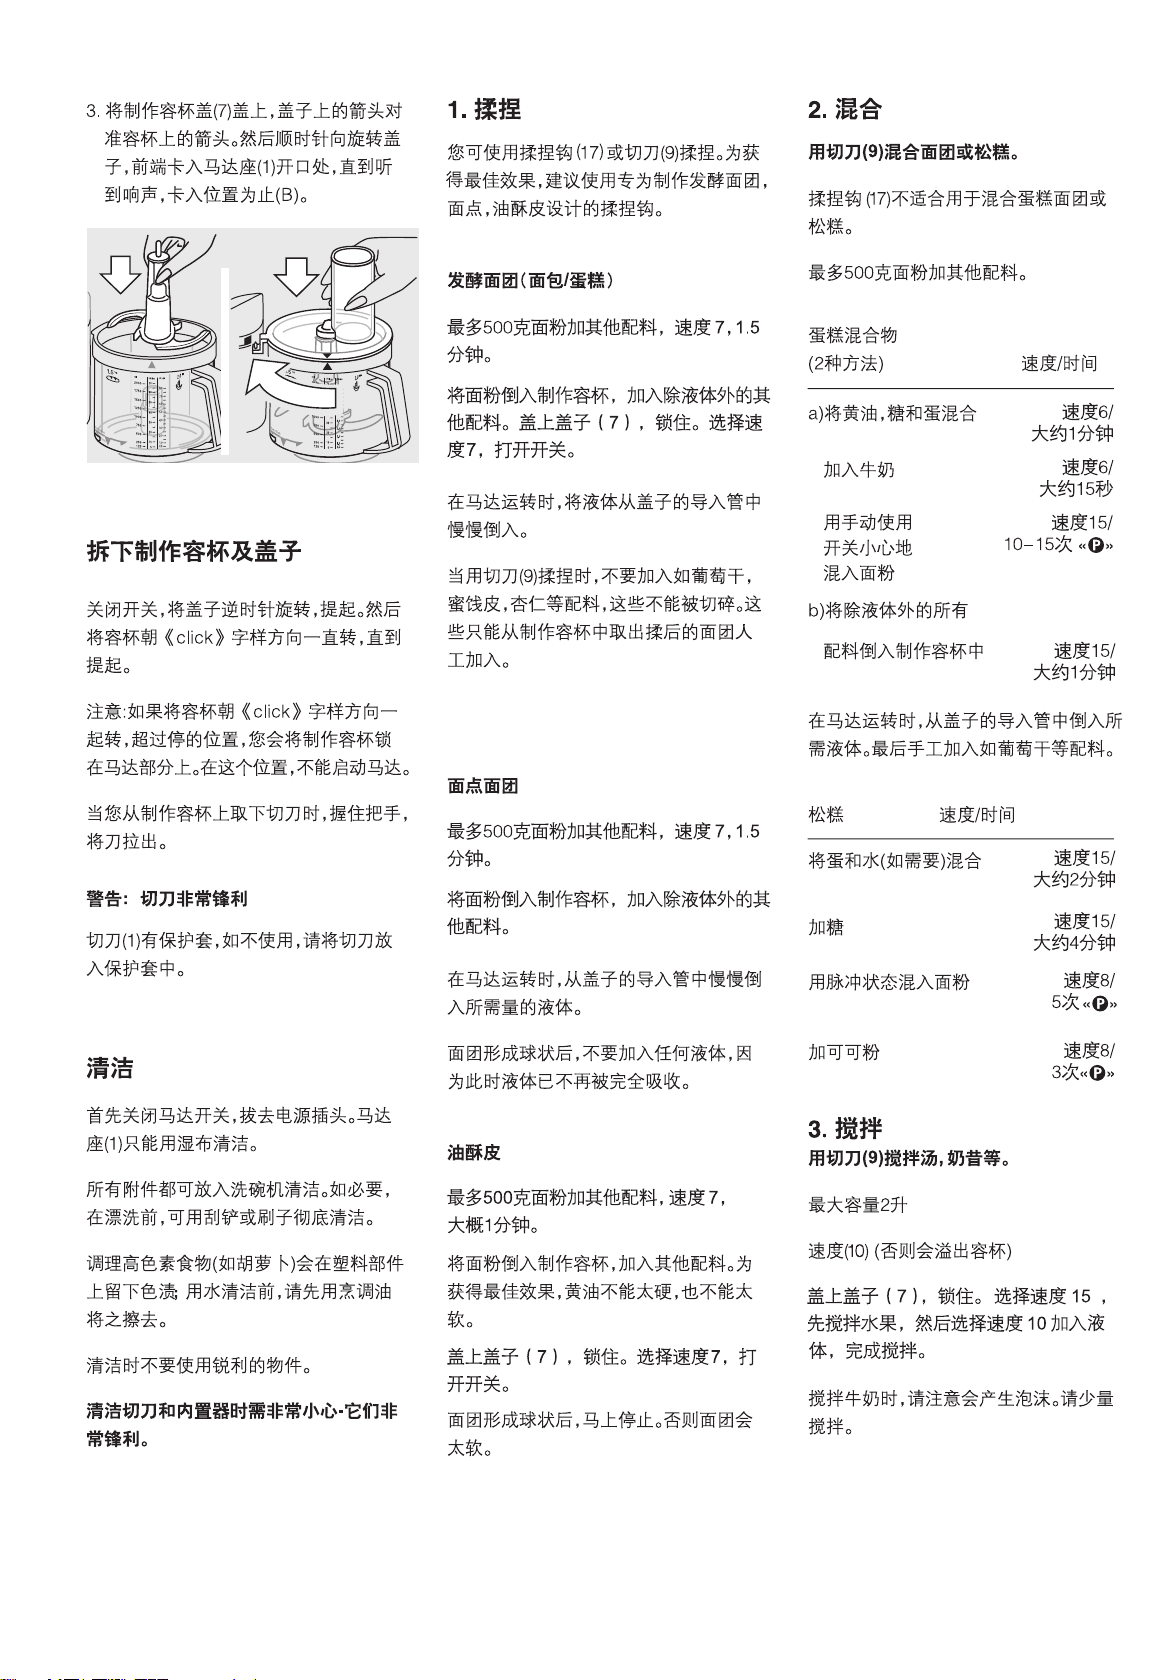
K 650
K 600
Page 2
K 600 K 650
(a)
(b)
(c)
(d)
(e)
GB
IRL
HK
Braun Infolines
0 800 783 70 10
1 800 509 448
852-25249377
(Audio Supplies Company Ltd.)
Internet:
www.braun.com
Braun GmbH
Frankfurter Straße 145
61476 Kronberg / Germany
99657852/VIII-10
China/GB
Page 3
10
8
11
a
12
13
b
c
7
14
d
e
15
16
9
17
6
18
1
354
2
Page 4
A
1
2
4
Page 5
B
click
click
1
2
5
Page 6

a
C
E
1
2
D
6
Page 7

a
b
cd e f
8
6
4
2
14
12
10
2
1
2
1
1
2
1
o
2
a
ef g
bc d
P
7
Page 8

8910
Page 9

Page 10

English
A
1
2
Our products are engineered to meet
the highest standards of quality,
functionality and design. We hope you
thoroughly enjoy your new Braun
appliance.
Please read the use instructions
carefully before first use.
Important
• The blade 9 is very sharp!
Take hold of the blady by the
knob only. After use, always first
remove the blade from the food
processor bowl 6 before removing
the processed food.
• Make sure that your voltage corre-
sponds to the voltage printed on the
bottom of the appliance. Connect
to alternating current only.
• Keep the appliance out of the reach
of children.
• This appliance is not intended for
use by children or persons with
reduced physical, sensory or mental
capabilities, unless they are given
supervision by a person responsible
for their safety. In general, we recommend that you keep the appliance out
of reach of children. Children should
be supervised to ensure that they do
not play with the appliance.
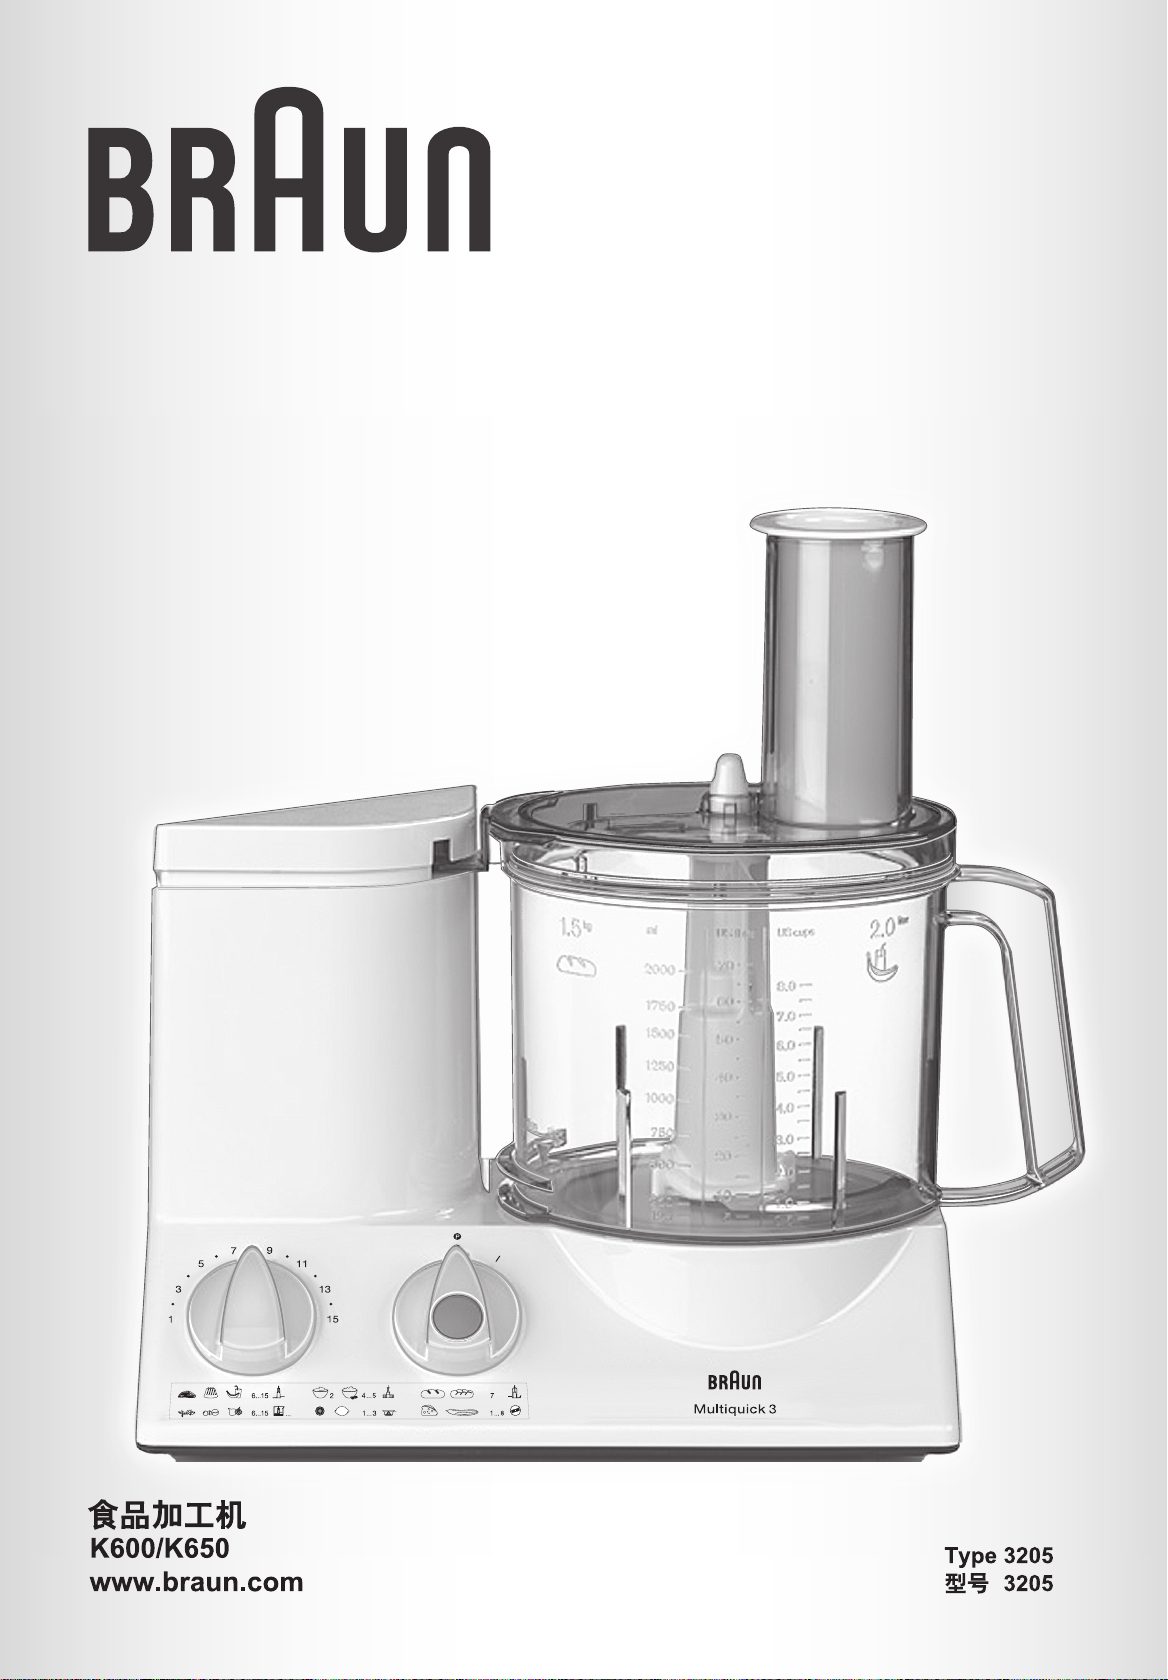
Description
The Braun Multiquick 3 meets highest
demands for kneading, mixing, blending,
chopping, slicing, shredding and grating,
both simply and quickly.
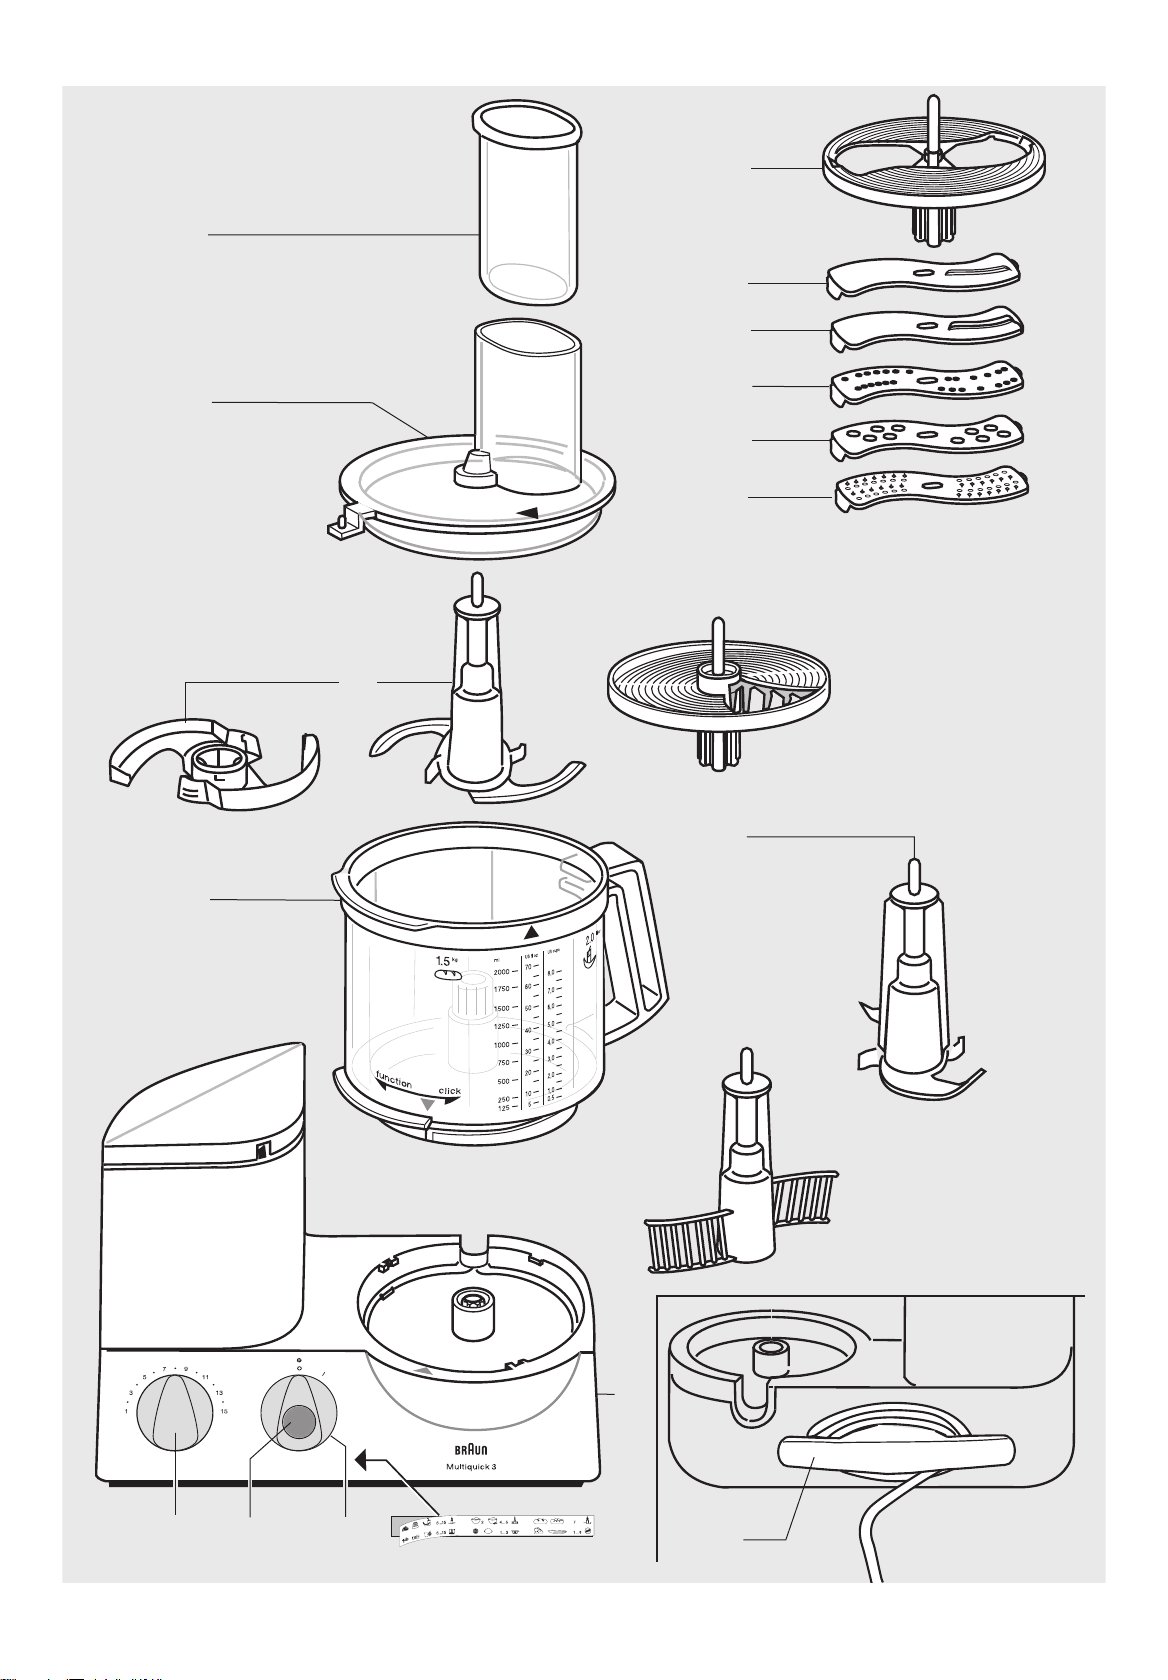
1 Motor block
2 Cord storage
3 Motor switch (on = «I», off = «O»)
4 Pulse mode «»
5 Variable speed regulator (1 - 15)
6 Food processor bowl (2 l capacity)
7 Lid for food processor bowl 6
8 Pusher for lid 7
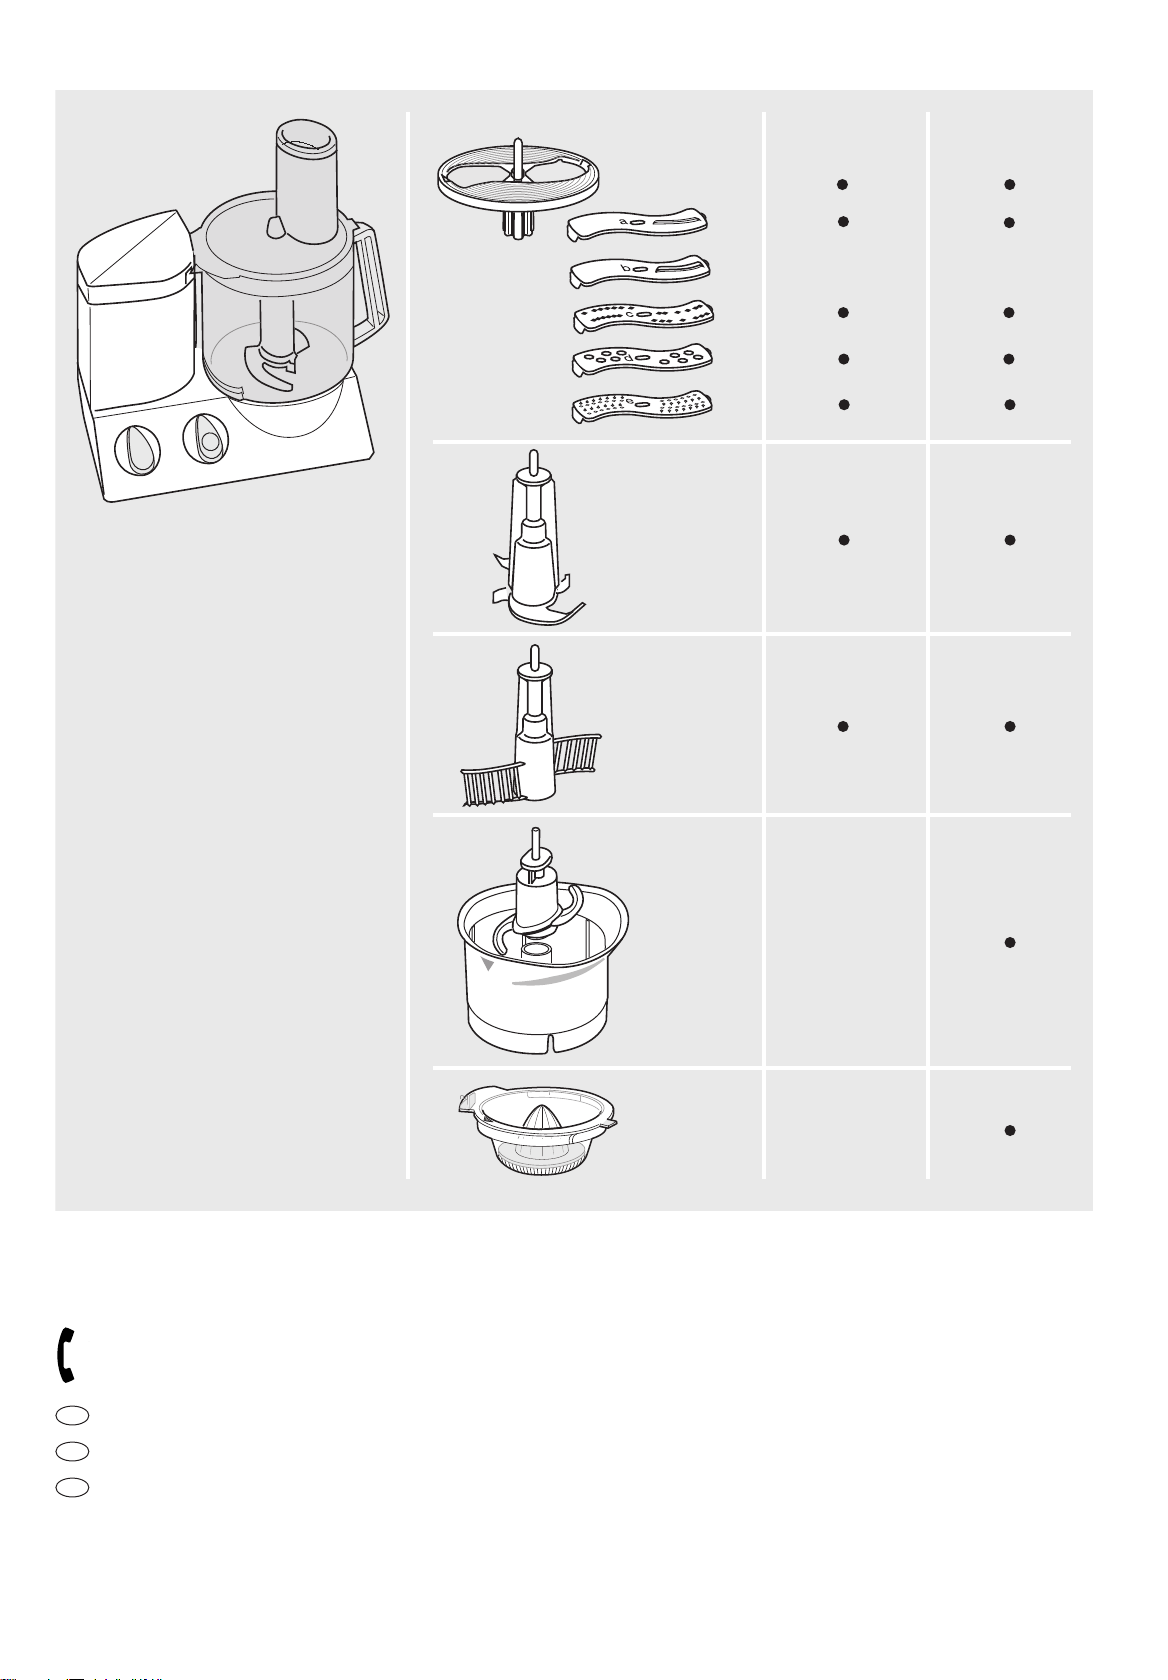
Attachments for food processor
bowl 6
(Important: Not all attachments will be
included in the standard equipment of
all models.)
9 Blade with protective cover
j Insert carrier
q Fine slicing insert – a
l Coarse slicing insert – b
m Fine shredding insert – c
n Coarse shredding insert – d
o Grating insert – e
p French-fries system
q Kneading hook
r Whipping attachment
Note:
Before using the food processor
for the first time, clean all parts as
described under «Cleaning».
Recommended speed
ranges for individual attachments
Set the speed range by means of the
variable speed regulator 5. It is recommended to first select the speed and
then switch on the appliance in order to
work whith the desired speed right from
the beginning.
Attachments Speed range
Kneading hook 7
Blade 6 - 15
Whipping attachment:
– egg-whites 4 - 5
– cream 2
Slicing, grating and
shredding inserts 1 - 8
French-fries system 1 - 2
(please also refer to product printing)
Double safety feature
The appliance can only be switched on
when the food processor bowl with lid is
properly engaged. If the lid is opened
during operation, the motor switches off
automatically. As in this case the motor
switch 3 is still on «I», turn it back to
«O» to avoid switching on the motor
accidentally.
• This appliance was constructed for
household use only to process the
listed quantities.
• Do not use any parts in the microwave
oven.
• Do not allow the appliance to operate
unsupervised.
• Braun electric appliances meet
applicable safety standards. Repairs
or the replacement of the mains cord
must only be done by authorised
service personnel. Faulty, unqualified
repair work may cause considerable
hazards to the user.
• Switch the appliance off and disconnect it from the outlet before storing it.
Specifications
• Voltage/wattage: See typeplate on the
bottom of the appliance.
• Operating time and max. capacity:
See processing instructions.
Overload protection
In order to avoid damages caused by
overload, this appliance is equipped with
an automatic security switch which shuts
off the current supply if necessary. In
such case, turn the motor switch 3 back
to «O» and wait approx. 15 minutes to
allow the motor to cool off before switching on the appliance again.
Pulse mode «» 4
The pulse mode is for example useful
for the following applications:
• Chopping delicate and soft food, e.g.,
eggs, onions or parsley.
• Carefully folding flour into dough or
batter to maintain the creaminess.
• Adding whipped eggs or cream to
more solid food.
The pulse mode «» is activated by
pressing the blue knob on the motor
switch 4 with switch setting «O».
Before activating the pulse mode, set
the desired speed with the speed regulator 5. When releasing the pulse knob
4, the appliance is switched off.
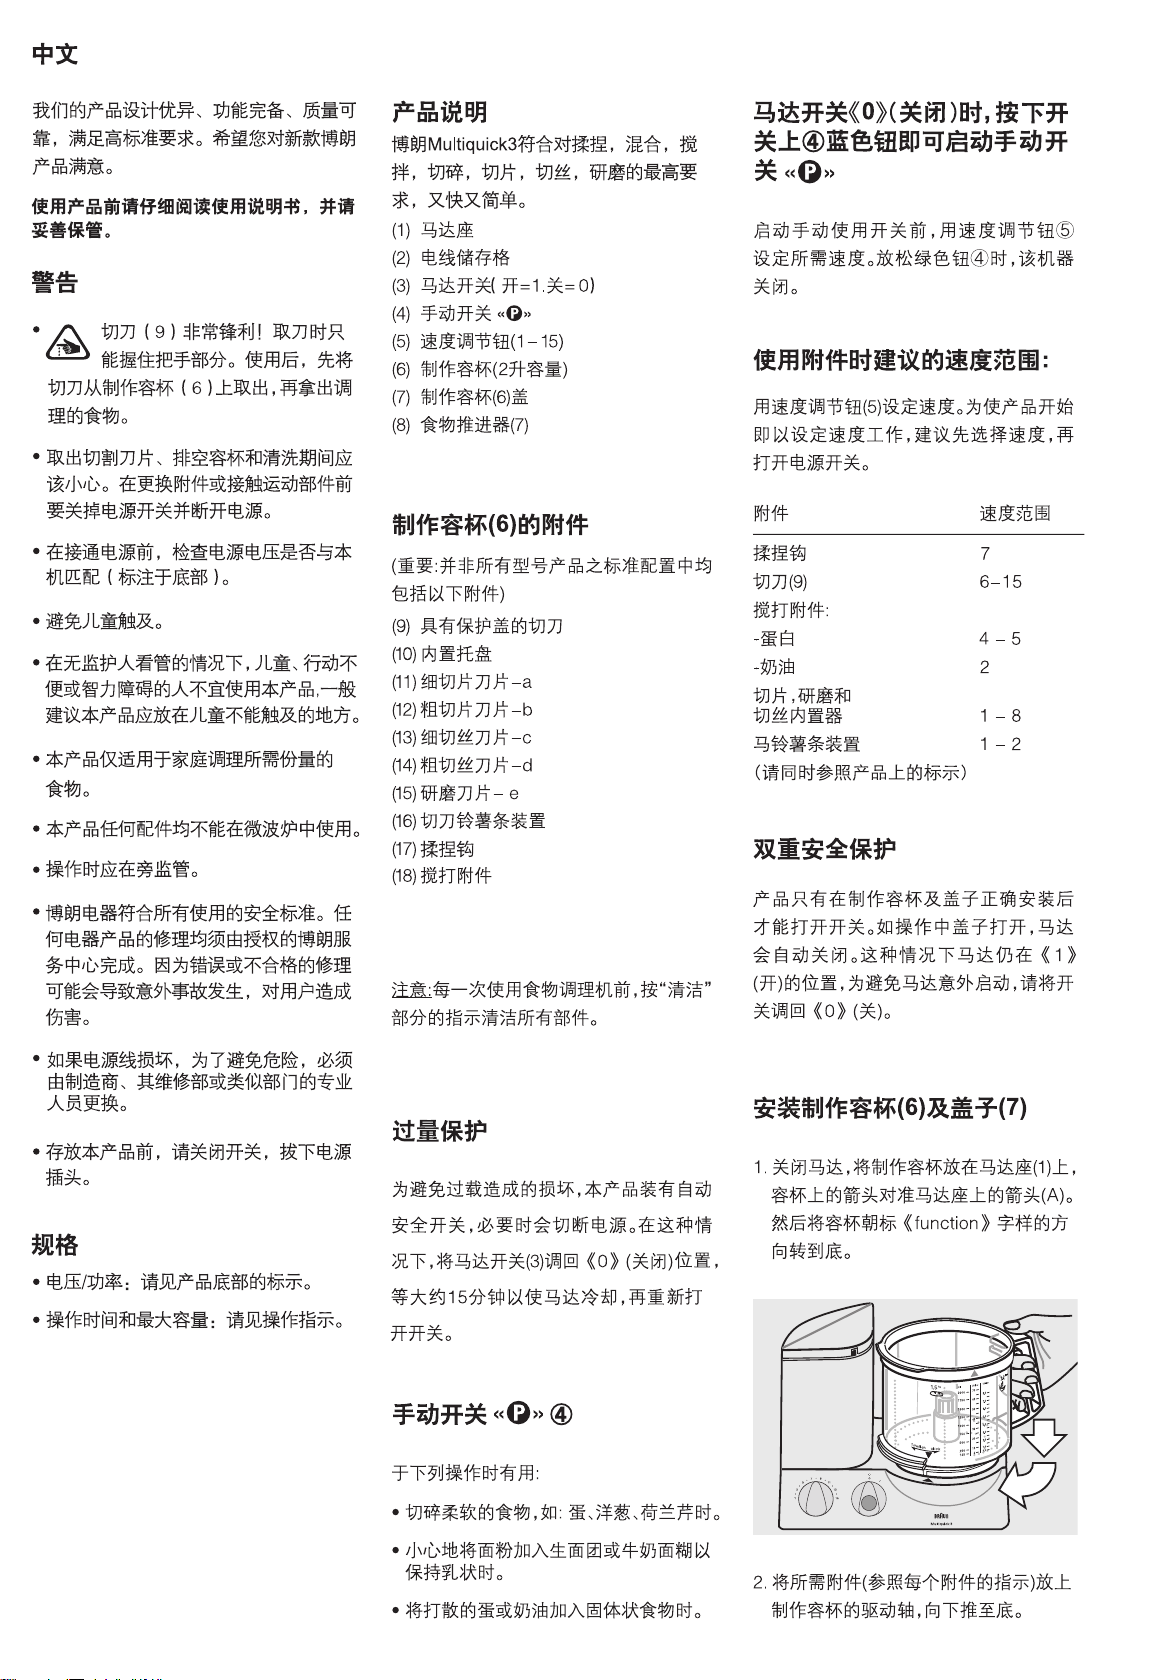
Attaching the food processor
bowl 6 and the lid 7
1. With the motor switched off, place
the food processor bowl onto the drive
place of the motor block 1 matching
the arrow on the bowl with the arrow on
the motor block (A). Then turn the bowl
in the «function» direction as far as it
will go.
2. Put the attachment needed (see
instructions for each of the attachments)
onto the drive shaft of the bowl and
push it down as far as it will go.
3. Put the lid 7 onto the bowl matching
the arrow on the lid with the arrow on
the bowl.
Then turn the lid clockwise guiding its
nose rim into the safety lock opening of
Page 11

the motor block 1 until it audibly snaps
B
click
click
1
2
in place (B).
1. Kneading
For kneading you can use the kneading
hook q or the blade 9. For best results,
we recommend using the kneading hook
which is specially designed for making
yeast dough, pasta and pastries.
2. Mixing
For mixing cake dough or sponges
use the blade 9.
The kneading hook q is not suitable for
mixing cake doughs or sponges.
Removing the food
processor bowl and the lid
Switch off the appliance. Turn the lid
counterclockwise and lift it off. Then turn
the food processor bowl in the «click»
direction until it locks and lift off the
bowl.
Note: If you continue turning the food
processor bowl in the «click» direction
as far as it will go
tion, you can lock the food processor
bowl on the motor part. In this position,
however, you cannot switch on the
motor.
When removing the blade from the bowl,
take hold of it by the knob and pull it off.
Caution: The blade is very sharp.
The blade 9 comes with a protective
cover. If not in use, store the blade in
the protective cover.
, beyond the stop posi-
Cleaning
First, always switch off the motor and
unplug the appliance. Clean the motor
block 1 with a damp cloth only.
All parts can be cleaned in the dishwasher. If necessary, clean all parts
thoroughly with a spatula or a brush
before rinsing them.
Color-intensive food (e.g. carrots) may
leave stains on the plastic parts; wipe
them off with cooking oil before cleaning
with water.
Do not use sharp objects for cleaning
purposes.
Yeast dough (bread/cake)
Max. 500 g flour plus other ingredients
Speed 7, 1
Pour the flour into the food processor
bowl, then add the other ingredients –
except liquids.
Put on the lid 7 and lock in place.
Then choose speed 7 and switch the
appliance on.
Add liquids by pouring them through the
filling tube of the lid while the motor is
running.
When kneading with the blade 9, do
not add ingredients like raisins, candied
peel, almonds, etc. which are not supposed to be cut. These have to be added
maually after having taken the kneaded
dough out of the food processor bowl.
Pasta dough
Max. 500 g flour plus other ingredients
Speed 7, 1
Pour the flour into the food processor
bowl, then add the other ingredients –
except liquids.
Pour the required amount of liquid
through the filling tube in the lid when
the motor is running.
Do not add any liquid after the dough
has formed into a ball as then the liquid
will no longer be absorbed evenly.
Pastries
Max. 500 g flour plus other ingredients
Speed 7, approx. 1 minute
Pour flour into the food processor bowl,
then add the other ingredients. For best
results, be butter used must not be too
hard, nor too soft.
Put on the lid 7 and lock in place.
Choose speed 7 and switch on the
appliance.
Stop kneading the dough shortly after a
ball has formed. Otherwise the pastry
dough will become too soft.
1
/2minutes
1
/2minutes
Max. 500 g flour plus other ingredients
Cake mixture
(2 methods) Speed / Time
a) Cream butter with
sugar end eggs 6 / ca. 1 min
pour in milk and 6 / ca. 15 secs
carefully fold in 15 / ca. 10-15 x
flour with pulse «»
mode.
b) Pour all ingredients
except liquids into
the food processor
bowl. 15 / ca. 1 min
Add required liquids through the
filling tube of the lid while the motor
is running. Finally add ingredients like
raisins manually.
Sponge Speed / Time
Cream eggs and
water (if required) 15 / ca. 2 mins
and sugar 15 / ca. 4 mins
fold in flour with
pulse mode 8 / 5 x «»
add cocoa powder 8 / 3 x «»
3. Blending
Use the blade 9 for blending soups,
shakes, etc.
Maximum capacity 2 l
Speed 10
(otherwise the bowl may overflow)
For milk-shakes, pour coarsely chopped
fruit into the food processor bowl.
Put on the lid 7 and lock in place.
With speed 15, blend fruit first, then add
liquid at speed 10 and finish blending.
When blending milk, please note that it
will froth. Use smaller quantities.
Clean the blades and the inserts very
carefully – they are very sharp.
11
Page 12

4. Chopping
E
1
2
D
Chopping with the blade 9
Processing examples
The processing times are approximate and depend on the quality, the amount of food
to be processed and the required degree of fineness.
Product Max. Preparation Speed Mode Time/pulses
amounte
Hard bread 4 quartered 15 I 45 secs
rolls
Ice cubes 28 whole 15 I 1 minute (snow)
Apples 700 g quartered 8 I 15 secs
Chocolate 400 g broken 15 I coarse 15 secs
cool fine 30 secs
Eggs 8 whole 6 8 x
Cheese (soft) 400 g 3-cm cubes 15 I 20 secs
Fine slicing insert – a q
Speed 1 - 2
Processing examples: cucumbers,
cabbage, raw potatoes, carrots, onions,
radishes.
Coarse slicing insert – b l
Speed 1 - 2
Processing examples: cucumbers,
kohlrabi, raw potatoes, onions, bananas,
tomatoes, mushrooms, celery.
Fine shredding insert – c m
Speed 3 - 6
Processing examples: cheese (soft to
medium), cucumbers, carrots, raw
potatoes, apples.
Coarse shredding insert – d n
Speed 3 - 6
Processing examples: cheese (soft to
medium), cucumbers, kohlrabi, beetroot,
carrots, raw potatoes, apples, cabbage.
Cheese (hard) 700 g 3-cm cubes 15 I 60-70 secs
Meat 700 g in cubes 15 I 40 secs
Carrots 700 g in pieces 15 I 10 secs
Onions 700 g quartered 15 10 - 13 x
5. Slicing, shredding, grating
• Place the insert you want to use into
the insert carrier j as shown in (C) and
snap into position. In order to remove
the insert, push up the insert end that
protrudes at the bottom of the insert
carrier.
C
a
cessed into the filling tube while the
motor is switched off. Refilling should
be done with the motor switched off.
• Never reach into the filling tube when
the motor is running. Always use the
pusher 8 (E).
N.B.:
• Put the assembled slicer/shredder
onto the drive shaft of the food processor bowl (D).
•Put on the lid 7 and lock in place. Set
the speed and fill the food to be pro-
When processing juicy or soft
food, you will obtain better results at a
lower speed. Hard food should be
processed at a higher speed. Do not
overload the food processor bowl.
Grating insert – e o
Speed 8 - 15
Processing examples: raw potatoes
(e.g. for potatoe pancakes), horseradish,
parmigiano cheese (hard).
6. Whipping with the
whipping attachment
Speed / Time
Whipping sponges
Max. 280-300 g flour
plus ingredients
Cream eggs and
water (if required) 5 / ca. 2 mins
add sugar 5 / ca. 2 mins
fold in flour 1 / ca. 30 secs
Whipping egg-whites
Min.: 2 egg-whites 4 - 5 / ca. 4 mins
Max.: 6 egg-whites 4 - 5 / ca. 6 mins
Whipping cream
Min.: 0.15-0.2 l 2 / ca. 1-2 mins
Max.: 0.4 l 2 / ca. 3.5-4 mins
Before whipping sterilized cream, keep
the cream cool for several hours
(at 4° C approx.).
r
Other accessories:
French-fries system p
(available at your retailer or at Braun
Service Centres)
12
Place the French-fries system onto the
drive shaft, put on the lid 7 and lock in
place. For best results, place 3 - 4 potatoes (depending on size) in the filling tube
of the lid 7 while the motor is switched
off.
Set speed to 1 - 2 and switch on the
appliance. Before filling in a new load,
switch the motor off. Use the pusher 8
to apply slight pressure when pushing
the potatoes into the filling tube.
Page 13

Please do not dispose of the
a
b
cd e f
8
6
4
2
14
12
10
2
1
2
1
1
2
1
o
2
a
ef g
bc d
P
product in the household waste
at the end of its useful life.
Disposal can take place at a
Braun Service Centre or at
appropriate collection points
provided in your country.
Subject to change without notice.
Special accessories
Braun Citrus press PJ 600 Type 3200, Speed: 1 - 3
Braun Chopper attachment CH 600 Type 3200
13
Page 14

Caution
• The blade is very sharp! Take hold of
the blade by the knob only. After using
the blade, always first remove it from
the chopper bowl before taking out the
processed food.
• Keep out of reach of children.
• This appliance is suitable for household
use and for processing small quantities
only.
Processing examples
(recommended quantity:
max. 200 ml/200 g)
When processing large pieces of food,
first use the pulse mode and then continue with the highest speed until you
reach the desired degree of fineness.
Do not chop extremely hard food such
as coffee beans or nutmeg.
Produkt
Recomm.
quantity
Herbs
Onions
Cheese (hard)
Nuts
1
50 g
50 g
Salad dressing
Mayonnaise
max. 1 egg
Baby food
(vegetables/fruits)
Recipe example
Dried Fr
uit in Vanilla-Honey
(as a pancake stuffing or spread)
(use the food processor bowl, speed: 15)
Chill 500g creamy honey and chopped
dried fruit (250 g prunes, 250 g dried
figs) in the fridge. Fill honey and dried
fruit into the food processor bowl and
chop for 20 seconds, then add 250 ml
water and 3 drops vanilla aroma and
resume chopping for 3 seconds.
Preparation
without stems
quartered
in pieces
whole
chop herbs beforehand
mix egg, seasoning, mustard,
vinegar, add oil slowly while
motor is running
raw or cooked,
no hot food
Speed
15
6
15
15
7
15
15
Switch
setting
I
I
I
I
I
I
Time/pulses
5 - 10 secs
5 x
45 secs
30 secs
5 - 10 secs
60 secs
20 - 30 secs
Cleaning
Be careful when cleaning the blade.
Take hold of it by the knob only. Please
note that the chopper bowl is not dishwasher-proof.
Clean it manually with warm water.
14
 Loading...