

Page 1
User's guide - Trapezoid hood
Le guide d’utilisation - Hotte trapèze
Ïдзгьт чсЮузт фпх фсбрежпейдЮ брпсспцзфЮсб убт.
Gebruiksaanwijzing van uw afzuigkap "piramide"
O guia de utilização - Extractor de fumos
trapézio
GB
FR
GR
NL
PT
99631292_ML_A.qxd 22/03/05 08:48 Page 1
Page 2
Introduction
Dear Customer,
Thank you for choosing the BRANDT hood.
Our design staff have produced a new generation of kitchen
equipment, to make everyday cooking a pleasure.
The modern, attractive design of your new BRANDT hood will
blend smoothly into your kitchen installation, providing an optimum combination of easy use and performance.
The Brandt range also includes a huge choice of fitted cooking
hobs, ovens, dish-washers and refrigerators, that will match
your new BRANDT hood.
Of course, we make every effort to ensure that our products
meet all your requirements, and our Customer Relations department is at your disposal, to answer all your questions and to
listen to all your suggestions.
A specialist in the world of cooking, BRANDT works hard to
contribute to your culinary success, and your cooking pleasure,
offering ever more effective products, which are easy to use,
environmentally friendly, attractive and reliable.
The BRANDT name.
99631292_ML_A.qxd 22/03/05 08:48 Page 2
Page 3
Safety instructions
- You should never "flambé" dishes under the hood or operate gas rings under
the hood without cooking utensils being placed on them (the flames sucked up
into the hood can damage the appliance).
- When frying food under the appliance, a careful watch must be kept on this at all times.
- Repairs must only be carried out by an approved specialist.
- You should regularly clean the filter cartridge.
- The hood should never be used over a combustible fuel burning stove (wood, coal, etc).
These hoods have been designed for non-commercial use in private homes.
With a view to constantly improving our products, we reserve the right to modify their
technical, functional or aesthetic characteristics, making any changes to their features
considered necessary or desirable in view of technical progress.
These hoods are designed exclusively for cooking foodstuffs and drinks. These products do
not contain any asbestos based components.
Throughout this manual,
indicates safety recommendations,
indicates advice to help you make the
best use of your oven
GB
99631292_ML_A.qxd 22/03/05 08:48 Page 3
Page 4
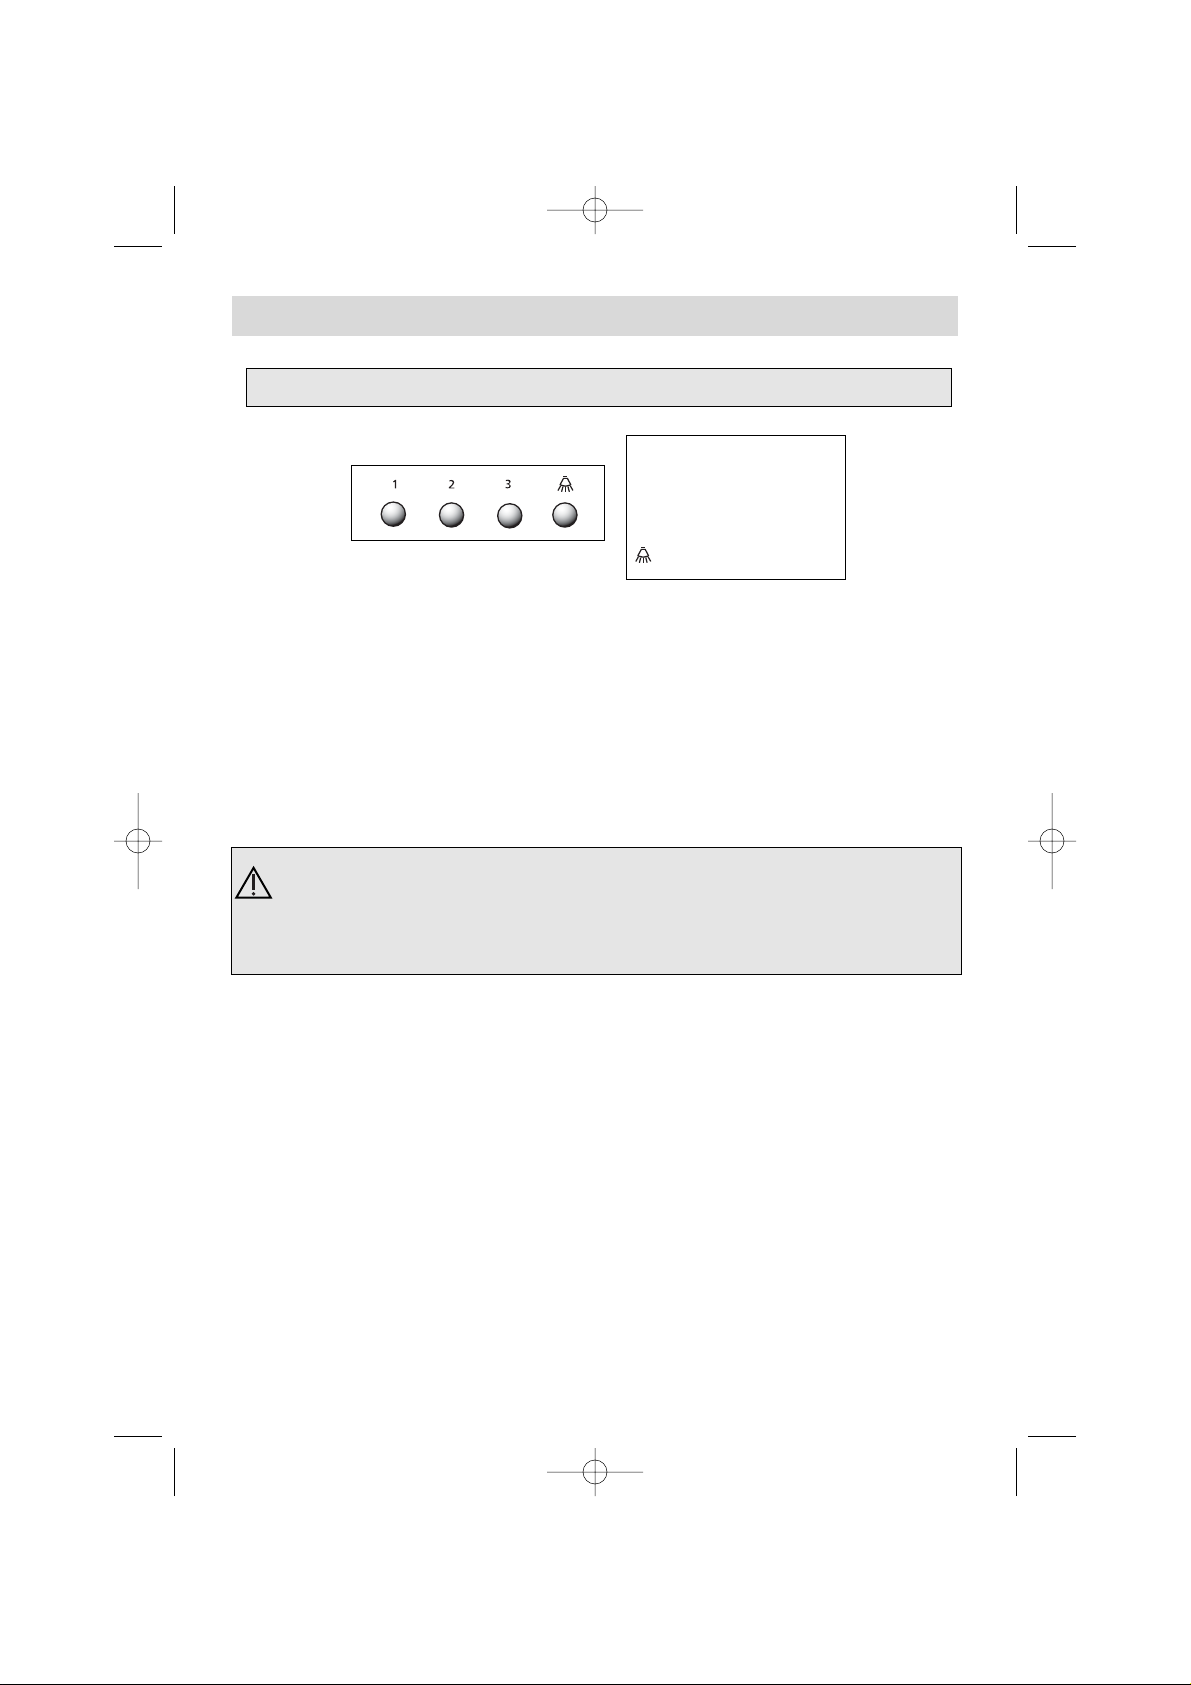
T
he controls on your hood Fig.1
In the case of a kitchen heated by a device connected to a chimney (for
example a stove) the "recycling" version of the hood should be installed. Do not
use the hood without metal filters.
Suitable ventilation should be ensured for the room when the suction hood is used at
the same time as appliances using gas or another combustible fuel.
3-speed model
1 Slow speed
2 Medium speed
3 Fast speed
Lighting
Important: When several speed buttons are pressed-in, the highest speed
applies.
The hood turns off when none of the buttons are pressed-in.
99631292_ML_A.qxd 22/03/05 08:48 Page 4
Page 5

The hood must be installed in conformity with the applicable regulations
concerning the ventilation of premises. In France, these regulations are
detailed in DTU 61.1 from the CSTB. In particular, the evacuated air must not
be channelled into a duct used to evacuate fumes from appliances using gas or
other combustible fuels. Disused ducts may only be used after approval from a
competent specialist.
The minimum distance between the cooking surface and the lowest part of the
hood must be 70 cm. If the instructions for the hob installed under the hood
specify a distance of more than 70 cm, this requirement must be respected.
Installing your hood ?
If you possess an outlet to the exterior: fig. 4
Your hood can be connected to this using a flue (minimum Ø 125 mm, enamelled, made from
aluminium, flexible or made from a non-flammable material). If your flue is below 125 mm in
diameter, you must obligatorily use the "recycling" mode.
If you do not possess an outlet to the exterior: fig. 5
All of our appliances can be used in recycling mode.
In this case, you should add an active carbon filter which will keep in odours.
- Draw a horizontal line 70 cm minimum from the cooktop.
- Draw a vertical line on the wall running from the ceiling to the lower edge of the hood.
- Place the mounting hole template against the wall (fig. 2)
.
- Drill the 6 holes. Insert the 6 wall plugs.
- Screw up the top two screws of the hood, but not completely - allow them to
protrude by 5 mm.
- Remove the metal filter.
- Attach the suction hood to the two screws (fig. 3).
- Screw up the two screws at the bottom.
Assembling your hood
Connecting up your hood
This appliance is delivered with a H 05 VVF power cable with 2 conductors of 0.75 mm2 (neutral, live). This must be
connected to the 220-240 V single phase mains network via a CEI 60083
standard plug which must remain accessible following installation. We will
not be liable in the event of an accident arising following incorrect installation.
The fuse for your installation must be 10 or 16A. If the power cable is damaged, call the after sales service department in order to avoid danger.
Adjust the level of your hood before fully tightening up all four screws.
GB
99631292_ML_A.qxd 22/03/05 08:48 Page 5
Page 6
Assembling the chimney
Hood to be used with external evacuation : fig. 4 and 8
- Attach the metal chimney bracket to the wall, also placing this against the ceiling (fig. 6).
Take care in aligning the 2 triangular slots on the metal bracket with the vertical line on the wall.
- In the case of a flue with a diameter of 125 mm, use the adapter supplied (fig. 8).
If your exterior duct is below 125 mm, you must obligatorily connect your hood in
recycling mode
- Prepare your telescopic chimney taking care to block off the vents (fig. 8).
Fit the chimneys into one another as far as they will go.
- Fit the upper part to the metal bracket.
- Adjust the length of the telescopic chimney by bringing down the lower part and fitting it to the
top of the hood.
Hood to be used in "recycling" mode: f
ig. 5 and 9
- It is possible to remove the back flow valves.
- Fit the plastic smoke deflector to the wall also placing this against the ceiling.
Take care to centre the deflector vis-à-vis the vertical line drawn on the wall (fig. 7).
- Prepare your chimney taking care to place the vents toward the top to ensure that
they are visible (fig. 9).
- Fit the upper part to the plastic deflector.
- Adjust the length of the telescopic chimney by bringing down the lower part and fitting it into
the top of the hood.
To ensure optimal use of your device, we advise that you connect a flue with a
diameter of 150 mm (not supplied). Limit the number of angles and bends as
far as possible, and keep the length of the flue to a minimum. In the event
that the hood will be functioning using exterior evacuation, you should ensure
a sufficient inlet of fresh air to avoid a pressure deficiency in the room.
Changing the lamp ?
1. Remove metal filters (fig. 10).
2. Unscrew then change the E14-40W bulb (fig. 11).
3. Replace the metal filters.
Before carrying out any work, the power supply to the hood must be turned off,
either by unplugging it or by using the circuit breaker switch,
99631292_ML_A.qxd 22/03/05 08:48 Page 6
Page 7

Dismantling the filter cartridge
(fig. 10)
Assembling the carbon filter
(fig. 12)
1. Remove the cartridges.
2. Place the carbon filter on the cartridge, on the inner side of the hood.
3. Fit the 2 fastener clips.
4. Repeat this operation on all of the cartridges.
Cleaning your hood ?
The power supply to the hood must be turned off either by removing the plug or
by using the circuit breaker switch before you remove the metal filters. After
cleaning, the metal filters must be refitted in conformity with the instructions.
MAINTENANCE
WHY?
HOW ?
VITAL EVERY MONTH
VITAL EVERY YEAR
This filter traps fatty vapours and dust. This
component plays an important part in
ensuring the effectiveness of your hood.
This filter traps odours and must be
changed at least once a year
depending on your level of use.
Use a commercial household cleaning product then
rinse abundantly and dry. This cleaning can be
carried out in your dishwasher in the vertical position (ensure that the cartridge never comes
into contact with dirty crockery or silver
tableware).
You should order these filters from
your dealer (quoting the reference
shown on the ID plate located
inside the hood) and note the date
the filter was changed.
FILTER CARTRIDGE
ACTIVATED CARBON FILTER
Never use metal scouring pads, abrasive products or excessively stiff brushes.
To clean the body and the lighting port, you should use only commercial household cleaning products
diluted in water and then rinse using clean water, drying with a soft cloth.
Remove the protective film before using the
filter cartridge for the first time.
For hoods installed in
"recycling" mode.
To avoid all risks of fire.
GB
99631292_ML_A.qxd 22/03/05 08:48 Page 7
Page 8
BRANDT APPLIANCES SAS
7 rue Henri Becquerel
92500 RUEIL MALMAISON
MADE IN FRANCE
220 - 240V ~ 50 Hz
Who should I contact ?
Blemishes on the hood caused by abnormal use or cleaning with abrasive products which do
not cause the appliance to cease functioning or which do not cause it to become unsuitable for
use will not be dealt with by the manufacturer. Any repairs must be carried out by a qualified
technician.
Only the distributors of our brand :
• Are fully familiar with your appliance and its operation
• Are fully familiar with your appliance and its operation,,
• Fully apply our adjustment, maintenance and repair methods,
• Fully apply our adjustment, maintenance and repair methods,
• Use only original parts.
• Use only original parts.
To submit a complaint or to order spare parts from your distributor, please be sure to give him the
complete reference for your appliance (type of appliance and serial number).
You can find this information on the identification plate fitted inside the appliance.
The descriptions and characteristics featuring in this booklet are provided for information
purposes only, and are not binding upon us. Indeed, as part of our ongoing commitment to
improving the quality of our products, we reserve the right to make any modifications or
improvements necessary, without notice.
99631292_ML_A.qxd 22/03/05 08:48 Page 8
Page 9

Edito
Chère Cliente, Cher Client,
Vous venez d'acquérir une nouvelle hotte BRANDT et nous
vous en remercions.
Nos équipes de recherche ont conçu pour vous une nouvelle
génération d'appareils pour vous permettre d'exercer pleinement vos talents culinaires et vous régaler chaque jour.
Avec des lignes pures et une esthétique moderne, votre nouvelle hotte BRANDT s'intègre harmonieusement dans votre
cuisine et allie parfaitement facilité d'utilisation et performances de cuisson.
Vous trouverez également dans la gamme des produits BRANDT,
un vaste choix de fours, cuisinières, tables de cuisson, lavevaisselle, fours micro-ondes et réfrigérateurs intégrables, que
vous pourrez coordonner à votre nouvelle hotte BRANDT.
Bien entendu, dans un souci permanent de satisfaire au mieux
vos exigences vis à vis de nos produits, notre service consommateurs est à votre disposition et à votre écoute pour répondre à toutes vos questions ou suggestions.
Spécialiste de tout l'univers de la cuisson, BRANDT contribue
ainsi à la réussite culinaire, au plaisir partagé, à la convivialité
en vous apportant des produits toujours plus performants, simples d'utilisation, respectueux de l'environnement, esthétiques
et fiables.
La Marque BRANDT.
FR
99631292_ML_A.qxd 22/03/05 08:48 Page 9
Page 10
Consignes de sécurité
- Il est interdit de flamber des mets ou de faire fonctionner des foyers gaz sans
les recouvrir de plats de cuisson au-dessous de la hotte (les flammes aspirées risqueraient de détériorer l’appareil).
- Les fritures effectuées sous l’appareil doivent faire l’objet d’une surveillance constante.
- Les réparations doivent être exclusivement effectuées par un spécialiste agréé.
- Nettoyez régulièrement le filtre cassette pour éviter tout risque de prise de feu.
- Le fonctionnement au-dessus d’un foyer à combustible (bois, charbon, etc...) n’est pas
autorisé.
Ces hottes ont été conçues pour être utilisées par des particuliers dans un lieu d’habitation.
Dans le souci d’une amélioration constante de nos produits, nous nous réservons le droit
d’apporter à leurs caractéristiques techniques, fonctionnelles ou esthétiques toutes modifications de leurs caractéristiques liées à l’évolution technique.
Ces hottes sont destinées exclusivement à la cuisson des boissons et denrées alimentaires.
Ces produits ne contiennent aucun composant à base d’amiante.
Tout au long de la notice,
vous signale les consignes de sécurité,
vous signale les conseils et les astuces
99631292_ML_A.qxd 22/03/05 08:48 Page 10
Page 11

FR
Comment se présente votre hotte ? Fig.1
Dans le cas d’une cuisine chauffée avec un appareil raccordé à une cheminée
(ex : poêle), il faut installer la hotte en version recyclage. Ne pas utilisez la hotte
sans les filtres métalliques.
Une ventilation convenable de la pièce doit être prévue lorsqu’une hotte de cuisine est
utilisée simultanément avec des appareils utilisants du gaz ou un autre combustible.
Modèle 3 vitesses
1 Petite vitesse
2 Moyenne vitesse
3 Grande vitesse
Éclairage
Important : Lorsque plusieurs touches de vitesse sont enfoncées, la vitesse la
plus élevée est privilégiée.
L’arrêt de la hotte se fait lorsque toutes les touches ne sont pas enfoncées.
99631292_ML_A.qxd 22/03/05 08:48 Page 11
Page 12
L’installation doit être conforme aux règlements en vigueur pour la ventila-
tion des locaux. En France, ces règlements sont indiqués dans le DTU 61.1 du
CSTB. En particulier, l’air évacué ne doit pas être envoyé dans un conduit uti-
lisé pour évacuer les fumées d’appareils utilisant du gaz ou autre combustible.
L’utilisation de conduits désaffectés ne peut se faire qu’après accord d’un spécialiste compétent.
La distance minimale entre le plan de cuisson et la partie la plus basse de la hotte
doit être de 70 cm. Si les instructions de la table de cuisson installée sous la hotte
spécifient une distance plus grande que 70 cm, celle-ci doit être prise en compte.
Comment installer votre hotte ?
Vous possédez une sortie vers l’extérieur : fig. 4
Votre hotte peut être raccordée sur celle-ci par l’intermédaire d’une gaine d’évacuation (minimum
Ø 125 mm, émaillée, en alu, flexible ou en matière ininflammable). Si votre gaine est inférieure
à 125 mm de diamètre, passez obligatoirement en mode recyclage.
Vous ne possédez pas de sortie vers l’extérieur : fig. 5
Tous nos appareils ont la possibilité de fonctionner en mode recyclage.
Dans ce cas, ajoutez un filtre à charbon actif qui retiendra les odeurs.
- Tracez un trait horizontal à 70 cm minimum du plan de cuisson.
- Tracez un trait vertical sur le mur allant du plafond jusqu’au bord inférieur de la hotte.
- Placez contre le mur les gabarits de montage (fig. 2)
.
- Percez les 6 trous. Enfoncez les 6 chevilles.
- Vissez les deux vis du haut de la hotte en les laissant dépasser de 5 mm.
- Retirez le filtre métallique.
- Accrochez la hotte aspirante aux deux vis (fig. 3).
- Vissez les deux vis du bas.
Montage de votre hotte
Raccordement de votre hotte
Cet appareil est livré avec un câble d’alimentation H 05 VVF à 2 conducteurs de 0,75 mm2(neutre et phase). Il doit être branché sur réseau
220-240 V monophasé par l’intermédiaire d’une prise de courant normalisée CEI 60083 qui doit rester accessible après installation, conformément
aux règles d’installation.
Notre responsabilité ne saurait être engagée en cas d’accident consécutif à une
installation incorrecte. Le fusible de votre installation doit être de 10 ou 16 A.
Si le câble d’alimentation est endommagé, faites appel au service après-vente
afin d’éviter un danger.
Avant serrage complet des 4 vis, ajustez le niveau de la hotte.
99631292_ML_A.qxd 22/03/05 08:48 Page 12
Page 13

FR
Montage de la cheminée
Fonctionnement en évacuation extérieure: fig. 4 et 8
- Fixez contre le mur, en appui sur le plafond, le support de cheminée métallique (fig. 6).
- Dans le cas d’une gaine diamètre 125 mm, utilisez l’adaptateur fourni (fig. 8).
Si votre gaine extérieure est inférieure à 125 mm, il est obligatoire de raccorder votre
hotte en mode recyclage.
- Préparez votre cheminée télescopique en prenant soin de dissimuler les ouïes (fig. 8).
Emboîter les cheminées l’une dans l’autre au maximum.
- Fixez la partie supérieure sur le support métallique.
- Ajustez la longueur de la cheminée télescopique en descendant la partie inférieure et l’emboîter
dans le sommet de la hotte.
Fonctionnement en recyclage: f
ig. 5 et 9
- Il est possible de retirer les clapets anti-retours.
- Fixez contre le mur, en appui sur le plafond, le déflecteur plastique des fumées.
Prendre soin de centrer le déflecteur par rapport au trait vertical tracé sur le mur
(fig. 7).
- Préparez votre cheminée en prenant soin de placer les ouïes vers le haut de manière qu’elles soient visibles (fig. 9).
- Fixez la partie supérieure sur le déflecteur plastique.
- Ajustez la longueur de la cheminée télescopique en descendant la partie inférieure et l’emboîter
dans le sommet de la hotte.
Pour une utilisation optimale de votre appareil, nous vous conseillons le raccordement à une gaine diamètre 150 mm (non livrée). Limiter au maximum le
nombre de coude et la longueur de la gaine. Dans le cas où la hotte fonctionne
en évacuation extérieure, il convient d’assurer une arrivée d’air frais suffisante pour éviter de mettre la pièce en dépression.
Comment changer la lampe ?
1. Retirez les filtres métalliques (fig. 10).
2. Dévissez puis changez l’ampoule E14-40W (fig. 11).
3. Replacez les filtres métalliques.
Avant toute intervention, la hotte doit être mise hors tension, soit en retirant la
prise, soit en actionnant le disjoncteur,
99631292_ML_A.qxd 22/03/05 08:48 Page 13
Page 14

Démontage du filtre cassette
(fig. 10)
Montage du filtre charbon
(fig. 12)
1. Retirez les cassettes.
2. Placez le filtre charbon sur la cassette coté intérieur de la hotte.
3. Placez les 2 tringles de maintien.
4. Faîtes cette opération sur toutes les cassettes.
Comment nettoyer votre hotte ?
La hotte doit être mise hors tension, soit en retirant la prise, soit en actionnant le disjoncteur, avant que les filtres métalliques soient enlevés. Après le nettoyage, les filtres
métalliques doivent être de nouveau fixés conformément aux instructions.
ENTRETIEN
POURQUOI ?
COMMENT ?
IMPERATIF TOUS LES MOIS
IMPERATIF TOUS LES ANS
Ce filtre retient les vapeurs grasses et les
poussières. Il est l’élément assurant une part
importante de l’efficacité de votre hotte.
Ce filtre retient les odeurs et doit
être changé au moins tous les ans
en fonction de votre utilisation.
Avec un nettoyant ménager du commerce, puis rin-
cez abondamment et séchez. Ce nettoyage peut
être effectué dans votre lave-vaisselle en position
verticale (ne pas mettre en contact avec de la
vaisselle sale ou des couverts en argent).
Commandez ces filtres chez votre
revendeur (sous la référence indi-
quée sur la plaque signalétique
située à l’intérieur de la hotte) et
notez la date de changement.
FILTRE CASSETTE
FILTRE CHARBON ACTIF
N’utilisez jamais de tampons métalliques, de produits abrasifs ou de brosses trop dures.
Pour nettoyer la carrosserie et le hublot d’éclairage, utilisez exclusivement des nettoyants ménagers du
commerce dilués dans de l’eau, puis rincez à l’eau claire et essuyez avec un chiffon doux.
Avant la première utilisation du filtre cassette,
retirez le film de protection.
Pour les hottes installées en
recyclage
Pour éviter tout risque d’incendie.
99631292_ML_A.qxd 22/03/05 08:48 Page 14
Page 15

FR
BRANDT APPLIANCES SAS
7 rue Henri Becquerel
92500 RUEIL MALMAISON
MADE IN FRANCE
220 - 240V ~ 50 Hz
Qui contacter ?
Les défauts d’aspect provoqués par une utilisation anormale ou le nettoyage avec des produits abrasifs qui n’entraîne pas un non fonctionnement ou une inaptitude à l’usage ne sont pas pris en compte
par le fabriquant. Tout dépannage doit être effectué par un technicien qualifié.
Seuls les distributeurs de notre marque :
• • CConnaissent parfaitement votre appareil et son fonctionnement
onnaissent parfaitement votre appareil et son fonctionnement,,
• • AAppliquent intégralement nos méthodes de réglage, d’entretien et de
ppliquent intégralement nos méthodes de réglage, d’entretien et de
réparation,
réparation,
• • UUtilisent exclusivement les pièces d’origine.
tilisent exclusivement les pièces d’origine.
En cas de réclamation ou pour commander des pièces de rechange à votre distributeur, précisez-lui la
référence complète de votre appareil (type de l’appareil et numéro de série)
Ces renseignements figurent sur la plaque signalétique fixée à l’intérieur de l’appareil.
Les descriptions et les caractéristiques apportées dans ce livret sont données seulement à titre d’information et non d’engagement. En effet, soucieux de la qualité de nos produits, nous nous réservons le
droit d’effectuer, sans préavis, toutes modifications ou améliorations nécessaires.
Pour en savoir plus sur tous les produits de la marque :
informations, conseils, les points de vente, les spécialistes après-vente.
Pour communiquer :
nous sommes à l’écoute de toutes vos remarques, suggestions, propositions auxquelles nous vous répondrons personnellement.
Vous pouvez nous écrire :
S
ERVICE CONSOMMATEURS BRANDT
BP
9526
95069
CERGY PONTOISE CEDEX
ou nous téléphoner au :
* Service fourni par Brandt Customer Services, société par actions simplifiée au capital de
2.500.000 euros - 5/7 avenue des Béthunes, 95310 Saint Ouen l’Aumône - RCS Pontoise 440 303 303
Brandt Appliances - société par actions simplifiée au capital de 10.000.000 Euros
RCS Nanterre 440 302 347.
Relations consommateurs
99631292_ML_A.qxd 22/03/05 08:48 Page 15
*
Page 16

Å
йубгщгЮ
Бойьфймз релЬфйууб, Бойьфйме релЬфз,
Убт ехчбсйуфпэме рпх бгпсЬубфе Энбн брпсспцзфЮсб фзт
BRANDT.
Пй пмЬдет Эсехнбт дзмйпхсгпэн гйб еуЬт нЭет генйЭт рспъьнфщн
кбй ухукехюн гйб нб еЯнбй фп мбгеЯсемб кбизмесйнЮ брьлбхуз.
Ме брблЭт гсбммЭт кбй уэгчспнз бйуизфйкЮ, п нЭпт
брпсспцзфЮсбт убт BRANDT енущмбфюнефбй бсмпнйкЬ уфзн
кпхжЯнб убт кбй ухндхЬжей брпдюуейт кбй ехкплЯб чсЮузт.
З Brandt рбсЬгей ерЯузт пльклзсет уейсЭт брь рспъьнфб, ьрщт
кпхжЯнет, цпэснпхт, рлхнфЮсйб рйЬфщн, шхгеЯб. ¼лб бхфЬ мрпспэн нб енфпйчйуфпэн Ю нб ухндхбуфпэн мбжЯ ме фпн нЭп
брпсспцзфЮсб убт áðü ôçí BRANDT.
ВЭвбйб уе мйб ухнечЮ рспурЬиейб нб йкбнпрпйЮупхме ухнечют
кблэфесб фйт брбйфЮуейт брЭнбнфй уфб рспъьнфб мбт з хрзсеуЯб
релбфюн еЯнбй уфз дйЬиеуЮ убт гйб нб убт бкпэуей, гйб нб
брбнфЮуей уфйт есщфЮуейт убт Ю гйб фйт прпйеудЮрпфе ухуфЬуейт
убт
.
Ейдйкьт уфйт пйкйбкЭт ухукехЭт кпхжЯнбт, з BRANDT ухмвЬллей
уфзн ерйфхчЯб кбй фзн брьлбхуз фщн цбгзфюн убт, кбиют кбй уфз
дзмйпхсгЯб цйлйкпэ ресйвЬллпнфпт, рспуцЭспнфЬт убт ьлп кбй
рйп брпдпфйкЬ, ехкпльчсзуфб, пйкплпгйкЬ, кблбЯуизфб кбй
бойьрйуфб рспъьнфб
З мЬскб BRANDT.
99631292_ML_A.qxd 22/03/05 08:48 Page 16
Page 17

Ì
Эфсб буцблеЯбт
- Брбгпсеэефбй нб цлбмрЬсефе цбгзфЬ Ю нб иЭфефе уе лейфпхсгЯб фйт еуфЯет
хгсбесЯпх чщсЯт нб фйт кблэрфефе ме укеэз мбгейсЭмбфпт кЬфщ брь фпн
брпсспцзфЮсб (бн з ухукехЮ брпсспцЮуей цльгет кйндхнеэпхн нб фзт
рспкблЭупхн влЬвз).
- Фп фзгЬнйумб кЬфщ брь фпн брпсспцзфЮсб рсЭрей нб еЯнбй бнфйкеЯменп мьнймзт
ерЯвлешзт.
- Пй ерйукехЭт рсЭрей нб рсбгмбфпрпйпэнфбй брпклейуфйкЬ брь еоейдйкехмЭнп
рспущрйкь.
- РсЭрей нб кбибсЯжефе фбкфйкЬ фзн кбуЭфб цЯлфспх.
- З лейфпхсгЯб фзт ухукехЮт рЬнщ брь еуфЯет кбэуймзт элзт (оэлп, кЬсвпхнп, клр...) ден ерйфсЭрефбй.
Пй брпсспцзфЮсет бхфпЯ Эчпхн учедйбуфеЯ гйб нб чсзуймпрпйпэнфбй брь йдйюфет уе
пйкйбкь ресйвЬллпн. Ме уфьчп фз ухнечЮ велфЯщуз фщн рспъьнфщн мбт, дйбфзспэме фп
дйкбЯщмб нб фспрпрпйЮупхме фб фечнйкЬ, лейфпхсгйкЬ Ю бйуизфйкЬ чбсбкфзсйуфйкЬ фщн
ухукехюн уэмцщнб ме фйт фечнйкЭт еоелЯоейт.
Пй брпсспцзфЮсет бхфпЯ рсппсЯжпнфбй брпклейуфйкЬ уфзн рбсбукехЮ фспцЯмщн кбй
рпфюн. Фб рспъьнфб мбт ден ресйЭчпхн кбнЭнб уфпйчеЯп ме вЬуз фпн бмЯбнфп.
Уе ьлп фп егчейсЯдйп, фп
убт ерйузмбЯней фйт пдзгЯет буцблеЯбт,
убт ерйузмбЯней фйт ухмвпхлЭт кбй фб фечнЬумбфб
GR
99631292_ML_A.qxd 22/03/05 08:48 Page 17
Page 18

ÐбспхуЯбуз фпх брпсспцзфЮсб убт учЮмб 1
Уе ресЯрфщуз рпх з кпхжЯнб иесмбЯнефбй брь ухукехЮ з прпЯб еЯнбй ухндедемЭнз ме
еобгщгЮ бЭсб (р.ч. уьмрб), п брпсспцзфЮсбт рсЭрей нб егкбфбуфбиеЯ ме уэуфзмб
бнбкэклщузт. Мз чсзуймпрпйеЯфе фпн брпсспцзфЮсб чщсЯт фб мефбллйкЬ цЯлфсб.
РсЭрей нб рспвлециеЯ йкбнпрпйзфйкьт еобесйумьт фпх чюспх ьфбн Энбт брпсспцзфЮсбт
кпхжЯнбт чсзуймпрпйеЯфбй фбхфьчспнб ме ухукехЭт пй прпЯет чсзуймпрпйпэн хгсбЭсйп Ю
кЬрпйб Ьллз кбэуймз элз.
МпнфЭлп 3 фбчхфЮфщн
1 ЧбмзлЮ фбчэфзфб
2 МеубЯб фбчэфзфб
3 ХшзлЮ фбчэфзфб
Цщфйумьт
Уе ресЯрфщуз рпх рбфзипэн ресйууьфесб фпх еньт рлЮкфсб фбчэфзфбт, иб дпиеЯ
рспфесбйьфзфб уфзн хшзльфесз фбчэфзфб. П брпсспцзфЮсбт уфбмбфЬ ьфбн
кбнЭнб рлЮкфсп ден еЯнбй рбфзмЭнп.
99631292_ML_A.qxd 22/03/05 08:48 Page 18
Page 19

З егкбфЬуфбуз рсЭрей нб ухммпсцюнефбй ме фйт йучэпхует нпмйкЭт дйбфЬоейт гйб
фпн еобесйумь фщн еущфесйкюн чюсщн. Уфз ГбллЯб, бхфЭт пй дйбфЬоейт ресйлбмвЬнпнфбй
уфп DTU 61.1 фпх CSTB (Пйкпдпмйкь Ерйуфзмпнйкь кбй Фечнйкь КЭнфсп). ЙдЯщт, п
еккенщмЭнпт бЭсбт ден рсЭрей нб кбфблЮгей уе кЬрпйп бгщгь п прпЯпт чсзуймпрпйеЯфбй гйб фзн
еккЭнщуз бесЯщн рспесчьменщн брь ухукехЭт рпх чсзуймпрпйпэн хгсбЭсйп Ю кЬрпйб Ьллз
кбэуймз элз. З чсЮуз бгщгюн уе егкбфЬлейшз хрькейфбй уфзн Эгксйуз еньт ейдйкпэ. З елЬчйуфз
брьуфбуз мефбоэ фпх ерйрЭдпх шзуЯмбфпт фщн фспцЯмщн кбй фпх чбмзльфеспх фмЮмбфпт фпх
брпсспцзфЮсб рсЭрей нб еЯнбй 70 ек. Уе ресЯрфщуз рпх пй пдзгЯет фзт вЬузт еуфйюн рпх Эчефе
егкбфбуфЮуей кЬфщ брь фпн брпсспцзфЮсб кбипсЯжпхн ьфй з брьуфбуз рсЭрей нб еЯнбй
мегблэфесз фщн 70 cm., иб рсЭрей нб фзн фзсЮуефе.
Ð
щт нб егкбфбуфЮуефе фпн брпсспцзфЮсб убт
ДйбиЭфефе Эопдп рспт фб Эощ: учЮмб 4
П брпсспцзфЮсбт убт мрпсеЯ нб ухндеиеЯ ме фзн Эопдп дйб мЭущ еньт бгщгпэ еккЭнщузт (елЬчйуфз
дйЬмефспт 125 mm, п прпЯпт мрпсеЯ нб еЯнбй брь ембгйЭ, блпхмЯнйп, еэкбмрфпт Ю брь Ькбхуфп хлйкь)
Уе ресЯрфщуз рпх п бгщгьт убт Эчей дйЬмефсп мйксьфесз брь 125 mm, ресЬуфе хрпчсещфйкЬ уе
лейфпхсгЯб бнбкэклщузт.
Ден дйбиЭфефе Эопдп рспт фб Эощ:
учЮмб 5
¼лет мбт пй ухукехЭт мрпспэн нб лейфпхсгЮупхн уе лейфпхсгЯб бнбкэклщузт.
Уфзн ресЯрфщуз бхфЮ, рспуиЭуфе Энб цЯлфсп енесгпэ Ьнисбкб фп прпЯп иб ухгксбфеЯ фйт мхсщдйЭт.
- КЬнфе мйб псйжьнфйб гсбммЮ уе брьуфбуз фпхлЬчйуфпн 70 cm брь фпн рЬгкп вЬузт еуфйюн.
- КЬнфе мйб кЬиефз гсбммЮ уфпн фпЯчп брь фп фбвЬнй мЭчсй фп кЬфщ Ьксп фпх брпсспцзфЮсб.
- ФпрпиефЮуфе уфпн фпЯчп рсьфхрб фпрпиЭфзузт (ейк. 2).
- КЬнфе фйт 6 прЭт. ВЬлфе фб 6 пэрбф.
- Вйдюуфе фйт дэп вЯдет фпх рЬнщ мЭспхт фпх брпсспцзфЮсб бцЮнпнфбт нб рспеоЭчпхн 5 mm.
- БцбйсЭуфе фп мефбллйкь цЯлфсп.
- Уфесеюуфе фпн брпсспцзфЮсб уфйт дэп вЯдет (ейк. 3).
- Вйдюуфе фйт дэп вЯдет фпх кЬфщ мЭспхт.
ÔпрпиЭфзуз фпх брпсспцзфЮсб убт
Óэндеуз фпх брпсспцзфЮсб убт
З ухукехЮ ;бхфЮ дйбфЯиефбй ме кблюдйп фспцпдпуЯбт H 05 WF ме фсейт бгщгпэт
0,75 mm2 (пхдЭфесп, цЬуз). РсЭрей нб ухндеиеЯ уе мпнпцбуйкь сеэмб 220-240 V
мЭущ рсЯжбт сеэмбфпт ме вЬуз фб рсьфхрб CEI 60083, з прпЯб рсЭрей нб
еобкплпхиЮуей нб еЯнбй рспувЬуймз мефЬ фзн егкбфЬуфбуз.
ПхдемЯб ехиэнз цЭспхме уе ресЯрфщуз бфхчЮмбфпт льгщ брпхуЯбт геЯщузт Ю
лбнибумЭнзт геЯщузт. З буцЬлейЬ убт рсЭрей нб еЯнбй 10 Ю 16 Б. Уе ресЯрфщуз рпх фп
кблюдйп фспцпдпуЯбт еЯнбй цибсмЭнп, кблЭуфе фзн хрзсеуЯб фечнйкЮт еохрзсЭфзузт юуфе
нб брпцэгефе кЬие кЯндхнп.
Рсйн уцЯоефе фелеЯщт фйт 4 вЯдет, блцбдйЬуфе фпн брпсспцзфЮсб.
GR
99631292_ML_A.qxd 22/03/05 08:48 Page 19
Page 20

Ô
прпиЭфзуз фпх кбрнбгщгпэ
ЛейфпхсгЯб еощфесйкЮт еккЭнщузт бесЯщн: учЮмбфб 4 кбй 8
- Уфесеюуфе уфпн фпЯчп, ме уфЮсйоз уфп фбвЬнй, фз мефбллйкЮ вЬуз фпх кбрнбгщгпэ (учЮмб 6).
ЦспнфЯуфе нб ехихгсбммЯуефе фйт дэп фсйгщнйкЭт егкпрЭт фзт мефбллйкЮт вЬузт ме фзн кЬиефз
гсбммЮ уфпн фпЯчп.
- Уе ресЯрфщуз рпх п бгщгьт убт Эчей дйЬмефсп 125 mm чсзуймпрпйЮуфе фп рбсечьменп
рспубсмпуфйкь еоЬсфзмб (учЮмб 8).
Уе ресЯрфщуз рпх п еощфесйкьт убт бгщгьт Эчей дйЬмефсп мйксьфесз брь 125 mm, рсЭрей
брбсбЯфзфб нб ухндЭуефе фпн брпсспцзфЮсб уе лейфпхсгЯб бнбкэклщузт.
- РспефпймЬуфе фпн фзлеукпрйкь убт кбрнбгщгь цспнфЯжпнфбт нб кблэшефе фйт прЭт (учЮмб 8).
Ецбсмьуфе фпн Энб кбрнбгщгь мЭуб уфпн Ьллпн рйЭжпнфбт мЭчсй фЭсмб.
- Уфесеюуфе фп ерЬнщ мЭспт фзт мефбллйкЮт вЬузт.
- Рспубсмьуфе фп мЮкпт фпх фзлеукпрйкпэ кбрнбгщгпэ кбфевЬжпнфбт фп кЬфщ фмЮмб кбй
ецбсмьжпнфЬт фп уфзн кпсхцЮ фпх брпсспцзфЮсб.
ЛейфпхсгЯб бнбкэклщузт: учЮмб 5 кбй 9
- ЕЯнбй дхнбфьн нб бцбйсеипэн фб клбрЭфб бнферйуфспцЮт.
- Уфесеюуфе фпн рлбуфйкь екфспрЭб кбрнюн уфпн фпЯчп, ме уфЮсйоз уфп фбвЬнй.
ЦспнфЯуфе нб ехихгсбммЯуефе фпн екфспрЭб уе учЭуз ме фзн кЬиефз гсбммЮ рпх Эчефе
кЬней уфпн фпЯчп (учЮмб 7).
- РспефпймЬуфе фпн кбрнбгщгь убт цспнфЯжпнфбт нб фпрпиефЮуефе фйт прЭт рспт фб ерЬнщ
Эфуй юуфе нб еЯнбй псбфЭт (учЮмб 9).
- Уфесеюуфе фп ерЬнщ фмЮмб уфпн рлбуфйкь екфспрЭб.
- Рспубсмьуфе фп мЮкпт фпх фзлеукпрйкпэ кбрнбгщгпэ кбфевЬжпнфбт фп кЬфщ фмЮмб кбй
ецбсмьжпнфЬт фп уфзн кпсхцЮ фпх брпсспцзфЮсб.
Гйб фз вЭлфйуфз чсЮуз фзт ухукехЮт убт, убт ухнйуфпэме нб фз ухндЭуефе ме бгщгь
дйбмЭфспх 150 mm (ден рбсЭчефбй ме фз ухукехЮ). Мейюуфе ьуп фп дхнбфьн
ресйууьфесп фпн бсйимь фщн гщнйюн кбй фп мЮкпт фпх бгщгпэ. Уе ресЯрфщуз рпх п
брпсспцзфЮсбт лейфпхсгеЯ ме еощфесйкЮ еккЭнщуз фпх бЭсб, рсЭрей нб
еобуцблЯуефе ьфй иб хрЬсчей йкбнпрпйзфйкЮ рбспчЮ кбибспэ бЭсб Эфуй юуфе нб мзн
бнбрфхчиеЯ хрпрЯеуз уфз чюсп.
Ðщт нб бнфйкбфбуфЮуефе фз лЬмрб
1. БцбйсЭуфе фб мефбллйкЬ цЯлфсб (ó÷. 10).
2. Оевйдюуфе кбй бнфйкбфбуфЮуфе фз лхчнЯб Б14-40 W (ó÷. 11).
3. ЕрбнбфпрпиефЮуфе фб мефбллйкЬ цЯлфсб.
Рсйн брь кЬие ерЭмвбуз, рсЭрей нб дйбкьшефе фзн злекфсйкЮ фспцпдпуЯб фпх
брпсспцзфЮсб, еЯфе вгЬжпнфбт фзн рсЯжб, еЯфе енесгпрпйюнфбт фп дйбкьрфз дйбкпрЮт.
99631292_ML_A.qxd 22/03/05 08:48 Page 20
Page 21

БцбЯсеуз фпх цЯлфспх кбуЭфбт
(Åéê. 10)
ФпрпиЭфзуз фпх цЯлфспх Ьнисбкб
(Åéê. 12)
1. БцбйсЭуфе фйт кбуЭфет.
2. ФпрпиефЮуфе фп цЯлфсп Ьнисбкб уфзн кбуЭфб еущфесйкЮ рлехсЬ фпх
брпсспцзфЮсб.
3. ФпрпиефЮуфе фйт 2 сЬвдпхт ухгксЬфзузт.
4. КЬнфе фзн Ядйб дйбдйкбуЯб уе ьлет фйт кбуЭфет.
Ê
бибсйумьт фпх брпсспцзфЮсб убт
РсЭрей нб дйбкьшефе фзн рбспчЮ злекфсйкЮт фспцпдпуЯбт фпх брпсспцзфЮсб, еЯфе вгЬжпнфбт фзн
рсЯжб, еЯфе енесгпрпйюнфбт фп дйбкьрфз дйбкпрЮт, рсйн бцбйсЭуефе фб мефбллйкЬ цЯлфсб. МефЬ
фпн кбибсйумь, фб мефбллйкЬ цЯлфсб рсЭрей нб ербнбфпрпиефзипэн уэмцщнб ме фйт пдзгЯет.
УХНФЗСЗУЗ
ГЙБФЙ;
ÐÙÓ;
БРБСБЙФЗФЗ КБИЕ МЗНБ
БРБСБЙФЗФЗ КБИЕ ЧСПНП
Бхфь фп цЯлфсп ухгксбфеЯ фпхт лйрбспэт бфмпэт кбй
фйт укьнет. БрпфелеЯ фп еоЬсфзмб рпх ерзсеЬжей уе
мегЬлп вбимь фзн брпфелеумбфйкьфзфб фпх
брпсспцзфЮсб убт.
Фп цЯлфсп бхфь ухгксбфеЯ фйт мхсщдйЭт
êáé рсЭрей íá бнфйкбиЯуфбфбй
фпхлЬчйуфпн мйб цпсЬ фп чсьнп бнЬлпгб
кбй ме фз чсЮуз фзт ухукехЮт убт.
Ме кЬрпйп хгсь кбибсйумпэ пйкйбкЮт чсЮузт фп прпЯп
иб оевгЬлефе ме Ьципнп несь рсйн уфегнюуефе. Бхфьт п
кбибсйумьт мрпсеЯ нб гЯней кбй уфп рлхнфЮсйп рйЬфщн
уе кЬиефз иЭуз (нб мзн Эсией уе ербцЮ ме всюмйкб
рйбфйкЬ Ю бузмЭнйб мбчбйспрЯспхнб).
РбсбггеЯлефе бхфЬ фб цЯлфсб брь фпн
бнфйрсьущрь убт (ме фпн кщдйкь
бнфбллбкфйкпэ п прпЯпт бнбгсЬцефбй
уфзн ендейкфйкЮ рйнбкЯдб уфп еущфесйкь
фпх брпсспцзфЮсб) кбй узмейюуфе фзн
змеспмзнЯб бнфйкбфЬуфбузт.
КБУЕФБ ЦЙЛФСПХ
ЦЙЛФСП ЕНЕСГПХ БНИСБКБ
Мзн чсзуймпрпйеЯфе мефбллйкь уэсмб, лейбнфйкЬ рспъьнфб Ю рплэ уклзсЭт впэсфует.
Гйб нб кбибсЯуефе фп рлбЯуйп кбй фп рспуфбфехфйкь кЬлхммб фпх цщфйумпэ, чсзуймпрпйЮуфе брпклейуфйкЬ хгсЬ кбибсйумпэ
пйкйбкЮт чсЮуещт дйблхмЭнб уе несь, кбй ен ухнечеЯб оевгЬлфе ме кбибсь несь кбй укпхрЯуфе ме Энб брбль рбнЬкй.
Рсйн фзн рсюфз чсЮуз фзт кбуЭфбт цЯлфспх,
бцбйсЭуфе фзн рспуфбфехфйкЮ фбйнЯб.
Гйб фпхт брпсспцзфЮсет уе
лейфпхсгЯб бнбкэклщузт.
Гйб нб брпцэгефе прпйпдЮрпфе кЯндхнп рхскбгйЬт.
GR
99631292_ML_A.qxd 22/03/05 08:48 Page 21
Page 22

BRANDT APPLIANCES SAS
7 rue Henri Becquerel
92500 RUEIL MALMAISON
MADE IN FRANCE
220 - 240V ~ 50 Hz
Å
рйкпйнщнЯб
Пй бфЭлейет емцЬнйузт рпх ендЭчефбй нб рспклзипэн брь лбнибумЭнз чсЮуз Ю кбибсйумь ме
лейбнфйкЬ рспъьнфб кбй пй прпЯет ден Эчпхн убн брпфЭлеумб фз мз лейфпхсгЯб Ю фзн
рспвлзмбфйкЮ лейфпхсгЯб фзт ухукехЮт ден лбмвЬнпнфбй хрьшз брь фпн кбфбукехбуфЮ. З
брпкбфЬуфбуз прпйбудЮрпфе влЬвзт рсЭрей нб рсбгмбфпрпйеЯфбй брь еоейдйкехмЭнп фечнйкь.
Мьнпн пй еопхуйпдпфзмЭнпй дйбнпмеЯт фзт мЬскбт мбт:
ГнщсЯжпхн фЭлейб фз ухукехЮ убт кбй фз лейфпхсгЯб фзт
ГнщсЯжпхн фЭлейб фз ухукехЮ убт кбй фз лейфпхсгЯб фзт,,
Ецбсмьжпхн рлЮсщт фйт меиьдпхт мбт сэимйузт, ухнфЮсзузт кбй ерйукехЮт,
Ецбсмьжпхн рлЮсщт фйт меиьдпхт мбт сэимйузт, ухнфЮсзузт кбй ерйукехЮт,
Чсзуймпрпйпэн брпклейуфйкЬ гнЮуйб бнфбллбкфйкЬ.
Чсзуймпрпйпэн брпклейуфйкЬ гнЮуйб бнфбллбкфйкЬ.
Уе ресЯрфщуз рбсбрьнщн Ю гйб рбсбггелЯб бнфбллбкфйкюн, рсЭрей нб дюуефе фпн бксйвЮ
кщдйкь фзт ухукехЮт убт (фэрпт ухукехЮт кбй уейсйбкьт бсйимьт).
БхфЭт пй рлзспцпсЯет бнбгсЬцпнфбй уфзн ендейкфйкЮ рйнбкЯдб уфп еущфесйкь фзт ухукехЮт.
Пй ресйгсбцЭт кбй фб чбсбкфзсйуфйкЬ рпх рбспхуйЬжпнфбй уфп рбсьн егчейсЯдйп рбсЭчпнфбй
мьнпн ендейкфйкЬ кбй ден еЯнбй деумехфйкЭт. РсЬгмбфй, ме уфьчп фз ухнечЮ велфЯщуз фщн
рспъьнфщн мбт, дйбфзспэме фп дйкбЯщмб нб рсбгмбфпрпйЮупхме, чщсЯт рспзгпэменз ейдпрпЯзуз, ьлет фйт брбсбЯфзфет фспрпрпйЮуейт Ю велфйюуейт.
99631292_ML_A.qxd 22/03/05 08:48 Page 22
Page 23

Inhoud
Geachte klant,
U heeft net een afzuigkap van BRANDT aangekocht. We willen u
hier graag voor bedanken.
Onze onderzoeksteams hebben voor u een nieuwe generatie
van apparaten ontworpen waarmee koken en bakken dag na
dag een waar plezier wordt.
Dank zij het moderne en verfijnde ontwerp zal uw nieuwe
BRANDT-afzuigkap harmonieus in uw keuken kunnen
worden ingepast. Uw afzuigkap is een geslaagde combinatie
van gebruiksvriendelijkheid en
optimale prestaties.
In het gamma van BRANDT-producten vindt u tevens een
ruime keuze aan kookplaten, ovens, vaatwasautomaten en
koelkasten voor inbouw die u allemaal harmonieus met uw
BRANDT-afzuigkap kan combineren.
Uiteraard wensen wij onze klanten ook na de aankoop altijd
tevreden te houden. Onze servicedienst zal u altijd met uw
vragen of suggesties
verderhelpen.
Als keukenspecialist streeft BRANDT ononderbroken naar
kookplezier en perfecte kookresultaten. U zal onmiddellijk
ontdekken dat onze apparaten garant staan voor
betrouwbaarheid, schitterende kookprestaties en een
opvallend gebruiksgemak. Bovendien zijn ze milieuvriendelijk
en besteden we alle zorg aan een esthetisch verfijnde
vormgeving.
BRANDT.
NL
99631292_ML_A.qxd 22/03/05 08:48 Page 23
Page 24

Veiligheidsaanwijzingen
- Flambeer nooit gerechten onder de afzuigkap en laat nooit een gasvuur branden
zonder dat u er een kookpot op zet (de vlammen worden door de afzuigkap
aangezogen en kunnen het apparaat beschadigen).
- Frituren onder de afzuigkap mag, maar enkel indien u ononderbroken toezicht houdt
- Laat herstellingen uitsluitend door een erkend vakman uitvoeren.
- Reinig regelmatig de filtercassette.
- Het gebruik van een afzuigkap boven een fornuis dat met brandstof zoals hout, houtskool enz.
werkt, is verboden.
Deze afzuigkappen zijn ontworpen voor gebruik door privé-personen in woningen.
Wij streven ononderbroken naar verbetering van onze produkten en behouden ons dan ook
het recht voor de technische, functionele en esthetische kenmerken van onze produkten te
wijzigen om ze aan de nieuwste technische evolutie aan te passen.
Deze afzuigkappen zijn uitsluitend bestemd voor het koken en bakken van dranken en
voedingsmiddelen. Deze produkten bevatten geen enkel bestanddeel op basis van asbest.
In deze gebruikshandleiding geeft symbol
veiligheidsaanwijzingen en symbool,
tips en praktische richtlijnen aan
99631292_ML_A.qxd 22/03/05 08:48 Page 24
Page 25

NL
Overzicht van uw afzuigkap ? Fig.1
Indien uw keuken wordt verwarmd met een toestel dat op een schouw is
aangesloten (kachel...), dient u de afzuigkap met luchtzuivering te installeren.
Gebruik de afzuigkap nooit zonder de metalen filters.
Gebruikt u in een bepaalde ruimte gelijktijdig een afzuigkap en apparaten die met gas
of een andere brandstof werken, zorg dan voor voldoende verluchting in de ruimte.
Model met 3 snelheden
1 Lage snelheid
2 Gemiddelde snelheid
3 Hoge snelheid
Verlichting
Indien u meer dan één snelheidstoets heeft ingedrukt, zal de toets met de
hoogste snelheid worden toegepast. Om de afzuigkap te stoppen,
zorgt u er gewoon voor dat geen enkele toets is ingedrukt.
99631292_ML_A.qxd 22/03/05 08:48 Page 25
Page 26

De installatie dient overeenkomstig de geldende bepalingen met betrekking
tot de ventilatie van de installatieplaats te worden uitgevoerd. In Frankrijk
gelden de bepalingen van DTU 61.1 van de CSTB. In het bijzonder mag de
afgevoerde lucht niet worden afgevoerd via een buis die ook wordt gebruikt voor
de afvoer van de rook van apparaten die met gas of een andere brandstof werken.
Het gebruik van tweedehands afvoerbuizen is enkel na raadpleging van een
erkend vakman toegelaten.
De minimale afstand tussen de kookplaat en de onderzijde van de afzuigkap dient
70 cm te bedragen. Indien in de gebruiksaanwijzing van de kookplaat een minimale
afstand van meer dan 70 cm staat vermeld, dient u deze aanwijzing toe te passen.
Installatie van de afzuigkap ?
U heeft een afvoer naar de buitenlucht : fig. 4
Gebruik een afvoerbuis met een minimale diameter van 125 mm om de afzuigkap op de
luchtafvoer aan te sluiten (gebruik een geëmailleerde afvoerbuis in aluminium, soepel materiaal
of onontvlambaar materiaal). Indien u een afvoerbuis met een diameter van minder dan 125 mm
gebruikt, dient u verplicht de luchtzuivering te installeren.
U heeft geen afv
oer naar de buitenlucht : fig. 5
Al onze apparaten kunnen met luchtzuivering worden geïnstalleerd.
Gebruik in dit geval een actieve-koolfilter die de geuren filtert.
- Trek een horizontale lijn op minimaal 70 cm boven de kookplaat.
- Trek een verticale lijn op de muur vanaf het plafond tot de onderrand van de afzuigkap.
- Plaats de montageplaten tegen de muur (fig. 2)
.
- Boor de 6 bevestigingsgaten en plaats vervolgens de 6 pluggen.
- Schroef de 2 schroeven aan de bovenzijde van de afzuigkap vast. Laat ze 5 mm uit
de wand steken.
- Verwijder de metalen filter.
- Haak de afzuigkap op de twee schroeven (fig. 3).
- Schroef de 2 schroeven aan de onderzijde van de afzuigkap vast.
Montage van de afzuigkap
Aansluiting van uw afzuigkap
Dit apparaat wordt geleverd met een voedingskabel van het type H 05 VVF
met 2 geleiders van 0,75mm
2
(nulleider, fase). Uw apparaat dient te worden
aangesloten op een elektriciteitsnet van 220-240 V ~ (monofasig) via een
genormaliseerd stopcontact (1 fasedraad + 1 nulleider) overeenkomstig de
norm CEI 60083 (het stopcontact dient na de aansluiting
bereikbaar te blijven).
Onze aansprakelijkheid vervalt bij een ongeval ten gevolge van onjuiste installatie.
De zekering van de installatie dient 10 of 16 A te bedragen. Vervang een beschadigde
voedingskabel altijd veiligheidshalve door een voedingskabel die u bij de servicedienst
kan aankopen.
Alvorens de 4 schroeven volledig vast te draaien, controleert u eerst of
de afzuigkap perfect hangt.
99631292_ML_A.qxd 22/03/05 08:48 Page 26
Page 27

NL
Montage van de schouw
Bij afvoer naar de buitenlucht : fig. 4 en 8
- Plaats de metalen schouwsteun tegen de muur en tegen het plafond (fig. 6).
Let erop dat de twee driehoekige inkepingen van de metalen steun mooi in lijn liggen met de
vertikale streep op de muur.
- Bij gebruik van een afvoerbuis met een diameter van 125 mm gebruikt u de bijgeleverde
adapter (fig. 8).
Bij gebruik van een afvoerbuis met een buitendiameter van minder dan 125 mm dient
u de luchtzuivering op uw afzuigkap te installeren.
- Schuif uw teleskopische schouwelementen zoveel mogelijk ineen (fig. 8).
Zorg ervoor dat de luchtspleten niet zichtbaar blijven.
- Bevestig het bovenste deel op de metalen steun.
- Pas de lengte van de teleskopische schouw aan door het onderste element te verlagen en in de
bovenzijde van de afzuigkap te schuiven.
Bij een afzuigkap met luchtzuivering : f
ig. 5 en 9
- U kan de terugslapkleppen verwijderen.
- Plaats de plastic rookdeflector tegen de muur en tegen het plafond. Let erop dat de
deflector mooi in lijn ligt met de vertikale streep op de muur (fig. 7).
- Schuif uw teleskopische schouwelementen ineen. Zorg ervoor dat de luchtspleten
naar boven worden gericht zodat ze zichtbaar zijn (fig. 9).
- Bevestig het bovenste deel op de plastic deflector.
- Pas de lengte van de teleskopische schouw aan door het onderste element te verlagen en in de
bovenzijde van de afzuigkap te schuiven.
Om een optimaal gebruik van uw afzuigkap te garanderen, raden wij u aan een afvoerbuis
met een diameter van 150 mm te gebruiken (niet bijgeleverd). Beperkt zoveel mogelijk het
aantal gebogen buisselementen evenals de lengte van de afvoerbuis. Bij gebruik van een
afzuigkap met afvoer naar de buitenlucht, dient u voor voldoende ventilatie met frisse lucht
te zorgen om onderdruk in de kamer te vermijden.
Vervanging van de lamp ?
1. Verwijder de metalen filters (fig. 10).
2. Schroef het lampje los en plaats een nieuw lampje van het type E14-40W (fig. 11).
3. Plaats de metalen filters opnieuw op de afzuigkap.
Trek de stekker van de afzuigkap uit het stopcontact (of zet de
beveiligingsschakelaar uit) alvorens het lampje te vervangen,
99631292_ML_A.qxd 22/03/05 08:48 Page 27
Page 28

Demontage van de filtercassette
(fig. 10)
Montage van de koolfilter
(fig. 12)
1. Verwijder de cassettes.
2. Plaats de nieuwe koolfilter op de cassette aan de binnenzijde van de afzuigkap.
3. Plaats de 2 dwarsstangen die de filter op zijn plaats houden.
4. Ga op dezelfde manier tewerk voor alle andere cassettes.
Reiniging van de afzuigkap ?
Trek de stekker van de afzuigkap uit het stopcontact (of zet de beveiligingsschakelaar
uit) alvorens de metalen filters te verwijderen. Na de reiniging dienen de metalen filters
overeenkomstig de aanwijzingen opnieuw in de afzuigkap worden gemonteerd.
ONDERHOUD
WAAROM ?
HOE ?
VERPLICHT MAANDELIJKS
VERPLICHT JAARLIJKS
Deze filter houdt stof en vettige dampen
tegen en is een onmisbaar onderdeel om uw
afzuigkap proper te houden.
Deze filter houdt geuren tegen en dient
al naargelang van de intensiteit van het
gebruik van uw afzuigkap jaarlijks te
worden vervangen.
Met een huishoudelijk reinigingsprodukt. Spoel de
filterkassette vervolgens goed af en droog ze. U
kan de filterkassette vertikaal in uw
vaatwasmachine reinigen (let erop dat de
kassette geen vuile vaatwas of zilveren
bestek raakt).
Bestel deze filter bij uw verkoper.
Vermeld de referentie op het
infoplaatje (zie binnenzijde van
de afzuigkap) en noteer de
vervangingsdatum.
FILTERKASSETTE
ACTIEVE-KOOLFILTER
Gebruik nooit metalen sponsen, schuurprodukten of te harde borstels.
Om de behuizing van de afzuigkap en de verlichtingskap te reinigen, gebruikt u uitsluitend
huishoudelijke reinigingsmiddelen (verdund in water). Spoel ze vervolgens met zuiver water af en veeg ze
met een zachte doek droog.
Vóór het eerste gebruik van de filterkassette
verwijdert u de beschermfolie.
Voor afzuigkappen met
luchtzuivering
om brandgevaar te vermijden.
99631292_ML_A.qxd 22/03/05 08:48 Page 28
Page 29

NL
BRANDT APPLIANCES SAS
7 rue Henri Becquerel
92500 RUEIL MALMAISON
MADE IN FRANCE
220 - 240V ~ 50 Hz
Contactpersoon?
Esthetische fouten die zijn veroorzaakt door een verkeerd gebruik van de afzuigkap of het gebruik van
schurende produkten, maar die de werking van de afzuigkap niet storen of onmogelijk maken, vallen
niet onder de garantie van de fabrikant. Elke herstelling dient te gebeuren door een erkend vakman.
Enkel de verdelers van ons merk :
• Kennen perfect uw apparaat en de werking ervan
• Kennen perfect uw apparaat en de werking ervan,,
• Passen onze regel-, onderhouds- en herstellingsmethoden volledig toe,
• Passen onze regel-, onderhouds- en herstellingsmethoden volledig toe,
• • GGebruiken uitsluitend originele wisselstukken.
ebruiken uitsluitend originele wisselstukken.
Bij klachten of bestellingen van wisselstukken bij uw verdeler vermeldt u de precieze en
volledige referentie van uw apparaat (type van apparaat en serienummer).
Deze gegevens vindt u op het identificatieplaatje aan de binnenzijde van uw afzuigkaps.
De beschrijvingen en kenmerken in deze handleiding worden enkel ter informatie gegeven en
brengen geen enkele verbintenis met zich mee. Wij streven naar een optimale kwaliteit en
behouden ons bijgevolg het recht voor zonder voorafgaandelijke kennisgeving alle
noodzakelijke wijzigingen of verbeteringen aan te brengen.
99631292_ML_A.qxd 22/03/05 08:48 Page 29
Page 30

Editorial
Estimado(a) Cliente,
Acabou de adquirir um exaustor BRANDT e agradecemoslhe a sua confiança.
As nossas equipas de pesquisa conceberam, pensando em si,
uma nova geração de aparelhos para que o acto de cozinhar
seja um prazer no dia a dia.
Dotado de linhas puras e de um design contemporâneo, o seu
novo exaustor Brandt, integra-se harmoniosamente na sua
cozinha e alia perfeitamente facilidade de utilização e altos
desempenhos.
Encontrará também na gama dos produtos Brandt, uma vasta
escolha de placas de cozedura, de fornos, de máquinas de
lavar loiça e de frigoríficos integráveis que poderá coordenar
ao seu novo exaustor Brandt.
Evidentemente, com a preocupação permanente de satisfazer
da melhor maneira possível as suas expectativas em relação
aos nossos produtos, o nosso serviço de consumidores
encontra-se à sua disposição e à sua escuta para responder
a todas as suas perguntas ou sugestões.
Especialista de todo o universo da cozedura, a BRANDT
contribui desta forma para o sucesso culinário, o prazer
partilhado e o convívio apresentando electrodomésticos com
um contínuo desempenho, de simples utilização, amigos do
ambiente, estéticos e fiáveis.
A Marca BRANDT.
99631292_ML_A.qxd 22/03/05 08:48 Page 30
Page 31

Instruções de Segurança
- É interdito realizar receitas "flambé" ou fazer funcionar os bicos de gás sem os
cobrir com pratos de cozedura por cima do extractor de fumos (as chamas
aspiradas são susceptíveis de deteriorar o aparelho).
- As frituras efectuadas sob o aparelho devem ser alvo de uma vigilância constante.
- As reparações devem ser efectuadas exclusivamente por um técnico homologado.
- Limpe regularmente o filtro da cassete.
- O funcionamento por cima de um foco de combustível (madeira, carvão, etc...) não é autorizado.
Estes extractores de fumos foram concebidos para serem utilizados por particulares num local
de habitação.
Com a preocupação de melhorar constantemente os nossos produtos, reservamo-nos o direito de
realizar modificações nas suas características técnicas, funcionais ou estéticas, modificações
estas inerentes à evolução técnica.
Estes extractores de fumos estão destinados exclusivamente à cozedura das bebidas e
alimentos. Estes produtos não contém qualquer componente à base de amianto.
Ao longo do folheto,
assina-lhe as instruções de segurança,
assinala-lhe os conselhos e as astúcias
PT
99631292_ML_A.qxd 22/03/05 08:48 Page 31
Page 32

C
omo se apresenta o seu exaustor? Fig.1
Em caso de cozinha aquecida com um aparelho ligado a uma chaminé (ex.:
fogão de aquecimento), é necessário instalar o extractor de fumos na sua
versão reciclagem. Não utilize o extractor de fumos sem os filtros metálicos.
Deverá ser prevista uma ventilação conveniente do espaço quando um extractor de
fumos de cozinha for utilizado simultaneamente com aparelhos que utilizam gás ou
qualquer outro combustível.
Modelo 3 velocidades
1 Pequena velocidade
2 Média velocidade
3 Grande velocidade
Iluminação
Quando várias teclas de velocidade estiverem pressionadas, é privilegiada a
velocidade mais elevada. A paragem do extractor de fumos faz-se
quando todas as teclas deixarem de estar pressionadas.
99631292_ML_A.qxd 22/03/05 08:48 Page 32
Page 33

A instalação deverá estar conforme aos regulamentos em vigor para a
ventilação dos locais. Em França, estes regulamentos estão indicados no DTU
61.1 do CSTB. Em particular, o ar evacuado não deve ser enviado numa
conduta utilizada para evacuar os fumos de aparelhos que utilizam gás ou
qualquer outro combustível. A utilização de tubos desafectados só pode ser feita
após acordo de um especialista competente.
A distância mínima entre a placa de cozedura e a parte mais baixa do extractor
de fumos deverá ser de 70 cm. Se as instruções da placa de cozedura instalada
sob o extractor de fumos especificarem uma distância superior a 70 cm, esta
deverá ser levada em consideração.
Como instalar o seu extractor de fumos ?
Você possui uma saída para o exterior? fig. 4
O seu extractor de fumos pode ser ligado a ela por intermédio de uma conduta de evacuação
(mínimo Ø 125 mm, esmaltada, em alumínio ininflamável). Se o diâmetro da conduta for inferior
a 125 mm, deve passar obrigatoriamente para o modo reciclagem.
Você não possui saída para o exterior : fig. 5
Todos os nossos aparelhos têm a possibilidade de funcionar em modo reciclagem.
Neste caso, acrescente um filtro de carvão activo que captará os cheiros.
- Faça um traço horizontal no mínimo a 70 cm da área de cozedura.
- Faça um traço vertical na parede, a partir do tecto até ao rebordo inferior do exaustor.
- Coloque contra a parede as guias de montagem (fig. 2)
.
- Abra os 6 orifícios e fixe as 6 cavilhas.
- Aparafuse os 2 parafusos na parte superior do exaustor até 5 mm.
- Retire o filtro metálico.
- Fixe o exaustor por meio dos 2 parafusos (Fig. 3).
- Aparafuse ambos os parafusos da parte inferior.
Montagem do seu extrator de fumos
Ligação do seu extractor de fumos
Este aparelho é fornecido com um cabo eléctrico H 05 VVF de 2 condutores de 0,75 mm2(neutro, fase). Ele deve ser ligada à rede 220-240 V
monofásica por intermédio de uma tomada eléctrica normalizada CEI
60083 que deve ficar acessível após instalação.
A nossa responsabilidade não poderia ser empenhada em caso de acidente
consecutivo a uma instalação incorrecta. O fusível da sua
instalação deve ser de 10 ou 16 A. Se o cabo eléctrico estiver estragado,
recorra ao serviço pós-venda a fim de evitar qualquer perigo.
Antes de aparafusar totalmente os 4 parafusos, regule o nível do
exaustor..
PT
99631292_ML_A.qxd 22/03/05 08:48 Page 33
Page 34

Montagem da chaminé
Funcionamento em evacuação exterior : fig. 4 e 8
- Fixe contra a parede, apoiado ao tecto, o suporte da chaminé metálica (fig. 6).
Tome cuidado de maneira a alinhar as duas ranhuras triangulares do suporte metálico com o traço
vertical na parede.
- Em caso de um tubo com 125 mm de diâmetro, utilize o adaptador incluído (fig. 8).
Se o seu tubo exterior for inferior a 125 mm, é indispensável a ligação do seu
extractor de fumos em modo reciclagem.
- Prepare a sua chaminé telescópica tomando cuidado para dissimular os orifícios (fig. 8).
Encaixar ao máximo as chaminés uma dentro da outra.
- Encaixar a parte superior no suporte metálico.
- Ajuste o comprimento da chaminé telescópica baixando a parte inferior e encaixá-la no topo
do extractor de fumos.
Funcionamento em modo reciclagem : f
ig. 5 e 9
- É possível retirar as válvulas de retenção.
- Fixe contra a parede, apoiado contra o tecto, o deflector plástico dos fumos.
Tome cuidado de maneira a centrar o deflector em relação ao traço vertical
traçado na parede (fig. 7).
- Prepare a sua chaminé tomando cuidado para colocar os orifícios voltados para
cima de maneira a que fiquem visíveis (fig. 9).
- Fixe a parte superior ao deflector de plástico.
- Ajuste o comprimento da chaminé telescópica baixando a parte inferior e encaixando-a no topo
do extractor de fumos.
Para uma utilização optimizada do seu aparelho, aconselhamo-lo a ligar a uma
conduta com 150 mm de diâmetro (não incluída). Limitar ao máximo o número
de cotovelos e o comprimento do tubo. Se o extractor de fumos funcionar em
evacuação exterior, convém assegurar-se da existência de uma entrada de ar
fresco suficientemente grande para evitar colocar a peça em depressão.
Como substituir a lâmpada ?
1. Retire os filtros metálicos (fig. 10).
2. Desenrosque a lâmpada E14-40W e substitua-a (fig. 11).
3. Coloque novamente os filtros metálicos.
Antes de qualquer intervenção, o extractor de fumos deverá ser colocado fora de
tensão, quer retirando a tomada, quer accionando o disjuntor.
99631292_ML_A.qxd 22/03/05 08:48 Page 34
Page 35

Desmontagem do filtro cassete
(fig. 10)
Montagem do filtro carvão
(fig. 12)
1. Retire as cassetes.
2. Coloque o filtro carvão sobre a cassete na parte interna do extractor.
3. Coloque os 2 ganchos de fixação.
4. Efectue esta operação em todas as cassetes.
Como limpar o seu extractor de fumos ?
O extractor de fumos deve ser colocado fora de tensão, quer retirando a tomada, quer
accionando o disjuntor, antes de retirar os filtros metálicos. Após a limpeza, os filtros
metálicos devem ser fixados de novo em conformidade com as instruções.
MANUTENÇÃO
PORQUÊ ?
COMO ?
INDISPENSÁVEL TODOS OS MESES
INDISPENSÁVEL TODOS OS ANOS
Este filtro absorve os vapores gordos e as
poeiras. Ele é o elemento que assegura a parte
importante da eficácia do seu extractor de fumos.
Este filtro absorve os cheiros e deve
ser substituído pelo menos todos os
anos em função da sua utilização.
Com um produto de limpeza doméstico vendido no
comércio, em seguida enxagúe e seque. Esta limpeza
pode ser efectuada no seu lava-loiça em posição
vertical (não colocar em contacto com a loiça
suja ou com talheres de prata).
Encomende filtros no seu
revendedor (sob a referência
indicada na placa de característica
situada dentro do extractor de
fumos) e anote a data de
substituição.
FILTRO CASSETE
FILTRO CARVÃO ACTIVO
Nunca utilize esfregões metálicos, produtos abrasivos ou escovas demasiado duras.
Para limpar a parte exterior e o vigia de iluminação, utilize exclusivamente produtos de limpeza domésticos
vendidos no comércio diluídos em água, em seguida enxagúe com água límpida e seque com um pano.
Antes da primeira utilização do filtro cassete,
retire a película de protecção.
Para os extractor de fumos
instalados em modo reciclagem
Para evitar qualquer perigo de incêndio.
PT
99631292_ML_A.qxd 22/03/05 08:48 Page 35
Page 36

BRANDT APPLIANCES SAS
7 rue Henri Becquerel
92500 RUEIL MALMAISON
MADE IN FRANCE
220 - 240V ~ 50 Hz
Quem contactar?
Qualquer defeito no aspecto que tenha sido provocado por uma utilização incorrecta ou pela
limpeza com produtos abrasivos e que não provoquem o não funcionamento ou uma
incapacidade de utilização não serão levados em consideração pelo fabricante. Qualquer arranjo
deverá ser efectuado por um técnico competente.
Apenas os distribuidores da nossa marca :
• • CConhecem perfeitamente o seu aparelho e o seu funcionamento,
onhecem perfeitamente o seu aparelho e o seu funcionamento,
• • AAplicam integralmente os nossos métodos de regulação, de manutenção e de
plicam integralmente os nossos métodos de regulação, de manutenção e de
reparação,
reparação,
• Utilizam exclusivamente as peças de origem.
• Utilizam exclusivamente as peças de origem.
Em caso de reclamação ou para encomendar peças sobresselentes ao seu distribuidor,
indique-lhe a referência completa do seu aparelho (tipo de aparelho e número de série).
Estas informações estão inscritas na placa de características fixada no interior do aparelho.
As descrições e as características incluídas neste manual são dadas apenas a título de informação
e não de compromisso. De facto, preocupados com a qualidade dos nossos produtos,
reservamo-nos o direito de efectuar, sem pré-aviso, todas as modificações ou melhoramentos
necessários.
99631292_ML_A.qxd 22/03/05 08:48 Page 36
Page 37

Fig. 1 / учЮмб 1
Fig. 2 / учЮмб 2
Fig. 4 / учЮмб 4
Fig. 5 / учЮмб 5
Fig. 3 / учЮмб 3
99631292_ML_A.qxd 22/03/05 08:49 Page 37
271 mm
274 mm
2
1
110 mm
514 mm
500 mm
5mm
565 mini - 1120 mm maxi
600 / 900 mm
> 70 cm
=
=
A
125
150
125
150
Page 38

Fig. 6 / учЮмб 6 Fig. 7 / учЮмб 7
Fig. 8
учЮмб 8
Fig. 9
учЮмб 9
Fig. 12 / учЮмб 12
Fig. 10 / учЮмб 10
Fig. 11 / учЮмб 11
99631292_ML_A.qxd 22/03/05 08:49 Page 38
=
=
=
=
Page 39

99631292_ML_A.qxd 22/03/05 08:49 Page 39
Page 40

99631292 06/04
99631292_ML_A.qxd 22/03/05 08:49 Page 40
 Loading...