


The Bowflex Xceed™
Home Gym
Owner’s Manual
and Fitness Guide
PN 001-6906 Rev. B (08/06)
Costco_BFX_Xceed_OM_FINAL_print.indd 1 |
|
|
8/16/2006 3:39:47 PM |
|
|
||
|
|
|
|

CONGRATULATIONS on your commitment to improving your health and fitness! With the Bowflex Xceed™ home gym, you have everything you need to exceed all of your physical fitness, strength, and health expectations!
The Bowflex Xceed™ home gym’s exceptional resistance and quality is unmatched by any other single piece of home fitness equipment available. You will not believe the amazing results your body will get with the Bowflex Xceed™ home gym!
Please take your time to read through the entire manual and follow it carefully before attempting to use your Bowflex Xceed™ home gym. Also locate and read all warning labels that are posted on the machine. It’s important to understand how to properly perform each exercise before you do so using Power Rod® Resistance.
With all of the fitness choices available today, finding the best workout equipment for your needs can be very confusing. Everyone at Nautilus would like to thank you for selecting the Bowflex Xceed™ home gym.
Bowflex Xceed™ home gym is the finest home fitness product available, and you’re just about to prove it to yourself.
Costco_BFX_Xceed_OM_FINAL_print.indd 2 |
|
|
8/16/2006 3:39:48 PM |
|
|
||
|
|
|
|

Table of Contents
Specifications / Approvals . . . . . . . . . . . . . . . . . . . . . . . . . .2
Important Safety Precautions. . . . . . . . . . . . . . . . . . . . . . . .3
Safety Warning Labels . . . . . . . . . . . . . . . . . . . . . . . . . . . . . .4 Get To Know Your Home Gym . . . . . . . . . . . . . . . . . . . . .6 How to Use Your Machine. . . . . . . . . . . . . . . . . . . . . . . . . . .7 Define Your Goals . . . . . . . . . . . . . . . . . . . . . . . . . . . . . . . .11 Workout Guide . . . . . . . . . . . . . . . . . . . . . . . . . . . . . . . . . . 13
The Workouts:
The 20 Minute Better Body Workout . . . . . . . . . . . . . . . . . 14
Advanced General Conditioning. . . . . . . . . . . . . . . . . . . . . 14
20 Minute Upper / Lower Body . . . . . . . . . . . . . . . . . . . . .15
Body Building . . . . . . . . . . . . . . . . . . . . . . . . . . . . . . . . . . . .16
Circuit Training Anaerobic / Cardiovascular . . . . . . . . . . 17
True Aerobic Circuit Training. . . . . . . . . . . . . . . . . . . . . . .18
Strength Training . . . . . . . . . . . . . . . . . . . . . . . . . . . . . . . . .19
Chest Exercises:
Bench Press . . . . . . . . . . . . . . . . . . . . . . . . . . . . . . . . . . . . . .20
Chest Fly. . . . . . . . . . . . . . . . . . . . . . . . . . . . . . . . . . . . . . . . .20
Decline Bench Press . . . . . . . . . . . . . . . . . . . . . . . . . . . . . . .21
Incline Bench Press. . . . . . . . . . . . . . . . . . . . . . . . . . . . . . . .21
Shoulder Exercises:
Reverse Fly . . . . . . . . . . . . . . . . . . . . . . . . . . . . . . . . . . . . . . .22
Crossover Reverse Fly . . . . . . . . . . . . . . . . . . . . . . . . . . . . . .22
Crossover Rear Deltoid Rows . . . . . . . . . . . . . . . . . . . . . . . .23
Crossover High Rear Deltoid Rows . . . . . . . . . . . . . . . . . . .23
Lateral Shoulder Raise . . . . . . . . . . . . . . . . . . . . . . . . . . . . .24
Forearm Lateral Shoulder Raise . . . . . . . . . . . . . . . . . . . . .24
Front Shoulder Raise . . . . . . . . . . . . . . . . . . . . . . . . . . . . . .25
Seated Shoulder Press . . . . . . . . . . . . . . . . . . . . . . . . . . . . .25
Shoulder Rotator Cuff (internal) . . . . . . . . . . . . . . . . . . . .26
Shoulder Rotator Cuff (external) . . . . . . . . . . . . . . . . . . . .26
Shoulder Extension. . . . . . . . . . . . . . . . . . . . . . . . . . . . . . . .27
Shoulder Shrug . . . . . . . . . . . . . . . . . . . . . . . . . . . . . . . . . . .27
Scapular Protraction. . . . . . . . . . . . . . . . . . . . . . . . . . . . . . .28
Scapular Depression . . . . . . . . . . . . . . . . . . . . . . . . . . . . . . .28
Scapular Retraction . . . . . . . . . . . . . . . . . . . . . . . . . . . . . . .29
Back Exercises:
Standing Shoulder Pullover w/ Bent Lat Bar . . . . . . . . . .30 Standing Shoulder Pullover w/ Hand Grips . . . . . . . . . . .30 Narrow Pulldowns w/ Bent Lat Bar . . . . . . . . . . . . . . . . . .31 Narrow Pulldowns w/ Hand Grips . . . . . . . . . . . . . . . . . . .31 Bent Over Row. . . . . . . . . . . . . . . . . . . . . . . . . . . . . . . . . . . .32 Crossover Bent Over Row. . . . . . . . . . . . . . . . . . . . . . . . . . .32 Seated Lat Rows. . . . . . . . . . . . . . . . . . . . . . . . . . . . . . . . . . .33 Crossover Seated Lat Rows. . . . . . . . . . . . . . . . . . . . . . . . . .33 Standing Low Back Extension . . . . . . . . . . . . . . . . . . . . . . .34 Reverse Grip Pulldowns . . . . . . . . . . . . . . . . . . . . . . . . . . . .34 Crossover Wide Pulldowns w/ Hand Grips . . . . . . . . . . . .35
Crossover Narrow Pulldowns w/ Hand Grips . . . . . . . . . .35 Seated Lat Pulldowns . . . . . . . . . . . . . . . . . . . . . . . . . . . . . .36 Seated Wide Lat Pulldowns . . . . . . . . . . . . . . . . . . . . . . . . .36
Arm Exercises:
Triceps Pushdown w/ Hand Grips . . . . . . . . . . . . . . . . . . .37 Triceps Hammer Pushdown. . . . . . . . . . . . . . . . . . . . . . . . .37 Triceps Pushdown w/ Bent Lat Bar . . . . . . . . . . . . . . . . . .38 Triceps Extension . . . . . . . . . . . . . . . . . . . . . . . . . . . . . . . . .38 Hammer Triceps Extension . . . . . . . . . . . . . . . . . . . . . . . . .39 Cross Triceps Extension . . . . . . . . . . . . . . . . . . . . . . . . . . . .39 Triceps Kickback . . . . . . . . . . . . . . . . . . . . . . . . . . . . . . . . .40 Hammer Triceps Kickback. . . . . . . . . . . . . . . . . . . . . . . . . .40 Resisted Dip. . . . . . . . . . . . . . . . . . . . . . . . . . . . . . . . . . . . . .41 Biceps Curl. . . . . . . . . . . . . . . . . . . . . . . . . . . . . . . . . . . . . . .41 Concentration Biceps Curl. . . . . . . . . . . . . . . . . . . . . . . . . .42 Reverse Curl. . . . . . . . . . . . . . . . . . . . . . . . . . . . . . . . . . . . . .42 Barbell Biceps Curl . . . . . . . . . . . . . . . . . . . . . . . . . . . . . . . .43 Reverse Barbell Biceps Curl. . . . . . . . . . . . . . . . . . . . . . . . .43 Seated Biceps Curl . . . . . . . . . . . . . . . . . . . . . . . . . . . . . . . .44 Seated Biceps Hammer Curl . . . . . . . . . . . . . . . . . . . . . . . .44 Wrist Extension . . . . . . . . . . . . . . . . . . . . . . . . . . . . . . . . . . .45 Wrist Curl. . . . . . . . . . . . . . . . . . . . . . . . . . . . . . . . . . . . . . . .45
Abdominal Exercises:
Trunk Rotation . . . . . . . . . . . . . . . . . . . . . . . . . . . . . . . . . . .46
Seated (resisted) Oblique Abdominal Crunch . . . . . . . . .46
Seated (resisted) Abdominal Crunch. . . . . . . . . . . . . . . . .47
Leg Exercises:
Leg Extension . . . . . . . . . . . . . . . . . . . . . . . . . . . . . . . . . . . .48 Squat. . . . . . . . . . . . . . . . . . . . . . . . . . . . . . . . . . . . . . . . . . . .48 Standing Hip Extension (knee bent) . . . . . . . . . . . . . . . . .49 Standing Hip Extension (knee extended) . . . . . . . . . . . . .49 Leg Kickback . . . . . . . . . . . . . . . . . . . . . . . . . . . . . . . . . . . . .50 Hip Flexion . . . . . . . . . . . . . . . . . . . . . . . . . . . . . . . . . . . . . .50 Dead Lift . . . . . . . . . . . . . . . . . . . . . . . . . . . . . . . . . . . . . . . .51 Stiff Leg Dead Lift . . . . . . . . . . . . . . . . . . . . . . . . . . . . . . . .51 Standing Hip Adduction . . . . . . . . . . . . . . . . . . . . . . . . . . .52 Standing Hip Abduction . . . . . . . . . . . . . . . . . . . . . . . . . . .52 Calf Raise. . . . . . . . . . . . . . . . . . . . . . . . . . . . . . . . . . . . . . . .53
Muscle Chart. . . . . . . . . . . . . . . . . . . . . . . . . . . . . . . . . . . . .54
Exercise Log . . . . . . . . . . . . . . . . . . . . . . . . . . . . . . . . . . . . .55
Fast Fat Loss Now!
By Ellington Darden, Ph.D. . . . . . . . . . . . . . . . . . . . . . . . . .57
Bowflex Xceed™ Home Gym Warranty Card . . . . . . . . . . |
77 |
Warranty Information . . . . . . . . . . . . . . . . . . . . . . . . . . . . . |
79 |
Important Contact Numbers. . . . . . . . . . . . . . . . . . . . . . . . |
80 |
|
|
|
Bowflex Xceed™ Owner’s Manual |
1 |
Costco_BFX_Xceed_OM_FINAL_print.indd 3 |
|
|
8/16/2006 |
3:39:48 PM |
|
|
|||
|
|
|||
|
|
|
|
|

Specifications / Approvals
Product Specifications:
Product Weight |
157 lbs. |
(71 kg) |
Product Dimensions |
53" (135 cm) long x 49" (124 cm) wide x 82" (208 cm) high |
|
Workout Area |
96" (244 cm) long x 78" (198 cm) wide |
|
Number of Exercises |
Over 60 |
|
Power Rod® Resistance |
210 lbs. |
(95 kg) |
Power Rod® Upgradability |
310 lbs. |
(141 kg.) |
|
410 lbs. |
(186 kg.) |
User Weight Limit |
300 lbs. |
(136 kg) |
Regulatory Approvals:
Meets:
EN957-1 Class H
EN957-2 Class H
Meets:
ASTM F2276-05
ASTM F2216-05
2Bowflex Xceed™ Owner’s Manual
Costco_BFX_Xceed_OM_FINAL_print.indd 4 |
|
|
8/16/2006 3:39:49 PM |
|
|
||
|
|
|
|
Important Safety Precautions
IMPORTANT SAFETY INSTRUCTIONS
The following definition applies to the word “Warning” found throughout this manual:
|
Used to call attention to POTENTIAL hazards that could result |
|
in personal injury or loss of life. |
PRIOR TO USING THIS EQUIPMENT,
OBSERVE THE FOLLOWING WARNINGS.
•Read and understand the Owners Manual prior to using this machine.
•Read and understand all Warning Labels on this machine.
•Keep Children away from this machine. Children must be supervised closely if they are near the equipment or are present during the operation of this equipment.
•Consult a physician prior to commencing an exercise program. If, at any time, you feel faint or dizzy, or experience pain, stop and consult your physician.
•Inspect this machine for loose parts or signs of wear. Pay special attention to Cables and Belts and their connections. Do not use if found in this condition; contact Nautilus Customer Service.
•This machine is designed for a User’s Weight Limit of 300 pounds (136 kg). Do not use if you are over this weight.
•This machine contains moving parts. Use Caution. Do not wear loose clothing or jewelry.
•Set up and operate this machine on a solid level surface.
•This machine is for Consumer use only.
•Do not use additional means to increase the resistance (lifting load) of this machine.
•Be sure that the Selector Hook is correctly attached to the Rod End.
•Select a workout area that provides a minimum clearance behind the rod box of 0.5 ft (15 cm) and a total width of 6.5 ft (2.0 m). Allow a minimum of 3.0 ft (0.9 m) free space in front of the machine. Keep third parties out of this area when the machine is in use.
•Operate the machine in the manner described in this manual. It can be hazardous to over-exert yourself during exercise.
•Make sure that all positional adjustment devices are securely engaged.
|
|
|
Bowflex Xceed™ Owner’s Manual |
3 |
Costco_BFX_Xceed_OM_FINAL_print.indd 5 |
|
|
8/16/2006 |
3:39:49 PM |
|
|
|||
|
|
|||
|
|
|
|
|

Safety Warning Labels
The following safety warnings are located on the Bowflex Xceed™ exercise machine. Please read all safety precautions and warning information prior to using your product. Be sure to replace any warning label if damaged, illegible, or missing. If you need replacement labels, please call a Nautilus Representative at 1-800-NAUTILUS (628-8458).
Label 1
Label 3
Label 2


 Home Gym
4Bowflex Xceed™ Owner’s Manual
Costco_BFX_Xceed_OM_FINAL_print.indd 6 |
|
|
8/16/2006 3:39:50 PM |
|
|
||
|
|
|
|

Safety Warning Labels
The following safety warnings are located in site specific areas on the unit. Please review and understand the safety warning labels and their locations on the unit prior to use.
If you need to replace a warning label please call 1-800-NAUTILUS (1-800-628-8458) to obtain a new label.
Label 1: Please make sure all users read, understand, and follow the warning labels on the home gym. See Figure 1 for general use safety label.
Location: The warning label in Figure 1 is located on the back side of the lat tower.
Label 2: See figure 2 for “Caution” safety label.
Location: Left and right side of rod box.
Figure 2
Label 3: See Figure 3 for “Do not hang” notice.
Location: Top front of the lat tower.
Figure 1
Figure 3
|
|
|
Bowflex Xceed™ Owner’s Manual |
5 |
Costco_BFX_Xceed_OM_FINAL_print.indd 7 |
|
|
8/16/2006 |
3:39:50 PM |
|
|
|||
|
|
|||
|
|
|
|
|

Get to Know Your Machine
Pulley
Upper Lat
Tower
Power Rod®
Resistance Rods
Rod Hook
Cable
Hand Grip
Rod Box
Lower Pulley/ Squat
Station
6Bowflex Xceed™ Owner’s Manual
50” Bent Lat
Bar
Rod Caps
Center Cross Bar
Seat Back
Pad
Seat
Leg Attachment
Base Frame
Platform
Costco_BFX_Xceed_OM_FINAL_print.indd 8 |
|
|
8/16/2006 3:39:51 PM |
|
|
||
|
|
|
|

How to Use Your Machine
Power Rod® Resistance
Power Rod® resistance rods are made from a special composite material. Your rods are sheathed with a protective black rubber coating. Each rod is marked with its weight rating on the “Rod Cap.”
Adjusting and
Understanding
the Resistance
The standard Bowflex Xceed™ home gym comes with 210 pounds
of resistance (one pair of 5 lb. (2.25 kg) rods, two pairs of 10 lb. (4.5 kg) rods, one pair of 30 lb. (13.5 kg) rods, and one pair of 50 lb. (22.5 kg) rods.
If you upgraded to a 310 (140 kg) or 410 pound (186 kg) capacity you will have an additional one or two pair of 50 lb. (22.5 kg) rods, respectively.
Hooking Power Rod® Resistance Rods to the Cables
You may use one rod or several rods in combination, to create your desired resistance level.
To hook multiple rods up to one cable, bend the closest rod toward the cable and place the cable hook through that rod cap. You can then hook up the next closest rod through the same cable hook.
Hooking up the closest rod first prevents rods from crossing over the top of one another.
WhenYou Are Not UsingYour
Bowflex Xceed™ Home Gym
Disconnect the cables from the Power Rod® resistance rods when your are not
using your Bowflex Xceed™ home gym. Use the rod binding strap included with your machine to bind all the rods together at the top. You can also place your cables and grips through the strap to keep them out of the way.
Safety
When hooking the Power
Rod® resistance rods to the cable hooks, do not stand directly over the tops of the rods. Stand off to one side when connecting and disconnecting the Power
Rod® resistance rods from the cables.
To Order Additional Sets of 50 lb. (22.5 kg) Power Rod®
Resistance Rods,
Please Call 1-800-628-8458
|
|
|
Bowflex Xceed™ Owner’s Manual |
7 |
Costco_BFX_Xceed_OM_FINAL_print.indd 9 |
|
|
8/16/2006 |
3:39:52 PM |
|
|
|||
|
|
|||
|
|
|
|
|

How to Use Your Machine
The Bowflex Xceed™ Home Gym Pulley
Positions
With the versatility to perform over 65 different exercises, the Bowflex Xceed™ home gym easily transitions from one exercise to another. Below is a guide to the five different pulley positions you will use to optimally perform your workout routine.
The Bowflex Xceed® Home Gym Cable
Routing
As you use your home gym, you will connect the cables and pulleys in a variety of ways to perform the exercises. Refer to the illustrations below for proper cable routing.
Position One: |
Position Two: |
Standard Position – most |
Lat Pulldown Position. Active |
common. Active pulleys are |
pulleys are on lat tower. |
on center cross bar. |
|


 Chest
Chest
Exercises
Position Three (optional):
Leg Extension Position. Active pulleys are on the squat pulley frame.
Position Four:
Squat position. Active pulleys are on squat pulley frame and on center cross bar.
Leg and Squat
Exercises
Position Five:
Rowing position. Active pulleys are on squat pulley frame.


 Lat Pulldown
Exercises
8Bowflex Xceed™ Owner’s Manual
Costco_BFX_Xceed_OM_FINAL_print.indd 10 |
|
|
8/16/2006 3:39:57 PM |
|
|
||
|
|
|
|
How to Use Your Machine
Maintenance and Care of Your Bowflex Xceed® Home Gym
Inspect your machine for any worn or loose components prior to use. Tighten or replace any worn or loose components prior to use. Pay close attention to cables, straps, or harness and their connections.
Clean the bench with a non-abrasive household cleaner after each use. This will keep it looking new. Do not use automotive cleaner, which can make the bench too “slick.”
Review all warning notices. The safety and integrity designed into a machine can only be maintained when the equipment is regularly examined for damage and repaired. It is the sole responsibility of the owner to ensure that regular maintenance is performed. Worn or damaged components shall be replaced immediately or the equipment removed from service until the repair is made. Only manufacturer supplied components shall be used to maintain/repair the equipment.
If you have any questions regarding your Bowflex Xceed™ home gym, please contact our Customer Service Department at 1-800-605-3369 or by mail to: Customer Service, Nautilus, Inc. World Headquarters, 16400 SE Nautilus Drive, Vancouver, Washington, USA 98683.
|
|
|
Bowflex Xceed™ Owner’s Manual |
9 |
Costco_BFX_Xceed_OM_FINAL_print.indd 11 |
|
|
8/16/2006 |
3:39:59 PM |
|
|
|||
|
|
|||
|
|
|
|
|

How to Use Your Machine
Hand Grips and Straps
The hand grips fit snugly around your wrist, ankle, or instep. Attach grips to cables by snapping the cable clip onto the D-ring.
Standard Grip: Grasp the handle and cuff together to form a grip without inserting your hand through the cuff portion. Most exercises utilize
this grip. The Standard Grip also is used for Hammer Grip exercises, when you need to hold the hand grip vertically for greater wrist support.
Hand Cuff Grip: Slip your hand through the cuff so that the foam pad rests on the back of your hand. Then grasp the remainder of the grip that is sitting in
your palm. This method of gripping is great for exercises like front shoulder raises or any exercise where your palm is facing down.
Ankle Cuff Grip: The cuff opening can be made larger to accommodate the ankle. Simply insert your hand in the cuff and slide it away from the handle.
Insert your foot or ankle and tighten the grip by sliding the handle back toward the cuff.
Arch Cuff Grip: The cuff opening can also fit securely over the arch of your foot. For this grip, insert your foot through the cuff until it is around the arch of your instep, and tighten the cuff
around your heel to secure the grip.
Abdominal Crunch Shoulder Harness: Attach the snap hooks to the D-rings on both ends of the harness. Sit on the bench. Place the harness on your shoulders letting the handles hang to your chest. Cross your
arms and grab both handles.
10 Bowflex Xceed™ Owner’s Manual
Lat Pulldown
The Lat Pulldown tower enhances exercises that work back, shoulders and triceps muscles.
Safety:
•Before using the Lat Pulldown, make sure that all fasteners are in place and tightened.
•Make sure that the Lat Tower’s cables are securely fastened to the regular Bowflex Xceed™ home gym cables.
•Always use the bar holders to support the lat bar or remove the bar when not in use.
•Do not hang from the Lat Tower nor attempt to perform “chin ups” from the bar.
•Never pull on the bar unless there is resistance attached to it.
Leg Extension
Designed to add more effectiveness to all exercises where “leg work” is required.
Safety:
•Before using the Leg Extension, make sure that all fasteners are in place and tightened.
•Make sure that the Leg Extension’s cables are securely fastened
to the regular Bowflex Xceed™ home gym cables.
•Always use the Lock Knob to secure the attachment to your Bowflex Xceed™ home gym.
Grips manufactured under license agreement with HandsOn Sports & Gym Accessories, Inc. Patent #4756527
Costco_BFX_Xceed_OM_FINAL_print.indd 12 |
|
|
8/16/2006 3:40:02 PM |
|
|
||
|
|
|
|

Define Your Goals
Your body will do what you train it to do. That’s why it’s important to define your goals and focus them. Here are some fitness components that will help you define your goals and choose your fitness program.
Muscle Strength is the maximum force that you can exert against resistance at one time. Your muscle strength comes into play when you pick up a heavy bag of groceries or lift a small child. It is developed when a localized muscle is worked both positively (concentric) and negatively (eccentric) at a resistance – great enough so you can perform only five to eight repetitions of the exercise before the muscle fails. Each set of repetitions is followed by
a rest interval that typically runs three times longer than the set. Later, between exercise sessions, the muscle overcompensates for the stress and usually increases in both strength and size.
Muscle Endurance is the ability to perform repeated contractions. It comes into play when you crosscountry ski or work on your feet all day. Endurance training addresses the slow twitch, endurance muscle fibers, which depend on oxygen for energy. To develop muscle endurance, use low resistance and high repetitions – about 15-20 repetitions in each set, three sets to each exercise, working the muscle only to fatigue.
Muscle Power is the combination of strength and speed of the muscular contraction. This is often misinterpreted as A) being directly associated with certain skill or sport and/or B) meaning that you must move fast. Load is actually a more important factor than speed when attempting to improve power. When training to achieve muscular power, pick a resistance that fatigues you in the 3-5 repetition range. When performing these reps, it is
more important to think of contracting the muscles faster rather than attempting to move faster. Performing sport simulation exercises usually results in a deterioration of the motor pattern or skill. The biomechanically sound method of improving power in your sport is to train for power using the correct joint movements, as described in this manual. Then practice the skill associated with your sport, learning to apply this newly achieved power.
Body Composition is the ratio of fat weight (fat) to lean weight (muscles, bones and tissue). As you age, the ratio shifts. The fat weight increases and the lean weight decreases. Training for muscle strength will generally increase muscle size and aerobic conditioning will help burn extra calories. Performing these two forms of exercise, either at different times or together, will create the greatest changes in body fat weight.
Balanced Strength and alignment are the result of equal strength developed in all parts of the body. It comes into play in your standing and sitting posture, and in your ability to perform just about any activity safely and effectively. An over-development of the back will round the shoulders; weak or stretched abdominals can cause lower back pain. You want
a balance of muscle strength in front and back. In addition, you need a balance of strength between your middle, lower and upper body.
Flexibility is the ability of a muscle or group of muscles to move the joint through a full range of motion. Flexibility comes into play when you execute an overhand serve or stretch for the top shelf in the kitchen. It is a cooperative movement of opposite muscle groups. When a muscle contracts, its opposite muscle group must relax for the action to occur. Increased flexibility means an increased range of motion, made possible by this simultaneous contracting and relaxing. Good
flexibility is important in protecting the body from injury and can be achieved through the balanced strength training programs that are included in this manual.
Cardiovascular Endurance is the ability of the heart and lungs to supply oxygen and nutrients to exercising muscles over an extended period of time. It comes into play when you jog a mile or ride a bike. It is a critical component of overall fitness and health. You may want to design your own personal program specifically geared to your goals and lifestyle. Designing a program is easy, as long as you follow the below guidelines.
Bowflex Xceed™ Owner’s Manual |
11 |
Costco_BFX_Xceed_OM_FINAL_print.indd 13 |
|
|
8/16/2006 3:40:02 PM |
|
|
||
|
|
|
|

Define Your Goals
Design Your Own Program
Understand fitness and its components.
Improperly designed programs can be dangerous. Take some time to review this manual as well as other fitness guides.
Know your current fitness level. Before you start any fitness program you should consult a physician who will help you determine your current abilities.
Identify your goals. Goals are critical to choosing and designing an exercise program that fits and enhances your lifestyle, but so is strategy. It’s important not to rush the process and try to accomplish too much too soon. That will lead to setbacks and discouragement. Instead, set a series of smaller achievable goals.
Select complementary exercises. Be sure to pair exercises that address compound joint movements and single joint movements. In addition, select exercises that address complimentary muscle groups.
Put first things first. During each session, first work muscle groups that need the most training.
Remember your cardiovascular component. Any fitness program must contain a cardiovascular fitness component to be complete. So complement your resistance training with aerobic exercise such as walking, running, or bicycling.
Training variables. When designing your own program there are several variables that, when mixed properly, will equal the right fitness formula for you. In order to find out the best formula, you must experiment with several combinations of variables.
The variables are as follows:
•Training Frequency: The number of times you train per week. We recommend daily activity but not daily training of the same muscle group.
•Training Intensity: The amount of resistance used during your repetition.
•Training Volume: The number of repetitions and sets performed.
•Rest Intervals: The time you rest between sets and the time you rest between workouts.
Once you’ve established a base of fitness, follow these basic principles:
•Isolate Muscle Groups: Focus work on specific muscle groups.
•Progressive Loading: The gradual systematic increase of repetitions, resistance and exercise period.
12 Bowflex Xceed™ Owner’s Manual
Costco_BFX_Xceed_OM_FINAL_print.indd 14 |
|
|
8/16/2006 3:40:02 PM |
|
|
||
|
|
|
|

Workout Guide
Working Out
A workout begins in your mind’s eye. With concentration and visualization you can approach your workout with a positive, constructive attitude. A good pre-workout mental routine is to sit and relax, so that you can focus on what you are about to do and think about achieving your end goal.
Warming Up
We recommend that you warm up by doing light stretching and performing light exercises on the Bowflex Xceed™ home gym.
Your Routine
The workout portion of your fitness routine is the series of exercises devoted to your particular goals. Remember, make sure to have fun!
Cool Down
An essential part of the exercise routine is the cool down. Gradually reduce the level of exercise intensity so that blood does not accumulate in one muscle group, but continues to circulate at a decreasing rate. Remember to gradually move yourself into a relaxed state.
Breathing
The most important part of breathing during exercise is, quite simply, that you do it. Breathing in or out during the actual performance is not dependent upon the direction of air flow relative to exertion. It is, in fact, a mechanical process that changes the position of your spine as your rib cage moves. Here are some tips for breathing:
1)Be cautious when you are concentrating or exerting effort. This is when you will probably hold your breath. DO NOT hold your breath. Do not exaggerate breathing. Depth of inhalation and exhalation should be natural for the situation.
2)Allow breathing to occur, naturally, don’t force it.
|
|
|
Bowflex Xceed™ Owner’s Manual |
13 |
Costco_BFX_Xceed_OM_FINAL_print.indd 15 |
|
|
8/16/2006 3:40:02 PM |
|
|
|
|||
|
|
|||
|
|
|
|
|

The Workouts
20 Minute Better Body Workout
Frequency: 3 Days Per Week (M-W-F) Time: About 20 Minutes
Start by performing one set of each exercise. Warm up with a light resistance that you can perform easily for 5 -10 reps without fatiguing. Focus on practicing and learning your technique before increasing the resistance. Then move to a more challenging resistance that you can perform no less than 10 reps and no more than 15 reps without your form deteriorating. As you become stronger, you can advance to two sets for each exercise. Complete all sets of each exercise before moving on to the next one. Rest 30 to 45 seconds between sets. Move slowly on each rep. Use a pace that would allow you to stop the movement instantly at any point in the rep. Count three seconds up and three seconds down and work to fatigue during each set.
Body Part |
Exercise |
Sets |
Reps |
Chest |
Bench Press |
1-2 |
10-15 |
Back |
Seated Lat Rows |
1-2 |
10-15 |
Shoulders |
Crossover Rear Deltoid Rows |
1-2 |
10-15 |
Arms |
Biceps Curl |
1-2 |
10-15 |
|
Triceps Pushdown |
1-2 |
10-15 |
Legs |
Leg Extension |
1-2 |
10-15 |
Trunk |
Standing Low Back Extension |
1-2 |
10-15 |
|
Seated Abdominal Crunch |
1-2 |
10-15 |
|
|
|
|
Advanced General Conditioning
Frequency: 4 Days Per Week (M-T-TH-F) Time: About 35-45 Minutes
When you are proficient in performing the exercise techniques of the above routine and are no longer realizing results, or have become just plain bored, it is time to change your program. You can increase your training with this “split system” routine that works opposing muscle groups on different days. To do this, you’ll increase your resistance when you can perform 12 reps perfectly, and you’ll increase your volume by performing more sets and more exercises. Move slowly on each rep. Use a pace that would allow you to stop the movement instantly at any point in the rep. Count three seconds up and three seconds down and work to fatigue during each set.
Day 1 & 3 |
|
Body Part |
Exercise |
Sets |
Reps |
|
|||
|
|
Chest |
Bench Press |
1-3 |
10-12 |
|
|||
|
|
Shoulders |
Seated Shoulder Press |
1-3 |
10-12 |
|
|||
|
|
Arms |
Triceps Pushdown |
1-3 |
10-12 |
|
|||
|
|
|
Biceps Curl |
1-3 |
10-12 |
|
|||
|
|
Legs |
Leg Extension |
1-3 |
10-12 |
|
|||
Day 2 & 4 |
|
|
|
|
|
|
|
|
|
|
Body Part |
Exercise |
Sets |
Reps |
|
||||
|
|
Back |
Seated Lat Rows |
1-3 |
10-12 |
|
|||
|
|
|
Seated Lat Pulldowns |
1-3 |
10-12 |
|
|||
|
|
Shoulders |
Crossover Rear Deltoid Row |
1-3 |
10-12 |
|
|||
|
|
Arms |
Biceps Curl |
1-3 |
10-12 |
|
|||
|
|
|
Reverse Curl |
1-3 |
10-12 |
|
|||
|
|
Trunk |
Standing Low Back Extension |
1-3 |
10-12 |
|
|||
|
|
|
Seated Abdominal Crunch |
1-3 |
10-12 |
|
|||
|
|
|
|
|
|
|
|
|
|
14 Bowflex Xceed™ Owner’s Manual |
|
|
|
|
|
|
|
||
Costco_BFX_Xceed_OM_FINAL_print.indd |
16 |
|
|
|
|
|
|
8/16/2006 3:40:02 PM |
|
|
|
|
|
|
|
||||
|
|
|
|
|
|
||||
|
|
|
|
|
|
|
|
|
|

The Workouts
20 Minute Upper/Lower Body
Frequency: 4 Days Per Week (M-T-TH-F) Time: About 20 Minutes
This program provides you with a quick and effective workout that combines muscle conditioning with some cardiovascular benefits. Do this routine when you are limited in time or just want a variation to your normal routine. Perform this program training 2 days, resting 1 to 2. Perform all exercises to near failure, stopping at the point that your technique starts to deteriorate. Rest only 20-30 seconds between sets. As you get stronger, increase the number of sets you perform. Move slowly on each rep. Use a pace that would allow you to stop the movement instantly at any point in the rep. Count three seconds up and three seconds down.
DAY 1 & 3 |
Body Part |
Exercise |
Sets |
Reps |
|
Chest |
Bench Press |
1-3 |
12-15 |
|
Back |
Seated Lat Rows |
1-3 |
12-15 |
|
Shoulders |
Crossover Rear Deltoid Rows |
1-3 |
12-15 |
|
Arms |
Biceps Curl |
1-3 |
12-15 |
|
|
Triceps Extension |
1-3 |
12-15 |
|
|
|
|
|
DAY 2 & 4 |
Body Part |
Exercise |
Sets |
Reps |
|
Legs |
Leg Extension |
1-3 |
12-15 |
|
|
Standing Hip Extension |
1-3 |
12-15 |
|
|
Standing Hip Abduction |
1-3 |
12-15 |
|
|
Standing Low Back Extension |
1-3 |
10-12 |
|
Trunk |
Seated Abdominal Crunch |
1-3 |
10-12 |
|
|
|
|
|
|
|
|
Bowflex Xceed™ Owner’s Manual |
15 |
Costco_BFX_Xceed_OM_FINAL_print.indd 17 |
|
|
8/16/2006 3:40:02 PM |
|
|
|
|||
|
|
|||
|
|
|
|
|

The Workouts
Body Building
Frequency: 3 Days On, 1 Day Off Time: About 45-60 Minutes
Body building requires focused concentration and dedication to training, as well as proper eating habits. Train each muscle group to failure before moving on to the next exercise. Do not neglect any muscle group. If needed, include an aerobic activity to increase your caloric expenditure and help to reduce your body fat levels to achieve a defined muscular look. Rest 30-60 seconds between each set and exercise. Focus on proper form. Tighten the muscle before you move, squeeze the muscle as you move, cramp the muscle at the point of full contraction, and resist the movement as you lower the weight. Move slowly on each rep. Use a pace that would allow you to stop the movement instantly at any point in the rep. Count three seconds up and three seconds down and work to fatigue during each set.
DAY 1 |
Body Part |
Exercise |
Sets |
Reps |
|
Chest |
Bench Press |
2-4 |
8-12 |
|
|
Chest Fly |
2-4 |
8-12 |
|
Shoulders |
Seated Shoulder Press |
2-4 |
8-12 |
|
|
Crossover Rear Deltoid Row |
2-4 |
8-12 |
|
|
Lateral Shoulder Raise |
2-4 |
8-12 |
|
|
Shoulder Shrug |
2-4 |
8-12 |
DAY 2 |
|
|
|
|
Body Part |
Exercise |
Sets |
Reps |
|
|
Back |
Seated Lat Row |
2-4 |
8-12 |
|
|
Seated Lat Pulldowns |
2-4 |
8-12 |
|
Arms |
Biceps Curl |
2-4 |
8-12 |
|
|
Reverse Curl |
2-4 |
8-12 |
|
|
Triceps Pushdown |
2-4 |
8-12 |
|
|
Triceps Extension |
2-4 |
8-12 |
DAY 3 |
|
|
|
|
Body Part |
Exercise |
Sets |
Reps |
|
|
Legs |
Squat |
2-4 |
8-12 |
|
|
Leg Extension |
2-4 |
8-12 |
|
|
Standing Hip Extension |
2-4 |
8-12 |
|
|
Standing Low Back Extension |
2-4 |
8-12 |
|
Trunk |
Seated Abdominal Crunch |
2-4 |
8-12 |
|
|
Seated Oblique Abdominal Crunch |
2-4 |
8-12 |
|
|
|
|
|
16 Bowflex Xceed™ Owner’s Manual
Costco_BFX_Xceed_OM_FINAL_print.indd 18 |
|
|
8/16/2006 3:40:02 PM |
|
|
||
|
|
|
|

The Workouts
Circuit Training – Anaerobic/Cardiovascular
Frequency: 2-3 Times Per Week |
Time: About 20-45 Minutes |
Circuit training is a great way to achieve the benefits of strength training and cardiovascular training in one quick, challenging routine. The idea is to move quickly from exercise to exercise, taking only as much rest between sets as it takes to set up the next exercise (less than 20 seconds). One circuit equals one set of each exercise. Initially, start with completing one round of Circuit 1. Then add an additional round of the same circuit. Once you reach three rounds of Circuit 1, add one round of Circuit 2. Add additional rounds of Circuit 2 as your fitness level increases. Repeat process with Circuit 3. Do not let your heart rate exceed 220 minus your resting heart rate. Perform each rep of each exercise slowly and with perfect technique. Count three seconds up and three seconds down.
Circuit 1 |
Body Part |
Exercise |
Reps |
|
Chest |
Bench Press |
8-12 |
|
Legs |
Squat |
8-12 |
|
Back |
Seated Lat Row |
8-12 |
|
Trunk |
Seated Abdominal Crunch |
8-12 |
Circuit 2 |
|
|
|
Body Part |
Exercise |
Reps |
|
|
Shoulders |
Seated Shoulder Press |
8-12 |
|
Legs |
Leg Extensions |
8-12 |
|
Back |
Seated Lat Pulldowns |
8-12 |
|
Trunk |
Standing Low Back Extension |
8-12 |
|
Arms |
Biceps Curl |
8-12 |
Circuit 3 |
|
|
|
Body Part |
Exercise |
Reps |
|
|
Shoulders |
Crossover Rear Deltoid Rows |
8-12 |
|
Arms |
Triceps Pushdown |
8-12 |
|
Trunk |
Seated Oblique Crunch |
8-12 |
|
|
|
|
|
|
|
Bowflex Xceed™ Owner’s Manual |
17 |
Costco_BFX_Xceed_OM_FINAL_print.indd 19 |
|
|
8/16/2006 3:40:03 PM |
|
|
|
|||
|
|
|||
|
|
|
|
|

The Workouts
True Aerobic Circuit Training
Frequency: 2-3 Times Per Week |
Time: About 20-60 Minutes |
Circuit training is a great way to achieve the benefits of strength training and cardiovascular training in one quick, challenging routine. By returning to an aerobic exercise between each set you are increasing your aerobic capacity, endurance and burning fat as energy. The idea is to move quickly from exercise to exercise, taking only as much rest between sets as it takes to set up the next exercise (less than 20 seconds). One circuit equals one set of each exercise.
Initially, start with completing one round of Circuit 1. Then add an additional round of the same circuit. Once you reach three rounds of Circuit 1, add one round of Circuit 2. Add additional rounds of Circuit 2 as your fitness level increases. Do not let your heart rate exceed 220 minus your resting heart rate. Perform each rep of each exercise slowly and with perfect technique. Count three seconds up and three seconds down.
Any type of aerobic exercise can be used for this routine. Some examples are: jumping jacks, jogging in place or stair climbing.
Circuit 1 |
Body Part |
Exercise |
Reps |
|
Chest |
Bench Press |
8-12 |
|
Aerobic Exercise |
30 – 60 Seconds |
|
|
Legs |
Squat |
8-12 |
|
Aerobic Exercise |
30 – 60 Seconds |
|
|
Back |
Seated Lat Rows |
8-12 |
|
Aerobic Exercise |
30 – 60 Seconds |
|
|
Trunk |
Seated Abdominal Crunch |
8-12 |
|
Aerobic Exercise |
30 – 60 Seconds |
|
|
|
|
|
Circuit 2 |
Body Part |
Exercise |
Reps |
|
Shoulders |
Seated Shoulder Press |
8-12 |
|
Aerobic Exercise |
30 – 60 Seconds |
|
|
Legs |
Leg Extension |
8-12 |
|
Aerobic Exercise |
30 – 60 Seconds |
|
|
Back |
Seated Lat Pulldowns |
8-12 |
|
Aerobic Exercise |
30 – 60 Seconds |
|
|
Trunk |
Standing Low Back Extension |
8-12 |
|
Aerobic Exercise |
30 – 60 Seconds |
|
|
Arms |
Biceps Curl |
8-12 |
|
|
|
|
18 Bowflex Xceed™ Owner’s Manual
Costco_BFX_Xceed_OM_FINAL_print.indd 20 |
|
|
8/16/2006 3:40:03 PM |
|
|
||
|
|
|
|
The Workouts
Strength Training
Frequency: 3 Days Per Week (M-W-F) |
Time: About 45-60 Minutes |
This program is designed to emphasize overall strength development. This is an advanced routine to be used only after you have progressed from the advanced general conditioning routine and only after you have perfected your exercise techniques. Work each set to near exhaustion. If you can perform more than 5 to 8 reps, you should
increase your resistance 5 pounds and decrease your reps to 5. Rest 60 – 120 seconds between each set and exercise. Focus on proper form. Tighten the muscle before you move, squeeze the muscle as you move, cramp the muscle at the point of full contraction, and resist the movement as you lower the weight. Move slowly on each rep. Use a pace that would allow you to stop the movement instantly at any point in the rep. Count two seconds up and four seconds down and work to fatigue during each set.
Day 1 |
Body Part |
Exercise |
Sets |
Reps |
|
|
Chest |
Bench Press |
2-4 |
5 |
-8 |
|
|
Chest Fly |
2-4 |
5 |
-8 |
|
Shoulders |
Seated Shoulder Press |
2-4 |
5 |
-8 |
|
|
Crossover Rear Deltoid Rows |
2-4 |
5 |
-8 |
|
|
Shoulder Shrug |
2-4 |
5 |
-8 |
Day 2 |
|
|
|
|
|
Body Part |
Exercise |
Sets |
Reps |
||
|
Back |
Seated Lat Row |
2-4 |
5 |
-8 |
|
|
Seated Lat Pulldowns |
2-4 |
5 |
-8 |
|
Arms |
Biceps Curl |
2-4 |
5 |
-8 |
|
|
Reverse Curl |
2-4 |
5 |
-8 |
|
|
Triceps Pushdown |
2-4 |
5 |
-8 |
|
|
Triceps Extension |
2-4 |
5 |
-8 |
Day 3 |
|
|
|
|
|
Body Part |
Exercise |
Sets |
Reps |
||
|
Legs |
Squat |
2-4 |
5 |
-8 |
|
|
Leg Extension |
2-4 |
5 |
-8 |
|
|
Standing Low Back Extension |
2-4 |
8 |
-12 |
|
Trunk |
Seated Abdominal Crunch |
2-4 |
5 |
-8 |
|
|
|
|
|
|
|
|
|
Bowflex Xceed™ Owner’s Manual |
19 |
Costco_BFX_Xceed_OM_FINAL_print.indd 21 |
|
|
8/16/2006 3:40:03 PM |
|
|
|
|||
|
|
|||
|
|
|
|
|

Chest Exercises
Bench Press – Shoulder Horizontal Adduction (and Elbow Extension)
Muscles worked:
Chest muscles (pectoralis major). Also involves front shoulder muscles (anterior deltoid and triceps, located on the back of the upper arm.
Position:
Seated – facing outward
Accessory:
Hand Grips
Pulleys:
Center Cross Bar – wide position
Before you begin:
Remove Leg Extension and adjust seat height. The pulleys should be in the wide position.
Key Points:
•Maintain a 90º angle between upper arms and torso throughout exercise.
•Limit range of motion so elbows do not travel behind shoulders.
•Keep shoulder blades pinched together and maintain good spinal alignment.
|
|
|
START |
|
FINISH |
|
|
|
|
|
|
START
•Sit and grasp hand grips.
•Straighten arms to front.
•Be sure arms are directly in line with cables, palms facing down and wrists straight.
•Raise chest and pinch shoulder blades together. Maintain a very slight, comfortable, arch in lower back.
ACTION
•Slowly move elbows out, simultaneously bending arms, keeping forearms in line with cables.
•Stop when upper arms are straight out to the sides, level with shoulders.
•Slowly press forward, moving hands toward center. Return to start position with arms straight to front at shoulder width. Keep chest muscles tightened.
Chest Fly – Shoulder Horizontal Adduction (Elbow Stabilized)
Muscles worked: |
START |
FINISH |
Emphasizes chest muscles (pectoralis major). Involves front shoulder muscles (anterior deltoid).
Position:
Seated – facing outward
Accessory:
Hand Grips
Pulleys:
Center Cross Bar – wide position
Before you begin:
Remove Leg Extension and adjust seat height. The pulleys should be in
the wide position.
Key Points:
•Maintain 90º angle between upper arms and torso throughout exercise.
•Limit range of motion so elbows do not travel behind shoulders.
•Keep shoulder blades pinched together and maintain good spinal alignment.
START
•Sit and grasp hand grips.
•Straighten arms to front.
•Be sure arms are directly in line with cables, palms facing in and wrists straight.
•Raise chest and pinch shoulder blades together. Maintain a slight, comfortable, arch in lower back.
ACTION
•Slowly move arms inward, maintaining the elbows in a slightly bent position throughout movement.
•Stop when upper arms are straight out in front, level with shoulders.
•Slowly return to start position. Keep chest muscles tightened during motion.
20 Bowflex Xceed™ Owner’s Manual
Costco_BFX_Xceed_OM_FINAL_print.indd 22 |
|
|
8/16/2006 3:40:05 PM |
|
|
||
|
|
|
|
Chest Exercises
Decline Bench Press – Shoulder Horizontal Adduction (and Elbow Extension)
Muscles worked:
Chest muscles (pectoralis major). Also involves front shoulder muscles (anterior deltoid) and triceps.
Position:
Seated (seat in lowest position) facing outward
Accessory:
Hand Grips
Pulleys:
Center Cross Bar – standard position
BeforeYou Begin:
Remove Leg Extension and adjust seat to lowest setting.
Key Points:
•Maintain 90º angle between upper arms and torso at the bottom of the motion, and slightly less than 90º at the top of the motion.
•Limit range of motion so elbows do not travel behind shoulders.
•Keep shoulder blades pinched together and maintain good spinal alignment.
START
START
•Sit and grasp hand grips with cable and grip positioned beneath forearm.
•Lower arms 5-6 inches from standard bench press position.
•Straighten arms to front.
•Be sure arms are directly in line with cables, palms facing down and wrists straight.
•Raise chest and pinch shoulder blades together. Keep a gentle arch in lower back.
FINISH
ACTION
•Slowly move elbows outward, simultaneously bending arms, keeping forearms in line with cables at all times.
•Stop when upper arms are straight out to sides, 10º below shoulders.
•Slowly press forward, moving hands toward center. Return to start position, arms straight at shoulder width, hands just above knees in line with cables. Keep chest muscles tightened..
Incline Bench Press – Shoulder Horizontal Adduction (and Elbow Extension)
Muscles worked:
Chest muscles (pectoralis major), especially upper portion. Also involves front shoulder muscles (anterior deltoid) and triceps.
Position:
Seated – facing outward
Accessory:
Hand Grips
Pulleys:
Center Cross Bar – wide position
BeforeYou Begin:
Remove Leg Extension and adjust seat height.
Key Points:
•Upper arms will be 90º from sides of torso at the bottom of movement and slightly more than 90º from the front of torso at the top.
•Limit range of motion so elbows do not travel behind shoulders.
•Keep shoulder blades pinched together and maintain good spinal alignment.
START |
|
FINISH |
|
|
|
START
•Sit and grasp hand grips.
•Straighten arms to front.
•Raise arms 6-8 inches above regular bench press position.
•Keep arms in line with cables, palms down, wrists straight.
•Raise chest and pinch shoulder blades together. Keep a slight, comfortable, arch in lower back.
ACTION
•Slowly move elbows out, simultaneously bending arms. Keep forearms in line with cables.
•Stop when upper arms are out to sides, 10º above shoulders.
•Slowly press forward, moving hands toward center. Return to start position, with arms straight to front at shoulder width and in line with cables.
|
|
|
Bowflex Xceed™ Owner’s Manual |
21 |
Costco_BFX_Xceed_OM_FINAL_print.indd 23 |
|
|
8/16/2006 3:40:07 PM |
|
|
|
|||
|
|
|||
|
|
|
|
|

Shoulder Exercises
Reverse Fly – Shoulder Horizontal Abduction (Elbows Stabilized)
Muscles worked:
Back portion of shoulder muscles (rear deltoids, rear portion of middle deltoids).
Position:
Standing – facing machine
Seat:
Removed
Accessory:
Hand Grips
Pulleys:
Center Cross Bar – narrow position
BeforeYou Begin:
Remove Leg Extension. The pulleys should be in the narrow position.
Key Points:
•Maintain a 90º angle between upper arms and sides of torso throughout exercise.
•Keep shoulder blades pinched together and maintain good spinal alignment.
START |
|
FINISH |
|
|
|
START
•Stand on platform.
•Grasp hand grips with palms facing floor, arms nearly straight.
•Stand up straight and bend over slightly from hips until arms are in front of body at a 90º angle to torso.
•Lift chest and pinch shoulder blades together.
ACTION
•Maintaining the same slight bend in arms, move elbows out and back, keeping a 90º angle between upper arms and sides of torso.
•Move until elbows are slightly behind shoulders, then slowly reverse the motion, keeping rear shoulder muscles tightened.
Crossover Reverse Fly – Shoulder Horizontal Abduction (Elbows Stabilized)
Muscles worked: |
START |
|
FINISH |
Back portion of shoulder muscles (rear deltoids, rear portion of middle deltoids).
Position:
Standing – facing machine
Accessory:
Hand Grips
Pulleys:
Center Cross Bar – narrow position
BeforeYou Begin:
•Remove seat and leg extension. The pulleys should be in the narrow position.
Key Points:
•Maintain 90º angle between upper arms and sides of torso throughout exercise.
•Keep shoulder blades pinched together and maintain good spinal alignment.
22 Bowflex Xceed™ Owner’s Manual
START
•Stand on platform.
•Cross arms in front of body and grasp hand grips (right grip in left hand and vice versa) with palms facing floor and arms nearly straight.
•Stand up straight and bend over slightly from hips until arms are in front of body at a 90º angle to torso.
•Lift chest and pinch shoulder blades together.
ACTION
•Maintaining same slight bend in arms, move elbows out and back, crossing cables as you pull arms back.
•Keep a 90º angle between upper arms and sides of torso.
•Move until elbows are slightly behind shoulders, then slowly reverse motion keeping rear shoulder muscles tightened.
Costco_BFX_Xceed_OM_FINAL_print.indd 24 |
|
|
8/16/2006 3:40:10 PM |
|
|
||
|
|
|
|

Shoulder Exercises
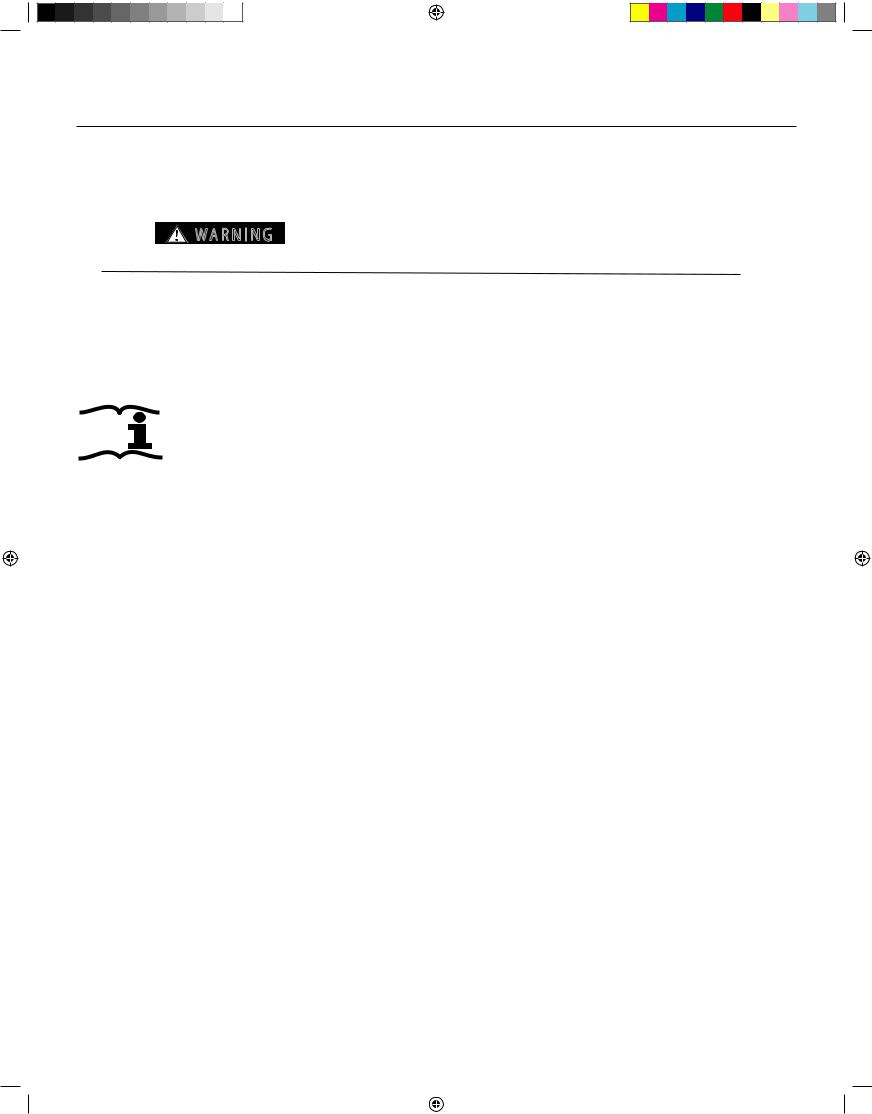
Crossover Rear Deltoid Rows – Elbow Flexion
Muscles worked:
Back portion of shoulder muscles (rear deltoids, rear portion of middle deltoids).
Position:
Standing – facing machine
Accessory:
Hand Grips
Pulleys:
Center Cross Bar – narrow position
BeforeYou Begin:
Remove Leg Extension and seat. Center Cross Bar Pulleys should be
in narrow position.
Key Points:
•Maintain a 90º angle between upper arms and sides of torso.
•Keep shoulder blades pinched together and maintain good spinal alignment.
•To work one arm at a time, place nonworking hand on top of bench for additional stabilization.
START |
|
FINISH |
|
|
|
START
•Stand on platform.
•Cross arms in front of body and grasp hand grips (right grip in left hand and vice versa) with palms facing down and arms nearly straight.
•Bend over slightly from hips (not spine) and raise arms in front of body, 90º to torso.
•Lift chest, stand up straight with spine in good alignment and tighten trunk muscles.
ACTION
•Allowing arms to bend as you go, move elbows outward and backward keeping a 90º angle between upper arms and sides of torso.
•Always point forearms in the direction of cables.
•Move until elbows are slightly behind shoulders, then slowly reverse motion. Keep rear shoulder muscles tightened during entire motion.
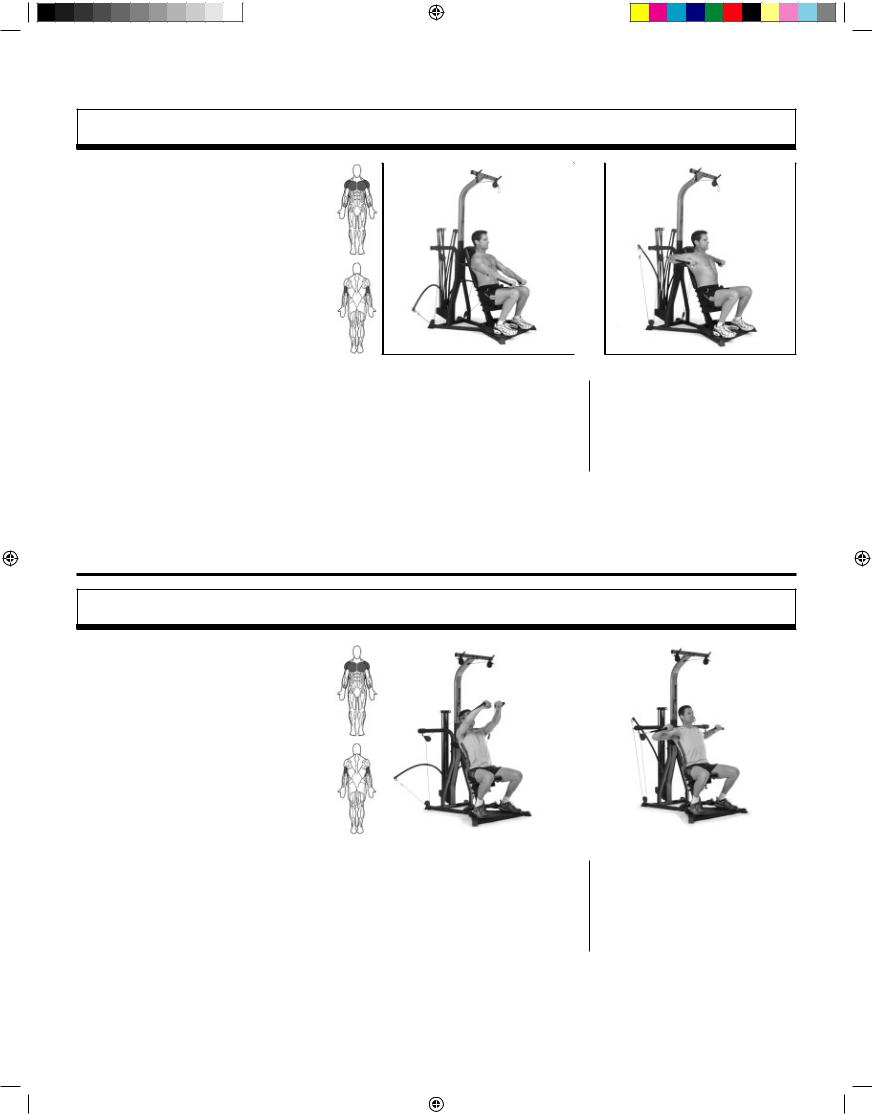
Crossover High Rear Deltoid Rows – Elbow Flexion
Muscles worked:
Back portion of shoulder muscles (rear deltoids, rear portion of middle deltoids).
Position:
Standing – facing machine
Accessory:
Hand Grips
Pulleys:
Lat Tower
BeforeYou Begin:
Remove Leg Extension and seat.
Key Points:
•Keep shoulder blades pinched together and maintain good spinal alignment.
START
START
•Stand on platform, with knees slightly bent.
•Cross arms and grab hand grips with palms facing down, arms straight (right hand on left hand grip and vice versa).
•Stand up straight and slightly lean back from hips.
•Lift chest and pinch shoulder blades together.
FINISH
ACTION
•Allowing arms to bend as you go, move elbows out and back keeping a 90º angle between upper arms and sides of torso.
•Always point forearms in direction of cables.
•Move until elbows are slightly behind shoulders, then slowly reverse motion. Keep rear shoulder muscles tightened.
|
|
|
Bowflex Xceed™ Owner’s Manual |
23 |
Costco_BFX_Xceed_OM_FINAL_print.indd 25 |
|
|
8/16/2006 3:40:14 PM |
|
|
|
|||
|
|
|||
|
|
|
|
|

Shoulder Exercises
Lateral Shoulder Raise – Shoulder Abduction (Elbows Stabilized)
Muscles worked:
Side shoulder muscles (middle deltoids), top muscle of rotator cuff (supraspinatus) and upper trapezius muscles.
Position:
Standing – facing outward
Accessory:
Hand Grips
Pulleys:
Squat Pulley Frame – use squat straps
BeforeYou Begin:
Remove Seat and Leg Extension
Key Points:
•DO NOT swing arms upward or move trunk.
START
START
•Stand on platform facing outward. Grasp hand grips with palms facing each other.
•Attain good spinal posture and bend forward slightly at hip (15 to 20º) by keeping spine straight and sticking rear end out. Do not bend at waist.
•Let arms hang directly in line with cables.
•Elevate shoulders slightly toward back of head.
FINISH
ACTION
•Raise arms out to sides to nearly shoulder level.
•Keep side of arm/elbow facing out/up throughout movement.
•Slowly bring arms into start position without relaxing.
Seated Forearm Lateral Shoulder Raise – Elbows Stabilized
Muscles worked:
Side shoulder muscles (middle deltoids), top muscle of rotator cuff (supraspinatus) and upper trapezius muscles.
Position:
Seated – facing outward
Accessory:
Hand Grips over elbows
Pulleys:
Squat Pulley Frame – narrow position
BeforeYou Begin:
Remove Seat and Leg Extension
Key Points:
•DO NOT swing arms upward or move trunk.
24 Bowflex Xceed™ Owner’s Manual
START
START
•Slide hand grips over forearms until grip is cradled in elbow.
•Let upper arms hang in line with cables and bend elbows 90º.
•Elevate shoulders slightly toward the back of your head.
•Raise chest and pinch shoulder blades together.
•Maintain a slight, comfortable, arch in lower back.
FINISH
ACTION
•Raise arms out to sides to almost shoulder level.
•Keep side of forearms/elbows facing out/up throughout movement.
•Slowly bring arms to start position without relaxing.
Costco_BFX_Xceed_OM_FINAL_print.indd 26 |
|
|
8/16/2006 3:40:17 PM |
|
|
||
|
|
|
|
 Loading...