


BXT216
NER’S MANUAL
Manual en Español
Latino Americano:
www.support.nautilus.com

Welcome to the Bowflex® BXT216 fitness machine!
You’re about to experience an incredible workout that can help you lose weight and reshape your entire body so you’ll look and feel better than ever before. We thank you for trusting in the Bowflex brand.
Use this Manual as a guide to getting started on your Bowflex® workouts and for tips to keep your machine well maintained.
Yours in Health,
The Bowflex Family
TableofContents |
|
Important Safety Instructions ................................. |
3 |
Safety Warning Labels and Serial Number............. |
6 |
Grounding Instructions............................................ |
7 |
Emergency Stop Procedure.................................... |
7 |
Specifications / Before Assembly............................ |
8 |
Parts ....................................................................... |
9 |
Hardware / Tools .................................................. |
10 |
Assembly .............................................................. |
10 |
Moving and Storing the Machine........................... |
20 |
Unfolding the Machine.......................................... |
22 |
Leveling Your Machine.......................................... |
23 |
Features................................................................ |
24 |
Connectivity with the Fitness App ........................ |
29 |
Fitness Basics....................................................... |
32 |
Operations............................................................. |
39 |
Before You Start ................................................... |
39 |
Power Up / Idle Mode ........................................... |
40 |
Initial Setup .......................................................... |
40 |
User Profiles ......................................................... |
40 |
Workout Programs ............................................... |
41 |
Pausing or Stopping ............................................. |
44 |
Workout Complete / Results ................................ |
45 |
Fitness Score Display .......................................... |
45 |
Celebrations ......................................................... |
47 |
Machine Settings Mode ........................................ |
48 |
Maintenance.......................................................... |
49 |
Walking Belt Alignment.......................................... |
50 |
Lubricating the Walking Belt.................................. |
51 |
Maintenance Parts................................................ |
53 |
Troubleshooting.................................................... |
55 |
Body Weight Loss Guide....................................... |
58 |
Warranty................................................................ |
67 |
To validate warranty support, keep the original proof of purchase and record the following information:
Serial Number __________________________ Date of Purchase ____________________
To register your product warranty, go to: www.bowflex.com/register
Or call 1 (800) 605–3369.
If you have questions or problems with your product, please call 1 (800) 605–3369.
Nautilus, Inc., (800) NAUTILUS / (800) 628-8458, www.NautilusInc.com - Customer Service: North America (800) 605-3369, csnls@nautilus.com | outside U.S. twww.nautilusinternational.com | Printed in China | © 2016 Nautilus, Inc. | ® indicates trademarks registered in the United States. These marks may be registered in other nations or otherwise protected by common law. Bowflex, the B logo, Bowflex Connect, Bowflex Trainer, Nautilus,
Schwinn, and Universal are trademarks owned by or licensed to Nautilus, Inc. Polar®, OwnCode®, Android™, iTunes®, Google Play™, and Nut Thins® are trademarks of their respective owners. Apple and the Apple logo are trademarks of Apple Inc., registered in the U.S. and other countries. App Store is a service mark of Apple Inc. The Bluetooth® word mark and logos are registered trademarks owned by Bluetooth SIG, Inc., and any use of such marks by Nautilus, Inc. is under license.
2
Assembly / Owner’s Manual

Important Safety Instructions
When using an electrical appliance, basic precautions should always be followed, including the following:
 This icon means a potentially hazardous situation which, if not avoided, could result in death or serious injury. Obey the following warnings:
Read and understand all Warnings on this machine.
Carefully read and understand the Assembly/Owner’s Manual.
Carefully read and understand the Assembly instructions. Read and understand the complete Manual. Keep the Manual for future reference.
To reduce the risk of electrical shock or unsupervised usage of the equipment, always unplug this machine from the electrical outlet immediately after using and before cleaning.
To decrease the risk of burns, electric shock, or injury to persons, read and understand the complete Assembly/Owner’s Manual. Failure to follow these guidelines can cause a serious or possibly fatal electrical shock or other serious injury.
•Keep bystanders and children away from the product you are assembling at all times.
•Do not connect power supply to the machine until instructed to do so.
•The machine should never be left unattended when plugged in. Unplug from outlet when not in use, and before putting on or taking off parts.
•Before each use, examine the machine for damage to power cord, loose parts or signs of wear. Do not use if found in this condition. Contact
Nautilus Customer Service for repair information.
•Not intended for use by persons with medical conditions where those conditions may impact the safe operation of the treadmill or pose a risk of injury to the user.
•Do not drop or put objects into any opening of the machine.
•Never operate this treadmill with the air openings blocked. Keep the air openings free of lint, hair and the like.
•Do not assemble this machine outdoors or in a wet or moist location.
•Make sure assembly is done in an appropriate work space away from foot traffic and exposure to bystanders.
•Some components of the machine can be heavy or awkward. Use a second person when doing the assembly steps involving these parts. Do not do steps that involve heavy lifting or awkward movements on your own.
•Set up this machine on a solid, level, horizontal surface.
•Do not try to change the design or functionality of this machine. This could compromise the safety of this machine and will void the warranty.
•If replacement parts are necessary, use only genuine Nautilus replacement parts and hardware. Failure to use genuine replacement parts can cause a risk to users, keep the machine from operating correctly and void the warranty.
•Do not use until the machine has been fully assembled and inspected for correct performance in accordance with the Manual.
•Use this machine only for its intended use as described in this manual. Do not use attachments not recommended by the manufacturer.
•Do all assembly steps in the sequence given. Incorrect assembly can lead to injury or incorrect function.
•Connect this machine to a properly grounded outlet only (see Grounding Instructions).
•Keep the power cord away from heat sources and hot surfaces.
•Do not operate where aerosol products are being used.
•To disconnect, turn all controls to the off position, then remove plug from outlet.
•SAVE THESE INSTRUCTIONS.
3
Assembly / Owner’s Manual

Before using this equipment, obey the following warnings:
 Read and understand the complete Manual. Keep the Manual for future reference.
Read and understand all Warnings on this machine. If at any time the Warning stickers become loose, unreadable or dislodged, contact Nautilus Customer Service for replacement stickers.
To reduce the risk of electrical shock or unsupervised usage of the equipment, always unplug the power cord from the wall outlet and/or the machine and wait 5 minutes before cleaning, maintaining or repairing the machine. Place the power cord in a secure location.
•Children must not be let on or near to this machine. Moving parts and other features of the machine can be dangerous to children.
•Not intended for use by anyone under 14 years of age.
•Consult a physician before you start an exercise program. Stop exercising if you feel pain or tightness in your chest, become short of breath, or feel faint. Contact your doctor before you use the machine again. Use the values calculated or measured by the machine’s computer for reference purposes only.
•Before each use, examine this machine for damage to power cord, power receptacle, loose parts or signs of wear. Do not use if found in this condition. Contact Nautilus Customer Service for repair information.
•Maximum user weight limit: 400 lbs. (181 kg). Do not use if you are over this weight.
•Do not wear loose clothing or jewelry. This machine contains moving parts. Do not put fingers or other objects into moving parts of the exercise equipment.
•Always wear rubber soled athletic shoes when you use this machine. Do not use the machine with bare feet or only wearing socks.
•Set up and operate this machine on a solid, level, horizontal surface.
•Use caution when you step on and off the machine. Use the supplied foot support platforms for stability before walking on the moving belt.
•To prevent injury, stand on the foot support platforms before you start the machine or end a workout. Do not dismount the machine by standing on the moving Walking Belts and exiting off the rear of the machine.
•Disconnect all power before servicing this machine.
•Do not operate this machine outdoors or in moist or wet locations.
•Keep at least 24” (0.6 m) on each side of the machine and 79” (2 m) behind the machine clear. This is the recommended safe distance for access and passage around and emergency dismounts from the machine. Keep third parties out of this space when machine is in use.
•Do not over exert yourself during exercise. Operate the machine in the manner described in this manual.
•Perform all regular and periodic maintenance procedures recommended in the manual.
•Read, understand, and test the Emergency Stop Procedure before use.
•Keep the walking belt clean and dry.
•Do not drop or put objects into any opening of the machine.
•Do not stand on machine motor cover or front trim cover.
•Keep power cord away from heat source and hot surfaces.
•This machine must be connected to an appropriate, dedicated electrical circuit. Nothing else must be connected to the circuit.
•Always connect the power cord to a circuit capable of handling 15 amperes with no other loads applied.
•Connect this machine to a correctly grounded outlet; consult a licensed electrician for assistance.
•Do not operate where aerosol products are being used.
•Do not let liquids touch the electronic controller. If it does, the controller must be inspected and tested for safety by an approved technician before it can be used again.
•The electrical wiring for the residence in which the machine will be used must obey the applicable local and provincial requirements.
•Exercise on this machine requires coordination and balance. Be sure to anticipate that changes in belt speed and incline angle of deck can occur during workouts, and be attentive in order to avoid loss of balance and possible injury
•A machine should never be left unattended when plugged in. Unplug from outlet when not in use, and before putting on or taking off parts.
•Use this machine only for its intended use as described in this manual. Do not use attachments not recommended by the manufacturer.
4
Assembly / Owner’s Manual
•This appliance is not intended for use by persons with reduced physical, sensory or mental capabilities, or lack of knowledge, unless they have been given supervision or instruction concerning use of the appliance by a person responsible for their safety. Keep children under the age of 14 away from this machine.
5
Assembly / Owner’s Manual
Safety Warning Labels and Serial Number
CAUTION
Risk of Injury to Persons - To Avoid injury, use extreme caution when stepping onto or off of a moving belt. Read instruction manual before using.
WARNING!
•Injury or death is possible if caution is not used while using this machine.
•Keep children and pets away.
•Read and follow all warnings on this machine.
•Refer to the Owner’s Manual for additional warnings and safety information.
•The heart rate displayed is an approximation and should be used for reference only.
•Not intended for use by anyone under 14 years of age.
•The maximum user weight for this machine is 400 lbs (181 kg.)
•This machine is for home use only.
WARNING!
HAZARDOUS VOLTAGE.
- Contact may cause electrical shock or burn. - Turn off and lock out power before servicing.
WARNING!
- Moving parts can crush and cut. - Keep guards in place.
- Lock out power before servicing.
6
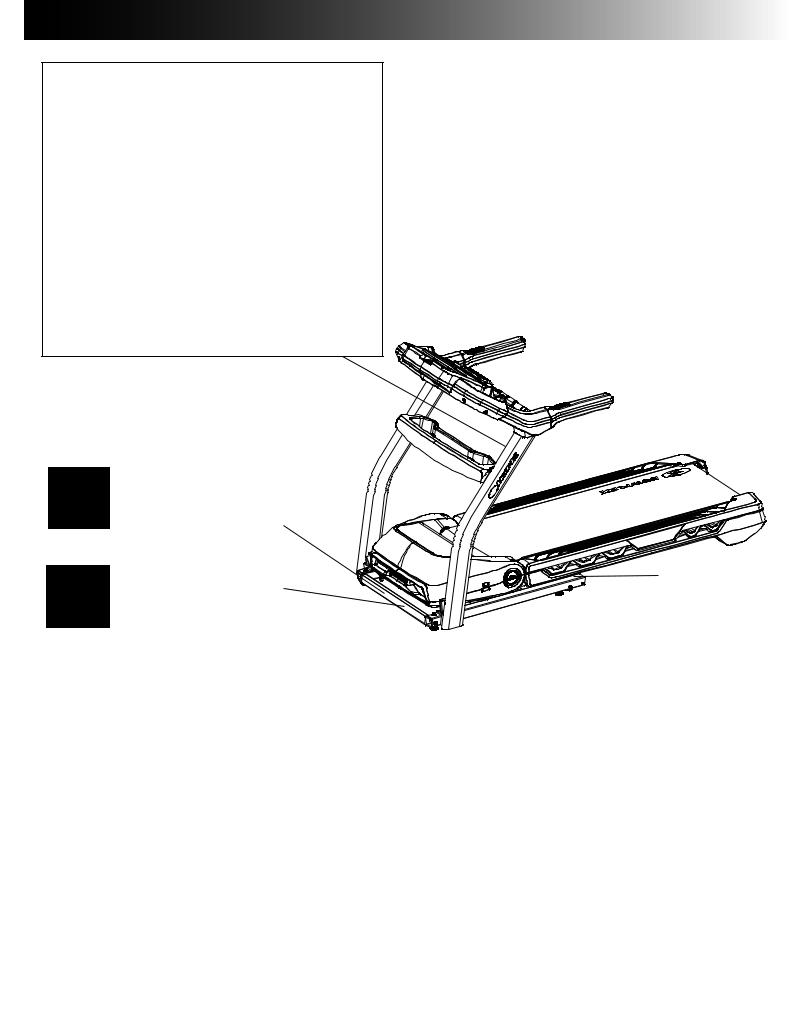
Serial Number and
Product Specification
Assembly / Owner’s Manual
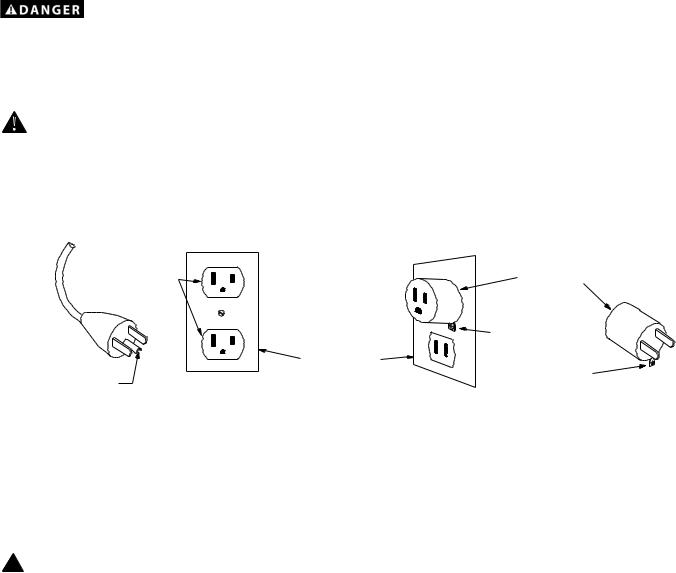
GroundingInstructions
This product must be grounded. If it should malfunction or break down, grounding provides a path of least resistance for electric current to reduce the risk of electric shock. This product is equipped with a cord having an equipment-grounding conductor and a grounding plug. The plug must be plugged into an appropriate outlet that is properly installed and grounded in accordance with all local codes and ordinances.
Improper connection of the equipment-grounding conductor can result in a risk of electric shock. Check with a qualified electrician or service provider if you are in doubt as to whether the product is properly grounded. Do not modify the plug provided with the product – if it will not fit the outlet, have a proper outlet installed by a qualified electrician.
If you connect the machine to an outlet with GFI (ground fault interrupt) or AFI (arc fault interrupt), machine operation can cause the circuit to trip.
This machine is for use on a nominal 120-V circuit, and has a grounding plug that looks like the plug illustrated below. A temporary adapter that looks like the adapter illustrated may be used to connect this plug to a 2-pole receptacle as shown if a properly grounded outlet is not available.
The temporary adapter should be used only until a properly grounded outlet can be installed by a qualified electrician. The tab for the grounding screw must be connected to a permanent ground such as a properly grounded outlet box cover. Whenever the adapter is used, it must be held in place by a metal screw.
|
Grounded |
Adapter |
|
Outlet |
|
|
|
Metal Screw |
|
Grounded |
Tab for Grounding |
Grounding Pin |
Outlet Box |
|
|
Screw |
|
|
|
EmergencyStopProcedure
The Treadmill machine is equipped with a Safety Key that can prevent serious injury, as well as prevent children from playing with and/or being injured on the machine. If the Safety Key is not correctly inserted into the Safety Key Port, the belt will not operate.
!Always attach the Safety Key Clip to your clothing during your workout.
When you use the machine, only remove the Safety Key in an emergency. When the key is removed while the machine is in operation, it will stop quickly, which could cause the loss of balance and possible injury.
For safe storage of the machine, and to prevent unsupervised operation of the machine, always remove the Safety Key and disconnect the power cord from the wall outlet and the power inlet. Place the power cord in a secure location.
The Console will display “ ERROR SAFETY KEY ”, followed by “INSERT SAFETY KEY ”, for a Safety Key fault. The Treadmill machine will not start a Workout, or will end and clear an active Workout, when the Safety Key is removed. Inspect the Safety Key and be sure it is connected to the Console correctly.
7
Assembly / Owner’s Manual
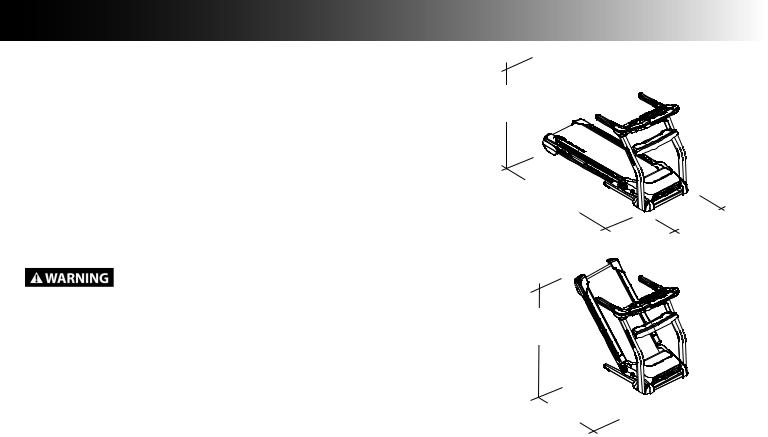
Specifications / Before Assembly
Maximum User Weight: |
400 lbs (181.4 kgs) |
54.7” |
|
|
|
Maximum Inclined Deck Height: |
16 inches (40.6 cm) |
(139 cm) |
|
||
Machine Weight: |
304 lbs (137.9 kg) |
|
Power Requirements: |
|
|
Operational Voltage: |
120V AC @60Hz |
|
Operating Current: |
15 A |
84.5” |
Heart Rate Chest Strap: |
1 CR2032 battery |
(214.6 cm) |
|
|
38.5” |
|
|
(97.8 cm) |
This product, its packaging, and components contain chemicals |
|
|
known to the State of California to cause cancer, birth defects, or |
|
|
reproductive harm. This Notice is provided in accordance with |
|
|
California’s Proposition 65. If you would like additional information, |
67” |
|
please refer to our web site at www.nautilus.com/prop65. |
(170.2 cm) |
|
|
|
52.5” |
|
|
(133.4 cm) |
Before Assembly
Select the area where you are going to set up and operate your machine. For safe operation, the location must be on a hard, level surface. Allow a minimum workout area of 86.5” x 163.5” (218.7 cm x 415.3 cm). Be sure that the workout space you are utilizing has adequate height clearance, taking into consideration the height of the user and the maximum incline of the machine.
Basic Assembly
Follow these basic points when you assemble your machine:
•Read and understand the “Important Safety Instructions” before assembly.
•Collect all the pieces necessary for each assembly step.
•Using the recommended wrenches, turn the bolts and nuts to the right (clockwise) to tighten, and the left (counterclockwise) to loosen, unless instructed otherwise.
•When attaching 2 pieces, lightly lift and look through the bolt holes to help insert the bolt through the holes.
•The assembly requires 2 people.
•Do not use any power tools for assembly.
Note: This fitness machine is designed to plug into a grounded, non-GFI/non-AFCI outlet only. To determine if your outlet or circuit breaker is GFI/AFCI, look for a test and reset button on them. If they have the test and reset button, it is a GFI/AFCI outlet or circuit breaker.
Machine Mat
The Bowflex™ Machine Mat is an optional accessory that helps keep your workout area clear and adds a layer of protection to your floor. The rubber machine mat provides a non-slip, rubber surface which limits static discharge and reduces the possibility of display errors. If possible, put your Bowflex™ Machine Mat in your selected workout area before you begin assembly.
To order the optional machine mat, go to: www.bowflex.com, or call 1 (800) 605–3369.
8
Assembly / Owner’s Manual
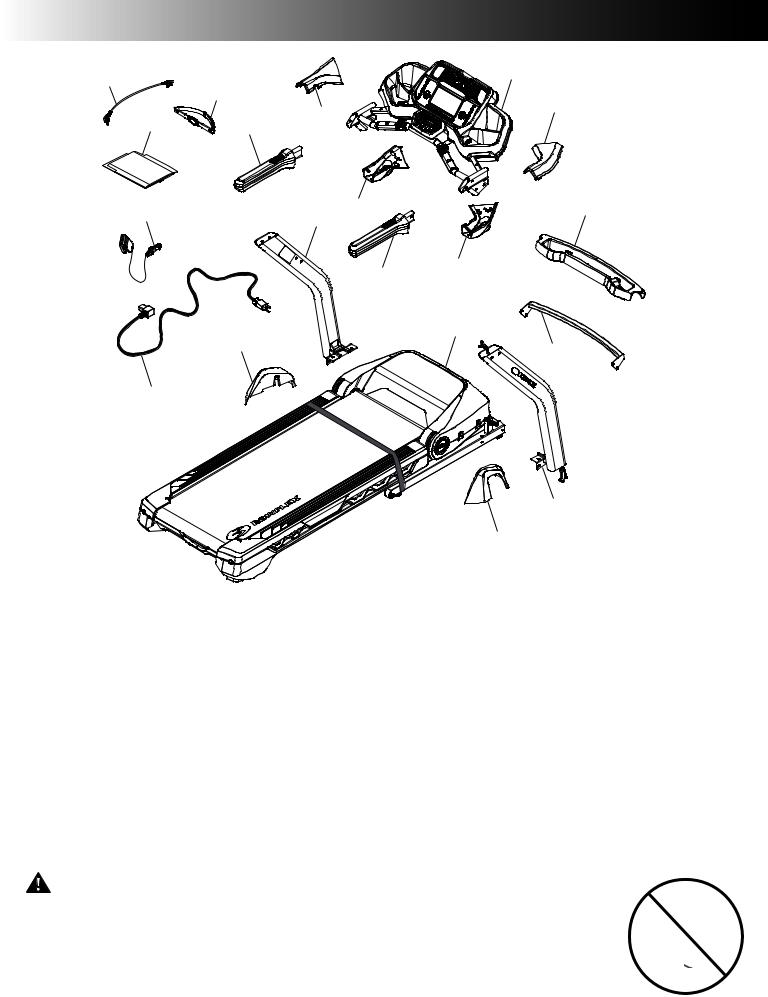
Parts
19 |
|
|
1 |
|
18 |
|
|
|
|
7 |
|
|
|
2 |
|
|
17 |
|
|
|
3 |
|
|
|
|
|
16 |
4 |
8 |
13 |
|
|
|
|
5 6
14 |
12 |
|
9 |
||
|
15
*
10
11
Item |
Qty |
Description |
Item |
Qty |
Description |
1 |
1 |
Console Assembly |
11 |
1 |
Base Shroud, Right |
2 |
1 |
Upper Junction Cover, Left |
12 |
1 |
Base Assembly |
3 |
1 |
Handlebar Assembly, Incline |
13 |
1 |
Upright, Left |
4 |
1 |
Lower Junction Cover, Left |
14 |
1 |
Base Shroud, Left |
5 |
1 |
Handlebar Assembly, Speed |
15 |
1 |
Power Cord |
6 |
1 |
Lower Junction Cover, Right |
16 |
1 |
Safety Key |
7 |
1 |
Upper Junction Cover, Right |
17 |
1 |
Document Kit / Hardware Card |
8 |
1 |
Tray |
18 |
1 |
Heart Rate Strap |
9 |
1 |
Crossbar |
19 |
1 |
Media Cable |
10 |
1 |
Upright, Right |
|
|
|
DO NOT CUT the Shipping Strap ( * ) on the Base Assembly until instructed.
When moving the Base Assembly, do not touch the Walking Deck Release Button. Pressing the Walking Deck Release Button releases the locking mechanism on the hydraulic lift.
9
Assembly / Owner’s Manual

Hardware / Tools / Assembly
A |
B |
C |
D |
E |
F G |
Item |
Qty |
Description |
Item |
Qty |
Description |
A |
22 |
Socket Hex Head Screw, M8x1.25x20 Black |
E |
6 |
Curved Washer, M8x18 Black |
B |
4 |
Socket Hex Head Screw, M8x1.25x70 Black |
F |
4 |
Pan Phillips Head Screw, M3.9x16 Black |
C |
26 |
Lock Washer, M8x18 Black |
G |
2 |
Pan Phillips Head Screw, M5x10 Black |
D |
20 |
Flat Washer, M8x18 Black |
|
|
|
Note: Select pieces of Hardware have been provided as spares on the Hardware Card. Be aware that there may be remaining Hardware after the proper assembly of your machine.
Tools
Included |
|
Not Included |
6mm |
#2 |
(recommended) |
DO NOT CUT the Shipping Strap on the Base Assembly until it has been placed face up as shown in the appropriate work space.
*
10
Assembly / Owner’s Manual
1. Connect the Cables and Attach the Uprights to Frame
Note: Do not crimp cables. Do not fully tighten Hardware until instructed.
13
 6mm
6mm
X4
A |
10 |
C

D 
12
X4
D
C
B 


6mm
11
Assembly / Owner’s Manual
2. Attach the Crossbar to the Frame Assembly
Note: Do not crimp cables. Do not fully tighten Hardware until instructed.
A right (“ R ”) decal has been applied to the right side of this part to assist with assembly.
12
9
X4
6mm
A
C 
D
Assembly / Owner’s Manual

3. Place the Lower Junction Covers onto the Uprights
Note: Do not let the Console Cables to fall into the Right Upright.
4
6
13
Assembly / Owner’s Manual
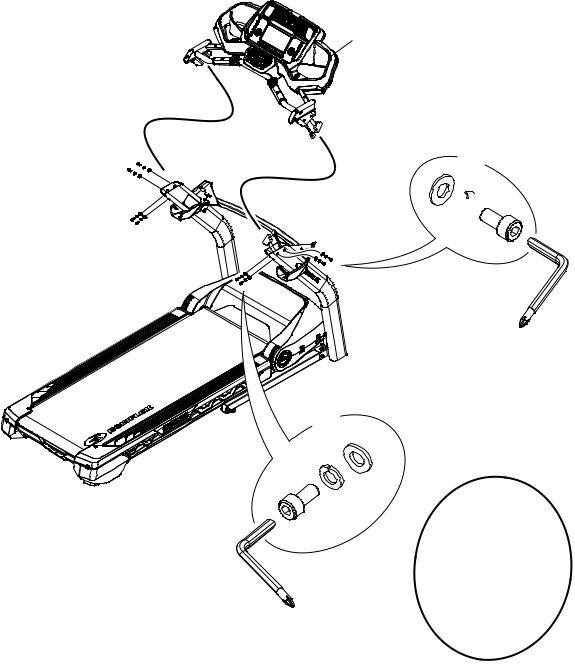
4. Connect the Cables and Attach the Lower Junction Covers and Console Assembly
Note: Do not crimp cables. Do not fully tighten Hardware until instructed.
1
X4
D C
A
6mm 
X4
E
C
A
6mm
14
Assembly / Owner’s Manual

5. Fully Tighten All Hardware from Previous Steps
Note: Do not crimp the Cables.
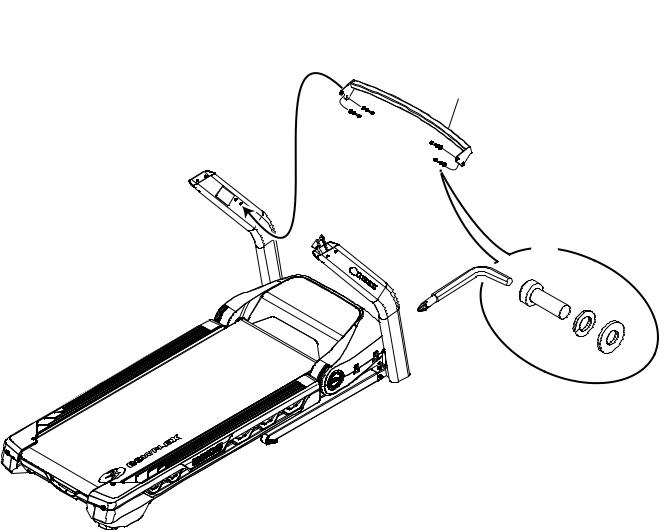
6. Connect the Cables and Attach the Side Handlebars to the Frame Assembly
Note: Do not crimp the Cables.
|
X4 |
|
3 |
D |
|
C |
||
|
||
|
A |
|
“INCLINE” |
6mm |
|
5 |
||
|
“SPEED”
X2
 E
E
 C
C
 A
A
 6mm
6mm
15
Assembly / Owner’s Manual

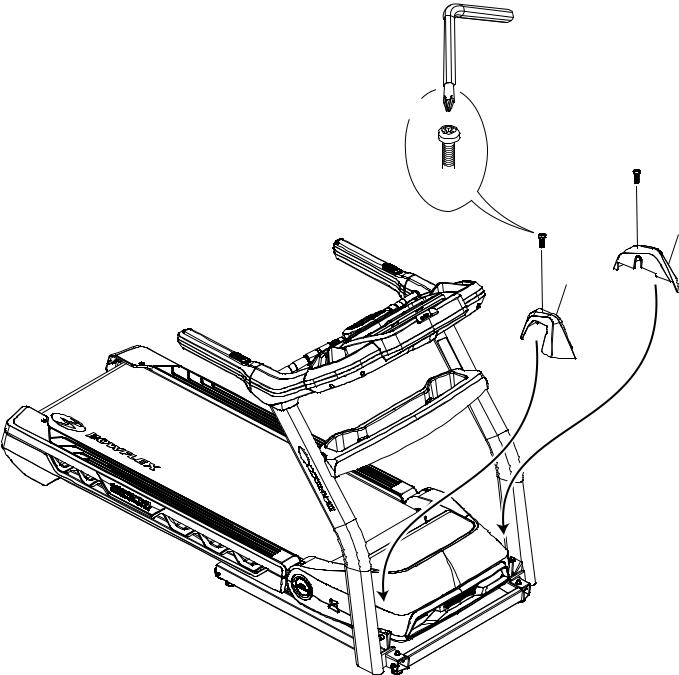
7.Snap the Upper and Lower Junction Covers into Place and Secure with Hardware to the Frame Assembly
2 |
7 |
|
X4
F

#2
16
Assembly / Owner’s Manual
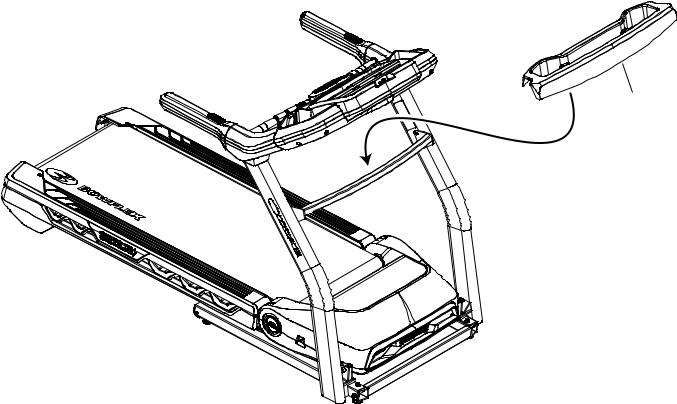
8. Tighten All Hardware from Previous Steps and Attach the Crossbar Tray to the Frame Assembly
8
17
Assembly / Owner’s Manual
9. Attach the Base Shrouds to the Frame Assembly
#2
X2
G
14
11
18
Assembly / Owner’s Manual
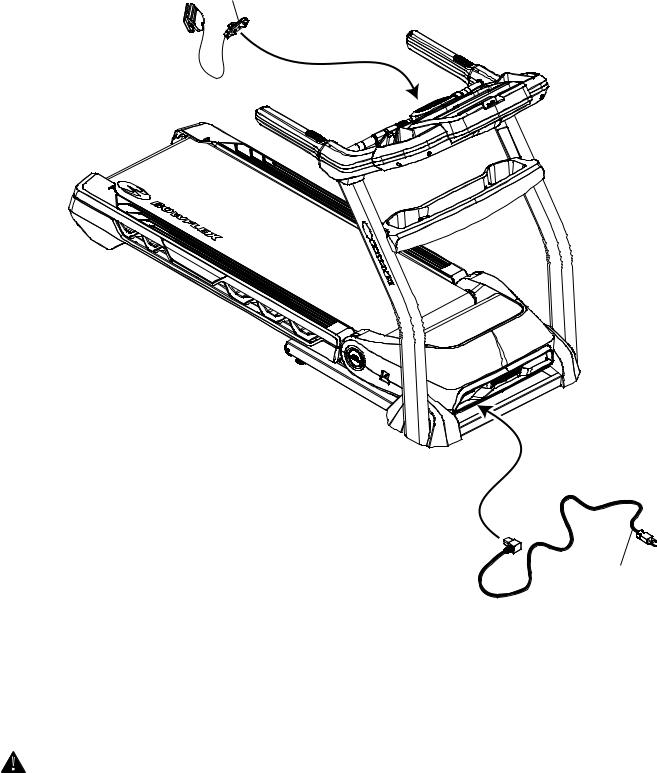
10. Connect the Power Cord and Safety Key to the Frame Assembly
 Connect this machine to a properly grounded outlet only (see Grounding Instructions).
16
15
11. Final Inspection
Inspect your machine to ensure that all fasteners are tight and components are properly assembled.
Note: Remove any protective covers from the face of the Console.
Be sure to record the serial number in the field provided at the front of this manual.
Do not use until the machine has been fully assembled and inspected for correct performance in accordance with the Owner’s Manual.
19
Assembly / Owner’s Manual
Adjustments
Moving and Storing the Machine
The machine can be moved by one or more persons. Use caution when you move the machine. The treadmill is heavy and can be awkward. Make sure that your own physical strength is capable of moving the machine. Use a second person if necessary.
1. Before the machine can be moved, inspect the Walking Deck to be sure the Incline setting is at “0”. If necessary, adjust the Incline setting to “0”.
Be sure the area below the machine is clear before adjusting the incline of the Deck. Fully lower the incline of the Deck after each workout.
2. Remove the Safety Key and place it in a secure location.
 When this machine is not in operation, remove the Safety Key and keep out of the reach of children.
3.Make sure that the power switch is turned Off, and the power cord is disconnected.
4.You must fold the treadmill before you move it. Never move the treadmill if it is not folded.
 Never move the machine with the Walking Deck not folded. Rotating or moving parts can pinch, resulting in personal injury.
5. Make sure that there is safe clearance around, on and above your treadmill. Make sure there is no object to spill or cause blockage from the fully folded position.
 Be sure there is adequate height clearance for the raised deck.
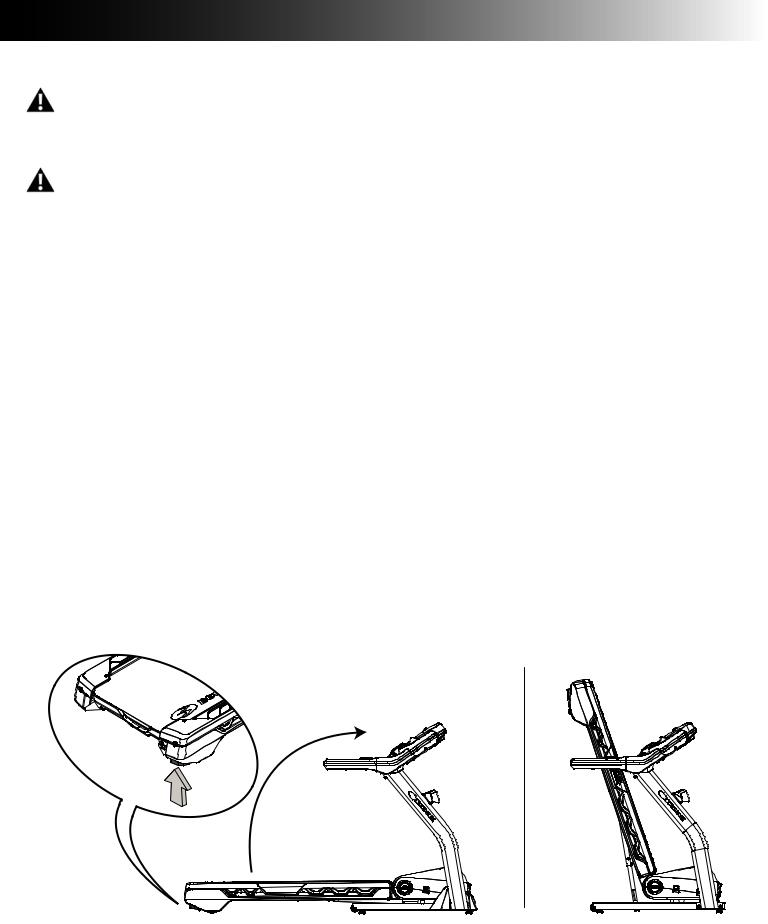
6. With your right hand, push and hold down the Walking Deck Release Button. Using the lifting handle found below the rear of the walking belt, lift the walking deck fully upward and engage the hydraulic lift. The Walking Deck Release Button can be released when the walking deck has moved about 10 inches (25.4 cm). Be sure that the hydraulic lift is correctly locked in place.
20
Assembly / Owner’s Manual
Use proper safety precautions and lifting techniques. Bend your knees and elbows, keep your back straight and pull up equally with both arms. Make sure that your own physical strength is capable of lifting the walking deck until it engages the locking mechanism.
Use a second person if necessary.
Do not use the walking belt or rear roller to lift the treadmill. These parts do not lock in place and can abruptly move. Injury to you or damage to the machine can occur.
7. Make sure that the locking mechanism is engaged. Carefully pull back on the walking deck and make sure that it does not move. When you do this, keep clear of movement path in case the treadmill lock is not engaged.
 Do not lean against the treadmill when it is folded. Do not put items on it that could cause it to become unstable or fall. Do not connect the power cord or try to operate the treadmill in the folded position.
8. Carefully tilt the base frame of the folded treadmill a small distance back on the transport wheels while grasping the front support bar.
Do not use the Console, handlebars, or lifted walking deck to lift or move the treadmill. Damage to the treadmill can occur.
Keep clear of the movement path of the lifted walking deck.
9. Roll the machine on the transport wheels to its new location.
Place the machine on a clean, hard, level surface, free from unwanted material or other objects that may hamper your ability to move freely. A rubber mat should be used below the machine to prevent the release of static electricity and protect your flooring.
Do not put objects in the path of the walking deck when lowered.
NOTICE: Move the machine carefully so that it does not hit other objects. This can damage the Console operation.
10. Prior to use, refer to the “Unfolding the Machine” procedure in this manual.
To prevent unsupervised operation of the machine always turn the power switch to Off, remove the Safety Key, and disconnect the power cord from the wall outlet and machine power input. Place the power cord in a secure location.
21
Assembly / Owner’s Manual
 Loading...