


TC1000
Bowex® TreadClimber®
Assembly Guide and
Owner’s Manual
TC1000 • TC3000 • TC5000
Special Edition Includes:
Dr. Ellington Darden’s Six Week Fat
Loss-Body Leanness Program:
“Fast Fat Loss Now!”
Preface
7 ! 2 . ) . '
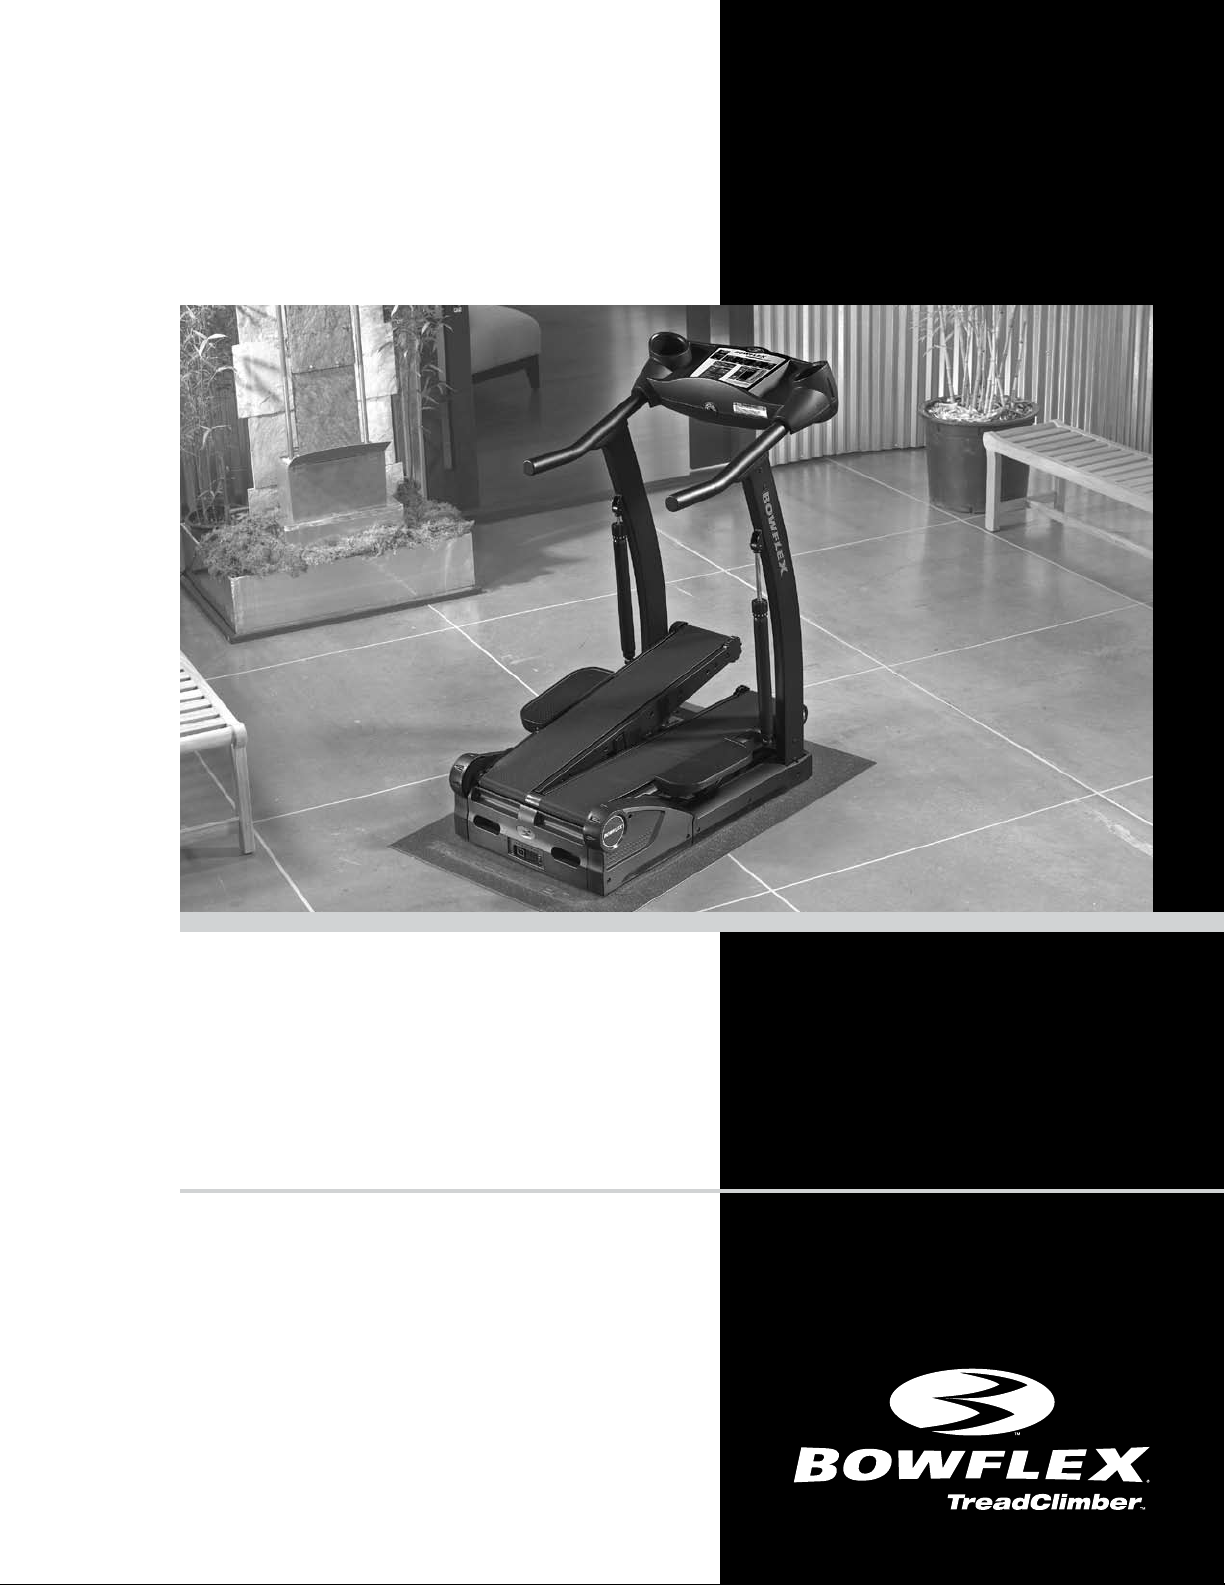
CONGRATULATIONS on your commitment to
improving your health and fitness! By choosing
Bowflex® TreadClimber® exercise machine as
your key to success, you will be using the best
tool available to help you shed pounds, increase
cardiovascular efficiency, and most importantly,
look and feel GREAT!
The Bowflex® TreadClimber® machine is an
innovative blend of the best features from the
three most effective aerobic workout machines
available: elliptical, stair climber, and treadmill,
which means your results on the TreadClimber®
machine will outperform those you can get using
any other single aerobic fitness machine!
This three-in-one versatility uniquely targets your
muscles and provides you the means to achieve
optimum fitness and tone while minimizing the
impact of typical workout stressors on your body.
Instead of pounding your joints and tendons while
jogging, running or cycling, the TreadClimber®
machine burns fat while you maintain a walking
pace throughout the length of your workout.
Please take your time to read through the entire
Assembly Guide and Owner’s Manual before
attempting to use your Bowflex® TreadClimber®
machine. It’s important to understand how to
assemble and use the machine and how to best
perform each exercise before you actually do so.
With all of the health and fitness choices available
today, we understand that finding the best workout
equipment can be confusing. Everyone at Nautilus,
Inc. would like to congratulate you and thank you
for selecting a product into which we have put
years of research, innovation, and ingenuity. We
are proud to offer you the Bowflex® TreadClimber®
machine.
How to Use This Manual
Regular use of the TreadClimber® exercise system
is an effective way to develop aerobic fitness while
conditioning the major muscles of the lower body.
To get the best results and keep your machine in
peak operating condition, carefully read and follow
the guidelines presented in this manual.
This Assembly Guide and Owner’s Manual
contains Bowflex® TreadClimber® machine workout
combinations to build the best
calorie-burning, cardiovascular
fitness routines for you, and a
specialized health program “Fast
Fat Loss Now!” by Dr. Ellington
Darden.
THIS SYMBOL APPEARING THROUGHOUT THIS
Combine TreadClimber® workout
results with “Fast Fat Loss Now!”
to build lifetime health habits and
become the healthiest, leanest,
fittest YOU ever!
MANUAL MEANS PAY ATTENTION! BE ALERT!
YOUR SAFETY IS INVOLVED!
Consult Your Physician Before Starting
Any Exercise Program.
Only he or she can determine the exercise program that is
appropriate for your particular age and condition. If you have
not been exercising or are pregnant or have a heart condition or
any physical limitation, failure to consult your physician before
engaging in physical exercise, such as using the Bowflex®
TreadClimber® exercise machine, could result in serious injury
or death. If while using the Bowflex® TreadClimber® exercise
machine you have any pain or tightness in your chest, an
irregular heart beat, shortness of breath, feel faint, light-headed
or dizzy or have any pain or discomfort, STOP and consult your
physician immediately.
i
Bowex® TreadClimber® Owner’s Manual

Table of Contents
Before You Start
TreadClimber® Features . . . . . . . . . . . . . . 1
TreadClimber® Specifications . . . . . . . . . . 2
Important Safety Precautions . . . . . . . . . . 3
Emergency Stop Procedures . . . . . . . . . . 5
Care of Your TreadClimber® Machine . . . . 6
Assembly Guide
Before You Assemble . . . . . . . . . . . . . . . . . 9
TreadClimber® Parts Reference Guide . . 10
Hardware and Tool List . . . . . . . . . . . . . . 13
Assembling Your TreadClimber® Machine 14
Calibration Process
(TC3000 and TC5000 only) . . . . . . 24
TreadClimber® Satisfaction Guarantee . 27
TreadClimber® Warranty Information . . 28
TreadClimber® Workout Instructions
Determining Your Fitness Level . . . . . . . . 42
Treadmill Workout . . . . . . . . . . . . . . . . . . 44
Stair-Stepper Workout . . . . . . . . . . . . . . . 46
TreadClimber® Workout . . . . . . . . . . . . . . 47
Fat Loss-Body Leanness Program
“Fast Fat Loss Now!”
By Dr. Ellington Darden . . . . . . . . . 51
Repairs/Maintenance
Contacting Customer Service . . . . . . . . . 60
Ordering Replacement Parts . . . . . . . . . . 60
TC5000/TC3000 Diagnostics . . . . . . . . . . 61
Parts . . . . . . . . . . . . . . . . . . . . . . . . . . . . 62
Important Contact Numbers . . . . . . . . . . 65
Getting Started
Before You Start . . . . . . . . . . . . . . . . . . . . 32
Select Your Workout Level . . . . . . . . . . . . 33
Adjusting Workout Level Settings . . . . . . . 34
Pausing or Stopping . . . . . . . . . . . . . . . . . 35
TC5000 Features . . . . . . . . . . . . . . . . . . . 36
TC3000 Features . . . . . . . . . . . . . . . . . . . 39
TC1000 Features . . . . . . . . . . . . . . . . . . . 39
Setting English or Metric Measurement Units
(TC3000 and TC5000 only) . . . . . . 40
Walking Belts Adjustment . . . . . . . . . . . . . 41
Bowex® TreadClimber® Owner’s Manual
ii
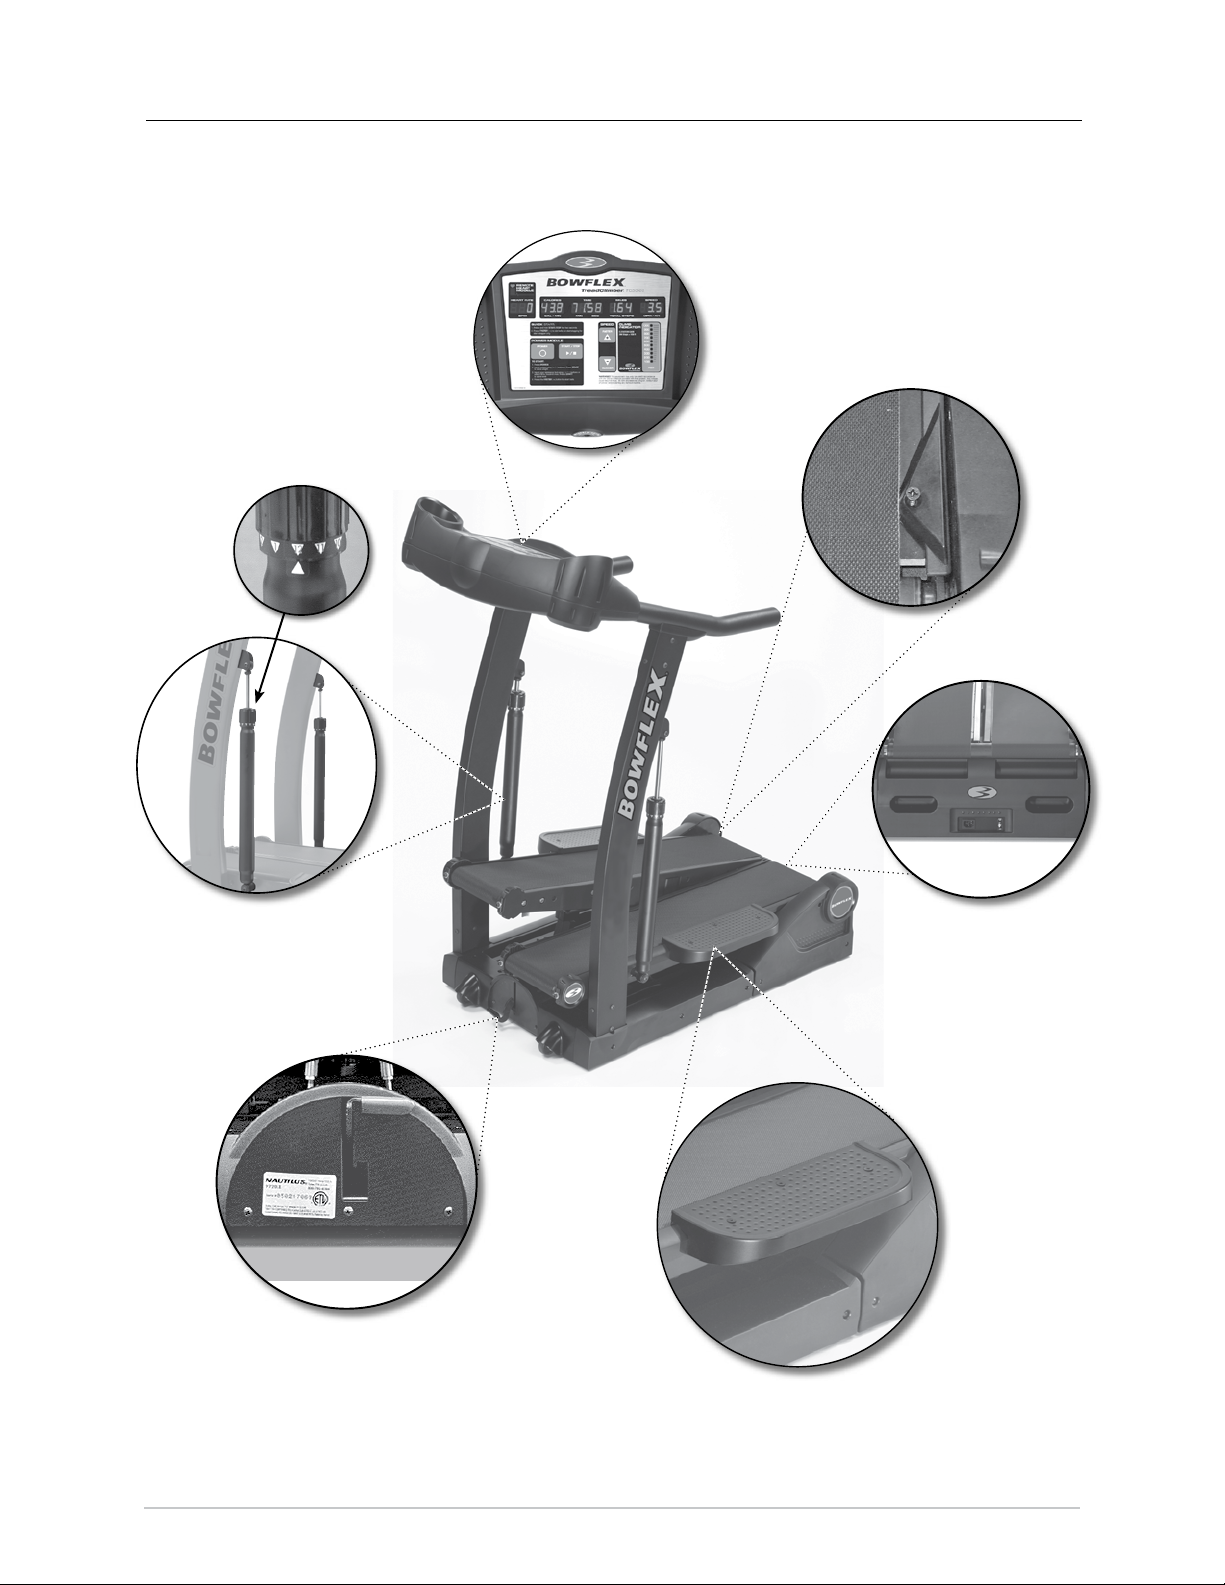
TreadClimber® Features
Workout Level
Setting Dials
Console
Belt Guides
Hydraulic Resistance Cylinders
Locking Lever
(Rear View)
Transport Handles,
Incoming Power Plug,
and Main Power Switch
Treadle Side Foot
Support Platforms
1
Bowex® TreadClimber® Owner’s Manual
TreadClimber® Specifications
Throughout this manual, all references to the left or right side, and to the front or back, are made as if
you were on the TreadClimber® machine, ready to exercise. For example, the power cord is plugged into
the incoming power plug at the back of the base.
The dimensions and general specifications for the Bowflex® TreadClimber® exercise machine are as
follows:
Physical Dimensions
Length
Width 28.5 inches (72.5 cm)
Height 55.25 inches (140.5 cm)
Weight 185 pounds (84 kg)
Shipping Weight 220 pounds (100 kg)
System Capacities
Maximum Weight Capacity
Speed
TC1000 0.5 to 3.8 MPH (0.8 to 6.1KPH )
TC3000 and TC5000 0.7 to 4.0 MPH (1.1 to 6.4 KPH)
Workout Resistance Levels 1 to 12
Warranty Length See the Warranty section for full
46 inches (117 cm)
300 lbs (136 kgs)
information per machine type
Component Specifications
Belt
7.75 in x 38.5 in (19.5 cm x 98 cm)
Motor 0.5 hp continuous duty
Treadmill Incline 10% Grade
Frame Powder-coated steel
Operational Voltage 95 to 130 VAC 50 - 60 Hz
Operational Current 10A Max
Breaker 12A
Always use a 15A circuit with no loads. A short 14 gauge, 3 wire extension cord is permissible.
Regulatory Approvals
Patent Information
U.S. and International Patents Pending
TC1000 TC3000 TC5000
Bowex® TreadClimber® Owner’s Manual
2
Important Safety Precautions
7 ! 2 . ) . '
SAVE THESE INSTRUCTIONS
The following definition applies to the word “Warning” found throughout this manual:
WARNING – Used to call attention to POTENTIAL hazards that could result in personal injury
or loss of life.
READ ALL INSTRUCTIONS BEFORE USING THE MACHINE
Failure to follow these precautions can cause damage to
the Bowflex® TreadClimber® exercise machine and serious
injury to users and bystanders and can also compromise the
effectiveness of your exercise program.
1. Read, understand and carefully follow all warnings, instructions, and procedures on the Bowflex® TreadClimber® exercise
machine, and in the Assembly Guide and Owner’s Manual before using the TreadClimber® machine. Pay particular attention
to and test the Emergency Stop Procedures on Page 5 before use.
2. CONSULT YOUR PHYSICIAN BEFORE STARTING ANY EXERCISE PROGRAM. Only he or she can determine the exercise
program that is appropriate for your particular age and condition. If you have not been exercising or are pregnant or have
a heart condition or any physical limitation, failure to consult your physician before engaging in physical exercise, such as
using the Bowflex® TreadClimber® , could result in serious injury or death. If while using the Bowflex® TreadClimber you
have any pain or tightness in your chest, an irregular heart beat, shortness of breath, feel faint, light-headed or dizzy or have
any pain or discomfort, STOP and consult your physician immediately.
3. Parents and others in charge of children should be aware that children, because of their natural play instinct and fondness
for experimenting, may be tempted to situations and behavior for which the equipment is not intended, with resulting
damage to the equipment and injury to the children or others. Children’s access to the equipment should therefore be
controlled, and they should be instructed about the potential for personal injury and damage if they play with the equipment
4. Inspect the TreadClimber® machine for incorrect, worn, or loose components and then correct, replace, or tighten prior
to use. The machine can only be safely used when it is regularly inspected for damage or wear. Inoperable components
should be replaced immediately or the equipment taken out of use until it is repaired
5. Be careful when mounting or dismounting the TreadClimber® machine. Do not stand on the Plastic Frame or Drive Covers
but always step directly onto the Side Foot Support Platforms. Never step onto the treadles at a high belt speed. Start your
workout slowly and gradually increase to your desired workout speed.
6. The maximum speed of the TreadClimber® machine is 4 MPH (6.4 KPH). Do not attempt to run on the TreadClimber®
machine, but keep your highest speed at a brisk walk.
7. Do not wear any loose or dangling clothing or jewelry while using the Bowflex® TreadClimber® exercise machine.
Always keep your hands, feet, clothing, etc. clear from beneath the treadles and from all moving parts. Never use your
TreadClimber® machine with the Plastic Drive or Frame Covers removed.
8. Always wear rubber-soled athletic shoes on the TreadClimber® machine. Never use the TreadClimber® machine
barefooted or wearing only socks.
9. Keep your foot centered on each treadle—do not allow your feet to cross in front of your body as you increase speeds.
3
Bowex® TreadClimber® Owner’s Manual

Important Safety Precautions
10. Keep your hands on the support handlebars and stand as close to the front of the machine as is comfortable in order to
remain in balance on the treadles.
11. Never convert from or into treadmill mode while the belts are in motion or the machine is powered up. Turn off power,
unplug cord from wall outlet, line up the treadles, and then lock or release the treadle locking lever.
12. Never adjust the Hydraulic Cylinder Workout Settings while belts are in motion. Step completely off of the TreadClimber®
machine, stop the belts, and turn the power off prior to adjusting.
13. Maximum user weight for the Bowflex® TreadClimber® exercise machine is 300 pounds (136 kg). For your safety, do not
use or allow others to use the Bowflex® TreadClimber® exercise machine if they weigh in excess of 300 pounds (136 kg).
14. Make certain that observers stand clear of the Bowflex® TreadClimber® exercise machine when it is in use. Extra care
must be taken when disabled persons or pets are nearby.
15. Never allow children to use the Bowflex® TreadClimber® exercise machine unsupervised. To do so could result in injury.
Before children are allowed to use the equipment, their mental and physical development should be taken into account
through consultation with their doctor, who must approve any exercise program before a child attempts it. Children should
be controlled and instructed on the correct use of the equipment.
16. This equipment is under no circumstances suitable as a children’s toy.
17. For safety and security, when the TreadClimber® machine is not in use, always lock the treadles and remove the Safety
Key.
18. Locate the TreadClimber® machine on a clean, hard, level surface, free from debris, or other objects that may hamper
your ability to move freely. Always use a rubber mat beneath the TreadClimber® machine to ground it, to prevent static
electricity discharge and to protect your flooring.
19. Do not use your TreadClimber® machine outdoors, on dirt floors, or in any damp or wet location.
20. Keep the surface of the TreadClimber® machine dry and free from dust or moisture.
21. Use only parts, attachments or accessories that are provided with the TreadClimber® machine.
22. Always connect the power cord to a circuit capable of handling 10 amperes with no other loads. Keep all cords away from
heated surfaces.
23. Always unplug the power cord from the wall outlet before removing or installing parts to avoid the risk of electrocution,
shock or mechanical injury.
24. Position the power cord alongside the Bowflex® TreadClimber® exercise machine, out of your way when you dismount the
machine. Take care to avoid stepping on the power plug. Check cord and plug placement before beginning your workout.
25. Always be gentle when plugging in and unplugging the power cord from the machine base.
26. Never use the power cord if it has a damaged cord or plug, has been immersed in water, or is not working properly. Contact
a TreadClimber® Representative to arrange for replacement of a damaged cord.
27. Never drop or insert any object into any opening on the machine.
28. Do not operate where aerosol (spray) products are being used.
29. Do NOT attempt to move the TreadClimber® machine without help, or from the front of the unit. Doing so could cause injury
to you or damage the machine.
30. The TreadClimber® machine is intended for individual consumer use only, and is not meant for use by institutions.
31. The warning labels affixed to the TreadClimber® machine contain important information about your safety. Always read
and follow the Warning and Safety labels. Do not remove these labels. If at any time the warning labels become loose,
unreadable or dislodged, replacements are available by calling a Nautilus Representative.
Bowex® TreadClimber® Owner’s Manual
4
Emergency Stop Procedures
7 ! 2 . ) . '
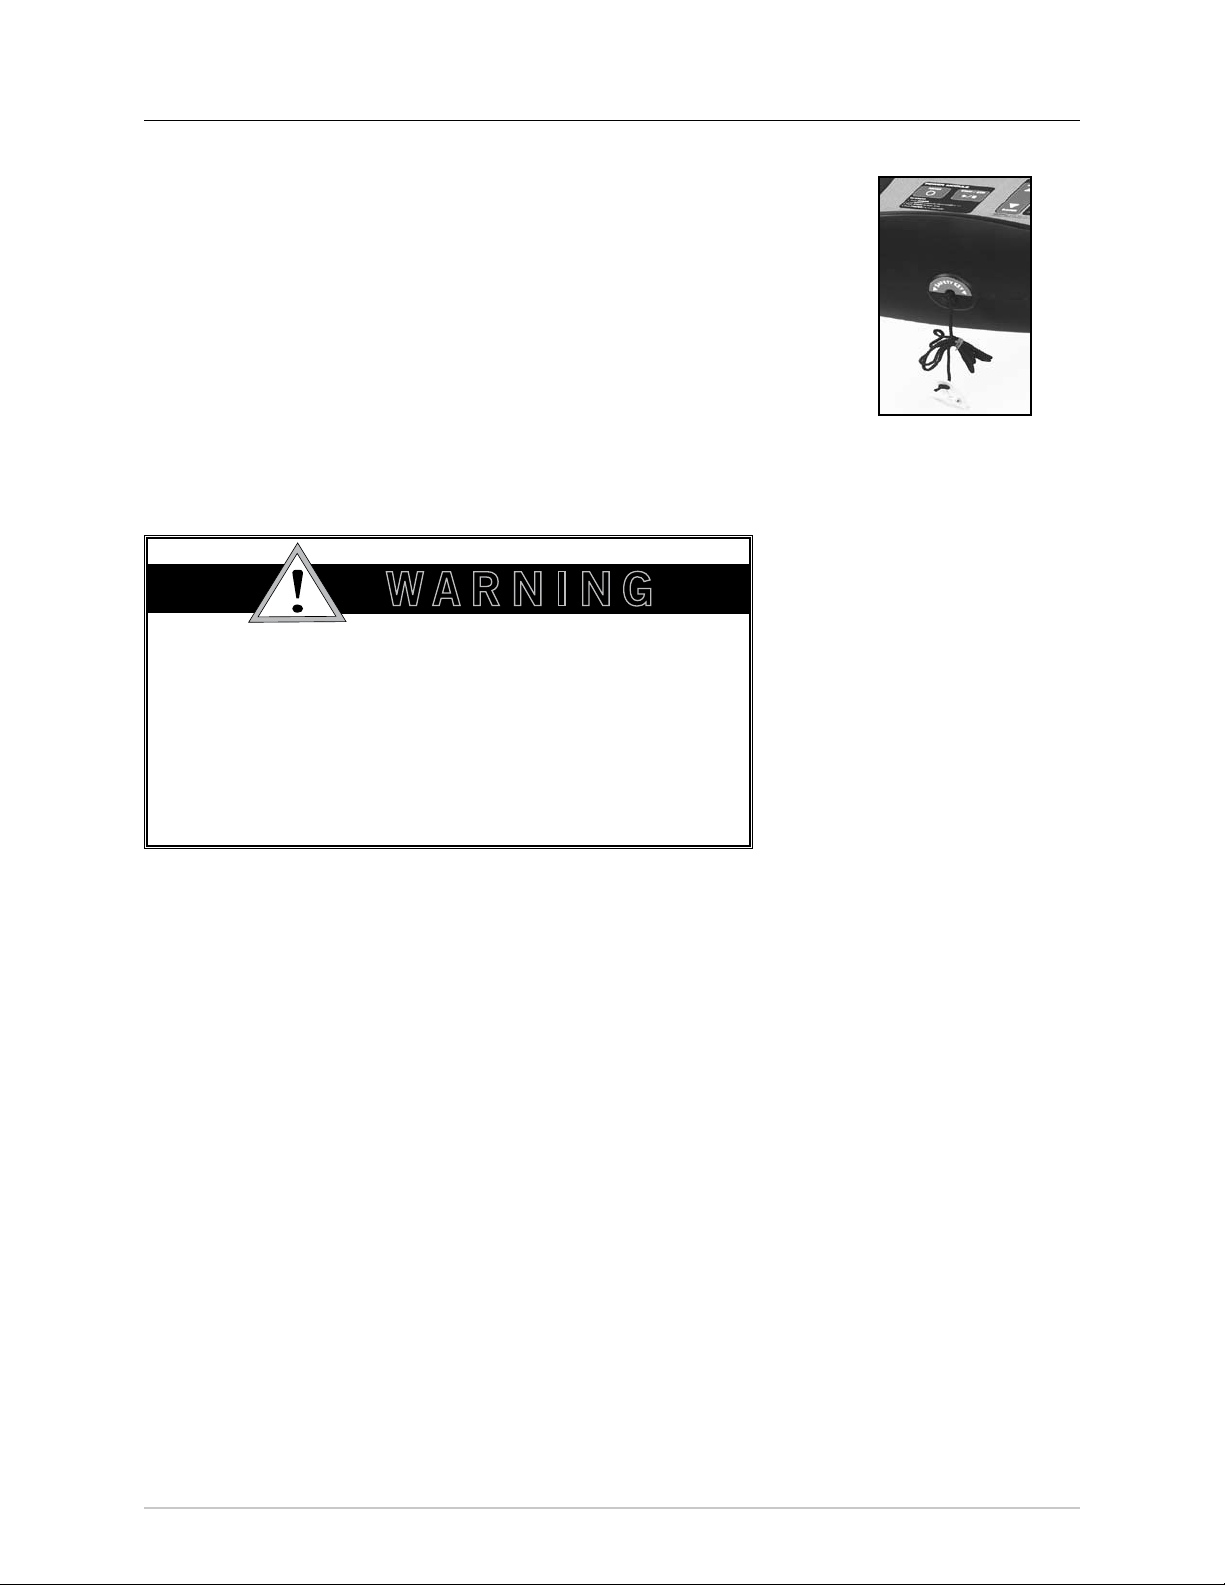
Your TreadClimber® machine is equipped with a SAFETY KEY
that can protect you from serious injury and inhibit children from
playing with and/or being injured on the TreadClimber® machine.
If the Safety Key is not fully inserted into the safety keyhole, the
TreadClimber® machine will NOT power up.
ALWAYS ATTACH THE SAFETY KEY CLIP TO YOUR CLOTHING
DURING YOUR WORKOUT.
Always remove the Safety Key from the TreadClimber® machine
when not in use to prevent children or other persons from using the
machine unsupervised.
Safety Key with Clip
REMOVE THE SAFETY KEY WHILE USING
THE TREADCLIMBER® MACHINE ONLY IN AN
EMERGENCY. WHEN THE KEY IS REMOVED, THE
TREADCLIMBER® MACHINE WILL STOP INSTANTLY,
WHICH COULD CAUSE SOMEBODY USING THE
MACHINE TO LOSE BALANCE OR FALL.
This feature is meant to prevent serious harm and, used properly, is an excellent way to protect
your safety during your workout.
5
Bowex® TreadClimber® Owner’s Manual
Care of your TreadClimber® Exercise Machine
7 ! 2 . ) . '
! 4 4 % . 4 ) / .
$ ! . ' % 2
The Bowflex® TreadClimber® machine’s safety and integrity
can only be maintained when it is regularly examined for
damage and immediately repaired.
It is the sole responsibility of the owner to ensure that
regular maintenance is performed. Worn or damaged
components still under warranty must be replaced
immediately and the TreadClimber® machine shall
remain unused until the required repair is made. Only
manufacturer-supplied or approved components shall be
used to maintain and repair the TreadClimber® machine.
ALWAYS UNPLUG YOUR TREADCLIMBER MACHINE FROM
THE OUTLET BEFORE CLEANING OR SERVICING THE
UNIT.
Helpful Hints
Read all maintenance instructions thoroughly
before beginning work. In some cases, an
assistant is required to perform the necessary
tasks. All references to the right or left side, and to
the front or back are made as if you were on the
TreadClimber® machine ready to exercise.
Initial Service
Upon receiving your TreadClimber® machine, use
a soft, clean towel to wipe off the dust that may
have accumulated during shipping. Your new
machine will require minor assembly. Refer to the
Assembly Guide section of this manual for details.
Accessories
For best performance, we recommend your
TreadClimber® machine be placed on a rubber
machine (treadmill) mat. Along with reducing
noise, a rubber mat will help keep dust and debris
away from your TreadClimber® machine’s motor
and belts, and will reduce static electricity, which
could otherwise cause a sudden charge to the
TreadClimber® machine’s electronic components.
The Bowflex® TreadClimber® Machine Mat is
a professional-quality machine mat designed
specifically to fit under your Bowflex®
TreadClimber® fitness machine and provide added
stability. In addition to protecting your floors from
scratches and perspiration, the machine mat
reduces your TreadClimber® motor’s exposure to
dust and debris. And it gives your workout area a
clean, finished look.
For more information on this accessory and other
Bowflex products available from Nautilus, Inc.
check out: www.nautilus.com or www.treadclimber.
com.
Cleaning
General cleaning of the TreadClimber® machine
will prolong the life of your machine and improve
performance.
Keep the unit clean by dusting regularly. Be sure
to dust the exposed part of the deck on either side
of the walking belts and also the side rails.
Clean the top of the belt with a damp, soapy cloth
and wipe carefully and thoroughly with a dry cloth.
Be careful to keep liquid away from inside the
base frame and beneath the belts.
Bowex® TreadClimber® Owner’s Manual
6

Care of your TreadClimber® Exercise Machine
7 ! 2 . ) . '
7 ! 2 . ) . '
! 4 4 % . 4 ) / .
$ ! . ' % 2
# ! 5 4 ) / .
Walking Belt and Deck Lubrication
The TreadClimber® machine is equipped with a
pre-lubricated, low maintenance deck and belt
system. Belt friction may affect the function and life
of the TreadClimber® machine. For the best results
from your TreadClimber® machine, lubricate the
treadles periodically with a silicone lubricant, using
the following instructions:
1. Unplug the TreadClimber® machine completely
from the wall outlet, and remove the power cord
from the incoming power plug.
Always unplug the power cord from
the wall outlet before removing or
installing parts to avoid the risk of
electrocution, shock or mechanical
injury.
2. While the TreadClimber® machine’s treadle
surfaces are still warm (not hot), apply a very
thin layer of silicone lubricant directly onto the
treadle beneath each belt—gently lift each
side of the belt and apply a few drops of the
lubricant.
treadle surfaces under the belts. If the
decks appear worn, contact a TreadClimber®
Representative at 1-800-NAUTILUS (1-800-628-
8458).
NOTE: To reduce the possibility of slipping, be
sure the treadle area is free from grease
or oil. Wipe off any excess oil from the
machine surfaces.
Use the following timetable as a guide to lubricate
the decks:
• Light user (fewer than 3 hours/week):
annually
• Medium user (3-5 hours/week):
every 6 months
• Heavy user (more than 5 hours/week):
every three months
We recommend that you use the following:
• Lube-N-Walk® Treadmill Lubrication Kit,
available from JAD Fitness, Inc. (800-8773486 or www.jadfitness.com) or your local
specialty fitness dealer.
• 8300 Silicone Spray, available at most
Hardware and Auto Parts stores.
Always use a silicone-based lubricant.
Never use a degreaser like WD-40® on
the Bowflex® TreadClimber® exercise
machine, as this could seriously
impact performance.
3. Plug the TreadClimber® machine back into the
machine base and then into wall outlet.
4. Stand to one side of your TreadClimber®
machine on the rubber mat.
5. Turn on your TreadClimber® machine, and start
the belts at the slowest speed. Let the belts run
for approximately 15 seconds.
6. Turn off your TreadClimber® machine.
7. Take care to wipe up any excess lubricant from
the treadles and your rubber floor mat. We also
recommend a periodic inspection of the
7
Inspecting
1. Visually inspect the TreadClimber® machine
every time you use it for wear, damage, or
loose parts.
2. Inspect the frame for any rust, bubbling, or
paint chips during the weekly cleaning. The
salt in perspiration can damage the unpainted
surfaces.
3. Inspect the belts for excessive wear during
lubrication. Adjust the belt tension if necessary.
Bowex® TreadClimber® Owner’s Manual
Care of your TreadClimber® Exercise Machine
7 ! 2 . ) . '
Determining Hours Used (TC3000 and TC5000 models only)
To determine the number of hours you have used your TreadClimber® machine:
1. With the TreadClimber® Main Power Switch turned on, stand on the side foot support platforms.
2. Remove and re-insert the SAFETY KEY.
3. The total whole hours used will be displayed in the TIME display window. No fractions of, or
partial hours will be displayed.
4. The software version will also be displayed in the MILES display window.
5. The display will only be visible for 3-5 seconds. Repeat removing and re-inserting the SAFETY
KEY to view the display again.
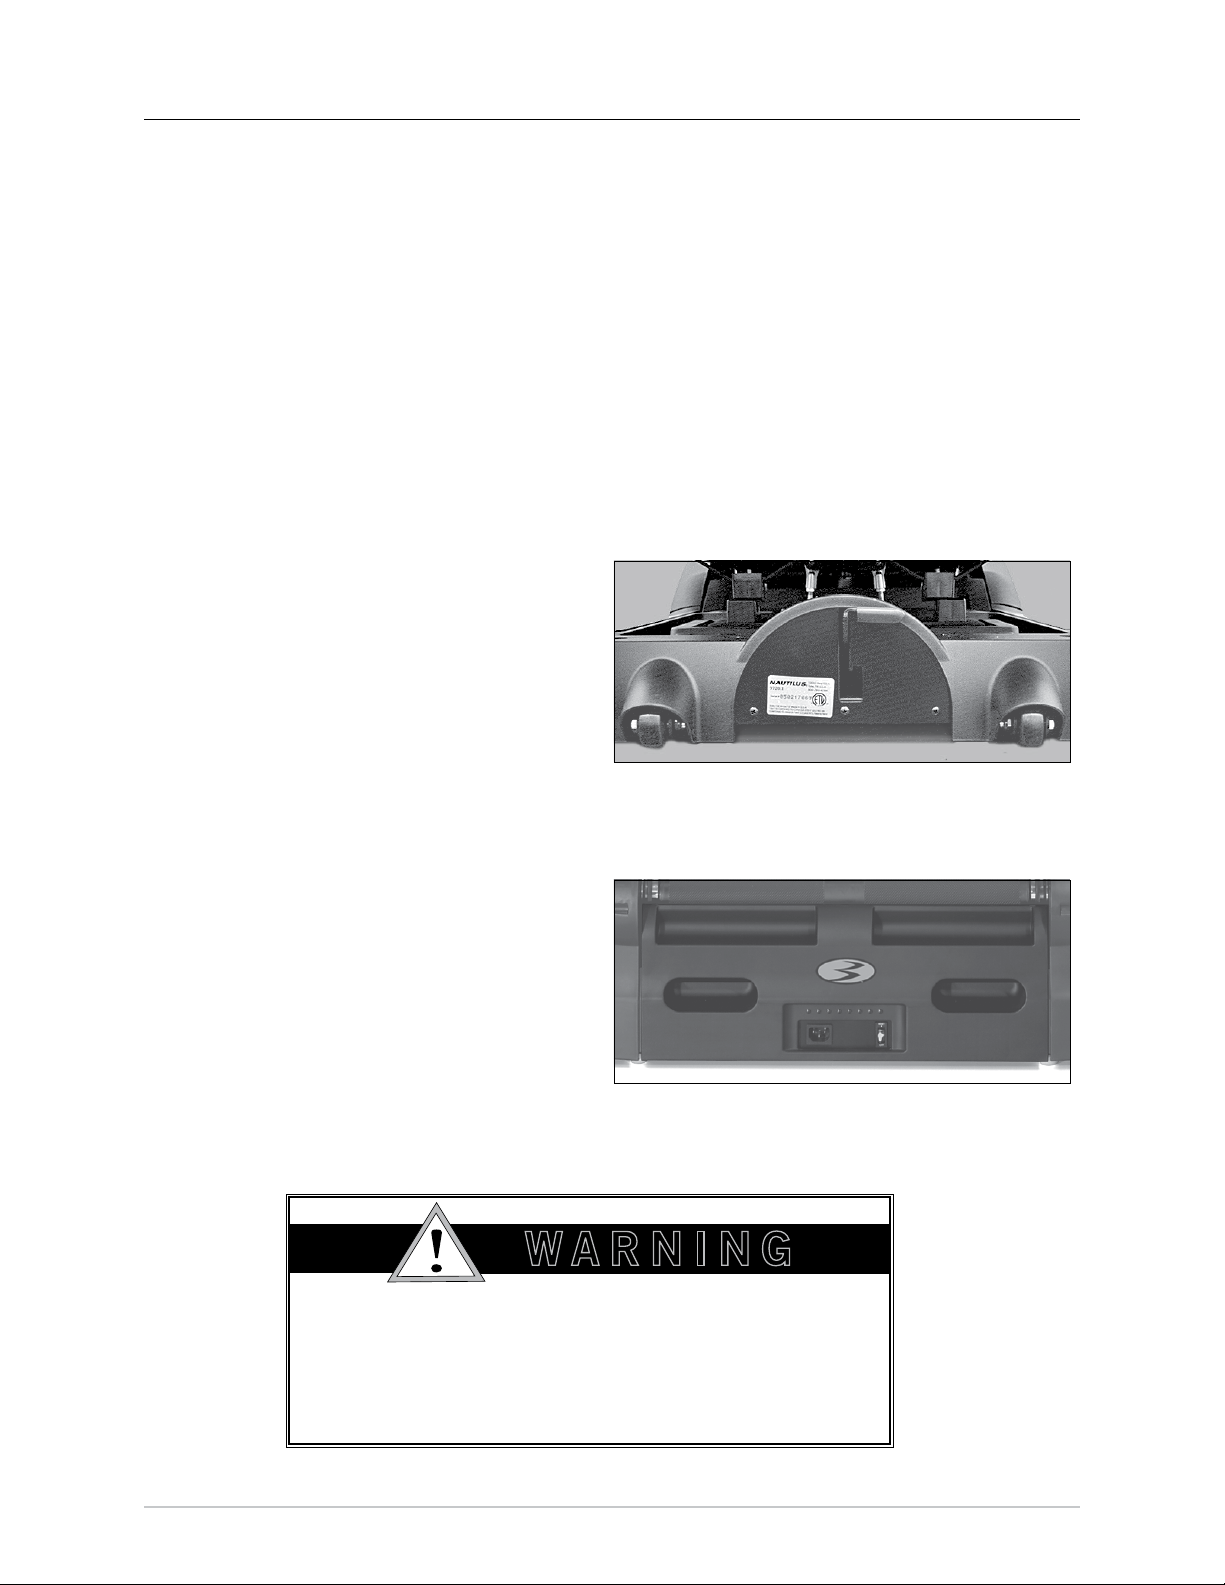
Storing Your TreadClimber® Machine
The TreadClimber® machine weighs 185 pounds
when fully assembled, and should never be
moved or lifted without taking some precautionary
care.
There are two handles for lifting on the back of
the base and two wheels on either side of the
front of the base beneath the console.
The TreadClimber® machine requires 90 pounds
of force to lift the base to achieve the 30 degree
angle necessary to roll it on the front wheels. As
this is a considerable amount of force, it is highly
recommended that you do not attempt to ever lift
or move the TreadClimber® machine without help.
When lifted properly, your TreadClimber®
machine can be rolled on the wheels for storage
and/or cleaning. Failure to follow precautions
could result in physical injury to you, or damage
to the machine, or both.
TreadClimber® Base – Front Wheels
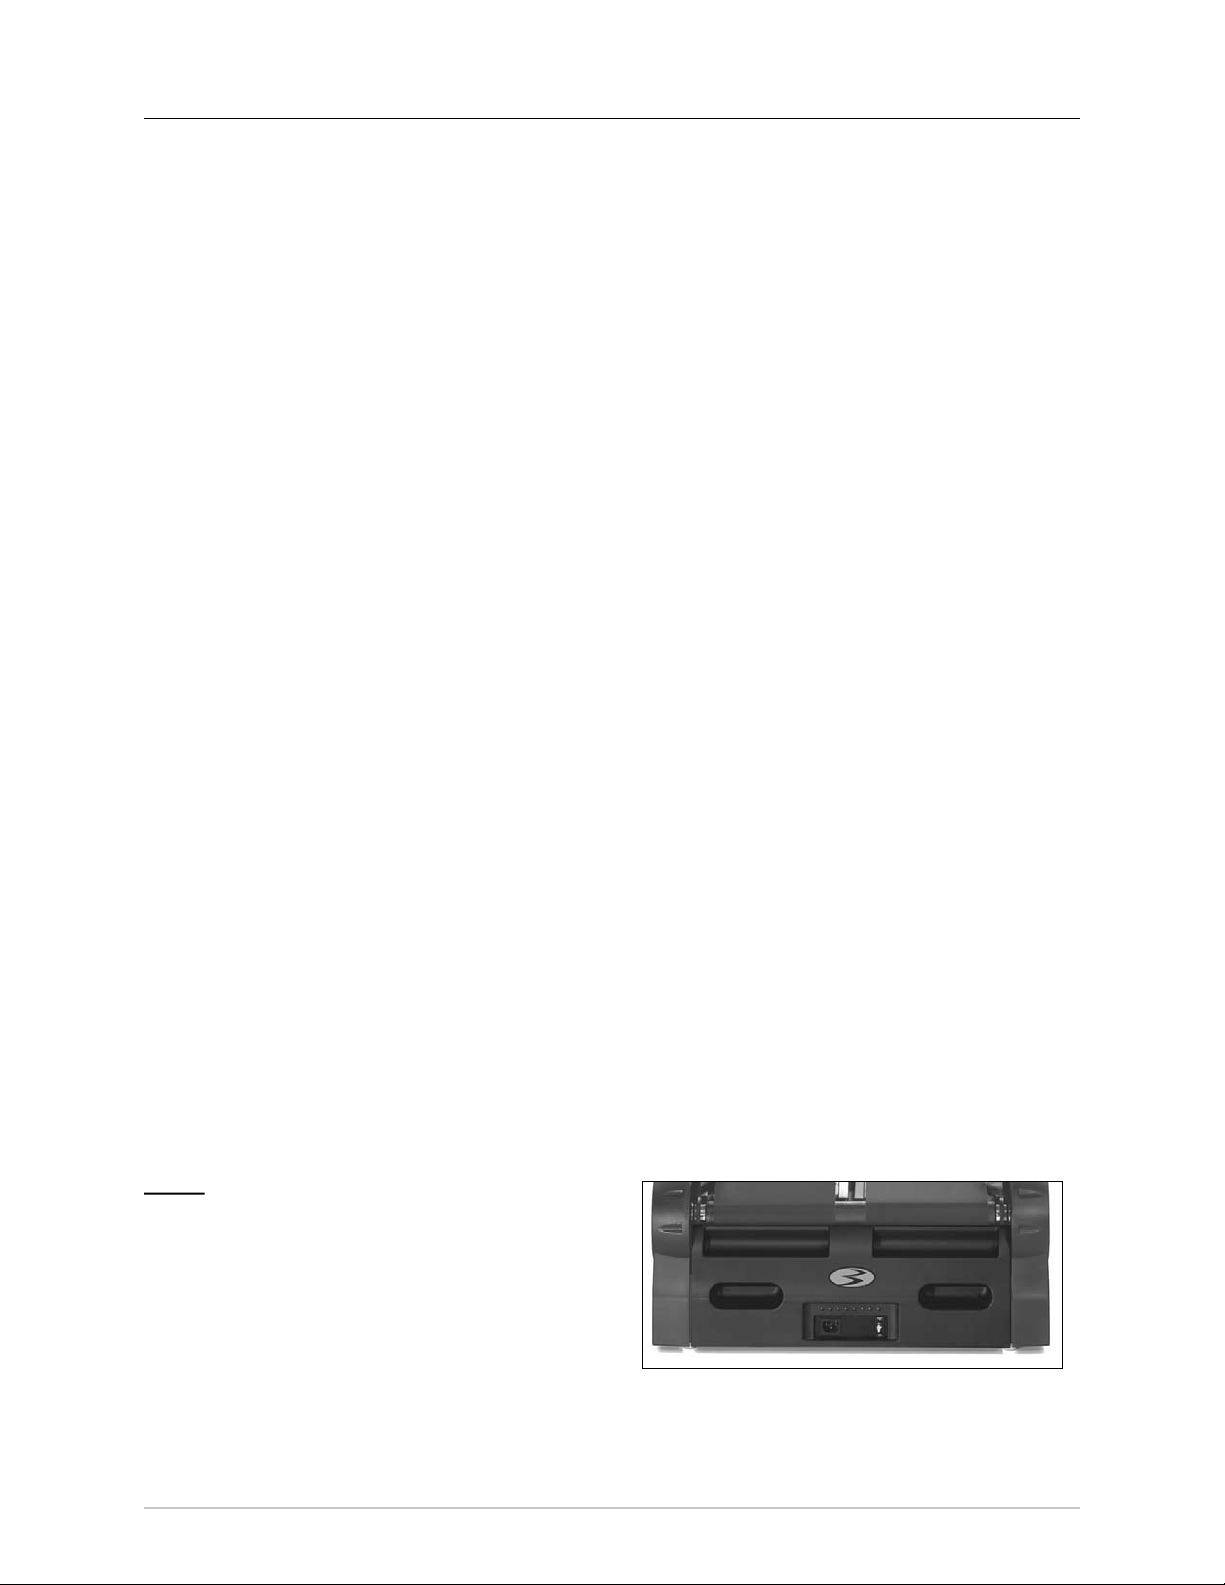
TreadClimber® Base – Rear Lift Handles
Do not use the uprights, arms, or console to lift or
move the TreadClimber® machine. Doing so could cause
physical injury to you, and could damage or destroy the
TreadClimber® machine.
Bowex® TreadClimber® Owner’s Manual
8
Assembly Guide
Before You Assemble
Basic Assembly Principals
Here are few basic assembly tips that can make
assembly of your
machine quick and easy.
1. You can make the assembly process go faster
by gathering the pieces you need for each step
prior to starting the step.
2. As a general rule, and for all bolts and locknuts
on your
machine, turning toward the right will tighten,
turning towards the left will loosen. An easy
way to remember this is by remembering the
expression, “Lefty loosey, righty tighty.”
3. All of the tools needed for assembly of your
Bowflex® TreadClimber® exercise machine have
been included. You may find the use of a utility
knife or scissors beneficial during the unpacking
and assembly process.
Bowflex® TreadClimber® exercise
Bowflex® TreadClimber® exercise
Machine Mat
The Bowflex® TreadClimber® Machine Mat is an
optional accessory for the TreadClimber® machine
that helps keep your workout area free from debris
and dust. The rubber machine floor mat provides a
non-slip surface for you to use when mounting and
dismounting the TreadClimber® machine and limits
static discharge when you touch the machine—
greatly reducing the possibility of display or
running errors. Further, a rubberized mat will
protect your flooring when you are performing
repairs or maintenance on the TreadClimber®
machine.
®
Put your Bowflex
place in your selected workout area before you
start assembly to protect your floors and your
TreadClimber® machine from damage.
Positioning Your TreadClimber® Machine
Take great care when moving your TreadClimber®
machine into place prior to assembly.
TreadClimber® Machine Mat in
Select Your Workout Area
Select where you are going to put your Bowflex®
TreadClimber® exercise machine carefully. The
best place for your TreadClimber® machine is on a
hard, level surface. You will need at least two feet
on each side and in front of your TreadClimber®
machine, and at least three feet behind it for
dismount.
Make sure that the location you choose has a
grounded, 3-prong power outlet within reach of
the TreadClimber® machine power cord, preferably
to the right side of the machine where you will be
less likely to step on the cord during dismount.
NOTE: The TreadClimber® machine is designed to
plug into a grounded, non-GFI outlets only. To
determine if your outlet or circuit breaker is GFI,
look for a test and reset button on them. If they
have the test and reset button it is a GFI outlet or
circuit breaker.
Further, if you ever perform any repairs on your
TreadClimber® machine that require you to lay it
on its side, you will need at least five feet to one
side of your workout area.
There are two handles for lifting on the back of the
base and two wheels on either side of the front of
the base beneath the console. The TreadClimber®
machine requires 90 pounds of force to raise
the base the 30 degrees necessary to roll it on
the front wheels for storage or cleaning. As this
is a considerable amount of force, it is highly
recommended that you do not attempt to ever lift or
move the TreadClimber® machine without help.
When you assemble the TreadClimber® machine,
you will need at least two people to set the base
in place, place the treadles, and lift the handlebar
assembly.
TreadClimber® Base -
Rear Lift Handles
9
Bowex® TreadClimber® Owner’s Manual
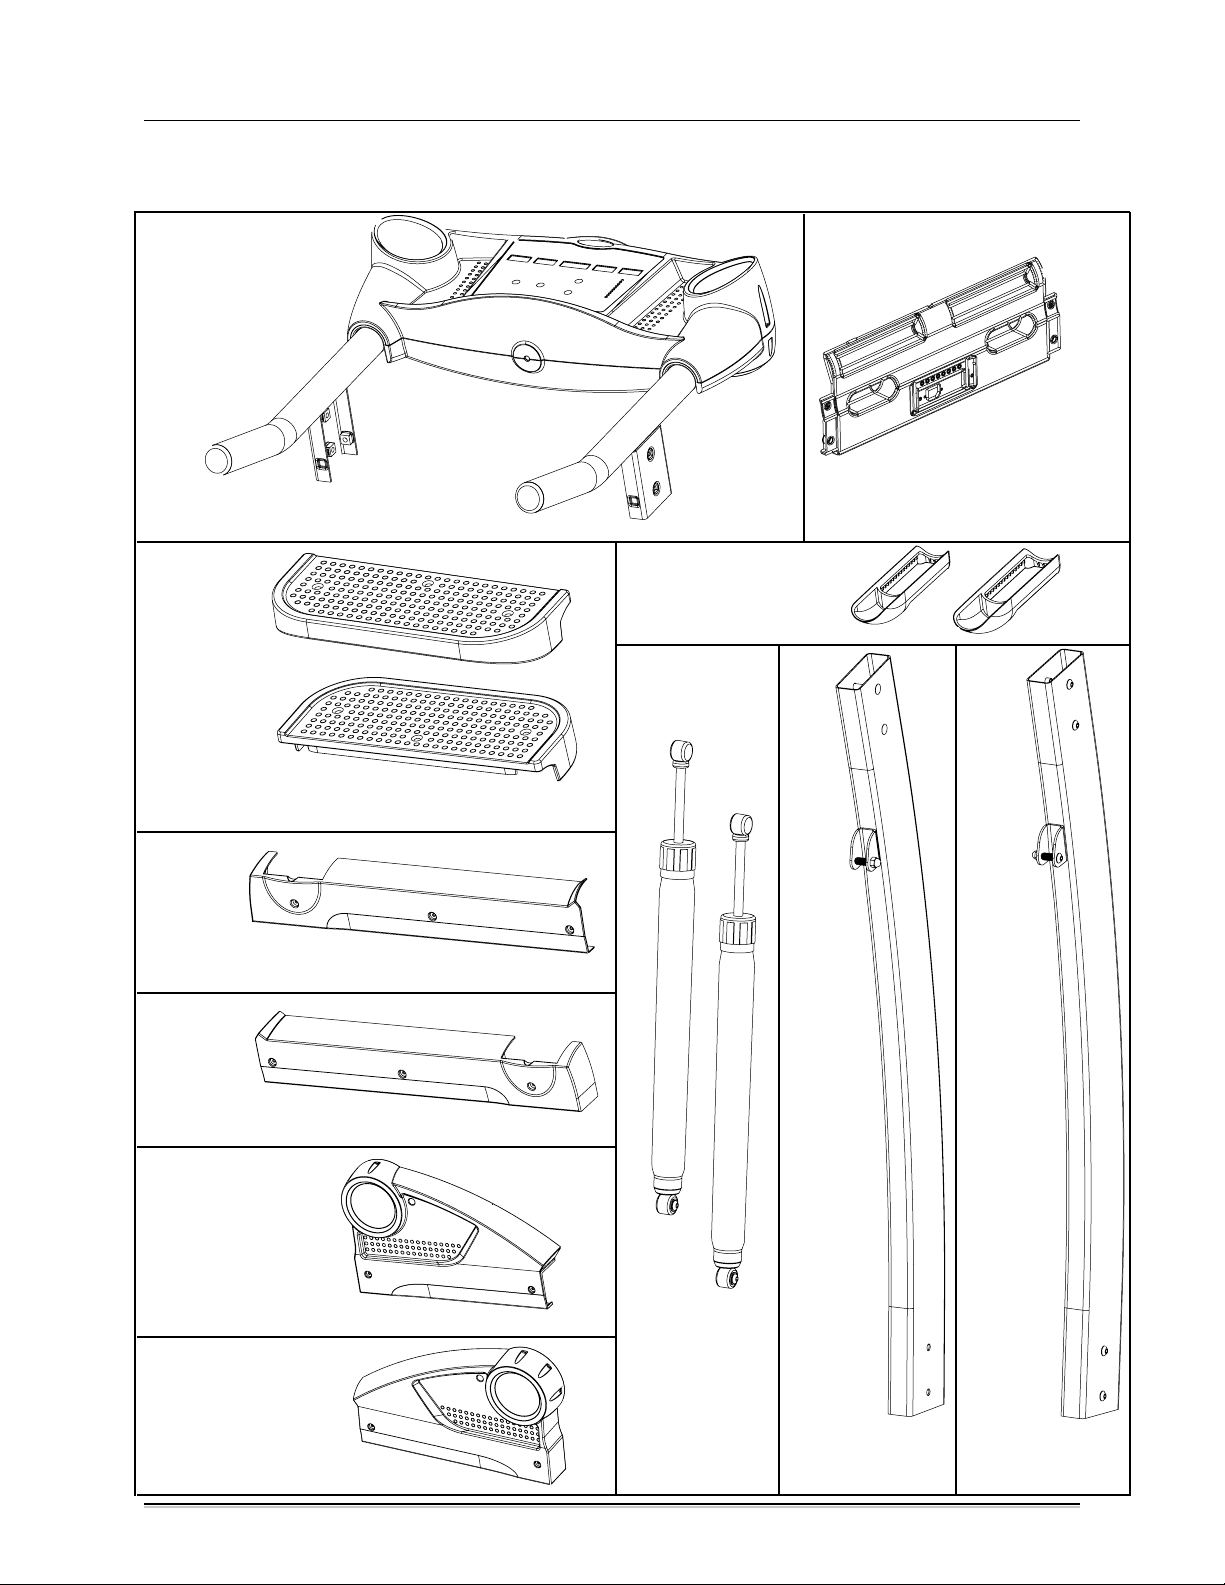
TreadClimber® Parts Reference Guide
Box 1 contains:
Qty: 1
Descr: Control Panel/Handlebar Assembly
Qty: 2
Descr: Left and Right Side Foot Support Platform
Qty: 1
Descr: Left Side Plastic Frame Cover
Qty: 1
Descr: Rear Cover
Qty: 2
Descr: Plastic Upright Junction Covers
Qty: 1
Descr: Right Side Plastic Frame Cover
Qty: 1
Descr: Right Side Plastic Drive Cover
Qty: 1
Descr: Left Side Plastic Drive Cover
Bowex® TreadClimber® Owner’s Manual
Qty: 2
Descr: Left & Right
Hydraulic
Cylinder
Qty: 1
Descr: Left
Upright
Support
Qty: 1
Descr: Right
Upright
Support
10

7 ! 2 . ) . '
TreadClimber® Parts Reference Guide
To reduce the risk of electric shock and fire, and to prevent severe
damage to the machine, use only the power cord approved for
use with this equipment. In addition, your machine should be
properly grounded using a rubber or rubberized mat beneath the
TreadClimber® machine to protect from static electricity.
DO NOT USE NEAR WATER!
BOX 1 also contains:
Qty: 1
Descr: OWNER’S MANUAL BAG contains the following:
• The Bowflex® TreadClimber® Assembly Guide and Owner’s Manual
• (1) Drive Belt
• Power Cord
• (2) Treadle Decals
• (2) Drive Cover Decals
• TreadClimber® Safety Key *Note: TC1000 Safety Key plugged into console.
• Heart Rate Monitor Chest Strap (TC5000 Only)
• (1) #2 Phillips Screw Driver
Qty: 1
Descr: ASSEMBLY HARDWARE BAG contains the following:
• (1) #2 Phillips Screwdriver • (2) 5/16" x 1 1/2" Button Head Screw
• (1) 3/16" Hex Key • (12) 5/16" Flat Washers SAE
• (1) 5/32" Hex Key • ( 2) 5/16" Acorn Nut
• (1) 9/16" Open End Wrench • (1) 3/8" x 3 3/4" Shoulder Bolt
• (6) 1/4" x 1" Flat Head Screw • ( 1) 5/16" Nylock Nut
• (2) 5/16" Flat Washers • ( 4) 3/8" Cosmetic Plugs
• (14) 5/16" x 1" Button Head Screw • (16) #10 Phillips Head Screws
NOTE:
Occasionally extra parts are included.
(smaller O.D.)
If there are any missing parts when you unpack your TreadClimber®
machine, please call a TreadClimber® Representative at
1-800-NAUTILUS (1-800-628-8458).
11
Bowex® TreadClimber® Owner’s Manual

TreadClimber® Parts Reference Guide
Box 2 contains the TreadClimber® treadles.
Cylinder Stud
Qty: 1
Descr: TreadClimber® Treadle Assembly
Box 3 contains the TreadClimber® base.
Qty: 1
Descr: TreadClimber® Base Assembly
Bowex® TreadClimber® Owner’s Manual
12
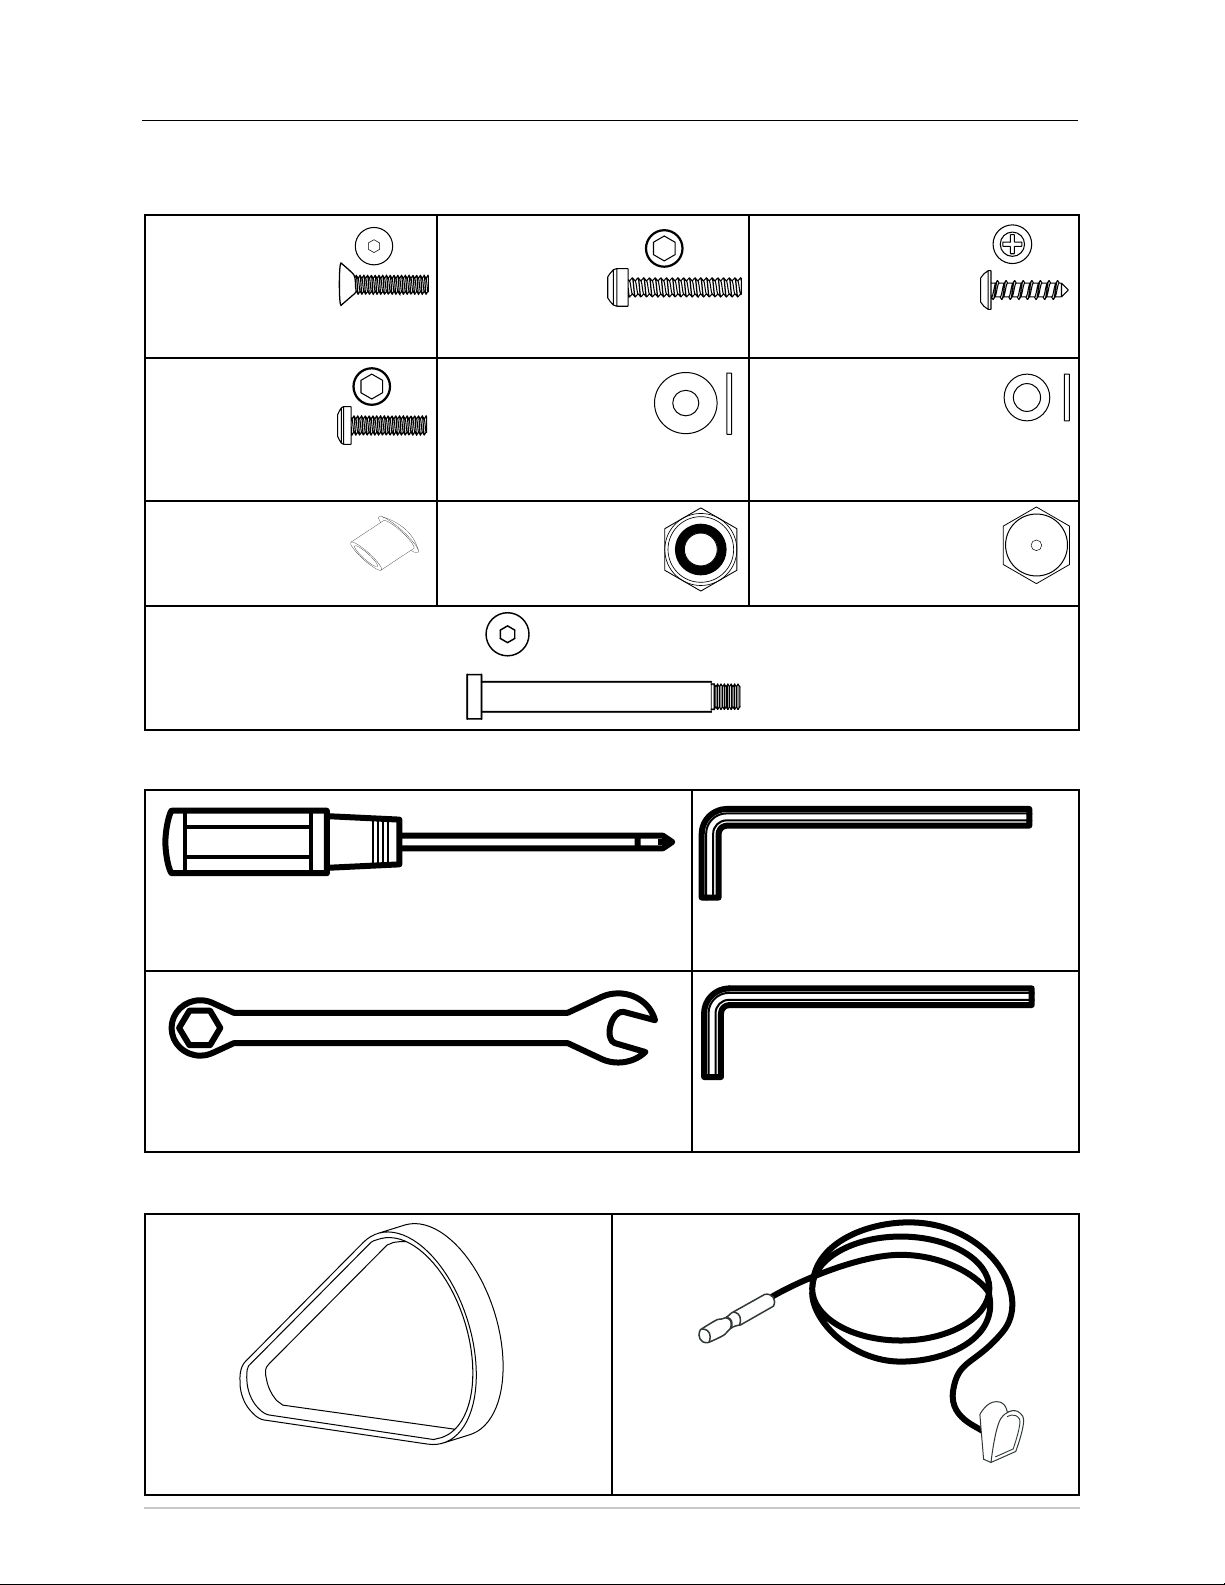
TreadClimber® Hardware and Tool List
NOTE: IMAGES BELOW ARE NOT TO SCALE
Hardware:
Qty: 6
Descr: 1/4” x 1” Flat Head Screw
Qty: 14
Descr: 5/16” x 1” Button Head Screw
Qty: 4
Descr: 3/8” Cosmetic Plugs
Qty: 1
Descr: 3/8” x 3 3/4” Shoulder Bolt
Tools:
Qty: 2
Descr: 5/16” x 1 1/2” Button Head Screw
Qty: 2
Descr: 5/16” Flat Washer
Qty: 1
Descr: 5/16” Nylock Nut
Qty: 16
Descr: #10 Phillips Head Screw
Qty: 12
Descr: 5/16” Flat Washer SAE
Qty: 2
Descr: 5/16” Acorn Nut
Qty: 1
Descr: #2 Phillips Screwdriver Qty: 1
Qty: 1
Descr: 9/16” Open End Wrench Qty: 1
Descr: 3/16” Hex Key
Descr: 5/32” Hex Key
Parts:
Qty: 1
Descr: Drive Belt
Qty: 1
Descr: Safety Key with Clip (Models TC3000 & TC5000 only.)
13
Bowex® TreadClimber® Owner’s Manual

Assembly Guide
#!,,7)4(15%34)/.3
0/524/54%15%34)/.!00%,%:,%
ALIGN TO TREADLES
ALIGN TO UPRIGHT
BRACKET
FF2899
#!,,7)4(15%34)/.3
0/524/54%15%34)/.!00%,%:,%
ALIGN TO TREADLES
ALIGN TO UPRIGHT
BRACKET
FF2899
TREADLES
BRACKET
#!,,
7)4(15%34)/.3
0/524/54%15%34)/.!00%,%:,%
ALIGN TO TREADLES
ALIGN TO UPRIGHT
BRACKET
FF2899
Remove before use and follow these directions, “Before
tightening the bolts on the rear casting, center the treadles
using this card as a guide.”
Retirez avant l'emploi et suivez les ces directions, “Avant
serrant les boulon sur le bâti arrière, centrez les pédales en
utilisant cette carte comme guide.”
Assembly Instructions
Step 1: PLACING TREADLES ON BASE
Locate the following for this step:
PARTS:
• TreadClimber® Base Assembly
• TreadClimber® Treadle Assembly
HARDWARE:
• Four (4) 3/8” x 1-1/4” Hex Bolts
TOOLS:
• 9/16” Open End Wrench (included)
• Scissors or other cutting tool
1-1 Place the latch lever on the base in the unlocked
position (see Figure 1-1).
1-2 Cut the wire ties on the teeter assembly and
extend the teeter to the center of the treadles
(see Figure 1-2).
Figure 1-1
Figure 1-2
1-3 With the help of another, carefully rotate the
treadle assembly so the teeter is hanging
downward above the base. Slowly lower
treadle assembly onto base. Make sure teeter
mechanism passes freely through hole in the
center of base (see Figure 1-3). Carefully
align roller casting so it lays flush on the base
(see Figure 1-4). For TC3000 and TC5000
models verify that the step sensor is properly
aligned (see Figure 1-3). For all TreadClimber
machines center the treadles, using the orange
Illustration 1-A
treadle alignment card (see Illustration 1-A),
before proceeding.
®
Figure 1-3
Align roller casting so it lays
flush on base
1-4 Using the 9/16" open end wrench, tighten the
Bowex® TreadClimber® Owner’s Manual
Figure 1-4
(4) 3/8" x 1-1/4" hex bolts on the rear roller
casting to bring the casting and base snugly
together (see Figure 1-5).
Figure 1-5
14

Assembly Guide
Step 2: CONNECTING SPEED PICKUP WIRE
Locate the following for this step:
PARTS:
• TreadClimber® Base & Treadle Assembly from
Step 1.
2-1 Connect the speed pickup wire from base
assembly and left rear roller casting
(see Figure 2-1 & 2-2).
NOTE: Speed pickup needs to be about 1/8"
from the pulley and the red speed
pickup cap is flush to the left drive
bracket/roller casting.
Step 3: ATTACHING TEETER
Locate the following for this step:
Speed pickup
wire from base.
Speed pickup
wire from left rear
roller casting.
Figure 2-1
Figure 2-2
PARTS:
• TreadClimber® Base & Treadle Assembly from
Step 2.
HARDWARE:
• One (1) 3/8” x 3-3/4” Shoulder Bolt
• One (1) 5/16” Nylock Nut
TOOLS:
• 3/16” Hex Key (included)
• 9/16” Open End Wrench (included)
• Scissors or other cutting tool
3-1 Carefully set unit up on its right side. This will have
the pulley side up and expose underneath side of
unit (see Figure 3-1).
3-2 Using the 3/8" x 3-3/4" shoulder bolt and 5/16"
nylock nut attach the teeter assembly to base
frame (see Figure 3-2). Tighten using the 3/16"
hex key and 9/16" open end wrench
(see Figure 3-3).
3-3 Cut wire tie from teeter stop brackets.
Figure 3-1
Figure 3-2
NOTE: Manipulation of the teeter and or
treadles may need to occur to line
up all the holes.
15
Figure 3-3
Bowex® TreadClimber® Owner’s Manual

Assembly Guide
Step 4: INSTALLING DRIVE BELT
Locate the following for this step:
PARTS:
• TreadClimber® Base & Treadle Assembly from
Step 3.
• One (1) Drive Belt
TOOLS:
• 3/16” Hex Key (included)
4-1 Place drive belt over roller pulley and motor
pulley (see Figure 4-1).
4-2 Make sure belt is seated into grooves and
installed exactly as shown (see Figure 4-2).
4-3 Using (1) 3/16" hex key completely remove
motor shipping bolt from motor pan (see Figure
4-3) and retain the bolt after removing.
Figure 4-1
NOTE: Removing shipping bolt will create
spring-loaded tension to drive belt
and make it tight.
4-4 Carefully lay unit back over to the upright
position.
Step 5: LOCKING THE TREADLES
Locate the following for this step:
PARTS:
• TreadClimber® Base & Treadle Assembly from
Step 4.
5-1 Line up the treadles until they are parallel with
each other.
5-2 Move the locking lever downward and to the left
and then upward into the ‘locked’ position with
your foot (see Figure 5-1). You may need to
gently rock the treadles up and down with your
hand until you hear a ‘click’ to lock the treadles.
Figure 4-2
Figure 4-3
Figure 5-1
Lever in locked position
NOTE: Locking lever must be all the way to
the top of the front plate. If not fully
engaged the treadles may unlock
during workout.
Bowex® TreadClimber® Owner’s Manual
16
Assembly Guide
Step 6: INSTALLING THE UPRIGHTS
Locate the following for this step:
PARTS:
• TreadClimber® Base & Treadle Assembly from
Step 5.
• One (1) Left Upright Support & Hydraulic
Cylinder
• One (1) Right Upright Support & Hydraulic
Cylinder
HARDWARE:
• Two (2) 5/16” x 1” Button Head Screws
Figure 6-1
6-1 On the base assembly screw a 5/16" x 1" button
head screw half way in on the outside of both
the right and left lower upright bracket (see
Figure 6-1).
6-2 Place the left upright onto the left upright bracket
(see Figure 6-2), so it rests on the button head
screw (see Figure 6-3). Make sure the cylinder
bracket is at the top and pointing to rear.
6-3 Repeat this process on the right side.
Step 7: INSTALLING THE UPRIGHT
JUNCTION COVERS AND
COSMETIC PLUGS
Locate the following for this step:
PARTS:
• TreadClimber® Base & Treadle Assembly from
Step 6.
• Two (2) Plastic Upright Junction Covers
Figure 6-2
Figure 6-3
Figure 7-1
HARDWARE:
• Four (4) Cosmetic Plugs
7-1 Place the plastic upright junction covers onto
the top of left upright support (see Figure 7-1).
7-2 Insert the cosmetic plugs (2 per side) into the
holes on the top, inside and outside of the left
upright support (see Figure 7-2).
7-3 Repeat this process on the right side.
17
Figure 7-2
Bowex® TreadClimber® Owner’s Manual

Assembly Guide
Step 8: INSTALLING THE CONSOLE/
HANDLEBAR ASSEMBLY
Locate the following for this step:
PARTS:
• TreadClimber® Base & Treadle Assembly from
Step 7.
• Console/Handlebar Assembly
HARDWARE:
• Six (6) 5/16” x 1” Button Head Screws
• Six (6) 5/16” Flat Washers SAE
TOOLS:
• 3/16” Hex Key (included)
8-1 With the help of another person, carefully lift
the console/handlebar assembly above the tops
of the upright supports. Feed the cable down
the top of the right upright support (see Figure
8-1 & 8-1A). Make sure cable extends through
the bottom of the right upright.
8-2 Slide the brackets on the console/handlebar
assembly into the tops of the upright supports—
both sides at the same time. Be careful when
sliding the console/handlebar assembly onto
the uprights to avoid damaging the electrical
cable.
Figure 8-1
Figure 8-1A
Figure 8-2
8-3 Attach the upright using (6) 5/16" x 1" button
head screws and (6) 5/16" flat washers SAE
(3 per upright). Tighten with the provided 3/16"
hex key (see Figure 8-2).
8-4 Pull out the wire connector at the bottom of
the right upright support. Firmly connect the
electrical cable at the bottom of the right upright
support to the cable on the right side of the
base upright bracket (see Figure 8-3).
Figure 8-3
Bowex® TreadClimber® Owner’s Manual
18
 Loading...