


MFN-201
MANUAL FLOORING NAILER
CLAVADORA MANUAL PARA PISOS
CLOUEUSE MANUELLE À PLANCHER
OPERATION AND MAINTENANCE MANUAL
MANUAL DE OPERACIÓN Y DE MANTENIMIENTO
MANUEL D’INSTRUCTIONS ET D’ENTRETIEN
BEFORE OPERATING THIS TOOL, ALL OPERATORS SHOULD STUDY THIS MANUAL TO UNDERSTAND AND FOLLOW THE SAFETY WARNINGS AND INSTRUCTIONS. KEEP THESE INSTRUCTIONS WITH THE TOOL FOR FUTURE REFERENCE. IF YOU HAVE ANY QUESTIONS, CONTACT YOUR BOSTITCH REPRESENTATIVE OR DISTRIBUTOR.
ANTES DE OPERAR ESTA HERRAMIENTA, TODOS LOS OPERADORES DEBERÁN ESTUDIAR ESTE MANUAL PARA PODER COMPRENDER Y SEGUIR LAS ADVERTENCIAS SOBRE SEGURIDAD Y LAS INSTRUCCIONES. MANTENGA ESTAS INSTRUCCIONES CON LA HERRAMIENTA PARA FUTURA REFERENCIA, SI TIENE ALGUNA DUDA, COMUNÍQUESE CON SU REPRESENTANTE DE BOSTITCH O CON SU DISTRIBUIDOR.
LIRE ATTENTIVEMENT LE PRÉSENT MANUEL AVANT D’UTILISER L’APPAREIL. PRÉTER UNE ATTENTION TOUTE PARTICULIÈRE AUX CONSIGNES DE SÉCURITÉ ET AUX AVERTISSEMENTS. GARDER CE MANUEL AVEC L’OUTIL POUR FUTUR RÉFÉRENCE. SI VOUS AVEZ DES QUESTIONS, CONTACTEZ VOTRE REPRÉSENTANT OU VOTRE CONCESSIONNAIRE BOSTITCH.
180332REVA 1/08 |
STANLEY FASTENING SYSTEMS L.P. |
|
INTRODUCTION
BOSTITCH tools are precision-built tools, designed for precise, high volume nailing. These tools will deliver efficient, dependable service when used correctly and with care. As with any fine tool, for best performance the manufacturer’s instructions must be followed. Please study this manual before operating the tool and understand the safety warnings and cautions. The instructions on installation, operation and maintenance should be read carefully, and the manual kept for reference. NOTE: Additional safety measures may be required because of your particular application of the tool. Contact your BOSTITCH representative or distributor with any questions concerning the tool and its use. BOSTITCH, East Greenwich, Rhode Island 02818.
INDEX
Safety Instructions . . . . . . . . . . . . . . . . . . . . . . . . . . . . . . . . . . . . . . . . . . . . . . . . . . . . . . . . . 3
Tool Specifications . . . . . . . . . . . . . . . . . . . . . . . . . . . . . . . . . . . . . . . . . . . . . . . . . . . . . . . . 4
Loading the Tool . . . . . . . . . . . . . . . . . . . . . . . . . . . . . . . . . . . . . . . . . . . . . . . . . . . . . . . . . . 5
Tool Operation . . . . . . . . . . . . . . . . . . . . . . . . . . . . . . . . . . . . . . . . . . . . . . . . . . . . . . . . . . . . 6
Fastener Depth & Maintenance . . . . . . . . . . . . . . . . . . . . . . . . . . . . . . . . . . . . . . . . . . . . . . 7
Other BOSTITCH Products . . . . . . . . . . . . . . . . . . . . . . . . . . . . . . . . . . . . . . . . . . . . . . . . . . 8
NOTE:
BOSTITCH tools have been engineered to provide excellent customer satisfaction and are designed to achieve maximum performance when used with precision BOSTITCH fasteners engineered to the same exacting standards. BOSTITCH cannot assume responsibility for product performance if our tools are used with fasteners or accessories not meeting the specific requirements established for genuine BOSTITCH nails, staples and accessories.
7-YEAR LIMITED WARRANTY — U.S. and Canada Only
Effective December 1, 2005 Bostitch, L.P. warrants to the original retail purchaser that the product purchased is free from defects in material and workmanship, and agrees to repair or replace, at Bostitch’s option, any defective Bostitch branded pneumatic stapler or nailer for a period of seven (7) years from date of purchase (one (1) year from the date of purchase for compressors and tools used in production applications). Warranty is not transferable. Proof of purchase date required.This warranty covers only damage resulting from defects in material or workmanship; it does not cover conditions or malfunctions resulting from normal wear, neglect, abuse, accident or repairs attempted or made by other than our national repair center or authorized warranty service centers. Driver blades, bumpers, o-rings, pistons and piston rings are considered normally wearing parts. For optimal performance of your Bostitch tool always use genuine Bostitch fasteners and replacement parts.
THIS WARRANTY IS IN LIEU OF ALL OTHER WARRANTIES, EXPRESS OR IMPLIED, INCLUDING BUT NOT LIMITED TO THE IMPLIED WARRANTIES OF MERCHANTABILITY OR FITNESS FOR A PARTICULAR PURPOSE. BOSTITCH SHALL NOT BE LIABLE FOR ANY INCIDENTAL OR CONSEQUENTIAL DAMAGES.
Some states and countries do not allow limitations on how long an implied warranty lasts, or the exclusion or limitation of incidental or consequential damages, so the above limitations or exclusions may not apply to you. This warranty gives you specific legal rights, and you may also have other rights which vary from state to state and country to country.
To obtain warranty service in the U.S. return the product, together with proof of purchase, to the U.S. Bostitch National or Regional Independent Authorized Warranty Service Center. In the U.S. you may call us at 1-800-556-6696 or visit www.BOSTITCH.com for the location most convenient for you. In Canada please call us at 1-800-567-7705 or visit www.BOSTITCH.com.
2
SAFETY INSTRUCTIONS
EYE PROTECTION which conforms to ANSI specifications and provides protection against flying particles both from the FRONT and SIDE should ALWAYS be worn by the operator and others in the work area when loading, operating or servicing this tool. Eye protection is required to guard against flying fasteners and debris, which could cause severe eye injury.
The employer and/or user must ensure that proper eye protection is worn. Eye protection equipment must conform to the requirements of the American National Standards Institute, ANSI Z87.1 and provide both frontal and side protection. NOTE: Non-side shielded spectacles and face shields alone do not provide adequate protection.
CAUTION:Additional Safety Protection will be required in some environments. For example, the working area may include exposure to noise level which can lead to hearing damage. The employer and user must ensure that any necessary hearing protection is provided and used by the operator and others in the work area. Some environments will require the use of head protection equipment. When required, the employer and user must ensure that head protection conforming to ANSI Z89.1 is used.
NEVER USE MALLET WITH A LOOSE HEAD OR SPLINTERED HANDLE.
CAUTION: Replace worn or damaged parts immediately.
CAUTION: To avoid accidental injury, to yourself and others, bystanders must maintain a safe distance from you, during use of this tool especially when swinging the mallet
CAUTION: The operator should always wear safety shoes.
CAUTION: Use only cleats manufactured from Bostitch.
CAUTION: Never hit the plunger with the metal face of the mallet.
LOADING TOOL
When loading tool: 1.) Never place a hand or any part of body in fastener discharge area of tool; 2.) Never point the tool at anyone.
OPERATION
Always handle the tool with care: 1.) Never engage in horseplay; 2.) Never actuate the tool unless fastener discharge area of tool is directed toward the work; 3.) Keep others a safe distance from the tool while tool is in operation as accidental actuation may occur, possibly causing injury.
Keep hands and body away from the discharge area of the tool.
Do not drive fasteners on top of other fasteners or with the tool at an overly steep angle as this may cause deflection of fasteners which could cause injury.
Do not drive fasteners close to the edge of the work piece as the wood may split, allowing the fastener to be deflected possibly causing injury.
This tool produces SPARKS during operation. NEVER use the tool near flammable substances, gases or vapors including lacquer, paint, benzine, thinner, gasoline, adhesives, mastics, glues or any other material that is - or the vapors, fumes or by-products of which are -- flammable, combustible or explosive. Using the tool in any such environment could cause an EXPLOSION resulting in personal injury or death to user and bystanders.
MAINTAINING THE TOOL
When working on tools note the warnings in this manual and use extra care when evaluating problem tools.
3

MFN-201 TOOL SPECIFICATIONS
All dimensions in inches unless otherwise specified
|
|
|
|
MFN-201 |
|
|
|
|
|
|
|
|
Description |
|
Manual Flooring Nailer |
|
|
|
|
|
|
|
|
Fastener Type |
|
“L”Type 16 Gauge Flooring Cleats |
|
|
|
|
|
|
|
|
Magazine Capacity |
|
120 cleats |
|
|
|
|
|
|
|
|
Length |
|
13-7/16” (340mm) |
|
|
|
|
|
|
|
|
Width |
|
3-1/2” (89mm) |
|
|
|
|
|
|
|
|
Height |
|
17-1/2” (444mm) |
|
|
|
|
|
|
|
|
Weight |
|
8.6 lbs (3.9kg) |
|
|
|
|
|
|
|
|
|
|
|
|
|
|
|
|
|
|
MFN-201 FASTENER SPECIFICATIONS |
|
|
|
|
|
||||
|
|
|
|
|
|
|
|
|
|
|
|
|
Tool Model |
Fastener Type |
Fastener SKU |
Gauge |
Length |
|
|
|
|
|
|
MFN-201 Manual |
|
|
FLN-150 |
16 |
1-1/2” |
|
|
|
|
|
Flooring Nailer |
|
|
FLN-200 |
16 |
2” |
|
|
|
|
|
|
|
|
|
|
|
|
|
|
NOTE:
BOSTITCH tools have been engineered to provide superior customer satisfaction and are designed to achieve maximum performance when used with precision BOSTITCH fasteners engineered to the same exacting standards. BOSTITCH cannot assume responsibility for product performance if our tools are used with fasteners or accessories not meeting the specific requirements established for genuine BOSTITCH fasteners and accessories.
TOOL SETUP
The MFN-201 was designed to install 1/2” to 3/4” tongue and groove hardwood flooring. The tool is factory set for 3/4” flooring. Two additional foot plates are included with this tool to accommodate 1/2” and 5/8” flooring.
Flooring products will vary and the user must ensure the tool is properly adjusted each time flooring is being installed. Dimensions listed on the footplates are suggestions. Test fastener
placement on scrap pieces of wood before installing floor.
To change footplates: |
|
|
|
|
|
|
|
|||
1. Remove 4 flat head cap screws. |
|
|
|
|
|
|
Flat head |
|||
2. |
Change to desired plate. |
|
|
|
|
|
|
|||
|
|
|
|
|
|
cap screws |
||||
3. |
Replace 4 flat head cap screws. |
|
|
|
|
|
|
|
||
FASTENER PLACEMENT: |
|
|
|
|
|
|
|
|||
|
|
|
|
|
|
|
||||
|
|
Too High |
|
Correct |
|
|
Too Low |
|||
|
|
|
|
|
|
|
|
|
|
|
|
|
|
|
|
|
|
|
|
|
|
|
|
|
|
|
|
|
|
|
|
|
|
|
|
|
|
|
|
|
|
|
|
4

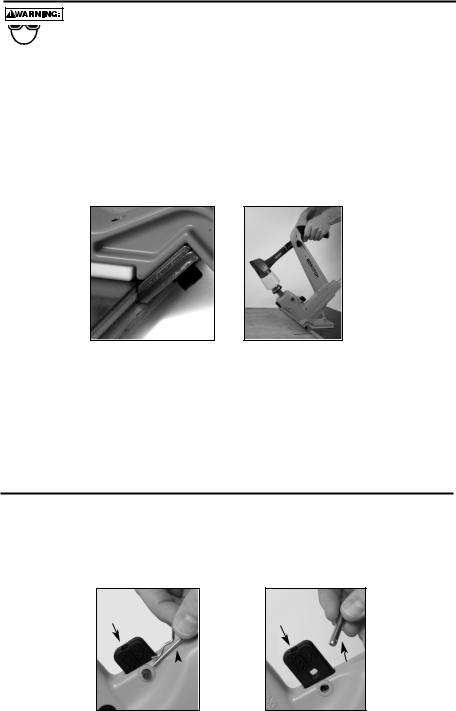
LOADING THE MFN-201
EYE PROTECTION which conforms to ANSI specifications and provides protection against flying particles both from the FRONT and SIDE should ALWAYS be worn by the operator and others in the work area when loading, operating or servicing this tool. Eye protection is required to guard against flying fasteners and debris, which could cause severe eye injury.
The employer and/or user must ensure that proper eye protection is worn. Eye protection equipment must conform to the requirements of the American National Standards Institute, ANSI Z87.1 and provide both frontal and side protection. NOTE: Non-side shielded spectacles and face shields alone do not provide adequate protection.
TO PREVENT ACCIDENTAL INJURIES:
•Never place a hand or any other part of the body in nail discharge area of tool.
•Never point the tool at anyone else.
•Never engage in horseplay.
•Always handle the tool with care.
•Do not contact the actuator while loading the tool.
LOADING THE TOOL
1.Release the pusher spring clip and remove the pusher blade.
2.Load the fasteners into guide channel.
3.Insert rounded end of pusher blade into channel to retain fasteners.
4.Latch pusher spring clip to notched end of pusher blade. Ensure sufficient engagement of pusher blade for smooth fastener feeding.
1. 2.
3. 4..


 FASTENER MAY NOT FEED CONSISTENTLY IF PUSHER BLADE IS NOT INSTALLED.
BEFORE HANDLING OR OPERATING THIS TOOL READ AND UNDERSTAND THE WARNINGS CONTAINED IN THIS MANUAL.
5
OPERATION
EYE PROTECTION which conforms to ANSI specifications and provides protection against flying particles both from the FRONT and SIDE should ALWAYS be worn by the operator and others in the work area when loading, operating or servicing this tool. Eye protection is required to guard against flying fasteners and debris, which could cause severe eye injury.
The employer and/or user must ensure that proper eye protection is worn. Eye protection equipment must conform to the requirements of the American National Standards Institute, ANSI Z87.1 and provide both frontal and side protection. NOTE: Non-side shielded spectacles and face shields alone do not provide adequate protection.
The MFN-201 was designed to install 1/2” - 3/4” tongue and groove hardwood flooring. NOTE: Always test on a scrap piece of flooring.
CAUTION: NEVER HIT THE PLUNGER WITH THE METAL END OF THE MALLET.
1.Position the flooring per the manufacture’s specifications.
2.Place the tool with the guide plate above the tongue and firmly against the forward face of the flooring material.
3.Ensure that the composite foot is firmly held against the top surface of the flooring.
4.Using the rubber face of the mallet strike the top end of the metal plunger.
2.4.
NOTE: Sufficient force is required to completely drive a single fastener with one strike of the mallet.
NOTE: REGARDING THE USE OF THIS TOOL TO INSTALL PRE-FINISHED FLOORING
The BOSTITCH MFN-201 has been precisely engineered to be compatible with today’s vast array of hardwood flooring products, including pre-finished flooring. Due to the ever changing products and manufacturing processes used in producing pre-finished hardwood flooring, caution must be used to ensure that the flooring finish is not damaged by the tool. Always test the tool and installation technique on a sample section of flooring to be certain that both the tool and the installation technique do not damage the pre-finished flooring. This procedure should be followed before each job due to variations in flooring and tool condition. BOSTITCH cannot assume responsibility for any flooring damage.
RATCHET OPERATION
To change drive mode:
1.Remove the cotter pin and then the clevis pin.
2.Position ratchet mechanism.
•For ratcheting (multi-blow) operation, set as shown in Fig. 1.
•For non-ratcheting (single-blow) operation, set as shown in Fig. 2.
3.Replace clevis pin and the cotter pin after adjustment.
RATCHETING |
NON- |
RATCHETING |
 clevis cotter pin
pin
Fig. 1 |
Fig. 2 |
6
FASTENER DEPTH
UNDER DRIVEN FASTENER |
PROPERLY DRIVEN FASTENER |
Floor |
Fastener |
Sub Floor |
|
|
If the plunger does not fully return the nail has not been completely driven. When this happens, use the rubber face of the mallet to strike the top end of the metal plunger again. When the nail is completely driven the ratcheting mechanism will allow the plunger to return.
MAINTENANCE
Tool
As with any quality tool regular maintenance will improve its operation and life span. BOSTITCH replacement parts are recommended. Do not use modified parts or parts which will not give equivalent performance to the original equipment.
1.To inspect or replace any parts of the plunger, first remove the retaining clip and pull out the locking pin.
2.Pull out the plunger assembly.
3.Clean old grease, dirt and abrasive particles off of all parts.
4.Replace all damaged or worn parts.
CAUTION: WHEN REPLACING THE DRIVER BLADE, ENSURE THAT THE WORD “FRONT” STAMPED ON THE BLADE IS VISIBLE AFTER YOU HAVE INSTALLED IT ON THE PLUNGER.
Mallet
Over time the rubber face on the mallet may became worn, cracked, or chipped. These are signs that a new rubber face will need to be installed.
Remove old rubber face:
1.Secure the rubber face in a bench vise.
2.Pull upward on the handle till the rubber face is released from the steel stud.
To install a new rubber face on the mallet, we recommend doing it in the shop with the use of an arbor press. If you must do it manually follow these instructions.
1.Secure the mallet head in a bench vise.
2.Put the rubber cap slightly inclined on top of the steel stud, push downward with a twisting motion to engage the rubber cavity over the edge of the steel stud.
3.Once fully engaged over the edge, you can release the mallet from the vise and hit it on solid surface to properly seat the rubber face on the mallet head.
7
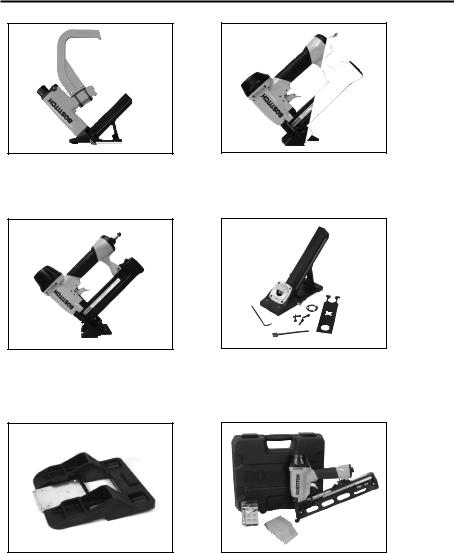
BOSTITCH FLOORING PRODUCTS
MIIIFS/MIIIFN
Pneumatic Flooring Tools
SX150-BHF-2
18 Gauge
Hardwood Flooring Stapler
MIIIFOOT-KIT
MIIIFS/MIIIFN Pre-Finished
Flooring Adapter Foot Kit
LHF97125
20 Gauge
Hardwood Flooring Stapler
MIIIFN-KIT
MIIIFS Cleat Nailer
Conversion Kit
N62FNK-2
15 Gauge
Oil-Free Finish Nailer Kit
For more information log on to: www.BOSTITCH.com
8
 Loading...