

Page 1
このたびは、デュアル・フット・スイッチ FS-6をお買い上げいただき、まことにありがとうございます。この機器を正しくお使いいただくために、ご使用前に『安全上のご注意』
と『使用上のご注意』をよくお読みください。また、この機器の優れ た機能を十分ご理解いただくためにも、取扱説明書をよくお読みください。取扱説明書は必要なときにすぐ見
ることができるよう、手元においてください。
■ 主な特長
○ FS-5L(ラッチ・タイプ)と FS-5U(モーメンタリー・タイプ)の両方の機能を兼ね備えたフット・スイッチです。
2 つのフット・スイッチそれぞれで、ラッチ/モーメンタリーの設定が可能です。
○ TRS 標準ジャックのコントロール入力を持つ機器には、ステレオ標準プラグ←→ステレオ標準プラグの接続コードを
使って接続することができます。
FS-6 は、FS-5U または FS-5L が使用可能なボス/
ローランド製品にお使いいただけます。
※ 指定外の機 器またはジ ャックに接続 した場合の
動作保証については、ご容赦願います。
○ FS-6 同士や FS-5U/5L、AB-2 との連結が可能です。
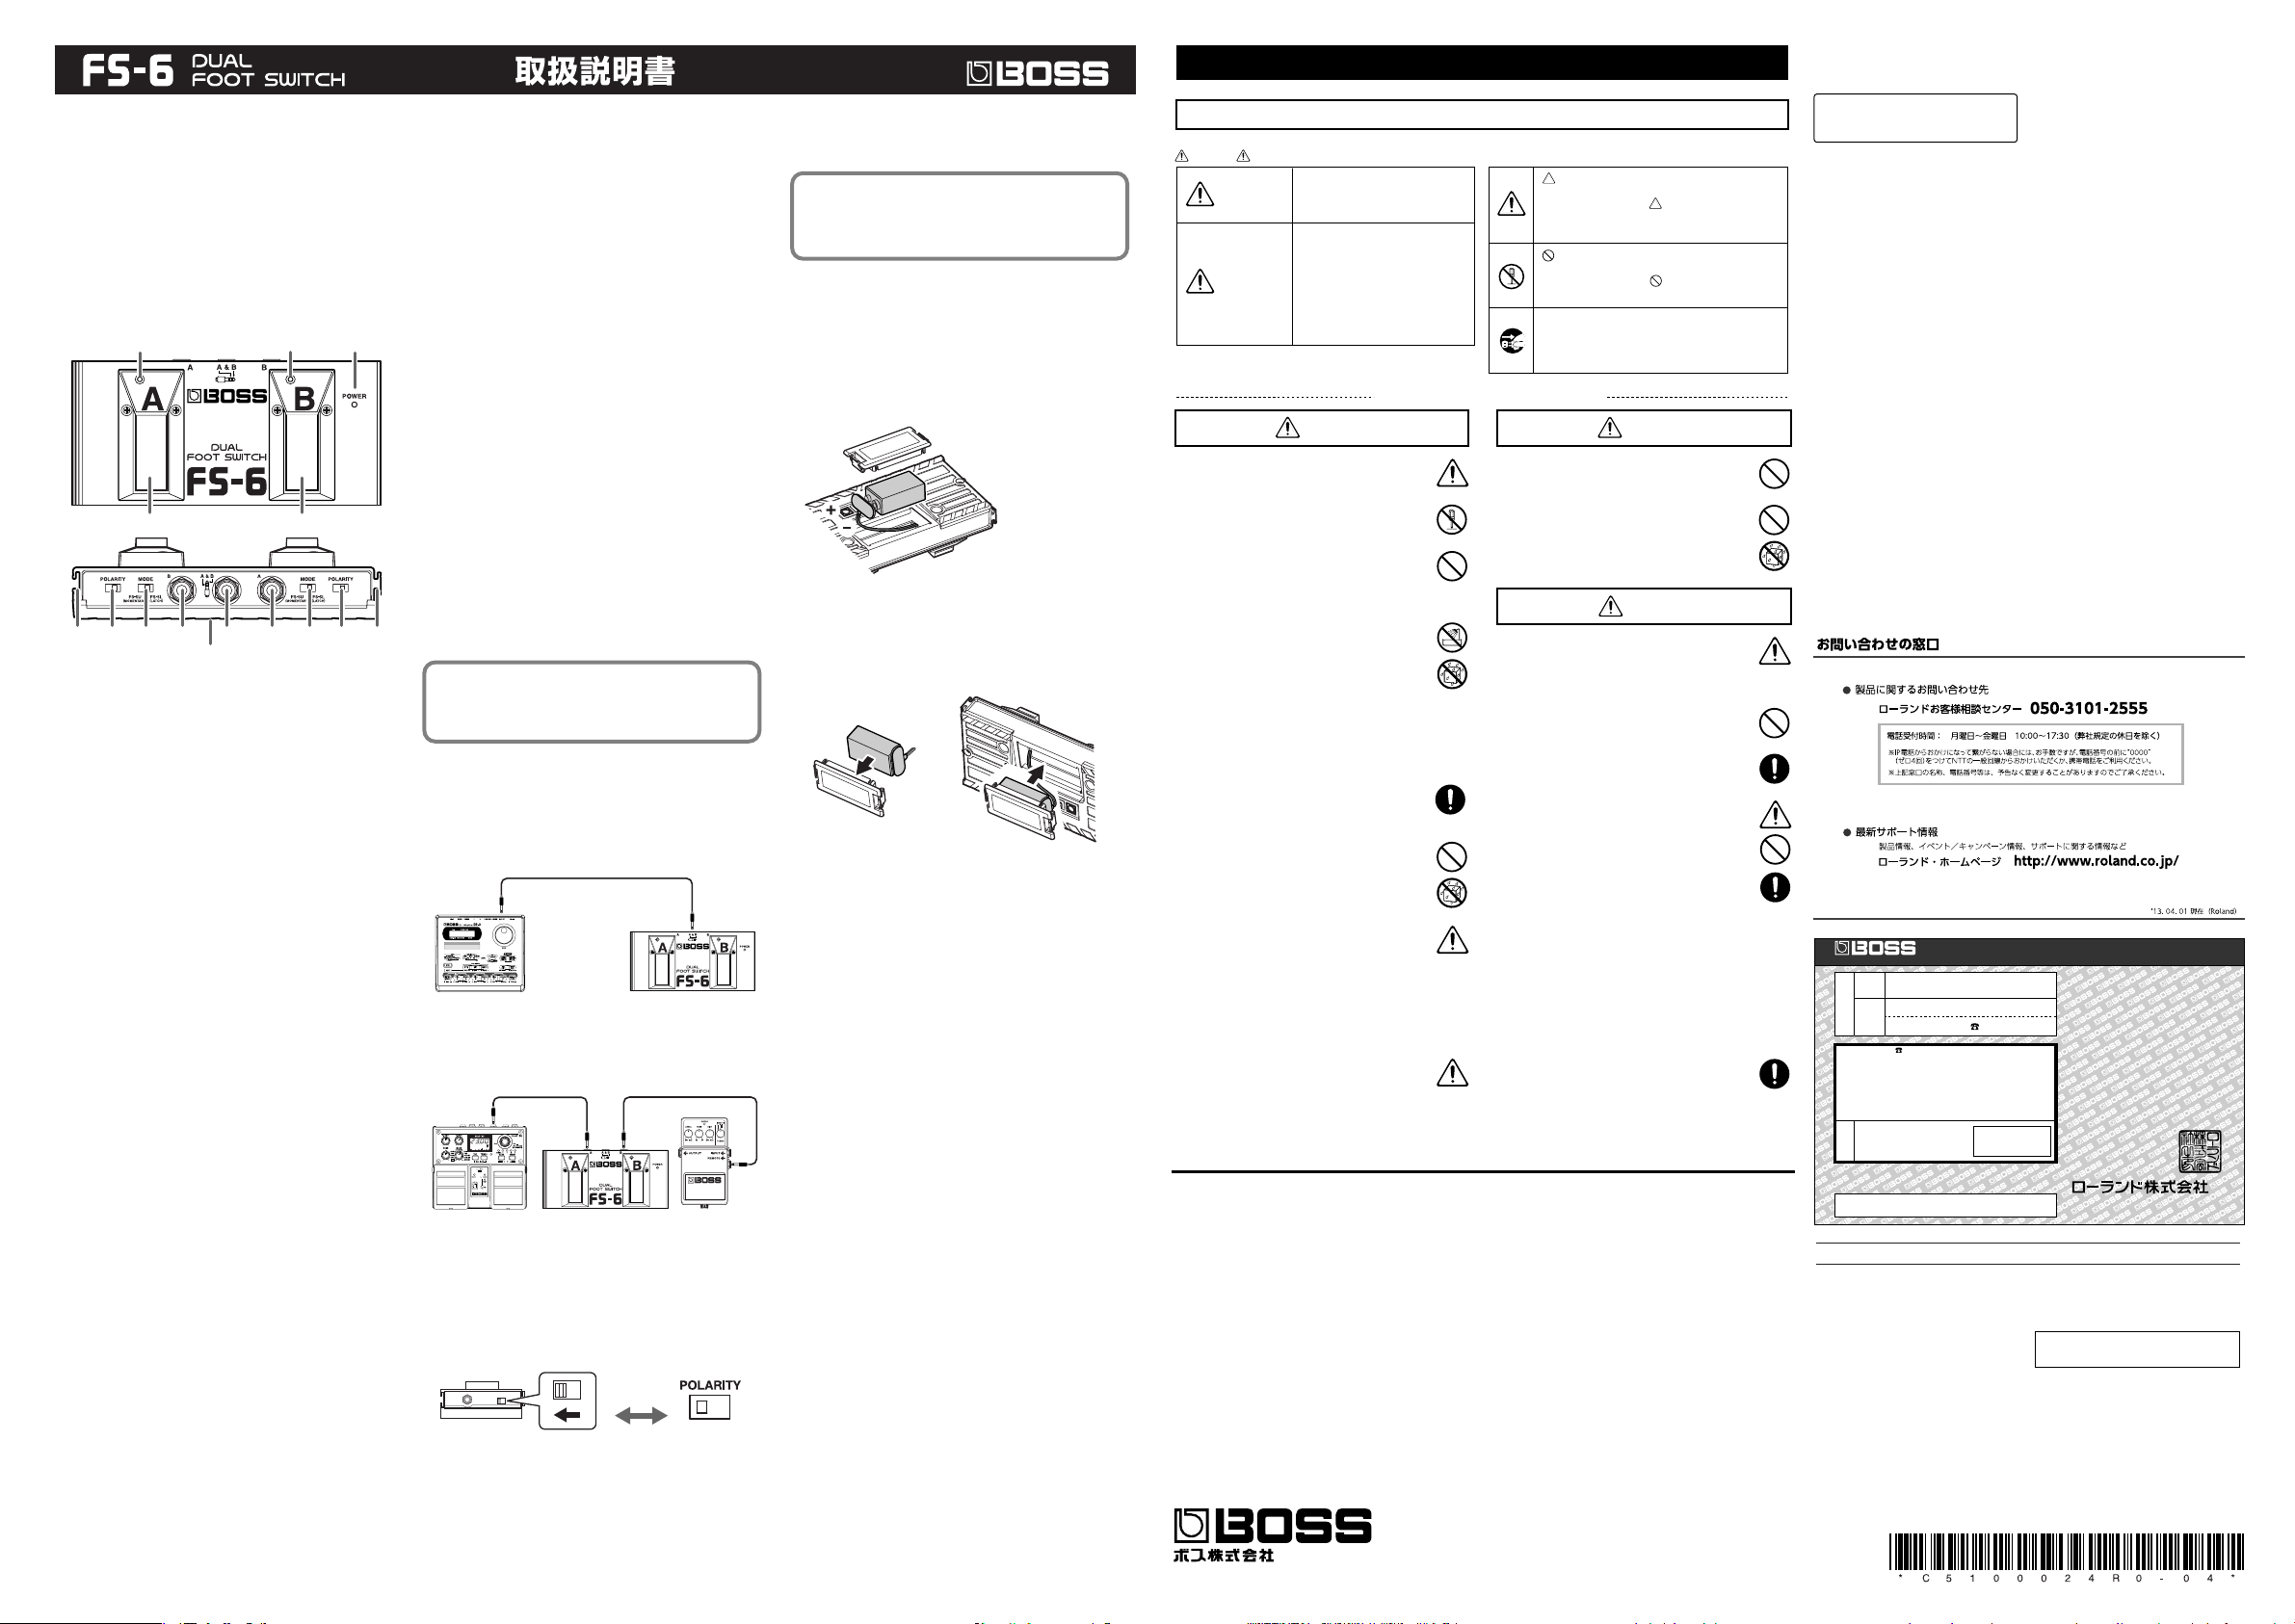
■ 各部の名称と働き
fig.01
3
4
12
11. MODE(モード)スイッチ B
ペダル・スイッチ B の機能を、ラッチ(LATCH)/モー
メンタリー(MOMENTARY)のいずれかに設定します。
ラッチ:
ペダル・スイッチを踏むたびにオン/オフが切り替わります。
モーメンタリー:
ペダル・スイッチを踏んでいる間がオン(オフ)、離すとオフ(オ
ン)になります。
12. POWER(パワー)インジケーター
電源がオンになっているとき(ジャックにプラグが差し込
まれているとき)に点灯します。
※ このインジケーターはバッテリー・チェックの機能も
■ 電池交換のしかた
電池が消耗してくるとインジケーターが暗くなります。早
めに電池を交換してください。
※ 本体を裏返す際は、落下や転倒を引き起こさないよう
取り扱いにご注意ください。
1. バッテリー・カバーを開けます。
※
電池交換時、本体内部の
基板に指が触れないよう
ご注意ください。
兼ねています。暗くなったり点灯しなくなったときは、
1 2
電池が消耗していますので、新しい電池と交換してく
ださい。
13. バッテリー・カバー
このカバー開けると、電池の交換ができます。交換方法に
6
11
9
57
1414
8
10
13
1. ペダル・スイッチ A
ジャック A、ジャック A & B に接続した機器のスイッチ
として使用します。『接続のしかた』参照。
ついては、『電池交換のしかた』をご覧ください。
14. FS 連結部
FS-6、FS-5L、FS-5U、AB-2 を連結することができます。
ご注意
工場出荷時、付属の電池は接続されておりません。
ご使 用になる 前に、(+/-)の極性に 注意して 電池ス
ナップに接続してください。
2. 電池を取り出し、電池スナップをはずします。
3. 新しい電池を電池スナップに接続します。
※ 極性(+/-)を間違わないようにご注意ください。
4. バッテリー・カバーに電池を収めます。
2. ペダル・スイッチ B
ジャック B、ジャック A & B に接続した機器のスイッチ
として使用します。『接続のしかた』参照。
3. ペダル・スイッチ A インジケーター
ペダル・スイッチ A をラッチ(LATCH)に設定している
ときは、ペダル・スイッチを踏むたびに消灯・点灯が切り
替わります。
ペダル・スイッチ A をモーメンタリー(MOMENTARY)
に設定しているときは、ペダル・スイッチを踏んでいる間
だけ点灯します。
4. ペダル・スイッチ B インジケーター
ペダル・スイッチ B をラッチ(LATCH)に設定している
ときは、ペダル・スイッチを踏むたびに消灯・点灯が切り
替わります。
ペダル・スイッチ B をモーメンタリー(MOMENTARY)
に設定しているときは、ペダル・スイッチを踏んでいる間
だけ点灯します。
5. ジャック A
ペダル・スイッチ A でコントロールする機器を接続しま
す。標準プラグ←→標準プラグの接続コードを使います。
6. ジャック B
ペダル・スイッチ B でコントロールする機器を接続しま
す。標準プラグ←→標準プラグの接続コードを使います。
7. ジャック A & B
TRS 標準ジャックのコントロール入力を持 つ機器と接続
します。ステレオ標準プラグ←→ステレオ標準プラグの接
続コード(Roland PCS-33 など)を使います。
※ ジャックA/B/A & B は電源スイッチも兼ねています。
接 続プラ グをジ ャック に差し 込むと 電源が オンに な
り、抜くとオフになります。本機を使用しないときは、
接続プラグを抜いてください。
8. POLARITY(ポラリティー)スイッチ A
ペダル・スイッチ A の極性を切り替えます。接続機器の
説明書を参照し、適切な方向に切り替えてください。
9. POLARITY(ポラリティー)スイッチ B
ペダル・スイッチ B の極性を切り替えます。接続機器の
説明書を参照し、適切な方向に切り替えてください。
10. MODE(モード) スイッチ A
ペダル・スイッチ A の機能を、ラッチ(LATCH)/モー
メンタリー(MOMENTARY)のいずれかに設定します。
■ 接続のしかた
※ 他の機器と接続するときは、誤動作やスピーカーなど
の破損を防ぐため、必ずすべての機器の音量を絞った
状態で電源を切ってください。
ジャック A & B との接続
fig.03
(ステレオ標準プラグ←→ステレオ標準プラグ)
接続コード
RolandPCS-33(別売)など
※ ジャック A & B に接続する場合は、ジャック A また
はジャック B に機器を接続しないでください。故障や
誤動作の原因となります。
ジャック A または B との接続
fig.02
■ POLARITY スイッチの設定
FS-6 のポラリティー設定と、接続機器の取扱説明書に記
載されている FS-5U または FS-5L のポラリティー設定を
合わせるときは、以下のように設定してください。
※ この設定では、スイッチをオンした時がオープン
(OPEN)、オフにした時がクローズ(CLOSE)になり
ます。
fig.04
FS-5L / FS-5U FS-6
5. バッテリー・カバーと電池が離れないように押さえな
がら、バッテリー・カバーを閉じます。
※ 「カチッ」と音がするまで確実に押し込んでください。
■ 故障と思う前に
電源が入らない(POWER インジケーターが点灯しない)
□ ジャックにプラグが確実に差し込まれていますか?
→ ジャックにプラグが差し込まれると、電源がオンにな
ります。確実にプラグを差し込んでください。
□ 電池が切れていませんか?
→ 『電池交換のしかた』に従って新しい電池と交換してく
ださい。
□ ジャック A またはジャック B との接続に、ステレオ標
準プラグ←→ステレオ標準プラグの接続コードを使っ
ていませんか。
→ 標準プラグ←→標準プラグの接続コードを使用してく
ださい。
接続機器が正常に動作しない
□ 接続機器の適切なジャックに接続されていますか?
→ 接続先機器のジャックを確認してください。
□ POWER インジケーターが暗くありませんか?
→ 電池が消耗しています。『電池交換のしかた』に従って
新しい電池と交換してください。
□ ポラリティー・スイッチの設定は適切ですか?
→ 接続機器の仕様に合わせて、ポラリティーを設定して
ください。
□ モード・スイッチの設定は適切ですか?
→ 接続機器の仕様に合わせて、モードを設定してくださ
い。
ペダル・スイッチ・インジケーターが点灯しない
□ スイッチがオフになっていませんか?
→ ペダル・スイッチを踏んでください。
□ ポラリティー・スイッチが確実に切り替わっています
か?
→ ポラリティー・スイッチを確実に切り替えてください。
インジケーターが暗い
→ 電池が消耗しています。『電池交換のしかた』に従って
新しい電池と交換してください。
安全上のご注意
火災・感電・傷害を防止するには
注意の意味について警告と
取扱いを誤った場合に、使用者が
警告
注意
死亡または重傷を負う可能性が想
定される内容を表わしています。
取扱いを誤った場合に、使用者が
傷害を負う危険が想定される場合
および物的損害のみの発生が想定
される内容を表わしています。
※物的損害とは、家屋・家財およ
び家畜・ペットにかかわる拡大
損害を表わしています。
以下の指示を必ず守ってください
警告 警告
001
● この機器を使用する前に、以下 の指示と取
扱説明書をよく読んでください。
..............................................................................................................................
002a
● この機器を分解したり、改造し たりしない
でください。
..............................................................................................................................
003
● 修理/部品の交換などで、取扱 説明書に書
かれていないことは、絶対にし ないでくだ
さい。必ずお買い上げ店またはローランド・
サービスに相談してください。
..............................................................................................................................
004
● 次のような場所での使用や保存 はしないで
ください。
○ 温度が極端に高い場所(直射日光の当た
る場所、暖房機器の近く、発熱する機器
の上など)
○ 水気の近く(風呂場、洗面台、濡れた床
など)や湿度の高い場所
○ 雨に濡れる場所
○ ホコリの多い場所
○ 振動の多い場所
..............................................................................................................................
007
● この機器を、ぐらついた台の上 や傾いた場
所に設置しないでください。必 ず安定した
水平な場所に設置してください。
..............................................................................................................................
011
● この機器に、異物(燃えやすいもの、硬貨、
針金など)や液体(水、ジュー スなど)を
絶対に入れないでください。
..............................................................................................................................
012d
● 次のよう な場合は 、直ちに 電源を切 って、
お買い上げ店またはローラ ンド・サービス
に修理を依頼してください。
○ 煙が出たり、異臭がしたとき
○ 異物が内部に入ったり、液体がこぼれた
りしたとき
○ 機器が(雨などで)濡れたとき
○ 機器に異常や故障が生じたとき
..............................................................................................................................
013
● お子様のいるご家庭で使用 する場合、お子
様の取り扱いやいたずらに注意 してくださ
い。必ず大人のかたが、監視/ 指導してあ
げてください。
..............................................................................................................................
■ 主な仕様
●コントロール
ペダル・スイッチA, B /ポラリティー・スイッチ
A, B /モード・スイッチ A, B
●接続端子
ジャック A、ジャック B(標準ジャック)、
ジャック A & B(TRS 標準ジャック)
●電源
DC 9 V:乾電池 006P/9 V 6F22(マンガン)
※ 連続使用時の 電池の寿命(使用 状態によって
異なります)
マンガン電池:
約 70 時間、アルカリ電池:約 100 時間
(A, B 常時オン、MODE = LATCH)
発売元:ローランド株式会社
6LR61(アルカリ)
2004 ボス株式会社
©
本書の一部、もしくは全部を無断で複写・転載することを禁じます。
BOSS は、日本国およびその他の国におけるローランド株式会社の
登録商標または商標です。
図記号の例
は、注意(危険、警告を含む)を表わしていま
す。
具体的な注意内容は、 の中に描かれています。
左図の場合は、「一般的な注意、警告、危険」を
表わしています。
は、禁止(してはいけないこと)を表わしてい
ます。
具体的な禁止内容は、 の中に描かれています。
左図の場合は、「分解禁止」を表わしています。
●は、強制(必ずすること)を表わしています。
具体的な強制内容は、
左図の場合は、「電源プラグをコンセントから抜
くこと」を表わしています。
014
● この機器を落とし たり、この機器に強い衝
撃を与えないでください。
..............................................................................................................................
019
● 電池は、充電、加熱、分解 したり、または
火や水の中に入れたりしないでください。
●の中に描かれています。
注意
104
● 接続したコードや ケーブル類は、繁雑にな
らないように配慮してください。特に、コー
ドやケーブル類は、お 子様の手が届かない
ように配慮してください。
..............................................................................................................................
106
● この機器の上に乗 ったり、機器の上に重い
ものを置かないでください。
..............................................................................................................................
108c
● この機器を移動す るときは、外部機器との
接続を外してください。
..............................................................................................................................
111(選択)
● 電池の使いかたを間違えると、破裂したり、
液漏れしたりしま す。次のことに注意して
ください。
1 ○ 電池の + と - を間違えないように、指示
どおり入れてください。
3 ○ 長時間使用しないときは、電池を取り出
しておいてください。
5 ○ 液漏れを起こした場合は、柔らかい布で
電池 ケー スに ついた液 をよ くふきと っ
てから新しい電池を入れてください。ま
た、漏れた液が身体についた場合は、皮
膚に炎症を起こす恐れがあります。また
眼に 入る と危 険ですの です ぐに水で よ
く洗い流してください。
6 ○ 電池を、金属性のボールペン、ネックレ
ス、ヘア ピンなどと一 緒に携帯 したり、
保管したりしないでください。
..............................................................................................................................
112
● 使用済みの電池は、あ なたの地域のゴミ分
別収集のしかたに従って、捨ててください。
..............................................................................................................................
●消費電流
8 mA(最大)
●寸法
188(W)× 91(D)× 43(H)mm
●質量
470 g ( 乾電池含む)
●付属品
乾電池 006P/9V(6F22)、取扱説明書
※ 製品の仕様および外 観は、改良のため 予告な
く変更することがあります。
使用上のご注意 ......................................
291a
「安全上のご注意」以外に、次のことに注意してください。
この製品はフット・コントロール専用
機器です。取扱説明書に記載のない用
途には使用しないでください。
電源、電池のセットや交換について
304b
● 電池のセットや交換は、誤動作やス
ピーカーなどの破損を防ぐため、他
の機器と接続する前に行なってくだ
さい。
306b
●
この機器には、工場出荷時に電池が付
属されています。この電池は検査用の
ため、寿命が短い場合があります。
307
●
接続するときは、誤動作やスピーカー
などの破損を防ぐため、必ずすべての
機器の電源を切ってください。
設置について
352b
● 携帯電話などの無線機器を本機の近
くで使 用する と、着信時や 発信時、
通話時に本機から雑音が出ることが
あります。この場合は、それらの機
器を本機から遠ざけるか、もしくは
電源を切ってください。
354a
● 直射日光の当たる場所や、発熱する
機器の近く、閉め切った車内などに
放置しないでください。変形、変色
することがあります。
355b
● 極端に温湿度の違う場所に移動する
と、内部に水滴がつく(結露)こと
があります。そのまま使用すると故
障の原因になりますので、数時間放
置し、結露がなくなってから使用し
てください。
Products of Roland
ご芳名
お
客
〒
様
ご住所
取扱販売店名・住所・
お買い上げ日
保
証
期
間
年 月 日より
太枠内に記入または捺印の無い場合は、必ず販売店発行の領収書またはそのお買い
上げ年月日・販売店等を証明するものを保証書に添えて大切に保存してください。
記入もしくは添付の無い場合は無効となりますので、ご注意ください。
型名
デュアル・フット・スイッチ FS-6
ボス製品保証書
ただし、ソフトウェア、
付属品、消耗部品は除く
お手入れについて
401a
● 通常のお手入れは、柔らかい布で乾
拭きするか、堅く絞 った布で汚れを
拭き取ってくだ さい。汚れが激しい
ときは、中性洗剤を 含んだ布で汚れ
を拭き取ってか ら、柔らかい布で乾
拭きしてください。
402
● 変色や変形の 原因と なるベン ジン、
シンナーおよび アルコール類は、使
用しないでください。
修理について
451a
● お客様がこの機器を分解、改造され
た場合、以後の性能 について保証で
きなくなりま す。また、修理をお断
りする場合もあります。
その他の注意について
553
● 故障の原因になりますので、ボタン、
つまみ、入出力端子 などに過度の力
を加えないでください。
556
● ケーブルの抜き差しは、ショートや
断線を防ぐため、プ ラグを持ってく
ださい。
558b
● 音楽をお楽しみになる場合、隣近所
に迷惑がかから ないように、特に夜
間は、音量に十分注意してください。
559a
● 輸送や引っ越しをするときは、この
機器が入っていた ダンボール箱と緩
衝材、または同等品 で梱包してくだ
さい。
559c
●
この機器が入 っていた梱包箱や緩衝
材を廃棄する場合、各市町村のゴミの
分別基準に従って行ってください。
●
本保証書は、本書記載内容で無料修理をさ
様
せていただくことをお約束するものです。
●保証期間中に故障が発生した場合は、製品
と本書をご持参ご提示の上、お買上げの販
売店にご依頼ください。
●修理についてご不明な点や、お買上げ販売
店に修理を依頼することができない場合は
ローランドお客様相談センターにお問い合
わせください。
●本書は再発行いたしません。所定事項の記
入および内容をよくお読みの上、大切に保
本体は一年間
存してください。
本社工場 〒431-1304浜松市北区細江町中川2036-1
電話(053)523-0230
保証規定
(ト)
1.保証期間内において、取扱説明書・本体貼付ラベルなどの
注意書に従った正常なご使用状態で発生した故障につい
ては、第3項に示す場合を除き、無料修理いたします。
2.保証期間内に無料修理をお受けになる場合は、お買い上げ
の販売店にご依頼いただくか、またはローランドお客様
相談センターにご相談ください。
なお、修理の際には本書をご提示ください。お客様のご
事情により出張修理を依頼された場合、保証期間中であっ
ても出張料金を申し受けます。
3.保証期間内でも、次の場合には有料修理となります。
(イ)本書のご提示が無い場合。
(ロ)本書にお買上げ年月日・販売店名の記入が無い場
合、または字句を書き換えられた場合。
(ハ)ご使用上の誤り、又は当社の指定者以外の手によ
り修理・改造された場合。
(ニ)本製品に異常がなく、他の部分、他の機器に異常
があり、点検及び改善した場合。
(ホ)お買い上げ後の輸送、移動、落下等による故障や
損傷および使用中に生じたキズ・汚れなどの外観
上の変化。
(ヘ)地震、落雷、風水害、その他の天災地変、火災、
公害、ガス、異常電圧による故障や損傷。
消耗部品(例:電池など)の取り替えを要する場合、
および消耗部品の摩耗や劣化に起因する故障や損傷。
4.
本製品は日本国内でご使用いただくことを前提に製造・
販売しております。従って本製品の保証は、日本国外で
はお受けできませんので、ご了承ください。
This warranty is valid only in Japan.
修理メモ
本保証書は以上の保証規定により無料修理をお約束する
※
ものです。従ってこの保証書によってお客様の法律上の
権利を制限するものではありません。
本製品の補修用性能部品(製品の機能を維持するために必
※
要な部品)の最低保有期間は製造打切後6年です。この部
品保有期間を修理可能の期間とさせていただきます。但し、
部品製造者側での早期製造打ち切りや入手困難な状況に伴
い、期間満了以前に対応出来なくなる場合がありますので
予めご了承願います。保有期間経過後も、故障内容によっ
ては修理可能の場合がありますので、ローランドお客様相
談センターまでお問い合わせください。
※修理の際、交換した部品を再生、再利用、製品の品質向
上等の目的で回収させていただくことがありますので、
ご協力願います。
[持込修理]
Page 2

Thank you, and congratulations on your choice of BOSS FS-6 Dual Foot Switch. Before using this unit, carefully read the sections entitled: “USING THE UNIT SAFELY” and
“IMPORTANT NOTES.” These sections provide important information concerning the proper operation of the unit. Additionally, in order to feel assured that you have gained a
good grasp of every feature provided by your new unit, this manual should be read in its entirety. The manual should be saved and kept on hand as a convenient reference.
■ Features
• This unit combines the functions of the FS-5L (latch type) and FS-5U (momentary type) foot switches. Both of the
unit’s foot switches may be set to function as either a latch or momentary type switch.
• You can connect to gear equipped with TRS 1/4” phone jacks using a connection cable with stereo 1/4” phone plugs at
both ends.
• The FS-6 can be connected to another FS-6, a FS-5U/5L, or an AB-2.
■ Panel Description
fig.01
3
1 2
4
12
11. MODE Switch B
This sets the function for pedal switch B to LATCH or
MOMENTARY.
LATCH:
Alternately switches on or off each time the pedal switch is pressed.
MOMENTARY:
Switches on (off) while the pedal switch is held down, and off (on)
when the switch is released.
12. POWER Indicator
This lights when the power is on (when a plug is connected to a jack).
* If this indicator goes dim or no longer lights while the power
is on, the battery is near exhaustion and should be replaced
immediately.
Use the FS-6 with BOSS or Roland devices compatible with the FS-5L or FS-5U.
* No assurances can be given with respect to the proper
functioning of this unit if it is connected with devices
or jacks other than those specified.
■ Changing the Battery
When the POWER indicator goes dim or no longer lights
while the power is on, it means that the battery is nearly
dead and must be replaced.
* When turning the unit upside-down, handle with care to
avoid dropping it, or allowing it to fall or tip over.
1. Open the battery cover.
fig.05
When changing the battery,
*
be careful not to touch the
circuit board inside the unit.
13. Battery Cover
Open this cover to replace the battery. For instructions on
replacing the battery, refer to “Changing the Battery.”
6
11
9
57
1414
8
10
13
1. Pedal Switch A
Use this as a switch for the device connected to Jack A or
Jack A & B. Refer to “Connections.”
14. FS Joint Panel
The FS-6 can be connected to another FS-6, a FS-5U/5L, or
an AB-2.
Before Using
Connect the battery supplied to the snap cord with
correct polarity.
2. Remove the old battery from the battery housing, and
remove the snap cord connected to it.
3. Connect the snap cord to the new battery.
*
Be sure to carefully observe the battery’s polarity (+ versus -).
4. Place the battery inside the housing.
2. Pedal Switch B
Use this as a switch for the device connected to Jack B or
Jack A & B. Refer to “Connections.”
3. Pedal Switch A Indicator
When pedal switch A is set to the latch type function, this
indicator alternately lights or goes out each time the pedal
switch is pressed. When pedal switch A is set to the
momentary type function, this indicator lights only while
the pedal switch is held down.
4. Pedal Switch B Indicator
When pedal switch B is set to the latch type function, this
indicator alternately lights or goes out each time the pedal
switch is pressed. When pedal switch B is set to the
momentary type function, this indicator lights only while
the pedal switch is held down.
5. Jack A
Connect the device being controlled with pedal switch A
here. Use a connection cable with 1/4” phone plugs at
both ends.
6. Jack B
Connect the device being controlled with pedal switch B
here. Use a connection cable with 1/4” phone plugs at
both ends.
7. Jack A & B
Connect devices equipped with TRS 1/4” phone jacks
here. Use a connection cable with stereo 1/4” phone plugs
at both ends.
*
Jacks A, B, and A & B also function as power switches. The
power is switched on when a plug is inserted in any of these
jacks, and switched off when no plug is connected. Unplug any
cable from these jacks whenever you are not using the unit.
8. POLARITY Switch A
This switches the polarity of pedal switch A.
After referring to the owner's manual for the device you
are connecting, switch this to the appropriate setting.
9. POLARITY Switch B
This switches the polarity of pedal switch B.
After referring to the owner's manual for the device you
are connecting, switch this to the appropriate setting.
10. MODE Switch A
This sets the function for pedal switch A to LATCH or
MOMENTARY.
This unit is a dedicated foot control device. Do not use it for any purpose other than those described in the
owner’s manual.
■ Connections
* To prevent malfunction and/or damage to speakers or other
devices, always turn down the volume, and turn off the
power on all devices before making any connections.
Connecting to Jack A & B
Connection Cable
(stereo 1/4” phone plugs at both ends)
* When connecting to Jack A & B, do not plug any device into
Jack A or Jack B. This may result in damage and/or malfunction.
Connecting to Jack A or B
■ Setting the POLARITY Switch
When matching the FS-6’s polarity setting with the polarity setting for the FS-5U or FS-5L given in the owner's
manual for the device being connected, set as described
below.
* According to these settings, the setting switches to OPEN
when the switch is on and CLOSE when the switch is off.
fig.04
FS-5L / FS-5U FS-6
5. While holding the assembly carefully, so the battery
cover doesn't get separated from the battery, close the
battery cover.
* Press the cover until you hear it click into place.
■ Troubleshooting
Power not turning on (POWER indicator not lighting)
❐ Is the cable fully plugged into the jack?
→ The power switches when a cable is plugged into one
of the jacks. Make sure the cable is plugged in firmly
and securely.
❐ Is the battery dead?
→ Replace the battery with a new one as described in
“Changing the Battery.”
Are you using a connection cable with stereo 1/4”phone
❐
plugs at both ends to connect to Jack A or Jack B?
→ Use a connection cable with mono 1/4” phone plugs
at both ends.
Connected device not operating properly
❐ Have you connected to the appropriate jack on the
device?
Check the type of jack used on the device being connected.
→
❐ Is the POWER indicator dimmed or off?
→ The battery may be dead. Replace the battery with a
new one as described in “Changing the Battery.”
❐ Is the setting of the POLARITY switch correct?
→ Set the polarity in accordance with the specifications
for the connected device.
❐ Is the MODE switch setting correct?
→ Set the MODE in accordance with the specifications
for the connected device.
Pedal switch indicator not lighting
❐ Is the switch off?
→ Depress the pedal switch.
❐ Is the POLARITY switch set firmly in the correct posi-
tion?
→ Make sure the POLARITY switch is set securely in the
correct position.
Indicator dimmed/off
→ The battery may be dead. Replace the battery with a
new one as described in “Changing the Battery.”
IMPORTANT NOTES ..................................
291a
In addition to the items listed under “USING THE UNIT SAFELY”, please read and observe
the following:
Used for instructions intended to alert
the user to the risk of death or severe
injury should the unit be used
improperly.
Used for instructions intended to alert
the user to the risk of injury or material
damage should the unit be used
improperly.
* Material damage refers to damage or
other adverse effects caused with
respect to the home and all its
furnishings, as well to domestic
animals or pets.
001
• Before using this unit, make sure to
read the instructions below, and the
Owner’s Manual.
.........................................................................................................
002a
• Do not open (or modify in any way)
the unit.
.........................................................................................................
003
• Do not attempt to repair the unit, or
replace parts within it (except when this
manual provides specific instructions
directing you to do so). Refer all
servicing to your retailer, the nearest
Roland Service Center, or an authorized Roland
distributor, as listed on the “Information.”
.........................................................................................................
004
•
Never use or store the unit in places
that are:
• Subject to temperature extremes (e.g.,
direct sunlight in an enclosed vehicle,
near a heating duct, on top of heatgenerating equipment); or are
• Damp (e.g., baths, washrooms, on wet
floors); or are
• Humid; or are
• Exposed to rain; or are
• Dusty; or are
• Subject to high levels of vibration.
.........................................................................................................
007
• Make sure you always have the unit
placed so it is level and sure to
remain stable. Never place it on
stands that could wobble, or on
inclined surfaces.
.........................................................................................................
011
• Do not allow any objects (e.g.,
flammable material, coins, pins); or
liquids of any kind (water, soft
drinks, etc.) to penetrate the unit.
.........................................................................................................
012d
• Immediately turn the power off, and
request servicing by your retailer,
the nearest Roland Service Center, or
an authorized Roland distributor, as
listed on the “Information” when:
• If smoke or unusual odor occurs
• Objects have fallen into, or liquid has been
spilled onto the unit; or
• The unit has been exposed to rain (or
otherwise has become wet); or
• The unit does not appear to operate normally
or exhibits a marked change in performance.
.........................................................................................................
013
• In households with small children,
an adult should provide supervision
until the child is capable of following
all the rules essential for the safe
operation of the unit.
.........................................................................................................
■ Specifications
● Controls
Pedal Switch A, B / POLARITY Switch A,
B / Mode Switch A, B
● Connectors
Jack A, Jack B (1/4 inch phone type)
Jack A & B (TRS 1/4 inch phone type)
● Power Supply
DC 9 V: Dry battery/9 V 6F22 (carbon),
6LR61 (alkaline)
* Expected battery life under continuous use:
Carbon: 70 hours, Alkaline: 100 hours
(A and B = ON, MODE = LATCH)
These figures will vary depending on the actual
conditions of use.
The symbol alerts the user to important instructions
or warnings.The specific meaning of the symbol is
determined by the design contained within the
triangle. In the case of the symbol at left, it is used for
general cautions, warnings, or alerts to danger.
The symbol alerts the user to items that must never
be carried out (are forbidden). The specific thing that
must not be done is indicated by the design contained
within the circle. In the case of the symbol at left, it
means that the unit must never be disassembled.
The ● symbol alerts the user to things that must be
carried out. The specific thing that must be done is
indicated by the design contained within the circle. In
the case of the symbol at left, it means that the powercord plug must be unplugged from the outlet.
• Protect the unit from strong impact.
(Do not drop it!)
.........................................................................................................
019
• Batteries must never be recharged,
heated, taken apart, or thrown into
fire or water.
.........................................................................................................
104
• Try to prevent cords and cables from
becoming entangled. Also, all cords
and cables should be placed so they
are out of the reach of children.
.........................................................................................................
106
• Never climb on top of, nor place
heavy objects on the unit.
.........................................................................................................
108c
• Disconnect all cords coming from
external devices before moving the
unit.
.........................................................................................................
111: Selection
• If used improperly, batteries may
explode or leak and cause damage or
injury. In the interest of safety,
please read and observe the
following precautions.
1 • Carefully follow the installation
instructions for batteries, and make
sure you observe the correct polarity.
3 • Remove the batteries whenever the
unit is to remain unused for an
extended period of time.
5 • If a battery has leaked, use a soft piece of
cloth or paper towel to wipe all remnants of
the discharge from the battery compartment.
Then install new batteries. To avoid inflammation of the skin, make sure that none of the
battery discharge gets onto your hands or
skin. Exercise the utmost caution so that none
of the discharge gets near your eyes. Immediately rinse the affected area with running
water if any of the discharge has entered the
eyes.
6 • Never keep batteries together with metallic
objects such as ballpoint pens, necklaces,
hairpins, etc.
.........................................................................................................
112
• Used batteries must be disposed of
in compliance with whatever regulations for their safe disposal that may
be observed in the region in which
you live.
.........................................................................................................
● Current Draw
8 mA (max.)
● Dimensions
188 (W) x 91 (D) x 43 (H) mm
7-7/16 (W) x 3-5/8 (D) x 1-3/4 (H) inches
● Weight
470 g / 1 lb 1 oz (including battery)
● Accessories
Dry battery/9 V (6F22), Owner’s Manual
* In the interest of product improvement, the
specifications and/or appearance of this
unit are subject to change without prior
notice.
Power Supply: Use of Batteries
304b
• Batteries should always be installed or replaced before connecting any other devices. This way, you
306b
• A battery was installed in the unit before it left the factory. The life of this battery may be limited, however,
307
• Before connecting this unit to other devices, turn off the power to all units. This will help prevent
Placement
352b
• Noise may be produced if wireless communications devices, such as cell phones, are operated in the
354a
• Do not expose the unit to direct sunlight, place it near devices that radiate heat, leave it inside an
355b
• When moved from one location to another where the temperature and/or humidity is very
Maintenance
401a
• For everyday cleaning wipe the unit with a soft, dry cloth or one that has been slightly dampened
402
• Never use benzine, thinners, alcohol or solvents of any kind, to avoid the possibility of discoloration
Additional Precautions
553
• Use a reasonable amount of care when using the unit’s buttons, sliders, or other controls; and when
556
• When connecting / disconnecting all cables, grasp the connector itself—never pull on the cable. This
558b
• To avoid disturbing your neighbors, try to keep the unit’s volume at reasonable levels (especially
559a
• When you need to transport the unit, package it in the box (including padding) that it came in, if
Copyright © 2004 BOSS CORPORATION
All rights reserved. No part of this publication may be
reproduced in any form without the written permission
of BOSS CORPORATION.
BOSS is a registered trademark of Roland Corporation in the United States and/or other countries.
can prevent malfunction and/or damage to speakers or other devices.
since its primary purpose was to enable testing.
malfunctions and/or damage to speakers or other devices.
vicinity of this unit. Such noise could occur when receiving or initiating a call, or while conversing.
Should you experience such problems, you should relocate such wireless devices so they are at a
greater distance from this unit, or switch them off.
enclosed vehicle, or otherwise subject it to temperature extremes. Excessive heat can deform or
discolor the unit.
different, water droplets (condensation) may form inside the unit. Damage or malfunction may
result if you attempt to use the unit in this condition. Therefore, before using the unit, you must
allow it to stand for several hours, until the condensation has completely evaporated.
with water. To remove stubborn dirt, use a cloth impregnated with a mild, non-abrasive detergent.
Afterwards, be sure to wipe the unit thoroughly with a soft, dry cloth.
and/or deformation.
using its jacks and connectors. Rough handling can lead to malfunctions.
way you will avoid causing shorts, or damage to the cable’s internal elements.
when it is late at night).
possible. Otherwise, you will need to use equivalent packaging materials.
For EU Countries
This product complies with the requirements of
EMC Directive 2004/108/EC.
 Loading...