

Page 1
IMPORTANT: IMPORTANT : IMPORTANTE:
Equalizer
Custom
Memory
Clock
Tune
Volume
Bass Treb
Source
Seek
Seek
Subwoofer
Read Before Using Lire avant usage Leer antes de usar
Operating/Safety Instructions
Consignes de fonctionnement/sécurité
Instrucciones de funcionamiento y seguridad
PB360S
PB360S-C
Call Toll Free for
Consumer Information
& Service Locations
Pour obtenir des informations et
les adresses de nos centres de
service après-vente,
appelez ce numéro gratuit
Llame gratis para
obtener información
para el consumidor y
ubicaciones de servicio
1-877-BOSCH99 (1-877-267-2499) www.boschtools.com
For English Version Version française Versión en español
See page 2 Voir page 14 Ver la página 26
Page 2
WARNING
CAUTION:
RISK OF ELECTRIC SHOCK
DO NOT OPEN
!
- TO PREVENT FIRE OR SHOCK HAZARD, DO NOT USE THIS PLUG WITH AN EXTENSION CORD, RECEPTACLE OR
OTHER OUTLET UNLESS THE BLADES CAN BE FULLY INSERTED TO PREVENT BLADE EXPOSURE.
- TO PREVENT FIRE OR SHOCK HAZARD, DO NOT EXPOSE THE APPLIANCE TO RAIN OR MOISTURE.
The lighting flash with arrowhead
symbol within an equilateral
triangle is intended to alert the user
to the presence of uninsulated
“dangerous voltage” within the
product’s enclosure that may be of
sufficient magnitude to constitute a
risk of electric to persons.
CAUTION: TO REDUCE THE RISK
OF ELECTRIC SHOCK, DO NOT
REMOVE COVER (OR BACK). NO
USER SERVICEABLE PARTS
INSIDE. REFER SERVICING TO
QUALIFIED SERVICE PERSONNEL.
The exclamation point within an
equilateral triangle is intended to
alert the user to the presence of
important operating and
maintenance (servicing)
instructions in the literature
accompanying the product.
IMPORTANT SAFETY INSTRUCTIONS
1) Read these instructions.
2) Keep these instructions.
3) Heed all warnings.
4) Follow all instructions.
5) Do not use this apparatus near water.
6) Clean only with dry cloth.
7) Do not block any ventilation openings. Install in accordance with the manufacturer’s instructions.
8) Do not install near any heat sources such as radiators, heat registers, stoves, or other apparatus (including
amplifiers) that produce heat.
9) Do not defeat the safety purpose of the polarized or grounding-type plug. A polarized plug has two blades with one
wider than the other. A grounding type plug has two blades and a third grounding prong. The wide blade or the third
prong are provided for your safety. If the provided plug does not fit into your outlet, consult an electrician for
replacement of the obsolete outlet.
10) Protect the power cord from being walked on or pinched particularly at plugs, convenience receptacles, and the
point where they exit from the apparatus.
11) Only use attachments/accessories specified by the manufacturer.
12) Use only with the cart, stand, tripod, bracket, or table specified by the manufacturer, or sold with the
apparatus. When a cart is used, use caution when moving the cart/apparatus combination to avoid injury
from tip-over.
13) Unplug this apparatus during lightning storms or when unused for long periods of time.
14) Refer all servicing to qualified service personnel. Servicing is required when the apparatus has been damaged in
any way, such as power-supply cord or plug is damaged, liquid has been spilled or objects have fallen into the
apparatus, the apparatus has been exposed to rain or moisture, does not operate normally, or has been dropped.
15) The mains plug is used as the disconnect device, the disconnect device shall remain readily operable.
16) Read the rating label on the bottom of the unit for power input and other safety information.
Apparatus shall not be exposed to dripping or splashing water and that no object filled with liquids such as vases
shall be placed on the apparatus.
Warning: To reduce risk of electric shock, only plug the unit into a Ground fault circuit interrupter (GFCI) protected
outlet when used in damp locations. if a GFCI protected outlet is not available, use a portable receptacle with built-in
GFCI protection.
2
Page 3

Table of Contents
Page Page
Safety...................................................................................2-3
Important Safety Instructions..............................................2
Table of Contents..................................................................3
FCC Information..................................................................3
Battery/Charger...................................................................4
Battery Care........................................................................4
Battery Disposal..................................................................4
Functional Description and Specifications........................5
LCD Displays.......................................................................6
Setting the Clock.................................................................6
PB360S & PB360S-C Controls ..........................................7
Operating Instructions.......................................................8-9
Audio Settings.....................................................................8
Radio Function....................................................................8
Aux Function.......................................................................8
USB Function......................................................................9
SD/MMC Card Function......................................................9
Releasing and Inserting the Battery Pack........................10
Charging the Battery Pack................................................10
Important Charging Notes.................................................11
To Power the Unit................................................................11
Use of the Convenient 4-way Outlets.............................11
Use of GFCI (Ground Fault Circuit Interruptor)................11
Use of 12V Outlet..............................................................12
Changing Fuse..................................................................12
Changing Clock Batteries.................................................12
Trouble Shooting.................................................................12
Maintenance ........................................................................13
Accessories..........................................................................13
FCC Information
NOTE: This equipment has been tested and found to comply
with the limits for a Class B digital device, pursuant to Part 15
of the FCC Rules. These limits are designed to provide
reasonable protection against harmful interference in a
residential installation. This equipment generates, uses and
can radiate radio frequency energy and, if not installed and
used in accordance with the instructions, may cause harmful
interference to radio communications. However, there is no
guarantee that interference will not occur in a particular
installation. If this equipment does cause harmful interference
to radio or television reception, which can be determined by
turning the equipment off and on, the user is encouraged to try
to correct the interference by one or more of the following
measures:
• Reorient or relocate the receiving antenna.
• Increase the separation between the equipment and receiver.
• Connect the equipment into an outlet on a circuit different
from that to which the receiver is connected.
• Consult the dealer or an experienced radio/TV technician for
help.
3
Page 4
Battery/Charger Rules
Before using battery charger, read all instructions and
cautionary markings on (1) battery charger, (2) battery
pack, and (3) product using battery.
Use only the charger which accompanied your product
or direct replacement as listed in the catalog or this
manual.
Do not disassemble radio unit or operate the radio unit if
it has received a sharp blow, been dropped or otherwise
damaged in any way. Replace damaged cord or plugs
immediately. Incorrect reassembly or damage may result in
electric shock or fire.
Do not recharge battery in damp or wet environment. Do
not expose radio unit to rain or snow. If battery case is
cracked or otherwise damaged, do not insert into
charger. Battery short or fire may result.
Charge only Bosch approved rechargeable batteries. See
Functional Description and Specifications. Other types of
batteries may burst causing personal injury and damage.
Charge battery pack in temperatures above +32 degrees
F (0 degrees C) and below +113 degrees F (45 degrees
C). Store radio unit and battery pack in locations where
temperatures will not exceed 120 degrees F (49 degrees
C). This is important to prevent serious damage to the
battery cells.
Battery leakage may occur under extreme usage or
temperature conditions. Avoid contact with skin and
eyes. The battery liquid is caustic and could cause chemical
burns to tissues. If liquid comes in contact with skin, wash
quickly with soap and water. If the liquid contacts your eyes,
flush them with water for a minimum of 10 minutes and seek
medical attention.
Place radio unit on flat non-flammable surfaces and
away from flammable materials when re-charging
battery pack. The charger and battery pack heat during
charging. Carpeting and other heat insulating surfaces block
proper air circulation which may cause overheating of the
charger and battery pack. If smoke or melting of the case
are observed unplug the charger immediately and do not
use the battery pack or charger.
Use of an attachment not recommended or sold by
Bosch may result in a risk of fire, electric shock or injury
to persons.
Battery Care
!
WARNIN
objects. For example, to protect terminals from shorting DO
NOT place batteries in a tool box or pocket with nails,
screws, keys, etc. Fire or injury may result.
When batteries are not in tool or
G
charger, keep them away from metal
Battery Disposal
!
WARNIN
projecting from the battery terminals. Fire or injury may
result. Prior to disposal, protect exposed terminals with
heavy insulating tape to prevent shorting.
If equipped with a lithium-ion battery, the battery must be
collected, recycled or disposed of in an environ mentally sound
manner.
Do not attempt to disassemble the
G
battery or remove any com ponent
Lithium-ion Batteries
“The EPA certified RBRC Battery Recycling
Seal on the lithium-ion (Li-ion) battery indicates
Robert Bosch Tool Corporation is voluntarily
participating in an industry program to collect
and recycle these batteries at the end of their
CAUTION: Danger of explosion if battery is incorrectly
replaced. Replace only with the same or equivalent
type.
DO NOT PUT BATTERIES INTO FIRE OR EXPOSE TO
HIGH HEAT. They may explode.
useful life, when taken out of service in the United States or
Canada.
The RBRC program provides a convenient alterative to
placing used Li-ion batteries into the trash or the munici pal
waste stream, which may be illegal in your area.
Please call 1-800-8-BATTERY for information on Li-ion battery
recycling and disposal bans/restrictions in your area, or return
your batteries to a Skil/Bosch/Dremel Service Center for
recycling. Robert Bosch Tool Corporation’s involvement in this
program is part of our commitment to preserving our
environment and conserving our natural resources.”
4
Page 5
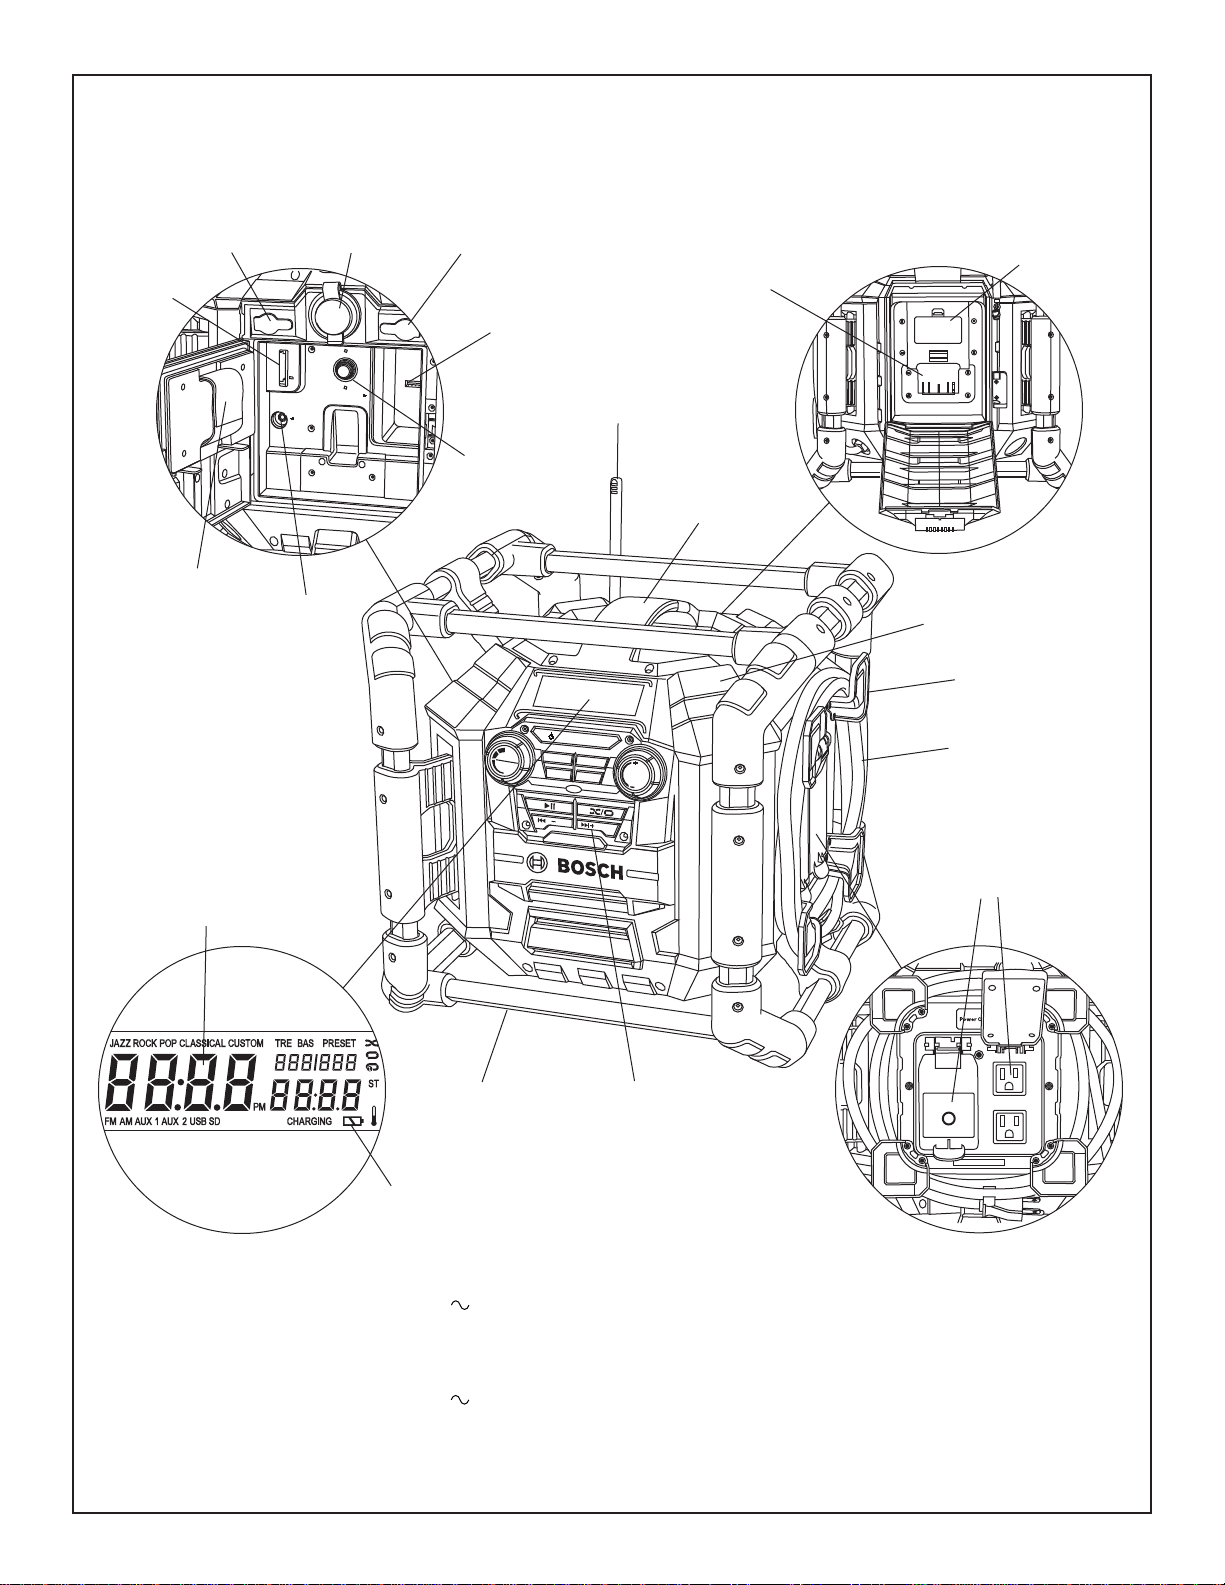
Functional Description and Specifications
Equalizer
Custom
Memory
Clock
Tune
Volume
Bass Treb
Source
Seek
Seek
Subwoofer
AUX 1
IN
LINE
OUT
12V
250V
1AMP
FUSE
FOR 12V
OUTLET
USB
AUX 2 IN
SD / MMC
AUX 1 IN
120V AC
A
REPLACE AA BATTE RY
WHEN UNIT NO LONGER
KEEPS CORRECT TIME
Jobsite Stereo with 4-way outlet
SD/MMC
CARD PORT
STORAGE
LOCATION FOR
DIGITAL MEDIA
AUXILIARY 1
INPUT
DEVICE
AUXILIARY 2
INPUT
12V DC
OUTLET
LINE
OUT
USB PORT
12V DC FUSE
LOCATION OF
AA BATTERIES
CHARGER/BATTERY
BAY
ANTENNA
CARRY
HANDLE
SPEAKERS
CORD WRAP
POWER CORD
DIGITAL
CLOCK
CHARGER
INDICATOR
Model number PB360S & PB360S-C
Voltage rating 120 V 60 Hz
Amperes 12 A
Compatible batteries
Outlets
Voltage 120 V 60 Hz
Amperes 10 A
BAT607, BAT614,
BAT609 & BAT618
ROLL
CAGE
4-WAY POWER
OUTLET
CONTROL
PANEL
DC power outlets
Voltage 12V
Amperes 1 Amp fuse
Radio AM 530-1710kHz
FM 87.5-107.9MHz
SD/MMC/USB MP3, WMA Compatible
Memory AM 10-presets
FM 20-presets
5
Page 6

LCD Display
1 2 3 4 5 20 19 16 15
21
22
23
6
7
8
13
14
12
11
1. JAZZ– Illuminates when Jazz is selected in Equalizer.
2. ROCK– Illuminates when Rock is selected in Equalizer.
3. POP– Illuminates when Pop is selected in Equalizer.
4. CLASSICAL – Illuminates when Classical is selected in
Equalizer.
5. CUSTOM – Illuminates when Custom is selected in
Equalizer or when Custom button is pressed.
6. NUMERIC – Shows the clock time once it has been set
and the radio station during tuning.
7. ST (STEREO) – Illuminates when the radio station is
broadcasting in Stereo channel.
8. NUMERIC – Shows FM or AM station frequency in tuner
mode, or running time of digital music track.
9. CHARGING – Flashes when the unit is charging the
battery.
10.BATTERYicon – Indicates that a battery is in the unit. This
icon flashes when the battery is almost dead.
11.FM – Indicates FM band in tuner mode.
12.AM – Indicates AM band in tuner mode.
13.AUX 1 – Illuminates when you select AUX 1 mode for
playing external media player device.
14.AUX 2 – Illuminates when you select AUX 2 mode for
playing external media player device (inside Digital Media
Bay).
15.NUMERIC– Shows the number of a preset radio station in
tuner mode, or the track being played and number of tracks
stored on your USB or SD/MMC card device.
18
17
24
16.PRESET – Illuminates when preset radio station is
selected and flashes when setting station presets to
memory.
17.SD – (SD/MMC Card) Illuminates when you select
SD/MMC Card mode.
18.USB– Illuminates when you select USB mode.
19.BAS– Illuminates when you set the desired Bass level.
20.TRE– Illuminates when you set the desired Treble level.
21.RANDOM – Icon Illuminates when in Random mode (USB
and SD/MMC devices only).
22.REPEAT FOLDER – Icon illuminates when in Repeat
Folder mode (USB and SD/MMC devices only).
23.TRACK REPEAT – Icon illuminates when in Track Repeat
mode (USB and SD/MMC devices only).
24.PM – Illuminates when time setting is in PM mode.
25.TEMPERATURE icon - When the radio unit is NOT
plugged into a 120V power source, but a battery is installed
properly in the battery/charger bay, this icon will illuminate
and flash if the battery temperature is too hot
(approximately 50 celsius or more) or too cold
(approximately -10 celsius or less). If the battery
temperature exceeds 70 celsius, the radio unit will shut
down in order to protect the battery from damage. When
the battery temperature reaches the normal operating
temperature range (see Battery/Charger Rules), the radio
unit can be powered on and resume normal function. The
TEMPERATURE icon will NOT illuminate or flash when
the radio unit is plugged into a 120V power source.
9
10
25
Setting the Clock
When the AC plug or the battery pack is inserted, the unit
defaults to standby mode and the LCD shows “12:00”.
Follow the steps below to set the correct local time.
1. Press and hold Clock button on the unit and “hour” is
activated and flashes.
2. Turn /-Seek or Seek+/ to choose the correct hour
number. For “PM” setting, turn TUNE DIAL until “PM”
illuminates in the LCD display.
3. Press Clock button once to set the hour and “minute” is
activated and flashes.
4. Turn /-Seek or Seek+/ to choose the correct
minute number.
5. Press CLOCK button once to save the clock setting.
Note: 2 AA batteries are needed to keep time current when
unit is not plugged in. Replace AA batteries when unit no
longer keeps proper time. (See charging AA clock battery
section.)
6
Page 7
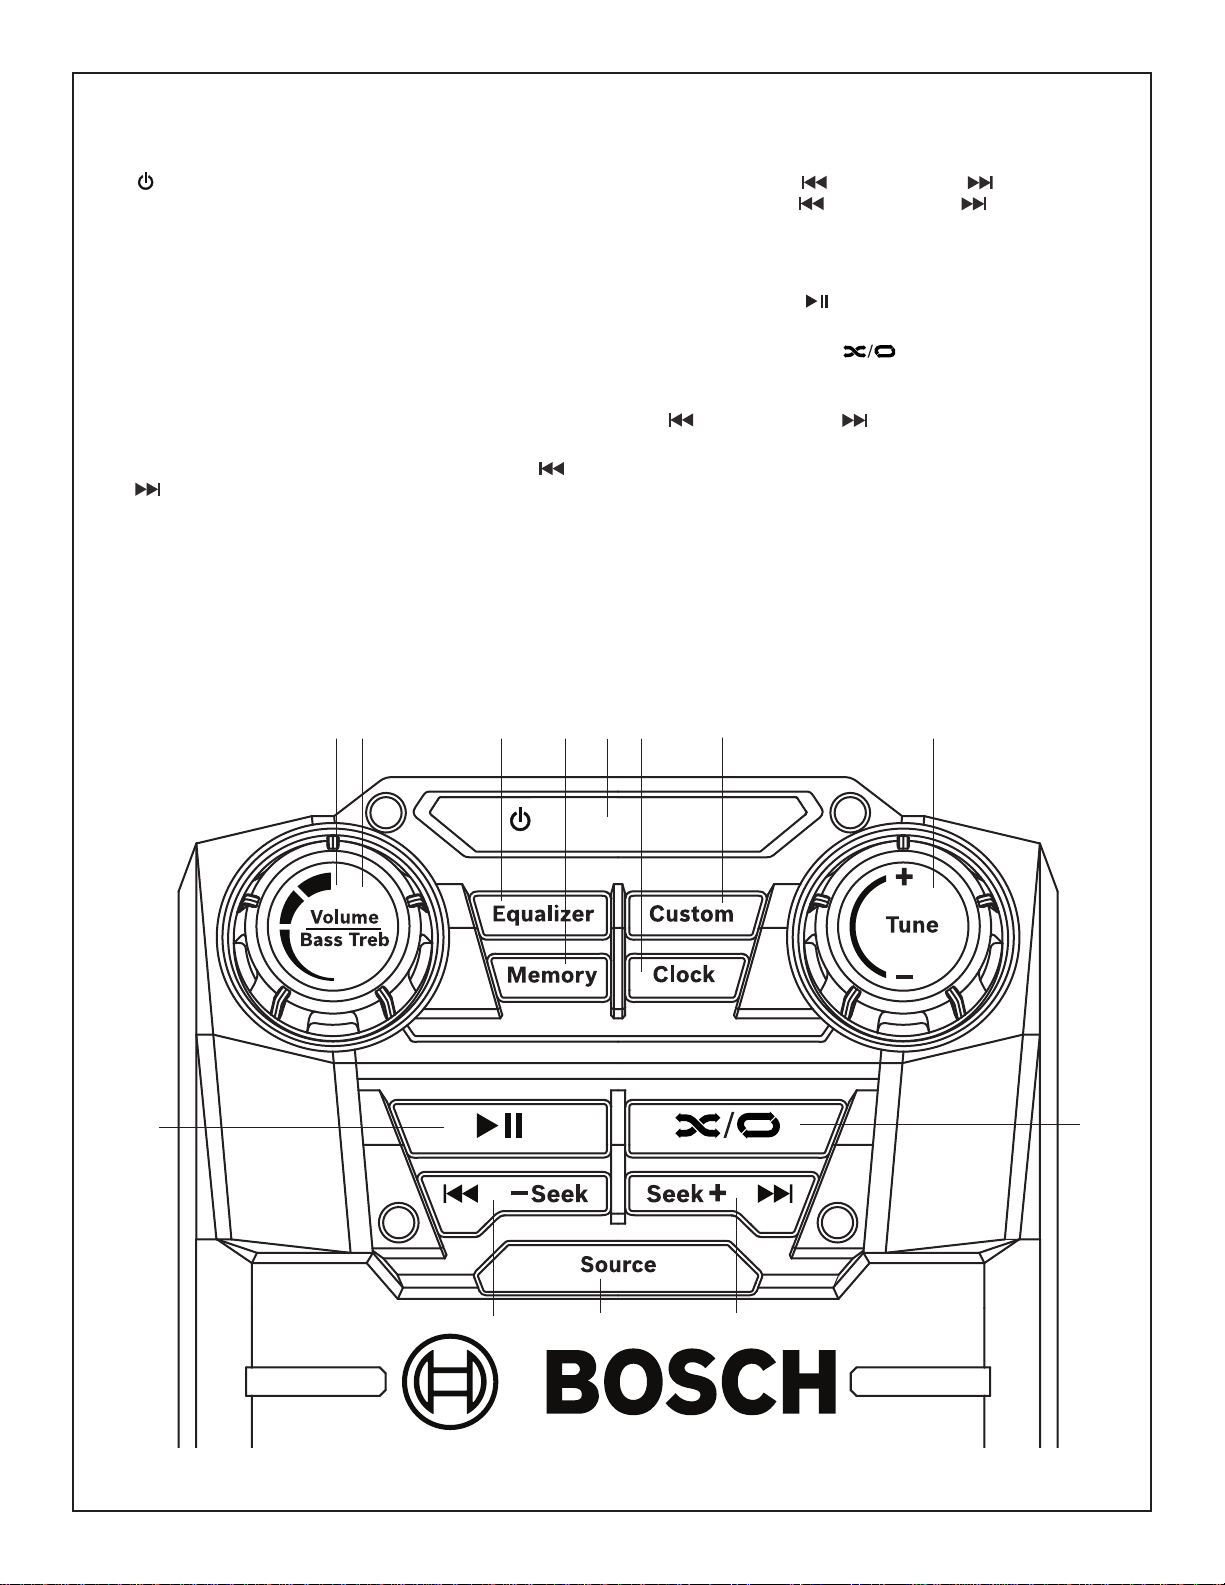
PB360S & PB360S-C Controls
1. – To switch between power-on and standby modes.
2. Volume/Bass Treb – To increase/decrease the audio
volume at all modes Volume adjusts from 0-20 (min-max)
in one full revolution. Dial spins 360-degrees.
3. Volume/Bass Treb – Adjusts custom Bass and Treble
when unit is in “Custom” equalizer setting. And when
custom button is pressed and icon is flashing
4. Equalizer – To toggle between preset Jazz, Rock, Pop,
Classical and Custom equalizer settings.
5. Custom – Press once to engage custom Bass and Treble
settings. (controlled by Volume/Bass/Treb dial)
6. Memory – Pressing Sets Radio Tuner Presets. To Set:
Tune in to desired radio station, Press Memory, use or
buttons to move to desired preset, press Memory to
save station to preset.
7. Clock – Pressing sets and Saves clock setting. To Set:
2
3
4
6
Press once, use /-Seekor Seek+/ to adjust hour;
Press again, use /-Seekor Seek+/ to adjust minute;
Press again to set.
8. Tune +/- – When playing Radio source, turn dial to adjust
radio station channel.
9. PLAY / PAUSE – To play or pause a track when
listening to USB, SD/MMC source.
10.RANDOM / REPEAT – To random play / repeat
folder/repeat single track when unit is playing USB or SD
source.
11. /-Seek or Seek+/ – When playing Radio source:
Press once to toggle between radio station presets. Press
and hold to quickly Seek radio stations up or down. When
listening to USB or SD source: Press once to skip to
previous track
12.Source – Press to toggle between Radio FM, AM, AUX1,
AUX2, USB, or SD/MMC.
7
1
5
8
9
11
12
11
10
7
Page 8

Operating Instructions
Audio Settings
VOLUME
Your Jobsite Stereo has 20 selectable preset volume settings.
To adjust the VOLUME level, turn Volume/Bass/Treb Dial
clockwise or counterclockwise to desired volume level.
Equalizer
Your Jobsite Stereo has 5 selectable preset equalizer settings
and custom setting which allow you to custom select the level
of Bass and Treble tones.
Pressing Equalizer repeatedly will select through 5 equalizer
and custom settings, illuminating each setting on the LCD:
JAZZ, ROCK, POP, CLASSICAL, and CUSTOM.
To set CUSTOM Bass and Treble settings, follow the steps
below:
1. Press Equalizer repeatedly until “CUSTOM” is selected.
or, simply press the CUSTOM button once.
2. Press Custom button once and “BAS” (for BASS) along
with the bass level number will flash on the LCD display.
3. Turn Volume/Bass/Treb Dial clockwise or
counterclockwise to desired bass level.
4. Press Custombutton twice and “TRE” (for TREBLE) along
with the treble level number will flash on the LCD display.
5. Turn Volume/Bass/Treb Dial clockwise or
counterclockwise to desired treble level.
6. Press Custom button once more to set levels to memory.
Your custom bass and treble settings are now saved, and
“TRE” and treble level number stop flashing and disappear
from the LCD display.
Note: Bass and Treble settings each have a range of 0 (min)
to 10 (max) levels.
STEREO
When a strong FM signal is received by the FM tuner, “ST” will
illuminate on the LCD display. If a weak signal is received by
the FM tuner, “ST” will not illuminate on the LCD display. To
improve the sound of a weak station, adjust the external
antenna or position your Jobsite Stereo in a different location.
Radio Function
TO SELECT BAND AND STATIONS
This tuner is operated in standard AM frequency from 5301710kHz and in standard FM frequency from 87.5-107.9MHz.
Follow the steps below to tune the station:
1. Press Source button repeatedly until “FM” or “AM” is
selected.
2. Turn Tune +/- Dial clockwise or counterclockwise to tune
into desired radio frequency.
3. To “Seek”, press and hold /-Seekbutton for one second
to seek down or Seek+/ button to seek up until a station
with a strong signal is received.
Note: If there is no station received when the unit stops
seeking, repeat the steps mentioned above to seek for the
preferred stations.
TO PRESET STATIONS
Up to 20 stations for FM and 10 stations for AM can be preset.
Follow the steps below to preset a station:
1. Tune in to desired radio station using Tune +/- Dial.
2. To preset desired station, press MEMORY button once.
PRESET and the preset number will flash on the display.
3. Press either the /-Seek or Seek+/ buttons once to
move to the desired station preset.
4. Press Memory button again to save desired station to
desired station preset to memory. PRESET and the station
preset number will stop flashing.
Note: Once 20 stations for FM or 10 stations for AM are set,
the first preset station will be replaced if you continue to preset
another station.
TO RETRIEVE PRESET STATIONS
1. Press the /-Seek or Seek+/ buttons once to search
down or up for the desired preset station.
AUX Function
If you want to use an external audio player such as a digital
media player or portable CD player, the unit has two Auxiliary
Ports to accept these sources.
AUX 1intended for use when it is more desirable to control the
external player from outside the unit.
1. Press Source button repeatedly until AUX 1 is illuminated
on the LCD display.
2. Open AUX 1 IN port cover on the left side of the unit.
3. Insert plug from your cord into the AUX 1 IN jack.
4. Connect the other end of the cord into the headphone out
or Aux out port on your external audio player.
5. Play the external audio source as you normally would.
6. Use the Volume/Bass/Treb Dialto adjust the volume.
AUX 2 intended for use when it is more desirable to secure the
external player inside the Digital Media Bay (See Digital Media
Bay) for increased convenience and protection.
1. Press Source button repeatedly until AUX 2 is illuminated
on the LCD display.
2. Open Digital Media Bay Door.
3. Insert plug from your cord into the AUX 2 IN jack.
4. Connect the other end of the cord into the headphone out
or Aux out port on your external audio source.
5. Play the external audio source as you normally would.
6. Use the Volume/Bass/Treb Dial to adjust the volume.
Note: You can not control your digital media player device
(play, pause, track, etc.) through the control panel on the front
of your Jobsite Stereo when your device is connected through
an Auxiliary port.
8
Page 9
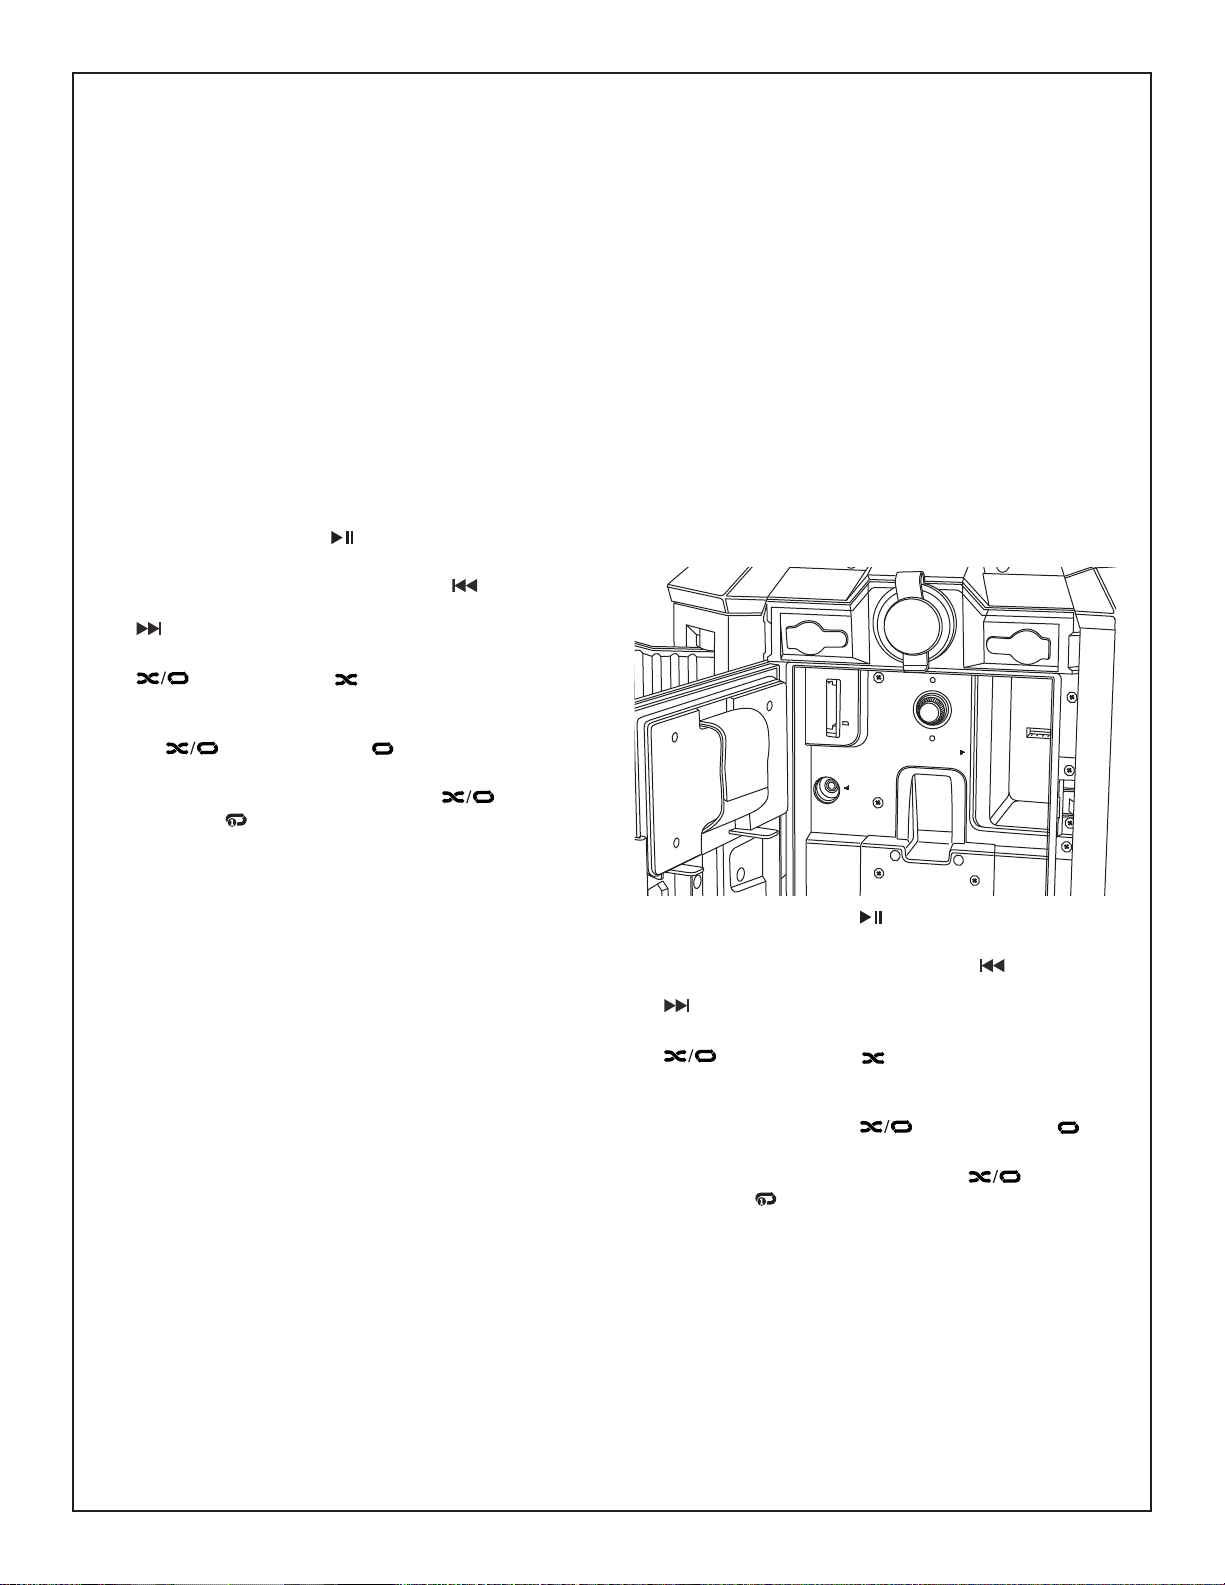
USB Function
AUX 1
IN
LINE
OUT
12V
250V
1AMP
FUSE
FOR 12V
OUTLET
USB
AUX 2 IN
SD / MMC
AUX 1 IN
LINE OUT
Your Jobsite Stereo has a powered USB port located inside
the Digital Media Bay that can be used to play digital music
files from a USB mass storage device as well as charge most
USB-enabled devices.
USB - PLAYING DIGITAL MUSIC
The USB port is designed to work with USB mass storage
devices only* and is compatible with mp3 and wma file types.
Follow the steps below to play your digital music files from your
USB device:
1. Press Source button repeatedly until USB is illuminated on
the LCD display.
2. Open Digital Media Bay Door
3. Insert USB mass storage device into USB port. Numeric
display on right side of LCD display will flash while USB
device is being read. When ready, numeric display will
show the track to be played and the number of tracks
stored on your USB device. Close Digital Media Bay Door.
4. To PLAY a track, press button once. Press again to
PAUSE.
5. To skip to the previous track press the /-Seek button
once. To skip ahead to the next track, press the Seek+/
button once.
6. To randomly play your digital music tracks press the
button once. The icon will illuminate in the LCD
display.
7. To play your digital music tracks in a continuous loop press
the button twice. The icon will illuminate in the
LCD display.
8. To repeat a digital music track press the button three
times. The icon will illuminate in the LCD display.
To remove your USB device simply pull the device slowly
outward until it is free from the USB port.
Note: For errors with USB when playing music please
reference the Troubleshooting Guide.
USB - CHARGING
The USB port is designed to charge most USB-enabled
devices such as cell phones and external digital media players.
Follow the steps below to charge your USB-enabled device:
1. Make sure your Jobsite Stereo is plugged into a 120V
power source.
2. Insert the USB end of your device cable into the USB port
inside the Digital Media Bay. Insert the other end of your
device cable into your device. Your device should begin to
charge.
Note: With your Jobsite Stereo plugged into a 120V power
source your USB-enabled device will power at any time,
regardless of which SOURCE your Jobsite Stereo is being
used. * Not guaranteed to work with all USB-enabled devices.
SD/MMC Card Function
Your Jobsite Stereo has a SD/MMC expandable memory card
port located inside the Digital Media Bay that can be used to
play digital music files.
SD/MMC - PLAYING DIGITAL MUSIC
The SD/MMC port is designed to work with most SD/MMC
cards and is compatible with mp3 and WMA file types. Follow
the steps below to play your digital music files from your
SD/MMC memory card device:
1. Press Source button repeatedly until SD is illuminated on
the LCD display.
2. Open Digital Media Bay Door
3. Insert SD/MMC card device into SD/MMC port until the
card is secure. Note: For proper insertion, label side of the
SD/MMC card should be facing right. Numeric display on
right side of LCD display will flash while SD/MMC card
device is being read. When ready, numeric display will
show the track to be played and the number of tracks
stored on your SD/MMC card device. (See figure below
Close Digital Media Bay Door.
4. To PLAY a track, press button once. Press again to
PAUSE.
5. To skip to the previous track press the /-Seek button
once. To skip ahead to the next track, press the Seek+/
button once.
6. To randomly play your digital music tracks press the
button once. The icon will illuminate in the LCD
display.
7. To play your digital music tracks in a continuous loop within
the same folder press the button twice. The icon
will illuminate in the LCD display.
8. To repeat a digital music track press the button three
times. The icon will illuminate in the LCD display.
To remove your SD/MMC memory card simply depress the
card in its slot and the card will eject.
Note: For errors with SD/MMC memory cards when playing
music please reference the Troubleshooting Guide.
9
Page 10
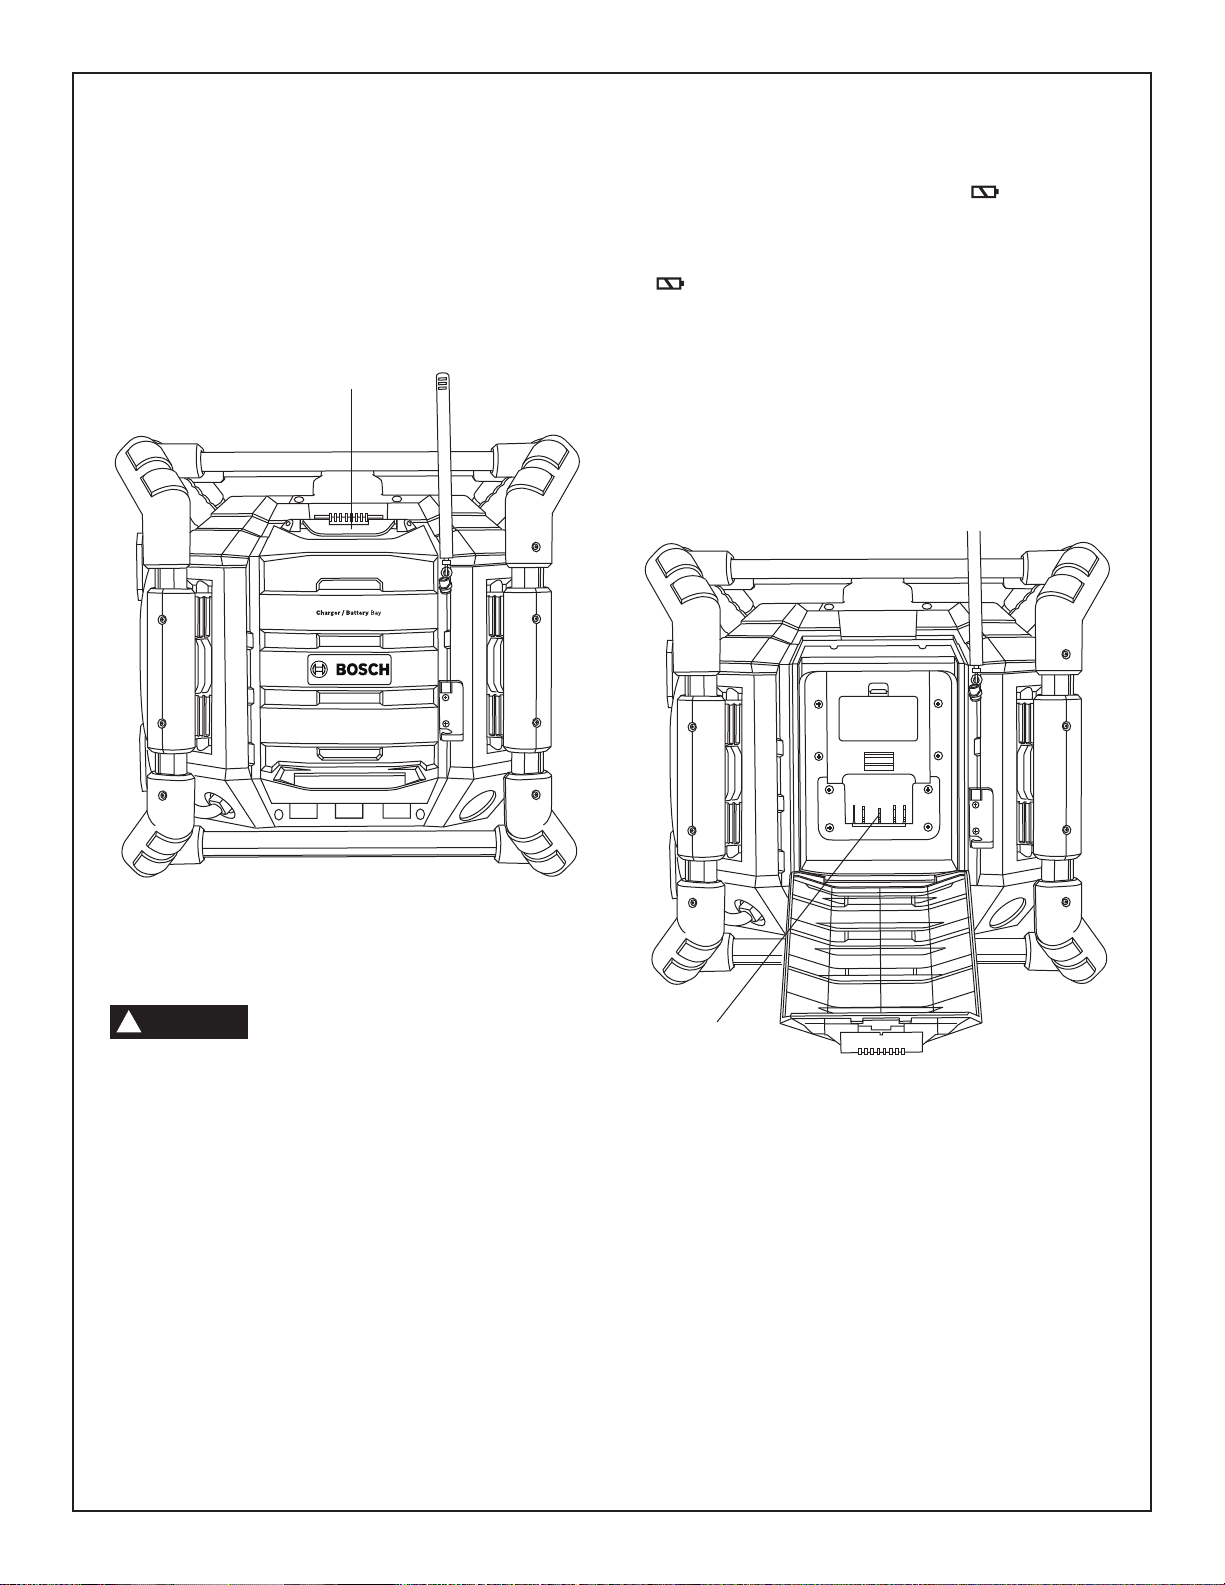
Releasing and Inserting
REPLAC E AA B ATTERY
WHEN UNIT NO LONGER
KEEPS CORRECT TIME
Battery Pack
To release or insert the battery pack from radio unit, open
the charger door by unlocking the latch. To insert battery,
align battery with terminals and slide battery pack onto
terminal until it locks into position. Do not force.
To release battery, depress battery release button and slide
battery of the terminals.
DOOR RELEASE
LATCH
Open charger door by releasing latch. Plug the unit’s power
cord into your standard power outlet, then insert battery pack
into charger.
1. The LCD will display the “CHARGING ” ICON on the
front of the unit. This indicates the battery pack is
charging.
2. When the word “CHARGING” next to the battery ICON
disappears, charging is complete.
3. The purpose of the charging icon on the LCD is to indicate
that the battery pack is charging. The charging icons will
disappear in less time if the battery pack was not
completely discharged.
4. When the battery pack is fully charged, the battery pack
can be inserted into a tool, or used to power the radio
instead of the power cord.
Note: It is recommended that the battery charger bay door
be kept shut at all times.
Charging Battery Pack
CHARGER OPERATION:
Insert battery and close door.
!
WARNIN
batteries may burst causing injury and damage. Read
additional safety information on underside of radio.
Charge only Bosch batteries
G
BAT614, BAT609 & BAT618
BAT607,
. Other
TERMINALS
10
Page 11
Important Charging Notes
A
1. The charger was designed to fast charge the battery only
when the battery temperature is between 32˚F (0˚C) and
113˚F (45˚C). If the battery pack is too hot or too cold, the
charger will not fast charge the battery. (This may happen if
the battery pack is hot from heavy use). When the battery
temperature returns to between 32˚F (0˚C) and 113˚F
(45˚C), the charger will automatically begin charging.
2. A substantial drop in operating time per charge may mean
that the battery pack is nearing the end of its life and should
be replaced.
3. Remember to unplug charger during storage period.
4. If battery does not charge properly:
a. Check for voltage at outlet by plugging in some other
electrical device.
b. Check to see if outlet is connected to a light switch which
turns power “off” when lights are turned off.
c. Check battery pack terminals for dirt. Clean with cotton
swab and alcohol if necessary.
d. If you still do not get proper charging, take or send tool,
battery pack and charger to your local Bosch Service
Center. See “Tools, Electric” in the Yellow Pages for
names and addresses.
Note: Use of chargers or battery packs not sold by Bosch will
void the warranty.
To power the unit
To Connect AC Power Plug
Plug the AC power cord of the unit into a standard AC
power outlet/socket with AC 120V/60Hz, it will switch to AC
once it is plugged in if it was running from a battery.
Note: The unit starts charging the battery automatically
once the unit is running by AC power.
To Operate by the Battery
Bosch battery pack supplies DC power to the unit in all
modes when the unit is disconnected from AC power. 12V
outlet power and 4 power outlets are not available until AC
cord is plugged into AC.
!
WARNIN
interrupter (GFCI) protected outlet when used in damp
locations. if a GFCI protected outlet is not available, use a
portable receptacle with built-in GFCI protection. Test GFCI
protected outlet according to instruction provided by GFCI
manufacturer. If the GFCI protected outlet does not pass
the GFCI testing, do not use that outlet. Only plug radio into
a functional GFCI protected outlet.
To reduce risk of electric shock, only plug
G
the unit into a Ground fault circuit
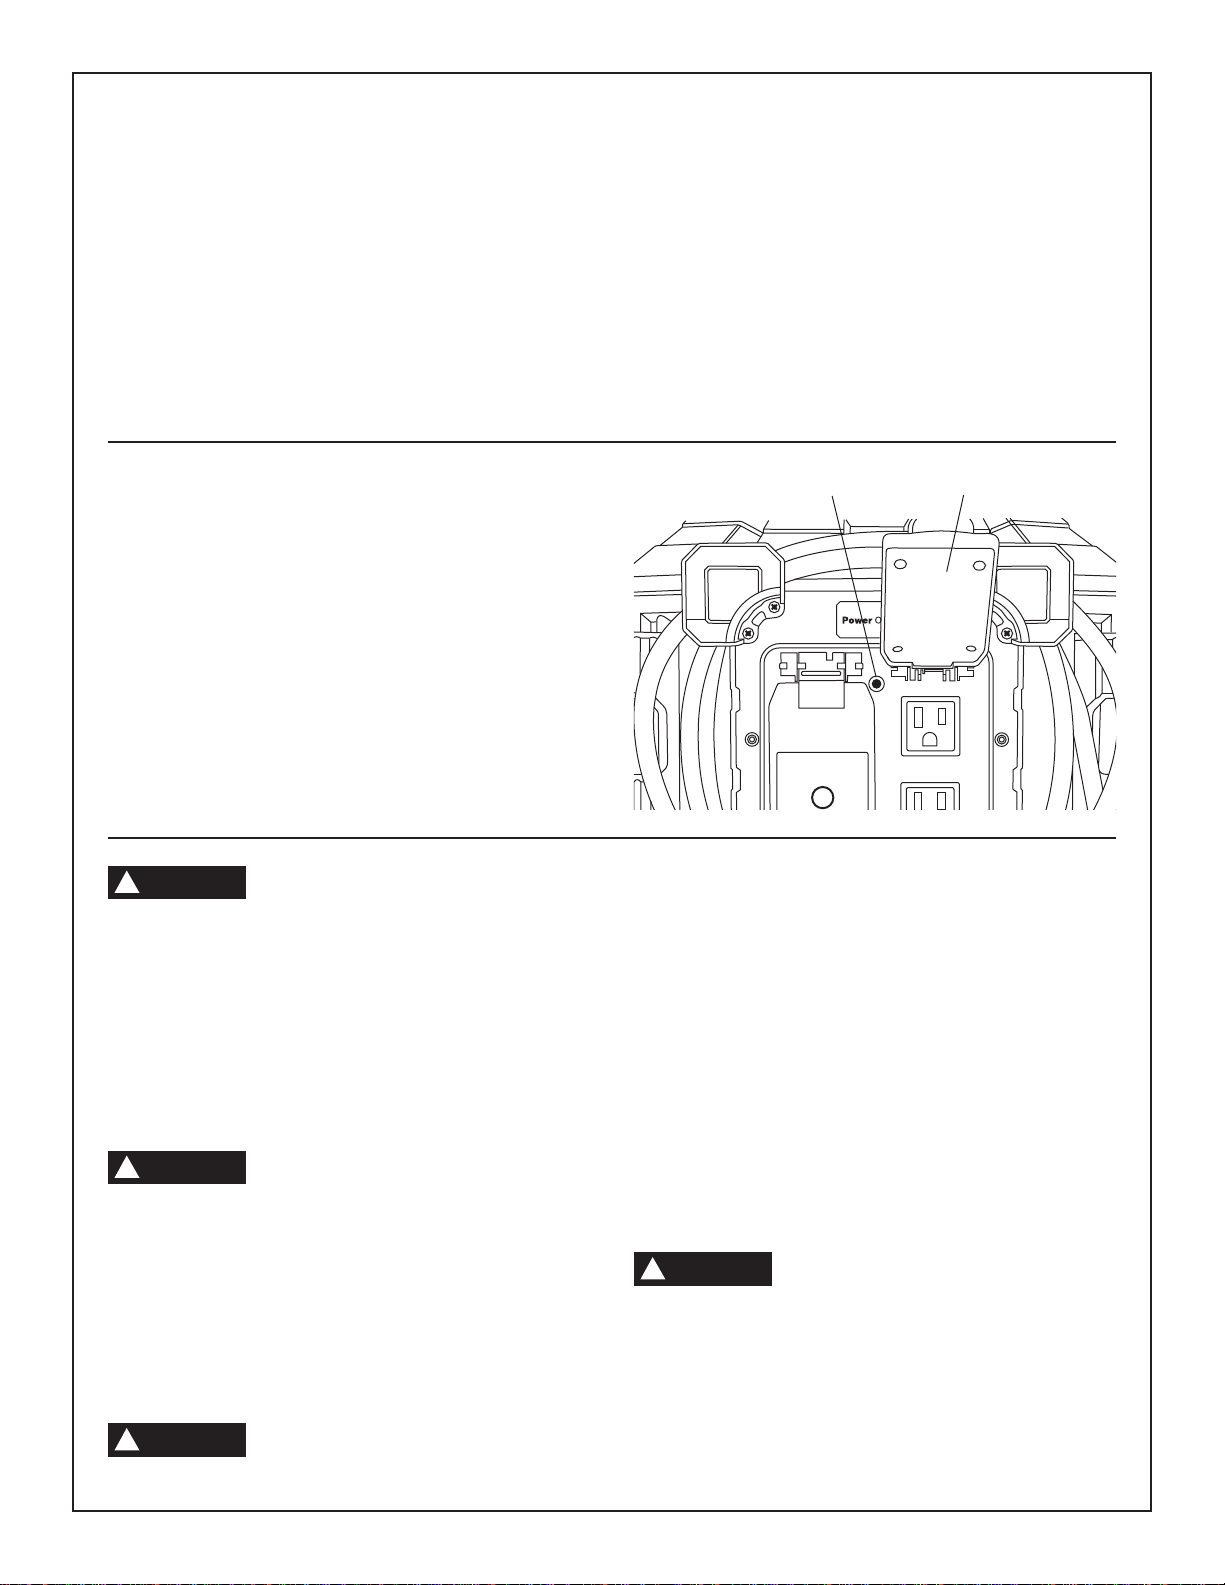
Use of the Convenient
4-way Outlets
!
WARNIN
of electric shock or fire hazard, do not overload the AC
outlets.
With the Unit plugged into AC power, perform the following
steps to use the convenient power outlets:
1. Lift up the protective cover to expose the AC power
outlets.
2. Plug into the outlet the desired AC appliance or power
tool.
3. Once you are done using the AC outlets on the unit,
insure that the protective covers properly close.
!
WARNIN
The combined output rating of the four
G
AC outlets is 10A Max. To reduce the risk
Do not use where water is likely to enter
G
unit. This device will not guard against
INDICATOR
LIGHT
shock hazard from: 1. Defects or faults in the electrical
supply to the interrupter. 2. Personal contact with both
circuit conductors from the interrupter.
PROTECTIVE
COVER
USE OF GFCI
(Ground fault circuit interruptor)
The GFCI helps protect you against hazardous electrical
shock that may be caused if your body becomes a path
through which electricity travels to ground. This could
happen when you touch a power tool that is "live" through a
faulty mechanism, dampness, worn insulation on the power
cord, etc. A shock may happen even if you are only
touching plumbing or another material that leads to ground.
When using a GFCI device you may still feel a shock, but
the GFCI is designed to cut off power quickly enough so
that a normal healthy adult will not experience serious
electrical injury.
!
WARNIN
1. Line-to-line shocks (of the type received when touching
metal inserted in both straight slots of a receptacle).
2. Current overloads or line-to-neutral short-circuit. THE
FUSE OR CIRCUIT BREAKER AT THE DISTRIBUTION
BOX OR PANEL MUST PROVIDE SUCH OVERCURRENT PROTECTION!
GFCI's will NOT protect against:
G
11
Page 12
Use of 12V Outlet
12V
AUX 1
IN
LINE
OUT
250V
1AMP
FUSE
FOR 12V
OUTLET
USB
SD / MMC
AUX 1 IN
LINE OUT
REPLA CE AA BATTER Y
WHEN UNIT NO LONGER
KEEPS CORRECT TIME
Note: Do not insert any device that pulls more than 1 Amp
or else the fuse will open. 12V outlet will not operate
from battery pack.
1. Lift the rubber lid marked with 12V of the jack and insert
the plug of the device or the appliance.
2. Close the lid as soon as you finish using the outlet to
prevent any other things from entering the jack.
3. If no power is available then check fuse.
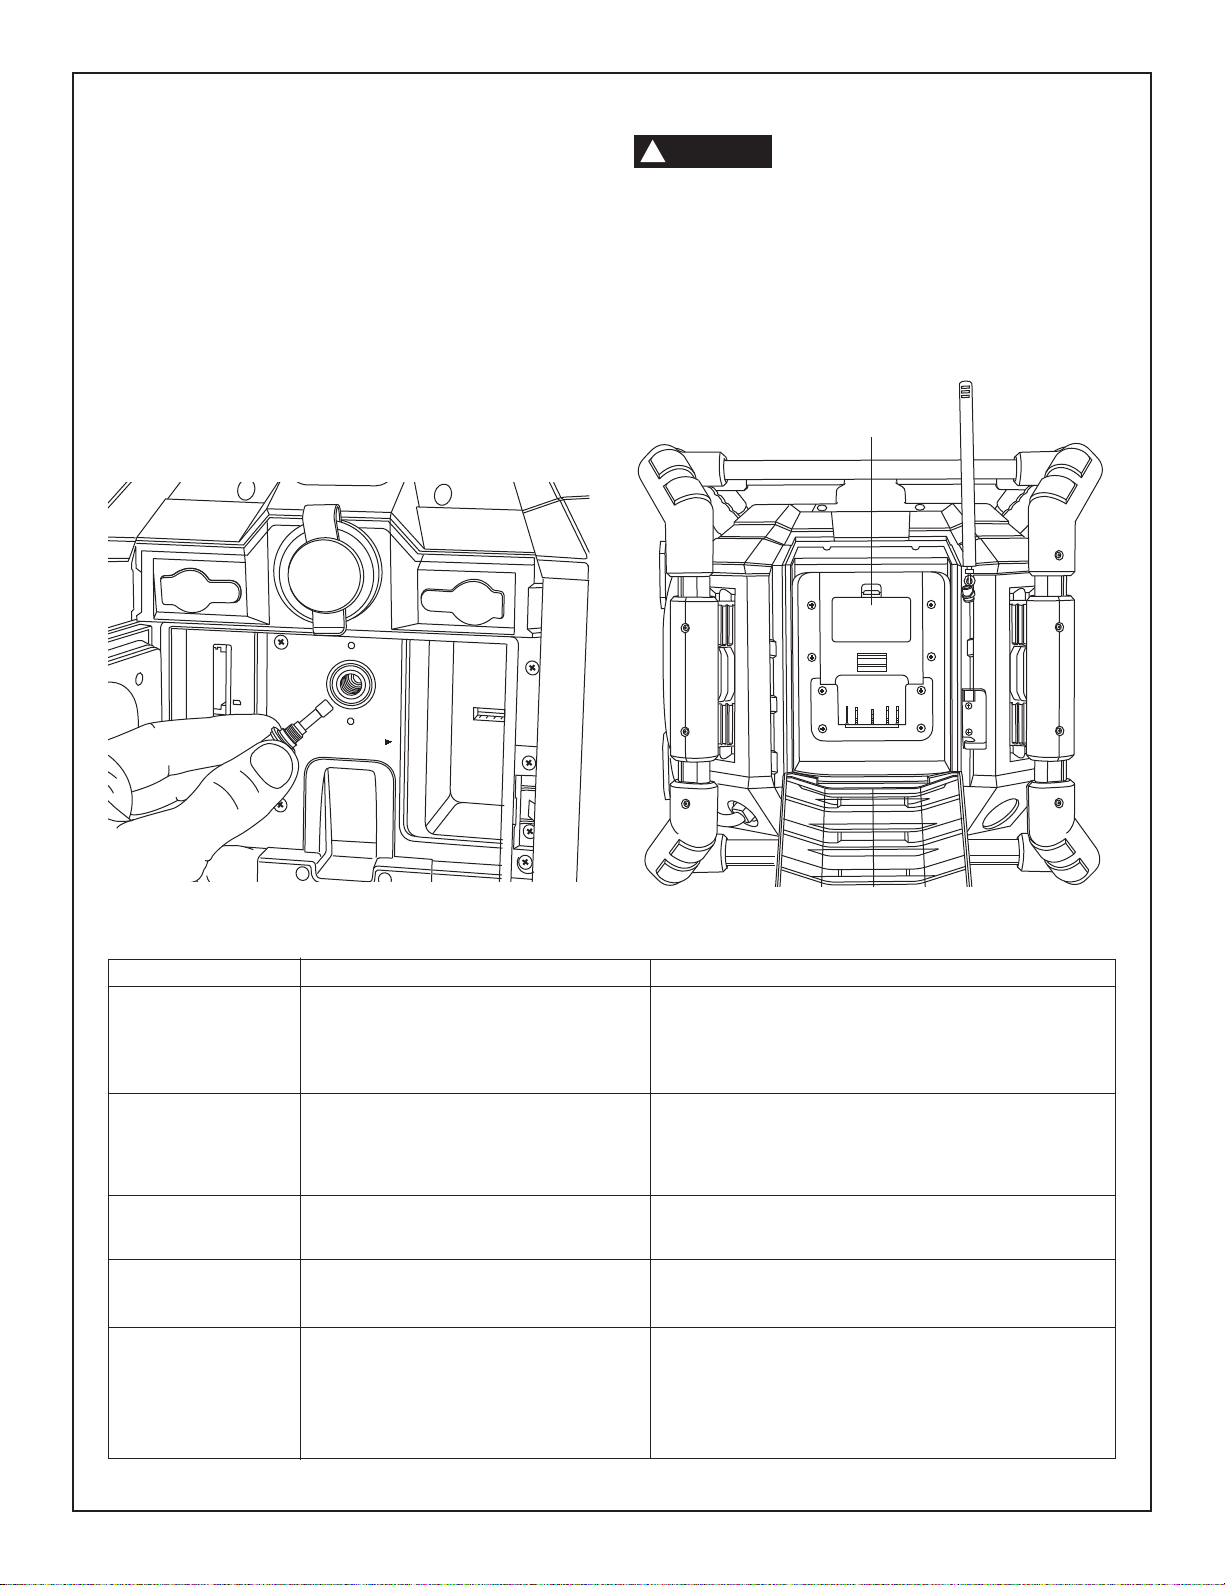
Changing fuse
1. Unscrew fuse cap in counterclockwise direction.
2. Replace fuse. Replace only with a metric 5x20mm fast
acting 1 Amp fuse (F1AL 250V).
3. Tighten fuse cap assembly in clockwise direction.
!
WARNIN
Do not bypass the fuse or use any other
G
fuse except what is specified, as it may
cause damage to the unit.
Changing Clock Batteries
1. Open battery bay door.
2. Remove AA battery cover.
3. Remove old batteries and dispose of properly.
4. Insert new AA batteries. Do not use mismatched
batteries, use only new Alkaline batteries.
LOCATION OF AA
BATTERIES
Trouble Shooting Guide
Problem Checkpoint Remedy
Audio Unit doesn’t 1. Is power cord properly connected ? 1. Plug in AC power cord.
function.
It is noisy or weak 1. Is there any facility interfering with 1. Move unit to new location away from
in radio receiving. the unit. interference.
12V DC outlet 1. Is 1 amp fuse properly inserted? 1. Insert 1 amp fuse.
doesn’t function 2. Has the 1 amp fuse blown open? 2. Replace fuse.
4-Way Power outlet 1. Is power cord properly connected? 1. Plug in AC power cord.
does not function
Does unit suddenly 1. Is power cord properly connected 1. Plug in power to unit.
fail to work to unit?
2. Is the Bosch battery pack installed or 2. Make sure battery is completely inserted.
inserted properly?
3. Does the battery need charging? 3. Plug in power cord and insert battery.
2. Is there any interference to the 2. Turn the unit in different directions.
internal FM antenna?
2. Is green light illuminated on outlets?
2. Is the LCD displaying that there is 2. Software in unit needs to be reset. Remove all
power to the unit? batteries from unit and unplug AC power cord, wait
for 30 seconds and reconnect AC power cord.
12
Page 13

Maintenance
Service
WARNING
!
un au thorized personnel may result in misplacing of
internal wires and components which could cause
serious hazard. We recom mend that all tool service be
performed by a Bosch Factory Service Center or Authorized
Bosch Service Station. SERVICE MEN: Disconnect radio unit
from power source before servicing.
Service must be performed only by qualified repair
personnel. Service or maintenance performed by
unqualified personnel may result in a risk of injury.
When servicing, use only identical replacement parts.
Follow instructions in the Maintenance section of this
manual. Use of unauthorized parts or failure to follow
Maintenance Instructions may create a risk of shock or
injury.
Be alert for battery packs that are nearing their end of
life. If you notice decreased tool performance or
significantly shorter running time between charges then it is
time to replace the battery pack. Failure to do so can cause
the tool to operate improperly or damage the charger.
NO USER SERVICEABLE PARTS INSIDE.
Preventive maintenance performed by
BATTERIES
Cleaning
WARNING
!
cleaning.
Never insert a dirty/scraped disc into unit or allow dirt or
sand to enter the unit.
Do not remove the unit suddenly from a very cold area into a
warm area. Otherwise moisture condensation may form on
the optical lens, preventing proper operation.
Do not leave the unit exposed to direct light sunlight for long
periods of time, it may deform or discolor the cabinet and
may also cause malfunctioning.
Wipe the unit with a soft cloth. Remove stubborn dirt using a
damp cloth that was dipped in soapy water, then wipe dry.
If you intend to use a chemical cleaning cloth, read it’s
instruction first.
Do not use alcohol or paint thinners.
!
CAUTION
gasoline, car bon tetrachloride, chlorinated cleaning solvents,
ammonia and household detergents that contain ammonia.
To avoid accidents, always disconnect the
radio unit from the power supply before
THE MAIN UNIT
Certain cleaning agents and solvents
damage plastic parts. Some of these are:
Accessories
WARNING
!
capable of carrying the current necessary for your tool
must be used. This will prevent excessive voltage drop,
loss of power or overheating. Grounded tools must use 3wire extension cords that have 3-prong plugs and
receptacles.
NOTE: The smaller the gauge number, the heav i er the cord.
If an extension cord is necessary, a cord
with adequate size conductors that is
13
RECOMMENDED SIZES OF EXTENSION CORDS
120 VOLT ALTERNATING CURRENT TOOLS
Tool’s
Ampere
Rating
3-6
6-8
8-10
10-12
12-16
Cord Size in A.W.G.
Cord Length in Feet Cord Length in Meters
25 50 100 150 15 30 60 120
18 16 16 14 0.75 0.75 1.5 2.5
18 16 14 12 0.75 1.0 2.5 4.0
18 16 14 12 0.75 1.0 2.5 4.0
16 16 14 12 1.0 2.5 4.0 —
14 12 —— — — — —
Wire Sizes in mm
2
Page 14

AVERTISSEMENT
!
- POUR ÉVITER TOUT RISQUE D’INCENDIE OU DE DÉCHARGE ÉLECTRIQUE N’UTILISEZ PAS CETTE FICHE AVEC UNE RALLONGE, OU AVEC
UNE PRISE FEMELLE OU UNE AUTRE PRISE DE COURANT DANS LAQUELLE LES BROCHES NE POURRAIENT PAS ÊTRE ENFONCÉES
COMPLÈTEMENT ET RESTERAIENT PARTIELLEMENT EXPOSÉES.
- N’EXPOSEZ PAS L’APPAREIL À LA PLUIE OU À L’HUMIDITÉ POUR ÉVITER TOUT RISQUE D’INCENDIE OU DE DÉCHARGE ÉLECTRIQUE.
MISE EN GARDE :
RISQUE DE DÉCHARGE ÉLECTRIQUE
NE PAS OUVRIR
Le symbole de l’éclair se terminant par
une pointe de flèche à l’intérieur d’un
triangle équilatéral a pour but d’avertir
l’utilisateur et de lui indiquer la présence
d’une « tension dangereuse » non isolée
à l’intérieur de l’enceinte du produit qui
peut être assez élevée pour causer un
risque de décharge électrique affectant
les personnes.
MISE EN GARDE : POUR REDUIRE LE
RISQUE DE DECHARGE ELECTRIQUE, NE
RETIREZ PAS LA PLAQUE DU HAUT (OU
LA PLAQUE ARRIERE) DE L’ENCEINTE.
AUCUN COMPOSANT NE PEUT ETRE
REPARE PAR L’UTILISATEUR A
L’INTERIEUR DE L’APPAREIL. ADRESSEZVOUS A UN REPARATEUR AGREE EN CAS
DE PROBLEME.
Le symbole du point d’exclamation à
l’intérieur d’un triangle équilatéral a
pour but d’avertir l’utilisateur et de lui
indiquer la présence de consignes de
fonctionnement et de maintenance
importantes (entretien) dans la littérature
technique accompagnant le produit.
CONSIGNES DE SÉCURITÉ IMPORTANTES
1) Lisez ces consignes de sécurité.
2) Conservez ces consignes de sécurité.
3) Respectez tous les avertissements.
4) Suivez toutes les consignes de sécurité.
5) N’utilisez pas cet appareil à proximité de l’eau.
6) Nettoyez seulement avec un chiffon sec.
7) Ne bloquez pas les ouvertures de ventilation ; installez l’appareil conformément aux instructions du fabricant.
8) N’installez pas l’appareil à proximité de quelconques sources de chaleur telles que des radiateurs, des registres de chaleur, des poêles ou
d’autres appareils (y compris des amplificateurs) qui produisent de la chaleur.
9) Ne circonvenez pas la fonction de sécurité des fiches de type polarisé ou à mise à la terre. Une fiche de type polarisé est munie de deux
lames de largeur différente. Une fiche de type à mise à la terre est munie de deux lames et d’une broche pour la mise à la terre. La plus
grande lame (de la fiche polarisée) et la broche (de la fiche à mise à la terre) ont pour objet d’assurer la sécurité de l’utilisateur. Si la fiche
fournie ne peut pas être insérée dans la prise de courant, consultez un électricien afin de remplacer la prise de courant désuète.
10) Protégez le cordon d’alimentation de façon à ce que personne ne marche dessus et de façon à ce que le cordon ne soit pas pincé, en
particulier au niveau de la fiche, près de la prise de courant et à proximité de l’emplacement où il sort de l’appareil.
11) Utilisez exclusivement des équipements et accessoires spécifiés par le fabricant.
12) Utilisez uniquement avec le chariot, la plateforme, le trépied, le support ou la table qui ont été spécifiés par le fabricant, ou qui
sont vendus avec l’appareil. Quand vous utilisez un chariot, faites attention de ne pas renverser l’ensemble chariot/appareil quand
vous le déplacez ; cela pourrait causer des blessures.
13) Débranchez cet appareil pendant les orages accompagnés de foudre ou quand il ne va pas être utilisé pendant une période prolongée.
14) Adressez-vous à un réparateur agréé en cas de problème. Des réparations sont nécessaires lorsque l’appareil a été endommagé d’une
façon quelconque – par exemple, si le cordon d’alimentation ou la fiche est endommagé, si du liquide a pénétré dans l’appareil ou si des
objets y sont tombés, si l’appareil a été exposé à la pluie ou à l’humidité, s’il ne fonctionne pas normalement ou si quelqu’un l’a laissé
tomber.
15) La fiche branchée dans la prise de courant secteur sert de coupe-circuit. Il faut toujours avoir un accès facile à ce coupe-circuit.
16) Lisez l’étiquette indiquant les valeurs nominales sur le dessous de l’appareil ; vous y trouverez la mesure de la puissance absorbée et
d’autres informations sur la sécurité.
Cet appareil ne doit pas être exposé à de l’eau – qu’il s’agisse de grands volumes d’eau ou d’eau tombant au goutte à goutte – et aucun objet
rempli de liquide, comme un vase, ne doit être placé sur l’appareil.
Avertissement : Testez la prise de courant protégée par un disjoncteur de fuite à la terre en suivant les instructions fournies par le
fabricant du disjoncteur de fuite à la terre. Si le test de la prise de courant protégée par un disjoncteur de fuite à la terre ne donne pas
satisfaction, n’utilisez pas cette prise. Branchez seulement la radio dans une prise de courant protégée par un disjoncteur de fuite à la
terre fonctionnelle.
14
Page 15

Table des matières
Page Page
Sécurité.......................................................................................14-15
Consignes de sécurité importantes..............................................14
Table des matières ..........................................................................15
Informations relatives à la FCC....................................................15
Chargeur de piles .........................................................................16
Entretien des piles........................................................................16
Mise au rebut des piles................................................................16
Description fonctionnelle et caractéristiques techniques.............17
Écran d’affichage à cristaux liquides............................................18
Réglage de l’horloge ....................................................................18
Commandes PB360S et PB360S-C............................................19
Consignes de fonctionnement.........................................................20
Réglages audio.............................................................................20
Fonction Radio.............................................................................20
Fonction Aux ................................................................................21
Fonction USB ...............................................................................21
Fonction de la carte SD/MMC......................................................21
Retrait et insertion du bloc-piles.....................................................22
Charge du bloc-piles....................................................................22
Remarques importantes relatives à la charge..............................23
Alimentation de l’appareil...............................................................23
Utilisation des prises de courant quadruples pratiques ...........23
Utilisation du disjoncteur de fuite à la terre .................................23
Utilisation de la prise de 12 V.......................................................24
Remplacement du fusible ............................................................24
Remplacement des piles de l’horloge..........................................24
Détermination de la cause, et résolution, des problèmes.............24
Entretien............................................................................................25
Accessoires.......................................................................................25
Informations relatives à la FCC
REMARQUE : ce matériel a été testé et il a été démontré qu'il
respecte les limites fixées pour un appareil numérique de Classe B,
conformément à la Partie 15 des Règles de la FCC. Ces limites sont
conçues de manière à assurer une protection raisonnable contre les
perturbations nuisibles dans une installation résidentielle. Ce
matériel produit, utilise et peut rayonner de l'énergie de fréquence
radioélectrique et, s'il n'est pas installé et utilisé conformément aux
instructions, il risque de causer des perturbations nuisibles aux
communications radio. Cependant, il n'est pas possible de garantir
qu'aucune perturbation ne résultera d'une installation particulière. Si
ce matériel cause des perturbations radioélectriques nuisibles
affectant la réception de la radio ou de la télévision – ce qui peut être
déterminé en mettant ce matériel sous tension et hors tension –
l'utilisateur devrait essayer de remédier à de telles perturbations en
prenant une ou plusieurs des mesures suivantes :
• Changer l'orientation de l'antenne de réception ou la placer à un
autre endroit.
• Augmenter la distance entre le matériel et le récepteur.
• Brancher le matériel dans une prise de courant faisant partie d'un
circuit différent de celui auquel le récepteur est connecté.
• Consulter le revendeur ou un technicien radio/télévision
expérimenté pour obtenir de l'aide.
15
Page 16

Règles relatives au bloc-piles/chargeur
Avant d’utiliser le chargeur de pile, lisez toutes les consignes et
tous les marquages d’avertissement sur (1) le chargeur de pile,
(2) le bloc-piles et (3) le produit utilisant la pile.
N’utilisez que le chargeur qui accompagnait votre produit ou
remplacement direct, comme indiqué dans le catalogue ou ce
manuel.
Ne désassemblez pas la radio et ne l’utilisez pas s’il a reçu un
choc violent, s’il est tombé ou s’il a été endommagé par ailleurs.
Remplacez immédiatement les cordons ou les fiches abîmés. Un
remontage incorrect ou des dommages peuvent provoquer un
incendie ou des secousses électriques.
Ne rechargez pas la pile dans un environnement mouillé ou
humide. N’exposez pas la radio à la pluie ou à la neige. Si le
boîtier de la pile est fissuré ou endommagé par ailleurs, ne
l’insérez pas dans le chargeur. Il pourrait y avoir un incendie ou un
court-circuit de pile.
Ne charger que des piles rechargeables approuvées par Bosch.
Voir Description fonctionnelle et Spécifications. Les autres types de
piles peuvent éclater causant ainsi des blessures et des dommages.
Chargez le bloc-piles à des températures de plus de 0 degrés C
(+32°F) et de moins de 45 degrés C (+113°F). Rangez la radio et
le bloc-piles à des endroits dont la température ne dépasse pas
49 degrés C (+120°F). Ceci est important pour prévenir des
dommages considérables aux éléments des piles.
Il peut y avoir une fuite de pile dans des conditions extrêmes
d’utilisation ou de température. Évitez tout contact avec la peau et
les yeux. Le liquide de pile est caustique et pourrait causer des
brûlures chimiques aux tissus. Si le liquide vient en contact avec la
peau, lavez rapidement à l’eau savonneuse. Si le liquide vient en
contact avec les yeux, rincez-les à l’eau pendant au moins 10
minutes et sollicitez des soins médicaux.
Posez la radio sur une surface plate inflammable et à distance
de matériaux inflammables lorsqu’on recharge un bloc-piles. Le
chargeur et le bloc-piles s’échauffent pendant la charge. Le coussi net de mousse souple et autres surfaces isolantes empêchent la
circulation normale de l’air, ce qui peut provoquer une surchauffe
du chargeur et du bloc-piles. S’il y a dégagement de fumée ou si le
boîtier fond, débranchez le chargeur immédiatement et n’utilisez ni
le chargeur, ni le bloc-piles.
L’utilisation d’un accessoire non recommandé ni vendu par Bosch
peut causer des risques d’incendie, de chocs électriques ou de
lésions corporelles.
Entretien des piles
!
AVERTISSEMENT
métalliques. Ainsi, pour éviter un court-circuitage des bornes, NE
PLACEZ PAS les piles dans la boîte à outils ou dans la poche avec des
clous, des vis, des clés, etc. Ceci peut provoquer un incendie ou des
blessures.
Lorsque les piles ne sont pas dans l’outil ou
le chargeur, gardez-les à l’écart d’objets
Mise au rebut des piles
!
AVERTISSEMENT
des bornes de piles, ce qui peut provoquer un incendie ou des
blessures. Avant la mise au rebut, protégez les bornes exposées à
l’aide d’un ruban isolant épais pour prévenir le court-circuitage.
Si le produit est équipé d'une pile lithium-ion, la pile doit être
ramassée, recyclée ou mise au rebut d'une manière qui ne soit pas
nocive pour l'environnement.
Ne tentez pas de désassembler le bloc-piles
ou d’enlever tout composant faisant saillie
Piles lithium-ion
“Le sceau RBRC de recyclage des piles, homologué
par l’EPA (Agence pour la protection de
l’environnement des États-Unis), qui se trouve sur les
piles au lithium-ion (Li-ion) indique que Robert
Bosch Tool Corporation participe volontairement à
un programme industriel de ramassage et de
MISE EN GARDE : il existe un risque d’explosion si les piles sont
remplacées par des piles inadéquates. Ne remplacez les piles
que par des piles de type similaire ou équivalent.
NE METTEZ PAS LES PILES AU FEU ET NE LES EXPOSEZ PAS À UNE
CHALEUR ÉLEVÉE.Elles peuvent exploser.
recyclage de ces piles au terme de leur vie utile, pourvu qu’elles soient
mises hors service aux États-Unis ou au Canada. Le programme du
RBRC offre une alternative pratique à la mise des piles au Li-ion usées
au rebut ou au ramassage d’ordures municipal, ce qui pourrait être
interdit dans votre région.
Veuillez appeler le 1-800-8-BATTERY pour obtenir de plus amples
renseignements sur le recyclage des piles au Li-ion et sur les
restrictions ou interdictions de mise au rebut qui s’appliquent à votre
région ou renvoyez vos piles à un Centre de Service
Skil/Bosch/Dremel pour recyclage. La participation de Robert Bosch
Tool Corporation à ce programme s'insère dans le contexte de notre
engagement à préserver notre environnement et à conserver nos
ressources naturelles.”
16
Page 17

Description fonctionnelle et caractéristiques techniques
Equalizer
Custom
Memory
Clock
Tune
Volume
Bass Treb
Source
Seek
Seek
Subwoofer
AUX 1
IN
LINE
OUT
12V
250V
1AMP
FUSE
FOR 12V
OUTLET
USB
AUX 2 IN
SD / MMC
AUX 1 IN
120V AC
A
REPLACE AA BATTE RY
WHEN UNIT NO LONGER
KEEPS CORRECT TIME
Stéréo de chantier avec prise à 4 voies
ENTRÉE
AUXILIAIRE 1
PORT POUR
CARTE
SD/MMC
AIRE DE RANGEMENT
POUR APPAREIL
MULTIMÉDIA
NUMÉRIQUE
PRISE DE
COURANT
12 V c.c.
ENTRÉE
AUXILIAIRE 2
SORTIE
DE LIGNE
PORT USB
FUSIBLE
12 V c.c.
ANTENNE
COMPARTIMENT DU
CHARGEUR/BLOC-PILES
POIGNÉE DE
TRANSPORT
EMPLACEMENT
DES PILES AA
HAUT-PARLEURS
CROCHET POUR
L’ENROULEMENT
DU CORDON
CORDON
D’ALIMENTATION
HORLOGE
NUMÉRIQUE
CAGE DE
PROTECTION
INDICATEUR
DE CHARGE
Numéro de modèle PB360S et PB360S-C
Tension nominale 120 V 60 Hz
Intensité 12 A
Piles compatibles BAT607, BAT614,
Prises munies disjoncteur
de fuite à la terre
Tension nominale 120 V 60 Hz
Intensité 10 A
BAT609 et BAT618
PRISE DE COURANT
À 4 VOIES
PANNEAU DE
COMMANDE
Prises de courant c.c.
Tension nominale 12 V
Intensité Fusible 1 A
Radio AM 530-1710kHz
FM 87,5-107,9MHz
SD/MMC/USB Compatible avec MP3, WMA
Mémoire AM : 10 stations programmées
FM : 20 stations programmées
17
Page 18

Écran d’affichage à cristaux liquides
1 2 3 4 5 20 19 16 15
21
22
23
6
7
8
13
14
12
11
1. JAZZ - s’illumine lorsque Jazz est sélectionné dans Equalizer.
2. ROCK - s’illumine lorsque Rock est sélectionné dans Equalizer.
3. POP - s’illumine lorsque Pop est sélectionné dans Equalizer.
4. CLASSICAL - s’illumine lorsque Classical est sélectionné dans
Equalizer.
5. CUSTOM - s’illumine lorsque Custom (choix personnalisé) est
sélectionné dans Equalizer ou quand le bouton Custom est
enfoncé.
6. NUMERIC - affiche l’heure sur l’horloge après qu’elle a été réglée,
et la station radio dans le mode « Tuner ».
7. ST (STÉRÉO) - s’illumine lorsque la station radio est diffusée sur la
chaîne stéréo.
8. NUMERIC - affiche la fréquence FM ou AM dans le mode « Tuner
», ou le temps écoulé lors de la lecture d’une piste musicale
numérique.
9. CHARGING - clignote lorsque l’appareil est en train de charger le
bloc-piles.
10. Icône de PILE - indique que le bloc-piles est dans l’appareil. Cette
icône clignote lorsque les piles sont presque complètement
déchargées.
11. FM - indique la bande FM dans le mode « Tuner ».
12. AM - indique la bande AM dans le mode « Tuner ».
13. AUX 1 - s’illumine lorsque vous sélectionnez le mode AUX 1 pour
jouer un appareil multimédia extérieur.
14. AUX 2 - s’illumine lorsque vous sélectionnez le mode AUX 2 pour
jouer un appareil multimédia extérieur (à l’intérieur du
compartiment multimédia numérique).
15. NUMERIC - affiche le numéro d’une station radio programmée
dans le mode « Tuner », ou la piste lue et le nombre de pistes
enregistrées sur votre carte USB ou SD/MMC.
18
17
24
16. PRESET - s’illumine lorsqu’une station radio programmée est
sélectionnée et clignote lors de la mise en mémoire d’une station
radio.
17. SD - (carte SD/MMC) s’illumine lorsque vous sélectionnez le mode
de carte SD/MMC.
18. USB - s’illumine lorsque vous sélectionnez le mode USB.
19. BAS - s’illumine lorsque vous sélectionnez le niveau désiré pour
les tonalités basses.
20. TRE - s’illumine lorsque vous sélectionnez le niveau désiré pour les
tonalités aigües.
21. ALÉATOIRE - cette icône s’illumine lorsque vous êtes dans le
mode aléatoire (appareils USB et SD/MMC seulement).
22. RÉPÉTITION DE DOSSIER - cette icône s’illumine lorsque vous
êtes dans le mode de répétition de dossier (appareils USB et
SD/MMC seulement).
23. RÉPÉTITION DE PISTE - cette icône s’illumine lorsque vous êtes
dans le mode de répétition de piste (appareils USB et SD/MMC
seulement).
24. PM - s’illumine lorsque le réglage de l’horloge est dans le mode
PM (après-midi).
25. Icône de TEMPÉRATURE - Lorsque l’appareil radio n’est PAS
branché dans une prise de courant de 120 V, mais si une pile est
installée correctement dans le compartiment de la pile/du chargeur,
cette icône s’illuminera et clignotera si la température de la pile est
trop chaude (à peu près 50 degrés Celsius ou plus) ou trop froide (à
peu près -10 degrés Celsius ou moins). Si la température de la pile
dépasse 70 degrés Celsius, l’appareil radio s’éteindra afin de
protéger la pile contre tout risque d’endommagement. Lorsque la
température de la pile atteint la plage de températures de
fonctionnement normales (voir les règles relatives au chargeur et à
la pile), l’appareil radio peut être mise sous tension et recommencer
à fonctionner normalement. L’icône de TEMPÉRATURE ne
s’illuminera PAS et ne clignotera PAS lorsque l’appareil radio est
branché dans une prise de courant de 120 V.
9
10
25
Réglage de l’horloge
Lorsque la fiche c.a. ou le bloc-piles est introduit, l’appareil passe par
défaut dans le mode d’attente et l’écran à cristaux liquides affiche
« 12:00 ». Suivez la procédure ci-dessous pour afficher l’heure locale
correcte.
1. Appuyez sur le bouton Clock (Horloge) sur l’appareil et maintenezle enfoncé jusqu’à ce que « hour » soit activé et commence à
clignoter.
2. Tournez le bouton /-Seek ou Seek+/ pour choisir le chiffre
correspondant à l’heure correcte. Pour un réglage de l’heure dans
le mode « PM » (Après-midi), tournez TUNE DIAL jusqu’à ce que «
PM » s’illumine sur l’écran ACL.
3. Appuyez une fois sur le bouton Clock pour choisir le nombre
correspondant à l’heure ; ceci activera la fonction « minute », qui
clignotera alors.
4. Tournez le bouton /-Seek ou Seek+/ pour choisir le chiffre
correspondant à la minute correcte.
5. Appuyez une fois sur le bouton Clock pour enregistrer le temps
actuel.
Remarque : 2 piles AA sont nécessaires pour permettre à l’horloge de
continuer à indiquer l’heure correcte lorsque l’appareil est débranché.
Remplacez les piles AA lorsque l’appareil n’indique plus l’heure
correcte. (Veuillez vous reporter à la rubrique concernant le remplace ment
des piles de l’horloge.)
18
Page 19

Commandes PB360S et PB360S-C
1. - pour basculer entre les modes en marche et en attente.
2. Volume/Bass Treb - pour augmenter/diminuer le volume audio
dans tous les modes. Le volume se règle de 0 à 20 (minimummaximum) sur un tour complet du bouton. Le cadran tourne sur
360 degrés.
3. Volume/Bass Treb - pour contrôler les tonalités basses et aigües
lorsque l’appareil est sur l’option « Custom » de l’equalizer et
quand le bouton « custom » est enfoncé et les icônes sont en train
de clignoter.
4. Equalizer - pour basculer entre le choix personnalisé (Custom) et
les options prédéfinies de l’equalizer : Jazz, Rock, Pop et Classique.
5. Custom - appuyez une fois pour engager les options de tonalités
basses et aigües personnalisées (contrôle effectué par le cadran
Volume/Bass/Treb).
6. Memory - appuyez sur ce bouton pour programmer des stations
de radio. Pour programmer : choisissez la station de radio que
vous souhaitez programmer, appuyez sur le bouton Memory,
utilisez les bouton ou pour atteindre le numéro de station
choisie, et appuyez sur le bouton Memory pour enregistrer la
station que vous souhaitez programmer.
2
3
4
6
7. Clock - appuyez sur ce bouton pour programmer l’heure et pour
l’enregistrer. Pour mettre à l’heure : appuyez une fois, utilisez
/-Seek ou Seek+/ pour régler l’heure ; appuyez à nouveau,
utilisez /-Seek ou Seek+/ pour régler les minutes ; appuyez
à nouveau pour enregistrer.
8. Tune +/- lorsque vous écoutez la radio, tournez le cadran pour
ajuster la chaîne de la station radio. Lorsque vous réglez l’horloge
(Clock), tournez la cadran pour ajuster les paramètres d’heure et
de minutes. Le cadran tourne sur 360 degrés.
9. PLAY / PAUSE - pour lire une piste ou faire une pause lorsque
vous écoutez une source USB ou SD/MMC.
10. LECTURE ALÉATOIRE / RÉPÉTITION - pour lire de façon
aléatoire / répéter le dossier / répéter une seule piste lorsque
l’appareil lit une source USB ou SD.
11. /-Seek ou Seek+/ - lorsque vous écoutez une source radio
: appuyez une fois pour basculer entre les stations radio
programmées. Appuyez sur l’un de ces boutons et maintenez-le
enfoncé pour chercher rapidement des stations radio vers le haut
ou vers le bas. Lorsque vous écoutez une source USB ou SD :
appuyez une fois pour revenir à la piste antérieure.
12. Source - appuyez sur ce bouton pour basculer entre Radio FM,
AM, AUX1, AUX2, USB ou SD/MMC.
7
1
5
8
9
11
12
11
10
19
Page 20

Consignes de fonctionnement
Options de réglages audio
VOLUME
Votre Stéréo de chantier a 20 options de volume préétablies qui sont
sélectionnables. Pour ajuster le niveau de VOLUME, tournez le cadran
Volume/Bass/Treb dans le sens des aiguilles d’une montre ou dans le
sens contraire des aiguilles d’une montre jusqu’au niveau de volume
désiré.
Equalizer
Votre Stéréo de chantier a cinq option préétablies et sélectionnables
pour l’equalizer ainsi que des options personnalisables qui vous
permettent de sélectionner le niveau exact des tonalités basses et
aigües qui vous convient.
Si vous appuyez de façon répétée sur le bouton Equalizer, vous
pourrez sélectionner l’une des quatre options de l’equalizer ou l’option
que vous aurez personnalisée, illuminant tour à tour chaque paramètre
sur l’écran ACL : JAZZ, ROCK, POP, CLASSICAL ou CUSTOM.
Pour programmer les paramètres personnalisés des tonalités basses
et aigües, suivez les étapes de la procédure ci-après :
1. Appuyez de façon répétée sur le bouton Equalizer jusqu’à ce que
« CUSTOM » soit sélectionné. Ou appuyez seulement une fois sur le
bouton Custom.
2. Appuyez une fois sur le bouton Custom, et « BAS » (pour
BASS/basses) ainsi que le numéro du niveau des tonalités basses
commenceront à clignoter sur l’écran ACL.
3. Tournez le cadran Volume/Bass/Treb dans le sens des aiguilles
d’une montre ou dans le sens contraire des aiguilles d’une montre
jusqu’à ce que vous ayez atteint le niveau de tonalités basses désiré.
4. Appuyez à deux reprises sur Custom, et « TRE » (pour
TREBLE/aigües) ainsi que le numéro du niveau des tonalités aigües
commenceront à clignoter sur l’écran ACL.
5. Tournez le cadran Volume/Bass/Treb dans le sens des aiguilles
d’une montre ou dans le sens contraire des aiguilles d’une montre
jusqu’à ce que vous ayez atteint le niveau de tonalités aigües désiré.
6. Appuyez une fois de plus sur le bouton Custom pour mettre les
niveaux programmés en mémoire. Vos paramètres personnalisés de
tonalités basses et aigües sont maintenant enregistrés, et « TRE »
ainsi que le numéro du niveau des tonalités aigües cesseront alors
de clignoter et disparaîtront de l’écran ACL.
Remarque : les options Bass et Treble ont chacune une plage de
niveaux allant de 0 (min.) à 10 (max.).
STÉRÉO
Quand un puissant signal FM est reçu par le syntoniseur FM, « ST »
s’illuminera sur l’écran ACL. Si un signal faible est reçu par le
syntoniseur FM, « ST » ne s’illuminera pas sur l’écran ACL. Pour
améliorer le son d’une station faible, ajustez l’antenne extérieure ou
positionnez votre Stéréo de chantier à un endroit différent.
Fonction radio
POUR SÉLECTIONNER LA BANDE ET LES STATIONS
Ce syntoniseur est conçu pour fonctionner dans la fréquence AM
standard de 530 à 1 710 kHz et dans la fréquence FM standard de 87,5
à 107,9 MHz. Suivez les étapes ci-dessous pour vous régler sur la
station radio désirée :
1. Appuyez de façon répétée sur le bouton Source jusqu’à ce que « FM
» ou « AM » soit sélectionné.
2. Faites tourner le cadran Tune +/- dans le sens des aiguilles d’une
montre ou dans le sens contraire des aiguilles d’une montre pour
atteindre la fréquence radio désirée.
3. Pour chercher une station, appuyez sur le bouton /-Seek
pendant une seconde pour chercher vers le bas ou sur le bouton
Seek+/ pendant une seconde pour chercher vers le haut jusqu’à
ce qu’une station avec un puissant signal soit reçue.
Remarque : si aucune station n’a été reçue lorsque l’appareil cesse de
chercher, recommencez la procédure indiquée plus haut pour chercher
les stations préférées.
POUR PROGRAMMER DES STATIONS
Il est possible de programmer jusqu’à 20 stations pour FM et jusqu’à
10 stations pour AM. Suivez les étapes ci-dessous pour programmer
une station radio :
1. Utilisez le cadran Tune +/- pour atteindre la station radio désirée.
2. Pour programmer la station désirée, appuyez une fois sur le bouton
MEMORY. PRESET et le numéro programmé commenceront à
clignoter sur l’écran.
3. Appuyez une fois soit sur le bouton /-Seek soit sur le bouton
Seek+/ pour avancer vers la station que vous désirez
programmer.
4. Appuyez une nouvelle fois sur le bouton Memory pour enregistrer la
station désirée et la mettre en mémoire. PRESET et le numéro de la
station programmée cesseront de clignoter sur l’écran.
Remarque : après que 20 stations pour FM ou 10 stations pour AM
auront été programmées, la première station programmée sera
remplacée si vous continuez et programmez une nouvelle station.
POUR RETOURNER AUX STATIONS PROGRAMMÉES
AFIN DE LES ÉCOUTER
1. Appuyez une fois soit sur le bouton /-Seek soit sur le bouton
Seek+/ pour aller vers le bas ou vers le haut, respectivement,
afin de retourner à la station programmée de votre choix.
Fonction AUX
Si vous voulez utiliser un appareil audio externe tel qu’un lecteur
multimédia numérique ou un lecteur de CD portable, l’appareil
comporte deux ports auxiliaires pour vous permettre d’accepter ces
sources.
AUX 1 est conçu en vue d’emploi quand il est plus désirable de
contrôler le lecteur externe depuis l’extérieur de l’appareil.
1. Appuyez de façon répétée sur le bouton Source jusqu’à ce que AUX
1 soit illuminé sur l’écran ACL.
2. Ouvrez le couvercle du port AUX 1 IN sur le côté gauche de
l’appareil.
3. Insérez la fiche de votre cordon dans la prise AUX 1 IN.
4. Connectez l’autre bout du cordon dans le port « headphone out »
(sortie casque d’écoute) ou dans le port « Aux out » (sortie
équipement auxiliaire) sur votre lecteur audio externe.
5. Faites jouer la source audio externe comme vous le feriez
normalement.
6. Utilisez le cadran Volume/Bass/Treb sur votre Stéréo de chantier
pour régler le volume.
AUX 2 est conçu en vue d’emploi quand il est plus désirable de placer
le lecteur externe à l’intérieur du compartiment multimédia numérique
(voir Compartiment multimédia numérique) pour des raisons de
commodité et de protection.
1. Appuyez de façon répétée sur le bouton Source jusqu’à ce que AUX
2 soit illuminé sur l’écran ACL.
2. Ouvrez la porte du Compartiment multimédia numérique.
3. Insérez la fiche de votre cordon dans la prise AUX 2 IN.
20
Page 21

4. Connectez l’autre bout du cordon dans le port « headphone out »
AUX 1
IN
LINE
OUT
12V
250V
1AMP
FUSE
FOR 12V
OUTLET
USB
AUX 2 IN
SD / MMC
AUX 1 IN
LINE OUT
(sortie casque d’écoute) ou dans le port « Aux out » (sortie
équipement auxiliaire) sur votre lecteur audio externe.
5. Faites jouer la source audio externe comme vous le feriez
normalement.
6. Utilisez le cadran Volume/Bass/Treb sur votre Stéréo de chantier
pour régler le volume.
Remarque : vous ne pouvez pas contrôler votre lecteur multimédia
numérique (lecture, pause, recherche, etc.) en utilisant le panneau de
commande sur le devant de votre Stéréo de chantier lorsque votre
appareil est connecté par le biais d’un port auxiliaire.
Fonction USB
Votre Stéréo de chantier a un port USB alimenté à l’intérieur du
Compartiment multimédia numérique qui peut être utilisé pour lire des
fichiers de musique numérique depuis un dispositif de mémoire
auxiliaire USB et qui peut aussi être utilisé pour charger la plupart des
équipements compatibles USB.
USB - LECTURE DE MUSIQUE NUMÉRIQUE
Le port USB est conçu pour fonctionner avec exclusivement avec des
dispositifs de mémoire auxiliaires USB*, et il est compatible avec des
fichiers de types mp3 et WMA. Suivez la procédure ci-dessous pour
jouer vos fichiers de musique numérique depuis votre dispositif USB :
1. Appuyez de façon répétée sur le bouton Source jusqu’à ce que USB
soit illuminé sur l’écran ACL.
2. Ouvrez la porte du Compartiment multimédia numérique.
3. Insérez le dispositif de mémoire auxiliaire USB dans le port USB. Le
pavé numérique du côté droit de l’écran ACL clignotera pendant que
le dispositif USB sera lu. Quand tout sera prêt, le pavé numérique
affichera la piste à jouer et le nombre de pistes enregistrées sur
votre dispositif USB. Fermez la porte du Compartiment multimédia
numérique.
4. Pour lire (PLAY) une piste, appuyez une fois sur le bouton .
Appuyez à nouveau sur ce bouton pour faire une PAUSE.
5. Pour retourner à la piste antérieure, appuyez une fois sur le bouton
/-Seek. Pour passer à la piste suivante, appuyez une fois sur le
bouton Seek+/ .
6. Pour jouer au hasard vos pistes de musique numérique, appuyez une
fois sur le bouton . L’icône s’illuminera sur l’écran ACL.
7. Pour jouer vos pistes de musique numérique dans une boucle
continue, appuyez deux fois sur le bouton . L’icône
s’illuminera sur l’écran ACL.
8. Pour répéter une piste de musique numérique, appuyez à trois
reprises sur le bouton . L’icône s’illuminera sur l’écran
ACL.
Pour retirer votre dispositif USB, tirez simplement lentement sur le
dispositif pour le faire sortir totalement du port USB.
Remarque : en cas d’erreurs affectant le dispositif USB lorsque vous
jouez de la musique, veuillez vous référer au tableau de détermination
de la cause des problèmes.
USB - CHARGE
Le port USB est conçu pour charger la plupart des dispositifs
compatibles USB tels que des téléphones portables/mobiles et des
lecteurs multimédia numériques externes. Suivez les étapes de la
procédure ci-dessous pour charger votre dispositif compatible USB :
1. Assurez-vous que votre Stéréo de chantier est branché dans une
prise de courant secteur 120 V.
2. Insérez le bout pour connexion USB du câble de votre dispositif
dans le port USB à l’intérieur du Compartiment multimédia
numérique. Insérez l’autre bout du câble de votre dispositif dans
votre dispositif. Votre dispositif devrait commencer à se charger.
Remarque : lorsque votre Stéréo de chantier est branché dans une
source d’alimentation secteur 120 V, votre dispositif compatible USB
se chargera à tout moment, quelle que soit la SOURCE d’alimentation
avec laquelle votre Stéréo de chantier est utilisé. * Pas de garantie de
fonctionnement avec tous les dispositifs compatibles USB.
Fonction de carte SD/MMC
Votre Stéréo de chantier a un porte pour carte mémoire extensible
SD/MMC qui est situé à l’intérieur du Compartiment multimédia
numérique et peut être utilisé pour jouer des fichiers de musique
numérique.
SD/MMC - LECTURE DE MUSIQUE NUMÉRIQUE
Le port SD/MMC est conçu pour fonctionner avec la plupart des cartes
SD/MMC, et il est compatibles avec les fichiers des types mp3 et
WMA. Suivez les étapes de la procédure ci-dessous pour jouer vos
fichiers de musique numérique depuis votre carte mémoire SD/MMC :
1. Appuyez de façon répétée sur le bouton Source jusqu’à ce que SD
soit illuminé sur l’écran ACL.
2. Ouvrez la porte du Compartiment multimédia numérique.
3. Insérez la carte SD/MMC à l’intérieur du port SD/MMC jusqu’à ce
que la carte soit solidement introduite. Remarque : pour permettre
l’insertion correcte, le côté de la carte comportant l’étiquette doit être
orienté vers la droite. Le pavé numérique sur le côté droit de l’écran
ACL clignotera pendant que la carte SD/MMC est en train d’être lue.
Quand tout sera prêt, le pavé numérique affichera la piste à jouer et
le nombre de pistes enregistrées sur votre carte SD/MMC. (Voir la
figure ci-dessous.) Fermez la porte du Compartiment multimédia
numérique.
4. Pour lire (PLAY) une piste, appuyez une fois sur le bouton .
Appuyez à nouveau sur ce bouton pour faire une PAUSE.
5. Pour retourner à la piste antérieure, appuyez une fois sur le bouton
-Seek. Pour passer à la piste suivante, appuyez une fois sur le
bouton Seek+/ .
6. Pour jouer au hasard vos pistes de musique numérique, appuyez
une fois sur le bouton . L’icône s’illuminera sur l’écran
ACL.
7. Pour jouer vos pistes de musique numérique dans une boucle
continue, appuyez deux fois sur le bouton . L’icône
s’illuminera sur l’écran ACL.
8. Pour répéter une piste de musique numérique, appuyez à trois
reprises sur le bouton . L’icône s’illuminera sur l’écran
ACL.
Pour retirer votre carte SD/MMC, appuyez simplement sur la carte
dans son logement et la carte sera alors éjectée.
Remarque : en cas d’erreurs affectant la carte mémoire SD/MMC
lorsque vous jouez de la musique, veuillez vous référer au tableau de
détermination de la cause des problèmes.
21
Page 22

Retrait et insertion du bloc-piles
REPLA CE AA BATTER Y
WHEN UNIT NO LONGER
KEEPS CORRECT TIME
Pour retirer le bloc-piles de la radio ou pour l’y insérer, ouvrez la
porte du chargeur en déverrouillant le loquet. Pour insérer les piles,
alignez les piles avec les bornes et faites glisser le bloc-piles sur les
bornes jusqu’à ce qu’il se bloque en place. Ne forcez pas.
Pour retirer les piles, appuyez sur le bouton de retrait des piles et
faites glisser le blocs-piles hors des bornes.
LOQUET DE
VERROUILLAGE/DÉVERROUILLAGE
DE LA PORTE
Ouvrez la porte du chargeur en déverrouillant le loquet. Branchez le
cordon d’alimentation de l’appareil dans votre prise de courant
murale standard, puis insérez le bloc-piles dans le chargeur.
1. L’écran ACL affichera l’icône de pile et le mot « CHARGING »
sur le devant de l’appareil. Ceci indique que le bloc-piles est en
train de charger.
2. La disparition du mot « CHARGING » à côté de l’icône de pile
indique que le bloc-piles est complètement chargé.
3. La raison d’être de l’icône de charge sur l’écran ACL est d’indiquer
que le bloc-pile est en train de charger. Les icônes de charge
disparaîtront plus vite si le bloc-piles n’était pas complètement
déchargé.
4. Lorsque le bloc-piles est complètement chargé, il peut être inséré
dans un outil ou utiliser pour alimenter la radio au lieu du cordon
d’alimentation.
Remarque : il est recommandé de garder la porte du Compartiment
du chargeur de piles fermée tout le temps.
Charge du bloc-piles
FONCTIONNEMENT DU CHARGEUR :
Insérez les piles et fermer la porte.
Ne chargez que des piles Bosch BAT607, BAT614, BAT609 et BAT618.
D’autres piles risqueraient d’exploser et de causer des blessures aux
personnes et des dommages aux biens. Lisez les consignes de
sécurité supplémentaires figurant sur le dessous de la radio.
BORNES
22
Page 23

Remarques importantes relatives à la charge
120V AC
A
1. De même, le chargeur n’est destiné qu’à la charge rapide des blocpiles dont la température se situe entre 0°C (32°F) et 45°C (113°F).
Si le bloc-piles est trop chaud ou trop froid, la charge rapide est
alors impossible. (Chose possible si le bloc-piles devient trop
chaud à l’usage intensif). Quand la température du bloc-piles
retourne entre 0°C (32°F) et 45°C (113°F), le chargeur rassumera
automatiquement sa fonction.
2. Une diminution marquée de la réserve énergétique entre les
charges peut signaler l’épuise ment du bloc-piles et le besoin d’un
remplacement.
3. N'oubliez pas de débrancher le chargeur durant la période de
remisage.
4. Si le bloc-piles ne se charge pas normale -ment :
a. Vérifiez la présence de courant à la prise en y branchant un autre
appareil électrique.
b. Vérifiez si la prise n’est pas raccordée con jointement à un
interrupteur qui servirait à éteindre les lumières.
c. Vérifiez la propreté des bornes du bloc-piles. Nettoyez-les au
besoin avec un bâtonnet imbibé d’alcool.
d. Si vous n’arrivez toujours pas à obtenir la charge satisfaisante,
confiez l’outil, le bloc-piles et le chargeur à votre centre
d’entretien Bosch habituel. Voir les noms et adresses des centres
d’entretien sous la rubrique « Outils électriques» dans les pages
jaunes de l’annuaire de téléphone.
Remarque : L’utilisation de chargeurs ou de bloc-piles non vendus
par Bosch annule la garantie.
Alimentation de l’appareil
Branchement sur le secteur
Branchez le cordon d’alimentation c.a. de l’appareil dans une prise de
courant/prise murale c.a. standard (c.a. 120 V/60 Hz). S’il était
alimenté auparavant par des piles, l’appareil, dès qu’il aura été
branché, sera désormais alimenté par le secteur.
Remarque : l’appareil commence à charger les piles automatiquement
dès qu’il est alimenté par le secteur.
Fonctionnement avec les piles
Le bloc-piles Bosch alimente l’appareil en courant continu dans tous
les modes lorsque l’appareil est déconnecté de sa source
d’alimentation c.a. La prise de 12 volts et la prise à 4 voies ne sont
pas disponibles si le cordon d’alimentation c.a. n’est pas branché sur
le secteur.
!
AVERTISSEMENT
courant protégée par un disjoncteur de fuite à la terre lorsque vous
l’utilisez dans un endroit humide. S’il n’y a pas de prise de courant
protégée par un disjoncteur de fuite à la terre, utilisez une prise de
courant portative protégée par un disjoncteur de fuite à la terre
incorporé. Testez la prise de courant protégée par un disjoncteur de
fuite à la terre en suivant les instructions fournies par le fabricant
du disjoncteur de fuite à la terre. Si le test de la prise de courant
protégée par un disjoncteur de fuite à la terre ne donne pas
satisfaction, n’utilisez pas cette prise. Branchez seulement la radio
dans une prise de courant protégée par un disjoncteur de fuite à la
terre fonctionnelle.
Pour réduire le risque de choc électrique, ne
branchez cet appareil que dans une prise de
Utilisation des prises de courant
quadruples pratiques
!
AVERTISSEMENT
Pour réduire le risque de choc électrique ou d’incendie, ne
surchargez jamais les prises de courant c.a.
Après avoir branché l’appareil dans une source d’alimentation c.a.,
effectuez les actions suivantes pour utiliser les prises de courant
pratiques :
1. Soulevez le cache de protection pour exposer les sorties
d’alimentation c.a.
2. Branchez l’équipement ou outil électrique désiré dans la prise.
3. Après avoir fini d’utiliser les prises de courant c.a. de l’appareil,
assurez-vous que les capuchons de protection sont fermés
correctement.
Le débit nominal combiné maximum des
quatre prises de courant c.a. est de 10 A.
VOYANT
!
AVERTISSEMENT
ne protégera pas contre les décharges électriques provenant : 1. des
défauts ou des problèmes affectant l’alimentation électrique de
l’interrupteur ; 2. des contacts entre une personne et les deux
conducteurs du circuit de l’interrupteur.
N’utilisez pas lorsqu’il est probable que de
l’eau s’infiltrera dans l’appareil. Ce dispositif
CAPUCHON DE
PROTECTION
UTILISATION DU DISJONCTEUR
DE FUITE À LA TERRE
Le disjoncteur de fuite à la terre aide à vous protéger contre les chocs
électriques dangereux qui peuvent être causés si votre corps devient un
parcours à travers lequel l’électricité circule au sol. Ceci pourrait se
produire lorsque vous touchez un outil électrique qui est sous tension
en raison d’un mécanisme défectueux, d’humidité, d’isolation usée sur
le cordon, etc. Un choc peut se produire même si vous ne touchez
qu’aux canalisations ou à un autre matériau qui mène au sol. Lorsque
vous utilisez un disjoncteur de fuite à la terre, vous pouvez néanmoins
sentir un choc, mais ce disjoncteur est conçu de manière à couper le
courant suffisamment vite pour qu’un adulte normal en santé ne
subisse pas de lésions électriques graves.
!
AVERTISSEMENT
1. Les chocs ligne à ligne (du type reçu lorsqu’on touche au métal
inséré dans les deux fentes droites d’une prise).
2. Les surcharges de courant ou le court-circuit ligne à neutre. LE
FUSIBLE OU LE DISJONCTEUR AU PANNEAU OU À LA BOÎTE DE
DISTRIBUTION DOIT ASSURER CETTE PROTECTION CONTRE LES
SURINTENSITÉS !
23
Les disjoncteurs de fuite à la terre NE
protégeront PAS contre :
Page 24

Utilisation de la prise de 12 V
12V
AUX 1
IN
LINE
OUT
250V
1AMP
FUSE
FOR 12V
OUTLET
USB
SD / MMC
AUX 1 IN
LINE OUT
REPLAC E AA B ATTERY
WHEN UNIT NO LONGER
KEEPS CORRECT TIME
Remarque : n’insérez pas de dispositif nécessitant une intensité de
plus d’un ampère. Sinon, le fusible s’ouvrira. La prise de 12 V ne peut
pas être alimentée par le bloc-piles.
1. Soulevez le couvercle en caoutchouc identifié par « 12 V » pour
exposer la prise et insérez la fiche du dispositif ou de l’équipement.
2. Fermez le couvercle dès que vous aurez fini d’utiliser la prise afin
d’empêcher la pénétration d’autres objets dans les ouvertures de la
prise.
3. Inspectez le fusible s’il n’y a pas de courant.
Remplacement du fusible
1. Dévissez le capuchon du fusible en tournant dans le sens contraire
des aiguilles d’une montre.
2. Remplacez le fusible. Utilisez seulement un fusible rapide d’un
ampère 5 x 20 mm métrique (F1AL 250V).
3. Serrez l’ensemble de capuchon de fusible en tournant dans le sens
des aiguilles d’une montre.
!
AVERTISSEMENT
Ne circonvenez pas le fusible et n’utilisez
aucun fusible autre que celui qui est spécifié
pour ne pas endommager l’appareil.
Remplacement des piles de l’horloge
1. Ouvrez la porte du compartiment des piles.
2. Retirez le cache des piles AA.
3. Retirez les anciennes piles et mettez-les au rebut conformément à
la réglementation applicable.
4. Insérez les nouvelles piles AA. N’utilisez pas de piles usagées ou de
types différents ; utilisez seulement des piles alcalines neuves.
EMPLACEMENT
DES PILES AA
Détermination de la cause, et résolution, des problèmes
Problème Détermination de la cause Résolution du problème
La partie audio 1. Le cordon d’alimentation est-il 1. Branchez le cordon d’alimentation c.a.
ne fonctionne pas. connecté correctement ?
2. Le bloc-piles Bosch a-t-il été 2. Assurez-vous que le bloc-piles est inséré complètement.
inséré ou installé correctement ?
3. Le bloc-piles doit-il être rechargé ? 3. Branchez le cordon d’alimentation et insérez le bloc-piles.
La réception radio 1. Y a-t-il un autre équipement à 1. Déplacez l’appareil à un autre endroit à distance
est bruyante ou faible. proximité qui produit des interférences ? de la source des interférences.
2. L’antenne FM interne est-elle affectée 2. Orientez l’appareil dans un autre sens.
par des interférences ?
La prise de 12 V c.c. 1. Le fusible d’un ampère a-t-il été 1. Insérez le fusible d’un ampère.
ne fonctionne pas. inséré correctement ?
2. Le fusible d’un ampère s’est-il ouvert ? 2. Remplacez le fusible.
La prise à 4 voies 1. Le cordon d’alimentation est-il 1. Branchez le cordon d’alimentation c.a.
ne fonctionne pas. connecté correctement ?
L’appareil cesse 1. Le cordon d’alimentation est-il 1. Branchez l’appareil sur une source d’alimentation.
subitement connecté correctement à l’appareil ?
de fonctionner. 2. L’écran à cristaux liquides indique-t-il 2. Le logiciel de l’appareil doit être réinitialisé. Retirez toutes les
2. Le voyant vert est-il illuminé sur
les prises de courant ?
que l’appareil est sous tension ? piles de l’appareil et débranchez le cordon d’alimentation c.a.,
puis attendez 30 secondes et rebranchez le cordon
d’alimentation c.a. dans la prise secteur.
24
Page 25

Entretien
Service
!
AVERTISSEMENT
L’UTILISATEUR. L’entretien préventif exécuté par des personnes
non autorisés peut entraîner un positionnement erroné des
composants et des fils internes, ce qui peut présenter de graves
dangers. Nous recommandons de confier toute intervention d’entre -
tien sur l’outil à un centre de service-usine Bosch ou à un centre de
service après-vente Bosch agréé. TECHNICIENS : débranchez la radio
de l’alimentation avant de commencer la réparation.
L’entretien et les réparations ne doivent être effectués que par
des techniciens agréés. Une personne incompétente risquerait de
se blesser lors de toute opération d’entretien ou de réparation.
Si un composant doit faire l’objet d’une substitution, n’utilisez
qu’un composant identique pour la substitution. Suivez les
consignes de la rubrique de ce mode d’emploi qui est consacrée à
l’entretien. L’emploi de pièces non autorisées ou le non-respect des
consignes de maintenance risque de créer un danger de décharge
électrique ou de blessure.
Faire attention aux blocs-piles qui approchent la fin de leur vie.
Si vous remarquez une diminution dans les performances de votre
radio ou une durée de fonctionnement réduite de manière
significative entre charges, il est temps de remplacer le bloc-piles.
S’il n’est pas remplacé, il se peut qu’il endommage le chargeur ou
que l’outil fonctionne incorrectement.
IL N’EXISTE À L’INTÉRIEUR AUCUNE PIÈCE
SUSCEPTIBLE D’ÊTRE ENTRE TENUE PAR
PILES
Nettoyage
!
AVERTISSEMENT
avant de procéder au nettoyage.
N’insérez jamais un disque sale/éraflé dans l’appareil, et ne laissez pas
de saletés ou de sable pénétrer à l’intérieur.
Ne retirez pas subitement l’appareil d’un endroit très froid pour le
mettre dans un endroit chaud. Ceci risquerait de causer la formation
de condensation sur la lentille optique et empêcher un fonction nement correct.
Ne laissez pas l’appareil exposé à la lumière directe du soleil pendant
des périodes prolongées ; ceci pourrait déformer ou décolorer le
coffret, et risquerait également de causer un mauvais fonctionnement
de l’appareil.
Essuyez l’appareil avec un chiffon doux. Retirez les saletés incrustées
avec un chiffon humide trempé dans de l’eau savonneuse, puis
essuyez pour sécher.
Si vous avez l’intention d’utiliser une pièce d’étoffe imbibée d’un
produit chimique, lisez d’abord le mode d’emploi qui l’accompagne.
N’utilisez pas d’alcool ou de diluants.
!
MISE EN GARDE
plastique. Parmi ceux-ci se trouvent : l’essence, le tétrachlorure de
carbone, les dissolvants de nettoyage chlorés, l’ammoniaque ainsi
que les détergents domestiques qui en contiennent.
Pour éviter les accidents, déconnectez
toujours la radio du boîtier d’alimentation
UNITÉ PRINCIPALE DE L’APPAREIL
Certains agents de nettoyages et certains
dissolvants abîment les pièces en
Accessoires
!
AVERTISSEMENT
avec conducteurs de dimension adéquate pouvant porter le
courant nécessaire à votre outil. Ceci préviendra une chute
excessive de tension, une perte de courant ou une surchauffe. Les
outils mis à la terre doivent utiliser des cordons de rallonge
trifilaires pourvus de fiches à trois broches ainsi que des prises à
trois broches.
REMARQUE : Plus le calibre est petit, plus le fil est gros.
Si un cordon de rallonge s’avère
nécessaire, vous devez utiliser un cordon
25
DIMENSIONS DE RALLONGES RECOMMANDÉES
OUTILS 120 VOLTS COURANT ALTERNATIF
Intensité
nominale
de l’outil
3-6
6-8
8-10
10-12
12-16
Calibre A.W.G.
Longueur en pieds Longueur en mètres
25 50 100 150 15 30 60 120
18 16 16 14 0,75 0,75 1,5 2,5
18 16 14 12 0,75 1,0 2,5 4,0
18 16 14 12 0,75 1,0 2,5 4,0
16 16 14 12 1,0 2,5 4,0 —
14 12 —— — — — —
Calibre en mm
2
Page 26

ADVERTENCIA
!
– PARA EVITAR UN PELIGRO DE INCENDIO O DE DESCARGAS ELÉCTRICAS, NO USE ESTE ENCHUFE CON UN CORDÓN DE EXTENSIÓN, UN
RECEPTÁCULO ELÉCTRICO U OTRO TOMACORRIENTE, A MENOS QUE LOS TERMINALES SE PUEDAN INTRODUCIR COMPLETAMENTE
PARA EVITAR QUE QUEDEN AL DESCUBIERTO.
– PARA EVITAR UN PELIGRO DE INCENDIO O DE DESCARGAS ELÉCTRICAS, NO EXPONGA EL ELECTRODOMÉSTICO A LA LLUVIA NI A LA
HUMEDAD.
PRECAUCIÓN:
RIESGO DE DESCARGAS ELÉCTRICAS
NO ABRA LA UNIDAD
El símbolo de destello de rayo con cabeza
de flecha, ubicado dentro de un triángulo
equilátero, tiene como finalidad alertar al
usuario de la presencia de un “voltaje
peligroso” sin aislamiento dentro de la
carcasa del producto, que podría ser de
magnitud suficiente como para constituir
un riesgo de descargas eléctricas a las
personas.
PRECAUCIÓN: PARA REDUCIR EL RIESGO
DE DESCARGAS ELÉCTRICAS, NO QUITE
LA TAPA (O LA PARTE DE ATRÁS). EN EL
INTERIOR NO HAY PIEZAS A LAS QUE
EL USUARIO PUEDA HACER SERVICIO DE
REVISIÓN. PONGA EL SERVICIO DE
REVISIÓN EN MANOS DE PERSONAL
DE SERVICIO CALIFICADO.
El signo de admiración ubicado dentro de
un triángulo equilátero tiene como finali dad alertar al usuario de la presencia de
instrucciones importantes de funciona miento y mantenimiento (servicio de revi sión) en los documentos que acom pañan
al producto.
INSTRUCCIONES DE SEGURIDAD IMPORTANTES
1) Lea estas instrucciones.
2) Guarde estas instrucciones.
3) Haga caso de todas las advertencias.
4) Siga todas las instrucciones.
5) No use este aparato cerca de agua.
6) Limpie la unidad solamente con un paño seco.
7) No bloquee ninguna abertura de ventilación. Instale la unidad de acuerdo con las instrucciones del fabricante.
8) No instale la unidad cerca de cualquier fuente de calor, como radiadores, registros de calor, estufas u otros aparatos (incluyendo
amplificadores) que produzcan calor.
9) No anule el propósito de seguridad del enchufe de tipo polarizado o de tipo de conexión a tierra. Un enchufe polarizado tiene dos
terminales, uno de los cuales es más ancho que el otro. Un enchufe de tipo de conexión a tierra tiene dos terminales y una tercera
espiga de conexión a tierra. El terminal ancho o la tercera espiga se proporciona para brindar seguridad al usuario. Si el enchufe
provisto no cabe en el tomacorriente, consulte a un electricista para reemplazar el tomacorriente obsoleto.
10) Proteja el cordón de energía para que no sea pisado ni pellizcado, especialmente en los enchufes, los receptáculos eléctricos
auxiliares y el punto por donde salen del aparato.
11) Utilice únicamente aditamentos y accesorios especificados por el fabricante.
12) Utilice el aparato solamente con el carrito, la base de soporte, el trípode, el soporte o la mesa que el fabricante
especifique o que se venda con el aparato. Cuando se utilice un carrito, tenga precaución al mover la combinación de carrito y
aparato, para evitar lesiones por causa de vuelco.
13) Desenchufe este aparato durante tormentas con relámpagos o cuando no se use durante períodos prolongados.
14) Ponga todo el servicio de revisión en manos de personal de servicio calificado. Es necesario hacer servicio de revisión cuando el
aparato se haya dañado de alguna manera, como cuando el cordón de energía o el enchufe esté dañado, cuando se haya derramado
líquido o hayan caído objetos dentro del aparato, o cuando el aparato haya sido expuesto a lluvia o humedad, cuando no funcione
normalmente o cuando se haya caído.
15) El enchufe de la red eléctrica se utiliza como el dispositivo de desconexión, el dispositivo de desconexión permanecerá fácilmente
operable.
16) Lea la etiqueta de capacidad nominal ubicada en la parte inferior de la unidad para conocer la entrada de potencia y otra
información de seguridad.
Este aparato no se debe exponer a agua que gotea o salpica, y no se deben colocar objetos llenos de líquidos, como por ejemplo
jarrones, sobre el aparato.
Advertencia: Para reducir el riesgo de descargas eléctricas, enchufe la unidad solamente en un tomacorriente protegido por un
interruptor de circuito accionado por corriente de pérdida a tierra (GFCI) cuando se utilice en lugares húmedos. Si no se dispone de un
tomacorriente protegido por un GFCI, utilice un tomacorriente portátil con protección GFCI incorporada.
26
Page 27

Índice de materias
Página Página
Seguridad ...................................................................................26-27
Instrucciones de seguridad importantes .....................................26
Índice de materias ...........................................................................27
Información de la FCC..................................................................27
Baterías/Cargador.........................................................................28
Cuidado de las baterías ...............................................................28
Eliminación de las baterías ..........................................................28
Descripción funcional y especificaciones ......................................29
Pantalla de LCD............................................................................30
Ajuste del reloj .............................................................................30
Controles del modelos PB360S y PB360S-C...............................31
Instrucciones de funcionamiento...............................................32-33
Ajustes de audio...........................................................................32
Función radio ...............................................................................32
Función auxiliar............................................................................32
Función USB ................................................................................33
Función de tarjeta SD/MMC.........................................................33
Suelta e introducción del paquete de batería ................................34
Carga del paquete de batería........................................................34
Notas importantes sobre la carga................................................35
Para suministrar alimentación a la unidad....................................35
Utilización de los tomacorrientes de 4 conectores de
conveniencia................................................................................35
Uso del GFCI (interruptor de circuito accionado
por corriente de pérdida a tierra).................................................35
Uso del tomacorriente de 12 V ....................................................36
Cambio del fusible........................................................................36
Cambio de las baterías del reloj...................................................36
Resolución de problemas...........................................................36
Mantenimiento ................................................................................37
Accesorios........................................................................................37
Información de la FCC
NOTA: Este equipo ha sido sometido a pruebas y se ha comprobado
que cumple con los límites para un dispositivo digital de Clase B,
conforme a la parte 15 de las Normas de la FCC. Estos límites están
diseñados para proporcionar protección razonable contra la
interferencia perjudicial en una instalación residencial. Este equipo
genera, usa y puede irradiar energía de radiofrecuencia y, si no se
instala y utiliza de acuerdo con las instrucciones, puede causar
interferencia perjudicial para las radiocomunicaciones. Sin embargo,
no hay garantía de que no vaya a ocurrir interferencia en una
instalación específica. Si este equipo causa interferencia perjudicial
para la recepción de radio o televisión, lo cual se puede determinar
apagando y encendiendo el equipo, se recomienda al usuario que
intente corregir la interferencia tomando una o más de las medidas
siguientes:
• Reoriente o reubique la antena receptora.
• Aumente la separación entre el equipo y el receptor.
• Conecte el equipo a un tomacorriente que esté en un circuito
distinto al circuito al que el receptor esté conectado.
• Consulte al distribuidor o a un técnico experto en radio/TV para
obtener ayuda.
27
Page 28

Reglas para las baterías y el cargador
Antes de utilizar el cargador de baterías, lea todas las instruc ciones e indicaciones de precaución que se encuentran en (1) el
cargador de baterías, (2) el paquete de baterías y (3) el producto
que utiliza baterías.
Utilice solamente el cargador que acompañaba al el producto o
un reemplazo directo según se indica en el catálogo o en este
manual.
No desarme la radio ni la haga funcionar si ha recibido un golpe
brusco, se ha caído o se ha dañado de cualquier modo. Cambie el
cordón o los enchufes dañados inmediatamente. El reensamblaje
incorrecto o los daños pueden ocasionar sacudidas eléctricas o
incendio.
No recargue la batería en un entorno húmedo o mojado. No
exponga la radio a la lluvia ni a la nieve. Si la caja de baterías
está agrietada o dañada de algún otro modo, no la introduzca en
el cargador. Se puede producir un cortocircuito de las baterías o
un incendio.
Cargue solamente baterías recargables aprobadas Bosch.
Consulte Descripción funcional y especificaciones. Otros tipos de
baterías pueden reventar causando lesiones personales y daños.
Cargue el paquete de baterías a temperaturas superiores a +32
grados F (0 grados C) e inferiores a +113 grados F (45 grados C).
Guarde la radio y el paquete de baterías en lugares donde las
temperaturas no superen 120 grados F (49 grados C). Esto es
importante para evitar daños graves a los elementos de la batería.
Se puede producir un escape del líquido de las baterías bajo
condiciones extremas de uso o de temperatura. Evite el contacto
con la piel y los ojos. El líquido de la batería es cáustico y podría
causar quemaduras químicas en los tejidos. Si el líquido entra en
contacto con la piel, lávela rápidamente con agua y jabón. Si el
líquido entra en contacto con los ojos, enjuáguelos con agua
durante un mínimo de 10 minutos y obtenga atención médica.
Ponga la radio sobre superficies planas ininflamables y alejada
de materiales inflamables cuando recargue el paquete de
baterías. El cargador y el paquete de baterías se calientan durante
el proceso de carga. Las alfombras y otras superficies termo aislantes bloquean la circulación adecuada de aire, lo cual puede
causar sobrecalentamiento del cargador y del paquete de baterías.
Si observa humo o que la carcasa se está derritiendo, desenchufe
inmediatamente el cargador y no utilice el paquete de baterías ni el
cargador.
El uso de un accesorio no recomendado ni vendido por Bosch
puede constituir un peligro de incendio, sacudidas eléctricas o
lesiones a las personas.
Cuidado de las baterías
ADVERTENCIA
!
objetos metálicos. Por ejemplo, para evitar que los terminales hagan
corto circuito, NO ponga las baterías en una caja de herramientas o
en un bolsillo con clavos, tornillos, llaves, etc. Se pueden producir un
incendio o lesiones.
Cuando las baterías no están en la herramienta
o en el cargador, manténgalas alejadas de
Eliminación de las baterías
ADVERTENCIA
!
terminales de la batería. Se pueden producir lesiones o un incendio.
Antes de tirarla, proteja los terminales que están al descubierto con
cinta adhesiva aislante gruesa para prevenir cortocircuitos.
Si este producto está equipado con una batería de iones de litio, dicha
batería debe recogerse, reciclarse o eliminarse de manera segura para
el medio ambiente.
No intente desarmar la batería ni quitar ninguno
de los com ponentes que sobresalen de los
BaterÍas de iones de litio
“El sello de reciclaje de baterías RBRC certificado por
la EPA que se encuentra en la batería de iones de litio
(Li-ion) indica que Robert Bosch Tool Corporation
está participando voluntariamente en un programa
de la industria para recoger y reciclar estas baterías
al final de su vida útil, cuando se retiran de servicio
PRECAUCIÓN: Peligro de explosión si la batería es reemplazada
incorrectamente. Reemplácela solamente con una del mismo
tipo o de tipo equivalente.
NO ARROJE LAS BATERIAS AL FUEGO NI LAS EXPONGA AL CALOR
INTENSO.Pueden explotar.
en los Estados Unidos y Canadá. El programa RBRC proporciona una
alternativa conveniente a tirar las baterías de Li-ion usadas a la basura
o a la corriente municipal de aguas residuales, lo cual quizás sea ilegal
en su área.
Tenga la amabilidad de llamar al 1-800-8-BATTERY para obtener
información acerca de las prohibiciones/restricciones sobre el
reciclaje y la eliminación de baterías de Li-ion en su lugar o devuelva
las baterías a un Centro de servicio Skil/Bosch/Dremel para
reciclarlas. La participación de Robert Bosch Tool Corporation en este
programa es parte de nuestro compromiso hacia preservar nuestro
medio ambiente y conservar nuestros recursos naturales.”
28
Page 29

Descripción funcional y especificaciones
Equalizer
Custom
Memory
Clock
Tune
Volume
Bass Treb
Source
Seek
Seek
Subwoofer
AUX 1
IN
LINE
OUT
12V
250V
1AMP
FUSE
FOR 12V
OUTLET
USB
AUX 2 IN
SD / MMC
AUX 1 IN
120V AC
A
REPLACE AA BATTE RY
WHEN UNIT NO LONGER
KEEPS CORRECT TIME
Estéreo para el sitio de construcción con tomacorriente de 4 conectores
ENTRADA
AUXILIAR 1
PUERTO PARA
TARJETAS
SD/MMC
ÁREA DE
ALMACENAMIENTO
PARA DISPOSITIVOS
DE MEDIOS DIGITALES
TOMACORRIENTE
DE 12 V CC
ENTRADA
AUXILIAR 2
SALIDA
DE LÍNEA
PUERTO USB
FUSIBLE
DE 12 V CC
ANTENA
BAHÍA DEL CARGADOR
Y LAS BATERÍAS
ASA DE
TRANSPORTE
UBICACIÓN DE LAS
BATERÍAS AA
PARLANTES
ENROLLADOR
DEL CORDÓN
CORDÓN DE
ENERGÍA
RELOJ
DIGITAL
ANTIVUELCO
INDICADOR DEL
CARGADOR
Número de modelo PB360S y PB360S-C
Tensión nominal 120 V 60 Hz
Amperaje 12 A
Baterías compatibles BAT607, BAT614,
Tomacorrientes con GFCI
Tensión 120 V 60 Hz
Amperaje 10 A
BAT609 y BAT618
JAULA
TOMACORRIENTE DE 4
CONECTORES
PANEL DE
CONTROL
Tomacorrientes de CC
Tensión 12 V
Amperaje Fusible de 1 A
Radio AM 530-1710kHz
FM 87.5-107.9MHz
SD/MMC/UBS Compatible con MP3, WMA
Memoria AM 10 preajustes
FM 20 preajustes
29
Page 30

Pantalla de LCD
1 2 3 4 5 20 19 16 15
21
22
23
6
7
8
13
14
12
11
1. JAZZ: Se ilumina cuando se selecciona Jazz en Equalizer.
2. ROCK: Se ilumina cuando se selecciona Rock en Equalizer.
3. POP: Se ilumina cuando se selecciona Pop en Equalizer.
4. CLASSICAL: Se ilumina cuando se selecciona Classical en
Equalizer.
5. CUSTOM (PERSONALIZADO): Se ilumina cuando se selecciona
Custom en Equalizer o cuando se presiona el botón Custom.
6. NUMÉRICA: Muestra la hora del reloj una vez que se ha ajustado y
la estación de radio durante la sintonización.
7. ST (ESTÉREO): Se ilumina cuando la estación de radio está
emitiendo en canal estéreo.
8. NUMÉRICA: Muestra la frecuencia de estación de FM o AM en el
modo de sintonizador, o el tiempo que ha transcurrido de la pista
de música digital.
9. CHARGING (CARGANDO): Parpadea cuando la unidad está
cargando la batería.
10. Icono de BATERÍA: Indica que la batería está en la unidad. Este
icono parpadea cuando la batería está casi descargada.
11. FM: Indica la banda de FM en el modo de sintonizador.
12. AM: Indica la banda de AM en el modo de sintonizador.
13. AUX 1: Se ilumina cuando usted selecciona el modo AUX 1 para
usar un dispositivo reproductor de medios externo.
14. AUX 2: Se ilumina cuando usted selecciona el modo AUX 2 para
usar un dispositivo reproductor de medios externo (dentro de la
bahía de medios digitales).
15. NUMÉRICA: Muestra el número de una estación de radio
preajustada en el modo de sintonizador, o la pista que está siendo
reproducida y el número de pistas almacenadas en su dispositivo
USB o de tarjeta SD/MMC.
18
17
24
16. PRESET (PREAJUSTE): Se ilumina cuando se tiene una estación
de radio preajustada seleccionada y parpadea cuando se ponen los
preajustes de estación en la memoria.
17. SD: (Tarjeta SD/MMC) Se ilumina cuando usted selecciona el
modo de tarjeta SD/MMC.
18. USB:Se ilumina cuando usted selecciona el modo USB.
19. BAS (GRAVES): Se ilumina cuando usted ajusta el nivel de bajos
deseado.
20. TRE (AGUDOS):Se ilumina cuando usted ajusta el nivel de agudos
deseado.
21. MODO AL AZAR: El icono se ilumina cuando se está en el modo
“al azar” (dispositivos USB y SD/MMC solamente).
22. REPETIR CARPETA: El icono se ilumina cuando se está en el
modo “repetir carpeta” (dispositivos USB y SD/MMC solamente).
23. REPETIR PISTA: El icono se ilumina cuando se está en el modo
“repetir pista” (dispositivos USB y SD/MMC solamente).
24. PM: Se ilumina cuando el ajuste de la hora está en el modo PM.
25. Icono de TEMPERATURA: Cuando la unidad de radio NO esté
enchufada en una fuente de alimentación de 120 V, pero una
batería esté instalada apropiadamente en la bahía de
batería/cargador, este icono se iluminará y parpadeará si la
temperatura de la batería es demasiado caliente
(aproximadamente 50 grados Celsius o más) o demasiado fría
(aproximadamente -10 grados Celsius o menos). Si la
temperatura de la batería excede 70 grados Celsius, la unidad de
radio se apagará para proteger la batería contra los daños. Cuando
la temperatura de la batería alcance el intervalo de temperatura de
funcionamiento normal (consulte Reglas para la batería y el
cargador), se podrá encender la unidad de radio y reanudar la
función normal. El icono de TEMPERATURA NO se iluminará ni
parpadeará cuando la unidad de radio esté enchufada en una
fuente de alimentación de 120 V.
9
10
25
Ajuste del reloj
Cuando el enchufe de CA o el paquete de batería esté introducido, la
unidad irá preestablecidamente al modo de espera y la pantalla de
LCD mostrará “12:00”. Siga los pasos que se indican a continuación
para ajustar la hora local correcta.
1. Presione y mantenga presionado el botón Clock (Reloj) de la
unidad y “hour” (hora) se activará y parpadeará.
2. Gire /-Seek o Seek+/ para escoger el número de hora
correcto. Para el ajuste de “PM”, gire el DIAL DE SINTONIZACIÓN
hasta que “PM” se ilumine en la pantalla de LCD.
3. Presione una vez el botón Clock para ajustar la hora y “minute”
(minuto) se activará y parpadeará.
4. Gire /-Seek o Seek+/ para escoger el número de minuto
correcto.
5. Presione una vez el botón CLOCK para almacenar el ajuste de reloj.
Nota: Se necesitan 2 baterías AA para mantener actualizada la hora
cuando la unidad no esté enchufada. Reemplace las baterías AA
cuando la unidad ya no mantenga la hora correcta. (Consulte la
sección sobre cambio de las baterías AA del reloj.)
30
Page 31

Controles del modelos PB360S y PB360S-C
1. Para cambiar entre los modos de encendido y espera.
2. Volume/Bass Treb:Para aumentar/reducir el volumen de audio en
todos los modos. El volumen se ajusta de 0-20 (min-máx) en una
revolución completa. El dial gira 360 grados.
3. Volume/Bass Treb: Ajusta los bajos y los agudos cuando la unidad
está en el ajuste de ecualizador “Custom” (personalizar). Y cuando
el botón Custom es presionado y el icono está parpadeando
4. Equalizer: Para cambiar entre los ajustes de ecualizador prefijados
Jazz, Rock, Pop, Classical y Custom.
5. Custom (personalizado): Presiónelo una vez para activar los
ajustes personalizados de bajos y agudos (controlado por el dial de
Volume/Bass/Treb)
6. Memory:Al presionar este botón se ajustan las posiciones valores
del sintonizador de radio. Para realizar el ajuste: Sintonice la
estación de radio deseada, presione Memory, use los botones
o para desplazarse hasta el preajuste deseado y presione
Memory para almacenar la estación y preajustarla.
7. Clock (Reloj): Al presionarlo se gradúa y se almacena el ajuste del
reloj. Para ajustarlo: Presiónelo una vez, use /-Seek o
2
3
4
6
Seek+/ para ajustar la hora; presiónelo de nuevo y use
/-Seek o Seek+/ para ajustar el minuto; presiónelo de
nuevo para ajustarlo.
8. Tune +/-: Cuando use la fuente de Radio, gire el dial para ajustar el
canal de la estación de radio. Cuando ajuste el Reloj, gire el dial
para ajustar los valores de horas y minutos. El dial gira 360
grados.
9. PLAY / PAUSE (REPRODUCIR / PAUSAR): Para reproducir o
pausar una pista cuando escuche una fuente USB, SD/MMC.
10. MODO AL AZAR / REPETIR : Para reproducir al azar /
repetir carpeta / repetir una pista cuando la unidad está
reproduciendo una fuente USB o SD.
11. /-Seek o Seek+/ > /-Seek o Seek+/ : Cuando use
la fuente de Radio: Presione una vez el botón para cambiar entre
los preajustes de estaciones de radio. Presiónelo y manténgalo
presionado para buscar rápidamente estaciones de radio hacia
arriba o hacia abajo. Cuando escuche una fuente USB o SD:
Presione una vez el botón para saltar a la pista previa.
12. Source (Fuente): Presiónelo para cambiar entre Radio FM, AM,
AUX1, AUX2, USB o SD/MMC.
7
1
5
8
9
11
12
11
10
31
Page 32

Instrucciones de funcionamiento
Ajustes de audio
VOLUMEN
Su Estéreo para el sitio de construcción tiene 20 ajustes de volumen
preajustados seleccionables. Para ajustar el nivel de VOLUME, gire el
dial de Volume/Basss/Treb en el sentido de las agujas del reloj o en
sentido contrario al de las agujas del reloj hasta el nivel de volumen
deseado.
Ecualizador
Su Estéreo para el sitio de construcción tiene 5 posiciones de
ecualizador preajustadas seleccionables y un ajuste personalizado que
le permitirá seleccionar el nivel de los tonos graves y agudos.
Al presionar repetidamente Ecualizador se seleccionará a través de
los 5 ajustes de ecualizador y el personalizado, iluminándose cada
ajuste ubicado en la pantalla de LCD: JAZZ, ROCK, POP, CLASSICAL
y CUSTOM.
Para ajustar los valores personalizados de bajos y agudos, siga los
pasos que se indican a continuación:
1. Presione repetidamente Ecualizador hasta que se seleccione
“CUSTOM”. O simplemente presione una vez el botón CUSTOM.
2. Presione una vez el botón Custom y “BAS” (de BASS, o bajos)
junto con el número de nivel de bajos parpadearán en la pantalla de
LCD.
3. Gire el dial de Volume/Basss/Treb en el sentido de las agujas del
reloj o en sentido contrario al de las agujas del reloj hasta el nivel
de bajos deseado.
4. Presione dos veces el botón Custom y “TRE” (de TREBLE, o
agudos) junto con el número de nivel de agudos parpadearán en la
pantalla de LCD.
5. Gire el dial de Volume/Basss/Treb en el sentido de las agujas del
reloj o en sentido contrario al de las agujas del reloj hasta el nivel
de agudos deseado.
6. Presione el botón Custom una vez más para ajustar los niveles en
la memoria. Sus ajustes personalizados de bajos y agudos estarán
ahora almacenados y “TRE” y el número de nivel de agudos
dejarán de parpadear y desaparecerán de la pantalla de LCD.
Nota: Los ajustes de bajos y agudos tienen cada uno una gama de 0
(mín) a 10 (máx) niveles.
ESTÉREO
Cuando el sintonizador de FM reciba una señal fuerte de FM, “ST” se
iluminará en la pantalla de LCD. Si el sintonizador de FM recibe una
señal débil, “ST” no se iluminará en la pantalla de LCD. Para mejorar
el sonido de una estación débil, ajuste la antena extra o posicione la
Estéreo para el sitio de construcción en una ubicación distinta.
Función de radio
PARA SELECCIONAR LA BANDA Y LAS ESTACIONES
Este sintonizador es operado en frecuencia de AM estándar de 5301710 kHz y en frecuencia de FM estándar de 87.5-107.9 MHz. Siga
los pasos que se indican a continuación para sintonizar la estación:
1. Presione repetidamente el botón Source (Fuente) hasta que se
seleccione “FM” o “AM”.
2. Gire el dial de sintonización Tune +/- en el sentido de las agujas
del reloj o en sentido contrario al de las agujas del reloj para
sintonizar la frecuencia de radio deseada.
3. Para “Buscar”, presione y mantenga presionado el botón /-Seek
durante un segundo para buscar hacia abajo o el botón Seek+/
para buscar hacia arriba hasta que se reciba una estación con señal
fuerte.
Nota:Si no se está recibiendo ninguna estación cuando la unidad deje
de buscar, repita los pasos mencionados anteriormente para buscar
las estaciones preferidas.
PARA PRESELECCIONAR ESTACIONES
Se pueden preseleccionar hasta 20 estaciones de FM y 10 estaciones
de AM. Siga los pasos que se indican a continuación para
preseleccionar una estación:
1. Sintonice la estación de radio deseada utilizando el dial de
sintonización Tune +/-.
2. Para preseleccionar una estación deseada, presione una vez el
botón MEMORY. PRESET (preajuste) y el número preajustado
parpadearán en la pantalla.
3. Presione los botones /-Seek o Seek+/ una vez para
desplazarse hasta el preajuste de estación deseado.
4. Presione de nuevo el botón Memory para almacenar la estación
deseada en el preajuste de estación deseado en la memoria.
PRESET y el número de preajuste de la estación dejarán de
parpadear.
Nota: Una vez que 20 estaciones de FM ó 10 estaciones de AM estén
preajustadas, la primera estación será reemplazada si usted continúa
y preajusta otra estación.
PARA RECUPERAR LAS ESTACIONES PREAJUSTADAS
1. Presione los botones /-Seek o Seek+/ una vez para buscar
hacia abajo o hacia arriba la estación preajustada deseada.
Función AUXILIAR
Si desea usar un reproductor de audio externo, tal como un
reproductor de medios digitales o un reproductor de CD portátil, la
unidad tiene dos Puertos Auxiliares para aceptar estas fuentes.
AUX 1, diseñado para utilizarse cuando es más deseable controlar el
reproductor externo desde el exterior de la unidad.
1. Presione repetidamente el botón Source (Fuente) hasta que AUX 1
esté iluminado en la pantalla de LCD.
2. Abra la cubierta del puerto AUX 1 IN ubicada en el lado izquierdo de
la unidad.
3. Inserte el enchufe de su cable en el conector hembra AUX 1 IN.
4. Conecte el otro extremo del cable al puerto de salida para
audífonos o de salida auxiliar de su reproductor de audio externo.
5. Reproduzca la fuente de audio externa de la manera en que lo haría
normalmente.
6. Use el dial de Volume/Bass/Treb para ajustar el volumen.
AUX 2, diseñado para utilizarse cuando es más deseable asegurar el
reproductor externo ubicado en el interior de la bahía de medios
digitales (consultar Bahía de medios digitales) para mayor
conveniencia y protección.
1. Presione repetidamente el botón Source (Fuente) que se ilumine
AUX 2 en la pantalla de LCD.
2. Abra la puerta de la bahía de medios digitales.
3. Inserte el enchufe del cable en el conector hembra AUX 2 IN.
4. Conecte el otro extremo del cable al puerto de salida para
audífonos o de salida auxiliar de su fuente de audio externa.
5. Reproduzca la fuente de audio externa de la manera en que lo haría
normalmente.
6. Use el dial de Volume/Bass/Treb para ajustar el volumen.
Nota: Usted no puede controlar su dispositivo reproductor de medios
digitales (reproducir, pausar, seleccionar pistas, etc.) a través del
32
Page 33

panel de control ubicado en la parte delantera de su Estéreo para el
AUX 1
IN
LINE
OUT
12V
250V
1AMP
FUSE
FOR 12V
OUTLET
USB
AUX 2 IN
SD / MMC
AUX 1 IN
LINE OUT
sitio de construcción cuando su dispositivo esté conectado a través
de un puerto auxiliar.
Función USB
Su Estéreo para el sitio de construcción tiene un puerto USB
alimentado ubicado dentro de la bahía de medios digitales que se
puede utilizar para reproducir archivos de música digital desde un
dispositivo de almacenamiento masivo USB, así como para cargar la
mayoría de dispositivos habilitados para USB.
USB: REPRODUCCIÓN DE MÚSICA DIGITAL
El puerto USB está diseñado para funcionar solamente con
dispositivos de almacenamiento masivo USB* y es compatible con
tipos de archivos mp3 y wma. Siga los pasos que se indican a
continuación para reproducir sus archivos digitales de música desde
su dispositivo USB:
1. Presione repetidamente el botón Source (Fuente) que USB se
ilumine en la pantalla de LCD.
2. Abra la puerta de la bahía de medios digitales
3. Inserte el dispositivo de almacenamiento masivo USB en el puerto
USB. La pantalla numérica ubicada en el lado derecho de la pantalla
de LCD parpadeará mientras el dispositivo USB está siendo leído.
Cuando esté listo, la pantalla numérica mostrará la pista que se va a
reproducir y el número de pistas almacenadas en su dispositivo
USB. Cierre la puerta de la bahía de medios digitales.
4. Para REPRODUCIR una pista, presione una vez el botón .
Presiónelo de nuevo para PAUSAR.
5. Para saltar a la pista previa, presione una vez el botón /-Seek.
Para saltar hacia delante hasta la próxima pista, presione una vez el
botón Seek+/ .
6. Para reproducir al azar sus pistas de música digital, presione una
vez el botón . El icono se iluminará en la pantalla de
LCD.
7. Para reproducir sus pistas de música digital en un bucle continuo,
presione dos veces el botón . El icono se iluminará en la
pantalla de LCD.
8. Para repetir una pista de música digital, presione tres veces el
botón . El icono se iluminará en la pantalla de LCD.
Para retirar su dispositivo USB, simplemente jale lentamente el
dispositivo hacia fuera hasta que esté libre del puerto USB.
Nota: En el caso de errores con USB cuando se reproduzca música,
sírvase consultar la Guía de resolución de problemas.
USB: CARGA
El puerto USB está diseñado para cargar la mayoría de dispositivos
habilitados para USB, tales como teléfonos celulares y reproductores
de medios digitales externos. Siga los pasos que se indican a
continuación para cargar su dispositivo habilitado para USB:
1. Asegúrese de que su Estéreo para el sitio de construcción esté
enchufada en una fuente de alimentación de 120 V.
2. Inserte el extremo USB del cable de su dispositivo en el puerto USB
ubicado dentro de la bahía de medios digitales. Inserte el otro
extremo del cable de su dispositivo en su dispositivo. Su
dispositivo debería comenzar a cargarse.
Nota: Con el Estéreo para el sitio de construcción enchufado en una
fuente de alimentación de 120 V, su dispositivo habilitado para USB
se encenderá en cualquier momento, independientemente de qué
FUENTE esté usando su Estéreo para el sitio de construcción. * No se
garantiza que funcione con todos los dispositivos habilitados para
USB.
Función de tarjeta SD/MMC
La Estéreo para el sitio de construcción tiene un puerto para tarjeta de
memoria expansible SD/MMC ubicado dentro de la bahía de medios
digitales, que se puede utilizar para reproducir archivos digitales de
música.
SD/MMC: REPRODUCCIÓN DE MÚSICA DIGITAL
El puerto SD/MMC está diseñado para funcionar con la mayoría de
tarjetas SD/MMC y es compatible con archivos tipo mp3 y WMA. Siga
los pasos que se indican a continuación para reproducir sus archivos
de música digital desde su dispositivo de tarjeta de memoria
SD/MMC:
1. Presione repetidamente el botón Source (Fuente) hasta que SD se
ilumine en la pantalla de LCD.
2. Abra la puerta de la bahía de medios digitales
3. Inserte el dispositivo de tarjeta SD/MMC en el puerto SD/MMC
hasta que la tarjeta esté segura. Nota: Para realizar una instalación
correcta, el lado de la etiqueta de la tarjeta SD/MMC debe estar
orientado hacia la derecha. La pantalla numérica ubicada en el lado
derecho de la pantalla de LCD parpadeará mientras el dispositivo de
tarjeta SD/MMC está siendo leído. Cuando esté listo, la pantalla
numérica mostrará la pista que se va a reproducir y el número de
pistas almacenadas en su dispositivo de tarjeta SD/MMC. (Vea la
figura que se muestra a continuación, Cierre la puerta de la bahía de
medios digitales.
4. Para REPRODUCIR una pista, presione una vez el botón. Presiónelo
de nuevo para PAUSAR.
5. Para saltar a la pista previa, presione una vez el botón /-Seek.
Para saltar hacia delante hasta la próxima pista, presione una vez el
botón Seek+/ .
6. Para reproducir al azar sus pistas de música digital, presione una
vez el botón . El icono se iluminará en la pantalla de LCD.
7. Para reproducir sus pistas de música digital en un bucle continuo
dentro de la misma carpeta, presione dos veces el botón . El
icono se iluminará en la pantalla de LCD.
8. Para repetir una pista de música digital, presione tres veces el
botón . El icono se iluminará en la pantalla de LCD.
Para retirar su tarjeta de memoria SD/MMC simplemente presione la
tarjeta hacia el interior de su ranura y la tarjea será eyectada.
Nota:En el caso errores con las tarjetas de memoria SD/MMC cuando
reproduzca música, sírvase consultar la Guía de resolución de
problemas.
33
Page 34

Suelta e introducción
REPLA CE AA BATTER Y
WHEN UNIT NO LONGER
KEEPS CORRECT TIME
del paquete de batería
Para soltar o introducir el paquete de batería de la unidad de radio,
abra la puerta del cargador desbloqueando el pestillo. Para insertar la
batería, alinee la batería con los terminales y deslice el paquete de
batería sobre el terminal hasta que el paquete quede bloqueado en la
posición correcta. No lo fuerce.
Para soltar la batería, presione el botón de liberación de la batería y
deslice la batería hacia fuera hasta separarla de los terminales.
PESTILLO PARA SOLTAR
LA PUERTA
Abra la puerta del cargador soltando el pestillo. Enchufe el cable de
alimentación de la unidad en un tomacorriente estándar y luego
inserte el paquete de batería en el cargador.
1. La pantalla de LCD mostrará el ICONO “CHARGING ”
(CARGANDO) en la parte delantera de la unidad. Esto indica que
el paquete de batería está cargando.
2. Cuando la palabra “CHARGING” ubicada junto al ICONO de
batería desaparezca, se habrá completado la carga.
3. El propósito del icono de carga ubicado en la pantalla de LCD es
indicar que el paquete de batería se está cargando. Los iconos de
carga desaparecerán en menos tiempo si el paquete de batería no
estaba completamente descargado.
4. Cuando el paquete de batería esté completamente cargado, dicho
paquete se podrá insertar en una herramienta o se podrá utilizar
para suministrar energía a la radio en lugar del cable de
alimentación.
Nota: Se recomienda que la puerta de la bahía del cargador de
baterías se mantenga cerrada en todo momento.
Carga del paquete de batería
OPERACIÓN DEL CARGADOR:
Introduzca la batería y cierre la puerta.
ADVERTENCIA
!
podrían reventar, cau sando lesiones y daños. Lea la información de
seguridad adicional que está en la parte inferior de la radio.
Cargue únicamente baterías Bosch BAT607,
BAT614, BAT609 y BAT618. Otras baterías
TERMINALES
34
Page 35

Notas importantes sobre la carga
120V AC
A
1. El cargador fue diseñado para cargar la bate ría rápidamente sólo
cuando la temperatura de la batería está entre 0°C (32°F) y 45°C
(113°F). Si el paquete de baterías está demasiado caliente o
demasiado frío, el cargador no cargará rá pidamente la batería.
(Esto puede ocurrir si el paquete de baterías está caliente debido a
una utilización intensa.) Cuando la temperatura de la batería vuelva
a estar entre 0°C (32°F) y 45°C (113°F), el cargador comenzará a
cargar auto máticamente.
2. Un descenso considerable en el tiempo de funcionamiento por
carga puede significar que el paquete de baterías se está acercando
al final de su vida y que debe ser sustituido.
3. Recuerde desenchufar el cargador durante el período de
almacenamiento.
4. Si la batería no carga adecuadamente:
a. Compruebe que hay tensión en el toma corriente enchufando
algún otro dispositivo eléctrico.
b. Compruebe si el tomacorriente está conectado a un interruptor
de luz que corta el suministro de energía cuando se apagan las
luces.
c. Compruebe si hay suciedad en las ter minales del paquete de
baterías. Límpielas con un pedazo de algodón y alcohol si es
necesario.
d. Si usted sigue sin obtener una carga adecuada, lleve o envíe la
herramienta, el paque te de baterías y el cargador al Centro de
servicio Bosch local. Busque bajo “Herramientas eléctricas” en
las páginas amarillas para obtener nombres y direcciones.
Nota: La utilización de cargadores o paquetes de batería no vendidos
por Bosch anulará la garantía.
Para suministrar alimentación a la unidad
Para conectar el enchufe de energía de CA
Enchufe el cordón de energía de CA de la unidad en un tomacorriente/
receptáculo eléctrico de CA estándar con CA de 120 V/60 Hz; la unidad
cambiará a CA una vez que esté enchufada si estaba funcionando con
energía procedente de una batería.
Nota: La unidad comienza a cargar la batería automáticamente una
vez que esté funcionando con energía de CA.
Para operar la unidad con la batería
El paquete de batería Bosch suministra alimentación de CC a la unidad
en todos los modos cuando la unidad está desconectada de la
alimentación de CA. El tomacorriente de 12 V y los 4 toma corrientes de
la unidad no están disponibles hasta que el cordón de energía de CA está
enchufado en una fuente de energía de CA.
ADVERTENCIA
!
tomacorriente protegido por un interruptor de circuito accionado
por corriente de pérdida a tierra (GFCI) cuando se utilice en lugares
húmedos. Si no se dispone de un tomacorriente protegido por un
GFCI, utilice un tomacorriente portátil con protección GFCI
incorporada. Pruebe el tomacorriente protegido por un GFCI de
acuerdo con las instrucciones provistas por el fabricante del GFCI.
Si el tomacorriente protegido por un GFCI no pasa la prueba de
GFCI, no utilice ese tomacorriente. Enchufe la radio solamente en
un tomacorriente protegido por un GFCI funcional.
Para reducir el riesgo de descargas eléctricas,
enchufe la unidad solamente en un
Utilización de los tomacorrientes de 4
conectores de conveniencia
ADVERTENCIA
!
reducir el riesgo de descargas eléctricas o peligro de incendio, no
sobrecargue los tomacorrientes de CA.
Con la unidad enchufada en la fuente de alimentación de CA, realice
los siguientes pasos para utilizar los tomacorrientes de
conveniencia:
1. Levante la cubierta protectora para dejar al descubierto los
tomacorrientes de CA.
2. Enchufe en el tomacorriente el electrodoméstico o la herramienta
mecánica de CA que se desee usar.
3. Una vez que haya terminado de usar los tomacorrientes de CA de la
unidad, asegúrese de que las cubiertas protectoras se cierren
adecuadamente.
La capacidad nominal de salida de los cuatro
tomacorrientes de CA es de 10 A Máx. Para
LUZ
INDICADORA
ADVERTENCIA
!
de descargas eléctricas por causa de: 1. Defectos o fallas en el
suministro eléctrico al interruptor. 2. Contacto personal con ambos
conductores del circuito del interruptor.
No use la unidad donde sea probable que le entre
agua. Este dispositivo no protege contra el peligro
CUBIERTA
PROTECTORA
USO DEL GFCI
(Interruptor de circuito accionado por corriente
de pérdida a tierra)
El GFCI ayuda a proteger al usuario contra las sacudidas eléctricas
peligrosas que se pueden producir si su cuerpo se convierte en una ruta
a través de la cual la electricidad viaja hasta tierra. Esto podría suceder al
tocar una herramienta mecánica que tenga corriente debido a un
mecanismo defectuoso, humedad, aislamiento desgas tado en el cordón
de energía, etc. Se pueden producir sacudidas eléctricas incluso si sólo
se están tocando tuberías metálicas u otro material que conduzca a
tierra. Al utilizar un dispositivo con GFCI, es posible que aún se sientan
las sacudidas eléctricas, pero el GFCI está diseñado para interrumpir el
suministro eléctrico con suficiente rapidez para que un adulto sano
normal no sufra lesiones graves por electricidad.
ADVERTENCIA
!
1. Descargas eléctricas de línea a línea (del tipo que se reciben al tocar
metal introducido en las dos ranuras rectas de un receptáculo).
2. Sobrecargas de corriente o cortocircuitos de una línea al neutro.
¡EL FUSIBLE O EL CORTACIRCUITO QUE ESTÁ EN LA CAJA O EN
EL PANEL DE DISTRIBUCIÓN DEBE PROPORCIONAR DICHA
PROTECCIÓN CONTRA SOBRECORRIENTE!
35
Los GFCI NO protegen contra:
Page 36

Uso del tomacorriente de 12 V
12V
AUX 1
IN
LINE
OUT
250V
1AMP
FUSE
FOR 12V
OUTLET
USB
SD / MMC
AUX 1 IN
LINE OUT
REPLAC E AA B ATTERY
WHEN UNIT NO LONGER
KEEPS CORRECT TIME
Nota: No introduzca ningún dispositivo que tome más de 1 A o de lo
contrario el fusible se abrirá. El tomacorriente de 12 V no funcio nará
con alimentación procedente del paquete de batería.
1. Levante la tapa de goma marcada con 12 V del conector hembra e
introduzca el enchufe del dispositivo o del electrodoméstico.
2. Baje la tapa para cerrar el conector hembra en cuanto haya acabado
de usar el tomacorriente, para evitar que cualquier otra cosa entre
en el conector hembra.
3. Si no hay energía disponible, compruebe el fusible.
Cambio del fusible
1. Desenrosque la tapa del fusible en sentido contrario al de las agujas
del reloj.
2. Reemplace el fusible. Reemplácelo solamente con un fusible de 1A
de actuación rápida con dimensiones métricas de 5 x 20 mm
(F1AL 250V).
3. Apriete el conjunto de la tapa del fusible en el sentido de las agujas
del reloj.
ADVERTENCIA
!
No pase por alto el fusible ni use ningún otro
fusible, excepto el que se especifica, ya que
hacerlo podría causar daños a la unidad.
Cambio de las baterías del reloj
1. Abra la puerta de la bahía de las baterías.
2. Quite la tapa de las baterías AA.
3. Saque las baterías viejas y deséchelas apropiadamente.
4. Introduzca las baterías AA nuevas. No use baterías nuevas con
viejas, utilice únicamente baterías alcalinas nuevas.
UBICACIÓN DE
LAS BATERÍAS AA
Guía de resolución de problemas
Problema Punto de comprobación Remedio
La unidad de audio 1.¿Está conectado apropiadamente 1. Enchufe el cordón de energía de CA.
no funciona. el cordón de energía?
2.¿Está instalado o introducido 2. Asegúrese de que la batería esté introducida
apropiadamente el paquete de batería Bosch? completamente.
3.¿Necesita carga la batería? 3. Enchufe el cordón de energía e introduzca la batería.
La recepción de la 1.¿Hay alguna instalación que esté interfiriendo 1. Lleve la unidad a otra ubicación alejada de la interferencia.
radio es ruidosa o débil. con la unidad?
2.¿Hay alguna interferencia con la antena 2. Gire la unidad en distintas direcciones.
de FM interna?
El tomacorriente de 1.¿Esta introducido apropiadamente el fusible 1. Introduzca el fusible de 1 A.
12 V CC no funciona. de 1 A?
El tomacorriente de 1.¿Está conectado apropiadamente el 1. Enchufe el cordón de energía de CA.
4 conectores cordón de energía?
no funciona.
La unidad deja 1.¿Esta conectado apropiadamente a la unidad 1. Enchufe el cordón de energía para suministrar alimentación
de funcionar el cordón de energía? a la unidad.
repentinamente. 2.¿Está la pantalla de LCD mostrando que está 2. Es necesario reajustar el software de la unidad. Retire todas las
2.¿Se ha abierto el fusible de 1 A? 2. Reemplace el fusible.
2.¿Está iluminada la luz verde en
los tomacorrientes?
llegando energía a la unidad? baterías de la unidad y desenchufe el cable de alimentación de
CA, espere 30 segundos y reconecte el cable de alimentación
de CA.
36
Page 37

Mantenimiento
Servicio
ADVERTENCIA
!
USUARIO. El mantenimiento preventivo realizado por personal no
autorizado puede dar lugar a la colocación incorrecta de cables y
componentes internos que podría constituir un peligro serio.
Recomendamos que todo el servicio de las herramientas sea realizado
en un Centro de servicio de fábrica Bosch o en una Estación de
servicio Bosch autorizada. TECNICOS DE REPARACIONES:
Desconecte la unidad de radio de la fuente de energía antes de hacerle
servicio de revisión.
El servicio de revisión debe ser realizado únicamente por personal
de reparaciones calificado. El servicio de revisión o mantenimiento
realizado por personal no calificado puede causar un riesgo de
lesiones.
Cuando haga servicio de revisión, utilice únicamente piezas de
repuesto idénticas. Siga las instrucciones de la sección Manteni miento de este manual. El uso de piezas no autorizadas o el no
seguir las instrucciones de Mantenimiento puede crear un riesgo de
descargas eléctricas o lesiones.
Esté alerta a los paquetes de baterías que estén aproximándose al
final de su vida útil. Si observa una disminución del rendimiento de
la radio o un tiempo de funcionamiento significativamente más corto
entre cargas, entonces ha llegado el momento de cambiar el paquete
de baterías. Si no se hace esto, el resultado puede ser que la radio
funcione incorrectamente o que el cargador se dañe.
NO HAY PIEZAS EN EL INTERIOR QUE PUEDAN
SER AJUSTADAS O REPARADAS POR EL
BATERÍAS
Limpieza
ADVERTENCIA
!
limpiarla.
No introduzca nunca en la unidad un disco sucio ni rayado, ni deje que
entre suciedad o arena en la unidad.
No lleve repentinamente la unidad de un área muy fría a un área tem plada. De lo contrario, se podría formar condensación de humedad en
el lente óptico, lo cual impediría el funcionamiento correcto.
No deje la unidad expuesta a la luz solar directa durante períodos
prolongados, ya que esto podría deformar o descolorar la carcasa y
también podría causar un funcionamiento incorrecto.
Limpie la unidad con un paño suave. Quite la suciedad difícil usando
un paño húmedo que se haya sumergido en agua jabonosa y luego
seque la unidad con un paño.
Si piensa usar un paño de limpieza química, lea primero las instruc ciones.
No use alcohol ni diluyentes de pintura.
PRECAUCION
!
gasolina, tetracloruro de carbono, disolventes de limpie za clorados,
amoníaco y detergentes domésticos que contienen amoníaco.
Para evitar accidentes, desconecte siempre la
unidad de radio de la fuente de energía antes de
LA UNIDAD PRINCIPAL
Ciertos agentes de limpieza y disolventes dañan
las piezas de plástico. Algunos de es tos son:
Accesorios
ADVERTENCIA
!
adecuado que sea capaz de transportar la corriente necesaria para
la herramienta. Esto evitará caídas de tensión excesivas, pérdida de
potencia o recalentamiento. Las herramientas conectadas a tierra
deben usar cordones de extensión de 3 hilos que tengan enchufes de 3
terminales y receptáculos para 3 terminales.
NOTA: Cuanto más pequeño es el número de calibre, más grueso es el
cordón.
Si es necesario un cordón de extensión, se debe
usar un cordón con conductores de tamaño
TAMAÑOS RECOMENDADOS DE CORDONES DE EXTENSION
HERRAMIENTAS DE 120 V CORRIENTE ALTERNA
Capacidad
nominal
en amperes
de la
herramienta
3-6
6-8
8-10
10-12
12-16
Tamaño del cordón en A.W.G.
Longitud del cordón en pies Longitud del cordón en metros
25 50 100 150 15 30 60 120
18 16 16 14 0,75 0,75 1,5 2,5
18 16 14 12 0,75 1,0 2,5 4,0
18 16 14 12 0,75 1,0 2,5 4,0
16 16 14 12 1,0 2,5 4,0 —
14 12 —— ——— —
Tamaños del cable en mm
37
2
Page 38

Notes:
38
Page 39

Remarques :
Notas:
39
Page 40

LIMITED WARRANTY OF BOSCH PORTABLE AND BENCHTOP POWER TOOLS
Robert Bosch Tool Corporation (“Seller”) warrants to the original purchaser only, that all BOSCH portable and benchtop power tools will be free from defects in material
or workmanship for a period of one year from date of purchase. SELLER’S SOLE OBLIGATION AND YOUR EXCLUSIVE REMEDY under this Limited Warranty and, to
the extent permitted by law, any warranty or condition implied by law, shall be the repair or replacement of parts, without charge, which are defective in material or
workmanship and which have not been misused, carelessly handled, or misrepaired by persons other than Seller or Authorized Service Station. To make a claim under
this Limited Warranty, you must return the complete portable or benchtop power tool product, transportation prepaid, to any BOSCH Factory Service Center or
Authorized Service Station. For Authorized BOSCH Power Tool Service Stations, please refer to your phone directory.
THIS LIMITED WARRANTY DOES NOT APPLY TO ACCESSORY ITEMS SUCH AS CIRCULAR SAW BLADES, DRILL BITS, ROUTER BITS, JIGSAW BLADES, SANDING
BELTS, GRINDING WHEELS AND OTHER RELATED ITEMS.
ANY IMPLIED WARRANTIES SHALL BE LIMITED IN DURATION TO ONE YEAR FROM DATE OF PURCHASE. SOME STATES IN THE U.S., SOME CANADIANPRO V INCESDO
NOT ALLOW LIMITATIONS ON HOW LONG AN IMPLIED WARRANTY LASTS, SO THE ABOVE LIMITATION MAY NOT APPLY TO YOU.
IN NO EVENT SHALL SELLER BE LIABLE FOR ANY INCIDENTAL OR CONSEQUENTIAL DAMAGES (INCLUDING BUT NOT LIMITED TO LIABILITY FOR LOSS OF
PROFITS) ARISING FROM THE SALE OR USE OF THIS PRODUCT. SOME STATES IN THE U.S. AND SOME CANADIAN PROVINCES DO NOT ALLOW THE EXCLUSION
OR LIMITATION OF INCIDENTAL OR CONSEQUENTIAL DAMAGES, SO THE ABOVE LIMITATION OR EXCLUSION MAY NOT APPLY TO YOU.
THIS LIMITED WARRANTY GIVES YOU SPECIFIC LEGAL RIGHTS, AND YOU MAY ALSO HAVE OTHER RIGHTS WHICH VARY FROM STATE TO STATE IN THE U.S.,
PROVINCE TO PROVINCE IN CANADA AND FROM COUNTRY TO COUNTRY.
THIS LIMITED WARRANTY APPLIES ONLY TO PORTABLE AND BENCHTOP ELECTRIC TOOLS SOLD WITHIN THE UNITED STATES OF AMERICA, CANADA AND THE
COMMONWEALTH OF PUERTO RICO. FOR WARRANTY COVERAGE WITHIN OTHER COUNTRIES, CONTACT YOUR LOCAL BOSCH DEALER OR IMPORTER.
GARANTIE LIMITÉE DES OUTILS ÉLECTRIQUES PORTATIFS ET D'ÉTABLI BOSCH
Robert Bosch Tool Corporation (le « vendeur ») garantit à l'acheteur initial seulement que tous les outils électriques portatifs et d'établi BOSCH seront exempts de
vices de matériaux ou d'exécution pendant une période d'un an depuis la date d'achat. LA SEULE OBLIGATION DU VENDEUR ET LE SEUL RECOURS DE L’ACHETEUR
sous la présente garantie limitée, et en autant que la loi le permette sous toute garantie ou condition implicite qui en découlerait, sera l’obligation de remplacer ou
réparer gratuitement les pièces défectueuses matériellement ou comme fabrication, pourvu que lesdites défectuosités ne soient pas attribuables à un usage abusif ou à
quelque réparation bricolée par quelqu’un d’autre que le vendeur ou le personnel d’une station-service agréée. Pour présenter une réclamation en vertu de cette
garantie limitée, vous devez renvoyer l'outil électrique portatif ou d'établi complet, port payé, à tout centre de service agréé ou centre de service usine BOSCH.
Veuillez consulter votre annuaire téléphonique pour les adresses.
LA PRÉSENTE GARANTIE NE S’APPLIQUE PAS AUX ACCESSOIRES TELS QUE LAMES DE SCIES CIRCULAIRES, MÈCHES DE PERCEUSES, FERS DE TOUPIES,
LAMES DE SCIES SAUTEUSES, COURROIES DE PONÇAGE, MEULES ET AUTRES ARTICLES DU GENRE.
TOUTE GARANTIE IMPLICITE SERA LIMITÉE COMME DURÉE À UN AN À COMPTER DE LA DATE D’ACHAT. CERTAINS ÉTATS AMÉRICAINS, CERTAINES
PROVINCES CANADIENNES N’ADMETTANT PAS LE PRINCIPE DE LA LIMITATION DE LA DURÉE DES GARANTIES IMPLICITES, IL EST POSSIBLE QUE LES
LIMITATIONS CI-DESSUS NE S’APPLIQUENT PAS À VOTRE CAS.
EN AUCUN CAS LE VENDEUR NE SAURAIT ÊTRE TENU POUR RESPONSABLE DES INCIDENTS OU DOMMAGES INDIRECTS (INCLUANT, MAIS NE SE LIMITANT
PAS AUX PERTES DE PROFITS) CONSÉCUTIFS À LA VENTE OU L’USAGE DE CE PRODUIT. CERTAINS ÉTATS AMÉRICAINS ET CERTAINES PROVINCES
CANADIENNES N’ADMETTANT PAS LE PRINCIPE DE LA LIMITATION NI L’EXCLUSION DES DOMMAGES INDIRECTS ET CONSÉQUENTIELS, IL EST POSSIBLE QUE
LES LIMITATIONS OU EXCLUSIONS CI-DESSUS NE S’APPLIQUENT PAS À VOTRE CAS.
LA PRÉSENTE GARANTIE VOUS ACCORDE DES DROITS BIEN DÉTERMINÉS, Y COMPRIS POSSIBLEMENT CERTAINS DROITS VARIABLES DANS LES DIFFÉRENTS
ÉTATS AMÉRICAINS, PROVINCES CANADIENNE ET DE PAYS À PAYS.
CETTE GARANTIE LIMITÉE NE S'APPLIQUE QU'AUX OUTILS ÉLECTRIQUES PORTATIFS ET D'ÉTABLI VENDUS AUX ÉTATS-UNIS D'AMÉRIQUE, AU CANADA ET AU
COMMONWEALTH DE PORTO RICO. POUR COUVERTURE DE GARANTIE DANS LES AUTRES PAYS, CONTACTEZ VOTRE IMPORTATEUR OU REVENDEUR BOSCH
LOCAL.
GARANTIA LIMITADA PARA HERRAMIENTAS MECANICAS PORTATILES Y PARA TABLERO DE BANCO BOSCH
Robert Bosch Tool Corporation ("el Vendedor") garantiza, únicamente al comprador original, que todas las herramientas mecánicas portátiles y para tablero de banco
BOSCH estarán libres de defectos de material o de fabricación durante un período de un año a partir de la fecha de compra. LA UNICA OBLIGACION DEL VENDEDOR
Y EL RECURSO EXCLUSIVO QUE USTED TIENE bajo esta Garantía Limitada y, hasta donde la ley lo permita, bajo cualquier garantía o condición implícita por ley,
consistirá en la reparación o sustitución sin costo de las piezas que presenten defectos de material o de fabricación y que no hayan sido utilizadas inco rrectamente,
manejadas descuidadamente o reparadas incorrectamente por personas que no sean el Vendedor o una Estación de servicio autorizada. Para efectuar una
reclamación bajo esta Garantía Limitada, usted debe devolver el producto, que consiste en la herramienta mecánica portátil o para tablero de banco completa, con el
transporte pagado, a cualquier Centro de servicio de fábrica o Estación de servicio autorizada BOSCH. Para Estaciones de servicio autorizadas de herramientas
mecánicas BOSCH, por favor, consulte el directorio telefónico.
ESTA GARANTIA LIMITADA NO SE APLICA A ARTICULOS ACCESORIOS TALES COMO HOJAS PARA SIERRAS CIRCULARES, BROCAS PARA TALADROS, BROCAS
PARA FRESADORAS, HOJAS PARA SIERRAS DE VAIVEN, CORREAS PARA LIJAR, RUEDAS DE AMOLAR Y OTROS ARTICULOS RELACIONADOS.
TODAS LAS GARANTIAS IMPLICITAS TENDRAN UNA DURACION LIMITADA A UN AÑO A PARTIR DE LA FECHA DE COMPRA. ALGUNOS ESTADOS DE LOS EE.UU.,
ALGUNAS PROVINCIAS CANADIENSES NO PERMITEN LIMITACIONES EN CUANTO A LA DURACION DE UNA GARANTIA IMPLICITA, POR LO QUE ES POSIBLE QUE
LA LIMITACION ANTERIOR NO SEA APLICABLE EN EL CASO DE USTED.
EL VENDEDOR NO SERA RESPONSABLE EN NINGUN CASO DE NINGUN DAÑO INCIDENTAL O EMERGENTE (INCLUYENDO PERO NO LIMITADO A
RESPONSABILIDAD POR PERDIDA DE BENEFICIOS) QUE SE PRODUZCA COMO CONSECUENCIA DE LA VENTA O UTILIZACION DE ESTE PRODUCTO. ALGUNOS
ESTADOS DE LOS EE.UU. Y ALGUNAS PROVINCIAS CANADIENSES NO PERMITEN LA EXCLUSION O LIMITACION DE LOS DAÑOS INCIDENTALES O EMERGENTES,
POR LO QUE ES POSIBLE QUE LA LIMITACION O EXCLUSION ANTERIOR NO SEA APLICABLE EN EL CASO DE USTED.
ESTA GARANTIA LIMITADA LE CONFIERE A USTED DERECHOS LEGALES ESPECIFICOS Y ES POSIBLE QUE USTED TAMBIEN TENGA OTROS DERECHOS QUE VARIAN
DE ESTADO A ESTADO EN LOS EE.UU., DE PROVINCIA A PROVINCIA EN CANADA Y DE UN PAIS A OTRO.
ESTA GARANTIA LIMITADA SE APLICA SOLAMENTE A HERRAMIENTAS ELECTRICAS PORTATILES Y PARA TABLERO DE BANCO VENDIDAS EN LOS ESTADOS
UNIDOS DE AMERICA, CANADA Y EL ESTADO LIBRE ASOCIADO DE PUERTO RICO. PARA COBERTURA DE GARANTIA EN OTROS PAISES, PONGASE EN
CONTACTO CON SU DISTRIBUIDOR O IMPORTADOR LOCAL DE BOSCH.
© Robert Bosch Tool Corporation 1800 W. Central Road Mt. Prospect, IL 60056-2230
Exportado por: Robert Bosch Tool Corporation Mt. Prospect, IL 60056 -2230, E.U.A.
2610008357 02/10
Importado en México por: Robert Bosch, S.A. de C.V., Calle Robert Bosch No. 405, Zona Industrial,
Toluca, Edo. de México, C.P. 50070, Tel. (722) 2792300
Printed in China
 Loading...