

Bosch pb360c, pb360c-c Operating And Safety Instructions Manual
For English Version Version française Versión en español
See page 2 Voir page 14 Ver la página 26
Operating/Safety Instructions
Consignes de fonctionnement/sécurité
Instrucciones de funcionamiento y seguridad
IMPORTANT: IMPORTANT : IMPORTANTE:
Read Before Using Lire avant usage Leer antes de usar
1-877-BOSCH99 (1-877-267-2499) www.boschtools.com
Call Toll Free for
Consumer Information
& Service Locations
Pour obtenir des informations et
les adresses de nos centres de
service après-vente,
appelez ce numéro gratuit
Llame gratis para
obtener información
para el consumidor y
ubicaciones de servicio
PB360C
PB360C-C
BM 2610032718 07-15.qxp_BM 2610027750 01-13.qxp 7/17/15 10:38 AM Page 1
2
IMPORTANT SAFETY INSTRUCTIONS
WARNING
- TO PREVENT FIRE OR SHOCK HAZARD, DO NOT USE THIS PLUG WITH AN EXTENSION CORD, RECEPTACLE OR
OTHER OUTLET UNLESS THE BLADES CAN BE FULLY INSERTED TO PREVENT BLADE EXPOSURE.
- TO PREVENT FIRE OR SHOCK HAZARD, DO NOT EXPOSE THE APPLIANCE TO RAIN OR MOISTURE.
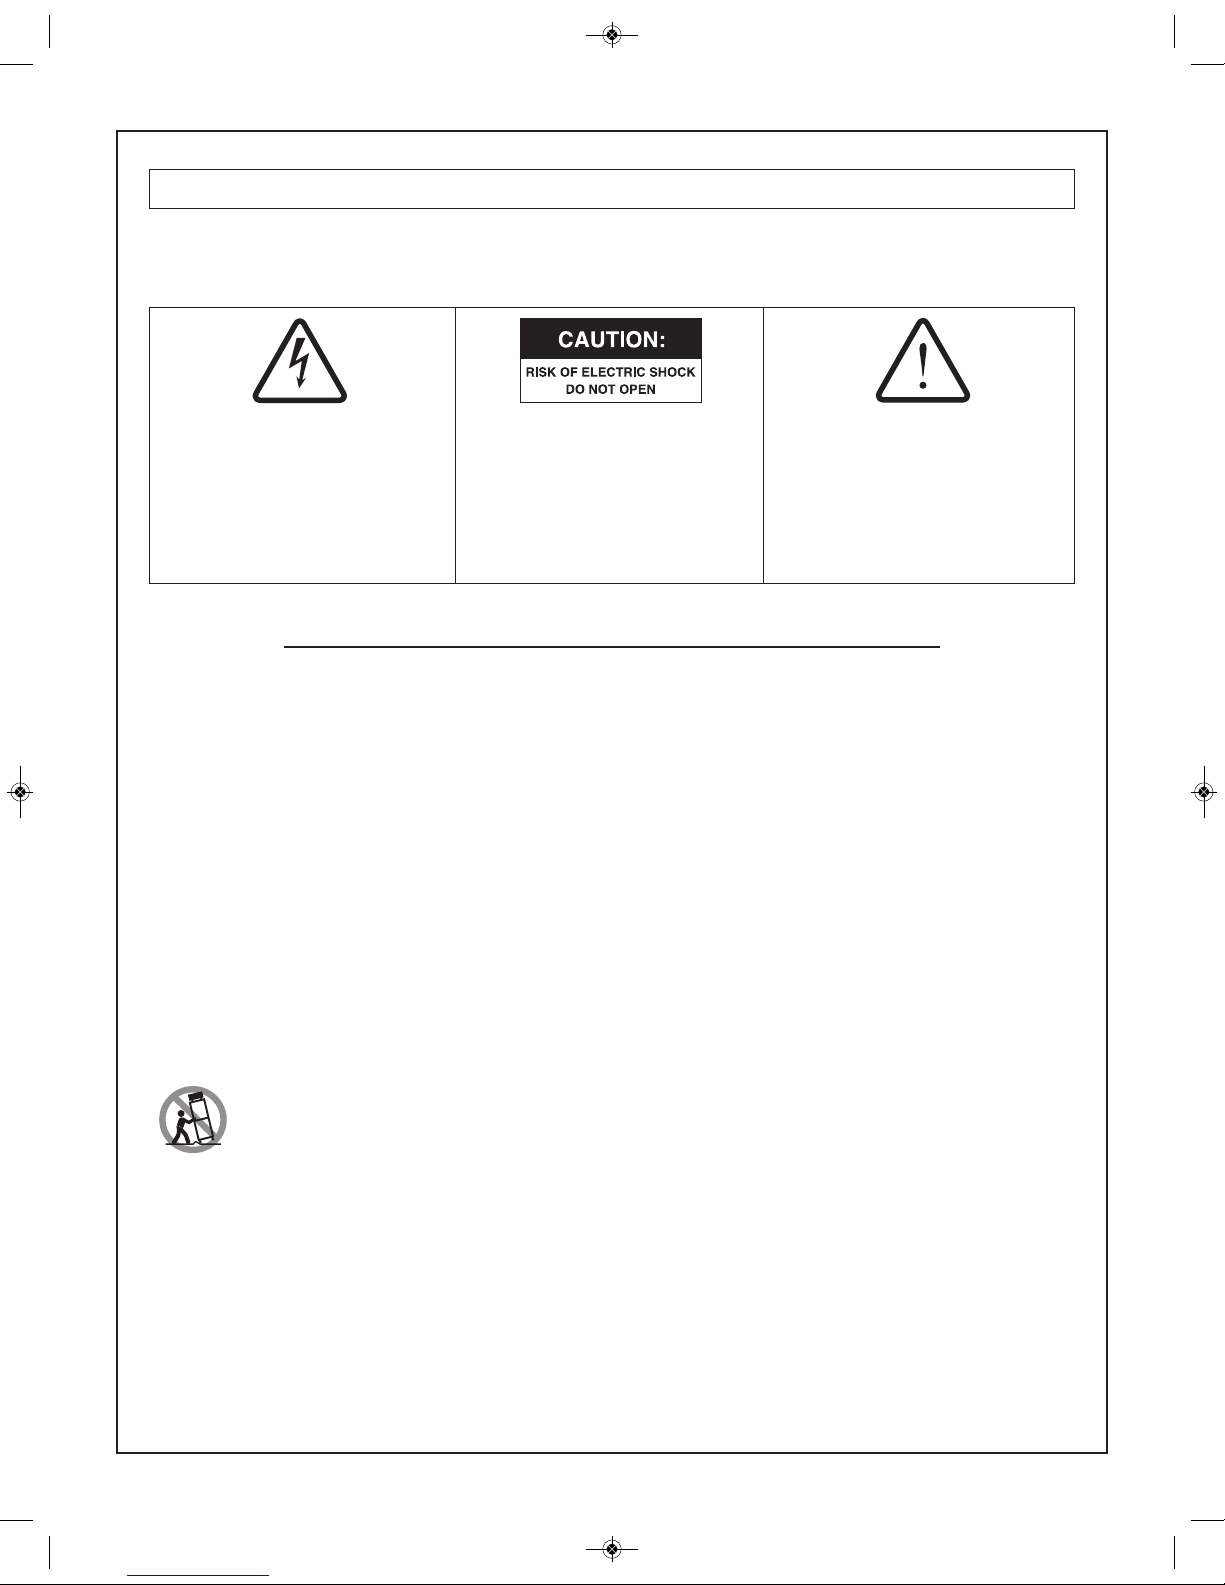
CAUTION: TO REDUCE THE RISK
OF ELECTR I C S H O CK, DO N OT
REMOVE COVER (OR BACK). NO
USE R SER V I C E A B L E PA R T S
IN SIDE . REF ER S ERVI CING TO
QUALIFIED SERVICE PERSONNEL.
The lighting flash with arrowhead
symb o l wit h i n an equilat e r a l
triangle is intended to alert the user
to the prese n c e of u n i nsulate d
“d ange r ous vol tage ” wit h in the
product’s enclosure that may be of
sufficient magnitude to constitute a
risk of electric to persons.
The exclamation point wit hin an
e
quilateral triangle is intended to
alert the user to the presence of
imp o r t a n t ope r a t i n g and
main t e n a n c e (se r v i c i n g )
ins t r u c t i o n s in th e lite r a t u r e
accompanying the product.
1) Read these instructions.
2) Keep these instructions.
3) Heed all warnings.
4) Follow all instructions.
5) Do not use this apparatus near water.
6) Clean only with dry cloth.
7) Do not block any ventilation openings. Install in accordance with the manufacturer’s instructions.
8) Do not install near any heat sources such as radiators, heat registers, stoves, or other apparatus (including
amplifiers) that produce heat.
9) Do not defeat the safety purpose of the polarized or grounding-type plug. A polarized plug has two blades with
one wider than the other. A grounding type plug has two blades and a third grounding prong. The wide blade or the
third prong are provided for your safety. If the provided plug does not fit into your outlet, consult an electrician for
replacement of the obsolete outlet.
10) Protect the power cord from being walked on or pinched particularly at plugs, convenience receptacles, and the
point where they exit from the apparatus.
11) Only use attachments/accessories specified by the manufacturer.
12) Use only with the cart, stand, tripod, bracket, or table specified by the manufacturer, or sold with the
apparatus. When a cart is used, use caution when moving the cart/apparatus combination to avoid injury
from tip-over.
13) Unplug this apparatus during lightning storms or when unused for long periods of time.
14) Refer all servicing to qualified service personnel. Servicing is required when the apparatus has been damaged in
any way, such as power-supply cord or plug is damaged, liquid has been spilled or objects have fallen into the
apparatus, the apparatus has been exposed to rain or moisture, does not operate normally, or has been dropped.
15) The mains plug is used as the disconnect device, the disconnect device shall remain readily operable.
16) Read the rating label on the bottom of the unit for power input and other safety information.
Apparatus shall not be exposed to dripping or splashing water and that no object filled with liquids such as vases
shall be placed on the apparatus.
Warning: To reduce risk of electric shock, only plug the unit into a Ground fault circuit interrupter (GFCI) protected
outlet when used in damp locations. if a GFCI protected outlet is not available, use a portable receptacle with built-in
GFCI protection.
BM 2610032718 07-15.qxp_BM 2610027750 01-13.qxp 7/17/15 10:38 AM Page 2

3
Table of Contents
S
afety..........................................................................2-3
Important Safety Instructions .....................................2
Table of Contents .........................................................3
FCC/IC Information.....................................................3
Battery/Charger..........................................................4
Battery Care................................................................4
Battery Disposal .........................................................4
Functional Description and Specifications...............5
LCD Displays..............................................................6
Setting the Clock ........................................................6
PB360C & PB360C-C Controls .................................7
Operating Instructions..............................................8-9
Audio Settings.............................................................8
Radio Function ...........................................................8
Aux Function...............................................................8
Bluetooth Pairing Function.........................................9
USB Charging.............................................................9
R
eleasing and Inserting the Battery Pack...............10
Charging the Battery Pack.......................................10
Important Charging Notes........................................11
To Power the Unit.......................................................11
Use of the Convenient 4-way Outlets.....................11
Changing Clock Batteries.........................................12
Trouble Shooting........................................................12
Maintenance ...............................................................13
Accessories.................................................................13
FCC Statement
This device complies with FCC radiation exposure limits set
forth for an uncontrolled environment.
This device compl ies with P art 15 of the F CC Rul es.
Operation is subject to the following two conditions: (1) this
device may not cause harmful interference, and (2) this device
must accept any interference received, including interference
that may cause undesired operation.
Any changes or modifications not expressly
approved by the party responsible for
compliance could void the user's authority to operate the
equipment.
NOTE: This equipment has been tested and found to comply
with the limits for a Class B digital device, pursuant to Part 15
of the FCC Rules. These limits are designed to provide
reasonable protection against harmful interference in a
residential installation. This equipment generates, uses and
can radiate radio frequency energy and, if not installed and
used in accordance with the instructions, may cause harmful
interference to radio communications. However, there is no
guarantee that interference will not occur in a particular
installation. If this equipment does cause harmful interference
to radio or television reception, which can be determined by
turning the equipment off and on, the user is encouraged to try
to correct the interference by one or more of the following
measures:
• Reorient or relocate the receiving antenna.
• Increase the separation between the equipment and receiver.
• Connect the equipment into an outlet on a circuit different
from that to which the receiver is connected.
• Consult the dealer or an experienced radio/TV technician for
help.
Industry Canada (IC)
This device complies with Industry Canada’s licence-exempt
RSSs. Operation is subject to the following two conditions:
(1) This device may not cause interference; and
(2) This device must accept any interference, including
interference that may cause undesired operation of the device.
The device meets the exemption from the routine evaluation
limits in section 2.5 of RSS 102 and compliance with RSS-102
RF exposure, users can obtain Canadian information on RF
exposure and compliance.
CAUTION
!
BM 2610032718 07-15.qxp_BM 2610027750 01-13.qxp 7/17/15 10:38 AM Page 3
4
Battery/Charger Rules
Before using battery charger, read all instructions and
c
autionary markings on (1) battery charger, (2) battery
pack, and (3) product using battery.
Use only the charger which accompanied your product
or direct replacement as listed in the catalog or this
manual.
Do not disassemble radio unit or operate the radio unit if
it has received a sharp blow, been dropped or otherwise
damaged in any way. Replace damaged cord or plugs
immediately. Incorrect reassembly or damage may result in
electric shock or fire.
D
o not recharge battery in damp or wet environment. Do
not expose radio unit to rain or snow. If battery case is
crack ed or oth erw ise dam age d, do not insert i nto
charger. Battery short or fire may result.
Charge only Bosch approved rechargeable batteries. See
Functional Description and Specifications. Other types of
batteries may burst causing personal injury and damage.
Charge battery pack in temperatures above +32 degrees
F (0 degrees C) and below +113 degrees F (45 degrees
C). Store radio unit and battery pack in locations where
temperatures will not exceed 120 degrees F (49 degrees
C
). This is important to prevent serious damage to the
battery cells.
Battery leakage may occur under extreme usage or
temperature conditions. Avoid contact with skin and
eyes. The battery liquid is caustic and could cause chemical
burns to tissues. If liquid comes in contact with skin, wash
quickly with soap and water. If the liquid contacts your eyes,
flush them with water for a minimum of 10 minutes and seek
medical attention.
Place radio unit on flat non-flammable surfaces and
aw ay fro m f lamm abl e mat eria ls whe n r e-ch arg ing
battery pack. The charger and battery pack heat during
charging. Carpeting and other heat insulating surfaces block
proper air circulation which may cause overheating of the
charger and battery pack. If smoke or melting of the case
are observed unplug the charger immediately and do not
use the battery pack or charger.
Use of an attachment not recommended or sold by
Bosch may result in a risk of fire, electric shock or injury
to persons.
Whe n batteries are not in tool or
charger, keep them away from metal
objects. For example, to protect terminals from shorting DO
NOT place batteries in a tool box or pocket with nails,
screws, keys, etc. Fire or injury may result.
CAUTION: Danger of explosion if battery is incorrectly
replaced. Replace only with the same or equivalent
type.
DO NOT PUT BATTERIES INTO FIRE OR EXPOSE TO
HIGH HEAT. They may explode.
Battery Care
Battery Disposal
Do not attempt t o disass em ble the
ba tte ry or rem ove any com pone nt
projecting from the battery terminals. Fire or injury may
result. Prior to disposal, protect exposed terminals with
heavy insulating tape to prevent shorting.
Lithium-ion Batteries
If equipped with a lithium-ion battery, the battery must be
collected, recycled or disposed of in an environ mentally sound
manner.
“The EPA certified RBRC Battery Recycling
Seal on the lithium-ion (Li-ion) battery indicates
Robert Bosch Tool Corporation is voluntarily
participating in an industry program to collect
and recycle these batteries at the end of their
useful life, when taken out of service in the United States or
Canada.
The RBRC program provides a convenient alterative to
placing used Li-ion batteries into the trash or the munici pal
waste stream, which may be illegal in your area.
Please call 1-800-8-BATTERY for information on Li-ion battery
recycling and disposal bans/restrictions in your area, or return
your batteries to a Skil/Bosch/Dremel Service Center for
recycling. Robert Bosch Tool Corporation’s involvement in this
progr am is part of our commitm ent to pre serving our
environment and conserving our natural resources.”
WARNIN
G
!
WARNIN
G
!
BM 2610032718 07-15.qxp_BM 2610027750 01-13.qxp 7/17/15 10:38 AM Page 4

5
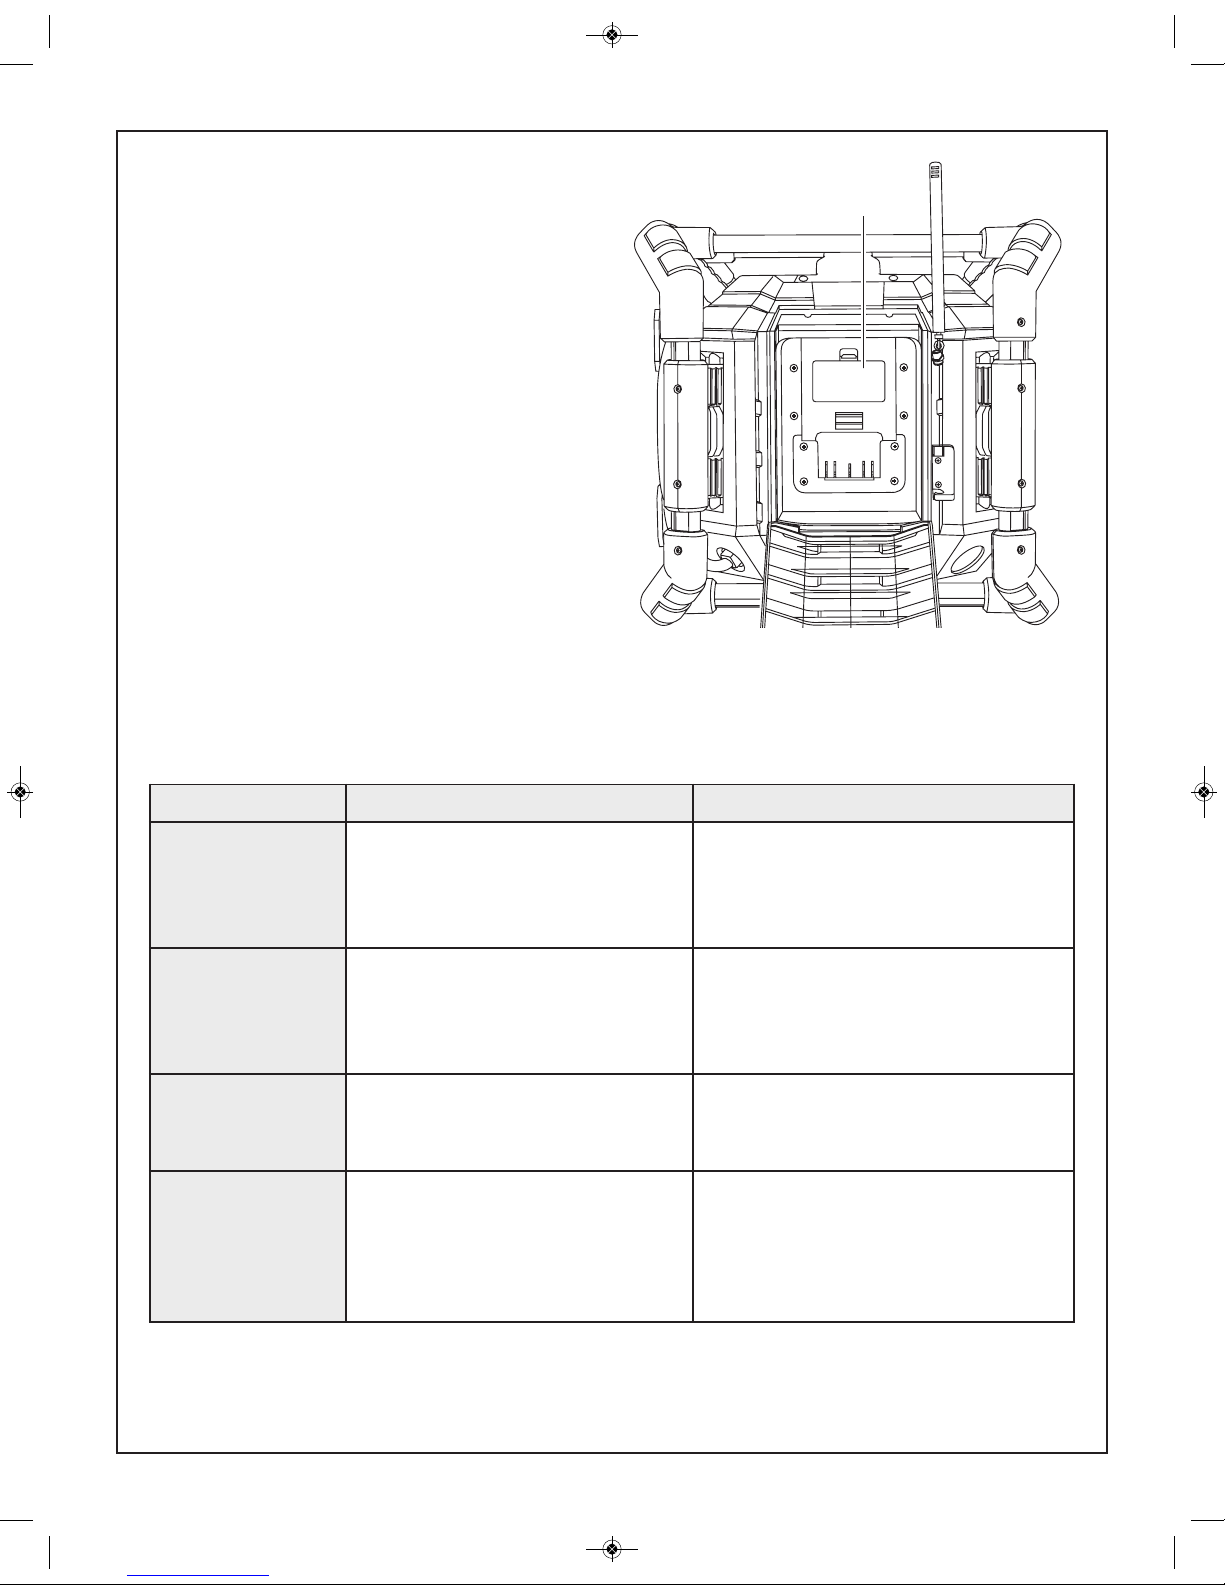
Functional Description and Specifications
Jobsite Stereo with 4-way outlet
Model Number PB360C & PB360C-C
Voltage Rating 120 V 60 Hz
Amperes 12 A
Compatible Batteries
BAT600 - BAT620
Outlets Voltage: 120 V 60 Hz
Amperes: 10 A
Radio AM 530-1710kHz
FM 87.5-107.9MHz
Memory AM 10-presets
FM 20-presets
REPLACE AA BATT ERY
WHEN UNIT NO LONGER
K
EEPS CORRECT TIME
120V AC
A
CARRY
HANDLE
CONTROL
PANEL
SPEAKERS
CORD WRAP
ROLL
CAGE
POWER CORD
CHARGER/BATTERY
BAY
4-WAY POWER
OUTLET
CHARGER
INDICATOR
DIGITAL
CLOCK
LOCATION OF
AA BATTERIES
ANTENNA
USB
PORT
AUXILIARY
INPUT
BM 2610032718 07-15.qxp_BM 2610027750 01-13.qxp 7/17/15 10:38 AM Page 5
6
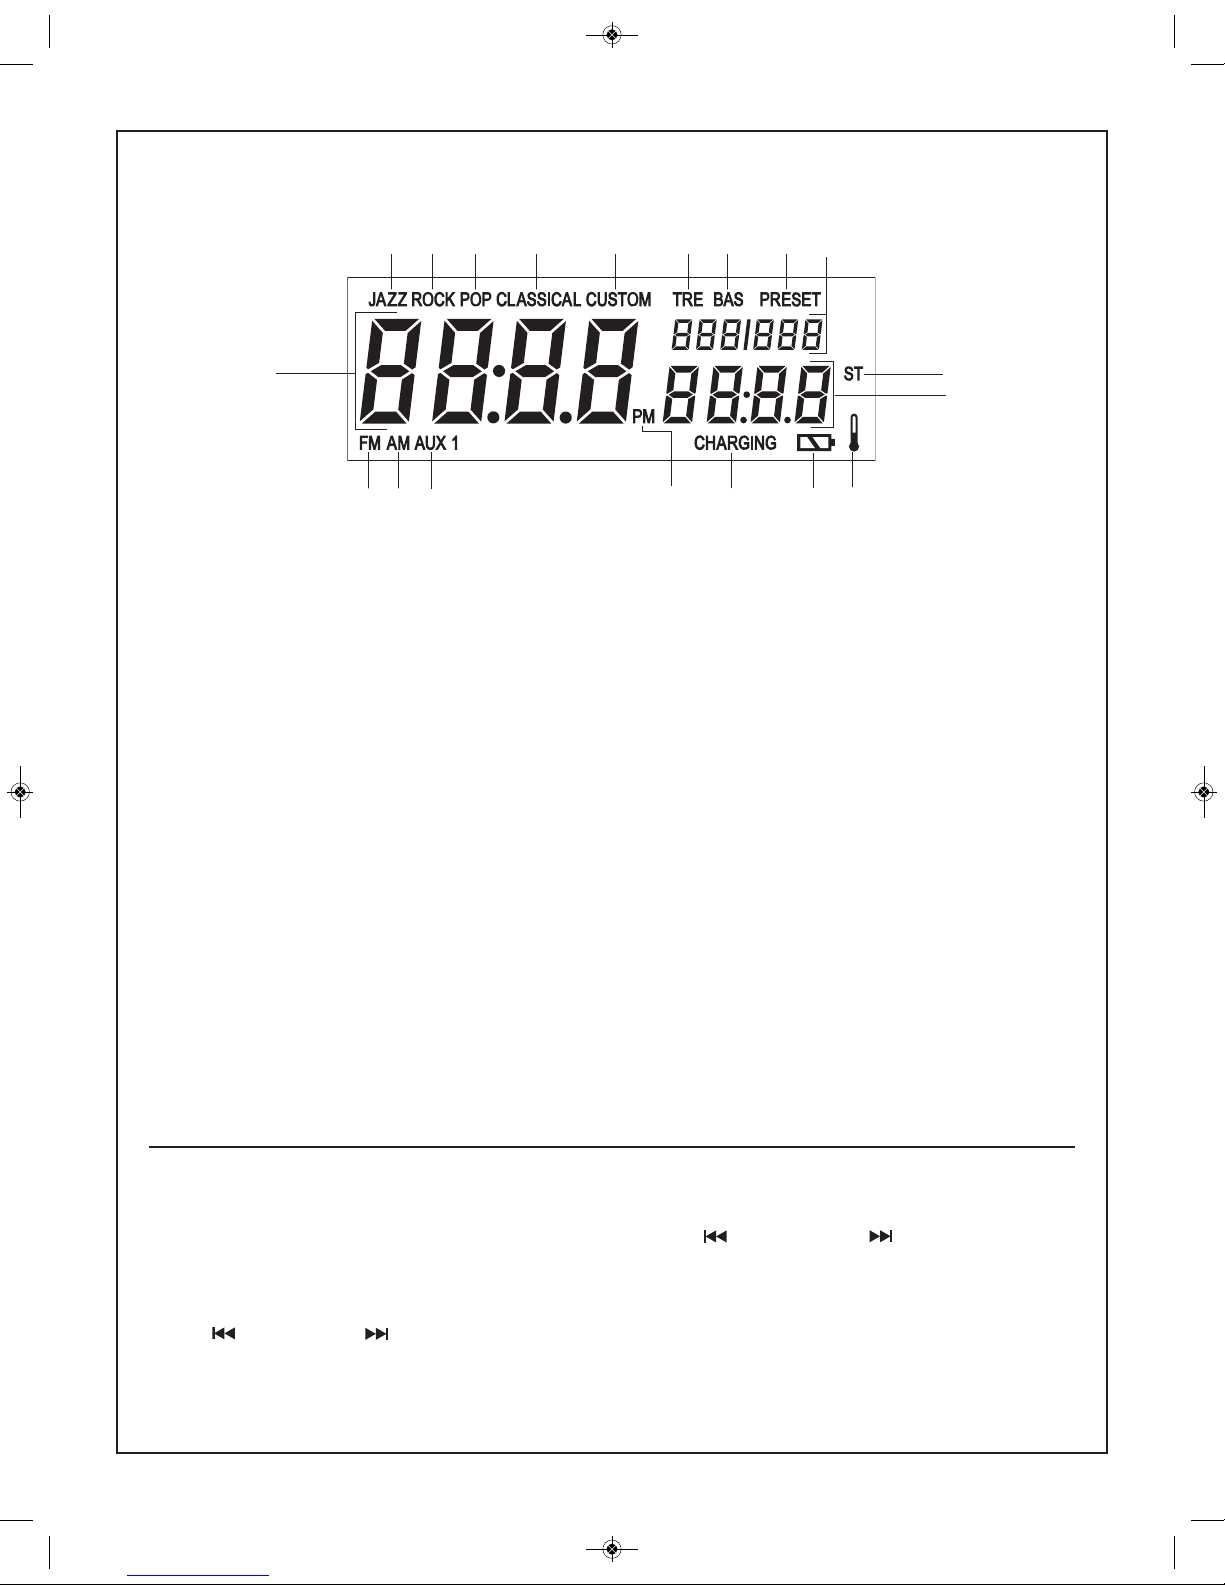
LCD Display
1. JAZZ – Illuminates when Jazz is selected in Equalizer.
2. ROCK – Illuminates when Rock is selected in Equalizer.
3. POP – Illuminates when Pop is selected in Equalizer.
4. CLASSICAL – Illuminates when Classical is selected in
Equalizer.
5. CUSTOM – Illuminates when Custom is selected in
Equalizer or when Custom button is pressed.
6. NUMERIC – Shows the clock time once it has been set
and the radio station during tuning.
7. ST (STEREO) – Illuminates when the radio station is
broadcasting in Stereo channel.
8. NUMERIC – Shows FM or AM station frequency in tuner
mode, or running time of digital music track. Also displays
“bt” for Bluetooth.
9. CHARGING – Flashes when the unit is charging the
battery.
10. BATTERY icon – Indicates that a battery is in the unit. This
icon flashes when the battery is almost dead.
11. FM – Indicates FM band in tuner mode.
12. AM – Indicates AM band in tuner mode.
13. AUX 1 – Illuminates when you select AUX 1 mode for
playing external media player device.
14. NUMERIC – Shows the number of a preset radio station in
tuner mode.
15. PRESET – Illuminates when preset radio station is
selected and flashes when setting station presets to
memory.
16. BAS – Illuminates when you set the desired Bass level.
17. TRE – Illuminates when you set the desired Treble level.
18. PM – Illuminates when time setting is in PM mode.
19. TEMPERATURE icon - When the radio unit is NOT
plugged into a 120V power source, but a battery is installed
properly in the battery/charger bay, this icon will illuminate
and fla sh if the ba ttery t emperat ure is too hot
(appr oximate ly 50 cel sius or more ) o r too cold
(appr oximate ly -10 celsius o r les s). If the batter y
temperature exceeds 70 celsius, the radio unit will shut
down in order to protect the battery from damage. When
the battery temperature reaches the normal operating
temperature range (see Battery/Charger Rules), the radio
unit can be powered on and resume normal function. The
TEMPERATURE icon will NOT illuminate or flash when
the radio unit is plugged into a 120V power source.
Setting the Clock
When the AC plug or the battery pack is inserted, the unit
defaults to standby mode and the LCD shows “12:00”.
Follow the steps below to set the correct local time.
1. Press and hold Clock button on the unit and “hour” is
activated and flashes.
2. Turn /-Seek or Seek+/ to choose the correct hour
number. For “PM” setting, turn TUNE DIAL until “PM”
illuminates in the LCD display.
3. Press Clock button once to set the hour and “minute” is
activated and flashes.
4. Turn /-Seek or Seek+/ to choose the correct
minute number.
5. Press CLOCK button once to save the clock setting.
Note: 2 AA batteries are needed to keep time current when
unit is not plugged in. Replace AA batteries when unit no
longer keeps proper time. (See charging AA clock battery
section.)
1 2 3 4 5 171
6 1514
7
8
10
9
11
12
1
3
6
18
19
BM 2610032718 07-15.qxp_BM 2610027750 01-13.qxp 7/17/15 10:38 AM Page 6
7
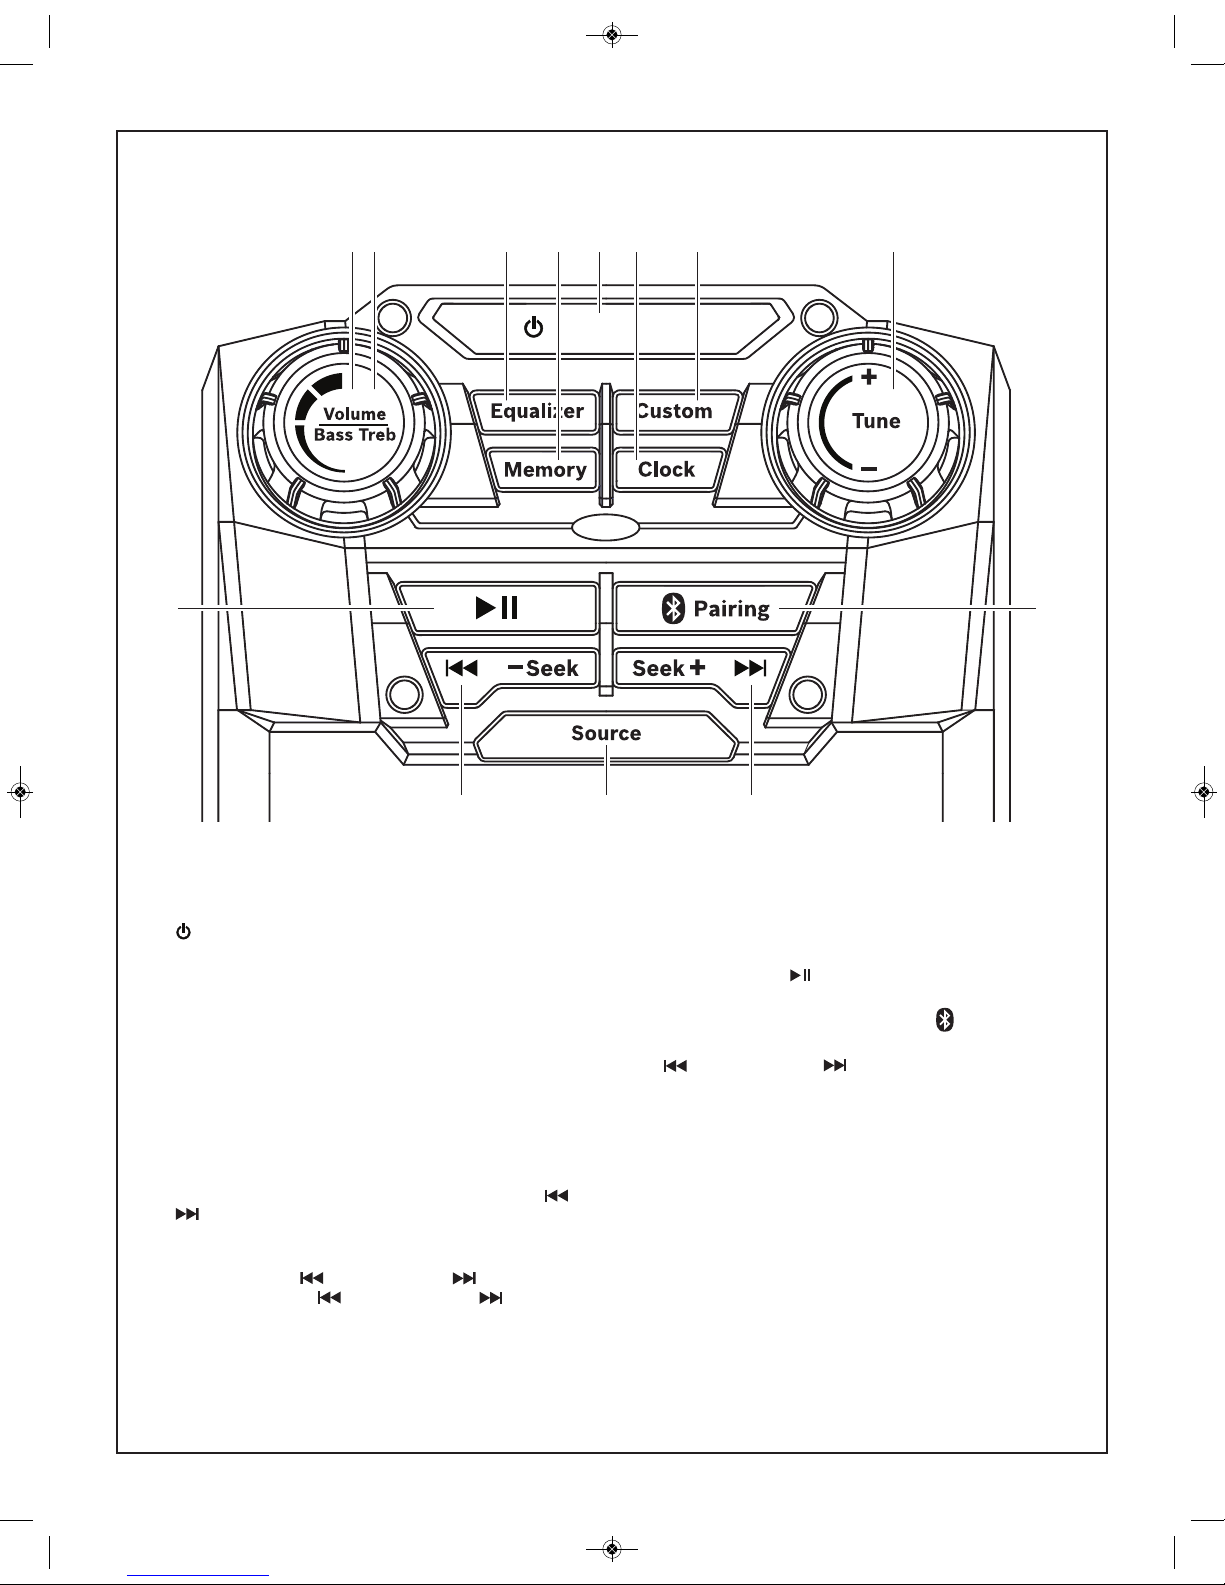
1. – To switch between power-on and standby modes.
2. Volume/Bass Treb – To increase/decrease the audio
volume at all modes Volume adjusts from 0-20 (min-max)
in one full revolution. Dial spins 360-degrees.
3. Volume/Bass Treb – Adjusts custom Bass and Treble
when unit is in “Custom” equalizer setting. And when
custom button is pressed and icon is flashing
4. Equalizer – To toggle between preset Jazz, Rock, Pop,
Classical and Custom equalizer settings.
5. Custom – Press once to engage custom Bass and Treble
settings. (controlled by Volume/Bass/Treb dial)
6. Memory – Pressing Sets Radio Tuner Presets. To Set:
Tune in to desired radio station, Press Memory, use or
buttons to move to desired preset, press Memory to
save station to preset.
7. Clock – Pressing sets and Saves clock setting. To Set:
Press once, use /-Seek or Seek+/ to adjust hour;
Press again, use /-Seek or Seek+/ to adjust
minute; Press again to set.
8. Tune +/- – When playing Radio source, turn dial to adjust
radio station channel.
9. PLAY / PAUSE – To play or pause a track when
listening to Bluetooth source.
10. BLUETOOTH PAIRING BUTTON – To pair to a
Bluetooth enabled device.
11. /-Seek or Seek+/ – When playing Radio source:
Press once to toggle between radio station presets. Press
and hold to quickly Seek radio stations up or down. When
listening to Bluetooth device source: Press once to skip to
previous track
12. Source – Press to toggle between Radio FM, AM, AUX1,
or bt (Bluetooth).
PB360C & PB360C-C Controls
109
11 11
12 346 75 8
12
BM 2610032718 07-15.qxp_BM 2610027750 01-13.qxp 7/17/15 10:38 AM Page 7

8
Operating Instructions
Audio Settings
V
OLUME
Your Jobsite Stereo has 20 selectable preset volume settings.
To adjust the VOLUME level, turn Volume/Bass/Treb Dial
c
lockwise or counterclockwise to desired volume level.
Equalizer
Y
our Jobsite Stereo has 5 selectable preset equalizer settings
and custom setting which allow you to custom select the level
of Bass and Treble tones.
Pressing Equalizer repeatedly will select through 5 equalizer
and custom settings, illuminating each setting on the LCD:
JAZZ, ROCK, POP, CLASSICAL, and CUSTOM.
To set CUSTOM Bass and Treble settings, follow the steps
below:
1. Press Equalizer repeatedly until “CUSTOM” is selected.
or, simply press the CUSTOM button once.
2. Press Custom button once and “BAS” (for BASS) along
with the bass level number will flash on the LCD display.
3. T urn Vo lum e/Bass/ Tre b Dial clock wis e or
counterclockwise to desired bass level.
4. Press Custom button twice and “TRE” (for TREBLE) along
with the treble level number will flash on the LCD display.
5. T urn Vo lum e/Bass/ Tre b Dial clock wis e or
counterclockwise to desired treble level.
6. Press Custom button once more to set levels to memory.
Your custom bass and treble settings are now saved, and
“TRE” and treble level number stop flashing and disappear
from the LCD display.
Note: Bass and Treble settings each have a range of 0 (min)
to 10 (max) levels.
STEREO
When a strong FM signal is received by the FM tuner, “ST” will
illuminate on the LCD display. If a weak signal is received by
the FM tuner, “ST” will not illuminate on the LCD display. To
improve the sound of a weak station, adjust the external
antenna or position your Jobsite Stereo in a different location.
Radio Function
TO SELECT BAND AND STATIONS
This tuner is operated in standard AM frequency from 5301710kHz and in standard FM frequency from 87.5-107.9MHz.
Follow the steps below to tune the station:
1. Press Source button repeatedly until “FM” or “AM” is
selected.
2. Turn Tune +/- Dial clockwise or counterclockwise to tune
into desired radio frequency.
3. To “Seek”, press and hold /-Seek button for one
second to seek down or Seek+/ button to seek up
until a station with a strong signal is received.
Note: If there is no station received when the unit stops
seeking, repeat the steps mentioned above to seek for the
preferred stations.
TO PRESET STATIONS
Up to 20 stations for FM and 10 stations for AM can be preset.
Follow the steps below to preset a station:
1
. Tune in to desired radio station using Tune +/- Dial.
2. To preset desired station, press MEMORY button once.
P
RESET and the preset number will flash on the display.
3. Press either the /-Seek or Seek+/ buttons once to
move to the desired station preset.
4. Press Memory button again to save desired station to
desired station preset to memory. PRESET and the station
preset number will stop flashing.
N
ote: Once 20 stations for FM or 10 stations for AM are set,
the first preset station will be replaced if you continue to preset
another station.
TO RETRIEVE PRESET STATIONS
1. Press the /-Seek or Seek+/ buttons once to search
down or up for the desired preset station.
AUX Function
If you want to use an external audio player such as a digital
media player or portable CD player, the unit has one Auxiliary
Port to accept these sources.
AUX 1 intended for use when it is more desirable to control the
external player from outside the unit.
1. Press Source button repeatedly until AUX 1 is illuminated
on the LCD display.
2. Open AUX 1 IN port cover on the left side of the unit.
3. Insert plug from your cord into the AUX 1 IN jack.
4. Connect the other end of the cord into the headphone out
or Aux out port on your external audio player.
5. Play the external audio source as you normally would.
6. Use the Volume/Bass/Treb Dial to adjust the volume.
BM 2610032718 07-15.qxp_BM 2610027750 01-13.qxp 7/17/15 10:38 AM Page 8
9
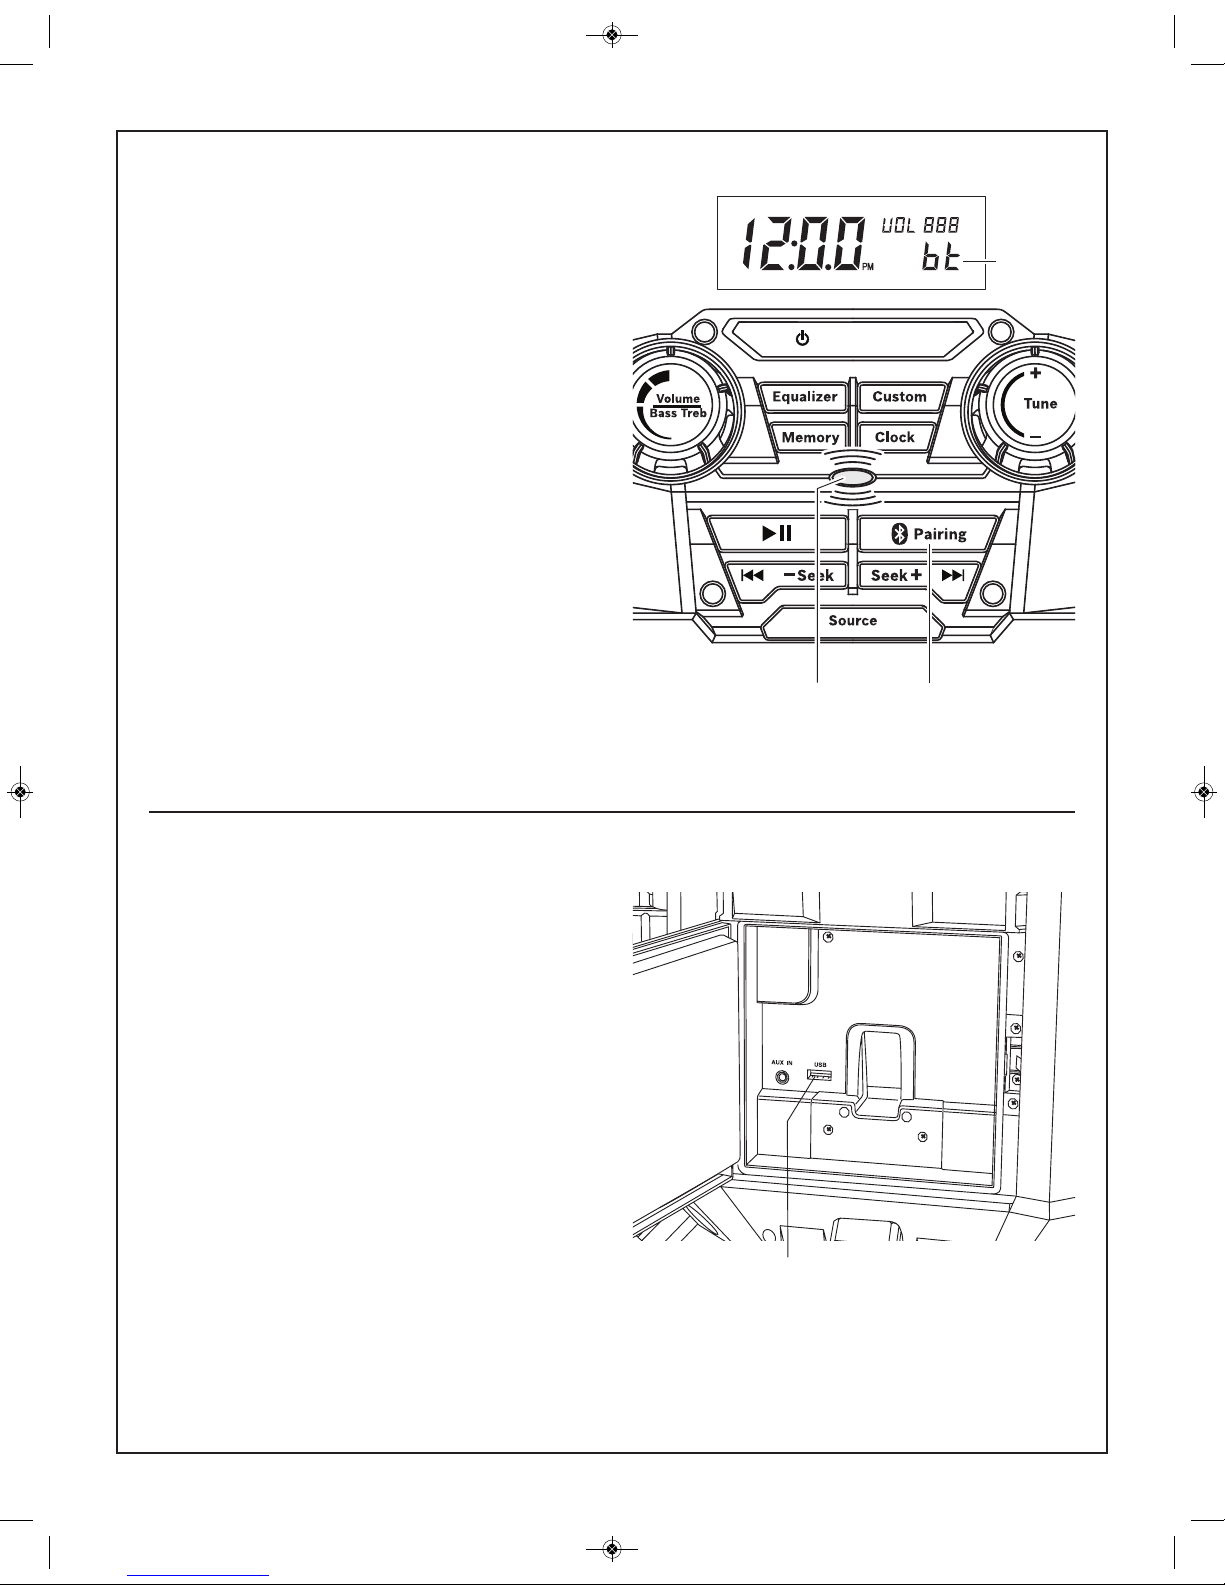
Bluetooth Pairing Function
1
. Make sure your personal device’s Bluetooth is turned on.
2. Turn on unit by pressing the Power button.
3. Press the Bluetooth “Pairing” button or the “Source”
button until “bt” is displayed on the lower right hand side
of the LCD screen and a blue light is slowly flashing on
the front of the unit.
4. Hold the Bluetooth “Pairing” button on the unit until the
blue light rapidly flashes.
5. Once the light is rapidly flashing select “PB360C” from
your personal devices Bluetooth menu.
6. Once the devices have been linked the flashing blue
light will stop flashing and remain on.
7. Select music from your personal device that you would
like to play.
8. Make sure to check the volume level on your personal
device as this will impact the volume output on the unit.
Note: Set your personal device audio output level to
100% to maximize audio output on the unit. Now control
volume with the volume control knob on the unit.
9. Press play on your personal device and enjoy.
BLUETOOTH
PAIRING
BUTTON
BLUETOOTH
PAIRING LIGHT
BLUETOOTH
USB Charging
The USB port is designed to charge most USB-enabled
devices such as cell phones and external digital media players.
Follow the steps below to charge your USB-enabled device:
1. Make sure your Jobsite Stereo is plugged into a 120V
power source.
2. Insert the USB end of your device cable into the USB port
inside the Digital Media Bay. Insert the other end of your
device cable into your device. Your device should begin to
charge.
Note: With your Jobsite Stereo plugged into a 120V power
source your USB-enabled device will power at any time,
regardless of which SOURCE your Jobsite Stereo is being
used. * Not guaranteed to work with all USB-enabled devices.
USB
PORT
BM 2610032718 07-15.qxp_BM 2610027750 01-13.qxp 7/17/15 10:38 AM Page 9
10
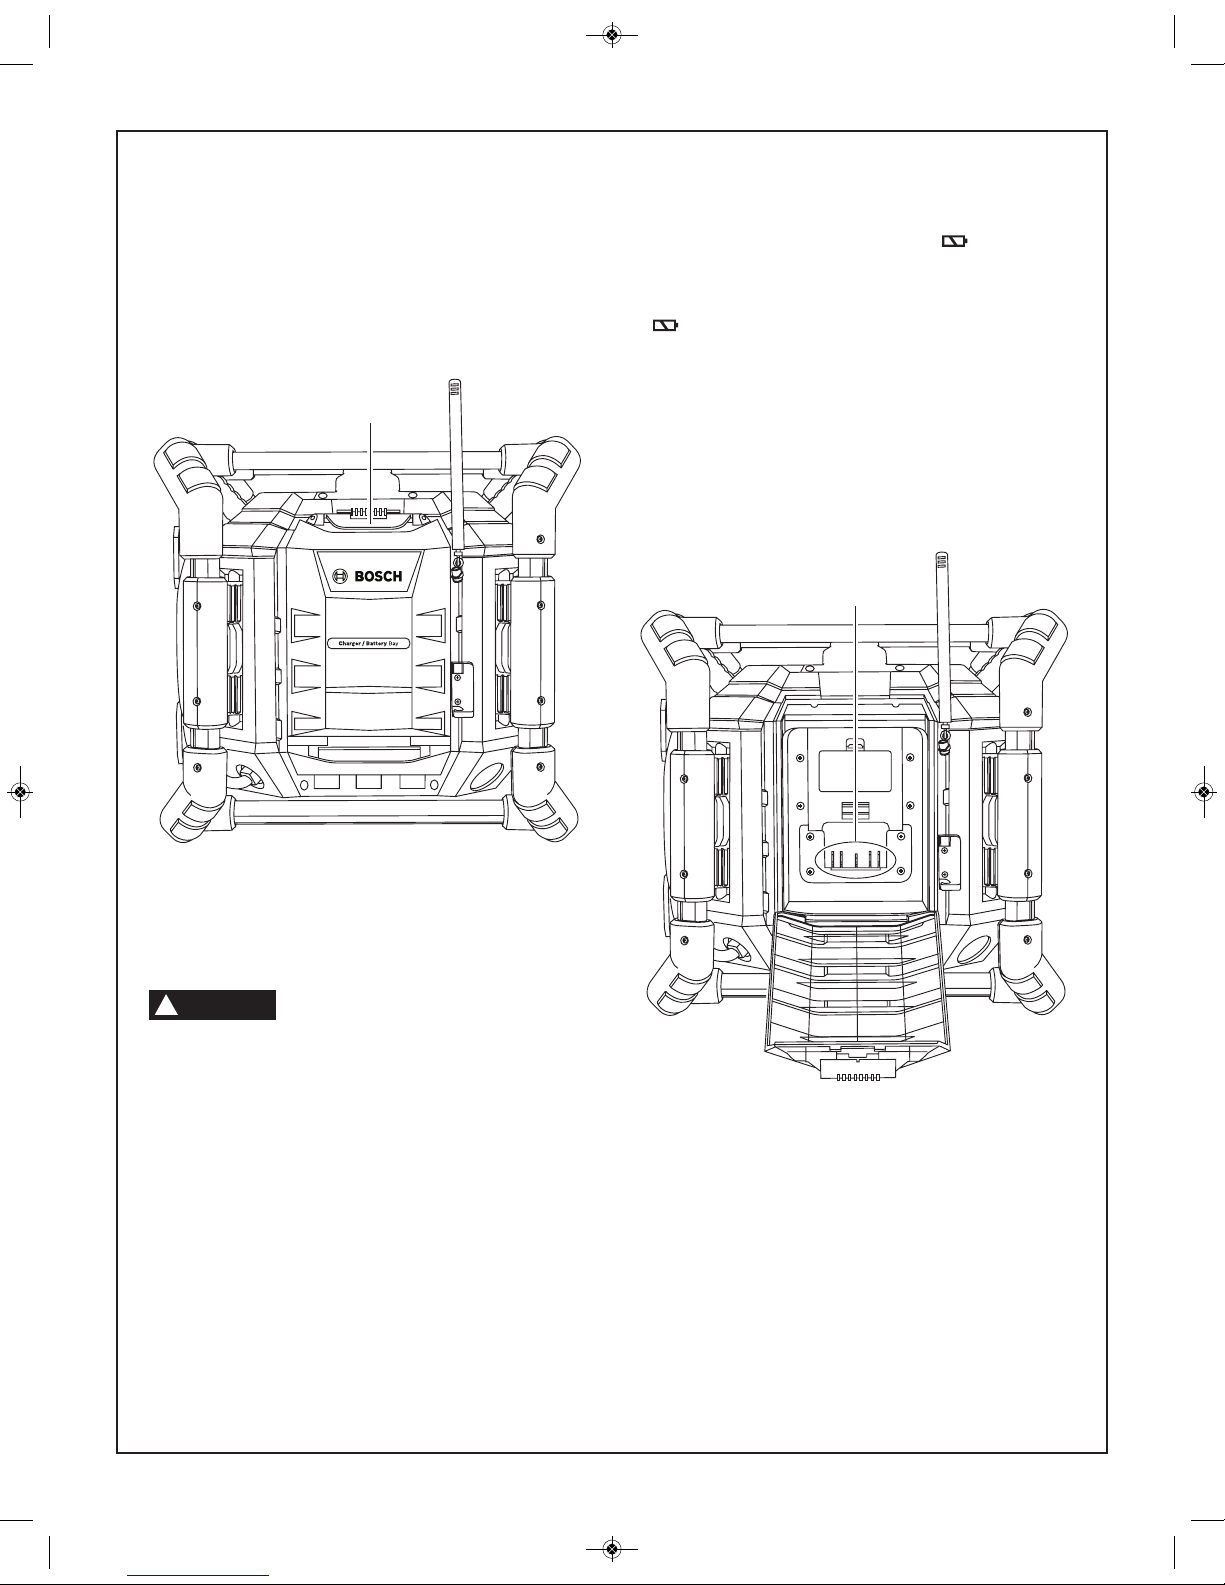
Releasing and Inserting
Battery Pack
To release or insert the battery pack from radio unit, open
t
he charger door by unlocking the latch. To insert battery,
align battery with terminals and slide battery pack onto
terminal until it locks into position. Do not force.
To release battery, depress battery release button and slide
battery of the terminals.
Charging Battery Pack
CHARGER OPERATION:
Insert battery and close door.
Charge only Bosch batteries (
BAT600 -
BA T62 0)
. Ot h er batt e r ies may bu rst
ca u s i ng injury a n d damag e . Read addition a l safet y
information on underside of radio.
Open charger door by releasing latch. Plug the unit’s power
cord into your standard power outlet, then insert battery pack
into charger.
1. The LCD will display the “CHARGING ” ICON on the
front of the u nit . T his indicat es the b attery pack is
charging.
2. When the word “CHARGING” next to the battery ICON
d
isappears, charging is complete.
3. The purpose of the charging icon on the LCD is to indicate
that the battery pack is charging. The charging icons will
di sappe ar i n l e ss t ime if the batt e ry p ack was not
completely discharged.
4. When the battery pack is fully charged, the battery pack
can be inserted into a tool, or used to power the radio
instead of the power cord.
N
ote: It is recommended that the battery charger bay door
be kept shut at all times.
REPLAC E AA B ATTERY
WHEN UNIT NO LONGER
K
EEPS CORRECT TIME
DOOR RELEASE
LATCH
WARNIN
G
!
TERMINALS
BM 2610032718 07-15.qxp_BM 2610027750 01-13.qxp 7/17/15 10:38 AM Page 10
11
1. The charger was designed to fast charge the battery only
when the battery temperature is between 32˚F (0˚C) and
113˚F (45˚C). If the battery pack is too hot or too cold, the
charger will not fast charge the battery. (This may happen if
the battery pack is hot from heavy use). When the battery
temperature returns to between 32˚F (0˚C) and 113˚F
(45˚C), the charger will automatically begin charging.
2. A substantial drop in operating time per charge may mean
that the battery pack is nearing the end of its life and should
b
e replaced.
3. Remember to unplug charger during storage period.
4. If battery does not charge properly:
a. Check for voltage at outlet by plugging in some other
electrical device.
b. Check to see if outlet is connected to a light switch which
t
urns power “off” when lights are turned off.
c. Check battery pack terminals for dirt. Clean with cotton
s
wab and alcohol if necessary.
d. If you still do not get proper charging, take or send tool,
battery pack and charger to your local Bosch Service
Center. See “Tools, Electric” in the Yellow Pages for
names and addresses.
Note: Use of chargers or battery packs not sold by Bosch will
void the warranty.
Important Charging Notes
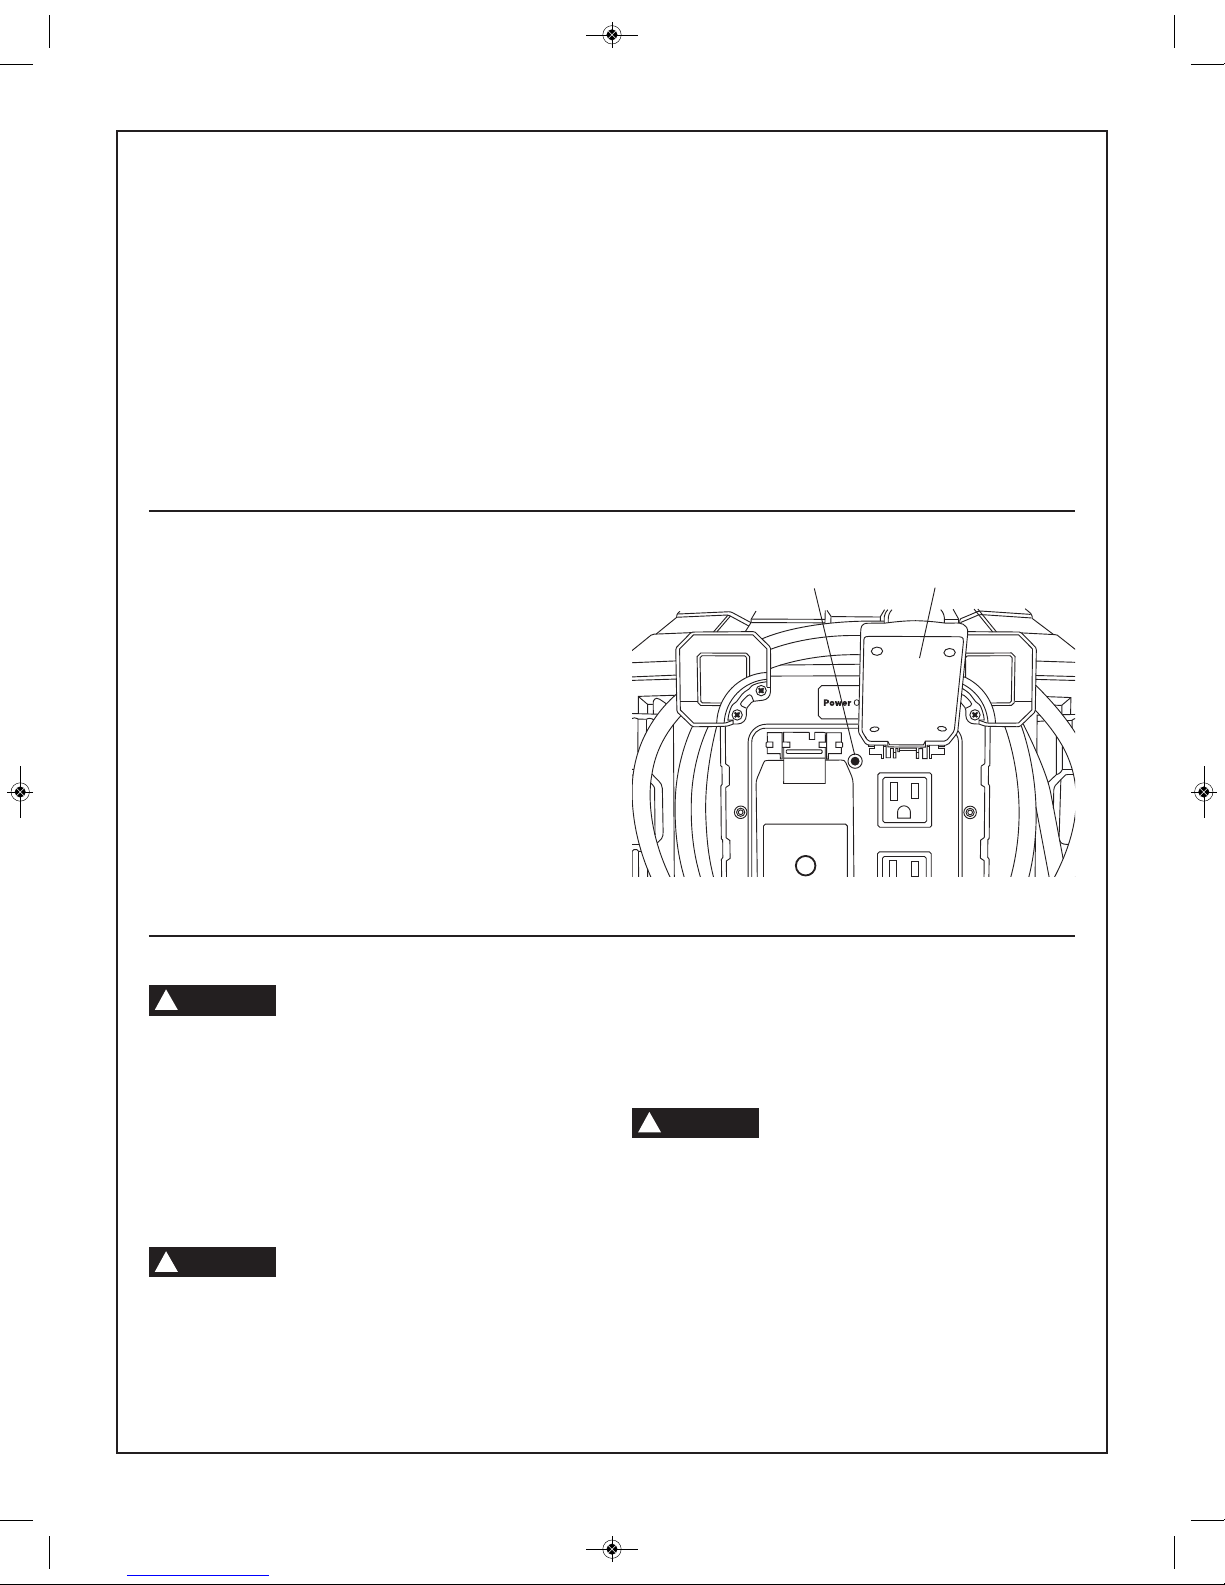
To power the unit
To Connect AC Power Plug
Plug the AC power cord of the unit into a standard AC
power outlet/socket with AC 120V/60Hz, it will switch to AC
once it is plugged in if it was running from a battery.
Note: The unit starts charging the battery automatically
once the unit is running by AC power.
To Operate by the Battery
Bosch battery pack supplies DC power to the unit in all
modes when the unit is disconnected from AC power. The 4
power outlets are not available until AC cord is plugged into
AC.
A
PROTECTIVE
COVER
INDICATOR
LIGHT
To reduce risk of electric shock, only plug
the unit into a Ground fault circuit
interrupter (GFCI) protected outlet when used in damp
locations. if a GFCI protected outlet is not available, use a
portable receptacle with built-in GFCI protection. Test GFCI
protected outlet according to instruction provided by GFCI
manufacturer. If the GFCI protected outlet does not pass
the GFCI testing, do not use that outlet. Only plug radio into
a functional GFCI protected outlet.
Use of the Convenient
4-way Outlets
The combined output rating of the four
AC outlets is 10A Max. To reduce the risk
of electric shock or fire hazard, do not overload the AC
outlets.
With the Unit plugged into AC power, perform the following
steps to use the convenient power outlets:
1. Lift up the protective cover to expose the AC power
outlets.
2. Plug into the outlet the desired AC appliance or power
tool.
3. Once you are done using the AC outlets on the unit,
insure that the protective covers properly close.
Do not use where water is likely to enter
unit. This device will not guard against
shock hazard from: 1. Defects or faults in the electrical
supply to the interrupter. 2. Personal contact with both
circuit conductors from the interrupter.
WARNIN
G
!
WARNIN
G
!
WARNIN
G
!
BM 2610032718 07-15.qxp_BM 2610027750 01-13.qxp 7/17/15 10:38 AM Page 11
12
Changing Clock Batteries
1. Open battery bay door.
2. Remove AA battery cover.
3. Remove old batteries and dispose of properly.
4. In s ert n ew A A batt e ries. D o not use m ismat c hed
b
atteries, use only new Alkaline batteries.
Trouble Shooting Guide
REPLAC E AA B ATTERY
WHEN UNIT NO LONGER
KEEPS CORRECT TIME
LOCATION OF AA
BATTERIES
Problem Checkpoint Remedy
Audio Unit doesn’t
function.
1. Is power cord properly connected ?
2. Is the Bosch battery pack installed or
inserted properly?
3. Does the battery need charging?
1. Plug in AC power cord.
2. Make sure battery is completely inserted.
3. Plug in power cord and insert battery.
It is noisy or weak in
radio receiving.
1. Is there any facility interfering with
the unit.
2. Is there any interference to the
internal FM antenna?
1. Move unit to new location away from
interference.
2. Turn the unit in different directions.
4-Way Power outlet
does not function
1. Is power cord properly connected?
2. Is green light illuminated on outlets?
1. Plug in AC power cord.
Does unit suddenly
fail to work
1. Is power cord properly connected
to unit?
2. Is the LCD displaying that there is
power to the unit?
1. Plug in power to unit.
2. Software in unit needs to be reset.
Remove all batteries from unit and unplug
AC power cord, wait for 30 seconds and
reconnect AC power cord.
BM 2610032718 07-15.qxp_BM 2610027750 01-13.qxp 7/17/15 10:38 AM Page 12
 Loading...