

Page 1
OBD 100
en
Original instructions
EOBD & CAN Scan Tool
Page 2

2 | OBD 100 | Symbols used | OBD 100 | 3
en
Content English
1. Symbols used 3
1.1 In the documentation 3
1.1.1 Warning notices - Structure and meaning 3
1.1.2 Symbols in this documentation 3
1.2 On the product 3
2. User information 3
2.1 Terms of warranty 3
2.2 Exemption from liability 3
2.3 Data and software 3
3. Product description 4
3.1 Intended use 4
3.2 Prerequisites 4
3.3 Scope of delivery 4
3.4 Description of device 4
3.4.1 Button panel 4
3.4.2 OBD diagnostic connector 4
3.5 Cleaning 4
4. All you need to know about OBD 5
4.1 What are OBD, OBD II, OBD-2 and EOBD 5
4.2 Is my vehicle provided with OBD 5
4.3 Where is the OBD diagnostic socket
located 5
4.4 Why and when does the malfunction
indicator light (MIL) come on 5
4.5 What are trouble codes 6
4.5.1 Trouble code structure 6
4.5.2 Stored trouble codes 6
4.5.3 Pending code (Pnd) 6
4.5.4 Confirmed code (Cnf) 6
4.5.5 Permanent code (Prm) 6
4.5.6 Erasing trouble codes 7
5. Operation 7
5.1 Safety information 7
5.2 Connection to vehicle 8
5.3 Functions in main menu 8
5.4 Codes (trouble codes) 9
5.4.1 Reading trouble codes 9
5.4.2 Erasing trouble codes 9
5.5 Live data (PID display) 10
5.6 MIL status (malfunction indicator light) 11
5.7 I/M monitors 11
5.8 Freeze frame (data) 12
5.9 VIN (vehicle identification number) 12
5.10 Faults 12
6. Decommissioning 13
6.1 Change of location 13
6.2 Disposal and scrapping 13
7. Technical data 13
7.1 Dimensions and weights 13
7.2 Temperature and humidity 13
7.2.1 Ambient temperature 13
7.2.2 Humidity 13
7.3 Electromagnetic compatibility (EMC) 13
8. Glossary 14
9. PID definitions 16
569624 Rev "A" 2013-12-19
|
Robert Bosch GmbH
Page 3
Symbols used | OBD 100 | 3 en
1. Symbols used
1.1 In the documentation
1.1.1 Warning notices -
Structure and meaning
Warning notices warn of dangers to the user
or people in the vicinity. Warning notices also
indicate the consequences of the hazard as well
as preventive action. Warning notices have the
following structure:
Warning
symbol
The key word indicates the likelihood of
occurrence and the severity of the hazard in the
event of non-observance:
1.1.2 Symbols in this documentation
Symbol Designation Explanation
KEY WORD – Nature and source of
hazard!
Consequences of hazard in the event
of failure to observe action and
information given.
¶ Hazard prevention action and
information.
Key word Probability of
DANGER Immediate
WARNING Possible
CAUTION Possible dangerous
!
i
1.
2.
e
"
occurrence
impending danger
impending danger
situation
Attention Warns about possible property
Information Practical hints and other
Multi-step
operation
One-step
operation
Intermediate
result
Final result There is a visible final
Severity of danger
if instructions not
observed
Death or severe
injury
Death or severe
injury
Minor injury
damage.
useful information.
Instruction consisting of
several steps.
Instruction consisting of one
step.
An instruction produces a
visible intermediate result.
result on completion of the
instruction.
2. User information
These operating instructions describe the
functions of the OBD 100 and contain step-bystep directions for use of the OBD 100. Study
and observe these operating instructions in full
before using the OBD 100. It is also essential
to heed all the vehicle manufacturer's safety
instructions and information.
2.1 Terms of warranty
The warranty is expressly restricted to the
first purchasers of Bosch electronic diagnostic
testers (referred to in the following as units). A
2-year (24-month) warranty against material and
manufacturing defects applies to Bosch units as
of the date of delivery. This warranty does not
apply to any units used incorrectly, modified or
employed for a purpose for which they are not
intended or which deviates from that described
in the usage instructions. The sole course of
action in the event of a defective unit is repair or
replacement by Bosch. Under no circumstances
is Bosch liable for direct, indirect, special and
exemplary damages or consequential damages
(including lost profits) whether this is based
on warranty, contract, tort or any other legal
theory.
2.2 Exemption from liability
The above warranty supersedes all other
guarantees made explicitly or implicitly,
including guarantees of marketability or
suitability for a particular area of application.
2.3 Data and software
The system software is protected by copyright.
Users have no rights or claims to the system
software other than a restricted right of use
which can be revoked by Bosch. The system
software must not be passed on or disclosed
without the written consent of Bosch. Copying
of the system software is not permissible.
1.2 On the product
! Observe all warning notices on products and
ensure they remain legible.
569624 Rev "A"
| Robert Bosch GmbH
2013-12-19
Page 4
4 | OBD 100 | Product description All you need to know about OBD | OBD 100 | 5
en
3. Product description
3.1 Intended use
The OBD 100 reads and displays emissionrelated diagnostic data via the OBD interface
of gasoline and diesel passenger vehicles. It is
also possible to erase or reset trouble codes
and to display additional electronic control unit
information. The diagnostic data can help to
establish the cause of problems in the vehicle.
! The OBD 100 is only to be used with the
vehicle stationary. Use whilst driving is
prohibited.
3.2 Prerequisites
OBD interface (OBD-2 or EOBD) in the vehicle
to be tested (refer also to Section "4.1 What are
OBD, OBD II, OBD-2 and EOBD").
3.3 Scope of delivery
Designation Order number
OBD 100 diagnostic tester SP02000002
Original operating instructions 569624 Rev "A"
Tab. 1: Scope of delivery
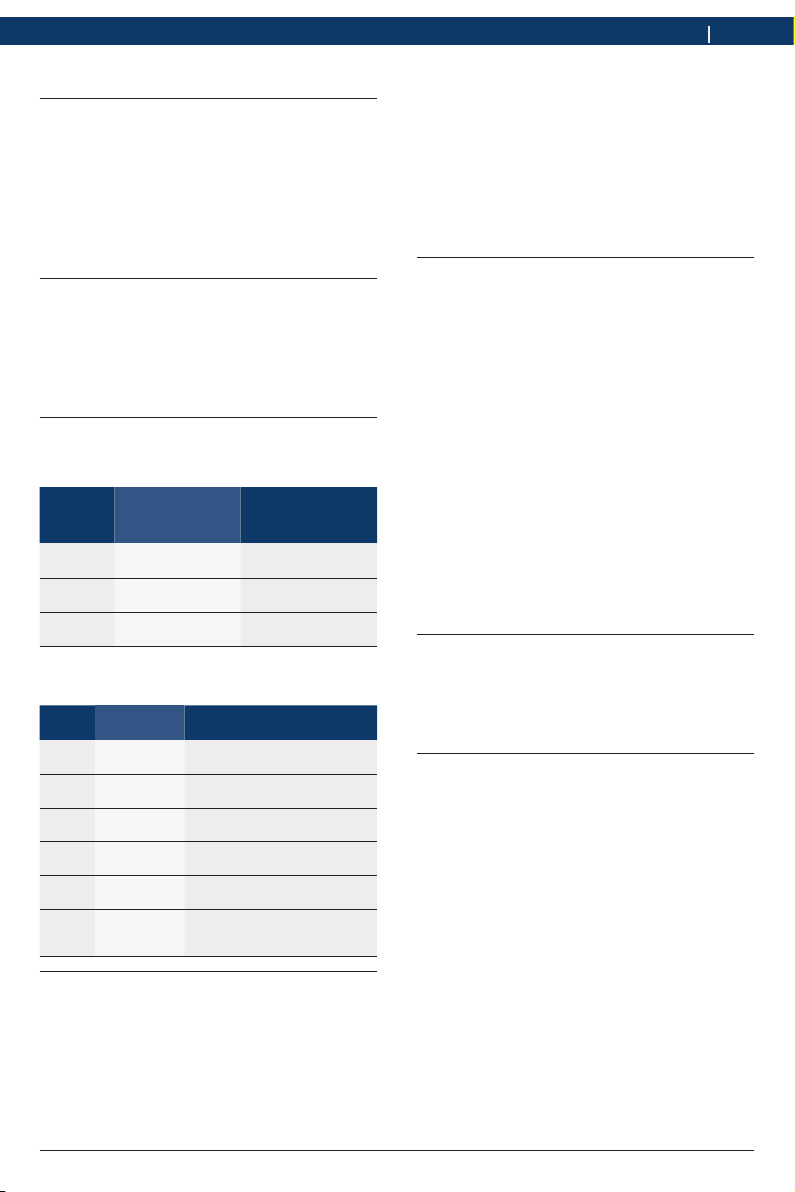
3.4 Description of device
3.4.1 Button panel
Fig. 2: OBD 100 buttons
Button Function
READ
ERASE
Tab. 2: Buttons and their functions
R Scrolls down through the screen dis-
play when ↓ or ↕ appears on the
screen.
R Reading of electronic control unit diag-
nostic data (press and hold for 2 seconds).
R Scrolls up through the screen display
when ↑ or ↕ appears on the screen.
R Erasing of trouble codes in electron-
ic control unit (press and hold for 3
seconds).
R Resetting of inspection and main-
tenance monitors in electronic control unit.
E
R Go to function selected.
R Return to main menu.
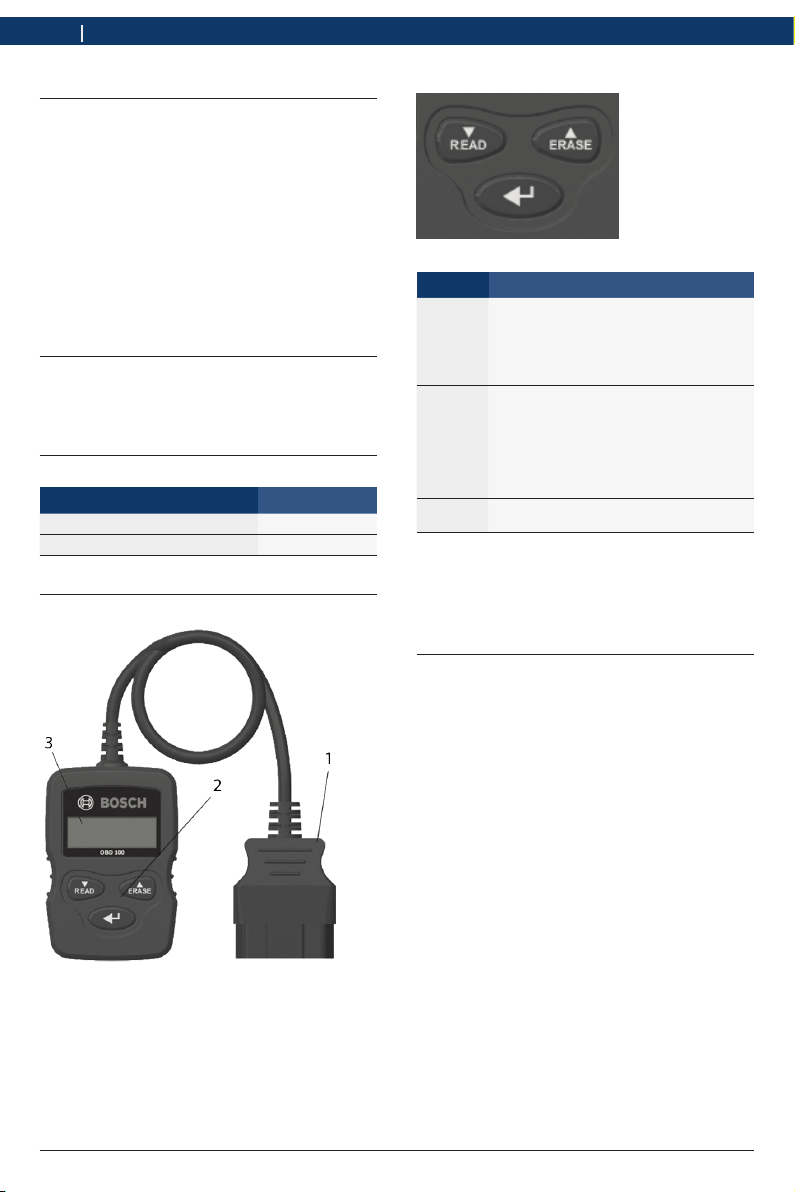
3.4.2 OBD diagnostic connector
This connects the OBD 100 to the OBD
diagnostic socket in the vehicle.
Fig. 1: OBD 100
1 OBD diagnostic connector
2 Button panel
3 LCD (two-line)
569624 Rev "A" 2013-12-19
|
3.5 Cleaning
! Do not use abrasive cleaning agents and
coarse workshop cloths.
¶ The housing is only to be cleaned with a soft
cloth and neutral cleaning agents.
Robert Bosch GmbH
Page 5

All you need to know about OBD | OBD 100 | 5 en
4. All you need to know
about OBD
4.1 What are OBD, OBD II, OBD-2
and EOBD
OBD (on-board diagnosis) means that
R Emission-related components and systems
are monitored by the vehicle whilst driving
R Any malfunctions are recorded and indicated
by a warning lamp (MIL)
R This information can be read by a diagnostic
tester
i A further purpose of OBD is to protect
vulnerable components such as catalytic
converters.
In these operating instructions, OBD is always
used to refer to the standard OBD-2 (OBD II).
OBD-2 has been obligatory in the USA for all
new vehicles since 1st January 1996. In the EU,
OBD-2 was introduced for new vehicles with
gasoline engine in January 2001 with the EURO3 standard and for diesel vehicles in January
2004. EOBD is the abbreviation for European
on-board diagnosis based on OBD-2.
The OBD diagnostic system is integrated into the
electronic control unit and constantly monitors
defined emission-related components in the
vehicle. The malfunction indicator light (MIL)
informs the driver of OBD faults reported by the
electronic control unit.
A minimum of five monitoring systems are
provided:
R Emission-related components
R Missing combustion
R Fuel system
R Upstream and downstream Lambda sensors
R Catalytic converter efficiency
R Exhaust gas recirculation
R Secondary air system
The following are monitored once per drive
cycle:
R Lambda sensor function
R Catalytic converter function
i Speed, temperature and Lambda sensor
values can also be read out by way of the
OBD diagnostic socket.
4.2 Is my vehicle provided with OBD
In the EU, OBD-2 was introduced for new vehicles
with gasoline engine in January 2001 with the
EURO-3 standard and for diesel vehicles in
January 2003.
i Vehicles manufactured before these dates
may however also be provided with OBD.
4.3 Where is the OBD diagnostic socket located
The OBD diagnostic socket is usually situated
in the driver's footwell in the area of the center
console or in the glove compartment.
i The installation location can also be looked
up in the owner's manual of the vehicle
concerned or found in the internet.
4.4 Why and when does the malfunction indicator light (MIL)
come on
The malfunction indicator light must come on
briefly when switching on the ignition. The
malfunction indicator light must go out at the
latest when the engine is started. The MIL status
(malfunction indicator light "On" or "Off") is
read from the vehicle electronic control unit.
If the vehicle has detected an emission-related
fault, the status is set to "faulty". It is then no
longer possible to pass the exhaust emission
test. In such cases the malfunction indicator
light is permanently lit to show the driver that
the vehicle should be taken to a workshop.
The following are permanently monitored:
R Missing combustion
R Fuel system (injection times)
R Circuits for emission-related components
569624 Rev "A"
| Robert Bosch GmbH
2013-12-19
Page 6

6 | OBD 100 | All you need to know about OBD All you need to know about OBD | OBD 100 | 7
en
4.5 What are trouble codes
The OBD trouble codes (DTC) are defined in
SAE J2012 and ISO 15031-6. Manufacturerspecific trouble codes can be defined by vehicle
manufacturers.
A trouble code is a 5-position code made up of
a letter and four digits. A distinction is made
between standard trouble codes which may
occur with all vehicle makes and manufacturerspecific trouble codes specified by vehicle
manufacturers for certain vehicle models.
i A plain language text outlining the cause of
the problem can be assigned to each trouble
code.
4.5.1 Trouble code structure
i The structure of the trouble codes is shown in
the following table. This information facilitates
trouble-shooting in situations for which no
trouble code description is provided.
Trouble codes are 5-position codes.
Example:
P 0 1 22 Throttle position sensor signal too low
Pos. Value Description
1 B
2
Example
for P
3
Example
for P0
4, 5 00 – 99 Identification of individual
Tab. 3: Trouble code structure
Body
C
Chassis
P
Powertrain
U
Network
0, 2
Trouble code defined by ISO / SAE
1
Trouble code defined by
manufacturer
3
Trouble code defined by ISO / SAE
or by manufacturer
0 – F
Grouped by systems
0 – 2
Fuel air metering
3
Ignition system
4
Auxiliary emission controls
5
Vehicle speed and idle control
6
Computer and output signals
7 – 9
Transmission
A – C
Hybrid
D – F
Reserved for ISO / SAE
components
4.5.2 Stored trouble codes
Stored trouble codes (DTC) are trouble codes
which have been stored in the electronic control
unit (ECU). The description of the trouble
code and the number of the electronic control
unit with the designation of its origin are also
displayed.
i If a trouble code has been set which causes
the malfunction indicator light (MIL) to come
on, the electronic control unit stores the
current values of the sensors at the time at
which the fault occurred.
4.5.3 Pending code (Pnd)
The first time a fault occurs this is stored
as a pending code in the fault memory. If a
pending code is confirmed in the second drive
cycle, it becomes a confirmed code. A pending
code stored in the electronic control unit is
automatically erased after 40 drive cycles
if the prevailing operating conditions were
the same as when the trouble code was set.
Otherwise the pending code is erased after
80 engine cycles. Such trouble codes report
those faults which have occurred during a drive
cycle but which were not sufficient to cause a
trouble code to be stored, i.e. not causing the
malfunction indicator light to come on.
4.5.4 Confirmed code (Cnf)
If a pending code is confirmed in the second
drive cycle, it becomes a confirmed code and
the malfunction indicator light comes on.
4.5.5 Permanent code (Prm)
Permanent codes are a special form of confirmed
codes. Permanent codes have only been set by
vehicles since 2010, which means that they are
not supported by all vehicles.
i Permanent codes cannot be erased with a
diagnostic tester or by disconnecting the
battery voltage. The problem must have been
rectified and must not have occurred again for
the trouble code to be automatically deleted
from the fault memory by the electronic control
unit.
569624 Rev "A" 2013-12-19
|
i The presence of a permanent code will cause
the vehicle to fail an Inspection or exhaust
emission test.
Robert Bosch GmbH
Page 7

All you need to know about OBD | OBD 100 | 7 en
4.5.6 Erasing trouble codes
"Erase trouble codes" erases all pending and
confirmed codes from the fault memory.
! Before erasing trouble codes it must be
remembered that this procedure also resets
all the freeze frame data and the status of the
on-board monitoring (Readiness codes). As
a result, exhaust emission testing performed
directly after erasing the trouble codes may not
be passed by reading out the OBD diagnostic
data, as the vehicle has not yet completed its
internal tests. Additional testing (exhaust gas
measurement or sensor testing) is required in
such cases.
Erasing the trouble codes also deletes the
following information stored in the electronic
control unit:
R Number of trouble codes
R Freeze frame data
R Status of system monitoring tests
R Engine running time (in minutes) with activated
malfunction indicator light since trouble codes
were last erased.
5. Operation
5.1 Safety information
! The OBD 100 can only read and recognize
emission-related diagnostic data and
faults. It is not possible to read and display
information or faults relating to airbags, the
braking system, steering or other important
vehicle functions. The vehicle is therefore
to be taken to a workshop in the event of
any vehicle reports which are not emissionrelated.
¶ Pay attention to the warnings, instructions
and service procedures of the vehicle
manufacturer.
¶ The OBD 100 is not intended for use by
anyone (including children) with physical,
sensory or mental disabilities or without
the necessary experience and/or knowledge
unless they are supervised by a person
responsible for their safety or have received
instructions from this person on how to use
the OBD 100.
¶ Make sure the OBD 100 is always kept in a
safe place.
¶ Never expose the OBD 100 to direct sunlight.
¶ Keep oils, greases, moisture, rainwater and
the like away from the OBD 100. Avoid all
contact with water or other liquids. Water
could cause a short circuit and damage both
the vehicle to be tested and the OBD 100.
¶ Make sure the OBD 100 and the OBD
diagnostic connector are dry before
connecting the OBD 100 to the vehicle.
¶ Never connect the OBD 100 to a vehicle with
wet hands.
¶ Secure the vehicle to stop it rolling away.
¶ Prior to vehicle testing make sure the
transmission is set to PARK (automatic) or
NEUTRAL (manual) and that the handbrake
is applied.
¶ Unless otherwise stated, the ignition is
always to be set to OFF on connecting and
disconnecting electrical components.
¶ The OBD 100 is maintenance-free and has no
exchangeable replacement parts. It is thus
not necessary to open the OBD 100.
¶ Make sure the OBD 100 is not damaged in
any way before connecting the OBD 100 to
the vehicle.
569624 Rev "A"
| Robert Bosch GmbH
2013-12-19
Page 8

8 | OBD 100 | Operation Operation | OBD 100 | 9
en
¶ Never route the OBD diagnostic cable over
sharp edges or hot surfaces.
¶ Ensure adequate ventilation if the OBD 100 is
used with the engine running.
¶ In Germany and other EU countries it is not
permissible to operate the OBD 100 whilst
driving.
¶ Pull the OBD diagnostic connector and not
the cable to disconnect the OBD 100 from
the vehicle.
5.2 Connection to vehicle
i The OBD 100 is supplied with power solely by
way of the vehicle OBD interface.
1. Locate the OBD diagnostic socket in the
vehicle.
i The OBD diagnostic socket is usually situated
in the driver's footwell in the area of the
center console or in the glove compartment.
The installation location can also be looked
up in the maintenance manual of the vehicle
concerned or found in the internet.
5.3 Functions in main menu
2. Remove the cover over the OBD diagnostic
socket if necessary.
3. Switch on the ignition (position 2).
! Do not start the engine.
4. Insert the OBD diagnostic connector of the
OBD 100 in the OBD diagnostic socket of the
vehicle.
The OBD 100 is switched on.
The OBD diagnostic data are read out.
" The main menu appears.
i Use READ or ERASE to select the
corresponding main menu functions.
Main menu Description and function Notes Read Erase Reset
1) Codes Reading, erasing and
2) Live data Display of emission-
3) MIL STATUS Display of stored MIL
4) I/M monitor Display of current status
5) Freeze frame Display of PID data if a
6) VIN Display of the vehicle
Tab. 4: Functions in main menu
569624 Rev "A" 2013-12-19
resetting of stored vehicle
trouble codes.
related diagnostic data.
status of electronic
control unit.
of emission-related
Readiness codes.
trouble code has been
set.
identification number
stored in the electronic
control unit.
|
Different functions are available depending
on the trouble code (pending, confirmed
and permanent) and the vehicle connected.
The information (PID) displayed depends
on the vehicle.
Use whilst driving is prohibited.
The status of the malfunction indicator light
(MIL) is read from the electronic control
unit in the vehicle and can be compared
to the display of the malfunction indicator
light in the vehicle.
The Readiness codes are evaluated in the
exhaust emission test.
This menu item can be used to check
whether all emission-related tests have
been performed and passed.
If a trouble code has been set, the data
stored at the time of occurrence and
transmitted are displayed.
The VIN display can be used to check
whether the vehicle identification number
stored in the electronic control unit
matches the vehicle identification number
of the vehicle.
x x x
x – –
x – –
x – x
x x –
x – –
Robert Bosch GmbH
Page 9

Operation | OBD 100 | 9 en
5.4 Codes (trouble codes)
5.4.1 Reading trouble codes
1. Switch on the ignition (position 2).
2. Connect the OBD 100 to the vehicle.
Data are read.
3. In the main menu select "1) Codes" and
confirm with E.
i Alternatively, press and hold READ for
2seconds.
i If the vehicle does not have any DTCs, "No
Codes" will be displayed.
One or more trouble codes is/are displayed.
Fig. 3: Trouble code display - description from top left
to bottom right
1 Trouble code
2 Type of trouble code (see Tab. 5)
3 Trouble code number, continuously changing display
(see Tab. 6)
4 Note on scrolling (see Tab. 7)
5 Trouble code description (moving message with long
descriptions)
Type Function
Pnd Pending code
Cnf Confirmed code
Prm Permanent code
Tab. 5: Type of trouble code
Number Function
Mod ## Indicates the module (electronic control
#/# Indicates the sequence of the trouble code
Tab. 6: Trouble code number
Scroll Function
↑
↓
↕
Tab. 7: Scrolling
unit) which transmitted the trouble code.
## stands for consecutive numbering of
electronic control units
and the number (trouble code x of n).
Example: The display 2/9 means the 2nd of
9 trouble codes reported by the electronic
control unit.
Scrolling up possible.
Scrolling down possible.
Scrolling up and down possible.
5.4.2 Erasing trouble codes
! The function "Erase trouble codes" is not to
be performed until the systems have been
fully checked and the trouble codes written
down.
! Do not erase the trouble codes before
establishing whether repair is necessary.
Failure to perform essential repairs
could prove costly and dangerous. If the
malfunction indicator light (MIL) is reset
without the underlying problem having
been rectified, the indicator light will come
on again. If the underlying problem is of a
serious nature, further trouble codes may
be set or the fault may be aggravated if
appropriate action is not taken. It is not
sufficient to just erase the trouble codes and
reset the warning light. The underlying fault
must be rectified.
! Before erasing trouble codes it must be
remembered that this procedure also erases
all the freeze frame data and the status of
the on-board monitoring (status mask). As a
result, exhaust emission testing performed
immediately after erasing may not be
successful if the vehicle has not completed
its internal tests by then.
i Once the vehicle has been serviced any
trouble codes stored can be erased if so
desired. If a trouble code appears again, this
means that the problem has not yet been
rectified or other faults have occurred.
i All trouble codes are displayed with the
corresponding icon.
i Scroll through trouble codes using READ or
ERASE.
569624 Rev "A"
| Robert Bosch GmbH
2013-12-19
Page 10

10 | OBD 100 | Operation Operation | OBD 100 | 11
en
Implementation of the "Erase trouble code"
function results in the following:
R Confirmed and pending codes are erased.
i Permanent codes can only be erased by the
vehicle.
R Freeze frame data results are erased.
R I/M monitors are set to "Not ready".
1. Switch on the ignition (position 2).
2. Connect the OBD 100 to the vehicle
Data are read.
! Do not start the engine. The engine must not
be running when erasing the trouble codes.
3. Press ERASE for 3 seconds.
A confirmation message appears on the
screen.
i Cancel the operation and return to the main
menu by pressing E.
Cancel the operation and read data again
with READ.
4. Press the ERASE button for a further
3seconds to erase trouble codes.
i It may be necessary to drive the vehicle again.
5.5 Live data (PID display)
The Live data function enables parameters
(PID) of the vehicle electronic control unit to
be displayed in real time. A list of the PIDs
supported by the OBD 100 is given in Section 9.
i All values are displayed in metric units.
i Press E to return to the main menu.
1. Switch on the ignition (position 2).
2. Connect the OBD 100 to the vehicle.
Data are read.
3. In the main menu select "2) Live data" with
READ or ERASE and confirm with E.
i If there is more than one electronic control
unit in the vehicle, the OBD 100 displays a
menu for selecting the electronic control unit
for which the Live data are to be displayed.
" PID data are displayed.
Fig. 4: Live data display - description from top left to
bottom right
1 PID
2 Note on scrolling
3 Value, status or note
Symbol Function
Scroll down to the next PID with READ.
↓
Scroll up to the next PID with ERASE.
↑
Scroll down or up to the next PID with
↕
READ or ERASE.
Tab. 8: Scrolling symbols
569624 Rev "A" 2013-12-19
|
i Scrolling through PIDs with READ or
ERASE.
i Section 9 provides an alphabetical list of PIDs
and what they mean.
Robert Bosch GmbH
Page 11

Operation | OBD 100 | 11 en
5.6 MIL status (malfunction indica-
tor light)
The status of the malfunction indicator light
(MIL status) provides an indication of the
status reported ("On" or "Off") by the electronic
control unit with the engine running. This
information can be used to check correct
operation of the malfunction indicator light.
1. Switch on the ignition (position 2).
2. Connect the OBD 100 to the vehicle.
Data are read.
3. Start the engine.
4. In the main menu select "3) MIL-Status" with
READ or ERASE.
" The status ON or OFF is displayed.
i If the malfunction indicator does not light
with the engine running in MIL ON status,
there is a problem in the malfunction
indicator circuit in the vehicle.
5.7 I/M monitors
The I/M monitor function is used for inspection
and maintenance monitoring of the emissionrelated functions.
The OBD 100 supports the following monitoring
functions (Readiness codes):
Function Description
Misfire Monitor
Fuel System
Comprehen Comp
Catalyst
Htd Catalyst
Evaporative Sys
Second Air Sys
A/C Sys Refrig
Oxygen Sensor
Htd 02 Sensor
EGR/VVT
NMHC Catalyst
NOX Treatment
Boost Pressure
Exhaust Gas Sen
PM Filter
Tab. 9: I/M monitors
Misfire Monitor
Fuel System Monitor
Comprehensive Components
Monitor
Catalyst Monitor
Heated Catalyst Monitor
Evaporative System Monitor
Secondary Air System Monitor
Air Conditioning Refrigerant
Monitor
Oxygen Sensor Monitor
Oxygen Sensor Heater Monitor
Exhaust Gas Recirculation or
variable valve timing monitor
Non-Methane Hydrocarbon
Catalyst
Nitrogen Oxide Treatment
Boost Pressure
Exhaust Gas Sensor
Particulate Matter Filter
i This is a complete list of the inspection and
maintenance monitors supported by the
OBD 100. The number of monitors depends
on the vehicle. Vehicles with diesel engine
have no oxygen sensor monitors for example.
1. Switch on the ignition (position 2).
2. Connect the OBD 100 to the vehicle
Data are read in.
3. In the main menu select "4) I/M Monitor"
with READ or ERASE and confirm with E.
" Inspection and maintenance monitors for
emission-related functions are displayed.
Fig. 5: I/M monitor display - description from top left
to bottom right
1 I/M monitor (see table 9)
2 Note on scrolling (see table 7)
3 Report on test performed (see table 10)
Report Function
Ready Test has completed
Not ready Test has not completed
N. A. Test not possible for this vehicle
Tab. 10: I/M monitor - reports and function
i Display emission-related tests performed with
READ or ERASE.
i Taking Germany as an example:
To pass an OBD exhaust emission test, all
monitors must be listed as "Ready" or "N. A.".
569624 Rev "A"
| Robert Bosch GmbH
2013-12-19
Page 12

12 | OBD 100 | Operation Decommissioning | OBD 100 | 13
en
5.8 Freeze frame (data)
This provides an image of the operating and
ambient conditions at the moment in time at
which the trouble code was first generated.
Freeze frames are not stored and displayed for
all PIDs. A list of the PID numbers (parameter
IDs) supported by the OBD 100 is given in
Section 9.
1. Switch on the ignition (position 2).
2. Connect the OBD 100 to the vehicle
Data are read in.
3. In the main menu select "5) Freeze Frame" with
READ or ERASE and confirm with E.
Trouble codes are displayed
4. Select the trouble code and confirm with E.
" Freeze frame data are displayed.
i Scroll through the corresponding freeze
frame data using READ or ERASE.
5.9 VIN (vehicle identification
number)
i The VIN function is not supported by all
vehicles.
1. Switch on the ignition (position 2).
2. Connect the OBD 100 to the vehicle.
Data is read.
3. In the main menu select "6) VIN" with
READ or ERASE and confirm with E.
" The vehicle identification number appears as a
moving message.
5.10 Faults
Fault Remedy
LINK ERROR During reading
MIL status
Tab. 11: Faults
Turn the ignition key to the OFF
position for 10 seconds; then
return to the ON position and
press the <READ> button.
Make sure the ignition key is set
to ON (position 2) and not to
ACCESSORIES (position 1).
During erasing
Turn the ignition key to the
OFF position for 10 seconds;
then return to the ON position
and press one of the following
buttons with the ignition key set
to ON (position 2) and not to
ACCESSORIES (position 1):
R Continue erasing operation
with ERASE.
R Cancel erasing operation with
READ (read codes again) or
E (return to main menu).
A trouble code will appear again if
the cause of the problem has not
yet been rectified.
If the MIL status is ON and the
warning light does not come on
with the engine running, there
is a problem in the circuit of
the malfunction indicator light.
It is then advisable to consult a
workshop.
569624 Rev "A" 2013-12-19
|
Robert Bosch GmbH
Page 13

Decommissioning | OBD 100 | 13 en
6. Decommissioning
6.1 Change of location
¶ If the OBD 100 is passed on, all the
documentation included in the scope of
delivery must be handed over together with
the unit.
6.2 Disposal and scrapping
The OBD 100 is subject to the
European directive 2002/96/EC
(WEEE).
Dispose of used electrical and
electronic devices, including
cables, accessories and batteries,
separately from household waste.
¶ Make use of the local return and
collection systems for disposal.
¶ Proper disposal of the OBD 100
prevents environmental pollution
and possible health hazards.
7. Technical data
7.1 Dimensions and weights
Properties Value/Range
Dimensions (H x W x D) 83 x 56 x 19 mm
Weight (without accessories) 0,1 kg
7.2 Temperature and humidity
7.2.1 Ambient temperature
Properties Value/Range
Storage and transportation -25 °C – 60 °C
Function 0 °C – 45 °C
7.2.2 Humidity
Properties Value/Range
Storage and transportation 20 % – 80 %
Function 20 % – 80 %
7.3 Electromagnetic compatibility (EMC)
The OBD 100 is a class B product as per
EN 61 326-1.
3.3 x 2.2 x 0.7 inch
0.2 lb
-13 °F – 140 °F
32 °F – 113 °F
569624 Rev "A"
| Robert Bosch GmbH
2013-12-19
Page 14

14 | OBD 100 | Glossary Glossary | OBD 100 | 15
en
8. Glossary
Cnf Confirmed code
If a pending code is confirmed in the second
drive cycle, it becomes a confirmed code and
the malfunction indicator light (MIL) comes on.
DTC Diagnostic trouble code
A trouble code is a 5-position code made up of
a letter and four digits. A distinction is made
between standard trouble codes which may
occur with all vehicle makes and manufacturerspecific trouble codes specified by vehicle
manufacturers for certain vehicle models.
Aplain language text outlining the cause of the
problem can be assigned to each trouble code.
ECU Electronic control unit
EOBD European On-Board diagnosis
EOBD is not an official term but is often used to
refer to OBD-2 in conjunction with EU vehicles.
For further information refer to Section 4.1.
Drive cycle
A drive cycle commences on starting the engine
(warm or cold) and ends on switching off the
engine.
Freeze frame data (FFD)
The following data (freeze frame data) are
stored in connection with the first pending
code:
R Vehicle speed
R Coolant temperature
R Intake manifold pressure
R Engine load
R Mixture formation adaptation value
R Lambda control status (control loop)
R Time since trouble first recorded
The data represent a sort of snapshot of the
prevailing operating and ambient conditions at
the moment in time at which the trouble was
detected. A freeze frame data set remains stored
in the memory even if another emission-related
trouble code is stored (this does not however
apply to trouble codes resulting from misfiring
or faults in the fuel system). Freeze frame data
stored for a trouble code arising from misfiring
or a fuel system fault overwrite all previously
stored data and cannot be overwritten
themselves.
I/M monitors
The Readiness code is used in OBD to refer
to the testing of emission-related functions.
Since the introduction of OBD-2 all electrical
components have been continuously checked for
proper operation. In addition, complete systems
(e.g. exhaust gas recirculation) are checked
by way of diagnostic routines which are not
constantly active. The Readiness code is set as
a means of checking whether these diagnostic
routines have been performed.
The Readiness code gives an indication of
whether a diagnosis result has been supplied
for all individual systems since the fault memory
was last erased or the electronic control unit
was replaced.
The following are permanently monitored:
R Missing combustion
R Fuel system (injection times)
R Circuits for emission-related components
The following are monitored once per drive
cycle:
R Lambda sensor function
R Catalytic converter function
If the functions of systems and components
are tied to certain operating conditions, these
are only checked on passing the corresponding
operating points (speed, load or temperature
thresholds).
569624 Rev "A" 2013-12-19
|
i The Readiness code was introduced as a
means of revealing manipulation. It makes
it possible to see whether the fault memory
was erased by disconnecting the battery for
example.
Robert Bosch GmbH
Page 15

Glossary | OBD 100 | 15 en
MIL Malfunction indicator light
The malfunction indicator light (also called
malfunction lamp or engine warning lamp) comes
on:
R If the ignition key is in position II (bulb check
function).
R If a fault occurs during the electronic control
unit self-test.
R If an emission-related fault occurs in two
consecutive drive cycles.
R If a fault (misfiring) occurs which results
in cylinder deactivation, i.e. for catalytic
converter protection (the MIL flashes in this
case).
i The malfunction indicator light goes out
automatically in the fourth drive cycle if
the fault has no longer occurred in three
consecutive drive cycles.
OBD On-Board diagnosis
In these operating instructions, OBD is always
used to refer to the standard OBD-2. In the EU,
OBD-2 (EOBD) was introduced for new vehicles
with gasoline engine in January 2001 with the
EURO-3 standard and for diesel passenger
vehicles in January 2003.
i Vehicles marketed before these dates may
however also be provided with OBD.
Prm Permanent code
Permanent codes are a special form of
confirmed codes. Permanent codes were first
set by vehicles around 2010, which means that
they are not supported by all vehicles. Whereas
confirmed codes can be erased by way of the
diagnostic tester, this is not possible in the
case of permanent codes. Permanent codes are
erased by the vehicle if the electronic control
unit has decided that the fault no longer exists.
Readiness code Refer to I/M monitors
VIN Vehicle identification number
The vehicle identification number is the serial
number assigned to a vehicle at the factory.
The vehicle identification number is marked
on the driver side of the dashboard and can
be seen from outside the vehicle. The vehicle
identification number contains information
on the vehicle, as well as the body and engine
code numbers for example. Provided that the
electronic control unit has not been replaced,
the vehicle identification number displayed in
the OBD 100 must coincide with the vehicle
identification number of the vehicle. Matching
numbers ensure that the correct diagnostic data
are being displayed. It is advisable to consult a
workshop if the vehicle identification numbers
do not match.
OBD-2 Refer to OBD
PID Parameter identification
Status information, actual values and electronic
control unit values calculated by the system are
output by way of PID (refer also to Section 9).
Pnd Pending code
The first time a fault occurs this is stored as a
pending code in the fault memory. This fault
appeared during a drive cycle but was not
sufficient to set the MIL status to ON.
569624 Rev "A"
| Robert Bosch GmbH
2013-12-19
Page 16

16 | OBD 100 | PID definitions PID definitions | OBD 100 | 17
en
9. PID definitions
PID PID description
ABS FRP Absolute Fuel Rail Pressure
ABS LOAD Absolute Load Value
ABS TPS B, C Throttle Position B, C
ABSLT TPS Absolute Throttle Position
ACC POS D Accelerator Pedal D, E, F
ACC POS REL
AECD1_TIME1,
TIME 2
AECD10_TIME1,
TIME 2
AECD11_TIME1,
TIME 2
AECD12_TIME1,
TIME 2
AECD13_TIME1,
TIME 2
AECD14_TIME1,
TIME 2
AECD15_TIME1,
TIME 2
AECD16_TIME1,
TIME 2
AECD17_TIME1,
TIME 2
AECD18_TIME1,
TIME 2
AECD19_TIME1,
TIME 2
AECD2_TIME1,
TIME 2
AECD20_TIME1,
TIME 2
AECD3_TIME1,
TIME 2
AECD4_TIME1,
TIME 2
AECD5_TIME1,
TIME 2
AECD6_TIME1,
TIME 2
AECD7_TIME1,
TIME 2
AECD8_TIME1,
TIME 2
AECD9_TIME1,
TIME 2
ALCOHOL Alcohol Fuel Percent
BARO PRS Barometric Pressure
BAT_PWR
Relative Accelerator Pedal
Position
Total Run Time with EI-AECD #1
Timer 1 Active, #2 Timer Active
Total Run Time with EI-AECD #10
Timer 1 Active, #2 Timer Active
Total Run Time with EI-AECD #11
Timer 1 active, #2 Timer Active
Total Run Time with EI-AECD #12
Timer 1 active, #2 Timer Active
Total Run Time with EI-AECD #13
Timer 1 active, #2 Timer Active
Total Run Time with EI-AECD #14
Timer 1 active, #2 Timer Active
Total Run Time with EI-AECD #15
Timer 1 active, #2 Timer Active
Total Run Time with EI-AECD #16
Timer 1 active, #2 Timer Active
Total Run Time with EI-AECD #17
Timer 1 active, #2 Timer Active
Total Run Time with EI-AECD #18
Timer 1 active, #2 Timer Active
Total Run Time with EI-AECD #19
Timer 1 active, #2 Timer Active
Total Run Time with EI-AECD #2
Timer 1 Active, #2 Timer Active
Total Run Time with EI-AECD #20
Timer 1 active, #2 Timer Active
Total Run Time with EI-AECD #3
Timer 1 Active, #2 Timer Active
Total Run Time with EI-AECD #4
Timer 1 Active, #2 Timer Active
Total Run Time with EI-AECD #5
Timer 1 Active, #2 Timer Active
Total Run Time with EI-AECD #6
Timer 1 Active, #2 Timer Active
Total Run Time with EI-AECD #7
Timer 1 Active, #2 Timer Active
Total Run Time with EI-AECD #8
Timer 1 Active, #2 Timer Active
Total Run Time with EI-AECD #9
Timer 1 Active, #2 Timer Active
Hybrid Battery Pack Remaining
Life
PID PID description
BP_A_ACT, B_ACT
BP_A_CMD, B_CMD
BP_A_STAT, B_STAT
CACT 11, 12
CACT 21,22
CALC LOAD Calculated Engine Load
CAT TEMP11,
TEMP12
CAT TEMP21,
TEMP22
CLR DIST Distance since erase
CLR TIME Minutes Run since Erase
CLR TRPS Warmups Since Erase
CMD EQ RAT Commanded Equivalence Ratio
COOLANT Engine Coolant Temp
DPF_REG_AVGD
DPF_REG_AVGT
DPF_REG_STAT
DPF_REG_TYP
DPF_REGEN_PCT
DPF1_DP, DPF2_DP
DPF1_INP, DPF2_
INP
DPF1_INT, DPF2_
INT
DPF1_OUTP, DPF2_
OUTP
DPF1_OUTT, DPF2_
OUTT
ECT 1, 2
EGR CMD Comanded EGR
EGR ERR Exhaust Gas Recirculation Error
EGR_A_ACT, B_ACT
EGR_A_CMD, B_
CMD
EGR_A_ERR, B_ERR EGR A Error, B Error
Boost Pressure Sensor A,
Sensor B
Commanded Boost Pressure A,
Pressure B
Boost Pressure A Control Status,
B Control Status
Charge Air Cooler Temperature
Bank 1 Sensor 1 supported,
Sensor 2 supported
Charge Air Cooler Temperature
Bank 2 Sensor 1 supported,
Sensor 2 supported
Cataltic Converter Temp Bank1,
Temp Bank 3
Cataltic Converter Temp Bank2,
Temp Bank 4
Average Distance Between DPF
Regen
Average Time Between DPF
Regen
Diesel Particulate Filter (DPF)
Regen Status
Diesel Particulate Filter (DPF)
Regen Type
Normalized Trigger for DPF
Regen
Diesel Particulate Filter (DPF)
Bank 1 Delta Pressure Ban,k 2
Delta Pressure
Diesel Particulate Filter (DPF)
Bank 1 Inlet Pressure, Bank 2
Inlet Pressure
DPF Bank 1 Inlet Temperature
Sensor, Bank 2 Inlet
Temperature Sensor
Diesel Particulate Filter (DPF)
Bank 1 Outlet Pressure, Bank 2
Outlet Pressure
DPF Bank 1 Outlet Temperature
Sensor, Bank 2 Outlet
Temperature Sensor
Engine Coolant Temperature 1,
Temperature 2
Actual EGR A Duty Cycle/
Position, B Duty Cycle/Position
Commanded EGR A Duty Cycle/
Position, B Duty Cycle/Position
569624 Rev "A" 2013-12-19
|
Robert Bosch GmbH
Page 17

PID definitions | OBD 100 | 17 en
PID PID description
EGRT 11, 21
EGRT 12, 22
EGT 11, 21
EGT 12, 22
EGT 13, 23
EGT 14, 24
EMIS_SUP
ENG RUN Time Since Engine Start
ENG SPEED Engine RPM
EOT Engine Oil Temperature
EP_1, 2
EQ RATIO Equivalence Ratio
EVAP PURGE Commanded EVAP Purge
EVAP VP EVAP Vapor Pressure
EVAP VPA Absolute EVAP Vapor Pressure
FRP_A, B Fuel Rail Pressure A, B
FRP_A_CMD, B_
CMD
FRT_A, B Fuel Rail Temperature A, B
FUEL LEVEL Fuel Level Input
FUEL PRES Fuel Rail Pressure
FUEL SYS 1, 2
FUEL TYPE Fuel Type
FUEL_RATE Engine Fuel Rate
Exhaust Gas Recirculation
Temperature Bank 1 Sensor 1,
Bank 2 Sensor 1
Exhaust Gas Recirculation
Temperature Bank 1 Sensor 2,
Bank 2 Sensor 2
Exhaust Gas Temperature
(EGT) Bank 1 Sensor 1, Bank 2
Sensor 1
Exhaust Gas Temperature
(EGT) Bank 1 Sensor 2, Bank 2
Sensor 2
Exhaust Gas Temperature
(EGT) Bank 1 Sensor 3, Bank 2
Sensor 3
Exhaust Gas Temperature
(EGT) Bank 1 Sensor 4, Bank 2
Sensor 4
Emission requirements to which
vehicle is designed
Exhaust Pressure Sensor Bank
1, Bank 2
Commanded Fuel Rail Pressure
A, B
Fuel System 1 Loop Status,
System 2 Loop Status
PID PID description
FUEL_TIMING Fueling Injection Timing
GPL_STAT Glow Plug Lamp Status
IAF_A_CMD, B_CMD
IAF_A_REL, B_REL
IAT Intake Air Temp
IAT 11, 21
IAT 12, 22
IAT 13, 23
ICP_A, B Injection Control Pressure A, B
ICP_A_CMD, B_
CMD
IDLE_TIME Total Idle Run Time
IGN ADV Timing Advance
LAMBDA11, 21
LAMBDA12, 22
LT FTRM1 Long Term Fuel Trim 1 or 3
LT FTRM2 Long Term Fuel Trim 2 or 4
LT SEC FT1, 2, 3, 4
MAF, A, B Mass Air Flow, A, B
MAP, A, B Manifold Absolute Pressure, A, B
MIL DIST MIL_DIST
MIL STATUS Malfunction Indicator Lamp
MIL TIME Minutes Run by MIL activated
MST Manifold Surface Temperature
N/D_STAT Auto Trans Neutral Drive Status
N/G_STAT
NNTE_Stat NOx NTE control area status
NOX 11, 21
NOX 12,22
Commanded Intake Air Flow A
Control, B Control
Relative Intake Air Flow A
Position, B Position
Intake Air Temperature Sensor
Bank 1 Sensor 1, Bank 2 Sensor
1
Intake Air Temperature Sensor
Bank 1 Sensor 2, Bank 2 Sensor
2
Intake Air Temperature Sensor
Bank 1 Sensor 3, Bank 2 Sensor
3
Commanded Injection Control
Pressure A, B
02 Sensor Lambda Bank 1
Sensor 1, Bank 2 Sensor 1
02 Sensor Lambda Bank 1
Sensor 2, Bank 2 Sensor 2
Long Term Secondary O2 Sensor
Fuel Trim 1, 2, 3, 4
Manual Trans Neutral Gear
Status
NOx Sensor Concentration Bank
1 Sensor 1, Bank 2 Sensor 1
NOx Sensor Concentration Bank
1 Sensor 2, Bank 2 Sensor 2
569624 Rev "A"
| Robert Bosch GmbH
2013-12-19
Page 18

18 | OBD 100 | PID definitions PID definitions | OBD 100 | 19
en
PID PID description
SCR inducement system actual
state 10K history HI1 (0-10000
NOX LEVEL HI, HI1,
HI2, HI3, HI4
NOX_ADS_DESUL
NOX_ADS_REGEN NOx Adsorber Regen Status
NWI_TIME
O2S
O2S11_PCT,
O2S21_PCT
O2S12_PCT,
O2S22_PCT
OBD2 STAT OBD Status
OUT TEMP Ambient Air Temp
PM 11, PM 21
PNTE_Stat PM NTE control area status
PTO STATUS PTO Status
PTO_STAT Power Take Off (PTO) Status
PTO_TIME Total Run Time With PTO Active
REAG_DEMD
REAG_LVL Reagent Tank Level
REAG_RATE Average Reagent Consumption
REL FRP Relative Fuel Rail Pressure
REL TPS Relative Throttle Position
RUN_TIME Total Engine Run Time
SCR REAG DEV,
DEV1, DEV2, DEV3,
DEV4
SCR REAG LOW,
LOW1, LOW2,
LOW3, LOW4
km), 10K history HI2 (1000020000 km), 10K history HI3
20000-30000 km), 10K history
HI4 (30000-40000 km): NOx
emission too high
NOx Adsorber Desulfurization
Status
Total Run Time by the Engien
whicle NOx warning mode is
activated
O2 Voltage or Current indicates
Bank/Sensor
02 Sensor Concentration Bank 1
Sensor 1, Bank 2 Sensor 1
02 Sensor Concentration Bank 1
Sensor 2, Bank 2 Sensor 2
PM Sensor Mass Concentration
Bank 1 Sensor 1, Bank 2 Sensor 1
Average Demanded Reagent
Consumption
SCR inducement system actual
state 10K history DEV1 (0 10000 km), 10K history DEV2
(10000 - 20000 km), 10K history
DEV3 (20000 - 30000 km), 10K
history DEV4 (30000 - 40000
km): deviation of reagent
consumption
SCR inducement system actual
state 10K history LOW1 (0 10000 km), 10K history LOW2
(10000 - 20000 km), 10K history
LOW3 (20000 - 30000 km), 10K
history LOW4 (30000 - 40000
km): reagent level too low
PID PID description
SCR inducement system actual
SCR REAG
WRONG, WRONG1,
WRONG2,
WRONG3,
WRONG4
SCR SYS ACTIVE
SCR_DIST_1D
SCR_DIST_1N, 2N,
3N, 4N
SECOND AIR Secondary Air Status
ST FTRM Fuel Trim Bank/Sensor
ST FTRM1, 3 Short Term Fuel Trim1 or 3
ST FTRM2, 4 Short Term Fuel Trim2 or 4
ST SEC
FT1, 2, 3, 4
TAC_A_CMD, B_
CMD
TAC_A_REL, B_REL
TCA_CINP, TCB_
CINP
TCA_CINT, TCB_
CINT
TCA_COUT, TCB_
COUT
TCA_RPM, TCB_
RPM
TCA_TCOUT, TCB_
TCOUT
TCA_TINT, TCB_
TINT
THROT CMD
TP G Absolute Throttle Position G
TQ_ACT Actual Engine - Percent Torque
TQ_DD
TQ_MAX1, 2, 3, 4, 5
TQ_REF Engine Reference Torque
TROUB CODE Code causing the Freeze Frame
VEH SPEED Vehicle Speed
state 10K history WRONG1
(0 - 10000 km), 10K history
WRONG2 (10000 - 20000 km),
10K history WRONG3 (20000
- 30000 km), 10K history
WRONG4 (30000 - 40000 km):
incorrect reagent
SCR inducement system actual
state: inducement system active
Distance travelled in current 10K
block (0 - 10000 km)
Distance travelled while
inducement system active in
current 10K block 1N (0 - 10000
km), 20K block 2N (10 - 20000
km), 30K block 3N (20 - 30000
km), 40K block 4N (30 - 40000
km)
Short Term Secondary O2
Sensor Fuel Trim 1, 2, 3, 4
Commanded Throttle Actuator A
Control, B Control
Relative Throttle A Position, B
Position
Turbocharger Compressor Inlet
Pressure Sensor A, Pressure
Sensor B
Turbocharger A Compressor Inlet
Temperature, Turbocharger B
Turbocharger A Compressor
Outlet Temperature,
Turbocharger B
Turbocharger A RPM, B RPM
Turbocharger A Turbine Outlet
Temperature, Turbocharger B
Turbocharger A Turbine Inlet
Temperature, Turbocharger B
Commanded Throttle Actuator
Control
Driver's Demand Engine Percent Torque
Engine Percent Torque At Point
1 (Idle), Point 2, 3, 4, 5
569624 Rev "A" 2013-12-19
|
Robert Bosch GmbH
Page 19

PID PID description
VGT_A_ACT, B_ACT
VGT_A_CMD, B_
CMD
VGT_A_STAT, B_
STAT
VPWR Control Module Voltage
WG_A_ACT, B_ACT Wastegate A Position, B Position
WG_A_CMD, B_
CMD
TQ_DD Driver's demand engine percent
TQ_ACT Actual engine percent torque
TQ_MAX1,
MAX2, MAX3,
MAX4, MAX5
TQ_REF Engine reference torque
VGT_A_ACT Variable geometry turbo A
VGT_A_CMD Commanded variable geometry
VGT_A_STAT Variable geometry turbo A
VGT_B_ACT Variable geometry turbo B
VGT_B_CMD Commanded variable geometry
VGT_B_STAT Variable geometry turbo B
VPWR Control module voltage
WG_A_ACT Wastegate A position
WG_A_CMD Commanded wastegate A
WG_B_ACT Wastegate B position
WG_B_CMD Commanded wastegate B
Tab. 12: PID definitions
Variable Geometry Turbo A
Position, Turbo B
Commanded Variable Geometry
Turbo A Position, Turbo B
Variable Geometry Turbo A
Control Status, Turbo B
Commanded Wastegate A
Control, B Control
torque
Engine percent torque at
idle point 1, 2, 3, 4, 5
position
turbo A position
control status
position
turbo B position
control status
control
control
PID definitions | OBD 100 | 19 en
569624 Rev "A"
| Robert Bosch GmbH
2013-12-19
Page 20

Robert Bosch GmbH
Diagnostics
Franz-Oechsle-Straße 4
73207 Plochingen
DEUTSCHLAND
www.bosch.com
bosch.prueftechnik@bosch.com
569624 Rev "A" | 2013-12-19
 Loading...