

Bosch GBH 2-23 S Professional, GBH 2-23 RE Professional, GBH 2-23 E Professional Original Instructions Manual
Robert Bosch GmbH
Power Tools Division
70745 Leinfelden-Echterdingen
Germany
www.bosch-pt.com
1 619 P09 069 (2010.10) PS / 62 ASIA
Boschhamm e
r
Boschhamm e
r
GBH Professional
2-23 S | 2-23 E | 2-23 RE
en Original instructions
cn 正本使用说明书
tw 正本使用說明書
ko 사용 설명서 원본
th หนังสือคู่มือการใช้งานฉบับต้นแบบ
id Petunjuk-Petunjuk untuk
Penggunaan Orisinal
vi BΩng hõëng dÿn nguy›n bΩn
OBJ_BUCH-1281-002.book Page 1 Tuesday, October 12, 2010 3:05 PM

OBJ_BUCH-1281-002.book Page 2 Tuesday, October 12, 2010 3:05 PM
2 |
English. . . . . . . . . . . . . . . . . . . . . . . . . . . . . . Page 5
中文 . . . . . . . . . . . . . . . . . . . . . . . . . . . . . . . . . . . . . . . . . . . . 页 14
中文 . . . . . . . . . . . . . . . . . . . . . . . . . . . . . . . . . . . . . . . . . . . . 頁 21
한국어 . . . . . . . . . . . . . . . . . . . . . . . . . . . . . . . . . . . . . 면 28
ภาษาไทย . . . . . . . . . . . . . . . . . . . . . . . . . . . . . . . . . . . . . . . . หน้า 35
Bahasa Indonesia . . . . . . . . . . . . . . . . . . Halaman 43
Tiøng Vi·t . . . . . . . . . . . . . . . . . . . . . . . . . . . . . Trang 53
1 619 P09 069 | (12.10.10) Bosch Power Tools
e
e
Boschhammer
BoschhammerBoschhammer
OBJ_BUCH-1281-002.book Page 3 Tuesday, October 12, 2010 3:05 PM
3
Boschhammer
2
Boschhammer
1
| 3
4
5
6
7
8
9
10
11
12
GBH 2-23 RE
Professional
AB
r
r
Bos
Bosc
mm
hha
chhamme
e
1
10
11
hhamm
Bosc
Boschhamm
Bosch Power Tools 1 619 P09 069 | (12.10.10)
X
11
9
o
o
o
o
OBJ_BUCH-1281-002.book Page 4 Tuesday, October 12, 2010 3:05 PM
4 |
C D
14
13
E
15
F
3
ammer
oschh
Boschhammer
B
B
B
9
11
16
G
17 18 19 20 21
1 619 P09 069 | (12.10.10) Bosch Power Tools
X
H
22
B
B
OBJ_BUCH-1281-002.book Page 5 Tuesday, October 12, 2010 3:05 PM
English | 5
en
Safety Notes
General Power Tool Safety Warnings
WARNING
the warnings and instructions may result in electric shock, fire and/or serious injury.
Save all warnings and instructions for future
reference.
The term “power tool” in the warnings refers to
your mains-operated (corded) power tool or
battery-operated (cordless) power tool.
1) Work area safety
a) Keep work area clean and well lit. Clut-
tered or dark areas invite accidents.
b) Do not operate power tools in explosive
atmospheres, such as in the presence of
flammable liquids, gases or dust. Power
tools create sparks which may ignite the
dust or fumes.
c) Keep children and bystanders away
while operating a power tool. Distrac-
tions can cause you to lose control.
2) Electrical safety
a) Power tool plugs must match the outlet.
Never modify the plug in any way. Do not
use any adapter plugs with earthed
(grounded) power tools. Unmodified
plugs and matching outlets will reduce
risk of electric shock.
b) Avoid body contact with earthed or
grounded surfaces, such as pipes, radiators, ranges and refrigerators. There is
an increased risk of electric shock if your
body is earthed or grounded.
c) Do not expose power tools to rain or wet
conditions. Water entering a power tool
will increase the risk of electric shock.
d) Do not abuse the cord. Never use the
cord for carrying, pulling or unplugging
the power tool. Keep cord away from
heat, oil, sharp edges and moving parts.
Damaged or entangled cords increase the
risk of electric shock.
Read all safety warnings and all
instructions. Failure to follow
e) When operating a power tool outdoors,
use an extension cord suitable for outdoor use. Use of a cord suitable for out-
door use reduces the risk of electric
shock.
f) If operating a power tool in a damp loca-
tion is unavoidable, use a residual current device (RCD) protected supply. Use
of an RCD reduces the risk of electric
shock.
3) Personal safety
a) Stay alert, watch what you are doing and
use common sense when operating a
power tool. Do not use a power tool
while you are tired or under the influence of drugs, alcohol or medication. A
moment of inattention while operating
power tools may result in serious personal injury.
b) Use personal protective equipment. Al-
ways wear eye protection. Protective
equipment such as dust mask, non-skid
safety shoes, hard hat, or hearing protection used for appropriate conditions will
reduce personal injuries.
c) Prevent unintentional starting. Ensure
the switch is in the off-position before
connecting to power source and/or battery pack, picking up or carrying the
tool. Carrying power tools with your fin-
ger on the switch or energising power
tools that have the switch on invites accidents.
d) Remove any adjusting key or wrench be-
fore turning the power tool on. A wrench
or a key left attached to a rotating part of
the power tool may result in personal injury.
e) Do not overreach. Keep proper footing
and balance at all times. This enables
better control of the power tool in unexpected situations.
f) Dress properly. Do not wear loose cloth-
ing or jewellery. Keep your hair, clothing
and gloves away from moving parts.
Loose clothes, jewellery or long hair can
be caught in moving parts.
Bosch Power Tools 1 619 P09 069 | (12.10.10)
OBJ_BUCH-1281-002.book Page 6 Tuesday, October 12, 2010 3:05 PM
6 | English
g) If devices are provided for the connec-
tion of dust extraction and collection facilities, ensure these are connected and
properly used. Use of dust collection can
reduce dust-related hazards.
4) Power tool use and care
a) Do not force the power tool. Use the cor-
rect power tool for your application. The
correct power tool will do the job better
and safer at the rate for which it was designed.
b) Do not use the power tool if the switch
does not turn it on and off. Any power
tool that cannot be controlled with the
switch is dangerous and must be repaired.
c) Disconnect the plug from the power
source and/or the battery pack from the
power tool before making any adjustments, changing accessories, or storing
power tools. Such preventive safety
measures reduce the risk of starting the
power tool accidentally.
d) Store idle power tools out of the reach of
children and do not allow persons unfamiliar with the power tool or these instructions to operate the power tool.
Power tools are dangerous in the hands of
untrained users.
e) Maintain power tools. Check for mis-
alignment or binding of moving parts,
breakage of parts and any other condition that may affect the power tool’s operation. If damaged, have the power tool
repaired before use. Many accidents are
caused by poorly maintained power tools.
f) Keep cutting tools sharp and clean. Prop-
erly maintained cutting tools with sharp
cutting edges are less likely to bind and
are easier to control.
g) Use the power tool, accessories and tool
bits etc. in accordance with these instructions, taking into account the working conditions and the work to be performed. Use of the power tool for
operations different from those intended
could result in a hazardous situation.
5) Service
a) Have your power tool serviced by a qual-
ified repair person using only identical
replacement parts. This will ensure that
the safety of the power tool is maintained.
Hammer Safety Warnings
f Wear ear protectors. Exposure to noise can
cause hearing loss.
f Use auxiliary handle(s), if supplied with the
tool. Loss of control can cause personal in-
jury.
f Hold power tool by insulated gripping sur-
faces, when performing an operation where
the cutting accessory or fastener may contact hidden wiring. Cutting accessory and
fasteners contacting a “live” wire may make
exposed metal parts of the power tool “live”
and could give the operator an electric
shock.
f Use suitable detectors to determine if utili-
ty lines are hidden in the work area or call
the local utility company for assistance.
Contact with electric lines can lead to fire
and electric shock. Damaging a gas line can
lead to explosion. Penetrating a water line
causes property damage or may cause an
electric shock.
f When working with the machine, always
hold it firmly with both hands and provide
for a secure stance. The power tool is guided
more secure with both hands.
f Secure the workpiece. A workpiece clamped
with clamping devices or in a vice is held
more secure than by hand.
f Always wait until the machine has come to
a complete stop before placing it down. The
tool insert can jam and lead to loss of control
over the power tool.
1 619 P09 069 | (12.10.10) Bosch Power Tools
OBJ_BUCH-1281-002.book Page 7 Tuesday, October 12, 2010 3:05 PM
English | 7
Products sold in GB only: Your product is fitted
with an BS 1363/A approved electric plug with
internal fuse (ASTA approved to BS 1362).
If the plug is not suitable for your socket outlets,
it should be cut off and an appropriate plug fitted in its place by an authorised customer service agent. The replacement plug should have the
same fuse rating as the original plug.
The severed plug must be disposed of to avoid a
possible shock hazard and should never be inserted into a mains socket elsewhere.
Products sold in AUS and NZ only: Use a residual current device (RCD) with a rated residual
current of 30 mA or less.
Functional Description
Read all safety warnings and all instructions. Failure to follow the
warnings and instructions may result in electric shock, fire and/or serious injury.
Intended Use
The machine is intended for hammer drilling in
concrete, brick and stone. It is also suitable for
drilling without impact in wood, metal, ceramic
and plastic. Machines with electronic control
and right/left rotation are also suitable for
screwdriving.
Product Features
The numbering of the product features refers to
the illustration of the machine on the graphics
page.
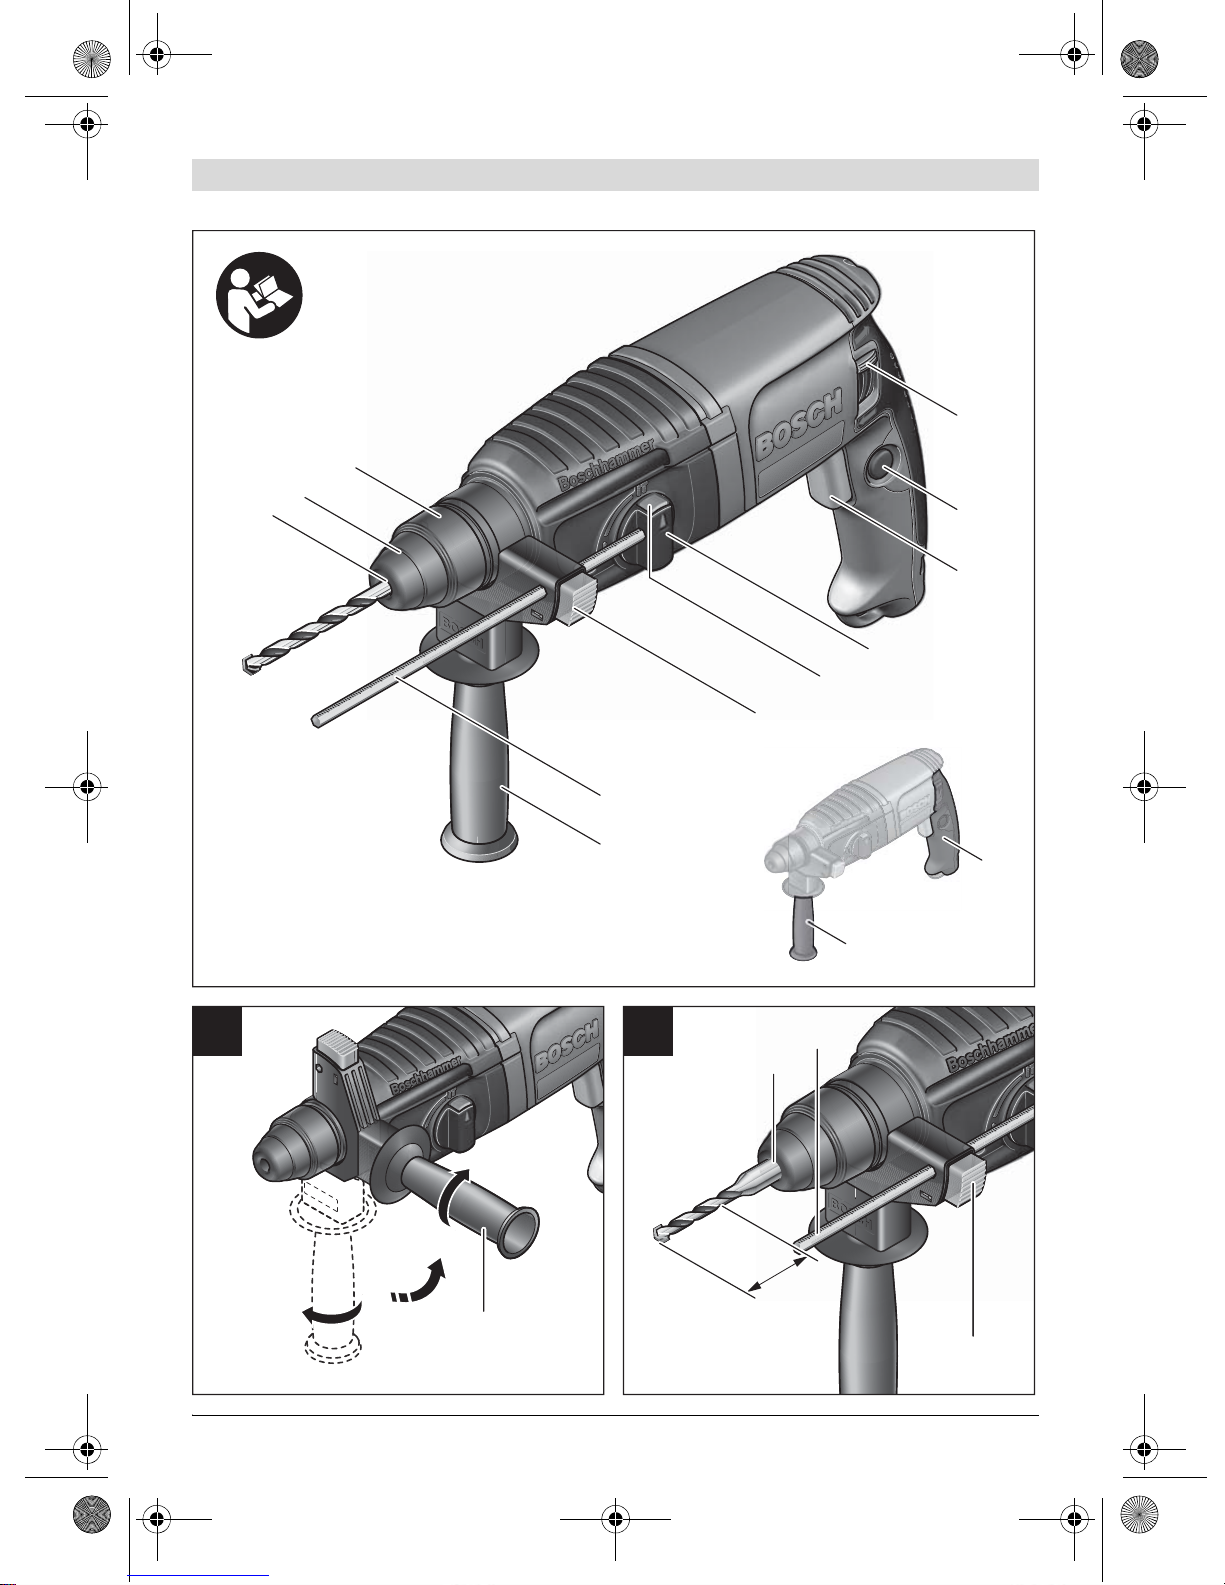
1 SDS-plus tool holder
2 Dust protection cap
3 Locking sleeve
4 Rotational direction switch (GBH 2-23 RE)
5 Lock-on button for On/Off switch
6 On/Off switch
7 Release button for drilling/hammer drilling
selector switch
8 Selector switch for drilling/hammer drilling
9 Button for depth stop adjustment
10 Depth stop
11 Auxiliary handle (insulated gripping surface)
12 Handle (insulated gripping surface)
13 Securing screw for key type drill chuck *
14 Key type drill chuck *
15 SDS-plus adapter shank for drill chuck*
16 Extraction sleeve of the dust extraction
attachment*
17 Clamping screw for the dust extraction
attachment*
18 Depth stop of the dust extraction attach-
ment*
19 Telescopic pipe of the dust extraction
attachment*
20 Wing bolt of the dust extraction attach-
ment*
21 Guide pipe of the dust extraction attach-
ment*
22 Universal bit holder with SDS-plus shank *
*Accessories shown or described are not part of the
standard delivery scope of the product. A complete
overview of accessories can be found in our accessories program.
Bosch Power Tools 1 619 P09 069 | (12.10.10)
OBJ_BUCH-1281-002.book Page 8 Tuesday, October 12, 2010 3:05 PM
8 | English
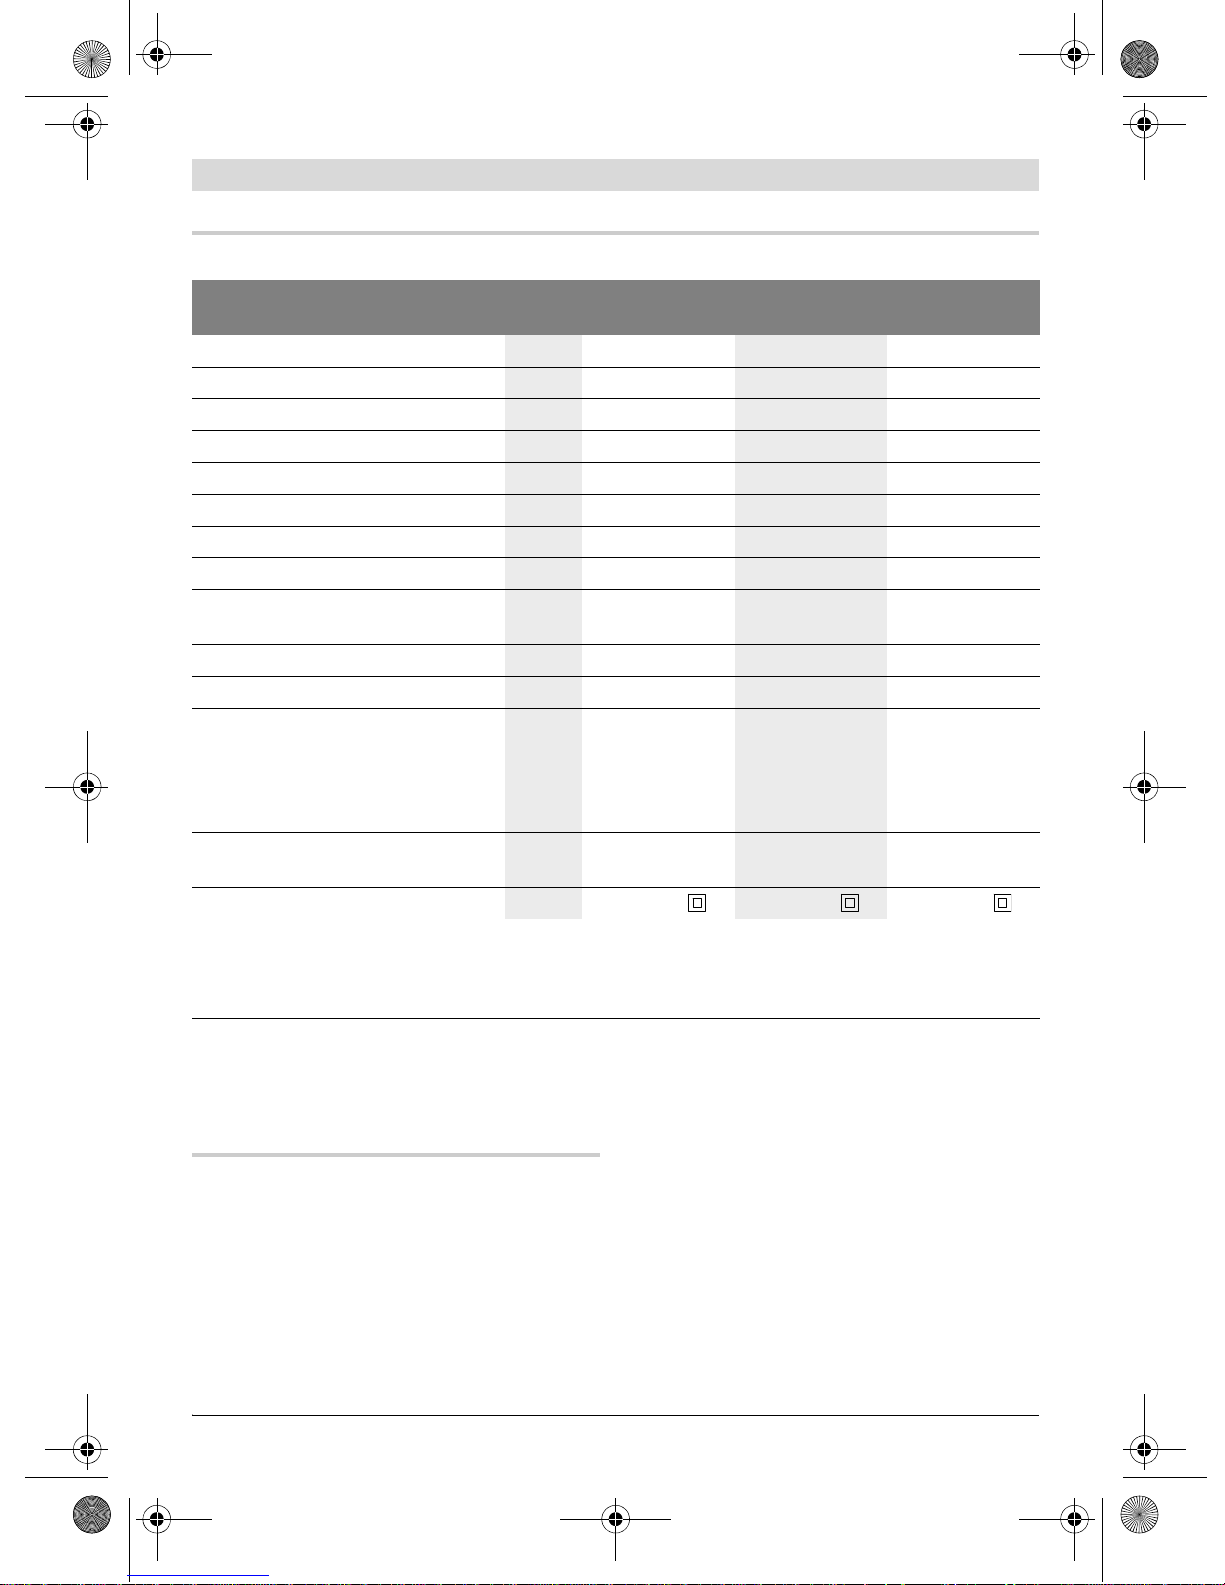
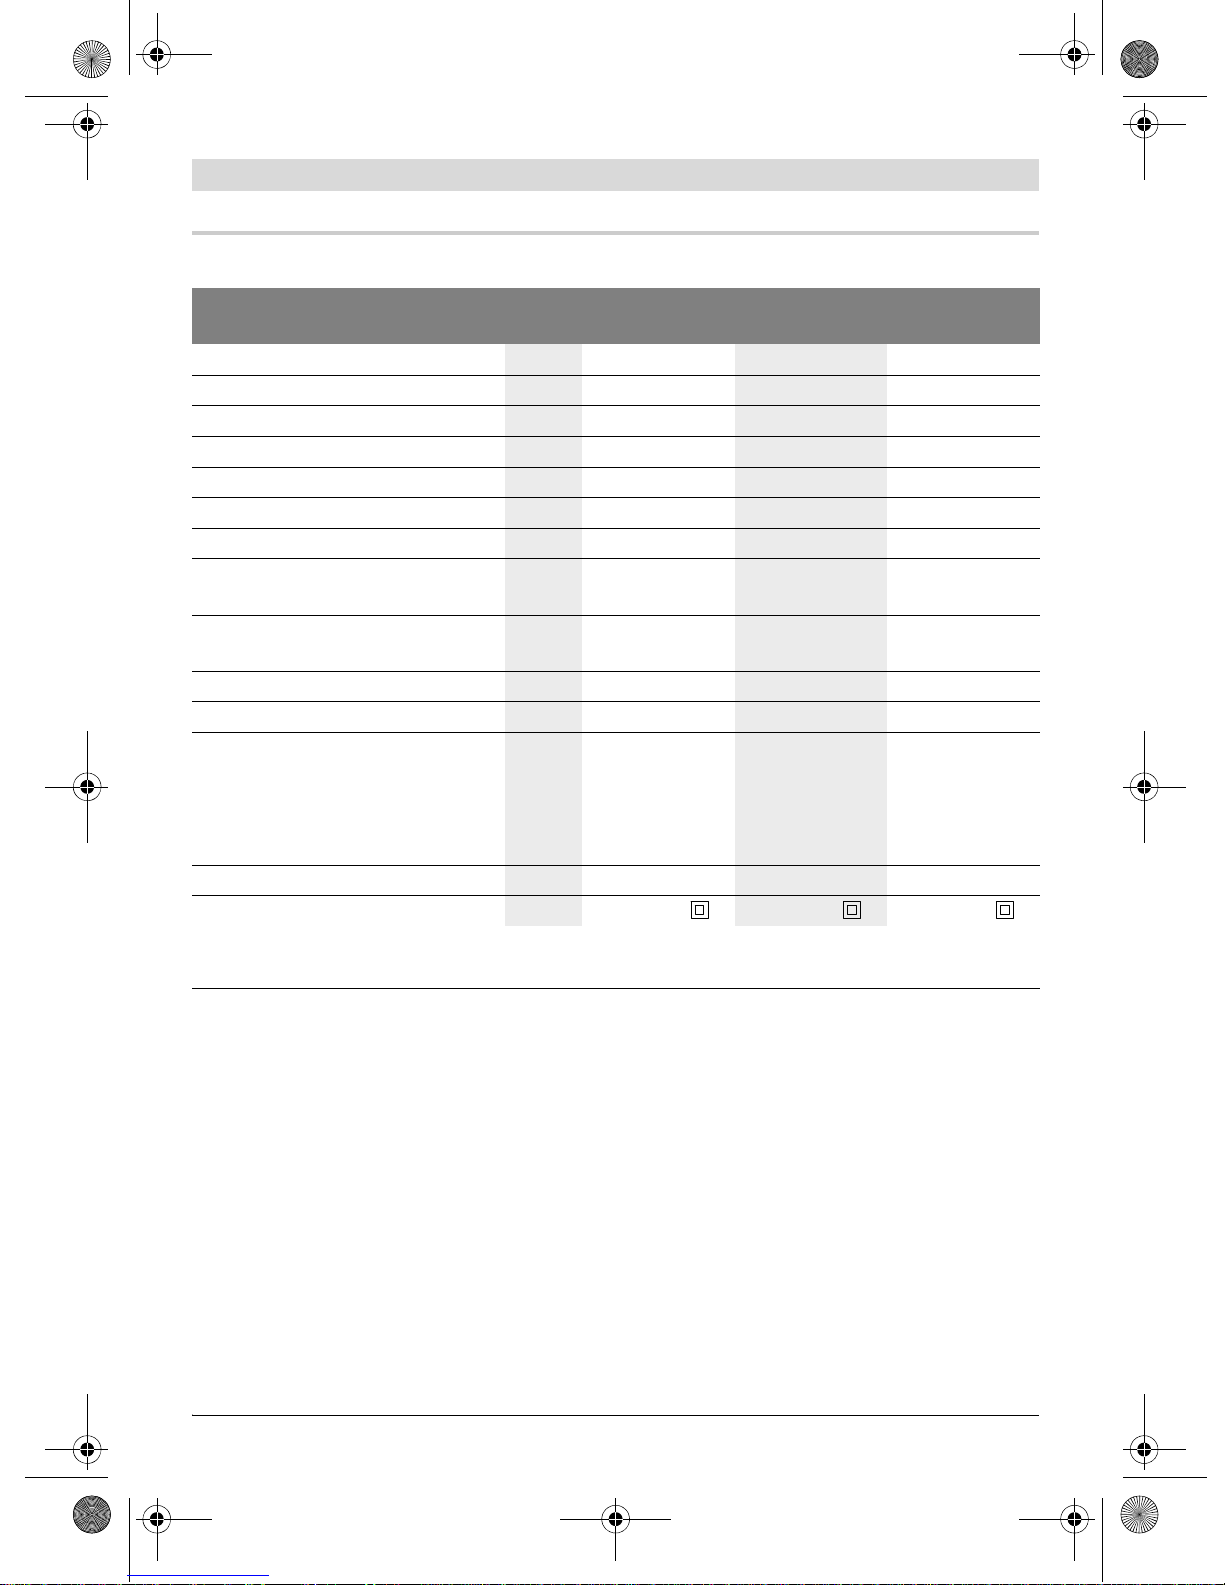
Technical Data
Rotary Hammer GBH 2-23 S
Professional
Article number
3 611 B50 2.. 3 611 B50 8.. 3 611 B50 4..
Speed control
Right/left rotation
Rated power input
Impact rate
Impact energy per stroke
Rated speed
Tool holder
Spindle collar diameter
W650650 650
-1
min
4400 0–4400 0–4400
J2.52.5 2.5
-1
min
1000 0–1000 0–1000
SDS-plus SDS-plus SDS-plus
mm 43
(Euro-Norm)
Hammer Drilling
Drilling
– zz
– – z
z zz
z zz
GBH 2-23 E
Professional
43
(Euro-Norm)
GBH 2-23 RE
Professional
43
(Euro-Norm)
Drilling diameter, max.:
–Concrete
– Brickwork (with core bit)
– Steel
– Wood
mm
mm
mm
mm
23
68
13
30
23
68
13
30
23
68
13
30
Weight according to
EPTA-Procedure 01/2003
Protection class
The values given are valid for a nominal voltage [U] of 230 V. For different voltages and models for specific countries,
these values can vary.
Please observe the article number on the type plate of your machine. The trade names of the individual machines
may vary.
kg 2.3 2.3 2.3
/II /II / II
Assembly
f Before any work on the machine itself, pull
the mains plug.
Auxiliary Handle
f Operate your machine only with the auxilia-
ry handle 11.
Changing the position of the auxiliary handle
(see figure A)
The auxiliary handle 11 can be set to any position for a secure and low-fatigue working posture.
1 619 P09 069 | (12.10.10) Bosch Power Tools
– Turn the bottom part of the auxiliary handle
11 in counterclockwise direction and swivel
the auxiliary handle 11 to the desired position. Then retighten the bottom part of the
auxiliary handle 11 by turning in clockwise direction.
Adjusting the Drilling Depth (see figure B)
The required drilling depth X can be set with the
depth stop 10.
– Press the button for the depth stop adjust-
ment 9 and insert the depth stop into the
auxiliary handle 11.
OBJ_BUCH-1281-002.book Page 9 Tuesday, October 12, 2010 3:05 PM
English | 9
– The knurled surface of the depth stop 10
must face downward.
– Insert the SDS-plus drilling tool to the stop
into the SDS-plus tool holder 1. Otherwise,
the movability of the SDS-plus drilling tool
can lead to incorrect adjustment of the drilling depth.
– Pull out the depth stop until the distance be-
tween the tip of the drill bit and the tip of the
depth stop correspond with the desired drilling depth X.
Selecting Drill Chucks and Tools
For hammer drilling and chiselling (chiselling
only with MV 200 accessory), SDS-plus tools are
required that are inserted in the SDS-plus drill
chuck.
For drilling without impact in wood, metal, ceramic and plastic as well as for screwdriving,
tools without SDS-plus are used (e.g., drills
with cylindrical shank). For these tools, a keyless chuck or a key type drill chuck are required.
Changing the Key Type Drill Chuck
To work with tools without SDS-plus (e.g., drills
with cylindrical shank), a suitable drill chuck
must be mounted (key type drill chuck or keyless chuck, accessories).
Removing the Key Type Drill Chuck
– Push the locking sleeve 3 toward the rear
and pull out the key type drill chuck 14.
Changing the Tool
The dust protection cap 2 largely prevents the
entry of drilling dust into the tool holder during
operation. When inserting the tool, take care
that the dust protection cap 2 is not damaged.
f A damaged dust protection cap should be
changed immediately. We recommend having this carried out by an after-sales service.
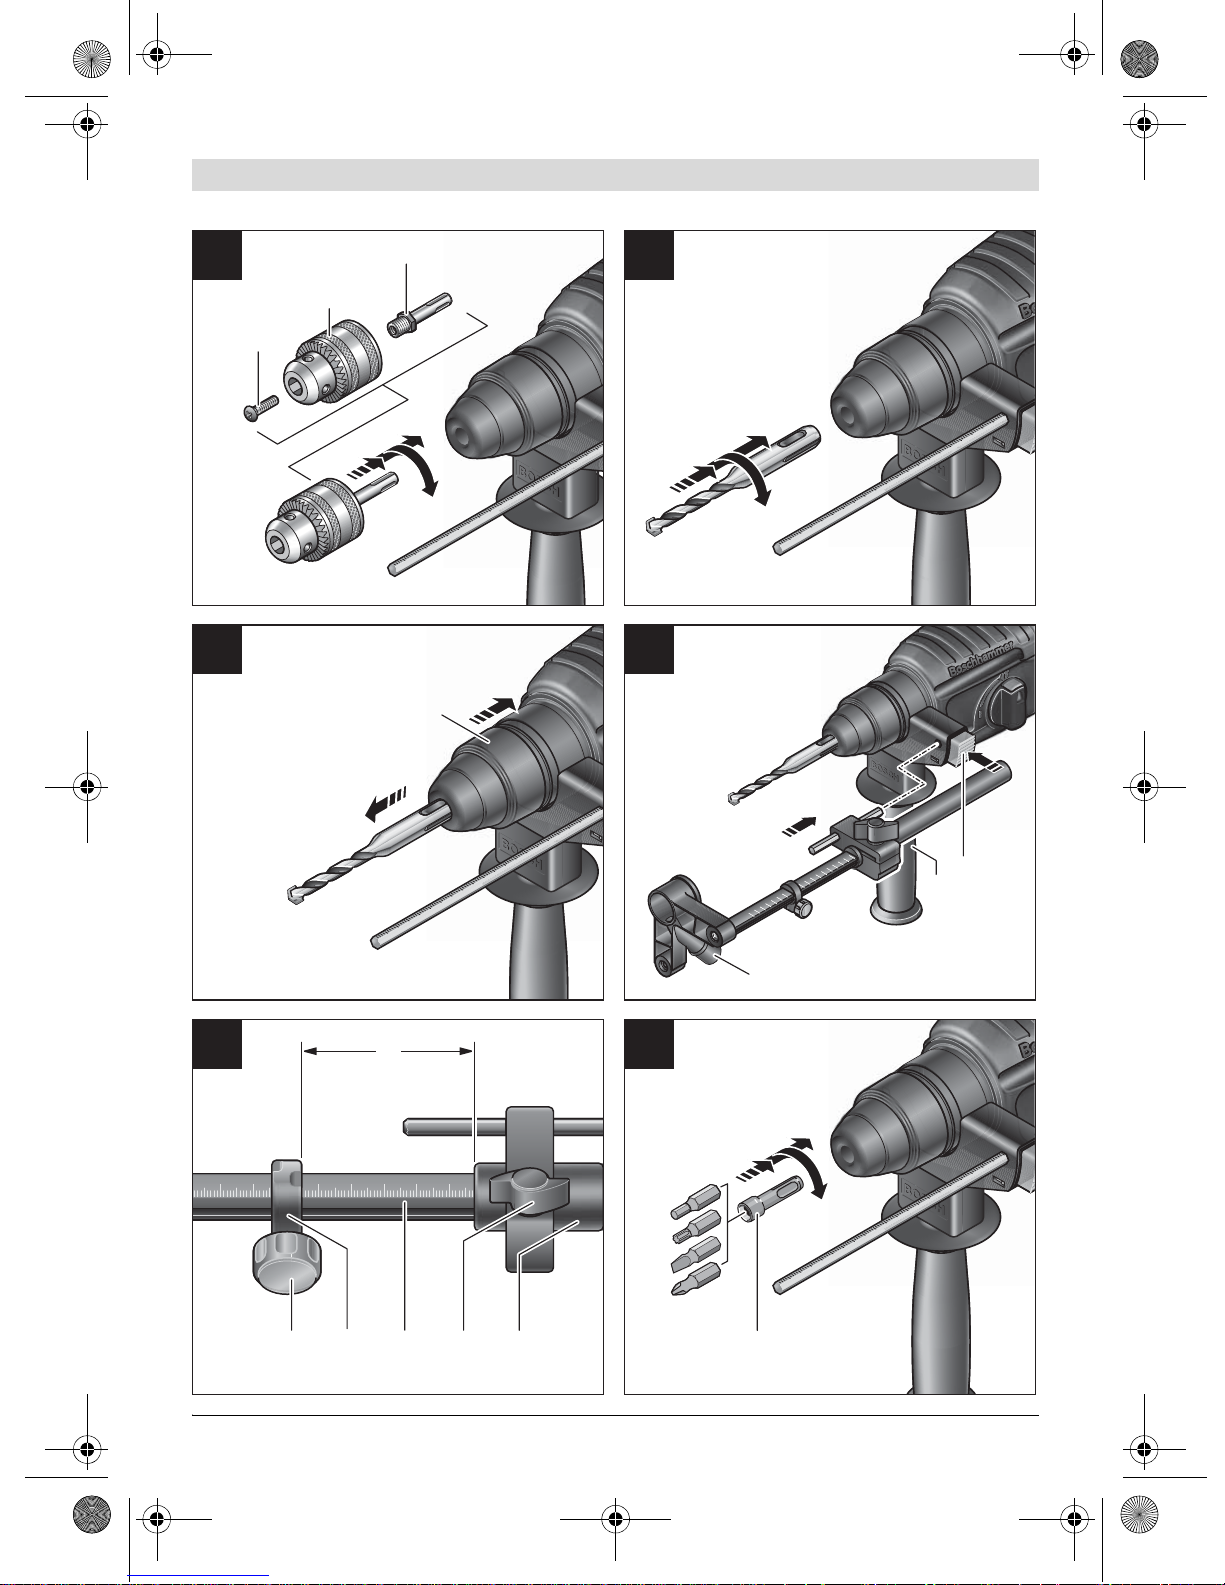
Inserting SDS-plus Drilling Tools (see figure D)
The SDS-plus drill chuck allows for simple and
convenient changing of drilling tools without the
use of additional tools.
– Clean and lightly grease the shank end of the
tool.
– Insert the tool in a twisting manner into the
tool holder until it latches itself.
– Check the latching by pulling the tool.
As a requirement of the system, the SDS-plus
drilling tool can move freely. This causes a certain radial run-out at no-load, which has no effect on the accuracy of the drill hole, as the drill
bit centres itself upon drilling.
Mounting the Key Type Drill Chuck
(see figure C)
– Screw the SDS-plus adapter shank 15 into a
key type drill chuck 14. Secure the key type
drill chuck 14 with the securing screw 13.
Please observe that the securing screw has
a left-hand thread.
Inserting the Key Type Drill Chuck
(see figure C)
– Clean the shank end of the adapter shank
and apply a light coat of grease.
– Insert the key type drill chuck with the adapt-
er shank into the tool holder with a turning
motion until it automatically locks.
– Check the locking effect by pulling the key
type drill chuck.
Bosch Power Tools 1 619 P09 069 | (12.10.10)
Removing SDS-plus Drilling Tools
(see figure E)
– Push back the locking sleeve 3 and remove
the tool.
Inserting Drilling Tools without SDS-plus
Note: Do not use tools without SDS-plus for
hammer drilling! Tools without SDS-plus and
their drill chucks are damaged by hammer drilling.
– Insert a key type drill chuck 14 (see “Chang-
ing the Key Type Drill Chuck”, page 9).
– Open the key type drill chuck 14 by turning
until the tool can be inserted. Insert the tool.
– Insert the chuck key into the corresponding
holes of the key type drill chuck 14 and clamp
the tool uniformly.
– Set the selector switch 8 to the “Drilling”
symbol.

OBJ_BUCH-1281-002.book Page 10 Tuesday, October 12, 2010 3:05 PM
10 | English
Removing Drilling Tools without SDS-plus
– Turn the sleeve of the key type drill chuck 14
with the drill chuck key in anticlockwise direction until the drilling tool can be removed.
Dust Extraction with the Dust Extraction Attachment (Accessory)
f Dusts from materials such as lead-containing
coatings, some wood types, minerals and
metal can be harmful to one’s health. Touching or breathing-in the dusts can cause allergic reactions and/or lead to respiratory infections of the user or bystanders.
Certain dusts, such as oak or beech dust, are
considered as carcinogenic, especially in
connection with wood-treatment additives
(chromate, wood preservative). Materials
containing asbestos may only be worked by
specialists.
– As far as possible, use a dust extraction
system suitable for the material.
– Provide for good ventilation of the work-
ing place.
– It is recommended to wear a P2 filter-
class respirator.
Observe the relevant regulations in your
country for the materials to be worked.
f Prevent dust accumulation at the work-
place. Dusts can easily ignite.
Mounting the Dust Extraction Attachment
(see figure F)
For dust extraction, the dust extraction attachment (accessory) is required. When drilling, the
dust extraction attachment retracts so that the
attachment head is always close to the surface
at the drill hole.
– Press the button for depth stop adjustment 9
and remove the depth stop 10. Press button
9 again and insert the dust extraction attachment into the auxiliary handle 11 from the
front.
– Connect an extraction hose (diameter
19 mm, accessory) to the extraction sleeve
16 of the dust extraction attachment.
The vacuum cleaner must be suitable for the material being worked.
When vacuuming dry dust that is especially detrimental to health or carcinogenic, use a special
vacuum cleaner.
Adjusting the Drilling Depth on the Dust Extraction Attachment (see figure G)
The required drilling depth X can also be adjusted when the dust extraction attachment is
mounted.
– Insert the SDS-plus drilling tool to the stop
into the SDS-plus tool holder 1. Otherwise,
the movability of the SDS-plus drilling tool
can lead to incorrect adjustment of the drilling depth.
– Loosen the wing bolt 20 on the dust extrac-
tion attachment.
– Without switching the power tool on, apply it
firmly to the drilling location. The SDS-plus
drilling tool must face against the surface.
– Position the the guide pipe 21 of the dust ex-
traction attachment in its holding fixture in
such a manner that the head of the dust extraction attachment faces against the surface
to be drilled. Do not slide the guide pipe 21
further over the telescopic pipe 19 of the
dust extraction attachment than required, so
that as much as possible of the scale 19 on
the telescopic pipe remains visible.
– Retighten the wing bolt 20 again. Loosen the
clamping screw 17 on the depth stop of the
dust extraction attachment.
–Move the depth stop 18 on the telescopic
pipe 19 in such a manner that the
clearance X shown in the figure corresponds
with the required drilling depth.
– Tighten the clamping screw 17 in this posi-
tion.
1 619 P09 069 | (12.10.10) Bosch Power Tools
OBJ_BUCH-1281-002.book Page 11 Tuesday, October 12, 2010 3:05 PM
English | 11
Operation
Starting Operation
f Observe correct mains voltage! The voltage
of the power source must agree with the
voltage specified on the nameplate of the
machine. Power tools marked with 230 V
can also be operated with 220 V.
Setting the Operating Mode
With the selector switch for drilling/hammer
drilling 8, the operating mode of the machine is
selected.
Note: Change the operating mode only when the
machine is switched off! Otherwise, the machine can be damaged.
– To change the operating mode, press the re-
lease button 7 and turn the drilling/hammer
drilling selector switch 8 to the desired position until it can be heard to latch.
Position for hammer drilling in
concrete or stone as well as for
chiselling (chiselling only with the
MV 200 accessory)
Position for drilling without impact
in wood, metal, ceramic and plastic
as well as for screwdriving and
thread cutting
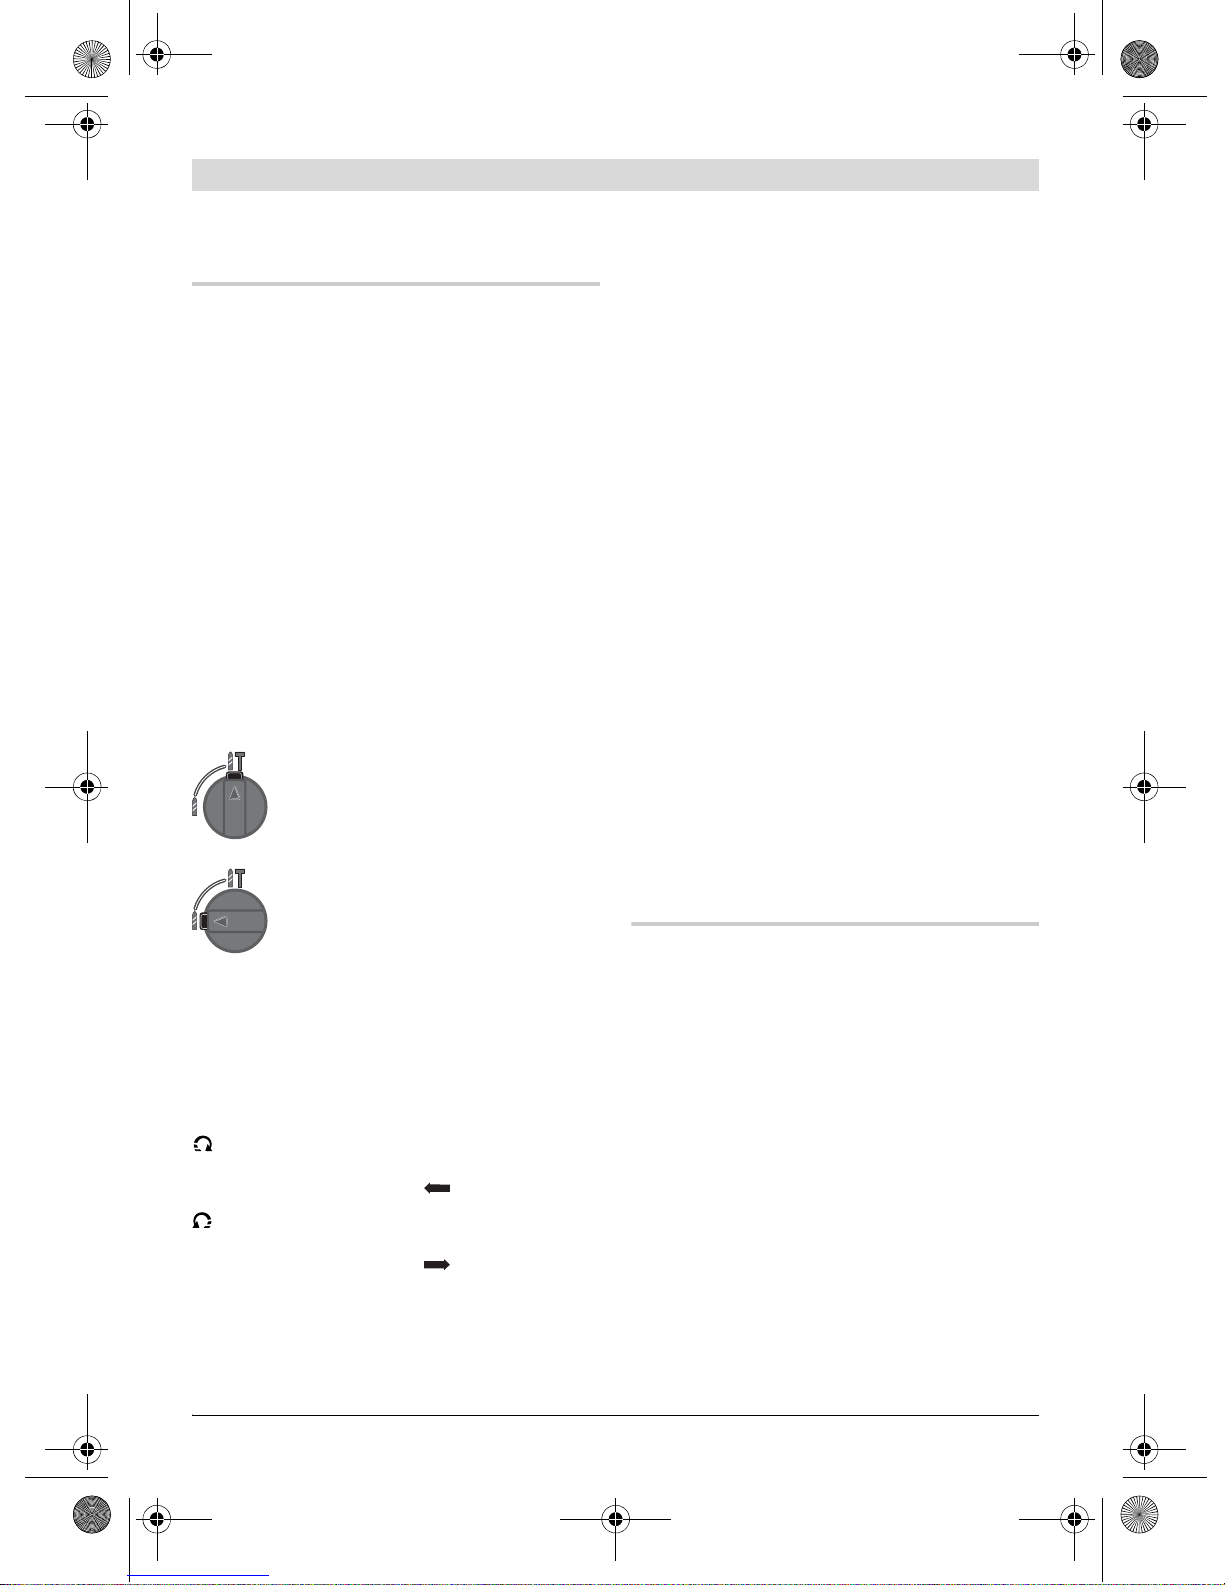
Reversing the Rotational Direction
(GBH 2-23 RE)
The rotational direction switch 4 is used to reverse the rotational direction of the machine.
However, this is not possible with the On/Off
switch 6 actuated.
Right rotation: Turn the selector switch for
drilling/hammer drilling 4 on both sides to
the stop in the position .
Left rotation: Turn the selector switch for
drilling/hammer drilling 4 on both sides to
the stop in the position .
Set the direction of rotation for hammer drilling,
drilling and chiselling always to right rotation.
Switching On and Off
–To start the machine, press the On/Off
switch 6.
–To lock the On/Off switch, keep it pressed
and additionally push the lock-on button 5.
–To switch off the machine, release the
On/Off switch 6. When the On/Off switch 6
is locked, press it first and then release it.
Setting the Speed/Impact Rate
(GBH 2-23 E/RE)
The speed/impact rate of the switched on power tool can be variably adjusted, depending on
how far the On/Off switch 6 is pressed.
Light pressure on the On/Off switch 6 results in
low speed/impact rate. Further pressure on the
switch increases the speed/impact rate.
Safety Clutch
f If the tool insert becomes caught or
jammed, the drive to the drill spindle is interrupted. Because of the forces that occur,
always hold the power tool firmly with both
hands and provide for a secure stance.
f If the power tool jams, switch the machine
off and loosen the tool insert. When switching the machine on with the drilling tool
jammed, high reaction torques can occur.
Working Advice
f Before any work on the machine itself, pull
the mains plug.
Chiselling
For chiselling, a MV 200 SDS-plus chiselling attachment (accessory), which is inserted into the
SDS-plus tool holder 1, is required.
Inserting Screwdriver Bits (see figure H)
f Apply the power tool to the screw/nut only
when it is switched off. Rotating tool inserts
can slip off.
To work with screwdriver bits, a universal bit
holder 22 with SDS-plus shank (accessory) is required.
– Clean the shank end of the adapter shank
and apply a light coat of grease.
Bosch Power Tools 1 619 P09 069 | (12.10.10)

OBJ_BUCH-1281-002.book Page 12 Tuesday, October 12, 2010 3:05 PM
12 | English
– Insert the universal bit holder with a turning
motion into the tool holder until it automatically locks.
– Check the locking effect by pulling the uni-
versal bit holder.
– Insert a screwdriver bit into the universal bit
holder. Use only screwdriver bits that match
the screw head.
– To remove the universal bit holder, pull the
locking sleeve 3 toward the rear and remove
the universal bit holder 22 out of the tool
holder.
Maintenance and Service
Maintenance and Cleaning
f Before any work on the machine itself, pull
the mains plug.
f For safe and proper working, always keep
the machine and ventilation slots clean.
f A damaged dust protection cap should be
changed immediately. We recommend having this carried out by an after-sales service.
– Clean the tool holder 1 each time after using.
If the machine should fail despite the care taken
in manufacturing and testing procedures, repair
should be carried out by an after-sales service
centre for Bosch power tools.
In all correspondence and spare parts order,
please always include the 10-digit article
number given on the type plate of the machine.
After-sales Service and Customer
Assistance
Our after-sales service responds to your questions concerning maintenance and repair of your
product as well as spare parts. Exploded views
and information on spare parts can also be
found under:
www.bosch-pt.com
Our customer service representatives can answer your questions concerning possible applications and adjustment of products and accessories.
People’s Republic of China
China Mainland
Bosch Power Tools (China) Co., Ltd.
567, Bin Kang Road
Bin Jiang District 310052
Hangzhou, P.R.China
Service Hotline: 400 826 8484
Fax: +86 571 8777 4502
E-Mail: contact.ptcn@cn.bosch.com
www.bosch-pt.com.cn
HK and Macau Special Administrative Regions
Robert Bosch Hong Kong Co. Ltd.
21st Floor, 625 King’s Road
North Point, Hong Kong
Customer Service Hotline: +852 (21) 02 02 35
Fax: +852 (25) 90 97 62
E-Mail: info@hk.bosch.com
www.bosch-pt.com.hk
Indonesia
PT. Multi Tehaka
Kawasan Industri Pulogadung
Jalan Rawa Gelam III No. 2
Jakarta 13930
Indonesia
Tel.: +62 (21) 46 83 25 22
Fax: +62 (21) 46 82 86 45/68 23
E-Mail: sales@multitehaka.co.id
www.multitehaka.co.id
Philippines
Robert Bosch, Inc.
28th Floor Fort Legend Towers,
3rd Avenue corner 31st Street,
Fort Bonifacio Global City,
1634 Taguig City, Philippines
Tel.: +63 (2) 870 3871
Fax: +63 (2) 870 3870
matheus.contiero@ph.bosch.com
www.bosch-pt.com.ph
Bosch Service Center:
9725-27 Kamagong Street
San Antonio Village
Makati City, Philippines
Tel.: +63 (2) 899 9091
Fax: +63 (2) 897 6432
rosalie.dagdagan@ph.bosch.com
1 619 P09 069 | (12.10.10) Bosch Power Tools
OBJ_BUCH-1281-002.book Page 13 Tuesday, October 12, 2010 3:05 PM
English | 13
Malaysia
Robert Bosch (S.E.A.) Pte. Ltd.
No. 8A, Jalan 13/6
G.P.O. Box 10818
46200 Petaling Jaya
Selangor, Malaysia
Tel.: +60 (3) 7966 3194
Fax: +60 (3) 7958 3838
cheehoe.on@my.bosch.com
Toll-Free: 1800 880 188
www.bosch-pt.com.my
Thailand
Robert Bosch Ltd.
Liberty Square Building
No. 287, 11 Floor
Silom Road, Bangrak
Bangkok 10500
Tel.: +66 (2) 6 31 18 79 – 18 88 (10 lines)
Fax: +66 (2) 2 38 47 83
Robert Bosch Ltd., P. O. Box 2054
Bangkok 10501, Thailand
Bosch Service – Training Centre
2869-2869/1 Soi Ban Kluay
Rama IV Road (near old Paknam Railway)
Prakanong District
10110 Bangkok
Thailand
Tel.: +66 (2) 6 71 78 00 – 4
Fax: +66 (2) 2 49 42 96
Fax: +66 (2) 2 49 52 99
Singapore
Robert Bosch (SEA) Pte. Ltd.
11 Bishan Street 21
Singapore 573943
Tel.: +65 6571 2772
Fax: +65 6350 5315
leongheng.leow@sg.bosch.com
Toll-Free: 1800 333 8333
www.bosch-pt.com.sg
Vietnam
Robert Bosch Vietnam Co. Ltd
10/F, 194 Golden Building
473 Dien Bien Phu Street
Ward 25, Binh Thanh District
84 Ho Chi Minh City
Vietnam
Tel.: +84 (8) 6258 3690 ext. 413
Fax: +84 (8) 6258 3692
hieu.lagia@vn.bosch.com
www.bosch-pt.com
Australia, New Zealand and Pacific Islands
Robert Bosch Australia Pty. Ltd.
Power Tools
Locked Bag 66
Clayton South VIC 3169
Customer Contact Center
Inside Australia:
Phone: +61 (01300) 307 044
Fax: + 61 (01300) 307 045
Inside New Zealand:
Phone: +64 (0800) 543 353
Fax: +64 (0800) 428 570
Outside AU and NZ:
Phone: +61 (03) 9541 5555
www.bosch.com.au
Disposal
The machine, accessories and packaging should
be sorted for environmental-friendly recycling.
Do not dispose of power tools into household
waste!
Subject to change without notice.
Bosch Power Tools 1 619 P09 069 | (12.10.10)
OBJ_BUCH-1281-002.book Page 14 Tuesday, October 12, 2010 3:05 PM
14 | 中文
cn
安全规章
电动工具通用安全警告
阅读所有警告和所有说明 ! 不遵照以下警告
和说明会导致电击、着火和/或严重伤害。
保存所有警告和说明书以备查阅。
在所有下列的警告中术语 " 电动工具 " 指市电驱动 (有
线)电动工具或电池驱动 (无线)电动工具。
1) 工作场地的安全
a) 保持工作场地清洁和明亮。 混乱和黑暗的场地会
引发事故。
b) 不要在易爆环境,如有易燃液体、气体或粉尘的
环境下操作电动工具。 电动工具产生的火花会点
燃粉尘或气体。
c) 让儿童和旁观者离开后操作电动工具。 注意力不
集中会使你失去对工具的控制。
2) 电气安全
a) 电动工具插头必须与插座相配。绝不能以任何方
式改装插头。 需接地的电动工具不能使用任何转
换插头。未经改装的插头和相配的插座将减少电
击危险。
3) 人身安全
a) 保持警觉,当操作电动工具时关注所从事的操作
并保持清醒。当你感到疲倦,或在有药物、酒精
或治疗反应时,不要操作电动工具。 在操作电动
工具时瞬间的疏忽会导致严重人身伤害。
b) 使用个人防护装置。始终佩戴护目镜。 安全装
置,诸如适当条件下使用防尘面具、防滑安全
鞋、安全帽、听力防护等装置能减少人身伤害。
c) 防止意外起动。确保开关在连接电源和 / 或电池
盒、拿起或搬运工具时处于关断位置。 手指放在
已接通电源的开关上或开关处于接通时插入插头
可能会导致危险。
d) 在电动工具接通之前,拿掉所有调节钥匙或扳
手。 遗留在电动工具旋转零件上的扳手或钥匙会
导致人身伤害。
e) 手不要伸展得太长。时刻注意立足点和身体平
衡。 这样在意外情况下能很好地控制电动工具。
f) 着装适当。不要穿宽松衣服或佩戴饰品。让你的
衣服、手套和头发远离运动部件。 宽松衣服、佩
饰或长发可能会卷入运动部件中。
g) 如果提供了与排屑、集尘设备连接用的装置,要
确保他们连接完好且使用得当。 使用这些装置可
减少尘屑引起的危险。
b) 避免人体接触接地表面,如管道、散热片和冰
箱。 如果你身体接地会增加电击危险。
c) 不得将电动工具暴露在雨中或潮湿环境中。 水进
入电动工具将增加电击危险。
d) 不得滥用电线。绝不能用电线搬运、拉动电动工
具或拔出其插头。使电线远离热源、油、锐边或
运动部件。 受损或缠绕的软线会增加电击危险。
e) 当在户外使用电动工具时,使用适合户外使用的
外接软线。 适合户外使用的软线将减少电击危
险。
f) 如果在潮湿环境下操作电动工具是不可避免的,
应使用剩余电流动作保护器 (RCD)。 使用
RCD 可减小电击危险。
4) 电动工具使用和注意事项
a) 不要滥用电动工具,根据用途使用适当的电动工
具。 选用适当设计的电动工具会使你工作更有
效、更安全。
b) 如果开关不能接通或关断工具电源,则不能使用
该电动工具。 不能用开关来控制的电动工具是危
险的且必须进行修理。
c) 在进行任何调节、更换附件或贮存电动工具之
前,必须从电源上拔掉插头和/或使电池盒与工
具脱开。 这种防护性措施将减少工具意外起动的
危险。
d) 将闲置不用的电动工具贮存在儿童所及范围之
外,并且不要让不熟悉电动工具或对这些说明不
了解的人操作电动工具。 电动工具在未经培训的
用户手中是危险的。
1 619 P09 069 | (12.10.10) Bosch Power Tools
OBJ_BUCH-1281-002.book Page 15 Tuesday, October 12, 2010 3:05 PM
中文 | 15
e) 保养电动工具。检查运动件是否调整到位或卡
住,检查零件破损情况和影响电动工具运行的其
他状况。如有损坏,电动工具应在使用前修理
好。 许多事故由维护不良的电动工具引发。
f) 保持切削刀具锋利和清洁。 保养良好的有锋利切
削刃的刀具不易卡住而且容易控制。
g) 按照使用说明书,考虑作业条件和进行的作业来
使用电动工具、附件和工具的刀头等。 将电动工
具用于那些与其用途不符的操作可能会导致危
险。
5) 维修
a) 将你的电动工具送交专业维修人员,使用同样的
备件进行修理。 这样将确保所维修的电动工具的
安全性。
针对锤钻的安全规章
f 佩戴耳罩。 工作噪音会损坏听力。
f 使用随工具提供的辅助手柄。 操作失手时会引起人
身伤害。
f 安装在机器上的工具或螺丝如果可能割断隐藏的 电
线,一定要按住绝缘手柄操作电动工具。 电动工具
如果割断了带电的电线,机器上的金属部件会导电,
并进而导致操作者触电。
f 使用合适的侦测装置侦察隐藏的电线,或者向当地
的相关单位寻求支援。 接触电线可能引起火灾並让
操作者触电。损坏了瓦斯管会引起爆炸。凿穿水管
不仅会造成严重的财物损失,也可能导致触电。
f 工作时必须用双手握紧电动工具,並且要确保立足
稳固。 使用双手比较能够握稳电动工具。
f 固定好工件。 使用固定装置或老虎钳固定工件,会
比用手持握工件更牢固。
f 等待电动工具完全静止后才能够放下机器。 机器上
的工具可能在工作中被夹住,而令您无法控制电动
工具。
功能解说
阅读所有的警告提示和指示。 如未确实遵
循警告提示和指示,可能导致电击、火灾
並且 / 或其他的严重伤害。
按照规定使用机器
本电动工具适合在混凝土,砖墙和石材上进行震动钻。
另外也可以使用本电动工具在木材,金属,陶材和塑料
上 进行无震动功能的正常钻。有电子调节装置和正逆转
功能的 电动工具也能够拧转螺丝。
插图上的机件
机件的编号和电动工具详解图上的编号一致。
1 SDS-plus (四坑系统)工具接头
2 防尘盖
3 锁定套筒
4 正逆转开关 (GBH 2-23 RE)
5 起停开关的锁紧键
6 起停开关
7 " 正常钻 / 震动钻 " 转换开关的解锁按键
8 " 正常钻 / 震动钻 " 的转换开关
9 调整深度尺的按键
10 深度尺
11 辅助手柄 (绝缘握柄)
12 手柄 (绝缘握柄)
13 齿环夹头上的固定螺丝*
14 齿环夹头*
15 夹头的 SDS-plus (四坑系统)接头柄 *
16 吸尘装备 (Saugfix)的吸孔*
17 吸尘装备 (Saugfix)的拧紧螺丝*
18 吸尘装备 (Saugfix)的深度挡块*
19 吸尘装备 (Saugfix)的伸缩尺*
20 吸尘装备 (Saugfix)的蝶翼螺丝*
21 吸尘装备 (Saugfix)的导管*
22 有 SDS-plus (四坑系统)接头柄的通用连杆 *
*图表或说明上提到的附件,并不包含在基本的供货范围中。 本
公司的附件清单中有完整的附件供应项目。
Bosch Power Tools 1 619 P09 069 | (12.10.10)
OBJ_BUCH-1281-002.book Page 16 Tuesday, October 12, 2010 3:05 PM
16 | 中文
技术数据
电锤
GBH 2-23 S
Professional
物品代码
3 611 B50 2.. 3 611 B50 8.. 3 611 B50 4..
转速控制装置
正 / 逆转功能
额定输入功率
冲击次数
单一冲击强度
额定转速
瓦
次 / 分
焦耳
次 / 分
工具夹头
(四坑系统)
主轴颈直径
毫米
(欧洲标准)
锤钻
钻孔
最大钻孔直径:
– 混凝土
– 土墙 (使用空心钻头)
– 钢板
– 木材
毫米
毫米
毫米
毫米
重量符合 EPTA-Procedure 01/2003 公斤
绝缘等级
本说明书提供的参数是以 230 V 为依据,於低电压地区,此数据有可能不同。
GBH 2-23 E
Professional
GBH 2-23 RE
Professional
– zz
– – z
650
4400
2,5
1000
SDS-plus
(四坑系统)
43
(欧洲标准)
650 650
0–4400 0–4400
2,5 2,5
0–1000 0–1000
SDS-plus
SDS-plus
(四坑系统)
43
(欧洲标准)
43
z zz
z zz
23
68
13
30
2,3
23
68
13
30
23
68
13
30
2,3 2,3
/II /II /II
请认清电动工具铭牌上的物品代码。电动工具在销售市场上没有统一的商品名称。
1 619 P09 069 | (12.10.10) Bosch Power Tools
OBJ_BUCH-1281-002.book Page 17 Tuesday, October 12, 2010 3:05 PM
中文 | 17
安装
f 维修电动工具或换装零、配件之前,务必 从插座上
拔出插头。
辅助手柄
f 操作电动工具时务必使用辅助手柄 11.
转动辅助手柄 (参考插图 A)
您可以根据需要改变辅助手柄 11 的位置,以提高工作
安全和增加工作的舒适性。
– 朝著逆时针方向转动辅助手柄 11。把辅助手柄 11
摆动到需要的位置。接著再朝顺时针方向转紧辅助
手柄 11。
调整钻深 (参考插图 B)
使用深度尺 10 可以设定需要的钻深 X。
– 按下调整深度尺的按键 9,再把深度尺装入辅助手柄
11 中。
– 深度尺 10 上的肋纹必须朝下。
– 把 SDS-plus(四坑系统)工具插入 SDS-plus (四坑
系统)接头 1 中,并把工具推到底。 如果未安装好
工具,会影响设定深度的准确性。
– 适当调整深度尺,从钻咀尖端到深度尺尖端的距离
必须和需要的钻深 X 一致。
更换齿环夹头
必须在机器上安装合适的夹头 (齿环夹头,快速夹头或
附件)后, 才能使用无 SDS-plus (四坑系统)的工具
(例如有圆柱柄的钻头)。
组合齿环夹头 (参考插图 C)
– 把有 SDS-plus (四坑系统)接头柄的通用连杆 15
转入齿环夹头 14 中。以螺丝 13 固定齿环夹头 14。
注意,固定螺丝有左螺纹。
安装齿环夹头 (参考插图 C)
– 清洁接头柄的末端并在接头柄末端涂抹少许油脂。
– 把齿环夹头的接头柄拧入机器的工具接头中,至接
头柄自动锁定为止。
– 抽拉齿环夹头,以确定夹头是否已经锁定了。
拆卸齿环夹头
– 向后抽拉锁定套筒 3,接著便可以拔出齿环夹头
14。
更换工具
防尘盖 2 可以防止工作时凿削废尘侵入夹头中。安装工
具时必须小心,勿损坏防尘盖 2。
f 如果防尘盖坏损了必须马上更换。 最好委托本公司
的顾客服务处换装。
选择夹头和工具
进行震动钻和凿击 (凿击时必须安装附件 MV 200)时
必须使用 能够安装在 SDS-plus (四坑系统)夹头上的
SDS-plus (四坑系统)工具。
在木材,金属,陶材和塑料上进行无震动功能的正常
钻,以及拧转螺丝时,必须使用无 SDS-plus 的工具
(例如带圆柱柄的钻头)。上述工具必须配合快速夹头
或齿环夹头一起使用。
Bosch Power Tools 1 619 P09 069 | (12.10.10)
安装 SDS-plus (四坑系统)工具 (参考插图 D)
有了 SDS-plus (四坑系统)夹头,不必使用工具也可
以快速便利地安装钻头。
– 清洁工具柄並在柄上塗少许润滑脂。
– 把工具转入工具夹头中,至工具自动锁牢为止。
– 抽拉工具以确定它是否正确锁紧了。
SDS-plus (四坑系统)系统的工具是活动的,因此在无
负载状态下此类工具会偏心旋转。 开始钻孔时工具便会
自动定心,所以上述现象并不会影响钻孔的准确度。
OBJ_BUCH-1281-002.book Page 18 Tuesday, October 12, 2010 3:05 PM
18 | 中文
拆卸 SDS-plus (四坑系统)工具 (参考插图 E)
– 向后推移锁定套筒 3 並取出工具。
安装无 SDS-plus (四坑系统)的工具
指示: 不可以使用无 SDS-plus (四坑系统)的工具进
行震动钻!无 SDS-plus (四坑系统)的工具和它的夹
头会在进行震动钻时受损。
– 装上齿环夹头 14 (参考 " 更换齿环夹头 ",第 17
页)。
– 转动齿环夹头 14 至能够装入工具为止,安装好工
具。
– 把夹头扳手插入齿环夹头 14 上的扳手孔中,均匀地
拧紧扳手来固定好工具。
– 把转换开关 8 拧转到 " 正常钻 " 的符号上。
拆卸无 SDS-plus (四坑系统)的工具
– 使用夹头扳手,朝著逆时针方向转动齿环夹头 14 上
的套筒,至能够拿出工具为止。
使用吸尘装备 (Saugfix)吸尘 (附件)
f 含铅的颜料以及某些木材、矿物和金属的加工废尘
有害健康。 机器操作者或者工地附近的人如果接触、
吸入这些废尘,可能会有 过敏反应或者感染呼吸道
疾病。
某些尘埃 (例如加工橡木或山毛榉的废尘)可能致
癌,特别是和处理 木材的添加剂 (例如木材的防腐
剂等)结合之后。 只有经过专业训练的人才能够加
工含石棉的物料。
– 尽可能使用适合物料的吸尘装置。
– 工作场所要保持空气流通。
– 最好佩戴 P2 滤网等级的口罩。
安装吸尘装备 (Saugfix) (参考插图 F)
吸尘装备 Saugfix (附件)是用来吸取钻孔时产生的废
尘。 当钻头吃入工件中时吸尘装备会向后回缩,这样可
以确保吸尘装备 能够紧贴着工件表面。
– 按住辅助手柄上的按键 9,拔出深度尺 10 。再度按
下按键 9,把吸尘装备 从机器前端插入辅助把手 11
中。
– 在吸尘装备的吸孔 16 上安装吸尘软管 (管直径
19 毫米,附件)。
根据工件的物料选择合适的吸尘装置。
吸集可能危害健康,可能导致癌症或干燥的废尘时,务
必使用特殊的吸尘装置。
在吸尘装备上设定钻孔深度 (参考插图 G)
安装了吸尘装备后也能够设定钻孔深度 X。
– 把 SDS-plus(四坑系统)工具插入 SDS-plus (四坑
系统)接头 1 中,并把工具推到底。 如果未安装好
工具,会影响设定深度的准确性。
– 松开吸尘装备上的蝶翼螺丝
– 把尚未开动的电动工具紧紧地顶在工件上。
SDS-plus (四坑系统) - 工具也必须紧贴著工件。
– 推移吸尘装备的导管 21,让装备的顶端能够靠在钻
孔表面上。 不可以过度推出导管 21,这样可能遮盖
了伸缩尺 19 上的刻度。 尽可能充分利用伸缩尺 19
上的刻度。
– 收紧蝶翼螺丝 20。放松吸尘装备上深度挡块的拧紧
螺丝 17。
– 调整伸缩尺 19 上的深度档块 18 的位置以设定钻深。
插图中的线段长度 X 便是实际需要的钻孔深度。
– 拧紧螺丝 17 把挡块固定在这个位置。
20。
请留心并遵守贵国和加工物料有关的法规。
f 避免让工作场所堆积过多的尘垢。 尘埃容易被点燃。
1 619 P09 069 | (12.10.10) Bosch Power Tools

OBJ_BUCH-1281-002.book Page 19 Tuesday, October 12, 2010 3:05 PM
中文 | 19
操作
操作机器
f 注意电源的电压!电源的电压必须和电动工具铭牌
上标示的电压一致。
设定操作模式
使用 " 正常钻 / 震动钻 " 的转换开关 8,可以变换电动工
具的操作方式。
指示: 务必先关闭电动工具,然后才可以改变操作功
能!否则会损坏电动工具。
– 变换操作方式前,先按下解锁按键 7 并且把 " 正常钻 /
震动钻 " 的转换开关 8 拧转的需要的位置上,至听见
卡入声响为止。
在混凝土或石材上进行 震动钻 或凿击
(凿击时必须使用附件 MV 200) 时的开关
位置。
在木材、金属、陶材和塑料上进行 正常
钻, 以及拧转螺丝和攻丝时的开关位置
调整转速 / 冲击次数
随著在起停开关 6 上施压大小,可以无级式地提高或降
低转速 / 冲击次数。
轻按起停开关 6,机器以低转速 / 冲击次数运作。增强
施加在起停开关上的压力,可以提高机器的转速 / 冲击
次数。
过载离合器
f 如果工具卡住了,传往主轴的动力会中断。此时会
产生非常大的震动力。因此操作机器时务必要用双
手握紧机器,并且要确保立足稳固。
f 如果电动工具卡住了,先关闭电动工具 , 再取出工
具。 开动工具被卡住的电动工具,会产生很高的反
应力矩。
(GBH 2-23 E/RE)
有关操作方式的指点
f 维修电动工具或换装零、配件之前,务必 从插座上
拔出插头。
凿击
进行凿击时必须使用 SDS-plus (四坑系统) - 凿刀附加
件 MV 200 (附件),这样才能够 把凿刀安装在 SDSplus (四坑系统) - 工具接头 1 中。
改变转向 (GBH 2-23 RE)
使用正逆转开关 4 可以改变机器的转向。如果按住了起
停开关 6,则无法改变转向。
正转: 把机器两侧的正逆转开关 4 推到底,让开关
停留在此符号上 。
逆转 : 把机器两侧的正逆转开关 4 推到底,让开关
停留在此符号上 。
进行震动钻、正常钻和凿削时,都必须把转向设定为正
转。
开动 / 关闭
– 按下起停开关 6,可以 开动 电动工具。
– 锁定 起停开关,按住起停开关并同时按下锁紧键 5。
– 关闭 电动工具,放开起停开关 6。如果起停开关 6
被锁定了,先按下起停开关紧接著再放开开关。
Bosch Power Tools 1 619 P09 069 | (12.10.10)
安装螺丝批嘴 (参考插图 H)
f 先关闭电动工具,然后再把工具放置在螺母 / 螺丝
上。 安装在接头上的工具如果仍继续转动,容易从
螺丝头上滑开。
使用螺丝批嘴时必须在机器上安装有 SDS-plus (四坑
系统)接头柄的通用连杆 22。
– 清洁接头柄的末端并在接头柄末端涂抹少许油脂。
– 把通用连杆拧入工具接头中,并让连杆自动锁定。
– 抽拉连杆,检查连杆是否已经正确锁牢。
– 把螺丝批嘴插入通用连杆中。必须使用与螺丝头大
小相符的螺丝批嘴。
– 拆卸通用连杆时必须先向后抽拉锁定套筒 3,接著便
可以从 工具接头上取出通用连杆 22。
 Loading...