

GAS FREE-STANDING CONVECTION RANGE
Use and Care Manual
For Use with Model(s): all gas models
A Special Message to Our Customers
Dear Bosch Range Owner:
Thank you and congratulations on the purchase of your Bosch Convection Range.
Whether you are an expert chef or an aspiring cook, we know that your new range
will exceed your expectations. Decades of knowledge and experience are built into
this range making it among the highest quality, most versatile and most efficient
available.
We ask that you read this manual thoroughly before using your new range. Please
pay particular attention to the safety precautions printed at the front of this book and
the numerous safety hints and cautions placed throughout. Also, be sure to familiarize
yourself with the proper operation of the range and its cleaning and maintenance
procedures. Adherence to these instructions and procedures will ensure that you
realize the full potential of your new Bosch range as well as maintain it for years of
dependable use.
Thank you and good cooking,
Bosch Home Appliances
WARNING
When used in accordance with its intended purposes
and properly cared for, your new Bosch range has
been designed to be a safe, reliable appliance. Read
all instructions carefully before using this range.
These precautions will reduce the risk of burns,
electric shock, fire, and injury to persons. Do not
operate the oven or cooktop controls if the glass is
broken. Food splatter or cleaning solution may
penetrate a broken control panel and create a risk of
electric shock. Contact a qualified technician
immediately should your glass control panel become
broken. When using kitchen appliances, basic safety
precautions must be followed, including those in the
following pages.
IMPORTANT SAFETY NOTICE
The California Safe Drinking and Toxic Enforcement
Act requires the Governor of California to publish a
list of substances known to the state to cause
cancer, birth defects or other reproductive harm,
and requires businesses to warn customers of
potential exposure to such substances.
The burning of gas cooking fuel and the elimination
of soil during self-cleaning can generate small
amounts of Carbon Monoxide.
The fiberglass insulation in self-clean ovens gives
off very small amounts of formaldehyde during the
first several cleaning cycles.
California lists formaldehyde as a potential cause of
cancer. Carbon Monoxide is a potential cause of
reproductive toxicity.
Exposure to these substances can be minimized by:
1. Providing good ventilation when cooking with
gas.
2. Providing good ventilation during and
immediately after self cleaning the oven.
3. Operating the unit according to the instructions
in this manual.
The Bosch range referred to thoughout this manual is manufactured by BSH Home Appliance Corp.

Table of Contents
Important Safety Instructions ......................................................................................... 1
Getting Familiar with Your Range.................................................................................... 3
Setting Up Your Range
Setting and Changing the Clock ....................................................................................... 5
Setting the Functions ...................................................................................................... 6
Accessing and Using the Select Functions Menu ................................................................ 6
Volume ..................................................................................................................... 7
Change Temperature.................................................................................................. 7
Temperature Format .................................................................................................. 7
Clock Display ............................................................................................................. 7
Demo Mode............................................................................................................... 7
Language Option ....................................................................................................... 7
Lock Keys.................................................................................................................. 7
Oven Temperature Offset ........................................................................................... 7
Reset Defaults ........................................................................................................... 7
Sabbath Feature ........................................................................................................ 8
Time Format.............................................................................................................. 8
The Cooktop
Cooktop Features............................................................................................................ 9
Cooktop Operation .......................................................................................................... 10
The Oven
Oven Modes and Features ............................................................................................... 11
Oven Modes and Features - Bake and Convection Bake ..................................................... 13
Oven Modes and Features - Broil ..................................................................................... 14
Oven Modes and Features - Convection Roast ................................................................... 14
Oven Modes and Features - Dehydrate ............................................................................. 15
Selecting the Oven Mode................................................................................................. 16
Using the Timer (s) ......................................................................................................... 17
Using Timed Cook ........................................................................................................... 18
Using the Probe .............................................................................................................. 19
The Warming Drawer ........................................................................................................ 20
Using the Warming Drawer.............................................................................................. 21
Care and Cleaning
Cooktop .........................................................................................................................22
Oven .............................................................................................................................. 23
Self Help, Maintenance, Etc.
Cookware Selection Guide ............................................................................................... 26
Maintenance
Removing the Oven Door ........................................................................................... 27
Replacing the Oven Light ........................................................................................... 27
Self Help
Cooktop .................................................................................................................... 28
Oven......................................................................................................................... 29
Customer Service and Warranty ....................................................................................... 30

Important Safety Instructions
Please read all instructions before using this appliance.
Range Safety
• Have the installer show you the locations of
the circuit breaker or fuse and the gas shut
off valve. Mark them for easy reference.
• This appliance must be properly installed and
grounded by a qualified technician. Connect only to
properly grounded outlet. Refer to Installation Instructions
for details.
• Service should only be performed by an authorized
service technician who has undergone training for
this specific type of unit. This is a high-tech appliance.
Unauthorized service technicians may not be familiar with
the sophisticated workings of this appliance and may,
therefore, cause damage to the unit or create a hazard.
Contact the nearest authorized service center for
examination, repair or adjustment.
• Do not repair or replace any part of the range
unless specifically recommended by an authorized service
technician.
• Do not operate this appliance if it is not working
properly or if it has been damaged until an
authorized servicer has examined it.
• Use this appliance only for its intended use as
described in this manual. If you have any questions, contact
the manufacturer.
• Do not use corrosive chemicals, vapors, flammables
or nonfood products in this appliance. This type of
range is specifically designed to heat or cook food. It is not
designed for industrial or laboratory use. The use of
corrosive chemicals in heating or cleaning will damage the
appliance and could result in injury.
• Secure all loose garments, etc. before beginning. Tie
long hair so that it does not hang loose, and do not wear
loose fitting clothing or hanging garments such as ties,
scarves, jewelry, or dangling sleeves. Avoid reaching or
leaning over the appliance. Be aware that certain clothing
and hair sprays may contain flammable chemicals that
could be ignited if brought in contact with hot surface units
or heating elements and may cause severe burns.
• In the event that personal clothing or hair catches
fire, DROP AND ROLL IMMEDIATELY to extinguish
flames.
• Do not touch the cooking area(s) or the immediate
surrounding area(s) while using the range or while it is
cooling. Areas adjacent to the burners, oven and warming
drawer may become hot enough to cause burns and may
be hot even though they are off. Never let clothing,
potholders, or other flammable materials come in contact
with a cooking area until it has cooled.
• Do not operate range during a power failure. If the
power fails, always turn off the range. If the range is not
turned off and the power resumes, the range will begin to
operate again. Once the power resumes, reset the clock
and oven function.
• Always turn hood ON when flambeing food (i.e.
Crepes Suzette, Cherries Jubilee, Peppercorn Beef Flambe).
• Clean ventilating fans frequently. Grease should not
be allowed to accumulate on the blower or filter. Grease left
on filters can remelt and move into the vent.
WARNING: If the information
in this manual is not followed
exactly, a fire or explosion may
result causing property damage,
personal injury or death.
Do not store or use combustible
materials, gasoline or other flammable
vapors and liquids in the vicinity of this
or any other appliance.
WHAT TO DO IF YOU SMELL GAS:
• Do not try to light any appliance.
• Do not touch any electrical switch.
• Do not use any phone in your
building.
• Immediately call your gas supplier
from a neighbor’s phone. Follow
the gas supplier’s instructions.
• If you cannot reach your gas
supplier, call the fire department.
Installation and service must be
performed by a qualified installer,
authorized service agency or the gas
supplier.
• DO NOT operate oven without oven bottom in place.
• Whenever possible, do not operate the blower
during a cooktop fire. However, DO NOT REACH
THROUGH FIRE TO TURN OFF BLOWER.
• Do not clean the range while it is still hot. Some
cleaners produce noxious fumes when applied to a hot
surface.
• Exercise caution when opening the oven or warming
drawer. Standing to the side, open the door slowly and
slightly to let hot air and/ or steam escape. Keep your face
clear of the opening and make sure there are no children or
pets near the unit. After the release of hot air and/ or
steam, proceed with your cooking. Keep doors shut unless
necessary for cooking or cleaning purposes. Do not leave
open doors unattended.
• Do not heat or warm unopened food containers
either in the oven or the warming drawer. Build-up of
pressure may cause the container to burst and cause injury.
• Always place oven racks in desired location while
oven is cool. If a rack must be moved while oven is hot, do
not let potholder contact the hot heating elements.
• Always use dry potholders. Moist or damp potholders
on hot surfaces may result in burns from steam. Do not let
potholder touch hot heating elements. Do not use a towel or
other bulky cloth.
• Do not use water or a wet rag or towel on a grease
fire. Smother fire with baking soda or use a dry chemical or
foam-type (ABC) extinguisher.
• Take care that drafts like those from fans or forced
air vents do not blow flammable material toward the
flames or push the flames so that they extend beyond the
edges of the pan.
Getting Started
English • 1
Important Safety Instructions
Please read all instructions before using this appliance.
English • 2
• Have an appropriate fire extinguisher available,
nearby, highly visible and easily accessible near the oven.
• Keep the oven free from grease build up.
• Do not place food directly on oven bottom.
• Follow the manufacturer’s directions when using
cooking or roasting bags.
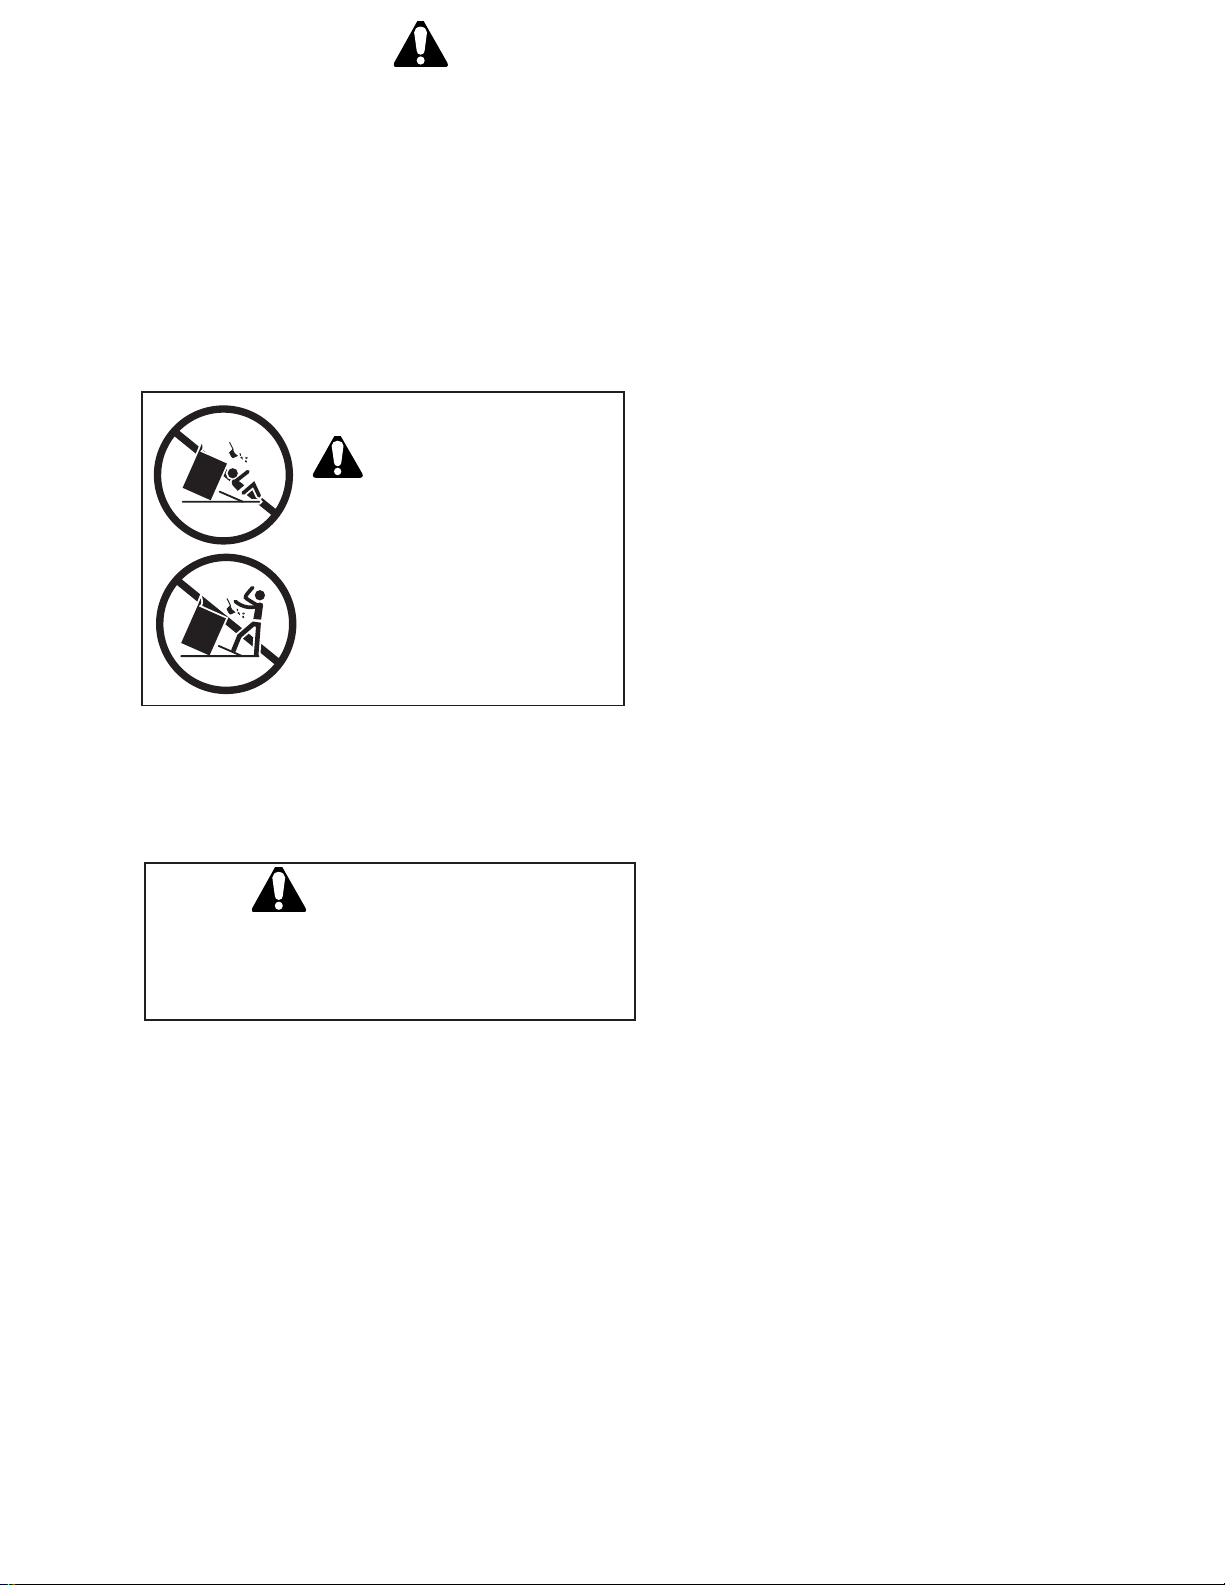
• Do not allow anyone to climb, stand, lean, or sit
on any part of the oven, nor to hang on the oven
door, warming drawer, or storage drawer. This can
damage the range, and the unit may tip over,
potentially causing severe injury.
WARNING
• ALL RANGES CAN TIP.
• INJURY TO PERSONS COULD
RESULT.
• INSTALL ANTI-TIP DEVICE
PACKAGED WITH RANGE.
SEE INSTALLATION
INSTRUCTIONS.
• Do not allow children to use this appliance unless
closely supervised by an adult. Children and pets
should not be left alone or unattended in the area
where the appliance is in use. They should never be
allowed to sit or stand on any part of the appliance or to
play in its vicinity, whether or not the appliance is in use.
CAUTION
Items of interest to children should not be stored in
the range, in cabinets above the range or on the
backsplash of the range. Children climbing on the
range to reach items could be seriously injured.
• If materials inside the oven should ignite, keep
oven door closed.Turn off oven and disconnect the
circuit at the circuit breaker box.
• Use high heat settings on the cooktop only
when necessary. Heat oil slowly on no more than
a low-medium setting, to avoid bubbling and splatter.
Hot oil is capable of causing extreme burns and injury.
• Never move a pan of hot oil, especially a deep fat
fryer. Wait until it is cool.
• Never leave the cooktop unattended. Boilovers
can cause smoke and possibly damage the cooktop.
More importantly, if the burner flames are smothered,
unburned gas will escape into the room. See warning,
page 1.
• After a spill or boilover, turn off the burner and
allow cooktop to cool. Clean around the burner
and burner ports. After cleaning, check for proper
operation.
• Hold the handle of the pan to prevent movement
of the utensil when stirring or turning food.
• Use only utensils that are approriate for
cooktop use on the cooktop (See “Cookware
Selection Guide”, pg. 26 for further details). Other
types of utensils may break with sudden temperature
changes. Use utensils according to the manufacturer’s
directions.
• Use only low or medium heat settings when
possible, particularly with pans larger than the grate
or that span more than one burner. Prolonged use of
high heat settings with these types of utensils can
cause poor combustion. Poor combustion results in
harmful by-products.
• Match pan size to size of burner. Undersized pans
expose element to direct contact which could result in
burn or injury. Do not allow flames to spread around
or over the rim of a pan that contains grease. A
grease fire could be ignited. Proper pan size also
improves efficiency.
• Clean cooktop with caution. Be sure all cooktop
controls are turned off and the cooktop is cool before
beginning. Some cleaners can produce noxious fumes
when applied to a hot surface. Sprayed chemicals
could ignite or cause hot metal parts to corrode.
• Keep the ignitor ports clean for proper lighting
performance of the burners. It is necessary to
clean these when there is a boilover or when the
burner does not light even though the electronic
ignitors click.
• This range is intended for residential use only.
It is not approved for outdoor use.
• Take care that drafts like those from fans or
forced air vents do not blow flammable material
toward the burners.
• Always position handles of utensils inward so
they do not extend over adjacent work areas, burners
or the edge of the cooktop.
• If you smell gas, your installer has not done a
proper job of checking for leaks. If the
connections are not perfectly tight, you can have a
small leak and, therefore, a faint smell. Finding a gas
leak is not a “do-it-yourself” procedure. Some leaks
can only be found with the burner control in the ON
position and this must be done by a qualified service
technician. See Warning, page. 1.
• Open a window or door in the event that a
burner goes out and gas escapes. Do not attempt
to use the cooktop until the gas has had time to
dissipate. Wait at least five minutes before using the
range.
• Always place pan on burner before turning it
on. Be sure you know which knob controls which
burner. When cooking is complete, turn the burner off
before removing the pan.
Self-Cleaning Safety
• Confirm that the door locks and will not open by
pulling gently on it once the door lock icon appears. If
the door does not lock, touch OFF and do not run SelfClean. Phone Bosch at 800-944-2904 for service.
Note: During a normal Self-Clean cycle, the door does
not lock at the beginning of the cycle; However, it does
lock prior to reaching the high self-clean temperatures.
In a Delayed Self-Clean cycle, the door locks
immediately. (Continued next page).
Getting Familiar With Your Range
Self-Cleaning Safety (Continued)
• Do not clean the oven gasket. It is essential for
a good seal. Care should be taken not to rub,
damage, move or remove the oven gasket.
• Do not use commercial oven cleaners or oven
liner protective coatings of any kind in or around
any part of the oven.
• Clean only oven parts listed in this manual.
• Remove the broiler pan, oven racks, over probe
and other utensils and wipe out excess soft
spillage before self-cleaning the oven.
Regarding Pet Birds:
Birds have very sensitive respiratory systems. Keep pet
birds out of the kitchen or other rooms where kitchen
fumes could reach them. During self-clean, fumes are
released that may be harmful to birds. Other kitchen
fumes such as overheating margarines and cooking oils
may also be harmful.
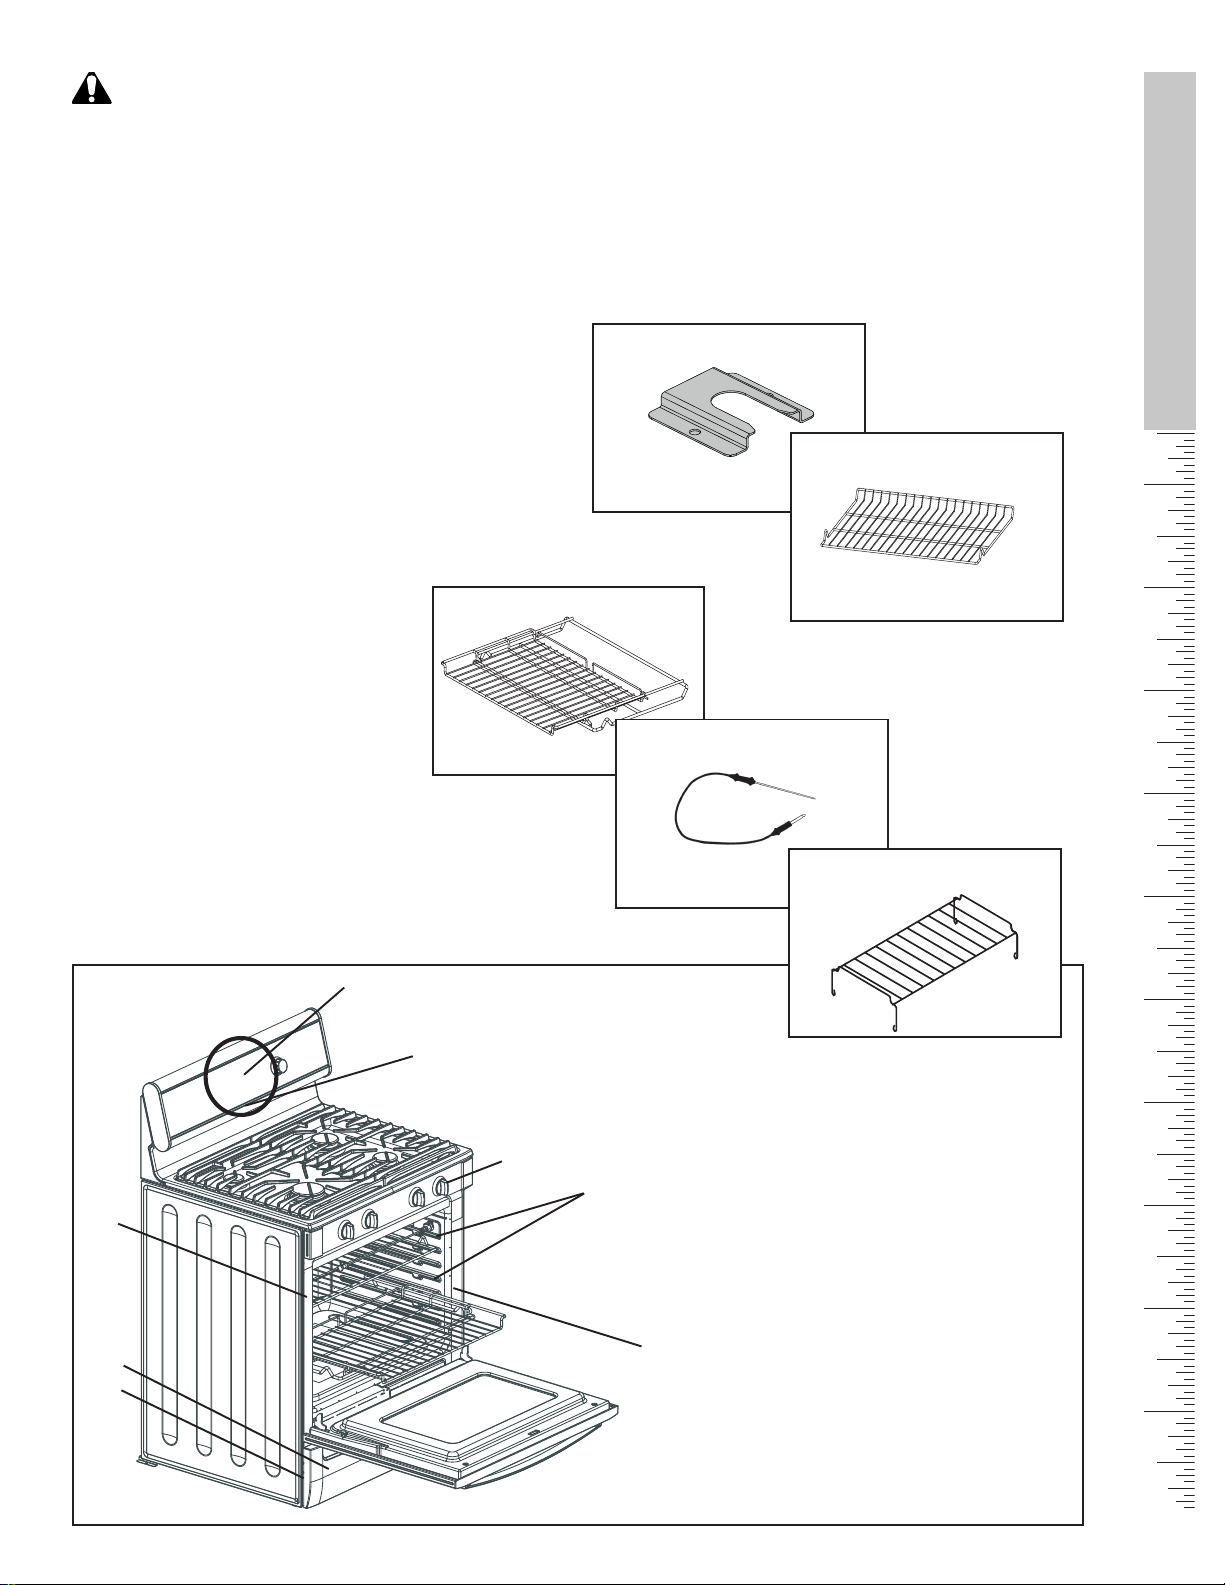
Parts Included with Your Range:
1. Anti-Tip Bracket
2. Broiler Pan and Grid (not shown
3. Literature Kit:
Quick Reference Guide
Use & Care Manual
Installation Instructions
AHAM Anti-Tip Brochure
AHAM Safer Cooking Brochure
Wiring Diagram
Warranty/ Registration Card
Cookbook (Some Models)
4. Oven Racks, Flat (2 or 3; varies by model)
5. Oven Rack, Full Extension (Some Models)
6. Probe (Some Models)
7. Warming Drawer Rack (Some Models)
5. Oven Rack, Full Extension
(Some Models)
1. Anti-Tip Bracket
6. Probe
(Some Models)
Getting Started
4. Oven Rack, Flat
7. Warming Drawer Rack
(Some Models)
Drawings are not to scale.
14
20
17
10
9
23
Range Parts:
11
15
8. Incandescent Lights (back wall)
9. Oven Control Panel
10. Oven Control Knob
11. Cooktop Knobs
12. Broil Element
13. Convection Fan and Element
14. Probe Receptacle (Some Models)
15. Rack Guides
16. Door Gasket
17. Model & Serial # Plate
16
18. Bake Element
19. Oven Door Lock
20. Warming Drawer
21. Oven Vent
English • 3

Getting Familiar with Your Range
Cooking Mode
Temperature
Start
Light
Time
Off
AM
PM
The Oven Control Panel
Light Time
Off
Preheat or Probe
Temperature
Clock/ Timer
Oven
Temperature
Probe
Indicator
Display Window Features
Clock– Shows the time of day with a 12-hour or 24-
hour clock option.
Cooking Mode - Touch pad to display cooking
mode.
Cooking or Timed Mode – Shows the number
of hours and minutes the oven will be on. Cooking mode
icon is also displayed when cooking mode is seleceted.
Control Knob - Used to set the clock, timers, select
cooking mode and temperature. Turn clockwise to
increase and turn counterclockwise to decrease.
Light - Touch pad to turn oven light on or off.
Door Lock Indicator - Icon is displayed during
the self-clean mode when the door is locked. DO NOT
attempt to open the door until the lock symbol is no
longer present.
Off - Touch pad to turn off oven and/or warming
drawer.
Oven Temperature - Shows the oven
temperature selected.
Preheat - Displays temperature of oven during
preheat mode. Also displays internal temperature of
food when probe is in use.
Probe Indicator - Indicates the probe is installed
in oven. The internal temperature of the meat is
displayed in place of the preheat temperature.
Start - Touch pad to complete an entry.
Temperature - Touch pad to select cooking
temperature.
Time - Touch pad to set time of day and/ or timer.
Warming Drawer Indicator - Icon displays
when warming drawer is in use. Indicates warming
drawer setting.
Lock
Indicator
Cooking Mode
Warming
Drawer
Indicator
Start
Temperature
Control Knob
Other Indicators and Features
Beep - Signals that more information must be
entered or confirms the receipt of an entry. A Beep also
signals the end of a program or an error.
Default Settings - The cooking modes
automatically select the default temperature. These can
be changed when a different one is needed.
Flashing Symbol or Number - Signals an
incomplete setting and calls for another step or START
to be touched.
F Number Codes - These codes are displayed
when there is a problem with the range. The display
will also beep continuously (Refer to self help section,
pg. 30).
Convection Fan - The convection fan operates
during any convection mode and the self clean mode.
When the oven is operating in the convection mode, the
fan will turn off automatically when the door is opened
except when in the dehydrate mode.
Timer – There are two timers - TIMER 1 and TIMER
2; Each counts down the time in hours and minutes.
With less than 60 minutes remaining, the timer also
displays seconds.
English • 4
Setting Up Your Range
Setting the Clock (after power to the range has been off)
• Always set the clock after installation or after a power failure. Once power returns to the oven, the clock
defaults to 12:00 am.
• The time of day is displayed in hours and minutes.
• The clock time will appear during all oven operations except when the timer operation is running. Turn
knob to display clock when timer is running.
• The oven is preset to a 12-hour clock and indicates AM and PM.
• The clock display can also be turned off (See Clock Display, Page 7).
Note: To switch to a 24 hr. clock, see "Select Functions”
section.
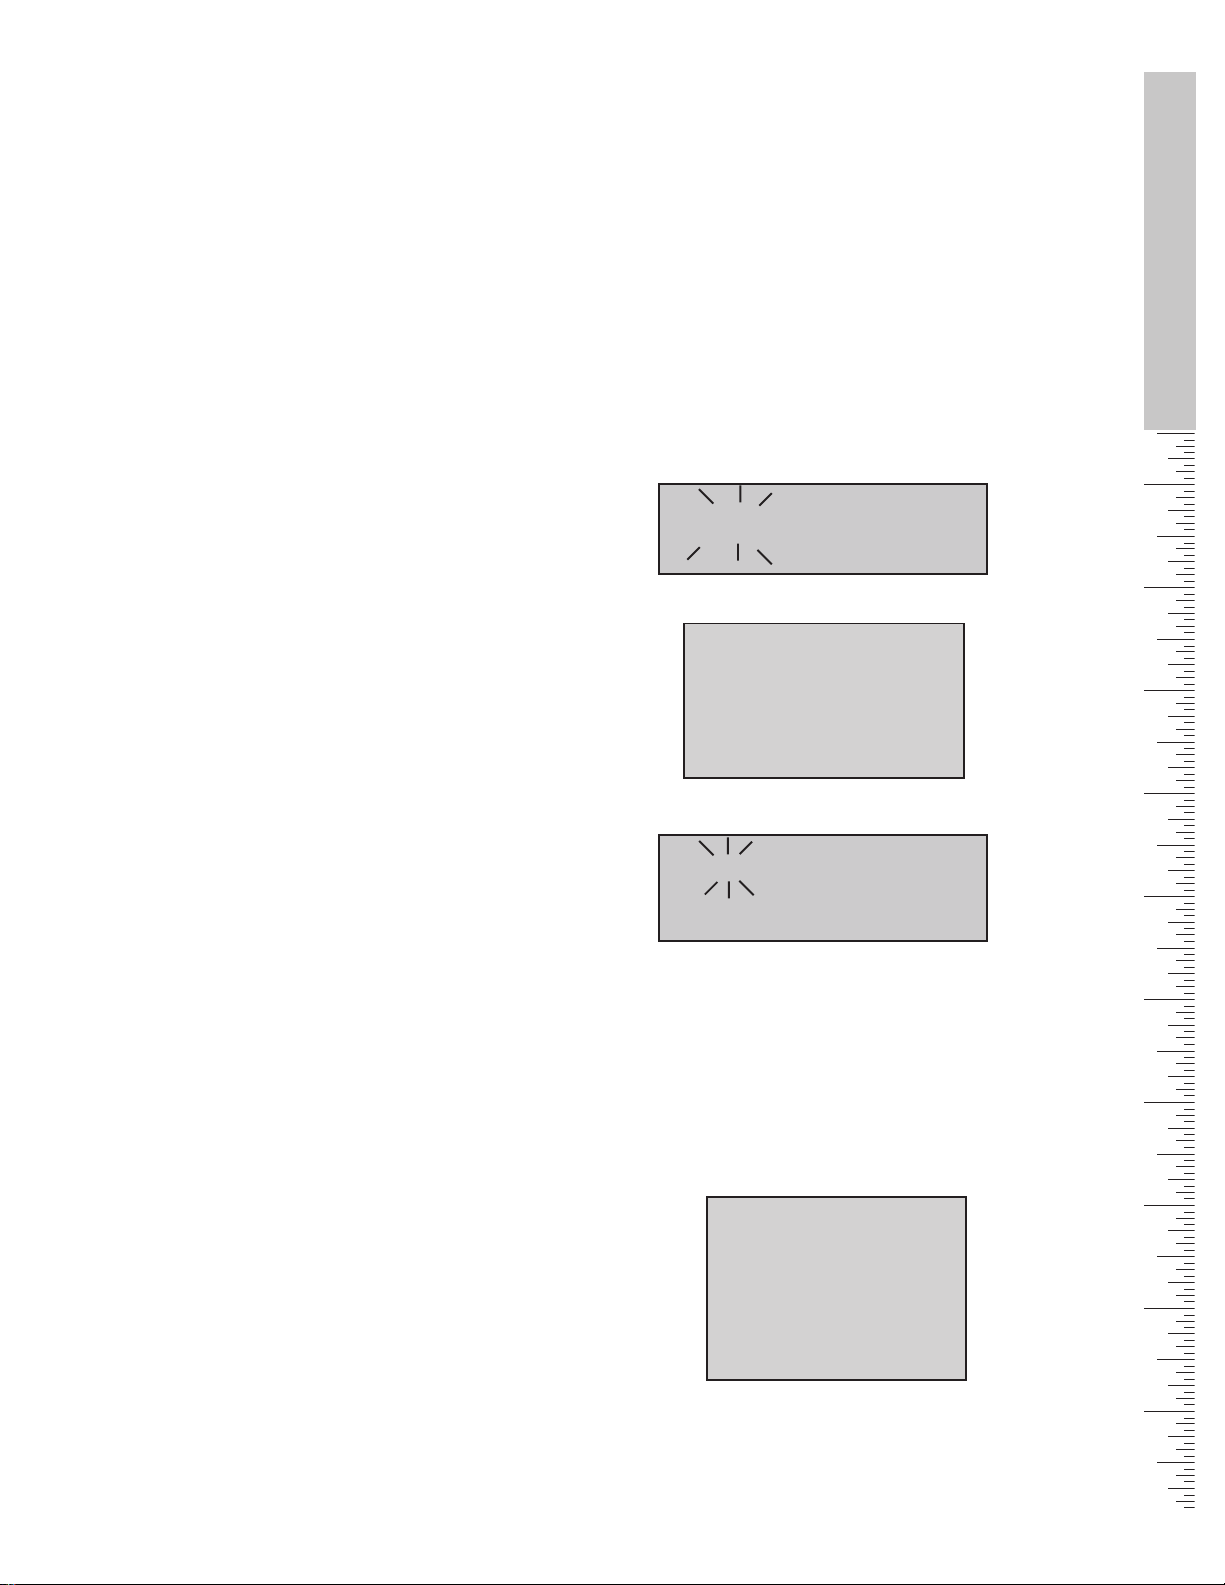
1. CLOCK will be displayed and the hour digits will
flash.
2. Turn knob to select hour and AM or PM.
3. Touch TIME. CLOCK will still be displayed and the
minute digits will flash.
4. Turn knob. Set minutes.
5. Touch TIME and the clock is now set.
Changing the Clock Time
1. Touch Time. TIMER 1 will flash in display.
2. Turn knob to select CLOCK .
3. Touch TIME again and hour digits will flash.
4. Turn knob to change hours.
5. Touch TIME again and minute digits will flash.
6. Turn knob to change minutes.
7. Touch TIME again and the clock is set.
11
22
1
2: 00
11
22
AM
BEEP REMINDER
If operation is not completed,
the oven will beep periodically
as a reminder to set clock
time. Push OFF.
0: 000: 00
0: 00
0: 000: 00
AM
HR:MIN
TIMER
TIMER 1TIMER 1
TIMER 1
TIMER 1TIMER 1
CLOCKCLOCK
CLOCK
CLOCKCLOCK
Getting Started
Helpful Hint
To cancel the TIME
selection when setting
the clock, touch OFF at
any time while in the
clock mode.
English • 5
Setting Up Your Range
SELECT FUNCTIONS is the section of the menu where you can set or change the following features on your range:
VOLUME (decrease or increase loudness of
control beeps)
TEMPERATURE FORMAT (switch
temperature scale to Fahrenheit or Celsius)
TIME FORMAT (12 hr or 24 hr)
LOCK KEYS (oven control pad lockout )
LANGUAGE OPTION (for display; select
English, Spanish, or French)
CLOCK DISPLAY (yes or no)
OVEN TEMPERATURE OFFSET (used to
calibrate the oven temperature)
TIPS for Setting Functions
• There will be a slight delay
before each message (or
feature) can be seen in the
display.
• Turn knob slowly, and wait
approximately one second
for display to show next
feature.
• To move through the feature
menu, slowly turn the knob
clockwise one click after each
feature appears.
DEMO MODE (used by appliance stores)
RESET DEFAULTS (change
settings back to original factory settings)
SABBATH FEATURE (for religious faiths
with “no work” requirements on the Sabbath)
NOTE: In the event of a power failure, the functions
return to the factory settings and will need to be reset.
all
function
Accessing and Using the Select
Functions Menu
To access the SELECT FUNCTIONS menu, touch and
hold COOKING MODE touch pad for five (5) seconds.
SELECT FUNCTION is displayed.
1. Turn knob to desired feature.
2. Press START to choose any function, and turn
knob to choose any sub-functions.
3. After selecting feature, touch OFF.
BEEPS
To indicate when a mode is
finished, 3 consecutive beeps
will sound.
NOTE:
In the event of a power
failure, the functions return to
the factory settings and will
need to be reset.
English • 6
See next page for further information.
Setting Up Your Range
BEEP VOLUME
• The volume of the control beep can be
changed from LOW (softest) to HIGH (loudest).
• The control default for beep volume is MEDIUM.
Changing the Beep Volume
1. Access SELECT FUNCTION Menu.
2. Turn knob clockwise until VOLUME is displayed.
3. Touch START.
4. Turn knob to select volume level Low, Medium
or High.
5. Touch START.
CHANGE TEMPERATURE
• The oven has been preset to the Fahrenheit
temperature scale.
• The feature allows you to switch between
Fahrenheit and Celsius temperature.
Changing the Temperature Scale
1. Access SELECT FUNCTION Menu.
2. Turn knob clockwise untiL SELECT TEMP F-C
is displayed.
3. Touch START.
4. Turn knob to select Fahrenheit (F) or Celsius (C).
5. Touch START to accept new selection.
CLOCK DISPLAY (ON or OFF)
• Clock time display can be turned off.
• The default display is on.
Turning the Clock Display ON or OFF
1. Access SELECT FUNCTION Menu.
2. Turn knob clockwise until CLOCK DISPLAY is
displayed.
3. Touch START.
4. Turn knob once and ON or OFF will appear in
display.
5. Touch START to accept new selection.
LOCK KEYS
• The oven keypad can be locked for safety
purposes.
• This feature can be used to prevent changes
to the oven function.
Locking or Unlocking the Oven Control Panel
1. Access SELECT FUNCTION Menu.
2. Turn knob clockwise until LOCK KEYS is
flashing.
3. Touch START. KEY PAD LOCKED is displayed.
The display will beep if a key is pressed to
indicate that the keypad is locked.
4. To unlock keypads, touch COOKING MODE
and hold for 5 seconds. Display will read
UNLOCKING KEY PAD.
5. When unlocked, the clock will again appear in
the display.
Note: This function DOES NOT lock oven door.
12 HR
OVEN TEMPERATURE OFFSET
• This feature allows the adjustment of the oven
temperature if food is consistently too brown or
too light.
Changing the Oven Temperature Offset
1. Access SELECT FUNCTION Menu.
2. Turn knob clockwise until OVEN TEMP OFFSET
is displayed.
3. Touch START. 0° F is displayed.
4. Turn the knob to the right to increase
temperature +25°F and to the left to decrease
-25° temperature.
5. Touch START to accept a temperature change.
DEMO MODE
The demo mode is for appliance store use only.
Getting Started
LANGUAGE DISPLAY
• Language choices are English, Spanish, and
French.
• English is the default language.
Changing the Language Display
1. Access SELECT FUNCTION Menu.
2. Turn knob clockwise until desired language is
displayed.
3. Touch START.
4. Turn knob clockwise to select a different
language.
5. Touch START to accept a language change.
RESET DEFAULTS
• This feature is used to change all the “Select
Functions” settings back to the original factory
settings (or defaults).
Resetting the factory settings.
1. Access SELECT FUNCTIONS Menu.
2. Turn knob clockwise until RESET DEFAULTS is
displayed.
3. Touch START. Display reads SELECT
FUNCTIONS.
NOTE
The SELECT FUNCTION menu is displayed in English only, regardless of
language selected.
English • 7

Setting Up Your Range
SABBATH FEATURE
• The oven will bake for 73 hours before
automatically turning off.
• Oven or warming drawer must be off to set the
Sabbath Feature.
Setting the Sabbath Feature
1. Verify that both the oven and the warming
drawer are off before beginning.
2. Access SELECT FUNCTIONS Menu.
3. Turn knob clockwise until SABBATH OPTION
appears.
4. Touch START. BAKE will show in display and
temperature will flash.
5. Turn knob to set oven temperature.
6. Turn oven light on if desired (touch LIGHT).
Note: The light cannot be changed after this point.
It will stay on or off, as selected, during the entire
Sabbath mode.
7. Touch START. Oven starts after 5 seconds.
Note: The probe CANNOT be used during the
Sabbath mode.
While baking in Sabbath mode, the display will show
SABBATH and the BAKE icon will be displayed. The clock
will be off and no temperature will show in the display.
During the Sabbath mode, only the OFF key will operate.
Press Off at any time during the Sabbath mode to
end the mode and turn off the oven.
At the end of 73 hours, the oven will turn OFF automatically
and the display will show SABBATH END. Touch OFF to
return to time of day.
TIME FORMAT
• The clock can be set to a 12-hr or 24-hr format.
• The oven default for clock format is 12-hr.
Changing the Time Format
1. Access SELECT FUNCTION Menu.
2. Turn knob clockwise until TIME FORMAT is
displayed.
3. Touch START.
4. Turn knob to select 12 hr or 24 hr format.
5. Touch START to accept new selection.
English • 8
Cooktop Features
Before Using the Cooktop
• Remove all packing materials and labels from the
cooktop surface.
• While cool, wipe with a clean, damp sponge and dry.
• Optimum cooking results depend on the proper
cookware being selected and used.
• Read and understand all safety precautions and Use
and Care Manual information prior to operating.
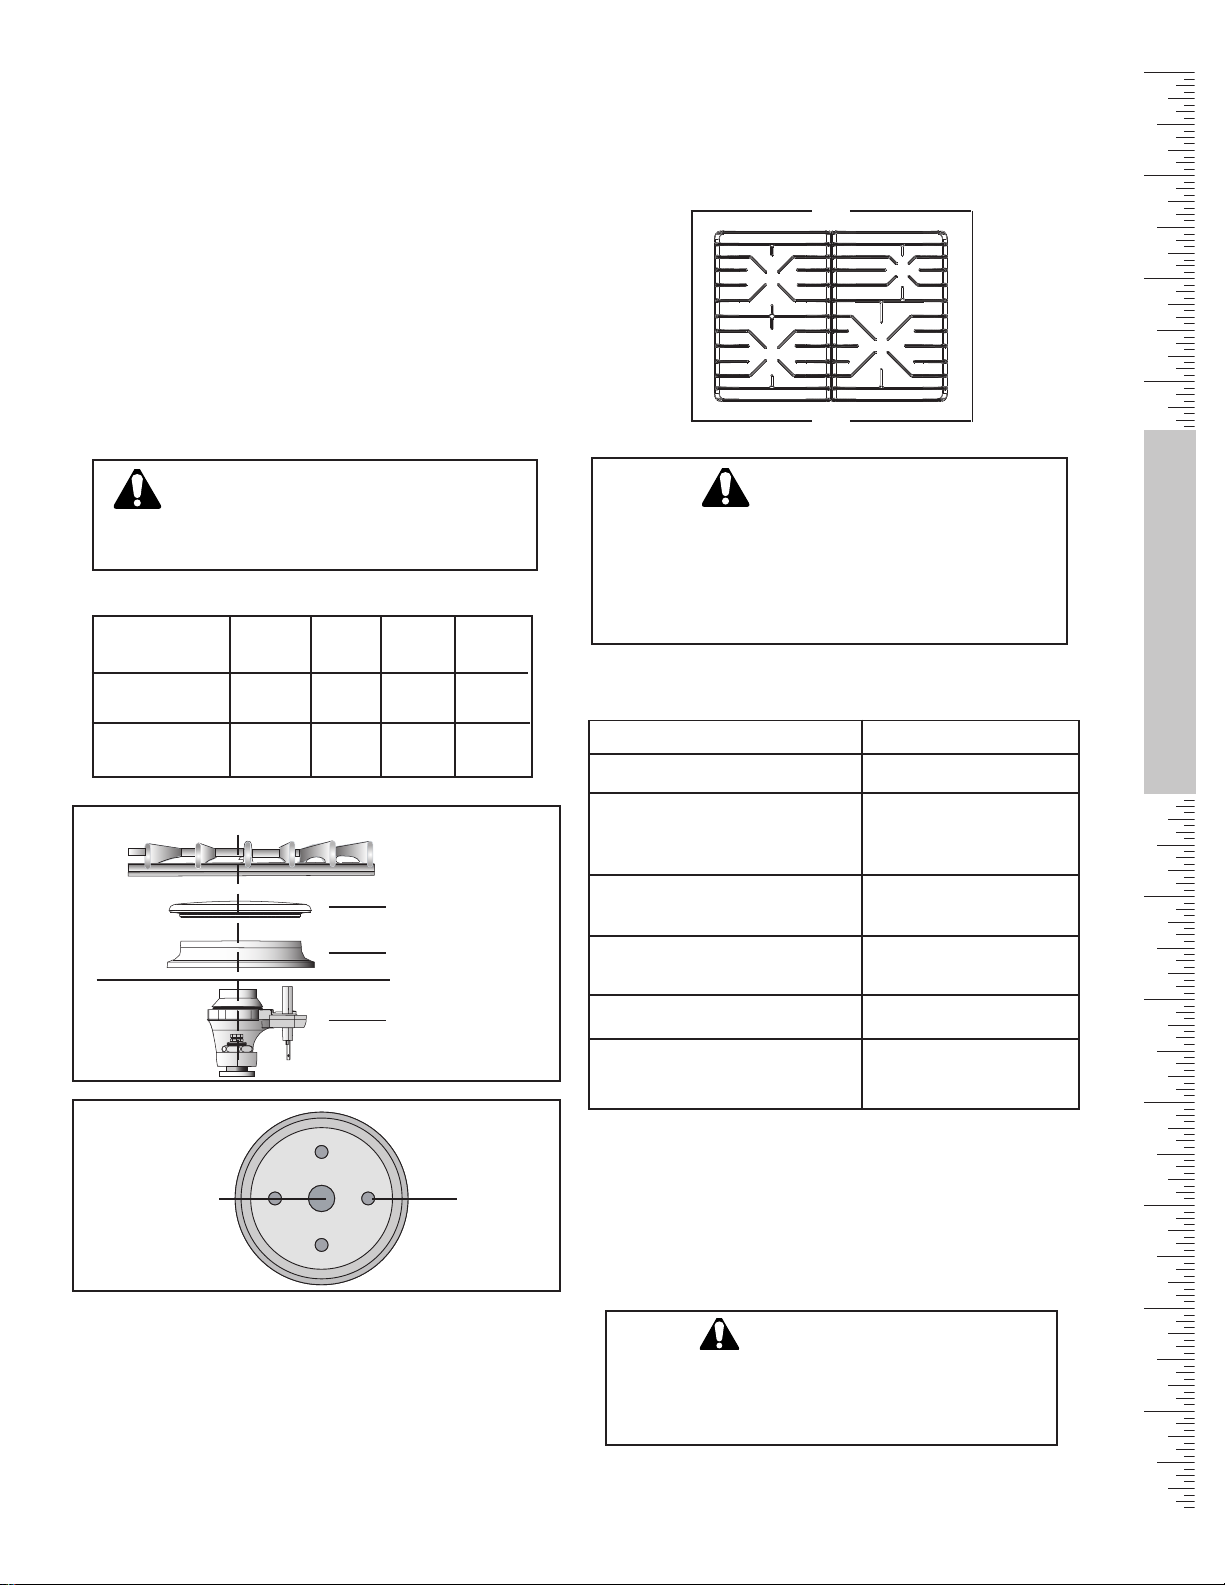
Burner Grates
Your cooktop has two grates: one for the left side of the
cooktop and one for the right side of the cooktop.
Position them as shown in the figure below. Do not
operate the burner without a pan on the grate.
Sealed Gas Burners
Your new cooktop has sealed gas burners and
removable burner caps. There are no burner parts
under the cooktop to clean, disassemble or adjust. Your
cooktop has four (4) different burner cap sizes. Match
the pan size to the burner size.
WARNING:
To prevent flare-ups do not use the
cooktop without all burner caps and all
burner grates properly positioned.
Burner Output by Fuel Type (BTU/hr)
Left
Rear
12500 15000 5500
11000 15000
Natural Gas
Propane
Left
Front
9100
7500
Right Side Burner - Side View
Right
Front
Burner Grate
Burner Cap
Right
Rear
5000
Left Side
Right Side
WARNING:
To prevent flare-ups all grates must be properly
positioned on the cooktop whenever the cooktop is
in use. Each of the feet must be placed into the
corresponding dimples in the cooktop. Do not use a
grate if the rubber feet are missing or damaged.
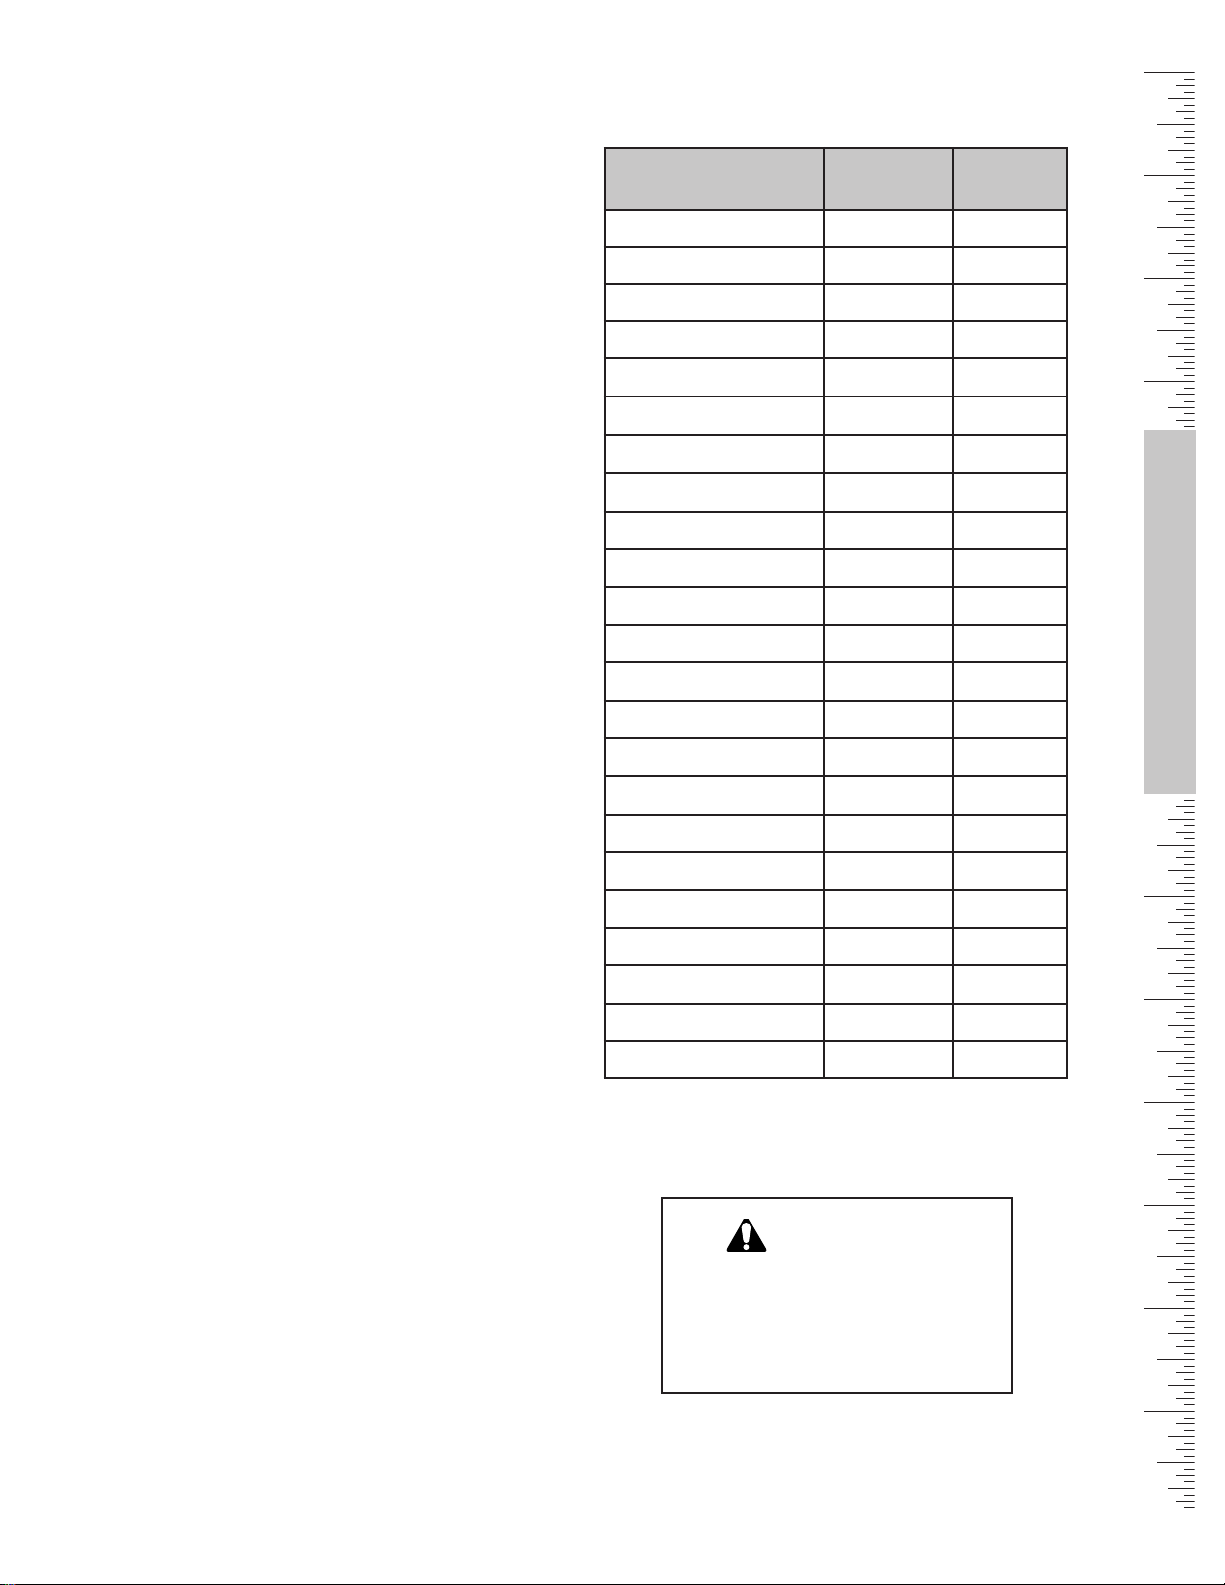
Use this chart as a guide for heat settings:
Heat SettingsUses
Bringing water to a boil
Pan frying, sauteing, browning
meat, deep fat frying
Most frying, eggs, pancakes,
slow boil
High
Medium High
Medium
Use - Cooktop
Burner Base
Cooktop
Ignitor
Right Side Burner Top View
Orifice Ignitor
Burner Caps
The burner cap is porcelainized steel. Make sure the
burner cap is completely seated into the burner base
before attempting to light the burner. If the burner cap
is not placed correctly, the burner may not light or the
flame may not burn completely or correctly.
Finish cooking covered foods,
steaming
Melting butter and chocolate
Tomato sauces, soups, stews,
keeping foods warm
A range of heat settings are listed because the actual setting
depends on:
1) size, type and quality of pan (See “Cookware Selection Guide”,
page 26).
2) type, quantity and temperature of the food.
3) burner used.
4) the cook’s preference.
Medium Low
Low
Sim (Simmer)
CAUTION:
To prevent possible burns or possible damage
to the pan or range, the flame should not
extend beyond the edge of the pan.
English • 9
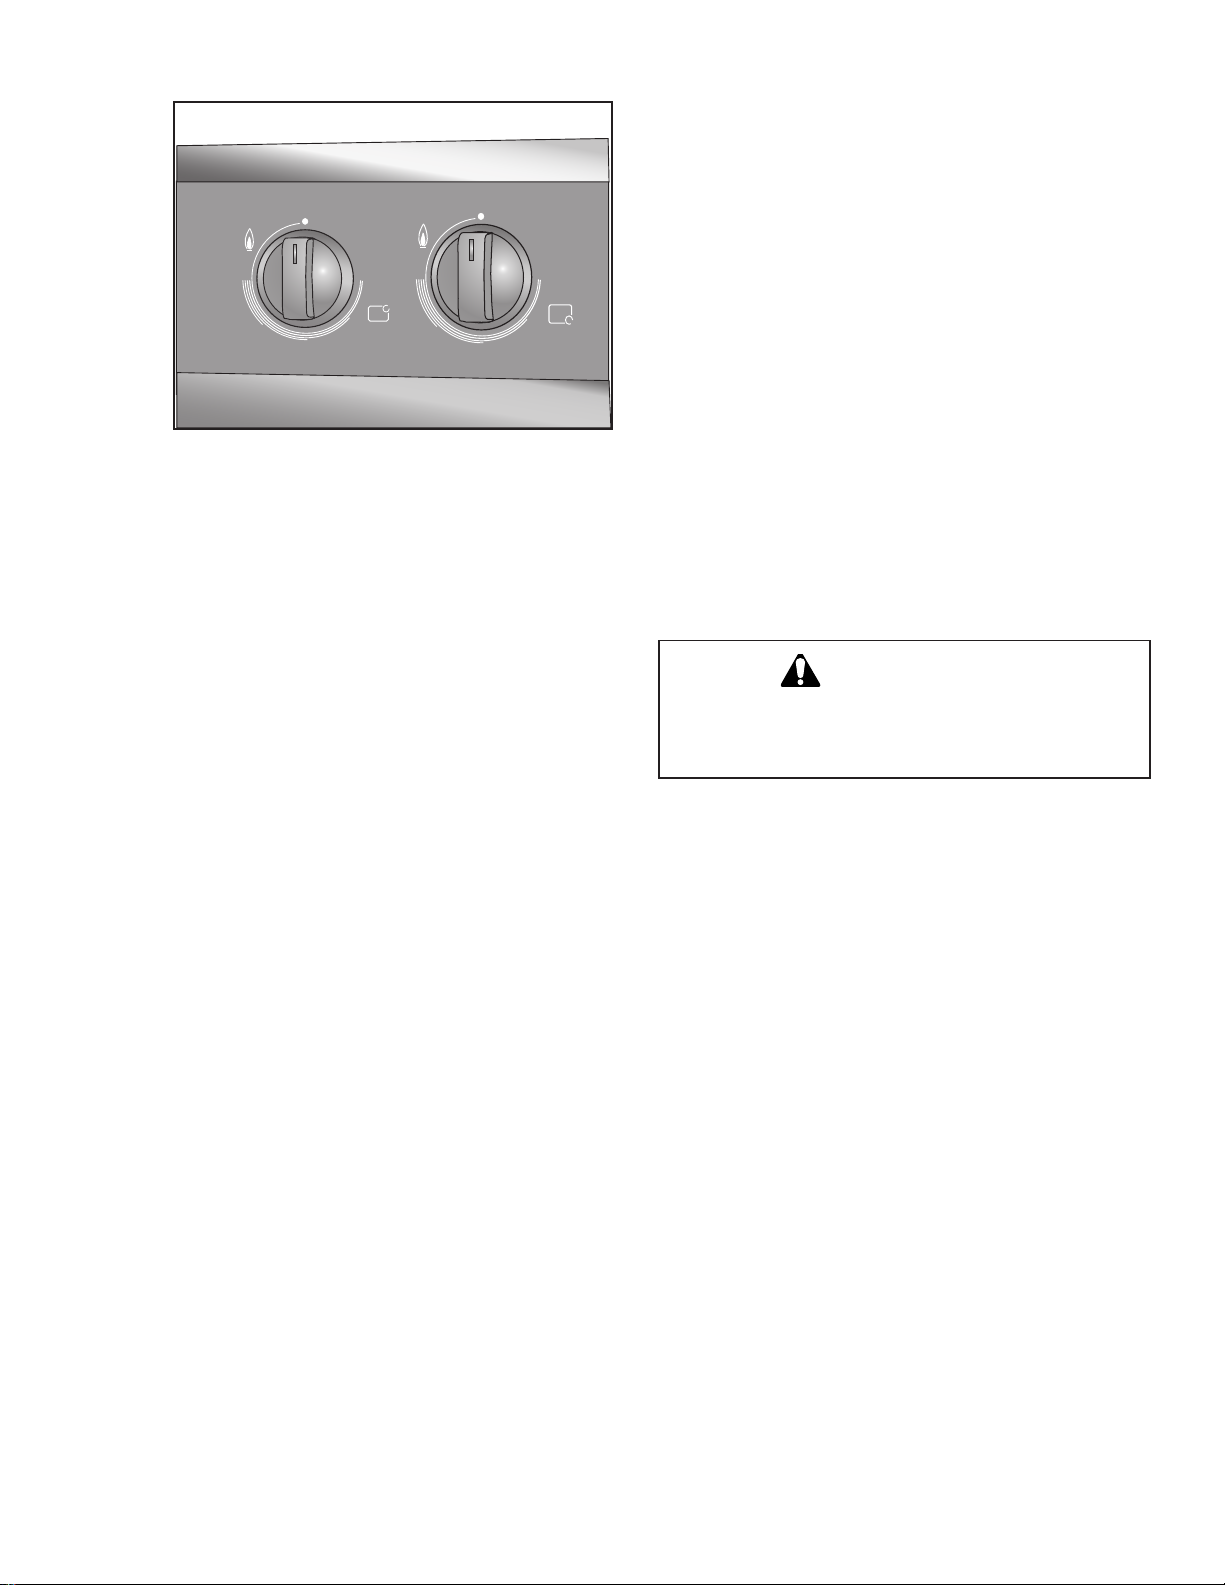
Burner Control Knobs
Control Knobs - Front View
OFF
HI
LO
Cooktop Operation
Typical Flame Characteristics
Foreign particles in the gas line may cause an orange
flame during initial use. This should disappear with use.
Check burner cap to make sure port holes are not
obstructed. If the ports are clogged, see “Cleaning the
OFF
HI
SIM
LO
Cooktop”, page 22. For natural gas use, the burner
flame should be blue in color and stable with no yellow
tips, excessive noise or fluttering. It should burn
completely around the burner cap. For Propane (LP)
use, some yellow tips are normal.
Note: An audible “pop” may be heard when the burner
is turned off manually. The “popping” may be louder
with LP gas than with natural gas. This is normal.
Refer to the Cooking Guide (previous page) for flame
settings.
The burner controls have an infinite number of heat
settings with no fixed positions. A plastic bezel is
located under each control knob.
To LIGHT: Select the appropriate control knob, push in
and turn counterclockwise to the flame symbol. The
ignitor will click.
To SET FLAME SIZE: After lighting, turn
counterclockwise to the desired flame size.
Turn OFF by turning the control knob clockwise to OFF.
To remove knob, spring and bezel: Place knob in
the OFF position. Pull straight out and off. Spring and
bezel will be loose and can be pulled straight off after
the knob is removed.
To replace knob, spring and bezel: Place spring and
knob on top of bezel being careful to line up center
holes. Push down on knob so that spring is tense. With
knob in off position, place center hole around shaft on
range and push bezel, spring and knob in toward range.
Release knob.
Electronic Ignition
The cooktop uses electronic igniters to light the burners.
There is no pilot light. Each burner has its own igniter.
For best results, center the pan over the burner before
ignition.
The ignitor should be clean and dry for proper
operation.
• Avoid getting water or food on the ignitor.
• If the ignitor is wet or soiled, it may spark without
igniting the burner.
Note: If the burner does not light within 4 seconds, turn
the burner off. Check to see that the cap is positioned
correctly on the burner base and the igniter is clean and
dry. If a burner still fails to ignite, see Self “Help Cooktop”, page 26.
Power Failure
In the event of a power failure, the cooktop burners can
be ignited manually. Hold a match at the port and turn
the control knob to the HI position. Wait until the flame
is burning all the way around the burner before
adjusting the flame to the desired height.
CAUTION:
All igniters spark when any single burner is turned
ON. Do not touch any of the burners when the
cooktop is in use.
Burner Performance
For best cooking results, observe the following burner
characteristics:
PowerSim™ Burner (Some Models): The PowerSim™
is the largest, most versatile burner on the cooktop. The
burner cap retains heat longer than normal burner caps
and, at low settings, prohibits the flame from touching
the cookware. This results in a gentle, more predictable
heat. It can be set low enough to simmer sauces
without scorching and high enough to stir-fry and boil
quickly. The large burner cap also accommodates large
pots, so it is also well suited for cooking large quantities
of food.
Right Rear: The right rear burner is the smallest
burner. It is well suited for delicate cooking such as
melting chocolate and butter.
English • 10
Oven Modes and Features
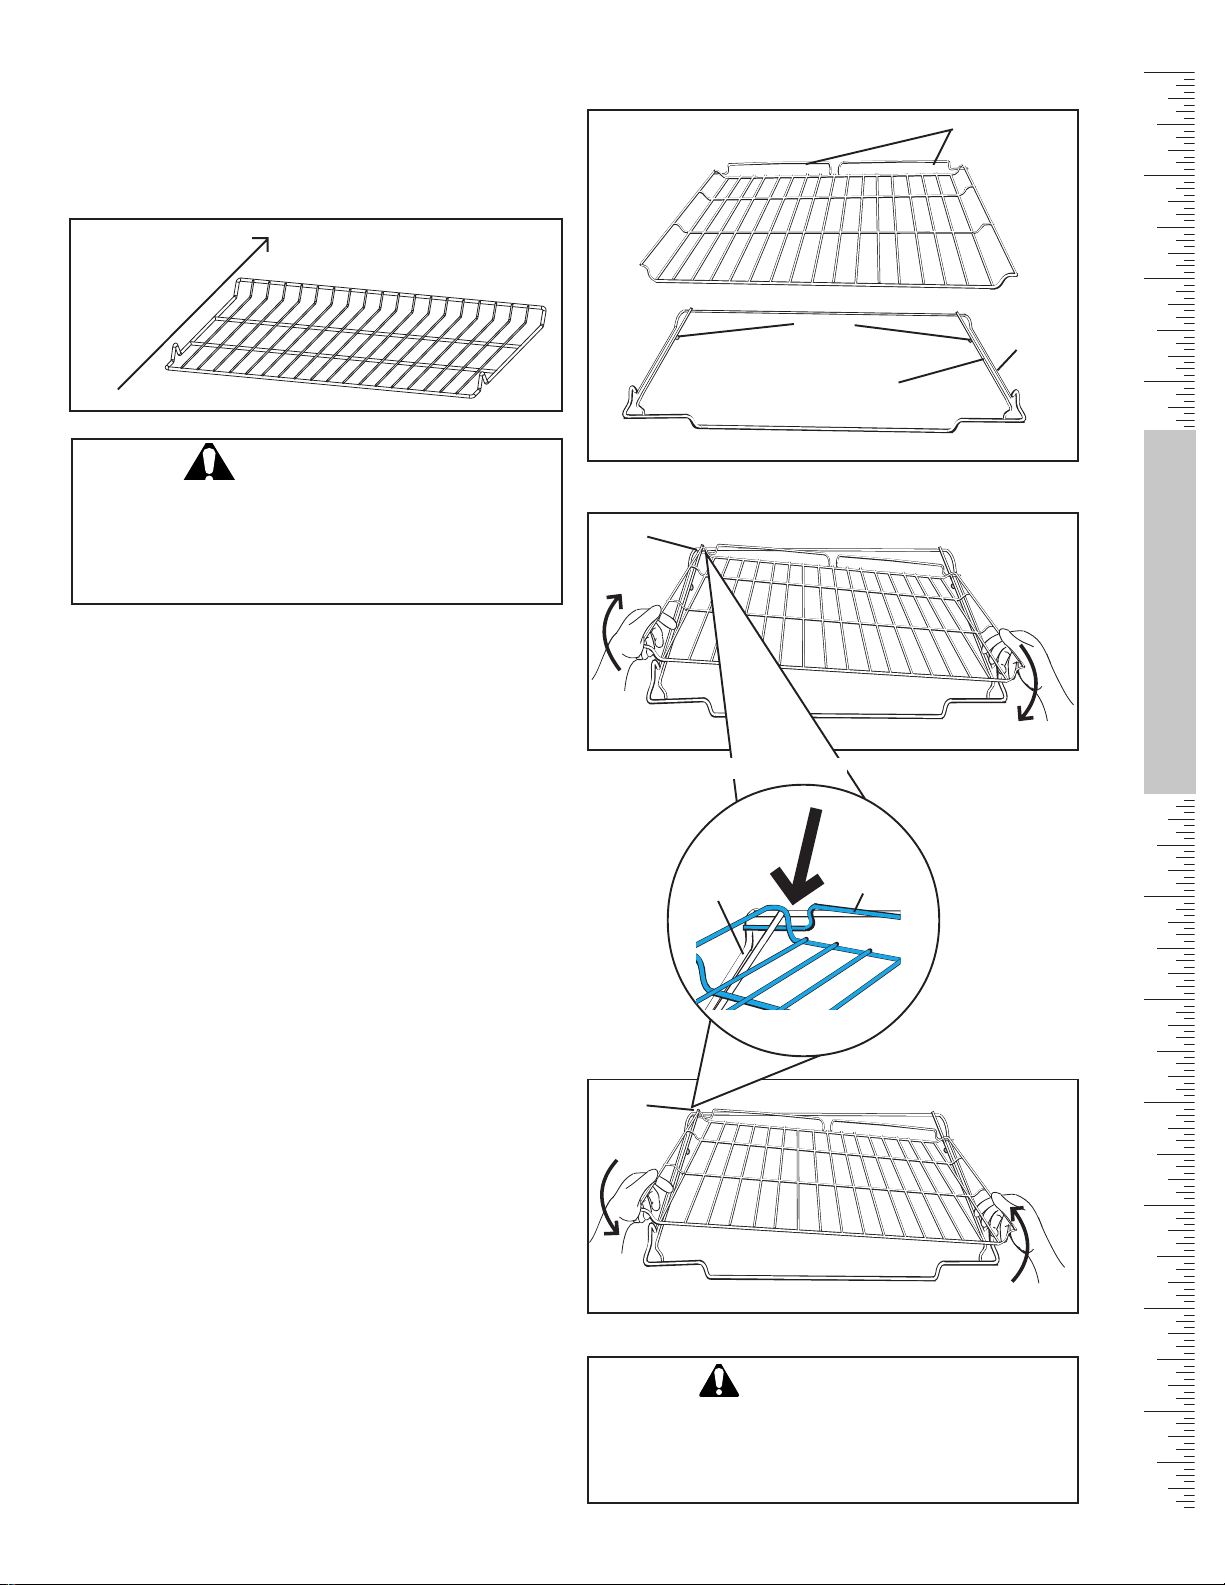
Oven Racks
Depending on the model, the range is equipped with
either three flat racks or two flat racks and one full
extension rack. The racks are designed with a stop so
they will stop before coming completely out of the oven
and not tilt.
Back of Rack
Insert Rack with back of rack
toward back wall of range
Figure 1 - The Flat Rack
Front of Rack
CAUTION:
To avoid possible burns, place oven racks in desired
positions before turning the oven on. Always use oven
mitts when the oven is warm. If a rack must be moved
while the oven is hot, do not let oven mitts contact hot
heating elements.
Removing from oven: Grasp rack firmly on both sides
and pull rack toward you. When the stop is reached, tilt
rack up and pull the rest of the way out.
Replacing in oven: Grasp rack firmly on both sides.
Tilt rack up to allow stop into rack holder. Bring rack to
a horizontal position and push the rest of the way in.
Use - The Oven
Rack should be straight and flat, not crooked.
Note: The full extension rack must be in the closed
position when removing and replacing. Grasp the entire
rack (both sections).
The Full Extension Rack (some models) allows for
easier access to cooking foods. The bottom section
extends as far as the standard flat rack. However, the
top section extends beyond the bottom section bringing
the food closer to the user. To order a full extension
rack, contact Bosch Service: 800-944-2904 for a dealer
near you.
Use: First, grasp the bottom section and pull straight
out. Once the stop is reached, grasp the top section
and pull straight out until the second stop is reached.
Cleaning: Clean rack with hot sudsy water. Dry
thoroughly. For stubborn dirt, use a soap filled steel
wool pad. DO NOT clean the rack in the self-
cleaning oven.
Back of Rack
Top Rack
Bottom Rack
Stops
Front of Rack
Figure 1 - The Full Extension Rack
Closed
Position
Figure 2 - Taking the Rack Apart
Bottom Rack
Closed
Position
Back of Rack
Closed
Position
Back of Rack
Pan Stops
Rack
Guide
Top
Rack
Rest
Use - Oven
Front of Rack
Top Rack
The two sections of the rack are designed to come
apart for easier cleaning. To do so, place rack on flat
surface in the closed position top side up. Rotate one
side of top rack towards you until it is past the stop (ball).
Pull the rack up and out, rotated side first (See Figure 2).
To reassemble rack, hold top rack diagonally across
bottom rack. Insert one side of top rack to closed
position. Rotate the other side toward the back of the
rack until it passes the stop (ball). Push top rack the rest
of the way in (See Figure 3).
If the top rack will not extend fully, it is not installed
correctly. Reinstall it so that the pan stop is in the back of
the oven.
Front of Rack
Figure 3 - Putting the Rack Together
CAUTION:
Always verify that top rack is installed correctly after
reassembly. The back edges of the top rack must be
under the rack guide on the bottom rack. DO NOT
simply rest the top rack on top of the bottom one.
English • 11

Oven Modes and Features
Rack Position
(see graphic at right for further details)
RACK 6 (highest position) – Use for melting cheese and
broiling thin foods.
RACK 5 – Use for broiling most meats and toasting
bread.
RACK 4 – Use for broiling thicker meats.
RACK 3 – Use for most baked goods when baking on
one rack, such as on a cookie sheet or baking pan. Use
for cakes, frozen convenience foods, biscuits, brownies,
and muffins.
RACK 2 – Use for pies, casseroles, breads, bundt or
pound cakes, small roasts or poultry.
RACK 1 (lowest position) – Use for angel food cake,
large roasts, turkey.
Multiple Rack Cooking:
When using multiple racks, follow the placement
recomendations below.
Two rack: For cakes, use rack positions 2 and 5.
Three rack: (for convection bake): Use positions 1, 3
and 6.
Pan Placement
Baking results are better if pans are placed in the center
of the oven. If baking more than one pan on a rack,
allow at least 1” to 1 ½” of air space around the pan.
When baking four cake layers at the same time, stagger
pans on two racks so that one pan is not directly above
the other. To allow for best baking results, stagger pans
as shown in graphic at right.
Rack Positions
6
5
4
3
2
1
CAUTION:
Many factors affect cooking performance.
Always check food for doneness before serving.
Pan Placement
One Rack
Two Racks
Preheating
Preheat the oven if the recipe recommends it.
Preheating is necessary for good results when baking
cakes, cookies, pastry and breads. When using the
probe preheating is not recommended. Setting a higher
temperature does not shorten preheat time. Place oven
racks in proper position before preheating. A beep will
confirm that the oven is preheated and the selected
oven temperature will be displayed.
Baking Pans
Glass baking dishes absorb heat, therefore, reduce oven
temperature 25° F when baking in glass.
Shiny, smooth metal reflects heat resulting in lighter,
more delicate browning.
Dark, rough or dull pans will absorb heat resulting in
browner, crisper crust. Some manufacturers
recommended reducing temperature 25° F when using
this type of pan. Follow manufacturer
recommendations. Use dark pans for pies.
Insulated baking pans may increase the length of the
recommended baking time.
Power Failure
DO NOT attempt to light the broil burner or bake burner
manually. Only the cooktop burners can be lit manually.
English • 12
Oven Modes - Bake and Convection Bake
BAKE, PROOF (some models) and WARM
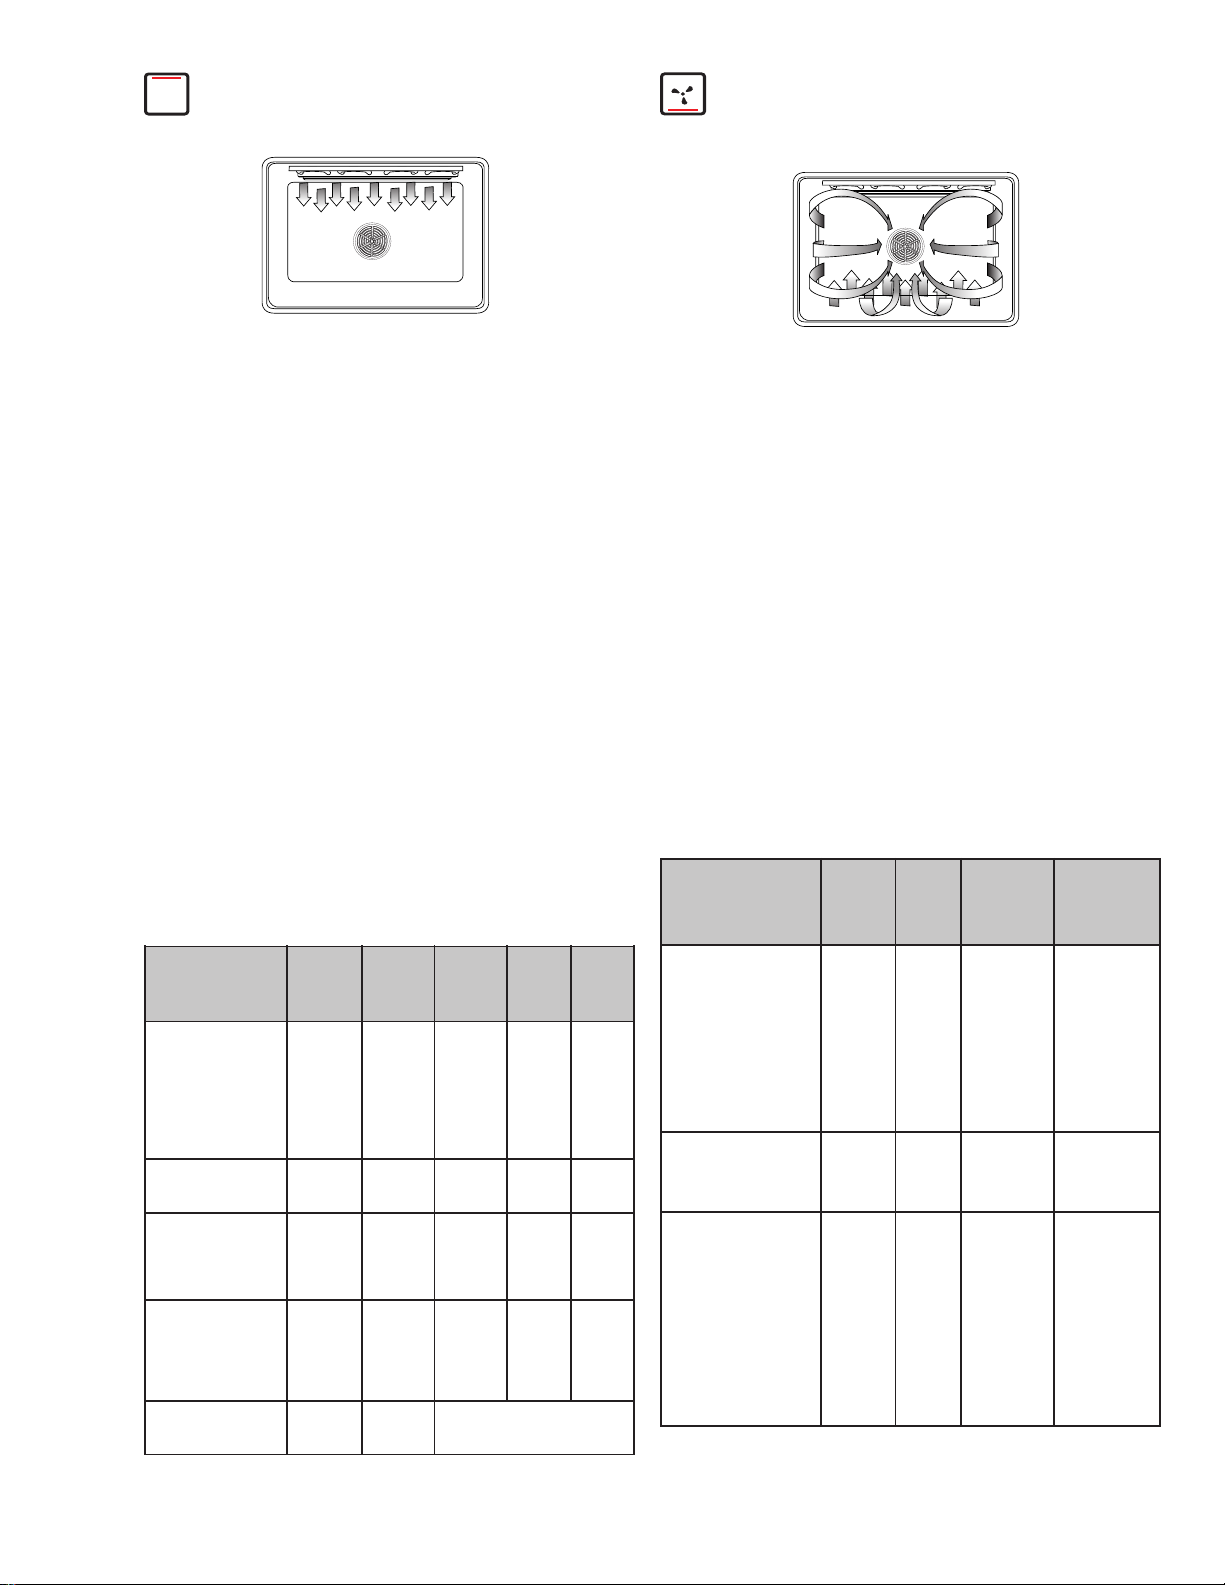
Baking is cooking with dry, heated air. Both the upper
and lower element cycle to maintain the oven
temperature:
The Bake mode can be used to prepare a variety of food
items, from pastries to casseroles. It can also be used
to roast meats.
In the Warming mode, the oven uses the upper and
lower element to maintain a low temperature to keep
food at serving temperature.
• Use the Warming setting on the oven to keep foods
hot until ready to serve.
• The Warming mode temperatures are 140° - 220°
F. The default temperature is 170° F.
• Foods that need to be kept moist should be covered
with a lid or aluminum foil.
Proofing is the rising of a yeast dough. In the Proofing
mode, the oven will use the upper and lower element to
maintain a low temperature to proof bread.
• The Proofing mode temperatures are 85° to 110° F.
The default temperature is 100° F.
• Loosely cover the bowl or pan and use any rack that
accomodates the size of the container.
• Keep the door closed and use the oven light to
check the rising of the dough.
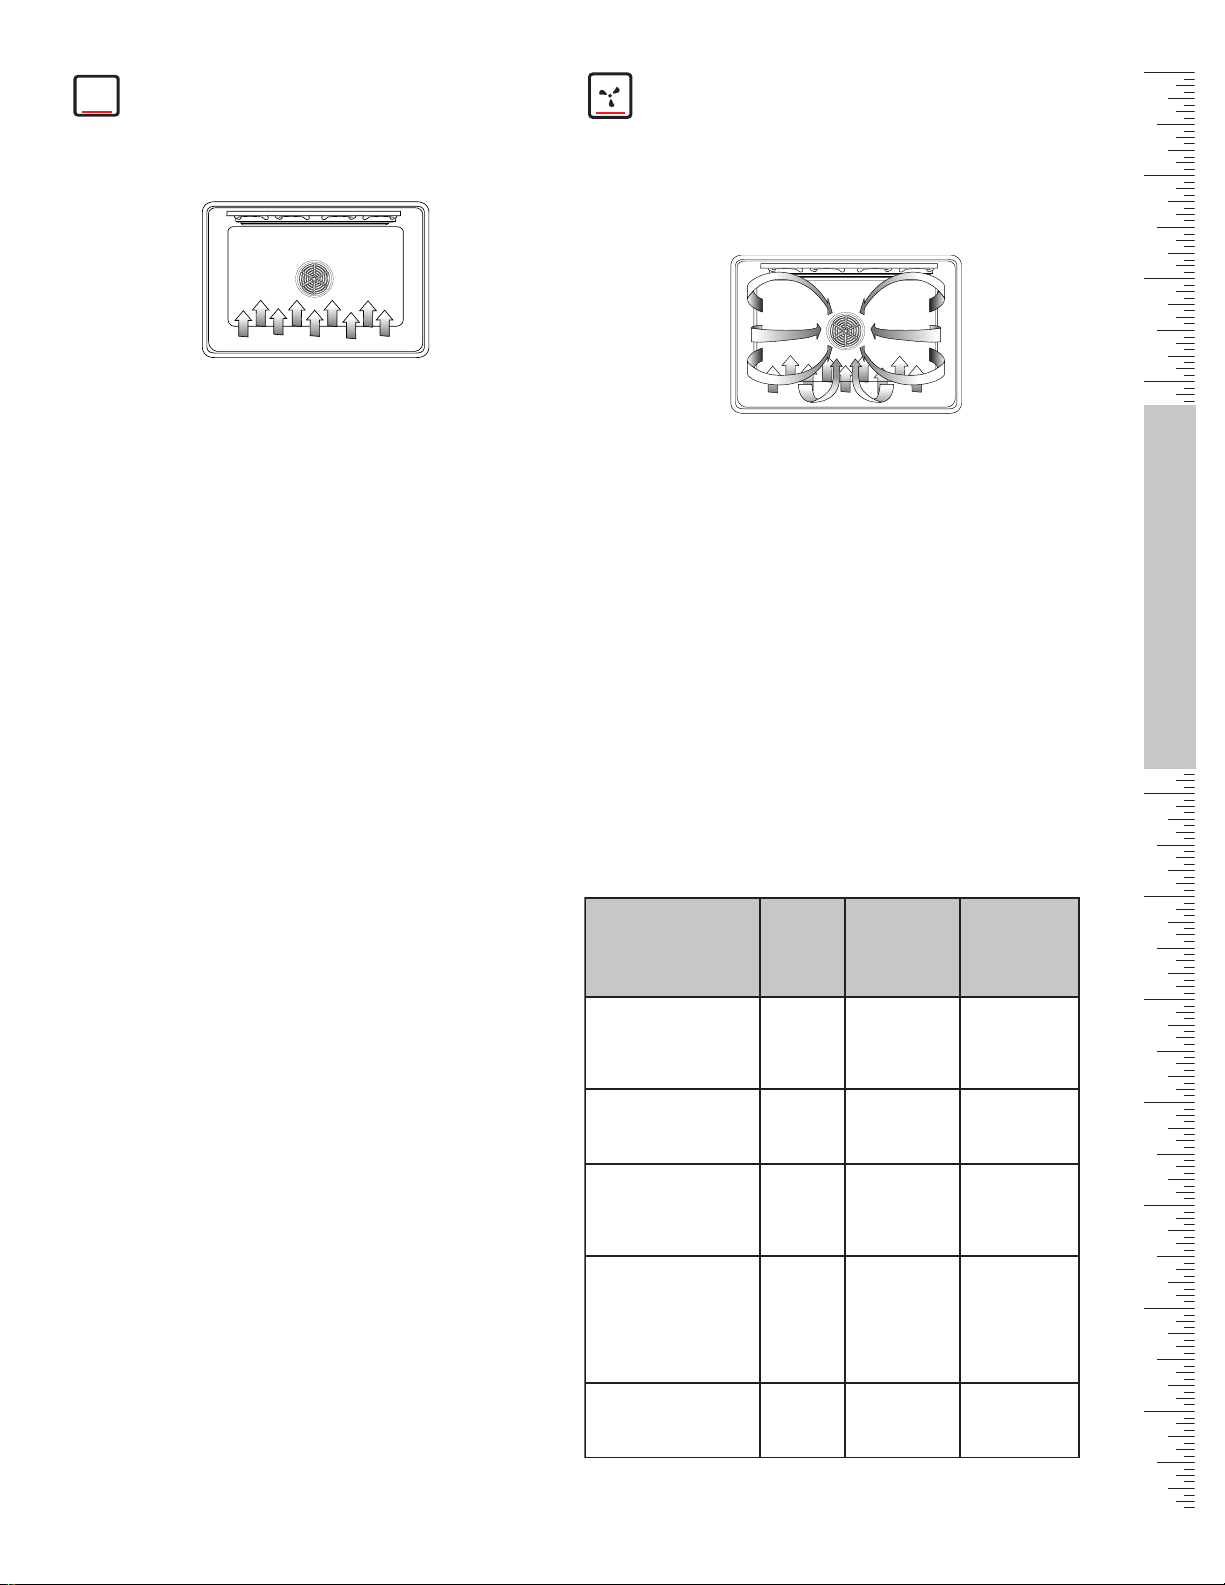
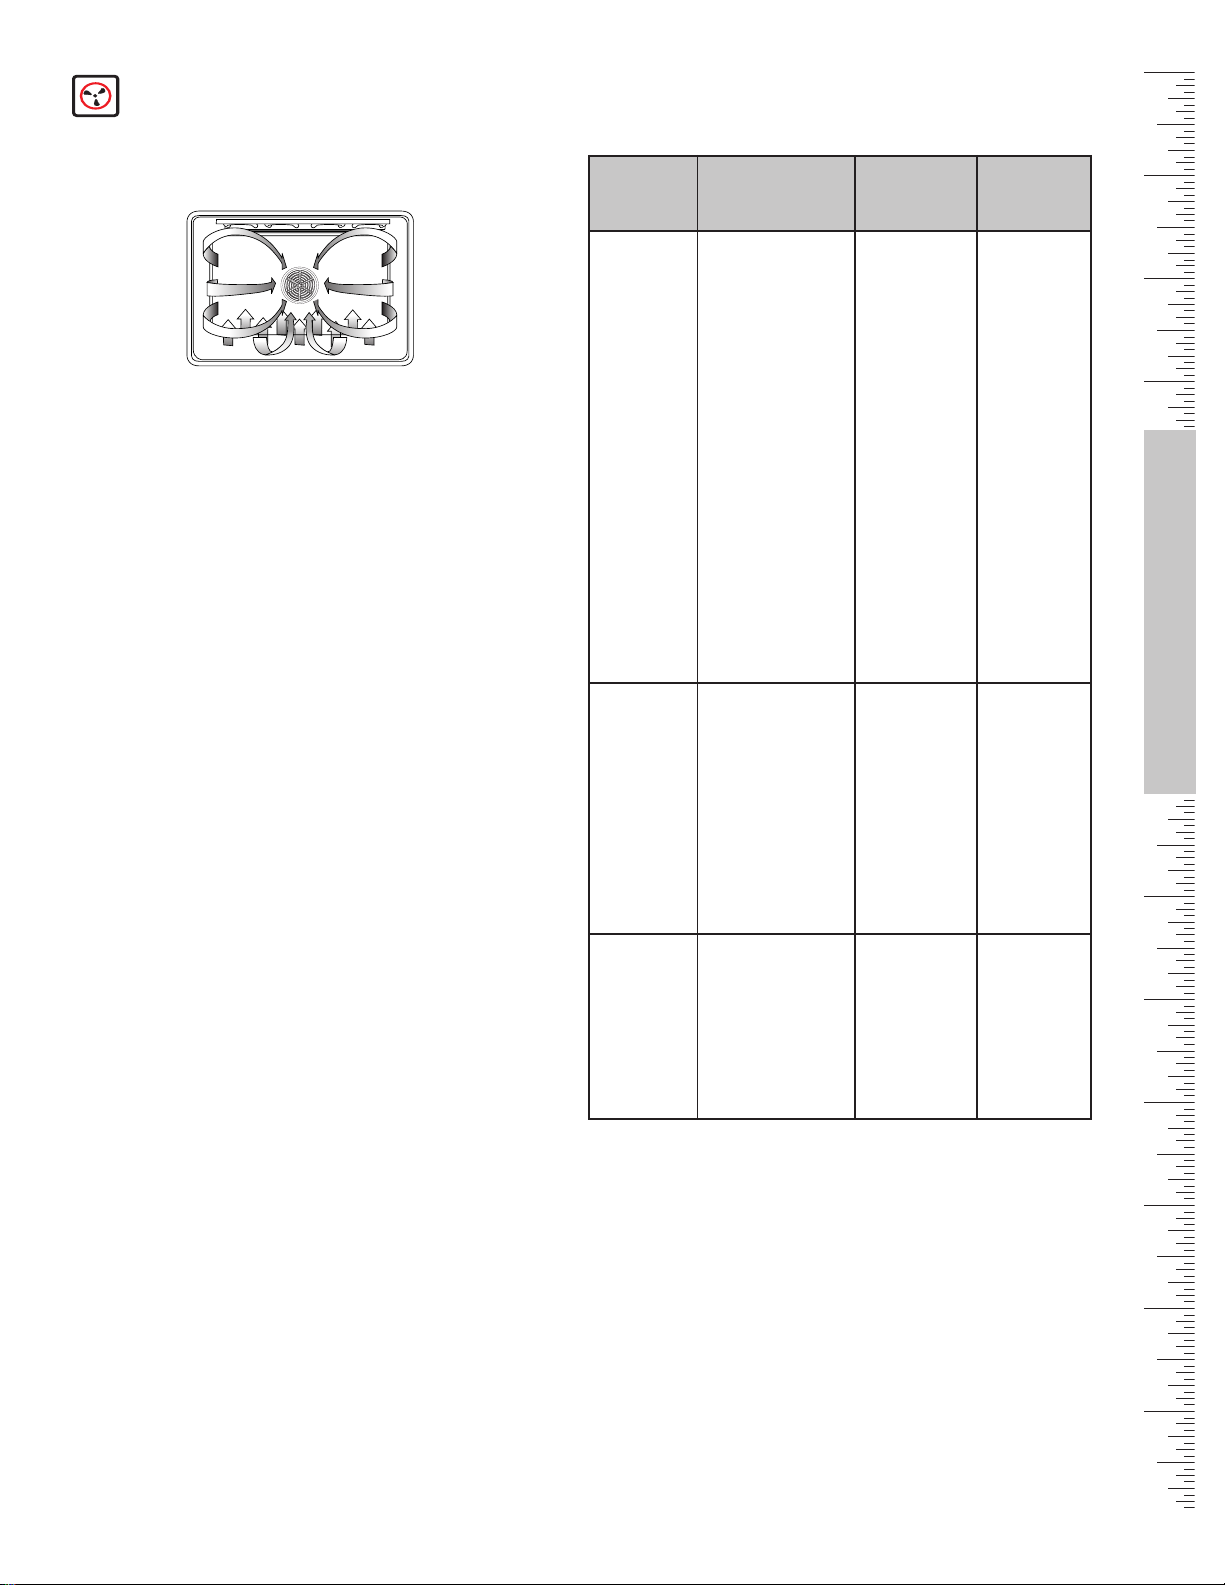
CONVECTION BAKE
Convection Baking is similar to Baking. In this case,
heat comes from the lower heating element and a third
element behind the backwall. The main difference in
convection baking is that the heat is circulated
throughout the oven by the convection fan:
The Convection Bake mode is well-suited for baking
large quantities of food on multiple racks. It can be
used to prepare cookies, pies, cupcakes, pastries,
breads, snack foods and appetizers among other items.
The benefits of Convection Baking include:
• Slight decrease in cooking time
• Three rack cooking (more even browning)
• Higher Volume (yeast items rise higher)
• Cook more items at once
For Best Results:
• Reduce recipe temperature by 25° F. Refer to the
Convection Baking chart for examples.
• Place food in low-sided, uncovered pans such as
cookie sheets without sides.
• Center baking pans side to side on the oven rack.
Convection Bake Chart
Oven
Use - Oven
*The convection bake temperature is 25°F less than recommended
on packages or recipes. The temperature in this chart has been
reduced 25°F.
**This chart is a guide. Actual times depend on the mixes or
recipes baked. Follow recipe or package directions and reduce
temperature appropriately.
metIdooF
kcaR
noitisoP
detaeherp(
)nevo
)°F(
*.pmeT
ekaC
sekacpuC
ekaCtdnuB
dooFlegnA
eiP
"9,hserf,tsurc2
seikooC
raguS
pihCetalocohC
seinworB
sdaerB
5x9,faol,daerbtsaeY
sllortsaeY
4x8,faol,daerBkciuQ
stiucsiB
sniffuM
azziP
nezorF
hserF
3
2
1
2
2
"9,tiurfnezorf,tsurc2
3
3
3
2
3
2
3
3
3
3
523
523
523
004-053
053
053-523
053-523
523
053
573-053
053-523
573-053
004
524-573
524-004
noitcevnoC
emiTekaB
)nim(**
12-81
34-73
34-93
55-54
87-86
11-6
51-01
63-92
42-02
81-41
55-54
51-11
02-61
62-32
51-21
English • 13
Oven Modes - Broil and Convection Roast
BROIL
Broiling uses intense heat radiated from the upper
element:
The Broil mode is best suited to cooking thin, tender
cuts of meat (1” or less), poultry and fish. It can also be
used to brown breads and casseroles.
The benefits of Broiling include:
• Fast and efficient cooking
• Cooking without the addition of fats or liquids
• Browning as the food cooks
For Best Results:
• Preheat oven 3-4 minutes.
• Steaks and Chops should be at least 3/4” thick.
• Brush fish and poultry with butter or oil to prevent
sticking.
• Use the broil pan and grid included with your range.
• Do not cover the broiler grid with foil. It is designed
to drain fats and oils away from the cooking surface
to prevent smoking and spattering.
• Turn meats once halfway through the
recommended cooking time (see Broil Chart for
examples).
• When top browning casseroles, use only metal or
glass ceramic dishes such as Corningware®.
• Never use heat-proof glass (Pyrex®);it cannot
tolerate the high temperature.
ALWAYS BROIL WITH THE DOOR CLOSED
Broil Chart
dnadooF
ssenkcihT
feeB
)"1-"4/3(kaetS
eraRmuideM
muideM
lleW
lleW
yrtluoP
)ni-enob(tsaerB
kroP
)"1(spohCkroP
hserf-egasuaS
)"2/1(ecilSmaH
doofaeS
"1,steliFhsiF
derettuB
daerB
*Broiling times are approximate and may vary slightly. Times are
based on cooking with a preheated broil element.
kcaR
noitisoP
liorB
gnitteS
)F°(
5
5
5
)"1-"4/3(sregrubmaH
4
4*woL07102-8191-81
4
3
5
4woL
5hgiH4-2
secils"1,daerBcilraG
*hgiH
hgiH
hgiH
hgiH
hgiH
hgiH
hgiH
541
061
071
061
061
061
061
sekalf
ylisae
lanretnI
emiT
.pmeT
&euqapo
krofhtiw
litnukooC
1ediS
*
)nim(
7-6
8-7
9-8
11-9
9-8
9-7
4-3
7-6oD
6-5
7-6
9-7
01-8
8-7
8-6
3-2
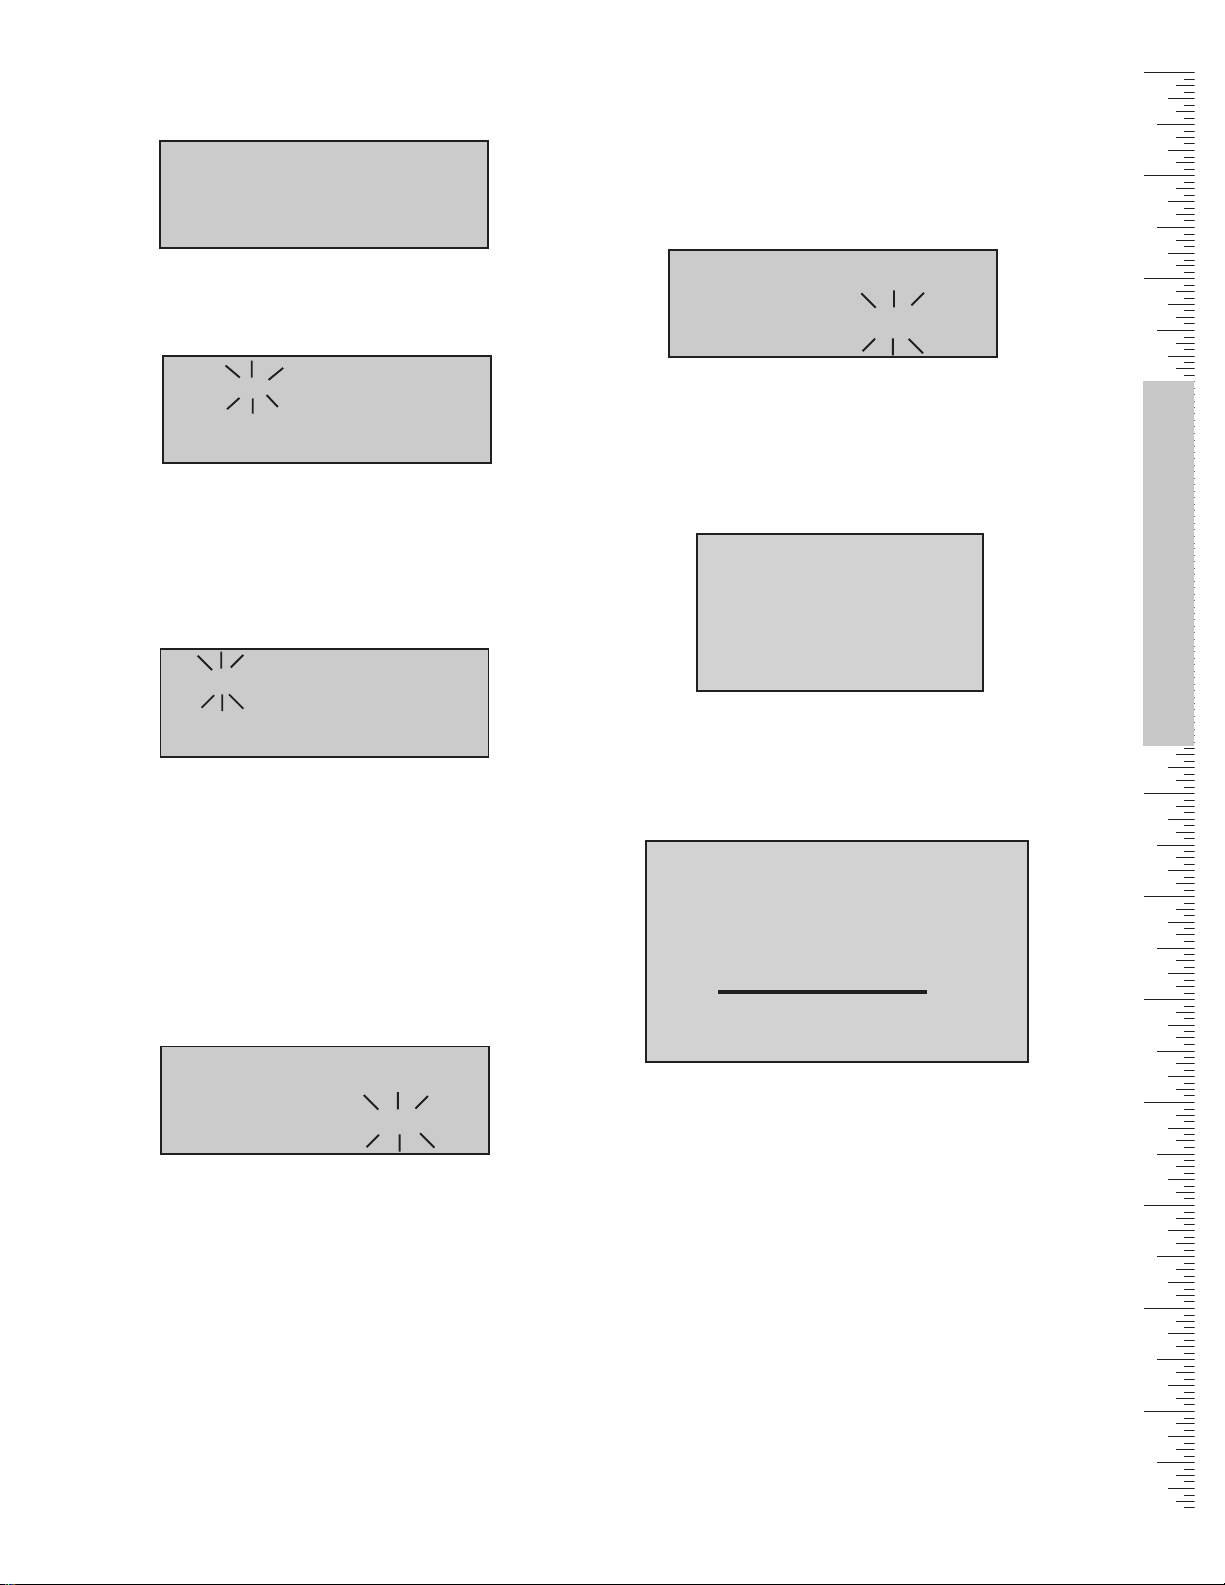
CONVECTION ROAST
Convection Roast uses heat from the bottom burner as
well as heat circulated by the convection fan:
The Convection Roast mode is well suited to preparing
tender cuts of meat and poultry.
The benefits of Convection Roasting, include:
• As much as 25% faster cooking than standard Roasting/
Baking
• Rich, golden browning
For Best Results:
• Use the same temperature as indicated in the recipe.
• Check doneness early as roasting time may decrease
by as much as 25%. Refer to Convection Roast Chart
for examples.
• Do not cover meat or use cooking bags.
• Use the broil pan and grid provided with the range for
roasting. A low-sided, uncovered pan can also be
used.
• Use the probe or a meat thermometer to determine the
internal temperature of the meat.
• If the meat is browned to your liking, but is not yet
done, a small strip of foil can be placed over the
browned area to prevent overbrowning.
Convection Roast Chart
nevO
staeM
emiT
2ediS
*
)nim(
nrutton
feeB
tsaoRbiR
,tsaoReyEbiR
)sselenob(
,piT,eyE,pmuR
)sselenob(niolris
tsaoRniolredneT
kroP
tsaoRnioL
redluohS
yrtluoP
neHhsinroC
*Roasting times are approximate and may vary depending on the
shape of the meat.
**Stuffed turkey requires additional roasting time. The minimum safe
temperature for stuffing in poultry is 165°F.
)ni-enobrosselenob(
elohw-nekcihC
**deffutsnu,yekruT
**deffutsnu,yekruT
**deffutsnu,yekruT
tsaerByekruT
thgieW
)bl(
6-4
6-4
6-3
3-2
8-5
6-3
4-3
51-21
02-61
52-12
8-3
½1-1
.pmeT
)F°(
523
523
523
524
053
053
573
523
523
523
523
053
gnitsaoR
*emiT
repnim(
)bl
23-52
23-82
23-42
23-72
03-52
23-82
52-51
52-51
03-02
02-41
41-01
31-9
01-6
52-02
latot(57-54
)emit
lanretnI
.pmeT
)F°(
)erar/dem(541
)muidem(061
)erar/dem(541
)muidem(061
)erar/dem(541
)muidem(061
)erar/dem(541
061
061
081
081
081
081
071
081
English • 14
Oven Modes - Dehydrate (some models)
DEHYDRATE
Convection Roast Chart
Dehydrate dries with heat from a third element behind
the back wall of the oven. The heat is circulated
throughout the oven by the convection fan.
dooF noitaraperP
Dehydrate Chart
etamixorppA
gniyrD
)srh(*emiT
roftseT
ssenenoD
Dehydrating is used to dry and/or preserve foods such
as fruits, vegetables and herbs. This mode holds an
optimum low temperature (100° F - 160° F) while
circulating the heated air to slowly remove moisture.
For Best Results:
• Dry most fruits and vegetables at 140° F. Dry herbs
at 100° F. (Refer to the Dehydrate Chart for
examples).
• Drying times vary depending on the moisture and
sugar content of the food, the size of the pieces, the
amount being dried and the humidity in the air.
Check food at the minimum drying time.
• Multiple racks can be used simultaneously. Contact
your Bosch dealer for drying racks.
• Treat fruits with antioxidants to avoid discoloration.
• Consult a food preservation book, county
Cooperative Extension Office or library for additional
information.
The door must be open during the Dehydrate
mode. Prop the door open at least 1" by placing an
object (i.e.; wooden spoon) in the upper corner
between the door and the side panel. Be careful that
the object does not touch the oven gasket.
tiurF
selppA
sananaB
seirrehC
egnarO
dnasleeP
secils
elppaeniP
sgnir
seirrebwartS
selbategeV
sreppeP
smoorhsuM
seotamoT
sbreH
,onagerO
yelsrapegas
,emyhtdna
lennefdna
lisaB
nomelpuc¼nideppiD
;retawspuc2dnaeciuj
secils"¼
nomelpuc¼nideppiD
,retawspuc2dnaeciuj
secils"¼
.yrdlewotdnahsaW
,seirrehchserfroF
stipevomer
;egnarofosecils"¼
niksfotrapegnaro
morfdeleepylniht
segnaro
deirdlewoT
.yrdlewotdnahsaW
niks,kciht"½decilS
kcarnonwod)edistuo(
.yrdlewotdnahsaW
foenarbmemevomeR
ylesraoc,sreppep
"1tuobadeppohc
seceip
.yrdlewotdnahsaW
tuC.dnemetsffotuC
secils"8/1otni
.yrdlewotdnahsaW
"8/1,secilsnihttuC
.llewniard,kciht
htiwyrddnaesniR
lewotrepap
4ot3sevaellisabesU
yarpS.potmorfsehcni
ffoekahs,retawhtiw
yrdtapdnaerutsiom
51-11
51-01
51-01
4-2:sleeP
61-21:secilS
31-9:dennaC
21-8:hserF
71-21
elbailpylthgilS
elbailp,tfoS
,elbailP
ywehc,yrehtael
:leepegnarO
.elttirbdnayrd
:secilsegnarO
yrderasniks
tiurf,elttirbdna
tsiomylthgilssi
elbailpdnatfoS
elttirb,yrD
Use - Oven
02-61
21-7
32-61
Fº001tayrD
srh5-3
Fº001tayrD
srh5-3
htiwyrehtaeL
erutsiomon
edisni
dnahguoT
yrd,yrehtael
derkcirb,yrD
roloc
elttirbdnapsirC
elttirbdnapsirC
* Oven will stay on for 48 hours before shutting off automatically
English • 15

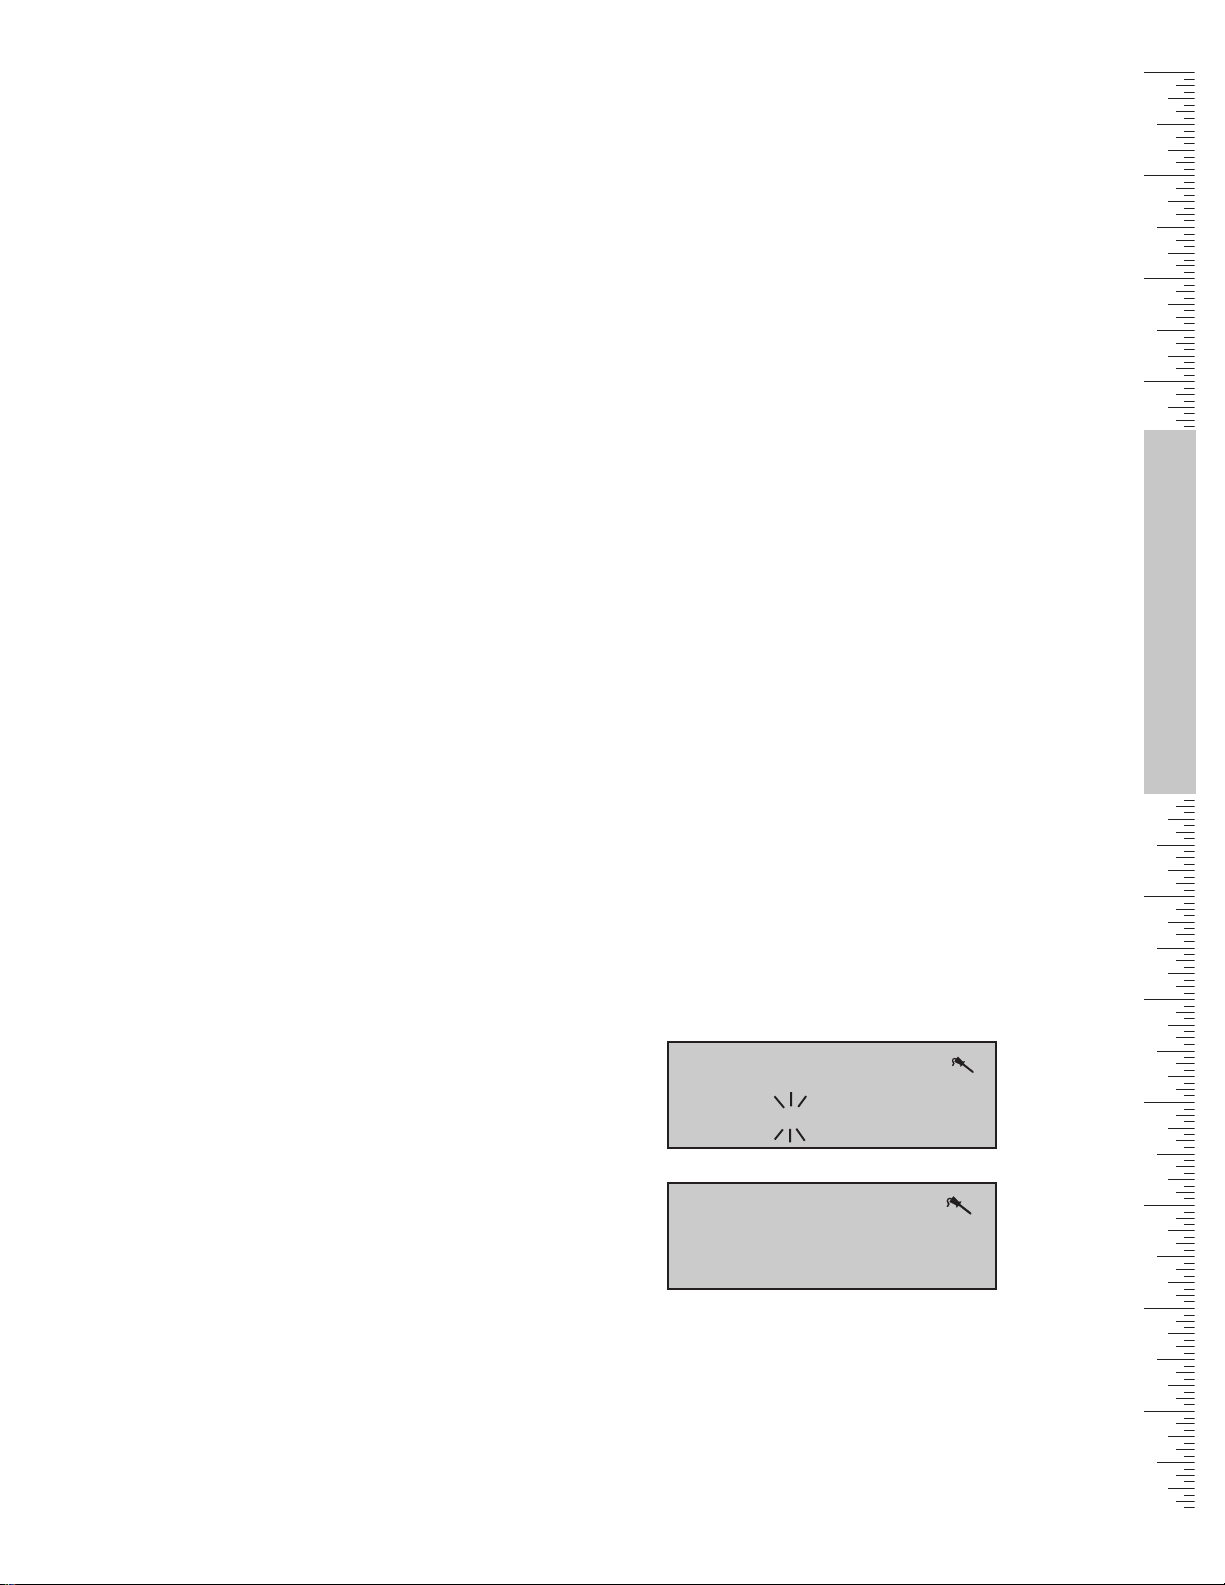
Selecting the Oven Mode
Setting the Cooking Mode
1. Touch COOKING MODE.
2. BAKE will flash in the display.
If no further setting is made within 5 seconds,
control will beep and flash. If this occurs, press
START.
3. To change the cooking mode, turn knob.
4. Push START.
The selected mode will appear in the display, along
with the default temperature for that mode, which
will be blinking.
5. To select a different temperature, turn knob to
desired temperature.
6. Touch START. If START is not touched, oven will
automatically turn on in 5 seconds.
7. The display alternates between the cooking mode
and preheat.
The preheated temperature is also displayed,
starting at 100ºF. The actual temperature increases
until set temperature is reached, at which point the
oven will beep.
8. To change temperature during cooking, touch
TEMPERATURE. Turn the knob to select new
Temperature and press START.
9. Once cooking has been completed, touch OFF to
turn off oven.
6: 356: 35
6: 35
6: 356: 35
PM
11
0000
1
00
BB
11
0000
B
BB
AKEAKE
AKE
AKEAKE
HELPFUL TIP
To back out of a current
mode, push OFF.
Selecting OFF when not
in a setting mode will
stop oven function.
380º380º
380º
380º380º
Note: After the oven has been turned off, HOT appears
in the display where the cooking mode was. This is to
indicate that the oven is off but still hot. When the oven
temperature drops below 176° F, HOT is no longer seen
in the display.
Oven Operation Time
The oven will automatically shut off after 12 hours (24
hours if the time format is set for 24 hour in the SELECT
FUNCTION section).
Oven Vent
The oven vent is located above the cooktop directly
below the display.
CAUTION:
This area may become hot
when the oven is in use.
It is normal to see steam escaping from the vent and
condensation may collect on the backguard and cooktop.
This area may become hot when the oven is in use.
Do not block the vent as it is important for air
circulation.
English • 16
Using the Timer/s
Setting the Timer/s
1. Touch TIME and TIMER 1 will be displayed.
0: 000: 00
0: 00
0: 000: 00
TIMER 1TIMER 1
TIMER 1
TIMER 1TIMER 1
2. Turn knob to select TIMER 1 or 2, then push
TIME. SET TIMER 1 (2) appears in display. Minutes
flash.
: 00: 00
1
: 00
: 00: 00
HR:MIN
TIMER
3. Turn knob to set minutes.
If setting only minutes, press START. Otherwise,
continue to step 4.
4. Touch TIME again and the hours will flash.
2:2:
2: 02
2:2:
PM
SET TIMER 2SET TIMER 2
SET TIMER 2
SET TIMER 2SET TIMER 2
Clearing the Timer/s
1. Touch TIME once. TIMER 1 flashes.
2. Turn knob to select CLEAR TIMER 1(2).
3. Touch TIME.
4. If TIME pad is not touched, range will beep and
display will continue flashing.
0: 000: 00
0: 00
0: 000: 00
CLEAR TIMER 1 CLEAR TIMER 1
CLEAR TIMER 1
CLEAR TIMER 1 CLEAR TIMER 1
When the specified time has elapsed, the control beeps.
TIMER 1 (2) END flashes in the display.
1. Touch TIME to return to main screen.
TIP
Turn the knob to display the
time of day or further
information about the oven
mode when the timers are
in use.
Use - Oven
HR:MIN
TIMER
5. Turn knob to set hours.
6. Touch TIME again.The TIMER is now set.
If TIME or START is not touched, display will beep
and timer will flash.
SET TIMER 2SET TIMER 2
SET TIMER 2
SET TIMER 2SET TIMER 2
Changing the Timer/s
1. Touch Time. TIMER 1 will appear in display. Select
either TIMER 1 or 2.
: 00: 00
0
: 00
: 00: 00
AM
TIMER 1TIMER 1
TIMER 1
TIMER 1TIMER 1
2. Push TIME. RESET TIMER 1 (2) appears in the
display. Minute digits flash.
3. Turn knob to change minutes.
4. Touch TIME again and hour digits will flash.
5. Turn knob to change hours.
6. Touch TIME and new time is set.
CANCELLING
If operation is not completed, the oven
will beep periodically as a reminder to
set time. Push OFF to exit the TIMER
mode.
Selecting OFF when not in a setting
mode will stop oven function.
English • 17

Using Timed Cook
The TIMED COOK feature sets the oven to a cooking mode for a set period of time and then turns it off. The
TIMED COOK feature is available for Bake, Convection Bake and Convection Roast.
Be sure that the time-of-day clock displays the correct
time before beginning. See “Changing the Clock Time”
to adjust the time.
Setting a Timed Mode
1. Touch COOKING MODE.
2. BAKE will be displayed. To select a different cooking
mode, turn the knob.
3. Touch START.
4. Turn knob to select desired temperature.
5. Touch TIME. TIMED BAKE appears in the display.
6. Touch TIME. SET BAKE TIME appears in the display
and minutes flash. Set minutes. Touch TIME.
7. Hours Flash. Set hours. Touch START.
Note: time required for the oven to reach temperature
must be included in the set cooking time.
8. TIMED BAKE appears in display and the oven
begins to preheat.
After cooking is complete, display flashes TIME COOK
END and reminder beeps will sound.
1: 201: 20
1: 20
1: 201: 20
PM
HR:MIN
TIMER
DELADELA
DELA
DELADELA
YED BYED B
YED B
YED BYED B
NOTE
At the end of the programmed
cooking time, the oven will
automatically turn off. The
display will show the mode and
END.
350°350°
350°
350°350°
AKEAKE
AKE
AKEAKE
F
Delaying the Start of a Timed Mode
1. Follow steps 1 through 5 above.
2. Turn knob until DELAYED BAKE appears in
display.
3. Touch Time. SET BAKE TIME appears in the display
and minutes flash. Set minutes. Touch TIME.
4. Hours Flash. Set hours. Touch TIME.
5. SET BAKE END appears in the display. Touch TIME.
6. Use knob to enter the time of day the oven will
stop cooking or turn off:
Set hours. Touch TIME.
Set minutes. Touch TIME.
The clock automatically calculates the time of day at
which the cooking mode starts and stops. The
displayed cooking time counts down by the minute.
7. At the end of the programmed cooking time, the
oven will automatically turn off. Display will show
TIME COOK END and the oven will beep.
Note: Remove food from oven immediately after
cycle has finished to prevent overcooking. Food left in
the oven will continue to cook even after the cycle is
complete.
To check the cooking time and stop time after a delay
has been set, touch TIME. Turn knob to BAKE END
or BAKE TIME. Touch TIME.
5: 005: 00
5: 00
5: 005: 00
HR:MIN
TIMER
PM
DELADELA
DELA
DELADELA
YED BYED B
YED B
YED BYED B
NOTE
Delayed cooking is not
recommended for foods that
need to rise (i.e.; cookies,
cakes, breads, souffles, etc.)
400°400°
400°
400°400°
AKEAKE
AKE
AKEAKE
F
English • 18
Using the Probe (some models)
About the Probe
• The probe can be used to determine the internal
doneness or the “END” temperature of many foods,
especially meats and poultry.
• The temperature range for the probe is 135°F to
200°F.
• Preheating the oven is not recommended when
using the probe. A hot oven will impair your ability
to easily connect the probe to the receptacle and
to insert it into the meat.
• Oven temperature can be set for 100°F up to 450°F
.
Inserting the Probe
Insert the probe tip into the food item.
• For meats, insert the probe tip into the thickest
part and do not touch bone, fat, or gristle.
• For large poultry products and turkeys, insert the
probe in the thickest part of the inner thigh.
• For other foods, such as a meatloaf, the probe tip
should be located in the center of the thickest part
of the food.
Using the Probe
1. Prepare meat and place in roasting pan (or on rack
in roasting pan as recipe specifies). Insert the probe
into the meat (See “Inserting the Probe”, above).
2. Make sure the probe is not touching gristle, fat,
bone, the roasting rack or the pan.
3. Place roasting pan with meat in cold oven on
recommended oven rack. Plug probe into the
probe receptacle. The probe symbol will appear
in display.
Note: The probe temperature can only be set
when the probe is installed in the oven.
4. Touch COOKING MODE and select BAKE,
CONVECTION BAKE or CONVECTION ROAST.
5. Touch START. The default oven temperature will
appear.
6. Turn knob to change oven temperature if
necessary.
7. Touch START.
8. Turn knob to set the probe temperature (desired
end temperature of the food).
9. Touch START.
• The chosen oven temperature is displayed in
the upper right hand corner of the display.
• The probe temperature is displayed in the
center to the left of the cooking mode. It starts
at 80° and increases in 5°F increments
until the chosen probe temperature is reached.
• The oven is preheated when the beep signals
once.
• When the set probe temperature is reached,
END appears in display and oven turns off.
Probe Use Tips
• The oven is well insulated and the retained heat
will continue to cook the meat after the oven has
shut off. For this reason, remove the meat from
the oven as soon as the control beeps.
• Since meat continues to cook after being removed
from the oven, set the internal (probe) temperature
5 - 10 degrees below the desired final internal
temperature (exception: poultry). Allow “standing
time” (10 -20 minutes) before carving the meat.
• Always use the handle of the probe for inserting
and removing. Use a potholder to remove since the
probe becomes hot.
• Remove the probe from the oven when it is not
being used.
• The probe cannot be used with frozen meats. For
best results, completely thaw meats before using
the probe.
Changing the Oven Temperature
1. Touch TEMPERATURE. OVEN TEMP will flash in the
display.
2. Turn the knob to desired temperature and press
START twice.
Changing the Probe Temperature
1. Touch TEMPERATURE. The oven temperature will
flash.
2. Press START and PROBE TEMP will appear.
Temperature will flash.
3. Turn the knob to desired temperature and press
START again.
F
325°325°
325°
PRPR
PR
PRPR
CC
ONV RONV R
C
ONV R
CC
ONV RONV R
325°325°
OBE TEMPOBE TEMP
OBE TEMP
OBE TEMPOBE TEMP
325°325°
325°
325°325°
OO
ASAS
TINGTING
O
AS
TING
OO
ASAS
TINGTING
F
5: 005: 00
5: 00
5: 005: 00
5: 005: 00
5: 00
5: 005: 00
Note:
Always remove probe from oven when cooking
is complete. The probe symbol will remain in the
display until the probe is removed. Do not leave probe
attachment in oven during self-clean. Oven will not selfclean with the probe installed in the oven.
PM
00
0
00
PM
8080
80
8080
Use - The Oven
Use - Oven
English • 19

The Warming Drawer
(some models)
Parts Key:
1. Stainless Steel Drawer Interior
2. Gasket
3. Rail Lock
1
2
3
Warming Drawer Rack
(some models)
Contact your dealer to order a warming drawer rack
About the Warming Drawer
The warming drawer will keep hot, cooked foods at
serving temperature.
Warming drawer settings are Low, Medium, and High.
Refer to the Warming Drawer Chart (next page) for
recommended settings.
To keep several different foods hot, set the temperature
to the food needing the highest setting.
Place item needing the highest setting toward the side
of the drawer and item needing less heat on the rack or
in the center of the drawer bottom.
Food should be at serving temperature (above 140° F)
before being placed in the warming drawer. DO
NOT use to heat cold food other than crisping crackers,
chips, and dry cereal, or warming dishes or
plates.
The warming drawer can be used with or without a
rack. Preheat with rack in place if using this
arrangement. It fits side to side.
Preheat empty serving dish while preheating drawer if
desired.
Place cooked, hot food in warming drawer in its original
cooking container or in a heat-safe serving dish.
Aluminum foil may be used to cover food; However DO
NOT line the warming drawer with aluminum foil.
DO NOT use the warming drawer for storage.
Usable Space and Dish Sizes
Drawer Interior:
25"W x 17"D x5" H
Dish sizes:
• 2 - 9 x 13" Pyrex 3-quart dishes, side by side.
• 2 - 9 1/2 x 15" Pyrex 4-quart dishes, side by side.
• 4 - 10 1/2" plates, single or stacked
• 3 - 11" plates, single or stacked
The warming drawer has three settings: Low, Meduim
and High. The icons below are seen in the display when
the corresponding setting is selected:
Low
Medium
High
See next page for detailed instructions.
English • 20
Using Your Warming Drawer (some models)
Warming Empty Serving Bowls and
Plates
• Use only heat-safe dishes.
• May use reversible rack, in low position to raise
utensil from direct contact with bottom of drawer.
• Warm on setting appropriate for utensil.
• Check dish temperature during warming period.
• Place empty plates or dishes in a cold warming
drawer. Do not preheat drawer prior to placing
dishes.
Crisping Stale Items
• Place food in low sided dishes or pans.
• Preheat on Low.
• Check crispness after 45 minutes. Add time as
needed.
Warming Drawer Guide
dooF erutarepmeT
nocaBiHderevocnU
enodllewdnamuidem,feeBdeMderevoC
erar,feeBwoLderevoC
slloRdraH,daerBdeMderevocnU
sekaCeeffoC,slloRtfoS,daerBdeMderevoC
stiucsiBdeMderevoC
seloressaCdeMderevoC
/derevoC
derevocnU
Preheating
For best results, always preheat warming drawer when
warming food.
Preheat times
Low: 10 minutes
Medium: 15 mintues
High: 20 minutes
Setting the Warming Drawer
When Only Using the Warming Drawer:
1. Touch COOKING MODE.
2. Turn knob to select WARMING DRAWER.
3. Touch START.
4. Turn knob to select heat setting.
5. Touch START.
When Also Using The Oven:
1. Touch COOKING MODE.
2. Touch START to select WARMING DRAWER
3. Turn knob to select heat setting.
4. Touch START.
sggEdeMderevoC
doofaeS,hsiFdeMderevoC
sdooFdeirFiHderevocnU
secuaSmaerC,yvarGdeMderevoC
maHdeMderevoC
sekacnaPiHderevoC
tsurCenO,seiPdeMderevoC
stsurCowT,seiPdeMderevocnU
azziPiHderevoC
kroPdeMderevoC
dekaB,seotatoPiHderevoC
dehsaM,seotatoPdeMderevoC
detsaoR,yrtluoPdeMderevoC
selbategeVdeMderevoC
setalPwoLderevocnU
dooFfoetalPdeMderevoC
Use - Warming Drawer
Turning Off the Warming Drawer
When Only Using the Warming Drawer:
1. Touch OFF.
When Using the Warming Drawer and the Oven:
1. Touch OFF.
2. Turn knob to select CANCEL DRWR, CANCEL
OVEN, or CANCEL BOTH.
3. Touch OFF.
CAUTION:
Plastic containers or plastic wrap
can melt if in direct contact with the
drawer or a hot utensil. If it melts
onto the drawer, it may not be
removable.
English • 21

Cleaning the Cooktop
Daily Cleaning Techniques
The entire range can be safely cleaned by wiping with a
soapy sponge, then rinsing and drying.
Note: The cleaners recommended in this manual
indicate cleaner types and do not constitute an
endorsement of a particular brand. Use all products
according to package directions.
Cooktop Care Chart
CAUTION:
• Before cleaning, be certain the burners are turned
off and the grates are cool.
• Always use the mildest cleaner that will do the
job. Use clean, soft cloths, sponges or paper
towels.
• Rub stainless steel finishes in the direction of the
grain. Wipe area dry to avoid water marks.
• Do not clean removable cooktop parts in any selfcleaning oven.
• After cleaning, place all parts in their proper
positions before using cooktop.
Cooktop Part / Material
Burner Base/ Aluminum
Burner Cap and
exterior finish
Porcelain Enamel
Control Knobs and
Bezels / Plastic
Exterior Finish /
Stainless Steel
Grates / Porcelain
Enamel on Cast Iron
Igniters / Ceramic
Suggested Cleaners Important Reminders
• Detergent and hot water; rinse and
dry.
• Abrasive cleansers: Brillo® or S.O.S.® pads.
Rinse and dry.
• Hot sudsy water; rinse and dry thoroughly.
• Nonabrasive cleansers: Fantastic®, Formula
409®.
• Mild abrasive cleansers: Bon Ami®, Ajax®,
Comet®.
• Liquid cleaners: Soft Scrub®.
• Reassemble. Make sure that the cap is
seated on the base.
• Hot sudsy water; rinse and dry immediately.
• To remove knobs, place in off position and
pull straight out.
• Nonabrasive cleaners: Hot water and
detergent, Fantastic®, Formula 409®.
Rinse and dry immediately.
• Cleaner polish: Stainless Steel Magic® to
protect the finish from staining and pitting;
enhances appearance.
• Hard water spots: Household white
vinegar.
• Mild Abrasive Cleaners: Kleen King
stainless steel liquid cleaner, Cameo
aluminum & stainless steel cleaner, Bon
Ami®.
• Heat discoloration: Bar Keepers Friend®.
• Nonabrasive cleaners: Hot water and
detergent, Fantastic, Formula 409.
Rinse and dry immediately.
• Mild abrasive cleaners: Bon Ami® and
Soft Scrub®.
• Carefully wipe with a cotton swab
dampened with water, ammonia or
Formula 409®.
• Gently scrape soil off with a toothpick.
®
®
• Clean ports with a stiff nylon bristle
toothbrush to clean port openings.
• Do not scratch or gouge the port openings.
• Do not use a toothpick; it may break off.
• Acidic and sugar-laden spills deteriorate
the porcelain enamel. Remove soil immediately.
• Do not use wet sponge or towel on hot
porcelain.
• Do not soak burner caps.
• Always apply minimal pressure with abrasive
cleaners.
• Never use oven cleaners, caustic cleaning
agents or abrasive cleaning agents on
exterior of range.
• Do not soak knobs.
• Do not force knobs onto valve shaft.
• Do not use abrasive scrubbers or cleansers,
such as BonAmi®, Ajax®, or Comet®. They
may permanently damage the finish.
• Stainless steel resists most food stains and
pit marks providing the surface is kept
clean and protected.
• Never allow food stains or salt to remain on
stainless steel for any length of time.
• Rub lightly in the direction of polish lines.
• Chlorine or chlorine compounds in some
cleaners are corrosive to stainless steel.
Check ingredients on label before using.
• The grates are heavy; use care when
lifting. Place on a protected surface.
• Blisters / crazing / chips are common due
to the extreme temperatures on grate
fingers and rapid temperature changes.
• Acidic and sugar-laden spills deteriorate
the enamel. Remove soil immediately.
• Abrasive cleaners, used too vigorously or
too often, can eventually mar the enamel.
• Avoid excess water on the igniter. A damp
igniter will prevent burner from lighting.
• Remove any lint that may remain after
cleaning.
English • 22
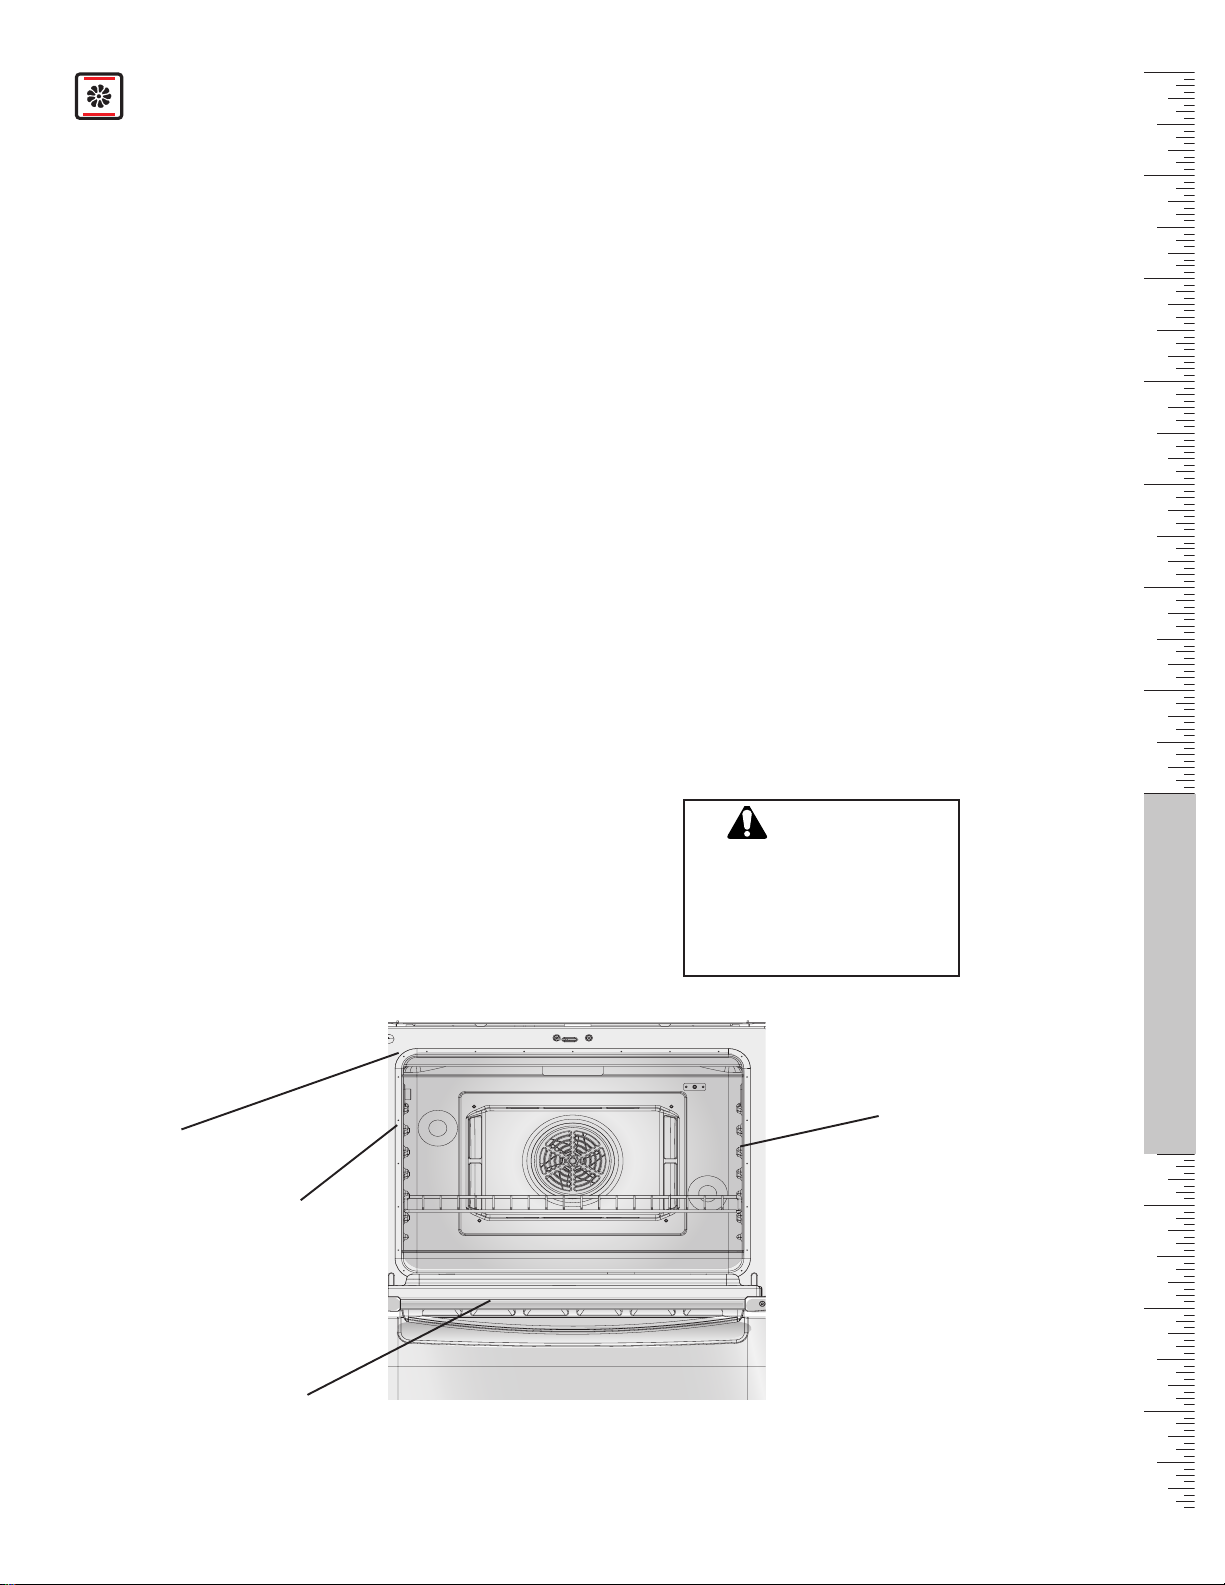
Care and Cleaning - Oven
Self Cleaning the Oven
Bosch ovens feature a self-cleaning function that
eliminates the manual labor involved with cleaning your
oven. During self-cleaning, the oven uses a very high
temperature to burn away food soil and grease.
• It is common to see smoke and/or an occasional
flame-up during the Self-Clean cycle, depending on
the content and amount of soil remaining in the
oven. If a flame persists, turn off the oven and
allow it to cool before opening the door to wipe up
the excessive food soil.
• In a normal Self-Clean mode, the door does not
lock at the beginning of the cycle; However, it does
lock prior to reaching the high self clean
temperatures. The door lock symbol will appear in
the display at this point. The door will not lock at
the start of the cycle.
• The oven light does not operate during this mode.
• During Self-Clean, the kitchen should be well
ventilated to help eliminate odors associated with
Self-Clean. Odors will lessen with use.
• The preset length of cleaning time is 4 hours. The
range can also be set to clean for 3 or 5 hours.
• The mode automatically stops at the end of the
clean hours.
• When the oven heat returns to a safe temperature
after cleaning, the automatic door lock will release
and the door can be opened.
Preparing the Oven for Self Clean
1. Remove all utensils and bakeware.
2. Remove oven racks. If oven racks are left in the
oven during the self-clean cycle, they will
permanently lose the shiny finish and change to a
dull dark finish. They will also not glide smoothly.
See Oven Cleaning Chart for proper care.
3. Wipe up any soft soil spills and grease with paper
towels. Excess grease will cause flames and smoke
inside the oven during self-cleaning.
4. Review illustration below. Some areas of the oven
must be cleaned by hand before the cycle begins.
Use a soapy sponge or plastic scrubber or a
detergent-filled S.O.S.® pad. Hand clean the oven
door edge, oven front frame and up to 1-1/2 inches
inside the frame with detergent and hot water. Do
not clean or rub the gasket on the oven. Rinse all
areas thoroughly then dry.
5. Be sure oven light is turned off and the light bulbs
and lens covers are in place. Do not operate
oven without lightbulb and cover in place.
Do not use commercial oven cleaners on the self-clean
oven or any part; they will damage the finish or part.
DO hand
clean frame
area
outside
gasket
DO NOT
hand
clean
gasket
DO hand
clean door
area
outside
gasket
WARNING
A flexible door gasket is
necessary for a good seal.
Do not clean, rub, damage or
move the gasket.
Do not remove oven bottom.
DO hand clean
1-1/2" from
rack guides to
front of oven
cavity.
Care and Cleaning
English • 23
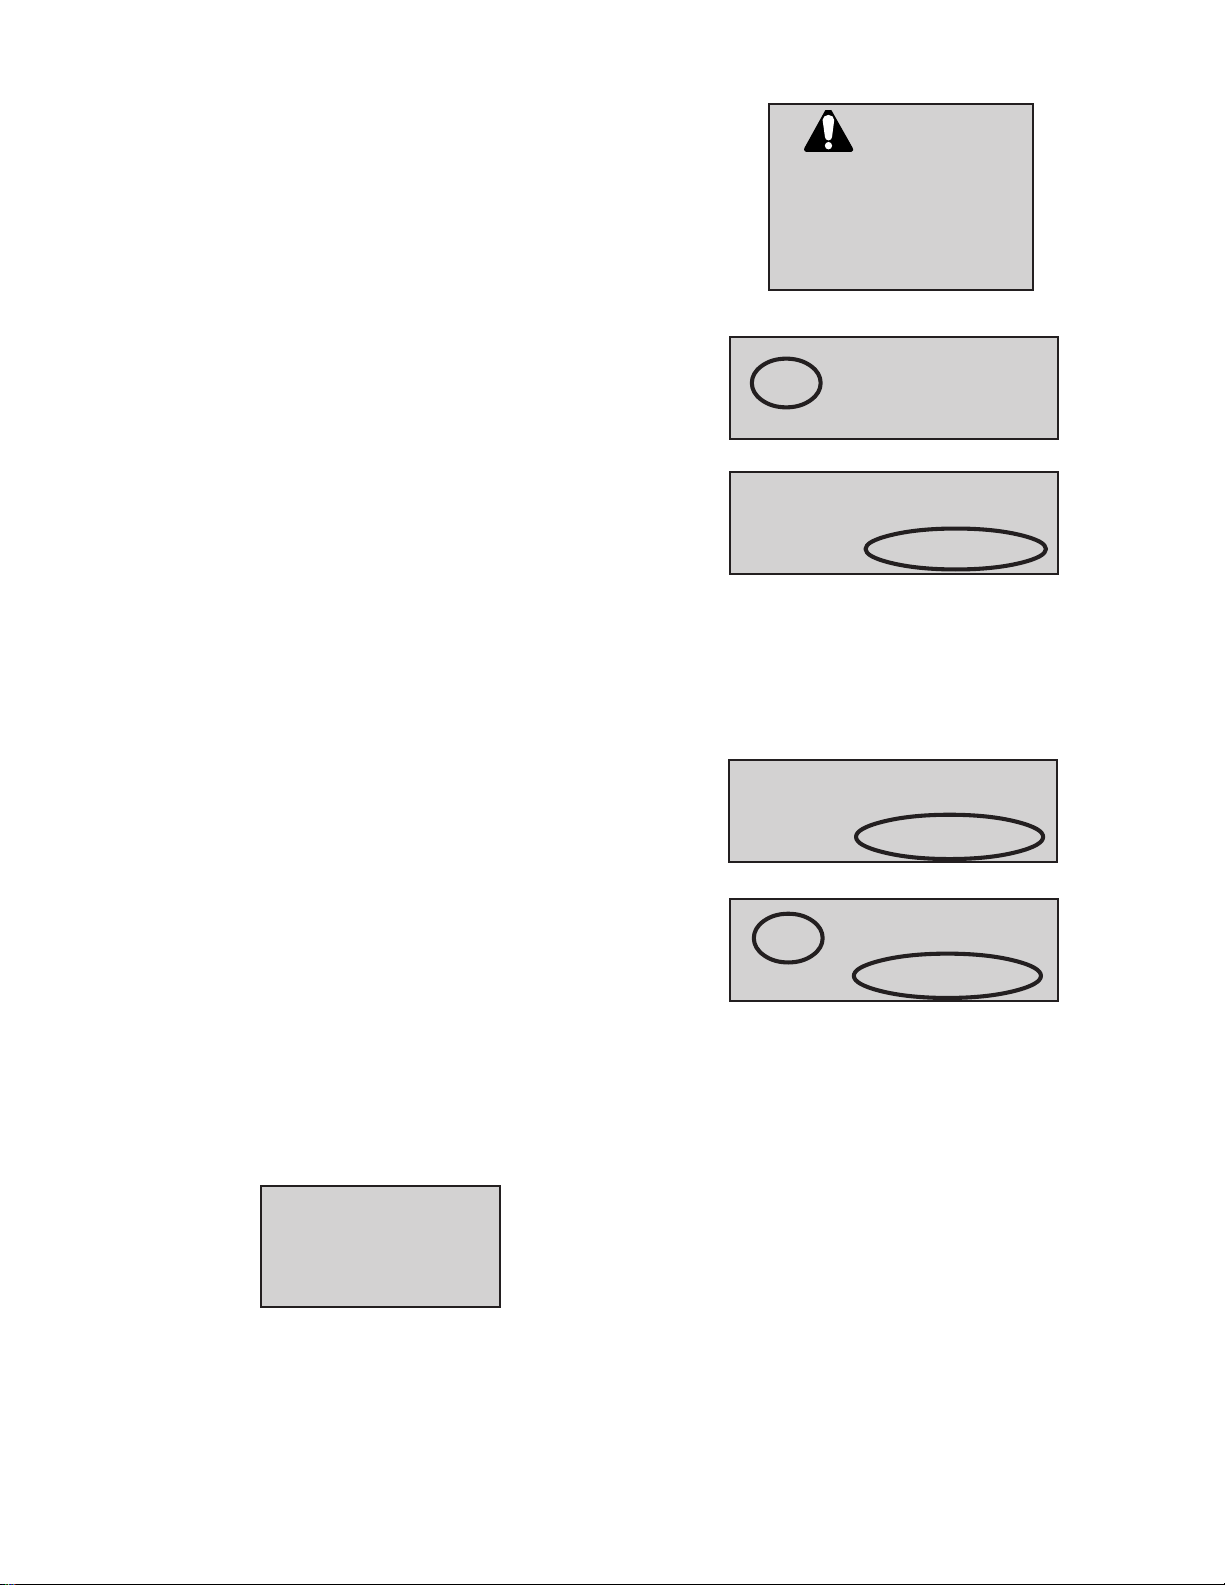
Care and Cleaning - Oven
Setting the Self-Clean Mode
1. Touch COOKING MODE.
2. Turn knob until SELF CLEAN mode appears. Press
START.
3. The default cleaning time is 4 hours. To change
cleaning time, turn knob to change number of
hours. Otherwise, continue to step 4 (See Fig. 1).
4. Touch START. SELF CLEAN flashes. Press START.
5. REMOVE RACKS appears in the display as a
reminder to remove oven racks (See Figure 2).
6. Touch START again to begin the self clean.
Note: In a normal Self-Clean mode, the door does not
lock at the beginning of the cycle; however, it does lock
prior to reaching the high self clean temperatures. The
door lock symbol will appear in the display at this point.
WARNING
If door does not lock, press
CANCEL and do not selfclean; phone Bosch at 800944-2904 for service.
Figure 1
4: 004: 00
4: 00
4: 004: 00
SELF CLEANSELF CLEAN
SELF CLEAN
SELF CLEANSELF CLEAN
Delaying the Start of the Self-Clean
Note: The time of day must be correctly set for
this option to work properly. See section “Setting
the Clock” in “Setting Up Your Range”, Page 5.
1. Touch COOKING MODE.
2. Turn knob until SELF CLEAN mode appears. Press
START.
3. The default cleaning time is 4 hours. To change
cleaning time, turn knob to change number of
hours. Otherwise, continue to step 4 (See Figure 1).
4. Touch START.
5. Turn knob until DELAYED CLEAN mode appears.
Press START (See Figure 3).
6. SELF CLEAN END appears in the display (See Fig. 4).
7. Turn knob to enter the time of day you want the
self-clean to end: Set hours, touch time, set
minutes.
8. Touch START. REMOVE RACKS appears in the
display as a reminder to remove oven racks (See
Figure 2).
9. Touch START. The display shows DELAYED
CLEAN. The self-clean will automatically start at the
appropriate time.
Note: In the Delayed Self Clean mode, the door latch
is automatically activated at the beginning of the
cycle. The door lock symbol will appear in the display at
this point.
NOTE
The oven lights do not
operate in the Self
Clean mode.
Figure 2
SELF CLEANSELF CLEAN
SELF CLEAN
REMOREMO
REMO
REMOREMO
DELADELA
DELA
DELADELA
SELF CLEANSELF CLEAN
VE RAVE RA
CC
VE RA
VE RAVE RA
SELF CLEANSELF CLEAN
SELF CLEAN
SELF CLEANSELF CLEAN
YED CLEANYED CLEAN
YED CLEAN
YED CLEANYED CLEAN
SELF CLEANSELF CLEAN
SELF CLEAN
SELF CLEANSELF CLEAN
KSKS
C
KS
CC
KSKS
4: 004: 00
4: 00
4: 004: 00
Figure 3
4: 004: 00
4: 00
4: 004: 00
Figure 4
5: 455: 45
5: 45
5: 455: 45
SELF CLEAN ENDSELF CLEAN END
SELF CLEAN END
SELF CLEAN ENDSELF CLEAN END
After Self-Cleaning:
1. At the end of the programmed cleaning time, the
oven will automatically turn off. SELF CLEAN END
appears in the display. Press OFF to clear.
Note: To cancel or stop while the mode is operating,
touch OFF. The door will not unlock until the oven
reaches a safe temperature.
2. The self-clean mode may produce ash which will
settle in the oven. If this happens, remove ash with
a damp cloth before using the oven.
3. Wipe rack edges with cooking oil to allow for proper
glide. Wipe off excess.
English • 24
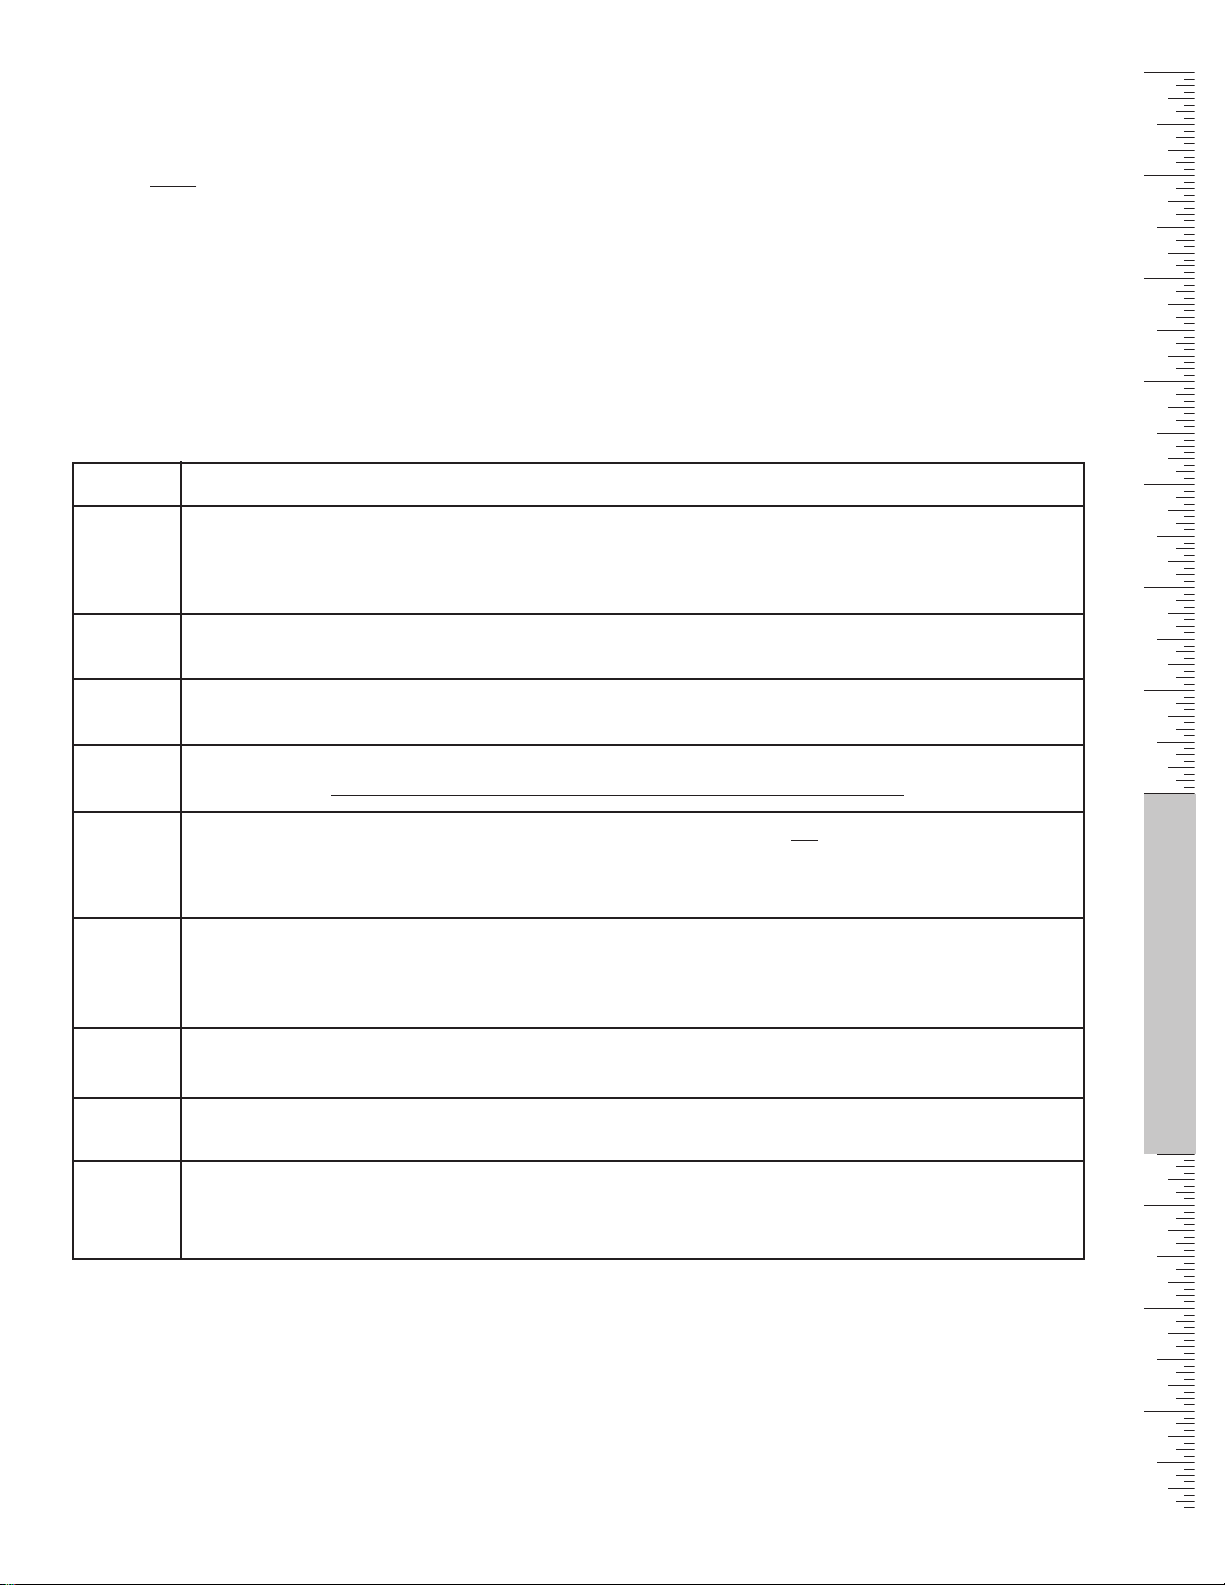
Care and Cleaning - Oven
After self-cleaning, the entire oven can be safely cleaned with a soapy sponge, rinsed and dried.
If stubborn soil remains, follow the recommended cleaning methods below.
• Always use the mildest cleaner that will remove the soil.
• Rub metal finishes in the direction of the grain.
• Use clean, soft cloths, sponges or paper towels.
• Rinse thoroughly with a minimum of water so it does not drip into door slots.
• Dry to avoid water marks.
The cleaners listed in this manual indicate types of products to use and are not being endorsed. Use all products
according to package directions.
PART
Racks Wash with hot sudsy water. Rinse thoroughly and dry. Or, gently rub with cleansing powder or soap filled
(Oven, pads as directed. If oven racks are cleaned in the oven during the self-clean mode, they will lose
Warming their shiny finish and may not glide smoothly. If this happens, wipe the rack edges with a small amount
Drawer) of vegetable oil, then wipe off excess.
Fiberglass DO NOT HAND CLEAN GASKET.
Gasket
Glass Wash with soap and water or glass cleaner. Use Fantastik® or Formula 409® to remove grease
Painted Clean with hot sudsy water or apply Fantastik® or Formula 409® to a clean sponge or paper towel
Surfaces and wipe clean. Avoid using powdered cleansers, steel wool pads and oven cleaners.
Porcelain Immediately wipe up acid spills like fruit juice, milk and tomatoes with a dry towel. Do not use a
Surfaces moistened sponge/towel on hot porcelain. When cool, clean with hot sudsy water or apply Bon-Ami® or
Stainless Always wipe or rub with grain. Clean with a soapy sponge then rinse and dry.
Steel Or, wipe with Fantastik® or Formula 409® sprayed onto a paper towel. Protect and polish with Stainless
Probe Clean probe by hand with detergent and hot water. Then rinse and dry. Do not soak or clean in
(some models)
CLEANING METHOD
spatters and stubborn stains.
Soft Scrub® to a damp sponge. Rinse and dry. For stubborn stains, gently use soap filled pads. It is
normal for porcelain to craze (fine lines) with age due to exposure from heat and food soil.
Steel Magic® and a soft cloth. Remove water spots with a cloth dampened with white vinegar. Use Bar
Keeper’s Friend® to remove heat discoloration.
dishwasher.
Care and Cleaning
Plastic & When cool, clean with soapy water, rinse and dry.
Controls
Drawers When cool, wash with hot soapy water, rinse and dry.
(Warming
& Storage)
English • 25
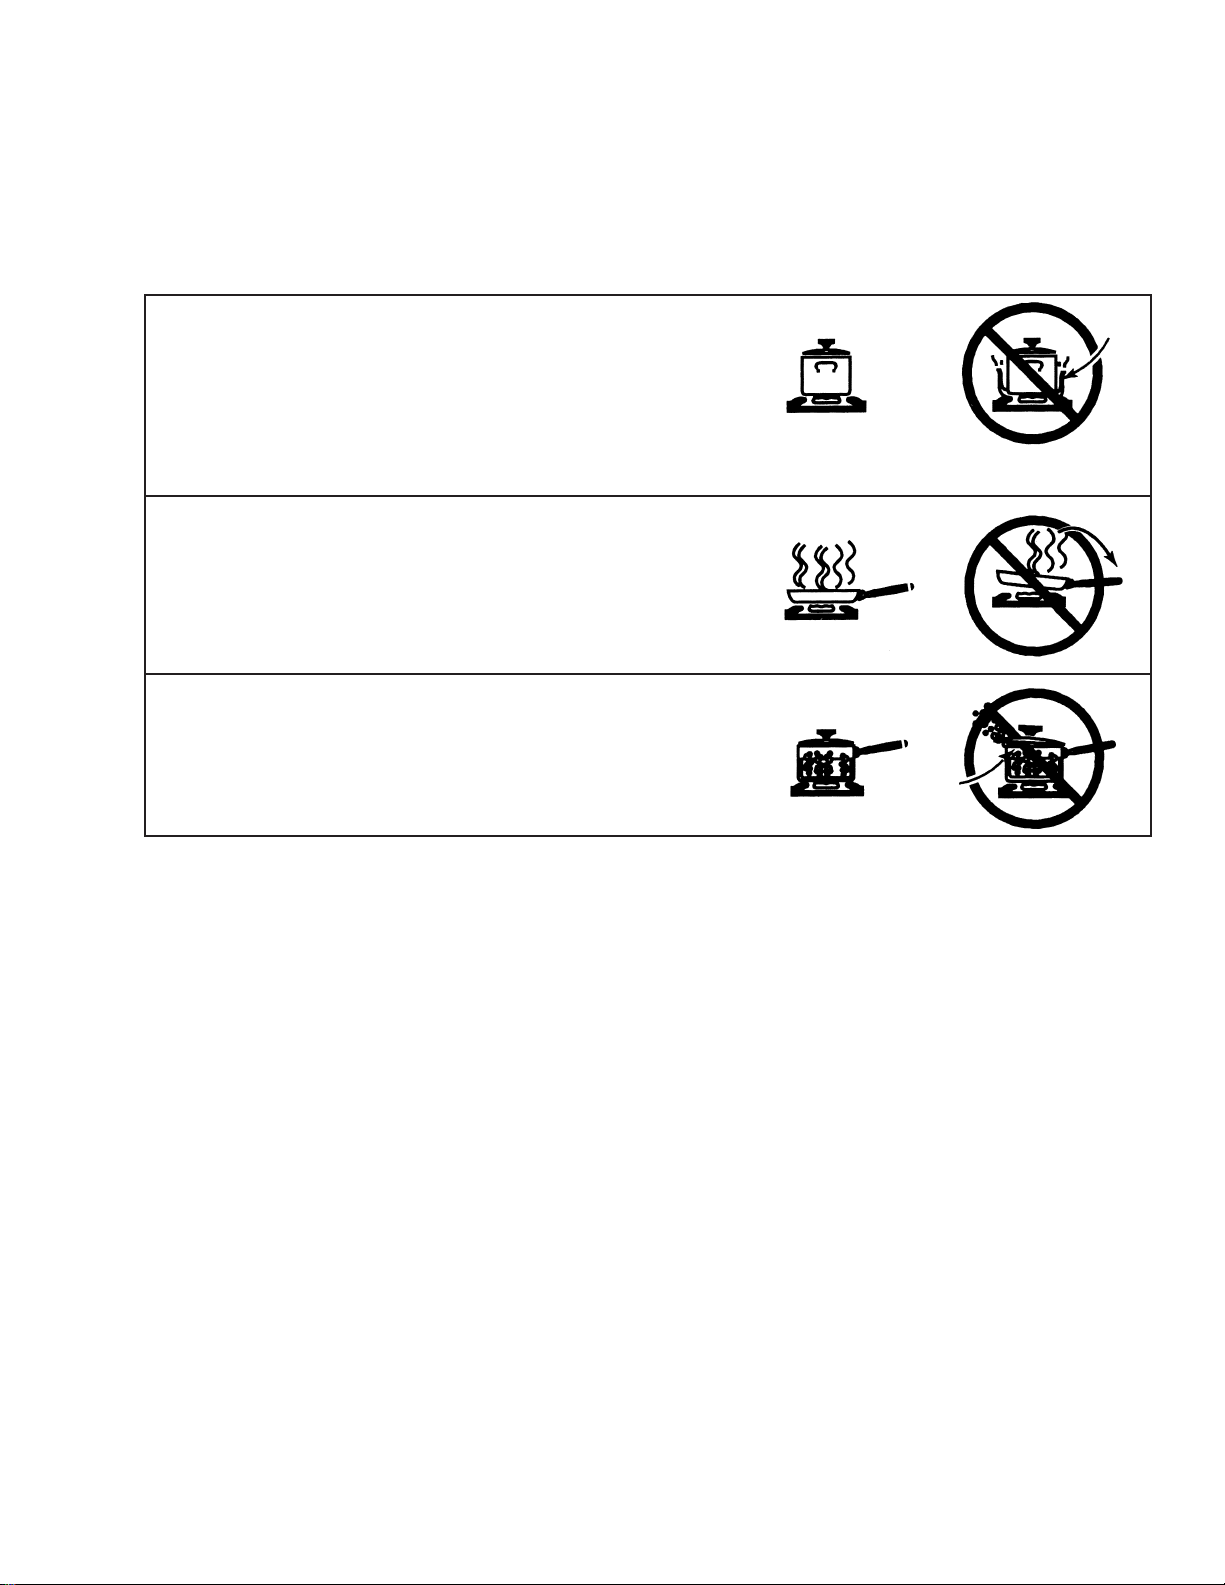
Cookware Selection Guide
For best results, choose cookware with the following characteristics:
• Aluminum or copper bottomed pans conduct heat evenly.
• Steel pans, if not combined with other metals, may cook unevenly.
• Cast-iron cookware absorbs heat slowly and cooks more evenly at low-to-medium settings.
• Flat, heavy bottom pans provide even heat and stability.
DO NOT USE pans that are thin, warped, dented or ridged as they heat unevenly.
Match Pan Diameter to Flame Size
– The flame should be the same size as the bottom of the pan or
smaller. Do not use small pans with high flame settings as the
flames can lick up the sides of the pan.
– Oversize pans that span two burners are placed on the left side,
front to rear (not side to side).
Use Balanced Pans
– Pans must sit level on the cooktop grate without rocking.
– Center pan over burner.
Use a Lid That Fits Properly
– A well-fitting lid helps shorten the cooking time.
• Use a wok with a flat bottom.
• For simmering stews and soups, use right front burner. For melting chocolate, use the burner in the right
rear position.
• Canners and pressure cookers must meet the same requirements as described above. After bringing
contents to a boil, use lowest heat setting possible to maintain a boil or pressure (for pressure canners/
cookers).
English • 26
 Loading...