

Page 1

A Guide to assist you in estimating,
installing, operating and maintaining
Security Escort Systems
Security Escort Training
Page 1 of 142
Page 2

Security Escort Training
Page 2 of 142
Page 3

1. System Overview - Sales Literature P/N: 30251
• System Demo
• Component Description –
• How to Layout System –
2. System Installation
Wiring Guidelines and Type of Wire -
Installation and Setup Manual
Installation and Setup Manual
Installation and Setup Manual
• Component Wiring
1. Transponder:
2. Receiver:
3. Output Module:
4. 485 Module:
5. ProxLink - overview -
3. Central Console, Computer Setup and Programming
• Installation of Software and Bit Maps - v2.04
User Guides
User Guides
User Guides
User Guides
Installation and Setup Manual
Windows Setup Manual & Tech. Ref. Manual
38947 page 83
• System Configuration
1. Setup Communication Ports -
• Transponder Database -
1.Transfer Transponder Info. Sheet to Transponder Database
2. Creating areas and area Text -
• System Power Up
1. Transponder Current Status –
Manual
pages 51 to 53
2. Transponder Communications -
Installation and Setup Manual
• System Troubleshooting -
Tech. Ref. Manual
Installation and Setup Manual
Tech. Ref. Manual
pages 18 to 26
Tech. Ref. Manual
Installation and Setup Manual
Tech. Ref. Manual
• Receiver Configuration
1. Receiver Setup Mode -
58
• Post Construction Setup (Accuracy) -
Installation and Setup Manual
Installation and Setup Manual
• Computer Software
1. System Preferences -
2. Security Preferences
3. System Defaults -
Tech. Ref. Manual
Tech. Ref. Manual
pages 63 to 66
Pages 33 and 34
(P/N: 33831) pages 10 - 22
pages 23 - 27
pages 34 to 44
pages 36, 42 and 43
pages 67 and 68
pages 23 and 26
page 47
page 47 and
pages 48 to 51
pages 53 to 60
page 40 and
Tech. Ref. Manual
pages 28 to 30
(P/N:
Tech. Ref.
pages 56 to
4. Subscriber Database
• Subscriber Data -
• Subscriber Info Fields -
• Merging Subscriber Files -
• Subscriber Image file -
• Advanced Features -
1. Fixed Location Transmitter -
2. Schedules -
3. Pager Setup -
Operations Manual
Operations Manual
Tech. Ref. Manual
Tech. Ref. Manual
Tech. Ref. Manual
Tech. Ref. Manual
Tech. Ref. Manual
• Entering Transmitter ID Number -
5. Operator Database - Operations Manual
(P/N: 38946) pages 16 to 19
page 19
pages 89 to 92
pages 83 and 84
pages 14 to 17
Tech. Ref. Manual
pages 36 to 41
pages 85 to 88
Operations Manual
pages 15 and 16
Security Escort Training
Page 3 of 142
pages 14 to 17
page 18
Page 4

6. Reports Database - Operations Manual
pages 21 to 23
7. Transmitter Change - Operations Manual
8. Utilities - Tech. Ref. Manual page 27 and Operations Manual page 24
• Backup & Restore -
• Print Reports -
9. Setup - Tech. Ref. Manual page 42
• Show History -
• History Filter -
• Popup trouble filter -
Tech. Ref. Manual
Tech. Ref. Manual
Tech. Ref. Manual
Tech. Ref. Manual
Tech. Ref. Manual
• Transponder Parameter Change -
• Data view -
Tech. Ref. Manual
• Receiver Configuration -
• Receiver Test -
• Network status -
• System status -
• Remote connection -
• Pager Setup -
• Sent pager Message -
Tech. Ref. Manual
Tech. Ref. Manual
Tech. Ref. Manual
Tech. Ref. Manual
Tech. Ref. Manual
Tech. Ref. Manual
pages 20 and 21
pages 27 to 29 and
page 35 and
pages 42
pages 42 to 44
pages 45 to 48
Tech. Ref. Manual
pages 55 and 56
Tech. Ref. Manual
pages 59 and 60
pages 60 and 61
pages 61 and 62
pages 70 to 73
pages 72 and 7
page 73
Operations Manual
pages 54 and 55
pages 56 to 58
Operations Manual
Page 30
page 25
Security Escort Training
Page 4 of 142
Page 5

What is Security Escort?
• Unique multiple user help call and asset tracking system
• Identifies user information and location, by floor, above or below ground
• Small, easy to carry transmitters
• Indoor/outdoor protection for 60,000+ users and assets as well as multiple buildings
• Man-down alarm, officer tracking & guard tour
• Post-alarm tracking and alarm map recall
• System capabilities perfect for campus and community environments
Emphasis on Reliability
• Supported by a multi million dollar company
• Extensive field testing under maximum abuse conditions, from -20°F to +120°F
• Supervised system communication
and
• Low battery user
• Archived retrieval of system activity
• Patented technology
• Post alarm transmitter tracking
• System-wide backup power feature
system operator notification
System Applications
• Student Safety
• Officer Tracking
• Guard Tour
• Employee/Faculty Security
• VIP Protection
• Executive Protection
• Man-Down
• Asset Tracking
Security Escort Training
Page 5 of 142
Page 6

Some Example Installations
Educational Facilities:
• Florida Southern, FL
• Oswego State, NY
• Nazareth College, NY
Healthcare Facilities:
• New Hanover Medical Center, NC
• Provo Psychiatric Hospital, Utah
• Fairport Retirement Home, NY
Correctional Facilities:
• Westchester County D.O.C., Valhalla, NY
• Immigration & Naturalization Facility, TX
• US Naval Brig, SC
Other:
• Diamond Mines, South Africa
• Amusement Park, FL
• International Art Museum, NY
Other Escort Applications
• Hotels & Casinos
• Amusement Parks
• Commercial Complexes
-- Buildings
-- Parking Lots/Garages
• Museums
• Financial Institutions
• Child Care Facilities
Security Escort Training
Page 6 of 142
Page 7

Escort Features
The Security Escort System is engineered to provide reliability and user ease of operation. Our patented feature set
allows for customization and integration in any installation. These features ensure system integrity and the comfort
that when assistance is needed, help is just a click away.
User Self Test
• Assures you that your transmitter is working
• Battery condition sent with every transmission
• Each test verifies system integrity
• Logs each test performed for easy access and reporting
• Can be performed indoors and outdoors
• Ensures user acceptance and peace of mind
Asset Tracking
• Location of assets
• Protection against removal
• Wireless sensing
• No re-cabling for asset relocation
• Auto tracking and location identification
Fixed Point Identification
• Allows for identification of any fixed point
• Simple system integration
• Expands over all system capability and functionality
Security Escort Training
Page 7 of 142
Page 8
System Components Description
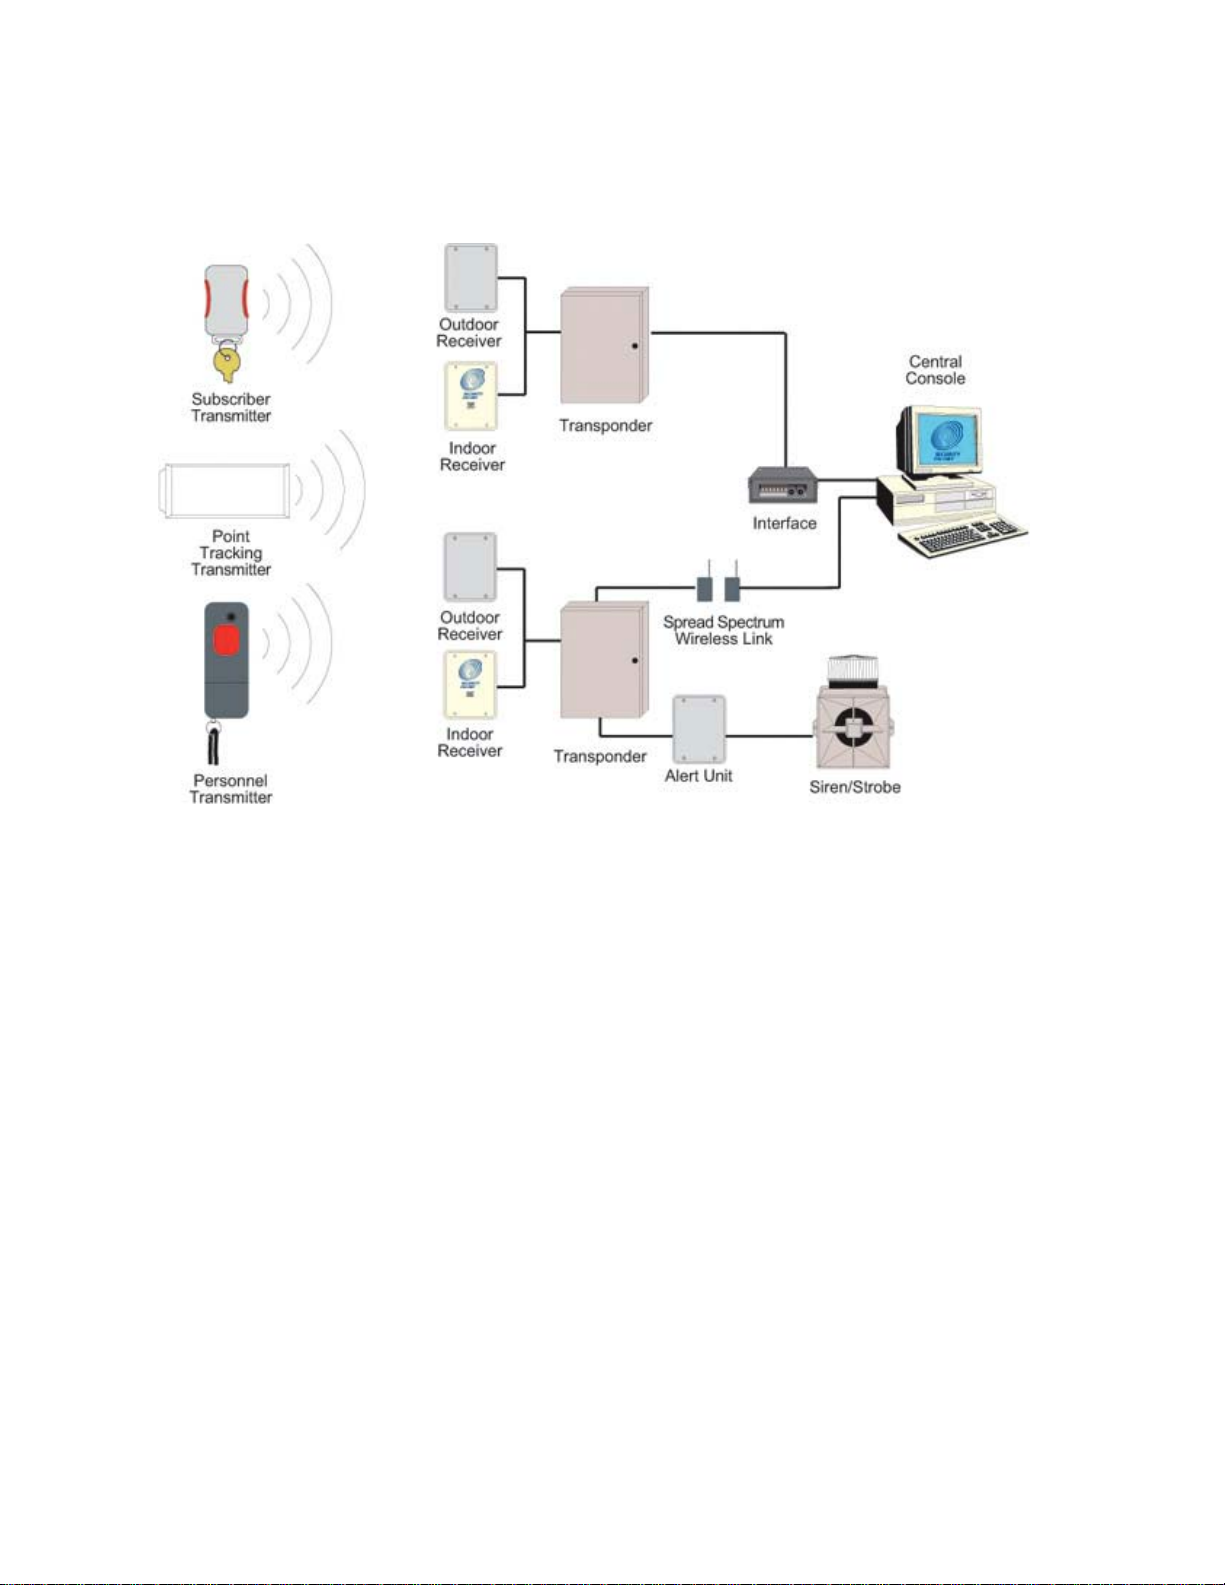
The Security Escort System consists of five basic components: Transmitters, Receivers, Alert Units,
Transponders, and the Central Console.
Figure 1: System Block Diagram
The
Transmitter
The
Receivers
Alert Units
groups of Receivers and Alert Units, connected to them by wire. Each Transponder relays alarm and test signals
from its Receivers to the Central Console. In addition, the Transponder tests for device and wiring faults, and
transmits problem conditions to the Central Console. The
optional backup and up to 8 optional workstations) which receives alarm and trouble signals from the
Transponders, analyzes the signals, activates Strobes and Sirens on the Alert Units, and produces a display for
the Security Dispatcher. Each of these system elements is described more fully in the sections that follow.
is a miniature, hand-held radio Transmitter used to transmit either a distress or a test signal.
are located throughout the protected area and detect the radio transmissions from Transmitters.
are Siren/Strobe units activated in the event of an alarm.
Central Console
Transponders
consists of a computer (plus an
are devices that control
Security Escort Training
Page 8 of 142
Page 9

Compatible Parts
The following table indicates the parts available for inclusion in a Security Escort System. Contact Bosch
Security Systems Customer Service for up-to-date model numbers.
Part Name Description
Electronics, Components
EA500 Electronics for eight-bus Transponder
EA102 Electronics for indoor or outdoor Receiver
EA120 Electronics for indoor and outdoor Alert Unit
SE485 Interface between Transponder and Central Console
SE3 Transmitters Personal Duress Transmitter
SE2 Transmitters Man-down, lanyard, supervisory, and duress Transmitter
SE3401 Point tracking Transmitter
SE88 Personal Watch/Pendant Transmitter
SEFD1 Fall Down Transmitter
Enclosures and Housings
AE3 Large (51.5 cm x 37.5 cm [20.25 in. x 14.75 in.]) Enclosure
AE1 Small (36.8 cm x 31.8 cm [14.5 in. x 12.5 in.]) Enclosure
AE100 Indoor Receiver Enclosure
AE101 Outdoor Receiver Enclosure
Cables
C311 3 or 7 Ah battery harness parallel expansion kit
C312 Cables for Transponder to ProxLink Radio Module
Software
SE2005 System software for up to 500 users
SE2010 System software for up to 1,000 users
SE2050 System software for up to 5,000 users
SE2100 System software for up to 10,000 users
Misc. Parts and
Accessories
HOLST-LGB-SE2 Leather holster for SE2 Transmitters, large belt loop (5.7 cm [2.25 in.])
HOLSTER-SE2 Leather holster for SE2 Transmitters, standard belt loop (4.5 cm [1.75 in.])
E28666B Security hex driver for Receivers
TR1850 Transformer
P335-10 SE2 Replacement Batteries, 10 pack of CR2, 3 VDC Lithium
E28629B 3 Ah 12 V battery for outdoor Alert Unit
P334 7 Ah 12 V battery for indoor Alert Unit
D1218 17 Ah 12 V Battery
SE112 Portable Test Receiver with display
CTS1-70 Enclosure Cover/Wall Tamper for AE1 and AE3
Security Escort Training
Page 9 of 142
Page 10

System Components/Specifications
Central Console
Description
The Central Console consists of one or two IBM PC compatible computers (and up to 8 additional workstations)
running the Security Escort software within the Microsoft Windows environment. One computer serves as the
master controller for the entire Security Escort system and the second slave computer serves as a back-up. The
slave computer can be used for administrative functions such as adding subscribers or performing routine
system tests without interfering with the operation of the main computer. The workstations can perform all normal
Security Escort functions with the exception of communicating with the Escort transponders.
Software Overview
The Central Console contains all of the operating software and all of the databases required by the Security
Escort System. The installation and maintenance portion of the Security Escort Software is designed to facilitate
set-up and modification of the system and to provide rapid diagnosis of system problems, usually with only one
person being required. The System Software also continually monitors the status of each Transponder to ensure
it is functioning correctly.
Versions
There are several versions of the software available. The number of users the system will support defines each
version. The following table lists the available models and the number of supported users:
Model User Base
SE2005 500
SE2010 1,000
SE2050 5,000
SE2100 10,000
NOTE: For systems supporting more than 10,000 users contact Bosch Security Systems Sales.
Minimum System Requirements
As a minimum, each computer in the Central Console should be equipped with the following features and
components:
• Processor: Pentium class processor or better, 200 MHz or faster.
• Operating system: Microsoft Windows 95
• RAM: 16 Megabytes of RAM minimum, 32 Megabytes preferred, in Windows 95 or Windows 98. Windows NT
or Windows 2000 systems should have 64 Megabytes of RAM.
• Hard disk space: 1 Gigabyte of Hard Disk Space should be available to allow collection of historical data.
• Backup: External backup drive, such as an Iomega or SyQuest Cartridge Hard Disk for backup and history
storage.
• Video: VGA (640x480) at 256 colors minimum, 800x600 High color (16 bits) recommended, 1024x768 High
color supported. True color (24 bits) is also supported. If displaying subscriber images, High color (16 bits) or
True color (24 bits) should be used.
• Modem: Optional V.32bis (14.4), V.34 (33.8), or V.90 (56.6) modem for remote access and pager dial-out. If
modem is external an additional serial port is required.
• Sound: Any Windows compatible sound system. One set of computer speakers per computer.
• Printer: Parallel port dot matrix continuous forms printer for alarm output.
Other Specifications
• Temperature range: +32ºF to +105ºF (0ºC to +40ºC)
• Primary power: 120 VAC 900 Watts (two computers, two monitors and one printer).
• Backup power: 1200 VA UPS per computer will provide 45 minutes to one hour backup. System should also
be backed up by an emergency generator for extended blackouts (can be shared with other emergency
equipment).
• Pager: Pager support is included and selected troubles can be automatically sent to a service pager.
®
, Windows 98®, Windows NT® (4.0 or later) or Windows 2000®.
Security Escort Training
Page 10 of 142
Page 11

SE3 Subscriber Transmitter
Features
• Alerts Central Console of user’s name and location immediately on alarm.
• Post-alarm tracking, alarm map recall, and more.
• Allows user to test from anywhere within the protected area.
• Internal antenna.
• Four-year battery life, field replaceable.
• Key-chain attachment.
• Low battery indication at Central Console.
• Optional silent alarm.
Description
The SE3 Subscriber Transmitter contains a unique code which is associated with the subscriber at the time the
Transmitter is assigned. When the subscriber generates an alarm, this code is sent to the Central Console. The
Central Console graphically displays the subscriber’s location on a map along with the subscriber’s picture, his or her
name, and address.
Transmitting an Alarm
In the event of an emergency, the user simply presses and holds the alarm buttons to produce an alarm. Depending
on the installed options, when an alarm is generated within approximately two seconds, the sounders in any nearby
Receivers will be activated as well as the Strobes and Sirens connected to nearby Alert Units. The alarm signal is
transmitted to the Receivers which in turn relay the alarm signal to the Transponder and along to the Central
Console. The Central Console then graphically displays the subscriber’s location along with the subscriber’s name,
vital information (such as a medical condition or disability) and a picture of the subscriber. Also, once an alarm is
initiated, the Transmitter commences its Auto-Tracking feature.
Auto-Tracking
During an alarm, the Transmitter automatically resends the alarm signal every few seconds, constantly updating the
Central Console of the subscriber’s location.
Testing
The Test Mode allows a subscriber to test their Transmitter anywhere in the protected area. When the user is indoors
in sight of an Indoor Receiver, or outdoors in sight of a Strobe, pressing the buttons in sequence performs a test. If
the test is successful, a small green light will flash on the Indoor Receiver, or the Strobe will flash briefly. There will be
no response at all if the test fails. If the test fails, the user should contact the Security Office as soon as possible.
Every successful test is recorded in the Subscriber Database in the Central Console Software and optionally printed
on the hardcopy printer. The Subscriber Database contains all of the information relating to each subscriber, including
the date and time of the most recent test transmission. It is possible to search the Subscriber Database for individuals
who have not performed tests for a specified period of time.
Low Battery Reporting
When the Transmitter is tested, a special “low battery” message is included in the transmission to the Central
Console if the Transmitter’s battery is in need of replacing. Also, the system will not give a visual or audible response
during a test, indicating that the Transmitter requires service. Low battery alerts are logged at the Central Console.
Available Models
There are two SE3 models available:
• User Transmitter: This is the standard Transmitter used by all system subscribers.
Security Transmitter: This is the same as the standard Transmitter except the Transmitter does not emit an
audible tone when activated. This Transmitter is normally distributed to Security Personnel.
Security Escort Training
Page 11 of 142
Page 12

SE2 Personnel Transmitter
Features:
• Personal Duress Alarm Transmitter.
• Man-Down alarm.
• Lanyard Pull alarm (optional).
• Allows user to test from anywhere within the protected area.
• Notifies Central Console of user’s name and location immediately on alarm.
• Post-alarm and supervision tracking, alarm map recall, and more.
• Internal antenna.
• User replaceable battery with four-year life.
• Belt clip attachment.
• Optional silent manual alarm.
• Low battery indication.
• Optional holster for common security belt sizes.
Description
The SE2 Personnel Transmitter contains a unique code which is associated with the user at the time the Transmitter
is assigned. When the user generates an alarm, this code is sent to the Central Console. The Central Console
graphically displays the user’s location on a map along with the user’s picture, and his or her name, and any other
necessary information.
Transmitting an Alarm
There are three ways in which an alarm may be generated, depending on the features enabled on the Transmitter.
The types of alarms are as follows:
• Manual Duress Alarm: An alarm can be initiated by pressing the large button on the Transmitter.
• Man-Down Alarm: The Transmitter will transmit an alarm to the Central Console if it is tipped 60° from upright.
• Lanyard Pull: A cord connected to the pin inserted in the base of the Transmitter can be looped around a utility belt
and if the pin is removed from the Transmitter (such as when the Transmitter is pulled away from the belt) the
Transmitter will immediately go into alarm.
Auto-Tracking Feature
During an alarm, the Transmitter automatically resends the alarm signal every few seconds constantly updating the
Central Console of the user’s location.
Supervision Tracking
With Supervision Tracking enabled, the Transmitter will send a tracking signal to the Central Console constantly
updating the user’s location.
Testing
The Test Mode allows a user to test their Transmitter anywhere in the protected area. When the user is indoors, in
sight of an Indoor Receiver, or outdoors, in sight of a Strobe, pressing the manual test button performs a test. If the
test is successful, a small green light will flash on the indoor Receiver, or the Strobe will flash briefly. There will be no
response at all if the test fails. If the test fails, the user should contact the Security Office as soon as possible. When
the Transmitter is tested, a special “low battery” message is included in the transmission to Central Console if the
Transmitter’s battery is in need of replacing. Every successful test is recorded in the Subscriber Database in the
Central Console Software and optionally printed on the hardcopy printer. The Subscriber Database contains all of the
information relating to each subscriber, including the date and time of the most recent test transmission. It is possible
to search the Subscriber Database for individuals who have not performed tests for a specified period of time.
Security Escort Training
Page 12 of 142
Page 13

SE3401 Asset Tracking Transmitter
Features
• Alerts Central Console of Transmitter’s ID and location immediately on alarm.
• Available post-alarm tracking, alarm map recall, and more.
• Internal antenna.
• Two-year battery life.
• Can be mounted virtually anywhere on virtually anything.
• Low battery indication at Central Console.
• Includes mounting plate.
Description
The SE3401 Point Tracking Transmitter contains a unique code which is associated with an asset at the time the
Transmitter is assigned. When an alarm is generated, this code is sent to the Central Console, which graphically
displays the asset’s location on a map along with a picture of the asset and any other necessary information.
Installation
The SE3401 can be configured to monitor magnetic or dry external contacts. When mounted with an external
magnet, the SE3401 is mounted on the asset and the magnet is mounted on an opposite surface (such as a wall).
When mounted with external contacts, the SE3401 can be mounted anywhere on the asset and connects to the
contact by two wires connected to the terminals inside the Transmitter and an end-of-line resistor.
Transmitting an Alarm
Depending on the installed options, when an alarm is generated within approximately two seconds, the sounders in
any nearby Receivers could be activated as well as the Strobes and Sirens connected to nearby Alert Units. The
alarm signal is transmitted to the Receivers which in turn relay the alarm signal to the Transponder and along to the
Central Console. The Central Console graphically displays the Transmitter’s location along with the asset’s
description and a picture of the asset. Also, once an alarm is initiated, the Transmitter commences its Auto-Tracking
feature.
Auto Tracking Feature
Once an alarm has been initiated (such as when the Transmitter has been moved away from the magnet) the AutoTracking feature will begin. The Transmitter will send a signal back to the Central Console every few seconds
updating its location for several minutes. To reset the Transmitter after an alarm has been initiated, all device
conditions (e.g., tamper, loop, magnet) must be reset to normal.
Supervision Feature
The SE3401 Point Tracking Transmitter can also be configured to transmit periodically when there is no other activity
to report its status and location to the Central Console.
Low Battery Reporting
When the Transmitter is tested, a special “low battery” message is included in the transmission to the Central
Console if the Transmitter’s battery is in need of replacing. These low battery alerts are logged at the Central
Console.
Security Escort Training
Page 13 of 142
Page 14

RF3401 Asset Tracking Transmitter
Features
• Supervised Sensor Loop (monitors any dry contact device)
• Internal Reed Switch (used with magnet)
• Supervisory Signal Every 65 Minutes
• Complete Status, including Battery and Tamper Sent with Every Transmission
TM
• Compatible with all DS RF-Tech
• Factory Programmed Transmitter ID for Quick and Simple Transmitter Enrollment
• Installer (or user) Replaceable Lithium Battery
• Quick Install Mounting Base Plate Included
• Cover Tamper
Receivers @304 MHz
Description
The RF3401 Point Transmitter features a supervised sensor loop and a magnetic reed switch. Use the supervised
sensor loop to monitor any device with a dry contact output. When used with an external magnet assembly the
RF3401 reed switch allows for quick and easy installation on doors and windows.
SE88 Panic Transmitter
Features
• Can be worn like a watch, pendant or mounted to a permanent location
• Once activated, sends immediate notification of wearer's identity and location
• Water resistant
Description
The SE88 Security Escort Watch/Pendant Panic Transmitter is designed to work with the Security Escort System.
Once activated, the wearer's identity and location is sent to the security office. The SE88 may be worn like a watch,
around the neck like a pendant or even mounted to a stationary location with a mounting bracket (optional
accessories, please order separately). It is ideal for use in elder care or assisted living facilities where immediate
emergency notification is required.
Transmitting an Alarm
• In the event of an emergency, the user simply presses and holds the alarm buttons to produce an alarm. Transmittal
will vary with different options. Generally, within two seconds of an alarm being generated, sounders in Receivers
and Strobes or Sirens connected to Alert Units will activate.
• The alarm signal transmits to the Receivers. The Receivers relay the alarm signal to the Transponder and to the
Central Console.
• The Central Console displays the user’s location, picture, name, and vital information (such as a medical condition or
disability).
Auto-Tracking Feature
• During an alarm, the Transmitter automatically resends the alarm signal every few seconds constantly updating the
Central Console of the user’s location.
Security Escort Training
Page 14 of 142
Page 15
Testing
• The Test Mode allows a user to test his or her Transmitter anywhere in the protected area. When the user is indoors
in sight of an Indoor Receiver, or outdoors in sight of a Strobe, pressing the buttons in sequence performs a test. If
the test is successful, a small green light will flash on the indoor Receiver, or the Strobe will flash briefly. There will be
no response at all if the test fails. If the test fails, the user should contact the Security Office as soon as possible.
• Every successful test is recorded in the Subscriber Database in the Central Console Software and optionally printed
on the hardcopy printer. The Subscriber Database contains all of the information relating to each subscriber, including
the date and time of the most recent test transmission. It is possible to search the Subscriber Database for individuals
who have not performed tests for a specified period of time.
Low Battery Reporting
• When the Transmitter is tested, a special “low battery” message is included in the transmission to Central Console if
the Transmitter’s battery is in need of replacing. Also, the system will not give a visual or audible response during a
test, indicating that the Transmitter requires service. Low battery alerts are logged at the Central Console.
SEFD1 Transmitter
Calls for Help Even When You Cannot
The SEFD1 Fall Detector and Personal Help Button provides assistance that no
other personal Help Button can offer. The device alerts your emergency
monitoring service
push the Help Button on the device.
The SEFD1 is designed to work in and immediately around your home or
facility. The device must be close enough to a receiver for a help signal to be
received. The coverage area of the device will vary from one location to
another. It is important for you to know the effective range of your device.
The SEFD1 is designed to detect falls that meet certain criteria. It may not
detect every fall, especially slight falls that are generally not disabling. The
SEFD1 Fall Detector device may also generate a fall alarm when you have not
fallen. For example, if the device drops on the floor, it may alert the monitoring
center that you have fallen.
automatically
when it detects a fall, even if you are unable to
Operation
The SEFD1 device transmits three conditions:
• Push Button (Help Button)
• Fall
• Low Battery
Component Descriptions – Receivers
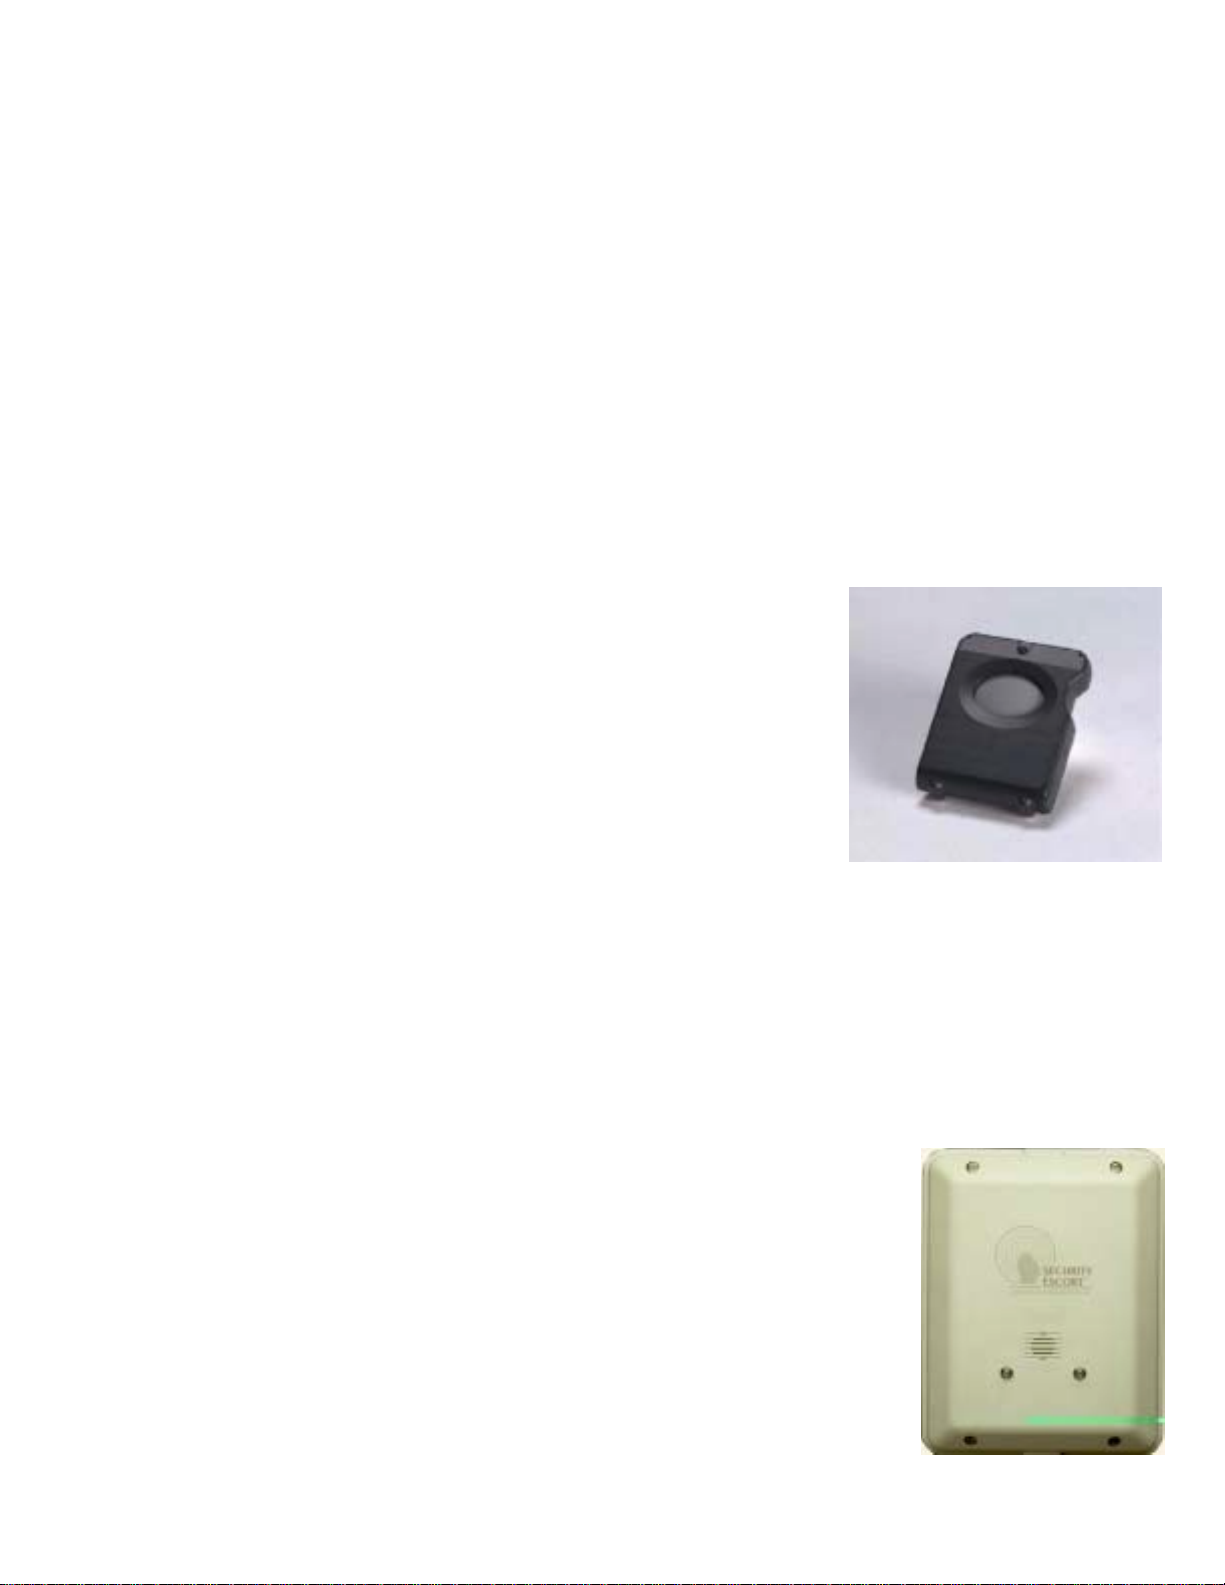
EA102 Receiver
Features
• Receives Transmitter alarms and tests, and relays the information to the Transponder.
• Built-in self testing through Buddy Check feature.
• Indoor and outdoor security enclosures available.
• Indoor enclosure provides confirmation of successful Transmitter test.
(Outdoor enclosures use other type of signaling device, such as a Horn/Strobe.)
• Indoor Receivers provide local sounders in alarm events.
Security Escort Training
Page 15 of 142
Page 16
Description
The Receivers are located throughout the protected area, including building interiors.
Each Receiver contains a radio receiver to detect the transmissions from Transmitters, and a microcomputer to
decode and interpret the received test and alarm messages. In addition, the microcomputer monitors tampering and
other problems, and reports such conditions to the Transponder.
Each Receiver contains an internal self-contained sounder. These sounders are optionally activated if the Receiver
has detected an alarm transmission.
Indoor Receivers are typically mounted on inside walls and are housed in small beige, rectangular units. Indoor
Receivers have one red and one green light. The green light is used to indicate a successful test of a Transmitter; the
red light is only illuminated during certain system tests and during alarms.
Outdoor Receivers are contained in small weatherproof enclosures typically mounted on the sides of buildings and on
light posts. Outdoor Receivers do not have the visible red and green LED’s. Outdoors, the strobe lights connected to
the Alert Units flash to acknowledge a successful test.
Function During an Alarm
In the event of an alarm, the Receivers detect an alarm signal from a Transmitter and send this information to the
Transponder. The Transponder forwards this information the Central Console where, using the reported information
from all the Receivers that detected the signal, the location of the transmission is graphically displayed on the Alarm
Map.
Buddy Check
In addition to its radio receiver, each Receiver also contains a transmitter functionally similar to the hand held
Transmitters. This transmitter can be commanded by the Central Console to transmit a test message to other nearby
Receivers. This Buddy Checking is performed periodically to verify that the Receivers are functioning satisfactorily.
Results of the Buddy Check are compared with the results of earlier Buddy Checks, and any changes in a Receiver’s
sensitivity are reported to the Central Console where this information is stored in a system database.
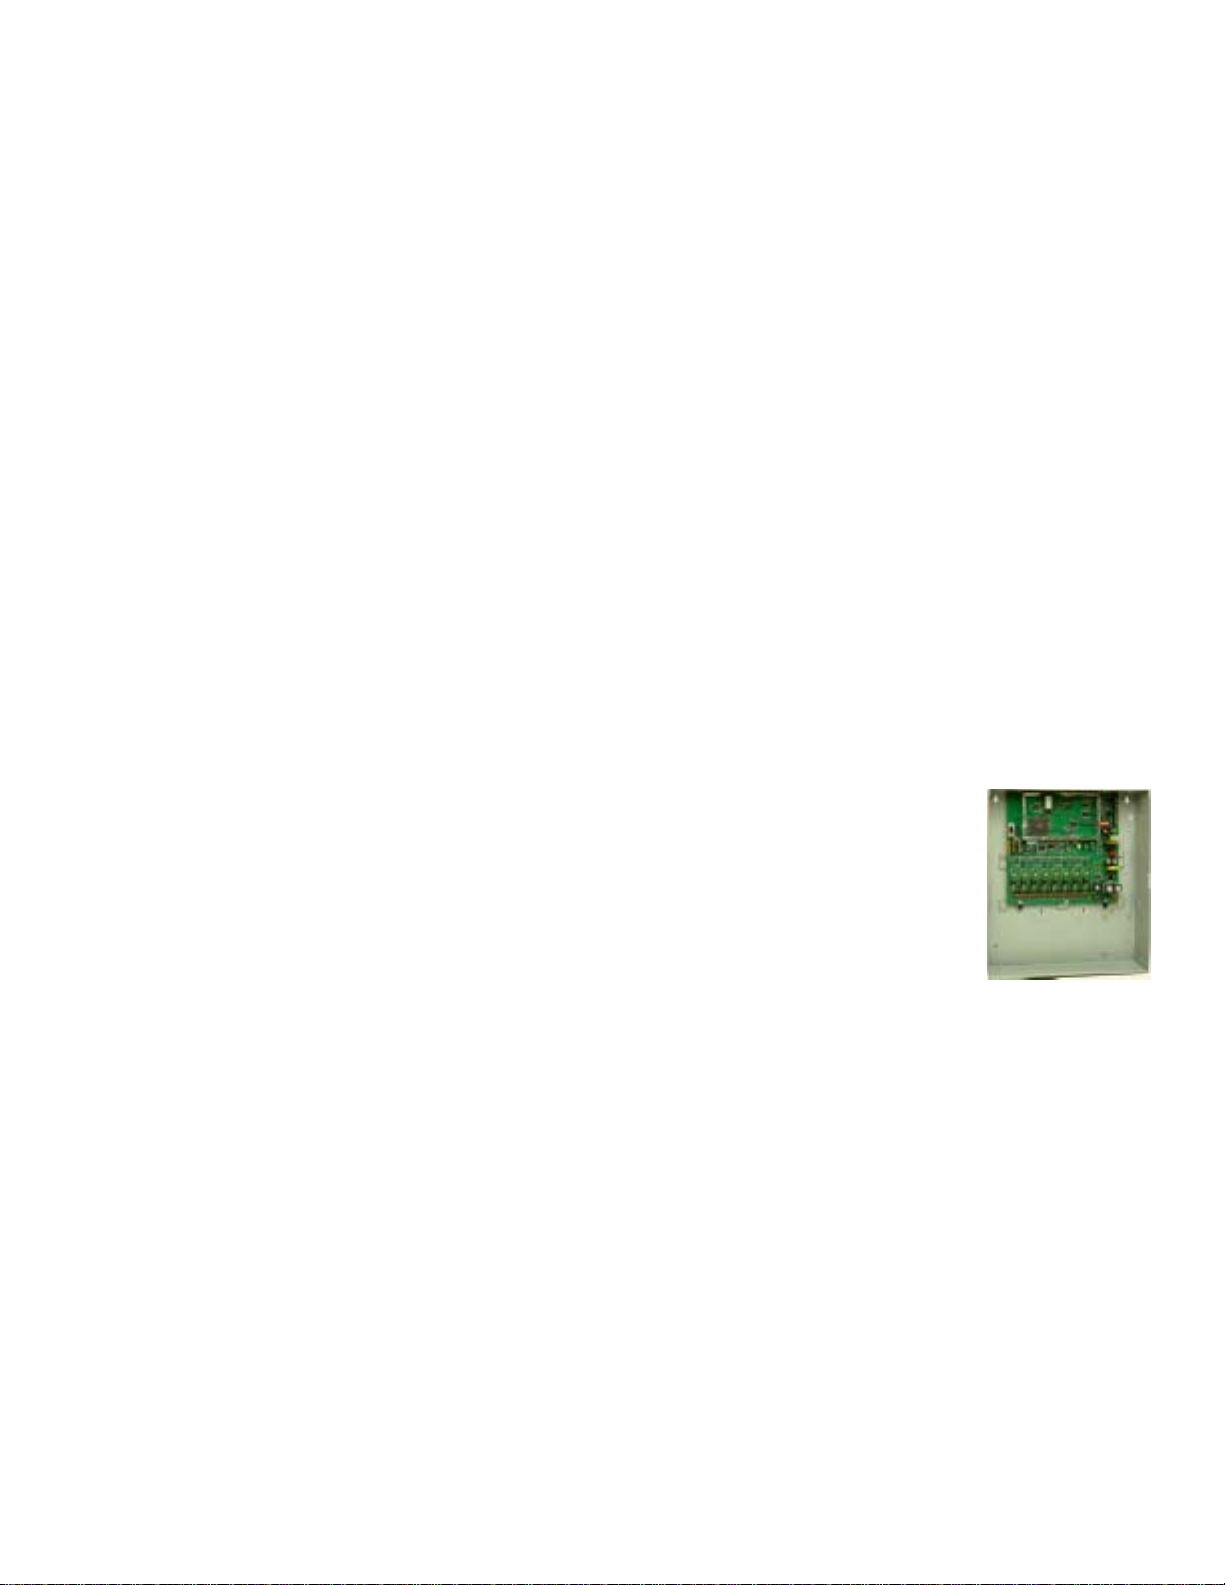
Component Descriptions – EA500 Transponder
Features
• Relays alarm and test signals from the Receiver to the Central Console.
• Can support a combined total of 64 Receivers and Alert Units.
• AC powered with battery backup for all Receivers.
• Can provide power to SE485 Interface and/or Spread Spectrum Radio.
• Available in a large or small indoor enclosure.
• Monitors Receivers and Alert Units 10 times per second for alarms, tests, tamper notification, and power loss.
Description
The Transponder is a device controller for up to 64 devices -- any combination of Receivers and Alert Units. Its
primary function is to monitor the Receivers and Alert Units and report conditions and events to the Central Console
via either wire or ProxLink radios. It also provides power output to certain devices.
Installation
The Transponder can be mounted in one of two different sized enclosures. It is always mounted indoors. The devices
are connected to the Transponder by means of eight four-wire Multiplex Busses, two wires for power and two wires
for data. Each bus is capable of supporting up to eight devices. A Security Escort System supports up to 255
Transponders.
Configuration
Each Receiver and Alert Unit is identified to its Transponder by a Multiplex Address which is set during system
installation using a multi-position switch on the Receiver or Alert Unit circuit board. Transponders communicate on
the data bus with individual Multiplex devices by issuing commands, which contain the Receiver or Alert Unit’s
Multiplex Address.
Security Escort Training
Page 16 of 142
Page 17
Setup and Testing
Each Transponder and the devices connected to it are set up and can be tested remotely from the Central Console.
Also, each Transponder reports any problems, such as low battery, immediately upon detecting them.
Function During an Alarm
When a Receiver or Alert Unit detects an alarm, it goes into an “Off Normal” state. To quickly locate any devices
which might be in the “Off Normal” state, the Transponder issues global commands (which are interpreted
simultaneously by all of its devices) approximately 10 times per second. These global commands are followed by
commands to specific devices to determine the nature of the “Off Normal” condition and, in the case of an alarm (or
test), to obtain the Transmitter Identification Number, Transmitter battery condition, and received signal strength. This
information is then sent to the Central Console, by either wire or through ProxLink radios, where it is used to
graphically display the identity of the subscriber transmitting the alarm and to determine the subscriber’s location.
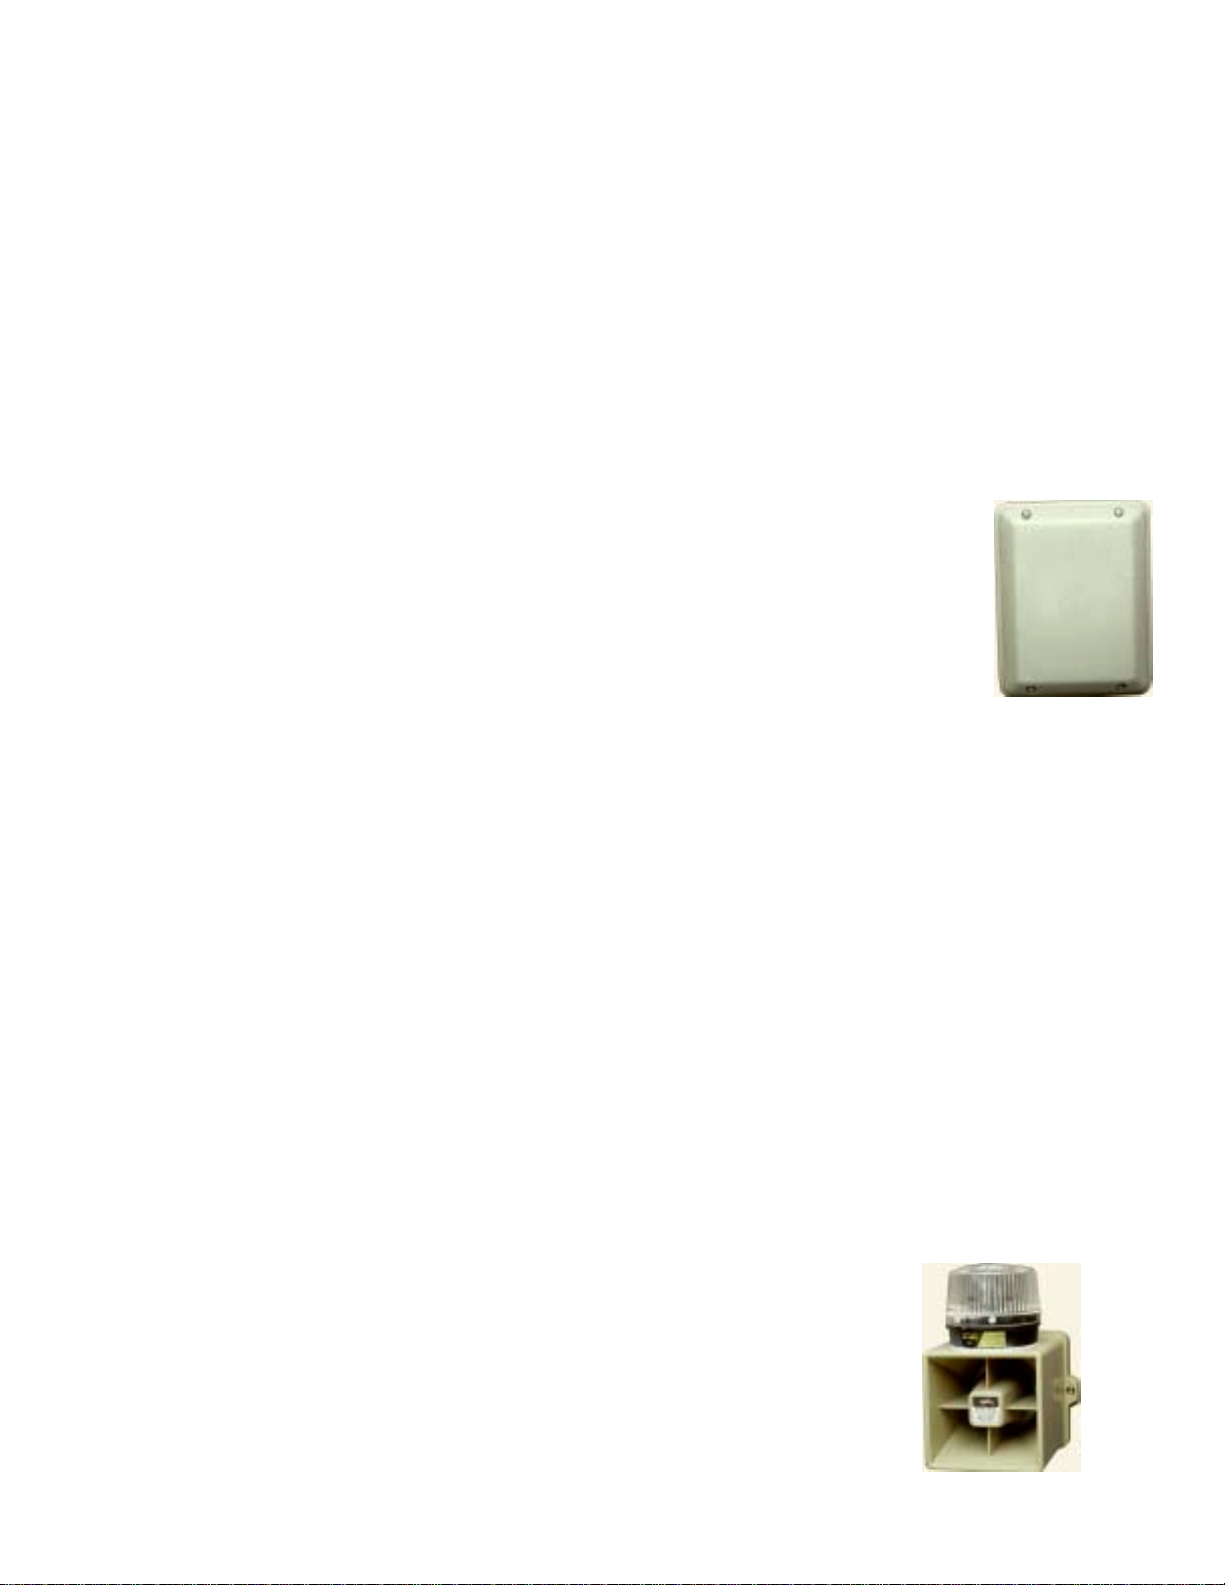
Component Descriptions – EA120 Alert Unit
Features
• Provides output for alarm annunciation through the Siren/Strobe or other third party switched device.
• Provides output to Siren/Strobe to indicate a successful Transmitter test.
• Indoor and Outdoor enclosures available.
• AC powered with battery backup.
• Activated on command from the Central Station through the Transponder.
• Reports tampering, AC power loss, backup battery power to the Transponder, and output status.
Description
An Alert Unit is a control module that communicates with the Transponder on the MUX Bus. In most installations, it is
used to activate Siren/Strobe units or other switched devices in the event of an alarm. The Alert Unit also reports
tampering, AC power loss, and backup battery level to the Transponder.
Installation
The Alert Unit may be housed in either a metal indoor enclosure or an outdoor enclosure (similar to the Outdoor
Receiver enclosure), depending on the application. The Strobe/Siren units are always mounted in outdoor locations.
Function
The Alert Unit has backup battery power in addition to AC power. The Alert Unit Driver contains a microprocessor that
communicates with the Transponder for Strobe and Siren commands, status reports, and trouble indications. The
troubles monitored are “Tamper,” “Loss of AC Power,” and “Low Battery.”
Test Acknowledgment
In addition to the function of attracting attention in the event of an emergency, the Strobe unit is used to acknowledge
a successful test of a Transmitter. The Alert Unit can be configured to cause a Siren to emit a short tone and the
strobe to flash for a successful Transmitter test.
Function During an Alarm
In the event of an alarm, the Alert Unit receives a signal from the Transponder and begins powering the Siren/Strobe
(or other switched device). The Siren/Strobe will be active until the alarm is restored at the Central Console.
Security Escort Training
Page 17 of 142
Page 18

Equipment Estimation, Location Accuracy and Receiver
Location
General
A Security Escort system installation consists of three major steps. The pre-bid equipment estimation, the preconstruction coverage verification survey, and the post construction setup. The Security Escort Receivers work
effectively in a wide variety of installations and can be placed with confidence provided these installation
requirements are met. Therefore, at the pre-bid stage, it is acceptable to estimate the required equipment. To
ensure proper coverage after proposal acceptance, potential Receiver locations can be verified using a standard
Receiver in test mode or the portable test Receiver before construction begins.
Location Accuracy
The Security Escort system is intended to provide quick response to a duress call. Its intent is to dispatch a
responding individual to an area that will not add additional delay to their response to that duress call.
The Security Escort system uses radio frequency (RF) for alarm transmissions. This is a significant positive
because it prevents normal construction from blocking the signal and helps to eliminate dead spots where the
alarm could not be heard. The fact that RF energy passes through normal construction also prevents Security
Escort from locating an alarm with 100% certainty to a specific side of a wall. Alarms originating at or near
building walls will typically be indicated within 25 ft. (7.5 m) of the actual location, however there may be times
when the computed location may appear to be on the other side of the wall.
Security Escort system was designed to provide a computed alarm location typically within 25 ft. (7.5 m) of the
actual location when indoors and a computed alarm location typically within 50 ft. (15 m) of the actual location
outdoors. Any deviation from the following installation guidelines will degrade the computed location accuracy.
Therefore to achieve accuracy the following installation guidelines must be adhered to:
Pre-Bid Equipment Estimation
The pre-bid equipment estimation is performed prior to bidding the installation. At this point, it must be
determined what type of coverage is desired, and where the coverage will be required. For example, the amount
of equipment required for a full-coverage (indoor and outdoor) system in a multi-building application will be
Figure 1a: System Block Diagram
Security Escort Training
Page 18 of 142
Page 19
greater than an installation that requires outdoor only coverage. The customer should be consulted and the
areas of most concern should be given special consideration.
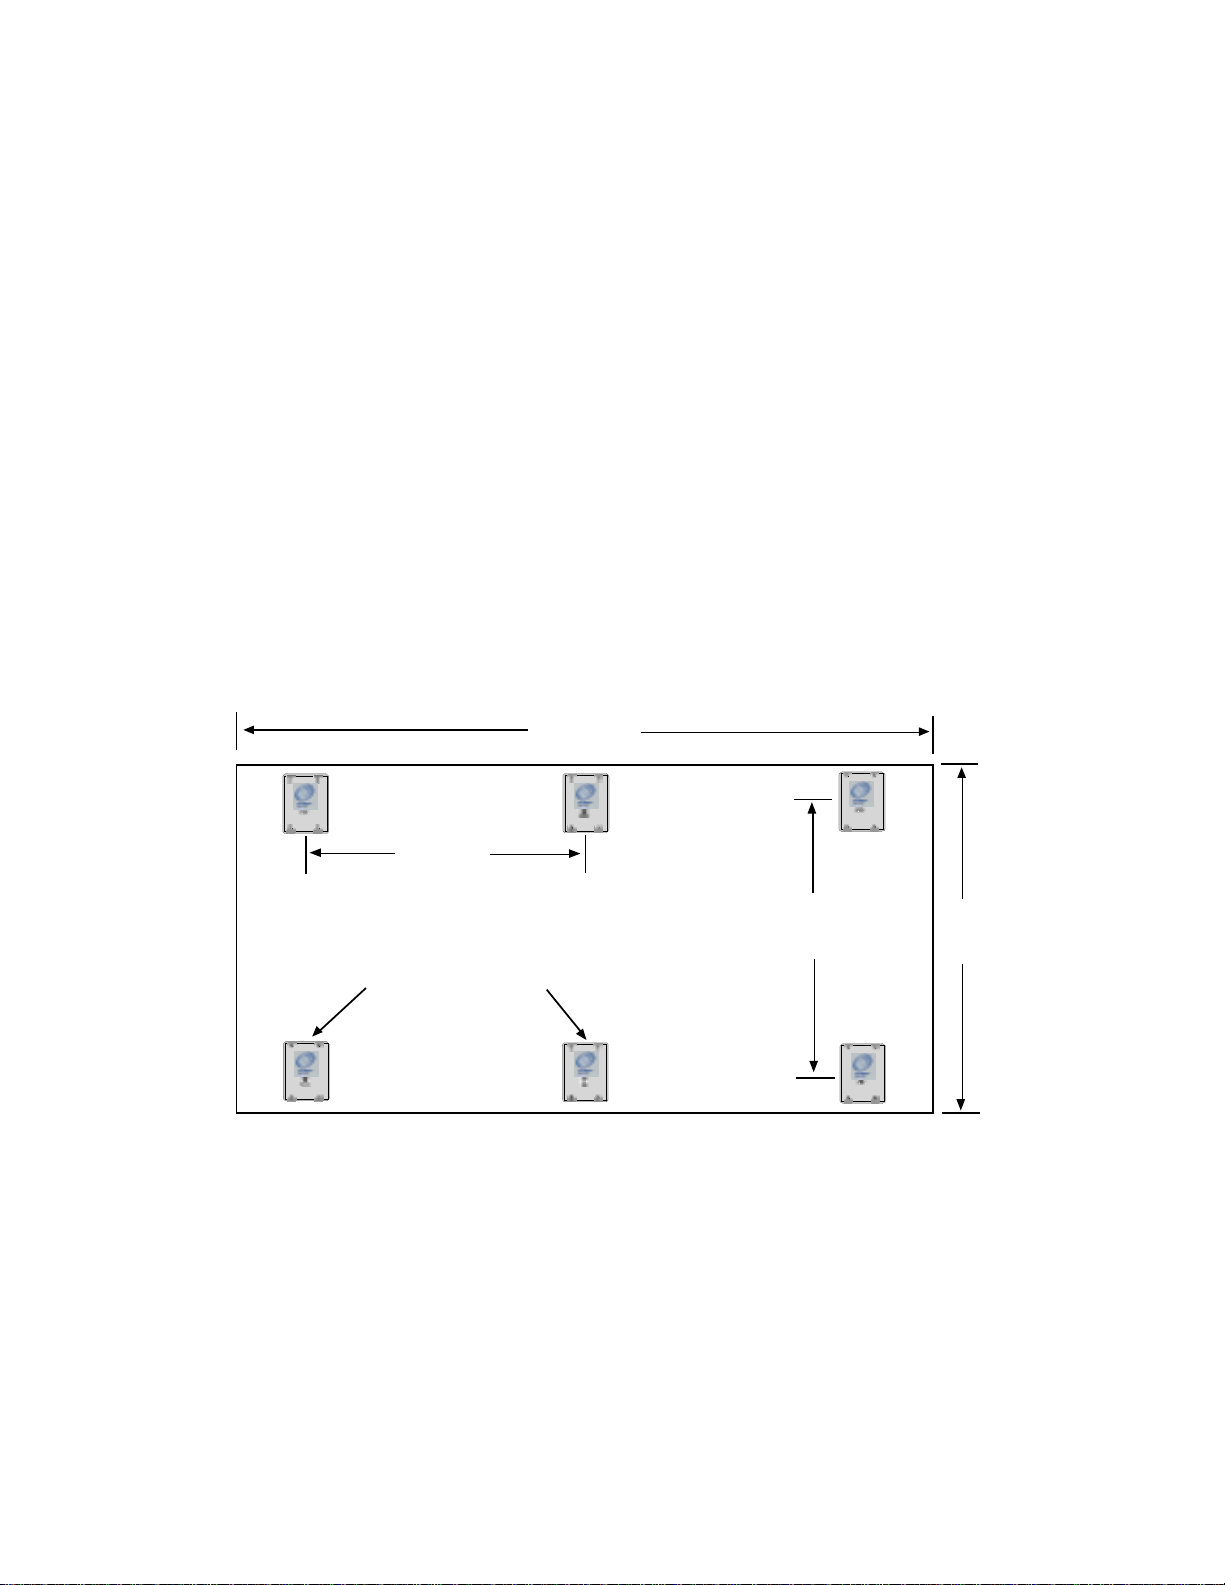
Initial Equipment Estimate
Number of Indoor Receivers
To estimate the number of indoor Receivers, assume the receivers will be placed on a grid with a maximum
spacing of 80 ft. (25 m) between Receivers for standard construction. In multi-floor applications the Receivers on
each floor must be placed directly above the Receivers on the floor below (this is required for proper floor-to-floor
location).
For example, to determine the number of Receivers required to protect a building of standard construction of 60
m (200 ft.) by 30 m (100 ft.) and four floors:
1. To determine the number of Receivers in each direction, divide each dimension of the building by 25 m (80
ft.) and drop the remainder and add 1.
(60 m/25 m = 2.4 becomes 2 add 1 = 3 and 30 m/25 m =1.2 becomes 1 add 1 = 2) or
(200 ft./80 ft. = 2.5 becomes 2 add 1 = 3 and 100 ft./80 ft. =1.25 becomes 1 add 1 = 2)
2. To determine the number of Receivers required per floor, multiply the number of Receivers in one direction
by the number of Receivers in the other direction.
(3 x 2 = 6) 6 Receivers per floor.
3. To determine the total number of Receivers, multiply the number of Receivers per floor by the number of
floors.
(6 x 4 = 24) 24 Receivers for the building.
60 m
(200 ft.)
25 m
(80 ft.)
25 m
(80 ft.)
30 m
(100 ft.)
Receivers (6)
Each floor would require 6 Receivers, resulting in a total of 24 Receivers to protect this building.
For the best location accuracy consistent Receiver spacing is important. Do not place Receivers significantly
closer in one section of a building than another section.
Security Escort Training
Page 19 of 142
Page 20
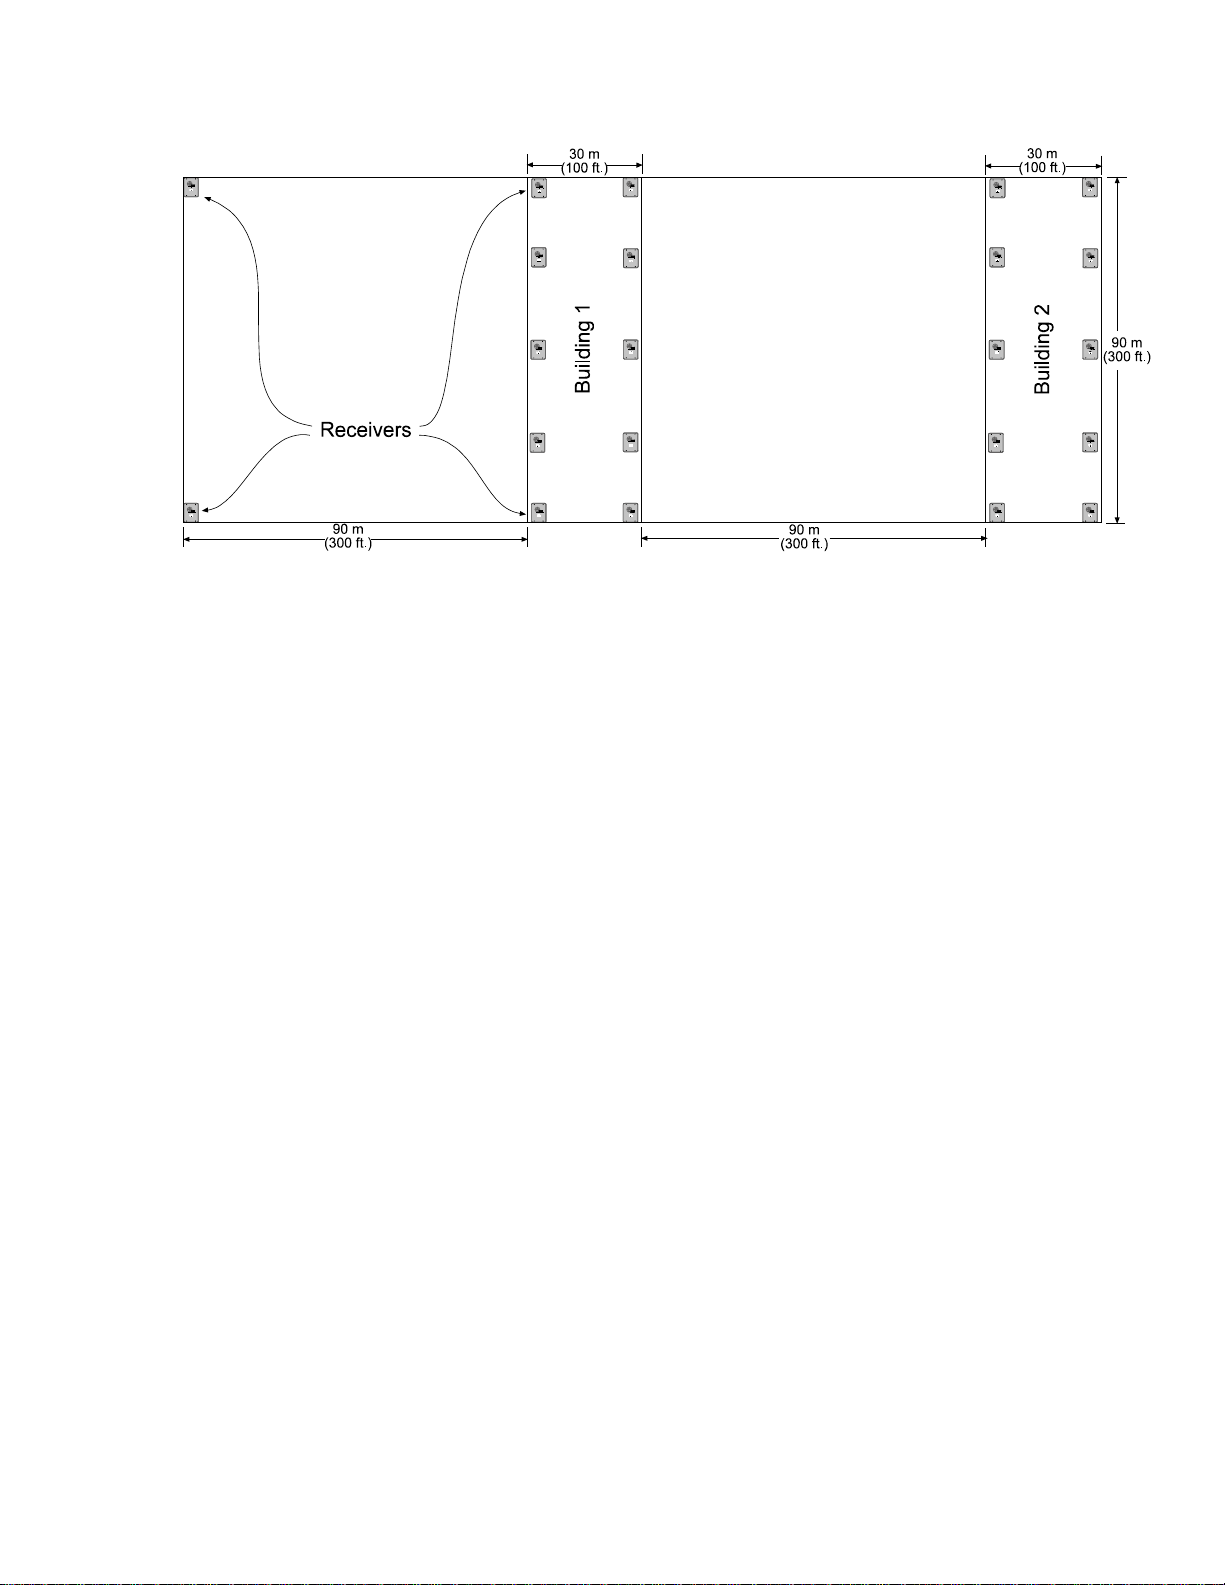
Number of Outdoor Receivers
To estimate the number of Receivers, assume a maximum Receiver spacing of 90 m (300 ft.) between
Receivers, in both directions, for Receivers that are not within 30 m (100 ft.) of a building with inside coverage.
Receivers within 30 m (100 ft.) of a building should be spaced at the spacing of Receivers in the building
(spacing the outside Receivers at a somewhat larger spacing is acceptable in most cases).
An outside area directly between two buildings with inside protection will need no additional Receivers if the
buildings are 90 m (300 ft.) or less apart. If the buildings are more than 90 m (300 ft.) apart the outside Receivers
should be placed evenly spaced between the buildings. Make sure the standard 90 m (300 ft.) spacing is not
exceeded. For spacing outside adjacent to a covered building, start the 90 m (300 ft.) spacing at the building
wall.
Allowance for Special Coverage Requirements
For purposes of the bid, the number of Receivers estimated above should be raised by 5% to allow for special
coverage considerations and RF problem areas.
Number of Transponders
Assume one Transponder per building for indoor installations. If wiring can be run from other buildings or from
outdoor Receivers, they may be connected to one Transponder but never exceed the total number of 64 devices
(Receivers and Alert Units) per Transponder. All outside wiring must be under ground or in metal conduit.
Number of Receiver and Alert Units Per Multiplex Bus
Although each bus can handle 8 Receivers and Alert Units it is a good idea to leave some addresses available
on each bus to allow for future expansion.
Multiplex Bus Wire
The multiplex bus should be wired with 4 conductor 18 gauge (1.2 mm) wire. The wire should not be paired or
shielded. In the United States this is the same as fire system wire, except it should not be red.
Number of Alert Units
The number of Alert Units will be determined by each system’s requirements. In general, enough Alert Units
should be installed to be heard and seen from all outdoor locations of protection. Remember that even in a silent
system, Alert Units can be used outside to provide test feedback. Horn/Strobe units should be mounted in
predictable locations to make them easy to identify by subscribers. Alert Units are not required indoors because
the indoor Receiver provides alarm and test feedback. Each Transponder will drive one siren and one strobe if
they are less than 15 m (50 ft.) from the Transponder.
It is a good idea for each protected parking lot to have a siren/strobe near it.
Security Escort Training
Page 20 of 142
Page 21
Pre-Construction Coverage Verification Survey
The pre-construction coverage verification survey is performed after the bid has been accepted and before
construction begins. It is done to determine the location of each Receiver. Each Receiver location should be
checked using a standard Receiver in the test mode.
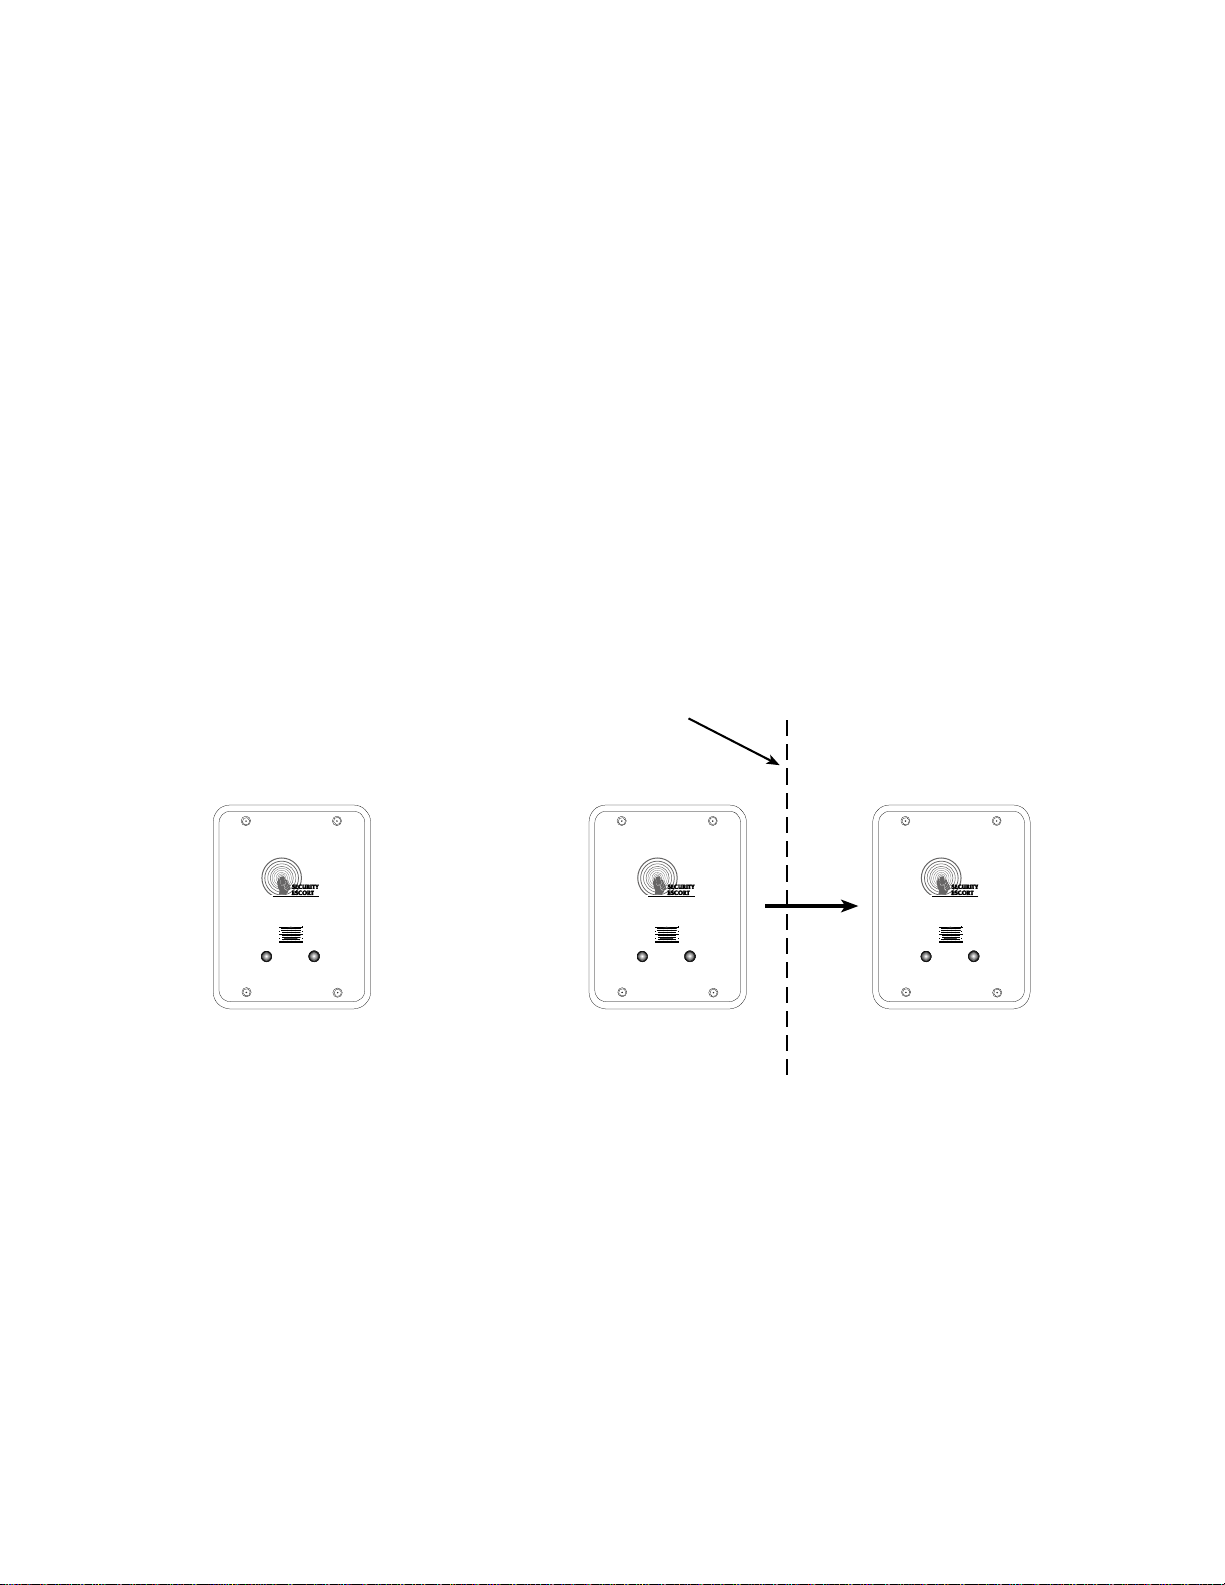
Verify Each Potential Receiver Location
Using a Standard Receiver in Receiver Spacing Mode
Receiver Spacing Mode is enabled with Jumper P5 in place (Jumper P4 removed) on a standard Receiver (see
the EA102 Receiver Installation Instructions). This mode is exactly the same as the Test Mode above, except
that only transmissions with an adequate receive margin are sounded. This indicates the maximum acceptable
spacing of Receivers. Use the following procedure to test the spacing of Receivers:
1) Mount the first Receiver. Put jumpers P1, P2, P3, and P5 in place, remove all other jumpers. Power the
Receiver from a 9 or 12 VDC source.
2) Take the second Receiver and a Transmitter a distance away from the first Receiver.
3) Activate the Transmitter.
4) If Receiver 1 sounds the test beep, Receiver 2 is within range. Repeat this test until Receiver 1 no longer
sounds the test beeps. Move back to the last location where Receiver 1 received the test beeps. This location
marks the maximum spacing between Receivers. The distance between receivers should not exceed 24 m (80
ft.) indoors and 91 m (300 ft.) outdoors. Mount Receiver 2 at this location or closer to Receiver 1.
NOTE: Do not use the Test Mode (Jumper P4) to determine Receiver spacing.
Receiver 1 stops sounding the test beeps when
Receiver 2 is moved beyond thi s point
Detection Systems, Inc.
by
Receiver 1
Receiver 2 at
maximum range
Detection Systems, Inc.
by
Detection Systems, Inc.
by
Receiver 2 beyond
maximum range
Figure 2: Receiver Spacing
Using a Standard Transponder, Receivers and Laptop Computer to Determine
Receiver Location
NOTE: System Software and Area Map must be installed on Laptop Computer to use this method.
A standard Transponder with long multiplex wires connected to standard Receivers can be used to see actual
alarm location before the Receivers are placed. Place the Receivers in the proposed locations wired back to the
Transponder. Program the Receivers with their locations in the Transponder database. Using the maintenance
Transmitter and the maintenance alarm database activate alarm transmissions within the area surrounded by the
temporarily placed Receivers. Verify that the location accuracy is acceptable at all points of concern. If not
acceptable move the Receivers, update the Receiver location in the Transponder database and retest. Do not
test outside of the last Receiver in any direction, as this will give incorrect locations. Repeat this test in all areas
of different construction and concern at the site.
Security Escort Training
Page 21 of 142
Page 22

Indoor Receiver Installation
• Indoor receivers must be mounted in a evenly spaced grid no more than 80 ft. apart.
• Indoor receivers must be mounted 1.5 to 1.8 m (5 to 6 ft.) above the floor. This is true even if this is a single
story building. Do not mount receivers above the ceiling or in roof rafters.
• In multistory buildings the receivers must be mounted directly above the receivers on the floor below. The
same number of receivers must be used on each floor level. If you meet all of the indoor installation guidelines,
you can expect the computed location to indicate the correct floor about 95% of the time.
• Receivers must not be mounted within 30 cm (1 ft.) of any metal object, including wire mesh, metal foil, metal
pipe and HVAC ducting in walls.
• Take care that large metal objects do not shield a receiver from a protected area. For example metal
staircases, metal food serving lines, metal walls, lead lined walls, metal roofs, wire mesh in walls, walk-in
freezers and refrigerators.
For the best indoor and outdoor location or an indoor only system.
• Mount the indoor receivers on the recommended 25 m (80 ft.) grid, with the last row of indoor receivers at the
outside wall of the building. Do this even if the building is less than 25 m (80 ft.) wide or long.
• There should be a receiver at each of the outside corners of a building.
How to handle 2 protected buildings that share a common wall and have floor levels
that don’t match
• Ask the customer which building has areas of greater concern and favor the recommended mounting heights
in that building.
• The recommended 80 ft. (25 m) maximum indoor spacing grid should be maintained throughout both buildings
as if that wall in question was not there. Mounting heights only for those receivers at or near (within 6 m [20
ft.]) the wall in question should be affected; mounting heights for all other receivers in the buildings must follow
the indoor recommendation. Mark the recommended mounting height for receivers on the higher floor level
and also mark the recommended mounting height for receivers on the lower floor level. Mount the receiver at
its normal grid location midway between these two heights, but not above the ceiling level of the lower floor.
Outdoor Receiver Installation
• Outdoor receivers must be mounted in a evenly spaced grid no more than 90 m (300 ft.) apart.
• Outdoor receivers must be mounted 3 m (10 ft.) above the ground.
• Receivers must not be mounted within 30 cm (1 ft.) of any metal object, including fences, metal walls and walls
with wire mesh. If a receiver is mounted on a metal fence, that fence should be grounded (not floating or
insulated from ground) and the receiver should be spaced 30 cm (1 ft.) from the fence and 3 m (10 ft.) above
the ground.
• Take care that large metal objects do not shield a receiver from a protected area. For example; metal fences,
metal staircases, metal buildings, power transformers and metal roofs.
• Receiver locations should be below building overhangs and eaves as these can shield the areas below them.
• Receivers should have a clear line of sight of the protected area. Therefore, take care where the ground is hilly
or uneven, that there are no areas and low spots where several receivers can’t hear the signal.
Security Escort Training
Page 22 of 142
Page 23

Transition Areas Between Indoor And Outdoor Areas
• An outside area directly between two buildings with complete indoor protection will need no additional
Receivers between the buildings, if they are 90 m (300 ft.) or less apart.
• When protecting an outside area directly between two buildings with complete indoor protection and they are
more than 90 m (300 ft.) apart; place a row of outside Receivers evenly spaced between the buildings. Make
sure the receiver row does not exceed the standard 90 m (300 ft.) spacing from the buildings. The spacing
between receivers in that row should be about the same as the spacing for the receivers in the buildings.
• Indoor receivers should be no more than 25 m (80 ft.) apart and outdoor receivers should be no more 90 m
(300 ft.) apart. Both of these recommendations work well in their respective areas. However this means that
where a building is adjacent to an outdoor area, that the building will have a greater density of receivers and
therefore will have a tendency to pull the computed location towards it. To counteract the building tendency to
pull the location consider the following special cases:
• If the outdoor area adjacent to the building is wide open and the customer is not concerned about
reduced location accuracy in this area, then nothing special needs to be done. Follow the normal indoor
and outdoor recommendations.
• The building is near the boundary of the protected area, with or without a fence at the boundary. The
receivers in the building should be placed at the recommended 25 m (80 ft.) spacing. The receivers at
the boundary of the protected area near the building should be spaced about the same as those in the
building, approximating the same grid as used in the building.
• The building is adjacent to a large protected outdoor area that extends for more than 90 m (300 ft.) from
the building. The receivers in the building should be placed at the recommended 25 m (80 ft.) spacing.
The receivers in the large protected outdoor area should be placed on the normal 90 m (300 ft.) grid
except for the first row of receivers adjacent to the building. This first row of outdoor receivers in the
transition area should “split the difference” between the indoor and outdoor spacing at about 60 m (200
ft.).
Boundary Areas at the Outer Edge of the Protected Area
• The system cannot locate an alarm past the last receiver at the boundary of the protected area. Therefore, the
last row of receivers must be at or past the end of the protected area.
Security Escort Training
Page 23 of 142
Page 24

System Wiring
General Guidelines
After the site survey (and special pre-construction verifications) has been completed, the wiring may be run
between the proposed locations of the system components and the Central Console. See specific installation
instructions accompanying each component for wiring details. The following table indicates the specifications for
the wiring:
Application Diagram Maximum
From To Reference Gauge Conductors Distance Notes
Transponder Transformer 1 #16 (1.5 mm) 2 15 m (50 ft.) Standard lamp cord
Alert Unit 2 #18 (1.2 mm) 4 3000 ft. (900
Receiver 2 #18 (1.2 mm) 4 3000 ft. (900
SE485 3 #24 (0.5 mm) 4 wire, 2
Siren/Strobe 4 #18 (1.2 mm) 4 50 ft. (15 m) Solid, not twisted,
Alert Unit Transformer 5 #16 (1.5 mm) 2 50 ft.
Siren/Strobe 6 #18 (1.2 mm) 4 50 ft.
twisted pair
m) per bus
m) per bus
(15 m)
(15 m)
Solid, not twisted,
not shielded
Solid, not twisted,
not shielded
IMPORTANT!
be twisted pair
not shielded
Standard lamp cord
Solid, not twisted,
not shielded
Must
Transponder - SE485 Wiring Table
Number of Transponders Maximum Wire Length
1 to 4 20,000 ft. (6100 m)
8 10,000 ft. (3050 m)
12 5,000 ft. (1525 m)
16 3,000 ft. (900 m)
Observe Established Standards
Install cable according to local code requirements. In USA refer to the National Electrical Code Standards,
located in Chapter 8 Article 800 of the National Electrical Code, and applicable local and regional codes.
Security Escort Training
Page 24 of 142
Page 25
Component Wiring Guidelines
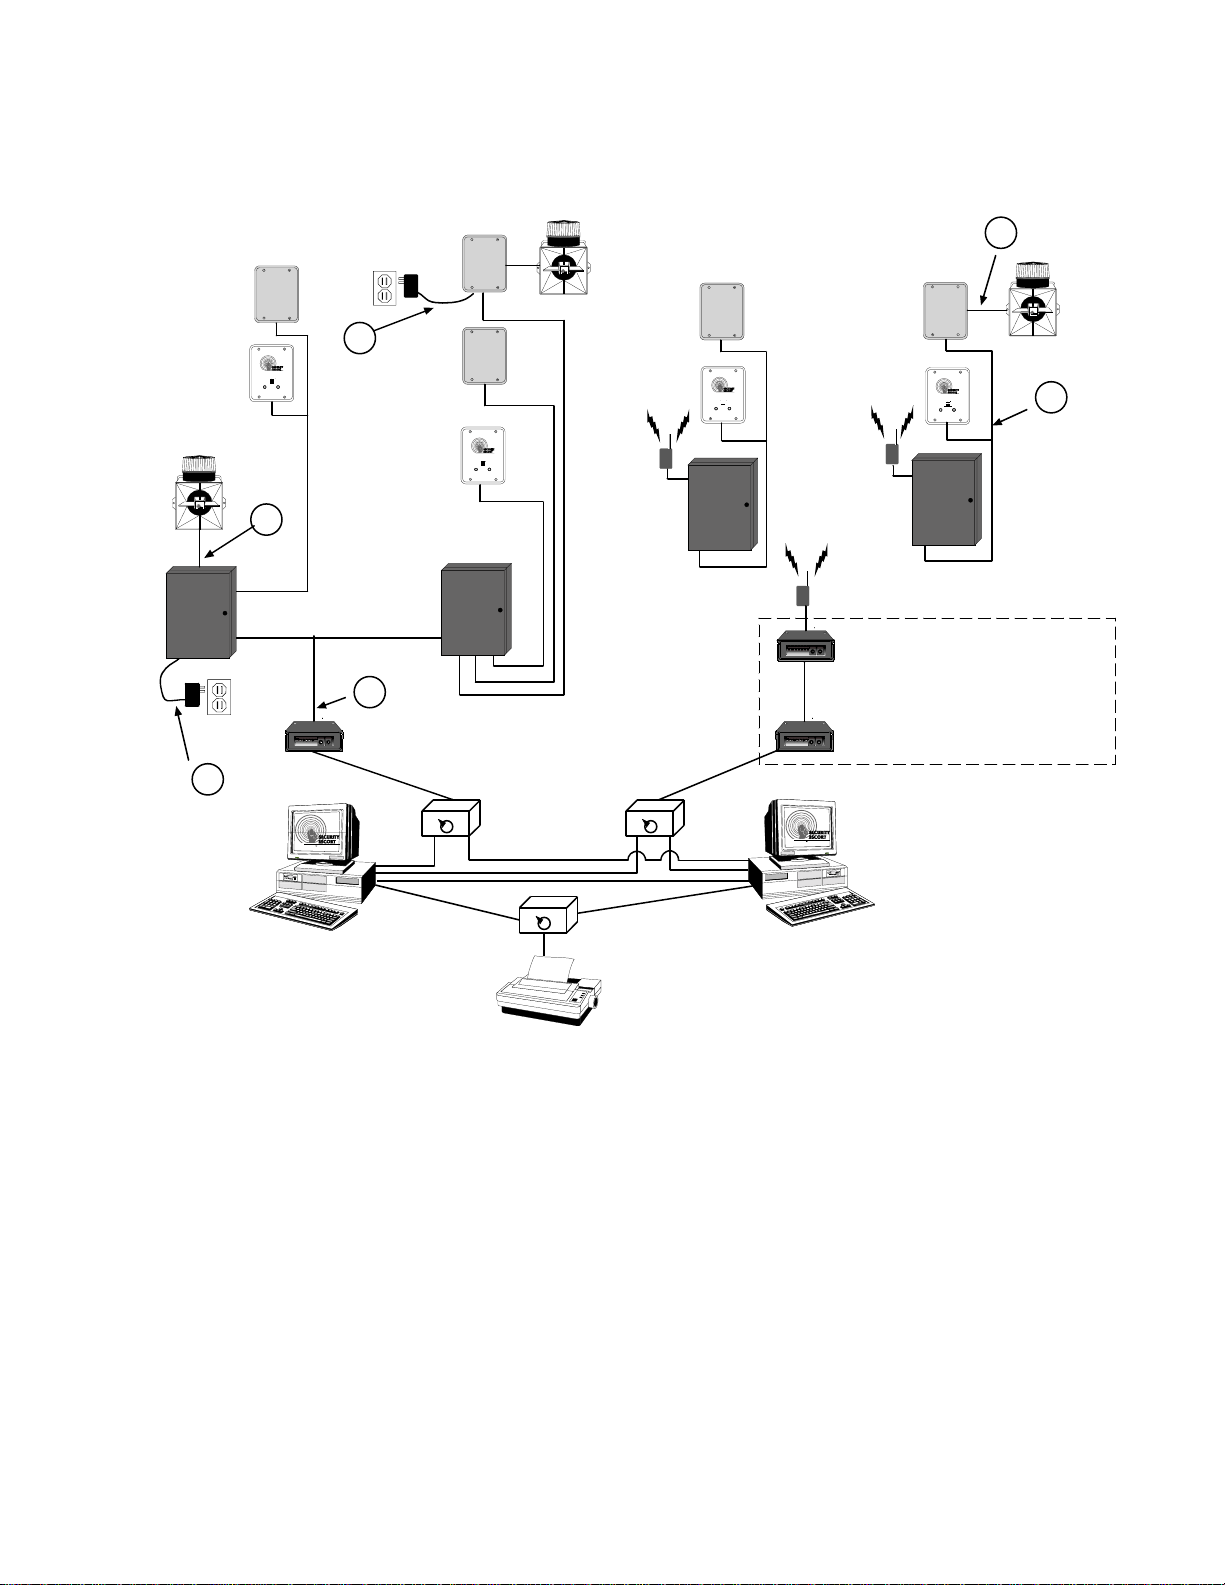
General Wiring Diagram
Outdoor
Receiver
Indoor
Receiver
Siren/Strobe
1
by
Detection Systems, Inc.
4
Transponder
SE485 Interface
Alert Unit
5
Outdoor
Receiver
Indoor
Receiver
Transponder
3
by
Detection Systems, Inc.
Siren/Strobe
Outdoor
Receiver
Indoor
Receiver
ProxLink
Transponder
6
Alert Unit
Siren/Strobe
by
Detection Systems, Inc.
Indoor
Receiver
by
Detection Systems, Inc.
ProxLink
Transponder
ProxLink
SE485 Interface
SE485 interface units are only
NOTE:
needed if the length of the cable
between the Console and the ProxLink
is greater than 15 m (50 ft.).
SE485 Interface
2
Central
Console
Computer #1
(Primary)
Detection Systems, Inc
A
B
.
A
B
A
B
.
Detection Systems, Inc
Central
Console
Computer #2
(Backup)
Printer
General Wiring Diagram
Security Escort Training
Page 25 of 142
Page 26
Additional Transponders
SE485
Twisted Pair Cable
#24 AWG (0.6 mm)
To Computer
Transponder
(Non-Shielded)
4 Conductor
(CA T3-CAT5)
16 -18 AWG
(1.5 - 1.2 mm)
2 Conductor
Receiver
Green
Yellow
Black
#18 AWG (1.2 mm)
Non-Shielded
4 conductor
Maximum of 8 Devices per Bus.
3000 ft. (915 m) Maximum wire length
Red
#18 AWG (1.2 mm) 4 Conductor cable
Transformer
Alert
Unit
Security Escort Training
Page 26 of 142
Page 27

Transponder Information Sheet
Transponder Number: Transponder Location:
Transformer for Transponder Location:
Breaker Panel Location: Breaker Number:
Siren/Strobe Output To:
Keyswitch Monitoring To:
Bus #0 Locations:
Point #0:
Point #1:
Point #2:
Point #3:
Point #4:
Point #5:
Point #6:
Point #7:
Bus #1 Locations:
Point #0:
Point #1:
Point #2:
Point #3:
Point #4:
Point #5:
Point #6:
Point #7:
Bus #2 Locations:
Point #0:
Point #1:
Point #2:
Point #3:
Point #4:
Point #5:
Point #6:
Point #7:
Bus #3 Locations:
Point #0:
Point #1:
Point #2:
Point #3:
Point #4:
Point #5:
Point #6:
Point #7:
Security Escort Training
Page 27 of 142
Page 28

Bus #4 Locations:
Point #0:
Point #1:
Point #2:
Point #3:
Point #4:
Point #5:
Point #6:
Point #7:
Bus #5 Locations:
Point #0:
Point #1:
Point #2:
Point #3:
Point #4:
Point #5:
Point #6:
Point #7:
Bus #6 Locations:
Point #0:
Point #1:
Point #2:
Point #3:
Point #4:
Point #5:
Point #6:
Point #7:
Bus #7 Locations:
Point #0:
Point #1:
Point #2:
Point #3:
Point #4:
Point #5:
Point #6:
Point #7:
Location of Splices:
Security Escort Training
Page 28 of 142
Page 29

EA500 Transponder
General
The EA500 Transponder is the Security Escort module that provides communications between the Central
Console and the many Receivers and Alert Units throughout the protected area. In addition to its
communications functions, it also supplies power to the Receivers. Each Transponder also includes drivers for a
single strobe and siren.
Specifications
Enclosure (AE3): 15 in. W, 20.75 in. H, 4.25 in. D
Hardware Kit: H500
Temperature Range: -40° to +149°F (-40° to +65°C)
Power: 18.0 VAC, 50 VA maximum plug-in Transformer for 110 V, 60 Hz
Supplies battery backed 12.0 VDC power to Receivers
Power Output: 9V DC used for SE485 or for Proxim radio power
Driver Outputs:
Battery Backup: 12 VDC Lead Acid Battery
Multiplex Buses: 8 multiplex drivers, each capable of driving 8 Receivers or Alert Units for a combined total of
Comm. Interface: Selectable SE485 or RS-232
Keyswitch Input: 47k EOL resistor, supervised loop
Compatibility: *ROM version 4.00 or greater (version shipped with this unit) is compatible with “-304”
Strobe
: 500 mA solid state sink, terminal switches to ground in an alarm condition.
Siren
: 500 mA solid state sink, terminal switches to ground in an alarm condition.
64 Receivers and Alert Units per transponder
equipment (e.g., EA102A-304). Version 4.00 or greater is NOT compatible with non “-304”
equipment.
*ROM versions earlier than 4.00 are compatible with non “-304” equipment.
Mounting
Normally, the enclosures are mounted first and all the wiring run, then the electronics are mounted, wired, and
tested.
The enclosures come with their own mounting hardware (H500 Hardware Kit) for mounting the enclosure to a
wall and mounting the circuit board to the enclosure.
• Mount the enclosure to the mounting surface.
• Mount the circuit board to the enclosure.
Wiring
Wire the transponder. See Figure 3.
Wiring to Receivers and Alert Units can be Home-Run (individual), Daisy-Chain (from device to device), or a
combination of both. T-Tapping is OK. The recommended cable is 4-conductor, 18 AWG (1.2mm) fire rated.
Wiring from SE485 to Transponders can be Home-Run (individual), Daisy-Chain (from device to device), or a
combination of both. T-Tapping is OK. The recommended cable is 4-conductor, 22 AWG (0.8mm).
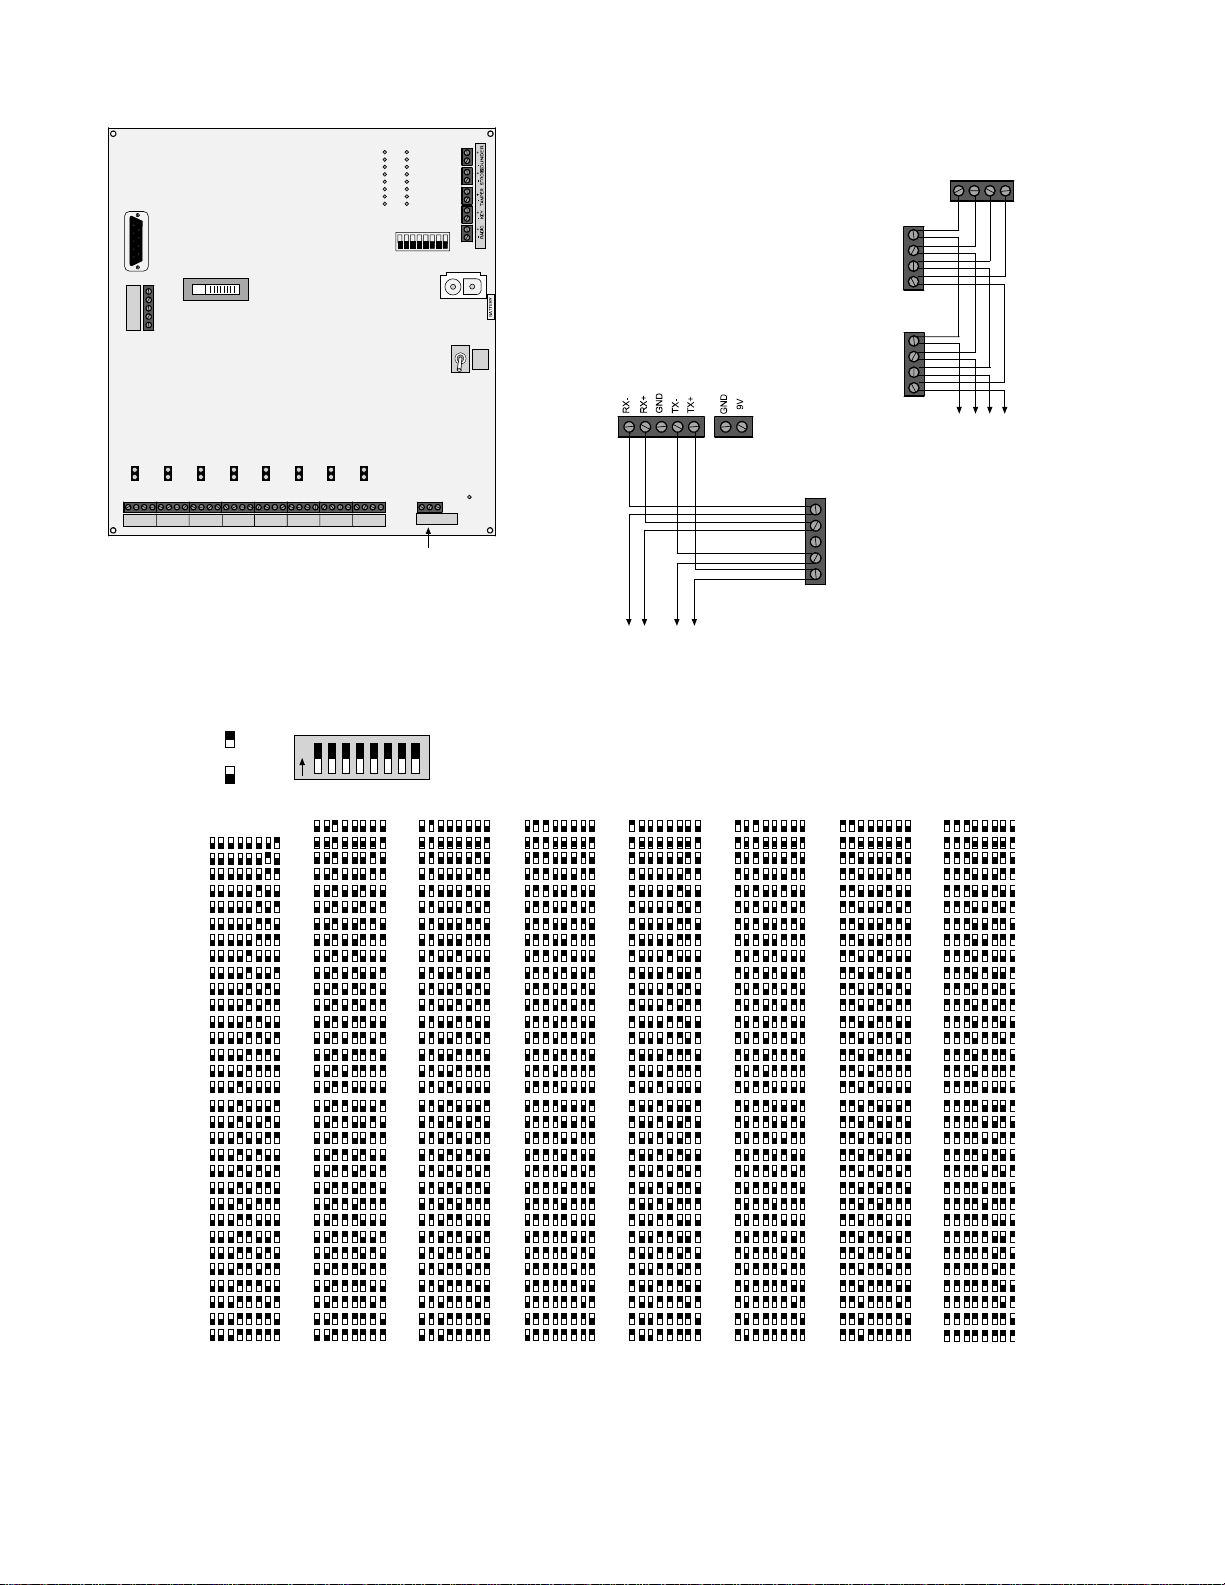
Set the Address
Every Transponder in the system must have its own address. Set the address on the transponder using the
dipswitches in the upper-right corner. See the Figure 2.
Figure 4 shows how to set the dip switches for each possible address.
Security Escort Training
Page 29 of 142
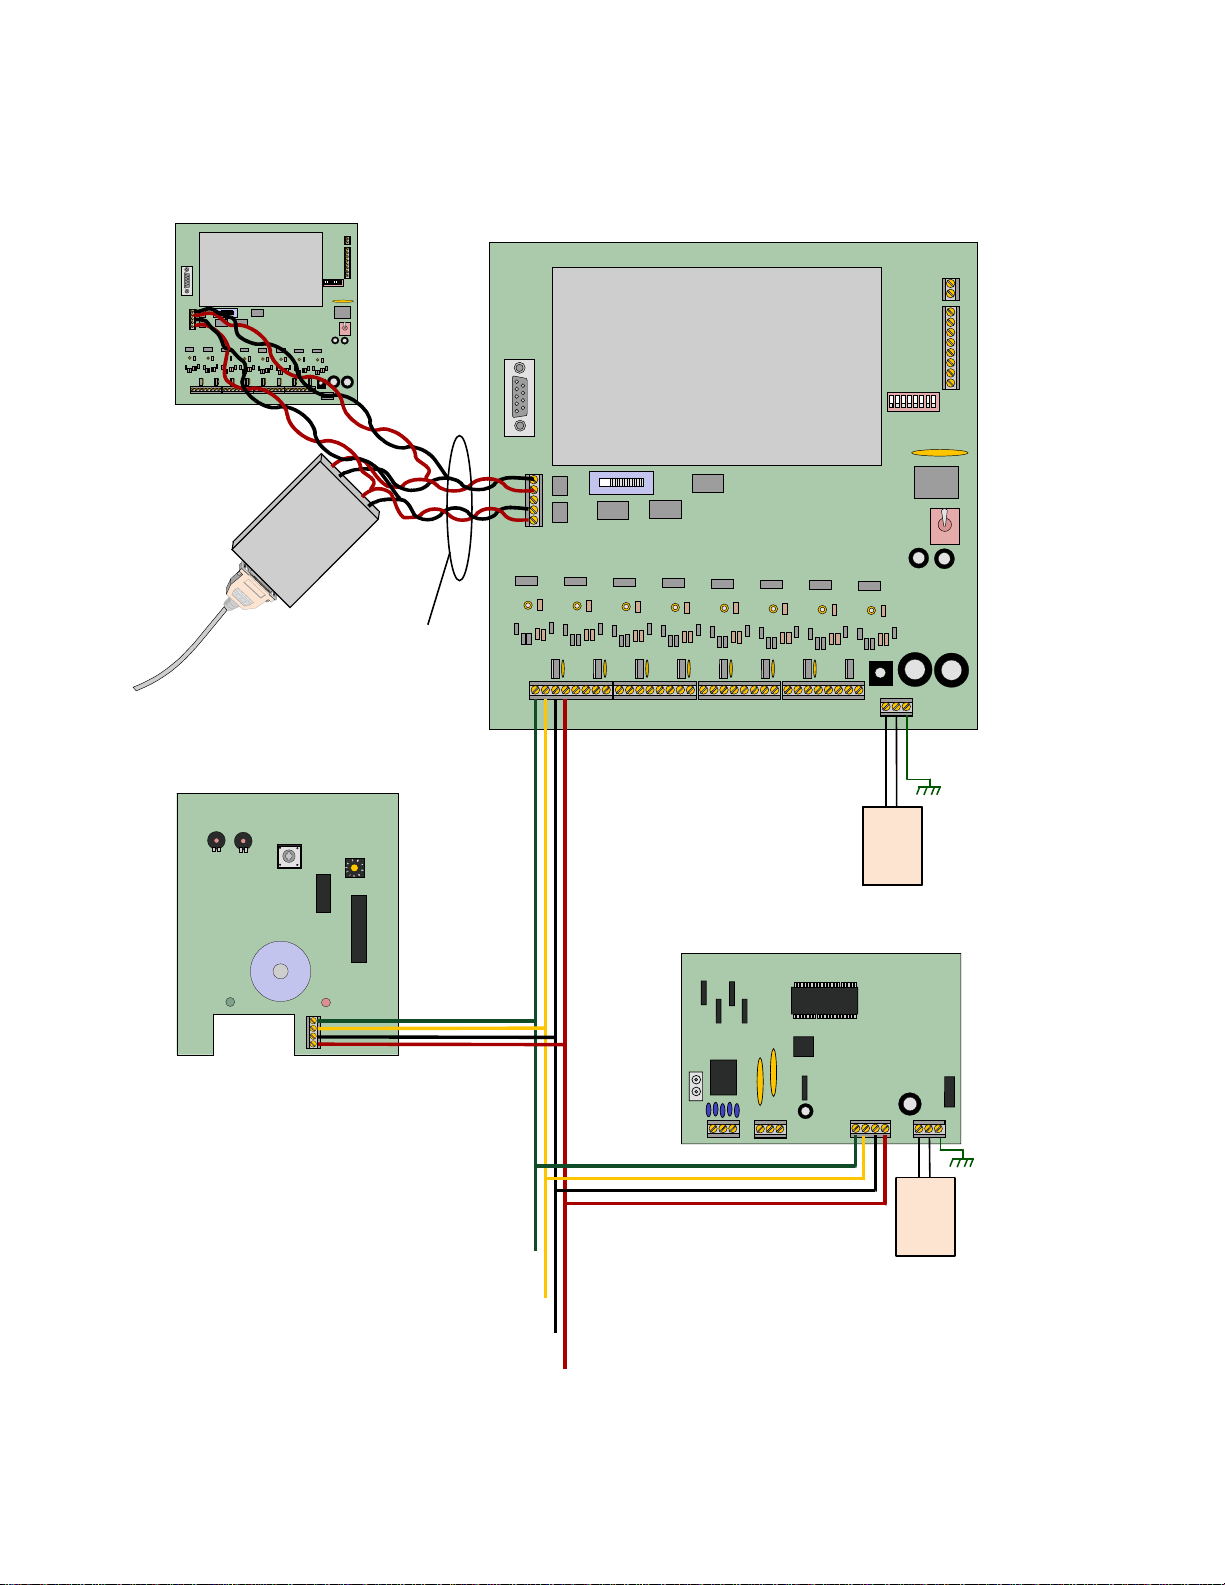
Page 30
_
+
_
+
_
+
_
+
Transponder
_+_
+
BUS 0 PW R 0
Bus 0
Comm Fail
Bus 1
Carrier Detect
Bus 2
Transmit D ata
Bus 3
Receive Data
Bus 4
CRC Error
Bus 5
Test in Porgress
Bus 6
Alarm in Prog r ess
Bus 7
Heartbeat
RS-232 Port
Select
RS232 SE485
-
TX
+
GND
-
RX
+
SE485
Transponder Address
12 VDC
Battery Connector
Power Switch
: Does not disconnect
NOTE
A/C Input Power.
Alert Siren
12 VDC, 0.5 A Current Sink
Strobe
12 VDC, 0.5 A Current Sink
Tamper
Keyswitch
9 V Radio Power
OFF
ON
SE485
Typical
Receiver
Typical
Output
Module
BUS
POWER
BUS
POWER
Bus 0
Bus 1
Bus 2
Bus 3
Bus 4
Bus 5
Bus 6
Enable
Enable
Enable
Enable
Enable
Enable
_+_+_+_+_+_+_+_+_+_+_+_+_+_+_+_
BUS 0 PWR 0 BUS 1PWR 1BUS 2PWR 2 BUS 4PWR 4BUS 5PWR 5BUS 6PWR 6BUS 3 PWR 3 BUS 7 PWR 7
Enable
Bus 7
Enable
Figure 2: Transponder
O
ON
n
OFF
1 2 3 4 5 6 7 8 1 2 3 4 5 6 7 8 1 2 3 4 5 6 7 8 1 2 3 4 5 6 7 8 1 2 3 4 5 6 7 8 1 2 3 4 5 6 7 8 1 2 3 4 5 6 7 8 1 2 3 4 5 6 7 8
1
2
3
4
5
6
7
8
9
10
11
12
13
14
15
16
17
18
19
20
21
22
23
24
25
26
27
28
29
30
31
32
33
34
35
36
37
38
39
40
41
42
43
44
45
46
47
48
49
50
51
52
53
54
55
56
57
58
59
60
61
62
63
+
18 VAC
Input
Power
AC AC EARTH
Transformer
64
65
66
67
68
69
70
71
72
73
74
75
76
77
78
79
80
81
82
83
84
85
86
87
88
89
90
91
92
93
94
95
GROUND
Power
LED
To next device
AC
-
TX
+
GND
Transponder
-
RX
+
To next transponder
Figure 3: Wiring
110
111
112
113
114
115
116
117
118
119
100
101
102
103
104
105
106
107
108
109
120
121
122
123
124
125
126
127
96
97
98
99
128
129
130
131
132
133
134
135
136
137
138
139
140
141
142
143
144
145
146
147
148
149
150
151
152
153
154
155
156
157
158
159
160
161
162
163
164
165
166
167
168
169
170
171
172
173
174
175
176
177
178
179
180
181
182
183
184
185
186
187
188
189
190
191
192
193
194
195
196
197
198
199
200
201
202
203
204
205
206
207
208
209
210
211
212
213
214
215
216
217
218
219
220
221
222
223
224
225
226
227
228
229
230
231
232
233
234
235
236
237
238
239
240
241
242
243
244
245
246
247
248
249
250
251
252
253
254
255
Figure 4: Dipswitch settings
Security Escort Training
Page 30 of 142
Page 31

EA102A – 304 Receiver
Specifications
Enclosure Available in indoor and weatherproof outdoor enclosure
Temperature Range -40° to + 149°F (-40° to +65°C)
Power 12VDC, 25 mA typical, 55mA with horn sounding
RF Input Frequency 304.000 Mhz
Signal Strength Measured in 255 steps
Antenna Type Diversity antennas
Compatibility SE2x-304 Series and SE4x-304 Series Transmitters; EA500B Transponder with a ROM version
4.00 or greater.
NOTE: The EA102A-304 is compatible only with other “-304” equipment (e.g., the SE2x-304 and the
SE4x-304). Also, do NOT install this unit in conjunction with an EA500B Transponder with a
ROM version earlier than 4.00.
Mounting
Choose a mounting location based upon the previous site survey. The receiver should be mounted as close as
possible to the location found with the test receiver. The following is a guideline for receiver mounting and
spacing:
Indoor Receiver Installation
Receiver Spacing: Receiver spacing should be no more than 24 m (80 ft.) between receivers for standard
construction. Range will be dependent upon the construction of the building. For example: a building with hollow
drywall walls may support 24 m (80 ft.) spacing; a building with steel reinforced concrete may require reduced
spacing. It is very important to maintain a consistent spacing as this will ensure optimum signal locating. The
more receivers that can detect a transmitted signal, the more accurate the locating will be.
Mounting Height: Receivers should be mounted 1.5 to 1.8 m (5 to 6 ft.) from the floor. Maintain a consistent
mounting height to ensure optimum signal locating. Do not place receivers close to the ceiling; this will cause
them to be closer to the floor above, and therefore, reduce the floor to floor location accuracy. It may also be
helpful to place the receivers somewhat higher only on the top floor to be covered and somewhat lower only on
the bottom floor to be covered.
Multi-Floor Installations: Receivers MUST be mounted over one another in multi-floor installations. This helps
maintain proper floor-to-floor reception.
Select a mounting location that:
• provides a clear line-of-sight of the protected area, if possible,
• is at least 30 m (1 ft.) away from metal objects such as HVAC ducts,
• is on an inside wall, if possible,
• is 1.5 to 1.8 m (5 to 6 ft.) from the floor,
• is not at a barrier where it is important to resolve which side an alarm location is on, and
• will not be damaged by tampering or opening doors.
Security Escort Training
Page 31 of 142
Page 32

Outdoor Receiver Installation
Receiver Spacing: Receivers should be mounted every 91.5 m (300 ft.). It is very important to maintain as
consistent spacing as possible, as this will ensure optimum signal locating. The more receivers that can detect a
transmitted signal, the more accurate the locating will be. Each receiver should have a clear line-of-sight of the
intended protection area.
Mounting Height: Receivers should be mounted 3 m (10 ft.) above grade. Maintain a mounting height that is as
consistent as possible to ensure optimum signal locating.
Overhangs/eaves: Receiver locations should be below building overhangs and eaves. Most transmissions will
occur a few feet (1 m) above grade; mounting above overhangs and eaves could result in inaccurate signal
locating. Be especially careful around metal roofs as these can block the signal.
Select a mounting location that:
• provides a clear line-of-sight of the protected area,
• is away from metallic objects such as chain-link fences and electrical transformers. If coverage is required
near such items, testing should be performed near these items to determine the potential need for additional
receivers,
• is 3 m (10 ft.) above grade,
• is not at a barrier where is it important to resolve which side an alarm location is on,
• is easy to service, and
• will not be damaged by tampering.
Wiring
CAUTION: Apply power only after all connections have been made and inspected.
Connect wiring as shown:
Switches and Jumpers
Loop Address
The Rotary Switch is used to select the loop address. This is the address that is reported to the transponder the
receiver is connected to. Each device on a loop should have its own address. Only addresses 0 through 7 are
valid. Do not use addresses 8 and 9.
Security Escort Training
Page 32 of 142
Page 33

Jumpers
There are two groups of jumpers on the EA102A-304 Receiver. The first group contains Jumpers P1 through P3.
The second contains Jumpers P4 through P8. The function of each jumper is indicated in the table below:
NOTES:
* Remove Jumpers P1, P2, and P3 when installed in an outdoor enclosure.
** Remove Jumpers P4, P5, P6, and P7 for normal operation.
Test Mode
The module goes into Test Mode when Jumper P4 is in place (Jumper P5 removed). In this mode, all test and
alarm receptions will be sounded.
Jumper Operation With Jumper in Place
P1* Sounder is enabled
P2* Green LED is enabled
P3* Red LED is enabled
P4** Test Mode is enabled
P5** Receiver Spacing Mode is enabled
P6** Left Antenna is disabled
P7** Right Antenna is disabled
P8 Do not place a jumper across these pins.
NOTE: The sounder and LEDs (Jumpers P1, P2, and P3) must also be enabled to operate the Test Mode.
Each receiver should be tested using the following method (test only one receiver at a time):
1) Enable the Test Mode by placing the P4 Jumper across both pins (Jumper P5 removed).
• The red LED will turn ON and stay ON during the test.
• The green LED will flicker if the receiver is connected to a working transponder.
• There will be no data transmitted to the central station.
• The central station will receive a "not responding" failure.
2) Activate the transmitter from at least five different locations near the receiver.
• The LEDs will respond to a received transmission.
• If the receiver detected all the packets from the transmission, the sounder will beep three times.
• If the receiver detected the transmission, but some of the packets were missing, it will beep once. This
could indicate that the signal is not sufficient from this location.
Testing Receiver Spacing
Receiver Spacing Mode is enabled with Jumper P5 in place (Jumper P4 removed). This mode is exactly the
same as the Test Mode above, except that only transmissions with an adequate receive margin are sounded.
This indicates the maximum acceptable spacing of receivers. Use the following procedure to test the spacing of
receivers:
1) Mount the first receiver.
2) Take the second receiver and a transmitter a distance away from the first receiver.
3) Activate the transmitter.
4) If Receiver 1 sounds the test beeps, Receiver 2 is within range. Repeat this test until Receiver 1 no longer
sounds the test beeps. Move back to the last location where Receiver 1 received the test beeps. This
location marks the maximum spacing between receivers. Mount Receiver 2 at this location or closer to
Receiver 1.
NOTE: Do not use the Test Mode (Jumper P4) to determine receiver spacing.
Security Escort Training
Page 33 of 142
Page 34

Pre-Wired Installations
When mounting the enclosure to a pre-wired electrical box, make sure that the electrical box has a six inch
overhead clearance. The enclosure should be mounted as shown below:
Drilling Templates
Use the following templates for mounting the AE101 Outdoor Enclosure. Remember to remove Jumpers P1, P2,
and P3 prior to installing the receiver.
Security Escort Training
Page 34 of 142
Page 35

Security Escort Training
Page 35 of 142
Page 36

Drilling Template for AE101 Outdoor Enclosure Bottom Entry
Security Escort Training
Page 36 of 142
Page 37

EA120B Alert Unit
Specifications
Electronics: EA120B
Enclosures: Indoor: AE1 (9"H x 7"W x 1.75"D)
Outdoor: AE101 (14.75"H x 12.75"W x 3.5" D)
Hardware Kits: Indoor: H500
Outdoor: H121
Temperature Range-40° to + 149°F (-40° to +65°C)
Power 18 VAC, 50 VA
Battery Backup 12 VDC Lead Acid Battery
Accessory Equipment:Horn/Strobe: E28000B
• Strobe: 500 mA solid state sink, terminal switches to ground in an alarm condition.
• Siren: 500 mA solid state sink, terminal switches to ground in an alarm condition.
• Power: 12 V @ 1A, max.
Transformer: TR1850
Batteries (3 Amp Hour): E28629B
(7 Amp Hour): E19729B
Battery Cables: C316 (3 or 7 Amp)
C315 (17 Amp)
C311 (3 or 7 Amp
expansion)
Compatibility: EA500B ROM Version 4.00 or higher
General Information
The Alert Unit is a driver for output modules such as Security Escort's E28000B Horn/Strobe. The unit should be
mounted indoors; however, an outdoor enclosure is available. The Horn/Strobe should always be mounted
outdoors.
The Alert Unit gets its main power (for horn/strobe activation) from the 18 VAC transformer and its backup power
from a battery; however, the multiplex bus will continue to supply the Transponder information on status and
troubles in the event "local" power is lost.
Mounting
Normally, the enclosures are mounted first and all the wiring run, then the electronics are mounted, wired, and
tested.
The enclosures come with their own mounting hardware. The hardware kits listed above are for mounting the
circuit board to the enclosures (the indoor hardware kit also includes a tamper switch and a lock and key).
Mount the circuit board to the enclosure as indicated in the figures below.
Security Escort Training
Page 37 of 142
Page 38

Wiring
Wire the Alert Unit using the figure below:
Set the Address
Battery
Connector
(Use cable)
Ta mp er Switch wired t o
[T] and [P-] Terminals.
Microprocessor
BB+
SP1 T P- P+ SI- ST-
0
5
Address Switch
_
+
BUS-
+PWR
AC AC
BUS BUS +
PWR PWR +
Transponder
To Next Device
Every module on each multiplex bus of the Transponder must have its own address. Set the address on the Alert
Unit using the Address Switch.
Use only address numbers 0 through 7. Do NOT use address numbers 8 and 9.
Security Escort Training
Page 38 of 142
Page 39

SE485 Interface
Introduction
The SE485 is designed as an interface between the RS-485 signal bus of the Security Escort Transponder, and
the Serial Bus (RS-232) of the Security Escort Central Station.
Specifications
Dimensions: 135 mm (5.375 in.) x 85 mm (3.031 in.) x 30 mm (1.187 in.)
Power: Use the included 120 VAC adaptor to 9 VDC, 300 mA or power from the Transponder
Recommended Cable:
Compatibility: EA500B Transponder
Installation
• Remove the cover by removing the cover screws shown below.
• Connect the wiring as shown below.
2 twisted pair, 4 conductor, 22 AWG (0.8 mm)
EA501B Transponder
Twisted Pair Wire
Power Supply (31578)
-
+
Center Positive
GND
GND
RX-
RX+
TX-
TX+
+9V
Wiring Connectors
to Transponder
(Ground is Not Needed)
Optional 9 VDC Input
from Transponder
To Central Station RS-232
Port. Use 25 pin male to
9 pin female or 25 pin
male to 25 pin female
straight computer serial
cable no longer than 15 m (50
ft.) (do not use Null
Modem Cable).
Connector for
Multiple SE485s
To Next Transponder
TXTX+
GND
RXRX+
TXTX+
GND
RXRX+
Escort Transponder
Escort Transponder
Power LED
• After wiring the system, replace the cover and power up the unit.
Installation and Operation Notes
• Each Transponder must have its own address.
• For the Security Escort
adaptor provided plugged into an uninterrupted power supply (UPS).
• The SE485 may also be powered from the Transponder’s 9 V output connected to the 9 VDC input wiring
connectors.
• Up to four SE485s can be included in an installation. If using multiple SE485s, use the connector cable provided.
®
System to maintain operation, the SE485 must be powered at all times. Use the 9 V
Security Escort Training
Page 39 of 142
Page 40

ProxLink Setup
Configuration Procedure
ProxLink
C312 Data Cable
C312 Data
Cable
SE485 Interface
ProxLink
C312 Power Cable
TX
+
GND
RX
+
OFF
Transponder
ON
_
_
_
_
_
_
_
_
+
+
+
+
+
+
+
+
ACACEARTH
GROUND
BUS 0PWR 0
BUS 1PWR 1
BUS 2PWR 2
BUS 4PWR 4
BUS 5PWR 5
BUS 6PWR 6
BUS 3PWR 3
BUS 7PWR 7
0 m to15 m (0 ft. to 50 ft.)
ProxLink to Transponder
ProxLink
C312 Power
Cable
3
0 m to15 m (0 ft. to 50 ft.) Mu ltiple
Transponders to One ProxLink
TX
+
GND
RX
+
_
_
_
_
_
+
+
+
+
+
BUS 0PWR 0
BUS 1PWR 1
BUS 2PWR 2
BUS 4PWR 4
BUS 5PWR 5
BUS 3PWR 3
TX
+
GND
RX
+
_
_
_
_
_
+
+
+
+
+
BUS 0PWR 0
BUS 1PWR 1
BUS 2PWR 2
BUS 4PWR 4
BUS 5PWR 5
BUS 3PWR 3
_
_
_
+
+
+
BUS 6PWR 6
BUS 7PWR 7
_
_
_
+
+
+
BUS 6PWR 6
BUS 7PWR 7
Transponder
OFF
ON
ACACEARTH
GROUND
Transponder
OFF
ON
ACACEARTH
GROUND
C312 Data Cable
SE485 Interface
3
SE485 Interface
Serial Cable
C312 Data Cable
ProxLink
15 m (50 ft.)
or Greater
TX
+
GND
RX
+
OFF
ON
_
_
_
_
_
_
_
_
ACACEARTH
+
+
+
+
+
+
+
+
GROUND
BUS 0PWR 0
BUS 1PWR 1
BUS 2PWR 2
BUS 4PWR 4
BUS 5PWR 5
BUS 6PWR 6
BUS 3PWR 3
BUS 7PWR 7
15 m (50 ft.) or Greater
ProxLink to Transponder
ProxLink
(Requires
Backup
Power)
Transponder
SE485 Interface
(Requires
Backup
Power)
ProxLink Data
Cable 9 to
25 Pin
(Supplied
with ProxLink)
Detection Systems, Inc.
Central Console Computer
(Requires Backup Power)
SE485 Interface
Serial Cable
0 m to 15 m (0 ft. to 50 ft.)
ProxLink to Computer
NOTE: For more details refer to the ProxLink Radio Module User’s Manual
(Requires
Backup
Power)
3
15 m (50 ft.)
or Greater
Detection Systems, Inc.
Central Console Computer
(Requires Backup Power)
15 m (50 ft.) or Greater
ProxLink to Computer
Security Escort Training
Page 40 of 142
Page 41

Required Equipment
• ProxLink Radio Module
• PC with RS-232 Port running a terminal emulation software package. (Located: Start Button, Programs,
Accessories, then click on Hyper Terminal)
• ProxLink DB-9 to DB-25 Female RS-232 Cable
• 9 VDC Power Supply
Configure
Select one of seven radio channels (902 - 928MHz). Make certain that the one chosen is set the same in all the
ProxLink located at the Transponders and for the ProxLink at the Central Console Computer.
Select one ProxLink for your Central Control Computer. The Serial # (located on a silver tag on the bottom of the
ProxLink) on this ProxLink must be entered in the Destination Serial Number and Serial # Filter location in all
ProxLink Radios connected to the Transponders.
1. Attach the PC to the ProxLink using the ProxLink RS-232 cable. Attach the DB-9 Connector to the ProxLink
and attach the DB-25 Female Connector the PC. Gender changers or DB-25 to DB-9 converters may be
required depending on your serial port connector type.
2. Start your terminal emulation software (Hyper Terminal). Configure the ProxLink as follows: 9600 Baud, 8
Data Bits, 1 Stop Bit and no parity.
3. Put the ProxLink in User Interface mode by pressing the configuration button on the front of the unit. The
ProxLink should respond by displaying the Main Menu screen.
4. Once the main menu is displayed, to configure a ProxLink parameter select a menu option and press the
[ENTER] key. This will either display a prompt or a sub-menu. After finishing with a sub-menu, press the
[ESC] key to return to the previous menu.
5. After you have finished configuring the ProxLink, type “L” and then [ENTER] and then type “Y” to place the
unit in operating mode.
Configuration should look as follows in Main Menu, D - Display ProxLink Radio Module Parameters:
PARAMETER SET TINGS
Serial #______
Serial Port
--------- Operating Mode: Pass-Through Delimiters: No ne
Echo Mode: None Max Length: 256
Baud Rate: 9600 Input Time-Out: 1
XON/XO FF Ge n er a ti o n: Disabled XON/XOFF Recognition: Disabl e d
CTS Generation: Disabled DSR Generation: Disabled
Network
----- Radio Channel: 6 Radio Speed: 121 Kbaud
Subchannel: 1 Broadcast Address: 1
Dest. Seri al #: 36591 Lost Communication: Continue
Serial # Filter: 36591 Type Filter: Broadcast
Press <Enter> to continue. . .
Serial # 36591
Serial Port
------- Operating Mode: Pass-Through Delimiters: None
Echo Mode: None Max Length: 256
Baud Rate: 9600 Input Time-Out: 1
XON/XOFF Generation: Disabled XON/XOFF Recognition: Disabled
CTS Generation: Disabled DSR Generation: Disabled
Network
----- Radio Channel: 6 Radio Speed: 121 Kbaud
Subchannel: 1 Broadcast Address: 1
Dest. Serial #: Broadcast Lost Communication: Continue
Serial # Filter: None Type Filter: Directed
Press <Enter> to continue. . .
ProxLink Radio to Transponders
PARAMETER SETTIN GS
ProxLink Radio to Computer
These numbers must match
ProxLink Radio Module Configuration
Security Escort Training
Page 41 of 142
Page 42

DEMO INSTALLATIONS
When the software is used for demo purposes, it is limited to 5 records in the Subscriber Database, 1
transponder in the Transponder Database and only receivers 0 through 3 on bus 0 can be defined for that
transponder (no other points can be programmed for that transponder). If these limitations are observed then the
software will communicate with the single transponder and the system can be used with full functionality for
demo purposes. Refer to the Escort software install section of this document to install the software. After the
software has been installed, but before it is run, double click on the HDD32.EXE file in the Escort directory
(C:\ESCORT). This will install the driver for the software key. This is required even for demo installations that will
not have the software key. If the HDD32.EXE installer is not run before the Escort software is run the first time,
the Escort software will stop with an error and the HDD32.EXE will automatically run. The demo installation is
complete at this point and you do not have to refer to the rest of this document.
In demo mode communications are allowed to one transponder even if the transponder database has more than
one transponder in it for diagnostic purposes. The transponder selected in the Transponder Current Status dialog
or Transponder Communications dialog will be the transponder that can be communicated with. The transponder
can be reselected at any time to change the current transponder in communication. All tests, supervisions and
maintenance alarms will function normally; however only subscriber alarms that contain reports from receivers 0
through 3 on bus 0 will function. If an alarm also includes other receivers reporting, that alarm will be ignored.
Therefore actual Escort operation can be demonstrated using up to 4 receivers. Also a demo system can be
used to directly connect to transponders using the actual transponder database from the system to perform all
functions except subscriber alarms. This is desirable to allow a laptop to be plugged directly into a transponder to
diagnose problems. In both of these modes the subscriber database must have 5 or less subscribers.
NON-NETWORK INSTALLATIONS
If this system will not be using the network to connect Master, Slave and Workstation computers, refer to the
Escort software install section of this document to install the software. After the software has been installed, but
before it is run, plug the software key into the parallel port connector on the back of the computer and double
click on the HDD32.EXE file in the Escort directory (C:\ESCORT). This will install the driver for the software key.
If the HDD32.EXE installer is not run before the Escort software is run the first time, the Escort software will stop
with an error and the HDD32.EXE will automatically run. A non-network installation is complete at this point and
you do not have to refer to the rest of this document.
NETWORK INSTALLATIONS
The Escort software supports a single master computer, a single slave computer (optional) and a maximum of 8
workstations (limited to the number programmed in the software key). The master computer normally processes
the real time communications to the transponders and controls the system. The slave computer can assume the
master’s role by the use of A/B switches to direct the transponder communications to the slave computer. The
workstation computers allow other computers to respond to alarms, perform maintenance and edit the
databases.
Security Escort Training
Page 42 of 142
Page 43

INSTALLING THE ESCORT SOFTWARE
Software Installation Procedure
Typically the Security Escort program is delivered on floppy disks. It is strongly recommended that you exit all
other programs before running this installation program. Place Installation Disk #1 in the computer’s floppy disk
drive. Run SETUP.EXE from that floppy disk by one of the following methods:
1) Double click on the “My Computer” icon on the desktop. Select the “3½ Floppy (A:)”,then run
SETUP.EXE from it.
2) Click on the “Start” button on the Windows® Task Bar. Select “Programs” on the list that pops up. Then
select “Windows Explorer”. In “Windows Explorer” select “3½ Floppy (A:)”,then run SETUP.EXE from it.
3) Click on the “Start” button on the Windows® Task Bar. Select “Run” on the list that pops up. Then type
“A:\SETUP.EXE” in the Open box and click the OK button.
Once SETUP.EXE is running
Figure 1 will be shown.
Click the “Next” button or hold the “Alt” key and
tap the “N” key and the Software License
Agreement will be shown (Figure 2).
Click the “Yes” button or hold the “Alt” key and
tap the “Y” key to accept the Software License
Agreement. If you chose “No” the installation
will terminate.
Figure 1: Setup Welcome Dialog
Figure 2: License Agreement
Security Escort Training
Page 43 of 142
Page 44

The Readme Information will appear
(Figure 3). You may click the Cancel
button at any time to exit the installation
procedure.
Read the entire file before proceeding
(use the scroll bar on the right side to
see the portion not currently displayed).
When done, click the “Next” button or
hold the “Alt” key and tap the “N” key.
The “Choose Destination Location”
dialog will reappear.
Figure 3: Readme Information Dialog
Figure 4 selects the location on the hard disk drive to install the Security Escort program. Typically the default
location is best (C:\Escort). In the “Choose Destination Location” dialog, click the “Next” button or hold the “Alt”
key and tap the “N” key. Only if you desire to install the program in a different location click Browse and the
dialog in Figure 5 will appear.
Enter the desired location and click OK.
Figure 4: Choose Destination Location Dialog
Security Escort Training
Page 44 of 142
Figure 5: Choose Directory Dialog
Page 45

The “Setup Type” dialog will reappear
(Figure 6).
Select the type of installation you desire.
Typical – For new installations this is the
option you should choose. It will
guarantee that all required components
would be installed and includes the
installer for the software key. Use this
selection for demo installations. Do not
use this selection on existing
installations, as it will replace the
databases and maps with the demo
databases and maps.
Compact – Only installs the application
files. This selection can be used to
update an existing installation as it will
not write over the databases and map
files.
Figure 6: Setup Dialog
This selection can’t be used for new installations because it doesn’t contain all required components, the installer
for the software key, databases and maps.
Custom – This selection contains all systems components, databases and maps. You may choose which to
install.
Click the “Next” button or hold the “Alt” key and tap the “N” key.
We are set to copy the files, click the
“Next” button or hold the “Alt” key and tap
the “N” key to proceed. The files will now
be copied (Figure 7).
Security Escort Training
Page 45 of 142
Figure 7: Start Coping Files Dialog
Page 46

The installation is now complete. If you
desire to run the Security Escort program
now, place a check mark in the “Launch
the program file” box by clicking in it.
Then click the Finish button (Figure 8).
To manually start the Security Escort
program after installation, click on the
Windows Start button in the Task Bar.
Select Programs and then select Security
Escort from the list that pops up.
In a live system it is recommended that
the Security Escort program be
configured to automatically start. To auto
start the program, place a shortcut to
ESC32.EXE (the Security Escort
program, typically located in C:\Escort) in
the following path:
C:\WINDOWS\Start Menu\Programs\StartUp
Image Files
Map File Generation and Scaling
The Security Escort maps are standard Windows bitmap files (.BMP). Map0.edb is the default map file, usually
the ground floor in multiple map systems. The map must be saved in the Escort subdirectory (typically c:\Escort).
These maps may be created from scratch using any Windows paint program, however it is best to scan in an
existing site map. Commercial copy centers usually have scanners that can handle larger drawing sizes.
If an AutoCad file is available have AutoCad export a bitmap for the best looking maps that require the least work
to make presentable. If the scale of the exported map is too large or too small, re-export the map at the corrected
scale rather than scaling the map in a graphic editor. Scaling a bitmap file directly will produce a file that will
require a significant amount of manual effort to make presentable.
The scanned image should be saved as a Windows bitmap file (.BMP) with 256 colors (8 bit color). High Color
(16 bit) or True Color (24 bit) can also be used, but the file sizes will be much larger and the maps will be slower
to load and may require more system RAM. It should be scaled so that the entire map file is at least 800x600
pixels (will cover the entire Windows screen). The Security Escort software auto scrolls the map, therefore it is
not a problem if the map is larger than the screen. The map should not be too large though, there should be
enough area of the map on the screen when an alarm is shown, so there is no question where in the facility the
alarm is located from a quick review of the map. A good rule-of-thumb is 100 pixels would represent 15 m (50 ft.)
or greater.
Figure 8: Setup Complete Dialog
Multiple Map Files
For a multi-story building the maps for each floor must have the same resolution. Each map must be vertically
aligned with all the floors above and below it. Therefore the maps will have the same origin (0,0 = upper left
corner). Typically you would do the map for the ground floor, then make the maps for the other floors by editing
copies of the ground floor map.
Where transponders from multiple systems are reporting into the same computer the map(s) for each system will
be separate and assigned unique map numbers, from the other maps on that same computer. The origin for the
maps for each system will be 0,0 = upper left corner. Therefore the location of the receivers in the transponder
database will only consider this system’s map without respect to the maps for any other systems being handled
by the same computer.
The maps must be named Map0.edb, Map1.edb through Map99.edb. Where Map0.edb is the default map file,
usually the ground floor. The Escort software will show the default map, if there is no other events being
processed at a given time.
Assign the desired map number to an area or point in the transponder database. Assign the map for a fixed
location transmitters in the Subscriber Database, Advanced dialog.
Security Escort Training
Page 46 of 142
Page 47

Central Console, Computer Setup and Programming
Transponder Comm Port Setup
Transponder Comm Port Setup Dialog
This dialog connects the Comm port indexes set for each transponder in the Transponder database to the
physical Comm ports on the computer.
Security Escort Training
Page 47 of 142
Page 48

“COM”
The actual physical Comm port over which communications to the transponder will be carried.
“Carrier Det”
If checked, verify that the communications port is not in use before communicating. Only to be used on half
duplex links where carrier detect indicates that the link is in use. This setting is rarely used.
“No CTS ”
If checked, do not monitor the Clear to Send before communicating. This setting is normally checked.
“Mon Power”
If checked, monitor the Ring Indicator pin to indicate a remote power supply used on this Comm link has not
failed. This setting is normally unchecked.
Remote Port Setup Dialog
This dialog connects the network, modem and system serial ports to the physical Comm ports on the computer
and sets their baud rate.
“Network Port”
This is the port that connects the master and slave computers of the Security Escort System. If this system has
only a single computer, this setting should be set to none.
Remote Port Setup Dialog
Security Escort Training
Page 48 of 142
Page 49

“Modem Port”
This is the port that typically connects to the modem for remote access and pager dial out. If set in the “Remote
Setup” dialog this port can be used without a modem for direct connection to a computer that is always on line.
“System Serial 1”
This is a general-purpose serial port; its function is set up in the “Remote Setup” dialog.
“System Serial 2”
This is a general-purpose serial port; its function is set up in the “Remote Setup” dialog.
“COM”
The actual physical Comm port over which these communications are to be carried.
“Baud”
The speed characters are transmitted on this serial port. This setting must match the baud rate of the device
connected at the other end of this serial connection. This setting should always be at the highest speed that both
connected devices have in common. Modem connections are typically much more efficient, if the baud rate is set
significantly faster that the modems rated speed (for a 28.8 modem set the baud rate to 57600 or 115200).
“CR/LF”
Append carriage return and line feed characters at the end of each string transmitted (default). Only functions
with the System Serial Ports (is ignored on the network and modem ports).
“CR Only”
Append a carriage return character at the end of each string transmitted. Only functions with the System Serial
Ports (is ignored on the network and modem ports).
“LF Only”
Append a line feed character at the end of each string transmitted. Only functions with the System Serial Ports
(is ignored on the network and modem ports).
Security Escort Training
Page 49 of 142
Page 50

Remote Setup Dialog
This dialog sets up the remote access and system serial port parameters.
“Default Master Computer”
This computer is the only or on startup defaults to the master computer in a live Security Escort System.
“Default Slave Computer”
This computer on startup defaults to the slave computer in a live Security Escort System.
“Workstation Computer”
“Remote Computer”
This computer is not in a live Security Escort System; it is used only for remote access. For this setting to be
enabled, all transponder Comm ports and the network port must be all set to none.
“Emergency Answer Only”
Allows the master computer to answer a remote access only after 10 rings. If the master does not answer the
slave will answer after 12 rings.
“Master Computer Answers”
Allows the master computer to answer a remote access after the programmed number of rings. If the master
does not answer, the slave will answer after the programmed number of rings plus two.
Remote Setup Dialog
Security Escort Training
Page 50 of 142
Page 51

“Slave Computer Answers”
Allows the slave computer to answer a remote access after the programmed number of rings. If the slave does
not answer, the master will answer after the programmed number of rings plus two. Generally it is better to have
the master computer answer remote access calls.
“Direct Connect Port”
The modem port is not connected to a modem. This setting will allow a direct connection to another computer.
This additional computer will not display alarms, but otherwise will behave like a slave computer.
“Answering Machine Override”
If checked an answering machine is connected to this phone line. If the answering machine answers a remote
access call, hang up and redial. When another call is received within one minute of the last ring of a previous
call, then the Security Escort System will answer on the first ring, overriding the answering machine.
“Pulse Dial”
If checked use pulse dial on all outgoing calls. Otherwise tone dialing (default) is used.
“Answer On Ring”
Program the number of rings to answer on. If there is an answering machine on this phone line, set the number
of rings to at least 2 greater than the number of rings that the answering machine answers on. Also check the
Answering Machine Override checkbox below.
“Dialing Prefix”
On outgoing calls enter the dialing prefix, if any.
“Password”
This is the password that will be used to gain remote access to the Security Escort System. If the first 5
characters of the password match the remote systems password, read only access will be allowed. If the first 8
characters match you will be allowed to edit databases remotely (not currently implemented). If all 12 characters
match then you will also be allowed to change system parameters remotely.
“Password Verify”
For verification reenter the same password from above.
“Disabled”
If selected, this system serial port is disabled (default).
“History Filter Output”
If selected, this system serial port will send out whatever items are selected in the “History Filter” dialog.
“Video Switcher Control”
If selected, this system serial port will send out the strings programmed in the “Video Switcher” field of the
“Transponder Database Edit” dialog’s Area data. Also see Video Switcher Restore below.
“Remote System Control”
If selected, this system will be controlled by another system through a proprietarily protocol. This setting can only
be used when two systems are specifically designed to work together.
Security Escort Training
Page 51 of 142
Page 52

“Local Service Pages”
“Local Security Pages”
“All Local Pages”
“Video Switcher Restore”
This string is output on any system serial port programmed for “Video Switcher Control” when all alarms are
restored. This string is output to the video switcher to reset it to the default displays.
“Modem Init”
This is the initialization string output to the modem. Normally this setting would not have to be changed. To allow
changes to this string, hold down the SHIFT and CTRL keys when this dialog is first opened. This string is
specific to each modem model.
“Modem Reset”
This is the reset string output to the modem. Normally this setting would not have to be changed. To allow
changes to this string, hold down the SHIFT and CTRL keys when this dialog is first opened. This string is
specific to each modem model.
Transponder Database
The Transponder Database is established at System set-up and contains all necessary configuration data for
each Transponder, receiver and alert unit. It describes the basic structure of the installation, including all device
names, locations, types, Multiplex Addresses, etc. This information is used by the Central Console to generate
“Alarm” and “Test” displays on the Console and in determining which Alert Units are to be activated. Access to
the Transponder Database is from the “File” menu on the Main Menu bar. The following paragraphs describe the
elements of the Transponder Database Dialog.
Security Escort Training
Page 52 of 142
Page 53

Transponder Information Sheet
Transponder Number: Transponder Location:
Transformer for Transponder Location:
Breaker Panel Location: Breaker Number:
Siren/Strobe Output To:
Keyswitch Monitoring To:
Bus #0 Locations:
Point #0:
Point #1:
Point #2:
Point #3:
Point #4:
Point #5:
Point #6:
Point #7:
Bus #1 Locations:
Point #0:
Point #1:
Point #2:
Point #3:
Point #4:
Point #5:
Point #6:
Point #7:
Bus #2 Locations:
Point #0:
Point #1:
Point #2:
Point #3:
Point #4:
Point #5:
Point #6:
Point #7:
Bus #3 Locations:
Point #0:
Point #1:
Point #2:
Point #3:
Point #4:
Point #5:
Point #6:
Point #7:
Security Escort Training
Page 53 of 142
Page 54

Bus #4 Locations:
Point #0:
Point #1:
Point #2:
Point #3:
Point #4:
Point #5:
Point #6:
Point #7:
Bus #5 Locations:
Point #0:
Point #1:
Point #2:
Point #3:
Point #4:
Point #5:
Point #6:
Point #7:
Bus #6 Locations:
Point #0:
Point #1:
Point #2:
Point #3:
Point #4:
Point #5:
Point #6:
Point #7:
Bus #7 Locations:
Point #0:
Point #1:
Point #2:
Point #3:
Point #4:
Point #5:
Point #6:
Point #7:
Location of Splices:
Security Escort Training
Page 54 of 142
Page 55

Transponder Database
The Transponder
Database is established at
System set-up and
contains all necessary
configuration data for each
Transponder, receiver and
alert unit. It describes the
basic structure of the
installation, including all
device names, locations,
types, Multiplex
Addresses, etc. This
information is used by the
Central Console to
generate “Alarm” and
“Test” displays on the
Console and in
determining which Alert
Units are to be activated.
Access to the Transponder Database is from the “File” menu on the Main Menu bar. The following paragraphs
describe the elements of the Transponder Database Dialog.
Figure 9: Transponder Database Dialog
Security Escort Training
Page 55 of 142
Page 56

Transponder
Created
Modified
Modify Oper
Transponder ID
Comm Port Index
Radio ID
Isolate From All Other
Transponders For
Location
Ignore Communications
Failure
Insert New
Edit Data
Kill Transponder
Delete Point
Copy
Print
This box contains the names of the Transponders. Clicking the mouse on the
arrow to the right of this box causes a drop-down list to appear, displaying the
names of each Transponder in the system, allowing easy selection for review or
editing.
The Transponder names are assigned during set-up and are used to indicate the
physical location of the Transponder or the region of the Protected area covered by
a particular Transponder.
The system software automatically creates these three fields to the right of the
“Transponder” window. They represent the date the Transponder was first entered
into the Transponder Database, the date of the last change of any entry for this
Transponder, and the identity of the operator making the last change (determined
from the password entered to make the change).
This is a number assigned to the Transponder at system set-up. It is used by the
Central Console to identify the Transponder during all communications between
the Console and the Transponder. The number must agree with the Transponder
address, which is set during final installation by means of switches on the
Transponder circuit board.
NOTE: “Zero” is not allowed as a Transponder address.
This indicates which Central Console communications port will beused to
communicate with this Transponder. The Transponder Comm Port Setup dialog
selects the specific physical port that this index will refer to.
This is the identification number for the Radio Interface Unit, if the Transponder
communicates to the Central Console by means of a radio link. (This feature is
currently not implemented)
When checked this transponder is isolated from all other transponders for location
considerations. This should be used when distant transponders sometimes hear an
alarm and throw off the alarm location calculation. If this checkbox is checked it
indicates that this transponder is protecting an area that is independent of all other
transponders in the system. When an alarm is reported, and receivers on this
transponder have best reception then only the receivers on this transponder will be
considered for the location of this alarm. If another transponder has the best
reception then the receivers on this transponder will be ignored for the location of
this alarm.
This checkbox allows “Communications Failures” to be ignored for this
Transponder. It is used during a new installation for Transponders that are not yet
fully on line. During system maintenance, when a Transponder will be out of
service for a while, it is used so that the “Communications Failure” messages will
not flash on the screen and distract the Operator. Checking this checkbox will
cause the system to ignore communication failure, therefore if
communications fail with this transponder, the area this transponder protects
will not be protected and alarms from subscribers in that area will be missed
without the operator’s knowledge. This checkbox should not be checked in a
live system.
Clicking this button displays an empty transponder edit dialog. This is used to enter
a new transponder to the database.
Clicking this button allows the currently displayed transponder’s database record to
be edited.
Clicking this button will delete the currently displayed transponder’s database
record. If the transponder is “killed” its data is permanently deleted and can’t be
recovered.
Clicking this button will delete the currently displayed point only from the currently
displayed transponder’s database record. If the point is deleted, its data is
permanently deleted and can’t be recovered.
Clicking this button will copy the currently displayed transponder’s database record
into a new transponder record. This allows similarly configured transponders to be
programmed once then copied into a new record. Note: It is not possible to edit the
Transponder ID itself. If this should be necessary, the “Copy” button can be used to
produce another Transponder Database entry duplicating the first, but with the
Transponder ID blank. The new Transponder ID can be entered, the new data
saved by using the “Save” key, and the old Transponder entry can be deleted by
using the “Kill Transponder” button.
Clicking this button will print the currently displayed transponder’s database record.
Security Escort Training
Page 56 of 142
Page 57

Beginning
Previous
Next
End of File
Mux Point Data
The lower portion of the Transponder Database dialog provides information on each of the devices controlled by
the Transponder selected in the “Transponder” box. There are two digits that represent each Receiver or Alert
Unit address, the first is the number of the
second is the
up to eight devices may be installed, but each device must be assigned a unique Multiplex “Point” Address (zero
to 7). More than one device may have a particular Multiplex “Point” Address, but only if on different busses. The
Multiplex “Point” Addresses are assigned by switch settings on the device (Receiver or Alert Unit) circuit boards.
These Multiplex “Point” Address settings are also a part of the Transponder Database. The Multiplex Address
shown in the Transponder Database and the Multiplex Address set on the device circuit board must agree. The
“Transponder Setup” Dialog, described later, is used to verify Multiplex Address settings.
Reminder: It is a good idea to create an entry in the Transponder Database for each Transponder in the
System before entering the data for each device so that all Transponders will appear in the drop-down
menus.
Clicking this button will change the currently displayed transponder to the first
transponder in the database.
Clicking this button will change the currently displayed transponder, to the previous
transponder in the database.
Clicking this button will change the currently displayed transponder, to the next
transponder in the database.
Clicking this button will change the currently displayed transponder to the last
transponder in the database.
Multiplex “Point” Address
Multiplex bus
assigned to the particular device. On each of the eight Multiplex Busses,
on which the device is mounted (zero to 7) and the
Creating a New Transponder Entry
The creation and modification of the Transponder Database requires special authority levels usually assigned
only to Installing Company personnel.
The button labeled “Insert New” creates a new Transponder Database Dialog, ready for entry of data.
The System Design Layout
Sheets prepared in advance by
the installation manager should
contain the necessary
information for assigning the
Transponder Name and ID, the
Com Port or Radio ID, as well
as the names and Multiplex
Addresses for all Receivers and
Alert Units connected to each
Transponder.
The Layout Sheets will also
contain the text to be used to
indicate the Receiver locations
and will designate the Alert
Units to be driven by each
Receiver.
Figure 10: Blank Dialog Resulting from Selection of “Insert New” Button
Security Escort Training
Page 57 of 142
Page 58

Setting Receiver Parameters
If the Transponder Database already contains the Transponder the “Edit” button is used to allow completion or
modification of the data.
Trouble Type Text
Trouble Tamper Text
Trouble Response Text
Show Points
Show Areas
Area Number
Point Number
Each Receiver and Alert Unit
connected to the Transponder has a
unique “Point Number” assigned during
the System design process. This
number will correspond to a specific
“Bus Number” and “Point Multiplex
Address” number. The “Multiplex
Address”, set by means of switches on
the device (Receiver or Alert Unit)
itself, must correspond with the “Point
Number” assigned in the Transponder
Database. For instance, a device
programmed with Multiplex Address
location 3 and on Bus 5 would be Point
Number 29. This relationship is
displayed in the table which is
displayed anytime a “?” box is clicked
with the mouse. Clicking on any
number in the table will automatically
enter that number into the “Point
Number” box on the Transponder
Database Dialog and will close the
table dialog.
This is the text that will be shown in the trouble dialog when the Remote Key
input on the transponder goes active (shorted).
This is the text that will be shown in the trouble dialog when the Remote Key
input on the transponder goes into trouble (open).
This is the text that will be shown in the trouble dialog as the response test.
The actions the responding individual should take.
If selected the lower half of the transponder database’s dialog will show the
point’s (receiver, virtual receiver or alert unit’s) database values.
If selected the lower half of the transponder database’s dialog will show the
area’s database values.
Each Transponder can have up to 80 areas defined in them (prior to version
2.04 of the software only 40 areas could be defined). “Area Numbers” range
from 0 to 79. Use the Locate button to define the area graphically on the map.
Figure 11: Select Point Dialog with "All Points" Selected
A third number, the “Point Number” is unique to a particular device. “Point Numbers” range from 0 to 63. There
is a one-to-one correspondence between a “Point Number” and a “Point Multiplex Address”/“Bus Number” pair.
The “Point Number” assignment is presented in a table which is displayed whenever the “?” box to the right of
the “Point Number” box is clicked.
Security Escort Training
Page 58 of 142
Page 59

This table provides a quick way to select a particular
device without having to translate between the two
numbering systems. Three buttons at the bottom of
this dialog allow the user to display all possible
device numbers (whether or not the particular
Transponder has a device assigned to the number)
or, to display only locations populated by Receivers
or only locations populated by Alert Units.
When a “Point Number” button in the table is clicked,
the “Point Number” table disappears and that “Point
Number” automatically appears in the “Point
Number” box of the “Transponder Database”
window. The “Bus Number” and “Point” Address are
also changed to reflect the selection.
+, -, Bus + and Bus -
These buttons, just below the “Point Number”, allow the user to quickly advance the device selection by one
location, either one “Point” location (“+” or “-”) or one “Bus” number (“Bus +” or “Bus -”). This is useful when a
task requires proceeding from device to device, as during system setup or check out. The “?” box is used to
display all devices to facilitate quick selection of a particular device. It is most useful when diagnosing a problem
with a particular device.
Point Type
The receiver selection is used
when there is a physical
receiver connected at this bus
location.
Figure 12: Select Point Dialog with "Receivers Only"
Selected
The “Point Type” box indicates the type of
device (Receiver, virtual receiver or Alert Unit)
located at the location currently selected in the
“Point Number” box. Once the “Point Number”
box contains the proper value, the device type
is set by selecting from the options in the dropdown menu that appears when the arrow to the
right of the “Point Type” box is clicked.
Figure 13: Drop-Down Menu for Selection
of Point Type
Figure 14: Data Entry After Selection of Receiver Point Type
Security Escort Training
Page 59 of 142
Page 60

The alert unit selection is
used when there is an alert
unit connected at this bus
location.
Figure 15: Data Entry after Selection of Alert Unit Point Type
The virtual selection is used
when there is no physical
device connected at this bus
location. Starting with version
2.03 of the Escort software
you can add Virtual receivers
in the transponder database.
A Virtual receiver is added at
one of the 64 points allowed
per transponder. However
there is no physical hardware
used.
Figure 16: Data Entry after Selection of Virtual Receiver Point Type
The Virtual receiver is intended to compensate in cases where there is a receiver imbalance. For example if a
building with a dense population of receivers is adjacent to a fence with few receivers and an alarm occurs
between them; the alarm location may pull towards the building. The Virtual receiver references two other
physical receivers that must be on the same transponder. Only if both of the referenced receivers receive an
alarm transmission, then the Virtual receiver will be added to the alarm as if was a physical receiver that heard
the alarm at the average receive level of the 2 referenced receivers. The Virtual receiver’s location and sensitivity
may be adjusted the same as a physical receiver. After a Virtual receiver is added, verify the surrounding areas
to make sure they have not been adversely affected. In no event should a virtual receiver be utilized as a
cost savings measure to avoid the installation of an actual receiver.
Figure 17: Data Entry when Show Areas is selected
Alert 1, Alert 2, Alert 3 and Test
Each Receiver can be assigned up to three Alert Units that are to be activated if it is one of the Receivers
reported by the Transponder as part of an “Alarm” event. Each Receiver can also be assigned one Alert Unit
that is to be activated to confirm “Test” transmissions. These Alert Units need not be connected to the same
Transponder as the Receiver. The “Transponder” box contains the Transponder to which the designated Alert
Unit is connected and the “Point” box contains the Point Number of the Alert Unit on that Transponder.
Security Escort Training
Page 60 of 142
Page 61

The “Test” boxes similarly designate the Alert Unit,
if any, whose Strobe Unit is to be activated in the
event of a “Test” transmission from a Transmitter.
To assign Alert Units to each Receiver, the dropdown menus to the right of the boxes labeled
“Alert 1”, “Alert 2”, and “Alert 3” are used to select
the Transponder of the designated Alert Unit. The
Point Number is typed into the “Point” box.
Algorithm
Starting with version 2.03 of the Escort software there are 5
different location algorithms that can be selected on an
individual receiver basis in the transponder database. Classic
(original Escort algorithm), linear, low pull, medium pull and
strong pull. By default when a receiver is set for outside or
tunnel, it will use the linear algorithm and all other receivers will
use the low pull algorithm. The receiver that hears the alarm
transmission the strongest will determine the algorithm used for
this alarm.
Changing the algorithm setting for a receiver only affects the location when the alarm is close to this receiver and
it hears the alarm the strongest. The stronger the pull the more the alarm will be pulled towards the receiver, with
linear having no extra pull.
The Algorithm setting will only be available if the "Enable algorithm tweaks" box is checked in the System
Preferences dialog. Also starting with version 2.03 of the Escort software allows individual receiver sensitivity to
be set in the transponder database. Receivers can be adjusted from 50% to 149% of their normal sensitivity
using the SA% setting.
Figure 18: Drop-Down Menu for Assigning Alert Units to
Receivers
Figure 19: Location algorithm selection
Alarm Area Setup
In the Transponder database
under the File menu, select the
transponder that has the alarm
area desired programmed in it.
Then click Edit data. Click Show
areas and select the area
desired.
The Pager group field may be
programmed with a pager group
that will be paged if this area is
the most likely location of an
alarm. This pager group will be
the first group paged to allow
quick response by those
individuals charged with
responding to an alarm in this
area. Each area may be
assigned a pager group that can
be the same or different from
other alarm areas.
The default alarm pager group defined in the Pager Setup dialog will also be paged after the pager group
assigned to an area. If a pager group is not assigned to an area or the alarm location is not within a defined area
then only the default pager group will be paged.
Figure 20: Transponder Area Edit dialog
Security Escort Training
Page 61 of 142
Page 62

Floor Level
Receiver 1
Receiver 2
Location
SA%
Map
Video Switcher
Pager Group
This selects the physical floor level that a receiver
is mounted at or a virtual receiver will act like it is
mounted at. It is very important for the operation of
the location algorithm that this setting is correct.
Figure 21: Receiver floor level
selection
These are the 2 receivers on the same transponder that a virtual receiver will assume the
average of. Both of the receivers will have to receive a signal before the virtual receiver will
report that it also received a signal that is the average of the other 2 receivers signals. The
location algorithm and sensitivity adjust work the same for a virtual receiver as for a physical
receiver.
This block contains the text to be displayed on the “Alarm” screen if this Receiver is one of
those closest to the Alarm source. The description is developed with the guidance of the
security personnel who must respond to an Alarm. It is vital that the description be clear
and unambiguous to them.
To enter a location description, place the cursor in the “Location” text block, click the mouse,
and begin typing. Receiver and Alert Unit location names are important as they are used for
directing response to an Alarm and to aid service personnel in identifying the device in the
event of a problem. The problem reports that are displayed on the Console Screen and
printed by the Hardcopy Printer contain the device location descriptions that are entered in
the “Location” text blocks.
Starting with version 2.03 of the Escort software allows individual receiver sensitivity to be
set in the transponder database. Receivers can be adjusted from 50% to 149% of their
normal sensitivity. No physical receiver changes or upgrades are required. This setting
should only be changed if there are known location accuracy problems in the area of this
receiver. Settings of 50 to 99 will desensitize the receiver to 50% to 99% of the actual
received signal strength. Settings of 1 to 49 increase the sensitivity to 101% to 149% of the
actual received signal strength. Try changing the sensitivity of receivers one at a time while
testing the alarm location response. For example if alarms are being pulled towards a
particular receiver, lower its sensitivity in 10% increments and retest. If the area can be
corrected using this method, verify the surrounding areas to make sure they have not been
adversely affected. It is generally better if the correction is done in small steps while
verifying the adjacent areas, rather than trying to correct the entire error in one step.
The SA% option will only be available if the "Enable algorithm tweaks" box is checked in the
System Preferences dialog.. Also in the transponder database there is the Algorithm
dropdown list box to allow selection of DEFAULT, CLASSIC, LINEAR, LOW, MEDIUM or
STRONG pull location algorithms for each transmitter. The point reporting the best reception
level determines the actual algorithm used for location on any event. If programmed for
DEFAULT the algorithm used will be LINEAR for points programmed as outdoor or tunnel
and all other points will use LOW. If the point reporting the best reception level is not
programmed for the DEFAULT algorithm then the location calculation will use the algorithm
programmed.
Defines which bitmap is to be displayed for this receiver or area when an alarm to
determined to be closest to it. The default map is 0, which corresponds to bitmap
MAP0.EDB stored in the Escort sub-directory. Map 1 would be MAP1.EDB. There can be
100 maps per Security Escort system (0-99).
This string will be output on a system serial port that is programmed in the Remote Setup
dialog. The purpose is to display the area, where the alarm is most likely located, on the
CCTV monitors near the Central Console. Therefore the string would activate a macro in the
video switcher that selects the appropriate camera and controls any required zoom and tilt
actions. Up to 40 characters may be entered. Control characters may be entered as "^A" for
control A.
This is the pager group that will be paged if the alarm location is determined to be in this
area.
Security Escort Training
Page 62 of 142
Page 63

Floor
Virtual Fence Area
Locate
Cut
Copy
Paste
Save
Determines the floor number that this area is defined on. The areas on floors above and
below this one may be defined differently. In order for an area to be selected when an alarm
is received, the location determined by the Central Console must be located within the
defined area and it must be located on the designated floor.
If this checkbox is checked this area will not be used for normal alarm area location. This
area will only be used to define a “Virtual Fence”. Specific transmitters in the subscriber
database can reference this transponder and area. When they reference this area and the
system locates the transmitter position outside the area a Wandering (Virtual Fence) Alarm
will be generated. This alerts the operator and shows the position of the transmitter.
When clicked the transponder’s edit dialog will disappear and the cursor will change to a
cross hair. Moving the cursor to a point on the map and clicking the left mouse button will
scroll the map so that point is at the center of the screen and all previously defined receivers
and areas will be shown with numerical labels.
When the map is showing the location of the receiver desired, move the cross hair to the
exact location of the receiver and click the right mouse button. The transponder edit dialog
will reappear and the selected location will be entered into the X and Y coordinates.
When the map is showing the location of the area desired, move the cross hair to the exact
location of the first point of the polygon that will describe the boundary of the area and right
click. Move the cursor to the second point of the polygon and again right click. The computer
will draw a straight line between the first and second points. Repeat this process drawing all
sides of the polygon to define the area. To close the polygon the last point should be placed
on top of the first point. The polygon can have up to 19 sides and no two lines of the polygon
may cross each other. If you try to create more than 19 sides the computer will automatically
close the polygon with the 19
make it more visible. After the polygon is complete double click the left mouse button to
return to the Transponder Edit dialog.
If the area being defined is a virtual monitor “fence” area for Wandering Alarms, the monitor
fence (area boundary) should be drawn at least 8 m (25 ft.) past the area to be protected to
reduce potential false alarms. This is due to the basic location accuracy of the Security
Escort system.
If while the cross hair cursor is being displayed, you desire to exit without changing any
coordinate values, press the ESC key and the transponder edit dialog will reappear.
Clicking this button will copy the displayed point or area data to a “clipboard” and clear all
values to default.
Clicking this button will copy the displayed point or area data to a “clipboard”. Displayed
values will not be changed.
Clicking this button will copy the “clipboard” values to the displayed point or area data. The
values on the “clipboard” will not be changed and may be copied to more points or areas.
Clicking this button will save all changes to the database.
th
side. When the polygon is closed it will be crosshatched to
Security Escort Training
Page 63 of 142
Page 64

Powering Up the System for the First Time
After the system is configured, the system may be powered up. If the system uses multiple Transponders it is
easier and more effective to power up the Transponders one at a time. By doing this troubleshooting time can be
significantly reduced, especially if there is a wiring problem in the SE485 bus between Transponders.
NOTE: It is very important that twisted pair wiring is used for the SE485 bus. The Tx+ and Tx- wires must be
twisted together and the Rx+ and Rx- wires must be twisted together.
1. Turn on the power switch on the first Transponder. In the Security Escort Central Console software go to the
Setup menu and select Transponder Current Status. The following window will appear:
Current Transponder Status Window
2. Select the desired Transponder. Click the Reset Transponder Troubles button. If the selected
Transponder is communicating with the Central Console, the number 1 will appear in the Total Outgoing
Messages field and in the Successful Incoming Messages field. The Transponder is now communicating
with the Central Console software. If the number 1 only appeared in the Total Outgoing Messages field
there is a wiring problem between the Central Console and the Transponder (refer to Section 0,
Troubleshooting Reference, of this manual and locate the problem).
3. Check the Stress Test box. This tests the communications reliability by causing the Central Console
software to send a continuous stream of messages to the selected Transponder. The values in the
Successful Incoming Messages and Total Outgoing Messages fields should start counting up rapidly,
with few if any errors. It is normal to have slightly fewer Total Outgoing Messages than Successful
Incoming Messages. If the errors are greater than 1% of the number of messages, then there is a problem
that should be corrected (refer to Section 0, Troubleshooting Transponders, Points and Alert Units, of this
manual and locate the problem).
4. From the Setup menu select Transponder Communications. The following window will appear:
Security Escort Training
Page 64 of 142
Page 65

Transponder Communications Window
5. Select the desired Transponder. Then click the Not Responding Map button. A grid should appear on the
screen. The columns of the grid represent multiplex buses from 0 to 7 (left to right). The rows of the grid are
points on the multiplex buses from 0 to 7 (bottom to top). At this point there will be a zero (0) on the grid
location for each Receiver connected to the selected Transponder. A zero means that a Receiver is
programmed in the database and is communicating with the Transponder. If the number 1 appears at a point
location, the Receiver is programmed in the database but not communicating to the Transponder (refer to
Section 0, Troubleshooting Reference, of this manual and locate the problem). If an X appears on the grid at
a point location the Receiver is communicating to the Transponder but is not programmed in the database.
Reprogram this point in the database or rotate the Receiver ID rotary switch on the Receiver’s circuit board
to the proper point number. (Y = Alert Unit is in the database but not responding to the system; N = Alert
Unit is in the database and is responding to the system.)
When the Transponder is communicating with all the Receivers and the Receivers Database records are correct
back up the database files to the hard drive again, if any changes have been made. From the Utilities menu
select Backup, make sure it is set to the hard drive and click on Backup. It is also wise to back up each
database to a 3 1/2” floppy. Mark the floppy label with the databases and backup date.
Security Escort Training
Page 65 of 142
Page 66

Troubleshooting Transponders, Points, Receivers, and Alert
Units
Common Errors
6
2
Transponder
1
3
SE485
4
8
5
7
10
9
Receiver
1. Wrong type of cable. You must use twisted pair cable. Common errors are that twisted pairs are not used or that
separate wires from more than one pair is used.
2. Check to see if + and – are reversed or if TX and RX are reversed.
3. The correct connections from the SE485 to the Transponder are: RX+ to TX+ and RX- to TX-.
4. The cable should be straight through to your computer serial port connector. Do not use a null modem cable or a
cable marked for printer use.
5. Switch set in the wrong position.
6. DIP switch settings incorrect.
7. Power Jumper not on.
8. ON/OFF switch not ON.
9. Wrong point address.
10. Forgot to put on the tamper spring.
Security Escort Training
Page 66 of 142
Page 67

Built-In Troubleshooting Aids
Receiver
Jumpers
There are two groups of jumpers on the EA102A-304 Receiver. The first group contains Jumpers P1 through P3.
The second contains Jumpers P4 through P8. The function of each jumper is indicated in the table below:
Jumper Operation with Jumper in Place
P1* Sounder is enabled
P2* Green LED is enabled
P3* Red LED is enabled
P4** Test Mode is enabled
P5** Receiver Spacing Mode is enabled
P6** Left Antenna is disabled
P7** Right Antenna is disabled
P8 Do not place a jumper across these
pins
NOTES:
* Remove Jumpers P1, P2, and P3 when installed in an outdoor enclosure.
** Remove Jumpers P4, P5, P6, and P7 for normal operation.
Test Mode
Each EA102A Receiver provides a Test Mode that may be used to check the unit’s functionality. The module
goes into Test Mode when Jumper P4 is in place (Jumper P5 removed). In this mode, all test and alarm
receptions will be sounded.
NOTE: The sounder and LEDs (Jumpers P1, P2, and P3) must also be enabled to operate the Test Mode.
Each receiver should be tested using the following method (test only one receiver at a time):
1) Enable the Test Mode by placing the P4 Jumper across both pins (Jumper P5 removed).
• The red LED will turn ON and stay ON during the test. This indicates that power is properly connected
and the receiver is in Test Mode. If the red LED does not come on check the POWER+ and POWERwiring to this receiver. Also verify the corresponding transponder bus enable jumper is in place and the
transponder is on and powered.
• The green LED will flicker if the receiver is connected to a working transponder. If the green LED is not
flickering verify the BUS+ and BUS – wiring to this receiver (note, this is a rapid flickering).
• There will be no data transmitted to the central station. Therefore, the Central Station will report this
receiver as “Not responding” while the receiver is in test mode.
2) Activate the transmitter from different locations near the receiver.
• The red and green LEDs will respond to a received transmission.
• If the receiver detected all the packets from the transmission, the sounder will beep three times.
• If the receiver detected the transmission, but some of the packets were missing, it will beep once. This
could indicate that the signal is not sufficient from this location.
3) Remove the P4 Jumper to return the receiver to normal operating mode.
Security Escort Training
Page 67 of 142
Page 68

Transponder
Status LEDs
Each Transponder contains LEDs that display the transponder’s condition and its response to events. With the
exception of the AC Power LED (which is located in the lower right hand corner of the transponder circuit board),
the diagnostic LEDs are located in the top right corner of the transponder board.
Generally, the LEDs indicate the unit’s status and signal system events. Each LED and its function is indicated
below:
LED Function
AC Power (Lower right hand corner of the transponder board.) If this LED is off there is no AC power
Comm Fail This LED will light if the transponder is in a communications failure condition with the Central
Carrier Detect This LED is operational only for SE485 communications. It will flash on every time any
Transmit Data This LED will flash on every time this transponder sends a message to the Central Station,
Receive Data This LED will flash on every time this transponder successfully receives a message addressed
CRC Error
Test in Progress This LED comes on whenever a transmitter has been tested. It will stay on for the duration of
Alarm in Progress
Heartbeat Flashes at a fixed rate to indicate that the microprocessor is operating normally. If this LED
(Mains power) to the board. Find and correct the AC power (Mains power) problem. This LED
will light even if the transponder’s power switch is off.
Station. It will automatically go out when communications are restored.
transponder (including this transponder) on this SE485 bus sends a message to the Central
Station. It is used to monitor overall communications from the transponders to the Central
Station. If the Carrier Detect LED stays on there is a problem with one of the transponders on
this bus or the wiring that must be corrected before normal communications will be restored.
whether or not the Central Station receives it. If this transponder initiated the communications
and the Central Station correctly receives the message the Receive Data LED should flash
soon thereafter indicating that the Central Station successfully returned an acknowledgement.
to it from the Central Station. If the Central Station initiated the communications the Transmit
Data LED should flash soon thereafter indicating that this transponder is returning an
acknowledgement.
This LED will come on every time a message is received containing errors, whether or not it
was addressed to this transponder. The LED will remain on until the next message addressed
to this transponder is received without error. The most common cause for this LED to turn on is
wiring errors. Verify that the SE485 TX+ and TX- are on a twisted pair. Also verify that the
SE485 RX+ and RX - are on a twisted pair.
the test display, typically 5 to 10 seconds, then it will go out. If a test is received while another
test is in progress, the Test in Progress LED will go out momentarily then come on for the
duration of the second test.
This LED comes on whenever a transmitter is in alarm. It will stay on for the duration of the
transponder’s involvement in the alarm, then it will go out. If an alarm is received while another
alarm is in progress, the Alarm in Progress LED will go out momentarily then will stay on as
long as any alarms are active in the transponder. An alarm that causes the receiver sounders
to stay on will keep the Alarm in Progress LED to remain on. Silent alarms or alarms from
unauthorized transmitters will cause the Alarm in Progress LED to turn on and to go out when
the Central Station acknowledges the alarm message. This will also occur for every alarm
follower message. A maintenance alarm message will cause the Alarm in Progress LED to
come on for 5 to 10 seconds then to automatically go off.
stops flashing, the transponder is not operational. Turn it off using the power switch for five
seconds. Then turn it back on. If the LED does not flash the transponder should have the AC
power and the back up battery disconnected wait a few seconds and then connect back up. If
the LED does not flash at this time, the transponder should be replaced.
Security Escort Training
Page 68 of 142
Page 69

Bus 0 – 7
Normally these LEDs will be on if the corresponding Bus Enable jumper is in place, and will be
off if the jumper is removed. If the bus is enabled, the LED will flash off and come back on,
every time a receiver or alert module on that bus communicates with the transponder. A bus
LED will flash at the rate of the heartbeat LED if there is any kind of bus fault (data to ground,
data to power and bus power to ground) on that bus. On the EA501 the communications failure
LED will flash at this rate since there is no Bus LED. A Bus LED will flash at ½ the rate of the
heartbeat LED if there are no points reporting on that bus (open connection). On the EA501 the
communications failure LED will flash at this rate. If a Bus LED is flashing for a bus that is not
enabled, it can be reset in the Central Station’s Transponder Data View dialog by selecting this
transponder and clicking the Clear EE button. There are two special displays on the bus LEDs.
All the Bus LEDs go out, and for 2 seconds a single LED is on walking down the display from
Bus 0 to Bus 7 indicates that a battery test is in progress. Usually after the tamper switch is
released the Bus LEDs count rapidly to indicate that the EEPROM memory is being updated.
Verifying Communications
To verify communications press the test feature on any transmitter. The Test in Progress LED will come on. If it
did not come on the receivers are not communicating with the transponder. About a second after the Test in
Progress LED comes on the Transmit Data LED will flash on (indicating that the transponder is sending the test
message to the Central Station). Less than a second later the Receive Data LED will flash (indicating the Central
Station returned an acknowledgement).
Toggling the transponder’s tamper switch on/off will cause the Transmit Data LED to flash on (indicating that the
transponder is sending the tamper message to the Central Station). Less than a second later the Receive Data
LED will flash (indicating the Central Station returned an acknowledgement).
Security Escort Training
Page 69 of 142
Page 70

Troubleshooting Reference
Transponder Communications With SE485 Bus
Symptoms Probable Cause Possible Solution
All Transponders on one bus
in communications failure.
A. Power to SE485. A. Check 9 VDC adapter for proper voltage. Red
Power LED should be ON (on SE485).
B. Wire between SE485 and
Transponder incorrectly
installed.
C. Open, short or grounded
cable from SE485 to first
splice or Transponder.
D. Wrong cable between SE485
and computer.
E. Bad SE485 module. E. Replace SE485 module.
F. Using third party RS-485
Interface
B. Check to make sure transmit from
Transponder goes to receive of SE485 and
receive from Transponder goes to transmit on
SE485
(RX+ to TX+, RX- to TX-).
C. Use VOM to test cable for short, open or
ground. Repair or replace cable. Also check
for + - pair reversed.
D. Cable should be a straight through to your
computer serial port connection. Do not use
null modem cable or cable marked for printer.
F. Due to changes made for transient protection,
transformer isolation, and link busy detection,
these signals are not compatible with third
party RS485 Interfaces. Replace with SE485
High Communications Error
Count.
Single Transponder in
communication failure.
A. Wire between SE485 and
Transponder incorrectly
installed.
B. Wrong wire type. (See
Section 0.)
A. Transponder not on. A. Check power switch.
B. Wrong Transponder address. B. Check dip switch setting on Transponder to
C. RS-232/SE485 switch
position.
D. SE485 wiring on
Transponder.
E. Close lightning hit. E. Power down Transponder and restart. If this
F. Bad Transponder. F. Replace Transponder.
A. Check to make sure transmit from
Transponder goes to receive of SE485 and
receive from Transponder goes to transmit on
SE485
(RX+ to TX+, RX- to TX-).
B. Wire type must be twisted pair.
correspond with your Transponder data base
setting.
C. Check slide switch on Transponder to make
sure it is in the SE485 position.
D. Check to make sure transmit from
Transponder goes to receive of SE485 and
receive from Transponder goes to transmit on
SE485
(RX+ to TX+, RX- to TX-).
does not work replace Transponder.
Transponder Communication With ProxLink Radio
Symptoms Probable Cause Possible Solution
Communication failures from
all Transponders.
A. Loss of power. A. Check power to ProxLink from central
console. Also, if using SE485, check power to
SE485 module.
B. Cable from ProxLink to
computer.
C. ProxLink Radio Module
maybe in programming
mode.
B. Must use 25 to 9 pin cable supplied from
Proxim.
C. Unplug power to ProxLink and plug back in to
re-start ProxLink.
Security Escort Training
Page 70 of 142
Page 71

Symptoms Probable Cause Possible Solution
D. SE485 module. D. Check wiring between SE485 and computer,
and SE485 at ProxLink Radio Module.
Transmit should be going to receive and
receive should be going to transmit
(RX+ to TX+, RX- to TX-).
E. Cable from SE485. E. Cable from SE485 to computer must be
straight through 25 pin to 25 pin or 25 pin to 9
pin depending on your serial port on the back
of the computer. Do not use cable labeled for
printer or null modem cable. Replace cable if
bad. Check cable between SE485 and
ProxLink Radio Module. Replace if bad.
F. ProxLink Radio Module. F. Check programming for central console
ProxLink Radio Module to be sure it is correct.
If everything else checks OK, replace
ProxLink.
One Transponder in
communication fail on
ProxLink Radio Module link.
One Transponder in
communication fail on
ProxLink Radio Module link.
(Cont’d)
A. Transponder. A. 1. Check slide switch on Transponder to
make sure it is in the RS232 position.
2. Check dip switch address for Transponder
to be sure it corresponds with Transponder
data base.
B. Cable from ProxLink Radio
B. Replace cable.
Module to Transponder.
C. ProxLink Radio Module. C. 1. Check power to ProxLink. Make sure radio
power LED is lit.
2. Check antenna connection to ProxLink
Radio Module.
3. Check programming for ProxLink Radio
Module.
4. Radio out of range or not in line of sight of
Central Console antenna.
5. Ice on antenna.
6. If antenna is remote from ProxLink use
RG8U cable to prevent dB loss.
7. Replace ProxLink Radio Module.
D. SE485. D. 1. Check power to ProxLink to SE485.
2. Make sure slide switch on Transponder is
set for SE485.
3. Check wiring from Transponder to SE485
(RX+ to TX+, RX- to TX-). Make sure transmit
goes to receive and receive goes to transmit.
4. Replace SE485 module.
Security Escort Training
Page 71 of 142
Page 72

EA500 Transponder Bus Faults
Symptoms Probable Cause Possible Solution
Bus failure. A. Bus power jumper not in
place.
B. Short or open on the bus
wires.
C. No power to Receiver. C. Check power for 10.5 to 13.5 VDC. If lower
D. Close lightning hit. D. Power down Transponder (AC and battery)
E. Bad bus on Transponder. E. Remove cable from bus, meter terminals with
A. Place jumper on for corresponding bus (see
Transponder Installation Instructions for
location of jumper).
B. Put meter across bus wire. Should be reading
between 7.5 to 10.5 VDC. If voltage is not
present or lower than 9 V, check wiring
(BUS+ to BUS-)for possible ground, short, or
open.
than 10 or no voltage present check wiring
(PWR+ to PWR-) on power side of Receiver
repair or replace cable.
for 30 seconds then turn power back on. If
bus failure does not clear go on to solution E
below.
VOM, if voltage is lower then 9VDC on BUS+
or lower then 12VDC on PWR+ replace
Transponder.
EA102 Receiver Issues
Symptoms Probable Cause Possible Solution
Single Receiver not
responding.
A. Address switch in wrong
position
B. Open on the bus wires B. Put meter across bus wire. Should be reading
C. No power to Receiver C. Check power for 10.5 to 13.5 VDC. If lower
D. Defective Receiver D. If power is present on BUS+ and PWR+ and
A. Rotate switch to correspond with Transponder
database location.
between 7.5 to 10.5 VDC. If voltage is not
present or lower than 9 volts, check wiring
(BUS+ to BUS-)for possible ground or open.
than 10 or no voltage present check wiring
(PWR+ to PWR-) on power side of Receiver
repair or replace cable.
rotary switch is set to correct address, replace
Receiver.
Single Receiver intermittently
not responding
Single Receiver intermittently
not responding (Cont’d)
Single Receiver reporting bad
check sum.
A. Receiver is located past the
914 m (3,000 ft.) maximum
cable run.
B. Moisture on circuit board. B. Seal housing where moisture is entering
C. Cable going to ground
occasionally.
D. Insects nesting on circuit
board.
E. Bad splice to Receiver. E. Check all splices to make sure cables are
F. Defective Receiver. F. If power is present on BUS+ and PWR+,
A. Two Receivers on the bus
with the same address ID
number.
B. Moisture or water on
Receiver.
Security Escort Training
Page 72 of 142
A. Re-engineer location or reroute cable to be
under 914 m (3,000 ft.)
enclosure. Replace Receiver until the old one
dries out.
C. Replace or repair cable.
D. Seal any entry point and spray insect
repellent inside housing to stop any further
invasions into Receiver.
tight and not loose causing high resistant
open.
between 7.5 and 10.5VDC on bus and 10.5
and 13.5VDC on power replace Receiver.
A. Check rotary switches on all Receivers on
that bus to be sure there are no duplicate ID
numbers.
B. Replace Receiver with new one until the old
Receiver dries out. Seal any point where
moisture is entering the Receiver housing.
Page 73

Symptoms Probable Cause Possible Solution
C. Length of cable to Receiver.
Receiver is mounted over
914 m (3,000 ft .) from
C. Reconfigure the bus run to make sure
Receiver is within 914 m (3,000 ft .) of the
Transponder.
Transponder.
D. Bad splice to Receiver. D. Check all splices to make sure cables are
tight and not loose causing high resistance
open.
E. Defective Receiver. E. If power is present on BUS+ and PWR+,
between 7.5 and 10.5VDC on bus and 10.5
and 13.5VDC on power replace Receiver.
Receiver jamming. A. Electrical equipment in area
causing jamming on
Receiver.
Receiver LEDs not working. A. LEDs not positioned behind
viewing lens.
B. Jumpers in “Off” position on
Receiver.
C. Bad Receiver. C. After performing steps A and B above and
Receiver’s sounder not
operating.
A. Jumper in “Off” position on
Receiver.
B. “Run Silent” is turned on in
the Central Console
Software.
C. Bad Receiver. C. After performing steps A and B and the
A. Go into setup on the software to Receiver
Configuration. Increase jamming threshold by
one degree at a time until jamming has
stopped and Receiver has returned to normal.
If jamming persists after increasing level,
relocate Receiver or attempt to identify and
minimize the jamming source.
A. Remove cover, straighten LEDs, replace
cover carefully so LEDs are positioned behind
viewing lens. Use Maintenance Transmitter
on test and alarm after installing cover to
check visibility of LED.
B. Remove cover, check jumpers to right of
sounder above Red LED and make sure
Jumpers P2 and P3 are On.
LEDs still do not operate on test or alarm
replace the Receiver.
A. Remove the cover, check jumper to right of
sounder above red LED and make sure
jumper P1 is On.
B. At the Central Console click on “Setup” then
“Transponder Parameter” and un-check the
“Run Silent” box.
sounder still does not operate replace the
Receiver.
Security Escort Training
Page 73 of 142
Page 74

Receiver Configuration Dialog
Once the Receiver and Alert Unit data for a Transponder has been entered into the Transponder Database, this
dialog is used to verify that each Receiver is working and is properly addressed in the database. This setup tool
identifies errors in the address switch settings of Receivers and Alert Units as well as data entry errors in the
Transponder Database.
“To Confirm the RF Reception”
1. To confirm the RF reception, LED and sounder operation and location of each Receiver, from the Setup
menu select Receiver Configuration. The following window will appear:
Figure 18: Receiver Configuration Windows
2. Select the desired Transponder. Click on the? button next to the point number. A bus and point grid will
appear showing the programmed receivers. Click on the lowest point number button. If the first Receiver is
point zero (0) click on the Zero button, or if the first Receiver is point one (1) click on the 1 button. The point
number will be automatically entered. Click on the Put this receiver in setup mode button. The red and
green LEDs will light for the selected receiver on the selected Transponder. Take the Maintenance
Transmitter and go to the selected Receiver. The red and green light should be lit when you arrive at the first
receiver location. Transmit an alarm from the Maintenance Transmitter. The Receiver should activate by
blinking the red lights and sounding the sounder (if the sounder jumper is in place on the Receiver). This will
confirm that the RF portion of the Receiver is working and you are at the right location. The software will
then turn off the LEDs on the tested Receiver. The Receiver with the next higher point number will be
automatically selected and its red and green LEDs will light. Proceed to that Receiver and perform the same
operation with an alarm on the Maintenance Transmitter until the operation of all Receivers has been
confirmed and all Receivers are working and in their proper location on that Transponder. If the LEDs fail to
light, the LED jumpers may be missing on that Receiver, the Receiver may be set to the wrong address, or
you may be at the wrong location. If the LEDs are lit but the Receiver fails to respond to the maintenance
alarm there may be a problem with the Receiver board or another Receiver is receiving the signal stronger.
3. Repeat the above sequence starting with step 1 for all Transponders and Receivers in the system.
Note: The illuminated LED’s indicate to the service person standing near the device that the Receiver is
actually the one currently in the setup mode. If the LED’s of the designated receiver are not
illuminated, there is probably an error in the switch settings of the Receiver or an error in the
address in the Transponder Database. To help resolve such problems, the person at the Central
Console can command any device to illuminate its LED’s and/or sound its Horn.
Security Escort Training
Page 74 of 142
Page 75

Post Construction Setup
Testing the location accuracy of an installation
NOTE: Before doing any of the testing below it is critically important to verify that every receiver in the system is
functioning correctly using the procedure described in the Security Escort Installation and Setup manual.
Additionally every receiver must be programmed in the transponder database with its actual physical location
and floor level. It is also important that receivers that are physically stacked directly above one another on
floors of a building are also located at the same X and Y coordinates in the database.
There are 3 methods that can be used to verify the location accuracy of an installed system, using a standard
subscriber transmitter or using a maintenance transmitter. Repeat the chosen process throughout all protected
areas. Ask the customer for the areas where they have special concern and devote extra attention to those
areas, since the customer is likely to be more critical in those areas.
Remember the intent of the Security Escort system is to dispatch a responding individual to an area that will not
add additional delay to their response to that duress call. Therefore the computed location should be considered
to be in error only when it would add unacceptable additional time to the response to the alarm.
While testing it is helpful to see which receivers are involved in the alarm response and the relative reception
level they reported. To display the receivers, under the Utilities menu select Security Preferences. Make sure the
No Receiver Icon checkbox is not checked and click the Save button. Under the Setup menu select System
Preferences. If Show Test Levels and Show Maintenance Levels are checked the relative reception level will be
shown in the receiver icons, otherwise the floor number will be shown.
When testing with any of the following methods, the transmitter must be used exactly as it would be used in
normal operation. A transmitter designed to be belt mounted or used in a holster must be in its normal mounting
attitude and be worn on the belt of the individual originating the test transmissions. Handheld transmitters must
be held in the hand about waist high, never held above the head.
1) Using a standard subscriber transmitter
This method requires 2 people with radio contact between them. One person operates the computer running the
Escort software and the other takes the subscriber transmitter to the area to be tested. Press the alarm on the
transmitter and remain at the spot where you transmitted. At the computer acknowledge the alarm and
accurately describe the computed location over the radio. The individual with the transmitter should confirm that
they are at the reported location or describe over the radio actually where they are. Either individual must record
all discrepancies, including the actual and computed locations. We recommend using a map or floor plan and
drawing an arrow from the actual alarm location to the reported location. It is also helpful if all successful alarm
locations are marked with a P (passed). Then the alarm can be reset from the computer screen. For areas where
there are alarm location problems, try facing in different directions in the same spot. Also generate additional
alarms from different spots to fully understand the extent of the problem. You should also generate alarms in
areas adjacent to the area with the problem to see if they are affected also.
Security Escort Training
Page 75 of 142
Page 76

2) Using a maintenance transmitter with only 1 person
The Escort software will retain the last 50 maintenance alarm locations. Make sure you are the only one using a
maintenance transmitter on site, buddy check is off and that you limit yourself to a maximum of 50 maintenance
alarms per sequence. Synchronize the time on your watch to the computer. Carry a detailed map or floor plan of
the area to be tested that you can write on. Take the maintenance transmitter to the area to be tested. Press the
alarm on the transmitter and accurately mark the spot on the map where you transmitted with a 1 (for the first
transmission). Also record the time of the first transmission only. Continue to the next location, transmit and mark
that spot on the map with a 2. Repeat the process throughout the area to be tested, being sure not to exceed 50
alarm transmissions and make sure that at least 10 seconds elapse between transmissions. When done return to
the computer and select the Maintenance Alarm database under the File menu. Scroll the alarm list to the alarm
that matches the time of your first transmission. This is the maintenance alarm that you marked as 1 on your
map. Confirm that the actual location from the map matches the reported location. If the actual location differs
from the reported location draw an arrow on the map from the actual location to the reported location. Then press
the up arrow once to go to the next alarm. Compare the locations, drawing an arrow to the reported location if
they differ. Repeat going through all points on your map, making sure that the points on the map stop when you
run out of entries in the scrolling list on the computer screen. Otherwise the points on the map and the screen
are out of sync and the errors on your map are incorrect and will be misleading. For areas where there were
alarm location problems, you may want to repeat the above process facing in different directions in the same
spot. Also generating additional alarms from different spots in the problem areas to fully understand the extent of
the problem. You should also generate alarms in areas adjacent to the area with the problem to see if they are
affected also.
3) Using a maintenance transmitter with 2 people
The 2 people must have radio contact between them. One person operates the computer running the Escort
software and the other takes the maintenance transmitter to the area to be tested. At the computer select the
Maintenance Alarm database under the File menu. Make sure the top item in the scrolling list is selected. Press
the alarm on the transmitter and remain at the spot where you transmitted. At the computer observe the alarm
and accurately describe the computed location over the radio. The individual with the transmitter should confirm
that they are at the reported location or describe over the radio actually where they are. Either individual must
record all discrepancies, including the actual and computed locations. We recommend using a map or floor plan
and drawing an arrow from the actual alarm location to the reported location. It is also helpful if all successful
alarm locations are marked with a P (passed). For areas where there are alarm location problems, try facing in
different directions in the same spot. Also generate additional alarms from different spots to fully understand the
extent of the problem. You should also generate alarms in areas adjacent to the area with the problem to see if
they are affected also.
Reviewing potential problem areas
Review the potential problem areas on the maps with the customer to see which areas cause them concern and
which areas they consider acceptable as is. If the customer considers an area acceptable it typically is not worth
spending additional time trying to improve the location accuracy in those areas.
Improving the location accuracy of an installation
Now we have identified those areas that must be improved, what are the options to improve the computed
location accuracy?
NOTE: All changes using the following steps potentially change the computed locations for all alarms at or
around the changed area. Therefore after any change is made the entire vicinity around the changed area must
be verified.
• Typically the first thought is to add more receivers in the problem area. Generally this is a bad approach. If the
system was properly designed using the recommended grid layout, adding extra receivers in any area of the
grid will distort the response in adjacent areas and floors. Therefore while it may seem to fix the problem area,
typically it will create more problems in adjacent areas. The exception to this is when an area is shielded by
something like wire mesh in the walls that prevent the RF transmitted signal from passing. Therefore additional
receivers may have to be added in the shielded area to insure that all alarm transmissions will be heard.
• Verify that the location of the receivers in the transponder database is accurate to their physical location and
the receivers are indicated to be at the correct floor level. It is also important that receivers that are physically
stacked directly above one another on floors of a building are also located at the same X and Y coordinates in
the database.
Security Escort Training
Page 76 of 142
Page 77

• Try changing the transponder database location of receivers (not the actual physical location) one at a time
while testing the alarm location response, using one of the testing methods above. For example if alarms are
getting pulled outside a building in one area, move the closest receiver (in the transponder database) to that
area a little further into the building and retest. If the area can be corrected using this method, verify the
surrounding areas to make sure they have not been adversely affected. It is generally better if the correction is
done in small steps while verifying the adjacent areas, rather than trying to correct the entire error in one step.
• Starting with version 2.03 of the Escort software allows individual receiver sensitivity to be set in the
transponder database. Receivers can be adjusted from 50% to 149% of their normal sensitivity. No physical
receiver changes or upgrades are required. Try changing the transponder database sensitivity of receivers one
at a time while testing the alarm location response, using one of the testing methods above. For example if
alarms are being pulled towards a particular receiver, lower its sensitivity in 10% increments and retest. If the
area can be corrected using this method, verify the surrounding areas to make sure they have not been
adversely affected. It is generally better if the correction is done in small steps while verifying the
adjacent areas, rather than trying to correct the entire error in one step.
• Starting with version 2.03 of the Escort software there are 5 different location algorithms that can be selected
on an individual receiver basis in the transponder database. Classic (original Escort algorithm), linear, low pull,
medium pull and strong pull. By default when a receiver is set for outside or tunnel, it will use the linear
algorithm and all other receivers will use the low pull algorithm. The receiver that hears the alarm transmission
the strongest will determine the algorithm used for this alarm. Changing the transponder database algorithm
setting for a receiver only affects the location when the alarm is close to this receiver and it hears the alarm the
strongest. Change the transponder database algorithm setting for a receiver and test in its area, using one of
the testing methods above. The stronger the pull the more the alarm will be pulled towards the receiver, with
linear having no extra pull. Verify the surrounding areas to make sure they have not been adversely affected.
• Starting with version 2.03 of the Escort software the 5 different location algorithms can individually limit how
close other receivers have to be to the receive level of the receiver hearing the alarm the best, before they will
be included in the alarm. Classic (original Escort algorithm), linear, low pull, medium pull and strong pull each
have a separate setting. By adjusting this setting you can control if distant receivers with low receive levels will
be considered in the alarm calculation.
• Starting with version 2.03 of the Escort software you can add Virtual receivers in the transponder database. A
Virtual receiver is added at one of the 64 points allowed per transponder. However there is no physical
hardware used. The Virtual receiver is intended to compensate in cases where there is a receiver imbalance.
For example if a building with a dense population of receivers is adjacent to a fence with few receivers and an
alarm occurs between them; the alarm location may pull towards the building. The Virtual receiver references
to other physical receivers that must be on the same transponder. Only if both of the referenced receivers
receive an alarm transmission, then the Virtual receiver will be added to the alarm as if was a physical receiver
that heard the alarm at the average receive level of the 2 reference receivers. The Virtual receiver’s location
and sensitivity may be adjusted the same as a physical receiver. After a Virtual receiver is added, verify the
surrounding areas to make sure they have not been adversely affected. In no event should a virtual receiver
be utilized as a cost savings measure to avoid the installation of an actual receiver.
Security Escort Training
Page 77 of 142
Page 78

System Preferences Dialog
The “Set System Preferences” dialog
under the “Setup” menu contains a
number of settings that govern the
behavior of the Security Escort System.
Force Map
Background
Erase
Run Buddy
Check
This checkbox is used
to cause an extra
erase of the map
screen. It should only
be checked if there are
problems with icons
not being cleared
properly from the
screen. Otherwise it
will cause the screen
to flicker.
This checkbox enables
and disables the
“Buddy Check” feature
of the system.
When checked, the Central Console periodically issues a command (via the Transponders) to
each Receiver, to activate its on-board transmitter. The Console then compares the signals
received from neighboring Receivers to the results of earlier “Buddy Checks”, thus identifying
Receivers, which appear to have changed sensitivity.
Figure 22: System Preferences Dialog
Security Escort Training
Page 78 of 142
Page 79

Day Month Format
High Speed Buddy
Check
Checking this box causes all dates to be presented in day month year format rather
than the month day year format used in North America.
Checking this box allows the buddy check to run as fast as it can. Normally only one
buddy check transmission is sent each minute.
Show Maintenance
Levels
Show Test Levels
Enable Algorithm
Tweaks
Pager Communications
Monitor
Communications
Display Maintenance
Alarm
Sound Maintenance
Alarm
Checking this box causes the Central Console to display the signal strength
measured by each receiver as a number (from 1 to 15) inside the Receiver icon when
Maintenance “Alarms” are displayed. Otherwise the floor number is displayed.
This checkbox causes signal strength levels to be displayed on the receiver icons
when displaying tests on the main map screen. Otherwise the green “Test” icons are
displayed.
When checked this checkbox causes the Map Scale, Alarm Spot Size, and depth
settings to be displayed in this dialog. Also it controls the display of the SA% and
Algorithm settings in the Transponder Edit dialog
Normally this box is not checked. If checked the communications to the dial-up wide
area paging system through the modem will be displayed on the history screen. This
function would only be used to diagnose communications problems to the paging
system.
Normally this box is not checked. If checked the communications to the modem will
be displayed on the history screen. This function would only be used to diagnose
communications problems with the modem.
Normally when a maintenance alarm is received from a maintenance transmitter, the
red light on all receivers hearing the transmission will flash for 5 seconds. If this box
is checked the receiver with the loudest reception level will turn on both the red and
green lights for five seconds.
If this box is checked the receiver with the loudest reception level on a maintenance
alarm will turn on its sounder for five seconds. Normally this box is not checked.
Disable Idle
Processing
No Buddy Check Delay
No Password To Exit
No Password on
Reentry
No Password Timeout
Bring to Front on
Alarm
Bring to Front on
Trouble
Normally this software registers with Windows to return to the Escort program if there
is any idle time, so Escort can use it to speed up its response to serial
communications and other background tasks. If checked, the software will not
register for the idle time. Normally this box is not checked. Windows NT and 2000
can show the amount of time each application (task) is taking. When this checkbox is
not checked it may appear that Escort is “hogging” the processor resources. This is
not true, because Escort is only taking the time that Windows gives it through the idle
process. To prove this, check this checkbox. The amount of time that Escort needs
will drop dramatically and Escort will continue to operate normally (same
communications responses will be slowed by several hundred milliseconds).
If checked the software will not impose the hour between buddy checks from the
same receiver. Normally this box is not checked and should not be checked for live
systems.
If checked the software will exit without asking for a password. Normally this box is
not checked.
If checked the software will not ask for a password when the user switches to another
program and then switches back to the still running Escort. Normally this box is not
checked.
If checked the software will not ask for a password after the screen saver has run.
Normally this box is not checked.
If checked the software will jump to the front when a new alarm occurs. Normally this
box is checked.
If checked the software will jump to the front when a trouble dialog pops up. Normally
this box is checked.
Security Escort Training
Page 79 of 142
Page 80

Control Room Output
to Siren
If checked, anytime there is an unacknowledged alarm, the siren output on the
Control Room Output indicated below will operate.
Control Room Output
to Strobe
Control Room Output
to Spare
Not Always Top
Window
Excel Test History
Files
Optional Parameter
ID Receiver - Assigning
a Receiver For
Automated Transmitter
Exchanges
Control Room
Alarm Zone
Map Scale %
Alarm Spot Size
Linear Depth
If checked, anytime there is an unacknowledged alarm, the strobe output on the
Control Room Output indicated below will operate.
If checked, anytime there is an unacknowledged alarm, the spare output on the
Control Room Output indicated below will operate.
If Escort is intended to be the only application running on this computer leave this
checkbox unchecked. This will prevent other applications from taking over the screen
co Escort will always be present. If Escort is to be run on a computer with other
applications check this box and Escort will share the computer’s display like all other
Windows applications. After checking this box stop and restart the Escort application
for this feature to take effect. This checkbox is unchecked by default.
Do not check this box in a live Security Escort System. It is for diagnostic Engineering
testing only.
These parameters are not currently used in the system. They should be left
unchecked.
The Security Escort System Software contains a feature whereby the Transmitter
Identification Number of a Transmitter can be automatically entered into the
Subscriber Database. This is used for entering Transmitters when first issuing them
to subscribers and for Transmitter exchanges.
This automatic capture of the Transmitter Identification Number is accomplished by
performing certain procedural steps (See the Security Escort Operators Manual) and
then using the Transmitter to make a “Test” transmission in close proximity to a
designated Receiver, usually located close to the Central Console. By capturing the
Transmitter Identification Number in this manner, keystroke errors are avoided during
Database entries and changes. The Receiver chosen for this purpose is designated
as the “ID Capture Receiver”. To assign the ID Capture Receiver, its Transponder
Name and its “Point Number” are selected using the two boxes labeled
“Transponder” and ”Point” in the middle of the “Set System Preferences” Dialog.
The Security Escort System Software can activate an output to call attention when
there is an alarm that has been received and no operator has responded to the
system yet. To assign the Control Room output, select Transponder Name it is
connected to and its “Point Number”.
4 Alarm zones allow the selection of which alarms from specific transmitters will be
reported on this workstation. This workstation will display the alarms only for the
alarm zones that are checked. Each transmitter can be assigned to one or more
alarm zones and when that transmitter generates an alarm; if this workstation has
one or more of the same alarm zones checked then that alarm would be displayed.
The system defaults to all alarms are displayed on all workstations.
This value changes the scale that the maps are presented with. It is not intended for
normal operation; typically it is used for testing to allow more of the map to be seen.
The setting may range from 30% to 400%. The Enable Algorithm Tweaks checkbox
must be checked for this to be displayed.
This setting changes the size of the yellow dot that marks the calculated location of
the alarm. The settings range from 19 to 76 (half to double the default alarm dot size).
It is best to set the size of the alarm spot so that represents a diameter of 50 feet on
the displayed map, as this is the area where the transmission of the alarm most likely
took place. The Enable Algorithm Tweaks checkbox must be checked for this to be
displayed.
This setting controls the involvement of receivers in the alarm location calculation
only when the Linear Algorithm is being used. The setting can range from 0 to 6 (it is
defaulted to 2). When set to 0 only the receivers that are closer to the actual location
of the alarm will be considered in the location calculation. As the setting is raised
more distant receivers will be included in the alarm calculation. Typically lower
settings are better than higher settings. This setting should be changed if there are
known problems with the location using the Linear Algorithm. The Enable Algorithm
Tweaks checkbox must be checked for this to be displayed.
Security Escort Training
Page 80 of 142
Page 81

Low Depth
Medium Depth
Strong Depth
This setting controls the involvement of receivers in the alarm location calculation
only when the Low Algorithm is being used. The setting can range from 0 to 6 (it is
defaulted to 2). When set to 0 only the receivers that are closer to the actual location
of the alarm will be considered in the location calculation. As the setting is raised
more distant receivers will be included in the alarm calculation. Typically lower
settings are better than higher settings. This setting should be changed if there are
known problems with the location using the Low Algorithm. The Enable Algorithm
Tweaks checkbox must be checked for this to be displayed.
This setting controls the involvement of receivers in the alarm location calculation
only when the Medium Algorithm is being used. The setting can range from 0 to 6 (it
is defaulted to 2). When set to 0 only the receivers that are closer to the actual
location of the alarm will be considered in the location calculation. As the setting is
raised more distant receivers will be included in the alarm calculation. Typically lower
settings are better than higher settings. This setting should be changed if there are
known problems with the location using the Medium Algorithm. The Enable Algorithm
Tweaks checkbox must be checked for this to be displayed.
This setting controls the involvement of receivers in the alarm location calculation
only when the Strong Algorithm is being used. The setting can range from 0 to 6 (it is
defaulted to 2). When set to 0 only the receivers that are closer to the actual location
of the alarm will be considered in the location calculation. As the setting is raised
more distant receivers will be included in the alarm calculation. Typically lower
settings are better than higher settings. This setting should be changed if there are
known problems with the location using the Strong Algorithm. The Enable Algorithm
Tweaks checkbox must be checked for this to be displayed.
Security Preferences Dialog
The “Security Preferences” dialog
controls those aspects of the
Security Escort System operation,
which are to be determined by the
Security Director.
Turn On Outside Sounders
This checkbox is used to activate or
deactivate the sirens on Alert Units
and transponders. Some security
directors prefer that all alarms be
silent, others choose to employ
sirens. Checking this option
causes the sirens on the Alert
Units, to sound in the event of an
alarm. Temporarily deactivating the
sounders may be necessary during
maintenance.
Figure 23: Security Preferences Dialog
Security Escort Training
Page 81 of 142
Page 82

Turn On Alarm Strobes
Display Unauthorized Alarms
Sound Unauthorized Alarms
Filter virtual fence
No Point Text If Area Text
Output includes Subscriber ID
Output includes Transmitter ID
Limit Alarms to 1 Transponder
Option 2
Require Alarm Report
Security Alarms Silent
Installer Alarms Silent
Alarm Voice Output
Show Personal Data
No Receiver Icons
Show Tests On The Map
Checking this option causes the strobe lights on the Alert Units and
transponders, to flash in the event of an alarm.
This checkbox determines if "Unauthorized" alarms are to be displayed on
the Central Console. Unauthorized alarms are those triggered by
Transmitters not currently registered in the Subscriber Database. These
could be Transmitters that have been removed from the database
because they were lost or stolen, they could be transmitters not yet
issued, or they could be transmitters issued to subscribers at another
Security Escort System. Typically this checkbox should not be checked.
This checkbox determines if "Unauthorized” alarms are to be sounded on
the Horns of the Receivers and the sirens of the Alert Units and
transponders. The option is not available unless the "Display
Unauthorized Alarms" option is selected. Typically this checkbox should
not be checked.
If the virtual fence option is be used, this box may be checked if some
false alarms are generated to reduce the number of the false alarms. If it
is checked then the actual alarms will be delayed by the supervision
period of the transmitter.
This checkbox affects the location text shown on the alarm screen. If this
checkbox is checked and the alarm is determined to be within a
predefined area then only the area text will be displayed (any receiver
location text will be suppressed). Typically this checkbox should be
checked.
If this checkbox is checked then any time the system prints or displays
text for an alarm or test the subscriber’s ID number will also be displayed.
Otherwise the subscriber’s ID will not be shown.
If this checkbox is checked then any time the system prints or displays
text for an alarm or test the transmitter ID number will also be displayed.
Otherwise the transmitter ID will not be shown. Typically this checkbox
would not be checked.
This box should not be checked. It was used only in a system where all
transponders operate on areas that are separate from each other. It would
prevent all interactions between receivers on different transponders.
Typically this would be very undesirable and there is now a selection on
an individual transponder basis to accomplish this feature.
This checkbox is for a future option and at this time it has no function.
Leave this checkbox unchecked.
If this checkbox is checked then the operator will be prompted to complete
an alarm report when the alarm is reset from the screen. If the responding
officer is required to complete the report, or if no system report is desired,
this box should not be checked. If the operator should complete the report
then check this box.
If this checkbox is checked then alarms transmitted by "Security" or
"Watchman" Transmitters are to be “silent”, alerting the operator at the
Central Console, but not sounding the sirens of the Alert Units or the
Horns in the Receivers.
If this checkbox is checked then alarms transmitted by transmitters issued
to installing company representatives and visitors are to be “silent”,
alerting the operator at the Central Console, but not sounding the sirens of
the Alert Units or the Horns in the Receivers. Typically this checkbox
would be checked.
If this checkbox is checked then predefined sound (.WAV) files can be
played at the alarm console for specific alarm types. Typically this
checkbox would not be checked.
If this checkbox is checked then personal height, build, hair and eye color
data will be displayed on the alarm screen.
If this checkbox is checked then individual receiver icons will not be
shown on the alarm map display. Typically this checkbox would be
checked.
If this checkbox is checked then "Tests" from subscriber's Transmitter will
be displayed on the normal map screen as “OK” or “FAIL” icons, signifying
a successful test by a valid subscriber or an attempted test transmission
from a Transmitter not in the Subscriber Database. This option doesn’t
affect the display the subscriber receives from a receiver or Alert Unit’s
strobe. Typically this checkbox would be checked.
Security Escort Training
Page 82 of 142
Page 83

Option 3
Option 4
Option 5
Auto Silence Alarm In 'X'
Seconds
Recall Operator In 'X' Seconds
On Outside Tests Flash Strobe
For 'X' Seconds
Man Down Delay Timer ‘X’
Seconds
End Of Shift Reminder"
First, Second, Third Shift
Reminder
Database Find Level
Locate Test Level
Guard Tour Level
Guard Tour Minutes
This checkbox is for a future option and at this time it has no function.
Leave this checkbox unchecked.
This checkbox is for a future option and at this time it has no function.
Leave this checkbox unchecked.
This checkbox is for a future option and at this time it has no function.
Leave this checkbox unchecked.
This box determines the length of time that the sirens and Horns will
sound before being automatically silenced by the Central Console. When
the sounders are automatically silenced in this way, the Central Console
remains in its “Alarm” mode. The numerical value is in seconds, and it
can be set between 0 and 9999. Typically this value would be set to
prevent violating local noise ordinances and it defaults to 240 seconds (4
minutes).
This box determines the length of time before a "Recall" alert is issued to
the operator at the Central Console when an alarm is being displayed. If
neither the mouse nor any key has been actuated for the specified length
of time, the Console will resound the "Alarm" sound once. This feature
prevents inadvertently ignoring an active alarm event. The numerical
value is in seconds, and it can be set between 0 and 240. Typically this
would be set to 60 seconds.
The entry in this box controls the approximate length of time the strobe on
an Alert Unit will flash to signify a successful Transmitter test. The value
is in seconds, and can be set between 0 and 15. Typically it is set to 5
seconds.
This value controls the time that a Transmitter must be in a man down
condition before a man down alarm is displayed. Typically it would be set
to 10 seconds. Setting this value too short will cause inadvertent man
down alarms to be generated.
A check in this box causes a prompt to appear on the Central Console
screen each five minutes for 30 minutes prior to the end of each shift if
there are incident reports that have not yet been completed. It is intended
to responding officers to complete alarm reports before the end of their
shift.
The entries in these fields are the times (24-hour clock) at which the
Central Console will prompt the operator that there are one or more
incident reports that have not yet been completed. Prompts will be given
only if the "End of Shift Reminder" option is selected.
This is the minimum receive level (1-255) that must be heard before the
system will automatically enter the transmitter in the Subscriber Locate
dialog. It determines the distance the subscriber’s transmitter must be
within the specified ID capture receiver (set in the System Preferences
dialog) before the system will recognize the test.
This is the minimum receive level (1-255) that must be heard before the
system will accept a test generated by a transmitter other than a guard, to
be printed with a location. It determines the distance the transmitter must
be within from a receiver before the system will recognize the test and
print the location. If the transmitter is too far away from the receiver, that
receiver’s green light will not be displayed, so the guard knows that they
must move closer to the receiver for the test to register.
This is the minimum receive level (1-255) that must be heard before the
system will accept a test generated by the guard’s transmitter to be
entered as a location in the guard tour report. It determines the distance
the guard’s transmitter must be within from a receiver before the system
will recognize the test and create the guard tour entry. If the guard is too
far away from the receiver, that receiver’s green light will not be displayed,
so the guard knows that they must move closer to the receiver for the test
to register.
This setting controls the time spacing, in minutes, for entries of the
guard’s current location in the automatically generated guard tour report.
Therefore if set to 15 minutes, an entry will be generated each 15 minutes
that the guard’s transmitter is within range of the system.
Security Escort Training
Page 83 of 142
Page 84

Popup Trouble Box Contact
Information”
The Operator ID field will be automatically filled in with the next available ID number, there is no need to change
the number selected.
System Defaults Dialog
This dialog allows the names for
each class of subscribers to be
changed to match the specific
application of this Security Escort
System.
Titles that are entered into the
subscriber name field in the
subscriber database are entered
here. The system alphabetizes the
subscriber database entries by last
name. When a title is entered after
the last name in the name field the
entry would be alphabetized
incorrectly by title. Entering the
titles used prevents this problem.
The labels for the 4 Information
fields in the subscriber database
are also changeable here.
Each yellow, pop-up trouble box that is displayed on the Central Console
to advise of system problems contains specific instructions for the
operator. Entries in this text box will be displayed in the pop-up trouble
boxes whenever a system problem occurs that requires attention. This
information usually includes the name and telephone number of the
designated Security Escort maintenance technicians.
System Labels Dialog
The alarm type definitions are customized to the
customer requirements in this dialog.
Figure 24: System Defaults Dialog
Figure 25: System label dialog
Security Escort Training
Page 84 of 142
Page 85

Subscriber Database
A subscriber is anyone
who has been issued a
Security Escort
Transmitter. This
database includes all
transmitters assigned in
the system, whether
they are protecting
people or things. The
Subscriber Database is
very similar to the
Operator Database; the
method by which the
names and other
information are stored is
virtually identical.
Edit Subscriber Database Record
Figure 26: Find Subscriber’s Database Record
Figure 27: Edit Subscriber’s Database Record
When editing a subscriber’s file or creating a new file, the following information must be entered to complete the
file: subscriber name, subscriber identification number, and transmitter identification code. The computer will not
allow the edit screen to be closed until all of the mandatory fields have been completed. The accuracy of
information in the Subscriber Database is very important: in the event that a subscriber transmits an alarm, the
information displayed in the Alarm Screen is taken from this database. A faulty address could hinder Security’s
response to an alarm.
Security Escort Training
Page 85 of 142
Page 86

Disabled
Subscriber Class
Name
Address
Phone Number
Subscriber ID
Transmitter ID / New ID
Browse Image File
Male/Female
Height
Build
Hair Color
Eye Color
There is an option to disable an individual subscriber's Transmitter in such a way that it
will not produce an alarm message on the Central Console. This can be used to halt a
subscriber’s misuse of the system. Disabling or enabling a subscriber is accomplished by
locating the subscriber in the Subscriber Database, clicking on the "Edit Data" button, and
clicking on the box next to the word “Disabled” in the upper-left corner of the dialog. (This
box is called a
be ignored by the system; if it does not, the transmitter will be recognized and alarms will
be displayed.
From the dropdown list (see Figure 28) select the
appropriate class for this subscriber or asset.
Selecting the Acknowledge subscriber class will allow
the alarm signal to be used to remotely acknowledge
alarms. It will not create an alarm. When this transmitter
transmits an alarm the alarms currently present on the
alarm screen will be acknowledged in the order they
were received, which should be the same order the
alarms would be received on a pager for a roving
officer.
The individual or item assigned to this transmitter. This
is a required field.
The address of this individual or item within the
protected area. The first address line on the left side is
shown on the alarm screen.
The phone number to access this individual within the protected area. The phone number
on the left side is shown on the alarm screen.
The Subscriber ID (typically the Social Security Number) must be typed into its field. This
is a required field, it must be filled in with a unique ID.
The Transmitter Identification Code can be typed into its field, but a much faster and error
free method is to delete any existing entry in the Transmitter Identification Code field and
then perform a "Test" with the Transmitter to be assigned to this Subscriber. The new
Transmitter ID will be displayed in the New ID field. That new Transmitter ID must be
manually entered into the Transmitter ID field or using the mouse highlight the existing
Transmitter ID and press and hold the SHIFT key and tap the INSERT key (this will
transfer the new Transmitter ID to the correct field). This is a required field; it must be
filled in with a unique ID. Complete the change to the Subscriber information by clicking
on the "Save" button.
Enter the filename for the image of this individual or item to be shown on the alarm
screen. Click the Browse button to open a dialog box to select the filename from a list of
available files.
These characteristics are shown on the alarm screen.
"checkbox."
) If the box has a check mark, the subscriber's transmitter will
Figure 28: Subscriber Class
dropdown list
Silent
Handicap
Supervision
Alarm Zone
If checked, a system that would normally sound alarms will be silent for all alarms
generated by this transmitter.
If this individual is handicapped, select an item from this drop down list. The condition will
be displayed on the alarm screen. If a handicap is selected the Notes field will not show
on the alarm screen.
Specific transmitter types periodically transmit “Supervisory” messages so the system can
monitor their function and location. The supervisory feature must be enabled in the
transmitter. Only for transmitters that have the supervisory feature enabled, select the
interval of these “Supervisory” messages. The supervision period that is specific to the
assigned transmitter must be selected if this feature is used. You can’t change the
supervision period of a transmitter.
Specific Alarm Zones are assigned to the different computer workstations of the Security
Escort system. Each transmitter entered in the Subscriber Database can be assigned to
one or more of the Alarm Zones. Therefore you may control which computer workstations
alarms from this transmitter will appear on.
Security Escort Training
Page 86 of 142
Page 87

Advanced
Information
The “Information” button
is used to enter specific
information about the
holder of this
transmitter. Car type,
parking sticker number,
license number, and
medical information are
examples of the types of
information typically
entered.
Each of the fields would
typically hold different
information. The
installer can change the
field labels to labels that
would define your
intended usage.
The “Advanced” button is used to set up special transmitters that monitor fixed locations,
these features are not used for personal transmitters. This button is available only to the
maintenance and installing personnel (see the Technical Reference Manual)
Save
Figure 29: Information Entry Screen
Clicking the Save button saves all changes to the database.
Security Escort Training
Page 87 of 142
Page 88

Subscriber Images
Display subscriber images. This software does not capture the images, it displays images that were previously
captured by some other means. The subscriber image can be captured using a digital camera, video capture
board etc. The source of the image is not critical. We have not identified, nor require a specific manufacturer of
the image capture equipment. The images must be saved individually in JPG format. The images should not be
larger that 160 pixels wide and 160 pixels high. If they are they will have to be scaled and therefore they may
loose image quality. Under the Setup menu, in the System Preferences dialog the path to the images is set in
"Subscriber image file path" (default location of the images is "C:\ESCORT\IMAGES", but they can be located
anywhere). The three-character file extension of the image files is set in "Extension" (default is JPG). Subscriber
images may also be saved in Windows bitmap (.BMP) however this format requires significantly more disk
storage.
Only when the display is set to 640x480 (not recommended) the images are displayed on top of the map and the
"Scaling %" (10 - 200) controls the size of the image (try different settings to control the image size in the alarm
screen). Under the Files menu in the Subscriber Database dialog, select the desired subscriber, then click "Edit
data". The "Image file" is the name of file that has this subscriber's image. For example if the subscriber's image
is stored in a file with the name "Image1.jpg", enter "Image1" in this box. You should have a minimum of a 1 Meg
video card to display subscriber’s images. Go to the Windows 95
click the "Start" button. Select "Settings:Control panel:Display". Click the "Settings" tab. In the "Color palette"
control you can select 256 color, High Color (16 bit) or True Color (24 bit). The system should be set to High
Color or True Color (256 color likely will produce undesirable results). When in doubt set to High Color. In the
same dialog "Desktop area" can be set to 640x480, 800x600 or 1024x768 pixels. When the display is set to
640x480 (not recommended) the images are displayed on top of the map and therefore limit how much of the
map displayed. The 1024x768 setting may require too much memory for most video cards and show more of the
map, decreasing the size of the map details. Most video cards can be set to 800x600 and when in doubt this
setting should be selected. If you can't choose these settings you video card or monitor setting may be incorrect,
refer to the system documentation to correct.
®
(Windows 98®, Windows NT®) Task bar and
Fixed Location Transmitters
Fixed Location Dialog
different paging companies and they may require different baud rates. Set the baud rate to the highest baud rate
common to all of the paging companies to be accessed.
The Character limit (characters per page), Pages per call affect all pages of the indicated type (local and dial-up).
These fields must be set to the lowest setting for any of the routes that may be used. Remember that dial-up
pages may be routed to different paging companies and they may have different restrictions.
Security Escort Training
Page 88 of 142
Page 89

Subscriber (individual) Pager Setup
In the subscriber database
select the record for the
desired individual. Press Edit
data then press Advanced,
the dialog below will be
displayed.
The pager ID is required for
all individual pagers dial-up
and local. If the phone
number and password are
assigned the page will be sent
over the modem connection.
If the phone number and
password fields are blank the
page will be routed to the
local paging system. If you do
not desire this individual to
have pager support leave the
phone number, password and
pager ID fields all blank.
Figure 30: Subscriber Database Advanced dialog
If the pager information is entered above this individual may be assigned to 3 paging groups. Each group will
accept 8 members maximum. Remember it takes time to communicate with a paging service, therefore only add
members to a group if they need to be there, otherwise you may slow the paging report to people that must
respond.
A pager group may contain members accessed by the local paging system and members that require
dial-up access. Dial-up access typically takes much longer and it may slow pages to the local paging
system.
Security Escort Training
Page 89 of 142
Page 90

Subscriber Database
The Subscriber Database contains
the information on the transmitters
that are assigned in the system.
See the “Security Escort
Operations Manual”. When the
Advanced button is pressed in the
Subscriber Database Edit dialog
the following Edit Subscriber
Advanced Features dialog will be
displayed.
The “Edit Advanced Subscriber
Features” dialog is used to set up
special transmitters that monitor
fixed locations,, subscriber pager
access, parameters for point
transmitters, the virtual fence for a
Wandering Alarm, the alarm group
for arming of the transmitter and
check-in requirements for this
transmitter.
Phone Number
This phone number is dialed to send a pager message to this subscriber. Typically this is a different phone
number than the one that is manually dialed to access this pager. The phone number is assigned by the paging
service.
Figure 31: Subscriber Advanced Features Dialog
Security Escort Training
Page 90 of 142
Page 91

Pager Password
Pager ID
Pager Group
Fixed Location
Transmitter
This is the password to be sent to the paging service when a page is sent to this
subscriber. Leave blank if not required (typically the Pager Password is not
required). The Pager Password is assigned by the paging service.
This is the ID that identifies the pager to receive the pager message (many times
this value is the last 7 digits that would be manually dialed to access this pager).
The Pager ID is assigned by the paging service.
These are the pager groups that this subscriber is a member of. This subscriber
may be a member of up to 3 different pager groups.
This section is to be used only when this transmitter is mounted in a fixed location (it
does not move). When this transmitter transmits and alarm it will always be reported
at the programmed location.
Floor Level
Map X Position
Map Y Position
Locate
Map Number
Enable Reed Switch
Optional Text
Disable Shorted Loop
Alarm on Shorted Loop
Trouble on Shorted
Loop
This is the floor level where this alarm is to be located for a fixed location
transmitter.
This is the X coordinate of the map position where this alarm is to be located for a
fixed location transmitter.
This is the Y coordinate of the map position where this alarm is to be located for a
fixed location transmitter.
When clicked the dialog will disappear and the cursor will change to a cross hair.
Moving the cursor to a point on the map and clicking the left mouse button will scroll
the map so that point is at the center of the screen.
When the map is showing the desired alarm location, move the cross hair to the
exact location of the alarm to be reported and click the right mouse button. The
dialog will reappear and the selected location will be entered into the X and Y
coordinates.
If while the cross hair cursor is being displayed, you desire to exit without changing
any coordinate values, press the ESC key and the transponder edit dialog will
reappear.
Defines which bitmap is to be displayed for the fixed location of this transmitter. The
default map is 0, which corresponds to bitmap MAP0.EDB stored in the Escort subdirectory. Map 1 would be MAP1.EDB. There can be 100 maps per Security Escort
system (0-99).
If checked the reed switch input of this transmitter enabled to cause an alarm.
Otherwise the reed switch input will be disabled. The alarm group this transmitter is
assigned to must be armed, for this input to cause an alarm, which is displayed. If
no alarm group is assigned, the transmitter is always armed. For this option to be
enabled the transmitter’s class must be set to “Point type”.
This is optional text that will be added to the location text when this input reports an
alarm. For this option to be enabled the transmitter’s class must be set to “Point
type”.
If selected a shorted loop on this transmitter will not cause an alarm or trouble report
to be displayed. For this option to be enabled the transmitter’s class must be set to
“Point type”.
If selected and the alarm group this transmitter is assigned to, is armed, then a
shorted loop on this transmitter will cause an alarm report to be displayed. The
alarm group this transmitter is assigned to must be armed, for this input to cause an
alarm, which is displayed. If no alarm group is assigned, the transmitter is always
armed. For this option to be enabled the transmitter’s class must be set to “Point
type”.
If selected a shorted loop on this transmitter will cause a trouble report to be
displayed. For this option to be enabled the transmitter’s class must be set to “Point
type”.
Alarm When Armed,
Trouble When Disarmed
on Shorted Loop
Disable Open Loop
If selected and the alarm group this transmitter is assigned to, is armed; then a
shorted loop on this transmitter will cause an alarm report to be displayed. If
selected and the alarm group this transmitter is assigned to, is disarmed, then a
shorted loop on this transmitter will cause a trouble report to be displayed. If no
alarm group is assigned, the transmitter is always armed. For this option to be
enabled the transmitter’s class must be set to “Point type”.
If selected an open loop on this transmitter will not cause an alarm or trouble report
to be displayed. For this option to be enabled the transmitter’s class must be set to
“Point type”.
Security Escort Training
Page 91 of 142
Page 92

Alarm on Open Loop
Trouble on Open Loop
Alarm When Armed,
Trouble When Disarmed
on Open Loop
Fixed Location and
Pager Text
If selected and the alarm group this transmitter is assigned to, is armed, then an
open loop on this transmitter will cause an alarm report to be displayed. The alarm
group this transmitter is assigned to must be armed, for this input to cause an alarm,
which is displayed. If no alarm group is assigned, the transmitter is always armed.
For this option to be enabled the transmitter’s class must be set to “Point type”.
If selected an open loop on this transmitter will cause a trouble report to be
displayed. For this option to be enabled the transmitter’s class must be set to “Point
type”.
If selected and the alarm group this transmitter is assigned to, is armed; then an
open loop on this transmitter will cause an alarm report to be displayed. If selected
and the alarm group this transmitter is assigned to, is disarmed, then an open loop
on this transmitter will cause a trouble report to be displayed. If no alarm group is
assigned, the transmitter is always armed. For this option to be enabled the
transmitter’s class must be set to “Point type”.
This is the text that will be displayed as the location of the alarm for fixed location
transmitters and on pagers reporting this alarm.
Transponder Name
Transponder Area
Alarm Group
Requires Check-in
Done
Select the transponder with the area that defines the area for a Wandering (virtual
fence) alarm. See Transponder Area below for the operation and setup of the
wandering alarm (virtual fence alarm).
Wandering Alarm - Create a protected area by placing a virtual monitor “fence”
around an area of the main map. These areas are defined in the transponder
database. If this transmitter will be constrained to remain within one of these defined
areas, first select the defining transponder in Transponder Name above. Then select
the desired area that the from this dropdown list of the transponder’s area names.
For the Wandering Alarm to work the supervision period must also be programmed
for this transmitter.
Then specific transmitters are marked in the subscriber database to be constrained
within a specific fenced area defined by this option. If the transmitters leave their
defined area, the system will report this as a Wandering Alarm and continue to
monitor and track the location of the transmitter until the alarm is canceled from the
screen in the normal way. However these tracking updates can only occur every
supervision transmission period (not on an accelerated rate like a tracking alarm)
The Escort system computes the location of the transmitters when they broadcast
automatic supervision transmissions periodically.
Because of the basic location accuracy and the floor-to-floor accuracy of the system,
there is a potential for some false alarms. If false alarms are a problem, check the
Filter Virtual Fence checkbox in the Security Preferences dialog. If you do this two
successive location calculations will have to indicate the transmitter has moved
outside the protected area before an alarm is generated. The downside of this is a
delay in the reporting of a wandering alarm of one extra transmitter supervision
period.
This is the alarm group that controls the arm/disarm status of this transmitter. Select
the desired alarm group from the dropdown list of the alarm group names. This
alarm group must be armed, for this transmitter to cause an alarm, which is
displayed. If no alarm group is assigned, the transmitter is always armed.
When this checkbox is checked, this transmitter will have to be activated once each
day during the Check-in Schedule time. At the end of the check-in period if the
subscriber fails to check-in, a Failed to Check-in Report will be generated and
presented to the operator of the software. This report contains all of the people who
failed to check-in with their first address line and phone number. All subscribers in
the report must be checked on to make sure they are not in need of assistance, as
this may be a life-treating situation. A printed report may also be generated.
If the transmitter is not a point type, then the transmitter can generate alarms and
therefore a test transmission will be used for the check-in.
If the transmitter is a point type then any non-trouble transmission will serve as a
check-in.
One of the 10 schedules must be selected as the check-in schedule to define the
check-in period.
Click this button when all changes to this dialog are complete to return the main
Subscriber database edit dialog.
Security Escort Training
Page 92 of 142
Page 93

Ignore Holidays for this
Schedule
You may directly enter the date or press (…). The
Holiday dates do not accept wildcards therefore
you must enter an entire date as shown above.
Figure 32 is a list of holidays that may be used as
exceptions to the one or more of the 10
schedules.
Ellipsis (…)
Remove >>
Each schedule individually can use the holiday dates as exceptions. If the Ignore
Holidays checkbox is checked then on the indicated holiday dates the schedules will
be active (armed) that entire day. If the Ignore Holidays checkbox is not checked then
the normal action of the schedules will take place on the holiday dates.
Figure 32: Holiday selection in the Schedule dialog
Clicking this button will display a calendar so you can graphically select a date as
shown above.
Clicking this button will remove the selected date from the Holiday Dates list.
<< Add
Clicking this button will add the date shown to the Holiday Dates list.
Edit Schedule Times Dialog
This dialog allows the arming and disarming times to be
programmed for each of the days of the week. All times
are expressed in 24-hour time (00:00 to 23:59). Each
schedule has one Arm Time and one Disarm Time for
each of the 7 days of the week.
If both the Arm Time and Disarm Time are programmed to
00:00 then the schedule will be active (armed) for the
entire day.
If the Arm Time is 00:00 and the Disarm Time is
programmed then from midnight to the programmed
Disarm Time the schedule will be active (armed) and from
the Disarm Time to the end of the day the schedule will be
off (disarmed).
If the Disarm Time is 00:00 and the Arm Time is
programmed then from midnight to the programmed Arm
Time the schedule will be off (disarmed) and from the Arm
Time to the end of the day the schedule will be active
(armed).
If both the Disarm Time and the Arm Time are programmed and the Disarm Time occurs before the Arm Time
(normal 8 to 5 style day), then from midnight to the programmed Disarm Time the schedule will be active
(armed). From the Disarm Time to the Arm Time the schedule will be off (disarmed). From the Arm Time to the
end of the day the schedule will be active (armed).
If both the Disarm Time and the Arm Time are programmed and the Arm Time occurs before the Disarm Time,
then from midnight to the programmed Arm Time the schedule will be off (disarmed). From the Arm Time to the
Disarm Time the schedule will be active (armed). From the Disarm Time to the end of the day the schedule will
be off (disarmed).
Figure 33: Edit Schedule Time dialog
Security Escort Training
Page 93 of 142
Page 94

Arm Time
Disarm Time
Day of the Week
View Alarm Groups Dialog
This dialog will show the alarm groups that are
assigned to the selected schedule and their
current arming state. The ON and OFF states
indicate that the alarm group is under manual
control. AUTO is under control of the selected
schedule. Therefore the alarm group will be armed
if the schedule is active.
This is the time that the schedule will become active (on or armed) for the selected
day of the week. Times are expressed in 24-hour time (00:00 to 23:59).
This is the time that the schedule will go off (disarmed) for the selected day of the
week. Times are expressed in 24-hour time (00:00 to 23:59).
Select the day you desire to change the time for. The Arm Time and Disarm time are
programmed separately for each day of the week. Therefore you must select
individually each day of the week and set the desired times.
Alarm Groups Dialog
This selection allows setup and
arm/disarm control of the 99
alarm groups. Any number of
point type transmitters can be
assigned to an alarm group in
the Subscriber Database’s
Advanced dialog. However each
transmitter can only be assigned
to one alarm group.
An alarm group can be manually
armed and disarmed or
assigned to a schedule to
automatically arm and disarm
the alarm group.
Alarm Group Name
Alarm Group #
Arming State of this
Alarm Group
Figure 34: View Alarm Groups dialog
Figure 35: Alarm Groups dialog
Enter a descriptive name to identify the function of the points in this alarm group.
This is the number of the alarm group (1-99).
The Off, On and .Automatic by Schedule selection will control the arming state of this
alarm group.
Security Escort Training
Page 94 of 142
Page 95

Off (disarmed)
On (armed)
Automatic by
Schedule
First
Clicking this button will disarm the alarm group. The alarm group will remain off
(disarmed) until manually changed in this dialog to On or Automatic by Schedule.
Clicking this button will arm the alarm group. The alarm group will remain on (armed)
until manually changed in this dialog to Off or Automatic by Schedule.
Clicking this button will assign the alarm group’s arming state to be controlled by the
indicated schedule. When the schedule is active (on or armed) the alarm group will be
armed. When the schedule is off (disarmed) the alarm group will be disarmed. Any
number of alarm groups may be assigned to the same schedule.
Clicking this button will take you to alarm group 1.
Previous
Next
Clicking this button will take you to the next lower alarm group from the one currently
displayed. It will not wrap around. Therefore it will be disabled at alarm group 1.
Clicking this button will take you to the next higher alarm group from the one currently
displayed. It will not wrap around. Therefore it will be disabled at alarm group 99.
Clicking this button will take you to alarm group 99.
Last
Alarm Group State Dialog
This selection will
display a list of the
alarm groups that
are currently armed
and have one or
more transmitters
(points) faulted. The
points are presented
because they were
not restored when
their automatic
schedule armed or
there was an alarm
while the alarm
group was on.
Print Report
Acknowledge
Figure 36: Alarm Group State dialog
Clicking this button will print the displayed data to the Report printer.
Clicking this button will close the dialog if it was selected from the menu. However
if the dialog was presented automatically at the arm time of an alarm group’s
automatic schedule because they were not restored when their automatic schedule
armed or there was an alarm while the alarm group was on, then you will be
required to enter your password to the acknowledge the dialog and remove it from
this computers (and all other computer workstations) screens.
Security Escort Training
Page 95 of 142
Page 96

Current Check-in Status Dialog
This selection will display a list of
the subscribers that are required
to check-in and failed to do so
during the last check-in period.
Also presented are their address,
phone number and the last time
they did check-in.
Print Report
Clicking this button will print the
displayed data to the Report
printer.
Acknowledge
Clicking this button will close the
dialog if it was selected from the
menu.
However if the dialog was presented automatically at the end of the check-in period because there were
subscribers that failed to check-in, then you will be required to enter your password to the acknowledge the
dialog and remove it from this computers (and all other computer workstations) screens.
Figure 37: Current Check-in Status dialog
Security Escort Training
Page 96 of 142
Page 97

Importing a Subscriber Database
This section describes the file format required to import data into the Subscriber database. There is no way to
undo this operation, therefore DO A DATABASE BACKUP FIRST and verify the updated data before the
changed database is placed in service. If there are problems, restore the Subscriber database from the backup.
The file of new data record entries must be in tab delimited text format. It must be placed in the Escort
subdirectory (typically C:\Escort) and be named TABMERGE.DAT. The data fields must be in the following order,
delimited by the horizontal tab character (decimal 8) and the record must be terminated with a carriage return
(decimal 13). If a data field has no data just store the terminating tab character for that field. The total number of
characters in all the fields of a record must be 255 characters or less, including the tab and carriage return
characters. After the TABMERGE.DAT file is stored in the Escort subdirectory, start ESC32.EXE, enter the
Subscriber database and click the DATA MERGE button. Be patient, it may take a while, watch for the disk
activity to stop. After the data is successfully merged it is a good idea to remove the TABMERGE.DAT file, to
disable the DATA MERGE feature.
Excel
Data fields in required
order
Subscriber Name A This field may be up to 30 characters. This field may contain any
Subscriber ID B This field may be up to 12 characters. This field may contain only
Here Phone Number C
Column
printable ASCII character except the ‘?’.
ALPHA, numeric and the dash ASCII characters.
This field may be up to 16 characters. This field may
Restrictions
contain only numeric, ‘#’, ‘*’, ‘(‘, ‘)’, comma and the dash
ASCII characters.
Here Address 1 D This field may be up to 30 characters. This field may contain any
printable ASCII character except the ‘?’.
Here Address 2 E This field may be up to 30 characters. This field may contain any
printable ASCII character except the ‘?’.
Here City F This field may be up to 20 characters. This field may contain any
printable ASCII character except the ‘?’.
Here State G This field may be up to 3 characters. This field may contain only
ALPHA ASCII characters.
Here Zip H This field may be up to 10 characters. This field may contain only
ALPHA, numeric and the dash ASCII characters.
Away Phone Number I This field may be up to 16 characters. This field may contain only
numeric, ‘#’, ‘*’, ‘(‘, ‘)’, comma and the dash ASCII characters.
Away Address 1 J This field may be up to 30 characters. This field may contain any
printable ASCII character except the ‘?’.
Away Address 2 K This field may be up to 30 characters. This field may contain any
printable ASCII character except the ‘?’.
Away City L This field may be up to 20 characters. This field may contain any
printable ASCII character except the ‘?’.
Away State M This field may be up to 3 characters. This field may contain only
ALPHA ASCII characters.
Away Zip N This field may be up to 10 characters. This field may contain only
ALPHA, numeric and the dash ASCII characters.
Supplemental Text Field
1
Supplemental Text Field
2
Supplemental Text Field
3
Supplemental Text Field
4
Pager Phone Number S This field may be up to 16 characters. This field may contain only
Pager Password T This field may be up to 6 characters. This field may contain only
Pager Pager ID U This field may be up to 10 characters. This field may contain only
O This field may be up to 254 characters. This field may contain
any printable ASCII character except the ‘?’.
P This field may be up to 254 characters. This field may contain
any printable ASCII character except the ‘?’.
Q This field may be up to 254 characters. This field may contain
any printable ASCII character except the ‘?’.
R This field may be up to 254 characters. This field may contain
any printable ASCII character except the ‘?’.
numeric, ‘#’, ‘*’, ‘(‘, ‘)’, comma and the dash ASCII characters.
numeric, and ALPHA ASCII characters.
numeric ASCII characters.
Security Escort Training
Page 97 of 142
Page 98

Data fields in required
Excel
Column
Restrictions
order
Subscriber Type V "0 Unclassified", "1 Commuter", "2 Faculty", "3 Resident", "4
Security", "5 Staff", "6 Installer", "7 Out of Service", "8
Watchman", "9 Visitor", "10 Point type", "11 Acknowledgement".
This field should contain only numeric ASCII characters.
Handicapped Type W "0 No handicap", "1 Blind", "2 Deaf", "3 Handicapped", "4 Wheel
chair". This field should contain only numeric ASCII characters.
Transmitter ID X This field may be up to 9 characters. This field should contain
only numeric ASCII characters.
Away Name Y This field may be up to 30 characters. This field may contain any
printable ASCII character except the ‘?’.
Image Filename Z This field may be up to 30 characters. This field may contain any
printable ASCII character that is valid for a file name.
Height Feet AA 0-7, This field should contain only numeric ASCII characters.
Height Inches AB 0-11, This field should contain only numeric ASCII characters.
Build Code AC "0 Medium", "1 Slim", "2 Large". This field should contain only
numeric ASCII characters.
Hair Color AD "0 Brown", "1 Auburn", "2 Black", "3 Blond", "4 Brunet", "5 Grey",
"6 Red". This field should contain only numeric ASCII characters.
Eye Color AE "0 Brown", "1 Blue", "2 Green", "3 Hazel", "4 Grey". This field
should contain only numeric ASCII characters.
Pager Group A AF 0-99, This field should contain only numeric ASCII characters.
Pager Group B AG 0-99, This field should contain only numeric ASCII characters.
Pager Group C AH 0-99, This field may contain only numeric ASCII characters.
Fixed Floor Level AI "0 Basement5", "1 Basement4", "2 Basement3", "3 Basement2",
"4 Basement1", "5 Tunnel", "6 Basement ", "7 Ground","8
Outside", "9 Floor 1", "10 Floor 2", "11 Floor 3", "12 Floor 4", "13
Floor 5", "14 Floor 6", "15 Floor 7", "16 Floor 8", "17 Floor 9", "18
Floor 10", "19 Floor 11", "20 Floor 12", "21 Floor 13", "22 Floor
14", "23 Floor 15", "24 Floor 16", "25 Floor 17", "26 Floor 18", "27
Floor 19", "28 Floor 20", "29 Floor 21", "30 Floor 22", "31 Floor
23", "32 Floor 24", "33 Floor 25", "34 Floor 26", "35 Floor 27", "36
Floor 28", "37 Floor 29", "38 Floor 30", "39 Floor 31", "40 Floor
32", "41 Floor 33", "42 Floor 34", "43 Floor 35", "44 Floor 36", "45
Floor 37", "46 Floor 38", "47 Floor 39". This field should contain
only numeric ASCII characters.
Fixed Map X Location AJ This field may contain only numeric ASCII characters.
Fixed Map Y Location AK This field may contain only numeric ASCII characters.
Fixed Bitmap Number AL 0-99 This field may contain only numeric ASCII characters.
Supervision Interval AM “0 None”, “1 is 90 Second Supervision”, “2 is 30 Second
Supervision”, “3 is 1 Hour Supervision. This field may contain
only numeric ASCII characters.
Alarm Group AN 0-99, This field may contain only numeric ASCII characters.
Shorted Loop AO This field may contain only numeric ASCII characters.
Open Loop AP This field may contain only numeric ASCII characters.
Status AQ Encoded value. Do not change.
Enable Magnetic Reed AR This field may contain only numeric ASCII characters.
Fixed Location Text AS This field may be up to 254 characters. This field may contain
any printable ASCII character except the ‘?’
Magnetic Reed Text AT This field may be up to 30 characters. This field may contain any
printable ASCII character except the ‘?’
Shorted Loop Text AU This field may be up to 30 characters. This field may contain any
printable ASCII character except the ‘?’
Open Loop Text AV This field may be up to 30 characters. This field may contain any
printable ASCII character except the ‘?’
Status Flags AW Encoded value. Do not change.
Modify Op AX 0-30000, This field may contain only numeric ASCII characters.
Test Time AY Encoded 32-bit time value. Do not change.
Last Transmitter Change AZ Encoded 32-bit time value. Do not change.
Spare Date BA Encoded 32-bit time value. Do not change.
Last Fail To Test Letter BB Encoded 32-bit time value. Do not change.
Security Escort Training
Page 98 of 142
Page 99

Data fields in required
Excel
Column
Restrictions
order
Created BC Encoded 32-bit time value. Do not change.
Modified BD Encoded 32-bit time value. Do not change.
Low Battery BE Encoded 32-bit time value. Do not change.
Spare2 BF This field should be blank.
Spare3 BG This field should be blank.
A (Blank) B (First Name) C (MI) D (Last Name) E (Blank)
Click E1
go to Insert then click on Function
Now click Text, then Concatenate
then click Next
Text1 = click B1 (First Name)
Text2 = “space”
Test3 = click C1 (MI)
Test4 = “space”
Text5 = click D1 (Last Name)
Now click Finish
click E1 go to Edit then Copy
click E hi-light Column
go to Edit then Paste
Now click E hi-light column
go to Edit then Copy
Now click A hi-light column
go to Edit then Paste Special
then click Values
then click OK
Now Delete B,C,D,& E
Done.
Security Escort Training
Page 99 of 142
Page 100

The Operator Database
The figure above is a typical screen from the Operator Database. The term "Operator" is used to refer to a
person who has the authority to use the various features of the Security Escort System software. The term
includes the Security Department's dispatchers who initiate responses to alarms, Security Officers who may be
required to produce incident reports, and other employees of the Security Department who may be responsible
for maintaining the Subscriber and Operator Databases.
The information in an "Operator Database" record includes his or her password, full name, a unique operator
identification number, an authority level, local address and phone number, and notes. All fields but the password
field are displayed; even when a specific operator’s file is edited (via the Edit Data command), the password is
represented by a number of asterisks for security.
Edit Operator Database Record
Security Escort Training
Page 100 of 142
 Loading...