

Page 1

Remote Programming Software (RPS)
D5500CU
en Installation Guide
Page 2

Page 3

Remote Programming Software (RPS) Table of Contents | en 3
Table of contents
1
1.1 About documentation 4
1.2 Software license agreement 4
2
3
4
4.1 Install RPS 9
4.1.1 Install the SQL database and RPS 11
4.2 View the installation log file 13
4.3 Known issues 14
5
5.1 Backup and restore the RPS database 15
5.2 Upgrade RPS 15
6
6.1 Set security levels by panel type for networked users 17
6.2 Modify, repair, or remove RPS 18
6.3 Switch from a client to a network installation 20
7
7.1 RPS minimum system requirements 22
7.2 Automatic RPS installation 22
7.2.1 Overview 22
7.2.2 Generate the RPSInstallation.ini file 23
7.2.3 Use the RPSInstallation.ini file 23
7.2.4 Customize the RPSInstallation.ini file 24
7.3 Back up the SQL or SQL Express database 24
7.4 Special upgrade types 25
7.4.1 v5.6 and lower upgrades 25
7.4.2 v5.11 and lower upgrades 26
Introduction 4
Overview and installation options 7
Get started 8
New RPS installations 9
RPS upgrades 15
Maintenance 17
Appendix 22
Index 28
Bosch Security Systems, Inc. Installation Guide 2015.03 | 18 | 4998141259
Page 4

4 en | Introduction Remote Programming Software (RPS)
1
1.1
Introduction
Remote Programming Software (RPS) is an account management and control panel
programming utility for Microsoft Windows operating systems. Operators can perform remote
programming, account record storage, remote control, and diagnostics on specific control
panels.
About documentation
Copyright
This document is the intellectual property of Bosch Security Systems, Inc. and is protected by
copyright. All rights reserved.
Trademarks
All hardware and software product names used in this document are likely to be registered
trademarks and must be treated accordingly.
Related documentation
The Release Notes provide additional information about RPS that became available after the
printing of this manual. Review these notes before using RPS. The Release Notes also list
control panels that are compatible with RPS.
Refer to RPS Help for detailed instructions about how to program each of your control panel’s
parameters using Remote Programming Software.
1.2
Software license agreement
Bosch Security Systems, Inc. ("Bosch") licenses this software and all associated
documentation (the "Software") for your (also referred to herein as "Licensee") non-exclusive
use. Licensee has read this End User Software License Agreement ("License") and agrees to
abide by the terms and conditions of this License. By using the Software you the Licensee
accept and agree that you will abide by and are legally bound by the terms of this License. If
you do not agree to abide by the terms of this License you shall immediately return the
Software to Bosch. Licensee's use of the Software is subject to the following terms and
conditions:
1. LICENSE: Under the terms of this nonexclusive, non-transferable (except as specifically
permitted herein) license:
2. You may use a machine-readable form of the Software on a single computer or a single
server at a time, or as otherwise defined in the installation/operation manual of the Bosch
product and only for the operation of Bosch products.
3. You may not modify, translate, create derivative works, decompile, disassemble or
reverse engineer the Software.
4. You may not sublicense, lease or otherwise rent the Software without Bosch's prior
written consent.
5. You may make one copy of the Software solely for backup or archival purposes, provided
such copy must contain the original Software proprietary notice. No other copying of the
Software or the accompanying documentation is permitted.
6. This License will terminate automatically if you fail at any time to comply with any of its
terms or conditions. Upon termination, you shall immediately destroy the Software or
return it to Bosch along with any copies you have made, and to delete any installed copy
from your hardware.
7. TRANSFER OF OWNERSHIP: You may transfer this License to another party only if you:
2015.03 | 18 | 4998141259 Installation Guide Bosch Security Systems, Inc.
Page 5

Remote Programming Software (RPS)
8. Also transfer the License, Software, and all accompanying documentation and (by sale or
lease) ownership of the associated Bosch hardware, if applicable,
9. Require the other party to abide by the terms of this License, and
10. Destroy all copies of the Software and any updates that you do not transfer to the other
party.
11. OWNERSHIP AND PROPRIETY RIGHTS: Although the media containing the Software is
yours, the Software is owned and copyrighted by Bosch and/or its suppliers. Except for
the rights expressly granted herein, Bosch and its suppliers retain all rights to the
Software, including, without limitation, the title to all copyright, patent, trade secret and
other intellectual and proprietary rights therein and any copies thereof, in whole or in
part, all of which are the valuable property of Bosch and/or its suppliers. You may not
remove, change or delete the copyright notice from the Software. If you make any copies
of the Software in whole or in part, all such copies shall contain the same copyright and
proprietary markings as appear on or in the original Software copy, including media
markings. You will instruct your employees and others having access to the Software in
and ensure their compliance with the terms of this License. You will use your best efforts
to prevent any unauthorized copying of the Software. You will be responsible for any
breach of any provision of this License by your employees. You shall not sell, transfer,
publish, disclose or otherwise make available the whole or any part of the Software or
any copies thereof to any third party or persons not permitted by the terms of, and
pursuant to the terms contained in this License. You are not in violation of this
Agreement, including this section, when a third party views the functional output
resulting from your use of the Software.
12. TAXES: You must pay all taxes that may now or hereafter be imposed, levied, or assessed
with respect to the possession or use of the Software or this License. You shall file all
reports required in connection with such taxes.
13. WARRANTY, LIMITATION OF LIABILITY, REMEDIES: THE SOFTWARE IS PROVIDED "AS
IS" WITHOUT WARRANTY OF ANY KIND INCLUDING WARRANTIES THAT THE SOFTWARE
IS ERROR FREE OR WILL RUN UNINTERRUPTED, OR WARRANTIES OF
MERCHANTABILITY, FITNESS FOR A PARTICULAR PURPOSE OR AGAINST INFRINGEMENT.
NEITHER BOSCH NOR ITS SUPPLIERS SHALL BE LIABLE FOR ANY LOSS OF PROFITS,
LOSS OF USE, INTERRUPTION OF BUSINESS, LOSS OF DATA, NOR FOR INDIRECT,
SPECIAL, INCIDENTAL, OR CONSEQUENTIAL DAMAGES OF ANY KIND WHETHER UNDER
THIS LICENSE OR OTHERWISE, OR FOR ANY CLAIM BY ANY OTHER PARTY. Bosch does
not warrant the functions provided by the Software. However, Bosch warrants the media
on which the Software is furnished to be free from material defects in materials and
workmanship under normal use for a period of 90 days from the date of original purchase.
Bosch's entire liability to you, and your exclusive remedy, shall be the replacement of the
media not meeting Bosch's warranty, provided you return the same to Bosch. The
replacement will be warranted for the remainder of the term of the original warranty or
30 days, whichever is longer. You assume responsibility for the selection of the Software
to achieve your intended results, and for the installation, use and results obtained from
the Software. Without limiting the generality of the foregoing, in no event shall Bosch be
liable for any consequential, special or general damages in any action, whether based on
tort, contract or otherwise, in connection with this License, or the Software furnished
hereunder. The damages excluded under this paragraph include, but are not limited to,
damages for loss of actual and anticipated profits, loss of programming and/or
production materials, and damage to the business reputation of user.
Introduction | en 5
Bosch Security Systems, Inc. Installation Guide 2015.03 | 18 | 4998141259
Page 6

en | Introduction Remote Programming Software (RPS)
6
14. U.S. GOVERNMENT RESTRICTED RIGHTS: The Software is provided with restricted
rights. Use, duplication, or disclosure by the U.S. Government is subject to restrictions as
set forth in subparagraph (c)(1)(ii) of the Rights in Technical Data and Computer
Software clause at DFAR 252.227-7013, Federal Acquisition Regulation clause 52.227-19
(c) (2) Commercial Computer Software Restricted Rights, NASA clause 52.227.86 (d)
Commercial Computer Software Licensing or their successor.
15. EXPORT LAWS, APPLICABLE LAW: If you, the licensee under this License, are not a U.S.
citizen or you will take delivery of the Software outside the United States, Bosch will
secure the necessary U.S. Government authorizations for exportation of the Software to
your country of destination. You agree to not reexport the Software from that destination
to another foreign country without complying with all applicable U.S. Government
restrictions and requirements. If you, the licensee, are a U.S. citizen or you will take
delivery of the Software inside the United States, then you agree to not export the
Software from the United States without complying with all applicable U.S. Government
restrictions and requirements, including obtaining any necessary U.S. Government
authorization for the export. You will not permit the Software to be reexported from an
authorized foreign destination country to any other foreign country except in compliance
with all U.S. laws and regulations. This License will be governed by the laws of the State
of New York and the United States of America, including U.S. copyright laws.
16. TERM AND TRANSFER: You may terminate this Agreement at any time by returning the
Software to Bosch or destroying the Software together with all copies in any form. Bosch
may terminate this Agreement if you fail to comply with its terms and conditions in any
material respect. Upon termination, you may not use the Software and must return or
destroy all copies thereof in whole or in part, and we will not further support the
Software.
17. ENTIRE CONTRACT: This License, including all schedules, constitutes the entire and only
agreement between the parties and supersedes all prior agreements, understandings and
communications, whether oral or written, between the parties respecting the subject
matter hereof. There are no understandings, agreements, warranties or representations,
express or implied, except as set forth herein. This License prevails over any additional,
conflicting or inconsistent terms and conditions appearing on any purchase order
submitted by Licensee. This License shall be governed by and interpreted under the laws
of New York, excepting any conflicts of laws provision. Jurisdiction for any suit brought
hereunder shall be the federal or state courts residing in New York City.
2015.03 | 18 | 4998141259 Installation Guide Bosch Security Systems, Inc.
Page 7
Remote Programming Software (RPS) Overview and installation options | en 7
2
Overview and installation options
Before installing RPS, review the list of installation types, select the one that best meets your
needs, and then read the corresponding instructions. For all installations, follow the
instructions in Get started, page 8 before following the steps for the specific installation
type.
Notice!
To install or upgrade RPS, the RPS operator must have administrative rights on the target
computer. Once RPS is installed or upgraded, the RPS operator does not need administrative
rights to use RPS on the target computer.
If you are using an unreleased version of RPS, such as an alpha or beta version, you must
uninstall (remove) RPS before installing a released version.
Typical installation types
Install RPS, page 9
Use this section’s instructions to install RPS for the first time with the SQL database installed
on the same computer as RPS.
Install the SQL database and RPS, page 11
Use this section’s instructions to install RPS for the first time with the SQL database installed
on a network instead of on the same computer as RPS.
RPS upgrades, page 15
Use this section’s instructions to upgrade RPS. This section also directs you to instructions for
special upgrade types.
Automatic RPS installation, page 22
Use this section’s instructions to install RPS from a network drive.
Bosch Security Systems, Inc. Installation Guide 2015.03 | 18 | 4998141259
Page 8

8 en | Get started Remote Programming Software (RPS)
3
Get started
This section provides steps for accessing the RPS documentation and starting the installation
process.
To start the installation process:
1. Insert the RPS DVD into your CD/DVD drive. The RPS startup program automatically
starts.
Notice!
If the startup program does not automatically start, select Start > Run… and at the prompt,
type: X:\setup.exe. "X" = the drive letter assigned to your DVD drive.
2. When the startup window opens, select a language from the list provided. An instruction
window opens in the selected language.
3. From the instruction window, you can open the RPS documentation and install RPS.
4. Click Install.
RPS automatically checks for .NET 2.0 or later, and installs it if necessary. Move to the steps in
New RPS installations, page 9 or RPS upgrades, page 15.
2015.03 | 18 | 4998141259 Installation Guide Bosch Security Systems, Inc.
Page 9
Remote Programming Software (RPS) New RPS installations | en 9
4
4.1
New RPS installations
Once you complete the instructions in Get started, page 8, make SQL database installation and
RPS installation decisions.
Install RPS
Choosing a local or network database installation:
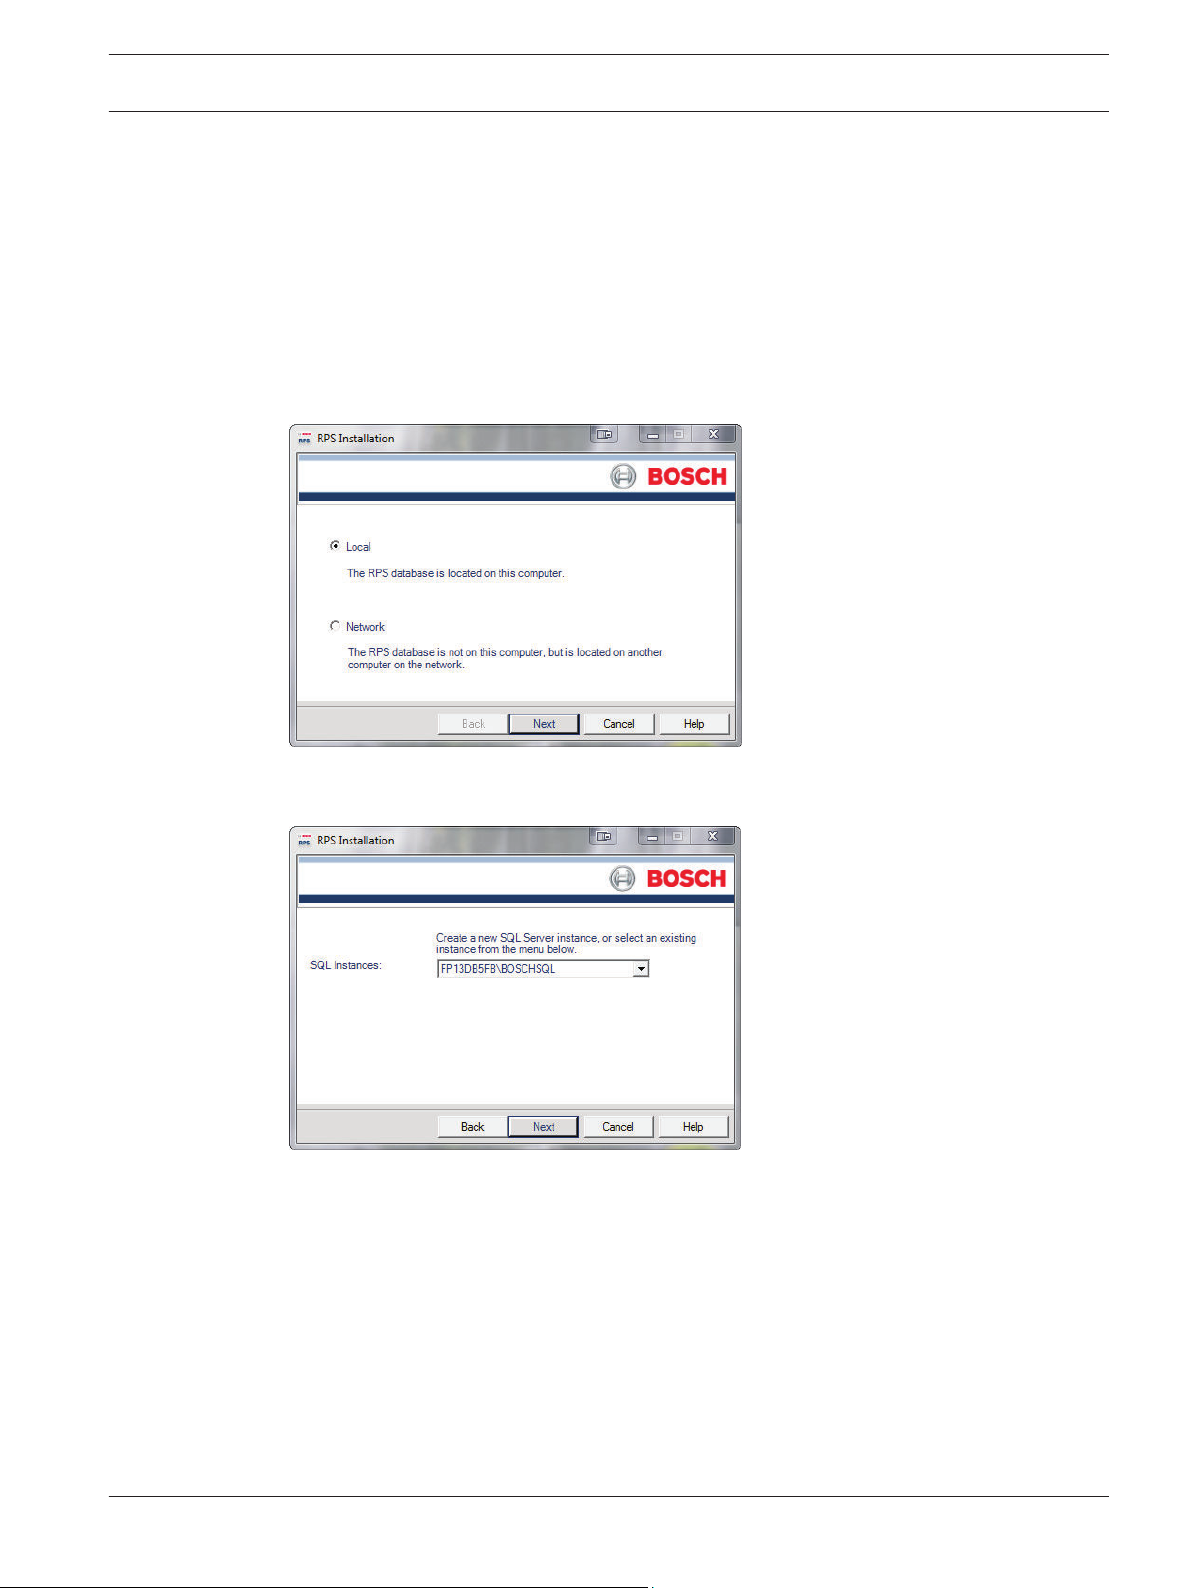
1. If prompted for a setup language, select your language and then click Next. The Database
Location window opens.
2. Select Local to install the SQL database on the same computer as RPS or select Network
to install the SQL database on a network. Click Next. The SQL Instance window opens.
3. Continue to the steps in either existing SQL or new SQL instance.
Use an existing SQL instance
1. On the SQL Instance window, click the SQL Instances menu and select the appropriate
SQL instance. Authentication of the selected SQL instance starts.
Bosch Security Systems, Inc. Installation Guide 2015.03 | 18 | 4998141259
Page 10
en | New RPS installations Remote Programming Software (RPS)
10
2. By default, Windows Authentication is used. If the authentication fails, you are prompted
to use SQL Authentication.
3. To use SQL Authentication, check the SQL Authentication box, then enter your SQL user
name (sa is the default) and password (RPSsql12345 is the default) in the respective
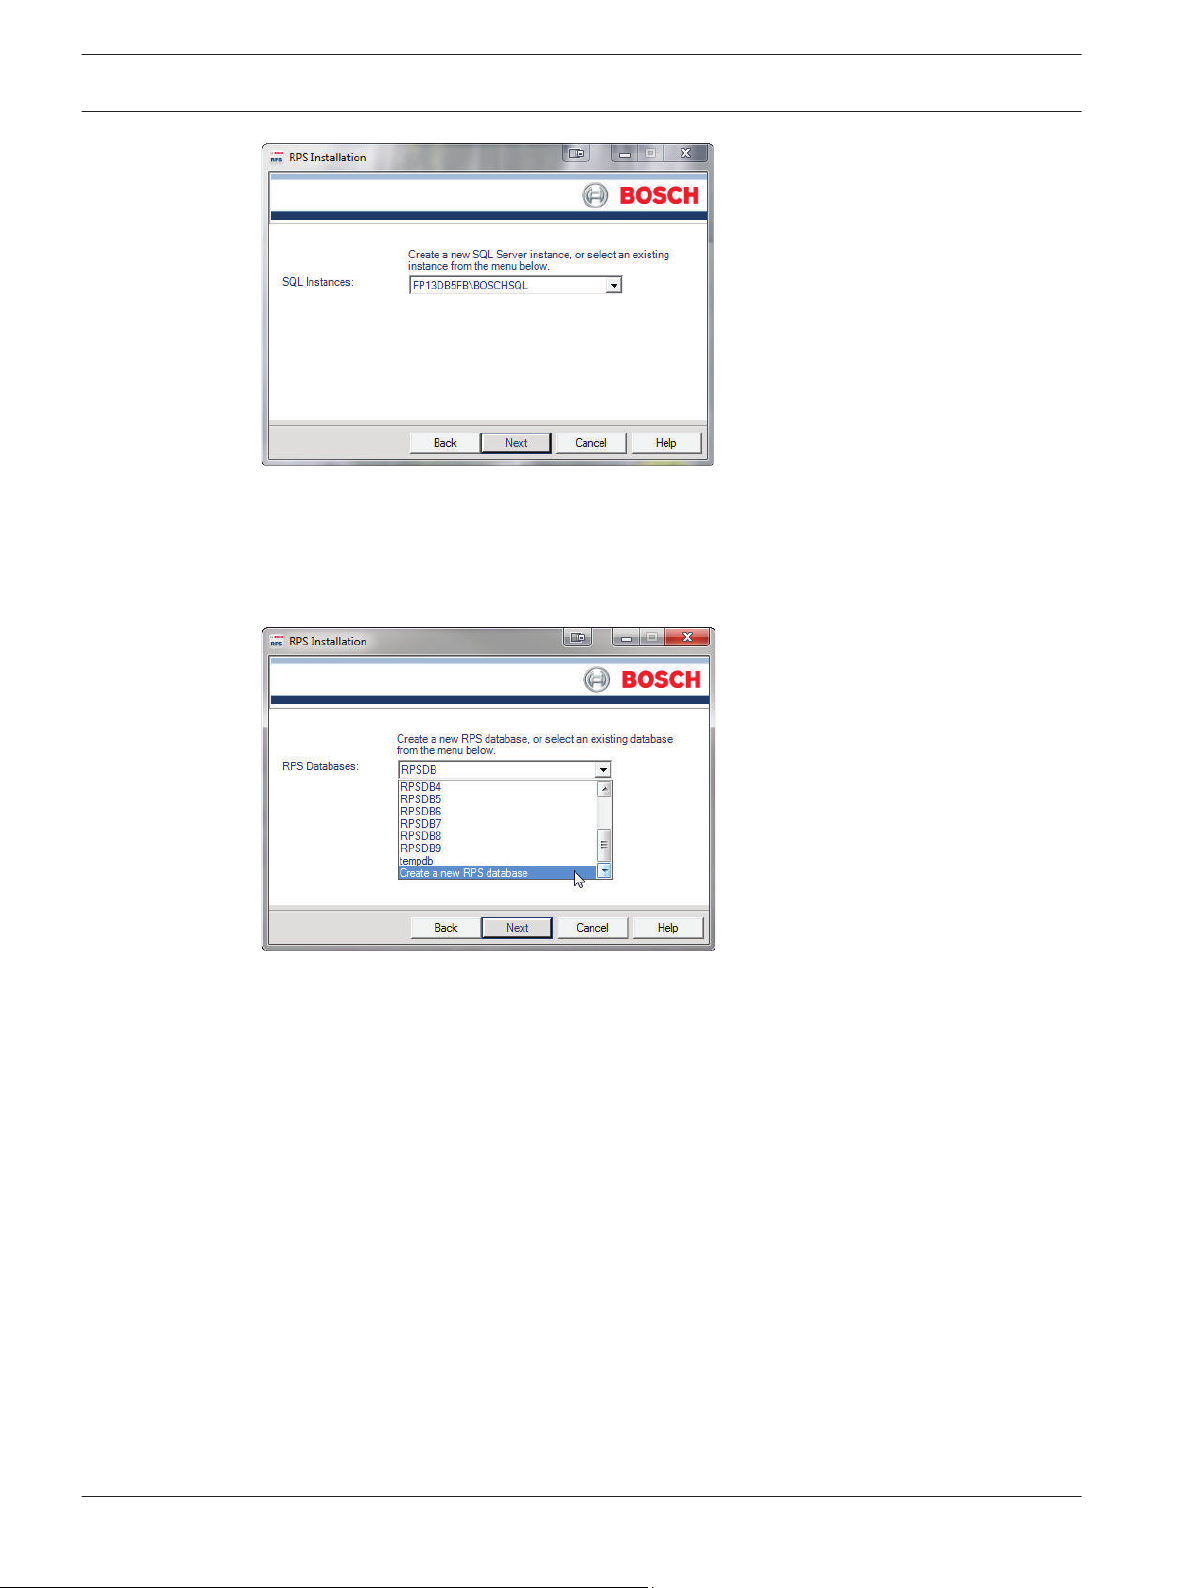
fields. Click Next. The RPS Database window opens.
4. Select an existing RPS database, or create a new RPS database.
5. Continue to Installation Summary.
Create and use a new SQL instance
1. Select Local from the Select SQL Instance window. RPS creates a new SQL instance on
the local computer that contains the following information:
SQL Instance Name: BOSCHSQL
If BOSCHSQL is already used, the new instance is named BOSCHSQLn, where n = a
number. For example, BOSCHSQL1.
Authentication: SQL Server Authentication
User Name: sa
Password: RPSsql12345
RPS Database Name: RPSDB
If RPSDB is already used, the new database is named RPSDBn, where n = a number. For
example, RPSDB1.
2. Click the Share Database checkbox in order to share the new SQL instance with other
computers on the network. When the Share Database checkbox is selected, the SQL
browser service automatically starts. This service is required to allow other computers to
access the local SQL instance.
2015.03 | 18 | 4998141259 Installation Guide Bosch Security Systems, Inc.
Page 11

Remote Programming Software (RPS) New RPS installations | en 11
3. Continue to Installation Summary.
Installation summary and continuation
After the SQL instance is established, the Installation Summary window opens.
4.1.1
– If you need to change any settings, click Back to review and modify the previous
installation setup windows as needed.
– If you would like to print the installation summary, click Print.
– If you are ready to install the SQL database and RPS, click Next. The installation process
starts.
Install the SQL database and RPS
The installation of the SQL database is automatic. No user interaction is needed. When the
SQL database installation is complete, the RPS installation starts.
Install RPS
Installing RPS:
1. When the Welcome window opens, click Next. The Choose Destination Location window
opens.
Bosch Security Systems, Inc. Installation Guide 2015.03 | 18 | 4998141259
Page 12

12 en | New RPS installations Remote Programming Software (RPS)
2. Click Next to accept the default installation directory.Click Browse to select a different
directory, if desired, and then click Next. The Select Features window opens.
3. Select the desired features and control panel types for this RPS installation, then click
Next. The Select Program Folder window opens.
Notice!
If you wish to install Unattended Service, select the Unattended checkbox. By default,
Unattended Service is not installed.
2015.03 | 18 | 4998141259 Installation Guide Bosch Security Systems, Inc.
Page 13

Remote Programming Software (RPS) New RPS installations | en 13
4. Click Next. The Start Copying Files window opens.
5. Click Next. The Setup Status window indicates the installer's progress.
6. When the InstallShield Wizard Complete window opens, click Finish. The computer
restarts.
After logging onto the computer, start RPS by selecting Start > Bosch > RPS 6.x, or by double-
clicking on the computer's desktop. For login information, refer to Logging Into and Out
of RPS.
4.2
Bosch Security Systems, Inc. Installation Guide 2015.03 | 18 | 4998141259
View the installation log file
During installation, RPS creates the RPSInstallation.log file, and logs the entire installation
process in the file. This file is located in X:\RPS\Logs (“X” = the drive letter on the computer
where RPS is installed).
The log file contains the following:
– All installation log entries with summary information
– Database file transfer information
– RPS database information
Use the installation log file for troubleshooting purposes.
Page 14

14 en | New RPS installations Remote Programming Software (RPS)
4.3
Known issues
Network drive installation
– If you copy the contents of the RPS CD/DVD-ROM to a networked drive, the drive must be
mapped to a drive letter in order for RPS to properly install on local computers
connected to the networked drive.
– RPS cannot install from a networked drive that uses the Universal Naming Convention
(UNC).
– If you copy the contents of the RPS CD/DVD-ROM to a local or network drive, you must
change the Read/Write permission on the License folder.
Directory installation
Do not install a directory with a space in its name (for example, “Program Files”).
Unattended operation
Home versions of Microsoft’s operating systems do not support Unattended Service.
Microsoft SQL Express 2012 installation
If SQL Server is not already installed on the system, Microsoft SQL Express 2012 might fail to
install. This results in a termination of the RPS installation. To resolve this issue, reboot the
system, then rerun the RPS installation.
2015.03 | 18 | 4998141259 Installation Guide Bosch Security Systems, Inc.
Page 15

Remote Programming Software (RPS) RPS upgrades | en 15
5
5.1
RPS upgrades
Before upgrading RPS, review the list of special installation types. If any of the installation
types apply to your installation, review the instructions in the corresponding section prior to
upgrading.
Special upgrade types
v5.11 and lower upgrades, page 26
Review this section’s instructions prior to upgrading from RPS v5.11 or lower.
v5.6 and lower upgrades, page 25
Review this section’s instructions prior to upgrading from v.5.6 or lower to RPS 5.12 or higher.
Backup and restore the RPS database
Before you upgrade RPS, back up your current RPS database and export a copy of it for
recovery purposes, if needed. Refer to the RPS Help for more information related to backing
up the RPS database.
Backing up the RPS database:
1. In RPS, select File > Backup. The Backup Filename dialog box opens.
Notice!
In versions of RPS 3.x and earlier, Backup only backs up control panel accounts and
templates. In versions of RPS 5.x and higher, all data is backed up. The database backup does
not include firmware files that you upload to RPS. If you still need these files after the
database restore, re-upload the firmware files.
2. Enter a file name for the backup file, specify a location to save the backup file, and click
Save.
3. For versions of RPS 3.x and earlier:
Select the Operators List and record the data for all RPS operators.
Select Config > System > Datalock and record any datalock codes listed on the Datalock
tab.
Select Config > System> Encryption Key and record any encryption keys listed on the
Encryption Key tab.
Restoring the RPS database backup:
1. When the new installation of RPS is complete, start RPS.
2. In RPS, select File > Restore. The Import Accounts dialog box opens.
3. Find the backup file you created previously and click Open. RPS restores your control
panel accounts and templates.
4. For versions of RPS 3.x and earlier, re-enter the operator data, datalock codes, encryption
keys, and custom security settings that you recorded. For versions of RPS 5.x and higher,
re-enter custom security settings that you recorded.
RPS is now up-to-date with your account information.
Note: You can backup the SQL database using an SQL management tool.
5.2
Bosch Security Systems, Inc. Installation Guide 2015.03 | 18 | 4998141259
Upgrade RPS
Upgrading RPS:
Page 16

16 en | RPS upgrades Remote Programming Software (RPS)
1. Follow the instructions in Get started, page 8. RPS then detects the existing SQL database
and connects to it.
2. Follow the instructions in Install RPS, page 9 to complete the installation.
2015.03 | 18 | 4998141259 Installation Guide Bosch Security Systems, Inc.
Page 17

Remote Programming Software (RPS) Maintenance | en 17
6
6.1
Maintenance
Notice!
After system installation and any control panel programming, perform a complete system test.
A complete system test includes testing the control panel, all devices, and communication
destinations for proper operation.
Set security levels by panel type for networked users
If your company is using a database on a networked drive and you want to allow users to be
able to set security levels for control panels, you must copy the control panel definition files to
each workstation on the network. This preserves the security settings you have set for each
control panel type on the individual workstations on the network.
Notice!
If these files are not copied to each workstation, users on other workstations can change data
for control panel types that you restricted.
Transferring your security settings to other computers on the network:
1. From RPS, set the security levels for each control panel type on any one computer on the
network. Only users with an authority level of 15 can perform this operation.
Refer to the RPS General Help in RPS for more information on setting security levels in
RPS.
Notice!
Setting the security levels for a control panel type sets the levels for all accounts for that
control panel type (new and existing).
2. Use Windows Explorer to copy the appropriate control panel definition files (peg defs) to
each computer on the network after you set the security level for each field in each panel
type. To do this, open the RPS directory on the computer where you are currently
working. Find the folder labeled PegDefs.
3. Use Windows Explorer to copy the PegDefs folder to each of the RPS directories on all
workstations running RPS. Use the drag-and-drop feature in Windows to move the
PegDefs folder to each computer on the network. Click and hold the PegDefs folder with
the right mouse button and drag the folder to the RPS directory on the target workstation
computer. Release the right mouse button. A small dialog box opens and asks if you want
to Move, Copy, Create a Shortcut to the folder or Cancel
Notice!
Ensure that you select Copy. Selecting Move moves the entire PegDefs folder from the
current computer to the workstation computer. Click Yes if the File Already Exists - Do you
want to overwrite? message appears.
Bosch Security Systems, Inc. Installation Guide 2015.03 | 18 | 4998141259
Page 18

18 en | Maintenance Remote Programming Software (RPS)
Notice!
Moving the PegDefs folder prevents RPS from working on the current computer. If you
accidentally move the PegDefs folder, return it to the RPS directory on the computer, and
then recopy it to the workstation.
4. After Windows finishes the copy process, the workstation has the same security settings
as the original computer. Repeat Step 3 for each workstation on the network.
Notice!
If you change the control panel security setting in the future, you must copy the new PegDefs
files to each workstation again.
6.2
Modify, repair, or remove RPS
Modify RPS
Notice!
To modify the current RPS installation, you must use the original installation files.
If RPS was installed from the CD/DVD-ROM, you must use the CD/DVD-ROM.
If RPS was installed from a folder containing the installation files, you must use the same
folder in the location it resided at when RPS was installed.
Installing other features that were not initially installed, such as Unattended Operation, or
removing currently installed features:
1. Open the Windows Add/Remove Programs dialog box.
2. Scroll down the list until you see RPS. Click RPS to select it.
3. Click Change. The RPS Setup Maintenance dialog box opens.
2015.03 | 18 | 4998141259 Installation Guide Bosch Security Systems, Inc.
Page 19

Remote Programming Software (RPS) Maintenance | en 19
Figure 6.1:
4. Click Modify, and then click Next. The Select Features dialog box opens.
1. Select the checkboxes for the features you want to install, or clear the checkboxes for the
features you want to remove.
2. Click Next. The selected features are either installed or uninstalled as selected.
3. When the Install Complete dialog box opens, click Finish to end the RPS Setup
Maintenance process.
Repair RPS
Notice!
To repair the current RPS installation, you must use the original installation files.
If RPS was installed from the CD/DVD-ROM, you must use the CD/DVD-ROM.
If RPS was installed from a folder containing the installation files, you must use the same
folder in the location it resided at when RPS was installed.
Reinstalling all of the program features installed during the previous setup:
1. Select Start > Settings > Control Panel > Add/Remove Programs. The Add/Remove
Programs dialog box opens.
2. Scroll down the list until you see RPS. Click RPS to select it.
Bosch Security Systems, Inc. Installation Guide 2015.03 | 18 | 4998141259
Page 20

20 en | Maintenance Remote Programming Software (RPS)
3. Click Change/Remove. The RPS Setup Maintenance dialog box opens.
4. Click Repair, and then click Next. A progress indicator dialog box opens. When the repair
is complete, the Install Complete dialog box opens.
5. Click Finish to end the RPS Setup Maintenance process.
Remove RPS
Notice!
Only remove RPS if you do not intend on using RPS in the future.
If you are using an unreleased version of RPS, such as an alpha or beta version, you must
uninstall (remove) RPS before installing a released version.
Removing RPS and all of its features:
1. Select Start > Settings > Control Panel > Add/Remove Programs. The Add/Remove
Programs dialog box opens.
2. Scroll down the list until you see RPS. Click RPS to select it.
3. Click Change/Remove. The RPS Setup Maintenance dialog box opens.
4. Click Remove, and then click Next.
5. When the Confirm Uninstall dialog opens, click Yes. A progress dialog box opens.
6. When the removal process is complete, restart the computer.
6.3
Switch from a client to a network installation
It can be advantageous to place your RPS database files on a network drive so that many
workstations can access a single database.
Placing RPS database files on a network drive:
1. Start RPS, and log on when the RPS Logon Information dialog box opens.
2. Select Config > System. The System Configuration dialog box opens with the Work
Station Specific tab open and Database Settings highlighted.
3. In the Select or Enter SQL Server name field, select the name of the network SQL
Server.
1. If the SQL Server database already exists, enter the SQL Server Name, SQL Database
Name, User Name, and Password, then click OK. If the SQL Server database does not
already exist, enter the SQL Server Name and the desired SQL Database Name, User
Name and Password for the database, then click Create Database. The Database
Created Successfully dialog box opens.
2. Click OK. The Please re-login dialog box opens.
2015.03 | 18 | 4998141259 Installation Guide Bosch Security Systems, Inc.
Page 21

Remote Programming Software (RPS) Maintenance | en 21
3. Click OK to restart RPS.
When the database is shared on a network drive, two or more operators can access a single
account. When an operator attempts to access an account that is already open by another
operator (for example, one that has a different user name), a Panel Already Open dialog box
appears, indicating that the account is already opened for editing by another operator (the
operator's log-in name shows in the message box). The operator opening a second instance of
the database can view the contents of the account, but cannot edit any of the information in
the account.
Notice!
If an operator logs on to two different terminals with the same user name and accesses the
same account from both terminals, RPS prompts the operator at the second terminal to
either override the lock and allow edits, or open the account in View Only mode.
Do not log on to RPS using the same user name on multiple computers.
Bosch Security Systems, Inc. Installation Guide 2015.03 | 18 | 4998141259
Page 22

22 en | Appendix Remote Programming Software (RPS)
7
7.1
Appendix
RPS minimum system requirements
Computer system requirements
Operating System Windows 7, Windows 8, Windows 8.1, Windows Server 2008, Windows
Server 2012 R2
SQL Express 2012 SP2
Processor type x64 Processor: AMD Opteron, AMD Athlon 64, Intel Xeon with Intel
EM64T support, Intel Pentium IV with EM64T support
x86 Processor: Pentium III-compatible processor or faster
Processor speed Minimum:
x86 Processor: 1.0 GHz
x64 Processor: 1.4 GHz
Recommended: 2.0 GHz or faster
RAM Recommended:
x86 Processor: 1 GB
x64 Processor: 2 GB
Hard disk size x86 Processor: 16 GB of available hard disk space
x64 Processor: 20 GB of available hard disk space
7.2
7.2.1
Monitor Super-VGA or higher resolution: at least 1024 x 728 resolution
Notice!
These minimum system requirements are based on installing RPS with SQL Express on the
same computer. For any other configurations of OS and SQL, reference specific requirements
on Microsoft's website:
http://windows.microsoft.com
Notice!
Microsoft Operating System Support: As of July 13, 2010, Microsoft stopped supporting
Windows 2000. As of April 8, 2014, Microsoft will stop supporting Windows XP. As a result,
Bosch Security Systems, Inc. no longer supports the operation of RPS 5.13 or later on a
Windows 2000 or Windows XP operating system.
Automatic RPS installation
Overview
When installing or upgrading to version 5.12 or later, RPS creates a file called
RPSInstallation.ini. This file contains the SQL database settings that are selected when
installing or upgrading RPS.
2015.03 | 18 | 4998141259 Installation Guide Bosch Security Systems, Inc.
Page 23

Remote Programming Software (RPS) Appendix | en 23
After the first installation or upgrade of RPS, you can run the RPSInstallation.ini file to
complete subsequent installations or upgrades that are identical to the first installation or
upgrade.
7.2.2
Generate the RPSInstallation.ini file
To generate the RPSInstallation.ini file, you must install, or upgrade to, version 5.12 or later.
During the installation or upgrade process, RPS collects the selected settings for the SQL
database and saves them at X:\RPSInstallation.ini (“X” = the drive letter assigned to the
computer’s local drive).
The RPSInstallation.ini file contains the following settings:
– SQLExpressInstanceName: This setting contains the name of the selected SQL Express
instance name.
– RPSDatabaseName: This setting contains the name of the selected RPS database.
– UserName: This setting contains the user name required for SQL authentication. By
default, RPS uses Windows authentication. This setting is not required for Windows
authentication.
– Password: This setting contains the password required for SQL authentication. By
default, RPS uses Windows authentication. This entry is not required for Windows
authentication. This entry is encyrpted.
7.2.3
Figure 7.1: Example RPSInstallation.ini file
Use the RPSInstallation.ini file
Using the RPSInstallation.ini file to install RPS with the same SQL database settings as the
first installation:
1. Copy the following files to a blank CD-ROM:
– All files from the master RPS CD-ROM
– The RPSInstallation.ini file from the computer where the first installation or upgrade
was performed (X:\RPSInstallation.ini, where “X” = the drive letter assigned to the
computer’s local drive).
All of the required installation files, including the RPSInstaller.exe file, reside in the
fscommand folder at the root level of the RPS CD-ROM. The RPSInstallation.ini file
must reside in this folder as well.
2. Insert the copied RPS CD-ROM into the next computer that requires an installation or
upgrade of RPS.
RPS installs the SQL database according to the settings in the RPSInstallation.ini file, and
then installs RPS. When the installation process is complete, RPS connects to the SQL
database.
3. Repeat Step 2 for all remaining computers that require an RPS installation or upgrade.
Bosch Security Systems, Inc. Installation Guide 2015.03 | 18 | 4998141259
Page 24

24 en | Appendix Remote Programming Software (RPS)
7.2.4
7.3
Customize the RPSInstallation.ini file
If the RPS installation requires that the SQL database is installed locally on each computer
(not shared), you can customize the RPSInstallation.ini file.
Customizing the RPSInstallation.ini file:
1. Create a text file (.txt) in a text editor such as Notepad.
2. Copy the following lines in the order as shown below:
– [Installation]
– NewSQLInstance=
– NewRPSDatabase=
3. Save the file.
Use RPSInstallation for the filename. Change the file extension from .txt to .ini.
4. Close the file.
5. Copy the custom .ini file along with all of the files on the master RPS CD-ROM to a blank
CD-ROM.
All of the required installation files, including the RPSInstaller.exe file, reside in the
fscommand folder at the root level of the RPS CD-ROM. The RPSInstallation.ini file must
reside in this folder as well.
6. Install RPS onto each computer that requires an installation or upgrade.
RPS creates unique SQL instance names and RPS database names on each computer.
Back up the SQL or SQL Express database
1. From the computer's Start > Programs menu, select Microsoft SQL Management Studio
or Microsoft SQL Management Studio Express.
2. When the Connect to Server dialog box opens, click Connect.
3. Right-click the RPS database, then select
Tasks > Back Up....
2015.03 | 18 | 4998141259 Installation Guide Bosch Security Systems, Inc.
Page 25

Remote Programming Software (RPS) Appendix | en 25
4. When the Back Up Database dialog box opens, click OK.
5. When the Backup Completed Successfully dialog box opens, click OK.
7.4
7.4.1
Bosch Security Systems, Inc. Installation Guide 2015.03 | 18 | 4998141259
Special upgrade types
v5.6 and lower upgrades
If you are using a version of RPS prior to RPS 5.7, automatic upgrading to RPS 5.12 or later is
not supported. You must first uninstall the current version of RPS and perform a new
installation to install the latest version of RPS.
Prior to uninstalling the current version of RPS, back up the RPS database. Refer to Backup
and restore the RPS database, page 15.
Page 26

26 en | Appendix Remote Programming Software (RPS)
7.4.2
v5.11 and lower upgrades
In Versions 5.11 and lower, RPS uses a network drive to share database files (.dat files)
among all of the RPS computers. In Versions 5.12 and later, RPS integrates the .dat files into
the SQL database. The SQL database is then installed locally on the same computer that RPS
is installed on, or it is installed on a network that all of the RPS computers can access.
During a new installation of RPS 5.12 or higher, or when upgrading to RPS 5.12 or higher, the
RPS .dat files are automatically integrated into the SQL database.
This section describes the steps to take if the DAT files do not integrate automatically.
Manual integration
If the integration of the RPS .dat files into the SQL database fails (for example, a network
failure occurs), then the RPS .dat files must be manually integrated into the SQL database.
Manually integrating the RPS .dat files into the SQL database:
1. Start RPS, and log on when the RPS Logon Information dialog box opens.
2. Select Config > System. The System Configuration dialog box opens.
3. Select the Database Settings tab.
4. Click Upgrade Database. All existing RPS .dat files are copied from their current location
to the new SQL database location.
Upgrade from RPS 5.11 and lower
If upgrading from RPS 5.11 and lower, the DAT Files Integration window opens when you click
Upgrade Database on the File Locations tab.
– If the path shown in the DAT Files Integration window matches the location of the RPS
database files, click OK.
– If the path shown in the DAT Files Integration window does not match the path to where
the new SQL database is installed, click Browse, and navigate to the location of the new
SQL database. Then click OK.
All existing RPS .dat files are copied from their current location to the new SQL database
location.
Create a new database
If the SQL database fails to upgrade automatically, click Create Database on the File
Locations tab to merge the existing database with a new database.
Conversion log file
If an RPS .dat file does not exist in the database folder, RPS copies a corresponding
default .dat file to the new SQL database location. RPS then creates a DATFileConversion.log
file in X:\RPS\Logs (“X” = the drive letter associated to the drive where RPS is installed).
This log file consists of the following information:
– The date and time that the conversion occurred
– The versions that RPS was upgraded from and to
– The location of the RPS .dat files before the conversion started
– The conversion results
Below is a sample conversion file log:
2015.03 | 18 | 4998141259 Installation Guide Bosch Security Systems, Inc.
Page 27

Remote Programming Software (RPS)
To view the DATFileConversion.log file, click View Conversion Log on the DAT File Integration
Results window.
Share the SQL database
If several networked computers share the SQL database, the first computer requires the RPS
upgrade. After that, run RPS on the first computer to upgrade the existing SQL database
before installing the new version of RPS on the other networked computers. During the
database upgrade, the database files (.dat files) are moved from the shared database folder
and merged into the SQL database.
The site’s network administrator usually performs the first upgrade. All other users only need
to upgrade the RPS application on their local computers.
Appendix | en 27
Bosch Security Systems, Inc. Installation Guide 2015.03 | 18 | 4998141259
Page 28

28 en | Index Remote Programming Software (RPS)
Index
A
Authentication
SQL, 10
Windows, 9
B
Back Up the SQL or SQL Express Database, 24
C
Client
Switch from a Client to a Network Installation, 20
Conversion File Log, 26
D
Database
Automatic Integration of the RPS Database Files
into the SQL Database, 26
Back Up the SQL or SQL Express Database, 24
Conversion File Log, 26
Create a New Database, 26
Create new RPS Database, 10
Install RPS with a Local SQL Database, 8
Manual Integration of the RPS Database Files into
the SQL Database, 26
Select existing RPS Database, 10
Share SQL Database option, 10
Share the SQL Database, 27
Upgrading from RPS 5.11 or lower, 26
DATFileConversion.log, 26
I
Install
.Database, 11
.SQL, 11
Installation
Automatic Installation, overview, 22
Customize the RPSInstallation.ini File, 24
Generate the RPSInstallation.ini File, 23
Install RPS with a Local SQL Database, 8
Overview, 7
Switch from a Client to a Network Installation, 20
Use the RPSInstallation.ini File, 23
View the Installation Log File, 13
Instance
Use an Existing SQL Instance, 9
Integration
Automatic Integration of the RPS Database Files
into the SQL Database, 26
Integrate the RPS Database Files into the SQL
Database, 26
Manual Integration of the RPS Database Files into
the SQL Database, 26
L
Local
Install RPS with a Local SQL Database, 8
Switch from a Client to a Network Installation, 20
Log
Conversion File Log, 26
View the Installation Log File, 13
M
Modify
Modify RPS, 18
N
Network
Set Security Levels by Panel Type for Networked
Users, 17
Switch from a Client to a Network Installation, 20
2015.03 | 18 | 4998141259 Installation Guide Bosch Security Systems, Inc.
Page 29

Remote Programming Software (RPS) Index | en 29
R
Reinstall
Repair RPS, 19
Remove
Remove RPS, 20
Repair
Repair RPS, 19
RPS
Automatic Installation, overview, 22
Automatic Integration of the RPS Database Files
into the SQL Database, 26
Create a New Database, 26
Create new RPS Database, 10
Customize the RPSInstallation.ini File, 24
Database, 11
Generate the RPSInstallation.ini File, 23
Install, 11
Install RPS with a Local SQL Database, 8
Installation, overview, 7
Manual Integration of the RPS Database Files into
the SQL Database, 26
Modify RPS, 18
Remove RPS, 20
Repair RPS, 19
RPSInstallation.ini file, 23
Select existing RPS Database, 10
SQL, 11
Upgrading from RPS 5.11 or lower, 26
Use the RPSInstallation.ini File, 23
View the Installation Log File, 13
U
Uninstall
Remove RPS, 20
Upgrade
Create a New Database, 26
Share the SQL Database, 27
Upgrading from RPS 5.11 or lower, 26
Upgrade RPS, 15
Upgrade v5.11 and lower, 26
Upgrade v5.6 and lower, 25
User
Set Security Levels by Panel Type for Networked
Users, 17
W
Windows
Authentication, 9
S
Security
Set Security Levels by Panel Type for Networked
Users, 17
SQL
Authentication, 10
Automatic Integration of the RPS Database Files
into the SQL Database, 26
Back Up the SQL or SQL Express Database, 24
Conversion File Log, 26
Create a New Database, 26
Install RPS with a Local SQL Database, 8
Manual Integration of the RPS Database Files into
the SQL Database, 26
Share SQL Database option, 10
Share the SQL Database, 27
Use an Existing SQL Instance, 9
Switch from a Client to a Network Installation, 20
Bosch Security Systems, Inc. Installation Guide 2015.03 | 18 | 4998141259
Page 30

Page 31

Page 32

Bosch Security Systems, Inc.
130 Perinton Parkway
Fairport, NY 14450
USA
www.boschsecurity.com
© Bosch Security Systems, Inc., 2015
Bosch Sicherheitssysteme GmbH
Robert-Bosch-Ring 5
85630 Grasbrunn
Germany
 Loading...