

Page 1

RX+ 10
Digitalradio mit Uhrenfunktion
Digital radio with clock radio
Page 2

RX+ 10
2
Page 3

RX+ 10
3
Page 4

RX+ 10
4
Page 5

RX+ 10
5
Page 6

RX+ 10
6
Page 7

RX+ 10
7
Page 8

RX+ 10
8
Page 9

RX+ 10
9
Page 10
RX+ 10
10
Page 11

RX+ 10
11
Page 12
RX+ 10
12
Page 13

RX+ 10
13
Page 14
RX+ 10
14
Page 15

RX+ 10
15
Page 16

RX+ 10
16
Page 17

RX+ 10
17
Page 18

RX+ 10
18
Page 19

RX+ 10
19
Page 20

RX+ 10
20
Page 21

RX+ 10
21
Page 22

RX+ 10
22
Page 23
RX+ 10
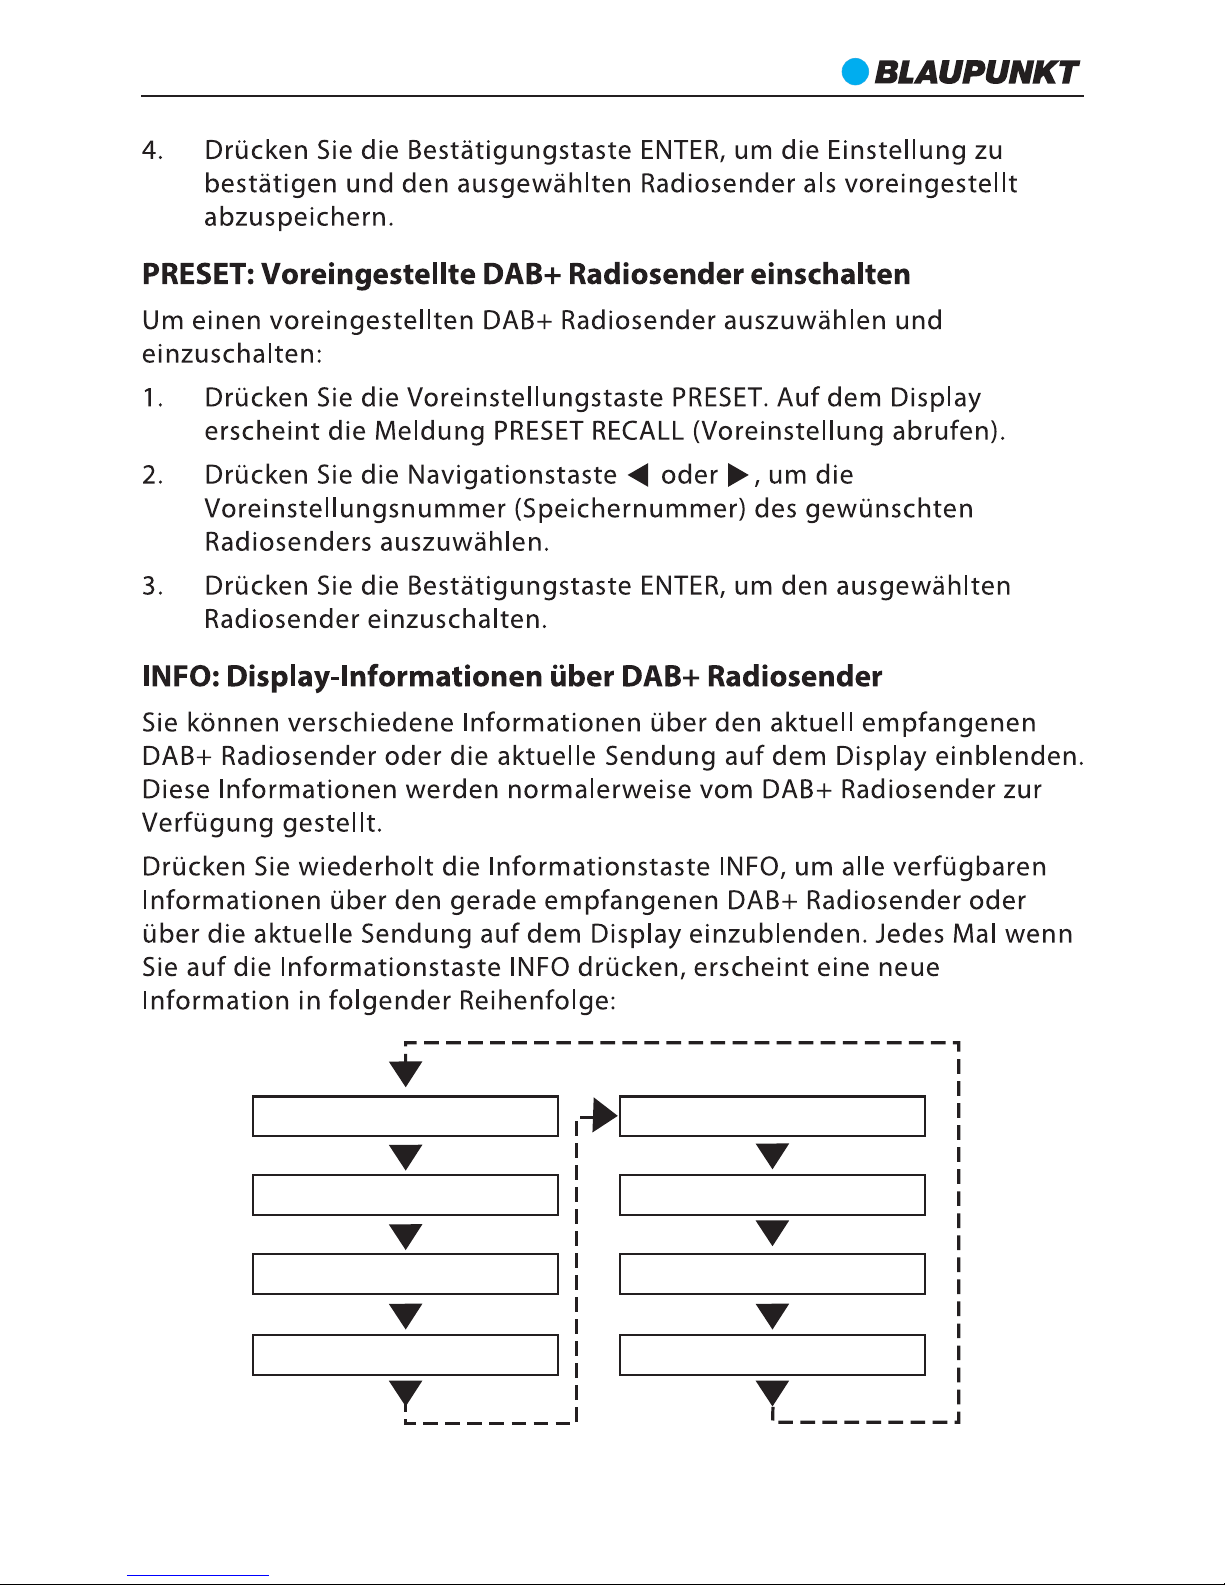
Signal error
Time/Date
DLS (radio text)
Frequency
Program type
Program name
Bit rate
Signal strength
23
Page 24

RX+ 10
24
Page 25

RX+ 10
25
Page 26

RX+ 10
26
Page 27

RX+ 10
27
Page 28

RX+ 10
28
Page 29

RX+ 10
Programme
Type Time/date
Signal strength
Radio Text
29
Page 30

RX+ 10
30
Page 31

RX+ 10
31
Page 32

RX+ 10
32
Page 33

RX+ 10
33
Page 34

RX+ 10
34
Page 35

RX+ 10
35
Page 36

RX+ 10
36
Page 37

RX+ 10
37
Page 38

RX+ 10
38
Page 39

RX+ 10
39
Page 40

RX+ 10
40
Page 41
RX+ 10
IMPORTANT SAFETY INSTRUCTIONS
Important Safety Instructions
Caution:
To reduce the risk of electric shock, do not dismantle the product and do not expose
the apparatus to rain or moisture. No user-serviceable parts inside. Refer ser vicing to
qualified personnel only.
Explanation of Graphical Symbols:
To achieve the utmost in enjoyment and performance, and in order to become familiar
with its features, please read this manual carefully before attempting to operate this
product. This will assure you years of trouble free performance and listening pleasure.
Important Notes
This safety and operating instruction should be retained for future reference.
The apparatus should not be exposed to dripping or splashing or placed in a
humid atmosphere such as a bathroom.
Do not install the product in the following areas:
Places exposed to direct sunlight or close to radiators.
On top of other stereo equipment that radiate too much heat.
Blocking ventilation or in a dusty area.
Areas where there is constant vibration.
Humid or moist places.
Do not place near candles or other naked flames.
Operate the product only as instructed in this manual.
Before turning on the power for the first time, make sure the power adaptor is
properly connected.
For safety reasons, do not remove any covers or attempt to gain access to the inside of
the product. Refer any servicing to qualified personnel.
Do not attempt to remove any screws, or open the casing of the unit; there are no user
serviceable parts inside. Refer all ser vicing to qualified service personnel.
The lightning flash within an equilateral triangle is intended to alert
you to the presence of uninsulated dangerous voltage within the
product's enclosure that may be of sufficient magnitude to constitute
an electric shock to a person or persons.
The exclamation point within an equilateral triangle is intended to
alert you to the presence of important operating and maintenance
(servicing) instructions in the literature accompanying the product.
41
Page 42

Conformity
Model number: RX+ 10
Description: Digital radio with clock radio
Brand name: Blaupunkt
Responsible party: M3 Electronic GmbH
Gutenbergstrasse 5, D-65830 Kriftel. Germany
Hereby, Blaupunkt Competence Center Audio M3 Electronic GmbH, declares that this
Class 1 equipment is in compliance with the essential requirement and other relevant
provisions of Directive 1999/5/EC.
Letter of conformity can be obtained from info@m3-electronic.de.
SAFETY INSTRUCTIONS
1. Read Instructions - All the safety and operating instructions must be read before
the product is operated.
2. Retain Instructions - The safety and operating instructions should be kept with the
product for future reference.
3. Heed warnings - All warnings on the product and in the operating instructions
should be adhered to.
4. Follow instructions - All operating and users’ instructions should be followed.
5. Installation - Install in accordance with the manufacturer's instructions.
6. Power sources - This product should be operated only from the type of power
source indicated by the marking adjacent to the power cord entry. If you are not sure
of the type of power supply to your home, consult your product dealer or local power
company.
7. Grounding or polarization - the product is not required to be grounded. Ensure
that the plug is fully inserted into the wall outlet or extension cord receptacle to
prevent blade or pin exposure. Some versions of the product are equipped with a
power cord fitted with a polarized alternating line plug (a plug having one blade
wider than the other). This plug will fit onto the power outlet only one way. This is a
safety feature. If you are unable to insert the plug fully into the outlet, try reversing
the plug. If the plug should still fail to fit, contact your electrician to replace your
obsolete outlet. Do not defeat the safety purpose of the polarized plug. When using
an extension power-supply cord or a power-supply cord other than that supplied with
the appliance, it should be fitted with the appropriate molded plugs and carry safety
approval appropriate to the country of use.
8. Power cord protection - Power-supply cords should be routed so that they are not
likely to be walked on, kinked or pinched by items placed on or against them, paying
particular attention to cords from plugs, receptacles and the point where they exit
from the product.
9. Overloading - Do not overload wall outlets, extension cords, or multiple sockets, as
this can result in a risk of fire or electric shock.
RX+ 10
42
Page 43

10. Ventilation - The product must be properly ventilated. Do not place the product
on a bed, sofa, or other similar surface. Do not cover the product with any items such
as tablecloths, newspapers, etc.
11. Heat - The product should be situated away from heat sources such as radiators,
heat registers, stoves, or other products, including amplifiers that produce heat. No
naked flame sources, such as lighted candles, should be placed on the apparatus.
12. Water and moisture - To reduce the risk of fire or electric shock, do not expose the
product to train, dripping, splashing or excessive moisture such as in a sauna or
bathroom. Do not use this product near water, for example, near a bathtub, washbowl,
kitchen sink, laundr y tub, in a wet basement or near a swimming pool (or similar).
13. Object and Liquid Entry - Never push objects of any kind into this product
through openings, as they may touch dangerous voltage points or short-circuit parts
that could result in a fire or electric shock. Never spill liquid of any kind on the
product. Do not place any object containing liquid on top of the product.
14. Cleaning - Unplug the product from the wall outlet before cleaning. Dust in the
woofer may be cleaned with a dry cloth. If you wish to use an aerosol cleaning spray,
do not spray directly on the cabinet; spray onto the cloth. Be careful not to damage
the drive units.
15. Attachments - Do not use attachments not recommended by the product
manufacturer, as they may cause hazards.
16. Accessories - Do not place this product on an unstable cart, stand, tripod, bracket
or table. The product may fall, causing serious injury to a child or adult, and serious
damage to the product. Use only with a cart, stand, tripod, bracket or table
recommended by the manufacturer or sold with the product. Any mounting of the
product should follow the manufacturer’s instructions and should use a mounting
accessory recommended by the manufacturer.
17. Moving the product - A product and cart combination should be moved with
care. Quick stops, excessive force and uneven sur faces may cause the product and cart
combination to overturn.
18. Unused periods - The power cord of the appliance should be unplugged from the
outlet during lightning storms or when the apparatus is left unused for a long period
of time.
19. Servicing - Do not attempt to service this product yourself, as opening or
removing covers may expose you to dangerous voltage or other hazards. Refer all
servicing to qualified service personnel.
20. Please remove the power plug form the main power source or wall power source
when not in use. When plugged in to a power source, the system is in standby mode,
so the power is not entirely cut off.
21. Replacement parts - When replacement parts are required, ensure that the
service technician has used replacement parts specified by the manufacturer or have
the same characteristics as the original part. Unauthorized substitutions may result in
fire, electric shock or other hazards.
RX+ 10
43
Page 44

22. Mains fuses - For continued protection against fire hazard, use fuses only of the
correct type and rating. The correct fuse specification for each voltage range is
marked on the product.
23. Do not turn up the volume while listening to a section with very low level inputs or
no audio signals. If you do, the speaker may be damaged when a peak level section is
suddenly played.
24. The only means of completely disconnecting the product from the power supply is
by removing the power cord from the wall outlet or the product. The wall outlet or the
power cord entry to the product must remain freely accessible at all times while the
product is in use.
25. Try to install the product near a wall socket or extension cord and shall be easily
accessible.
26. The highest environmental temperature suitable for this product is 35°C.
27. ESD hints - The normal function of the product may be disturbed by strong
Electro-Magnetic Interference. If so, simply reset the product to resume normal
operation by following the instruction manual. In case the function could not resume,
please use the product in other location.
WARNING
This appliance is not intended for use by persons (including children) with reduced
physical sensory or mental capabilities, or lack of experience and knowledge, unless
they have been given supervision or instruction concerning use of the appliance by a
person responsible for their safety. Children should be supervised to ensure that they
do not play with the appliance.
1. Never use the device unsupervised! Switch off the device whenever you are not
using it, even if this only for a short while.
2. The appliance is not intended to be operated by means of an external timer or
separate remote control system.
3. If the supply cord is damaged, it must be replaced by the manufacturer, its service
agent or similarly qualified persons in order to avoid a hazard.
4. Before operating this system, check the voltage of this system to see if it is identical
to the voltage of your local power supply.
28. Battery
1). The batteries must not be exposed to excessive heat such as sunshine, fire or the
like.
2). The batteries should be drawn to the environmental aspects of battery disposal.
3). Battery usage CAUTION-to prevent battery leakage which may result in body
injuries, property damage, or damage to the apparatus:
- Install all batteries correctly, + and – as marked on the apparatus.
- Do not mix batteries (old and new or carbon and alkaline, etc.)
- Remove batteries when the unit is not used for a long time.
RX+ 10
44
Page 45

RX+ 10
5. The unit should not be impeded by covering the ventilation opening with items
such as newspaper, table -cloths, curtains etc. Make sure that there are at least 20 cm
of space above and at least 5 cm of space on each side of the unit.
6. The apparatus must not be exposed to dripping or splashing and that objects filled
with liquids, such as vases, must not be placed on the apparatus.
7. To prevent fire or shock hazard, do not expose this equipment to hot places, rain,
moisture or dust.
8. Do not locate this unit near any water sources e.g. taps, bathtubs, washing
machines or swimming pools. Ensure that you place the unit on a dry, stable surface.
9. Do not place this unit close to a strong magnetic field.
10. Do not place the unit on a amplifier or receiver.
11. Do not place this unit in a damp area as the moisture will affect the life of electric
components.
12. If the system is brought directly from a cold to a warm location, or is placed in a
very damp room, moisture may condense on the lens inside the player. If this occurs,
the system will not operate properly. Please leave the system turned on for about an
hour until the moisture evaporates.
13. Do not attempt to clean the unit with chemical solvents as this might damage the
finish. Wipe with a clean, dry or slightly damp cloth.
14. When removing the power plug from the wall outlet, always pull directly on the
plug, never pull on the cord.
15. The mains plug is used as the disconnect device, the disconnect device must
remain readily operable.
45
Page 46
RX+ 10
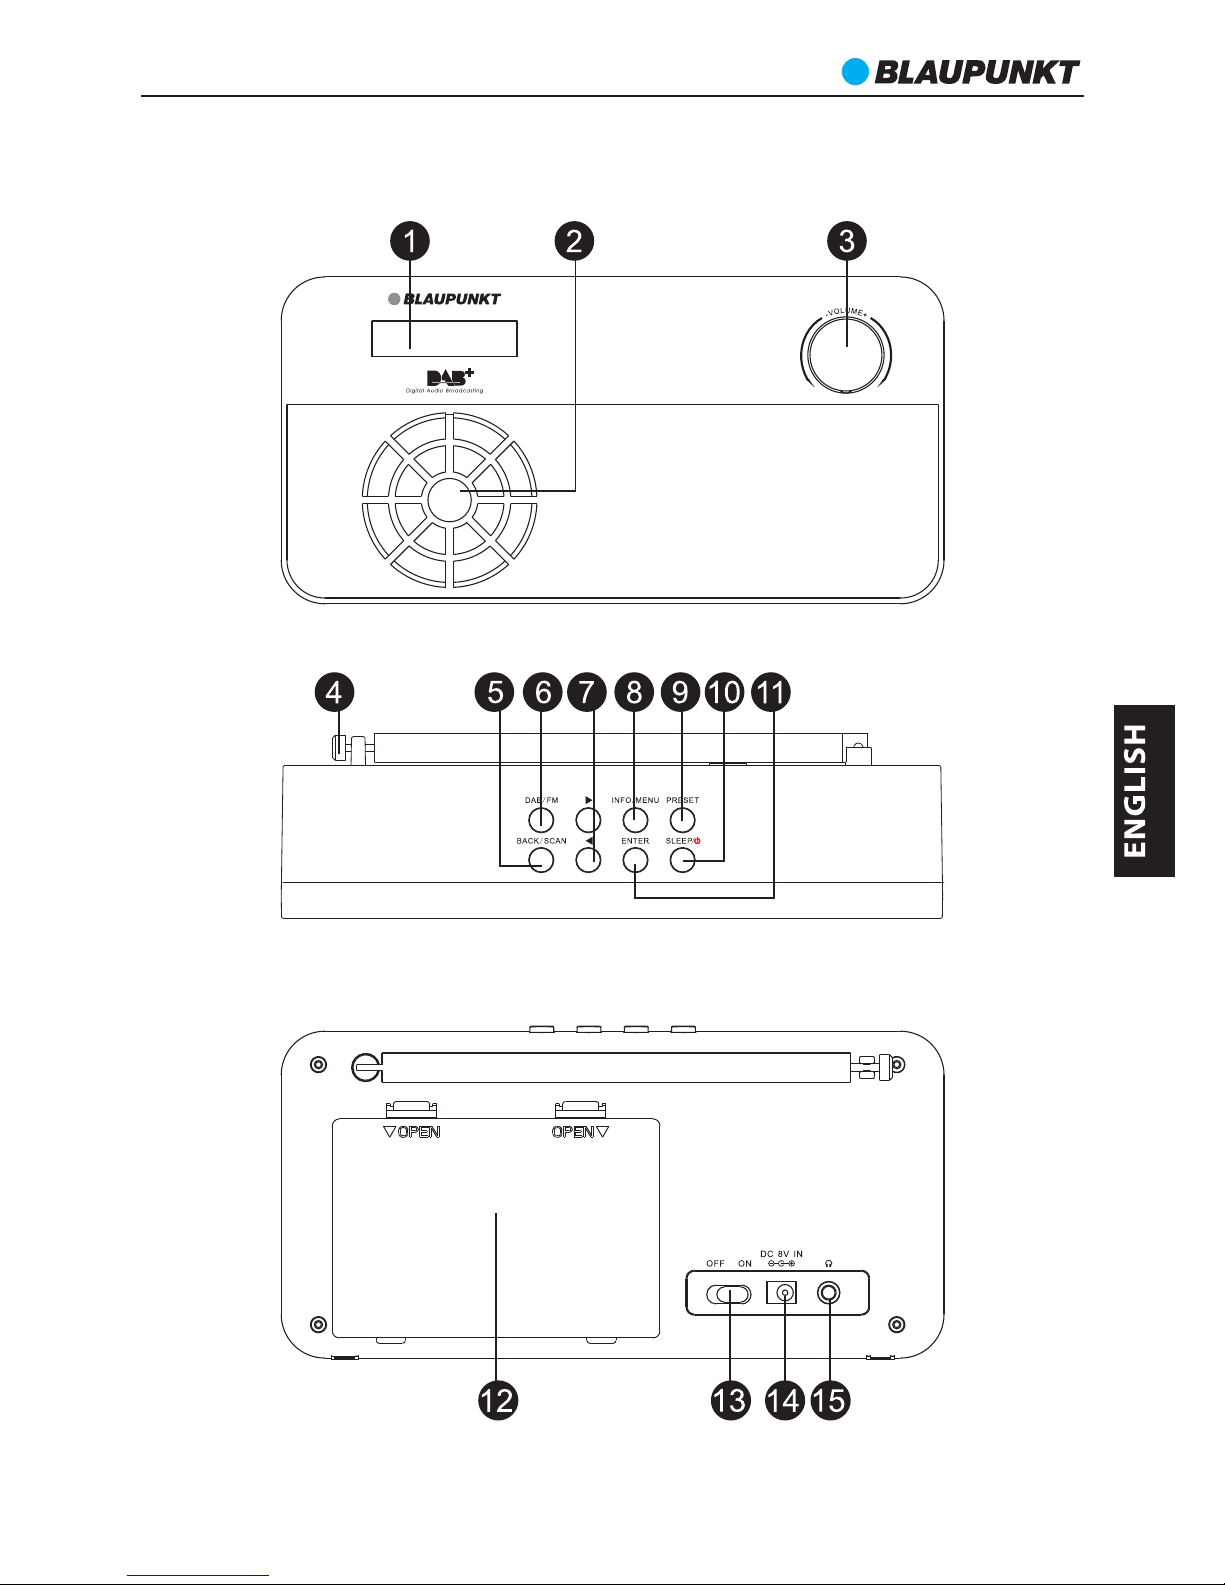
PANEL CONTROLS
46
Page 47
RX+ 10
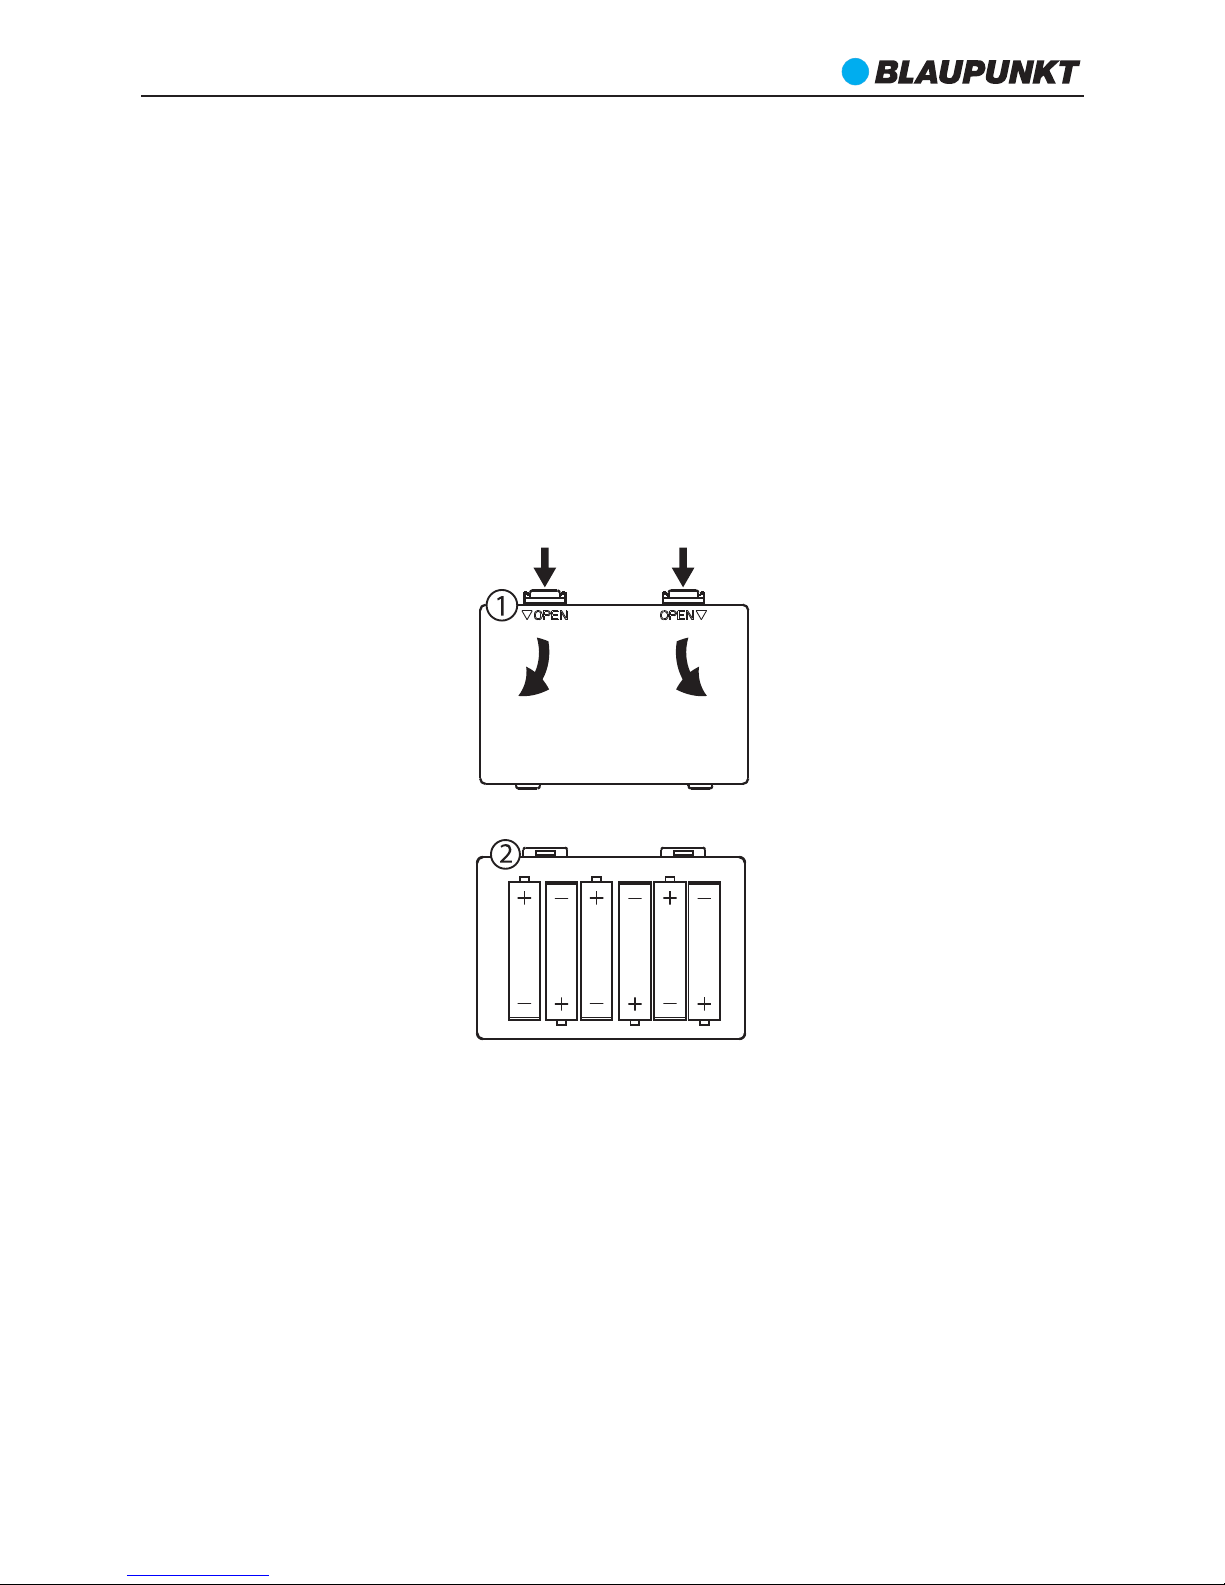
BATTERY POWER INSTALLATION
When replacing the batteries, refer to the diagram 1 & 2.
1. Push and open the battery door on the rear panel of unit and put six
batteries into the compartment. Please pay attention to the polarity
symbol, and direct it accordingly.
2. Close the battery door and the radio is ready to play with batteries.
DISPOSAL OF BATTERIES
Dispose used batteries with regard to the recycling regulations in your
area. Do NOT short circuit batteries or throw them into water, the general
rubbish or in a fire. Weak batteries can leak and damage the radio. Replace
them in good time!
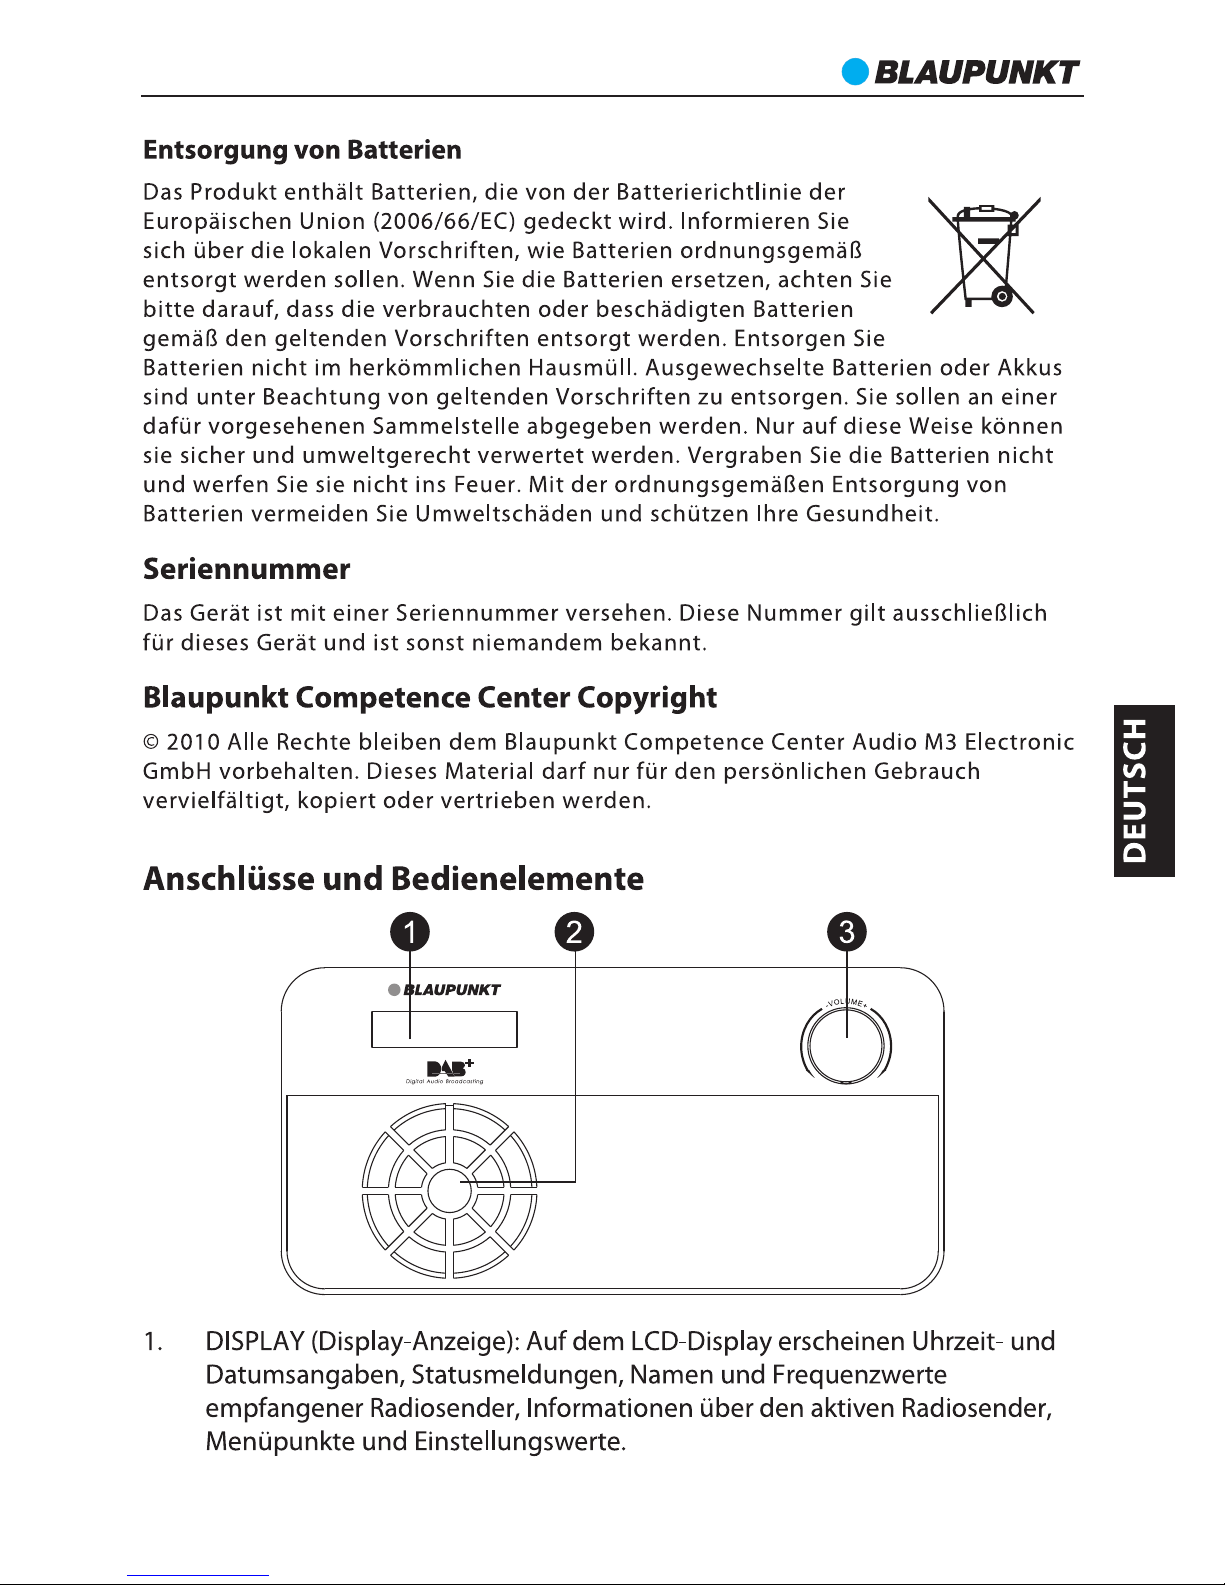
1. DISPLAY SCREEN
2. SPEAKER
3. VOLUME+/-
4. AERIAL
5. BACK/SCAN
6. DAB/FM
7. UP/DOWN
8. INFORMATION/MENU
9. PRESET
10. SLEEP/STANDBY
11. ENTER
12. BATTERY COMPARTMENT
13. POWER SWITCH
14. POWER INPUT
15. EARPHONE PORT
47
Page 48
RX+ 10
GENERAL OPERATION
Mains Adaptor (supplied with the package)
Connect the mains adaptor to the power socket on the rear panel.
Battery (not supplied)
Open the battery door and insert 6 x 1.5V batteries. (Pay attention to the
+/- polarities.)
Get the best reception
Extend the telescopic aerial as far as it can go. Place the unit away from
other electronic appliances like laptops.
Power on the unit
Slide the Power ON/OFF switch to ON to turn on the radio. The radio will
automatically operate the quick scan in DAB+ mode after you switch on for
the first time.
Listen to the radio by earphone
Connect the earphone via the earphone port on the rear panel.(Power on
and rotate the volume knob to adjust the volume to the lowest level
before you insert the earphone.)
Wake up the unit
Press and hold the STANDBY button to turn to standby mode or to wake
up the unit.
Adjust the volume
Rotate the volume knob to adjust the volume to a comfortable level.
Listen to the radio at high volume level may destroy the hearing. Avoid
listening at high volume level for long time.
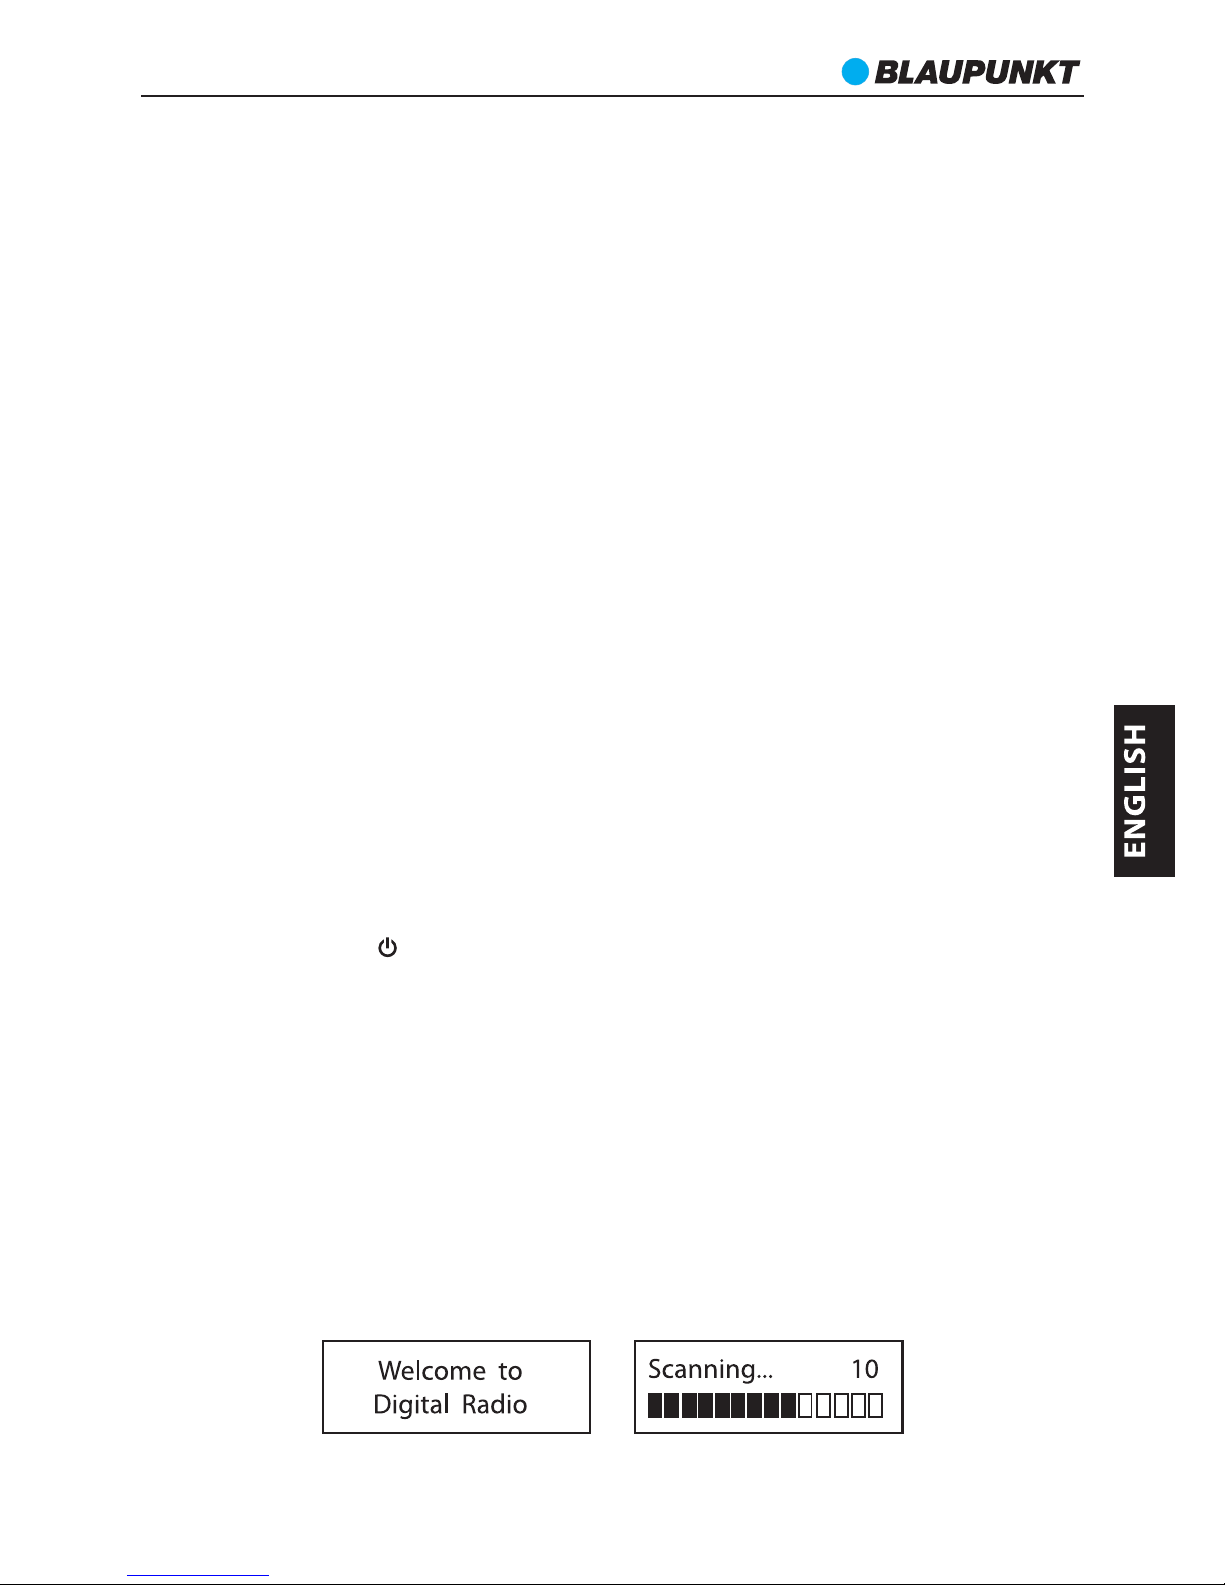
Turn on the unit for the first time
Slide the Power On/Off to switch on the radio, the unit will automatically
scan the stations it founds in DAB+ mode after you switch on for the first
time.
48
Page 49

RX+ 10
During scanning, the screen will display a slide bar that indicates the
progress of the scan, and the amount of radio stations that have been
found so far. Once the scan has finished, the radio will select the first
alphanumeric station.
Sleep timer
To set the sleep time, continuously press the SLEEP button to select from
Sleep off, 15 minutes, 30 minutes, 45 minutes, 60 minutes, 90 minutes.
When the time is out, the unit will enter sleep mode.
Select modes
Press DAB/FM button to enter DAB mode or FM mode.
Menu setting operation
Press and hold the MENU button to enter the menu setting interface, use
the / button to select the menu contents. Press ENTER button to
confirm the selection or to enter the next setting interface.
Press the BACK button to go back to the previous setting interface or exit
the menu.
Store stations
It is possible to store up to 10 of your favorite stations. This will enable you
to access your favorite stations quickly & easily.
1. To store a preset, you must first be listening to the station you would like
to save.
2. Press and hold the PRESET button 3 seconds. The screen will then show:
3. Press or to select the desired preset number 1~10.
4. Press ENTER to confirm.
Recall a stored station
Once you have saved the stations to the preset buttons, you can recall by
pressing the PRESET button. The screen will show <Preset Recall>. Then
press or to select the stored stations, and press ENTER to confirm.
49
Page 50

RX+ 10
Scan stations
Press and hold the SCAN button to scan the stations.
Station information
Briefly press the INFO button to check the station’s information. Please
refer to DISPLAY INFORMATION.
NOTE: (in the menu setting interface)
The dialogue screen marks the current setting with an asterisk (*).
Enter the menu setting interface
1. Press and hold the MENU button,
*when the <Station scan> appears in DAB mode, or
*when the <Audio setting> appears in FM mode, press or button to
find the <Main menu>.
2. Press ENTER button and then press / button to cycle through the
menu contents:
<Time setup>, <Alarms>,<Sleep>, <Language>, <Prune station>,
<Station order>, <DRC> (in DAB mode), <Factory reset>, <SW version>.
3. Select one of the contents, and press ENTER to enter the setting
interface.
Time auto update
The time and date can be updated automatically if the system detects the
RDS signal. But if the RDS (radio data system) is not strong enough, the
time can not be auto updated.
Follow the steps of manual set time to update the time.
Manual set time
Follow the steps to manually update the time and date. The original time
and date are displayed as
Press and hold the MENU button to enter the menu setting interface,
press / and then press ENTER to enter the <Time setup>. Then press
ENTER button to enter the selection interface. Press / button to select
the digits of the time and date.
50
Page 51

RX+ 10
1. Set clock> Press ENTER> 00:00(Hour:Minutes)> Press / to select
the Hour digits> Press ENTER> Press / to select the Minute digits>
Press ENTER to confirm.
2. Set date> Enter the date 01-01-2014 (Day-Month-Year)> Use the above
steps of SET CLOCK to select the digits of the date, press ENTER to
confirm.
3. Auto update> Select No update or From radio> Press ENTER to
confirm selection.
*If selected NO UPDATE, the time and date will not update from the
system, and you should manually set the time and date.
*If selected FROM RADIO, the time and date will auto update from the
system if it detects the RDS signal. But if the RDS signal is not strong
enough, the time/date will not update.
4. Set 12/24 hour> Use / to select the 12 hour or 24 hour according to
your favor> Press ENTER to confirm.
5. After finish the steps above, the time is set up manually.
Set the Alarms
Enter <Main menu>, then select <Alarms>. When the <Alarm 1: off>
appears:
1. Press ENTER button to set the alarm ON, the screen display as:
Use the / to select the alarm time, press ENTER to confirm.
2. Select the alarm days: Daily, Once, Weekdays, Weekends.
3. Set the alarm mode: DAB, FM, Buzzer.
*If you choose the DAB or FM mode as the alarm mode, the unit will offer
you to select a preset (if any available) or the last listened radio.
*If you choose the Buzzer mode, when the alarm goes on, there will be a
audible sound coming. Press ENTER button to set to NAP status, the alarm
goes on again after 5 minutes. To stop the alarm, press SLEEP button.
4. Set the presets, this option enables the unit to turn on from one of the
preset stations or from the last listened station if unit is set to alarm in FM
or DAB mode.
5. Set the alarm volume level, there is a slide bar for adjusting the alarm
volume, press / buttons to increase or decrease the volume level, press
ENTER to confirm.
51
Page 52

RX+ 10
6. After all the above settings, enter the SAVE interface, press ENTER to
save the alarm 1. To set alarm 2, follow the steps of alarm 1.
7. To cancel the alarms, enter the alarm setting interface, press ENTER
button to select alarm off and enter SAVE interface to save the alarm off
setting.
Sleep time setting (Briefly press SLEEP button)
Enter the sleep time setting interface to select the sleep time:
15/30/45/60/90 minutes/sleep off.
Language
Select one of the languages of the system: English or German.
Factory Reset
To set the unit to the original settings, enter the factory reset interface,
follow the tips (Press INFO button), then the unit will restart.
SW Version
To check the software version of the system.
Display information
Press INFO button in DAB mode repeatedly cycle through the DAB
information provided by the broadcasting stations:
Briefly press INFO button in FM mode to cycle through the FM information
provided by the stations:
Signal error
Time/Date
DLS (radio text)
Frequency
Program type
Program name
Bit rate
Signal strength
Programme
Type Time/date
Signal strength
Radio Text
52
Page 53

RX+ 10
Ensemble/Station name/Multiples
A multiplex/ensemble is a collection of radio stations that are bundled and
transmitted on one frequency. There are national and local multiplexes.
Local ones contain stations that are specific to that area e.g. MXR West.
NOTE: DAB-unlike normal radio, groups together several radio stations
and transmits them on one frequency.
DLS (Dynamic Label Segment)
Dynamic label segment is message that the broadcaster may include with
their transmissions. It usually includes the information like music style,
etc.
Radio text
As with DAB, the broadcaster can include the station text that displays the
information about the current program.
If radio text information is not available, it will display: No Text.
If the RDS (radio data system) is available, it will show the station
information provided by the station.
DAB OPERATION
Scan stations
When turning on to DAB mode, the unit will automatically scan the
stations it found in this area.
1. Press and hold the SCAN button to scan the stations. It stops scanning
after it has finished scanning and starts to play the first station it founds
after you switch on for the first time.
2. Press / button to select the previous or next stations, and press
ENTER button to activate to play the station.
Station tuning
Press and hole the MENU button, when the <Station scan> appears, press
ENTER, then use the / button to cycle through the scanning options:
<Full scan>, <Manual tune>.
*Select the Full scan, and press ENTER to enable a full scanning.
*Select the <Manual tune> and press ENTER, use / button to select
station from 5A:174.928MHz to 13F:239.200MHz. Then press ENTER
button to activate the selected station.
53
Page 54

RX+ 10
Prune the station
When the radio has performed a scan in several locations, you may find
there are some stored stations that no longer receive.
This prune function automatically can remove them from the stored
station list.
Enter the menu, press / to find <Prune station>, then follow the tips
<Press “ENTER” to prune station> to press the ENTER button.
Station order
Enter the menu and find <Station order>, press ENTER, then press / to
select one of the station order:
Multiplex, Alphanumeric, Active.
DRC (Dynamic range control)
This function enables the radio to reduce the dynamic range of the audio
signal and adapts to be listened to the audio in a noisy environment.
Enter the menu and find the <DRC>, use / to select the DRC off, DRC
low, or DRC high, press ENTER to confirm.
Note: This is not available for many DAB stations.
FM OPERATION
Select stations
To search for an FM station from 87.5 to 108.0MHz.
1. Press and hold the / to skip to the previous or next station of
strongest reception. Once a station has been found, it stops scanning
automatically. If no station is found, the unit will stop after it has cycled
through the entire frequency.
2. Briefly press the / to reward or forward the frequency by the step of
0.05MHz.
Tuning stations
1. Press and hold the SCAN button to scan the stations. It starts playing
once it found a station with strongest signal.
2. Press and hold the MENU button to enter <Audio setting> interface,
press ENTER and select one of the auto-scan modes: <Mono only> or
<Stereo or mono>.
54
Page 55

RX+ 10
TROUBLE SHOOTING
There is no sound from the speaker.
Check if the volume level is turned up;
The sound is distorted.
The volume is too high, turn down the volume level.
Adjust the antenna to get a stronger signal reception.
Not find the desired stations.
Use the manual tune function to find the station.
Signal reception is too low, adjust the antenna or move to a stronger signal
location.
Texts display abnormal on the screen.
No DAB coverage in your area, adjust the position of the aerial.
Turn off the machine, then turn back on again.
A burbling noise on some stations.
Batteries power is low, exchange some new batteries.
Re-position the aerial to get the best reception.
55
Page 56

RX+ 10
SPECIFICATIONS
Mains Supply: DC 8V, 750mA
Batteries: 6 x 1.5V (not included)
Power consumption (on mode): 5 Watt
Power consumption (standby mode): < 1 Watt
DAB Frequency: 174.928~239.200MHz
FM frequency: 87.5-108MHz
Headphone jack: 3,5 mm
ACCESSORIES
• Power adaptor
• Instruction Manual
• Quick start guide
CARE AND MAINTENANCE
*To clean this unit, wipe the case with a slightly moist, lint-free cloth.
*Do not use any cleaning fluids containing alcohol, ammonia or abrasives.
*Do not spray an aerosol at or near the radio.
*Always use original packaging if it is necessary to transport the unit at
any time.
*If this unit is used in a dusty environment, it may be necessary to have the
unit serviced at your local dealer periodically.
*It is not advisable to allow large deposits of dust to accumulate within the
unit as it may prevent adequate cooling.
*Similarly dust deposits which become damp can sometimes lead to
electrical problems which may cause severe damage to the delicate
electronics within this unit.
56
Page 57

RX+ 10
This symbol on the product or in the instructions means that your
electrical and electronic equipment should be disposed at the end of its
life separately from your household waste.
There are separate collection systems for recycling in the EU.
For more information, please contact the local authority or your retailer
where you purchased the product.
All rights reserved by Blaupunkt Competence Center Audio M3
Electronic GmbH. This material may be reproduced, copied or distributed
for personal use only.
57
Page 58

 Loading...