

Page 1
MELBOURNE C34
BND
/TS
MENU
/AUDIO
FFFR
PR OG
MELBOURNE C34
High-Power FM/MW/L W Cassette player with Detachable Face
Lecteur de cassette FM/MW/L W haute puissance avec façade détachable
Reproductor de cintas de alta potencia FM/MW/L W con Frontal Extraíble
Toca Fitas FM/MW/L W de Alta-potência com
Painel Frontal Desmontável
Robert Bosch Corporation
Sales Group —
Blaupunkt Division
2800 South 25th Avenue,
Broadview, Illinois 60155
http://www.blaupunkt.com
ENGLISH
FRANÇAIS
ESPAÑOL
PORTUGUÊS
Page 2
FCC WARNING
Precautions
Handling the Front Panel
This equipment has been tested and found to comply with the
limits for a Class B device, pursuant to Part 15 of the FCC
Rules. These limits are designed to provide reasonable protection against harmful interference in a residential installation. This equipment generates, uses, and can radiate radio
frequency energy, and, if not installed and used in accordance with instructions, may cause harmful interference with
radio communications. However, there is no guarantee that
radio interference will not occur in particular installation. If
this equipment does cause harmful interference to radio or
television reception, which can be determined by turning the
equipment off and on, the user is encouraged to consult the
dealer or an experienced radio/TV technician for help.
You are cautioned that any changes or modifications not expressly approved in this manual could void your authority to
operate this equipment.
Features
• Detachable front panel
• Built-in power amplifier
(max. output : 35W X 4ch)
• FM/MW/LW PLL Synthesizer tuner
• 30 Station preset memory
• Travel Store / Scan tuning
• Telephone mute
• CD changer control
• Avoid installing the unit where it would be subject to high
temperatures, such as in direct sunlight or a hot air stream
from the heater, or where it would be subject to dust, dirt, or
excessive vibration.
• Do not turn on the unit if the temperature inside the car is
very high. Always cool down the unit before usage. Parking
your car in direct sunlight will result in a temperature rise.
• If the unit does not turn on, check the connections first. Then
check whether the fuse at the back of the unit is blown.
• Carefully read this manual before using the unit. If you encounter any problems that are not covered in this manual,
please consult the dealer where you purchased the unit or
the dealer nearest to you.
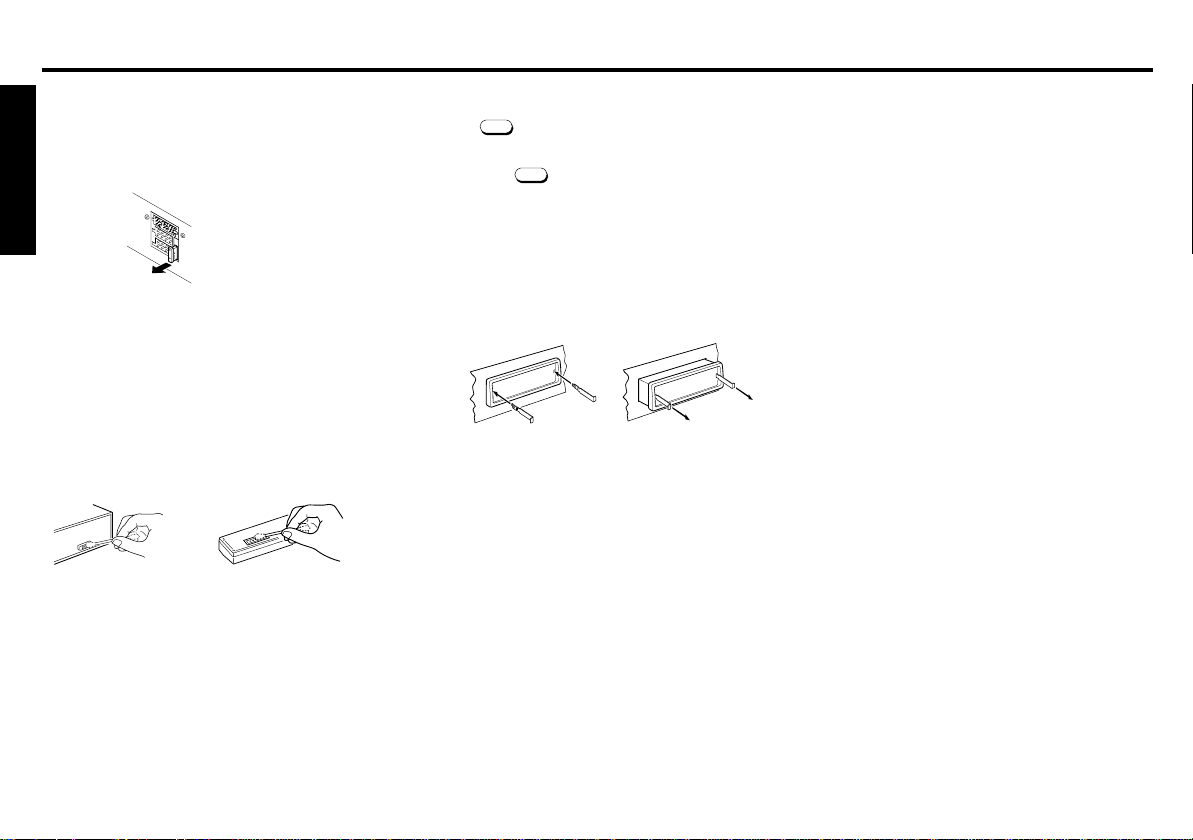
Handling Cassettes
• Do not keep a cassette in the unit when not in use.
• Do not expose cassettes to direct sunlight, extremely low
temperatures, or moisture.
• Do not insert a cassette that appears to be broken, twisted,
dirty or with loose or torn labels on it.
• Usage of cassettes longer than 90 minutes is not recommended since their tapes are very thin and tend to be
stretched. Frequent playing back and stopping of these
cassette can cause them to be pulled into the cassette deck
mechanism.
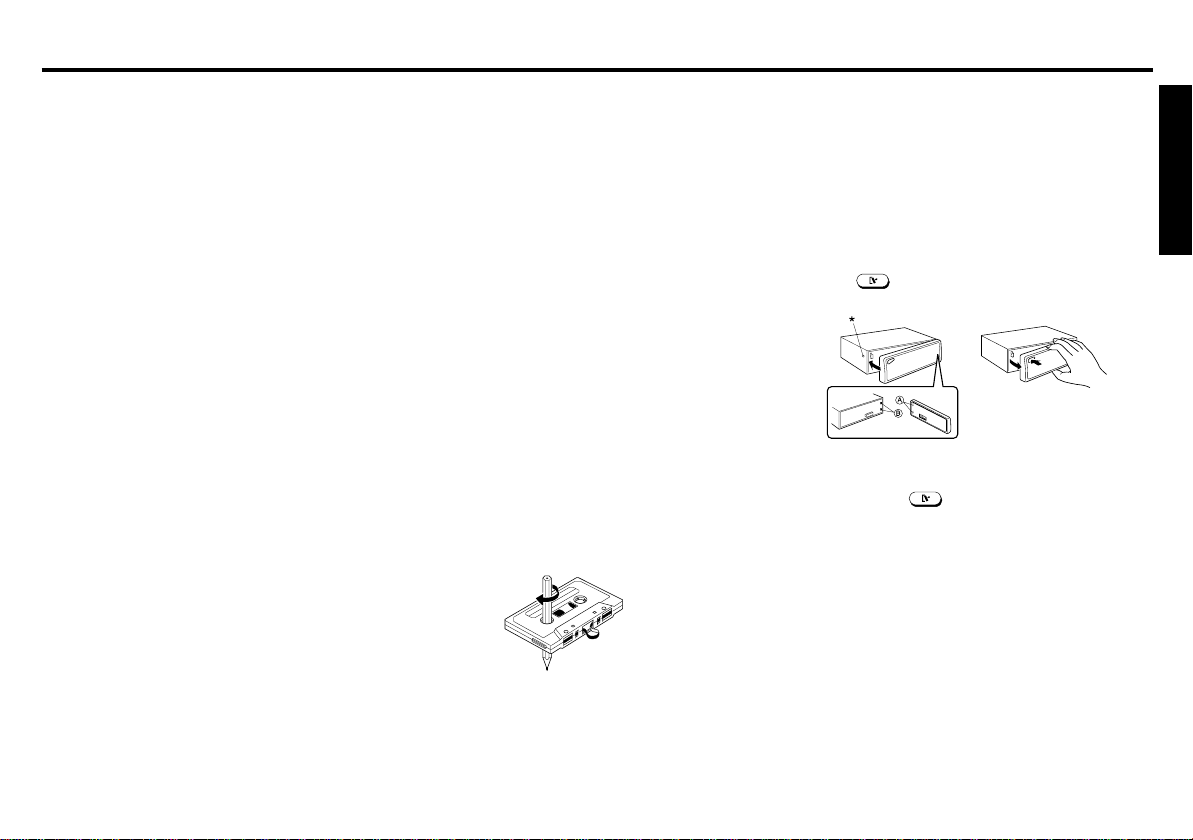
• Before inserting a cassette into the unit, make sure that the
tape is not slack. If it is, turn the reel hub with a pencil or
similar tool to rewind tightly, as shown below.
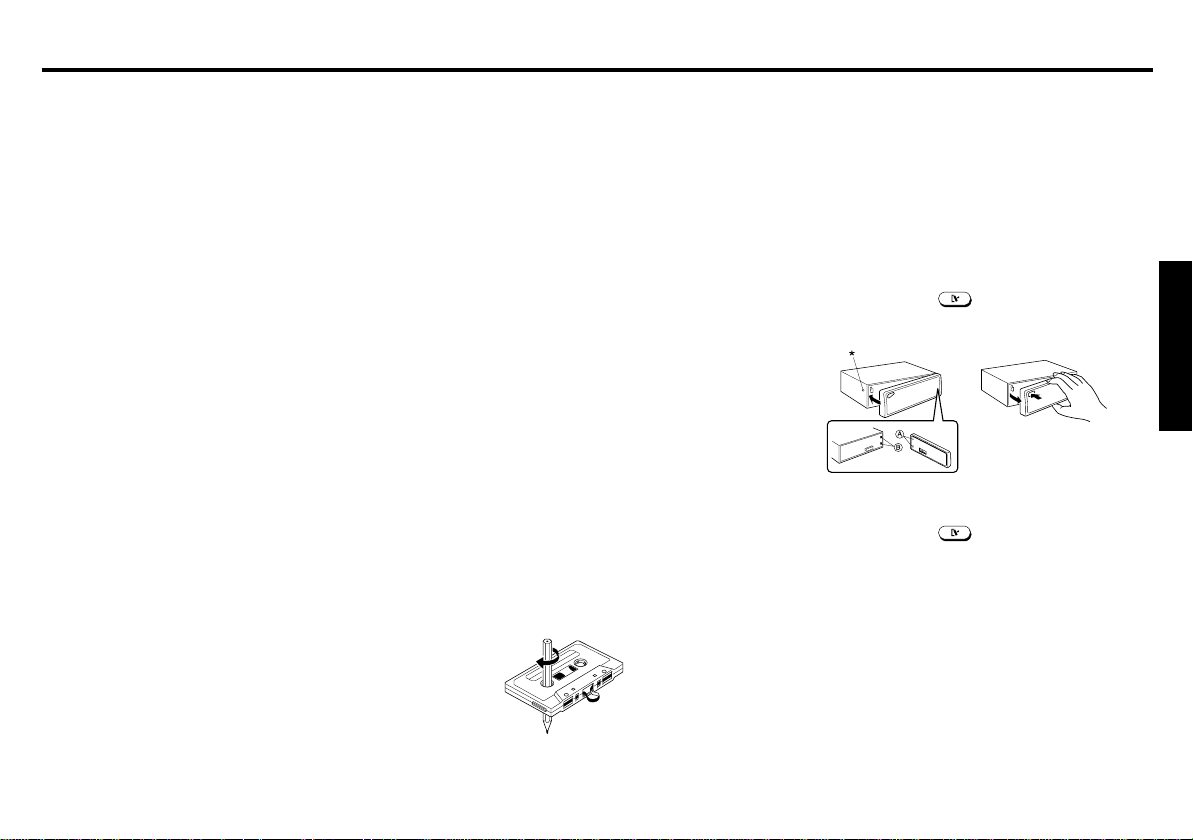
Attaching the Front Panel
Place the right hand side of the front panel so that the parts
A of the front panel are engaged with the parts B of the unit
as shown below. Then push the left hand side of the front
panel until it is securely locked.
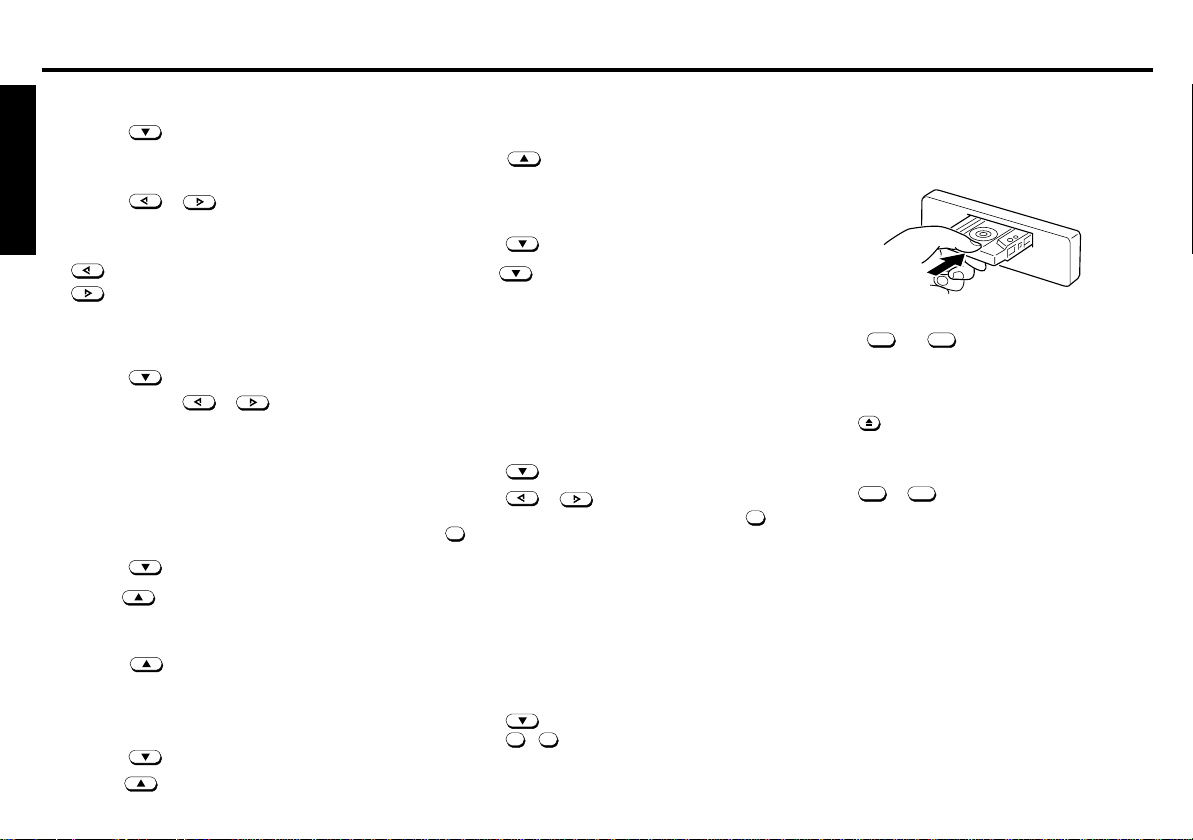
Detaching the Front Panel
Remove the Tape from the unit, if any, and turn off the power
of the unit.
Press the
the front panel as shown below and remove it from the unit.
to unlock the front panel from the unit. Grasp
Security
To avoid theft or loss of the front panel, you can inactivate
the release button
by installing the screw provided.
1.Unscrew the bolt marked ✼ at the left front side of the
unit. (See diagram above)
2.Attach the front panel.
3.Select a locking screw from the mounting hardware (See
page 8) and screw it into the same hole to fasten the front
panel.
Notes
• Do not press hard on the front panel when affixing it to the
unit. No more than light to moderate pressure should be
needed.
• Make sure there is no dust or dirt on the electrical terminals
on the back of the front panel as this could cause intermitent
operation or other malfunctions.
ENGLISH
E-1
Page 3
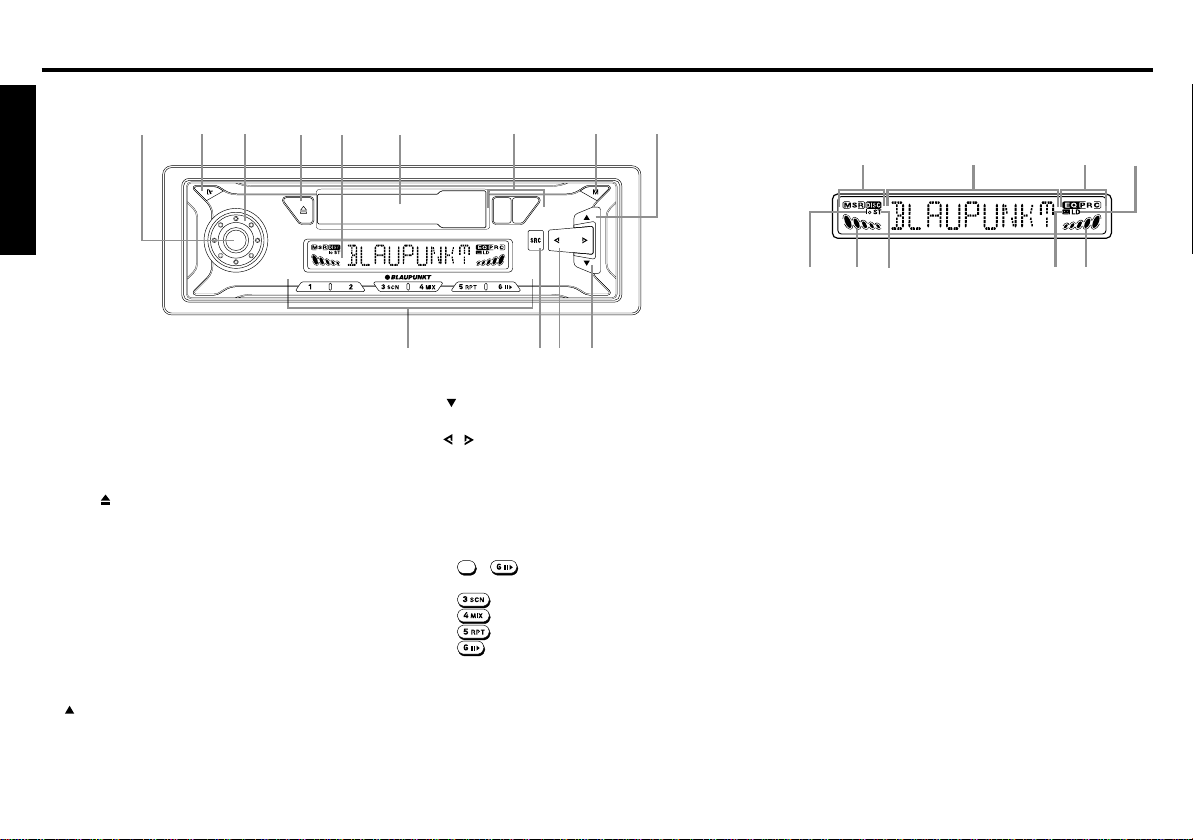
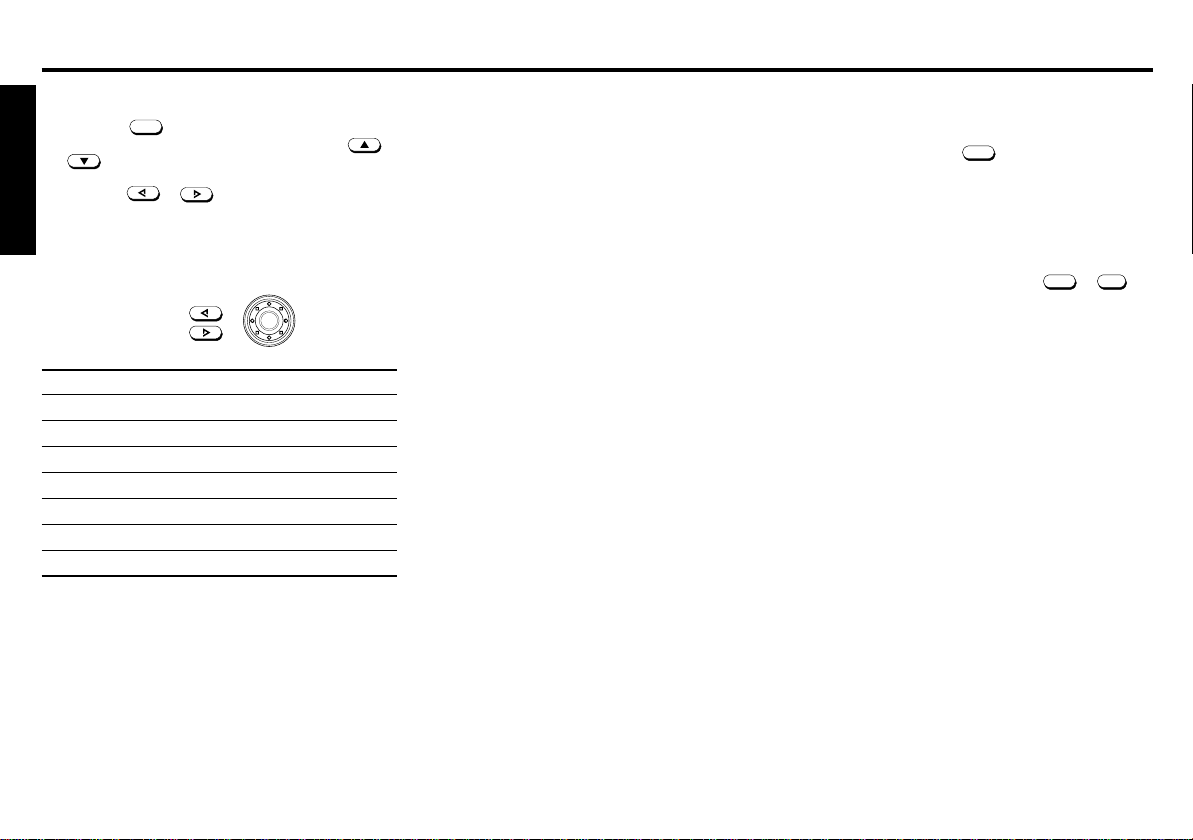
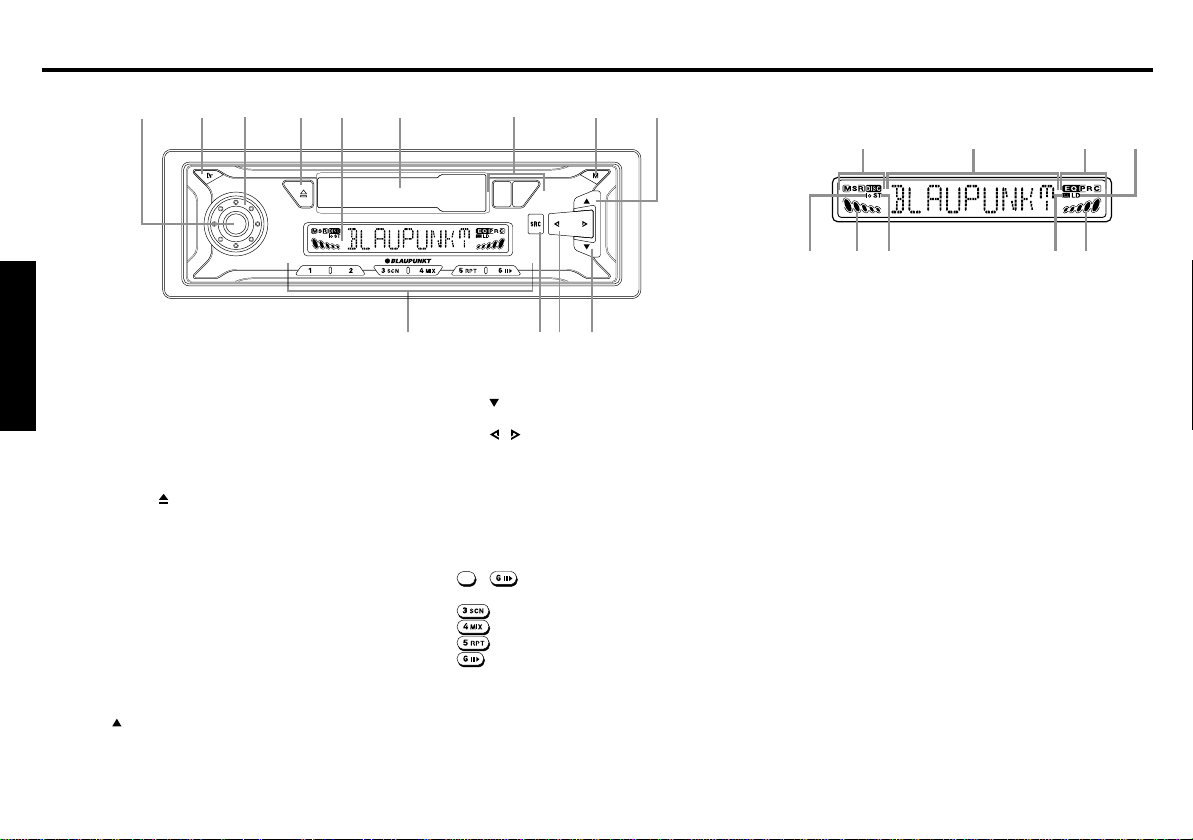
Identification of Controls
Front Panel
4
1
ENGLISH
1 PWR button
Turns the power of the unit on or off. Mutes the sound.
2 REL button
Releases the detachable front panel.
3 VOL dial
Adjusts the volume level and audio control.
4 Eject button
Ejects the Tape.
5 LCD Display window
6 TAPE insertion slot
Insert the Tape here.
7 FR/FF button
Tape transport direction change.
FR : Rewind FF : Fast forward.
8 MENU button
Display selector. Enters the display item adjustment mode.
Hold for more than 2 seconds to enters the Audio adjustment mode. (Bass, Treble, Loudness, Balance, Fader
etc,.).
9 button
Scan/Preset scan tuning. Select the item in adjustment
mode. Select the disc in CDC mode.
3
2
5
6
MELBOURNE C34
13
10 button (BND/TS button)
Selects the band & Travel store.
11 / button
Used to tune in to the desired station. Select the item in
adjustment mode.
12 SRC button
Selecting the operating source.
Reset the unit(Press and hold for more than 10 seconds).
13 PRESET MEMORY button
During radio reception :
1
- ; For Preset memory/call
During CDC mode :
11
8
MENU
/AUDIO
B
N
D
/T
S
7
PR OG
FFFR
12 10
; For Scan/Disc scan play
; For Mix/Disc mix play
; For Repeat/Disc repeat play
; For Pause
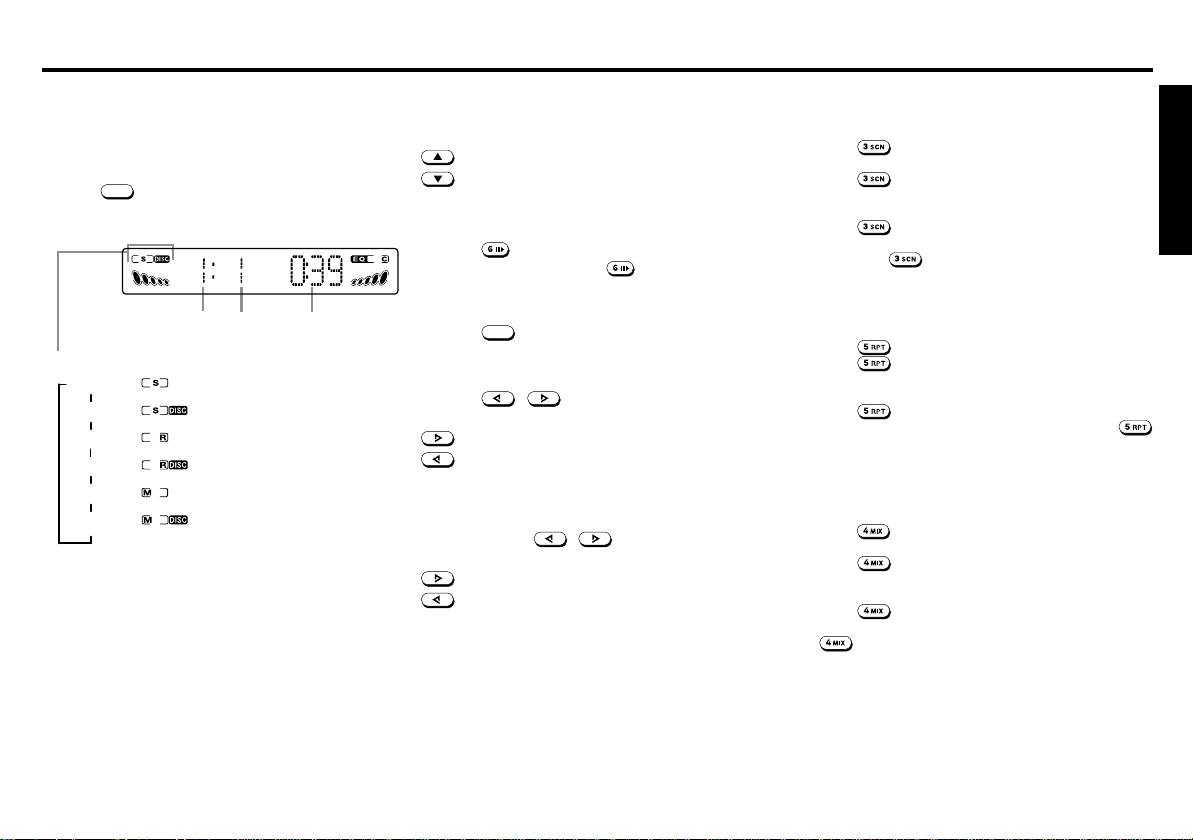
LCD Display
9
134
7
8
9
1 CDC playback mode indicator
2 Main display section
3 Equalizer indicator
4 LOUDNESS indicator
5 R-ch Level Meter/Manual tuning indicator
6 TAPE IN indicator
7 STEREO signal indicator
8 L-ch Level Meter/Manual tuning indicator
9 lo(Local) indicator
2
5
6
E-2
Page 4
General Operations
Turning the power On
Press the
PWR
button to turn the unit On.
Turning the power Off
Press the
revert to clock indication.
Tip
When you turn on the unit, “HELLO” will be displayed then
“WELCOME” will momentarily be displayed before actual
power on.
When you turn off the unit, “SEE YOU” will be displayed then
“GOOD-BYE” will momentarily be displayed before actual
power off.
You can edit these messages. (See “Turn on/off message edit”).
PWR
button for more than 2 seconds. Display will
Volume Control
Rotate the VOL dial to adjust the volume.
Volume down Volume up
Muting the sound
PWR
Press
To restore the previous volume level, press
Mute level can be adjustable. (See “
Characteristics
. The R-ch/L-ch Level Meter flashes.
”)
PWR
Adjusting the Sound
again.
Switching the Display
Press the
setting is clock display) for few seconds. Then automatically
returns to the previous indication.
• Radio mode
• Tape mode
• CDC mode
MENU
to display the temporary indication (initial
Frequency or Clock.
Tape Status or Clock.
CDC Status or Clock.
Setting the Clock
1. Turn the ignition key to the ON position.
2. Press the
3. Press the
play “CLK SET”.
4. Press the
5. Use the following buttons and dial to set the clock. (The blink-
ing section can be adjusted.)
PWR
6. Press the
ting mode.
Ignition-off Clock Recall
The display will illuminate showing the time and then automatically shut off after 5 seconds.
Press the
position.
PWR
to turn on the unit.
MENU
, then press the or to dis-
PWR
to enter the clock adjustment mode.
: To switch Hour/Minute blink
or : Adjust the Hour and minute
MENU
momentarilfly to complete the Clock set-
MENU
while the ignition switch is in the “ OFF ”
Switching the Source
Each time the
change over as shown below;
Note
If the
and no CD changer connected to the unit, The RADIO mode
will remains as it is.
SRC
is pressed, the operation source will
SRC
button is pressed when no Tape has been loaded
Adjusting the Sound Characteristics
1. Press the
audio adjustment mode, then press the
to select the desired adjustment item as table below.
MENU
for more than 2 seconds to enter the
or
2. Press the or or rotate the VOL dial to adjust
the selected item.
Use the following tables as a guide for adjusting the settings in each item.Adjust within 5 seconds after selecting
the item. After 5 seconds, the unit returns to previous
indication.
or
Adjustment Range
EQ OFF (Equalizer will be displayed if set up)
BASS BAS –5
TREBLE TRE –5
LOUDNESS LOUD
BALANCE BAL L9(Full left)
FADER FAD R9(Full rear)
ON VOL 0
MUTE 0
OFF
•A italicized letter is an initial value.
Tips
• EQ OFF (EQ Display)
Displays the current setting of equalizer curve, if the equalizer has been set. (See page 5)
• ON VOL (Limit volume)
Adjust the volume at the time of power on. You can adjust
with the actual sound.
• MUTE (Mute level)
You can adjust the mute level with the actual sound.
• Settings for BASS, TREBLE, and LOUDNESS can be made
to each of the following modes independently:
Each radio band, TAPE, CDC.
0
BAS +5
0
TRE +5
LOUD ON
0
BAL R9(Full right)
0
FAD F9(Full front)
50
20
80
80
E-3
ENGLISH
Page 5
Adjusting the Menu Items
1. Press the
(indicates the Clock temporaliry) then press the
below.
2. Press the or or rotate the VOL dial to adjust
ENGLISH
the selected item.
Use the following tables as a guide for adjusting the settings in each mode. Adjust within 6 seconds after selecting the item. After 6 seconds, the unit returns to previous
indication.
MAIN DISP (See right column)
SENS HI LO /
LEVEL LO OFF / LO / HI
MESG ON OFF /
CLK SET (See page 3)
24H MODE 12H /
CLOCK ON OFF /
AREA SET USA /
MENU
to enter the display adjustment mode,
to select the desired adjustment mode as table
or
Adjustment Range
HI
ON
24H
ON
EURO
•A italicized letter is an initial value.
Tips
• MAIN DISP
Y ou can adjust with which priority items are to be displayed
or
in the Main display. Display priority can be set for the following items in each mode.
Radio
FREQ : Frequency indication. (Initial value)
CLOCK : Clock indication.
TAPE
STATUS : PLAY,FF,REW.
CLOCK : Clock indication.
CDC
D/TRK/TIM : Disc/Track/Elapsed Time.
CLOCK : Clock indication.
• SENS HI (Local/DX) (Radio mode only)
This feature is used to select the signal strength at which
the radio will stop during Seek Tuning.
If you select the Local setting and only strong (local) stations will be received. The “ lo ” appears on the display window. Select the Distant setting and the radio will stop at a
wider range of signals, including weaker more distant stations. The “ lo ” will go out on the display window. DX is the
suggested default setting.
LO : Local.
HI : DX.
• LEVEL LO (Level sens)
The sensitivity of the level meter display can be switched.
OFF : Off.
LO : Normal sensitivity.
HI : High sensitivity.
• MESG (Message)
Turn on/off message can be switched.
OFF : No message is diplayed.
ON : A message is displayed when power on/off.
• CLK ADJ
Adjust the clock. (See page 3)
• 24H MODE
12H or 24H can be switched.
12H : Clock uses a 12-hour display system.
24H : Clock uses a 24-hour display system.
• CLOCK ON
Clock indication when the power off can be switched.
OFF : The Clock indication and illumination is not
ON : The Clock indication is displayed after power
• AREA SET (Radio mode only)
This unit is supplied pre-set at the factory for reception of
European radio stations. Use in other areas of the world
may require different channel spacing.
Select the desired area, then press the
USA : For North America.
EURO : For Europe.
*A previously preset station is cleared when you change the
displayed after power off.
Press the
tion for few seconds when power off.
off.
MENU
to recall the clock indica-
SRC
or
PWR
.
area.
Mute while telephoning
If your car audio system is equipped with a mobile telephone,
it will automatically switch to mute when you use the phone.
This will only work if the mobile phone is connected to the car
audio system as described in the installation instructions.
The volume will be reduced to the configured volume mute
level.
E-4
Page 6

Setting the equalizer
You can select an equalizer curve for 3 music types (Rock,
Pop, Classic).
You can store and adjust the equalizer settings for frequency and level.
Selecting the equalizer curve
1. Press the
the audio adjustment mode.
2. Press the or or rotate the VOL dial to
select the desired equalizer curve as follows.
Adjusting the equalizer curve
1. Adjust the desired sound characteristics.(See page
3 “Adjusting the Sound Characteristics”)
2. Press and hold the (USER 1) or (USER
2) for more than 2 seconds to store the equalizer
curve, while displaying “BAS/TRE” in the display window.
Cancelling the equalizer curve
1. Press the
the audio adjustment mode.
2. Press the
The “EQ OFF” will blinking for few seconds.
MENU
for more than 2 seconds to enter
Display indication
ROCK
POP
CLASSIC
USER 1
USER 2
EQ OFF
MENU
for more than 2 seconds to enter
SRC
to cancel the equalizer curve.
Turn on/off message edit
You can edit the turn on/off message and store it in memory.
Following four messages can be edit with 9 characters each.
Turn-on message
• HELLO (MESG 1) / WELCOME (MESG 2)
Turn-off message
• SEE YOU (MESG 3) / GOOD-BYE (MESG 4)
1. Press the
play the “MESG ON” on the display window.
2. Press the
MENU
, then press the or to dis-
SRC
PWR
or
to flash the “HELLO”.
3. Rotate the VOL dial to select the desired message you
want to edit.
HELLO ➜ WELCOME ➜ SEE YOU ➜ GOOD- BYE
4. Press the
A. Rotate the VOL dial in a clockwise direction to select
B. Press the
C. Repeat steps A. and B. to complete entering the en-
5. Press the
The new message flashes and automatically returns to
previous indication.
Tips
• To erase /correct a message, press the
2 seconds to clear the character and re-enter.
• If you make no button input or dial operation in 30 seconds,
the message edit mode will turn off automatically.
• Make sure the “MESG” will be “ON” .
• When entering a name, pressing the following buttons affects the display of characters as follows.
SRC
PWR
or
, then enter the character.
the desired characters.
(A➜B➜C➜...Z➜
➜0➜1➜2➜3...9➜“ ”Space )
sor.
tire message 9 characters max.
SRC
:Changes to inputting letters. (Starts with “ A ”.)
:Changes to inputting numbers. (Starts with “ 0 ”.)
:Changes to inputting characters. (Starts with “ < ”.)
:Enters a space (blank).
<➜>➜∗➜+➜
or to move the flashing cur-
PWR
or
to store the message.
′
MENU
for more than
➜−➜.➜/
Erasing the turn on/off message
You can erase the turn on/off message if so desired.
1. Press the
play the “MESG ON” on the display window.
2. Press the
lect the desired message you want to erase.
3. Press the
than 2 seconds.
4. To return to the previous indication, Press
Repeat steps 2. and 3. if you want to erase other message.
MENU
, then press the or to dis-
SRC
PWR
or
, then rotate the VOL dial to se-
SRC
or
PWR
, then press the
MENU
MENU
ENGLISH
for more
.
E-5
Page 7
Radio Reception
Tape Operations
Seek Tuning
1. Press the to select the desired band.
F1(FM 1) ➜ F2(FM 2) ➜ F3(FM 3) ➜ MW ➜ LW
(FM 3 & MW, LW are Travel Store bands.)
2. Press the or to tune in stations. Tuning au-
ENGLISH
tomatically stops at a broadcasting frequency.
When tuned in to FM stereo broadcasting stations, the
“ ST ” will appear on the display window.
: Lower Frequency.
: Higher Frequency.
Manual Tuning
1. Press the to select the desired band.
2. Press and hold the or for more than 0.5 sec-
ond to activate the manual tuning mode.
R-ch/L-ch Level Meter will light on the display window.
Press again to tune in to stations.
After 4 seconds of completing Manual Tuning, the tuning
control will revert to the Seek Tuning mode.
Scan Tuning
1. Press the to select the desired band.
2. Hold the pressed for less than 2 seconds.
The unit will scan the selected band for stations and the
unit will stop at each receivable station for 10 seconds, before continuing to the next station.
Press the
this on the selected frequency.
again to stop Scan Tuning and remain
Preset Scan Tuning
1. Press the to select the desired band.
2. Hold the pressed for more than 2 seconds. The
E-6
unit will scan preset memory for the each 6 stations from the
MW/LW band or the 18 stations from the FM bands. The
unit will stop at each receivable station for 10 seconds, before continuing to the next preset station.
Press the
remain this on the selected frequency.
again to stop Preset Scan Tuning and
Listening to Tape Playback
Inserting a Cassette
Insert a cassette to start playback. Playback begins automatically.
Memorizing Stations Automatically (Travel Store)
1. Press the to select the desired band.
2. Hold the pressed for longer than 2 seconds.
Up to 6 stations will be automatically stored in preset
memory for the selected band.
If the radio is in FM 1 or FM 2, it switches to FM 3.
Note
This function is available for FM 3 and MW, LW.
Changing the tape direction
Press both FR and FF at the same time, to change the
tape direction.
Ejecting the cassette
Memorizing Only the Desired Stations
You can store up to 6 stations on each band (18 for FM, 6 for
MW and LW) in the order of your choice.
1. Press the to select the desired band.
2. Press the or to tune in stations.
3. Press and hold the desired preset memory button
6
for about 2 seconds until the frequency indicator
flashes twice.
The number of the pressed preset memory button appears on the display window.
Note
If when you store another station on the same preset number
button, the previously stored station is replaced with new one.
Press the to stop playback and eject the cassette.
Fast Forward / Rewind
Press the FR or FF until it is locked.
To resume playback, press the opposite direction button half-
1
-
way to release the locked button.
Note
• Before turning off the unit, eject the tape to avoid tape
damage.
Receiving the Memorized Stations
1. Press the to select the desired band.
2. Press the
1
- 6 momentarily.
Page 8
CD Changer Controls
Playing the CD Changer
This product can control a CD changer. Please check with
your nearest car stereo specialist for recommendations of the
models that will work with this radio.
Press the
to change back to radio mode.
CDC Playback mode indicator.
SRC
TRACK SCAN
DISC SCAN
TRACK REPEAT
DISC REPEAT
TRACK MIX
DISC MIX
to switch the CD changer mode. Press again
Disc No,
Elapsed TimeTrack No,
Disc Select
Press the Disc select buttons to select the desired disc for
play.
: To advance to a higher number disc.
: To return to a lower number disc.
Pausing Playback
Press the .
To resume playback, press the again.
Stopping Playback
Press the
SRC
to select the radio reception.
Track Search
Press the / buttons.
Track numbers appear in the display window.
: Playback starts from the beginning of the next track.
: Playback starts from the beginning of the current
track. Press again to play the previous track.
Cue / Review
Press and hold the / buttons. Release when you
have found the desired point.
: To search forward.
: To search backward.
Track / Disc Scan Play
Track Scan
Press the
This will play the first 10 seconds of all the tracks on the disc.
Press the
Disc Scan
Press the
This will play the first 10 seconds of the first track on each
disc. Press the
.
again to cancel this feature.
for more than 2 seconds.
again to cancel this feature.
Track / Disc Repeat Play
Track Repeat
Press the
Press the
Disc Repeat
Press the
The current disc will be continually repeated. Press the
again to cancel this feature.
. The current track is played repeatedly.
again to cancel this feature.
for more than 2 seconds.
Track / Disc Mix Play
Track Mix
Press the
in random order.
Press the
Disc Mix
Press the
Both discs and tracks will be played in random order. Press
the
. All the tracks on the current disc are played
again to cancel this feature.
for more than 2 seconds.
again to cancel this feature.
ENGLISH
E-7
Page 9
Installations
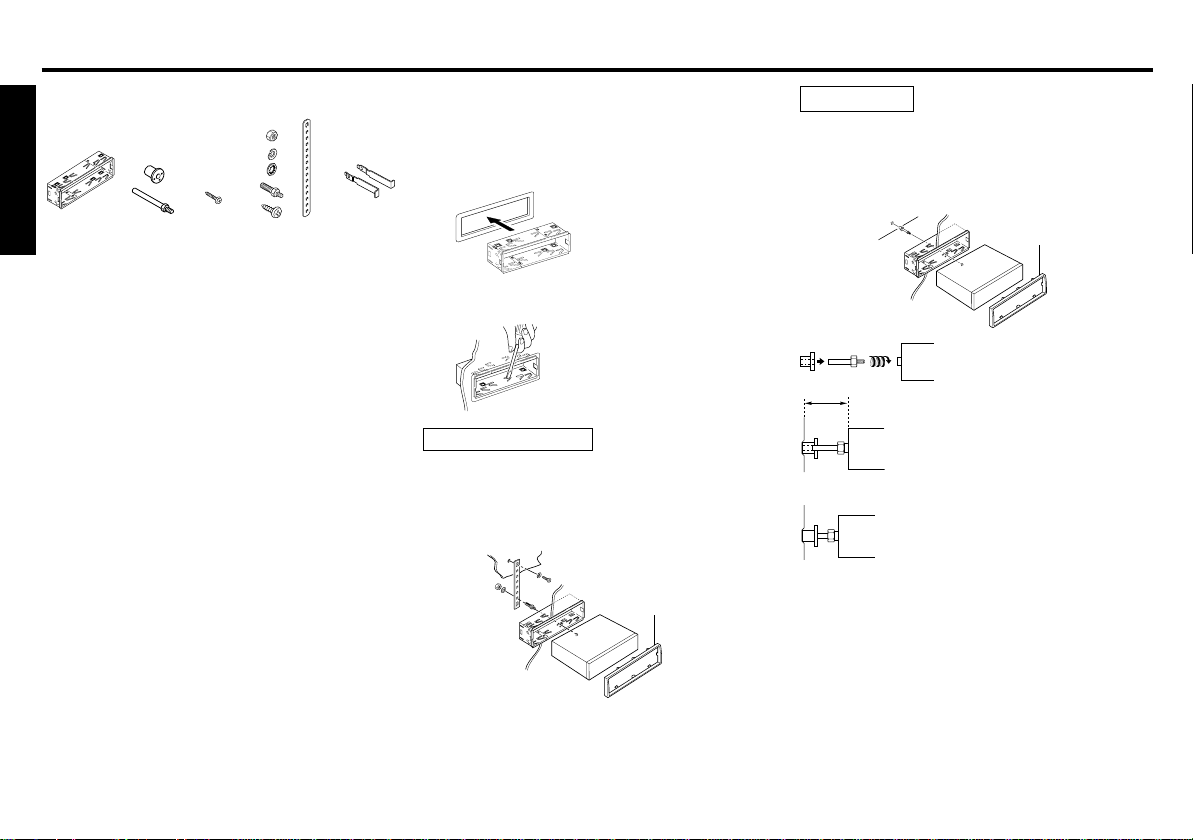
Supplied Mounting Hardware
ENGLISH
Sleeve
Bushing, Locking Mounting Strap Release
Screw screw and Screw Keys
Precautions
• Be sure to detach the front panel before you start installing the unit.
• Choose the mounting location carefully so that the unit will
not interfere with the normal driving operations of the driver.
• Use only the supplied mounting hardware for a safe and
secure installation.
• When mounting the unit in a car, keep the unit as level as
possible. If the unit must be mounted at an angle, due to
the design of the vehicle, make sure that the unit does not
tilt upward by more than 30°.
Mounting Example
Installation in the dashboard.
1. Install the sleeve in the dashboard.
2. Select and bend the appropriate tabs to hold the sleeve
firmly in place.
Mounting Strap Use
3. Attaching the Mounting Strap to the underside of the
dash board, using screw.
Attach the back of the unit to the Mounting Strap using the support stem bolt and hardware.
Fire wall
Removal trim ring
(Supplied)
Bushing Use
3. As shown in the figure below, securely fasten the
screw, which has been inserted into the bushing to
the rear of the set.
Fire wall
The distance to the fire wall varies due to the
type of the car. Be sure to secure the unit by
properly inserting the bushing.
Note
Some Japanese/Asian vehicles such as TOYOTA & NISSAN do
not require use of the sleeve and trim ring assembly.
To secure the replacement radio use the O.E.M. brackets and
mounting screws. These brackets will align with the threaded
screw holes found on each side of the new radio.
Removal trim ring
(Supplied)
E-8
Page 10

Connections
Warning
• To prevent short circuit, remove the key from the ignition
and disconnect the battery’s (-) terminal.
• This unit is designed for negative ground 12 V DC operation
only. You can not use it for 24 V or other types of car batteries.
Connection procedure
Caution
• DO NOT connect any speaker wires to the metal body or
chassis of the vehicle.
• DO NOT connect the speaker common (-) wires to each
other.
• Connect each speaker wire directly to each speaker terminal.
• All speaker common (-) wires must remain floating.
ie. No common connections or connection to vehicle grd.
• Connect each pair of speaker leads only to a single speaker
(or speaker system) that has an impedance of least 4 ohms,
as well as adequate power-handling capability.
• Do not connect speaker leads to any inputs on external
amplifiers. This will cause damage to the internal amplifier
of this unit.
1 Make sure the car’s ignition key has been removed.
2 Disconnect the negative(-) terminal of the car’s bat-
tery.
3 Connect the car’s antenna terminal to the antenna
socket of the unit.
4 Connect the Car-specific adapter cable which is avail-
able at your dealer to the unit.
5 Reconnect the negative(-) terminal of the car’s bat-
tery.
6 Start the car’s engine.
7 Make sure the unit operates properly.
C
B
A
1
Telephone mute
2
3
Permanent +12V
4
Aut. antenna
5
6
Kl.15/Ignition
7
8
1
2
3
4
5
6
+12V Amplifire
C-1
4
1
36
5
2
1
2
1
2
Ground
Ground
C-2 C-3
7
8
3
4
3
4
A
NC
NC
NC
C-1
NC
NC
NC
NC
ENGLISH
16 19
10
13
12
15
9
18
20
11
17
14
7
5
8
6
7
5
8
6
B
1
Speaker out RR+
2
Speaker out RR–
3
Speaker out RF+
4
Speaker out RF–
5
Speaker out LF+
6
Speaker out LF–
7
Speaker out LR+
8
Speaker out LR–
C
C-2 C-3
NC
7
NC
8
NC
9
10
11
12
NC
NC
NC
CDC Data In
13
CDC Data Out
14
15
+12V
16
Bus Masse/GND
17
Line In Masse/Ground
18
19
Line In L
20
Line In R
NC
CD Changer
E-9
Page 11
Maintenance
Replacing the Fuse
If the fuse is blown, check the power connection first and
then replace the fuse. If the fuse blows again under normal
conditions, the unit may be defective.
ENGLISH
Back of the unit
Warning
Use only a fuse with the specified amperage (10 A).
Use of another type of fuse can result in a fire or unit damage.
Cleaning the Connectors
If the connectors of the unit and the front panel are contaminated, malfunctions may occur.
Detach the front panel and clean the connectors with an alcohol dampened cotton swab as shown below.
Main unit Back of the front panel
Returning to the Initial Settings
When the
the microcomputer of the unit returns to the initial settings. If
the display window is not properly shown or the unit malfunctions, press the
SRC
button is pressed for more than 10 seconds,
SRC
button for more than 10 seconds.
Removing the Unit
Use the supplied release keys when you need to remove the
unit from the car.
Insert them into the unit as shown below. This will unlock the
unit from the sleeve, allowing for removal of the unit.
Note
• Handle the release keys carefully to avoid injuring your fingers.
• Keep the release keys in a safe place for future use.
E-10
Page 12
Troubleshooting Guide
Specifications
The following check will assist in the correction of most problems which you may encounter with your unit. Before going
through the check list below, refer back to the connection and
operating procedures.
General
Trouble
• Memorized stations and
correct time are erased.
• The fuse has blown.
• Radio works when the igni-
tion key is the ON, ACC and
OFF positions.
• No power is being supplied
to the unit.
• The power is continuously
supplied to the unit.
Cause/Solution
Leads are not matched
correctly with the car’s
accessory power
connector.
Check wiring for short
circuits.
The car doesn't have an
ACC position.
Radio reception
Trouble
Preset stations are not receivable.
Seek tuning is not possible
Travel Store feature does
not complete storing of six
stations.
Also make sure that antenna is connected, extended and dry
inside.
If the above mentioned solutions do not help to improve the
situation, consult your nearest Blaupunkt dealer or in the
United States call 1-800-266-2528 for technical assistance,
parts and service. Call 1-800-950-2528 for dealer referral or
to request product brochure.
Cause/Solution
The broadcast signal is too
weak.
The broadcast signal is too
weak. → Use manual tuning.
Not enough broadcast frequencies are receivable.
CD Changer Troubleshooting
When problems should develop while operating CD changer,
an error message appears in the display window.
Refer to the table below to identify the problem, then take the
suggested corrective action. If the error persists or “MECHA
ERR” and “09 ERROR” appears, contact your nearest
Blaupunkt dealer.
Message
NO MAG
NO DISC
CD ERROR
COMM ERR
TEMP ERR
Possible cause
No magazine.
No disc.
Up-side-down.
Focus error.
Communication error.
Excessive temperature conditions at the
CD changer.
Recommended action
Load the magazine in
the CD changer.
Check the disc.
Check the disc.
Check the connection
of the CD changer.
The error sign will go
off and play will
resume when the temperature to a normal
range.
GENERAL
Dimensions : Approx. 178 mm × 50 mm × 155 mm
Power requirements : 12 volts DC car battery
Output Power : 23 watts RMS × 4 ch/35 watts peak × 4 ch
Output Wiring : Floating-ground type designed for 4
Output Impedance : Compatible with 4-8 ohm speakers.
(W × H × D)
(negative ground)
speaker use.
TUNER
Tuning Range : MW : 531 - 1,602 kHz (9 kHz step)
Sensitivity : MW : 20 µV
FM
Stereo Separation : 35 dB
LW : 153 - 279 kHz (9 kHz step)
FM : 87.5 - 108,0 MHz (50 kHz step)
FM : 9.1 dBf mono sensitivity
CASSETTE PLAYER
Frequency
Response : 30 - 15,000 Hz
S/N Ratio : 50 dB
Wow & Flutter : 0.15 % WRMS
ENGLISH
E-11
Page 13
AVERTISSEMENT DE LA FCC
Précautions
Manipulations de la face avant
Cet appareil a été testé et déclaré conforme aux limitations
d’un dispositif de classe B, conformément à la section 15 des
règlements de la FCC. Ces limitations ont été conçues afin
de fournir une protection adéquate contre toute interférence
nuisible lors d’une installation pour une utilisation non
professionnelle.
Cet appareil génère, utilise et peut émettre de l’énergie de
radiofréquence; par conséquent, lors d’une installation et d’une
utilisation contraires aux instructions, il risquerait d’interférer
de façon nuisible avec les communications radio. Toutefois, il
n’est pas garanti qu’aucune interférence radio ne se manifeste
dans certains cas. Si cet appareil interfère de façon nuisible
avec les réceptions radio ou télévision, ce qui peut être
déterminé en allumant et en éteignant l’appareil, il est
recommandé de consulter le revendeur ou un technicien radio/TV qualifié pour toute assistance nécessaire.
Nous souhaitons vous avertir du fait que toute modification
ou tout changement non conforme à ce manuel annulera votre
droit d’utiliser cet appareil.
Caractéristiques
• Façade détachable
• Amplificateur de puissance intégré
(Sortie max.: 35W X 4 Voies)
• Syntoniseur / Synthétiseur PLL FM/MW/LW
• Mémoire de présélection de 30 stations
• Mémorisation automatique de voyage / Re-
cherche par balayage
• Mise en sourdine lors de l’utilisation du
téléphone
• Commande du changeur CD
• Eviter d’exposer l’appareil à de hautes températures, par
exemple à la lumière directe du soleil ou au flux d’air chaud
d’un chauffage, ou de l’installer dans des endroits
poussiéreux, sales ou soumis à des vibrations excessives.
• Ne pas allumepÔD’appareil si la température à l’intérieur
du véhicule est très élevée. Toujours laisser refroidir
l’appareil avant utilisation. Si vous garez votre voiture en
plein soleil, la température intérieure augmentera.
• Si l’appareil ne se met pas en marche, vérifier en premier
les connexions. Vérifier ensuite que le fusible situé à l’arrière
de l’appareil n’a pas sauté.
• Lire soigneusement cette notice avant d’utiliser l’appareil.
Si vous rencontrez des problèmes autres que ceux qui y
sont expliqués, veuillez consulter votre revendeur ou le
revendeur le plus proche.
Manipulation des cassettes
• Ne pas laisser de cassette dans l’appareil s’il n’est pas
utilisé.
• Ne pas mettre les cassettes en plein soleil, sous des
températures extrêmement basses ou au contact de
l’humidité.
• Ne pas insérer une cassette qui semble cassée, tordue,
sale ou pourvue d’étiquettes décollées ou déchirées.
• L’utilisation de cassettes d’une durée supérieure à 90 minutes n’est pas recommandée car leur bande étant très fine,
elles risquent de s’étirer. La lecture et l’arrêt fréquents de
ces cassettes peuvent les faire se coincer dans le
mécanisme de la platine cassette.
• Avant d’insérer une cassette dans l’appareil, assurez-vous
que la cassette n’est pas détendue. Le cas échéant, tourner
le porte-bobine avec un crayon ou un outil similaire pour
bien rembobiner comme indiqué ci-dessous.
Fixation de la face avant
Placer la partie droite de la face avant de sorte que les
éléments As’insèrent dans les éléments B de l’appareil
comme indiqué ci-dessous. Pousser ensuite sur la partie
gauche de la face jusqu’à ce qu’elle soit correctement mise
en place.
Retrait de la face avant
Retirer la cassette de l’appareil, s’il y en a une et mettre
l’appareil hors tension.
Appuyer sur la touche
l’appareil. Saisir la face avant comme indiqué ci-dessous et
la détacher de l’appareil.
pour libérer la face avant de
Security
Pour protéger la façade contre le vol et la perte, désactiver la
touche de dégagement
en installant la vis fournie.
1.Dévisser le boulon indiqué ✼ sur la partie avant gauche
de l’appareil (Voir le diagramme ci-dessus).
2.Fixer la face avant.
3.Sélectionner une vis de blocage dans les pièces de mon-
tage (voir page 8) et le visser dans le même orifice pour
fixer la face avant.
Remarques
• Ne jamais appuyer trop fort sur la face avant lors de sa fixation à l’appareil. Seule une légère pression, voire une pression modérée, est nécessaire.
• Vérifier s’il n’y a pas de poussières ou de saletés sur les connecteurs électriques situés à l’arrière de la face avant car
cela pourrait provoquer un fonctionnement sporadique de
l’appareil, voire des erreurs de fonctionnement.
F1
FRANÇAIS
Page 14
Identification of Controls
Front Panel
FRANÇAIS
1 Touche PWR
Pour allumer ou éteindre l’autoradio. Coupe le son.
2 Touche REL
Pour déverrouiller la façade amovible.
3 Bouton rotatif VOL (VOLUME)
Pour régler le volume sonore et la commande audio.
1
2
4
3
4 Touche EJECT button
Ejecte la cassette.
5 Fenêtre de l’affichage à cristaux liquides
6 Fente d’insertion de la CASSETTE
Insérer la cassette ici.
7 Touche FR/FF
Pour changer le sens de défilement de la cassette.
FR : Rembobinage FF : Avance rapide.
8 Touche MENU
Affiche le sélecteur. Pour passer en mode de réglage de
la rubrique affichée.
Maintenir enfoncée plus de 2 secondes pour passer au
mode de réglage Audio. (Bass, Treble, Loudness, Balance, Fader etc.)
9 Touche
Recherche par balayage et recherche par balayage des
stations mémorisées. Pour sélectionner une rubrique en
mode réglage. Pour sélectionner le disque en mode CDC.
F-2
5
11
8
MENU
/AUDIO
B
N
D
/T
S
6
MELBOURNE C34
13
7
PR OG
FFFR
12 10
10 Touche (touche BND/TS)
Sélectionne la fréquence & Travelstore.
11 Touche /
Utilisée pour se brancher sur la station souhaitée. Pour
sélectionner une rubrique en mode réglage.
12 Touche SRC
Pour sélectionner la source.
Pour réinitialiser l’appareil (Maintenir enfoncée pendant
plus de 10 secondes).
13 Touche PRESET MEMORY (mémorisation automatique)
Pendant la réception radio :
1
- ; Pour mémoire/ appel actuel
Pendant le mode CDC:
; Pour une lecture par balayage Scan/Disc
; Pour une lecture aléatoire Mix/Disc
; Pour une lecture répétée Repeat/Disc
; Pour effectuer une pause
9
Affichage à cristaux liquides (LCD)
134
7
8
9
2
5
6
1 Témoin du mode de lecture CDC
2 Section de l’affichage principal
3 Témoin de l’égalisateur
4 Témoin de la puissance sonore
5 Témoin Compteur de niveau du canal droit/
syntonisation manuelle
6 Témoin PRÉSENCE CASSETTE
7 Témoin du signal STEREO
8 Témoin Compteur de niveau du canal gauche/
syntonisation manuelle
9 Témoin lo (Local)
Page 15

Utilisation générale
Mise sous tension
Appuyer sur la touche
PWR
pour allumer l’autoradio.
Mise hors tension
Appuyer sur la touche
passera à l’indication de l’heure.
Astuce
Quand vous mettez l’appareil sous tension, “HELLO” s’affiche,
puis “WELCOME” s’affiche momentanément avant qua
l’appareil ne soit réellement sous tension.
Quand vous mettez l’appareil hors tension, “SEE YOU”
s’affiche, puis “GOOD-BYE” s’affiche momentanément avant
que l’appareil ne soit réellement hors tension.
Vous pouvez modifier ces messages. (Voir “Modification des
message qui apparaissent à la mise sous/hors tension”.)
PWR
plus de 2 secondes. L’affichage
Commande de volume
Tourner le bouton rotatif VOL pour régler le volume.
Diminution de volume Augmentation de volume
Arrêt du son
Appuyer sur la touche
gauche/droit clignote.
Pour rétablir le niveau de volume précédent, réappuyer sur
la touche
Vous pouvez régler le niveau d’arrêt du son. (Voir “
des caractéristiques sonores
PWR
PWR
. Le compteur du niveau du canal
.
”)
Réglage
Changement de l’affichage
Appuyez sur
réglage initiale est l’affichage de l’horloge) pendant quelques
secondes. Puis celle-ci revient automatiquement à l’indication
précédente.
• Mode Radio • Mode CDC
Fréquence ou Heure. Statut du CDC ou horloge.
• Mode Cassette
Statut de la cassette ou horloge.
MENU
pour afficher l’indication temporaire (le
Réglage de l’horloge
1. Tournez la clé de contact sur la position ON.
2. Appuyez sur
3. Appuyer sur
afficher “CLK SET”.
4. Appuyer sur la touche
d’adjustement de l’horloge.
5. Utiliser les touches et le bouton rotatif suivants pour régler
l’horloge. (La section clignotante est celle qui se régle.)
PWR
6. Appuyer momentanément sur la touche pour valider le
réglage de l’horloge.
Rappel de l’heure lorsque le contact n’est pas mis
Cet affichage s’éclaire pour indiqer l’heure puis il s’éteint
automatiquement après 5 seconds.
Appuyer sur la touche
sur la position “OFF”.
PWR
pour mettre l’appareil sous tension.
MENU
, puis appuyer sur ou pour
PWR
pour entrer dans le mode
: Pour faire clignoter les heures / minutes
ou : Pour régler les heures et les minutes.
MENU
lorsque la clé de contact se trouve
Changement de la source
A chaque pression sur
comme indiqué ci-dessous;
Remarque
Si vous appuyez sur la touche
cassette et qu’aucun changeur CD n’est raccordé à l’appareil,
Le mode RADIO restera tel quel.
SRC
, la source opérée changera
SRC
alors qu’il n’y a pas de
Réglage des caractéristiques sonores
1. Appuyer sur
mode de réglage audio, puis appuyer sur
pour sélectionner la rubrique de réglage désirée du tableau ci-dessous.
MENU
plus de 2 secondes pour passer au
ou
2. Appuyer sur ou ou tourner le bouton VOL
pour régler la rubrique sélectionnée.
Utiliser les tableaux ci-dessous pour se guider dans les
réglages de chaque mode. Effectuer le réglage dans les
5 secondes qui suivent la sélection de l’élément.
Cinq secondes plus tard, l’appareil revient à l’indication
précédente.
ou
Plage de Reglages
EQ OFF (L’égaliseur sera affiché s’il a été réglé.)
BASS BAS –5
TREBLE TRE –5
LOUDNESS LOUD
BALANCE BAL L9
FADER FAD R9
ON VOL 0
MUTE 0
OFF
(complètement à gauche) (complètement à droite)
(complètement en arrière) (complètement en avant)
•A italicized letter is an initial value.
Astuces
• EQ OFF (Affichage EQ)
Affiche le réglage actuel de la courbe d’égalisation, s’il a
été réglé. (Voir page 5.)
• ON VOL (Volume limité)
Régler le volume au moment de la mise sous tension. Vous
pouvez régler à partir du son actuel.
• MUTE (Niveau de sourdine)
Vous pouvez régler le niveau de sourdine à partir du son actuel.
• Les réglages pour BASSES, AIGUS et PUISSANCE SONORE
peuvent être effectués pour chacun des modes suivants
indépendamment: chaque bande par radio, CASSETTE, CDC.
0
0
0
0
50
20
BAS +5
TRE +5
LOUD ON
BAL R9
FAD F9
80
80
FRANÇAIS
F3
Page 16

Réglage des éléments menu
1. Appuyer sur
l’affichage, (indique l’heure provisoirement) puis appuyer
sur
souhaité comme indiqué dans le tableau ci-dessous.
MENU
pour passer en mode de réglage de
ou pour sélectionner le mode de réglage
2. Appuyer sur ou ou tourner le bouton VOL
pour régler la rubrique sélectionnée.
Utiliser les tableaux suivants comme guide pour le réglage
des paramètres dans chaque mode. Effectuer le réglage
dans les 6 secondes qui suivent la sélection d’un élément.
Six secondes plus tard, l’appareil revient à l’indication
précédente.
ou
FRANÇAIS
MAIN DISP (Voir la colonne de droite.)
SENS HI LO /
LEVEL LO OFF / LO / HI
MESG ON OFF /
CLK SET (Voir page 3.)
12H MODE 12H /
CLOCK ON OFF /
AREA SET EURO /
•Une lettre en italique représente une valeur initiale.
Plage de réglage
HI
ON
24H
ON
USA
Astuces
• MAIN DISP
Vous pouvez régler les éléments à afficher en priorité dans
l’affichage principal. Vous pouvez régler la priorité
d’affichage pour les éléments suivante dans chaque mode.
Radio
FREQ : Indication de fréquence. (Valeur initiale)
CLOCK : Indication d’horloge.
TAPE
STATUS : LECTURE, AVANCE RAPIDE,
CLOCK : Indication de l’heure.
CDC
D/TRK/TIM : Disque/Plage/Temps écoulé.
CLOCK : Indication de l’heure.
• SENS HI (Local/DX) (mode Radio uniquement)
Cette fonction est utilisée pour sélectionner la force du signal sur
lequel la radio s’arrêtera pendant la localisation des stations.
Si vous sélectionnez le réglage Local, seules les stations au signal fort (locales) seront reçues. “ lo ” apparaîtra sur la fenêtre
d’affichage.
En sélectionnant le réglage Distant, la radio s’arrêtera sur une
gamme plus large de signaux, y compris les signaux plus faibles
des radios distantes.
“ lo ” disparaîtra de la fenêtre d’affichage. DX est le réglage par
défaut recommandé.
LO : Local.
HI : DX.
• LEVEL LO (Sensibilité du niveau)
Vous pouvez régler la sensibilité de l’indicateur de niveau.
OFF : Désactivé.
LO : Sensibilité normale.
HI : Sensibilité élevée.
• MESG (Message)
Vous pouvez activer/désactiver le message.
OFF : Aucun message ne s’affiche.
ON : Un message s’affiche à la mise sous/hors
• CLK SET
Régler l’horloge. (Voir page 3.)
REMBOBINAGE.
tension.
• MODE 12H
12H ou 24H peuvent être permutés.
12H : L’horloge utilise le système d’affichage sur
24H : L’horloge utilise le système d’affichage sur
• CLOCK ON
L’indication de l’heure peut être affichée ou non une fois
l’autoradio éteint.
OFF : L’indication de l’heure et l’illumination ne
ON : L’indication de l’heure est affichée même
• AREA SET (Mode Radio seulement)
L’appareil a été préréglé en usine pour la réception des stations de radio de l’Europe. L’utilisation dans d’autres régions
du monde risque de nécessiter des pas de canaux différents.
Sélectionner la zone souhaitée, puis appuyez sur
PWR
USA : Pour l’Amérique du Nord.
EURO : Pour l’Europe.
* Une station précédemment mémorisée sera effacée si
12 heures.
24 heures.
sont pas affichées une fois l’autoradio éteint.
Appuyer sur
de l’heure pour quelques secondes avec
l’autoradio éteint.
une fois l’autoradio éteint.
.
MENU
pour ramener l’indication
SRC
ou
vous changez de zone.
Mise en sourdine lors de l’utilisation du téléphone
Si le système audio de votre véhicule est équipé d’un
téléphone portable, il se mettra automatiquement en sourdine
si vous utilisez le téléphone.
Ceci ne fonctionnera que si le téléphone portable est raccordé
au système audio du véhicule comme décrit dans les instructions de montage.
Le volume sera baissé au niveau de sourdine du volume
configuré.
F-4
Page 17

Réglage de l’égaliseur
Vous pouvez sélectionner une courbe d’égalisation pour 3
types de musique (Rock, Pop et Classic).
Vous pouvez enregistrer et régler les paramètres de fréquence
et de niveau de l’égaliseur.
Sélection de la courbe d’égalisation
1. Appuyer sur
mode de réglage audio.
2. Appuyer sur ou , ou encore tourner le bouton
rotatif VOL pour sélectionner la courbe d’égalisation
désirée comme suit.
ROCK
POP
CLASSIC
USER 1
USER 2
EQ OFF
MENU
plus de 2 secondes pour passer au
Affichage
Réglage de la courbe d’égalisation
1. Régler les caractéristiques sonores désirées. (Voir page
3 “Réglage des caractéristiques sonores”)
2. Maintenir enfoncée (UTILISATEUR 1) ou
(UTILISATEUR 2) plus de 2 secondes pour mémoriser la
courbe d’égalisation, tout en montrant “BAS/TRE” dans
le viseur.
Annulation de la courbe d’égalisation
1. Appuyer sur
mode de réglage audio.
2. Appuyer sur
“EQ OFF” clignotera quelques secondes.
MENU
plus de 2 secondes pour passer au
SRC
pour annuler la courbe d’égalisation.
Modification des messages qui apparaissent
à la mise sous/hors tension
Vous pouvez modifier le contenu des messages qui
apparaissent à la mise sous/hors tension et les mémoriser.
Vous pouvez ainsi éditer les quatre messages suivants de 9
caractères chacun.
Message à la mise sous tension
• HELLO (MESG 1) / WELCOME (MESG 2)
Message à la mise hors tension
• SEE YOU (MESG 3) / GOOD-BYE (MESG 4)
1. Appuyer sur
afficher “MESG ON” sur la fenêtre d’affichage.
2. Appuyer sur
MENU
, puis appuyer sur ou pour
SRC
PWR
ou
pour faire clignoter “HELLO”.
Astuces
• Pour effacer/corriger un message, appuyer sur
dant plus de 2 secondes afin de supprimer le caractère et le
ré-entrer.
• Si vous n’actionnez aucune touche ni aucun bouton pendant 30 secondes, le mode d’édition des messages se
désactive automatiquement.
• Vérifier si la fonction “MESG” est sur “ON” .
• Lors de la saisie d’un nom, la sollicitation des boutons
suivants affecte l’affichage des caractères comme suit:
3. Tourner le bouton rotatif VOL pour sélectionner le mes-
sage à éditer.
HELLO ➜ WELCOME ➜ SEE YOU ➜ GOOD- BYE
4. Appuyer sur
A. Tourner le bouton rotatif VOL dans le sens des aigu-
illes d’une montre pour sélectionner les caractères
souhaités.
(A➜B ➜ C ➜...Z➜
➜0➜1➜2➜3...9➜“ ”Space )
B. Appuyer sur
clignotant.
C. Répéter les opérations A et B pour entrer le mes-
sage complet de 9 caractères max.
5. Appuyer sur
Le nouveau message clignote et revient automatiquement
à l’indication précédente.
SRC
PWR
ou
, puis saisir le caractère.
<➜> ➜ ∗➜ +➜
ou pour déplacer le curseur
PWR
SRC
ou
pour mémoriser le message.
′
➜− ➜ . ➜ /
Effacement des messages qui apparaissent à la mise
sous/hors tension
Si vous le désirez, vous pouvez effacer le message qui
s’affiche à la mise sous/hors tension.
1. Appuyer sur
afficher “MESG ON” sur la fenêtre d’affichage.
2. Appuyer sur
VOL pour sélectionner le message que vous souhaitez
effacer.
3. Appuyer sur
MENU
4. Pour retourner à l’affichage précédent, appuyer sur
Répéter les opérations 2 et 3 si vous souhaitez effacer
d’autres messages.
:Passe à l’entrée des lettres.
(En commençant par “A”.)
:Passe à l’entrée des chiffres.
(En commençant par “0”.)
:Passe à l’entrée des symboles.
(En commençant par “<”.)
:Entre un espace (vide).
MENU
, puis appuyer sur ou pour
SRC
PWR
ou
, puis tourner le bouton rotatif
SRC
PWR
ou
pendant plus de 2 secondes.
, puis appuyer sur la touche
MENU
pen-
MENU
FRANÇAIS
.
F5
Page 18

Réception Radio
Fonctionnement de la cassette
Localisation des stations
1.
Appuyer sur la touche pour sélectionner la bande souhaitée.
F1 (FM 1) ➜ F2 (FM 2) ➜ F3 (FM 3) ➜ MW ➜ LW
(FM 3 & MW, L W sont des bandes de fréquence TravelStore.)
2. Appuyer sur ou pour syntoniser les stations. La
recherche s’arrête automatiquement lors de la localisation d’une
fréquence d’émission. La recherche s’arrête automatiquement
lors de la localisation d’une fréquence d’émission.Lors de la
localisation de stations FM émettant en stéréo, le signal “ST”
indiquant le fonctionnement en stéréo s’affiche.
: Basses fréquences
: Hautes fréquences
Recherche manuelle
1.
Appuyer sur la touche pour sélectionner la bande souhaitée.
2. Maintenir enfoncé ou plus de 0,5 secondes
FRANÇAIS
pour activer le mode de recherche manuelle (par pas de
1 kHz).
Le compteur de niveau du canal gauche/droit s’illuminera
sur la fenêtre d’affichage.
Appuyer à nouveau pour syntoniser les stations.
Quatre secondes après la fin de la recherche manuelle,
la commande de recherche repasse au mode de localisation des stations.
Recherche par balayage
1.
Appuyer sur la touche pour sélectionner la bande souhaitée.
2. Maintenir enfoncé plus de 2 secondes.
L’appareil balaye la bande sélectionnée pour rechercher
les stations et l’appareil s’arrête sur chaque station
pouvant être reçue pendant 10 secondes avant de passer
à la station suivante.
Appuyer à nouveau sur
par balayage et rester sur la fréquence sélectionnée.
Recherche par balayage des stations mémorisées
1.
Appuyer sur la touche pour sélectionner la bande souhaitée.
2.
Maintenir enfoncé plus de 2 secondes.
a préréglé la mémoire pour les chaque 6 stations de la
F-6
pour arrêter la recherche
L’unité balayera
bande de MW/LW ou les 18 stations des bandes de FM.
L’appareil s’arrête pendant 10 secondes sur chaque station préréglée pouvant être reçue avant de passer à la
station présélectionnée suivante.
Appuyer à nouveau sur
par balayage des stations mémorisées et rester sur la
fréquence sélectionnée.
pour arrêter la recherche
Ecoute de la cassette
Insertion d’une cassette
Insérez une cassette pour lancer la lecture. La lecture démarre
automatiquement.
Mémorisation automatique des stations
(Mémorisation de voyage)
1.
Appuyer sur la touche pour sélectionner la bande souhaitée.
2. Maintenir la touche enfoncée pendant plus de 2
secondes.
Un maximum de 6 stations seront automatiquement
mémorisées en mémorisation automatique pour la bande
sélectionnée.
Si la radio est sur FM 1 ou FM 2, elle passe à FM 3.
Remarque
Cette fonction est disponible pour les bandes FM 3 et MW, LW.
Mémorisation des stations souhaitées uniquement
Vous pouvez mémoriser jusqu’à 6 stations pour chaque bande
(18 pour FM, 6 pour MW et LW) dans l’ordre de votre choix.
1.
Appuyer sur la touche pour sélectionner la bande souhaitée.
2. Appuyer sur ou pour syntoniser les stations.
3. Appuyer sur la touche de présélection souhaitée, de
à 6 , et la maintenir enfoncée pendant environ 2
secondes jusqu’à ce que l’indicateur de fréquence
clignote deux fois.
Le chiffre correspondant à la touche de présélections
sollicitée apparaît à la fenêtre d’affichage.
Modification du sens de défilement de la cassette
Appuyer sur FR et FF simultanément pour modifier le
sens de défilement de la cassette.
Ejection de la cassette
Appuyer sur pour arrêter la lecture et éjecter la cassette.
Avance rapide / Rembobinage
Appuyer sur FR ou FF jusqu’à ce que la touche soit
verrouillée.
Pour reprendre la lecture, appuyer à mi-course sur la touche
dans le sens opposé pour libérer la touche verrouillée.
1
Remarque
• Avant d’éteindre l’appareil, éjecter la cassette pour éviter
de l’endommager.
Remarque
ILors de la mémorisation d’une autre station sous le même
numéro de présélection, la station mémorisée précédemment
est remplacée par la nouvelle.
Réception des stations mémorisées
1.
Appuyer sur la touche pour sélectionner la bande souhaitée.
2. Appuyer brièvement sur une des touches
1
à 6.
Page 19

Commandes du changeur CD
Lecture à partir du changeur CD
Cet appareil peut commander un changeur CD. Consulter votre
spécialiste en autoradio le plus proche pour des recommandations
sur les modèles compatibles avec cette radio.
Appuyer sur
Appuyer à nouveau pour revenir au mode radio.
Témoin du mode de lecture CDC.
TRACK SCAN
DISC SCAN
TRACK REPEAT
DISC REPEAT
TRACK MIX
DISC MIX
SRC
pour passer au mode Changeur CD.
N° de plage,
Temps écouléN° de disque,
Sélection du disque
Appuyer sur les touches de sélection du disque pour
sélectionner le disque à lire.
: Pour avancer à un numéro de disque supérieur.
: Pour revenir à un numéro de disque inférieur.
Pause durant la lecture
Appuyer sur .
Pour reprendre la lecture, appuyer à nouveau sur
.
Arrêt de la lecture
Appuyer sur
SRC
pour sélectionner la réception radio.
Recherche de plages
Appuyer sur les touches / .
Les numéros de plage apparaissent dans la fenêtre
d’affichage.
: La lecture commence à partir du début de la plage
suivante.
: La lecture commence à partir du début de la plage
actuelle. Appuyer à nouveau pour lire la plage
précédente.
Avance / Retour
Maintenir enfoncées les touches / . Relâchez une
fois trouvé le point désiré.
: Pour une recherche en avant.
: Pour une recherche en arrière.
Lecture par balayage de plage/ disque
Balayage des plages
Appuyer sur
Les 10 premières secondes de chaque plage sur le disque
seront lues.
Appuyer à nouveau sur
Balayage du disque
Appuyer sur
Les 10 premières secondes de la première plage de chaque
disque seront lues. Appuyer à nouveau sur
nuler cette fonction.
.
pour annuler cette fonction.
plus de 2 secondes.
pour an-
Lecture répétée de plage/ disque
Répétition des plages
Appuyer sur
Appuyer à nouveau sur
Répétition du disque
Appuyer sur
La lecture du disque actuelle sera répétée continuellement.
Appuyer à nouveau sur
. La lecture de la plage actuelle est répétée.
pour annuler cette fonction.
plus de 2 secondes.
pour annuler cette fonction.
Lecture aléatoire de plage/ disque
Plages au hasard
Appuyer sur
de lecture sont lues dans un ordre aléatoire.
Appuyer à nouveau sur
Disques au hasard
Appuyer sur
Les disques et les plages seront lus dans un ordre aléatoire.
Appuyer à nouveau sur
. Toutes les plages sur le disque en cours
pour annuler cette fonction.
plus de 2 secondes.
pour annuler cette fonction.
FRANÇAIS
F7
Page 20

Installation
Supplied Mounting Hardware
Cadre de
fixation
Capsule en
caoutchouc,
Vis
Vis de
fixation
Patte perforée
et vis de
montage
Clés de
montage
et de
démontage
Précautions
• La façade amovible doit être détachée avant de procéder
à la pose.
• Choisir l’emplacement de montage avec soin pour éviter
FRANÇAIS
que l’appareil ne gêne les opérations de conduite normales.
• Effectuer la pose au moyen du matériel de montage fourni
pour garantir la sécurité de l’installation.
• A l’installation de l’appareil dans la voiture, le maintenir aussi
horizontal que possible. Si l’appareil doit être incliné à cause
de la conception du véhicule, vérifier qu’il n’est pas penché
à plus de 30°.
Exemple de montage
Installation sur le tableau de bord.
1. Installer le cadre sur le tableau de bord.
2. Sélectionner les griffes appropriées et les plier pour fixer
le cadre fermement en place.
Avec la patate perforée
3. Attacher la patte perforée sous le tableau de bord avec
la vis. Attacher l’arrière de l’appareil à la patte perforée
en utilisant le boulon et le matériel de soutien.
Protection
Anneau d’ajustement
d’assiette (Fourni)
Avec la capsule en caoutchouc
3. Comme illustré ci-dessous, fixer la vis insérée dans
la capsule en caoutchouc à l’arrière de l’ensemble.
Protection
La distance de la protection diffère selon le
type de véhicule. Toujours veiller à bien attacher l’appareil en insérant correctement la
capsule en caoutchouc.
Anneau d’ajustement
d’assiette (Fourni)
Remarque
Certains véhicules japonais/asiatiques comme TOYOTA et
NISSAN ne nécessitent pas d'ensemble de cadre et d’entourage
de garniture. Pour fixer la radio de remplacement, utiliser les
étriers et les vis de montage fabriqués en OEM. Ces étriers
s’alignent sur les orifices de vis filetés qui se trouvent de chaque
côté de la nouvelle radio.
F-8
Page 21

4 ohms
4 ohms
4 ohms
4 ohms
Mise en sourdine
radio (faible)
Branchements
Avertissement
• Pour éviter tout risque de court-circuit, retirer la clé de con-
tact et débrancher la borne négative (–) de la batterie.
• Cet appareil est conçu uniquement pour fonctionner sur
unealimentation de 12 V CC à terre négative. Il ne peut donc
pas être utilisé sur une batterie de 24 V ou autre.
Méthode de branchement
Attention
• NE JAMAIS raccorder aucun câble des enceintes au corps
métallique ou au châssis du véhicule.
• NE JAMAIS raccorder les fils communs (–) aux enceintes
l’un à l’autre.
• Raccorder directement chaque fil d’enceinte à chaque borne
de l’enceinte.
• T ous les fils communs aux enceintes doivent rester flottants.
• Connecter chaque paire de fils d’enceinte uniquement à
une seule enceinte (ou à un système d’enceintes) qui
possède une impédance d’au moins 4 ohms minimum ainsi
qu’une capacité de gestion de l’alimentation adéquate.
• Ne jamais connecter les fils d’enceinte à des entrées d’am-
plificateurs externes sous peine d’endommager
l’amplificateur interne de l’appareil.
1 Vous assurer que la clé de contact a bien été retirée.
2 Déconnecter la borne négative (–) de la batterie du
véhicule.
3 Brancher la borne de l’antenne du véhicule à la prise
d’antenne de l’appareil.
4 Raccorder le câble de l’adaptateur spécial voiture
disponible chez un revendeur à l’appareil.
5 Rebrancher la borne négative (–) de la batterie du
véhicule.
6 Mettre le contact.
7 Vérifier si l’appareil fonctionne correctement.
C-1
1
36
C
2
1
B
2
1
A
2
1
Mise en sourdine
lors de l’utilisation
2
du téléphone
3
+12V constante
4
Antenne aux.
5
6
Kl.15/Allumage
7
Terre
8
1
2
3
4
5
6
+12V Amplificateur
4
5
NC
NC
NC
C-1
Terre
3
4
3
4
A
NC
NC
NC
NC
C-2 C-3
16 19
10
13
7
12
15
9
8
11
14
7
5
8
6
7
5
8
6
18
20
17
Sortie enceinte RR+
1
Sortie enceinte RR–
2
Sortie enceinte RF+
3
Sortie enceinte RF–
4
Sortie enceinte LF+
5
Sortie enceinte LF–
6
Sortie enceinte LR+
7
Sortie enceinte LR–
8
7
8
9
10
11
12
B
C
C-2 C-3
NC
NC
NC
NC
NC
NC
Données CDC sortie
13
Données CDC entrée
14
15
16
Bus Masse/Terre
17
Entrée ligne Masse/Terre
18
19
Entrée ligne L
20
Entrée ligne R
NC
+12V
FRANÇAIS
Changeur CD
F9
Page 22

Entretien
Remplacement du fusible
Si le fusible a sauté, vérifier en premier la connexion de
l’alimentation avant de remplacer le fusible. Si le fusible saute
de nouveau alors que l’appareil est utilisé dans des conditions normales, il se peut que l’appareil soit défectueux.
Arrière de l’appareil
Avertissement
Utiliser uniquement un fusible répondant à l’ampérage spécifié
(10A).
L’utilisation de tout autre type de fusible risque de provoquerun
incendie ou d’endommager l’appareil.
FRANÇAIS
Nettoyage des connecteurs
Si les connecteurs de l’appareil et la façade sont sales, il se
peut que l’appareil ne fonctionne pas correctement.
Dans ce cas, détacher la façade et nettoyer les connecteurs
au moyen d’un coton-tige imbibé d’alcool comme illustré cidessous.
Appareil principal Arrière de la façade détachable
Retour aux réglages initiaux
When the
the microcomputer of the unit returns to the initial settings. If
the display window is not properly shown or the unit malfunctions, press the
SRC
button is pressed for more than 10 seconds,
SRC
button for more than 10 seconds.
Retrait de l’autoradio
Utilisez les clés de démontage fournies pour retirer l’appareil
du véhicule.
Les insérer dans l’appareil comme indiqué ci-dessous. Ceci
déverrouillera l’appareil du cadre, ce qui permettra de sortir
l’appareil.
Remarques
• Manipuler les clés avec soin pour éviter de se blesser les
doigts.
• Conserver les clés dans un endroit sûr pour pouvoir les
réutiliser ultérieurement.
F-10
Page 23

Guide de dépannage
Spécifications techniques
Ce guide vous permettra de résoudre la plupart des problèmes
que vous rencontrerez lors de l’utilisation de cet appareil.
Avant d’utiliser la liste ci-dessous, veuillez cependant consulter les procédures de branchement et d’utilisation.
Général
Problème
• Les stations mémorisées et
l’heure exacte ont disparu.
• Le fusible a sauté.
• La radio fonctionne lorsque la
clé de contact se trouve sur les
positions ON, ACC et OFF.
• L’appareil n’est pas sous tension.
• L’appareil est continuellement
sous tension.
Cause/Remède
Les fils ne sont pas branchés
correctement dans le
connecteur d’alimentation du
véhicule.
Vérifier si les câbles ne sont
pas en court-circuit.
La voiture ne possède pas de
position ACC.
Réception radio
Problème
Les stations présélectionnées
ne peuvent pas être reçues.
Impossible de localiser les
stations.
La mémorisation “de voyage”
ne parvient pas à finir de
mettre en mémoire les six stations.
Assurez-vous également que l’antenne est branchée, étendue
et sèche à l’intérieur.
Si les solutions susmentionnées ne vous aident pas, veuillez
consulter votre revendeur Blaupunkt le plus proche ou aux
Etats-Unis appeler le 1-800-266-2528 pour une assistance
technique, des pièces ou une intervention technique. Veuillez
appeler le 1-800-950-2528 aux Etats-Unis pour obtenir le nom
d’un revendeur ou une brochure avec les différents
accessoires disponibles.
Cause/Remède
Le signal est trop faible.
Le signal est trop faible. →
Utiliser la recherche manuelle.
Ne reçoit pas un assez
grand nombre de
fréquences d’émission.
Guide de dépannage du changeur CD
Si des problèmes surgissent lors du fonctionnement du
changeur CD, un message d’erreur apparaîtra dans la fenêtre
d’affichage.
Se reporter au tableau ci-dessous pour identifier le problème,
puis exécuter l’action corrective suggérée. Si l’erreur persiste
ou que “MECHA ERR” ou “09 ERROR” s’affiche, contacter le
revendeur Blaupunkt le plus proche.
Message
NO MAG
NO DISC
CD ERROR
COMM ERR
TEMP ERR
Cause possible
Pas de magasin.
Pas de disque.
Disque à l’envers.
Erreur de focalisation.
Erreur de communication.
Température excessive du changeur CD.
Action recommandée
Charger le magasin
dans le changeur CD.
Vérifier le disque.
Vérifier le disque.
Vérifier le raccordement
du changeur CD.
La signalisation
d’erreur s’éteindra et la
lecture reprendra
lorsque la température
sera redevenue
normale.
SPECIFICATIONS GENERALES
Dimensions : env. 178 mm × 50 mm × 155 mm
Alimentation : Batterie de voiture c.c.12 volts (avec
Puissance de sortie : 23 watts RMS × 4 voies / 35 watts
Câblage de sortie : De type à masse flottante conçu pour
Impédance de sortie : Compatible avec les enceintes 4-8
(L × H × P)
masse négative)
crête × 4 voies
4 enceintes.
ohms.
SYNTONISEUR
Plage de syntonisation
Sensibilité : MW : 20 µV
Séparation stéréo
en FM : 35 dB
: MW : 531 - 1,602kHz
(par pas de 9 kHz)
LW : 153 - 279 MHz
(par pas de 9 kHz)
FM : 87,5 - 108,0 MHz
(par pas de 50 kHz)
FM : 9,1 dBf avec une sensibilité
mono
LECTEUR DE CASSETTE
Réponse en fréquence
Rapport Signal/Bruit : 50 dB
Pleurage & Scintillement
: 30 – 15.000 Hz
: 0,15 % WRMS
FRANÇAIS
F11
Page 24

ADVERTENCIA SOBRE LA NORMATIVA DE LA FCC
Precauciones
Frontal extraíble
Este aparato ha sido sometido a las pruebas sobre
dispositivos de clase B, Parte 15, de las normas de la
organización FCC, situándose dentro de los límites permitidos.
Las limitaciones que establece la FCC están pensadas para
reducir hasta cierto punto las interferencias negativas sobre
los equipos de uso doméstico. Este aparato, genera, utiliza y
puede transmitir frecuencias de radio y, si no se instala de
acuerdo con las instrucciones, puede interferir negativamente
en las comunicaciones por radio. Con todo, no podemos
garantizar que no se vayan a producir interferencias de radio
en algunos casos concretos. Si el aparato provoca
interferencias negativas en la recepción de las señales de
radio o televisión, cosa que podrá comprobar simplemente
apagándolo y encendiéndolo, le recomendamos que solicite
ayuda a su distribuidor o a un técnico de radio o televisión
cualificado. T ambién le advertimos que si realiza algún cambio
o modificación en el aparato que no esté permitido
expresamente en este manual quedará desautorizado a
utilizarlo.
Características
• Panel frontal extraíble
• Amplificador de potencia incorporado
(Potencia máx. de salida: 35 W X 4 canales)
• Sintonizador sintetizador FM/MW/LW PLL
• Memoria para 30 presintonías
• Memorización automática de emisoras /
exploración de emisoras
• Teléfono mudo
• Control del cambiador de CD
• Evite instalar el aparato en lugares donde pueda estar
expuesto a altas temperaturas, a la luz directa del sol, a
aire caliente procedente de la calefacción o en lugares
donde pueda estar expuesto al polvo, a la suciedad o a
excesivas vibraciones.
• No encienda el equipo si la temperatura interior del coche
es excesivamente alta. Espere siempre a que se enfríe
antes de utilizarlo. Si aparca el coche al sol la temperatura
interior subirá considerablemente.
• Si el equipo no se enciende, repase primero las conexiones;
luego compruebe que no se haya fundido el fusible de la
parte posterior del equipo.
• Lea atentamente este manual antes de utilizar el equipo.
Si detecta algún problema que no venga explicado en este
manual póngase en contacto con el establecimiento en el
que lo compró o con el distribuidor más cercano.
Manipulación de cintas
• No mantenga la cinta en la unidad cuando esta no este en
uso
• No exponga las cintas a la luz directa del sol, temperaturas
demasiado bajas o humedad
• No introduzca una cinta que parezca rota, torcida, o con
los rótulos en ella flojos o deteriorados
• No se aconseja el uso de cintas de más de 90 minutos de
duración ya que estas son demasiado delgadas y tienden
a estirarse. La constante reproducción y detenido de estas
cintas puede provocar que se atasquen en el mecanismo
del reproductor de cintas.
• Antes de introducir una cinta dentro de la unidad, cerciórese
de que la cinta no esta floja. Si lo esta, gire el cubo del
carrete con una lápiz o herramienta similar como rebobinarla
firmemente, como se muestra abajo.
Cómo colocar el frontal extraíble
Coloque la parte derecha del frontal extraíble de manera que
la parte A coincida con la parte B del equipo, como se
muestra en la ilustración inferior. Posteriormente presione
ligeramente la parte izquierda del frontal hasta que quede
bien enganchado.
Cómo sacar el frontal extraíble
Remueva la cinta de la unidad, si existe alguna, y apague la
unidad.
Pulse el botón
como se muestra en la ilustración y tire de él hacia afuera.
para liberar el frontal extraíble; sujételo
Seguridad
Para evitar el robo o la pérdida del panel frontal, podrá
desactivar el botón de liberación
suministrado.
instalando el tornillo
1. Desatornille el tornillo ✼ de la parte izquierda frontal del
equipo (véase ilustración superior).
2. Coloque el frontal extraíble.
3. Busque un tornillo de fijación entre los accesorios de
montaje (véase pág. 8) y atorníllelo en el mismo orificio.
De esta manera, el frontal quedará fijo.
Notas
• No ejerza demasiada presión sobre el frontal al colocarlo
en el equipo; basta con que lo empuje ligeramente.
• Asegúrese de que no entre polvo ni suciedad en los terminales eléctricos de la parte posterior del frontal extraíble,
ya que podrían producirse anomalías o intermitencias en el
funcionamiento del equipo.
S-1
ESPAÑOL
Page 25

Identificación de los mandos
Frontal extraíble Pantalla LCD
4
1
3
2
5
6
7
8
9
134
2
1 Botón PWR
Pone la alimentación de la unidad en ON o en OFF.
Hace el sonido mudo.
2 Botón REL
Libera el panel frontal separable
3 Dial VOL
Ajusta el nivel de volumen y el control de audio
4 Botón EJECT
Extrae la cinta.
5 Ventana de la pantalla LCD
ESPAÑOL
6 GRABE la ranura de la inserción
Inserte la CINTA aquí.
7 Botón de FR/FF
Grabe el cambio de dirección del transporte.
FR : Rebobinado FF : Delantero rápido.
8 Botón MENU
Selector de la pantalla. Introduce el modo de ajuste del
elemento de la pantalla. Mantenga pulsado por más de
dos segundos para introducir el modo de ajuste del audio (Bass, Treble, Loudness, Balance, etc)
9 Botón
Sintonizador de escaneo/preseleccionado escaneo.
Selecciona el elemento en el modo de ajuste. Seleccione
el disco en el modo CDC.
S-2
MELBOURNE C34
13
10 Botón (botón BND/TS)
Seleccione la banda y el depósito de viaje.
11 Botón /
Usado para sintonizar en la estación deseada. Selecciona
el elemento en el modo de ajuste
12 Botón SRC
Selección de la fuente en operación
Resetea la unidad (Pulse y mantenga por más de 10
segundos)
13 Botón PRESET MEMORY
Durante la recepcion de radio
1
Durante el modo CDC
PR OG
- ; Para memoria/call preestablecido
MENU
/AUDIO
FFFR
B
N
D
/T
S
11
12 10
; Para reproducción de escaneo
; Para reproducción de mezcla
; Para reproducción de repetición
; Para reproducción de repetición
7
8
9
5
6
1 Indicador del modo de reproducción CDC
2 Sección de la pantalla principal
3 Indicador del ecualizador
4 Indicador LOUDNESS
5
Indicador de sintonización manual/Medidor de nivel R-ch
6 Indicador TAPE IN
7 Indicador de señal STEREO
8
Indicador de sintonización manual/Medidor de nivel L-ch
9 Indicador lo (local)
Page 26

Funcionamiento básico
Colocando la alimentación de potencia en ON
Pulse el botón
PWR
para colocar la unidad en ON.
Colocando la alimentación de potencia en OFF
Pulse el botón
Consejo
Cuando encienda la unidad, se visualizará “HELLO” y después
se visualizará “WELCOME” momentáneamente antes de
encenderse realmente. Cuando apague la unidad, se visualizará
“SEE YOU” y después se visualizará “GOOD-BYE”
momentáneamente antes de apagarse realmente. Podrá editar
estos mensajes. (Consulte “Edición de mensajes al encender/
apagar”).
PWR
para colocar la unidad en OFF.
Control del volumen
Gire el mando VOL para ajustar el volumen.
Menos volumen
Silenciamiento del sonido
PWR
Pulse
Para restablecer el nivel de volumen anterior, pulse
vez.
Se puede ajustar el nivel de silenciamiento. (Consulte “
ajustar las características del sonido
. El medidor de nivel R-ch/L-ch parpadea.
Más volumen
”)
PWR
otra
Cómo
Cambios en la pantalla
Aprete el
exibición de relog) derante unos segundos. Y después, esta
indicación se altera en la indicación anterior.
• Modo Radio
• Modo de cinta
• Modo CDC
MENU
para exibir la indicación (ajuste inicial es
Frecuencia o reloj
Estatus de la cinta o reloj.
Estatus CDC o reloj.
Puesta en hora del reloj
El reloj utiliza el sistema de visualización de 12 horas.
1. Ponga la tecla de encendido en la posición ON.
2. Presione
3. Pulse
“CLK SET”.
4. Pulse el botón
reloj.
5. Emplee los botones y el mando siguientes para poner en
hora el reloj. (La sección que parpadea puede ajustarse.)
6. Pulse momentáneamente el botón
el modo de ajuste del reloj.
Cómo consultar la hora con el coche apagado
La pantalla se iluminará para mostrar la hora y se apagará
automáticamente después de 5 segundos.
Pulse el botón
PWR
para encender la unidad.
MENU
, luego pulse o para visualizar
PWR
para entrar en el modo de ajuste del
PWR
o : Ajuste la hora y los minutos
: Para activar el parpadeo de las horas
/ minutos
MENU
MENU
con el coche apagado.
para completar
Cambio de la Fuente
Cada vez que
cambiará como se muestra abajo.
Nota
Si se pulsa el botón
la unidad y no hay cambiador de CD conectado a la unidad,
el modo RADIO permanecerá tal como esta.
SRC
es presionado, la fuente de operación
SRC
cuando no se ha cargado la cinta en
Cómo ajustar las características del sonido
1. Pulse el botón
introducir el modo de ajuste de audio, entonces pulse
o para seleccionar el elemento de ajuste
deseado como en la tabla de abajo.
2. Pulse o o gire el dial de VOL para ajustar el
elemento seleccionado.
Utilice las tablas siguientes como orientación para el
ajuste de las funciones en cada modo. Dispondrá de 5
segundos para el ajuste después de haber seleccionado
el elemento. Transcurridos los 5 segundos, la unidad
volverá a la indicación anterior.
EQ OFF (se visualizara el ecualizador si este se ha ajustado)
BASS BAS –5
TREBLE TRE –5
LOUDNESS LOUD
BALANCE BAL L9
FADER FAD R9
ON VOL 0
MUTE 0
Trucos
• EQ OFF (Pantalla EQ)
Visualiza el ajuste actual de la curva del ecualizador, si el
ecualizador ha sido ajustado. (ver pagina 5)
• ON VOL (Limite de volumen)
Ajusta el volumen al tiempo del encendido. Puede ajustar
con el sonido actual.
• MUTE (Nivel mudo)
Puede ajustar el nivel mudo con el nivel actual.
• Ajustes para BASS, TREBLE, y LOUDNESS pueden ser
hechos para cada uno de los siguientes modos
independientemente: Cada venda de radio, TAPE, CDC.
MENU
por más de dos segundos para
o
Gama de ajustes
0
BAS +5
0
OFF
(Total izquierda) (Total derecha)
(Total trasera) (Total delantera)
•El valor inicial es el de las letras cursivas.
0
0
50
20
TRE +5
LOUD ON
BAL R9
FAD F9
80
80
S-3
ESPAÑOL
Page 27

Ajuste de los elementos de menú
1. Pulse
2. Pulse o o gire el dial VOL para ajustar el
MAIN DISP (Consulte la columna de la derecha)
SENS HI LO /
LEVEL LO OFF / LO / HI
MESG ON OFF /
CLK SET (Consulte las páginas 3)
24H MODE 12H /
CLOCK ON OFF /
ESPAÑOL
AREA SET USA /
MENU
pantalla, (indica temporalmente el reloj) entonces pulse
deseado como se muestra en la tabla de abajo.
elemento seleccionado.
Utilice las tablas siguientes a modo de guía para ajustar
los ajustes en cada modo. Ajuste antes de transcurrir 6
segundos después de seleccionar el elemento. Después
de 6 segundos, la unidad volverá a la indicación anterior.
para ingresar el modo de ajuste de la
o para seleccionar el modo de ajuste
o
Gama de ajuste
HI
ON
24H
ON
EURO
•El valor inicial es el de las letras cursivas.
Consejos
• MAIN DISP
Podrá seleccionar qué elementos prioritarios se visualizarán
en la pantalla principal. La prioridad de visualización podrá
ser ajustada para los siguientes elementos en cada modo.
Radio
FREQ : Indicación de la frecuencia (Valor inicial)
CLOCK : Indicación del reloj.
TAPE
STATUS : PLAY, FF, REW
CLOCK : Indicación del reloj
CDC
D/TRK/TIM : Disco/Canción/tiempo transcurrido
CLOCK : Indicación del reloj
• SENS HI (Local/DX) (Modo radio solamente)
Este rasgo es usado para seleccionar la potencia de la señal
a la cual el radio se detendrá durante la sintonización de
búsqueda.
Si selecciona el ajuste local, solamente estaciones fuertes
(locales) serán recibidas. El “lo” aparece en la ventana de
la pantalla. Seleccione el ajuste distante y el radio se
detendrá en una rango más amplio de señales, incluyendo
estaciones más distantes y débiles. El “lo” aparecerá en la
ventana de la pantalla. DX es el ajuste sugerido por defecto.
LO : Local.
HI : DX.
• LEVEL LO (Nivel de sensibilidad)
Se puede cambiar la sensibilidad de la indicación del
medidor de nivel.
OFF : Desactivado.
LO : Sensibilidad normal
HI : Sensibilité élevée.
• MESG (Mensaje)
Se puede cambiar el mensaje de encendido/apagado.
OFF : No se visualiza mensaje.
ON : Se visualiza un mensaje al encender/
• CLK SET
Ajuste el reloj. (Consulte las páginas 3)
apagar.
• 12H MODE
Puede seleccionarse o 12H o 24H.
12H : El reloj usa un sistema de visualización de
24H : El reloj usa un sistema de visualización de
• Reloj en ON
Indicación del reloj cuando puede cambiarse el apagado
OFF : La indicación del reloj y la iluminación no
ON : La indicación del reloj se visualiza luego del
• AREA SET (Modo Radio solamente)
Esta unidad se suministra preajustada en fábrica para la
recepción de emisoras de radio de Norteamérica. Para
utilizarla en otras áreas del mundo podrá requerirse una
separación de canales diferente.
Seleccione el área deseada, entonces pulse
USA : Para Norteamérica.
EURO : Para Europa.
12H
24H
se visualizan después del apagado.
MENU
Pulse
reloj por pocos segundos cuando apague.
apagado.
para invocar la indicación del
SRC
PWR
o
* Una estación preseleccionada anteriormente se borra
cuando se cambia el área.
Modo mudo mientras se telefonea
Si su sistema de audio del automóvil esta equipado con
teléfono móvil, este cambiará automáticamente a mudo
cuando telefonee.
Este solo trabajará si el teléfono móvil esta conectado al
sistema de audio del automóvil como se describe en las
instrucciones de instalación. El volumen se reducirá al nivel
de volumen mudo configurado.
S-4
Page 28
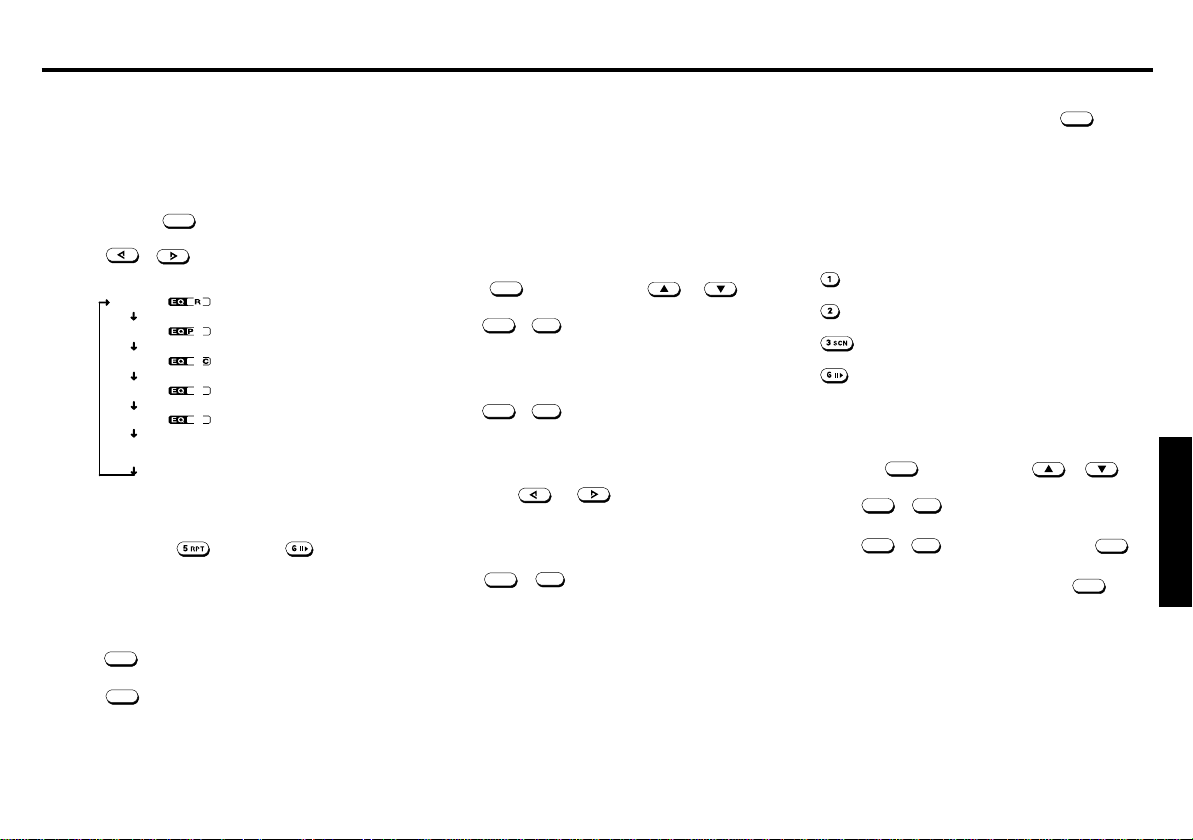
Cómo poner el ecualizador
Podrá seleccionar una curva de ecualizador para 4 tipos de
música (Rock, Pop, Clásica).
Podrá ajustar y almacenar la frecuencia y nivel de la curva
de ecualizador.
Selección de la curva de ecualizador
1. Pulse el botón
introducir el modo de ajuste del audio.
2. Pulse o para girar la perilla de volumen y
seleccione la curva del ecualizador deseada como sigue:
ROCK
POP
CLASSIC
USER 1
USER 2
EQ OFF
MENU
por más de dos segundos para
Indicación de la pantalla
Ajuste de la curva del ecualizador
1. Ajuste las características de sonido deseadas. (ver pagina
3 “Ajuste de las características de sonido”)
2. Pulse y mantenga (USER 1) o (USER 2) por
más de dos segundos para almacenar la curva del
ecualizador, mientras que exhibe “BAS/TRE” en la
ventana de exhibición.
Cancelación de la curva del ecualizador
1. Pulse
2. Pulse
MENU
modo de ajuste del audio.
“EQ OFF” parpadeará por pocos segundos.
por más de dos segundos para introducir el
SRC
para cancelar la curva del ecualizador. El
Edición de mensajes al encender/apagar
Puede editar el mensaje de encendido/apagado y almacenarlo
en la memoria.
Puede editar los siguientes cuatro mensajes con 9 caracteres
cada uno.
Mensajes de encendido
• HELLO (MESG 1) / WELCOME (MESG 2)
Mensajes de apagado
• SEE YOU (MESG 3) / GOOD-BYE (MESG 4)
1. Pulse
2. Pulse
MENU
visualizar “MESG ON” en la ventana de la pantalla.
, entonces pulse o para
SRC
PWR
o
para hacer parpadear el “HELLO”.
Consejos
• Para borrar o corregir un mensaje, pulse
• Si no pulsa ningún botón o gira el mando durante 30
• Cerciórese de que “MESG” esté encendido “ON”.
• Cuando introduzca un nombre, la presentación de los
3. Gire el mondo VOL para seleccionar el mensaje que
desea editar.
HELLO ➜ WELCOME ➜ SEE YOU ➜ GOOD- BYE
SRC
4. Pulse
A. Gire el mondo VOL hacia la derecha para seleccionar
los caracteres deseados.
(A➜B ➜ C ➜ ...Z➜
➜0➜1➜2➜3...9➜“ ”Space )
B. Pulse
parpadeando.
C. Repita los pasos A y B para completar la introducción
de todo el mensaje con una longitud máxima de 9
caracteres.
5. Pulse
mensaje parpadea y automáticamente retorna a la
posición indicada.
PWR
o
, entonces ingrese el carácter.
<➜> ➜ ∗ ➜ +➜
o para mover el cursor
➜− ➜ . ➜ /
′
Cómo borrar el mensaje de apagado
Puede borrar el mensaje de apagado si lo desea.
1. Presiona
2. Pulse
3. Pulse
PWR
SRC
o
para salvar el mensaje. El nuevo
4. Para volver a la indicación anterior, pulse
MENU
segundos para borrar los caracteres e introducirlos
nuevamente.
segundos, el modo de edición de mensajes se apagará
automáticamente.
más de 2
caracteres se afecta al pulsar los botones mostrados del
siguiente modo:
:Cambia a la introducción de letras.
(Empieza por “A”.)
:Cambia a la introducción de números.
(Empieza por “0”.)
:Passe à l’entrée des symboles.
(En commençant par “<”.)
:Introduce un espacio (en blanco).
MENU
visualizar “MESG ON” en la ventana de la pantalla.
seleccionar el mensaje que quiera borrar.
rante más de 2 segundos.
los pasos 2 y 3 si desea borrar otros mensajes.
, entonces pulse o para
SRC
PWR
o
, después gire el mando VOL para
SRC
PWR
o
, después pulse el botón
MENU
MENU
. Repita
du-
ESPAÑOL
S-5
Page 29

Recepción de emisoras
Operaciones de la cinta
Búsqueda automática de emisoras
1. Pulse el botón para seleccionar la banda deseada.
F1(FM 1) ➜ F2(FM 2) ➜ F3(FM 3) ➜ MW ➜ LW
(FM 3 & MW, L W son bandas de almacenamiento de viaje)
2. Pulse o para sintonizar las estaciones. La
búsqueda automática se detiene cuando el equipo
encuentra la frecuencia de alguna emisora.
Cuando sintonice emisoras de FM estéreo, se encenderá
el indicador de señal estéreo “ ST ” en la pantalla.
: Frecuencia más baja.
: Frecuencia más alta.
Sintonización manual
1. Pulse el botón para seleccionar la banda deseada.
2. Pulse y mantenga o por mas de 0,5
segundos para activar el modo de sintonización manual
(a intervalos de 1 kHz).
El medidor de nivel R-ch/L-ch se alumbrará en la ventana
de la pantalla. Pulse de nuevo para sintonizar las
estaciones.
El equipo volverá al modo de búsqueda automática cuatro
segundos después de que haya terminado de ajustar
manualmente la emisora.
Exploración de emisoras
ESPAÑOL
1. Pulse el botón para seleccionar la banda deseada.
2. Mantenga presionado por menos de 2 segundos.
La unidad explorará la banda seleccionada para encontrar
les emisoras y se detendrá durante 10 segundos en cada
emisora recibida, tras lo cual continuará buscando la
siguiente emisora.
Pulse
escaneo y mantener la misma frecuencia.
de nuevo para detener la sintonización de
Exploración de emisoras preseleccionadas
1. Pulse el botón para seleccionar la banda deseada.
2. Mantenga presionado por más de 2 segundos. La
unidad explorará preestableció la memoria para las cada
S-6
6 estaciones de la venda del MW/LW o las 18 estaciones
de las vendas de FM. La unidad se detendrá durante 10
segundos en cada emisora preseleccionada que pueda
recibir, tras lo cual continuará buscando la siguiente
emisora.
Pulse
escaneo de preselección y mantener la frecuencia
seleccionada.
de nuevo para detener el sintonizador de
Escuchar la cinta a reproducir
Introducir la cinta
Introduzca una cinta para iniciar la reproducción. La
reproducción comienza automáticamente.
Memorización automática de emisoras (Sintonización en viaje)
1. Pulse el botón para seleccionar la banda deseada.
2. Mantenga pulsado el botón durante más de dos
segundos.
Se almacenarán automáticamente hasta 6 estaciones en
la memoria preseleccionada para la banda seleccionada.
Si el radio esta en FM1 o en FM2 este cambia a FM 3.
Nota
Esta función puede utilizarse con las bandas FM 3 y MW, LW.
Memorización de las emisoras preferidas
El equipo le permite almacenar hasta 6 emisoras por banda
en la memoria del equipo (18 para FM, 6 para MW y LW).
Puede decidir en qué orden desea almacenarlas.
1. Pulse el botón para seleccionar la banda deseada.
2. Pulse o para sintonizar las estaciones.
3. Pulse y mantenga pulsado durante unos dos segundos
el botón del número
la emisora hasta que el indicador de frecuencia parpadee
dos veces en la pantalla.
En la pantalla aparecerá el número asignado.
Nota
Si cuando almacena otra estación en el mismo botón de
número preseleccionado, la estación seleccionada
anteriormente es reemplazada por una nueva.
1
à 6, en el que desee memorizar
Cambiar la dirección de la cinta
Presione los botones FR y FF al mismo tiempo, para
cambiar la dirección de la cinta.
Extraer la cinta
Presione para detener la reproducción y extraer la cinta.
Avance rápido/Rebobinado
Presione FR o FF hasta que se bloquee.
Para terminar la reproducción, pulse el botón de la dirección
opuesta a mitad de camino para liberar el botón bloqueado.
Nota
• Antes de apagar la unidad, extraiga la cinta para evitar que
se dañe.
Cómo sintonizar las emisoras memorizadas
1. Pulse el botón para seleccionar la banda deseada.
2. Pulse los botones
1
à 6.
Page 30

Controles del cambiador de CD
Manejo del cambiador de CD
Este modelo puede controlar un cambiador de CD. Verifique
con su especialista en estereos para automóviles más cercano
sus recomendaciones de los modelos que trabajan con este
radio.
SRC
Pulse
Pulse de nuevo para regresar al modo de radio.
Indicador de modo de reproducción CDC
para cambiar al modo del cambiador de CD.
Disco No.
TRACK SCAN
DISC SCAN
TRACK REPEAT
DISC REPEAT
TRACK MIX
DISC MIX
Tiempo transcurridoCanción No.
Selección del disco
Pulse los botones de selección del disco para seleccionar el
disco deseado a reproducir.
: Para avanzar a un número de disco mayor
: Para retornar a un número de disco menor
Pausa de la reproducción
Presione .
Para detener la reproducción, pulse
de nuevo.
Detener la reproducción
SRC
Pulse
para seleccionar la recepción de radio.
Búsqueda de canción
Pulse los botones / .
Los números de las canciones aparecen en la ventana de
visualización.
: La reproducción comienza desde el inicio de la
siguiente canción.
: La reproducción comienza desde el inicio de la
canción actual. Pulse de nuevo para reproducir la
canción anterior.
Indicación/Revisión
Pulse y mantenga los botones / . Libere cuando
haya encontrado el punto deseado.
: Para buscar hacía adelante
: Para buscar hacía atrás
Escaneo/ Reproducción del escaneo del disco
Escaneo de la canción
Pulse
Esto reproducirá los primeros 10 segundos de todas las
canciones del disco. Pulse
característica.
Escaneo del disco
Presione
Esto reproducirá los primeros 10 segundos de cada canción
en cada disco. Pulse
característica.
.
de nuevo para cancelar esta
por más de dos segundos
de nuevo para cancelar esta
Canción/Reproducción de repetición de disco
Repetición de canción
Presione
repetidamente.
Presione
Repetición del disco
Presione
El disco actual será repetido continuamente. Pulse
nuevo para cancelar esta característica.
, La canción actual se reproduce
de nuevo para cancelar esta característica
por más de dos segundos.
de
Disco/ Reproducción mezclada del disco
Mezcla de canciones
Pulse
reproducen en orden aleatorio.
Pulse
Mezcla de discos
Presione
Tanto discos como canciones serán reproducidos en orden
aleatorio. Pulse
. Todas las canciones en el disco actual se
de nuevo para cancelar esta característica.
por más de dos segundos.
para cancelar esta característica.
ESPAÑOL
S-7
Page 31

Montaje
Accesorios de montaje incluidos con el equipo
Ejemplo de montaje
En el salpicadero.
1. Introduzca la carcasa en el lugar correspondiente del
Carcasa Cojinete,
Tornillo
Tornillo
de cierre
Cinta de
montaje y
tornillo
Llavel de
extracción
2. Doble hacia adentro las patillas que considere necesarias
Precauciones
• Asegúrese de sacar el frontal extraíble antes de empezar
con el montaje.
• Escoja bien el lugar en el que va a montar el equipo para
que no le moleste cuando conduzca.
• Para que el montaje quede lo más seguro posible utilice
únicamente los accesorios de montaje suministrados con
el equipo.
• Cuando instale la unidad en un coche, mantenga la unidad
lo más horizontal que sea posible. Si la unidad se instala
en ángulo, debido al diseño del vehículo, asegúrese de que
la unidad no esté inclinada en más de 30°.
ESPAÑOL
Pared de
protección
salpicadero.
para que la carcasa quede bien sujeta al salpicadero.
Uso de abrazadera de montaje
3. Conecte la abrazadera a la parte inferior del
salpicadero mediante tornillos. Conecte la espalda del
aparato a la abrazadera de montaje mediante pernos
y soporte metálico.
Extracción del anillo de
adorno (suministrado)
Uso de cojinete
3. Como se muestra en la siguiente ilustración, apriete
firmemente el tornillo introducido en la parte trasera
de la caja.
Pared de
protección
La distancia de la protección antiincendios
varía de un coche a otro. Introduzca el tornillo, ajústelo y apriételo firmemente para que
el equipo quede bien sujeto.
Extracción del anillo de
adorno(suministrado)
Nota
Algunos vehículos japoneses/asiáticos, tales como los de las
marcas TOYOTA y NISSAN, no necesitan el montaje del manguito ni del marco de guarnición. Para fijar la radio de
reemplazo emplee las ménsulas O.E.M. y
los tornillos de montaje. Estas ménsulas se alinearán con los
orificios para enroscar los tornillos que hay a cada lado de la
nueva radio.
S-8
Page 32

(Max 150mA)
4 Ohmios
4 Ohmios
4 Ohmios
4 Ohmios
Radio mudo (bajo)
Conexiones
Advertencias
• Para evitar que se produzca un cortocircuito, saque la llave
de contacto y desconecte el terminal negativo (–) de la
batería.
• Este equipo funciona únicamente a 12 V DC con terminal
negativo a masa; no admite baterías de coche de 24 V ni de
ningún otro tipo.
Procedimiento de conexión
Precaución
• NO conecte los cables de los altavoces al cuerpo metálico o
chasis del vehículo.
• NO conecte los cables comunes (–) de los altavoces entre sí.
• Conecte cada uno de los cables de los altavoces directamente
a cada uno de los terminales de los altavoces.
• Todos los cables comunes (–) de los altavoces deben
permanecer flotantes, es decir, no debe efectuarse ninguna
conexión o conexiones comunes en el suelo del vehículo.
• Conecte cada par de cables de altavoz a un único altavoz (o
sistema de altavoces) con una impedancia mínima de 4 ohmios
y una capacidad adecuada de potencia.
• No conecte los cables de los altavoces a las entradas de ningún
amplificador externo, ya que se dañaría el amplificador interno
del equipo.
1 Asegúrese de haber sacado la llave del contacto.
2 Desconecte el terminal negativo (–) de la batería del
coche.
3 Conecte el terminal de la antena del coche a la entrada
de antena que posee el equipo.
4 Conecte a la unidad el cable adaptador específico
para el vehículo disponible en su concesionario.
5 V uelva a conectar el terminal negativo (–) a la batería
del coche.
6 Ponga en marcha el motor.
7 Compruebe que el equipo funciona correctamente.
C-1
4
1
36
C
5
2
1
B
2
1
A
2
NC
1
Teléfono mudo
2
NC
3
12V+ permanentes
4
Antena automática
5
NC
6
Encendido/15 Kl.
7
Tierra
8
C-1
1
2
3
TIERRA
4
5
Amplificador de
6
fuego/+12V
C-2 C-3
7
9
8
3
4
3
4
A
NC
NC
NC
NC
16 19
10
13
12
15
18
20
11
17
14
7
5
8
6
7
5
8
6
SALIDA DEL PARLANTE RR+
1
SALIDA DEL PARLANTE RR–
2
SALIDA DEL PARLANTE RF+
3
SALIDA DEL PARLANTE RF–
4
SALIDA DEL PARLANTE LF+
5
SALIDA DEL PARLANTE LF–
6
SALIDA DEL PARLANTE LR+
7
SALIDA DEL PARLANTE LR–
8
7
8
9
10
11
12
B
C
C-2 C-3
NC
NC
NC
NC
NC
NC
Entrada de data CDC
13
Salida de data CDC
14
15
16
Masa de bus/TIERRA
17
Línea en masa/TIERRA
18
19
Línea en L
20
Línea en R
NC
+12V
ESPAÑOL
Cambiador de CD
S-9
Page 33

Mantenimiento
Cómo cambiar el fusible
Si el fusible se funde, compruebe en primer lugar la conexión
a la corriente y después cambie el fusible. Si se vuelve a
fundir en condiciones normales es posible que el equipo esté
defectuoso.
Parte posterior del equipo
Advertencia
Utilice únicamente fusibles del amperaje indicado (10 A).
Si utiliza fusibles de otro amperaje, el equipo se podría
estropear o incendiar.
Cómo limpiar los conectores
Si se han ensuciado los conectores del frontal extraíble, es
posible que el equipo no funcione correctamente.
Saque el frontal y limpie los conectores con un algodón
empapado en alcohol, como se muestra en la siguiente
ilustración.
ESPAÑOL
Equipo principal Parte posterior del panel frontal
Cómo recuperar la configuración inicial
Cuando se presiona el botón
el micro computador de la unidad retorna a los ajustes
originales. Si la ventana de visualización no se muestra
apropiadamente o si la unidad esta funcionando mal, pulse
SRC
el botón
por más de diez segundos.
SRC
por más de 10 segundos,
Cómo sacar la unidad
Utilice las llaves de extracción suministradas para sacar el
equipo del coche.
Insértelos en el aparato como se muestra a continuación. De
este modo se desbloqueará el aparato del manguito,
permitiendo la extracción de la unidad.
Notas
• Utilice las llaves de extracción con cuidado para no hacerse
daño en los dedos.
• Guarde las llaves en un lugar seguro para la próxima vez
que tenga que sacar el equipo.
S-10
Page 34

Guía para la solución de problemas
Características técnicas
La siguiente lista de comprobaciones le ayudará a solucionar
la mayoría de problemas que se le planteen al utilizar el equipo, pero antes de recurrir a la lista consulte en el manual los
apartados en los que se explican las conexiones y el funcionamiento del aparato.
General
Problema
• Las emisoras memorizadas y
el tiempo correcto se han
borrado.
• El fusible se ha quemado.
• La radio funciona cuando la
llave de encendido está en las
posiciones ON, ACC y OFF.
• El equipo no recibe corriente
eléctrica.
• La unidad recibe corriente
eléctrica permanentemente.
Causa/Solución
Los cables no se adecuan
correctamente al conector
de alimentación de
accesorios del vehículo.
Compruebe si existe algún
cortocircuito en el
cableado.
El vehículo no dispone de
una posición ACC.
Recepción de las emisoras
Problema
No se sintonizan las emisoras
memorizadas.
La búsqueda automática de
emisoras no funciona.
La función de memorización
para sintonización en viaje no
consigue memorizar las seis
emisoras.
Asegúrese también de que la antena esté conectada, extendida y seca por dentro.
Si las soluciones mencionadas no mejoran la situación, consulte con su distribuidor Blaupunkt más cercano; en los Es-
tados Unidos puede solicitar asistencia técnica, recambios o
reparaciones llamando al 1-800-266-2528. Si desea saber a
qué distribuidor dirigirse o recibir documentación sobre el producto, llame al 1-800-950-2528.
Causa/Solución
La señal es muy débil.
La señal es muy débil. →
Sinto-nice
No se encuentran las
suficientes frecuencias de
radio.
Solución de problemas del cambiador de CD
Cuando se presentan problemas en la operación del
cambiador de CD, aparece un mensaje de error en la pantalla
de visualización. Refiérase a la tabla de abajo para identificar
el problema, entonces tome las medidas correctivas
apropiadas. Si el error persiste, o si aparecen “MECHAERR”
o “09 ERROR”, contacte a su representante de Blaupunkt
mas cercano.
Mensaje
NO MAG
NO DISC
CD ERROR
COMM ERR
TEMP ERR
Posibles Causas
No hay magazín
No hay disco
Invertido
Error de foco
Error de comunicación
Condiciones de
temperatura excesivas
en el cambiador de CD
Acción recomendada
Cambie el magazín en
el cambiador de CD.
Revise el disco.
Revise el disco.
Revise la conexión del
cambiador de CD.
La señal de error se
apagara y se detendrá
la reproducción
cuando la temperatura
sea normal.
GENERALES
Dimensiones : Aproximadamente 178 mm × 50 mm
Corriente necesaria : Batería de coche de 12 voltios de CC
Potencia de salida : 23 vatios RMS × 4 canales / 35 vatios
Cableado de salida : Flotante-toma a tierra, para cuatro
Impedancia de salida
RADIO
Margen de sintonía : MW : 531 - 1,602 kHz
Sensibilidad : MW : 20 µV
FM
Separación estéreo : 35 dB
REPRODUCTOR DE CINTAS
Respuesta de Frecuencia
Radio S/N : 50 dB
Gimoteo y Centelleo : 0, 15 % WRMS
× 155 mm (An × Al × Pr)
(toma a tierra negativa)
pico × 4 canales
altavoces.
: Compatible con altavoces de 4-8
ohmios.
(a intervalos de 9 kHz)
LW : 153 - 279 kHz
(a intervalos de 9 kHz)
FM : 87,5 - 108,0 MHz
(a intervalos de 50 kHz)
FM : 9,1 dBf monosensibilidad
: 30-15.000 Hz
ESPAÑOL
S-11
Page 35

AVISO DA FCC
Precauções Manuseamento do painel frontal
Este equipamento foi testado e está em conformidade com
os limites relativos a um aparelho digital de Classe B, de
acordo com a Secção 15 das Regras FCC. Estes limites
destinamse a fornecer uma protecção razoável contra
interferências nocivas numa instalação residencial. Este
equipamento gera, utiliza e pode irradiar energia de frequência
de rádio e, se não for instalado e utilizado segundo as
instruções, pode causar interferência nas comunicações de
rádio. No entanto, é impossível garantir a ausência de
interferência numa ou outra instalação. Se este equipamento
causar qualquer interferência nociva à recepção de rádio ou
de televisão é possível determinar a interferência sintonizando
e dessintonizando o equipamento, aconselha-se que o
utilizador peça ajuda a um revendedor ou a um técnico
experiente em televisão e rádio.
Chamamos-lhe a atenção de que qualquer mudança ou
alteração não expressamente autorizada neste manual
poderá anular o direito de utilizar este equipamento.
Features
• Painel frontal desmontável
• Amplificador potente incorporado (Potência
Máx.: 4 X 35 W)
• Sintonizador PLL FM/MW/LW
• Memória de pré-programação de 30 estações
• Memorização de Percurso / Sintonia por
Pesquisa
• Emudecedor de telefone
• Controlo do permutador de CDs
• Evite instalar a unidade em lugares sujeitos a altas
temperaturas, por exemplo exposta aos raios directos do
sol ou a fluxos de ar quente provenientes de aquecedores,
ou em lugares expostos à poeira, à sujidade ou às vibrações
excessivas.
• Não ligue a unidade se a temperatura no interior do carro
for muito alta. Deixe arrefecer sempre a unidade antes de
a utilizar. O estacionamento do carro ao sol provoca a subida
da temperatura.
• Se a unidade não activar, verifique primeiro as ligações.
Depois, veja se o fusível atrás da unidade está queimado.
• Leia atentamente este manual antes de utilizar a unidade.
Se detectar quaisquer problemas que não estejam indicados
neste manual, consulte o revendedor onde adquiriu a
unidade ou o revendedor mais perto de si.
Manuseamento dos cassetes
• Evite manter o cassete na unidade quando não for utilizado.
• Não expor cassetes à luz directa do sol, temperaturas
extremamente baixas ou humidade.
• Não inserir um cassete que aparente estar quebrado,
retorcido, sujo, com folgas ou etiquetas rasgadas nele.
• A utilização de cassetes maiores que 90 minutos não é
recomendada, uma vez que estas fitas são muito finas e
tendem a se estirar.Retrocessos e paradas frequentes
destes cassetes podem fazer com que estes sejam
rejeitados para fora do mecanismo de cassete da unidade.
• Antes de inserir um cassete na unidade, certificar-se de
que a fita não esteja frouxa.Se estiver, gire o carretel com
um lápis ou ferramenta similar para rebobinar justo, como
mostrado abaixo.
Fixação do painel frontal
Coloque o lado direito do painel frontal de modo que as peças
A do painel frontal engatem nas peças B da unidade, como
ilustrado abaixo. Em seguida, empurre o lado esquerdo do
painel frontal até ficar bem bloqueado.
Remoção do painel frontal
Remover a fita da unidade, se existir, e desactivar a
alimentação da unidade.
Prima
o painel frontal, tal como ilustrado abaixo e retire-o da unidade.
para libertar o painel frontal da unidade. Segure
Segurança
Para evitar roubos ou extravios do painel frontal, pode-se
desactivar o botão de liberação
fornecido.
instalando o parafuso
1. Desaperte o parafuso com a marca ✼ na parte dianteira
esquerda da unidade (consulte o diagrama acima).
2. Fixe o painel frontal.
3. Seleccione um parafuso de travament a partir do mate-
rial de montagem (consulte a página 8) e insira-o no
mesmo orifício para fixar o painel frontal.
Notas
• Não exerça demasiada pressão sobre o painel frontal quando
o fixar à unidade. Basta uma pressão ligeira a moderada.
• Certifique-se de que não há poeira nem sujidade nos
terminais eléctricos, na parte de trás do painel frontal, para
evitar um mau funcionamento ou um funcionamento
intermitente.
P-1
PORTUGUÊS
Page 36

Identificação dos Comandos
Painel Frontal Visor LCD
4
1
3
2
5
6
7
8
9
134
2
1 Botão de Alimentação PWR
Altera a alimentação da unidade on ou off. Silencia o som.
2 Botão REL
Desprende o painel frontal separável.
3 Dial VOL
Ajusta o nível de volume e controle audio.
4 Botão de ejecção
Ejecta a fita.
5 cran de visor LCD
6 Fenda de inserção de FITA
Inserir a fita aqui.
7 Botão FR/FF
A direcção de transporte da fita muda.
FR : Retrocesso FF : Avanço rápido.
8 Botão MENU
Selector de exibição. Entra o ítem de exibição no modo
de ajuste.
Oprima por mais de 2 segundos para entrar no modo de
configuração de áudio.(Grave, Agudo, Altura de Som,
Balanço, Esmaecedor, etc.)
9 botão
Pesquisa/Pré-programação de sintonização através de
PORTUGUÊS
pesquisa. Seleccione o ítem no modo de ajuste. Selecção
do disco no modo CDC.
P-2
MELBOURNE C34
13
PR OG
FFFR
12 10
10 button (BND/TS button)
Selects the band & Travel store.
11 / botão
É usado para sintonizar na estação desejada. Seleccione
o ítem no modo de ajuste.
12 Botão SRC
Selecciona a fonte de operação.
Rearmar a unidade. (Oprima e mantenha por mais de 10
segundos).
13 Botão de Memória Pré-programada
Durante recepção de rádio:
1
- ; Para memory/call pré-ajustado
Durante o modo CDC :
MENU
/AUDIO
B
N
D
/T
S
11
; Para Reprodução de pesquisa
; Para Reprodução MIX
; Para Reprodução Repetir
; Para Pausa
7
8
9
5
6
1 Indicador de modo de reprodução CDC
2 Secção principal da exibição
3 Indicador de equalizador
4 Indicador de sonoridade
5 Indicador de sintonia Manual/ medidor de nível do
canal-D
6 Indicador de FITA INSERIDA
7 Indicador de sinal ESTÉREO
8 Indicador de sintonia Manual/ medidor de nível do
canal-E
9 Indicador lo (Local)
Page 37

Funcionamiento básico
Pôr a alimentação em activa.
Oprima o
PWR
botão para activar a unidade.
Pôr a alimentação em desactiva.
Oprima o
reverterá em indicação de relógio.
Sugestão
Quando activar a unidade, “Hello” será exibido e depois
“WELCOME” será momentaneamente exibido antes da
alimentação ser realmente activada.
Quando desactivar a unidade, “SEE YOU” será exibido e depois
“GOOD-BYE” será momentaneamente exibido antes da
alimentação ser realmente desactivada.
Pode-se editar estas mensagens (Veja “Compor a mensagem
de activar/desactivar”).
PWR
botão durante mais de 2 segundos. Exibição
Controlo de Volume
Rode o dial VOL para ajustar o volume.
Diminuir volume
Aumentar volume
Silenciamento do som
Carregue em
esquerdo acende.
Para restaurar o n í vel de volume anterior,carregue
novamente em
O n í vel de silenciamento pode ser ajustado (Veja “
das Características do Som
PWR
. O mediador de nível canal direito / canal
PWR
.
”).
Regulação
Alterar a exibição
Oprime o
inicial é exibição de relógio) durante alguns segundos. E em
seguida, esta indicação altera-se na indicação anterior.
• Modo Rádio • Modo CDC
• Modo de fita
MENU
para exibir a indicação temporária (ajuste
Frequência ou Relógio Estado CDC ou relógio.
Estado de fita ou relógio.
Acertar o Relógio
1. Vire a chave de igni çã o at é a posi çã o ON.
2. Carregue em
3. Oprima
mostrar “CLK SET”.
4. Carregue em
do rel ó gio.
PWR
para ligar a unidade.
MENU
, e oprima em seguida, ou para
PWR
para entrar no modo de regula çã o
5. Utilize os seguintes bot õ es e o dial para acertar o rel ó
gio (A sec çã o que cintila pode ser ajustada).
PWR
ou : Para acertar a hora e os minutos
6. Prima o bot ã o
o acerto do rel ó gio.
: Para activar a cintila çã o dos d í
gitos da hora /minutos
MENU
temporariamente para completar
Ver as Horas com a Ignição Desligada
O visor acende e mostra a hora,apagando-se depois
automaticamente ap ó s 5 segundos.
Carregue em
o “ OFF ”.
MENU
com o interruptor de igni çã o na posi çã
Alterar a Fonte
Cada vez que se oprima
como abaixo indicado:
Nota
Se o botão
carregada e nenhum modificador de CD conectado à unidade,
o modo RADIO irá permanecer como está.
SRC
SRC
, a fonte de operação mudará
for oprimido quando nenhuma fita estiver
Regulação das Características do Som
1. Oprimir o
modo de configuração de áudio e então oprimir
como tabela abaixo.
MENU
por mais de 2 segundos para entrar no
para seleccionar o item de configuração desejado
ou
2. Oprima ou ou vire o dial VCL para ajustar o
ítem seleccionado.
Utilize as seguintes tabelas como guia para regular os
ajustes em cada modo.Ajuste dentro do intervalo de 5
segundos ap ó s seleccionar o item.
Ap ó s 5 segundos,o aparelho retornar á à indica çã o
anterior.
ou
Limite de Ajuste
EQ OFF (O equalizador será exibido se ajustado)
BASS BAS –5
TREBLE TRE –5
LOUDNESS LOUD
BALANCE BAL L9
FADER FAD R9
ON VOL 0
MUTE 0
•O parâmetro escrito em itálico é a predefinição inicial.
OFF
(Totalmente esquerda) (Totalmente direita)
(T otalmente atrás) (T otalmente a diante)
Sujestões
• EQ OFF (Exibição EQ)
Exibe a configuração actual da curva do equalizador, se
este estiver sido ajustado.(Consultar página 5)
• ON VOL (Volume límite)
Ajuste o volume ao activar a alimentação. Você pode ajustar
com o som atual.
• MUTE (Nível de silêncio)
Pode-se ajustar o nível de silêncio com o som atual.
• Os ajustes para BASSO, TRIPLE e SONORIDADE podem
ser feitos indenpendentemente para cada um dos seguintes
modos : Cada faixa de rádio, FITA, CDC.
0
0
0
0
50
20
BAS +5
TRE +5
LOUD ON
BAL R9
FAD F9
80
80
P-3
PORTUGUÊS
Page 38

Ajuste dos Itens de Menu
1. Oprima
2. Oprima ou ou vire o dial VCL para ajustar o
MAIN DISP (Veja a coluna direita)
SENS HI LO /
LEVEL LO OFF / LO / HI
MESG ON OFF /
CLK SET (Veja as p á ginas 3)
24H MODE 12H /
CLOCK ON OFF /
AREA SET USA /
MENU
(indica temporalmente o Relógio) e oprima em seguida,
desejado como a seguinte tabela.
ítem seleccionado.
Utilize as tabelas a seguir como um guia para regular os
ajustes de cada modo.Ajuste no intervalo de 6 segundos
depois de seleccionar o í tem.Ao decorrer 6 segundos,a
unidade retornar á para a indica çã o anterior.
para entrar no modo Ajuste de exibição,
ou para seleccionar o modo de ajuste
ou
Gama de ajuste
HI
ON
24H
ON
EURO
•O parâmetro escrito em itálico é a predefinição inicial.
Sugestões
• MAIN DISP
Pode-se ajustar em qual ordem de prioridade os itens ser ã
o exibidos no visor principal.A prioridade de exibi çã o pode
ser ajustada para os seguintes itens em cada modo.
Radio
FREQ : Indica çã o de frequ ê ncia (Predefini çã
CLOCK : Indica çã o do rel ó gio
TAPE
STATUS : REPRODUÇÃO, AVANÇO RÁPIDO,
CLOCK : Indicação de relógio.
CDC
D/TRK/TIM : Tempo decorrido/faixa/disco.
CLOCK : Indicação de relógio.
• SENS HI (Local/DX) (somente no modo Rádio)
Esta função é utilizada para seleccionar a fôrça de sinal na qual o
rádio irá parar durante a Sintonização através de procura.
Se você seleccionar o ajuste Local, só as estações fortes (locais)
serão recebidas. O “lo” aparece no écran do visor. Seleccione o
ajuste Distante e o rádio irá parar numa gama mais amplia de
sinais, incluindo estações menos fortes e mais distantes. O “lo”
irá aparecer no écran de visor . DX é o ajuste descuidado sugerido.
LO : Local.
HI : DX.
• LEVEL LO (Sensibilidade de nível sonoro)
Pode-se comutar a exibi çã o da sensibilidade do son ó
metro.
OFF : Desactivada
LO : Sensibilidade normal
HI : Alta sensibilidade
• MESG (Mensagem)
Pode-se comutar a activa çã o/desactiva çã o da mensagem.
OFF : N ã o ser á exibida nenhuma mensagem.
ON : Uma mensagem ser á exibida ao activar/
• CLK SET
Acerte o rel ó gio (Veja a p á gina 3).
o inicial)
RETROCESSO RÁPIDO.
desactivar a alimenta çã o.
• 24H MODE
Pode- se alterar 12 H ou seja 24 H.
12H : O relógio utiliza o sistema de exibição de
24H : O relógio utiliza um sistema de exibição de
• CLOCK ON
Indicação de relógio, quando a alimentação está
desactivada, pode ser conmutada.
OFF : A indicação de relógio e luz não são exibidas
ON : A indicação de relógio é exibida após a
• AREA SET (Somente no modo Rádio)
Esta unidade vem predefinida de f á brica para a recep çã
o de esta çõ es de r á dio da Am é rica do Norte. Se for
utilizada em outras regi õ es do mundo,poder á ser necess
á rio diferentes separa çõ es de canais.
Seleccione a área desejada, e oprima en seguida,
PWR
ou
USA : Para a América do Norte
EURO : Para a Europa
12 horas.
24 horas.
após a alimentação ter sido desactivada.
MENU
Oprima
relógio por alguns segundos quando a
alimentação estiver desactivada.
alimentação ter sido desactivada.
.
para recordar a indicação de
SRC
* “A estação préviamente pré-programada ficará
desprendida quando você mudar a área.
Silêncio enquanto no telefone
Se o sistema de áudio do veículo é equipado com telefone
celular, este irá mudar automaticamente para silenciador
quando o usuário utilizar o telefone.
Este não irá funcionar se o telefone celular estiver conectado
ao sistema de áudio do veículo conforme descrito nas
instruções de instalação.
O volume será reduzido para o nível de silenciador de volume configurado.
PORTUGUÊS
P-4
Page 39

Ajuste do equalizador
Pode-se seleccionar uma curva de equaliza çã o para 4 tipos
de m ú sica (Rock,Popular,Clássica).
Pode-se armazenar e regular a frequência e o nível dos
ajustes do equalizador.
Selecção da curva do equalizador
1. Oprima o
modo de configuração de áudio.
2. Oprima ou ou gire o botão VOL para
seleccionar a curva de equalizador desejada como a
seguir.
MENU
por mais de 2 segundos para entrar no
Indicação de exibição
ROCK
POP
CLASSIC
USER 1
USER 2
EQ OFF
Configuração da curva do equalizador
1. Ajuste as características de som desejadas.
(Consultar página 3 “Ajuste das Características de Som”).
2. Oprima e mantenha o (USUÁRIO 1) ou
(USUÁRIO 2) por mais de 2 segundos para
armazenar a curva do equalizador, ao indicar “BAS/TRE”
na janela de exposição.
Cancelamento da curva do equalizador
1. Oprima o
modo de configuração de áudio.
2. Oprima
“ EQ OFF” irá piscar por poucos segundos.
MENU
por mais de 2 segundos para entrar no
SRC
para cancelar a curva do equalizador.
Compor a mensagem de activar/desactivar
Você pode alterar a mensagem de activar/desactivar e
colocála em mem ó ria.
As seguintes quatro mensagens podem ser alteradas com 9
caracteres cada.
Mensagem de activar
• HELLO (MESG 1) / WELCOME (MESG 2)
Mensagem de desactivar
• SEE YOU (MESG 3) / GOOD-BYE (MESG 4)
1. Oprima
2. Oprima
MENU
exibir “MESG ON” no écran de visor.
, e oprima em seguida, ou para
SRC
PWR
ou
para acender “HELLO”.
Sugestões
• Para apagar/corrigir a mensagem, carregue em
rante mais de 2 segundos de modo a apagar o carácter e
depois voltar a introduzir um carácter.
• Se dentro de 30 segundos não fizer nenhuma introdução
com os botões ou uma operação com o botão rotativo, o
modo de alterar a mensagem será automaticamente
desactivado.
• Certifique-se de que “MESG” (mensagem) está “ON”
(activada).
• Quando introduzir um nome, ao premir os seguintes botões
afecta a visualização de caracteres do seguinte modo:
3. Rode o botão rotativo para seleccionar a mensagem que
pretende alterar.
HELLO ➜ WELCOME ➜ SEE YOU ➜ GOOD- BYE
SRC
4. Oprima
A. Rode o dial VOL para a direita para seleccionar os
caracteres pretendidos.
(A➜B ➜ C ➜...Z➜
➜0➜1➜2➜3...9➜“ ”Space )
B. Oprima
brilhante.
C. Repita os passos A e B para completar a introdu ção
completa do nome com o máximo de 9 caracteres.
5. Oprima
A nova mensagem acende e automaticamente retorna à
indicação anterior.
PWR
ou
, e entre o carácter.
<➜> ➜ ∗➜ +➜
ou para mover o cursor
PWR
SRC
ou
para armazenar a mensagem.
➜− ➜ . ➜ /
′
Apagar a mensagem de activar/desactivar
Se pretender,pode apagar a mensagem de activar/desactivar .
1. Oprima
exibir “MESG ON” no écran de visor.
2. Oprima
seleccionar a mensagem que deseja apagar.
3. Oprima
rante mais de 2 segundos.
4. Para voltar à indicação anterior,carregue em
pretender apagar outros nomes repita os passos de 2 a
3.
:Muda para a introdu çã o de letras.
(Inicia com “A”.)
:Muda para a introdu çã o de números.
(Inicia com “0”.)
:Muda para a introdu ção de símbolos.
(Inicia com “<”.)
:Introduz um espaço (em branco).
MENU
, e oprima em seguida, ou para
SRC
PWR
ou
, e então rode o dial VOL para
SRC
PWR
ou
, e então carregue em
MENU
MENU
MENU
du-
du-
. Se
PORTUGUÊS
P-5
Page 40

Recepção de Rádio
Operações de fita
Sintonizar através de procura
1. Carregue em para seleccionar a banda desejada.
F1(FM 1) ➜ F2(FM 2) ➜ F3(FM 3) ➜ MW ➜ LW
(FM3 e MW, LW são bandas de armazenamento de
viagem)
2. Oprima ou para sintonizar em estações. A
sintonização pára automaticamente na frequência de um
posto captado.
Quando estiver sintonizado numa estação em FM
estéreo,aparece no visor a indicação de estéreo “ ST ”.
: Frequências mais baixas.
: Frequências mais altas.
Sintonizar Manualmente
1. Carregue em para seleccionar a banda desejada.
2. Oprima e carregue em ou durante mais de
5 segundos para activar o modo de sintonização manual
(passo de 1 kHz).
O Mediador de nível canal direito/canal esquerdo
acenderá no écran de visor.
Oprima outra vez para sintonizar em estações.
4 segundos depois de terminar a Sintonização Manual,
o controlo de sintonização altera para o modo de
Sintonizar através de Procura.
Sintonização através de Pesquisa
1. Carregue em para seleccionar a banda desejada.
2. Carregue em oprimido durante menos de 2 segundos.
A unidade pesquisará a banda seleccionada para as
esações e parará em cada estação recebível durante 10
segundos, antes de prosseguir para a estação seguinte.
Oprima
de Pesquisa e o mantenha na frequência seleccionada.
Sintonização através de Pesquisa Pré-programada
PORTUGUÊS
1. Carregue em
2. Carregue em ou oprimido durante mais de
2 segundos. A unidade fará a varredura pré-ajustou a
P-6
outra vez para parar na Sintonização através
BND
para seleccionar a banda desejada.
memória para cada 6 estações da faixa do MW/LW ou
18 estações das faixas de FM. A unidade parará em cada
estação pré-programada recebível durante 10 segundos
antes de prosseguir para a estação pré-programada
seguinte.
Oprima
através de Pesquisa pré-programada e o mantenha na
frequência seleccionada.
outra vez para parar na Sintonização
Memorización automática de emisoras (Sintonización en viaje)
1. Carregue em para seleccionar a banda desejada.
2.
Mantenha o botão carregado durante mais de 2 segundos.
Ao máximo 6 estações serão automaticamente armazenadas na
memória pré-programada para a banda seleccionada.
Se o rádio estiver em FM 1 ou FM 2, este muda para FM 3.
Nota
Esta função está disponível para FM 3 e MW, LW.
Memorizar Apenas as Estações Desejadas
Até 6 estações de rádio podem ser armazenadas em cada
banda (18 para FM, 6 para MW e LW) na ordem desejada.
1. Carregue em para seleccionar a banda desejada.
2. Oprima ou para sintonizar em estações.
3. Carregue e mantenha premido o botão de memória pré-
programado pretendido de 1 - 6 durante cerca de 2
segundos até que o indicador de frequência pisque duas vezes.
O número do botão de memória pré-programado premi-do
aparece no visor.
Nota
Quando memorizar uma outra estação no mesmo botão de
número pré-programado, a estação anteriormente memorizada é substituída pela nova.
Recepção das Estações Memorizadas
(receiving the memorized stations)
1. Carregue em para seleccionar a banda desejada.
2. Carregue temporariamente no botão de
1
- 6.
Audição de uma reprodução de fita
Inserção de um cassete
Inserir um cassete para iniciar a reprodução.A reprodução
inicia automaticamente.
Modificação da direcção da fita
Oprima FR e FF ao mesmo tempo para modificar a
direcção da fita.
Ejecção do cassete.
Oprima o para parar a reprodução e ejectar o cassete.
Avanço/retrocesso rápido
Oprima FR ou FF até travar.
Para retomar a reprodução, oprima o botão directo oposto a
meio caminho para liberar o botão travado.
Nota
• Antes de desactivar a unidade, ejectar a fita para evitar
danos a ela.
Page 41
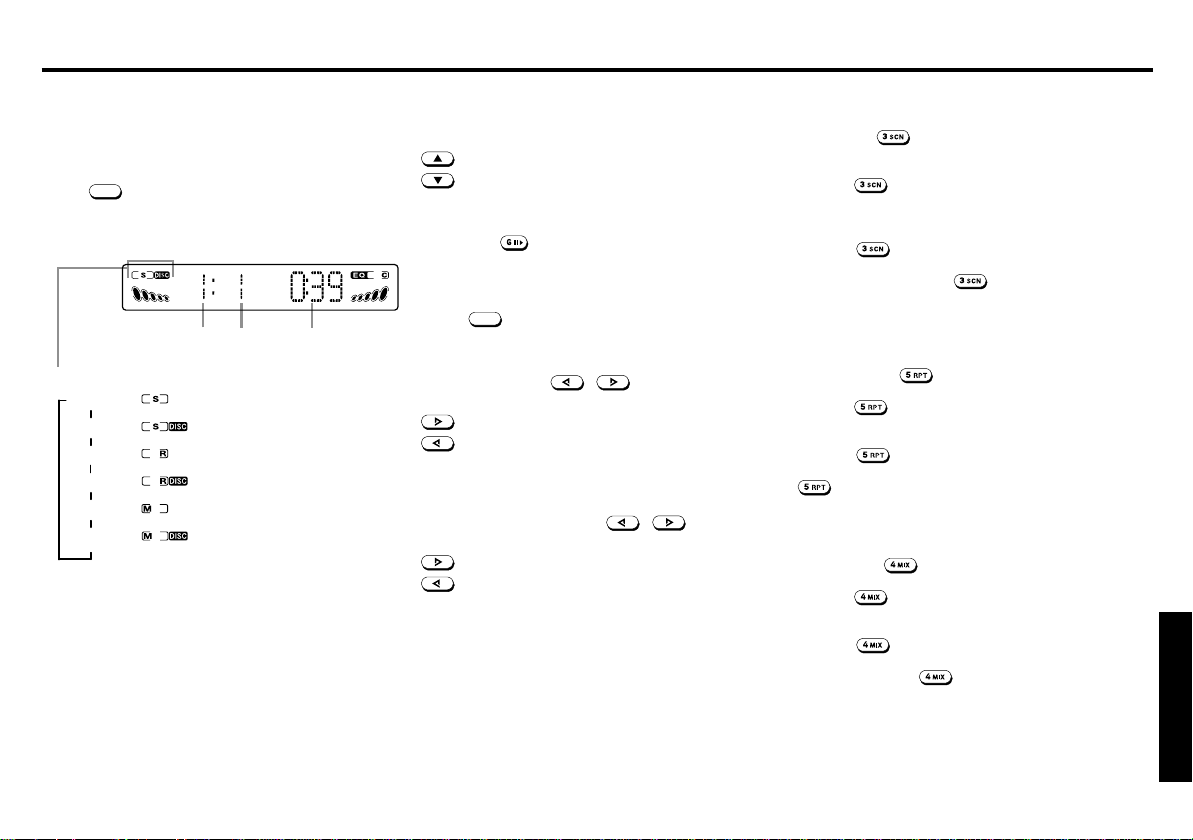
Controlos de modificador de CD
Playing the CD Changer
This product can control a CD changer. Please check with
your nearest car stereo specialist for recommendations of the
models that will work with this radio.
SRC
Oprima
CD.Oprima novamente para modificar de volta ao modo de
rádio.
Indicador de modo de reprodução CDC
TRACK REPEAT
para modificar para o modo de modificador de
N.º de disco,
TRACK SCAN
DISC SCAN
DISC REPEAT
TRACK MIX
DISC MIX
Tempo decorridoN.º de faixa,
Selecção de disco
Oprima os botões de selecção de disco para seleccionar o
disco desejado para reproduzir.
: Para avançar para um número de disco superior.
: Para retornar a um número de disco inferior.
Pausa de reprodução
Pressionar o .
Para retomar a reprodução, oprima novamente.
Parada de reprodução
SRC
Oprima
para seleccionar a recepção de rádio.
Procura de faixa
Pressionar os botões / .
Os números das faixas aparecem na janela de exibição.
: A reprodução inicia no início da próxima faixa.
: A reprodução inicia no início da faixa actual.Para
retomar a reprodução, oprima novamente.
Sugestão/revisão
Oprima e mantenha os botões / .Soltar quando
encontrar os pontos desejados.
: Para procurar para frente.
: Para procurar para trás.
Reprodução de varredura de faixa/disco.
Varredura de faixa
Pressionar o
Isto irá reproduzir os primeiros 10 segundos de todas as faixas
no disco.
Oprimir o
Varredura de disco
Varredura de disco
Oprima o
Isto irá reproduzir os primeiros 10 segundos da primeira faixa
de cada disco. Oprima o
esta característica.
.
novamente para cancelar esta característica.
por mais de 2 segundos.
novamente para cancelar
Reprodução repetitiva de faixa/disco.
Repetição de faixa
Pressionar o
repetidamente.
Oprima o
Repetição de disco
Oprima o
O disco actual será reproduzido continuamente.Oprima o
novamente para cancelar esta característica.
.A faixa actual é reproduzida
novamente para cancelar esta característica.
por mais de 2 segundos.
Reprodução misturada de faixa/disco.
Mistura de faixa
Pressionar o
reproduzidas em ordem aleatória.
Oprima o
Mistura de disco
Oprima o
T anto os discos como as faixas serão reproduzidos em ordem
aleatória.Oprima o
característica.
.Todas as faixas no disco actual são
novamente para cancelar esta característica.
por mais de 2 segundos.
novamente para cancelar esta
P-7
PORTUGUÊS
Page 42

Instalações
Material de Montagem Fornecido
Suporte Casquilho,
Parafuso
Perno de
Bloqueio
Barra de
Montagem
e Parafusos
Chavez de
Libertação
Precauções
• Certifique-se de que separa o painel frontal antes de
iniciar a instalação da unidade.
• Escolha cuidadosamente o local de montagem,de maneira
que a unidade não interfira nas operações normais de
condução do condutor.
• Utilize apenas o material de montagem fornecido para obter
uma instalação segura e adequada.
• Ao montar a unidade num veículo,mantenha a unidade a
mais nivelada possível.Se houver necessidade de montar
a unidade num ângulo devido ao design do veículo,certifique-se de que a inclinação da unidade não ultrapassa os
30 °.
Exemplo de Montagem
Instalação no tablier.
1. Instale o suporte no tablier.
2. Seleccione e dobre as abas para segurar bem o suporte
no seu lugar.
Usar a Barra de Montagem
3. Fixe a Barra de Montagem à parte inferior do tablier,
usando parafusos.
Fixe a parte de trás da unidade à Barra de Montagem
com o parafuso e o material de apoio.
Parede de
incêndio
Anel da guarnição da
remoção (fornecido)
Usar o Casquilho
3. Como mostrado na figura abaixo,aperte bem o
parafuso que foi inserido no casquilho à parte traseira
do aparelho.
Parede de
incêndio
A distância ao corta-fogo difere segundo o
tipo de carro.
Certifique-se de que fixa bem a unidade ao
introduzir correctamente o casquilho.
Anel da guarnição da
remoção (fornecido)
Nota
Alguns veículos japoneses/asiáticos, tais como TOYOTA &
NISSAN não requerem o uso de suporte e armação de aro de
compensação. Para garantir a substituição do rádio, utilize os
suportes O.E.M. e parafusos de montagem.
Tais suportes serão alinhados com os orifícios de parafuso
rosqueados em cada lado do novo rádio.
PORTUGUÊS
P-8
Page 43

(máx. 150 mA)
Emudecedor de
rádio (baixo)
Ligações
Aviso
• Para evitar curtos- circuitos, retire a chave da ignição e
desligue o terminal (–) da bateria.
• Esta unidade foi concebida para funcionar ligada à terra com
12 Vcc. Não a deve utilizar com corrente de 24 V ou outros
tipos de baterias de carro.
Procedimento de ligação
Cuidado
• NÃO ligue nenhuns fios de altifalante ao corpo metálico ou
ao chassis do veículo.
• NÃO ligue os fios comuns de altifalante (–) uns aos outros.
• Ligue cada fio de altifalante directamente a cada terminal
do altifalante.
• Todos os fios comuns de altifalante (–) devem ficar
flutuantes,isto é,sem ligações comuns ou ligação à terra
do veículo.
• Ligue cada par de fios de altifalante apenas a um altifalante
(ou a uma sistema de altifalantes) com uma impedância de
pelo menos 4 ohms e uma capacidade de potência
adequada.
• Não ligue fios de altifalante a nenhumas entradas de
amplificadores externos,porque isso poderá causar danos
ao amplificador interno desta unidade.
1 Certifique-se de que retirou a chave de ignição do carro.
2 Desligue o terminal negativo (–) da bateria do carro.
3 Ligue o terminal da antena do carro à tomada da an-
tena da unidade.
4 Conecte o fio adaptador específico do veículo que
está disponível no revendedor para a unidade.
5 Volte a ligar o terminal negativo (–) da bateria do carro.
6 Ligue o motor do carro.
7 Certifique-se de que a unidade funciona correctamente.
C-1
1
C
2
1
B
2
1
A
2
1
Silenciador de
2
telefone
3
+12V permanente
4
Antena aut.
5
6
KI.15/Ignição
7
Aterramento
8
1
2
3
Aterramento
4
5
6
Amplificador +12V
36
4
5
NC
NC
NC
C-1
NC
C-2 C-3
10
7
9
8
11
3
5
4
6
3
5
4
6
A
NC
NC
NC
16 19
13
12
15
18
20
17
14
7
8
7
8
1
2
3
4
5
6
7
8
7
8
9
10
11
12
B
Saída de altifalante RR+
Saída de altifalante RRSaída de altifalante RF+
Saída de altifalante RFSaída de altifalante LF+
Saída de altifalante LFSaída de altifalante LR+
Saída de altifalante LR-
C
C-2 C-3
NC
NC
NC
NC
NC
NC
Saída de dados CDC
13
Entrada de dados CDC
14
15
16
17
18
19
20
NC
+12V
Barramento
Massa/GND
Entrada de linha
Massa/GND
Entrada D
Entrada E
Modificador de CD
PORTUGUÊS
P-9
Page 44
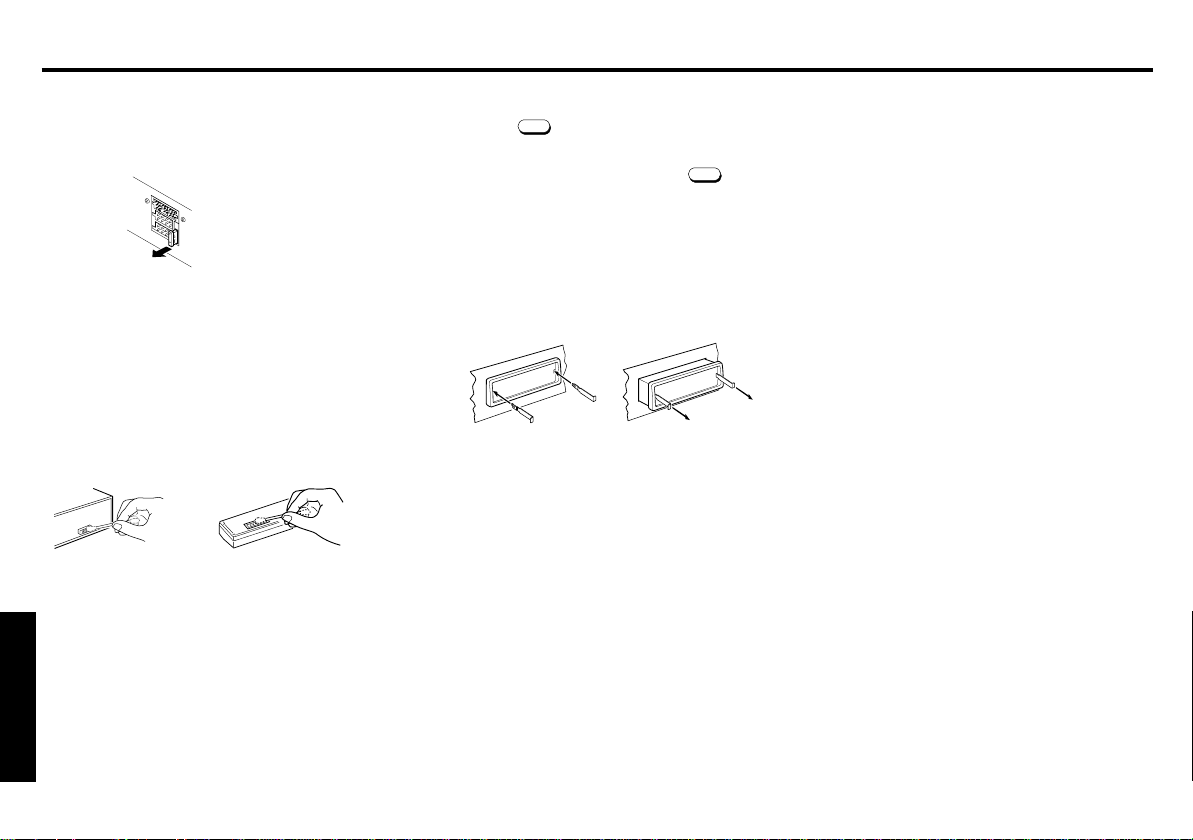
Manutenção
Substituição do Fusível
Se o fusível se queimar,verifique primeiro a ligação eléctrica
e depois substitua-o. Se o fusível voltar a queimar-se em
condições normais,a unidade poderá ter um defeito.
Parte traseira da unidade
Aviso
Utilize apenas fusíveis com a amperagem especificada (10 A).
Se utilizar um outro tipo de fusível, pode provocar um incêndio
ou danos na unidade.
Limpeza dos conectores
Se os conectores da unidade e do painel frontal estiverem
sujos,esta poderá funcionar mal.
Retire o painel frontal e limpe os conectores com um cotonete
humedecido em álcool,como mostrado na figura abaixo.
Unidade principal Parte traseira do painel frontal
Voltar para as Definições Iniciais
Quando o botão
o micro-computador da unidade retorna à configuração inicial.
Se a janela de exibição não é mostrada apropriadamente ou
a unidade não funciona direito, oprima o botão
de 10 segundos.
SRC
é oprimido por mais de 10 segundos,
SRC
por mais
Retirar a unidade
Utilize as chaves de libertação fornecidas se precisar de retirar
a unidade do carro.
Insira-as no aparelho conforme mostrado abaixo.Isto
desprenderá o aparelho do suporte,permitindo a sua remoção.
Notas
• Utilize as chaves de libertação com muito cuidado para
evitar ferir os dedos.
• Guarde as chaves de libertação em lugar seguro para
utilização futura.
PORTUGUÊS
P-10
Page 45

Guia de Resolução de Problemas
Especificações
A verificação que se segue ajudá-lo-á a solucionar a maior
parte dos problemas com os quais se poderá deparar em
relação à sua unidade.Antes de analisar a lista de verificação
abaixo, consulte os procedimentos de operação e de ligação.
Geral
Problema
• As estações memorizadas
e a hora correcta estão
apagadas.
• O fusível queimou-se.
• O rádio funciona quando a
chave de ignição está na
posição ON,ACC e OFF.
• A unidade não está a
receber energia.
• O fornecimento de energia
para a unidade é contínuo.
Causa/Solução
Os fios não estão correctamente combinados com
o conector de potência
acessório do carro.
Verifique a cablagem para
ver se há curto-circuito.
O carro não tem nenhuma
posição de ACC.
Recepção de Rádio
Problema
Não é possível receber as
estações pré-programadas.
Não é possível sintonizar por
procura.
A função Memorização de
Percurso não completa a
memorização das seis estações.
Certifique-se também de que a antena está ligada,puxada
para fora e seca no interior.
Se as soluções mencionadas acima não ajudarem a melhorar
a situação,consulte o seu representante Blaupunkt mais
próximo ou ligue para os Estados Unidos para o número 1800-266-2528 para obter assistência técnica,encomendar
componentes e serviços de manutenção.Contacte o 1-800950-2528 para lhe ser indicado um revendedor ou para pedir
catálogos sobre o produto.
Causa/Solução
O sinal de transmissão é
dema-siado fraco.
O sinal de transmissão é
dema-siado fraco. →Utilize
a sintoni-zação manual.
Nã o sã o recebidas
frequências de transmissão
suficientes.
Resolução de problemas do modificador de CD
Quando ocorrerem problemas durante a operação do
modificador de CD, uma mensagem de erro aparece na janela
de exibição.
Consultar a tabela abaixo para identificar o problema e então
realizar a acção correctiva sugerida.Se o erro persistir ou
“MECHA ERR” e “09 ERROR” aparecerem, contactar seu
revendedor Blaupunkt mais próximo.
Mensagem
NO MAG
NO DISC
CD ERROR
COMM ERR
TEMP ERR
Causa possível
Sem Magazine
Sem disco
Virado
Erro de foco
Erro de comunicação.
Condições de
temperatura
excessivas no
modificador de CD.
Acção recomendada
Carregar o magazine
no modificador de CD.
Verificar o disco.
Verificar o disco.
Verificar a conexão no
modificador de CD.
Um sinal de erro irá
aparecer e a
reprodução será
retomada quando a
temperatura voltar ao
normal.
GERAL
Dimensões : Aprox.178 mm × 50 mm × 155 mm
Alimentação : Bateria do carro de 12 Vcc
Potência de saída : Eficaz de 23 watts ×4 canais / máxima
Cablagem de saída : Tipo flutuante,ligada à terra para 4
Impedância de saída: Compatível com altifalantes de 4-8
SINTONIZADOR
Limite de sintonização : MW : 531 -1,602 kHz
Sensibilidade : MW : 20 µV
FM
Separação de estéreo : 35 dB
APARELHO CASSETE
Frequência
Resposta : 30 - 15,000 Hz
Taxa S/N : 50 dB
Distorção & Estremecimento
(L × A × P)
(ligação à terra,negativa)
de 35 watts × 4 canais
altifalantes
ohms
(passo de 9 kHz)
LW : 153 -279 kHz
(passo de 9 kHz)
FM : 87,5 -108,0 MHz
(passo de 50 kHz)
FM : 9,1 dBf sensibilidade mono
: 0.15 % WRMS
PORTUGUÊS
P-11
Page 46

Issue date 03-04
288F1060
 Loading...