

Page 1
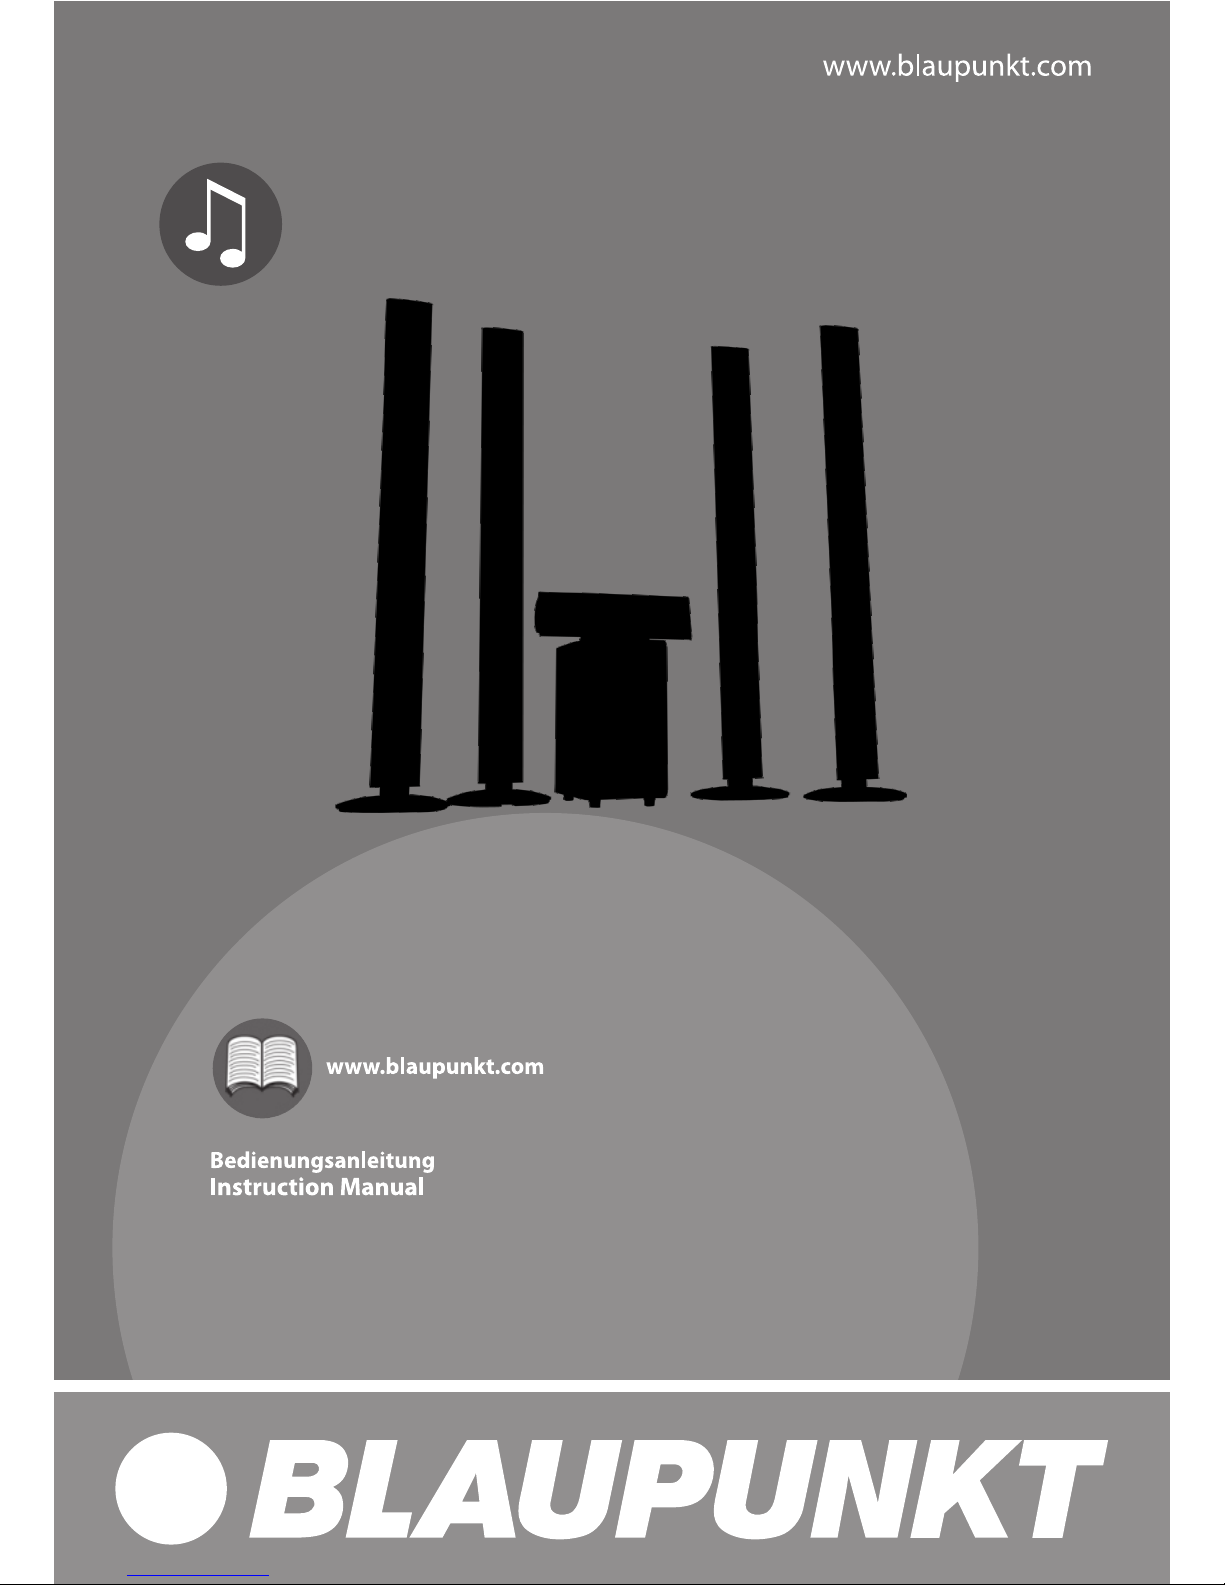
LS 255
5.1 Heimkinosystem mit Funk Rücklautsprechern
Page 2
LS 255
2
Page 3
LS 255
3
Page 4
LS 255
4
Page 5
LS 255
5
Page 6
LS 255
6
Page 7
LS 255
7
Page 8
LS 255
8
Page 9
LS 255
9
Page 10
LS 255
10
Page 11
LS 255
11
Page 12
LS 255
Vir tua12 .1ch
Vir tua15 .1ch
Volu me Leve l
12
Page 13
LS 255
13
Page 14
LS 255
Wireless-Rear Speaker
10
11
12
13
15
16
AC 250 V
10A
POWER
AC230V 50Hz~
ON
OFF
14
17
14
Page 15
LS 255
15
Page 16

LS 255
18
19
20
21
22
23
24
25
26
27
28
29
30
31
6CH (5.1CH)
AUX
CO1 CO2OPT
16
Page 17

LS 255
17
Page 18

LS 255
18
Page 19

LS 255
19
Page 20

LS 255
20
Page 21

LS 255
TV
21
Page 22

LS 255
22
Page 23

LS 255
23
Page 24

LS 255
24
Page 25

LS 255
25
Page 26

LS 255
26
Page 27

LS 255
27
Page 28

LS 255
28
Page 29

LS 255
29
Page 30

LS 255
30
Page 31

LS 255
Page 32

LS 255
32
Page 33

LS 255
33
Page 34

LS 255
34
Page 35

Conformity
Model number: LS 255
Description:
Brand name: Blaupunkt
Responsible party: M3 Electronic GmbH
Gutenbergstrasse 5, D-65830 Kriftel. Germany
Hereby, Blaupunkt Competence Center Audio M3 Electronic GmbH, declares that this Class 1
equipment is in compliance with the essential requirement and other relevant provisions of
Directive 1999/5/EC.
Letter of conformity can be obtained from info@m3-electronic.de.
5.1CH Home Cinema System with Wireless Rear Surround Speakers
Safety Instructions
1. READ INSTRUCTIONS – All the safety and operating instructions should be read before
appliance's operated.
2. RETAIN INSTRUCTIONS - The safety and operating instructions should be retained for
future reference.
3. HEED WARNINGS – All warnings on the appliance and in the operating instructions
should be adhered to.
4. FOLLOW INSTRUCTIONS – All operating instructions should be followed.
5. WATER AND MOISTURE – The appliance should not be used near water, for example,
near a bathtub, washbowl, kitchen sink, laundry tub, swimming pool or in web basement.
6. VENTILATION – The appliance should be situated so that its location or position does
not interfere with its proper ventilation. Do not place on bed, sofa, rug or similar surface
that may block the ventilation openings, in a built-in installation, such as a bookcase or
cabinet that may impede the flow of air through the ventilation openings.
7. HEAT – The appliance should be situated away from heat sources such as radiators,
stoves, or other appliances (including amplifiers) that produce heat.
8. POWER SOURCE – the appliance should be connected to power supply only of the type
described in the operating instructions or as marked on the appliance.
9. POWER CORD PROTECTION – power supply cords should be routed so that they are
not likely to be walked on or pinched by items placed upon or against them.
10. POWER LINES – an outdoor antenna should be located away from power lines.
11. OBJECT AND LIQUID ENTRY – care should be taken so that objects do not fall and
liquids are not spilled into the enclosure through openings.
LS 255
35
Page 36

12. ESD WARNING – the display does not function properly or not reaction to operation
of any the control may due to the electrostatic discharge. Switch off and unplug the set.
Reconnect after a few seconds.
13. DAMAGE REQUIRING SERVICE – the appliance should be serviced by qualified
service personal when: a. the power-supply cord or plug has been damaged. b. Objects
have fallen into, or liquid has been spilled into the appliance enclosure. c. The appliance
has been exposed to rain. d. The appliance has been dropped, or the enclosure damaged.
e. The appliance does not appear to operate normally.
14. SERVICING – the user should not attempt to service the appliance beyond that
described in the user operation instructions. All other servicing should be referred to
qualified service personnel.
15. DO ensure that all electrical connections (including the mains plug, extension leads
and inter-connections between the pieces of equipment) are properly made and in
accordance with the manufacturer's instructions. Switch off and unplug the power before
making or changing connections.
16. Unplug this apparatus during lightning storms or when unused for long periods of
time.
17. Never unplug your radio by pulling on the power cord. Always grasp the plug firmly
and pull straight out from the outlet.
18. DON'T remove any fixed cover as this may expose dangerous voltages.
19. DON'T place hot objects or naked flame sources such as lighted candles or nightlight
on, or close to equipment. High temperatures can melt plastic and lead to fires.
20. DON'T leave equipment switched on when it is unattended unless it is specifically
stated that it is designed for unattended operation. Switch off using the switch on the
equipment and make sure that your family knows how to do this. Special arrangements
may need to be made for infirm or handicapped people.
21. DON'T continue to operate the equipment if you are in any doubt about if it's working
normally or if it's damaged in any way. Switch it off, unplug the mains power and consult
your dealer.
22. REPAIR OR REPLACE all electric service cords that have become frayed or otherwise
damaged immediately. Do not use a cord that shows cracks or abrasion damage along its
length, the plug, or the connector end.
23. DON'T place objects filled with liquids, such as vases on the apparatus.
24. Batteries shall not be exposed to excessive heat such as sunshine, fire or the like.
25. The mains plug shall remain readily operable.
LS 255
36
Page 37

26. Ensure a minimum distance of 5cm around the apparatus for sufficient ventilation.
27. The ventilation should not be impeded by covering the ventilation opening with
items such as newspapers, table-cloths, curtains, etc.
28. The batteries should be drawn to the environmental aspects of batter y disposal.
This device is with built-in 2.4GHz wireless system. If the working environment is with
other working 2.4GHz devices like microwave oven, 2.4GHz mobile phone, intercom
system and so on, there maybe interference. Please keep this device at least 30M away
from other similar 2.4GHz devices, or keep them off.
CAUTION
LS 255
37
Page 38

1.
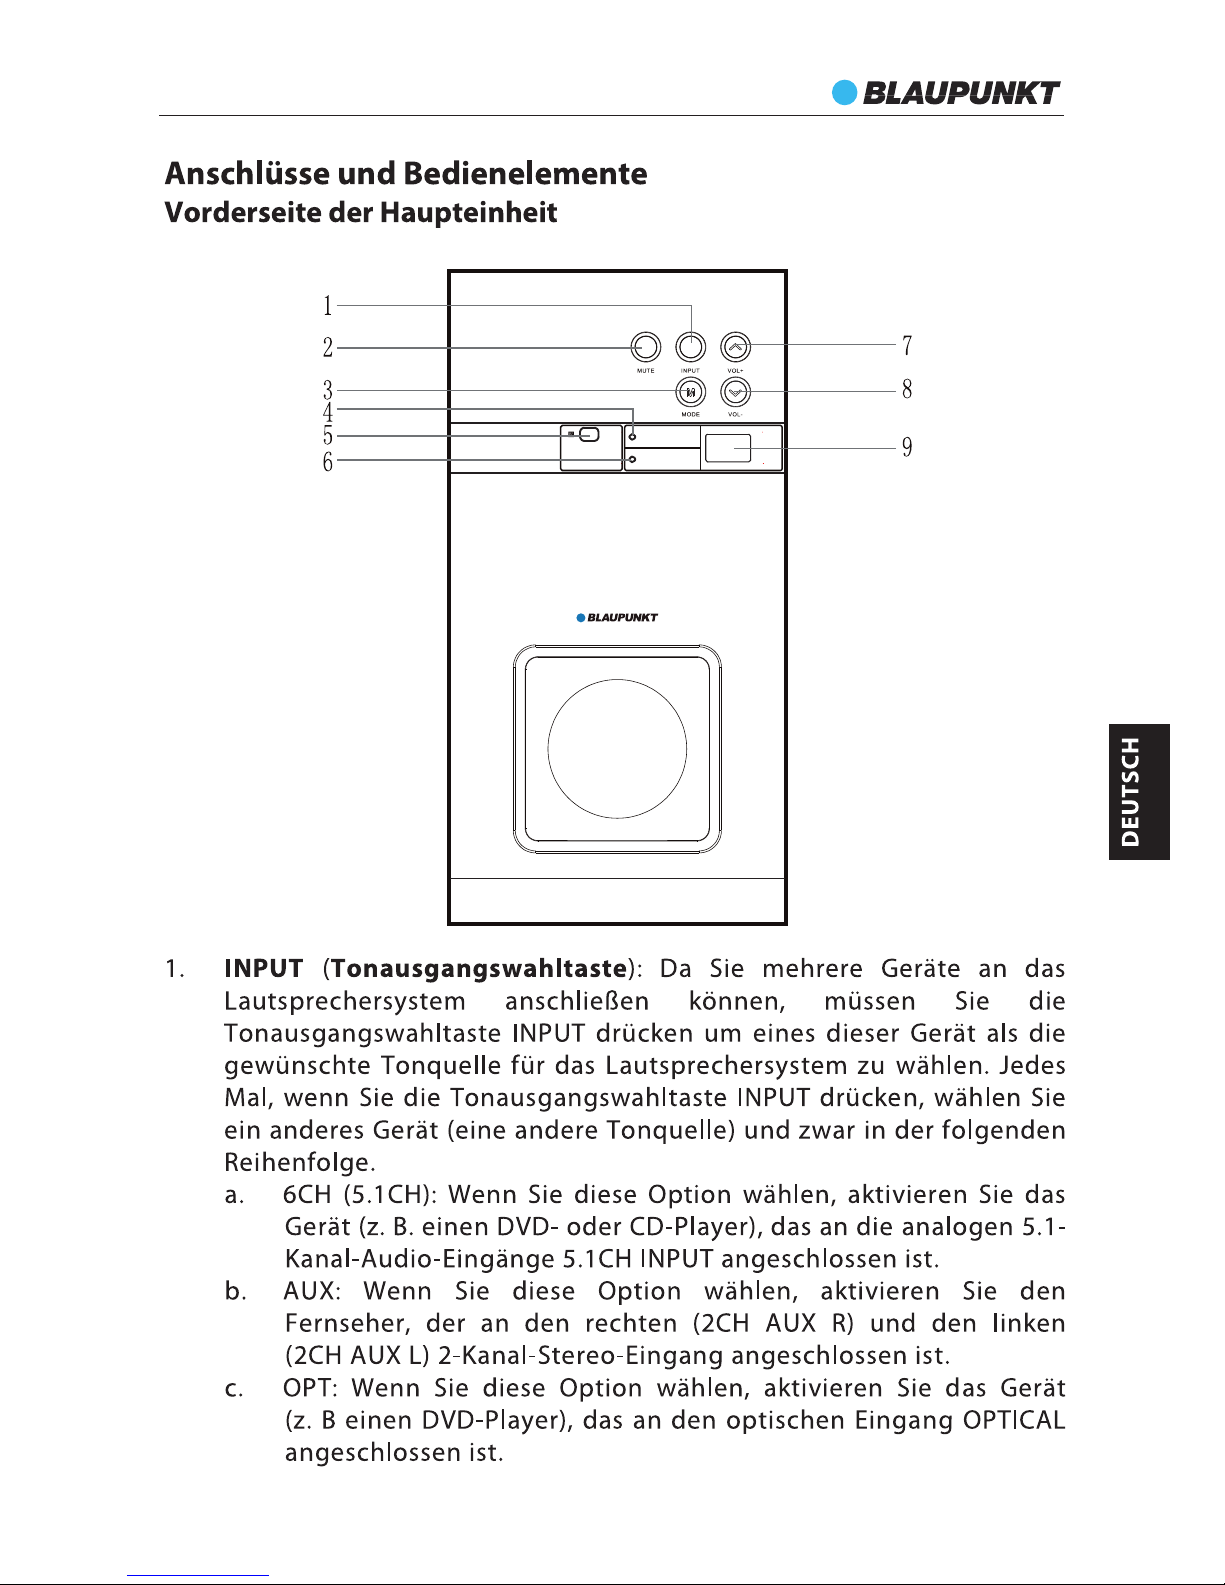
2. MUTE: Mute function button.
3. MODE: 5.1ch & 2.1ch mode select button.
4. 2.1ch.: 2.1Channel Input Indicator.
5. Remote Sensor.
6. 5.1ch.: 5.1 Channel Input Indicator.
7. Volume +: Volume Up button.
8. Volume -: Volume Down button.
9. LED Display.
INPUT: Input source select button.
Vir tua 12.1 ch
Vir tua 15.1 ch
Volu me Leve l
Front panel - controls and functions
LS 255
38
Page 39

Rear panel - controls and functions
LS 255
Wireless-Rear Speaker
10
11
12
13
15
16
AC 250 V
10A
POWER
AC230V 50Hz~
ON
OFF
14
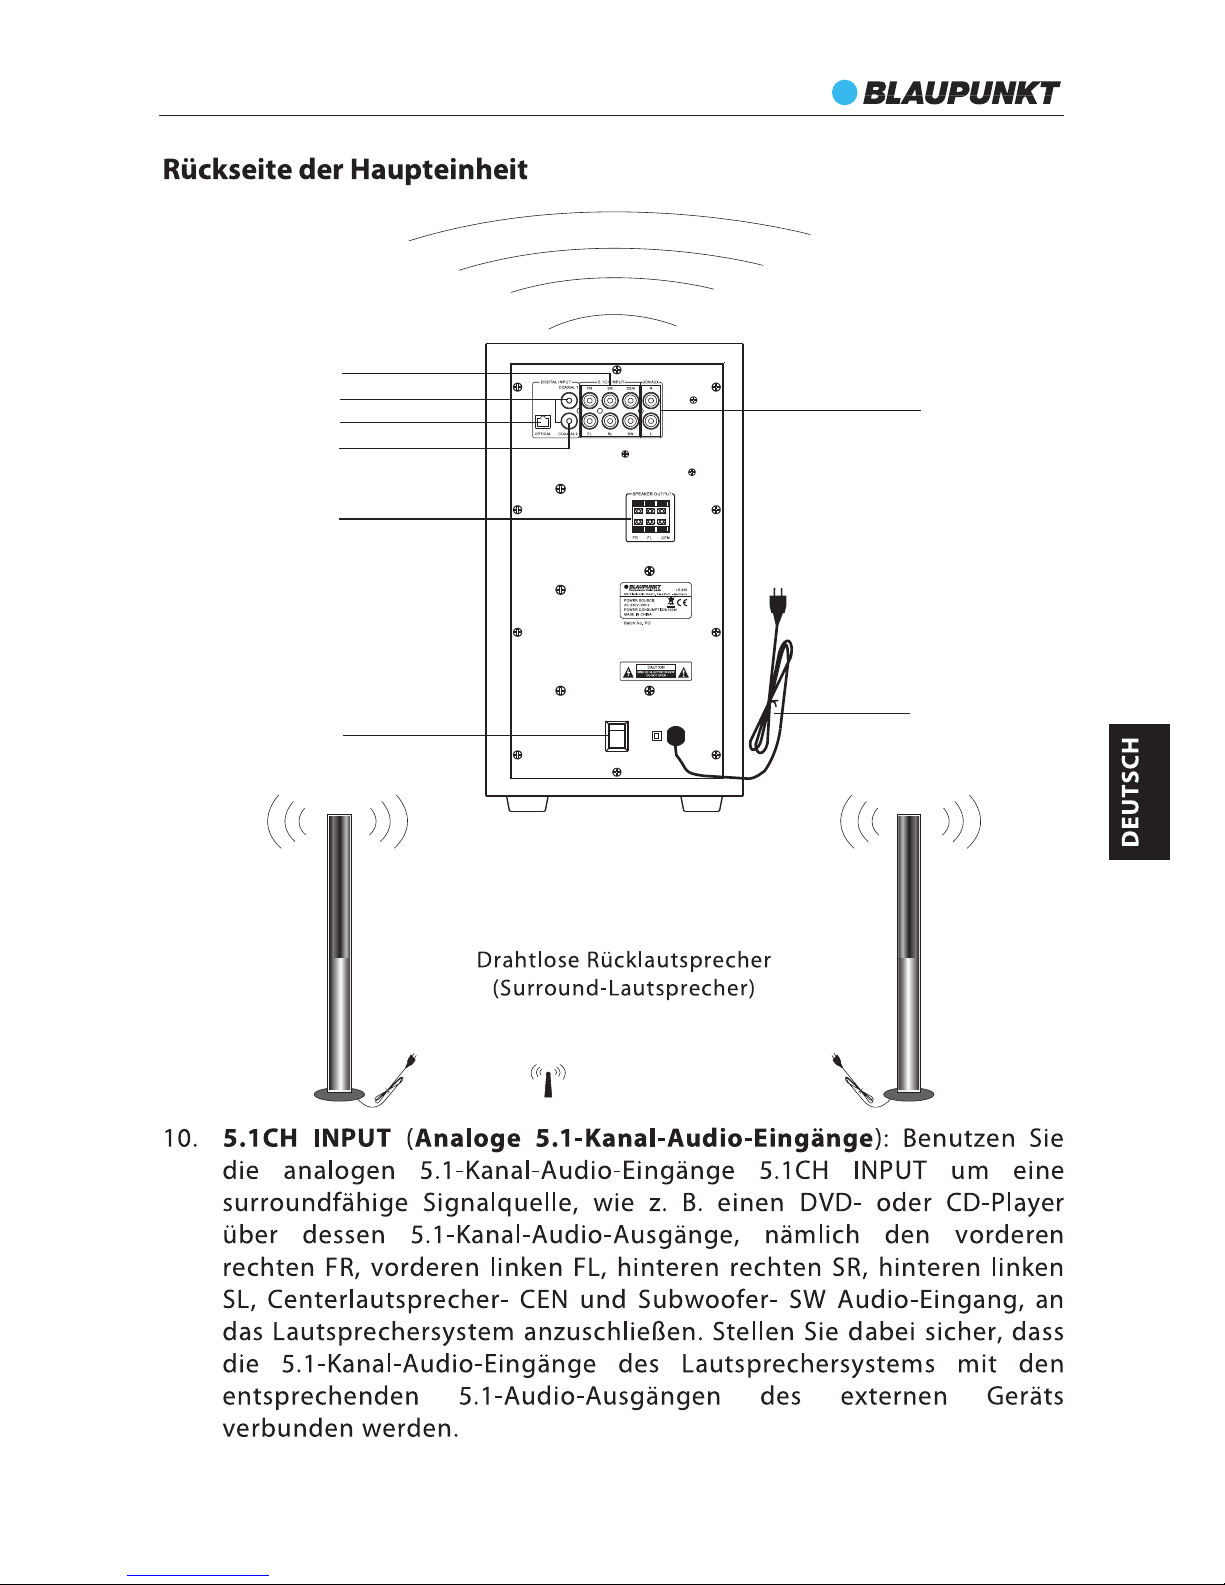
10. Analog 5.1ch input jack for FR/FL/SR/SL/CEN/SW connection.
11. Coaxial 1 input jack.
12. Optical input jack.
13. Coaxial 2 input jack.
14. Speaker output jack.
FR: for Front Right Speaker connection.
FL: for Front Left Speaker connection.
CEN: for Center Speaker connection.
15. Power On/Off Switch.
16. Stereo input jack.
17. AC Power Cord.
17
39
Page 40

Operating instruction - controls and functions
LS 255
18
19
20
21
22
23
24
25
26
27
28
29
30
31
18. INPUT: Input Source Selection Button.
Recycle selection will be:
19. CEN +: increase the volume for Center Speaker.
20. FRONT +: increase the volume for Front Speaker.
21. FRONT -: decrease the volume for Front Speaker.
22. CEN -: decrease the volume for Center Speaker..
23. SW -: decrease the volume for Subwoofer.
24. VOLUME -: decrease the volume for System.
25. MUTE: Mute Function Button.
26. MODE: Mode Selection Button.
27. RESET: Location retrieval.
28. SURR +: increase the volume for Rear Speaker.
29. SURR -: decrease the volume for Rear Speaker.
30. SW +: increase the volume for Subwoofer.
31. VOLUME +: decrease the volume for System.
6CH (5.1CH)
AUX
CO1 CO2OPT
40
Page 41

1. Before using the remote controller, please insert correct type of batteries into the
battery compartment.
2. The remote controller uses 2x1.5V/AAA batteries.
3. Please insert the batteries indicated as below.
a. Push and open the battery compartment cover.
b. Insert 2 batteries as per the polarities marked inside of the battery compar tment.
c. Re-locate the battery cover.
4. If the remote controller does not work, please check the batteries or change new
batteries before consulting technical personnel.
LS 255
Operating instruction - controls and functions
41
Page 42

System connection instructions
LS 255
Connect to
DVD player
TV
Optical cable
Coaxial cable
Sub Woofer/DVD Player/TV Analogue audio connect to
42
Page 43

System connection instructions
Using the speaker cable connect FL/FR/CEN speaker with subwoofer as below.
Note: Be sure to match the speaker cable to the appropriate jacks on components:
"White" to "Red", and "Black" to "Black".
Front right speaker
Front left speaker
LS 255
43
Page 44

Speaker Assembly Drawing
LS 255
Screws
Chassis
Tower speaker
Spacer
44
Page 45

Operating instruction
A. Switch On/Off and pairing the product
1. Before turning on the system, please connect it according to the System Connection
Instruction.
2. Connect AC power supply with this product.
(Caution: Power source must be consistent with this product.)
3. Press on the power switch button on the Rear Panel of the main unit to power on the
system, Press it once again to power off the unit.
B. Volume
1. Press the Volume + button on the front panel of the main unit or VOL + button on the
remote controller to increase the volume of system.
2. Press the Volume - button on the front panel of the main unit or VOL - button on the
remote controller to decrease the volume of system.
C. Subwoofer Speaker
1. Press SW + button on the remote controller to increase the volume of subwoofer.
2. Press SW - button on the remote controller to decrease the volume of subwoofer.
D. Front Speaker
1. Press FRONT + button on the remote controller to increase the volume of Front Speaker.
2. Press FRONT - button on the remote controller to decrease the volume of Front Speaker.
E. Center Speaker
1. Press CEN + button on the remote controller to increase the volume of Center Speaker.
2. Press CEN - button on the remote controller to decrease the volume of Center Speaker.
F. Surround Speaker
1. Press SURR + button on the remote controller to increase the volume of Rear Speaker.
2. Press SURR - button on the remote controller to decrease the volume of Rear Speaker.
G. Surround effects and PCM Decoder
1. Connect and place the whole system properly accord to connection instruction.
2. Select the MODE button as 5.1ch output.
3. If the input connection is from analog 5.1ch, then the system will decode as surround
effects.
4. If the input connection is from coaxial/optical/stereo with PCM signal, then the PCM
decoder will workable; you also can switch to 5.1ch output, and get surround sound
effects output.
4. When you start to play the system, please make sure the distance between the rear
surround speaker and subwoofer should less than 15M, because of wireless transmission.
5.When you switch on the power of subwoofer and rear speaker, the rear speaker will auto
detect and pairing with subwoofer. Please check the pairing status before you play them.
LS 255
45
Page 46

H. 5.1 Channels Input
1. Connect the system properly. When you have 5.1ch audio input connected, it will be
5.1ch audio output. Meanwhile, when you have connected AUX(2.0ch), Opt, Coa1, Coa2
input, you can optional select play in 5.1ch & 2.1ch output.
2. Press INPUT button on the remote controller to shift the status from audio input to
5.1ch channels input.
3. Adjust all output settings including VOLUME, SW, FRONT, CEN, SURR (if necessary) now
to enjoy the wonderful and tremendous Home Theater effects.
4. Please kindly note, when the signal input from AUX/optical/coaxial 1/coaxial 2, the rear
speaker also have output if you select 5.1ch mode, but without surround effects.
I. Mute
1. Press the MUTE button on the remote controller once to keep the performance silent.
2. MUTE Indicator on the front panel will then light up.
3. Press it again to resume the per formance.
J. Reset
Press the RESET button on the remote controller and it will reset all settings including
Subwoofer Speaker output, Front Speaker output, Center Speaker output, Surround
Speaker output to factory default settings. Meanwhile, the main volume reverts to 30 dB,
surround channels(FL, FR, CEN, SR, SL) revert to 0dB.
1. No output
(1) Check whether the system is connected correctly.
(2) Check whether the Volume is set at minimum. Adjust it accordingly.
(3) Check whether the Audio Input is in PLAY mode.
2. No sound from front left speaker
(1) Check whether the system is connected correctly with the Front Left speaker.
(2) Check whether the Balance function is switched off. Adjust it accordingly.
(3) Check whether the system is connected correctly with the audio source.
3. No sound from front right speaker
(1) Check whether the system is connected correctly with the Front Right speaker.
(2) Check whether the Balance function is switched off. Adjust it accordingly.
(3) Check whether the system is connected correctly with the audio source.
4. No sound from center speaker
(1) Check whether the system is connected correctly with the Center speaker.
(2) Check whether the system is connected correctly with the audio source.
(3) Check whether 2.1ch is selected as audio output.
LS 255
46
Page 47

5. No sound from rear speaker
(1) Check whether the system is connected correctly with the Rear speaker.
(2) Check whether the system is connected correctly with the audio source.
(3) Check whether 2.1ch is selected as audio output.
(4) Check whether 5.1ch is selected as audio output.
LS 255
Specifications
1. Power Supply........................................................................................................AC 230V/50Hz
2. Total Power Output.............................................................................................................100W
3. Input Sensitivity (Subwoofer)............................................................................60mV 20mV
4. Input Sensitivity (Satellite)...............................................................................300mV 50mV
5. Speaker Impedance (Subwoofer)...................................................................................8 Ohm
6. Speaker Impedance (Satellite)........................................................................................8 Ohm
7. S/N (A Weight).......................................................................................................................75dB
8. Subwoofer Power Output ....................................................................................................40W
9. Front Speaker Power Output ..........................................................................................12Wx2
10.Center Speaker Power Output ............................................................................................12W
11.Rear Speaker Power Output ............................................................................................12Wx2
12.THD (1kHz, 1W)......................................................................................................................0.5%
13.Frequency Response....................................................................................40Hz~20kHz 5dB
14.L/R Separation (1kHz)..........................................................................................................30dB
15.L/R Balance (Stereo)............................................................................................................. 2dB
47
Page 48

This symbol on the product or in the instructions means that your electrical and electronic
equipment should be disposed at the end of its life separately from your household waste.
There are separate collection systems for recycling in the EU.
For more information, please contact the local authority or your retailer where you purchased
the product.
All rights reserved by Blaupunkt Competence Center Audio M3 Electronic GmbH. This
material may be reproduced, copied or distributed for personal use only.
LS 255
48
Page 49

 Loading...