

Page 1

Page 2

Page 3

Deutsch
Deutsch
ACHTUNG NETZSTECKER ZIEHEN
BEIM VERLASSEN DER MASCHINE, BEI WARTUNGSARBEITEN ODER BEIM WECHSELN VON MECHANISCHEN TEILEN ODER
ZUBEHÖRTEILEN
WICHTIGE SICHERHEITSANWEISUNGEN
Bei der Verwendung eines elektrischen Gerätes sollen immer für die Sicherheit grundsätzliche Vorsichtsmaßnahmen getroffen werden, einschließlich:
Lesen Sie vor der Verwendung (dieses Gerätes) alle Gebrauchshinweise.
GEFAHRENHINWEIS -- zur Verminderung des Risikos eines elektrischen Schlages:
Ein Apparat, der an das elektrische Netz durch den Stecker angeschlossen ist, sollte nie unbeobachtet bleiben. Sofort nach der Verwendung und vor
der Reinigung dieses Apparates soll sein Stecker immer aus der Steckdose gezogen werden.
WARNHINWEISE -- zur Verminderung des Risikos von Verbrennungen, Feuer, Elektrischen Schlägen oder
Verletzungen von Personen:
1. Erlauben Sie nicht, dass dieses Gerät als Spielzeug verwendet wird. Hohe Wachsamkeit ist notwendig, wenn dieses Gerät von oder in der Nähe
von Kindern verwendet wird.
2. Benutzen Sie dieses Gerät ausschließlich für den im Handbuch beschriebenen Gerbrauch. Verwenden Sie nur vom Hersteller empfohlene
Zubehörteile, die im Handbuch angegeben sind.
3. Arbeiten Sie nie mit diesem Gerät, wenn es ein beschädigtes Kabel oder einen beschädigten Stecker hat, wenn es nicht richtig funktioniert, wenn
es fallengelassen oder beschädigt wurde oder wenn es ins Wasser gefallen ist. Bringen Sie dieses Gerät zu dem nächstgelegenen zuständigen
Händler oder zu einer Service Werkstätte, um es überprüfen, reparieren oder mechanisch einstellen zu lassen.
4. Arbeiten Sie nie mit diesem Gerät, wenn eine der Lüftungsöffnungen verstopft ist. Halten Sie die Lüftungsöffnungen der Nähmaschine und des
Fußanlassers frei von Stoffstreifen, Staub und losen Kleidungsstücken.
5. Lassen Sie nie irgendwelche Gegenstände in irgendeine Öffnung fallen oder stecken Sie sie nie hinein.
6. Verwenden Sie das Gerät nicht im Freien.
7. Arbeiten Sie nicht an einem Ort, wo Sprayprodukte oder Sauerstoff verwendet werden.
8. Bevor Sie den Stecker aus der Steckdose ziehen, drehen Sie alle Kontrollknöpfe auf "Aus" ("O").
9. Ziehen Sie den Stecker nicht durch Ziehen am Kabel heraus. Halten Sie den Stecker selbst, wenn Sie ihn herausziehen wollen.
GEFAHRENHINWEIS
1. Ziehen Sie immer den Stecker heraus, bevor Sie eine Lampe auswechseln. Ersetzen Sie die Glühlampe durch eine gleichartige 15 Watt starke
Lampe. (Nur bei Ausführung mit Glühlampe!)
2. Greifen Sie nicht nach dem Gerät, das ins Wasser gefallen ist. Ziehen Sie sofort den Stecker heraus.
3. Lagern Sie das Gerät nicht an Orten oder stellen Sie es nicht dort auf, wo es herunterfallen kann oder in ein Becken gezogen werden oder
versinken kann. Stellen oder tauchen Sie es nicht in Wasser oder in eine andere Flüssigkeit.
D
Page 4

D
Deutsch
WARNHINWEISE
1. Halten Sie Ihre Finger weg von allen sich bewegenden Teilen. Besondere Vorsicht ist rund um die Nadel der Nähmaschine geboten.
2. Verwenden Sie die Original Stichplatte.
3. Verwenden Sie keine verbogene bzw. stumpfe Nadel.
4. Der Stoff soll während des Nähens weder gezogen noch geschoben werden. Falsches Bedienen kann zu Nadelbruch führen.
5. Schalten Sie die Nähmaschine immer aus ("O"), wenn Sie die Nadel oder den Nähfuß wechseln, wenn der Unterfaden leer ist usw.
6. Ziehen Sie immer den Netzstecker heraus, wenn Sie die Maschine reinigen, ölen oder eine Wartung - wie im Handbuch beschrieben vornehmen.
7. Benutzen Sie das Gerät nie auf einer weichen Oberfläche wie z.B. Bett, Sofa usw. wo die Lüftungsöffnungen verstopft werden können.
8. Dieses Gerät kann von Kindern ab 8 Jahren und darüber sowie von Personen mit verringerten physischen, sensorischen oder mentalen
Fähigkeiten oder Mangel an Erfahrung und Wissen benutzt werden, wenn sie beaufsichtig oder bezüglich des sicheren Gebrauchs des Gerätes
unterwiesen wurden und die daraus resultierenden Gefahren verstehen. Kinder dürfen nicht mit dem Gerät spielen. Reinigung und BenutzerWartung dürfen nicht von Kindern ohne Beaufsichtigung durchgeführt werden.
!!!!! BITTE BEACHTEN SIE DIESE WARNHINWEISE!!!!!
220~250V-50Hz
Motor: 70W
Page 5

INHALTSVERZEICHNIS
……………………………...
D
Teil 1
Hauptteile der Maschine………….
Te
il2
Nähvorbereitung…………………...
Fußanlasser………………………...
Nählicht
Anschiebetisch……………………..
Nähfußbefestigung………………..
Nadelwechsel………………………
Einstellen Garnrollenstift………....
Einfädeln des Oberfadens………..
Aufspulen des Unterfadens……...
Einsetzen der Unterspule………...
Einfädeln des Oberfadens………..
Einfädeln des Unterfadens……….
Regulieren der Fadenspannung…
Stichprogramm…………………….
Stichlängenregelung……………...
5
7
7
7
8
8
9
10
10
10
11
11
12
12
13
13
Einstellen von Stretch Stichen…...….
"Rückwärts" Zurück Nähen………….
Nählineal………………………………
Stopfplatte……………………………..
Linke Nadelposition…………………..
Teil 3
Geradstich……………………………..
Nährichtung ändern…………………..
Zick-Zack-Stich……………………….
Teil 4
Zick-Zack nähen………………………
Federstich (offener Overlockstich)….
Elastik Zick-Zack……………………...
Dreifach Geradstich (Elastikstich)…..
Reißverschluss………………………..
Rollsaum………………………………
14
14
14
14
14
15
15
15
16
16
16
16
17
17
Annähen von Knöpfen……………….
Knopfloch……………………………...
Te
il 5
Muschelsaum…………………………
Overlockstich………………………….
Stichprogramm………………………..
Oberfadenspannung………………….
Teil 6
Reinigen der Maschine………………
Transporteur reinigen………………...
Ölen…………………………………….
Fehlertabelle…………………………..
18
19
20
20
20
20
21
21
21
22
5
Page 6
D
Fadengeber
Ausloserad
Abdeckung
Greiferabdeckung
Fadenführung zum
Spulen
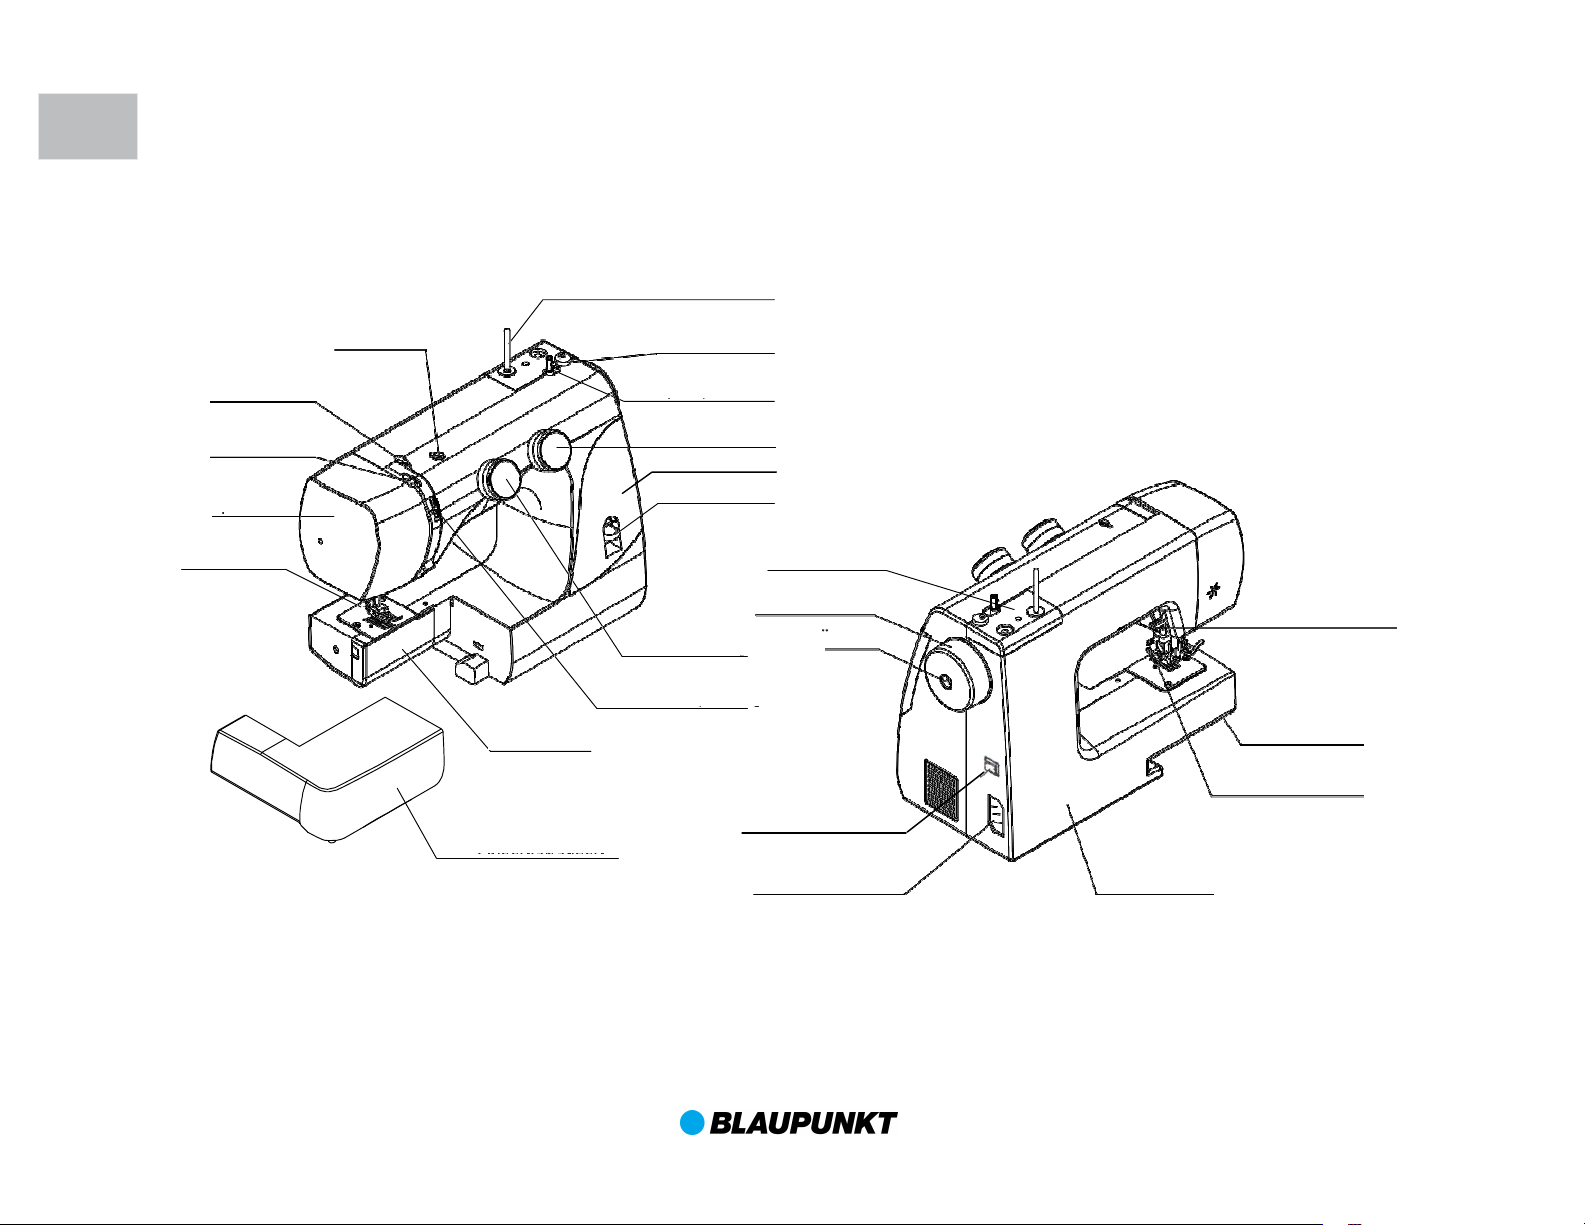
HAUPTTEILE
Garnrollenhalter
Spulen
Überlaufstopper
Fadenführung
Fadengeber
Kopfdeckel
Nadelplatte
Anschiebetisch
Spulspindel
Stichlängenwahlknopf
Rücklauftaste
Armabdeckung
Stichwahlknopf
Oberfadenspannung
An/Aus-Schalter
Handrad
Stecker
Füßchenheber
Freiarm
Nadel-
Befestigungsschraube
Abdeckung
6
Page 7
(A
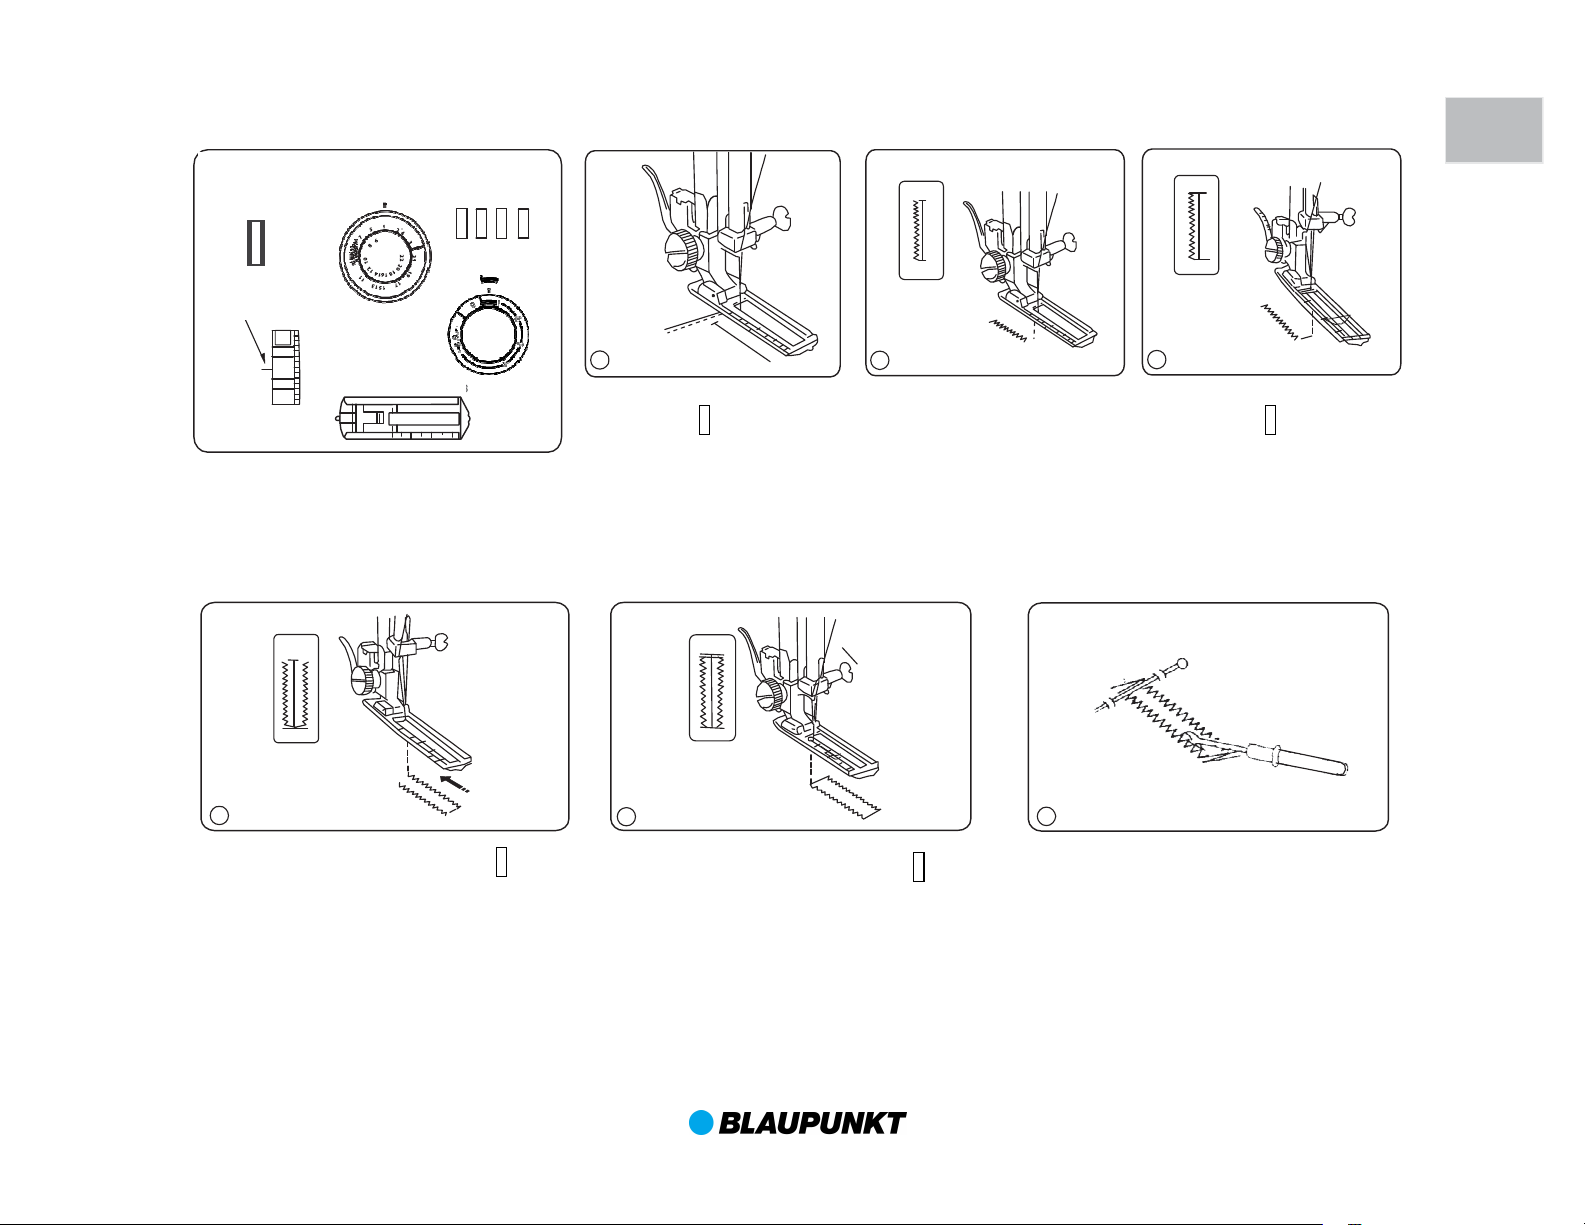
NÄHVORBEREITUNG
DER FU
ß
ANLASSER
ANSCHLUSS DES FUßANLASSERS
AUSWECHSELN DER GLÜHLAMPE
n Sie das Pedal so auf den
ACHTUNG NETZSTECKER
ZUBEHÖR
SONDERZUBEHÖR
D
ANSCHLUSS DES FUSSANLASSERS
Verbinden Sie Fußanlasser und Kabel wie abgebildet.
Bevor Sie die Maschine anschließen, beachten Sie bitte, dass die
Netzspannung mit der Angabe auf der Rückseite der Maschine
übereinstimmt.
* Angaben sind von Land zu Land unterschiedlich.
Mittels des Fußanlassers
(Pedal) wird die
Nähgeschwindigkeit reguliert.
Lege
Boden, dass Sie es bequem
erreichen können.
Leichter Druck auf das Pedal langsam nähen.
Starker Druck auf das Pedal schnell nähen.
Nur bei Ausführung mit Glühlampe
ZIEHEN!
(Nur für Ausführung mit E14
Glühlampe)
Kopfdeckel abschrauben wie Abb.
zeigt. Drehen Sie die Glühlampe
entgegen dem Uhrzeigersinn
heraus. Die neue Glühlampe im
Uhrzeigersinn hineindrehen.
Lampe max. 15 Watt
2 Spulen für den Unterfaden
1 Großer Schraubenzieher
1 Stichplatten Schraubenzieher
1 Stopfplatte
2 Nadeln
1 Zippfuss
1 Knopflochfuss
1 Zick-Zack-Fuß auf der
Maschine vormontiert
Rollsaumfuß
Blindstichfuß
Overlockfuß
Geradstichfuß
usw.
7
Page 8
D
Problem
meh
r.
ENTFERNEN DES ANSCHIEBETISCHES
Die einzelnen Zubehörfüße werden
erstange,
Der Anschiebetisch (Zubehörbox)
Für einfache Näharbeiten sollte der
Anschiebetisch verwendet werden.
Dadurch wird die Arbeitsfläche vergrößert
und somit das Nähen erleichtert.
Ziehen Sie den Anschiebetisch in Pfeilrichtung
nach vorne weg und Sie können nun den
Freiarm benutzen.
Schwer zugängliche Stellen wie Manschetten,
Ärmel, Hosenbeine usw. können mit dem
Freiarm mühelos genäht werden. Taschen
aufnähen, Steppnähte an Kleidern, Mäntel ....,
alles kein Problem mehr.
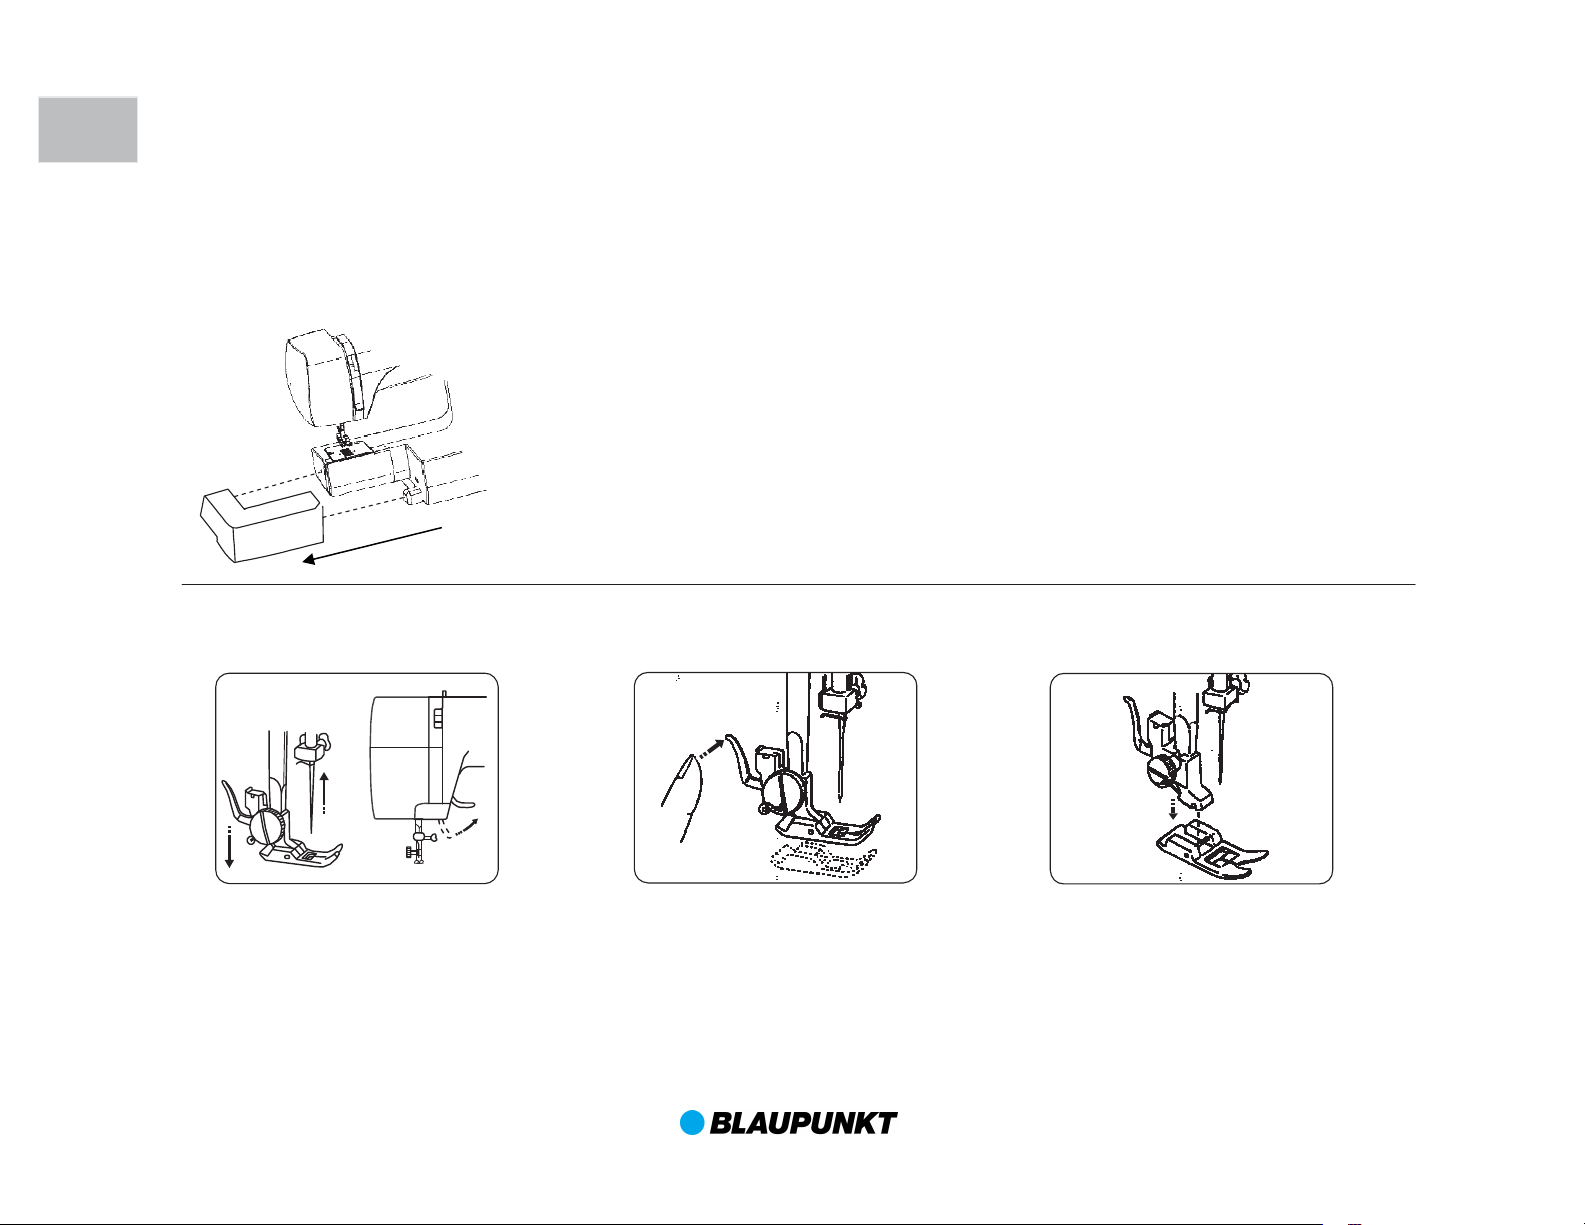
Auswechseln der Nähfüße
am Nähfußhalter
befestigt. Um den Fuß richtig
einzusetzen, muss man den
Lifterhebel nach oben stellen.
Drücken Sie den Hebel in
Pfeilrichtung, damit sich das
Füßchen löst.
8
Legen Sie ein neues Füßchen
unter die Aussparung des
Füßchenhalters.
Senken Sie die Stoffdrück
bis der Nähfuß einrastet.
Page 9
Auswechseln der Nadel
drehen, die Nadel in höchster
weg) und so setzen Sie nun die neue
D
Handrad in Ihre Richtung
Stellung, den Lifterhebel
heben.
Lösen Sie die Nadelbefestigungsschraube und nehmen Sie die Nadel
heraus.
Einsetzen der neuen Nadel:
ie flache Seite des Nadelkolbens
D
muss nach hinten zeigen (von Ihnen
Nadel in die Nadelstange ein.
Schieben Sie die Nadel bis zum
Anschlag nach oben und ziehen Sie
die Nadelbefestigungsschraube fest.
Verwenden Sie stets gerade Nadeln
mit einer einwandfreien Spitze.
Verbogene oder stumpfe Nadeln
verursachen, Fehlstiche, Nadelbruch
und können auch Greifer und
Stichplatte beschädigen.
ACHTUNG:
adeln der Type 130/705 verwenden!
N
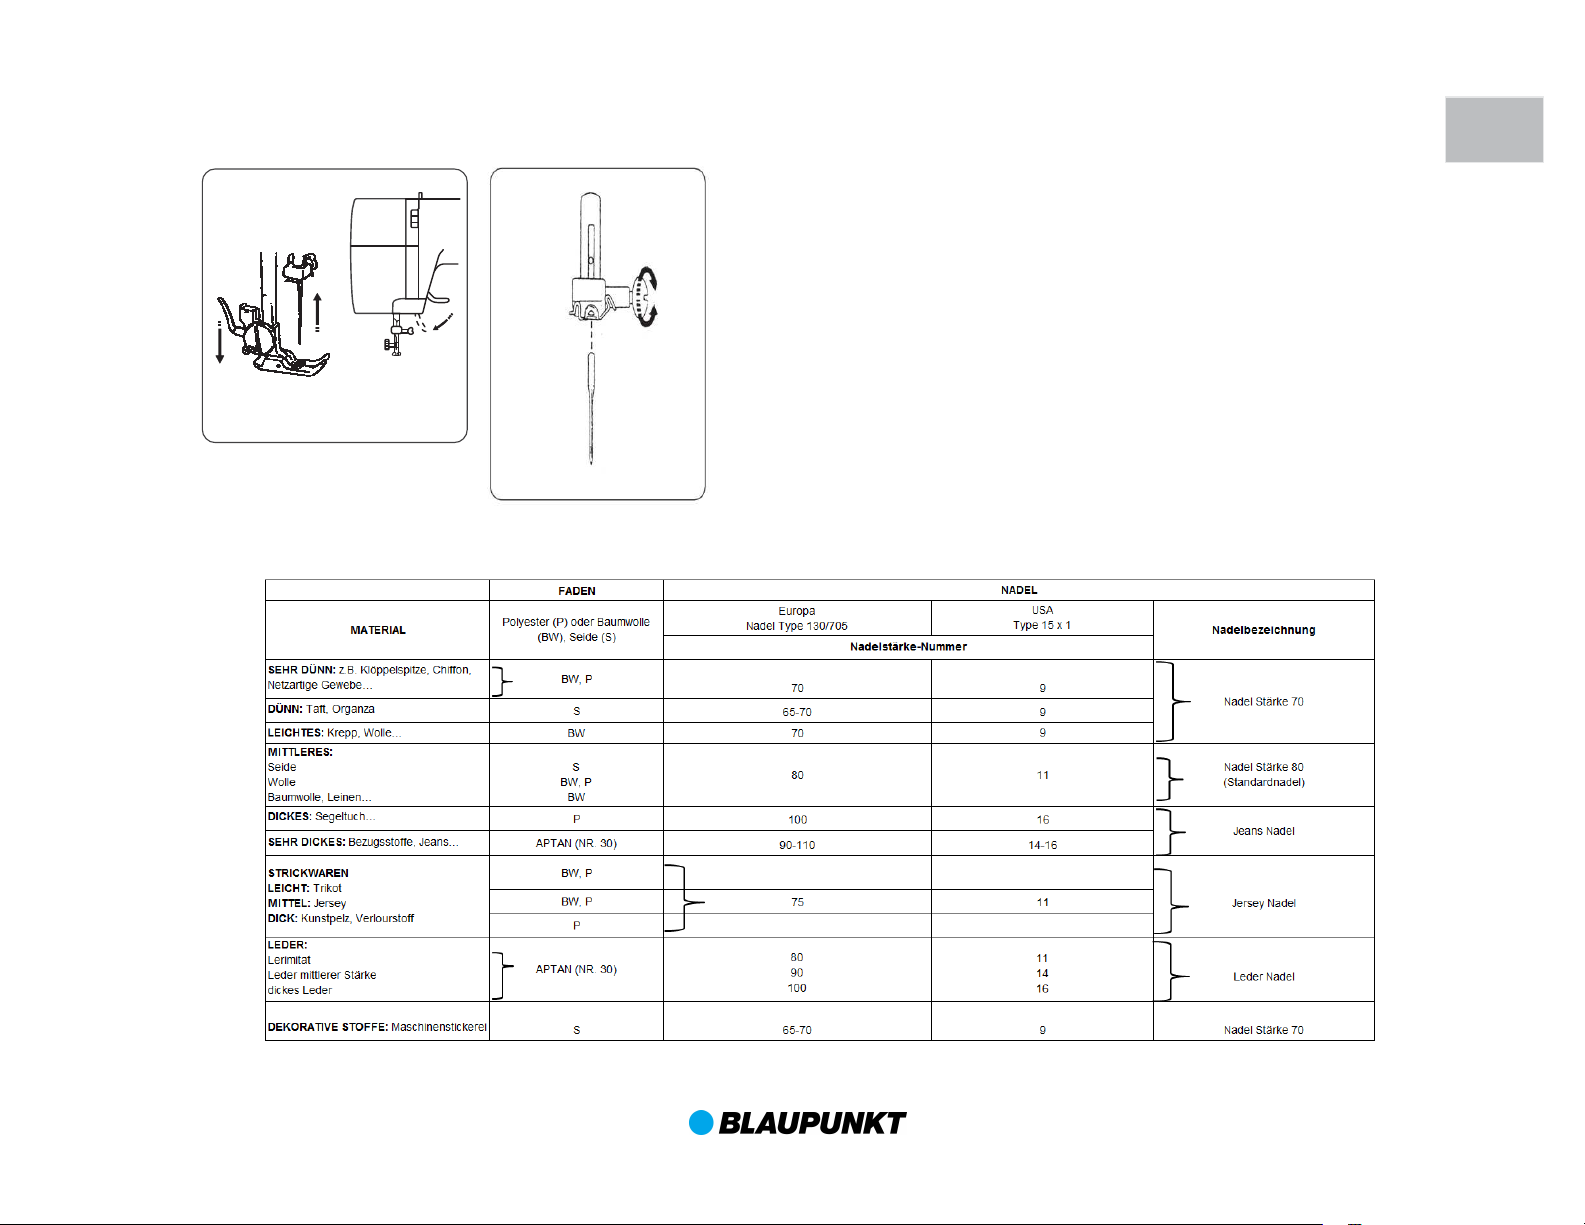
Material, Faden und Nadeltabelle
9
Page 10
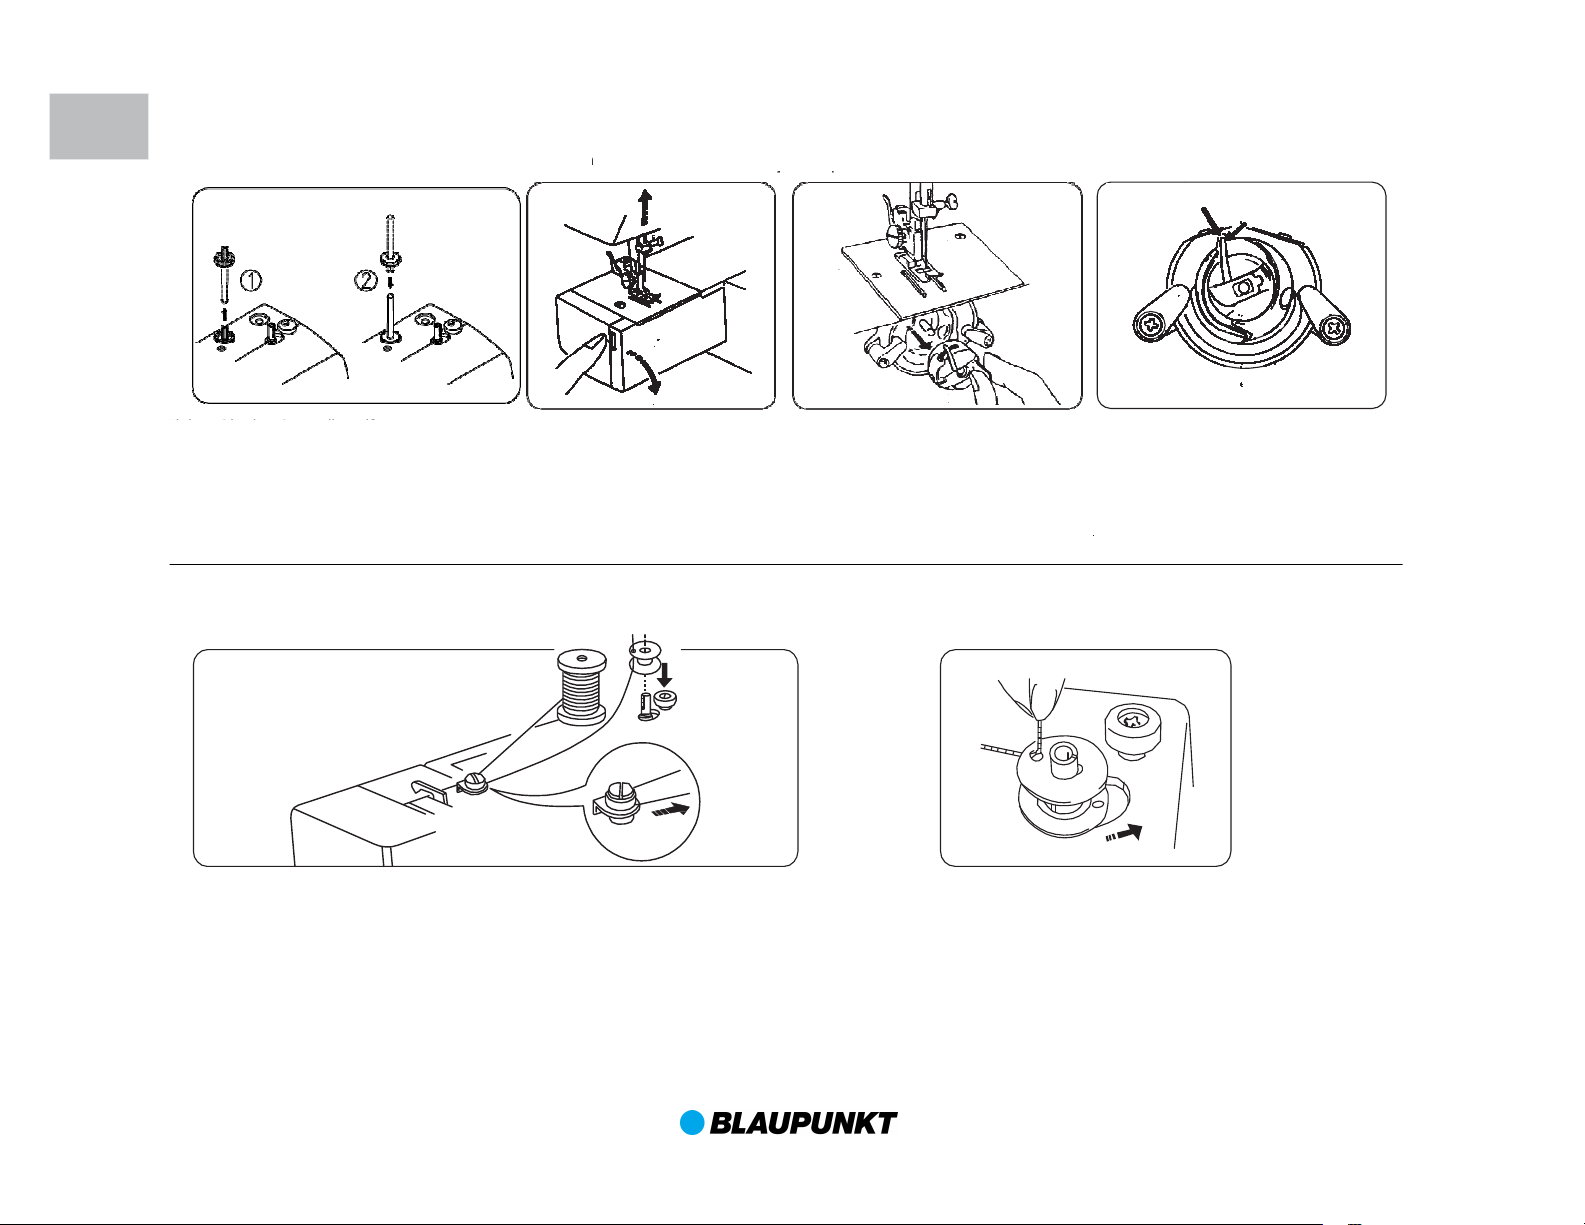
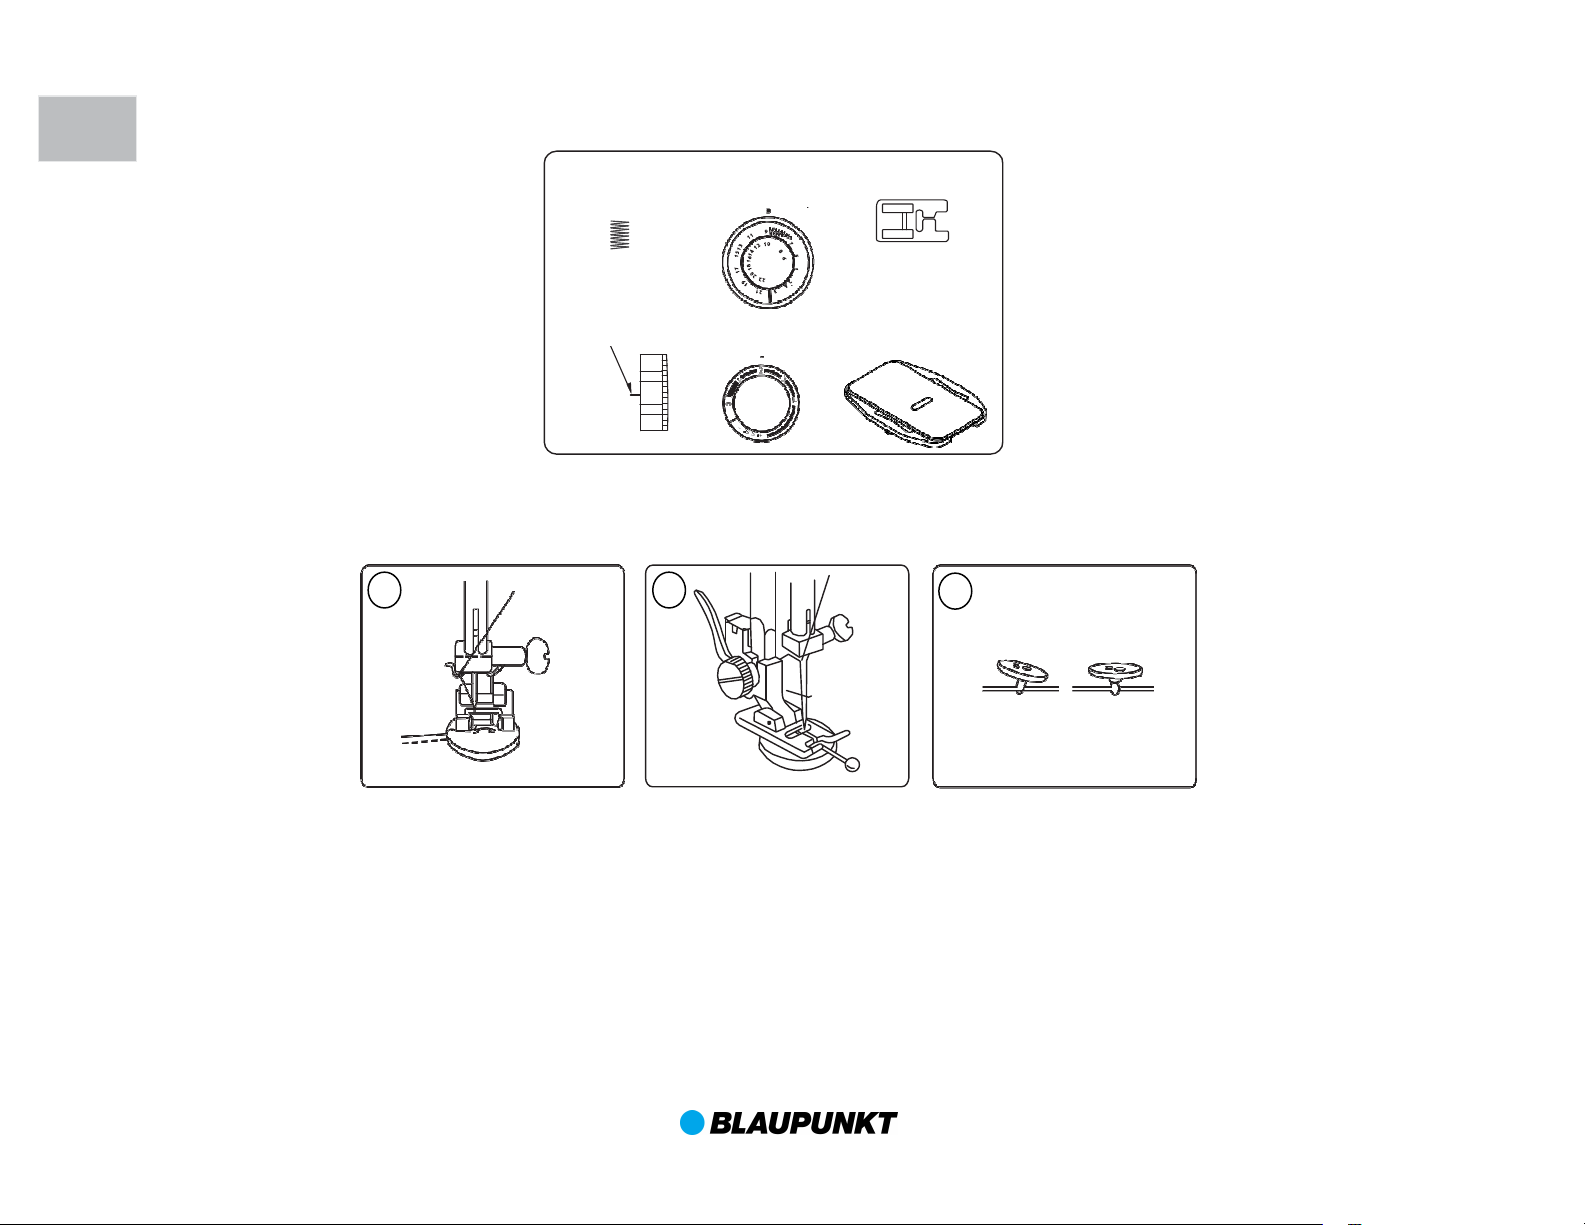
Einstellen
Garnrollenstift
Ziehen Sie
den Garnrollenstift.
D
Herausnehmen und Einsetzen der Spulenkapsel
Öffnen Sie die Greiferabde
Nadel in höchste Position bringen,
indem Sie das Handrad zu sich
Kreuzen Sie beim Aufspulen die Fäden
Setzen Sie eine Spule auf den Stift und ziehen Sie den Faden von der
Legen Sie den Faden mehrmals im Uhrzeigersinn um
Schalten Sie die Maschine während dieser
Beim Einsetzen der Spulenkapsel ca.
10cm des Fadens aus der
kapsel heraushängen lassen.
Sie die Spulenkapsel an der Spulen
elklappe und setzen Sie diese
genau wie abgebildet wieder ein.
Einsetzen der Spulenkapsel
nach rechts drücken und
Wenn die Spule voll ist hält die
Arbeit aus!
Einfädeln des Oberfadens
Einstellen Garnrollenstift
Ziehen Sie den Garnrollenstift aus
der Maschine. Stecken Sie die
Legen Sie die kürzere Seite
kürzere Seite des Garnrollenstift in
die Maschine.
für eine gute Spannung.
Spule durch den Fadenführer.
Setzen Sie die Spule nun auf den Stift.
drehen.
ckung.
Nehmen Sie die Spulenkapsel nun
heraus, indem Sie die Klappe an
der Spulenkapsel öffnen.
Aufspulen des Unterfadens
Spule
Fußanlasser bedienen.
die Spule.
Maschine automatisch an.
kaps
Spulen-
Halten
-
10
Page 11
Setzen Sie die Spule in die
Spulenkapsel wie
abgebildet
Arbeit aus!
1
Faden nach links, unter die
Spannungsfeder hindurch bis zur
öchste Stellung bringen,
und dann von vorne nach
Schneiden Sie den Faden mit einer scharfen Schere ab, dadurch
1 6 5 6
und dann von vorne nach
Faden in Pfeilrichtung.
Schalten Sie die Maschine während dieser
Einsetzen der Spule
Faden in den Schlitz der
.
Spulenkapsel gleiten lassen.
Einfädeln des Oberfadens
D
Öffnung ziehen.
Nähfußheber nach oben und Gelenkfadenhebel in h
indem Sie das Handrad auf sich zu drehen.
Einfädeln in der Reihenfolge -Fädeln Sie den Faden durch die Fadenführungen
hinten durch das Nadelöhr ein.
Etwa 10cm Faden nach hinten herausziehen.
Anmerkung:
ist es leichter, den Faden einzufädeln.
11
Page 12
D
Ihre Richtung, bis der Gelenkfadenhebel sich
wieder in der höchsten Stellung befindet.
Der Oberfaden und der Unterfaden
aussehen.)
Einstellrad erhöhen
Nummer wird die
Stich erhalten Sie
Nähen
Einfädeln des Unterfadens
Fadenende des Oberfadens mit der linken
Hand wie auf der Abbildung halten.
sollen genau in der Mitte der zwei
Stofflagen miteinander verknüpfen.
Ob die Fadenspannung richtig
eingestellt ist, sehen Sie am
Stichbild. (Auf den genähten Stoff
sollten beide Seiten gleich
Regulierung der Fadenspannung
Einstellmarke
höher
niedriger
Durch Einstellen
einer höheren
Nummer am
Sie die
Fadenspannung.
Drehen Sie nun das Handrad langsam in
Ziehen Sie den Oberfaden leicht an, und der
Unterfaden wird in Form einer kleinen
Schlinge heraufgeholt.
Oberfadenspannung
zu fest
Durch Einstellen einer
niedrigeren Nummer wird
die Fadenspannung
verringert.
Oberfadenspannung
zu locker
Durch Einstellen einer
höheren
Fadenspannung erhöht.
Beide Fäden bis etwa 15cm herausziehen
und nach links unter den Nähfuß legen.
Fadenspannung beim Zick-Zack-
Beim Zick-Zackdas beste Stichbild, wenn die
Oberfadenspannung ein wenig
lockerer ist als die Unterfadenspannung
12
Page 13
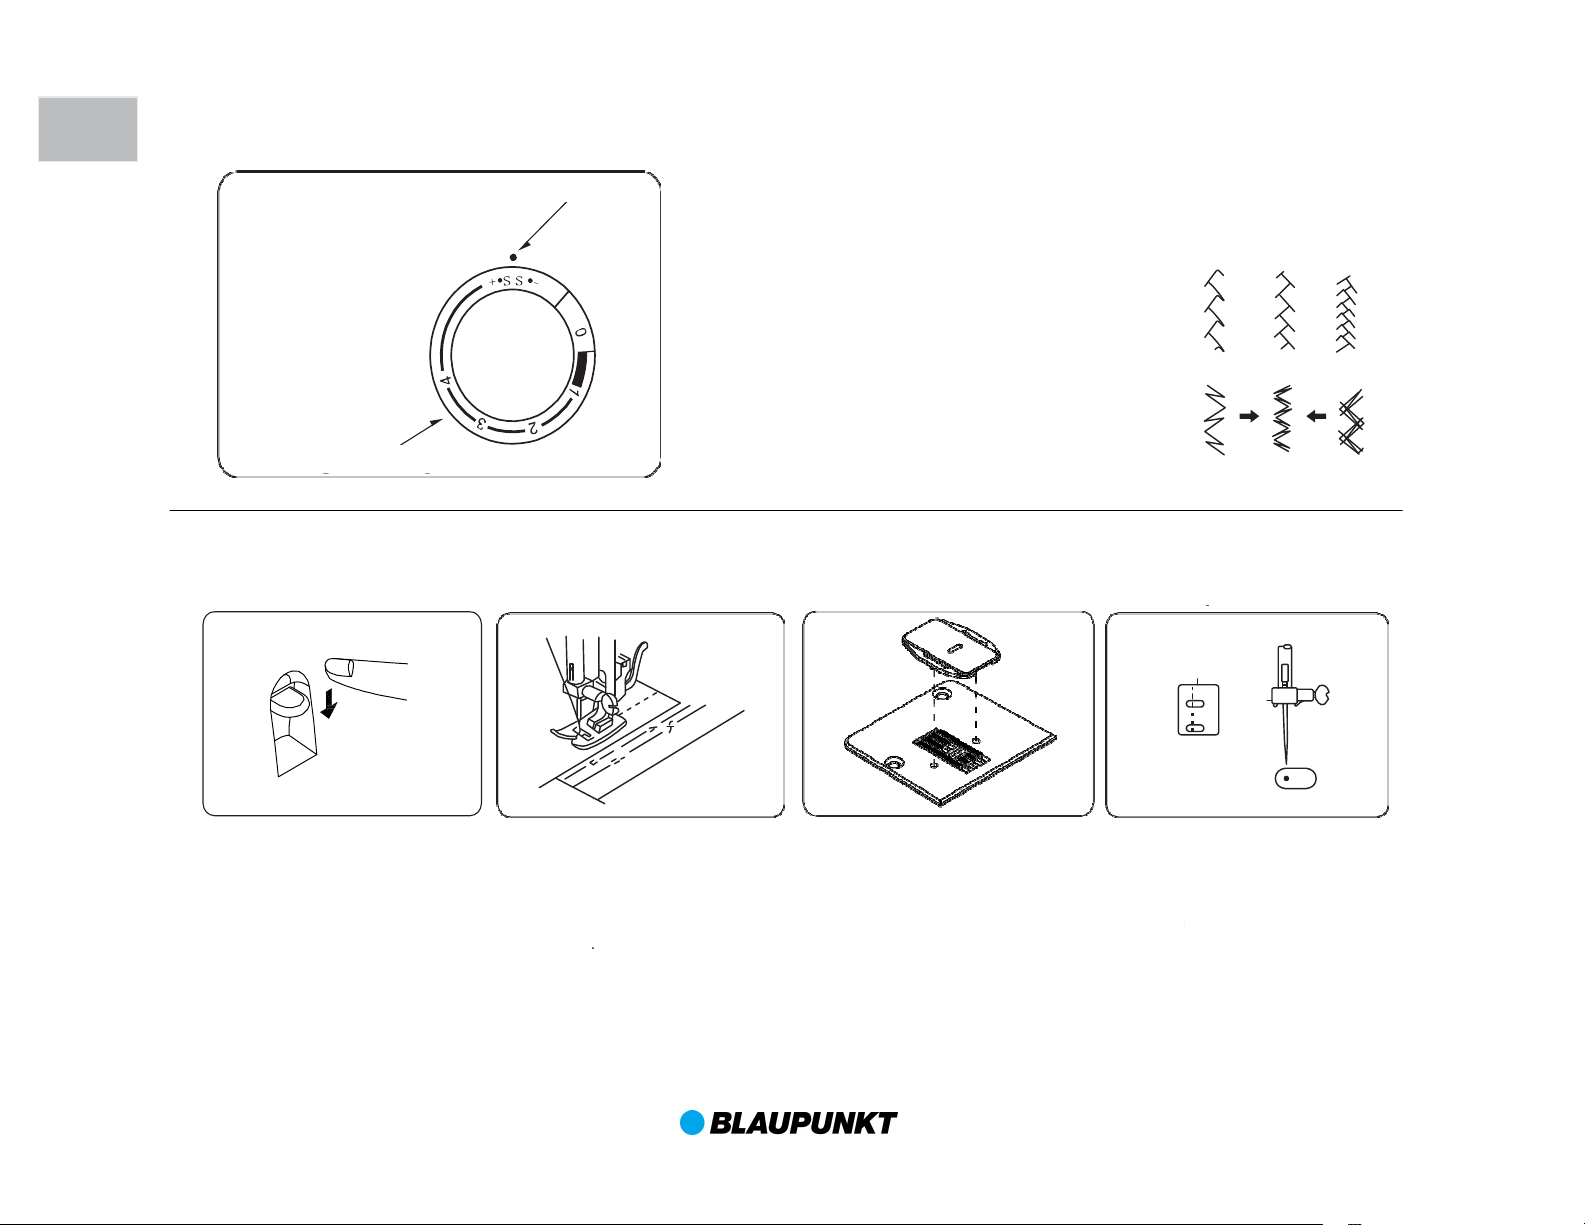
0 1 2 3
4
5 7
9
11
13 15 17 19
21 6 8
10 12 14 16 18 20
22
Musterwählknopf
Einstellmarke
Einstellmarke
(Programm-Selector)
Musterwahlknopf
Stichprogramm
D
Dieser Knopf wird entsprechend dem gewünschten Muster gedreht,
entweder nach links oder nach rechts.
* Bitte beachten Sie, dass beim Drehen des Musterknopfes die
Nadel immer in höchster Position steht.
Stichlängenregulierung
Stichlänge
Stichlängeneinstellung
Mit dem Stichlängeneinstellknopf regeln Sie die Stichlänge.
Je höher die eingestellte Zahl, desto länger der Stich.
0 bedeutet kein Stofftransport.
Beim Nähen eines Knopfloches soll die Stichlänge im Bereich
( ) eingestellt sein.
13
Page 14
D
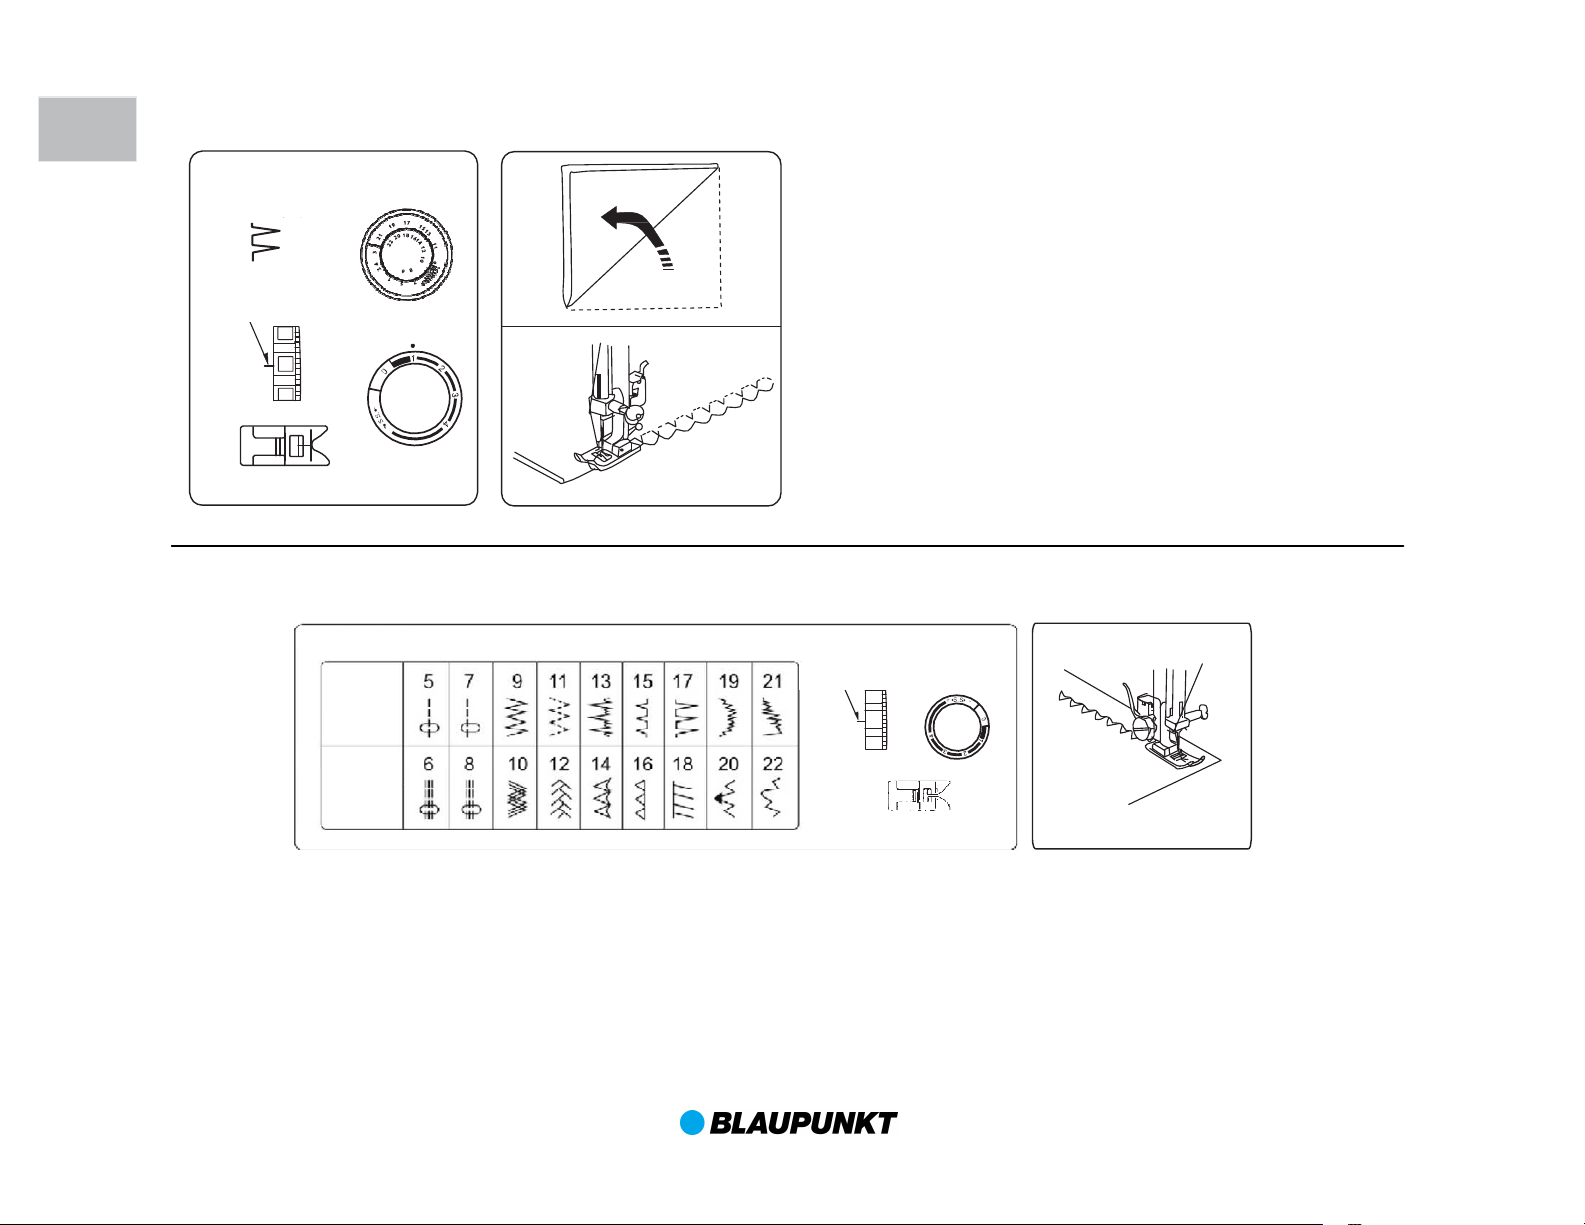
Einstellung der Stretchstiche
MITTE
Die Nummern auf der Stichplatte
zeigen den Abstand zwischen
el in Mittelposition und dem
Vordere Nr.: cm
Hintere Nr.: inches
Linke Nadelposition kann zum
parallel Nähen verwendet werden.
Bemerkung: Nur mit dem Zick
Fuß möglich!
Linke Nadelposition
Stich
Stichlängeneinstellung
Einstellmarkierung
Nahtlineal
Um die Stretchstiche einzustellen, drehen Sie den
Stichlängeneinstellknopf in den Bereich – SS +.
Die Stretchstiche befinden sich im inneren Kreis des
Stichmusterwählers, diese sollten in der Mitte des + SS -
Bereiches eingestellt werden.
Um die Stichdichte zu verändern drehen Sie entweder in
Richtung + oder -.
ückwärts zurück Nähen
R
Stopfplatte
+ .SS. -
auswahl
Nähen Sie zuerst den
gewünschten Stich nach vorne.
Drücken Sie nun die Taste zum
Rückwärtsnähen. So lange Sie die
Taste gedrückt halten, näht die
Maschine zurück.
Nad
Stich.
Legen Sie die Stopfplatte auf die
Stichplatte und fixieren Sie diese
mit den Steckern in den Löchern
auf der Nadelplatte.
ZackNun kann der Transporteur den
Stoff nicht mehr bewegen.
-
14
Page 15

5
4
3
5
1.5 ~ 4
Maschineneinstellung
Stich (5)
Stichwahlknopf
Nähen Sie bis zur Stoffkante um die
wieder loslassen.
4
3
2
9
~
4
Maschineneinstellung
verwendet.
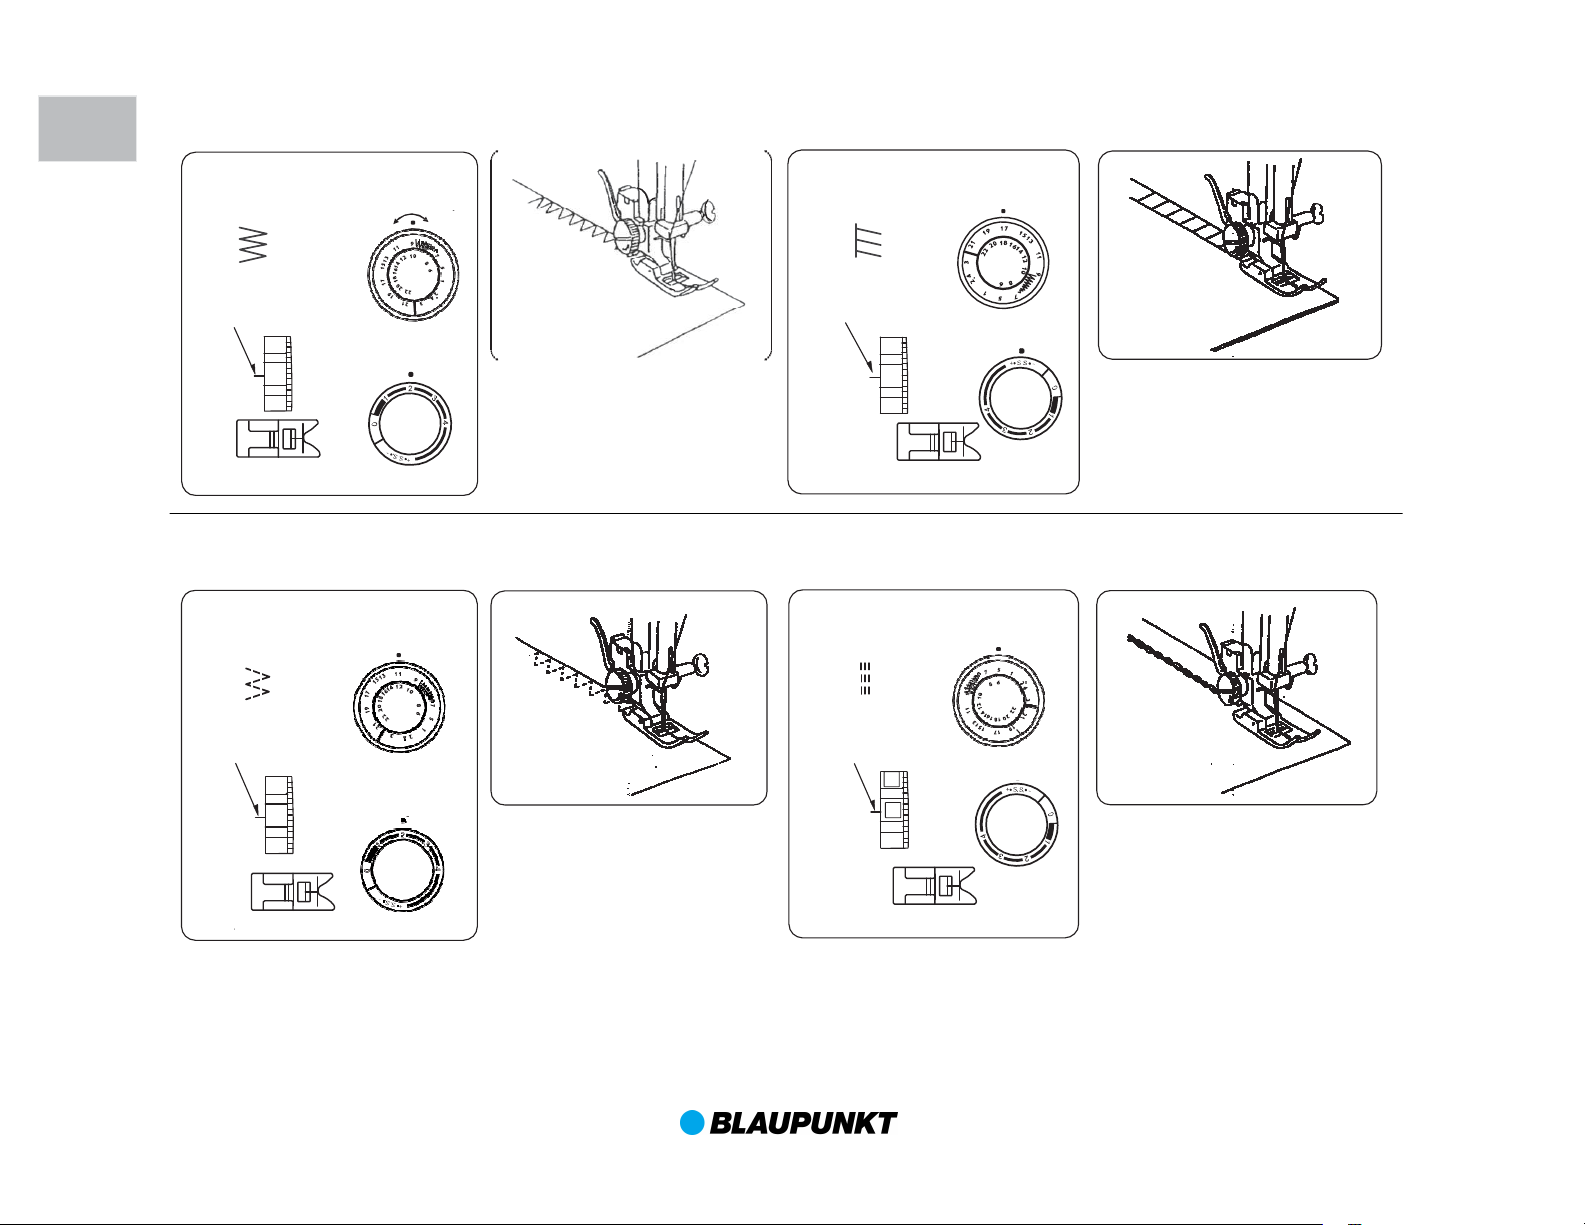
Geradstich
D
Fadenspannung
2-6
Zick-Zack-Fuß
Nährichtung ändern Der Zick-Zack-Stich
Um die Nährichtung zu ändern, muss das
Nähgut unbedingt flach auf der Maschine
bzw. der Stichplatte aufliegen. Die Nadel
muss senkrecht über der Naht stehen und
den Stoff sauber durchstechen. So können
Sie das Nähgut problemlos in eine andere
Richtung drehen.
Stichlänge
1.5 - 4
Legen Sie das Nähgut so unter den
Nähfuß, dass sich dieser ca. 1 cm
innerhalb des Stoffes befindet
(siehe Abbildung).
Legen Sie den Stoff parallel zum
Führungslineal und senken Sie den
Nähfuß. Betätigen Sie den Fußanlasser und die Maschine beginnt
zu nähen. Ziehen Sie nicht am Stoff.
Naht zu verstärken. Taste zum
Rückwärtsnähen drücken und
Stich (9)
Fadenspannung
1-5
Zick-Zack-Fuß
Stichwahlknopf
Stichlänge
Schneiden Sie den Faden mit
Hilfe des eingebauten
Fadenschneiders ab.
4
Stellen Sie die Maschine laut
Abbildung ein.
Der Zick-Zack-Stich wird zum
Versäubern oder Applizieren
15
Page 16
D
3
2 1
Maschineneinstellung
3
2
1
18
Maschineneinstellung
Mit diesem Stich können Sie nun
in einem Arbeitsgang Nähen und
5
4
3
5
3
2
1
11
Maschineneinstellung
Maschineneinstellung
würden, sind diese Stiche elastisch.
Versäubern, zum Absteppen von
Federstich (offener Overlockstich)
Stich (9)
Fadenspannung
von 1 - 4
Zick-Zack-Fuß
Stich (11)
Fadenspannung
von 1 - 4
Stichwahlknopf
Stichlänge
1 - 2
Stich (17)
Stichwahlknopf
Fadenspannung
von 1 - 4
Maschine wie auf Abbildung
einstellen. Nähen Sie sorgfältig,
so dass alle Stiche auf der
rechten Seite genau mit dem
Rand abschließen.
Zick-Zack-Fuß
Dreifach Geradestich (Elastikstich)
Stich (5) Stichwahlknopf
Fadenspannung
von 2 - 6
Stichwahlknopf
Stichlänge SS
Legen Sie zwei Stoffe mit den
rechten Seiten aufeinander.
(Abbildung)
Versäubern.
Stichlänge SS
Zick-Zack-Fuß
Stichlänge 1 - 2
Für elastische Stoffe zum
Säumen als sichtbare Ziernaht
und zum Gummiband aufnähen
geeignet.
16
Zick-Zack-Fuß
Die Dreifachnaht ergibt eine
besonders feste Naht. Während
normale Nähte beim Dehnen reißen
Sie eignen sich deshalb vor allem für
alle elastischen Stoffe, zur Verstärkung von Nähten bei Sportbekleidung
und im Allgemeinen für alle
besonders strapazierten Nähte.
Page 17
2
3
4
0.7cm(1/4")
0.7cm(1/4")
5
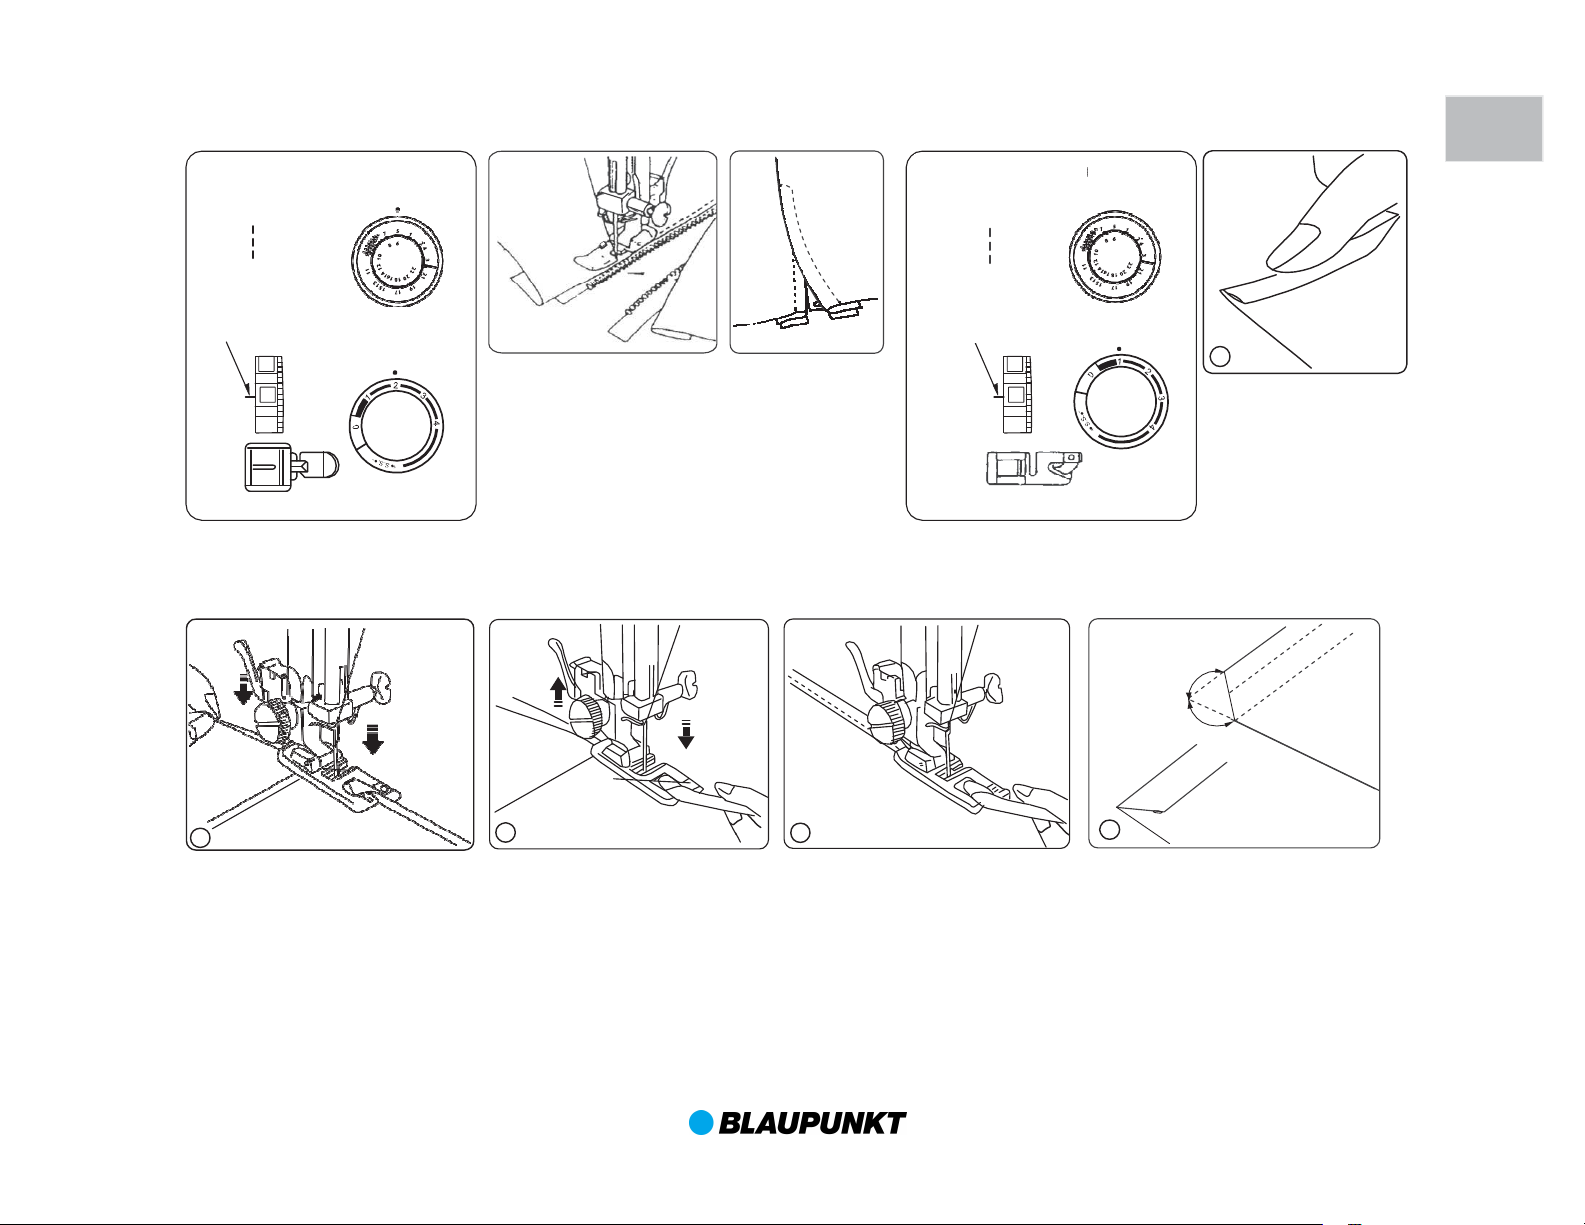
Reißverschluss Einnähen Rollsaum
1
5
4
3
5
1.5-4
5
5
Maschineneinstellung
Maschineneinstellung
2 - 4
Legen Sie genau von der
Nähfuß heben und den Stoff in die
wie z. B. Chiffon geeignet.
D
Stich (5)
Fadenspannung
3 - 6
Zipp-Fuß
Stichwahlknopf
Stichlänge
Stellen Sie die Maschine wie auf der Abb. ein.
Befestigen Sie die Nähfußsohle so an dem
Füßchenhalter, dass sie rechts von der Nadel
liegt. Nähen Sie nun die rechte Seite des
Reißverschlusses an und achten Sie darauf,
dass die Zähne des Reißverschlusses genau
parallel zum linken Rand des Füßchens liegen.
Wenn Sie den speziellen Reißverschlussfuß
verwenden, können Sie Reißverschlüsse
einnähen, ohne das Material zu wenden.
Stich (5)
Fadenspannung
2 - 6
Stichwahlknopf
Stichlänge
Rollsaum Fuß - Sonderzubehör
Stoffkante eine
Doppelfalte.
Stechen Sie die Nadel in das
Material und senken Sie den
Nähfuß.
Nähen Sie 3-4 Stiche und halten
dabei die beiden Fäden.
Nadel im Stoff stecken lassen,
Rollführung legen.
Nähfuß senken und nähen
beginnen.
17
Nun bildet sich ein Rollsaum wie
abgebildet.
Rollsaumfuß nur für dünne Stoffe
Page 18
D
3
2
1
Maschineneinstellung
eingestellt werden
Zickzackzeiger auf O stellen und
1 2 3
Knopf annähen
Stich (9)
Fadenspannung
von 1 - 4
Verwenden Sie zum Knopf annähen die Stopfplatte.
Stichwahlknopf
Zick-Zack-Fuß
Stichlänge muss nicht
Stopfplatte
Maschine wie auf Abb. einstellen.
Knopf und Stoff befinden sich unter dem Füßchen. Senken Sie das
Füßchen, wenn die Nadel links über dem Loch des Knopfes steht.
Nadel nach oben und Zickzackbreite so einstellen, dass die Nadel
genau in das rechte Loch des Knopfes trifft. Abb. 1
18
Nadel nach oben,
3-4 Stiche nähen.
Durch das einlegen der
Stecknadel entsteht ein
Fadenschaft, der dem Knopf
einen Abstand vom Stoff
ermöglicht. Abb. 2 und 3.
Page 19
1
2
3
456
Knopfloch nähen
4
3 2
-
-
-
4 2
2
Maschineneinstellung
wahlknopf auf
wahlknopf auf
wo Sie mit dem Knopfloch
1
3
Knopfloch aufschneiden
D
Stich (1)
Stichwahlknopf
1
Stichlänge
Fadenspannung
von 1 auf 5
Knopflochfuß
Nähen Sie als Test ein Knopfloch auf
einem Stück Reststoff.
Dies hilft, Fehler zu vermeiden.
4
3
Stellen Sie den Muster-
. Senken Sie
den Nähfuß. Stechen Sie nun
mit der Nadel in den Stoff, dort
Nähen Sie nun die linke Seite.
Dies hilft, Fehler zu vermeiden.
Stellen Sie den Muster-
4
und nähen 5
2
Stiche. Drehen Sie mit Hilfe des
Handrades die Nadel aus dem
Stoff.
beginnen wollen.
Stellen Sie den Musterwahlknopf auf und
nähen Sie die rechte Seite des Knopfloches.
Die Maschine näht nun zurück. Drehen Sie
mit Hilfe des Handrades die Nadel aus dem
Stoff.
4
Stellen Sie den Musterwahlknopf auf und
nähen Sie wieder 5 Stiche.
2
Sie können nun mit ein paar Stichen das
Knopfloch vernähen, indem Sie auf
Geradstich stellen und die Stichlänge auf 0
stellen.
19
Stecken Sie jeweils 1 Nadel in den oberen
und unteren Riegel, damit Sie nicht zu weit
einschneiden. Mit dem Knopflochschneider
dann in der Mitte aufschneiden.
Page 20
D
3
1
16
6
5
4
17
Maschineneinstellung
Maschineneinstellung
Stich (17)
Fadenspannung
von 3 - 9
Zick-Zack-Fuß
Stichwahlknopf
Stichlänge 1-2
Muschelsaum
Der Muschelsaum ist eine Ziernaht, der an
Kanten Bogen bildet. Legen Sie die
Stoffkante unter den Nähfuß und nähen Sie
nun an der Kante entlang.
Stichprogramm
Fadenspannung
Sticheinstellung
bei
Elastikstichen
Stiche
ElastikStiche
Stiche 5-21 sind Nutzstiche.
Fadenspannung zwischen 4-5 / Stichlänge zwischen 1-4
Stiche 6-22 sind Elastikstiche.
Fadenspannung zwischen 3-4 / Stichlänge auf + SS -
20
2
Zick-Zack-Fuß
Page 21
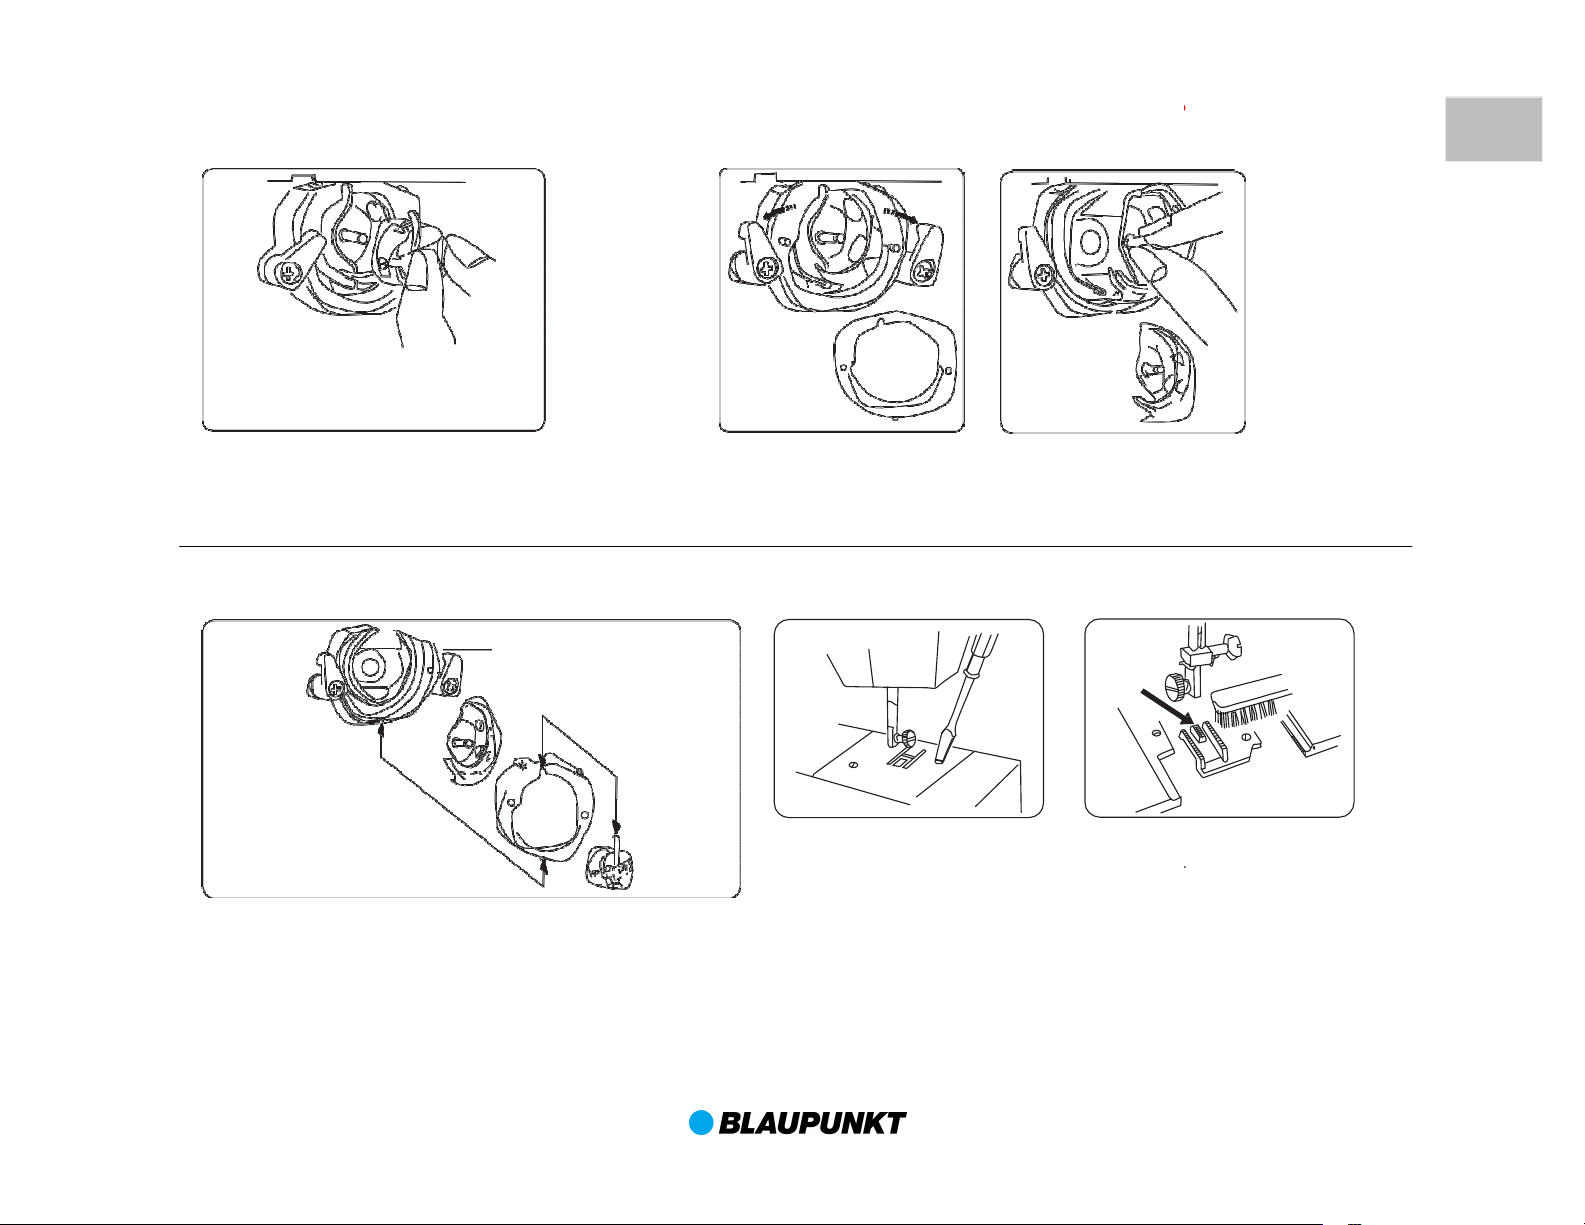
Bei allen Wartungsarbeiten wie z. B. Nadel wechseln, Reinigen und Ölen muss die Stromzufuhr unterbrochen werden!
Entfernen der Spulenkapsel
Einsetzen der Teile
Nach dem Reinigen und Ölen setzen Sie wie Abb. den Greifer,
die Greiferbahn und die Spulenkapsel wieder ein.
Reinigen der Maschine
Greifer herausnehmen und mit
einer Bürste den Staub
Geben Sie einen
Tropfen Öl auf
Mit der Bürste
Staub entfernen.
DAMIT SIE MÖ
GLICHST LANGE VON IHRER NÄHMASCHINE
PROFITIEREN, IST REGELMÄSSIGES REINIGEN UND ÖLEN
den Greifer.
D
Nadel in höchste Position bringen.
Öffnen Sie die Klappe der Spulenkapsel und nehmen Sie diese nun
heraus.
Öffnen Sie die Greiferbahnhalter wie Abb. (Pfeile
beachten) und entfernen Sie
die Greiferbahn.
R
einigen des Transporteurs
Nadel, Füßchen und Stichplatte
entfernen.
NOTWENDIG.
entfernen.
wie auf Abb.
21
Page 22

D
Funktionsstörungen
Lautes Geräusch bei der Maschine
STÖRUNG URSACHE BESEITIGUNGS-SEITE
Oberfaden reißt
Unterfaden reißt
Nadelbruch
Fehlstiche
Naht zieht sich beim Nähen zusammen
Material wird unregelmäßig transportiert
Maschine hat keine Funktion
Maschine blockiert bzw. näht nicht
1. Greifer verschmutzt 18
2. Transporteur verschmutzt 18
1. Faden falsch eingefädelt 6
2. Schlechte Qualität des Garnes Gutes Nähgarn verwenden
3. Fadenspannung falsch eingestellt 17
4. Nadel verbogen oder stumpf 5
1. Faden falsch eingefädelt 8
2. Verbogene, kaputte oder falsche Spule
3. Verschmutzte Spulenkapsel 18
1. Falsche Nadel 5
2. Nadel falsch eingesetzt 5
3. Verbogene oder stumpfe Nadel verwendet
4. Nadel für Material zu dünn 5
5. Über Knöpfe, Zipp ect. genäht Langsam Nähen wenn Knöpfe ect. in der Nähe sind
1. Nadel falsch eingesetzt oder verbogen
2. Greifer beschädigt Blaupunkt Servicehotline anrufen
3. Falsche Nadel verwendet 5
4. Nicht richtig eingefädelt 6
1. Falsche Fadenspannung 17
2. Falsche Nadel 5
3. Falscher Stich für den Stoff
1. Transporteur verschmutzt 18
2. Stichlänge zu klein Stichlänge verändern
1. Nicht eingeschaltet 3
2. Netzstecker nicht eingesteckt 3
1. Abgebrochene Nadelspitze hat sich in der
Greiferbahn verklemmt
2. Maschine auf Spulen eingestellt Auslöserad beim Handrad fixieren
3. Verbogene Nadel bleibt stecken 5
Originalspulen verwenden
5
5
Testen Sie vor dem Nähen zuerst den Stich auf einem
Probestoff
18
22
Page 23

DO NOT THROW AWAY!
NE PAS JETER!
WIEDERVERWERTUNG
Wir sind zum Umweltschutz verpflichtet. Unser Bestreben ist, den Umwelteinfluss unserer Produkte zu minimieren, indem wir
die Umwelt ausüben.
BITTE NICHT WEGWERFEN!
¡NO DESECHAR!
NON SPRECHIAMO NULLA!
GOOI DIT NIET WEG
ständig unsere Herstellungsmethoden verbessern.
Bitte beachten Sie bei der Entsorgung des Produktes, dass dies nach den folgenden umweltfreundlichen Richtlinien geschieht.
Dieses Produkt ist mit dem durchgestrichenen Symbol, wie oben auf dem Datenschild, gekennzeichnet. Es weist darauf hin, dass es nach den
Richtlinien der Europäischen Union "Elektroabfall und elektronisches Gerät" (WEEE) und der "Beschränkung auf den Gebrauch der bestimmten
gefährlichen Substanzen in elektrischem und elektronischem Gerät" (ROHS) entsorgt gehört und nicht zusammen mit Ihren Haushaltsabfällen. Bitte
beachten Sie, dass dieses Produkt entsprechend der nationalen und kommunalen Gesetzgebung entsorgt wird, und dass es in Kategorie 2 "Kleine
Haushaltsgeräte" WEEE's fällt. Nach dem kommunalen und nationalen Recht könnten Sie für die gesetzeswidrige Entsorgung dieses Produkts
verantwortlich gemacht werden. Schauen Sie auf die Webseite oder kontaktieren Sie eine zuständige nationale oder kommunale Stelle, die Sie über
die verfügbare Rückgabe und das Sammlungssystem informieren.
Sie können einen positiven Einfluss auf die Wiederverwendung, Recycling und andere Formen der Wiederherstellung durch das WEEE ausüben.
Dies würde die Deponien entlasten und den Umwelteinfluss der von Ihnen benutzten Produkte minimieren.
D
Gefährliche Substanzen in elektronischen und elektri
Die Bedeutung der durchgestrichenen Mülltonne: Entsorgen Sie elektrische Geräte nicht im Hausmüll, nutzen Sie die Sammelstellen in
Ihrer Gemeinde. Fragen Sie Ihre Gemeindeverwaltung nach den Standorten der Sammelstellen.
Wenn elektrische Geräte unkontrolliert entsorgt werden, können während der Verwitterung gefährliche Stoffe ins Grundwasser und
damit in die Nahrungskette gelangen, oder Flora und Fauna auf Jahre vergiftet werden.
Wenn Sie das Gerät durch ein neues ersetzen, ist der Verkäufer gesetzlich verpflichtet, das alte Gerät kostenlos zur Entsorgung
entgegenzunehmen.
Die Nutzung des Geräts ist sowohl für Kinder, gebrechliche oder behinderte Personen, als auch Personen, die mit dem Umgang nicht
vertraut sind, ungeeignet, außer wenn sie unter ständiger Aufsicht stehen oder durch verantwortliche Personen im Umgang des Geräts
eingewiesen worden sind. Kinder, die sich in der Nähe des Geräts aufhalten, müssen beaufsichtigt werden, um sicherzustellen, dass
sie damit nicht spielen.
schen Produkten können einen schädlichen Einfluss auf die menschliche Gesundheit und auf
23
Page 24

Page 25

UK ONLY IMPORTANT PLEASE READ CAREFULLY
English
English
The wires in this mains lead are colored in accordance with the following code:
BLUE-NEUTRAL BROWN-LIVE (OR ACRTIVE)
As the colors of the mains lead of this appliance ma
FOLLOWS: The earth plug pin is unnecessary. As the Machine is designed under double insulation structure, the earth wire is removed from the machine.
The wire colored BROWN must be connected to the terminal marked L or A or colored RED. The wire colored BLUE must be connected to the terminal
marked N or colored BLACK. Neither core is to be connected to the earth terminal of a three-pin plug.
y not correspond with the colored markings identifying the terminals in your plug -- PROCEED AS
IMPORTANT SAFETY INSTRUCTIONS
When using an electrical appliance, basic safety precautions should always be followed, including the following:
Read all instructions before using (this appliance).
DANGER - - To reduce the risk of electric shock:
An appliance should never be left unattended when plugged in. Always unplug this appliance from the electric outlet immediately after using and before cleaning.
WARNING - - To reduce the risk of burns, fire, electric shock, or injury to persons:
1. Do not allow to be used as a toy. Close attention is necessary when this appliance is used by or near children.
2. Use this appliance only for its intended use as described in this manual. Use only attachments recommended by the manufacturer as contained in
this manual.
3. Never operate this appliance if it has a damaged cord or plug, if it is not working properly, if it has been dropped or damaged, or dropped into
water. Return the appliance to the nearest authorized dealer or service center for examination, repair, electrical or mechanical adjustment.
4. Never operate the appliance with any air openings blocked. Keep ventilation openings of the sewing machine and foot controller free from the
accumulation of lint, dust, and loose cloth.
5. Never drop or insert any object into any opening.
6. Do not use outdoors.
7. Do not operate where aerosol (spray) products are being used or where oxygen is being administered.
8. To disconnect, turn all controls to the off("O") position, then remove plug from outlet.
9. Do not unplug by pulling on cord. To unplug, grasp the plug, not the cord.
10. This appliance can be used by children aged from 8 years and above and persons with reduced physical, sensory or mental capabilities or lack of
experience and knowledge if they have been given supervision or instruction concerning use of the appliance in a safe way and understand the
hazards involved. Children should not play with the appliance. Cleaning and user maintenance should not be made by children without
supervision.
DANGER
1. Always unplug before relamping. Replace the bulb with same type rated at 15 watts.
2. Do not reach for an appliance that has fallen into water. Unplug immediately.
3. Do not place or store appliance where it can fall or be pulled into a lub or sink. Do not place or drop into water or other liquid.
EN
Page 26

EN
English
WARNING
1. Keep fingers away from all moving parts. Special care is required around the sewing machine needle.
2. Always use proper needle plate. The wrong plate can cause the needle to break.
3. Do not use bent needles.
4. Do not pull or push fabric while stitching. It may deflect the needle causing it to break.
5. Switch the sewing machine off ("O") when making any adjustments in the needle area, such as threading needle, changing needle, threading
bobbin, or changing presser foot, etc.
6. Always unplug sewing machine from the electrical outlet when removing covers, lubricating, or when making any other user servicing adjustments
mentioned in the instruction manual.
7. Never operate on a soft surface such as a bed or couch where the air openings may be blocked.
SAVE THESE INSTRUCTIONS
220~240V-50Hz
Motor:70W
Page 27

TABLE OF CONTENTS
SECTION I
ESSENTIAL PARTS
Name of parts……………………………………...
SECTION II GETTING READY TO SEW
Connecting the Machine to the Power Supply…
Foot Control………………………………………..
Sewing Light……………………………………….
Extension Table (Accessory storage Box)……...
To Snap On and Snap Off the Presser Foot……
Changing Needles…………………………………
Thread and Needle Chart………………………...
Setting spool pin…………………………………...
Removing or Inserting the Bobbin Case………..
Winding the Bobbin………………………………..
Threading Bobbin Thread………………………...
Threading the Machine……………………………
Drawing Up Bobbin Thread………………………
Balancing Needle Thread Tension………………
Stitch Selector……………………………………..
Stitch Length Control……………………………...
Adjusting Stretch Stitch Balance……
28
Reverse Stitch Control……………….
Darning Plate………………………….
Left Needle Position………………….
29
SECTION III BASIC SEWING
29
29
Straight Stitch Sewing………………
30
To change the Sewing Direction……
30
Zigzag Stitching……………………….
31
31
SECTION IV UTILITY STITCHING
32
32
Overcasting……………………………
32
Overedge Stitch………………………
33
Tricot Stitch……………………………
33
Triple Stretch Stitch…………………..
34
Zipper Application…………………….
Rolled Hem……………………………
34
35
35
Sewing Buttons……………………………….
36
Buttonhole Stitching………………………….
36
36
SECTION V DECORATIVE STITCHING
36
Shell Tuck……………………………………..
Stretch Stitch Patterns……………………….
SECTION VI CARE OF YOUR MACHINE
37
Dismantling and Assembling Hook Race….
37
Cleaning the Feed Dogs…………………….
37
Oiling…………………………………………..
Trouble Shooting……………………………..
38
38
38
38
39
39
40
41
EN
42
42
43
43
43
44
27
Page 28

Fadengeber
Ausloserad
Abdeckung
Names of Parts
Spool Pin
stopper
Spindle
ccessory
PARTS DIAGRAM
EN
Thread guide
Take up lever
Face Plate
Needle Plate
Bobbin winder
thread guide
Hook cover
Extension table (A
storage box)
Bobbin winder
Bobbin winder
Stitch length control knob
Reverse stitch Lever
Arm cover
Balance wheel
Stitch selector
Upper thread tension dial
ON/OFF switch
Cord socket
Presser foot lever
Screw
Free arm
Needle clamp screw
Back cover
28
Page 29

(A)
GETTING READY TO SEW
Sewing Light
(For E14 bilb only)
(A)
Connecting the Machine to the Power Supply Foot Control
EN
Before connecting the machine to the power supply, make sure
that the voltage and frequency of your electricity matches that of
the machine.
Fit the non-reversible plug into the cord socket and plug the
machine into the power supply.
Sewing speed can be varied by
the foot control.
The harder you press on the
control, the faster the machine
runs.
29
The sewing light is located behind the
face plate.
Turn the screw counter-clockwise and
remove the face plate.
• To remove..... Turn to the left
• To replace.... Turn to the right.
Page 30

EN
For free arm sewing
Turn the balance wheel toward you
Press the lever on the back of
Place the presser foot so the pin on
Extension Table (Accessory Storage Box)
Extension Table
The extension table provides added sewing surface and can be easily removed for free arm sewing.
Pull the end of the extension table away from
the machine, as illustrated.
For attaching the table
Push the extension table toward the machine
making sure that the locating pins are aligned.
To Snap On and Snap Off the Presser Foot
To snap off To snap on
to raise the needle to its highest
position. Raise the presser foot.
the foot holder. The presser
foot will drop off.
the foot lies just under the groove
of the foot holder. Lower the foot
holder to lock the foot in place.
30
Page 31

Changing Needles
the balance wheel toward you
tighten the clamp screw firmly with the screwdriver. Please do not over tighten as
Thread and Needle Chart
In general, fine threads and needles are used for
sewing thin fabrics, and thicker threads and needles
are used for sewing heavy fabrics. Always test thread
and needle size on a small piece of fabric which will
When sewing stretch, very fine fabrics and synthetics,
use a BALL POINT needle. The blue tipped needle
piece of
Switch off the machine and disconnect the machine from the power point.
Loosen the needle clamp screw by turning it counter-clockwise.
Undo the needle clamp screw just enough to release the needle.
Remove the needle from the clamp.
Insert the new needle into the needle clamp with the
When inserting the needle into the clam, push it up as far as it will go and
this can snap the needle bar. Thread the needle.
Reconnect the machine to the power point, switch on the machine and continue
to sew.
flat side away from you.
EN
Raise the needle by turning
and lower the presser foot.
•
be used for actual sewing.
• Use the same thread for needle and bobbin.
•
effectively prevents skipped stitches.
• When sewing very fine fabrics, sew over a
paper to prevent fabrics distortion.
Check your needles frequently for barbed or blunted points. Snags and
runs in knits, fine silks and silk-like fabrics are permanent and are
almost always caused by a damaged needle.
Fabrics Threads Needle Size
Light Crepe de Chine, Voile Fine Silk 9
weight Lawn, Organdy, Georgette, Fine Cotton or
Tricot Fine Synthetic 11
Fine Cotton Covered
Polyester
Medium Linen, Cotton, Pique, 50 silk 11
weight Serge, Double Knits, 50 to 80 Cotton or
Percale 50 to 60 Synthetic 14
Cotton Covered
Polyester
Heavy Denim, Tweed, Gabardine, 50 silk 14
weight Coating, Drapery and 40 to 50 Cotton or
Upholstery Fabrics 40 to 50 Synthetic 16
Cotton Covered
Polyester
Denim Jeans 16
31
Page 32

Einstellen
Garnrollenstift
Ziehen Sie den Garnrollenstift.
EN
Removing or Inserting the Bobbin Case
Open the hook cover.
spool. Guide the thread around the bobbin winder thread guide.
Insert the thread through one of the holes in the bobbin
Put the bobbin on the bobbin winder spindle, and push it to the right. This will disengaged the machine and engage the spooli
With the free end of the thread held in your hand, depress the foot control. Stop t
close to the hole in the bobbin. Depress the foot control again.
When the bobbin is fully wound, it will stop automatically.
Return the bobbin winder to its original position by moving the spin
Switch off the machine while doing this!
When inserting the bobbin case,
place the horn into the recess of the
hook race.
Switch on the machine.
he machine when it has made a few turns, and cut the thread
Inserting the Bobbin Case
Setting spool pin
Pull out the spool pin. Insert the
shorter side of spool pin into the
Legen Sie die kürzere Seite
machine.
Cross the cotton in a figure of
eight for good tension
Draw the thread from the
Raise the needle by turning the
balance wheel toward you.
Take out the bobbin case by holding
the latch.
Winding the Bobbin
from the inside to the outside.
dle to the left, and cut the thread.
ng facility.
32
Page 33

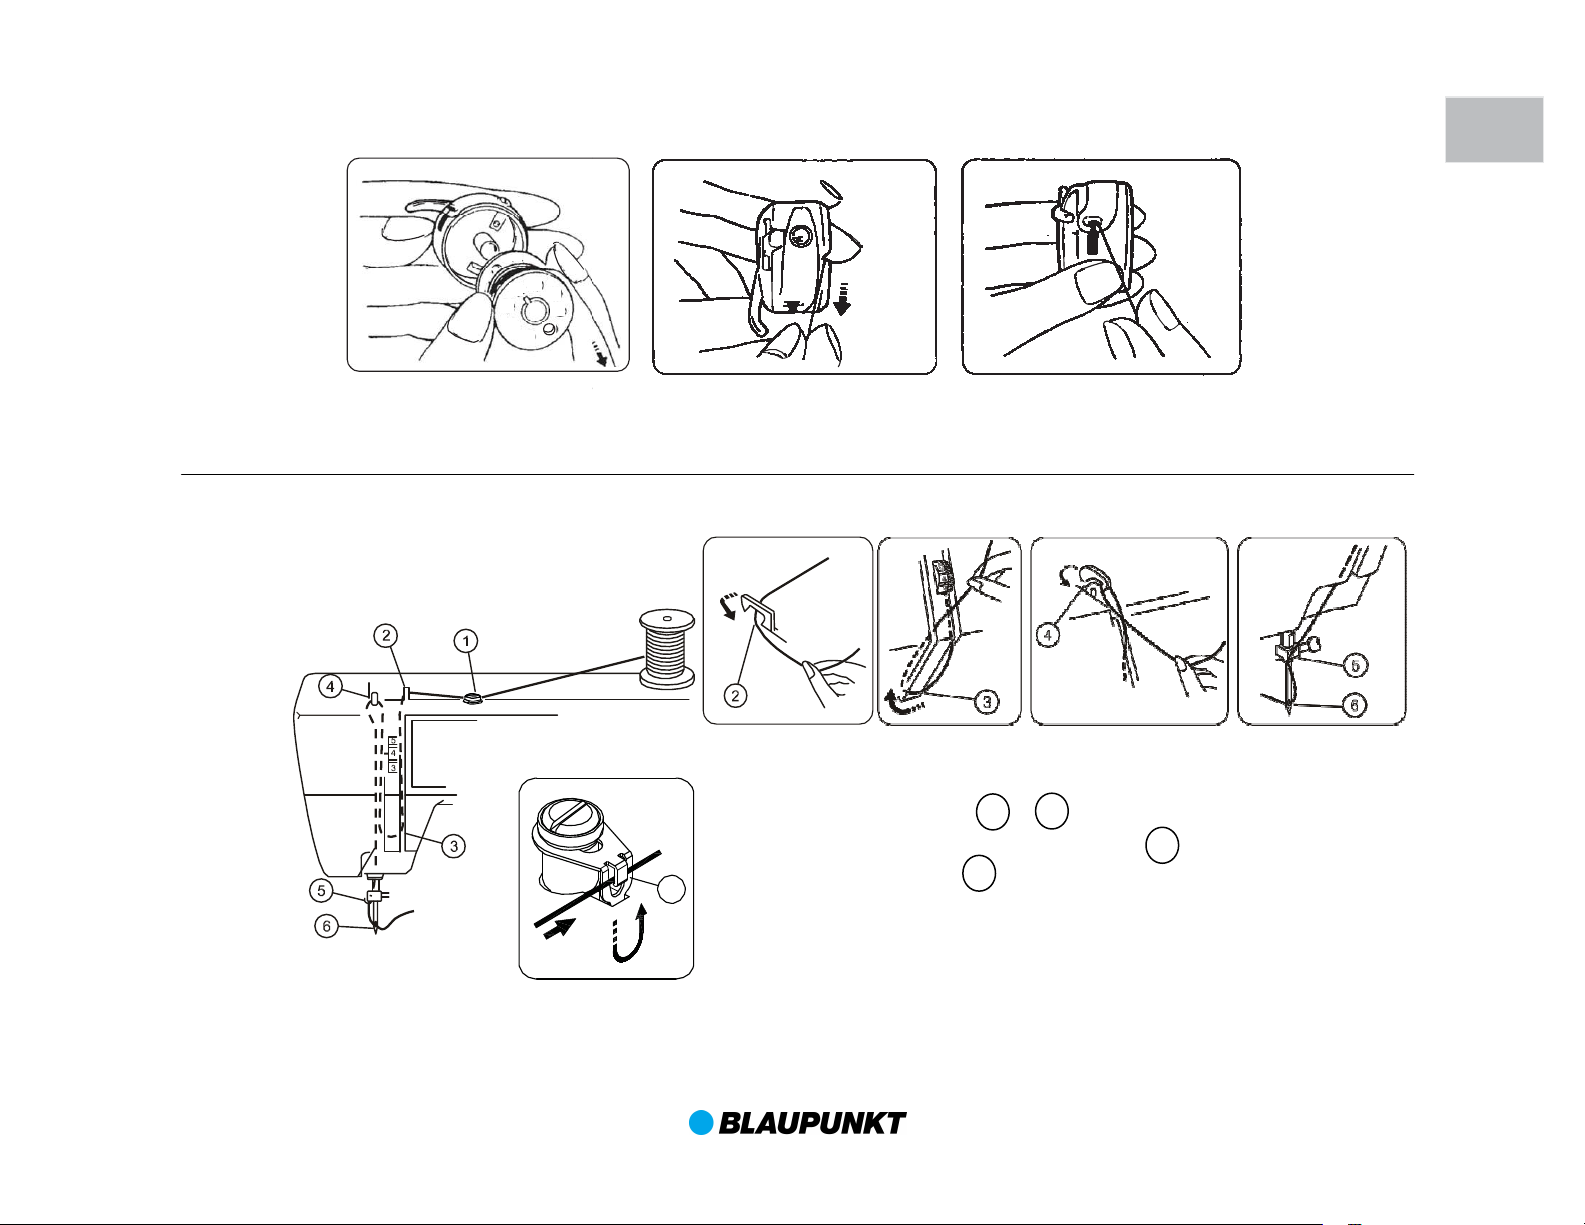
Place bobbin into bobbin
case. Make sure the thread
unwinds in the direction of
arrow.
1
1
Threading Bobbin Case
Pull the thread into the bobbin
Draw the thread under the tension
spring and into the delivery eye.
eave about 10cm (4 inches) of free
2 3
the
e
with thread c
read guide using both hands.
thread into the second (2) thread guide using both hands.
e
tension area and then around the check spring holder
up lever from right to
needle bar thread guide.
thread with a pair of sharp scissors
edle threading. Switch on the power after threading the machine and
e
EN
Always thread your machine with the power off!
case slot.
Threading the Machine
Raise the take-up lever to its highest position by turning
toward you. Raise the presser foot. Place the spool on th
oming from the back of the spool.
1. Draw the thread into th
2. Draw the
3. While holding the thread near the spool, draw th
4. Firmly draw the thread up and through the takeleft.
5. Draw the thread down and slip it into the
6. Thread the needle eye from front to back.
NOTE: You may want to cut the end of the
for easier ne
bobbin. You are now ready to sew.
* L
thread.
balance wheel
spool pin as shown,
thread down into the
.
33
Page 34

EN
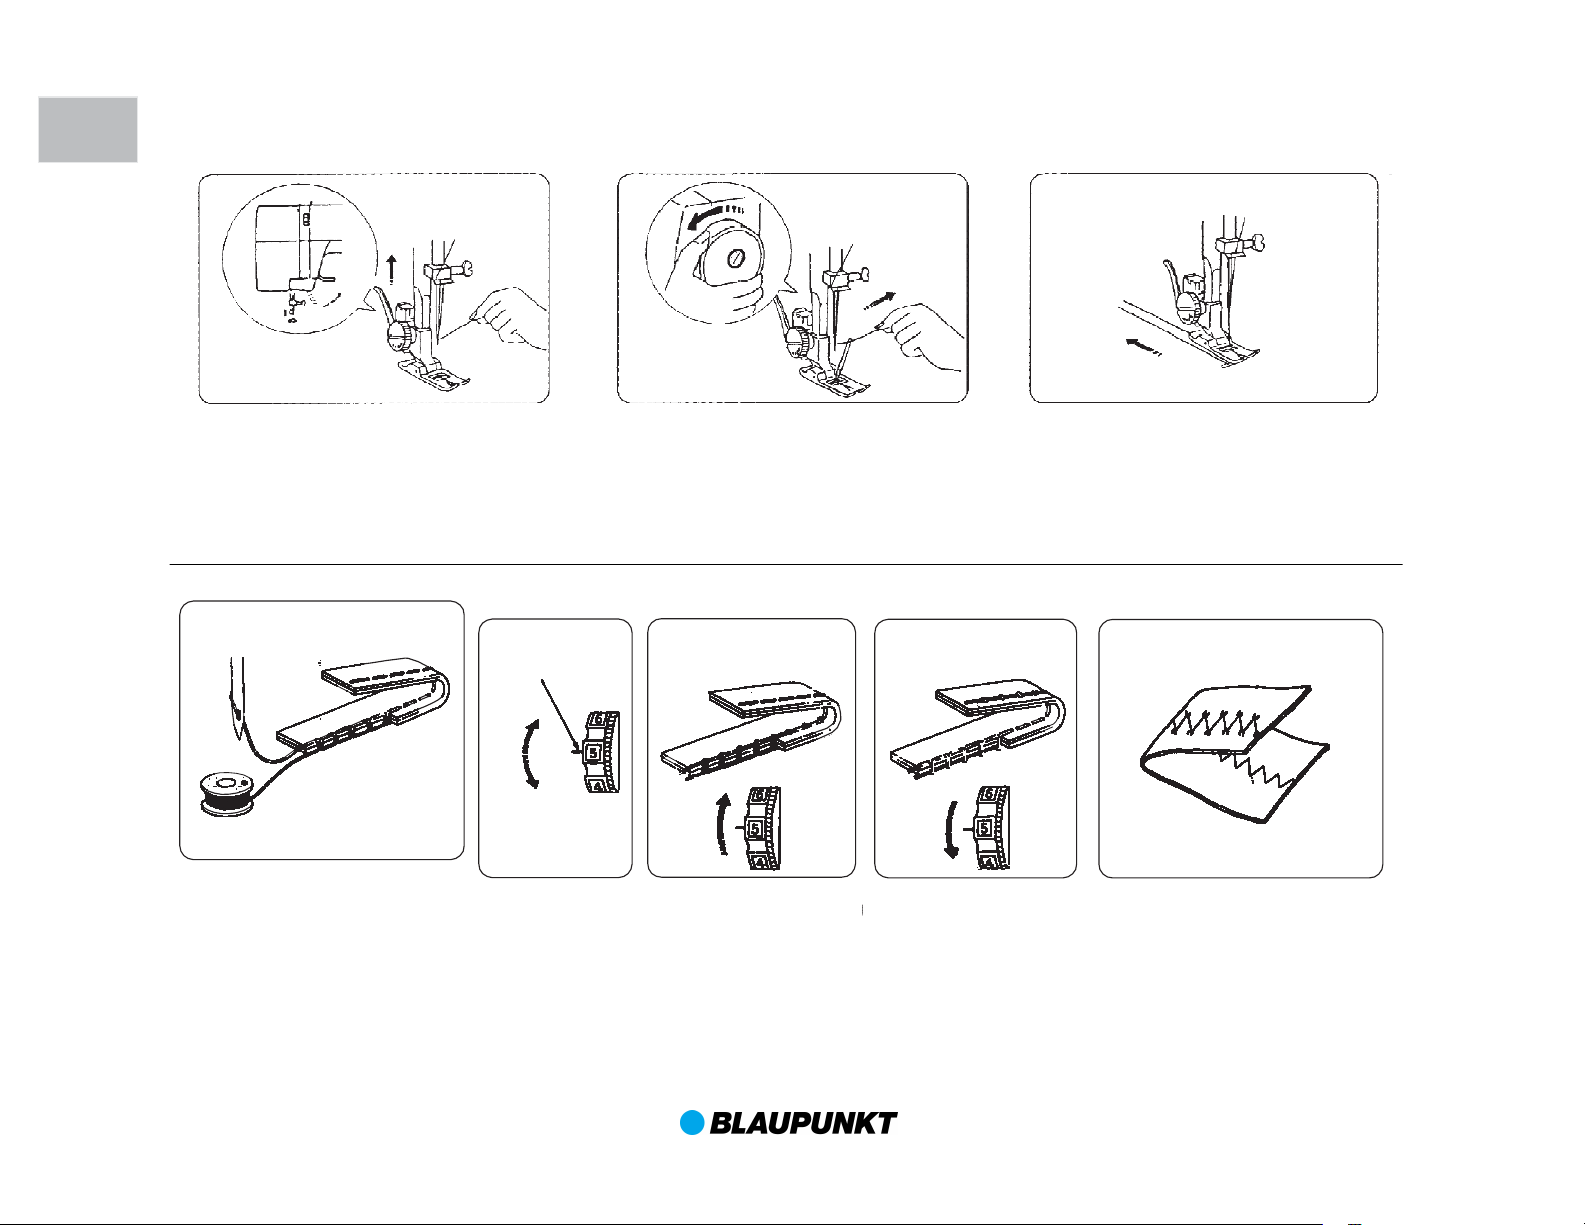
with your right hand until th
1 2 3
Loosen the needle thread
Tighten the needle thread
The needle thread ist
Thread Tension for Zigzag
Sewing
Drawing up Bobbin Thread
Raise the presser foot and hold the needle
thread lightly with your left hand.
The needle thread and the bobbin
thread should interlock in the
center of two layers of fabric in
straight stitch seams.
B
alancing Needle Thread Tension
Setting mark
Loosen
Tinghten
Set the desired
number of the
thread tension dial
at setting mark.
Turn the balance wheel slowly towards you
e needle goes
down and continue turning balance wheel
until the take-up lever is at its highest
position. Lightly draw up the needle thread
forming a loop of the bobbin thread.
The needle thread is
too tight
tension by moving the
dial to a lower number
to loose
tension by moving the
dial to a higher number.
Pull 15cm (6") of both threads back and
under the presser foot.
To obtain better zigzag stitches,
the upper tension should be
slightly lower than in the case of
straight sewing. The upper thread
should appear slightly on the
reverse side of the fabric.
34
Page 35

Stitch Selector Dial
0 1 2 3
4
5 7
9
11
13 15 17 19
21 6 8
10 12 14 16 18 20
22
The stitch selector not only determines the stitch you select, but also
Stitch Selector
Setting mark
Stitch Length
regulates the stitch width for regular zigzag and rick rack stretch
stitches.
NOTE: To avoid needle or fabric damage, be sure your needle is up
and out of the fabric when adjusting this control.
Stitch Length Control
The stitch length control regulates the length of stitches, and also
Setting mark
has a stretch stitch setting.
The higher the number, the longer the stitch.
"O" means no feed.
EN
Stitch Length Control
Depending upon your fabric or your own preference in buttonholes,
you may alter the buttonhole stitch density within the buttonhole
range ( ) on the stitch length control.
35
Page 36

Adjusting Stretch Stitch Balance
To Put on the Darning Plate:
Position the darning plate
the 3 pins on the bottom.
Fit the darning plate pins into
the needle plate holes. The
feed dogs will show through
the darning plate holes.
Darning Plate
forward stitches of
EN
Stitch length
Stitch Length Control
Reverse Stitch Control
Setting mark
To select Stretch Stitches, set this control at SS position.
In stretch stitch sewing, Stitch Length Control should be in
the Center position between - and + (SS position) for most
materials. Depending upon the type of fabric used. You
may need to adjust this control to match
stretch sewing with reverse motion stitches.
To shorten stretch stitches, turn the control slightly toward
"-" To lengthen, turn toward "+"
Reverse Stitch Control
Left Needle Position
Stitch selector
+ .SS. -
Smocking stretch
Rick rack stretch
As long as you keep the reverse
stitch control depressed, the
machine sews backwards.
1.
2.
with
Use Left Needle Position for more
control while topstitching or edge
stitching difficult fabrics.
NOTE: Use only zigzag presser
foot for Left Needle Sewing
36
Page 37

5
4
3
5
1.5 ~ 4
Ma
chine Setting
Stitch
(5)
4
3
2
9
~
Machine Setting
Straight Stitch Sewing
Make sure the take
-
up lever i
s at the highest position before starting
Stitch selector
BASIC SEWING
EN
Upper thread
tension dial 2 to 6
Zigzag foot
To Change the Sewing Directions Zigzag Stitching
Stitch length
1.5 - 4
Raise the presser foot and position
the fabric under the presser foot.
Lower the presser foot and smooth
the threads toward the back.
Depress the foot control.
Gently guide the fabric letting the
fabric feed by itself.
For fastening the ends of seams,
press the reverse stitch control and
sew several reverse stitches.
Raise the presser foot and remove
the fabric, drawing the threads to
the back.If the fabric won´t release
turn the hand wheel towards you to
complete the stitch and gently pull
out material.
Stitch (9)
Upper thread
tension dial 2 to 5
Stitch selector
Stitch length
4
The threads are cut to the proper
length for the next seam.
Stop the machine and turn the balance wheel
toward you to bring the needle down into the
fabric.
Raise the presser foot.
Pivot the fabric around the needle to change
sewing direction as desired. Lower the
presser foot and continue sewing.
37
Zigzag foot
Simple zigzag stitching is widely
used for overcastting, sewing on
buttons etc.
Page 38

UTILITY STITCHING
3
2 1
Machine S
etting
3
2
1
18
Machine
S
etting
5
4
3
5
3
2
1
11
Machine S
etting
Machine S
etting
Guide the work so the right hand
Overcastin
g
Overedge Stitch
Tric
ot Stitch
Triple Strength Stitch
EN
Stitch (9)
Upper thread
tension dial 1 to 4
Zigzag foot
Stitch (11)
Upper thread
tension dial 1 to 4
Stitch selector
Stitch length
1 to 4
Stitch selector
This type of stitch is used on the
seam to prevent fabrics from
fraying at raw edges.
Stitch (18)
Upper thread
tension dial 1 to 4
Zigzag foot
Stitch (5)
Upper thread
tension dial 2 to 6
Stitch selector
Stitch length SS
Overedge stitches are most
effective when the right side
stitches of Zigzag fall slightly off
the edge of the fabric.
Stitch selector
Stitch length SS
Stitch length 1 to 2
Zigzag foot
Place the fabric under the
presser foot so that the edge will
be slightly inside the right hand
side of the presser foot.
stitches lay at the edge of the
fabric.
38
Zigzag foot
The stitch is sewn with two stitches
forward and one stitch backward
forming a seam that does not rip
easily.
Garments should be basted for fitting
before seaming.
Basting stitch-large loose stitch also
known as tucking stitch.
Page 39

2
3
4
0.7cm(1/4")
0.7cm(1/4")
5
1
5
55 4
3
5
1.5-
4
2
1.5 to 4
Turn the fabric over and sew the other side of the
zipper in the same way as you did on the left side
where you are going to start
Zipper Application
Machine Setting
Rolled Hem
Machine Setting
Stitch (5)
Stitch selector
Stitch (5)
Stitch selector
EN
Upper thread
tension dial 3 to 6
Stitch length
Zipper foot
Lower the needle to the point
sewing and then lower the
hemmer foot.
Sew 3 or 4 stitches while holding
the needle and bobbin threads.
Pin or baste zipper tape to fabric and place it
under the foot.
Smooth the threads toward the back and lower
the foot. To sew the left side of the zipper, guide
the edge of the zipper along the zipper teeth and
stitch through the garment and zipper tape.
of the zipper.
Insert the folded portion of the
fabric into the curl of the hemmer
foot.
Lower the hemmer foot, then sew
by lifting up the edge of the fabric
to keep it feeding smoothly and
evenly.
Upper thread
Stitch length
tension dial 2 to 6
Hemmer foot – optional Part
Trim about 0.7cm (1/4") from
corners as illustrated, to reduce
bulk.
Make a double 0.25cm
(1/8") fold approximately
8 cm (3") in length.
39
Page 40

Machine Setting
Sti
Upper thread
tension dial
Use the darning plate for button sewing (see page 10).
A pin can be placed on top of the button to form a shank.
the slot of the foot and place the left hole
of the button just below the needle point. Lower the foot and turn the
pattern selector until the needle point comes
just above the right hole of the button. Sew about five stitche
raise needle. Set the stitch selector at "
again and sew a few stitches to lock thread.
1
3
2
1
To strengthen the shank, cut the
threads leaving a 20cm (8") trail.
in the button and wind it around
2 3
tch (9)
Sewing Buttons
Stitch selector
EN
Zigzag foot
Stitch length control any number (not
1 to 4
necessary to adjust)
Darning plate
Set the stitch selector at "
". Align both holes of the button with
s and
"
40
Bring the needle thread down
through the hole
the shank.
Draw the thread to the wrong
side and knot.
Page 41

1
2
3
456
Buttonhole Stitching
4
3 2
-
-
-
4 2
2
1
right side of the buttonhole. Stop the machine
when yo
3
stitch selector at straight stitch sewing. Sew a
Machine Setting
Stitch (1)
Stitch selector
1
3
Stitch length
Upper thread
tension dial 1 to 5
Buttonhole foot
Make a sample button hole using a piece
of the sample material as the garment.
Place the button on the fabric sample and
mark the top and bottom to determine the
buttonhole length.
4
EN
4
Set the stitch selector at " ".
Slide both threads to the left.
Lower the needle into the
garment where the buttonhole
is to start, and lower the foot.
Sew down the left side stopping
at the bottom mark. Raise the
needle.
Set the stitch selector at " ",
sew 5 stitches of bartack and
raise the needle up from the
fabric.
2
Set the stitch selector at " ". Sew up the
u are directly opposite the first stitch
on the left hand side and raise the needle.
4
Set the stitch selector at " ". Sew 5
bartacks stitches and raise the needle up
2
from the fabric.
Set the stitch length control to "0" and the
few locking stitches.
41
Remove the fabric from the machine and cut
the sewing threads. Insert a pin inside the
bartack. Then cut the opening with a seam
ripper. Take care not to cut the stitches.
Page 42

3
1
16
6
5
4
17
Machine Setting
foot. The needle should fall off the edge of the
Machine Setting
Shell Tuck
DECORATIVE STITCHING
EN
Stitch (17)
Upper thread
tension dial 3 to 9
Zigzag foot
Stitch
Stitch selector
Stitch length 1-2
Place the folded edge along the slot of the
fabric on the right forming a tuck.
S
tretch Stitch Patterns
Upper thread
tension dial
1 to 4
2
Stitch length
control knob
SS
Stitch
selector
When forward and reverse feeds become unbalanced depending upon the type of fabric, correct
the balance by turning the stitch length control as follows:
When patterns are compressed, correct it by turning the dial toward "+" (see page 10)
When patterns are drawn out, correct it by turning the dial toward "-" (see page 10)
Zigzag foot
42
Page 43

When caring for your machine, cleaning, removing the thread or any other function please make sure that the power is switched
Dismantling and Assembling hook race
Raise the needle to its highest position and open
Fitted in the machine
Hold the hook by the center pin and fit it carefully back tothe hook race,
forming a perfect circle with shuttle driver. Attach the hookrace ring making
bottom pin fits into the notch. Lock the hook race ringby turning the
holders back into position. Insert the bobbin case. Threadthe bobbin and
machine, reconnect the power, switch on the machine andyou are ready to
sew.
Disconnect your machine from the power
Cleaning the machine
Clean the hook race with a
soft dry cloth
Disconnect your machine from
Remove the hook.
ith a brush, clean out dust and
lint clogging on the feed dog
teeth. Replace the needle plate
and tighten the screws.
NOTE: It is easier if you lay t
he machine on its back to replace the race.
source
To dismantle hook race:
the hook cover.
Open the hinged latch of the bobbin case and
remove it from its position
machine is unplugged!
the power source. Open the
hook race ring holders and
remove the hook race ring.
Cleaning the Feed Dogs
Oil with one
drop of oil
brush and a
off and the
EN
.
Remove the needle and the
To assemble the hook race:
sure
presser foot. Unscrew the
needle plate set screws and
remove the needle plate.
43
W
Page 44

EN
Trouble Shooting
44
Page 45

Environment
Meaning of crossed out wheeled dustbin:
Do not dispose of electrical appliances as unsorted municipal waste, use separate collection facilities.
Contact your local government for information regard
If electrical appliances are disposed of in landfills or dumps, hazardous substances can leak into the groundwater and
get into the food chain, damaging your health and well-being.
When replacing old appliances with new ones, the retailer is legally obligated to take back your old appliances for
disposals at least free of charge.
This appliance is not intended for use by persons (including children) with reduced physical, sensory or mental
capabilities, or lack of experience
and knowledge, unless they have been given supervision or instruction concerning use of appliance by a person
responsible for their safety.
Children should be supervised to ensure that they do not play with the appliance.
ing the collection systems available.
EN
45
Page 46

Page 47

I
F
rançais
mportant : PRESCRIPTION DE SECURITE
Lors de l’utilisation d’un appareil électrique, des mesures élémentaires de sécurité doivent toujours être respectées.
Lire toutes les prescriptions avant utilisation (de cet appareil)
DANGER – Afin de réduire le risque d’électrocution :
Il ne faut jamais laisser un appareil sans surveillance lorsqu’il est branché. Toujours déconnecter cet appareil de la pris électrique immédiatement après
l’avoir utilisé et avant de la nettoyer.
ATTENTION – Afin de réduire le risque de brûlure, d’incendie, d’électrocution ou de blessure :
1. Ne pas utiliser comme jouet. Il est nécessaire d’être très attentif lorsque cet appareil est utilisé par ou prés d’enfants.
2. Utiliser cet appareil uniquement pour l’application décrite dans ce manuel. Utiliser uniquement les accessoires recommandés par le fabricant et
décrits dans ce manuel.
3. Ne jamais utiliser cet appareil si le cordon ou la prise est endommagé, s’il ne fonctionne pas convenablement, s’il est tombé, s’il a été
endommagé ou immergé. Rapporter l’appareil au distributeur ou au centre de maintenance agréé le plus proche pour examen, réparation,
réglage électrique ou mécanique.
4. Ne jamais utiliser l’appareil si les ouvertures de ventilation sont bloquées. Veillez à éviter toute accumulation de peluches, de poussière et de
morceau de tissu devant les ouvertures de ventilation de la machine á coudre ou du rhéostat.
5. Veillez à toujours éteindre la machine alors que vous changez l’aguille ou le pied presseur ou lorsque la bobine est vide
6. Veillez à toujours éteindre la machine alors que vous la nettoyez où huilez.
7. Ne pas utiliser dans des endroits où l’on emploie des produits aérosols (sprays) où l’on administre de l’oxygène.
8. Pour débrancher, mettre tous les réglages en position off (« O ») et ensuite enlever la fiche da la prise.
9. Ne pas débrancher en tirant sur le cordon. Pour débrancher tirer la fiche, pas le cordon
FR
DANGER
1. Toujours débrancher avant de remplacer la lampe. Remplacer l’ampoule par une ampoule de même type de 15 watts.
2. Ne pas essayer de rattraper un appareil tombé dans l’eau. Débrancher immédiatement.
3. Ne pas placer ni ranger l’appareil à un endroit où il peut tomber par terre, dans l’eau ou couler. Ne pas placer ou laisser tomber dans l’eau ou
dans tout autre liquide.
Page 48

FR
F
rançais
ATTENTION
Eloigner les doigts de toutes les parties en mouvement. Il faut faire particulièrement attention au niveau de l’aguille de la machine à coudre.
Toujours utiliser la plaque aiguille appropriée. Si vous n’utilisez pas la plaque appropriée, l’aguille peut casser.
Ne pas utiliser d’aguilles tordues.
Ne pas pousser ni tirer le tissu pendant que vous cousez. Cette manœuvre peut faire dévier l’aguille et la casser.
Eteindre la machine à coudre (position « o ») lors de tout réglage, comme enfiler l’aguille, enfiler une bobine, ou changer le pied de biche, etc. dans la
zone de l’aguille.
Toujours déconnecter la machine à coudre de la prise électrique lorsque vous enlevez les couvercles, que vous lubrifiez ou que vous effectuez tout autre
réglage mentionné dans le manuel d’utilisation.
Cet appareil n’est pas destiné à être utilisé par des personnes (y compris les enfants) ayant un handicap physique, sensoriel ou mental, ou un manque
d’expérience et de connaissances à moins qu’ils ne soient supervisés ou dirigés par une personne responsable de leur sécurité pour l’utilisation de
l’appareil.
Les enfants doivent être surveillés pour qu’ils ne jouent pas avec l’appareil.
CONSERVER CES RECOMMANDATIONS
220~240V-50Hz
Moteur : 70W
Page 49

TA
BLE DES MATIERES
PARTIE I PARTIES ESSENTIELLES
Nom des pièces…………………………...………….
PARTIE II AVANT DE COMMENCER
A COUDRE
Branchement de la machine à la prise électrique…
Rhéostat………………...…………………….............
Ampoule………………...…………………….............
Table d’extension (boîte accessoires) ………….....
Changement du pied de biche………………...…….
Changement des aiguilles………………...…………
Choix du fil et utilisation des aiguilles………………
Installation de la tige porte bobine………………….
Montage du boîtier canette…………………………..
Bobinage de la canette………………...…………….
Mise en place du fil dans la canette………………...
Enfilage de la machine……………………………….
Se préparer à coudre…………………………………
Réglage de la tension du fil………………………….
Le sélecteur de points………………...……………...
Réglage de la longueur de point……………………
Réglage du points stretch
50
Marche arrière……………………….
Coudre avec le guide fil…………….
Plaque de Reprisage……………….
51
Position de l’aiguille à gauche……..
51
51
PARTIE III BASES DE COUTURE
51
Coudre un point droit……………….
52
Pour changer le sens de la couture.
52
La couture du point zig-zag………...
53
53
PARTIE IV POINTS UTILISAIRES
54
Surfilages…………………………….
54
Points de recouvrement…………….
54
Point tricot……………………………
55
Couture du triple point stretch……..
55
Pose de fermeture éclair……………
55
Coudre un ourlet…………………….
Coudre des boutons………………...
56
56
57
Couture de la boutonnière………………….
58
PARTIE VOINTS DE DECORATIES……...
58
PARTIE IV ENTRETIEN DE LA MACHINE
58
Démontage de la coursière………………...
58
Nettoyage de la plaque aiguille……………
Huilage……………………………………….
Tableau des dérangements………………...
59
59
59
60
60
60
60
61
61
62
63
64
65
65
65
66
FR
49
Page 50

Fadengeber
Abdeckung
Nomenclature
Releveur de pied
point
Réglage de tension de fil supérieur
Coursière
Table d’extension (boite a
Guide fil pour le bobinage de
la canette
NOM DES PIECES
Porte bobine
Stoppeur bobinage
canette
FR
Guide fil
Tendeur de fil
Capot
Plaque
aiguille
accessoires)
Bobineur canette
Réglage longueur de point
Bouton de marche arrière
Couverture de bras
Volant
Sélecteur de
Volant de
débrayage
Bouton de marche
prise
presseur
Bras libre
Porte aiguille
Couverture arrière
50
Page 51

(A
AVANT DE COMMENCER A COUDRE
L’ampoule est situé dans le coté latéral de
pression exercée
vous que
Branchement de la pédale et du cordon d’alimentation électrique Le rhéostat Remplacement de l’ampoule
La vitesse de couture peut
la machine. Dévissez et enlevez la
coquille. (seulement pour modèle avec
ampoule E14)
(A) Pour enlever Tournez sur la
gauche
Pour remplacer Tournez à
droite
Avant de brancher votre machine sur le secteur assurezla tension est la même.
Branchez le rhéostat à la machine et branchez la prise
d’alimentation sur le secteur.
varier selon la
sur le rhéostat. Plus vous
appuyez sur la pédale plus la
machine fonctionne rapidement.
FR
(B) Pour enlever Poussez et
tournez vers la gauche
Pour remplacer Poussez et
tournez vers la droite
51
Page 52

FR
Problem
meh
r.
juste en face de la rainure du
s’emboite automatiquement dans la
position
Table d’extension (Boîte accessoires)
Table d’extension
Permet d’optimiser votre surface de couture et permet d’utiliser la machine en bras libre
Pour la couture en bras libre
Enlever la tablette de la machine comme
illustré.
Pour la remettre en place la pousser dans son
logement.
Pour changer le pied de biche
Enlever le pied de biche
Tournez le volant vers vous afin
d’amener l’aiguille dans sa
la plus haute.
Levez le pied presseur.
Appuyer sur le levier à
l’arrière du support afin de
libérer le pied de biche.
52
Pour mettre un nouveau pied de
biche. Placer le pied de biche de
façon à ce que la tige se trouve
support. Abaisser le levier du pied
de biche de telle sorte que l’axe
rainure.
Page 53

Changement d’aiguille
nt vos aiguilles. Déchirures et autre sur la soie, le tricot etc. sont
régulièrement causées par des aiguilles endommagées.
Desserrez la vis suffisamment afin de libérer l’aiguille.
Eteindre la machine et la débrancher.
Relevez l’aiguille en tournant
le volant vers vous et
abaissez le pied presseur.
Choix du fil de l’aiguille
• En générale les fils tins sont utilisés pour les tissus
fins et les aiguilles plus épaisses pour les tissus
plus épais.
• Essayez toujours fils et aiguilles sur une petite
partie de tissus avant de commencer la couture.
• Utilisez le même fil pour l’aiguille et la canette.
Pour le point stretch les tissus très fins et
synthétiques utilisez un aiguille Ball point.
• Pour le travail sur tissus très fins, coudre sur un
petit moreau de papier afin d’éviter que le tissu ne
plisse.
Retirer l’aiguille.
Insérez un nouvelle aiguille dans son logement avec
Insérer l’aiguille dans son logement aussi loin qu’elle puisse aller et serrer
fermement la vis de maintien à l’aide du tournevis.
Enfiler l’aiguille.
Rebrancher la machine sur le secteur. Mettez la en marche et continuez à coudre.
Vérifiez régulièreme
le coté plat vers l’arrière.
TAILLE DES
TISSU FILS
Tissu fin Crêpe de chine, voile Soie fine 8
organdi, batiste, Coton fin ou
crêpe Synthétique fin 11
coton, polyester fin
Tricot
Tissu moyen Lin, coton, tergal 50 soie 11
50 à 80 coton ou
Tricot 50 à 60 synthétique
Coton / polyester
Tissu épais Toile de jean, tweed, 14
gabardine ou
AIGUILLES
14
16
FR
53
Page 54

Einstellen
Garnrollenstift
Ziehen Sie den Garnrollenstift.
obinage de la canette
Fil supérieur
Ouvrir le cache co
Tirer le fil de la bobine, passer le fil autour du guide fil. Placer le fil à l’
Placer la canette sur le dévidoir et le pousser vers la droite.
appuyez sur le rhéostat, arrêter lorsque le fil s’est enroulé de plusieurs tours autour de la canette, coupez le départ
du fil au raz de la canette. Appuyer sur le rhéostat de nouveau, lorsque la canette est complètement remplie, elle s’arrête a
Replacer le dévidoir à sa position originale en le poussant vers la gauche. Couper le fil et remettre le volant de débrayage
Enfiler le fil supérieur
Mise en place du boitier canette
Mise en place du boitier canette corne
Pour mettre en place le boitier canette,
placer de doigt du boitier dans le
logement prévu à cet effet.
Mettre la machine en marche.
intérieur des trous de la canette, de l’intérieur vers l’extérieur.
Maintenez le volant de la main gauche et poussez le bouton en position en position
plus haute en tournant le volant vers
corne
FR
Installation de la tige porte bobine
Tirer la tige porte bobine. Insérez la
partie la plus petite dans la machine
Legen Sie die kürzere Seite
B
Faire un “8“ avec le fil pour une bonne
tension
Trous Bourrage
ursière
Amener l’aiguille à sa position la
vous. Sortir le boitier canette de son
logement en le maintenant par la
languette.
canette.
Maintenez le fil avec la main,
54
utomatiquement.
à sa position couture.
Page 55

Enfilage
boitier. Assurer vous que le fil
se déplacera dans la direction
de la flèche.
Toujours réaliser cette opération la mise débranchée
1
1
Mise en place la canette
ressort de
tension et dans l’encoche, laissez
à peu près 10 cm de fil libre
Amenez le releveur de fil à sa position la plus haute en tournant le volant vers
fil sur la tige porte bobine
Tout en maintenant le fil placez le dans le tendeur
Passez le fil dans le releveur de la droite vers la gauche
la barre aiguille
Note : Vous pouvez couper le fil avec des ciseaux fins de façon à enfiler
l’aiguille plus facilement. Après ces opérations, allumer la machine vous
3 2
Placer la canette dans le
Tirer le fil dans l’encoche du
boitier.
supérieur de la machine
!
vous. Levez le pied presseur. Placer la bobine de
comme indiqué.
1. Passez le fil dans le guide fil
2. Passez le fil dans le guide fil
3.
4.
5. Passez le fil dans le guide fil de
6. Enfiler l’aiguille de l’avant vers l’arrière
Passez le fil sous le
FR
.
êtes prête à coudre.
55
Page 56

Enfiler le fil de la canette
Levez le pied presseur, maintenir le fil avec
FR
la main.
Si la tension est correcte, les deux
fils s’entrecroisent au centre de
l’ouvrage
Tournez le volant vers vous jusqu’à ce que
l’aiguille descende puis remonte à sa
position la plus haute. Tirez doucement le fil
qui doit former une boucle avec le fil de la
canette.
R
églage de la tension du fil
Marque
relaché
tendu
Sélectionner la
tension de fil en
tournant la molette
sur le chiffre désiré.
trop tondu
La tension est trop forte.
Relâchez la tension
comme indiqué.
Tirez un longueur de 15cm de chaque fil
vers l’arrière et abaissez le pied presseur.
Le fil de l’aiguille est
trop relaché
La tension est trop faible.
Resserrez la tension
comme indiqué.
Tension de fil pour point Zig-ZagLe fil de l’aiguille est
Pour obtenir un beau point ZigZag, la tension supérieure doit
être légèrement inférieure à la
tension inférieure contrairement
au point droit. Le fil supérieur doit
être légèrement visible sur le
verse du tissu.
56
Page 57

5 7
9
11
13 15 17 19
21 6 8
10 12 14 16 18 20
22
marque
Selecteur de point
0 1 2 3
4
marque
Sélecteur de point
Le sélecteur de point n’indique pas seulement le point que vous
avez sélectionné mais règle également la longueur du point des
points zig-zag et stretch.
Note : pour éviter de casser l’aiguille, assurez-vous toujours
que celle-ci est en position haute lors de ce réglage
Longueur de point
FR
Longueur de point
sélecteur longueur de point
Le sélecteur donna la longueur de point et permet également le
réglage des points stretch
Plus le numéro est haut, plus le point est long
« 0 » signifie pas de longueur
Selon le tissu ou votre préférence concernant les boutonnières,
vous pouvez jouer sur la densité du point (point boutonnière)
57
Page 58

Repère de couture
Les chiffres sur
indiquent la distance entre le
centre de l’aiguille et la ligne.
Les chiffes gravées à l’arrière
indiquent les « pouces »
pression sur ce bouton, la machine
Réglage du point stretch
Sélecteur de point
Utiliser cette position
couture bord à bord.
utiliser uniquement un pied
zig
Position aiguille gauche
FR
longueur de point
Réglage de la longueur de point
Marche arrière
maque
Pour sélectionner le point stretch, amener le bouton sur la
position SS.
Pour la couture du point stretch, le réglage de la longueur
du point doit être sur la position médiane, entre le - et le +
(position SS) pour la plupart de tissus. Selon le tissu
utilisé, vous devrez jouer sur ces réglages.
Pour allonger un point stretch, amenez le bouton vers le et pour l’allonger vers le +
Plaque de reprisage
+ .SS. -
Smocking stretch
Rick rack stretch
Tant que vous maintenez la
ira en marche arrière.
la plaque aiguille
Mise en place :
1. A positionner avec les trois
ergots vers le bas
2. Insérer les ergots dans les
trous de la plaque aiguille (la
griffe doit apparaître)
58
pour la
Note :
-zag dans ce cas
Page 59

Assurez
-
vous toujou
rs que le releveur de
Couture point droit
5
4
3
Réglage de la machine
tension supérieure
point 1.5 ~ 4
4
3
2
~
Réglage de la machine
vous de façon à ce que l’aiguille entre dans le
tissu autour de l’aiguille afin de l’amener dans
BASES DE COUTURE
fil est position haute avant de
Point (5)
contrôle de la
de fil 2 à 6
pied-de-biche zig-zag
sélecteur de point
Changer le sens de la couture Point zig-zag
sélecteur de
longueur de
baissez le pied de la biche sur le
tissu à coté d’un des repères de la
plaque aiguille. Appuyez sur le
rhéostat et guidez légèrement le
tissu ver l’arrière. Relâchez la
pression sur le rhéostat, guidez le
tissu le long du repère.
Pour stopper la couture appuyer plusieurs fois sur le bouton marche
arrière. Relever le pied presseur, sortir le tissu vers l’arrière.
Si le tissu ne sort pas tournez le volant vers vous de la valeur d’un point
complet et tirez le doucement.
Le fil est coupé à la bonne longueur pour la prochaine opération.
Point (9)
contrôle de la
tension supérieure
de fil 2 à 5
sélecteur de point
sélecteur de longueur
de point
4
FR
Arrêter la machine, tourner le volant vers
tissu, relever le pied presseur, faire pivoter le
la position désirée, abaisser le pied presseur
et continuer à coudre.
pied-de-biche zig-zag
59
Le point zig-zag simple est utilisé
pour le surjet, couture de bouton
etc.
Page 60

Points utilitaires
Point de recourvrement
Surfilage
3
2
1
3
2 1
Réglage de la machine
Réglage de la machine
de fil
1 à
4
contrôle de la tension
Ce point est plus beau lorsque le
5
4
3
3
2
1
Réglage de la machine
Réglage de la machine
tension supérieure
de point
SS
Placer le tissu de façon à ce que
ci soit à droite de
Guider le tissu de façon à ce que
FR
point (9)
sélecteur de point
point (17)
sélecteur de point
contrôle de la
supérieure de fil 1 à 4
sélecteur de longueur
de point 1à 2
tension supérieure
sélecteur de longueur
de point SS
Ce point est utilisé pour éviter
que le tissu ne s’effiloche.
pied-de-biche zig-zag
pied-de-biche zig-zag
Point tricot Triple piqûre
point (11)
sélecteur de point
contrôle de la
tension supérieure
de fil 1 à 4
sélecteur de longueur
point (5)
contrôle de la
de fil 2 à 6
de point 1à 2
sélecteur de point
sélecteur de longueur
coté droit du point zig-zag
déborde très légèrement du
tissu.
pied-de-biche zig-zag
le bord de celuil’encoche intérieur du pied-debiche.
le point sur coté droit tend juste
sur le bord du tissu.
60
pied-de-biche zig-zag
Ce point apparaît avec deux points
vers l’avant et un point vers l’arrière
formant une couture plus résistante.
Si vous placez des appliques faîtes
le avant de commencer la couture.
Page 61

5
4
3
5
1.5-4
5
5
0.7cm(1/4")
0.7cm(1/4")
5
4
3
2
Fermeture à glissière Coudre un ourlet
1
Réglage de la machine
Réglage de la machine
de fil 3
à 6
cm et approximativement
Accessoire en
point (5)
sélecteur de point
contrôle de la
tension supérieure
pied-de-biche glissieve
sélecteur de
longueur de point 2
Placer la fermeture sous le tissu et le pied.
Placer les fils vers l’arrière, abaisser le pied.
Pour coudre le coté gauche guider le bord de la
glissière comme indiqué.
Et coudre le tissu et la glissière. Tourner le tissu,
coudre de l’autre coté comme précédemment.
point (5)
sélecteur de point
contrôle de la
tension supérieure
de fil 2 à 6
sélecteur de longueur
de point 1.5 à 4
pied-de-biche pied ourleur
Faîtes un ourlet de 0.25
FR
de 8 cm de long.
option
Faire pénétrer l’aiguille dans le
tissu et abaisser le pied.
Coudre 3 ou 4 points en
maintenant les fils.
Insérer l’ourlet dans le guide du
pied.
Abaisser le pied et coudre en
maintenant l’ourlet vers le haut.
61
Recouvrir approximativement 0.7
cm du coin comme indiqué.
Page 62

Réglage
point
contrôle de la
tension supérieure
de fil
Utiliser la plaque de reprisage pour la couture des boutons
1
e sélecteur sur la position “ “
avec l’encoche du pied. Et placer le trou de gauche du bouton juste
au dessous de la position de l’aiguille. Abaisser le pied et tourner le
sélecteur jusqu’à ce que l’aiguille tour
Coudre quelques points et relever l’aiguille. Plac
, de nouveau de façon à stopper la couture.
Couture des boutons
3
2
1
de la machine
1 à
4
point
3 2
Pour renforcer la couture, laisser
20 cm de fil et l’enrouler autour
FR
(9)
sélecteur de point
pied-de-biche zig-zag
contrôle longueur de
Placer l
position “ “
, aligner les trous du bouton
de la couture du bouton.
ne parfaitement dans les trous.
er le sélecteur sur la
62
Page 63

3
2
1
456
Point boutonnière
4
3 2
-
-
-
4 2
2
longueur de point
1
3
placer un épingle sur le point d’arrêt, percer la
placer le sélecteur de la longueur de point sur
Réglage de la machine
point (1)
contrôle de la tension
supérieure de fil 1 à 5
sélecteur de point
1
sélecteur de
pied-de-biche
boutonnière
Faire une boutonnière test sur un
échantillon de même tissu. Placer le
bouton dessus, afin de déterminer la
longueur.
4
3
FR
Placer le sélecteur sur la
position , les deux fils placés
vers la gauche.
Abaisser l’aiguille à sa position
de départ et abaisser le pied.
Coudre du coté gauche et
arrêtez vous à la marque
correspondant à la longueur et
relever l’aiguille.
Placer le sélecteur sur la
position , coudre 5 points
4
2
d’arrêt et relever l’aiguille.
Placer le sélecteur sur la position , coudre
le coté droit de la boutonnière et arrêtez vous
lorsque la longueur correspond exactement à
celle du coté opposé. Relever l’aiguille.
4
Placer le sélecteur sur la position , coudre
quelques points d’arrêt, relever l’aiguille
2
0 et la sélecteur de point sur point droit ;
Coudre quelques points d’arrêt.
63
Retirer le tissu de la machine, couper le fil,
boutonnière à l’aide d’un découvit en prenant
soin de na pas couper les points.
Page 64

6
5
4
17
3
1
Réglage de la machine
point (17)
sélecteur longueur
Réglage de la machine
sélecteur de point
POINTS DECORATIFS
Placer le tissu et procéder comme indiqué
(l’aiguille doit piquer au bord du tissu).
FR
contrôle de la tension
supérieure de fil 3 à 6
pied-de-biche zig-zag
Point
Selecteur
de point
de point 1 à 2
Réglage de la machine.
contrôle de la
tension supérieure
de fil 2 à 6
2
sélecteur de
longueur de
point SS
pied-de-biche zig-zag
Lorsque la couture en marche avant marche arrière est déséquilibrée, selon le type de tissu
rééquilibré le point en tournant le contrôle de longueur de point comme suit :
Lorsque les motifs sont serrés, corriger en tournant le bouton vers le + Lorsque les motifs sont
trop long, corriger en tournant le bouton ver le -
64
Page 65

Lots de l’entretien ou du nettoyage de votre machine, retirez le fil, débranchez le rhéostat (même lors d’un changement d’aig
Nettoyage de la griffe
Démontage et remontage de la
coursière
Einsetzen der Teile
Pour remonter la coursière tirez crochet par la tige du centre et
le prudemment dans son logement de façon à former
un cercle parfait. Replacez l’étrier de la coursière en vous
assurant que les ergots sont bien positionnés, verrouillez les
de maintien, puis insérez la canette. Note : il est plus
facile d’effectuer ces opérations la machine couchée
Débranchez votre machine
Extraction de votre machine
huiler avec
Retirez le crochet et nettoyez
le avec une brosse et un
A l’aide d’une brosse nettoyer la
poussière et les peluches.
Remettre en place la plaque
revisser.
une goutte
d’huile
uille)!
FR
Pour démonter la coursière amenez
l’aiguille à sa position la plus haute.
Tirez l’ergot du boîtier canette et
sortez-le.
replacez-
ergots
Enlevez l’étrier de la coursière
de en poussant les ergots de
maintien.
chiffon doux et sec.
-
d’entraînement
Retirez l’aiguille du pied-debiche. Dévissez la plaque
aiguille et la retirer.
aiguille et
.
65
Page 66

FR
66
Page 67

NE PAS JETER !
Recyclage
Nous sommes concernés par
la protection de l’environnement. Nous nous efforçons de réduire l’impact négatif de nos
judiciaires en cas de non
produits sur l’environnement en améliorant continuellement nos produits, nos méthodes de production.
Lorsque le moment est venu de vous débarrasser de votre ancien appareil, nous vous demandons de le faire dans les conditions les plus
respectueuses possibles de l’environnement.
FR
Le logo qui se trouve à l’arrière de votre machine et sur la plaque d’identification signifie que ce produit tombe sous l’application de la directive
européenne concernant les déchets des équipements électroniques et électriques (DEEE) et sous la directive concernant la restriction de l’usage de
certaines substances dangereuses dans les équipements électriques et électroniques (ROHS), vous ne pouvez donc pas jeter votre appareil avec
d’autres déchets ménagers. Lorsque vous séparez de votre ancien appareil, vous devez vous assurer de le faire dans le respect de la législation
locale et nationale et que celui-ci soit repris sous la catégorie 2 "petit électroménager" DEEE. Sachez que vous vous exposez à des poursuites
internet) afin de trouver quels sont les systèmes de collecte et de recyclage à votre disposition ainsi que leurs localisations. En tant que personne
responsable, vous pouvez avoir un impact positif sur la réutilisation, le recyclage et les autres formes de récupération des déchets électriques et
électroniques (DEEE). Ceci permettra de réduire l’usage des décharges et de minimiser l’impact environnemental des produits que vous utilisez.
Les substances dangereuses présentes dans les produits électriques et électroniques peuvent avoir un effet néfaste sur la santé et sur
l’environnement.
-respect des règles de recyclage. Veuillez vous renseigner auprès des autorités nationales ou locales compétentes (ou sur
67
Page 68

 Loading...