

Page 1
User's Guide
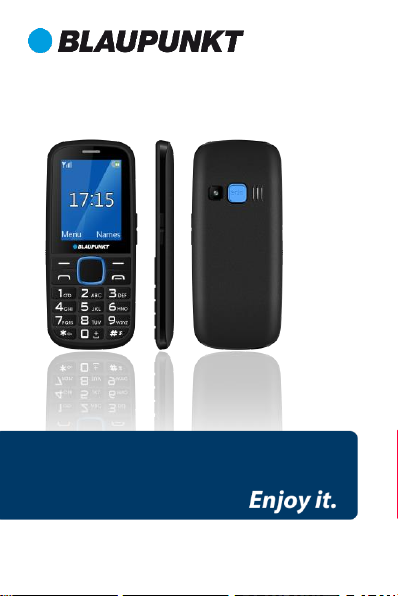
Mobile phone BS 04
Page 2

Contents
General Information ................................................................ 1
1. Safety .................................................................................... 2
2. Product specifications ......................................................... 4
3. About the keys ..................................................................... 4
4. Getting Started ..................................................................... 6
4.1. Installation .................................................................. 6
4.2. Charging the battery .................................................. 6
4.3. Maintaining the battery ............................................. 6
5. Use this unit ......................................................................... 7
5.1. Power On/Off .............................................................. 7
5.2. Make a call .................................................................. 8
5.3. Receiving Calls ............................................................ 8
5.4. Emergency call ............................................................ 9
5.5. Functions available during a call ............................... 9
6. Main menu ......................................................................... 10
6.1. Phonebook ................................................................ 10
6.2. Messages .................................................................. 13
6.2.1 Write a message .............................................. 13
6.2.2 Incoming messages .......................................... 13
6.2.3 Drafts ................................................................ 14
6.2.4 Outbox .............................................................. 14
6.2.5 Sent messages.................................................. 15
6.2.6 Message settings ............................................. 15
6.3. Call logs ..................................................................... 15
6.3.1 Call history ........................................................ 15
6.3.2 Call settings ...................................................... 16
6.4. Multimedia ............................................................... 18
6.4.1 Camera ............................................................. 18
6.4.2 Image viewer .................................................... 19
6.4.3 Video recorder ................................................. 19
Page 3

6.4.4 Audio Player ..................................................... 19
6.4.5 Video player ..................................................... 20
6.4.6 Sound recorder ................................................ 20
6.4.7 FM Radio .......................................................... 21
6.4.8 File Manager .................................................... 22
6.5. Magnifier .................................................................. 22
6.6. Organizer .................................................................. 22
6.6.1 Alarm ................................................................ 22
6.6.2 Calculator ......................................................... 23
6.6.3 Bluetooth.......................................................... 23
6.6.4 Calendar ........................................................... 24
6.6.5 Flashlight .......................................................... 24
6.7. Settings ..................................................................... 24
6.7.1 Profiles .............................................................. 24
6.7.2 Phone settings ................................................. 25
6.7.3 SOS function settings ....................................... 26
6.7.4 Network Settings ............................................. 27
6.7.5 Security Settings .............................................. 27
6.7.6 Restoring settings ............................................ 28
7. Declaration of Conformity ................................................. 29
Page 4

1
General Information
Thank you for purchasing the product.
Our mobile phone meets the GSM network standards and the
most stringent European standards.
This device can be used on various international networks,
depending on the roaming rules of your service provider. To
use the device, GSM service is required, provided by your
service provider for a fee.
Many features of the device depend on the services provided
by the network service provider.
For more information, please contact your service provider.
The user manual has been manufactured by the
manufacturer and is not responsible for any printing, typing
errors or changes, and may not be warranted to change the
device without prior notice.
Copyrights, trademarks and copyrights mentioned in this
document are the property of the current owner, copyrighted
or partially copyrighted material is strictly prohibited without
the prior permission of the holder.
We recommend that you read this guide carefully before
using your device to use your device under the best
conditions.
Page 5

2
1. Safety
Please read the safety instructions carefully, as ignoring it
may be dangerous or illegal.
The owner of the device is responsible for the use of this
appliance.
Explosion hazards and restricted areas
Turn off the device in explosion hazardous areas. Sparks in
such places may lead to an explosion or fire that may result
in serious injury or death. Turn off the devicce at gasoline or
gas filling stations, especially near the fuel pumps. Follow the
instructions strictly in locations such as fuel tanks, chemical
plants, and explosive substances.
Road safety
Observe the local laws and regulations regarding smartphone
usage while driving. If you make a phone call while driving,
observe the following rules: Focus on driving to become
aware of traffic conditions; If the device has a hands-free
function, use handsfree. If the traffic situation requires, stop
the car before you pick up the phone.
Interference
Do not switch on the device, where it is prohibited to use a
mobile phone or to interfere with radio waves.
Qualified service
The product can only be repaired by a qualified person.
Charger, battery and other accessories
Only use a battery, charger and other accessories approved
Page 6

3
by the manufacturer. Do not connect incompatible products.
The mains power socket used must be close to the
charger/holder and easily accessible, so that it can be used as
an 'on/off' facility.
Hearing protection
To avoid hearing loss, do not listen to music or radio for a long
time at high volume.
Water resistance
The appliance is not waterproof, so keep it dry.
Use environment
The device complies with the recommended emission values
for radio waves when kept at a minimum distance of 1.5 cm
from the ear. When carrying the phone in a case, belt clip or
holder, make sure that it does not contain metal and that the
phone is slightly distracted from the body. When using other
accessories, it is not possible to operate in accordance with
radio frequency guidelines. If you do not use a case and do
not hold the phone on your ear, keep it at least 2.5 cm away
from your body, especially during data transfer.
Page 7

4
2. Product specifications
The device handles a Micro SIM card.
Power Supply Features:
• Input: (AC), 100-240 V - 50/60 Hz – 0.1 A
• Output: (DC), 5 V - 500 mA – 2.5 W
Battery Type and Voltage:
• Li-ion battery, 3.7 V - 900 mAh
Network type:
• GSM 900/1800 MHz
SAR values:
• 0.375 W/Kg (Head)
• 1.058 W/Kg (Body)
Note: Actual operating conditions depend on local conditions,
network environment, and user habits.
3. About the keys
1. Right softkey: In standby mode, enter Names. In Menu
mode: to return to the home screen
2. Left softkey: In standby mode: enter the Main menu and
select "OK" button in other menus
3. Call (Dial) button: Dialing and Receiving calls. In Idle mode,
open the Call list
4. Call End Button: Press and hold to turn on/off the phone
5. Navigation keys (scroll in the menu): In standby mode,
Page 8
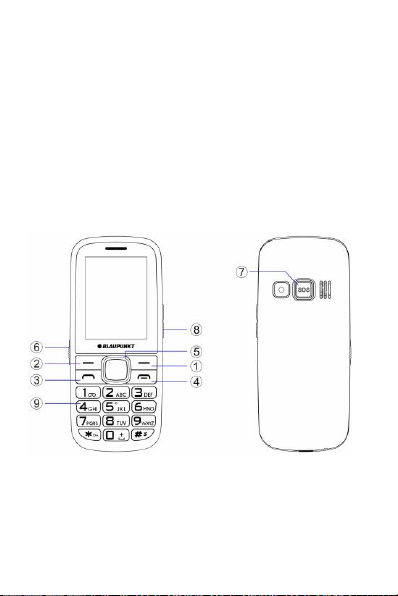
5
various functions can be set in the directions.
6. Flashlight button: Turning the flashlight on and off.
7. SOS: In emergency, by pressing this button, alarms the
previously set contacts for this function.
8. Volume button: Increase and decrease the volume during
calls
9. Alphanumeric keypad: Press the corresponding keys to
enter numbers when dialing or the characters of the
numbers when writing text.
Page 9

6
4. Getting Started
4.1. Installation
1. Open and remove the phone back protection cover
2. Insert the SIM into the device. The golden contacts on the
SIM card face down and the edges align with the
corresponding edges of the SIM card.
3. Insert the battery chip into the protruding metal point in
the battery slot, insert the battery, and push the top down
until the battery engages in the recess.
4. Put back the back cover.
4.2. Charging the battery
Connect the charger to the appliance and plug the other end
into the socket. If the device is turned on while charging, the
battery icon will move in the right corner of the display.
Charging is completed when the charging indicator on the top
right is lit. If charging is switched off, a charging indicator
appears on the display. When charging is complete, unplug
the charger from the unit.
Note: When the battery voltage is low, a warning message is
displayed on the display. Charge the battery as soon as you
can, to avoid any inconvenience, the device can be switched
off during a telephone conversation. Your device can
automatically turn off when the power level is too low.
4.3. Maintaining the battery
The device has a rechargeable battery. When not using the
charger, disconnect it from the power source. For more than
a week, do not leave the phone charging. Temperature
Page 10

7
influences battery capacity. Battery may need to be cooled or
warmed up before charging. If the battery temperature is
lower than 0 ° C or higher than 45 ° C, do not charge the
battery. Use the battery according to its intended purpose.
Do not short-circuit the battery terminals. Do not use a
damaged battery. If you are using an appliance under
extreme temperature conditions, the battery will not work
properly and its life span will be reduced. DO NOT throw the
battery into fire, follow local laws and regulations regarding
the disposal of the spent battery.
5. Use this unit
5.1. Power On/Off
Press and hold the End / On-Off button to turn the unit on or
off.
1. If a SIM card is not inserted, it is defective or not fit correctly,
a warning message will be displayed after switching on the
display. Turn off your readiness and make sure the SIM card
is inserted correctly.
2. If you insert the SIM card into the device, the PIN request
and the phone password are active, the device prompts you
for the password and PIN code and switches to standby mode.
After switching on, the phone automatically searches for the
network. If the device has found the allowed network, it will
display its name and signal strength.
If your device does not find a suitable network, you can only
make an emergency call or access non-network services on
your phone
Page 11

8
5.2. Make a call
5.2.1 Starting a domestic call
In Idle mode, press the number keys to enter the number you
want to call, press the right soft key to clear the wrong
numbers, press the left soft key (Options), then Call or the
dial key to start the call if the specified number is correct.
5.2.2 Starting an international call
To make an international call, press and hold the [0] key until
"+" international call sign appears on the display.
After entering the country call, enter the area code and then
the phone number.
You can make an international call as follows: "+" Sign,
country calling - full phone number dialing button.
5.3. Receiving Calls
When you have an incoming call, your device will respond
properly if your service provider supports the number display,
then the caller or caller name appears on the display
(depending on whether you have saved it in the phone book).
1. Press the dial key or the left soft key and answer [Answer]
to the incoming call.
2. If any button responds to the function, [Menu / Call logs /
Call settings / Advanced Settings / Answer Mode / Anykey],
you can answer any call using any key except the Right softkey
and the End / Off button.
3. When the headset is connected to the unit and [Auto] is
activated [Menu / Call logs / Call settings / Advanced Settings
/ Answer Mode / Auto answer when headset mode],
Page 12

9
incoming calls are automatically received by your phone after
5 seconds of vibration or ringing.
4. If you do not want to answer the call, press the End / Off
button to reject the call.
The End / Off button can also be used to disconnect the call.
5. During a call, you can use the volume keys on the side of
the machine to reduce or increase the loudspeaker volume.
5.4. Emergency call
You can immediately make an emergency call without a SIM
card. Different networks can use different emergency
numbers, so please contact your network operator.
5.5. Functions available during a call
Some operations and services are available during an active
call. Many of these depend on network support, please check
with your network service provider for these options.
Press the right soft key to activate the loudspeaker during an
active call; Similarly, you can reset the call to the handset.
Press the left soft key [Options] to access the call during the
active call in the menu, these are the following (some
functions can only be used under special conditions):
Hold / Continue: Hold an active call or keep it from hold.
End single call: Hang up the current call.
Phonebook: Displays the search, add contacts, and other
phonebook functions.
Call history: view call history.
Messages: You can enter the messages menu.
Page 13

10
Mute: You can mute your device's microphone when you
need to make a conversation while you are on the call so that
someone on the other side of the line does not hear it.
End all calls: * Hang up all calls
Transfer: *Transfer the active call and exit from the
conversation.
Swap: * You can exchange the held and active calls.
Conference *: Combine calls.
Split: * Separate the conference call.
End conf. call: * Hang up the conference call.
Note: The menu items marked with [*] only work under
special conditions. Such as: "Swap", which can only be
achieved if one of the calls is held on the other active. To
access the conference call, you need a service that you can
activate with your network operator.
6. Main menu
6.1. Phonebook
In Idle mode, use the right soft key to enter Names or to
access Menu> Phonebook. You can store and edit frequentlydialed contacts in the phonebook. You can save the numbers
and names you frequently use to the SIM card and the
devicetoo. The number of contacts that can be stored on the
SIM card depends on the card's capacity. You can store up to
300 contacts in phone memory. When you enter the
phonebook, you can view all the contacts (stored on the SIM
card and on your device). Various icons indicate which
Page 14

11
contact is saved for which storage. You can search for that
contact by entering the first letter of the contact. After
searching for a contact, you can dial the number by pressing
the Dial button and press the End call button to disconnect
the line.
Add new contact
In Standby mode, enter the phone number and select (left)
Options> Save to Phonebook.
Select storage space (SIM or Phone) to save the phone
number.
Enter contact details: name, phone number.
To save, press the Options (left) soft key and select Save.
Press Options (left soft key) to select one of the following
options:
➢ View: You can view the details of that contact.
➢ Send SMS: Send a text message to the selected contact's
phone number.
➢ Call: Call the selected phone number.
➢ Edit: Edit the selected contact.
➢ Delete: Deletes the selected connection.
➢ Copy: You can copy the selected connection from the
device to the SIM card and vice versa.
➢ Move: Move the selected contact from the device to the
SIM card and vice versa.
➢ Add to blacklist
Page 15

12
➢ Phonebook settings
- Preferred storage: You can select whether the phone
or SIM card (or both) should be the default save
location for new contacts.
- Speed Dial: You can set frequently dialed numbers to
the numeric keys on your machine, so you can make
calls to these numbers at the touch of a button. To set
up speed dial, go to Menu> Phonebbok > Phonebook
settings> Speed Dial. In the Status menu, turn on the
function by pressing OK (left soft key), then selecting
On. In the Set Number menu, set a number for the
different (2-9) keys. Key 1 dial the voicemail number
(if previously set).
- Memory status: view the number of contacts stored
on the device and the SIM card, and how many
contacts can be stored. The storage capacity of the
SIM card may vary by card type.
- Copy contacts: Copy the selected contact from SIM
card or Phone
- Move contacts: Move the selected contact from SIM
card or Phone
- Delete all contacts: Delete all contacts from SIM card
or Phone
Page 16

13
6.2. Messages
Message service is a network-dependent service that allows you
to send and receive SMS. For more information, contact your
network provider.
6.2.1 Write a message
In Menu mode, select Messages> Write message.
Note: To send the SMS, you must have the correct message
center number from your network service provider. You can
check and change the message center in Menu > Messaging >
Message settings > SIM > Profile settings >.
While writing a message, press # to switch between input
modes.
Press the left soft key [Options] during message editing to
access the following functions:
Send to: You can specify the recipient of the message
manually or select it from Phonebook.
Input method: Select the correct input method.
Writing language: Select the message language.
Advanced: You can insert name or phone number from the
Phonebook
Save: Save a message between drafts.
6.2.2 Incoming messages
You can store received messages on your device or on the SIM
card and access it.
When you receive a message, a beep or vibration (as
previously configured in the menu) ([Settings / Profiles /
Page 17

14
Options / Customize / Message]) will alert you to this or a
graphic will appear on the display. Press the left soft key [View]
to view the message, and the right soft key to return to the
SMS menu to read other incoming messages.
If the SMS memory is full, you will see a "Memory full"
indicator on the display and the SMS icon flashes. Before you
can receive a message, delete some of the older ones. If the
size of the new message exceeds the capacity of incoming
messages, the information may be lost or incomplete.
In the message list, press the left soft key [View] to view the
message. Pressing the left soft key [Options] repeatedly lets
you choose:
• Reply: You can reply directly to the message.
• Call sender: Call the sender directly.
• Forward: Forward a message to another recipient.
• Delete: Deletes the message
• Delete all: Delete all messages
• Save to Phonebook: Save the senders phone numver
6.2.3 Drafts
You can view unfinished messages in this folder.
6.2.4 Outbox
When [Save sent SMS] is activated, unanswered messages are
saved in this folder.
In the messages list, press the View soft key (left soft key) to
read the selected message.
Page 18

15
6.2.5 Sent messages
If the message is sent, the sent message is saved in the Sent
Items folder.
6.2.6 Message settings
You can modify and save SMS service parameters on your SIM
card:
SIM menu item:
• Profile name: profile name, SMSC address.
• Validity period
• Delivery report
• Voicemail server
To validate the changes, press the left soft key [Save] or
Options> Save.
To save outgoing SMS, you can activate the Message settings
/ Sent SMS save / On option. In SMS settings, you can save
messages (Preferred storage) to your device or SIM card, or
check SMS memory status and SMS counter.
6.3. Call logs
6.3.1 Call history
The machine logs missed calls, dialed calls, received calls, and
their dates. You can only log calls if these features are
supported by the network.
You can access the call history in standby mode by pressing
the Dial key or Menu > Call logs > Call history.
- Missed / Dialed / Received / All Calls
Page 19

16
Displays the list of Missed / Dialed / Received / All Calls
- Delete call history
Deletes the list of Missed / Dialed / Received / All Calls.
To call a selected phone number, press the Dial button once
in the call log list. To view the details of the call, press the left
soft key (Options) to access the following functions:
· View: View the details of the call.
· Call: You can make another call to that number.
· Send SMS: Send a text message to that number.
· Save to phonebook: saves that number in the phone book
(only this option is displayed for unsaved phone numbers).
· Add to Blacklist: Adds the selected number to the blacklist
· Editing before call: You can edit the number before dialing.
· Delete: Deletes the call details you have.
6.3.2 Call settings
In Menu > Call logs > Call settings, You can choose the
following options:
Call Waiting
(Depends on network support): Turn on or off or answer the
Call Waiting status.
When the phone is switched on, an alert is heard during a call,
if it is called by another person, and the display shows the
caller's number or name (depending on whether you have
saved it in the phonebook).
Page 20

17
Call divert
(depends on network support): Divert calls divert incoming
voice calls to voicemail or other phone numbers, depending
on the setting. The redirection may be unconditional [All
voice divert redirection] or conditional (redirect if not
available; redirection if no response; redirection if busy). Use
the up / down arrows to select the appropriate divert type
from the list, press the OK button or the Left soft key [OK] to
select one of the following options:
• On: Switches the incoming call to a new number or
Voicemail (by type):
• For a new number: Use the up / down navigation key to
select this line, then use the left soft key or OK to enter
it. Enter the full phone number to which you want to
divert incoming calls.
• To voicemail: If you have a voicemail, pressing the OK or
Left soft key [OK] will cause the conditional or
unconditional redirection to the voicemail if you have
previously set your voicemail number in Menu>
Messaging> SMS Settings> Voice Mail Server.
Call barring
You can restrict calls on your device. The following options
available in the menu: Outgoing calls, Incomming calls,
Cancel all, Change barring password,
Advanced settings:
o Blacklist: You can add numbers to the blacklist that
you will not be able to receive while you are in the list.
o Auto redial: When the function is active and the called
Page 21

18
party is busy, the machine automatically attempts to
call again after a while.
o Call time display
o Call time reminder: indicates a preset time (or time
interval) when the phone is ringing during a call.
o Answer Mode: You can set whether or not to receive
the call or headset mode with any key.
6.4. Multimedia
6.4.1 Camera
Your device has a camera for taking photos. Go to Menu >
Multimedia > Camera. To take a photo, press the middle
navigation key.
In Photo Preview mode, you can choose from the following
options by pressing Options (left soft key) in the popup
window:
Switch to video recorder
Photos: Opens saved photos.
Camera Settings: Use the Up / Down Navigation Keys to move
between Anti-Flicker, Scene Mode, White Balance, Delay
timer. To save the changes, press Save (left soft key).
Image Settings: In this menu, you can adjust the image size
and picture quality.
Restore default: Reset the camera settings to the factory
settings
Attention! To save the images, you need a memory card.
Page 22

19
6.4.2 Image viewer
In this menu, you can view the images saved on the memory
card. Press OK in the selected image, then Options (left soft
key) to access the following functions.
View: view the selected image.
Browse style: Choose from matrix and list view.
Send: Send selected image via bluetooth.
Use as: set photos as wallpaper.
Rename: You can change the name of the image.
Delete: Deletes the current image.
Delete all files: Deletes all images.
Image information: Here you can see the details of the
picture, such as: resolution, size, creation time.
6.4.3 Video recorder
Insert a memory card to make a video recording. Go to Menu>
Multimedia> Video recorder. To start recording, press the
middle navigation key. You can pause the recording by
pressing the button again. To stop, press the right soft key.
By pressing the options (left soft key), the following options
are available:
Switch to Camera
Video recorder settings: Anti-flicker
Video settings: In this menu, you can adjust the video quality.
6.4.4 Audio Player
On the player interface, press the middle navigation button
Page 23

20
to select / play / pause the Left and Right navigation buttons
to move to the previous / next / audio file. You can adjust the
volume using the volume key on the side of the device.
Using the left soft key [List] you can enter the playlist by
pressing the left soft key [Options] again to access the player
program: Play, Add, Remove, Remove all, Settings.
In Settings, you can set Repeating, Shuffle, Background
playing.
6.4.5 Video player
This menu item allows you to play video clips stored on a
memory card.
Press Options (left soft key) to access the following functions
on the selected video:
Playback: Plays the video, press middle navigation key to start
playback, then press this button to pause. Press the Left and
Right buttons to move between the videos in the playback
view. For full screen play, press the up navigation key, the
down navigation button to stop.
Send: You can send the video via Bluetooth.
Rename: You can change the name of the video.
Delete: Deletes the selected video.
Delete all: Deletes all video
6.4.6 Sound recorder
You can make voice recordings with the voice recorder.
Select Options (Left soft key)> "New record", press the left
soft key to pause the recording, stop the recording with the
Page 24

21
right softkey, the recording will be saved and a warning
message will appear on the display.
After recording, you can access the following options by
pressing the Left soft key [Options].
· New Recording: Create a new recording.
· List: To view the list of recordings, use the Options (left soft
key) to select from the following options:
o Play: Play back the current recording
o Rename: You can change the recording name.
o Delete: Deletes the selected recording.
o Delete all: Deletes all selected recording.
o Send: You can send the video via Bluetooth.
6.4.7 FM Radio
In Menu mode, go to Multimedia > FM radio. To connect to a
radio, connect the headset, which acts as an antenna. If you
do not connect a headset to your device, you may not be able
to receive radio reception or in very poor quality.
In the FM radio application, press the middle navigation
button to play / pause, the Up and Down navigation buttons
to move between the channels. Use the buttons on the side
of the device to adjust the volume.
Note: 1. If the Background play feature is active, you can also
listen to the radio in standby or menu mode. You can also
listen to the radio with handsfree, but do not remove the
headset.
2. The quality of radio broadcasting is influenced by the
Page 25

22
environment. You can improve the quality by manual search
and by placing your device closer to the window.
Press Options (left soft key) to enter channel list, manually
enter frequency (manual input) or perform automatic
channel search.
6.4.8 File Manager
In Menu mode, go to Multimedia > File Manager. You can
view all or the free storage of the memory card (if it is
connected to a memory card). To view the files, select the
device or memory card with the navigation keys, then go to
the Options (left soft key) menu and select Open.
New Folder: Create a new directory on the current drive.
Rename: You can change the name of the file or directory
depending on which one is selected.
Delete: Deletes the selected library or file, depending on
which one you chose.
6.5. Magnifier
By using the camera zoom function, this menu helps you to
read small texts.
6.6. Organizer
6.6.1 Alarm
In Menu mode, go to the Organizer> Alarm menu, where you
can set 5 different alarms. The wake-up function also works
when the device is switched off.
When the alarm clock sounds, press the Left soft key or the
End call key to stop; press the Right soft key to the snooze.
Page 26

23
To change the alarm details, select one from the list and press
the left soft key [Edit]:
1. Activate / deactivate the alarm by selecting the status
(press Right and Left navigation keys). In the alarm clock list,
the active alarms are indicated by a check mark.
2. To change the alarm time (Time), scroll with the navigation
keys (up and down) and use the numeric keypad to enter the
alarm / alarm time.
3. To set Repeat, press Options (left soft key)> Select and then
select Once, Everyday, or Custom (Pre-set Day) to be active.
With Options> Save, save the setting.
4. Select the alarm tone to change the alarm sound. Press the
left soft key [Options> Select] to display the list of ringtones,
press the down / up navigation buttons to scroll through the
list and listen to the alarm tone by pressing the left soft key
[OK] to activate the selected sound.
To save the alarm parameters, press Save (left soft key).
6.6.2 Calculator
In Menu mode, go to Organizer> Calculator to open the
calculator. The calculator in the machine can perform the 4
basic operations.
6.6.3 Bluetooth
In Menu mode, go to Organizer> Bluetooth to open bluetooth.
You can make the following settings in the menu item:
• Power/Bluetooth: Turns the function on and off using the
left soft key.
• Visibility: When the feature is active, your device is visible
Page 27

24
to other bluetooth devices.
• My device: Find new devices and show paired devices.
Search audio device: Seach for Bluetooth audio devices.
• My Name: You can change the device name for other
bluetooth devices.
• Advanced: You can set the audio path and check the
device MAC address.
6.6.4 Calendar
To open Calendar - in menu mode - go to Organizer> Calendar.
The calendar indicates the current month, highlighting the
current date with color. Press the left soft key [Options] to
choose from: Jump to date, Go to Today, Start of week.
6.6.5 Flashlight
To turn the flashlight on and off using the "Flashlight" button
on the side of the unit, slide the button upwards to turn it on
and down to turn it off.
6.7. Settings
6.7.1 Profiles
Turn silent mode on or off:
To activate the Silent mode, press and hold #. If you press and
hold # again, you can activate the General Mode (or the mode
that was set when you activated Silent Mode).
In Menu mode, go to Settings > Profiles, then select Silent
mode. You can return to the General Profile in the same menu
item.
Page 28

25
Customize profiles:
In Menu mode, go to the Settings > Profiles menu, and then
select the profile you want to change. There are 4 profiles in
the device: General, Silent, Meeting, Outdoor.
To change the profile, press [Options] and select Customize.
In this menu, you can change the following settings: Alert
type, Ring type, Ringtone, Ringtone volume, Message,
Message volume, Keypad sound, Keytone volume.
In the Reset menu, you can reset the factory defaults for the
profile.
Add a ringtone from a memory card:
In Menu mode, go to Settings > Profiles > Options >
Customize > Ringtone, and then select Select from File.
Then, the device enters the File Manager where you can
select from the music stored on the memory card (if there is
a memory card in the device) by pressing the OK soft key.
6.7.2 Phone settings
· You can change the following in the Date and Time submenu:
• Set date and time: Use the navigation keys to highlight
the line you want to set, and then use the numeric
keypad to enter the time and date. To save, press Save
(left soft key).
• Enter Format: You can set the time and date format.
· Schedule power on/off: You can set the time when the
device automatically turning on/off.
· Language: You can select the language you want to use
Page 29

26
· Writing language: You can edit your keyboard input method
according to your custom.
· Display: You can customize the display:
• Wallpaper: Choose a wallpaper for your phone from
pre-installed wallpapers (System) or from your own files
(Custom); this picture is displayed in standby mode.
• Show date and time: to set whether the date and time
should be displayed on the display in standby mode.
• LCD Backlight: You can set the display backlight time
and brightness.
··Shortcuts: Allows you to assign different applications to your
device's pushbuttons.
··Dedicated key: You can assign functions to the middle
navigation button of the machine. The Up, Down, Right, Left
buttons have different applications / menus available.
· Flying mode: In this menu item, you can turn the flying mode
on and off. The flying mode turns off all network functions.
6.7.3 SOS function settings
To set the SOS function, go to Menu> Settings> SOS Settings.
• Status: activates the function (SOS button on the back of the device).
• SOS numbers: dial the numbers listed here by pressing the SOS
button or sending an SMS message (if active) to the numbers in the
list. The alarm chain lasts until one of the numbers in the list answers
the call. Attention! Do not enter a number where call reception is
automatic.
• SOS SMS on / off: Enable or disable SOS SMS function.
• SOS SMS: In this menu item, you can edit the text of a n emergency
message. At the end of editing, save the message text using Save (left
soft key).
Page 30

27
• Warning Tone Status: Enable or Disable the sound during an alarm.
To start the SOS alarm, press and hold the SOS button on the back of
the device. To cancel the chain, press again.
6.7.4 Network Settings
Under Settings> Network Settings, you can select automatic
(network access automatically) and manual network
selection (from the displayed list to the network).
6.7.5 Security Settings
You can change security settings in this menu so you can not
use your device or your SIM card in the appropriate settings.
· SIM Security
To change the SIM card and phone security settings in menu
mode, go to Settings> Security Settings. To set the SIM card's
settings, select SIM security, then press OK (left soft key).
Within the SIM Security menu, you have the following options:
• PIN lock: Press the left soft key (On / Off) to activate or
deactivate, the current status is indicated as [PIN lock] in the
line. Enter the PIN code to activate the SIM PIN. If the PIN
request is activated, you must enter a PIN whenever the PIN
is requested. For more information, contact your service
provider. Note: If the PIN is entered incorrectly three times,
the SIM card will be locked, which can be cleared by entering
the PUK code. The PUK code is required to unblock the PIN.
The PIN and PUK codes can be found in the SIM card package;
otherwise contact your service provider.
• Change PIN and Change PIN2: In this menu, you can change
the PIN / PIN2 codes, enter the new codes twice twice after
entering the old code for which a message appears on the
Page 31

28
display. The code must consist of 4 to 8 digits. You can only
change the PIN code if the PIN request is active.
· Phone security
Press OK to turn the phone lock on or off, the current status
is indicated by the [Phone Lock] line.
To activate the phone lock, you must enter the phone
password. If this feature is active, the phone password must
be entered every time you turn it on.
Note: The default phone password is 1122. Please change this
to a unique code as soon as possible. The specified code may
consist of 4 to 8 digits.
· Screen auto lock
In this menu, you can deactivate the keypad lock and set how
fast it will be on when it is switched on (Off, 15 sec, 30 sec, 1
minute, 5 minutes).
6.7.6 Restoring settings
To reset the settings - in the menu mode - go to Settings>
Restore Settings to reset your device settings to factory
defaults. Enter the phone password to reset. Selecting [Yes]
will reset the device and restart the device. Attention! This
setting can not be undone and deletes all data on the device
(such as names, messages, personal settings).
Page 32

29
7. Declaration of Conformity
The Blaupunkt BS 04 is compliant with the essential
requirements and relevant provisions of RoHS Directive
2014/53 / EU and 2011/65 / EU. The Declaration of
Conformity is available on our website.
Designed and Engineered by
Blaupunkt Competence Center Mobile Europe
HTM Mobile Kft.
1118 Budapest, Dayka Gábor utca 3. Hungary
Assembled in P.R.C by
CSM Technology Co., Ltd.
5F, Bld. C, Hongshengyuan Industrial Park, Longgang District,
Shenzhen, China
For more information on this product, visit our website at
www.htmmobile.hu or www.blaupunkt.com.
 Loading...