

Blackmagic Design CINECAMURSA4K-PL User manual

Installation and Operation Manual
Blackmagic Cameras
English, 日本語, Français, Deutsch, Español, 中文, 한국어 and Русский
Mac OS X
Windows
July 2014
™
™

Blackmagic Cameras
English
日本語
Français
Deutsch
Español
中文
한국어
Русский
3
45
88
131
174
217
260
303

Welcome
Thank you for purchasing your Blackmagic Camera!
We have worked hard to produce three cameras that have been
designed from the ground up to fit any kind of workflow. Our new
Pocket Cinema Camera is a Super 16 digital film camera with 13
stops of dynamic range that is small enough to take anywhere. The
Cinema Camera records uncompressed CinemaDNG RAW files
for pristine images and our new Production Camera 4K is a Super
35 Ultra HD 4K camera with a global shutter and 6G-SDI output.
Our cameras are designed to produce files that are "flat", which
means they preserve the wide dynamic range from the sensor,
as well as standard file formats that work with all video software.
This allows you to make creative decisions by using the included
DaVinci color correction software!
We think this means you get a cinema style shooting experience
where you capture and preserve more of the image so you have
as many creative options as possible. We have also included large
screens on our cameras for easy focus and metadata entry. We
hope you connect to our cameras in creative ways and produce
some amazing looking images! We are extremely excited to see
what creative work you produce!
Grant Petty
CEO Blackmagic Design

Contents
Blackmagic Cameras
5
12
15
16
Getting Started
Introducing Blackmagic Cameras 5
Attaching a Lens 7
Turning Your Camera On 7
Inserting an SD Card 9
Inserting an SSD 9
Recording 10
Playing Back Clips 11
About SSDs
Choosing a Fast SSD 12
Preparing SSDs for Recording 13
About SD Cards
Preparing SD Cards for Recording 15
Choosing a Fast SD Card 15
Connections
Blackmagic Pocket Cinema Camera 16
Blackmagic Cinema Camera and Production Camera 4K 17
28
29
34
39
Adjusting Settings 26
Status Strip 27
Entering Metadata
What is the Slate? 28
Camera Video Output
Waveform Monitoring using Thunderbolt 29
Using Blackmagic UltraScope 30
Monitoring using SDI 33
Post Production Workflow
Working with Files from SSDs 34
Working with Files from SD Cards 34
Editing your Clips 35
Using Final Cut Pro X 36
Using Avid Media Composer 37
Using Adobe Premiere Pro CC 37
Using Autodesk Smoke 2013 38
Blackmagic Camera Utility
18
Settings
Camera Settings 18
Audio Settings 20
Recording Settings 21
File Naming Convention 23
Display settings 24
On Screen Metering 25
40
42
44
Attaching Accessories
Help
Warranty
5
OK
MENU
IRIS FOCUS
OK
MENU
IRIS FOCUS
Getting Started
Getting Started
1 2
4
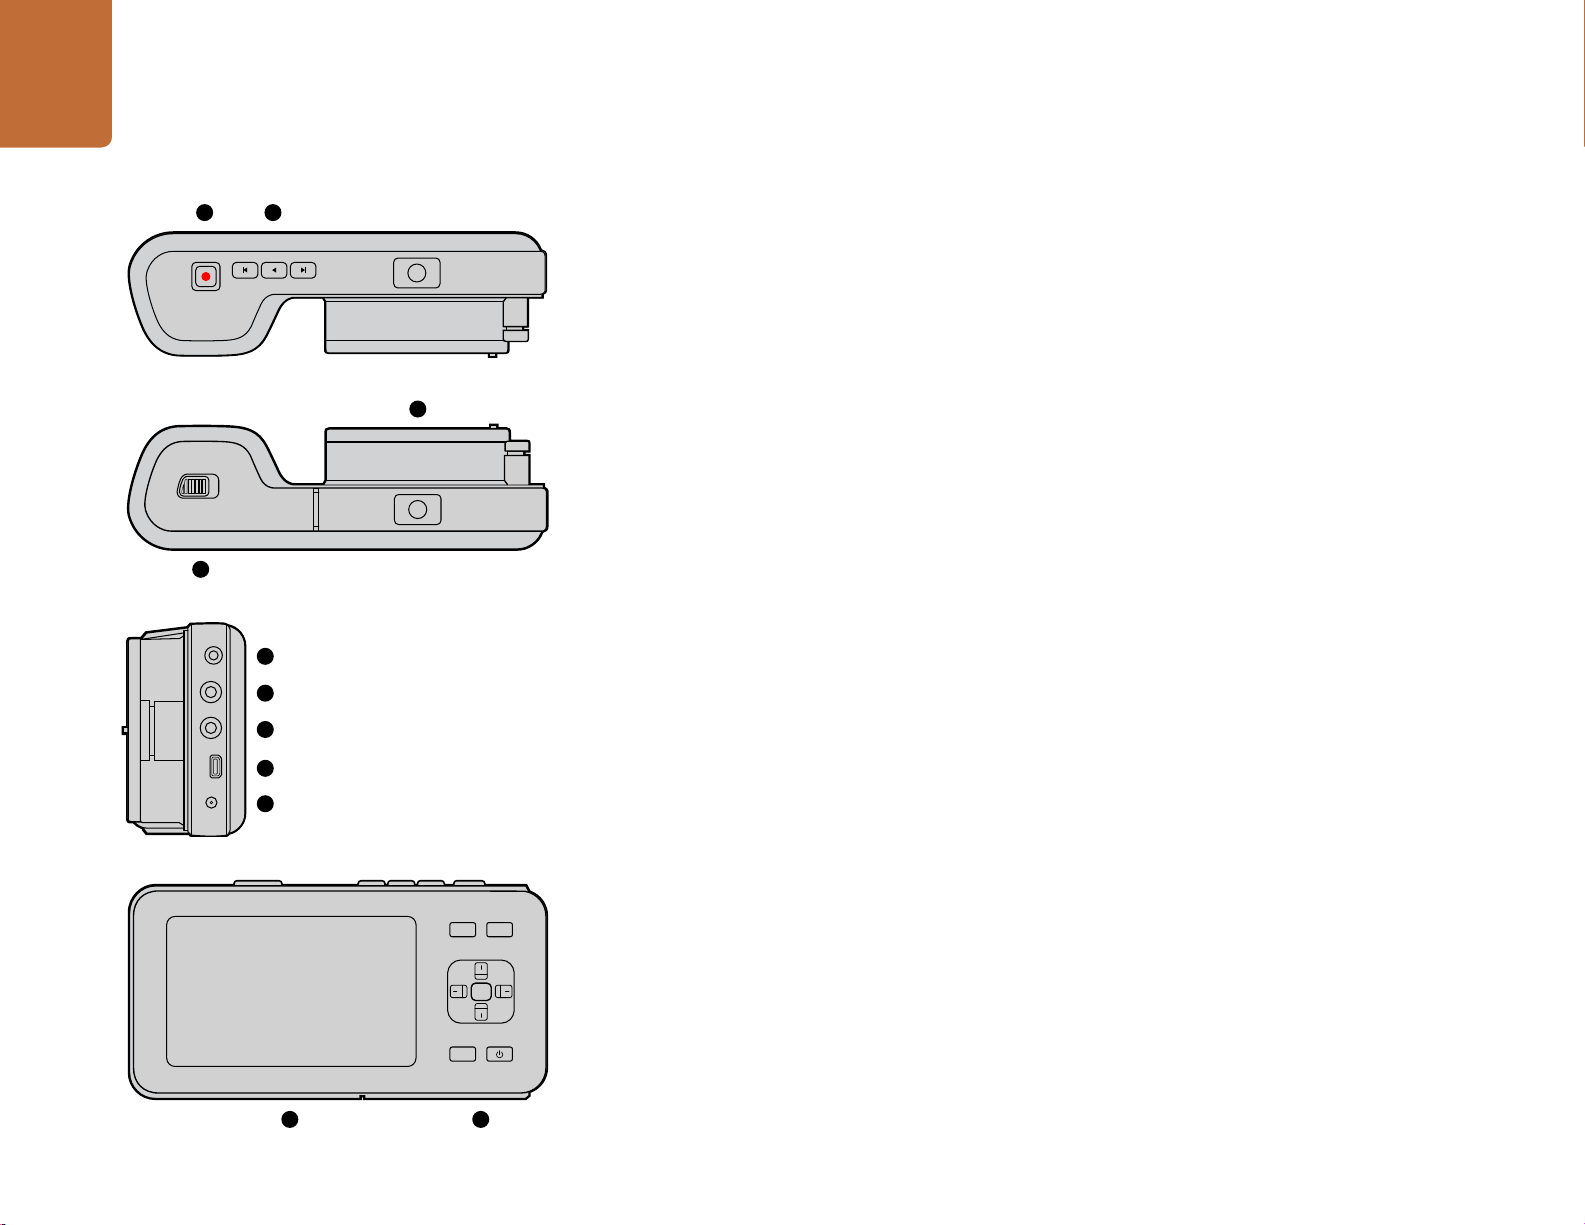
Introducing Blackmagic Cameras
Blackmagic Pocket Cinema Camera Features
1. RECORD BUTTON
Press this button to record clips to your SD card. See page 10.
2. TRANSPORT CONTROL
3
5
6
7
8
9
Use these buttons to play, skip or shuttle clips. See page 11.
3. LENS MOUNT
Micro Four Thirds lens mount for a wide selection of lenses. See page 7.
4. BATTERY TERMINAL
Open the battery door via the release button to:
Insert and remove the rechargeable Lithium Ion battery. See pag e 7.
Insert a SDHC or SDXC card for recording. See pag e 9.
Access the USB Mini-B port for software configuration and updates. See page 38.
5. LANC REMOTE
The 2.5mm stereo jack for LANC remote control supports record start and stop, iris control, and manual focus.
See page 16.
6. HEADPHONES
3.5 mm stereo headphone jack connection. See page 16.
7. AUDIO IN
3.5mm stereo jack for mic or line level audio. See pages 16 and 20.
IRIS FOCUS
MENU
10 11
OK
8. HDMI OUT
Micro HDMI port for monitoring or outputting video to a switcher. See page 16.
9. POWER
0.7mm 12 – 20V power input for power and battery charging. See page 16.
10. LCD
Watch the LCD while recording or playing back a clip. See page 26.
11. CONTROL BUTTONS
Use these buttons for power, menu navigation, iris control, focus peaking, auto focus and LCD zoom.

6
Getting Started
1
2 4
3
Blackmagic Cinema Camera and Production Camera 4K Features
1. RECORD BUTTON
Record clips to your SSD. See page 10.
2. IRIS BUTTON
The Iris button activates electronic iris control on the EF Cinema Camera and the Production Camera 4K. Adjust the
aperture of your lens by pressing the forward and reverse skip/shuttle playback buttons. See page 25.
3. TOUCHSCREEN LCD
Watch the LCD monitor while recording or playing back a clip, or when using the menu. See page 27.
4. FOCUS BUTTON
Press the Focus button for focus peaking on the LCD. See page 25.
5. TRANSPORT CONTROLS
Press these buttons to stop, skip/shuttle, or play your clips. See page 11.
6. MENU BUTTON
Access the menu on the LCD.
7. POWER BUTTON
Press the power button to turn on the Blackmagic Cinema Camera. Press and hold the button to turn the camera
off. See page 8.
8. LANC REMOTE
The 2.5mm stereo jack for LANC remote control suppor ts record start and s top, iris control and manual foc us. See pa g e 17.
1 5 6 7
8
9
10
11
12
13
9. HEADPHONES
3.5 mm stereo headphone jack connection. See page 17.
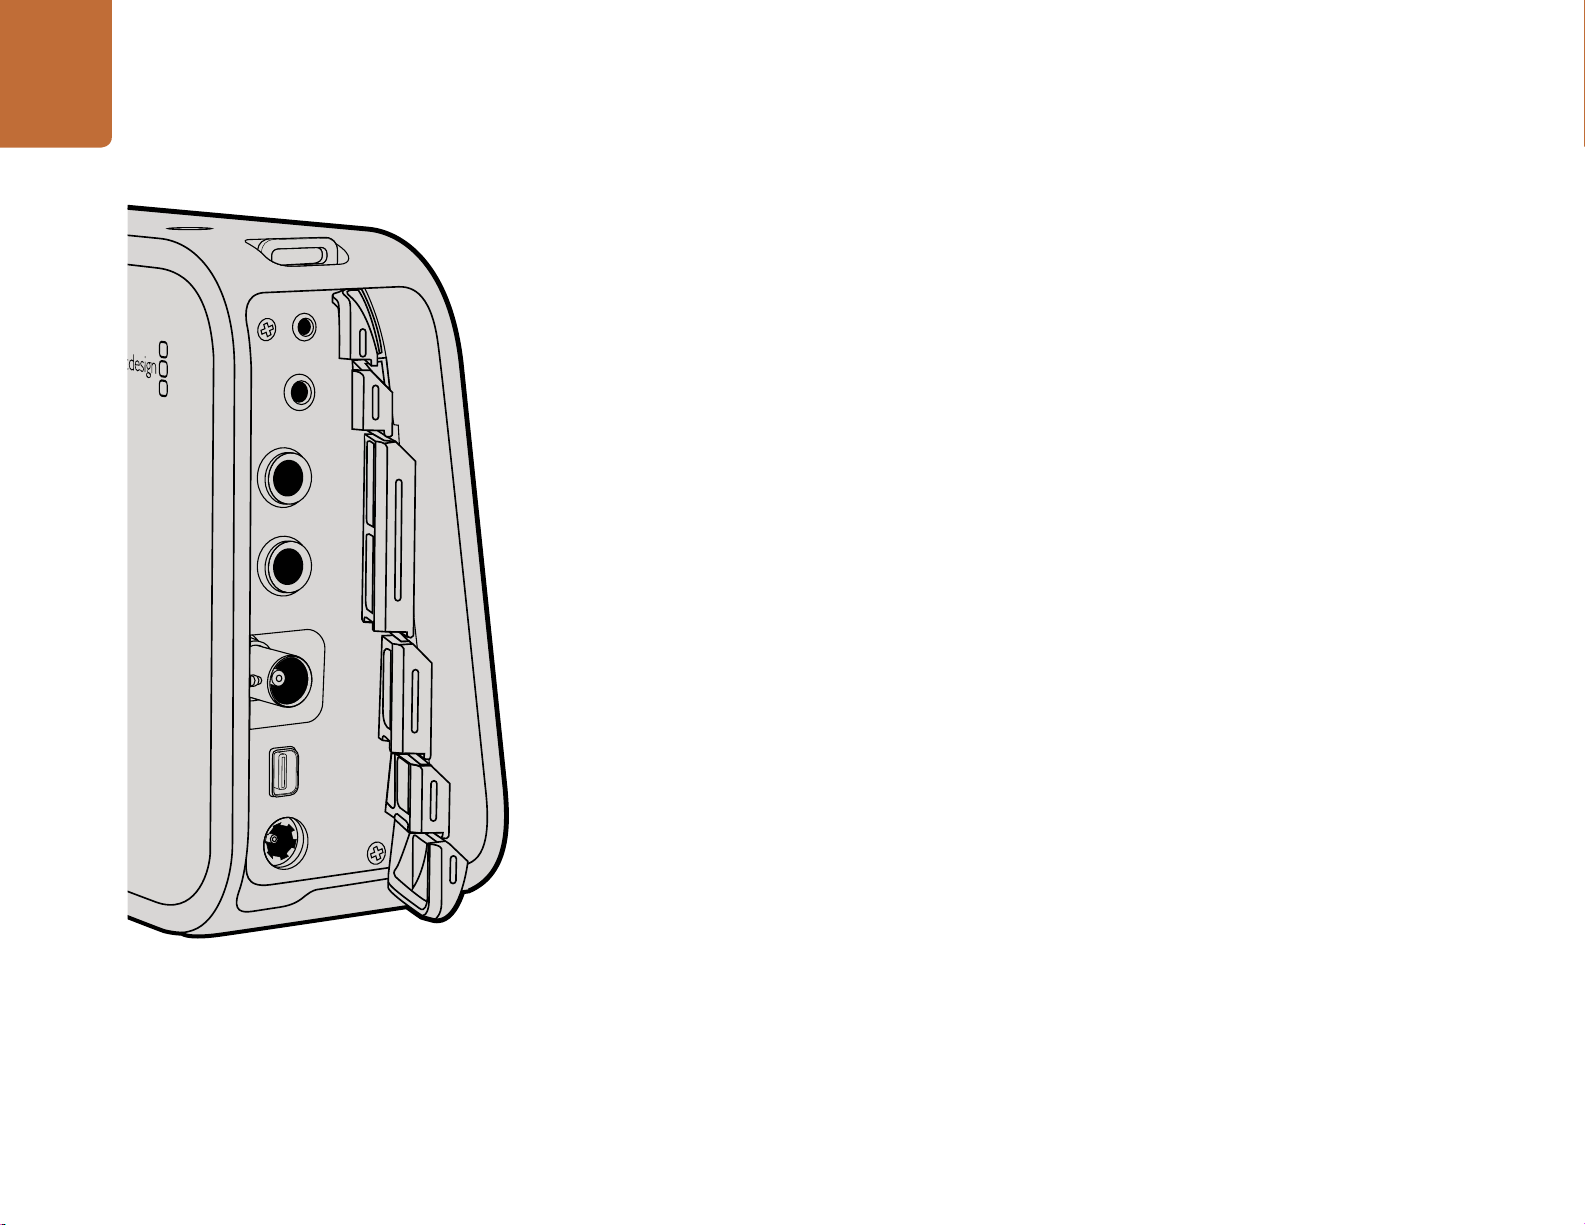
10. AUDIO IN
2 x 1/4 inch balanced TRS phono jacks for mic or line level audio. See pages 17 and 20.
11. SDI OUT
SDI output for connecting to a switcher or to DaVinci Resolve via capture device for live grading. See pages 17 and 34.
12. THUNDERBOLT CONNECTION
Blackmagic Cinema Camera outputs 10-bit uncompressed 1080 p HD. Production Camera 4K also outputs compressed
Ultra HD 4K. Use the Thunderbolt connection for HD UltraScope waveform monitoring and streaming video to a
Thunderbolt compatible computer. See pages 17 and 28.
13. POWER
12 – 30V power input for power supply and battery charging. See pages 8 and 17.
7
Getting Started
HDMI
12V
Attaching and removing a lens on Pocket Cinema Camera
Attaching and removing a lens on Cinema Camera and
Production Camera 4K
Attaching a Lens
Getting started with your Blackmagic Camera is as simple as attaching a lens and turning the camera
on. To remove the protective dust cap from the lens mount, hold down the locking button and rotate
the cap counterclockwise until it is released. We recommended you always turn off your Blackmagic
HDMI
12V
Camera prior to attaching or removing a lens.
To attach a lens:
Step 1. Align the dot on your lens with the dot on the camera mount. Many lenses have either a blue,
red or white dot or some other indicator.
Step 2. Twist the lens clockwise until it locks into place.
Step 3. To remove the lens, hold down the locking button, rotate the lens counterclockwise until its
dot or indicator reaches the 12 o’clock position and gently remove.
When no lens is attached to the camera, the sensor is exposed to dust and other debris so you'll want
to keep the dustcap on whenever possible.
Turning Your Camera On
Pocket Cinema Camera
Before you can operate Pocket Cinema Camera, you need to insert the battery.
Inserting the battery into Pocket Cinema Camera
Step 1. On the under side of the camera, push the door release towards the lens to access the battery
terminal.
Step 2. With the gold contacts facing into the terminal and the white arrow facing the lens, hook the
lip of the battery under the orange tab and insert the battery until you feel it press into place.
Push the orange tab to release the battery.
Step 3. Close the door to the battery terminal and slide the door release to the right to lock it.
Step 4. Press the power button on the bottom right of the back panel. The status strip will appear
along the bottom of the LCD.
Step 5. Press and hold the power button to switch off the camera.
Congratulations! You are now ready to insert an SD card and start recording!

8
Getting Started
Use the supplied power adapter to charge the internal battery
and power the camera.
Cinema Camera & Production Camera 4K
Cinema Camera and Production Camera 4K have internal batteries that can be charged using the supplied
power adapter. The camera can be charged and operated while connected via external power and will
switch between power sources without any interruption.
You can also charge the camera via a powered USB connection, however it takes longer to charge so
we recommend using the power adapter when possible.
Step 1. Press the power button below the touchscreen. The status strip will appear along the bottom
of the LCD.
Step 2. Press and hold the power button to switch off the camera.
Congratulations! You are now ready to insert an SSD and start recording!
Press and hold the power button to turn the camera on or off.

9
Getting Started
Inserting an SD card into the Pocket Cinema Camera.
Inserting an SD Card
You can insert an SDXC or SDHC card into Blackmagic Pocket Cinema Camera:
Step 1. On the under side of the camera, push the door release towards the lens to access the battery
terminal.
Step 2. With the gold contacts on the SD card facing towards the lens, insert the SD card until you
feel it lock into place. Push on the SD card to release it.
Step 3. Close the door to the battery terminal and slide the door release to the right to lock it.
Step 4. Power on the camera. The status strip will display a moving dot while the camera checks the
SD card and then it will say READY.
The supplied SD card is for software installation only and not suitable for video recording. You'll find a
list of recommended SD cards on page 15.
Inserting an SSD
You can insert a 2.5" 9.5 mm SSD formatted in either the HFS+ or exFAT file systems into Cinema Camera
and Production Camera 4K:
Step 1. Open the SSD door on the right hand side of the camera.
Inserting an SSD into the Cinema Camera and the Production
Camera 4K.
Step 2. With the gold SATA contacts facing towards the camera door, insert the SSD until you feel it
press into place. Close the SSD door.
Step 3. Power on the camera. The status strip will display a moving dot while the camera checks the
SSD and then it will say READY.
You'll find a list of recommended SSDs on page 12.
10
Getting Started
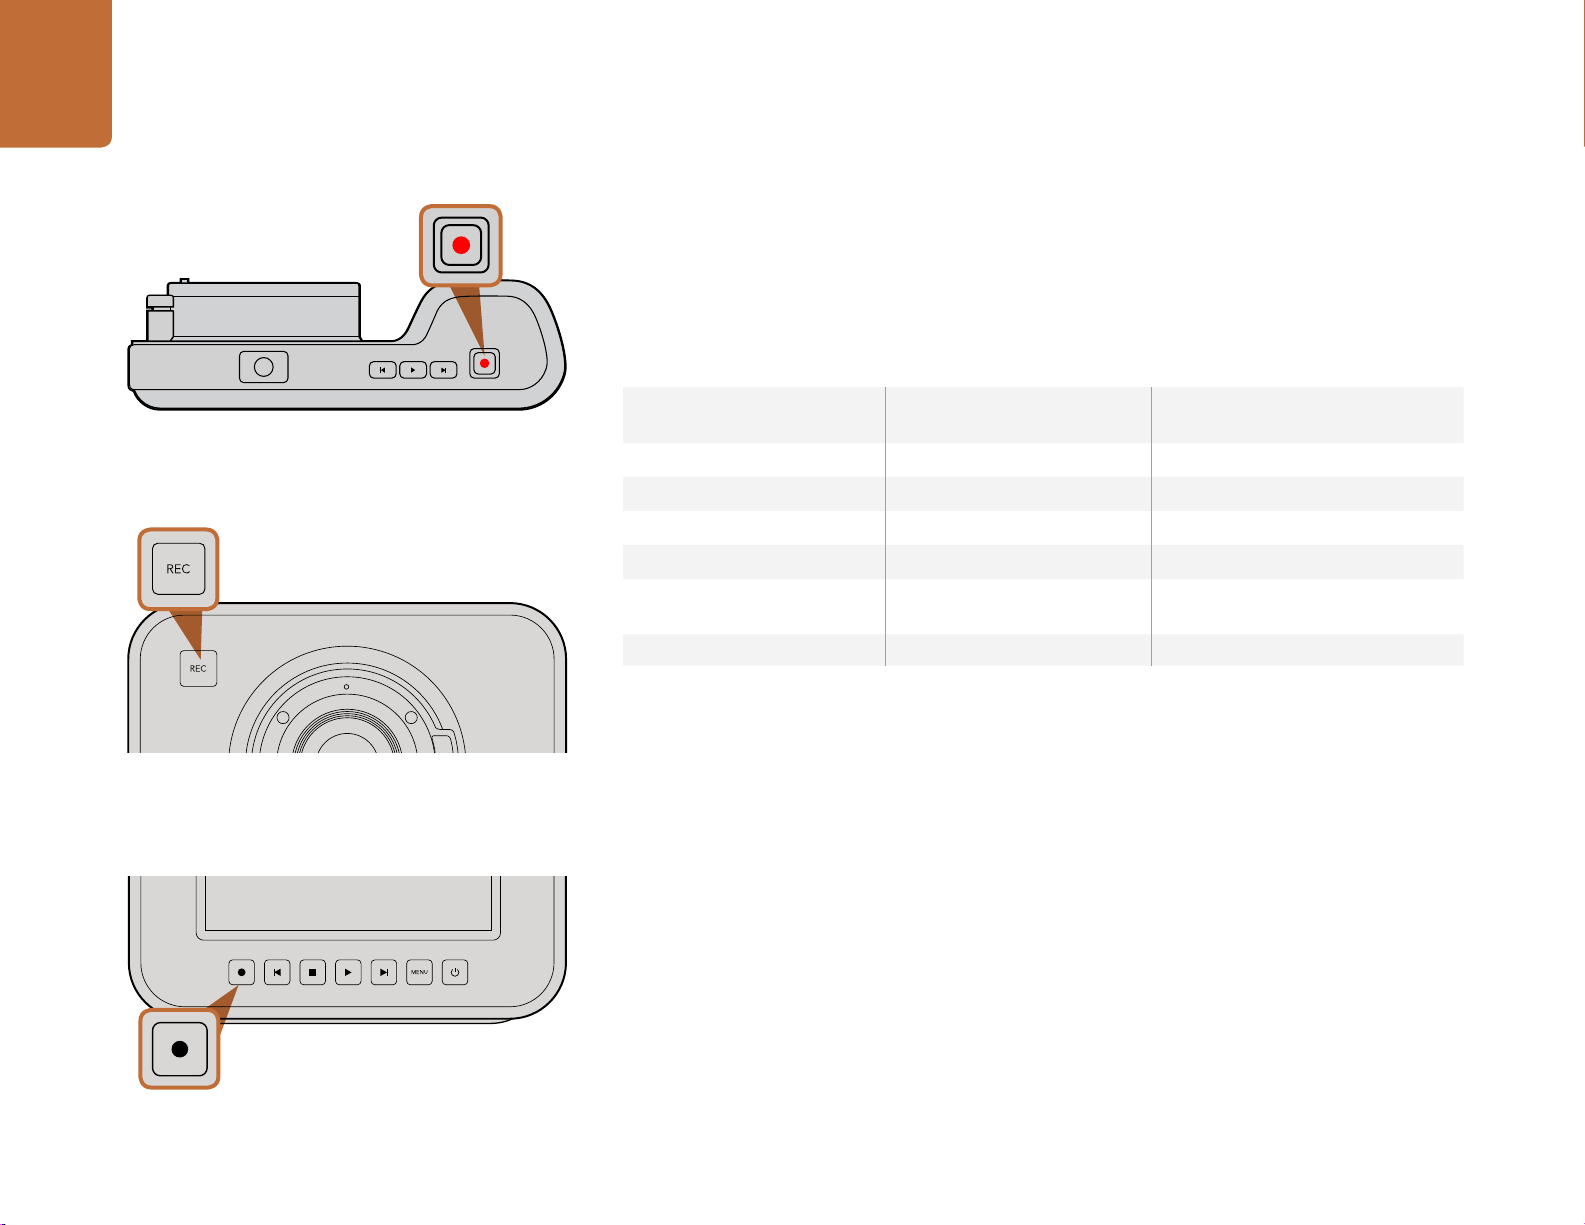
Recording
Press the REC button on your camera to begin recording immediately. Press REC again to stop recording.
Choosing the Recording Format
Blackmagic cameras record to several different formats, depending on which model you are using.
You may decide to experiment to see which format best suits your workflow.
Press the REC button on the top of Pocket Cinema Camera.
Press the REC button on the front face
or
on the transport control on the back of Cinema Camera and
Production Camera 4K.
Blackmagic Pocket
Cinema Camera
Apple ProRes 422 (HQ) Apple ProRes 422 (HQ) Apple ProRes 422 (HQ)
Apple ProRes 422 Apple ProRes 422 Apple ProRes 422
Apple ProRes 422 LT Apple ProRes 422 LT Apple ProRes 422 LT
Apple ProRes 422 Proxy Apple ProRes 422 Proxy Apple ProRes 422 Proxy
Lossless compressed
CinemaDNG RAW
You can choose from 4 different Apple ProRes formats. This lets you fit more video on your SSD or SD
card. ProRes 422 (HQ) provides the highest quality video with the lowest compression. Alternatively,
ProRes 422 Proxy gives you far more recording time with greater compression.
To select your desired video format:
Step 1. Press the MENU button.
Step 2. Select the RECORDING menu and use the selection arrows to set the desired recording format.
Step 3. Press the MENU button to exit.
Your camera is now ready to record in the video format you have selected. The current recording format
is shown on the left of the status strip on the LCD.
Blackmagic Cinema Camera Blackmagic Production
Camera 4K
CinemaDNG RAW 2.5K Lossless compressed CinemaDNG
RAW
Avid DNxHD
11
Getting Started
Blackmagic Cameras Supported Video Formats
To immediately view your recorded clip on a Blackmagic
Camera simply press the Play button on the transport
controls.
Blackmagic Pocket
Cinema Camera
1920 x 1080p23.98 2400 x 1350 12-bit 2.5K RAW 4000 x 2160 12-bit RAW
1920 x 1080p24 1920 x 1080p23.98 3840 x 2160p23.98
1920 x 1080p25 1920 x 1080p24 3840 x 2160p24
1920 x 1080p29.97 1920 x 1080p25 3840 x 2160p25
1920 x 1080p30 1920 x 1080p29.97 3840 x 2160p29.97
Blackmagic Cinema Camera Blackmagic Production
Camera 4K
1920 x 1080p30 3840 x 2160p30
1920 x 1080i50 (output) 1920 x 1080p23.98
1920 x 1080i59.94 (output) 1920 x 1080p24
1920 x 1080p25
1920 x 1080p29.97
1920 x 1080p30
1920 x 1080i50 (output)
1920 x 1080i59.94 (output)
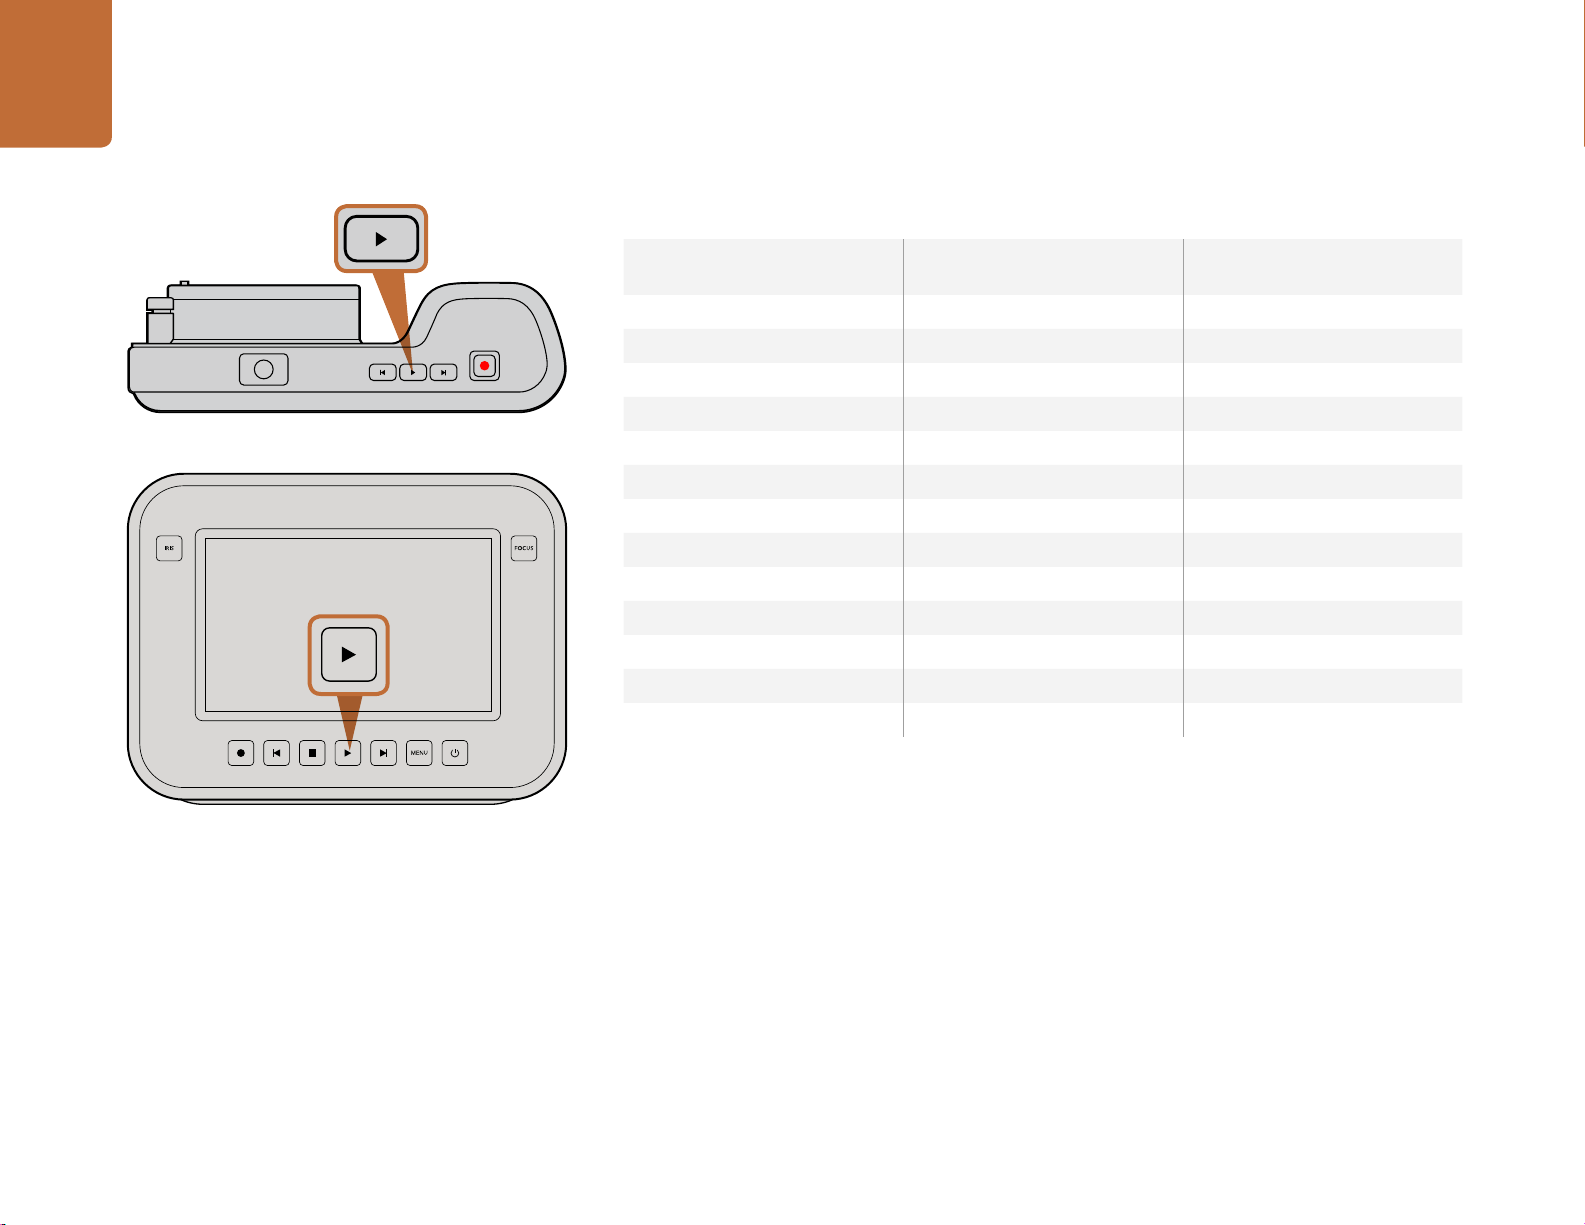
Playing Back Clips
Once you have recorded your video, you can use the transport control buttons to play back your video
on the LCD.
Press the play button once for instant playback and you'll see your video on the LCD and on any display
connected to the HDMI or SDI output. Hold down the forward or reverse buttons to fast forward or
reverse through the clip. Playback will finish when the end of the current clip is reached.
The controls of your camera work just like a CD player, so pressing the forward button will skip to the
start of the next clip. Press the reverse button once to go to the start of the current clip or press twice
to skip back to the start of the previous clip.

About SSDs
12
About SSDs
Intel 335 Series 240GB SSD
Sandisk Extreme 480GB SSD
Choosing a Fast SSD
When working with high data rate video it's important to carefully check the SSD you would like to use.
This is because some SSDs can have up to 50% lower write speed than the manufacturer’s claimed speed,
so even though the disk specifications claim an SSD is fast enough to handle video, in reality the disk is
not fast enough for real time video recording.
The following SSDs are recommended for 4K RAW and ProRes captures:
Sandisk Extreme Pro 240GB
(SDSSDXPS-240G-G25)
Sandisk Extreme Pro 480GB
(SDSSDXPS-480G-G25)
The following SSDs are recommended for 2.5K RAW CinemaDNG capture or compressed video capture:
Intel 335 Series 240GB SSD
Intel 520 Series 240GB SSD
Intel 520 Series 480GB SSD
Intel 530 Series 180GB SSD
Intel 530 Series 240GB SSD
Kingston 240 GB HyperX 3K
Kingston 480 GB HyperX 3K
Kingston 240 GB SSDNow KC300
Kingston 480 GB SSDNow KC300
Sandisk Extreme 240GB
Sandisk Extreme 480GB
PNY 240GB Prevail SSD (firmware 5.0.2)
OWC 120GB Mercury Extreme Pro 6G
(Firmware Rev 5.0.7)
Sandisk Extreme Pro 960GB
(SDSSDXPS-960G-G25)
OWC 240GB Mercury Extreme Pro 6G
(Firmware Rev 5.0.6)
OWC 480GB Mercury Extreme Pro 6G
(Firmware Rev 5.0.6)
Digistor 128GB SSD Professional Video
Extreme (pre-formatted ExFat)
Digistor 240GB SSD Professional Video
Series (pre-formatted ExFat)
Digistor 480GB SSD Professional Video
Series (pre-formatted ExFat)
Angelbird 240GB AV Pro (Firmware 2.54)
ADATA XPG SX900 256GB
Kingston HyperX 240GB SSD
In addition to the above, these SSDs work ONLY for compressed video capture:
Crucial 256GB M4 (firmware 000F)
OCZ Agility 3 240GB
If your SSD is dropping frames, try a different SSD or use a compressed HD recording format such as
ProRes or DNxHD for lower data rates. Check the Blackmagic Design website for the latest information.
Sandisk Extreme 120GB

13
About SSDs
Use Disk Utility on Mac OS X to erase your SSD in the
Mac OS Extended (Journaled) or exFAT format.
Preparing SSDs for Recording
SSDs used by Cinema Camera and Production Camera 4K must be formatted as either HFS+ or exFAT.
These disk formats allow long clips to be recorded as single files.
HFS+ is also known as Mac OS Extended. It is the recommended format as it supports "journaling".
In the event of a hardware or software malfunction, data on a journaled SSD is more quickly recovered
and less likely to be corrupted. HFS+ is natively supported by Mac OS X.
ExFAT is supported natively by Mac OS X and Windows without needing to purchase any additional
software. However exFAT does not support journaling which means data is less protected against
corruption, and less likely to be recovered in the rare event of a hardware or software malfunction.
Preparing SSDs on a Mac OS X computer
Use the Disk Utility application included with Mac OS X to format your drive in the HFS+ or exFAT formats.
Remember to back up anything important from your SSD as all data will be lost when it is formatted.
Step 1. Connect the SSD to your computer with an external dock or cable adapter and dismiss any
message offering to use your SSD for Time Machine backups.
Step 2. Go to Applications/Utilities and launch Disk Utility.
Step 3. Click on the disk icon of your SSD and then click the Erase tab.
Use the Format dialog box feature in Windows to format your
SSD in the exFAT format.
Step 4. Set the Format to "Mac OS Extended (Journaled)" or "exFAT".
Step 5. Type a Name for the new volume and then click Erase. Your SSD will quickly be formatted and
made ready for use.
Preparing SSDs on a Windows computer
The Format dialog box can format a drive in the exFAT format on a Windows PC. Remember to back up
anything important from your SSD as all data will be lost when it is formatted.
Step 1. Connect the SSD to your computer.
Step 2. Open the Start Menu or Start Screen and choose Computer. Right-click on your SSD.
Step 3. From the contextual menu, choose Format.
Step 4. Set the file system to "exFAT" and the allocation unit size to 128 kilobytes.
Step 5. Type a volume label, select "Quick Format" and click "Start".
Step 6. Your SSD will quickly be formatted and made ready for use.

14
About SSDs
Checking Disk Speed
Blackmagic Disk Speed Test is a fun application that measures the read and write performance of storage
media, then displays the results using video formats.
If you have ever wondered whether your hard drive is suitable for recording ("write") or playback (“read”)
of a particular video format, you can use Disk Speed Test to find out. Test the performance of your media
drives with a single click of the Start button! Disk Speed Test will even show you how many streams of
video your storage is capable of handling.
Disk Speed Test is included free in the Blackmagic Camera Software Utility supplied with your Blackmagic
Cinema Camera and Production Camera 4K. The Blackmagic Camera Software Utility can also be
downloaded from our website free of charge.
Use Disk Speed Test to find out the performance of your
media drives.
Disk Speed Test interface.

About SD Cards
15
About SD Cards
Preparing SD Cards for Recording
SD cards used by Blackmagic Pocket Cinema Camera must be formatted as HFS+ or exFAT. These disk
formats allow long clips to be recorded as single files. ExFAT is supported by both Windows and Mac
OS X computers.
Preparing SD Cards on a Mac OS X computer
Use the Disk Utility application included with Mac OS X to format your SD card in the HFS+ or exFAT format.
Remember to back up anything important from your SD card as all data will be lost when it is formatted.
Step 1. Plug your SD card into your computer's SD card slot or SD card reader.
Step 2. Go to Applications/Utilities and launch Disk Utility.
Step 3. Click on the disk icon of your SD card and then click the Erase tab.
Step 4. Set the Format to "Mac OS Extended (Journaled)" or "exFAT".
Step 5. Type a Name for the new volume and then click Erase. Your SD card will quickly be formatted
and made ready for use.
Preparing SD Cards on a Windows computer
The Format dialog box can format a drive in the exFAT format on a Windows PC.
Step 1. Plug your SD card into your computer's SD card slot or SD card reader.
Step 2. Open the Start Menu or Start Screen and choose Computer. Right-click on your SD card.
Step 3. From the contextual menu, choose Format.
Step 4. Set the file system to "exFAT" and the allocation unit size to 128 kilobytes.
Step 5. Type a volume label, select "Quick Format" and click "Start".
Step 6. Your SD card will quickly be formatted and made ready for use.
Choosing a Fast SD Card
It's important to use SDHC and SDXC cards with Blackmagic Pocket Cinema Camera. These cards are
rated for fast data speeds and support larger storage sizes.
Recommended SDHC and SDXC cards include:
Delkin Devices 16GB Elite SDHC UHS-I Sandisk 64GB Extreme SDXC UHS-I Sandisk 16GB Extreme Pro SDHC UHS-I
Delkin Devices 32GB Elite SDHC UHS-I Sandisk 128GB Extreme SDXC UHS-I Sandisk 64GB Extreme Pro SDHC UHS-I
Please check the tech notes on the Blackmagic Design website for the latest information.

Connections
HDMI
12V
16
Connections
Blackmagic Pocket Cinema Camera
LANC Remote Control
The remote por t on your camera is used to remotely control record starting and stopping, iris adjustments
and manual focus adjustments when using a compatible lens.
The port is a 2.5 mm stereo jack using the standard LANC protocol.
Headphones
Monitor audio while recording or playing back clips by plugging your headphones into the 3.5mm stereo
headphones jack.
Audio In
The 3.5mm stereo audio connector accepts microphone or line level audio. It's important to select the
appropriate setting or your audio may sound too quiet or too loud. The camera automatically switches
to line level if the audio is too loud for a sustained period.
HDMI Out
The micro HDMI port outputs 10-bit uncompressed HD1080p video, even while recording. It can be
used to output video to routers, monitors, capture devices, broadcast switchers and other HDMI devices.
Power
Use the 0.7mm 12 – 20V power input for connecting your power supply and to charge the battery.
USB
Use the USB port to connect your Blackmagic Pocket Cinema Camera to your computer and update the
internal software. The USB port can be found inside the battery compartment.
17
Connections
Blackmagic Cinema Camera and Production Camera 4K
LANC Remote Control
The remote por t on your camera is used to remotely control record starting and stopping, iris adjustments
and manual focus adjustments when using a compatible lens.
The port is a 2.5 mm stereo jack using the standard LANC protocol.
Headphones
Monitor audio while recording or playing back clips by plugging your headphones into the 3.5mm stereo
headphones jack.
Audio In
The 1/4 inch TRS Phone audio connectors accept microphone or line level audio. It's important to select
the appropriate setting or your audio may sound too quiet or too loud. The camera automatically switches
to line level if the audio is too loud for a sustained period.
SDI Out
Blackmagic Cinema Camera supports 3G-SDI so it can be used to output uncompressed 10-bit 4:2:2
video to routers, monitors, SDI capture devices, broadcast switchers and any other SDI devices.
Production Camera 4K supports 6G-SDI, so it can be used to connect to any SDI monitor as well as 4K
switchers such as ATEM Production Studio 4K.
Thunderbolt
When connected to a Mac OS X or Windows computer with Thunderbolt technology, your Cinema
Camera or Production Camera 4K can be used as a powerful solution for waveform monitoring and
color correction. Blackmagic Cinema Camera's Thunderbolt port always outputs 10-bit uncompressed
HD1080p video. Production Camera 4K's Thunderbolt port matches the SDI output, which can be 10-bit
uncompressed HD1080p or Ultra HD 4K.
Power
Use the 12 – 30V power input for connecting your power supply and to charge the internal battery.
USB
Use the USB port to connect your Blackmagic Cinema Camera or Produc tion Camera 4K to your computer
and update the internal software. Open the SSD door to access the USB port.

Settings
18
Settings
The Camera Settings screen
Camera Settings
To configure settings on your Blackmagic camera, press the MENU button.
Pocket Cinema Camera
Press the up and down buttons to highlight each settings menu. Press OK to enter a settings
menu. Use the left and right directional arrows to adjust values and the up and down arrows to
move between settings. Press Menu again to return to selecting between main settings pages.
Press Menu again to exit.
Cinema Camera & Production Camera 4K
Tap or slide the relevant arrows and icons on the touchscreen to change values or switch between
settings menus.
Camera ID
If using more than one Blackmagic Camera, it's helpful to set each camera's ID which will be
included with any metadata recorded with your clips. Set the camera ID with the onscreen
keyboard. When you have finished entering a new camera ID, select the Enter button to save, or
select Cancel to discard any changes.
Setting Date and Time
To set date and time on your Pocket Cinema Camera, select the + or - buttons to change the
year, month and day settings.
You can change the camera ID with the onscreen keyboard
Time is set to 24 hour format on Blackmagic Cameras. To set the time, select the + and - keys to
make adjustments to the time. If traveling with your Blackmagic Camera, remember to change
the date and time to local time zones.
If you have your Blackmagic Camera stored for long periods, the time may need to be reset.
It is always a good idea to check the time and date prior to recording. When connecting your
camera to your computer via USB and launching Blackmagic Camera Utility, your computer's
time is synced to your camera.

19
Settings
The Camera Settings screen
ISO
ISO settings are helpful when you are shooting in a variety of light conditions. The optimum ISO
setting for the Pocket Cinema Camera and Cinema Camera is 800ASA. For Production Camera
4K the optimum ISO setting is 400ASA.
Depending on your situation, however, you may choose a lower or higher ISO setting. For example,
in low light conditions 1600ASA would be suitable but may introduce some visible noise. In bright
conditions 400ASA would be best to record richer colors.
Adjust the ISO settings using the arrow icons in the menu.
White Balance
Your Blackmagic Camera includes 6 white balance presets for a variety of color temperature
conditions. These are:
3200K for tungsten light
4500K for fluorescent light
5000K, 5600K, 6500K and 7500K for a variety of daylight conditions such as time of day.
Adjust the White Balance settings using the arrow icons in the menu.
Shutter Angle
Shutter angle complements the ISO setting by regulating the amount of light on the sensor. 180
degrees is the optimum shutter angle, however as lighting conditions change you may need to
adjust accordingly. For example, 360 degrees is considered 'wide open' and allows maximum
light onto the sensor. This is useful for low light conditions. If you notice lights are flickering, 172.8
degrees will minimize this effect when shooting 24p in countries with 50 hertz power supplies.
Adjust the Shutter Angle settings using the arrow icons in the menu.
20
Settings
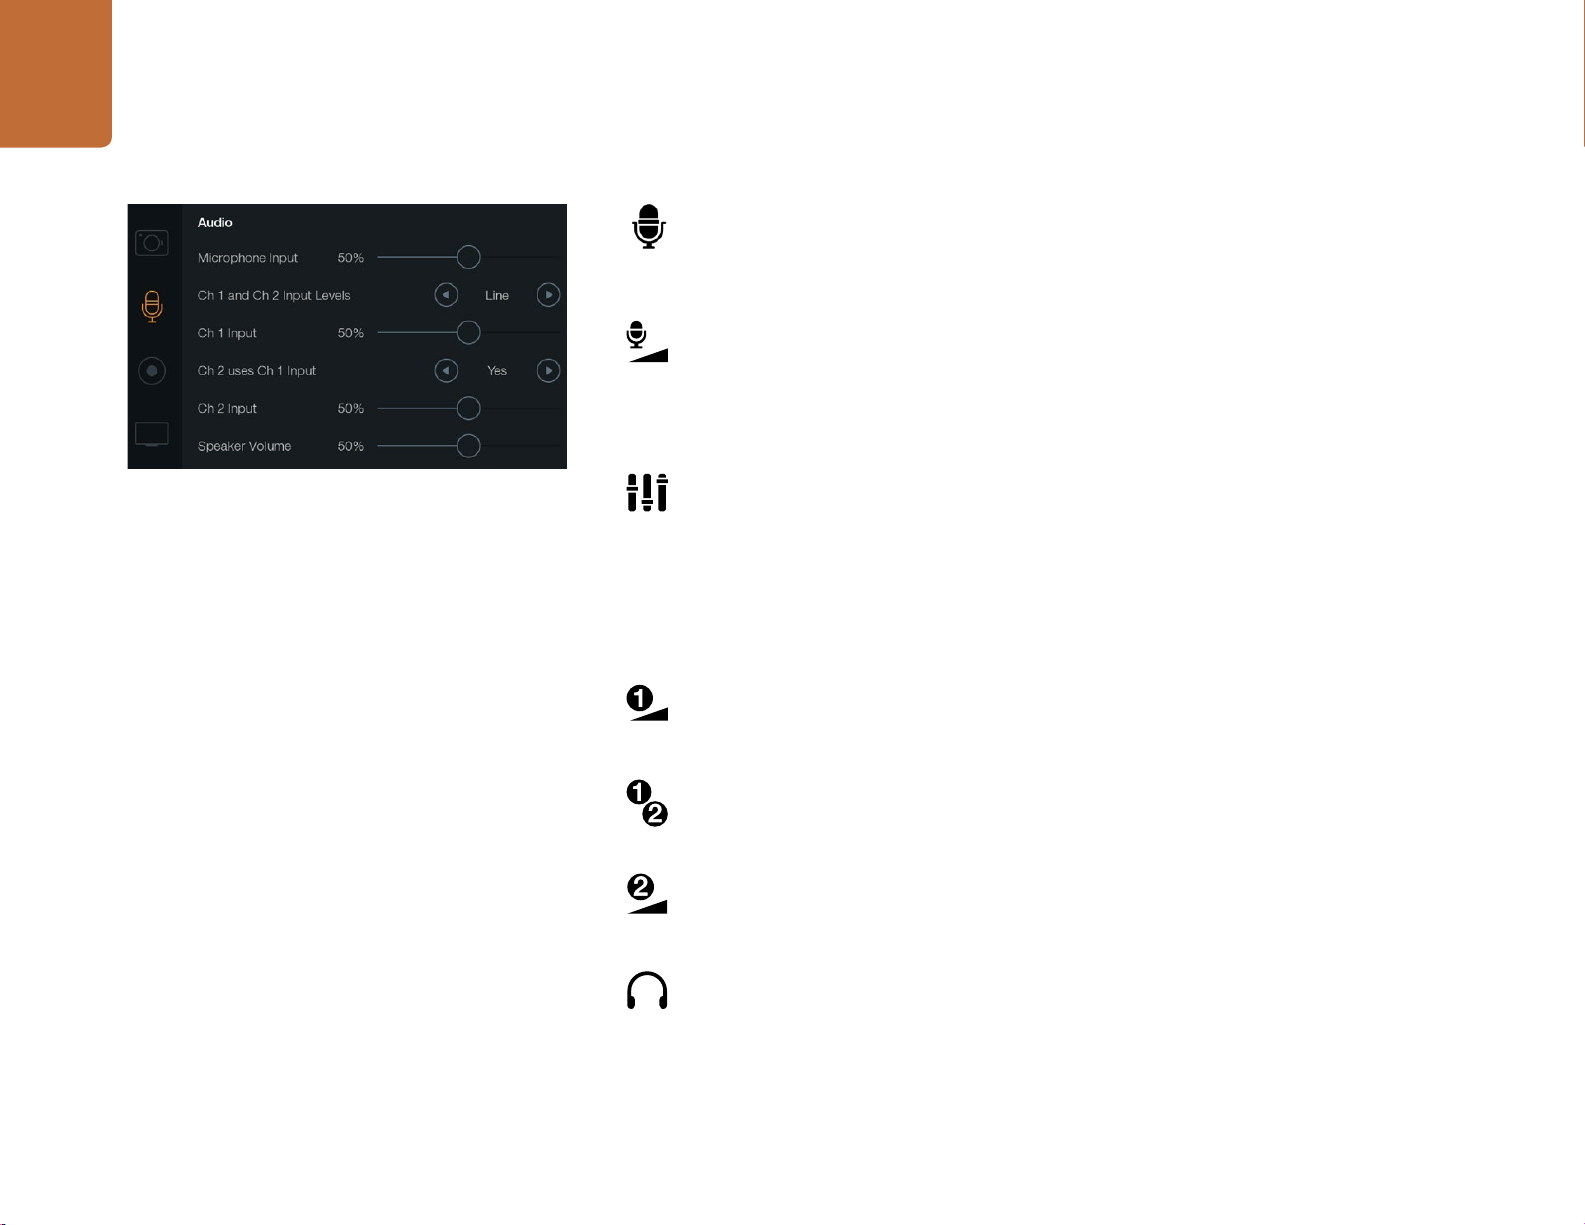
Audio Settings
To adjust audio input and audio monitoring settings on your Blackmagic Camera, press the MENU
button and select the microphone icon to the left of the display.
Microphone Input
Microphone input adjusts the recording levels of the built in microphone. Move the audio slider
left or right to increase or decrease levels. Pocket Cinema Camera has a built in stereo microphone
and Cinema Camera and Production Camera 4K have built in mono microphones. The built in
microphones record to audio channels 1 and 2 when no external audio source is connected.
The Audio Settings screen
Channel 1 and 2 Input Levels
External audio connectors accept audio at microphone level or line level. It's important to select
Mic or Line level audio as appropriate to avoid your external audio sounding almost inaudible
or too hot and distorted.
Set the external audio input levels by using the left and right arrows. To prevent damage, the
camera will automatically switch to line level input if the input levels are over the limit for a
sustained period of time.
Channel 1 Input Level
Move the audio slider icon left or right to increase or decrease levels for channel 1. The external
audio input overrides the built in microphone and is recorded to audio channel 1.
Channel 2 uses Channel 1 Input
Select Yes if you only have channel 1 input and want to record the same external audio to channels
1 and 2. You can leave this set to No if you only want to record one channel of audio.
Channel 2 Input Level
Move the audio slider icon left or right to increase or decrease levels for channel 2. The external
audio input overrides the built in microphone and is recorded to audio channel 2.
Headphone and Speaker Volume
When headphones are connected, a headphone icon will be displayed. When no headphones
are detected, a speaker icon will be displayed. Headphones will always be active when recording
or playing back, however speakers will only work when playing back. Move the volume slider left
or right to increase or decrease audio monitoring levels.
21
Settings
The Recording Settings screen
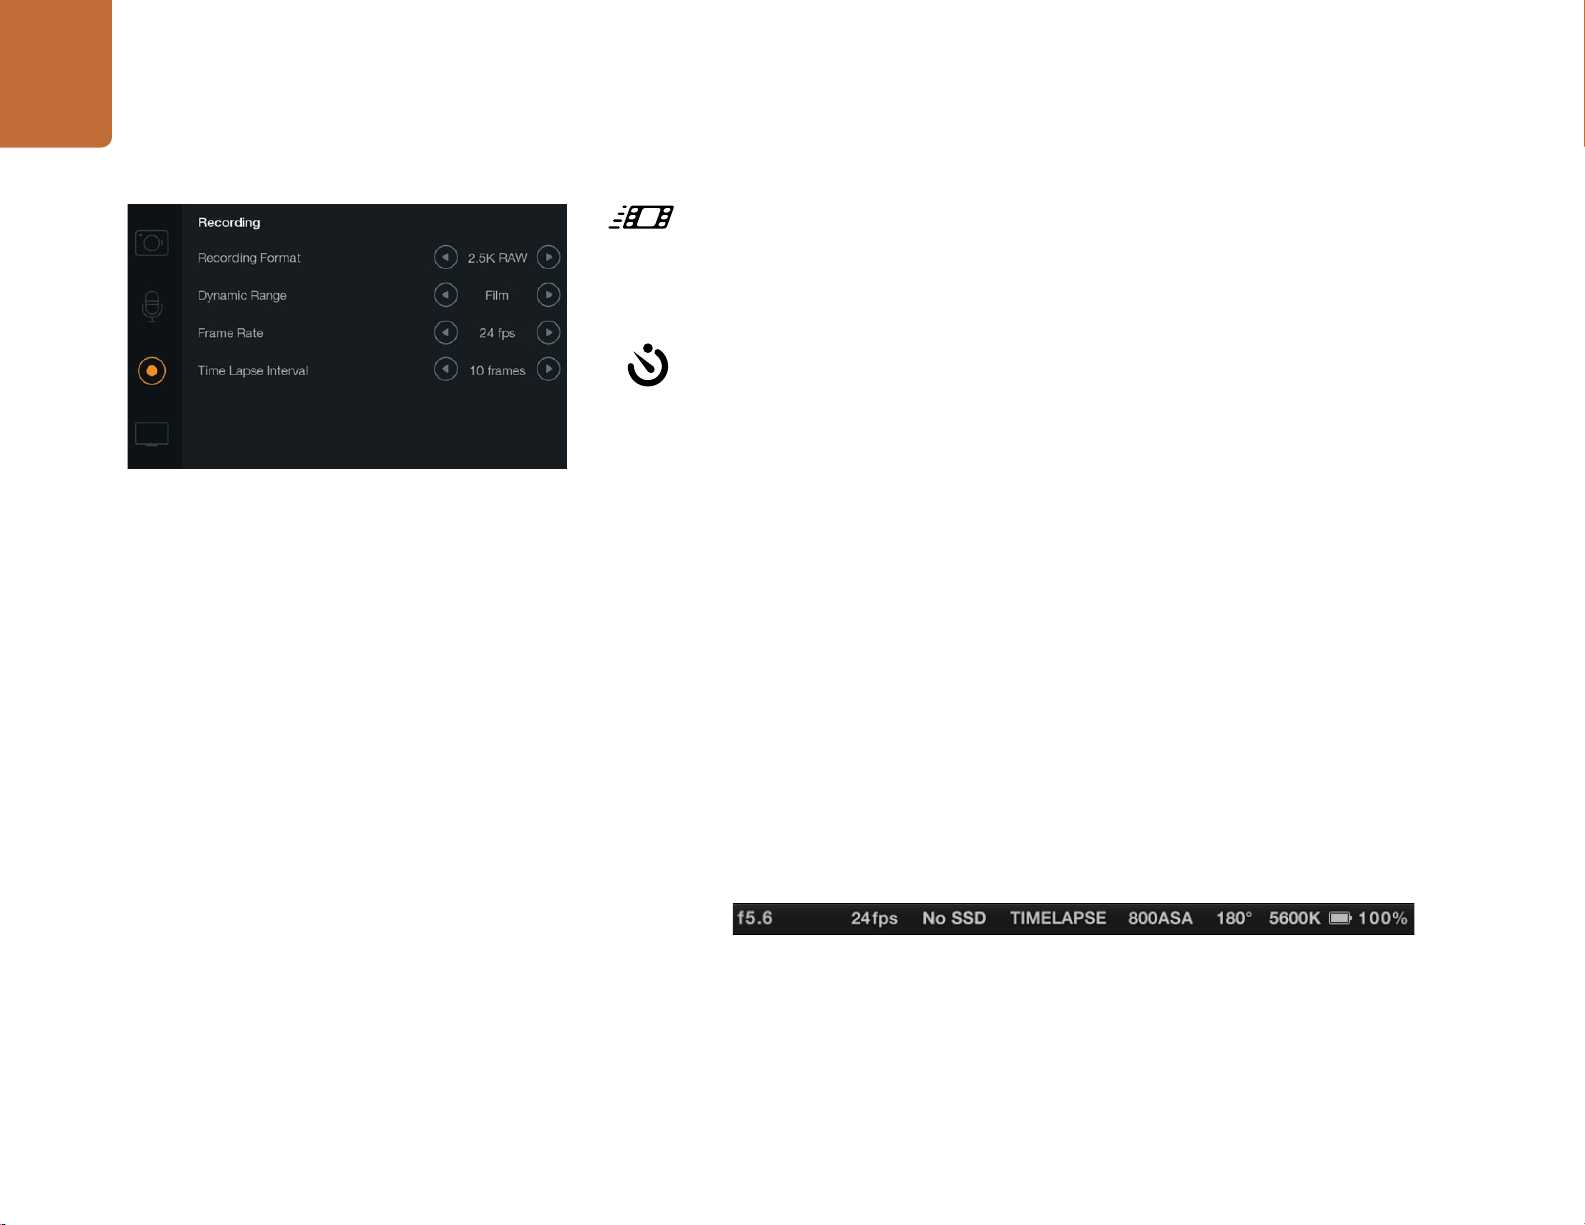
Recording Settings
The recording settings are used to set the video format recorded to your SD card or SSD. Press
the MENU button and touch the circular RECORD icon to access the Recording settings menu.
Recording Format
Pocket Cinema Camera
Touch the left and right arrow buttons to switch between ProRes HQ, ProRes 422, ProRes LT,
ProRes Proxy or RAW recording formats.
Cinema Camera
Touch the arrow icons to switch between 2.5K RAW, ProRes HQ, ProRes 422, ProRes LT, ProRes
Proxy or DNxHD recording formats.
Production Camera 4K
Touch the arrow icons to switch between HD formats such as ProRes HQ, ProRes 422, ProRes
LT and ProRes Proxy, or switch between 4K ProRes HQ, 4K ProRes 422, 4K ProRes LT, 4K ProRes
Proxy, or 4K RAW recording formats.
Dynamic Range
Blackmagic Cameras have two dynamic range settings:
Film
The film setting shoots video using a log curve and gives you 13 stops of dynamic range on
both Pocket Cinema Camera and Cinema Camera, or 12 stops on Production Camera 4K.
The Film dynamic range setting maximizes the information in your video signal to help you get
the most out of color grading software, such as DaVinci Resolve. When recording in CinemaDNG
RAW formats, only the Film dynamic range setting is available.
Video
The video setting uses the REC709 standard for high definition video. This lets you work faster by
recording directly to the compressed video formats your camera supports, which are compatible
with popular post production software.
Adjust the dynamic range settings using the arrow icons in the menu.
22
Settings
Frame Rate
Your Blackmagic Camera has five different frame rate settings for shooting common film and
video frame rates: 23.98 fps, 24 fps, 25 fps, 29.97 fps, 30 fps.
Adjust the frame rate setting using the arrow icons in the menu.
Time Lapse Interval
This setting allows you to record a still frame at the following intervals:
Frames: 2 - 10
Seconds: 1 - 10, 20, 30, 40, 50
The Recording Settings screen
Minutes: 1 - 10
For example, you can set the camera to record a still frame every 10 frames, 5 seconds, 30 seconds,
5 minutes etc.
The Time Lapse feature offers many creative options. For example, if the Time Lapse interval is
set to record a frame at 2 frame intervals, this will give your recorded video a high speed effect
when played back.
The format of each still frame is based on your recording format, so if you set the camera to record
in ProRes 422 (HQ), the Time Lapse setting will maintain this format. The frame rate will be based
on the video frame rate you have set the camera to, i.e., 24fps, so your time lapse footage can be
incorporated into your workflow easily.
When the REC button is pressed in Time Lapse mode, a "TIME LAPSE" message will replace
the timecode in the status strip and on the SDI or HDMI output for 2 seconds before reverting
back to the normal timecode display. The timecode counter updates when a frame of video is
recorded, meaning the rate of timecode increments depends on the Time Lapse interval setting.
Use the arrow icons to choose a Time Lapse interval or leave it set to Off if you do not want to
use the Time Lapse feature.

23
Settings
File Naming Convention
Pocket Cinema Camera
Pocket Cinema Camera uses the following file naming convention when recording video.
[Camera ID]_[Reel Number]_[yyyy-mm--dd]_[hhmm]_C[Clip number].mov
The table below shows an example of how this would appear on the LCD:
BMC01_1_2012-08-08_1631_C0002.mov
BMC01_1_ 2012-08-08_1631_C0 0 02.mov
BMC01_1_2012-08-08_1631_C0002.mov
BMC01_1_2012-08-08_1631_C0002.mov
BMC01_1_2012-08-08_1631_C0002.mov Time (16:31pm - 24hrs)
BMC01_1_2012-08-08_1631_C0002.mov Clip Number
For CinemaDNG files, the folder of the image sequence will also be named the same way.
QuickTime Movie Filename
Camera ID
Reel Number
Date (2012 Aug 08)
Blackmagic Cinema Camera and Production Camera 4K
Clips are recorded to your SSDs in the CinemaDNG RAW format or to a ProRes or DNxHD QuickTime
movie, depending upon which recording format you have chosen. Blackmagic Cinema Camera and
Production Camera 4K use the following file naming convention when recording video.
[Camera ID]_[Reel Number]_[yyyy-mm--dd]_[hhmm]_C[Clip number].mov
The table below shows an example of how this would appear on the camera's touchscreen:
BMC01_1_2012-08-08_1631_C0002.mov
BMC01_1_ 2012-08-08_1631_C0 0 02.mov
BMC01_1_2012-08-08_1631_C0002.mov
BMC01_1_2012-08-08_1631_C0002.mov Date (2012 Aug 08)
BMC01_1_2012-08-08_1631_C0002.mov Time (16:31pm - 24hrs)
BMC01_1_2012-08-08_1631_C0002.mov Clip Number
QuickTime Movie Filename
Camera ID
Reel Number
For CinemaDNG files, the folder of the image sequence will also be named the same way.
24
Settings
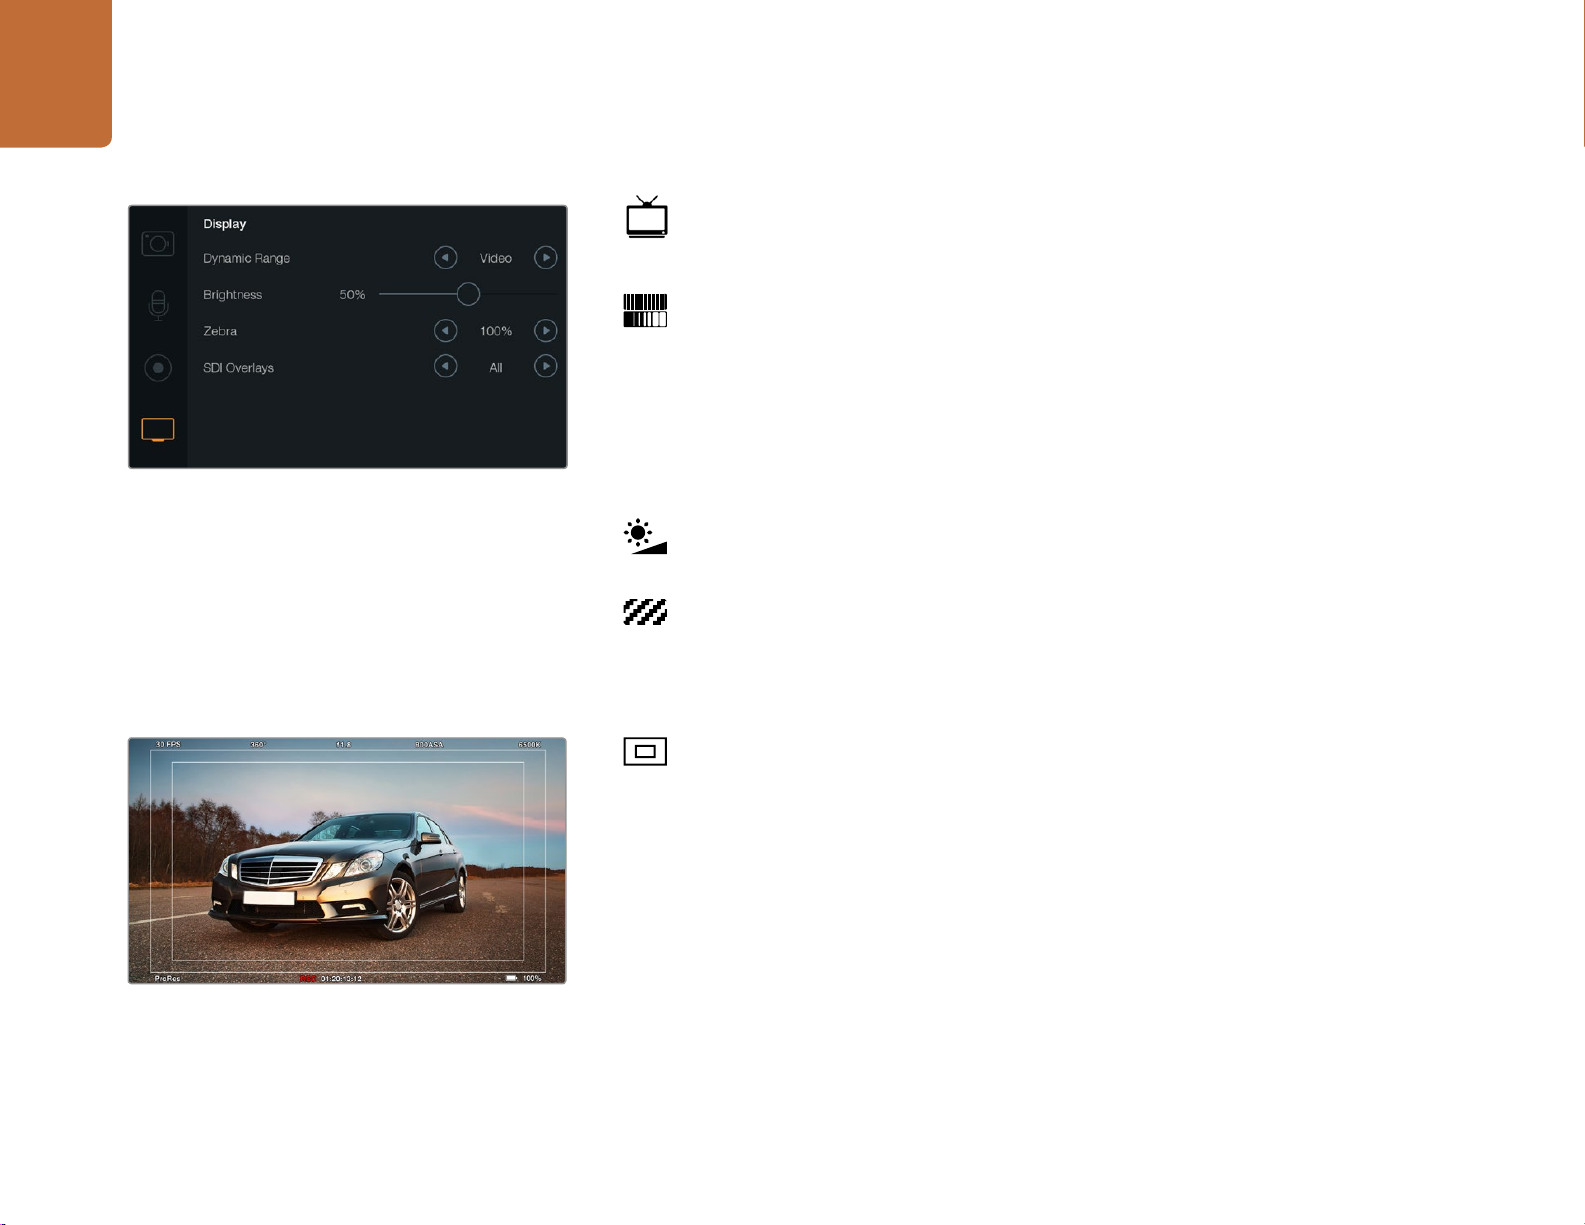
Display settings
To adjust the display settings for the LCD, press the MENU button and select the television icon.
Dynamic Range
The LCD allows you to view your video as you are recording. You can set the dynamic range of
the LCD by selecting Video or Film.
The dynamic range setting of the LCD is independent to the dynamic range set in the recorder
settings. Some people prefer to monitor video with the LCD set to Video even when the recording
format is set to Film.
Display Settings screen on Cinema Camera and
Production Camera 4K
SDI/HDMI Overlays set to display on an external monitor
Adjust the dynamic range setting of the LCD using the arrow icons in the menu.
Brightness
Move the slider icon left or right to adjust brightness settings for the LCD.
Zebra
Blackmagic Cameras have a zebra feature which gives an indication of exposure levels. Diagonal
lines will appear across any part of the video that exceeds the zebra exposure level.
Turn zebra on and select the desired zebra warning level by using the left and right arrows.
SDI/HDMI Overlays
You can monitor your video on an external display using the HDMI port on Pocket Cinema Camera,
or the SDI port on Cinema Camera and Production Camera 4K.
The SDI or HDMI Overlays setting lets you display useful information on your monitor. Use the
arrow icons to select which overlays to display on your SDI or HDMI feed.
All: displays both frame guides and recording information.
Status: displays only the recording information, such as f-stop number, frame rate, battery life etc.
Guides: displays only the frame guides.
Off: gives you a clean feed.

25
Settings
On Screen Metering
Production Camera 4K features additional displays such as Recording Time Remaining, Histogram and
Peak Audio Meters to assist when setting optimum exposure and to prevent your audio from clipping.
View the additional displays by swiping up from the bottom of the touch screen with your finger. Hide
the additional displays by swiping down.
Histogram
The Histogram display shows the distribution of the luminance in your video. Pure black is on the far left
side of the display and pure white is on the far right of the display. Keeping your video signal within these
limits prevents your shadows and highlights from being clipped and preserves detail in the tonal ranges.
Production Camera 4K on screen metering and status bar
Recording Time Remaining
The Recording Time Remaining indicator shows the remaining recording time for your SSD. The time is
shown in hours and minutes and will vary according to your selected frame rate and codec, for example,
ProRes 422 (HQ) at 24 frames per second. The indicator will automatically recalculate if either of these
settings are changed. When there is approximately 5 minutes remaining on your SSD, the indicator will
turn RED, and will BLINK intermittently when there is only 2 minutes remaining.
Peak Audio Meters
The Peak Audio Meters display audio levels for channels 1 and 2 when using the internal microphone,
or via external audio when connected. The display is calibrated to dBFS units and features peak hold
indicators which stay visible for a short time so you can clearly see the maximum levels reached. To
achieve optimum audio quality, ensure your audio levels never rise above 0 dBFS. If your audio rises
above 0 dBFS, the peak hold indicators will turn red, indicating that audio is clipped.
26
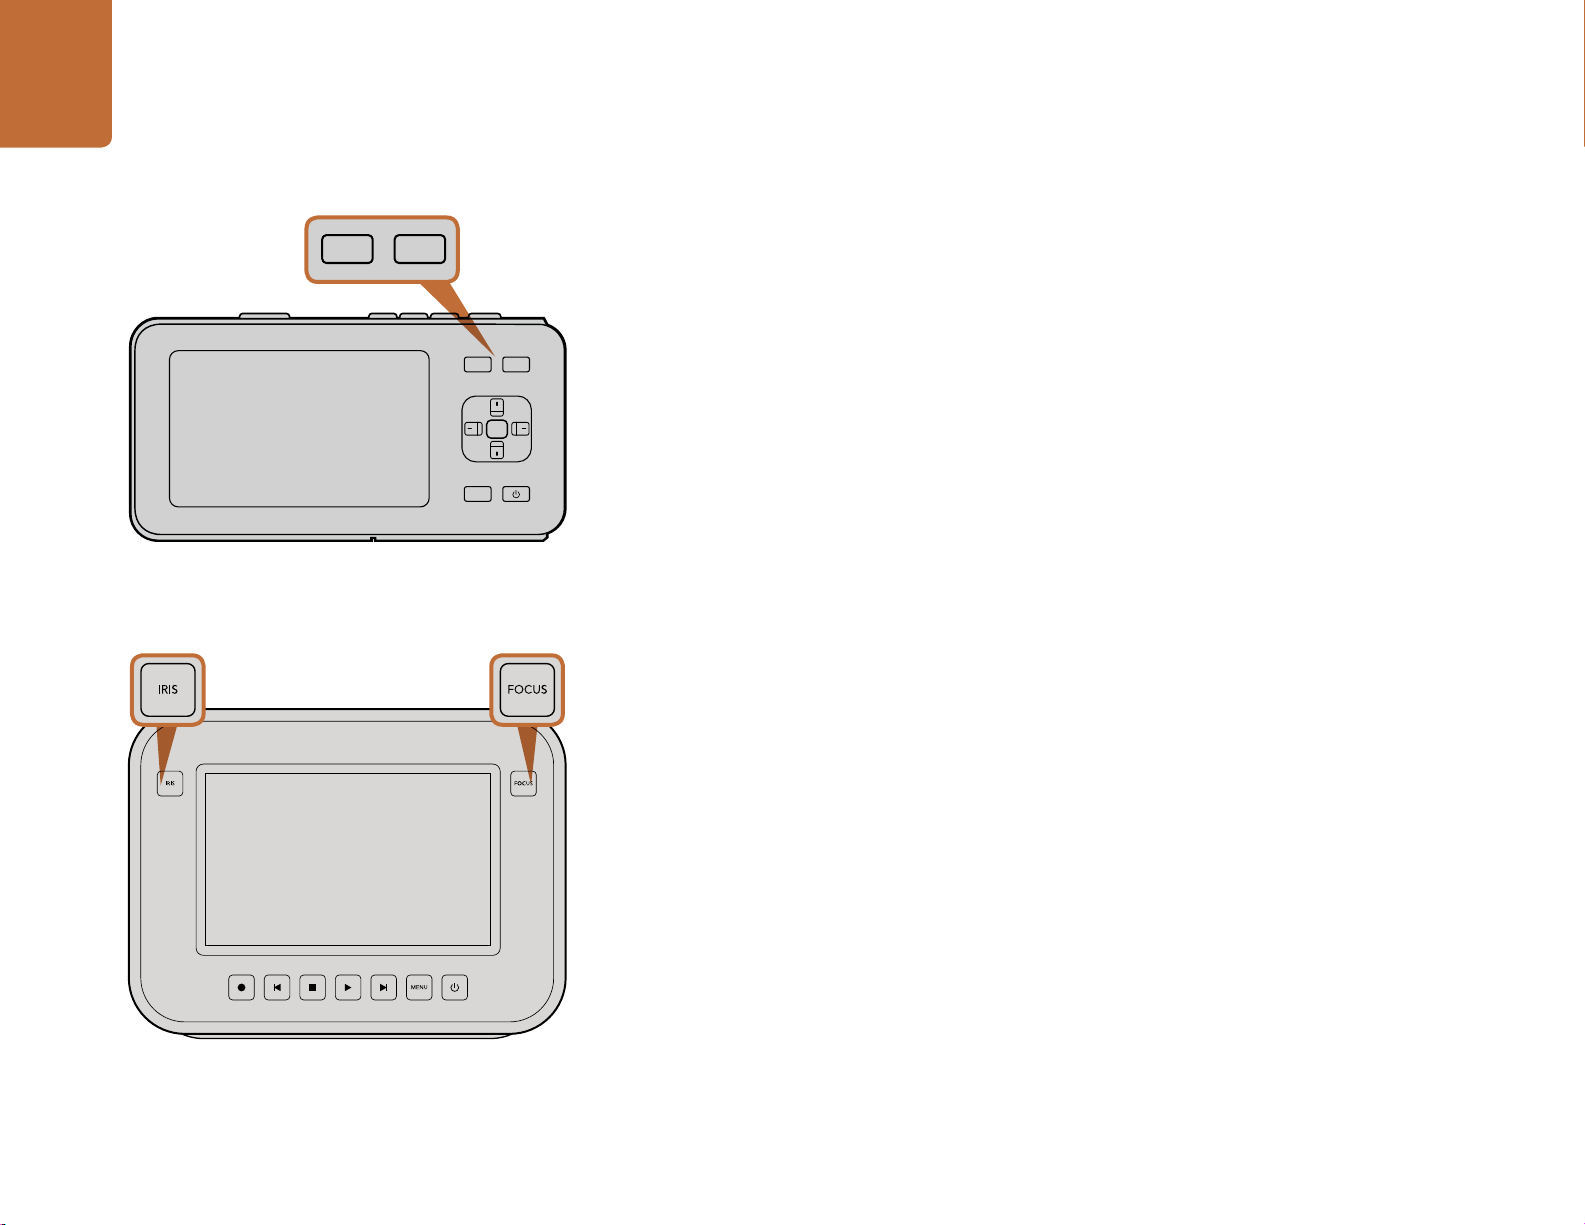
IRIS FOCUS
Settings
IRIS FOCUS
OK
MENU
On Pocket Cinema Camera, press the IRIS button, then use
the up and down directional buttons to adjust aperture
control. Press the FOCUS button for focus peaking.
Adjusting Settings
Blackmagic Pocket Cinema Camera, Cinema Camera EF and Production Camera 4K support electronic
lens control, which allows you to adjust lens controls from the camera such as aperture and autofocus.
Cinema Camera MFT has a passive lens mount if you want to use manual lenses without electronic control.
The focus peaking feature creates a yellow edge around the sharpest parts of the image so you can easily
confirm your focus. Focus peaking is only visible on the LCD and does not affect your recorded picture.
Iris Button
When using Video dynamic range settings, a single press of the Iris button will set an average exposure
based on the highlights and shadows in your shot. When using Film dynamic range settings, pressing
the IRIS button sets your exposure to the brightest highlight in your shot.
To set your aperture manually on Pocket Cinema Camera press the up and down directional buttons
on the back panel.
To set your aperture manually on Cinema Camera and Production Camera 4K press the forward and
reverse buttons on the transport controls.
Focus Button
When using an autofocus lens press the FOCUS button for focus peaking or autofocus. Press the FOCUS
button once to auto focus. A quick double press of the FOCUS button activates focus peaking.
When using a manual lens, press the FOCUS button once for focus peaking.
Focus Zoom
When using Pocket Cinema Camera, double press OK to zoom in for adjusting focus at the 1:1 pixel
scale. Double press OK again to zoom out.
On Cinema Camera and Production Camera 4K, double tap the touchscreen display to zoom into the
image for adjusting focus at the 1:1 pixel scale. Double tap the display again to zoom out.
On Cinema Camera and Production Camera 4K, press the
IRIS button, then use the transport controls to adjust aperture
control. Press the FOCUS button for focus peaking.

27
Settings
Image Stabilizer
Pocket Cinema Camera, Cinema Camera EF and Production Camera 4K support the image stabilizer (IS)
feature found in many active lenses. Simply set the Stabilizer switch to ON to use it with your camera. If your
lens also features a Stabilizer Mode switch, set it to the appropriate mode for still shots or for movement.
When using battery power, the camera will only activate the image stabilizer while recording, as the lens
draws additional power from the camera to operate the image stabilizer. When external power is connected
to the camera, the image stabilizer will be active any time you set the lens stabilizer switch to ON.
Status Strip
Your chosen settings are always displayed on a status strip, which runs the length of the LCD, showing
a convenient summary of the camera's current settings.
Battery Life Indicator
When the remaining charge drops below 25% capacity, the status strip will show the battery status in
red to warn you that battery life is running low.
1 2 3 4
1. Recording Format
2. F-Stop
3. Frame Rate
4. SD/SSD Status
5. Timecode
6
5 8 97
6. ISO Setting
7. Shutter Angle
8. White Balance
9. Battery Life Indicator
SD/SSD Activity Icons
The status strip displays important information showing the state of the inserted media.
Moving Dots
No SD/SSD This means no media is detected or present in the camera.
Ready Ready to Record.
Rec Recording.
Rec flashing Dropped Frames were detected.
Disk Full Flashes when SD card or SSD is almost full.
Playback mode Displays play, fast forward and reverse icons.
Time Displays the duration of the current shot while recording. When playing back
When you see the moving dots, the camera is checking and preparing the media.
clips from an SD card or SSD, this shows the time of the clip.

Entering Metadata
28
Entering Metadata
The Slate
Select the auto-increment icon if you want the scene, shot
or take number to auto-increment.
What is the Slate?
The LCD on your Blackmagic camera has many purposes, one of which is to allow you to easily log
metadata directly into the camera using the Slate feature. Metadata is stored in the recorded files and
is easily accessed by editing software.
Pocket Cinema Camera
Step 1. Press OK once to make the slate appear.
Step 2. Use the directional buttons to select the text you wish to change and press OK. An onscreen
keyboard will appear. Use the directional buttons to select characters on the keyboard and
press OK to confirm each character selection.
Step 3. Once you have typed in your information, select Save and press OK to return to the metadata
screen.
Step 4. If you want the scene, shot or take number to auto-increment, select the corresponding auto-
increment icon so it is illuminated and press OK.
Entering words into the Keywords field allows them to be used as search terms in your library database.
This may be particularly useful for large projects with lots of material. The use of keywords narrows down
the number of clips to search through, saving valuable time when you are editing.
On Cinema Camera and Production Camera 4K you can simply
tap the display once with your finger and the slate will appear.
All metadata is compatible with popular software such as Final Cut Pro X and DaVinci Resolve.
Cinema Camera & Production Camera 4K
Step 1. Tap the touchscreen once to make the slate appear.
Step 2. To enter or change details, tap the text you wish to change and an onscreen keyboard will
appear. Type in the desired information and press the save button.
Step 3. If you want the scene, shot or take number to auto-increment, tap the corresponding auto-
increment icon so it is illuminated. Tap it again if you want to turn off the auto-increment feature.
Entering words into the Keywords field will allow you to use them as search terms in your library database.
This may be particularly useful for large projects where you have lots of material. The use of keywords
narrows down the number of clips to search through, saving valuable time when you are editing.
All metadata is compatible with popular software such as Final Cut Pro X and DaVinci Resolve.
Camera Video Output
29
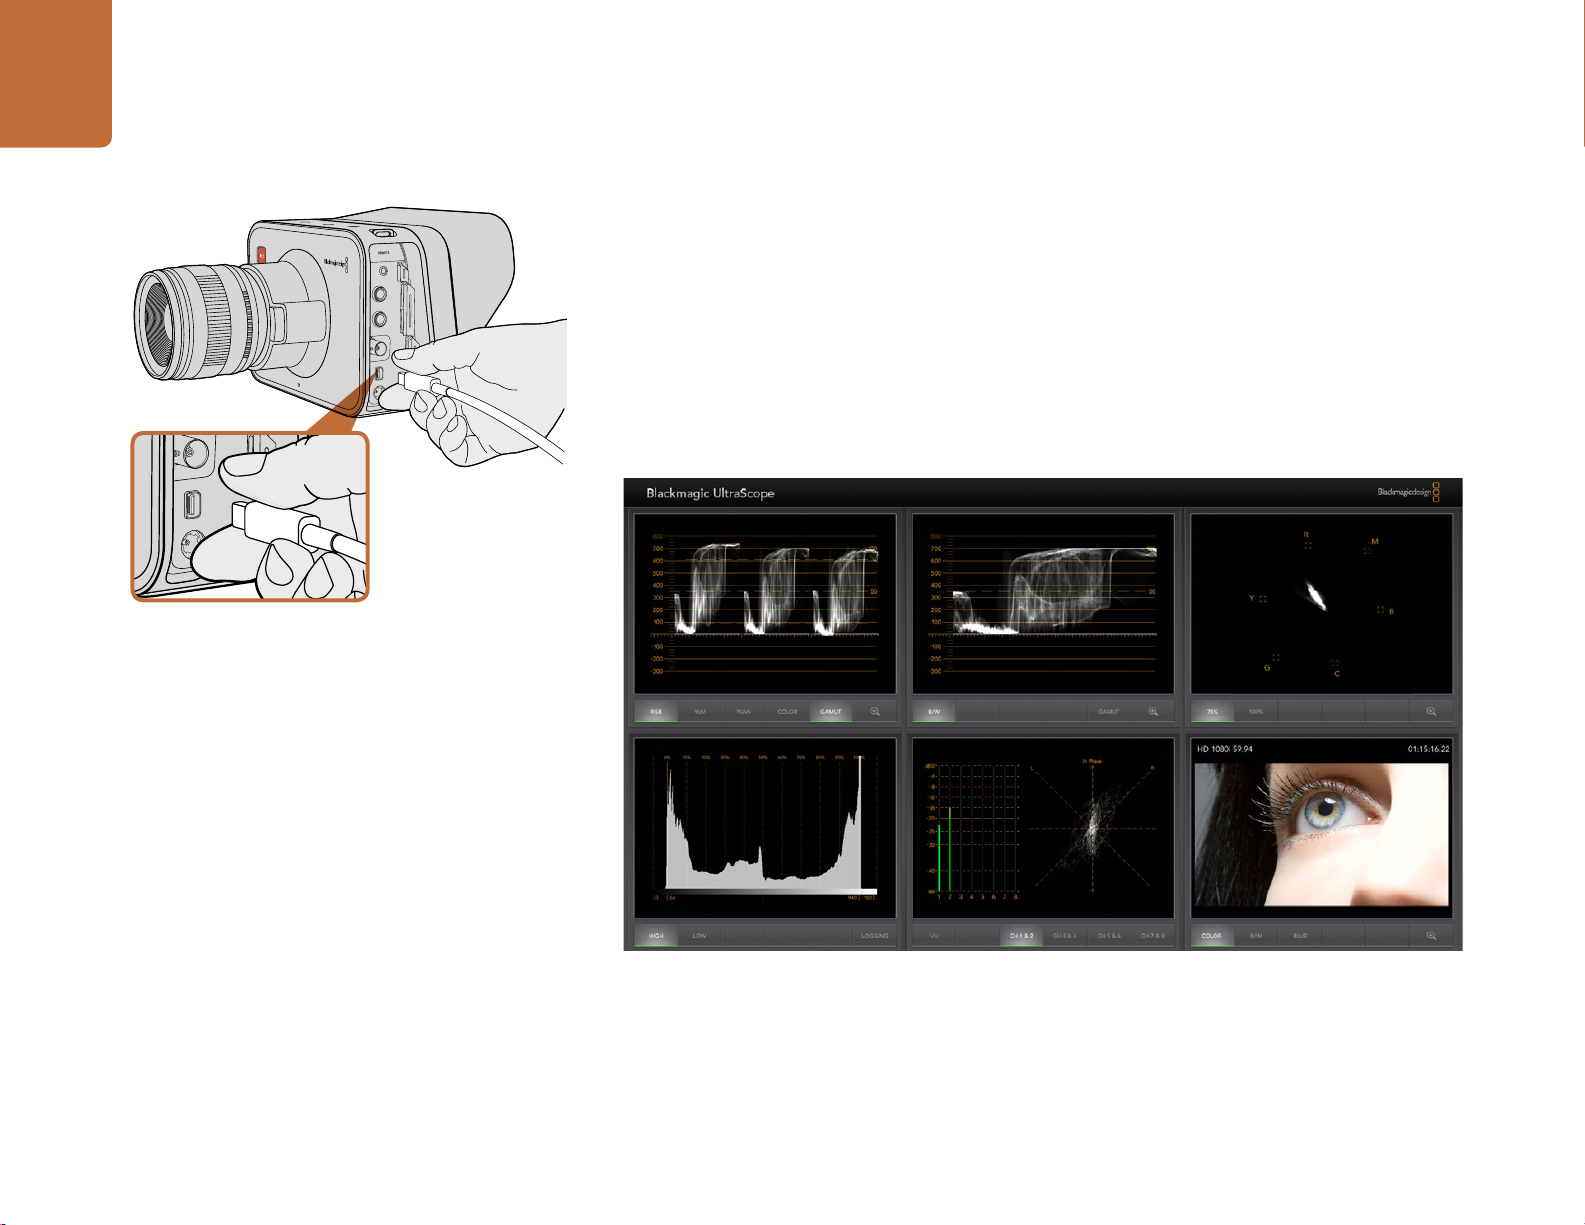
Camera Video Output
Waveform Monitoring using Thunderbolt
When connected to a Mac OS X or Windows computer with Thunderbolt technology, your Cinema
Camera or Production Camera 4K can be used as a powerful solution for waveform monitoring. Blackmagic
Cinema Camera's Thunderbolt port always outputs uncompressed 10-bit 1080p HD video. Production
Camera 4K matches the SDI output in either 10-bit 1080p HD or compressed Ultra HD 4K. For waveform
monitoring using Production Camera 4K set the recording format to HD.
The Blackmagic Camera Utility installs Blackmagic UltraScope software for waveform monitoring of
your camera during recording and playback. Blackmagic UltraScope allows you to monitor almost every
aspect of the video you record with your Cinema Camera or Production Camera 4K.
Connect to your computer via the Thunderbolt port of your
Cinema Camera or Production Camera 4K.
Blackmagic UltraScope software gives you accurate waveform monitoring via Thunderbolt.
30
Camera Video Output
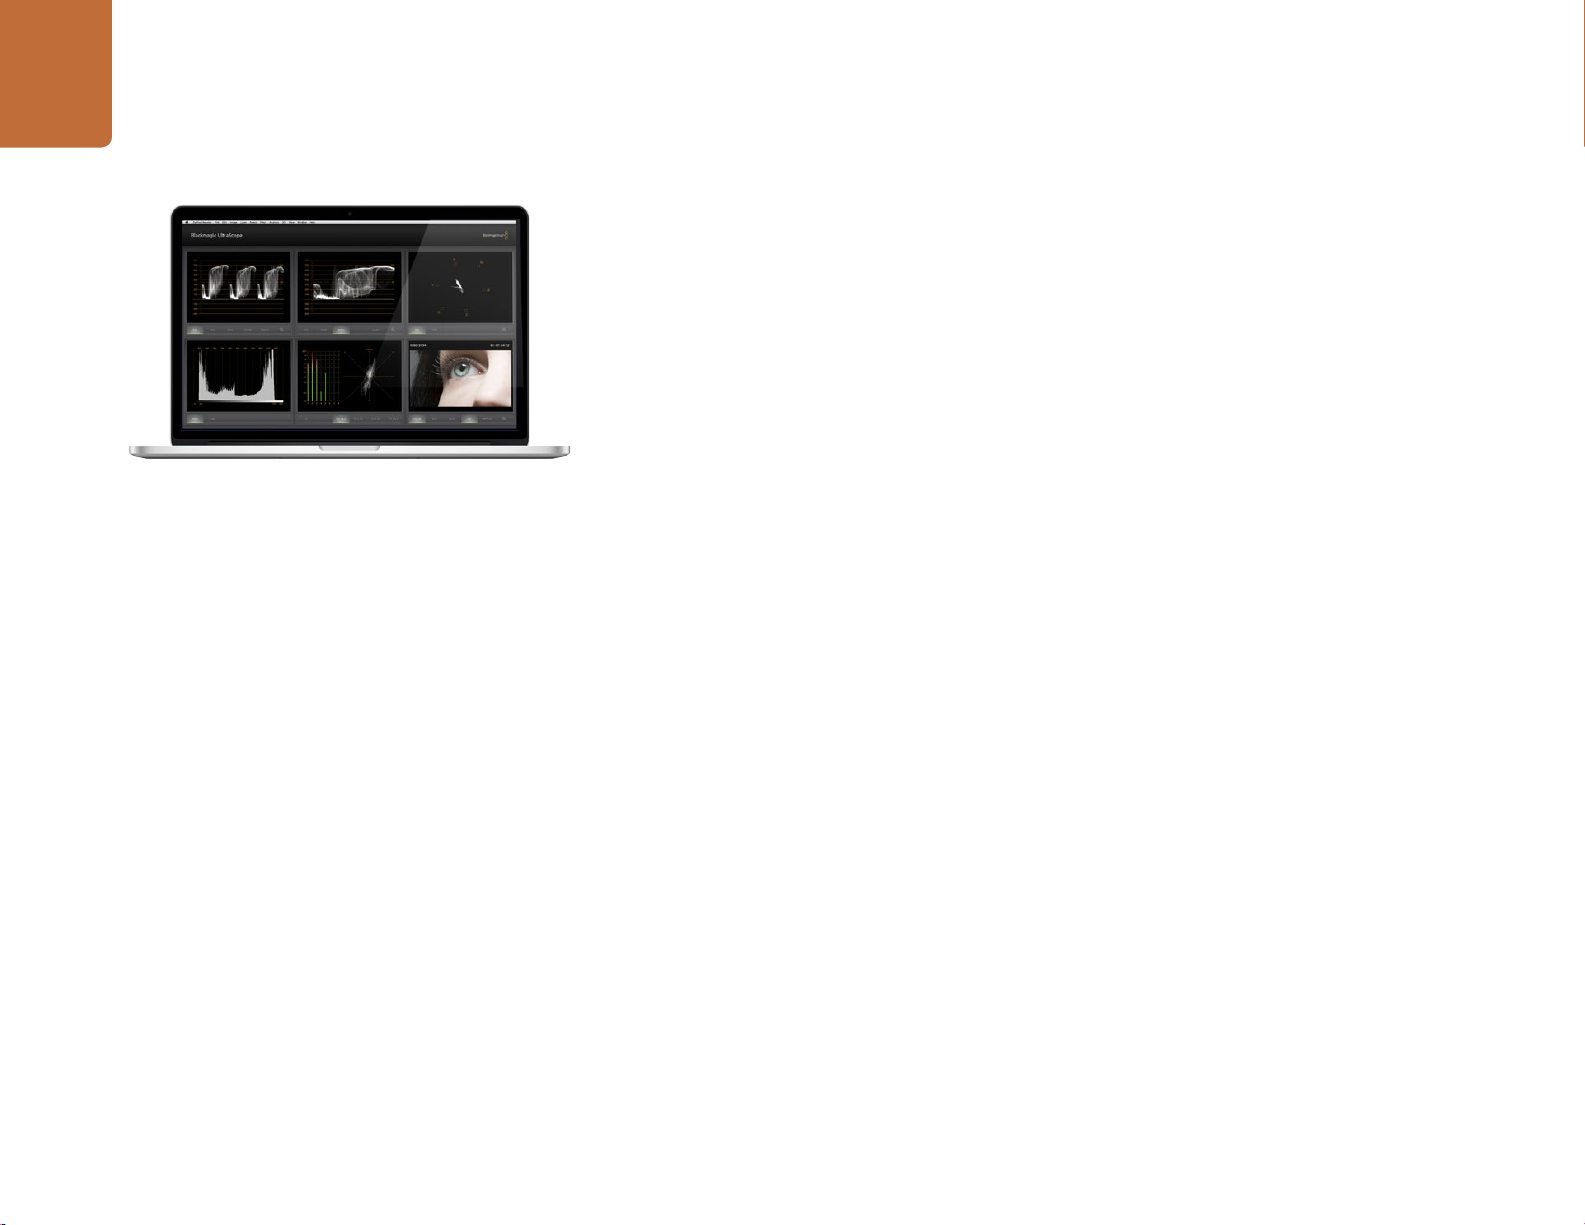
Blackmagic UltraScope - Full Screen View
Using Blackmagic UltraScope
What is Blackmagic UltraScope?
Blackmagic UltraScope software provides waveform monitoring of the video output from your Cinema
Camera or Production Camera 4K.
Previously, broadcast quality television and post production scopes were incredibly expensive and
bulky solutions that only let you see one scope at a time on a tiny screen! Some scopes look ugly and
unappealing to your client. With Blackmagic UltraScope, you get 6 wonderful scopes to monitor all
aspects of your video signal, perfect for checking levels on your camera while shooting. Any camera
adjustments are immediately seen using Blackmagic UltraScope!
Simply connect a Thunderbolt cable from your camera to the Thunderbolt port on your computer, turn
on your camera and launch UltraScope!
Installation Requirements
The Blackmagic UltraScope software interface requires a computer display with a minimum resolution
of 1280 x 800 pixels to view two scopes simultaneously. Blackmagic Design recommends viewing all
6 scopes simultaneously by using a computer display resolution of 1920 x 1200 or 1920 x 1080 pixels.
Please see the support pages at www.blackmagicdesign.com for a comprehensive list of the latest
minimum system requirements for Blackmagic UltraScope.
Understanding Blackmagic UltraScope Views
Blackmagic UltraScope has two different views available depending on your workflow needs and screen
resolution. You have the choice of viewing six displays in “Full Screen” view, or for more compact viewing,
choose any 2 displays in “2-up” view.
The display view can be selected from the
Choose
can quickly switch between Full Screen view and 2-up view by using the hot key CMD-F on Mac OS X,
or CTRL F on Windows.
In 2-up view, select the desired left and right scopes by opening the
anywhere in the UltraScope window. Make your selections from the
If you want the scopes to swap sides, select the left or right view and set it to be the same as the
other view. The scopes will swap sides because the 2-up view never displays the same scope in both the
left and right views.
Full Screen to enter Full Screen view. If this option is unchecked, 2-up view will be displayed. You
View menu.
View menu or by right-clicking
Left View
and
Right View
menu options.
 Loading...