

Page 1

Biostar T-Series TForce 6100
FCC Information and Copyright
This equipment has been tested and found to comply with the limits of
a Class B digital device, pursuant to Part 15 of the FCC Rules. These
limits are designed to provide reasonable protection against harmful
interference in a residential installation. This equipment generates,
uses and can radiate radio frequency energy and, if not installed and
used in accordance with the instructions, may cause harmful
interference to radio communications. There is no guarantee that
interference will not occur in a particular installation.
The vendor makes no representations or warranties with respect to
the contents here and specially disclaims any implied warranties of
merchantability or fitness for any purpose. Further the vendor
reserves the right to revise this publication and to make changes to
the contents here without obligation to notify any party beforehand.
Duplication of this publication, in part or in whole, is not allowed
without first obtaining the vendor’s approval in writing.
The content of this user’s manual is subject to be changed without
notice and we will not be responsible for any mistakes found in this
user’s manual. All the brand and product names are trademarks of
their respective companies.
P
ACKAGE CHECKLIST
FDD Cable x 1
HDD Cable x 1
S/PDIF Cable x 1
User’s Manual x 1
Serial ATA Cable x 1
Serial ATA power cable x 1
Fully Setup Driver CD x 1
Rear I/O Panel for ATX Case x 1
USB 2.0 Cable x 1 (optional)
i
User’s Manual
Page 2

Table of Contents
ACKAGE CHECKLIST..................................................................................... I
P
CHAPTER 1: INTRODUCTION...................................................... 1
1.1 MOTHERBOARD FEATURES...............................................................1
1.2 LAYOUT AND COMPONENTS...............................................................1
CHAPTER 2: HARDWARE INSTALLATION ...............................4
2.1 INSTALLING CENTRAL PRIOCESSING UNIT (CPU).............................4
2.2 SYSTEM MEMORY .............................................................................6
2.3 PERIPHERALS ...................................................................................8
CHAPTER 3: OVERCLOCK QUICK GUIDE.............................19
3.1: T- POWER INTRODUCTION ...............................................................19
3.2: T- POWER BIOS FEATURE ..............................................................20
3.3 T- POWER WINDOWS FEATURE........................................................ 28
CHAPTER 4: USEFUL HELP ........................................................37
4.1 DRIVER INSTALLATION NOTE..........................................................37
4.2 AWARD BIOS BEEP CODE...............................................................38
4.3 EXTRA INFORMATION .....................................................................39
4.4 TROUBLESHOOTING ........................................................................41
GERMAN .......................................................................................... 42
FRENCH ...........................................................................................42
ITALIAN............................................................................................ 46
SPANISH ...........................................................................................48
PORTUGUESE.................................................................................50
POLAND ...........................................................................................52
RUSSIAN........................................................................................... 54
ARABIC.............................................................................................56
JAPANESE ........................................................................................ 58
ii
User’s Manual
Page 3

Biostar T-Series TForce 6100
CHAPTER 1: INTRODUCTION
1.1 MOTHERBOARD FEATURES
CPU
Supports Socket 754.
Supports AMD Athlon 64 processor up to 3700+.
Supports AMD Sempron processor.
Supports HyperTransport Technology up to 1600MT/s.
Dimensions
Micro ATX Form Factor: 21.86cm (W) x 24.4cm (L)
System Memory
Supports DDR 266/333/400.
Maximum memory capacity is 2GB, supporting 2 DIMM
sockets.
Chipset
North Bridge: NVIDIA GeForce 6100.
South Bridge: NVIDIA nForce 410.
Super I/O
Chip: ITE IT8712F.
Environment Control initiatives.
H/W Monitor
Fan Speed Controller
ITE's "Smart Guardian" function
IDE
2 on-board connectors support 4 IDE disk drives.
Supports PIO mode 0~4 and Ultra DMA 33/66/100/133 bus
master mode.
Serial ATA II
nForce 410 supports SATA 2.0 specification, with data
transfer rates up to 3Gb/s.
AC’97 Audio Sound Codec
Chip: ALC655, supports 6 channels audio output.
10/100 LAN PHY
PHY: RTL8201BL/RTL8201CL, supports ACPI, PCI power
management.
1
User’s Manual
Page 4

Biostar T-Series TForce 6100
Operating Systems
Supports Windows 2000 and Windows XP.
Note: Does not support Windows 98SE and Windows ME.
Internal On-board Slots and Connectors
One PCI-Express X1 slot.
One PCI-Express X16 slot.
One S/PDIF-Out connector.
One CD-ROM audio-in connector.
Two PCI slots.
Two SATA ports.
Two Ultra DMA 33/66/100/133 IDE connectors.
Back Panel I/O Connectors and Ports
4 USB 2.0 Ports.
1 VGA Port.
1 Serial Port.
1 Printer Port.
1 RJ-45 LAN jack.
1 PS/2 Mouse Port.
1 PS/2 Keyboard Port.
1 Vertical audio port including 1 Line-in connector, 1
Line-out connector, and 1 MIC-in connector.
2
User’s Manual
Page 5
Biostar T-Series TForce 6100
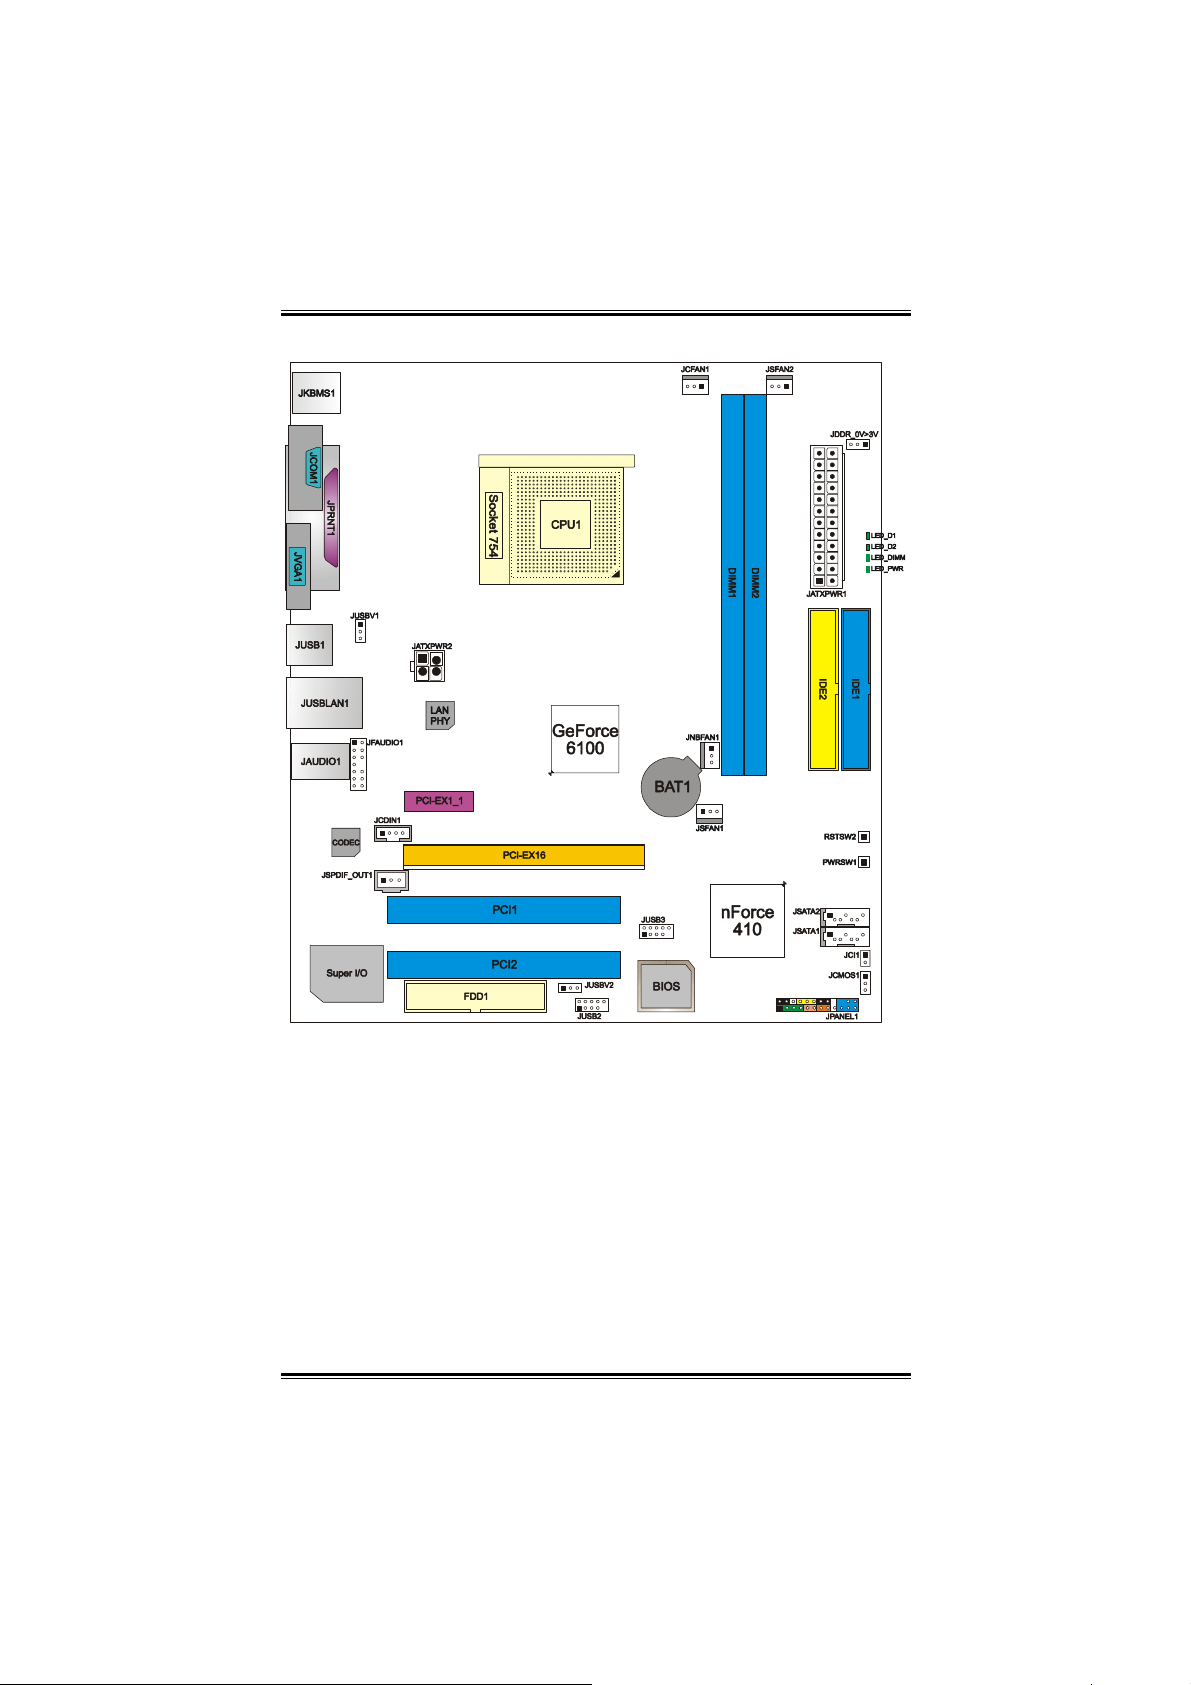
1.2 LAYOUT AND COMPONENTS
Note: ■ represents the 1st pin.
3
User’s Manual
Page 6
Biostar T-Series TForce 6100
CHAPTER 2: HARDWARE INSTALLATION
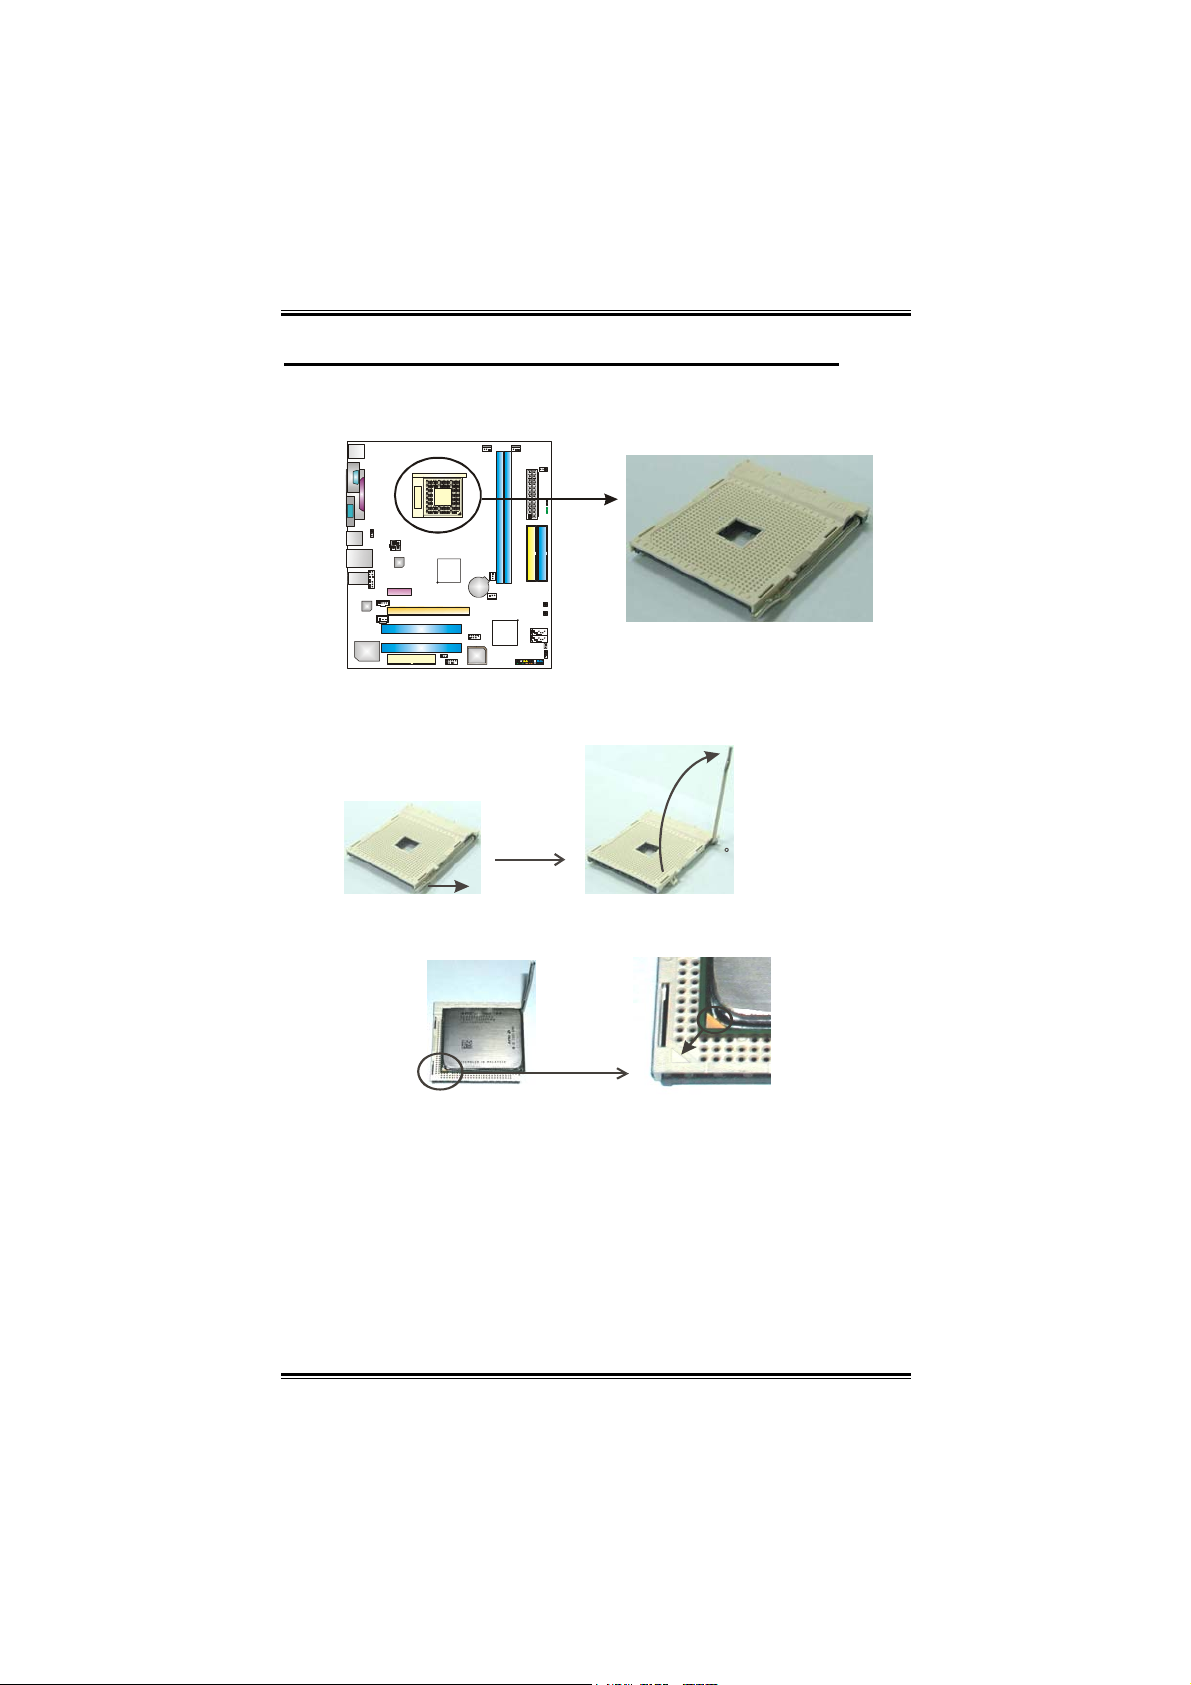
2.1 INSTALLING CENTRAL PRIOCESSING UNIT (CPU)
A. Central Processing Unit (CPU)
Step 1: Pull the lever toward direction A from the socket and then raise
the lever up to a 90-degree angle.
90
Step 2: Look for the white triangle on socket, and the gold triangle on
CPU should point forwards this white triangle. The CPU will fit only in
the correct orientation.
A
4
User’s Manual
Page 7
Biostar T-Series TForce 6100
5
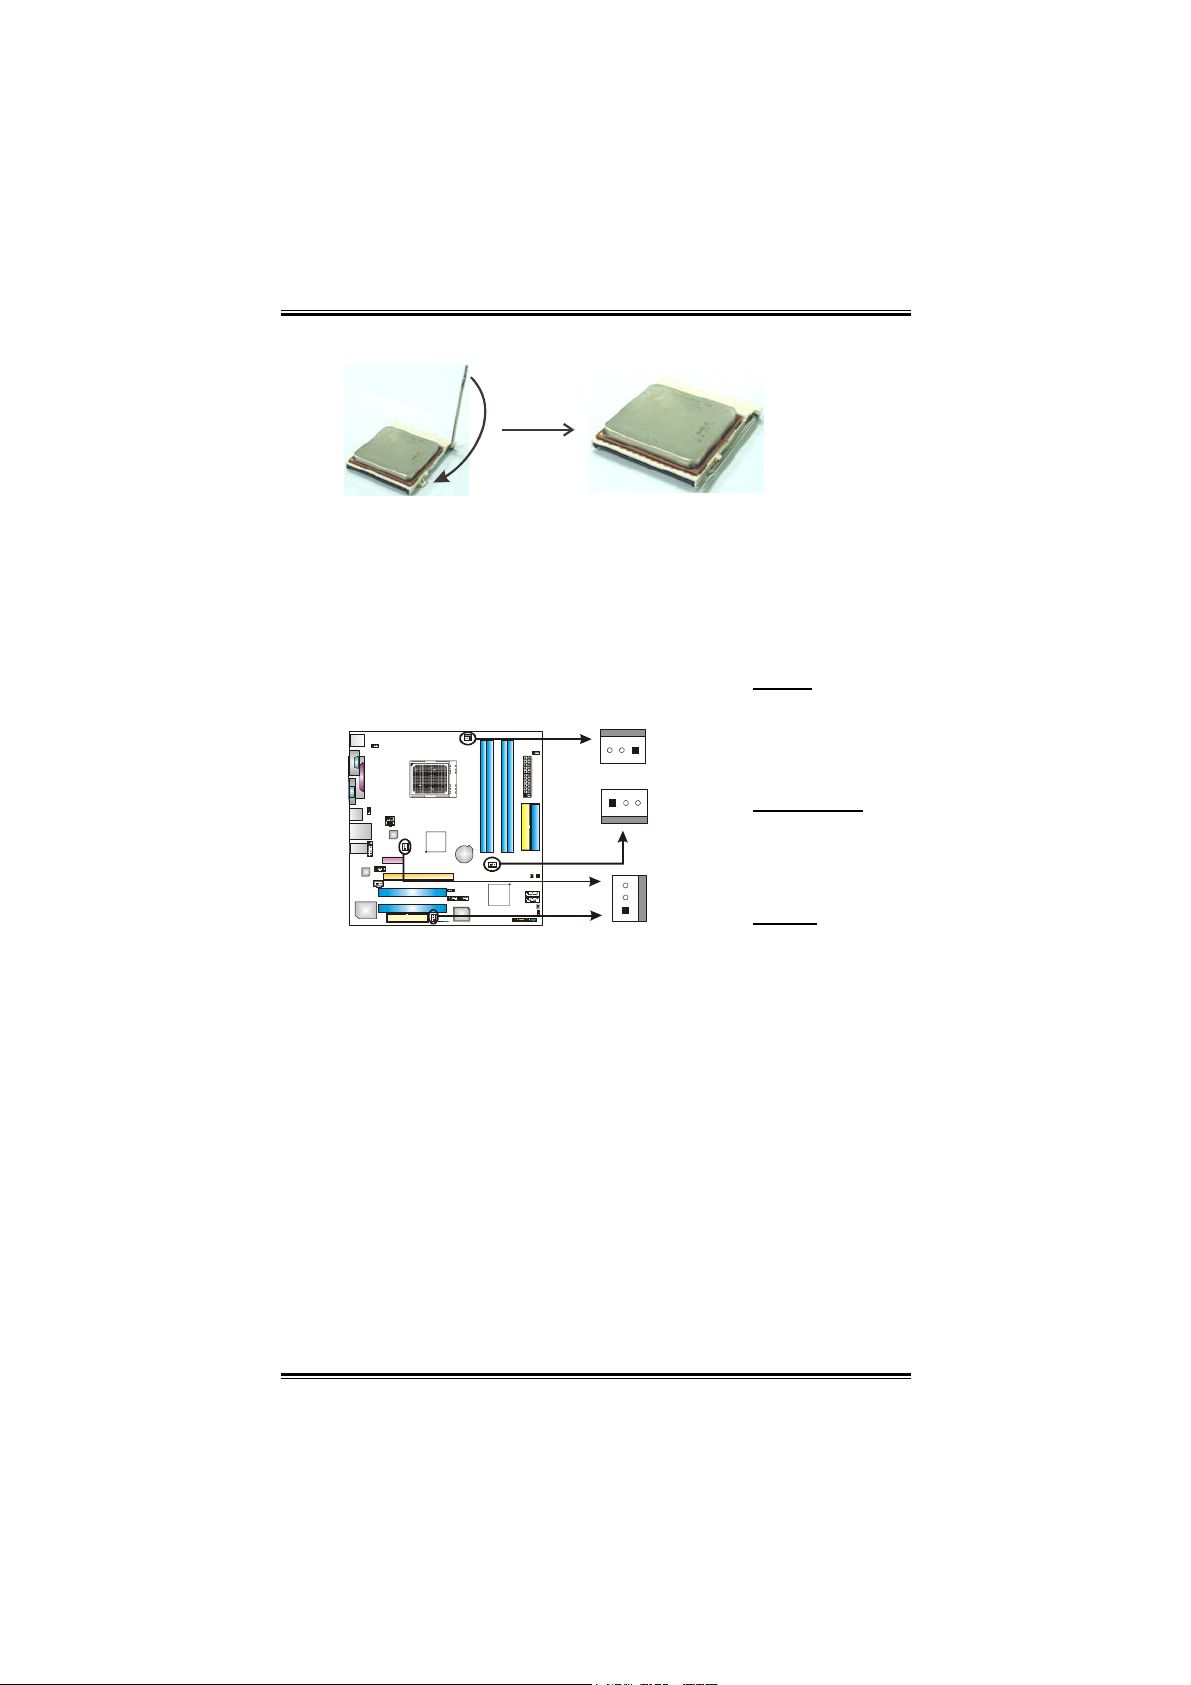
Step 3: Hold the CPU down firmly, and then close the lever to
complete the installation.
Step 4: Put the CPU Fan on the CPU and buckle it. Connect the CPU
FAN power cable to the JCFAN1. This completes the installation.
B. About FAN Headers
CPU FAN Power Header: JCFAN1
System Fan Power Headers: JSFAN1/JSFAN2
North Bridge Fan Power Header: JNBFAN1
JCFAN1:
Pin Assignment
1 Ground
2 Smart Fan
Control
FAN RPM
3
rate sense
JSFAN1/JSFAN2
Pin Assignment
1 Ground
2 +12V
FAN RPM
3
rate sense
JNBFAN1
1 Ground
2 +12V
N/A
3
13
13
JCFAN1
JSFAN1
JNFAN1
3
JSFAN2
1
User’s Manual
Page 8
Biostar T-Series TForce 6100
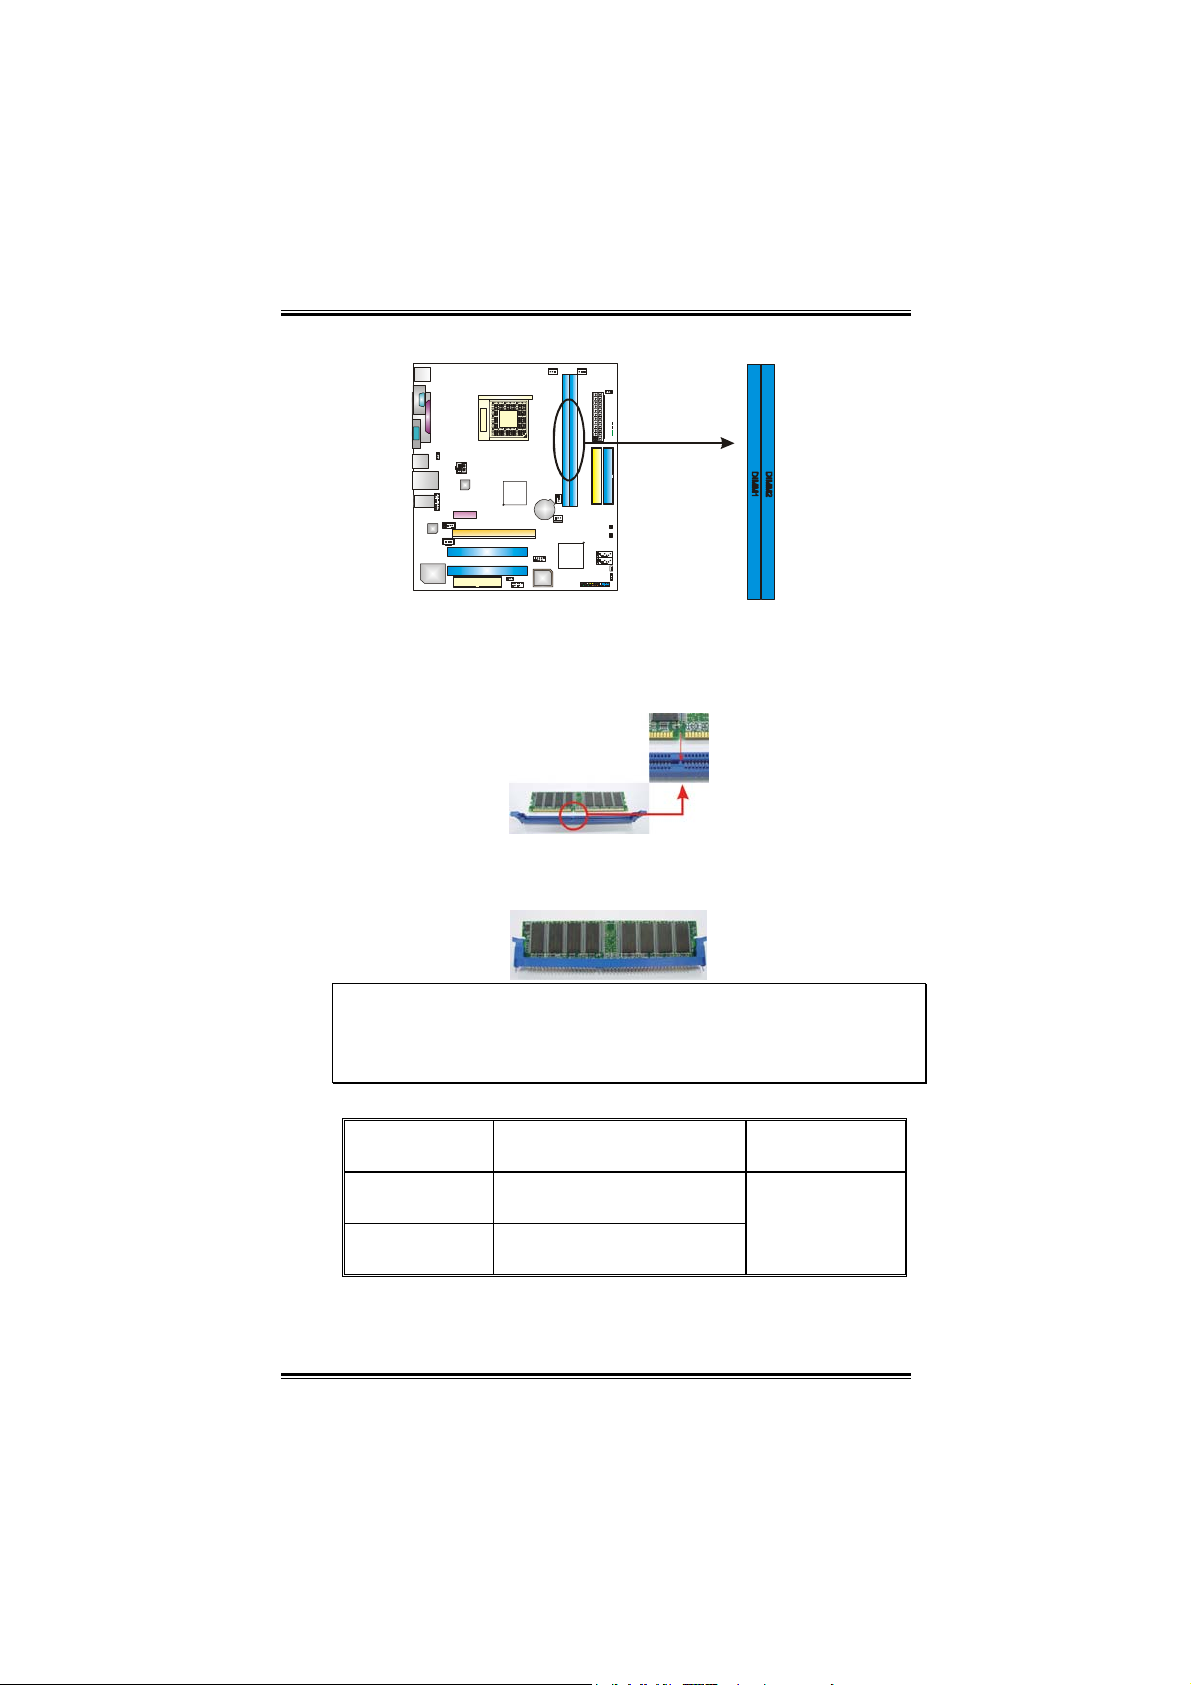
2.2 SYSTEM MEMORY
A. Memory Modules
1. Unlock a DIMM slot by pressing the retaining clips outward.
Align a DIMM on the slot such that the notch on the DIMM
matches the break on the slot.
2. Insert the DIMM vertically and firmly into the slot until the
retaining chip snaps back in place and the DIMM is properly
seated.
Notes:
To remove the DDR modules, push the ejector tabs at both sides
of the slot outward at the same time, and pull the modules out
vertically.
B. Memory Capacity
DIMM Socket
Location
DIMM1
DIMM2
DDR Module
128MB/256MB/512MB/1GB
*1
128MB/256MB/512MB/1GB
*1
Total Memor y
Size
Max is 2 GB.
6
User’s Manual
Page 9

Biostar T-Series TForce 6100
7
C. Dual Channel Memory installation
To trigger the Dual Channel function of the motherboard, the
memory module must meet the following requirements:
Install memory module of the same density in pairs, shown in
the following table.
Duual Channel Status
Enabled O X O X
Enabled X O X O
Enabled O O O O
(O means memory installed, X means memory not installed.)
The DRAM bus width of the memory module must be the same
(x8 or x16).
DIMM1
DIMM2 DIMM3 DIMM4
User’s Manual
Page 10
Biostar T-Series TForce 6100
2.3 PERIPHERALS
A. Card and I/O Slots:
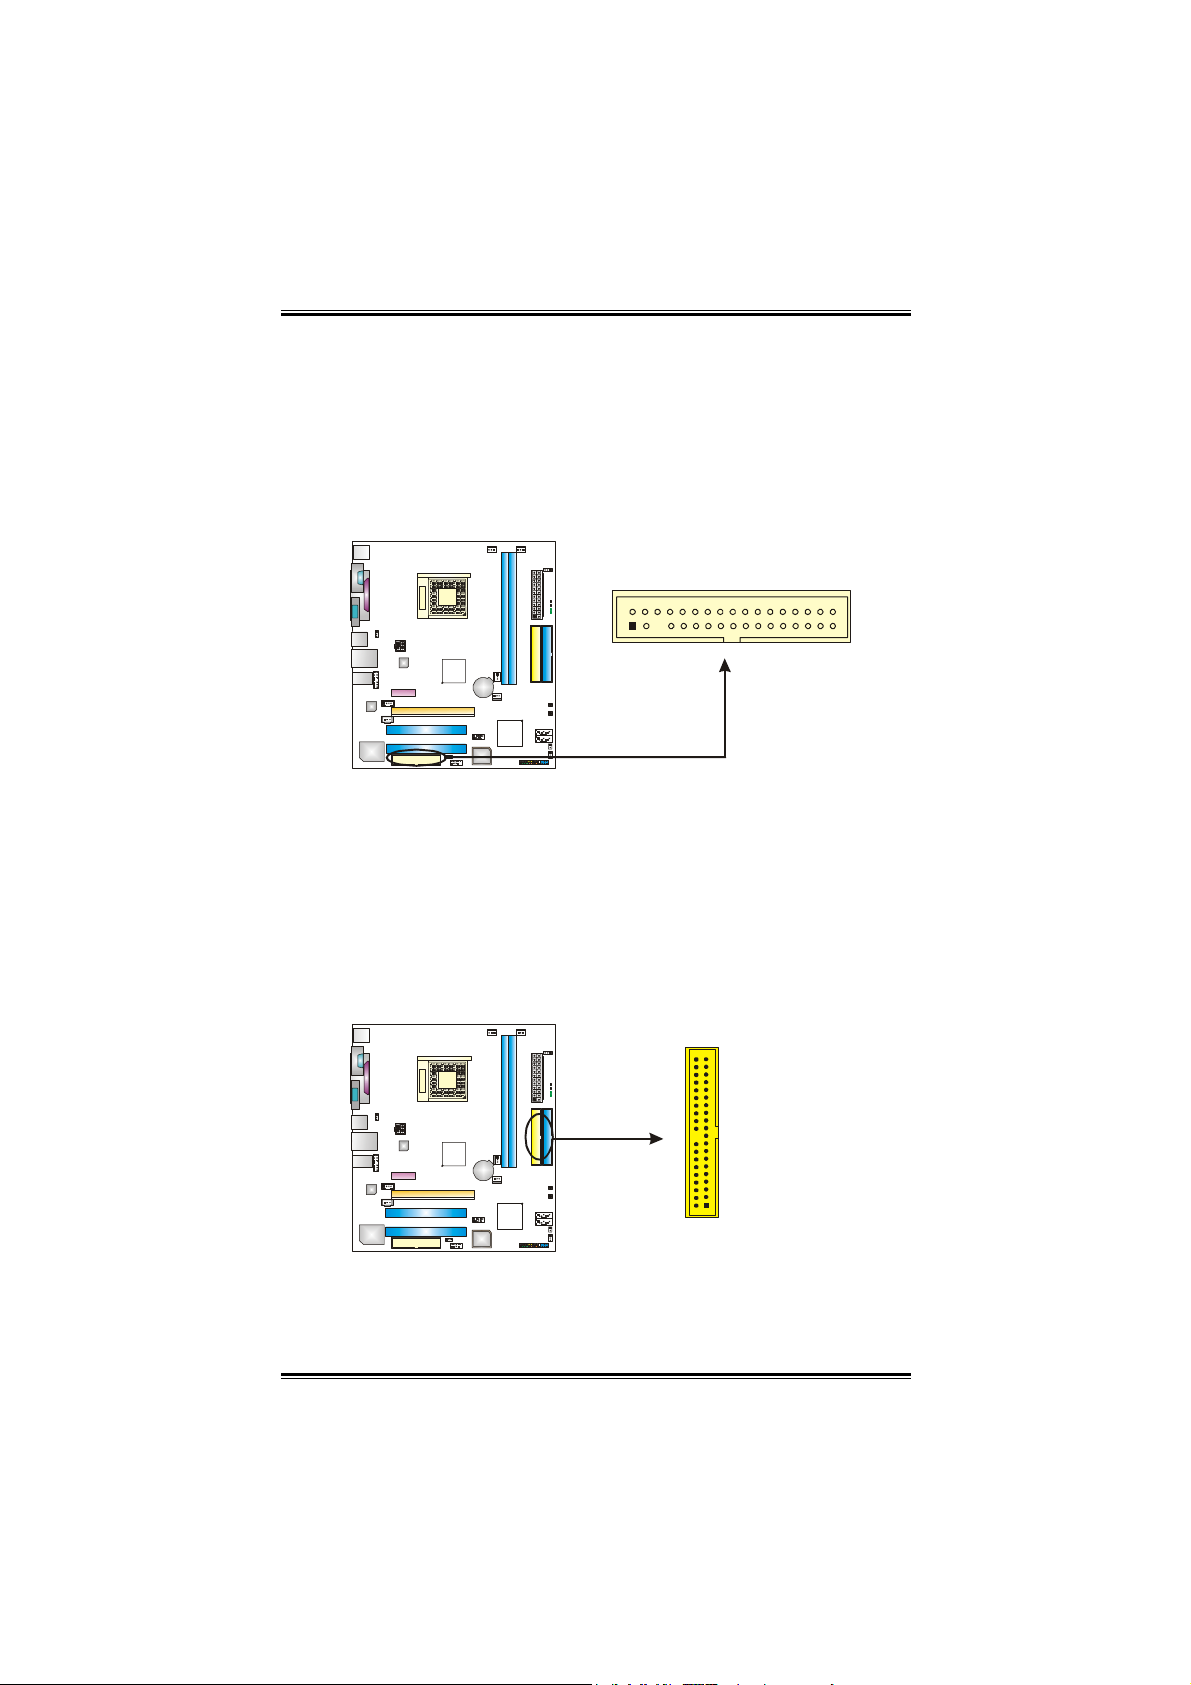
Floppy Disk Connector: FDD1
The motherboard provides a standard floppy disk connector that
supports 360K, 720K, 1.2M, 1.44M and 2.88M floppy disk types.
This connector supports the provided floppy drive ribbon cables.
2
133
34
Hard Disk Connectors: IDE1/IDE2
The motherboard has two 32-bit Enhanced PCI IDE Controllers that
provide PIO Mode 0~5, Bus Master, and Ultra DMA 33/66/100/133
functionality. It has two HDD connectors IDE1 (primary) and IDE2
(secondary). The IDE connectors can connect a master and a slave
drive, so you can connect up to four hard disk drives. The first hard
drive should always be connected to IDE1.
3940
21
IDE2IDE1
8
User’s Manual
Page 11
Biostar T-Series TForce 6100
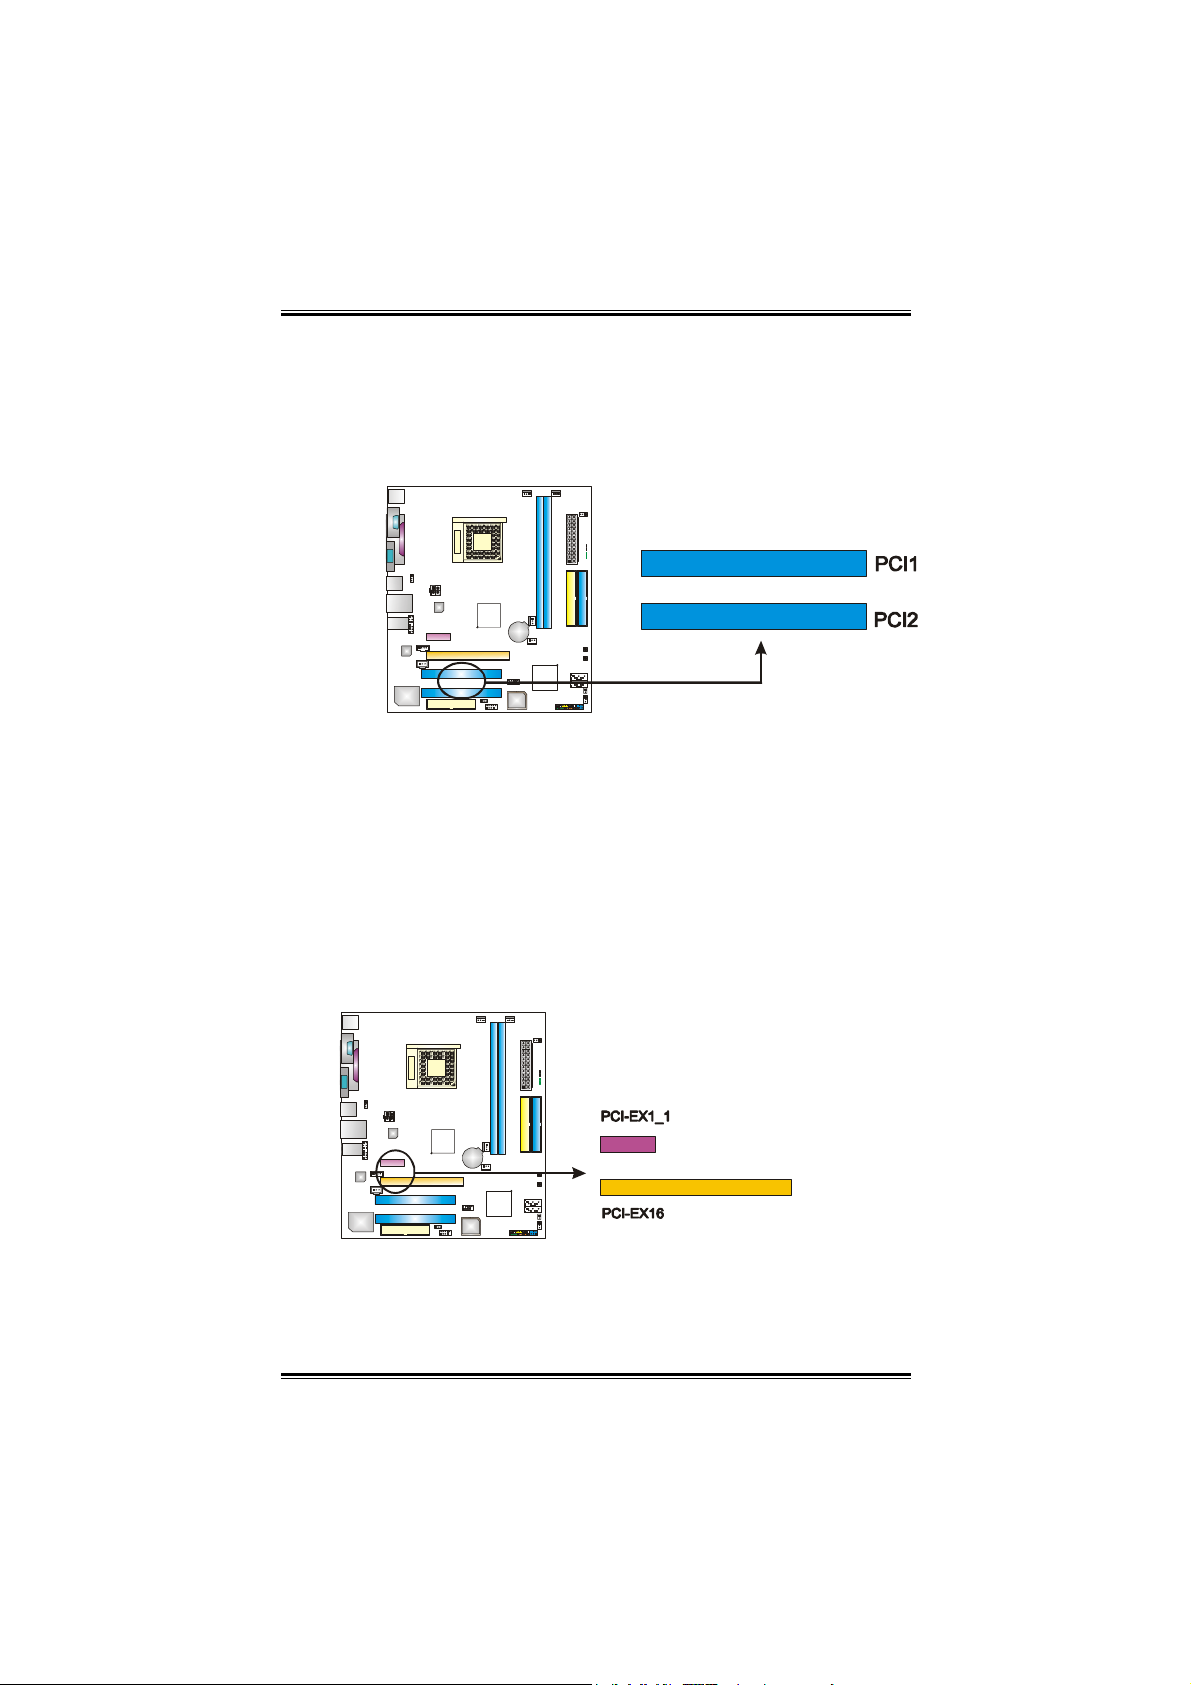
Peripheral Component Interconnect Slots: PCI1~PCI2
This motherboard is equipped with 4 standard PCI slots. PCI stands
for Peripheral Component Interconnect, and it is a bus standard for
expansion cards. This PCI slot is designated as 32 bits.
PCI-Express Slots: PCI-EX16/PCI-EX1_1
PCI-EX16:
PCI Express 1.0a compliant.
Maximum bandwidth is up to 4GB/s per direction.
PCI-EX1_1:
PCI Express 1.0a compliant.
Maximum bandwidth is up to 250MB/s per direction.
9
User’s Manual
Page 12
Biostar T-Series TForce 6100
B. Connectors and Headers:
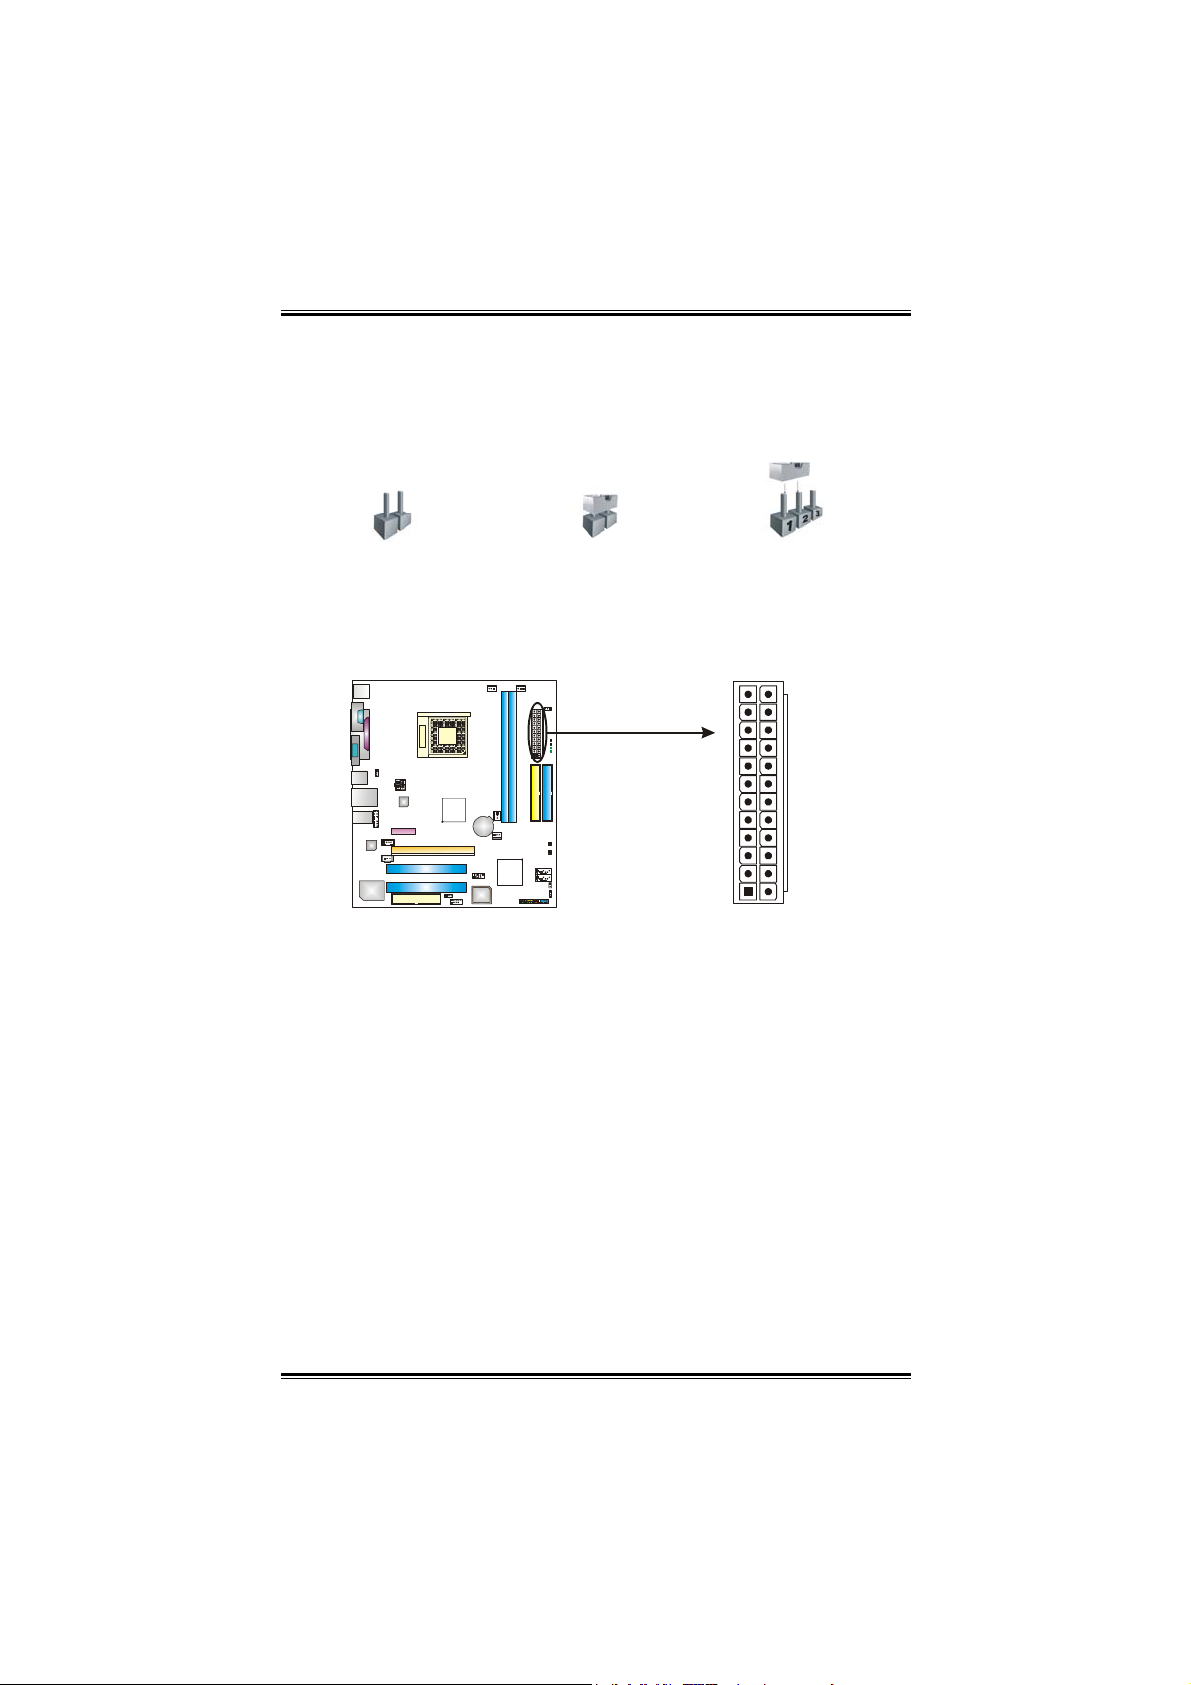
How to setup Jumpers
The illustration shows how to set up jumpers. When the jumper cap
is placed on pins, the jumper is “closed”, if not, that means the
jumper is “open”.
Pin opened Pin closed Pin1-2 closed
ATX Power Source Connector: JATXPWR1
JATXPWR1 allows user to connect 24-pin power connector on the
ATX power supply.
12
1
Pin Assignment Pin Assignment
13 +3.3V 1 +3.3V
14 -12V 2 +3.3V
15 Ground 3 Ground
16 PS_ON 4 +5V
17 Ground 5 Ground
18 Ground 6 +5V
19 Ground 7 Ground
20 NC 8 PW_OK
21 +5V 9 Standby Voltage+5V
22 +5V 10 +12V
23 +5V 11 +12V
24 Ground 12 +3.3V
24
13
10
User’s Manual
Page 13
Biostar T-Series TForce 6100
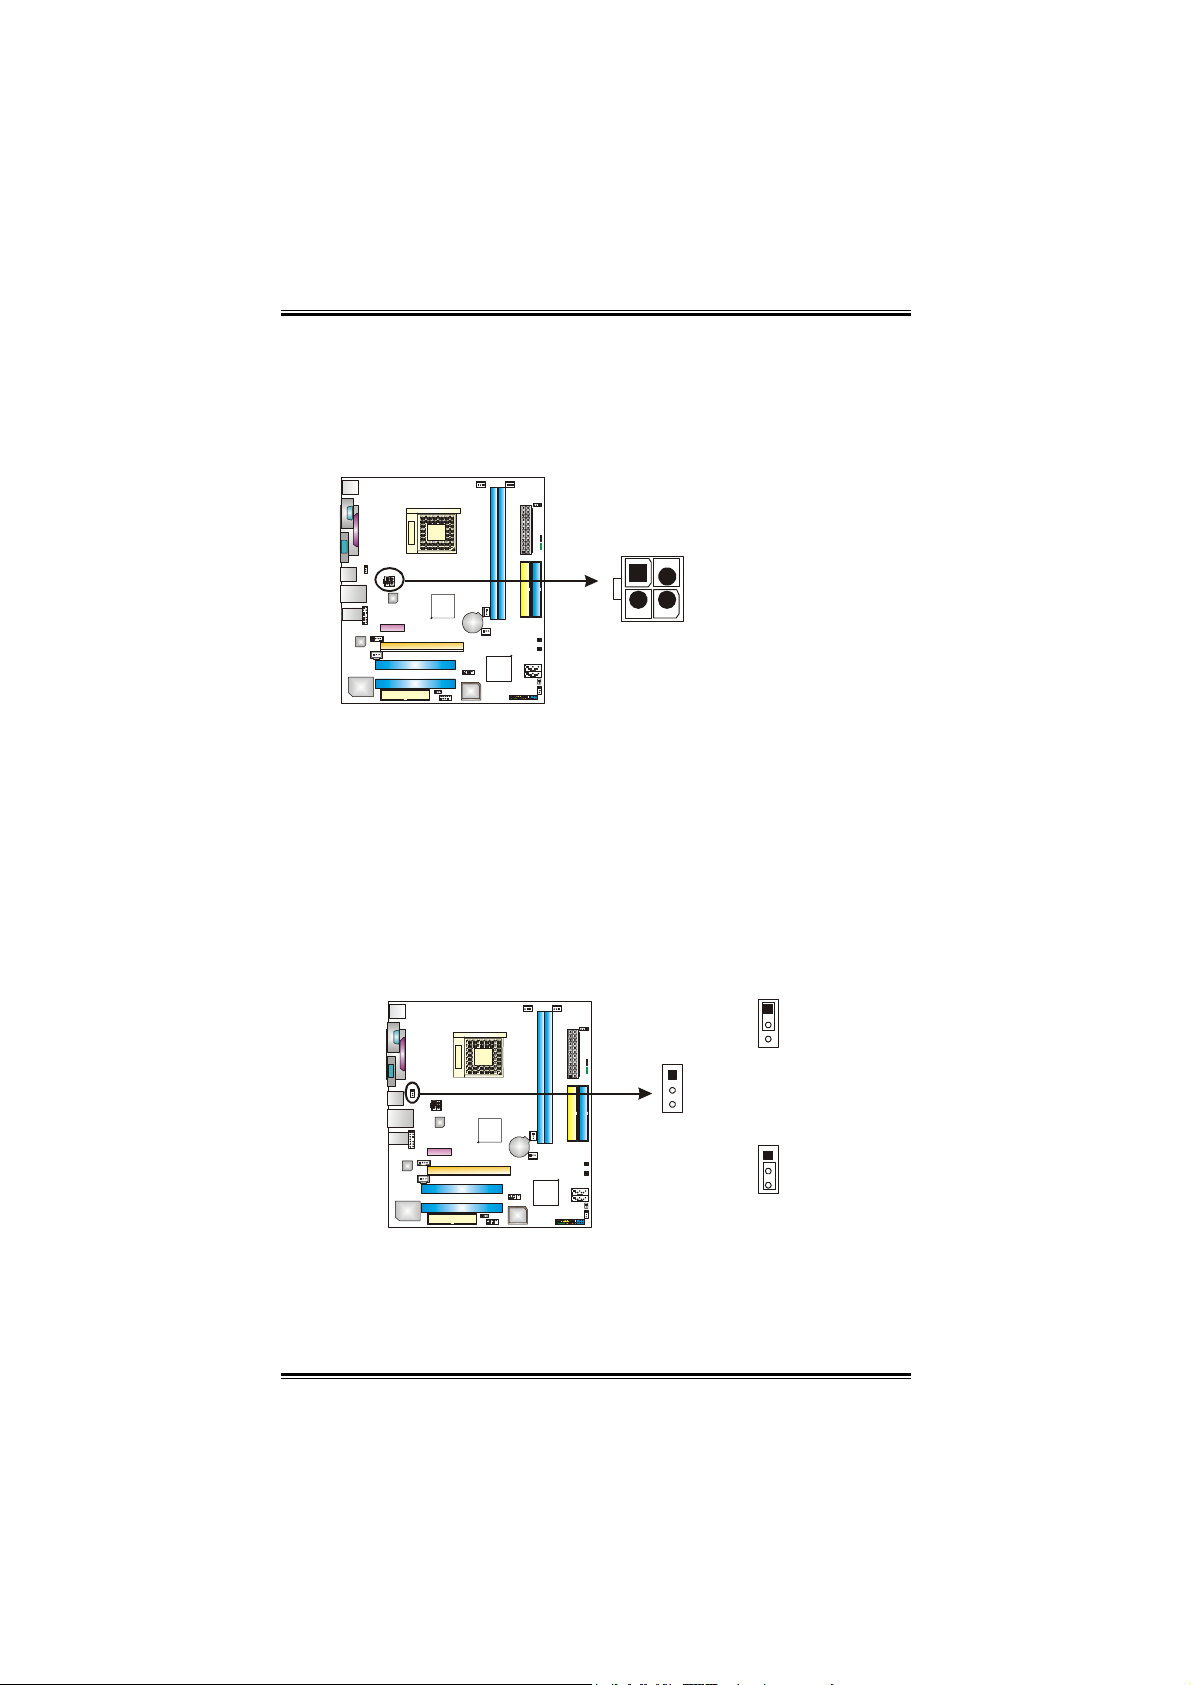
ATX Power Source Connector: JATXPWR2
By connecting JATXPWR2, it will provide +12V to CPU power
circuit.
JATXPWR2
4
1
3
2
Pin
Assignment
1 +12V
2 +12V
3 Ground
4 Ground
JUSBV1: Power Source Headers for PS/2 Keyboard and Mouse
and USB Ports
Pin 1-2 Close: +5V for USB ports at JUSBLAN1 and PS/2
keyboard and mouse ports at JKBMS1.
Pin 2-3 Close: USB ports at JUSBLAN1 and PS/2 keyboard
and mouse ports are powered by +5V or +5V standby
voltage.
1
3
1
Pin 1-2 Close (Default)
3
JUSBV1
1
3
Pin 2-3 Close
Note:
In order to support this function “Power-On system via
keyboard, mouse and USB device,” “JUSBV1” jumper cap
should be placed on Pin 2-3.
11
User’s Manual
Page 14
Biostar T-Series TForce 6100
Front Panel Audio-out Header: JFAUDIO1
This connector will allow user to connect with the front audio output
headers on the PC case. It will disable the output on back panel
audio connectors.
Default
Jumper
Setting
2
1
Assignment
Pin
1
Mic in/center
3
Mic power/Bass
Right line out/
5
Speaker out Right
7
Reserved
Left line out/
9
Speaker out Left
Right line in/
11
Rear speaker Right
Left line in/
13
Rear speaker Left
13
Pin
2
4
6
8
10
12
14
14
Assignment
Ground
Audio power
Right line out/
Speaker out Right
Key
Left line out/
Speaker out Left
Right line in/
Rear speaker Right
Left line in/
Rear speaker Left
12
User’s Manual
Page 15
Biostar T-Series TForce 6100
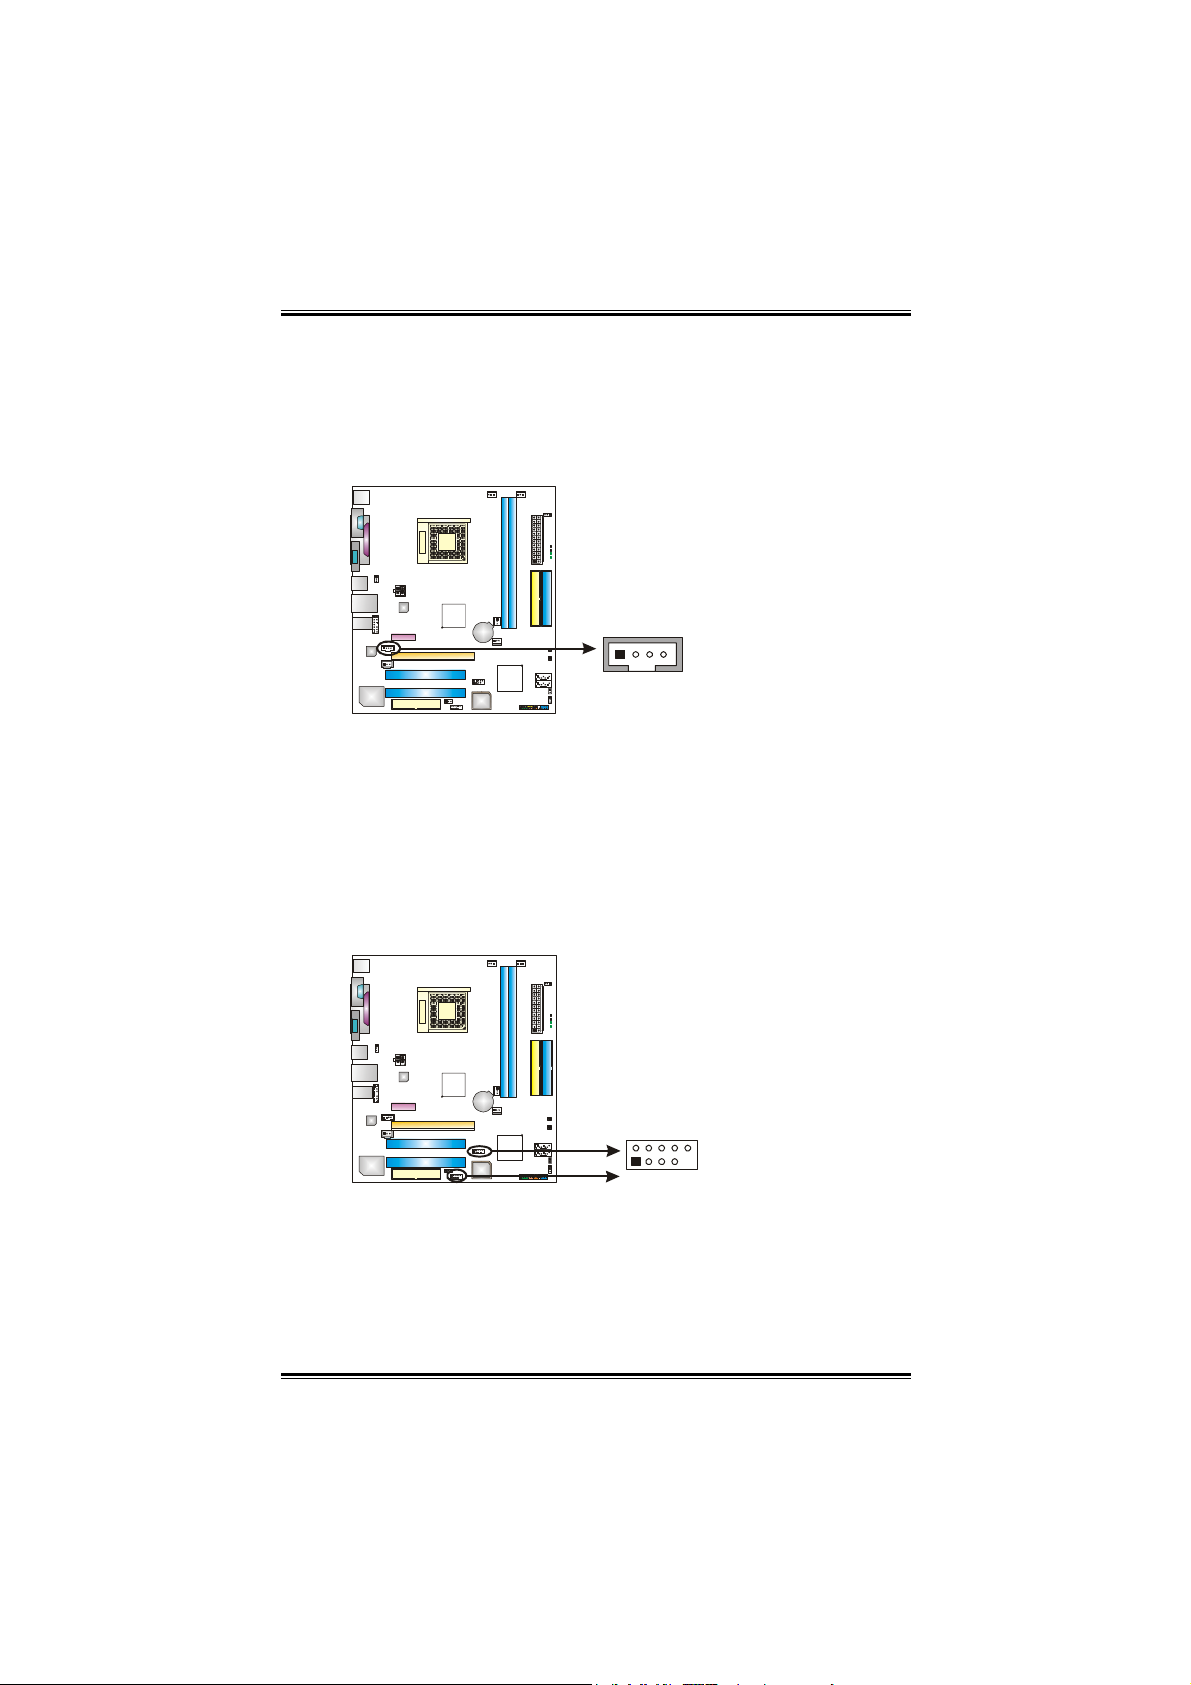
CD-ROM Audio-in Connector: JCDIN1
This connector allows user to connect the audio source from a
variety of devices, like CD-ROM, DVD-ROM, PCI sound card, PCI
TV tuner card etc.
Pin
Assignment
1 Left channel
input
2 Ground
3 Ground
4 Right channel
14
input
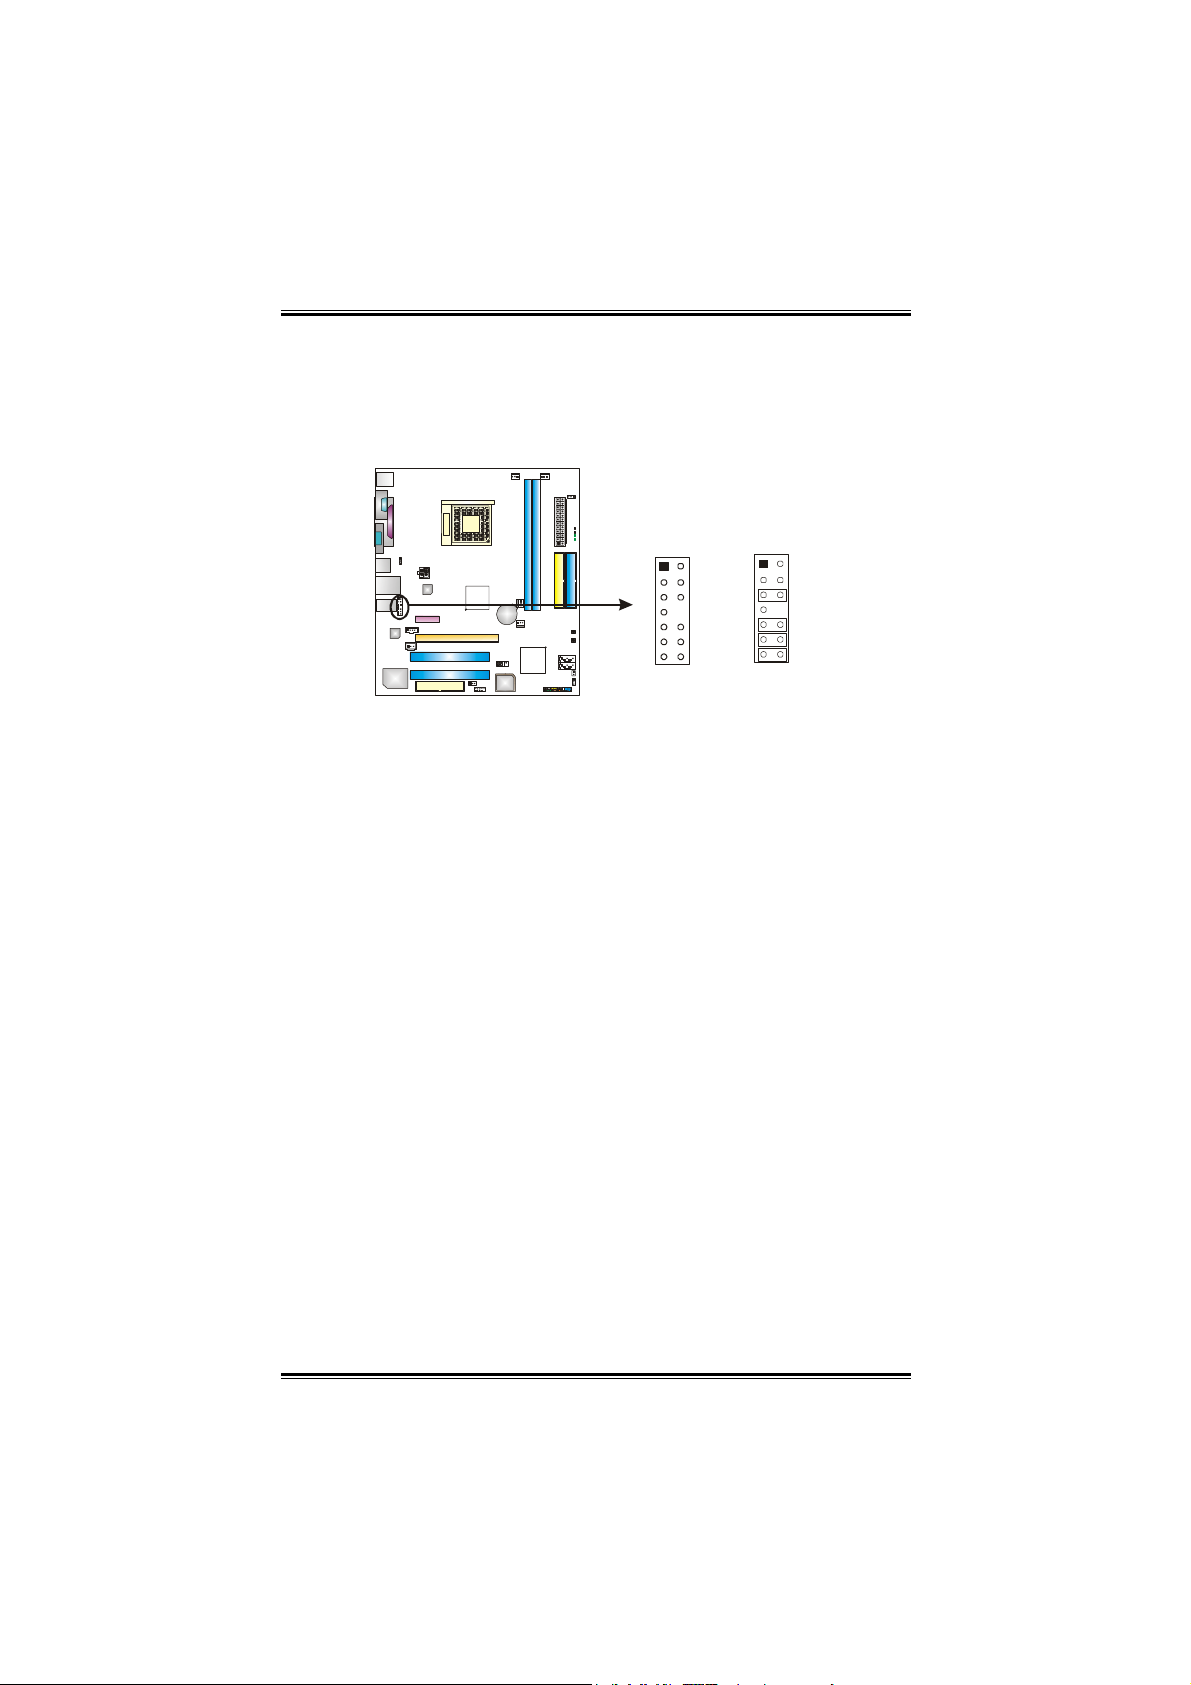
Headers for USB Ports at Front Panel: JUSB2~JUSB3
This connector allows user to connect additional USB cables at PC
front panel, and also can be connected with internal USB devices,
like USB card reader.
JUSB2 JUSB3
10
2
Pin
Assignment
1
+5V (fused)
2
+5V (fused)
3
USB-
4
USB-
5
USB+
6
USB+
7
Ground
8
Ground
9
Key
10
NC
13
1
9
User’s Manual
Page 16
Biostar T-Series TForce 6100
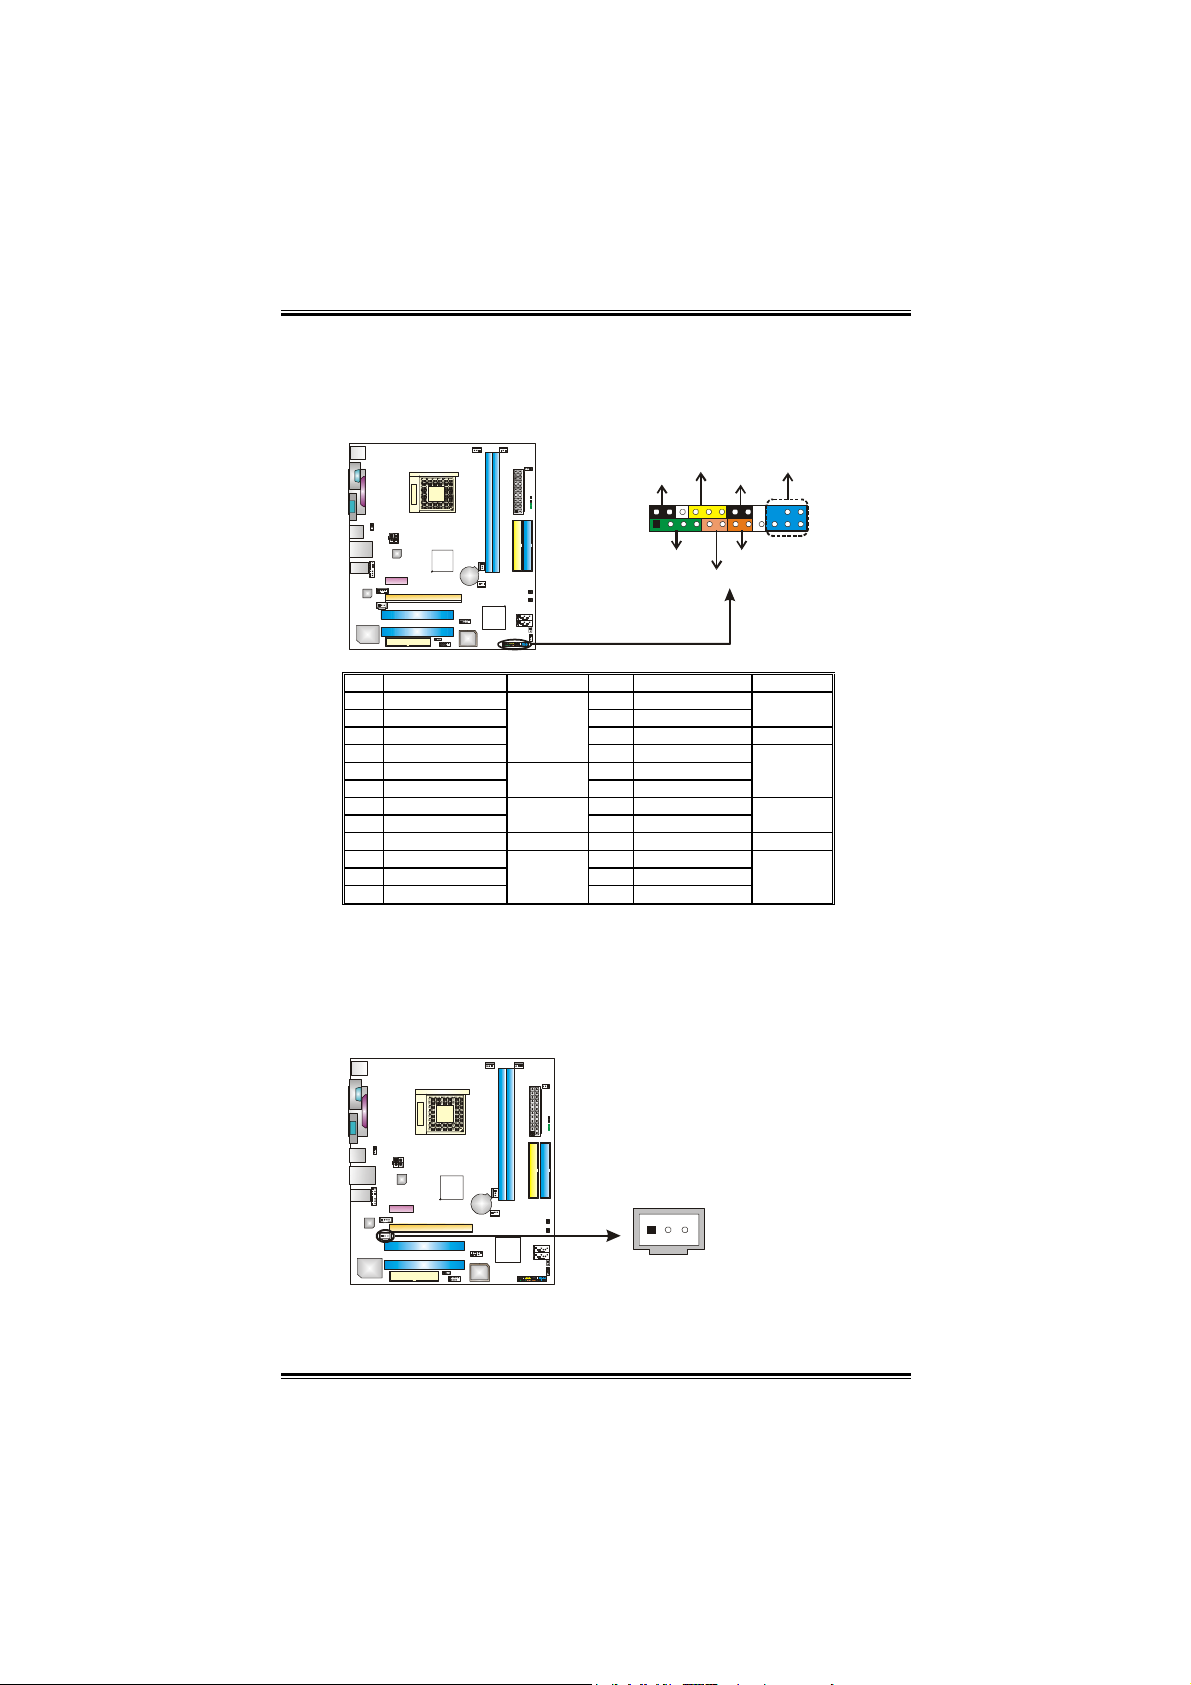
Header for Front Panel Facilities: JPANEL1
This 16-pin connector includes Power-on, Reset, HDD LED, Power
LED, Sleep button, speaker and IrDA Connection. It allows user to
connect the PC case’s front panel switch functions.
PWR_LED
SLP
++
2
1
SPK
Pin Assignment Function Pin Assignment Function
1 +5V 2 Sleep control
3N/A 4 Ground
5N/A 6 N/A N/A
7 Speaker
9 HDD LED (+) 10 Power LED (+)
11 HDD LED (-)
13 Ground 14 Power button
15 Reset control
17 N/A 18 Key
19 N/A 20 Key
21 +5V 22 Ground
23 IRTX
Speaker
nector
Hard drive
LED
Reset
button
IrDA
Connector
(Optional)
8 Power LED (+)
12 Power LED (-)
16 Ground
24 IRRX
-
-
+
HLED
On/Off
RST
IR (optiona l)
24
23
Sleep
button
Power LED
Power-on
button
IrDA
Connector
(Optional)
Digital Audio-out Connector: JSPDIF_OUT1
This connector allows users to connect the PCI bracket SPDIF
output header.
13
Pin
Assignment
1+5V
2 SPDIF OUT
3 Ground
14
User’s Manual
Page 17
Biostar T-Series TForce 6100
5
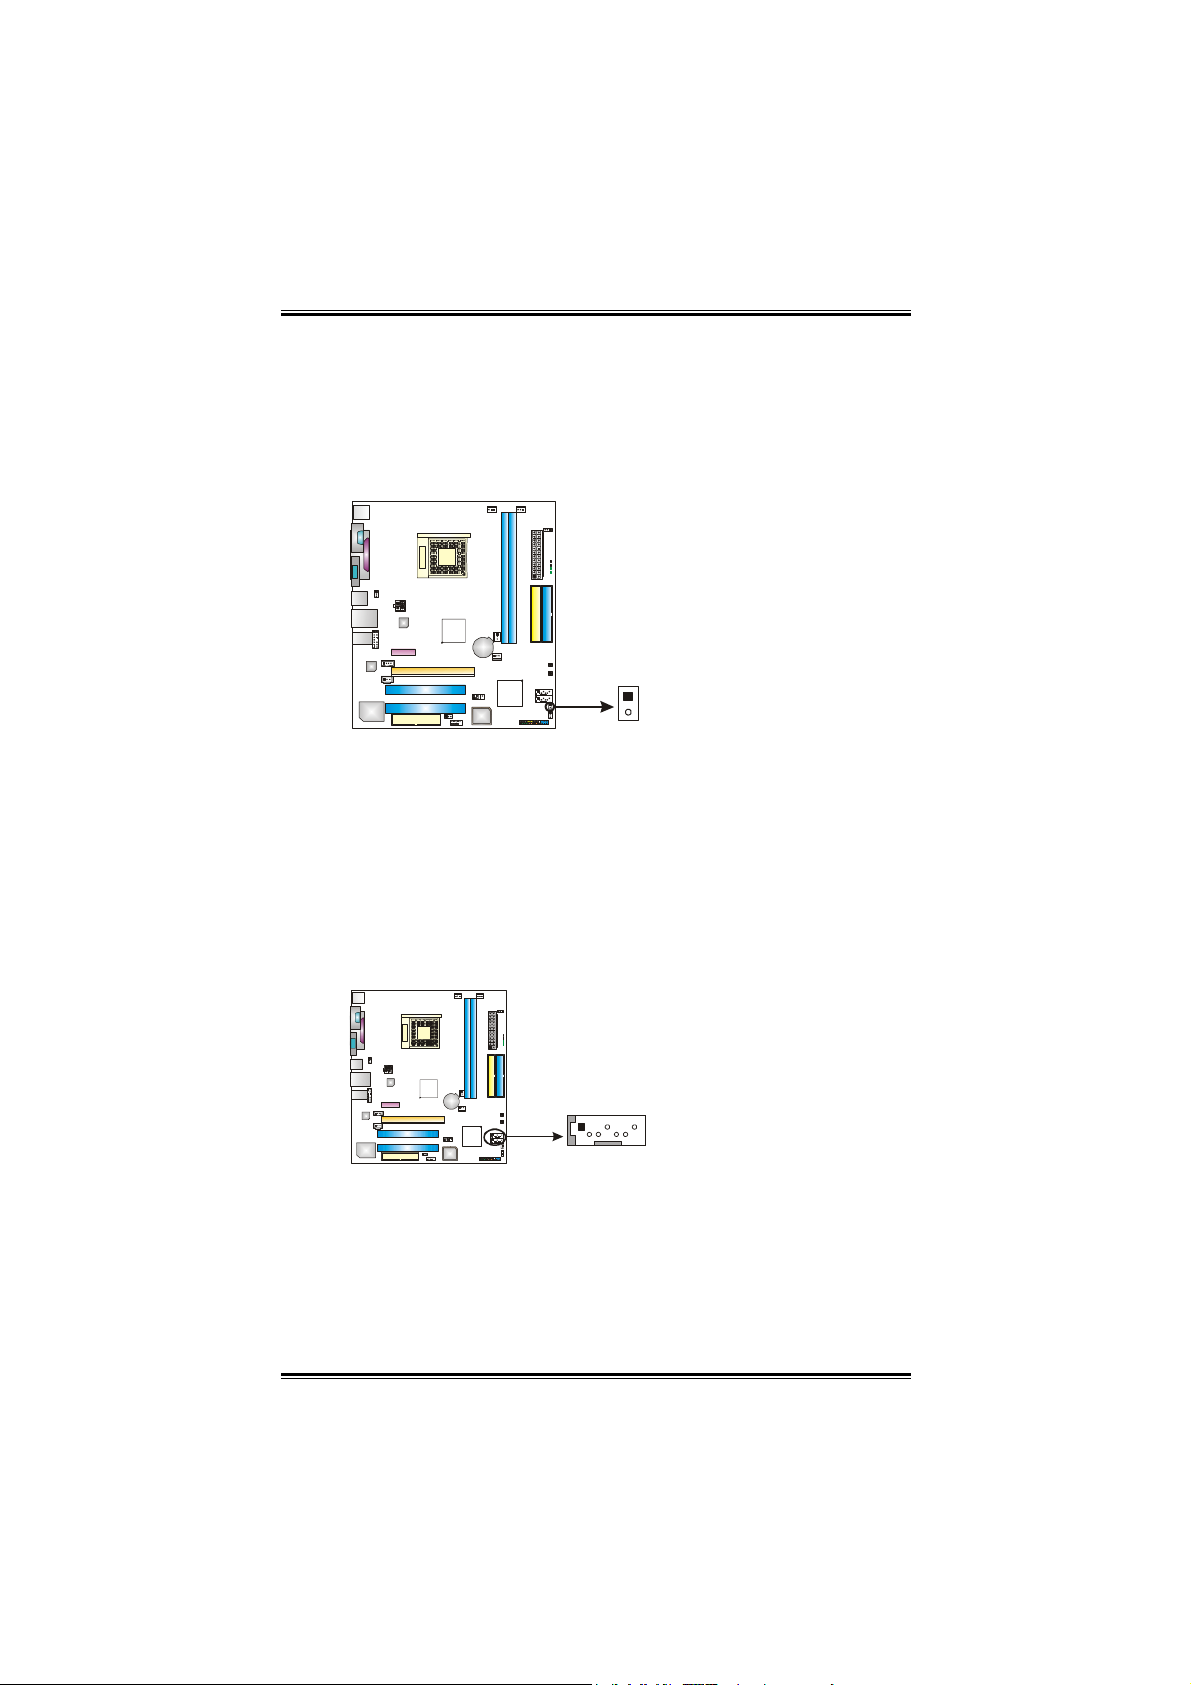
Case Open Header: JCI1
This connector allows system to monitor PC case open status. If the
signal has been triggered, it will record to the CMOS and show the
message on next boot-up.
Pin
Assignment
1 Case open
signal
2 Ground
1
Serial ATA Connectors: JSATA1~JSATA2
With the SATA Controller provided in the chipset, this motherboard
supports 4 channel SATA II connectors. It satisfies the SATA 2.0
spec with transfer rate of 3.0 Gb/s.
14 7
JSATA2
JSATA1
Pin
Assignment
1 Ground
2TX+
3TX4 Ground
5RX6RX+
7 Ground
1
User’s Manual
Page 18
Biostar T-Series TForce 6100
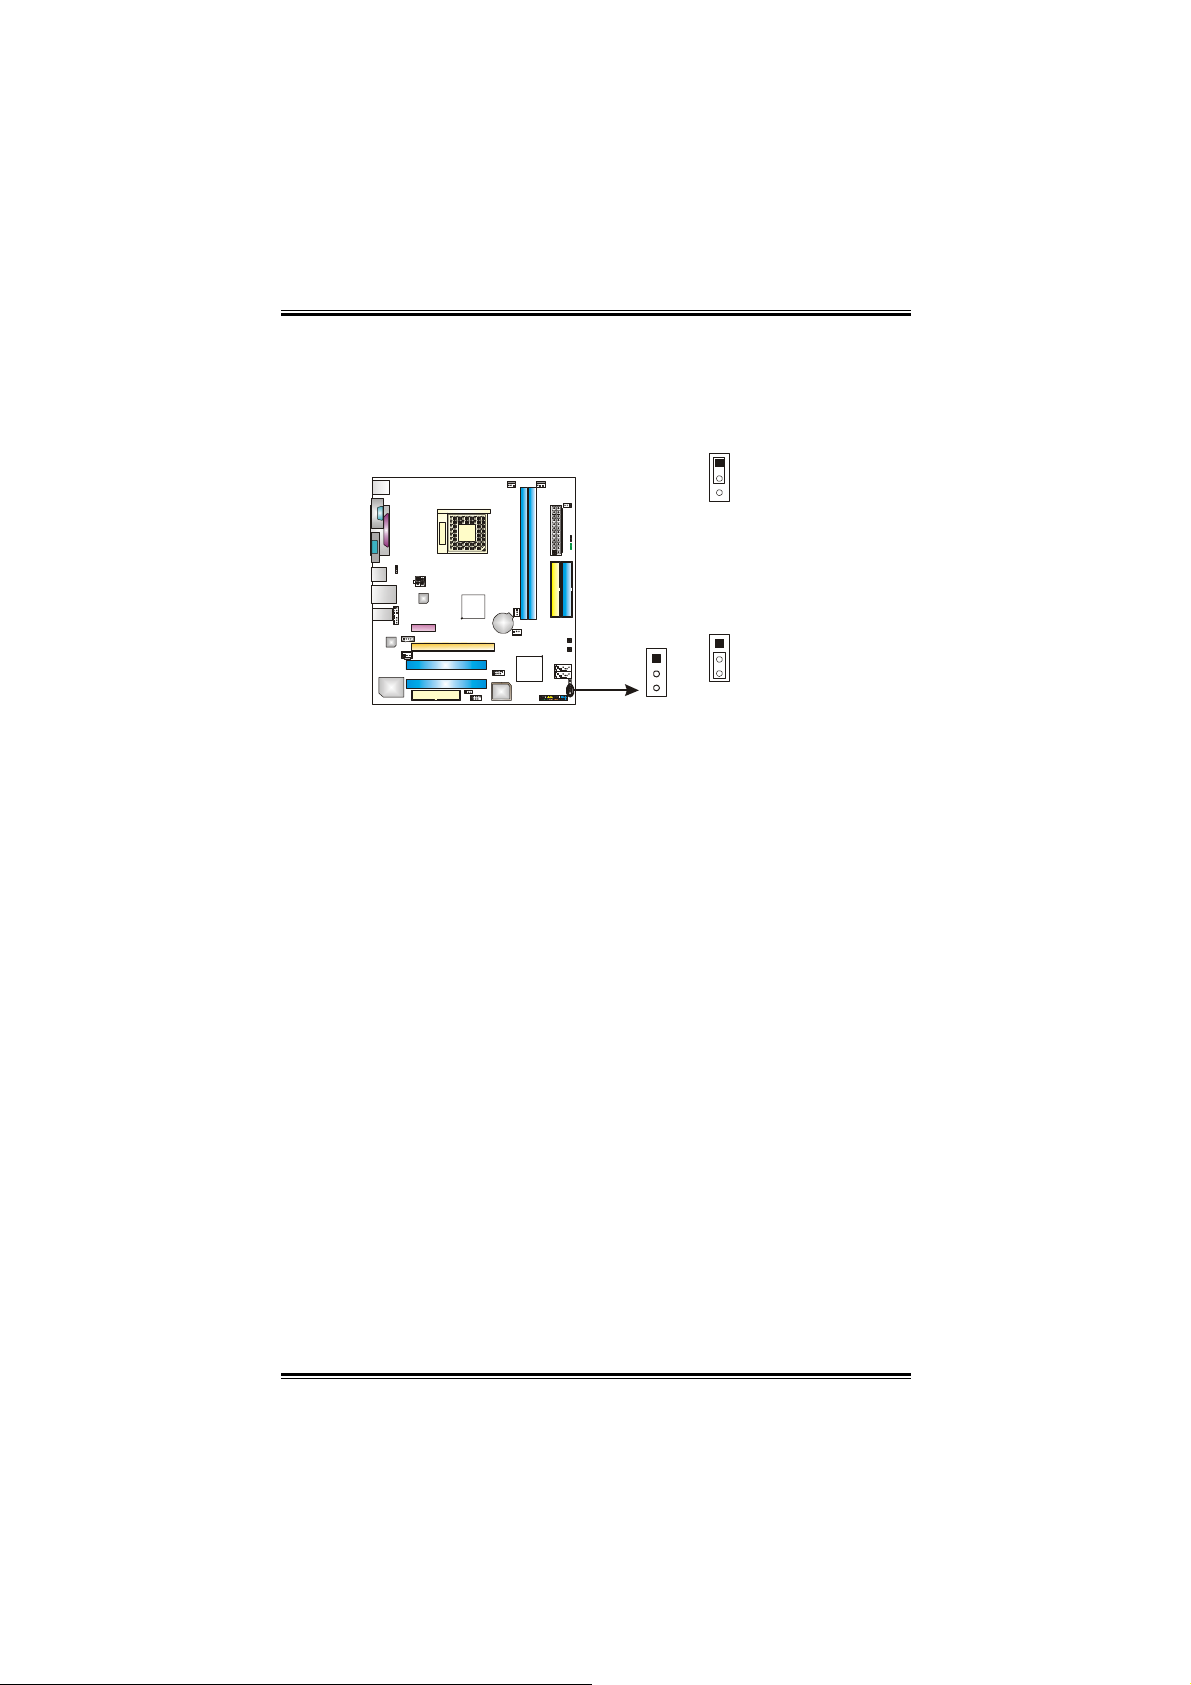
Clear CMOS Header: JCMOS1
By placing the jumper on pin 2-3, it allows user to restore the BIOS
safe setting and the CMOS data, please carefully follow the
procedures to avoid damaging the motherboard.
1
3
Pin 1-2 close:
Normal Operation
(Default).
1
1
3
3
Clear CMOS Procedures:※
1. Remove AC power line.
2. Set the jumper to “Pin 2-3 close”.
3. Wait for five seconds.
4. Set the jumper to “Pin 1-2 close”.1
5. Power on the AC.
6. Reset your desired password or clear the CMOS data.
Pin 2-3 close:
Clear CMOS data.
16
User’s Manual
Page 19
Biostar T-Series TForce 6100
7
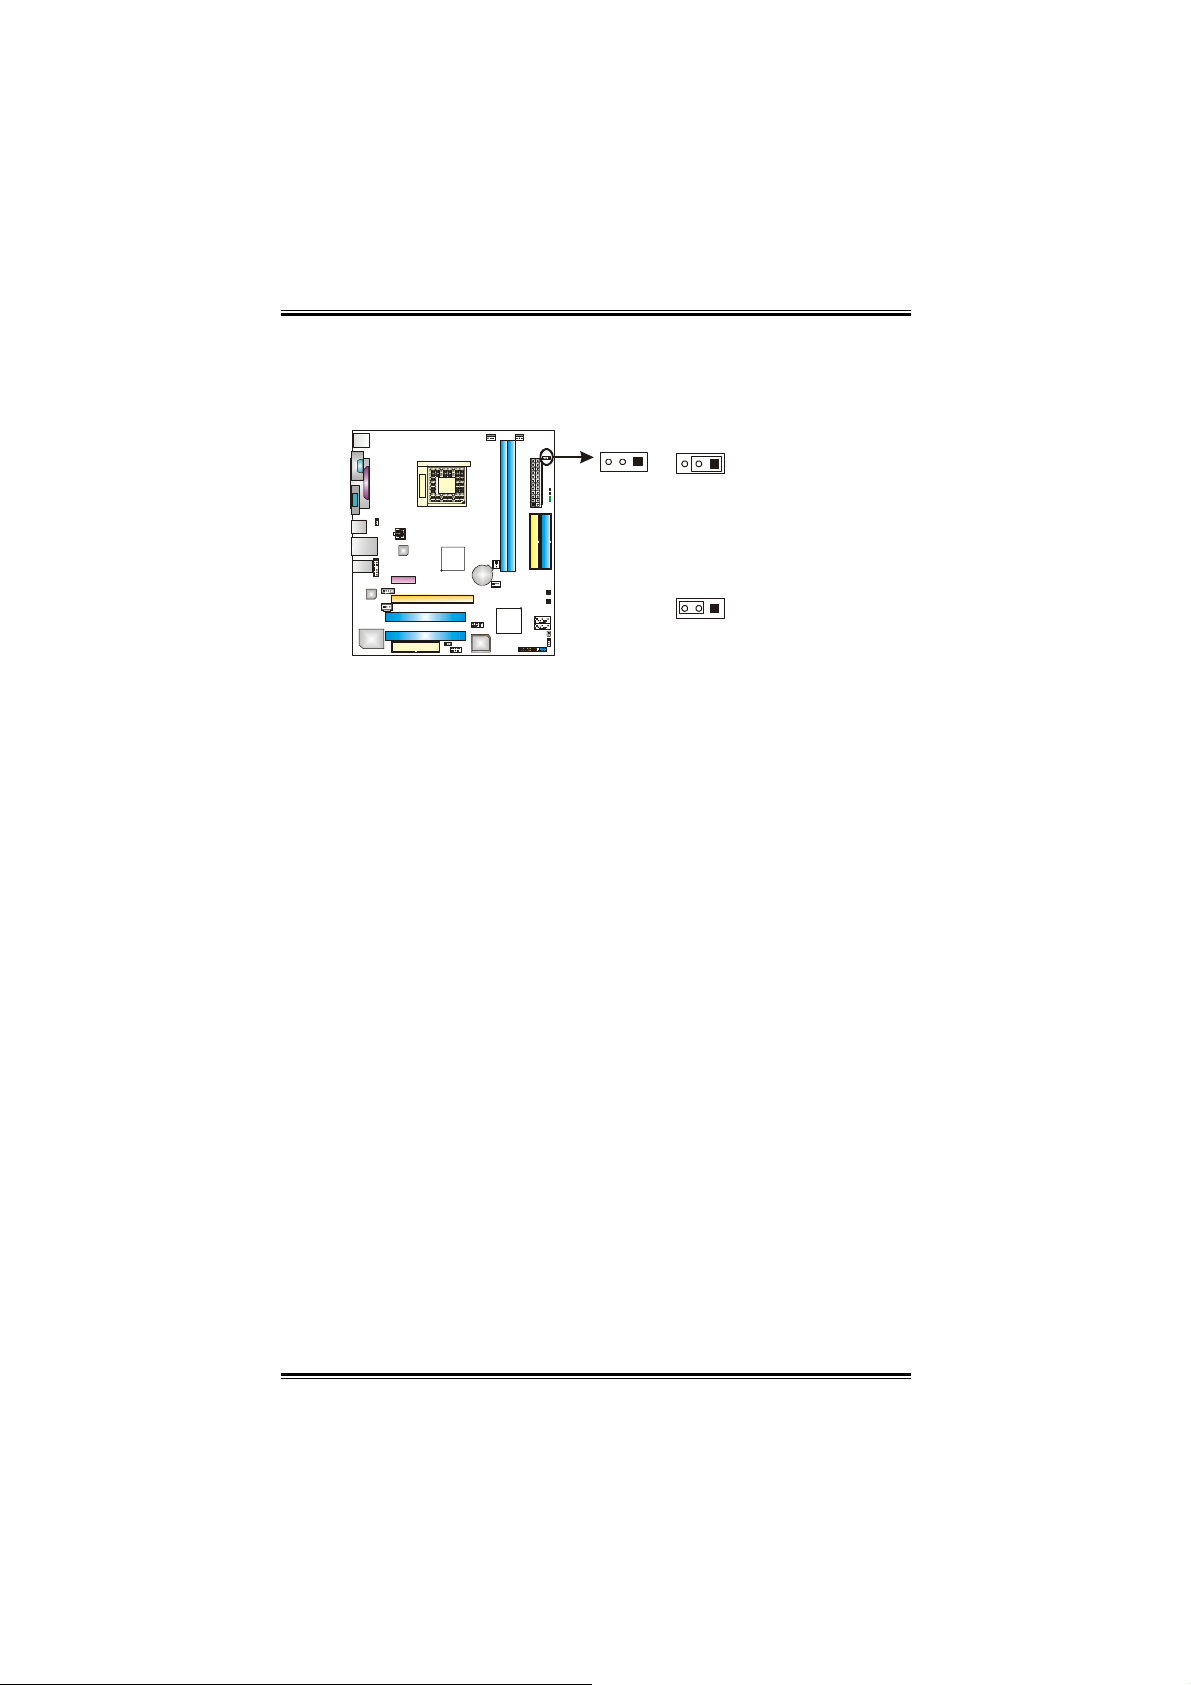
Header for Memory Voltage Overclocking: JDDR_OV>3V
When processing Memory Voltage Overclocking, please place the
jumper to pin1-2 Closed. The Default setting is Pin 2-3 Closed.
1
3
Note:
1. When “JDDR_OV>3V” jumper cap is placed on Pin 2-3,
memory voltage can be manually adjusted under CMOS setup.
2. When “JDDR_OV>3V” jumper cap is placed on Pin 1-2,
memory voltage will be fixed at 3.3V automatically, and can’t
be adjusted under COMS setup.
3. Before setting memory voltage overclocking, please ensure
that your DDR supports up to 3V. (Consulting your DDR
supplier)
1
3
Pin 1-2 Close:
Memory voltage Overclocking.
1
3
Pin 2-3 Close:
Normal status (default).
1
User’s Manual
Page 20
Biostar T-Series TForce 6100
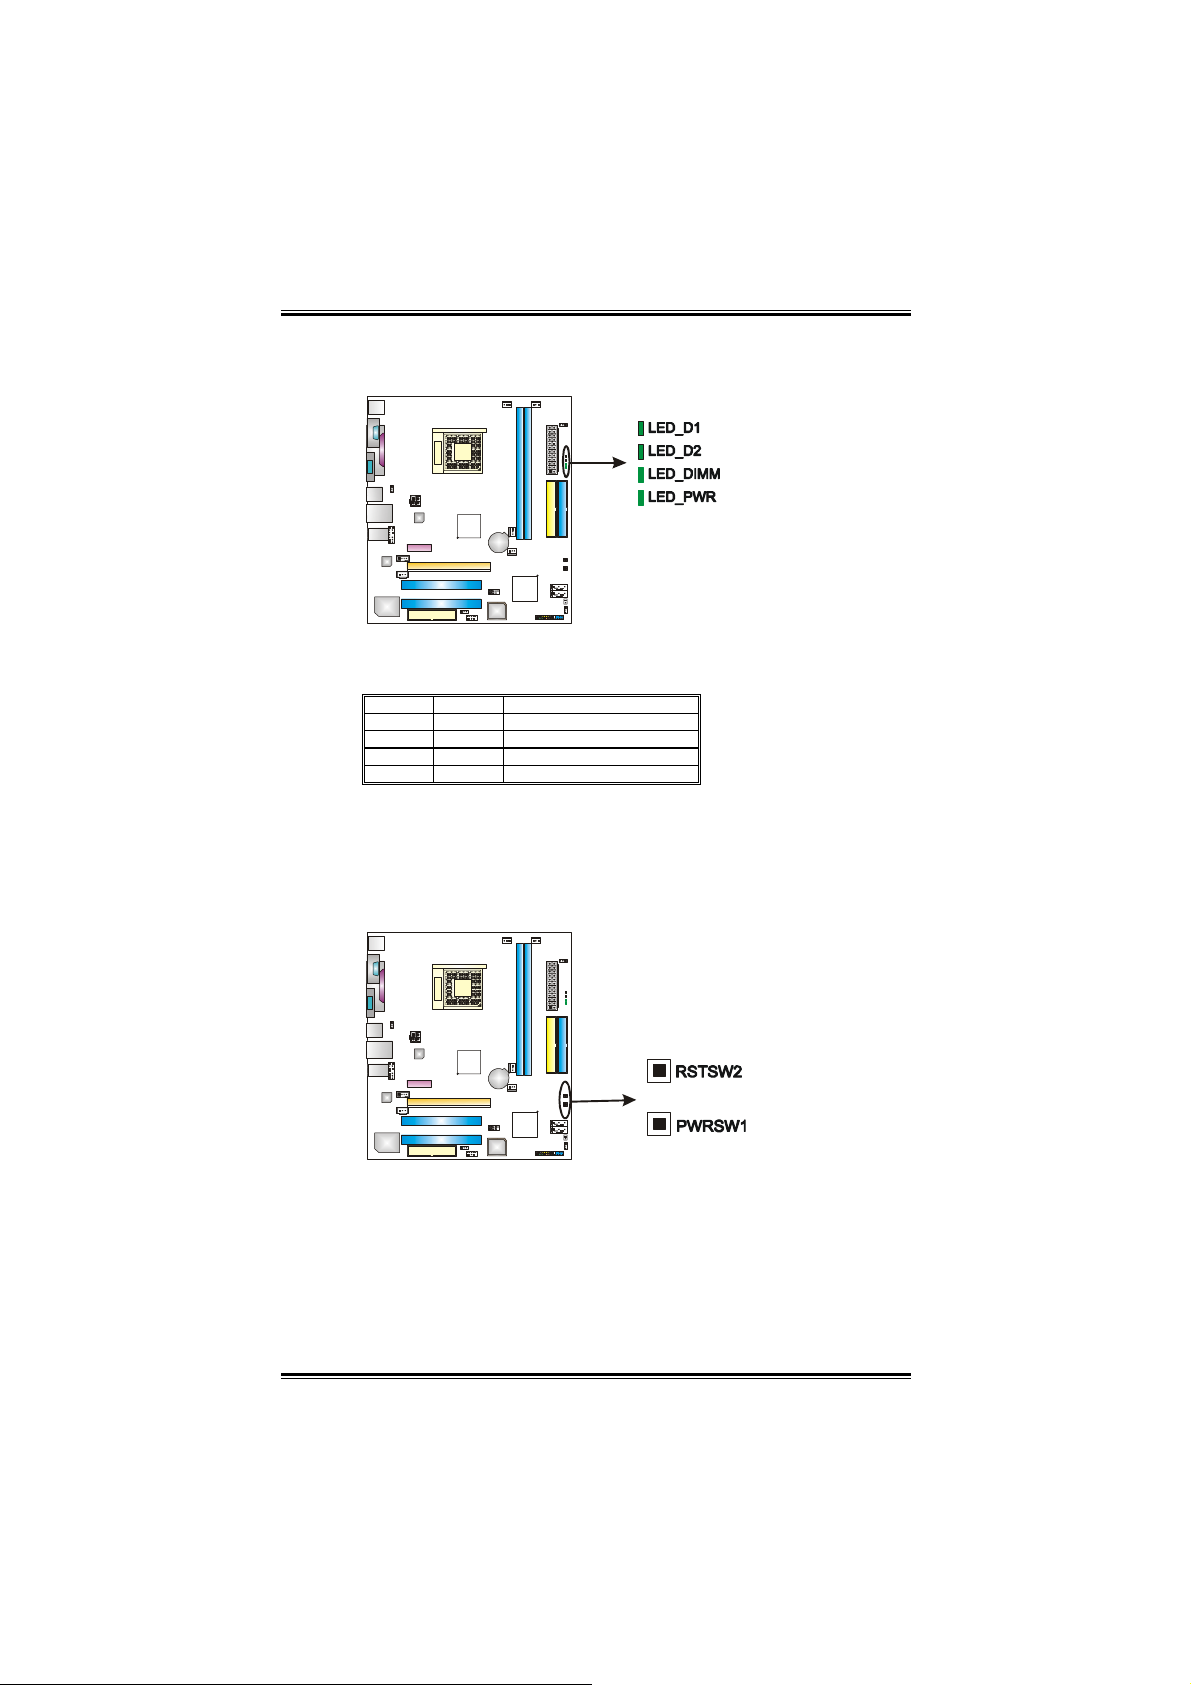
On-Board LED Indicators
There are 4 LED indicators on the motherboard to show system
status.
LED_D1 and LED_D2:
These 2 LED indicate system power on diagnostics.
Please refer to the table below for different messages:
LED_D1 LED_D2 Message
ON ON Normal
ON OFF Memory Error
OFF ON VGA Error
OFF OFF Abnormal: CPU / Chipset error.
LED_DIMM:
This LED indicates the voltage of memory is activated normally.
LED_PWR:
This LED indicates the system is ready for Power-on.
On-Board Buttons
There are 2 on-board buttons.
PWRSW:
This is an on-board Power Switch button.
RSTSW:
This is an on-board Reset button.
18
User’s Manual
Page 21

Biostar T-Series TForce 6100
CHAPTER 3: OVERCLOCK QUICK GUIDE
3.1: T-POWER INTRODUCTION
Biostar T-Power is a whole new utility that is designed for
overclock users.
Based on many precise tests, Biostar Engineering Team (BET)
has developed this ultimate overclock engine to raise system
performance.
No matter whether under BIOS or Windows interface, T-Power
is able to present the best system state according to users’
overclock setting.
T-Power BIOS Features:
Overclocking Navigator Engine (O.N.E.)
CMOS Reloading Program (C.R.P.)
Memory Integration Test (M.I.T., under Overclock
Navigator Engine)
Integrated Flash Program (I.F.P.)
Smart Fan Function (under PC Health Status)
Self Recovery System (S.R.S)
T-Power Windows Feature:
Hardware Monitor
Overclock Engine
Smart Fan Function
Life Update
19
User’s Manual
Page 22
Biostar T-Series TForce 6100
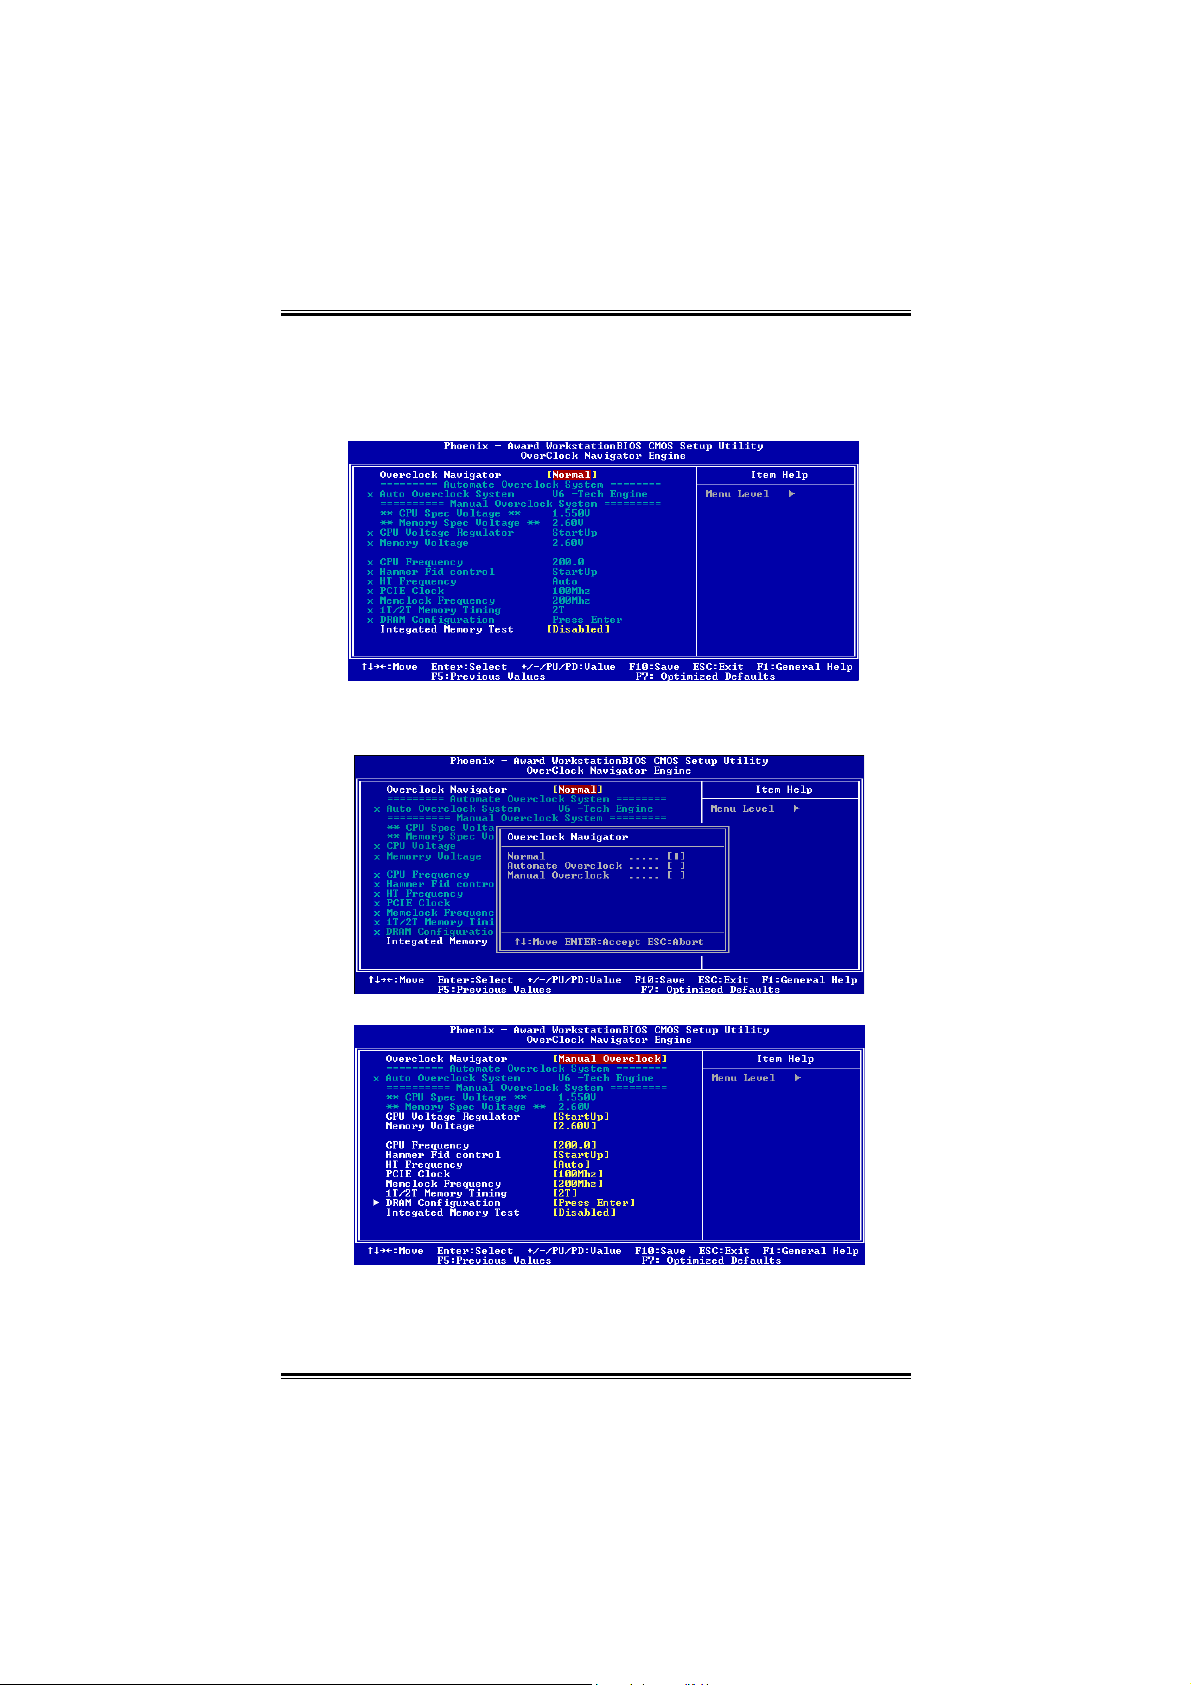
3.2: T-POWER BIOS FEATURE
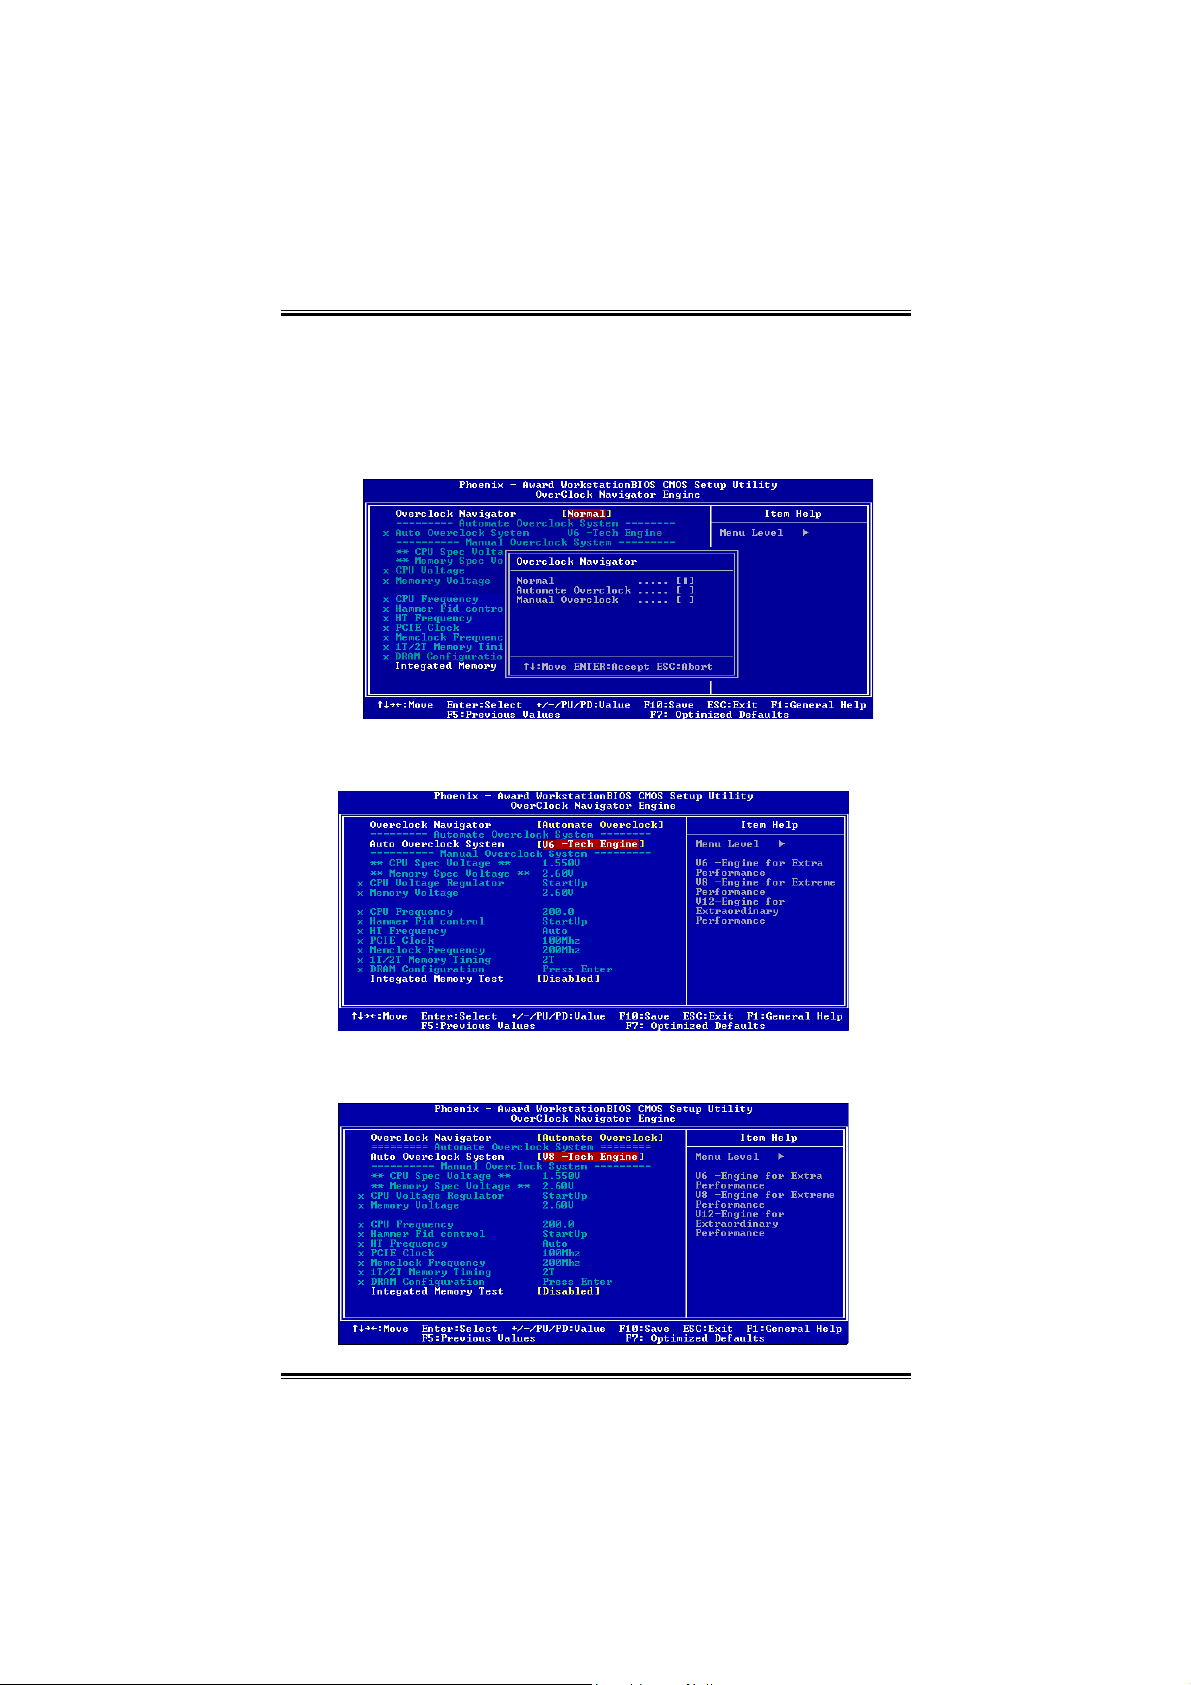
A. Overclocking Navigator Engine (O.N.E.):
ONE provides two powerful overclocking engines: MOS and
AOS for both Elite and Casual overclockers.
Manual Overclock System (M.O.S.)
MOS is designed for experienced overclock users.
It allows users to customize personal overclock settings.
20
User’s Manual
Page 23

Biostar T-Series TForce 6100
CPU Overclock Setting:
CPU Voltage:
This function will increase CPU stability when overclocking.
However, the CPU temperature will increase when CPU
voltage is increased.
Choices: The range is from 0.8V to 1.7V.
CPU Frequency:
CPU Frequency is directly in proportion to system performance.
To maintain the system stability, CPU voltage needs to be
increased also when raising CPU frequency.
Choices: This range is from 200 to 450, with an interval of
1MHz.
Hammer CPU Multiplier:
The MOS allows users to downgrade the CPU ratio when
overclocking.
Choices: The lower limit is x4 (800MHz). The upper limit is
decided by different CPU type. With an x1 (200MHz) interval.
Memory Overclock Setting:
Memory Voltage:
This function will increase memory stability when overclocking.
Choices: The range is from 2.6V to 2.9V, with an interval of
0.1V.
Memclock Frequency:
To get better system performance, sometimes downgrading the
memory frequency is necessary when CPU frequency is
adjusted over the upper limit.
Choices: 100, 133, 166, 200, 216, 233, 250 (MHz).
PCI-Express Overclock Setting:
PCIE Clock:
It helps to increase VGA card performance.
Choices: The range is from 100 to 145, with an interval of
1MHz.
Chipset Overclock Setting:
HT Frequency:
We recommend users to set this item at “x4” when
overclocking.
Choices: x1, x2, x3, x4, x5, Auto.
Notice: According to tests that have been done; AMD Athlon XP 3000+
CPU is the best CPU type for overclock function.
21
User’s Manual
Page 24
Biostar T-Series TForce 6100
Automatic Overclock System (A.O.S.)
For beginners in overclock field, BET had developed an easy,
fast, and powerful feature to increase the system performance,
named A.O.S.
Based on many tests and experiments, A.O.S. provides 3 ideal
overclock configurations that are able to raise the system
performance in a single step.
V6 Tech Engine:
This setting will raise about 10%~15% of whole system
performance.
V8 Tech Engine:
This setting will raise about 15%~25% of whole system
performance.
22
User’s Manual
Page 25
Biostar T-Series TForce 6100
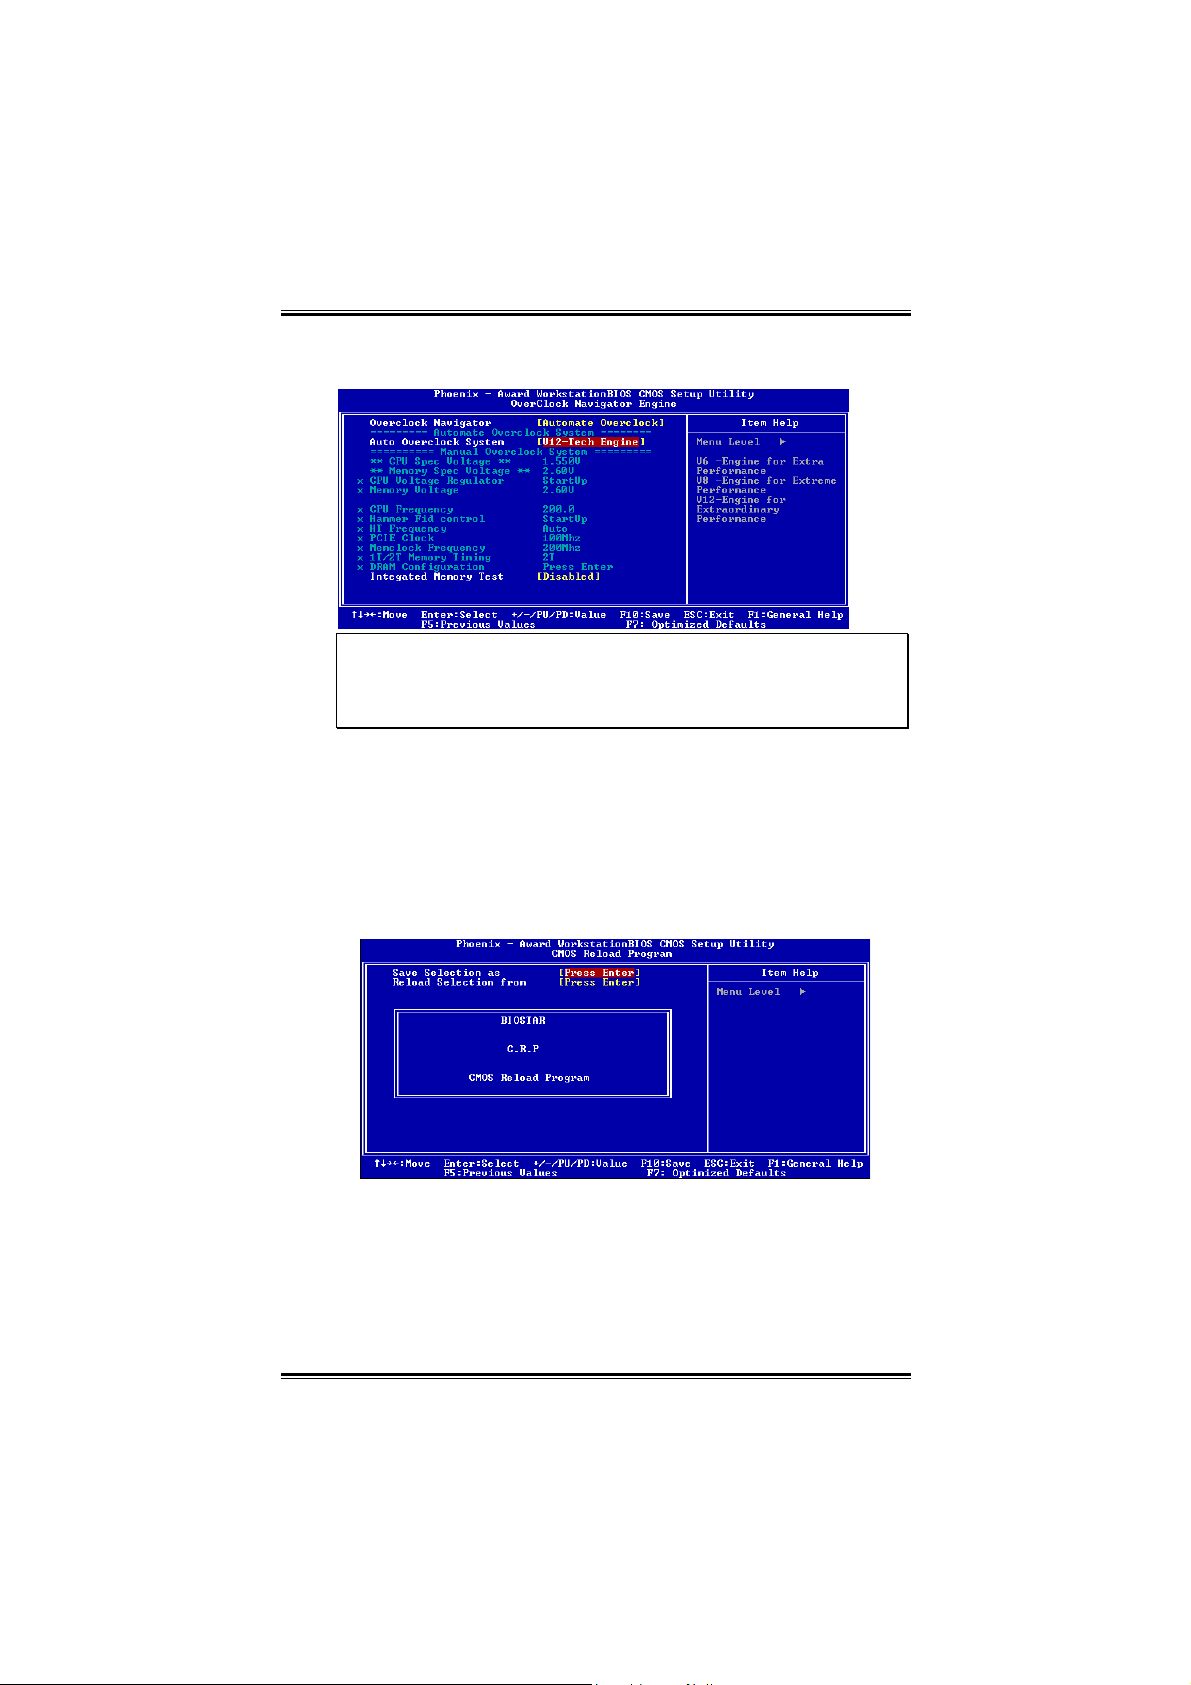
V12 Tech Engine:
This setting will raise about 25%~30% of whole system
performance.
Notices:
1. Not all types of AMD CPU perform above overclock setting ideally; the difference
will be based on the selected CPU model.
2. From BET experiments, the Atholon64 FX CPU is not suitable for this A.O.S.
feature.
B. CMOS Reloading Program (C.R.P.):
It allows users to save different CMOS settings into BIOS-ROM.
Users are able to reload any saved CMOS setting for customizing
system configurations.
Moreover, users are able to save an ideal overclock setting during
overclock operation.
There are 50 sets of record addresses in total, and users are able to
name the CMOS data according to personal preference.
23
User’s Manual
Page 26
Biostar T-Series TForce 6100
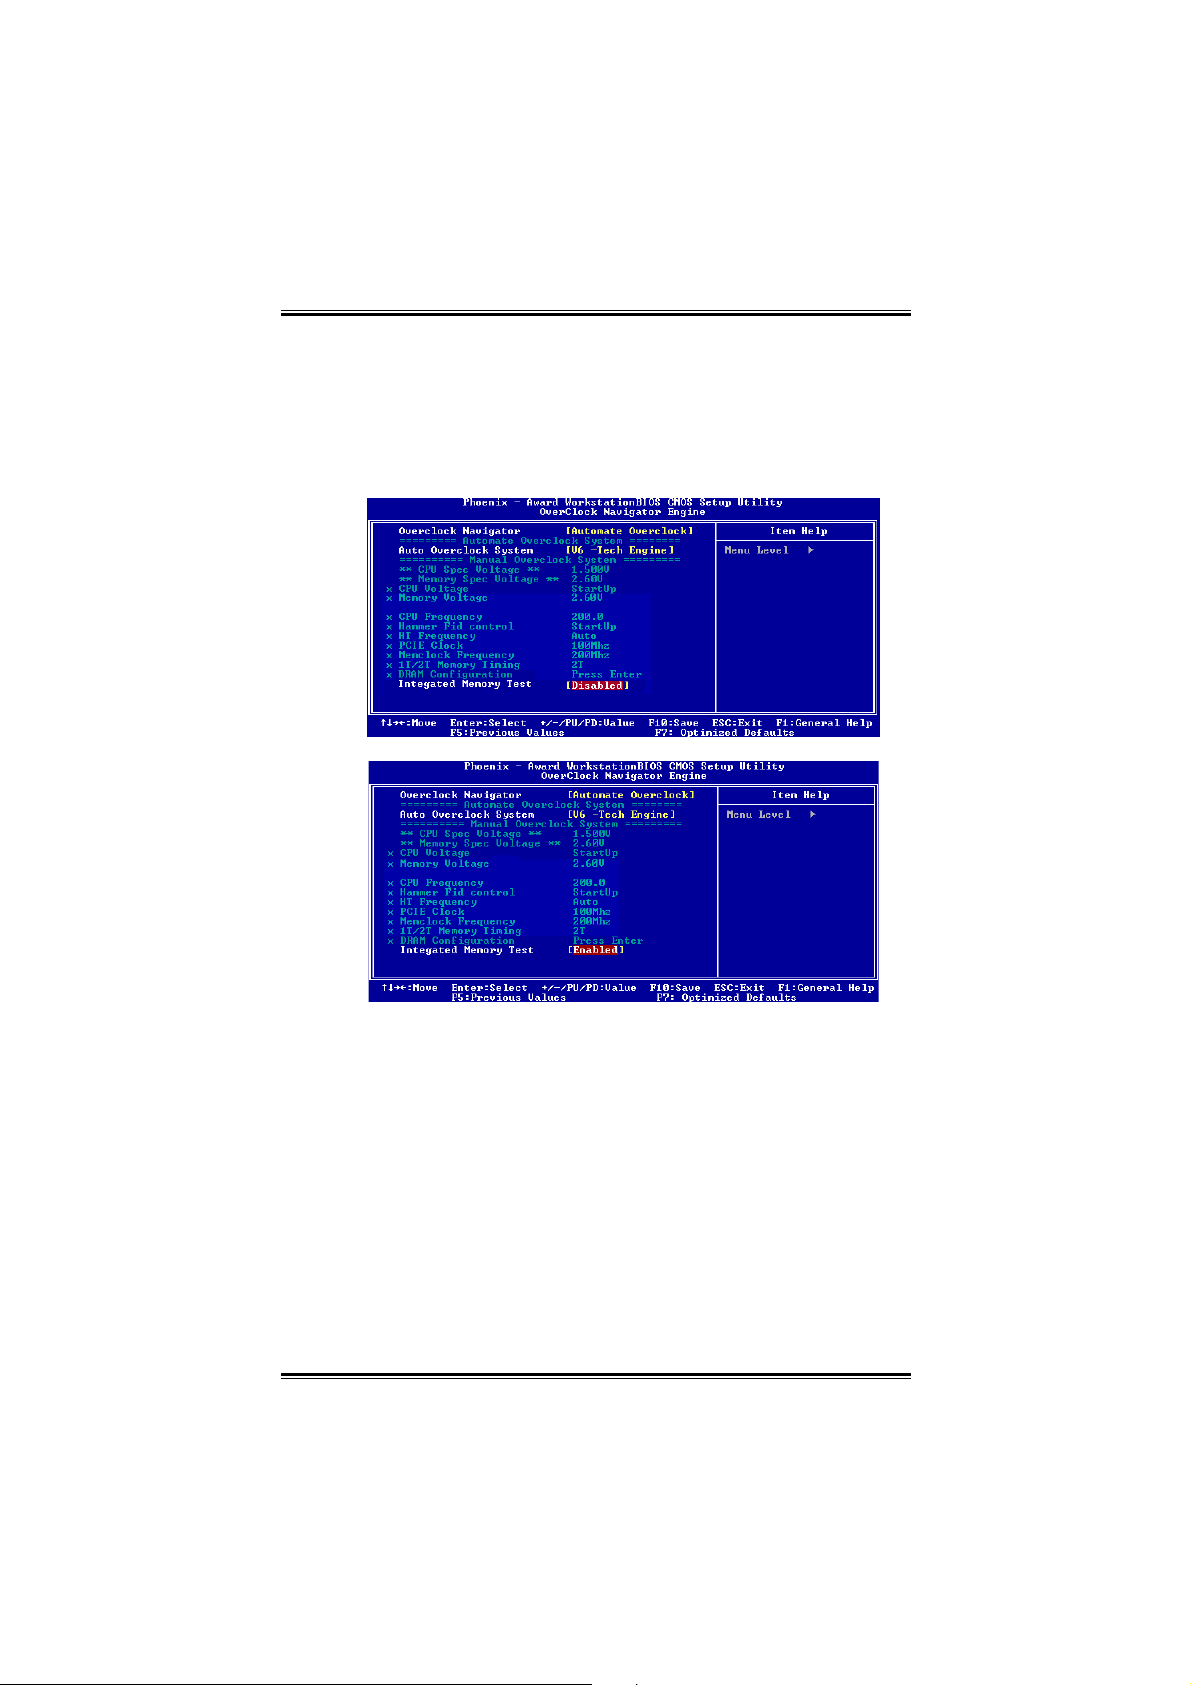
C. Memory Integration Test (M.I.T.):
This function is under “Overclocking Navigator Engine” item.
MIT allows users to test memory compatibilities, and no extra
devices or software are needed.
Step 1:
The default setting under this item is “Disabled”; the condition
parameter should be changed to “Enable” to proceed this test.
↓
Step 2:
Save and Exit from CMOS setup and reboot the system to activate
this test.
Run this test for 5 minutes (minimum) to ensure the memory
stability.
Step 3:
When the process is done, change the setting back from “Enable” to
“Disable” to complete the test.
24
User’s Manual
Page 27
Biostar T-Series TForce 6100
5
D. Self Recovery System (S.R.S.):
This function can’t be seen under T-Power BIOS setup; and is
always on whenever the system starts up.
However, it can prevent system hang-up due to inappropriate
overclock actions.
When the system hangs up, S.R.S. will automatically log in the
default BIOS setting, and all overclock settings will be re-configured.
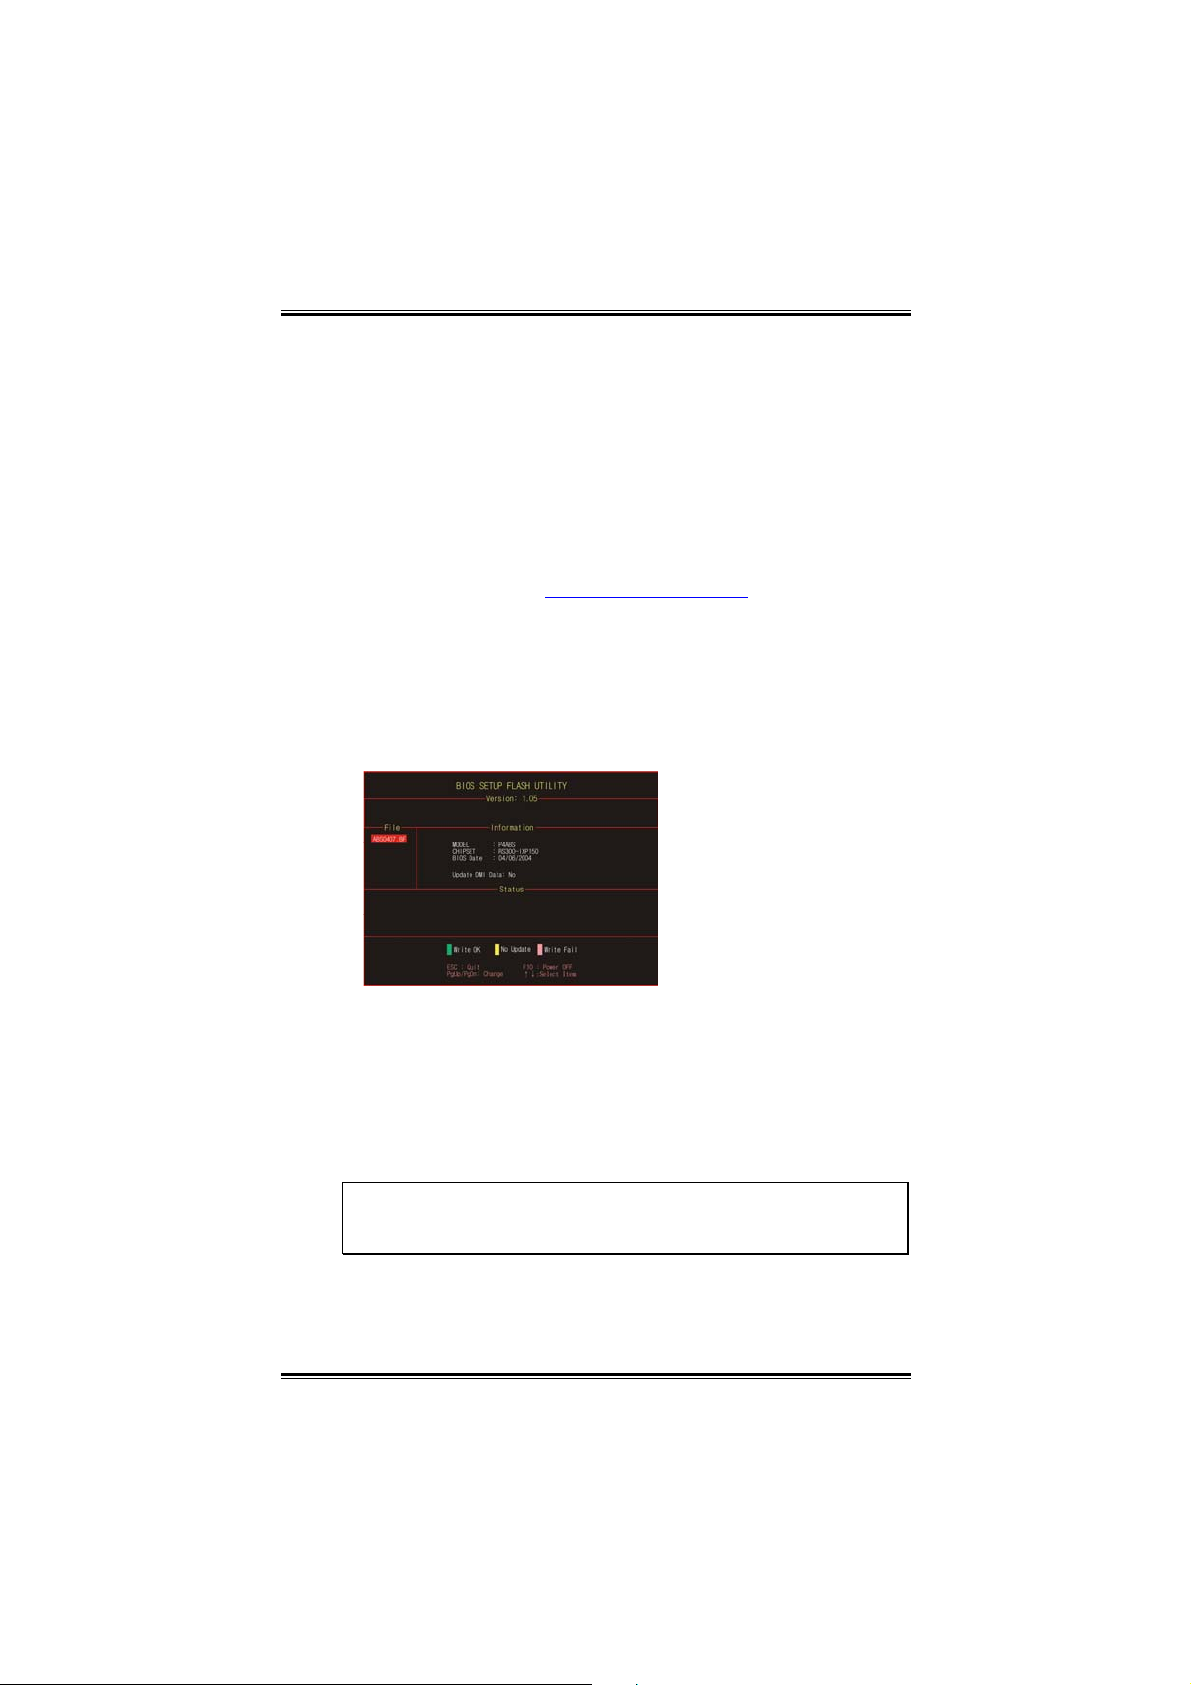
E. Integrated Flash Program (I.F.P.):
IFP is a safe and quick way to upgrade BIOS.
Step 1:
Go to Biostar website (http://www.biostar.com.tw
latest BIOS file. Then, save the file into a floppy disk.
Step 2:
Insert the floppy disk and reboot the system to get into CMOS
screen.
Step 3:
Select the item “Integrated Flash Program” to get the following
frame and choose the BIOS file downloaded in step 1.
) to download the
Step 4:
Press “Enter” key to start BIOS file loading, and BIOS updating will
process automatically.
Step 5:
When the BIOS update is completed, press YES to the message
“Flash done, Reset system”, and the system will reboot
automatically to finish the process.
Advise:
You can update the system BIOS by simply pressing “Enter” key for
three times.
2
User’s Manual
Page 28
Biostar T-Series TForce 6100
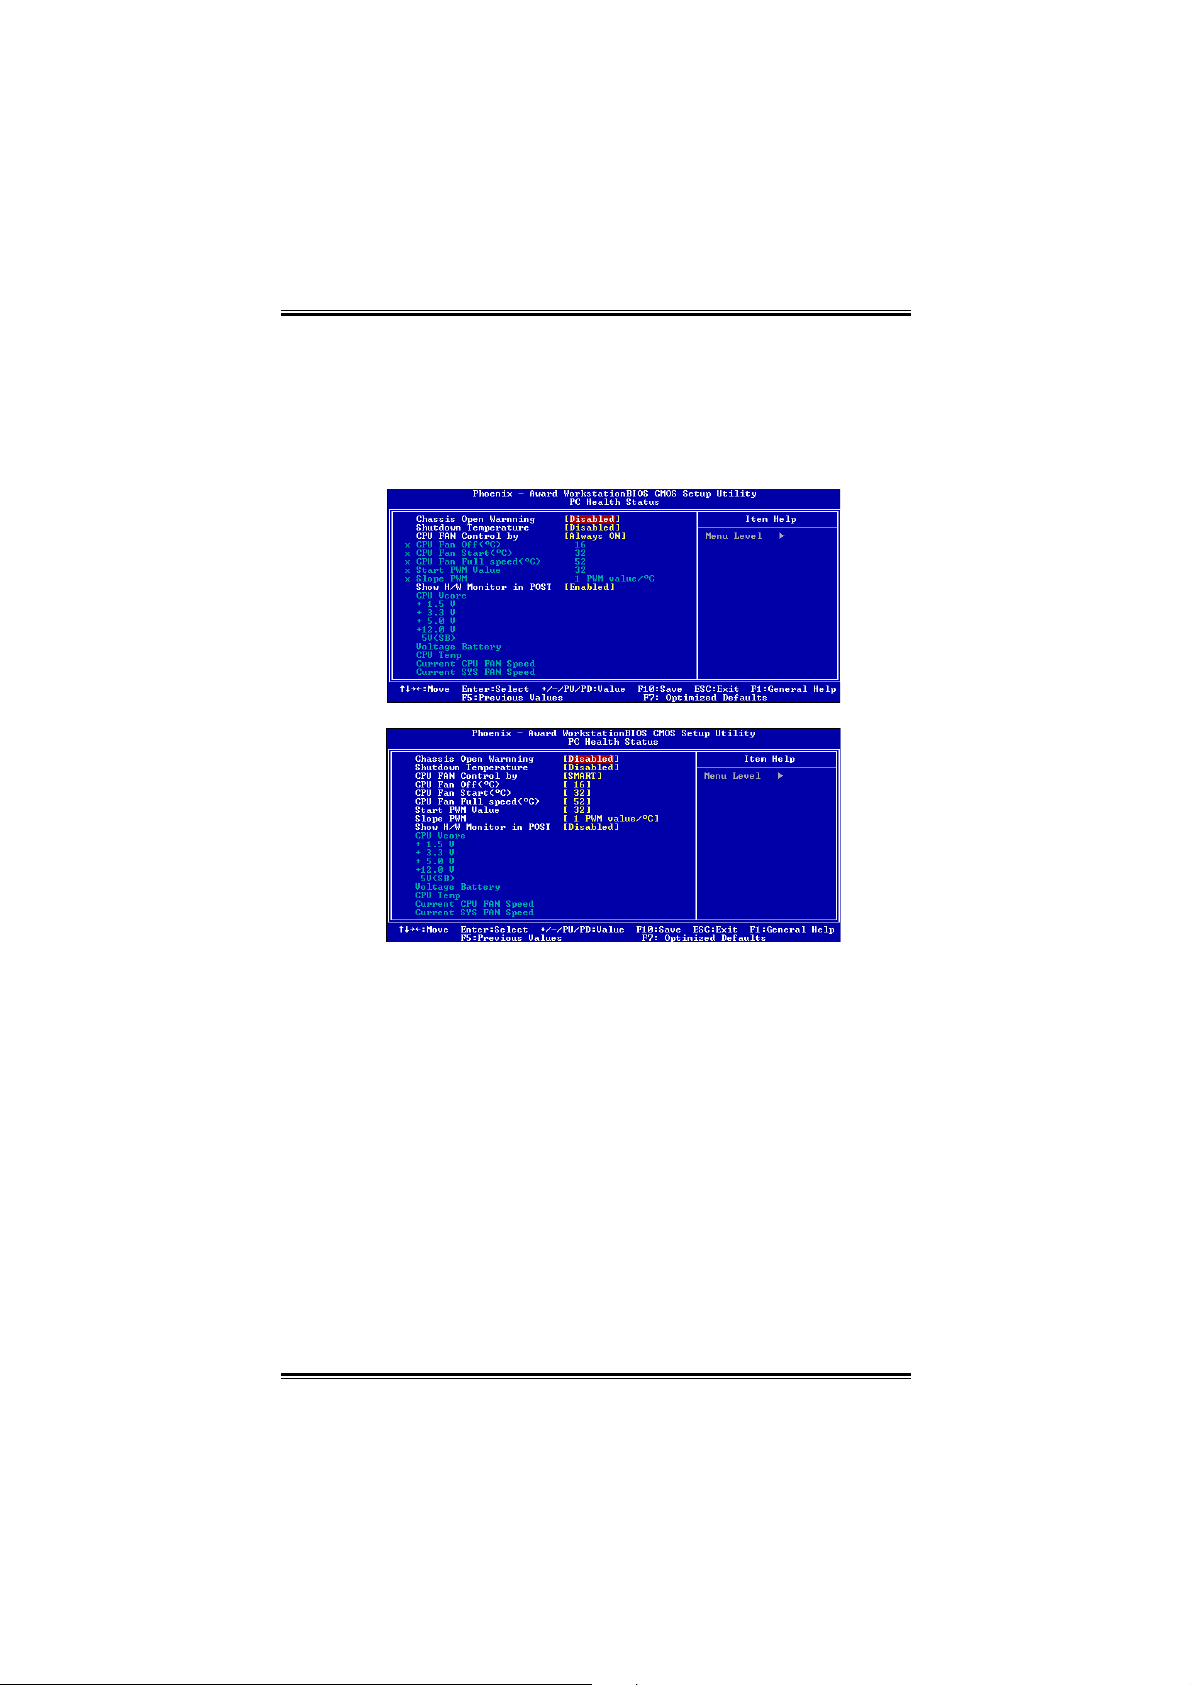
F. Smart Fan Function:
Smart Fan Function is under “PC Health Status”.
This is a brilliant feature to control CPU Temperature vs. Fan speed.
When enabling Smart Fan function, Fan speed is controlled
automatically by CPU temperature.
This function will protect CPU from overheat problem and maintain
the system temperature at a safe level.
↓
CPU Fan Off <℃>:
If the CPU temperature is lower than the set value, the CPU
fan will turn off. The range is from 0℃~127℃, with an interval
of 1℃.
Choices: 16℃ (default).
CPU Fan Start <℃>
The CPU fan starts to work when CPU temperature arrives to
this set value. The range is from 0℃~127℃, with an interval of
1℃.
Choices: 32℃ (default).
CPU Fan Full speed <℃>
When CPU temperature arrives to the set value, the CPU fan
will work under Full Speed. The range is from 0℃~127℃, with
an interval of 1℃.
Choices: 52℃ (default).
26
User’s Manual
Page 29
Biostar T-Series TForce 6100
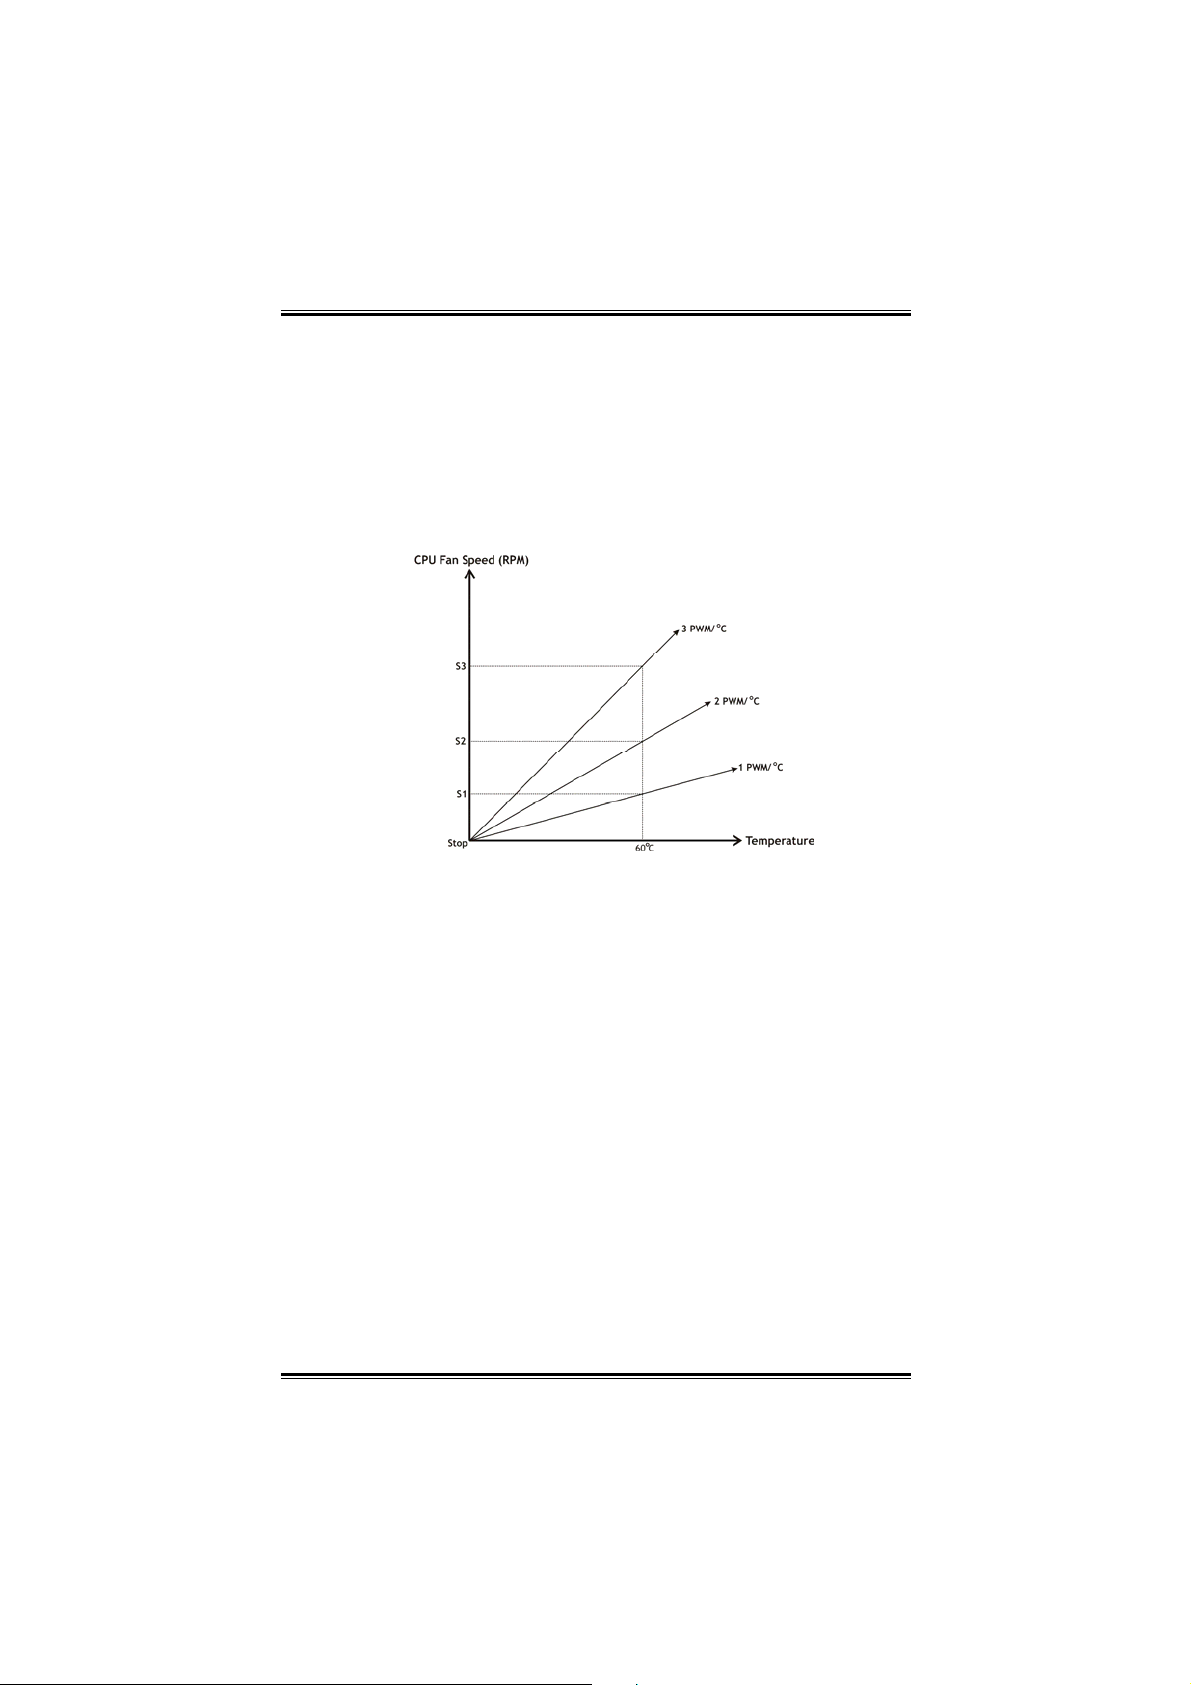
Start PWM Value
When CPU temperature arrives to the set value, the CPU fan
will work under Smart Fan Function mode. The range is from
0~127, with an interval of 1.
Choices: 32 (default).
Slope PWM
Choices: 1 PWM Value/℃ (default), 2 PWM Value/℃, 4 PWM
Value/℃, 8 PWM Value/℃, 16 PWM Value/℃, 32 PWM
Value/℃, 64PWM Value/℃.
S1: CPU temperature is 60℃, and PWM value is 1 PWM/℃.
S2: CPU temperature is 60℃, and PWM value is 2 PWM/℃.
S3: CPU temperature is 60℃, and PWM value is 3 PWM/℃.
Increasing the value of slope PWM will raise the speed of CPU
fan.
As in above diagram, when the CPU temperature reaches 60℃,
the CPU fan speed for 3 PWM/℃ is higher than 1 PWM/℃
(S1<S2<S3).
27
User’s Manual
Page 30

Biostar T-Series TForce 6100
3.3 T-POWER WINDOWS FEATURE
A.Hardware Monitor:
T-Power Hardware monitor allows users to monitor system
voltage, temperature and fan speed accordingly.
Additionally, a rescue action will be taken by the program
automatically while the system faces an abnormal condition.
The program will trigger an alarm or shut down the system
when unpredictable errors occur.
All the monitoring items are illustrated by a waveform diagram.
Hardware Monitor Toolbar
i. Start-up Setting
Click on this item to run Hardware Monitor Program when the
Windows starts-up.
ii. Dialogue-Box Setting
Click on this item to pop-up warning dialogue-box when PC
system is abnormal.
iii. Exit
Click on this item to exit Hardware Monitor Program.
iv. Hide
Click on this item to hide this program in system tray. When
hiding the program, there will be a check icon in the system
tray.
28
User’s Manual
Page 31

Biostar T-Series TForce 6100
CPU Temperature
This column configures the CPU temperature. There is a waveform
to represent the status of CPU temperature.
By adjusting , users can easily configure the upper limit of CPU
temperature for system operating.
In this diagram, the white line represents the upper limit which
user-set for CPU temperature and the green line shows present
CPU temperature.
If the CPU temperature is higher than the upper limit, the status line
color will change from green to red, and a warning sound will alert
you. Also, the system tray icon
would change to .
FAN Speed
By adjusting , users can easily configure the lower limit of the
fan speed.
In this diagram, the green line shows present CPU Fan speed, and
the yellow line shows System Fan speed (if any).
If any one of the fans speeds is lower than the set value, the status
line will change into a red warning line, and the program will trigger
an alarm system automatically. Also, the system tray icon
would change to .
29
User’s Manual
Page 32

Biostar T-Series TForce 6100
CPU/Battery Voltage
i. VCore
This item displays the CPU voltage, represented by a light blue
line.
Users can set the upper and lower limit by adjusting
monitor the CPU operating voltage.
If CPU voltage is higher or lower than the set value, the status
line will change into a red warning line, and a warning sound
will alert you. Also, the system tray icon will change to .
ii. VBAT
This item displays the CMOS battery voltage, represented by a
light green line.
Users can set the upper and lower limit by adjusting to
monitor the status of battery voltage.
If battery voltage is higher or lower than the set value, the
status line will change to a red warning line, and a warning
sound will alert you. Also, the system tray icon
to
.
Reference data
This column represents the status of power supply voltage and
cannot be adjusted, it is only for present status reference.
to
will change
30
User’s Manual
Page 33

Biostar T-Series TForce 6100
B. Overclocking Configurations
This diagram is designed for T-series
Overclocking utility. Friendly interface and solid
overclock features are the major concept of this
utility.
Graphic 1 will appear when activating this utility.
Graphic 2
By adjusting the overclocking
features in 4 sub-screens, users can
tune the system performance to an
optimal level.
Graphic 1
A. Clicking on “Biostar” will lead
you to the Biostar Homepage.
B. This column shows the CPU
speed information.
C. Click on this button and the utility
will pop-up 4 sub-screens
(Please refers to Graphic 3).
D. Click on this button to minimize
this program to taskbar.
E. This column shows present CPU
speed and overclocking
percentage.
F. Clicking on this button will make
the program start up as soon as
the Windows starts up.
G. Click on this button to exit this
overclock utility.
H. Click on this button to reset all
the overclock features to default
setting.
31
Graphic 3
User’s Manual
Page 34

Biostar T-Series TForce 6100
CPU Overclocking Settings:
By adjusting
can configure three items
for CPU overclocking.
A. CPU Frequency
Range: 133MHz~450MHz.
Interval: 1MHz.
B. CPU Ratio
Range: 4~25.
Interval: 1.
C. CPU Voltage
Range: 1.175V~1.725V.
Interval: 0.025V.
Memory Overclocking Settings:
By adjusting can configure two items for
Memory overclocking.
A. Memory Clock Frequency
Choices: 100, 133, 166, 200, 233,250.
B. Memory Voltage
Range: 2.5V~2.8V.
Interval: 0.1V.
AGP/PCI-Express Overclocking Setting:
By adjusting
can configure VGA card
overclocking. And this function helps to
increase VGA card performance.
Range: 100MHz~150MHz.
Interval: 1MHz.
32
User’s Manual
Page 35

Biostar T-Series TForce 6100
PCI Overclocking Setting:
This diagram shows present PCI working
status and helps to monitor PCI peripherals
working status.
This item cannot be adjusted.
33
User’s Manual
Page 36

Biostar T-Series TForce 6100
C. Smart Fan Function
When Smart Fan Function is activated, screens will pop-up to
illustrate the fan speed information.
i. CPU Temperature:
Show current CPU temperature.
ii. CPU Fan speed:
Show current CPU Fan speed.
iii. System Fan speed:
Show current system Fan speed.
iv. Calibrate:
When changing CPU Fan or System Fan, click on this
button to re-calibrate the Fan speed.
Note:
1. When Smart Fan Function activates for the first time, this calibrate
function would auto-run to get upper and lower limitation of CPU Fan and
System Fan.
2. When calibrating process is done, the calibrating window will auto-close,
and the main screen will show new fan speed data.
34
User’s Manual
Page 37

Biostar T-Series TForce 6100
5
v. Auto:
If the green indicator is lit up, the Smart Fan Function
is “On” (Default Setting).
Click on this button again to close Smart Fan Function,
and a screen as below would pop-up.
There will be pulling-meter besides the CPU Fan and
System Fan, the CPU Fan and the System Fan speed
can be adjusted by adjusting the Cursor Up or Down.
vi. Program Tool Bar:
z About:
Click on this button to get program-related
information.
z
Minimize:
Click on this button to minimize the program to
system tray
z
Exit:
Click on this button to exit this program.
3
User’s Manual
Page 38

Biostar T-Series TForce 6100
D. Live Update
When Live Update program is activated, a screen will pop up to
illustrate BIOS related information.
i. Link to Internet:
Click on this button will link to Biostar website and
BIOS file will be downloaded.
ii. Update BIOS:
Click on this button to run BIOS flashing process, and
it’s easy and safe.
iii. Backup BIOS:
Click on this button, and BIOS file will be saved into
the user-selected folder.
iv. Clear CMOS:
Click on this item will clear the CMOS Data. When
carrying this job, the previous CMOS data would be
cleared and returned to default setting.
36
User’s Manual
Page 39

Biostar T-Series TForce 6100
7
CHAPTER 4: USEFUL HELP
4.1 DRIVER INSTALLATION NOTE
After you installed your operating system, please insert the
Fully Setup Driver CD into your optical drive and install the
driver for better system performance.
You will see the following window after you insert the CD
The setup guide will auto detect your motherboard and
operating system.
Note:
If this window didn’t show up after you insert the Driver CD, please use file
browser to locate and execute the file SETUP.EXE under your optical drive.
Driver Installation
To install the driver, please click on the Driver icon. The setup
guide will list the compatible driver for your motherboard and
operating system. Click on each device driver to launch the
installation program.
Software Installation
To install the software, please click on the Software icon. The
setup guide will list the software available for your system, click
on each software title to launch the installation program.
3
User’s Manual
Page 40

Biostar T-Series TForce 6100
Manual
Aside from the paperback manual, we also provide manual in
the Driver CD. Click on the Manual icon to browse for available
manual.
Note:
You will need Acrobat Reader to open the manual file. Please download the
latest version of Acrobat Reader software from
http://www.adobe.com/products/acrobat/readstep2.html
4.2 AWARD BIOS BEEP CODE
Beep Sound Meaning
One long beep followed by two
short beeps
High-low siren sound
One Short beep when system
boots-up
Long beeps every other second No DRAM detected or installed
Video card not found or video card
memory bad
CPU overheated
System will shut down
automatically
No error found during POST
38
User’s Manual
Page 41

Biostar T-Series TForce 6100
4.3 EXTRA INFORMATION
A. BIOS Update
After you fail to update BIOS or BIOS is invaded by a virus, the
Boot-Block function will help to restore BIOS. If the following
message is shown after boot-up of the system, it means the
BIOS contents are corrupted.
In this case, please follow the procedure below to restore the
BIOS:
1. Make a bootable floppy disk.
2. Download the Flash Utility “AWDFLASH.exe” from the
Biostar website: www.biostar.com.tw
3. Confirm motherboard model and downl7oad the
respective BIOS from Biostar website.
4. Copy “AWDFLASH.exe” and respective BIOS onto
floppy disk.
5. Insert the bootable disk into floppy drive and press
Enter.
6. System will boot-up to DOS prompt.
7. Type “Awdflash xxxx.bf/sn/py/r” in DOS prompt.
8. System will update BIOS automatically and restart.
9. The BIOS has been recovered and will work properly.
39
User’s Manual
Page 42

Biostar T-Series TForce 6100
B. CPU Overheated
If the system shuts down automatically after power on of
system for a few seconds that means the CPU protection
function has been activated.
When the CPU is overheated, the motherboard will shutdown
automatically to avoid damaging the CPU, and the system will
not power on again.
In this case, please double check:
1. The CPU cooler surface is placed evenly with the CPU
surface.
2. CPU fan is rotating normally.
3. CPU fan speed is fulfilling the CPU speed.
After confirmation, please follow the steps below to relieve the
CPU protection function.
1. Remove the power cord from power supply for a few
seconds.
2. Wait for a few seconds.
3. Plug in the power cord and boot up the system.
Or you can:
1. Clear the CMOS data.
(See “JCMOS1: Clear CMOS Header” section)
2. Wait for a few seconds.
3. Power on the system again.
40
User’s Manual
Page 43

Biostar T-Series TForce 6100
4.4 TROUBLESHOOTING
Problem Solution
1. No power to the system at
all Power light don’t
illuminate, fan inside power
supply does not turn on.
2. Indicator light on keyboard
does not turn on.
System inoperative.
Keyboard lights are on,
power indicator lights are lit,
and hard drive is spinning.
System does not boot from
hard disk drive, can be
booted from optical drive.
System only boots from
optical drive. Hard disk can
be read and applications
can be used but booting
from hard disk is
impossible.
Screen message says
“Invalid Configuration” or
“CMOS Failure.”
Cannot boot system after
installing second hard
drive.
1. Make sure power cable is
securely plugged in.
2. Replace cable.
3. Contact technical support.
Using even pressure on both
ends of the DIMM, press
down firmly until the module
snaps into place.
1. Check cable running from
disk to disk controller board.
Make sure both ends are
securely plugged in; check
the drive type in the standard
CMOS setup.
2. Backing up the hard drive is
extremely important. All hard
disks are capable of breaking
down at any time.
1. Back up data and application
files.
2. Reformat the hard drive.
Re-install applications and
data using backup disks.
Review system’s equipment.
Make sure correct information
is in setup.
1. Set master/slave jumpers
correctly.
2. Run SETUP program and
select correct drive types. Call
the drive manufacturers for
compatibility with other drives.
41
User’s Manual
Page 44

Biostar T-Series TForce 6100
GERMAN
CPU
Unterstützt Sockel 754..
Unterstützt AMD Athlon 64 Prozessoren bis zu 3700+.
Unterstützt AMD Sempron Prozessoren.
Unterstützt HyperTransport™-Techologie bis zu 1600
MHz.
Abmessungen
Mikro-ATX-Formfaktor: 24.4cm (L) x 21.86cm (B)
Systemspeicher
Unterstützt DDR 266/333/400.
Unterstützt die Speichergröße von maximal 2GB mit 2
DIMM-Steckplätze.
Chipsatz
North Bridge: NVIDIA GeForce 6100.
South Bridge: NVIDIA nForce 410.
Super E/A
Chip: ITE 8712F.
Systemumgebungskontrolle.
Hardwareüberwachung
Lüfterdrehzahl-Controller
"Smart Guardian"-Funktion von ITE
IDE
Zwei integrierte Anschlüsse für 4 Geräte.
Unterstützt PIO-Modus 0~4 und Ultra DMA 33/66/100/133
Bus-Mastermodus.
Serial ATA II
nForce 410 unterstützt die Serial ATA 2.0-Spezifikation,
datentransferrate von bis zu 3GB/s.
AC’97 Audio Sound CODEC
Chip: ALC655, unterstützt 6 Kanäle.
10/100 LAN PHY
PHY: RTL8201BL/RTL8201CL, unterstützt die ACPI,
PCI-Energieverwaltung.
Betriebssystemunterstützung
Unterstützt Windows 2000 und Windows XP.
Hinweis: Windows 98SE und Windows ME werden nicht unterstützt.
42
User’s Manual
Page 45

Biostar T-Series TForce 6100
Interne integrierte Steckplätze und Anschlüsse
1 PCI-Express x1-Steckplatz
1 PCI-Express x16-Steckplatz
1 CD-ROM-Audioeingang
1 S/PDIF-Ausgangsanschluss
2 PCI-Steckplätze
2 Serial ATA II-Anschlüsse
2 Ultra DMA 33/66/100/133 IDE-Anschlüsse
Rücktafel-E/A-Anschlüsse
4 USB 2.0-Anschlüsse
1 VGA Anschluss
1 serieller Anschluss
1 drucker Anschluss
1 RJ-45 LAN-Anschluss
1 PS/2-Mausanschluss
1 PS/2-Tastaturanschluss
6 Audioanschlüsse für 8-Kanal-Audioausgabefunktionen.
43
User’s Manual
Page 46

Biostar T-Series TForce 6100
FRENCH
Processeur
Supporte le socket 754.
Supporte les processeurs AMD Athlon 64 jusqu’à 3700+.
Prise en charge des processeurs AMD Sempron.
Supporte Technologie HyperTransport™ jusqu’à
1600MHz.
Dimensions
Facteur de forme Micro ATX: 24.4cm (Long) x 21.86cm
(Larg)
Mémoire système
Prise en charge de DDR 266/333/400.
Espace mémoire maximum de 2GB, prenant en charge 2
barrettes DIMM.
Chipset
North Bridge: NVIDIA GeForce 6100.
South Bridge: NVIDIA nForce 410.
E/S disque
Chip: ITE 8712F.
Initiatives Contrôle d'environnement.
Moniteur matériel
Contrôleur de vitesse de ventilateur
Fonction "Smart Guardian" d'ITE
IDE
Deux connecteurs sur carte permettant la prise en charge
de 4 périphériques.
Prise en charge PIO mode 0~4 et mode bus maître Ultra
DMA 33/66/100/133.
ATA II Série
nForce 410 prise en charge des spécifications ATA 2.0
Série, débit de transfert des données jusqu'à 3 Go/s.
CODEC audio AC’97
Chip: ALC655, prise en charge 6 canaux.
10/100 LAN PHY
PHY: RTL8201BL/RTL8201CL, prise en charge Gestion
de l'alimentation ACPI, PCI.
Systèmes d'exploitation pris en charge
Prise en charge de Windows 2000 et Windows XP.
Note: Windows 98SE et Windows ME ne sont pas pris en charge.
44
User’s Manual
Page 47

Biostar T-Series TForce 6100
Emplacements et connecteurs sur carte internes
1 emplacement PCI-Express x1
1 emplacement PCI-Express x16
1 connecteur S/PDIF-Out
1 connecteur d'entrée CD-ROM audio-in
2 emplacements PCI
2 ports série ATA II
2 connecteurs IDE Ultra DMA 33/66/100/133
Connecteurs E/S panneau arrière
4 ports USB 2.0
1 port VGA
1 port imprimeur
1 port série
1 prise LAN RJ-45
1 port souris PS/2
1 port clavier PS/2
1 port audio vertical comprenant 1 connecteur d'entrée
Line-in, 1 connecteur de sortie Line-out, et 1 connecteur
d'entrée MIC-in.
45
User’s Manual
Page 48

Biostar T-Series TForce 6100
ITALIAN
CPU
Supporto di Socket 754.
Supporto AMD Athlon 64 fino a 3700+.
Supporto processore AMD Sempron.
Tecnologia HyperTransport™ fino a 1600MHz.
Dimensioni
Fattore di forma ATX micro: 24.4cm (L) x 21.86cm (P)
Memoria di sistema
Supports di DDR 266/333/400.
Lo spazio massimo di memoria è 2 GB e supporta 2 prese
DIMM.
Chipset
North Bridge: NVIDIA GeForce 6100.
South Bridge: NVIDIA nForce 410.
Super I/O
Chip: ITE 8712F.
Funzioni di controllo dell’ambiente.
Monitoraggio hardware
Controller velocità ventolina
Funzione "Smart Guardian" di ITE
IDE
Due connettori integrati supportano 4 dispositivi.
Modalità: PIO 0-4, bus master e Ultra DMA 33/66/100/133.
Serial ATA II
nForce 410 supporto specifiche Serial ATA 2.0, velocità di
trasferimento dei dati fino 3GB/s.
Audio CODEC AC’97
Chip: ALC655, supporto di 6 canali.
10/100 LAN PHY
PHY: RTL8201BL/RTL8201CL, supporto gestione
energetica ACPI, PCI.
Sistemi operativi supportati
Supporto di Windows 2000 e Windows XP.
Nota: Non supporta Windows 98SE e Windows ME.
46
User’s Manual
Page 49

Biostar T-Series TForce 6100
7
Connettori e alloggiamenti interni integrato
1 alloggiamento PCI-Express x1
1 alloggiamento PCI-Express x16
1 connettore S/PDIF-out
1 connettore ingresso audio CD-ROM
2 alloggiamenti PCI
2 porte Serial ATA II
2 connettori Ultra DMA 33/66/100/133 IDE
Connettori I/O del pannello posteriore
4 porte USB 2.0
1 porta VGA
1 porta Serial
1 porta stampatore
1 connettore LAN RJ-45
1 porta mouse PS/2
1 porta tastiera PS/2
1 porta audio verticale che include: 1 connettore Line-in
(ingresso linea), 1 connettore Line-out (uscita linea) ed 1
connettore MIC-in (ingresso microfono).
4
User’s Manual
Page 50

Biostar T-Series TForce 6100
SPANISH
Procesador
Soporta el Socket 754.
Admite procesador AMD Athlon 64 de hasta 3700+.
Compatible con el procesador AMD Sempron.
Admite la tecnología HyperTransport de hasta 1600 MT/s.
Dimensiones
Formato Micro ATX: 24.4cm (LA) x 21.86cm (AN)
Memoria del sistema
Compatible con Admite DDR 266/333/400.
Espacio máximo de memoria de 2 GB, que admite 2
zócalos DIMM.
Conjunto de chips
North Bridge: NVIDIA GeForce 6100.
South Bridge: NVIDIA nForce 410.
Súper E/S
Procesador: ITE 8712F.
Iniciativas de control medioambiental.
Supervisor H/W
Controlador de la velocidad del ventilador
Función "Guardián inteligente" de ITE
IDE
Dos conectores integrados que admiten 4 dispositivos.
Admite el modo PIO 0~4 y el modo de bus maestro Ultra
DMA 33/66/100/133.
Serial ATA II
nForce 410 compatible con la especificación Serial ATA
2.0, tasa de transferencia de datos de hasta 3 GB/s.
Códec de audio AC’97
Procesador: ALC655, admite 6 canales.
10/100 LAN PHY
PHY: RTL8201BL/RTL8201CL, admite administración de
energía ACPI.
Sistemas operativos compatibles
Compatible con Windows 2000 y Windows XP.
Nota: no compatible con Windows 98SE ni Windows ME.
48
User’s Manual
Page 51

Biostar T-Series TForce 6100
Conectores y ranuras integrados e internos
1 ranura 1X PCI-Express
1 ranura 16X PCI-Express
1 conector de salida S/PDIF
1 conector de entrada de audio en CD-ROM
2 ranuras PCI
2 puertos Serial ATA II
2 conectores Ultra DMA 33/66/100/133 IDE
Back Conectores de E/S del panel posterior
4 puertos USB 2.0
1 puertos VGA
1 puertos Serial
1 puerto impresora
1 conector de red LAN RJ-45
1 puerto para ratón PS/2
1 puerto para teclado PS/2
1 puerto de audio vertical que incluye un conector de
entrada de línea, un conector de salida de línea y un
conector de entrada de micrófono.
49
User’s Manual
Page 52

Biostar T-Series TForce 6100
PORTUGUESE
CPU
Suporta o socket 754.
Suporta um processador AMD Sempron.
Suporta um processador AMD 64 até 3700+.
Suporta a tecnologia HyperTransport™ até 1600 MHz.
Dimensões
Factor de forma Micro ATX: 24.4cm (C) x 21.86cm (L)
Memória do sistema
Suporta módulos DDR 266/333/400.
Capacidade máxima da memória: 2GB, suportando 2
sockets DIMM.
Chipset
Ponte Norte: NVIDIA GeForce 6100.
Ponte Sul: NVIDIA nForce 410.
Especificação Super I/O
Chip: ITE 8712F.
Iniciativas para controlo do ambiente.
Monitorização do hardware
Controlador da velocidade da ventoinha
Função "Smart Guardian" da ITE
IDE
Dois conectores na placa para 4 dispositivos.
Suporta o modo PIO 0~4 e o modo bus master Ultra DMA
33/66/100/133.
Serial ATA II
nForce 410 suporta a especificação Serial ATA 2.0,
velocidade de transferência de dados até3 GB/s.
CODEC de som AC'97
Chip: ALC655, suporta 6 canais.
10/100 LAN PHY
PHY: RTL8201BL/RTL8201CL, suporta a gestão de
energia ACPI, PCI.
Sistemas operativos suportados
Suporta o Windows 2000 e o Windows XP.
Nota: Não suporta o Windows 98SE e o Windows ME.
50
User’s Manual
Page 53

Biostar T-Series TForce 6100
Conectores e ranhuras internos na placa
1 ranhura PCI Express x1
1 ranhura PCI Express x16
1 conector S/PDIF-Out
1 conector CD-ROM para entrada de áudio
2 ranhuras PCI
2 portas Serial ATA II
2 conectores Ultra DMA 33/66/100/133 IDE
Conectores I/O do painel traseiro
4 portas USB 2.0
1 porta VGA
1 porta série
1 porta impressora
1 tomada LAN RJ-45
1 porta para rato PS/2
1 porta para teclado PS/2
1 porta de áudio vertical incluindo 1 conector de entrada
de linha, 1 conector de saída de linha e 1 conector de
entrada para microfone.
51
User’s Manual
Page 54

Biostar T-Series TForce 6100
POLAND
PROCESOR
Obsługa gniazd Socket 754.
Obsługa procesorów AMD Athlon 64 do 3700+.
Obsługa procesorów AMD Sempron
Obsługa HyperTransport Technology do 1600MT/s.
Wymiary
Obudowa Mikro ATX: 24.4cm (D) x 21.86cm (S)
Pamięć systemowa
Obsługa DDR 266/333/400.
Maksymalna wielkość pamięci wynosi 2GB z obsługą 2
gniazd DIMM.
Chipset
Mostek północny: NVIDIA GeForce 6100.
Mostek południowy: NVIDIA nForce 410.
Super I/O
Chip: ITE 8712F.
Inicjatywy kontroli środowiska.
Monitor H/W
Kontroler prędkości wentylatora
Funkcja ITE "Smart Guardian"
IDE
Dwa wbudowane złącza z możliwością obsługi 4
urządzeń.
Obsługa trybu PIO 0~4 oraz tryb magistrali głównej Ultra
DMA 33/66/100/133.
Serial ATA II
nForce 410 obsługa specyfikacji Serial ATA 2.0, transfer
danych do 3GB/s.
KODEK dźwięku AC’97
Chip: ALC655, obsługa 6 kanałów.
10/100 LAN PHY
PHY: RTL8201BL/RTL8201CL, obsługa zarządzania
zasilaniem ACPI, PCI.
Obsługiwane systemy operacyjne
Obsługa Windows 2000 oraz Windows XP.
Uwaga: Brak obsługi Windows 98SE oraz Windows ME.
52
User’s Manual
Page 55

Biostar T-Series TForce 6100
Wewnętrzne, wbudowane gniazda oraz złącza
1 gniazdo PCI-Express x1
1 gniazdo PCI-Express x16
1 złącze wyjścia S/PDIF
1 złącze wejścia audio CD-ROM
2 gniazda PCI
2 porty Serial ATA II
2 złącza Ultra DMA 33/66/100/133 IDE
Złącza I/O na panelu tylnym
4 porty USB 2.0
1 port VGA
1 port drukarki
1 port szeregowy
1 gniazdo LAN RJ-45
1 port myszy PS/2
1 port klawiatury PS/2
1 pionowy port audio zawierający 1 złącze wejścia
liniowego, 1 złącze wyjścia liniowego i 1 złącze wejścia
mikrofonu.
53
User’s Manual
Page 56

Biostar T-Series TForce 6100
RUSSIAN
Процессор
Поддерживает гнездо 754.
Поддерживает процессоры AMD Athlon 64 до 3700+.
Поддерживает процессоры AMD Sempron.
Поддержка технологии HyperTransport до 1600 млн.
передач в секунду.
Размеры
Форм-фактор Микро-ATX: 24.4cm x 21.86cm (Д x Ш)
Системная память
Поддерживает DDR 266/333/400.
Максимальный объем памяти 2 Гб в 2 гнездах DIMM.
Набор микросхем
Северный мост: NVIDIA GeForce 6100
Южный мост: NVIDIA nForce 410.
Супер ввод-вывод
Контроллер: ITE 8712F.
Функции управления режимом эксплуатации.
Монитор состояния оборудования
Контроллер скорости вентиляторов
Функция «Smart Guardian» компании ITE
IDE
Два встроенных разъема поддерживают подключение
четырех жестких дисков IDE.
Поддержка режимов PIO 0–4 и Ultra DMA
33/66/100/133.
Serial ATA II
nForce 410 Поддерживает спецификацию Serial ATA 2.0,
скорость передачи данных до или 3 Гб/с.
Звуковой кодек AC’97
Контроллер: ALC655, Поддерживает 6-канальный звук.
10/100 LAN PHY
PHY: RTL8201BL/RTL8201CL.
Поддерживает управление питанием ACPI, PCI.
Поддерживаемые операционные системы
Поддерживает Windows 2000 и Windows XP.
Примечание: не поддерживает Windows 98SE и Windows ME.
54
User’s Manual
Page 57

Biostar T-Series TForce 6100
5
Встроенные разъемы ввода-вывода
1 слот PCI Express x1
1 слот PCI Express x16
1 разъем S/PDIF-выхода
1 Один входной разъем звукового сигнала с привода
для компакт-дисков
2 слота PCI
2 порта Serial ATA II
2 разъем Ultra DMA 33/66/100/133 IDE
Разъемы ввода-вывода на задней панели
4 порта USB 2.0
1 порт мыши VGA
1 последовательный порт
1 порт принтер
1 гнездо RJ-45 ЛВС
1 порт мыши PS/2
1 порт клавиатуры PS/2
1 вертикальный звуковой порт, содержащий 1 разъем
линейного входа, 1 разъем линейного выхода и 1
разъем микрофонного входа.
5
User’s Manual
Page 58

Biostar T-Series TForce 6100
ARABIC
ﺔﻳﺰآﺮﻤﻟا ﺔﺠﻟﺎﻌﻤﻟا ةﺪﺣو)CPU(
ﻞﻴﺻﻮﺗ ةﺪﻋﺎﻗ ﻢﻋﺪﺗ.754
ﺞﻟﺎﻌﻣ ﻢﻋدAMD Athlon 64 ﻰﻠﻋ ﺪیﺰﺗ تﺎﻋﺮﺳ ﻰﺘﺣ 3700.
تﺎﺠﻟﺎﻌﻣ ﻢﻋﺪﺗ.AMD Sempron processor
ﺔﻴﻨﻘﺗ ﻢﻋدHyper Transport ﻰﺘﺣ 1600ﺔﻴﻥﺎﺜﻟا ﻲﻓ ﺎﺠﻴﻣ ﺔﻠﻘﻥ .
دﺎﻌﺑﻷا
ﻣﺎﻋ وﺮﻜیﺎﻣ جذﻮﻤﻥ ﻞATX :24.4 ﻢﺳ )لﻮﻄﻟا ( ×21.86 ﻢﺳ )ضﺮﻌﻟا(
مﺎﻈﻨﻟا ةﺮآاذ
ﻢﻋﺪﺗDDR 266/333/400.
ةﺮآاﺬﻠﻟ ﺔﺣﺎﺴﻣ ﻰﺼﻗأ2 ﻢﻋد ﻊﻣ ،ﺖیﺎﺑﺎﺠﻴﺝ 2ﺬﻓﺎﻨﻣ .DIMM
ﺢﺋاﺮﺸﻟا ﺔﻋﻮﻤﺠﻡ
ﻲﻟﺎﻤﺸﻟا ﺮﺴﺠﻟا :NVIDIA GeForce 6100.
ﻲﺑﻮﻨﺠﻟا ﺮﺴﺠﻟا :NVIDIA nForce 410.
دﻞﺧ/ ﻖﺋﺎﻓ جﺮﺧ
ﺔﺤیﺮﺸﻟا :ITE IT8712F.
ﺔﺌﻴﺒﻟا ﻲﻓ ﻢﻜﺤﺘﻟا تاردﺎﺒﻣ.
- ﺔﺒﻗاﺮﻣH/W
- ﺔﺣوﺮﻤﻟا ﺔﻋﺮﺳ ﻲﻓ ﻢﻜﺤﺗ ةﺪﺣو
- ITE ﺔﻔﻴﻇو"ﻲآﺬﻟا ﻲﻗاﻮﻟا "ﻦﻣ
IDE
ةﺰﻬﺝأ ﺔﻌﺑرأ نﺎﻤﻋﺪی ﺔﺣﻮﻠﻟا ﻰﻠﻋ نﻼﺻﻮﻣ.
ﻞﺧﺪﻟا ﻊﺿو ﻢﻋد/ ﺞﻣﺮﺒﻤﻟا جﺮﺨﻟا)PIO (0-4ﺔﻴﺴﻴﺉﺮﻟا عﺎﺿوﻷاو ﻞﻔﻘﻟا ﻊﺿوو ،.
ةﺮﺵﺎﺒﻣ ةﺮآاﺬﻠﻟ ﻖﺉﺎﻔﻟا لﻮﺻﻮﻟا لﻼﺧ ﻦﻣ ﻞﻘﻨﻠﻟ)Ultra DMA
33/66/100/133(.
ﺔﻠﺴﻠﺳATA II
ﻊﻣ ﺔﻠﻣﺎﻜﺘﻣ ﻢﻜﺤﺗ ةﺪﺣو410 nForce
ﻖﻓاﻮﺘیnForce 410 تﺎﻔﺻاﻮﻣ ﻊﻣ SATA 2.0 ﻞﻘﻥ لﺪﻌﻣ صﻮﺼﺨﺑ ﻚﻟذو
Windows 98SE وWindows ME.
ﻰﻟإ ﻞﺼی يﺬﻟا تﺎﻥﺎﻴﺑ3ﺔﻴﻥﺎﺜﻟا ﻲﻓ ﺎﺠﻴﺝ .
تﻮﺻ ةﺮﻔﺵAC’97
ﺔﺤیﺮﺸﻟا :ALC655 ﻢﻋﺪﺗ 6تﻮﺻ جﺮﺧ تاﻮﻨﻗ .
ﻞﻘﻥ ﺔﻋﺮﺴﺑ ﻲﻜﺒﺵ ﻞﻴﺻﻮﺗ100/10
PHY: RTL8201BL/RTL8201CL لﻼﺧ ﻦﻣ ﺔﻗﺎﻄﻟا ةرادإ ﻢﻋدو ACPI و
.
PCI
ﺔﻤﻋﺪﻤﻟا ﻞﻴﻐﺸﺘﻟا ﻢﻈﻥ
ﻢﻋﺪیWindows 2000و Windows XP.
ﺔﻈﺣﻼﻡ: ﻞﻴﻐﺸﺗ ﻲﻣﺎﻈﻨﻟ ﻢﻋد ﺪﺝﻮی ﻻ
56
User’s Manual
Page 59

Biostar T-Series TForce 6100
ﺔﻴﻠﺧاﺪﻟا ﺔﺣﻮﻠﻟا تﺎﺤﺘﻓو ﻞﻴﺻﻮﺗ ﺬﻓﺎﻨﻡ
1 ﺔﺤﺘﻓ PCI-Express ×1
1 ﺔﺤﺘﻓ PCI-Express ×16
1ﺬﻔﻨﻣ جﺮﺧ ﻞﻴﺻﻮﺗ SPDIF-Outﺪﺣاو
1 تﻮﺻ ﻞﺧد ﻞﻴﺻﻮﺗ ﺬﻔﻨﻣ CD-ROMﺪﺣاو
2 نﺎﺘﺤﺘﻓ PCI
2 ناﺬﻔﻨﻣ SATA II
2 ﻞﻴﺻﻮﺗ اﺬﻔﻨﻣ Ultra DMA 33/66/100/133 IDE
تﻼﺧﺪﻤﻟا تﻼﺻﻮﻡ/ﺔﻴﻔﻠﺨﻟا ﺔﺣﻮﻠﻟﺎﺑ تﺎﺝﺮﺨﻤﻟا
4 ﺬﻓﺎﻨﻣ USB 2.0
1 ﺬﻔﻨﻣ VGA
1ﻲﺴﻠﺴﺗ ﺬﻔﻨﻣ
1ﺔﻌﺑﺎﻃ ﺬﻔﻨﻣ
1 ﺲﺑﺎﻗ RJ-45 LAN
1 سوﺎﻣ ﺬﻔﻨﻣ PS/2
1 ﺢﻴﺗﺎﻔﻣ ﺔﺣﻮﻟ ﺬﻔﻨﻣ PS/2
1 ﻰﻠﻋ ﻞﻤﺘﺸی ﻲﺳأر تﻮﺻ ﺬﻔﻨﻣ 1و ﻞﺧاد ﻂﺧ ﻞﻴﺻﻮﺗ فﺮﻃ 1 ﻂﺧ ﻞﻴﺻﻮﺗ فﺮﻃ
و جرﺎﺧ1فﺮﻃ
57
User’s Manual
Page 60

Biostar T-Series TForce 6100
JAPANESE
CPU
Socket 754 をサポート。
AMD Athlon 64 プロセッサをサポート。
AMD Athlon 64 ププロセッサに対応、最大 3700+。
AMD Sempron プロセッサをサポート。
ハイパートランスポートテクノロジに対応、最大
1600MHz。
サイズ
ATX フォームファクタ: 24.4cm (長さ) x 21.86cm (幅)
システムメモリ
DDR 266/333/400 をサポート。
最大メモリ容量 2GB、2 つのDIMM ソケットをサポート。
チップセット
ノースブリッジ: NVIDIA GeForce 6100。
サウスブリッジ: NVIDIA nForce 410。
スーパー I/O
チップ: ITE IT8712F。
環境コントロールイニシアチブ、
H/W モニタ
ファン速度コントローラ
ITE「スマート・ガーディアン」機能
IDE
2つのオンボードコネクタが 4 つのデバイスをサポート。
PIO モード 0~4、ウルトラ DMA 33/66/100/133 バス・マ
スターモードに対応。
シリアル ATA II
nForce 410 シリアル ATA 2.0 仕様をサポート、 最大 3GB/
秒のデータ転送速度。
AC’97 オーディオ サウンド・コデック
チップ: ALC655、6 チャンネルをサポート。
10/100 LAN PHY
PHY: RTL8201BL/RTL8201CL, ACPI, PCI 電源管理をサポ
ート。
サポートするオペレーティングシステム
Windows 2000、Windows XP をサポート。
注: Windows 98SE と Windows ME では対応していません。
58
User’s Manual
Page 61

Biostar T-Series TForce 6100
内部オンボードスロットとコネクタ
PCI-Express x1 スロット(x1)
PCI-Express x16 スロット(x1)
S/PDIF アウトコネクタ(x1)
CD-ROM オーディオインコネクタ(x1)
PCI スロット(x2)
シリアル ATA I I ポート(x2)。
Ultra DMA 33/66/100/133 IDE コネクタ(x2)
背面パネル I/O コネクタ
USB 2.0 ポート(x4)
VGA ポート (x1)
プリンター ポート (x1)
シリアルポート(x1)
RJ-45 LAN ジャック(x1)
PS/2 マウスポート(x1)
PS/2 キーボードポート(x1)
ラインイン コネクタ 1つ、ラインアウト コネクタ 1つ、
および MIC イン
コネクタを含む縦型オーディオ ポート 1つ。
05/18, 2006
59
User’s Manual
Page 62

TForce 6100-939 & TForce 6100 BIOS Setup
BIOS Setup........................................................................................1
1 Main Menu .....................................................................................................3
2 Standard CMOS Features................................................................................... 6
3 Advanced BIOS Features................................................................................... 9
4 Advanced Chipset Features............................................................................... 14
5 Integrated Peripherals ...................................................................................... 16
6 Power Management Setup................................................................................ 21
7 PnP/PCI Configurations...................................................................................24
8 PC Health Status............................................................................................. 26
9 Over Clock Navigator Engine........................................................................... 28
10 CMOS Reload Program.................................................................................. 34
i
Page 63

TForce 6100-939 & TForce 6100
BIOS Setup
Introductio n
T his manual discusse d Award™ Setup p rogram bu ilt into the ROM BIOS. The Setup
program allows users to modify the basic system configuration. T his special information is
th en s to red in battery-b ack ed RAM so that it r etains the Setup informat ion w hen the po wer
is turned off.
T he Award B IOS™ installed in y our com puter syst em’ s ROM (Read Only Memory) is a
custom version of an industry standard BIOS. This means that it supports Intel Nvidia CK8
processor input/output system. The BIOS provides critica l low-leve l support for standard
devices such as disk drives and serial and parallel ports.
Adding important has customized the Award BIOS™, but nonstandard, features such as
virus and password protection as well as special support for detailed f ine-tuning of the
chipset controlling the entire system.
The rest of this manual is intended to guide you through the process of configuring your
system using Setup.
Plug and Play Support
These AWARD BIOS supports the Plug and Play Version 1.0A specification. ESCD
(Extended System Configuration Data) write is supported.
EPA Green PC Support
This AWARD BIOS supports Version 1.03 of the EPA Green PC specificat ion.
APM Support
These AWARD BIOS supports Version 1.1&1.2 of the Advanced Power Management
(APM) specif ication. Power management features are implemented via the System
Management Interrupt (SMI). Sleep and Suspend power management modes are supported.
Power to the hard disk drives and video monitors can be managed by this AWARD BIOS.
ACPI Support
Award ACPI BIOS support Version 1.0 of Advanced Configuration and Power interface
specification (ACPI). It provides ASL code for power management and device
configuration capabilities as defined in the ACPI specificat ion, developed by Microsoft,
Intel and Toshiba.
1
Page 64

TForce 6100-939 & TForce 6100
PCI B us Suppo rt
This AW ARD BIOS also supports Vers ion 2.1 of the Intel PCI (Peripheral Component
Interconnect) local bus specification.
DRAM Support
DDR SDRAM (Double Data Rate Synchronous DRAM) are supported.
Supported CP Us
T h is AW ARD B I OS s upp ort s t h e AMD C P U.
Us ing Setup
In general, you use the arrow keys to highlight items, press <Enter> to select, use the
<PgUp> and <PgDn> keys to change entries, press <F1> for help and press <Esc> to quit.
The following table provides more detail about how to navigate in the Setup program by
using the keyboard.
Keystroke Function
Up arrow Move to previo us item
Down arrow Move to next item
Left arro w Move to the item on the left (menu bar)
Right arrow Move to the item on the right (menu bar)
Move Enter Move to the item yo u desired
PgUp key Increase the numeric value or make c hanges
PgDn key Decrease the numeric value or make changes
+ Key Increase the numeric value or make changes
- Key Decrease the numeric value or make changes
Esc key Main Menu – Quit a nd not save changes into CMOS
F1 k ey General help on S et up navigation ke ys
F5 key Load previous values from CMOS
F7 key Load the optimized defaults
F10 key Save all the CMOS changes and exit
Status Page Setup Menu and Optio n Page Setup Menu – Exit
Current page a nd return to Main Menu
2
Page 65

TForce 6100-939 & TForce 6100
1 Main Menu
Once you enter Award BIOS™ CMOS Setup Utility, the Main Menu will appear on the
screen. T he Main Menu allows you to select from several setup functions. Use the arrow
keys to select among the items and press <Enter> to accept and enter the sub-menu.
!! WARNING !!
The information about BIOS defaults on manual (Figu re
1,2,3,4,5,6,7,8,9) is just for reference, please refer to the BIOS
installed on board, for update information.
Figure 1. Main Menu
Standa rd CMOS Features
This submenu contains industry standard configurable options.
Advance d BIOS Fe atures
This submenu allows you to configure enhanced features of the BIOS.
Advanced Chipset Features
This submenu allows you to configure special chipset features.
Integrated Peripherals
This submenu allows you to configure certain IDE hard drive options and Programmed
Input/ Output features.
3
Page 66

TForce 6100-939 & TForce 6100
Power Management Setup
This submenu allows you to configure the power management features.
PnP/PCI Configurations
This submenu allows you to configure certain “Plug and Play” and PCI options.
PC Health Status
This submenu allows you to monitor the hardware of your system.
OverClock Navigator Engine
ONE provides two powerful overclock engines, MOS & AOS for both
overclock expertises and beginners.
Lo ad Op timize d De fa u l ts
This selection allows you to reload the BIOS when the system is having problems
particularly with the boot sequence. These configurat ions are factory settings optim ized
for this system. A confirmation message will be displayed before defaults are set.
Set Supervisor Password
Setting the superv isor password will prohibit everyone except the supervisor from making
changes using the CMOS Setup Utility. You will be prompted with to enter a password.
Set User Password
If the Supervisor Password is not set, then the User P assword will function in the same way
as the Supe rvisor Passwor d. If the Supervisor P assword is set and t he User Pass word is
set, the “User” will only be able to view configurations but will not be able to change them.
Save & Exit Setup
Save all conf iguration changes to CMOS(memory) and exit setup. Confirmat ion message
will be disp layed before proceeding.
4
Page 67

TForce 6100-939 & TForce 6100
Exit Without Saving
Abandon all changes made during the current session and exit setup. confirmation message
will be disp layed before proceeding.
Integrate Flas hing Program
This is a very safe way to upgrade BIOS.
By pressing “Enter” key for three times, and the upgradin g process will be completed
easily.
5
Page 68

TForce 6100-939 & TForce 6100
2 Standard CMOS Features
The items in Standard CMOS Setup Menu are divided into 10 categories. Each category
includes no, one or more than one setup items. Use the arrow keys to highlight the item and
then use the<PgUp> or <P gDn> keys to select the value you want in each item.
Figure 2. Standard CM OS Setup
6
Page 69

TForce 6100-939 & TForce 6100
Main Menu Selections
This table shows the selections that you can make on the Main Menu.
Item Options Description
Date mm : dd : yy Set the system date. Note
Time hh : mm : ss Set the system internal
IDE Primary Master Options are in its sub
menu.
IDE Primary Slave Options are in its sub
menu.
IDE Secondary Master Options are in its sub
menu.
IDE Secondary Slave Options are in its sub
menu.
Drive A
Drive B
Video EGA/VGA
360K, 5.25 in
1.2M, 5.25 in
720K, 3.5 in
1.44M, 3.5 in
2.88M, 3.5 in
None
CGA 40
CGA 80
MONO
that the ‘Day’ automatically
changes when you set the
date.
clock.
Press <Enter> to enter the
sub menu of detailed
options
Press <Enter> to enter the
sub menu of detailed
options.
Press <Enter> to enter the
sub menu of detailed
options.
Press <Enter> to enter the
sub menu of detailed
options.
Select the type of flopp y
disk drive installed in your
system.
Select the default video
device.
7
Page 70

TForce 6100-939 & TForce 6100
Item Options Description
Halt On All Errors
No Errors
All, but Keyboard
All, but Diskette
All, but Disk/ Key
Base Memory N/A Displays the amount of
Extended Memory N/A Displays the amount of
Total Memory N/A Displays the total memory
Select the situation in which
you want the BIOS to stop
the POST process and
notify you.
conventional me mory
detected during boot up.
extended memory detected
during boot up.
available in the system.
8
Page 71

TForce 6100-939 & TForce 6100
3 Advanced BIOS Features
Figure 3. Adva nce d BIOS Se tup
Boot Seq & Floppy Setup
9
Page 72

TForce 6100-939 & TForce 6100
Removable Device Priority
T hese BIOS attempt to load the operating system from the device in the sequence selected
in these items.
The Choice s: Floppy Disks, LS120, USB-FDD0, USB-FDD1, USB-ZIP0, USB-ZIP1,
And ZIP100.
Hard Disk Boot Priority
These BIOS attempt to load the operating system from the device in the sequence selected
in these items.
The Choices: Pri. Master, Pri. Slave, Sec. Master, Sec, Slave, USBHDD0,
USB HDD1, USB HDD2, and B ootable Add-in Cards.
10
Page 73

Cache Setup
TForce 6100-939 & TForce 6100
First/ Second/ Third/ Boot Other Device
These BIOS attempt to load the operating system from the devices in the
sequence selected in these items.
The Choices: Floppy, LS120, HDD-0, SCSI, CDROM, HDD-1, HDD-2, HDD-3,
ZIP100, LAN, Disabled.
Swap Floppy Drive
For systems with two floppy drives, this option allows you to swap logical drive
assignments.
The Choices: Disabled (default), Enabled.
Boot Up Floppy Seek
Enabling this option will test the floppy drives to determine if they have 40 or 80
tracks. Disabling this option reduces the time it takes to boot-up.
The Choices: Enabled (default), Disabled.
These BIOS attempt to load the operating system from the device in the sequence selected in
these items.
CP U Internal Ca che
Depending on the CPU/chipset in use, you may be able to increase memory
access time with this option.
Enabled (default) Enable cache.
Disabled Disab le cache.
Externa l Cache
This option enables or disables “Level 2” secondary cache on the CPU, which
may improve performance.
The Choices:
Enabled (default) Enable cache.
Disabled Disable cache.
11
Page 74

TForce 6100-939 & TForce 6100
Virus Warning
T his o pt ion a llows you to choose the Virus Warnin g featu re that is used t o prot ec t the IDE
Hard Disk boot sector. If this function is enabled and an attempt is made to write to the
boot sector, BIOS will display a warning message on the screen and sound an alarm beep.
Disabled (default) Virus protection is disab led.
Enabled Virus protection is activated.
Quick Power On Self Test
Enabling this option will cause an abridged version of the Power On Self-T est (POST ) to
execute after you power up the computer.
Boot Up N umLock Status
Selects the NumLock. State after power on.
Gate A20 Option
Select if ch ipset or keyboard controller should control Gate A20.
Typematic Rate Se tting
When a key is held down, the keystroke will repeat at a rate determined by the keyboard
controller. When enabled, the typematic rate and typematic delay can be configured.
Typematic Rate (C hars/Sec)
Sets the rate at which a keystroke is repeated when you hold the key down.
The Cho ices: 6 (default), 8,10,12,15,20,24,30.
Typematic Delay (Msec)
Sets the delay time after the key is held down before it begins to repeat the keystroke.
The Cho ices: 250 (default), 500, 750, 1000.
Enabled (default) Enable quick P OST.
Disabled Normal POST.
On (default) Numpad is number keys.
Off Numpad is arrow keys.
Normal A pin in the keyboard controller
controls Gate A20.
Fast (default) Lets chipset control Gate A20.
Disabled (default)
Enabled
12
Page 75

TForce 6100-939 & TForce 6100
Security Optio n
This option will enable only individua ls with passwords to bring the system online and/or
to use the CMOS Setup Utility.
System A password is required for the system to boot and is
also required to access the Setup Utility.
Setup (default) A password is required to access the Setup Utility
only.
This will only apply if passwords are set from the Setup main menu.
APIC MODE
Selecting Enabled enables APIC device mode reporting from the BIOS to the operating
sys tem.
The Ch o ice s: En abl ed (default), Disabled.
Note: If the CPU type is AMD 939 Dual Core, this item will be always “Enabled”.
MPS Version Control For OS
The BIOS supports version 1.1 and 1.4 of the Intel multiprocessor specification.
Select version supported by the operation system running on this computer.
The Cho ices: 1.4 (default), 1.1.
OS Select For DRAM > 64MB
A choice other than Non-OS2 is only used for OS2 systems with memory exceeding 64MB.
The Cho ices: Non-OS2 (default), OS2.
Small Logo (EPA) Show
T his it em allows you to enable/ disa ble display th e sm all E PA lo go.
The Cho ices: Enabled (default), Disa bled .
Summary Screen Show
This item allows you to enable/ disable display the Summary Screen Show.
The Cho ices: Disabled (default), Enabled.
13
Page 76

TForce 6100-939 & TForce 6100
4 Advanced Chipset Features
T his submenu allows you to configure th e sp ecific features of the chipset installed on y our
system. This chipset manage bus speeds and access to system memory resources, such as
DRAM. It also coordinates communications with the PCI bus. The default settings that came
with your system have been optimized and therefore should not be changed unless you are
suspicious that the settings have been changed incorrectly.
Fig ure 4. Adva nce d Chips e t Setup
Frame Buffer Size
The Choices: 32M (default), 16M, 64M, 128M, Disabled.
PMU
The Ch oices: Auto (default), Disabled.
NB-->SB HT Speed
The Choices: 4X (default).1X, 2X, 3X, 5X.
NB<--SB HT Speed
The Choices: 4X (default).1X, 2X, 3X, 5X.
K8<->NB HT Width
The Choices:↓16 ↑16 (default), ↓ 8 ↑ 8.
NB<->SB HT Width
The Cho ices: ↓8 ↑8 (default), ↓ 16 ↑16.
14
Page 77

TForce 6100-939 & TForce 6100
Err94 Enh
Th is ite m allows you to enable/d isab le the “sequentia l P rufetch F eat ure” of K 8 CP U.
The Choices: Auto (default), Disabled.
Onboard GPU
The Choices: Auto (default), Always Enable.
CP U Spread Spec trum
The Choices: Disabled (default), Center, Down.
PCIE Spread Spectrum
This item allows you to disable \ enable the SATA spread spectrum function.
The Choices: Disabled (default), Enabled.
SATA Spread Spectrum
This item allows you to disable \ enable the SATA spread spectrum function.
The Ch oices: Disabled (default), Enabled.
HT Sp read Spectrum
The Choices: Disabled (default), Center, Down.
SSE/SSE2 Instructions
The C hoices: Enabled (default), Disabled.
System BIOS Cacheable
Selecting the “Disabled ” option allows caching of the system BIOS ROM at
F0000h-FFFFFh which can improve system performance. However, any
pro gram s wr itin g to this area of memory will cause con flicts and r es ult in
system errors.
The Choices: Disabled (default), Enabled.
15
Page 78

TForce 6100-939 & TForce 6100
5 Integrated Peripherals
Figure 5. Integrated Peripherals
IDE Function Setup
If you highlight the literal “Press Enter” next to the “IDE Function Setup” label and then press
the enter key, it will take you a submenu with the f ollow in g options:
OnChip IDE Channel 0/1
The motherboard chipset contains a P CI IDE interface with support for
two IDE channels. Select “Enabled” to activate the first and/or second
IDE interface. Select “Disabled” to deactivate an interface if you are
going to insta ll a primary and/or secondary add-in IDE interface.
The Choices: Enabled (default), Disabled.
16
Page 79

RAID Config
TForce 6100-939 & TForce 6100
Prima ry / Secondary /Master / Slave PIO
The IDE PIO (Programmed Input / Output) fields let you set a PIO
mode (0-4) for each of the IDE devices that the onboard IDE interface
supports. Modes 0 to 4 will increase performance progressively.
In Auto mode, the system automatically determines the best mode
for each device.
The Choices: Auto (default), Mode0, Mode1, Mode2, Mode3, Mode4.
Primary / Secondary /Master / Slave UDMA
Ultra DMA/100 functionality can be imp lemented if it is supported by the IDE
hard drives in your system. As well, your operating environment requires a DMA
driver (Windows 95 OSR2 or a third party IDE bus master driver). If your hard
drive and your system software both support Ultra DMA/100, select Auto to
enable BIOS support.
The Cho ices: Auto (default), Disabled.
IDE DMA Transfer Access
The Cho ices: Enabled (default), Disabled.
Serial-ATA 1
Enables support for Serial- ATA 1.
The Cho ices: Enabled (default), Disabled.
IDE Prefetch Mode
The Cho ices: Enabled (default), Disabled.
RAID Enable
TheChoices: Disabled (default), Enabled.
17
Page 80

TForce 6100-939 & TForce 6100
Supe r IO De vice
SATA 1 Primary
The Choices: Disabled (default), Enabled.
SATA 1 Secondary
The Choices: Disabled (default), Enabled.
POWER ON Function
This item allows you to choose the power on function.
The Cho ices: Button ONLY (default), Password, Hot Key, Mouse Left, Mouse
Right, Any Key, Keyboard 98.
KB Power On Passwo rd
This item allows you to enter a password with at least 5 characters.
HOT Key Power On
This item allows you to set the hot key to power on system.
The Cho ices: Ctrl-F1 (default), Ctrl-F2, Ctrl-F3, Ctrl-F4, Ctrl-F5, Ctrl-F6,
Ctrl-F7, Ctrl-F8, Ctrl-F9, Ctrl-F10, Ctrl-F11, Ctrl-F12.
Onboard FDC Co ntroller
Select Enabled if your system has a floppy disk controller (FDC) installed
on the system board and you wish to use it. If install and FDC or the system
has no floppy drive, select Disab led in this field.
The Cho ices: Ena ble d (default), Disabled.
Onboard Serial Port 1
Select an address and corresponding interrupt for the first and second serial ports.
The Choices: Disabled, 3F8/IR Q4 (default), 2F8/IRQ3, 3E8/IRQ4, 2E8/IRQ3,
Auto.
18
Page 81

TForce 6100-939 & TForce 6100
Onboard Serial Port 2
Select an address and corresponding interrupt for the first and second serial ports.
The Choices: Disabled (default), 2F8/IRQ3, 3F8/IRQ4, 3E8/IRQ4, 2E8/IRQ3,
Auto.
UART Mode Select
This item allows you to determine which Infra Red (IR) function of onboard
I/O chip.
The Choices: Normal, AS KIR, IrDA (default) .
Full-dup lex mode permits simultaneous two-direction transmission.
The Cho ice s : Hal f (de fault), Full.
Onboard Parallel Port
The Choices: 378/IRQ7 (default), 278/IRQ5, 3BC/IRQ7, Disabled.
Parallel Port Mode
The default value is SPP.
The Choices:
SPP(default ) Usin g P arallel port as Sta ndard P rinter Po rt.
EPP Using Parallel Port as Enhanced Parallel Port.
ECP Using Parallel port as Extended Capabilities Port.
ECP+EPP Using Parallel port as ECP & EPP mode.
Select a DMA Channel for the port.
The Choices: 3 (default), 1.
OnChip US B
USB M e mory T ype
The Choices: SHADOW (default), Base Memory(640K).
USB keyboard Support
Enables support for USB attached keyboard.
The Choices: Disabled, Enabled (default).
UR2 D uple x Mode
Select the value required by the IR device connected to the IR port.
Half-duplex mode permits transmission in one direction only at a time.
This item allows you to determine access onboard parallel port controller
with which I/O Address.
ECP M ode Use DM A
This option should be enabled if your system has a USB installed on the
system board. You will need to disable th is feature if you add a higher
performance controller.
The Choices: V1. 1+V2. 0 (default), Disabled, V1.1
19
Page 82

TForce 6100-939 & TForce 6100
USB Mouse Support
Enables support for USB attached mouse.
The Choices: Disabled, Enabled (default).
AC97 Audio
MAC LAN
Onboa rd LAN Boot ROM
MAC Media Interface
ID E HD D B lock Mo de
Blo ck m ode is also called block tr ansfer, multiple commands, or multiple sector
read / write. If your IDE hard drive supports block mode (most new drives do),
select Enabled for automatic detection of the optimal number of block mode
(m ost new drives do), select Enabled for autom atic de tection of the o ptim al
number of block read / write per sector where the drive can support.
The Choices: Enabled (default), Disabled.
POWER After PWR-Fail
This setting specifies whether your system will reboot after a power fail or interrupts
occurs.
Off Leaves the computer in the power off state.
On Reboots the computer.
Former-Sts Restores the system to the status before power failure or interrupt occurs.
The Cho ices: Off (default), On, Former-Sts.
This option allows you to control the onboard AC97 audio.
The Choices: Auto (default), Disabled.
This option allows you to change the state of the onboard MAC LAN.
The Choices: Auto (default), Disabled.
This item allows you to enable or disable Onboard LAN Boot ROM.
The Choices: Disabled (default), Enabled.
The Choices: Pin Strap (default).
20
Page 83

TForce 6100-939 & TForce 6100
6 Power Management Setup
The Power Management Setup Menu allows you to configure your system to utilize energy
conservation and power up/power down features.
Figure 6. Power Management Setup
ACP I functio n
This item displays the status of the Advanced Configuration and Power Management
(ACPI).
ACP I Sus pe nd Type
The item allows you to select the suspend type under the ACPI operating system.
Power Management
This category allows you to select the type (or degree) of power saving and is directly
related to the following modes:
1.HDD Power Down.
2. Su spend Mode.
There are four options of Power Management, three of which have fixed mode settings
The Choices: Enabled (default), Disabled.
The Choices: S1 (POS) (default) Power on Suspend
S3 (STR) Suspend to RAM
S1+S3 POS+STR
Min. Power Saving
Minimum power management.
Su spend Mode = 1 hr.
21
Page 84

TForce 6100-939 & TForce 6100
HDD Power Down = 15 min
Max. Power Saving
Maximum power management only available for sl CP U’s.
Su spend Mode = 1 min.
HDD Power Down = 1 min.
User De f ine (default)
Allows you to set each mode indiv idually.
When not disabled, each of the ranges is from 1 min. to 1 hr. except for HDD
Power Down which ranges from 1 min. to 15 min. and disable.
Video Off Method
T his o pt ion d etermines the m anner in whic h th e mo nitor is goes blank.
V/H S YNC+Blank
This selection will cause the system to turn off the vertical and horizontal
synchronization ports and write blanks to the video buffer.
Blank Screen
This option only writes blanks to the video buffer.
DPMS (default)
Initia l display power mana gement signalin g.
The Choices: Stop Grant, PwrOn Suspend.
HDD Powe r Down
When enabled, the hard disk drive will power down and after a set time of system inactivity.
Al l oth er devices remain act ive.
The Cho ices: Disabled (default), 1 Min, 2 Min, 3 Min, 4 Min, 5 Min, 6 Min, 7 Min, 8 Min,
9 Min, 10 Min, 11 Min, 12 Min, 13 Min, 14 Min, 15Min.
HDD Down In Suspend
The Cho ices: Disabled (default), Enable.
Soft-Off by PWR-BTTN
Pressing the power button for more than 4 seconds forces the system to enter the
Soft-Off state when the system has “hung.”
The Cho ices: Delay 4 S ec, Instant-Off (default).
WOL (PME#) From Soft-Off
The Cho ices: Disabled (default), Enabled.
22
Page 85

TForce 6100-939 & TForce 6100
WOR (RI#) From Soft-Off
The Cho ices: Disabled (default), Enabled.
USB Resume from S3
The Cho ices: Disabled (default), Enabled.
Power-On by Alarm
When you select Enabled, an alarm returns the system to Full ON state.
The Choices: Disabled (default), Enabled.
Date (of Month) Alarm
You can choose which month the system will boot up.
Time (hh:mm:ss) Alarm
You can choose shat hour, minute and second the system will boot up.
No te: If you have change the setting, you must let the system boo t up until it goes to
the operating system, before this functio n will work.
AMD K8 Cool’n’ Q uiet Con tro l
This function supports AMD Cool ’n’ Quic k function.
The Choices: AUTO (default).Disable.
23
Page 86

TForce 6100-939 & TForce 6100
7 PnP/PCI Configurations
This section describes configuring the PCI bus system. PCI, or Personal Computer
Interconnect, is a system which allows I/O devices to operate at speeds nearing the speed of
the CPU itself uses when communicating with its own special components. This section
covers some very technical items and it is strongly recommended that only experienced
users should make any changes to the default settings.
Figure 7. PnP/PCI Configurations
Init Display First
With systems that have multiple video cards, this option determines whether the primary
display uses a PCI Slot or an AGP Slot.
The Cho ices: PCI Ex (default),PCI Slot,Onboard.
Reset Configuration Data
The system BIOS supports the PnP feature which requires the system to record which
resources are assigned and protects resources from conflict. Every peripheral device has a
node, which is called ESCD. T his node records which resources are assigned to it. The
system nee ds to re cord and upd ate ESCD to the memory locations. These locations (4K)
are reserved in the system BIOS. If the Disabled (default) option is chosen, the system‘s
ESCD will update only when the new configuration varies from the last one. If the Enabled
option is chosen, the system is forced to update ESCDs and then is automatically set to the
“D isab led” mode.
The above settings will be shown on the screen only if “Manual” is chosen for the resources
controlled by function.
Le gacy is the term, which sign ifies that a resource is assigned t o the ISA Bus and provides
non-PnP ISA add-on cards. PCI / ISA PnP signifies that a resource is assigned to the PCI
Bus or provides for ISA PnP add-on cards and peripherals.
The Cho ices: Disabled (default), Enabled.
24
Page 87

TForce 6100-939 & TForce 6100
Resources Controlled By
By Choosing “Auto(ESCD)” (default), the system BIOS will detect the system resources
and automatically assign the relative IRQ and DMA channel for each peripheral. By
Choosing “Manual”, the user will need to assign IRQ & DMA for add-on cards. Be sure
that there are no IRQ/DMA and I/O port conflicts.
IRQ Resources
This submenu will allow you to assign each system interrupt a type, depending on the type
of device using the interrupt. When you press the “Press Enter” tag, you will be directed to
a submenu that will allow you to configure the system interrupts. This is only configurable
when “Resources Controlled By” is set to “Manual”.
PCI / VGA P alette Sn oop
Choose Disabled or Enabled. Some graphic controllers which are not VGA compatible
take the output from a VGA controller and map it to their display as a way to provide boot
information and VGA compatibility.
However, the color information coming from the VGA contro ller is drawn f rom t he palette
table inside the VGA controller to generate the proper colors, and the graphic controller
needs to know what is in the p alette of the VGA controller. T o do this, the non-VGA
graphic controller watches for the Write access to the VGA palette and registers the snoop
data. In PCI based systems, where the VGA controller is on the PCI bus and a non-VGA
graphic controller is on an ISA bus, the Write Access to the palette will not show up on the
ISA bus if the PCI VGA controller responds to the Write.
In this case, the PCI VGA controller s hou ld not resp ond to the Write, it should only snoop
the data and permit the access to be forwarded to the ISA bus. The non-VGA ISA graphic
controller can then snoop the data on the ISA bus. Unless you have the above situation,
you should disable this option.
Maximum Pa yload Size
IRQ-3 assigned to PCI Device
IRQ-4 assigned to PCI Device
IRQ-5 assigned to PCI Device
IRQ-7 assigned to PCI Device
IRQ-9 assigned to PCI Device
IRQ-10 assigned to PCI Device
IRQ-11 assigned to PCI Device
IRQ-12 assigned to PCI Device
IRQ-14 assigned to PCI Device
IRQ-15 assigned to PCI Device
Disabled (default) Disables the function.
Enabled Enables the function.
Set the maximum payload size for T ransaction packets (TLP ).
The Choice: 4096 (default.)
25
Page 88

TForce 6100-939 & TForce 6100
8 PC Health Status
A、Figure 8. PC Health Status
Chassis Open Warning
This item allows you to enable or disable Chassis Open Warnin g beep.
The Cho ices: Disabled (Default), Enabled.
Shutdo wn Temperature
T his it em allo ws y ou to set up the CPU shutdown T emperature. T his item only effective
under Windows 98 ACPI mode.
The Cho ices: Disabled (default), 60℃ /140F, 65℃/149F, 70℃ /158F, 75℃/167F.
Show H/W Monitor in POST
If your computer contains a monitoring system, it will show PC health status during POST
stage. T he item offers several delay time for you to choose.
The Cho ices: Enabled (default), Disabled.
CPU Vcore/ +1.2V+3.3V/ +5.0 V/ 5V<SB>/ Voltage Batte ry
Detect the system’s voltage status automatically.
CPU Temperature
This field displays the current temperature of the CP U.
26
Page 89

TForce 6100-939 & TForce 6100
Current CPU FAN Speed
This field displays the current speed of CPU fan.
Current SYS FAN Speed
This field d isplays the current speed SYSTEM fan.
27
Page 90

TForce 6100-939 & TForce 6100
9 Over Clock Navigator Engine
Au tomate Overc lo ck System
A.O.S. is designed for beginners in overclock field.
Based on many test and experiments from BET, A.O.S. provide 3 default overclock
configurations that are able to raise the system performance
28
Page 91

TForce 6100-939 & TForce 6100
z V6 Tech Eng ine:
z
V8 T ech E ng ine
This setting will raise about 15%~25% of whole system performance.
29
Page 92

TForce 6100-939 & TForce 6100
z V12 Tech Engine
This setting will raise about 25%~30% of whole system performance.
C a uti o ns :
1. Not all types of AMD CP U perform above overclock setting ideally; the difference
will be based on the selected CPU model.
2. From BET experiment, the Atholon64 FX CPU is not suitable for this A.O.S. feature.
Manual Overclock System (M.O.S.)
MOS is designed for experienced overclock users.
It allows users to customize personal overclock setting.
Cautio ns:
According tests have been done; AMD 3000+ CP U is the best CPU type for overclock
function.
30
Page 93

TForce 6100-939 & TForce 6100
CPU Voltage Regulato r
T his item al lows you to select CP U Voltage Con tro l.
The Choices: StartUp (default),1.825V,1.750V,1.675V,1.600V,1.575V,1.550V,
1.525V, 1.500V, 1.475 ……… 1.100.
Memory Voltage
The Choices: 2.60V (default), 2.70V, 2.80V, 2.90V.
CPU Frequency
This item allows you to select the CPU Frequency.
The Cho ices: 200 (default),201,202,203,204,205,206,207,208,209…..
450)
Hammer Fid Control
The Ch o ice s: St a rt Up (default).
HT Frequency
This item allows you to select the HT Frequency.
The Ch o ice s: Auto (default),1x,2x,3x,4X,5x.x4.
PCIE Clock
The Choices: 100MHz (default), 101MHz, 102MHz, 103MHz, 104MHz, 105MHz,
106MHz, 107MHz, etc.
Me mclock Freque ncy
The Choices: 200MHz (default), 100MHz, 133MHz, 166MHz, 200MHz, 216MHz,
233MHz, 250MHz.
1T/2T Memory Timing
The Choices: 2T (default).
450. (Max.is
31
Page 94

TForce 6100-939 & TForce 6100
DRAM Co nfiguration
Timing Mode
The Choices: Auto (default), Manual.
CAS# Latency
This field specify the cas# latency, i.e. cas# to read data valid.
The Choices: CL=2.5 (default), CL=3.0, CL=2.0
Min RAS# active time (tRAS)
This field spec ifies the minimum RAS# active time. Typically -45-60 Nsec.
The Cho ices: 8T (default).
RAS# to CAS# Delay (tRCD)
This field specifies the RAS# to CAS# Delay to read/ write command to the same
bank. Typically -20 Nsec.
The Cho ices: 4T (default).
Row precharge Time (tRP)
This field specif ies the Row precharge Time. Precharge to Active or
Aut o-Refre sh of the same bank. Typically 20-24 Nsec.
The Cho ices: 2T (default).
MIRR mapping mode
The Cho ices: Continuo us (default), Discrete.
32
Page 95

TForce 6100-939 & TForce 6100
Integrated Memory Test
Integrated Memory Test allows users to test memory compatibilities, and no extra
devices or software are needed.
Step 1:
The default setting under this item is “Disabled”, the condition should be change into
“Enabled” to proceed this test.
Step 2:
When the process is done, change the setting back from “Enabled” to “Disabled” to
co mple te the test.
33
Page 96

TForce 6100-939 & TForce 6100
10 CMOS Reload Program (C.R.P.)
It a llows users to sa ve d ifferent CMOS sett ings into BIOS-ROM.
Users are able to reload any saved CMOS setting to change system configurations.
Moreover, users are able to save ideal overclock setting when under overclock operation.
There are 50 sets record addresses in total, and users are able to name the CMOS data
according to personal like.
34
 Loading...